

Page 1

GREETINGS
Thank you for purchasing OPPO products!
This user manual lends support for you to operate
this player securely, so please read it carefully
before operating.
After purchasing this machine, do not forget to
register on www.oppo.com to get rights as a VIP user.
After registration to be a VIP user on official website
of OPPO, you can enjoy following rights.
1.OPPO professional technical workers serve 12
hours online to solve your player problems.
2.Downloade amounts of videos for free without
format switch, which can be played directly by OPPO
player.
3.Enjoy preference participation of OPPO online,
outline activities.
4.VIP email service. You can get the latest news
through your email address you provide in registration, such as latest information about products,
firmware upgrading, promotion information.
This player is produced according to Q/OPPO
1004-2006 corporation standard.
Page 2

PRECAUTIONS
WORKING DIRECTIONS
Avoid places with too high temperature (above 35 C), too low
temperature (below -5 C) or too much humidity.
Never strike this player severely and never place heavy objects on it.
Prevent foreign materials entering this player.
Never touch chemical materials such as benzene or thinner.
Prevent from splashing or dripping.
Keep away from direct beam or heat emission objects.
Keep away from ash-rich places.
Never disassemble, repair or refit by yourself.
ABOUT TRAFFIC SAFETY
Do not use headphone when riding bicycle or motorcycle, for it is very
dangerous and that you are likely to go against traffic rules. When
walking (especially through zebra lines), it will be very dangerous if
the headphone volume it too large.
HEARING PROTECTION
According to doctor's suggestion, if you listen in too high volume for a
long time, your hearing will probably be damaged. When tinnitus
appears, please decrease volume or stop using.
WORKING DIRECTIONS OF LITHIUM BATTERY
If you do not change with correct battery, explosion will occur. You can
only change with the same type or the equal effect battery.
To avoid the performance of lithium battery decreasing, please charge
on a regular basis (at least once in a month).
if you do not use for a long time, the battery capacity may probably be
too low that you can not power on. Please charge it for half an hour
before using it.
All images in this manual are sketch illustrations for reference
only,please reference to player for details.
1
Page 3
CONTENTS
CHAPTER ONE QUICK OPERATION
BUTTONS AND JACKS ILLUSTRATION
POWER ON / OFF
USE MOBILE STORAGE FUNCTION
DISCONNECT USB SAFELY
CHARGE
RESET
HOW TO PUT IN/OUT MICRO SD CARD
CHAPTER TWO USAGE INTRODUCTION
MAIN MENU ILLUSTRATION
MUSIC PLAYING INTERFACE ILLUSTRATION
VIDEO PLAYING INTERFACE ILLUSTRATION
TUNING INTERFACE ILLUSTRATION
RECORDING INTERFACE ILLUSTRATION
CHAPTER THREE BASIC OPERATION
PLAY MUSIC
MEDIA UPDATING
A-B REPEAT FUNCTION
SEARCH MUSIC
EQ MODE
MY EQ SETUP
MICROSOFT EQ SETUP
PLAYING MODE, SCREEN DISPLAY
VIDEO PLAYING
BROWSE PICTURE
PICTURE SETUP
2
Page 4

CONTENTS
BREAKPOINT PLAY
RESOURCE MANAGER
RECORDING
TUNING
E-BOOK BROWSING
E-BOOK SETUP
ADDITIONAL FUNCTIONS
CHAPTER FOUR SETUP
DISPLAY SETUP
DESKTOP SETUP
POWER ON PASSWORD
FILE ENCRYPTION
LANGUAGE SELECTION
CUSTOM MAIN MENU, MUSIC MENU
TIMING POWER- OFF
FACTORY SETTINGS
IMPORTANT PROMPT
DATE AND TIME
VOLUME RESTRICTION
SCREENSAVER ACTIVATION MODE
PRESS BUTTON CONTROL
SYSTEM INFORMATION
FIRMWARE UPGRADE
CHAPTER FIVE OTHER INFORMATION
FORMAT
TROUBLESHOOTING
ADDITIONAL INFORMATION
SPECIFICATION
3
Page 5
QUICK OPERATION
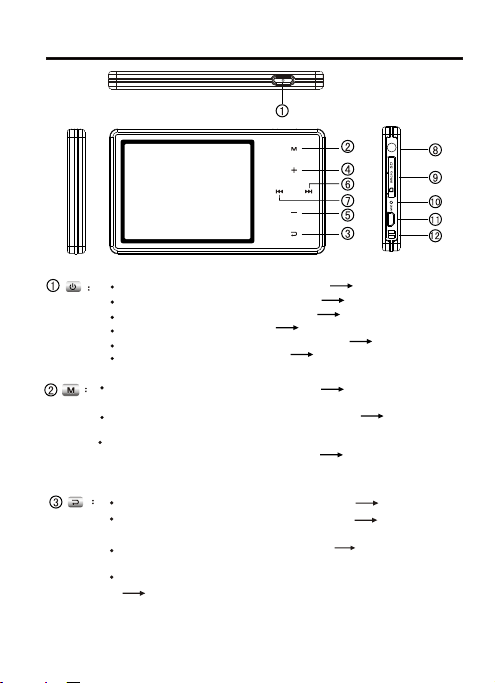
Press for short in POWER OFF state POWER ON
Press for long in POWER ON state POWER OFF
Press for short in playing interface pause/playing switch
Press for short in recording pause recording
Press for short in stopwatch timing state record time
Press for short in tuning state mute
Press for short when operating menu enter into option or
confirm setting
Press for short in stopwatch timing interface pause timing
/eliminate timing
Press for short in music playing, video, tuning, e-book
browsing, picture browsing interface eject online menu
BUTTONS AND JACKS ILLUSTRATION
Press for long A-B repeat
Press for short in file browsing interface return to
previous catalog
Press for short when operating menu not save setting
and exit menu
Press for long in picture, e-book, video playing interface
in music playing interface
adjust brightness
4
Page 6
QUICK OPERATION
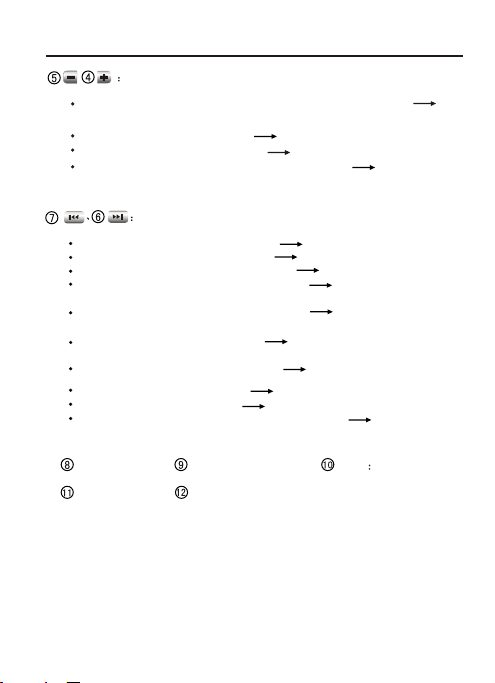
Press for short in video, music playing or tuning interface
adjust volume
Press when browsing e-book
Press for short in “my EQ setup” adjust db value
Press for short in breakpoint playing interface switch to
choose breakpoint
Press for short in playing interface previous song/ next song
Press for long in playing interface fast backward/fast forward
Press for short in tuning pre-set state select channel
Press for short in tuning searching state searching channel by
hand
Press for long in tuning searching state semi-automatic
channel searching
Press for short in "My EQ setup" select frequency band which
needs to be set
Press for short in picture browsing switch picture
Press when browsing e-book turn-over lines
Press when operating menu move cursor
Press for short in breakpoint playing interface switch the
current breakpoint
Earphone Jack
USB Jack
BUTTONS AND JACKS ILLUSTRATION
turn over lines
Micro SD Card Jack
Hanging rope hole
MIC Microphone
5
Page 7
QUICK OPERATION
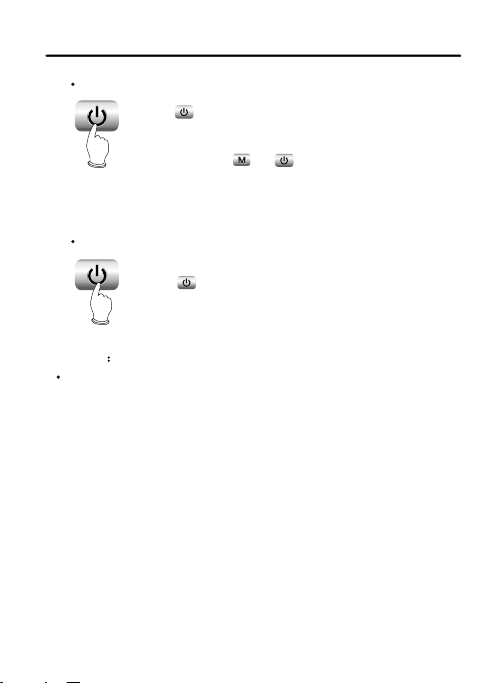
POWER ON/POWER OFF
POWER ON
Press button for short to power on, power-on picture
appears and enters main menu.
If there is no power-on password, you need to input pass
press
word and press or button for short to enter main
menu.
POWER OFF
Press button for long to power off.
long
press
NOTICENOTICE
The player would automatically power off if playing, tuning or recording
functions are not used in given time.
6
Page 8
BASIC OPERATION
This player may be used as mobile storage in Windows ME/2000/XP
operating system. Under Windows 98SE operating system, the player
may be used as mobile storage after drive program is being installed
(please download it from OPPO official website).
Connect MP3 player and computer with USB transmission line. After
the bottom right corner of desktop appears “ ”symbol, the mobile
storage function of MP3 player may be used normally.
NOTES:NOTES:
USE MOBILE STORAGE FUNCTION
To avoid abnormality of the player appears, you are
suggested to power off firstly before connecting MP4
player with computer, and then use USB transmission
line to connect Mp4 player, then connect computer.
In Windows 98 system, there is no “ ” symbol.
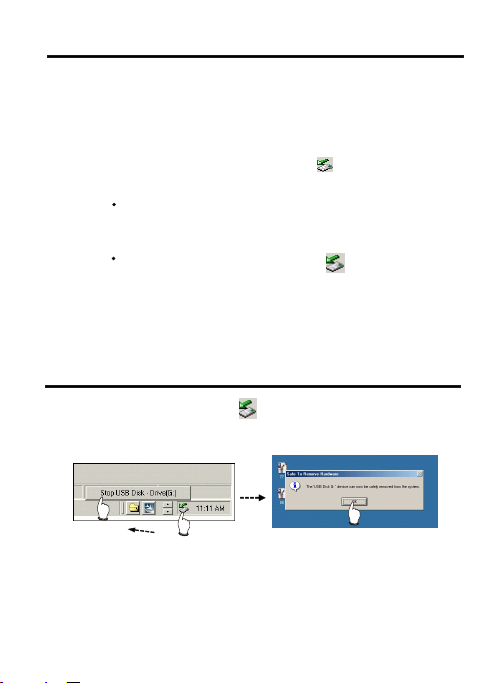
BASIC OPERATION
After operation finishes, click “ ” symbol on bottom right corner of
Windows desktop with right button of mouse, and disconnect USB
safely according to the computer prompt.
DISCONNECT USB SAFELY
7
Page 9
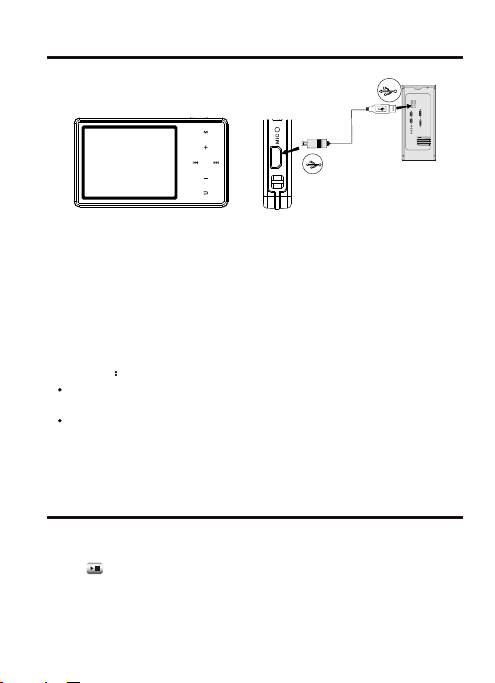
QUICK OPERATION
This player adopts lithium-ion battery to supply power. In any case,
connect this player to computer with USB line, it will power on and
begin to charge automatically. To charge this player fully by computer,
it needs about 2.5 hours. After fully charged, the player will stop
chargingautomatically.
Before unplugging USB transmission line, please stop using USB
memory function firstly. Data may be lost or player may be damaged
if you unplug it directly.
CAUTIONCAUTION
When charging, the player body is slightly hot, and this belongs to
normal phenomenon, so please take it easy to use it.
When electric charge is too low and when USB power supply is lower
than 100mA, it begins to charge, screen may probably have no
display,and even battery charge is unavailable.
CHARGE
QUICK OPERATION
When this player cannot be operated, please reset it.
Method for reset:
Push button for about 10 seconds. After reset finishes, power on
again and you may use it normally.
RESET
8
Page 10
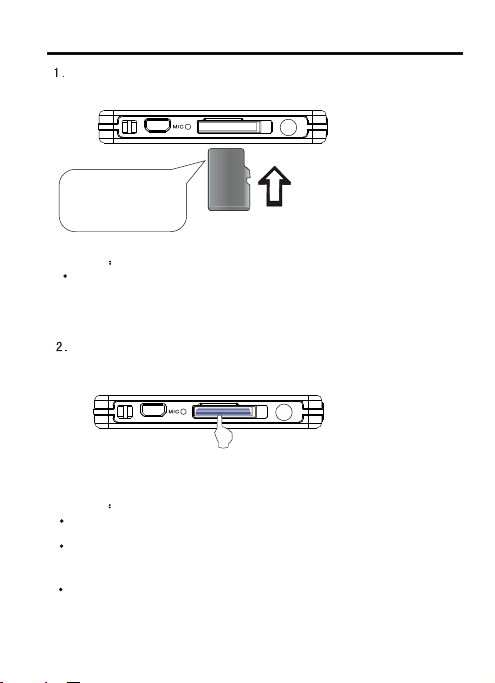
QUICK OPERATION
Insert Micro SD card: use fingernail to take out glue plug gently and
insert Micro SD card according to the following picture.
Socket and Micro
SD card would be
damaged if pushed
in incorrect direction.
CAUTIONCAUTION
There are various of Micro SD card in market, some of which are not
supported, please try before you buy.
Take out Micro SD card: unplug glue plug, use force to press Micro
SD card and it ejects.
CAUTIONCAUTION
To avoid damaging player or Micro SD card, please plug or unplug
Micro SD card in power off state.
Use forceps to take out Micro SD card if there is distortion, blot or
other things, which may cause the Micro SD card can not eject
smoothly.
The maximum supported capacity of the Micro SD card is about
2GB.
HOW TO PUT IN/OUT MICRO SD CARD
Push the Micro SD card into the
player.
Use force to press Micro SD card.
9
Page 11
USAGE INTRODUCTION
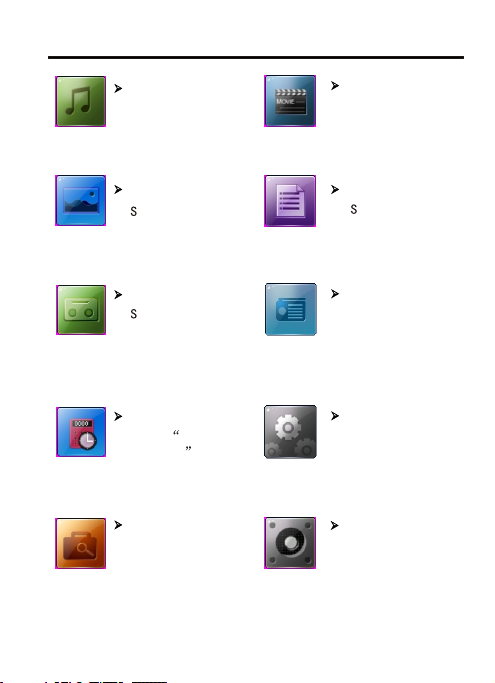
MAIN MENU ILLUSTRATION
Music playing
Save audio files
Picture browsing
ave picture files
Recording
elect recording to
enter recording
mode
Additional functions
Select additional
functions to enter
calender, stopwatch
and other modes.
Resource manager
Display all files.
10
Video
Save video files
E-book
ave text files
Tuning
Select to enter
tuning mode
Settings
Select “settings” to
set system options.
Breakpoint play
Play from the place
where the music,
movie and e-book
stopped last time.
Page 12
USAGE INTRODUCTION
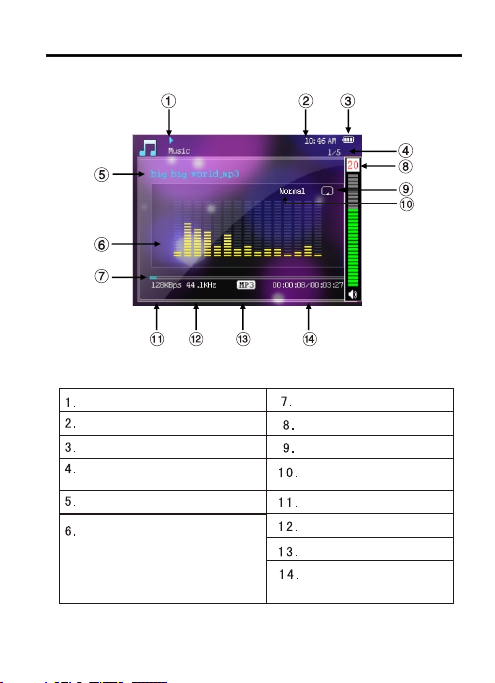
MUSIC PLAYING INTERFACE ILLUSTRATION
Music playing state
Clock display
Battery capacity
Current track serial number/
total track number
Song name
Screen display:
spectrum,
ID3 information,
lyrics.
Playback progress bar
Volume
Playback mode
EQ mode
Bit rate
Sampling rate
Music file format
Current playback time/
total track time.
11
Page 13
USAGE INTRODUCTION
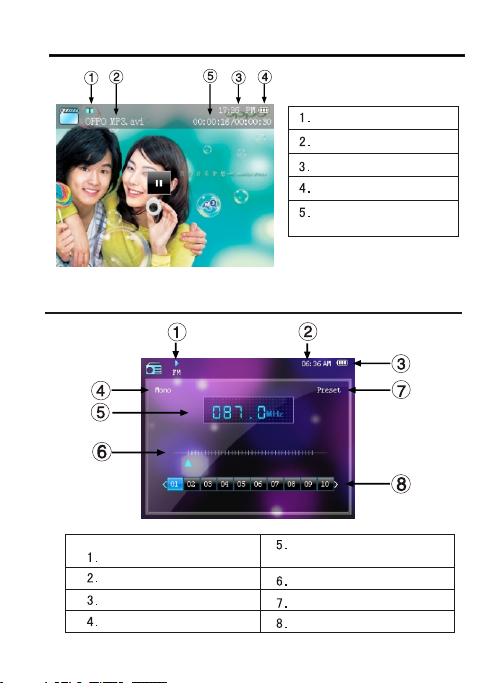
VIDEO PLAYING INTERFACE ILLUSTRATION
Playback state
Video file name
Clock display
Battery capacity
Time that has been
played/total time
USAGE INTRODUCTION
Tuning state
Clock display
Battery capacity
Single channel/stereo
TUNING INTERFACE ILLUSTRATION
Frequency of the current
radio station
Station search progress bar
Preset mode/search mode
Radio station serial number
12
Page 14

USAGE INTRODUCTION
RECORDING INTERFACE ILLUSTRATION
Recording state
Clock display
Battery capacity
As for the name of the recorded file “VREC005.WAV”: 005 is serial
number of the current recorded track and arranged in sequence; WAV
is the file format after recording.
Name of recorded file
Recording quality
Time that has been recorded /the
left recordable time
13
Page 15

BASIC OPERATION
PLAY MUSIC
In main interface, select “Music” and press button to enter.
Select your desired file type to browse and press button to enter;
select a track and press button for short to play music.
All Music: list all tracks.
Play List:
New media list: press button to select songs that needs
to be added into list and press button for short to confirm. After
selecting all required songs, press button for short to “YES”
and press button for short to confirm.
Edit media list: select playback list that needs to be edited. Add
songs according the method stated in reset playback list and choose
“YES” to save list.
Edit media list: press button for short to enter and select the
playback list that needs to be deleted. Then press button for short
to delete playback list.
Artist: array all songs according to all artists and unknown artists.
Album: array all songs according to albums and unknown albums.
PLAY MUSIC
Style: array all songs according to all genres and unknown styles.
CAUTION
When full pathname of the song is too long, it may cause this song
playback unavailable.
Songs can not be added in the same playback list.
5 resetting playback lists can be produced at most and 100 songs
can be added in.
PAUSE MUSIC
When playing music, press button for short to switch into playback
pause state and press button for short again to continue playback.
14
Page 16

BASIC OPERATION
PLAY MUSIC
NEXT and PREV
When playing, press button for short to skip to next track to play;
press button for short to skip to previous track to play.
FF and FB
In playing, press button for long without loose to realize fast
forward.
In playing, press button for long without loose to realize fast
backward.
ADJUST VOLUME
In playback or tuning interface, press button for short or long
to adjust volume.
CAUTIONCAUTION
APE files with NORMAL, FAST decode format of mainstream
3.95, 3.97, 3.98,3.99 are supported by this machine.
In some operating system (such as complex font Windows), the
operation of copying lyrics/song file and changing song's name may
probably lead to display mess code. When playing some songs which
are not standard or some special format songs, it may cause noise.
BASIC OPERATION
When files are deleted by hand, you can organize music sorting
information again through updating media.
In “Music” menu, select “mediaLib
update” and press button
for short to confirm and the media
begins updating. During that, it may
cost some time, please wait.
CAUTION:CAUTION:
Music would be stoped if you operate media updating when playing
music.
MEDIA UPDATING
15
Page 17

BASIC OPERATION
When playing, if you want to listen to content of a certain segment
repeatedly, please use A-B repeat function.
Press button for long for the first time to select the beginning point that
you want to play repeatedly and screen displays "A";press button for
long for the second time to select the end point that you want to play
repeatedly and screen displays "A-B" and system begins to repeat during
"A-B" period; press button for long for the third time to cancel A-B
repeat and playing continues.
A B REPEAT FUNCTION
BASIC OPERATION
In “Music” menu, select “search” and press button for short to eject
searching column. Then input the first letter of the file name of the song
and press button for short to confirm. After input the letter,
press button for short to clear away. For example, if you want to
search “hey”, use button and button to select “H” in
searching column and press button for short to confirm, then input
“E”and “Y” in sequence.Searching column displays “hey”, press
button for short, thus you can search the song.
CAUTION:CAUTION:
If the first letter of the song name is number, it can not be searched.
SEARCH MUSIC
16
Page 18

BASIC OPERATION
In “Music” menu, press button to select “EQ Select” and press
button for short to enter. Move the cursor by pressing button,
and choose suitable EQ mode.
Choose “User EQ”, it would correspond with the EQ that you already
set in “User EQ setup” in music playing menu.
When cursor moves to a certain EQ mode, press button for short to
select this EQ mode.
EQ MODE
BASIC OPERATION
In “User EQ setup” interface, the range value (dB) of each frequency
range may be increased or decreased.
If you want to adjust the range of mediant (1K), you may operate
according to the following diagram:
Press button to select adjusted frequency, press button
to adjust range value. Press button for short to confirm.
MY EQ SETUP
17
Page 19

BASIC OPERATION
In “MSEQ” interface, you can setup Microsoft EQ, which can bring you
the equivalent sound effect with vista platform. It mainly includes three
kinds of technology.
3D surround: the advanced space surround technology breaks the
past dual-channel music experience, which enables the normal head
-phone produce 3D stereo space effect and bring you rich and
substantial feeling and music level sense.
Pure bass: pure and clear bass can be produced through adjustable
bass intensifier, thus vertical and deep sense of music can be
highlighted. That makes headphone produce same striking sound
effect with big power loudspeaker.
Volume balance: provide same hearing sense in different tracks
playing procedure, which can bring you harmonious and pleased
music experience.
SETUP METHOD:
Press button to select adjustable Microsoft EQ and press
button for short to switch effect.
MICROSOFT EQ SETUP
18
Page 20

BASIC OPERATION
Press button for short when playing music to eject online menu:
“play Mode” and “Display”.
PLAYING MODE, SCREEN DISPLAY
PLAYBACK SETUP
The playing mode icons displayed in playback interface are shown as
follows:
Repeat all: repeat to play all tracks.
Playback in sequence: play in tracks sequence.
Single circular: repeat to play a single track.
Playback scanning: each track is played for about 10 seconds.
Random playback: play any track at random.
SCREEN DISPLAY
You can set ID3 , lyrics and spectrums display.
For example: press button for short to switch to “lyric”, press
button for short to exit music playing interface, thus you can see lyrics
synchronous display.
CAUTION:CAUTION:
When screen display is set to be “lyric”, it would switch to be “ID3”
display automatically if you play tracks without lyrics.
19
Page 21

BASIC OPERATION
After entering “video” menu, press button for short to enter
browsing interface of video files. Press button for short to select
movie file and then press button for short to play. Press button
for short to pause/play.
In playing interface, press button for short to skip to previous or
next movie. Press button for long to fast forward/fast backward.
Press button to adjust volume.
In video playing state, press for short to return to previous catalog,
press button for long to adjust brightness. Press button for
short to enter online menu in video playing state.
CAUTION:CAUTION:
For video file with big capacity, you may have to wait a few seconds to
begin playing after pressing button.
If there is any abnormal during playing, please try to copy this video
file again.
AVI video file with DivX 3.0 encoding format is not supported by this
machine.
VIDEO PLAYING
20
Page 22

BASIC OPERATION
Online menu: time to playback
When playing video, press button for short to eject online menu.
Press button for short to select “ time to playback” and press
button for short to enter. Use button and button to
set time.
Only video file with more than 1 minute playback time is available for
this function.
Online menu: screensaver
You can set screensaver when playing video. Screensaver is effective
only after you set screensaver time in “setup” of main menu.
For example:
after you set the screensaver time to be 15 seconds, select “screen
saver”when playing video, press button for short to switch to be
“on” and press button for short to exit. After video is played for
about 15seconds, screen would enter blankscreen state automatically.
VIDEO PLAYING
21
Page 23

BASIC OPERATION
After selecting picture files, press button for short to enter picture
browsing, press button for short to switch pictures:
Press button for long in picture browsing state to adjust brightness;
Press button for short to return to previous catalog.
Press button for short when browsing pictures to enter “online
menu”, you can set “zooming out, whirling, background and music
control.
CAUTION: CAUTION:
Pictures can be zoomed out only when its resolution is more than
320 240.
There is no button lock function when browsing pictures.
BROWSE PICTURE
BASIC OPERATION
PICTURE BROWSING TIME
You can set the stay time of automatic picture browsing. And it can be
set to be 2S, 3S, 5S, 10S, 20S and custom.
You can set custom time (0-60 seconds) through and
buttons. And you can switch it by hand if you set it to be 0 second.
INTERIM EFFECT
You can set the displayed effect when switching pictures.
You can set it to be none, random, gradual change, shutter and moving.
BROWSING MODE
When you set browsing mode to be “Filelist”, all picture files would be
listed according to file name in browsing state.
When you set browsing mode to be “Miniature”, all picture files would
be listed by previewing all pictures.
PICTURE SETUP
22
Page 24

BASIC OPERATION
In main menu, select “Resume play”, then press button for short to
enter, in which you can select “Audio Continue”, “video Continue”,
“EBook Continue”. This player can support two break-points.
For example: select “music breakpoint” , press button for short to
enter breakpoint option, press for short to select a breakpoint
and press button for short . Thus the song can be played from the
last place that it stoped.
BREAKPOINT PLAY
BASIC OPERATION
In main interface, enter “Explorer” , you can open and delete all files
and encrypt or decrypt for files.
RESOURCE MANAGER
BROWSE FILE
In music, video and e-book files browsing interface, or in “Explorer”,
press button for short to select files to browse .
23
Page 25

BASIC OPERATION
RESOURCE MANAGER
DELETE FILE
After enter resource manager, select files that need to be deleted,
press button for short to eject online menu.
Press button to select “delete” and press button for short to
confirm, thus the file can be deleted.
CAUTION: CAUTION:
Music would be stoped if you delete files when playing music.
ENCRYPT AND DECRYPT FOR FILES
Before you encrypt for files, please set code for files in “settings” of
the main menu.
You can not set code for files directly in resource manager.
After select the files that need to be encrypted, press button for
short to eject online menu. Press for short to select “encrypt”,
and then press button for short to confirm.
Select “decrypt “ in online menu, input code and press button for
short to decrypt. Before you reboot player next time, all encrypted files
are in decryption state.
CAUTIONCAUTION
After you set password, please save it carefully. If you loss it, please
send this player to OPPO after-sale service. All files in player can be
searched through backup by connecting USB with computer.
24
Page 26

BASIC OPERATION
In main menu, select “Record” and press button for short to enter,
press button for short to select “Start Record” .
Press button for short to enter recording ready state.
Press button for short to recording/pause recording.
Press button for short to eject dialogue box for saving, choose
select and press button for short to save the recorded file.
The recordable file is saved in “ Recording files” in “Record”menu.
CAUTION:CAUTION:
To avoid sudden machine down during recording, you can not record
when power is low; full disc is also unavailable, it may have “disc
space is full” prompt to exit recording if it is in recording.
Button pressing sound may be recorded in if you press button during
recording.
RECORDING
ALL RECORDING FILES
It contains recording files, including FM recording file. Select the
recorded file and press button for short to play.
RECORDING QUALITY
The recording quality is higher, the fidelity is better, and the occupied
space is larger. Both the recording quality adopt ADPCM format
encoding and are effective for MIC recording.
Press button for short to switch between high and low quality.
25
Page 27

BASIC OPERATION
ENTER TUNING MODE
Enter “Radio” in main menu, select “ Radio Player” and press for
short to enter tuning mode. Then put on headphone and you can listen
to radio.
Press button for short to exit tuning interface to main menu, but
the tuning is continuous
When listening to radio, press button for short to enter online menu.
TUNING
press
ONLINE MENU: MODE
In online menu, select “mode” and press button for short to switch
in modes.
1.Preset mode
In this mode, press button for short to switch to next channel,
press button for short to switch to previous channel.
2.Searching mode
there are two searching methods which are “by hand” and “automatic”.
Search channel by hand
0.1 MHz is increased for each short pressing button; 0.1MHz is
decreased for each short pressing button.
Press / button for long to continuously increase/decrease
frequency,and it will not stop until a channel is searched.
26
Page 28

BASIC OPERATION
TUNING
For example:
Search channel automatically
In online menu, select “Auto Search” and online menu would be
ejected. Choose “YES” to start fully automatic searching. All the
searched channels would be saved.
CAUTION:CAUTION:
Channel searching will stop when pressing button for short
during (fully automatic/semi-automatic) channel searching.
ONLINE MENU: SAVE STATION
After you search the station by hand or semi-automatic searching mode,
press button for short to enter online menu. Select “save ” and
press button to eject dialogue box, then press button for
short. After that choose “YES” to save station.
ONLINE MENU: DELETE STATION
If you want to delete the station that you saved before, you can press
button for short in tuning interface to enter online menu, select
“delete” item and press button for short to eject dialogue box.
After that select “YES” and press button for short to confirm.
27
Page 29

BASIC OPERATION
TUNING
ONLINE MENU: FM RECORDING
When listening to radio, press button for short to eject “online
menu”, select “Record” to enter FM recording; press button for
short to produce recording file, then exit to tuning state. FM recording
file is WAV format.
This file is saved in “Record files” of “Record” in main menu.
STATION LIST
This menu lists the saved stations.
Select the listed stations, press button for short to start listening
automatically.
INPUT STATION
After enter “Radio” in main menu, select “Set Frequency”, use
and buttons to input station frequency. Then press button
for short to listen to this channel.
FREQUENCY SETUP
Move the selection bar to “Set Channel”, press button for short
to select FM tuning range.
The frequency range on campus is 76MHz 87.0MHz.
The frequency range that used in common is 87.0MHz 108MHz.
STEREO SETUP
Set “Mono channel” and “automatic” .
28
Page 30
BASIC OPERATION
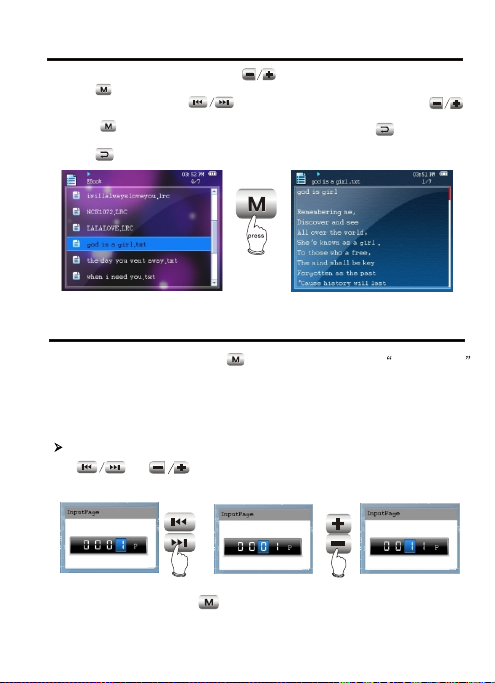
In e-book browsing state, press button for short to select text file,
press button for short to browse e-book.
Turn pages by pressing button and turn lines by pressing
button.
Press button for short to enter online menu; press button for
short to return to previous catalog.
Press button for long to adjust brightness.
E-BOOK BROWSING
BASIC OPERATION
When browsing e-book, press button for short to enter online menu .
In online menu, you can set page skipping, bookmark saving, bookmark
selection, bookmark deleting, font size, font colour, automatic page
turning, style selection and music playing.
SKIP PAGE
Use and buttons to set page skipping.
For example:
After finish setup, press button to confirm.
E-BOOK SETUP
29
Page 31

BASIC OPERATION
SAVE BOOKMARK
In online menu, select “savemark” and press button for short
to enter. Press to select place to save, then press button
for short to set the current page to be bookmark.
SELECT BOOKMARK
In online menu, select “LoadMark” and press button for short to
enter. Then press button for short to select your desired
bookmark and then press button for short to confirm.
DELETE BOOKMARK
After select “DelMark”, press button for short to eject dialogue
box, select “YES” and then press button for short to delete
bookmark.
FONT SIZE
There are large, medium and small fonts for selection.
FONT COLOUR
After select “Set colour”, press button for short to switch in font
colour.
E-BOOK SETUP
30
Page 32

BASIC OPERATION
AUTOMATIC PAGE TURNING
Press button for short to enter online menu, select “Flip Time” and
press button for short to switch in automatic page turning time,
which are 10, 15, 20, 25 and 30 seconds.
When time is set to be “off”, you can turn pages by hand.
SELECT STYLE
After select “Style set”, press button for short to switch style.
PLAY MUSIC
After enter “BackPlay”, press button for short to set “BackPlay”
to be “on”, then you can browse e-book and listen to music at the
same time.
E-BOOK SETUP
31
Page 33

BASIC OPERATION
In this menu, you can set “calender”, “stopwatch”, “World time”
functions.
CALENDER
Press button for short to enter
“calender”, then you can check it.
STOPWATCH
In “Stopwatch” menu, press button for short to start timing, press
button for short to save recording during timing and press for
short to stop timing.
INTERNATIONAL TIME
Press button for short to check the time of 24 time zones. The
time of eastern eighth zone is default (Beijing ,Hong Kong).
ADDITIONAL FUNCTIONS
32
Page 34

SYSTEM SETUP
SCREENSAVER TIME
Press button to select screensaver time, then press button
for short to confirm. For example, if screensaver time is 15 seconds, and
there is no any operation in 15 seconds, player would enter blank screen
state automatically.
CAUTIONCAUTION
Screensaver time is approximate, there would be difference in different
format music playing.
There is no screensaver function in stopwatch,e-book automatic page
turning and picture browsing interface.
ADJUST BRIGHTNESS
Press button to select suitable brightness and press button
for short to confirm.
INTERFACE STYLE
You can set two different interface styles, press button to
select suitable style and press button for short to confirm.
DEFAULT INTERFACE
Press button for short to eject dialogue box, and press
button to choose “YES”, then press button for short to resume
default interface.
DISPLAY SETUP
SYSTEM SETUP
DESKTOP SETUP
In this menu, you can set default background and custom background.
DESKTOP SETUP
33
Page 35

SYSTEM SETUP
POWER ON PASSWORD
You can set power on password.
Use and buttons to set numbers and press button
for short to confirm.
CAUTION:CAUTION:
After you set password, please save it carefully. If you loss it, please send
this player to OPPO after-sale service. All files in player can be searched
through backup by connecting USB with computer.
POWER ON PASSWORD
SYSTEM SETUP
You can set passwords for all files in “File Encrypt”.
You can set password through and buttons.
If you want to decrypt password, you only need to input once again the
past password and press button for short to confirm.
CAUTION: CAUTION:
After set the password, please save it carefully. If you loss it, you can
decrypt through upgrading firmware. It is suggested to delete the
upgrading firmware after finishing upgrade.
FILE ENCRYPTION
34
Page 36

SYSTEM SETUP
SELECT LANGUAGE
Set the language sorts in menu, Chinese and English are supported.
Press button to enter setup,and press button to select
language,then press button to confirm.
LANGUAGE SELECTION
SYSTEM SETUP
CUSTOM MAIN MENU
Except for “Music”, “video” and “settings”, custom hiding and display
are available for all main menu.
Take “EBook” hiding for example, press button to select
“EBook”,press button for short, the green icon in front of “EBook”
would disappear. Return to main menu at this time, “EBook” menu is
hidden. Enter “custom main menu” again, press button for short
by followingthe above operation, the “EBook” menu would display.
CUSTOM MUSIC MENU
Except for “All Music”, custom hiding and display are available for all
options in music menu. Operation method is same with the above.
CUSTOM MAIN MENU, MUSIC MENU
35
Page 37

SYSTEM SETUP
TIMING POWER- OFF
Press button to set the time of timing power- off , after that,
press button for short to confirm.For example, set the time to be
15 minutes, player would power off automatically if there is not any
button pressing operation.
You can also set power- off time by yourself. After select “custom”,
use and buttons to set time and press button for
short to confirm.
CAUTION: CAUTION:
It is defaulted to be ineffective for each time power on.
Time of timing power- off is approximate, there would be deviation.
Please do not set time power off during recording to avoid
unavailable recording file playing.
TIMING POWER- OFF
SYSTEM SETUP
If you want to full factory default setting (material and song files would
not be deleted), you can select “Default Set”. Press button for
short to enter this menu, after dialogue box is ejected, select “YES”
and press button for short to resume “Default Set”.
SYSTEM SETUP
Provide important prompt information for this player.
FACTORY SETTINGS
IMPORTANT PROMPT
36
Page 38

SYSTEM SETUP
DATE/TIME SETUP
In this menu, you can set year, month, date, clock and time system.
You can set the current year, month, date, time and time system through
and buttons. Press button to confirm.
Time system is 12 hours or 24 hours.
TIME ZONE
In this menu, you can set default time zone.
DATE AND TIME
SYSTEM SETUP
After set volume restriction to be “on”, the range of adjustable value
of volume is 0~26.
SYSTEM SETUP
SCREENSAVER ACTIVATION METHOD
In this menu, you can set screen saver activation method after player
enters screensaver. Press button for short to enter “screen
activate ” and press button to select your desired
screensaver activation method,“Any Key Start” or “Press PLAY Start”
button. Press button for short to confirm.
CAUTION:CAUTION:
PLAY button is button.
VOLUME RESTRICTION
SCREENSAVER ACTIVATION MODE
37
Page 39

SYSTEM SETUP
AUTOMATIC KEY LOCK
Press button to select time of automatic key lock and press
button for short to confirm.
UNLOCK METHOD OF KEYBOARD
In this menu, you can set the unlock method after keyboard is locked.
BUTTON PRESSING SOUND
After enter this menu, you can set to turn on or turn off button pressing
sound. Press button for short to switch between “on” or “off”.
PRESS BUTTON CONTROL
SYSTEM SETUP
SYSTEM INFORMATION
You can check memory capacity, remaining capacity and version
number information.
CAUTION: CAUTION:
As the firmware may occupy a certain space, the displayed memory
capacity may be different with the actual capacity.
SYSTEM SETUP
FIRMWARE UPGRADE
This player supports firmware upgrade. For detail upgrade method,
please refer to detailed instructions on OPPO website.
SYSTEM INFORMATION
FIRMWARE UPGRADE
38
Page 40

OTHER INFORMATION
FORMAT
FORMAT
When using computer to format this player. Please select FAT 32 file
system. Otherwise this player will work abnormally.
TROUBLESHOOTINGOTHER INFORMATION
I have lost my data?
The loss of some data is because unstable power supply in the course of
downloading (You are suggested to reserve data firstly. As for the loss of
user's data, our company will not take any responsibility.).
Cannot connect to computer correctly?
Windows 98SE Connect again after installing USB drive program.
Windows Me Delete USB drive program, install again and connect.
Windows 2000/XP Connect again after restarting up computer.
Drive program/upgrading program does not work?
Please refer to recommended PC configuration.
Why some WMA format songs cannot play after they are
downloaded into MP4 player?
To protect rights and benefits of song owners, some WMA songs on site
are with DRM (license) copyright protection, and cannot play unless been
authorised.
Why function operation of my MP4 player has slow response?
Large numbers of files are saved in player, after repeated operation of
delete and copy, file system will generate much scraps, which leads to the
slow function operation of player. In this case, please copy the data
required to save into the computer firstly and then use PC to format hard
disk directly.
39
Page 41

OTHER INFORMATION
MP4 player has system failure and cannot be operated?
If this case happens, please reset Mp4 player. Press button for 10
seconds until reset finishes and then you may power on again to use.
TROUBLESHOOTING
MP4 player cannot power on?
If you do not use for a long time, the battery capacity may be too low, now
please charge for half an hour before use.
Why different songs have different volume?
Because volume level adjustment parameter is different in the course
of recording, you may hear different volume.
Cannot download file.
Please confirm whether drive program in computer has been correctly installed.
Please confirm whether computer and player has been correctly connected.
Please confirm whether disc is fully used. Examine the left capacity in system
information.
MP4 player has powered off?
If function of playing, tuning or recording has not been used in a specified
period, MP3 plauer will power off automatically.
The player will also power off automatically when battery is low.
Check whether timing power-ff has been set.
40
Page 42

OTHER INFORMATION
LONGEST PLAYING TIME
In default volume, “normal” sound effect, locked button and screensaver
state, the longest playing time for Mp3 musical files with 128kbpsbit rate,
44.1kHz sampling rate is about 13 hours. Playing time in other cases will
be different.
Accessories
Headphone
User manual
USB transmission line
Warranty card
Hanging strip
The lowest computer configuration requirement
Above Windows98SE/2000/XP/ME
Pentium 200MHz centre processor or above
CD-ROM drive
40MB spare disc space
32MB memory
USB jack
ADDITIONAL INFORMATION
41
Page 43

SPECIFICATION
Model
Memory Capacity
Lithium battery
Continuous play
time
Size/weight
Audio SNR
Headphone
output
Frequency range
FM tuning range
Working
temperature
Audio file
Picture file
Video file
Design and specifications of product are subject to change without
notice.
Longest continuous playing time for MP3 is
about 13 hours.
Size 86mm 50mm 6.9mm Weight 59g
12mW+12mW 32 ohm (25mW+25mW when
headphone impedance is 16 ohm)
0 C 35 C
MPEG 1/2 Layer 3(16kbps 320kbps)
WMA(16kbps 320kbps) WAV OGG
APE FLAC
Support DCF standard JPEG format. (6 20 million
pixel at most is supportable. Picture width will not
excess 2506 pixel) BMP, GIF
Rm 720 576 resolution
RMVB 720 576 resolution
AVI 800 576 resolution
FLV 512 512 resolution
42
 Loading...