


SaleGuard

Retail Analytics Software
User Manual (v
ersion 3)
saleguard.net

SaleGuard
Version 3.0 - User Manual
Manual Edition 33112AB – FEBRUARY 2015
©2015, SaleGuard
All Rights Reserved
No part of this document may be reproduced by any means, electronic or mechanical, for any purpose, except as
expressed in the Software License Agreement. SaleGuard shall not be liable for technical or editorial errors or
omissions contained herein. The information in this document is subject to change without notice.
The information in this publication is provided “as is” without warranty of any kind. The entire risk arising out of the
use of this information remains with recipient. In no event shall SaleGuard be liable for any direct, consequential,
incidental, special, punitive, or other damages whatsoever (including without limitation, damages for loss of business
profits, business interruption or loss of business information), even if SaleGuard has been advised of the possibility of
such damages or whether in an action, contract or tort, including negligence.
This software and documentation are copyrighted. All other rights, including ownership of the software, are reserved
to SaleGuard. SaleGuard is a registered trademark of SaleGuard in the United States and elsewhere; Windows is a
registered trademark of Microsoft Corporation. All other brand and product names are trademarks or registered
trademarks of the respective owners.
The SaleGuard software includes open source software that is subject to GNU LGPL (Lesser General Public License)
and other similar licensing models.
If you would like a copy of the source code, as governed by the LGPL, please send, by registered mail, a certified
check for $15.00 to cover production and shipping costs. A CD with the applicable LGPL source code will be mailed
to you. This offer is good for three years from the original date of purchase. Mail To: SaleGuard ATTN Open Source
Compliance, 23221 E Knox Ave, Liberty Lake WA 99019.
This product uses MediaInfo Library (http://mediaarea.net/mediainfo), Copyright © 2002-2014 MediaArea.net SARL.
The following words and symbols mark special messages throughout this guide:
Text set off in this manner indicates information that is necessary for proper operation of the
product.
Text set off in this manner indicates information that may be helpful.
Text set off in this manner indicates that failure to follow directions could result in damage
to equipment or loss of information.
SaleGuard
Liberty Lake, WA ● U.S.A.
2 33112AB

TABLE OF CONTENTS ............................................................................................................................... 3
INTRODUCTION ........................................................................................................................................... 6
Product Description ................................................................................................................................................... 6
SaleGuard Professional ........................................................................................................................................ 6
SaleGuard Enterprise ........................................................................................................................................... 6
Installation Examples ................................................................................................................................................ 7
Single Location ..................................................................................................................................................... 7
Multiple Location ................................................................................................................................................... 7
GETTING STARTED .................................................................................................................................... 8
Installing SaleGuard ................................................................ .................................................................................. 8
Configuring the SaleGuard Manager ......................................................................................................................... 9
Configuring the Database Connection .................................................................................................................. 9
Changing the SaleGuard System Password .................................................................................................... 9
Configuring SQL Server Maintenance ................................................................................................................ 10
Email Notifications ......................................................................................................................................... 10
Installing the SaleGuard Client ................................................................................................................................ 11
Configuring the SaleGuard Client ............................................................................................................................ 11
Default Client Username and Password ............................................................................................................. 12
Licensing SaleGuard ................................ ................................ ............................................................................... 12
Locate the System ID ......................................................................................................................................... 12
Activate Online.................................................................................................................................................... 12
Activate by Phone ............................................................................................................................................... 12
Database Connection Manager ............................................................................................................................... 13
SALEGUARD SETUP ................................................................................................................................ 14
Adding a Location ................................................................................................................................................... 14
Configuring the SaleGuard Collector ....................................................................................................................... 15
Setting the Data Connection Mode ..................................................................................................................... 15
Setting the Local Database Connection .............................................................................................................. 16
Setting the Central Database Connection ........................................................................................................... 17
Add a POS Connection ....................................................................................................................................... 18
Mapping a Recorder to the Location ....................................................................................................................... 19
Mapping Cameras to Terminals .............................................................................................................................. 20
Editing Operator Information ................................................................................................................................... 21
Adding Users to SaleGuard ..................................................................................................................................... 22
User Permissions................................................................................................................................................ 22
Location and Feature Restrictions ................................................................................................................. 23
Notification Levels............................................................................................................................................... 24
Auto-Login .......................................................................................................................................................... 24
Adding Groups ........................................................................................................................................................ 25
Create a Group ................................................................................................................................................... 25
Editing Group Members ...................................................................................................................................... 25
Excluding Objects ................................................................ ............................................................................... 25
3

Configuring Key Performance Indicators (KPI) ................................................................................................... 26
Assigning Shifts to Your Group ........................................................................................................................... 26
OPERATIONS ............................................................................................................................................ 27
Dashboard ............................................................................................................................................................... 27
Control Bar .............................................................................................................................................................. 28
Risk Analysis ........................................................................................................................................................... 29
KPI Weighting ..................................................................................................................................................... 29
Custom KPIs .................................................................................................................................................. 30
Using Risk Analysis ............................................................................................................................................ 31
Generate Performance Report ....................................................................................................................... 32
Reports .................................................................................................................................................................... 33
Creating Custom Reports ................................................................................................................................... 33
Title and Basics ............................................................................................................................................. 34
Grouping ........................................................................................................................................................ 35
Email Recipients ............................................................................................................................................ 36
Generating Reports ............................................................................................................................................ 36
Search Data ................................ ................................................................ ............................................................ 37
Search Screen Overview .................................................................................................................................... 37
Performing a Quick Search ................................................................................................................................. 38
Performing an Advanced Search ........................................................................................................................ 39
Wildcard Searches ......................................................................................................................................... 40
Saving Filters ................................................................................................................................................. 40
Loading Filters ................................ ................................ ............................................................................... 40
Viewing Search Results ...................................................................................................................................... 40
Grouping the Results ..................................................................................................................................... 41
Search Video ........................................................................................................................................................... 42
Searching Video ................................................................................................................................................. 42
Viewing POS Overlay on Video .......................................................................................................................... 42
Save Still Image .................................................................................................................................................. 43
Print Still Image................................................................................................................................................... 43
Exporting Video Clips ......................................................................................................................................... 44
Live.......................................................................................................................................................................... 45
Viewing Live Video ............................................................................................................................................. 45
Alerts ....................................................................................................................................................................... 46
Creating an Alert ................................................................................................................................................. 46
Set the Basic Parameters .............................................................................................................................. 46
Filter Alert Criteria .......................................................................................................................................... 47
Assign E-Mail SMS Recipients ...................................................................................................................... 47
Reviewing Alert Data .......................................................................................................................................... 48
ID Search ....................................................................................................................................................... 48
Review by Category ....................................................................................................................................... 48
Clearing Alerts ............................................................................................................................................... 48
Business Intelligence............................................................................................................................................... 49
Use Management ............................................................................................................................................... 49
Use Management Configuration .................................................................................................................... 49
Use Management Report ............................................................................................................................... 51
Case Management ................................................................................................................................ .................. 52
4 33112AB

Case Overview ................................................................................................................................................... 53
Adding a Case Type ...................................................................................................................................... 53
Flagged Transactions ......................................................................................................................................... 54
Adding a Transaction to a Case File .............................................................................................................. 55
Attachments ........................................................................................................................................................ 56
To Add Attachments to a Case File ............................................................................................................... 56
Video .................................................................................................................................................................. 57
Attaching Video to a Case File ....................................................................................................................... 57
Notes .................................................................................................................................................................. 58
Adding Notes to a Case File .......................................................................................................................... 58
Alerts .................................................................................................................................................................. 59
Configuring Alerts to Present in a Case File .................................................................................................. 59
Export Options .................................................................................................................................................... 60
Appendix A: Key Performance Indicators ............................................................................................................... 61
5

SaleGuard is Point of Sale (POS) analysis software. By using exception-based reporting and data
analytics to pinpoint sales irregularities, SaleGuard is a valuable tool for combating shrinking profit
before it becomes a problem. SaleGuard automatically tracks key performance indicators and provides
sophisticated performance reports for employees, departments, and entire business locations. The POS
data collected by SaleGuard is combined with video surveillance from supported digital recorders to
create a powerful tool for forensics and training.
SaleGuard is compatible with both RS-232 and network registers. For a complete list of compatible
systems, go to saleguard.net.
There are three primary components to the SaleGuard software:
Client – The SaleGuard Client is the primary application that will be used by loss prevention managers.
The Client allows you to view and search video, configure POS reports, and evaluate Risk Analysis
data.
Collector – The SaleGuard Collector is the service that collects data from the POS terminals. Only one
Collector is typically installed per location and can handle numerous POS terminals.
Manager – The SaleGuard Manager is the central database manager that stores and processes the
data for all Collectors. Only one Manager can to be installed.
SaleGuard Professional
There are two available versions of SaleGuard software. SaleGuard Professional provides an easy and
powerful way to search POS transaction data. Users can group results, create and save custom data
filters and quickly, with the click of a button, view the video associated to a transaction. SaleGuard
Professional also allows users to view live and recorded video.
SaleGuard Enterprise
SaleGuard Enterprise takes loss prevention to a whole new level. This version adds an ExceptionBased Reporting (EBR) component that helps detect fraud, errors, and inefficiencies occurring in
businesses by analyzing the Point of Sale transaction data. In addition to offering all the capabilities of
SaleGuard Professional, SaleGuard Enterprise also offers the following features:
Central server capability for multi-location configurations
Ability to use SQL Server Standard to store large amounts of point of sale data for trend
analysis
Additional reports including Risk Analysis, Parent Object, Sales, Employee Performance, and
Ranking Reports
A concise snapshot of the current EBR data via SaleGuard Dashboard
Track and review individual cases for ongoing investigation, including video footage and POS
overlay, with Case Management
Monitor users and their use of SaleGuard features to optimize productivity
Customize KPIs to suit your business’s specific needs
6 33112AB
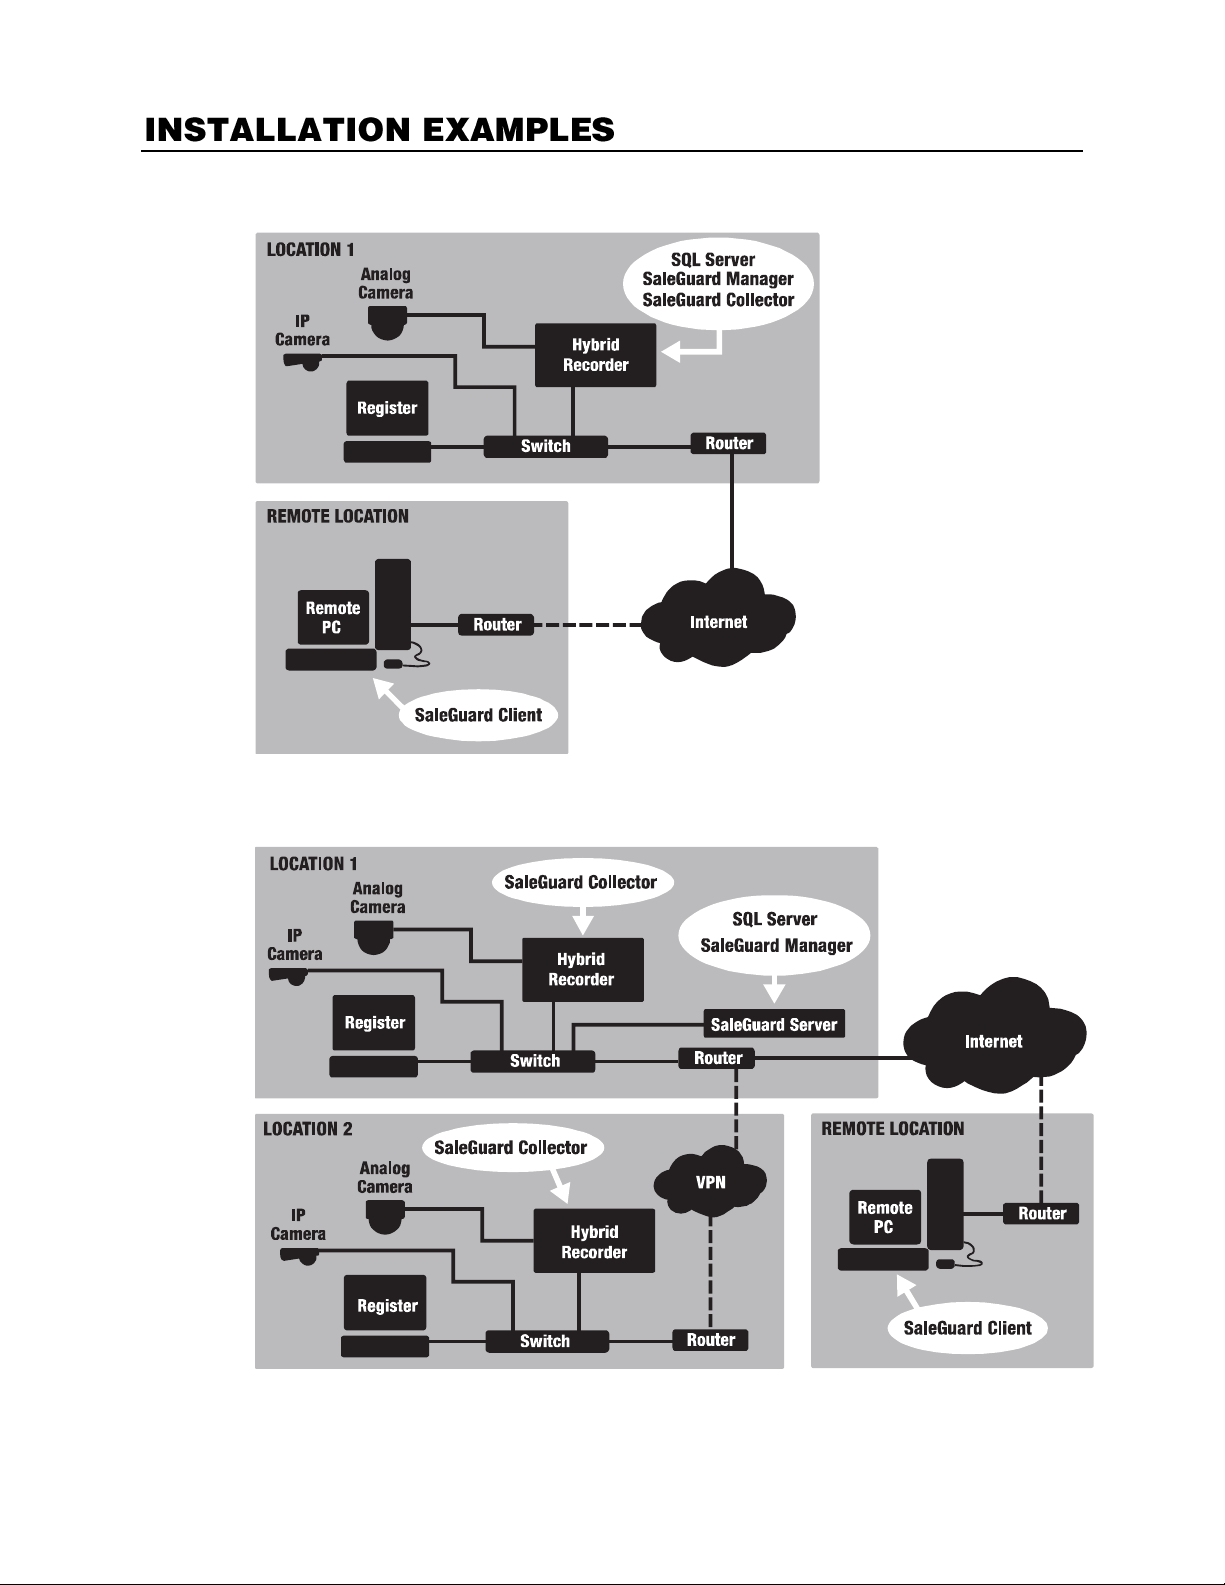
Single Location
Multiple Location
7
Before beginning, you must first determine where each of the three SaleGuard components (Collector,
Type of digital recorder
used with SaleGuard:
Supported Windows® Based
Digital Recorders
All Other Recorders
(Including Linux® based embedded
digital recorders)
Type of Location:
Single Location
Multi Location
Single Location
Multi Location
SaleGuard Collector:
Installed on
recorder
Installed on
recorder
Installed on a
separate PC
(same PC where the
Manager is installed)
Installed on a
separate PC
SaleGuard Manager:
Installed on
recorder
Installed on
separate server
running SQL
server
Installed on a
separate PC
(same PC where the
Collector is installed)
Installed on
separate server
running SQL
server
SaleGuard Client:
Installed on a
separate remote
station PC
Installed on a
separate remote
station PC
Installed on a
separate remote
station PC
Installed on a
separate remote
station PC
Manager & Client) needs to be installed. Use the chart below to determine the type of installation you
are working with.
To install SaleGuard, the following additional programs are required. These programs are included in
the SaleGuard setup files and you will be prompted to install them if necessary.
Microsoft .Net Framework 3.5 SP1
Microsoft .Net Framework 4.0
Windows Installer 4.5
Microsoft Powershell v2
1. Click SaleGuard Full Install on the SaleGuard CD menu to start the installation.
2. Follow the on-screen instructions until you reach the Select Features screen.
3. Select the desired SaleGuard components to install on the appropriate machine (based on chart
above):
a. Client – The SaleGuard Client is the primary application that will be used by loss
prevention managers on a day to day basis. The Client allows you to view and configure
POS reports, view and analyze Risk Analysis Data and to view and search video. The
client also allows you to configure the Collector and the Manager applications.
b. Collector – The SaleGuard Collector is the service that collects data from the POS
terminals. Only one Collector is typically installed per location and can handle numerous
POS terminals).
c. Manager – The SaleGuard Manager is the central database manager that stores and
processes the data for all Collectors. Only one Manager can be installed.
4. Click Next and then click Install to begin the installation. If you have elected to install the Manager,
the system will restart to install SQL Server 2008 R2 Express. The installation will automatically
resume after the system restarts.
5. Click Finish to exit the InstallShield Wizard when the installation is complete.
8 33112AB
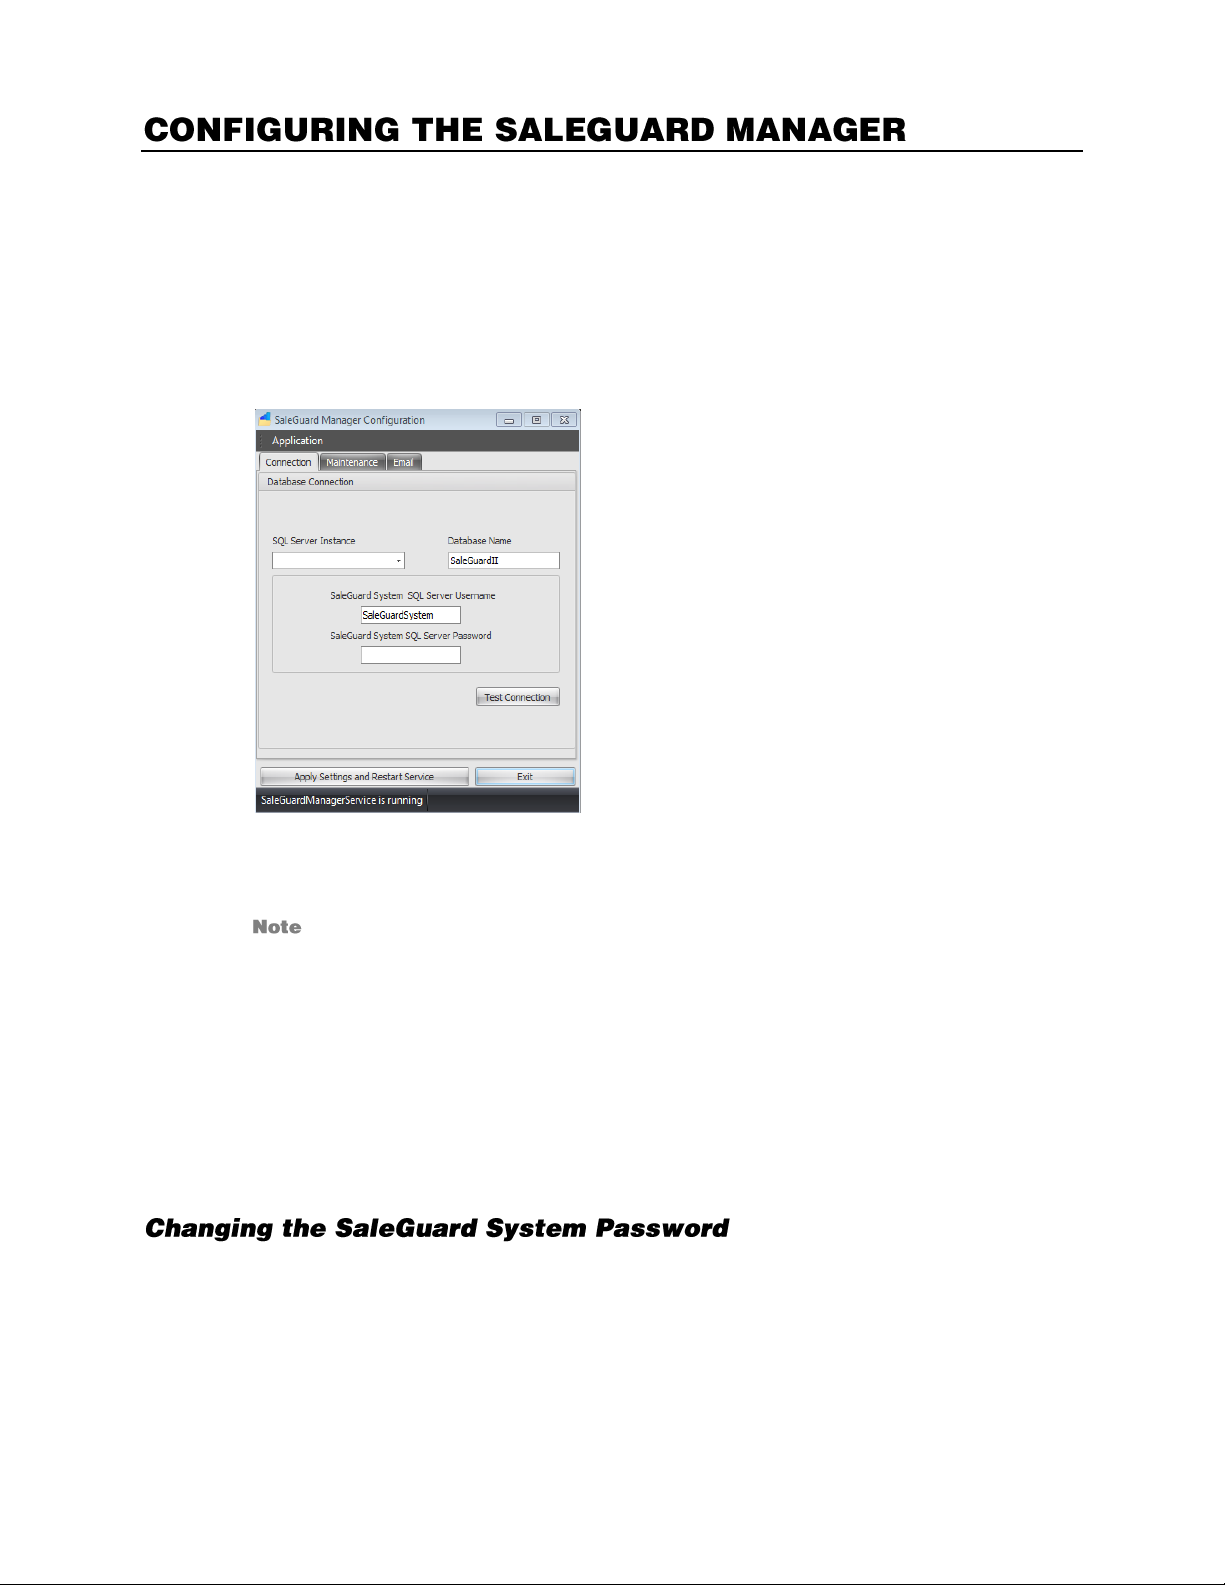
Configure the SaleGuard Manager to connect to the SQL database. Before you begin, you will need to know
the IP address of the SQL Server. In most cases this will be the IP address of the PC where you installed
the SaleGuard Manager.
Configuring the Database Connection
1. Open the SaleGuard Manager (OpenEye > SaleGuard 2 > SaleGuard 3 Manager
Configuration).
2. In the Central Database Connection section, type [computer IP] \ SALEGUARD in the SQL
Server Instance field.
OpenEye recommends using 127.0.0.1\SALEGUARD.
3. Type the default username and password in the SaleGuard System SQL Server boxes.
a. Username: SaleGuardSystem
b. Password: SaleGuardSystem
4. Click Test Connection to verify your SQL settings. If the connection is successful, click OK.
5. Click Maintenance. In the Essential SQL Server Maintenance Performed by column, select
SaleGuard.
6. Click Apply Settings and Restart Service to apply the new settings.
7. Click Exit after service has restarted.
To change the SaleGuard System password:
1. In the SaleGuard Manager Configuration menu, click Change SaleGuard System Password.
2. Type the new username and password and then click Apply Settings and Restart Service to
save the new password.
9
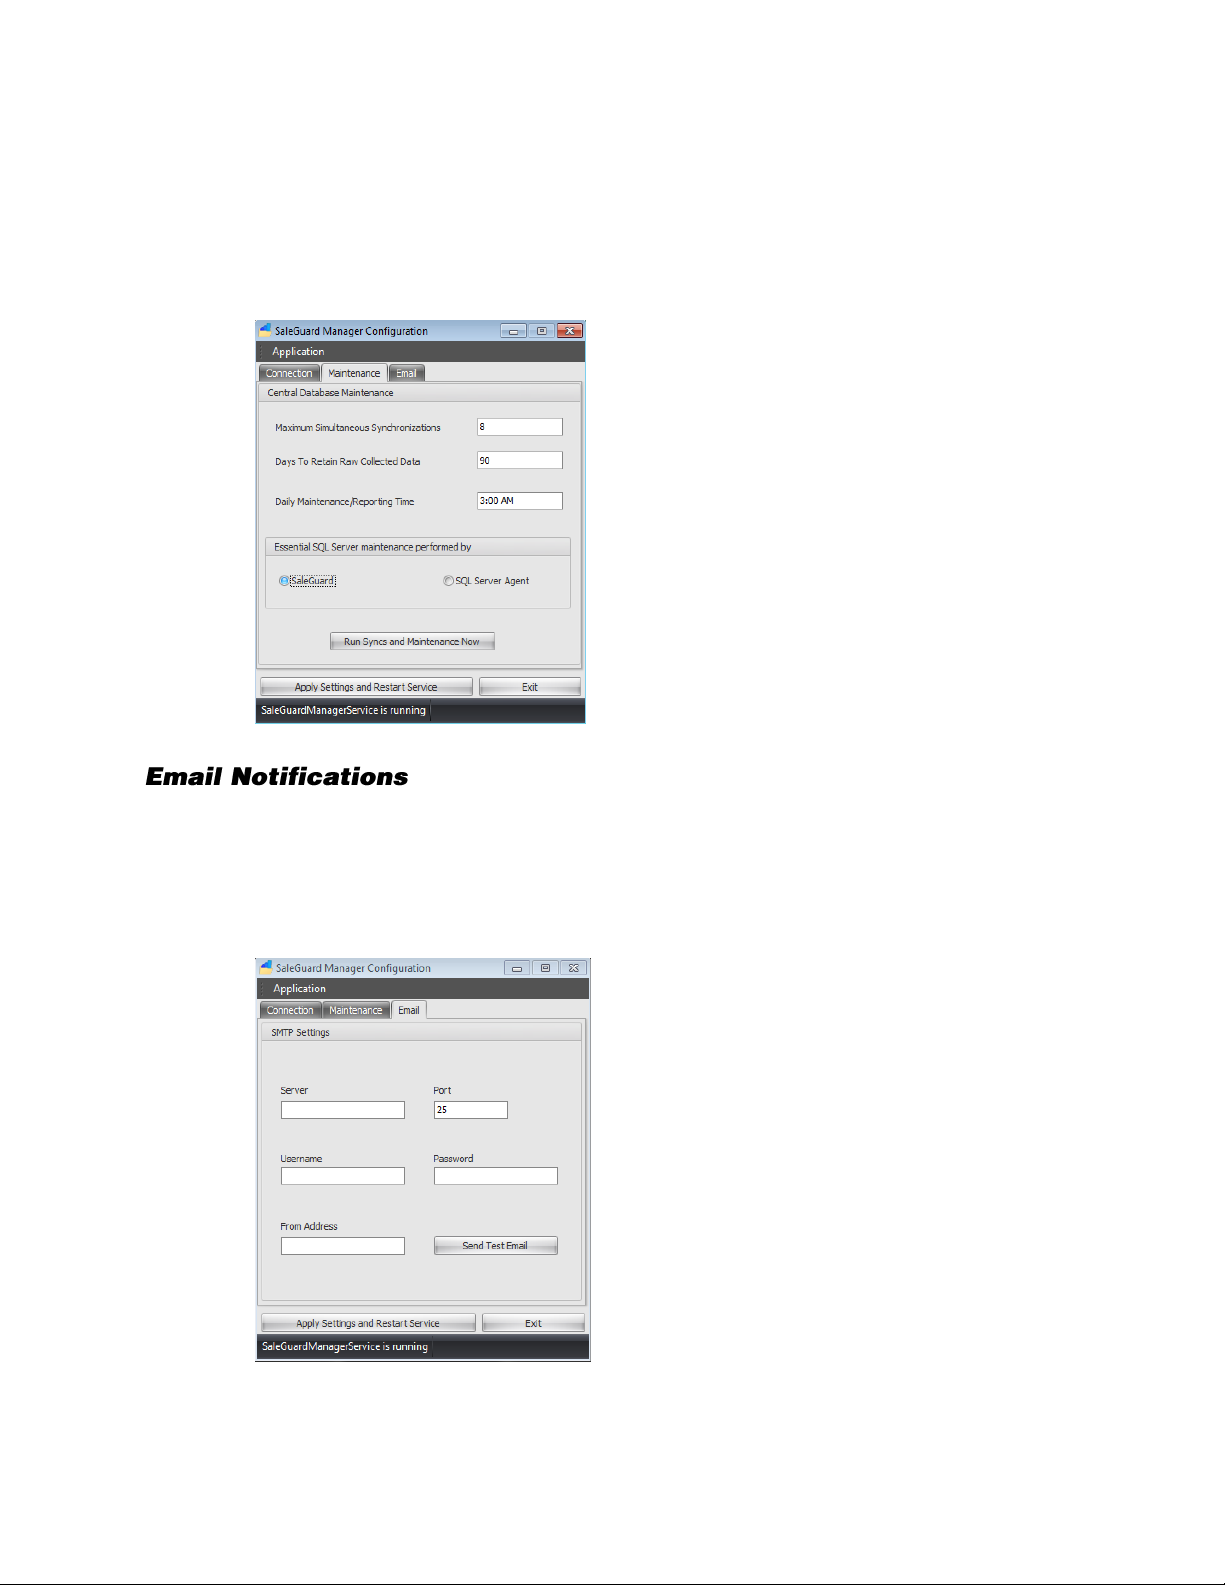
Configuring SQL Server Maintenance
1. Click the Maintenance tab.
2. Type your desired settings for Maximum Simultaneous Synchronizations, Days To Retain Raw
Collected Data, and the Daily Maintenance/Reporting Time. The default settings are generally
acceptable.
3. When you are finished, select which installed software will perform the SQL server maintenance.
1. To receive email messages regarding the status of your SaleGuard type the Server, click the Email
tab.
2. Type the appropriate Port, Username, Password, and address the message is to be sent from
(From Address).
3. Click Sent Test Email to confirm your settings.
10 33112AB
Install the SaleGuard Client software on a PC with a network connection (Internet or LAN) to your recorder
and your POS registers.
1. From the SaleGuard Software CD menu, click Install SaleGuard Client to launch the SaleGuard
Client Installer, and then click Next.
2. Read and accept the License Agreement, and then click Next.
3. Click Install to start the installation.
4. Click Finish to exit the InstallShield Wizard when the installation is complete.
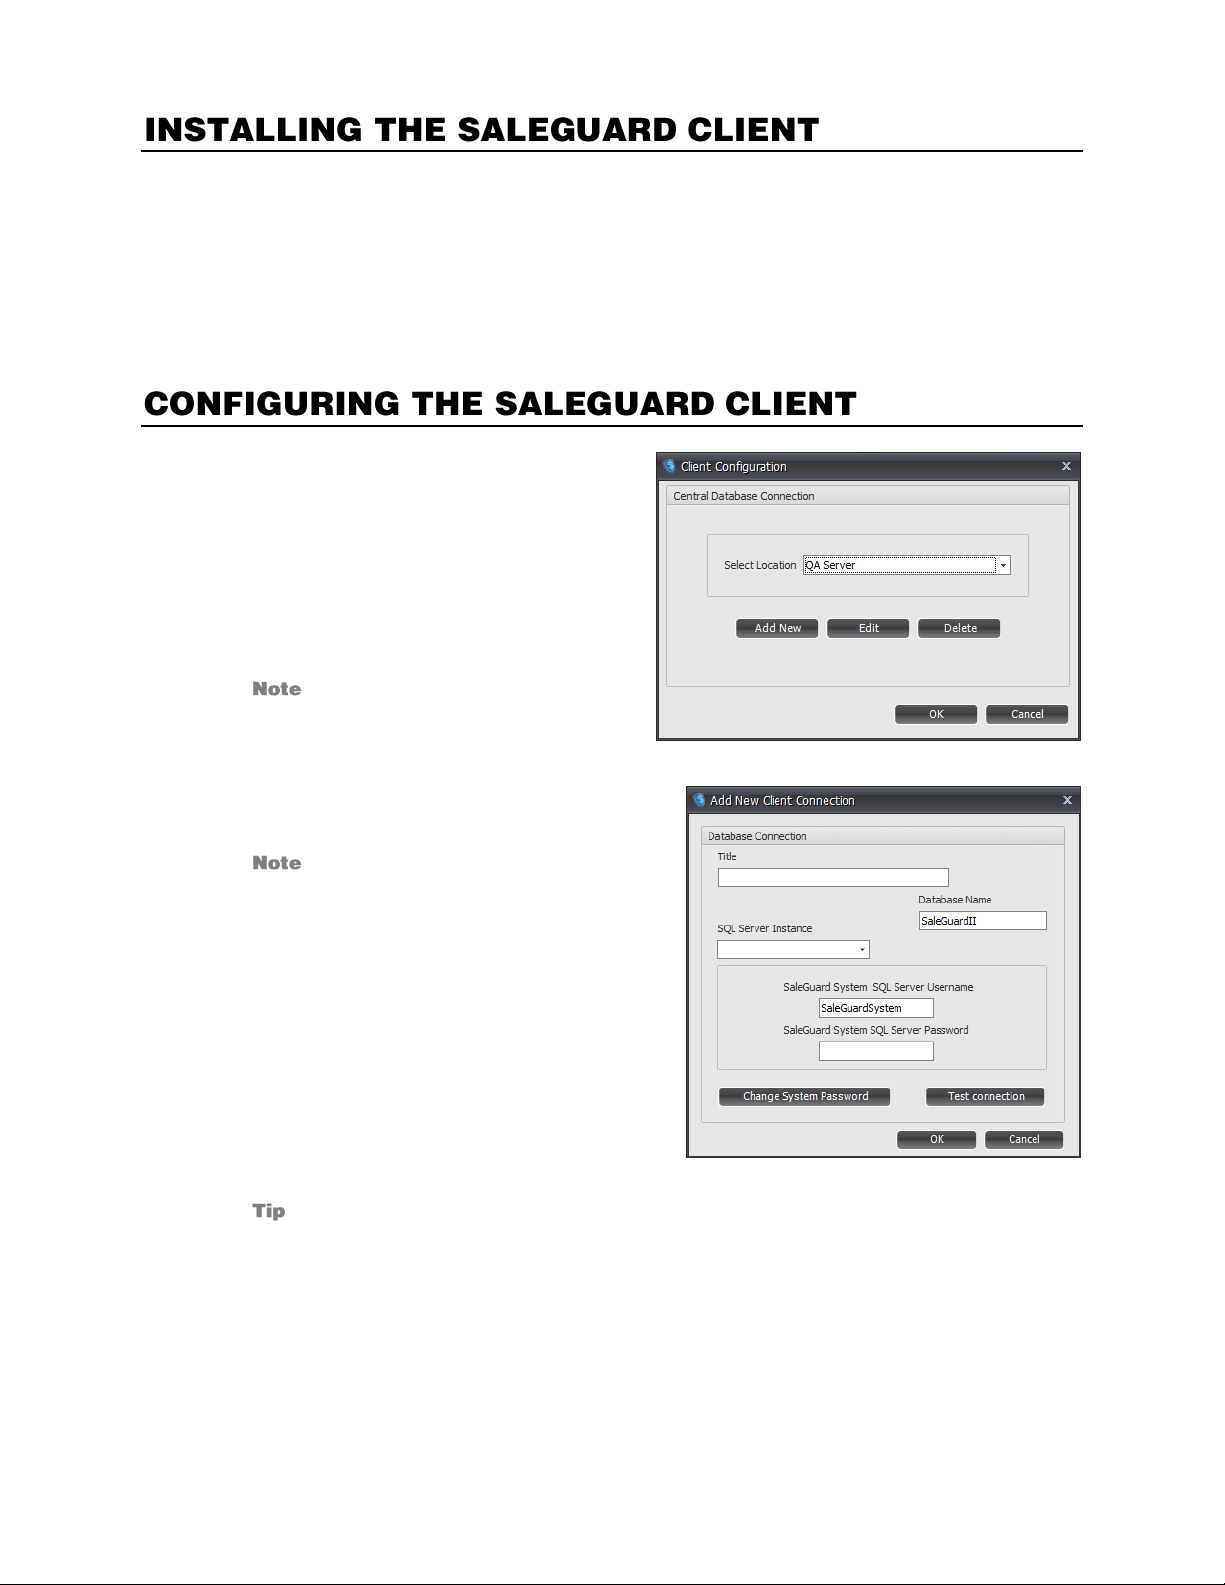
Before using the SaleGuard Client, you must
configure the SaleGuard Client to connect to one or
more SaleGuard databases to receive data from the
appropriate POS systems.
1. Open the SaleGuard Client.
(OpenEye > SaleGuard 2 > SaleGuard 3
Client).
2. Click Add New to add a new client
connection.
If the Client Configuration window
doesn’t open automatically, click
Application, and then click Database
Connection.
3. Type a custom title in the Title field that will be
used to uniquely identify this connection.
OpenEye recommends using a name that
describes the location of the SaleGuard
Client, such as “Brooklyn” or “Main
Street.”
4. Type the IP address of the SaleGuard
Manager ([IP Address]\SALEGUARD) in the
SQL Server Instance field. This is the same
SQL Server Instance that you used previously
in the Configuring the SaleGuard Manager
section.
5. Type the SaleGuard System SQL Server
Password field. This is the same username
and password that you used previously in the
Configuring the SaleGuard Manager section.
If you changed the username and password already, make sure to use the new password
here. The default password is SaleGuardSystem.
6. Click Test Connection to verify the connection status. If the connection is successful, click OK.
7. Select the location you just created from the Select Location list and click OK to connect.
11

Default Client Username and Password
Username: admin
Password: 1234
Your SaleGuard licenses must be activated within 30 days of installation. Follow the instructions below to
activate SaleGuard online or by phone.
Locate the System ID
1. Launch your SaleGuard Client, and then log in as admin.
2. In the Application menu, click Manage Locations.
3. Click Connect to POS Collector.
4. Click Manage Licenses. The SaleGuard License Management window will open and the System
ID will be located at the top.
5. Copy the System ID.
Activate Online
1. Locate the System ID (see previous instructions).
2. Open your Internet browser and navigate to: http://activate.saleguard.net
3. Type your SaleGuard Serial Number in the Product Serial Number field.
Your serial number is can be found on the packaging for your SaleGuard software.
4. Type the System ID.
5. Click Next.
If you are using a trial license, delete the trial license before moving on to Step 6.
6. Copy the unlock code, and then paste the code in the Add License box.
7. Click Add License.
Activate by Phone
The following information is necessary for phone registration:
Company Name
Company Phone Number & E-mail Address for notification of updates
System ID
1. Locate the System ID.
2. Call 1-888-309-5335 to talk to technical support.
3. Type the unlock code provided by support in the Add License field and then click Add License.
12 33112AB
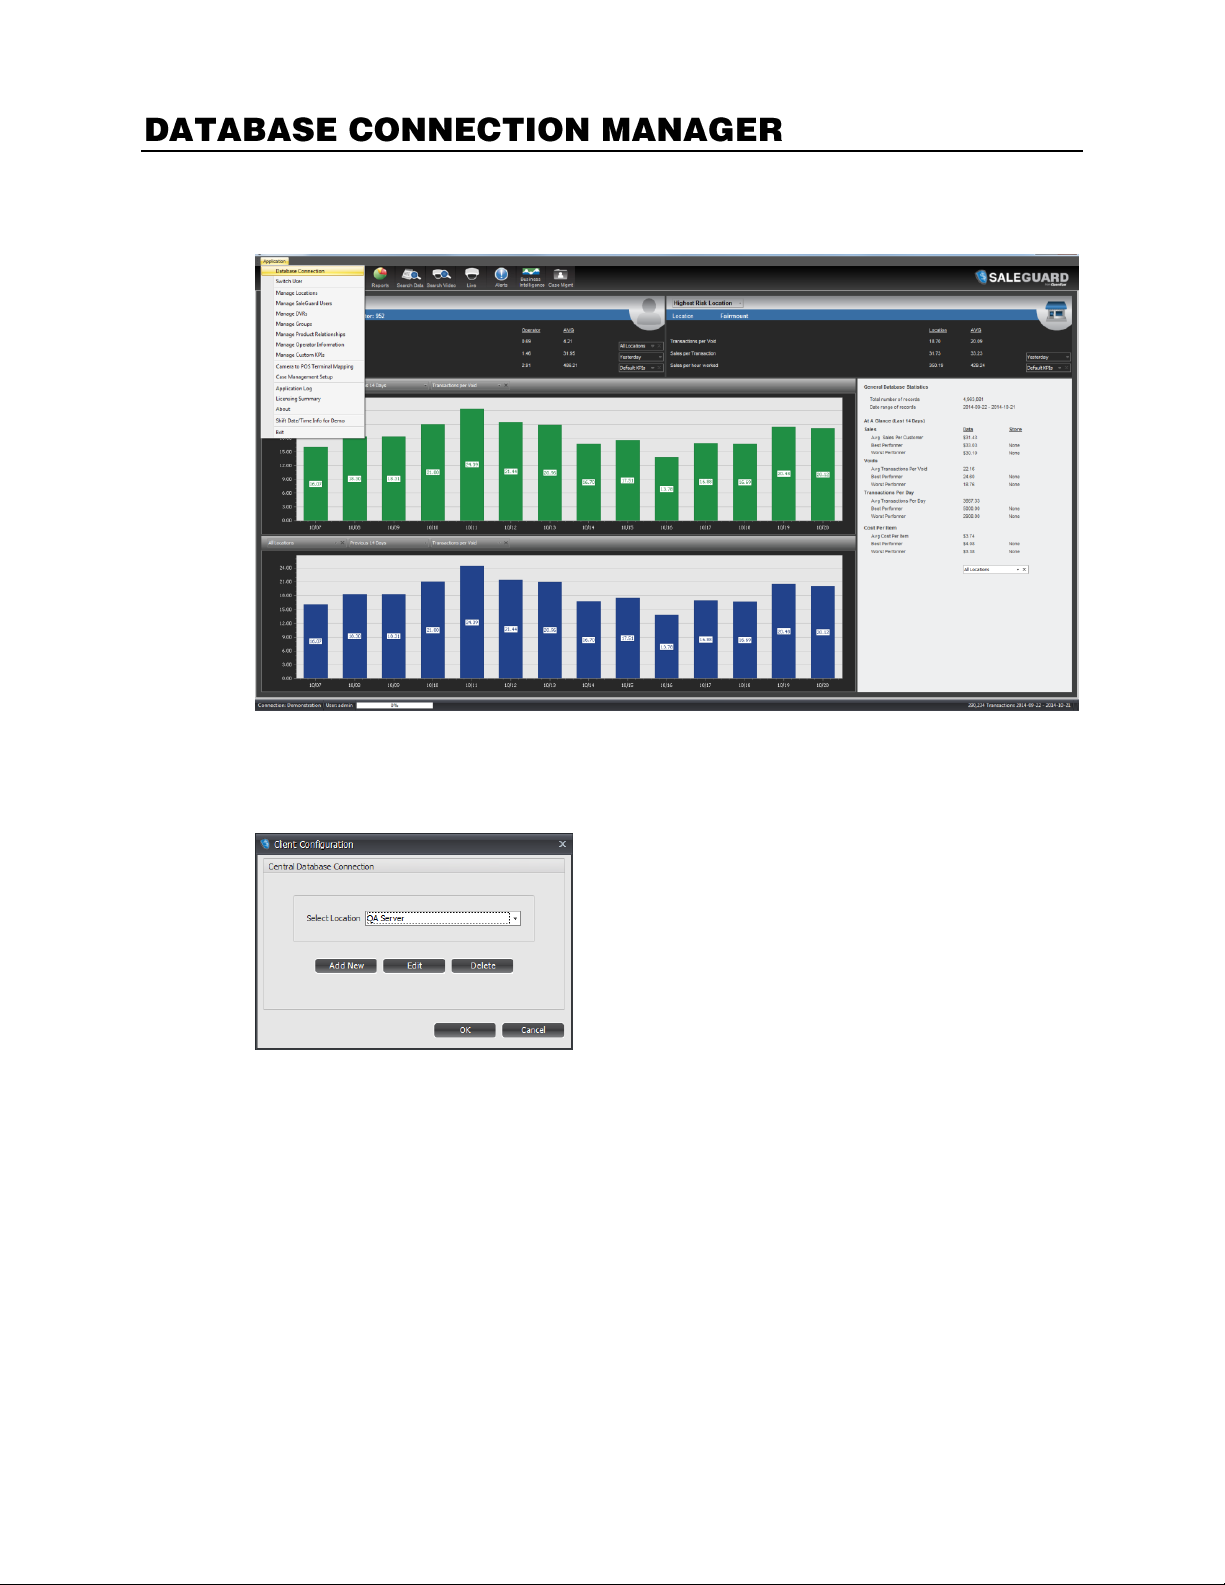
You can connect to a different SaleGuard Database without exiting the client software by using
Database Connection.
1. Click Application, and then click Database Connection.
2. Click Select Location, and then select the database you want to connect to.
3. Click OK.
4. The Login screen will appear. Enter the Username and Password. The default user name and
password are:
Username: admin
Password: 1234
5. Click Login.
13
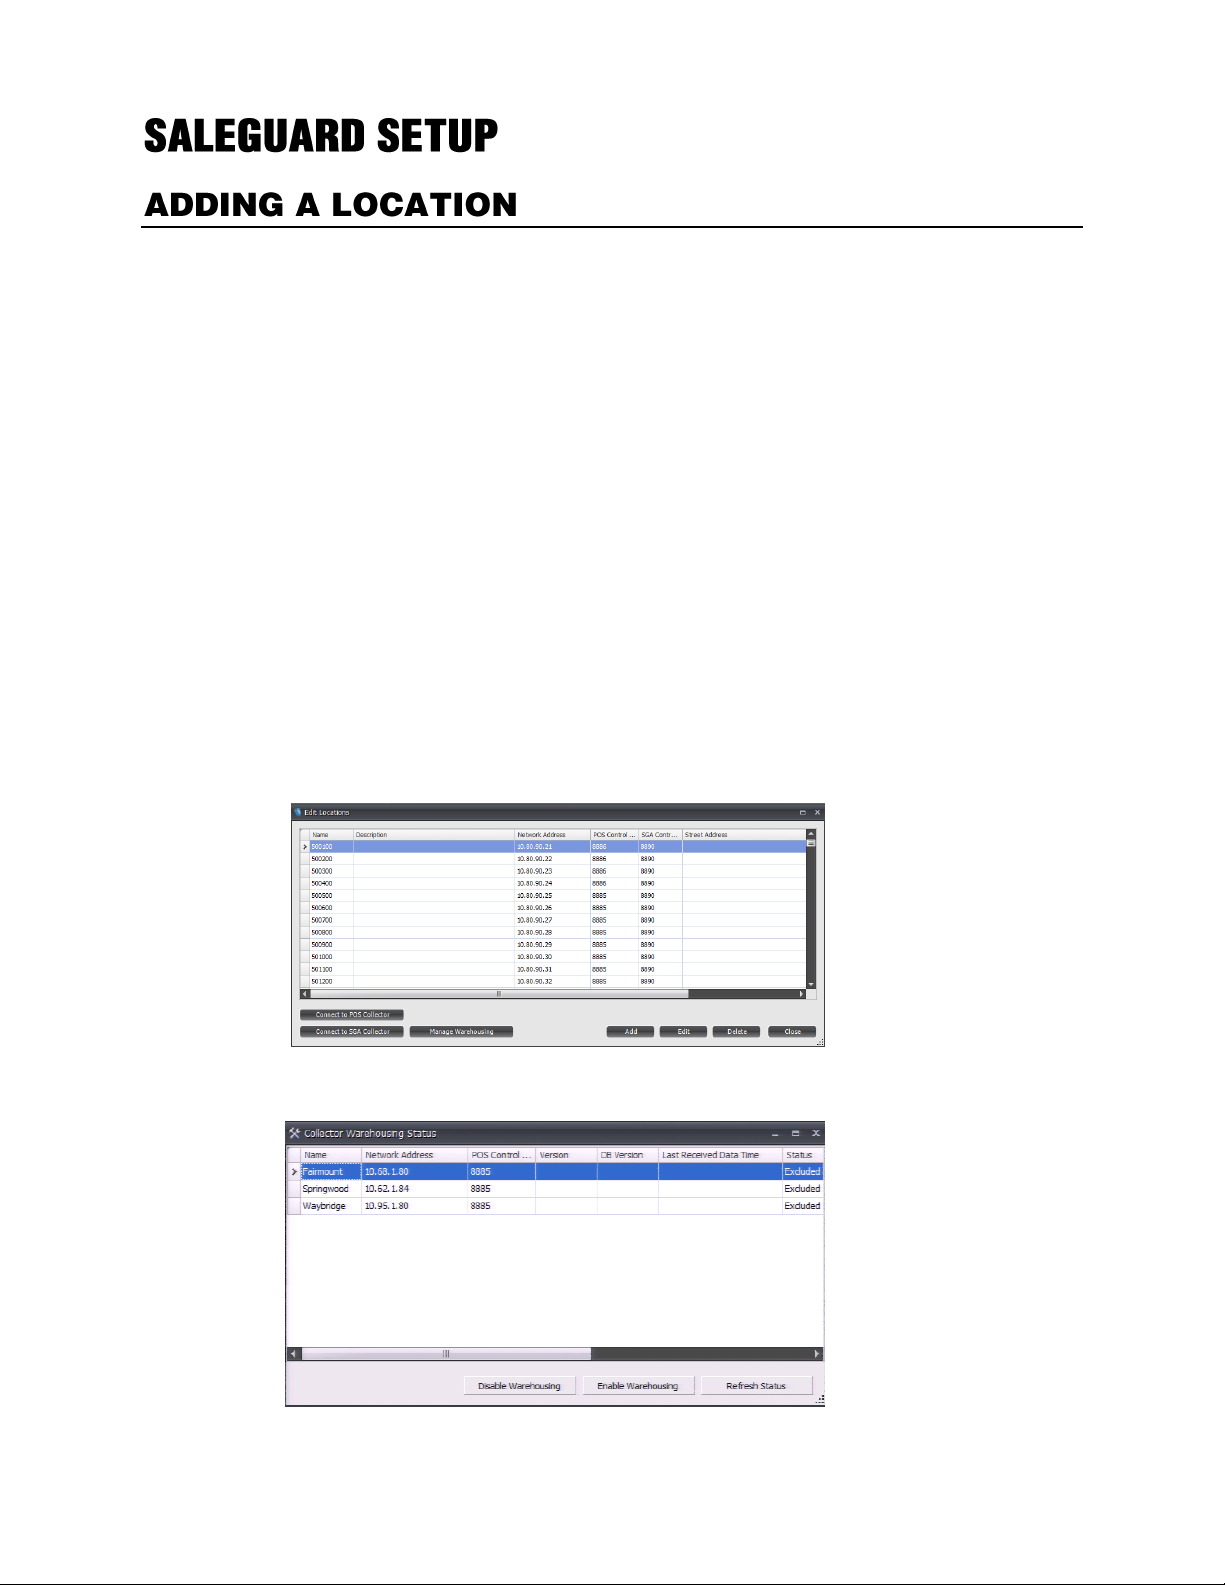
Every location shown in the Manage Locations window is a connection to a Collector. Once you have
entered the location, you can configure the Collector. If you have more than one Collector, you must repeat
the steps to add a location until all your locations have been added.
1. Click Application, and then click Manage Locations.
2. Click Add, and then complete the location information in the Edit Location window.
Name – The name of the Collector
Tip Use a name that you will recognize to identify the location of the Collector. This name will be
seen in the Dashboard and Risk Analysis tabs
Description – For informational purposes
Street Address – For informational purposes
Telephone – For informational purposes
Network Address – The IP address of the Collector
POS Control Port – The default port is 8886
Workgroup Username – This is the Microsoft Windows operating system account username of the
Collector
Workgroup Password – This is the Microsoft Windows operating system account password of the
Collector
3. Click OK and the location will appear in the list.
4. After a location is added to the SaleGuard Client, you can configure the Collector.
14 33112AB
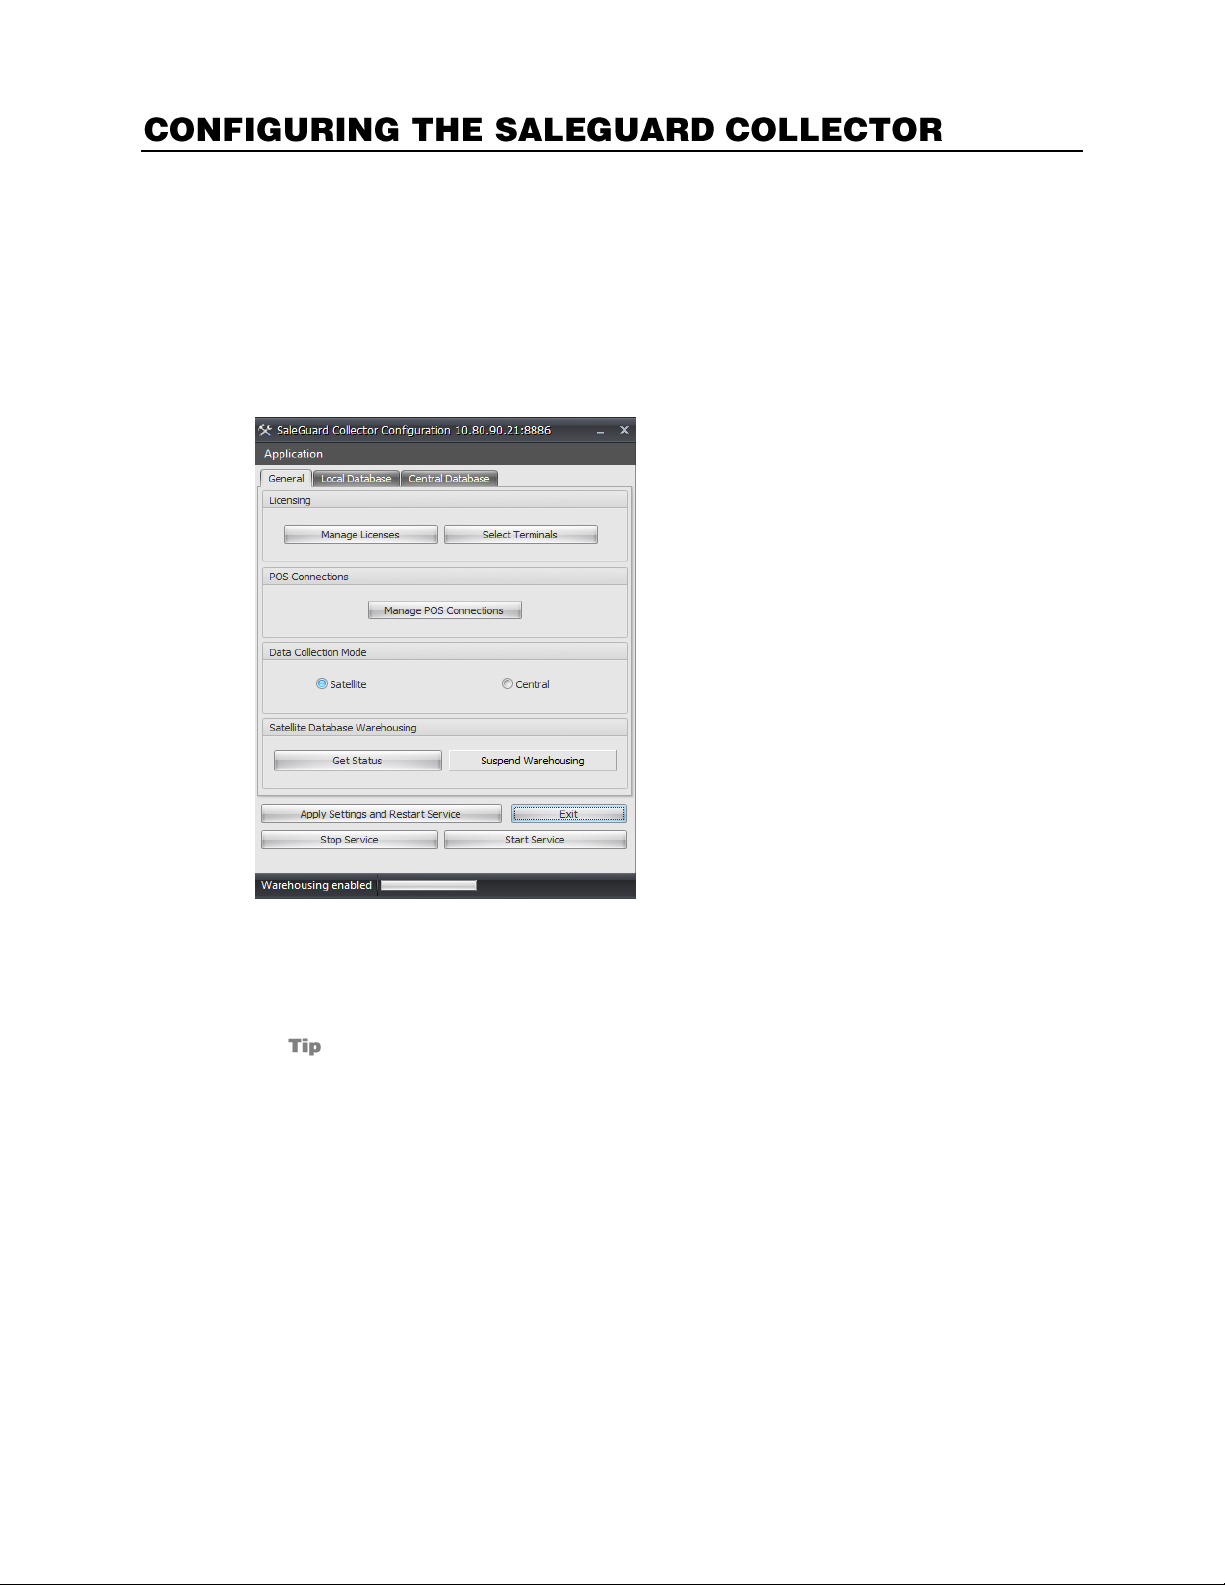
The SaleGuard Collector is a server used to take the POS transaction data from the POS terminals and
send it to the SQL database for long term storage. The following steps outline the steps to configure the
Collector to communicate with POS terminals and the SQL database.
Setting the Data Connection Mode
1. Click Application, and then click Manage Locations.
2. Select a location and click Connect to POS Collector.
3. If this is a single location installation, select Central and skip ahead to the Setting the Central
Database Connection section. Otherwise, ensure that Satellite is selected and continue on with
Setting the Local Database Connection.
Satellite refers to installations where the SaleGuard Manager and SQL Server are
located on a separate Server from the SaleGuard Collector.
Central refers to installations where the SaleGuard Collector, Manager and SQL Server
are all installed on the same server (such as a digital recorder).
15
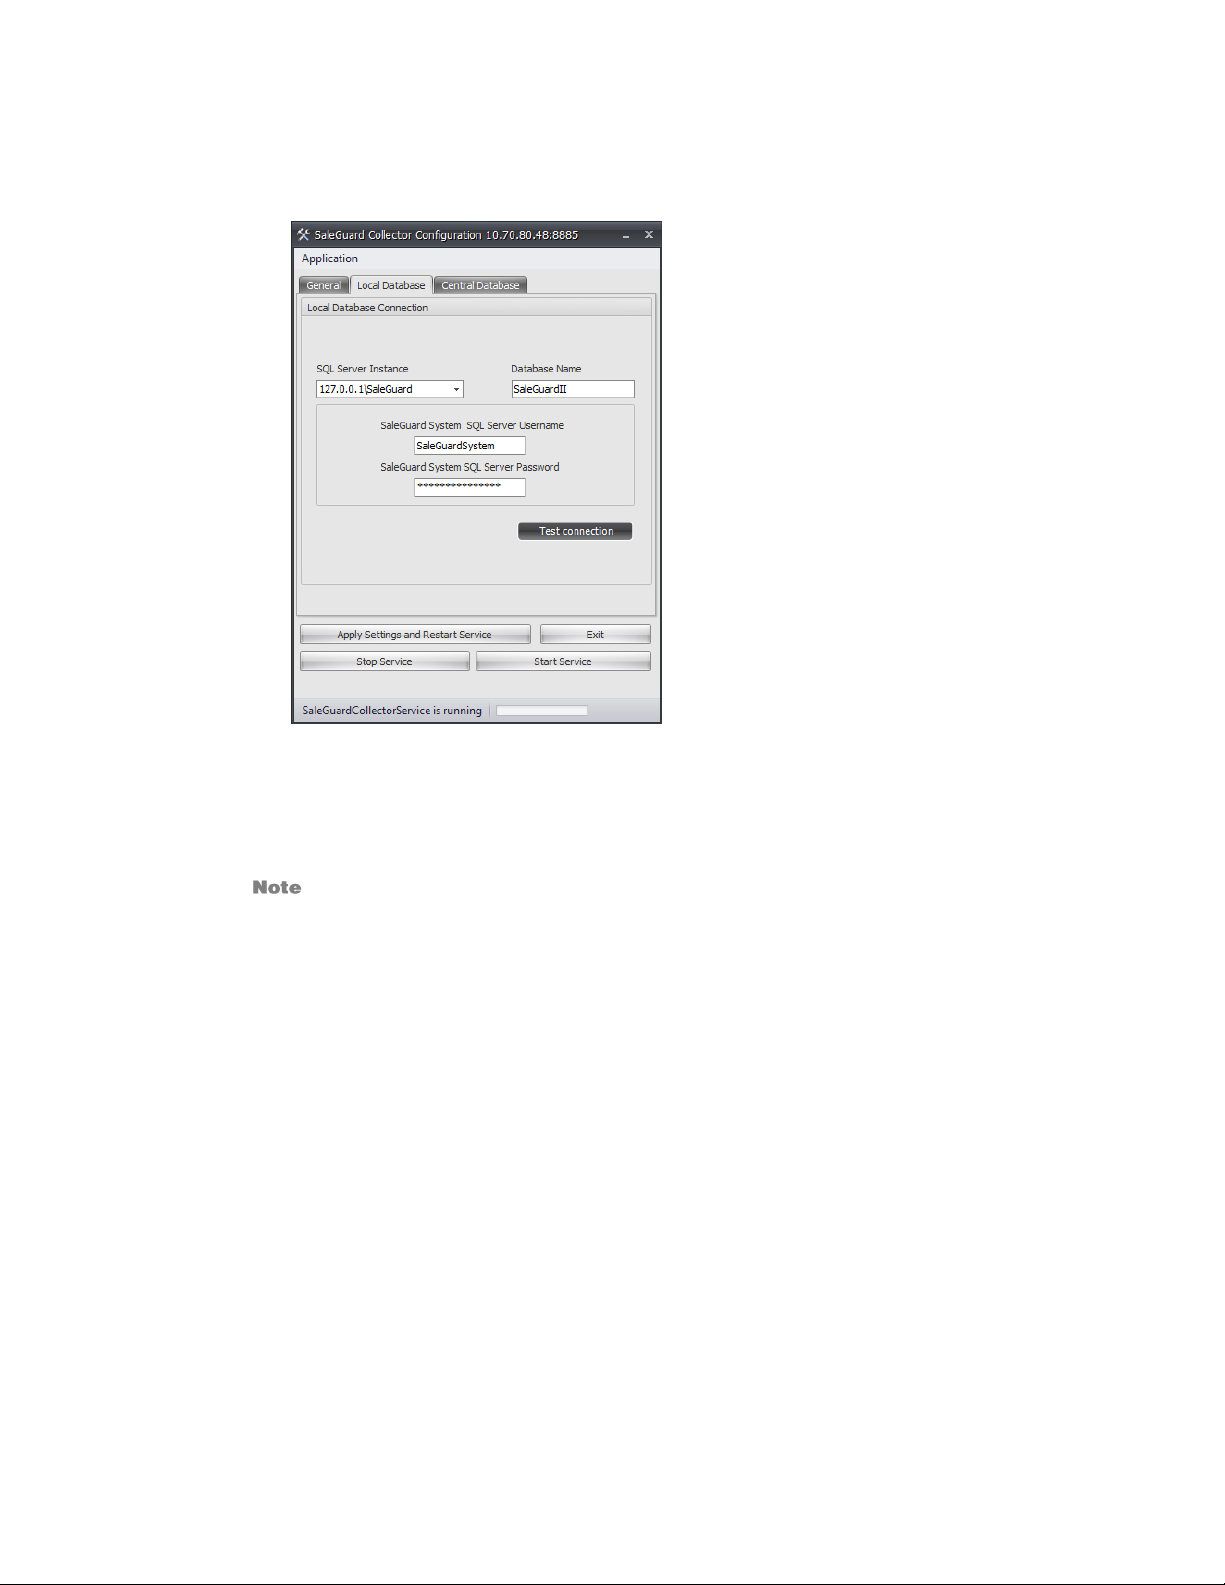
Setting the Local Database Connection
1. Click the Local Database tab.
2. Type [IP address]\SALEGUARD in the SQL Server Instance field. This is the same information
used in configuring the SaleGuard Manager.
3. Type the SaleGuard System SQL Server Password. This is the same password that you used
previously in the Configuring the SaleGuard Manager section.
The default password is SaleGuardSystem.
4. Click Apply Settings and Restart Service, and then click Yes to restart the service.
5. Proceed to Setting the Central Database Connection.
16 33112AB
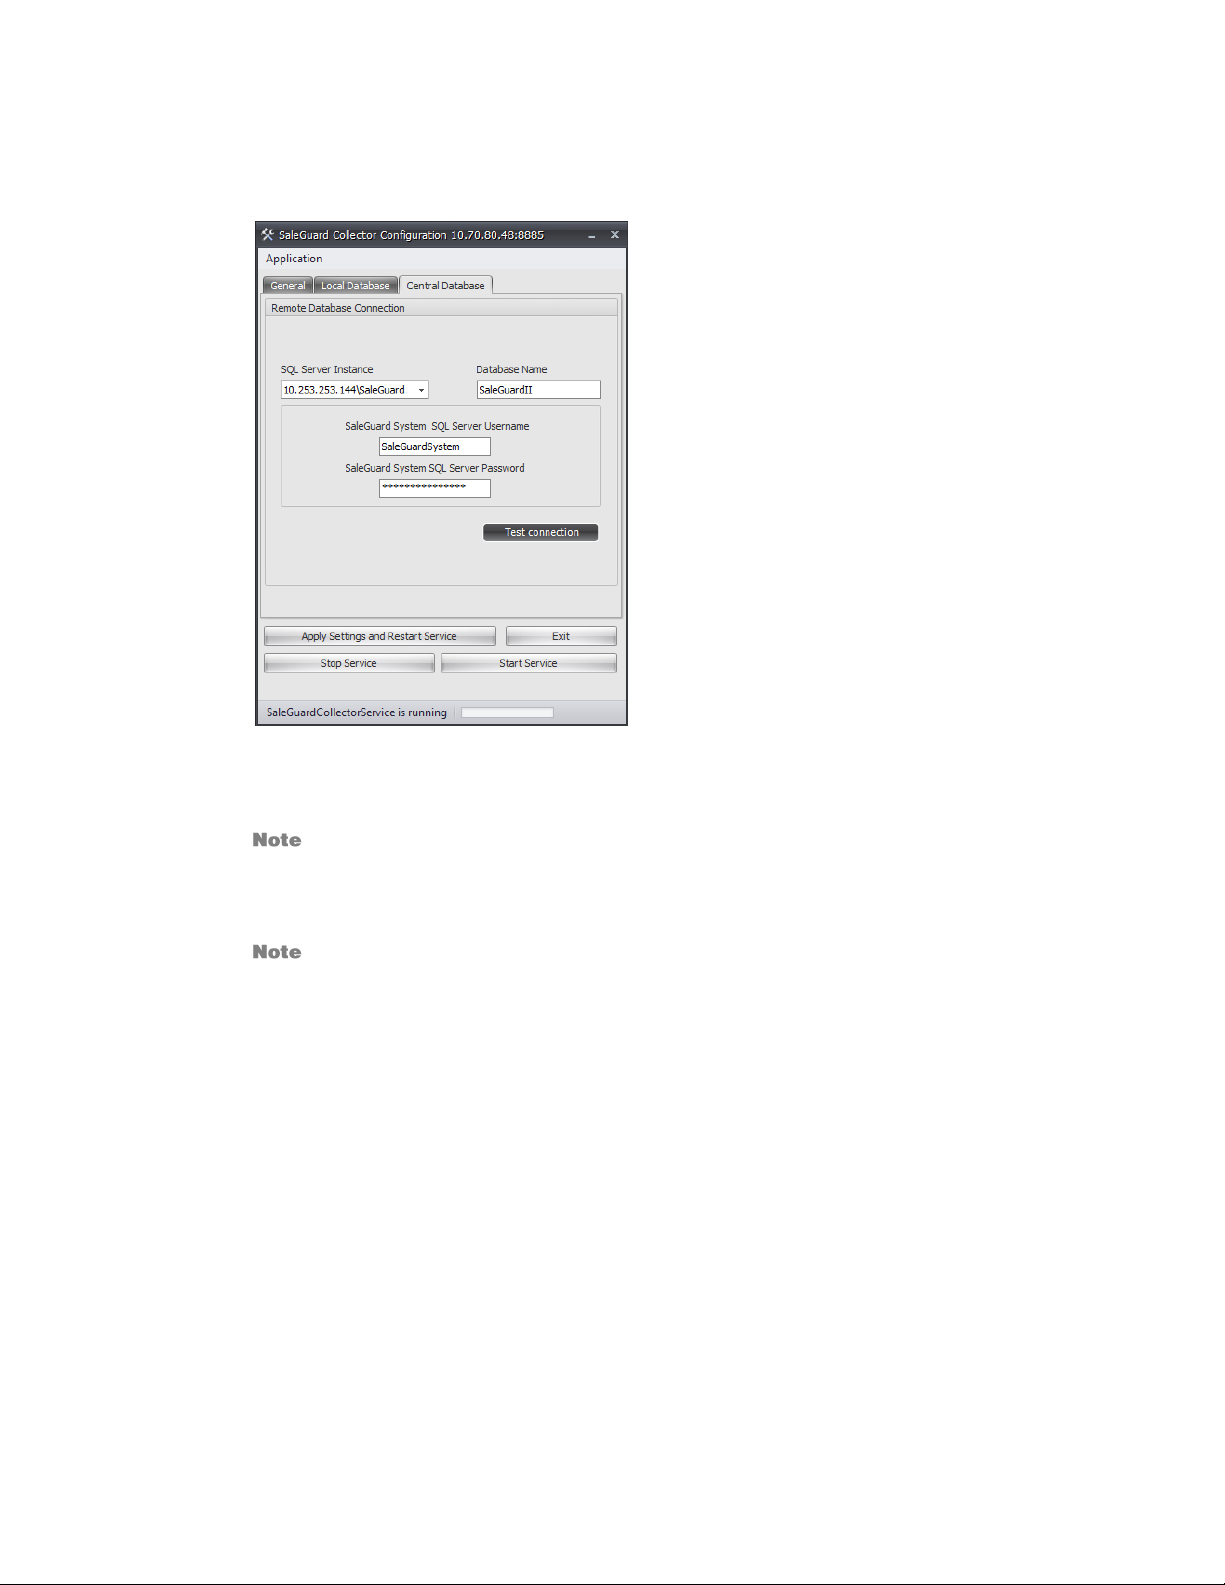
Setting the Central Database Connection
1. Click the Central Database tab.
2. Type [IP address]\SALEGUARD in the SQL Server Instance field. This is the same information
used in configuring the SaleGuard Manager.
If this is for a single-location installation, use 127.0.0.1\SALEGUARD.
3. Type the SaleGuard System SQL Server Password. This is the same password that you used
previously in the Configuring the SaleGuard Manager section.
The default password is SaleGuardSystem.
4. Click Test Connection. If the connection is successful, click OK.
5. Click Apply Settings and Restart Service, and then click Yes to restart the service.
17
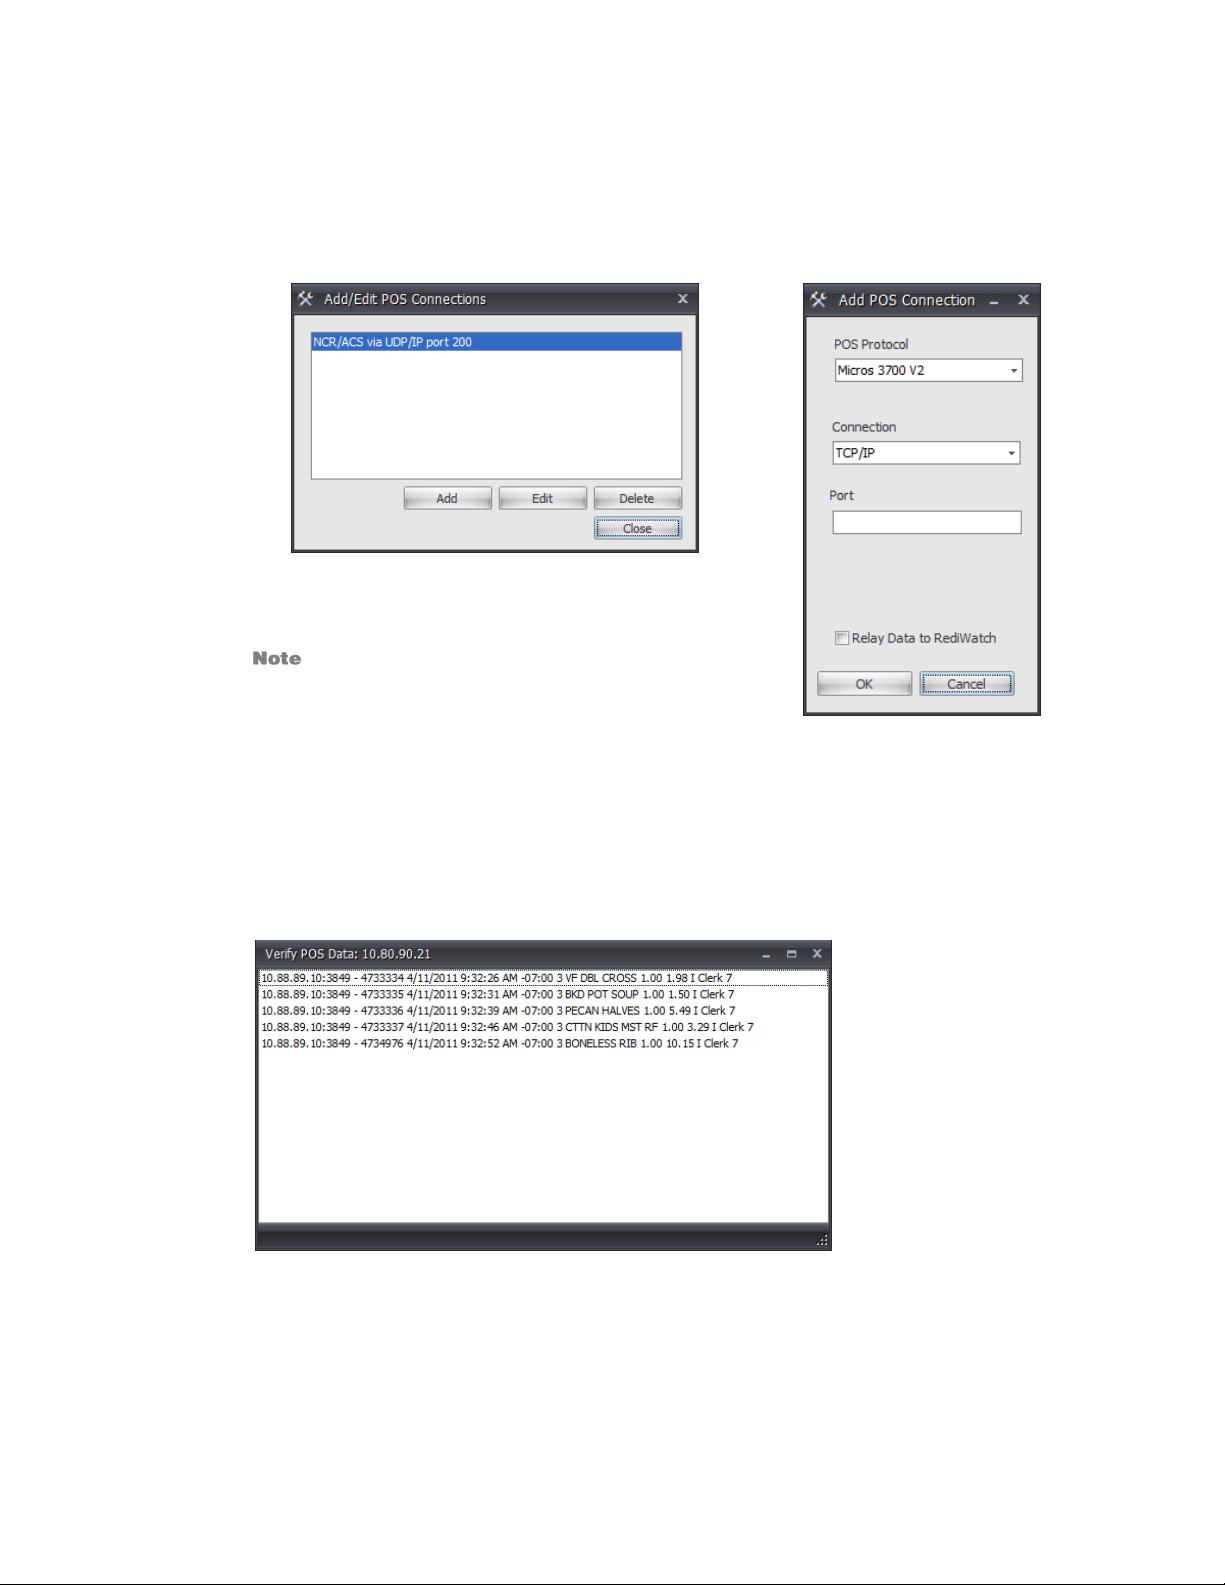
Add a POS Connection
You must add a POS connection for every POS terminal. Follow these instructions to add or edit a POS
connection or to add RediWatch legacy compatibility.
1. On the SaleGuard Collector Configuration window, in the General tab, click Manage POS
Connections.
2. Click Add, and then select the appropriate POS Protocol,
Connection type, and Port for the POS terminal.
If you are currently using RediWatch and want to keep
RediWatch integration, select the Relay to RediWatch
checkbox and fill in the IP address and port of the
RediWatch Server.
3. Click OK. Verify the information in the POS Connections list, and then click Close.
4. To apply the new POS connection, click Apply Settings and Restart Service.
5. Click Yes to restart the service.
6. On the SaleGuard Collector Configuration window, click Application, and then, click Verify POS
Data. If the POS terminal and SaleGuard Collector are configured correctly, the POS data will
populate in real-time.
18 33112AB
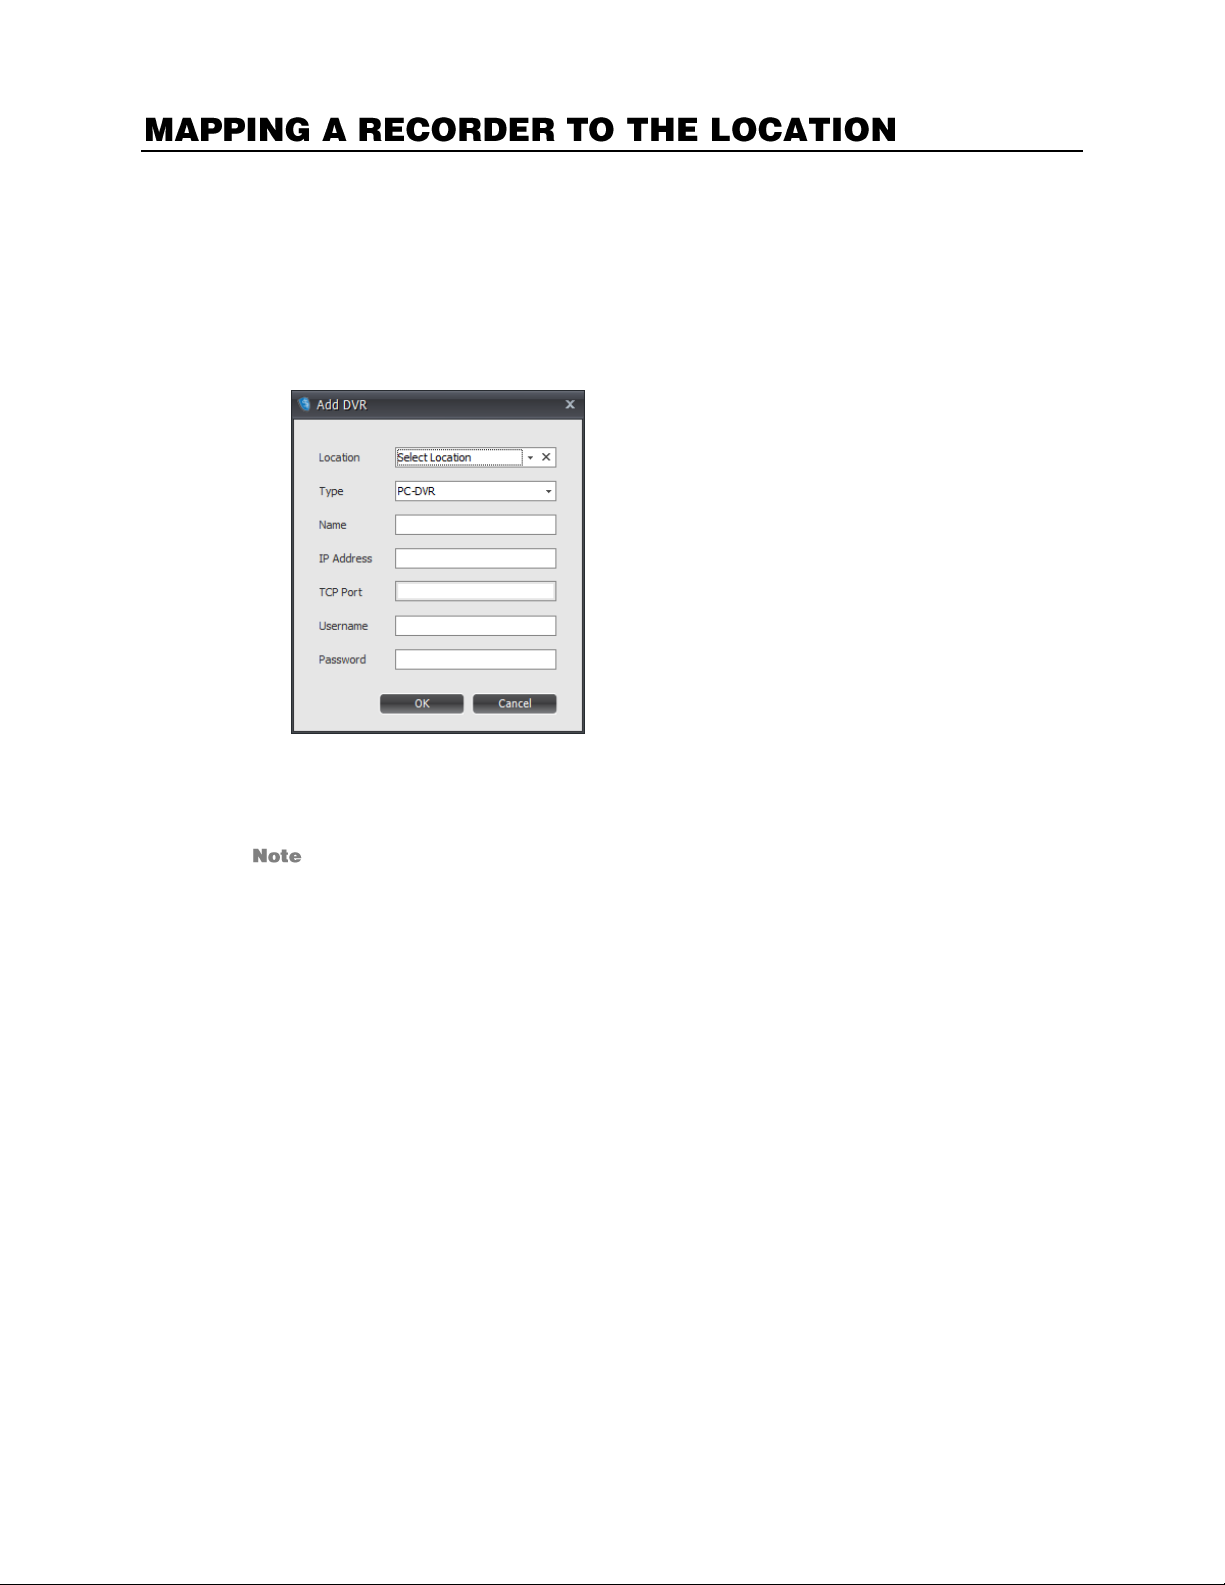
Once locations have been added and the Collector has been configured, you will need to map the recorders
to each location. This allows you to link specific cameras to POS terminals when searching video and
transactions.
1. Click Application, and then click Manage DVRs.
2. Click Add.
3. Select the corresponding Location to assign the recorder.
4. Select the Type of recorder (PC-DVR, OE3-E120/OE3-E480, or OE3-E240)
5. Type the recorder Name, IP address, TCP Port, and Username and Password of the recorder.
Assign a Name to the recorder that describes its location, such as “Lobby” or “Loading Dock.”
6. Click OK.
7. To add more recorders to the location, repeat these steps.
8. When you have added all of your recorders, click Close.
19
 Loading...