

Page 1

Multi-Site Management Software
Version 4 Software Manual
RADIUS
SW-RADIUS
www.openeye.net
Page 2

OpenEye® RADIUS
Version 4.05 - User Manual
Manual Edition 29677AC – FEBRUARY 2011
©2000-2011, OPENEYE
All Rights Reserved
No part of this document may be reproduced by any means, electronic or mechanical, for any purpose, except as
expressed in the Software License Agreement. OPENEYE shall not be liable for technical or editorial errors or
omissions contained herein. The information in this document is subject to change without notice.
The information in this publication is provided “as is” without warranty of any kind. The entire risk arising out of the
use of this information remains with recipient. In no event shall OPENEYE be li able for any direct, consequential ,
incidental, special, punitive, or other damages whatsoever (including without limitation, damages for loss of business
profits, business interruption or loss of business information) , even if OPENEYE has been advised of the possibility of
such damages or whether in an action, contract or tort, including neglige nce.
This software and documentation ar e c opyrighted. All other rights, including ownership of the software, ar e r eserved
to OPENEYE. OPENEYE, OpenEye, HDD R, and High Definition Digital Recorder are registered trademarks of
OPENEYE in the United States and els ewhere; Windows, and Windows XP Em bedded are registered trademark s of
Microsoft Corporation. All other br and and product names are trademarks or registered trademarks of the respec tive
owners.
The following words and symbols mark s pecial messages throughout thi s guide:
Note Text set off in this manner indicates i nformation that is necessary for pr oper operation of the
product.
Tip Text set off in this manner indicates information that may be helpful.
Caution Text set off in this manner indicates that failure to follow directions could result in damage
to equipment or loss of information.
OPENEYE
Liberty Lake, WA ● U.S.A.
2 29677AC
Page 3

TABLE OF CONTENTS
TABLE OF CONTENTS ............................................................................................................................... 3
INTRODUCTION ........................................................................................................................................... 7
Product Description ................................................................................................................................................... 7
PC Requirements ...................................................................................................................................................... 7
Minimum Requirements ........................................................................................................................................ 7
Recommended Requirements .............................................................................................................................. 7
Installing the Radius Software ................................................................................................................................... 8
Running the Radius Software .................................................................................................................................... 8
Logging in ............................................................................................................................................................. 8
Register Radius ......................................................................................................................................................... 9
Register Online ..................................................................................................................................................... 9
Register by Phone ................................................................................................................................................ 9
RADIUS BASICS ........................................................................................................................................ 10
Running the Radius Software .................................................................................................................................. 10
Logging in ........................................................................................................................................................... 10
Connecting to a Recorder ....................................................................................................................................... 10
Viewing Video ..................................................................................................................................................... 10
Moving Cameras ................................................................................................................................................. 11
Remove a Camera .............................................................................................................................................. 11
Main Display Screen ............................................................................................................................................... 11
Connection List ....................................................................................................................................................... 12
Shortcut Lists .......................................................................................................................................................... 12
Hot Spot .............................................................................................................................................................. 13
DVR Options ....................................................................................................................................................... 14
Camera Options.................................................................................................................................................. 14
Main Display Toolbar ............................................................................................................................................... 15
Live Display ............................................................................................................................................................. 15
Live Camera Options .......................................................................................................................................... 16
Live Camera Tools .............................................................................................................................................. 16
Custom Screens ...................................................................................................................................................... 17
Creating Custom Screens ................................................................................................................................... 17
Editing Custom Screens ..................................................................................................................................... 17
Create Screen Sequences .................................................................................................................................. 18
Using Multiple Windows .......................................................................................................................................... 18
Multiple Monitor Support ......................................................................................................................................... 19
Multiple Monitor Support ......................................................................................................................................... 19
Using Multiple Monitors ...................................................................................................................................... 19
SETUP ........................................................................................................................................................ 20
General Setup ......................................................................................................................................................... 20
Locking Functions ............................................................................................................................................... 21
3
Page 4

Live Setup ............................................................................................................................................................... 22
Set Schedule to Discard Alarms ......................................................................................................................... 23
Creating a Schedule to Discard Normal Alarms ............................................................................................. 23
DVR List Setup ........................................................................................................................................................ 24
Adding a New Recorder ...................................................................................................................................... 24
Editing a Recorder .............................................................................................................................................. 24
Name Sensors and Relays ................................................................................................................................. 24
Health Check Setup ................................................................................................................................................ 25
Set Up Health Check Options ............................................................................................................................. 25
Use PPP to connect to DVR .......................................................................................................................... 26
Enable Audio Warning on Failure .................................................................................................................. 26
Alarm Monitor Setup ................................................................................................................................................ 26
Set Up Alarm Monitor Options ............................................................................................................................ 27
Add Items to Alarm Confirm List .................................................................................................................... 27
DVR POS Setup ...................................................................................................................................................... 28
Admin Setup ............................................................................................................................................................ 29
Data Manager ..................................................................................................................................................... 30
Configuring Import / Export ............................................................................................................................ 30
Scheduling Log Cleanup ..................................................................................................................................... 31
User Management ................................................................................................................................................... 32
Creating Users .................................................................................................................................................... 32
Editing Users ...................................................................................................................................................... 32
E-Mail Alert Setup ................................................................................................................................................... 33
General E-mail Setup ......................................................................................................................................... 33
Users E-mail Setup ............................................................................................................................................. 33
Creating a User .............................................................................................................................................. 33
Activating a User ............................................................................................................................................ 33
Editing a User ................................................................................................................................................ 33
Deleting a User .............................................................................................................................................. 34
Normal Alarm E-mail Setup ................................................................................................................................ 34
Emergency Alarm E-mail Setup .......................................................................................................................... 34
Health Check Alarm E-mail Setup ...................................................................................................................... 35
MAPS .......................................................................................................................................................... 36
Map Overview ......................................................................................................................................................... 36
Adding a Map File ................................................................................................................................................... 37
Adding An HTML Map ............................................................................................................................................. 37
Opening a Map ........................................................................................................................................................ 37
Closing a Map ......................................................................................................................................................... 37
Creating Map Levels ............................................................................................................................................... 37
Placing Markers on a Map ....................................................................................................................................... 38
Attaching Cameras/Sensors ............................................................................................................................... 38
Attaching Map Links ........................................................................................................................................... 38
Changing Alarm Colors ....................................................................................................................................... 39
Adding a Map Alarm Sound ................................................................................................................................ 39
Viewing Video on Alarm ...................................................................................................................................... 39
4 29677AC
Page 5

VIDEO BACKUP ......................................................................................................................................... 40
Network Backup ...................................................................................................................................................... 40
Professional Recorders (X, Xr, H, N-Series) ....................................................................................................... 40
Backing up All Cameras ................................................................................................................................. 40
Commercial Recorders (E-Series) ...................................................................................................................... 41
Regular Backup ............................................................................................................................................. 41
Scheduled Backup ......................................................................................................................................... 41
Clip Backup ............................................................................................................................................................. 42
Backing up Selected Cameras ........................................................................................................................... 42
SEARCH ..................................................................................................................................................... 43
Search Overview ..................................................................................................................................................... 43
Performing a Basic Search ................................................................................................................................. 43
Bookmarks .......................................................................................................................................................... 44
Search Bookmarks ........................................................................................................................................ 44
Modify Bookmarks ......................................................................................................................................... 44
Save to JPG or AVI ............................................................................................................................................. 45
Printing an Image................................................................................................................................................ 45
Preview Search ....................................................................................................................................................... 46
Performing a Preview Search ............................................................................................................................. 46
Index Search ........................................................................................................................................................... 47
Performing an Index Search ............................................................................................................................... 47
Status Search .......................................................................................................................................................... 48
Performing a Status Search ................................................................................................................................ 48
POS Search ............................................................................................................................................................ 48
Multiple Search ....................................................................................................................................................... 49
Performing a Multiple DVR Search ..................................................................................................................... 49
LOG FILES ................................................................................................................................................. 50
Radius System Log ................................................................................................................................................. 50
View the Radius Log ........................................................................................................................................... 50
ALARM MONITOR ..................................................................................................................................... 51
Alarm Monitor Overview .......................................................................................................................................... 51
Assign Status Settings ........................................................................................................................................ 51
Configuring the Alarm Monitor ............................................................................................................................ 52
Filter Alarm Events ............................................................................................................................................. 52
View Recorded Alarm Video ................................................................................................................................... 53
Export Video ............................................................................................................................................................ 53
HEALTH CHECK ........................................................................................................................................ 54
Health Check Overview ........................................................................................................................................... 54
Health Check Status Icons ................................................................................................................................. 54
View Health Information ...................................................................................................................................... 55
Export DVR Health Information .......................................................................................................................... 55
POS FEATURES ........................................................................................................................................ 56
POS Options ........................................................................................................................................................... 56
Add POS Search Keywords ................................................................................................................................ 56
5
Page 6

Add POS Alert Text ............................................................................................................................................ 56
POS Text Overlay ................................................................................................................................................... 57
Turn Text Overlay On ......................................................................................................................................... 57
Turn Text Overlay Off ......................................................................................................................................... 57
POS Search ............................................................................................................................................................ 58
Search POS Data ............................................................................................................................................... 58
Filter POS Search Results .................................................................................................................................. 58
6 29677AC
Page 7

INTRODUCTION
PRODUCT DESCRIPTION
Radius software is Network DVR Management Software, a powerful utility that allows 100 or more DVR
units to be controlled using one c om puter. This software allows you to view live video, search saved
video, edit and configure setup on each DVR, and import maps of buildings and ot her locations.
The Radius software was specifically designed as an Enterprise software solution.
PC REQUIREMENTS
These are the hardware requirements to operate the Radius Software.
Minimum Requirements
• Intel Core 2 Duo 2.8 Ghz (or equivalent)
• 1 GB System Memory
• DirectX 9 or Higher
• 256 MB+ Nvidia or ATI Video Card
• 256k Network Connection
• TCP/IP Installed
• Microsoft Windows® 7, Vista, or XP
• 1280 × 1024 Optimal Display Resolut i on
• 32 Bit Color Depth
Recommended Requirements
Note Minimum requirements for H.264 sol utions and highly recommended for M egaPixel image
rendering.
• Intel Quad Core i7 (or equivalent)
• 2 GB System Memory
• DirectX 9 or Higher
• ATI 5750 Video Card (or equivalent)
• 512k Network Connection3
• TCP/IP Installed
• Microsoft Windows® 7, Vista, or XP
• 1280 × 1024 Optimal Display Resolut i on
• 32 Bit Color Depth
1
No support for Xeon processors.
2
FireMV. NVS and CAD cards are not supported. Dual video cards required for four monitor output. SLI/Crossfire
not supported.
3
Gigabit network highly recommended for LAN environments and configurations running multiple megapixel
cameras.
4
No support for server operating systems.
1
2
4
7
Page 8
INSTALLING THE RADIUS SOFTWARE
Caution Radius and Emergency Agent are not compatible to run on the same PC. If you have
Emergency Agent installed on thi s PC, you must uninstall it before installing Radius. Radius
will perform the same alarm notification as Emergency Agent.
1. Locate the Radius CD-ROM and make sur e that the PC is turned on.
2. Insert the Radius CD-ROM into the CD drive.
3. If the CD Drive is set to auto run, wait for the Radius Setup screen to appear . Once it appears, go
directly to Step 4.
a) If the Setup program does not automatically start, or to m anual ly start the setup process:
b) Click Start > My Computer – or – double-click the My Computer icon on the desktop.
c) Locate the CD drive and double-click on it to display contents of the CD-ROM, and then
double-click on the Radius direc tory to display contents of the direct ory.
d) Double-click Setup.exe – or – click Setup.exe then click Open.
4. Follow the on-screen instructions for installing the software.
5. The Setup process will notify you when Radius is installed. Click Finish to complete S etup and
close the installer window.
RUNNING THE RADIUS SOFTWARE
To run the Radius Software click Start > All Programs > OpenEye > Radius > Radius.
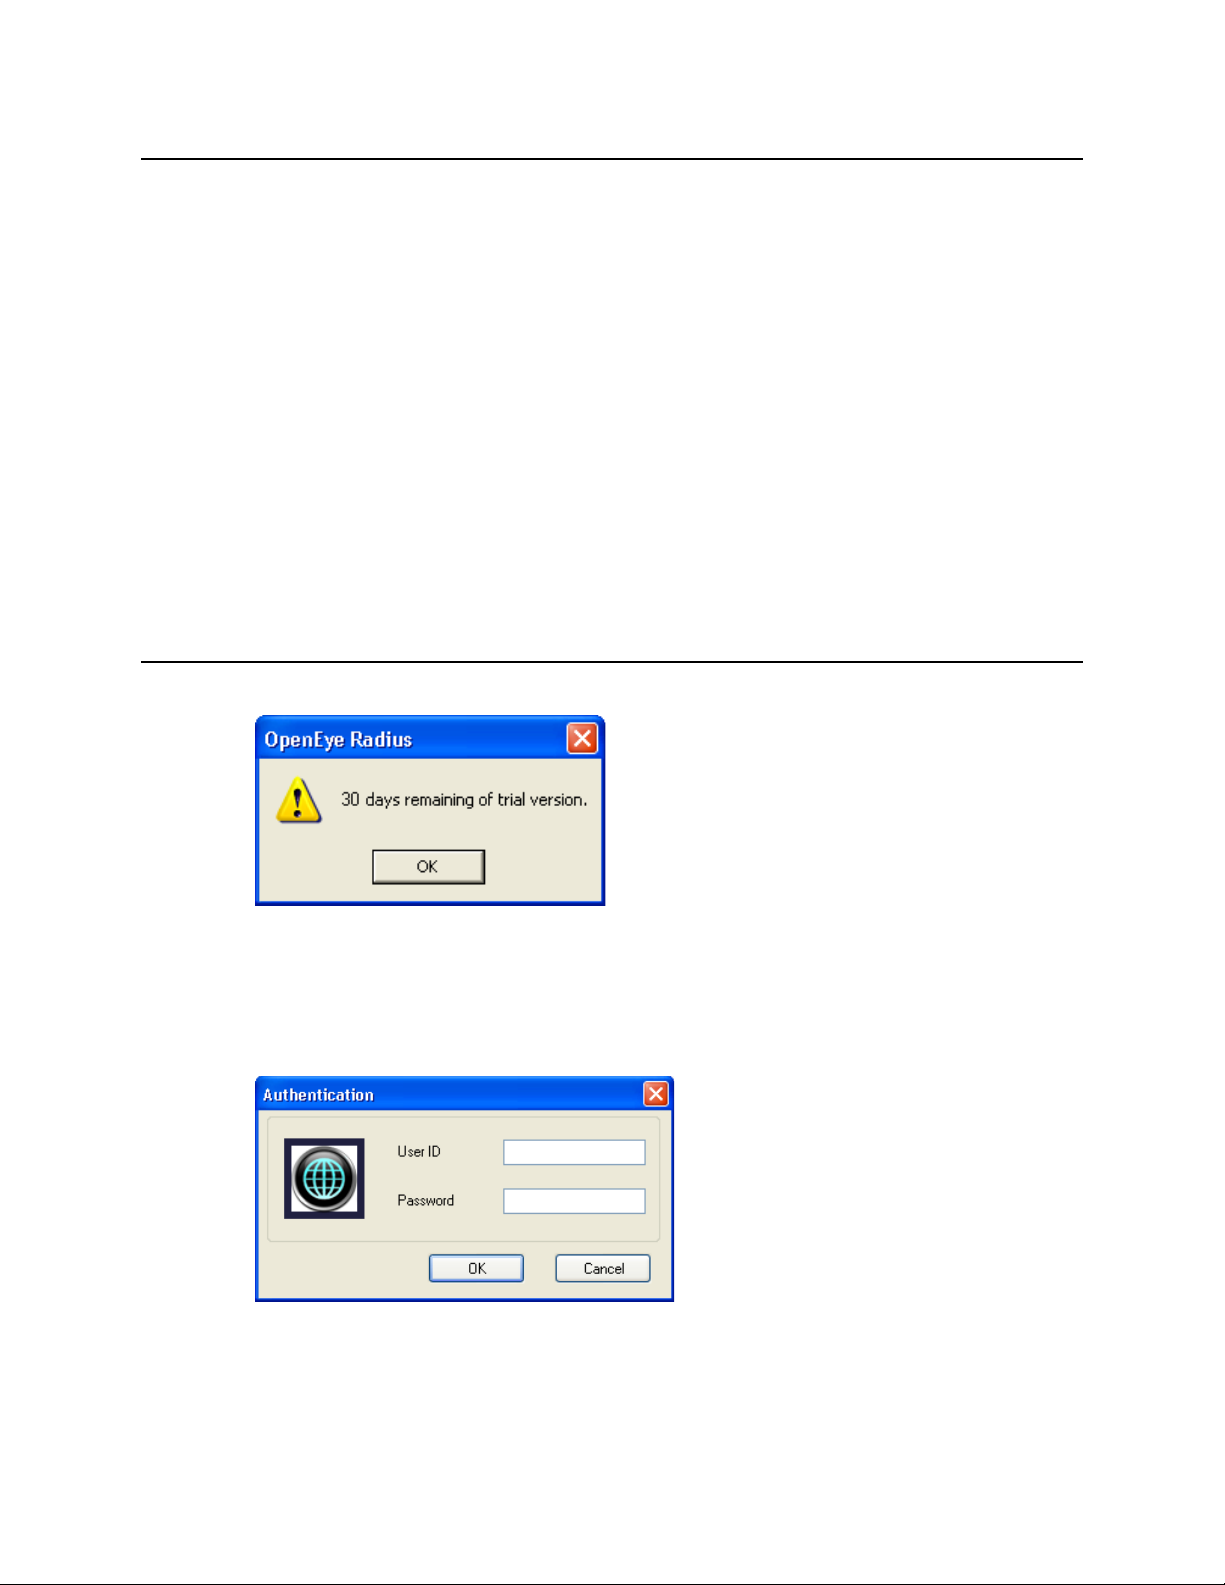
Until the software is registered, a reminder will display.
Logging in
Each time the Radius software star ts, the Authentication window opens, prompting the user to login with
a user account.
If logging in for the first time, use this l ogin:
USER ID: administrator
PASSWORD: <none>
8 29677AC
Page 9
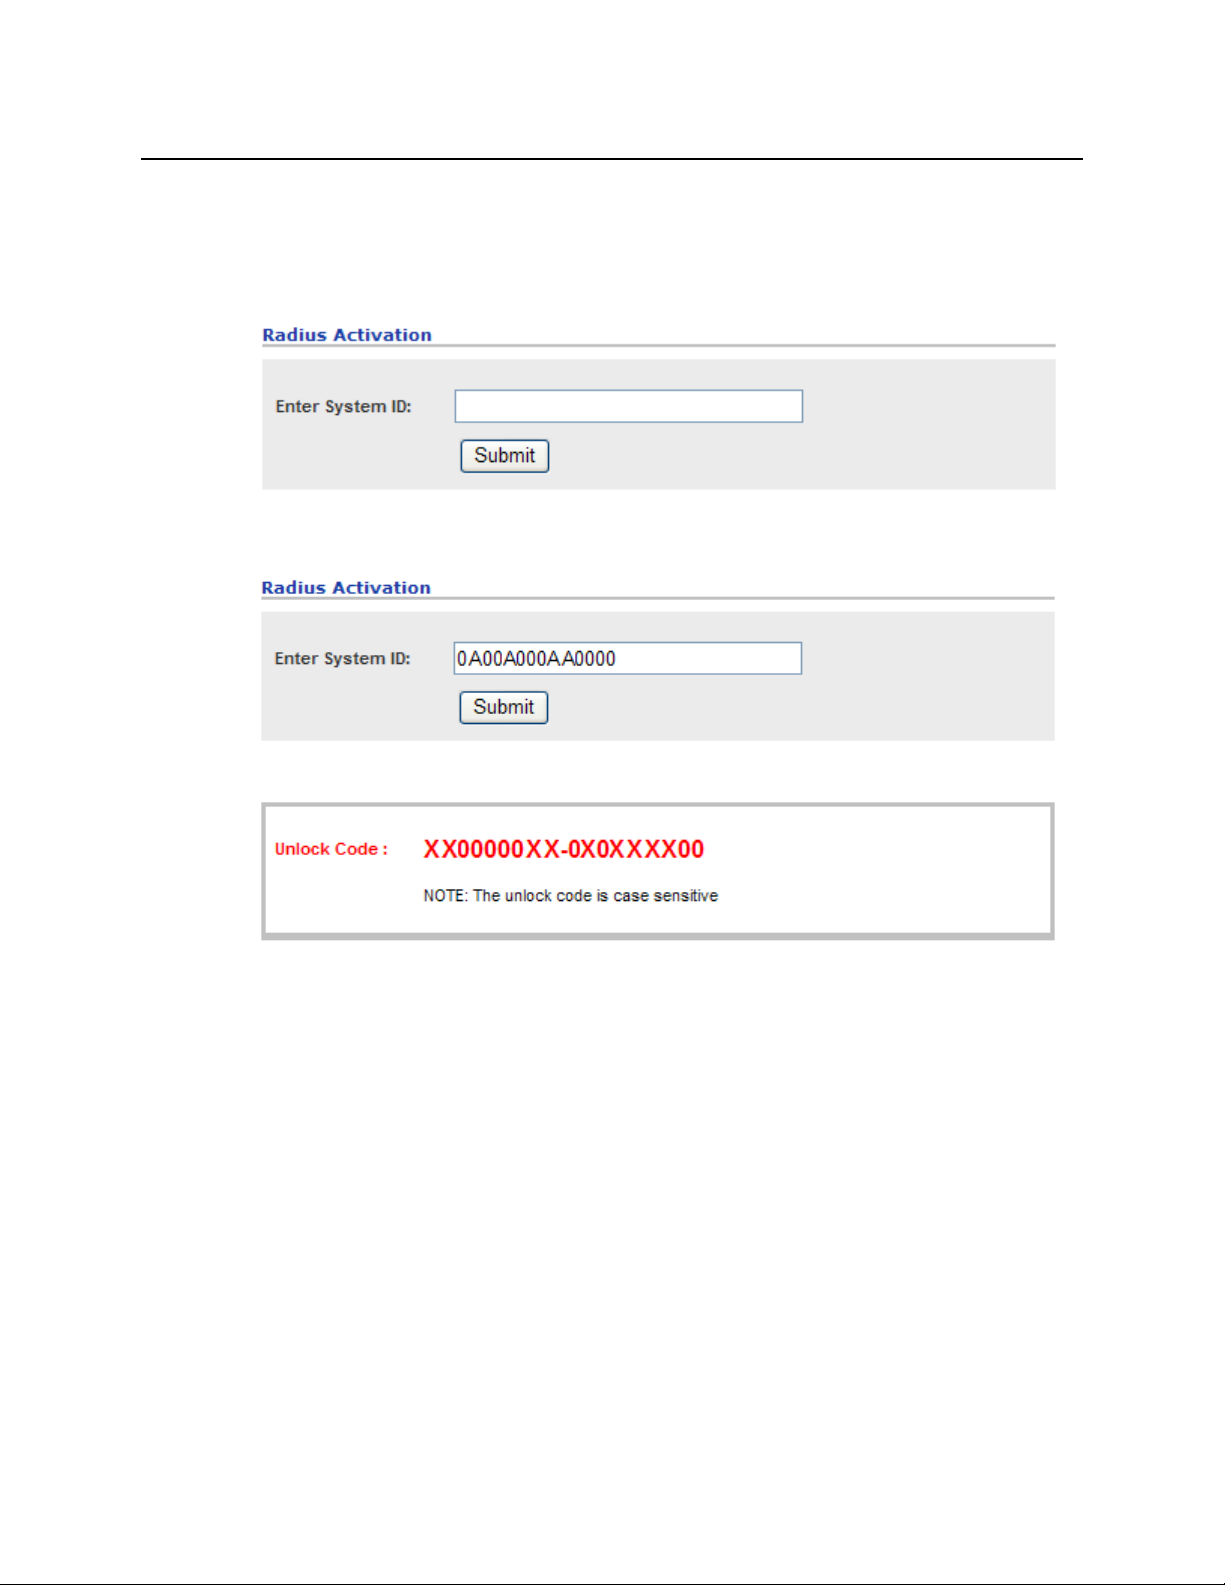
REGISTER RADIUS
Register Online
1. Locate the System ID in the Radius software. From the About menu, click Register.
2. Open an Internet browser and go to:
http://registration.openeye.net/openeye/Registration/Radiusregistration.aspx
3. Enter the System ID generated by the Radius software.
4. Click Submit.
5. Copy and paste the unlock code into the License Key box in the Register Radius window.
6. Click Register.
Register by Phone
The following information is nec es sary for phone registration:
• Company Name
• Company Phone Number
• E-mail Address for notification of updates
• System ID
1. Locate the System ID in the Radius software. From the About menu, click Register.
2. Call 1-888-542-1103
3. After completing registration by phone, enter the License Key provided by OpenEye in the
Register Radius window.
4. Click Register.
9
Page 10
RADIUS BASICS
RUNNING THE RADIUS SOFTWARE
To run the Radius Software click Start > All Programs > OpenEye > Radius > Radius.
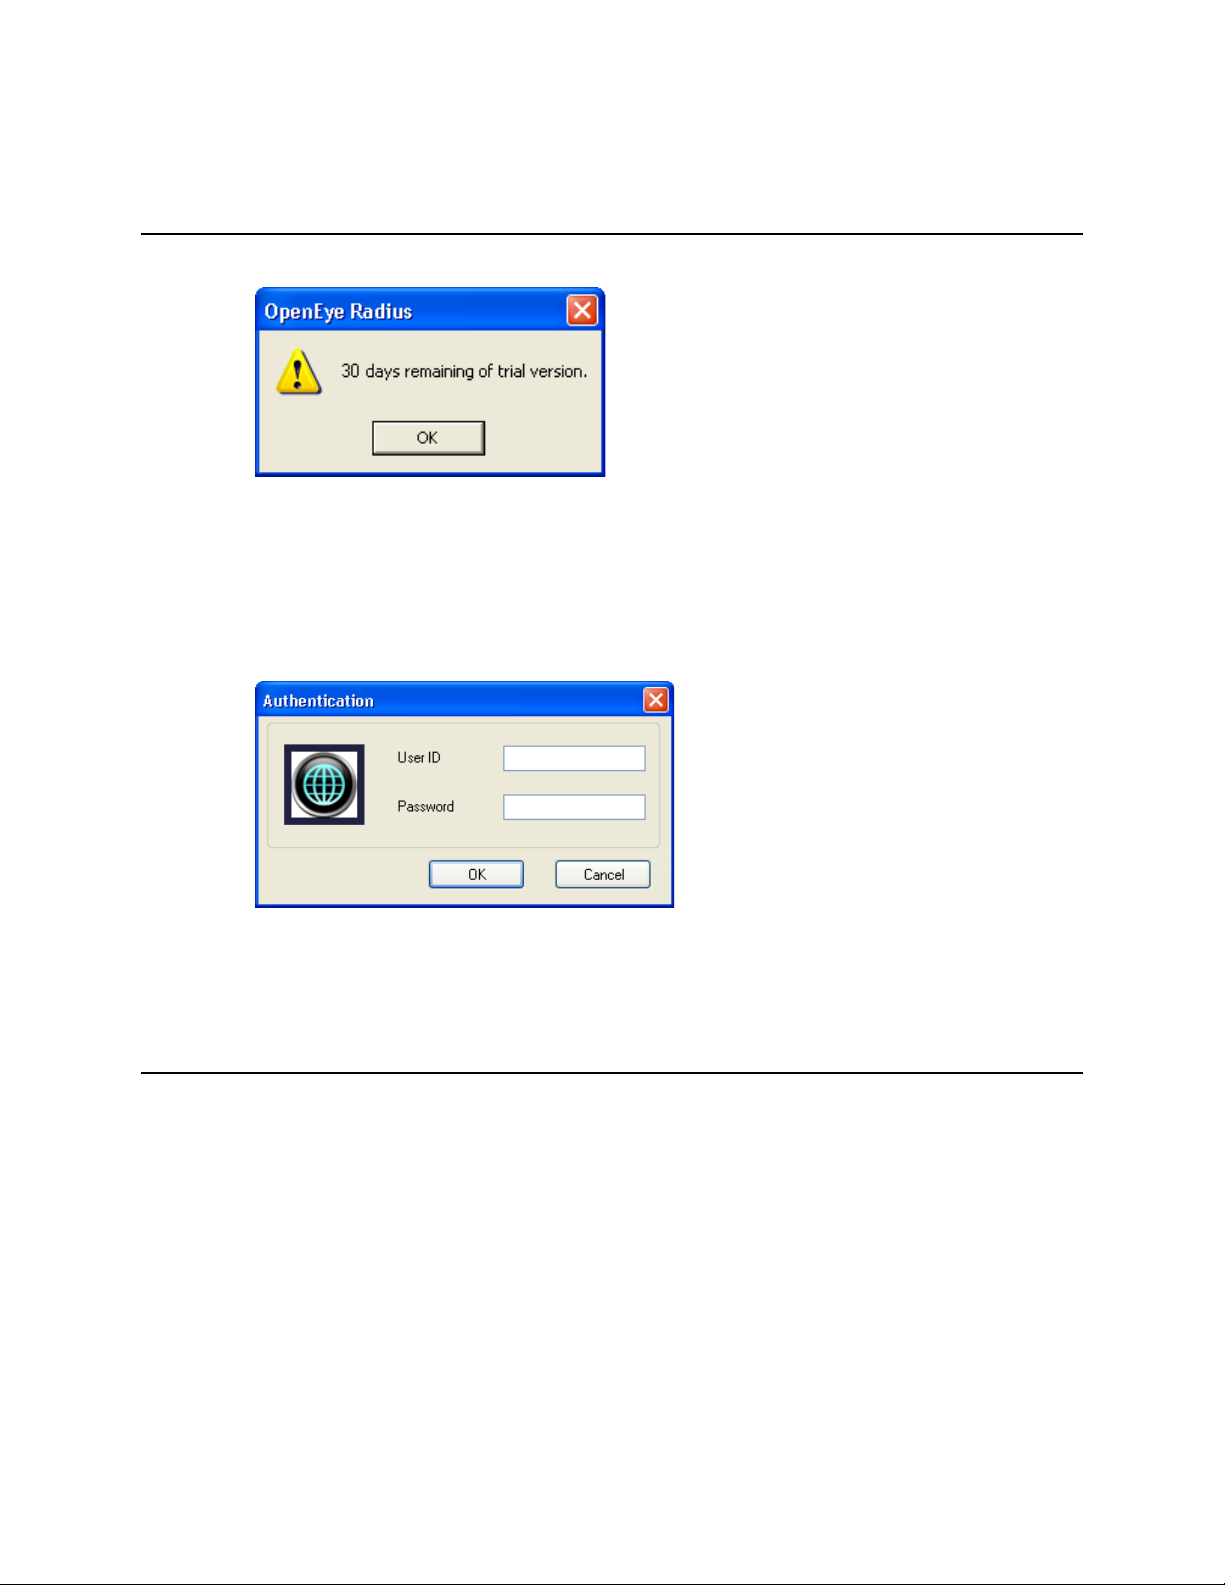
Tip Until the software is registered, a reminder will display.
Logging in
Each time the Radius software star ts, the Authentication window opens, prompting you to log in with a
user account.
If logging in for the first time, use this l ogin:
USER ID: administrator
PASSWORD: <none>
CONNECTING TO A RECORDER
Refer to the video recorder manual for instructions on configuring t he recorder for use with the Radius
software.
Viewing Video
1. Locate the recorder in the Connection list. If it is not visible, click the plus sign (+) next to the DVR
Group name to expand the file tree.
2. Double click the desired DVR icon – or – Right-click the icon and select Connect.
3. Click the plus sign next to the DVR icon to display the connected camera i c ons.
4. To view a camera double click it – or – Drag the camera icon onto a box on the Live Display
screen.
10 29677AC
Page 11
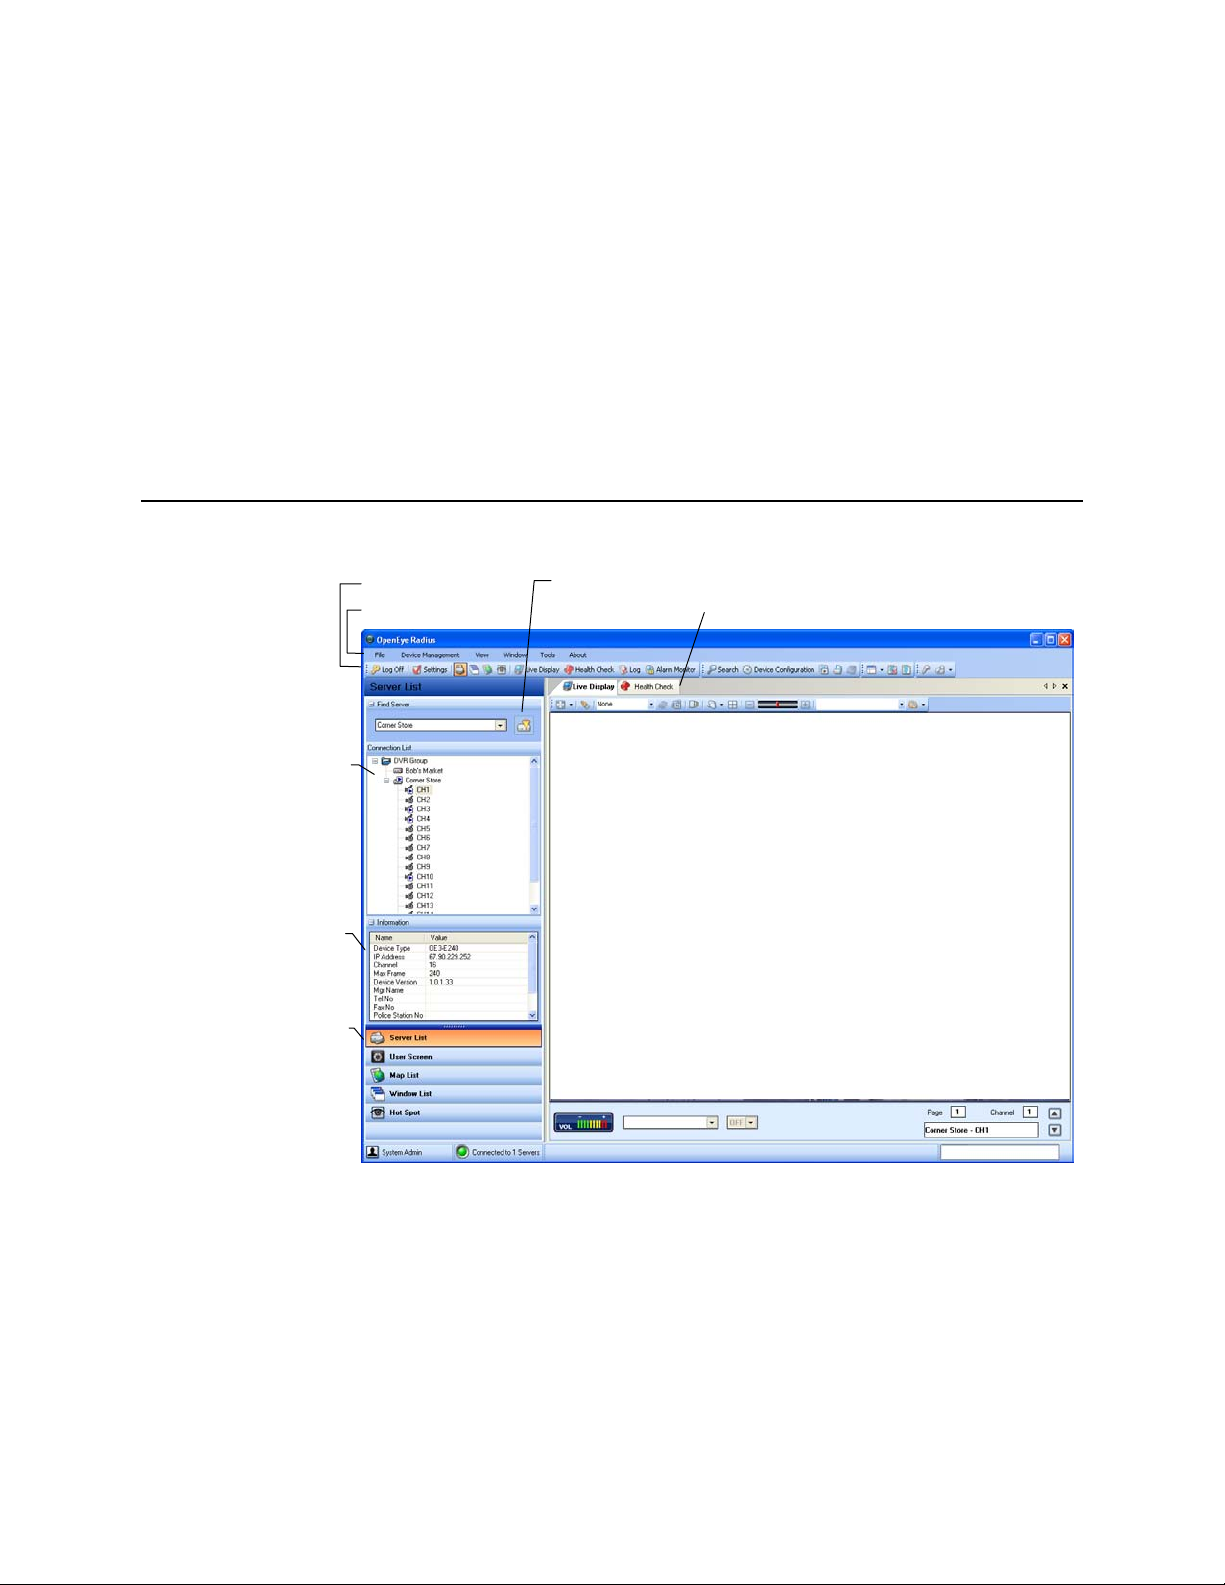
Moving Cameras
Display tabs
DVR Detail
Information
Connection
Menu options
Toolbar
Shortcuts
Show online servers only
To change the position of a camera on t he Live Display Screen:
Click on the displayed video and drag t o a new box
Remove a Camera
To remove a camera from the Live Display Screen:
Right-click the displayed video and select Close
– or –
Right-click the camera icon in the Connection list and select Close Live
MAIN DISPLAY SCREEN
list
11
Page 12
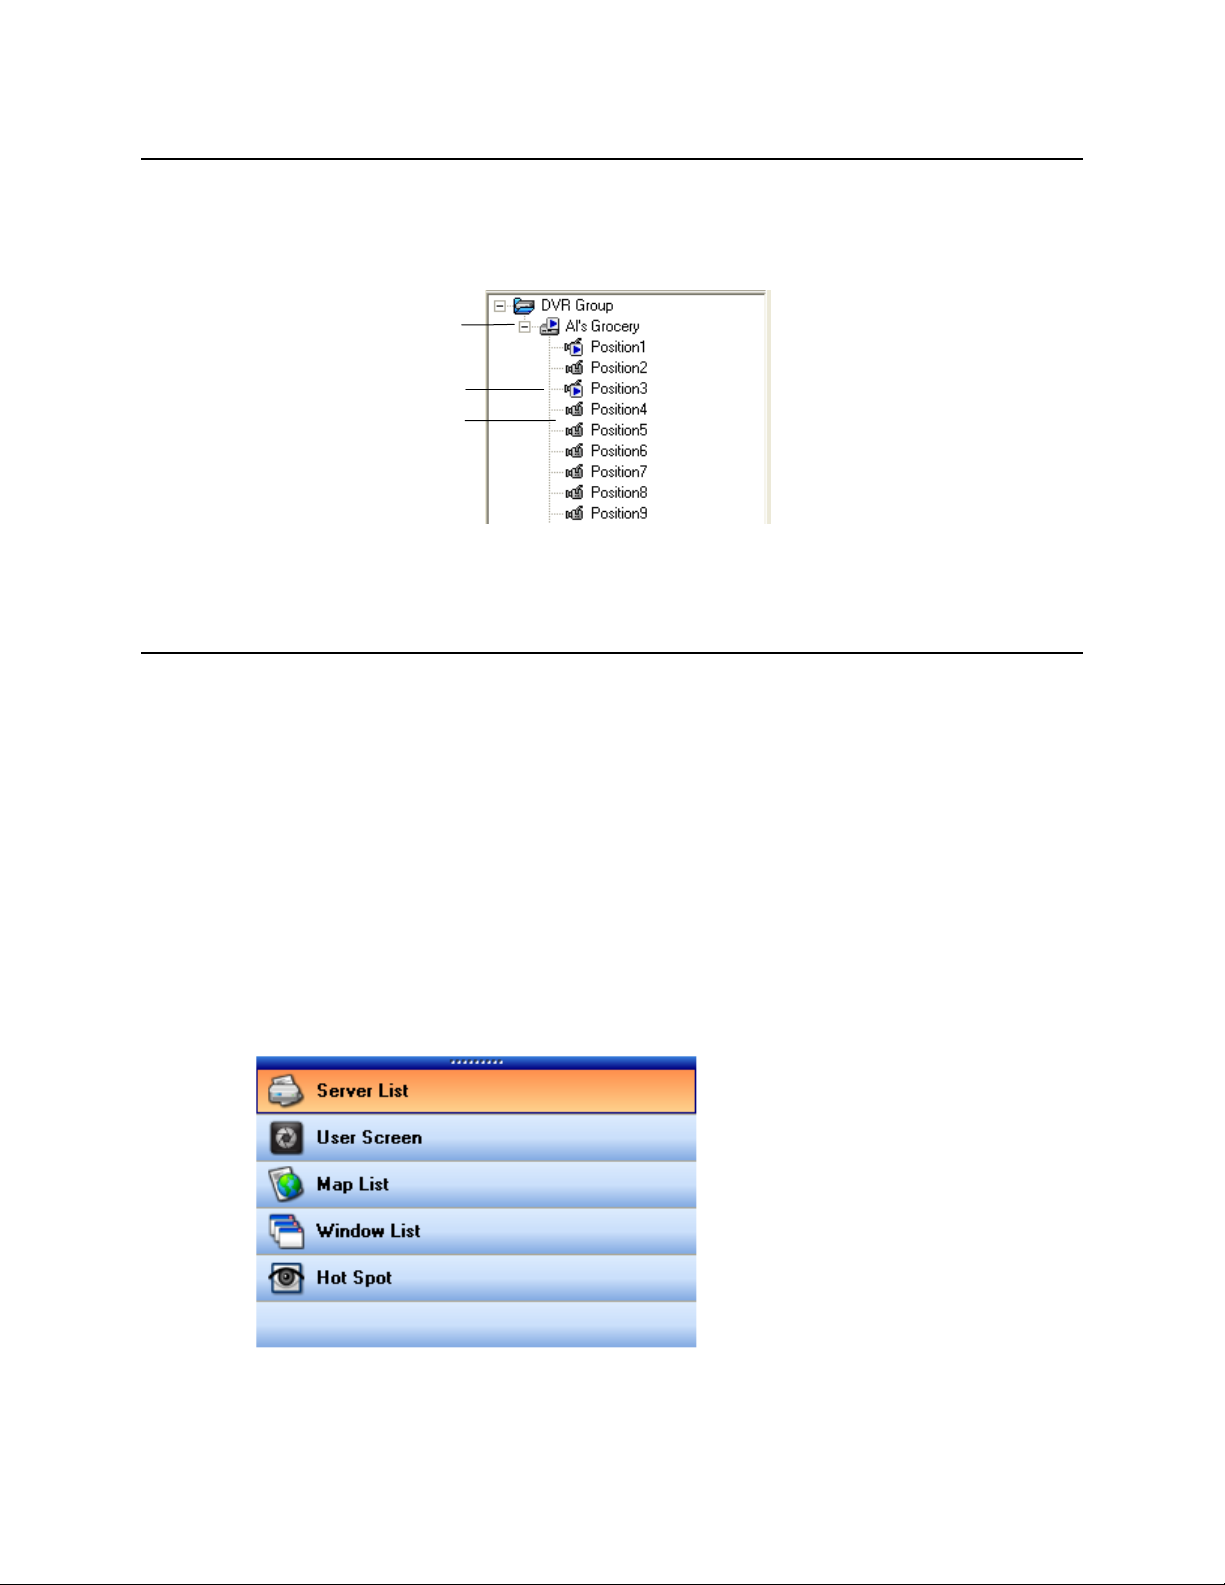
CONNECTION LIST
DVR Site – to hide the
sign
Camera not displayed
Camera currently displayed
The Connection list displays the cur r ent DVRs configured in the DVR List Setup window. Each DVR
can be displayed with the cameras showing or cameras minimized.
cameras click the minus
SHORTCUT LISTS
The shortcut lists help organize c onnected DVRs, open windows and available maps.
Server List. The Server List displays all added DVRs and allows users to connect to DVRs and t heir
associated cameras quickly. This list is the default display.
User Screen. View the list of custom video screens, add new screens, and edit existing screens.
Map List. The Map List displays all maps, open and closed, including HTML map links. The maps are
listed in the order they are added.
Window List. The Window List organizes open windows into the categor i es: Live Windows, Search
Windows, and Other Windows.
Hot Spot. The Hot Spot feature allows users to zoom in on an area of interest.
12 29677AC
Page 13
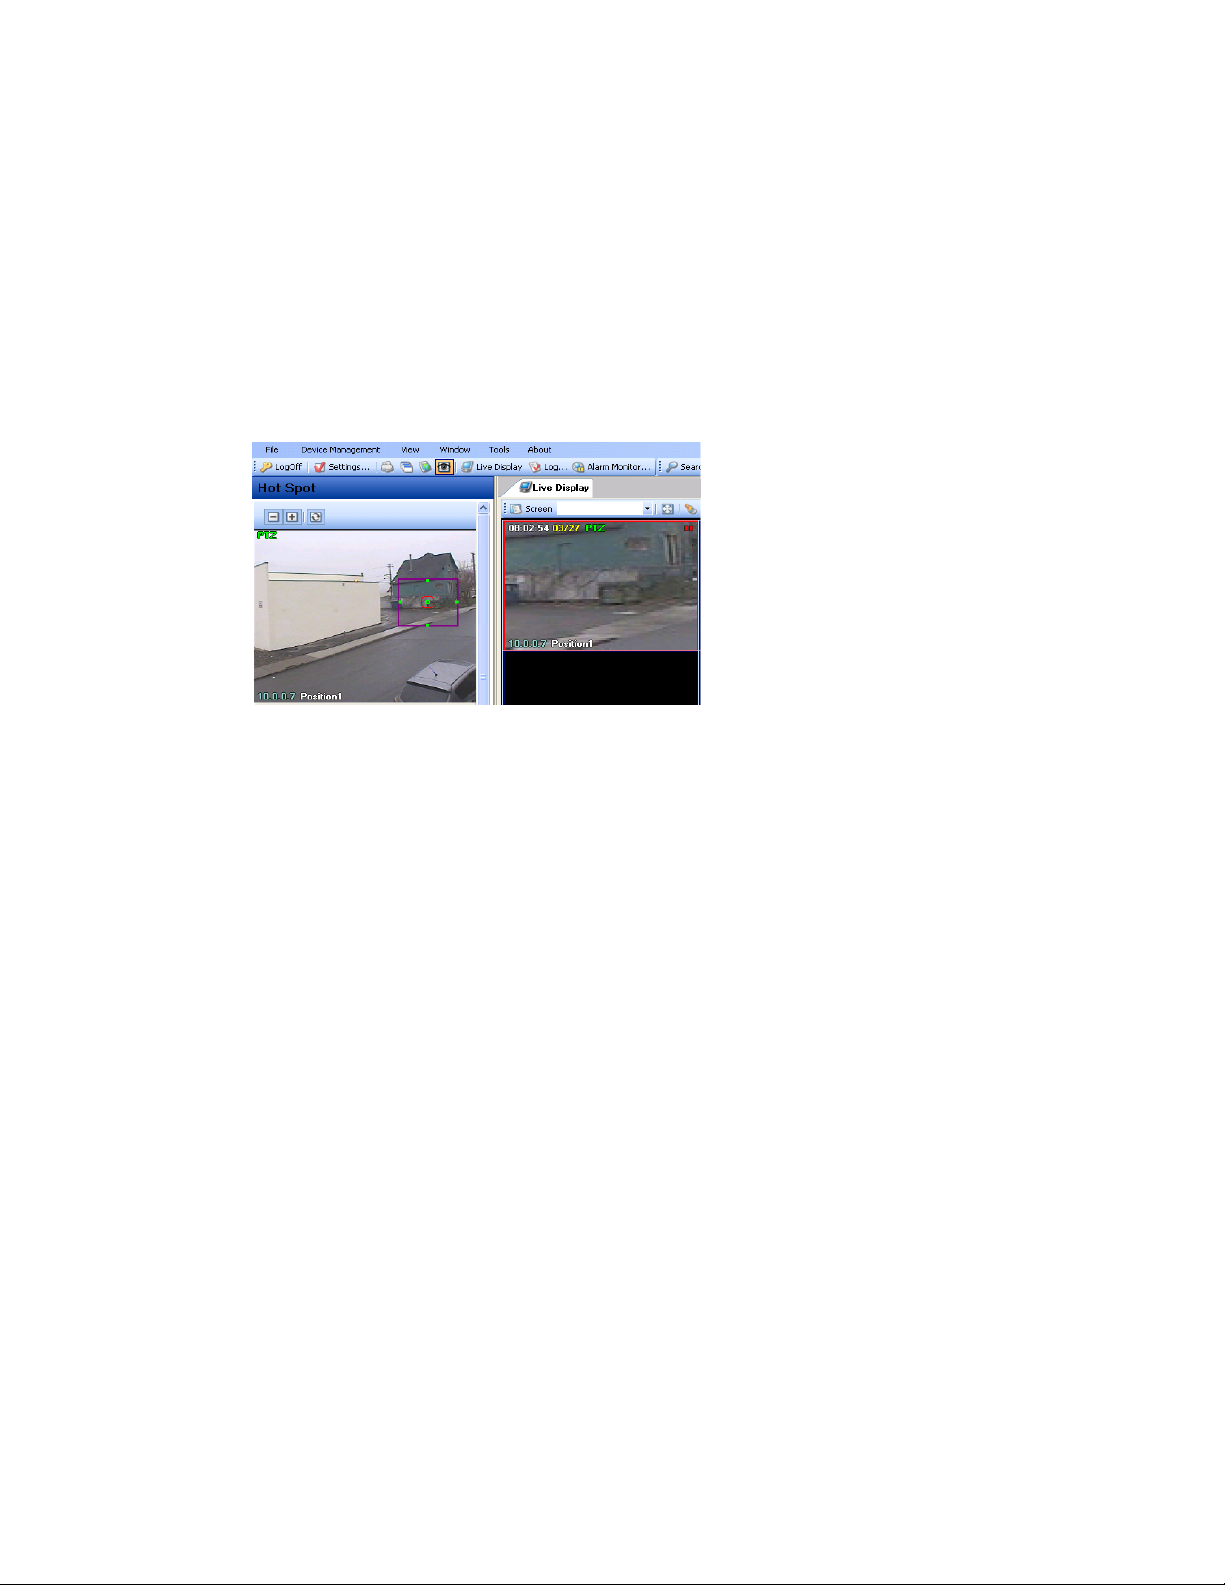
Hot Spot
The Hot Spot feature allows users to zoom in on an area of interest. This featur e i s especially useful
when using a network device as the Hot Spot will display the area in detail.
Click a live camera.
1. Click the Hot Spot shortcut link on the Main Display screen.
2. Drag a box around the area on the Hot Spot display. The corresponding camera on the Live
3. Use the on-screen PTZ controller to adjust the camera if using a PTZ enabled camera.
Display will zoom in to the Hot Spot.
13
Page 14
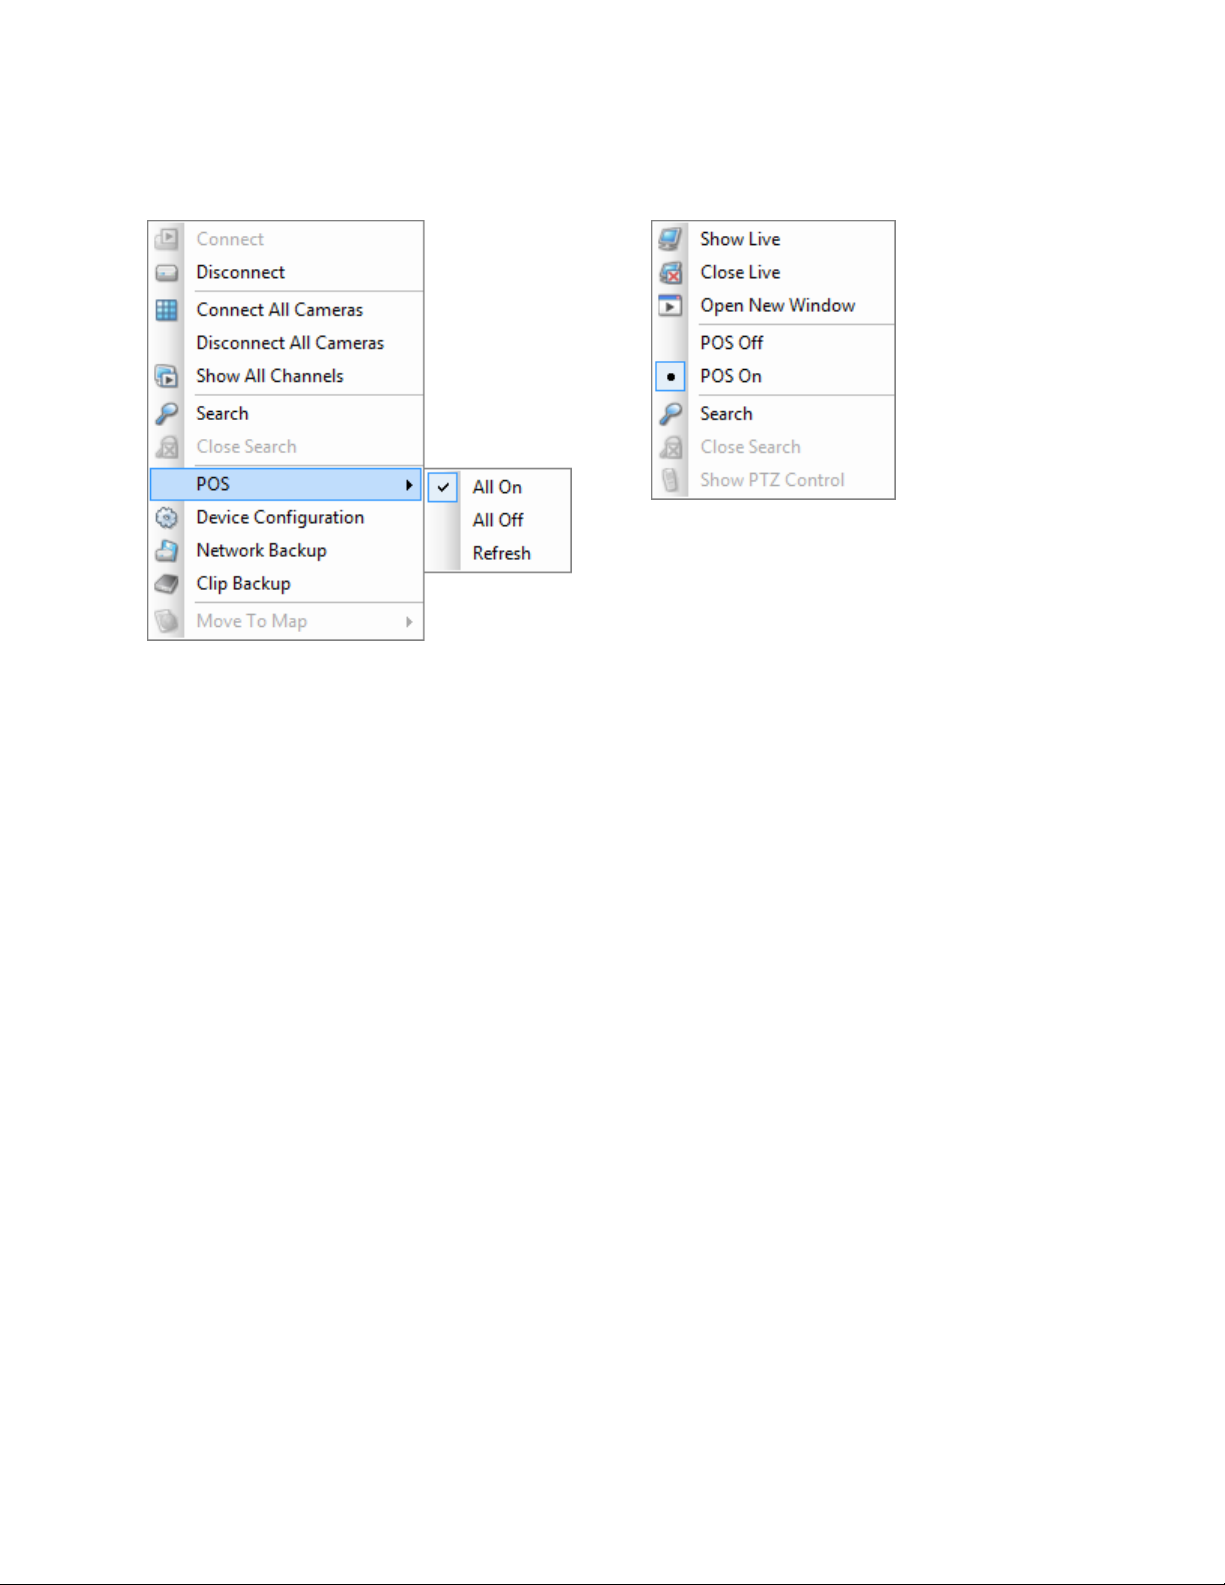
DVR Options
Camera Options
Right-click a DVR icon to display these shortc ut
options.
Connect – Opens a connection to the DVR.
Disconnect – Closes an open connect ion to the
DVR.
Right-click a camera icon to display these shortcut
options.
Show Live – Displays selected camera in the
Camera Display Area.
Close Live – Removes the camera from the Camera
Display Area.
Open New Window – Displays selected camera in a
new wind ow.
Pos On – Enable the POS text overlay (optional
upgrade).
Connect All Cameras – Connects all camera
channels on the DVR.
Disconnect All Cameras – Disconnects all camera
channels on the DVR.
Show All Channels - Displays all channels in a new
window.
Search – Opens Search Display with the current DVR
selected.
Close Search – Closes the Search Display and
returns to Live Display.
POS – Displays POS options (optional upgr ade).
Device Configuration – Opens the DVR Setup
window.
Network Backup – Opens the Net work Backup
window.
Clip Backup – Opens the Clip Backup win dow.
Move to Map – Shows a list of the maps associated
with the server. Select a map to open it in a new tab.
Pos Off – Disable the POS text overlay (optional
upgrade).
Search – Opens Search Display with the current DVR
selected
Close Search – Closes the Search Display and
returns to Live Display
Show PTZ Control – Opens the on-screen PTZ
controller
14 29677AC
Page 15
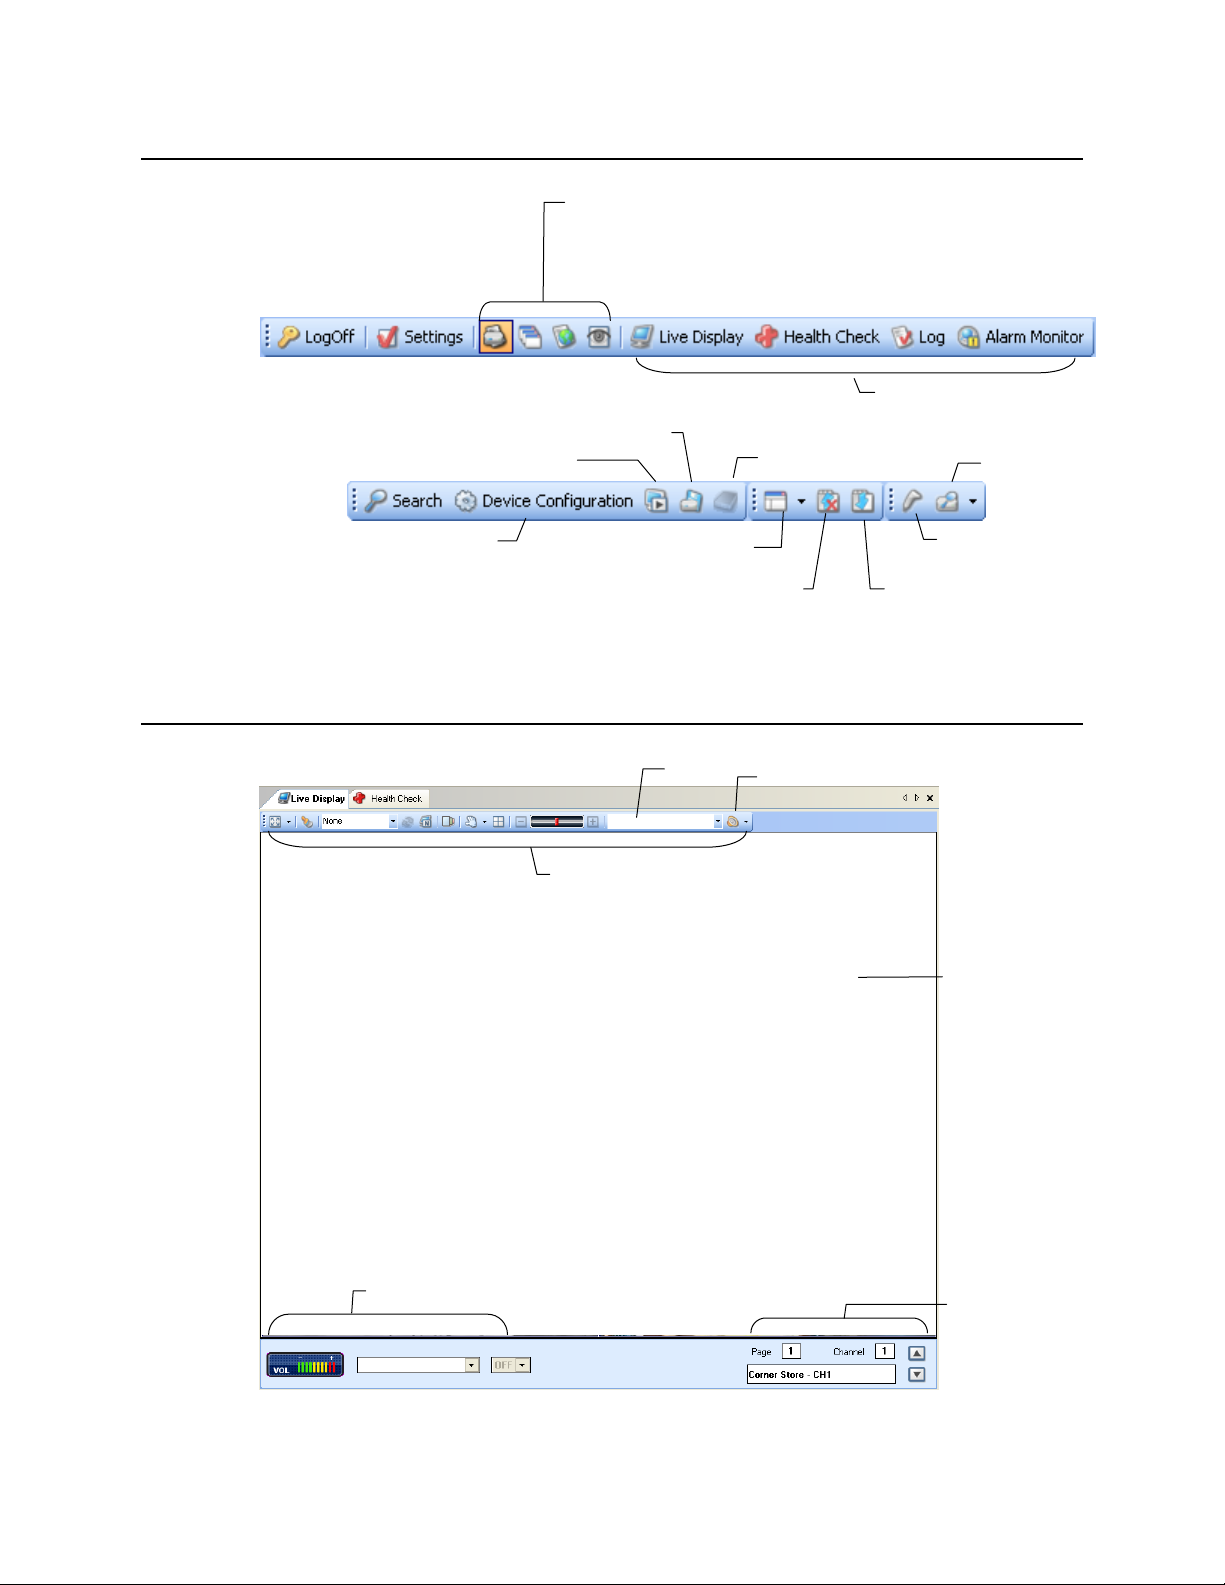
MAIN DISPLAY TOOLBAR
Camera Display
Page/Channel
Audio Controls
Tools
Network Backup
POS Search
Clip Backup
Viewing pane options
Dock all tabbed windows
Backup
Viewer
Display buttons
Shortcut buttons
• Server List
• Windows List
• Map List
• Hot Spot
Display all channels in a new window
Access DVR Setup
Note Motion grids configured using the Device Confi guration will be advanced mot ion grids.
LIVE DISPLAY
Lock tabs on mouse drag
Live Camera
DVR List
Audio On/Off
Area
Camera Display Area – Displays up t o 64 cameras. Move video display by drag ging display to a
different square.
15
Page 16
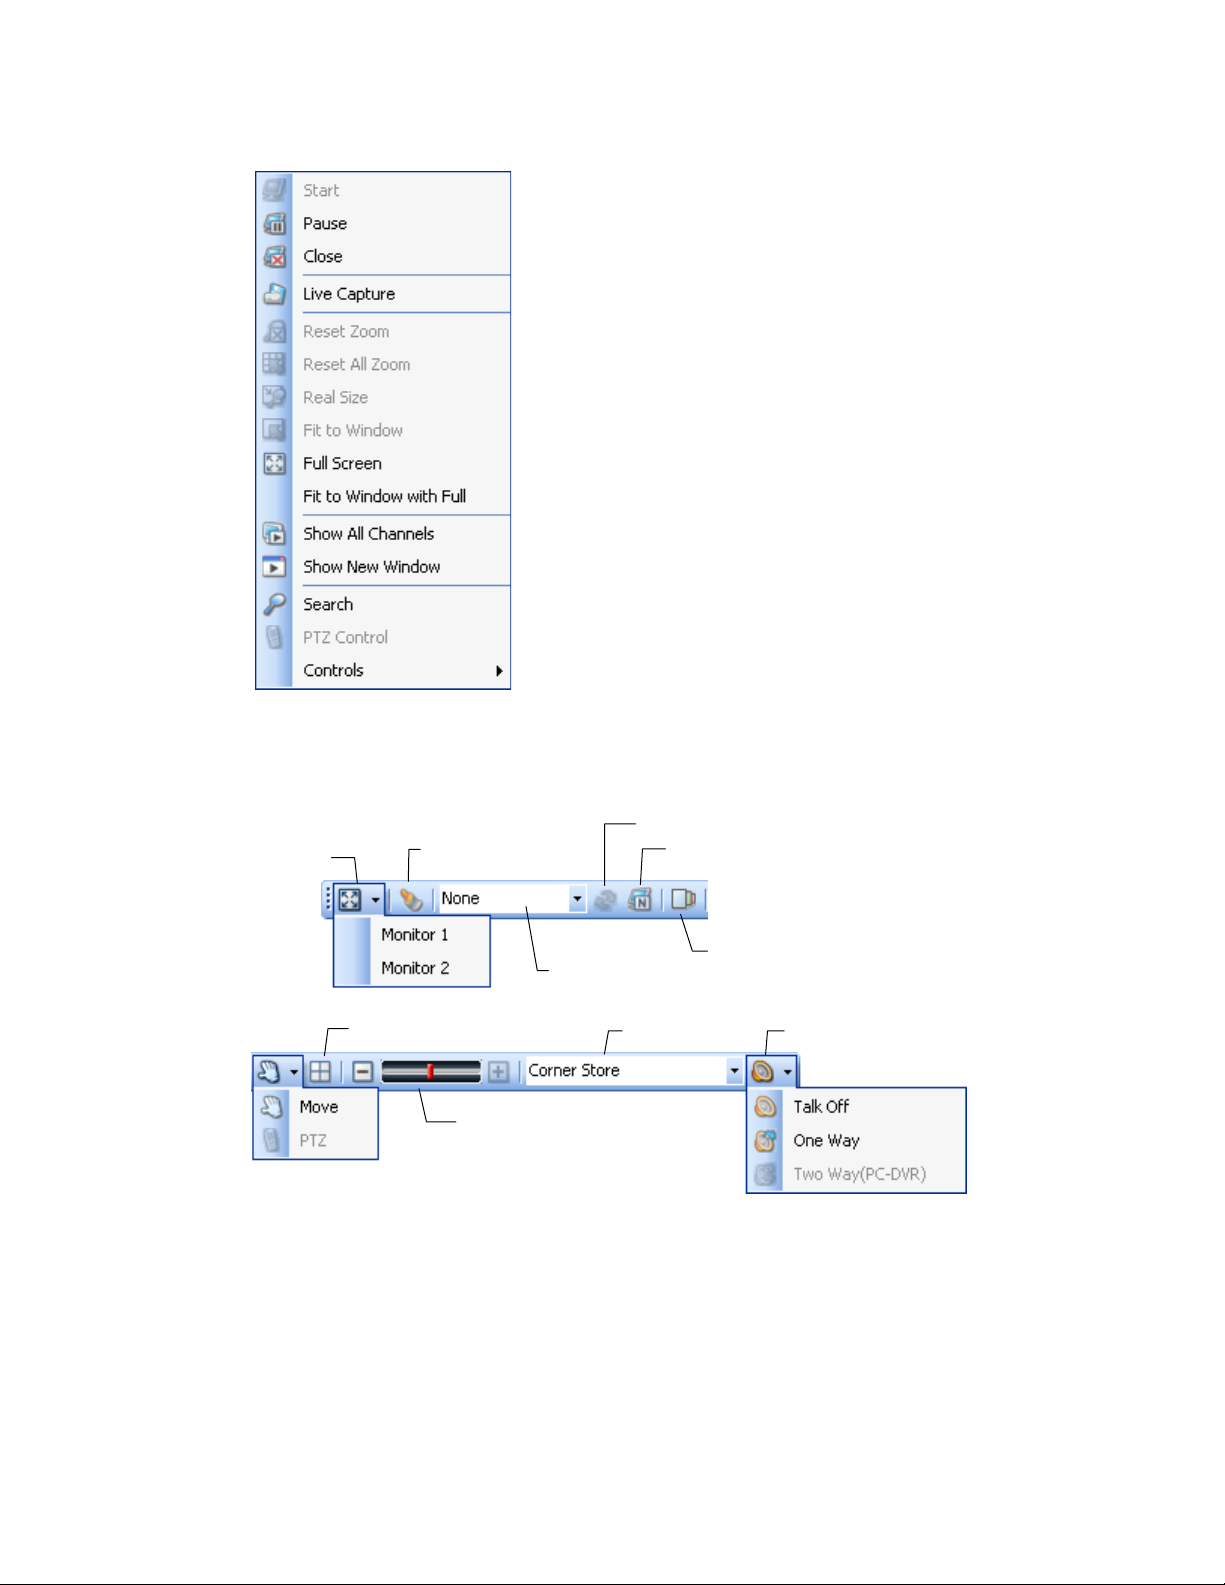
Live Camera Options
Adjust size
Screen division options
Clear camera display
Open sequence list window
Clone Live View in new window
Start – Start live video after pausing.
Pause – Pause live video.
Close – Close live video display.
Live Capture – Capture a JPG snapshot.
Reset Zoom –.Reset Zoom on specific camera.
Reset All Zoom – Reset Zoom on all camer as.
Real Size – Resize camera to actual resolution size.
Fit to Window – Return full screen display to show
full Live Display window.
Full Screen – Displays the Live Display full-screen
(Press ESC to exit full-screen mode)
Fit to Window with Full – Displays the selected
camera full-screen. (Press ESC to exit full-screen
mode)
Show All Channels – Opens a new window will all
channels displayed.
Show New Window – Open a new window with
selected channel displayed.
Search – Opens the Search Display wit h the channel
selected.
PTZ Control – Opens the on-screen PTZ controller.
Controls – Manually trigger a control output (relay).
Live Camera Tools
Full screen
Move – Drag l ive cameras from one location on the scr een to another. Selected by default.
PTZ – Enable on-screen PTZ compass. Drag mouse on the screen to move a PTZ camera.
Adjust Size – Adjust the size of a single camera display. Double-click live video for single camera
display; double click to return to previous camera view.
Talk Off / One Way / Two Way – Turn on or off the two-way audio with the selected DV R.
Sequence on/off
Sequence list
DVR list Audio on/off
16 29677AC
Page 17
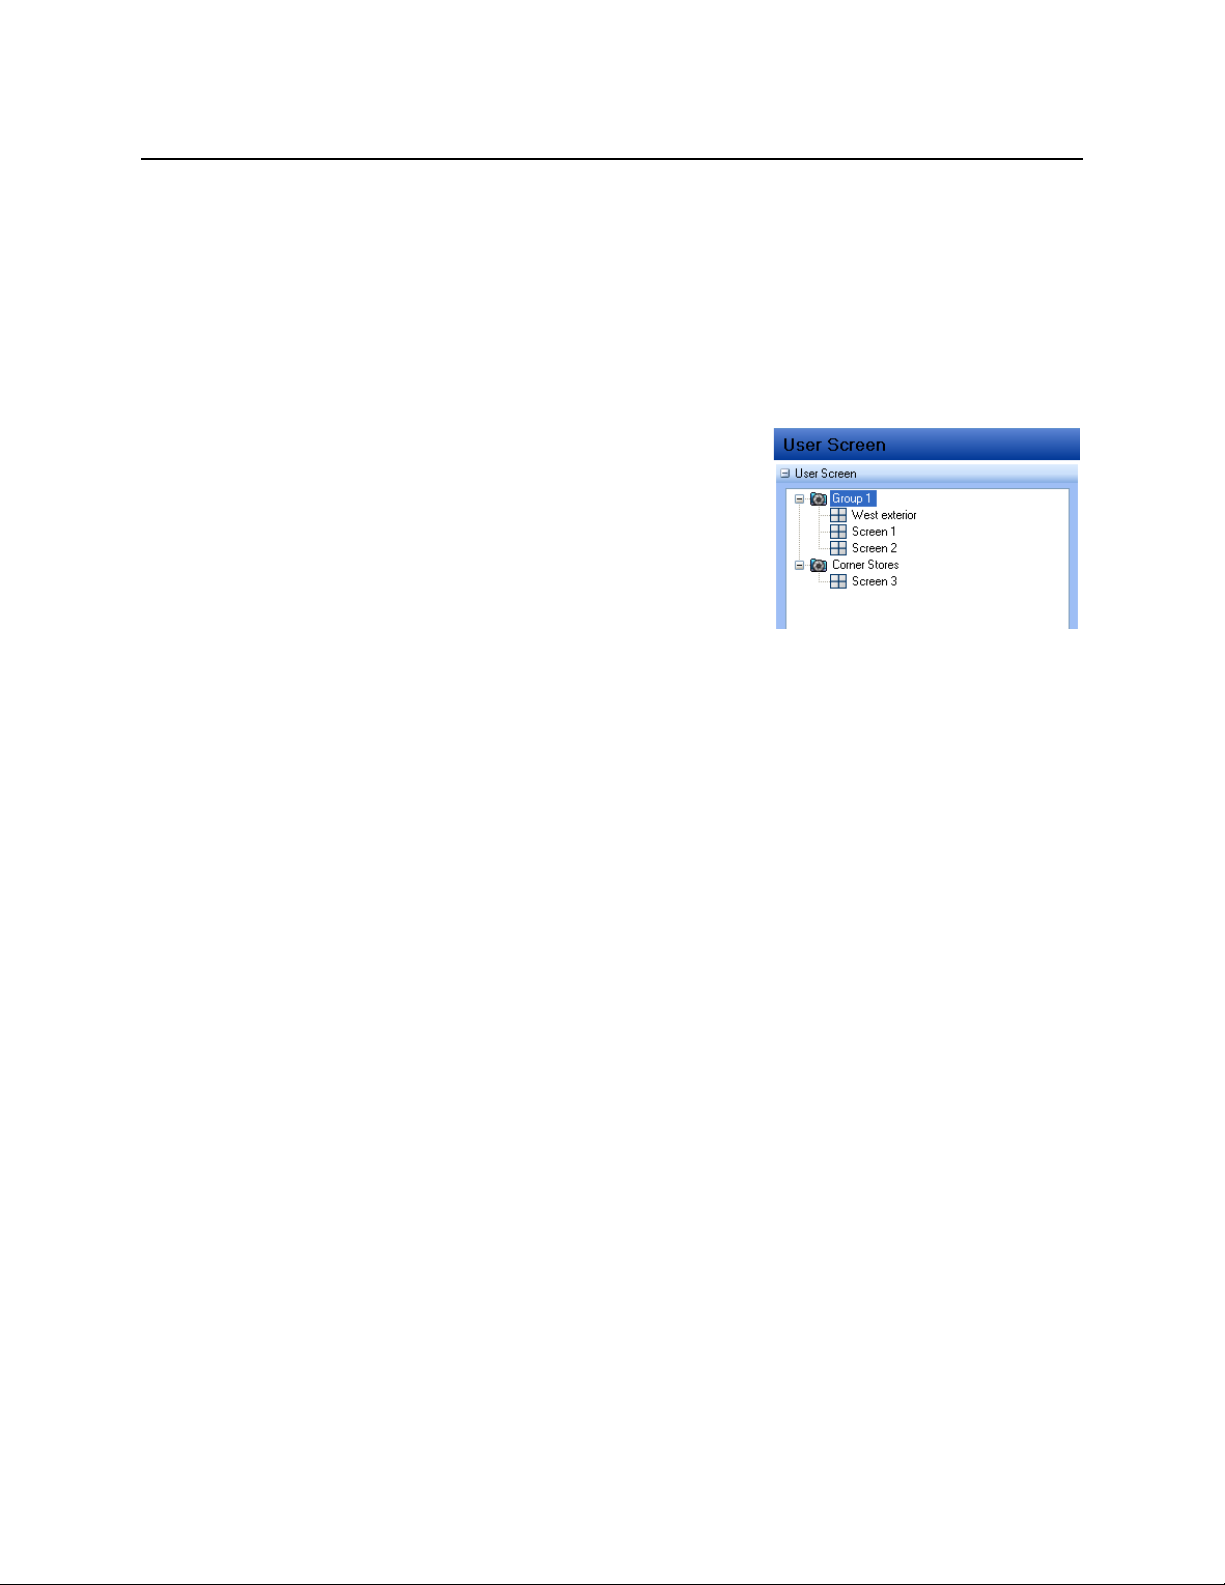
CUSTOM SCREENS
The Radius software allows the user to create groups of cameras called screens and customize the
organization of the cameras. Thes e screens can be selected from the S creen list.
Each Screen can contain up to 64 different cameras, and the Screen Division buttons will affect only the
selected screen. Screen names and configurations will not be available unless Auto Load Settings (on
Log on) and Auto Save Settings (on Log off) options are selected on the General settings screen.
Creating Custom Screens
Select a screen division option for the custom screen configuration.
1. Add cameras to the Live Display.
2. Select the desired screen division option.
3. Click User Screen in the shortcut list.
4. Right-click and select Add Group.
5. Type a name to identify the group.
Tip You must create or select a group before adding a
new screen.
6. Right-click the group name and select Add User Screen.
7. Type a name to identify the screen.
Editing Custom Screens
1. Right-click the screen name and sel ec t Edit User Screen.
2. Making changes or additions to the cust om screen.
3. When you have completed your changes, right-click the screen name again and select Apply to
change to save your changes. If you wish to cancel your changes, select Cancel to edit it.
17
Page 18
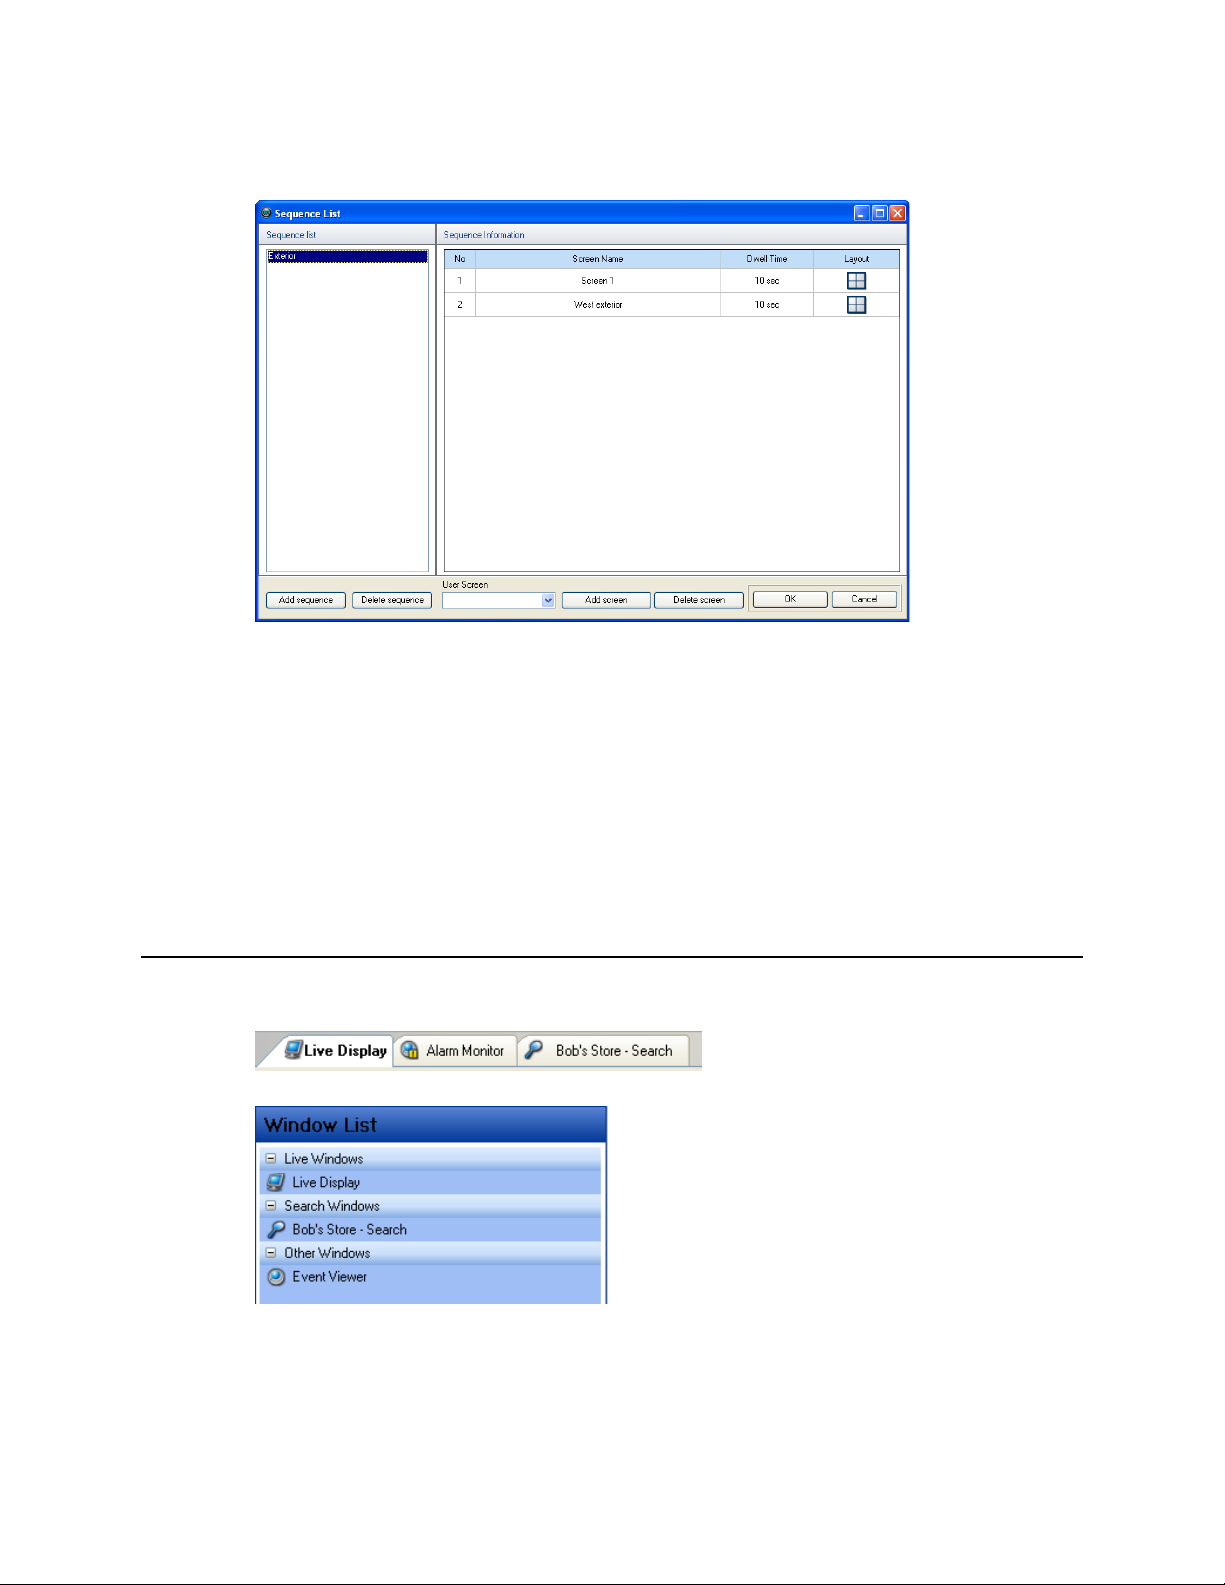
Create Screen Sequences
Combine several custom screens to create a sequence series.
1. Click User Screen in the shortcut list.
2. Right-click and select Show Sequence List Window.
-or- click the Sequence list windo w icon at the top of the Live Display tab.
3. Click Add Sequence.
4. Double click the new sequence on the list to type a custom name.
5. Select a screen from the User Screen list and then click Add screen.
Tip You must have created two or more user sc reens to create a sequence.
6. Repeat until you have added all the screens that you wish to include in the sequence.
USING MULTIPLE WINDOWS
The Radius software can support multiple open windows at one time. T he wind ows are organized using
tabs at the top of the Live/Search View Area. Switch between windows by cl icking the appropriate tab.
The Window List in the left pane also or ganizes open windows by type: Live, Search, and Other.
18 29677AC
Page 19

MULTIPLE MONITOR SUPPORT
Multiple monitors may be used with the Radius Software. Use multiple m onitors to view the Map Editor,
the Search window, and the Live Display at the same time.
Most Microsoft operating systems support multiple monitors but the video card may need to be
upgraded to support more than one disp l ay. Contact a local computer vendor or IT director for more
information.
Using Multiple Monitors
Drag a tab to open it in a new window.
1. Drag the window to another monitor.
2. Maximize the window by clicking the Maximize button on the top right corner of t he window.
19
Page 20

SETUP
user information
Change the password of
the current user
Configure Map
Alarm Event
Menu of configurable
options
Auto load and
save when
logging on / off
Triggers an audible alert when a DVR disconnects from Radius
GENERAL SETUP
Use the General Options to configure map alarm settings and user information.
Displays current
Options
User Information Displays the current user ID.
Change Password Change the password of the current user.
Load/Save Options Auto load or auto save all settings. (Must be selected to save user screens)
Open Lock List Displays a list of functions that can be locked after configurable time of inactivity.
Use Disconnect Notice Dialog Opens a dialog box, for the specified number of minutes, to indicate
that a DVR has disconnected from Radius.
Disconnect Alert Sound Setting Specify the audible alert to sound when a DVR disconnects from
Radius.
Map Alarm Event Specify the colors that display around map alarms on alarm events.
Auto-switching to map event Opens the map associated with an alarm on an alarm event for the
specified number of seconds.
Use Map Alarm Sound Triggers an audible alarm on a map alarm event.
Show linked object label Displays the user defined label under linked objects on maps.
Pop up DVR live on events Opens live video of recorder associ ated with an alarm on an alarm event.
Camera popup always on top Opens live video window on top of all current application windows
running on the system.
20 29677AC
Page 21

Locking Functions
Use the Lock List function to lock specific functions after the user-defined waiting period.
• Radius Setup
• DVR Configuration
• Edit Map
• Show Radius Log Viewer
• Show Alarm Moni tor
• Show Health Check Status
• Minimization or Maximization
• Shut down Radius
• Search
21
Page 22

LIVE SETUP
Location to
captures
Filter out Normal Alarms from Event Viewer display
Use the Live Setup to configure on scree n display options, full-screen on alarm settings, and JPEG
image capture on alarm.
On-screen display options
save image
Auto Switching Time (Sec) Sets time between the camera view sequencing
PTZ controller transparency setting Set the transparency level of the PTZ controller.
Enable full window when double clicked in live mode Enable to show a channel full screen when
the live mode display is double-clicked.
Reset live video position on disconnection Resets video positioning to display in sequential order.
Show PTZ controller with advanced mode Show that advanced menu when the PTZ controller
opens.
Hide hidden cameras in tree list Exclude cameras, which are set to be hidden from a user, from the
tree list of cameras.
Hold Screen Ratio
Hide all OSD Hide all on screen display text.
Hide at 64 division Disables the on-screen display for the 64ch screen division option.
Use Font Setting Change the font and font size of the on screen display text.
Save Directory The location to which alarm images are saved.
Jpeg Capture on Alarm Capture a JPEG image of the associated channel on an alarm event.
Full Screen Channel On Alarm Show alarm video full screen on motion or sensor alarm.
Note The duration defines the amount of time the video will display before a subsequent alarm
video can display. Single alarms will display full screen until closed by the user.
Audio play mode Quality first – Play best quality video / Sync first – Keep audio synced with video
Set Schedule Filter out Normal Alar m s, by category, from the Event Viewer display.
Preserves the native aspect ratio of the video.
22 29677AC
Page 23

Set Schedule to Discard Alarms
Connected recorders
Create a schedule to filter out Normal Alarms, by category, from the Event Viewer display.
Creating a Schedule to Discard Normal Alarms
1. From the Tools menu select Settings and then cl i c k Live Setup.
2. Click Set Schedule.
3. Select a recorder to apply this sc hedule to from the list of connected recorders or click Apply all
servers to apply the schedule to all connected recorders.
4. Select the days of the week the schedule is for.
5. Drag the mouse to select the hours of the day to ignore the desired type of alarm (Motion, Sensor,
Sensor (Camera), Relay).
6. Click Set after each block of time is selected.
23
Page 24

DVR LIST SETUP
Name used to
identify the
User name/ password of an authorized remote user
User defined local
contact numbers
Update edited settings
Save new settings
DVR
Adding a New Recorder
Displays list of added recorders
Delete selected site
1. From the Tools menu select Settings and then cl i c k DVR List Setup.
2. Select the recorder model type from the Model list.
3. Enter a name to identify the recorder in the Server Name box.
4. Enter the IP Address of the recorder in the IP / URL box.
5. Enter the Port# the recorder uses to transfer data. This port is specified in the Network Setup
display on the DVR.
6. Enter the User ID and Password of an authorized remote user.
7. Enter the name of a new group in the Group box – or – click the arrow to select a previously
created group.
8. When finished entering the informat i on click Add.
Editing a Recorder
1. From the Tools menu select Settings and then click DVR List Setup.
2. Select the recorder to edit from the list of connected recorders.
3. Edit the necessary information.
4. When you are finished editing information, click Update.
Name Sensors and Relays
1. From the Tools menu select Settings and then cl i c k DVR List Setup.
2. Double-click the recorder to edit from the list of connected recorders .
3. Type custom names for the sensors and relays in the Detail Server Information window.
24 29677AC
Page 25

HEALTH CHECK SETUP
List of recorders added in DVR List Setup
Enable PPP for
selected DVR
Number of occurrences to
define a Warning / Failure
Select modem used to
Incoming dialup
connection data
Test .wav file
Health Check will monitor the stat us of connected DVRs and notify users of video loss, recording
failures or storage failures via e-m ail alerts or trigger an audio warning to notify the Radius operator.
connect to DVR using
Selected DVR
name
Set Up Health Check Options
1. From the Tools menu select Settings and then click H ealth Check Setup.
2. Select the Enable Health Check check box.
3. Define the check interval - 10 Minutes to 7 Days.
4. Select the appropriate check boxes to enable checks for Video Loss, Recording Failure, Disk
Free Space, and Storage Failure.
5. Define the number of occurrences that determines a warning or failure
Note E-mail notification of warnings or failures can be set up in the Admin > E-Mail window. See
more information later in this chapter .
6. Select the check box next to the DVRs to include in Health Checks.
Note Only selected DVRs will be monitored by the Health Check function.
7. Enter the Health Check Port number under DVR Information for Health Check and click Update.
The Health Check Port number is defined in Network setup on each recorder.
25
Page 26

Use PPP to connect to DVR
Browse for .wav file
Enable popup
notice on
alarm
Text entry box
Alarm confirm
1. From the Tools menu select Settings and then cl i c k Health Check Setup.
2. Click on a DVR Name to highlight the appropriate DVR. The DVR name and associ ated Port
number will display on the right.
3. Select the Use PPP check box.
4. Enter the phone number of the dialup connection.
5. Enter the user name and password for the dialup account.
6. Click Update to save changes.
Enable Audio Warning on Failure
1. From the Tools menu select Settings and then cl i c k Health Check Setup.
2. Set up the Health Check options.
3. Select the Voice Warning on Failure check box.
4. Click the folder button to browse for a .wav file.
5. Click the speaker button to test the .wav file.
ALARM MONITOR SETUP
The Alarm Monitor Setup allows user s to define alarm confirm tags for use i n the Alarm Monitor
Window, select sound options for al ar m events and designate a location to save the alarm log file.
Defining alarm confirm tags will help identify and filter specific alarm events for later searches.
tag list
26 29677AC
Page 27

Set Up Alarm Monitor Options
1. From the Tools menu select Settings and then cl i c k Alarm Monitor.
2. Select the Use check box to enable Alarm Monitor options.
3. Enter the Network (Emergency) Port number.
4. Select Change to Alarm Monitor on alarm if desired to bring the Alarm Monitor application to the
front on alarm.
5. Select Show Popup Messenger if desired to show a small popup message on alarm.
6. Select a sound option for alarm events .
7. Add items to the Alarm Confirm List.
Add Items to Alarm Confirm List
1. From the Tools menu select Settings and then click Alarm Monitor.
2. Type the desired text in the text entry box.
Note The items in the Alarm Confirm List will be available o n a list under Status Setting in the
Alarm Monitor window.
3. Click Add.
27
Page 28

DVR POS SETUP
See the POS Features chapter of this manual for information on configurin g POS options.
Enable POS
Enable to utilize POS functions such as searching and displaying PO S text on screen.
Using Fonts
Configure the Font Set for Normal and Alert text.
Search Keywords
Configure for commonly searched PO S items.
Ignore DVR Server’s Alert
Allow custom alerts for Radius notification while ignoring DVR alert s .
28 29677AC
Page 29

ADMIN SETUP
Configure global
DVR settings
Import / Export
Enter additional
information
configuration, log
and map files
Schedule Alarm Log Clean Up and Resize the Alarm Log File
Write Radius Log Enable to write Radius events to the DVR log.
Disable DirectX Mode Disables Windows DirectX capabilities – (Disa ble when using older video
chipsets that do not use DirectX).
Use Digital Watermarking Adds a user defined digital watermark to exported JPEG files.
Auto reconnect delay time Specifies amount of time Radius waits before attempting to reconnect after
a disconnection with a DVR.
Sound alert on free disk space Enable an audible alert to sound when HDD spac e becomes limited
on the DVR.
PTZ command interval Delay PTZ commands to reduce the risk of multiple commands reaching the
camera at the same time due to network latency.
Network timeout setting Amount of time before Radius reports a disconnect from the DVR.
Alarm Log Cleanup Schedule Schedule alarm log clean up and resi z e the alarm log file.
Use keyboard control Enable use of a PTZ joystick keyboard controller.
Additional DVR Information User supplied contact information.
Run Data Manager Opens the Data Manager application to import and export configuration, log, and
map files.
Hide Video Noise (Lines) Adjust s ettings to hide analog camera video noise.
Audio Enables Audio for Live and Remote functi onality
29
Page 30

Data Manager
Cleanup Schedule alarm clean up or restore Alarm and DVR configuration to default settings
Import Import system settings
Export Export system settings
Map Conversion Convert maps from legacy versions of Radius to use in vers i ons 3.6+
Configuring Import / Export
Creating the custom settings for this application may take some time, depending on the number of DVR
units connected, and the complexity of m aps, etc. The import/export features pr ovide the option to
perform set up once and reuse the settings when desired. This option may need to be used when:
Using multiple stations. It may be practical to import settings if more than one station is used.
Installing new software versions . Upgrading to a newer software version sometimes forces the deletion
of settings.
Windows / Software Failure. Windo ws m ay become unstable for a number of reasons (viruses,
incompatible software, etc).
Exporting Settings
1. From the Tools menu select Settings and then cl i c k Admin.
2. Click Run Data Manager.
3. Click Export.
4. Type a file name and click the folder icon to select a save loc ation.
5. Select settings to export and click OK.
6. Click Run to complete export.
Import Settings
1. From the Tools menu select Settings and then cl i c k Admin.
2. Click Run Data Manager.
3. Click Import.
4. Click the folder icon to select a previously saved configuration file and click OK
5. Click Run to complete import.
30 29677AC
Page 31

Scheduling Log Cleanup
1. From the Tools menu select Settings and then click Admin.
2. Click Alarm Log Cleanup Schedule.
3. Select the Use Cleaning Alarm Log File Automatically check box.
4. Select the desired setting for the time to keep log files, how often and what time to delete log files.
31
Page 32

USER MANAGEMENT
Radius allows the administrat or to define user privileges. User privileges are defined individually per
user by the administrator.
Creating Users
1. From the Tools menu select Settings and then cl i c k
Users.
2. Click Add User.
Tip Select the User DVR Server’s Authent ication
3. Enter a username in the User ID box.
4. Enter and confirm a password.
5. From the Server Access Permission list, select the
DVR check boxes to allow the user access to the
server.
6. From the Permission list, select the Functions to
allow the user to access.
7. From the Hidden Camera list, select cameras to hide
from the user.
8. Click OK to apply the changes.
Editing Users
1. From the Tools menu select Settings and then click Users.
2. Select a user listed in the User window.
3. Click Update User.
4. Perform the desired changes; change t he password, user permissions, or server access.
5. Click OK to apply the changes.
check box to use the user ID and privileges
defined by the DVR server.
32 29677AC
Page 33

E-MAIL ALERT SETUP
Configure the E-mail setup window to se nd e-mail alerts to users based on alarm ev ents.
General E-mail Setup
1. From the Tools menu select Settings, click
E-mail and then click the General tab.
2. Select the Enable E-Mail Alarm check box.
3. Type the Displa y Name and E-Mail
Address of the e-mail account used to send
e-mail alerts.
4. Type the Primary SMTP Settings and click
Test.
5. If desired, click the checkbox to Use
Secondary SMTP Setting and enter the
secondary SMTP settings.
Users E-mail Setup
Creating a User
1. From the Tools menu select Settings, click
E-mail and then click the Users tab.
2. Type the user’s nam e i n the Recipient
Name box.
3. Type the user’s E-M ail Address.
4. Click Add.
Activating a User
1. From the Tools menu select Settings, and then click E-mail.
2. Click the Users tab.
3. Click the check box next to a user name.
Note Only activated users will receive e-mail notification of alar m events.
Editing a User
1. From the Tools menu select Settings, and then click E-mail.
2. Click the Users tab.
3. Select the user from the list
4. Edit the user’s name and/or e-mail address
5. Click Update to apply changes
33
Page 34

Deleting a User
1. From the Tools menu select Settings, and then click E-mail.
2. Click the Users tab.
3. Select a user from the list.
4. Click Delete to remove the user.
Normal Alarm E-mail Setup
1. From the Tools menu select Settings, and
then click E-mail.
2. Set up the General tab.
3. Create e-mail users on the User tab.
4. Click the Normal Alarm tab.
5. Under Send E-Mail On Normal Alarm
Event select the Use check box.
6. Select the alarm type to send e-mails o n.
7. Define how often to send e-mail not ices.
Emergency Alarm E-mail Setup
1. From the Tools menu select Settings, and
then click E-mail.
2. Set up the General tab.
3. Create e-mail users on the User tab.
4. Click the Emergency Alarm tab.
5. Under Send E-Mail On Emergency Alarm
Event select the Use check box.
6. Select the alarm type to send e-mails o n.
34 29677AC
Page 35

Health Check Alarm E-mail Setup
1. From the Tools menu select Settings, and then click E-mail.
2. Set up the General tab.
3. Create e-mail users on the User tab.
4. Click the Health Check Alarm tab.
5. Under Send E-Mail On Health Check Event select the Use check box.
6. Select the types of alarm to trigger an e-mail notification.
7. Type a comment to include with the e-mail if desired.
8. Click Save and Close to apply changes.
35
Page 36

MAPS
Camera icon
Zoom controls
Clear icons
Lock / unlock map
MAP OVERVIEW
The Radius software is capable of impor ting maps and associating cameras and s ensors to locations on
the map, as well as linking maps together. This feature allows user to quic kly identify alarm zones and
view the related video.
Sensor icon
Map Link icon
Relay icon
Server icon
Dome Camera icon
Map level
Search Devices on Map Display
Search for specific devices/icons on the map.
Map Level
Displays the level of the open map. C li c k available levels to quickly s wit ch maps.
36 29677AC
Page 37

ADDING A MAP FILE
Import as many maps as necessary. Maps ar e l isted in the Map List in the order that they are added so
name the files in a manner that allows for easy recognition.
1. Open a map. From the View menu, select Windows, and then click Map List.
-or- click the Map List shortcut.
2. Right-click the Map List and select Add Map.
3. Enter a name in the New Map Name box. Use a name that will easily identify the map.
4. Click Find to browse for the map file.
5. Select the file. Supported file types include:
1. Auto CAD files (up to R14) – DFX, DWG
2. Standard image files – JPG, BMP, EMF, WMF
6. Enter a comment to be included in the Information display for the map.
ADDING AN HTML MAP
1. Locate an HTML map in a preferred online m ap s ervice such as Google Maps or Microsoft Live
Search.
2. Copy the permalink to the clipboard.
3. Right-click the Map List and select Add Map.
4. Enter a name in the New Map Name box. Use a name that will easily identify the map.
5. Paste the permalink of the HTML map in the File Name box.
6. Select the URL check box
7. Enter a comment to be included in the Infor mation display for the map.
OPENING A MAP
Right-click the map name on the Map List and select Open Map.
- or -
Double-click the map name.
CLOSING A MAP
To close the map display tab, click in the top right corner.
CREATING MAP LEVELS
If you have many map files associated with your DVRs you may want to organize the maps by level.
Organize the maps so that lower level maps are grouped under the higher level maps. For example, if
your first level map is the state of California, you might want maps of Los Angeles, Sacramento and San
Francisco to be second level maps. Y ou can create up to four levels of maps.
To create a new map level:
• In the map list, drag a map over another map name to organize it as a lower level ma p.
37
Page 38

PLACING MARKERS ON A MAP
Placing cameras, sensors, relays, s er vers and links allows easy identification of the locations where
cameras and alarms are located, as well as the ability to link between mult i ple area maps.
Attaching Cameras/Sensors
1. Open a map. From the View menu, select Windows, and then click Map List.
-or- click the Map List shortcut.
2. Click the arrow next to Map Items and click the desired icon.
3. Click the location on the map to place the icon.
4. Select a DVR from the Server list.
5. Select a specific camera, sensor or r el ay from the Camera list.
6. Select the color of camera, sensor or relay from the Type list.
7. Select the desired Icon Size from the list.
Attaching Map Links
1. Open a map. From the View menu, select Windows, and then click Map List.
-or- click the Map List shortcut.
2. Click the arrow next to Map Items and cl ick the desired icon.
3. Click the location on the map to place th e i c on.
4. Select a map from the Map Name list.
5. Select the color of the map icon from the Type list.
38 29677AC
Page 39

Changing Alarm Colors
The colors of the three alarm types can b e customized in the Radius Options window. It may be
necessary to change the alarm colors depending on the colors of the map. Cust om i z e the color and
alarm time for Sensor, Motion and Video Loss events.
1. Open the General setup window. Click the Settings button and then click General.
2. Change the Map Alarm Event colors.
3. Under Auto-switching to map event select the Use check box to open the associated map on an
alarm event.
4. Enter the time in seconds for the alarm to flash after activation.
Adding a Map Alarm Sound
1. Open the General setup window. Click the Settings button and then click General.
2. Under Use Map Alarm Sound select the Use check box.
3. Select Beep or Wave File.
4. If using a Wave file, click the folder icon to browse to the file location.
5. Click Test.
Viewing Video on Alarm
When the Alarms are activated, colored circles will flash around the sensor icon in the map. To view
the camera associated with the alarm, double-click the flashing sensor i c on. The video will open in a
new wind ow.
39
Page 40

VIDEO BACKUP
Select Day
Select Backup
Storage Location
Indicates
Backup
Progress
Selected Site Information
Recorded Video
NETWORK BACKUP
The Network Backup window allo ws you to backup all cameras on the selected DVR to a local or
network drive.
Professional Recorders (X, Xr, H, N-Series)
Backing up All Cameras
1. Open the Network Backup window. Right-click the desired recorder on the Server List and then
click Network Backup.
2. If necessary, select the desired rec or der on the Site Name list and enter a User ID and Password.
3. Click Connect.
4. Click a date on the calendar. Browse to preceding months/years using the arrows.
5. Select blocks of time that contain e xisting data, selected block will turn red. Clear blocks by
clicking on them again.
6. Click the Backup Path folder icon to browse to the network storage location.
7. Click Start. The Download Stat us section will display backup progress
8. To stop a backup already in progress, click Stop.
Note If the amount of video exceeds the storage capacity of the selected media, an error mess age
will display. If this happens, reduce the amount of video in the backup or select a backup
media with a larger storage capacit y.
40 29677AC
Page 41

Commercial Recorders (E-Series)
Regular Backup
1. Open the Network Backup window. Right-click the desired recorder on the Server List and then
click Network Backup.
2. Click on a date on the calendar. Browse t o pr eceding months/years using the ar r ows.
3. Type a Start Time and an End Time or use the arrows to define the time.
4. Select a backup location from the T arget Drive list.
5. Select the check boxes next to the channels to include in the backup or clic k the All check box.
6. Click Start Backup. The Progress section will display backup progress
Scheduled Backup
The Scheduled Backup screen is used for performing bulk backup of video r ecorded by all cameras for
a selected period, on a regular scheduled basis (1-24 hours).
1. Open the Network Backup window. Right-click the
desired recorder on the Ser ver List and then click
Network Backup.
2. Click Schedule.
3. Select the recorders that you wish t o create backup
schedules for.
4. Select a backup location from the T arget Drive list.
5. Set the Schedule Time to define what time of day
the system will perform the backup.
6. Set the Start Time and the End Time to define the
hours of each day to include in the backup.
7. To run a scheduled backup each time the system is
turned on, select the Autorun on Windows startup
check box.
8. Click Apply to save changes.
41
Page 42

CLIP BACKUP
Select Day
Select
Select
The Clip Backup window allows you to backup one or more cameras on the current recorder to a local
drive, CD/DVD or USB device.
Note Clip Backup is not compatible with Commercial (E-Series) recorders.
Channel
Backing up Selected Cameras
1. Select the desired recorder from the Server List.
2. Right-click the desired record er and select Clip Backup.
3. Select an available drive under Bac ku p Drive.
4. Select one or more cameras under Chan nel Select.
5. In the Clip Backup Time area select the desired date and Start Time and End Time for the clip.
6. Type a name to identify the clip in the Title box.
7. Type a note in the Memo box if desired.
8. Type the desired file name in the Clip Name box.
9. To include the proprietary Backup Viewer application with the backup c lip, select the Include
Backup Viewer check box.
10. Click Size Check to make sure the backup drive has sufficient available spac e.
11. Click Start Clip Backup. The Status area will display backup progress
Status
Backup
Location
Note If the amount of video exceeds the storage capac i ty of the selected media, an error mess age
will display. If this happens, reduce the amount of video in the backup or select backup media
with a larger storage capacity.
42 29677AC
Page 43

SEARCH
Search methods
Save file as
Sync the playback of
rease
Displays Date/Time of video playback
Hour/Minute control bar
Displays camera buttons
Displays screen division buttons
SEARCH OVERVIEW
The Radius Software has several o ptions to allow easy searching to f ind specific video. From Motion
and Sensor indexing to calendar views showing days with recorded video, the Radius Software is
designed to help the user quickl y located specific data.
There are two types of Search windows:
• Standard Search – Provides multiple searching options but only allows searching video of one DVR
at a time.
• Multiple Search – Allows searching of video from multiple DVRs simult aneously.
Create and find
Bookmarks
Performing a Basic Search
1. Right-click a recorder or camera in the Server List and select Search – or – click the Search
button at the top of the screen.
2. Click the Date button to open the Calendar window.
3. Select a date.
4. Select the time using the Hour/Minute control bar.
5. Select one or more cameras with the camera buttons.
6. Start playback using the playback controls. Vi deo can be played forwards, backwards and frameby-frame.
multiple cameras
Playback controls
JPG or AVI
Increase/Dec
playback speed
Zoom In/Out
Audio controls
Opens calendar
43
Page 44

Bookmarks
Use bookmarks to mark a video clip during a search. Quickly
find bookmarked clips for later review or backup.
1. Perform a search for the desired video.
2. Stop playback at the beginning of t he des i red clip.
3. Under Bookmark, click Add.
4. Type a name to identify the bookmark in the Bookmark
Title box.
5. Enter a memo or notes in the Memo box.
6. You may also select additional channels to include video
at different locations recorded at the same time.
7. Click Add.
Search Bookmarks
Access previously bookmarked points of recorded video and open them in the Search screen
1. From the Search screen, under Bookmark click Search.
2. Select the desired bookmark from the li s t.
3. Click Search, the recorded video will open at the bookmarked point in the sear ch screen.
Modify Bookmarks
You can modify a previously created bookmark to change the start time of t he clip, add additional
comments, change the title, or add additional cameras.
1. From the Search screen, under Bookmark click Search.
2. Select the desired bookmark from the li s t.
3. Make the desired change.
4. Click Update.
5. When the modification is complete, c li c k Cancel to close the window.
44 29677AC
Page 45

Save to JPG or AVI
The Save function allows for the exp ort of single images in the .JPG file format or video clips in .AVI
format. JPG and .AVI file formats are t he m ost commonly used graphical formats used today. Virtually
every computer offers support for these file formats which makes them ideal for saving images/video.
• JPG – Optimized for compressing full-color or grayscale photographic images. .JPG images are
24-bit (16.7 million colors) graphic s. .JPG is used to save a single image or frame.
• AVI – Can be stored uncompressed but is typically compressed using a Windows-supplied or third-
party compression and decompression module called a codec. AVI is used to save video clips.
1. Perform a Basic, Preview, Index or Status search to locate saved video.
2. After locating the desired video, c l ick the Save button to ope n the Export Wizard window.
3. Select the type of file format; .AVI for a video clip or .JPG for a single frame.
4. If saving a video clip, select a compres sion codec, length of clip (seconds) and quality.
5. Click Next.
6. Enter a file name in the Export Name box.
7. Select a location to save the file by browsing the file tree.
8. Click Next.
9. Follow the on-screen instructions to complete the process.
Printing an Image
The Radius software can print a recorded image to a local or network printer.
1. Perform a Basic, Preview, Index or Status Search to locate saved video.
2. After locating the desired video, c l ick the Print button to open the Print Options window.
Depending on the printer used, there may be several printing options av ailable. Refer to the printer
manual for more information.
3. Click the Print button to print the selected image.
Note The message NO DEFAULT PRINTERS INSTALLED will display if no printer is connected.
45
Page 46

PREVIEW SEARCH
The Preview Search can be used in a number of circumstances to quickly find the exact moment where
an event (such as a theft) occurred. The Preview Search displays a 24-hour visual overview of a single
camera by separating a 24-hour period (1 day) into 24 images, one image for each hour of the day.
The search can then be further narrowed down into ten minute increments and one minute increments
by simply selecting one of the images displayed. The example below shows h ow the Preview Search
works.
The first screen has 24 images displayed. Each image represents the first second of each hour. If
there is no image recorded during that period, nothing will be displayed.
Double-click an image to select an hour. A new screen appears with 6 images, each one representing
a 10-minute segment of video. Double-click an image to select a 10-minute segment. The final screen
appears with the 10-minute segment broken into 1-minute increments (10 images).
Performing a Preview Search
1. Right-click a recorder or camera in the Server List and select Search – or – click the Search
button at the top of the screen.
2. Select a single camera. Turn off all cameras but one or double-click a video image to display it full
screen.
3. Click the Date button to select a date from the calendar.
4. Click Preview Search to display 24 images. If there is no recorded video during a portion of the
day, “No Image” will be displayed in place of an image.
5. Refine the search by double-clicking an image to display six 10-minute increment images.
6. Refine the search further by double-clicking an image to display ten 1-minute increment images.
7. Double-click an image to display a 1-minute segment of video. Return to the previous display by
right-clicking an image.
8. Use the playback controls to pla y t he v i deo segment.
9. To exit Preview Search with the current image still selected, click the Preview Search button to
clear it.
46 29677AC
Page 47

INDEX SEARCH
Using the Index Search can decrease the amount of time spent searching t hrough saved video. The
Index Search allows a user to perform a search based on criteria such as Sensor , Motion and Instant
Record events.
Performing an Index Search
1. Right-click a recorder or camera in the Server List and select Search – or – click the Search
button at the top of the screen.
2. Click the Date button to open the calendar and select a date.
3. Click Index to open the Index Search window.
4. Select one or more camera check boxes or select the Select All check box.
5. Select the type of event to search (Sensor, Motion, Instant Record) or select All Events.
6. The default search time is a 24 hour period. To specify a search interval, sel ec t the Selected Time
check box and define a Start Time and End Time.
7. Click Find. There may be a delay while results are returned. Results will display on the Index
Result tab. If no results are found, “No Data Received” will appear.
8. Double-click a displayed result to display the associated video.
9. To apply a selected result to the Main Sear ch, click Close.
47
Page 48

STATUS SEARCH
Recorded video displayed in Orange
The Status Search option displays a ti m eline in graph format. Scroll through multiple cameras and
easily locate hours with recorded video.
Cameras
Performing a Status Search
1. Right-click a recorder or camera in the Server List and select Search – or – click the Search
button at the top of the screen.
2. Click the Date button to open the calendar and select a date.
3. Click on an orange recorded video block.
4. After locating the desired video click Close.
5. Use the playback controls to play forwards, reverse or frame-by-frame.
24 Hours (0-23) AM & PM
POS SEARCH
See the POS Features chapter for more information on using the POS Search feature.
48 29677AC
Page 49

MULTIPLE SEARCH
Zoom In/Out
Playback Controls
Opens Calendar
Displays Date/Time of video playback
Hour/Minute Control Bar
Screen Division Buttons
Drag
Zoom
Increase/Decrease
playback speed
The Multiple Search window allows users to search video recorded on m ultiple DVRs
• Standard Search – Provides multiple searching options but only allows searching video of one DVR
at a time.
• Multiple Search – Allows searching of video from multiple DVRs simult aneously.
Performing a Multiple DVR Search
1. Open the Multiple Search window. From the Window menu, click Multiple Search.
2. Click the Date button to open the Calendar window. Select a date to search.
3. Select a time using the Hour/Minute Control Bar.
4. Drag cameras from any connected recorder on the Server List to the Multiple Search display.
Note Multiple Search is only compatible with OpenEye Professional recorders (X, Xr, N, H-Series).
5. Use the playback controls can be used to play video forward, backward, and frame-by-frame.
49
Page 50

LOG FILES
RADIUS SYSTEM LOG
The Radius System Log keeps track of when the software is opened closed and which users log in and
log out.
View the Radius Log
1. From the Window menu click Log – or – click the Log button on the toolbar.
2. Click a date on the calendar to view the log files from that day.
50 29677AC
Page 51

Export button
Status level buttons
Alarm
event list
Memo box
ALARM MONITOR
ALARM MONITOR OVERVIEW
The Alarm Monitor Setup window is used to view emergency alarms fr om the connected DVRs,
including Video Signal Loss and Sens or alarms. Use the Filter Options to filter through the different
types of alarms. After viewing event video, include a memo for future searches.
By double-clicking an alarm entry, the search window will open with the associated DVR, camera, and
time related to the event already selected.
Note If all Alarm Event results are not visible click t he Off button to turn the Filter Options off.
Alarm video display
Thumbnails of alarm events
Memo button
Assign Status Settings
1. Open the Alarm Monitor display. Fr om the Window menu, click Alarm Monitor.
2. Select an Alarm Event from the list.
3. Right-click the event and select a status level: Default, Review, Dismiss, Critical.
4. Select a defined Alarm Confirmed Type from the list under Status Setting.
5. Type a memo in the Memo box and click the Memo button.
51
Page 52

Configuring the Alarm Monitor
1. Open the Alarm Monitor settings window. From the Tools menu, click Settings and then click
Alarm Monitor.
2. Select the Use check box to enable the Alarm Monitor.
Note The Alarm Monitor uses one port to transfer the data (the Emergency Port). The port can be
adjusted inside the Network settings if necessary. It is reco m mended that the default setting
should be used unless the port must be c hanged.
3. Click Save and Close.
4. Select the DVR on the Server List and then click Device Configuration on the toolbar.
5. Click the Schedule tab. Enter the IP Address of the computer running the Radius software in the
Emergency IP list.
6. Click the check box next to the IP Address to enable it.
7. Create a schedule for the appropriat e sensors and cameras.
Tip The Alarm Monitor displays only events set up as Emergency Alarms.
8. Click Apply.
Filter Alarm Events
1. Open the Alarm Monitor display. Fr om the Window menu, click Alarm Monitor.
2. Select one or more Status Level buttons under Filter Options.
3. Select a date.
4. Select a DVR from the Server list.
5. Select the type of alarm event or select All Events.
6. Select Normal or Emergency Alarm or select All Alarms.
7. Select a Confirmed type.
8. Select the number and size of the thum bnail results.
9. Click the On button to filter results.
52 29677AC
Page 53

VIEW RECORDED ALARM VIDEO
1. Right-click an event listing and click Search to open the video in Search.
2. Use the play controls to locate the desir ed video frame.
EXPORT VIDEO
1. Right-click an event listing and click Search to open the video in Search.
2. Use the play controls to locate the desir ed video frame.
3. Click rewind to return to the beginning or desired spot in the video.
4. Click the Stop button.
5. Select the Export Type – JPG or AVI.
Save JPG:
a) Select the Digital Signature Text check box to print the digital signature on the JPG file and
click Next.
b) Click Save As to define the save location and click Ne xt.
c) Click Start to save the image.
Save AVI
a) Select a CODEC from the list and the number of frames to include in the AVI file. Reduce
Export Quality only if necessary to reduce the size of the file.
b) Click Next.
c) Click Save As to define the save locat ion and click Next.
d) Click Start to save the video file.
53
Page 54

HEALTH CHECK
Event List
HEALTH CHECK OVERVIEW
The Health Check window is used to view the health of DVRs connected to Radius.
DVR List
View Storage Report Shows Used and Free disk space on the DVR.
Health Check Status Icons
DVR Status
Healthy
Warning
Failure
Video / Recording /
Free Space
Healthy
Warning
Failure
Disabled
Network
Healthy
Failure
54 29677AC
Page 55

View Health Information
1. Open Health Check. From the Window menu, click Health Check.
2. Clear the Show Current Health Check Status check box.
3. Select the desired date from the Check List.
4. Select the desired health check event from the Event List.
Note Health check events with no failures display a green box next to the date and time; events
with one or more failures displa y a red box.
5. Double-click the appropriate DVR name. A detailed information window will open for the selected
DVR displaying the health check status for the selected parameters.
Export DVR Health Information
1. Open Health Check. From the Window menu, click Health Check.
2. Open detailed information window
3. Click the Export Button to save the health check information as an html file
55
Page 56

POS FEATURES
Enable/Disable
POS Transactions
List of POS Alerts
Add text to
Define Text Overlay Font
Define Alert Text Font Size
Type of Alert
POS OPTIONS
Use the POS options to configure the POS search feature to search data record ed on DVRs with a POS
upgrade
trigger
Add search keywords
Add POS Search Keywords
1. Select Tools > Settings > POS.
2. Select Enable POS.
3. Enter a search keyword.
4. Click the Add button in the Search Keywords section. They keyword will be added to the box
above and be available in the list of search terms in the POS Search window.
Add POS Alert Text
1. Select Tools > Settings > POS.
2. Select Enable POS.
3. Enter text to trigger an alert.
4. Select the Font or Beep check box to define the type of alert.
5. Click the Add button.
6. Select the check box next to the alert text above to enable the alert. Clear the check box to disable
the alert.
56 29677AC
Page 57

POS TEXT OVERLAY
The POS Text Overlay displays POS data on the live video display.
Turn Text Overlay On
1. Right-click a camera to open the Camera Opt ions.
2. Select POS On.
3. POS data will display over the video in the Live Display.
Turn Text Overlay Off
1. Right-click on a camera to open the Camera Options.
2. Select POS Off.
3. POS data will not display on video in the Live Display.
57
Page 58

POS SEARCH
Search
Results
Connected
Connected Registers
Time Range
Search Item(s)
Value
Conditions
Saved Searches
The POS Search allows users to search v i deo using POS data including specific registers, items or
conditions.
Caution POS index search simultaneously from two separate Radius work stations is not
recommended.
DVRs
Search POS Data
1. Open the POS Search Display. Window > POS Search.
2. Select a DVR from the Servers list.
3. Select a register from the POS ID list.
4. Define the Date and Time parameters.
5. Enter an item name in the Find Items box or select a predefined item from the list.
6. Click the >> button to add it to the box on the right.
7. Select AND or OR to apply to the item names entered above.
8. Click the Find button. The results will display o n the right side of the screen.
Filter POS Search Results
Perform a POS Search.
1. Enter an item name in the Item box under Item Filtering.
2. To define a value for the item select the Use Condition check box, select a value condition and
enter the value in the blank box.
3. Click Apply Filter.
58 29677AC
Page 59

www.openeye.net
1-888-542-1103
© 2011 OpenEye
All rights reserved. No part of thi s publication may be reproduced by any means without written permission from
OpenEye. The information in this pu bl ication is believed to be accurate in all respects. However, OpenEye cannot
assume responsibility for any cons equences resulting from the use thereof. The information contai ned herein is
subject to change without notice. R ev i s ions or new editions to this publication may be issued to incorporat e such
changes.
59
 Loading...