

Page 1

VAUXHALL VX220
Owner’s Manual
Page 2

P age 0, L: \Own er's Man ua l\N v\ Speedster-V X2 20\Mast er\ KTA 23 99- 5\V ML\ SKIPIn tro .fm RH D, Va ux Editio n 9.3.05
Data specific to your vehicle
Pleas e enter you r vehic le ’s data here to keep it easily acces sible.
This information is available under the section "Technical data" as well as on the identification plate.
Fuel
Designation
Engine oil
Grade
Viscosity
Tyre inflat ion pressure
Ty re size wi th full load
Summer ty res Front Rear
Winter ty res Front Rear
Weights
Permissible gross vehicle weight
– EC kerb weight
=Loading
0
Page 3

P age 1, L: \Own er's Man ua l\N v\ Speedster-V X2 20\Mast er\ KTA 23 99- 5\V ML\ SKIPIn tro .fm R HD, Vaux Ed ition 9.3 .05
Your VX 220
Develope d to the la te st findings of vehicle research, it offers technical s ophistication and exceptiona l comfort.
Your vehicle represents an ideal synthe sis of ad vanced technolog y, outstanding safety, environm ental compatibility and economy in
opera tion.
It now lie s with you to drive your vehicle safely and to see it performs perfectly.
This Owner's Manual provides you with all the necessary information to tha t end.
Make s ure you r pa ssengers are awa re of the poss ible ris k of a ccident and in jury which may re sult fro m improper use of the vehicle.
The Owner's Manual should always be kept with the vehicle.
Make use of the Owner's Manual:
z Its “In Brief” section will give you a n initial overview.
z Its inde x will help you find what y ou want.
z It will familiarize you with the sophisticated technology.
z It will increase your pleasure in y our vehicle.
z It will help you to handle your vehicle expertly.
The Owner's Manual is designe d to be clearly laid-out and easily understood.
This symbol:
6 signifies: continue reading on next page.
3 The asterisk signifies equ ipment op tions not in all vehicles
(m od el varia nts, engine options, models specific to one country, optional eq uipment, Genuine Vauxha ll Parts and Accessories).
Text highlighted in yellow indicates possible risk of a ccident or injury.
Disreg ard of these ins tructions may lead to i njuries or end ang er life. Veh icle
passengers should be informed accordingly.
Yellow arrows in the illustrations se rve as points of reference or ind icate some action to be performe d.
Black arrow s in the illustrations indicate a reaction or a second ac tion to be performed.
We wish you many hours of pleasurable driving
Your Vauxhall team
1
Page 4

P age 2, L: \Own er's Man ua l\N v\ Speedster-V X2 20\Mast er\ KTA 23 99- 5\V ML\ SKIPIn tro .fm R HD, Vaux Ed ition 9.3 .05
2
Page 5

P age 3, L: \Own er's Man ua l\N v\ Speedster-V X2 20\Mast er\ KTA 23 99- 5\V ML\ SKIPTOC.fm RHD, Vaux Editio n 10.6.04
Contents
Commitment to customer
satisfac tion:
Our aim: to keep you happy with your
vehicle. All Vauxhall Dealerships offer first
class service at competitive price s.
Experienced, fac tory traine d-technicians
work according to factory instructions.
Your dealership can supply you with
GENUINE VAUXHALL APPROVED PARTS,
whi ch h a ve un derg one s tringe n t qua li ty
and pre cision check s, and of course use ful
and attractive VAUXHALL APPROVED
ACCE SSORIES.
Our nam e is your guarantee!
For d etails of the
Vauxhall Dealership Network
please ring this number 01582 - 427200
In brie f ........ ......... ........ ......... ......... ......... ..... 4
Instrum ents .... ............. ......... ......... ......... .. 16
K eys, door s, b onn et ... .................. ......... .. 22
S eats , interior.......... ......... ......... ......... ...... 3 0
S afety system s.... ........ ......... ......... ......... .. 32
Light in g ............... ........ ......... ......... ......... .. 40
Windows, soft top, ha rd top ...... ......... .. 42
He ating, ve ntila tion ... .............. ......... ...... 4 6
Driving hints ............ ......... ......... ......... ...... 5 0
S avin g fu el .............. ......... ......... ......... ...... 52
Env ironmen tal protectio n ........ ......... ...... 5 4
Fuel co ns umption, fuel, refu elling........ .. 56
Catalytic converter, exhaust emissions 58
Brakes.... .................. ......... ......... ......... ...... 6 0
Wheels, tyres ........... .... .............. .... ..... ...... 64
S elf-h elp ..... ......... ........ ......... ......... ......... .. 68
If Y ou Have a Problem ... ......... ......... ...... 7 6
S ervice plan, m ainte nance .......... ......... .. 78
Vehicle care ........ .... .... .............. .... ........... 86
Te chnical data .. ............. .... .................. .. 90
Index.. ......... ......... ........ ......... ......... ......... 102
3
Page 6
P age 4, L: \Own er's Man ua l\N v\ Speedster-V X2 20\Mast er\ KTA 23 99- 5\V ML\ SKIPOM. fm RHD, Va ux Ed iti on 9.3.05
In brief
Key numbers, Code n umbers
Remove key number from key .
Th e key nu m ber is give n in th e veh icle
papers and in the Car Pass.
Immobilizer, radio 3 : t he code n umbe rs are
given in the Car Pass and Radio Pass 3
respectively.
Do not keep the Car Pa ss a nd Radio Pass 3
in th e v ehicle.
6 Further information - page s 22, 23.
4
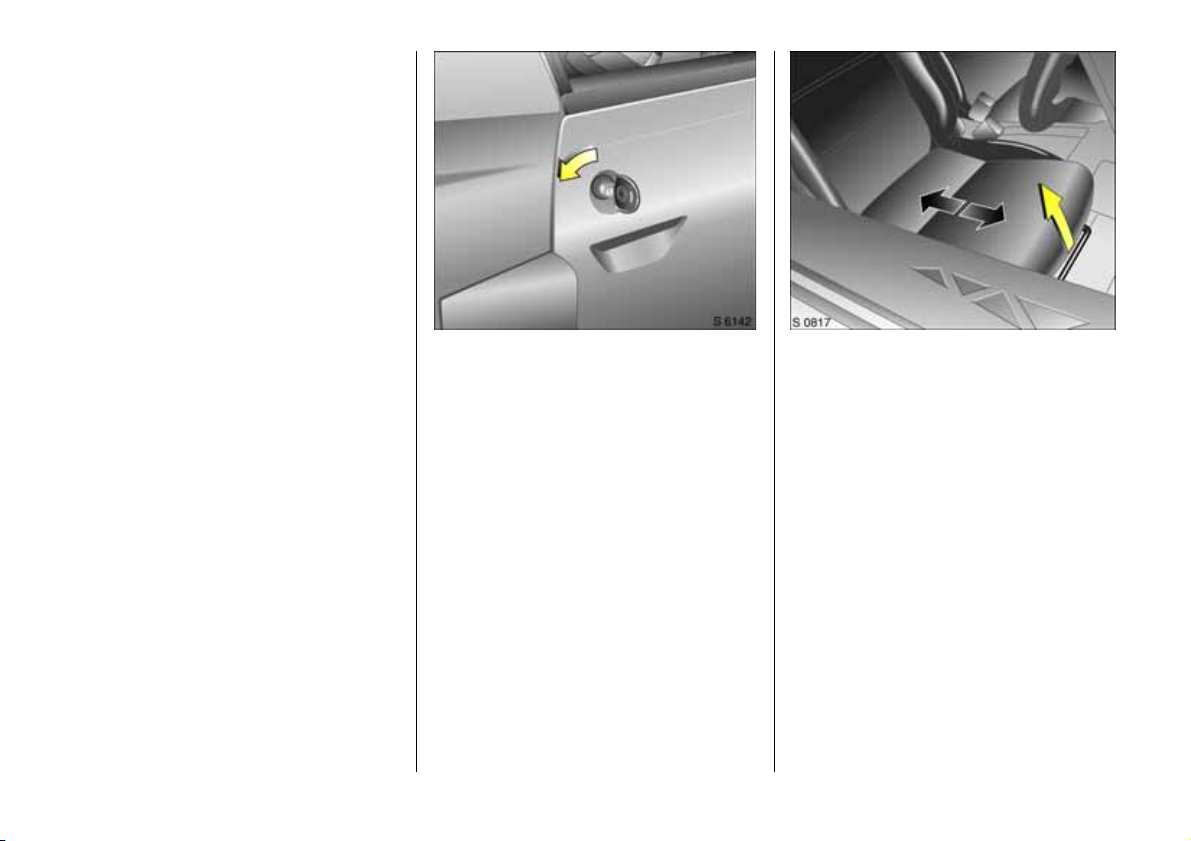
Unlocking t he vehicle:
Turn key i n do or lock,
remov e key
Press l ock button to open door
Remote ce ntral lock ing 3: Direct remote
control at v ehicle and press button. Press
lock button to open door.
6 Door locks - page 22,
electronic immobilizer - page 23,
central door locking - page 26,
remote control - page 24,
anti-theft alarm system - page 24.
Adjusting the s eat:
Pull handle, move seat,
release handle,
lock seat in position
N eve r adjust the driver's se at whils t drivin g.
It could move in an uncontrolled manner
whe n the handle has b een pulled.
The passe nger’s s eat and footrest are not
adjustable.
Page 7
P age 5, L: \Own er's Man ua l\N v\ Speedster-V X2 20\Mast er\ KTA 23 99- 5\V ML\ SKIPOM. fm RHD, Va ux Ed iti on 9.3.05
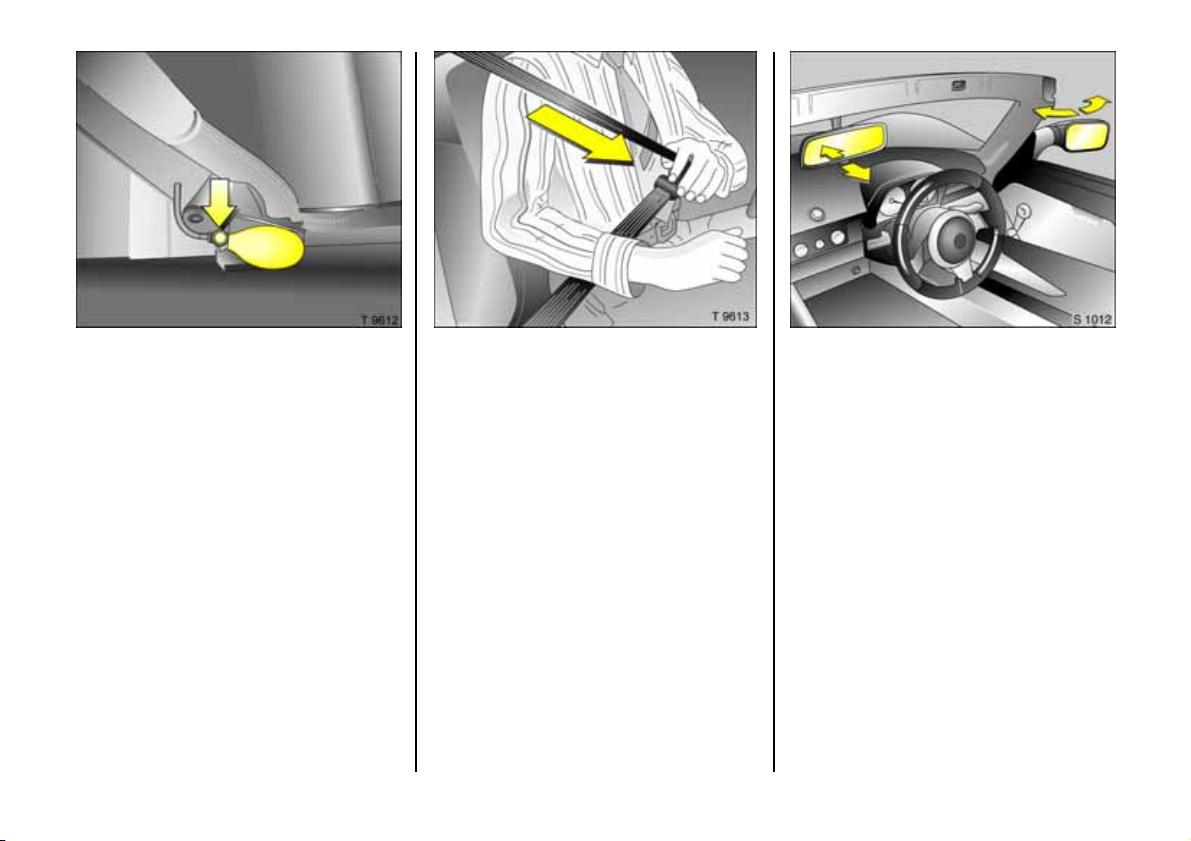
Lumbar s upport:
Pump on outboard side of seat
Operate pump to increase sup port.
To decrease support, release press ure with
valve button (arrowed).
Se at b el t:
Draw smoothly from inertia reel,
guide over the shoulder a nd
engage in buckle
The belt must not be twisted at any p oint.
The lap belt must fit snugly across the
body.
To relea se belt, press red button on belt
buckle.
6 Seat be lts - page s 32 to 34,
airbag - p age 35.
Adju st in te rior and exte rio r mir rors:
T he mir ror h ousings c an be swiv e lle d
into position
Move lever on underside of interior mirror
housing to reduce dazzle at night.
6 Further information - page 38.
5
Page 8
P age 6, L: \Own er's Man ua l\N v\ Speedster-V X2 20\Mast er\ KTA 23 99- 5\V ML\ SKIPOM. fm RHD, Va ux Ed iti on 9.3.05
6
Page 9

P age 7, L: \Own er's Man ua l\N v\ Speedster-V X2 20\Mast er\ KTA 23 99- 5\V ML\ SKIPOM. fm RHD, Va ux Ed iti on 9.3.05
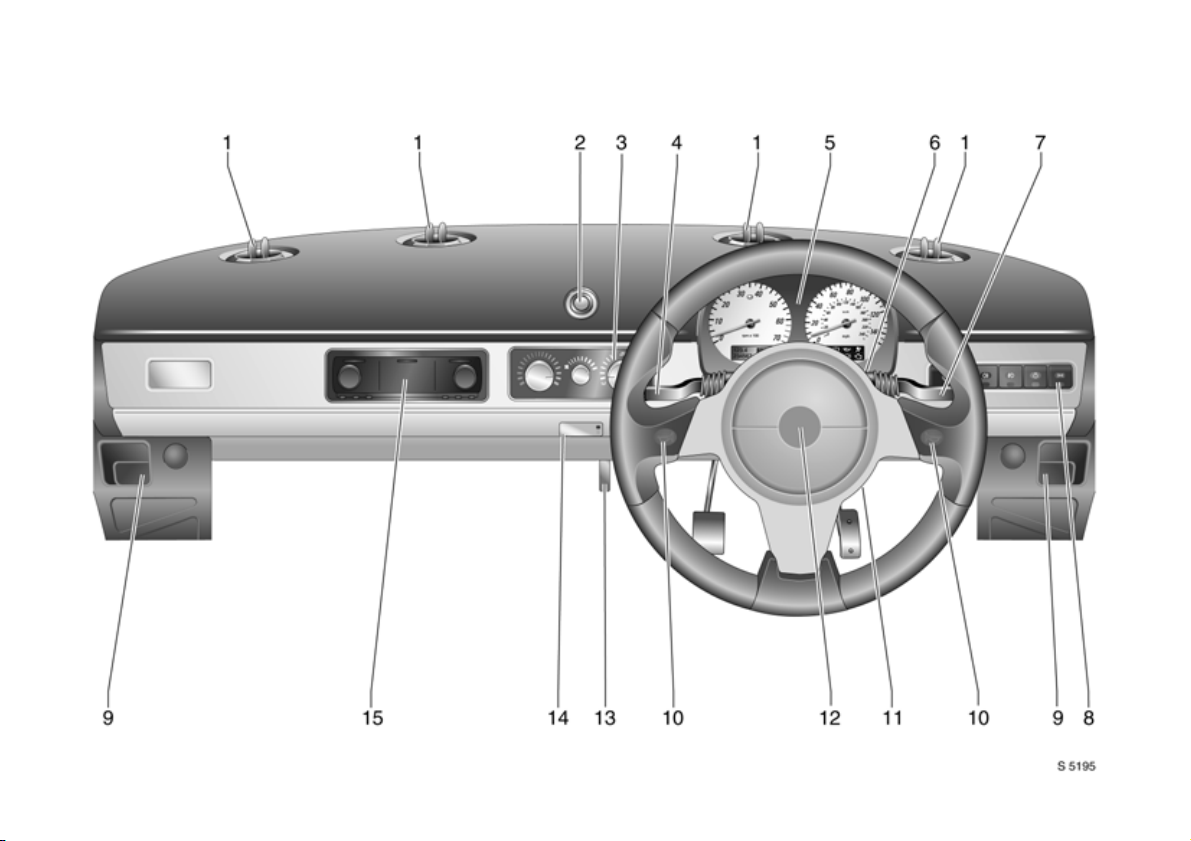
1 Ventilation je t .. ..... ............. .... ..... ......4 7
2 Star te r button ....... ......... ........ ......... ..1 1
3 Heating and ventilation controls ....46
4 Lever for
headlamps flash,
dipped and main beam, ........... ........ 9
turn signal lam ps, .... ..... ............. .... .... 9
5 Instruments....... ..... ................ 16, 18 , 1 9
6 Odometer reset button
(n ot visib le ) ............ .... ..... ............. 19, 41
7 Lever for windscreen wiper
and wa sh s ystem . ......... ........ ......... ..10
Page
Pa ge
8 Switches for
sidelamps, he adlamps, fog tail la mp,
front fog la m ps 3 and hazard warning
flashers ............ .... ............. ..... .... ......... 9
9 Stowage pocket
10 Horn ........ .... ..... ............. .... ................ 10
11 Ignition switch (no t visib le ) .. .... ....... 11
Central lock ing switch 3
(not visible ).. ......... ......... ......... ......... .. 26
12 Airba g ......... ..... .... ............. ..... ........... 35
13 Rele ase lev er fo r bonnet ........... ....... 2 8
14 Inte rio r light .............. ........ ......... .4 0, 75
15 Radio 3 ............ .... ..... ............. .... ....... 2 0
7
Page 10

P age 8, L: \Own er's Man ua l\N v\ Speedster-V X2 20\Mast er\ KTA 23 99- 5\V ML\ SKIPOM. fm RHD, Va ux Ed iti on 9.3.05
Control indicators
Fuel level: 3
Y
see pages 18, 57, 98.
Turn signal lamps:
O
see pages 9, 16.
Seat belt:
X
see page 16.
Brake system:
R
see pages 16, 61.
Oil p ressure:
I
see page 16.
Driver’s airbag system,
v
bel t tensioners:
see page 17.
Z Engine electronics:
see page 17.
P Headlamp m ain beam:
see page s 9, 40.
Lighti ng
8 Si de lamps:
see page 9, 40 .
0 Headlamps/side lamps:
see page s 9, 40.
r Fog tail lamp:
see page 9, 40 .
> Front fog lamps: 3
see page s 9, 40.
¨ Hazard warning flashers:
see page 40.
P Main beam:
see page s 17, 40.
Heating and ventilation
Blower switch:
x
see page 47.
Air distr ibution:
see page 46,
to foot a rea
K
to head area a nd to foot a re a
J
to demister
V
Windscreen wiper
Le ve r p osi t ions:
see page 10,
7
Off
Timed interval wipe
$
%
Slow
Fas t
&
n
Windscreen wash
u Anti-lock bra k e sys tem :
see page 61.
p Alternator:
see page 17.
H Coolant level low:
see page 17.
8
O Turn signal l amps:
see page s 9, 16.
Misce llan eous
j Horn:
see page 10.
) Cigarette lighter:
see page 30.
W Coolant temperature :
see pages 1 9, 80.
Page 11
P age 9, L: \Own er's Man ua l\N v\ Speedster-V X2 20\Mast er\ KTA 23 99- 5\V ML\ SKIPOM. fm RHD, Va ux Ed iti on 9.3.05
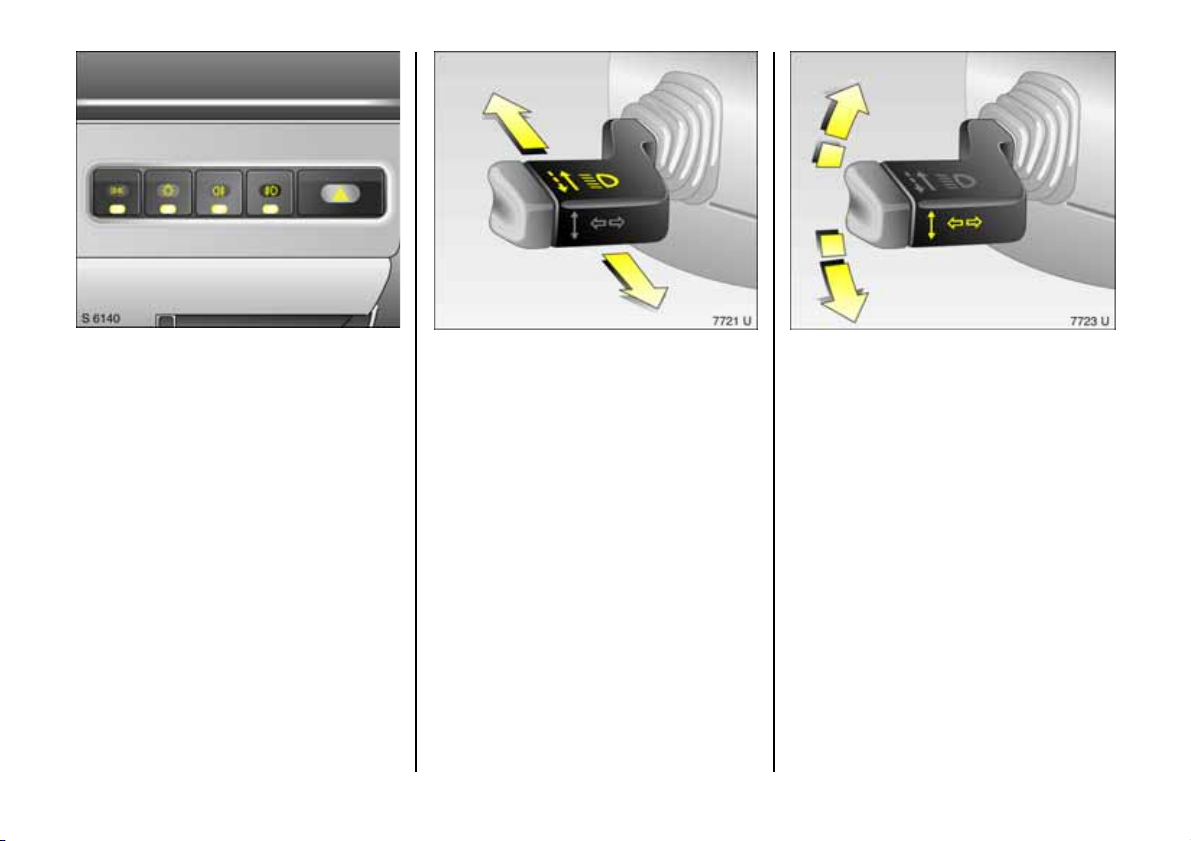
Light switche s:
¨ = Hazard warning lamps
> =Front fog lamps 3
r = Fog tail lamp
0 = Headlamps and side lamps
8 = Side la mp s
Press button to switch on and press again
to switch off.
The headlamps must be switched on
before the fog tail lamp or front fog lamps
3 can be switche d on.
6 Headla mp warning de vice - page 14,
further information - p age 40.
Dipped and main beam:
Push lever forwards = Main beam
Pull lever towards
steering wheel = Dippe d beam
Pullin g the lever towards the steering wh eel
to the first stop ope rates the headlamp
fl as h .
He adl amp flash:
Pull lever towards steering wheel
Headlamp flash can also be op erated
when turn signal lamps are on.
Turn signal lamps:
Le ver in res t position
Upwards = Right turn
Downwards = Left turn
W h en t he s t ee ring wh ee l i s tu rn ed bac k, t he
lever a utoma tica lly returns to its original
position. This will not h appen when making
a minor steering manoeuvre such as lane
changin g.
When lane cha nging, move lever part way
to first stop. When released, lever will
spring back.
9
Page 12
P age 10, L:\Owne r's Manu al\ Nv \Speed ster-VX220 \Maste r\KTA2 399-5\VML\SK IPOM.fm RH D, Vaux Edit ion 9.3.05
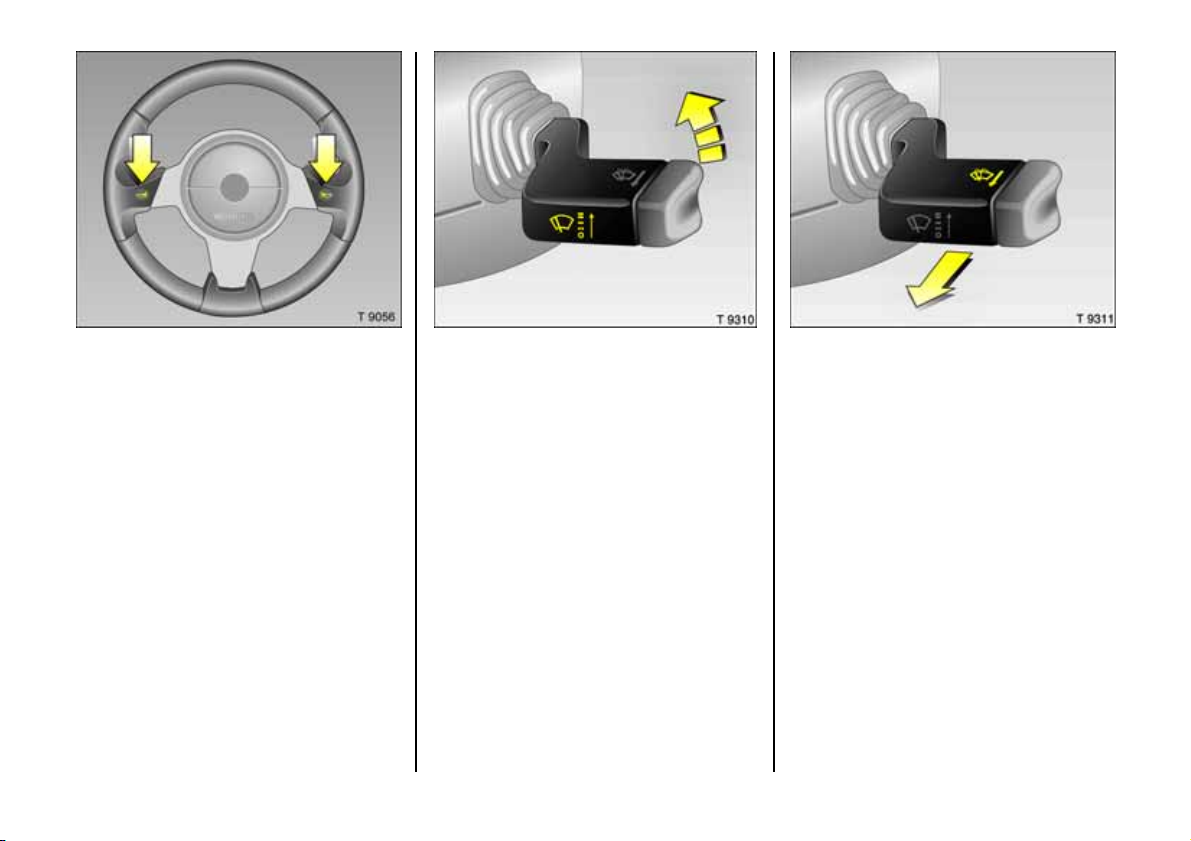
Horn:
Press
10
j
Windsc re en wiper:
Move lever upwards
7 =Off
$ = T im ed in te rva l w i p e
% =Slow
& =Fast
Windscreen wash sys tem:
P ull l ever towards steering wheel
Wash fluid is sprayed onto the windscreen
at the same tim e the wiper is operated for
several cy cles.
6 Further information - page 83.
Page 13
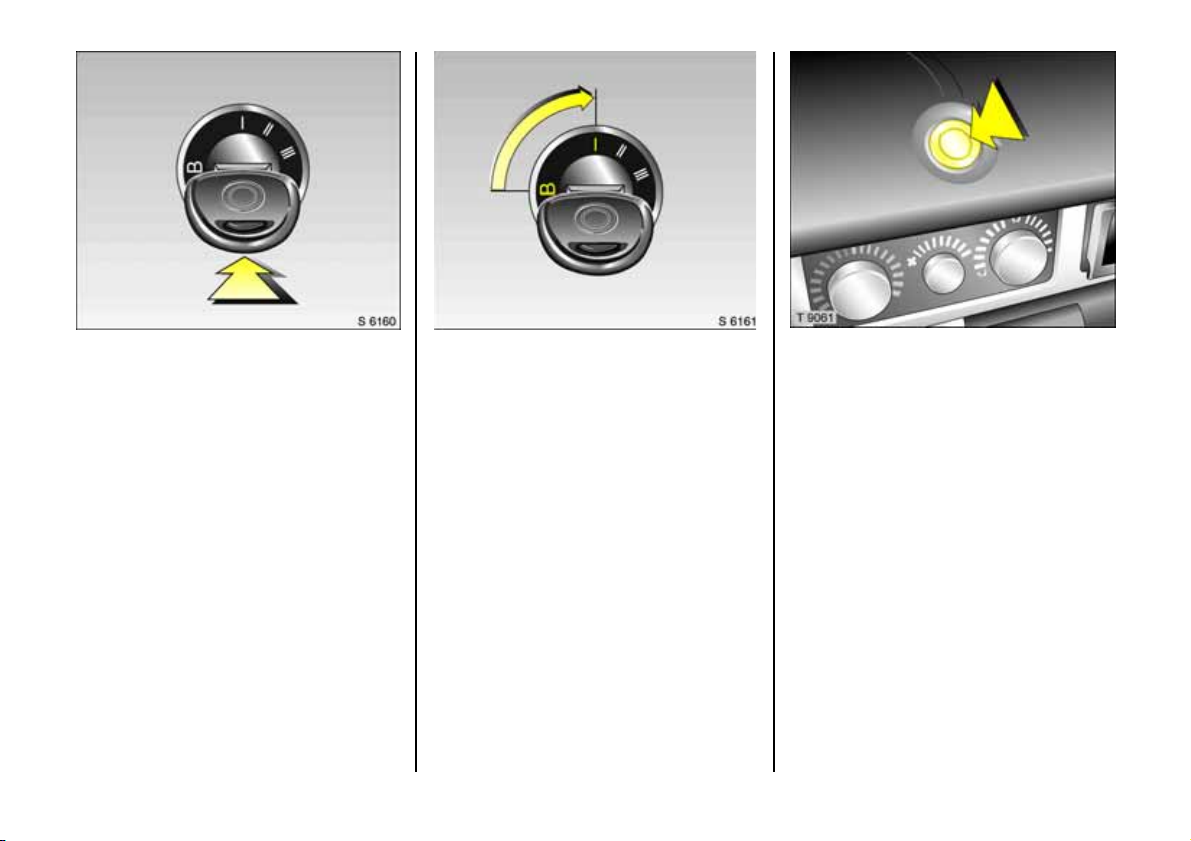
P age 11, L:\Owne r's Manu al\ Nv \Speed ster-VX220 \Maste r\KTA2 399-5\VML\SK IPOM.fm RH D, Vaux Edit ion 9.3.05
Starter switch:
B = Ignitio n off
I = Ste ering released, ignition off
II = Ignition on
II I = Key returns to position II
Press the starter button to sta rt the engine.
6 Electronic immobilizer - p age 23.
Re leasing t he steering column lock:
To re lease the lock , mo ve steering
wheel sligh tly and turn key to
po si ti on I
6 Remove key and lock steering wheel page 14.
Star te r butto n:
Depress button with the ignition on to start
the engine - (transmission in neutral).
Starter button is d eactivated once the
e ng ine is ru nn in g.
6 Starting - page 13 .
11
Page 14
P age 12, L:\Owne r's Manu al\ Nv \Speed ster-VX220 \Maste r\KTA2 399-5\VML\SK IPOM.fm RH D, Vaux Edit ion 9.3.05
Bef ore dr ivin g c hec k:
z Tyre pressure s and condition.
z E ngine oil level and fluid levels in e ngine
compa rtm ent (see page s 79 to 8 0).
z All windows, mirrors, exterior lighting
and nu mber plate s fre e from dirt, snow
and ice and a re operational.
z N o ob je ct s ar e on t h e in stru me nt p anel.
z Seats, seat belts and mirrors are
correctly adjusted.
z Brake operation.
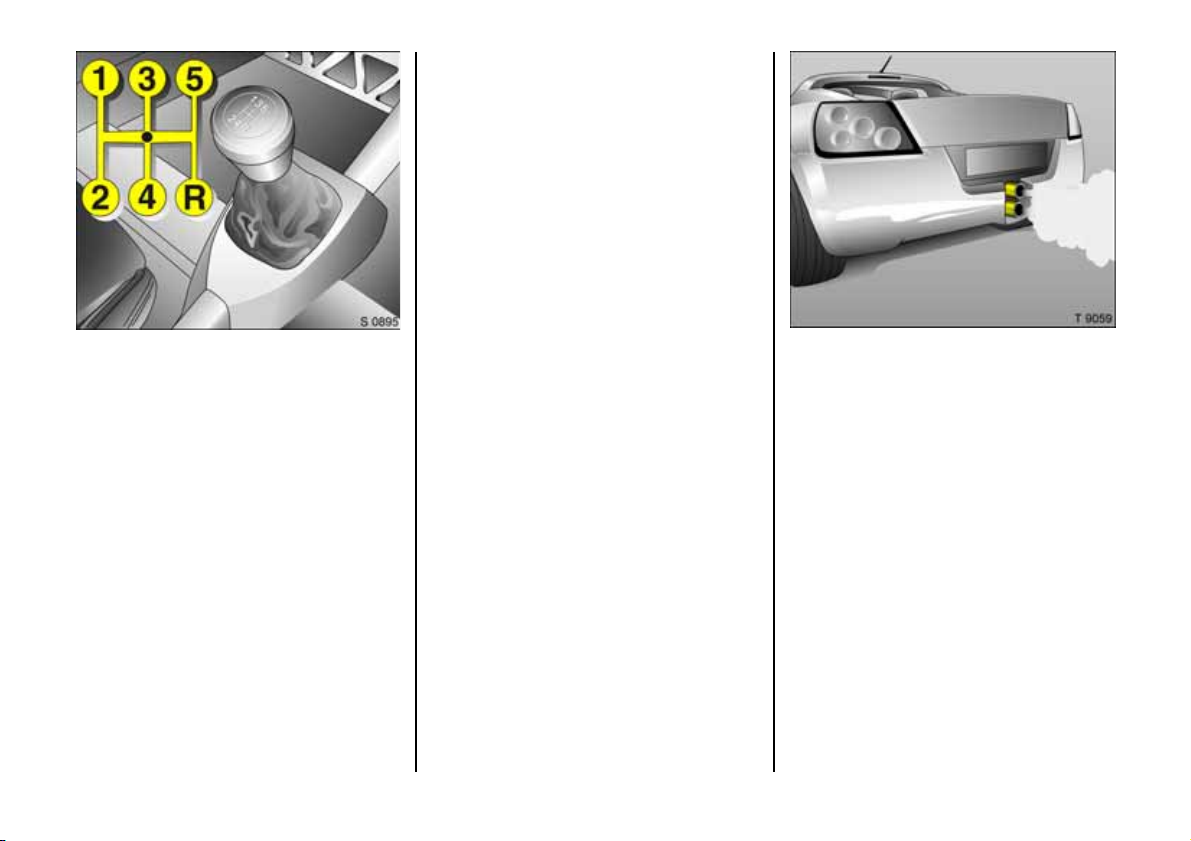
Manual transmission:
o =Neutral
1 to 5 = 1st to 5th gear
R = Reverse gear
When shifting up from 4th to 5th gear,
pressure must be exerted towards the right
at the beginning of the shift operation.
When shifting from 5th to 4th gea r, do not
exert any forc e towards the left.
Reverse gear: with vehicle stationary, mov e
shift lever to the right three seconds after
declutching and en gage gear.
If the gear does not engage: w ith lever in
neutral, releas e clutc h pedal and depress
again, then repeat gear selection.
12
Exhaust gases are poisonous
Exhaust gases contain ca rbon monoxide,
which is extremely pois onous but has no
odour or colour.
Therefore, ne ver inhale exhaust gases, and
never run the engine in a garage with the
garag e doors close d.
6 Exhaust gas - pa ge 58.
Page 15
P age 13, L:\Owne r's Manu al\ Nv \Speed ster-VX220 \Maste r\KTA2 399-5\VML\SK IPOM.fm RH D, Vaux Edit ion 9.3.05
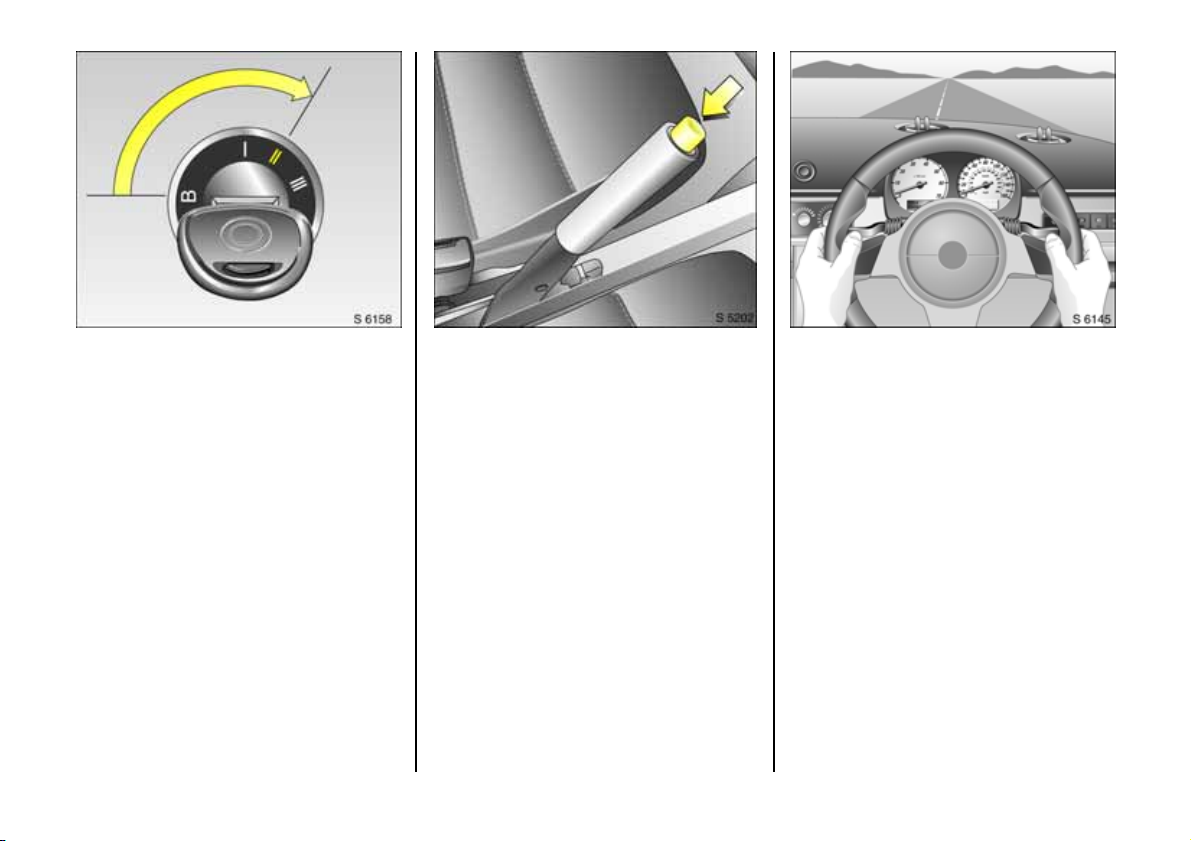
Starting:
Transmission in neutral
Depress clutch
D o n o t acc eler ate
Turn key to II
Press st arter butto n
When the engine starts, use the accelerator
pedal to maintain an increased e ng ine
speed until normal combustion conditions
are obtained, then release the accelerator
pedal.
6 Electronic immobilizer - p age 23,
further information - p ages 50, 52, 54 .
Releasing the hand brake
Slightly raise leve r. Depress lock button.
Lower lever fully.
The mechan ic al hand brake acts on the
rear wheels. It engages automa tica lly
when applied.
6 Brakes - page 60.
And now, h ave a go od jour ney –
Drive carefully,
economically and
with the environment in m ind
Whilst driving, do not do anything that
could dis tract you.
Take heed of the traffic re ports given out
on the ra dio 3.
6 Driving hints - pa ge 50,
saving fuel - page 52,
environmental protection - pa ge 54.
13
Page 16
P age 14, L:\Owne r's Manu al\ Nv \Speed ster-VX220 \Maste r\KTA2 399-5\VML\SK IPOM.fm RH D, Vaux Edit ion 9.3.05
Par king the vehicle:
Apply hand brake firmly
Switch off engine
Remove key
Engage steering wheel lock
Close windows
Lock doors
Further information - pages 23, 51,
central door locking 3 - page 26 ,
anti-theft alarm - page 24.
Warnin g buz zers
While driving:
z O perating the ind icators .
When the vehicle is parked and driver’s
door is opened:
z Headlamps switched on.
When parking:
z Alwa ys app ly hand brake firm ly . Engage
first ge ar or reverse gear.
On s lopes apply the hand brake as firmly
as possible.
z Turn steering wheel until lock is fe lt to
engage (an ti-theft protection).
z Switch off exterior lights, otherw ise the
headlamp warn ing device w ill sound
whe n t he d riv er’s doo r is o pened .
z Cooling fans may run on after the engine
has been switched off.
z Do not p ark the vehicle on a flammable
surface. The high temperature of the
exhaust sy stem could ignite the surface.
Service work,
Maintenance
We recommend that you entrust all work to
your Vauxhall Approved Repairer, who can
provide you with reliable service and
correctly perform all work according to
factory instructions.
Vauxhall Service - page 76.
14
Page 17

P age 15, L:\Owne r's Manu al\ Nv \Speed ster-VX220 \Maste r\KTA2 399-5\VML\SK IPOM.fm RH D, Vaux Edit ion 9.3.05
Genuine Vauxha ll Part s and
Accessories
We recommend the use of “Genuine
Vauxhall Parts and Accessories” and
conversion parts release d expressly for
your vehicle type. These parts have
undergone special tests to establish their
reliability, safety and specific suitability for
your vehicle. Despite continuous market
monit orin g, we ca nnot a ssess or guaran tee
these attributes for other products, even if
they have been granted approval by the
relevant authorities or in some other form.
"Genuine Vauxhall Parts and Accessories"
and conversion parts approved by
Vauxhall can be obtained from your
Vauxhall Approved Repairer. You will be
given advice about pe rmitted technical
changes and corre ct installation will tak e
place.
For your safety
Carry out regularly the checks
recom mended in this Owne r's Manual.
Ensure that your v ehicle is serviced at the
service intervals spec ifie d in the Serv ic e
Booklet. We recommend that y ou entrust
this work to your Vauxhall Approved
Repairer.
Have faults remedied without delay!
Consult a workshop. We recommend
your Vauxhall Approved Repairer. If
necessary, interrupt your journey.
6 Maintenance - pages 78 to 84.
That was a brief overview.
Please read on!
Your vehicle has still more
instrumen ts and contro ls,
po ssibly also o ptional
equ ipment:
You will also find further
important information on
operation, safety and maintenance
and a complete index.
6
36
6
15
Page 18
P age 16, L:\Owne r's Manu al\ Nv \Speed ster-VX220 \Maste r\KTA2 399-5\VML\SK IPOM.fm RH D, Vaux Edit ion 9.3.05
Instruments
16
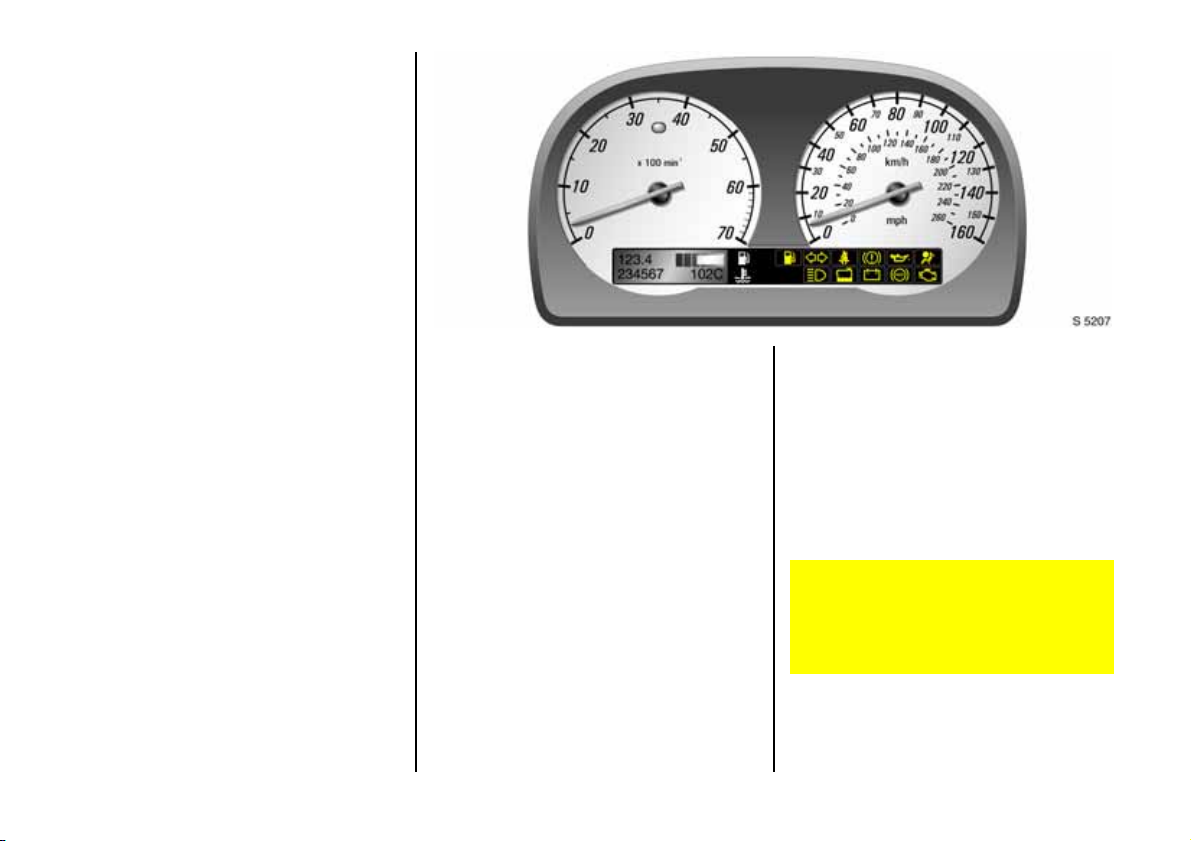
Control indicators
Y
Fuel level 3
Illuminate s when fuel le vel falls below 5
litres. Fill up - never let the tank become
empty .
Further inform ation - see page 18
O
Turn s ig n al
Flashes when turn signal lamps are on.
Flashes rapidly: a turn sig nal bulb has
fa il e d.
X
Seat be lt
Illuminates when the ignition is switche d on
then flashes 8 times to indicate that seat
belts should be engaged.
R
Brake system
Illuminates when ignition is switched on if
hand brake is applied and/or fluid level for
brak e hyd ra ulics is too low.
If it illuminates when the hand brake is
not a pplied: stop vehicle; interrupt your
journey immediately. Consult a
workshop. We recom mend your
Vauxhall Ap proved Repairer.
Furthe r information - see page 60.
I
Oil pressure
Illuminates when ignition is switched on.
Page 19

P age 17, L:\Owne r's Manu al\ Nv \Speed ster-VX220 \Maste r\KTA2 399-5\VML\SK IPOM.fm RH D, Vaux Edit ion 9.3.05
Goes out after engine is s tarted. Can light
up intermittently when idling w ith hot
engine; must go out when e ngine speed is
increased .
If it illuminates when the engine is running:
engine lubrication may b e interrupted,
resulting in damage to the engine and /or
locking of the driving wheels:
z Depress clutch.
z Move gear shift lever to neutral.
z Switch off ignition. Consid erably greater
force will be req uired for braking.
Do not remove key until vehicle has
com e to a sta nds till, otherwise the
steering column lock could e ngage
un ex pe ct edl y.
Check oil level before consulting a
workshop, we recommend your Vauxhall
Ap proved Repairer.
v
Airbag system, belt tensioners
see page 35.
Z
Engine electronics
Illum inates when the ignition is switche d
on. Goes out shortly after the engine starts
to run.
If it illuminates whe n the engine is running:
the re is a fault in the engin e co ntro l s ystem.
The permissible emission limits may be
exc eed ed. Consult a wor kshop. We
recommend your Vauxhall Approved
Repairer.
If it flashes when the engine is running a
fa ult has occurred which may damage the
catalytic conve rter. You may continue
driving, provided you lift your foot off the
accelerator pedal until the indicator stops
flashing and is s teadily lit. Should the
indicator continue to flash, consult a
workshop immediately. We recommend
your Vauxhall Ap proved Repairer.
p
Alternator
Illuminates when ignition is switched on.
Goe s out after engine is started.
If it illuminates when the engine is running:
stop vehicle and switch off engine. The
battery is not being cha rg ed and the
engine cooling may be inte rrupted.
Interrupt your journey and check drive belt
before consulting a work shop. We
recommend your Vauxhall Approv ed
Repairer.
H
Coolant level
Is illuminated wh en coola nt lev el is low and
require s topping up.
Che cking and topp ing up fluids - page 79.
P
Main beam
Illuminates when main beam is on and
headlamp flash is operated.
u
Anti-lock brake system
see page 61.
17
Page 20
P age 18, L:\Owne r's Manu al\ Nv \Speed ster-VX220 \Maste r\KTA2 399-5\VML\SK IPOM.fm RH D, Vaux Edit ion 9.3.05
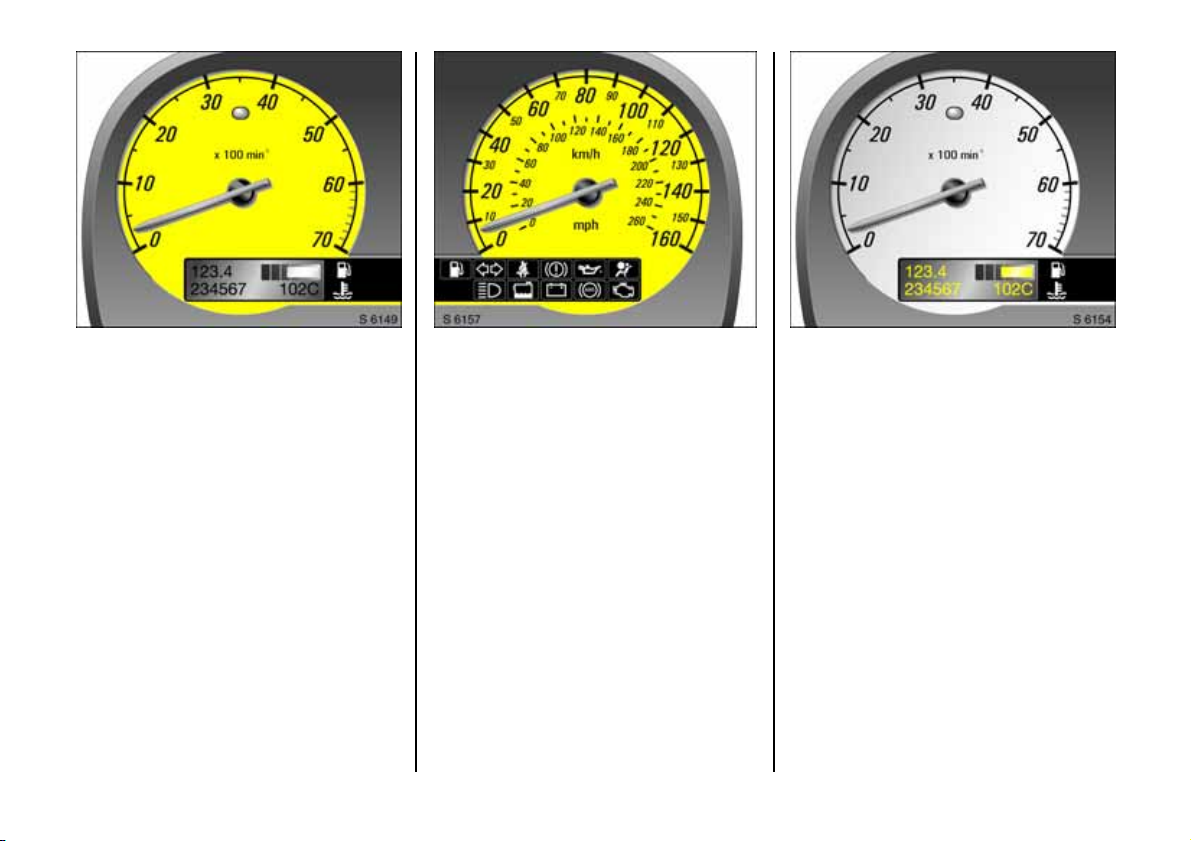
Tachometer1)
Making use of the tachometer helps to
save fuel; it indicates the engine speed in
revolutions per minute.
Warning zone on right: maximum
pe rm issible engine speed exc ee ded,
danger to engine.
If possib le , drive in each gear in the low
e ngin e sp eed ran ge (betwe en a pp ro x .
2000 and 3000 rpm) and maintain an even
vehic le speed.
Gear chang e-up warning LED 3
The w arning LED illuminate s to ind ic ate
that the recommended maximum engine
speed in th e current gear is being
exceeded and the next higher gear should
be s elec ted.
1)
The instrume nts in your vehicle may differ from
tho se i llu str ate d.
18
Spee dometer
1)
Indicates the vehicle speed.
Display panel
Displays fuel level, odometer, trip
odometer and coolant temperature.
The top right ha nd corne r of the LCD
displays the approx. fue l level.
The fuel level warning indicator Y 3 will
illuminate if the fuel level falls below 5 litres .
Never let the tank become empty!
Page 21
P age 19, L:\Owne r's Manu al\ Nv \Speed ster-VX220 \Maste r\KTA2 399-5\VML\SK IPOM.fm RH D, Vaux Edit ion 9.3.05
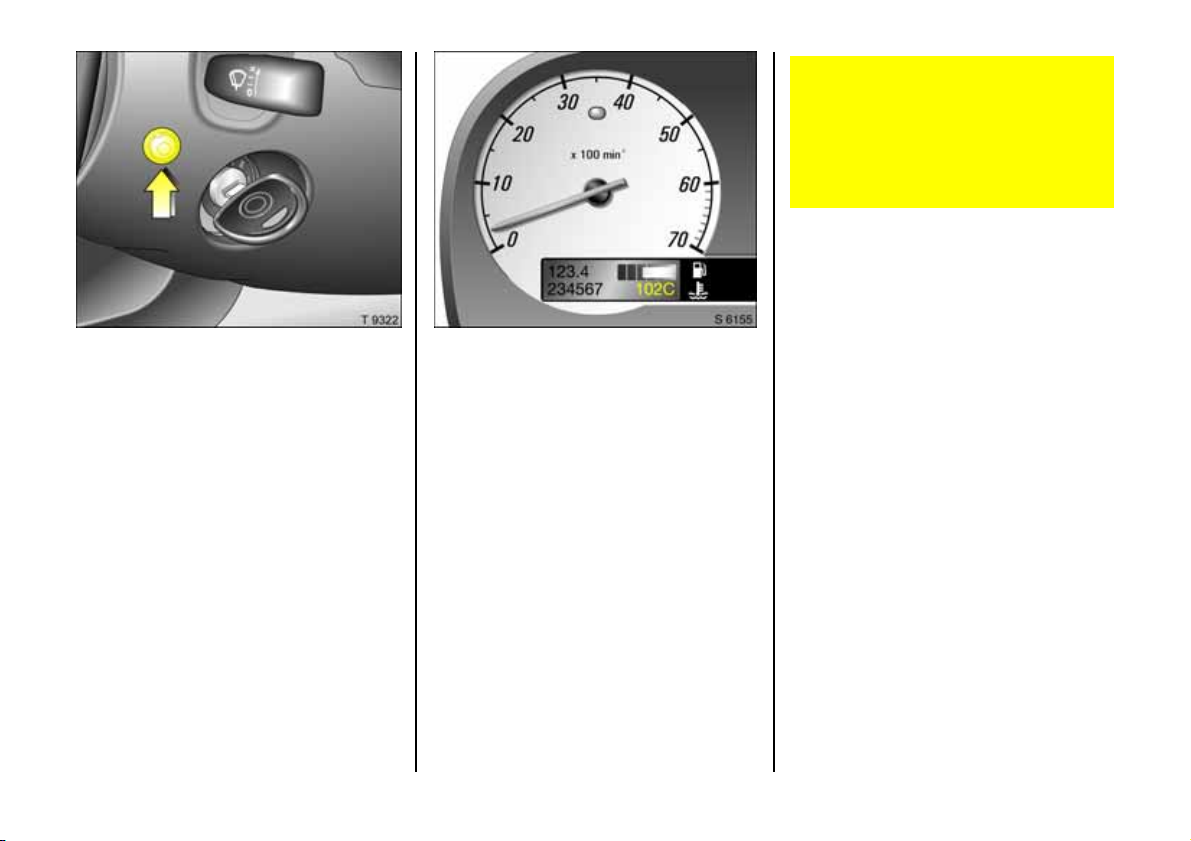
The display will flas h a t te mperature s of
over 110 °C, however, it is only if the
temperature exceeds 123 °C that the
temperature is too high. Stop vehicle,
switch off engine. Danger to engine.
Check coolant level immediately. See
page 81.
Odometer
Records the total distance driven.
Trip odometer
P r es sing the res et b utto n - loc a ted o n the
right hand side of the steering column
shroud - for less tha n one second, will zero
the setting. This button also controls the
brightness of the instrume nt illumination.
Further information, see page 4 1.
Coolant temperature gauge
The coolant temperature is displayed in the
bottom right hand corner of the display as
soon as the coolant te mperature reach es
70 °C.
For physical rea sons, the gauge shows the
coolant tempe rature only if the coolant
level is adeq ua te.
During operation the system is pressurized.
The temperature may therefore rise to over
10 0 °C.
19
Page 22
P age 20, L:\Owne r's Manu al\ Nv \Speed ster-VX220 \Maste r\KTA2 399-5\VML\SK IPOM.fm RH D, Vaux Edit ion 9.3.05
Radio 3
The rad io is ope rated as describe d in the
opera tin g ins truc tions supplied.
Vehicle radio reception will differ from that
obtained with domestic radios.
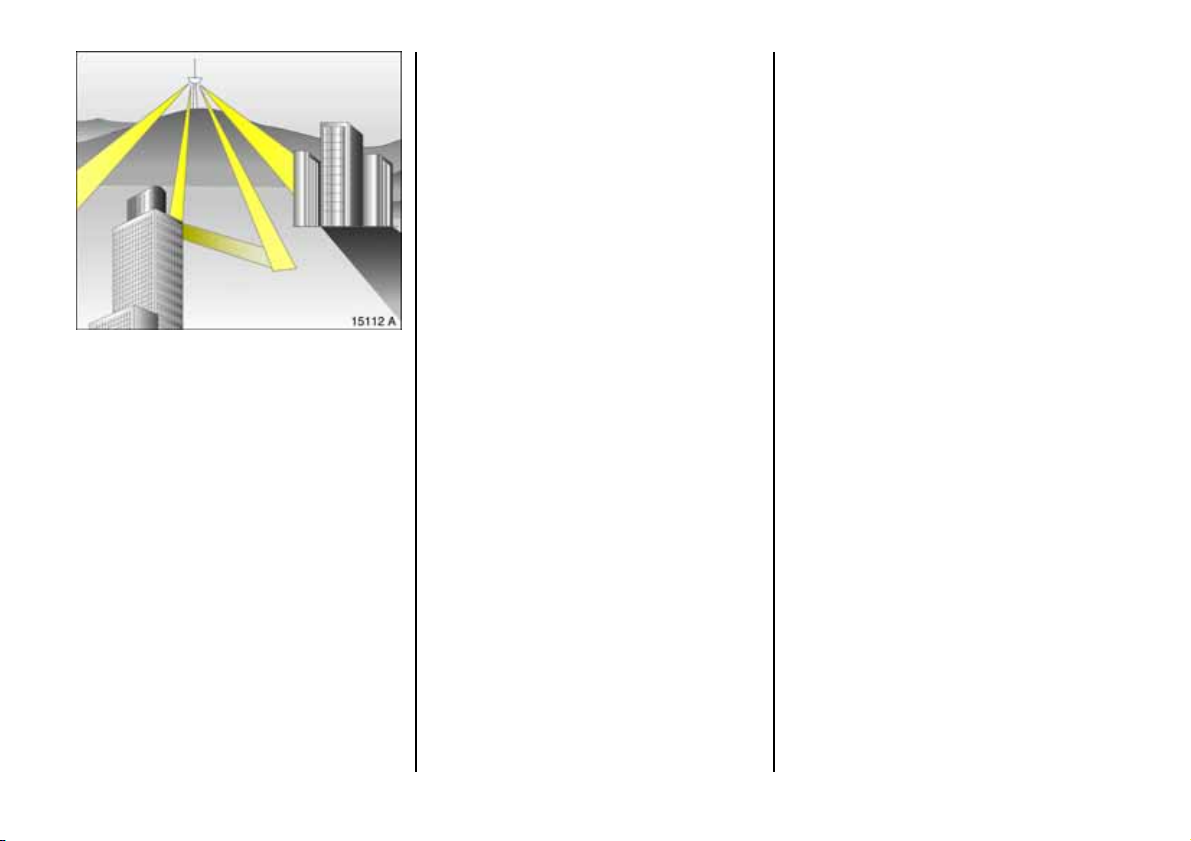
As the vehicle antenna is relativ ely near the
ground , the broadcasting companies
cannot guarantee the same quality of
reception as is obtaine d with a domestic
radio using an overhead antenna.
z C hange s in distance from the
transmitter,
z multi-path reception due to reflection
and
z shadowing
may cause hissing , noise, distortion or loss
of reception altogether.
CD mu ltichange r 3
The CD multichanger is located in the load
compartment.
Mobile telephones and radio
equ ipment (CB)
The Vauxhall installation instruc tions and
the op erating guidelines prov ided by the
telephone manufacturer must be observed
whe n fitting and op erating a m obile
te lepho ne. Fa ilu re to do so could invalidat e
the vehicle’s operating permit (EU Directive
95/54/EG).
Requirements to ensure trouble-free
operation:
z Professionally installed exterior ae ria l to
obtain the maximum range pos sible
z Maximum tra nsmission power 10 W
z Installation of the telephone in a suita ble
spot (see n ote on pa ge 35 ).
3
20
Page 23

P age 21, L:\Owne r's Manu al\ Nv \Speed ster-VX220 \Maste r\KTA2 399-5\VML\SK IPOM.fm RH D, Vaux Edit ion 9.3.05
O btain advice on pred etermined
installation locations for the external
antenna an d equipment holde r and w ays
of using devices with transmission power of
more than 10 Watts. We recommend that
you consult your Vauxhall Approved
Repairer, who will ha ve consoles and
various ins tallation kits and install them in
accordance with reg ulations.
Use a hands-free attachment if you must
use your phone while driving. Even with a
handsfree attachment, the telephone
could dis tract y ou from the traffic situatio n.
Follow the nationa l regulations of the
country in which you are driving.
When used in the vehicle interior, mobile
telephones and radio equipment (CB)
with inte grated ante nna may cause
malfunctions in the vehicle electronics.
Mobile telephone s and rad io equipment
(C B) should only be used with an
antenna fitte d on the vehicle exterior.
21
Page 24
P age 22, L:\Owne r's Manu al\ Nv \Speed ster-VX220 \Maste r\KTA2 399-5\VML\SK IPOM.fm RH D, Vaux Edit ion 9.3.05
Keys, doors, bonnet
Re pl acement ke ys
The key is a c onstituent of the electronic
immobiliser. Ordering key s froma Vaux hall
Ap proved Dealer guarantees fault-free
op eration of the e lectronic immobiliser.
This will avoid unnecessary costs and
difficulties when claiming from insurance
companies and problems when a sserting
warranty claims.
Door locking and unlocking
From outside
Mechanically - page 4,
radio remote control - pa ge 24.
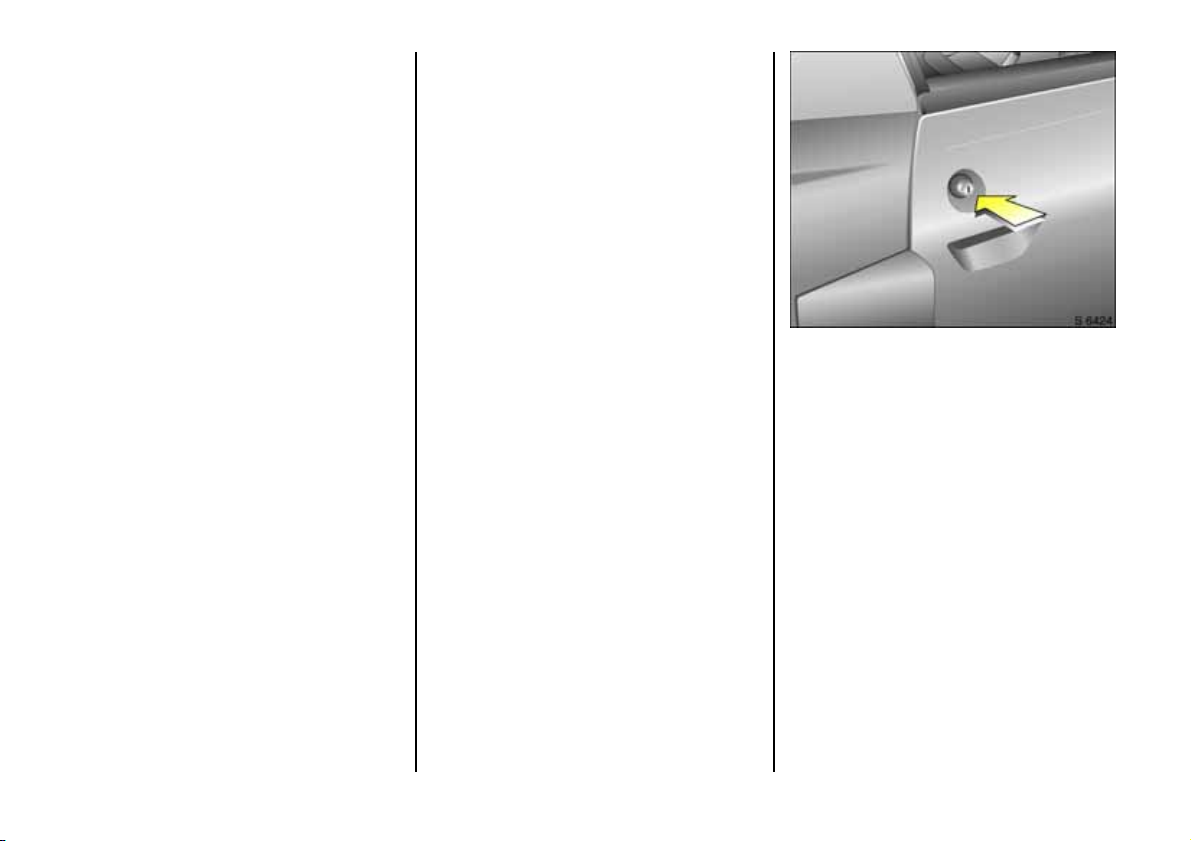
Push the lock button and pull the outside
handle, or pull the in side lever to open the
front door.
Cen tral door locking 3 - see page 26.
22
Page 25
P age 23, L:\Owne r's Manu al\ Nv \Speed ster-VX220 \Maste r\KTA2 399-5\VML\SK IPOM.fm RH D, Vaux Edit ion 9.3.05
Electronic immobilizer
Protects the vehicle ag ainst being sto len by
means of an electronic system which
prevents the engine being sta rted.
To activate:
Switch the ignition off and remove key.
To deacti vate:
Insert key and turn the ignition on; the
engine can then be started.
Deactivation is not possible in any other
way, so keep the s pare key to hand in a
safe place.
Note
The immobilizer does not lock the doors.
After leaving the vehicle, therefore, always
lock it.
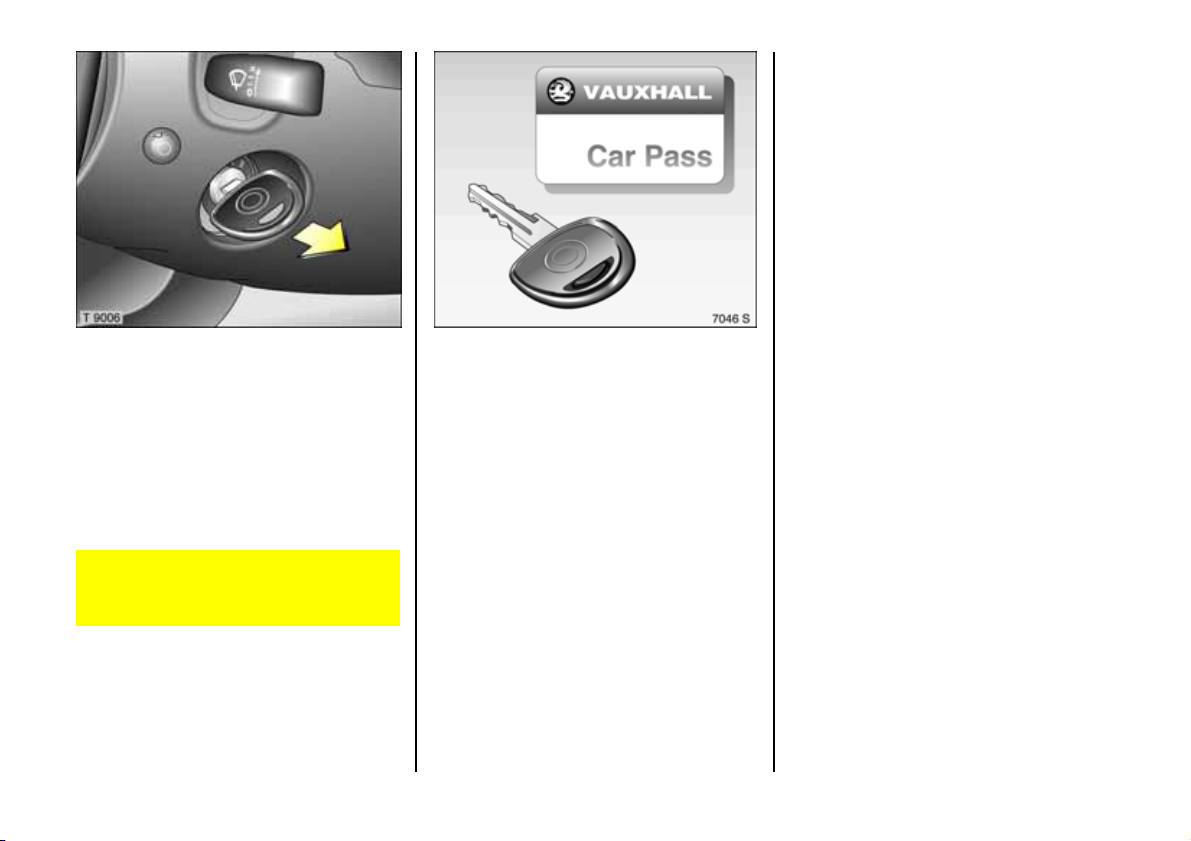
The Car Pa ss contains all the vehicle’s data
and therefore must not b e kept in the
vehicle.
Have your Car Pass ready to hand when
consulting your Vauxhall Approv ed
Repairer.
23
Page 26
P age 24, L:\Owne r's Manu al\ Nv \Speed ster-VX220 \Maste r\KTA2 399-5\VML\SK IPOM.fm RH D, Vaux Edit ion 9.3.05
For your convenience, we recommend that
the ce ntral locking system 3 always be
op erated using the remote control unit.
Treat the remote control unit with care; it
should be protected against moisture and
should not be operated unnecessarily.
The hazard warning lamps flash briefly to
show that the remote control is
op erational.
C entra l lock ing syste m 3
see page 26
Anti -theft alarm system
see page 24
Radio frequen cy re mote co ntrol
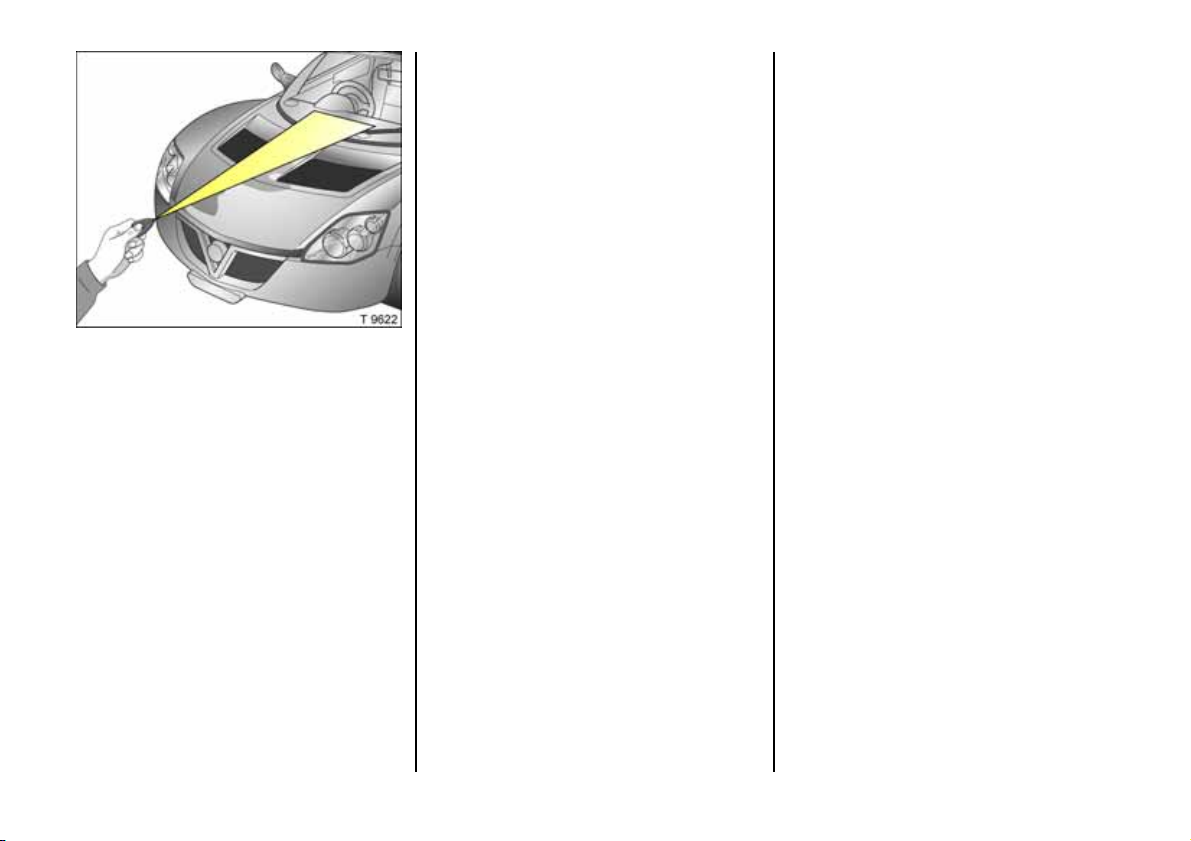
The radio frequency remote control is used
to switch the
z central locking s ystem 3
z anti-theft alarm system
on and off
The remote control has a range of approx.
3 me tre s. The range may be reduced
owing to the shadowing and reflection of
th e r ad io waves. To operat e th e r emot e
control direct it a t the vehicle.
24
Page 27
P age 25, L:\Owne r's Manu al\ Nv \Speed ster-VX220 \Maste r\KTA2 399-5\VML\SK IPOM.fm RH D, Vaux Edit ion 9.3.05
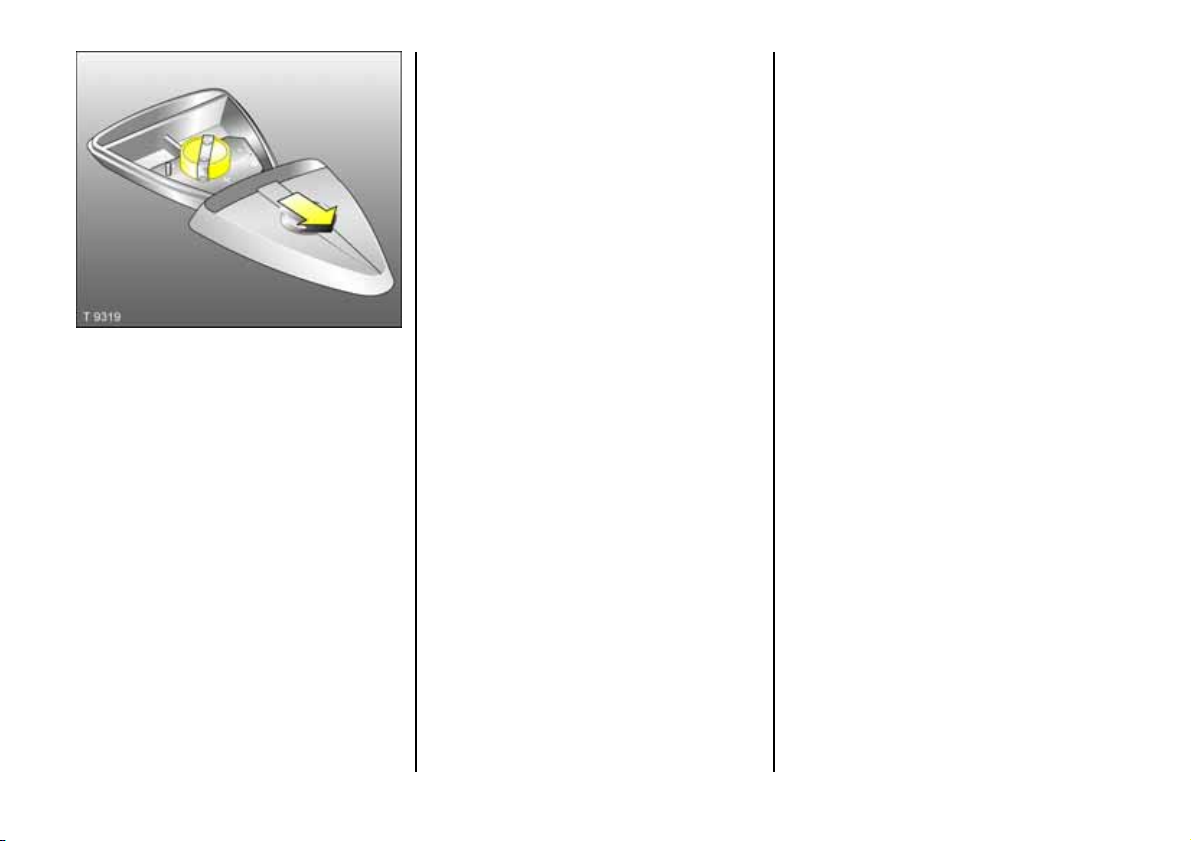
Changing the batteries in remote control
unit
Replace the batteries in accordance with
th e S ervi ce Bo okl et or wh en t he rang e of
the remote control starts to become
reduced.
Open the battery compartment by
unclipping the two halves.
Ensure the new b atteries are installed
correctly, "+" side uppermos t.
Close the battery com partment by clipping
together the two halves.
Make sure that y ou dispose of old b atteries
in accordance with environmental
protection regulations.
Note
If th e central locking syste m 3 or anti-theft
alarm system cannot be operated with the
re m o te contro l , this ma y be du e to the
following reasons:
z The remote control is out of range.
z The battery voltage of the remote
control is too low. Change the batteries
in the remote control unit.
z T he remote contr ol has been operated
many times in succession outside the
vehicle’s reception range (e.g. at too
great a distance from the vehicle). The
remote control must be reprogrammed
by a workshop. We recommend your
Vauxhall Approved Repairer.
25
Page 28
P age 26, L:\Owne r's Manu al\ Nv \Speed ster-VX220 \Maste r\KTA2 399-5\VML\SK IPOM.fm RH D, Vaux Edit ion 9.3.05
Centr al l ock ing sy st em 3
To lock and unlock both doors using the
remote control unit.
26
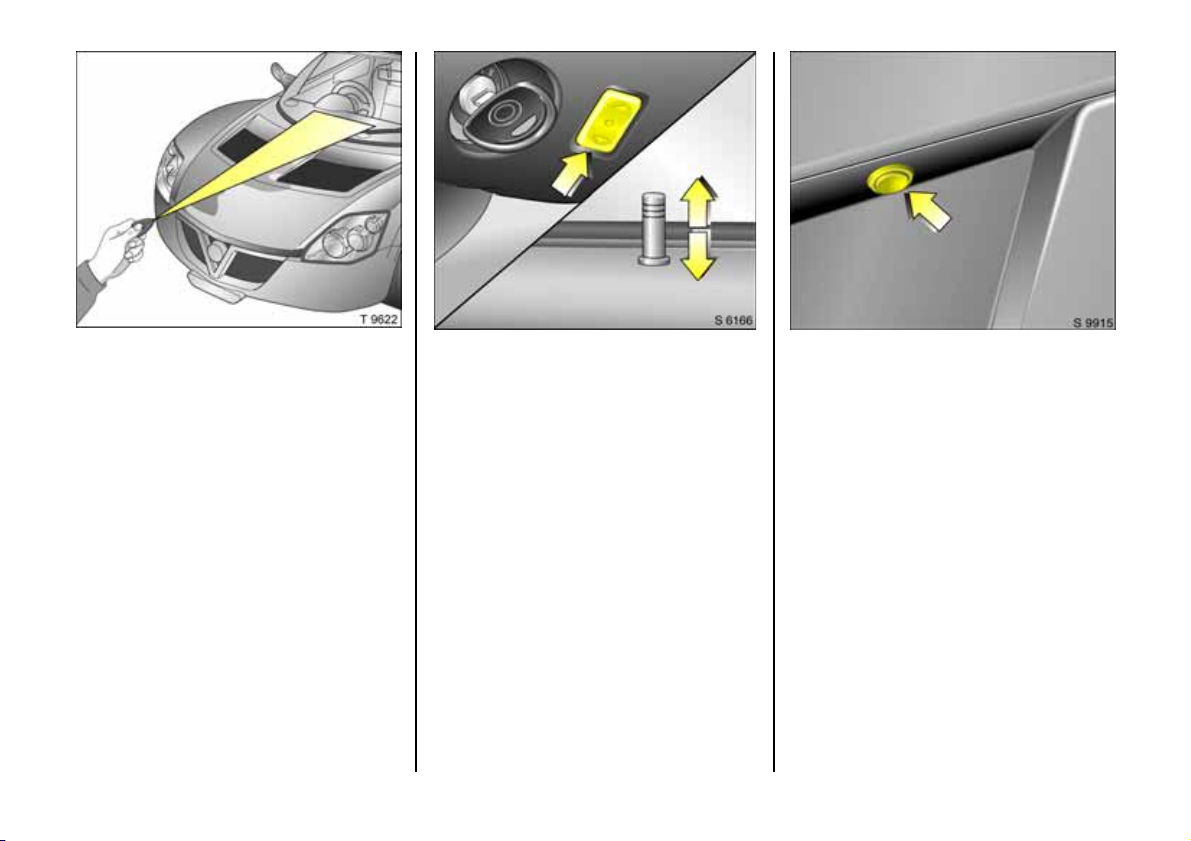
Locking and unlocking from the inside:
Depress the O switch 3 on the steering
column. Lock buttons raise or lower to
indica te lock status.
Operating the centr al lock ing system i n
the event of v eh icle b attery failu re
In the ev ent of the vehicle battery failing
the c entral locking syste m will not function.
To gain access to the vehicle therefore the
overrid e system must be activated:
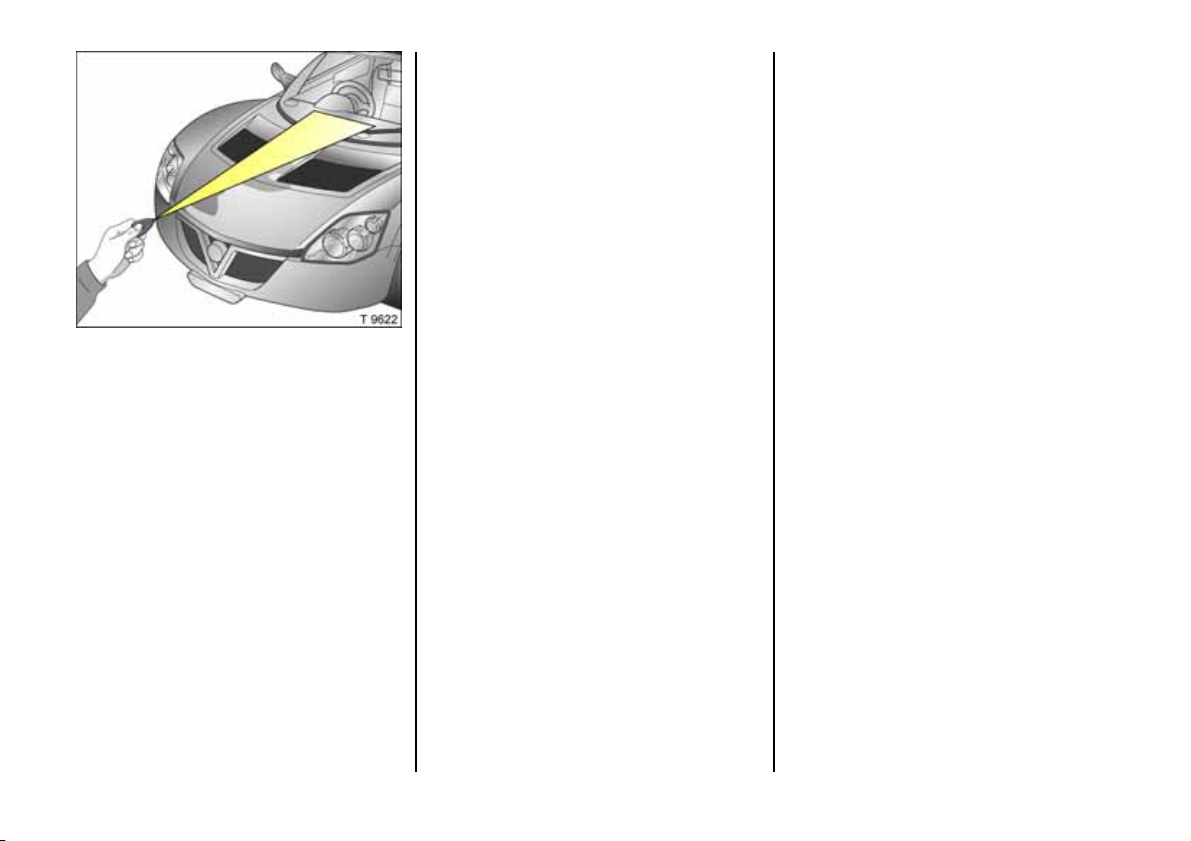
z Press override button located in the
up per rear number plate re cess .
z Whilst keeping the button depressed,
activate the radio fre quency remote
control.
z Doors will unlock.
Page 29
P age 27, L:\Owne r's Manu al\ Nv \Speed ster-VX220 \Maste r\KTA2 399-5\VML\SK IPOM.fm RH D, Vaux Edit ion 9.3.05
Anti-theft alarm system 3
The system monitors:
z doors, engine cover, bon net.
z passenger compartmen t.
Only the remote control can be used to
opera te the anti-theft alarm system.
The remote control has a range of
approxim ately 3 metre s. The ra ng e m ay be
reduced owing to shadowing and
reflection of the radio waves. To operate
the remote control, d irect the remote
control unit at the vehic le.
Treat the remote control unit with c are; it
should b e protected against moisture an d
should not be operated unnecessarily.
To activate
All doors must be closed; p ress the button
on the remote control unit.
Upon activation the indicators (including
side repeaters) will flas h twice. Once
activated the alarm system will b e armed
af ter 3 0 seco nd s.
The light emitting diod e (LED) mounted in
the instrument panel flashes continuously
to indic ate that the alarm is armed.
If any of the doors are not fully closed w he n
the anti-theft alarm system is activated a
warning will sound.
Passenger compartment monitoring
When the anti-theft alarm is a ctivated, the
system autom atic ally monitors the inside
of the vehicle for any moveme nt.
To disable the pa ss enger compartment
monitoring, (for e xample if an animal is left
in the veh icle):
z Press and hold the button on the remote
control for 4 s econds,
z the indicators (including side repeaters)
will flash three time s to confirm that the
passenger comp artm ent monitoring
function is disa bled.
The disable monitoring function will remain
until the alarm is deactivated or the doors
unlocked.
27
Page 30
P age 28, L:\Owne r's Manu al\ Nv \Speed ster-VX220 \Maste r\KTA2 399-5\VML\SK IPOM.fm RH D, Vaux Edit ion 9.3.05
To deacti vate
Press the button on the remote control.
The indicators (including side repeate rs)
will flash once. The alarm system is
immediately disarmed.
Under norma l circumstances the light
emitting diode (LED) will not flash when the
alarm is deactivated, however if it does, it
indicates that the alarm has been
triggered. Consult a w ork shop. We
recom mend your Vauxhall Approved
Repairer.
Alarm back-up system 3
The alarm system has a battery bac k-up
siren unit which in the event of its pow er
supply being d isconnected or
disconnection of the vehicle battery, it will
sound for approx. 4.5 minutes on its
internal batteries.
If the vehicle b attery has to be
disconnected it will be ne cessa ry to:
z Sw itch on the ignition,
z Open bonnet to gain access to vehicle
battery,
z Turn off ig nition,
z Disconnect battery leads within 15
seconds.
If battery is disconnected after 15 seconds
the siren will s ound on its internal power. To
stop the siren, reconnect the vehicle
battery and press the button on the remote
control unit.
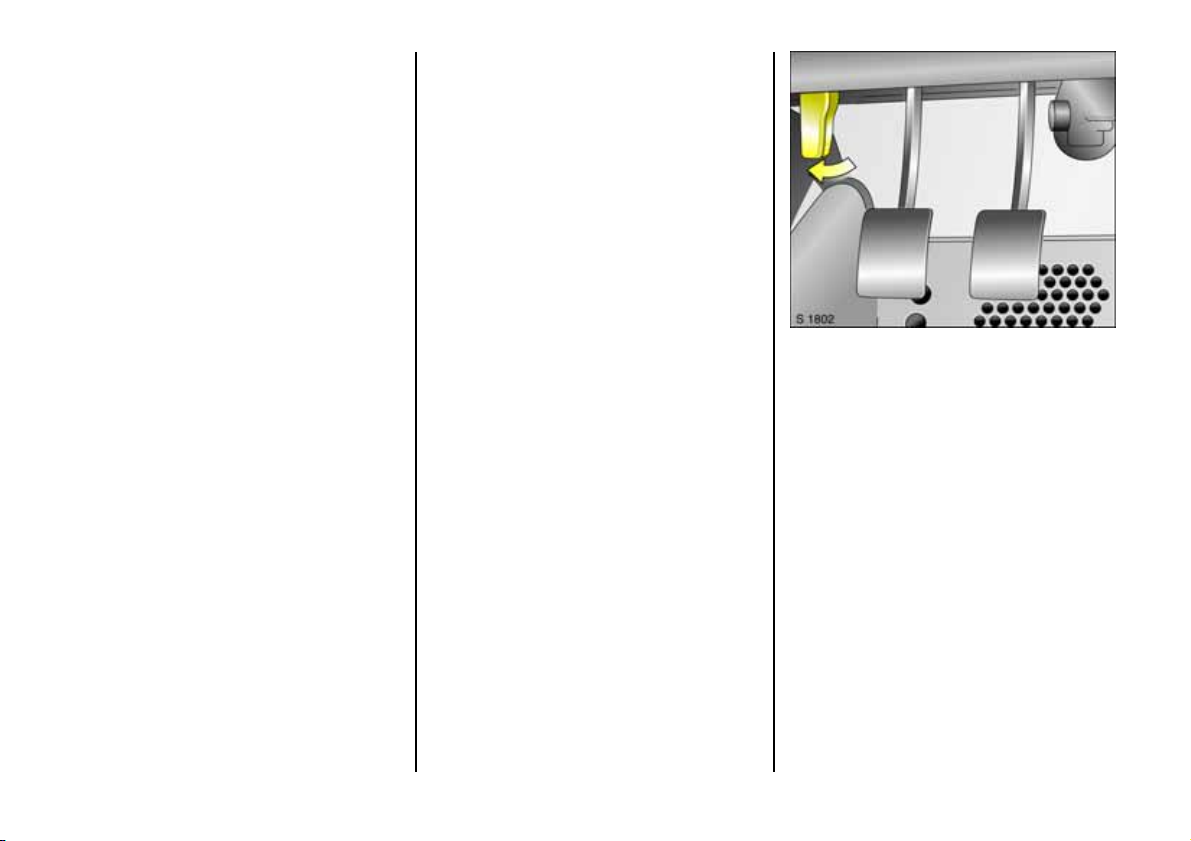
Bonnet release
The bonnet release lever is located
centrally under the instrument pane l. To
open the bonnet, pull the lever to the left.
The bonnet will then be unlocked and will
partially open - return release lever to its
original position.
Lift bonnet upwards to fully open.
Check that the bonnet is locked in position
by pulling at its edge. If it is not locked in
position, press the bonnet firmly down in
the area of its latch to ensure it is fully
closed.
28
Page 31
P age 29, L:\Owne r's Manu al\ Nv \Speed ster-VX220 \Maste r\KTA2 399-5\VML\SK IPOM.fm RH D, Vaux Edit ion 9.3.05
The maximum weight of items p la ced in
the load c om partment must not
exc eed 5 0 kg.
Aerosol cans i.e. de-icers, deodorants
etc. must n ot be sto re d in the rear
storage area as engine heat may create
the risk of ex plosion!
The ventila tion grilles on the engine
cover may become hot during opera tion.
Care should be taken when handling the
cover.
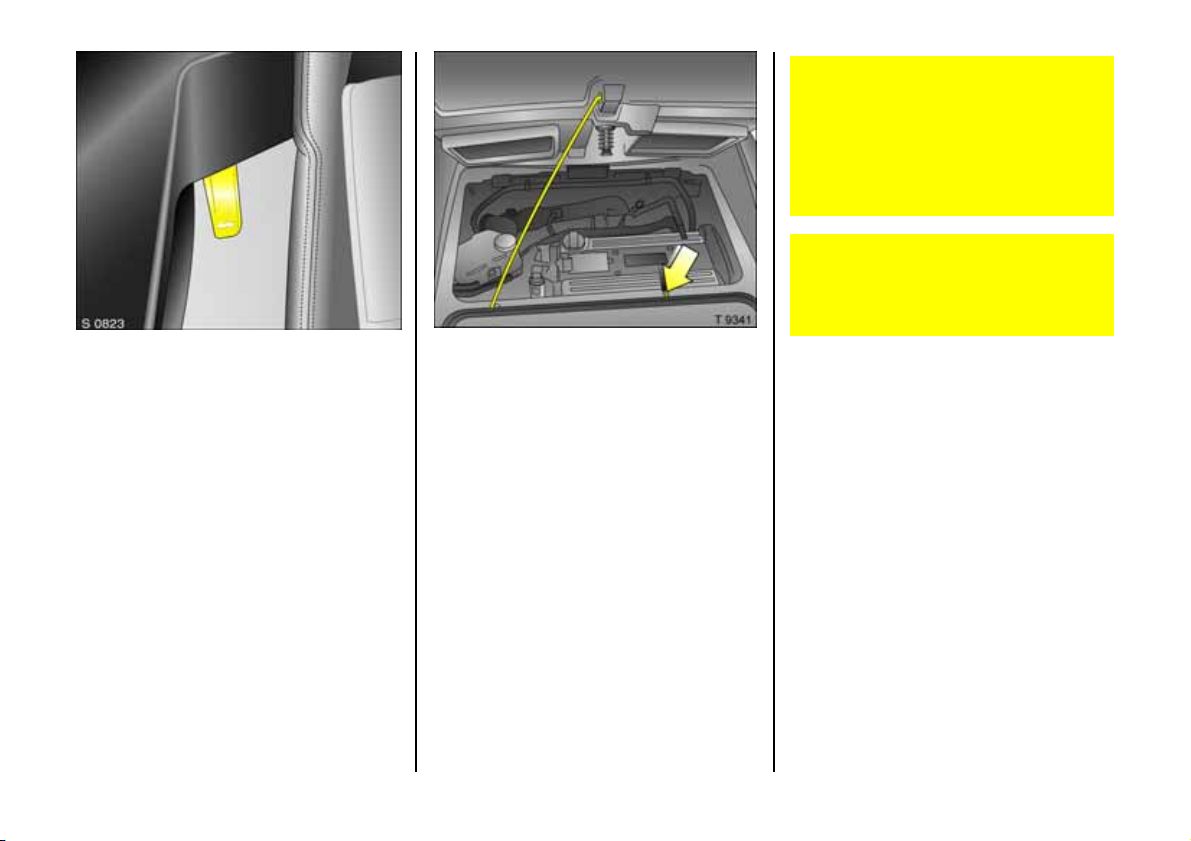
Engine and load compartment cover
re lease
The engine cover re lease lever is loca ted
behind the driver’s seat. To open the
engine cover, pull the leve r forwa rd s. The
engine cover will then be unlocked and will
partially op en - return release lever to its
original position.
To hold the cover in the ope n position,
insert the support rod into the slot provided
in the underside of the engine cover.
Before closing the cover, press the support
rod firmly into its retainer. Lower cover
slowly until it is almost closed (do not slam).
Press firmly down centrally in the area of
the latch only to ensure it is fully close d.
29
Page 32
P age 30, L:\Owne r's Manu al\ Nv \Speed ster-VX220 \Maste r\KTA2 399-5\VML\SK IPOM.fm RH D, Vaux Edit ion 9.3.05
Seats, interior
The use of non-approved acce ssories may
cause damage to the socket.
Do not connect any current-delivering
acc essories, e.g. electrical charging
devices or batteries.
Connected e lectrical accessories must
co mp ly with D IN VDE 40 839 stan dard in
te rm s of elec tro ma gne tic compa tib ility.
otherwise malfunctions may oc cur in the
vehicle.
Seat adjustment
see page 4.
Seat lumbar adjustment
see page 5.
30
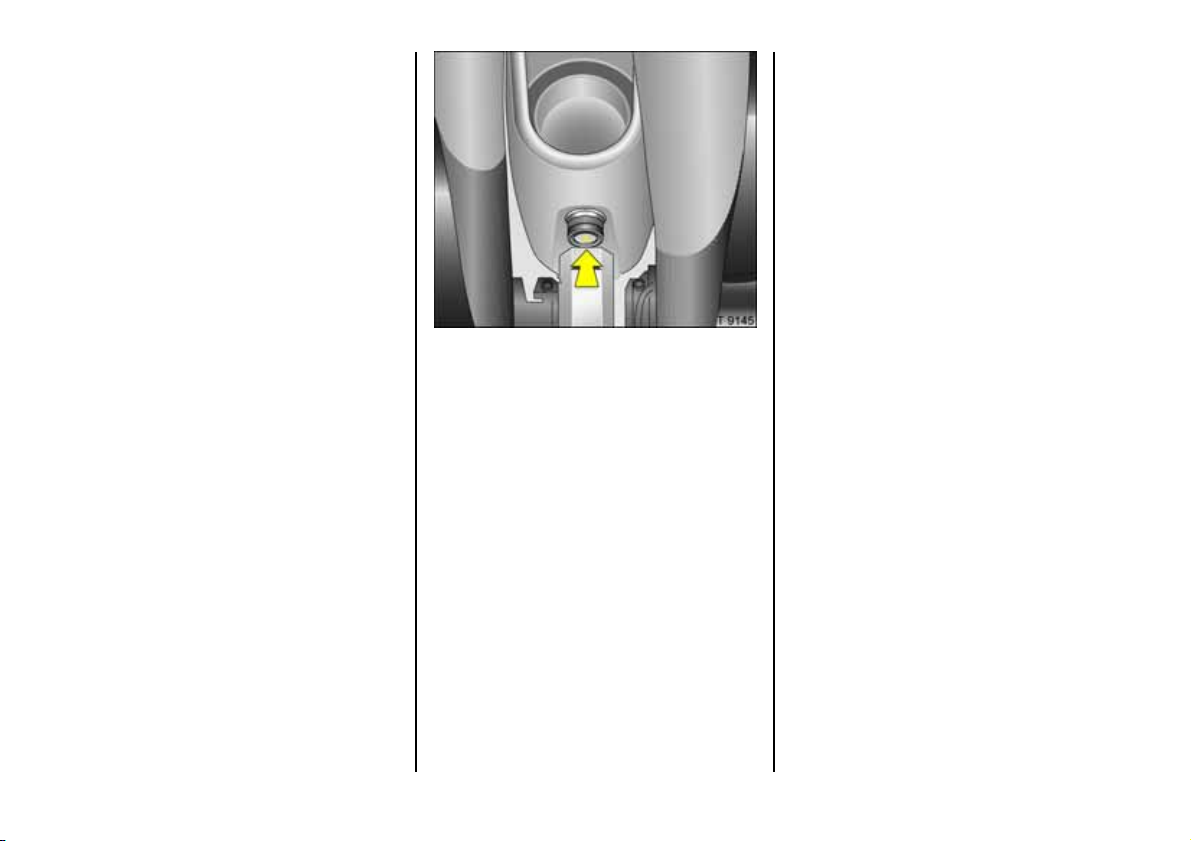
Cigarette lighter )
With ignition switche d on, press the
cigarette lighter. Heating up ceases once
element is glowing. Withdraw lighter.
Accessory socket
The soc ket for th e cigaret te light er can be
used to co nnect electrical acc es sories when
the ignition is switched on. When the
engine is not running this will cause the
battery to be discharged.
The maximum power require ment of
electrical accessories must not exceed 120
watts.
Page 33

P age 31, L:\Owne r's Manu al\ Nv \Speed ster-VX220 \Maste r\KTA2 399-5\VML\SK IPOM.fm RH D, Vaux Edit ion 9.3.05
31
Page 34

P age 32, L:\Owne r's Manu al\ Nv \Speed ster-VX220 \Maste r\KTA2 399-5\VML\SK IPOM.fm RH D, Vaux Edit ion 9.3.05
Safety systems
Three-stage restra int system
The system com prises
z Three-point seat belts.
z Seat belt tensione rs.
z Airbag system for driver.
These stages are activated in sequence
depending on the seriousness of the
accident:
z The automa tic se at belt locking devices
prevent the belt strap from being pulled
out and thus ensure that the vehicle
occupants are re tained in the ir seats .
z The seat belts are pulle d up. As a result,
the seat belts are instantaneously
tightene d and the occupants are mad e
aware of the deceleration of the v ehicle
at a very early stage. This reduces stress
placed on the body.
z The airb ag system is additionally
triggered in the event of a serious
accident involving a frontal impact and
forms a safety cushion for the driver.
Th e airbag s yst em s e rv es to s upp lem ent
the three-point seat belts. The seat belts
mu st th eref ore a lwa ys be worn.
Be sure to read the descriptions of all the
restraint systems on the following pa ges!
Seat belts
Alw ays wear your seat belt - and that
means also in urban traffic. It ca n save
your life!
Pregnant women too must always wea r
a seat b elt (see page 33).
Seat belts are designed to b e used by only
one person at a time. They are only
suita ble for children a ged ov er 12 or taller
than 150 cm.
Three-point seat belts
The vehicle is equipped with three-point
seat belts with automatic retrac tors and
locking d evice s, allowing freedom of body
movement although the spring tensioned
belts are alwa ys a snug fit.
The belt has a “vehicle sensitive retractor”
which is designed to lock during heavy
acceleration or deceleration in any
direction.
32
Page 35
P age 33, L:\Owne r's Manu al\ Nv \Speed ster-VX220 \Maste r\KTA2 399-5\VML\SK IPOM.fm RH D, Vaux Edit ion 9.3.05
Using t he belt s
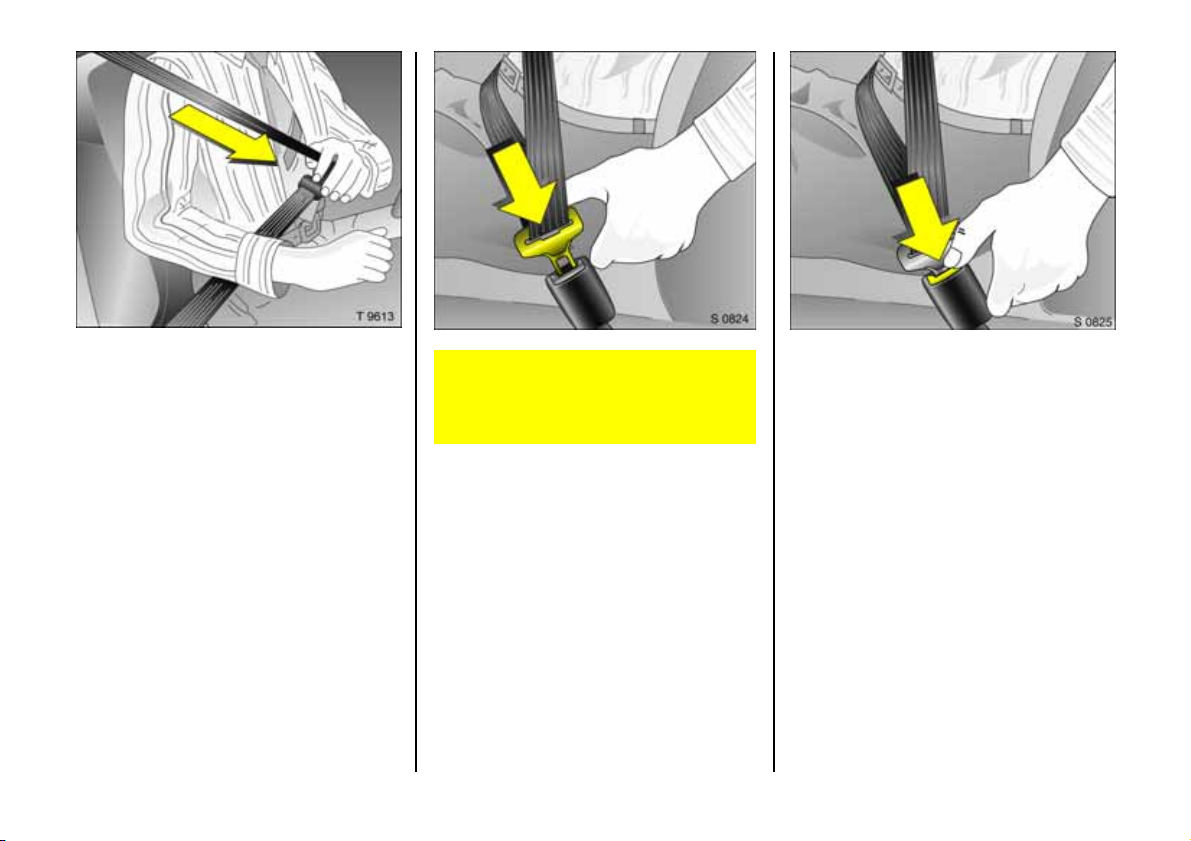
Fitting the b el t
Pull the belt out evenly from the retractor
and guide it across the body, making
certain that it is n ot twisted.
Insert the la tch plate into the buckle. The
lap belt mus t not be twisted and m ust fit
snugly across the body. Tension the belt
frequently whilst driv ing by tugging the
diagonal part of the be lt.
On pregnant women in particular the lap
belt must be positioned as low as
possible across the pelvis in order to
prevent pressure on the abdomen.
Bulky clothing prevents the belt from fitting
properly. The belt must not rest against
ha rd or fragile objects in the pockets of
you r clo thing (e .g. ballpo int pens, keys,
spectacles) be cause these could cause
injury. Do not place any objects (e.g.
ha ndb ags) between the belt a nd your
body.
Remov ing the belt
To re move the belt, depress the red pushbutton on the buckle; the belt will retract
automatically.
33
Page 36
P age 34, L:\Owne r's Manu al\ Nv \Speed ster-VX220 \Maste r\KTA2 399-5\VML\SK IPOM.fm RH D, Vaux Edit ion 9.3.05
Inspecti on of bel ts
Periodically ins pect all parts of the b elt
system for damage and to mak e sure they
are functioning properly. Have damaged
parts replac ed. Afte r an accid ent,
overstretche d belts mus t be re placed by
new ones. We recom mend consulting your
Vauxhall Approved Rep airer.
Do not perform any alterations on the
be lts, the ir ancho rages, th e automatic
retractors or the b elt buckles.
Make s ure that belts are not dam aged or
trapped by sharp-edged objects.
Belt tensioners
The seat belt system incorporates belt
tensioners. In the event of a head-on
collision the belts are pulle d downwards;
the diagonal and lap be lts are
instantaneously tighte ned.
Actuatio n of be lt tensioners
If the belt tensioners ha ve been actuated,
they must be replaced by a workshop. We
recommend your Vauxhall Approved
Repairer.
The b elt tensioners are operational only
whe n the control indica tor is unlit.
Belt tensioner control i nd icator
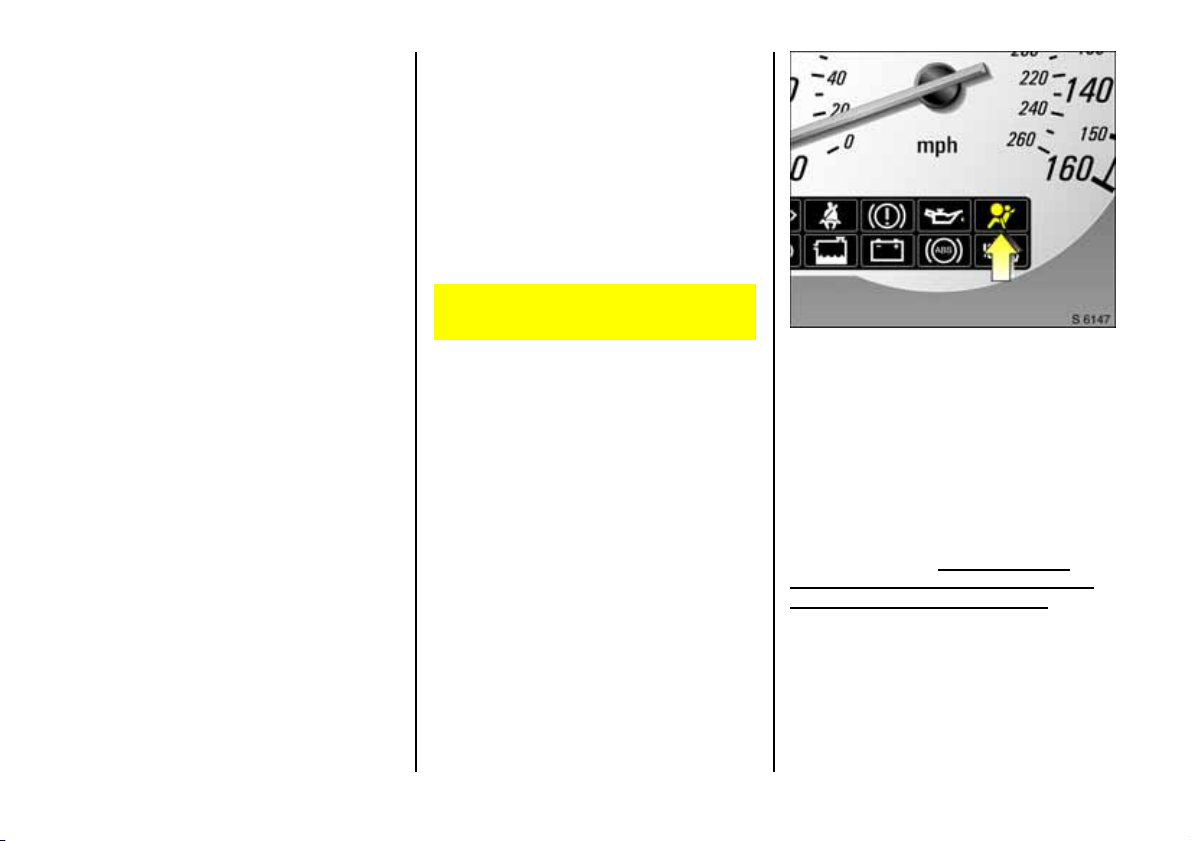
The seat belt tensioners are monitored
electron ically toget her with the airbag , and
their operation al readiness sh own by the v
control indicator in the instrume nt panel.
When the ignition is switched on, the
control ind icator illum inate s, then
extinguishes. If it does not light up or if it
illuminates during driving, there is a fault in
the airbag system or the belt tens ione rs
(see also page 37). H ave the system
checked without de lay. We recommend
your Vauxhall Approved Repairer. The
system’ s integral self-diagnosis facility
allows faults to be q uick ly rem edied.
34
Page 37
P age 35, L:\Owne r's Manu al\ Nv \Speed ster-VX220 \Maste r\KTA2 399-5\VML\SK IPOM.fm RH D, Vaux Edit ion 9.3.05
Im portant
z Accessories not released for your vehicle
type and other objects must not be
affixed or placed in the area in which the
belt tension ers operate, as they could
cause injury when the belt tensioners are
activated .
z Do not m ake any modifications to the
com pone nts of the belt tensioners, as
this will render the vehicle unroadworthy.
Improper handling (e.g. re moval or
installation) c an activate the belt
te nsioners – risk of injury.
z The belt tensioner and airbag syste m
control electronics c an be found in the
centre console area. In ord er to avoid
malfunctions, do not store magnetic
ob je cts in this area.
z We recom mend that you have the seats
removed by a Vauxhall Approved
Repairer.
z The belt tensione rs only a ctuate once.
Please replace belt tensioners that have
been triggered. We recommend that you
consult your Vaux ha ll Approved
Repairer.
z When dispos in g o f the v ehicle, pleas e
ob serve the applicable regulations.
Please have the vehicle disposed of by a
disposal company. We recommend tha t
you consult your Vauxhall Approved
Repairer.
Airbag system
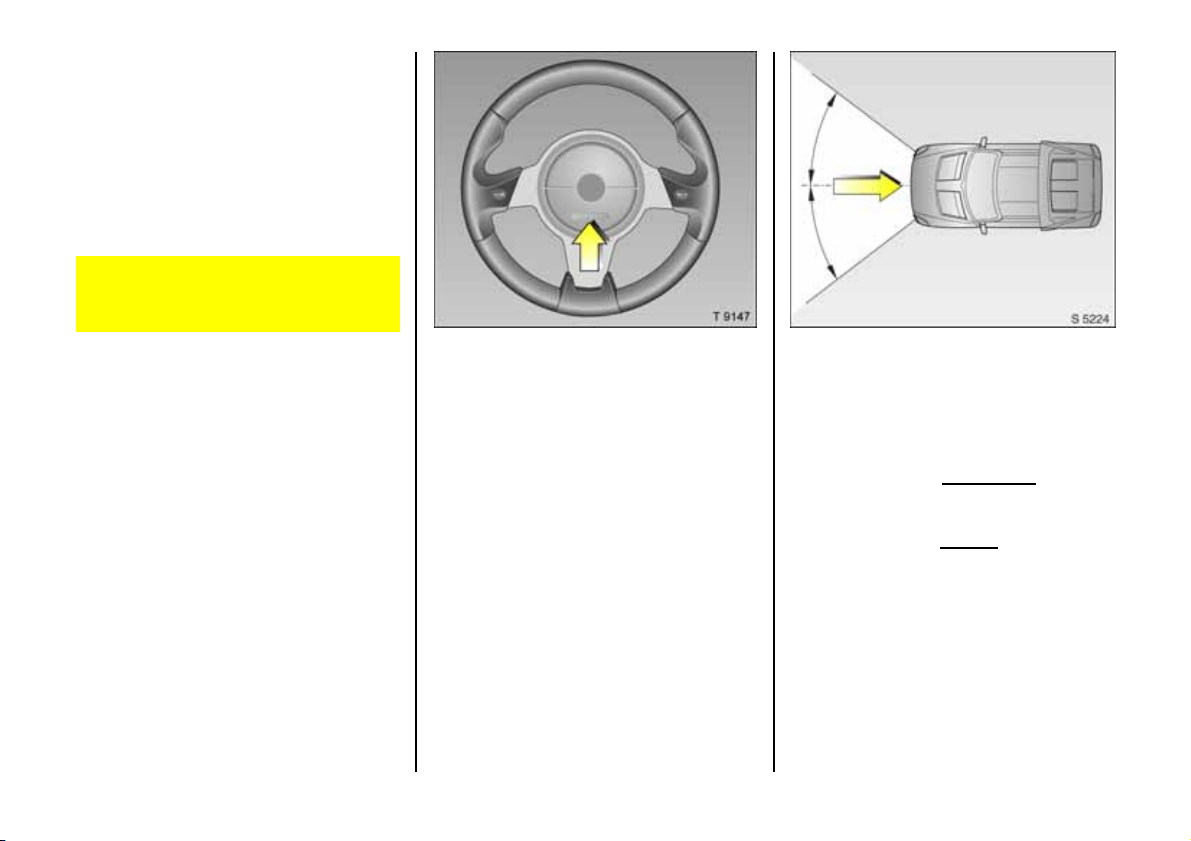
The airbag system is identified by the word
“airbag” on th e ste erin g whee l.
The airbag sy ste m comprises:
z an airbag with an inflator in the steering
wheel,
z the control e lectronics with im pact
sensor,
z the airb ag system control indicator v in
the instrument panel.
The airbag system is triggered:
z depending on the severity of the
accident
z depending on the ty pe of im pact
z within the range shown in the illustration.
Examples:
z Impact against a non-yielding obstacle:
the airbag is trigge red at low vehicle
spe ed .
z Impact agains t a yielding obsta cle (such
as another vehicle): the airb ag is only
trig gered at a highe r vehicle speed.
The speeds, directions of m ovement and
deform ation properties of the vehicles, and
th e pro perties of t he ob sta cle con cerne d,
determine the severity of the accident and
triggering of the driver’s airbag.
35
Page 38

P age 36, L:\Owne r's Manu al\ Nv \Speed ster-VX220 \Maste r\KTA2 399-5\VML\SK IPOM.fm RH D, Vaux Edit ion 9.3.05
The degree of damage to y ou r v ehicle
and the resulting repa ir costs alone are
not indicative that the criteria for
trigg ering of the driver’s airbag were
met.
When trigge re d, the airbag inflates in
milliseconds and forms a sa fety cushion for
th e d river. The fo rw ard moveme nt of the
driver is checked and the risk of injuries to
the upp er body and head thereby
substantially reduced.
No im pairment of view will occur, because
the a irb ag inflates and de flates so quickly
in an accid ent.
The airb ag system provides optimum
protection when the seat is correctly
adjusted. Adjust th e driver's seat
according to the occupant's height s uch
that with the driver sitting upright, the
steering wheel is held in the a re a of its
uppe r sp okes with th e d riv er's arms
slightly bent. Do not place the head ,
body, hands or feet on the cover of the
airbag system.
Th e thr ee-po int s eat b elt mus t be
correctly fitted (see page 33).
The airbag sy stem will not be triggered in
the event of:
z the ig nition being sw itched off.
z minor frontal collisions.
z accidents in which the vehicle overturns.
z collisions involving a side or rear impact
where it would not be of benefit to the
occupants.
Seat belts must therefore always be
worn. The airbag sy stem serves to
supplement the three-point seat belts. If
you do not wear your seat belt you risk
being seriously injured, or even thrown
from the vehicle, in the event of an
accident.
The belt helps to k eep you in the correct
seating position, in which th e airbag
system will provide you with e ffective
protection in the event of an accident.
36
Page 39
P age 37, L:\Owne r's Manu al\ Nv \Speed ster-VX220 \Maste r\KTA2 399-5\VML\SK IPOM.fm RH D, Vaux Edit ion 9.3.05
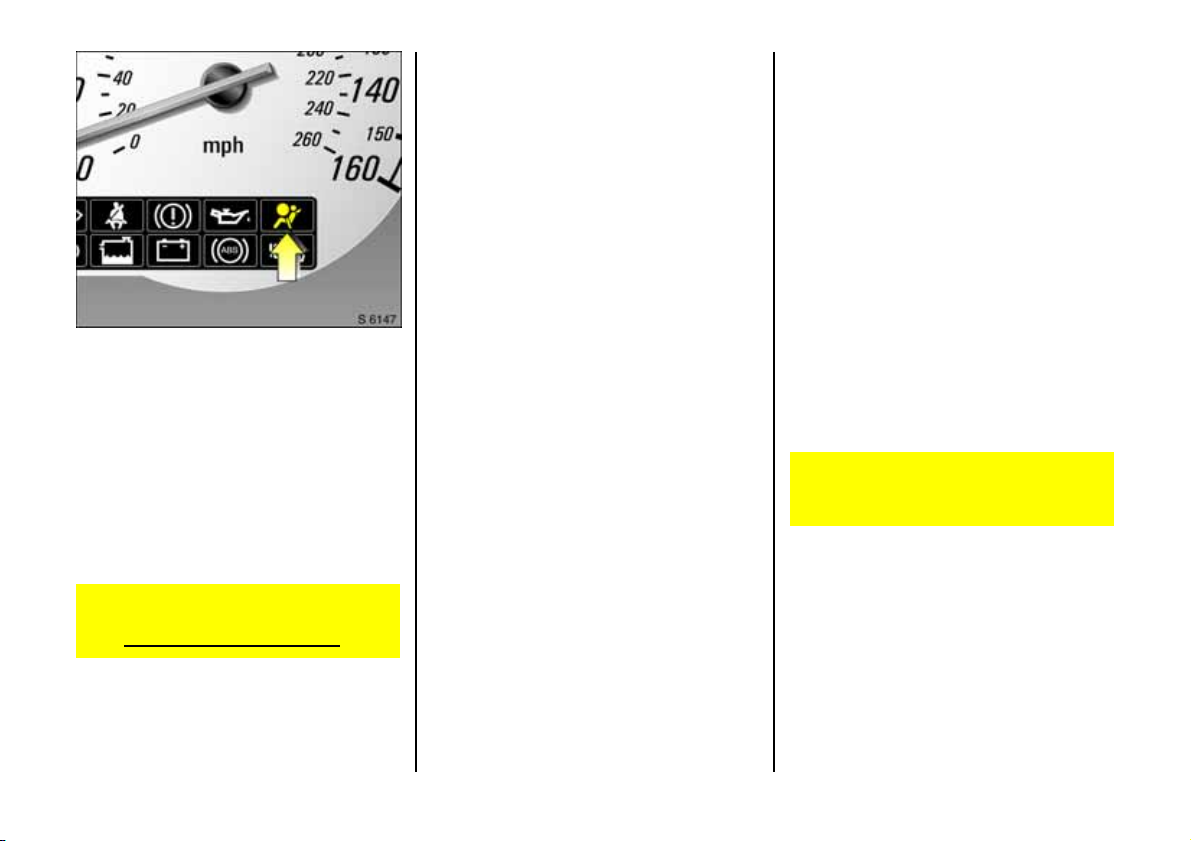
Airb ag control indica tor v
The a irbag system is monitored
electronically together with the belt
tensioners, and their operational readiness
shown b y the control indicator in the
instrument panel. When the ignition is
switched on, the control in dicator
illuminates then extinguishes. If it does not
light up, or if it illuminates d uring driving,
there is a fault in the airbag system. The
system might not be triggered in the event
of an accident.
Have the airbag system che cked without
delay. We recommend that you consult
your Vauxhall Approved Repairer.
Imp or tant
z Accessories not released for your v ehicle
type and other objects must not be
affixed or place d in the area in which the
airbag inflates, as they could cause
injury when the airbag is triggered.
z Do not place any objects between the
airbag system and the vehicle
occupants; danger of injury.
z Do not stic k or place anything on the
steering wheel or instrument p ane l in the
vicinity of the airbag a nd seat areas or
cover them with other materials.
z The airbag system and belt tensione r
control electronics can be found in the
centre console area. In order to avoid
malfunctions, d o not store magnetic
objects in this area.
z Use only a dry cloth or interior cleaner to
clean the steering wheel and instrument
panel. Aggressive cleaning agents may
cause damage.
z The airbag system is triggered
depending on the severity of the
accident and the type of imp act.
z The airbag only actuates once. Please
replace an airbag that has been
trig gered. Have the cause of the fault
remedied. We recommend that you
consult yourVauxhall Approved
Repairer.
z The speeds, directions of movement and
deformation properties of the vehicles,
and the properties of the obstacle
conc erned, determ ine the severity of the
accident and triggering of the airbag.
z Do not make any m odifications to the
components of the airbag system and
the seats, as this will render the vehicle
unroadworthy.
The system can be triggered abruptly
an d ca us e injury if they are ha nd le d
improperly.
The system's integral self-diagnosis facility
allows faults to be quickly remedied.
37
Page 40
P age 38, L:\Owne r's Manu al\ Nv \Speed ster-VX220 \Maste r\KTA2 399-5\VML\SK IPOM.fm RH D, Vaux Edit ion 9.3.05
z We recom mend ha v ing the stee ring
whe el, the ins trume nt pan el and the
se at s re mo ved by your Vau xhall
Ap proved Repairer.
z When dispos in g o f the v ehicle, pleas e
ob serve the applicable regulations.
Please have the vehicle disposed of by a
disposal company. We recommend tha t
you consult your Vauxhall Approved
Repairer.
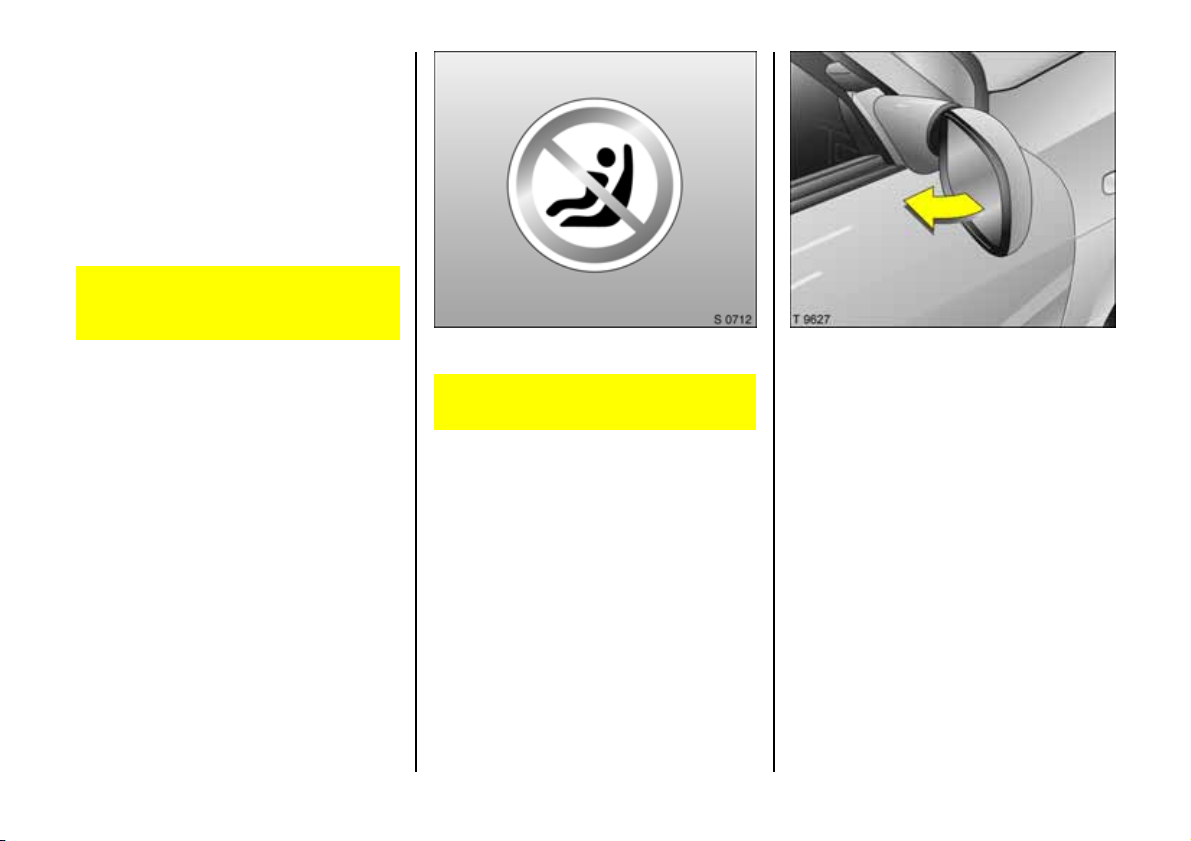
Child restraint sy stems as well as other
heavy objects must never be carried on
th e la p of passengers; risk of fatal injury.
Chi ld se ats Exterio r mirrors
The use of child seats in your VX220 is
not recomm ended.
For the safety of pedestrians, the exterior
mirrors will s wing out of their norm al
mounting position in the eve nt of an
acc id ent-like im pact.
38
Page 41

P age 39, L:\Owne r's Manu al\ Nv \Speed ster-VX220 \Maste r\KTA2 399-5\VML\SK IPOM.fm RH D, Vaux Edit ion 9.3.05
Safety accessor ies 3
The w id e range of Vaux hall access ories
allows you to equip your vehicle in
accordance with your own wis hes. In
addition to safety accessories, items for
improving comfort and a complete range
of vehicle care products you will find ma ny
articles which will be of great value to you
wh en n eeded.
All items are “Genuine Vaux hall Pa rts and
Access ories ”, guaranteeing high quality
and an accura te fit.
Your Vauxhall Approved Repairer will be
happy to advise you, for example with
regard to:
z To w r op e
z To w r od
z Jum p le ads
z Spare bulb kit
z Spare fus e kit
z Halogen fog lam ps
z Warning triangle
z First-aid kit (box)
z First-aid kit (cushion)
39
Page 42
P age 40, L:\Owne r's Manu al\ Nv \Speed ster-VX220 \Maste r\KTA2 399-5\VML\SK IPOM.fm RH D, Vaux Edit ion 9.3.05
Lighting
40
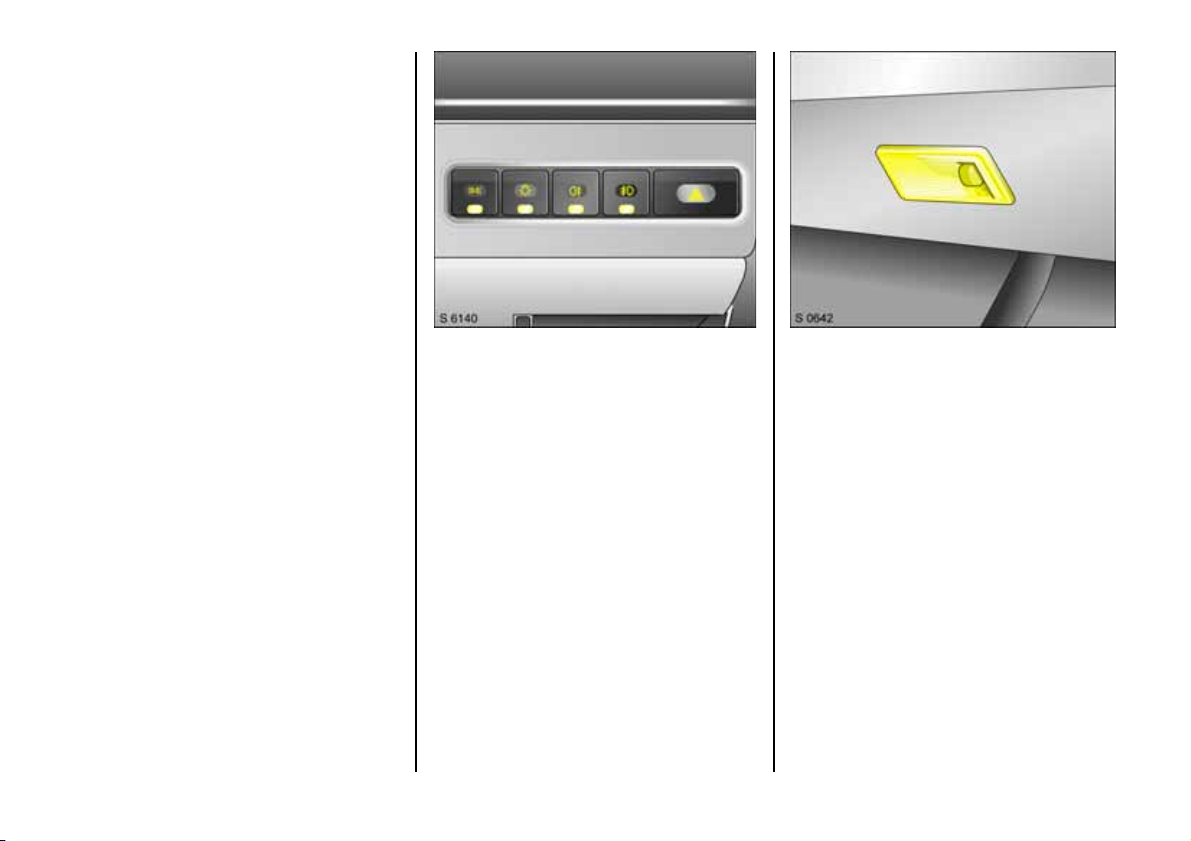
Ex te rio r li gh ts
¨ = Hazar d warn ing lamps
> =Front fog lamps 3
r = Fog tail lamp
0 = Headlamps and side lamps
8 = Side lamps
Press button to switch on and press again
to switch off.
The headlamps must be switched on
before the fog ta il la mp or front fog lamps
3 can be switched on.
Dip ped/main beam and headlamp flash,
see page 9.
Turn signals, hazard warning flashers
See page 9.
Interior lamp
Operated by the switch. With the switch in
its lowermost position, the lamp functions
as a courtesy light and operates when the
doors are opened or closed.
Reverse lamp
Com es on when reverse gear is e ngaged
and ig nition is switched on.
Page 43
P age 41, L:\Owne r's Manu al\ Nv \Speed ster-VX220 \Maste r\KTA2 399-5\VML\SK IPOM.fm RH D, Vaux Edit ion 9.3.05
Headlamps when driving abroad
The asymm etrical dipped beam increases
the field of vision on the near side of the
lane.
When driving in countrie s which d riv e on
t he op po s ite s ide o f the road , this cau s es
glare for oncoming traffic.
To avoid glare , the headlamp glasses must
be p rov ided with an appropriate black
cover strip.
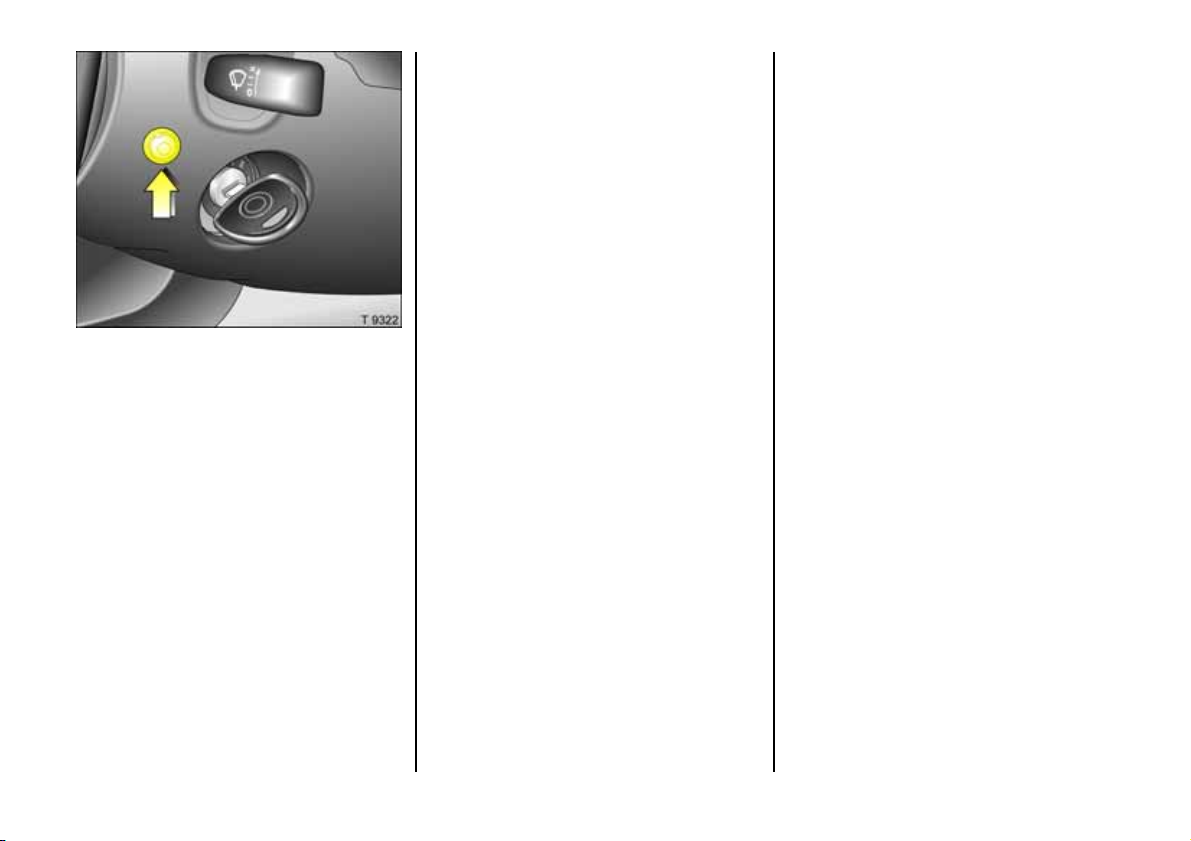
Instruments, cigarette lighter
illuminati on
Comes on when headlamps are switched
on.
To adjust the brightness of the instrument
illumination p ress and hold the trip
odometer button (arrowed). The
instruments cycle through 4 leve ls of
brightness, release the button when the
desired level has been reached.
Trip odometer, see page 19.
41
Page 44
P age 42, L:\Owne r's Manu al\ Nv \Speed ster-VX220 \Maste r\KTA2 399-5\VML\SK IPOM.fm RH D, Vaux Edit ion 9.3.05
Windows, soft top,
hard top
42
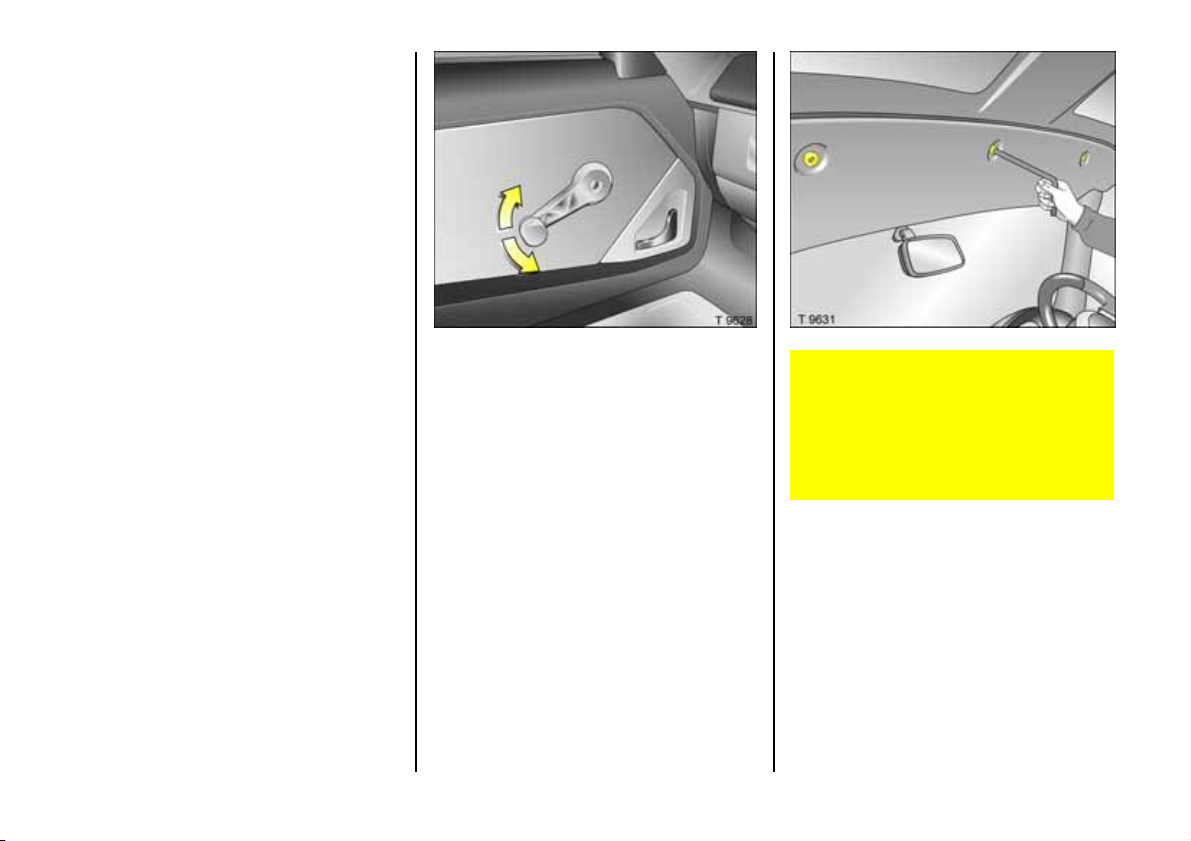
Door windows
The door windows can be opera ted with
the crank.
Hard to p 3
z Installation and removal of the hard top
is intended to be seasonal, rather than
as a frequent occurrence.
z If you experience difficulty or are unsure
about the procedure, contact a
workshop. We recommend your
Vauxhall Approved Repairer.
z Only use the 'torx' tool supplied when
installing or re moving the ha rd top.
z The occ asional as sistance of a second
person is recomm ended during the
installation or removal proce dure.
z The 'torx' bolts and other parts are
captive to prevent loss - do not attempt
to fully remove them.
If the hard top is purchased as an
accessory , we recom mend that your
Vauxhall Ap proved Repairer performs
the initial fitting to ensure correct
alignment of the locking bracke ts.
Bracket alignment is critical for reasons
of safety and w eather sealing.
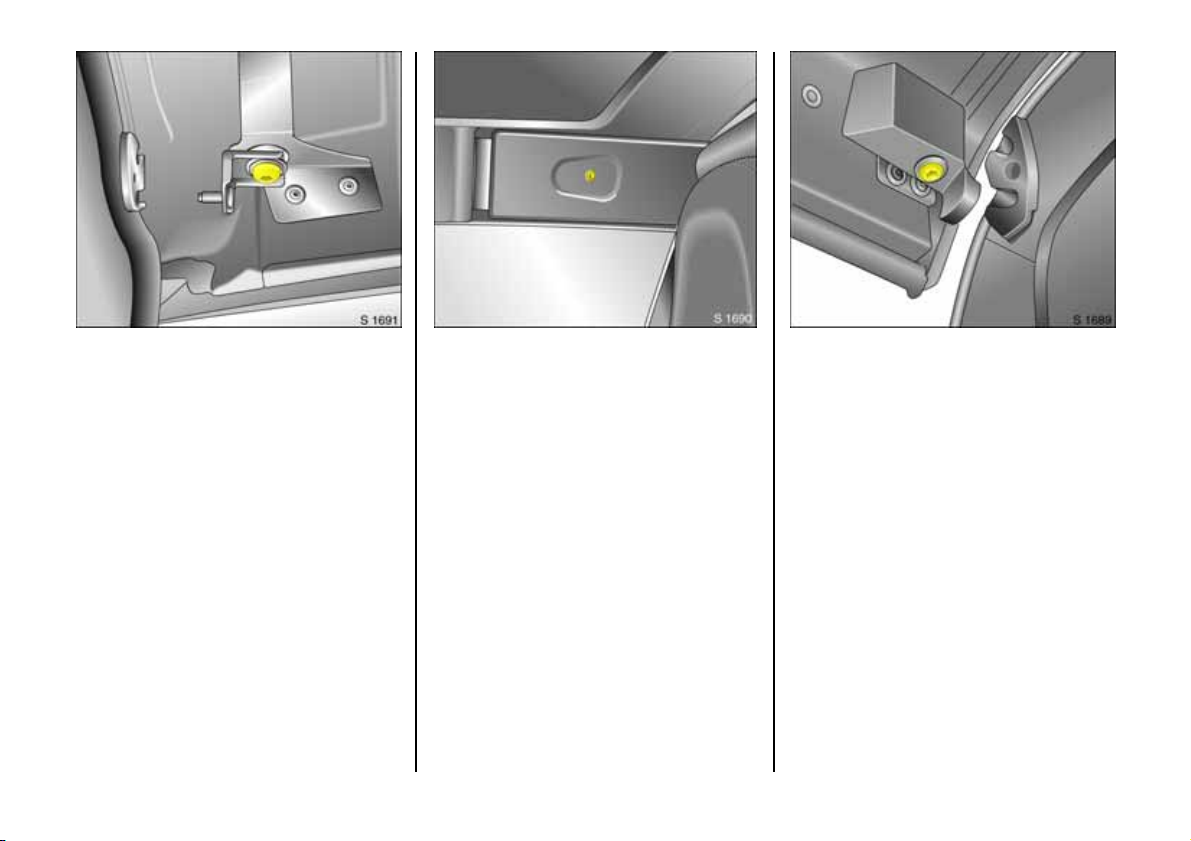
To remove
1. Open both doors or lower the w indows.
2. Unscrew the three bolts that secure the
front header panel and remove the
panel.
Page 45
P age 43, L:\Owne r's Manu al\ Nv \Speed ster-VX220 \Maste r\KTA2 399-5\VML\SK IPOM.fm RH D, Vaux Edit ion 9.3.05
3. Unscrew the bolt that secures the front
dowel brac ket a nd remove the bracket.
4. Repeat th is ope ration for th e fr ont dowe l
bracket loc ated on the opposite side.
5. Remove the rear cover panel which is
retaine d by either a bolt or by Velcro.
6. Repeat th is ope ra tion for the re ar cover
panel located on the opposite side.
7 . Unscre w the b olt that se cu res t he re ar
cup bracket and remove the brac ket.
8. Repeat this operation for the cup
bracket located on the opposite side.
9. With the assis tanc e of another person,
lift the hard top clear of the vehicle.
To av oid loss or dama ge, all components
should b e loosely re assem bled to the ha rd
top and the complete a ssem bly placed in
the storage bag 3. Disass emble all
components prior to insta lla tion.
43
Page 46
P age 44, L:\Owne r's Manu al\ Nv \Speed ster-VX220 \Maste r\KTA2 399-5\VML\SK IPOM.fm RH D, Vaux Edit ion 9.3.05
To install
z During installa tion, ensure that the
bracket tether wires do not becom e
trap ped.
z The bolts should only be tightene d using
the tool supplied. Do not over-tighten.
1. Open both doors or lower the windows.
2. With the assistance of another person,
lift the hard top onto the vehicle,
ensuring the front locates correctly and
without trapping the seal, b efore
lowering the rear into position.
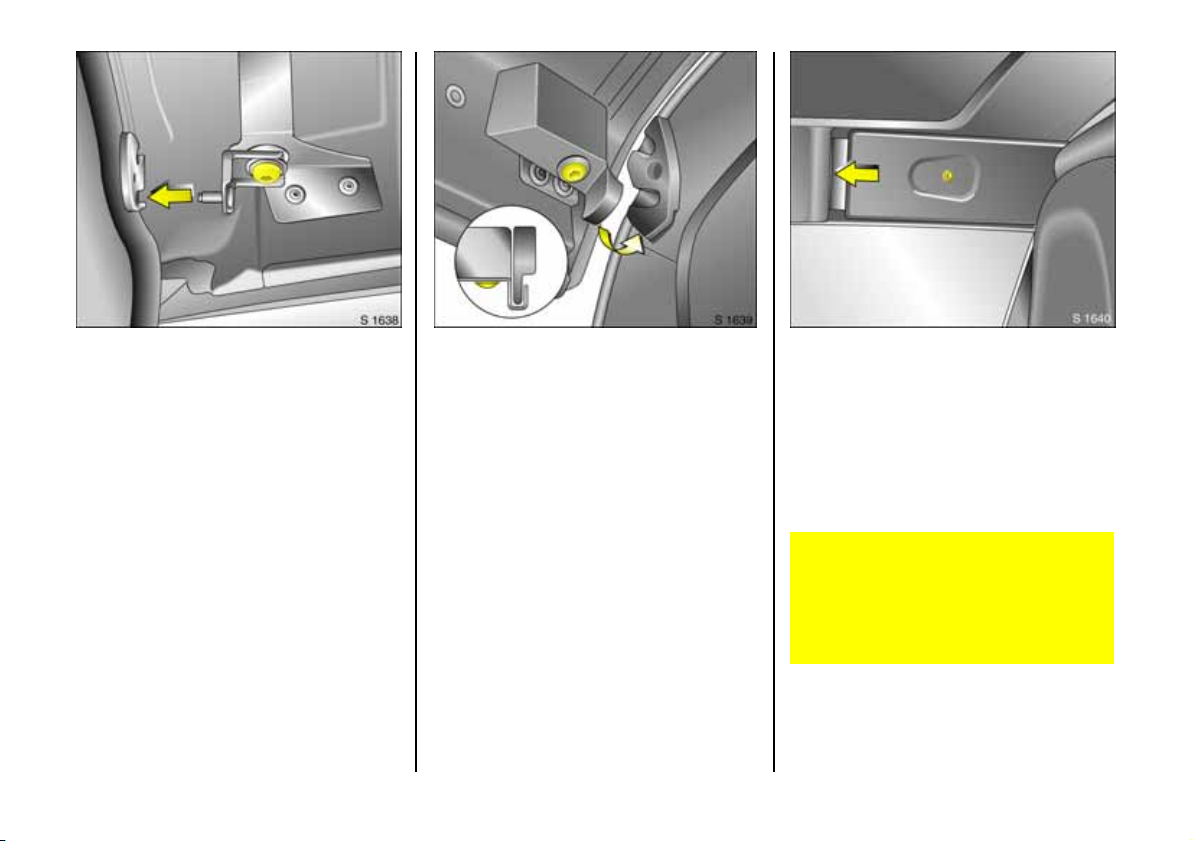
3. Install the front dowel bracket, ensuring
it loc ates fully into the cantrail bracket
and retain with the bolt. Do not fully
tighten until the rear cup brackets have
been installed .
4. Repeat th is ope ration for th e fr ont dowe l
bracket on the opposite s ide.
44
5. Install the rear cup bracket, ensuring
that the cup locates correctly over the
cantrail brack et (see inset), and retain
with the bolt.
6. Repeat th is ope ra tion for the re ar cup
bracket on the op posite side.
7. Fully tighten the front dowel bracket
bolts and the rear cup b racket bolts
using the tool supplied.
The rear cover panels are handed and can
only be installed to their respective sides.
8. Install the rear c over pa nel and retain
either with its bolt or by Velcro
9. Repeat this operation for the cover panel
on the opposite side.
10.Install the front he ader panel and
tighte n the three retaining bolts.
Finally, check the security of hard top
installation by applying modest upward
pressure in the area of all of the
mounting brackets. Repeat the
installat ion operation if movement o f the
ha rd top is ev id ent.
Page 47
P age 45, L:\Owne r's Manu al\ Nv \Speed ster-VX220 \Maste r\KTA2 399-5\VML\SK IPOM.fm RH D, Vaux Edit ion 9.3.05
Soft top
To remove
Ensure that the soft top canopy is dry and
that the windows or doors are open.
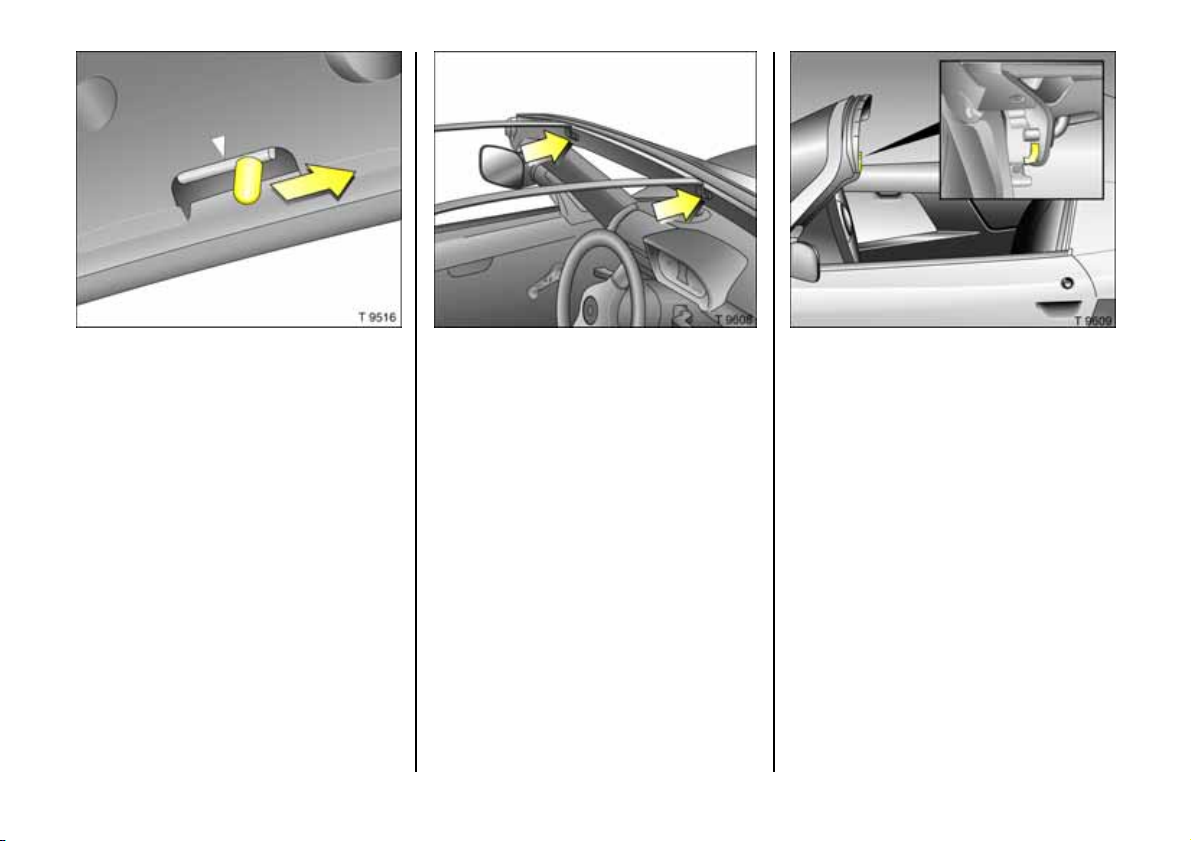
Release the latches and rotate the driver’s
side c antrail and dise ngage it from the
brackets, repeating the proc edure for the
passenger’s side cantrail.
Pull up the front and rear edges of the soft
top to release the tensioning cables.
Roll e ach side of the canop y up to th e
centre and place in the stowage bag
provided.
Flex the roof bows and disengage . Place
roof bows in the stowage bag and store in
the load compartme nt. Soft top care, see
page 8 7.
To in st all
Ensure that the windows are down or that
the ve hi cle d oo rs are o pen .
Remove the stowage bag containing the
canopy and roof bows from the load
compartment.
Flex roof bows and insta ll in the vehic le
with the arrows on the top surfa ce pointing
fo rw a rd s .
Unroll soft top canopy and lay loosely over
roof bows with the arrow s on the cantrail
body pointing forwards.
Load on e cantrail into the bracket, rotating
down to ensure tha t the latches engage.
From the other side of the vehicle, load the
second cantrail and rotate down, ensuring
that the latches engage.
Visually inspect the roof to e nsure a good
fit at the front and rear.
45
Page 48
P age 46, L:\Owne r's Manu al\ Nv \Speed ster-VX220 \Maste r\KTA2 399-5\VML\SK IPOM.fm RH D, Vaux Edit ion 9.3.05
Heating, ventilation
Heating and ventilation system
Vauxhall air m ixture system : b y m ixing cold
and hot air the temperature can be
regulate d without delay and held
practically constant at all speeds.
46
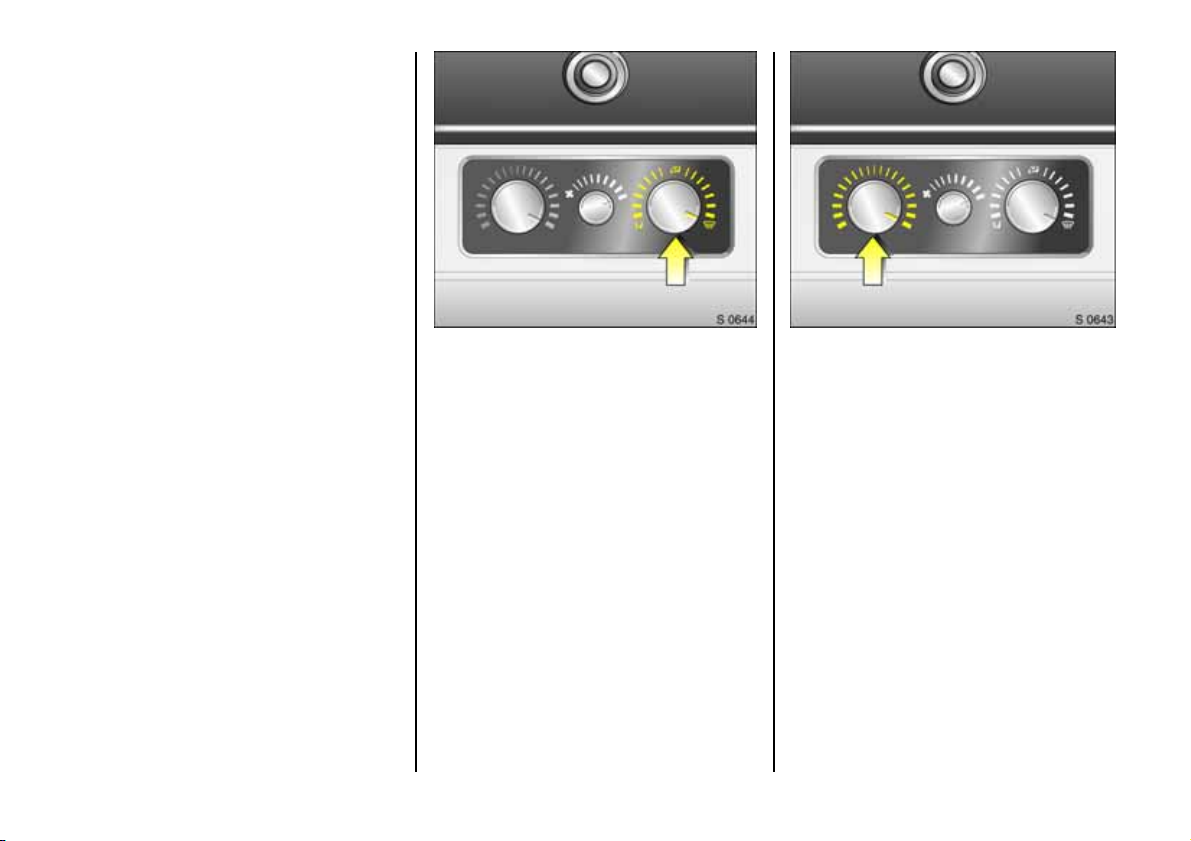
He ating and ventilation controls
Air distri bution switch
K To foot area
J To defrosters and foot area
V To d ef roste r s
The rotary switch can be set to a ny
intermediate position in order to adjust the
air distribution to suit personal
re q u ir em e n t s.
Open the v entilation jets when the switch is
set to J or V .
Temperature switch
To red Hotter
To blue Colder
Page 49
P age 47, L:\Owne r's Manu al\ Nv \Speed ster-VX220 \Maste r\KTA2 399-5\VML\SK IPOM.fm RH D, Vaux Edit ion 9.3.05
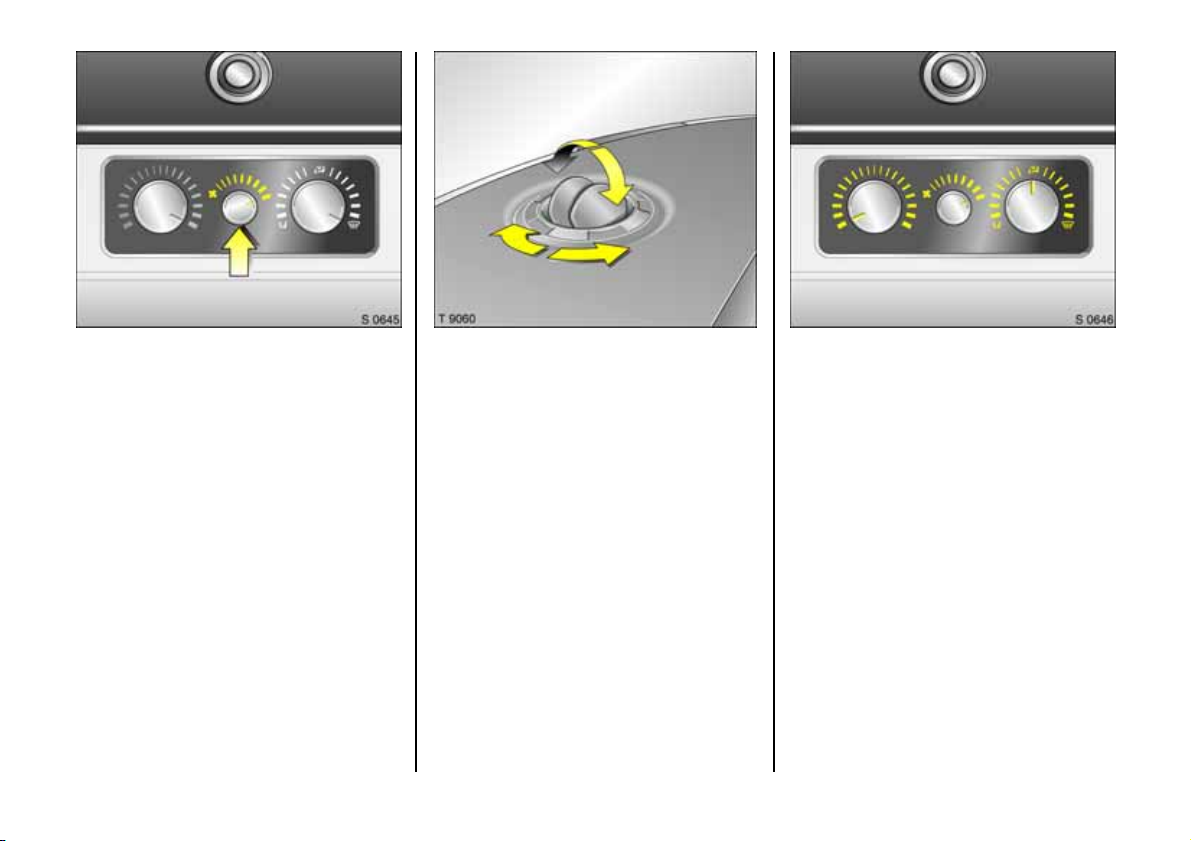
Fan switch
Three sp eeds:
0Off
3High speed
The rate of air flow is de termined by the
fa n. T he fa n should th ere fo re als o be
switched on during driving.
Ventilation jets
Depending up on the position of the
temperature switch, cold or heated air will
be d irected into the ve hic le v ia th ese je ts.
The air flow can b e d ire cted as desired by
tilting a nd swivelling fins.
To increase the air supply, switch on the
fa n.
Ventilation
z Turn temperature switch to blue.
z Switch on fan.
z For maximum ventilation in head area:
set air distribution switch to V, op en
and s wivel the ventilation jet fins to direct
the air toward the driver and passenger.
z For ventilation to foot area: set air
distribution switch to K.
z For simultaneous ventilation to head
and foot areas: set air distrib ution switch
to J.
47
Page 50
P age 48, L:\Owne r's Manu al\ Nv \Speed ster-VX220 \Maste r\KTA2 399-5\VML\SK IPOM.fm RH D, Vaux Edit ion 9.3.05
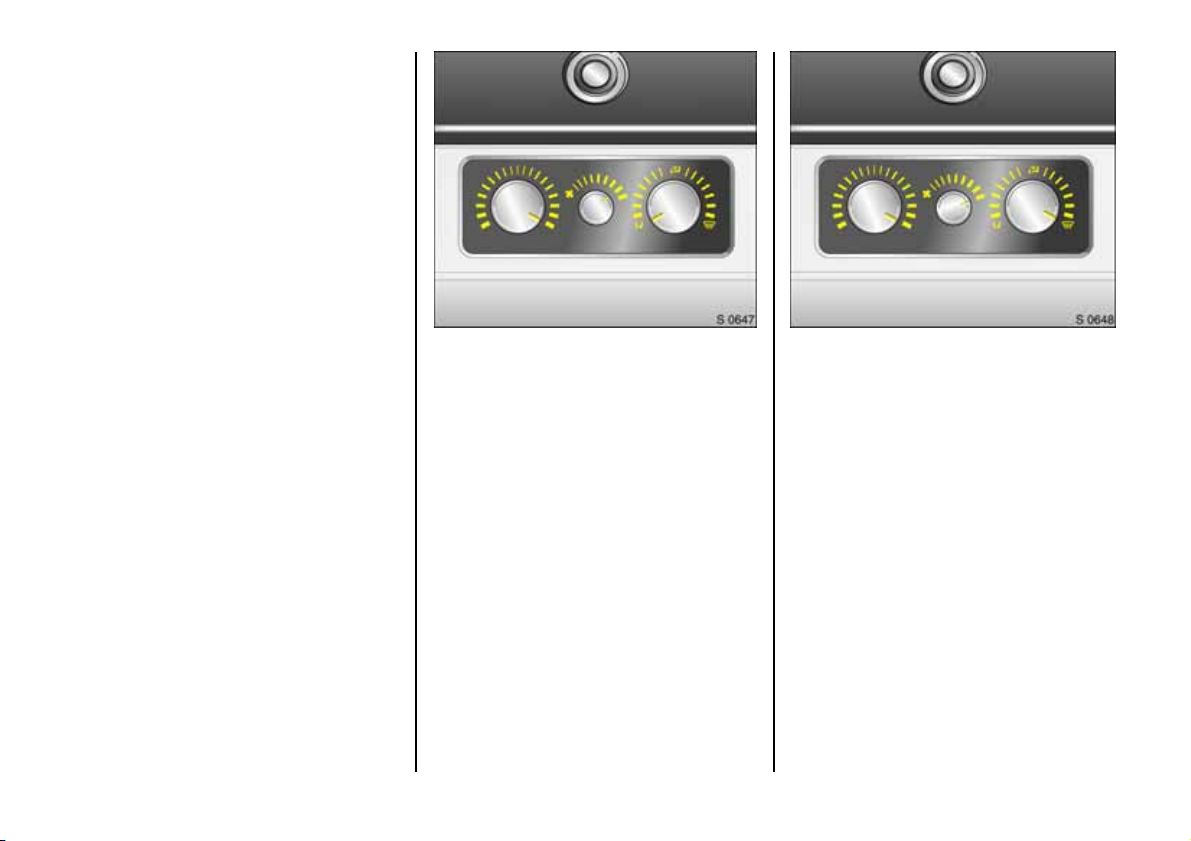
Heating
The amount of heat is dependant on the
engine tem perature and is thus not fully
attained until the engine is w arm.
For ra pid warming of the passe nger
compartment:
z Turn tem pera tu re switch to re d.
z Switch on fan.
z Set the air distribution switch to the
desired position.
The com fort and general we ll-being of the
vehic le occupants are to a large extent
depende nt on a correct se tting of the
ventilation and heating.
He ating the foot area
z Turn temperature switch to red.
z Set the air distribution sw itch to K.
z Sw itch on fan.
Window demisting and defrosting
z Turn temperature switch to red.
z Switch on fan.
z Set air distribution switch to V.
z Open ve ntilation jets as required and
direct them towards the door windows.
For simulta neous warming of the foot area,
set a ir distribution switch to J.
48
Page 51

P age 49, L:\Owne r's Manu al\ Nv \Speed ster-VX220 \Maste r\KTA2 399-5\VML\SK IPOM.fm RH D, Vaux Edit ion 9.3.05
49
Page 52

P age 50, L:\Owne r's Manu al\ Nv \Speed ster-VX220 \Maste r\KTA2 399-5\VML\SK IPOM.fm RH D, Vaux Edit ion 9.3.05
Driving hints
The first 600miles (1000km)
Driv e your v ehi cle at va rious spe ed s. Do
not use full throttle. Never allow the engine
to labour at low revs.
Make good use of all ge ars. Depress the
accelerator ped al a maximum of around
three quarters of the available p edal travel
in all gears and drive ra nges.
Do not d riv e faster than three quarte rs of
maximum speed.
The information concerns the engine and
parts of the power train, e.g. the final drive.
Driving in mo untain ou s terrain
Electrically driven fan: The fan cooling
capacity is not dependant on engine
speed. It is not necessary, therefore, when
driving uphill to shift down into a lower
gear if the vehicle can climb in a higher
gear.
Never coast with engine not running
Many units w ill then not function (e.g.
brake servo un it). Driving in this manne r is
a danger to yourself and others.
Brake servo un it
With the engine not running the brake
servo unit is no longer effective once the
brake peda l has been depresse d once or
twice. The braking effect is not red uced but
substantia lly grea ter foot pressure is
necessary to stop the vehicle.
50
Page 53

P age 51, L:\Owne r's Manu al\ Nv \Speed ster-VX220 \Maste r\KTA2 399-5\VML\SK IPOM.fm RH D, Vaux Edit ion 9.3.05
Switchin g o ff th e e ngine
If the engine temperature is very high, e.g.
after driv ing in mountainous terrain: allow
the engine to idle for approximately tw o
minutes in order to prevent heat
accumulation.
When you switch off, fans may continue
running for a time to cool the engine.
Vehicles with engine Z 20 LET1):
After running at hig h engine speeds or high
engine loa ds, ope rate the engine briefly at
a low load or run in ne utra l for approx.
30 seconds before switch ing off in order to
protect the turbocharger.
Save energy – more miles
Please observe the running-in hints on the
previous pag e and the tips for energy
saving on the following pages.
Good, technica lly correct and economical
driving ensures ma ximum durability and
performance for your vehic le.
Overrun
The fuel supply is automatically shut off
du ring ov erru n, e.g. wh en the ve hicle is
being driven down long gradients or during
braking. To e nable the overrun cut-off to
come into ac tion, d o not accelerate or
declutch during overrun.
Vehicles with engine Z 20 LET2):
Flow-generated noises may be audible if
the accelerator is released q uick ly on
account of air flow in the turbocharger.
Engine rpm
Under all d riv ing conditions drive in a
fa vourab le engine spee d range .
Warming up
Allow the engine to warm up while driving.
Do not warm it up by letting it run at idling
speed. Do not apply full throttle until the
engine has reached op erating
temperature.
Correct gear selection
Do not race your engine whilst in neutral or
with a low gear selected. Driving too fast in
indiv idua l gea rs or drive ranges as w ell as
stop-and-go traffic increase engine wear
and fuel cons um ption .
Change down
When decreasing speed shift down into the
next lowest gear. Do not slip the clutch with
a high-revving eng ine . This is especially
important when hill c lim bing.
Clutch
Alway s d epress the c lutch pe dal hard to
the floor to p revent shifting difficulties and
transmission damage. There must be no
ma ts in th e area of the pe dals.
When driving do not use the pedal as a
foot rest; this will cause s ubstantial clutch
wear.
Battery care whilst driving
When driving slowly or when the vehicle is
stationary, e.g. in slow urban traffic, stop-
and-go traffic or traffic jams, turn off all
unnecessary electrical loads w here
possible (auxiliary he adlamps e tc.).
When starting the eng ine , depress the
clutch pedal so that transmission
resistance is elimina ted and the starter
motor and battery are re lieved.
1)
Sales d esignat ion, see page 9 3.
2)
Sales desig nation, see page 93.
51
Page 54

P age 52, L:\Owne r's Manu al\ Nv \Speed ster-VX220 \Maste r\KTA2 399-5\VML\SK IPOM.fm RH D, Vaux Edit ion 9.3.05
Saving fuel
Warming up
z Driving at full th rottle or idling while the
engine is still cold inc reases engine wear
and fuel consumption.
z Drive away immediately after starting .
Engine speed should b e m od erate until
the engine has re ached operating
te mperatu re.
Idlin g
z The engine also consumes fuel when
idling .
z If yo u h ave to wait for mor e than one
minute, it is worthwhile switching off the
engine. Five minutes of idling
corresponds to approx . 0.6 mile s (one
kilometre) of driving.
En ergy -conscio us dri ving
z High fuel consumption is often a result of
failing to d riv e in an energy -conscious
manner.
z You should therefore drive w ith energy in
mind - “more miles with less fuel”.
Fuel consumption depends to a great
extent on your own personal driving
style. The following hints will help you to
achieve fuel consumption as close as
possible to the specified levels.
Check your vehicle's fuel consumption
every time you fill up. In this way you will
be able at an early stag e to d etec t any
irregularities causing increased
consumption.
52
Un if or m sp ee d
z He ctic driving significantly incre ases fu el
consumption.
z Do not acce lerate and brak e
unnecessarily.
Drive as often as possible in top gear.
In many cases you ca n shift into
fourth g ear at speeds as low as 30 mph
(50 km/h) in urban traffic.
In fourth gear fuel consumption in the
30to50mph (50to80km/h) range is
around 25 % low er than in third gear.
In the 45 to 55 mph (70 to 90 km/h)
range, fuel consum ption in fifth gear is
roughly 15 % lower than in fourth g ear.
Select the next higher gear as soon as
possible , and only change d own when
the engine is no longer running perfectly
smoothly.
Overrun
z The fuel su pply is automatically shut off
during ov errun, e.g. when the vehicle is
being driv en down long gradients or
during braking.
z To enable the overrun cut-off to come
into a ction a nd save fuel, do not
accelerate or declutch during ove rrun.
Correct gear selection
z High revs increa se engine wear and fue l
consumption.
z Do not race your engine. Driving too fast
in ind iv idual gears or drive ranges
increases engine wear and fuel
consumption.
Making use of the tachometer helps to
save fue l: If possible, driv e in each gear
in the low engine speed range (between
approx. 20 00 and 3000 rpm) and
maintain a steady vehic le s peed.
Page 55

P age 53, L:\Owne r's Manu al\ Nv \Speed ster-VX220 \Maste r\KTA2 399-5\VML\SK IPOM.fm RH D, Vaux Edit ion 9.3.05
Urban traffi c
z Freq uent driving off and stopping - for
example at tra ffic lights, in stop-a nd-g o
traffic or traffic queues - greatly
increases average fue l consumption.
z Plan carefully to avoid traffic congestion.
Good anticipation avoids unnecessary
stopping.
If poss ible, select roads with a good
traffic flow.
By keeping a safe distance from the
vehicle in front a nd by not la ne-hopping
you will be able to avoid fre quent
braking and acceleration, which uses u p
a lot of fue l.
High speed
z The higher the speed the g reater the fue l
consumption. At top spee d you consum e
a grea t deal of fuel.
z Slightly releas ing the acce lerator pedal
results in distinct fuel savings with no
major loss of speed.
Driv e at no m ore than around three
qua rte rs of m aximum speed and y ou will
use up to 50% less fuel, without losing a
great deal of time.
Tyre infl ati on pres sure
z Inade quate ty re pressure, leading to
higher road resistance , costs money in
two ways: for more fue l and increased
tyre wear.
z Re gular checks (every 14 d ays) pay off.
Elect rical lo ads
z The power consum ption of electrical
equipment increases fuel consumption.
z Sw itch off all auxiliary e lectrical loads
when not needed.
Loading
z U nnec e ssary wei gh t in crea se s fu e l
consumption, especially when
accelerating (urban traffic). A load of
100 kg can increase fuel consum ption in
urban traffic by up to 0.5 l/100 km.
z Re duce the loads you carry.
Repair and maintenance
z Improper repairs or adju stm ent and
maintenance work can increase fuel
consumption. Do not carry out work on
the e ng ine yourself.
z We recommend ha ving repairs and
maintenance carried out by your
Vauxhall Ap proved Repairer.
Extre me d riving c ondit ions
z Going up ste ep slopes, driving on poor
roads, corne ring or winter driving all
increase fuel consumption.
Fuel consumption increases dramatically
in ur ba n tra ffi c a nd at wint er
temperatures, especially on short trips
wh en t he e ngine o perati ng te mpe ra tu re
is not reached.
z Follow the hints given above to keep
consumption to a minimum under suc h
conditions.
53
Page 56

P age 54, L:\Owne r's Manu al\ Nv \Speed ster-VX220 \Maste r\KTA2 399-5\VML\SK IPOM.fm RH D, Vaux Edit ion 9.3.05
Environmental
protection
Trend-sett ing tec hnology
When developing and manufacturing your
vehicle, Vauxhallused environm ent-
friendly and in the main recycla ble
materials. The production methods used to
make your v ehicle are likewise
environmentally compatible.
Recycling of production wastes keeps the
circulation of material clos ed. Reduction of
energy and water requirements also helps
to conserve natural resources.
A highly advanced design m eans that your
vehicle can be easily disas sembled at the
end of its working life, and the individ ua l
materials separated for subsequent re-use.
Materials such as a sbestos and cadmium
are not used.
New painting techniques employ wa te r as
a solvent.
The pollutants contained in exhaust gas
are reduced.
As a Vauxhall driver, you can make a
major contribution to protecting the
enviro nmen t:
z Sa ve fue l when driving. The pre vious
section, entitle d "Saving fuel", give s you
numerous useful hints on this.
z Be conscious of the environment when
driving. The following section gives you
some further v alua ble hints in this
regard.
En vironment-co nscious dri ving
z High noise levels and exhaust emis sions
are often a result of driving without due
attention to the env ironment.
z Reduce the noise level and exhaust
emissions by adopting an env ironmentconscious d riv ing style. This is extre mely
worthwhile and improves the quality of
life.
“Jackrabbit" starts, i.e. screeching of
tyres and high revs, can increase the
noise level up to four times over.
Select the next higher gear as soon as
possible. A vehic le travelling at 30 mph
(50 km /h) in second gear causes as m uch
noise as thre e ve hicles drive n at 3 0 m ph
(50 km /h) in fourth.
Warming up
z Driv ing at full throttle or idling when the
engine is s till cold increa ses fuel
consumption, exhaust emissions and
nois e.
z Drive away immediately after starting.
Engine spe ed should be mode rate until
the engine has reached operating
temperature.
54
Page 57

P age 55, L:\Owne r's Manu al\ Nv \Speed ster-VX220 \Maste r\KTA2 399-5\VML\SK IPOM.fm RH D, Vaux Edit ion 9.3.05
Uniform speed
z Hectic driving significantly incre ases
noise a nd exhau st e miss io ns.
z Do not a ccele rate and brake
unneces sarily. Drive at uniform speed.
If you drive as often as pos sible in top
gear, and in urban traffic where possible
select fourth gear at sp eeds of 30 mph
(50 km/h) and above , and if you select
th e ne xt higher gear as soon a s possible,
only chang ing down w hen t he en gine is
no longer running perfectly smoothly,
you will reduce the noise impact on the
enviro nment ma ny t imes ove r.
Urban traffi c
z Freq uent driving off and stopping - for
example a t traffic lig hts - greatly
increases the noise level.
z Av oid unnecessary stops by always
anticipa ting the driving conditions in
fr on t .
If poss ible, select roads with a good
traffic flow.
Keep a safe dista nce from the vehicle in
front and avoid unnecessary braking
and acceleration.
Driv e considerately, especially in
res id ential areas and particularly at
nigh t.
High speed
z A t top speed you ca use exc essive no ise.
As sp eed increases, so does tyre and
wind noise. In top gear, tyre noise
determines the level of driving noise from
speeds as low as 45 mph (75 km /h). A
vehicle travelling at 90 mph (150 km /h)
caus es j ust a s m uch noise as four
vehicles travelling at 30 m ph (50 km/h)
or te n vehicles travelling at 45 mph
(70 k m/h).
z Avoid travelling at high speeds by
carefully planning your journeys.
Doors
z Slamming of doors creates noise.
z C lose doors quietly. Be considerate,
especially in residential areas and
particularly at night.
The first 600 miles/1000 km
z Technically incorrect and uneconomical
driving will impa ir the pe rformance of
your vehicle and sh orten its service life .
z Drive y our vehicle at various speed s,
making good use of all ge ars. Depress
the accelerator pedal a maximum of
around three quarte rs of the available
pedal travel. Do not use full throttle.
Do no t drive f aster than three quarters of
maximum speed.
Never a llow the engine to labour at low
revs.
Further information - see page 5 0.
Repair and maintenance
z Never carry out any repairs or
adjustment and maintena nce work on
the engine yourself:
You may out of ignorance infringe
environmental law s b y not disposing of
materials prope rly.
Appropriate parts might n ot b e recycle d.
Contact with some of the materials
involved may be hazard ous to the
he al th .
z We recommend ha ving repairs and
maintenance carried out by your
Vauxhall Ap proved Repairer.
55
Page 58

P age 56, L:\Owne r's Manu al\ Nv \Speed ster-VX220 \Maste r\KTA2 399-5\VML\SK IPOM.fm RH D, Vaux Edit ion 9.3.05
Fuel consumption,
fuel, refuelling
Fuel consumption
Optional equipment increase s the kerb
weight and in some cases also the
permissible gross vehicle weight. This in
turn increases fuel consumption and
reduces the m aximum speed of the v ehicle.
When the vehicle is new, there is increased
friction between the engine and
tra nsmission components lasting for
several thousand miles /kilometres. This
increases fuel consumption.
Fuel for pe trol engine s
Com mercially availab le high-quality fuels
are suitable. Fuel q uality has a decisive
influence on the pow er output, driveability
and life of the engine. The additives
contain ed in the fuel pla y an importan t role
in this conn ection. You s hould therefore
use only high-quality fuels containing
add itiv es.
Fuel with too low an octane rating can
cause pinking. Vauxhall cannot be held
liable for resultant damage.
Petrol with a hig her octane rating can
always be used.
Us e unle aded f uel . A d ispens ing pu mp f or
leaded fuel cannot be inserted in the fuel
tank fille r neck.
Use of petrol with an octane rating of 95
will en sure economical driving.
56
Page 59
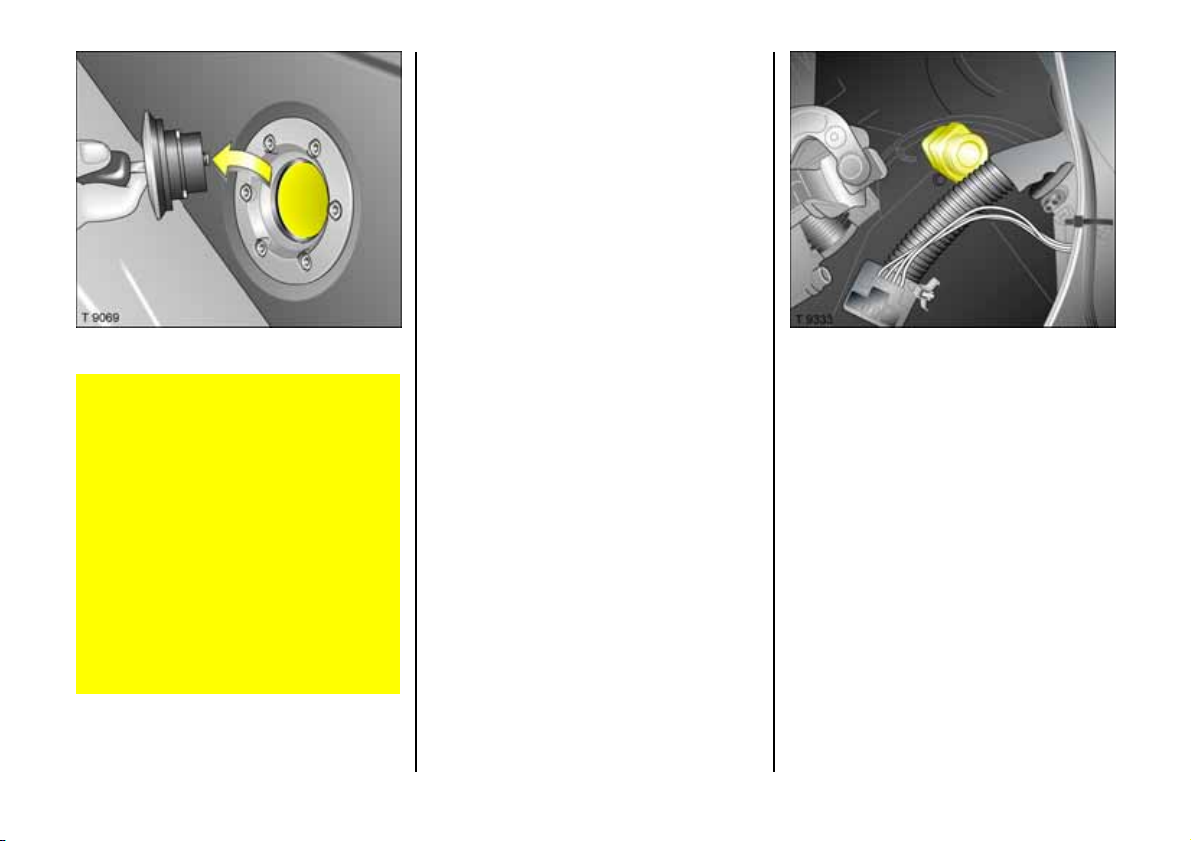
P age 57, L:\Owne r's Manu al\ Nv \Speed ster-VX220 \Maste r\KTA2 399-5\VML\SK IPOM.fm RH D, Vaux Edit ion 9.3.05
Refuelling
Care must be taken when dealing with
fu e l.
Before refuelling it is absolute ly vital to
switch off the engine and any heating
sys tem s wi th com bu sti on chambe rs.
Fuel is inf lam ma ble and exp losive ,
the ref ore a void de aling with fuel near
nak ed flames and doing a nythin g that
would gene ra te sparks. N o sm ok ing!
This also applies where the sm ell of fuel
is noticeable. If the smell of fuel vapour
occ urs in the vehicle itself, have the
cause remedie d immediately. We
recommend that you consult your
Vauxhall Approve d Repairer.
The fuel tank filler neck with bayonet cap is
located on the right-hand side of the
vehicle.
To unlock filler cap: insert key and turn
anti-clockwise.
The fuel tank has a limiting sy stem which
prevents overfilling of the tank.
Correct refue lling is largely dependent on
correct operation of the disp ensing p ump:
z Position dispensing pump nozzle at an
angle to ensure that the pump handle
does not contact the bodywork. Ensure
this position is maintaine d when
refuelling.
z Ins ert nozzle as far as it will go and
switch on.
z After the first automatic c ut-off, do not
fill the tank any further.
Replace the filler cap and turn key
cloc kwise as far as it will go.
Wipe off any overflowing fuel immedia te ly.
Fuel cut-off de vice
The fu el cut-off device is located in the
engine compartment.
If the vehicle is involved in a collision, the
fuel cut off de vice automatically isolates
the fue l supp ly .
Prior to restarting first che ck:
z tha t the vehicle is driveable,
z there is no smell of fuel,
z fuel is not leaking.
To restart the fuel supp ly , reset the cut-off
device by pres sing down the button.
57
Page 60
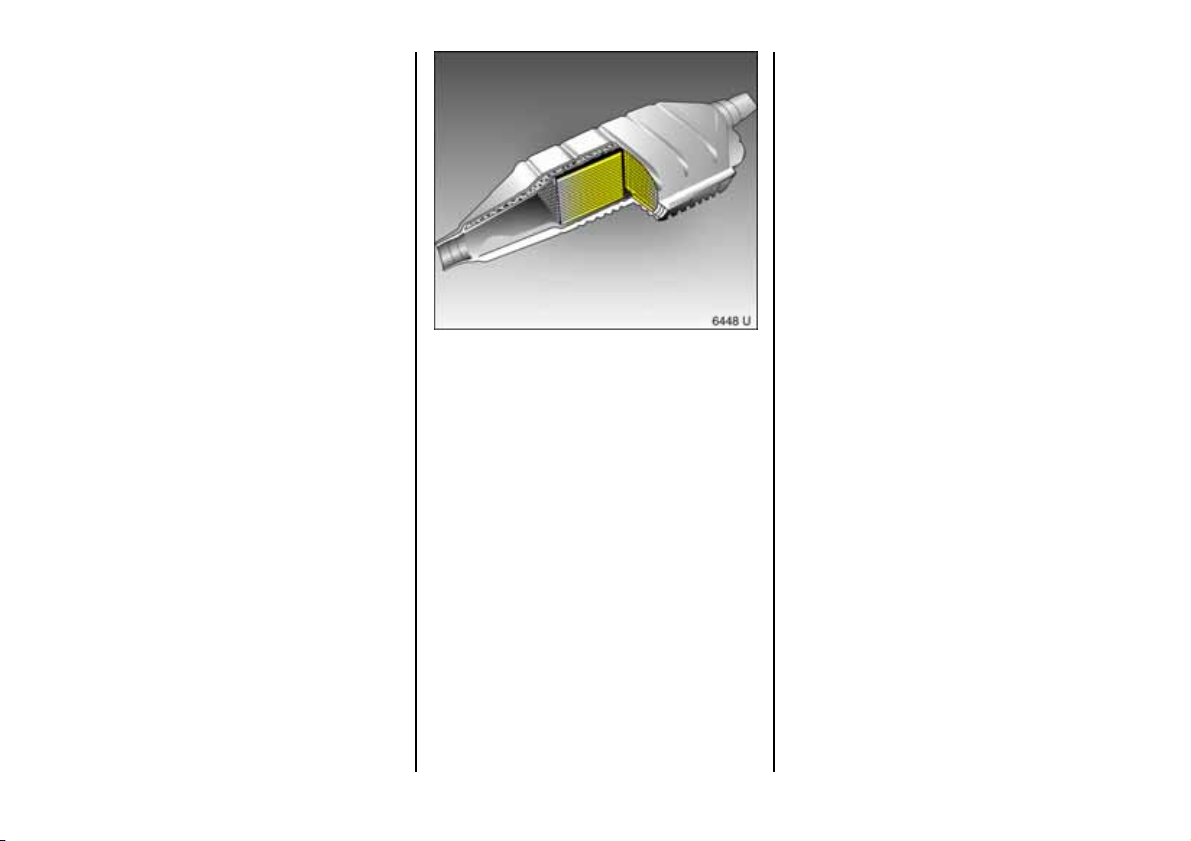
P age 58, L:\Owne r's Manu al\ Nv \Speed ster-VX220 \Maste r\KTA2 399-5\VML\SK IPOM.fm RH D, Vaux Edit ion 9.3.05
Catalytic converter,
exhaust emissions
Catalytic converter for petrol
engines
Leaded fue l will damage the cata lytic
converter and parts of the electronic
system, thereby rendering them
inope rative.
On vehicles with a catalytic converter, the
fuel ta nk filler neck is of a narrow design so
that a dispensing pump for leaded fuel
cannot b e inserted.
3
Damage to the catalytic conv erter or the
vehicle m ay result if the following points
are not observed:
z If the e ngine misfires or r uns rou ghly
after a cold start, the engine power has
reduced significantly or other unusual
operating pro blems occur th at indicate a
fault in the ignition system, please
contact a workshop as quickly a s
possible. W e recommend that you
consult yourVauxhall Approved
Repairer. Drive at a slower speed and
with less engine re vs for a short tim e if
ne ce ss ar y.
z If unb urnt fuel enters the catalytic
converter, this may result in overhe ating
and irreparable damage to the catalytic
converter.
You should therefore avoid frequent
coldstarts, unnecessarily long use of the
starter wh en s etting off, running the tank
dry (an irregular fuel supp ly lea ds to
overheating) and starting the engine by
pushing or towing.
58
Page 61
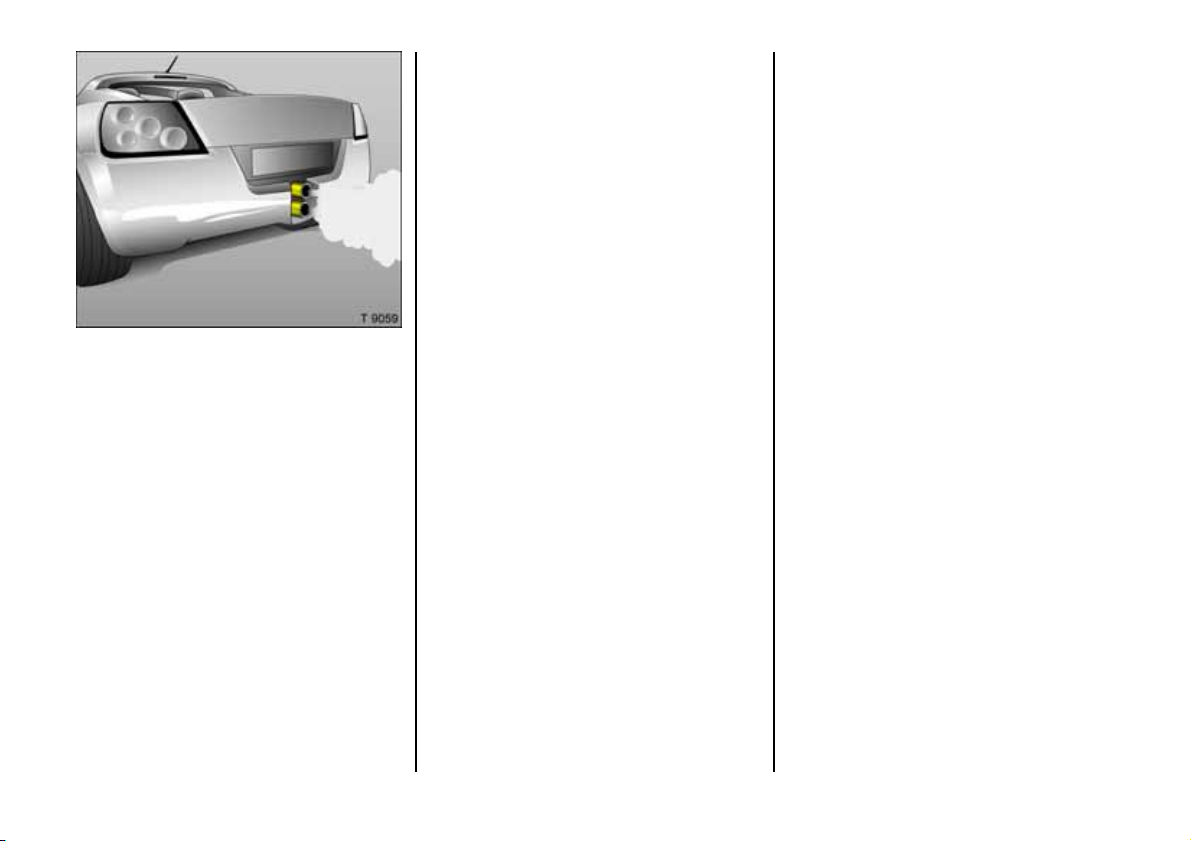
P age 59, L:\Owne r's Manu al\ Nv \Speed ster-VX220 \Maste r\KTA2 399-5\VML\SK IPOM.fm RH D, Vaux Edit ion 9.3.05
All check s and setting work should
therefore be left to a workshop. We
recom mend your Vauxhall Approved
Repairer which has suitable equipment
and trained personnel available. Electronic
testing systems pe rm it rapid diagnosis and
remedying of faults.
You are thereby m aking an imp ortant
contribution towards keeping the air clean
and compliance with emissions legislation.
Check ing and adj us tm ent of th e mixture
formation system and ignition system
forms part of the Service Plan. For this
reason you should have all maintenance
work carrie d out at the in tervals specified in
your Service Bookle t.
59
Page 62
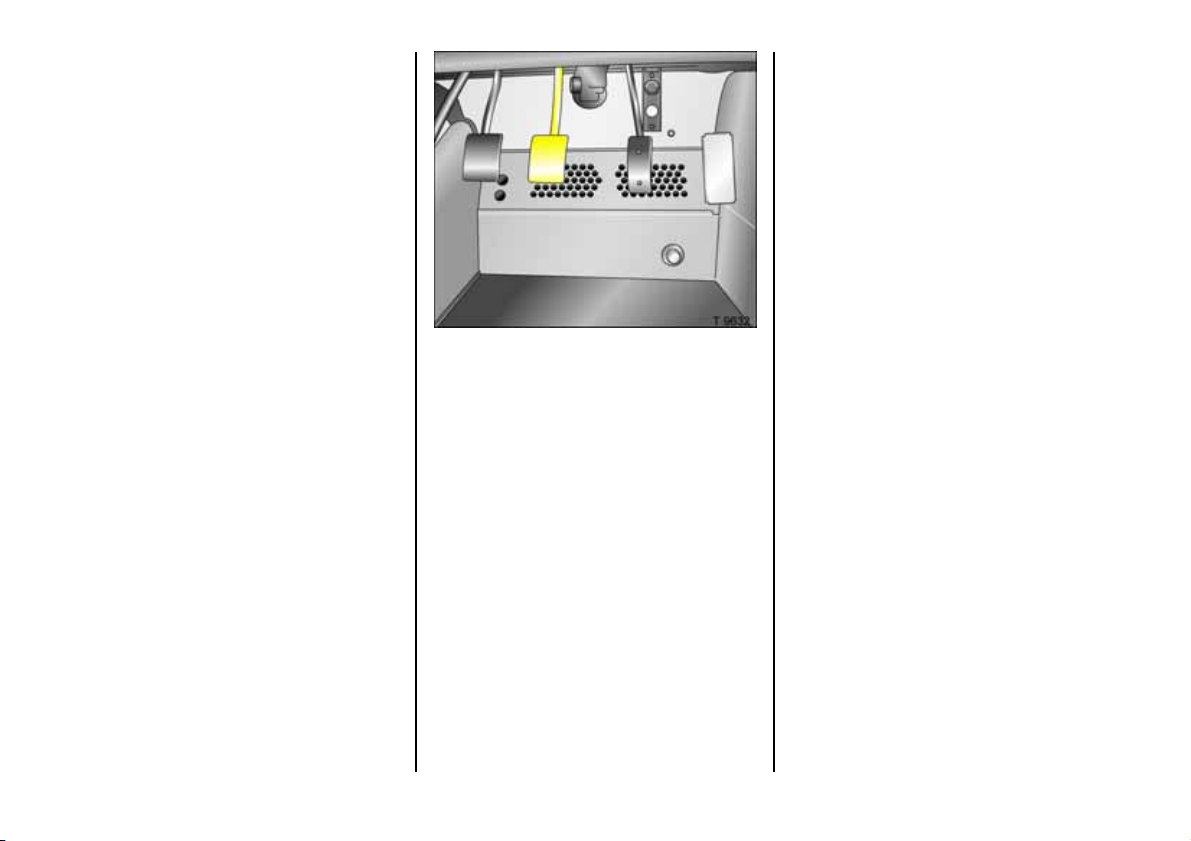
P age 60, L:\Owne r's Manu al\ Nv \Speed ster-VX220 \Maste r\KTA2 399-5\VML\SK IPOM.fm RH D, Vaux Edit ion 9.3.05
Brakes
The effectiveness of the brakes is an
important factor for traffic safety.
In the i nte res t of effe ctiv enes s, do not
brake unnecessarily hard during the first
120 miles (200 km) after new disc brake
pads have been fitted .
Wear of the brake linings must not exceed
a certain limit. Regular maintenance as
detailed in the Service Book let is therefore
of the utmost importance for traffic safety.
Have worn brake pa ds re placed. We
recommend that you consult your Vauxhall
Approve d Re pairer, who will fit parts that
have been tested and approv ed by
Vauxhall and guarantee optimum b ra king
power.
Foot brake
The braking system comprises two
separate, brake circuits. If one bra ke circuit
should fail, the v ehicle c an still be stopped
with the second remaining circuit. If this
ha ppens, th e brake peda l must be fully
depressed with greater pedal pressure. The
distance require d for braking will be
greater. Consult a workshop before
continuing to drive. We recommend that
you consult a Vauxhall Approved Rep airer.
In orde r to utilise the full pedal travel particularly in the event of a b ra ke circuit
fault - there must be no m ats in the area of
the pedals.
With the engine stop ped the servo
assistance is discontinue d afte r the brak e
pedal has been depressed once or twice.
The b ra king action w ill not be reduce d but
increa sed foot pressure will be necessary.
Take extra care when the vehicle is being
towed.
Check the brake lamps before starting out
on a journey . Shortly after the start of each
journey the brake system should be tested
at low speed for its effectiveness, especially
if the brakes are we t, e.g. afte r washing
your vehicle.
The brake fluid level should be checked
regula rly, see page 82.
60
Page 63
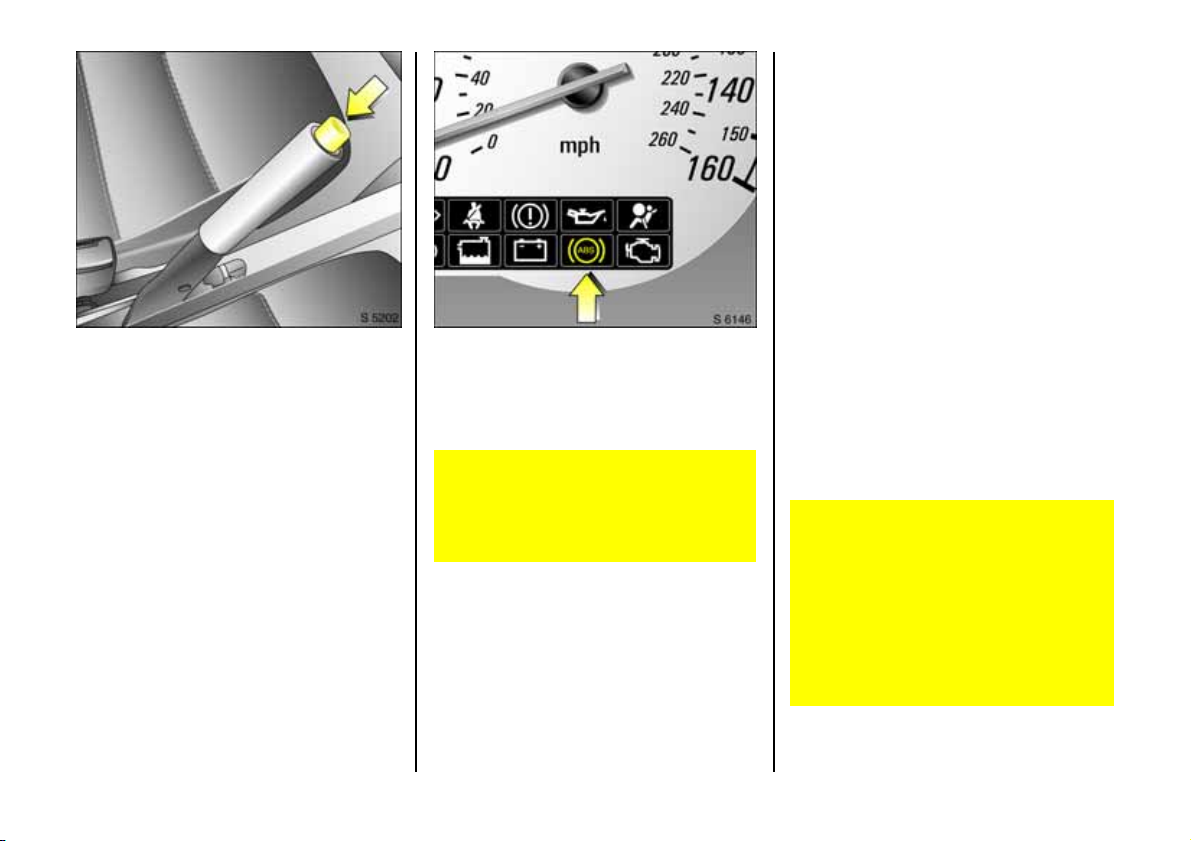
P age 61, L:\Owne r's Manu al\ Nv \Speed ster-VX220 \Maste r\KTA2 399-5\VML\SK IPOM.fm RH D, Vaux Edit ion 9.3.05
ABS
The AB S (anti-lock brake system)
continuously monitors the vehicle's brake
syst em an d pr ev ent s t he w he els from
locking, irrespective of the road condition
and ty re grip.
It starts to regulate the braking pressure as
soon as a whee l shows a tendency to lock.
Th e veh icle rema ins st eerable, eve n i n t he
event of very he avy braking, for in sta nce
on bends or when swerving to avoid an
obstacle. Ev en in the case of full-on
brak ing, the ABS makes it possible to drive
round an obstacle w ithout releasing the
Hand brake
The m echanical hand brake a cts only on
the rear wheels to secure the stopp ed or
parked ve hicle. It enga ges automatically
when a pplied.
Further information - see page 16
Control i nd icator R for brak e system
Control indicator illuminates when ignition
is switched on if hand brake is applie d and/
or fluid level for brake system is too low.
Brake fluid level - see page 8 2.
If it illuminates when the h and brak e is
not applied: stop vehic le; interrupt your
journey immediately. Consult a
works hop . We recom mend yourVauxhall
Approve d Repairer.
brak es.
The AB S makes itself notic eable through
pulsating of the brak e pedal and the noise
of the regulation process. Your vehicle is
now in a critica l situ ation; the ABS allows
you to keep control of the vehic le and
reminds you to match your speed to the
road c onditions.
To achieve optimum b ra king, keep the
brake ped al fully depressed throug hout
the braking process, despite the fact
that the pe dal is pulsa ting. Do not
reduce the pressure on the pedal.
Do not let this special safety feature
tempt you into taking risks when driving.
Tra ffic safety can only be achieved by
adopting a responsible d riv ing style.
61
Page 64
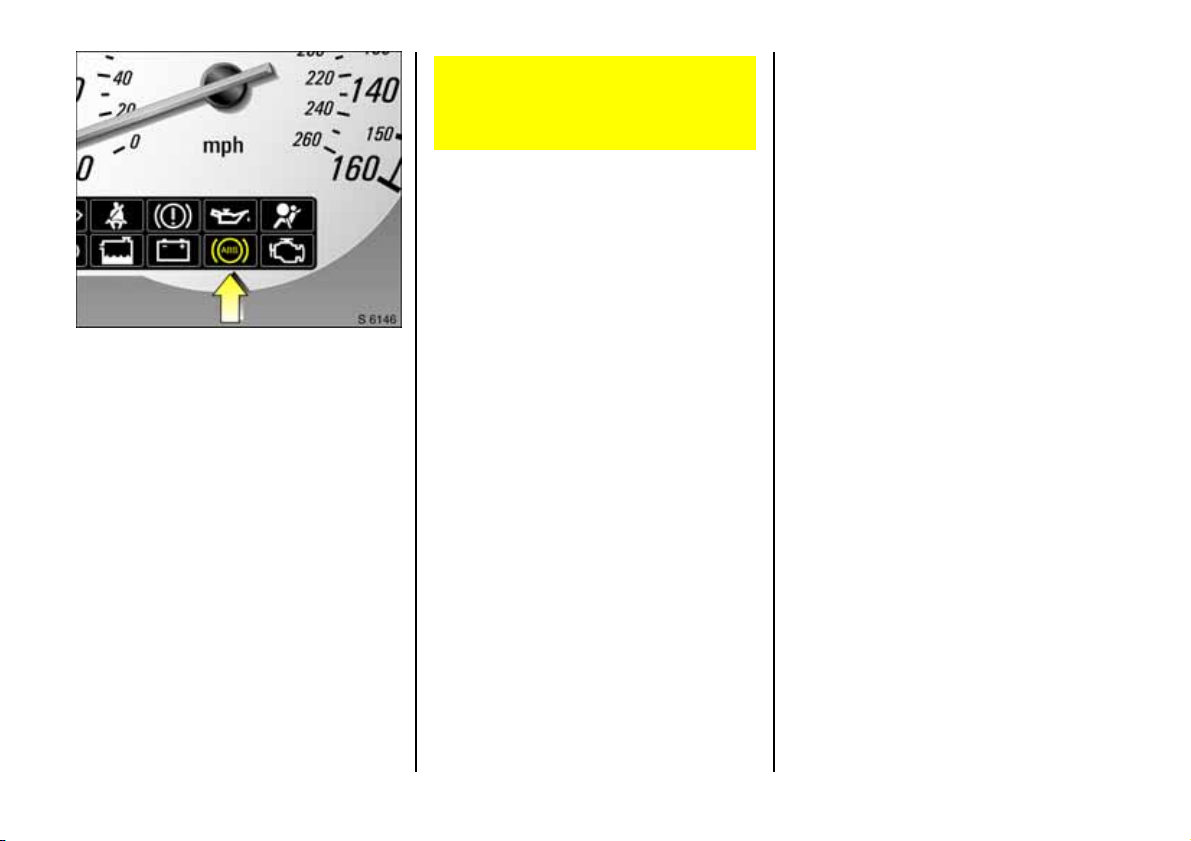
P age 62, L:\Owne r's Manu al\ Nv \Speed ster-VX220 \Maste r\KTA2 399-5\VML\SK IPOM.fm RH D, Vaux Edit ion 9.3.05
The wheels will tend to lock in the event
of heav y brak ing if the ABS fa ils. This
may cause the vehicle to swerve. The
benefits of the ABS are lost.
You can continue driving, provided you
drive with care and anticipation. Consult a
workshop to have the cause of the fault
eliminated. We recommend your Vauxhall
Ap proved Repairer.
When the ig nition is switched on, the ABS
control indicator illuminates. At the same
time, the system performs a self-check
which may be audible. Whe n the control
indicator goes out the system is ready for
opera tion. If the control indicator does not
go out after a few seconds, or if it
illuminates d uring driving, there is a fault in
th e AB S . Th e vehicle 's brake sys tem
remains operational without ABS
regulation.
62
Page 65

P age 63, L:\Owne r's Manu al\ Nv \Speed ster-VX220 \Maste r\KTA2 399-5\VML\SK IPOM.fm RH D, Vaux Edit ion 9.3.05
63
Page 66
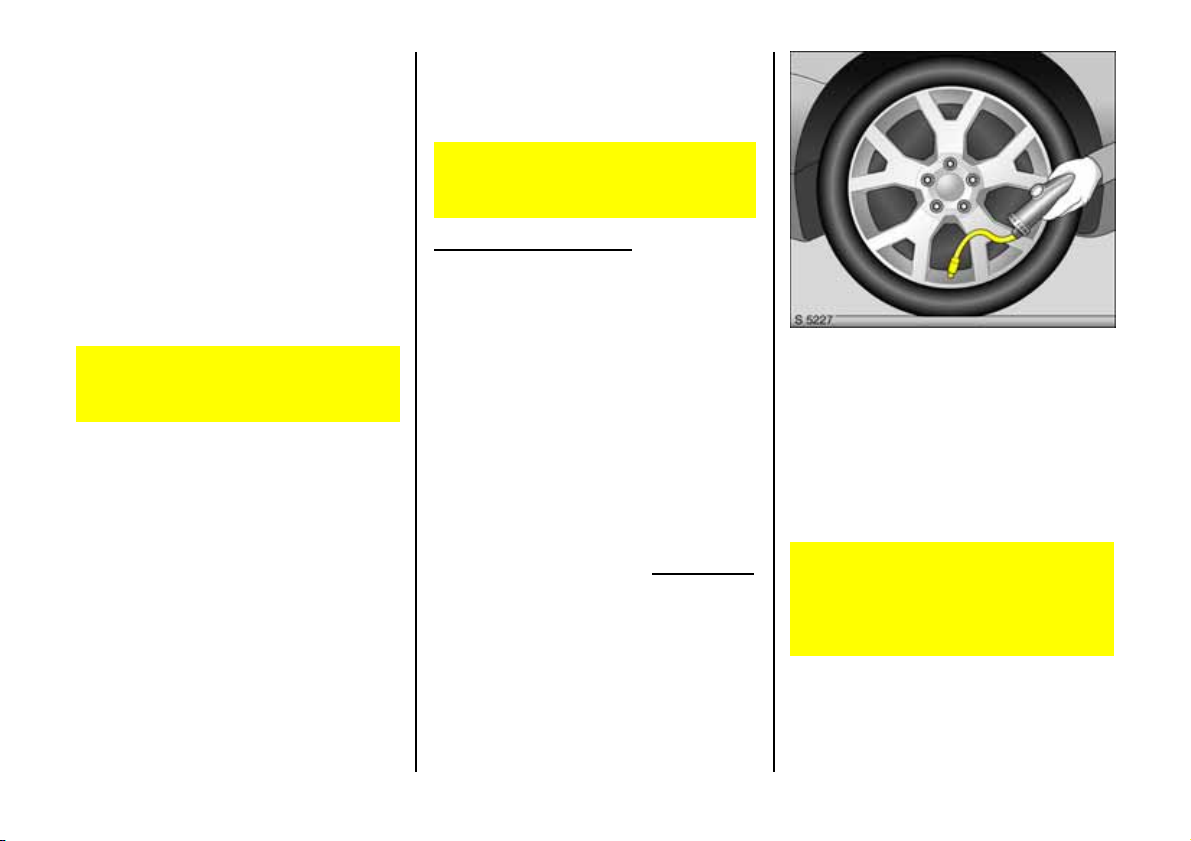
P age 64, L:\Owne r's Manu al\ Nv \Speed ster-VX220 \Maste r\KTA2 399-5\VML\SK IPOM.fm RH D, Vaux Edit ion 9.3.05
Wheels, tyres
To protect yourself and othe r road users,
it is essential to ob serve the follow ing
ru le s.
Tyre s
Factory-fitted tyres are matched to the
cha ssis and offer optimum driving comfort
and safety.
Use of unsuitab le tyres or wheels m ay
lead to accidents and render the vehicle
unroa dworthy.
New tyres should be fitted in pairs, or for
preferen ce in s e ts. Make sure tha t bo th
tyres on an axle are
z the same size
z the same desig n
z the same make
z and have the same tread pattern.
Changing tyre/whee l type
Before switching to different tyres or
wheels, seek advice on technical
possibilities . We recommend that you
consult your Vauxhall Approved Repairer,
who will be able to advise you of any
necessary modifications.
Increased pressure resulting from tyre
warm -up must not be reduced, othe rwise
th e pres sure may drop be low the
permissible minimum.
After hav ing checked the tyre pressures,
securely tighten the valve caps.
Incorrect inflation pressure s will impair
safety, vehicle handling, comfort and fuel
economy and will increase tyre wear.
Tyre infl ati on pres sure
Check tyre pre ssu res, at le ast ever y 14 d ays
and prior to any long journey. The tyre s
should be checked w hen cold.
Tyre p ressures, see page 96.
If the pressure is too low, this can result
in considerable ty re warm-up and
internal damag e, leading to tre ad
separation and even to tyre b low -out at
hig h spe eds .
64
Hidd en tyre damage is not e lim inate d by
subse quently adjus ting the inflation
pressure.
Page 67
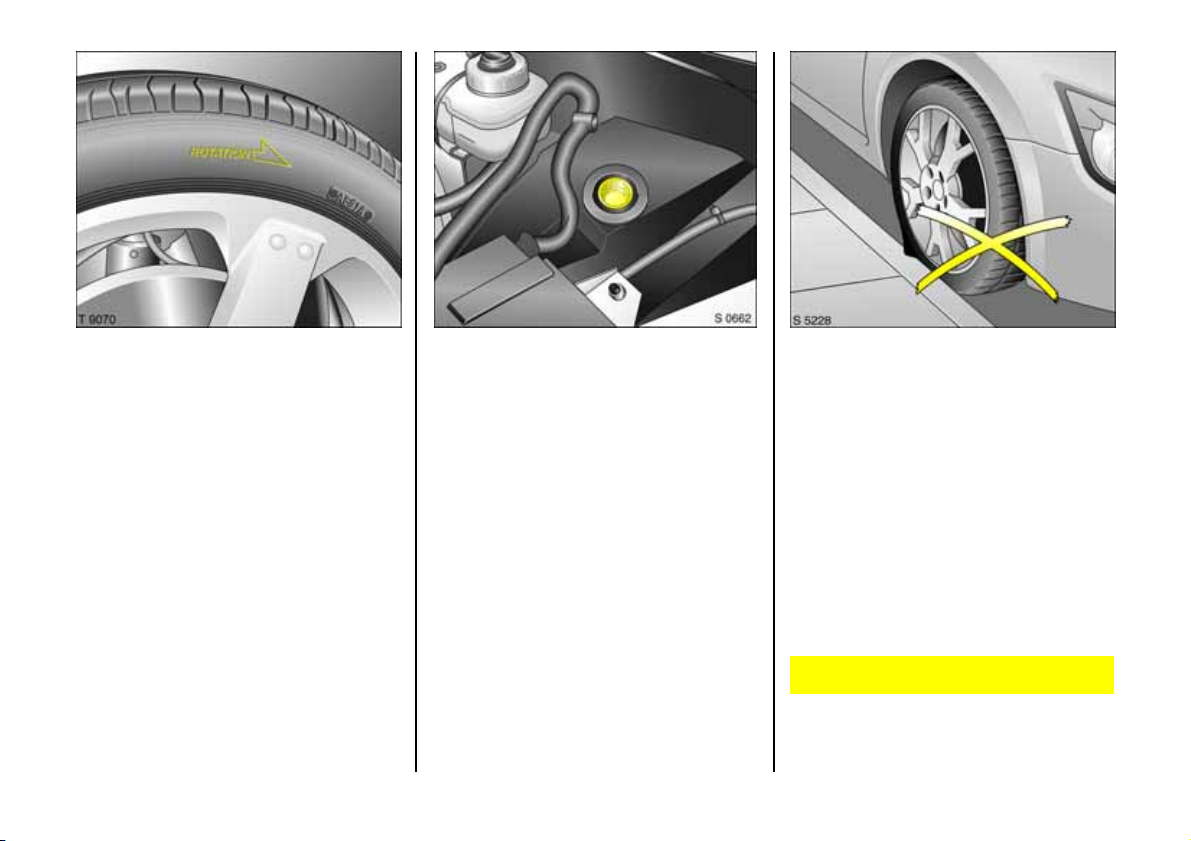
P age 65, L:\Owne r's Manu al\ Nv \Speed ster-VX220 \Maste r\KTA2 399-5\VML\SK IPOM.fm RH D, Vaux Edit ion 9.3.05
Wheels and tyres
Th e veh icle is e quipped wit h s po rt
directional tyres. Directional tyres must be
installed in their correct direction for
forward rotation. The tyre’s forward
rotation is shown by an arrow on its
sidewall.
To prevent theft, each whee l in co rpo rates
a security bolt. To cha ng e the wheel, this
bolt must be removed using the special
socket sup plied.
The socket is stowed in the front
compartment.
Ty re cond ition, wheel cond ition
Driving over sharp edges can lead to
hidden tyre damage and w he el damage
which is only noticed la ter.
Drive over edges slowly and at a right
angle if possible. When parking, ensure
that the tyres are not pressed ag ainst the
edge of the kerb.
Check tyres regularly for damage (foreign
bodies, punctures, cuts, cracks, bulge s in
sidewa lls). A damaged tyre could burs t.
Check wheels for damage. In the event of
dam age or abnorm al wear, consult a
workshop. We recommend your Vauxhall
Approve d Repairer.
Damage may lead to tyre blow-out!
65
Page 68
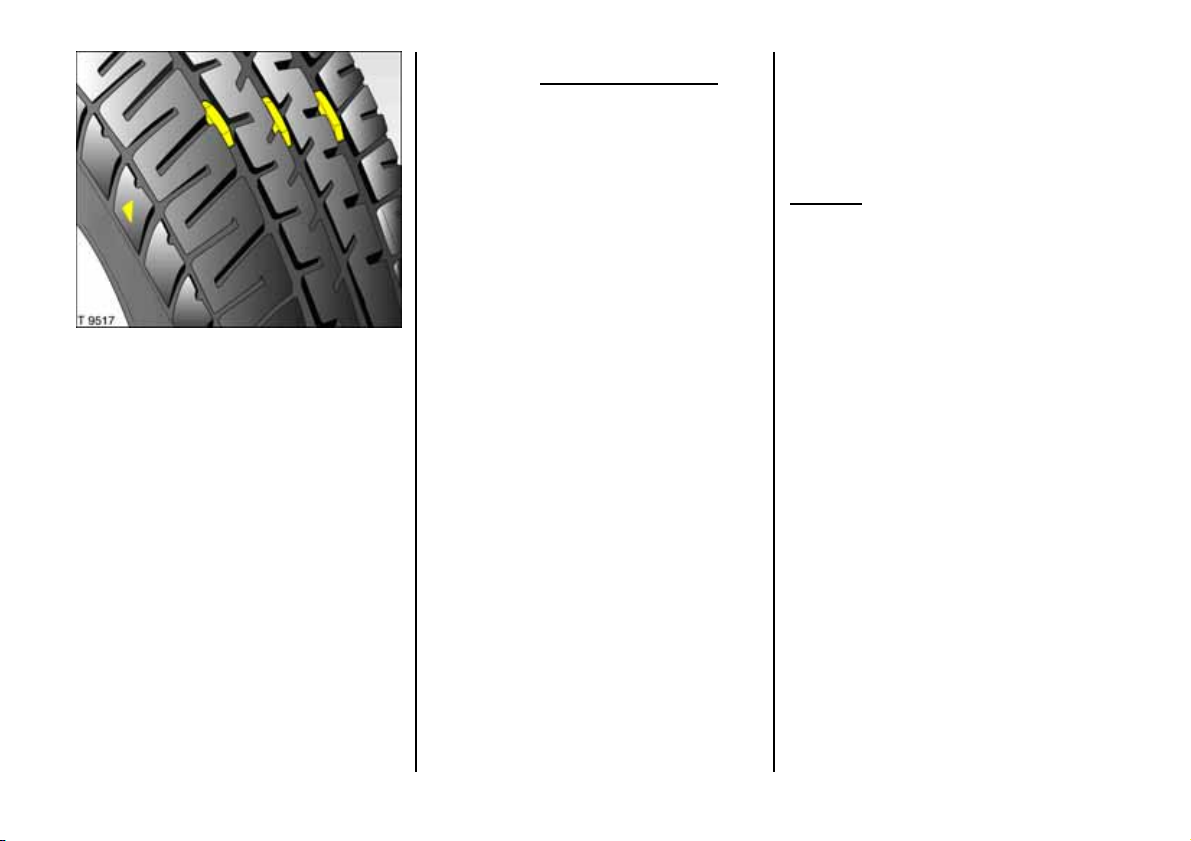
P age 66, L:\Owne r's Manu al\ Nv \Speed ster-VX220 \Maste r\KTA2 399-5\VML\SK IPOM.fm RH D, Vaux Edit ion 9.3.05
For safety reasons, tyres should be
replaced when their tread depth has worn
down to 2-3 mm. The legal perm issible
minimum tread depth (1.6 mm) has been
reache d when the tread has worn down as
far as one of the wea r ind icators.
Wear indica tors are sp aced at equal
intervals around the tyre within the tread.
Their position is indicated by markings on
General i nformati on
Note that the danger of aquaplaning is
greater if the tyres are w orn.
Never fit used tyres the previous history
and use of which you do not know.
Tyre designations
Meanings:
e.g. 225/45 R17 91W
22 5 =Tyre width in mm
45 = Aspect ratio in %
(tyre height to tyre width in %)
R = Belt type: Radial
17 = Rim diameter in inches
91 = Load index
W =Speed rating
Speed code letters:
Q Up to 100 mph (160 km/h)
S Up to 112 m ph (180 km/h)
T Up to 118 mph (190 km/h)
H Up to 130 m ph (210 km/h)
V Up to 150 mph (240 km/h)
W Up to 168 mph (270 km/h)
Winter tyres
Winter tyres cannot be fitted to the
standard whe els of your VX220.
Special s ize whee ls, which are available
from your Vauxhall Approved Repairer
must therefore be ins talled.
M+S tyres im prove safety at temperatures
below 7 °C and should the re fore be fitted
on all wheels.
The design of summer tyres means they
have limited qualities for winter driving.
If the maximum permissible speed for the
winter tyres is less than that of the vehicle,
a notice indicating the maximum
pe rm iss ib le sp ee d f or the tyr e s mu st b e
affixed within the driver’s field of vision1).
the tyre sidewall.
66
1)
Var ies from country to country on a ccount of
national reg ulations.
Page 69
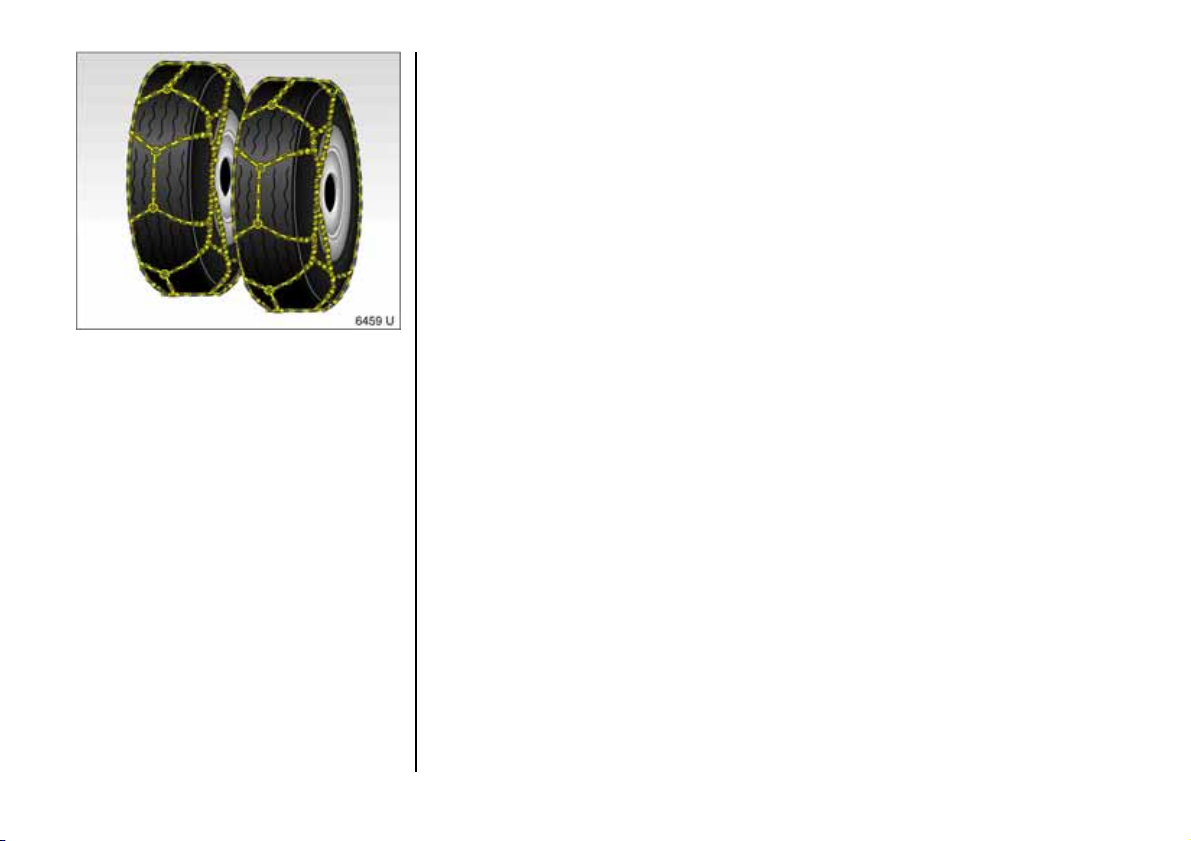
P age 67, L:\Owne r's Manu al\ Nv \Speed ster-VX220 \Maste r\KTA2 399-5\VML\SK IPOM.fm RH D, Vaux Edit ion 9.3.05
Tyr e chai ns
See page 96 for restrictions .
Tyr e chains m ay be used only on the drive
wheels (rear axle). They must be fitted
symmetrically on the tyre to ensure that
th ey are seated conce ntric ally.
Only fine -linked cha ins - not protruding
more than 15 mm on the tyre tread and
inboard sides (including chain lock).
We recommend that you consult your
Vauxhall Approved Repaire r, who w ill be
pleased to give ad vice.
Tyre chains m ay only be used at speeds up
to 30 mph (50 k m/h) and, when travelling
on roads that are fre e of snow, they may
only be used for b rief periods since they are
subject to rapid wear on a hard road and
may snap .
67
Page 70
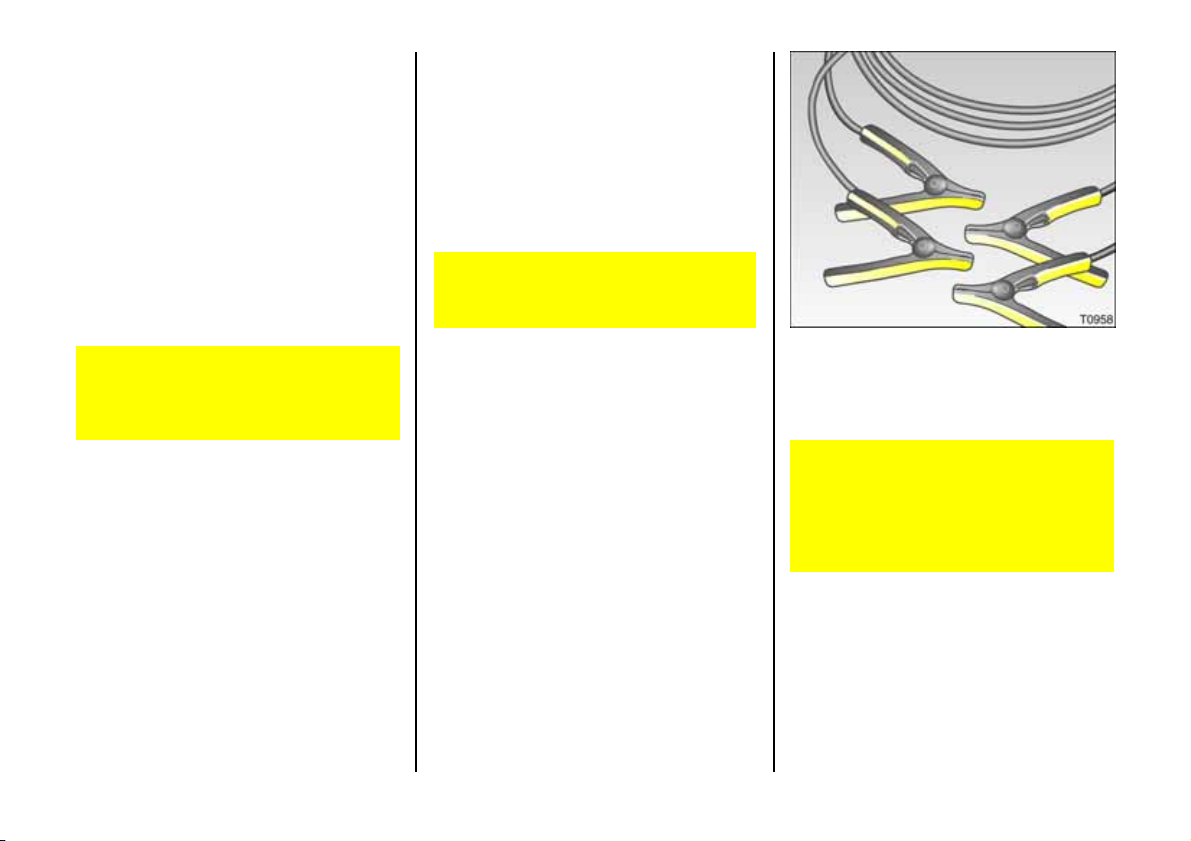
P age 68, L:\Owne r's Manu al\ Nv \Speed ster-VX220 \Maste r\KTA2 399-5\VML\SK IPOM.fm RH D, Vaux Edit ion 9.3.05
Self-help
Do not start with quick charger
This prevents damage to electronic
compon ents.
Fuel cut-off device
see page 57.
Starting the engine by pushing or
to win g
To avoid damage to you vehicle’s
catalytic converter the vehicle must not
be s tarte d by pushing or towing.
Disreg ard of these n otes ca n lead to
injuries which may be fatal. Vehicle
pa sseng e rs sho uld be in formed
accordingly.
68
Star ting th e eng ine w i th ju mp lea ds
A vehicle with a d ischarged battery can be
started using jump leads and the battery of
another vehicle.
This must be done with e xtrem e c are.
Any deviation from the following
instructions could lead to personal in jury
or damage resulting from battery
exp losion, as well as to damag e to t he
electrical systems in both vehicles.
3
Page 71
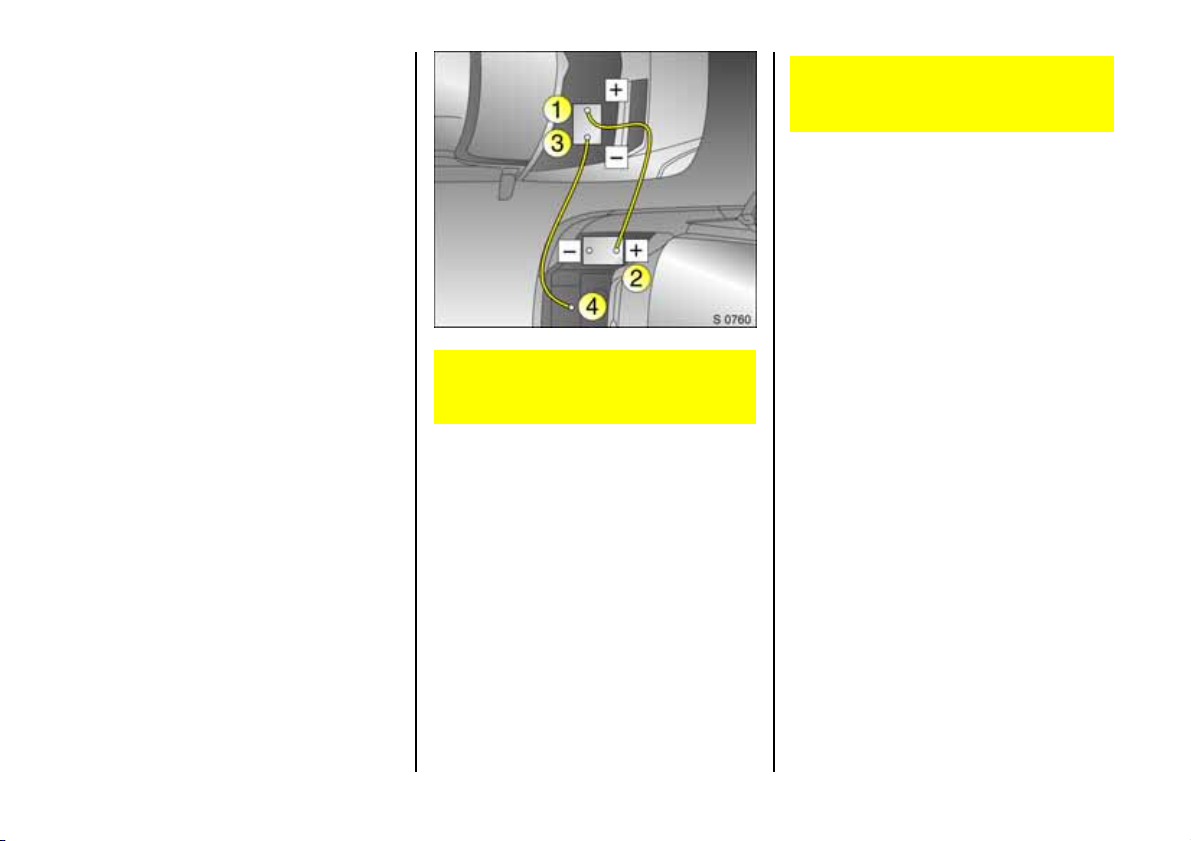
P age 69, L:\Owne r's Manu al\ Nv \Speed ster-VX220 \Maste r\KTA2 399-5\VML\SK IPOM.fm RH D, Vaux Edit ion 9.3.05
This m ust be done with extreme care. Any
deviation from the following instructions
could le ad to personal injury or dama ge
resulting from batte ry explosion, as well as
to d amage to the electrical systems in both
vehic le s.
z Never expose the battery to naked
flam es or sparks.
z Do not a llow battery fluid to contact
eye s, skin, fabrics o r pain ted surfaces.
The fl uid con ta ins sulp huri c a c id wh ich
can cause injuries and damage in the
event of direct contact.
z To lessen the risk of injury wear eye
protection when working ne ar any
battery.
z Make sure tha t the battery providing the
ju mp start has the sam e voltage as the
battery in your vehicle (12 V). Its
capacity (Ah) must not be substantia lly
lower than that of the discharged
battery. The voltage and c apacity are
given on the batteries.
z Do not d isconnect the disc ha rg ed
battery from the vehicle.
z Switch off all unnecessary electrical
lo a d s .
z Do not le an over th e battery during ju mp
sta rtin g.
z Do not allow the terminals of one lead to
touch those of the other lead.
z Ap ply hand brak e. Place gear lever in
ne ut ra l.
Slide wind scre en wash bottle upwards to
remove. Connect the leads in the order
shown in the picture:
1. Remove the rubber cover and connect
one end of the first jump lead to the
positive te rminal 1 o f the discharged
battery (id entified by “+” sign on battery
case or terminal).
2. Connect the other end of this lead to the
positive te rminal 2 of the battery
providing the jump s tart (“+” sign).
3. Connect the first end of the se cond jump
lead to the negative terminal 3 of the
discharged battery ("-" sign).
4. Connect the other end of this jump lead
4 to ground on the vehicle providing the
jump start, e.g. engine bloc k or screw
connection in engine suspension.
Care must be ta ken to ensure that the
leads do not inadvertently contac t me tal
surfaces within the com partment area.
z Do not connect the lead to the negative
terminal of the battery on the vehicle
providing th e ju mp start! The c onnec tion
point shou ld be as far away from the
battery as poss ible.
z The connection point should be as far
away from the discharged battery as
possible.
z Route the leads so that the y cannot
catch on rotating parts in the engine
compartment.
z The eng in e of the vehicle prov iding the
jump sta rt should be allowed to run
during starting. Attempts to start the
engin e of the ve hic le wi th th e disc har g ed
battery shou ld be made at inte rvals of
one minute a nd sh ould not last longer
than 15 seconds. After starting, allow
both engines to idle for approx. 3
minutes with the leads still connected.
z Reverse above seq uence exactly when
removing leads and replace the rubber
cover on the positive te rmina l.
69
Page 72
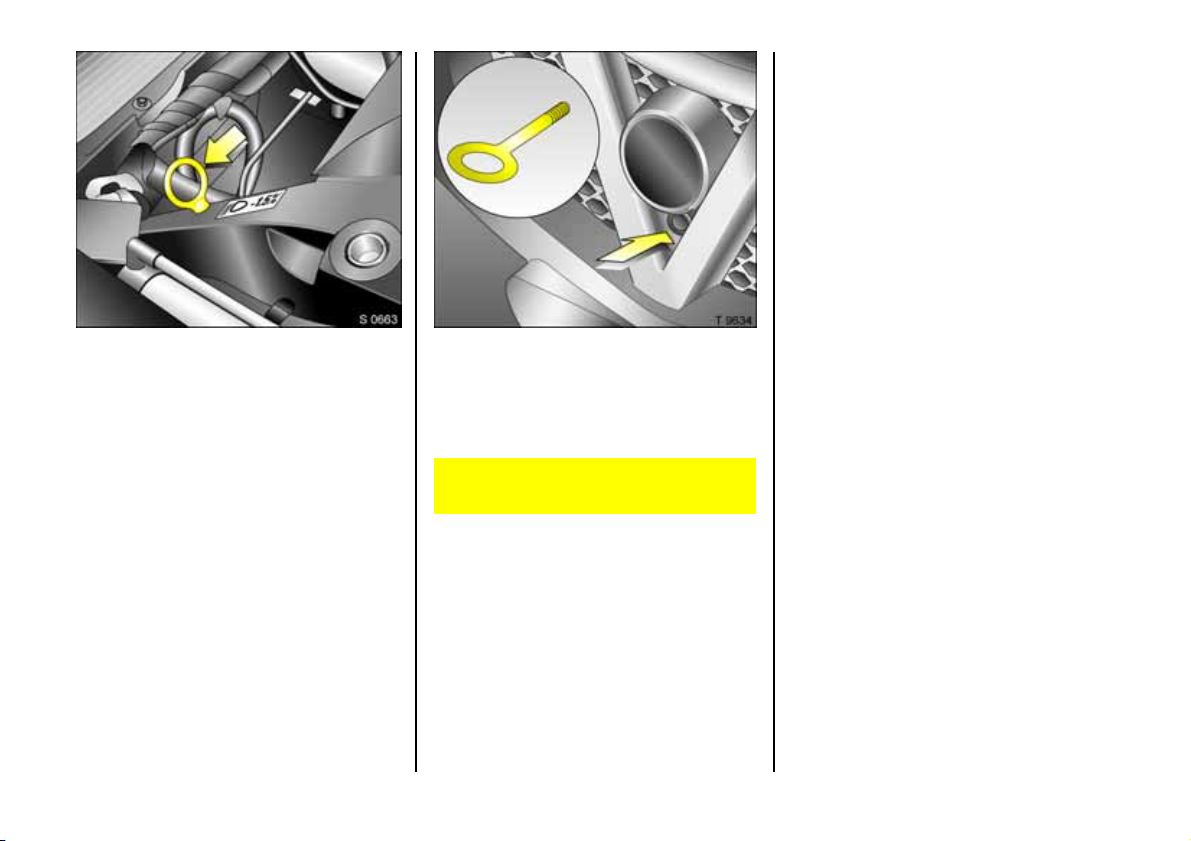
P age 70, L:\Owne r's Manu al\ Nv \Speed ster-VX220 \Maste r\KTA2 399-5\VML\SK IPOM.fm RH D, Vaux Edit ion 9.3.05
Drive off slowly and avoid jerky
mov ements. Imperm issible trac tiv e forces
could da mage the vehicles.
More brake pe dal pressure is necessary
whe n braking since the brake servo unit is
operative only when the engine is running.
To prevent th e ent ry o f exh au st fum es fro m
the tow ing vehicle, close the windows.
Consult a workshop. We recommend your
Vau xhall Approve d Repair er, who will ser ve
you best to get your vehicle back on the
road.
Towing service
Towing the vehicle
The towing eye is stowed in the front
compartment.
Remove blanking plug and screw the
tow ing eye fully into the towing point.
Attach the tow rope 3 - or better still, a tow
ro d 3 - to the towing ey e, never to the front
suspension units.
Never lift the vehicle using the towing
eye!
Plac e the gea r shift lever in the neutral
position. Switch on the ignition to re lease
the steering column lock and to pe rmit the
op eration of the brake lam ps, horn a nd
wind screen wiper.
Entrust your vehicle only to the towing
service of your choice and obtain an
estimate on towing costs before employing
any towing service. This will prevent
unnecessary expense and possible
insurance problem s d uring cla im
processing.
First-aid kit + 3
and warning triangle
Your first-aid kit and warning triangle can
be accommodated in the load
compa rtment.
¨ 3
70
Page 73
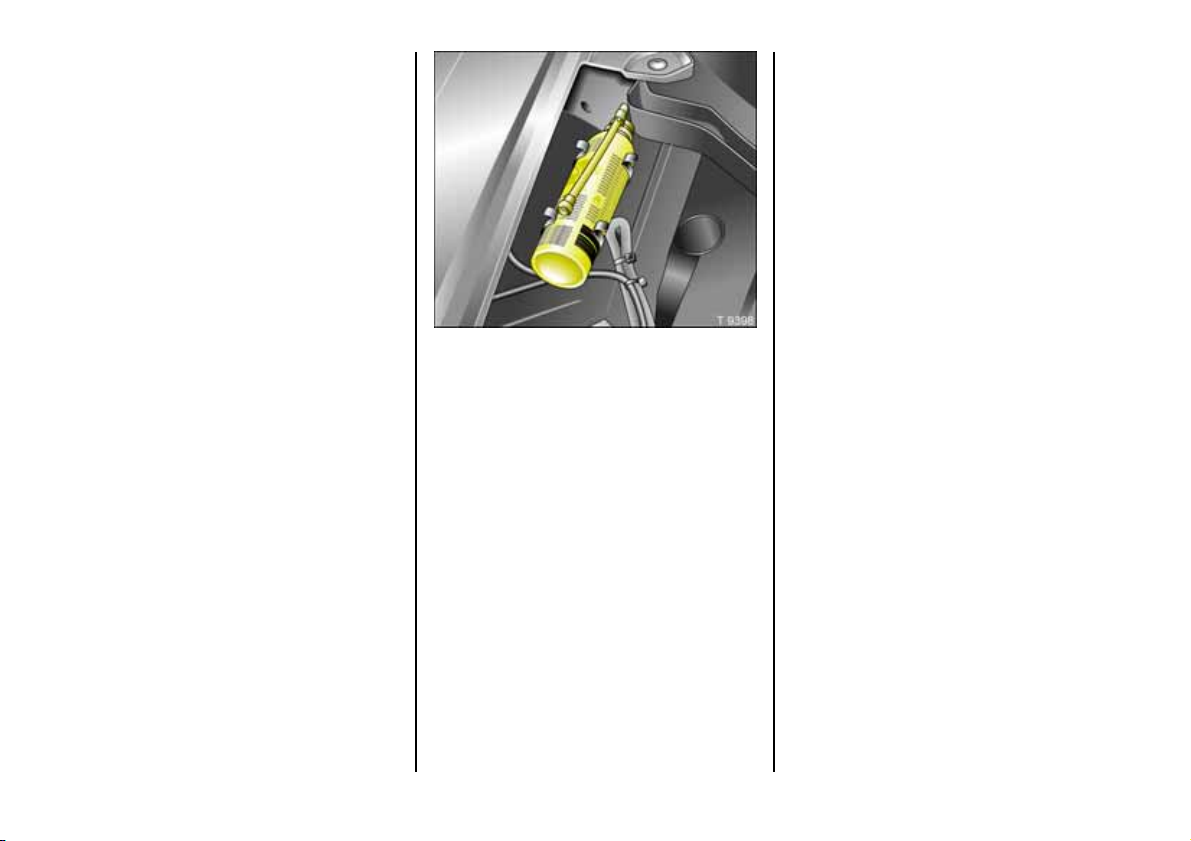
P age 71, L:\Owne r's Manu al\ Nv \Speed ster-VX220 \Maste r\KTA2 399-5\VML\SK IPOM.fm RH D, Vaux Edit ion 9.3.05
Puncture
In order to minimise vehicle weight the
VX220 is not fitted with a jack or a sp are
wheel.
It is re com mende d that wheel changing
and jack ing of the vehicle are only carried
out by a workshop. W e recommend your
Vauxhall Approved Rep airer.
However, if the vehicle needs to be lifted in
an emergency suitable ja cking points a re
indicated on the vehicle underbody by
stic kers.
Tem porary puncture re pair
Retriev e the emerge ncy tyre inflator
aerosol from the front compartment.
Remove the object ca using the p uncture
and rotate the wheel so that the puncture
site is lowermost. Fully deflate the tyre.
Shake the can vigorously. In cold
conditions warm the can using the vehicle’s
he ater outl e ts.
Screw the ae rosol tube on to the tyre valve
and remove the safety seal. Hold the can
upright and rotate the knob. Allow aerosol
to empty completely before rotating knob
in th e oppo site direction an d disconn ecting
the aerosol.
Immediately d rive for 6 to 12 miles (10 to
20 km) in a moderate manner and not
exceeding 30 mph (45 km/h) to allow the
sealant to spread. Then che ck and inflate
tyres to operating pressure.
Use of the aerosol does not constitute a
permanent repair but is designed as an
emergency measure, to allow the car to be
driven while awaiting tyre replaceme nt.
The aeros ol can be used for one repair
only, it must the n be replaced. C onsult a
workshop. We recommend your Vauxhall
Approve d Repairer.
z Do no t drive with m ore than one re paired
tyre.
z Do n ot dr ive fas ter than 30 mph (4 5 km/
h).
z Take bends slowly.
z Do not use the repaired wheel for a
lengthy period.
z Renew repaired tyre without delay.
71
6
Page 74

P age 72, L:\Owne r's Manu al\ Nv \Speed ster-VX220 \Maste r\KTA2 399-5\VML\SK IPOM.fm RH D, Vaux Edit ion 9.3.05
In orde r to reduce the chance of possible
injuries when using the emergency tyre
inflator aerosol, make the following
preparations and note the proce dure:
z Park on a le vel, firm and non-slippery
surf ace.
z Switch on hazard warning flashers and
apply hand b rake. Engage first gear or
re v e rs e .
z Correctly set up warning triangle 3.
z Never use the tyre aerosol on m ore than
one wheel at a time.
Fuses
When replacing a fuse, turn off the
re spective switch and the ignition.
A defective fuse can be recognized by its
melted wire . A new fuse should only be
installed after the cause of the trouble has
been eliminate d.
Only fuses of the specified rating should be
installed. The rating is given on all fuse s.
It is recomm ended to carry a complete
spare set of fuses, obtainable from your
Vauxhall Approved Repairer.
Fuses,
Colour
Grey 2 A
Vio let 3 A
Pink 4 A
Orange 5 A
Brown 7.5 A
Red 10 A
Blue 15 A
Yellow 20 A
Clear 25 A
1)
Rating i n A mperes.
Fuses,
Rating
1)
72
Page 75
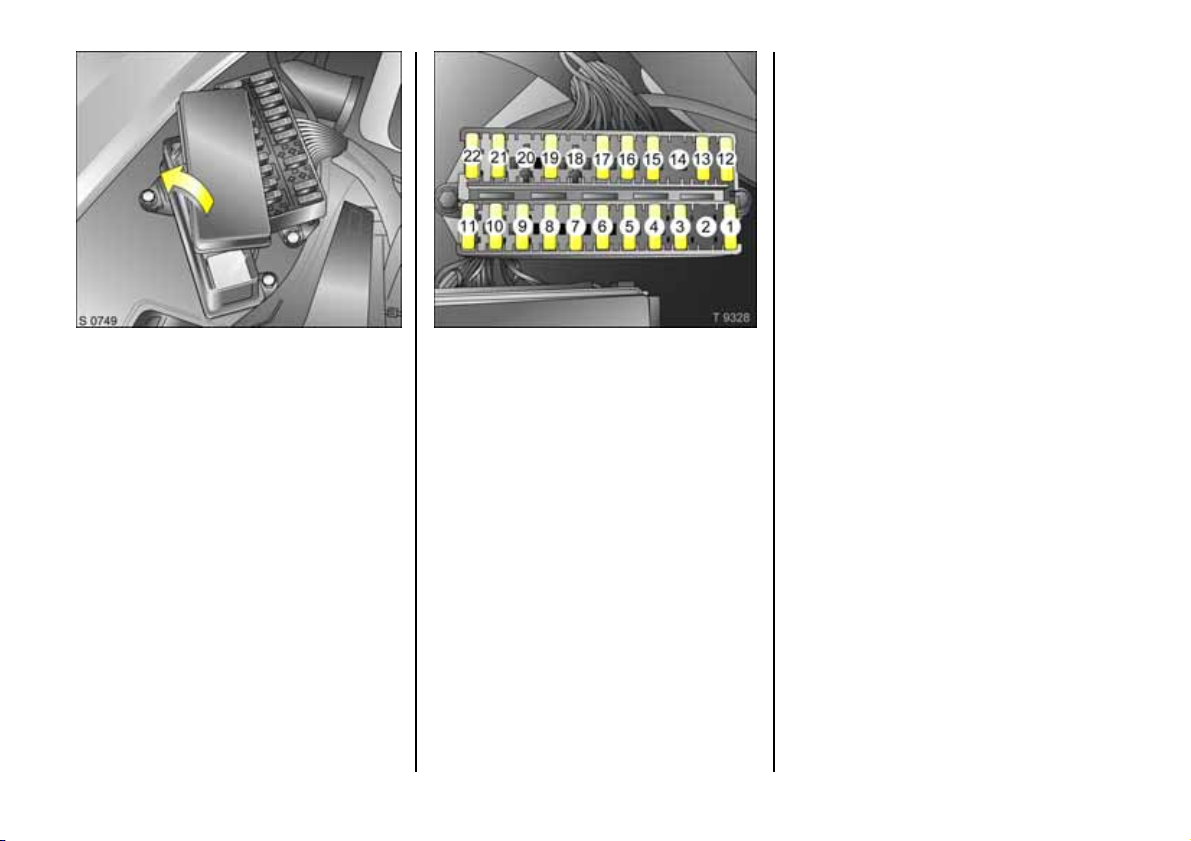
P age 73, L:\Owne r's Manu al\ Nv \Speed ster-VX220 \Maste r\KTA2 399-5\VML\SK IPOM.fm RH D, Vaux Edit ion 9.3.05
No. Circ uit Rating
10
Ho rn 7. 5 A
11
Alarm and interior lamp 10 A
12
Cooling fan 25 A
13
Central door locking 3 and
Alarm (Turbo only)
14
Head lamps 25 A
15
Radio 3 20 A
16
Side lamp LH 5 A
17
Side lamp RH 5 A
18
- -
19
Lam p switch es 10 A
Fuse box
The fus e box is located in the front
compartment. To open, rem ov e cover.
Fuses and the most im portant circuits
th ey prot ect
No. Circuit Rati ng
1
Rear fog lamp 3 A
2
Alarm siren 3 2 A
3
Interior f an 2 0 A
4
Wiper motor 15 A
5
Stop lamp / Reversing lamp 7.5 A
6
Direction indicators 7.5 A
7
Ignition services 10 A
8
Battery services 7.5 A
9
Hazard warning 10 A
20
Engine management
(Turbo only)
1)
21
Fro nt fog la mp 15 A
22
ABS 10 A
1)
7. 5 A
10 A
1)
Rat ing i n Am peres
73
Page 76
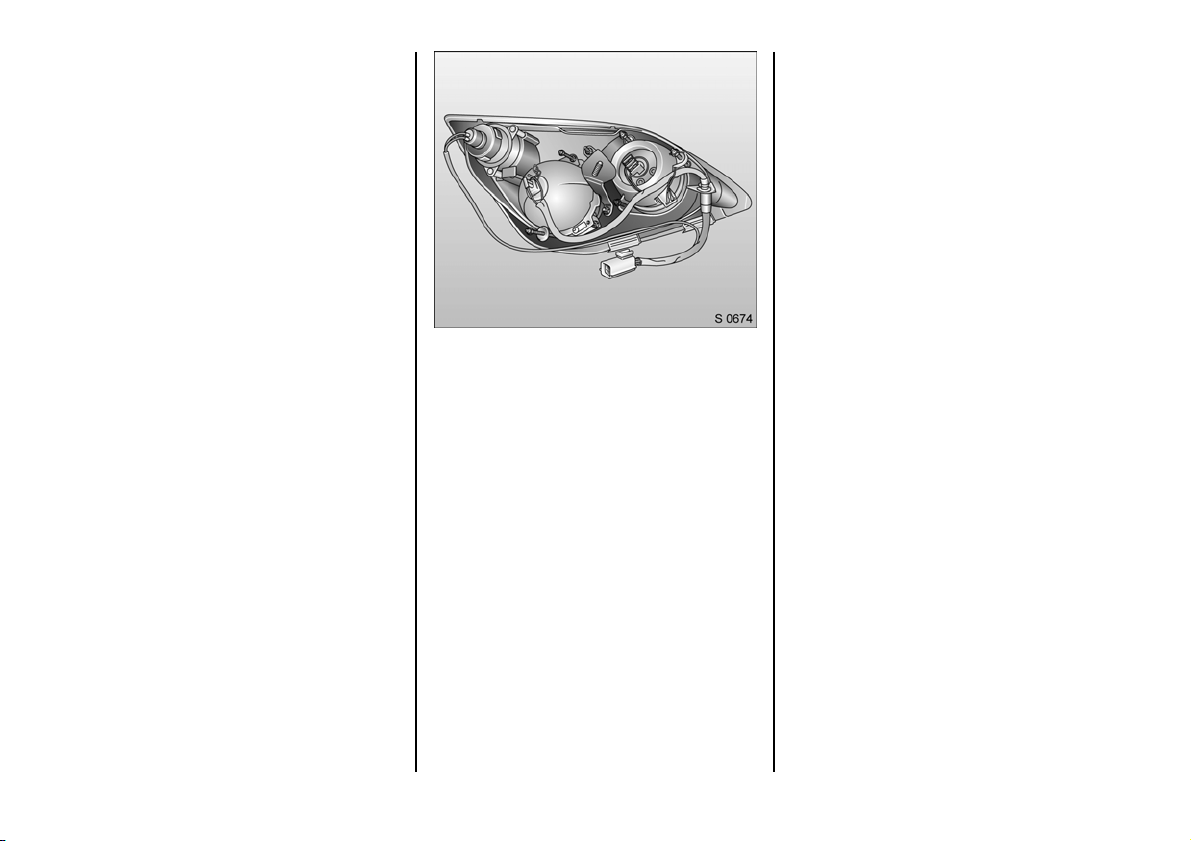
P age 74, L:\Owne r's Manu al\ Nv \Speed ster-VX220 \Maste r\KTA2 399-5\VML\SK IPOM.fm RH D, Vaux Edit ion 9.3.05
Bulb replacem ent
Before replacing a bulb, turn off the
respective lig ht switch.
Only hold new bulb at base! O il a nd gre ase
stains on the glass e vaporate, even tually
resulting in a dull reflector. Inadvertently
stained bulbs m ay be cleaned with a clean
non-fluffy cloth, using alcohol or white
spirit.
Replacem ent bulb must be in accordance
with data on base of defective bulb. Do not
exceed wattage given on bulb base.
3. Twist and rem ov e the bulb housing(s) as
required and remove the defe ctive
bulb(s).
4. Insert a new bulb and re place the
hous ing (s) .
5. Re-connect the multi-plug.
6. Re-position the headlamp assembly on
to the vehicle and tighten the nut. Ensure
the headlamp splash panel is not
displaced.
Headlamp aiming
We recommend that headla mp aiming be
carried out by your Vauxhall Approved
Repairer, who will have spe cial equipme nt.
Headlamp dipped and main beam,
parking and front turn signal
indica tor l am ps
The rear of the headlamp assembly is
accessed through the front compartment.
1. Remove the nut on the rear of the
headlamp assemb ly and slide out
ensuring the headlamp splash panel
remains in p osition.
2. Remove the headlamp multiplug.
74
Page 77
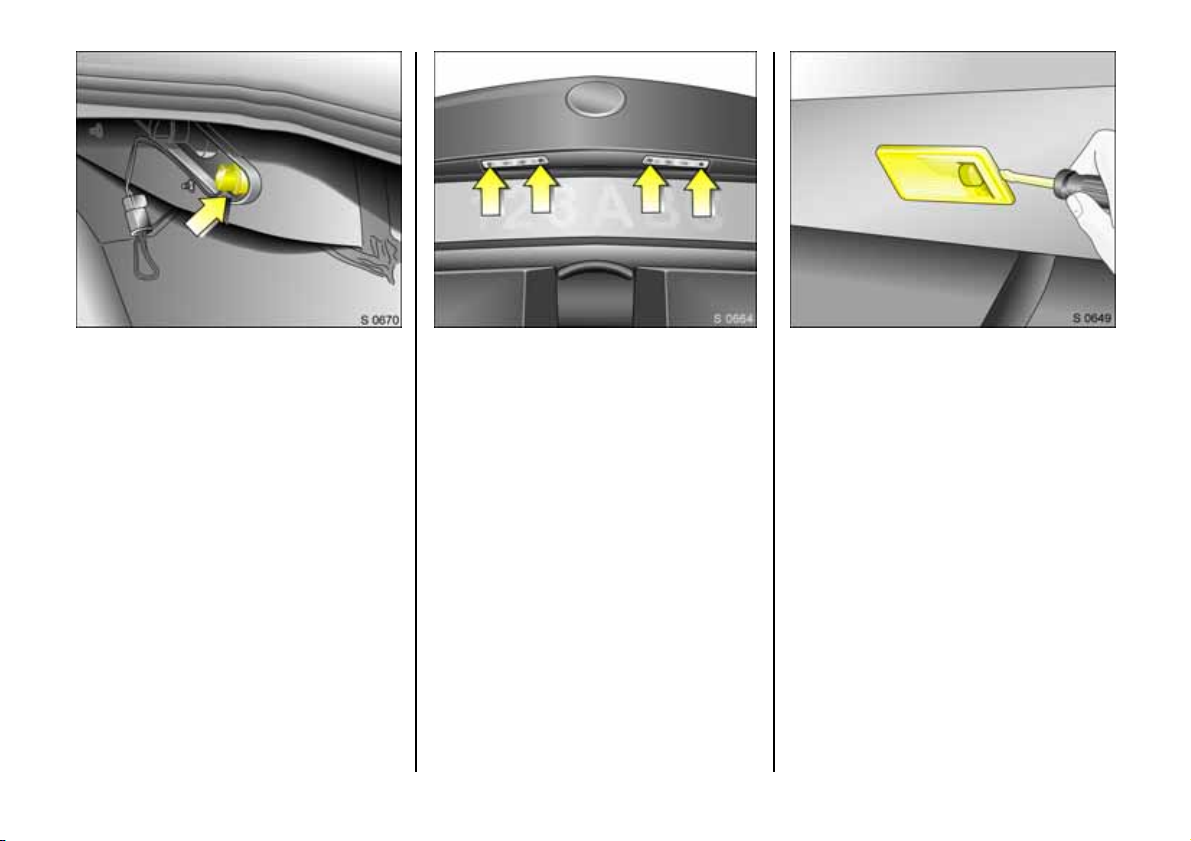
P age 75, L:\Owne r's Manu al\ Nv \Speed ster-VX220 \Maste r\KTA2 399-5\VML\SK IPOM.fm RH D, Vaux Edit ion 9.3.05
Rear brake, tail, turn signal, reverse
and fog lamps
1. The re ar lamp asse mbly can be a ccessed
directly through the rear load
com partment.
2. Twist and remov e the bulb housing(s) as
required and remove the defective
bulb (s ).
3. Inse rt a new bulb and re place the
hous ing( s) .
Number plate lamps
1. Remove two screws with a suitable
screwdriver.
2. Remove lens .
3. Renew bulb and install lens.
Interior lamp
1. Unclip lens assembly us ing a flat blade.
2. Renew bulb.
3. Reinstall lens assembly.
Instrumen t illu minati on
W e r e co mmend ha ving bu lb replac e ment s
made by your Vauxhall Approved
Repairer.
75
Page 78

P age 76, L:\Owne r's Manu al\ Nv \Speed ster-VX220 \Maste r\KTA2 399-5\VML\SK IPOM.fm RH D, Vaux Edit ion 9.3.05
If You Have a Problem
In our experience the m os t comm on ca use
of all comp la ints is th e result of
misundersta nding or la ck of
communication be tween the customer and
the Vauxhall Authorised Rep aire r.
We sincerely hope you will nev er have
cause to c om plain about your vehicle.
However, if thin gs do g o wro ng, the b est
course of action for you to take is to
contact your Vauxhall Authorised
Repairer’s Service Reception Staff and
explain the difficulty you are having. We
are confident they will do their utmost to
resolve the problem to your comp lete
satisfaction.
Sometime s, however, despite the best of
intentions of all concerne d,
misunderstandings can occur. If your
problem has not been resolved to your
satisfaction, please make an app ointme nt
to discuss the matter with the Manager of
the de partment concerned.
The majority of areas of concern can be
quic kly resolved in this way.
Should you wish to pursue the matter
further, the Principal of the Vauxhall
Authorised Repairer should be made
aware of your concern. It is ad visable in
cases such as this to write to him to confirm
your problem and the solu tions that have
been offe red.
You can be assured the Authorised
Repairer’s Principal w ill only be too anxious
to fully investigate your prob lems and
corre ct any errors m ade. After all, he has a
large investm ent in his business and is
proud of his reputation and
professionalism and fully realises that
sat is fied c ustomer s are h is k ey to succe ss.
In the unlikely event that you are still not
ha ppy with the answer your Vauxhall
Authorised Repairer has given, or the
action he prop oses to correct the problem,
you may conta ct the Custome r Care
Department1) where a team of Custom er
Care Consultants will spare no effort to
ensure your complete satisfaction.
Vaux hall Motors Ltd.
Custome r Ca re ,
Griffin House,
Osborne Road,
LUT ON,
Beds., LU1 3YT
Telephone: 01582 427200
1)
C alls may b e m onit o red a nd re c orde d f or tra in i ng
pur poses.
Th ey w ill re view a ll t he f act s involved. Then
if it is felt some further action can be tak en,
the Vauxhall Authorised Re pairer will be
advise d accordingly. In any case, your
contact will be ac knowledged confirm ing
Vauxhall Motor’s position in the matter.
If you are not satisfied with the outcome,
you ca n if you wish, seek advice from an
independe nt third p arty such as:
Automobile Association (A.A.)
Fanum House,
BASINGSTO KE,
Han ts ., R G21 2EA
Roy al Autom obile Club (R.A .C.),
R.A.C. Motoring S ervices Ltd.,
89-91 Pall Mall,
LONDON, SW1Y S45
The Customer Relations Department,
Society of Motor Manufactur ers and
Traders Ltd. (S .M.M. T.),
Forbes House , Halkin Street,
LONDON, SW1X 7DS
Customer Complaints Service,
Sc ottish Motor Tra de Association,
(S. M.T.A.),
3 Palmerston Place,
EDINBURGH, EH12 5AQ
The National Conciliation Service,
Retai l Motor Indust ry Federation,
9 North Street,
RUGBY, CV21 2AB
If you have a proble m w hilst abroad:
The Service Departm ents of Adam Opel AG
and General M otors branches everywhere
will provid e information and assistance:
76
Page 79

P age 77, L:\Owne r's Manu al\ Nv \Speed ster-VX220 \Maste r\KTA2 399-5\VML\SK IPOM.fm RH D, Vaux Edit ion 9.3.05
Opel Austria Vertrieb Gm bH
Groß-Enzersdorfer Str. 59
1220 Vienna - Austria
Tel. 01-2 88 77 444 or 01-2 88 770
Opel Belgium N.V.
Prins Boudewijnlaan 30
2550 Kontich – Belgium
Tel. 03- 4 50 63 1 1
O pel C & S spo l. s.r. o.
Na Pank ráci 26
140 00 Pra gue 4 – Czech Republic
Tel. 02- 61 21 -8 8 21
General Motors Danm ark
Jaegersbog Alle 4
2920 Charlottenlund – Denmark
Tel. 39 57 85 00
Vauxhall Motors Ltd.
Cus tomer C are
Griffin House, Osborne Road
Luton, Bedfordshire, LU1 3Y T – Eng land
Tel. 0 15 82 -42 72 00
General Motors Finland Oy
Pajuniityntie 5
00320 Helsinki – Finland
Tel. Helsinki 61 58 8 1
General Motors France
1 - 9, avenue du Marais
Angle Quai de Be zons
95101 Argenteuil Cedex – France
Tel. 1-34 26 30 00
ADAM OPEL AG
Bahnhofsp latz 1
65423 Rüsselsheim – Germany
Tel. 0 61 42-77 50 00 or 0 61 42-7 70
General Motors Hellas S.A.
56 Kifisias Avenue & Delfon str.
Am arousion
151 25 Athens – Greece
Tel. 1-6 80 65 01
Opel Southeast Europe Ltd .
Szabadsag utca 117
2040 Budaörs – Hungary
Tel. 06-23 446 100
General Motors India
Sixth Floor, Tower A
Glob al Business Park
Mehrauli - Gurgaon Road
Gurgaon - 122 022, Haryana, India
Tel. 0091 124 280 3333
Opel Ireland Ltd.
Opel House, Unit 60, Heather Road
Sandy ford, Dublin 18 – Ireland
Tel. 01-216 1000
Opel Italia S.p.A.
Piaz zale dell'Industria 40
00144 Rome – Italy
Tel. 06-5 46 51
For Luxembourg - contact
Opel Service Department in
Kontich - Belgium
Opel Nederland B.V.
Lage Mosten 49 -63
4822 NK Breda – Netherlands
Tel. 0 76-5 44 88 00
O pel Norge A S
Kjeller-Vest 6
2027 Kjeller – Norway
Tel. 23 50 01 04
General Motors Poland Sp. z o. o.
Domaniewsk a 41
06- 672 Warsa w – Poland
Tel. 0 22-606 17 00
Opel Portugal
Quinta da Fonte
Ed. Fernão Magalhães, Piso 2
Porto Salvo
2780 Oeiras – Portugal
Tel. 01-4 40 75 00
Opel España de Automóviles S.A.
Paseo de la Castellana, 91
28046 Madrid – Spain
Tel. 902 25 00 25
S aab Opel Sverig e AB
Esbogatan 8
164 74 Kista – Sw eden
Tel. 08-632 85 00
General Motors Suisse S.A.
Salzhausstraße 21
2501 Biel/Bienne – Switzerland
Tel. 0848 810 820 or 0 32-3 21 51 11
O pel Türkiye L td. S ti.
Kemalp asa yolu ü zeri
3586 1 Torb ali/Izmir – Turkey
Tel. 0 2 32-8 53 -1 4 53
In A lban ia, B osnia-He rzegov ina, Bu lgaria,
Croatia, Macedonia, Romania , Slovenia
and Yugosla via please contact the Opel
Service Department in Budaörs – H ungary .
Tel. 00 36-23 446 100
77
Page 80

P age 78, L:\Owne r's Manu al\ Nv \Speed ster-VX220 \Maste r\KTA2 399-5\VML\SK IPOM.fm RH D, Vaux Edit ion 9.3.05
Service plan,
maintenance
In orde r to gu arantee e con om ical and safe
vehicle operation and to maintain the
value of your v ehicle it is of vital
importance that all maintenance work is
carried out at the proper inte rvals as
specified by Vauxhall in the Service
Booklet. Time or mileage/kilometre
intervals - whichever is reached first -
determine when your vehicle is due for its
ne xt s erv ic e.
In the case of low mileage accumulation
with fre quent cold starts or p redominantly
urban tra ffic a nd stop-and-go traffic, an
additional engine oil and filter change is
recommended.
You will find the Service Booklet in the
literature pack.
Have service work – and repair work to
body and equipment – ca rried out by
professionals. We recommend that you
consult your Vauxhall Approved Repairer.
Your Va uxhall Approved Repairer has
excellent k nowledge of Vauxhall vehicles,
and has the special tools and the latest
Vauxhall se rv ice instructions . It is
particularly advisable to use a Vaux hall
Approv ed Repairer during the warranty
period to avoid loss of warranty claims. See
Servic e Booklet for additional information.
A no te o n s afety
To avoid the possibility of injury , only
carry out engine compartment check s
(e.g. checking the brake fluid level or the
engine oil level) when the ignition is
switched off.
The coolin g fan may be operated by a
thermosw itch a nd can therefore start to
op erate une xpe ctedly ev en whe n the
ignition is switched off - risk of injury !
Never carry out any repairs or
adjustment and maintena nce work on
the vehicle y ourself. This especially
applies to the engine, chassis and safety
parts. You may out of ignorance infringe
the provisions of the law and, by not
performing the work properly, you ma y
endanger yourself and other road users.
78
Page 81
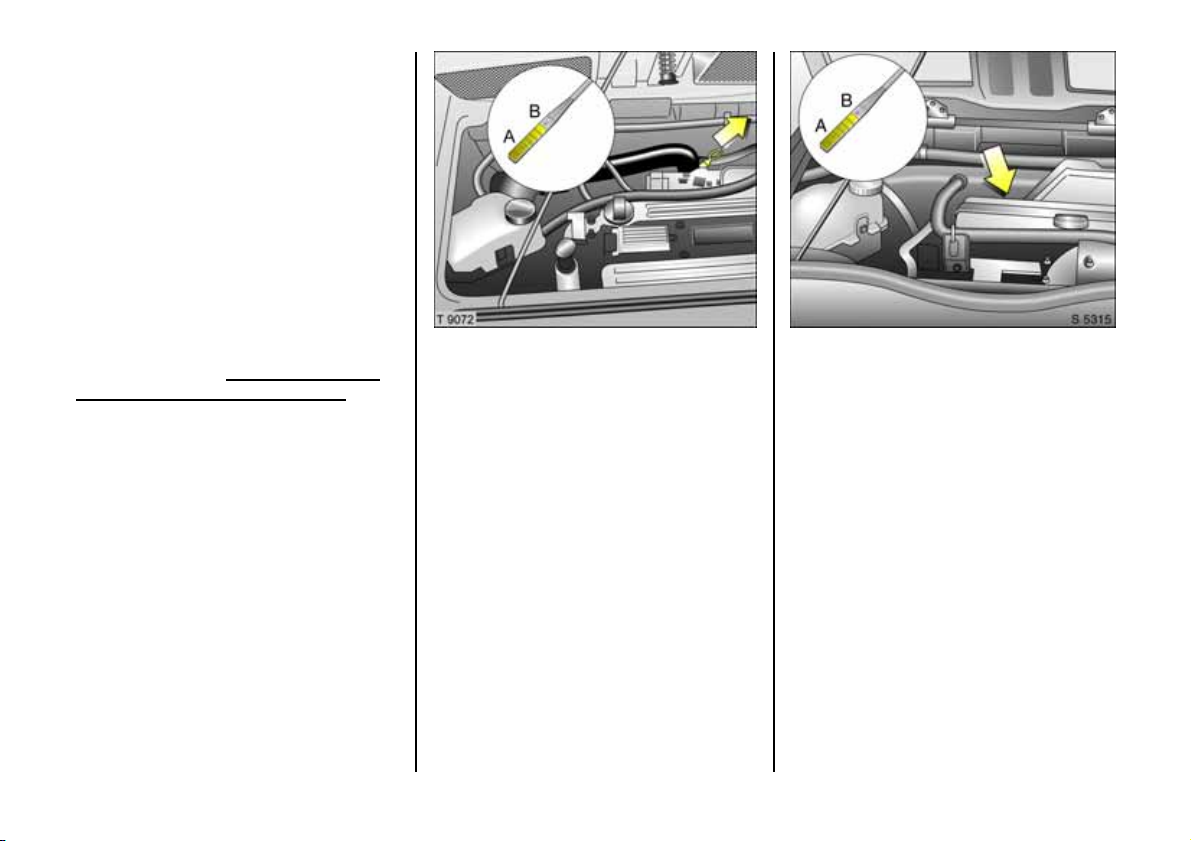
P age 79, L:\Owne r's Manu al\ Nv \Speed ster-VX220 \Maste r\KTA2 399-5\VML\SK IPOM.fm RH D, Vaux Edit ion 9.3.05
Checking and topping up fluids
To aid id entific ation, the e ngine oil filler
cap, the coolant e xpansion tank cap, the
lid of the fluid container for the windscreen
wash system and the handle of the oil
dipstick are coloured yellow.
Engine oil
Vauxhall engine oil is p artic ularly suitable
for the engine.
These high-quality oils are suitable for
sum mer and win ter o pe ration.
You may also use good-quality brand HD
oils with the proper viscosity c la ss (SAE )
and quality (ACEA). See page 91 for
information on oils. The ACEA c ategory
may be taken as a quality criterion.
In the case of brand oils the manufacturers
are responsible for ensuring that the oils
they supply are suitable for Vauxhall
vehic le s.
Engine oil level
It is no rma l for every eng ine to co ns um e
some oil. For this reason the engine oil leve l
should be checked every 300 miles
(500 km) or before starting a long trip. The
illustrations show checking the oil level on
the Z22SE and the Z20LET (Turbo) engines
re s p ec ti ve l y.
The oil leve l mus t be checked with the
vehicle horizontal and with the engine
(which must be at operating temperature)
switched off. Wait a t least two minutes
before checking the level to allow the
normal oil accum ulation in the engine to
drain back into the oil pa n. To check the
level, remove the oil gauge (dipstick), wipe
it cle an and re-insert it as fa r as it will go.
Top up if the oil level has dropped to the
"add oil" mark A.
The oil leve l mus t not go above the upper
ma rk B on the dipstick. This would lead, for
example , to increase d oil consumption and
exce ssive form ation of ca rb on residue .
79
Page 82
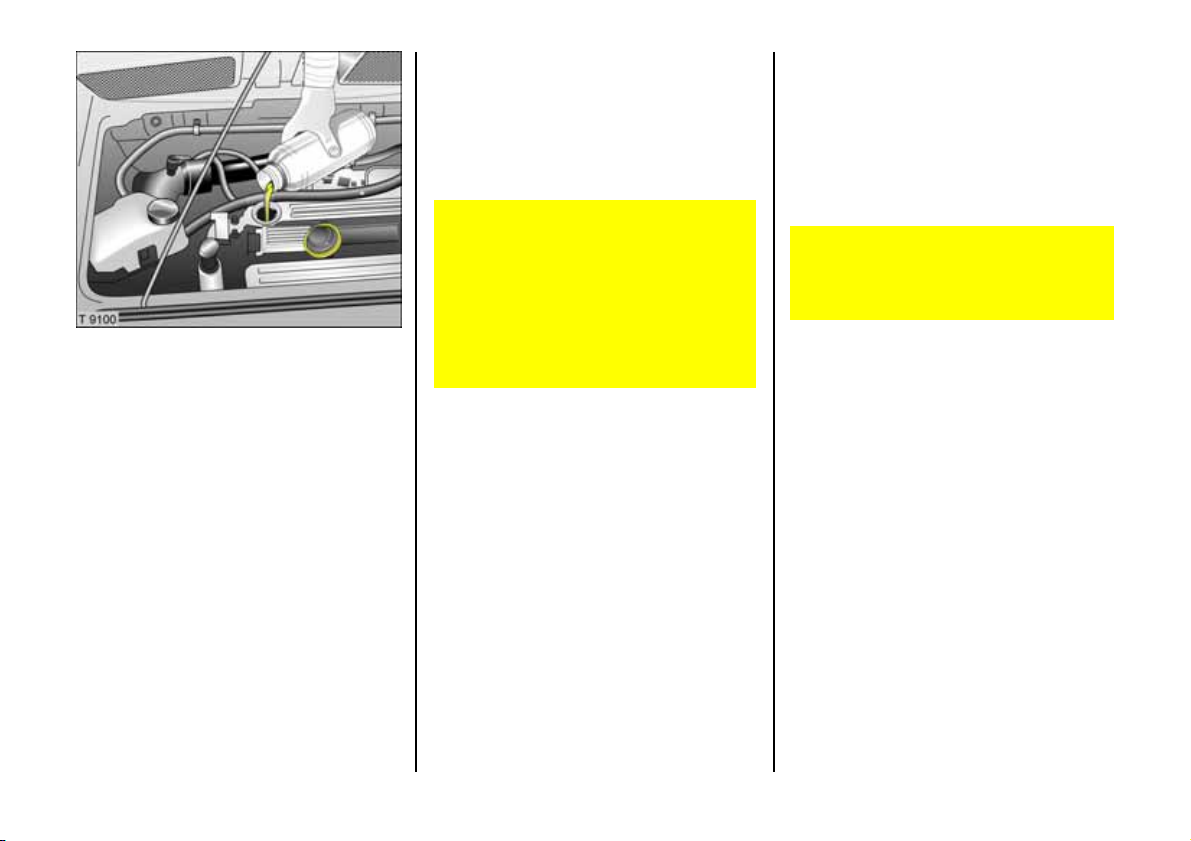
P age 80, L:\Owne r's Manu al\ Nv \Speed ster-VX220 \Maste r\KTA2 399-5\VML\SK IPOM.fm RH D, Vaux Edit ion 9.3.05
When rep lenishing, a ttempt to use the
same type of oil as used at the last oil
change.
Lubrica nt chart, se e page 92.
Capacities, see page 98 .
A stabilisation of the oil cons umption will
not take place until the vehicle has been
driven se veral thousand miles. Only then
can the actual degree of consumption be
established.
Oil change, oil fil ter change
Engine oil c hanges are to be ca rrie d out
depending on time inte rvals or mileag e
intervals, since oil loses its lubrication
properties not only through engine
op eration but als o through ageing.
Use genuin e Vauxhall oil filters.
Used oil filters and empty oil cans do not
belong in the domestic garbage. W e
recom mend hav ing oil changes and oil
filter change s carried out by a Vauxhall
Approve d Repairer. The Vauxhall
Approve d Repairer k nows the laws
concerning the disposal of used oil and
th ere fore protects th e envi ronment and
your health.
Coolant
Dur in g operation the sy ste m is pressur ized.
Th e tem peratu re may t he re fore rise to over
100 ° C.
The anti-freeze provides excellent
corrosion protection for the cooling and
heating sy ste m, as well as freeze
protec tion down to -30 °C.
Anti-freeze is a danger to health; it must
therefore be kept in the original
container and out of the reach of
children.
80
Page 83
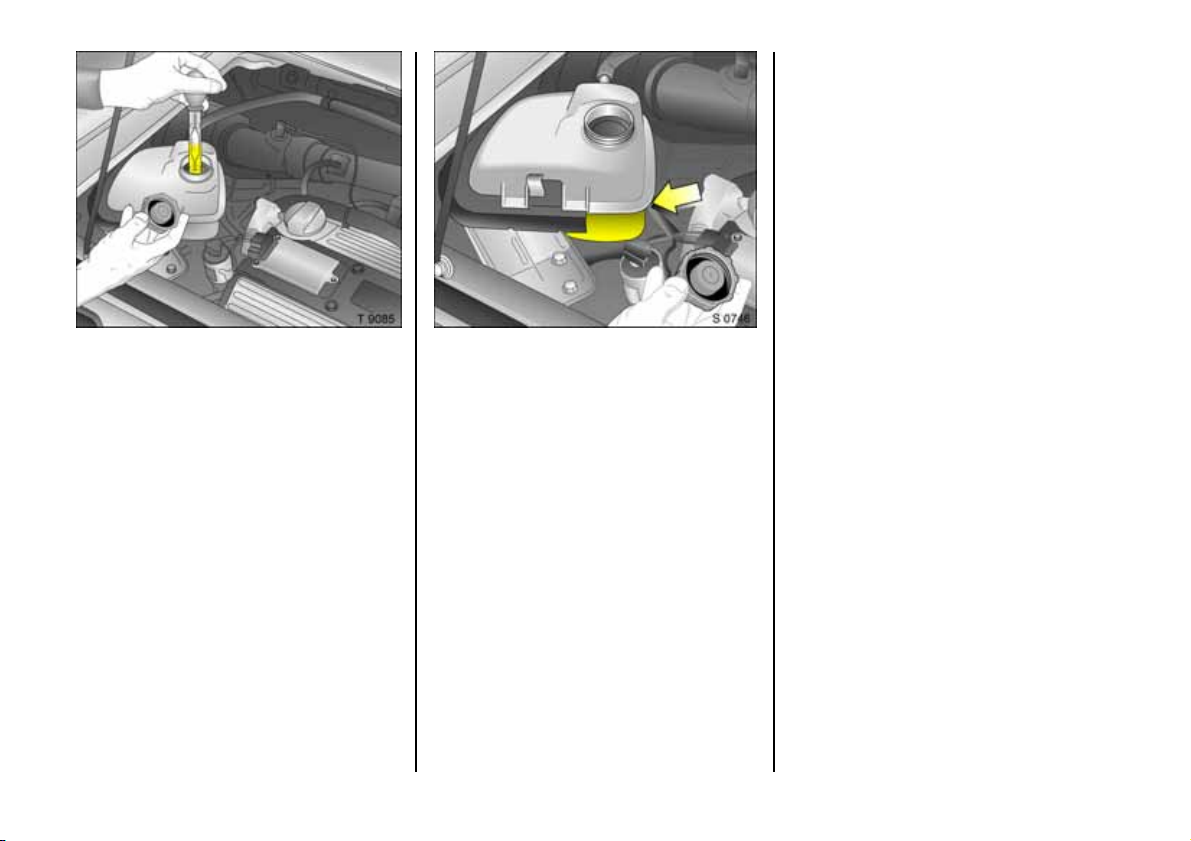
P age 81, L:\Owne r's Manu al\ Nv \Speed ster-VX220 \Maste r\KTA2 399-5\VML\SK IPOM.fm RH D, Vaux Edit ion 9.3.05
Freeze protection and corrosion
protection
Before the start of the cold we ather season,
have the coolant che cked with a calibrated
hydrome ter for correct concentration b y a
workshop. We recommend your Vauxhall
Approve d Repairer. The anti-freeze
content mu st guarantee freeze protection
down to app roximately -30 °C. An
insufficient co ncentration will re duce freeze
and corrosion protection. Add anti-freeze if
necessary.
If coolant loss is topped up with water,
have anti-freeze concentration chec ked
and more anti-freeze adde d as necessary.
Coolant level
Hardly any losses occur since the cooling
system is se aled and it is thus rarely
necessary to top up the coolant.
The coolant lev el in the exp ans ion tank
should be level with the centre seam when
the system is cold. It rises at eng ine
op erating temperature and drops again
wh en t he e ngine c oo ls down. If the lev el
falls below the centre seam, the coolant
shou ld be rep le nis hed .
Remove filler cap carefully so that pressure
can esca pe slowly. Top up a nti-freeze. If no
anti-freeze is available, top up with clean
tap water.
After topping up with water, have the
conce ntration checked, and anti-freeze
added if necessary, by a workshop. We
recommend your Vauxhall Approv ed
Repairer.
When clos ing , tighten coolant filler ca p as
far as it will go.
C oolant temp era ture
For physical reasons, the en gine
temperature gauge shows the coolant
temperature only if the coolant level is
adequate.
Dur in g operation the sy ste m is pressur ized.
Th e tem peratu re may t he re fore rise to over
100 ° C.
If the temp erature g auge fl as hes , ch e ck
the coola nt leve l immediately.
z Coolant level too low:
Top up coolant, see Coolant level. Have
the cause of the coolant loss remedied.
We recom mend you consult your
Vauxhall Ap proved Repairer.
z Coolant level O K:
Have the cause of the increased coolant
temperature remed ied. We recommend
you consult your Vauxhall Approved
Repairer.
81
Page 84
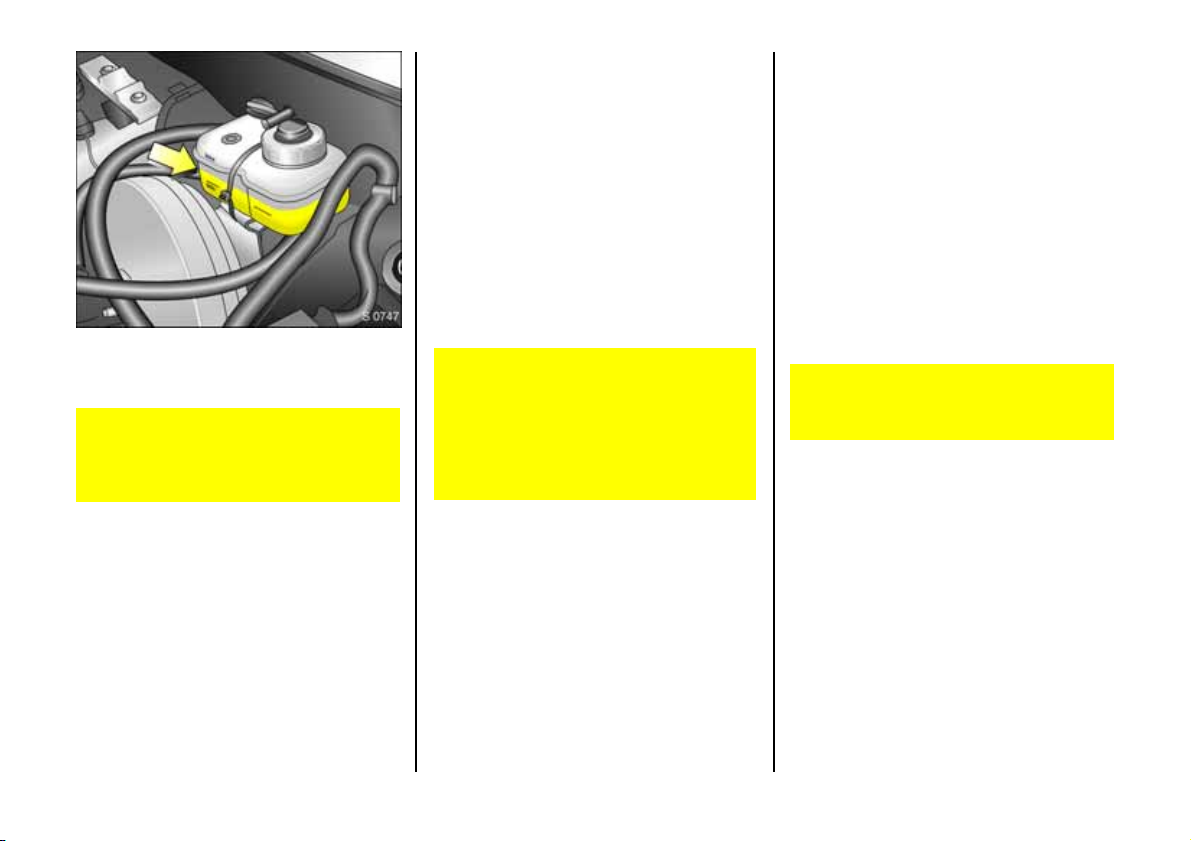
P age 82, L:\Owne r's Manu al\ Nv \Speed ster-VX220 \Maste r\KTA2 399-5\VML\SK IPOM.fm RH D, Vaux Edit ion 9.3.05
Brake fluid
Brake fluid level
Caution - brake fluid is poisonous and
corrosive. Do not allow it to contact eyes,
ski n, fab ric s or p ainted s urf aces. Direc t
contact ma y cause injuries and damage.
The fluid level in the container must not be
higher than the "MAX" mark or lower than
the "MIN" mark.
Use of s ome brake fluids could c ause
dam age or im pair braking effectiveness.
Stay we ll informed. We recommend that
you us e Vauxhall-approved high
performance brake fluid.
Extreme cleanliness is importa nt, since
brake fluid contamination can lead to
br ake sy ste m malfu nctions.
Afte r correcting the brake fluid level, have
the cause of the loss remedied. We
recommend that you consult your Vauxhall
Ap proved Repairer.
Brake fluid change
As brake fluid is hygroscopic, it ab sorbs
water. Vapour bubbles which impair the
braking effe ct may occur during braking.
The fluid change inte rvals specified in the
Servic e Boo kle t mu st therefore be
ob se r ved .
We recommend that you have brake
fluid changed by a Vauxhall Approved
Repairer, who will be familiar with the
require ments of the law as regards
disposal of brake fluid and can thus help
to protect the environment and your
health.
Windscreen wipers
Clear vision is essential for safe driving.
You should therefore perform regular
checks on the windscreen wiper to make
sure that it is opera ting correctly.
O peration of th e wind scre en wipe r on ice dup gla ss will result in damage to the wiper
lips.
Clean smearing wiper b lades with a soft
cloth and Vauxhall Windscreen Wash
Solvent.
If the wiper b ecome s frozen onto the glass,
it should be re leased with the aid of
Vauxhall De-icer Sp ray.
Operating the windscreen wiper if it is
frozen to the w indscreen may result in
damage to parts of the wiper system.
Wiper blades whose lips have become
harde ned, crack ed or covered with silicone
must be replaced. This may be necessary
as a result of the effects of ic e, thawing salt
or heat, or the incorrect use of cleaning
agents. We recommend that the wipe r
blad es are replaced annually.
82
Page 85
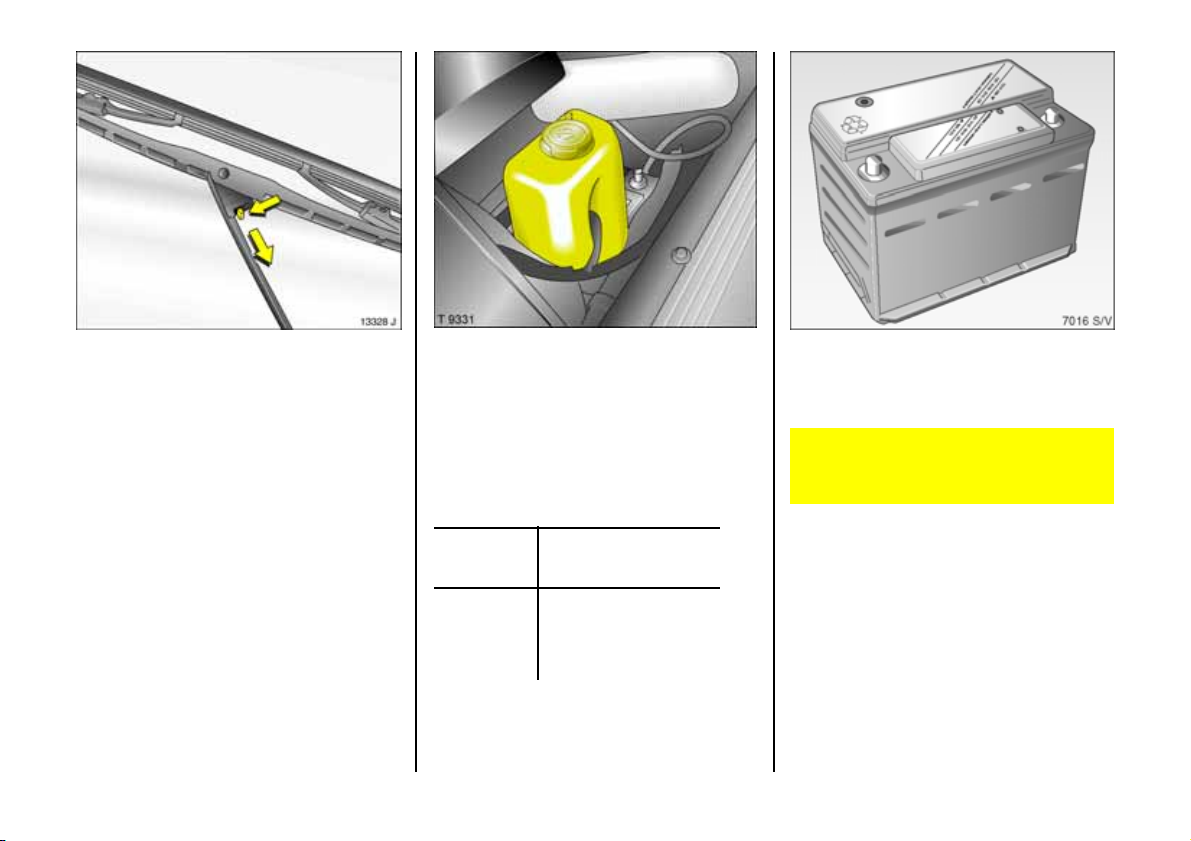
P age 83, L:\Owne r's Manu al\ Nv \Speed ster-VX220 \Maste r\KTA2 399-5\VML\SK IPOM.fm RH D, Vaux Edit ion 9.3.05
To rene w blade, lift wipe r arm, move
release le ver and deta ch wiper blade.
Windsc reen wash system
Fill only with clean water to prevent the
nozz les from clogging. To im prove
cleaning e fficiency, we recommend tha t
you add a little Vauxhall Cleaning Solvent
and Anti-fre eze.
To prevent the windscreen wash system
freezing in winter:
Fre eze
protection
down to
- 5 °C 1 : 3
- 10 °C 1 : 2
- 20 °C 1 : 1
- 30 °C 2 : 1
When closing the containe r, press the lid
firmly over the beaded edge.
Mixture - Vauxhall
Windscreen Wash
Solvent : Water
Battery
Th e batter y is m ainte nance-fr ee.
Ignition system
Electronic ignition systems use a very
high voltage. Do not touch the ignition
sy stem , da ng er to life.
83
Page 86

P age 84, L:\Owne r's Manu al\ Nv \Speed ster-VX220 \Maste r\KTA2 399-5\VML\SK IPOM.fm RH D, Vaux Edit ion 9.3.05
Pr otecti on o f electro nic co mponents
In order to avoid the breakdown of
electronic components within the electrical
system, never disconnect the battery with
the engine running. Never start the engine
while the battery is disconne cted (e.g.
when us ing jump le ads).
The battery must be d isconnected from the
vehic le before being charged : first
disconne ct the negativ e cab le an d the n the
positive ca ble. The polarity of the battery ,
i.e. the connections for the positive and
negative cables, must not be
interchanged. When reconnecting, first
connect the positive cable and then the
negative cable.
Vehicle decommissioning
Observe national regulations.
If the vehicle is to be taken off the road for
a period of several months, have the
following work carried out in order to
prevent damag e. We reco m mend you
consult your Vauxhall Approved Repairer.
z Wash and preserve the vehicle, see
page 87.
z Check preservation in engine
compa rtm ent and on underbody and
rectify where necessary.
z C le an and p reserve rubber seals on
doors.
z C hange engine oil, see page 80.
z C heck anti-freeze and corrosion
protection, see page 8 1.
z C heck coolant level, see page 81.
z Empty windscreen wash system.
Vehicle storage
z Park vehic le in dry and well-ventilated
premises. Engage first gear or re verse
gear. P lace wh eel c hock s o r s im ilar u nder
wheels to prevent vehicle from rolling
away.
z Do not apply hand brake.
z Disconnect b attery by disengag ing
negative terminal from vehicle electrical
sy ste m.
84
Page 87

P age 85, L:\Owne r's Manu al\ Nv \Speed ster-VX220 \Maste r\KTA2 399-5\VML\SK IPOM.fm RH D, Vaux Edit ion 9.3.05
Vehicle r ecomm issioning
Observe na tional regulations.
Carry ou t the fo llowing work before p uttin g
a vehicle back on the road.
z Connect battery, see page 84.
z Check tyre pressure , see page 96.
z Fill up windscreen wash syste m, see
page 83 .
z Check engine oil leve l, see page 7 9.
z Check coolant level, see page 81.
85
Page 88

P age 86, L:\Owne r's Manu al\ Nv \Speed ster-VX220 \Maste r\KTA2 399-5\VML\SK IPOM.fm RH D, Vaux Edit ion 9.3.05
Vehicle care
We recom mend that you consult your
Vauxhall Approved Repairer w ith regard to
care aids teste d and recommended by
Vauxhall.
In caring for your vehicle observe all
na tio nal env ir onm en tal reg ul at io ns,
particularly when wa shing your vehicle.
Regular, thorough care contributes to
improving the a ppearance of your vehicle
and maintaining its value. It is also a
prereq uis ite for cla im s mad e und er t he
warranty in the event of paint or corrosion
damage. In the following pages, we g iv e
you tips for vehicle care whic h, w ith correct
use, will help to ward off unavoidable and
ha rm ful e nvironmen tal influences.
Vehicle care aids 3
Vehicle wash:
z Car S ha mpoo
z Sponges
z Chamois Leather
z Wheel Clean ers
z Engine Cleaners
z Glass Cleaners
Exterior care:
z Touch-up Paints
z Car Polishe s/Colour Restorers
z Car W axes/Se ale rs
z Rust Preventative
z Lubrica nt S pr ays
z De-icer Sprays
z Win ds creen Wash S olv ent
Int e rior ca re :
z Interior/Upholstery Cleaner
86
Page 89

P age 87, L:\Owne r's Manu al\ Nv \Speed ster-VX220 \Maste r\KTA2 399-5\VML\SK IPOM.fm RH D, Vaux Edit ion 9.3.05
Washing
It is re com mende d that the vehicle is
washed by hand and that autom atic car
washes are avoided.
The paintwork of your vehicle is exposed to
environmental influences, e. g. continuous
changes in weather conditions, indus trial
waste gases and dust or tha wing salts, so
wash and wax your vehicle re gularly.
Bird droppings, dead insects, resin, polle n
and the like should be cleaned off
immediately , as they contain aggress ive
constituents which can cause paint
dam age.
Many contaminants are water soluble and
can be removed by thorough washing with
plenty of lukewarm water tog ether with a
car wash detergent (household dete rgents
are not recommende d as they ca n remove
wax and accelerate oxidation).
It is re com mende d that the vehicle be
washed by hand, in the shade, using a
cotton wash-m itt or sponge that is
regularly rinsed. Use a straight b ack and
forth washing m otion to av oid swirled
micro-scratches.
To minimise the damage from road salt,
the underside of the vehicle should be
rinsed with clean water as soon as possible
after travelling on treated roads.
Thoroughly rinse off and leather-off the
vehicle. Rinse leather frequently. Use
separate leathers for paint and w indow
surfaces: remnants of wax on the wind ow s
will impair vision .
So ft top c are
Pa rt icu la r ca re s houl d be ta k en wh e n
washing the fabric soft top. Carefully
vacuum the soft top before washing to
remove excess dust and dirt particles.
Wash in shade with a sponge (a chamois
will leave lint, while a brush may abrade
the threads) and use a Vauxhall Car
Shampoo and lukewarm water solution.
Wash the entire top uniformly to avoid
rings or spots. Rinse with plenty of clean
water.
Remove surface wa te r with a sponge and
allow to a ir dry. Be sure to allow th e soft to p
to dry comp letely before stowing as
prol ong ed s tow age of a w et or dam p r oo f
will promote rotting of the fabric.
z Remove bird droppings from the roof
immediately.
z Do not use aggressive cleaning agen ts
or stain removers.
z Do not direct water jets on to the edges
of the roof.
z Do not use sharp-e dged objects to
remov e s now an d i ce fr om th e roo f.
Whilst the soft top is weatherproof, it
cannot be guaranteed to be fully
waterproof if the vehicle is washed in an
automatic car wash. It is therefore
recommended that the vehicle is hand washed and that au tom atic car washes are
avoide d.
Exte rior stor age
Due to the soft top des ign being
weatherproof and not water tight in all
conditions , exte nded periods of rainfa ll
ma y result in some w ater collection in the
pass enger compartment. T herefo re, it is
recommended that the vehicle is not stored
outside without a suitable prote ctive
covering such as a showe r cover (available
from your Vauxhall App roved Repairer).
87
Page 90

P age 88, L:\Owne r's Manu al\ Nv \Speed ster-VX220 \Maste r\KTA2 399-5\VML\SK IPOM.fm RH D, Vaux Edit ion 9.3.05
Waxing
Wax y our vehicle regularly, in particula r
after it has b een washed using shampoo
and at the latest when water no longer
forms beads on the paintwork, otherwise
the p aintwork will dry out.
Never let things deteriorate this fa r.
Waxing prevents harmful chemical action.
Also wax e dge s an d fo lds on open e d door s
and flaps as well as the areas they cover.
Polishing
Polishing is necessary only if the paint has
become dull or if solid deposits have
become attached to it.
Polishing with silic one forms a protective
film, making waxing unnecessary .
Wheels
For alloy wheels we recommend use of
Alloy Wheel Cleaner.
Pain t dam age
Minor p aint damage such as stone chips ,
scratches etc. should be treated
immediately with Vauxhall Touch-Up Paint
or Ae rosol. If surface crack ing is beginning
to form, consult a workshop. We
recommend your Vauxhall Approved
Repairer. Do not forget the surfaces a nd
edges nearest to the road where s urface
cracks may also form unnoticed.
Ex te rio r li gh ts
Headlamp and other protective lamp
covers are made of plastic. If the lamp
covers re quire a dditional cleaning after the
vehicle has been washed, clean them with
Car Shampoo. Do not use any abrasive or
caustic agents, do not use an ice scraper,
and do not clean them dry.
Plastic and rubber parts
For additional cleaning of pla stic and
rubber parts use Cle aner. Do not use a ny
other a gent, and in particular do not use
solvents or petrol.
Wheels and tyres
Do not use high-pressure jet cleaners on
wheels and tyres.
Interior and upholstery
Clean the vehicle trim, including the
instrument panel using Cleaner.
Clean fabric upholstery with a vacuum
cleaner and brush. For removal of stains
use Cleaner, which is suitable for both
fabrics and vinyl.
For cleanin g fabrics, ca rp ets , th e
instrume nt panel a nd leather trim 3 in the
vehicle interior, do not use cleaning agents
such as acetone, carbon tetrac hloride ,
paint thinner, paint remover, nail varnis h
remover, washing powder or bleach. Petrol
is also uns uitable.
88
Page 91

P age 89, L:\Owne r's Manu al\ Nv \Speed ster-VX220 \Maste r\KTA2 399-5\VML\SK IPOM.fm RH D, Vaux Edit ion 9.3.05
Seat belts
Always ke ep seat be lts clean and dry.
Clean only with lukewarm wa ter or Cleaner.
Windows
Use a soft fluff-free cloth or chamois
lea ther in conjunction with Window
Cle aning Spray .
Vauxhall Windscreen Wash Solvent is
suitable for de-icing windows.
For mechanical removal of ice , use a
commercially available sharp-edged ice
scraper. Pre ss the sc ra per firmly against
the g lass so that no dirt can ge t under it
and scratch the glass.
Winds cr een wi pe r blade
We recommend that a sme aring wiper
blade be cleaned with a soft cloth and
Vauxhall Windscreen Wash Solvent, and
replaced if necessary.
Locks
The locks are lub ric ated before they leave
the factory with a high-grade lock cylinder
grease. Va uxha ll loc k cylinder grease
prevents the locks from free zing up. U se
de-icing agents only in emergencie s, as
they have a degreasing effect and will
impair the functioning of the locks. After
using de-icing age nts re-g rease the locks.
Engine compartment
Important areas of the engine
compartment hav e been prov ided with
permanen t prote ction at the factory in the
form of a high-quality, smooth protective
lacquer coating. Pa rts of the engine
compartment lacquered in the same colour
as the vehicle's paintwork ca n be treated in
the same way as all painted surfaces.
Wash engine only if absolutely ne cessary.
Before washing the engine, protect
alternator and brake fluid container with
plastic covers.
When w ashing the engine with a steam-jet
cleaner, do not direct the steam jet at ABS
components or the be lt drive and its
compon ents.
Underbody
The underbody should be washed
following the end of the cold weathe r
season to remove any dirt adhering to the
underbody.
89
Page 92
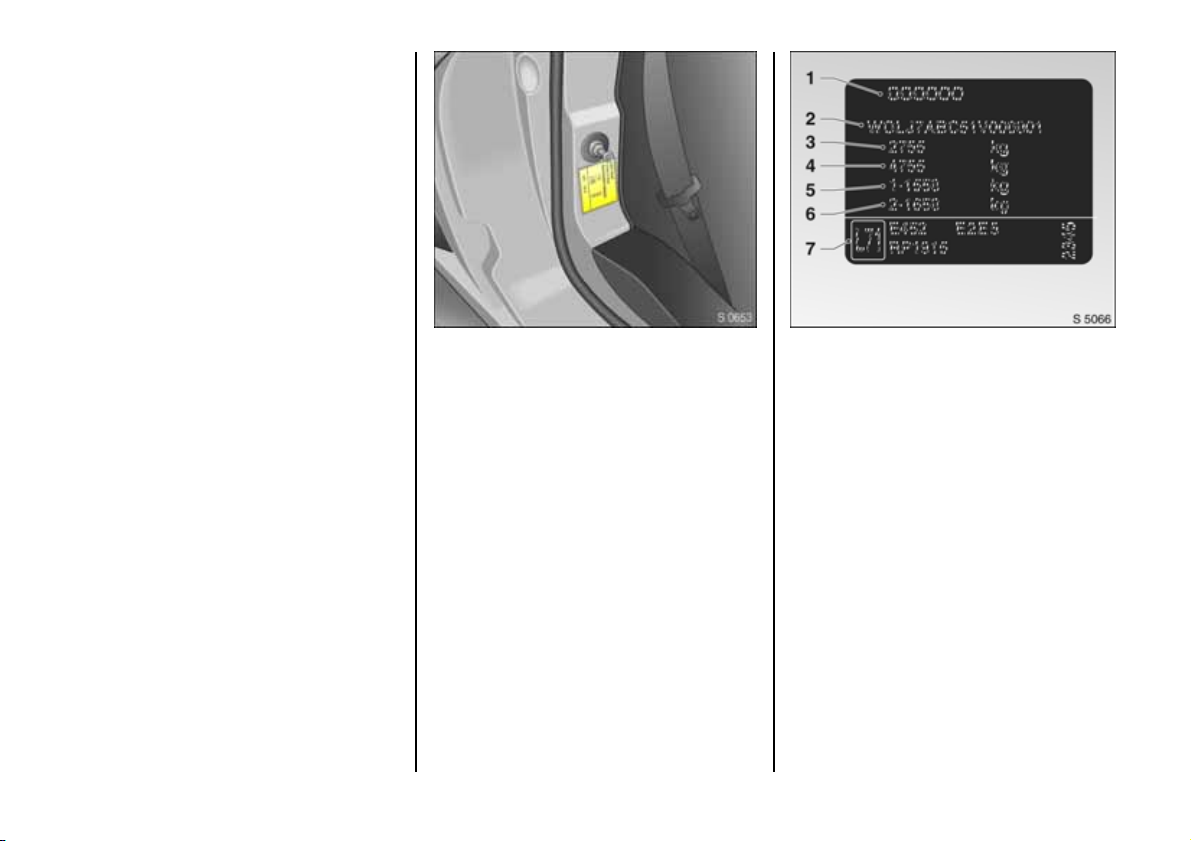
P age 90 , L:\Owner's Manual \Nv\Speedster -VX 220\Maste r\KTA2399 -5\VML\SK IPTechd ata.f m RHD, D Vaux Edit ion 9.3.05
Technical data
The technical data are determined in
accordance with European Comm unity
standards. Vauxhall reserve the right to
make m od ifications. Specifications in the
vehicle documents alw ays have priority
over those given in this manual.
90
Vehicle iden tificat ion data
The vehicle identification num ber is on the
vehicle identification plate, which is
mounted o n the right- hand s ide B-pillar, on
top of the instrument panel a nd on the
forward chassis, visible through the front
right-hand side wheel spokes.
Expl anation of V IN code:
1 Manufacturer
Type approval number
2 Vehic le identification number
3 Permissible gross vehicle weight
4 Permissible gross train weight
(not applicable)
5 Maximum permissible front axle load
6 Maximum permissible rear axle load
7 Vehicle-specific or country-specific data
Engine identifi er code and engine number
Th e en gin e id ent ifie r code and engine
number is locate d on the forwa rd face of
the oil filter housing.
Page 93

P age 91 , L:\Owner's Manual \Nv\Speedster -VX 220\Maste r\KTA2399 -5\VML\SK IPTechd ata.f m RHD, D Vaux Edit ion 9.3.05
Coolant, oil s, br ake fluid
To top up or lubricate:
z Coolant,
z Bra ke fluid,
z Manual transmission oil
Consult a workshop. We recommend your
Vauxhall Approved Rep airer, who w ill
advise you of the correct products to use.
Im portant : The use of incorrect lubrican ts
and fluids can cause severe damage to
your vehicle.
Engine oils
For engine lubrication, we recomm end
using Vauxhall engine oils with the
following qualities and viscosities:
ACEA A3-/B3- SAE 0W-30
– or –
ACEA A3-/B3- SAE 5W-40
– or –
ACEA A3-/B3- SAE 10W-40
Engine oil q uality
When using comm ercially ava ilab le engine
oils, as a matter of principle only those oils
that meet the minimum quality
requirements specified in the following
table are permissible.
Engines Oils
Pe tr ol A CEA -A3- or
ACEA-A3-/B3-
Information on ACEA classifications
The Association des C onstructeurs
Euro pé en s d' Automobiles classifies engine
oils according to their performance
(quality).
Each category is given letters and
numbers, e.g. A3-98.
The le tte r indica tes th e f ield of applicatio n:
A = Petrol e ngines in passenger ca rs
B = Diese l engines in pa ssenger cars
E = Diesel engines in trucks
The first number indicates the quality in
asce nding numerical order.
Th e se co nd num ber " 98" s ignif ies th at the
ACEA classification is applicable as from
January 199 8. Higher year numbers
indicate progressively refined oil
classifications.
91
Page 94
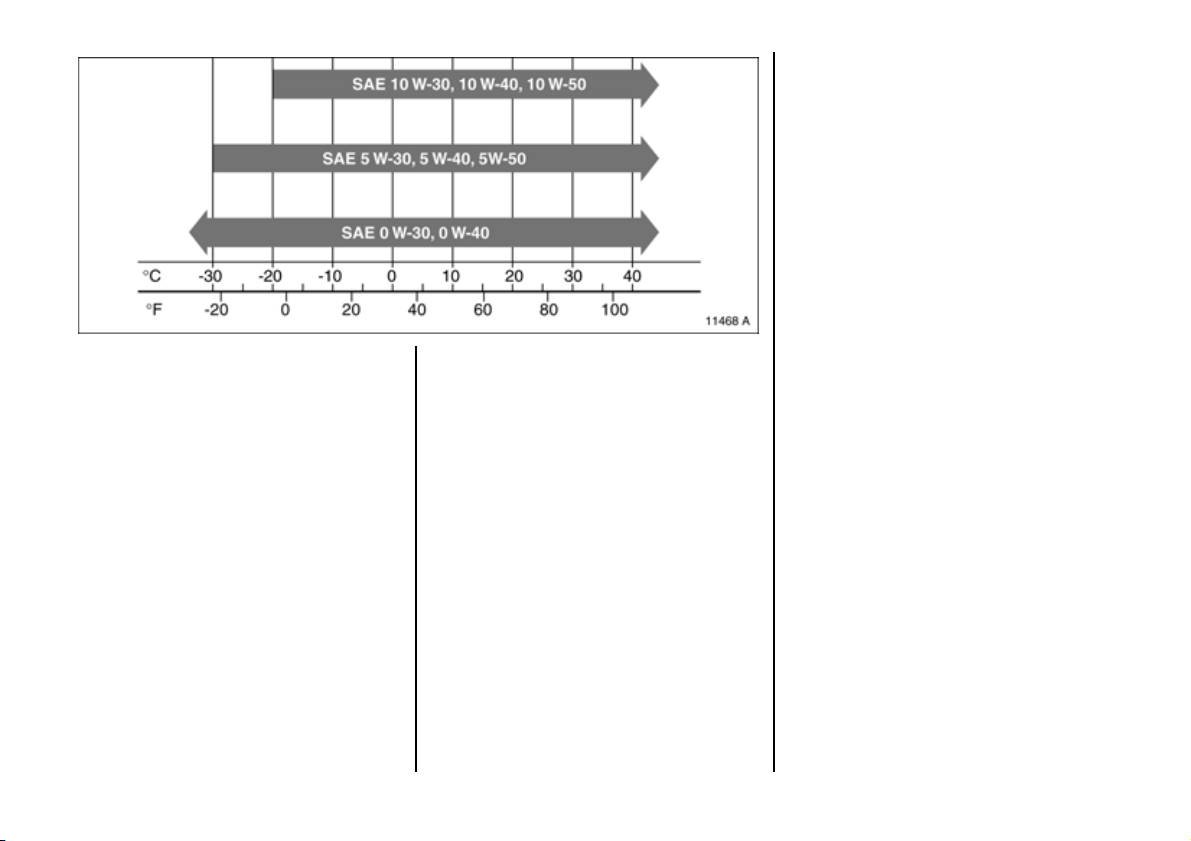
P age 92 , L:\Owner's Manual \Nv\Speedster -VX 220\Maste r\KTA2399 -5\VML\SK IPTechd ata.f m RHD, D Vaux Edit ion 9.3.05
Th e SAE classif ication does n ot provide
inform ation on the quality of the oil; it
merely indicates the ra nge of applica tion
of the oil dependent on the outside
temperature; see chart.
Do not sw itch to a different viscosity in the
e vent of brief temp era ture fluc tuati ons.
Furthe r information, see Service Booklet.
Eng ine oi l viscosity
Only the following viscosity class es are
permissible for p etrol engines:
SAE 10 W-30 (or higher than 30) or
SAE 5 W-30 (or higher than 3 0) or
SAE 0 W-30 (or higher than 3 0).
The range of applica tion of the oil is
dependent on the outside temperature,
see the viscosity chart.
92
Information on SAE classifications
Engine and trans mission oils are classified
by the Society of Automotive Engineers
according to their visc osity. Vis cos ity is the
measure of internal friction of the oil in flux,
depen den t o n its temp erature.
Page 95

P age 93 , L:\Owner's Manual \Nv\Speedster -VX 220\Maste r\KTA2399 -5\VML\SK IPTechd ata.f m RHD, D Vaux Edit ion 9.3.05
Engine data
Sales designation
Eng ine identifier code
Numb er of cylinders 4 4
Bore dia. (mm) 86.0 86.0
Stroke (mm) 94.6 86.0
Piston displacement (cm3) 2198 1998
Max. engine power (kW)
at rpm
Torque (Nm )
at rpm
Compression ratio 10.0 8.8
Octane requirement (RON)
1)
un le ad ed
or unle a ded
or unle a ded
Max. permiss ible eng ine speed,
continuous (rpm) ap prox .
Max. vehicle speed (km/h; mph)
Oil cons umption (l/1000 km)
2.2 16V
Z 22 SE
108
5800
203
4000
95 (P)
98 (PP)
91 (R)
1)
1)
1)2 )
2.0 Turbo
Z 20 LET
147
5500
250
1950 to 5300
95 (P )
98 (PP)
91 (R)
6500 6750
217;135 243;151
0.6 0.6
1)
1)
1)2)
1)
Sta ndard high-quality fuels, e.g. unleaded EN 228: R = Regular, P = Premium, PP = Premium Plus;
val ue p rint ed in bo ld: recomme nded f ue l.
2)
If no unl eade d premium- grade f uels are av ail able , 91 RON can be used, ta king car e t o avoi d severe engi ne load s a nd driving at full throttle.
93
Page 96

P age 94 , L:\Owner's Manual \Nv\Speedster -VX 220\Maste r\KTA2399 -5\VML\SK IPTechd ata.f m RHD, D Vaux Edit ion 9.3.05
Fu el consumptio n,
CO
em ission (approx.)
2
The EC Directive 80/1268/EEC as last
amended by 1999/10 0/EC applies to
measurement of the fuel consumption of
vehic le s.
Fuel consumption was prev iously given for
urban traffic, and constant speeds of 56
mph (90 km/h) and 120 mph (75 km/h). The
new stan dar d is b ase d on t he emis sio n
Fuel consumption (approx. l/100 k m
Engine Z 22 S E
Urban 12.3 11.9
Extr a-u rban 6.4 6.5
Combined 8.5 8 .5
CO
2
205 202
1)
), CO
em issions (ap prox. g/km).
2
2)
Z 20 LET
drive cy cles to determine CO2 em ission an d
fuel consumption.
Urban driving is ass umed to make up
around 1/3 of the overall consumption
figure and extra-urba n driving around 2/3.
Cold starting an d accele ration phases are
additionally taken into account. The new
figures are conse quently higher than the
old ones.
The new regulation also requires the CO2
emission leve l to be s ta ted.
The figure given must not be take n as a
guarantee for the actual fuel consumption
of th e v ehi cle.
Discrepancies between actual fuel
consumption and the figures given can
result from driving style, road and traffic
conditions or the condition of the vehicle.
2)
94
1)
To convert l/100 k m into mpg, divide 282 by number of litres/100 km.
2)
Sales desig nation: see page 93
Page 97

P age 95 , L:\Owner's Manual \Nv\Speedster -VX 220\Maste r\KTA2399 -5\VML\SK IPTechd ata.f m RHD, D Vaux Edit ion 9.3.05
Weights, payload and roof load
Th e paylo ad is t he d iffe re nc e between th e
permissible gross vehicle weight and the EC
kerb weight.
The com bine d total of front and rear axle
lo ads (s ee vehicle identific ation pla te) must
not exceed the permissible gross vehicle
Vehicle weights (kg)
Model Permissible gross
vehicle weight
2)
Z 22 SE
Z 20 LET
2)
1150 945
1150 1005
weight, i.e. if the front axle load is being
fully utilize d, the re ar axle load must not be
suc h that the perm issible gross vehicle
weight is exceeded.
Optional equipment and accessories
increase the kerb weight and in some cases
also the permissible gross vehicle w eight,
which means that the payload will also
change slightly.
Note the we ights given on the vehicle
identification plate.
Roof loads must not be carried on the
VX220.
Driving hints – page 50.
Kerb w ei ght
1)
1)
Acc ording to EC Direc tive, includi ng assumed wei ghts for d river (68 kg) , lu ggage (7 kg ) and all fl uids
(t ank 90 % ful l).
2)
Sales desig nation: see page 93
95
Page 98

P age 96 , L:\Owner's Manual \Nv\Speedster -VX 220\Maste r\KTA2399 -5\VML\SK IPTechd ata.f m RHD, D Vaux Edit ion 9.3.05
Tyr es
Restrictions
Not all tyres ava ila ble on the market
currently fulfil the neces sary design
req uirements. Consult a workshop. We
recom mend your Vauxhall Approved
Repairer to establish which makes of tyre
have been approved by Vauxhall.
Winter tyres
Bridgestone WT 12 tyres have been
approved for use on your VX220 in winter
driving conditions.
Special size wheels: 5.5J x 15 front and 6.0J
x 15 rear, ava ilab le from your Vauxhall
Approve d Repairer, must be used in
conjunction with these tyres.
Tyr e chai ns
Restrictions
Tyre chains may be used on the rear drive
wheels only - see page 67.
Wheels
Tightening torque: 90 Nm
Standa rd tyre Inflation pressure wit h full load (bar/psi)
Fro nt Rea r
Speedster 175/55 R17
225 /45 R1 7
Speedster Turbo 175/55 R17
225 /45 R1 7
1)
To convert to kPa mult iply bar by 100 (1 bar = 100 k Pa).
2)
Br idg estone Pot enza RE 04 0 only , availabl e from your Vauxhall Appr oved Repai rer.
2)
2)
2)
2)
1.8 /26 -
- 1.9 /27 .5
1.8 /26 -
- 2.1 /30
Wint er tyre Inflati on press ure with full load (ba r/psi)
Fro nt Rea r
185/65 R15 (M+S)
205/60 R15 (M+S)
1)
To convert to kPa mult iply bar by 100 (1 bar = 100 k Pa).
2)
Bridgestone WT12 winter tyres only.
2)
2)
1.8 /26 -
- 1.9/27.5
Tyre inflation pressures in bar/psi
The ty re pressures given are valid for cold
tyres. The increased tyre pres sure resulting
from extensive driving must not be
reduced.
The press ures given apply to both summer
and winter tyres - s ee page 64 .
1)
1)
96
Page 99

P age 97 , L:\Owner's Manual \Nv\Speedster -VX 220\Maste r\KTA2399 -5\VML\SK IPTechd ata.f m RHD, D Vaux Edit ion 9.3.05
Electrical system
Elec tronic ignition sy ste ms use a v ery
high v olta g e. Do no t to u ch ; d ang er to
li f e .
Ty pe Voltage Amp hours
Battery - 12 Volt 45 Ah
Central door locking s ystem 3 back-up battery - 12 Volt 4 Ah
Radio frequency remote control batteries CR 12 20 3 Volt (x2) -
97
Page 100

P age 98 , L:\Owner's Manual \Nv\Speedster -VX 220\Maste r\KTA2399 -5\VML\SK IPTechd ata.f m RHD, D Vaux Edit ion 9.3.05
Capacities (approx. in litres)
Engine Z 22 SE
Cooling system 12.3 1 3.2
Fuel tank 36.0 3 6.0
Engine oil with filter change 5.5 4 .5
Engine oil between MIN a nd MAX on dipstick 1.0 1.0
1)
Z 20 LET
1)
1)
Sales d esignat ion: see page 9 3
98
 Loading...