

Onwa KCOMBO-7 Owner's Manual

KCOMBO-7
OPERATOR'SMANUAL
GPSCHARTPLOTTERWITHFISHFINDER
SAFETY INSTRUCTIONS
WARNING
Do not ope n the equipment.
Only qual ified pe rso nnel should work
inside the equipment.
Do not disassemble or modify th e
equipment.
Fire,ele ctrica l shock or seri ous injury
can result.
Imme dia tel y turn off the power at
the sw itc hboard if the equipment is
emitting smo ke or fire.
Cont inued use of the equipmen t can
caus e fire or elect rical shock . Contact
a agent for service .ONWA
Use the prope r fuse.
Use of a wrong fu se can damag e the
equipme nt or cause fire.
Be sur e the power supply is
compatible with the equi pment.
Inco rrect power supp ly ma y cause the
equipme nt to overheat.
The useable temperat ure ran ge
-15 to 55 for the display unit. ćć
Use of the equipment out of th ose
ranges ma y damage the equipment.
Safety Instructions fo r t he Operator
Safety Instruction s for the Installer
WARNING
Do not ope n the cover unless totall y
familiar with electrical circui ts and
service manual.
Improper han dling can result i n
electrical shock.
Turn off the power at the switchboard
before be ginning the installation.
Fire or ele ctrical shock can result if th e
powe r is le ft on.
Be sur e that the power supply is
compatible with the voltage rating
of the equipment.
Conn ection of an in correct power
supp ly can cau se fire or equipment
damage.
Use the prope r fus e.
Use of a wrong fu se can damag e the
equipme nt or cause fire.

1ĂĂĂĂĂĂĂĂĂĂĂĂĂĂĂĂĂĂĂĂĂĂĂOPERATIONOVERVIEW7
1.1
ĂĂĂĂĂĂĂĂĂĂĂĂĂĂĂĂĂĂĂĂĂĂĂĂ
Keypad instruction
7
1.2
ĂĂĂĂĂĂĂĂĂĂĂĂĂĂĂĂĂĂĂĂĂ
Turning ON and OFF Power 8
1.3
ĂĂĂĂĂĂĂĂĂĂĂĂĂĂĂĂĂĂĂĂ
Adjusting Brilliance and DIM
8
1.4
9
ĂĂĂĂĂĂĂĂĂĂĂĂĂĂĂĂĂĂĂĂĂĂĂĂĂĂDisplay Modes
FOREWORD1ĂĂĂĂĂĂĂĂĂĂĂĂĂĂĂĂĂĂĂĂĂĂĂĂĂĂ
2ĂĂĂĂĂĂĂĂĂĂĂĂĂĂĂĂĂĂĂĂĂPLOTTERDISPLAYOVERVIEW10
2.1 10ĂĂĂĂĂĂĂĂĂĂĂĂĂĂĂĂĂĂĂĂChoosing the Display Range
2.2 10ĂĂĂĂĂĂĂĂĂĂĂĂĂĂĂĂĂĂĂĂĂĂĂĂMoving
the Cursor
2.3 ĂĂĂĂĂĂĂĂĂĂĂĂĂĂĂĂĂĂPanning the PLOTTER Display 11
2.4 ĂĂĂĂĂĂĂĂĂĂĂĂĂĂĂĂĂĂĂCentering Own Ship's Position 11
2.5 ĂĂĂĂĂĂĂĂĂĂĂĂĂĂĂĂĂĂĂĂĂĂĂĂĂĂĂCoordinates 11
2.6 ĂĂĂĂĂĂĂĂĂĂĂĂĂĂĂĂĂĂĂĂĂĂĂĂĂĂĂĂĂĂĂMap 12
2.7 ĂĂĂĂĂĂĂĂĂĂĂĂĂĂĂĂĂĂĂĂĂĂĂĂĂĂPerspective View 12
2.8 ĂĂĂĂĂĂĂĂĂĂĂĂĂĂĂĂĂĂĂĂĂĂĂĂĂĂĂĂHeading Line 13
2.9 Cursor 14ĂĂĂĂĂĂĂĂĂĂĂĂĂĂĂĂĂĂĂĂĂĂĂĂĂĂĂĂĂĂĂ
2.10 Ship shape/color 15ĂĂĂĂĂĂĂĂĂĂĂĂĂĂĂĂĂĂĂĂĂĂĂĂĂĂĂ
2.11 ĂĂĂĂĂĂĂĂĂĂĂĂĂĂĂĂĂĂĂĂĂĂĂĂĂĂĂRange Circle 15
319ĂĂĂĂĂĂĂĂĂĂĂĂĂĂĂĂĂĂĂĂĂĂĂĂĂĂĂĂĂĂTRACK
3.1 19ĂĂĂĂĂĂĂĂĂĂĂĂChanging Track Plotting Interval, Stopping Plotting
3.2 20ĂĂĂĂĂĂĂĂĂĂĂĂĂĂĂĂĂĂĂĂĂĂĂĂĂDisplaying the Track
3.3 ĂĂĂĂĂĂĂĂĂĂĂĂĂĂĂĂĂĂĂĂĂĂĂĂĂĂCreating Track Data 20
3.4 ĂĂĂĂĂĂĂĂĂĂĂĂĂĂĂĂĂĂĂĂĂĂĂĂĂĂĂĂErasing Track 21
3.5 ĂĂĂĂĂĂĂĂĂĂĂĂĂĂĂĂĂĂĂĂĂĂĂĂErasing All Backup Data 21
2.12 DrawingĂĂĂĂĂĂĂĂĂĂĂĂĂĂĂĂĂĂĂĂĂĂĂĂĂĂĂĂĂ16
2.13 PaletteĂĂĂĂĂĂĂĂĂĂĂĂĂĂĂĂĂĂĂĂĂĂĂĂĂĂĂĂĂĂĂ17
2.14 Map DirectionĂĂĂĂĂĂĂĂĂĂĂĂĂĂĂĂĂĂĂĂĂĂĂĂĂĂĂ18
MAINPERFORMANCEANDSPECIFICATIONS2ĂĂĂĂĂĂĂĂĂĂĂĂ
CONFIGERATION6ĂĂĂĂĂĂĂĂĂĂĂĂĂĂĂĂĂĂĂĂĂĂĂ
CONTENTS

4ĂĂĂĂĂĂĂĂĂĂĂĂĂĂĂĂĂĂĂĂĂĂĂĂĂĂĂĂWAYPOINT/MOB22
4.1 ĂĂĂĂĂĂĂĂĂĂĂĂĂĂĂĂĂĂĂĂĂĂĂĂĂĂEntering Waypoints 22
4.2 ĂĂĂĂĂĂĂĂĂĂĂĂĂĂĂĂĂĂĂĂĂĂĂĂEntering the MOB Mark 24
4.3 ĂĂĂĂĂĂĂĂĂĂĂĂĂĂĂĂĂĂĂĂĂĂDisplaying Waypoint Name 24
4.4 ĂĂĂĂĂĂĂĂĂĂĂĂĂĂĂĂĂĂOperation on the Waypoint Editing 25
4.5 ĂĂĂĂĂĂĂĂĂĂĂĂĂĂĂĂĂĂĂĂĂĂĂĂĂErasing Waypoints 26
5ROUTES27ĂĂĂĂĂĂĂĂĂĂĂĂĂĂĂĂĂĂĂĂĂĂĂĂĂĂĂĂ
5.1 ĂĂĂĂĂĂĂĂĂĂĂĂĂĂĂĂĂĂĂĂĂĂĂĂĂĂĂCreating Routes 27
5.2 ĂĂĂĂĂĂĂĂĂĂĂĂĂĂĂĂĂĂĂĂĂĂĂĂĂĂĂEditing Routes 29
5.3 ĂĂĂĂĂĂĂĂĂĂĂĂĂĂĂĂĂĂĂĂĂĂĂĂĂĂĂErasing Routes 30
6ĂĂĂĂĂĂĂĂĂĂĂĂĂĂĂĂĂĂĂĂĂĂĂĂĂĂĂDESTINATION32
6.1 ĂĂĂĂĂĂĂĂĂĂĂĂĂĂĂĂĂĂĂĂSetting Destination by Cursor 32
6.2 ĂĂĂĂĂĂĂĂĂĂĂĂĂĂĂSetting Destination by Waypoint (WPT) 33
6.3 ĂĂĂĂĂĂĂĂĂĂĂĂĂĂĂĂĂĂĂĂĂSetting Route as Destination 33
6.4 ĂĂĂĂĂĂĂĂĂĂĂĂĂĂĂĂĂĂĂSetting Track Data as Destination 35
6.5 ĂĂĂĂĂĂĂĂĂĂĂĂĂĂĂĂĂĂĂĂĂĂĂĂCanceling Destination 36
7ĂĂĂĂĂĂĂĂĂĂĂĂĂĂĂĂĂĂĂĂĂĂĂĂĂĂĂĂĂĂALARM39
7.1 ĂĂĂĂĂĂĂĂĂĂĂĂĂĂĂĂĂĂĂĂĂĂĂĂĂAnchor Drag Alarm 39
7.2 Arrival Alarm 40ĂĂĂĂĂĂĂĂĂĂĂĂĂĂĂĂĂĂĂĂĂĂĂĂĂĂĂ
7.3 XTE (Cross-Track Error) Alarm 41ĂĂĂĂĂĂĂĂĂĂĂĂĂĂĂĂĂĂĂĂ
7.4 Speed Alarm 41ĂĂĂĂĂĂĂĂĂĂĂĂĂĂĂĂĂĂĂĂĂĂĂĂĂĂĂĂ
7.5 Voltage Alarm 42ĂĂĂĂĂĂĂĂĂĂĂĂĂĂĂĂĂĂĂĂĂĂĂĂĂĂĂ
7.6 ĂĂĂĂĂĂĂĂĂĂĂĂĂĂĂĂĂĂĂĂĂĂĂĂĂĂĂĂTime Alarm 42
7.7 ĂĂĂĂĂĂĂĂĂĂĂĂĂĂĂĂĂĂĂĂĂĂĂĂBuzzer Type Selection 43
6.6 Distance 37ĂĂĂĂĂĂĂĂĂĂĂĂĂĂĂĂĂĂĂĂĂĂĂĂĂĂĂĂĂ
8 ĂĂĂĂĂĂĂĂĂĂĂĂĂĂĂĂĂĂĂĂĂĂĂĂĂĂĂĂĂDRAWING 44
8.1 ĂĂĂĂĂĂĂĂĂĂĂĂĂĂĂĂĂĂĂĂĂĂĂĂĂĂĂDrawing Marks 44
8.2 ĂĂĂĂĂĂĂĂĂĂĂĂĂĂĂĂĂĂĂĂĂĂĂĂĂĂĂDrawing Lines 45
8.3 Drawing Place name 45ĂĂĂĂĂĂĂĂĂĂĂĂĂĂĂĂĂĂĂĂĂĂĂĂ

8.4 Editing Drawing Marks 46ĂĂĂĂĂĂĂĂĂĂĂĂĂĂĂĂĂĂĂĂĂĂĂ
8.5 ĂĂĂĂĂĂĂĂĂĂĂĂĂĂĂĂĂĂĂĂĂĂĂEditing Drawing Lines 47
8.6 ĂĂĂĂĂĂĂĂĂĂĂĂĂĂĂĂĂĂĂĂEditing Drawing Place Name 48
8.7 ĂĂĂĂĂĂĂĂĂĂĂĂĂĂĂĂĂĂĂĂĂĂĂErasing Drawing Marks 49
8.8 Erasing Drawing Lines 50ĂĂĂĂĂĂĂĂĂĂĂĂĂĂĂĂĂĂĂĂĂĂĂ
8.9 Erasing Drawing Place Name 51ĂĂĂĂĂĂĂĂĂĂĂĂĂĂĂĂĂĂĂĂĂ
9OTHERSETTING52
ĂĂĂĂĂĂĂĂĂĂĂĂĂĂĂĂĂĂĂĂĂĂĂĂĂ
9.1 Map Scale 52
ĂĂĂĂĂĂĂĂĂĂĂĂĂĂĂĂĂĂĂĂĂĂĂĂĂĂĂĂĂĂ
9.2 Unit of Measurement 52
ĂĂĂĂĂĂĂĂĂĂĂĂĂĂĂĂĂĂĂĂĂĂĂĂĂĂ
9.3 Bearing Reference 53
ĂĂĂĂĂĂĂĂĂĂĂĂĂĂĂĂĂĂĂĂĂĂĂĂĂĂ
Ă
9.4 Magnetic Variation 54
ĂĂĂĂĂĂĂĂĂĂĂĂĂĂĂĂĂĂĂĂĂĂĂĂĂĂ
Ă
9.5 Deviation
55
ĂĂĂĂĂĂĂĂĂĂĂĂĂĂĂĂĂĂĂĂĂĂĂĂĂĂĂĂĂ
ĂĂ
9.6 Time
55ĂĂĂĂĂĂĂĂĂĂĂĂĂĂĂĂĂĂĂĂĂĂĂĂĂĂĂĂĂĂ
ĂĂ
9.7 TTG/ETA speed
56
ĂĂĂĂĂĂĂĂĂĂĂĂĂĂĂĂĂĂĂĂĂĂĂĂĂ
Ă
9.10 GPS setting
57
ĂĂĂĂĂĂĂĂĂĂĂĂĂĂĂĂĂĂĂĂĂĂĂĂĂĂ
Ă
9.11 NMEA data display 59
ĂĂĂĂĂĂĂĂĂĂĂĂĂĂĂĂĂĂĂĂĂĂĂ
9.8 Key beep
56
ĂĂĂĂĂĂĂĂĂĂĂĂĂĂĂĂĂĂĂĂĂĂĂĂĂĂĂ
Ă
9.9 Wind screen
56
ĂĂĂĂĂĂĂĂĂĂĂĂĂĂĂĂĂĂĂĂĂĂĂĂĂĂ
Ă
10THEAISFUNTION60ĂĂĂĂĂĂĂĂĂĂĂĂĂĂĂĂĂĂĂĂĂĂĂĂĂĂĂ
10.1 Vessels list 60ĂĂĂĂĂĂĂĂĂĂĂĂĂĂĂĂĂĂĂĂĂĂĂĂĂĂĂĂĂĂ
10.2 The collision alarm 60ĂĂĂĂĂĂĂĂĂĂĂĂĂĂĂĂĂĂĂĂĂĂĂĂĂĂ
10.3 Own ship's information 61ĂĂĂĂĂĂĂĂĂĂĂĂĂĂĂĂĂĂĂĂĂĂĂĂ
10.4 Chart Screen 61ĂĂĂĂĂĂĂĂĂĂĂĂĂĂĂĂĂĂĂĂĂĂĂĂĂĂĂĂĂ
10.5 View AIS vessels' information on chart screen 62ĂĂĂĂĂĂĂĂĂĂ
10.6 Check all AIS ships within the scope of Radar (AIS screen) 62ĂĂĂĂĂ
10.7 Emergency alarm 63ĂĂĂĂĂĂĂĂĂĂĂĂĂĂĂĂĂĂĂĂĂĂĂĂĂ
10.8 Entry/Departure setting 63ĂĂĂĂĂĂĂĂĂĂĂĂĂĂĂĂĂĂĂĂĂĂĂĂ
10.9 AIS Vessel 64ĂĂĂĂĂĂĂĂĂĂĂĂĂĂĂĂĂĂĂĂĂĂĂĂĂĂĂĂĂĂ

12INSTALLATION78ĂĂĂĂĂĂĂĂĂĂĂĂĂĂĂĂĂĂĂĂĂĂĂĂĂ
11ECHOSOUNDEROVERVIEW65ĂĂĂĂĂĂĂĂĂĂĂĂĂĂĂĂĂĂĂĂ
11.1 Sonar mode 65
ĂĂĂĂĂĂĂĂĂĂĂĂĂĂĂĂĂĂĂĂĂĂĂĂĂĂĂĂĂĂ
11.2 Gain 67
ĂĂĂĂĂĂĂĂĂĂĂĂĂĂĂĂĂĂĂĂĂĂĂĂĂĂĂĂĂĂĂĂĂĂ
11.3 Range 67
ĂĂĂĂĂĂĂĂĂĂĂĂĂĂĂĂĂĂĂĂĂĂĂĂĂĂĂĂĂĂ
ĂĂĂ
11.4 TVG 68
ĂĂĂĂĂĂĂĂĂĂĂĂĂĂĂĂĂĂĂĂĂĂĂĂĂĂĂĂĂĂĂ
ĂĂĂ
11.5 Pic. Advance 69
ĂĂĂĂĂĂĂĂĂĂĂĂĂĂĂĂĂĂĂĂĂĂĂĂĂĂĂ
ĂĂ
11.6 Split ratio 69
ĂĂĂĂĂĂĂĂĂĂĂĂĂĂĂĂĂĂĂĂĂĂĂĂĂĂĂĂ
ĂĂ
11.7 Sonar Menu 70
ĂĂĂĂĂĂĂĂĂĂĂĂĂĂĂĂĂĂĂĂĂĂĂĂĂĂ
ĂĂ
11.8 Alarm 75
ĂĂĂĂĂĂĂĂĂĂĂĂĂĂĂĂĂĂĂĂĂĂĂĂĂĂĂĂĂ
ĂĂĂ
11.9 System Menu 76
ĂĂĂĂĂĂĂĂĂĂĂĂĂĂĂĂĂĂĂĂĂĂĂĂĂ
ĂĂ
11.10 Data Field 77
ĂĂĂĂĂĂĂĂĂĂĂĂĂĂĂĂĂĂĂĂĂĂĂĂĂĂĂ
ĂĂ
16DATAIN/OUTDESCRIPTION82ĂĂĂĂĂĂĂĂĂĂĂĂĂĂĂĂĂĂĂĂĂĂ
13INTERCONNECTIONDIAGRAW79
ĂĂĂĂĂĂĂĂĂĂĂĂĂĂĂĂĂĂĂĂ
14DISPLAYSIZE80
ĂĂĂĂĂĂĂĂĂĂĂĂĂĂĂĂĂĂĂĂĂĂĂĂĂĂĂ
15SHORTCUTS81ĂĂĂĂĂĂĂĂĂĂĂĂĂĂĂĂĂĂĂĂĂĂĂĂĂĂĂ
17MENUTREE83ĂĂĂĂĂĂĂĂĂĂĂĂĂĂĂĂĂĂĂĂĂĂĂĂĂĂĂĂĂ
18ABBREVIATIONS89ĂĂĂĂĂĂĂĂĂĂĂĂĂĂĂĂĂĂĂĂĂĂĂĂĂĂĂ
19GLOSSARY90ĂĂĂĂĂĂĂĂĂĂĂĂĂĂĂĂĂĂĂĂĂĂĂĂĂĂĂĂĂ

1
The KCOMBO ONWA GPS PLOTTER aid are specially designed for the vessel
traffic management, ONWA is a professional brand of the domestic and foreign
navigation products.
The products are designed to be all-sealed and waterproof, can be rapid
position-fixing and resistant to poor environment. The software is powerful by
using the advanced ARM9 processors can be capable to display faster, and the
design for operation is professional and reasonable, can be easy to use. The
built-in Large-capacity map storage space provides intuitive and accurate
indication to navigation. It s applicable to the navigation and position-fixing of
various vessels at sea and rivers, as well as the information
collection, river management, etc. For the application for different types of the
products please refer to the following
ˈ
˖
'
hydrographic
Easy to operate
Ultra high brightness LCD, viewable under strong sunlight
Compatiable with dual mapping system,C-MAP NT MAX and ONWA K-Chart
Built-in GPS antenna, external antenna can be used as an option
Digital HD fishfinder technology
Built-in commercial fishfinder module which is widely using in worldwide
commercial fishing bost
IPX7 waterproof panel
ggggggg
FEATURES
FOREWORD

PlotterCharacteristics
12000 user waypoints with name, symbol.
3 system waypoints: MOB, Start , Cursor
10 proximity waypoints
Max 30 routes. And up to 170 points for each one
8000 points automatic track log;
10 saved tracks (up to 8000 track points each).
Let you retrace your path in both directions
XTE, Anchor drag, arrival, speed, voltage,
proximity waypoint and time,AIS alarm.
Normal
Daylight exposed to sunlight
Night in dark environment
NOAA paperchart colors
Tide data
Mercator projection
Degree of minutes and UTM
Built-in Onwa K-Chart
SD Cards slot for C-Map MAX and ONWA K-Chart
Internal backup of user settings,
or external SD-card
5s to 60min 0.01nm to 10nm Automatic way
0.001nm to 1000nm
Inputs:
$--GGA, $--GLL,$--GSA, $--GSV, $--RMC,
$--VTG, $--ZDA, $--VWR,$--VWT,$--MWD, $--VPW
Outputs:
GGA , GLL , RMC , AAM , APA ,
APB , BOD , BWC , BWR , DBT
DPT , HDT , MTW , RMB , TLL ,
VTG , WPL , XTE , ZDA , ZTG ,
ZDL , MWD , VPW , VWR , VWT ,
Outputs for autopilot:
$--APB,$--BOD,$--XTE,$--APA
On/off
Sunrise/Sunset Moonrise/Moonset
ĀāĀāĀāĀāĀā
ĀāĀāĀāĀāĀā
ĀāāāĀāĀāĀā
ĀāĀāĀāĀāĀā
ĀāĀāĀāĀāĀā
2
MAIN PERFORMANCE AND SPECIFICATIONS
Waypoint s/i cons
Ro utes
Tracks
Alarms
Palette
Tides
Project ion
Position format
Basemap
External M ap
User data storage
Plot Interval
Plotting scales
Nav Data
Perspective View
Celestial

3
10.5 to 35VDC, current drain<1.0A at 12V
243mm(H)X155mm(W)X82mm(D)
0.6kg
7-inches ColorTFT day-view LCD 800 600 pixelsh
one opto-isolated input Port
one RS232 Output Port
Display unit: IPX5
Display unit: -15 to +55ćć
Antenna unit: -25 to +70 ćć
PowerSupply
Size:
Weight:
Display:
Input & Output Port:
Waterproofing:
Temperature range:
Physical
GPSReceiverCharacteristics
Receiver: 50 parallel channel GPS receiver continuously tracks and
uses up to 50 satellites to compute and update your position
Acquisition time: Cold start: 60 seconds average
Hot start: 45 second average
Update rate: 1/second,continuous
Position: 2.5 meters(95%) without S/A
Velocity: 0.1 meter/sec without S/A
Time: 100ns synchronized to GPS time
Dynamics: Altitude: 50,000m Max
Velocity: 500 m/s
Acceleration: 4g Max
Datum: WGS 84 and user define

4
EquipmentList
Standard
1. Display unit
2. Operator manual
3. Installation materials and standard spare parts
AISinterface
Data input:
Baud rate:
N ME A 0 18 3 , R S2 3 2
3 8, 4 00
OptionAccessories
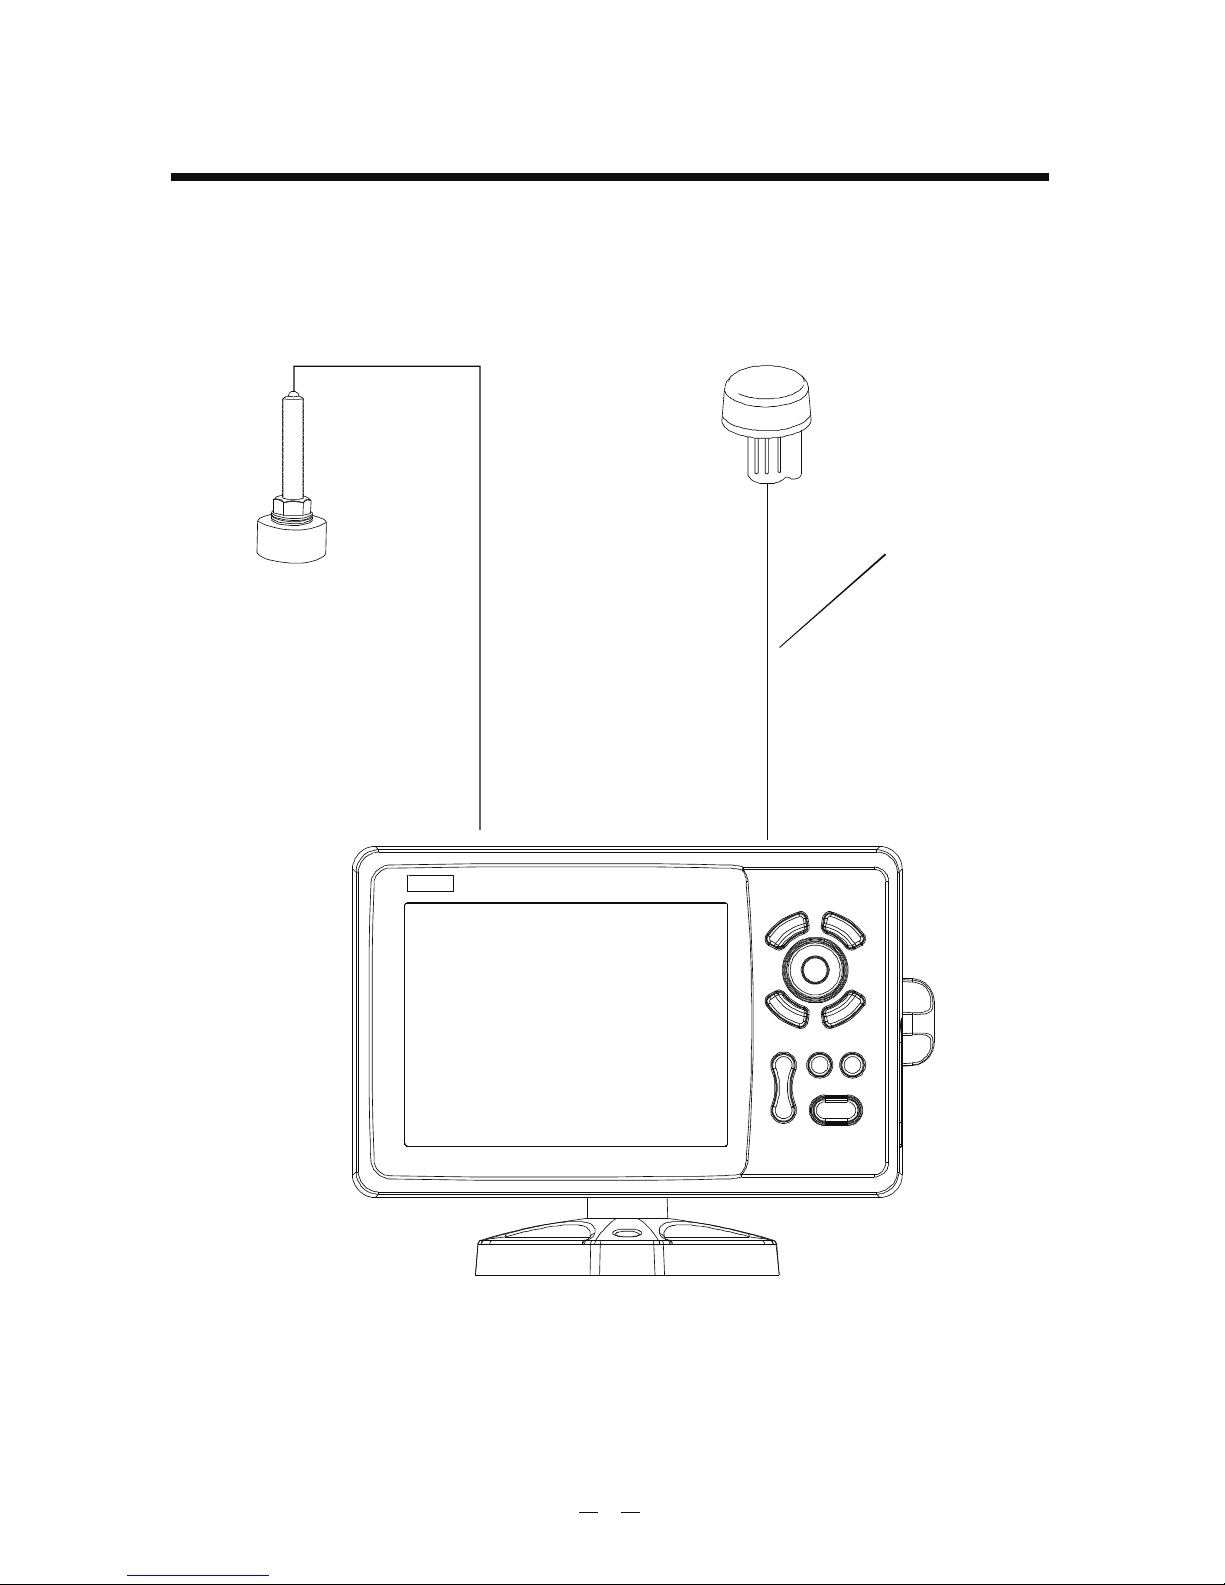
1) GPS antenna KA-07
2) Transducers
Dual Frequency Thru-Hull Transducer
- 600W Bronze NMM40-50/200
- 600W Plastic NBM40-50/200
- 600W Airmar Bronze Transducer w/Temp seosor B45
Dual Frequency Transom Mount Transducer
- 600W Onwa Transducer w/Temp seosor KTD-520_TM
- 600W Airmar transducer w/Temp seosor P58
3) Temperature seosor
Onwa Thru-Hull temperature seosor KTS-10K_TH
Onwa Transom Mount Temperature seosor KTS-10K_TM

16 colors (including background color) according to echo
intensity. The background color is selectable from blue,
light blue, white and black.
Meters 5/10/20/40/80/150/200/300/600/1000
Feet 15/30/60/120/200/400/600/1000/2000/3000
Fathoms 3/5/10/20/40/80/100/150/300/600
80 meters, 200 feet, 100fathoms
Times 2,3,4,6
5/10meters,10/20feet, 2/5fathoms
Automatic adjustment of range and gain
High Frequency (200KHz),Low Frequency (50KHz), Dual
(200K and 50K 1/2display on each), Zoom (200KHz and
50KHz zoom) and A-scope Display
Marker Zoom, Bottom Zoom and Bottom-lock Expansion
Lines/TX:Freeze,1/8,1/4,1/2,1/1,2/1
50 and 200kHz (alternately transmitted)
600W
Rejects unwanted signals by comparing last and present
echoes in strength.
Fish and Bottom alarms, Temperature alarm (sensor
required)
Echo Color
Basic Range
Range Shift
Zoom Range
Bottom Lock Expansion
Auto Mode
Display Mode
Zoom Display
Display Advance Speed
TX Frequency
Power Output
Pulse-length/TX rate
Interference Rejecter
Alarm
Display End Depth (m)
Pulse-Length (ms) 200K
TX Rate (Pulse/min)
5 10 20 40 80 150 200
300
600 1000
0.12 0.22 0.32 0.52 0.92 1.02 1.02 1.02 1.02 1.02
2400 1500 857 444 231 125 95 63 38 30
HDFishfinderCharacteristics
5
Pulse-Length (ms) 50K
0.17 0.27 0.37 0.57 0.97 1.07 1.07 1.07 1.07 1.07
Display Unit
KA-07
10M or 15M
6
CONFIGERATION
Transducer
(Optional)
(Optional)
1.1 Keypad instruction
Pressing it once displays the menu of the current page, pressing
it twice enters the main menu.
Plotter + Sounder Function:
Long press - Activates split ratio selection.
Short Press - Displays the menu of the screen that has
>50% screen coverage.
Display the seven main screens circularly, turn over the
listed interfaces.
Plotter Function: Press and hold to change track color.
Sounder Function: Press and hold to activate sonar mode selection.
Withdraw from an optional operation, or display the previous
page in reverse-cycle order.
Plotter function: Press and hold to switch track ON/OFF.
Confirms the input or data.
Plotter function: Long Press - Activates Drawing Mark option.
Short Press - Activates waypoint attribute edit
window.
Sounder function: Long Press - To switch from manual gain to
automatic gain and vice versa.
Short Press - To adjust gain level.
Plotter and AIS Function: Enlarges the scale of the maps and charts.
Sounder Function: Decreases the depth range for shallow waters.
Plotter and AIS Function: Reduces the scale of the maps and charts.
Sounder Function: Increases the depth range for deeper water.
Plotter function: Display other function (GOTO, tide table, search, etc.) menu.
Sounder function: Provides signal level selection. Eliminates low
intensity echoes (up to light-blue echoes) each level.
The MOB mark denotes man overboard position.
Long Press - Turn the power ON/OFF.
Short Press - Adjust the screen brightness and control panel dim. .
MENU
MOD E
ESC
MOB
7
Plotter function: Moving the cursor upward or to change the setting.
Sounder function: Moving the VRM upward.
Plotter function: Moving the cursor to the right.
Sounder function:
Long Press - Activates feeding rate selection for picture advancement
Short Press - Setting the depth range (setting upper range limit).
1. OPERATION OVERVIEW
ENT
F
1.2TurningONandOFFPower
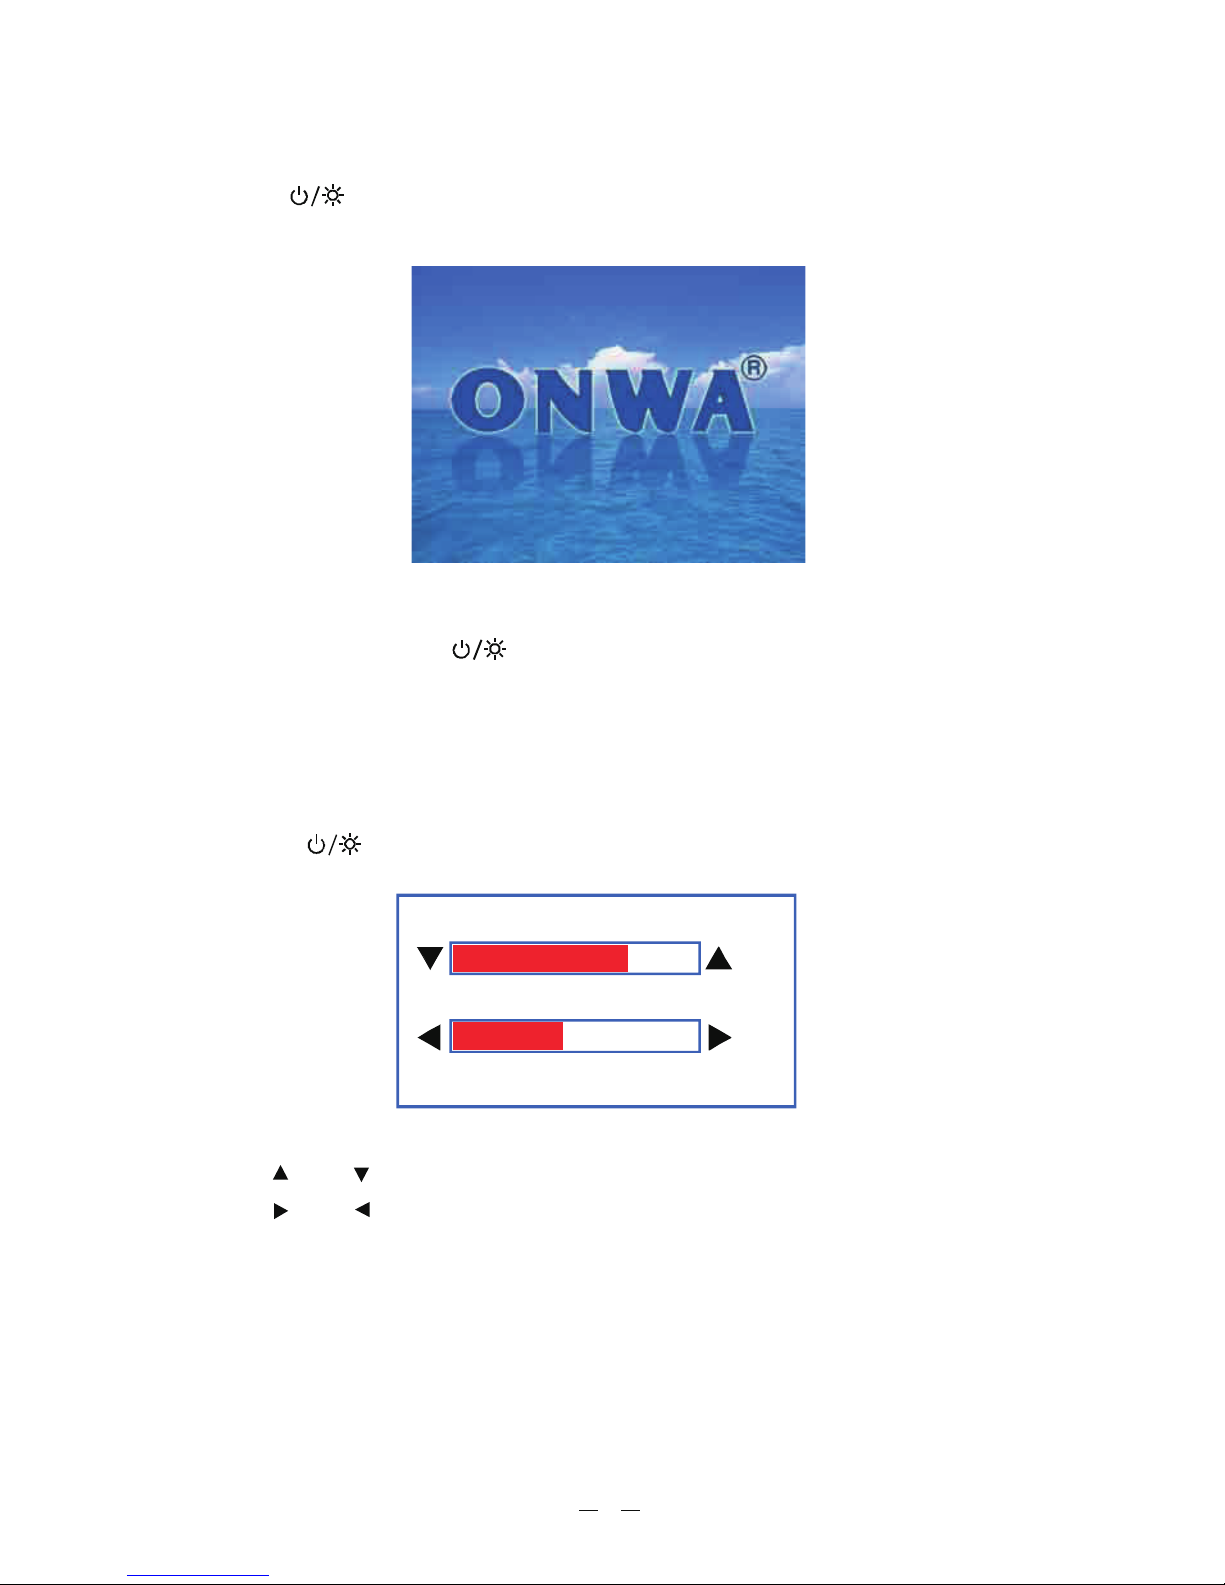
Turning on the power
[ ] ONWAPress the key. The unit beeps and displays the
starts up with the last used display mode.
" " logo. After a few
seconds, it
Turning off the power
[ ]
[ ]
Press and hold down the key until the screen goes blank
(about four seconds).
You can adjust display brilliance as shown below.
1. Press the key. The adjusting window appears.
.
to confirm and exit.
1.3AdjustingBrillianceandDIM
2. Press or to adjust LCD display brightness.
3. Press or to adjust keypad backlight
4. Press the key
[ ] [ ]
[ ] [ ]
[ESC]
BR ILL
DIM
(1~8)
(1~8)
EXIT [ENT]
8
1.4DisplayModes
[MODE]
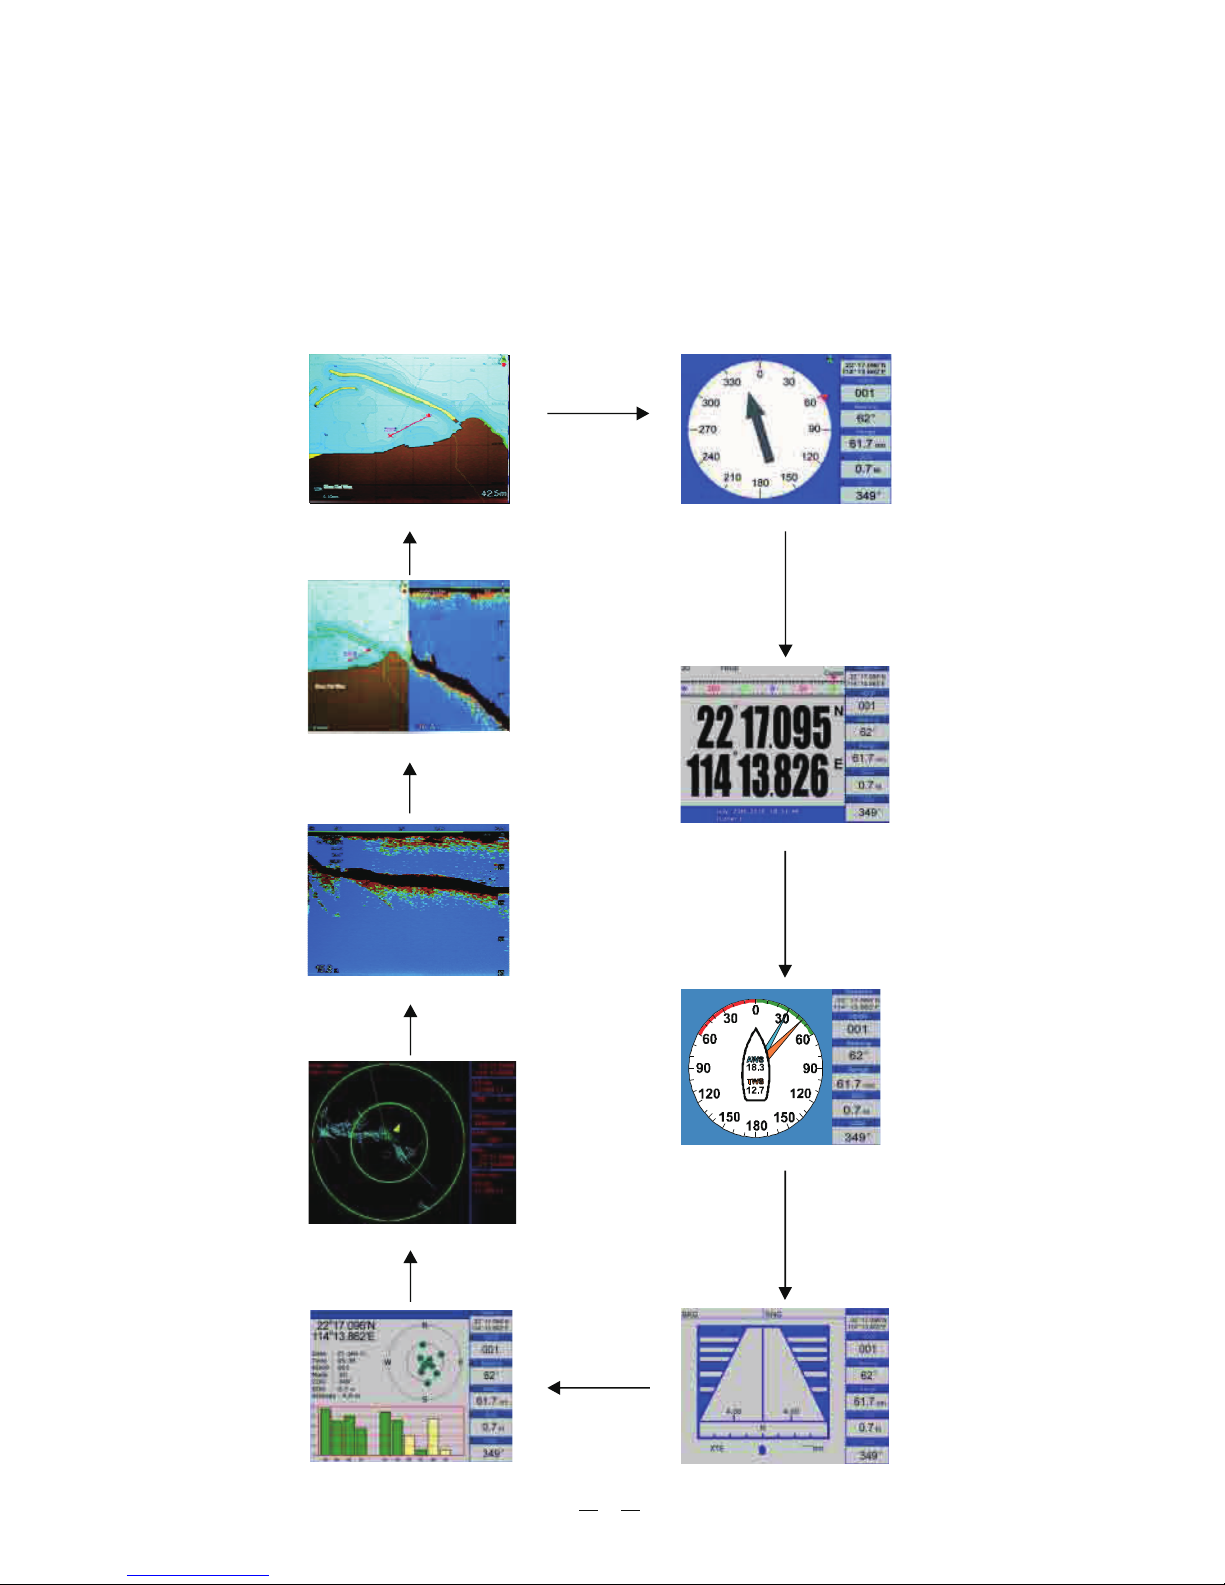
Your unit has eleven display modes: PLOTTER SCREEN, ,
WIND SCREEN, SCREEN, SATELLITE SCREEN
AIS SCREEN
Press the key to choose a display mode. Each time the key is pressed, the
display mode changes in the sequence shown below.
NAVIGATOR SCREEN
POSITION , HIGHWAY SCREEN,
, SOUNDER SCREEN and PLOTTER + SOUNDER SCREEN.
9
PLOTTER
NAVIGATOR
POSIT ION
SATELL ITE
SOUN DER
PL OTTER SOUNDER
+
WIND
AI S
HI GHWAY
Press the cursor pad to move the cursor. The cursor moves in the direction of the
pressed arrow. Whether up , down , left , right or diagonal .
Cursor position is displayed in latitude and longitude at the top left corner of
the display when the cursor is on. The range and bearing from own
ship to the cursor appears at the top left corner of the display too.
2.2MovingtheCursor
[ ] [ ] [ ] [ ] [ ]
PLOTTER
Cursor Position Turned On
2.1ChoosingtheZoomDisplayRange
You may press to Zoom In and to Zoom Out as desired
display.
on the PLOTTER
Cursor Position Turned Off
[ESC] Press the key to clear the cursor. Cursor position data will disappear when
the cursor is off.
Cursor position
Data Field
Range and Bearing
from vessel to cursor
10
2. PLOTTER DISPLAY OVERVIEW
2.3PanningthePLOTTERDisplay
2.4CenteringOwnShip'sPosition
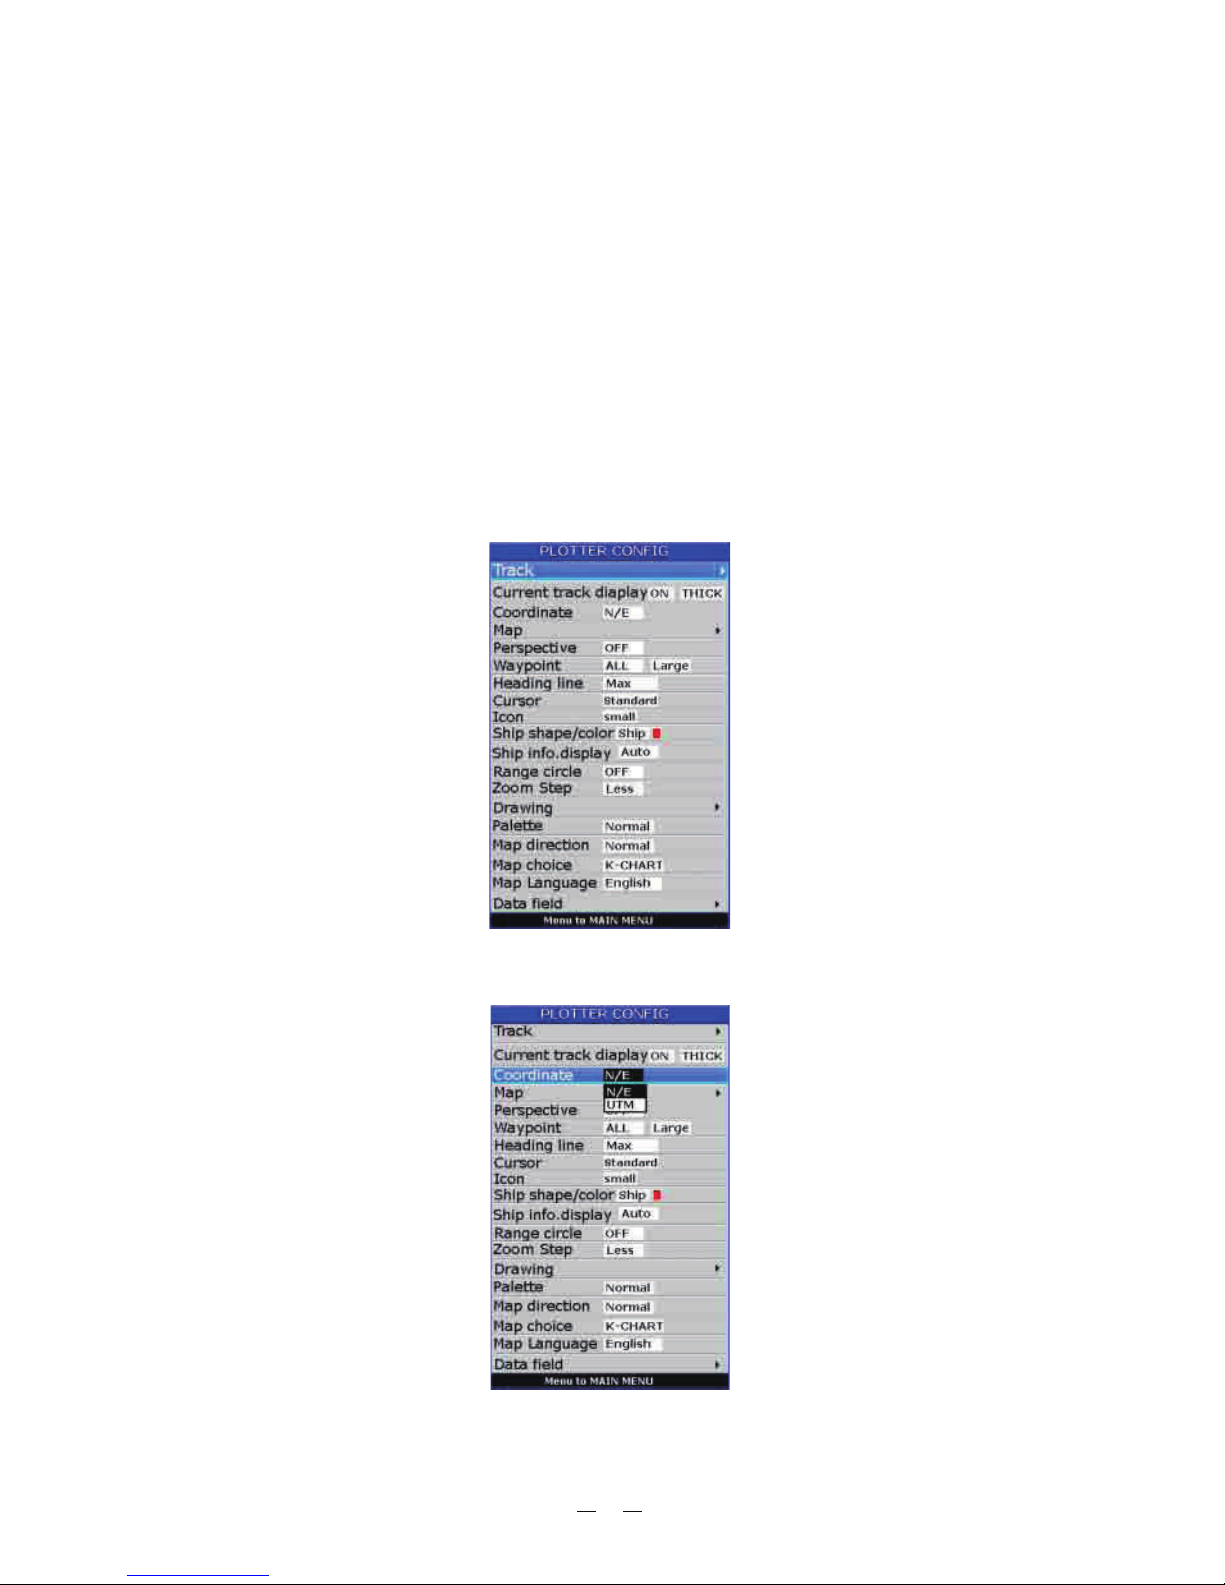
2.5Coordinates
[ESC]
[MENU] PLOTTER
Using the cursor, pan left, right, up or down on your desired area. Place the cursor
at the edge of the screen to start panning. The display shifts in the direction
opposite to cursor pad operation.
Press the key for centering own ship's position.
Coordinate Systems are ways of splitting up the world in order to form transferable
units (numbers) that relate to points on a map.
1. Press key in screen.
2. Choose and then press key to select.Coordinates [ENT]
3. Choose or as desired then press key to finish.N/E UTM [ENT] " " " "
11
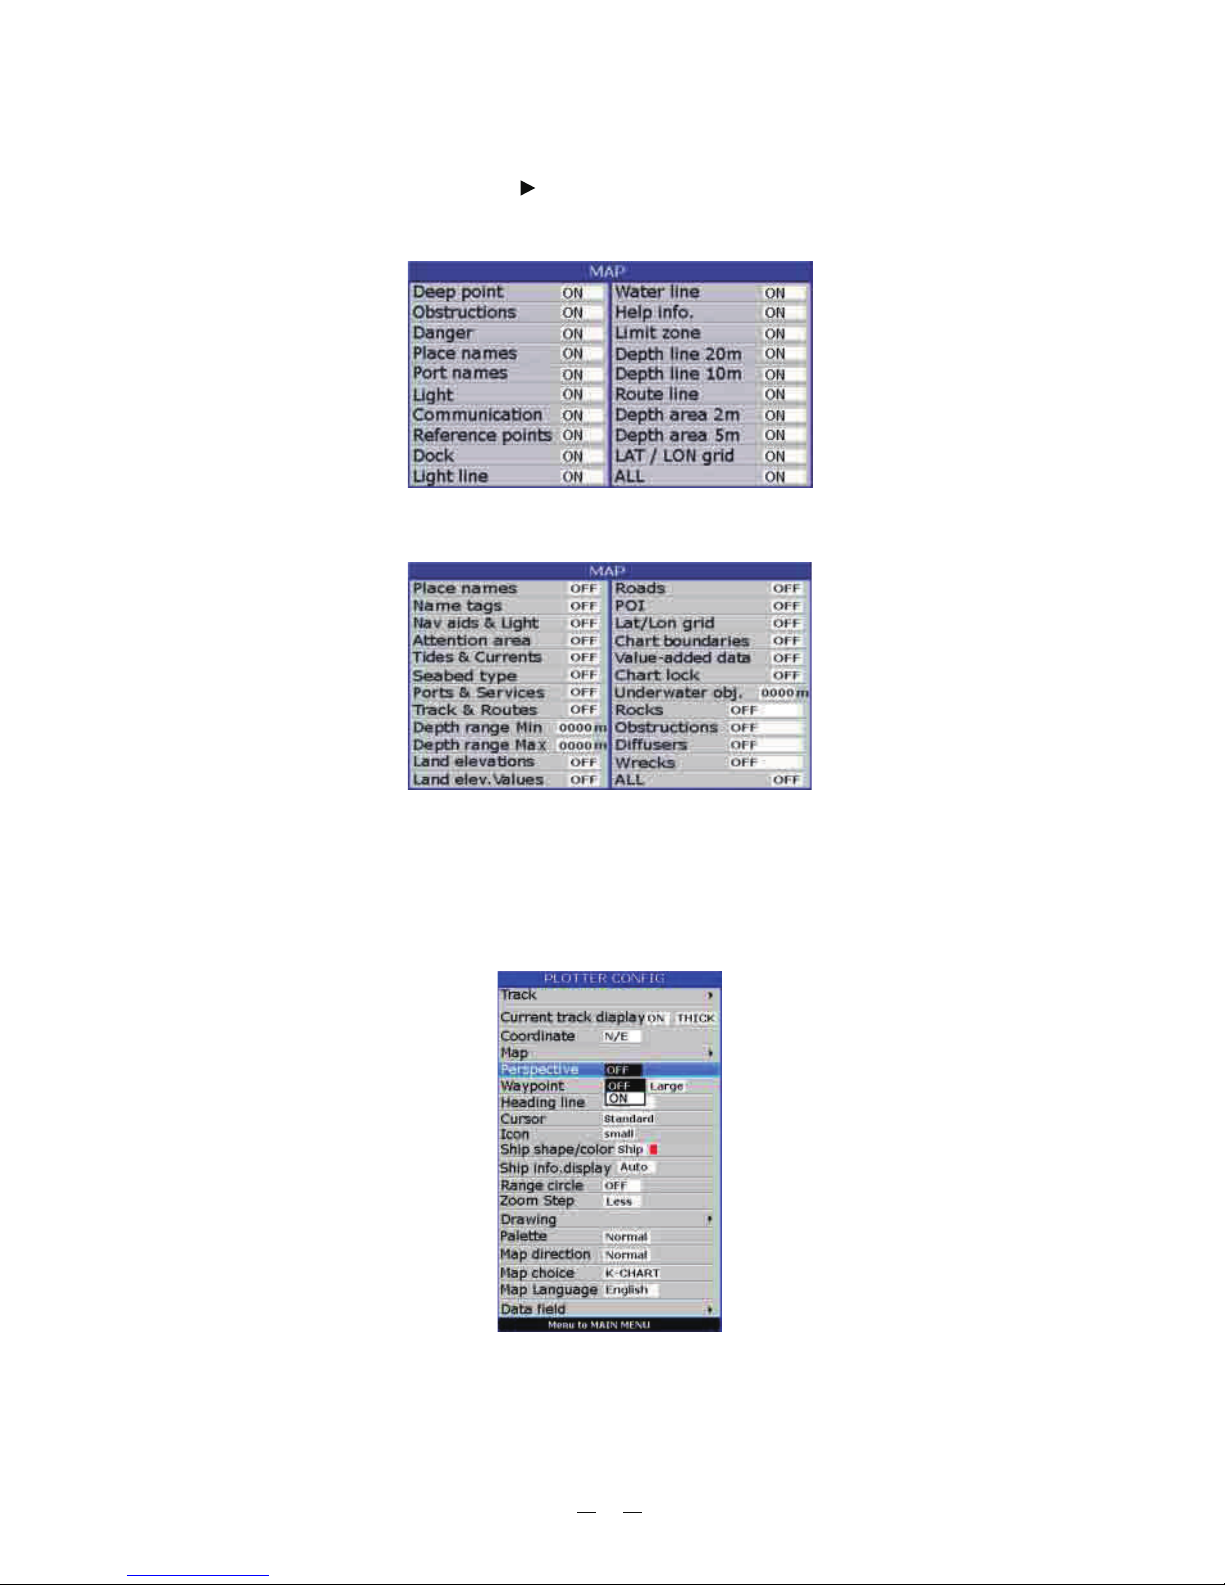
2.6Map
1. Press [ ] key in PLOTTER screen.
2. Choose and then press [ ] key to select.
3. Choose the layer ON or OFF as desired and then press [ ] key to finish.
MENU
Map
ENT" " " "
(K-Chart)
(C-MAP)
2.7
1. Press key in screen.
2. Choose and then press key to select.
[MENU] PLOTTER
[ENT]
" " " "
PerspectiveView
Perspective
ON OFF [ENT]3. Choose or as desired and then press key to finish.
12
4. Choose the layer "ON" as desired and then press [ ] key to finish.ENT
5. Choose the layer "OFF" as desired and then press [ ] key to finish.ENT
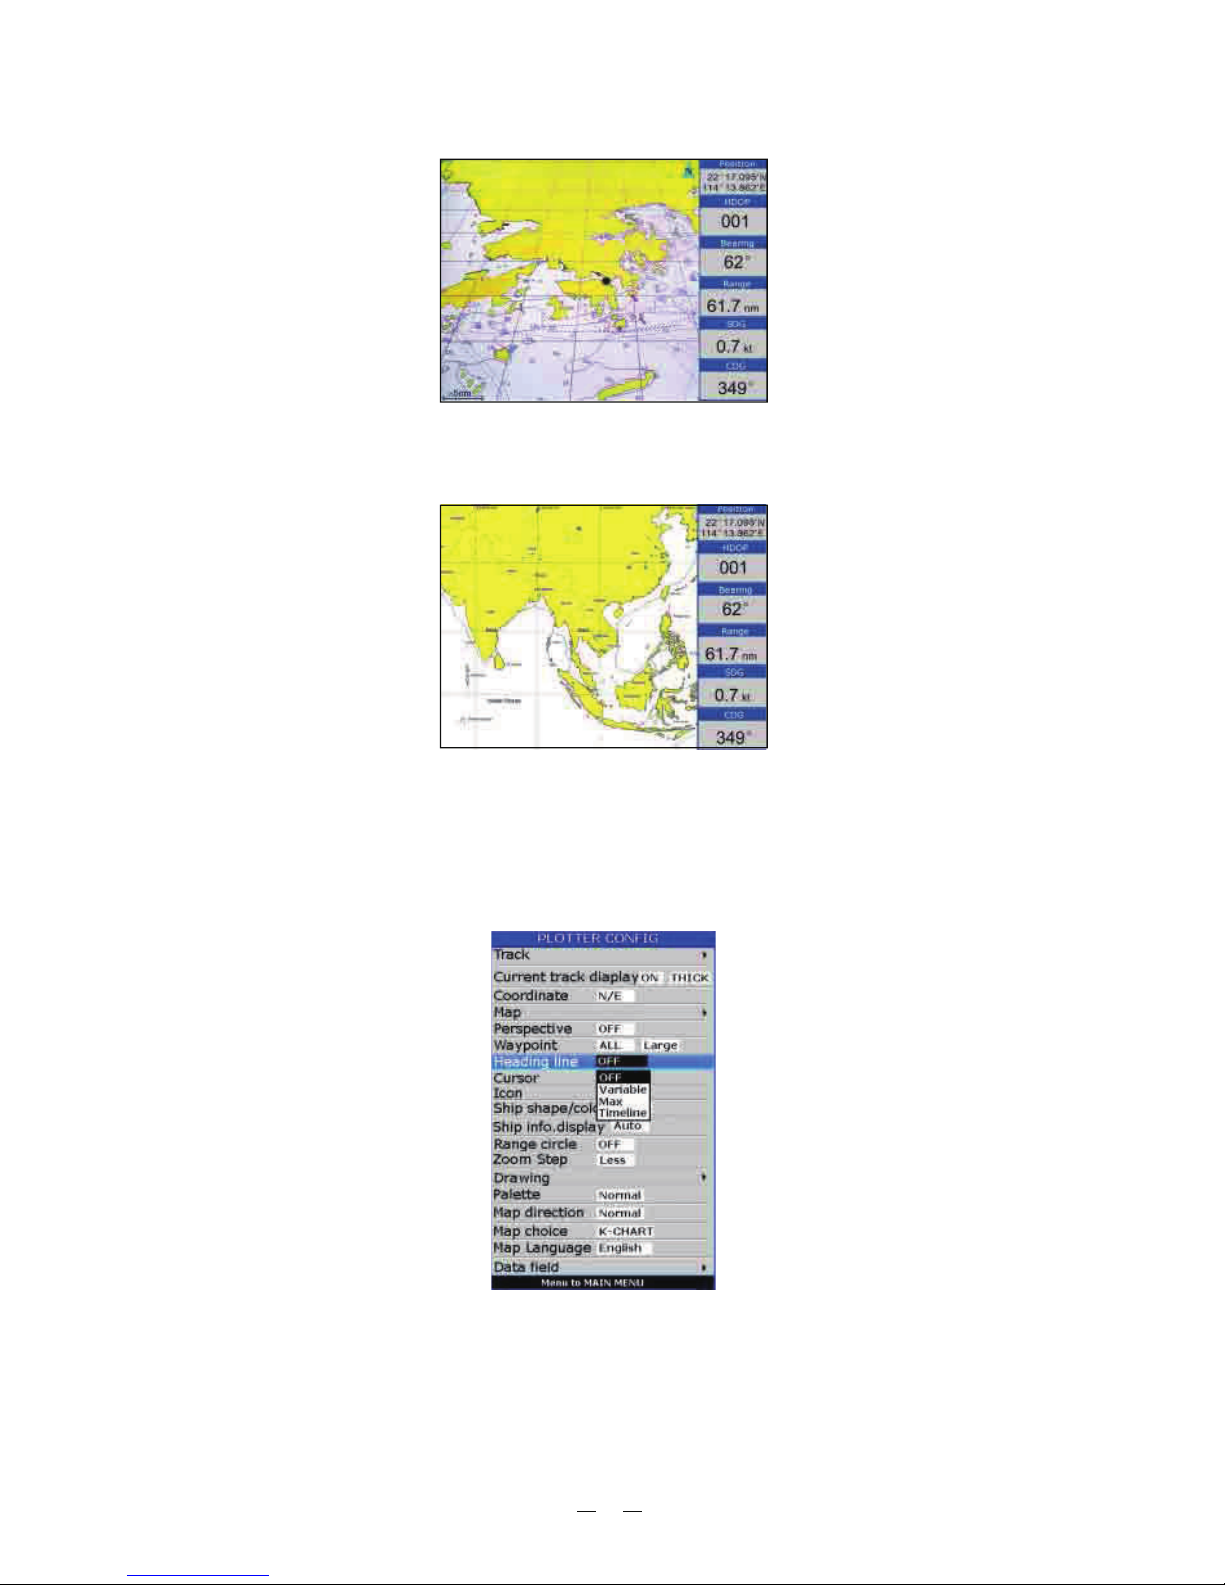
2.8HeadingLine
[MENU] PLOTTER
Heading Line [ENT]
1. Press key in screen.
2. Choose and then press key to select.
3. Choose Off , Variable Max [ENT] as desired and then press
key to finish.
" " " " " " "Timeline", or
13
4. Heading Line option: "COG Time Line" selection
The length of heading line will vary according to the SOG to show the estimated
point of destination after the set period. Example, if you set the COG Time Line
to 10 minutes then the length of the heading line will point to the position that
your boat will reach after 10 minutes.
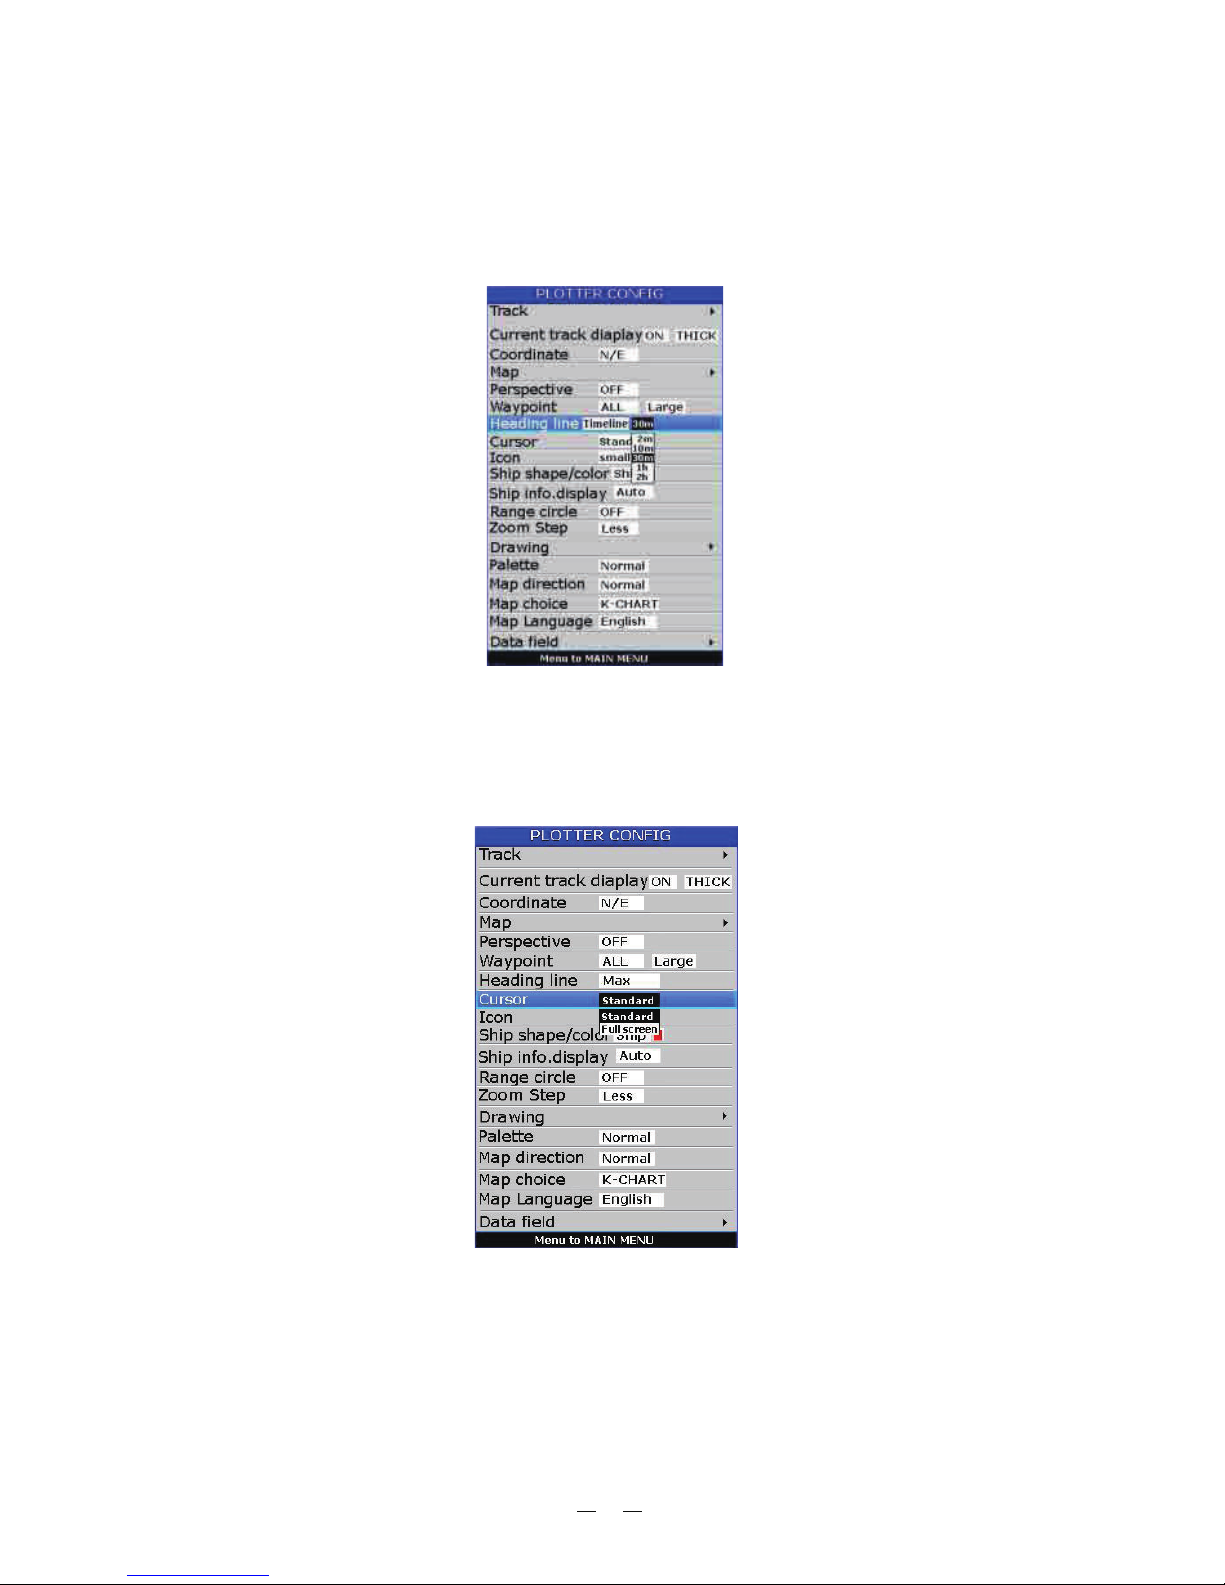
2.9Cursor
1. Press key in screen.
2. Choose and then press key to select.
3. Choose
[MENU] PLOTTER
Cursor [ENT]
"Standard" "Full Screen" [ENT] or as desired and then press key to finish.
14
2.10Shipshape/color
1. Press key in screen.
2. Choose and then press key to select.
[MENU] PLOTTER
Ship shape/color [ENT]
Press [ ] key
and then press
key[ENT] .
2.11RangeCircle
1. Press key in screen.[MENU] PLOTTER
2. Choose and then press key to select.Range Circle [ENT]
3. Choose ON (if you choose ON you need to input the radius of the
circle manually), or OFF as desired and then press [ ] key to finish.ENT
" " " ",
" "
15
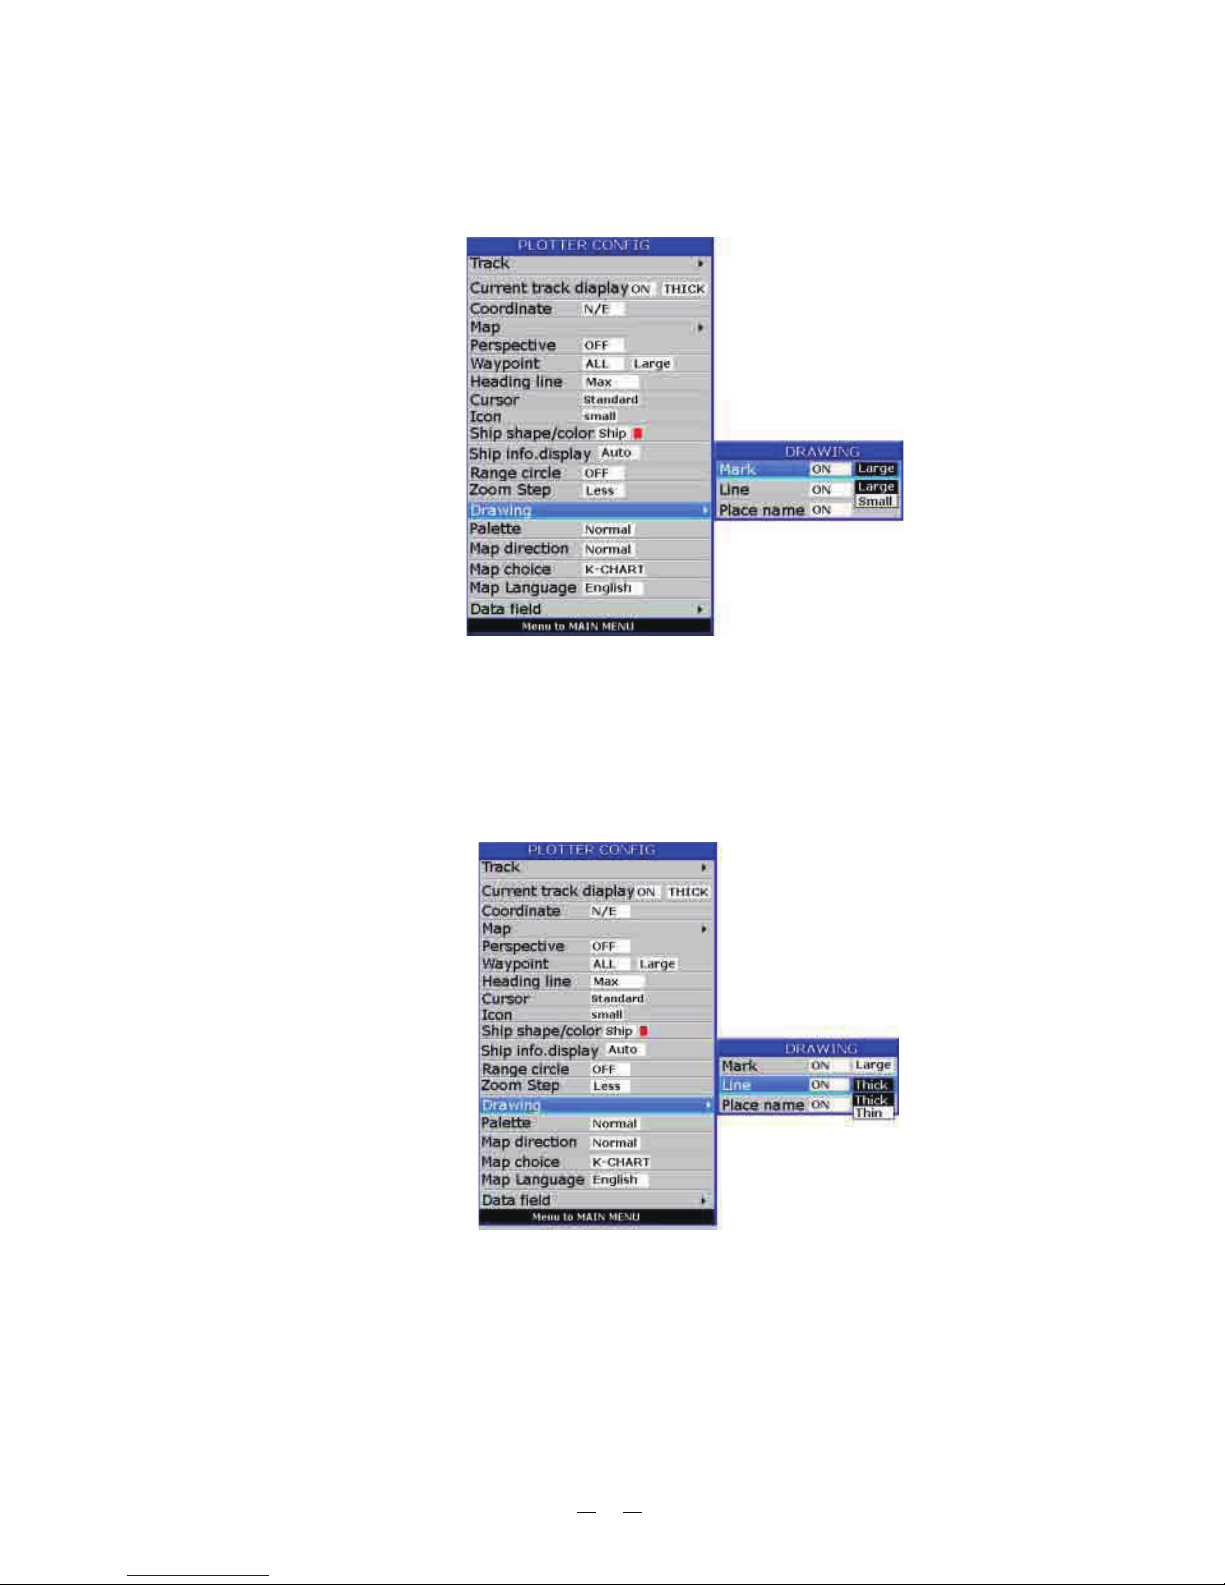
2.12Drawing
1. Press key in screen.
2. Choose and then press key to select.
[MENU] PLOTTER
Drawing [ENT]
3. Choose , as desired and then press [ ] key to
finish.
ENT"Mark" "Line" or "Place name"
4. User can change the size of User Marks.
16

2.13Palette
1. Press [ ] key in screen.MENU PLOTTER
2. Choose and then press [ ] key to select.Palette ENT
3. Choose "Normal or as desired and then press
[ ] key to finish.ENT
", "Daylight , "Night" "NOAA" "
17
5. User can change the size of Drawing Lines.

2.14MapDirection
1. Press key in screen.
2. Choose and then press key to select.
[MENU] PLOTTER
Map Direction [ENT]
3. Choose Normal , North Up , WPT Up or Up as desired and then
press [ ] key to finish.ENT
" " " " " " "COURSE "
18
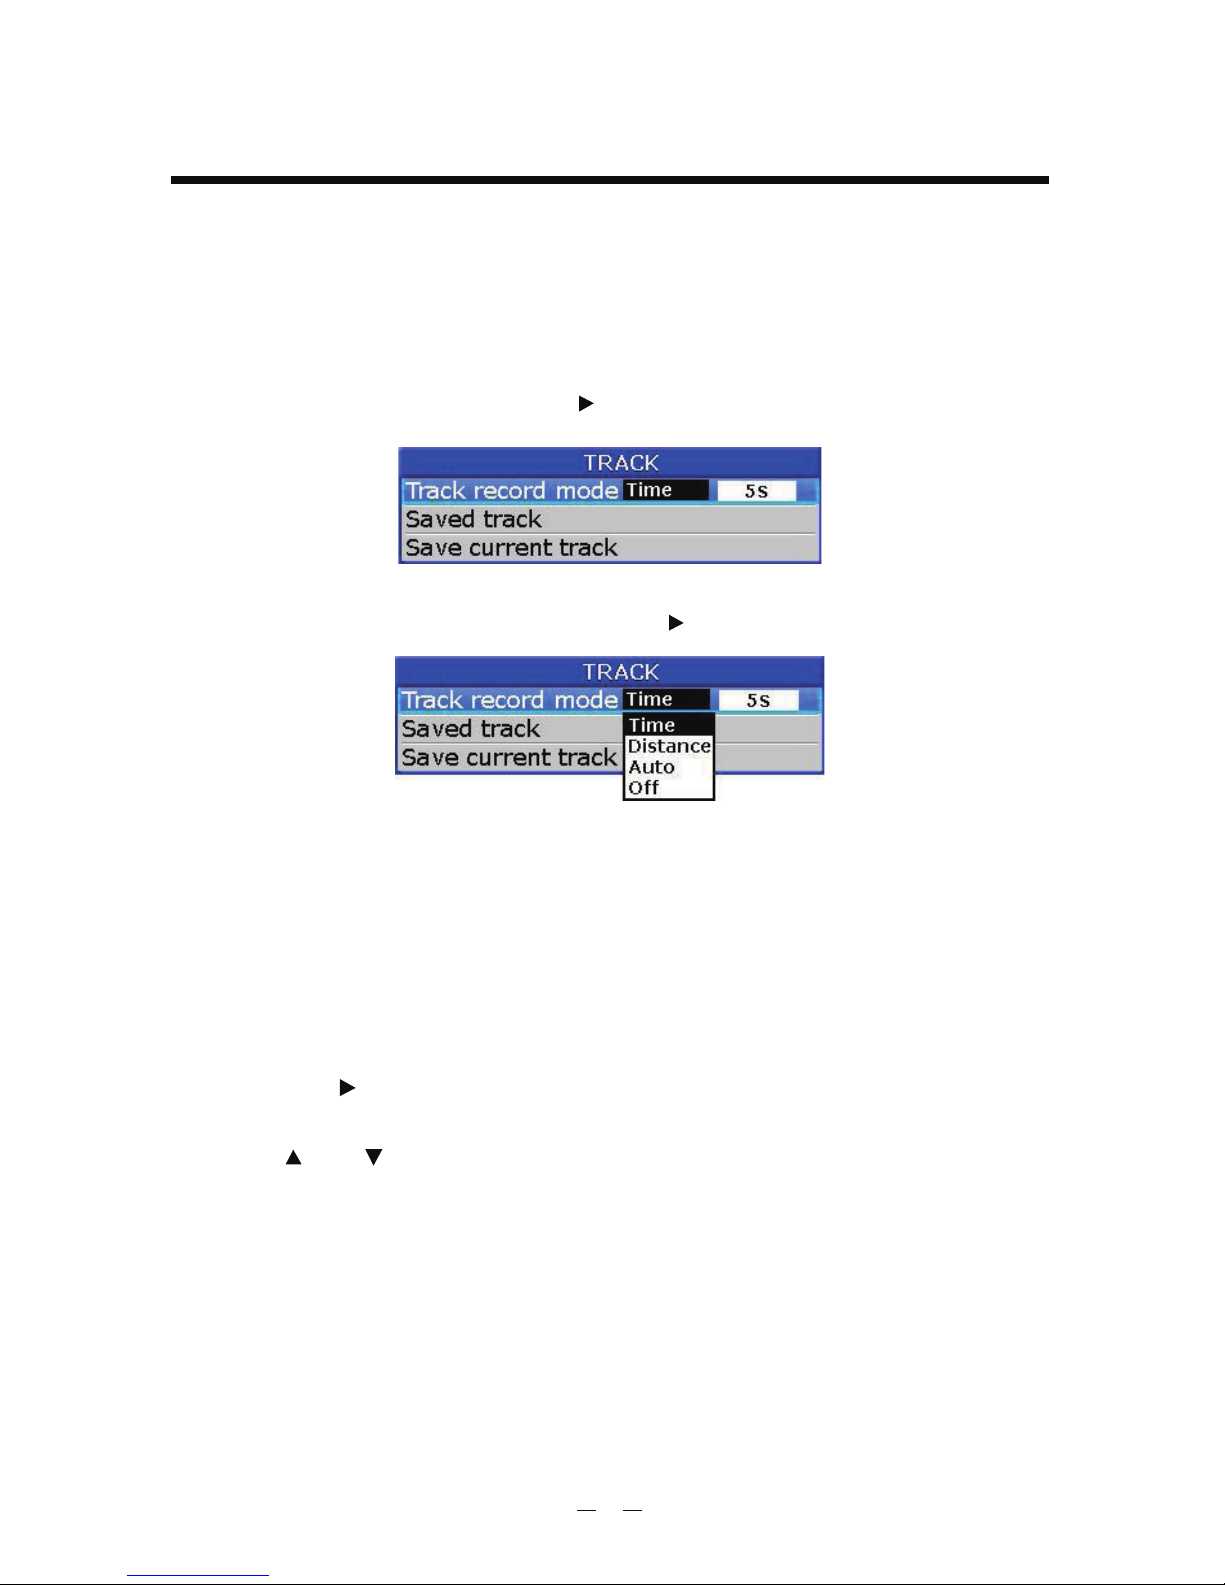
3.1ChangingTrackPlottingInterval,StopPlotting
[MENU]
Track record [ ]
When the track memory becomes full, the oldest track is erased to make room for the
latest.
1. Press the key twice to enter main menu.
2. Choose and then press key to select.
3. Choose Track record mode and then press [ ] key select.
4. Choose Time , Distance , Auto or Off .
Time: Track is recorded and plotted at the time interval set.
Distance: Track is recorded and plotted at the distance interval set.
Auto: Plotting and recording interval changes with display range selected.
Off: Track is neither recorded nor plotted.
5. For Time and Distance, enter the recording interval as follows:
a) Press the [ ] key to choose 5s , 10s , 30s , 1min , 5min , 10min ,
30min or 60min .
b) Use [ ] or [ ] to select value.
6. Press [ ] key to finish.ENT
" " " " " " " "
" " " " " " " " " " " "
" " " "
19
3. TRACK
3.2DisplayingtheTrack
1. Press key in screen.
2. Choose and then press key to select.
[MENU] PLOTTER
Track [ ]
3. Choose the color and if you want to turn it ON or OFF .
4. Press [ ] key to finish.MENU
" " " "
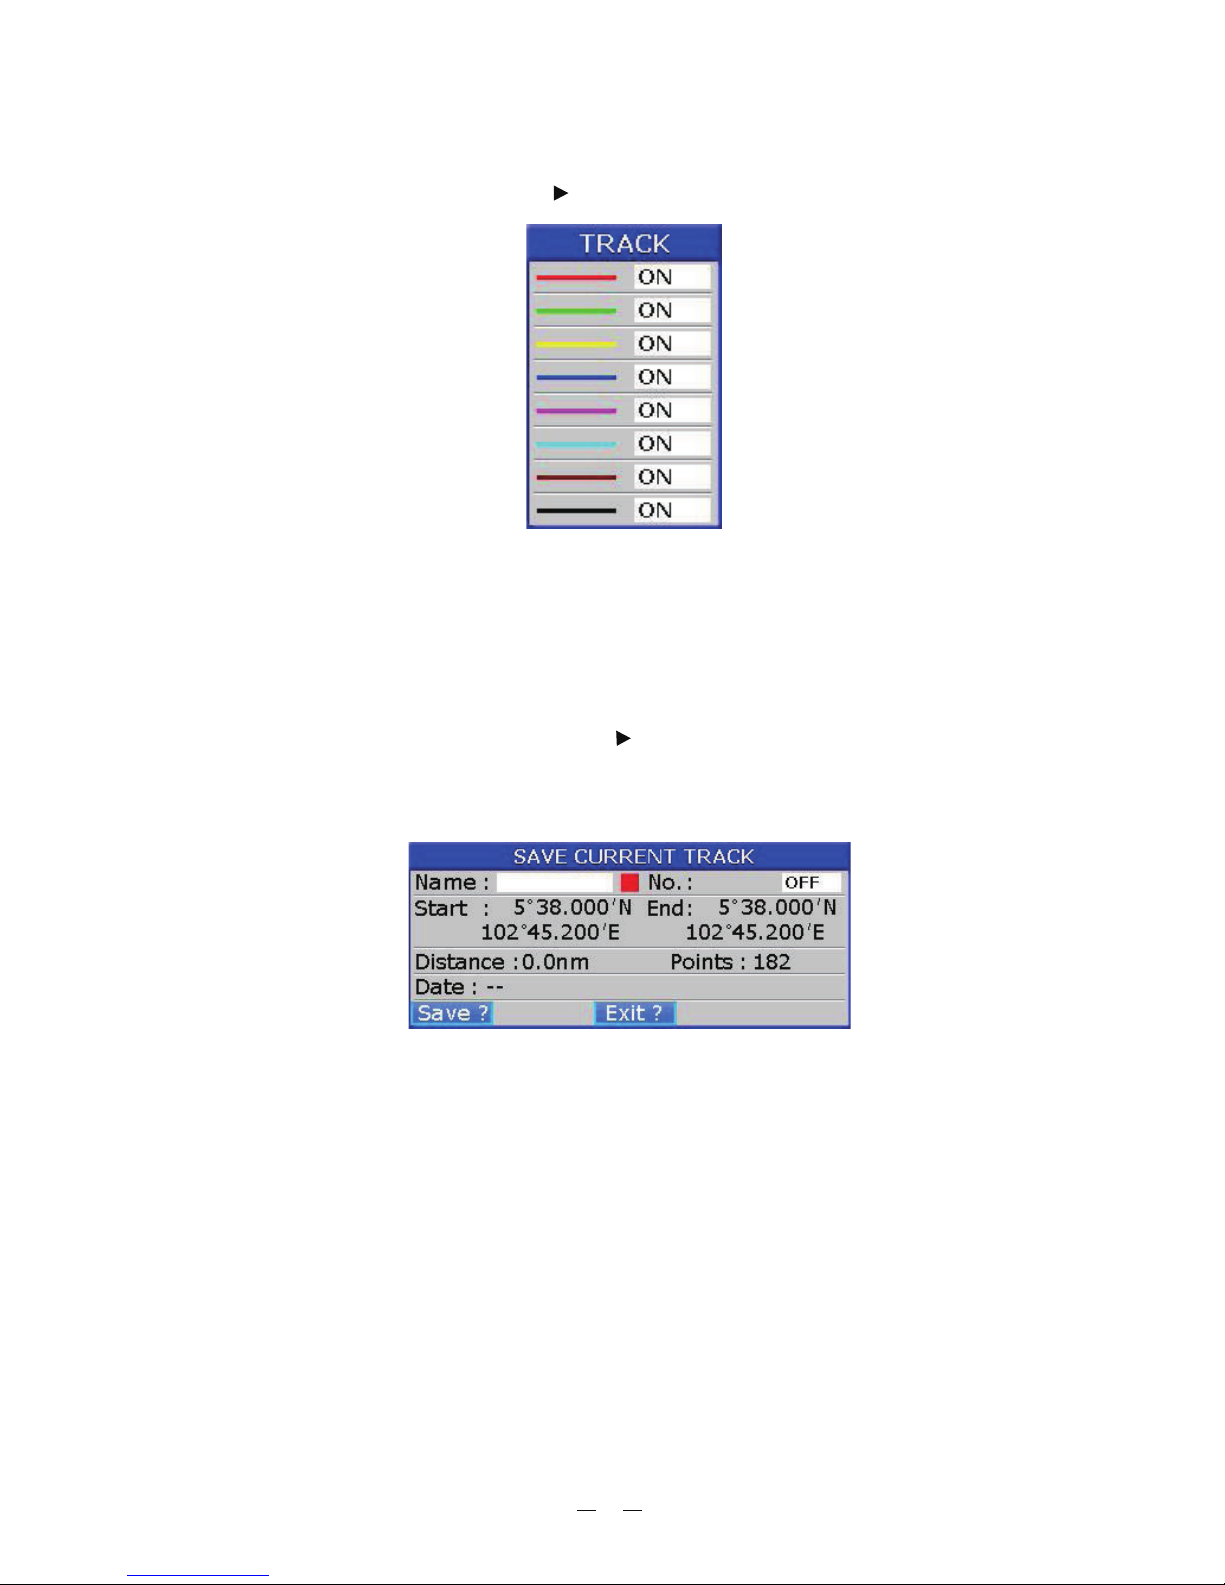
3.3CreatingTrackData
1. Press the key twice to enter main menu.
2. Choose and then press key to select.
[MENU]
Track Record [ ]
3. Choose Save Current Track and then press [ ] key.
The following window will appear.
ENT
Track Data can be used for navigation.
20
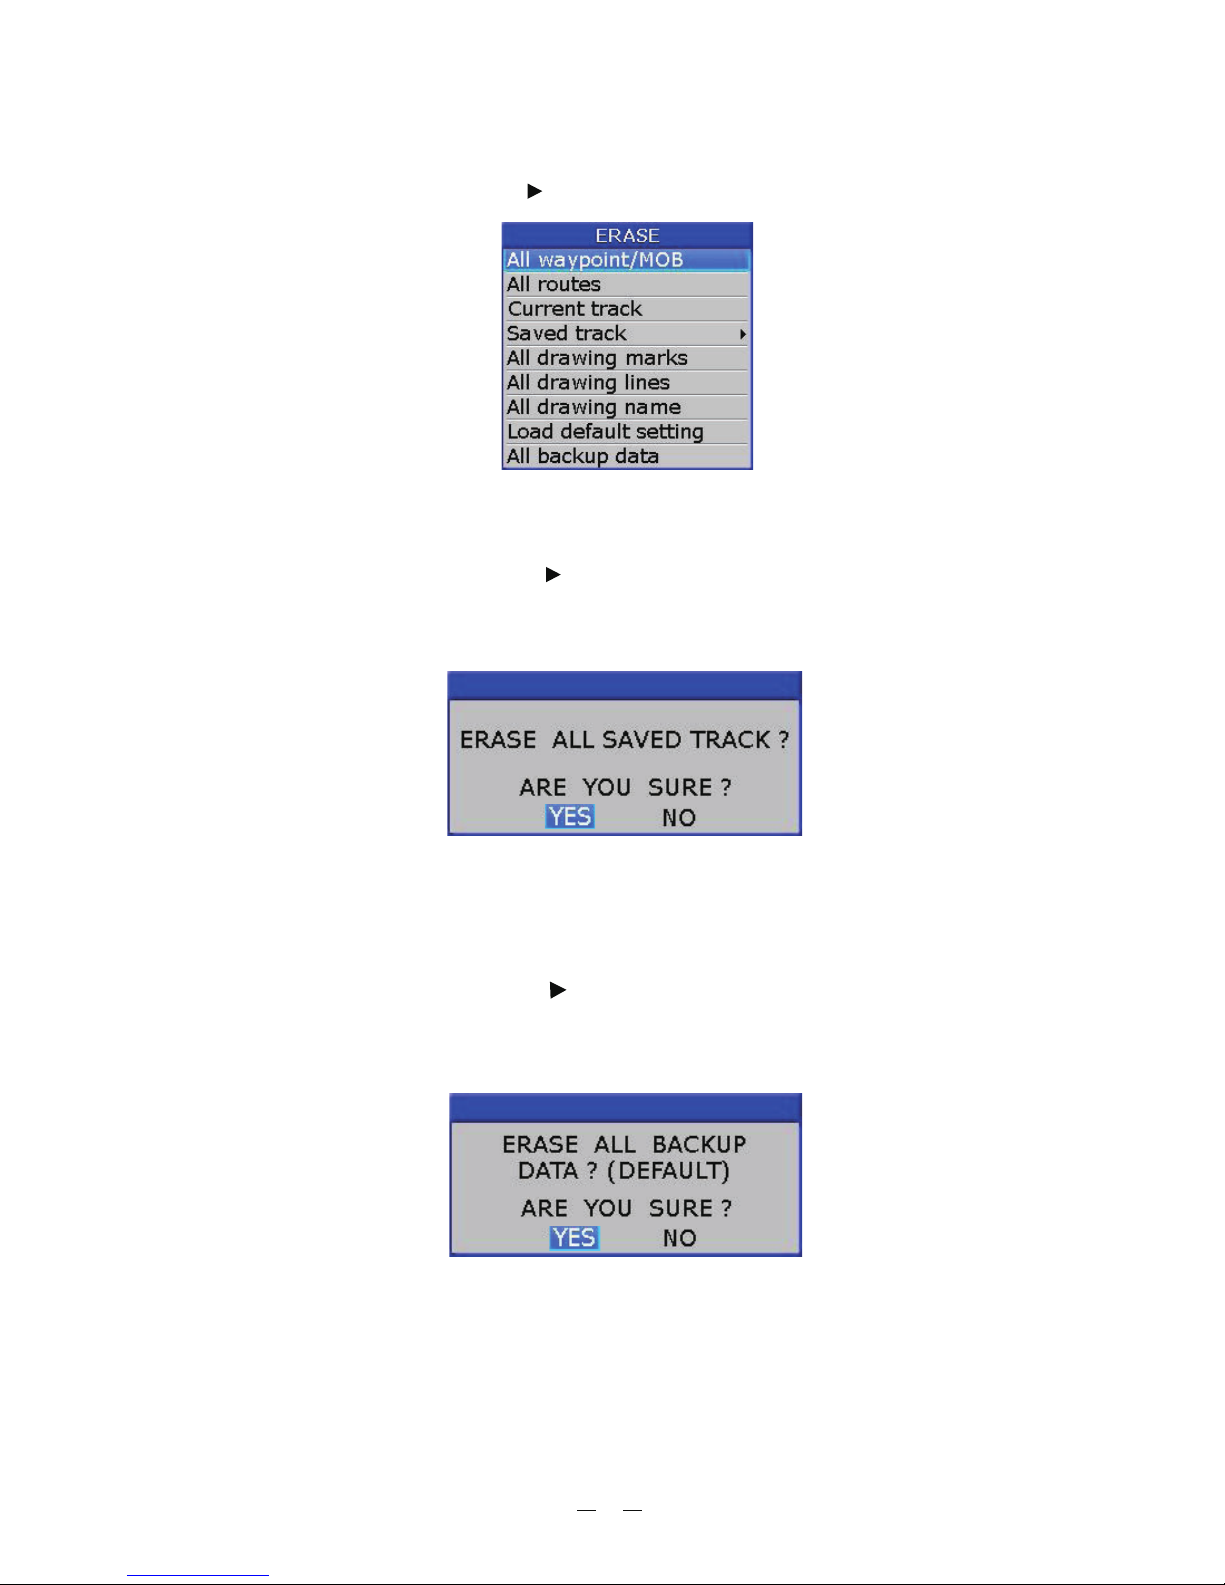
3.4ErasingTrack
[MENU]
Erase [ ]
Current track Saved track
Saved track [ ]
ALL [ENT]
1. Press key twice to enter main menu.
2. Choose and then press key to select.
3. Choose or .
4. If is chosen, press key to choose the color that you want to
erase or choose if you want to erase all tracks and then press key.
The following window will appear:
3.5 Erasing All Backup Data
1. Press key twice to enter main menu.
2. Choose and then press key to select.
3. Choose and then press key.
The following window will appear.
[MENU]
Erase [ ]
All backup data [ENT]
21
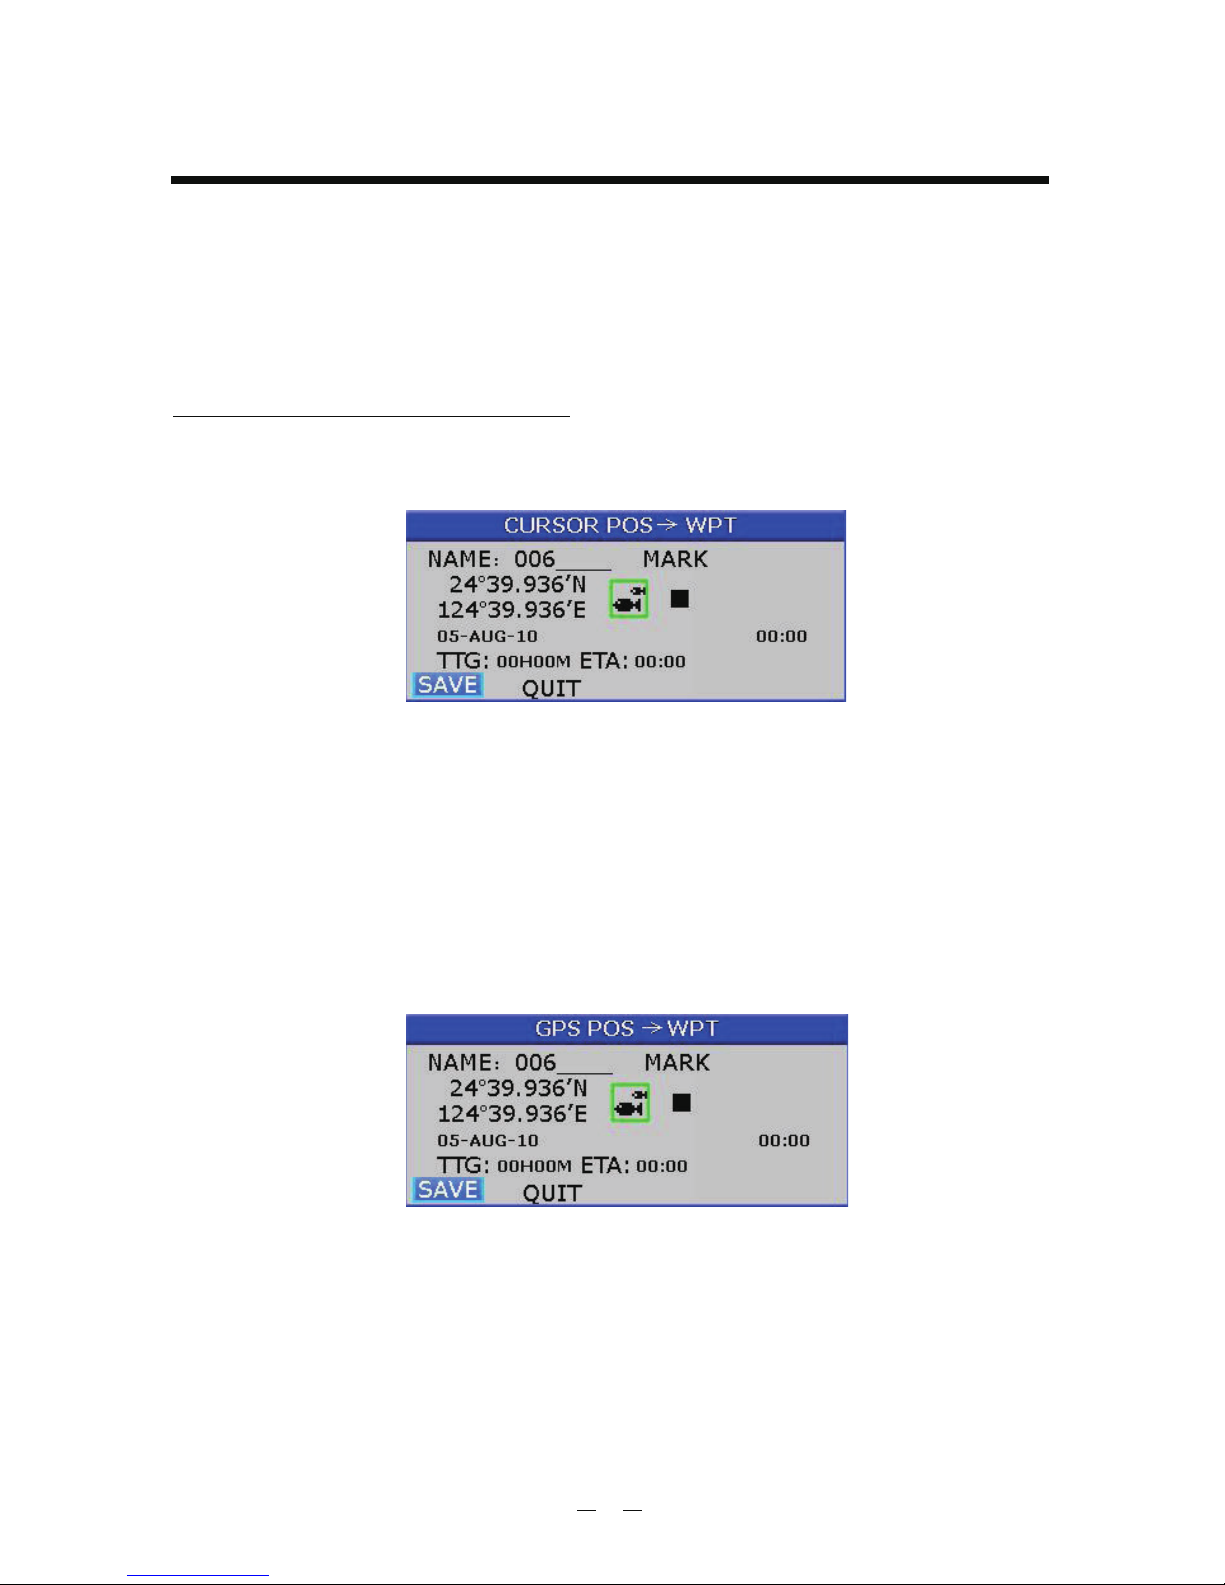
4.1EnteringWaypoints
PLOTTER
[ENT]
Waypoints can be entered on the display in three ways: by cursor
position, at own ship's position, and from the waypoint edit.
1. Use the cursor pad to place the cursor on the location desired for a waypoint.
2. Press the key. The following window appears.
Entering a waypoint with the cursor
3. This window is where you can rename, edit LON and LAT, choose mark shape
and color, and enter a comment.
4. Choose to finish.SAVE" "
Entering a waypoint at own ship s position'
1. Momentarily press [ ] key when no cursor is seen.
The following window appears.
ENT
2. If you do not need to change anything, choose SAVE to finish." "
22
4. WAYPOINT/MOB
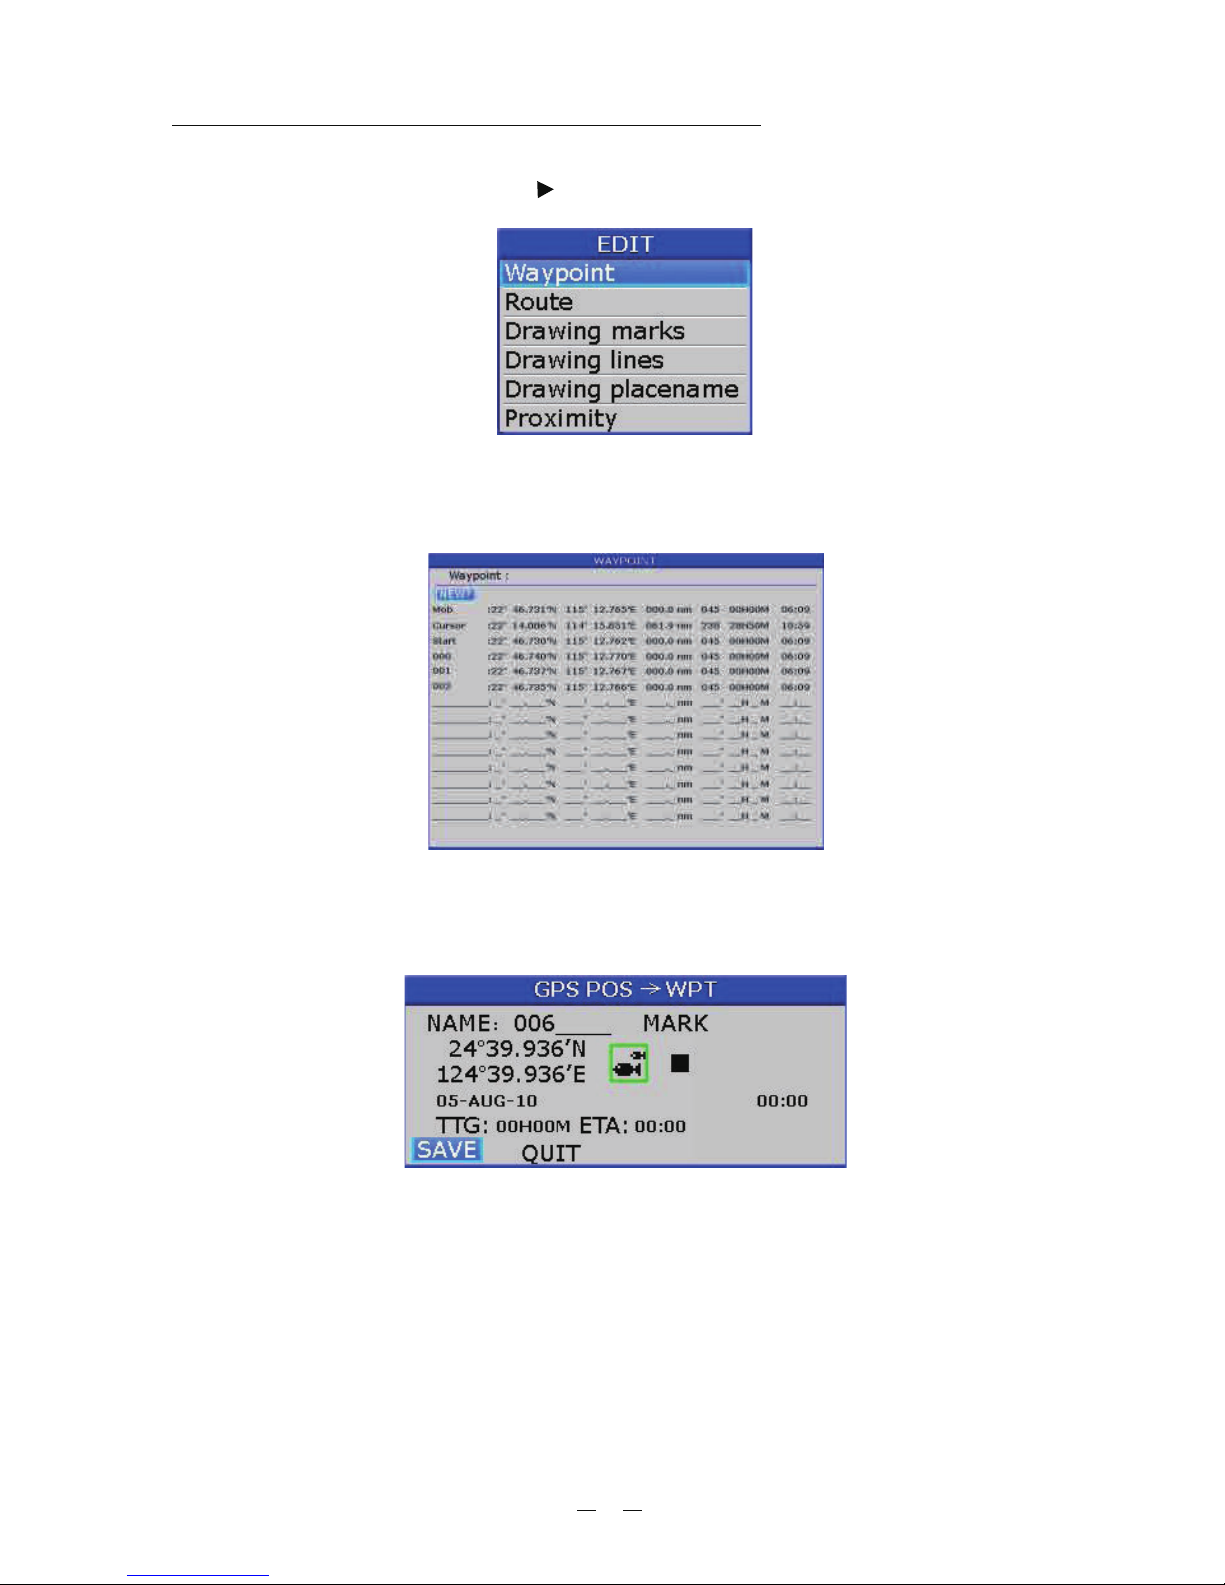
Entering a waypoint from the waypoint list
1. Press the key twice to enter main menu.
2. Choose and then press key to select.
[MENU]
Edit [ ]
3. Choose and then press [ ] key.
The following window will appear
Waypoint ENT
4. Choose then press [ ] key.
The following window appears.
NEW ENT
5. If you do not need to change anything, choose SAVE to finish." "
23
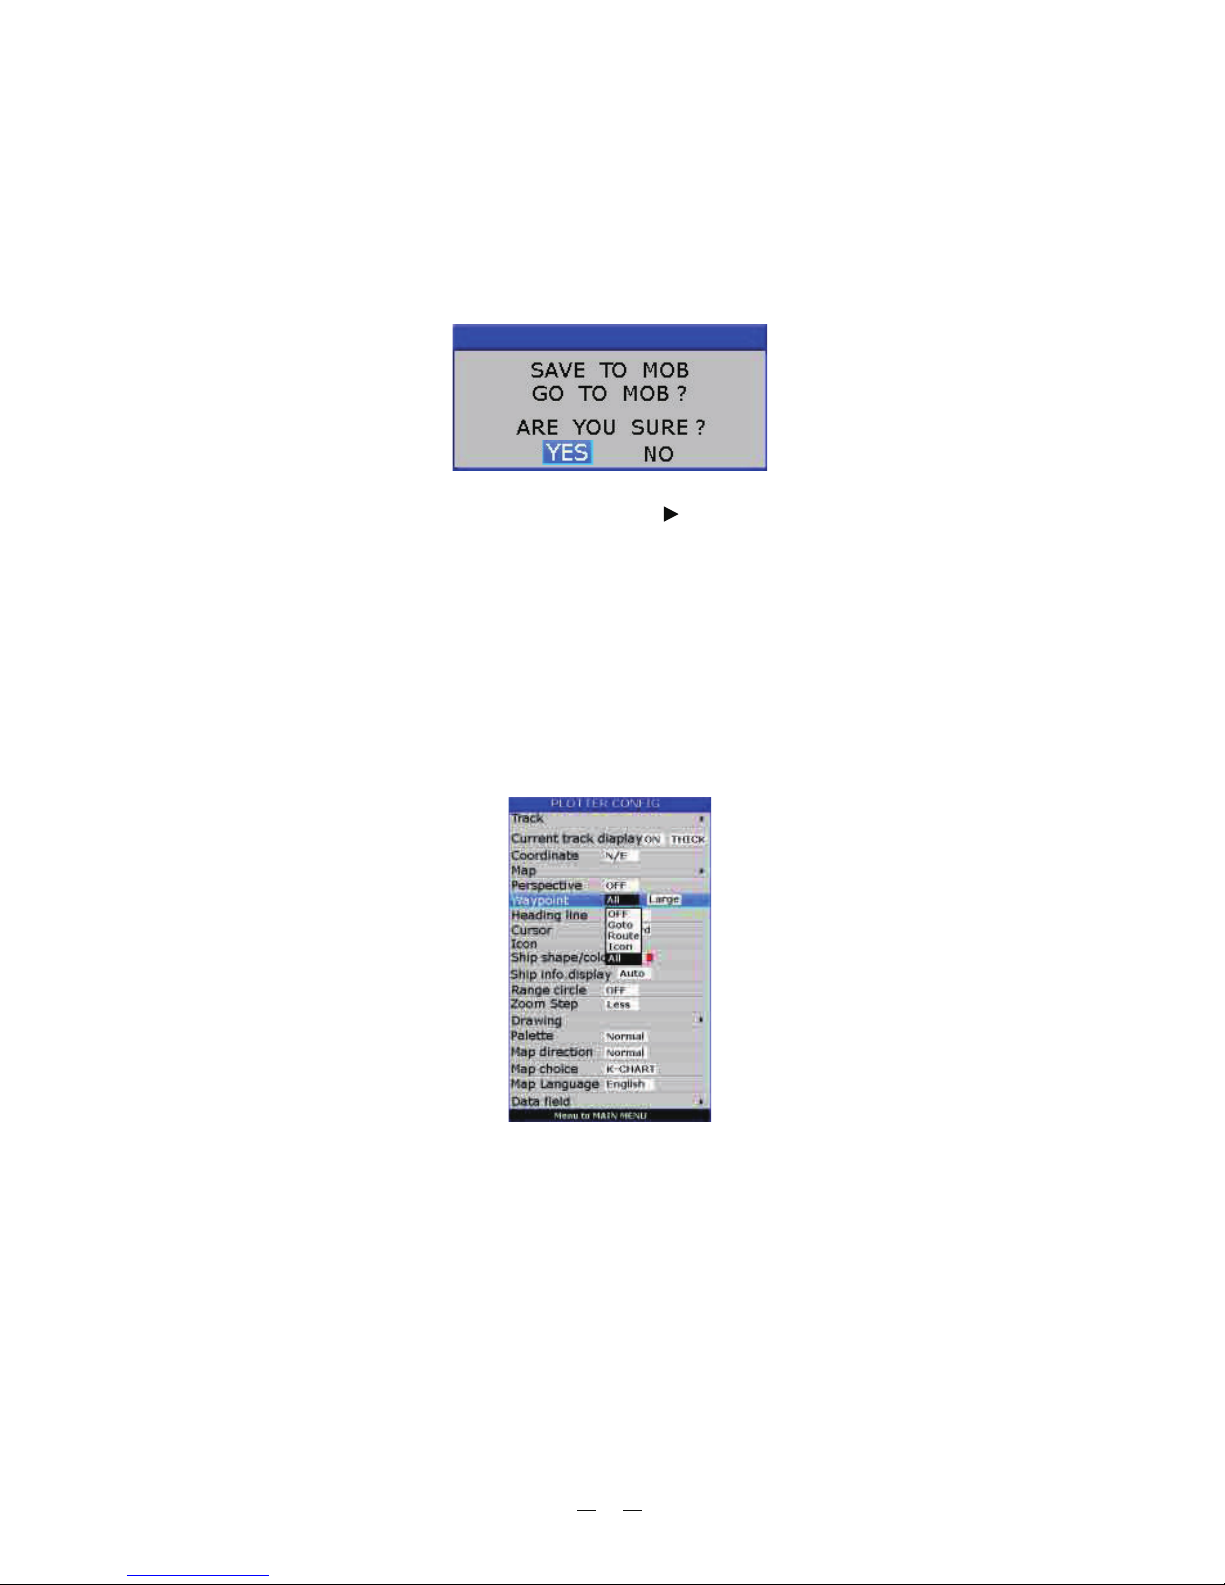
4.2EnteringtheMOBMark
Only one MOB mark may be entered.
Each time the MOB mark is entered, the previous MOB mark and its position data
are over-written.
The following display appears.
1. Long press the key on any display mode.[MOB]
2. To set MOB position as destination, press [ ] to choose YES and then press
[ ] key. Choosing NO saves the position as a waypoint called MOB .ENT
" "
" " " "
4.3DisplayingWaypointName
[MENU] PLOTTER
Waypoint [ENT]
You may display waypoint name as follows:
1. Press the key on the screen.
2. Choose and then press the key. The following window will
appear.
3. Choose , , or as desired and then press the key.
Displays all waypoint names.
Displays only the GOTO waypoint name.
Displays all waypoint names when a route is set as destination.
Do not display any waypoint name.
All Goto Route OFF [ENT]
All:
Goto:
Route:
OFF:
" " " " " ", " ""Icon"
24
 Loading...