

Page 1

English
Universal Port Option
HD Radio Tuner
UP-HT1
Instruction Manual
Manuel d’instructions
Français
Fr
E
n
Page 2
Thank you for purchasing an Onkyo product. Please
read this manual carefully before making any connections or using this product. By following these
instructions, you’ll get the best audio performance
and the most listening pleasure from your Onkyo
product. Keep this manual for future reference.
WARNING:
TO REDUCE THE RISK OF FIRE OR ELECTRIC SHOCK, DO NOT
EXPOSE THIS APPARATUS TO RAIN OR MOISTURE.
CAUTION:
TO REDUCE THE RISK OF ELECTRIC SHOCK, DO NOT REMOVE
COVER (OR BACK). NO USER-SERVICEABLE PARTS INSIDE.
REFER SERVICING TO QUALIFIED SERVICE PERSONNEL.
WARNING
RISK OF ELECTRIC SHOCK
DO NOT OPEN
The lightning flash with arrowhead symbol, within an equilateral
triangle, is intended to alert the user to the presence of
uninsulated “dangerous voltage” within the product’s enclosure
that may be of sufficient magnitude to constitute a risk of electric
shock to persons.
The exclamation point within an equilateral triangle is intended
to alert the user to the presence of important operating and
maintenance (servicing) instructions in the literature
accompanying the appliance.
AVIS
RISQUE DE CHOC ELECTRIQUE
OUVRIR
NE PAS
En-2
Important Safety Instructions
1. Read these instructions.
2. Keep these instructions.
3. Heed all warnings.
4. Follow all instructions.
5. Do not use this apparatus near water.
6. Clean only with dry cloth.
7. Do not block any ventilation openings. Install in accordance with the manufacturer’s instructions.
8. Do not install near any heat sources such as radiators,
heat registers, stoves, or other apparatus (including
amplifiers) that produce heat.
9. Do not defeat the safety purpose of the polarized or
grounding-type plug. A polarized plug has two blades
with one wider than the other. A grounding type plug
has two blades and a third grounding prong. The wide
blade or the third prong are provided for your safety. If
the provided plug does not fit into your outlet, consult
an electrician for replacement of the obsolete outlet.
10. Protect the power cord from being walked on or
pinched particularly at plugs, convenience receptacles,
and the point where they exit from the apparatus.
11. Only use attachments/accessories specified by the manufacturer.
12. Unplug this apparatus during lightning storms or when
unused for long periods of time.
13. Refer all servicing to qualified service personnel. Servicing is required when the apparatus has been damaged
in any way, such as power-supply cord or plug is damaged, liquid has been spilled or objects have fallen into
the apparatus, the apparatus has been exposed to rain
or moisture, does not operate normally, or has been
dropped.
Page 3

Important Safety Instructions—Continued
14. Damage Requiring Service
Unplug the apparatus from the wall outlet and refer servicing to qualified service personnel under the following conditions:
A. When the power-supply cord or plug is damaged,
B. If liquid has been spilled, or objects have fallen into
the apparatus,
C. If the apparatus has been exposed to rain or water,
D. If the apparatus does not operate normally by fol-
lowing the operating instructions. Adjust only
those controls that are covered by the operating
instructions as an improper adjustment of other
controls may result in damage and will often
require extensive work by a qualified technician to
restore the apparatus to its normal operation,
E. If the apparatus has been dropped or damaged in
any way, and
F. When the apparatus exhibits a distinct change in
performance this indicates a need for service.
Precautions
1. Recording Copyright—Unless it’s for personal use only,
recording copyrighted material is illegal without the
permission of the copyright holder.
2. Care—Occasionally you should dust the unit all over
with a soft cloth. For stubborn stains, use a soft cloth
dampened with a weak solution of mild detergent and
water. Dry the unit immediately afterwards with a clean
cloth. Don’t use abrasive cloths, thinners, alcohol, or
other chemical solvents, because they may damage the
finish or remove the panel lettering.
3. Never Touch this Unit with Wet Hands—Never handle
this unit or its power cord while your hands are wet or
damp. If water or any other liquid gets inside this unit,
have it checked by your Onkyo dealer.
4. Handling Notes
•If you need to transport this unit, use the original
packaging to pack it how it was when you originally
bought it.
•Do not leave rubber or plastic items on this unit for a
long time, because they may leave marks on the case.
•If you do not use this unit for a long time, it may not
work properly the next time you turn it on, so be sure
to use it occasionally.
En-3
Page 4

Precautions—Continued
Memory backup
The UP-HT1 uses a battery-less memory backup system in order to retain radio presets and other settings when it’s unplugged or in the case of a power
failure.
For U.S. models
FCC Information for User
CAUTION:
The user changes or modifications not expressly approved by
the party responsible for compliance could void the user’s
authority to operate the equipment.
NOTE:
This equipment has been tested and found to comply with the
limits for a Class B digital device, pursuant to Part 15 of the FCC
Rules. These limits are designed to provide reasonable protection against harmful interference in a residential installation.
This equipment generates, uses and can radiate radio frequency energy and, if not installed and used in accordance
with the instructions, may cause harmful interference to radio
communications. However, there is no guarantee that interference will not occur in a particular installation. If this equipment
does cause harmful interference to radio or television reception, which can be determined by turning the equipment off
and on, the user is encouraged to try to correct the interference by one or more of the following measures:
En-4
•Reorient or relocate the receiving antenna.
•Increase the separation between the equipment and
receiver.
•Connect the equipment into an outlet on a circuit different
from that to which the receiver is connected.
•Consult the dealer or an experienced radio/TV technician
for help.
Page 5
Features
HD Radio Capability
❑ CD-quality FM
❑ Rich-sound AM
❑ 40 presets
❑ Crystal-clear sound
❑ Through mode for connecting additional options
HD Radio™ Technology Manufactured Under License From
iBiquity Digital Corp. U.S. and Foreign Patents.
HD Radio™ and the HD Radio logo are proprietary trademarks of iBiquity Digital Corp.
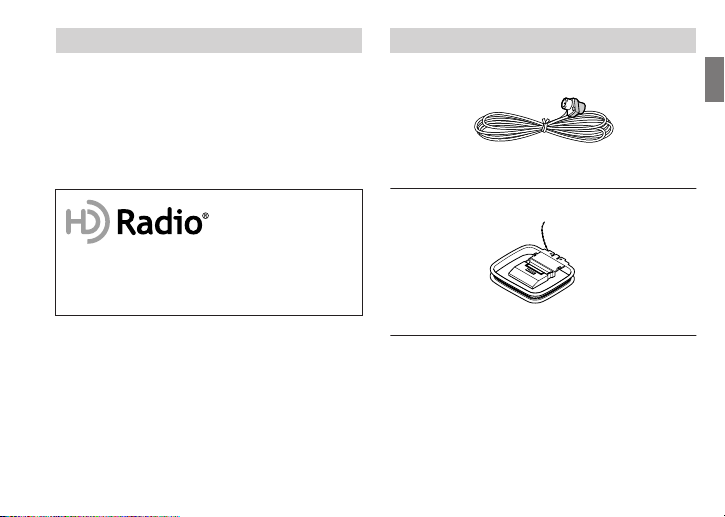
Supplied Accessories
Indoor FM antenna
AM loop antenna
En-5
Page 6
About the UP-HT1
1
2
Front
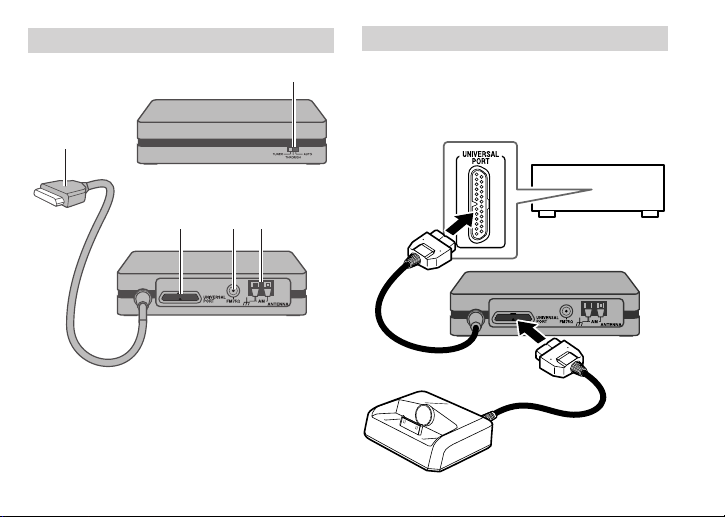
Connecting the UP-HT1
Turn off your Universal Port-compatible Onkyo product. Connect the UP-HT1 to its UNIVERSAL PORT. Set
the UP-HT1’s Mode selector.
Universal Portcompatible
Onkyo product
A Mode selector
2 Universal Port cable
3 UNIVERSAL PORT
4 FM antenna jack
5 AM antenna terminals
En-6
345
Rear
Onkyo Universal Port
dock, UP-A1, etc.
(optional)
Page 7
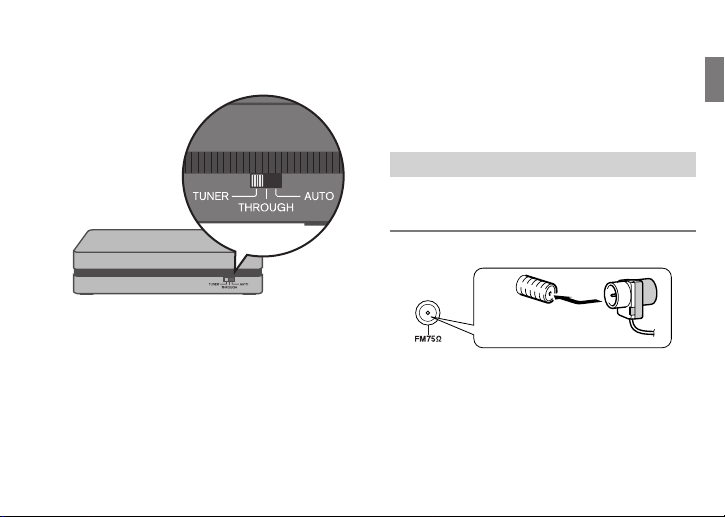
Setting the Mode Selector
Turn off the Universal Port-compatible Onkyo product before setting the Mode selector.
DOCK input source selects the dock (UP-A1, etc.)
connected to the UP-HT1’s Universal Port. Note
that some Universal Port-compatible Onkyo products do not support this functionality, in which
case you will need to set the Mode Selector manually.
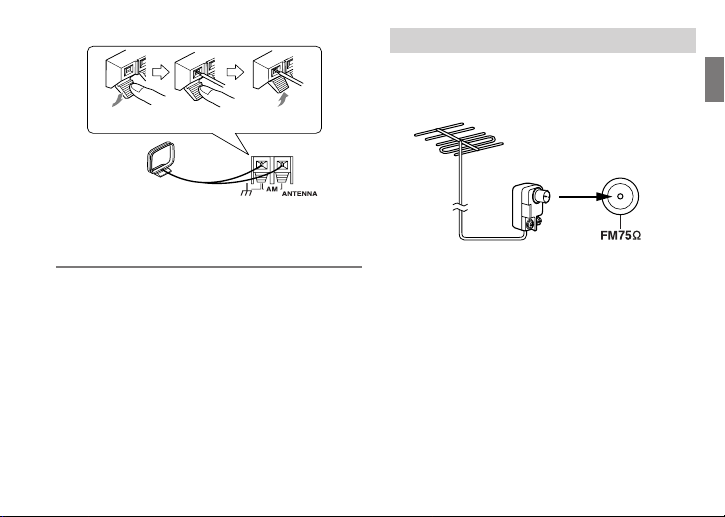
Connecting the Indoor FM Antenna
The supplied indoor FM antenna is for indoor use
only.
1. Attach the FM antenna, as shown.
• TUNER: Select this to listen to HD Radio.
• THROUGH: Select this to listen to the device connected to the UP-HT1’s Universal Port, for example, an iPod in a UP-A1 dock.
• AUTO: When AUTO is selected, the source is
selected automatically when the input source is
changed on the Universal Port-compatible Onkyo
product. For example, selecting the TUNER input
source selects the UP-HT1, while selecting the
Insert the plug fully
into the jack.
Once your UP-HT1 is ready for use, you’ll need to
tune into an FM radio station and adjust the position of the FM antenna to achieve the best possible
reception.
En-7
Page 8

2. Use thumbtacks or something similar to
fix the FM antenna into position.
Thumbtacks, etc.
Caution: Be careful that you don’t injure yourself
when using thumbtacks.
If you cannot achieve good reception with the supplied indoor FM antenna, try a commercially available outdoor FM antenna instead (see page 9).
En-8
Connecting the AM Loop Antenna
The supplied indoor AM loop antenna is for indoor
use only.
1. Assemble the AM loop antenna, inserting
the tabs into the base, as shown.
2. Connect both wires of the AM loop
antenna to the AM push terminals, as
shown.
Make sure that the wires are attached securely and
that the push terminals are gripping the bare wires,
not the insulation.
Page 9
Push Insert wire Release
If you cannot achieve good reception with the supplied indoor AM antenna, try using it with a commercially available outdoor AM antenna.
Connecting an Outdoor FM Antenna
If you cannot achieve good reception with the supplied indoor FM antenna, try a commercially available outdoor FM antenna instead.
Notes:
• Outdoor FM antennas work best outside, but
usable results can sometimes be obtained when
installed in an attic or loft.
•For best results, install the outdoor FM antenna
well away from tall buildings, preferably with a
clear line of sight to your local FM transmitter.
• Outdoor antenna should be located away from
possible noise sources, such as neon signs, busy
roads, etc.
En-9
Page 10
•For safety reasons, outdoor antenna should be situated well away from power lines and other highvoltage equipment.
• Outdoor antenna must be grounded in accordance with local regulations to prevent electrical
shock hazards.
❑ Using a TV/FM Antenna Splitter
It’s best not to use the same antenna for both FM
and TV reception, as this can cause interference
problems. If circumstances demand it, use a TV/FM
antenna splitter, as shown.
TV/FM antenna splitter
Connecting an Outdoor AM Antenna
If good reception cannot be achieved using the supplied AM loop antenna, an outdoor AM antenna can
be used in addition to the loop antenna, as shown.
Outdoor antenna
AM loop
antenna
Insulated
antenna cable
En-10
To UP-HT1
To TV (or VCR)
Page 11
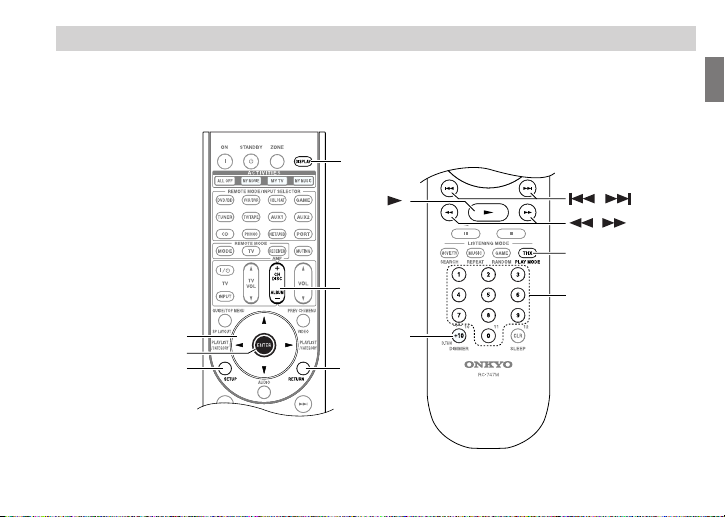
Remote Controller
You can control the UP-HT1 with your Universal Port-compatible Onkyo product’s remote controller. Aim it at
your Universal Port-compatible Onkyo product, not the UP-HT1. The layout of the remote controller’s buttons
varies depending on the Universal Port-compatible Onkyo product you are using.
DISPLAY
/
/
PLAY MODE
CH +/–
Number buttons
Arrow buttons
ENTER
SETUP
+10
RETURN
(An Onkyo AV receiver’s remote controller is shown here.)
En-11
Page 12
You can use the following buttons on your Universal Port-compatible Onkyo product’s remote controller.
Button Function Explanation
0–9 Direct Tuning/Preset
+10 Direct Tuning Set
DISPLAY Display Change Used to view various information on the display.
PLAY MODE Auto/Mono With AM and FM, this button selects the Auto or Manual tuning mode.
SETUP Setup/Return Selects Setup mode.
RETURN Return Returns to the previous display.
Arrow [ ]/[ ]
buttons
Arrow [ ]/[ ]
buttons
ENTER Blend Mode/Enter
CH +/– Preset Up/Down Used to select radio presets.
Play [ ]
/
/
Tuning Up/Down With AM and FM, the Up and Down [ ]/[ ] buttons are used for tuning.
Setup Up/Down In Setup menu, used to select and adjust settings.
Supplemental Program
Service Up/Down
Setup Up/Down In Setup menu, used to adjust settings.
AM/FM Used to select radio bands, AM or FM.
Preset Down/Up Used to select radio presets.
Tuning Down/Up With AM and FM, these buttons are used for tuning.
Used to select radio presets by number, and to enter AM/FM station frequencies.
Selects the Direct Tuning mode. With AM and FM, you can select a station
directly by entering its frequency.
Used to select secondary multicast channels.
Used to select Blend mode (Auto or Analog). In Setup menu, used to confirm various functions and settings.
En-12
Page 13
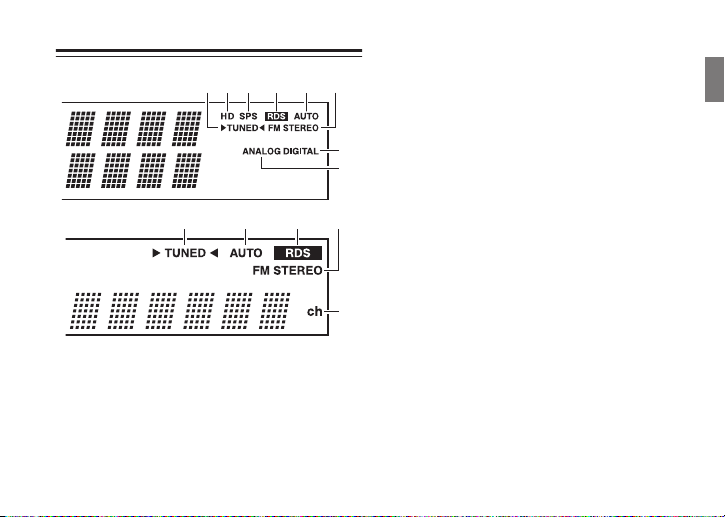
Display
12
3 4 56
51 4
This display information shows an example. Some
indicator may not appear depending on your connected model.
A TUNED
The Tuned indicator lights up when properly
tuned to a radio station. During Auto Tuning, the
Tuning Arrows flash.
6
7
8
9
2 HD
Lights up when tuned to an HD Radio station.
3 SPS
Lights up when an HD Radio station provides
multicast channel program.
4 RDS
Lights up when tuned to an FM radio station that
supports RDS (Radio Data System).
5 AUTO
Lights up when Auto Tuning mode is selected.
6 FM STEREO
Lights up when an analog audio is being
received in a stereo reception. (It indicates the
status of analog audio during digital HD Radio
reception.)
7 DIGITAL
Lights up when a digital HD Radio transmission is
being received.
8 ANALOG
Lights up when an analog HD Radio transmission
is being received.
9 ch
Lights up when a preset channel is displayed.
En-13
Page 14

Listening to AM and FM Radio
1. Turn on your Universal Port-compatible
Onkyo product and select the PORT input
source.
2. Press the [PORT] remote mode button on
your remote controller to select the PORT
remote mode.
3. Press the Play [ ] button repeatedly to
select AM or FM.
4. Press the [PLAY MODE] button repeatedly
to select Auto or Manual Tuning mode.
•Auto Tuning Mode
The AUTO indicator appears and stereo radio
reception is possible.
• Manual Tuning Mode
The AUTO indicator disappears and radio reception will be in mono.
5. Use the [ ]/[ ] buttons to tune into a
station.
In Auto Tuning mode, once a station is found, tuning stops automatically.
En-14
FM frequency changes in 0.2 MHz steps, 10 kHz
steps for AM.
In Manual Tuning mode, the frequency stops
changing when you release the buttons. Press the
buttons repeatedly to change the frequency one
step at a time.
When tuned into a station, the Tuned indicator on
your Universal Port-compatible Onkyo product
appears.
When tuned into a stereo FM station, the FM STEREO indicator on your Universal Port-compatible
Onkyo product appears.
The FM STEREO indicator shows the status of analog audio. (It does not indicate the status during
digital reception.)
Tuning into weak stereo FM stations
If the signal from a stereo FM station is weak, it may
be impossible to get good reception. In this case,
switch to Manual Tuning mode and listen to the station in mono.
Page 15

Tuning into Stations by Frequency
You can tune into AM and FM stations directly by
entering the appropriate frequency.
1. Press the [+10] button.
2. Within 8 seconds, use the number but-
tons to enter the frequency of the radio
station.
For example, to tune into an FM station at 87.5 MHz,
press [+10], [8], [7], and [5].
To select a multicast channel at the same time, use
number buttons [1] to [8] to enter its number
immediately after entering the station’s frequency.
Listening to HD Radio™ Stations
HD Radio technology brings digital radio to conventional analog AM and FM radio stations, with
improved sound quality, better reception, and new
data services. HD Radio technology provides CDquality sound for FM stations, and FM-quality sound
for AM stations. In addition, FM HD Radio stations
can transmit multiple programs on the same frequency by using multicast channels. Text data display includes station name, song title, artist name,
and so on.
For more information about HD Radio technology,
visit:
www.ibiquity.com
www.hdradio.com
En-15
Page 16

About HD Radio Stations Selecting Multicast Channels
HD Radio stations broadcast on the same AM and FM
frequencies they’ve always used, and you can receive
them by tuning into your favorite station as normal.
If the current AM or FM station supports HD Radio
technology, the HD Radio indicator lights up. When
an HD Radio transmission is received, the “HD SPS”
indicator appears or “HD Radio” appears on the display.
•If the current AM or FM station supports HD Radio
technology, the station’s name will be displayed
instead of the band and frequency.
•When music data is received, song title and artist
name information will be displayed next to the HD
indicator.
•If the current HD Radio station supports multicast
channels, the currently selected multicast channel
will be displayed to the right of the HD indicator.
FM HD Radio stations can transmit multiple programs on the same frequency by using what are
called multicast channels.
1. Use the Left/Right Arrow [ ]/[ ] buttons
to select a multicast channel.
If you select a multicast channel that is not currently broadcasting, a plus [+] symbol or period [.]
will appear next to the HD indicator, indicating that
the channel has been reserved. When broadcasting
commences, that channel will be selected automatically.
Reserved channel indication
HD Radio channel number
Note: Multicast channels are not available on AM.
En-16
Page 17

Setting the Blend Mode
HD Radio transmissions contain analog and digital
signals. If available, the digital signal is used automatically. In areas with poor reception, you may
want to choose the analog signal.
1. Press [ENTER] repeatedly to select Auto
or Analog.
Auto: Select to use the digital signal when avail-
able.
Anlg (Analog): Select to use the analog signal.
Note: Multicast channels 2 through 8 are digital
only, so you must select multicast channel #1 before
you can change the Blend mode.
Displaying HD Radio Information
Press the [DISPLAY] button repeatedly to cycle
through the available information.
Preset channel number
Station name
Radio reception
channel number
Indicates HD
HD Radio
Station name &
HD Radio channel number
HD channel, Artist name, and Song title are displayed in the 2nd line if the connected product has a
two-line display.
Frequency
Preset channel
number
Frequency &
Preset channel
number
Scrolling
station information
Station
information
En-17
Page 18
Scrolling
artist name
Artist
information
Scrolling
song title
Song title
information
Note: The exact information displayed depends on
your Universal Port-compatible Onkyo product.
En-18
If your Universal Port-compatible Onkyo product
supports Universal Port OSD (onscreen display), HD
Radio information can be displayed on your TV.
Frequency or
Band
FM
preset name
Station name
MHz
Preset number
39ch105. 5
HD channel
HD3 ONK–FM
NAME :
TIT
OT
HER
OTHER: station information
TITLE: song title
NAME: artist name
LE
abcde
: ABCD
: Information
Note: This information is displayed only when
receiving HD Radio.
Page 19

Using RDS
RDS stands for Radio Data System and is a method of
transmitting data in FM radio signals. RDS is
approved by the National Radio Systems Committee
(NRSC) and is available in North America.
Many FM stations use it these days. In addition to displaying text information, RDS can also help you find
radio stations by type (e.g., news, sport, rock, etc.).
This product supports the following types of RDS
information: Program Service Name (PS), Radio Text
(RT), and Program Type (PTY).
Displaying RDS Information
The RDS indicator lights up when tuned to an FM
radio station that supports RDS.
Press the [DISPLAY] button repeatedly to cycle
through the available information.
1. Program Service Name
When tuned to an RDS station that’s broadcasting PS information, the station’s name will be displayed.
2. Frequency
The frequency of the RDS station is displayed.
3. Radio Text
When tuned to an RDS station that’s broadcasting RT text information, the text will be shown
on the display.
4. Program Type
When tuned to an RDS station that’s broadcasting PTY information, the type of program will be
displayed.
Note: If the signal from an RDS station is weak, RDS
data may be displayed intermittently or not at all.
En-19
Page 20

Using Presets
Presetting Your Favorite Stations
With the Preset Write function, you can preset individual FM and AM radio stations. Presets make it easy
to select your favorite stations and eliminate the
need to tune the radio manually each time you want
to change stations. You can store up to 40 FM and
AM stations as presets.
1. Tune into the station you want to store as
a preset.
2. Press the [SETUP] button, and then use
the Up/Down Arrow [ ]/[ ] buttons to
select “Preset Write”
3. Press [ENTER].
4. Use the Left/Right Arrow [ ]/[ ] buttons
or CH [+] / [–] buttons to select a preset.
5. To store the station, press [ENTER].
En-20
Selecting Preset Stations
You must store some presets before you can select
them.
1. Use the CH [+] / [–] buttons to select a pre-
set.
Press the CH [+] button to select the previous preset. Press the CH [–] button to select the next preset.
You can also use the number buttons or
[ ]/[ ] buttons to select presets.
Page 21

Erasing Presets
1. Select the preset you want to erase.
2. Press the [SETUP] button, and then use
Up/Down Arrow [ ]/[ ] buttons to
select “Preset Erase”.
3. Press [ENTER].
A message requesting confirmation appears.
To cancel the Preset Erase function at this point,
press the [RETURN] button.
4. To erase the preset, press [ENTER].
The preset is erased and “Erase OK?” appears on the
display.
5. Press [ENTER].
The preset is erased and “Complete” appears on the
display.
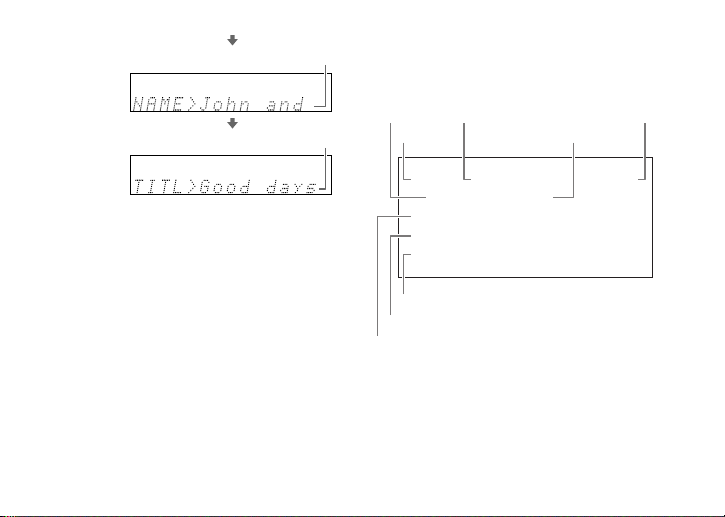
Naming Presets
You can name presets for easy identification. The preset name may contain of up to ten characters.
1. Select the preset you want to name.
2. Press the [SETUP] button, and then use
the Up/Down Arrow [ ]/[ ] buttons to
select “Name Edit”
3. Press [ENTER].
4. Use the Up/Down [ ]/[ ] buttons to
select the available characters (see next
page), and use the Left/Right [ ]/[ ] buttons to move the cursor.
5. When you’ve finished entering the name,
press [ENTER].
“Name Edit” appears on the display.
6. Press the [RETURN] button to return to
the normal display.
En-21
Page 22

Available Characters
A B C D E F G H I J K L M N O P Q R S T U V W X Y Z
a b c d e f g h i j k l m n o p q r s t u v w x y z
0 1 2 3 4 5 6 7 8 9
_ . ’ ( ) + * = / , : ; ! ? (space)
Erasing a Preset’s Name
1. Select the preset whose name you want
to erase.
2. Press the [SETUP] button, and then use
the Up/Down Arrow [ ]/[ ] buttons to
select “Name Erase”.
3. Press [ENTER].
The preset’s name is erased and “Erase OK?”
appears on the display.
4. Press [ENTER].
The preset’s name is erased and “Complete”
appears on the display.
En-22
Using a UP-A1 Dock
When the UP-HT1’s Mode Selector is set to TUNER,
the iPod in the connected UP-A1 dock will not be
charged. If you change the Mode Selector from
TUNER to THROUGH while your Universal Port-compatible Onkyo product is in Standby mode, you must
remove and reinsert the iPod in the UP-A1 to start
charging.
*iPod is a trademark of Apple Inc., registered in the
U.S. and other countries.
Page 23

Troubleshooting
If you have any trouble using the UP-HT1, look for a
solution in this section.
The UP-HT1 is not recognized by your Universal
Port-compatible Onkyo product
•Make sure the UP-HT1 is properly connected to
the UNIVERSAL PORT on your Universal Port-compatible Onkyo product.
•Turn off all devices before connecting to a UNIVERSAL PORT.
No sound
•Make sure your amplifier’s volume control is not
set to minimum.
• Check all connections and correct as necessary
(see page 6).
The UP-HT1 is connected to a Universal Port-compatible Onkyo product but doesn’t work
•Turn off all devices, and then set the UP-HT1’s
Mode selector to TUNER.
Can’t control the UP-HT1 by using the buttons on
the front panel of the Universal Port-compatible
Onkyo product
•This is normal. The UP-HT1 can be controlled only
by using the Universal Port-compatible Onkyo
product’s remote controller. (However, some products can control using the front panel’s buttons.)
•Press the [PORT] remote mode button on your
remote controller to select the PORT remote
mode.
The displays shown in this manual differ to what’s
displayed on your Universal Port-compatible
Onkyo product
•The exact information displayed depends on your
Universal Port-compatible Onkyo product. The
displays shown in this instruction manual serve as
examples only.
If you can’t resolve an issue yourself, try resetting the
UP-HT1 as follows before contacting your Onkyo
dealer.
Connect the UP-HT1 to your Universal Port-compatible Onkyo product. On your Universal Port-compatible Onkyo product, select the PORT input source.
En-23
Page 24

When the UP-HT1 has been recognized, while holding down the [PORT] button on the front panel of
the product, press the [STANDBY/ON] button on the
front panel of the product. (The reset procedure may
vary depending on your Universal Port-compatible
Onkyo product, so refer to its instruction manual as
well.)
Note that resetting the UP-HT1 will delete your radio
presets and custom settings.
En-24
Specifications
40 FM/AM presets
FM tuning frequency range:
87.5 MHz–107.9 MHz in 0.2 MHz steps
AM tuning frequency range:
530 kHz–1710 kHz in 10 kHz steps
Rating:
12 V, 300 mA
Dimensions (W x H x D):
140 x 32.5 x 110 mm (5-1/2" x 1-1/4" x 4-5/16")
Weight:
0.4 kg (0.9 lbs.)
Page 25

Nous vous remercions d’avoir opté pour un produit
Onkyo. Veuillez lire ce manuel d’instructions attentivement avant d’effectuer la moindre connexion et
d’utiliser ce produit. En suivant les instructions données, vous profiterez au mieux des possibilités de ce
produit Onkyo et de tout le plaisir qu’il peut procurer.
Conservez ce manuel afin de pouvoir le consulter
ultérieurement.
ATTENTION:
AFIN DE REDUIRE LES RISQUES D’INCENDIE ET DE DECHARGE ELECTRIQUE, NE PAS EXPOSER CET APPAREIL A LA PLUIE
OU A L’HUMIDITE.
DANGER:
AFIN D’EVITER TOUT DANGER DE DECHARGE ELECTRIQUE,
NE PAS OUVRIR LE BOITIER (OU L’ARRIERE) DE L’APPAREIL.
CONFIER TOUT TRAVAIL D’ENTRETIEN OU DE REPARATION A
UN TECHNICIEN QUALIFIE.
WARNING
RISK OF ELECTRIC SHOCK
DO NOT OPEN
Un symbole d’éclair fléché dans un triangle équilatéral est
destiné à attirer l’attention de l’utilisateur sur le fait que
certains organes internes non-isolés de l’appareil sont
traversés par un courant électrique assez dangereux pour
constituer un resque d’électrocution.
Un point d’exclamation dans un triangle équilatéral est destiné à attirer l’attention de l’utilisateur sur des instructions
importantes relatives à l’entretien et à l’utilisation du produit.
AVIS
RISQUE DE CHOC ELECTRIQUE
OUVRIR
NE PAS
Fr-1
Page 26

Remarques importantes pour votre sécurité
1. Veuillez lire ces instructions.
2. Veuillez conserver ces instructions.
3. Respectez tous les avertissements.
4. Suivez toutes les instructions.
5. Ne vous servez pas de cet appareil à proximité d’eau.
6. Essuyez le boîtier avec un chiffon sec uniquement.
7. Ne bloquez pas les orifices d’aération. Installez cet
appareil en suivant les instructions du fabricant.
8. Ne le placez pas à proximité de sources de chaleur telles
que radiateurs, chauffage, poêles ou autre dispositif (y
compris les amplificateurs) générateur de chaleur.
9. N’essayez pas de circonvenir le dispositif de sécurité que
représente une fiche polarisée ou une fiche avec mise à
la terre. Une fiche polarisée dispose de deux lames dont
l’une est plus large que l’autre. Une fiche avec terre est
munie de deux lames ainsi que d’une broche de mise à
la terre. La lame la plus large ou la broche assurent votre
sécurité. Si la fiche fournie ne peut être insérée dans la
prise murale, demandez à un électricien de remplacer la
prise.
10. Protégez le cordon d’alimentation en évitant qu’on ne
marche pas dessus et qu’il ne soit plié (notamment au
niveau des fiches, des cache-câbles et de la sortie de
l’appareil).
11. Servez-vous exclusivement des fixations/accessoires
préconisés par le fabricant.
12. Débranchez l’appareil durant un orage ou lorsqu’il reste
inutilisé longtemps.
Fr-2
13. Veuillez faire appel à un technicien qualifié pour l’entretien. Un entretien est indispensable si l’appareil a été
endommagé d’une façon ou d’une autre: cordon d’alimentation ou fiche endommagée, liquide renversé ou
chute de petits objets dans l’appareil, exposition à la
pluie ou à une humidité excessive, fonctionnement
anormal ou chute de l’appareil.
14. Dommages nécessitant réparation
Débranchez l’appareil du secteur et confiez-le à un
technicien qualifié lorsque:
A. Le cordon d’alimentation ou sa fiche sont endom-
magés.
B. Des objets sont tombés dans l’appareil ou du
liquide a été renversé et a pénétré ce dernier.
C. L’appareil a été exposé à la pluie.
D. L’appareil ne semble pas fonctionner normalement
lorsque vous l’utilisez en respectant les instructions
données. N’effectuez que les réglages préconisés
dans le manuel car un mauvais réglage d’autres
commandes risque d’endommager l’appareil et
nécessitera un long travail de remise en état par un
technicien qualifié.
E. L’appareil est tombé ou son boîtier est endom-
magé.
F. Ses per formances semblent affectées.
Page 27

Précautions
1. Enregistrement et droits d’auteur—Outre pour l’utili-
sation privée, tout enregistrement d’œuvres protégées
par des droits d’auteur est interdit sans l’accord préalable du détenteur de ces droits.
2. Entretien—Essuyez régulièrement le boîtier de l’appareil avec un chiffon doux et sec. Vous pouvez éliminer
les taches rebelles avec un chiffon légèrement imbibé
d’eau et de détergent doux. Essuyez ensuite l’appareil
avec un chiffon propre et sec. N’utilisez jamais de chiffons rêches, de dissolvant, d’alcool ou d’autres solvants
chimiques car ceux-ci pourraient endommager la finition ou faire disparaître la sérigraphie du boîtier.
3. Ne touchez jamais cet appareil avec des mains
mouillées—Ne manipulez jamais cet appareil ou son
cordon d’alimentation avec des mains mouillées ou
humides. Si de l’eau ou tout autre liquide pénètre à
l’intérieur de l’appareil, faites-le vérifier par votre revendeur Onkyo.
4. Remarques concernant la manipulation
• Si vous devez transporter cet appareil, servez-vous de
l’emballage d’origine pour l’emballer comme il l’était
lors de son acquisition.
• Ne posez pas d’objets en caoutchouc ou en plastique
à demeure sur cet appareil car ils risquent de laisser
des marques sur le boîtier.
• Si vous n’utilisez pas l’appareil durant une période
assez longue, il risque de ne pas fonctionner convenablement à la prochaine mise sous tension; veillez
donc à l’utiliser de temps en temps.
Sauvegarde des réglages
Le UP-HT1 comporte un système de sauvegarde des
réglages qui fonctionne sans pile. Ce système conserve les mémoires de la partie radio et d’autres
réglages quand vous mettez l’appareil hors tension
ou que vous le débranchez du secteur.
Fr-3
Page 28

Caractéristiques
Compatibilité HD Radio
❑ Son FM de qualité CD
❑ Son AM d’une grande richesse
❑ 40 mémoires de stations
❑ Son cristallin
❑ Mode “Through” permettant de brancher d’autres
options
Technologie HD Radio™ sous licence de iBiquity Digital
Corp. Brevets américains et étrangers.
HD Radio™ et le logo HD Radio sont des marques exclusives
de iBiquity Digital Corp.
Fr-4
Accessoires fournis
Antenne FM intérieure
Antenne-cadre AM
Page 29

A propos de l’UP-HT1
1
Avant
2
345
A Sélecteur de mode
2 Câble Universal Port
3 UNIVERSAL PORT
4 Prise d’antenne FM
5 Bornes pour antenne AM
Connexion de l’UP-HT1
Mettez votre produit Onkyo compatible Universal
Port hors tension. Branchez l’UP-HT1 à sa prise UNIVERSAL PORT. Réglez le sélecteur de mode de
l’UP-HT1.
Produit Onkyo compatible Universal Port
Arrière
Dock Onkyo Universal Port,
UP-A1 etc. (en option)
Fr-5
Page 30

Réglage du sélecteur de mode
Mettez le produit Onkyo compatible Universal Port
hors tension avant de régler le sélecteur de mode.
• TUNER: Choisissez ce réglage pour écouter l’HD
Radio.
• THROUGH: Choisissez ce réglage pour écouter la
source branchée à la prise Universal Port de
l’UP-HT1 (un iPod dans un dock UP-A1, par exemple).
• AUTO: Avec “AUTO”, la source est sélectionnée
automatiquement quand vous changez de source
d’entrée sur le produit Onkyo compatible Universal Port. Le choix de la source d’entrée “TUNER”, par
Fr-6
exemple, sélectionne l’UP-HT1 tandis que le choix
de la source d’entrée “DOCK” sélectionne le dock
(UP-A1 etc.) branché à la prise Universal Port de
l’UP-HT1. Notez que certains produits Onkyo compatibles Universal Port ne reconnaissent pas cette
fonctionnalité: dans ce cas, réglez le sélecteur de
mode manuellement.
Connexion de l’antenne FM intérieure
L’antenne FM fournie est conçue exclusivement pour
une utilisation intérieure.
1. Branchez l’antenne FM de la façon illus-
trée.
Branchez la fiche à
fond dans la prise.
Dès que le UP-HT1 est paré pour l’utilisation,
recherchez une station FM et déterminez l’emplacement idéal de l’antenne FM en vous basant sur la
qualité du signal reçu.
Page 31

2. Fixez l’antenne FM au mur à l’aide de
punaises.
Punaises, etc.
Attention: Veillez à ne pas vous blesser avec les
punaises.
Si la réception FM laisse à désirer avec l’antenne FM
intérieure, remplacez celle-ci par une antenne FM
extérieure (voyez page 9).
Connexion de l’antenne-cadre AM
L’antenne-cadre AM fournie est conçue exclusivement pour une utilisation intérieure.
1. Assemblez l’antenne-cadre AM en insé-
rant les saillies dans le socle.
2. Insérez les deux fils de l’antenne-cadre
AM dans les bornes à poussoir pour
antenne AM.
Vérifiez que les bornes à poussoir sont bien en contact avec les fils et non avec leur gaine.
Fr-7
Page 32

Appuyez Insérez le fil Relâchez
Si la réception AM laisse à désirer avec l’antennecadre AM , remplacez celle-ci par une antenne AM
extérieure.
Fr-8
Connexion d’une antenne FM extérieure
Si la réception FM laisse à désirer avec l’antenne FM
intérieure fournie, utilisez une antenne FM extérieure.
Remarques:
•Les antennes FM extérieures produisent une
réception optimale en extérieur. Cependant, il suffit parfois de les installer dans un grenier pour
obtenir une réception suffisante.
•Installez l’antenne FM extérieure en veillant à
l’éloigner au maximum de grands immeubles. Il
faut que l’antenne puisse recevoir correctement
les ondes.
• Ne placez jamais l’antenne à proximité d’une
source d’interférences (enseignes lumineuses,
routes à circulation intense, etc.).
Page 33

•Par mesure de sécurité, ne placez jamais
d’antenne à proximité de lignes à haute tension ou
d’appareils à haute tension.
• Une antenne extérieure doit être branchée à la
terre conformément aux règlements en vigueur
pour éviter les risques d’électrocution.
❑ Utilisation d’un répartiteur d’antenne TV/
FM
N’utilisez jamais la même antenne pour la réception
de signaux FM et de programmes télévisés car cela
pourrait produire des interférences. Si toutefois le
manque d’espace ne permet que cette solution, utilisez un répartiteur d’antenne TV/FM.
Répartiteur d’antenne
Vers l’UP-HT1
TV/FM
Vers le téléviseur
(ou magnétoscope)
Connexion d’une antenne AM extérieure
Si l’antenne-cadre AM fournie ne suffit pas à obtenir
une réception satisfaisante, vous pouvez ajouter une
antenne AM extérieure.
Antenne extérieure
Antennecadre AM
Câble d’antenne
isolé
Fr-9
Page 34

Télécommande
Vous pouvez piloter l’UP-HT1 avec la télécommande du produit Onkyo compatible Universal Port. Orientez-la
vers le produit Onkyo compatible Universal Port et non vers l’UP-HT1. L’agencement des boutons de la télécommande varie selon le produit Onkyo compatible Universal Port que vous utilisez.
DISPLAY
/
/
PLAY MODE
CH +/–
Boutons numériques
Boutons fléchés
Fr-10
ENTER
SETUP
+10
RETURN
(L’illustration montre la télécommande d’un ampli-tuner AV Onkyo.)
Page 35

Vous pouvez utiliser les boutons suivants de la télécommande du produit Onkyo compatible Universal Port.
Bouton Fonction Explication
0~9
+10 Sélection directe de station
DISPLAY Changement d’affichage Affiche différentes informations.
PLAY MODE Auto/Manuel Sélectionne la recherche automatique ou manuelle de stations.
SETUP Configuration/Retour S électionne la configuration.
RETURN Retour Retour à l’affichage précédent.
Boutons fléchés [ ]/[ ]
Boutons fléchés [ ]/[ ]
ENTER Modes Blend/Entrée
CH +/– Station mémorisée haut/bas Sélec tion de stations mémorisées.
Lecture [ ]
/
/
Sélection directe/
Station mémorisée
Recherche de stations haut/bas Permettent de rechercher des stations.
Configuration haut/bas Permet d’effectuer des réglages.
Service de programme
supplémentaire haut/bas
Configuration haut/bas Permet d’effectuer des réglages.
AM/FM Sélectionne AM ou FM.
Station mémorisée bas/haut Sélection de stations mémorisées.
Recherche de stations bas/haut Sert à la recherche de stations.
Permet d’entrer les fréquences des stations et de sélectionner
des stations mémorisées.
En mode de sélection directe, vous pouvez sélectionner directement une station de radio en entrant sa fréquence.
Permet de sélectionner des canaux multicast secondaires.
Permet de sélectionner le mode “Blend” (“Auto” ou “Analogique”). Dans le menu “Setup”, permet de confirmer divers réglages et fonctions.
Fr-11
Page 36

Ecran
12
3 4 56
7
8
51 4
Ce type d’écran ne constitue qu’un exemple. Certains
indicateurs peuvent ne pas apparaître sur votre
appareil, selon le modèle dont vous disposez.
A TUNED
Le témoin “Tuned” s’allume quand la syntonisation de la station radio est bonne. Durant la
recherche automatique, les flèches de syntonisation clignotent.
Fr-12
6
9
2 HD
S’allume lors de la réception d’une station HD
Radio.
3 SPS
S’allume quand une station HD Radio propose
une programmation sur canaux multicast.
4 RDS
S’allume à la réception d’une station FM émettant des informations RDS (“Radio Data System”).
5 AUTO
S’allume quand la fonction de recherche automatique de stations est active.
6 FM STEREO
S’allume en cas de réception stéréo de données
audio analogiques. (Indique le statut des données audio analogiques lors de la réception
numérique HD Radio.)
7 DIGITAL
S’allume lors de la réception de signaux numériques d’une station HD Radio.
8 ANALOG
S’allume lors de la réception de signaux analogiques d’une station HD Radio.
9 ch
S’allume quand une présélection est affichée.
Page 37

Ecouter la radio AM et FM
1. Mettez le produit Onkyo compatible Uni-
versal Port sous tension et sélectionnez la
source d’entrée “PORT”.
2. Appuyez sur le bouton [PORT] de la télé-
commande pour la faire passer en mode
“PORT”.
3. Appuyez plusieurs fois sur le bouton Lec-
ture [ ] pour choisir “AM” ou “FM”.
4. Appuyez plusieurs fois sur le bouton
[PLAY MODE] pour choisir le mode de
recherche automatique ou manuel.
• Recherche automatique de stations
Le témoin AUTO apparaît et la réception radio
stéréo est possible.
• Recherche manuelle de stations
Le témoin AUTO apparaît et la réception radio
est mono.
5. Choisissez la station voulue avec les bou-
tons [ ]/[ ].
En mode automatique, la recherche s’arrête dès
qu’une station est détectée.
FM frequency changes in 0.2 MHz steps, 10 kHz
steps for AM.
En mode manuel, la fréquence cesse de changer
dès que vous relâchez les boutons. Appuyez plusieurs fois sur les boutons pour changer la fréquence par pas.
Quand une station est détectée, le témoin “Tuned”
apparaît sur le produit Onkyo compatible Universal
Port .
Si la station détectée est une station FM, le témoin
“FM STEREO” apparaît sur le produit Onkyo compatible Universal Port.
Le témoin FM STEREO indique le statut des données audio analogiques. (Il n’indique pas le statut
lors de la réception de données numériques.)
Réception de stations FM stéréo faibles
Si le signal d’une station FM stéréo est faible, il peut
être impossible de la capter correctement. Dans ce
cas, activez le mode de recherche manuelle et écoutez la station en mono.
Fr-13
Page 38

Recherche d’une station radio par fréquence
Vous pouvez sélectionner une station AM ou FM en
entrant directement la fréquence correspondante.
1. Appuyez sur le bouton [+10].
2. Dans les 8 secondes, entrez la fréquence
de la station avec le pavé numérique.
Pour capter une station FM d’une fréquence
87.5 MHz, par exemple, appuyez sur [+10], [8], [7] et
[5].
Pour sélectionner simultanément un canal multicast, utilisez les boutons [1]~[8] pour entrer son
numéro immédiatement après la fréquence de la
station.
Fr-14
Ecouter des stations HD Radio™
HD Radio apporte la technologie numérique aux stations radio AM et FM analogiques conventionnelles
en améliorant la qualité sonore, la réception ainsi
que les services de données. La technologie HD
Radio confère un son de qualité CD aux stations FM
et de qualité FM aux stations AM. De plus, les stations FM HD Radio peuvent transmettre plusieurs
programmes sur la même fréquence en se servant
de canaux multicast. L’affichage de texte comprend
le nom de la station, le titre du morceau, le nom de
l’artiste etc.
Pour en savoir plus sur la technologie HD Radio, rendez-vous sur le site:
www.ibiquity.com
www.hdradio.com
Page 39

Stations HD Radio Sélection de canaux multicast
Les stations HD Radio émettent sur les fréquences
AM et FM qu’elles ont toujours utilisées et vous pouvez les capter en sélectionnant votre station favorite.
Si la station AM ou FM sélectionnée est compatible
avec la technologie HD Radio, le témoin HD Radio
s’allume. A la réception d’une transmission HD Radio,
le témoin “HD SPS” ou “HD Radio” apparaît à l’écran.
• Si la station AM ou FM choisie est compatible avec
la technologie HD Radio, le nom de la station
apparaît à l’écran au lieu de la bande et de la fréquence.
•Lors de la réception de données musicales, le titre
du morceau et le nom de l’artiste s’affichent à côté
du témoin “HD”.
• Si la station HD Radio choisie est compatible avec
les canaux multicast, le canal multicast sélectionné est affiché à droite du témoin “HD”.
Les stations HD Radio FM peuvent transmettre plusieurs programmes sur la même fréquence en se servant de canaux multicast.
1. Utilisez les boutons fléchés gauche/
droite [ ]/[ ] pour sélectionner un canal
multicast.
Si vous sélectionnez un canal multicast qui n’émet
pas, un signe [+] ou un point [.] apparaît à côté du
témoin “HD” pour indiquer que le canal est réservé.
Dès que la diffusion commence, ce canal est automatiquement sélectionné.
Indique un canal réservé
Numéro de canal HD Radio
Remarque: Les canaux multicast ne sont pas dis-
ponibles en AM.
Fr-15
Page 40

Réglage du mode ‘Blend’
Les transmissions HD Radio contiennent des signaux
analogiques et numériques. S’il est disponible, le
signal numérique est automatiquement sélectionné. Dans les zones où la réception est médiocre,
optez plutôt pour le signal analogique.
1. Appuyez plusieurs fois sur [ENTER] pour
sélectionner “Auto” ou “Analogique”.
Auto: Optez pour le signal numérique s’il est dispo-
nible.
Anlg (Analog): Sélection du signal analogique.
Remarque: Les canaux multicast 2~8 ne transmet-
tent que des signaux numériques. Sélectionnez
d’abord le canal multicast 1 pour pouvoir changer le
mode “Blend”.
Fr-16
Affichage d’informations HD Radio
Appuyez plusieurs fois sur le bouton [DISPLAY] pour
passer en revue les informations disponibles.
Numéro de mémoire
Nom de la station
Nom de la station
& numéro de
canal HD Radio
Le canal HD, le nom de l’artiste et le titre du morceau
sont affichés sur la seconde ligne si le produit
branché dispose d’un écran à deux lignes.
Fréquence
Fréquence &
Numéro de
mémoire
Infos de la
station
Numéro de canal
Indique la récep-
tion HD Radio
Défilement des
infos de la station
HD Radio
Numéro de
mémoire
Page 41

Défilement du
nom de l’artiste
Infos sur
l’artiste
Défilement du
titre du morceau
Infos sur le titre
du morceau
Remarque: Les information affichées dépendent de
votre produit Onkyo compatible Universal Port.
Si votre produit Onkyo compatible Universal Port
autorise l’affichage sur écran de téléviseur (“Universal Port OSD”), vous pouvez afficher les informations
HD Radio sur l’écran de votre téléviseur.
Canal HD
Bande
Fréquence ou nom de
la station mémorisée
FM
Nom de la station
MHz
39ch105. 5
No. de
mémoire
HD3 ONK–FM
NAME :
TIT
OT
HER
OTHER: Infos de la station
TITLE: Titre du morceau
NAME: Nom de l’artiste
LE
abcde
: ABCD
: Information
Remarque: Ces informations n’apparaissent qu’à la
réception d’une station HD Radio.
Fr-17
Page 42

Utiliser le RDS
RDS est l’acronyme de Radio Data System, un système de transmission de données au sein des
signaux radio FM. RDS est approuvé par le “National
Radio Systems Committee (NRSC)” et est disponible
en Amérique du Nord.
De nombreuses stations FM y font appel. Outre l’affichage d’informations, RDS vous permet aussi de
trouver des stations de radio par type (infos, sport,
rock, etc.).
Ce produit peut recevoir les informations RDS suivantes: “Program Service” (PS), “Radio Text” (RT) et
“Program Type” (PTY).
Fr-18
Affichage d’informations RDS
Le témoin RDS s’allume lorsque vous écoutez une
station FM compatible RDS.
Appuyez plusieurs fois sur le bouton [DISPLAY] pour
passer en revue les informations disponibles.
1. Program Service Name
Si vous écoutez une station RDS émettant des
signaux PS, le nom de la station s’affiche à
l’écran.
2. Fréquence
La fréquence de la station RDS est affichée.
3. Radio Text
Quand l’appareil capte une station RDS diffusant
des informations RT, le texte s’affiche à l’écran.
4. Program Type
Quand l’appareil capte une station RDS diffusant
des informations PTY, le type de programme
s’affiche à l’écran.
Remarque: Si le signal d’une station RDS est faible,
les données RDS peuvent apparaître par intermittence voire pas du tout.
Page 43

Utiliser les mémoires
Mémoriser vos stations préférées
La fonction “Preset Write” permet de régler manuellement des stations de radio FM et AM. Cette présélection facilite ensuite la sélection de vos stations
favorites et vous évite de recommencer une recherche quand vous changez de station. You can store up
to 40 FM and AM stations as presets.
1. Recherchez la station à mémoriser.
2. Appuyez sur le bouton [SETUP] et utilisez
les boutons fléchés haut/bas [ ]/[ ]
pour choisir “Preset Write”.
3. Appuyez sur [ENTER].
4. Servez-vous des boutons gauche/droit
[ ]/[ ] ou des boutons CH [+]/[–] pour
sélectionner une mémoire.
5. Pour mémoriser la station, appuyez sur
[ENTER].
Choix d’une présélection
Il faut mémoriser des stations avant de pouvoir choisir une présélection.
1. Choisissez une mémoire avec les boutons
CH [+] / [–].
Pour passer à la mémoire précédente, appuyez sur
le bouton CH [+]. Pour passer à la mémoire suivante, appuyez sur le bouton CH [–].
Vous pouvez aussi choisir des présélections avec les
boutons [ ]/[ ].
Fr-19
Page 44

Effacer des présélections
1. Choisissez la présélection à effacer.
2. Appuyez sur le bouton [SETUP] et utilisez
les boutons fléchés haut/bas [ ]/[ ]
pour choisir “Preset Erase”.
3. Appuyez sur [ENTER].
Une demande de confirmation apparaît.
Vous pouvez encore annuler la fonction “Preset
Erase” en appuyant sur le bouton [RETURN].
4. Pour effacer la présélection, appuyez sur
le bouton [ENTER].
La présélection est effacée et “Erase OK?” apparaît à
l’écran.
5. Appuyez sur [ENTER].
La présélection est effacée et “Complete” apparaît à
l’écran.
Fr-20
Nommer les présélections
Vous pouvez nommer vos présélections pour les
identifier facilement. Ce nom peut contenir jusqu’à
10 caractères.
1. Choisissez la présélection à nommer.
2. Appuyez sur le bouton [SETUP] et utilisez
les boutons fléchés haut/bas [ ]/[ ]
pour choisir “Name Edit”.
3. Appuyez sur [ENTER].
4. Utilisez les boutons haut/bas [ ]/[ ]
pour sélectionner les caractères disponibles (voyez la page suivante) et utilisez
les boutons gauche/droite [ ]/[ ] pour
déplacer le curseur.
5. Une fois que vous avez entré le nom,
appuyez sur le bouton [ENTER].
“Name Edit” apparaît à l’écran.
6. Appuyez sur [RETURN] pour retourner à
l’affichage normal.
Page 45

Caractères disponibles
A B C D E F G H I J K L M N O P Q R S T U V W X Y Z
a b c d e f g h i j k l m n o p q r s t u v w x y z
0 1 2 3 4 5 6 7 8 9
_ . ’ ( ) + * = / , : ; ! ? (espace)
Effacer le nom d’une présélection
1. Choisissez la présélection dont vous vou-
lez effacer le nom.
2. Appuyez sur le bouton [SETUP] et utilisez
les boutons fléchés haut/bas [ ]/[ ]
pour choisir “Name Erase”.
3. Appuyez sur [ENTER].
Le nom de la présélection est effacé et “Erase OK?”
apparaît à l’écran.
4. Appuyez sur [ENTER].
Le nom de la présélection est effacé et “Complete”
apparaît à l’écran.
Utilisation d’un dock UP-A1
Si le sélecteur de mode de l’UP-HT1 est réglé sur
“TUNER”, l’iPod inséré dans le dock UP-A1 n’est pas
chargé. Si vous changez le réglage du sélecteur de
mode et passez de “TUNER” à “THROUGH” alors que
le produit Onkyo compatible Universal Port est en
veille, il faut extraire puis réinsérer l’iPod dans le
UP-A1 pour le charger.
*iPod est une marque déposée d’Apple Inc. aux
Etats-Unis et dans d’autres pays.
Fr-21
Page 46

Dépannage
Si vous rencontrez des problèmes avec votre
UP-HT1, vous trouverez peut-être la solution dans
cette section.
L’UP-HT1 n’est pas reconnu par votre produit
Onkyo compatible Universal Port
•Vérifiez si l’UP-HT1 est correctement branché à la
prise UNIVERSAL PORT de votre produit Onkyo
compatible Universal Port.
•Mettez tous les dispositifs concernés hors tension
avant d’établir une connexion UNIVERSAL PORT.
Pas de son
•Vérifiez si la commande de volume de l’amplificateur n’est pas réglée au minimum.
•Vérifiez toutes les connexions et corrigez-les si
nécessaire (voyez page 6).
L’UP-HT1 est branché à un produit Onkyo compatible Universal Port mais ne fonctionne pas
•Mettez tous les dispositifs hors tension puis réglez
le sélecteur de mode de l’UP-HT1 sur “TUNER”.
Fr-22
Impossible de piloter l’UP-HT1 avec les boutons
en face avant du produit Onkyo compatible Universal Port
•C’est normal. Vous ne pouvez piloter l’UP-HT1
qu’avec la télécommande du produit Onkyo compatible Universal Port. (Certains produits peuvent
cependant être pilotés avec les boutons en face
avant.)
• Appuyez sur le bouton [PORT] de la télécommande pour la faire passer en mode “PORT”.
Les saisies d’écran illustrées dans ce mode
d’emploi n’indiquent pas ce qui est affiché à
l’écran de votre produit Onkyo compatible Universal Port
•Les information affichées dépendent de votre produit Onkyo compatible Universal Port. Les saisies
d’écran de ce mode d’emploi sont exclusivement
fournies à titre d’exemple.
Si vous ne parvenez pas à régler le problème, essayez
d’abord d’initialiser l’UP-HT1 de la façon suivante
avant de contacter votre revendeur Onkyo.
Branchez l’UP-HT1 à votre produit Onkyo compatible
Universal Port. Sur votre produit Onkyo compatible
Page 47

Universal Port, sélectionnez la source d’entrée “PORT”.
Quand l’UP-HT1 a été reconnu, maintenez le bouton
[PORT] enfoncé en face avant du produit et appuyez
sur le bouton [STANDBY/ON] en face avant du produit. (La procédure d’initialisation peut varier selon
votre produit Onkyo compatible Universal Port; consultez donc également son mode d’emploi.)
Notez cependant que l’initialisation du UP-HT1
efface vos présélections de radio et vos réglages personnels.
Fiche technique
40 mémoires FM/AM
Plage de fréquences FM:
87,5MHz~107,9MHz (par pas de 0,2MHz)
Plage de fréquences AM:
530kHz~1710kHz (par pas de 10kHz)
Alimentation:
12 V, 300mA
Dimensions (L x H x P):
140 x 32,5 x 110mm
Poids:
0,4kg
Fr-23
Page 48

Sales & Product Planning Div. : 2-1, Nisshin-cho, Neyagawa-shi, OSAKA 572-8540, JAPAN
Tel: 072-831-8023 Fax: 072-831-8124
ONKYO U.S.A. CORPORATION
18 Park Way, Upper Saddle River, N.J. 07458, U.S.A.
Tel: 201-785-2600 Fax: 201-785-2650 http://www.us.onkyo.com/
ONKYO EUROPE ELECTRONICS GmbH
Liegnitzerstrasse 6, 82194 Groebenzell, GERMANY
Tel: +49-8142-4401-0 Fax: +49-8142-4401-555 http://www.eu.onkyo.com/
ONKYO EUROPE UK Office
Suite 1, Gregories Court, Gregories Road, Beaconsfield, Buckinghamshire, HP9 1HQ
UNITED KINGDOM Tel: +44-(0)1494-681515 Fax: +44(0)-1494-680452
ONKYO CHINA LIMITED
Unit 1&12, 9/F, Ever Gain PlazaTower 1, 88, Container Port Road, Kwai Chung,
N.T., HONG KONG Tel: 852-2429-3118 Fax: 852-2428-9039
http://www.ch.onkyo.com/
http://www.jp.onkyo.com/
I0905-1
SN 29400046
(C) Copyright 2009 ONKYO CORPORATION Japan. All rights reserved.
Fr-24
* 2 9 4 0 0 0 4 6 *
 Loading...