

Page 1

DVD Receiver
DR-635
Instruction Manual
Contents
Thank you for purchasing the Onkyo DVD receiver.
Read this manual carefully before using your new
DVD receiver. A good understanding of its features
and operation will allow you to achieve optimum performance and enjoyment.
Keep this manual for future reference.
E
n
Page 2

IMPORTANT SAFETY INSTRUCTIONS
WARNING
RISK OF ELECTRIC SHOCKRISK OF ELECTRIC SHOCK
RISK OF ELECTRIC SHOCK
RISK OF ELECTRIC SHOCKRISK OF ELECTRIC SHOCK
DO NODO NO
T OPENT OPEN
DO NO
T OPEN
DO NODO NO
T OPENT OPEN
CAUTION: TO REDUCE THE RISK OF ELECTRIC
SHOCK, DO NOT REMOVE COVER (OR BACK). NO
USER-SERVICEABLE PARTS INSIDE. REFER SERVICING TO QUALIFIED SERVICE PERSONNEL.
The lightning flash with arrowhead symbol,
within an equilateral triangle, is intended to
alert the user to the presence of uninsulated
“dangerous voltage” within the product’s
enclosure that may be of sufficient magnitude to constitute a risk of electric shock to
persons.
The exclamation point within an equilateral
triangle is intended to alert the user to the
presence of important operating and maintenance (servicing) instructions in the literature accompanying the appliance.
SAFETY
1) Read these instructions.
2) Keep these instructions.
3) Heed all warnings.
4) Follow all instructions.
5) Do not use this apparatus near water.
6) Clean only with dry cloth.
7) Do not block any ventilation openings. Install in
accordance with the manufacturer’s instructions.
8) Do not install near any heat sources such as
radiators, heat registers, stoves, or other
apparatus (including amplifiers) that produce heat.
9) For countries with a polarized mains, do not defeat
the safety purpose of the polarized or
grounding-type plug. A polarized plug has two
blades with one wider than the other. A
grounding-type plug has two blades and a third
grounding prong. The wide blade or the third prong
is provided for your safety. If the provided plug does
not fit into your outlet, consult an electrician for
replacement of the obsolete outlet.
Caution:Caution:
Caution:
Caution:Caution:
To prevent electric shock, match the wide blade of
the plug to the wide slot, fully insert.
10) Protect the power cord from being walked on or
pinched particularly at plugs, convenience
receptacles, and the point where they exit from the
apparatus.
2
11) Only use attachments/accessories specified by the
manufacturer.
12) Use only with the cart, stand, tripod, bracket, or table
specified by the manufacturer, or sold with the
apparatus. When a cart is used, use caution when
moving the cart/apparatus combination to avoid
injury from tip-over.
13) Unplug this apparatus during lightning storms or
when unused for long periods of time.
14) Refer all servicing to qualified service personnel.
Servicing is required when the apparatus has been
damaged in any way, such as power-supply cord
or plug is damaged, liquid has been spilled or
objects have fallen into the apparatus, the
apparatus has been exposed to rain or moisture,
does not operate normally, or has been dropped.
15) Battery usage CAUTION - To prevent battery
leakage which may result in bodily injury, property
damage, or damage to the apparatus:
- Install all batteries correctly, + and - as marked
on the apparatus.
- Do not mix batteries (old and new or carbon and
alkaline, etc.).
- Remove batteries when the unit is not used for
a long time.
16) The batteries shall not be exposed to excessive heat
such as sunshine, fire or the like.
17) Apparatus shall not be exposed to dripping or
splashing.
18) Do not place any sources of danger on the
apparatus (e.g. liquid filled objects, lighted candles).
19) This product may contain lead and mercury.
Disposal of these materials may be regulated due
to environmental considerations.
WARNING
z Before operating this system, check the voltage of
this system to see if it is identical with the voltage
of your local power supply.
z The ventilation should not be impeded by covering
the ventilation openings with items such as
newspaper, table-cloths, curtains etc. Make sure
there is at least 20 cm of space above and at least
5 cm of space on each side of the unit.
z The apparatus shall not be exposed to dripping or
splashing and that no objects filled with liquids,
such as vases, shall be placed on the apparatus.
z To prevent fire or shock hazard, do not expose this
equipment to hot places, rain, moisture or dust.
z Don’t get close to the water source when using this
unit, such as near bathtub, bath slot, ish-washing
slot, washing machine to use it; also, don’t use this
unit on damp plinth or nearby swimming pool or
similar close to the water source.
Page 3

z Do not place this unit close to strong magnetic field.
z Do not place the unit on the amplifier or receiver.
z Don’t place this unit close to the damper, or the
moisture will affect the life of the laser head.
z If the system is brought directly from a cold to a
warm location, or is placed in a very damp room,
moisture may condense on the lens inside the
player. Should this occur, the system will not
operate properly. Remove the disc and leave the
system turned on for about an hour until the
moisture evaporates.
z To keep the laser pickup clean, do not touch it, and
always close the disc tray.
z Should any solid object or liquid fall into the system,
unplug the system and have it checked by qualified
personnel before operating it any further.
z Do not attempt to clean the unit with chemical sol
vents as this might damage the finish. Use a clean,
dry or slightly damp cloth.
z When removing the power plug from the wall outlet,
always pull directly on the plug, never yank on the
cord.
z Depending on the electromagnetic waves used by
a television broadcast, if a TV is turned on near this
unit while it is also on, lines might appear on the TV
screen. Neither this unit nor the TV are
malfunctioning. If you see such lines, keep this unit
well away from the TV set.
Do not move the unit during playback
During playback, the disc rotates at high speed. Do NOT
lift or move the unit during playback. Doing so may damage the disc or the unit.
is a trademark of DVD Format/Logo Licensing
Corporation.
This product incorporates copyright protection technology that is protected by U.S. patents and other intellectual property rights.
Use of this copyright protection technology must be
authorized by Macro vision, and is intended for home
and other limited viewing uses only unless otherwise
authorized by Macro vision. Reverse engineering or disassembly is prohibited.
Manufactured under license from Dolby Laboratories.
Dolby, Pro Logic and the double-D symbol are trademarks of Dolby Laboratories.
HDMI, the HDMI logo and High-Definition Multimedia
Interface are trademarks or registered trademarks of
HDMI Licensing LLC.
®
and the associated DivX® logos are registered
DivX
trademarks of DivX, Inc.
MPEG Layer-3 audio coding technology licensed from
Fraunhofer IIS and Thomson.
When moving this unit
When changing places of installation or packing the unit
for moving, be sure to remove the disc and return the
disc tray to its closed position in the player. Then, press
the power switch to turn the power off, and disconnect
the power cord. Moving this unit with the disc loaded
may result in damage to this unit.
This product is protected by certain intellectual property rights of Microsoft.
Use or distribution of such technology outside of this
product is prohibited without a license from Microsoft.
Windows Media is either a registered trademark or
trademark of Microsoft Corporation in the United States
and/or other countries.
3
Page 4

IMPORTANT SAFETY INSTRUCTIONS ................ 2
SAFETY ......................................................................... 2
WARNING ...................................................................... 2
Contents .................................................................. 4
FM Antenna ............................................................. 5
Speaker Connection ................................................ 5
Before connection .......................................................... 5
How to connect .............................................................. 5
Subwoofer ...................................................................... 5
Connection to a TV .................................................. 6
HDMI video/audio output terminal ................................. 6
Component video output terminals ................................6
Composite video output terminal ................................... 6
Connection to Audio Equipments etc. ..................... 7
Digital audio output terminal .......................................... 7
LINE 1/LINE OUT jacks ................................................. 7
Power cord receptacle ................................................... 7
Remote Control ....................................................... 7
Battery Installation ......................................................... 7
Precautions concerning batteries .................................. 7
Identifying the Parts ................................................. 8
Main Unit ........................................................................ 8
Remote Control .............................................................. 8
Discs ..................................................................... 10
Type of discs that can be played on this unit ............. 10
Playable file format ...................................................... 11
Example of Icons used on DVD discs ......................... 11
Caution ......................................................................... 11
Handling precautions ................................................... 11
Maintenance ................................................................ 11
Storage precautions ..................................................... 11
USB memory device compatibility ......................... 12
Setting the Clock ................................................... 12
Basic Operation ..................................................... 12
Recording a Source .................................................... 13
Dimmer ........................................................................ 13
Muting ......................................................................... 13
Super Bass boost ........................................................ 13
Adjusting the bass and treble ..................................... 13
Listening to a Disc ................................................. 14
Listening to a USB Memory Device ....................... 14
On-screen Menu ................................................... 15
DVD menus ................................................................. 15
Video CDs with PBC ................................................... 15
MP3 and Windows Media-formatted audio files ......... 16
JPEG files ................................................................... 16
Basic Operations for a Disc and USB Memory Device
....................................................................... 17
Pausing playback (Freezing the picture) .................... 17
Stopping playback (DVD only) ................................... 17
Contents
Skipping Playback ................................................. 17
Searching for a part of a chapter or track .............. 17
Selecting a Chapter or Track ................................. 17
Selecting Audio ..................................................... 18
Selecting Subtitles ................................................. 18
Changing Camera Angle ....................................... 18
Picture Zoom ......................................................... 18
Slow Motion ........................................................... 19
Repeat and Shuffle Playback ................................ 19
A-B Repeat Playback ............................................ 19
Changing the Display Mode .................................. 20
Time Search (VCD/CD) ......................................... 20
Time Search (MP3/WMA) ..................................... 20
Chapter Search/Time Search (DVD) ..................... 21
Chapter Search/Time Search (DivX®) .................. 21
Programmed Playback (DVD,VCD,CD) ................ 22
Programmed Playback (MP3,WMA) ..................... 22
Programmed Playback (DivX®) ............................ 23
Settings ................................................................. 24
Listening to the FM Radio .................................... 28
Preset Tuning ........................................................ 29
RDS (Display Setting of the FM) ........................... 30
Listening to an External Source ............................. 30
Sleep Timer ........................................................... 30
Wake Up Timer ..................................................... 31
Troubleshooting .................................................... 32
Specifications ........................................................ 34
Standard Accessories ........................................... 35
Chapter Search ........................................................... 21
Chapter Search ........................................................... 21
Time Search ................................................................ 21
Introduction ................................................................. 24
General Setup ............................................................. 25
Audio Setup ................................................................ 26
Video Setup ................................................................. 26
Preference Setup ........................................................ 27
Password Setup .......................................................... 28
FM MODE ................................................................... 29
If the reception is poor ................................................ 29
Automatic Memory Presetting .................................... 29
Manual Memory Presetting ......................................... 29
How to select preset stations ...................................... 29
4
Page 5

FM Antenna
Connect the supplied FM wire antenna to the FM Antenna socket on the unit.
If reception is poor, connect the outside antenna.
Note:
Before attaching a 75 ohm coaxial lead (the kind with a
round wire going to an outside antenna), disconnect
the supplied FM wire antenna.
Speaker Connection
Caution:
To avoid damaging the speakers with a sudden highlevel signal, be sure to switch the power off before connecting the speakers.
Before connection
Check the impedance of your speakers. Connect
speaker with an impedance of 4Ω ~ 16Ω.
The black speaker terminals are “-”±(negative).
Generally, the “+” side of the speaker cable is marked
to make it distinguishable from the “-”±side of the cable.
Connect this marked side to the “+” terminal and the
unmarked side to the black “-” terminal.
Caution:
To avoid noise, keep antennas away from the system,
the connecting cord and the AC power cord.
How to connect
1. Turn the terminal cap counterclockwise to loosen
it. The speaker terminal caps cannot be fully re
moved from the base.
2. Insert the wire into the terminal fully and turn the
terminal cap clockwise to securely connect it:
Subwoofer
Connect a subwoofer using a commercially-available
RCA cable. Use a subwoofer with built-in amplifier referred to as a “powered subwoofer”.
5
Page 6
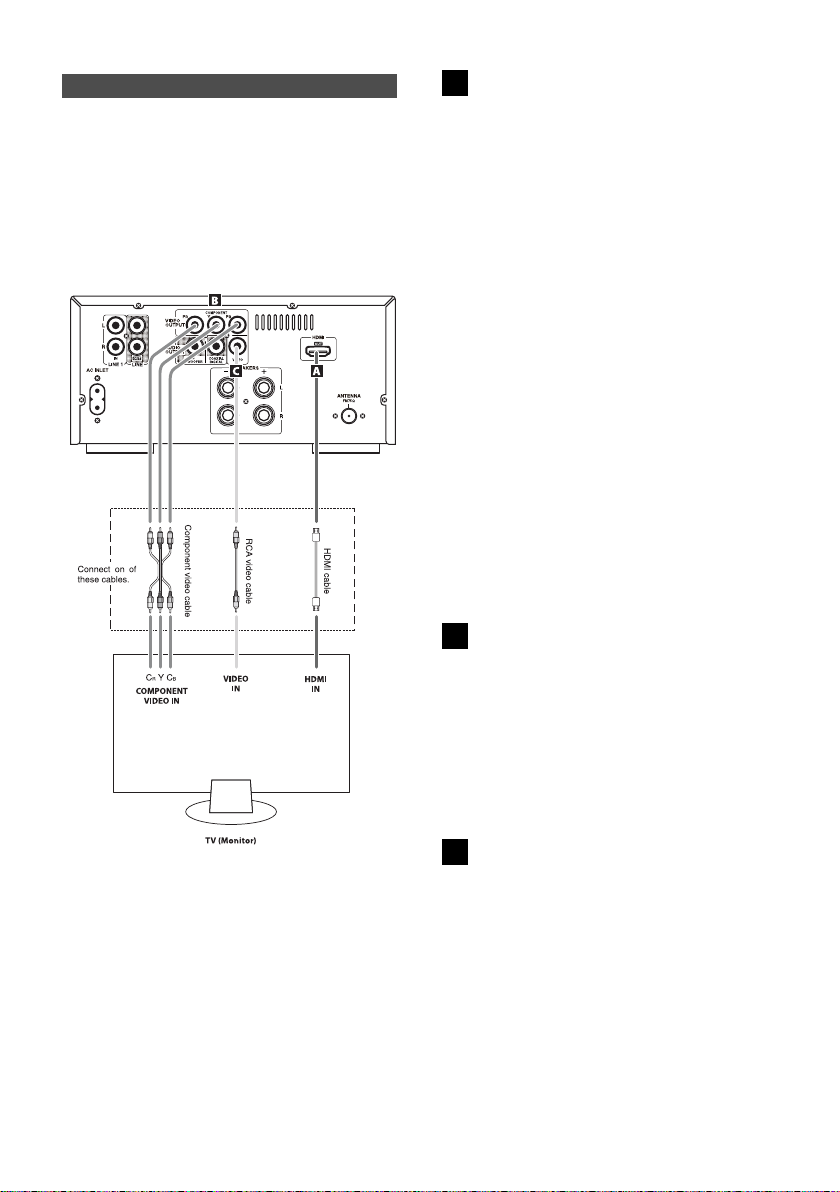
Connection to a TV
Caution:
z Switch off the power to all equipment before
making connections.
z Read the instructions of each component you
intend to use with this unit.
z Be sure to insert each plug securely. To prevent
hum and noise, avoid bundling the signal
interconnection cables together with the AC power
cord or speaker cables.
HDMI video/audio output terminal
A
Use a HDMI cable to connect the unit to a HDMI compatible television or monitor.
z If the television or monitor is equipped only with a
DVI terminal, a suitable adaptor cable or adaptors
should be used. Note that the television connected
in this way must be HDCP compatible. Also note
that this connection outputs no sound.
z Make sure that you read and understand the
documentation provided with the HDMI component.
HDMI video output formats
z 480p(60Hz)
z 720p(50Hz) or 720p(60Hz)
z 1080i(50Hz) or 1080i(60Hz)
z 1080p(50Hz) or 1080p(60Hz)
z 576p(50Hz)
To output audio from the HDMI terminal
If the connected HDMI component is capable of inputting HDMI audio, digital audio can be output from the
HDMI terminal.
z Select “ALL” or “PCM only” in the DIGITAL AUDIO
SETUP.
z To enjoy the digital surround audio from DVD-Video
discs, connect the HDMI terminal to a surround
amplifier and set the DIGITAL AUDIO SETUP to
“ALL”.
Component video output terminals
B
Use component video cables to connect the unit to the
component video inputs of a suitably equipped television or monitor to enjoy a high-quality picture. Use these
terminals in preference to composite video connections.
z If the component video terminals are connected to
a television with progressive scan capabilities, the
output can be set to match this.
z Note that these terminals cannot be connected to
high definition component terminals.
z Adjust the video aspect ratio to match that of the
television.
z This unit adopts analog copy protection features. If
the unit is connected to a TV through a VCR (video
cassette recorder), the resulting playback may be
affected. Connect the unit directly to the television.
z In all cases, use the highest quality cables for the
best possible picture.
z Select proper setting in the VIDEO OUTPUT setup.
6
Composite video output terminal
C
Use a RCA (pin) video cable to connect the unit to the
composite video connector of a television or monitor.
Use this connection only if no other video connection
method is available.
Page 7
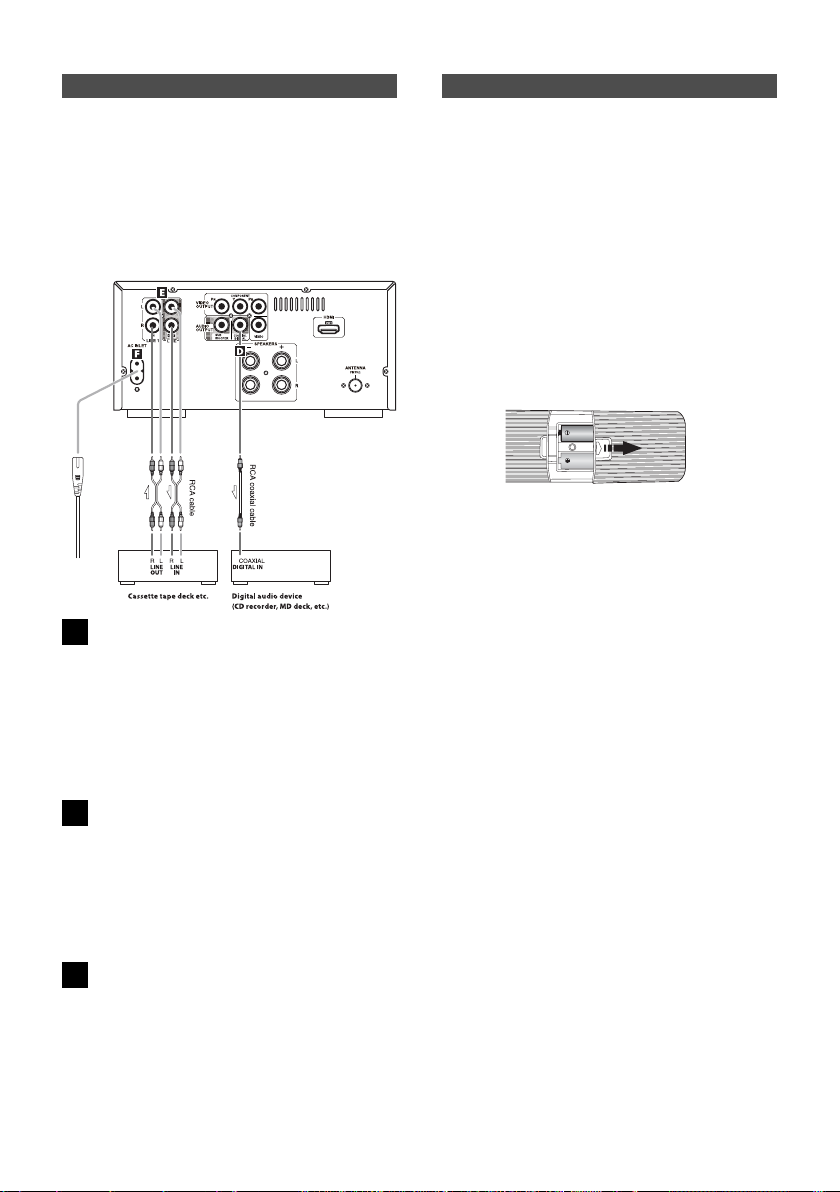
Connection to Audio Equipments etc.
Caution:
z Switch off the power to all equipment before
making connections.
z Read the instructions of each component you
intend to use with this unit.
z Be sure to insert each plug securely. To prevent
hum and noise, avoid bundling the signal
interconnection cables together with the AC power
cord or speaker cables.
D
Digital audio output terminal
Digital audio from DVD-Video, CD and video CD is output from this terminal. Connect an amplifiers including
a decoder, or digital audio devices such as CD
recorders, etc. to this jack using commercially-available
coaxial digital audio cable.
z Select “ALL” or “PCM only” in the DIGITAL AUDIO
SETUP.
E
LINE 1/LINE OUT jacks
Analog 2-channel audio signal is input or output from
these jacks. Connect a cassette tape deck etc. to these
jacks using commercially-available RCA cables.
Make sure to connect:
white plug: white jack (L: left channel)
red plug: red jack (R: right channel)
F
Power cord receptacle
After all other connections have been made, insert the
supplied AC power cord into this receptacle, then connect the other end of the power cord into the wall socket.
z In order to avoid the risk of electric shock, fire, and
so on, only use the supplied power cord.
z If you are not going to use the unit for some time,
disconnect the power cord from the wall socket.
Remote Control
The provided Remote Control allows the unit to be operated from a distance.
When operating the Remote Control, point it towards
the remote sensor on the front panel of the unit.
z Even if the Remote Control is operated within
the effective range (5m), remote control operation
may be impossible if there are any obstacles
between the unit and the remote control.
z If the Remote Control is operated near other
products which generate infrared rays, or if other
remote control devices using infrared rays are used
near the unit, it may operate incorrectly. Conversely,
the other products may operate incorrectly.
Battery Installation
1. Remove the battery compartment cover.
2. Insert two “AAA”± (R03 or UM-4) dry batteries. Make
sure that the batteries are inserted with their
positive “Q”±and negative “R”±poles positioned
correctly.
3. Close the cover.
Precautions concerning batteries
z Be sure to insert the batteries with correct positive
“Q” and negative “R” polarities.
z Use batteries of the same type. Never use different
types of batteries together.
z Either rechargeable or non-rechargeable batteries
can be used. Refer to the precautions on their labels.
z When the Remote Control is not to be used for a
long time (more than a month), remove the battery
from the Remote Control to prevent it from
leaking.
z If the batteries leak, wipe away the leakage inside
the battery compartment and replace the batteries
with new ones.
z Do not use any batteries other than those specified.
Do not mix new batteries with old ones.
z Do not heat or disassemble batteries. Never throw
them in fire or water.
z Do not carry or store batteries with other metallic
objects. Doing so could cause batteries to short
circuit, leak or explode.
z Never recharge a battery unless it is confirmed to
be a rechargeable type.
7
Page 8
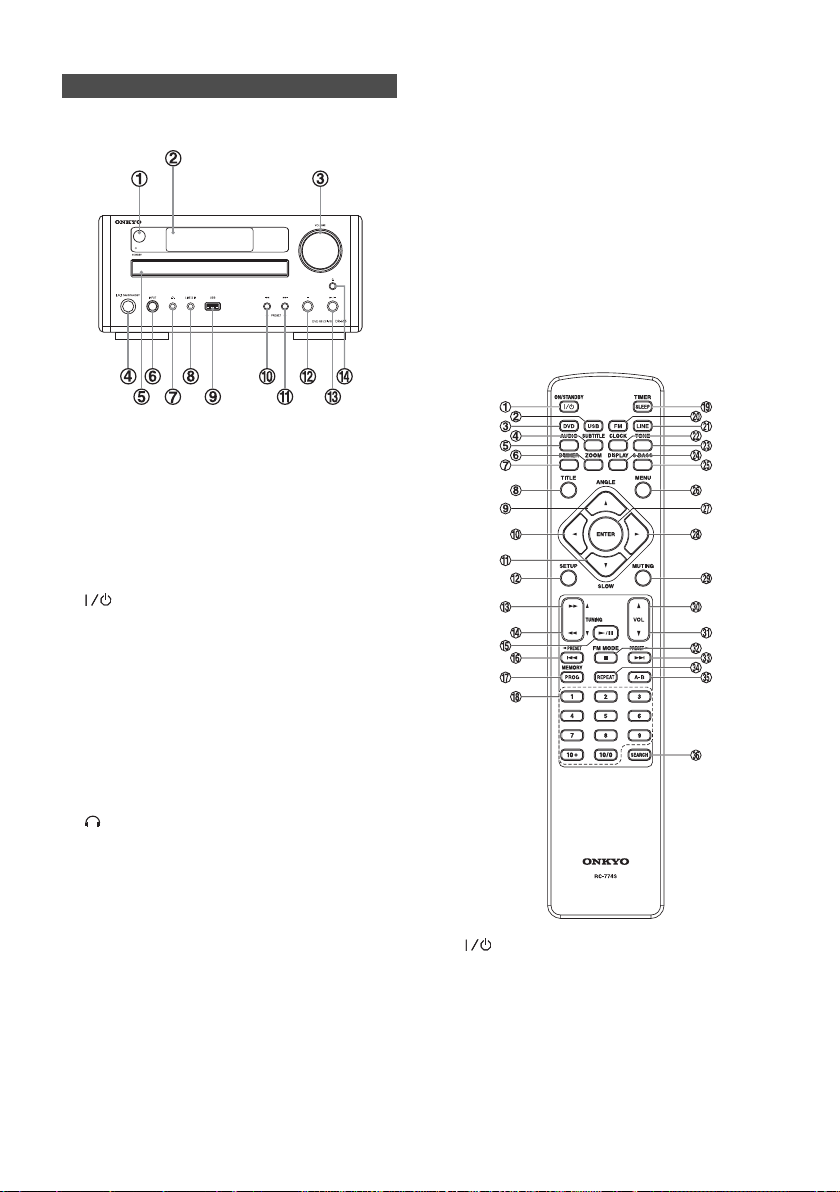
Identifying the Parts
Main Unit
- Remote control sensor
Receives signals from the Remote Control. Point
the Remote Control at this sensor when operating
the Remote Control.
/ Display
0 VOLUME
Turn this knob (or press the VOLUME buttons of
the Remote Control) to adjust the volume level.
1 ON/STANDBY
Use this button to turn the unit on and standby. The
standby indicator lights in the standby mode. It turns
off when the unit is turned on.
The equipment draws nominal non-operatingThe equipment draws nominal non-operating
The equipment draws nominal non-operating
The equipment draws nominal non-operatingThe equipment draws nominal non-operating
power from the AC outlet with its ON/STpower from the AC outlet with its ON/ST
power from the AC outlet with its ON/ST
power from the AC outlet with its ON/STpower from the AC outlet with its ON/ST
in the standby position.in the standby position.
in the standby position.
in the standby position.in the standby position.
2 Disc tray
3 INPUT
Use this button to select a function (DVD, USB, FM,
LINE1 or LINE2).
4
For private listening, insert the headphones plug
into this jack, and adjust the volume using the VOLUME knob.
5 LINE 2 IN
You can connect a portable audio player to this jack.
6 USB
You can connect a USB memory device to this
connector.
7 H
In DVD or USB mode, use this button to skip tracks.
In FM mode, use this button to select a preset
channel.
8 G
In DVD or USB mode, use this button to skip tracks.
8
ANDBYANDBY
ANDBY
ANDBYANDBY
In FM mode, use this button to select a preset
channel.
9 L
In DVD or USB mode, use this button to stop
playback.
In FM mode, use this button to select Auto mode or
Mono mode.
: B/F
In DVD or USB mode, use this button to start or
pause playback.
; K
Use this to open and close the disc tray.
Remote Control
- ON/STANDBY
Use this button to turn the unit on and standby.
The standby indicator lights in the standby mode. It
turns off when the unit is turned on.
/ USB
Use this button to select a USB source.
0 DVD
Use this button to select a DVD source.
Page 9

1 SUBTITLE
Use this button to select the displayed subtitles during DVD playback.
2 AUDIO
Use this button to select the audio for playback.
3 ZOOM
In DVD or USB mode, use this button to enlarge
the image.
4 DIMMER
In standby mode, use this button to change the
brightness of the front panel display.
5 TITLE
During PBC playback, use this button to display a
menu.
6 S/ANGLE
Use
S button for navigation of on-screen menus.
Use ANGLE button to select camera angles during
DVD playback.
7 W
Use W button for navigation of on-screen menus.
8 T/SLOW
Use
T button for navigation of on-screen menus.
In DVD mode, use SLOW button for slow motion
video playback.
9 SETUP
Use this button to enter the setup menu where you
can setup the parameters of the unit.
: C/TUNINGS
In DVD or USB mode, use C button to search for
a part of a track/file/song.
In FM mode, use TUNING
station.
S button to tune in a
; D/TUNINGT
In DVD or USB mode, use D button to search for
a part of a track/file/song.
In FM mode, use TUNING
station.
T button to tune in a
< B/F
In DVD or USB mode, use this button to start or
pause playback.
= H/WPRESET
In DVD or USB mode, use
files/songs.
In FM mode, use
set channel
H button to skip tracks/
WPRESET button to select a pre-
> PROG/MEMORY
In DVD or USB mode, use PROG button to
programme tracks.
In FM mode, use MEMORY button to preset
stations.
? Number buttons
Use these buttons to enter track numbers,
passwords, etc.
@ SLEEP/TIMER
When the unit is on, use SLEEP button to set the
sleep timer.
In the standby mode, use TIMER button to set the
wake up timer.
A FM
Use this button to select a FM source.
B LINE
Use this button to select a LINE source.
C CLOCK
In the standby mode, use this button to adjust clock.
D TONE
Use this button to adjust bass and treble together
with the VOLUME buttons.
E DISPLAY
In DVD or USB mode, use this button to display
information about the currently playing disc.
In FM mode, use this button to change the information on the second line of the display. (This function
only works in areas where RDS broadcasts are
available.)
F S.BASS
Use this button to boost low end bass.
G MENU
In DVD mode, use this button with menu-enabled
DVD discs to bring up the DVD menu.
During playback of MP3/WMA/JPEG files, use this
button to switch between the folder list and the file
list.
When a VCD (version 2.0) is loaded, use this button to turn the PBC function on or off.
H ENTER
Use this button to confirm menus selections.
I X
Use X button for navigation of on-screen menus.
J MUTING
Use this button to mute the sound.
K VOL S (Volume)
Use this button to adjust the volume level.
L VOL T (Volume)
Use this button to adjust the volume level.
M L/FM MODE
In DVD or USB mode, use
In FM mode, use FM MODE button to select auto
or monaural.
L button to stop playback.
N G/PRESETX
In DVD or USB mode, use G button to skip tracks/
files/songs.
9
Page 10
In FM mode, use PRESETX button to select a preset channel.
O REPEAT
In DVD or USB mode, use this button for repeat
playback.
P A-B
In DVD or USB mode, use this button to specify a
section and play it repeatedly.
SEARCH
Use this button to start time search.
In FM mode, use this button to preset stations
automatically.
Discs
Type of discs that can be played on this
unit
This player can playback discs bearing any of the following logos:
The DVD receiver does not support disc types not listed.
DVD VDVD V
ideoideo
DVD V
ideo
DVD VDVD V
ideoideo
z Single-sided or double-sided discs
z Single layer or dual layer discs
z Dolby Digital, MPEG or Linear PCM
digital audio
z MPEG-2 digital video
z This unit can play DVD-R discs recorded
in DVD video format.
z This unit can play DVD-RW discs
recorded in DVD video format or DVD
video recording format.
Discs are generally divided into one or more
titles.
Titles may be further subdivided into
chapters.
Audio CDAudio CD
Audio CD
Audio CDAudio CD
z 12cm or 8cm discs
z Linear PCM digital audio
Audio CDs are divided into tracks.
VV
ideo CDideo CD
V
ideo CD
VV
ideo CDideo CD
z 12cm or 8cm discs
z MPEG-1 digital audioM
z PEG-1 digital video
Video CDs are divided into tracks.
SVCDSVCD
SVCD
SVCDSVCD
z 12 cm or 8 cm discs
z MPEG-1 Audio Layer2
z MPEG-2 digital video
Region Number of DVD Video discs
DVD players and discs are designed with region numbers that dictate the regions in which a disc can be
played. If the region number on the disc you want to
play does not match the region number of your DVD
player, you will not be able to play the disc. In that case,
an error message will appear on the screen.
The region number is printed on the rear panel of this
unit.
Hongkong
About DVD-RW
z DVD-RW discs that were recorded with copy-once
only permission cannot be played.
z When playing a DVD-RW disc that was edited on a
DVD recorder, the screen may momentarily black
out at the edited point.
z When playing a DVD-RW disc that was edited on a
DVD recorder, you may see scenes from just
before the edited point.
About CD-R/CD-RW
CD-R/CD-RW discs recorded in Audio CD format and
finalized correctly are playable. But depending on the
quality of the disc and/ or the condition of the recording,
some CD-R/CD-RW discs may not be playable.
Caution:
z If you record a disc using a personal computer, even
if it is recorded in a compatible format, there are
cases in which it may not play because of the
settings of the application software used to create
the disc. (Check with the software publisher for more
detailed information.)
z Unfinalized CD-R/CD-RW/DVD-R/RW discs cannot
be played.
Caution:
If you attempt to play back such discs, there is a risk
that sudden loud noise can blast over the speakers at
full volume and cause damage to the speakers and your
hearing.
Copy-protected discs, Dual Discs and other discs that
do not conform to the CD standard may not play back
correctly in this player. If you use such discs in this unit,
Onkyo Corporation and its subsidiaries cannot be responsible for any consequences or guarantee the quality of reproduction. If you experience problems with such
non-standard discs, you should contact the producers
of the disc.
10
Page 11

Playable file format
This unit can play following files recorded on a CD-R,
CD-RW, DVD-R, DVD-RW or USB memory device:
- MP3 files
- Windows Media-formatted audio files
- JPEG files
- DivX® video files
(DivX® 5, DivX® 4, DivX® 3 and DivX® VOD video content)
z Never use a stabilizer. Using commercially
available CD stabilizers with this unit will damage
the mechanisms and cause them to malfunction.
z Do not use irregular shape discs (octagonal, heart
shaped, business card size, etc.). Discs of this sort
can damage the unit:
z File names should be alphanumeric characters. This
unit cannot display symbols and full-size or
double-byte characters (such as Japanese,
Chinese, etc.) correctly. Also, be sure to use the file
extension. (“.mp3”¯ for MP3 files, “.wma”¯for WMA
files, “.avi” or “.divx”¯ for DivX
®
video files, “.jpg” or
“.jpeg”¯for JPEG files.)
z Files are played in alphabetical order.
z MP3 files must be monaural or stereo MPEG-1
Audio Layer 3 format. This unit can play MP3 files
with sampling frequency 44.1 kHz or 48 kHz,
bit-rate 320 kbps or less.
z This unit can play WMA files with sampling
frequency 44.1 kHz, bit-rate 192 kbps or less.
z This unit cannot display the bit-rate of VBR (variable
bit-rate) files correctly.
z The disc must be finalized in order to play.
z This player is NOT compatible with multi-session
discs.
z The CD-ROM must be ISO 9660 compatible.
z It may take time to display a progressive JPEG
picture.
z Depending on the file size and compression rate,
some JPEG pictures cannot be displayed correctly.
Example of Icons used on DVD discs
Number of audio tracks recorded on the disc
Number of subtitles recorded on the disc
Screen aspect ratio
Disc recorded with multiple camera angles
Region code
Caution
z Do not play any disc that is warped, deformed or
damaged. Playing such discs may cause irreparable
harm to the playing mechanisms.
z Printable discs are not recommended, as the label
side might be sticky and damage the unit.
z Do not stick papers or protective sheets on the discs
and do not use any protective coating spray.
z Use a soft oil-based felt-tipped pen to write the in
formation on the label side. Never use a ball-point
or hard-tipped pen, as this may cause damage to
the recorded side.
Handling precautions
z Always place the disc on the disc tray with the label
side up. Compact discs can be played or recorded
only on one side.
z To remove a disc from its storage case, press down
on the center of the case and lift the disc out,
holding it carefully by the edges.
How to remove the disc How to hold the disc
Maintenance
z Should the disc become dirty, wipe the surface
radially (from the center hole outward towards the
outer edge) with a soft, dry cloth.
z Never use such chemicals as record sprays,
antistatic sprays or fluid, benzine or thinner to clean
the discs. Such chemicals will do irreparable
damage to the disc’s plastic surface.
Storage precautions
z Discs should be returned to their cases after use to
avoid dust and scratches that could cause the laser
pickup to “skip”.
z Do not expose discs to direct sunlight or high
humidity and temperature for extended periods.
Long exposure to high temperatures will warp the
disc.
z CD-R and CD-RW discs are more sensitive to the
effects of heat and ultraviolet rays than ordinary
CDs. It is important that they are not stored in a
location where direct sunlight will fall on them, and
away from sources of heat such as radiators or
heat-generating electrical devices.
If you are in any doubt as to the care and handling of a
disc, read the precautions supplied with the disc, or
contact the disc manufacturer.
11
Page 12

USB memory device compatibility
z Only USB flash memory can be used.
z Some flash memory players that charge from a
USB terminal cannot be played back.
z Hard disk drives, CD/DVD drives, and others
connected via USB cannot be used.
z The unit cannot copy, move, or delete files.
z Playable format: FAT12, FAT16, FAT32
z NTFS, HFS, HFS+ cannot be used.
z Max. number of playable folders: 300
z Max. number of playable files: 650
z USB memory device cannot be used by way of the
USB hub.
Setting the Clock
1 If the unit is on, press the ON/STANDBY
button to turn it standby.
2 Press the CLOCK button to show the time on the
display.
4 Press the CLOCK button.
The “minute” value starts blinking.
5 Press the SVOLT buttons to set the current minute.
6 Press the CLOCK button.
The clock starts.
z The time appears on the display (If the time is not
set after it blackout,"--:--" blinks). Press the CLOCK
button again, the "hour" value starts blinking.
z When no button is pressed for 30 seconds, the time
setting mode will be cancelled.
3 Press the SVOLT buttons to set the current hour.
12
Basic Operation
1 Press the ON/STANDBY button to turn the unit
on.
z The unit turns on with the source that was last
selected.
Page 13

2 Press the DVD, USB, FM, or LINE buttons to select
a source.
The selected source is shown on the front panel’s
display.
Press the LINE button repeatedly to switch between
LINE1 and LINE2.
Also, each time the INPUT button of the main unit
is pressed, the source changes as follows:
DVD Source
USB Source
FM Radio
LINE1 Source
LINE2 Source
3 Play the source, and adjust the volume using the
SVOLT buttons.
You can rotate the VOLUME knob on the unit to
reduce or bring up the volume continuously.
z Press the ON/STANDBY button to put the unit
in the standby mode when it is not being used.
z When the recording device is connected to the
LINE1IN jack and the LINE OUT jack, you cannnot
select the LINE1Source for the recording source.
Dimmer
Press the DIMMER button to dim the display.
Press the button again to cancel the dimmer function.
Muting
To mute the sound temporarily, press the MUTING
button. Press the MUTING button again to restore the
sound.
z “MUTING” blinks on the display while muting is
engaged.
z If you change the volume when the sound is muted,
it will be unmuted.
Super Bass boost
Recording a Source
You can record a source onto a CD Recorder or a cassette tape recorder connected to the DIGITAL OUT terminal or the LINE OUT jacks.
1. Select a source to be recorded by pressing the
DVD, USB, FM, or LINE buttons.
2. Start recording.
You can reinforce the bass sound to maintain rich, full
bass at low volume.
Press the S.BASS button to get the effect. Press this
button again to cancel the effect.
Adjusting the bass and treble
You can change the bass and treble sound between
“-5” to “+5”.
13
Page 14

1 Press the TONE button repeatedly to select Bass
or Treble.
2 Press the SVOLT buttons to adjust the sound level.
Listening to a Disc
4 Press the K button on the unit again to close the
tray.
z Some discs may automatically start playback.
5 Press the B/F button to start playback if playback
has not started automatically.
If a menu is shown on screen (some DVD or video
discs may show such a menu), see “On-screen
menu”.
1 Press the DVD button to select “DVD Source”.
z When no disc is loaded in the disc tray, “NO DISC”
is displayed.
2 Press the K button on the unit to open the tray.
3 Place the disc on the disc tray (with the printed side
up).
14
Listening to a USB Memory Device
Do NOT use a high-capacity USB hard disc with this
unit.
1 Press the USB button to select “USB Source”.
2 Plug your USB memory device into the USB
connector.
It takes a few seconds for the unit to load the USB
memory device. Some files may automatically start
playback.
z You can reverse steps 1 and 2.
3 Press the B/F button to start playback if playback
has not started automatically.
Page 15

On-screen Menu
An on-screen menu is shown when a DVD or video CD
with playback control (PBC) content is loaded.
The way in which the menu works may differ according
to disc.
DVD menus
Use the S,T,W,X buttons to select the menu item from
a DVD, and confirm the selection using the Enter button.
Select an item using the 10/0,1-9,10+ buttons to start
playback.
z Press the G button to advance to the next page.
Press the
z If you press the TITLE button during playback, the
H button to return to the previous page.
menu will appear on the screen.
Turning on or off the PBC function
Press the MENU button to turn the PBC function on or
off. If you press the MENU button during playback, playback will stop.
Returning to the menu screen
Press either the MENU button or the TITLE button.
z Depending on the disc, pressing the MENU button
during playback may restart playback from the first
chapter.
Video CDs with PBC
When a Video CD (Version 2.0) or Super Video CD
with Playback Control functions (PBC) is loaded, a menu
will appear on the screen.
When the PBC function is off:
If you press the
B/F button in the stop mode, play-
back will start from the first track.
When the PBC function is on:
If you press the
B/F button in the stop mode, a menu
will appear on the screen.
15
Page 16

Select an item using the 10/0,1-9,10+ buttons to start
playback.
MP3 and Windows Media-formatted
audio files
When a disc or USB is loaded, a list of directories appears on the screen and the first file will automatically
start playback.
1 Select a directory by pressing the S/T buttons and
press the Enter button.
File names will appear on the screen.
JPEG files
z Some discs or USB memory may automatically start
playback.
1 When in stop mode, choose a picture in the
directory list by pressing the
After a short wait a thumbnail of the picture will appear on the right.
z Some photos may appear distorted due to the
configuration or characteristics of the disc. Larger
photos may take a short while to appear due to their
larger data size.
S/T buttons.
2 Press the Enter or B/F button to viewing the
picture at full-screen size.
2 Select a file by pressing the S/T buttons and press
the Enter button.
Playback will start from the selected file.
z Press the MENU button to switch between the folder
list and the file list.
z If you want to return to the parent folder, display the
folder list using the MENU button, select “...”±
using the
button.
z During playback, elapsed time of the current file is
displayed on the front panel display.
16
S,T,W,Xbuttons and press the Enter
z When viewing at full-screen size, press H/G
buttons to view a previous or next photo. You can
also use the
z When viewing at full-screen size, press the L
W/X buttons to rotate the image.
button to display a number of thumbnails at a time
on the screen.
- You can use the
S,T,W,X buttons to select a
particular photo and then press the Enter button to
view that image at full-screen size.
- Select “Slide Show” to selections played in a
random order
- Select “Menu” to display “Remote Key Function”
list
- Select “
WPrev” to display previous screen of
thumbnail images
- Select “Next
X” to display next screen of thumbnail
images
z Press the MENU button to exit thumbnail or
full-screen views.
Page 17

Basic Operations for a Disc and
USB Memory Device
Pausing playback (Freezing the picture)
Searching for a part of a chapter or track
To Search quickly the disc in the forward or reverse
direction, press the
playback.
D /C buttons during
Press the B/F button to pause audio playback.
Any DVD or video CD image is frozen.
Press the
Caution:
Do not leave player in the “pause” mode for extended
periods of time. Damage to your television or the player
may occur.
B/F button again to restart playback.
Stopping playback (DVD only)
When the L button is pressed, playback is stopped,
and the display shows “Press Play Key To
Continue”. Pressing B /F button to continues
playback.
Pressing any of the following buttons cancels resume mode:
Stop (L) in the stop mode,
Open/Close (
K), INPUT, ON/STANDBY
Skipping Playback
Press the
listen to is found.
Each time the
speed changes as follows:
z The sound is muted during playback of DVD and
VCD.
B/F button when the part you want to
D/C button is pressed, the search
x2, x4, x8, x16, x32, normal speed
Selecting a Chapter or Track
Use the 10/0,1-9,10+ buttons to select tracks or
chapters for playback.
For instance, to select track number 35, press “10+”,
“10+”, “10+” and “5”.
To select a MP3 or WMA file, enter 3 digit numbers.
As an example, to select number 5, press “10/0”,
“10/0” and “5”. (Optionally, you may press just the
number “5” and then wait a few seconds.)
Press the H/G button repeatedly until the desired
chapter or track is found. The selected chapter or track
will be played from the beginning.
17
Page 18

Selecting Audio
Many DVD discs include audio in different languages,
as well as stereo and multi-channel surround versions
of the sound track. CDs and video CDs allow the left,
right or stereo channels to be selected.
Pressing the AUDIO button changes between the
different audio tracks available, and the result is
shown on screen.
z It may be necessary to change the audio on some
discs using the on-screen disc menu.
z Some discs cannot have their audio changed in the
way described here, as well as some discs which
only have one audio stream. If you attempt to
select different audio with these discs, the
prohibit icon “
” is shown on screen.
Selecting Subtitles
Changing Camera Angle
When a scene recorded with multiple angles is
played, the angle icon appears on the screen. Each
time you press the ANGLE button while the angle
icon is displayed, the camera angle changes.
z If you attempt to select a different angle with a disc
which no other angle is recorded, the prohibit icon
” will be displayed.
“
z The ANGLE button does not work during pause
mode.
Picture Zoom
Repeated presses of the SUBTITLE button cycle
through available languages on a disc.
z Subtitles do not always appear immediately after
the language has been selected. It may take a few
seconds until the subtitles appear.
z Some captions on some discs cannot be removed
or changed using this button. Some discs may have
only one sub-caption language, in which case, the
choice is obviously restricted to one subtitle or no
subtitles.
z It may be necessary to change the subtitles on some
discs using the on-screen disc menu.
z Some discs cannot have their subtitles changed in
the way described here. If you attempt to select a
different subtitle with these discs, the prohibit icon
” is shown on screen.
“
18
To zoom the picture, press the ZOOM button during playback.
Each time the ZOOM button is pressed, the magnification level changes as follows:
®
DVD, DivXDVD, DivX
DVD, DivX
DVD, DivXDVD, DivX
, VCD:, VCD:
, VCD:
, VCD:, VCD:
2x, 3x, 4x, 1/2, 1/3, 1/4, Normal
JPEG:JPEG:
JPEG:
JPEG:JPEG:
100%, 125%, 150%, 200%, 150%, 125%, 100%,
75%, 50%, Normal
z You can shift the zoom point by pressing the W/X
buttons during zoom playback.
Page 19

Slow Motion
For video discs only (DVD and VCD)
To play a disc in slow motion, press the SLOW
button. Each time the SLOW button is pressed, the
speed changes as follows:
DVD:DVD:
DVD:
DVD:DVD:
1/2, 1/4, 1/8, 1/16, 1/2, 1/4, 1/8, 1/
B
16,
VCD/DivXVCD/DivX
VCD/DivX
VCD/DivXVCD/DivX
®
::
:
::
1/2, 1/4, 1/8, 1/16, B
To resume normal playback, press the Play/Pause
B/F).
button (
z The sound is muted during slow-motion playback.
Repeat and Shuffle Playback
Repeat chapter/Repeat track/Repeat one
The currently selected chapter/track/file will be
played repeatedly. If another chapter/track/file is
selected during repeat playback, the newly-selected
chapter/track/file will repeat.
Repeat title (DVD only)
The currently selected title will be played repeatedly.
Repeat all
All the contents in the disc will be played repeatedly.
Shuffle
The whole contents of the disc will be played
randomly.
A-B Repeat Playback
You can Repeat Playback of a designated section.
1 Start playback and designate the point at which the
A-B repeat should start (point A) by pressing the
A-B button.
“A” appears on the screen.
Each time the REPEAT button is pressed, the mode
is changed as follows:
DVD:DVD:
DVD:
DVD:DVD:
Chapter, Title, All, Shuffle, No display
®
MP3/WMA/DivXMP3/WMA/DivX
MP3/WMA/DivX
MP3/WMA/DivXMP3/WMA/DivX
::
:
::
Repeat One, Repeat All, Shuffle, Off
VCD/CD:VCD/CD:
VCD/CD:
VCD/CD:VCD/CD:
Track, All, Shuffle, No display
z This feature is not available for some discs. The
“prohibit” mark is shown on screen in such cases.
z If one of the following buttons is pressed, repeat
mode will be canceled:
ON/STANDBY, Open/Close (K), INPUT
2 When the point at which repeat playback should
end (point B) is reached, press the A-B button again.
“AB” appears on the screen.
The designated section will be played repeatedly.
z The Search button (C) can be used to
fast-forward to point B after designating point A.
z To cancel the A-B Repeat, press the A-B button
again.
19
Page 20

Changing the Display Mode
Each time the DISPLAY button is pressed during
playback, following information appears on the
screen.
DVDDVD
DVD
DVDDVD
Title Elapsed time
Title Remain time
Chapter Elapsed time
Chapter Remaining time
Display off
CD/VCD/V
ideo CDideo CD
CD/V
ideo CD
CD/VCD/V
ideo CDideo CD
Single Elapsed time
Single Remain time
Total Elapsed time
Total Remain time
®
DivXDivX
DivX
DivXDivX
Title Elapsed time
Title Remain time
Chapter Elapsed time
Chapter Remaining time
Display off
TT
o select a track of the disco select a track of the disc
T
o select a track of the disc
TT
o select a track of the disco select a track of the disc
Press the SEARCH button 3 times.
“Select Track: - - / - -” is highlighted on the screen.
Then, enter the track number using the 10/0,1-9,
10+ buttons. (For example, when you want to select track 2, press “2”.)
2 Enter your desired hour and minute using the 10/0,
1-9,10+ buttons.
For example, if the length of the current track is 3
minutes, enter a number smaller than 3 minutes.
Playback starts from the selected part.
Time Search (MP3/WMA)
You can start playback from the specified hour/minute.
1 During playback, press the SEARCH button.
Time Search (VCD/CD)
You can start playback from the specified hour/minute.
1 During playback, press the SEARCH button.
TT
o search within the entire disco search within the entire disc
T
o search within the entire disc
TT
o search within the entire disco search within the entire disc
Press the SEARCH button once.
“Disc Go To: - - : - -” is highlighted on the screen.
TT
o search within the current tracko search within the current track
T
o search within the current track
TT
o search within the current tracko search within the current track
Press the SEARCH button twice.
“Track Go To: - - : - -” is highlighted on the screen.
20
TT
o search within the entire disco search within the entire disc
T
o search within the entire disc
TT
o search within the entire disco search within the entire disc
Press the SEARCH button once.
“- - -” is highlighted on the screen.
TT
o search within the current tracko search within the current track
T
o search within the current track
TT
o search within the current tracko search within the current track
Press the SEARCH button twice.
“- - : - -” is highlighted on the screen.
2 Enter your desired hour and minute using the 10/0,
1-9,10+ buttons.
Page 21

For example, if the length of the current file is 3
minutes, enter a number smaller than 3 minutes.
Playback starts from the selected part.
Chapter Search/Time Search (DVD)
Chapter Search
You can start playback from the beginning of the specified chapter.
1 During playback, press the SEARCH button.
TT
o search within a chapter/title of the disco search within a chapter/title of the disc
T
o search within a chapter/title of the disc
TT
o search within a chapter/title of the disco search within a chapter/title of the disc
Press the SEARCH button once.
“Title: - - / - - Chapter:- - / - -” is highlighted on the
screen.
TT
o search within the entire disco search within the entire disc
T
o search within the entire disc
TT
o search within the entire disco search within the entire disc
Press the SEARCH button twice.
“Title Time: - - : - -” is highlighted on the screen.
TT
o search within the current chaptero search within the current chapter
T
o search within the current chapter
TT
o search within the current chaptero search within the current chapter
Press the SEARCH button 3 times.
“Chapter Time: - - : - -” is highlighted on the screen.
1 During playback, press the SEARCH button.
“Select: - - -” appears on the screen.
2 Enter your desired file number (3 digit) using the
10/0,1-9,10+ buttons.
Playback starts from the beginning of selected file.
Time Search
You can start playback from the specified hour/minute/
second.
1 During playback, press the SEARCH button twice.
2 Enter your desired title number, chapter number or
time using the 10/0,1-9,10+ buttons.
Playback starts from the beginning of selected title
number, chapter number or time.
Chapter Search/Time Search (DivX®)
Chapter Search
You can start playback from the beginning of the specified chapter.
“Go To -:- -:- -” appears on the screen.
2 Enter your desired hour, minute and second using
the 10/0,1-9,10+ buttons.
Playback starts from the selected part.
21
Page 22

Programmed Playback (DVD,VCD,CD)
Up to 20 chapters/tracks can be programmed in the
desired order.
1 If another source is selected, press the DVD button
to select “DVD Source”.
z You can also select “DVD Source” by using the
INPUT button on the unit.
2 Press the PROG button.
The programme list appears on the screen.
z To cancel the programme mode, press the PROG
button again, or select “EXIT” using the
buttons and press the Enter button.
S,T,W,X
4 When the selection of chapter/track numbers is
completed, select “START” using the
buttons and press the Enter button to start
programmed playback.
z During programmed playback, the 10/0,1-9,10+
buttons do not work.
z When playback ends, the programme is cleared.
z If you press one of the following buttons, the
programmed contents will also be cleared:
Open/Close (
INPUT (LINE, USB, FM)
K), ON/STANDBY, Stop (L)
Programmed Playback (MP3,WMA)
S,T,W,X
1 If another source is selected, press the DVD or USB
button to select “DVD Source” or “USB Source”.
3 Enter your desired “title and chapter number” or
“track number” using the 10/0,1-9,10+ buttons.
For example, to enter number 5, press “5”.
Repeat this step to programme more titles, chapters or tracks.
z If you made a mistake, move the cursor on the track
number and overwrite it using the 10/0,1-9,10+
buttons.
z To programme more than 11 chapters/tracks, press
G button to advance to the next programme
the
page (or select “Next
and press the Enter button). Press the
to return to the previous page(or select “
using the
button).
S,T,W,X buttons and press the Enter
22
” using the S,T,W,X buttons
H button
Prev”
z You can also select “DVD Source” or “USB Source”
by using the INPUT button on the unit.
2 Select a file using the S,T,W,X buttons
Page 23

and press the PROG button.
The file is added to the programme list.
Programmed Playback (DivX®)
1 If another source is selected, press the DVD or USB
button to select “DVD Source” or “USB Source”.
3 Press the MENU button once to display the
programme list.
4 Highlight the first file in the programme list using
the
S,T,W,X buttons.
5 Press the Enter button to start programmed
playback.
z You can also select “DVD Source” or “USB Source”
by using the INPUT button on the unit.
2 Press the L button when it starts playing.
3 Select a file using the S,T,W,X buttons
and press the PROG button.
z If you press one of the following buttons, the
programmed contents will be cleared.
INPUT (LINE, USB, FM)
Open/Close (
K) (in DVD mode), ON/STANDBY
The file is added to the programme list.
23
Page 24

4 Press the MENU button once to display the
programme list.
1 Turn on the unit, and the connected television or
monitor.
5 Highlight the first file in the programme list using
the
S,T buttons.
6 Press the Enter button or the B/F button to start
programmed playback.
z If you press one of the following buttons, the
programmed contents will be cleared.
INPUT (LINE, USB, FM)
Open/Close (
K) (in DVD mode), ON/STANDBY
Settings
z The SETUP menu is available only in the DVD
Source mode or the USB Source mode. If another
source is selected, press the INPUT button on the
unit to select the DVD Source or the USB Source.
2 Press the SETUP button.
The setup menu appears on the screen.
z To exit the setup mode, press the SETUP button
again.
z Although it is possible to enter the setup menu while
playback is continuing (or in resume mode), not all
menu functions will be available. To expand the
number of available functions, press the Stop
L) twice.
button (
3 Use the S,T,W,X buttons to navigate the menus.
Introduction
This chapter describes how to use the SETUP menu.
Most settings and adjustments are required to be set
when you first use the system.
24
If no cursor is visible on the screen, use the
buttons to select a page.
S/T buttons to highlight menu items within
Use the
the selected page.
Press the
W button to return to the upper menu.
W/X
Page 25

4 Enter the menu item with the X button.
5 Use the S/T buttons to select the options within
the menu item, and press the Enter button to
confirm the entry.
Individual menu functions are described.
Repeat steps
3 through 5 as required.
6 Press the SETUP button to exit the setup mode.
Make this setting while playback is stopped; you can-Make this setting while playback is stopped; you can-
Make this setting while playback is stopped; you can-
Make this setting while playback is stopped; you can-Make this setting while playback is stopped; you cannot do this while playing back a disc.not do this while playing back a disc.
not do this while playing back a disc.
not do this while playing back a disc.not do this while playing back a disc.
Normal/PS
This mode is used with 4:3 televisions. 4:3 images
are displayed normally. When showing 16:9
programmes, the full height of the screen is
displayed, and the left and right part of the image
are cut off.
4:3 picture 16:9 picture
Normal/LB
This mode is used with 4:3 televisions. 4:3 images
are displayed normally. 16:9 images are visible at
their full width, but there are blank area at the top
and bottom of the screen.
4:3 picture 16:9 picture
Wide
Use with a 16:9 wide television.
General Setup
TV DISPLAY
The shape of the television or monitor may not match
the shape of the movie frame. To avoid distortion on
older televisions, you may need to change the way in
which the image is displayed. Televisions use a 4:3
aspect ratio; high-definition televisions use 16:9 aspect
ratio (as do movies).
Note:
You may need to read your television’s manual in conjunction with this section in order to achieve the best
results. Some discs do not allow the aspect ratio to be
changed and you will therefore have to change the aspect ratio on the TV.
4:3 picture 16:9 picture
z Some wide-screen discs that do not permit the Pan
Scan mode playback are automatically played in
Letter Box mode.
z Depending on the DVD, 4:3 Letter Box may be
selected automatically instead of 4:3 Pan Scan and
vice versa.
z If 16:9 (Wide) is selected and a normal TV is
connected, 16:9 content will appear distorted
during playback (objects look thin).
OSD (On Screen Display) Language
Select the desired language for on screen menus of
the unit from the following:
English
Chinesetrad
Screen Saver
On
The screen saver starts up if nothing is played back
and no operations are performed for 4 minutes.
25
Page 26

Off
The screen saver does not start up.
®
VOD
DivX
Ok
Display the DivX
®
registration code.
Audio Setup
SPDIF Output (Digital Audio Setup)
Off
Select this when you do not use the DIGITAL OUT.
No signal is output from these terminals.
All
Select this when the unit is connected to an audio
component equipped with a built-in Dolby Digital
decoder via the DIGITAL OUT or the HDMI out
terminal.
PCM only
Select this when the unit is connected to an audio
component such as amplifier/receiver, CD recorder
or MD deck via the DIGITAL OUT or the HDMI out
terminal.
material, reducing the volume of loud sounds, and
increasing the volume of quiet ones. This is useful
for spoken word material, and nighttime listening
etc.
Off
Turns off the audio dynamic compression.
z This function is effective only when playing back a
DVD disc recorded with Dolby Digital. This control
has no effect on other discs.
z The overall effect of this setting depends on the disc
being played, the amplifier, and the speakers used
for reproduction.
Audio Sync
This setting can cause delays in the sound signal in
10 ms increments ranging from 0 ms to 200 ms (only
for digital signals recorded on a disc or stored in a
USB device; unavailable for analog signals coming
from LINE 1 or 2).
Depending on the TV, it may take approximately
100 ms (0.1 sec.) for an image to appear after video
signals are input, causing the image to appear after the sound coming from the unit is heard.
Dual Mono (Dolby Digital Setup)
Stereo
Left channel is output from the left speaker, and
right channel is output from the right speaker.
L-Mono
Left channel is output from the front left and right
speakers.
R-Mono
Right channel is output from the front left and right
speakers.
Reverb Mode (3D Processing)
This setting provides following sound effects:
Off
Concert
Living Room
Hall
Bathroom
Cave
Arena
Church
Night Mode
On
Applies dynamic range control to Dolby Digital
26
z If this happens or audio and video synchronization
creates a less than optimal viewing experience,
adjust the delay with the left (decrease) or right
(increase) Cursor buttons (
W/X).
Video Setup
Component
Set the video output according to the video
connection.
On
If the component connection is used, select this
option.
Off
If the composite connection is used,select this
option.
TV Mode
This setting allows the selection of interlaced (Interlace)
or progressive-scan (Progressive) video from the component video outputs.
P-Scan
For progressive scan TV: turn on the progressive
scan mode.
Page 27

Interlace
For ordinary TV: turn on the interlace mode.
z When your TV is not compatible with progressive
scan, never select “P-scan”. No picture will be shown
on the monitor.
In case you select “PROGRESSIVE” by mistake,
disconnect the connection of the unit and the TV,
and then connect in again. And change the setting
to “INTERLACE” in the Video Setup menu.
Quality
You can adjust some parameters of video picture.
1 Highlight “Quality” and press the X button.
2 Use the W/X buttons to select the parameter.
Sharpness
This adjusts the sharpness of the picture shown on
the monitor.
Select High, Medium or Low using the Cursor
buttons, and press the Enter button.
3 Press the left button (W) to return to the Video Setup
Page.
HDMI Setup
Auto
Select this to have the signal output when your TV
or monitor is connected to the HDMI out terminal.
Off
Select this when you do not use the HDMI out
terminal.
No signal is output from the HDMI out terminal.
Preference Setup
TV Type
Pal
Select this when the unit is connected to a PAL TV.
Auto
Select this when the unit is connected to a Multi TV.
Brightness
This adjusts the brightness of the picture.
Use the left and right buttons to change the value,
and press the Enter button.
Contrast
This adjusts the picture contrast.
Use the left and right buttons to change the value,
and press the Enter button.
Gamma
This adjusts the gamma value of the picture.
Select High, Medium, Low or None using the Cursor buttons, and press the Enter button.
Hue
This adjusts the green/red balance of the picture
(only for progressive-scan and S-Video output).
Use the left and right buttons to change the value,
and press the Enter button.
Saturation
This adjusts the saturation level.
Use the left and right buttons to change the value,
and press the Enter button.
Luma Delay
This adjusts the luma delay.
Select 0T or 1T using the Cursor buttons, and press
the Enter button.
Ntsc
Select this when the unit is connected to an NTSC
TV.
Audio, Subtitle, Disc Menu
You can select a preferred language for audio, subtitle
and disc menu.
z When you select a preferred language that is not
recorded on the DVD, one of the recorded
languages is automatically selected.
z You can override the Audio setting in the Setup
menu by pressing the AUDIO button on the remote
control unit while a DVD disc is playing.
z You can override the Subtitle setting in the Setup
menu by pressing the SUBTITLE button on the
remote control while a DVD disc is playing.
z Select OffF to turn subtitles off. Note that subtitles
on some discs cannot be removed even when you
select Off.
Parental
Playback of some DVD discs can be limited depending
on the age of the users. The parental control system
allows the playback limitation level to be set by the
parent.
Notes:
z The lower the level, the stricter the limitation.
z If the rating of the loaded DVD disc is higher than
the level you set, the system will require a password.
Enter your password and press the Enter button to
start playback.
27
Page 28

1 Select the desired parental control level from the
menu, then press Enter button.
2 You will be prompted to enter your password. Use
the 10/0,1-9,10+ buttons to enter 2580 (or your
privacy password if already established).
z No need to enter a password if “Password Mode” is
set to OFF.
Default
All the items in the Setup menu (except for the password and parental control) will be reset to the default
settings.
Password Setup
Password Mode
You can temporarily unlock discs for playback according to the level.
To change this setting, select On or Off, enter your
password, and press the Enter button.
On
You need a password to change the level of parental control.
Off
You can change the level of parental control without a password. You cannot temporarily unlock discs
for playback.
Password
You can set a new password for parental control.
The default password is 2580.
Listening to the FM Radio
1 Select “FM Radio” using the FM button.
2 Hold down the STUNINGT buttons for more than
1 seconds to select the station you want to listen to
(Auto selection).
When a station is tuned in, the tuning process will
stop automatically.
Repeat this step until the station you want to listen
to is found.
z If you want to stop the tuning process, press the
STUNINGT button.
Selecting stations which cannot be tuned
automatically (Manual selection)
1 Select “Change” and press the Enter button.
2 Enter 2580 (or your privacy password) using the
10/0,1-9,10+ buttons.
3 Enter a new password.
4 Enter the same password again to confirm.
5 Press the Enter button.
Note that you will need your password to change
the level of control in the future as well as to temporarily unlock discs for playback.
If you forget your password, use 2580.
28
When the
momentarily, the frequency changes by a fixed step.
Press the
station you want to listen to is found.
S TUNINGT buttons is pressed
STUNINGT buttons repeatedly until the
Page 29

FM MODE
Pressing this button alternates between Auto mode
and Mono mode.
Manual Memory Presetting
1 Tune in a station.
Auto Mode
FM stereo or monaural broadcasts are received in
the same mode as the signal.
Mono Mode
To compensate for weak FM stereo reception, select this mode. Reception will now be forced to
monaural, reducing unwanted noise.
If the reception is poor
For the best reception, rotate the FM antenna until
you get stations clearly.
Preset Tuning
You can store up to 20 FM stations.
Automatic Memory Presetting
1 Select “FM Radio” using the FM button.
2 Press the MEMORY button.
3 Select a preset channel to store the station using
WPRESETX button,
the
and then press the MEMORY button.
2 Press the SEARCH button.
Up to 20 of the received stations in your area will be
stored automatically.
How to select preset stations
1 Select “FM Radio” using the FM button.
29
Page 30

2 Select a preset channel using the WPRESETX
buttons.
Listening to an External Source
1 Connect a cassette tape deck etc. to LINE 1 IN jack
of the unit using commercially-available RCA cables.
Or Connect the audio output jack of a portable
audio player to the LINE 2 IN jack of the unit.
z When you connect the portable audio player to
LINE2 IN jack of the unit, use the stereo mini plug
cable.
z You can also select a preset channel by using the
WPRESETX button on the unit.
RDS (Display Setting of the FM)
The Radio Data System (RDS) is a broadcasting service which allows stations to send additional information along with the regular radio programme signal.
1 Tune in an FM RDS station (see “Listening to the
FM Radio”).
2 Press the DISPLAY button.
Each time the DISPLAY button is pressed, the RDS
mode is changed as follows:
PS (Programme Service name)PS (Programme Service name)
PS (Programme Service name)
PS (Programme Service name)PS (Programme Service name)
Automatically displays the FM station name when PS
data is received.
PROG TYPE (Programme TPROG TYPE (Programme T
PROG TYPE (Programme T
PROG TYPE (Programme TPROG TYPE (Programme T
Displays the programme type. If there is no PTY data,
“NO PTY” will be displayed.
ype)ype)
ype)
ype)ype)
2 Press the LINE button to select “LINE1 Source” or
“LINE2 Source”.
3 Play the source, and adjust the volume using the
SVOLT buttons of the unit and of the audio player.
You can also adjust the volume by using the VOLUME knob on the unit.
Sleep Timer
The power can be switched off after a specified amount
of time.
Press the SLEEP button repeatedly until desired
time appears on the display.
RDS CLOCKRDS CLOCK
RDS CLOCK
RDS CLOCKRDS CLOCK
Displays the information about times provided from the
station.
If there is no time data, “NO CT” will be displayed.
RDS only works in areas where RDS broadcastsRDS only works in areas where RDS broadcasts
zz
z
RDS only works in areas where RDS broadcasts
zz
RDS only works in areas where RDS broadcastsRDS only works in areas where RDS broadcasts
are available.are available.
are available.
are available.are available.
30
SLEEP 10, 20, 30, 60 or 90
The power will be switched off 90 (60, 30, 20, or 10)
minutes later.
Page 31

SLEEP OFF
The sleep timer is off.
z If you want to check the remaining time, press the
SLEEP button once. The remaining time will be
displayed for 3 seconds, and then return to the
normal display.
Wake Up Timer
The unit can be programmed to turn on at a specified
time.
z Adjust the clock before setting the timer.
1 If the unit is on, press the ON/STANDBY
button to turn it off (standby).
2 Press the CLOCK button to show the time on the
display.
3 Press the TIMER button.
and then press the TIMER button.
The “minutes” value starts blinking.
5 Press the SVOLT buttons to set the start time
(minute),
and then press the TIMER button.
“Timer Set” appears on the display, and the “hour”
value starts blinking.
z When no button is pressed for 30 seconds, the timer
setting mode will be cancelled.
4 Press the SVOLT buttons to set the start time
(hour),
The “Off” starts blinking.
6 Press the SVOLT buttons to turn On or Off the timer
function,
31
Page 32

and then press the TIMER button.
Select “On” to turn the timer function on. The TIMER
indicator (
When you do not use the timer, select “Off”. (The
TIMER indicator disappears from the display.)
) appears on the display.
7 Turn the unit on and prepare the source.
To play a disc, select “DVD Source” using the INPUT button and set a disc.
To play a USB memory device, select “USB Source”
using the INPUT button and set a USB memory
device.
To listen to the FM, select “FM Radio” using the INPUT button and tune in a station.
8 Press the ON/STANDBY button to turn the unit
off (standby).
Troubleshooting
To keep the warranty valid, never try to repair the system yourself. If you encounter problems when using
this unit, check the following points before requesting
service.
No power.
- Ensure that the AC cord of the apparatus is
connected properly.
- Ensure that there is power at the AC outlet.
- Press the
on.
No disc detected
- Insert a disc.
- Check if the disc is inserted upside down.
- Wait until the moisture condensation at the lens has
cleared.
- Replace or clean the disc.
- Use a finalized CD or correct format disc.
No picture
- Check the video connection.
- Turn on the TV to the correct Video-In channel.
- Progressive scan is activated but the TV does not
support progressive scan.
Black and white or distorted picture
- The disc does not match the TV color system
standard (PAL/NTSC).
- Sometimes a slight picture distortion may appear.
This is not a malfunction.
- Clean the disc.
- A distorted picture may appear during progressive
scan setup.
ON/STANDBY button to turn the unit
z The unit will turn on at the specified time every day.
z The unit turns on with the source that was last
selected.
Do not forget to turn the unit off (standby), or
the timer will not work.
If the timer reaches the timer-on time, the unit is set
to “SLEEP 60” automatically and the power will be
switched off (standby) 60 minutes later.
If you want to listen continuously, press the SLEEP
button repeatedly to select “SLEEP OFF” before
reaches the timer-off-time.
32
The aspect ratio of the TV screen cannot be changed
even though you have set the TV display format.
- The aspect ratio if fixed on the loaded DVD disc.
- The aspect ratio may not be changed for some TV
systems.
No sound or poor sound
- Adjust the volume.
- Disconnect the headphones.
- Check that the speakers are connected correctly.
- Check if the stripped speaker wires are clamped.
Remote control does not work
- Before you press any function button, first select
the correct source.
- Reduce the distance between the remote control
and the unit.
- Insert the battery with its polarities (+/-) aligned as
indicated.
Page 33

- Replace the battery.
- Aim the remote control directly at the .sensor on
the front of the unit.
Disc does not play
- Insert a readable disc and ensure that the label side
faces up.
- Check the disc type, color system and regional code.
Check for any scratches or smudges on the disc.
- Press MENU to exit the system setup menu.
- Disable the password for parental control or change
the rating level.
- Moisture has condensed inside the system. Remove
the disc and leave the system turned on for about
an hour. Disconnect and reconnect the AC power
plug, and then turn on the system again.
Poor radio reception
- Increase the distance between the unit and your
TV or VCR.
- Fully extend the FM antenna.
- Connect an outdoor FM antenna instead.
Unable to select Progressive Scan
- Ensure the video output mode is set to [Pr/Cr
Pb/Cb Y].
Audio or subtitle languages cannot be set
- The disc is not recorded with sound or subtitles in
multiple languages.
- The audio or subtitle language setting is prohibited
on the disc.
Cannot display some files in USB device
- The number of folders or files in the USB device
has exceeded a certain limit. This phenomenon is
not a malfunction.
- The formats of these files are not supported.
USB device not supported
- The USB device is incompatible with the unit. Try
another one.
Timer does not work
- Set the clock correctly.
- Switch on the timer.
Clock/timer setting erased
- Power has been interrupted or the power cord has
been disconnected.
- Reset the clock/timer.
33
Page 34

Specifications
DVD Player
Pickup ................................................................................................ Semiconductor laser, Wave length 650/780nm
Signal system .............................................................................................................................................. NTSC/PAL
Video signal horizontal resolution ..................................................................................... More than 480 lines (DVD)
Video signal-to noise ratio ....................................................................................................... More than 50dB (DVD)
Component Video Frequency Resonse .................................................................................................. 5Hz - 13MHz
Audio frequency response .......................................................................................... CD: 20Hz to 20kHz (+1 / -3dB)
Dynamic range ..................................................................................................................................................... 80dB
Video output
Output level .............................................................................................................................................. 1Vp-p (75Ω)
Jacks ............................................................................................................................................................ RCA jack
Component video output (Y, PB, PR)
Y-Output level ....................................................................................................................................... 1.0Vp-p (75Ω)
PB, PR-output level ............................................................................................................................... 0.7Vp-p (75Ω)
Jacks ............................................................................................................................................................RCA jacks
HDMI output
Jack ................................................................................................................................... HDMI 19 pin (version 1.2a)
Amplifier
Output power
(4Ω, 1kHz,1 channel driven, 10%THD, JEITA) ......................................................................................... 40W + 40W
Total harmonic distortion .................................................................................. 10%(Rated power), 0.05%(1kHz, 1W)
Audio input sensitivity/impedance ................................................................................................. LINE: 600mV/47kΩ
Output level/impedance (LINE OUT) ................................................................................................. 1000mV / 1.5kΩ
Frequency response ............................................................................................................ 20Hz to 20kHz, +0 / -3dB
Signal-to-noise ratio ....................................................................................................................... 90dB(LINE, IHF-A)
DVD(96KHz): 20Hz to 44kHz (+1 / -3dB)
FM Tuner Section
Tuning range ............................................................................................................................ 87.5MHz to 108.0MHz
General
Power requirements ............................................................................................................................ AC~220V/50Hz
Power consumption ................................................................................................................... 36W (Standby: 0.9W)
Dimensions (W x H x D) ............................................................................................................... 215 x 108 x 348mm
Weight(net) ............................................................................................................................................................ 4kg
Note:
In catalogs and on packaging, the letter at the end of the product name indicates the color. Specifications and
operations are the same regardless of color.
34
Page 35

Standard Accessories
FM antenna x 1
RCA video cable x 1
AC Cord x 1
Batteries (AAA, R03, UM-4) x 2
Remote Control (RC-774S) x 1
Warranty Registration Card x 1
Owner’s manual (this document) x 1
z Design and specifications are subject to change without notice.
z Weight and dimensions are approximate.
41009412
35
Page 36

Sales & Product Planning Div. : 2-1, Nisshin-cho, Neyagawa-shi, OSAKA 572-8540, JAPAN
Tel: 072-831-8023 Fax: 072-831-8163
ONKYO U.S.A. CORPORATION
18 Park Way, Upper Saddle River, N.J. 07458, U.S.A.
Tel: 800-229-1687, 201-785-2600 Fax: 201-785-2650 http://www.us.onkyo.com/
ONKYO EUROPE ELECTRONICS GmbH
Liegnitzerstrasse 6, 82194 Groebenzell, GERMANY
Tel: +49-8142-4401-0 Fax: +49-8142-4401-555 http://www.eu.onkyo.com/
ONKYO EUROPE ELECTRONICS GmbH (UK BRANCH)
The Coach House 81A High Street, Marlow, Buckinghamshire, SL7 1AB, UK
Tel: +44-(0)1628-473-350 Fax: +44(0)-1628-401-700
ONKYO CHINA LIMITED
HOMEPAGE
http://www.onkyo.com/
Unit 1&12, 9/F, Tower 1, Ever Gain Plaza, 88, Container Port Road, Kwai Chung,
N.T., HONG KONG Tel: 852-2429-3118 Fax: 852-2428-9039
http://www.ch.onkyo.com/
SN 29400428
(C) Copyright 2009 ONKYO CORPORATION Japan. All rights reserved.
* 2 9 4 0 0 4 2 8 *
I0911-1
 Loading...