

Page 1
Audio Smartphone
DP-CMX1
Read this first 2
Playing Music 56
Telephone function 124
Using the camera 139
Settings 153
Others 161
Instruction Manual
Page 2
Read this first
Names of the parts 3
Recharging 9
Insert the SIM card 11
Initial settings 14
APN settings 28
Screen composition 33
Customizing the home screen 45
Entering text 55
2
Page 3
Names of the parts
² ³± ´ µ 
· ¸
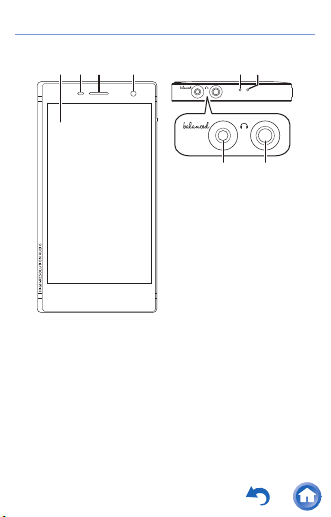
1. Display
2. Brightness sensor
This detects the ambient brightness when
using the feature that automatically adjusts
the brightness of the screen.
3. Telephone speaker
4. Front camera
Use to take photographs of subjects in front
3
Page 4

of the phone.
5. Call lamp
Blinks blue when there was an unanswered
call or mail was received. While charging, it
turns red, then orange, then green according
to the charge in the battery.
6. Microphone
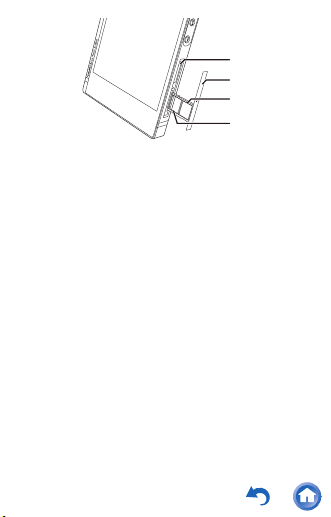
7. Headphone jack (balanced)
Connect headphones compatible with
balanced output. (2.5 mm/4-conductor)
8. Headphone jack ( )
Connect regular headphones. (3.5 mm/4conductor, microphone compatible)
0 Not all headphones are guaranteed to work.
0 This unit does not support simultaneous use
of the balanced headphone jack (7) and the
headphone jack (8). Using both jacks at the
same time may result in damage.
4
Page 5
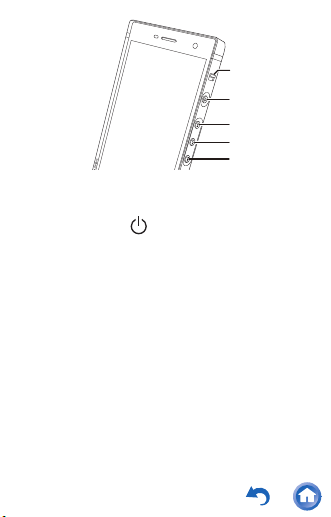
9. HOLD switch
±°
±±
±²
±³
¹
This locks the unit to prevent operations.
10. Power button ( )
Press and hold the power button to turn the
power on. After the unit starts, swipe up from
the bottom of the screen to display the home
screen. To turn the power off, press and hold
the power button, then tap "Power off". To
turn the display on or off, just press the
button.
11. Skip (9) button
Skip to the next track.
12. Play/pause (1/;) button
13. Skip (:) button
Skip to the beginning of the track or to the
previous track.
5
Page 6
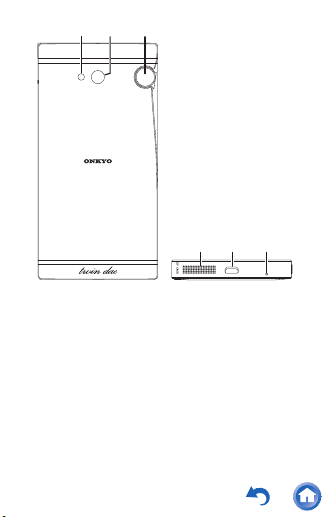
14. micro SD card slot
±´
±
±µ
±·
Take the slot tray (15) out to insert a micro
SD card.
15. Slot tray
Use the included slot tray ejector pin to push
into the small hole in the slot tray to open it.
16. nano SIM card slot 1 (4G LTE, 3G)
17. nano SIM card slot 2 (3G, 2G)
0 nano SIM card slot 2 is not compatible with
LTE communication.
6
Page 7
±¹
±¸ ²°
²± ²² ²³
18. Flash/light
19. Main camera
20. Volume dial
Turn the dial to adjust the volume.
0 When you put this unit in a pocket or case
while playing music, the volume dial may turn
accidentally, changing the volume. Set
7
Page 8

"Volume lock" to ON to disable volume
control with the volume dial.
For details ( 158)
21. Speaker
22. micro USB port
23. Microphone
8
Page 9
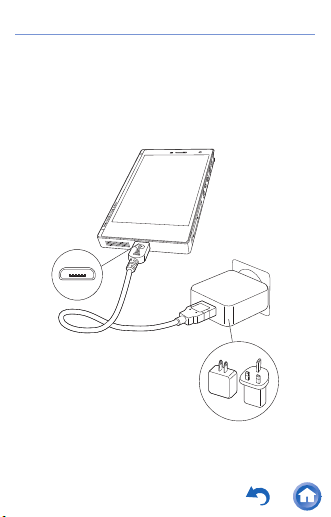
Recharging
The battery is not charged at the time of
purchase. First charge the unit with the supplied
micro USB cable and AC adapter before use.
Connect so the wider side of the plug is down
when inserting into this unit's micro USB port.
0 If you turn this unit off for recharging, the
recharging mark is displayed on the screen.
9
Page 10

The recharging mark may not appear
immediately depending on the condition of
this unit. When this occurs, the recharging
mark is displayed as recharging occurs, so
please wait for a few minutes.
0 You can also recharge while the unit is on.
The time for recharging may increase in this
case.
0 Use the supplied AC adapter to charge the
unit. Charging will take longer if you use
anything other than the supplied AC adapter
for charging.
0 Operation is not guaranteed if you use
anything other than the supplied AC adapter.
10
Page 11
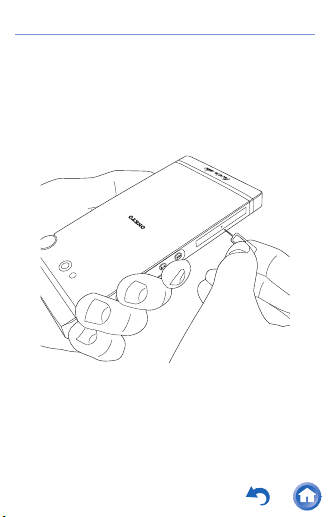
Insert the SIM card
This unit uses nano SIM cards. When inserting
the SIM card, turn this unit off first.
1 Use the included slot tray ejector pin and
push into the small hole in the slot tray to
open it.
11
Page 12

2 Make sure you insert the SIM card the
correct way when putting it into the slot tray.
0 Two SIM cards can be inserted into the slot
tray.
0 nano SIM card slot 2 is not compatible with
LTE communication.
12
Page 13
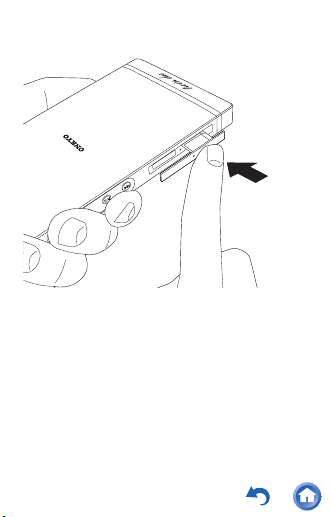
3 Push the slot tray straight in horizontally to
close it.
13
Page 14
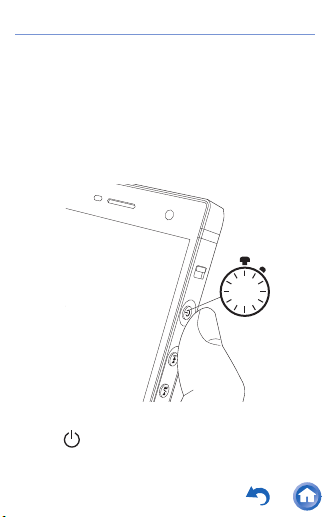
Initial settings
When the unit is turned on for the first time, the
setup wizard is automatically displayed. Follow
the on-screen instructions to setup the unit. The
setup wizard allows you to select the display
language, make Wi-Fi
information, setup a Google
make other initial settings.
®
settings, enter user
TM
account, and
3"
To turn the power on, press and hold the power
button ( ) for 3 or more seconds. It takes about
14
Page 15

2 minutes for the settings screen to be
displayed.
15
Page 16

∫ Select the language
1
Tap ▼ to select the language then tap .
0 A SIM error message is displayed when the
SIM card is not inserted correctly. Make sure
that the SIM card is correctly set.
16
Page 17

∫ Select Wi-Fi
1
Select the SSID of the access point you want
to connect from the list of networks.
2 Enter the password of the access point, then
tap "CONNECT".
0 For how to enter text ( 55)
17
Page 18
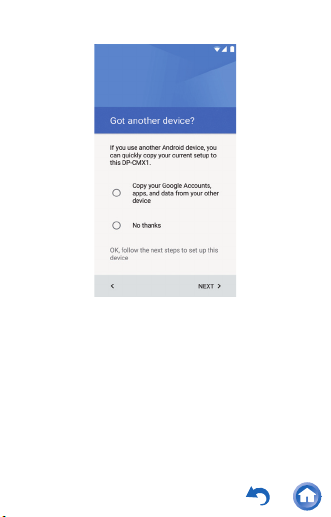
∫ Got another device?
If you are already using an Android device, you
can copy the Google account settings, apps,
etc., to this unit.
1 To copy, select "Copy your s". If you do not
want to copy, select "No thanks". Then tap
"NEXT".
0 If you selected "Copy your s", follow the on
screen instructions to proceed. For "Google
setting" apps that require operations on the
18
Page 19

other device, you can select the app in the
app list screen.
19
Page 20
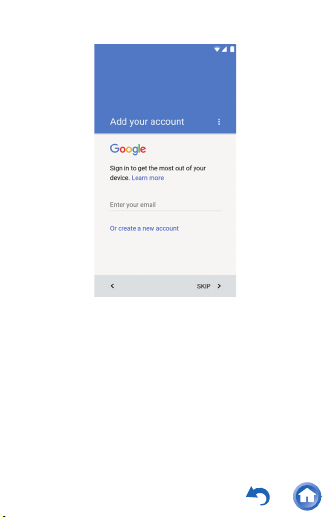
∫ Add your account
You can register a Google account you already
have on this unit or create a new Google
account.
1 To register a Google account that has
already been set up, enter the email address
registered in the Google account. To create a
new Google account, tap "Or create a new
account", then follow the on screen
instructions to enter the information.
20
Page 21
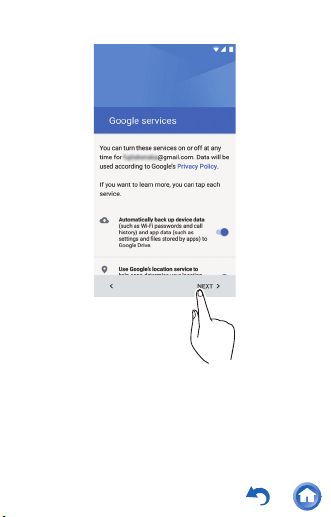
∫ Google services
You can select the Google services to use.
1 Select the Google service to use, then tap
"NEXT".
21
Page 22
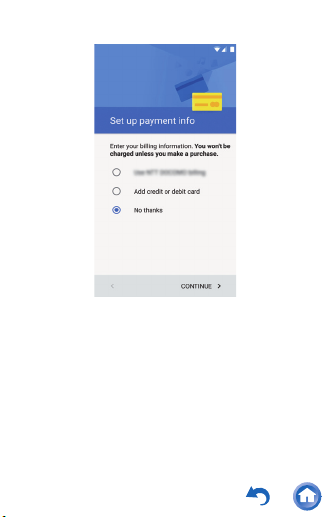
∫ Set up payment info
You can make settings for payments.
1 Either select the payment information, or
select "No thanks" if you do not intend to use
paid services, then tap "CONTINUE". To
enter payment information, follow the on
screen instructions to enter the information.
22
Page 23
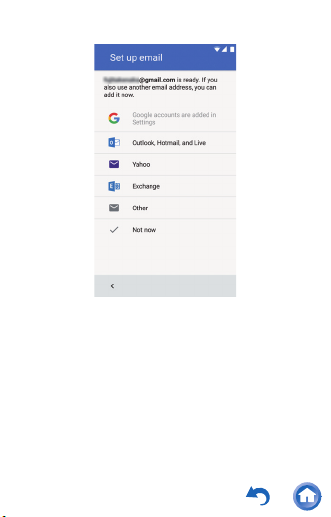
∫ Set up email
You can set an email address other than the one
for the Google account you set.
1 To use an email address other that the one
for the Google account on this unit, tap the
appropriate item and enter the information.
When one is not to be used, tap "Not now".
23
Page 24
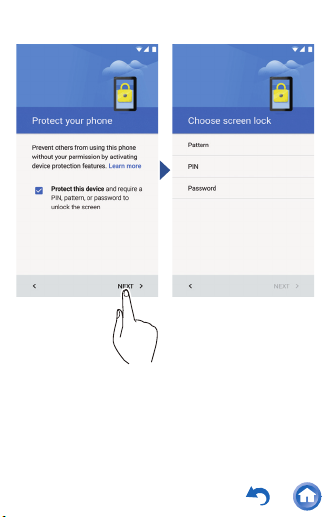
∫ Protect your phone
You can set up a screen lock, etc., to protect the
device.
1 To use protection features, then with the
check mark in place, tap "NEXT". Remove
24
Page 25

the check mark and tap "NEXT" if you do not
want to use these features.
0 It is recommended to use the protection
features to protect your personal information.
0 "Pattern" is where you create a pattern by
joining four or more points. "PIN" is a number
of four or more digits. "Password" is a
combination of four or more letters, numbers,
or symbols.
25
Page 26
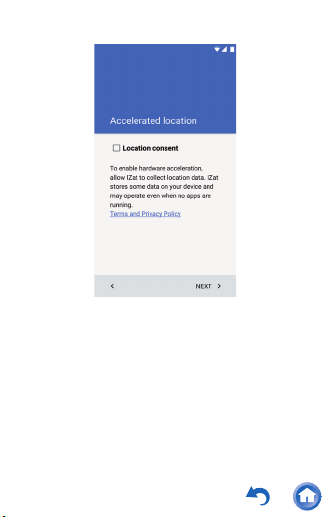
∫ Accelerated location
You can make settings to accelerate the
determining of your location.
1 To enable the setting, put a check mark in the
check box and click "NEXT".
26
Page 27
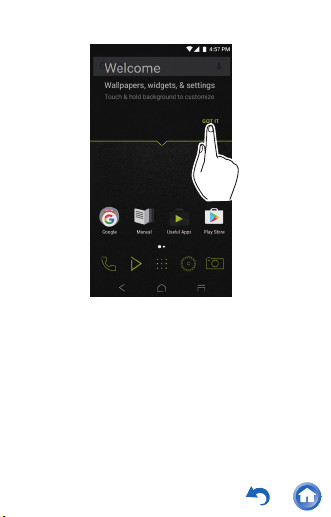
∫ This completes the initial settings
If the home screen is displayed, tap "GOT IT".
This completes the initial settings.
27
Page 28
APN settings
Settings
You need to make the APN settings
corresponding to the SIM card you are using in
order to transmit data. Depending on your
telecommunications provider, the connection
may be established automatically when you
insert the SIM card. You will need to enter the
information yourself if it is not set automatically.
1 Tap "Settings" in the home screen.
28
Page 29
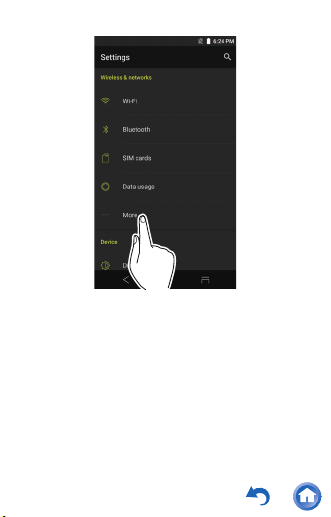
2 Tap "More".
29
Page 30
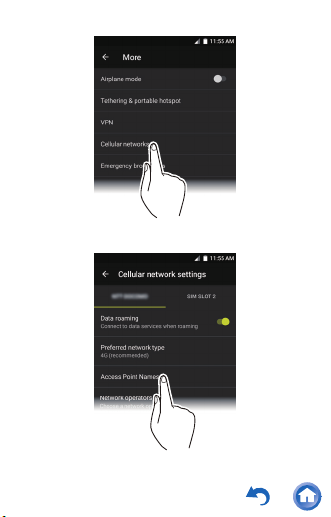
3 Tap "Cellular networks".
4 Tap "Access Point Names".
30
Page 31

5 Make sure the telecommunications provider
you are contracted to is selected in the list.
The process is complete if the
telecommunications provider is selected.
Proceed to step 6 if your telecommunications
provider is not in the list.
31
Page 32

6 If the telecommunications provider you are
contracted to is not in the list, click the icon at
the top right of the screen, then enter the
required information.
The information required depends on the
telecommunications provider. Contact your
telecommunications provider for details.
32
Page 33

Screen composition
Home screen App list screen
This unit is an audio smartphone running on the
TM
Android
screen and the app list screen. Tap the icons at
the bottom of the screen to switch between the
screens.
OS. The basic screens are the home
33
Page 34

These icons are shown even if you switch
screens.
Returns to the previous screen.
Switches to the home screen.
Displays a thumbnail list of apps you have
recently used. You can delete the app from the
list by tapping on the " " on the upper right of
the thumbnail or flicking the thumbnail left to
right.
34
Page 35

∫ The home screen
Home screen 1 Home screen 2
The screen that appears immediately after you
turn the unit on is called the home screen. Flick
left to right to switch the home screen.
35
Page 36

Home screen 1
²
±
1. Status bar
36
Page 37

2.
Google
Manual
A folder containing a collection of Google
apps, such as the Google Chrome browser
to view web pages and the YouTube
Gives you access to this document.
A collection of installers to download apps.
Useful Apps
This is an introduction to a selection of these.
Some apps may not be available for use in
some areas.
Onkyo Music
An app to help you access the Onkyo Music
site, where high-res sources are distributed.
Onkyo Remote
An app that enables you to wirelessly stream
music from this unit to Onkyo audio devices.
You can also use this unit as a remote
controller.
37
TM
app.
TM
Page 38

Pioneer ControlApp
Play Store
An app that allows you to use this unit as a
remote controller to operate Pioneer audio
products.
iControlAV5
An app that allows you to use this unit as a
controller to operate Pioneer AV receivers
and BD players.
Integra remote
An app that enables you to wirelessly stream
music from this unit to an Integra receiver.
You can also use this unit as a remote
controller.
SX-N30 Control App (Except for Japan)
An app that allows you to use this unit as a
remote control to operate SX-N30.
Gives you access to the "Google Play Store"
where you can download apps for the
Android OS. You may not be able to access
this store in some areas.
38
Page 39

You can make calls or register entries in a
Music
Settings
Camera
Phone
phone book.
The Music app for playing music.
Switches to the app list screen.
Takes you to the settings screen where you
can set "Wi-Fi", "Language & input", "Date &
time", etc.
You can take photographs or videos.
39
Page 40

Home screen 2
³
´
3. Music widget
You can play music, pause, skip, etc.
40
Page 41

4.
Ìéîå
Ïõô
You can switch the headphone output to the
line output mode to connect external
equipment.
Уфбод
бмпое
You can improve sound quality by turning off
®
Wi-Fi
, the Bluetooth® function, and the LCD.
Вбмбогед
A mode for balanced headphones. When
you connect balanced headphones, either
this mode or the following ACG (mode) is
automatically selected. Compared to the
normal single-ended operation, you can get
a larger output and the high voltage is not
grounded together with the small signal in
this mode, so you can anticipate a superior
effect in the background of the music.
Because you get a larger output, you can
drive headphones with a higher impedance.
41
Page 42

A mode for balanced headphones. You can
ÁÃÇ
switch to this ACG (mode) from Balanced
(mode). The basic operating method is the
same as the balanced mode, but uses
technology to even more forcefully fix
grounding standards, so you can enjoy a
sound quality with improved clarity and more
stability than the balanced mode. Output
volume is the same as the regular singleended operation, however.
42
Page 43

∫ The app list screen
When you tap the app list icon in the home
screen, the app list screen is displayed.
43
Page 44

When there are a lot of apps, flick up or down to
change the screen.
44
Page 45

Customizing the home screen
You can put shortcuts for apps and widgets*
such as clocks on the home screen, and you can
customize it to suit yourself.
* Widgets are small apps that you can put in the
home screen so that a clock is shown all the
time or shortcuts to your favorite home pages
can be shown.
45
Page 46

∫ Creating an app shortcut on the
home screen
1
Tap the app list icon in the home screen.
2 Long tap on the app in the app list screen.
46
Page 47

3 The background changes to the home
screen, so drag to the desired position and
release your finger.
47
Page 48

∫ Adding a widget to the home screen
1
Long tap in an area of the home screen
where there is nothing.
2 Tap "WIDGETS".
48
Page 49

3 Long tap the widget you want to add.
4 The background changes to the home
screen, so drag to the desired position and
release your finger.
49
Page 50

0 Some widgets allow you to change their size
with a long tap.
50
Page 51

∫ Changing the wallpaper in the home
screen
1
Long tap in an area of the home screen
where there is nothing.
51
Page 52

2 Tap "WALLPAPERS".
0 Select "My photos" to set a favorite photo
or image as your wallpaper. To take a
screen shot, press and hold the power
button (Í) and the skip button (:) at
the same time.
3 Tap the wallpaper you want to change to.
52
Page 53

4 Tap "Set wallpaper".
53
Page 54

∫ Deleting shortcuts and widgets
1
Long tap the shortcut or widget you want to
delete.
2 Drag to "Remove" and release your finger.
54
Page 55

Entering text
²
³
±
·
µ
´
When you tap a text box or other place to enter
text, a keyboard is automatically displayed.
1. Tap to enter text.
2. Tap to switch between upper case and lower
case. Double-tap to lock upper-case.
3. Tap to change the type of text.
4. The method of entry changes.
5. Enters a space.
6. Removes a character on the left of the
cursor.
7. Tap to confirm.
55
Page 56

Playing Music
Playing from a micro SD card 57
Copying from a computer and playing
62
Play operation details 82
Editing a play list 92
Equalizer settings 100
Slide menu 107
USB output 117
Bluetooth® function 120
56
Page 57

Playing from a micro SD card
Insert a micro SD card that has music files on it
and play them.
1 Turn off this unit, then insert the slot tray
ejector pin and into the small hole in the slot
tray to open it.
57
Page 58

2 Insert the micro SD card into the card slot.
With the contacts facing up, push in
completely so the card clicks into place.
3 Push the slot tray straight in horizontally to
close it.
58
Page 59

4 Tap Music in the home screen.
0 Do not connect headphones that have an
impedance outside the rated range as this
may result in damage.
See here for headphone ratings ( 162)
59
Page 60

5 In the library, tap the track you want to play.
0 It may take some time for tracks to be
displayed in the library.
Tap or click here Play operation details. ( 82)
60
Page 61

∫ Removing the micro SD card
Settings
Unmount the micro SD card using the following
procedure before removing it. The card can be
damaged or may stop working properly if you fail
to unmount the card first.
1 Tap "Settings" in the home screen.
2 Tap in "Storage & USB" - "SD card".
3 Turn off this unit, then insert the slot tray
ejector pin and into the small hole in the slot
tray to open it.
4 Push the micro SD card in until you hear a
click and then pull straight out. The micro SD
card will spring out so take care not to lose it.
5 Push the slot tray straight in horizontally to
close it.
61
Page 62

Copying from a computer and
playing
You can copy music data stored on your
computer to the built-in storage on this unit or to
a micro SD card in this unit.
∫ Copy with the data copying software
"X-DAP Link" and play
X-DAP Link is compatible with Windows 10 (32
bit/64 bit), Windows 8/8.1 (32 bit/64 bit),
Windows 7 (32 bit/64 bit), and Mac OS X 10.11
and OS X 10.10.
1 Start your computer and download the
installer for X-DAP Link from the following
site.
http://www.jp.onkyo.com/audiovisual/dap/
2 On a Windows computer double-click
"setup.exe" and on a Macintosh computer
double-click "XDAPLink.pkg" to install.
Follow the on-screen instructions to install. A
shortcut is created on the desktop after
installation on a Windows computer. On a
Macintosh computer, "X-DAP Link.app" is
added within the "Applications" folder.
62
Page 63

3 Turn on the power of the unit.
0 To copy to a micro SD card, insert a micro
SD card into the card slot. When inserting
a micro SD card, turn this unit off before
opening the slot tray.
4 Connect this unit to the computer with the
supplied micro USB cable. Connect so the
wider side of the plug is down when inserting
into this unit's micro USB port. You may
damage the plug or jack if you try to insert it
the wrong way.
63
Page 64

5 In the home screen of this unit, swipe from
top to bottom and tap "USB for charging".
64
Page 65

6 Tap "File transfers".
0 If the message such as "Connection of the
device is not recognized" is displayed on
the unit, close all running applications and
retry starting at step 3.
65
Page 66

7 Start X-DAP Link.
66
Page 67

8 Click 1 and select the folder that contains
the files you want to copy. If the folder you
want to copy is already displayed, start
selecting from 2.
onkyo music
If there are files you have downloaded from
onkyo music (a site that distributes music
files), select this folder.
iTunes Media
If you are using iTunes
content are displayed. If iTunes cannot be
selected, open "Preferences" - "Advanced" in
iTunes, then put a check mark next to "Share
®
, a play list and
67
Page 68

iTunes Library XML with other applications".
0 There may be some differences in the
operations screens and how operations
are performed depending on the iTunes
version. For details, see the operating
instructions for iTunes.
68
Page 69

9 Click 3 to select built-in storage or SD card
as the copy destination, then click "OK". You
can also click 4 to specify different copy
destinations to 3.
0 The copy destinations for this unit are the
built-in storage and SD slot ×1, so 5 is not
available for use.
69
Page 70

10 The following message may be displayed on
your computer. To select and copy only
certain files to add, select "No" in this screen.
Select "Yes" to reflect files that have already
been copied to the list. If you do this, music
files that you have deselected will be deleted
from this unit during copying.
0 The screen displayed depends on the OS
and language of your computer.
70
Page 71

11 Select the music files you want to copy
according to the copy destination.
When this copy destination is selected:
71
Page 72

When this copy destination is selected:
72
Page 73

12 Click the copy button with the same color as
the one you selected in step 11, then click
"OK" in the confirmation screen. The
selected music files are copied to this unit.
73
Page 74

13 Tap Music in the home screen of this unit.
0 Do not connect headphones that have an
impedance outside the rated range as this
may result in damage.
See here for headphone ratings ( 162)
74
Page 75

14 In the library, tap the track you want to play.
0 It may take some time for tracks to be
displayed in the library.
Tap or click here Play operation details. ( 82)
75
Page 76

∫ Drag and drop to copy and play
1
Use the supplied micro USB cable to connect
this unit to a computer. Connect so the wider
side of the plug is down when inserting into
this unit's micro USB port. You may damage
the plug or jack if you try to insert it the wrong
way.
76
Page 77

2 In the home screen of this unit, swipe from
top to bottom and tap "USB for charging".
77
Page 78

3 Tap "File transfers".
0 If "AutoPlay" or similar is displayed on your
computer, select "Open folder to view files"
and then proceed to step 5.
4 Select this unit from the "PC" option on your
computer.
78
Page 79

5 Open the folder you want to save to. To copy
to the built-in storage, open the "Music"
folder in the built-in storage. To copy to a
micro SD card, open the folder for the micro
SD card you want to copy to.
0 The screen displayed depends on the OS
and language of your computer.
6 Drag and drop the folder on your computer
that contains the music files that you want to
copy to the copy destination folder.
79
Page 80

7 Tap Music in the home screen of this unit.
0 Do not connect headphones that have an
impedance outside the rated range as this
may result in damage.
See here for headphone ratings ( 162)
80
Page 81

8 In the library, tap the track you want to play.
0 It may take some time for tracks to be
displayed in the library.
Tap or click here Play operation details. ( 82)
81
Page 82

Play operation details
∫ Library display
When Music starts the library (a list of tracks
synched with Music) is displayed. Flick the
library screen left or right to change the
categorization.
Folder
All tracks saved in the same folder level are
displayed.
Playlists
Displays a list of play lists you have created.
82
Page 83

Artists
Displays by artist.
Albums
Displays by album.
Songs
Displays all tracks.
Genres
Displays by genre.
Compilations
Displays by compilation albums.
Composers
Displays by song writer.
Format
Displays by data format.
0 Tap the search icon above the list
screen to search for a track.
0 When "Auto sync" or "Music Folders" have
not been set up, tracks may not be
displayed.
For details about "HD Library Sync" ( 110)
83
Page 84

∫ Play operations
When you tap the track you want to play in the
library, the screen changes to the play screen
and play starts. Tap to return to the library.
84
Page 85

Play/pause
Tap inside the displayed circle.
85
Page 86

Skipping tracks
Flick the play screen side to side.
86
Page 87

Adjusting the volume
The volume bar is displayed on the screen
when you turn the volume dial. You can then
adjust the volume by dragging the bar up or
down. You can also adjust the volume with
the volume dial.
87
Page 88

∫ The play screen
88
Page 89

A
±
´
³
²
1. Move to the queue.
The currently playing tracks and songs in the
album are displayed in order in a queue.
2. The lyrics of the songs are automatically
obtained and displayed. If the unit is not
connected to the internet or "Obtain
synchronized lyrics" is not On, the unit
displays the lyrics in the tags in the music
89
Page 90

files. Tap the icon at the top left to return to
the previous screen.
For Obtain synchronized lyrics ( 114)
3. Displays the slide menu where you can
change play and sound settings.
4. Seek bar
Progresses along with the track's progress.
Tap on the edge of the circle to skip to that
position in the track.
90
Page 91

B
·
¸
µ
¹
±°
5. The track being played is added to the
playlist.
6. Tap to see details about the track.
7. Repeat mode
Tap to change the mode: 1 track repeat Æ all
track repeat Æ no repeat.
8. Shuffle mode
Tap to turn random play on or off.
9. Move to the equalizer setting screen.
10. Tap to turn the equalizer on or off.
91
Page 92

Editing a play list
∫ Creating a play list
Select the tracks you like to create your own play
list.
1 In the library, tap the icon at the right of the
screen for the track you want to add to the
play list to display the list menu. The list
menu is also displayed when you long tap a
track that you want to add.
92
Page 93

2 Tap "Replace Up Next".
3 Tap the icon at the right of the screen for the
track you want to add next to display the list
menu, then tap "Play Next".
4 Repeat step 3 to make a list of tracks you
want to save as a play list.
5 Tap the jacket image icon at the top left of the
screen to move to the play screen.
93
Page 94

6 Tap the icon at the top left of the screen to
move to the queue.
94
Page 95

7 Tap "Save as playlist", enter a title and tap
"SAVE".
0 New play lists cannot be created from play
lists created outside of Music, for example
with iTunes.
95
Page 96

∫ Editing a play list
Editing a play list
Display the list of play lists from the library and
tap "Edit".
To delete a play list:
Tap the icon of the play list you want to delete
then tap "OK".
96
Page 97

To change the order of a play list:
Drag the icon of the play list you want to reorder.
To change the name of a play list:
Tap the play list you want to rename, enter the
name and tap "OK".
To finish editing:
Tap "Done".
97
Page 98

Editing tracks in a play list
Display the list of play lists from the library, tap
the play list you want to edit, and tap "Edit".
To delete a track from a play list:
Tap the icon of the track you want to delete then
tap "OK".
98
Page 99

To change the order of tracks in a play list:
Drag the icon of the track you want to reorder.
To finish editing:
Tap "Done".
0 Tracks are not deleted from the unit even if
you delete them from a play list.
99
Page 100

Equalizer settings
You can adjust the sound quality how you like by
setting the equalizer.
∫ Switching to the equalizer screen
Tap the equalizer screen icon in the play screen
to move to the equalizer screen.
100
 Loading...