

Onkyo CS-355 Instruction Manual
F
r
E
n
E
s
English Français
Español
CD Receiver System
CS-355
CD Receiver (CR-245BT)
Speakers (D-T05)
Instruction Manual
Thank you for purchasing an Onkyo CD Receiver System.
Please read this manual thoroughly before making any
connections and plugging it in.
Following the instructions in this manual will enable you to
obtain optimum performance and listening enjoyment from
your new CD Receiver System.
Please retain this manual for future reference.
Manuel d’instructions
Merci d’avoir porté votre choix sur système d’Ampli-tuner CD
de Onkyo. Veuillez lire attentivement ce manuel avant de
connecter l’appareil et de le mettre sous tension.
Observez les instructions données dans ce manuel afin de
pouvoir profiter pleinement de votre nouveau système
d’Ampli-tuner CD.
Conservez ce manuel afin de pouvoir le consulter
ultérieurement.
Manual de instrucciones
Muchas gracias por el sistema Receptor de CDs Onkyo.
Antes de realizar las conexiones y de conectar la
alimentación, lea detenidamente este manual.
Si sigue las instrucciones de este manual, logrará el óptimo
rendimiento y el máximo placer de escucha de su nuevo
sistema de Receptor de CDs.
Guarde este manual para futuras referencias.
Getting Started ............................En-2
Premiers pas.................................Fr-2
Primeros pasos ...........................Es-2
Connections ..............................
En-13
Branchements ............................Fr-13
Conexiones................................Es-13
Basic Operations.......................
En-17
Fonctionnement de base ...........Fr-17
Funcionamiento básico............Es-17
Playing CDs ...............................
En-19
Lecture de CD.............................Fr-19
Reproducción de CDs...............Es-19
Playing Your iPod/iPhone/iPad ...
En-22
Lecture d’un iPod/iPhone/iPad....
Fr-22
Reproducir su iPod/iPhone/iPad ...
Es-22
Playing Back via Bluetooth ......
En-23
Lecture de musique via Bluetooth ....
Fr-23
Reproduccion mediante Bluetooth....
Es-23
Listening to the Radio ..............
En-24
Écoute de la radio ......................Fr-24
Escuchar la radio ......................Es-24
Playing a USB Flash Drive........
En-26
Lecture d’une clé USB...............
Fr-26
Reproducir una unidad USB ....Es-26
Clock and Timer ........................
En-26
Horloge et minuterie ..................Fr-26
Reloj y Temporizador................Es-26
Miscellaneous............................
En-29
Divers ..........................................Fr-29
Varios .........................................
Es-29

En-2
Important Safety Instructions
1. Read these instructions.
2. Keep these instructions.
3. Heed all warnings.
4. Follow all instructions.
5. Do not use this apparatus near water.
6. Clean only with dry cloth.
7. Do not block any ventilation openings. Install in
accordance with the manufacturer’s instructions.
8. Do not install near any heat sources such as radiators, heat registers, stoves, or other apparatus
(including amplifiers) that produce heat.
9. Do not defeat the safety purpose of the polarized or
grounding-type plug. A polarized plug has two
blades with one wider than the other. A grounding
type plug has two blades and a third grounding
prong. The wide blade or the third prong are provided for your safety. If the provided plug does not
fit into your outlet, consult an electrician for
replacement of the obsolete outlet.
10. Protect the power cord from being walked on or
pinched particularly at plugs, convenience receptacles, and the point where they exit from the apparatus.
11. Only use attachments/accessories specified by the
manufacturer.
12.
Use only with the cart, stand,
tripod, bracket, or table specified by the manufacturer, or
sold with the apparatus.
When a cart is used, use caution when moving the cart/
apparatus combination to
avoid injury from tip-over.
13. Unplug this apparatus during lightning storms or
when unused for long periods of time.
14. Refer all servicing to qualified service personnel.
Servicing is required when the apparatus has been
damaged in any way, such as power-supply cord or
plug is damaged, liquid has been spilled or objects
have fallen into the apparatus, the apparatus has
been exposed to rain or moisture, does not operate
normally, or has been dropped.
15. Damage Requiring Service
Unplug the apparatus from the wall outlet and refer
servicing to qualified service personnel under the
following conditions:
A. When the power-supply cord or plug is damaged,
B. If liquid has been spilled, or objects have fallen
into the apparatus,
C. If the apparatus has been exposed to rain or
water,
D. If the apparatus does not operate normally by
following the operating instructions. Adjust only
those controls that are covered by the operating
instructions as an improper adjustment of other
controls may result in damage and will often
require extensive work by a qualified technician
to restore the apparatus to its normal operation,
E. If the apparatus has been dropped or damaged in
any way, and
F. When the apparatus exhibits a distinct change in
performance this indicates a need for service.
16. Object and Liquid Entry
Never push objects of any kind into the apparatus
through openings as they may touch dangerous voltage points or short-out parts that could result in a
fire or electric shock.
The apparatus shall not be exposed to dripping or
splashing and no objects filled with liquids, such as
vases shall be placed on the apparatus.
Don’t put candles or other burning objects on top of
this unit.
17. Batteries
Always consider the environmental issues and follow local regulations when disposing of batteries.
18. If you install the apparatus in a built-in installation,
such as a bookcase or rack, ensure that there is adequate ventilation.
Leave 20 cm (8") of free space at the top and sides
and 10 cm (4") at the rear. The rear edge of the shelf
or board above the apparatus shall be set 10 cm (4")
away from the rear panel or wall, creating a fluelike gap for warm air to escape.
WARNING:
TO REDUCE THE RISK OF FIRE OR ELECTRIC
SHOCK, DO NOT EXPOSE THIS APPARATUS
TO RAIN OR MOISTURE.
CAUTION:
TO REDUCE THE RISK OF ELECTRIC SHOCK,
DO NOT REMOVE COVER (OR BACK). NO
USER-SERVICEABLE PARTS INSIDE. REFER
SERVICING TO QUALIFIED SERVICE
PERSONNEL.
The lightning flash with arrowhead symbol, within an
equilateral triangle, is intended to alert the user to the
presence of uninsulated “dangerous voltage” within
the product’s enclosure that may be of sufficient
magnitude to constitute a risk of electric shock to
persons.
The exclamation point within an equilateral triangle is
intended to alert the user to the presence of important
operating and maintenance (servicing) instructions in
the literature accompanying the appliance.
WARNING
RISK OF ELECTRIC SHOCK
DO NOT OPEN
RISQUE DE CHOC ELECTRIQUE
NE PAS OUVRIR
AVIS
PORTABLE CART WARNING
S3125A

En-3
Precautions
1. Recording Copyright—Unless it’s for personal use
only, recording copyrighted material is illegal
without the permission of the copyright holder.
2. AC Fuse—The AC fuse inside the unit is not user-
serviceable. If you cannot turn on the unit, contact
your Onkyo dealer.
3. Care
—Occasionally you should dust the unit all over
with a soft cloth. For stubborn stains, use a soft cloth
dampened with a weak solution of mild detergent and
water. Dry the unit immediately afterwards with a
clean cloth. Don’t use abrasive cloths, thinners,
alcohol, or other chemical solvents, because they
may damage the finish or remove the panel lettering.
4. Power
WARNING
BEFORE PLUGGING IN THE UNIT FOR THE
FIRST TIME, READ THE FOLLOWING
SECTION CAREFULLY.
AC outlet voltages vary from country to country.
Make sure that the voltage in your area meets the
voltage requirements printed on the unit’s rear panel
(e.g., AC 230 V, 50 Hz or AC 120 V, 60 Hz).
The power cord plug is used to disconnect this unit
from the AC power source. Make sure that the plug
is readily operable (easily accessible) at all times.
For models with [POWER] button, or with both
[POWER] and [ON/STANDBY] buttons:
Pressing the [POWER] button to select OFF mode
does not fully disconnect from the mains. If you do
not intend to use the unit for an extended period,
remove the power cord from the AC outlet.
For models with [ON/STANDBY] button only:
Pressing the [ON/STANDBY] button to select
Standby mode does not fully disconnect from the
mains. If you do not intend to use the unit for an
extended period, remove the power cord from the
AC outlet.
5. Preventing Hearing Loss
Caution
Excessive sound pressure from earphones and
headphones can cause hearing loss.
6. Batteries and Heat Exposure
War nin g
Batteries (battery pack or batteries installed) shall
not be exposed to excessive heat as sunshine, fire or
the like.
7. Never Touch this Unit with Wet Hands—Never
handle this unit or its power cord while your hands
are wet or damp. If water or any other liquid gets
inside this unit, have it checked by your Onkyo
dealer.
8. Handling Notes
• If you need to transport this unit, use the original
packaging to pack it how it was when you
originally bought it.
• Do not leave rubber or plastic items on this unit
for a long time, because they may leave marks on
the case.
• This unit’s top and rear panels may get warm
after prolonged use. This is normal.
• If you do not use this unit for a long time, it may
not work properly the next time you turn it on, so
be sure to use it occasionally.
• When you’ve finished using this unit, remove all
discs and turn off the power.
9. Installing this Unit
• Install this unit in a well-ventilated location.
• Ensure that there’s adequate ventilation all
around this unit, especially if it’s installed in an
audio rack. If the ventilation is inadequate, the
unit may overheat, leading to malfunction.
• Do not expose this unit to direct sunlight or heat
sources, because its internal temperature may
rise, shortening the life of the optical pickup.
• Avoid damp and dusty places, and places subject
to vibrations from loudspeakers. Never put the
unit on top of, or directly above a loudspeaker.
• Install this unit horizontally. Never use it on its
side or on a sloping surface, because it may cause
a malfunction.
• If you install this unit near a TV, radio, or VCR,
the picture and sound quality may be affected. If
this occurs, move this unit away from the TV,
radio, or VCR.
10. Moisture Condensation
Moisture condensation may damage this unit.
Read the following carefully:
Moisture may condense on the lens of the optical
pickup, one of the most important parts inside this
unit.
• Moisture condensation can occur in the following
situations:
– The unit is moved from a cold place to a warm
place.
– A heater is turned on, or cold air from an air
conditioner is hitting the unit.
– In the summer, when this unit is moved from
an air conditioned room to a hot and humid
place.
– The unit is used in a humid place.
• Do not use this unit when there’s the possibility
of moisture condensation occurring. Doing so
may damage your discs and certain parts inside
this unit.
If condensation does occur, unplug the power cord
and leave the unit for two to three hours in the room
temperature.
This unit contains a semiconductor laser system and is
classified as a “CLASS 1 LASER PRODUCT”. So, to
use this model properly, read this Instruction Manual
carefully. In case of any trouble, please contact the store
where you purchased the unit.
To prevent being exposed to the laser beam, do not try
to open the enclosure.
CAUTION:
CLASS 1M VISIBLE AND INVISIBLE LASER
RADIATION WHEN OPEN. DO NOT VIEW
DIRECTLY WITH OPTICAL INSTRUMENTS.

En-4
Precautions—Continued
THIS PRODUCT UTILIZES A LASER. USE OF
CONTROLS OR ADJUSTMENTS OR
PERFORMANCE OF PROCEDURES OTHER THAN
THOSE SPECIFIED HEREIN MAY RESULT IN
HAZARDOUS RADIATION EXPOSURE.
The label on the right is
applied on the rear panel.
1. This unit is a CLASS 1
LASER PRODUCT and
employs a laser inside the cabinet.
2. To prevent the laser from being exposed, do not
remove the cover. Refer servicing to qualified
personnel.
This transmitter must not be co-located or operated in
conjunction with any other antenna or transmitter.
For U.S. models
FCC Information for User
IMPORTANT NOTE:
This equipment complies with FCC/IC radiation
exposure limits set forth for an uncontrolled
environment and meets the FCC radio frequency (RF)
Exposure Guidelines in Supplement C to OET65 and
RSS-102 of the IC radio frequency (RF) Exposure rules.
This equipment has very low levels of RF energy that it
deemed to comply without maximum permissive
exposure evaluation (MPE). But it is desirable that it
should be installed and operated keeping the radiator at
least 20 cm or more away from person’s body (excluding
extremities: hands, wrists, feet and ankles).
REMARQUE IMPORTANTE :
Cet équipement est conforme aux limites FCC/IC
d’exposition aux rayonnements définies pour un
environnement non réglementé, aux lignes directrices de
la FCC en matière d’exposition aux radiofréquences
(RF) spécifiées dans le supplément C du bulletin OET65
et aux régulations RSS-102 de l’IC sur l’exposition aux
radiofréquences (RF).
Cet équipement étant associé à de très faibles niveaux
d’énergie radiofréquence, il est considéré conforme sans
évaluation de l’exposition maximale admise (EMA). Il
est cependant conseillé de l’installer et de l’utiliser en
maintenant la source de rayonnement radioélectrique à
20 cm minimum du corps (à l’exclusion des extrémités
du corps : les mains, les poignets, les pieds et les
chevilles).
FCC Caution:
FCC WARNING
Changes or modifications not expressly approved by the
party responsible for compliance could void the user’s
authority to operate the equipment.
NOTE:
This equipment has been tested and found to comply
with the limits for a Class B digital device, pursuant to
Part 15 of the FCC Rules. These limits are designed to
provide reasonable protection against harmful
interference in a residential installation.
This equipment generates, uses and can radiate radio
frequency energy and, if not installed and used in
accordance with the instructions, may cause harmful
interference to radio communications. However, there is
no guarantee that interference will not occur in a
particular installation. If this equipment does cause
harmful interference to radio or television reception,
which can be determined by turning the equipment off
and on, the user is encouraged to try to correct the
interference by one or more of the following measures:
• Reorient or relocate the receiving antenna.
• Increase the separation between the equipment and
receiver.
• Connect the equipment into an outlet on a circuit
different from that to which the receiver is connected.
• Consult the dealer or an experienced radio/TV
technician for help.
For Canadian Models
NOTE:
THIS CLASS B DIGITAL APPARATUS COMPLIES
WITH CANADIAN ICES-003.
For models having a power cord with a polarized plug:
CAUTION:
TO PREVENT ELECTRIC SHOCK, MATCH WIDE
BLADE OF PLUG TO WIDE SLOT, FULLY INSERT.
Modèle pour les Canadien
REMARQUE:
CET APPAREIL NUMÉRIQUE DE LA CLASSE B
EST CONFORME À LA NORME NMB-003 DU
CANADA.
Sur les modèles dont la fiche est polarisée:
ATTENTION:
POUR ÉVITER LES CHOCS ÉLECTRIQUES,
INTRODUIRE LA LAME LA PLUS LARGE DE LA
FICHE DANS LA BORNE CORRESPONDANTE DE
LA PRISE ET POUSSER JUSQU’AU FOND.
This device complies with Industry Canada licenceexempt RSS standard(s). Operation is subject to the
following two conditions: (1) this device may not cause
interference, and (2) this device must accept any
interference, including interference that may cause
undesired operation of the device.
Le présent appareil est conforme aux CNR d’Industrie
Canada applicables aux appareils radio exempts de
licence. L’exploitation est autorisée aux deux conditions
suivantes : (1) l’appareil ne doit pas produire de
brouillage, et (2) l’utilisateur de l’appareil doit accepter
tout brouillage radioélectrique subi, même si le
brouillage est susceptible d’en compromettre le
fonctionnement.

En-5
Precautions—Continued
Before Using Your New Speakers
• Place the speakers on sturdy, flat surfaces. Putting
them on uneven or unstable surfaces where they may
fall and cause damage will affect the sound quality.
• Do not keep water or other liquids close to the
speakers. If a liquid is spilled over them, the woofer
and tweeter inside may be damaged.
• Do not handle the speakers with wet or damp hands.
Speaker Precautions
The speakers can handle the specified input power when
used for normal music reproduction. If they’re fed any
of the following signals, even if the input power is
within the specified rating, excessive current may flow
in the speaker coils, causing burning or wire breakage:
1. Interstation noise from an untuned FM radio.
2. Audio from a cassette that’s being fast-forwarded.
3. High-pitched sounds generated by an oscillator, electronic musical instrument, and so on.
4. Amplifier oscillation.
5. Special test tones from audio test CDs and so on.
6. Thumps and clicks caused by connecting or disconnecting audio cables (always turn off your amplifier
before connecting or disconnecting cables).
7. Microphone feedback.
The speakers contain powerful magnets. Do not put
metal items, such as screwdrivers, close to the speakers,
as they may be attracted toward the magnet, causing
injury, or damage to the tweeter diaphragm.
Using Close to a TV or Computer
TVs and computer monitors are magnetically sensitive
devices and as such are likely to suffer from
discoloration or picture distortion when conventional
speakers are placed nearby. To prevent this, the speakers
feature internal magnetic shielding. In some situations,
however, discoloration may still be an issue. In this
case, turn off your TV or monitor, wait 15 to 30
minutes, and then turn it back on again. This normally
activates the degaussing function, which neutralizes the
magnetic field, thereby removing any discoloration
effects. If discoloration problems persist, try moving the
speakers away from your TV or monitor. Note that
discoloration can also be caused by a magnet or
demagnetizing tool that’s too close to your TV or
monitor.
Note:
• If the speakers are placed close to a TV or monitor,
due to the electromagnetic waves radiated by the TV
or monitor, you may hear noise from the speakers even
after your amplifier has been turned off. To prevent
this, position the speakers away from your TV or
monitor.
En-6
Package Contents
Make sure you have the following items:
* In catalogs and on packaging, the letter at the end of
the product name indicates the color. Specifications
and operation are the same regardless of color.
You can improve the sound quality by attaching the
included floor pads to raise the speakers off the surface
and reduce the contact area. The floor pads also make
the speakers stable and prevent them from slipping.
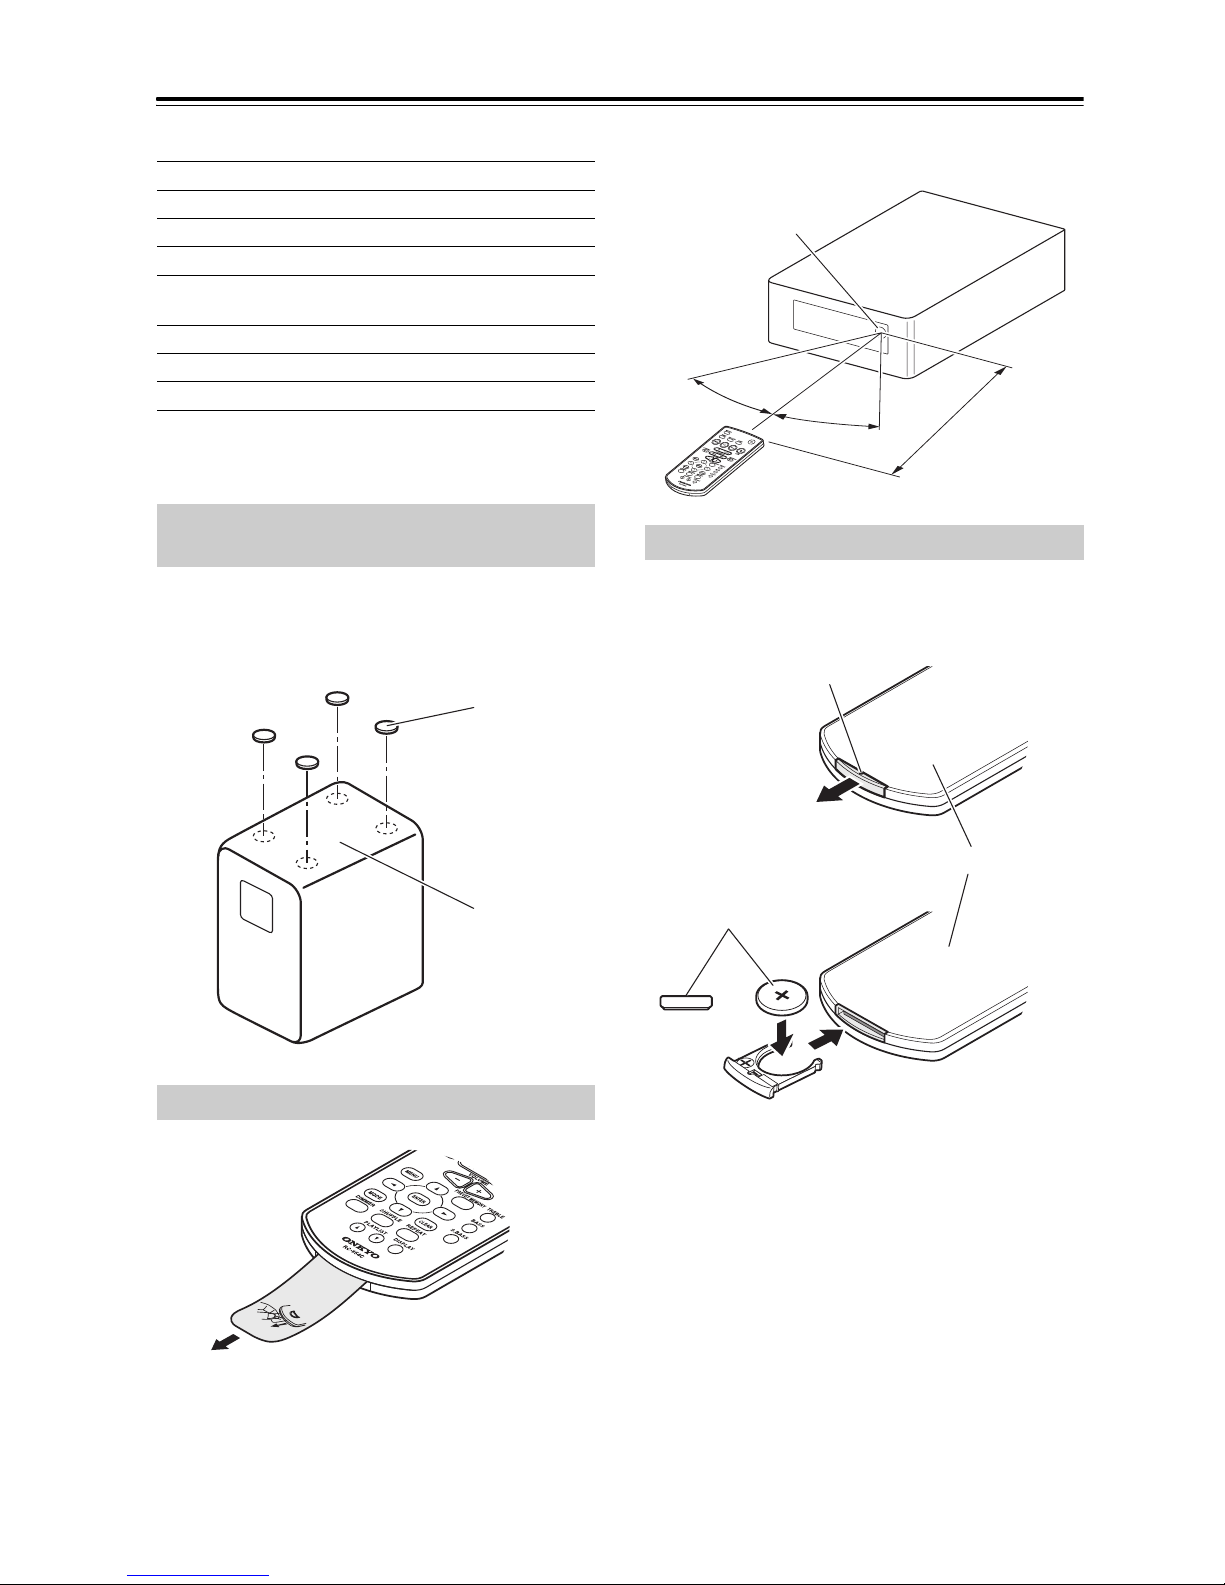
Remove the plastic film before using the remote
controller.
When using the remote controller, point it toward the
CD receiver’s remote control sensor, as shown below.
Use only a battery of the same type (CR2025).
Note:
• If the remote controller doesn’t work reliably, try
replacing the batteries.
• If you intend not to use the remote controller for a long
time, remove the batteries to prevent damage from
leakage or corrosion.
• Expired batteries should be removed as soon as
possible to prevent damage from leakage or corrosion.
Caution:
• Replacing the battery incorrectly may cause an
explosion. Use only a battery of the same type or an
equivalent.
CD Receiver (CR-245BT)
Remote controller (RC-854C)
Indoor FM antenna
AM loop antenna
Power cord
(Connector type varies from country to country.)
Speakers (D-T05)
Speaker cables
8 floor pads
Using the Included Floor Pads for
speakers
Using the Remote Controller
Floor pads
Bottom
D-T05
Replacing the Battery
30°
30°
A
ppr
o
x.
5
m
(1
6
f
t.
)
Remote control sensor
CR-245BT
Positive ⊕ side
Back side
Firmly insert a thin stick or similar
object into the hole, and pull out
firmly in the direction of the arrow.
En-7
Features
General
• Super Bass (S.Bass) function for deeper bass sounds
• Bass and treble tone controls
• Line input for external audio source
• AUDIO OUT (SUBWOOFER) jack
• Headphones jack
• Dimmable display
Speakers
• Stylish cabinet
• 2 Way Bass-reflex
iPod
• iPod/iPhone/iPad direct digital connection
*
1
• Control your iPod/iPhone/iPad with the remote
controller
• Made for iPod touch (1st, 2nd, 3rd and 4th
generation), iPod nano (2nd, 3rd, 4th, 5th and 6th
generation), iPhone 4S, iPhone 4, iPhone 3GS,
iPhone 3G, iPhone, iPad (3rd generation), iPad 2 and
iPad
Radio
•AM/FM tuner
• 30 AM/FM Presets
• FM Auto Preset function
CD Player
• Play audio CDs, MP3 CDs (CD-R and CD-RW)
• RANDOM playback mode
• 2-mode repeat function (current track or all tracks)
USB Flash Drive
• MP3 playback from USB flash drives
Timer and Clock
• Programmable timer
• Sleep timer
• The alarm play function of the iPod/iPhone/iPad can
power-on the CD receiver and switch the input to
iPod/iPhone/iPad
*
2
Bluetooth
• Wireless Music Playback via Bluetooth
*3
• Profile: A2DP 1.2
• Audio codec: SBC, AAC and aptX
*4
*1.
iPad, iPhone, iPod, iPod classic, iPod nano, iPod shuffle, and
iPod touch are trademarks of Apple Inc., registered in the U.S.
and other countries.
“Made for iPod”, “Made for iPhone” and “Made for iPad”
mean that an electronic accessory has been designed to connect
specifically to iPod, iPhone, or iPad, respectively, and has been
certified by the developer to meet Apple performance
standards. Apple is not responsible for the operation of this
device or its compliance with safety and regulatory standards.
Please note that the use of this accessory with iPod, iPhone or
iPad may affect wireless performance.
*2. This functionality might not be available depending on the
iPod/iPhone/iPad model or apps.
*3. Onkyo does not guarantee Bluetooth compatibility between the
CR-245BT system and all Bluetooth-enabled devices.
For compatibility between the CR-245BT system and another
device with Bluetooth technology, consult the device’s
documentation and dealer. In some countries, there may be
restrictions on using Bluetooth devices. Check with your local
authorities.
The Bluetooth® word mark and logos are registered trademarks
owned by Bluetooth SIG, Inc . and any use of such marks by
Onkyo is under license. Other trademarks and trade names are
those of their respective owners.
Please read rating label at the bottom or rear panel of system
for other safety information.
*4. aptX is a registered trademark of CSR plc.

En-8
Contents
Getting Started
Important Safety Instructions.....................................2
Precautions................................................................ 3
Package Contents .....................................................6
Using the Included Floor Pads for speakers..........6
Using the Remote Controller .................................6
Replacing the Battery ............................................6
Features ....................................................................7
Getting to Know the CD receiver ...............................9
Top and Front Panels ............................................9
Display.................................................................10
Rear Panel...........................................................10
Remote Controller................................................ 11
Disc (Audio CD and MP3)
and USB Flash Drive (MP3) Notes .......................12
Connections
Connecting Speakers ..............................................13
Connecting the Antennas ........................................14
Connecting an Outdoor FM Antenna................... 15
Connecting Other Components ...............................16
Connecting a Powered Subwoofer ......................16
Connecting an Audio Playback Device................16
Connecting the Power Cord................................. 16
Basic Operations
Basic Operations .....................................................17
Turning On the CD receiver.................................17
Setting Auto Standby (ASb).................................17
Selecting the Input Source...................................17
Adjusting the Volume...........................................17
Muting the CD receiver........................................17
Using Headphones ..............................................17
Adjusting the Bass and Treble.............................18
Using Super Bass................................................ 18
Changing the Display Brightness......................... 18
Playing CDs
Playing CDs.............................................................19
Playing CDs.........................................................19
Displaying CD Information ...................................19
Selecting MP3 Files............................................. 20
Displaying MP3 Information.................................20
Random Playback................................................21
Repeat Playback..................................................21
Playing Your iPod/iPhone/iPad
Playing Your iPod/iPhone/iPad................................22
Playing an iPod/iPhone/iPad via USB..................22
Navigating the iPod Menus with the Remote
Controller...........................................................22
Playing Back via Bluetooth
Playing Back via Bluetooth ......................................23
Listening to an audio from Bluetooth device ........23
Displaying Bluetooth Information .........................23
Setting Bluetooth Standby ...................................23
Listening to the Radio
Listening to the Radio ..............................................24
Tuning into Radio Stations...................................24
Presetting FM Stations Automatically
(Auto Preset) .....................................................24
Presetting AM/FM Stations Manually...................25
Selecting Preset Stations.....................................25
Erasing Presets....................................................25
Playing a USB Flash Drive
Playing a USB Flash Drive ......................................26
Clock and Timer
Setting the Clock......................................................26
Setting the Clock..................................................26
Using the Timer .......................................................27
Programming the Timer .......................................27
Turning Timer On and Off ....................................28
Using the Sleep Timer .........................................28
Timer Playback using the Alarm Play Function
of your iPod .......................................................28
Miscellaneous
Troubleshooting .......................................................29
Specifications...........................................................33

En-9
Getting to Know the CD receiver
For detailed information, see the pages in parentheses.
a 8 ON/STANDBY button (17, 23, 27, 28, 29)
b Bluetooth PAIRING button (23)
c INPUT button (17, 23)
d Previous [7]/PRESET [e] button
(19, 22, 25, 29)
e Next [6]/PRESET [r] button (19, 22, 25)
f Play/Pause [1/3] button (19, 20, 21, 22, 26)
g VOLUME [–]/[+] buttons (17, 22)
h Headphones [=] jack (17)
i USB port (26)
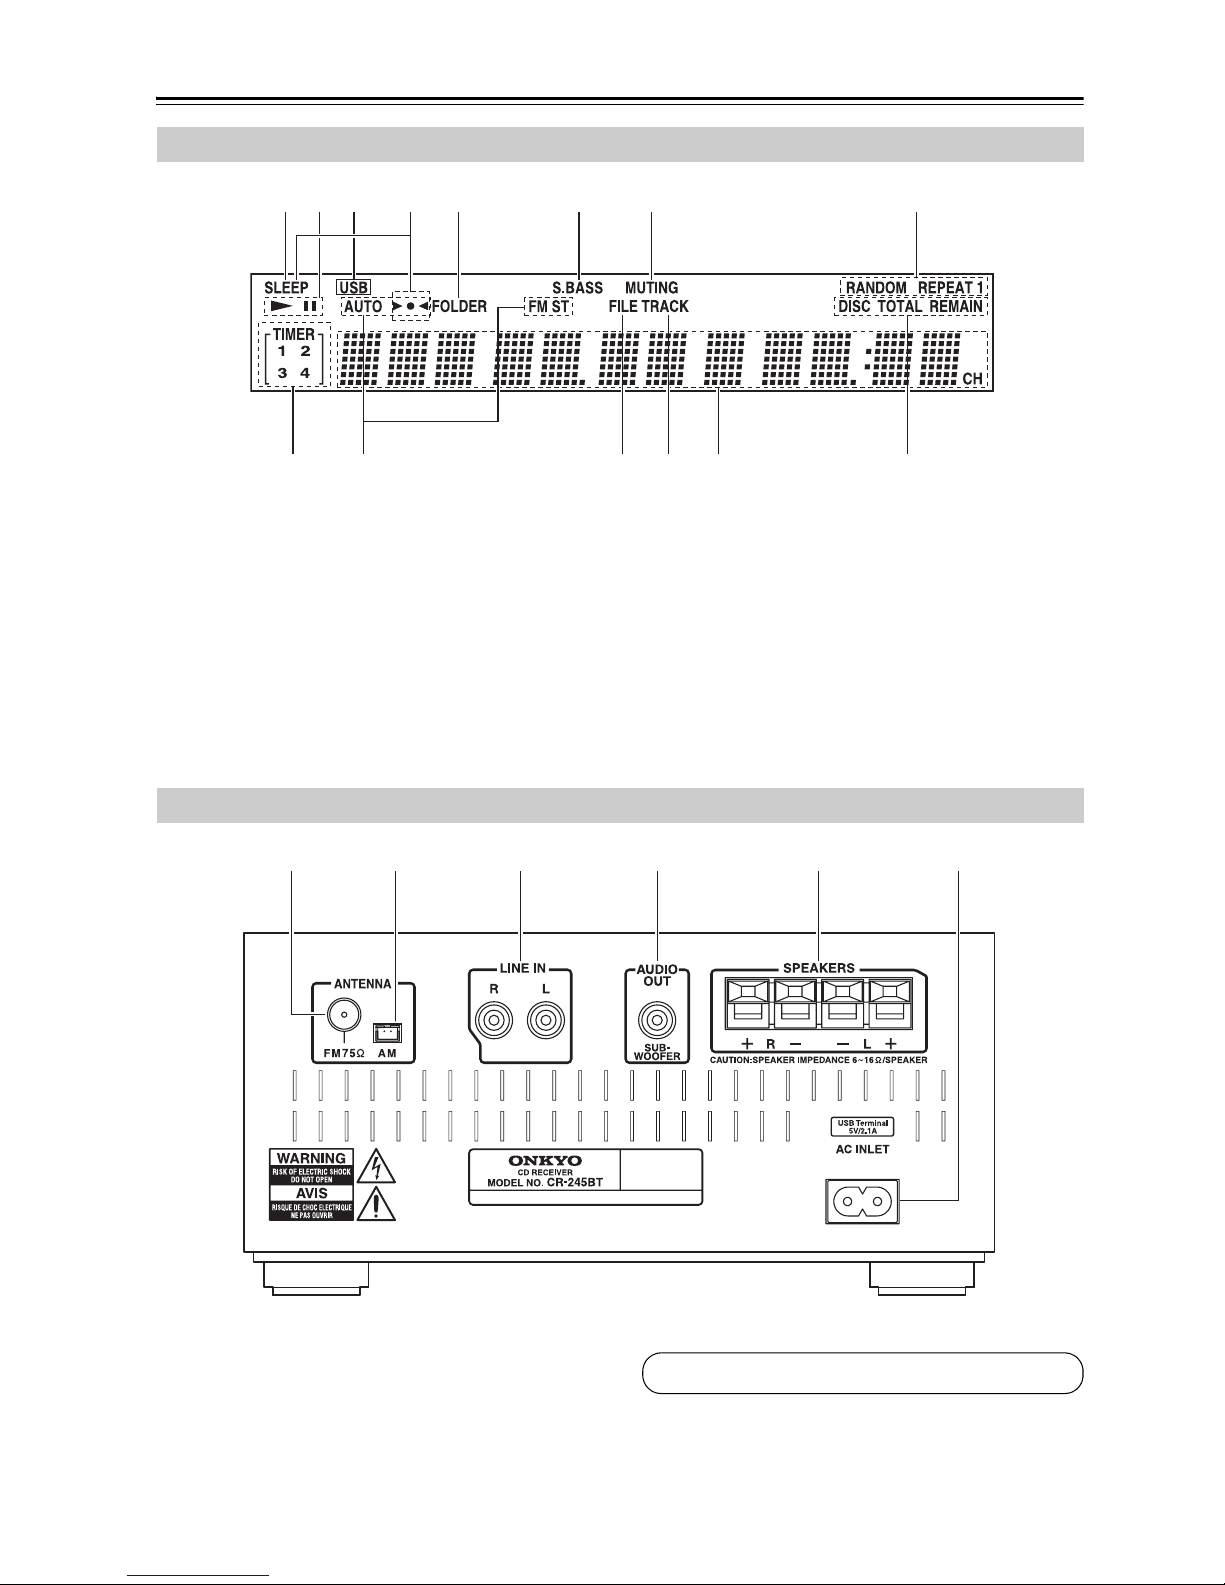
j Display
k Disc tray (19)
l Remote control sensor (6)
m Open/Close [0] button (19)
Top and Front Panels
i
jk l mh
agbcdef
Top Pa nel
Front Panel
En-10
Getting to Know the CD receiver—Continued
a SLEEP indicator
b Play 1 and Pause 3 indicators
c USB indicator
d Bluetooth indicators
e FOLDER indicator
f S.BASS indicator
g MUTING indicator
h Playback mode indicators
i TIMER indicators
j Tuning indicators
k FILE indicator
l TRACK indicator
m Message area
n DISC, TOTAL, and REMAIN indicators
a FM ANTENNA jack
b AM ANTENNA jack
c LINE IN jack
d AUDIO OUT (SUBWOOFER) jack
e SPEAKERS terminals
f AC INLET
Display
ah
jklmn
bc edfg
i
Rear Panel
bacdef
See pages 13 to 16 for connection information.
En-11
Getting to Know the CD receiver—Continued
For detailed information, see the pages in parentheses.
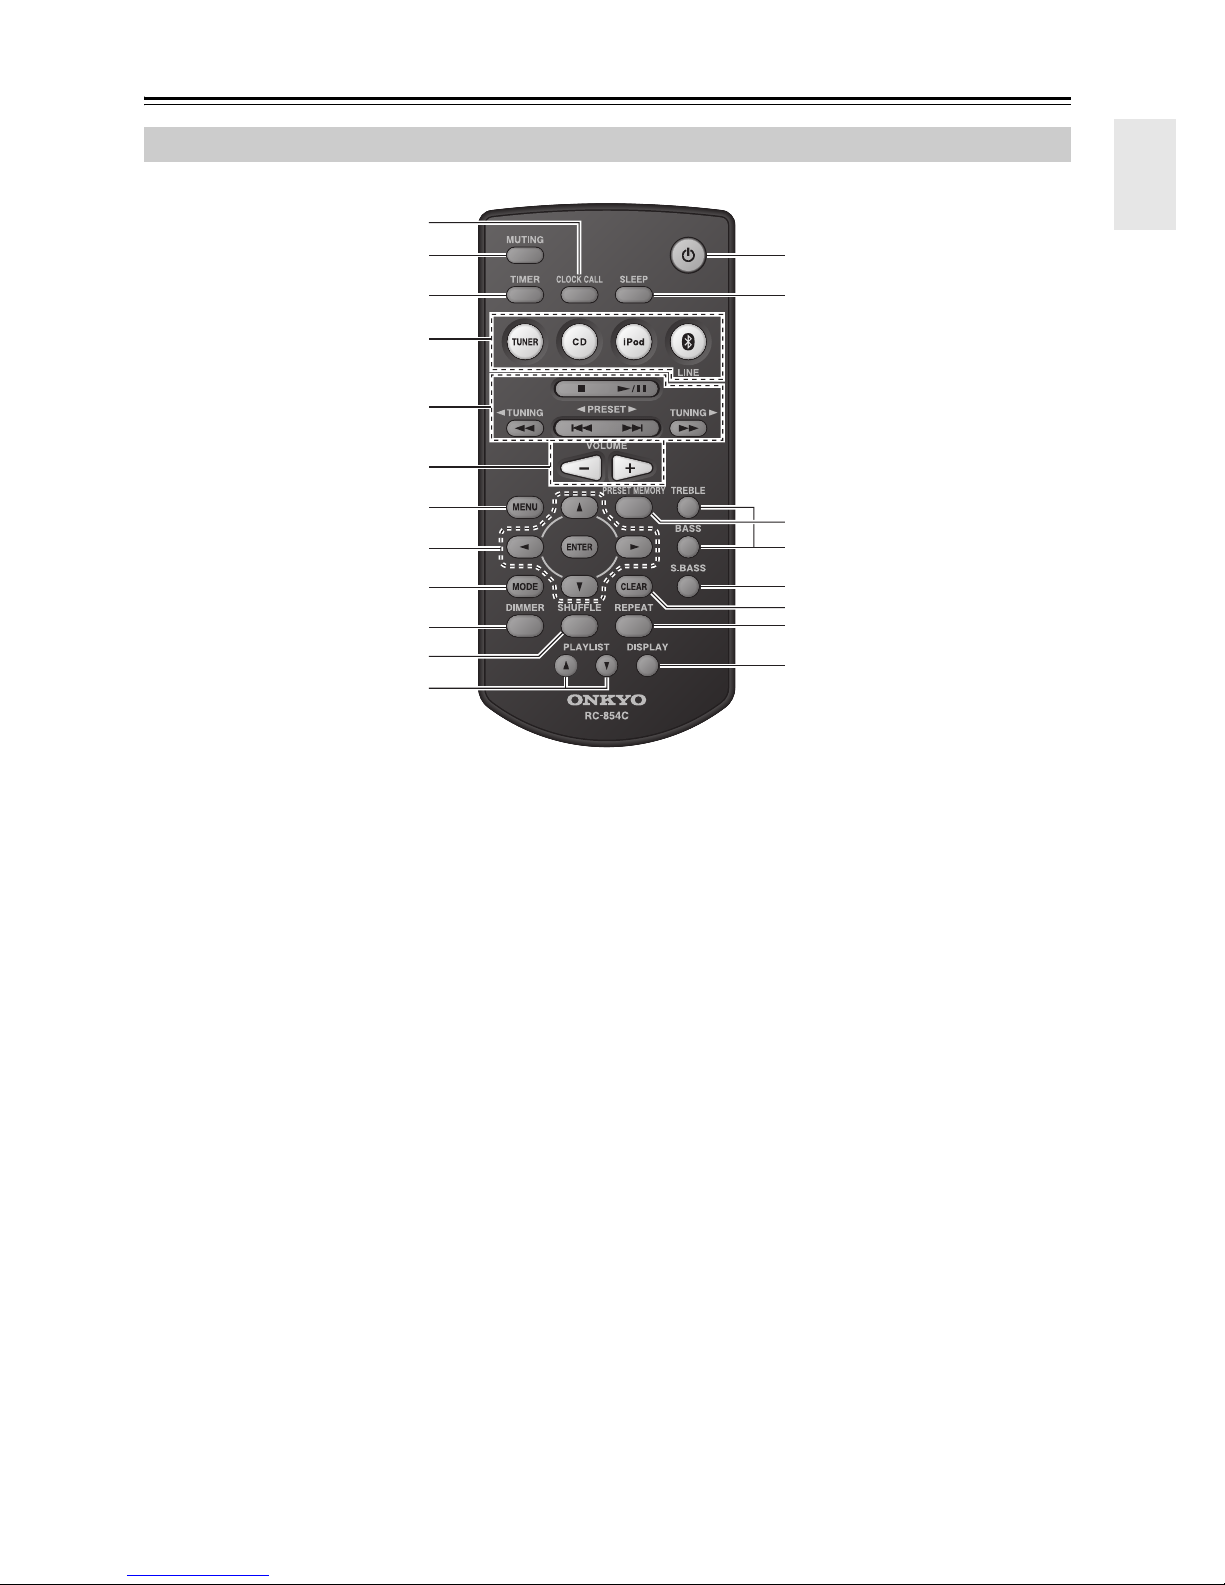
a CLOCK CALL button (26)
b MUTING button (17)
c TIMER button (26, 27, 28)
d Input Selector buttons (17, 22, 24, 25, 26)
e Stop [2] (19, 22),
Play/Pause [1/3] (19, 20, 21, 22, 26),
[7]/[6], PRESET [e]/[r] (19, 22, 25),
[5]/[4], TUNING [e]/[r] (19, 22, 24)
buttons
f VOLUME [–]/[+] buttons (17, 22)
g MENU button (22)
h Arrow [q]/[w]/[e]/[r] buttons and ENTER
button
i MODE button (20, 24)
j DIMMER button (18)
k SHUFFLE button (21, 22)
l PLAYLIST [q]/[w] buttons (22)
m On/Standby [8] button (17, 27, 28)
n SLEEP button (28)
o PRESET MEMORY button (24, 25)
p TREBLE/BASS buttons (18)
q S.BASS button (18)
r CLEAR button (18, 21, 25)
s REPEAT button (21, 22)
t DISPLAY button (19, 20, 23, 26, 27)
Remote Controller
a
g
i
j
k
l
b
c
d
e
f
h
m
s
n
o
p
q
r
t
 Loading...