

Page 1

ChadEdit
User Guide
Page 2

ChadEdit User Guide
© Copyright 2001 ONKYO CORPORATION,
All rights reserved.
Note:
The information in this manual is copyright-protected. No part of this manual may be copied or reproduced in
any form without prior written consent from ONKYO.
ONKYO SHALL NOT BE HELD LIABLE FOR OMISSIONS OR FOR TECHNICAL OR EDITORIAL
ERRORS CONTAINED IN THIS MANUAL. ONKYO SHALL NOT BE HELD LIABLE FOR INCIDENTAL
OR CONSEQUENTIAL DAMAGES RESULTING FROM THE SUPPLYING OR USE OF THIS
INFORMATION. ONKYO SHALL NOT BE HELD LIABLE FOR INCIDENTAL OR CONSEQUENTIAL
DAMAGES RESULTING FROM THE PERFORMANCE OR USE OF THE MATERIALS DESCRIBED IN
THIS MANUAL.
The information in this manual may be subject to changes without prior notice.
All other brand or product names are trademarks or registered trademarks of
their respective companies or organizations.
version 1.0 – October , 2001
2
Page 3

ChadEdit User Guide
Contents
Introduction 5
What is ChadEdit? 5
What is ChadEmulator? 6
ChadEdit system requirements 7
ChadEdit installation 7
What is a CCF? 8
Why would I use ChadEdit? 9
How can this guide help me use ChadEdit? 9
A note on menus 9
Loading and Saving 11
How do I upload a configuration from my USR-5? 11
How do I download a configuration into my USR-5? 12
How do I load a configuration from a CCF into ChadEdit? 13
How do I save the configuration in ChadEdit in a CCF? 14
Basic Tasks 15
How do I start with the factory default CCF? 15
How do I open a panel view? 15
How do I add a button to a panel? 16
How do I remove a button from a panel? 16
How do I move a button in a panel? 16
How do I copy a button? 16
How do I rename a button? 17
How do I change the font used in a button? 17
How do I copy all bitmaps from one button to another? 17
How do I assign an IR code to a button? 18
How do I assign an IR code to a direct-access or left/right key? 19
3
Page 4

ChadEdit User Guide
How do I assign a source switch IR code? 19
How do I change the RF Settings? 20
How do I let a button jump to a panel? 21
How do I move a panel? 21
How do I copy a panel? 21
How do I add a panel? 22
How do I move a device or macro group? 22
How do I copy a device or macro group? 22
How do I add a device or macro group? 23
How do I update the software in my USR-5? 23
Timers 24
How do I create – add a Timer Group? 24
How do I create – add a Timer Action? 24
How do I repeat a timer action weekly? 24
Advanced Tasks 25
How do I resize a button or a frame? 25
How do I use my own bitmaps? 25
How do I create a macro? 26
How can I use panel view grids? 28
How can I better select in a panel view? 29
How can I make ChadEmulator faster? 29
How can I make a screenshot in ChadEmulator? 30
How can I create my own gallery? 30
How can I create my own default panels? 30
How can I write-protect a configuration? 30
How can I copy a device from one CCF to another? 31
4
Page 5
ChadEdit User Guide
Introduction
What is ChadEdit?
ChadEdit is the visual editor for USR-5 configurations. A USR-5 configuration fully defines a USR-5 user
interface including all devices, macro groups, panel layouts, button appearances, and button, direct-access and
left/right key behaviors (including all IR codes). ChadEdit always has a single configuration open, the current
configuration. See What is a CCF? for more information on USR-5 configuration files.
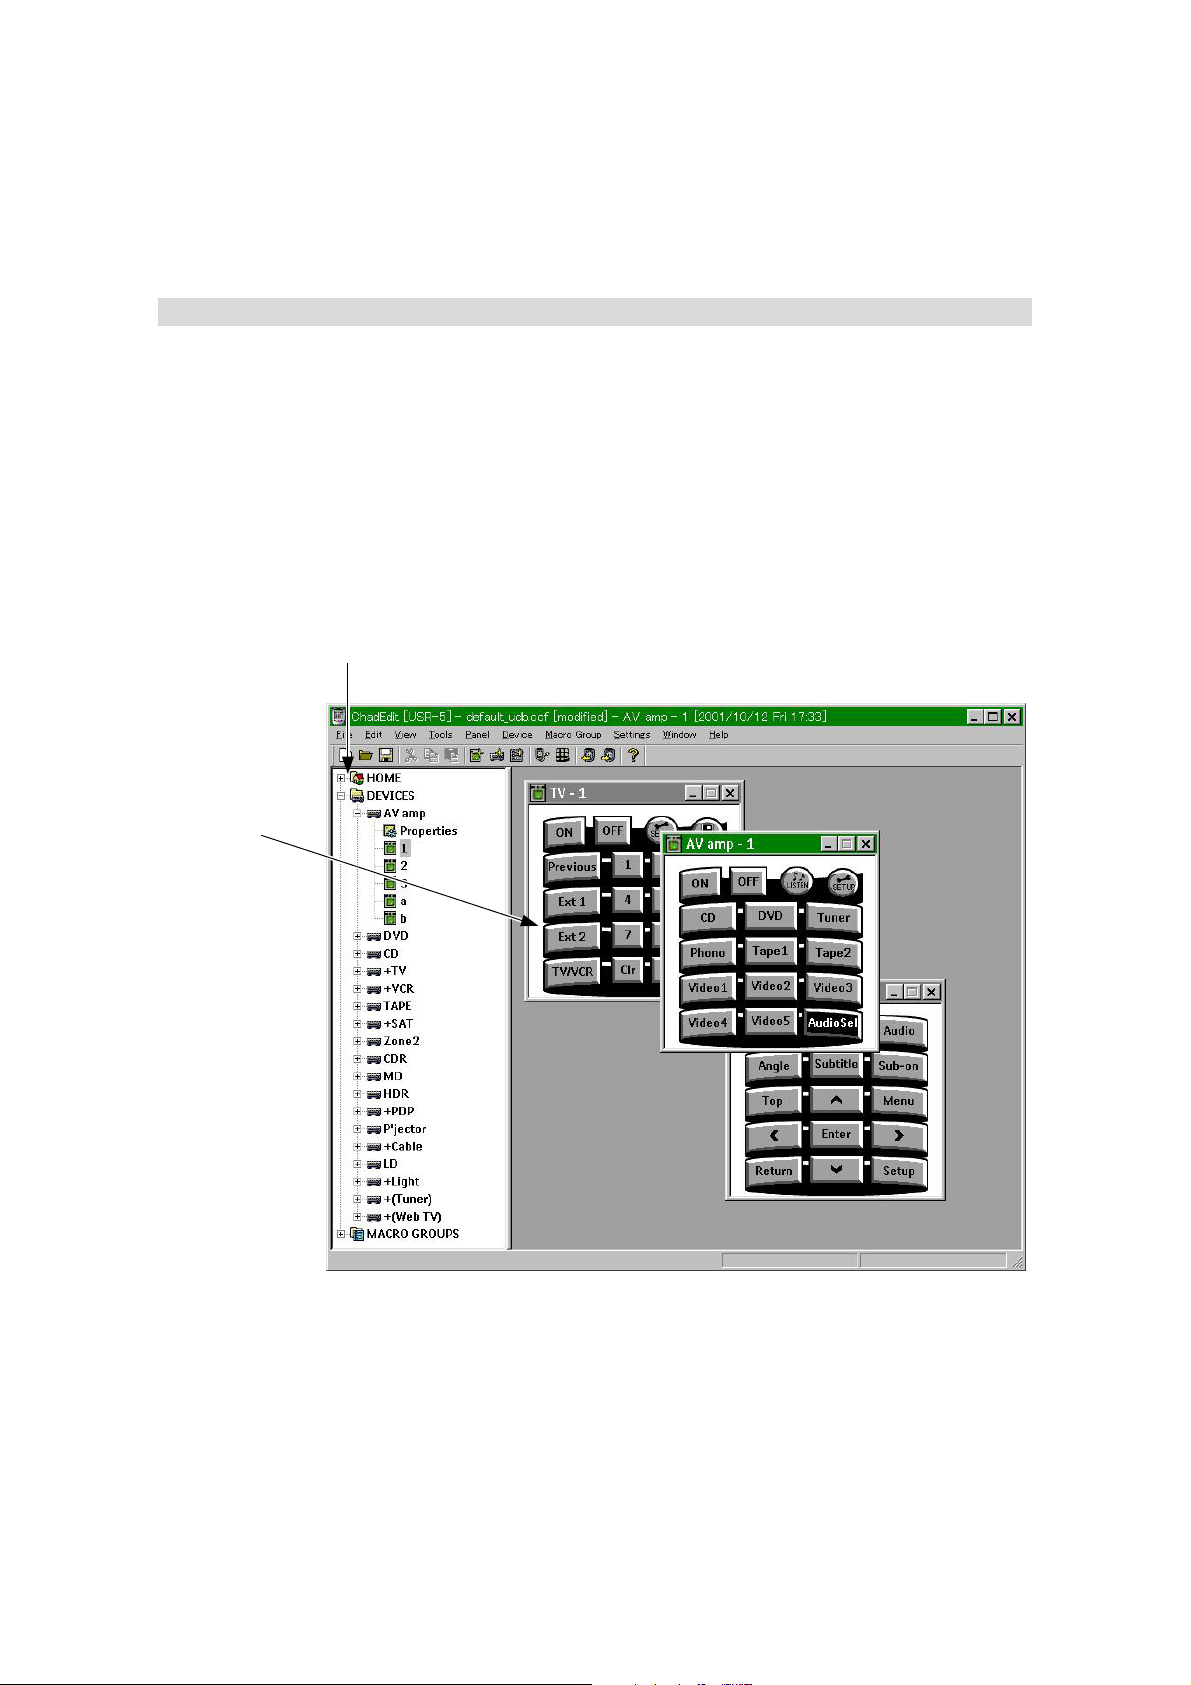
ChadEdit provides two complementary views on the current configuration. On the left side of
ChadEdit’s main window you’ll find the configuration view, a typical tree view of the overall structure of the
current configuration. At the top level of this tree view you’ll find HOME, DEVICES and MACRO GROUPS.
These top levels are associated with the home section, the right hand side device menu and the left hand side
macro group menu on your USR-5.
configuration view
panel view
Underneath DEVICES is a list of devices, and underneath MACRO GROUPS is a list of macro groups.
Underneath HOME, every device and every macro group is a property item and a list of panels. The property
item underneath HOME provides access to the USR-5 system properties, and the property item underneath a
device or macro group provides access to the properties of that device or macro group.
Included in these properties are the definitions of the direct-access and left/right keys.
On the right side of ChadEdit’s main window you’ll find panel views. A panel view displays the contents of a
5
Page 6

ChadEdit User Guide
panel as it is defined in the current configuration. Panel views provide an up to date view on the current
configuration, and any changes to a panel view are immediately incorporated into the current configuration.
What is ChadEmulator?
ChadEmulator is a separate application, although part of the ChadEdit package, which emulates every aspect of
a real USR-51. You can use ChadEmulator to test drive your configuration without the need to download it to
your USR-5. At any time you can launch ChadEmulator from ChadEdit by clicking on in the toolbar or
selecting Run Emulator from the Tools menu.
When the cursor is over ChadEmulator’s window, press the right mouse button to display a pop-up menu to get
access to the following ChadEmulator functions: Help, About, Transparent, Minimize and Close. Function
Transparent is discussed in How can I make ChadEmulator faster?.
1
The speed of the emulator depends on your PC configuration and may differ from the speed
of the real USR-5.
6
Page 7
ChadEdit User Guide
ChadEdit system requirements
• PC with a 486DX/66 MHz or higher processor
• Windows 95, Windows 98, Windows NT 4.0 or higher operating system
• 16 megabytes of RAM
• 15 megabytes of free disk space
• Super VGA or higher graphics card and monitor
• Available serial port which supports 115200 baud
ChadEdit installation
We recommend that you close all programs before installing ChadEdit.
Installing from the web site
1. Open your internet browser.
2. Browse to the ONKYO website: www.onkyousa.com
3. Download ChadEditSetup.exe.
4. Double-click ChadEditSetup.exe.
5. Follow the on-screen instructions that will guide you through the
installation procedure.
The first time you run ChadEdit, you have to accept the license
agreement. Otherwise ChadEdit will not run.
7
Page 8

ChadEdit User Guide
What is a CCF?
A CCF, or USR-5 configuration file, stores a single USR-5 configuration. A USR5 configuration fully defines a USR-5 user interface including all devices, macro
groups, panel layouts, and button appearances and behaviors (including all IR
codes). CCFs have file extension ‘ccf’ and icon
kinds of information:
•A Panel defines the rectangular area of your USR-5’s screen between the
menu bars at the top of the screen and the gray bar at the bottom of the
screen.
A panel consists of up to 255 frames or buttons, and in turn every frame
can contain up to 255 frames or buttons. Frames are inactive user interface
elements with either a background color or a bitmap, and a name. Buttons
are active user interface elements with a background color or a bitmap for
each of four different states, a name, and an action list. An action list is a
list of up to 255 actions. An action can be a delay, an IR code, or a reference
to another action list. The last action of every action list can be a jump to a
specific panel.
, and contain the following
•A Device is a list of panels plus an action list for every USR-5 direct-
access and left/right key. A single device usually defines the control buttons
for a single ‘real live’ device, but this is not required. Devices appear in the
right hand side device menu of your USR-5.
•A Macro Group is a list of panels plus an action list for every USR-5
direct-access key (in a macro group, the left/right keys cannot have an
action list). A single macro group usually defines a number of related
macros, but this is not required. Macro groups appear in the left hand side
macro group menu of your USR-5.
8
Page 9

ChadEdit User Guide
Why would I use ChadEdit?
One of the best features of the USR-5 is its adaptability: you can make buttons and whole panels appear and
disappear, change button labels, learn IR codes, and create and edit your own macros. But if you want to
personalize your USR-5 even more, ChadEdit is the perfect tool for you.
With ChadEdit you can make all the changes you can make on your USR-5. In addition, ChadEdit allows you
to perform a range of powerful tasks, including:
• upload and download configurations from and into your USR-5
• add buttons to panels
• rearrange panels
• add panels to devices
• add new devices
• use your own bitmaps
• create your own custom devices
• make any button into a macro
• create macros in macros
• let any button take you to any panel
• replace the home panels with your own panels
How can this guide help me use ChadEdit?
This guide provides step-by-step instructions for a range of common ChadEdit tasks and is only intended to get
you started with ChadEdit. This guide is not meant to be a ChadEdit reference guide and we encourage you to
investigate the range of features offered by ChadEdit which are not covered by this guide.
A note on menus
Most ChadEdit menu items are accessible both through the regular menus at the top of ChadEdit’s window and
through so-called context menus. Click on your right mouse button to open a context menu for the currently
selected item.
9
Page 10

ChadEdit User Guide
10
Page 11

ChadEdit User Guide
Loading and Saving
You need to choose the type of USR-5 first.
Before beginning to program, you should tell ChadEdit whether you are programming a USR-5
or a USR-5RF. After you have set this property once and cleared the “Show this dialog at startup”
check box, you can forget about it, ChadEdit will remember your choice in any future programming
session. The Title Bar shows your current settings. If you want to change your settings, click RF
User Interface from the Settings menu.
How do I upload a configuration from my USR-5?
1. Start ChadEdit.
2. Connect one end of the USR-5 serial cable to your USR-5 and connect
the other end to a serial port of your PC.
3. Click on
File menu.
4. ChadEdit now tries to connect to your USR-5. If ChadEdit cannot connect
to your USR-5, it will display a message saying USR-5 not connected or
not responding. You can click on the Details >> button to open a window
listing all the serial ports on your PC.
• If another application is using the serial port to which your USR-5 is
connected you can either try another serial port or have the other
application release the serial port.
• If ChadEdit could open the serial port to which your USR-5 is connected
but still could not connect, check to see if both ends of the cable are
properly inserted and if USR-5’s batteries have not run out. Then wait a
few seconds and try again. If after a number of tries ChadEdit still cannot
connect, try resetting your USR-5, wait until it beeps twice and try again.
5. After connecting to your USR-5, ChadEdit will upload the configuration
from your USR-5 and load it into ChadEdit. If ChadEdit’s current
configuration is not empty, ChadEdit will ask you if you want to Merge
with current configuration or replace it?. If you decide to merge,
ChadEdit will add all home panels, devices and macro groups uploaded
from your USR-5 to the current configuration. If you decide to replace,
ChadEdit will remove the current configuration (if it has been modified,
you will first be allowed to save it) and replace it with the configuration
uploaded from your USR-5.
in the toolbar, or select Upload from RC Device from the
You can cancel the upload at any time by clicking on the Cancel button.
It is best to not touch your USR-5’s screen or use any of your USR-5’s direct
access buttons, while uploading is in progress.
11
Page 12

ChadEdit User Guide
How do I download a configuration into my USR-5?
1. Start ChadEdit.
2. Connect one end of the USR-5 serial cable to your USR-5 and connect
the other end to a serial port of your PC.
3. Make sure you have a configuration in ChadEdit either by uploading one
from your USR-5 (see How do I upload a configuration from my USR-
5?) or by loading one from a file (see How do I load a configuration
from a CCF into ChadEdit?).
4. Click on
menu.
5. ChadEdit generates the configuration. If the resulting configuration does
not fit in your USR-5’s available memory, ChadEdit will tell you it is too
large and cancel the download. Based on how oversized the configuration
is (ChadEdit displays this information both in absolute and relative terms)
you should delete some elements and try again.
6. ChadEdit now tries to connect to your USR-5. If ChadEdit cannot connect
to your USR-5, it will display a message saying USR-5 not connected or
not responding. You can click on the Details >> button to open a window
listing all the serial ports on your PC.
• If another application is using the serial port to which your USR-5 is
connected you can either try another serial port or have the other
application release the serial port.
• If ChadEdit could open the serial port to which your USR-5 is connected
but still could not connect, check to see if both ends of the cable are
properly inserted and if USR-5’s batteries have not run out. Then wait a
few seconds and try again. If after a number of tries ChadEdit still cannot
connect, try resetting your USR-5, wait until it beeps twice and try again.
in the toolbar, or select Download into USR-5 from the File
7. After connecting to your USR-5, ChadEdit will check the configuration in
your USR-5.
• If your USR-5 does not contain a valid configuration, ChadEdit will display
a message saying Failed to get valid information from USR-5, do
you want to overwrite any configuration currently in USR-5?. Click
No or Cancel if you don’t want to overwrite the configuration in your
USR-5. Click Yes to continue downloading.
• If your USR-5 contains a modified configuration, ChadEdit will display
a message with the creation date and time of this configuration, and
ask you if you want to overwrite it. Click No or Cancel if you don’t want
to overwrite the configuration in your USR-5. Click Yes to continue
downloading.
12
Page 13

ChadEdit User Guide
8. ChadEdit will now download the configuration into your USR-5. After
downloading, your USR-5 will tell you when it is ready to be used again by
beeping twice.
You can cancel the download at any time by clicking on the Cancel button, but doing so may result in a
corrupted configuration in your USR-5 (you can fix this by fully downloading a configuration).
It is best to not touch your USR-5’s screen or use any of your USR-5’s direct
access buttons, while downloading is in progress.
How do I load a configuration from a CCF into ChadEdit?
There are a number of ways to load a CCF into ChadEdit.
• When ChadEdit is running.
1. Load a CCF into ChadEdit by doing one of the following
• drag a CCF and drop it on ChadEdit, or
• click on
in the toolbar or select Open Configuration... from the
File menu and select a CCF
2. ChadEdit now loads the selected CCF. If ChadEdit has a non-empty
current configuration, ChadEdit will ask you if you want to Merge with
current configuration or replace it?. If you decide to merge, ChadEdit
will add all home panels, devices and macro groups from the loaded
CCF to the current configuration. If you decide to replace, ChadEdit will
remove the current configuration (if it has been modified, you will first
be allowed to save it) and replace it with the configuration from the
loaded CCF.
• When ChadEdit is not running.
1. Start ChadEdit and load a CCF by doing one of the following
• double click on a CCF, or
• drag a CCF and drop it on the ChadEdit icon
13
Page 14

ChadEdit User Guide
How do I save the configuration in ChadEdit in a CCF?
If the current configuration in ChadEdit is not empty, you can save it in a CCF by clicking on in the toolbar,
or selecting Save Configuration or Save Configuration As... from the File menu.
If a saved configuration would not fit in your USR-5, ChadEdit will tell you it is too large and cancel the save.
Based on how oversized the configuration is (ChadEdit displays this information both in absolute and relative
terms) you should delete some elements and try again.
14
Page 15

ChadEdit User Guide
Basic Tasks
In this section we assume ChadEdit is running and contains the configuration
you want to change.
How do I start with the factory default CCF?
The ChadEdit distribution comes with a single sample CCF in
<install>/Samples where <install> is the directory where ChadEdit has been
installed. This sample CCF is called default_udb.ccf and it contains the factory
default configuration loaded in your USR-5. Load this CCF to start with the factory
default CCF. See How do I load a configuration from a CCF into ChadEdit?
for instructions on how to load a CCF into ChadEdit.
How do I open a panel view?
1. Find the name of the panel you want to open in the tree view on the left
side of the ChadEdit window. Click on
GROUPS to display the list of all devices or macro groups. Click on
front of HOME, or a device or macro group name, to display the list of all
its panels.
in front of DEVICES or MACRO
in
2. Double-click on the name of the panel you want to open. A panel view for
that panel will open in the area on the right side of the ChadEdit window.
Closing a panel view will not undo any changes made to that panel view. A panel
view is merely a view on the current configuration, and any changes to it are
immediately incorporated into the current configuration.
15
Page 16

ChadEdit User Guide
How do I add a button to a panel?
1. Open the panel view of the panel to which you want to add a button.
2. If the button and frame gallery is not visible, open it by clicking on
the toolbar or selecting Gallery from the Tools menu.
3. Select a group of frames and buttons by clicking on the group’s name in
the list on the left side of the gallery window. Alternatively, you can use the
cursor UP and DOWN keys to change the selection.
4. Click on the button you want to add, drag it to the panel view and drop it
where you want to add it. If the button you want to add is embedded in a
frame, clicking on that button will select the entire frame. Hold down a
SHIFT key while clicking on a button in the gallery to select only that button.
How do I remove a button from a panel?
1. Open the panel view of the panel with the button you want to remove.
2. Select the button you want to remove by clicking on it. A red frame will
appear around the selected button.
3. Press the DELETE key.
How do I move a button in a panel?
in
1. Open the panel view of the panel with the button you want to move.
2. Select the button you want to move by clicking on it. A red frame will appear
around the selected button.
3. Hold down the left mouse button and move the cursor to drag the button to
a new location. The status bar shows the current location of the selected
button. Alternatively you can use the cursor keys to move the button. To
move it faster with the cursor keys, hold the SPACE bar at the same time.
How do I copy a button?
1. Open the panel view of the panel with the button you want to copy.
2. If you want to copy a button to another panel, then open the panel view of
the panel to which you want to copy a button.
3. Hold down a CTRL key, click on the button you want to copy, hold down
the left mouse button and drag the button to the location to which you want
to copy it, and release the left mouse button to drop the dragged button.
16
Page 17

ChadEdit User Guide
ChadEdit does not support copying from one running copy of ChadEdit to another.
How do I rename a button?
1. Open the panel view of the panel with the button you want to rename.
2. Select the button you want to rename by clicking on it. A red frame will
appear around the selected button.
3. Press F2 and a name dialog with an on-screen keyboard will open. Click
on the Shift button to change from one keyboard layout to another (the
keyboard layouts are equal to the ones on your USR-5). Click on a key
button to add the symbol depicted on that button. You can also use your
PC keyboard to enter regular alphanumeric characters.
4. Press the ENTER key when you’re done.
How do I change the font used in a button?
1. Open the panel view of the panel with the button of which you want to
change the font.
2. Double-click on the button of which you want to change the font, or select
the button by clicking on it and press the INSERT key.
3. The Button Properties sheet appears. Select the Properties tab, and
choose a font from the drop-down list.
4. Click on the Apply button to look at the result of the change in the panel
view, and click on the OK button to accept the change or on the Cancel
button to decline it.
How do I copy all bitmaps from one button to another?
After creating a button and putting a few actions into its action list, you may want to change the appearance of
that button without having to recreate the action list. You can easily do this by copying all bitmaps from another
button to this button.
1. Open the panel view of the panel with the button to which you want to
copy bitmaps.
2. If you want to copy bitmaps from a button in another panel, open the panel
view of that panel. If you want to copy bitmaps from a button in the gallery,
open the gallery (see How do I add a button to a panel? for instructions
on how to open the gallery).
3. Press and hold an ALT key, click on the button from which you want to
copy icons, drag it to the button to which you want to copy bitmaps, and
drop the dragged button.
17
Page 18

ChadEdit User Guide
How do I assign an IR code to a button?
1. Open the panel view of the panel with the button to which you want to
assign an IR code.
2. Double-click on the button you want to assign an IR code to, or select the
button by clicking on it and press the INSERT key.
3. The button property sheet appears. Select the Action tab.
4. If the list of actions is not empty, select an action by clicking on it and
press the DELETE key until the list is empty (merely to ensure that this
button will only have a single IR code assigned to it).
5. Click on the Set IR button. The Add IR sheet appears.
6. There are two ways to assign an IR code.
• to assign a code from the IR database:
a. Select the device for which you want to set the IR code from the
Devices drop-down list.
b. Select the brand of the device from the Brands drop-down list.
c. For some brands the IR codes are divided into different code sets.
Select, if necessary, the appropriate set from the Code Set dropdown list.
d. Select which function has to be performed from the Functions list.
e. Click on the Test IR button to try out the selected function on your
USR-5. Before you perform this step, make sure to connect one end
of the USR-5 serial cable to your USR-5 and connect the other end to
a serial port of your PC. If the code set you selected doesn’t work
properly, return to the step c above and select a different code set.
f. Click on the OK button.
• to assign a code by learning it:
a. Connect one end of the USR-5 serial cable to your USR-5 and
connect the other end to a serial port of your PC.
b. Click on the Learn IR button.
c. Press the button you want ChadEdit to learn on the remote you
want to learn from like you would do when learning on your USR-5
ChadEdit will return with one of three replies:
• Learning completed successfully. The learned code has been
put in the list of actions. Press the OK button to close the button
property sheet and assign the code to the selected button.
• Learning failed (timeout). ChadEdit successfully connected to your
USR-5, but somehow couldn’t learn the code. Try again and if it still
doesn’t work, refer to your USR-5 user guide to trouble shoot IR
code learning.
18
Page 19

ChadEdit User Guide
• USR-5 not connected or not responding. You can click on the
Details >> button to open a window listing all the serial ports on
your PC.
• If another application is using the serial port to which your USR-
5 is connected you can either try another serial port or have the
other application release the serial port.
• If ChadEdit could open the serial port to which your USR-5 is
connected but still could not connect, check to see if both ends of
the cable are properly inserted and if USR-5’s batteries have not
run out. Then wait a few seconds and try again. If after a number
of tries ChadEdit still cannot connect, try resetting your USR-5,
wait until it beeps twice and try again.
See How do I create a macro? for information on how to assign more than a single IR code to a button.
How do I assign an IR code to a direct-access or left/right key?
The USR-5 has two kinds of key definitions: global and per-device. Whenever there is no per-device definition
(or an empty per-device definition), the global definition is used. There is only one global definition per key, but
there is a per-device definition per key for every device and macro group.
• to assign an IR code to the global definition of a key:
1. Double-click on System Properties underneath HOME in the
configuration tree view.
2. The USR-5 System Properties sheet appears. Select the Hard Keys
tab, click on the key as shown left, which you want to assign an IR
code, and proceed with step 4 of How do I assign an IR code to a
button?.
• to assign an IR code to the per-device definition of a key:
1. Double-click on the Properties item underneath the device or macro group
in the configuration tree view for which you want to assign an IR code.
2. The Device Properties or Macro Group Properties sheet appears. Select
the Hard Keys tab, click on the key as shown left, which you want to
assign an IR code, and proceed with step 4 of How do I assign an IR
code to a button?.
How do I assign a source switch IR code?
1. Double-click on the Properties item underneath the device or macro group
in the configuration tree view for which you want to assign a source switch
IR code.
2. The Device Properties or Macro Group Properties sheet appears. Select
the Action tab and proceed with step 4 of How do I assign an IR code to
a button?.
19
Page 20

ChadEdit User Guide
How do I change the RF Settings?
The USR-5RF can be set to transmit radio frequency (RF) signals, which allows you to operate your devices
inside closets or in an adjacent room. To receive these RF signals and convert them to infrared signals, you will
need an RF Receiver (RFR-5 : optional).
In the RF settings you can set Extender IDs and Channels. Both have to be identical to the ID- and CH-dials on
the RF Receiver(s). Refer to the RF Receiver User Manual for more details.
Note:
The RF settings can also be set on the USR-5RF. Refer to the USR-5RF User
Manual for more details. The RF transmission feature is not available on the
USR-5.
Defining an Extender ID
1. Open the Device Properties or Macro Group Properties.
2. Select the RF tab.
3. Select an Extender ID.
Make sure that this ID matches with the ID on the RF Receiver.
4. Click OK to accept the properties.
-or-
Click Cancel to return without changing the properties.
Defining the RF Channel
1. Open the USR-5 System Properties.
2. Select the RF tab.
3. Select an RF Channel.
Make sure the RF Channel matches with the CH on the RF Receiver.
4. Click OK to accept the properties.
-or-
Click Cancel to return without changing the properties.
20
Page 21

ChadEdit User Guide
How do I let a button jump to a panel?
Any button (or key) can jump to any panel (or be a link to that panel). This is a very powerful feature which
allows you to create your own USR-5 user interface structure.
1. Open the panel view of the panel with the button to which you want to
assign a ‘jump action’.
2. Double-click on the button to which you want to assign a ‘jump action’ or
select a button by clicking on it and press the INSERT key.
3. The button property sheet appears. Select the Action tab.
4. Select the panel to jump to in the Jump drop-down list.
There are a couple of special ‘panels’ in the Jump drop-down list:
• MOUSE MODE switches your USR-5 into a mouse mode in which your
USR-5’s touch screen acts as a touch pad to operate compatible*
interactive devices.
• SCROLL UP scrolls up to the previous panel, exactly like the scroll button
at the top of your USR-5’s screen would do.
• SCROLL DOWN scrolls down to the next panel, exactly like the scroll
button at the bottom of your USR-5’s screen would do.
How do I move a panel?
1. Select the panel you want to move in the tree view on the left side of the
ChadEdit window.
2. Hold down the left mouse button and drag the panel to its new location. If
you drop a panel on another panel, it will be inserted before the panel you
drop it on. If you drop a panel on HOME, a device or a macro group, it will
be appended to the list of panels of HOME, that device or that macro
group.
Alternatively, move the selected panel up or down its current list by holding
down a CTRL button while using the cursor UP or DOWN key.
How do I copy a panel?
1. Select the panel you want to copy in the configuration tree view.
*
Compatible with Philips DVX8000, October 2001
21
Page 22

ChadEdit User Guide
2. Press CTRL + C or select Copy from the Edit menu to copy the selected
panel into ChadEdit’s clipboard.
3. Select HOME, or the device or macro group you want to copy the panel to
and press CTRL + V or select Paste from the Edit menu.
ChadEdit does not support copying from one running copy of ChadEdit to another.
How do I add a panel?
Select a panel, HOME, or the device or macro group to which you want to add a panel and click on in the
toolbar or select Add Panel from the Panel menu. If a panel is selected, the newly added panel is inserted just
before the selected panel.
A newly added panel has the default contents of a home, device or macro group
panel. To add an empty panel, hold down a SHIFT key while adding the panel.
How do I move a device or macro group?
1. Select the device or macro group you want to move in the tree view on the
left side of the ChadEdit window.
2. Hold down the left mouse button and drag the device or macro group to its
new location. If you drop a device or macro group on another device or
macro group, it will be inserted before the device or macro group you drop it
on. If you drop a device or macro group on DEVICES or MACRO GROUPS,
it will be appended to the last of the list for devices or macro groups.
Alternatively, move the selected device or macro group up or down its
current list by holding down a CTRL button while using the cursor UP or
DOWN key.
Devices and macro groups are essentially equal. It is merely its location,
underneath DEVICES or underneath MACRO GROUPS, which makes a device
and a macro group. You can move a device from DEVICES to MACRO GROUPS
to turn that device into a macro group, and vice versa.
How do I copy a device or macro group?
1. Select the device or macro group you want to copy in the configuration
tree view.
2. Press CTRL + C or select Copy from the Edit menu to copy the selected
device or macro group into ChadEdit’s clipboard.
22
Page 23

ChadEdit User Guide
3. Select DEVICES or MACRO GROUPS and press CTRL + V or select Paste
from the Edit menu.
4. If you copy a template device (a device with ()’s around its name), the copy
will also be a template device. Select Is Template in the Device menu to
change a template device into a regular device.
ChadEdit does not support copying from one running copy of ChadEdit to another.
How do I add a device or macro group?
Click on in the toolbar or select Add Device from the Device menu to add a device. Click on in the
toolbar or select Add Macro Group from the Macro Group menu to add a macro group.
A newly added device or macro group is completely empty.
How do I update the software in my USR-5?
The software in your USR-5 can easily be updated to a later version. USR-5 software is distributed in single
files, called USR-5 Update Files. When you double click on a USR-5 Update File, it will launch ChadEdit
which will take you through the updating process. After completing an update, ChadEdit will ask you if you
want to make the USR-5 Update File, the standard USR-5 Update File. The standard USR-5 Update File is
used if you select Update USR-5... from the Tools menu in ChadEdit.
ChadEdit is distributed with a standard USR-5 Update File with the latest available
USR-5 software. We strongly advise you to update your USR-5 using this USR5 Update File.
Before you start the updating process, you should connect one end of the USR-5 serial cable to your USR-5 and
connect the other end to a serial port of your PC. During the update process, you should read the messages that
appear on your PC screen and push the appropriate buttons.
It is possible that after updating your USR-5, it asks you to calibrate the touch screen. Please refer to your USR5 User Guide for detailed instructions on calibration.
It is best to not touch your USR-5’s screen or use any of your USR-5’s direct
access buttons, while updating is in progress.
23
Page 24

ChadEdit User Guide
Timers
On your USR-5 there is the possibility to execute a certain action at a predefined
time and day. This functionality is called a timer.
In ChadEdit it is possible to add a timer to every button, device or macro that is defined. On your USR-5
however timers can only be edited in macro buttons. This means that you can add a “hidden” timer to a device
button, which cannot be edited by the user.
A timer can have a START and a STOP action, each with their own time and day of execution.
How do I create – add a Timer Group?
• Select a Macro Device, press the left mouse key, select the option “Is
TimerGroup”
• Or : Select a Macro Device, on the Menu bar select “Macro Group”, select
“Is TimerGroup”
The Macro Group will now be displayed between the brackets ‘<’ ‘>’
How do I create – add a Timer Action?
A Timer Action – like any other USR-5 action – can be added in an actionlist of a button, a key or a device,
using the properties box.
Only an “alias” action can be assigned as the START/STOP action of a timer. Pressing the “action key” will
open the “Alias” dialog box, from which an “alias” can be selected.
Unlike “USR-5”, ChadEdit only uses a 24-hour clock. The default time displayed in the START & STOP time
is 00:00. Initially, no days are selected.
How do I repeat a timer action weekly?
In the timer edit dialog mark the checkbox labeled “Wkly”. In this case, when a timer action was triggered, it
will be rescheduled at the same day and hour.
You can do this separately for the start and stop actions.
24
Page 25

ChadEdit User Guide
Advanced Tasks
In this section we assume ChadEdit is running and contains the configuration you want to change. We also
assume that you know how to open specific panel views.
How do I resize a button or a frame?
Buttons and frames can only be resized if they do not have any bitmaps. If a button has one or more bitmaps, the
width of the button is fixed to the smallest width of all its bitmaps and the height of the button is fixed to the
smallest height of all its bitmaps. The same is true for frames except that a frame can have at most one bitmap.
If a button or frame has no bitmaps, you can resize it as follows:
1. Select the button or frame you want to resize by clicking on it. A red frame
will appear around the selected button or frame.
2. Release the left mouse button and move over the edge of the button or
frame until the cursor changes into a resize cursor with the desired
orientation.
3. Hold down the left mouse button and move the cursor to drag the edge
underneath it and resize the button or frame. The status bar shows the
current size of the selected button or frame.
Alternatively you can use the cursor keys to resize the button or frame.
Hold down a SHIFT key to move the top or left edge, and hold down a
CTRL key to move the bottom or right edge. To move an edge faster with
the cursor keys, hold the SPACE bar at the same time.
You can only resize a button or frame if it has no bitmaps.
How do I use my own bitmaps?
Every button or frame can have its own unique bitmaps. A buttons can have up to four bitmaps, one for each of
its states. A frame can have only one bitmap.
Bitmaps take up memory and having many different bitmaps means there is
less room for other data, like IR codes. You can help minimize the memory bitmaps
require by reusing bitmaps, where possible, on your buttons and frames. ChadEdit
checks for equal bitmaps when saving a configuration by looking at the actual
bitmap contents, and only saves unique bitmaps
The four states of a button are.
• inactive and unselected
• inactive and selected
• active and unselected
• active and selected
25
Page 26

ChadEdit User Guide
A button is active when it has a non-empty action list. It is inactive when it has no
action list or its action list is empty. A button is selected when you push on it on
the USR-5. It is unselected when it is waiting to be pushed.
To set a bitmap of a button, take the following steps:
1. Double-click on the button you want to set a bitmap for, or select the button
by clicking on it and press the INSERT key.
2. The Button Properties sheet appears. Select the Icons tab.
3. Double-click on the bitmap you want to load, and select a Windows bitmap
file. ChadEdit can load any Windows bitmap file that has 1, 4 or 8 bits per
pixel and is at most 240 by 219 pixels (the size of a panel). ChadEdit will
automatically convert a color bitmap into a grayscale version more suitable
for display on your USR-5.
4. Click on the OK button to accept the new bitmap or on the Cancel button
to decline it.
To set the bitmap of a frame, take the following steps:
1. Double-click on the frame you want to set the bitmap for, or select the
frame by clicking on it and press the INSERT key.
2. The Frame Properties sheet appears. Select the Icons tab.
3. Double-click on the bitmap, and select a Windows bitmap file.
ChadEdit can load any Windows bitmap file that has 1, 4 or 8 bits per
pixel and is at most 240 by 219 pixels (the size of a panel).
ChadEdit will automatically convert a color bitmap into grayscale version
more suitable for display on your USR-5.
4. Click on the OK button to accept the new bitmap or on the Cancel button
to decline it.
If a button has one or more bitmaps, the width of the button is fixed to the smallest
width of all its bitmaps and the height of the button is fixed to the smallest height
of all its bitmaps. The same is true for frames except that a frame can have at
most one bitmap.
How do I create a macro?
On your USR-5 there is a clear distinction between macros and ‘regular buttons’. In ChadEdit such a distinction
does not exist. Every button and every direct-access or left/right key can either perform a single action, like
transmit an IR code, or be a macro and perform a whole list of actions.
26
Page 27

All macros can be used on your USR-5, but only macro buttons in a macro
group panel can be edited on your USR-5.
To create a macro, take the following steps:
1. Double-click on a button or select a button by clicking on it and press the
INSERT key.
2. The Button Properties sheet appears. Select the Action tab.
3. The currently assigned list of actions is displayed on the right side of the
property page. The currently assigned jump panel is displayed underneath
the list of actions. Click on one of the buttons on the left side of the property
page to add an action to the list:
• Alias: click on this button to open a tree view of all devices, direct-
access and left/right keys, and buttons in the current CCF. Select an
item to add an alias to that item to the action list. When your USR-5 is
executing an action list and comes across an alias, the action list referred
to by that alias is executed. Aliases are shown in the action list preceded
by [A] for a device alias, [K] for a direct-access or left/right key alias,
and [B] for a button alias.
ChadEdit User Guide
• Delay: click on this button to add a delay to the action list. Hold a SHIFT
key while clicking on this button to set the default delay duration. You
can always double click on a delay in the action list to change its duration.
Delays are shown in the action list preceded by a [D].
• SET IR: click on this button. The Add IR sheet appears. IR codes are
shown in the action list preceded by a [C]. Proceed with step 6 of How
do I assign an IR code to a button?.
• Delete : click on this button to delete an action from the action list.
• Beep : click on this button to add a beep to the action list. You must
enter Frequency, Duty Cycle and Duration. You can always double click
on a Beep in the action list to change these parameters. Beeps are
shown in the action list preceded by a [S].
• Timer : click on this button to add a timer action. See How do I create
– add a Timer Action?.
27
Page 28

ChadEdit User Guide
4. Repeat step 3 to add up to 255 actions to the action list.
5. If you want your USR-5 to ‘jump to’ a specific panel when it is done executing
the action list, select the panel to jump to in the Jump drop-down list.
When executing an action list, your USR-5 ignores panel jumps in aliases.
Actions can be moved up or down the action list, by selecting the action to be moved, holding down a CTRL
key and using the cursor UP or DOWN keys. Alternatively, you can drag actions up or down the action list
using the mouse.
How can I use panel view grids?
Panel view grids are a helpful tool to line up buttons and frames. A panel view grid is a set of up to 64 horizontal
and 64 vertical line segments. The main use for grids is grid snapping, which restricts button and frame locations
to grid locations, the locations where the line segments of a grid intersect. Grid snapping affects button and
frame moving, dropping a button or frame dragged from a panel or the gallery, as well as button or frame
resizing.
All grid functions are accessible through the Grid submenu of the Panel menu or the Grid submenu of the
panel view pop-up menu. Default grid settings, which affect all newly opened panel views, can be set in the
Settings menu. The following is an overview of some of the things you can do with grids:
• ChadEdit stores 10 different default grids, which are automatically assigned
to a panel view when it is opened. The grids can be modified per panel
view without affecting the default grids. Use the Set Default Grid submenu
of the Settings menu to set any of ChadEdit’s default grids to the current
grid of the active panel view.
• To change the current grid of a panel view, enable grid editing by selecting
Edit Grid in the Grid submenu. The Edit Grid item is only enabled if a grid
is currently visible.
• A horizontal grid line can be added by holding down a CTRL key while
clicking on a horizontal grid line. A similar approach works for vertical
grid lines.
• The selected grid line can be deleted by pressing the DEL key. Note
that every grid must contain at least one horizontal and one vertical
grid line. Therefore, the last horizontal and vertical grid line cannot be
deleted.
• When you put the selected grid line on top of another grid line and you
deselect the selected grid line, the selected grid line is deleted.
• To add a vertical grid line to the right of two other vertical grid lines at
the same distance as the distance between the two other vertical grid
lines, hold down a CTRL key and press the cursor RIGHT key. A similar
approach works for a vertical line to the left of two vertical grid lines and
horizontal grid lines.
• To create an evenly spaced grid, use the Auto Grid... menu item.
28
Page 29

ChadEdit User Guide
• By default ChadEdit snaps the top left corner of a button or frame to the
nearest grid location. However, you can instruct ChadEdit to snap to any
corner or the center of a button or frame using the Snap Mode submenu
of the Grid submenu. Note that the snap mode does not affect resizing,
only placement or moving.
• To make the current grid of panel A the current grid of panel B: make the
current grid of panel A default grid 9 (or any other unused grid, we just
picked 9 for this example), close panel B, open panel B, and select grid 9.
• To move an entire grid, hold down a SHIFT key and use the mouse or the
cursor UP or DOWN key to move the grid.
• Use the Export Grids or Import Grids items in the Files menu to export
or import the default grids to or from a text file. This allows you to keep
your grids with your CCFs and makes it easier to make changes to your
CCFs afterwards.
Grids are not stored in CCFs.
How can I better select in a panel view?
Here are some tips that can help you select the right button or frame when a panel contains many elements:
• If a button or frame is selected and the move or resize cursor is visible
when you press the left mouse button, the selection does not change.
Therefore, clicking on a button in a selected frame does not select that
button. If you want to select the topmost button or frame at the cursor location,
press the ESC key before pressing down the left mouse button. Pressing
the ESC key will always deselect the current selection.
• Press the TAB key to select the next sibling of the selected button or frame.
Hold down a SHIFT key while pressing the TAB key to select the previous
sibling of the selected button or frame.
• Use the zoom feature to get a better view of what you are selecting.
How can I make ChadEmulator faster?
If you find ChadEmulator a little slow you can make it faster by changing the shape of ChadEmulator’s window
into a rectangle. To do this, right click on ChadEmulator’s window to activate its pop-up menu, and select
Transparent.
29
Page 30

ChadEdit User Guide
How can I make a screenshot in ChadEmulator?
Simply press the PRINT SCREEN button to save the currently displayed screen of ChadEmulator in a Windows
bitmap file. ChadEmulator will tell you the full path of the file it saves (the screen shots usually go into directory
C:\OnkyoScreens). ChadEmulator saves up to 100 screenshots before it starts using the same filenames again.
How can I create my own gallery?
ChadEdit loads the gallery from <install>/Usr-5/gallery.ccf, where <install> is the directory where ChadEdit
has been installed. Simply load gallery.ccf as a regular CCF (which it is), make modifications like you would
do for any other configuration, and save the modified configuration back in gallery.ccf. The next time ChadEdit
is started, it will use the modified gallery.
Note that ChadEdit ignores all but the GALLERY panels of gallery.ccf (HOME has been renamed into
GALLERY in gallery.ccf).
How can I create my own default panels?
ChadEdit loads default panels from <install>/Usr-5/home.ccf,
<install>/Usr-5/device.ccf, and <install>/Usr-5/macro.ccf, where <install> is the
directory where ChadEdit has been installed. Simply load any of these CCFs,
modify the configuration, and save it back. The next time ChadEdit is started, it
will use the modified default panels.
The default macro panel CCF serves a second purpose: when you create a new
macro group on your USR-5, the panels of that macro group are actually copies
of the default macro panel.
Note that ChadEdit ignores all but the first DEFAULT panel of a default panel
CCF (HOME has been renamed into DEFAULT in the default panel CCFs).
How can I write-protect a configuration?
A write-protected configuration cannot be altered on your USR-5. This is useful if you want to set up a configuration
with ChadEdit and don’t want anyone to inadvertently make changes to it when they use your USR-5.
After loading a write-protected configuration in your USR-5, you can only access
USE mode on your USR-5. Write-protecting a configuration does not affect any
ChadEdit operations.
A configuration can be write-protected by taking the following steps:
1. Double-click on System Properties underneath HOME in the configuration
tree view.
2. The USR-5 system property sheet appears. Select the USR-5 System
Properties tab.
3. Check the configuration is write-protected box to make this configuration
write-protected.
30
Page 31

ChadEdit User Guide
How can I copy a device from one CCF to another?
Running copies of ChadEdit do not share a clipboard. This means that you cannot
copy a device from one CCF to another by running two copies of ChadEdit and
simply copying the device. Here is a workaround:
1. Load the CCF from which you want to copy a device.
2. Delete all but the device you want to copy.
3. Load the CCF to which you want to copy the device, and merge it with the
current configuration.
4. Save the configuration in the proper CCF.
31
Page 32

Sales & Product Planning Div. : 2-1, Nisshin-cho, Neyagawa-shi, OSAKA 572-8540, JAPAN
Tel: 072-831-8111 Fax: 072-833-5222
ONKYO U.S.A. CORPORATION
18 Park Way, Upper Saddle River, N.J. 07458, U.S.A.
Tel: 201-785-2600 Fax: 201-785-2650 http://www.onkyousa.com
ONKYO EUROPE ELECTRONICS GmbH
Industriestrasse 20, 82110 Germering, GERMANY
Tel: 089-849-320 Fax: 089-849-3265 E-mail: info@onkyo.de
ONKYO CHINA LIMITED
Units 2102-2107, Metroplaza Tower I, 223 Hing Fong Road, Kwai Chung,
N.T., HONG KONG Tel: 852-2429-3118 Fax: 852-2428-9039
HOMEPAGE
http://www.onkyo.co.jp/
D0110-1
E
 Loading...