

Page 1
Page 2

INTRODUCTION
This manual contains important information necessary to use the Digital LUPE.
To ensure correct use, please read this manual thoroughly to deepen your understanding of the
product. Please keep this manual in a safe place so that it can be referred to whenever necessary.
Page 3

READ AND UNDERSTAND THIS DOCUMENT
Please read and understand this document before using the products. Please consult yo ur
OMRON representative if you have any questions or comments.
WARRANTY
OMRON’s exclusive warranty is that the products are free from defects in materials and
workmanship for a period of one year (or other period if specified) from date of sale by
OMRON.
OMRON MAKES NO WARRANTY OR REPRESENTATION, EXPRESS OR IMPLIED,
REGARDING NON-INFRINGEMENT, MERCHANTABILITY, OR FITNESS FOR
PARTICULAR PURPOSE OF THE PRODUCTS. ANY BUYER OR USER
ACKNOWLEDGES THAT THE BUYER OR USER ALONE HAS DETERMINED THAT THE
PRODUCTS WILL SUITABLY MEET THE REQUIREMENTS OF THEIR INTENDED USE.
OMRON DISCLAIMS ALL OTHER WARRANTIES, EXPRESS OR IMPLIED.
LIMITATIONS OF LIABILITY
OMRON SHALL NOT BE RESPONSIBLE FOR SPECIAL, INDIRECT, OR
CONSEQUENTIAL DAMAGES, LOSS OF PROFITS OR COMMERCIAL LOSS IN ANY
WAY CONNECTED WITH THE PRODUCTS, WHETHER SUCH CLAIM IS BASED ON
CONTRACT, WARRANTY, NEGLIGENCE, OR STRICT LIABILITY.
In no event shall responsibility of OMRON for any act exceed the individual price of the
product on which liability is asserted.
IN NO EVENT SHALL OMRON BE RESPONSIBLE FOR WARRANTY, REPAIR, OR
OTHER CLAIMS REGARDING THE PRODUCTS UNLESS OMRON’S ANALYSIS
CONFIRMS THAT THE PRODUCTS WERE PROPERLY HANDLED, STORED,
INSTALLED, AND MAINTAINED AND NOT SUBJECT TO CONTAMINATION, ABUSE,
MISUSE, OR INAPPROPRIATE MODIFICATION OR REPAIR.
Digital LUPE
Operation Manual
1
Page 4

SUITABILITY FOR USE
OMRON shall not be responsible for conformity with any standards, codes, or regulations
that apply to the combination of products in the customer’s application or use of the product.
At the customer’s request, OMRON will provide applicable third party certification documents
identifying ratings and limitations of use that apply to the products. This information by itself
is not sufficient for a complete determination of the suitability of the products in combination
with the end product, machine, system, or other application or use.
The following are some examples of applications for which particular attention must be given.
This is not intended to be an exhaustive list of all possible uses of the products, nor i s it
intended to imply that the uses listed may be suitable for the products:
• Outdoor use, uses involving potential chemical contamination or electrical interference,
or conditions or uses not described in this document.
• Nuclear energy control systems, combustion systems, railroad systems, aviation systems, medical equipment, amusement machines, vehicles, safety equipment, and installations subject to separate industry or government regulations.
• Systems, machines, and equipment that could present a risk to life or property.
Please know and observe all prohibitions of use applicable to the products.
NEVER USE THE PRODUCTS FOR AN APPLICATION INVOLVING SERIOUS RISK TO
LIFE OR PROPERTY WITHOUT ENSURING THAT THE SYSTEM AS A WHOLE HAS
BEEN DESIGNED TO ADDRESS THE RISKS, AND THAT THE OMRON PRODUCT IS
PROPERLY RATED AND INSTALLED FOR THE INTENDED USE WITHIN THE OVERALL
EQUIPMENT OR SYSTEM.
PERFORMANCE DATA
Performance data given in this document is provided as a guide for the user in determining
suitability and does not constitute a warranty. It may represent the result of OMRON’s test
conditions, and the users must correlate it to actual application requirements. Actual
performance is subject to the OMRON Warranty and Limitations of Liability.
CHANGE IN SPECIFICATIONS
Product specifications and accessories may be changed at any time based on improvements
and other reasons.
It is our practice to change model numbers when published ratings or features are changed,
or when significant construction changes are made. However, some sp ecifications of the
product may be changed without any notice. When in doubt, special model numbers may be
assigned to fix or establish key specifications for your application on your request. Please
consult with your OMRON representative at any time to confirm actual specifications of
purchased products.
Digital LUPE
Operation Manual
2
Page 5

DIMENSIONS AND WEIGHTS
Dimensions and weights are nominal and are not to be u sed for manufacturing purposes,
even when tolerances are shown.
ERRORS AND OMISSIONS
The information in this document has been carefully checked and is believed to be accurate;
however, no responsibility is assumed for clerical, typographical, or proofreading errors, or
omissions.
PROGRAMMABLE PRODUCTS
OMRON shall not be responsible for the user’s programming of a programmable product, or
any consequence thereof.
COPYRIGHT AND COPY PERMISSION
This document shall not be copied for sales or promotions without permission.
This document is protected by copyright and is intended solely for use in conjunction with the
product. Please notify us before copying or reproducing this document in any manner, for any
other purpose. If copying or transmitting this document to another, please copy or transmit it
in its entirety.
Digital LUPE
Operation Manual
3
Page 6
Meanings of Signal Words
The following signal words are used in this manual.
Indicates a potentially hazardous situation which, if not avoided, will
result in minor or moderate injury, or may result in serious injury or
death. Additionally there may be significant property damage.
Indicates a potentially hazardous situation which, if not avoided, may
result in minor or moderate injury or in property damage.
Meanings of Alert Symbols
The following alert symbols are used in this manual.
Indicates prohibition when there is a risk of minor injury from electrical shock or
other source if the product is disassembled.
Indicates general prohibitions for which there is no specific symbol.
Alert statements in this Manual
The following alert statements apply to the products in this manual. Each alert statement also
appears at the locations needed in this manual to attract your attention.
Do not stare directly at the sun. It may cause permanent damage to vision.
Do not open the cover of the Digital LUPE. The inside high-voltage components may
cause an electric shock.
After removing the lens unit from the camera, do not leave it in a place exposed to
direct sunlight. Failure to do so may cause a fire.
Digital LUPE
Operation Manual
4
Page 7

Precautions for Safe Use
To ensure safe use of the product, the following points must be strictly observed.
1. Installation
• Take care not to drop the product. Dropping may result in breakdown.
• Make sure to tighten all installation screws securely.
2. Power Supply
• Do not use any AC power adapters other than the one supplied with the product.
• Use an AC power cable which is applicable to your power supply and voltage.
• Do not touch the power plug with wet hands. Doing so may result in electric shock.
3. Other
• If abnormalities, such as smoke, excessively hot external surface and odd smells,
are found, immediately stop operation, turn OFF the power and disconnect the
power plug from the AC power outlet. Repair of the product by the user is very
dangerous, so contact OMRON.
• Do not let any foreign matter enter the product through vent holes. Entry of such
matter may result in fire or electric shock.
• If the product is dropped or damaged, turn OFF the power and disconnect the
power plug from the AC power outlet, and then contact OMRON. Continuing to use
the product in such condition may result in fire.
• When observing the monitor continuously for long periods of time, make sure that
you take sufficient breaks.
• Dispose of this product as industrial waste.
Digital LUPE
Operation Manual
5
Page 8

FCC Statement
This equipment has been tested and found to comply with the limits for a Class A digital
device, pursuant to part 15 of the FCC Rules. These limits are designed to provide
reasonable protection against harmful interference when the equipment is operated in
a commercial environment. This equipment generates, uses, and can radiate radio
frequency energy and, if not installed and used in accordance with the instruction
manual, may cause harmful interference to radio communications. Operation of this
equipment in a residential area is likely to cause harmful interference in which case the
user will be required to correct the interference at his own expense.
Digital LUPE
Operation Manual
6
Page 9

Precautions for Correct Use
Please observe the following precautions to prevent failure to operate, malfunctions, or
undesirable effects on product and product performance.
1. Installation Site
Do not install the Digital LUPE in locations subjected to the following conditions:
• Ambient temperature outside the rating
• Rapid temperature fluctuations (causing condensation)
• Relative humidity outside the range of 20 to 85%
• Presence of corrosive or flammable gases
• Presence of dust, salt, or iron particles
• Direct vibration or shock
• Inclined or unstable surface
• Reflection of external intense light (such as laser beams or arc-welding light)
• Direct sunlight or near heaters
• Presence of water, oil, and chemical agent splash
• Strong magnetic or electric field
2. Power Supply
• When performing maintenance or when not using for long periods of time, the
power plug must be disconnected from the AC power outlet.
• Do not use the product with the power cable excessively bent.
3. Maintenance
• For your safety, turn OFF the power and remove various cables prior to
maintenance.
• Clean the lens with a lens-cleaning cloth or air brush.
• Dirt on the product must be wiped off gently with a soft cloth.
• Dirt on the polarized filter must be removed using an air brush.
• Do not use thinner or benzene.
Digital LUPE
Operation Manual
7
Page 10
Features / Checking the Package Contents
Features of Digital LUPE
The Digital LUPE is designed to observe the object by displaying its enlarged images
on the monitor.
• Provides electrically-operated zoom and auto focus functions.
Auto focus enables quick focus adjustment even for high-magnification observation.
• Allows switching to optimum magnification and lighting pattern with a single touch of a
button.
Preset buttons that allow registration of observation conditions are provided. This
enables quick switching to observation conditions suitable for the object.
• Provides 11 kinds of digital pattern lighting.
Digital pattern lighting that can be lit in 11 different directions is pr ovided. The Di gital
pattern suitable for your applications can be selected (e.g. emphasizing roughness
and scratches on the object's surface, eliminating irregular reflections on metal bars or
the like.)
• Provides non-reflection mode to reduce irregular reflections on metal surfaces.
This mode is suitable for inspection of objects with strong irregular reflections.
• Provides a function that outputs high-quality images to a monitor or personal
computer.
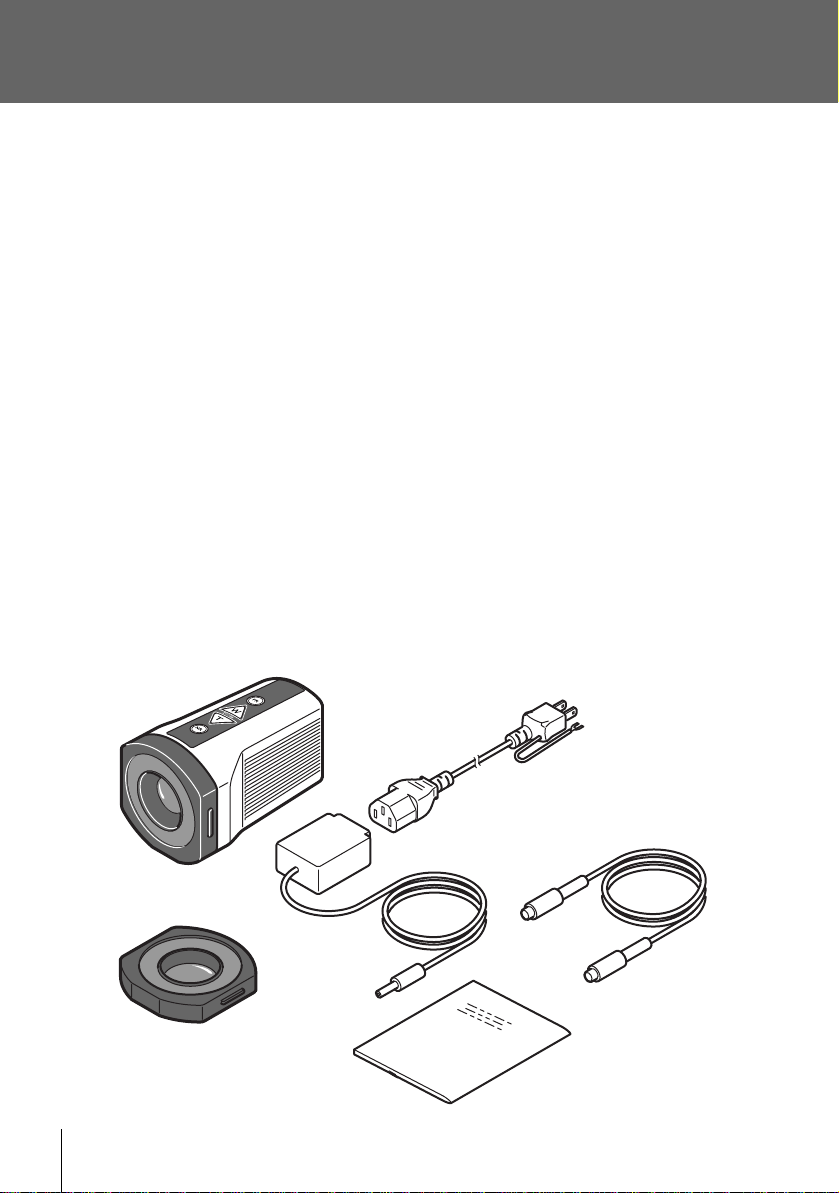
Checking the Package Contents
Before using the product, check that all the following items are present. It is e xtremely
rare for any items to be missing, but should this occur contact the nearest OMRON
representative.
Digital LUPE main unit
Two kinds of corresponding
lenses (x50 and x100)
* The magnification is written on each lens.
A corresponding lens (x50) is attached to
main unit when shipping from the factory.
Digital LUPE
Operation Manual
8
AC power cable (100 V)
S-video cable (1.5 m)
AC power adapter
Operation Manual
(This manual)
* The Digital LUPE stand must be purchased separately.
Page 11

CONTENTS
READ AND UNDERSTAND THIS DOCUMENT 1
Meanings of Signal Words 4
Precautions for Safe Use 5
Precautions for Correct Use 7
Features / Checking the Package Contents 8
Features of Digital LUPE 8
Checking the Package Contents 8
Quick Start 10
Part Names 12
Installation and Connections 14
How to Use the Digital LUPE 15
Preparation 15
Adjusting the Height of the Digital LUPE 16
Changing the Magnification Ratio 17
Adjusting the Light for the Object 18
Reducing Irregular Reflections 19
Changing the Magnification and Lighting Pattern in a Single Operation 20
Stopping the Video 21
Adjusting White Balance 22
Fixing the Focus 22
Registering Observation Conditions 23
Replacing the Lens 25
Maintenance 26
Troubleshooting 27
Specifications 28
Digital LUPE 28
Digital LUPE Stand 30
Revision History 31
Digital LUPE
Operation Manual
9
Page 12

Quick Start
Set the Digital LUPE. (p.14)
Mount the Ditanal LUPE on a Stand (Option: Model
VC-DLST) and install it in place.
Connect the AC power adapter to the
Digital LUPE.
Connect the AC power cable to a wall socket. (p.14)
Connect the Digital LUPE with the monitor
using the S-Video cable.
Turn on the Power and
Lights.
Turn on the power of monitor.
(p.15)
(p.14)
(p.14)
Set the object in place and adjust the height seeing the image. (p.16)
Set the [FOCUS] switch to AUTO, set the magnification to max. value and then adjust
the height.
Object
When a corresponding lens (x50) is used:
The lighting pattern can be switched over using the [L-PATTERN] button. (p.18)
Lights up the
object uniformly
Digital LUPE
Operation Manual
10
90 mm
Emphasizes
roughness
Typical lighting patterns:
Eliminates irregular reflectinos
of the metal bar or the like.
Emphasizes
scratches.
Lit
Lit off
Page 13

AC power cable
Monitor
(Available on
the market)
Switching from one lighting pattern to
another (p.18)
Changing the magnification ratio and
lighting pattern (p.20, 23)
Switching from one focus
mode to another (p.22)
Main unit
AC power
adapter
S-video cable
Turning the power ON or OFF (p.15)
Turning the lights ON or OFF (p.15)
Adjusting white balance (p.22)
FR button (p.21)
Stops the video.
By repressing this button, the freezed
state will be released.
Zoom W button (p.17)
Decreases the image of the object in
size.
Zoom T button (p.17)
Increases the image of the object in
size.
NR button (p.19)
Reduces irregular reflections on the
objectm resulting in a smooth image.
Fixing the focus
under the focus
mode “TRG” (semi
auto focue) (
p.22
)
Stand (Option: Model
VC-DLST)
Light
Lens
Lens attaching/
detaching button
Digital LUPE
Operation Manual
11
Page 14

Part Names
Remote controller
connecting terminal
Light
Lens
Lens attaching/
detaching button
Freeze Button
Operating panel
(Top, see the
illustration given
below)
Zoom Wide Button
Zoom Tele Button
No Reflection Mode
Button
Lighting Pattern
Control Button
Focus Trigger Button
Auto White Balance
Digital LUPE
Operation Manual
12
Power Connector
Button
Light Switch
Video Output Terminal
S-Video Output Terminal
Zoom Preset Button
Focus Mode Switch
Power Indicator
Power Switch
Page 15

Name Function
W Decreases the magnification ratio. Pressing this button reduces the
object’s image.
T Increases the magnification ratio. Pressing this button enlarges the
FR Stops the video. Pressing this button stops the video displayed on the
NR Switches to non-reflection mode. Pressing this button reduces irregular
POWER Turns ON/OFF the power to the Digital Lupe.
LIGHT Turns ON/OFF the light of the Digital Lupe.
FOCUS Switches between auto focus (AUTO) and semi auto focus (TRG).
FT Used for focus adjustment during semi auto focus mode. Pressing this
AWB
L-PATTERN
P1, P2, P3 Used to switch to the magnification and lighting pattern registered to
DC IN Connect the AC power adapter (supplied with the product) to this
S-VIDEO Connect the S-video cable (supplied with the product) to output the S-
VIDEO Used to output video signal by connecting a commercially available
Lens Two kinds of corresponding lenses are pro v i d ed : x5 0 an d x10 0
Remote controller
connecting
terminal
object's image.
monitor. Pressing the button again restarts the video.
reflections on the object’s surface. Pressing the button again tu rns off
non-reflection mode and returns to normal mode.
button switches to auto focus mode for a certain period of time without
changing the magnification and adjusts focus.
Used for white balance adjustment. p.22
Switches the lighting pattern each time this button is pressed.
p.18
the preset buttons. p.20
connector.
video signal.
video cable to this connector.
p.28
When button (switch) is operated, its name will appear for a few seconds in the right side of
the monitor. (POWER and LIGHT are not displayed.) “FR” is displayed while the video is
stopped, but the product can be set so that none is displayed even if the video is stopped.
p.21
Digital LUPE
Operation Manual
13
Page 16

Installation and Connections
Mount the Digital LUPE on a stand (Optional: Model VL-DLST).
The fixing screw must be tightened securely to prevent the Digital
LUPE falling.
Connect the S-video cable to
the S-video output terminal.
Connect the AC power adapter’s
plug into the power connector on
the Digital LUPE.
Connect the
power plug into an
AC power outlet.
Use the power
plug suitable for
your power outlet.
Digital LUPE
Operation Manual
14
Connect the S-video
cable to the S-video
input terminal.
• If you want to record the video taken by the Digital LUPE as video data, connect the Digital
LUPE to a video capture board installed on the personal computer.
• The video can also be output using a commercially available video cable. For this, the cable
must be connected to the video input terminal of a monitor etc.
• S-video output and video output can be used simultaneously.
Page 17

How to Use the Digital LUPE
Preparation
1. Turn ON the power.
Also turn ON the devices (e.g. monitor) connected
to the Digital LUPE.
2. Set the target object in place.
3. Turn ON the lights.
4. Check the image.
• To make the displayed image clear, adjust the
brightness and color tone of the monitor and
personal computer. For the setting method, refer to
the manual supplied with these products.
• If focus cannot be adjusted, check whether the
distance between the Digital LUPE and the object
is correct.
Adjusting the Height of the Digital LUPE
p.16
Digital LUPE
Operation Manual
15
Page 18

How to Use the Digital LUPE
Adjusting the Height of the Digital LUPE
To take the best performance of the Digital LUPE, the distance from the object’s surface to
the digital LUPE needs to be adjusted.
90 mm
48 mm
(for x50 lens)
For Smooth Height Adjustment
(for x100 lens)
1. Set the target object in place.
2. Turn ON the [FOCUS] switch.
The Digital LUPE will be placed in auto focus
mode.
3. Press to set the maximum
T
magnification ratio.
4. Adjust the height while observing the
monitor image.
The Digital LUPE must be secured to the stand at
the focused position.
Digital LUPE
Operation Manual
16
Page 19

Changing the Magnification Ratio
Change the magnification ratio so that it suits the object.
To increase the magnification ratio
1. Press ZOOM .
The image of the object will increase in size.
2. Release when the image is
T
T
enlarged to the desired size.
To decrease the magnification ratio
1. Press ZOOM .
The image of the object will decrease in size.
2. Release when the image is
W
W
reduced to the desired size.
Digital LUPE
Operation Manual
17
Page 20

How to Use the Digital LUPE
Adjusting the Light for the Object
The ring-shaped light attached to the Digital LUPE is divided into
four blocks. By turning ON/OFF certain blocks, 11 lighting patterns
can be provided to light up the object (digital pattern lighting).
Select a suitable lighting pattern that lights up th e inspection a rea
clearly.
Digital Pattern Lighting Type
Effect Pattern No. and Lighting Status
00: All lit
Lights up the
object
uniformly.
01: Upper left 02: Upper right 03: Lower right 04: Lower left
Emphasizes
roughness.
Lower
Left
Right
Upper
Eliminates
irregular
reflections
such as the
metal bar or
the like
Emphasizes
scars.
Sufficient effect may not be obtained depending on the material and shape of the object.
Digital LUPE
Operation Manual
18
05: Upper/lower 06: Right/left
07: Diagonal
(upper)
08: Diagonal
(lower)
: Lit : Lit Off
09: Diagonal
(left)
10: Diagonal
(right)
Page 21

To switch from one lighting pattern to another
1. Press the [L-PATTERN] button.
The lighting pattern switches from one to another
in the pattern number order. In addition, the pattern number is displayed in the right side of the
monitor.
2. Press down the [L-PATTERN] button
repeatedly until the desired lighting
pattern is obtained.
The lights will not come on unless the [LIGHT] switch is ON.
Reducing Irregular Reflections
If the image is difficult to see since the metal surface of the object causes irregular reflections,
set the Digital LUPE in non-reflection mode. The irregular reflections will be reduced,
resulting in a smooth image.
To obtain sufficient effect of non-reflection mode, make sure that no lights, except for the light
from the Digital LUPE, enter. Entry of external light may hinder elimination of irregular
reflections.
1. Press .
The mode will be switched to non-reflection mode.
NR
2. To return to normal mode, press
again.
NR
Digital LUPE
Operation Manual
19
Page 22

How to Use the Digital LUPE
Changing the Magnification and Lighting Pattern in a Single
Operation
Switching to optimum magnification and lighting pattern can be performed with a single touch
of a button.
Pressing a preset button (P1, P2, P3) restores the magnification and lighting pattern
registered to that button.
Default (factory) setting
Button Magnification Lighting
P1 Low (x2) All lit
P2 Middle (x5) All lit
P3 High (x7.5) All lit
It is possible to register the desired magnification and lightinbg pattern to each button.
Registering Observation Conditions p.23
To change the magnification and lighting pattern with a
single touch of a button
P1, P2, P3
Press the desired preset button.
The magnification and lighting pattern registered
to that button will be set.
Do not hold down a preset button for more than three seconds. Failure to do so will register the
current magnification and lighting pattern to that preset button.
Digital LUPE
Operation Manual
20
Page 23

Stopping the Video
The video currently displayed in the monitor can be sto pp e d.
This is useful when you want to keep the same observation conditions for a certain section
of the object so that you have enough time to observe it carefully.
1. Display the section of the object at
which you want to stop the video.
2. Press .
The monitor video will stop.
FR
3. To make the video play again, press
again.
FR
“FR”is displayed on the monitor while the video is at
stop. If you won't display the “FR”, make a setting as
follows.
1. Turn OFF the power.
2. Then, turn it ON while holding down the .
3. When “FR DISP ON/OFF” appears on the
monitor, release the from your finger.
If you want to display the “FR” again on the monitor,
perform the same steps as above.
FR
FR
Digital LUPE
Operation Manual
21
Page 24

How to Use the Digital LUPE
Adjusting White Balance
This section explains how to adjust white balance of the Digital LUPE.
1. Display a white object (e.g. paper,
cloth) on the monitor.
2. Press the [AWB] button with focus
adjusted.
“AWB” will flash for approximately five seconds in
the right corner of the monitor. When “AWB” disappears, adjustment of white balance is complete if the white object is disp layed white in
the monitor.
• Keep the object still while “AWB” is flashing on the monitor.
• White balance may not be adjusted at once depending on the operating conditions. In this
case, press the [AWB] button again.
Fixing the Focus
When operating the Digital LUPE repeatedly with the same magnification, the object can be
observed at fixed focus by setting the focus mode to “TRG” (semi auto focus).
The “TRG” also lighten the mechanical load to the product compared with the auto focus,
resulting in longer product life.
Set the [FOCUS] switch to “TRG”.
Focus will be fixed.
• About the Semi Auto Focus
When the magnification is changed by pressing , or a preset button, auto focus will
be activated for a certain period of time (approximately five seconds) to adjust focus. If you
want to adjust focus without changing the magnification, press the [FT] button. This will
activate auto focus for a certain period of time to adjust focus.
Digital LUPE
Operation Manual
22
T
W
Page 25

Registering Observation Conditions
The procedure for changing to appropriate magni fication and lighting pattern by pressing a
preset button (P1, P2, P3) is explained on p.20. Now, this section explains how to register
the desired the magnification and lighting pattern to preset buttons.
1. Press or to obtain the
W
T
magnification to be registered.
Observe the image, and make sure that the image
is in focus.
2. Press the [L-PATTERN] button to
switch the lighting pattern to the one
to be registered.
The lighting pattern switches from one to another
in the pattern number order.
Adjusting the Light for the Object p.18
3. Hold down the preset button showing
the preset magnification and lighting
pattern you want to register for more
than 3 seconds.
Press the button to be registered.
“REC” will appear in the monitor and registration is
now complete.
Digital LUPE
Operation Manual
23
Page 26

How to Use the Digital LUPE
To restore the default observation conditions
Once observation conditions (magnification and lighting pattern) are registered, the previous
conditions cannot be restored. However, it is still possible to restore the default conditions
(factory settings).
Default (factory) setting p.20
This operation will restore the default observation conditions for every preset button.
1. Turns OFF the power.
Turns OFF the [POWER] switch.
2. Turn ON the [POWER] switch while
holding down the [P1] and [P3]
buttons.
3. When the image and “INITIALIZED”
appear on the monitor, release the
buttons from your fingers.
This will restore the default observation conditions
for every preset button.
If you release the button before displaying “INITIALIZED” on the monitor, it is not possible to
restore the default observation conditions (factory settings).
Hold down both [P1]
and [P3] buttons.
Digital LUPE
Operation Manual
24
Page 27

Replacing the Lens
Two lenses (x50, x100) are supplied with the Digital LUPE.
Use the lens suitable for the object.
• Removing the Lens
1. Hold down the button.
• Attaching a Lens
2. Hold down the button.
2. Remove the lens slowly.
1. Make sure the lens is placed in
the correct direction.
3. Attach the lens.
Digital LUPE
Operation Manual
25
Page 28

Maintenance
To use the Digital LUPE usually under good conditions, perform the following checks.
• Prior to maintenance, turn OFF the power and remove the various cables.
• Do not use thinner or benzine.
Dirt on the lens: Clean the lens with a lens-cleaning cloth or air brush.
Dirt on the polarized filter: Remove the dirt wiht an air brush.
Dirt on the product: Wipe off the dirt gently with a soft cloth.
Polarized Filter
Digital LUPE
Operation Manual
26
Lens
Page 29

Troubleshooting
When abnormal symptom appears with the Digital LUPE, refer to the following table to take
necessary actions.
If the same symptom continues, contact OMRON.
Symptom Action Reference
No image on the monitor • Check that both monitor and Digital LUPE
are powered ON.
• Check that the video output is switched to
the connected video channel.
• Check that the video cable and power plug
are connected properly.
Incorrect color shade • Check color tone of the monitor has been
adjusted.
• Check that white balance is correct.
Not possible to adjust
focus.
Entire image is too bright. • Check that brightness of the monitor has
Buttons do not function. • Check that Digital LUPE is not set in freeze
Object causes irregular
reflections even in nonreflection mode.
Preset buttons do not
function properly.
Video cannot be recorded
by PC.
• Check that the distance to the object is
correct.
• Check that the lens is attached correctly.
• Check that the height was adjusted when
the lens was exchanged.
• Check that the lens is clean.
• Check that Digital LUPE is not set in freeze
mode.
been adjusted.
• Check that white balance is correct.
mode.
• Check that there is no entry of external light.
When operating, make sure that no lights,
except for the light from Digital LUPE, enter.
• Check that the observation conditions
registered to the preset buttons are
appropriate.
Restore the default observation conditions
for the preset buttons, and then register the
desired conditions again.
Refer to the manual of your personal
computer and video capture board.
p.15
—
p.14
p.15
p.22
p.16
p.25
p.16
p.26
p.21
p.15
p.22
p.21
p.19
p.23, 24
—
Digital LUPE
Operation Manual
27
Page 30

Specifications
Digital LUPE
VC-DL100
Image sensor 1/4 type CCD
Number of effective pixels Approx. 380,000 pixels
Lens 10x optical zoom
White Balance One-push auto white balance
Performance
specifications
General
specifications
To use a remote controller
The Digital LUPE has a terminal for remote controller, enabling you to operate some buttons
using your remote controller. To connect a remote controller, a 4-prong plug (2.5 diameter)
must be used.
An example of the buttons that can be operated by the remote controller and the pin
assignment is given below.
AE Control Full auto
Focusing System Semi-auto/Auto
Observation Assistant
Function
Light 32 White LEDs, Digital Pattern Lighting mode
Control input Zoom-T, W, FR (for 2.5mm 4- Conductor Plug)
Video output VBS : 1.0Vp-p (sync. negative), Y/C Output NTSC format
Operating temperature/
humidity
Storage temperature/
humidity
Supply voltage/Power
consumption
External dimensions 76 × 77.5 × 127.5mm
Weight Approx. 300 g
Freeze mode, Non-reflection mode
0 to +40°C / 20 to 85%RH (with no condensation)
-10 to +50°C/20 to 85%RH (with no condensation)
DC7V/5W AC adapter: AC100 to 240V
Plug Pin Assignment
Plug Pin Assignment
Circuit Diagram
Digital LUPE
Operation Manual
28
FR T W
GND
+5V
Internal circuits
Recommended Plug:
MP-425 (2.5
FR
W
T
GND
VC-DL100
φ
, 4-conductor) Marushin electric mfg. co., ltd
FR: Freeze button
W: Zoom wide button
T: Zoom tele button
Page 31

(Unit: mm)
Digital LUPE
Operation Manual
29
Page 32

Digital LUPE Stand
VC-DLST
■Stand
■Adjustment Unit
Movement
23mmup
12mmdown
(Unit: mm)
Black&WhiteStage
Stagemountingscrew
amount
Digital LUPE
Operation Manual
30
Weight: Approx. 1,9kg
* Including the Adjustment Unit and Black &
White Stage.
Page 33

Revision History
A manual revision code and reprint code appear as a suffi x to the catalog number at the
bottom of the front and back covers of this manual.
Cat. No.
SCNC-703B
Revision code
Revision code Date Revised content
A Sep. 2004 Original production
Added a wiring diagram for the remote controller
B Jan. 2005
B Jun. 2005 Minor change (P. 30)
and a diagram with external dimensions for the
stand.
Digital LUPE
Operation Manual
31
Page 34

OMRON Corporation
Industrial Automation Company
Application Sensors Division
Sensing Devices and Components Division H.Q.
Shiokoji Horikawa, Shimogyo-ku,
Kyoto, 600-8530 Japan
Tel: (81)75-344-7068/Fax: (81)75-344-7107
Regional Headquarters
OMRON EUROPE B.V.
Sensor Business Unit,
Carl-Benz-Str. 4, D-71154 Nufringen,
Germany
Tel: (49)7032-811-0/Fax: (49)7032-811-199
OMRON ELECTRONICS LLC
1 East Commerce Drive, Schaumburg, IL 60173
U.S.A.
Tel: (1)847-843-7900/Fax: (1)847-843-8568
OMRON ASIA PACIFIC PTE. LTD.
83 Clemenceau Avenue,
#11-01, UE Square,
239920 Singapore
Tel: (65)6835-3011/Fax: (65)6835-2711
OMRON CHINA CO., LTD. BEIJING OFFICE
Room 1028, Office Building,
Beijing Capital Times Square,
No. 88 West Chang'an Road,
Beijing, 100031 China
Tel: (86)10-8391-3005/Fax: (86)10-8391-3688
Authorized Distributor:
Cat. No. SCNC-703B ©OMRON Corporation 2004 All Rights Reserved.
Note: Specifications subject to change without notice.
Printed in Japan
0605-0.5M (B)
 Loading...