

Page 1
HEM-7070-E_i-C10_main.book 1 ページ 2011年11月4日 金曜日 午前10時20分
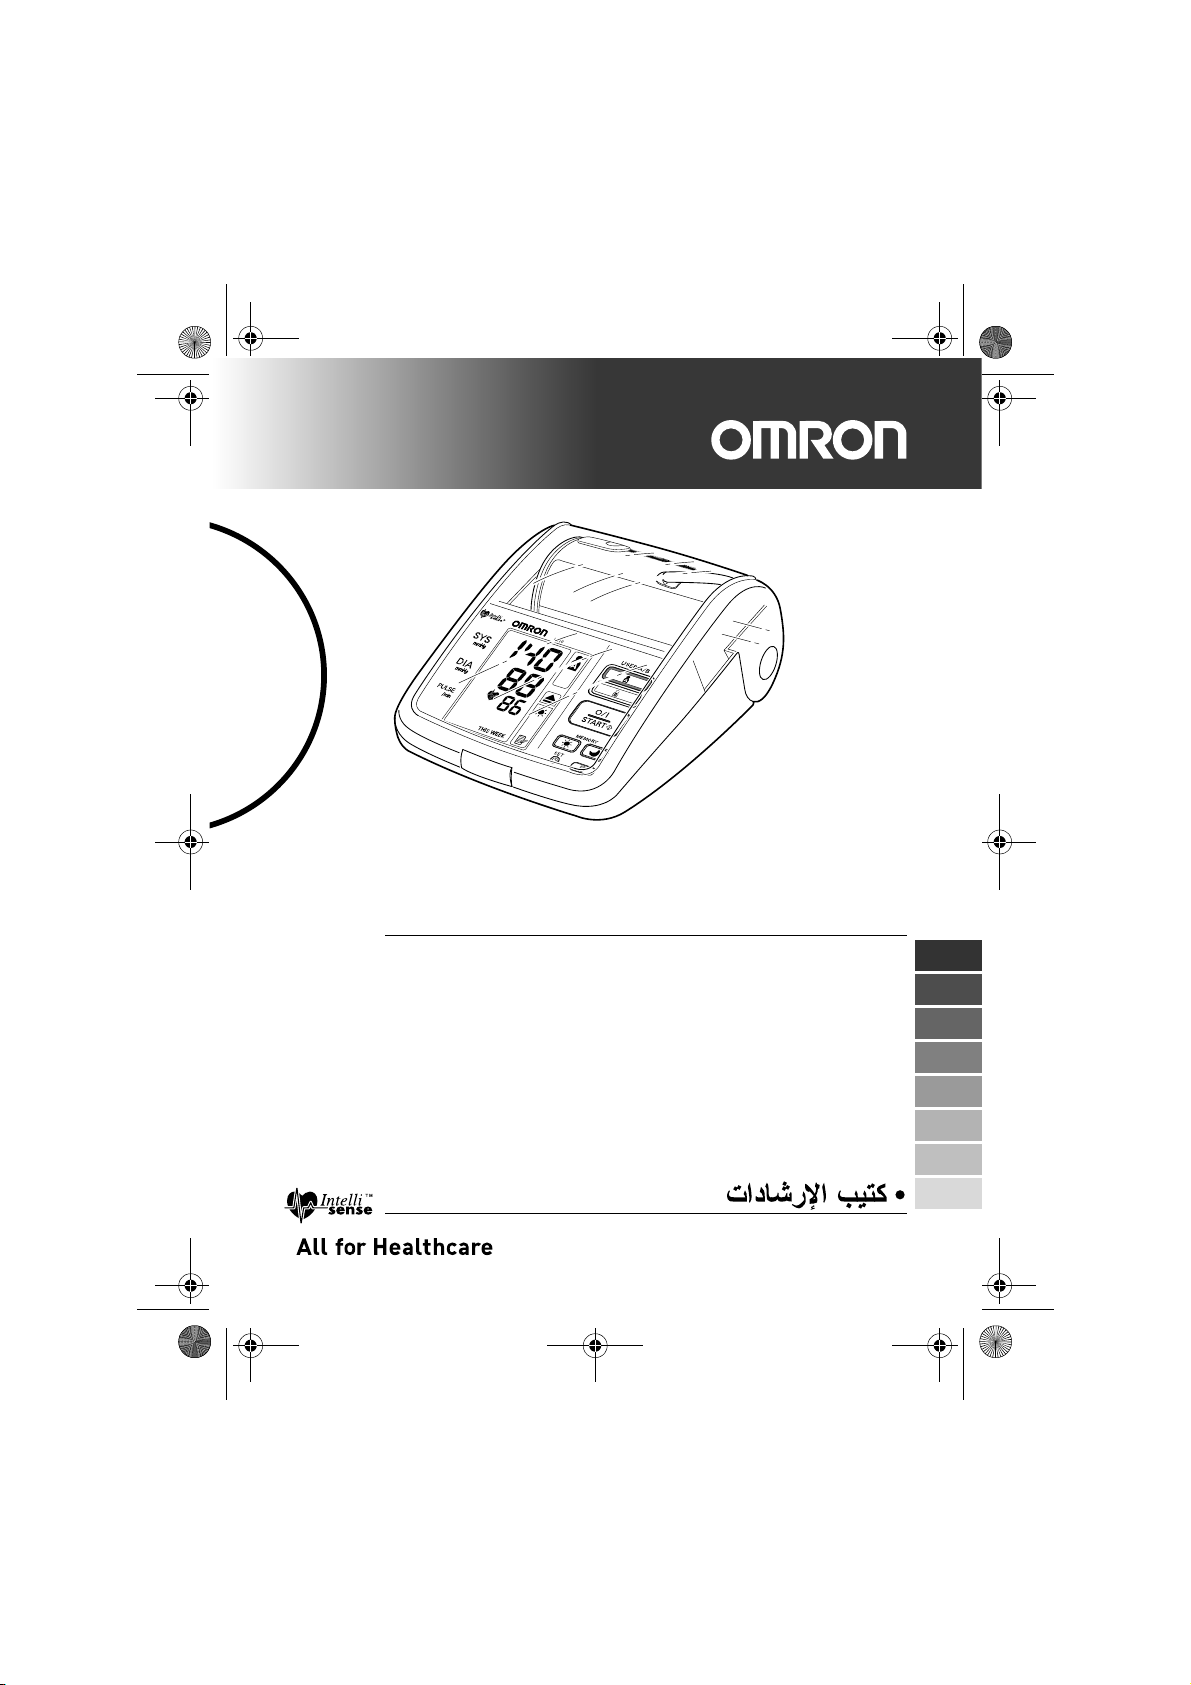
Digital Automatic Blood Pressure Monitor
Model i-C10
• Instruction Manual
• Mode d’emploi
• Gebrauchsanweisung
• Manuale di istruzioni
• Manual de instrucciones
• Gebruiksaanwijzing
• РУКОВОДСТВО ПО ЭКСПЛУАТАЦИИ
IM-HEM-7070-E-03-10/2011
5320473-7B
EN
FR
DE
IT
ES
NL
RU
AR
Page 2
HEM-7070-E_i-C10_main.book 2 ページ 2011年11月4日 金曜日 午前10時20分
Contents
Before using the unit
Introduction .................................................................................3
Important Safety Information ..................................................... 4
1. Overview ................................................................................ 6
2. Preparation .......................................................................... 10
2.1 Installing/Replacing the Batteries ...............................................10
2.2 Setting the Date and Time..........................................................12
Operating instructions
3. Using the Unit...................................................................... 16
3.1 How to Sit Correctly When Taking a Measurement....................16
3.2 Applying the Arm Cuff.................................................................18
3.3 Taking a Reading........................................................................21
3.4 Instructions for Special Conditions .............................................31
3.5 Using the Memory Function........................................................32
4. Quick Reference Guide ......................................................39
Care and maintenance
5. Handling Errors and Problems .......................................... 40
5.1 Error Messages ..........................................................................40
5.2 Troubleshooting..........................................................................41
6. Maintenance and Storage .................................................. 42
7. Optional Parts ..................................................................... 43
8. Technical Data.....................................................................44
9. Some Useful Information about Blood Pressure .............46
2
Page 3
HEM-7070-E_i-C10_main.book 3 ページ 2011年11月4日 金曜日 午前10時20分
Before using the unit
Introduction
Thank you for purchasing the OMRON i-C10 Intellisense Upper Arm
Blood Pressure Monitor.
The OMRON i-C10 Intellisense is a fully automatic blood pressure
monitor, operating on the oscillometric principle. It measures your
blood pressure and pulse rate simply and quickly. For comfortable
controlled inflation without the need for pressure pre-setting or reinflation the device uses its advanced “Intellisense” technology.
The monitor stores measurement results for two people and features
morning and evening averages. The auto mode allows for three
consecutive measurements with timed intervals for an average
reading.
Please read this instruction manual thoroughly before
using the unit. For specific information about your own
blood pressure, CONSULT YOUR DOCTOR.
Introduction
EN
3
Page 4
HEM-7070-E_i-C10_main.book 4 ページ 2011年11月4日 金曜日 午前10時20分
Important Safety Information
Important Safety Information
Consult your doctor during pregnancy, arrhythmia and arteriosclerosis. Please
read this section carefully before using the unit.
Warning:
Indicates a potentially hazardous situation which, if not avoided, could result in
death or serious injury.
(General Usage)
• Always consult your doctor. Self-diagnosis of measurement results and
selftreatment are dangerous.
• People with severe blood flow problems, or blood disorders, should consult a
doctor before using the unit. Cuff inflation can cause internal bleeding.
(Battery Usage)
• If battery fluid should get in your eyes, immediately rinse with plenty of clean
water. Consult a doctor immediately.
(Optional AC Adapter Usage)
• Never plug in or unplug the power cord from the electric outlet with wet
hands.
Caution:
Indicates a potentially hazardous situation which, if not avoided, may result in
minor or moderate injury to the user or patient or damage to the equipment or
other property.
(General Usage)
• Do not leave the unit unattended with infants or persons who cannot express
their consent.
• Do not use the unit for any purpose other than measuring blood pressure.
• Do not disassemble the unit or arm cuff.
• Do not inflate the arm cuff over 299 mmHg.
• Do not use a mobile phone, or other devices that emit electromagnetic fields,
near the unit. This may result in incorrect operation of the unit.
• Do not operate unit in a moving vehicle (car, airplane).
4
Page 5

HEM-7070-E_i-C10_main.book 5 ページ 2011年11月4日 金曜日 午前10時20分
Important Safety Information
(Optional AC Adapter Usage)
• Use only the original AC adapter designed for this unit. Use of unsupported
adapters may damage and/or may be hazardous to the unit.
• Plug the AC adapter into the appropriate voltage outlet.
• Do not use the AC adapter if the unit or the power cord is damaged. Turn off
the power and unplug the power cord immediately.
(Battery Usage)
• If battery fluid should get on your skin or clothing, immediately rinse with
plenty of clean water.
• Use only four “AA” alkaline batteries with this unit. Do not use other types of
batteries.
• Do not insert the batteries with their polarities incorrectly aligned.
• Replace old batteries with new ones immediately. Replace all four batteries at
the same time.
• Remove the batteries if the unit will not be used for three months or more.
• When the batteries are replaced, you may need to reset the date and time. If
the year is flashing on the display screen, refer to “2.2 Setting the Date and
Time”.
• Do not use new and used batteries together.
General Safety Precautions
• Do not forcibly bend the arm cuff or bend the air tube excessively.
• When removing the air tube, pull on the air plug at the connection with the
main unit not the tube itself.
• Do not inflate the arm cuff when it is not wrapped around your arm.
• Do not apply strong shocks and vibrations to or drop the unit.
• Do not take measurements after bathing, drinking alcohol, smoking,
exercising or eating.
• Do not wash the arm cuff or immerse it in water.
• Read and follow the “Important information regarding Electro Magnetic
Compatibility (EMC)” in the Technical Data Section.
• Read and follow the “Correct Disposal of This Product” in the Technical Data
Section when disposing of the device and any used accessories or optional
parts.
EN
Save these instructions for future reference.
5
Page 6
A
B
C
D
E
F
G
H
I
J
K
L
HEM-7070-E_i-C10_main.book 6 ページ 2011年11月4日 金曜日 午前10時20分
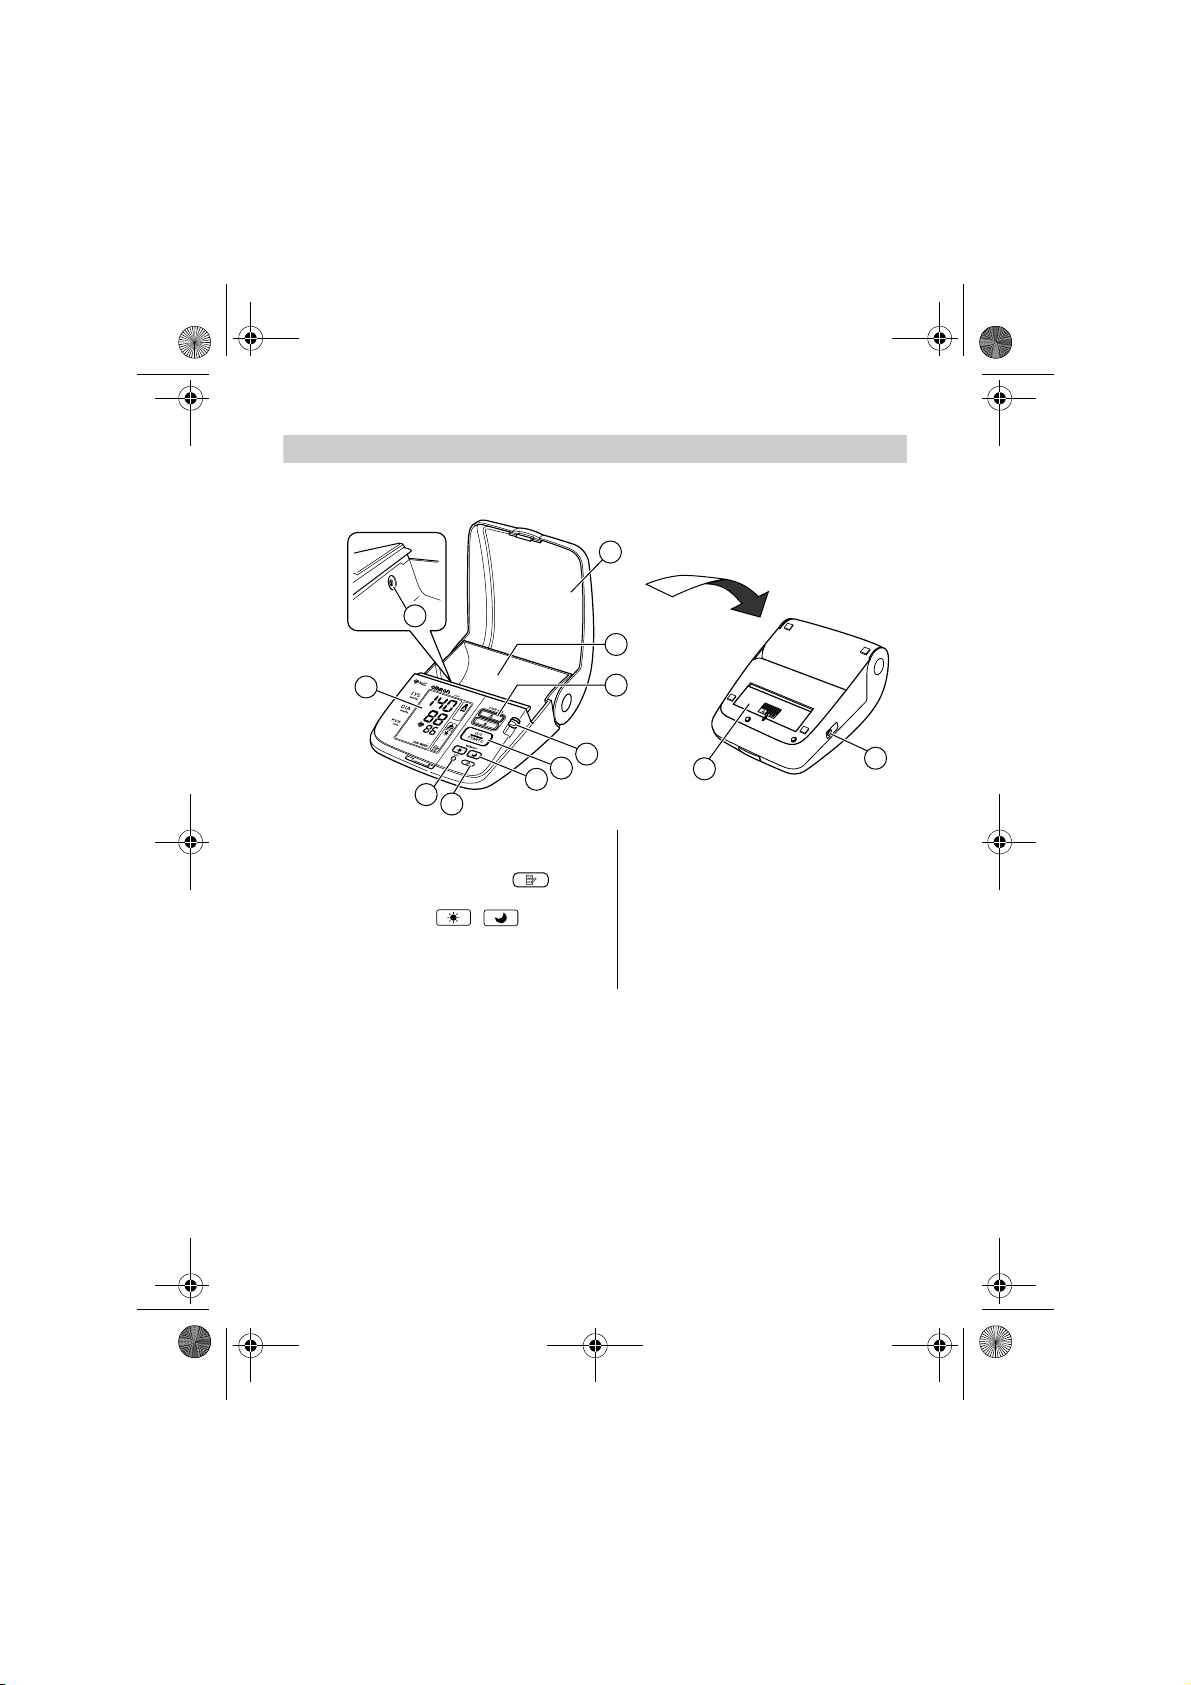
1. Overview
1. Overview
Main Unit
A. Display
B. SET button
C. MEMORY button ( )
D. Morning/Evening Average
buttons ( / )
E. O/I START button
F. User ID selection switch
(A or B)
G. User ID symbol (A or B)
H. Cuff compartment
I. Monitor cover
J. Air jack
K. Battery compartment
L. AC adapter jack (for optional
AC adapter)
6
Page 7
M
ON
HEM-7070-E_i-C10_main.book 7 ページ 2011年11月4日 金曜日 午前10時20分
1. Overview
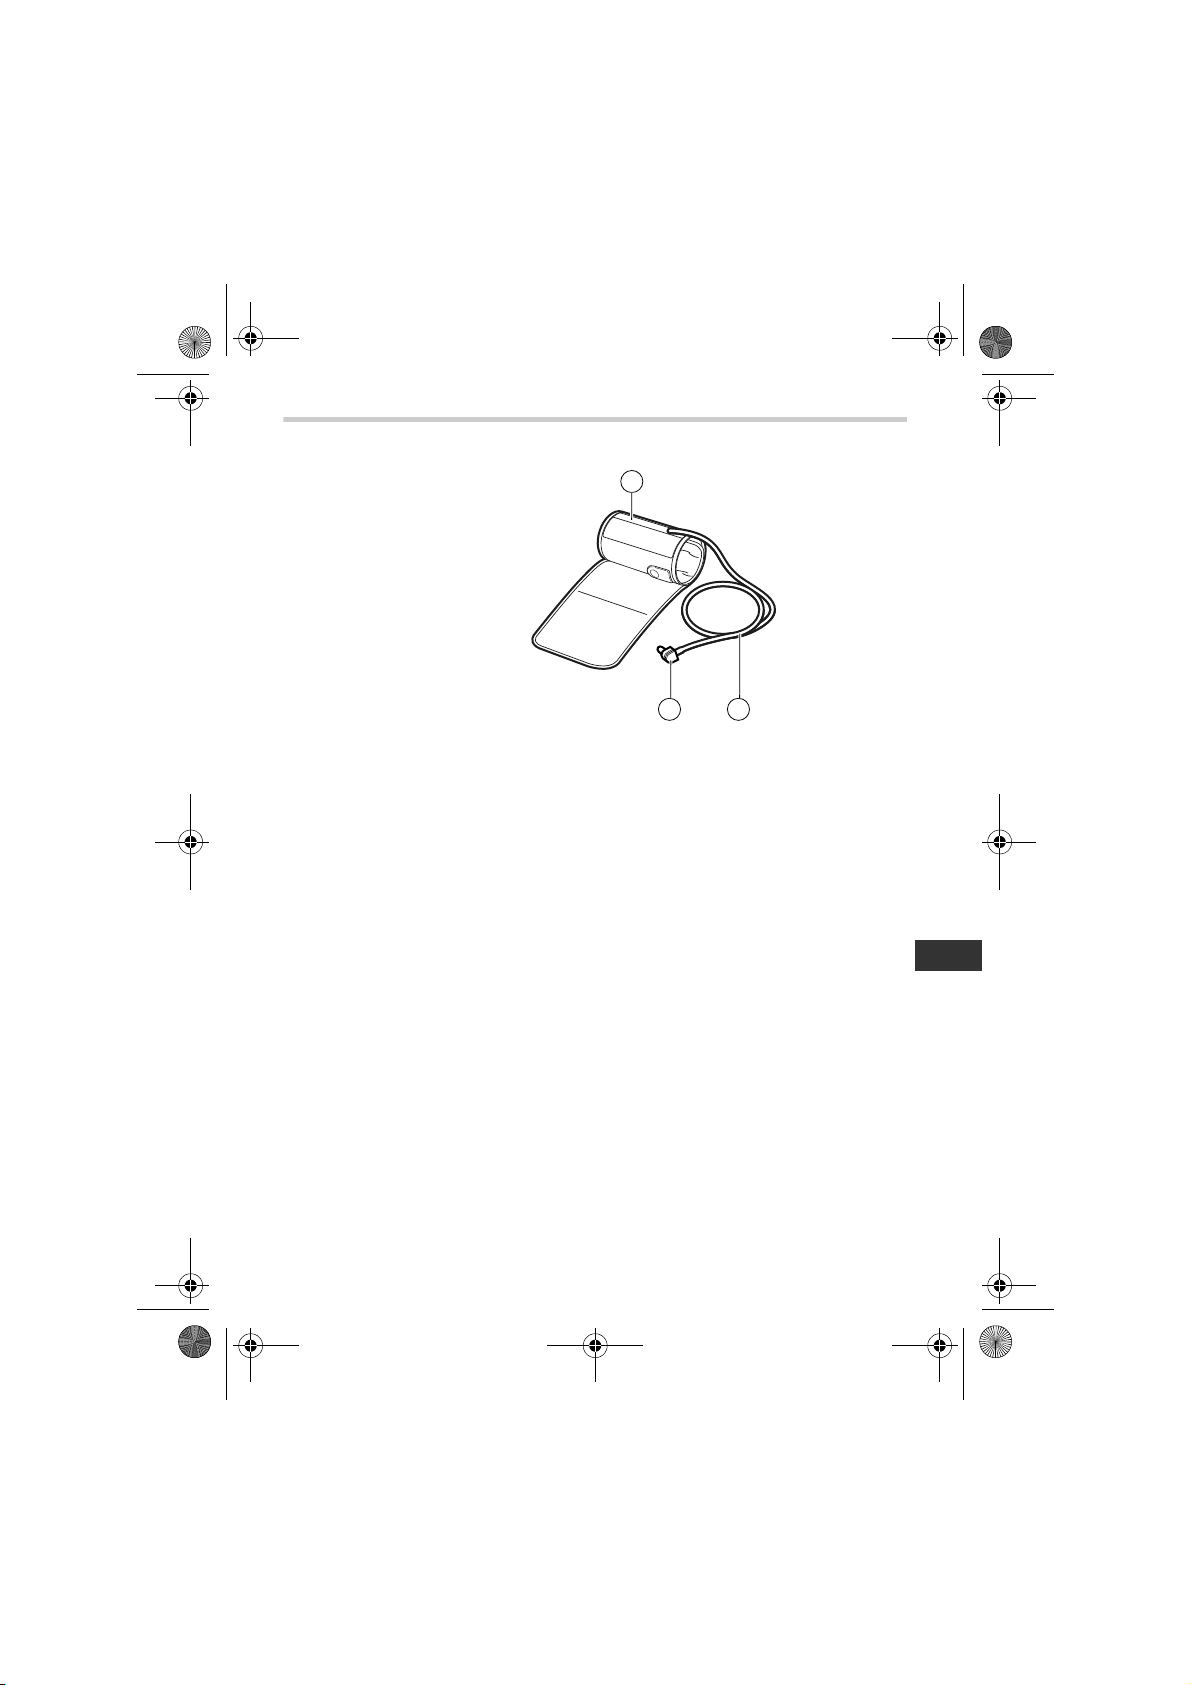
Arm Cuff
M. Arm cuff
(Medium cuff: arm circumference 22-42 cm)
N. Air Plug
O. Air Tube
EN
7
Page 8
P
X
AA
S
Q
U
V
R
T
Z
AB
AD
AF
Y
AC
AE
W
HEM-7070-E_i-C10_main.book 8 ページ 2011年11月4日 金曜日 午前10時20分
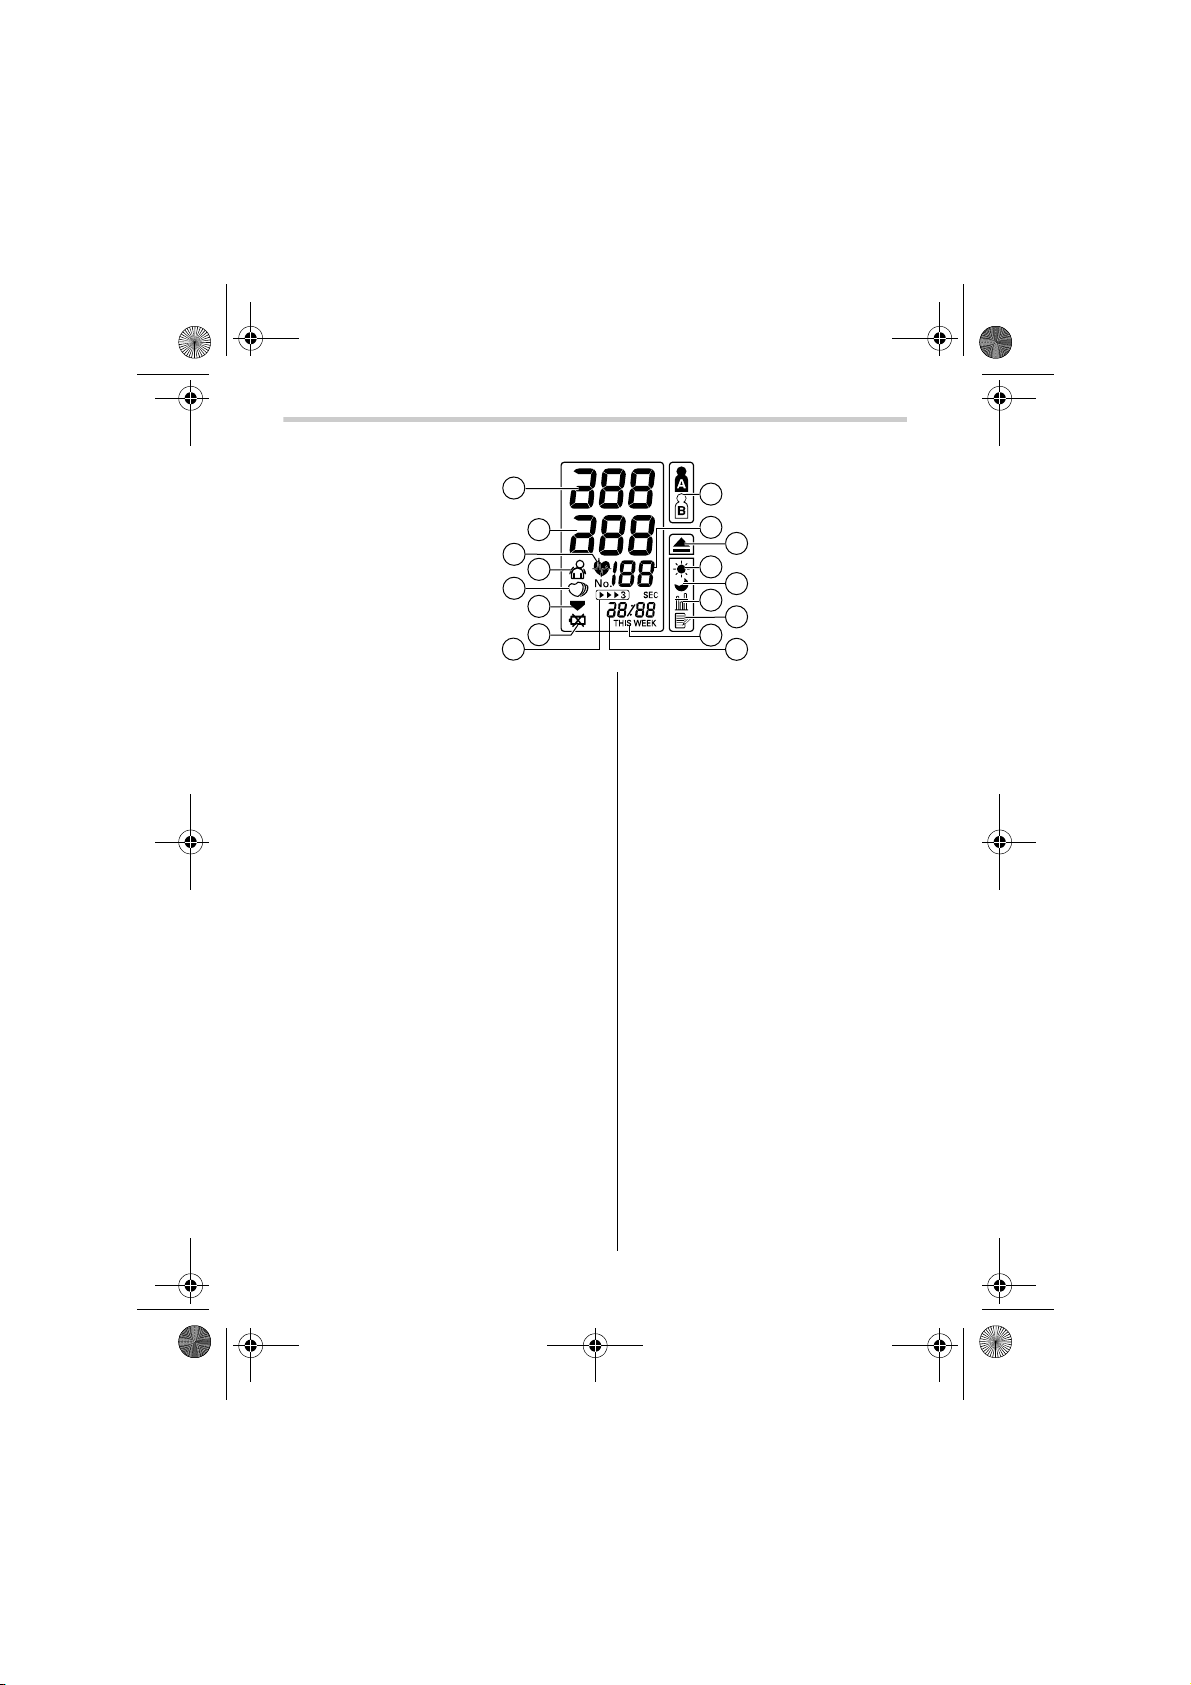
1. Overview
Display
P. Systolic blood pressure
Q. Diastolic blood pressure
R. Heartbeat symbol
1. (Flashes during measurement)
2. (If flashing after measurement
completed indicates blood
pressure out of recommended
range)
S. Movement symbol
(Displayed if you move your
body during the measurement.)
T. Irregular heartbeat symbol
U. Deflation symbol
V. Battery low symbol
W. Auto mode symbol
(Displayed when Auto Mode is
set.)
X. User ID symbol (A or B)
(Indicates user A or user B as
selected by the user to take a
measurement or when using
the memory function.)
Y. Pulse display
Z. Early morning hypertension
symbol
(Displayed if the morning
average reading for a week is
above 135 for the systolic
blood pressure value and/or 85
for the diastolic blood pressure
value.)
AA.Morning average symbol
(Displayed when viewing
morning averages using the
memory function.)
AB.Evening average symbol
(Displayed when viewing
evening averages using the
memory function.)
AC.Average value symbol
(Displayed when viewing value
for the last three
measurements)
AD.Memory symbol
(Displayed when viewing
values stored in memory)
AE.Week display
AF. Date/Time display
8
Page 9
AG
HEM-7070-E_i-C10_main.book 9 ページ 2011年11月4日 金曜日 午前10時20分
1. Overview
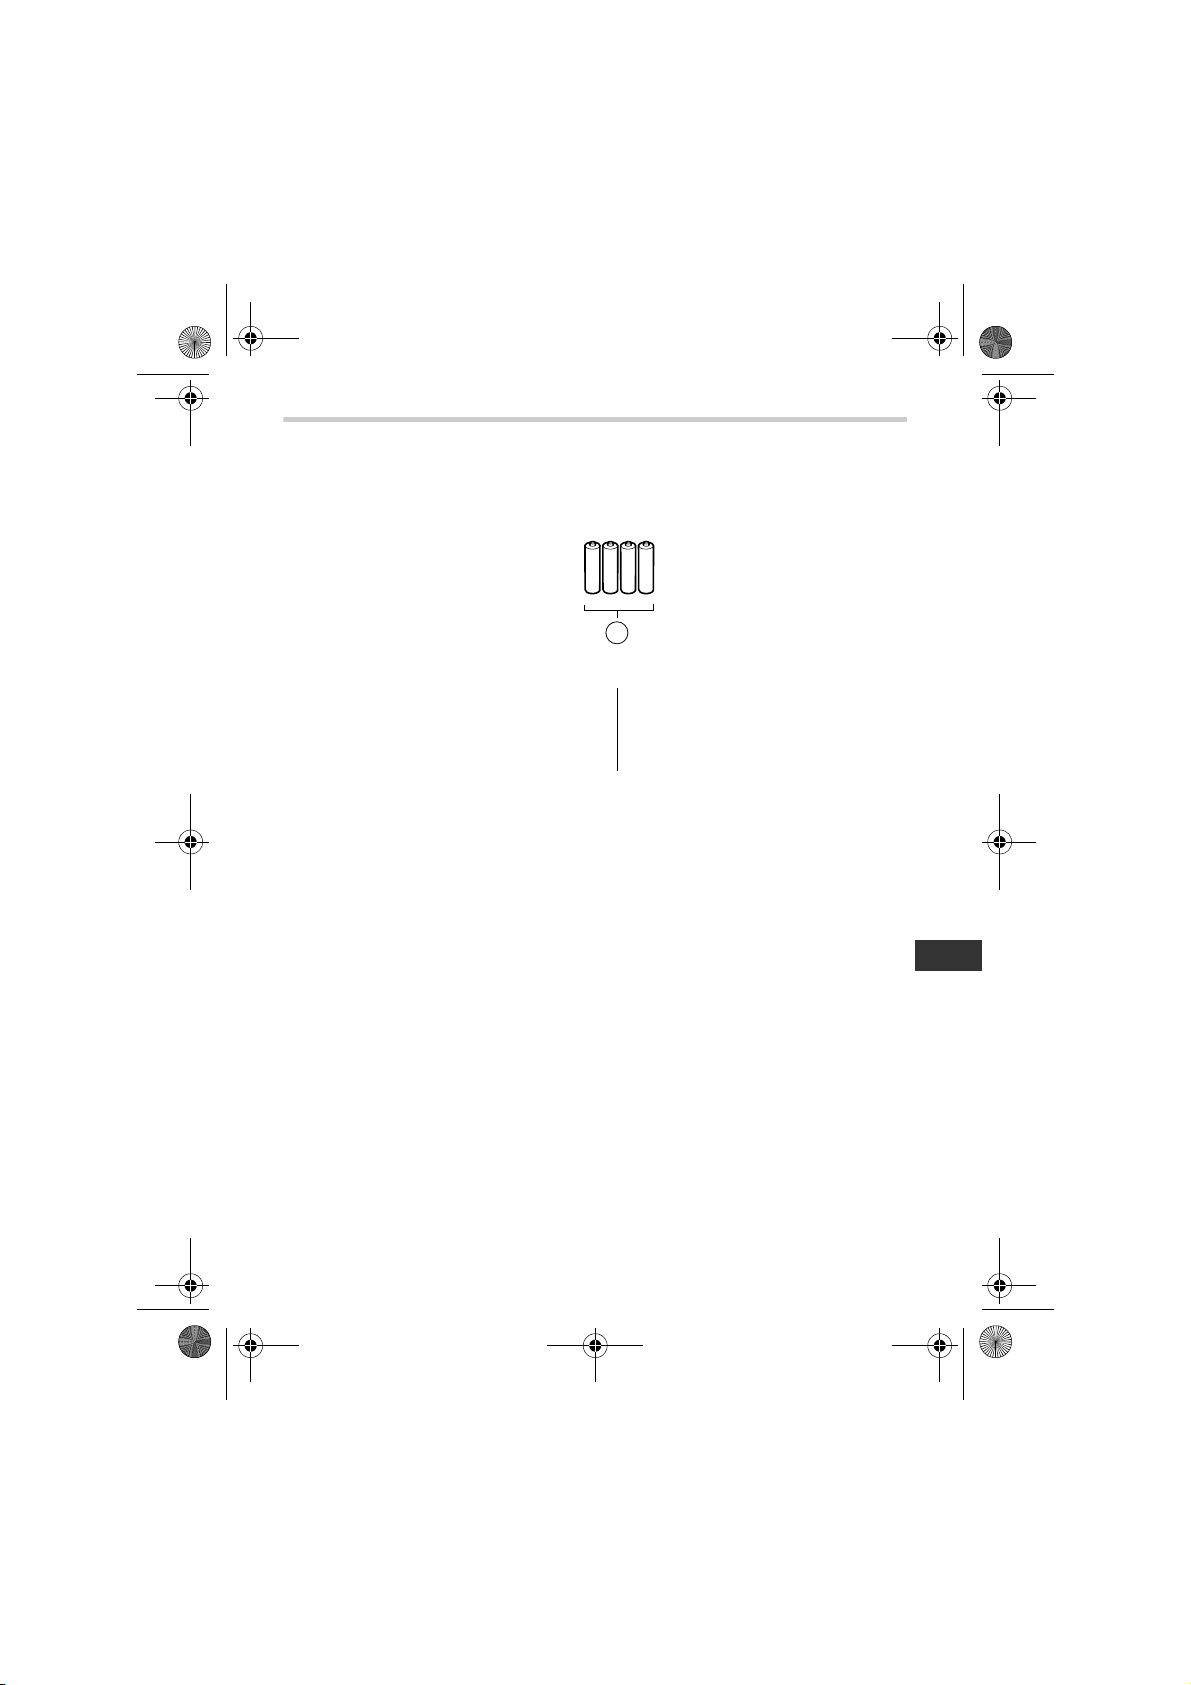
Package Contents
AG.Four “AA” alkaline (LR6)
batteries
• Instruction manual
• Guarantee card
• Blood pressure pass
• Blood Pressure Monitor unit
EN
9
Page 10
Battery Cover
HEM-7070-E_i-C10_main.book 10 ページ 2011年11月4日 金曜日 午前10時20分
2. Preparation
2. Preparation
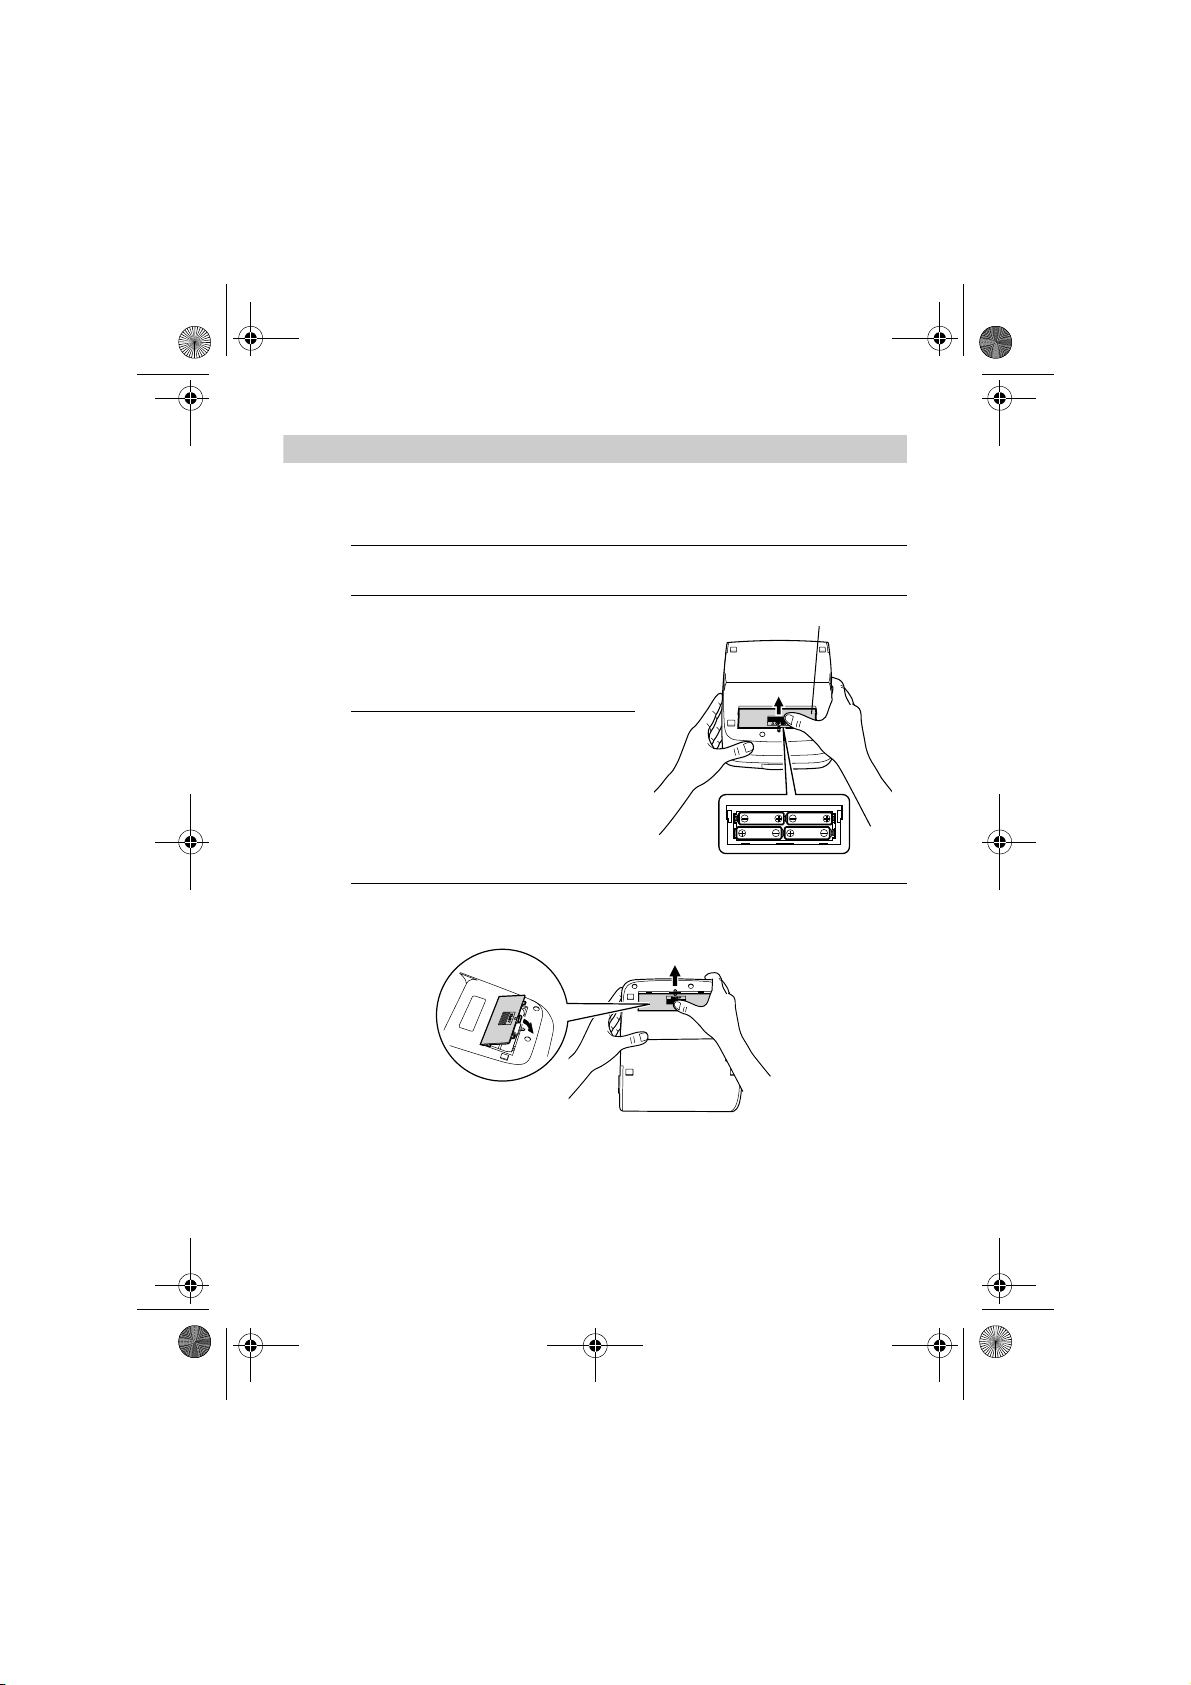
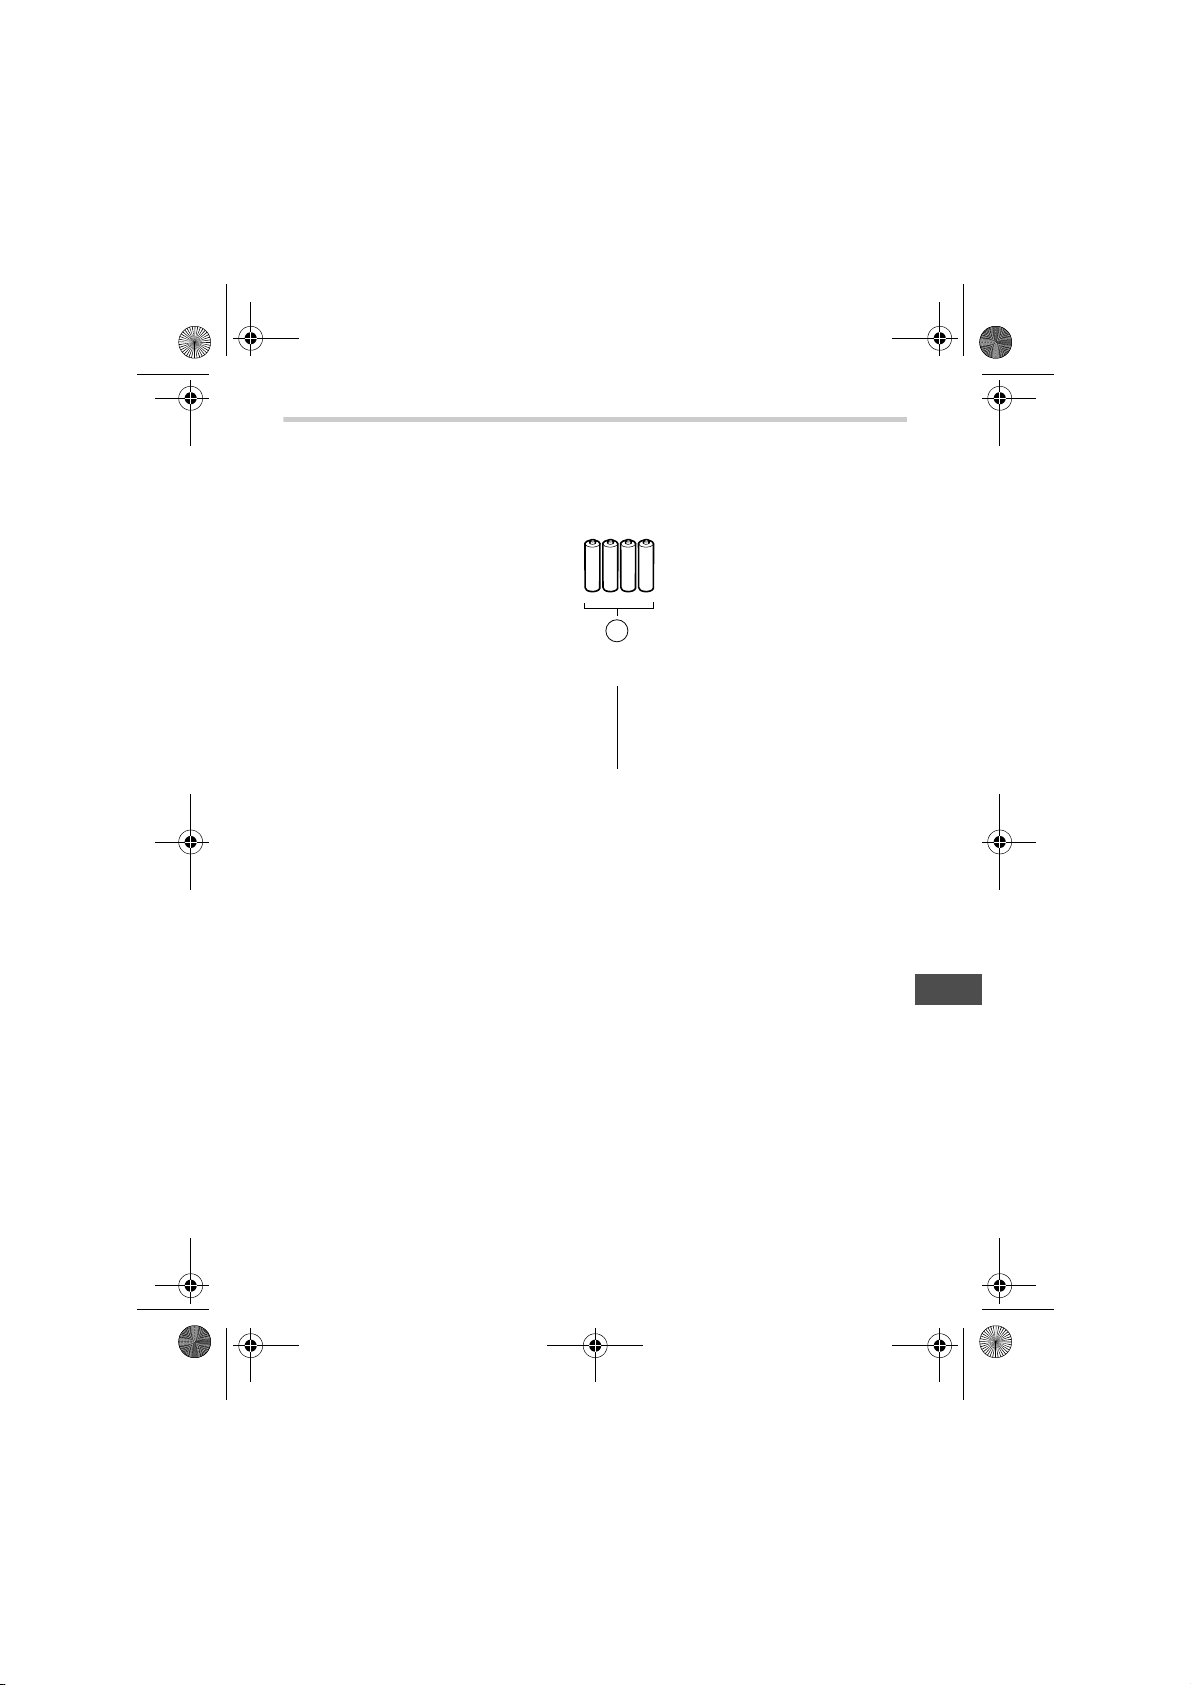
2.1 Installing/Replacing the Batteries
1. Turn the main unit upside down.
2. Slide the battery cover in the
direction of the arrow while
pressing the ribbed part of the
cover.
3. Install or replace four “AA” size
batteries so that the + (positive)
and - (negative) polarities
match the polarities indicated
on the battery compartment.
4. Put the battery cover back in place.
Slide the battery cover as indicated, until it clicks into place.
Note: The measurement values continue to be stored in memory even
after the batteries are replaced.
10
Page 11
HEM-7070-E_i-C10_main.book 11 ページ 2011年11月4日 金曜日 午前10時20分
2. Preparation
Battery Life & Replacement
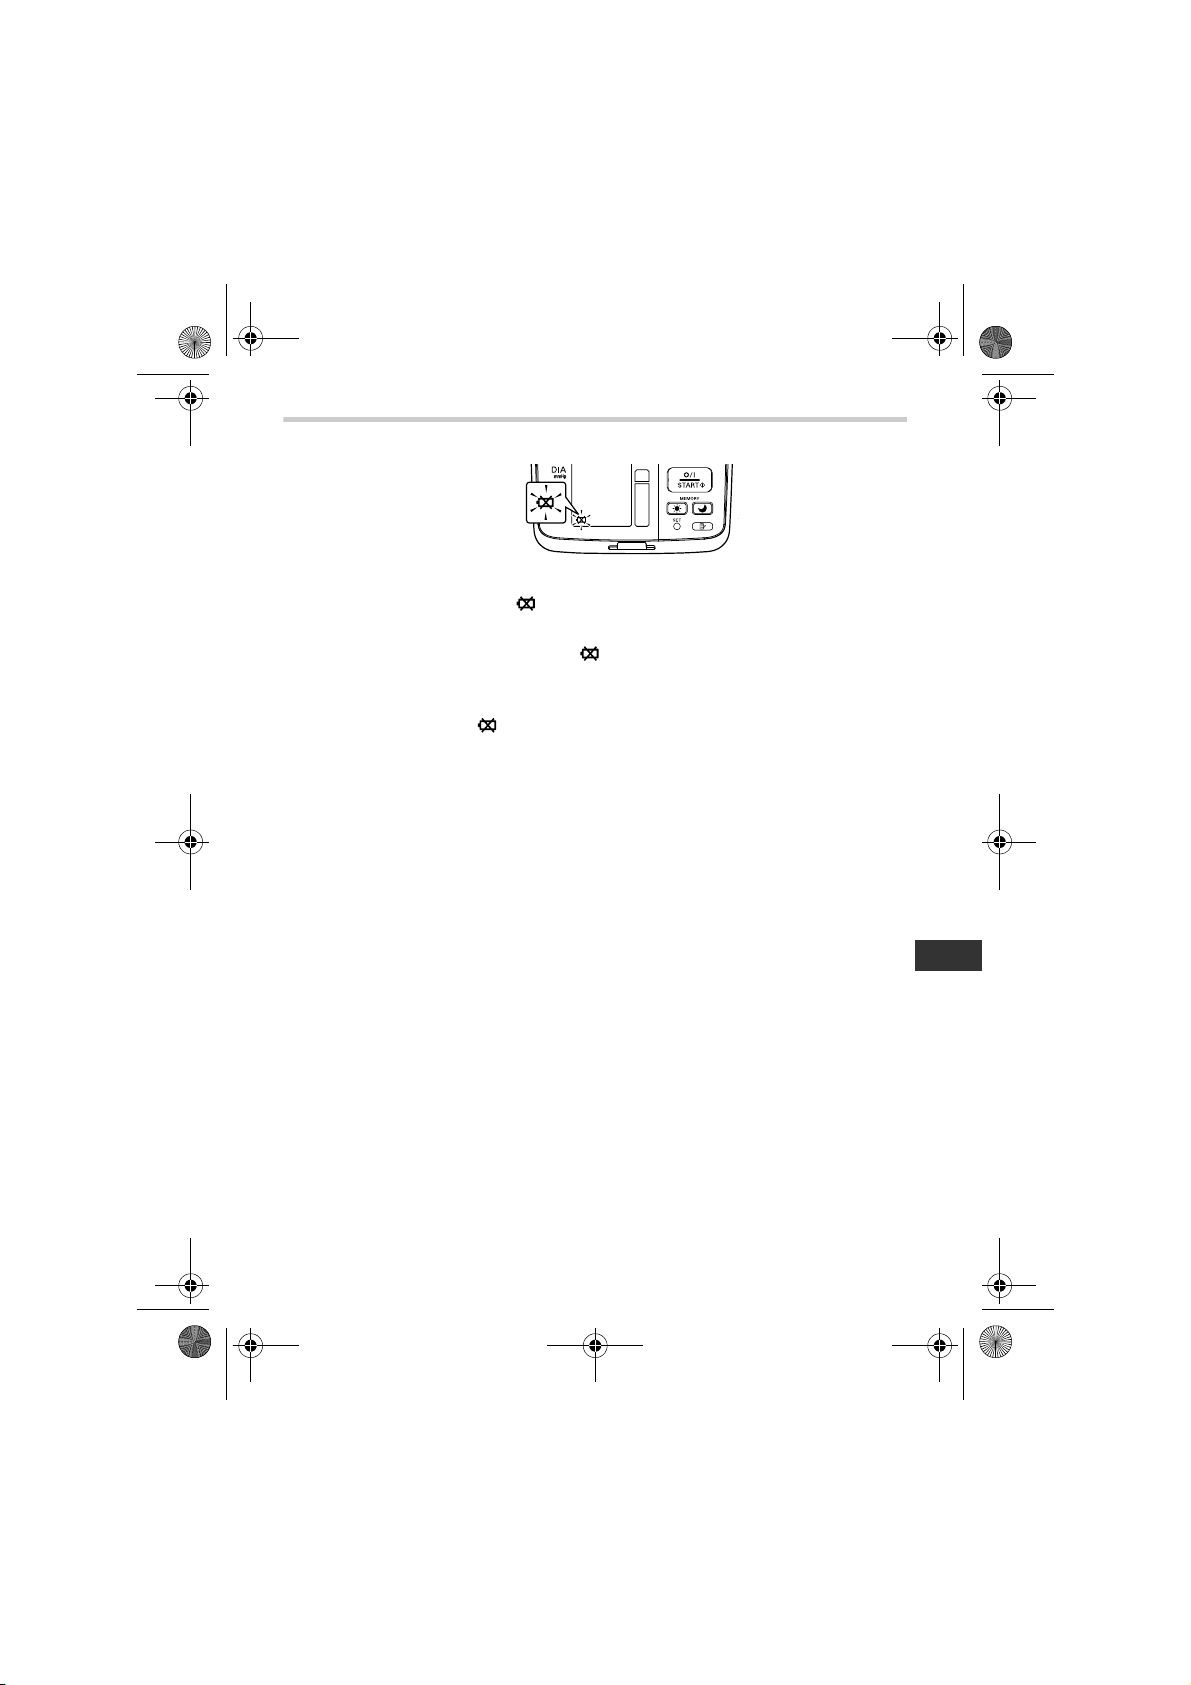
If the battery low symbol ( ) appears on the display, replace all four
batteries at the same time.
- When the battery low symbol ( ) starts to blink, you will still be
able to use the unit for a short while. You should replace the
batteries with new ones ahead of time.
- When the symbol ( ) remains lit, the batteries are exhausted. You
should replace the batteries with new ones at once.Turn the unit off
before replacing the batteries.
• Remove the batteries if the unit will not be used for three months or
more.
• If the batteries have been removed for more than 30 seconds, the
Date/Time setting will need to be reset. See Chapter 2.2 for details.
• Dispose of batteries according to applicable local regulations.
Four new
1400 measurements, when used to take six measurements a day.
Since the supplied batteries are for monitoring use only, they may have
a shorter life and not last for 1400 measurements.
“AA” alkaline batteries will last for approximately
EN
11
Page 12
HEM-7070-E_i-C10_main.book 12 ページ 2011年11月4日 金曜日 午前10時20分
2. Preparation
2.2 Setting the Date and Time
Your blood pressure monitor automatically stores up to 84 individual
measurement values with the date and time.
To make use of the memory and average values functions:
• Set the unit to the correct date and time before taking a measurement
for the first time.
• If the batteries have been removed for more than 30 seconds, the
Date/Time setting will need to be reset.
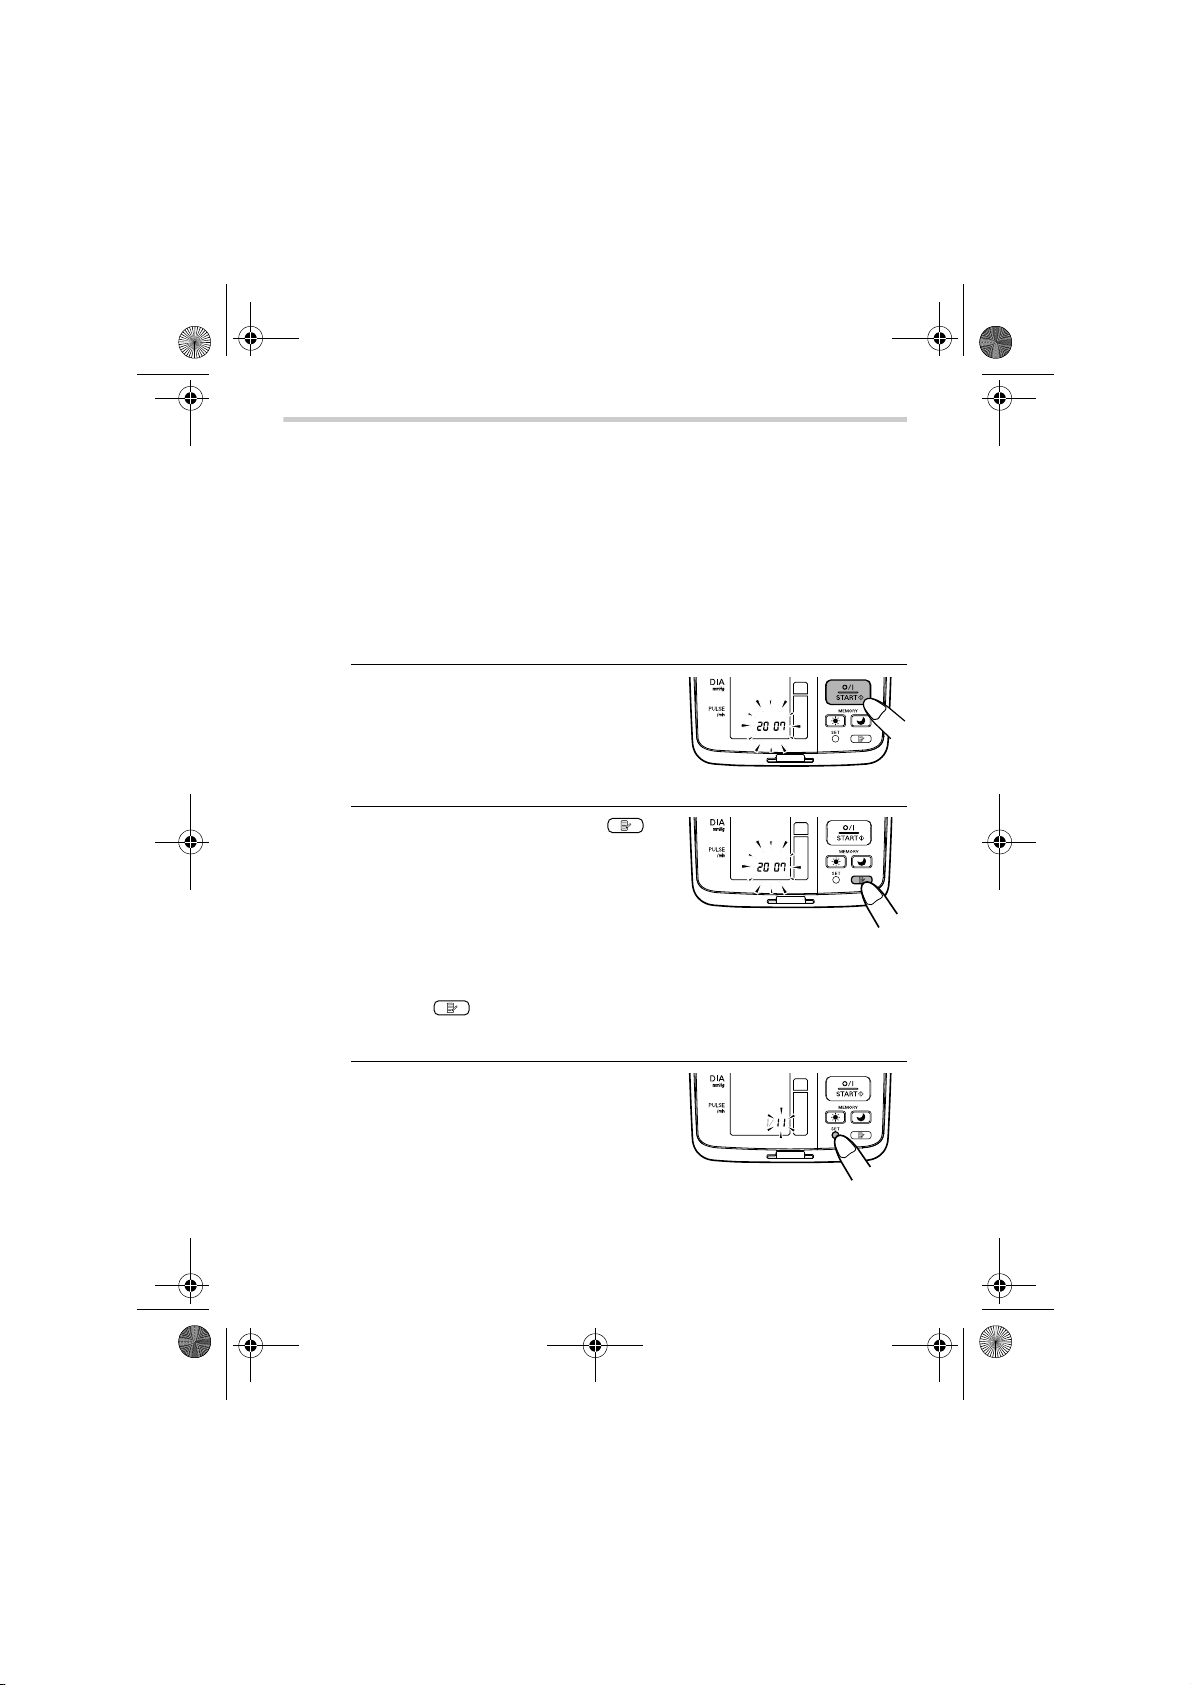
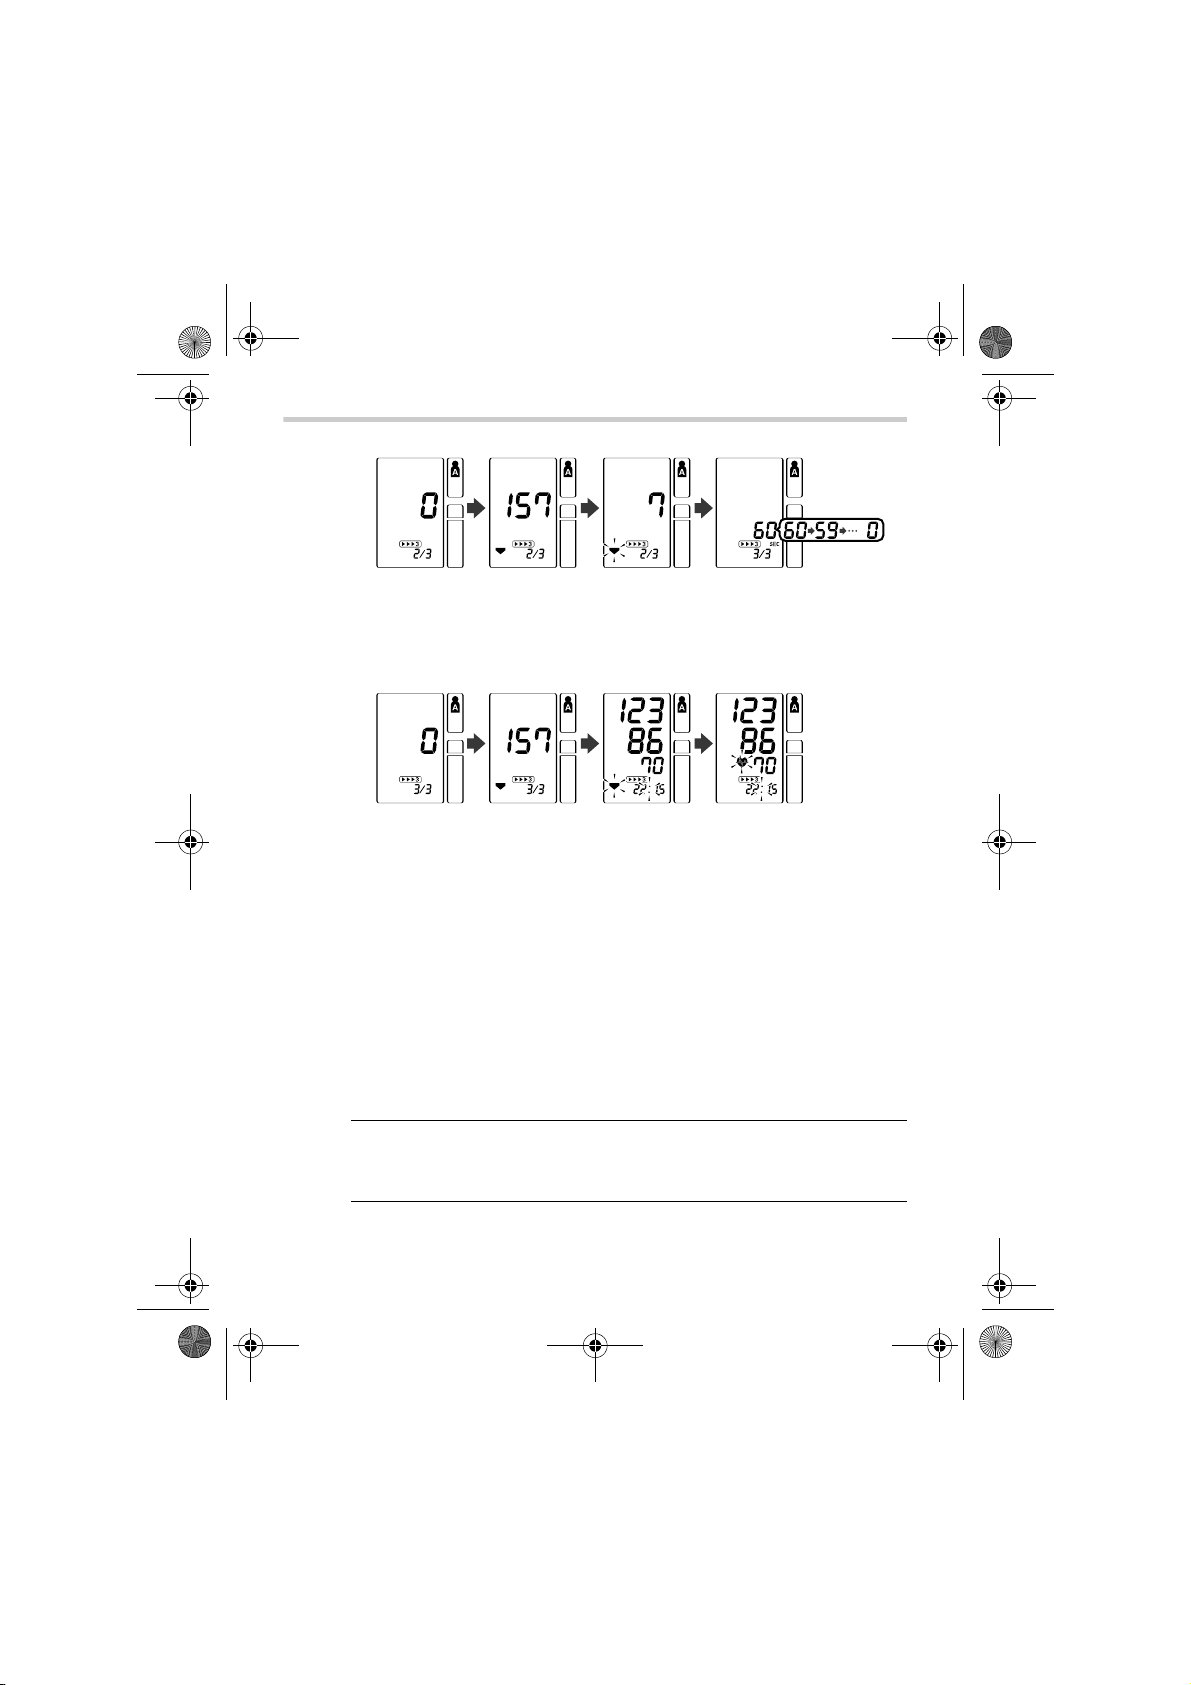
1. When the O/I START button is
pressed to turn the unit on for the
first time after inserting batteries,
the year digits (2007) will flash on
the display.
2. Press the MEMORY button ( )
to advance the digits one at a time.
Notes:
• The range for the year setting is
2007 to 2030. If the year reaches
2030, it will return to 2007.
• If you hold down the MEMORY
button ( ), the digits will
advance rapidly.
3. Press the SET button to confirm
the setting when the desired
number appears on the display.
The year is set and the month
digits flash on the display.
12
Page 13
HEM-7070-E_i-C10_main.book 13 ページ 2011年11月4日 金曜日 午前10時20分
2. Preparation
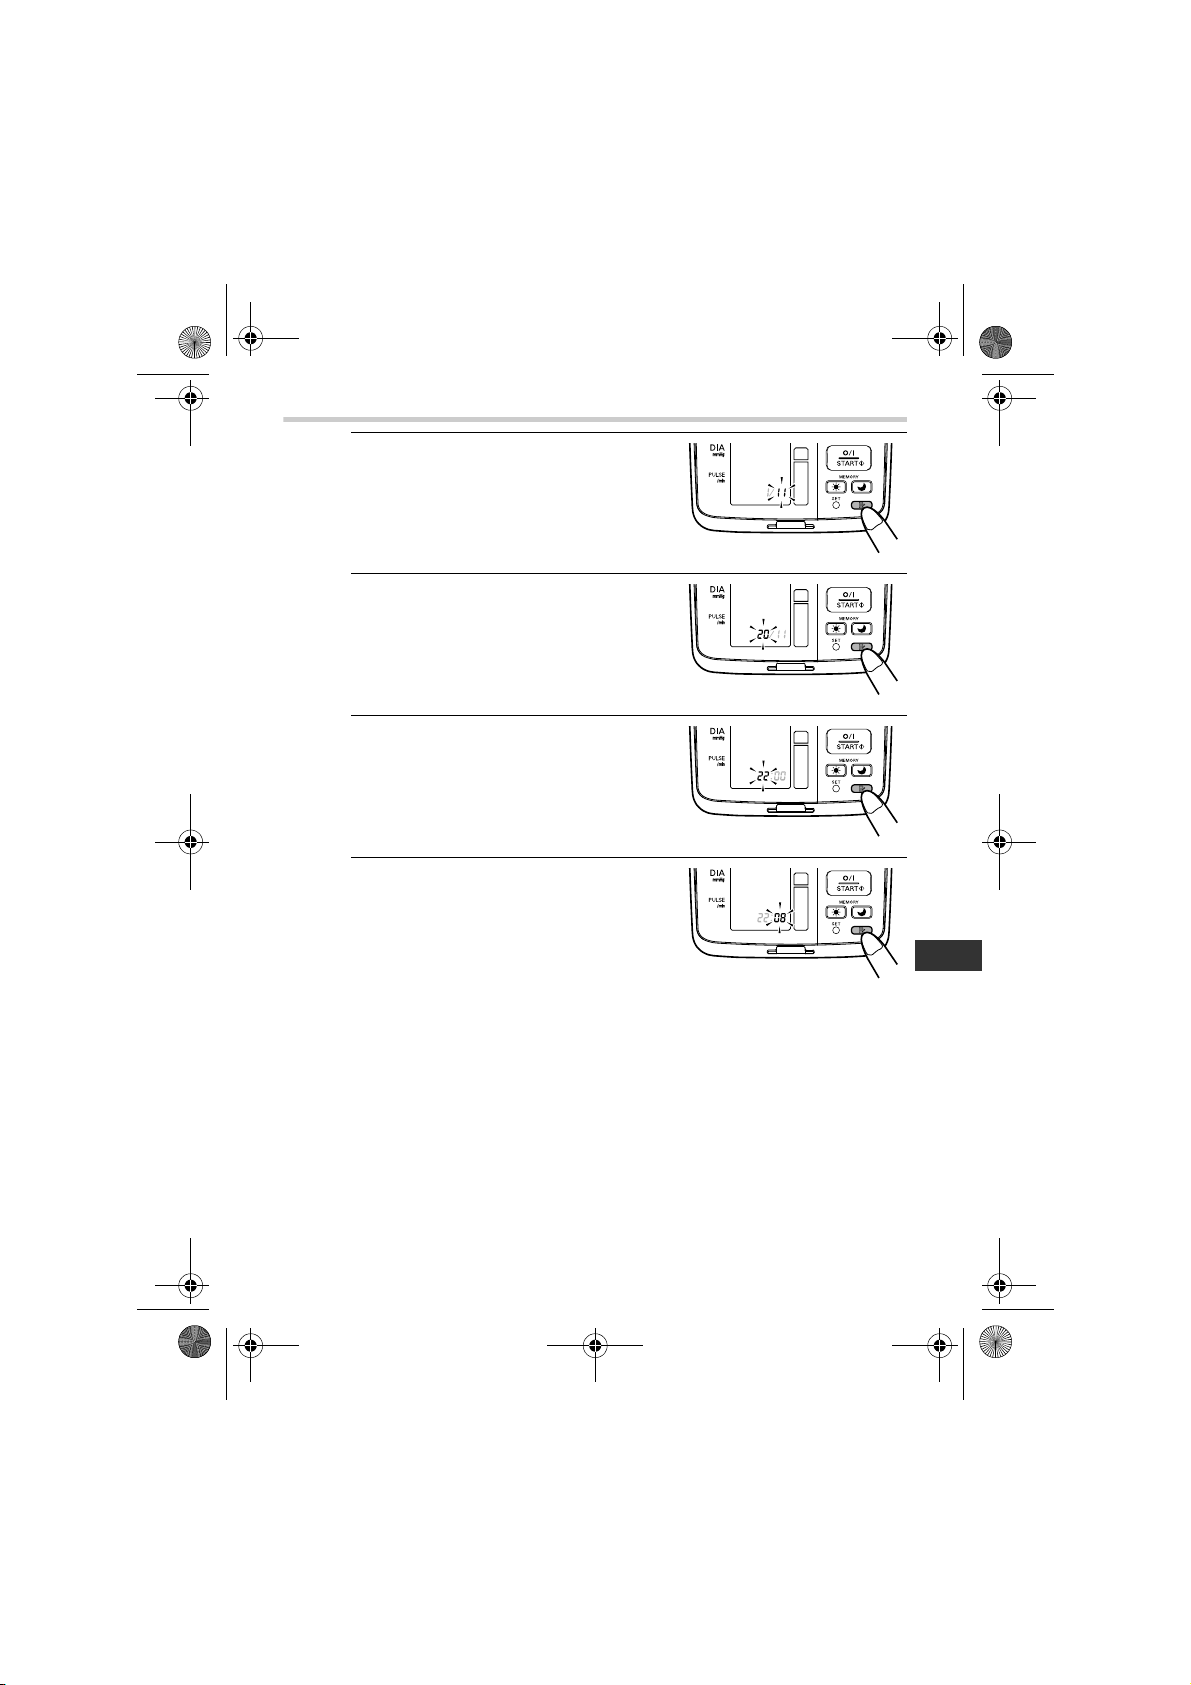
4. Repeat steps 2 and 3 to set the
month.
The month is set and the day digits
flash on the display.
5. Repeat steps 2 and 3 to set the
day.
The day is set and the hour digits
flash on the display.
6. Repeat steps 2 and 3 to set the
hour.
The hour is set and the minutes
digits flash on the display.
7. Repeat steps 2 and 3 to set the
minutes.
The minutes settings is set.
The unit automatically turns itself
off after the minute setting has
been set.
To adjust the date and time, press
and hold the SET button while the
unit is turned off.
EN
13
Page 14
HEM-7070-E_i-C10_main.book 14 ページ 2011年11月4日 金曜日 午前10時20分
2. Preparation
Notes on Adjusting the Date and Time Setting
If you need to adjust the date and time for some reason, or if the date
and time has been reset after replacing the batteries, adjust the date
and time between 10:00 and 18:59. This will avoid problems with
morning and evening weekly averages stored in memory.
To adjust the date or time at a later stage, start the unit in the off
position. Follow the steps below.
1. Press and hold the SET button.
The auto mode symbol and the current setting (on or
oFF) will appear on the display for the user ID selected.
If the year is not flashing, press the SET button once or twice
until the year is flashing.
The year flashes on the display.
2. Refer to Chapter 2.2.2 to start setting the date and time.
With this manual setting of date and time the unit needs to be
manually shut off. It will not automatically turn off after the
minutes have been set.
14
Page 15
HEM-7070-E_i-C10_main.book 15 ページ 2011年11月4日 金曜日 午前10時20分
2. Preparation
Notes:
• Please ensure that the date and time have been set correctly so that
the weekly averages will be displayed correctly. If the Date/Time
settings have been accidentally set incorrectly, press the SET button
to circle through the settings in order to adjust to their correct values.
• In the case where the time displays incorrectly after a long period of
non-use of the unit, reset the Date and Time (refer to Chapter 2.2 for
instructions on setting the clock values). Erase the recorded values
when reusing the unit (refer to Chapter 3.5 for directions on erasing
the recorded values).
15
EN
Page 16
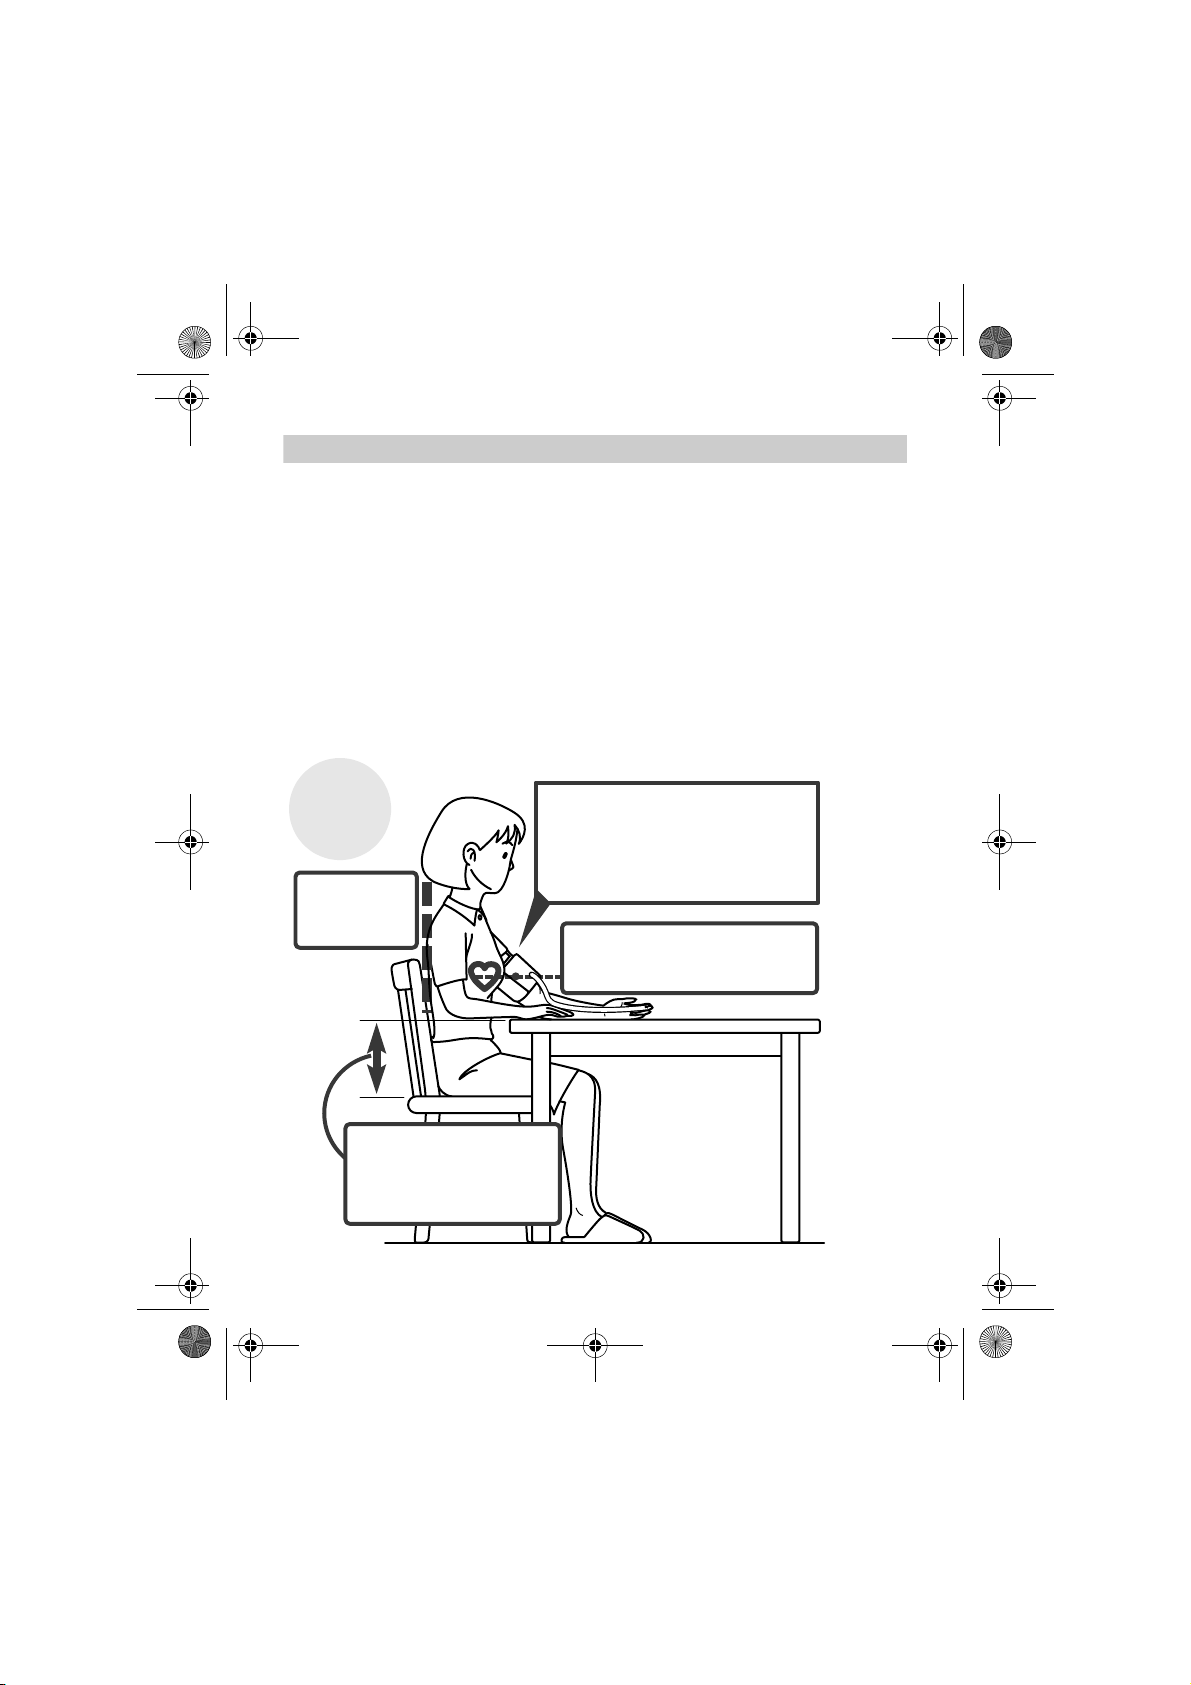
Correct
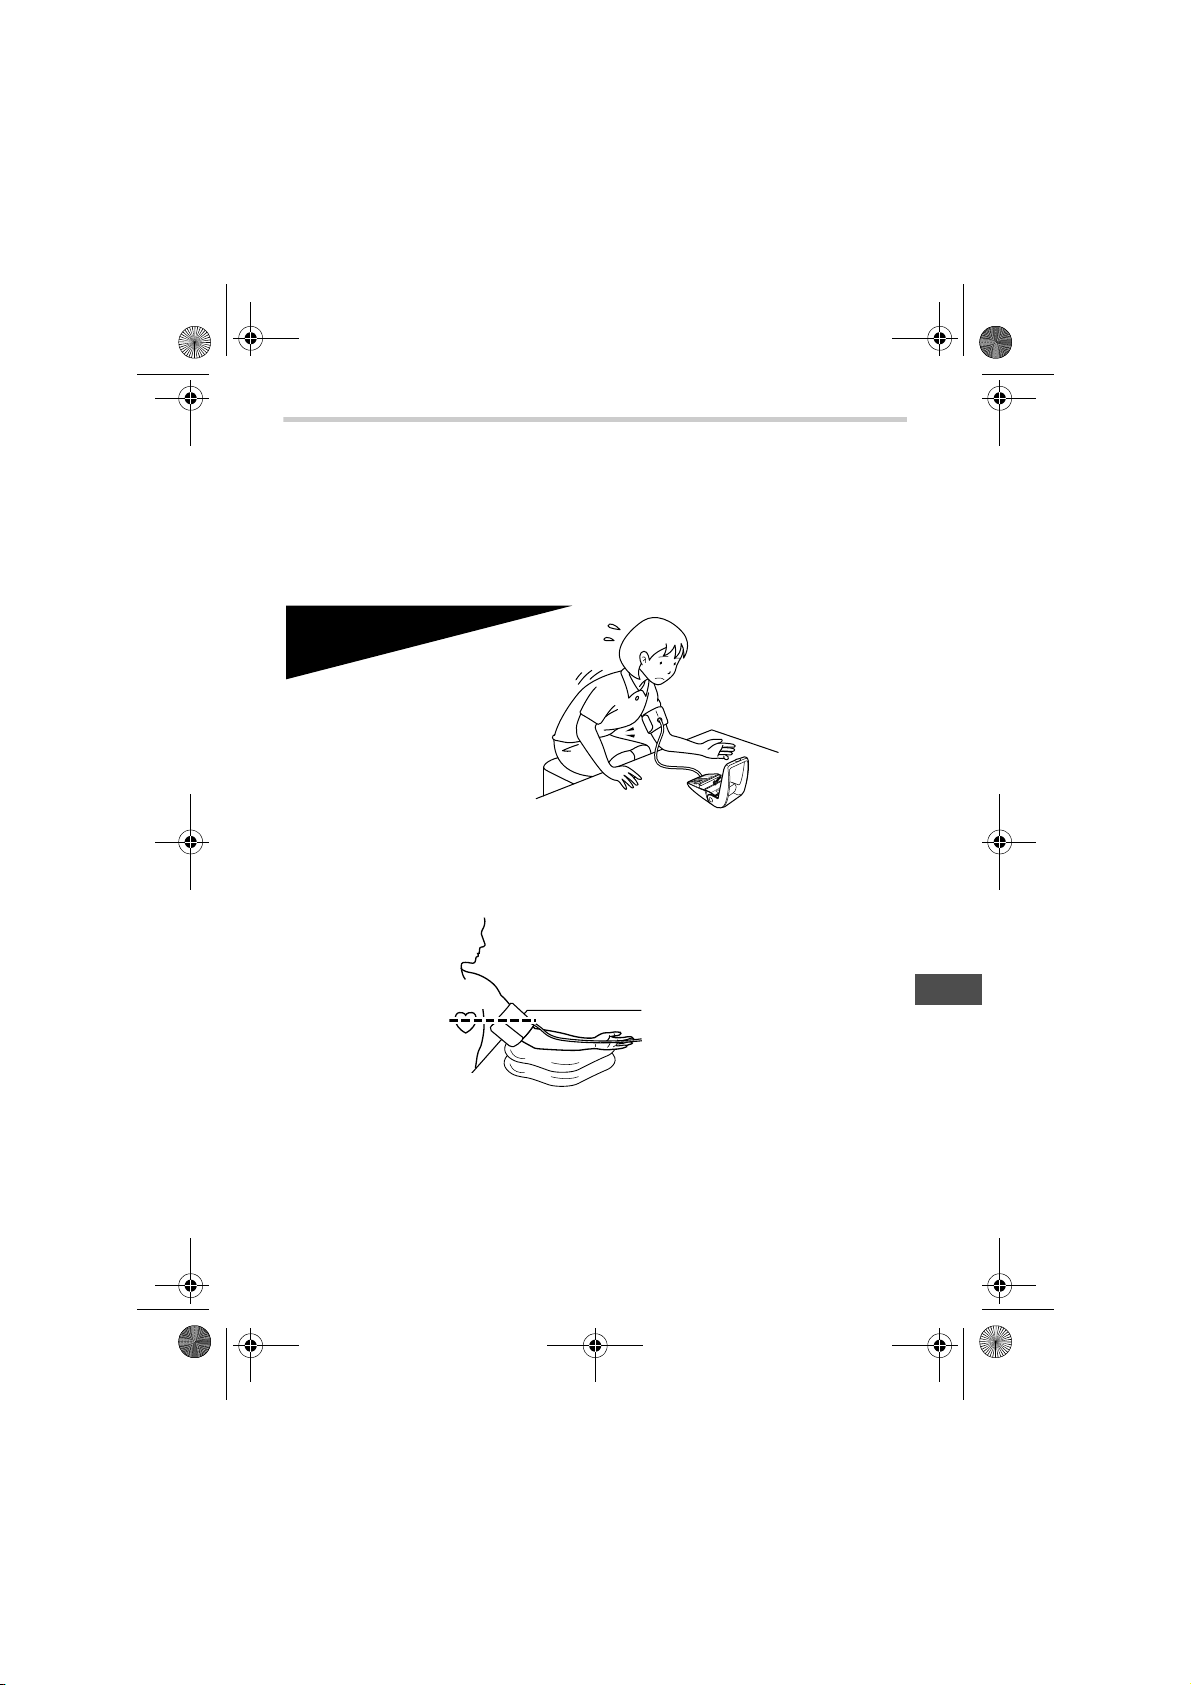
Posture
Remove tight fitting clothing from
your upper arm, and any thick
clothing such as a sweater.
Do not place the cuff over thick
clothes and do not roll up your sleeve
if it is too tight.
Sit upright
with your
back straight.
Place your arm on a table so
that the cuff will be at the same
level as your heart.
The gap between the
chair and the top of the
table should be between
25cm to 30cm.
HEM-7070-E_i-C10_main.book 16 ページ 2011年11月4日 金曜日 午前10時20分
Operating instructions
3. Using the Unit
3. Using the Unit
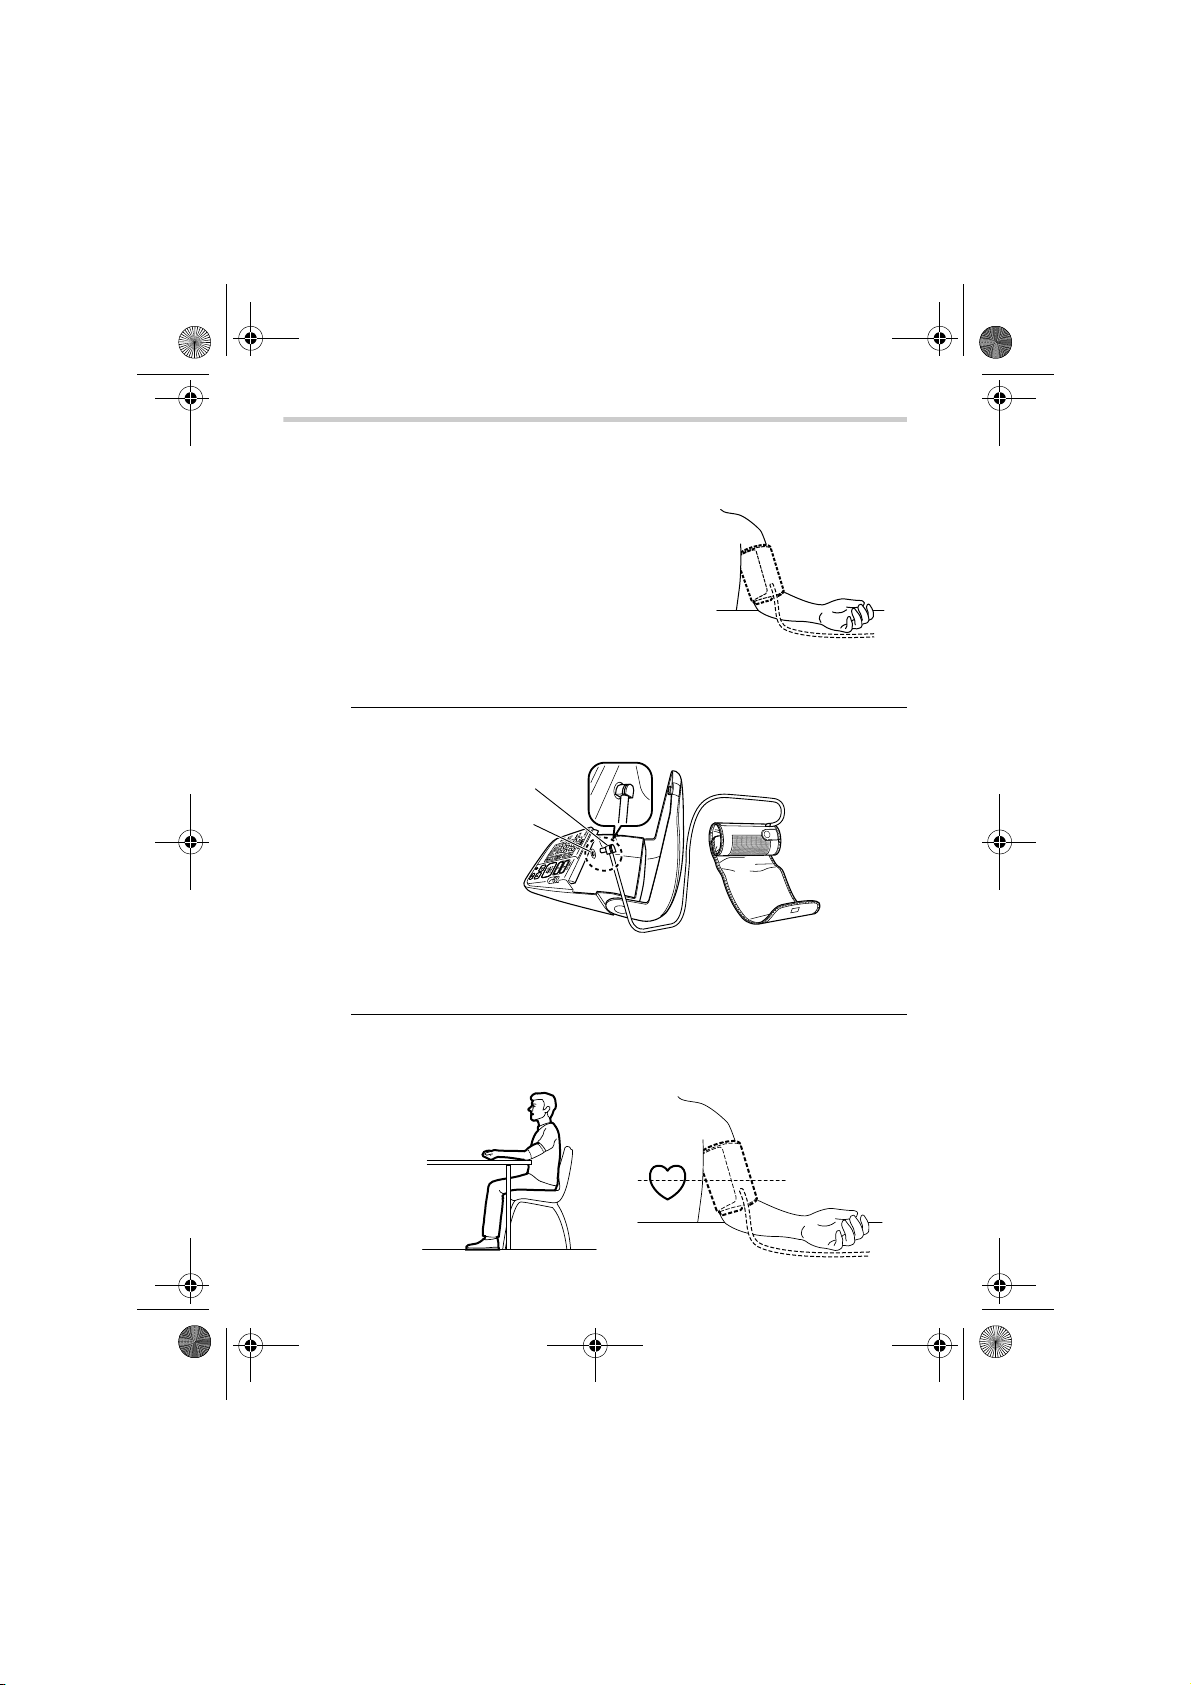
3.1 How to Sit Correctly When Taking a Measurement
You can take a measurement on either your left or right arm.
Notes:
• Measurements should be taken in a quiet place and you should be in
a relaxed, seated position. Make sure that the room is not too hot or
cold.
• Avoid eating, smoking, or exercising for at least 30 minutes before
taking a measurement.
• Do not move or talk during measurement.
16
Page 17
Incorrect Posture
These situations could lead to higher blood pressure values due to
strain or the arm cuff being lower than the heart.
If the arm cuff is at a lower position than your heart use cushions
etc., to adjust the height of your arm.
• Arched back (leaning
forwards)
• Sitting cross-legged
• Sitting on a sofa or at a low
table so that you tend to lean
forward
HEM-7070-E_i-C10_main.book 17 ページ 2011年11月4日 金曜日 午前10時20分
3. Using the Unit
Notes:
• Correct posture during measurement is necessary to get accurate
results.
• You should also try to measure your blood pressure at the same time
each day. (Within 1 hour after waking up is recommended.)
EN
17
Page 18
Air plug
Air jack
HEM-7070-E_i-C10_main.book 18 ページ 2011年11月4日 金曜日 午前10時20分
3. Using the Unit
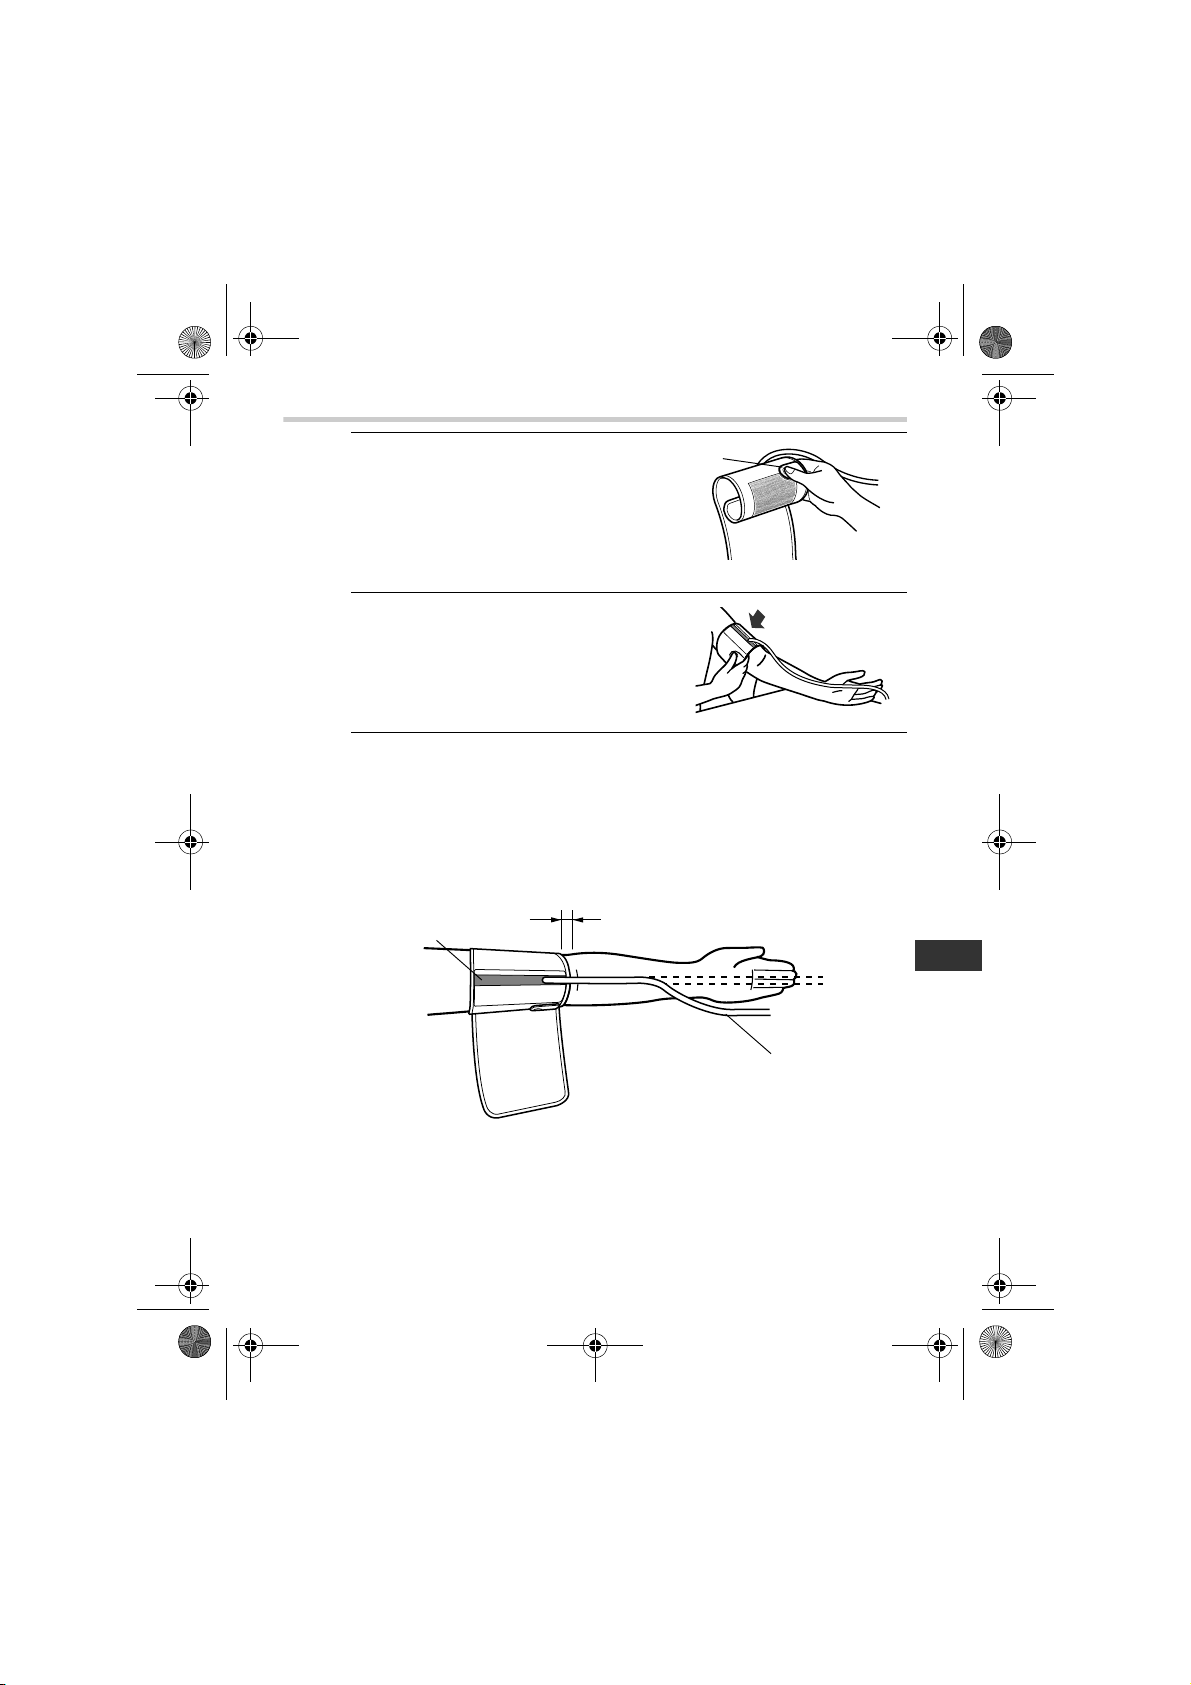
3.2 Applying the Arm Cuff
You can wrap the cuff either on your right or left arm.
• Remove tight-fitting clothing from your
upper arm.
• Do not place the cuff over thick clothes and
do not roll up your sleeve if it is too tight.
Taking Measurements on the Left Arm
1. Insert the air plug into the air jack (inside the Cuff Compartment
of the device).
The cuff must be fully deflated when it is inserted into the air
jack.
2. Sit on a chair with your feet flat on the floor and place your arm
on a table so that the cuff will be at the same level as your
heart.
18
Page 19
Grip
Fabric fastener
Blue strip
Bottom edge 1 to 2 cm
Air tube
HEM-7070-E_i-C10_main.book 19 ページ 2011年11月4日 金曜日 午前10時20分
3. Using the Unit
3. Hold the grip on the cuff securely
with your hand.
4. Turn the palm of your hand upward.
5. Apply the cuff to your upper arm so that the blue strip is centred
on the middle of your inner arm and points down the inside of
the arm. The air tube should run down the inside of your
forearm and be in line with your middle finger.
The bottom of the cuff should be approximately 1 to 2 cm
above the elbow.
EN
19
Page 20
HEM-7070-E_i-C10_main.book 20 ページ 2011年11月4日 金曜日 午前10時20分
3. Using the Unit
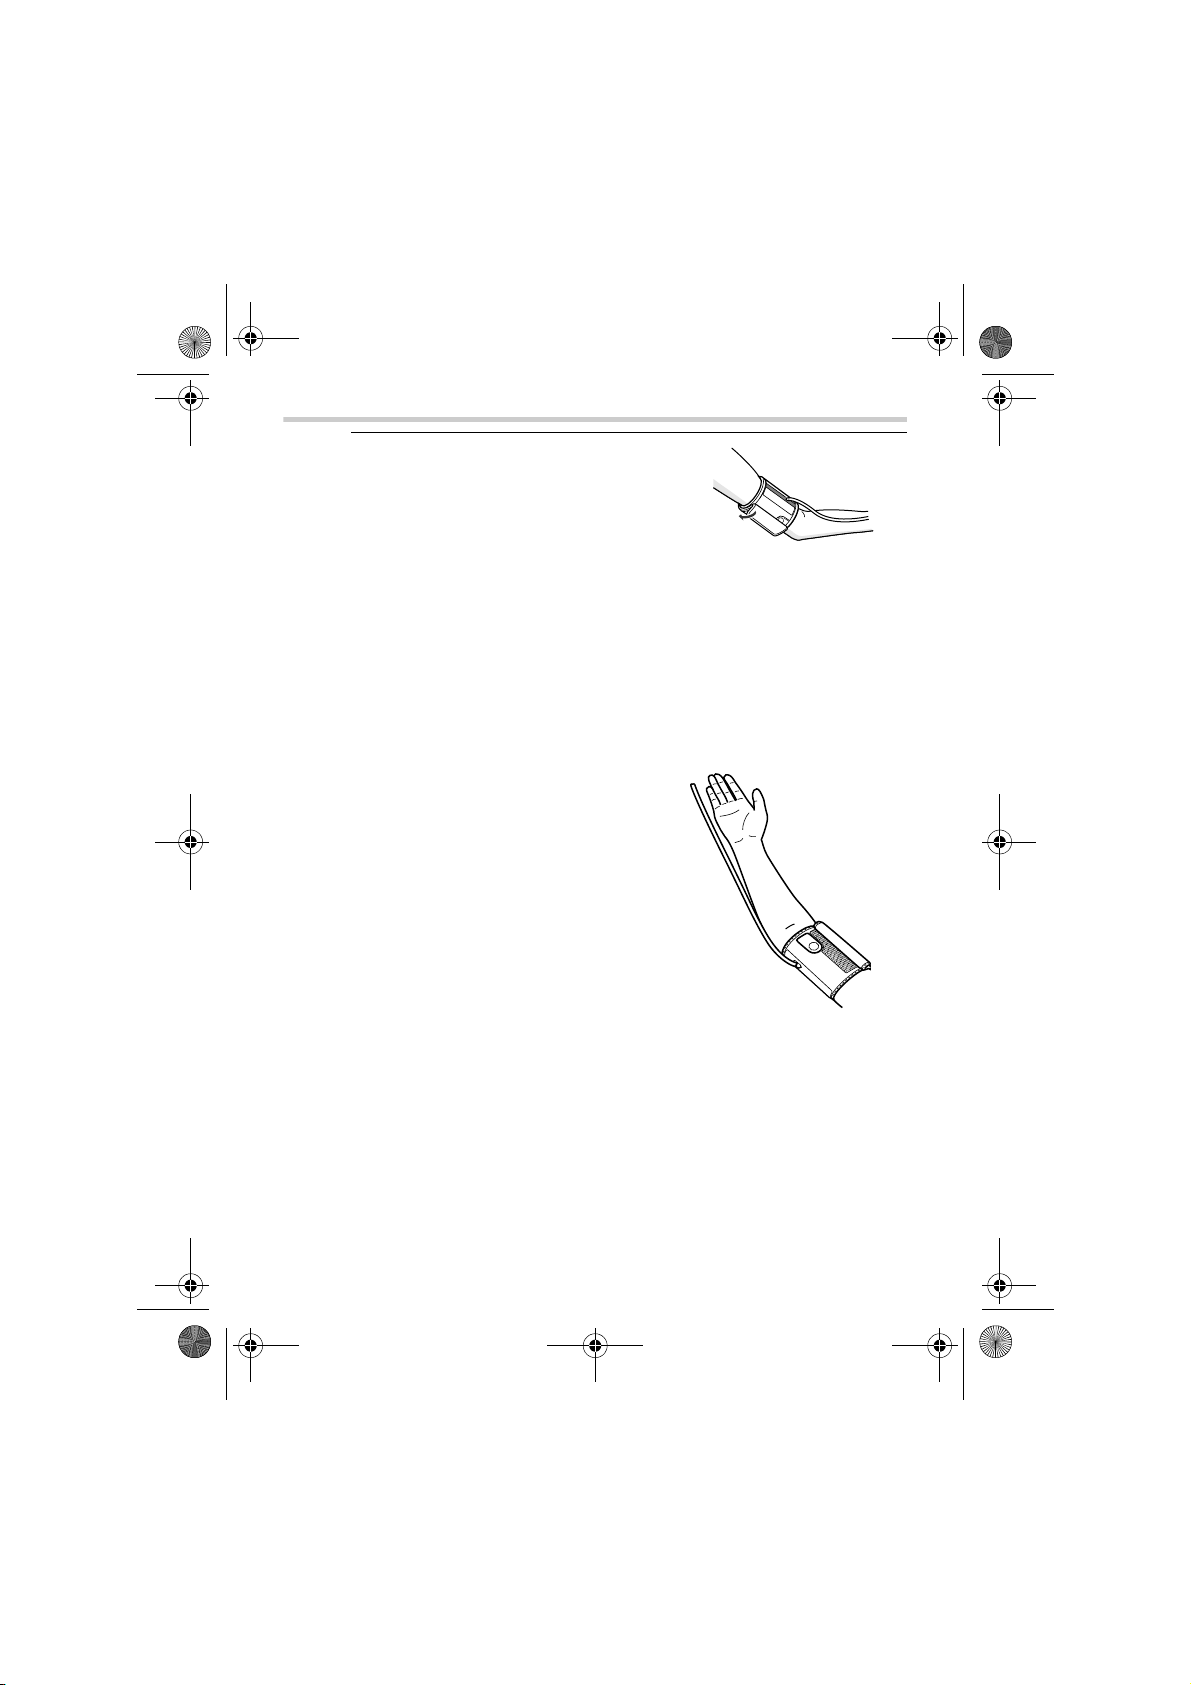
6. When the cuff is positioned correctly,
close the fabric fastener FIRMLY.
Notes:
• Make certain the cuff fits snugly around your arm.
• The cuff should make good contact with your skin. You should
be able to fit your index finger between the cuff and your arm
easily, so you can pull the cuff off and on.
• Make sure that there are no kinks in the air tubing.
Taking Measurements on the Right Arm
Please note the following points when
applying the cuff to your right arm. Apply the
cuff so that the air tube is at the side of your
elbow.
Notes:
• Be careful not to rest your arm on the air
tube, or otherwise restrict the flow of air to
the cuff.
• Apply the arm cuff so that no part of the
cuff is positioned over the elbow joint. The
cuff should be 1 to 2 cm above the elbow.
• If used 2 times per day, the cuff will last for 3 years.
• The blood pressure can differ between the right arm and the left arm,
and therefore also the measured blood pressure values can be
different. Omron recommends to always use the same arm for
measurement. If the values between the two arms differ substantially,
please check with your physician which arm to use for your
measurement.
20
Page 21
Press for at least 3 seconds
A and B display
goes out
HEM-7070-E_i-C10_main.book 21 ページ 2011年11月4日 金曜日 午前10時20分
3. Using the Unit
3.3 Taking a Reading
The unit is designed to take measurements and store the
measurement values in the memory for two people using user ID A and
user ID B.
The unit can also be used to take a single measurement for other
persons using the guest mode. The user ID symbol is not displayed
when using the guest mode. Measurements taken using the guest
mode are not stored in the memory.
Using the Guest Mode
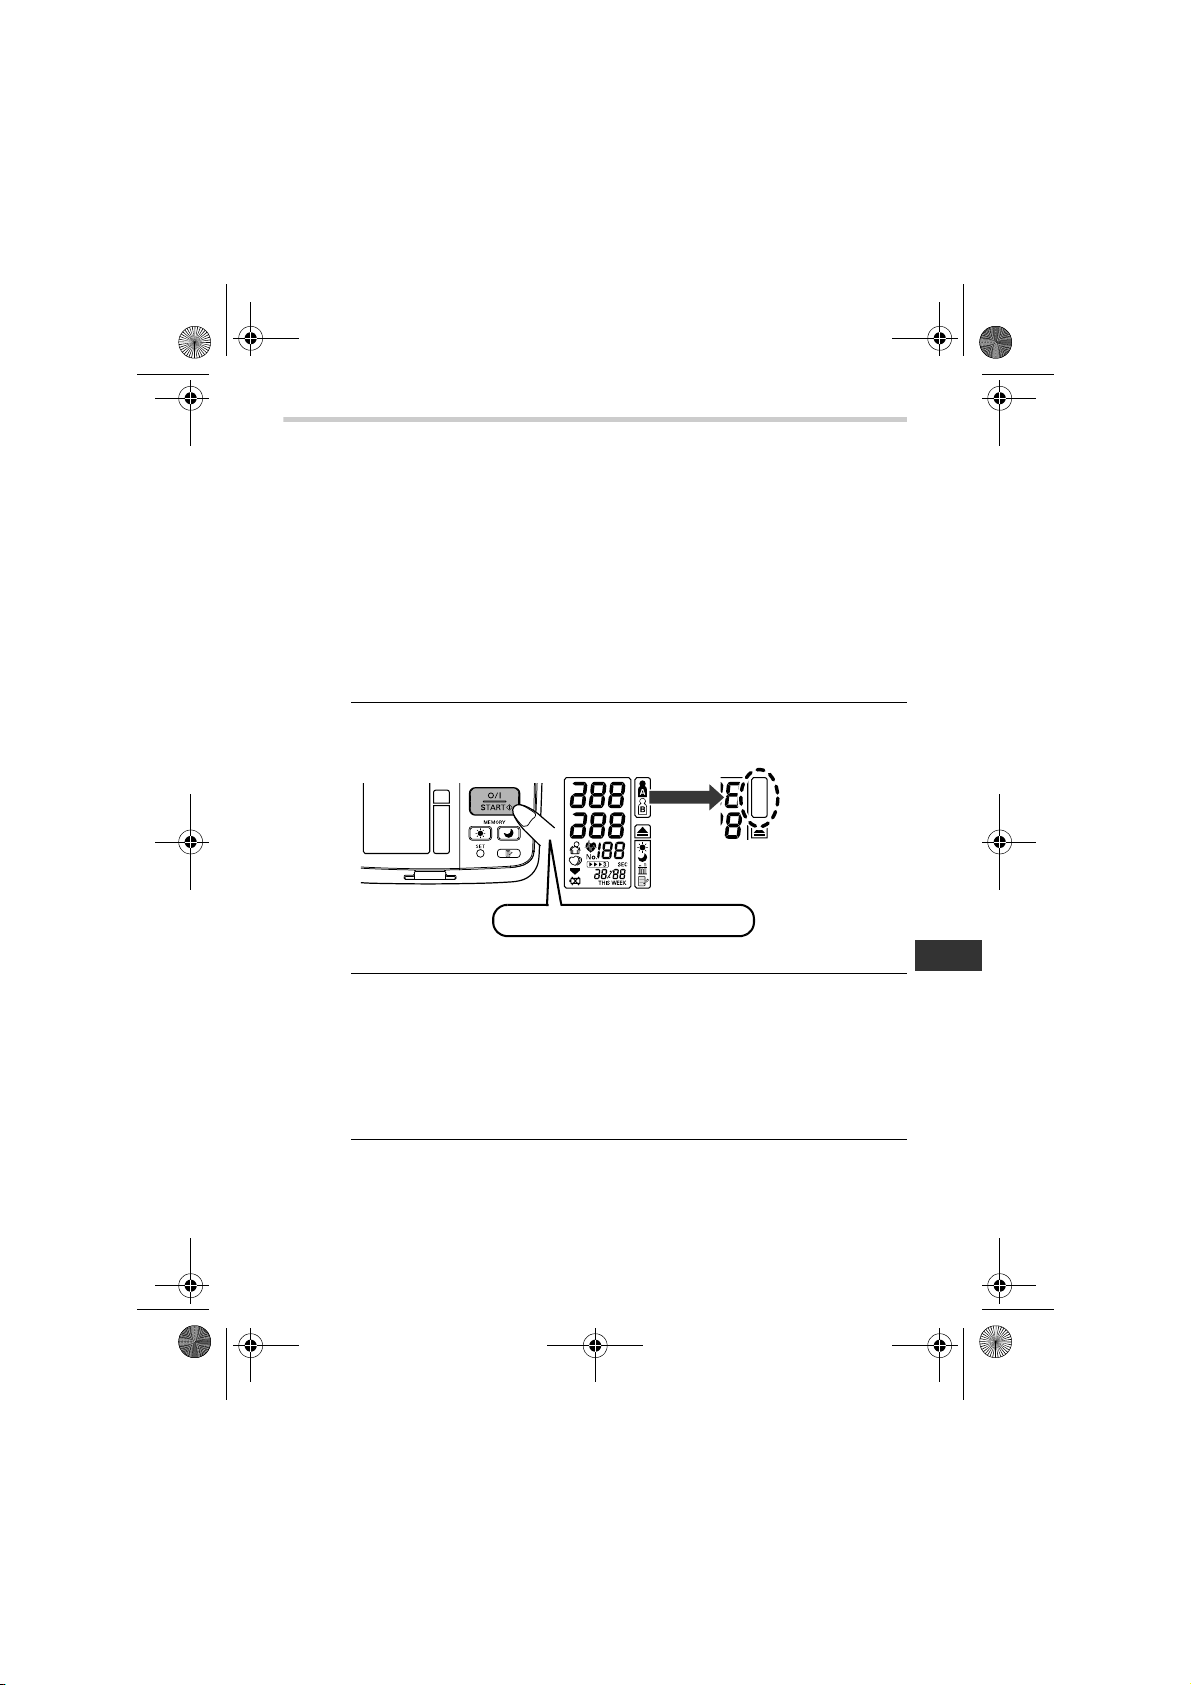
1. Press and hold the O/I START button until the A and B user
symbols disappear from the display.
2. Release the O/I START button.
The cuff starts to inflate automatically.
Note: To stop the inflation press and release the O/I START
button. The unit will stop inflating, start deflation and turn
off.
3. Inflation stops and the measurement is started. When the
measurement is completed, your blood pressure and pulse rate
appear on the display.
EN
21
Page 22
HEM-7070-E_i-C10_main.book 22 ページ 2011年11月4日 金曜日 午前10時20分
3. Using the Unit
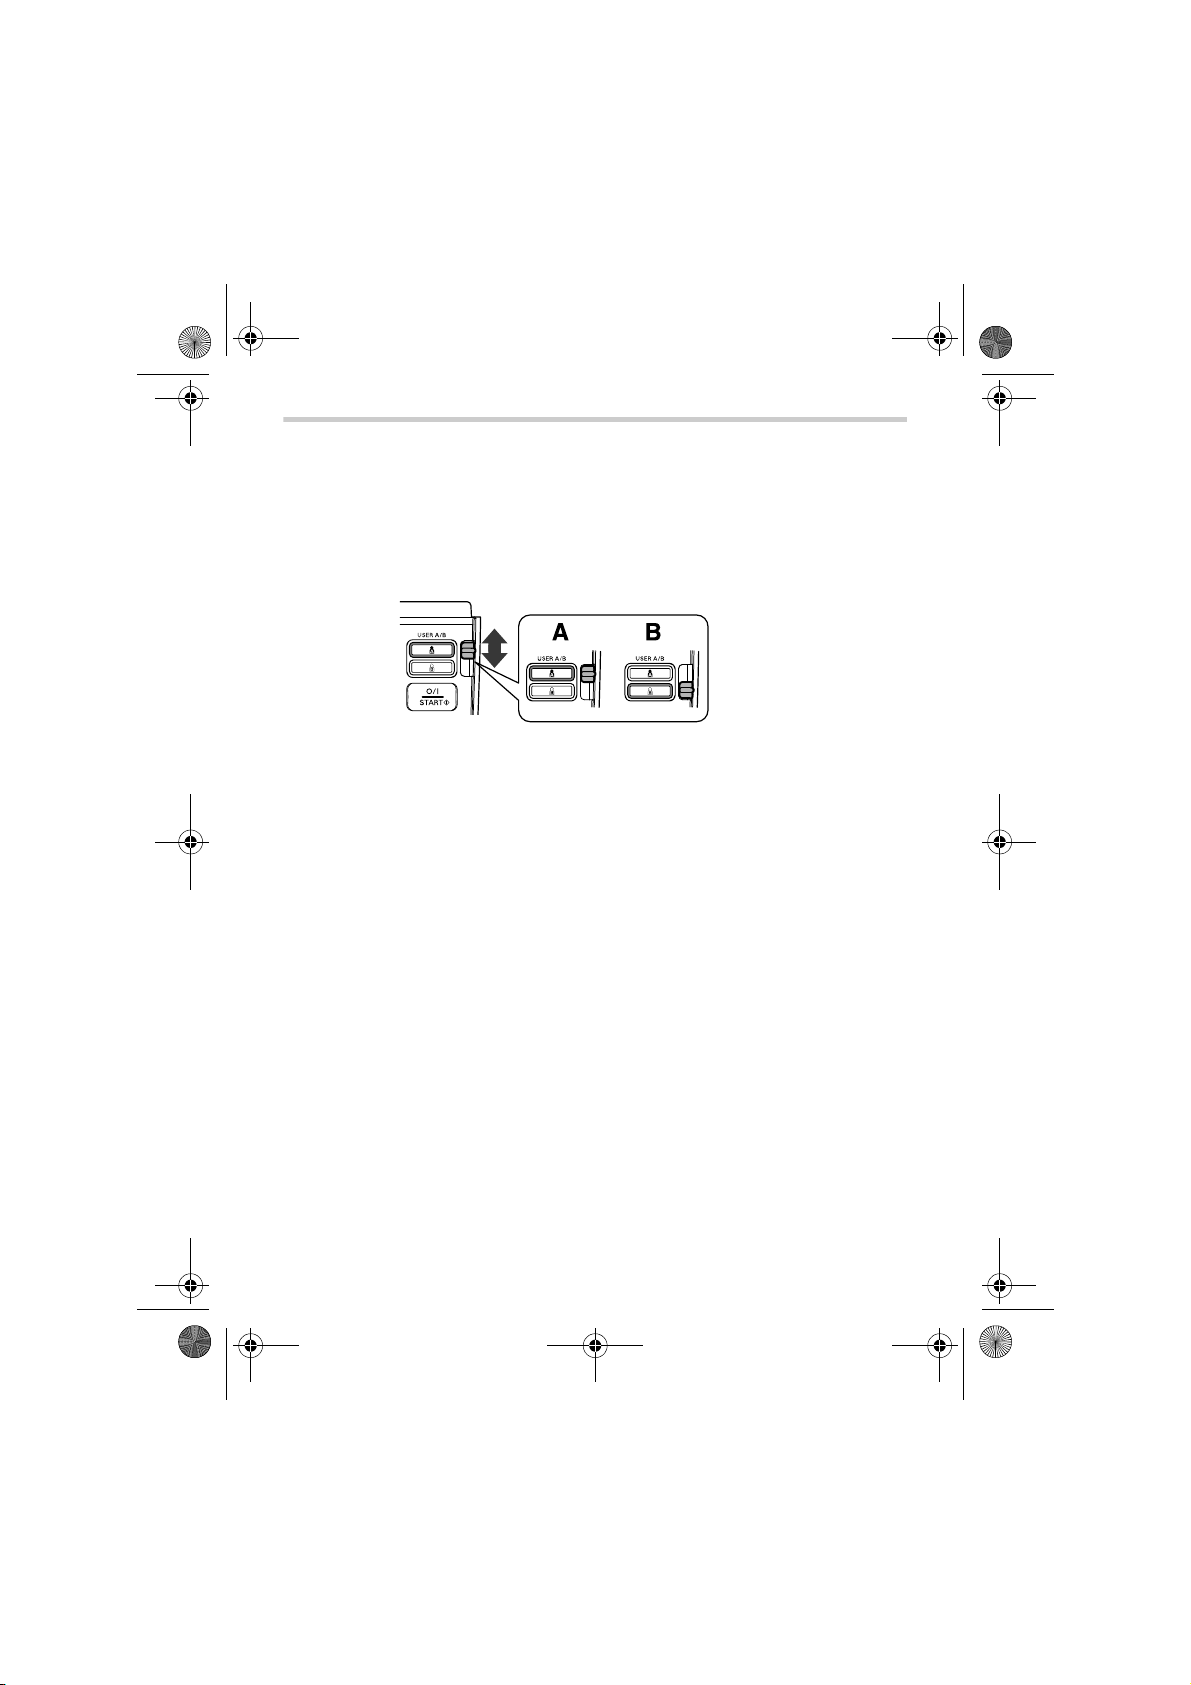
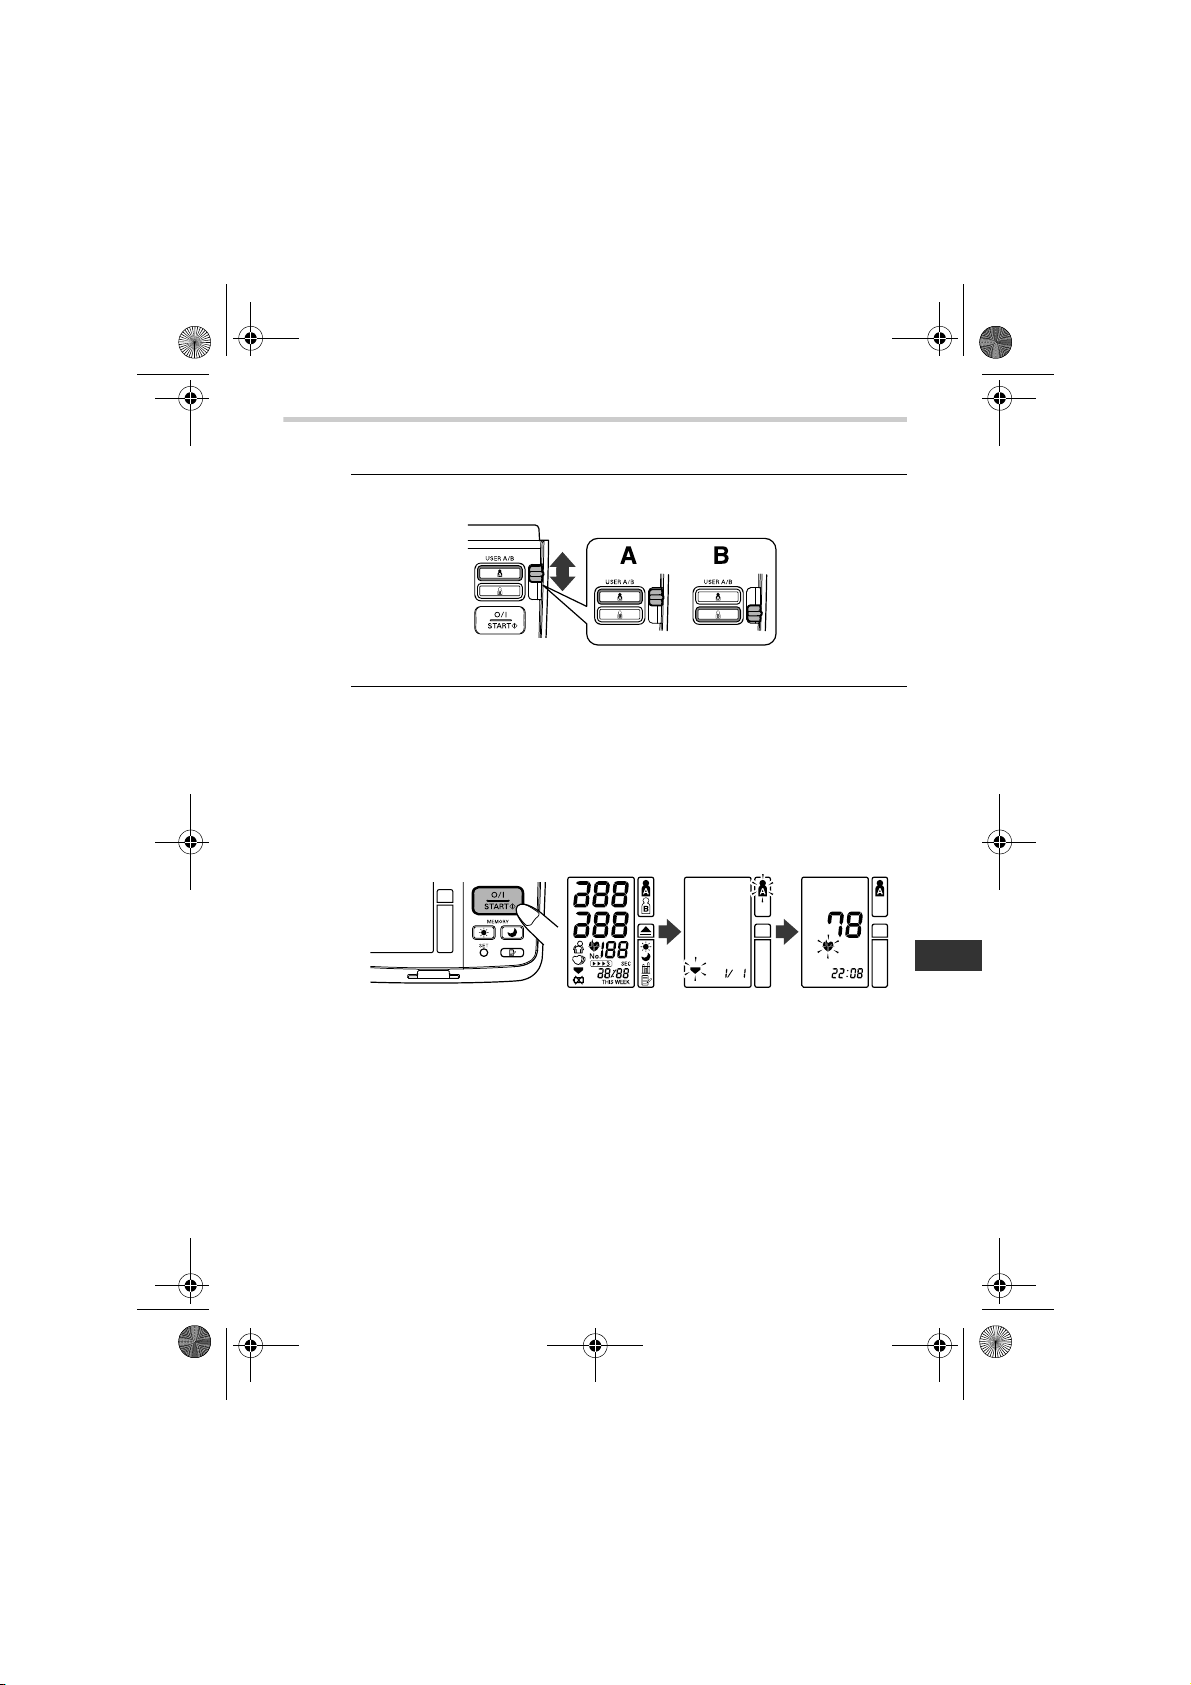
Selecting the User ID
Select your user ID. Always use the same user ID when taking a
measurement. The unit stores the measurement values in the memory
by the user ID selected. These measurement values are used to
calculate the morning averages and evening averages.
Slide the user ID selection switch up or down to select user A or B.
Using the User ID
When you select a user ID the unit can be set to take one
measurement using the single mode or three consecutive
measurements using the auto mode when you press the O/I START
button.
Note: The default value is set to the single mode to take one
measurement.
The auto mode takes three consecutive measurements. The unit will
inflate the cuff and take three measurements separated by a short
interval of time between each measurement.
22
Page 23
HEM-7070-E_i-C10_main.book 23 ページ 2011年11月4日 金曜日 午前10時20分
3. Using the Unit
Using the Single Mode
1. Select your user ID (A or B).
2. Press the O/I START button.
All symbols appear on the display. The user ID symbol you
selected flashes on the display.
The cuff starts to inflate automatically. As the cuff inflates, the
unit automatically determines your ideal inflation level. This unit
detects the pulse during inflation. Do not move your arm and
remain still until the entire measurement process is completed.
Note: To stop the inflation or measurement, press and release
the O/I START button. The unit will stop inflating, start
deflating and will turn off.
23
EN
Page 24
HEM-7070-E_i-C10_main.book 24 ページ 2011年11月4日 金曜日 午前10時20分
3. Using the Unit
3. Inflation stops automatically and the measurement is started.
As the cuff deflates, decreasing numbers appear on the
display. The heartbeat symbol ( ) flashes at every heartbeat.
4. When the measurement is complete, the arm
cuff completely deflates. Your blood pressure
and pulse rate are displayed.
5. Press the O/I START button to turn
the unit off.
24
Note: If you forget to turn the
monitor off, it will
automatically turn off after
five minutes.
Notes:
• Self-diagnosis of measured results and treatment are
dangerous. Please follow the instructions of your doctor.
• Wait 2-3 minutes before taking another blood pressure
measurement. Waiting between readings allows the arteries
to return to the condition prior to taking the blood pressure
measurement.
Page 25
HEM-7070-E_i-C10_main.book 25 ページ 2011年11月4日 金曜日 午前10時20分
3. Using the Unit
Selecting the Auto Mode
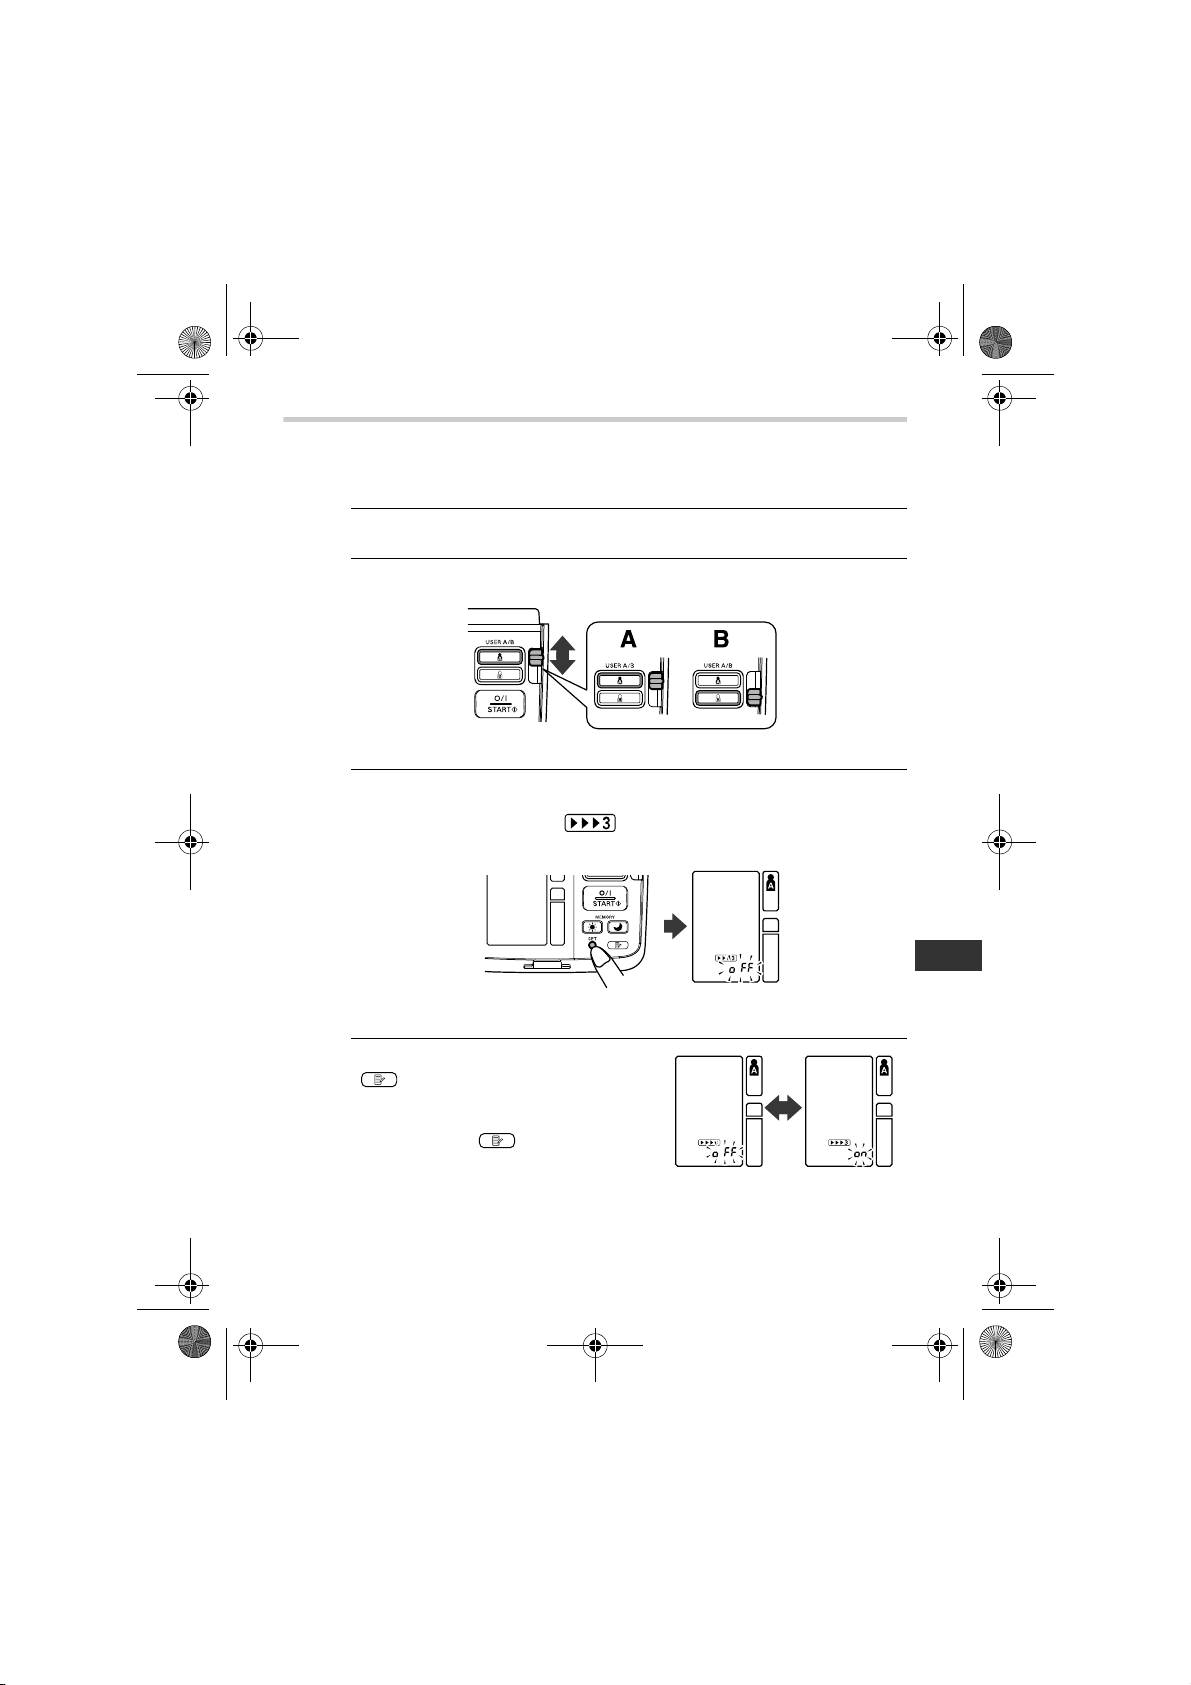
Auto Mode may be selected for either A or B user.
1. Make sure the unit is powered off.
2. Select your user ID (A or B).
3. Press and hold the SET button.
The auto mode symbol ( ) and the oFF setting appears on
the display.
4. Press the MEMORY button
( ) to select on.
Note: Press the MEMORY
button ( ) to alternate
between on and oFF.
EN
25
Page 26

HEM-7070-E_i-C10_main.book 26 ページ 2011年11月4日 金曜日 午前10時20分
3. Using the Unit
5. Press the SET button to confirm the change.
The number of seconds between each measurement is
displayed.
Note: The default value between each measurement is
60 seconds.
6. Press the MEMORY button ( ) to change the interval of
time between each measurement.
The interval can be set to 15 seconds, 30 seconds, 60 seconds
or 120 seconds. Continue to press the MEMORY button ( )
until the desired interval appears on the display.
7. Press the SET button to confirm the
setting.
The year flashes on the display.
8. Press the O/I START button to turn
the unit off.
26
Page 27

HEM-7070-E_i-C10_main.book 27 ページ 2011年11月4日 金曜日 午前10時20分
3. Using the Unit
Using the Auto Mode
1. Select your user ID (A or B).
2. Press the O/I START button.
All symbols appear on the display. The user ID Symbol you
selected flashes on the display. The cuff starts to inflate
automatically.
Note: To stop the inflation or measurement, press the O/I
START button. The unit will stop inflating, start deflating
and will turn off.
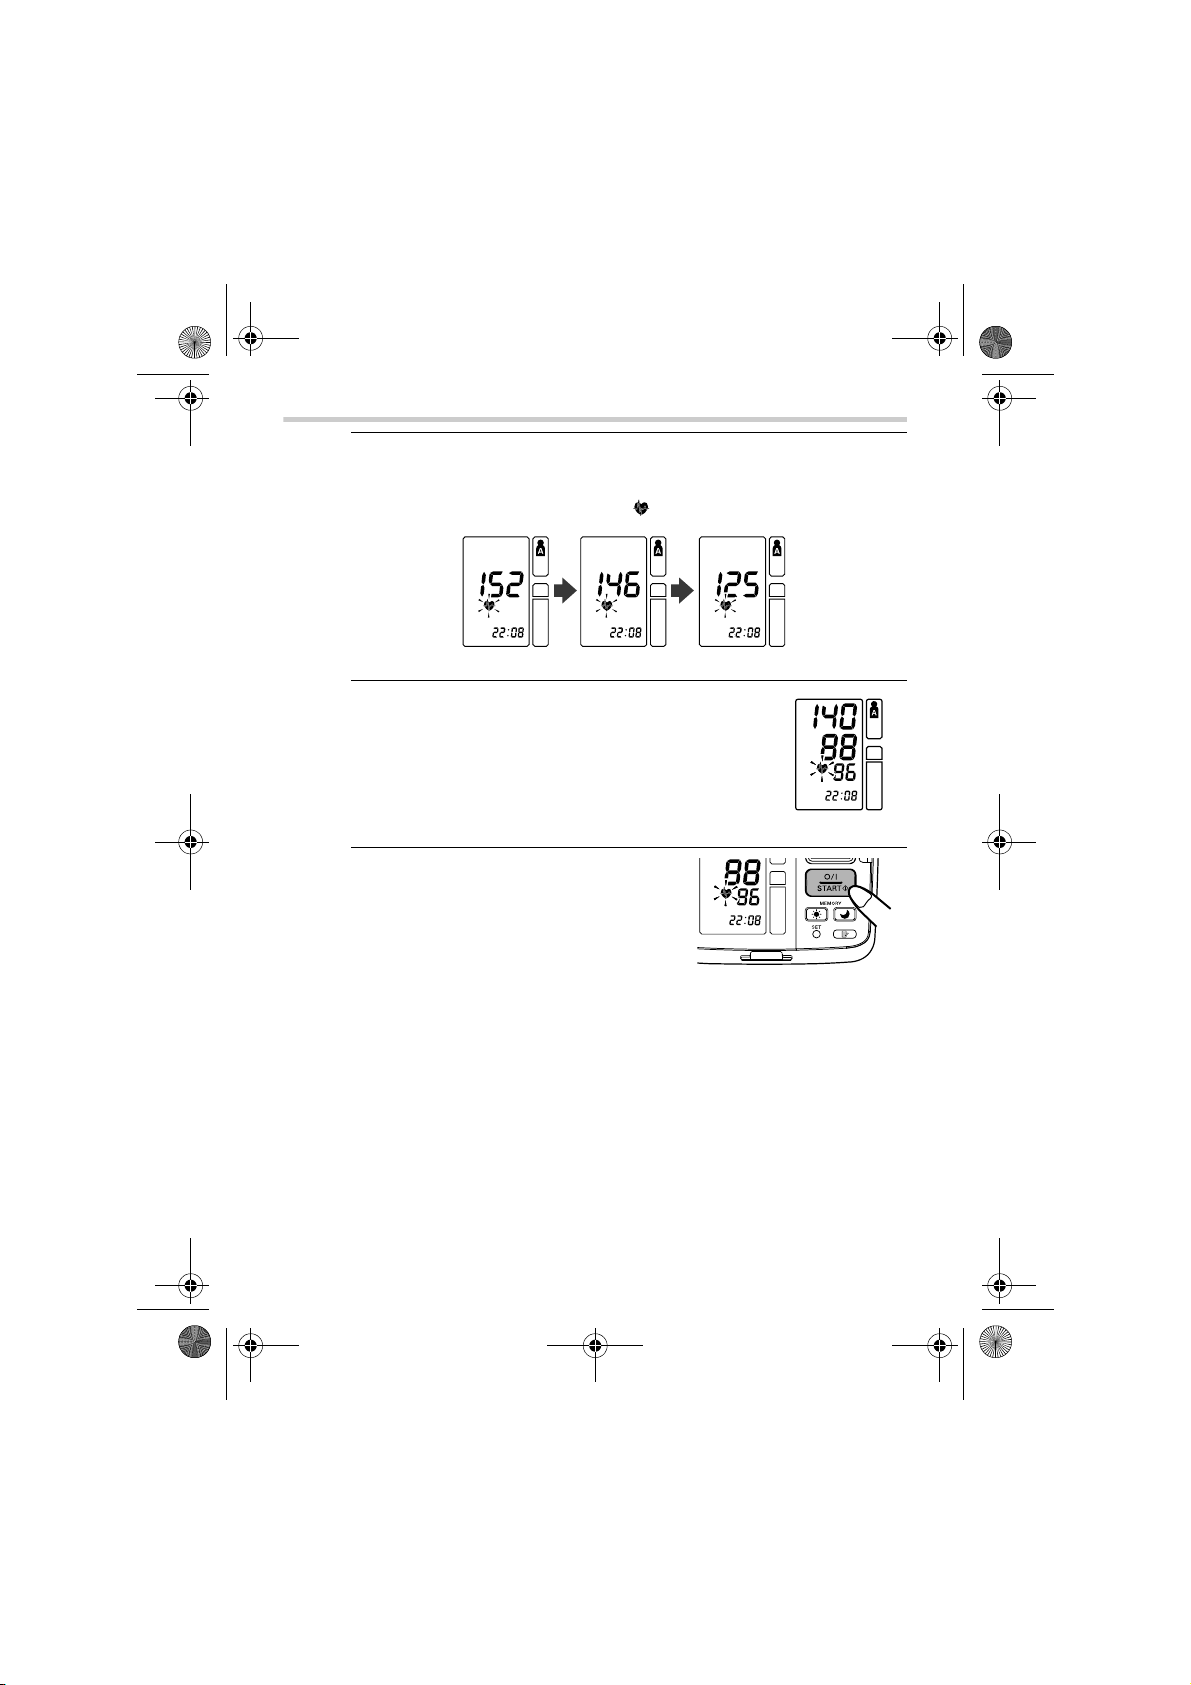
3. Inflation stops automatically and the measurement is started.
As the cuff deflates, decreasing numbers appear on the
display. The heartbeat symbol ( ) flashes at every heartbeat.
When the measurement is complete, the arm cuff completely
deflates.
Note: Do not move your arm and remain still until the entire
measurement process is completed.
4. Check the progress of the consecutive measurements.
The first measurement is complete, waiting to start the next
measurement. The interval of time set between each
measurement will appear on the display.
EN
27
Page 28
HEM-7070-E_i-C10_main.book 28 ページ 2011年11月4日 金曜日 午前10時20分
3. Using the Unit
The second measurement starts automatically.
The second measurement is complete, waiting to start the next
measurement.
The third measurement starts automatically.
The consecutive measurements are complete. The average for
the three measurements appears on the display.
The three individual measurement results are not displayed
while Auto Mode is taking the measurements. However, the
results for each individual measurement can be displayed after
all the measurements have been completed.
Note: During the Auto Mode the unit will repeat the
measurement in case of an error. After 3 errors the unit
will stop taking further measurements. If only two
measurements are successful the average of these two
measurements will be displayed. If only one
measurement is successful, this result will be displayed.
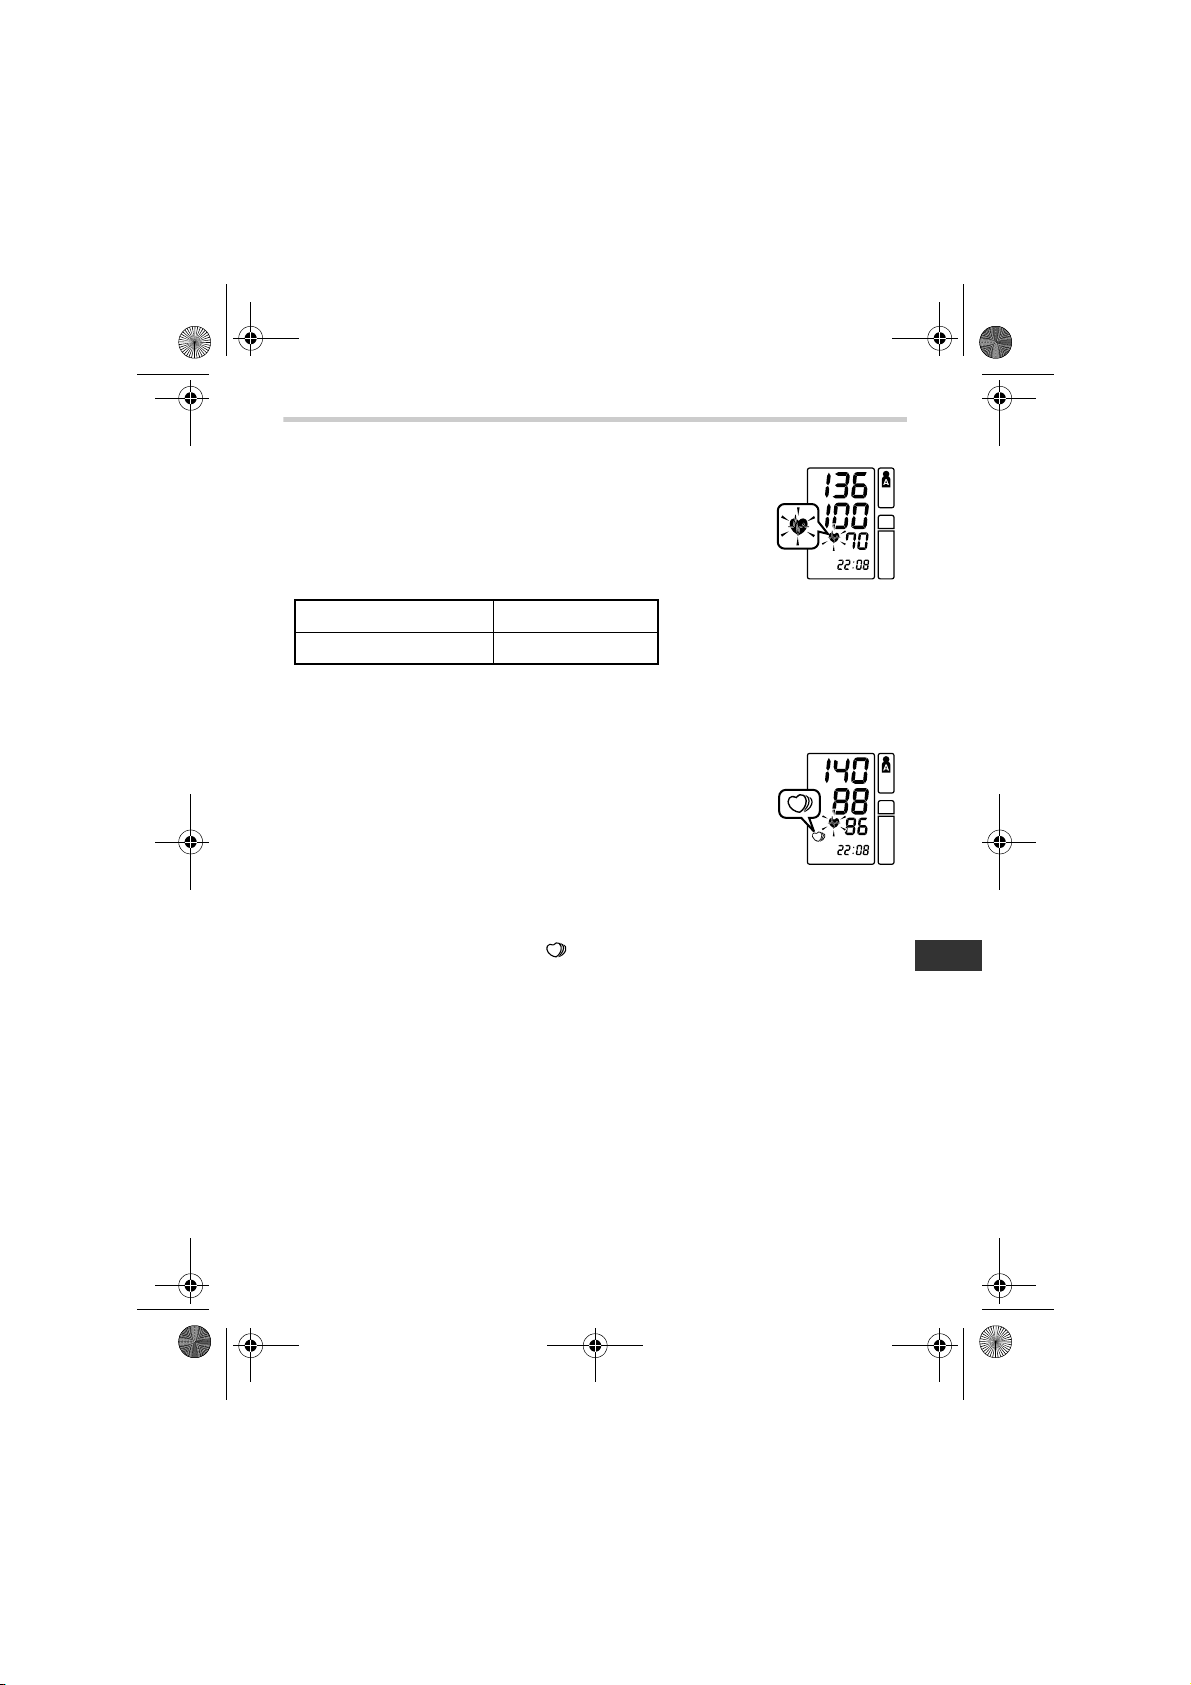
5. Press the SET button to display the blood pressure and pulse
rate for the first measurement. Press the SET button again to
display the next measurement.
6. Press the O/I START button to turn the unit off.
28
Page 29
HEM-7070-E_i-C10_main.book 29 ページ 2011年11月4日 金曜日 午前10時20分
3. Using the Unit
Important:
• If your systolic or diastolic pressure is outside the
standard range, the heartbeat symbol will blink when
the measurement result is displayed.
Recent research suggests that the following values
can be used as a guide to high blood pressure for
measurements taken at home.
Systolic Blood Pressure Above 135 mmHg
Diastolic Blood Pressure Above 85 mmHg
This criteria is for home blood pressure measurement.
For professional office blood pressure measurement criteria, please
refer to Chapter 9.
• Your blood pressure monitor includes an irregular
heartbeat feature. Irregular heartbeats can influence
the results of the measurement. The irregular
heartbeat algorithm automatically determines if the
measurement is usable or needs to be repeated. If
the measurement results are affected by irregular
heartbeats but the result is valid, the result is shown
together with the irregular heartbeat icon. If the irregular heartbeats
cause the measurement to be invalid, no result is shown. If the
irregular heartbeat symbol ( ) is shown after you have taken a
measurement, repeat the measurement. If the irregular heartbeat
icon is shown frequently, please make your doctor aware of it.
EN
29
Page 30
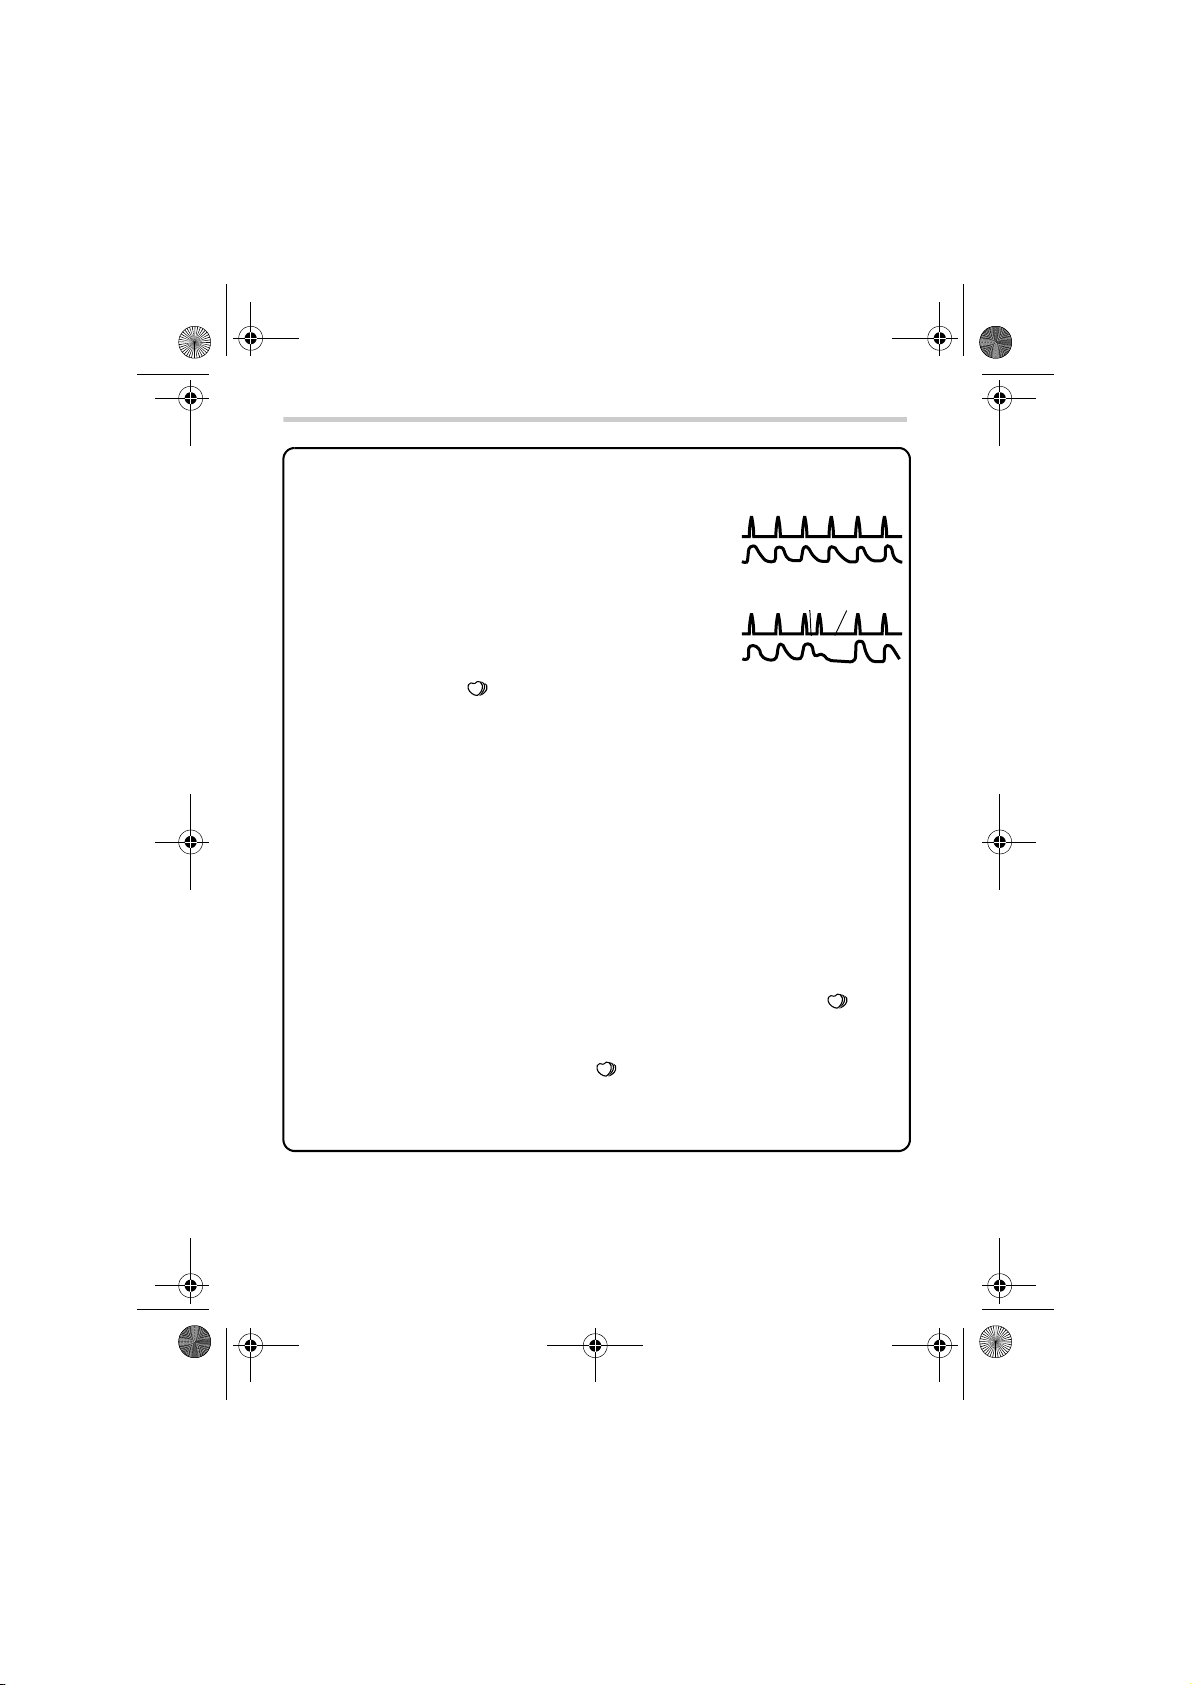
Normal Heartbeat
Irregular Heartbeat
Pulse
Blood pressure
Blood pressure
Short
Long
Pulse
HEM-7070-E_i-C10_main.book 30 ページ 2011年11月4日 金曜日 午前10時20分
3. Using the Unit
What is Irregular Heartbeat?
An irregular heartbeat is a heartbeat
rhythm that varies by more than 25%
from the average heartbeat rhythm
detected while the unit is measuring
the systolic and diastolic blood
pressure.
If such an irregular rhythm is
detected more than twice during
measurement, the irregular
heartbeat symbol ( ) appears on
the symbol when the measurement
results are displayed.
What is Arrhythmia?
A heartbeat is stimulated by electrical signals that cause the heart to
contract.
Arrhythmia is a condition where the heartbeat rhythm is abnormal due
to flaws in the bio-electrical system that drives the heartbeat. Typical
symptoms are skipped heartbeats, premature contraction, an
abnormally rapid (tachycardia) or slow (bradycardia) pulse. This can
be caused by heart disease, aging, physical predisposition, stress,
lack of sleep, fatigue etc. Arrhythmia can only be diagnosed by a
doctor through a special examination.
Whether the appearance of the irregular heartbeat symbol ( ) in
the results indicates arrhythmia or not can only be determined by an
examination and diagnosis by your doctor.
If the irregular heartbeat symbol ( ) is shown frequently, please
make your doctor aware of it. Conducting self-diagnosis and
treatment based on measurement results is dangerous. Be sure to
follow the instructions of your doctor.
30
Page 31

HEM-7070-E_i-C10_main.book 31 ページ 2011年11月4日 金曜日 午前10時20分
3. Using the Unit
3.4 Instructions for Special Conditions
If your systolic pressure is known to be more than 220 mmHg, press
and hold the O/I START button until the arm cuff inflates 30 to
40 mmHg higher than your suspected systolic pressure.
1. Press the O/I START button to turn
the unit on.
Measurement starts.
2. When the cuff starts to inflate, press the O/I START button and
keep it pressed until the pressure is 30 to 40 mmHg higher
than your suspected systolic pressure.
Note: You cannot inflate the cuff above 299 mmHg. (An error
will be displayed if you try to inflate the cuff above
300 mmHg.)
3. Release the O/I START button when the cuff has been inflated
to the desired pressure.
The cuff starts to deflate and measurement starts.
EN
4. The rest of the procedure is the same as for normal
measurement. Refer to Chapter 3.3.
Note: Do not apply more pressure than necessary.
31
Page 32

HEM-7070-E_i-C10_main.book 32 ページ 2011年11月4日 金曜日 午前10時20分
3. Using the Unit
3.5 Using the Memory Function
The unit is designed to store the blood pressure and the pulse rate in
the memory for two people (user A and user B) every time a
measurement is completed.
The unit automatically stores up to 84 sets of measurement values
(blood pressure and pulse rate) for each user (A and B). When 84 sets
of measurement values are stored, the oldest record is deleted to save
the most recent values. The unit also stores 8 weeks of morning
averages and 8 weeks of evening averages for each user (A and B).
Average Function
The unit calculates the average reading based on the three most
recent sets of measurement values taken within 10 minutes of the most
recent reading.
Note: If two sets of measurement values are stored in the memory for
the 10 minutes period, the average is based on the two sets of
measurement values. If one set of measurement values is
stored, this is displayed as the average.
To Display the Measurement Values
1. Select your user ID (A or B).
2. Press the MEMORY button ( ).
The average value is shown and the average symbol ( )
appears above the memory symbol ( ) on the display.
32
Page 33

Alternating display
HEM-7070-E_i-C10_main.book 33 ページ 2011年11月4日 金曜日 午前10時20分
3. Using the Unit
3. Press the MEMORY button ( ) to display the most recent
set of individual measurement values on the screen. The
values are displayed from the most recent to the oldest.
Note: The date and time are
alternately displayed with the
measurement values.
Press the MEMORY button ( ) to display the next set of
values.
Press and hold the MEMORY button ( ) to display the
values faster.
Auto mode
The average for the consecutive measurements appears on
the display with the auto mode symbol ( ). To display the
values for the individual measurements press the SET button
while the average is displayed.
EN
4. Press the O/I START button to turn the unit off.
33
Page 34

HEM-7070-E_i-C10_main.book 34 ページ 2011年11月4日 金曜日 午前10時20分
3. Using the Unit
Morning and Evening Averages
The unit calculates and displays a weekly average for measurements
taken in the morning ( ) and evening ( ). The unit stores 8 weeks of
morning averages and 8 weeks of evening averages for each user (A
and B).
Note: The week begins Sunday at 4:00.
Morning Averages
Morning averages are based on the first average reading using the
auto mode or the first reading using the single mode.
Measurement times must be between:
4:00 and 9:59
Evening Averages
Evening averages are based on the last average reading using the
auto mode or the last reading using the single mode.
Measurement times must be between:
19:00 and 1:59
34
Page 35

First measurement of
the morning
Within 10 minutes
9:59
4:00
Measurements of the morning
Up to 3 measurements
Morning Blood Pressure
Measurement
Measurement
Measurement
Measurement
Measurement
Measurement
Sunday Monday Tuesday Wednesday Thursday Friday Saturday
HEM-7070-E_i-C10_main.book 35 ページ 2011年11月4日 金曜日 午前10時20分
3. Using the Unit
About the Weekly Averages
Morning Weekly Average
This is the average for measurements taken during the morning
(4:00-9:59) between Sunday and Saturday. An average for each day is
calculated for up to three measurements taken within 10 minutes of the
first measurement of the morning.
Evening Weekly Average
This is the average for measurements taken during the evening
(19:00-1:59) between Sunday and Saturday. An average for each day
is calculated for up to three measurements taken within 10 minutes of
the last measurement of the evening.
Measurements of the evening
Sunday Monday Tuesday Wednesday Thursday Friday Saturday
19:00
Measurement
EN
Measurement
Within 10 minutes
Last measurement of
the evening
1:59
Measurement
Measurement
Measurement
Measurement
Up to 3 measurements
Evening Blood Pressure
35
Page 36

HEM-7070-E_i-C10_main.book 36 ページ 2011年11月4日 金曜日 午前10時20分
3. Using the Unit
To Display Morning and Evening Averages
1. Select your user ID (A or B).
2. Press the morning average
button ( ) or the evening
average button ( ).
The average for the current
week “THIS WEEK” appears on
the display.
The morning and evening
average value of the same week
can be displayed by pressing the
morning average button ( )
or the evening average button
( ). It is important to check
both morning and evening
average of the same week.
3. Continue to press the morning average button ( ) or the
evening average button ( ) to display the previous weeks.
The unit displays “-1 WEEK” for the previous week to
“-7 WEEK” for the oldest set of averages.
Note: If there are not enough measurements
taken in a week to calculate the average
the display will appear as illustrated.
4. Press the O/I START button to turn the unit off.
36
Page 37

HEM-7070-E_i-C10_main.book 37 ページ 2011年11月4日 金曜日 午前10時20分
3. Using the Unit
Notes on Display Combinations
In addition to the morning average and evening average symbols, the
unit may also display the morning hypertension symbol if the morning
average for that week is above the home blood pressure guideline.
(See Chapter 3 “Using the Unit - Important information” for details.)
Depending on your measurement results, these may be displayed in
the following combinations.
Display
Morning
Average
Morning average from This Week
with Morning Average Symbol
Morning average from 7 weeks
ago with Morning Average
Symbol + blinking heartbeat
Symbol + Morning Hypertension
Symbol
Evening
average
Evening average from This Week
with Evening Average Symbol
Average within home blood
pressure guideline
Evening average from 7 weeks
ago with Evening Average
Symbol + blinking Heartbeat
Symbol + Morning Hypertension
Symbol
Average above home blood
pressure guideline + Morning
Hypertension
EN
37
Page 38
HEM-7070-E_i-C10_main.book 38 ページ 2011年11月4日 金曜日 午前10時20分
3. Using the Unit
The morning hypertension symbol ( ) appears if the weekly average
for morning measurements is above 135/85.
In this case the morning hypertension symbol ( ) is displayed when
the evening average is displayed, regardless of the values for the
evening average.
To Delete All Values Stored in the Memory
The values stored in the memory are deleted by user ID.
You cannot partially delete values stored in the memory. All values for
the user you select will be deleted.
1. Select your ID (A or B).
2. While holding the MEMORY button ( ) press the O/I START
button simultaneously for more than 2 seconds and all values
will be deleted.
38
Page 39

HEM-7070-E_i-C10_main.book 39 ページ 2011年11月4日 金曜日 午前10時20分
4. Quick Reference Guide
4. Quick Reference Guide
This Quick Reference Guide is for reference only. Please read
the entire manual before using the unit for the first time.
To help ensure a reliable reading, avoid eating, smoking, or
exercising for at least 30 minutes before taking a measurement.
Note: Remove any tight-fitting clothing from your upper arm.
1. Sit on a chair with your feet flat on the floor and place your arm
on a table so that the arm cuff will be at the same level as your
heart.
2. Secure the cuff around your arm using the fabric fastener strip.
3. Select your user ID (A or B).
4. Press the O/I START button.
When measurement is complete, the
unit displays your blood pressure and
pulse rate, and automatically deflates
the cuff.
EN
Notes:
• Always wait at least 2-3 minutes before taking another blood
pressure measurement.
• Please note that all measurement results are stored in the
memory. If different people take measurements using the
same device, make sure that you are aware of this fact.
Care and maintenance
39
Page 40

Blinks or appears
continuously.
HEM-7070-E_i-C10_main.book 40 ページ 2011年11月4日 金曜日 午前10時20分
5. Handling Errors and Problems
5. Handling Errors and Problems
5.1 Error Messages
Error Display Cause Remedy
Cuff is under inflated.
40
Movement during
measurement.
Cuff over inflated.
Batteries have run down.
Movement, sound.
Cuff leaks air. Replace with a new cuff.
Carefully read and repeat the steps
listed under Chapter 3.3.
Replace all four “AA” batteries with
new ones.
Refer to Chapter 2.1.
Carefully read and repeat the steps
listed under Chapter 3.3.
Page 41

HEM-7070-E_i-C10_main.book 41 ページ 2011年11月4日 金曜日 午前10時20分
5. Handling Errors and Problems
5.2 Troubleshooting
Problem Cause Remedy
No display appears
when the O/I START
button is pressed.
Cannot measure or
readings are too high.
The blood pressure is
different each time. The
reading is extremely low
(or high).
The batteries are empty. Replace the batteries.
Is the cuff wrapped
correctly around the arm?
The cuff pressure does
not rise although the
pump motor can be
heard.
Blood pressure readings constantly vary with time of
measurement and nervous condition. Take deep
breaths to relax before taking a measurement.
Attach the arm cuff
correctly.
Check that the air plug is
properly connected to the
unit. Push the air plug
firmly into the air jack.
41
EN
Page 42

HEM-7070-E_i-C10_main.book 42 ページ 2011年11月4日 金曜日 午前10時20分
6. Maintenance and Storage
6. Maintenance and Storage
To protect your unit from damage, please observe the following:
• Do not subject your unit and cuff to extreme temperatures, humidity,
moisture or direct sunlight.
• Do not fold the cuff or tubing tightly.
• Do not disassemble the unit.
• Do not carry out repairs of any kind yourself. If a defect occurs,
consult the OMRON distributor or Customer Services as mentioned
on the packaging, or seek the advice of your surgical appliance
stockist or pharmacist.
• The OMRON i-C10 is a precision measuring device. It is important
that the accuracy remains within the specifications. It is recommended
that you have the unit inspected every two years to ensure it is
accurate and functioning correctly. Consult the OMRON distributor or
Customer Services as mentioned on the packaging for further details.
• Do not subject the unit to strong shocks or vibrations (for example,
dropping the unit on the floor.)
• Do not use volatile liquids to clean the unit. THE UNIT SHOULD BE
CLEANED WITH A SOFT, DRY CLOTH.
• Do not wash the arm cuff or immerse it in water.
• Use a soft, moistened cloth and soap to clean the arm cuff.
Storage
Close the monitor cover when not in use.
42
Page 43

HEM-7070-E_i-C10_main.book 43 ページ 2011年11月4日 金曜日 午前10時20分
7. Optional Parts
7. Optional Parts
AC Adapter "R"
AC Adapter "Q"
Arm Cuff
R Adapter-9997605-0
Q Adapter-1098336-8
Order No. 9956685-4
Using the Optional AC Adapter
Insert batteries into the battery compartment even when using the AC
adapter.
Notes:
• Never plug in or unplug the power cord from the electric outlet with
wet hands.
• Use only the original AC adapter designed for this unit. Use of
unsupported adapters may damage the unit.
• When storing the AC adapter with the main unit, be careful not to
damage the main unit or cuff.
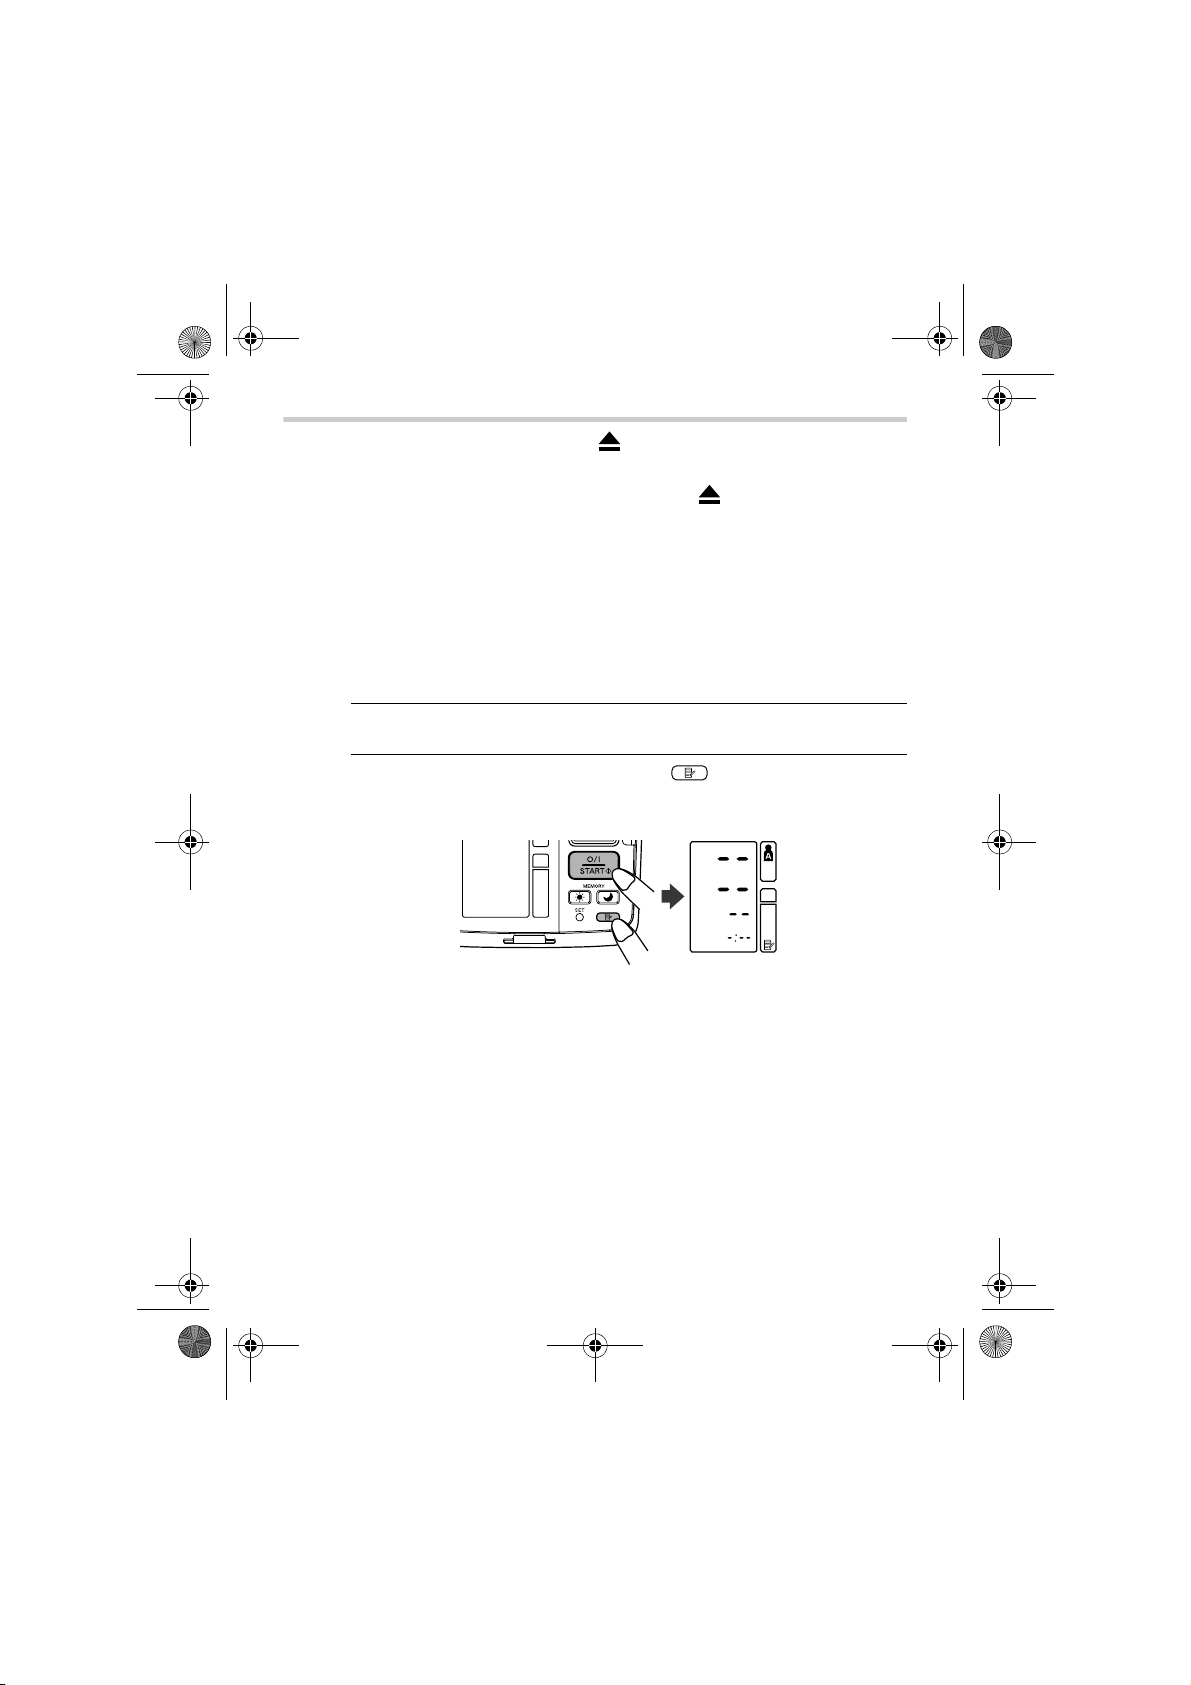
1. Insert the AC adapter plug into
the AC adapter jack on the left
side of the main unit.
2. Plug the AC adapter into an
electrical outlet.
To disconnect the AC adapter, unplug the AC adapter from the
electrical outlet first and then immediately remove the AC
adapter plug from the main unit.
EN
43
Page 44

= Type B
= Type B
HEM-7070-E_i-C10_main.book 44 ページ 2011年11月4日 金曜日 午前10時20分
8. Technical Data
8. Technical Data
Product Description Digital Automatic Blood Pressure Monitor
Model OMRON i-C10 (HEM-7070-E)
Display LCD Digital Display
Measurement Method Oscillometric method
Measurement Range Pressure: 0 mmHg to 299 mmHg
Accuracy Pressure: 3 mmHg
Inflation Fuzzy-logic controlled by electric pump
Deflation Automatic pressure release valve
Pressure Detection Capacitive pressure sensor
Memory 84 Measurements with date and time for each user
Power Source 4 “AA” batteries 1.5V or AC/ DC adapter (6V = 4W)
Battery Life Capacity of new alkaline batteries is approx. 1400
Operating temperature/
Humidity
Storage temperature/
Humidity/Air Pressure
Console Weight Approximately 960g without batteries
Cuff Weight Approximately 240g
Outer Dimensions Approximately 249 (l) mm 178 (w) mm 110 (h) mm
Cuff Dimensions Approximately 152 mm 600 mm
Package Content Cuff, instruction manual, battery set, guarantee card, blood
Note: Subject to technical modification without prior notice.
Pulse: 40 to 180/min.
Pulse: 5% of display reading
(A and B)
measurements when used 6 times a day with 4 new
alkaline batteries
+10°C to +40°C
Maximum: 30 to 90% RH
-20°C to +60°C
Maximum: 10 to 95% RH
700 - 1060 hPa
(Cuff: arm circumference 22 to 42 cm)
pressure pass
• This device fulfils the previsions of EC directive 93/42/EEC (Medical Device Directive).
• This blood pressure monitor is designed according to the European Standard EN1060,
Non-invasive sphygmomanometers Part 1: General Requirements and Part 3:
Supplementary requirements for electromechanical blood pressure measuring
systems.
• This OMRON product is produced under the strict quality system of OMRON
Healthcare Co. Ltd., Japan. The Core component for OMRON blood pressure
monitors, which is the Pressure Sensor, is produced in Japan for assembly.
44
Page 45

This marking shown on the product or its literature, indicates that it
should not be disposed of, with other household wastes at the end of
its working life. To prevent possible harm to the environment or human
health from uncontrolled waste disposal, please separate this from
other types of wastes and recycle it responsibly to promote the
sustainable reuse of material resources.
Household users should contact either the retailer where they purchased this product,
or their local government office, for details of where and how they can take this item
for environmentally safe recycling.
Business users should contact their supplier and check the terms and conditions of
the purchase contract. This product should not be mixed with other commercial
wastes for disposal.
This product does not contain any hazardous substances.
Important information regarding Electro Magnetic Compatibility (EMC)
With the increased number of electronic devices such as PC’s and mobile (cellular)
telephones, medical devices in use may be susceptible to electromagnetic
interference from other devices. Electromagnetic interference may result in incorrect
operation of the medical device and create a potentially unsafe situation.
Medical devices should also not interfere with other devices.
In order to regulate the requirements for EMC (Electro Magnetic Compatibility) with
the aim to prevent unsafe product situations, the EN60601-1-2 standard has been
implemented. This standard defines the levels of immunity to electromagnetic
interferences as well as maximum levels of electromagnetic emissions for medical
devices.
This medical device manufactured by OMRON Healthcare conforms to this
EN60601-1-2:2001 standard for both immunity and emissions.
Nevertheless, special precautions need to be observed:
• Do not use mobile (cellular) telephones and other devices, which generate strong
electrical or electromagnetic fields, near the medical device. This may result in
incorrect operation of the unit and create a potentially unsafe situation.
Recommendation is to keep a minimum distance of 7 m. Verify correct operation of
the device in case the distance is shorter.
Further documentation in accordance with EN60601-1-2:2001 is available at
OMRON Healthcare Europe at the address mentioned in this instruction manual.
Documentation is also available at www.omron-healthcare.com
.
Correct Disposal of This Product
(Waste Electrical & Electronic Equipment)
HEM-7070-E_i-C10_main.book 45 ページ 2011年11月4日 金曜日 午前10時20分
8. Technical Data
EN
45
Page 46

HEM-7070-E_i-C10_main.book 46 ページ 2011年11月4日 金曜日 午前10時20分
9. Some Useful Information about Blood Pressure
9. Some Useful Information about Blood Pressure
What is Blood Pressure?
Blood pressure is a measure of the force of blood flowing against the
walls of the arteries. Arterial blood pressure is constantly changing
during the course of the heart's cycle.
The highest pressure in the cycle is called the Systolic Blood Pressure;
the lowest is the Diastolic Blood Pressure.
Both pressure readings, the Systolic and Diastolic, are necessary to
enable a doctor to evaluate the status of a patient's blood pressure.
Why is it a Good Thing to Measure Blood Pressure at Home?
Having your blood pressure measured by a doctor can cause anxiety
which is itself a cause of high blood pressure. As a variety of conditions
affect blood pressure, a single measurement may not be sufficient for
an accurate diagnosis.
Many factors such as physical activity, anxiety, or the time of day, can
influence your blood pressure. Thus it is best to try and measure your
blood pressure at the same time each day, to get an accurate
indication of any changes in blood pressure. Blood pressure is typically
low in the morning and increases from afternoon to evening. It is lower
in the summer and higher in the winter.
Blood pressure is measured in millimetres of mercury (mmHg) and
measurements are written with the systolic pressure before the
diastolic e.g. A blood pressure written as 140/90, is referred to as
140 over 90 mmHg.
46
Page 47

mmHg
200
150
100
50
61218 24
Example: fluctuation within a day (male, 35 years old)
Time of day
Upper curve: systolic blood pressure
Lower curve: diastolic blood pressure
HEM-7070-E_i-C10_main.book 47 ページ 2011年11月4日 金曜日 午前10時20分
9. Some Useful Information about Blood Pressure
Classification of Blood Pressure by the World Health
Organization
The World Health Organization (WHO) and the International Society of
Hypertension (ISH) developed the Blood Pressure Classification
shown in this figure.
Systolic blood pressure
(mmHg)
180
160
140
130
120
Optimal blood
(target value)
Normal systolic value
Normal blood
pressure
Severe hypertension
Moderate hypertension
Mild hypertension
pressure
80
85 90 100 110
Diastolic
blood
pressure
(mmHg)
This classification is based on the blood pressure values measured on
people in a sitting position in outpatient departments of hospitals.
Note: There is no universally accepted definition of hypotension.
However, those having the systolic pressure below 100 mmHg
are assumed as hypotensive.
47
EN
Page 48

Manufacturer
OMRON HEALTHCARE Co., Ltd.
53, Kunotsubo, Terado-cho, Muko, Kyoto,
617-0002 JAPAN
EU-representative
OMRON HEALTHCARE EUROPE B.V.
Scorpius 33, 2132 LR Hoofddorp, THE NETHERLANDS
www.omron-healthcare.com
Production facility
OMRON (DALIAN) CO., LTD.
Dalian, CHINA
Subsidiary
OMRON HEALTHCARE UK LTD.
Opal Drive, Fox Milne, Milton Keynes, MK15 0DG, U.K.
OMRON MEDIZINTECHNIK
HANDELSGESELLSCHAFT mbH
John-Deere-Str. 81a, 68163 Mannheim, GERMANY
www.omron-medizintechnik.de
OMRON SANTÉ FRANCE SAS
14, rue de Lisbonne, 93561 Rosny-sous-Bois Cedex, FRANCE
Made in China
HEM-7070-E_i-C10_main.book 48 ページ 2011年11月4日 金曜日 午前10時20分
9. Some Useful Information about Blood Pressure
48
Page 49

HEM-7070-E_i-C10_main.book 49 ページ 2011年11月4日 金曜日 午前10時20分
Tensiomètre automatique
Modèle i-C10
• Instruction Manual
• Mode d’emploi
• Gebrauchsanweisung
• Manuale di istruzioni
• Manual de instrucciones
• Gebruiksaanwijzing
• РУКОВОДСТВО ПО ЭКСПЛУАТАЦИИ
EN
FR
DE
IT
ES
NL
RU
AR
Page 50

HEM-7070-E_i-C10_main.book 50 ページ 2011年11月4日 金曜日 午前10時20分
Table des matières
Avant d’utiliser l’appareil
Introduction ...............................................................................51
Informations importantes sur la sécurité ............................... 52
1. Présentation générale ........................................................54
2. Préparation .......................................................................... 58
2.1 Installation/Remplacement des piles ..........................................58
2.2 Réglage de la date et de l’heure.................................................60
Instructions de fonctionnement
3. Utilisation du tensiomètre.................................................. 64
3.1 Position assise correcte lors de la réalisation d’une mesure ......64
3.2 Application du brassard ..............................................................66
3.3 Réalisation d’une mesure ...........................................................69
3.4 Instructions pour certains cas particuliers...................................79
3.5 Utilisation du bouton Memory .....................................................80
4. Guide de référence rapide.................................................. 87
Entretien et maintenance
5. Résolution des erreurs et des problèmes ........................88
5.1 Messages d’erreur......................................................................88
5.2 Dépannage .................................................................................89
6. Maintenance et stockage ................................................... 90
7. Pièces optionnelles ............................................................91
8. Données techniques........................................................... 92
9. Informations utiles sur la pression artérielle ...................94
50
Page 51
HEM-7070-E_i-C10_main.book 51 ページ 2011年11月4日 金曜日 午前10時20分
Avant d’utiliser l’appareil
Introduction
Merci d’avoir fait l’acquisition du tensiomètre brassard OMRON i-C10
Intellisense.
L’OMRON i-C10 Intellisense est un tensiomètre entièrement automatisé, qui fonctionne sur le principe de l’oscillométrie. Il mesure votre
pression artérielle et votre pouls, simplement et rapidement. Pour un
gonflage contrôlé confortable sans préréglage de la pression ou regonflage, l’appareil fait appel à la technologie avancée « IntelliSense ».
Le tensiomètre stocke les résultats de la mesure de deux personnes et
donne deux moyennes (matin et soir). Le mode automatique permet
de prendre trois mesures consécutives dans des intervalles programmés afin d’obtenir une valeur moyenne.
Lire ce mode d’emploi attentivement avant d’utiliser
l’appareil. Pour des informations spécifiques sur votre
propre pression artérielle, CONSULTER VOTRE MEDECIN.
Introduction
51
FR
Page 52

HEM-7070-E_i-C10_main.book 52 ページ 2011年11月4日 金曜日 午前10時20分
Informations importantes sur la sécurité
Informations importantes sur la sécurité
Consulter votre médecin si vous êtes enceinte, souffrez d’arythmie ou d’artériosclérose. Lire attentivement cette section avant d’utiliser l’appareil.
Avertissement :
Indique une situation potentiellement dangereuse qui, si elle n’est pas évitée,
peut entraîner la mort ou de graves lésions.
(Utilisation générale)
• Toujours consulter votre médecin. Il est dangereux d’effectuer un autodiagnostic et d’instaurer un traitement sur la seule base des résultats de la
mesure.
• Les personnes ayant de graves problèmes de circulation artérielle ou des
troubles artériels doivent consulter un médecin avant d’utiliser l’appareil. Le
gonflage du brassard peut provoquer une hémorragie interne.
(Utilisation des piles)
• Si du liquide provenant des piles pénètre dans vos yeux, rincer immédiatement et abondamment avec de l’eau pure. Consulter immédiatement un
médecin.
(Utilisation du transformateur de courant alternatif optionnel)
• Ne jamais brancher ni débrancher le cordon d’alimentation de la prise électrique avec les mains mouillées.
Attention :
Indique une situation potentiellement dangereuse qui, si elle n’est pas évitée,
peut entraîner des blessures mineures ou modérées chez l’utilisateur ou le
patient, ou endommager l’équipement ou d’autres équipements matériels.
(Utilisation générale)
• Ne pas laisser l’appareil sans surveillance en présence de jeunes enfants ou
de personnes qui ne peuvent pas donner leur consentement.
• Ne pas utiliser l’appareil pour d’autres buts que la mesure de la pression artérielle.
• Ne pas démonter l’appareil ni le brassard pneumatique.
• Ne pas gonfler le brassard pneumatique au-dessus de 299 mmHg.
• Ne pas utiliser de téléphone portable ou d’autres dispositifs émettant des
ondes électromagnétiques à proximité de l’appareil sous peine d’en perturber
le fonctionnement.
• Ne pas utiliser l’appareil dans un véhicule en marche (voiture, avion).
52
Page 53
HEM-7070-E_i-C10_main.book 53 ページ 2011年11月4日 金曜日 午前10時20分
Informations importantes sur la sécurité
(Utilisation du transformateur de courant alternatif optionnel)
• Utiliser exclusivement le transformateur de courant alternatif d’origine prévu
pour cet appareil. L’utilisation de transformateurs inappropriés peut endommager et/ou se révéler dangereuse pour l’unité.
• Brancher le transformateur de courant alternatif sur la prise électrique appropriée.
• Ne pas utiliser le transformateur de courant alternatif si l’appareil ou le cordon
d’alimentation est endommagé. Eteindre l’appareil et débrancher immédiatement le cordon d’alimentation.
(Utilisation des piles)
• Si du liquide provenant des piles est projeté sur votre peau ou vos vêtements,
rincer immédiatement et abondamment avec de l’eau pure.
• Utiliser uniquement quatre piles alcalines AA avec cet appareil. Ne pas utiliser d’autres types de piles.
• Ne pas introduire les piles en inversant leurs polarités.
• Remplacer immédiatement les piles usagées par de nouvelles piles. Remplacer les quatre piles en même temps.
• Retirer les piles si l’appareil ne doit pas être utilisé pendant plus de trois mois.
• La date et l’heure devront être réglées de nouveau après le remplacement
des piles. Si l’année clignote sur l’écran d’affichage, voir « 2.2 Réglage de la
date et de l’heure ».
• Ne pas utiliser des piles neuves et usagées en même temps.
Précautions de sécurité générales
• Ne pas plier le brassard pneumatique en forçant et ne pas plier excessivement le tuyau de gonflage.
• Lors du retrait du tuyau de gonflage, tirer la prise de gonflage au niveau de la
connexion à l’appareil, et non le tuyau lui-même.
• Ne pas gonfler le brassard pneumatique tant qu’il n’est pas enroulé autour de
votre bras.
• Ne pas soumettre l’appareil à des chocs ou des vibrations intenses, et ne pas
le faire tomber.
• Ne pas prendre de mesures après un bain, une consommation d’alcool, une
cigarette, de l’exercice ou un repas.
• Ne pas laver le brassard pneumatique ni l’immerger dans l’eau.
• Lire attentivement et suivre les Informations importantes sur la compatibilité
électromagnétique (CEM) fournies dans la section « Données techniques ».
• Lire attentivement et suivre les directives relatives à « Comment éliminer ce
produit » de la section « Données techniques » lorsque vous mettez au rebut
l’appareil et les accessoires ou composants optionnels utilisés.
FR
Conserver ces instructions pour vous y référer ultérieurement.
53
Page 54

A
B
C
D
E
F
G
H
I
J
K
L
HEM-7070-E_i-C10_main.book 54 ページ 2011年11月4日 金曜日 午前10時20分
1. Présentation générale
1. Présentation générale
Appareil
A. Affichage
B. Bouton SET
C. Bouton MEMORY ( )
D. Boutons de moyennes du
matin/du soir ( / )
E. Bouton O/I START
F. Commutateur de sélection
d’identifiant d’utilisateur
(A ou B)
G. Symbole de l’identifiant d’utilis-
ateur (A ou B)
H. Compartiment du brassard
I. Couvercle du tensiomètre
J. Prise jack à air
K. Compartiment des piles
L. Prise pour transformateur de
courant alternatif (pour un
transformateur en option)
54
Page 55

M
ON
HEM-7070-E_i-C10_main.book 55 ページ 2011年11月4日 金曜日 午前10時20分
1. Présentation générale
Brassard
M. Brassard pneumatique
(brassard de taille moyenne : circonférence du bras com-
prise entre 22 et 42 cm)
N. Prise de gonflage
O. Tuyau de gonflage
FR
55
Page 56

P
X
AA
S
Q
U
V
R
T
Z
AB
AD
AF
Y
AC
AE
W
HEM-7070-E_i-C10_main.book 56 ページ 2011年11月4日 金曜日 午前10時20分
1. Présentation générale
Affichage
P. Pression artérielle systolique
Q. Pression artérielle diastolique
R. Symbole des pulsations cardi-
aques
1. (Clignote lors de la mesure)
2. (Si ce symbole clignote une
fois la mesure terminée, cela
indique que la pression artérielle sort de la plage recommandée)
S. Symbole de mouvement
(Apparaît si vous bougez pendant la mesure.)
T. Symbole de pulsations cardi-
aques irrégulières
U. Symbole du dégonflage
V. Symbole de faiblesse des piles
W. Symbole du mode automatique
(Apparaît lorsque le mode
automatique est sélectionné.)
56
X. Symbole de l’identifiant d’utilis-
ateur (A ou B) (Indique l’utilisateur A ou B, qui a été choisi par
l’utilisateur pour prendre une
mesure ou lors de l’utilisation
du bouton Memory.)
Y. Affichage du pouls
Z. Symbole de l’hypertension du
matin (Affiché si la valeur moy-
enne du matin sur une semaine
excède 135 pour la valeur de la
pression artérielle systolique et/
ou 85 pour la valeur de la pres-
sion artérielle diastolique.)
AA.Symbole de la moyenne du
matin (Affiché lors de la visuali-
sation des moyennes du matin
au moyen du bouton Memory.)
AB.Symbole de la moyenne du
soir (Affiché lors de la visuali-
sation des moyennes du soir
au moyen du bouton Memory.)
AC.Symbole de la valeur moyenne
(Affiché lors de la visualisation
de la valeur des trois dernières
mesures)
AD.Symbole de la mémoire
(Affiché lors de la visualisation
des valeurs conservées en
mémoire)
AE.Affichage de la semaine
AF. Affichage de la date et de
l’heure
Page 57
AG
HEM-7070-E_i-C10_main.book 57 ページ 2011年11月4日 金曜日 午前10時20分
1. Présentation générale
Contenu de l’emballage
AG.Quatre piles alcalines « AA »
(LR6)
• Mode d’emploi
• Carte de garantie
• Carte de la pression artérielle
• Tensiomètre
FR
57
Page 58

Couvercle du comparti-
ment des piles
HEM-7070-E_i-C10_main.book 58 ページ 2011年11月4日 金曜日 午前10時20分
2. Préparation
2. Préparation
2.1 Installation/Remplacement des piles
1. Retourner l’appareil.
2. Faire glisser le couvercle du
compartiment des piles dans le
sens de la flèche tout en
appuyant sur la partie nervurée
du couvercle.
3. Installer ou remplacer les
quatre piles AA en faisant correspondre les polarités + (positive) et – (négative) avec les
polarités indiquées sur le compartiment des piles.
4. Remettre en place le couvercle du compartiment des piles.
Faire glisser le couvercle du compartiment des piles comme
indiqué jusqu’à entendre un déclic.
Remarque : Les valeurs de la mesure sont toujours conservées en
mémoire, même après le remplacement des piles.
58
Page 59

HEM-7070-E_i-C10_main.book 59 ページ 2011年11月4日 金曜日 午前10時20分
2. Préparation
Durée de vie des piles et remplacement
Si le symbole de faiblesse des piles ( ) apparaît sur l’écran, remplacer les quatre piles en même temps.
- Lorsque le symbole de faiblesse des piles ( ) commence à clignoter, vous ne pourrez utiliser l’unité qu’un court instant. Vous devrez
remplacer les piles par des piles neuves plus tôt que prévu.
- Lorsque le symbole ( ) reste allumé, cela signifie que les piles
sont déchargées. Vous devez remplacer les piles par des piles
neuves immédiatement. Mettre l’appareil hors tension avant de remplacer les piles.
• Retirer les piles si l’appareil ne doit pas être utilisé pendant plus de
trois mois.
• Si les piles ont été retirées pendant plus de 30 secondes, la date et
de l’heure doivent être réglées de nouveau. Voir le chapitre 2.2 pour
plus de détails.
• Mettre les piles au rebut conformément aux réglementations locales
en vigueur.
Quatre piles alcalines AA neuves dureront environ 1 400 mesures à
raison de six mesures par jour.
Les piles fournies étant destinées à la surveillance uniquement, leur
durée de vie risque d’être plus courte.
FR
59
Page 60

HEM-7070-E_i-C10_main.book 60 ページ 2011年11月4日 金曜日 午前10時20分
2. Préparation
2.2 Réglage de la date et de l’heure
Le tensiomètre mémorise automatiquement jusqu’à 84 valeurs de
mesure individuelles avec la date et l’heure.
Pour utiliser les fonctions de mémoire et de valeur moyenne :
• Régler l’appareil sur la date et l’heure correctes avant la première
mesure.
• Si les piles ont été retirées pendant plus de 30 secondes, le réglage
de la date et de l’heure doit de nouveau être effectué.
1. Lorsque le bouton O/I START est
enfoncé pour allumer l’appareil
pour la première fois après l’insertion des piles, les chiffres de
l’année (2007) clignotent sur
l’écran.
2. Appuyer sur le bouton MEMORY
( ) pour faire défiler les chiffres
un par un.
Remarques :
• La plage de réglage de l’année
est comprise entre 2007 et 2030.
Si le réglage de l’année atteint
2030, il retourne à l’année 2007.
• Si le bouton MEMORY ( ) est
maintenu enfoncé, les chiffres
avancent rapidement.
3. Appuyer sur le bouton de réglage
pour confirmer le réglage lorsque
le chiffre souhaité apparaît sur
l’écran.
L’année est réglée et les chiffres du
mois clignotent sur l’écran.
60
Page 61

HEM-7070-E_i-C10_main.book 61 ページ 2011年11月4日 金曜日 午前10時20分
2. Préparation
4. Répéter les étapes 2 et 3 pour
régler le mois.
Le mois est réglé et les chiffres du
jour clignotent sur l’écran.
5. Répéter les étapes 2 et 3 pour
régler le jour.
Le jour est réglé et les chiffres de
l’heure clignotent sur l’écran.
6. Répéter les étapes 2 et 3 pour
régler l’heure.
L’heure est réglée et les chiffres
des minutes clignotent sur l’écran.
7. Répéter les étapes 2 et 3 pour
régler les minutes.
Les minutes sont réglées.
L’appareil s’éteint automatique-
ment lorsque les minutes sont
réglées.
Pour régler la date et l’heure,
appuyer sur le bouton SET et le
maintenir enfoncé pendant l’arrêt
de l’appareil.
FR
61
Page 62

HEM-7070-E_i-C10_main.book 62 ページ 2011年11月4日 金曜日 午前10時20分
2. Préparation
Remarques sur le réglage de la date et de l’heure
Si la date et l’heure doivent être réglées pour une raison quelconque
ou si la date et l’heure ont été réinitialisées après le remplacement des
piles, régler la date et l’heure entre 10:00 et 18:59. Ceci permettra
d’éviter des problèmes avec les moyennes hebdomadaires du matin et
du soir qui sont conservées en mémoire.
Pour régler la date ou l’heure ultérieurement, arrêter l’appareil. Procéder comme suit.
1. Appuyer sur le bouton SET et le maintenir enfoncé.
Le symbole du mode automatique et le réglage actuel
(on ou oFF) correspondant à l’identifiant d’utilisateur sélectionné s’affichent sur l’écran.
Si l’année ne clignote pas, appuyer une ou deux fois sur le
bouton SET jusqu’à ce que l’année clignote.
L’année clignote sur l’écran.
2. Se référer au chapitre 2.2.2 pour régler la date et l’heure.
Lorsque le réglage de la date et de l’heure se fait manuellement, l’appareil doit être arrêté manuellement. Il ne s’éteindra
pas automatiquement après que les minutes ont été réglées.
62
Page 63

HEM-7070-E_i-C10_main.book 63 ページ 2011年11月4日 金曜日 午前10時20分
2. Préparation
Remarques :
• Vérifier que la date et l’heure ont été réglées correctement afin que
les moyennes hebdomadaires puissent être affichées correctement.
Si la date et l’heure ont été mal réglées par erreur, appuyer sur le
bouton SET pour faire le tour des réglages afin d’entrer leurs valeurs
correctes.
• Lorsque l’heure s’affiche incorrectement après une période de nonutilisation de l’appareil, réinitialiser la date et l’heure (se référer au
chapitre 2.2 pour obtenir des instructions sur le réglage des valeurs
de l’horloge). Effacer les valeurs enregistrées lors de la réutilisation
de l’appareil (se référer au chapitre 3.5 pour des instructions sur
l’effacement des valeurs enregistrées).
63
FR
Page 64

Position
correcte
Retirer tout vêtement serré de la
partie supérieure de votre bras
ainsi que tout vêtement épais
(pull, par exemple).
Ne pas placer le brassard sur des
vêtements épais et ne pas rouler
votre manche si elle est trop serrée.
S’asseoir
bien droit, le
dos droit.
Placer le bras sur une table afin
de mettre le brassard au même
niveau que le cœur.
L’écart entre la chaise et
le sommet de la table
doit être compris entre
25 et 30 cm.
HEM-7070-E_i-C10_main.book 64 ページ 2011年11月4日 金曜日 午前10時20分
Instructions de fonctionnement
3. Utilisation du tensiomètre
3. Utilisation du tensiomètre
3.1 Position assise correcte lors de la réalisation d’une
mesure
La mesure peut être réalisée sur le bras gauche ou droit.
Remarques :
• Elle doit être prise dans un endroit calme et sur une personne assise
et détendue. Vérifier que la température de la pièce n’est ni trop
chaude ni trop froide.
• Ne pas manger, fumer ou faire du sport pendant au moins 30 minutes
avant la mesure.
• Ne pas bouger ni parler pendant la mesure.
64
Page 65
Position incorrecte
Ces situations peuvent augmenter les valeurs de la pression artérielle en raison de l’effort fourni ou lorsque le brassard est plus bas
que le cœur.
Si le brassard est plus bas que le cœur, utiliser des coussins, etc.,
pour régler la hauteur du bras.
• Dos cambré (penché vers
l’avant)
• Jambes croisées
• Assis sur un canapé ou à une
table basse, ce qui vous
incite à vous pencher vers
l’avant
HEM-7070-E_i-C10_main.book 65 ページ 2011年11月4日 金曜日 午前10時20分
3. Utilisation du tensiomètre
Remarques :
• Avoir une position correcte lors de la mesure est indispensable pour
obtenir des résultats fiables.
• Il est préférable de mesurer votre pression artérielle à la même heure
chaque jour. (Il est recommandé de la mesurer dans l’heure qui suit le
réveil.)
FR
65
Page 66

Prise à air
Prise jack à air
HEM-7070-E_i-C10_main.book 66 ページ 2011年11月4日 金曜日 午前10時20分
3. Utilisation du tensiomètre
3.2 Application du brassard
Vous pouvez enrouler le brassard sur votre bras droit ou gauche.
• Retirer tout vêtement serré de la partie
supérieure de votre bras.
• Ne pas placer le brassard sur des vêtements épais et ne pas rouler votre manche
si elle est trop serrée.
Prises de mesures au bras gauche
1. Introduire la prise de gonflage mâle dans la prise femelle (dans
le compartiment du brassard du dispositif).
Le brassard doit être entièrement dégonflé avant d’être inséré
dans la prise femelle.
2. S’asseoir sur une chaise, les pieds posés à plat sur le sol, et
placer le bras sur une table afin que le brassard soit au même
niveau que le coeur.
66
Page 67

Prise
Bande en tissu
Bande bleue
Bord inférieur 1 à 2 cm
Tuyau à air
HEM-7070-E_i-C10_main.book 67 ページ 2011年11月4日 金曜日 午前10時20分
3. Utilisation du tensiomètre
3. Maintenir solidement la prise sur le
brassard avec la main.
4. Tourner la paume de la main vers le
haut.
5. Appliquer le brassard sur la partie supérieure de votre bras de
telle sorte que la bande bleue soit centrée sur la face interne
du bras et pointe vers le sol. Le tuyau à air doit passer sur toute
la longueur de la face interne de l’avant-bras aligné avec le
majeur.
La partie inférieure du brassard doit être placée entre 1 et 2 cm
environ au-dessus du coude.
FR
67
Page 68

HEM-7070-E_i-C10_main.book 68 ページ 2011年11月4日 金曜日 午前10時20分
3. Utilisation du tensiomètre
6. Lorsque le brassard est correcte-
ment positionné, fermer la bande en
tissu FERMEMENT.
Remarques :
• S’assurer que le brassard s’adapte parfaitement autour du
bras.
• Le brassard doit être en contact étroit avec la peau. Vous
devez être en mesure de passer votre index entre le brassard
et votre bras sans forcer afin de pouvoir mobiliser le brassard.
• Vérifier que le tuyau à air n’est pas coudé.
Prises de mesures au bras droit
Faire attention aux points suivants lors du
placement du brassard au bras droit. Placer
le brassard de façon à ce que le tuyau à air
soit sur le côté du coude.
Remarques :
• Veiller à ne pas poser le bras sur le tuyau,
ou à ne pas restreindre de toute autre
manière l’arrivée d’air au brassard.
• Placer le brassard de manière qu’aucune
de ses parties ne soit placée sur l’articulation du coude. Le brassard doit être positionné entre 1 et 2 cm au-dessus du coude.
• La durée de vie du brassard est de 3 ans pour une utilisation deux
fois par jour.
• La pression artérielle peut être différente entre le bras droit et le bras
gauche et les valeurs mesurées de la pression artérielle pourront par
conséquent être également différentes. Omron recommande de toujours utiliser le même bras pour la mesure. Si les valeurs entre les
deux bras sont trop éloignées, consulter votre médecin pour savoir
quel bras utiliser pour la mesure.
68
Page 69

Appuyer pendant au moins 3 secondes
A et B disparaissent
de l’écran
HEM-7070-E_i-C10_main.book 69 ページ 2011年11月4日 金曜日 午前10時20分
3. Utilisation du tensiomètre
3.3 Réalisation d’une mesure
L’appareil est destiné à prendre des mesures et à stocker dans la
mémoire les valeurs de la mesure de deux personnes utilisant l’identifiant d’utilisateur A et l’identifiant d’utilisateur B.
L’appareil peut également être utilisé pour prendre une seule mesure
pour d’autres personnes utilisant le mode invité. Le symbole de l’identifiant d’utilisateur n’est pas affiché en mode invité. Les mesures prises
en mode invité ne sont pas stockées dans la mémoire.
Utilisation du mode invité
1. Appuyer sur le bouton O/I START et le maintenir enfoncé
jusqu’à ce que les symboles des utilisateurs A et B disparaissent de l’écran.
2. Relâcher le bouton O/I START.
Le brassard se gonfle automatiquement.
Remarque : Pour arrêter le gonflage, appuyer sur le bouton
O/I START puis le relâcher. L’appareil cesse de
gonfler, commence à dégonfler et s’arrête.
3. Le gonflage s’arrête et la mesure commence. Lorsque la
mesure est terminée, votre pression artérielle et la fréquence
de votre pouls apparaissent sur l’écran.
FR
69
Page 70

HEM-7070-E_i-C10_main.book 70 ページ 2011年11月4日 金曜日 午前10時20分
3. Utilisation du tensiomètre
Sélection de l’identifiant d’utilisateur
Sélectionner votre identifiant d’utilisateur. Toujours utiliser le même
identifiant d’utilisateur pour prendre une mesure. L’appareil stocke les
valeurs de la mesure en mémoire sous l’identifiant d’utilisateur sélectionné. Ces valeurs de la mesure servent à calculer les moyennes du
matin et celles du soir.
Faire glisser le commutateur de sélection d’identifiant d’utilisateur vers
le haut ou vers le bas pour sélectionner l’utilisateur A ou B.
Utilisation de l’identifiant d’utilisateur
Lorsqu’un identifiant d’utilisateur est sélectionné, l’appareil peut être
réglé pour prendre une seule mesure en mode simple ou trois mesures
consécutives en mode automatique lorsque le bouton O/I START est
enfoncé.
Remarque : La valeur par défaut est réglée sur le mode simple pour
une seule mesure.
Le mode automatique permet de prendre trois mesures consécutives.
L’appareil gonfle le brassard et prend trois mesures à un bref intervalle
de distance.
70
Page 71

HEM-7070-E_i-C10_main.book 71 ページ 2011年11月4日 金曜日 午前10時20分
3. Utilisation du tensiomètre
Utilisation du mode simple
1. Sélectionner votre identifiant d’utilisateur (A ou B).
2. Appuyer sur le bouton O/I START.
Tous les symboles apparaissent sur l’écran. Le symbole de
l’identifiant d’utilisateur que vous avez sélectionné clignote sur
l’écran.
Le brassard se gonfle automatiquement. Lorsque le brassard
se gonfle, l’appareil détermine automatiquement le niveau de
gonflage idéal. Cet appareil détecte le pouls lors du gonflage.
Ne pas bouger le bras et rester immobile jusqu’à ce que la
mesure soit terminée.
Remarque : Pour arrêter le gonflage ou la mesure, appuyer
sur le bouton O/I START puis le relâcher. L’appareil cesse de gonfler, commence à dégonfler et
s’arrête.
FR
71
Page 72

HEM-7070-E_i-C10_main.book 72 ページ 2011年11月4日 金曜日 午前10時20分
3. Utilisation du tensiomètre
3. Le gonflage s’arrête automatiquement et la mesure com-
mence.
Lorsque le brassard se dégonfle, des nombres décroissants
apparaissent sur l’écran. Le symbole des pulsations cardiaques ( ) clignote à chaque pulsation cardiaque.
4. Lorsque la mesure est terminée, le brassard
pneumatique se dégonfle complètement.
Votre pression artérielle et la fréquence de
votre pouls sont affichées.
5. Appuyer sur le bouton O/I START
pour arrêter l’appareil.
72
Remarque : Si vous oubliez
d’éteindre le tensiomètre, il s’arrêtera
automatiquement
après cinq minutes.
Remarques :
• Il est dangereux d’effectuer un autodiagnostic et d’instaurer
un traitement sur la seule base des résultats de la mesure.
Toujours suivre l’avis de votre médecin.
• Attendre 2-3 minutes avant de prendre une nouvelle mesure
de la pression artérielle. Ce temps d’attente entre les mesures
permet aux artères de reprendre leur fonctionnement normal.
Page 73
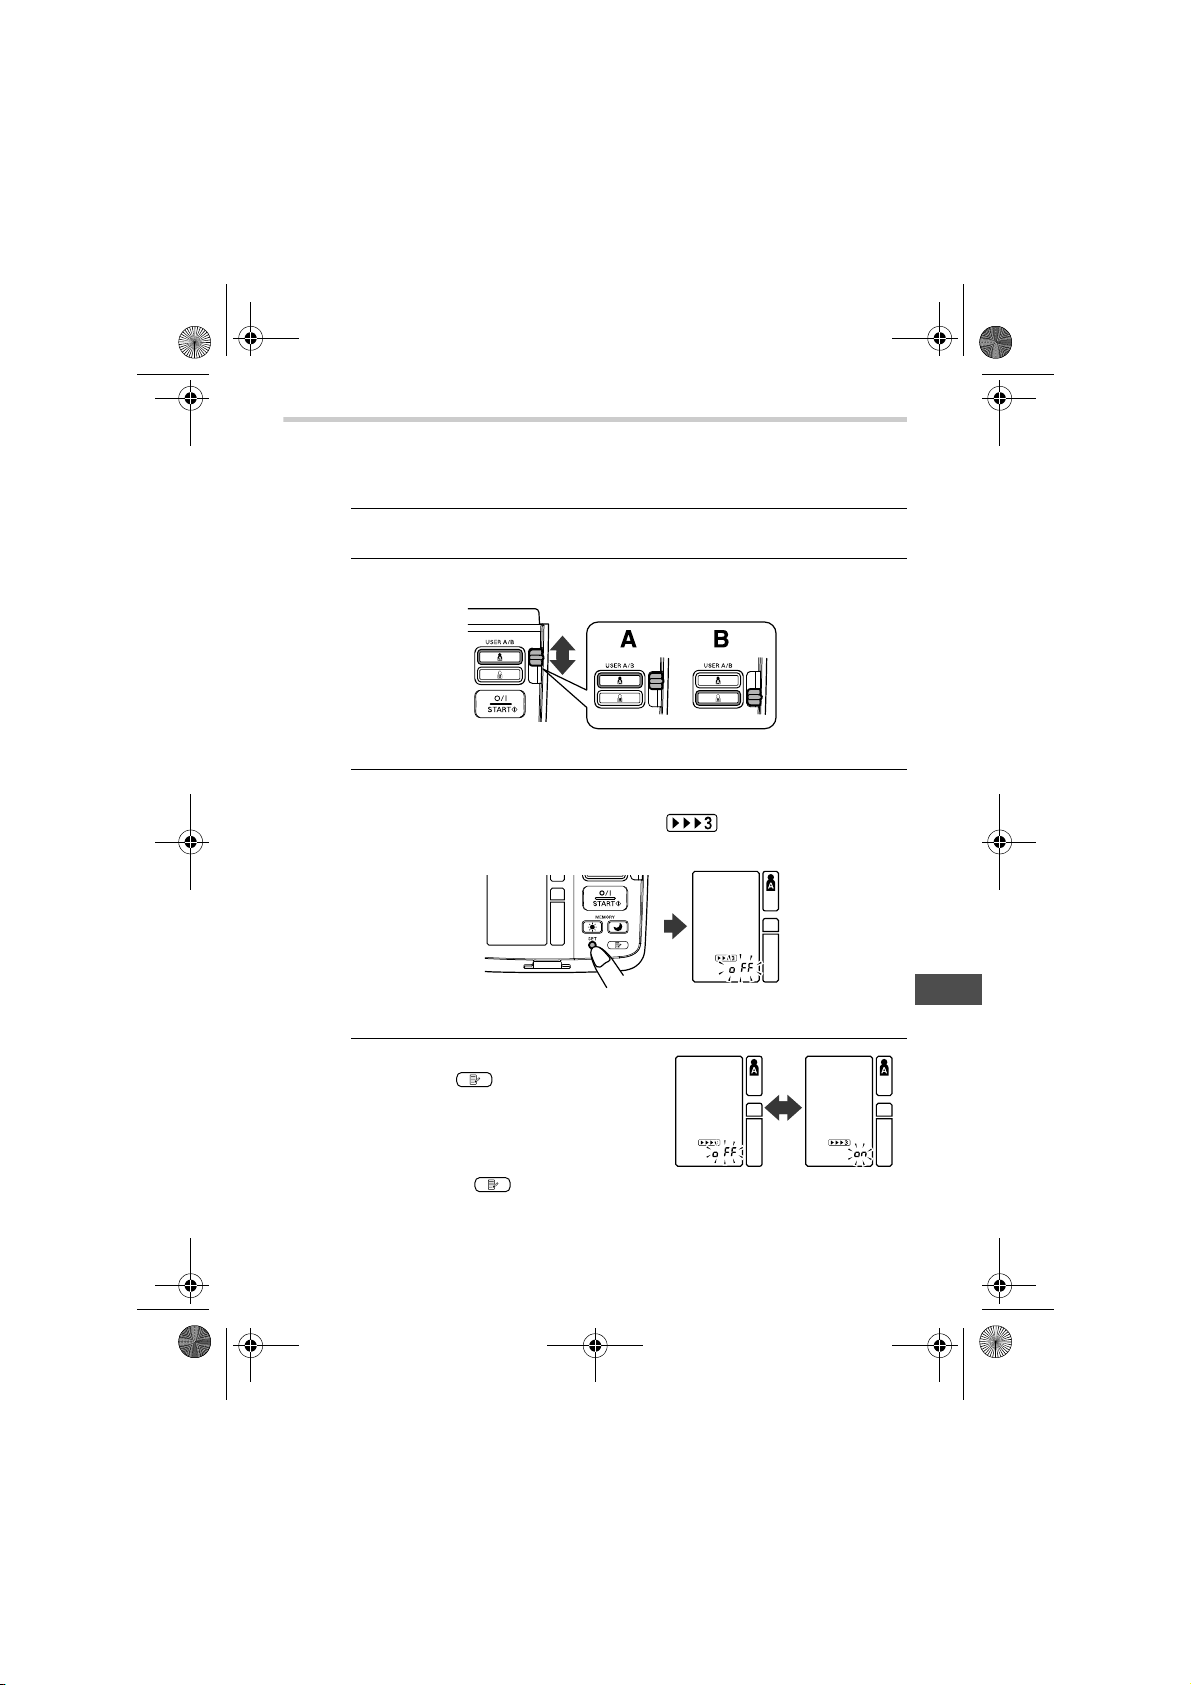
HEM-7070-E_i-C10_main.book 73 ページ 2011年11月4日 金曜日 午前10時20分
3. Utilisation du tensiomètre
Sélection du mode automatique
Le mode automatique peut être sélectionné pour l’utilisateur A ou B.
1. Vérifier que l’appareil est mis hors tension.
2. Sélectionner votre identifiant d’utilisateur (A ou B).
3. Appuyer sur le bouton SET et le maintenir enfoncé.
Le symbole du mode automatique ( ) et le réglage oFF
apparaissent sur l’écran.
4. Appuyer sur le bouton
MEMORY ( ) pour sélectionner on.
Remarque : Appuyer sur le bou-
ton MEMORY
( ) pour permuter entre on et oFF.
FR
73
Page 74

HEM-7070-E_i-C10_main.book 74 ページ 2011年11月4日 金曜日 午前10時20分
3. Utilisation du tensiomètre
5. Appuyer sur le bouton SET pour confirmer le changement.
Le nombre de secondes entre chaque mesure est affiché.
Remarque : La valeur par défaut entre chaque mesure est
60 secondes.
6. Appuyer sur le bouton MEMORY ( ) pour modifier l’inter-
valle de temps entre chaque mesure.
L’intervalle peut être réglé sur 15, 30, 60 ou 120 secondes.
Continuer à appuyer sur le bouton MEMORY ( ) jusqu’à ce
que l’intervalle souhaité apparaisse sur l’écran.
7. Appuyer sur le bouton SET pour
confirmer le réglage.
L’année clignote sur l’écran.
8. Appuyer sur le bouton O/I START
pour arrêter l’appareil.
74
Page 75

HEM-7070-E_i-C10_main.book 75 ページ 2011年11月4日 金曜日 午前10時20分
3. Utilisation du tensiomètre
Utilisation du mode automatique
1. Sélectionner votre identifiant d’utilisateur (A ou B).
2. Appuyer sur le bouton O/I START.
Tous les symboles apparaissent sur l’écran. Le symbole de
l’identifiant d’utilisateur que vous avez sélectionné clignote sur
l’écran. Le brassard se gonfle automatiquement.
Remarque : Pour arrêter le gonflage ou la mesure, appuyer
sur le bouton O/I START. L’appareil cesse de gonfler, commence à dégonfler et s’arrête.
3. Le gonflage s’arrête automatiquement et la mesure com-
mence.
Lorsque le brassard se dégonfle, des nombres décroissants
apparaissent sur l’écran. Le symbole des pulsations cardiaques ( ) clignote à chaque pulsation cardiaque. Lorsque la
mesure est terminée, le brassard pneumatique se dégonfle
complètement.
Remarque : Ne pas bouger le bras et rester immobile jusqu’à
ce que la mesure soit terminée.
4. Vérifier la progression des mesures consécutives.
La première mesure est terminée et l’appareil attend de commencer la mesure suivante. L’intervalle de temps défini entre
chaque mesure apparaît sur l’écran.
FR
75
Page 76

HEM-7070-E_i-C10_main.book 76 ページ 2011年11月4日 金曜日 午前10時20分
3. Utilisation du tensiomètre
La deuxième mesure commence automatiquement.
La deuxième mesure est terminée et l’appareil attend de commencer la mesure suivante.
La troisième mesure commence automatiquement.
Les mesures consécutives sont terminées. La moyenne des
trois mesures apparaît sur l’écran.
Les résultats des trois mesures individuelles ne sont pas affichés
lorsque l’appareil prend des mesures en mode automatique. Les
résultats de chaque mesure individuelle peuvent toutefois être
affichés lorsque toutes les mesures sont terminées.
Remarque : En mode automatique, l’appareil répète la mesure
en cas d’erreur. Lorsque 3 erreurs se sont produites, l’appareil ne prend plus de mesure. Si seulement deux mesures ont été prises correctement,
la moyenne de ces deux mesures est affichée. Si
une seule mesure a été prise correctement, ce
résultat est affiché.
5. Appuyer sur le bouton SET pour afficher la pression artérielle
et la fréquence du pouls de la première mesure. Appuyer de
nouveau sur le bouton SET pour afficher la mesure suivante.
6. Appuyer sur le bouton O/I START pour arrêter l’appareil.
76
Page 77

HEM-7070-E_i-C10_main.book 77 ページ 2011年11月4日 金曜日 午前10時20分
3. Utilisation du tensiomètre
Important :
• Si votre pression systolique ou diastolique sort de la
plage standard, le symbole des pulsations cardiaques clignotera à l’affichage du résultat de la
mesure.
Des recherches récentes suggèrent d’utiliser les
valeurs suivantes comme indicateur d’une élévation
de la pression artérielle pour les mesures prises au
domicile.
Pression artérielle systolique Supérieure à 135 mmHg
Pression artérielle diastolique Supérieure à 85 mmHg
Ces critères s’appliquent uniquement aux mesures de la pression
artérielle prises au domicile.
Pour obtenir les critères de mesure de la pression artérielle en cabinet médical, consulter le chapitre 9.
• Votre tensiomètre comprend une fonction relative
aux pulsations cardiaques irrégulières. Les pulsations cardiaques irrégulières peuvent fausser les
résultats de la mesure. L’algorithme des pulsations
cardiaques irrégulières détermine automatiquement
si la mesure peut être prise en compte ou si elle doit
être répétée. Si les résultats de la mesure sont associés à des pulsations cardiaques irrégulières mais que le résultat
reste valide, celui-ci est affiché avec l’icône des pulsations cardiaques irrégulières. Si les pulsations cardiaques irrégulières rendent
la mesure invalide, aucun résultat n’est affiché. Si l’icône des pulsations cardiaques irrégulières ( ) apparaît après une prise de
mesure, répéter la mesure. Si cette icône s’affiche fréquemment, le
signaler à votre médecin.
FR
77
Page 78

Battement cardiaque normal
Battement cardiaque irrégulier
Pulsation
Pression
artérielle
Pression
artérielle
Court
Long
Pulsation
HEM-7070-E_i-C10_main.book 78 ページ 2011年11月4日 金曜日 午前10時20分
3. Utilisation du tensiomètre
Que sont des pulsations cardiaques irrégulières ?
Des pulsations cardiaques irrégulières sont des pulsations dont la fréquence varie de plus de 25 % par
rapport à la moyenne détectée pendant que l’appareil mesure les pressions artérielles systolique et
diastolique.
Si ce rythme irrégulier est détecté
plus de deux fois au cours de la
mesure, le symbole des pulsations
cardiaques irrégulières ( )
s’affiche en même temps que les
résultats de la mesure.
Qu’est-ce que l’arythmie ?
Les battements cardiaques sont stimulés par des signaux électriques
qui provoquent la contraction du coeur.
L’arythmie est un état dans lequel le rythme cardiaque est anormal en
raison de défaillances du système bio-électrique qui commande les
battements cardiaques. Les symptômes classiques en sont des battements manquants, une contraction prématurée, un pouls anormalement rapide (tachycardie) ou anormalement lent (bradycardie). Ce
phénomène peut être dû à une maladie cardiaque, au vieillissement,
à une prédisposition organique, au stress, au manque de sommeil, à
la fatigue, etc. L’arythmie ne peut être diagnostiquée que par un
médecin, au moyen d’explorations complémentaires spécialisées.
Seuls un examen et un diagnostic par votre médecin permettent
d’affirmer si l’irrégularité des battements cardiaques indiquée par
l’icône ( ) indique une arythmie.
Si le symbole des pulsations cardiaques irrégulières ( ) s’affiche
fréquemment, le signaler à votre médecin. Il est très dangereux
d’effectuer un autodiagnostic et d’instaurer un traitement sur la seule
base des résultats de la mesure. Suivez toujours l’avis de votre
médecin.
78
Page 79

HEM-7070-E_i-C10_main.book 79 ページ 2011年11月4日 金曜日 午前10時20分
3. Utilisation du tensiomètre
3.4 Instructions pour certains cas particuliers
Si votre pression systolique est habituellement supérieure à
220 mmHg, appuyer sur le bouton O/I START et le maintenir enfoncé
jusqu’à ce que le brassard pneumatique se gonfle 30 à 40 mmHg endessus de votre pression systolique présumée.
1. Appuyer sur le bouton O/I START
pour arrêter l’appareil.
La mesure commence.
2. Lorsque le brassard commence à se gonfler, appuyer sur le
bouton O/I START et le maintenir enfoncé jusqu’à ce que la
pression soit de 30 à 40 mmHg supérieure à votre pression
systolique présumée.
Remarque : Vous ne pouvez pas gonfler le brassard au-delà
de 299 mmHg. (Une erreur s’affichera si vous
essayez de gonfler le brassard au-dessus de
300 mmHg.)
3. Relâcher le bouton O/I START lorsque le brassard est gonflé à
la pression souhaitée.
Le brassard commence à se dégonfler et la mesure com-
mence.
4. Le reste de la procédure est similaire à celui d’une mesure nor-
male. Consulter le chapitre 3.3.
Remarque : Ne pas gonfler plus que nécessaire.
79
FR
Page 80

HEM-7070-E_i-C10_main.book 80 ページ 2011年11月4日 金曜日 午前10時20分
3. Utilisation du tensiomètre
3.5 Utilisation du bouton Memory
L’appareil est conçu pour enregistrer en mémoire la pression artérielle
et le rythme cardiaque de deux personnes (utilisateur A et utilisateur B)
chaque fois qu’une mesure est terminée.
L’appareil enregistre automatiquement jusqu’à 84 valeurs de la mesure
(pression artérielle et fréquence du pouls) pour chaque utilisateur (A et
B). Lorsque 84 valeurs de la mesure sont enregistrées, l’enregistrement
le plus ancien est effacé pour laisser la place aux valeurs plus récentes.
L’appareil enregistre également 8 semaines de moyennes du matin et
8 semaines de moyennes du soir pour chaque utilisateur (A et B).
Fonction de moyenne
L’appareil calcule la valeur moyenne d’après les trois valeurs de
mesure les plus récentes prises dans les 10 minutes qui suivent la
prise de la valeur la plus récente.
Remarque : Si deux valeurs de la mesure sont enregistrées en
mémoire pendant la période de 10 minutes, la moyenne
est calculée d’après les deux valeurs de la mesure. Si une
seule valeur de la mesure est enregistrée, elle tient lieu
de moyenne.
Pour afficher les valeurs de la mesure
1. Sélectionner votre identifiant d’utilisateur (A ou B).
2. Appuyer sur le bouton MEMORY ( ).
La valeur moyenne est affichée et le symbole de la moyenne
( ) apparaît au-dessus du symbole de la mémoire ( ) sur
l’écran.
80
Page 81

Affichage alterné
HEM-7070-E_i-C10_main.book 81 ページ 2011年11月4日 金曜日 午前10時20分
3. Utilisation du tensiomètre
3. Appuyer sur le bouton MEMORY ( ) pour afficher les
valeurs des mesures individuelles les plus récentes sur l’écran.
Les valeurs sont affichées de la plus récente à la plus
ancienne.
Remarque : La date et l’heure sont
affichées en alternance avec les valeurs
de la mesure.
Appuyer sur le bouton MEMORY ( ) pour afficher les
valeurs suivantes.
Appuyer sur le bouton MEMORY ( ) et le maintenir enfoncé
pour afficher les valeurs plus rapidement.
Mode automatique
La moyenne des mesures consécutives apparaît sur l’écran
avec le symbole du mode automatique ( ). Pour afficher
les valeurs des mesures individuelles, appuyer sur le bouton
SET lorsque la moyenne est affichée.
FR
4. Appuyer sur le bouton O/I START pour arrêter l’appareil.
81
Page 82
HEM-7070-E_i-C10_main.book 82 ページ 2011年11月4日 金曜日 午前10時20分
3. Utilisation du tensiomètre
Moyennes du matin et du soir
L’appareil calcule et affiche une moyenne hebdomadaire des mesures
prises le matin ( ) et le soir ( ). L’appareil enregistre 8 semaines de
moyennes du matin et 8 semaines de moyennes du soir pour chaque
utilisateur (A et B).
Remarque : La semaine commence le dimanche à 4:00.
Moyennes du matin
Les moyennes du matin sont calculées d’après la première valeur
moyenne en mode automatique ou la première valeur en mode simple.
Les heures des mesures doivent être comprises entre :
4:00 et 9:59
Moyennes du soir
Les moyennes du soir sont calculées d’après la dernière valeur
moyenne en mode automatique ou la dernière valeur en mode simple.
Les heures des mesures doivent être comprises entre :
19:00 et 1:59
82
Page 83

Première mesure du
matin
Dans les 10 minutes
9:59
4:00
Mesures du matin
Jusqu’à 3 mesures
Pression artérielle du matin
Mesure
Mesure
Mesure
Mesure
Mesure
Mesure
Dimanche Lundi Mardi Mercredi Jeudi Vendredi Samedi
HEM-7070-E_i-C10_main.book 83 ページ 2011年11月4日 金曜日 午前10時20分
3. Utilisation du tensiomètre
A propos des moyennes hebdomadaires
Moyenne hebdomadaire du matin
Il s’agit de la moyenne des mesures réalisées le matin (4:00-9:59) du
dimanche au samedi. Une moyenne de chaque jour est calculée
d’après trois mesures maximum prises dans les 10 minutes qui suivent
la première mesure du matin.
Moyenne hebdomadaire du soir
Il s’agit de la moyenne des mesures réalisées le soir (19:00-1:59) du
dimanche au samedi. Une moyenne de chaque jour est calculée
d’après trois mesures maximum réalisées dans les 10 minutes qui
suivent la dernière mesure du soir.
Mesures du soir
Dimanche Lundi Mardi Mercredi Jeudi Vendredi Samedi
19:00
Mesure
FR
Mesure
Dans les 10 minutes
Dernière mesure du soir
1:59
Mesure
Mesure
Mesure
Mesure
Jusqu’à 3 mesures
Pression artérielle du soir
83
Page 84
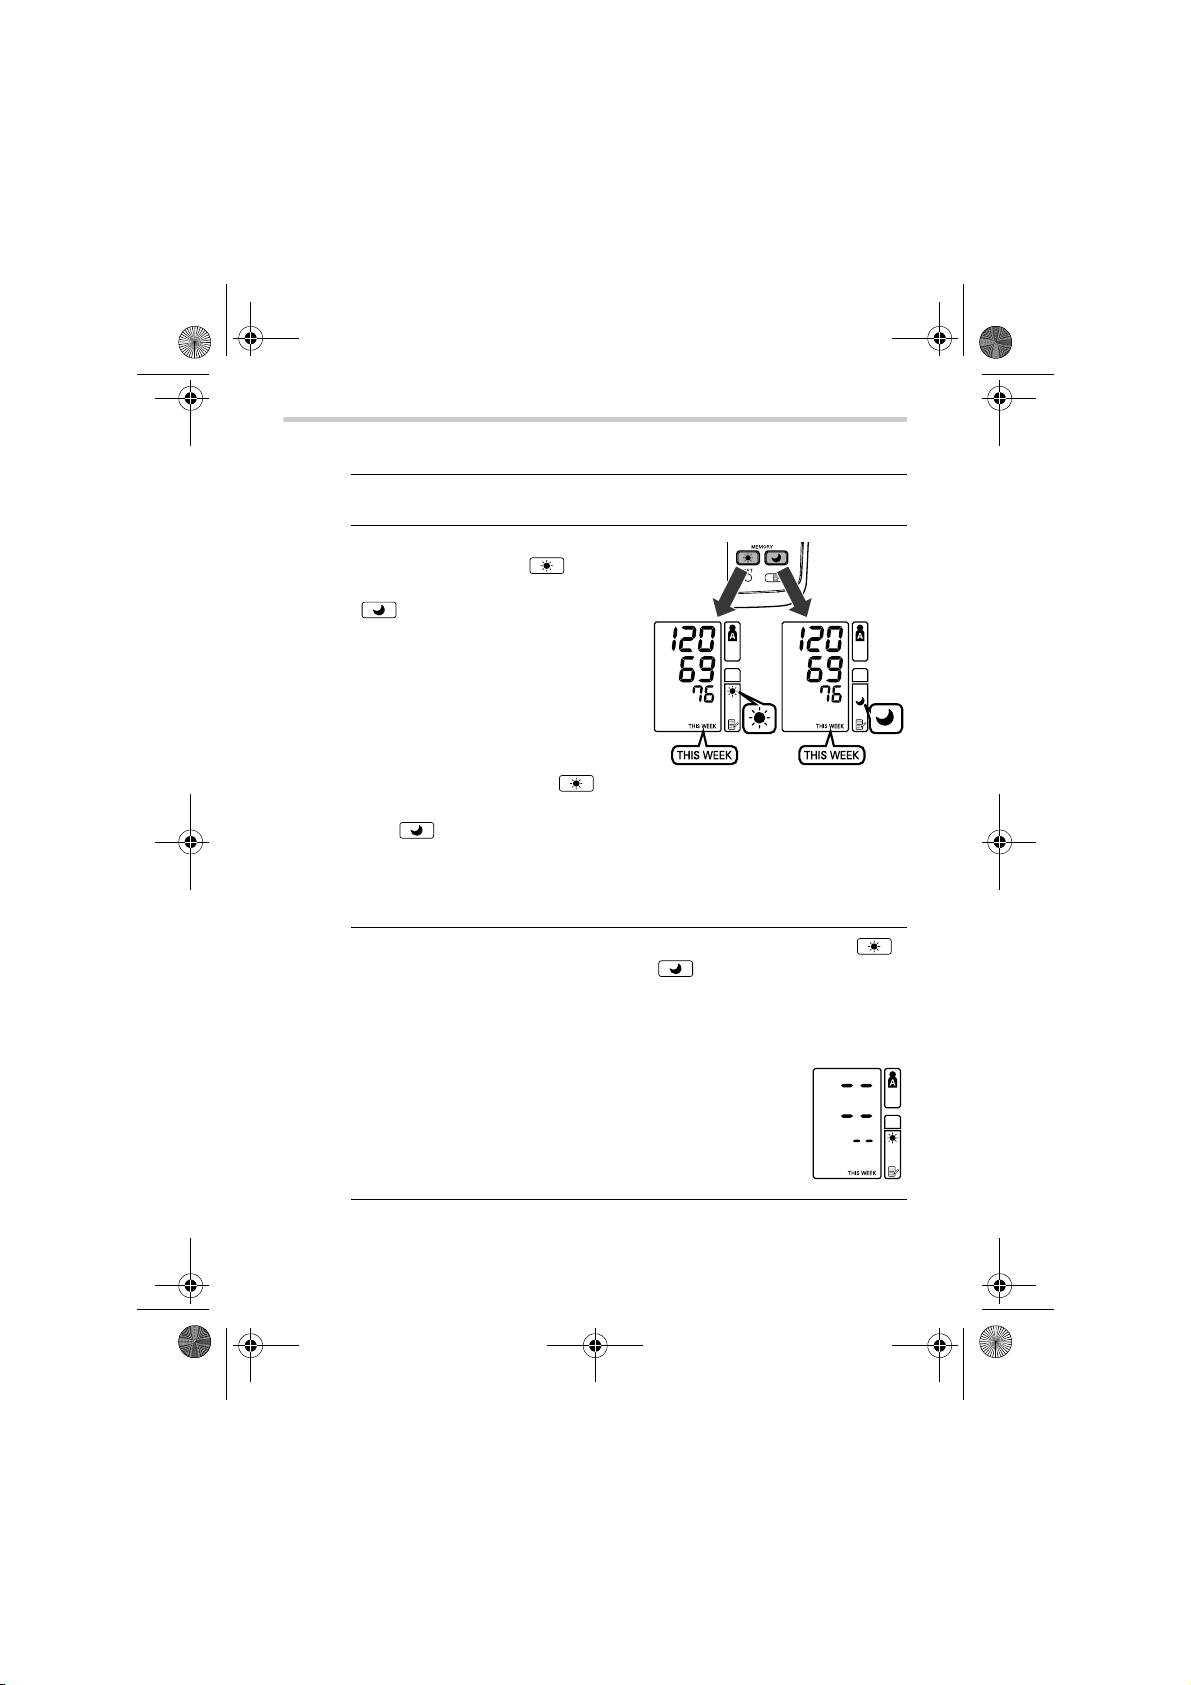
HEM-7070-E_i-C10_main.book 84 ページ 2011年11月4日 金曜日 午前10時20分
3. Utilisation du tensiomètre
Pour afficher les moyennes du matin et du soir
1. Sélectionner votre identifiant d’utilisateur (A ou B).
2. Appuyer sur le bouton de
moyenne du matin ( ) ou sur
le bouton de moyenne du soir
().
La moyenne de la semaine en
cours (« THIS WEEK ») apparaît
sur l’écran.
Pour afficher la valeur moyenne
du matin et du soir de la même
semaine, appuyer sur le bouton
de moyenne du matin ( ) ou
sur le bouton de moyenne du
soir ( ). Il est important de
consulter la moyenne du matin
et la moyenne du soir de la
même semaine.
3. Continuer à appuyer sur le bouton de moyenne du matin ( )
ou le bouton de moyenne du soir ( ) pour afficher les
semaines précédentes. L’appareil affiche « -1 WEEK » pour la
semaine précédente et « -7 WEEK » pour les moyennes les
plus anciennes.
Remarque : Si le nombre de mesures prises
dans une semaine ne suffit pas pour
calculer la moyenne, l’écran apparaît
comme illustré ci-contre.
4. Appuyer sur le bouton O/I START pour arrêter l’appareil.
84
Page 85
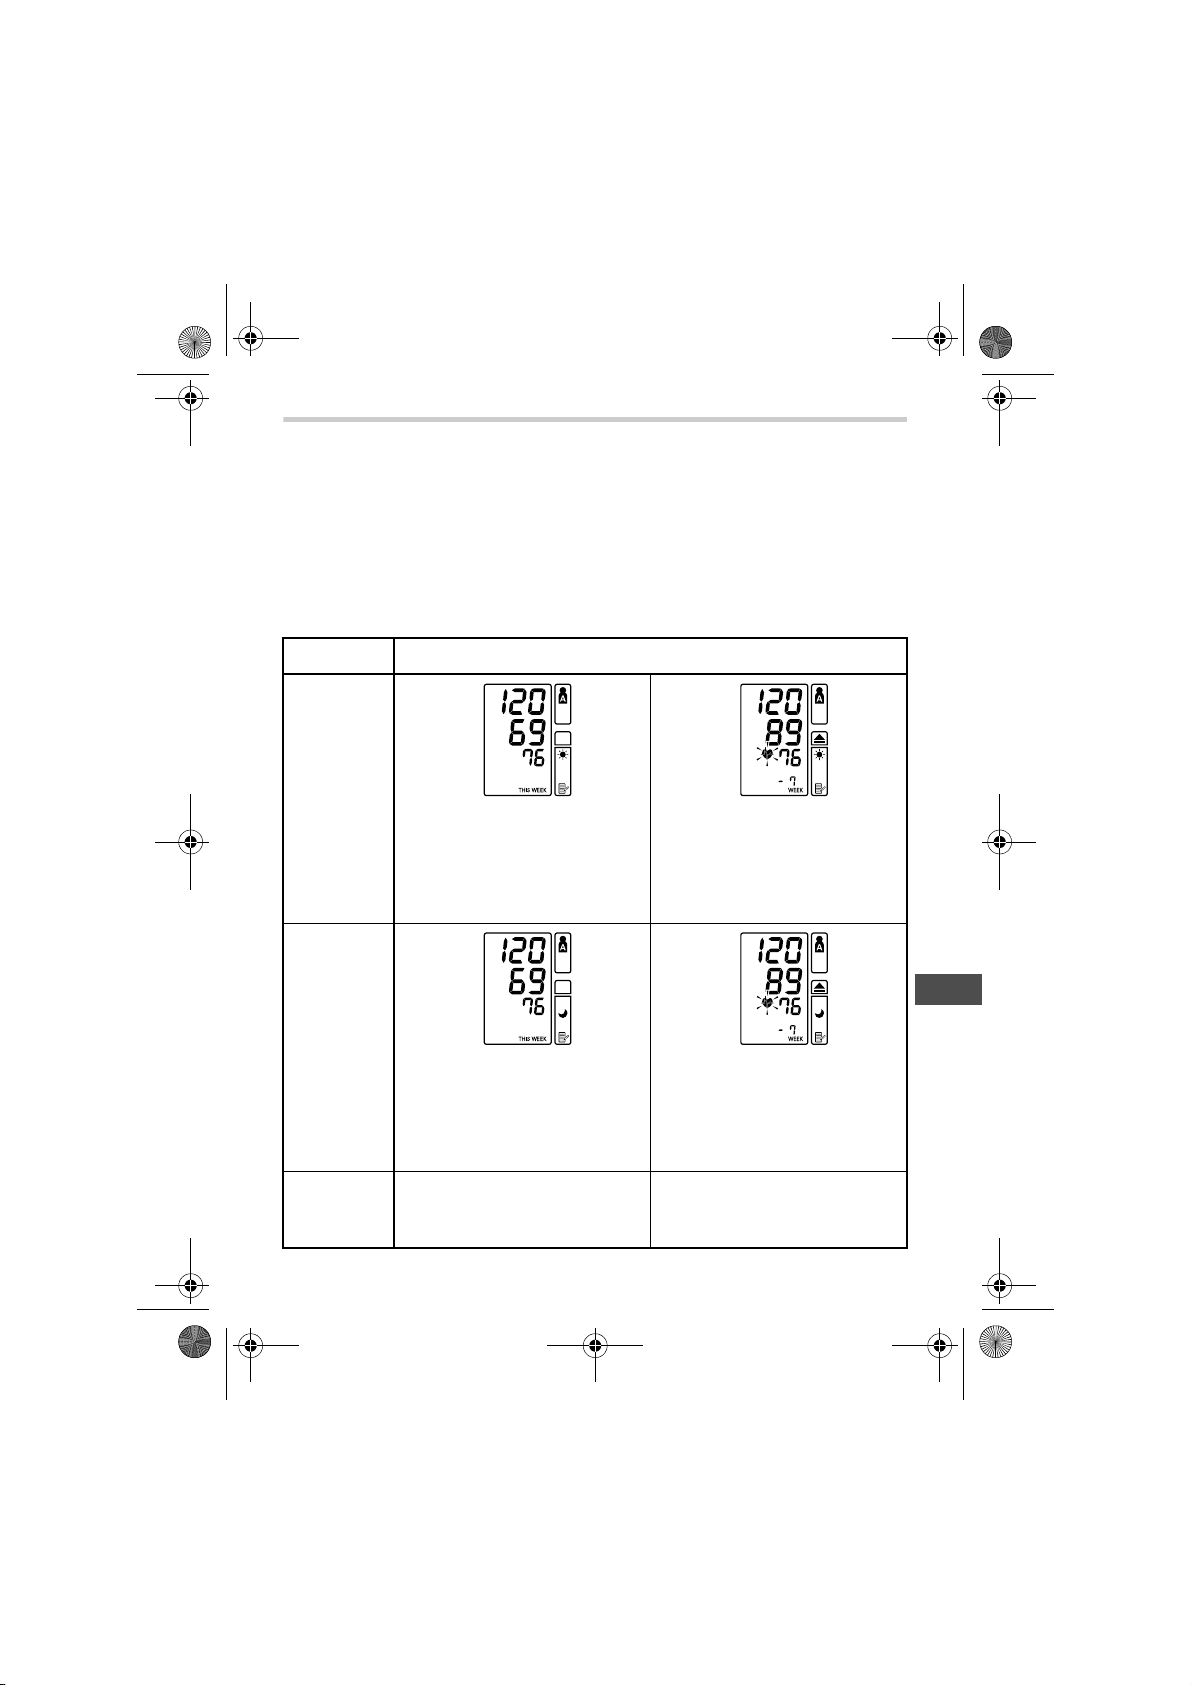
HEM-7070-E_i-C10_main.book 85 ページ 2011年11月4日 金曜日 午前10時20分
3. Utilisation du tensiomètre
Remarques sur l’affichage des combinaisons
En plus des symboles de la moyenne du matin et de la moyenne du
soir, l’appareil peut également afficher le symbole de l’hypertension du
matin si la moyenne du matin de cette semaine excède la pression
artérielle prise au domicile recommandée. (Voir le chapitre 3 Utilisation
du tensiomètre - Informations importantes pour de plus amples
détails.) Ces symboles peuvent être affichés dans les combinaisons
suivantes en fonction des résultats de vos mesures.
Affichage
Moyenne
du matin
Moyenne du matin de cette
semaine avec le symbole de la
moyenne du matin
Moyenne du matin sur
7 semaines avec le symbole de
la moyenne du matin + le symbole clignotant des pulsations
cardiaques + le symbole de
l’hypertension du matin
Moyenne
du soir
Moyenne du soir de cette
semaine avec le symbole de la
moyenne du soir
Moyenne dans la plage de la
pression artérielle prise au
domicile recommandée
Moyenne du soir sur 7 semaines
avec le symbole de la moyenne
du soir + le symbole clignotant
des pulsations cardiaques + le
symbole de l’hypertension du
matin
Moyenne excédant la plage de
la pression artérielle prise au
domicile recommandée +
hypertension du matin
FR
85
Page 86

HEM-7070-E_i-C10_main.book 86 ページ 2011年11月4日 金曜日 午前10時20分
3. Utilisation du tensiomètre
Le symbole de l’hypertension du matin ( ) apparaît si la moyenne
hebdomadaire des mesures du matin excède 135/85.
Dans ce cas, le symbole de l’hypertension du matin ( ) est affiché
lors de l’affichage de la moyenne du soir, indépendamment des
valeurs de la moyenne du soir.
Pour supprimer toutes les valeurs enregistrées en mémoire
Les valeurs enregistrées en mémoire sont supprimées par identifiant
d’utilisateur.
Il est impossible de ne supprimer qu’une partie des valeurs enregistrées en mémoire. Toutes les valeurs de l’utilisateur sélectionné seront
supprimées.
1. Sélectionner votre identifiant (A ou B).
2. Tout en maintenant le bouton MEMORY ( ) enfoncé,
appuyer simultanément sur le bouton O/I START pendant plus
de 2 secondes pour supprimer toutes les valeurs.
86
Page 87
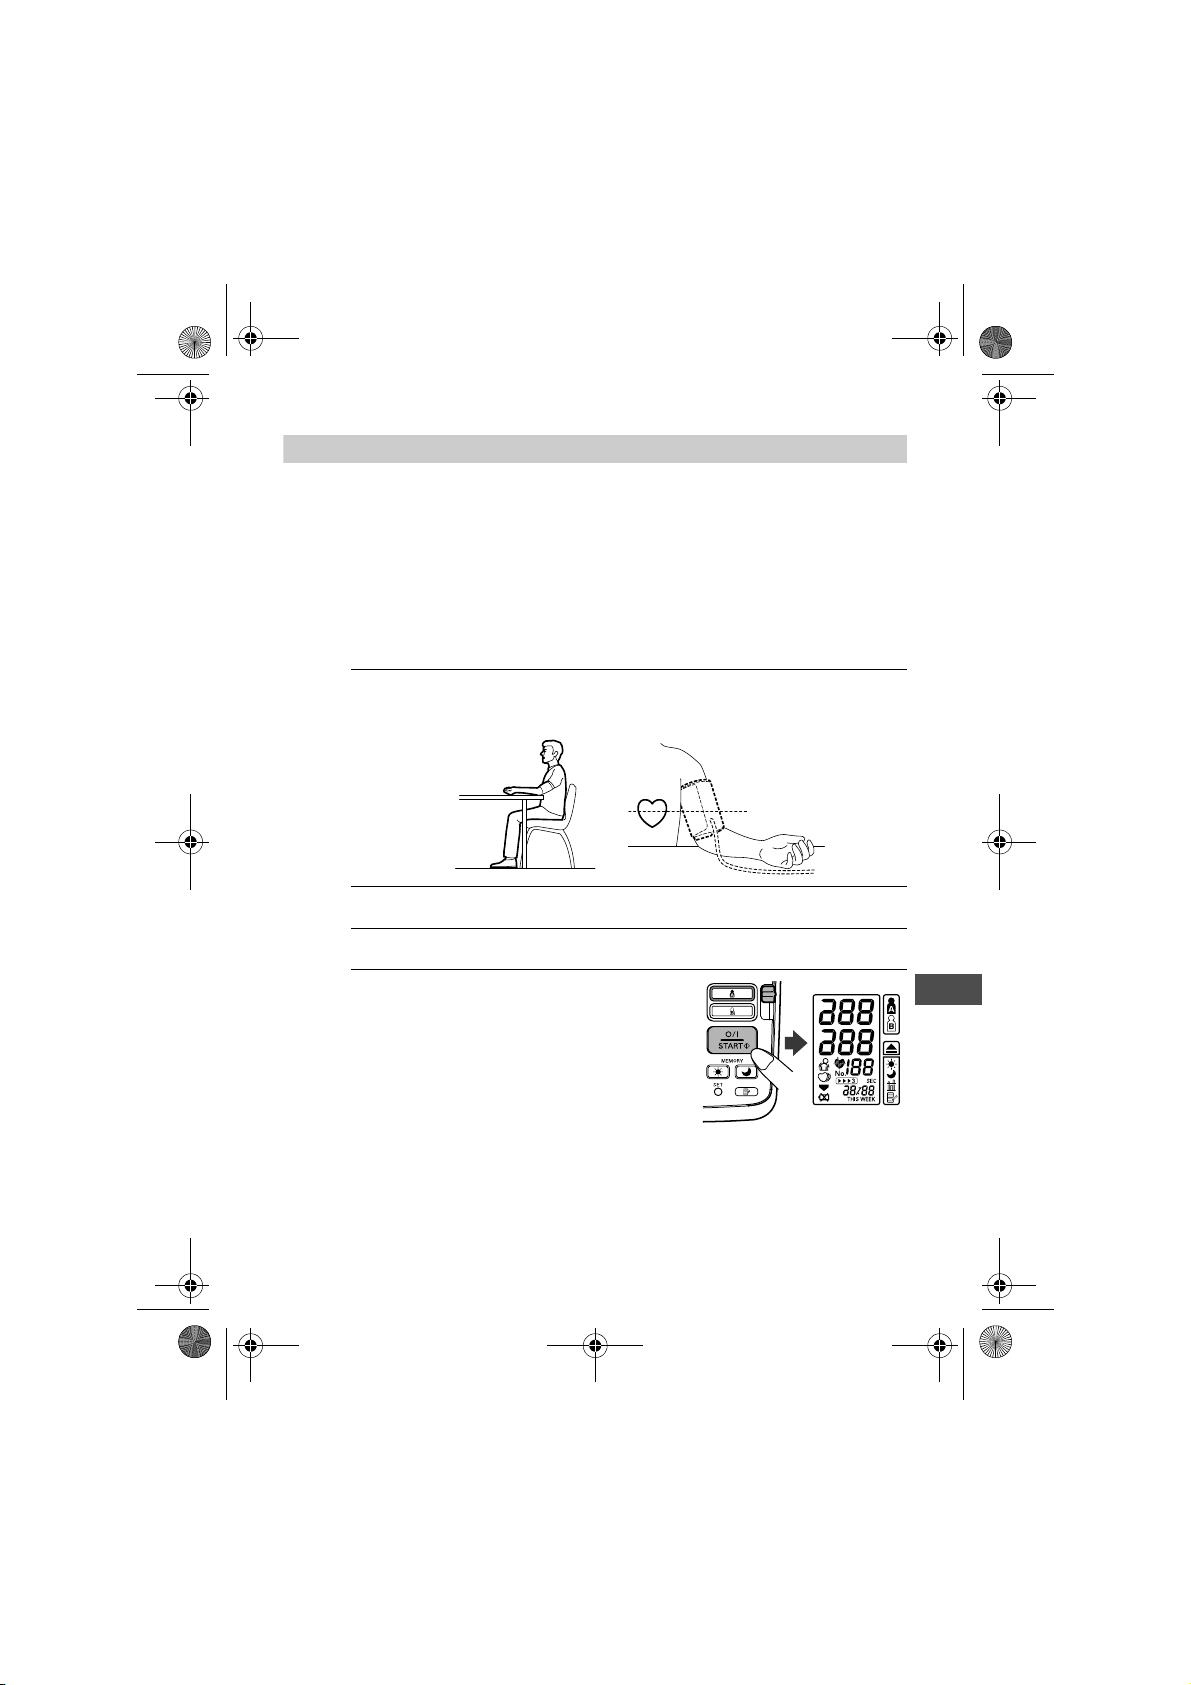
HEM-7070-E_i-C10_main.book 87 ページ 2011年11月4日 金曜日 午前10時20分
4. Guide de référence rapide
4. Guide de référence rapide
Ce Guide de référence rapide est fourni uniquement à titre de
référence. Lire le manuel dans son intégralité avant la première
utilisation de l’appareil.
Pour obtenir une mesure fiable, ne pas manger, fumer ou faire
du sport pendant au moins 30 minutes avant la mesure.
Remarque : Retirer tout vêtement serré de la partie supérieure de
votre bras.
1. S’asseoir sur une chaise, les pieds posés à plat sur le sol, et
placer le bras sur une table afin que le brassard soit au même
niveau que le coeur.
2. Fixer le brassard autour du bras avec le dispositif d’accrochage.
3. Sélectionner votre identifiant d’utilisateur (A ou B).
4. Appuyer sur le bouton O/I START.
Lorsque la mesure est terminée,
l’appareil affiche votre pression artérielle et la fréquence de votre pouls,
puis dégonfle automatiquement le
brassard.
Remarques :
• Toujours attendre au moins 2-3 minutes avant de prendre une
nouvelle mesure de la pression artérielle.
• Attention : tous les résultats des mesures sont enregistrés
dans la mémoire. Si différentes personnes utilisent le même
appareil, assurez-vous d’en être informé.
Entretien et maintenance
FR
87
Page 88
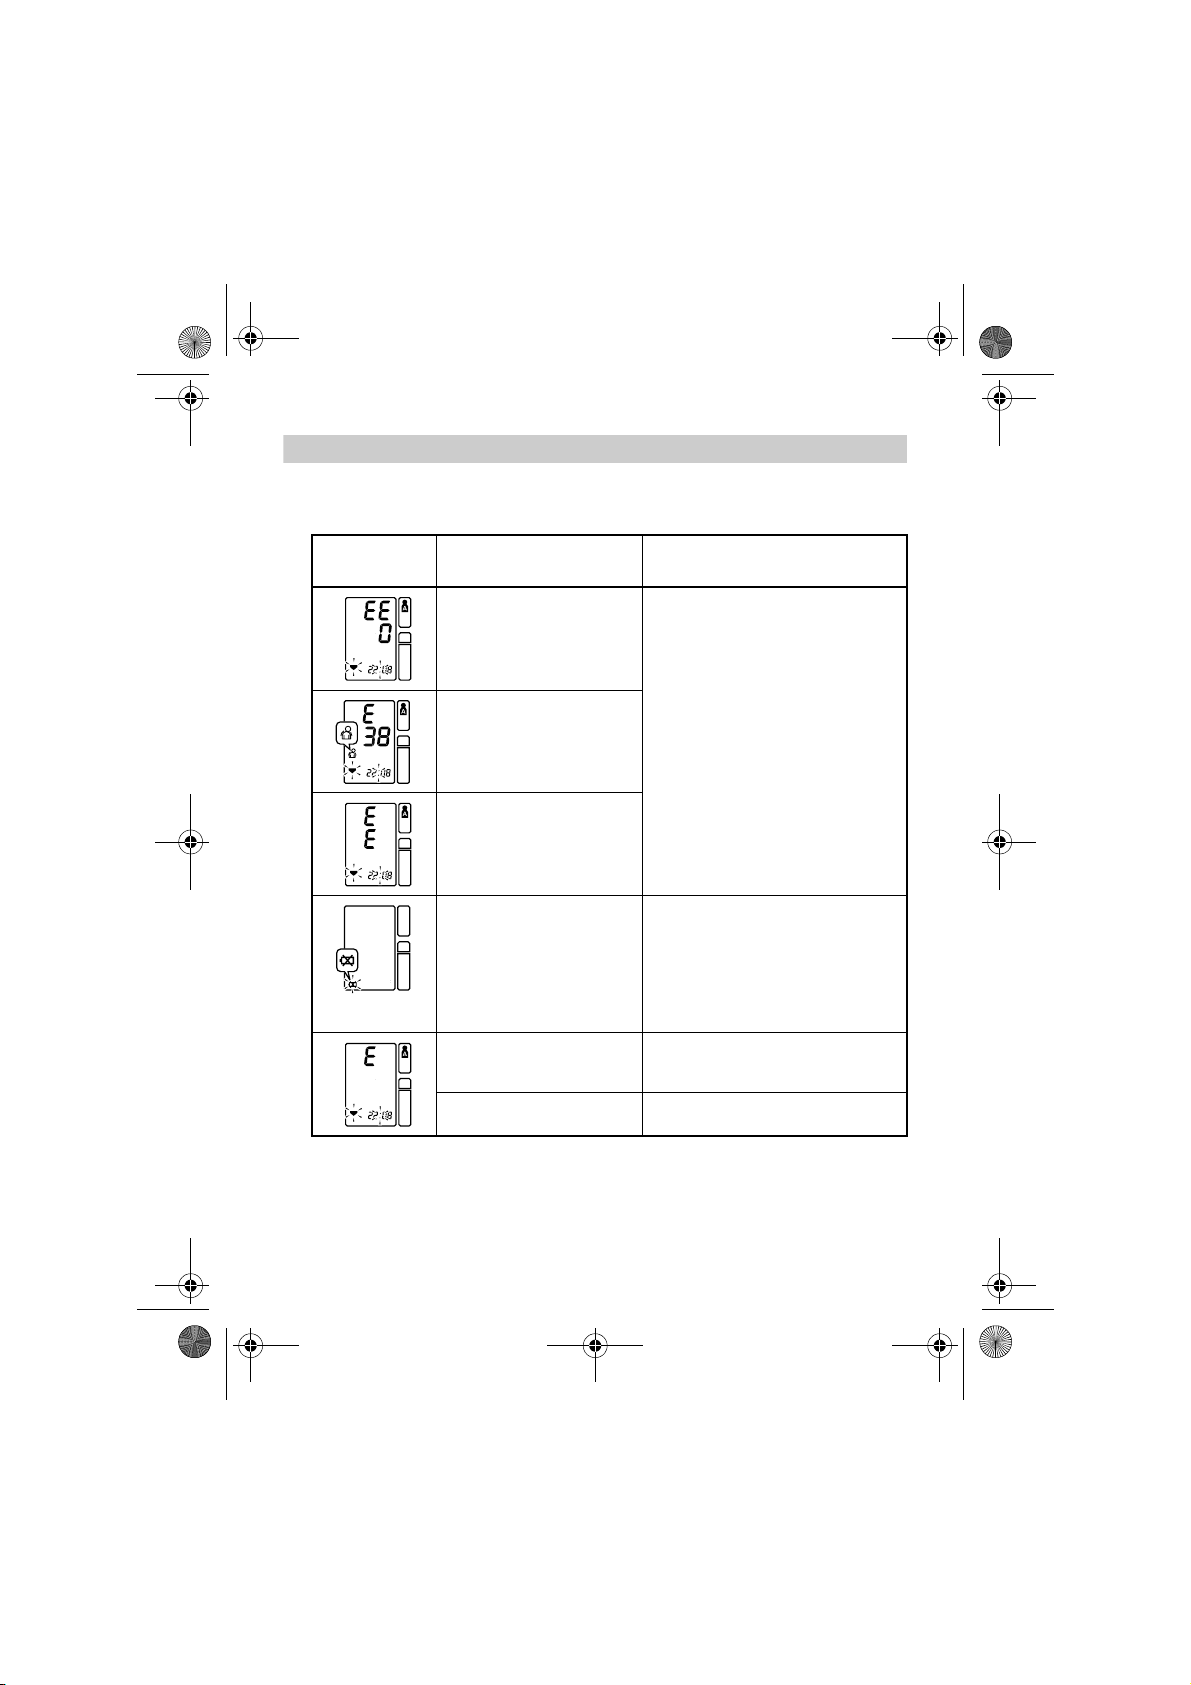
Clignote ou appa-
raît en continu.
HEM-7070-E_i-C10_main.book 88 ページ 2011年11月4日 金曜日 午前10時20分
5. Résolution des erreurs et des problèmes
5. Résolution des erreurs et des problèmes
5.1 Messages d’erreur
Affichage des
erreurs
Cause Solution
Le brassard est sous-gonflé.
Mouvement lors d’une
mesure.
Brassard surgonflé.
Les piles sont déchargées.
Mouvement, son.
De l’air s’échappe du brassard.
Lire attentivement les instructions
et répéter les étapes indiquées au
chapitre 3.3.
Remplacer les quatre piles « AA »
par de nouvelles piles.
Consulter le chapitre 2.1.
Lire attentivement les instructions
et répéter les étapes indiquées au
chapitre 3.3.
Remplacer le brassard par un brassard neuf.
88
Page 89

HEM-7070-E_i-C10_main.book 89 ページ 2011年11月4日 金曜日 午前10時20分
5. Résolution des erreurs et des problèmes
5.2 Dépannage
Problème Cause Solution
Aucun affichage n’apparaît lorsque le bouton O/
I START est enfoncé.
Mesure impossible ou
lectures trop élevées.
La pression artérielle
diffère à chaque
mesure. La lecture est
extrêmement basse (ou
élevée).
Les piles sont vides. Remplacer les piles.
Le brassard est-il correctement enroulé autour du
bras ?
La pression du brassard
ne s’élève pas, bien que
le moteur de la pompe
fonctionne.
Les lectures de la pression artérielle varient constamment selon l’heure de la mesure et l’état nerveux. Inspirer profondément à plusieurs reprises pour vous
détendre avant de prendre une mesure.
Attacher correctement le
brassard pneumatique.
Vérifier que la prise de
gonflage est correctement branchée à l’appareil. Insérer fermement la
prise mâle dans la prise
femelle de gonflage.
89
FR
Page 90

HEM-7070-E_i-C10_main.book 90 ページ 2011年11月4日 金曜日 午前10時20分
6. Maintenance et stockage
6. Maintenance et stockage
Pour protéger votre appareil des dommages éventuels, procéder comme suit :
• Ne pas installer votre appareil et votre brassard dans des environnements soumis à des températures extrêmes, à l’humidité ou à la
lumière directe du soleil.
• Ne pas plier excessivement le brassard ou le tuyau.
• Ne pas démonter l’appareil.
• Ne pas effectuer de réparations de quelque nature que ce soit par
vous-même. En cas de défaillance, contacter le distributeur ou les
Services clientèle d’OMRON dont les coordonnées figurent sur
l’emballage, ou consulter votre revendeur ou votre pharmacien.
• L’OMRON i-C10 est un dispositif de mesure de précision. Il est essentiel que cette précision reste dans les limites indiquées. Il est recommandé de faire contrôler l’appareil tous les deux ans afin de vérifier sa
précision et son bon fonctionnement. Consulter le distributeur ou les
Services clientèle d’OMRON dont les coordonnées figurent sur
l’emballage pour de plus amples détails.
• Ne pas soumettre l’appareil à des chocs ou des vibrations excessifs
(par exemple, faire tomber l’appareil sur le sol.)
• Ne pas utiliser de liquides volatils pour nettoyer l’appareil. L’APPAREIL DOIT ETRE NETTOYE AVEC UN CHIFFON SEC ET DOUX.
• Ne pas laver le brassard pneumatique ni l’immerger dans l’eau.
• Utiliser un chiffon doux humidifié et du savon pour nettoyer le brassard pneumatique.
Stockage
Fermer le couvercle du tensiomètre lorsqu’il
n’est pas utilisé.
90
Page 91

HEM-7070-E_i-C10_main.book 91 ページ 2011年11月4日 金曜日 午前10時20分
7. Pièces optionnelles
7. Pièces optionnelles
Transformateur de courant alternatif « R »
Transformateur de courant alternatif « Q »
Brassard
R Adapter-9997605-0
Q Adapter-1098336-8
Référence 9956685-4
Utilisation du transformateur de courant alternatif optionnel
Introduire les piles dans le compartiment des piles, même en cas d’utilisation du transformateur de courant alternatif.
Remarques :
• Ne jamais brancher ni débrancher le cordon d’alimentation de la prise
électrique avec les mains mouillées.
• Utiliser exclusivement le transformateur de courant alternatif d’origine
prévu pour cet appareil. L’utilisation de transformateurs inappropriés
peut endommager l’appareil.
• Lorsque vous stockez le transformateur de courant alternatif avec
l’appareil, veiller à ne pas endommager l’appareil ou le brassard.
1. Introduire la prise du transforma-
teur de courant alternatif dans la
prise pour transformateur de
courant alternatif située sur le
côté de l’appareil.
2. Brancher le transformateur de
courant alternatif sur une prise
électrique.
Pour débrancher le transformateur de courant alternatif, le
déconnecter d’abord de la prise électrique puis retirer immédiatement la prise du transformateur de courant alternatif de
l’appareil.
FR
91
Page 92

= Type B
= Type B
HEM-7070-E_i-C10_main.book 92 ページ 2011年11月4日 金曜日 午前10時20分
8. Données techniques
8. Données techniques
Description du produit Tensiomètre automatique
Modèle OMRON i-C10 (HEM-7070-E)
Affichage Affichage numérique LCD
Méthode de mesure Méthode oscillométrique
Plage de mesure Pression : 0 mmHg à 299 mmHg
Précision Pression : 3 mmHg
Gonflage Logique floue contrôlée par une pompe électrique
Dégonflage Soupape de régulation automatique de la pression
Détection de pression Capteur de pression capacitatif
Mémoire 84 mesures avec la date et l’heure pour chaque utilisateur
Source d’alimentation 4 piles AA 1,5 V ou transformateur de courant alternatif/
Durée de vie de la pile La capacité des piles alcalines neuves est d’environ 1 400
Température/Humidité
de fonctionnement
Température/Humidité
de stockage/Pression
atmosphérique
Poids de la console Environ 960 g sans les piles
Poids du brassard Environ 240 g
Dimensions extérieures Environ 249 mm (l) 178 mm (p) 110 mm (h)
Dimensions du brassard Environ 152 mm 600 mm
Contenu de l’emballage Brassard, mode d’emploi, jeu de piles, carte de garantie,
Remarque : Soumis à des modifications techniques sans préavis.
Impulsion : 40 à 180/min.
Impulsion : 5 % de la lecture de l’affichage
(A et B)
direct (6 V = 4 W)
mesures pour une utilisation 6 fois par jour avec 4 piles
alcalines neuves
+10 °C à +40 °C
Maximum : 30 à 90 % HR
-20°C à +60°C
Maximum : 10 à 95 % HR
700 - 1 060 hPa
(Brassard : circonférence du bras entre 22 et 42 cm)
carte de la pression artérielle
• Cet appareil répond aux dispositions de la Directive CE 93/42/CEE sur les appareils
médicaux.
• Ce tensiomètre est conçu conformément à la norme européenne EN 1060, Tensiomètres non invasifs Partie 1 : Exigences générales et Partie 3 : Exigences complémentaires concernant les systèmes électromécaniques de mesure de la pression artérielle.
• Ce produit OMRON a été fabriqué selon les normes de qualité rigoureuses d’OMRON
Healthcare Co. Ltd., Japon. Le composant fondamental des tensiomètres OMRON, à
savoir le capteur de pression, est monté au Japon.
92
Page 93

Ce symbole sur le produit ou sa documentation indique qu’il ne doit pas
être éliminé en fin de vie avec les autres déchets ménagers. L’élimination incontrôlée des déchets pouvant porter préjudice à l’environnement ou à la santé humaine, veuillez le séparer des autres types de
déchets et le recycler de façon responsable. Vous favoriserez ainsi la
réutilisation durable des ressources matérielles.
Les particuliers sont invités à contacter le distributeur leur ayant vendu le produit ou à
se renseigner auprès de leur mairie pour savoir où et comment ils peuvent se débarrasser de ce produit afin qu’il soit recyclé en respectant l’environnement.
Les entreprises sont invitées à contacter leurs fournisseurs et à consulter les conditions de leur contrat de vente. Ce produit ne doit pas être éliminé avec les autres
déchets commerciaux.
Ce produit ne contient aucune substance dangereuse.
Informations importantes sur la compatibilité électromagnétique (CEM)
Avec l’accroissement du nombre d’appareils électroniques comme les PC et les téléphones mobiles (cellulaires), les appareils médicaux utilisés peuvent être soumis aux
interférences électromagnétiques dégagées par d’autres appareils. Les interférences
électromagnétiques peuvent perturber le fonctionnement de l’appareil médical et
créer une situation potentiellement dangereuse.
Les appareils médicaux ne doivent pas non plus interférer avec d’autres appareils.
Afin de réglementer les exigences relatives à la CEM (compatibilité électromagnétique) dans le but de prévenir toute situation dangereuse causée par le produit, la
norme EN 60601-1-2 a été mise en œuvre. Cette norme définit les niveaux d’immunité aux interférences électromagnétiques ainsi que les niveaux maximum d’émissions électromagnétiques pour les appareils médicaux.
Cet appareil médical fabriqué par OMRON Healthcare est conforme à cette norme
EN 60601-1-2:2001 tant pour l’immunité que pour les émissions.
Il importe toutefois d’observer des précautions spéciales :
• N’utilisez pas des téléphones mobiles (cellulaires) et autres appareils générant des
champs électriques ou électromagnétiques puissants à proximité de l’appareil. Cela
risquerait de perturber le fonctionnement de l’appareil et de créer une situation potentiellement dangereuse. Il est recommandé de maintenir une distance minimum de
7 m. Vérifiez le bon fonctionnement de l’appareil si la distance est inférieure.
Une documentation complémentaire conforme à la norme EN 60601-1-2:2001 est
disponible auprès de OMRON Healthcare Europe à l’adresse mentionnée dans le
présent mode d’emploi.
Une documentation est également disponible sur le site www.omron-healthcare.com
.
Comment éliminer ce produit
(déchets d’équipements électriques et électroniques)
HEM-7070-E_i-C10_main.book 93 ページ 2011年11月4日 金曜日 午前10時20分
8. Données techniques
FR
93
Page 94

HEM-7070-E_i-C10_main.book 94 ページ 2011年11月4日 金曜日 午前10時20分
9. Informations utiles sur la pression artérielle
9. Informations utiles sur la pression artérielle
Qu’est-ce que la pression artérielle ?
La pression artérielle est une mesure de la pression exercée par le
sang sur les parois des artères. La pression artérielle change constamment tout au long du cycle cardiaque.
La pression la plus élevée au cours du cycle est appelée pression arté-
rielle systolique ; la plus basse correspond à la pression artérielle diastolique.
Les deux mesures de la pression (systolique et diastolique) permettent
au médecin d’évaluer la pression artérielle d’un patient.
Pourquoi est-ce souhaitable de mesurer la pression artérielle à
domicile ?
Faire mesurer votre pression artérielle par un médecin peut entraîner
une certaine anxiété qui provoque à son tour une élévation de la pression artérielle. Comme divers facteurs influencent la pression artérielle,
une seule mesure risque de ne pas suffire pour établir un diagnostic
précis.
De nombreux facteurs tels que l’activité physique, l’anxiété ou l’horaire
peuvent influencer votre pression artérielle. Il est donc préférable de
mesurer votre pression artérielle à la même heure chaque jour afin
d’obtenir une indication précise de tout changement survenu dans
votre pression artérielle. La pression artérielle est généralement basse
le matin et augmente l’après-midi et le soir. Elle est plus basse en été
qu’en hiver.
La pression artérielle est mesurée en millimètres de mercure (mmHg)
et les mesures affichent d’abord la pression systolique, puis la pression diastolique. Par exemple, une pression artérielle indiquée comme
140/90 est mentionnée comme 140 et 90 mmHg.
94
Page 95

mmHg
200
150
100
50
61218 24
Exemple : fluctuation sur un jour (homme, 35 ans)
Heure du jour
Courbe supérieure : pression artérielle systolique
Courbe inférieure : pression artérielle diastolique
HEM-7070-E_i-C10_main.book 95 ページ 2011年11月4日 金曜日 午前10時20分
9. Informations utiles sur la pression artérielle
Classification de la pression artérielle par l’Organisation mondiale de la santé
L’Organisation mondiale de la santé (OMS) et la Société internationale
d’hypertension (SIH) ont établi une classification de la pression artérielle illustrée dans cette figure.
Pression artérielle systolique
(mmHg)
180
160
140
Valeur systolique normale
130
Pression artérielle
120
Pression artérielle optimale
(valeur cible)
normale
Hypertension grave
Hypertension modérée
Hypertension légère
80
85 90 100 110
Pression
artérielle
diastolique
(mmHg)
La classification est établie d’après les valeurs de pression artérielle
recueillies sur des personnes assises dans les services de consultation externe des hôpitaux.
Remarque : Il n’existe aucune définition universellement acceptée de
l’hypotension. Toutefois, les personnes dont la pression
systolique est inférieure à 100 mmHg sont considérées
comme des personnes hypotendues.
95
FR
Page 96

Fabr icant
OMRON HEALTHCARE Co., Ltd.
53, Kunotsubo, Terado-cho, Muko, Kyoto,
617-0002 JAPON
Mandataire dans lUE
OMRON HEALTHCARE EUROPE B.V.
Scorpius 33, 2132 LR Hoofddorp, PAYS-BAS
www.omron-healthcare.com
Site de production
OMRON (DALIAN) CO., LTD.
Dalian, CHINE
Succursale
OMRON HEALTHCARE UK LTD.
Opal Drive, Fox Milne, Milton Keynes, MK15 0DG, ROYAUME-UNI
OMRON MEDIZINTECHNIK
HANDELSGESELLSCHAFT mbH
John-Deere-Str. 81a, 68163 Mannheim, ALLEMAGNE
www.omron-medizintechnik.de
OMRON SANTÉ FRANCE SAS
14, rue de Lisbonne, 93561 Rosny-sous-Bois Cedex, FRANCE
Uniquement pour le marché français:
OMRON Service Après Vente
Nº Vert 0 800 91 43 14
consommateurs@omron-sante.fr
www.omron-sante.fr/contact
Fabriqué en Chine
HEM-7070-E_i-C10_main.book 96 ページ 2011年11月4日 金曜日 午前10時20分
9. Informations utiles sur la pression artérielle
96
Page 97

HEM-7070-E_i-C10_main.book 97 ページ 2011年11月4日 金曜日 午前10時20分
Automatisches digitales Blutdruckmessgerät
Modell i-C10
• Instruction Manual
• Mode d’emploi
• Gebrauchsanweisung
• Manuale di istruzioni
• Manual de instrucciones
• Gebruiksaanwijzing
• РУКОВОДСТВО ПО ЭКСПЛУАТАЦИИ
EN
FR
DE
IT
ES
NL
RU
AR
Page 98

HEM-7070-E_i-C10_main.book 98 ページ 2011年11月4日 金曜日 午前10時20分
Inhalt
Vor der Verwendung des Messgeräts
Einführung.................................................................................99
Wichtige Sicherheitsinformationen....................................... 100
1. Überblick............................................................................ 102
2. Vorbereitung......................................................................106
2.1 Batterien einsetzen und auswechseln ......................................106
2.2 Datum und Uhrzeit einstellen....................................................108
Gebrauchsanweisung
3. Verwendung des Messgeräts ..........................................112
3.1 So sitzen Sie beim Messen richtig............................................112
3.2 Anlegen der Armmanschette ....................................................114
3.3 Eine Messung vornehmen........................................................117
3.4 Anweisungen für spezielle Bedingungen..................................127
3.5 Benutzung der Speicherfunktion...............................................128
4. Kurzanleitung ....................................................................135
Pflege und Instandhaltung
5. Störungen: Ursachen und Behebung .............................136
5.1 Fehlermeldungen......................................................................136
5.2 Fehlersuche und -behebung.....................................................137
6. Pflege und Lagerung ........................................................ 138
7. Optionale Zusatzprodukte................................................ 139
8. Technische Daten ............................................................. 140
9. Einige nützliche Informationen über den Blutdruck...... 142
98
Page 99

HEM-7070-E_i-C10_main.book 99 ページ 2011年11月4日 金曜日 午前10時20分
Vor der Verwendung des Messgeräts
Einführung
Vielen Dank, dass Sie sich für das OMRON i-C10 Intellisense Oberarm-Blutdruckmessgerät entschieden haben.
Das OMRON i-C10 Intellisense ist ein vollautomatisches Blutdruckmessgerät, das auf dem oszillometrischen Prinzip beruht. Es misst
Ihren Blutdruck und die Pulsfrequenz einfach und schnell. Für das
bequeme, kontrollierte Aufpumpen, ohne dass der Druck voreingestellt
oder neu aufgepumpt werden muss, verwendet das Gerät die fortschrittliche Technik „Intellisense“.
Das Messgerät speichert die Messergebnisse von zwei Personen und
bietet Morgen- und Abendmittelwerte. Der Automodus ermöglicht drei
aufeinander folgende Messungen mit abgestimmten Zeitspannen für
eine Mittelwertmessung.
Lesen Sie diese Gebrauchsanweisung aufmerksam
durch, bevor Sie das Gerät verwenden. Wenden Sie sich
für ausführliche Informationen zu Ihrem Blutdruck an
IHREN ARZT.
Einführung
99
DE
Page 100

HEM-7070-E_i-C10_main.book 100 ページ 2011年11月4日 金曜日 午前10時20分
Wichtige Sicherheitsinformationen
Wichtige Sicherheitsinformationen
Bei Schwangerschaft, Arrhythmie und Arteriosklerose sollten Sie sich an Ihren
Arzt wenden. Lesen Sie diesen Abschnitt aufmerksam durch, bevor Sie das
Gerät verwenden.
Warnung:
Zeigt eine möglicherweise gefährliche Situation an, die zum Tod oder zu sehr
schweren Verletzungen führen kann.
(Allgemeine Verwendung)
• Wenden Sie sich stets an Ihren Arzt. Selbstdiagnose und Selbstbehandlung
anhand der Messergebnisse sind gefährlich.
• Personen mit ernsthaften Blutflussproblemen oder Blutungsstörungen sollten
vor der Verwendung des Messgerätes ihren Arzt befragen. Das Aufpumpen
der Manschette kann innere Blutungen verursachen.
(Verwendung der Batterien)
• Wenn Batteriesäure in Ihre Augen gelangt, spülen Sie diese sofort mit reichlich klarem Wasser ab. Suchen Sie sofort einen Arzt auf.
(Verwendung des optionalen Netzteils)
• Nie das Netzkabel mit nassen Händen in die Steckdose einstecken oder aus
der Steckdose ziehen.
Achtung:
Gefahrensituation, die ohne Vorsichtsmaßnahmen zu leichten oder mittelschweren Verletzungen des Benutzers oder des Patienten oder Geräteschäden beziehungsweise Schäden an anderen Gegenständen führen kann.
(Allgemeine Verwendung)
• Das Gerät nicht unbeaufsichtigt bei Kleinkindern oder solchen Personen lassen, die ihre Zustimmung nicht ausdrücken können.
• Das Messgerät nur zum Messen des Blutdrucks verwenden.
• Das Messgerät und die Armmanschette nicht zerlegen.
• Die Armmanschette nicht auf über 299 mmHg aufpumpen.
• Verwenden Sie weder Handys noch andere Geräte, die ein elektromagnetisches Feld ausstrahlen, in der Nähe des Blutdruckmessgeräts. Dies könnte
zu einer Fehlfunktion des Messgeräts führen.
• Messgerät nicht in einem sich bewegenden Fahrzeug (Auto, Flugzeug) verwenden.
100
 Loading...