

Page 1
Instruction Manual
Body Composition MONITOR
with Scale
Model HBF-500
Page 2

TABLE OF CONTENTS
Before Using the Monitor
Introduction . . . . . . . . . . . . . . . . . . . . . . . . . . . . . . . . . . . . . . . . . . . . . . . . . .3
Safety Information . . . . . . . . . . . . . . . . . . . . . . . . . . . . . . . . . . . . . . . . . . . . .4
Useful Information . . . . . . . . . . . . . . . . . . . . . . . . . . . . . . . . . . . . . . . . . . . . .6
Body Mass Index and Ideal Weight . . . . . . . . . . . . . . . . . . . . . . . . . . . .6
Body Fat . . . . . . . . . . . . . . . . . . . . . . . . . . . . . . . . . . . . . . . . . . . . . . . . .7
Visceral Fat . . . . . . . . . . . . . . . . . . . . . . . . . . . . . . . . . . . . . . . . . . . . . . .8
Resting Metabolism & Skeletal Muscle . . . . . . . . . . . . . . . . . . . . . . . . .9
Long-term Planning for Successful Weight Loss . . . . . . . . . . . . . . . . .11
Principle of Body Composition Calculation . . . . . . . . . . . . . . . . . . . . .12
Recommended Measurement Times . . . . . . . . . . . . . . . . . . . . . . . . . . .13
Operating Instructions
Know Your Unit . . . . . . . . . . . . . . . . . . . . . . . . . . . . . . . . . . . . . . . . . . . . . .15
Battery Installation . . . . . . . . . . . . . . . . . . . . . . . . . . . . . . . . . . . . . . . . . . .18
Setting the Date and Time . . . . . . . . . . . . . . . . . . . . . . . . . . . . . . . . . . . . . .20
Setting Personal Data . . . . . . . . . . . . . . . . . . . . . . . . . . . . . . . . . . . . . . . . .22
Changing Personal Data . . . . . . . . . . . . . . . . . . . . . . . . . . . . . . . . . . . .24
How to Take a Measurement . . . . . . . . . . . . . . . . . . . . . . . . . . . . . . . . . . . .26
How to Measure Weight Only . . . . . . . . . . . . . . . . . . . . . . . . . . . . . . . . . . .32
How to Use the Memory Function . . . . . . . . . . . . . . . . . . . . . . . . . . . . . . .33
Care and Maintenance
Error Indicators . . . . . . . . . . . . . . . . . . . . . . . . . . . . . . . . . . . . . . . . . . . . . .37
Troubleshooting Tips . . . . . . . . . . . . . . . . . . . . . . . . . . . . . . . . . . . . . . . . . .38
Care and Maintenance . . . . . . . . . . . . . . . . . . . . . . . . . . . . . . . . . . . . . . . . .39
FCC Statement . . . . . . . . . . . . . . . . . . . . . . . . . . . . . . . . . . . . . . . . . . . . . . .40
Warranty . . . . . . . . . . . . . . . . . . . . . . . . . . . . . . . . . . . . . . . . . . . . . . . . . . . .41
Specifications . . . . . . . . . . . . . . . . . . . . . . . . . . . . . . . . . . . . . . . . . . . . . . . .42
Notes . . . . . . . . . . . . . . . . . . . . . . . . . . . . . . . . . . . . . . . . . . . . . . . . . . . . . . .43
2
Page 3

Before Using the Monitor
INTRODUCTION
Thank you for purchasing the OMRON®HBF-500 Body Composition MONITOR with Scale.
Fill in for future reference.
DATE PURCHASED:
SERIAL NUMBER:
Staple your purchase receipt here
The Body Composition MONITOR with Scale is easy to use. The monitor calculates the estimated
y fat per
values f
visceral fat level with two levels using the BI (Bioelectrical Impedance). The monitor also calculates
the estimated BMI (Body Mass Index) in four ranges as well as weight. Push the power switch on,
select y
function can be used to store data for up to four personal profiles. The memory function stores the
measurement results for each personal profile from 1 day, 7 days, 30 days and 90 days ago.
or bod
our Personal Pr
centage with 12 levels, skeletal muscle percentage, resting metabolism and
ofile Number, and step onto the measurement platform. The personal memory
Your HBF-500 comes with the following components:
• Main Unit
uction Manual
• Instr
• 4 “AA” Batteries
WARNING
Do not use, or allow others to use, this monitor if fitted with with a cardiac pacemaker
or other implanted medical device.
WARNING
Pregnant w
CAUTION
Read all of the information in the instruction manual and any other literature in the box
before operating the unit.
omen should not use this device.
SAVE THESE INSTRUCTIONS
3
Page 4
SAFETY INFORMATION
To assure the correct use of the product, basic safety measures should always be followed including
the warnings and cautions listed in this instruction manual.
SAFETY SYMBOLS USED IN THIS INSTRUCTION MANUAL
WARNING
result in death or serious injury.
Indicates a potentially hazardous situation which, if not avoided, may
Indicates a potentially hazardous situation which, if not avoided, could
CAUTION
result in minor or moderate injury to the user or patient or damage to the
equipment or other property.
OPERATING THE DEVICE
This monitor cannot be used with a cardiac pacemaker or other implanted medical devices. The Body
Composition MONITOR with Scale passes an extremely weak electrical current of 50kHz and less than
5 00 A through your body when taking a measurement to determine the amount of fat tissue. This weak
current is not felt while using the monitor. Do not use, or allow others to use, this monitor if fitted with a
cardiac pacemaker or other medical device.
Contact your physician or healthcare provider before beginning a weight reduction or exercise program.
Keep the monitor out of the reach of young children. Cord can become entangled and cause strangulation.
Persons with disabilities or persons that are physically frail should be assisted by another person when using
this monitor or use a handrail, a walker, or other support device to prevent falling when stepping on and off
the monitor.
Read all of the information in the instruction manual and any other literature in the box before operating the
unit.
Do not use mobile telephones, microwave and other devices that generate strong electrical or
electromagnetic fields near the monitor. This may result in an operational failure.
Do not step on the edge or the display area of the measurement platform. The monitor may tilt. The display
unit may be damaged.
Do not step on the measurement platform when your body or feet are wet, for example after taking a bath or
shower. You may slide and lose your balance.
correct measurement may
Do not place the monitor on a cushioned floor surface such as a carpet or mat.
not be possible.
Do not use the unit on slippery surfaces such as tile floors or wet floors. Amonitor may move. You may lose
your balance and fall.
ou may lose your balance and fall. The monitor may be
Do not jump on the measurement platform.
damaged.
Stand on the measurement platform with bare feet.
wearing socks may cause you to slip and lose your balance.
Y
Attempting to stand on the measurement platform when
A
4
Page 5

SAFETY INFORMATION
OPERATING THE DEVICE (continued)
Should battery fluid leak and contact your eyes, skin or clothing immediately rinse with plenty of
clean water. Immediately contact your physician in case of eye contact. (or skin, but not clothing.)
Dispose of the device, batteries, components and optional accessories according to applicable local
regulations. Unlawful disposal may cause environmental pollution.
Operate the unit only as intended. Do not use for any other purpose.
This unit is intended for home use only. It is not intended for professional use in hospitals or other
medical facilities. This unit does not support the standards required for professional use.
CARE
AND MAINTENANCE
Do not disassemble or modify the unit. Changes or modifications not approved by Omron
Healthcare will void the user warranty.
Do not subject the monitor to strong shocks, such as dropping the unit on the floor.
Do not submer
ge the device or any of the components in water.
5
Page 6

7.0 - 10.7
10.8 - 14.5
14.6 - 18.4
18.5 - 20.5
20.6 - 22.7
22.8 - 24.9
25.0 - 26.5
26.6 - 28.2
28.3 - 29.9
30.0 - 34.9
35.0 - 39.9
40.0 - 90.0
Less than 18.5
18.5 or more and less than 25
25 or more and less than 30
30 or more
- (Underweight)
0 (Normal)
+ (Overweight)
++ (Obese)
BMI
BMI (Designation by the WHO)
BMI Classification Bar
BMI Rating
USEFUL INFORMATION
WARNING
Contact your physician or healthcare provider before beginning a weight reduction or exercise
program.
BODY MASS INDEX AND IDEAL WEIGHT
Everybody is concerned about their weight. But what is the basis for determining your ideal weight?
The key is Body Mass Index.
How to Calculate BMI
BMI is short for Body Mass Index. This index uses the following simple formula to indicate the ratio
between weight and height of a person.
BMI = weight (lb) / height (inch) / height (inch)
he OMRON HBF-500 uses the height information stored in your Personal Profile Number to
T
××
703
calculate your BMI classification.
Let’s look at an example
WEIGHT
BMI
BMI CLASSIFICATION
Example of display:
• Weight: 162.8 lb
• BMI: 27.7
• BMI Classification +
Interpreting the BMI Result
The above-mentioned indices refer to the values for obesity judgment proposed by WHO, the World Health
Organization.
6
Page 7
BODY FAT
CaseA CaseB
F
34
5' 7 7/8"
144.0 lb
22.0
(Normal)
Gender
Age
Height
Weight
BMI
Body fat percentage
F
34
5' 7 1/2"
141.0 lb
21.8
(Normal)
27.2%
Normal
34.5%
High
USEFUL INFORMATION
Hidden Fat Not Revealed by BMI
Although BMI calculates a simple obesity
level, there is also hidden fat that not
revealed by a BMI designation.
Although both cases are for people of
similar height and weight, and their BMI
designation are normal, the body fat
percentage for case B is high.
That is, although case B has normal body
weight, the actual fat level is high, revealing
the “hidden fat.” This hidden fat may lead
to increased susceptibility to common
diseases, even though the BMI designation
is normal.
Let’s look at an example
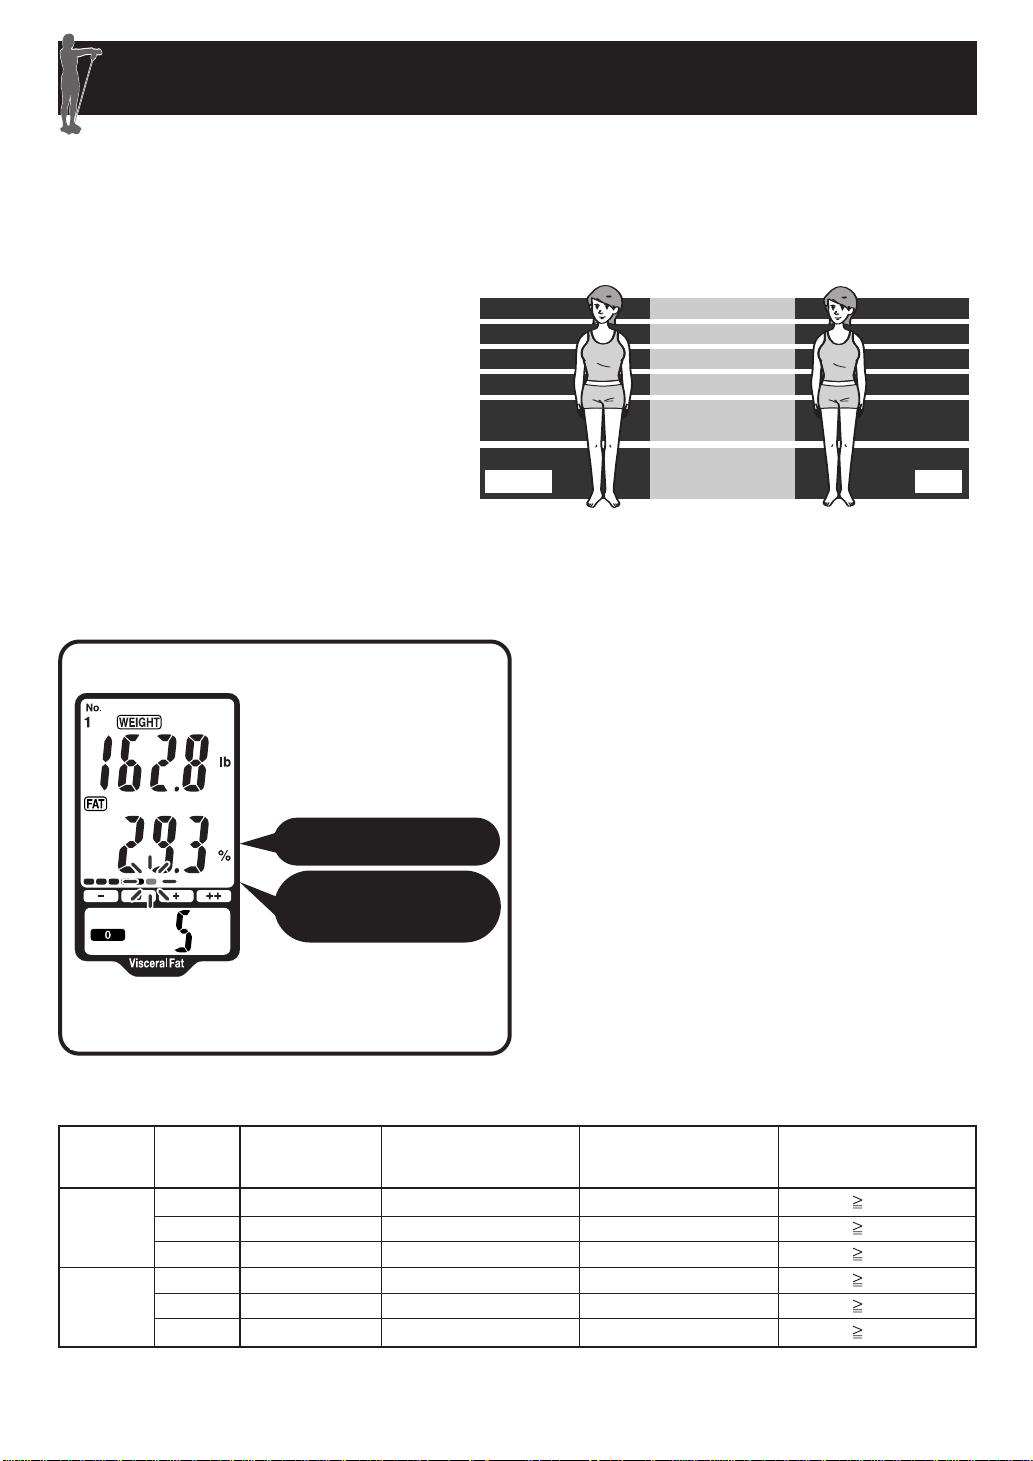
BODY FAT PERCENTAGE
BODY FAT PERCENTAGE
CLASSIFICATION
Examples of hidden fat
Body fat percentage classification
When most people think of body fat, they have a
negative image of it. However, body fat serves a
vital role in storing energy, protecting internal
While too m
gans, etc
or
.
unhealthy, having too little may also be unhealthy.
The distribution of body fat in men and women is
ferent, so the basis of classifying the body fat
dif
centage for males is different than for females.
per
uch body fat may be
Example of display:
• Body Fat Percentage:
• Body Fat Percentage Classification: 0
29.3 %
Interpreting the Body Fat Percentage Result
Gender
Female
Male
Based on NIH/WHO guidelines f
Based on Gallagher et al., American Journal of Clinical Nutrition, Vol. 72, Sept. 2000
Age
20-39
40-59
60-79
20-39
40-59
60-79
Low (–)
< 21.0
< 23.0
< 24.0
< 8.0
< 11.0
13.0
<
or BMI
Normal
21.0 - 32.9
23.0 - 33.9
24.0 - 35.9
8.0 - 19.9
11.0 - 21.9
13.0 - 24.9
(0)
7
High
(+)
33.0 - 38.9
34.0 - 39.9
36.0 - 41.9
20.0 - 24.9
22.0 - 27.9
25.0 - 29.9
Very High
39.0
40.0
42.0
25.0
28.0
30.0
(++)
Page 8
USEFUL INFORMATION
>
_
_
>
_
_
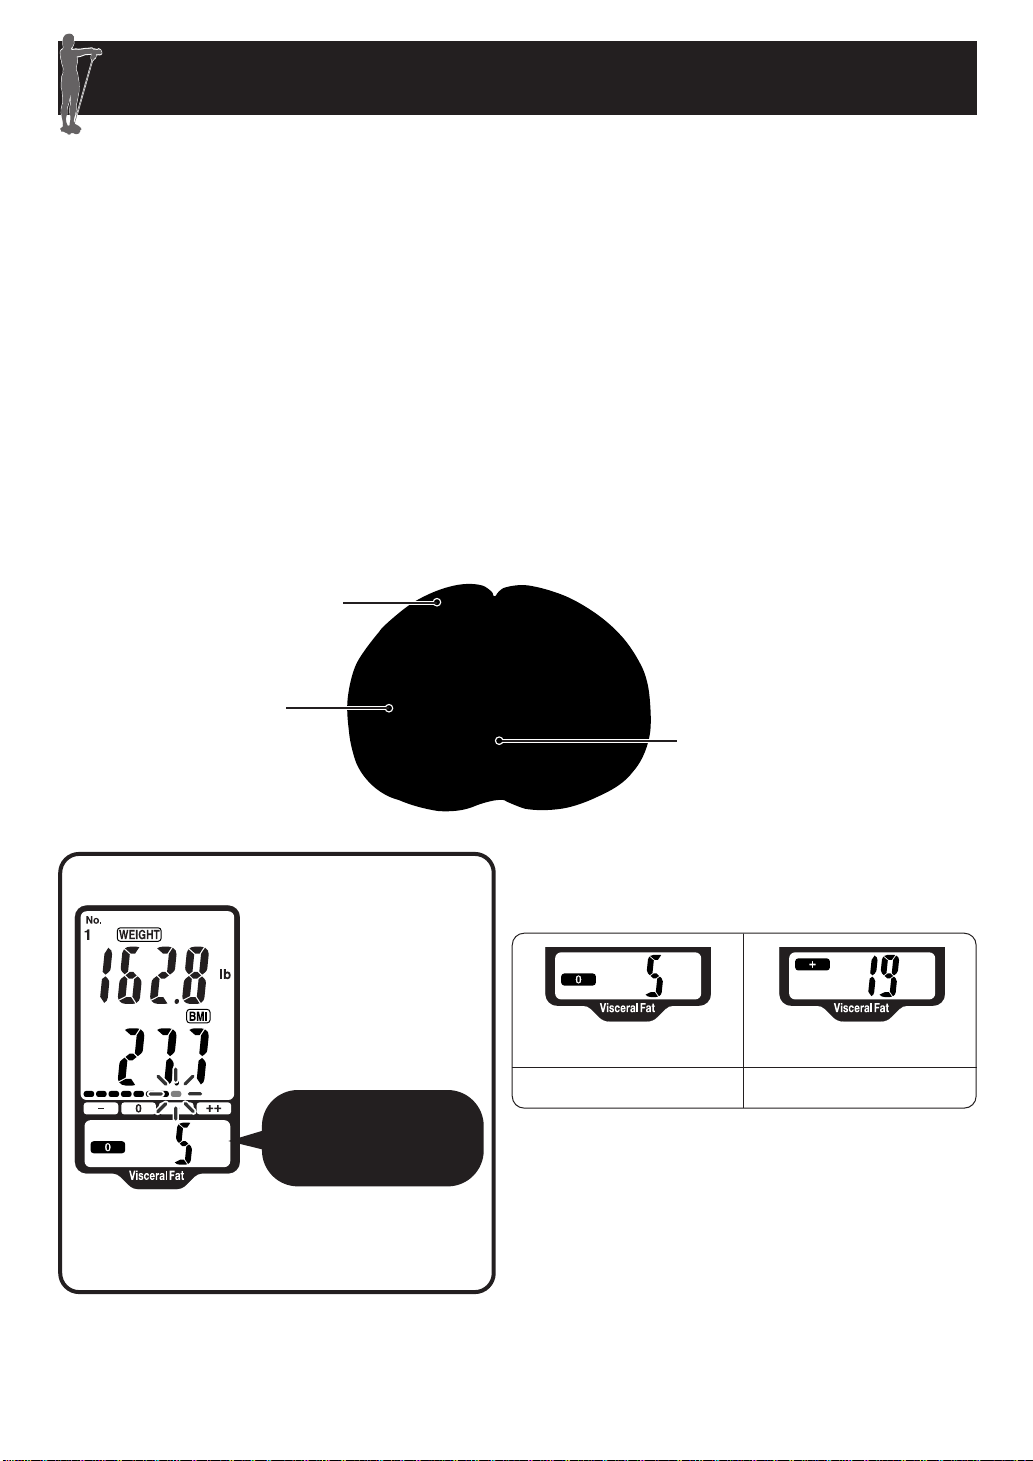
VISCERAL FAT
Body fat is classified as subcutaneous fat or visceral fat, depending on where it is located in the body.
Visceral fat = fat surrounding the internal organs
Too much visceral fat is thought to be closely linked to increased levels of fat in the bloodstream, which can lead to
common conditions such as high cholesterol, cardiovascular disease and diabetes. In order to prevent or improve
conditions of these common diseases, it is important to try and reduce the visceral fat levels to an acceptable level.
Subcutaneous fat = fat below the skin
Subcutaneous fat not only accumulates around the stomach but also around the upper arms, hips and thighs, and can
cause a distortion of the body’s proportions. Although not directly linked to increased risk of disease, it is thought to
increase pressure on the heart and may be associated with other complications. Subcutaneous fat is not displayed
separately in this unit, but is included in the body fat percentage.
MRI Cross Section of at the Navel Level
Subcutaneous Fat
Visceral Fat
Let’s look at an example
VISCERAL FAT LEVEL/
VISCERAL FAT
CLASSIFICATION
Example of display:
isceral Fat Classification:
• V
• Visceral Fat: 5
Spine
Interpreting the Visceral Fat Level Result
Visceral Fat Level 9
0 (Normal)
Visceral fat area (0 - Approx. 300 cm2, 1 inch=2.54 cm)
distribution with 30 levels.
Level Classification
0: 1 - 9 level
+: 10 - 30 level
0
* The data referenced by Omron Healthcare.
Visceral Fat Level 10
+ (High)
NOTE: Visceral fat levels are relative and not absolute values.
8
Page 9
USEFUL INFORMATION
Food
Daily activity metabolism
Diet-induced thermogenesis
Resting metabolism
Calories
Calories
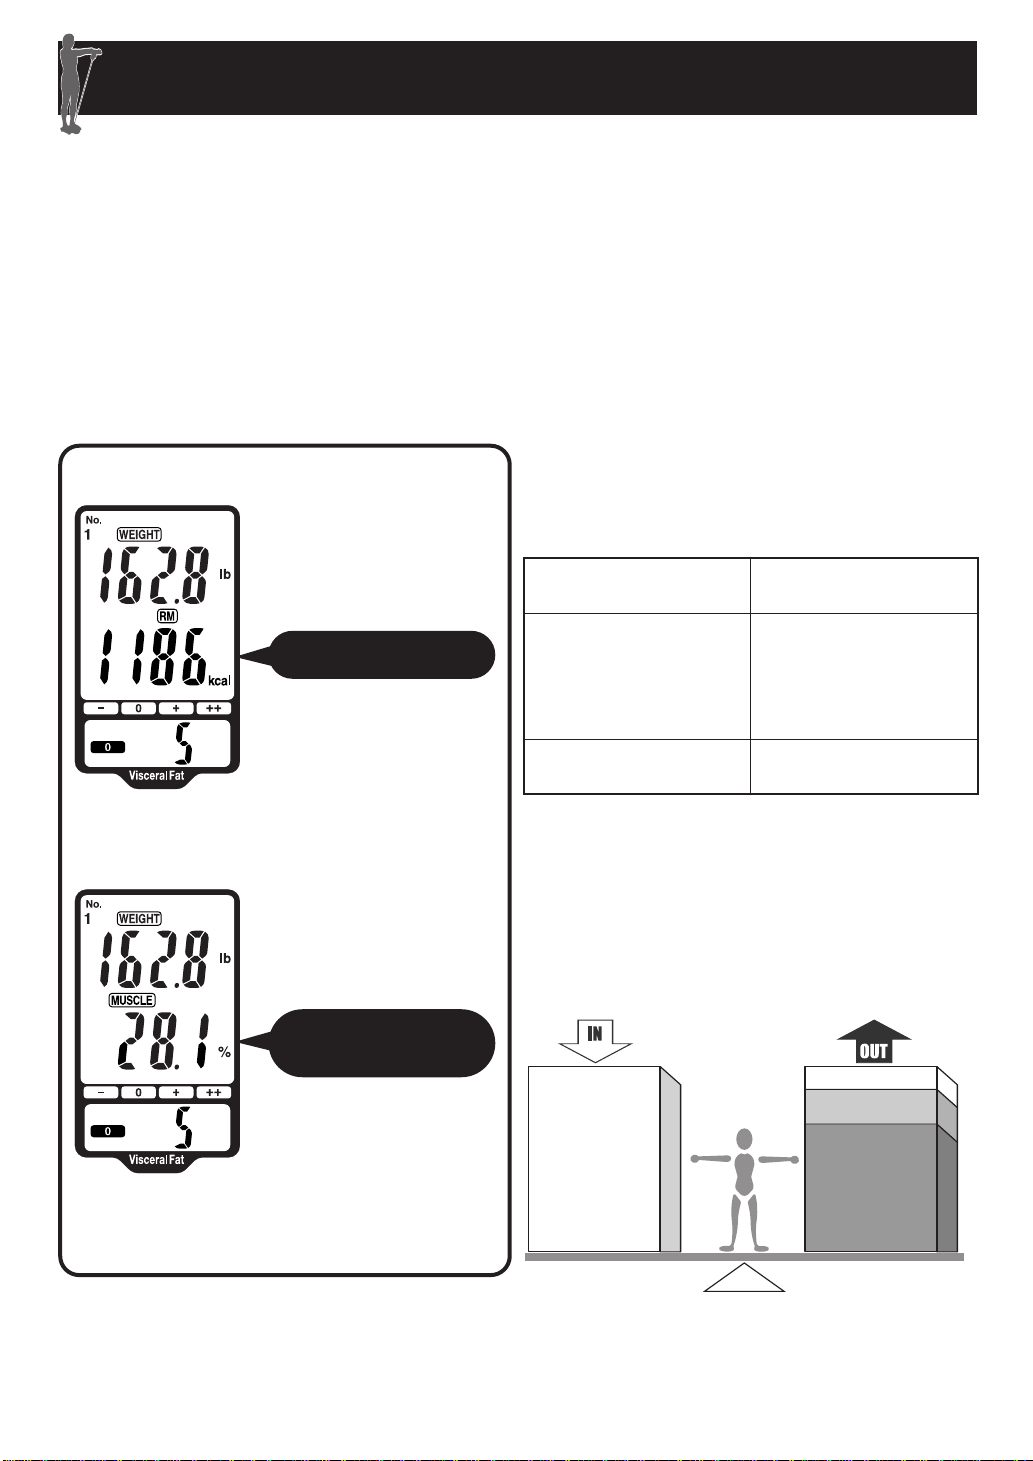
RESTING METABOLISM & SKELETAL MUSCLE
Skeletal muscle is muscle that is connected to bone and used to move parts of the body.
The maintenance and increase of this skeletal muscle is closely linked to resting metabolism.
What is resting metabolism?
Regardless of your activity level, a minimum level of energy is required to sustain the body's everyday
functions. Resting metabolism, the amount of calories needed to supply the body with the minimum
level of energy, differs between individuals depending on variables such as age, weight, body
composition, and energy expenditure.
Let’s look at an example
RESTING METABOLISM
Example of display:
• Resting Metabolism: 1186 kcal
SKELETAL MUSCLE
PERCENTAGE
60-70% of daily energy use is for
resting metabolism
The total amount of energy burned by the body in
a typical day is as follows.
Resting metabolism
Daily activity metabolism
Diet-induced
thermogenesis
The ratio of these is 60%-70% for resting
metabolism, 20%-30% for daily activity, and 10%
for diet induced thermogenesis. This means that
resting metabolism accounts for most of our daily
y consumption.
g
ener
If our daily food intake exceeds the amount of
energy required for these activities, the additional
ener
y is stor
g
ed as f
Energy required to
maintain vital functions.
Energy used for daily
activities such as
commuting to work,
household chores,
hobbies, etc.
Energy emitted after
eating a meal.
t.
a
Example of display:
• Skeletal Muscle Percentage: 28.1%
9
Page 10

USEFUL INFORMATION
What is skeletal muscle?
Muscle is divided into two types, muscle in internal organs, such as the heart, and muscle attached to
bones that is used to move the body. Skeletal muscle can be increased through exercise and other
activity.
Resting metabolism reduces as we get older
Resting metabolism level peaks in the late teenage years and then gradually reduces over the years.
This leads to reductions in the body’s functions as we get older and in particular, it is one of the main
causes for muscle reduction as we get older.
Even when not being used to move parts of the body, muscles burn energy throughout the day to
generate heat for the body which is part of the resting metabolism. As the amount of muscle decreases,
so does the amount of energy burned. If people continue to eat the same amount of food as when they
are younger, then they develop “middle-age spread.”
In order to avoid this, it is important to know your resting metabolism and maintain muscles through
.
cise
exer
10
Page 11
USEFUL INFORMATION
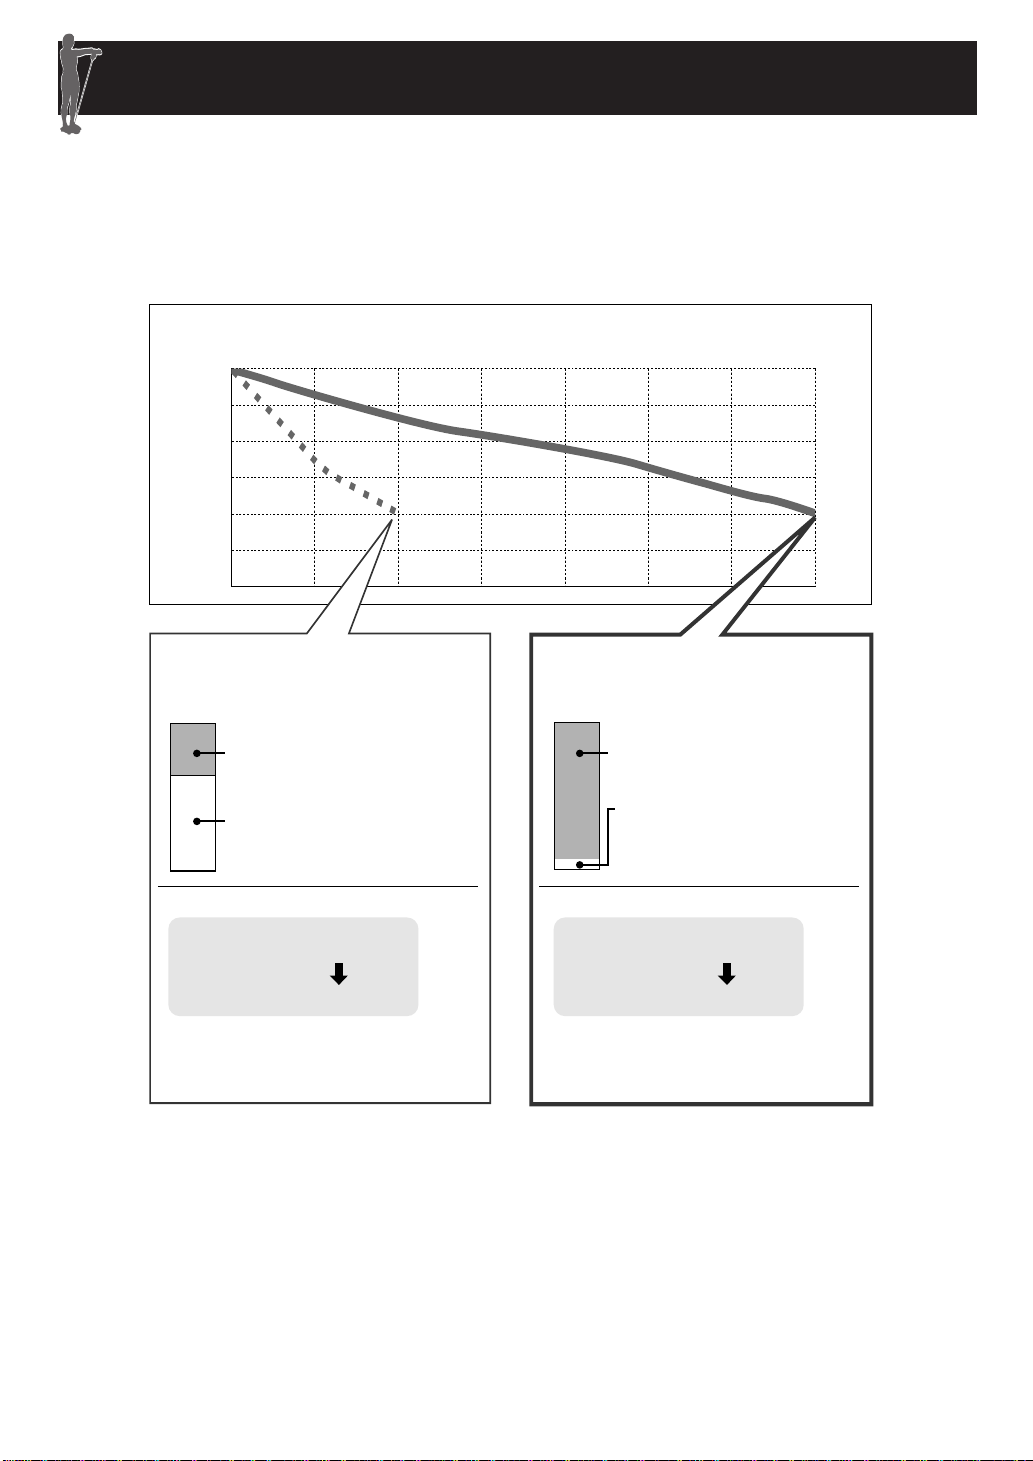
170
160
150
1234567
Weight
(lb)
Months
Fat reduction: 6 lb
A starvation diet produces
rapid weight loss of 20 lb,
but disrupts body mass...
A healthy diet
with weight loss of 20 lb...
Lean body mass reduction
(muscle, bone, etc.): 14 lb
Fat reduction: 18 lb
Lean body mass reduction
(muscle, bone, etc.): 2 lb
Change in body fat percentage
Before diet:
After diet:
36.0%
36.9%
Body fat percentage
Lean body mass (muscle, bone, etc.)
greatly reduced, while the body fat
percentage has not changed.
Change in body fat percentage
Before diet:
After diet:
36.0%
28.3%
Body fat percentage
Body fat percentage reduced to a normal
level.
LONG-TERM PLANNING FOR SUCCESSFUL WEIGHT LOSS
Ignoring a balanced diet and simply reducing food intake to lose weight can lead to a decline in muscle
and bone. So even though your weight goes down, your resting metabolism is reduced making the
body more prone to putting on fat.
Example comparing the same loss of 20 lb:
*This is an extreme case of the effect.
Repeated dieting and regaining weight leads to increased visceral fat levels
It is easy to r
then subcutaneous fat. Increased visceral fat levels are thought to increase the likelihood of common
diseases. Repeated dieting and subsequent regaining of weight may lead to increased visceral fat levels.
e
eight after sud
ain w
g
den diets.
gained weight tends to appear as visceral fat rather
e
his r
T
11
Page 12

USEFUL INFORMATION
PRINCIPLE OF BODY COMPOSITION CALCULATION
What is the Bioelectrical Impedance Method?
The HBF-500 estimates the body fat percentage by the Bioelectrical Impedance (BI) method.
Muscles, blood vessels and bones are body tissues with high water content that conduct electricity
easily. Body fat is tissue that has little electric conductivity. The HBF-500 sends an extremely weak
electrical current of 50 kHz and less than 500 µA through your body to determine the amount of each
tissue. This weak electrical current is not felt while operating the HBF-500.
How to Calculate the Body Composition
he following methods have been the established method for accurate evaluation of body composition.
T
Body Fat Percentage: This is based on the DXA (Dual Energy X-Ray Absorptiometry) method,
hich uses two different x-rays to make a quantitative assessment of the amount of fat in the body.
w
Resting Metabolism: This is based on exhalation analysis, where the composition of exhaled air is
analyzed. This makes it possible to calculate the resting metabolism by measuring the consumption of
oxygen in exhaled air.
Visceral Fat Level: This is based on MRI (Magnetic Resonance Imaging) analysis, which uses
nuclear magnetic resonance to make non-intrusive images of the body. This makes it possible to
calculate the area of visceral fat at cross section of abdomen.
Skeletal Muscle Percentage: This is based on MRI (Magnetic Resonance Imaging) analysis,
h uses nuclear magnetic resonance to make non-intrusive images of the body. This makes it
whic
le to calcula
possib
Omron has developed a formula referring to the above methods. The body composition is calculated
by a formula that includes five factors: electrical resistance, height, weight, age and gender.
te the amount of sk
eletal m
uscle in the bod
y.
Measures the whole body to avoid the influence of fluctuations
The ratios of the water in your upper body and lower body may change through the day. This means
that the electrical impedance of the body also varies. Since the HBF-500 uses electrodes for both the
hands and feet to take measurements, it can reduce the influence of water movement on measurement
results.
12
Page 13
USEFUL INFORMATION
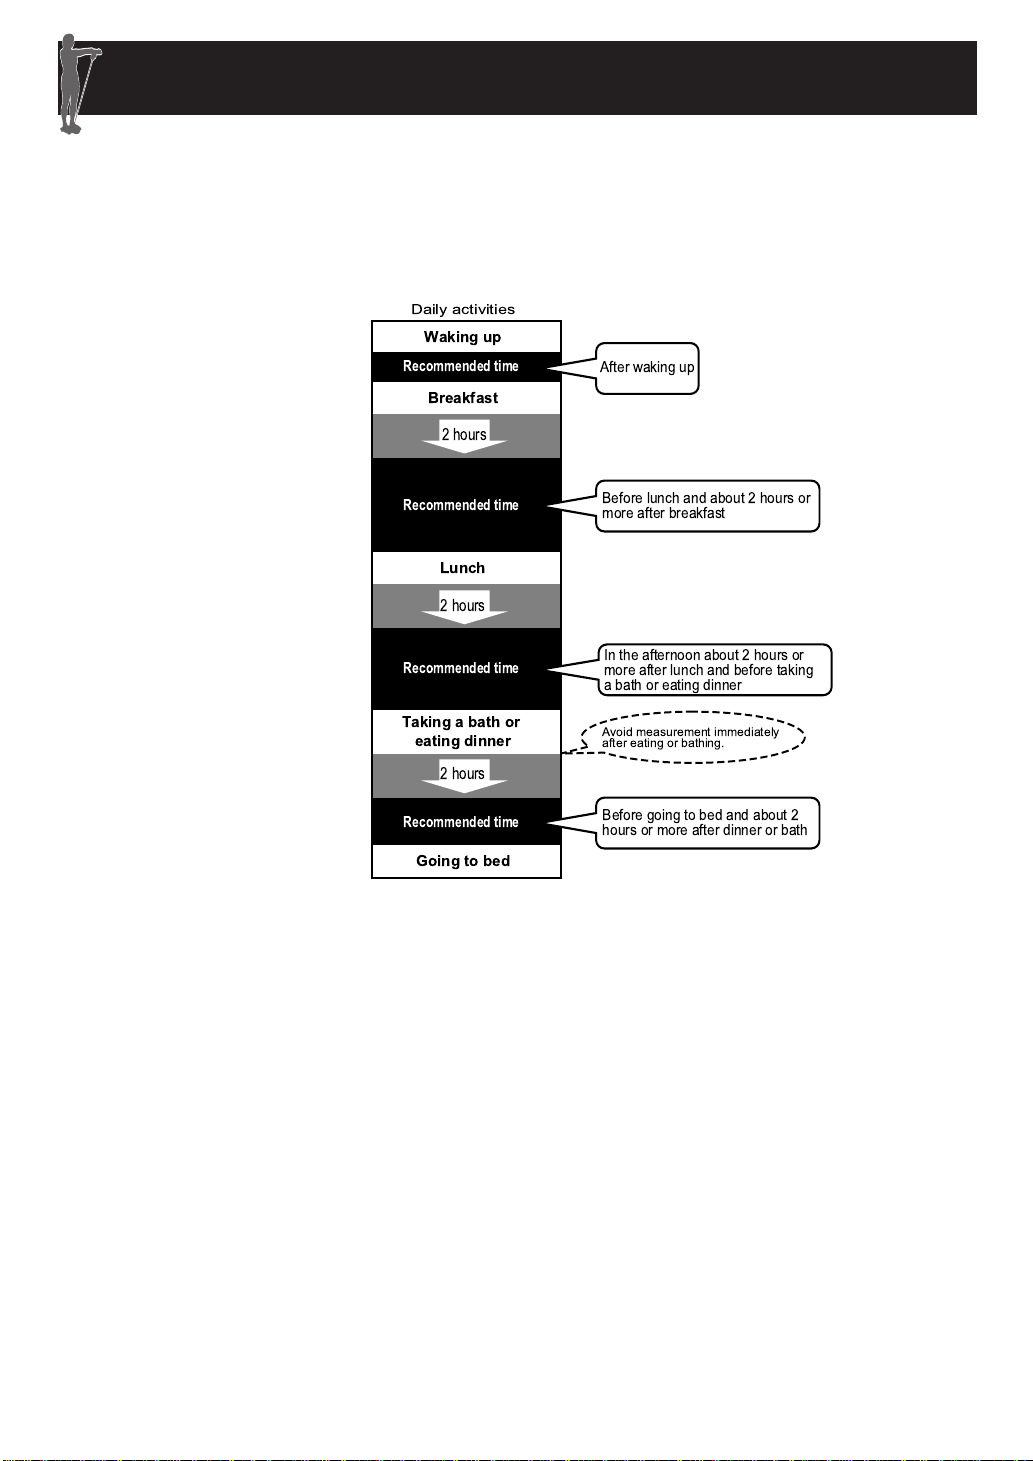
Daily activities
Waking up
Breakfast
Lunch
Taking a bath or
eating dinner
Going to bed
2 hours
2 hours
2 hours
A
fter waking up
B
efore lunch and about 2 hours or
m
ore after breakfast
In the afternoon about 2 hours or
more after lunch and before taking
a bath or eating dinner
Before going to bed and about 2
hours or more after dinner or bath
Recommended time
Recommended time
Recommended time
Recommended time
Avoid measurement immediately
after eating or bathing.
RECOMMENDED MEASUREMENT TIMES
Understanding the normal changes in your body fat percentage can help you in preventing or reducing
obesity. Being aware of the times when the body fat percentages shift within your own daily schedule
will assist you in obtaining an accurate trending of your body fat. It is recommended to use this unit in
the same environment and daily circumstances. Reference the chart below:
Avoid Taking Measurements Under the Following Conditions
If a measurement is taken under the following physical conditions, the calculated body composition
may differ significantly from the actual one because the water content in the body is changing:
Immedia
tel
amount of w
y after vig
ater or after a meal (1 to 2 hours).
or
ous exercise, after a bath or sauna, after drinking alcohol, after drinking a large
13
Page 14

USEFUL INFORMATION
The reason calculated results may differ from actual body fat percentage
There are certain conditions when significant differences may occur between the estimated and the
actual body fat values. These differences may be related to changing ratios of body fluid and/or body
composition.
The body fat percentage measured by this monitor may significantly differ from the actual body fat
percentage in the following situations:
• Elderly people
• People with a fever
• Body builders or highly trained athletes
• Persons undergoing dialysis
• Persons with osteoporosis who have very low bone density
• Pregnant w
• Post-menopausal women
• Persons with edema (Swelling in the body)
• Childr
omen
en in growth sta
ge
Operating Instructions
14
Page 15

KNOW YOUR UNIT
DDiissppllaayy UUnniitt
Personal Profile Number Button
Body Fat Button
SET Button
Resting Metabolism Button
Guest/Memory Button
Display Unit Holder
MMaaiinn UUnniitt
((MMeeaassuurreemmeenntt
PPllaattffoorrmm))
rip Electrodes
G
Display
Grip Electrodes
Personal Profile Number Button
Skeletal Muscle Button
UP/ DOWN Button
BMI Button
Cord
Foot Electrodes
Heel Electrode
FFrroonntt VViieeww
CCoommppoonneennttss
Foot Electrodes
Heel Electrode
Power Switch
15
Instruction Manual
Page 16

Weight Indicator
KNOW YOUR UNIT
easurement Start Indicator
M
Height Indicator
Guest Indicator
Personal Profile Number
Weight Results
Display Mode Indicator
Body Composition Results
Measurement Progress/
Body Fat Percentage and
BMI Classification Bar
Body Fat Percentage and
BMI Classification
Visceral Fat Classification
Indicator
Gender Indicator
Low Battery Indicator
Age Indicator
Memory Indicator
Visceral Fat Results
16
Page 17

KNOW YOUR UNIT
WARNING
Contact your physician or healthcare provider before beginning a weight reduction or exercise
program.
USING THE DISPLAY UNIT
Extend the cord as illustrated to the right.
STORING THE DISPLAY UNIT
1. Coil the cord into the Display Unit Holder.
Make sure the cord is coiled evenly, and does not
stick out of the Displa
2. Place the Display Unit into the Display Unit
Holder.
The display unit will click into place.
y Unit Holder.
POWER SWITCH
The power will automatically switch off in the following conditions:
1. If the monitor is not used within one minute of 0.0 lb appearing on the display.
2. If no information is entered for 5 minutes when entering personal data.
3. If the monitor is not used f
ve (5) minutes after the result is displayed when measuring weight only.
i
4. F
or 5 min
utes after the measur
ement r
esults ar
e displayed.
17
Page 18

BATTERY INSTALLATION
1. Locate the Battery Cover on the back of the
unit.
1) Press the tab on the battery cover in the
direction of the arrow to release the cover as
illustrated.
2) Pull the tab of the cover upwards.
Rear
INSTALL 4 “AA” SIZE BATTERIES
2.
(positive) and – (negative) polarities match the
polarities of the battery compartment as indicated
in the ba
Replace the battery cover.
3.
1) Align the hooks on the battery cover with
2) Push the battery cover until the tab clicks
ttery compartment
the slots in the battery compartment.
into place.
.
so the
+
18
Page 19

BATTERY INSTALLATION
BATTERY REPLACEMENT
Measurement values and personal profiles stored in the memory will not be deleted during battery
replacement. The date and time will need to be set when monitor is turned on.
Low Battery Indicator
When the Low Battery Indicator appears on the display screen remove all four worn batteries.
Replace with four new batteries at the same time.
NOTES:
• New batteries will last for approximately one year if the unit is used four times per day. Trial
batteries supplied with the unit may have a shorter life.
• Remove the batteries if you do not intend to use the unit for a period of three months or longer
before placing in storage.
CAUTION:
Should batter
clean water. Immediately contact your physician.
CAUTION:
Dispose of the device, batteries, components and optional accessories according to applicable local
regulations. Unlawful disposal may cause environmental pollution.
y fluid leak and contact your e
yes, skin or clothing immediately rinse with plenty of
19
Page 20

SETTING THE DATE AND TIME
When the power is turned on for the first time, it is necessary to set the date and time.
Buttons Used in this Procedure
SET Button
Use this button to confirm the setting
or move to the next item after
confirming the set item.
DOWN Button
Press this button to go back one.
Press continuously to rapidly
decrease.
1. Press the Power Switch to turn the monitor ON.
If this is the fir
st time that the monitor has been
turned on, the year setting flashes.
SETTING THE YEAR
2.
WN button to change the year.
1)
ess the
Pr
UP or
DO
UP Button
Press this button to advance one.
Press continuously to rapidly
advance.
2) Press the SET button.
The year is set.
The month flashes on the display.
3.
SETTING
THE MONTH
1) Press the UP or DOWN button to change the month.
ess the SET b
Pr
2)
The month is set
he day flashes on the display.
T
utton.
20
Page 21

SETTING THE DATE AND TIME
SETTING THE DAY
4.
1) Press the UP or DOWN button to change the day.
2) Press the SET button.
The day is set.
The hour flashes on the display.
SETTING THE HOUR
5.
1) Press the UP or DOWN button to change the hour.
2) Press the SET button.
The hour is set.
The minute flashes on the display.
SETTING THE MINUTE
6.
1) Press the UP or DOWN button to change the minute.
2) Press the SET button.
The current settings for the year, month and day, hour and minute appear in this sequence on the
display. The monitor automatically turns off.
TO ADJUST THE DATE AND TIME
1) Turn the monitor on.
The CAL symbol blinks on the display, then the
display changes to 0.0 lb. Wait until 0.0 lb appears on
.
the displa
2) Press and hold the SET button.
The year flashes on the display.
y
3) Refer to page 20, SETTING THE YEAR, to begin
changing the Date and Time.
21
Page 22

SETTING PERSONAL DATA
To measure Body Composition, your personal data must be set. Your personal data includes your age,
gender and height. The Body Composition Monitor with SCALE provides two options to enter your
personal data.
1) Select a personal profile number to save your personal data. The monitor saves up to 4 personal
profiles. Select a number 1 through 4. Use this number to enter your personal data and when
taking a measurement.
2) Select Guest/Memory button if you do not want your personal data stored in the memory. When
you use the Guest option you will need to enter your personal data each time you take a
measurement. Measurement results are not stored in the memory when the Guest option is used
to take a measurement.
Buttons Used in this Pr
Personal Profile Number Button
SET Button
Use this button to confirm the
personal data or move to the next
item after confirming the set item.
DOWN Button
Press this button to go back one.
Press continuously to rapidly
decrease.
1.
Press the P
ower Switch to turn the monitor ON.
ocedure
The CAL symbol blinks on the display, then the display changes
to 0.0 lb.
Wait until 0.0 lb appears on the display.
Lift the Displa
2.
y Unit out of the Displa
y Unit Holder.
Personal Profile Number Button
UP Button
Press this button to advance one.
Press continuously to rapidly
advance.
NO
TE:
his monitor can be set to either the US or Metr
T
ile and memor
System. P
sonal Pr
er
of
y will be displa
ic
yed
by selected system. To change the US/Metric mode:
1) Pr
ess and hold the UP button until “lb” and “kg” blink on the display.
2) Press the UP or DOWN button to select the mode, “lb” or “kg”.
ess the SET b
Pr
3)
utton to conf
m the c
ir
hange.
22
Page 23

SETTING PERSONAL DATA
3. Select a Personal Profile or GUEST as your Personal Data Option.
A. P
ersonal Profile
Press the desired Personal Profile Number button (1 through 4).
Press the SET button.
NOTE:
1) If no information has been entered for the Personal Profile
Number
age and height blink on the display.
2) If the personal data has been entered for the number, the
Personal Profile Number blinks on the display.
B. GUEST
Press the Guest/Memory button.
The Guest indicator appears.
The default value for age blinks on the display.
you selected, the number and the symbols for gender,
4. Enter your Personal Data
SETTING THE
Set the age between 10 and 80.
1) Press the UP or DOWN button to change the age.
Press the SET button.
2)
The age is set.
The gender symbols blink on the display.
AGE
23
Page 24

SETTING PERSONAL DATA
SETTING THE GENDER
Set the gender to MALE OR FEMALE
1) Press the UP or DOWN button to change the gender.
2) Press the SET button.
The gender is set.
The default value for height blinks on the display.
SETTING THE HEIGHT
Set the height betw
(Display range in metric display mode: 100.0 cm to 199.5 cm)
1) Press the UP or DOWN button to change the height.
een 3’4”
and 6’6 3/4”.
2) Press the SET button.
The height is set.
The current settings for age, gender, and height appear in this sequence on the display.
The 0.0 lb symbol appears on the display. You can now take a measurement using the Personal
Profile Number you selected or the Guest Mode.
Refer to page 26, HOW TO TAKE A MEASUREMENT.
CHANGING PERSONAL DATA
If your personal data changes, the information in the Personal Profile Number you selected must be
ectly.
or measur
ed f
hang
c
Press the Power Switch to turn the monitor ON.
1.
The CAL symbol blinks on the display, then the display changes to 0.0 lb.
Wait until 0.0 lb appears on the display.
2. Lift the Display Unit out of the Display Unit Holder.
ement r
esults to be calcula
ted cor
r
24
Page 25

SETTING PERSONAL DATA
3. Select the Personal Profile Number you want to change.
1) Press the Personal Profile Number button (1 thorough 4).
The selected Personal Profile Number flashes once on the display.
2) Press the SET button.
The Personal Profile Number is set.
The current SETTING for age blinks on the display.
4. Refer to page 23, enter your personal data to begin changing the
personal data.
DELETING PERSONAL PROFILE
1. Press the Power Switch to turn the monitor ON.
The CAL symbol b
Wait until 0.0 lb appears on the display.
2. Select the Personal Profile Number you want to delete.
1) Pr
2)
3. Press the Guest/Memory button for 2 seconds.
The personal data and measurement values are deleted from the
memory. The Clr symbol appears on the display followed by the
Personal Profile Number and the symbols for gender, age and height as
illustrated below.
ess the Personal Pr
The display of the selected Personal Profile Number flashes once.
ess the SET button.
Pr
The Personal Profile Number is confirmed and the selected age
setting blinks on the display.
links on the displa
ofile Number button to select a Personal Profile Number.
y, then the displa
y changes to 0.0 lb.
25
Page 26

HOW TO TAKE A MEASUREMENT
YOUR PERSONAL DATA MUST BE ENTERED BEFORE TAKING A MEASUREMENT.
CAUTION:
Consult your physician before using this monitor when pregnant.
CAUTION:
Persons with disabilities or persons that are physicially frail should be assisted by another person
when using this monitor or use a handrail, a walker, or other support device to prevent falling
when stepping on and off the monitor.
CORRECT POSTURE FOR MEASUREMENT
After you measure your
weight.
Raise your arms
horizontally, and extend
your elbows straight.
Stand with
90˚
your knees and
back straight
and look
straight ahead.
Step on the Main Unit bare-footed.
Heel Electrodes
Make sure each of your heels is
positioned on a heel electrode.
Stand with your weight evenly distributed
Extend your arms
straight at 90˚ angle
to your body.
POSTURES TO AVOID DURING MEASUREMENT
Incorrect posture may result in inaccurate measurement of Body Composition.
Hold the display unit
so that you can see
the display.
Movement
during
measurement
Arms bent Arms too low
or high
Display facing
upwards
26
Knees bent Standing on
edge of
monitor
Page 27

HOW TO TAKE A MEASUREMENT
HOW TO MEASURE BODY COMPOSITION
1. Press the Power Switch to turn the monitor ON.
The CAL symbol blinks on the display, then the display changes
to 0.0 lb.
Wait until 0.0 lb appears on the display.
NOTES:
• If you step onto the monitor before 0.0 lb appears on the
display, an error message “Err” will appear.
• This monitor can be set to either the US or Metric System.
Personal Profile and Memory will be displayed by selected
mode. To change the US/Metric mode:
1) Keep the UP button pressed until “lb” and “kg” blink on the display.
2) Press the UP or DOWN button to select the mode, “lb” or “kg”.
3) Press the SET button to confirm the change.
2. When the 0.0 lb appears on the display, lift the Display Unit out
of the Displa
NOTE:
w to Hold the Gr
Ho
y Unit Holder.
Do not take out the display unit until 0.0 lb appears on the
display.
ip Electr
odes
Press your palms firmly on the
grip electrodes.
Place both middle fingers
along the dents of the grip
electrodes.
Hold the inner grip
electrodes firmly with your
thumb and index finger
27
.
Hold the outer grip
electrodes with your ring
finger and small finger
.
Page 28

HOW TO TAKE A MEASUREMENT
3. Select the Personal Profile Number button or the Guest/Memory button.
A. Personal Profile Number
Press the button for the Personal Profile Number you
selected while holding the display unit. The Personal Profile
Number will appear after blinking once.
Ex.: To select Personal Profile
Number “1”, press button .
NOTE:
If the following appears on the display no personal data
was entered for the number you selected.
Refer to SETTING PERSONAL DATA on page 22.
B. GUEST
1) Press the Guest/Memory button while holding the Display
Unit.
“G” will be indicated at the top of the display while
“AGE” data flashes.
2) Enter your personal data. Refer to SETTING PERSONAL
ATA on page 22.
D
28
Page 29

HOW TO TAKE A MEASUREMENT
4. Start the measurement.
) Step onto the measurement platform and place your feet on the foot electrodes with your weight evenly
1
distributed.
Remain still and do not move until the weight measurement is complete.
The display will show your weight
and then the weight result will
blink twice.
The monitor will then start to
calculate body composition.
2) When “START” appears on the display extend your arms straight at a 90˚ angle to your body.
The indicators in the measurement
progress bar at the bottom of the
display will gradually appear from
left to right.
3) When the measurement is completed, your weight is displayed again. Step off the
measurement platform.
29
Page 30

HOW TO TAKE A MEASUREMENT
5. Check the measurement results.
Press the appropriate button to view the measurement results.
Weight
Body Fat Percentage
Body Fat Percentage
Classification
Visceral Fat Level/
Visceral Fat Classification
Weight
Resting Metabolism
Weight
Skeletal Muscle Percentage
Visceral Fat Level/
Visceral Fat Classification
Weight
BMI
BMI Classification
Visceral Fat Level/
isceral Fat Classification
V
Visceral Fat Level/
isceral Fat Classification
V
NOTES:
• The age range for the skeletal muscle percentage, resting metabolism and visceral fat level is 18
to 80 years old.
• The age range for the body fat percentage classification is 20 to 79 years old.
30
Page 31

HOW TO TAKE A MEASUREMENT
>
_
_
>
_
_
7.0 - 10.7
1
0.8 - 14.5
1
4.6 - 18.4
1
8.5 - 20.5
2
0.6 - 22.7
22.8 - 24.9
25.0 - 26.5
26.6 - 28.2
28.3 - 29.9
30.0 - 34.9
35.0 - 39.9
40.0 - 90.0
Less than 18.5
18.5 or more and less than 25
25 or more and less than 30
30 or more
-
(Underweight)
0 (Normal)
+ (Overweight)
++ (Obese)
B
MI
BMI (Designation by the WHO)
BMI Classification Bar
BMI Rating
Interpreting the BMI Result
The above index refers to the values for obesity judgment proposed by WHO, the World Health Organization.
Interpreting the Body Fat Percentage Result
Gender
Female
Male
Based on NIH/WHO guidelines for BMI
Based on Gallagher et al., American Journal of Clinical Nutrition, Vol. 72, Sept. 2000
Age
20-39
40-59
60-79
20-39
40-59
60-79
Low (–)
< 21.0
< 23.0
< 24.0
< 8.0
< 11.0
< 13.0
Normal
21.0 - 32.9
23.0 - 33.9
24.0 - 35.9
8.0 - 19.9
11.0 - 21.9
13.0 - 24.9
(0)
Interpreting the Visceral Fat Level Result
Visceral Fat Level 9
Visceral Fat Level 10
0 (Normal)
V
*
* V
iscer
T
ea (0 - Approx. 300 cm
t ar
al fa
ta referenced by Omron Healthcare.
he da
els are relativ
v
at le
isceral f
2
h=2.54 cm) distrib
1 inc
,
e and not absolute values.
ution with 30 le
High
(+)
33.0 - 38.9
34.0 - 39.9
36.0 - 41.9
20.0 - 24.9
22.0 - 27.9
25.0 - 29.9
+ (High)
vels.
Very High
39.0
40.0
42.0
25.0
28.0
30.0
(++)
6. Turn the monitor off.
Press the Power Switch to turn the monitor off. Store the Display Unit in the Display Unit
Holder.
31
Page 32

HOW TO MEASURE WEIGHT ONLY
1. Press the Power Switch to turn the monitor ON.
The CAL symbol blinks on the display, then the display
changes to 0.0 lb.
Wait until 0.0 lb appears on the display.
NOTES:
• If you step onto the monitor before 0.0 lb appears on the
display, an error message “Err” will appear.
• This monitor can be set to either the US or Metric
System. Personal Profile and memory will be displayed
by selected system. To change the US/Metric mode:
1) Keep the UP button pressed until “lb” and “kg” blink on the display.
2) Press the UP or DOWN button to select the desired measurement unit, “lb” or “kg”.
3) Press the SET button to confirm the change.
2. Step onto the Measurement Platform.
Stand with your weight evenly distributed on the
measurement platform.
Remain still and do not mo
complete.
3. Step off the Measurement Platform.
ve until the measurement is
4. Press the Power Switch to turn the monitor off.
32
Page 33

HOW TO USE THE MEMORY FUNCTION
Measurement results are automatically stored in memory when you take a measurement using a
Personal Profile Number button. You can view results for 1 day, 7, 30, and 90 days before.
The monitor automatically stores up to 97 measurement values for each Personal Profile Number.
When 97 sets of measurement values are stored in the memory for that Personal Profile Number, its
oldest record is deleted to save the most recent measurement values.
NOTES:
• If a measurement was not taken on the exact day for 1, 7, 30 and 90 days ago measurement results
stored in the memory as shown in the following chart will display.
1 day
7 days ago
30 days ago
90 days ago
• Only one set of measurement results is stored for each Personal Profile Number each day. If more
than one measurement is taken during a day, the results from the last measurement are stored.
Buttons Used in this Procedure
Closest data stored from day 2 to day 6
Closest data stored from day 8 to day 14
Closest data stored from day 31 to day 37
Closest data stored from day 91 to day 97
Personal Profile Number Button
Guest/Memory Button
Press this button to view previous
results for 1 day, 7 days, 30 days,
and 90 days ago.
Body Fat Button
Resting Metabolism Button
Skeletal Muscle Button
BMI Button
Comparing Results After Taking a Measurement
1. View the measurement results after taking a measurement.
1) Press the Guest/Memory button.
or the previous day are displayed.
esults f
he r
T
ess the Guest/Memory button to cycle through the results from “1 day”, “7 days”, “30 days” and
Pr
2)
“90 days” ago.
1 day ago
7 days ago
Personal Profile Number Button
30 days ago
90 days ago
33
Page 34

HOW TO USE THE MEMORY FUNCTION
NOTES:
• If there are no results for a selected memory, “- - - -” is
displayed for that item.
• To view previous results for other items, press the button for the desired item. The results for
the selected item are displayed.
Then press the Guest/Memory button to cycle through the previous results for that item.
Previous Body Fat results for the currently selected period.
Press the Guest/Memory b
previous results.
utton to c
ycle through the other
Previous Resting Metabolism results for the currently selected
period.
ess the Guest/Memory b
Pr
previous results.
Previous MUSCLE results for the currently selected period.
Press the Guest/Memory button to cycle through the other
previous results.
Previous BMI results for the currently selected period.
Press the Guest/Memory button to cycle through the other
vious r
e
pr
2. Press the Power Switch to turn the monitor off.
esults.
utton to c
ycle thr
ough the other
34
Page 35

HOW TO USE THE MEMORY FUNCTION
Viewing Previous Measurement Results
Follow this procedure if you just want to view and compare previous measurement results, without
taking a measurement.
1. Press the Power Switch to turn the monitor ON.
The CAL symbol blinks on the display, then the display
changes to 0.0 lb.
Wait until 0.0 lb appears on the display.
NOTE: If you step onto the measurement platform before
0.0 lb appears on the display, an error message
“Err” will appear.
When the 0.0 lb appear
2.
Unit out of the Display Unit Holder.
TE:
NO
3. Press the desired Personal Profile Number button.
Do not tak
appears on the display.
s on the displa
e out the display unit until 0.0 lb
y, lift the Displa
y
35
Ex.: To select Personal Profile
Number “1”, press button
.
Page 36

HOW TO USE THE MEMORY FUNCTION
4. View the previous measurement results.
1) Press the Guest/Memory button once.
The results for the previous day are displayed.
[Example]
2) Press the Guest/Memory button to cycle through the results from “1 day”, “7 days”, “30
days”,
and “90 days” ago.
NOTE: To view previous results for Body Fat, Resting Metabolism, Skeletal Muscle and BMI,
press the button for the desired item. The results for the selected item are displayed.
er to page 34.)
(Ref
5.
Press the P
ower Switch to turn the monitor off.
36
Page 37

ERROR INDICATORS
ERROR DISPLAY CAUSE CORRECTION
Make sure you are barefoot.
Make sure your palms or the soles of
Your palms or feet are not positioned
over the electrodes correctly.
your feet are clean and dry.
Make sure your feet are correctly
positioned.
Read “How to Take a Measurement”
on page 26.
The measurement position was not
stable.
Your palms or feet were not placed
correctly.
Feet are too dry.
The Body Composition values are
outside the measurement range.
Your palms or feet are not positioned
over the electrodes correctly.
The monitor is not set up correctly.
Remain still and do not move until the
measurement is complete. Read “How
to Take a Measurement” on page 26.
Slightly moisten the soles of your feet
with a damp towel and retake the
measurement.
Check the settings entered for your
personal data. Change the settings
if needed. Retake the measurement.
If this error occurs again and the
settings are correct, measurements
cannot be taken.
Make sure your palms or feet are
correctly positioned.
tteries. Wait one minute.
e the ba
v
Remo
Reinstall the batteries. Refer to “Battery
Installation” on page 18.
er Switc
w
ess the P
Pr
monitor on. Retake the measurement.
o
h and tur
n the
You stepped onto the measurement
platform before 0.0 lb was displayed.
The monitor was moved before 0.0 lb
w
as displayed.
ement during measurement.
Mov
Monitor detected weight over 300.0 lb.
37
Wait until 0.0 lb is displayed before
stepping onto the measurement
platform.
Do not move the monitor until 0.0 lb is
displa
yed.
Do not move until measurement is
complete.
This monitor can only be used by
people weighing less than 300.0 lb.
Page 38

TROUBLESHOOTING TIPS
PROBLEM CAUSE AND SOLUTION
Low Battery Indicator
No power
No display appears on the unit
The weight value is displayed abnormally low or
high.
he Body Composition value is displayed
T
abnormally low or high.
Other conditions
Check the battery installation for proper placement of
the battery polarities.
Replace all four worn batteries.
Place the monitor on a hard, level floor.
er to “The reason calculated results may differ
Ref
from actual body fat percentage” on page 14, and
“Recommended Measur
Check the settings entered for your personal data.
Remove the batteries. Wait one minute.
Reinstall the batteries. Refer to “Battery Installation”
on page 18.
ement Times” on page 13.
38
Page 39

CARE AND MAINTENANCE
To keep your Body Composition MONITOR with Scale in the best condition and protect the monitor
from damage follow the directions below:
Clean the monitor with a soft dry cloth. Do not use abrasive or volatile cleaners. The monitor is not
waterproof.
CAUTION:
Do not submerge the device or any of the components in water.
Store the monitor in a safe and dry location. Do not expose the monitor to direct sunlight, extreme
hot or cold temperatures or humidity. Thoroughly dry any moisture off the monitor before storing.
CAUTION:
Do not submerge the device or any of the components in water.
CAUTION:
Do not subject the monitor to strong shocks, such as dropping the unit on the floor.
Remove the batteries if the monitor will not be used for three months or longer.
Store the Display Unit in the Main Unit as shown in the figure.
As you place the lower portion of the Display Unit,
Do not crease the cord when storing in the Display Unit Holder.
Use the monitor consistent with the instruction provided in this manual.
CAUTION:
Do not disassemb
Healthcar
e will void the user warranty.
le or modify the unit. Chang
it clicks and fits into the Display Unit Holder.
es or modifications not approved by Omron
39
Page 40

FCC STATEMENT
NOTE:
POTENTIAL FOR RADIO/TELEVISION INTERFERENCE (for U.S.A. only)
This product has been tested and found to comply with the limits for a Class B digital device, pursuant to part
15 of the FCC rules.
These limits are designed to provide reasonable protection against harmful interference in a residential
installation. The product generates, uses, and can radiate radio frequency energy and, if not installed and used
in accordance with the instructions, may cause harmful interference to radio communications. However, there
is no guarantee that interference will not occur in a particular installation. If the product does cause harmful
interference to radio or television reception, which can be determined by turning the product on and off, the
user is encouraged to try to correct the interference by one or more of the following measures:
• Reorient or relocate the receiving antenna.
• Increase the separation between the product and the receiver.
• Connect the product into an outlet on a circuit different from that to which the receiver is connected.
• Consult the dealer or an experienced radio/TV technician for help.
POTENTIAL FOR RADIO/TELEVISION INTERFERENCE
(for Canada only)
This digital apparatus does not exceed the Class B limits for radio noise emissions from digital apparatus as
set out in the interference-causing equipment standard entitled “Digital Apparatus”, ICES-003 of the Canadian
Department of Communications.
Cet appareil numérique respecte les limites de bruits radioeléctriques applicables aux appareils numériques de
Clase B prescrites dans la norme sur le materiel brouilleur: “Appareils Numériques”, ICES-003 édictée par le
minister des communications.
Changes or modifications not expressly approved by the party responsible for compliance could void the user’s
authority to operate the equipment.
40
Page 41

WARRANTY
Limited Warranty
Your HBF-500 Body Composition MONITOR with Scale, excluding the batteries, is warranted to be free from
defects in materials and workmanship appearing within 1 year from the date of purchase, when used in
accordance with the instructions provided with the unit. The above warranties extend only to the original retail
purchaser.
We will, at our option, repair or replace without charge any monitor covered by the above warranties. Repair or
replacement is our only responsibility and your only remedy under the above warranties. To obtain warranty
service contact Omron Healthcare’s Customer Service by calling 1-800-634-4350 for the address of the repair
location and the return shipping and handling fee. Information for warranty service is available on our website at
www.omronhealthcare.com.
Enclose the Proof of Purchase. Include a letter, with your name, address, phone number, and description of the
specific problem. Pack the product carefully to prevent damage in transit. Because of possible loss in transit, we
recommend insuring the product with return receipt requested.
ALL IMPLIED WARRANTIES, INCLUDING BUT NOT LIMITED TO THE IMPLIED WARRANTIES
OF MERCHANTABILITY AND FITNESS FOR PARTICULAR PURPOSE, ARE LIMITED TO THE
DURATION OF THE APPLICABLE WRITTEN WARRANTY ABOVE.
limitations on how long an implied warranty lasts, so the above limitation may not apply to you.
OMRON SHALL NOT BE LIABLE FOR LOSS OF USE OR ANY OTHER INCIDENTAL,
CONSEQ
e
xclusion or limitation of incidental or consequential damages, so the above exclusions may not apply to you.
T
his w
sta
te
V
isit our w
Call toll free: 1-800-634-4350
UENTIAL OR INDIRECT COSTS, EXPENSES OR DAMAGES.
arranty gives you specific legal rights, and you may also have other rights which may vary from state to
.
FOR CUST
eb site at: www.omronhealthcare.com
OMER SER
VICE
Some states do not allow
Some sta
tes do not allow the
41
Page 42

SPECIFICATIONS
odel OMRON Body Composition MONITOR with Scale - HBF-500
M
Display
Set Ranges Height: 3’ 4” to 6’ 6 3/4” (100.0 to 199.5 cm)
Power Supply 4 AA batteries
Battery Life Approximately 1 year (when used four times a day)
Operating Temperature +50˚F to +104˚F (+10˚C to +40˚C), 30 to 85% RH
/Humidity
Storage Temperature -4˚F to +140˚F (-20˚C to +60˚C), 10 to 95% RH, 700 - 1060 hPa
/Humidity/Air Pressure
External Dimensions Display Unit: Approximately 11 7/8” (W) x 1 3/8” (H) x 6 1/8” (D)
Weight Approximately 4.85 lb (including batteries)
Contents Main Unit, 4 AA batteries, Instruction Manual, Graph Sheet
UPC Code 0 73796 26500 7
Weight display: 0 to 300 lb with 0.2 lb increments
(0 to 135 kg with 0.1 kg increments)
Body fat percentage: 5.0 to 60.0% with 0.1% increments
Skeletal muscle percentage:
BMI: 7.0 to 90.0 with 0.1 increments
Resting metabolism
Visceral fat level: 30 levels with 1 level increments
*The age range for the skeletal muscle percentage, resting metabolism and
visceral fat level is 18 to 80 years old.
*The age range for the body fat percentage classification is 20 to 79 years old.
BMI classification:
– (Underweight) / 0 (Normal) / + (Overweight) / ++ (Obese) with 12 levels of Bar display
Body fat percentage classification:
– (Low) / 0 (Normal) / + (High) / ++ (Very High) with 12 levels of Bar display
Visceral fat classification:
Memory: 1 day / 7 days / 30 days / 90 days
Age: 10 to 80 years old
Gender: Male/Female
Main Unit: Approximately 11 7/8” (W) x 2 1/4” (H) x 12 3/4” (D)
: 385 to 5000 kcal with 1 kcal increments
5.0 to 50.0% with 0.1% increments
0 (Normal) / + (High)
NOTE: Specifications are subject to change without prior notice.
42
Page 43

NOTES
43
Page 44

Distributed by:
OMRON HEALTHCARE, INC.
1200 Lakeside Drive
Bannockburn, Illinois 60015
www.omronhealthcare.com
Made in China
' 2006 Omron Healthcare, Inc.
HBF-500INST Rev.B
9054900-0B
 Loading...