

Page 1
1
Instruction manual
• English
• Deutsch
• Nederlands
U22
Page 2

3
Safety precautions
2
Table of contents
Dear customer,
Thank you for purchasing the OMRON MicroAIR U22 Nebuliser.
By buying the MicroAIR U22 nebuliser, you have chosen a high-quality, innovative device.
During its development, particular attention was given to reliability, easy and convenient handling.
Before using the nebuliser for the first time, please read through this manual carefully.
If you still have any questions regarding its use, contact OMRON customer service at the address
shown on the packaging or in this instruction manual. They will be pleased to assist you.
OMRON Healthcare Europe.
Safety precautions . . . . . . . . . . . . . . . . . . . . . . . . . . . . . . . . .3
Features of the MicroAIR U22 . . . . . . . . . . . . . . . . . . . . . . . .4
Contents of the MicroAIR U22 package . . . . . . . . . . . . . . . . .5
Names & functions of the parts . . . . . . . . . . . . . . . . . . . . . . .6
How to insert or replace the batteries . . . . . . . . . . . . . . . . . . .8
How to use the AC adapter . . . . . . . . . . . . . . . . . . . . . . . . . .9
How to assemble the unit and fill the medication container . .10
How to select the nebulisation mode . . . . . . . . . . . . . . . . . .13
How to inhale with the MicroAIR U22 . . . . . . . . . . . . . . . . . .14
How to clean the unit after each inhalation . . . . . . . . . . . . . .15
How to disinfect the unit each day . . . . . . . . . . . . . . . . . . . .17
How to replace the mesh cap . . . . . . . . . . . . . . . . . . . . . . . .18
Troubleshooting . . . . . . . . . . . . . . . . . . . . . . . . . . . . . . . . . .19
Specifications . . . . . . . . . . . . . . . . . . . . . . . . . . . . . . . . . . . .21
• This nebuliser is a medical device. Only use medications as prescribed and instructed by your doctor.
• Disinfect the nebuliser before first use and at least once per day when in use. See page 17 for disinfection instructions.
• Clean the nebuliser after each inhalation. See page 15 for cleaning instructions.
• Only use the nebuliser for its intended purpose; for inhalation therapy. Any other form of use constitutes an improper use and is therefore dangerous. The manufacturer cannot be held liable for any
damage caused by improper or incorrect use.
• Do not leave the nebuliser and AC adapter* unattended with people who require supervision (e.g.
people with infirmities or children).
• The nebuliser does not contain user serviceable parts. Never open the main unit. In case of problems, stop using the nebuliser and contact your OMRON dealer.
• Do not wash the main unit and AC adapter* with water; do not immerse them in water.
• Do not drop medication on the main unit or on the AC adapter*. If you drop medication, immediately
wipe it off.
• Do not apply strong shocks to the nebuliser or AC adapter*.
• Although this device complies with the provisions of the EMC (Electromagnetic Compatibility)
directive, operating the device should be avoided in direct vicinity of other electronic devices.
• Make sure that the electrical rating shown on the bottom of the AC adapter* corresponds to your
mains voltage and frequency.
• Always disconnect the mains cable of the AC adapter* before you start cleaning the nebuliser or
when you do not use the nebuliser.
• Do not plug in or unplug the AC adapter* powerplug from the electrical outlet with wet hands.
• Keep the mains cable of the AC adapter* away from heated or hot surfaces.
• The AC adapter* does not contain user serviceable parts. Never open it. In case of problems, stop
using it and contact your OMRON dealer.
• Keep this manual for future reference
* Optional
Page 3
5
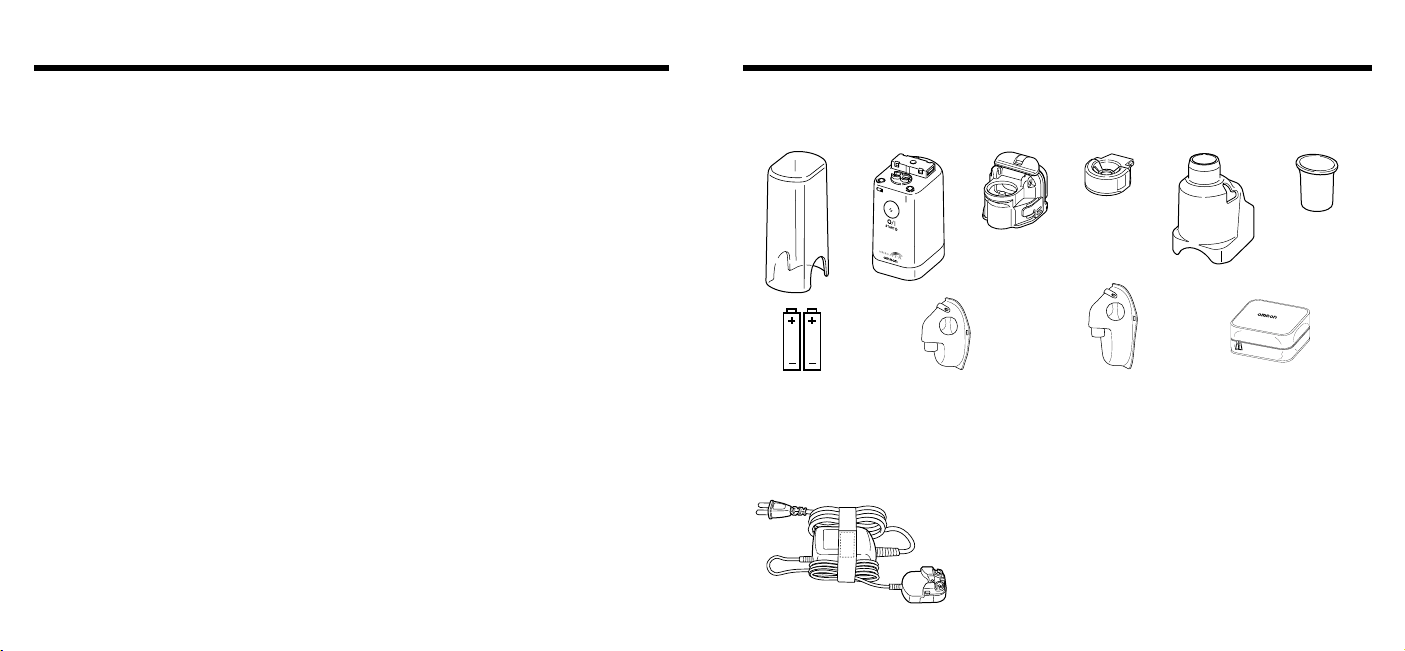
Contents of the OMRON MicroAIR U22 package
The following items are contained in the package:
Main unit Cover
Main Unit
Medication
Container
MouthpieceMask Adapter
Mesh Cap
(with Mesh)
• batteries (2x AA/LR6)
• instruction manual
• warranty card
Optional item (not included), contact your OMRON dealer.
AC adapter
Child mask Adult mask
Soft pouch
4
Features and benefits
In the MicroAIR U22, aerosol is generated by pushing liquid medication through fine holes in the
newly developed metal alloy mesh. This is realised by a titanium vibrator, oscillating at high frequency. This unique technology offers the following features and benefits:
True portable, pocket size
The device will fit in any handbag or briefcase. Running up to 4 hours on just two penlite batteries,
your medication is always within reach wherever you go, whatever you do.
Inhalation is possible at various angles
The device enables inhalation at various angles with stable nebulisation. Therefore the device can be
used even while in bed or can be used for a baby/child, laying in the arms of the care-taker.
Soundless operation
The soundless operation of the device enables discrete use.
No loud frightening noises, meaning calm treatment even while using it on a sleeping child.
Simple one-button operation
Wide medication compliance
Low medication waste and residue
Batteries
Page 4
76
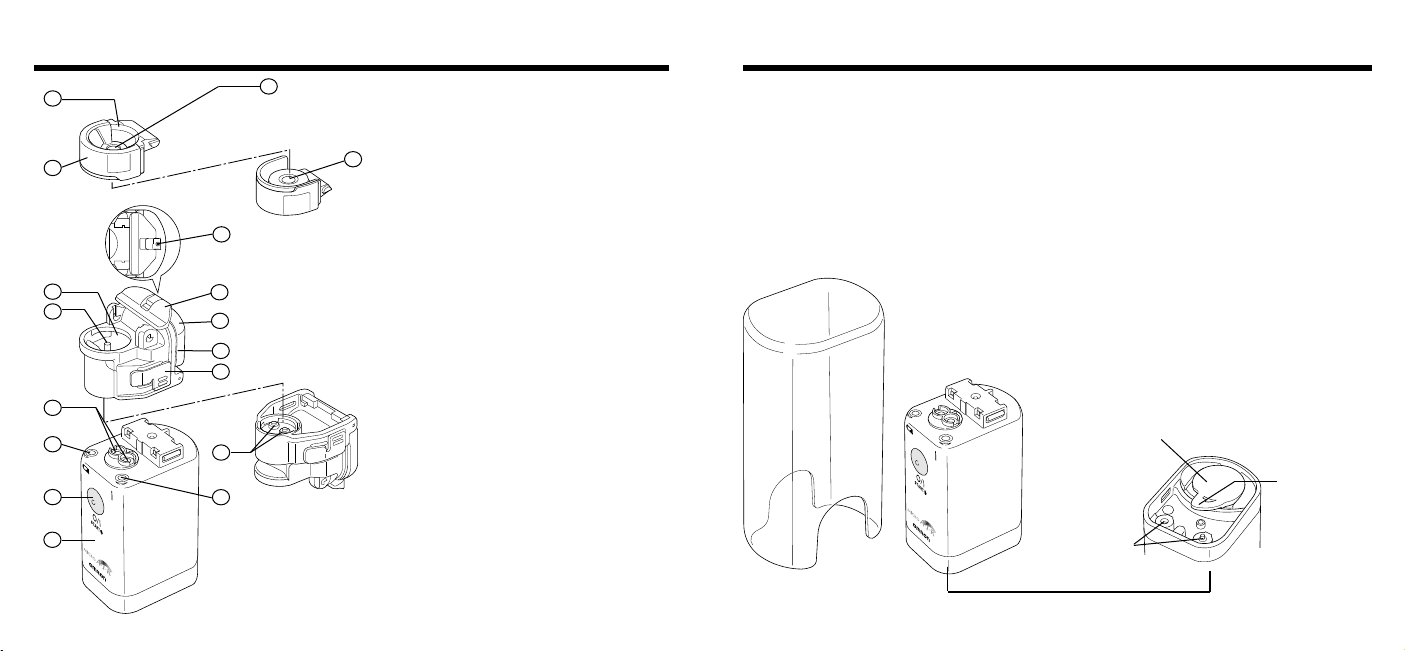
Names and functions of the parts
10. Container
Contains the medication (7 ml max.)
11. Medication container release button
Medication container can be removed when the
buttons on both sides are pushed.
12. Electrodes
Connects the main unit with the vibrator.
13. Battery Low Indicator
An orange light blinks when the batteries are
low.
14. ON/OFF button
15. Electrodes
Connects the vibrator with the main unit.
16. Power indicator
A green light turns on when the power is on.
17. Main unit
Battery Cover
Connections
for AC-adapter
Viewed from the
bottom
Battery cover
removal lever
Main unit cover
Protects the main unit.
Names and functions of the parts
1. Mesh Cap
Contains metal alloy mesh for nebulisation.
2. Nebulisation port
Nebulised medication exits here.
3. Mesh Cap Cover
Protects the mesh.
4. Mesh
Efficient nebulisation is realized through
the use of minute pores.
Do not touch this fragile part with your
fingers!
Do not attempt to clean with a cotton
swab or a pin!
5. Air port
Stabilizes nebulisation.
6. Medication Port
Medication can be filled here by opening
the mesh cap.
7. Vibrator
The tip of this vibrator oscillates at high
frequency and pushes the medication
through the pores of the mesh.
8. Medication container cap locking
lever
Opens the medication container cap.
9. Medication container cap
To be opened for cleaning the medication container.
1
2
4
3
5
6
8
7
9
10
11
15
12
13
16
14
17
Figure viewed from the above
Mesh cap viewed from
the bottom
Viewed from the bottom
Page 5
98
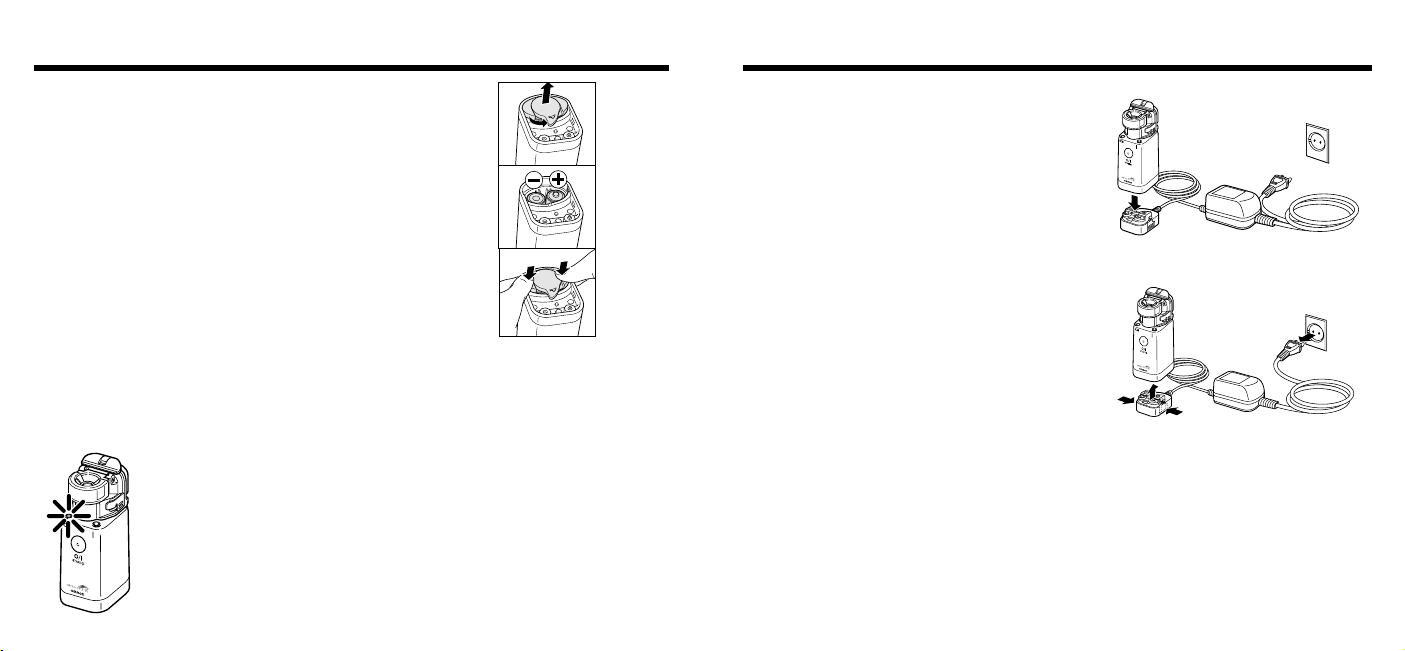
How to use the AC adapter
Using the AC adapter
The AC adapter is an optional accessory.
Place the main unit on the AC adapter connector.
Press firmly untill it clicks.
Plug in the power plug of the AC adapter to the electrical outlet.
To remove the AC adapter connector from the main
unit, remove the power plug from the electrical outlet
and unlock the AC adapter connector by pushing the
buttons on both sides.
How to insert or replace the batteries
Inserting batteries
1. Remove the battery cover by slightly rotating the disengaging
lever in the direction of the arrow (1).
2. Insert the batteries according to the battery polarity indicated
inside the battery compartment.
3. Replace battery cover by aligning tabs and, with your thumbs,
push into place until it clicks.
Battery life and battery replacement
The unit can operate with alkaline batteries or with nickel-metal-hydride (NiMH) rechargeable batteries. Depending on the capacity and condition of the batteries, the unit can operate upto 8 days on a
set of batteries based on usage of 30 minutes a day.
• When the battery low indicator (orange) flashes, the batteries should
be replaced. Replace both batteries with new ones.
• The (optional) AC adapter does not function as a battery charger;
rechargeable batteries must be charged in an external battery charger.
• Remove batteries if the unit is not in use for long periods. Failure to do
so could result in damage due to battery leakage.
• Batteries should be treated as chemical waste; disposal should be
done at your retail store or at appropiate collection locations.
Notes:
Page 6
1110
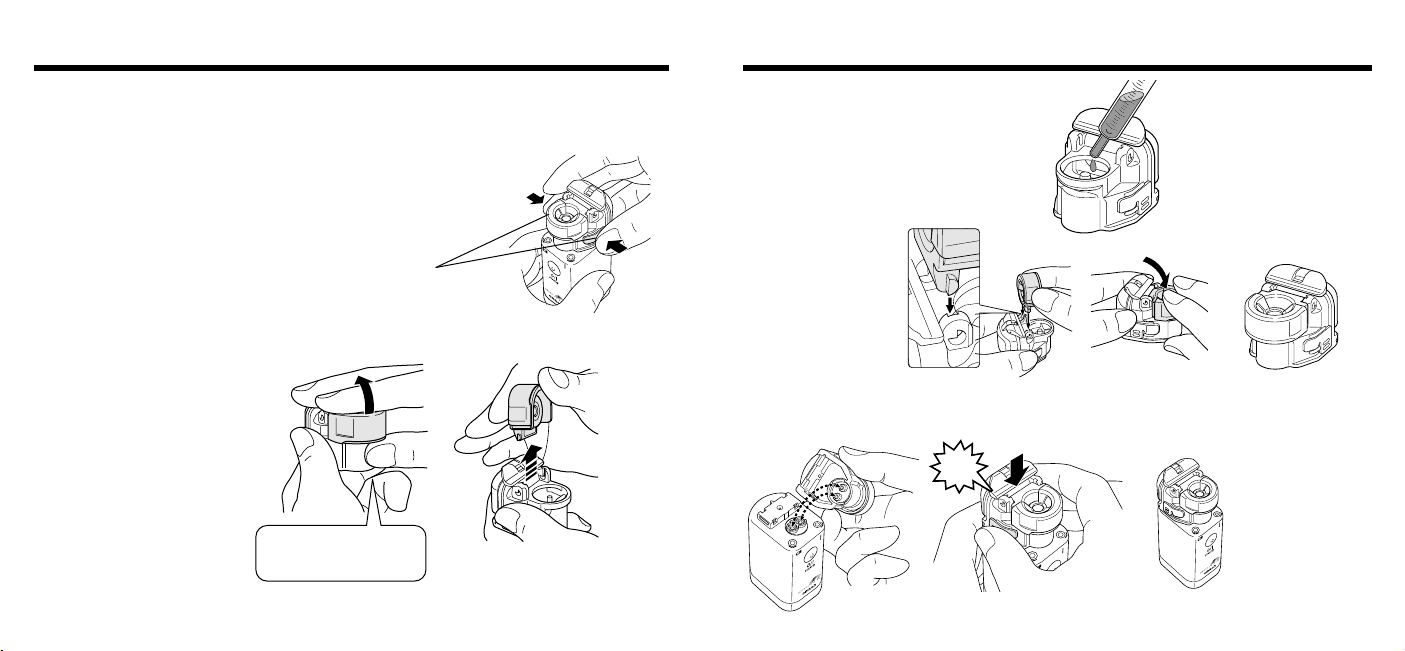
How to assemble the unit and fill the medication
4. Fill the medication container as illustrated.
The maximum capacity is 7 ml.
5. Install the mesh cap
Do not touch the mesh!
The mesh cap seals the
medication bottle.
Confirm if the cap is
securely installed.
6. Install the medication container on the main unit
Clicks.
How to assemble the unit and fill the medication
container
When using the unit for the first time or after not using it for a long period of time, clean and disinfect
the medication container, mesh, mask adapter, mouthpiece and mask. Refer to page 15 for instructions.
1. Insert batteries or use the (optional) AC adapter, see page 8 and 9.
2. Remove the medication container from the main unit. To do so,
push on the release buttons on both sides. This will disengage
the latch mechanism.
Medication container
release Buttons
Lift up the Mesh Cap
by placing your thumb
under the rim.
3. Remove the mesh cap by
placing your thumb under the
rim, gently pushing up, tilt the
cap back until perpendicular
and lift straight up.
Hold the medication bottle as
illustrated.
Do not touch the mesh!
Page 7
1312
How to select the nebulisation mode
Continuous nebulisation mode
If you push the ON/OFF (O/ I) button and
release within approximately 1 second,
the unit nebulises in continuous mode.
If you push the O/ I button again, the unit stops nebulisation.
The green power indicator lights up during nebulisation.
Manual nebulisation mode
If you hold the ON/OFF (O/ I) button
for approx. 2 seconds or more, the unit nebulises
in the manual nebulisation mode.
The unit only nebulises while you keep on pressing the
O/ I button and stops nebulisation when you remove
your finger from the button.
In this mode, nebulisation may be synchronised with
your Inhalation/exhalation cycle and medication waste is
minimized.
The green power indicator lights up during nebulisation.
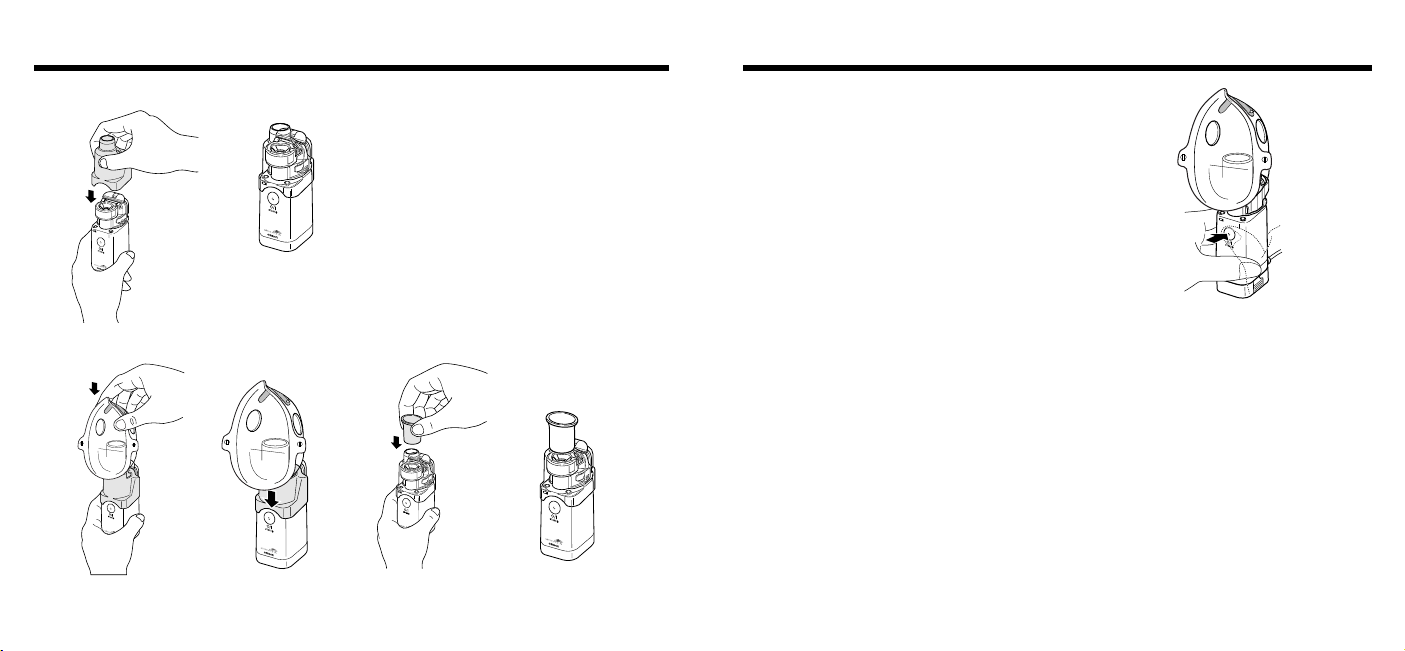
How to assemble the unit and fill the medication
7. Install the mask adapter on the main unit
8. Install the mask or mouthpiece on the mask adapter
The device is now ready for use.
Refer to the next section on how to select the nebulisation mode and how to inhale.
Page 8
1514
How to clean the unit after each inhalation
Note: if the device is not cleaned and disinfected correctly and frequently, micro-organisms may
remain in the unit, causing risk of infection.
The following items should be cleaned after each use:
Medication container, mesh cap, mask adapter, mouthpiece and mask.
1. Remove the mask adapter from the main unit.
2. Remove the medication container from the main unit:
3. Remove the mesh cap from the medication container, discard the medication and open the medication container cap. It is recommended to nebulize clean water to remove medication left in the
mesh holes after discarding the medication.
4. Remove the mesh cover from the mesh cap.
!Caution: Do not touch the mesh.
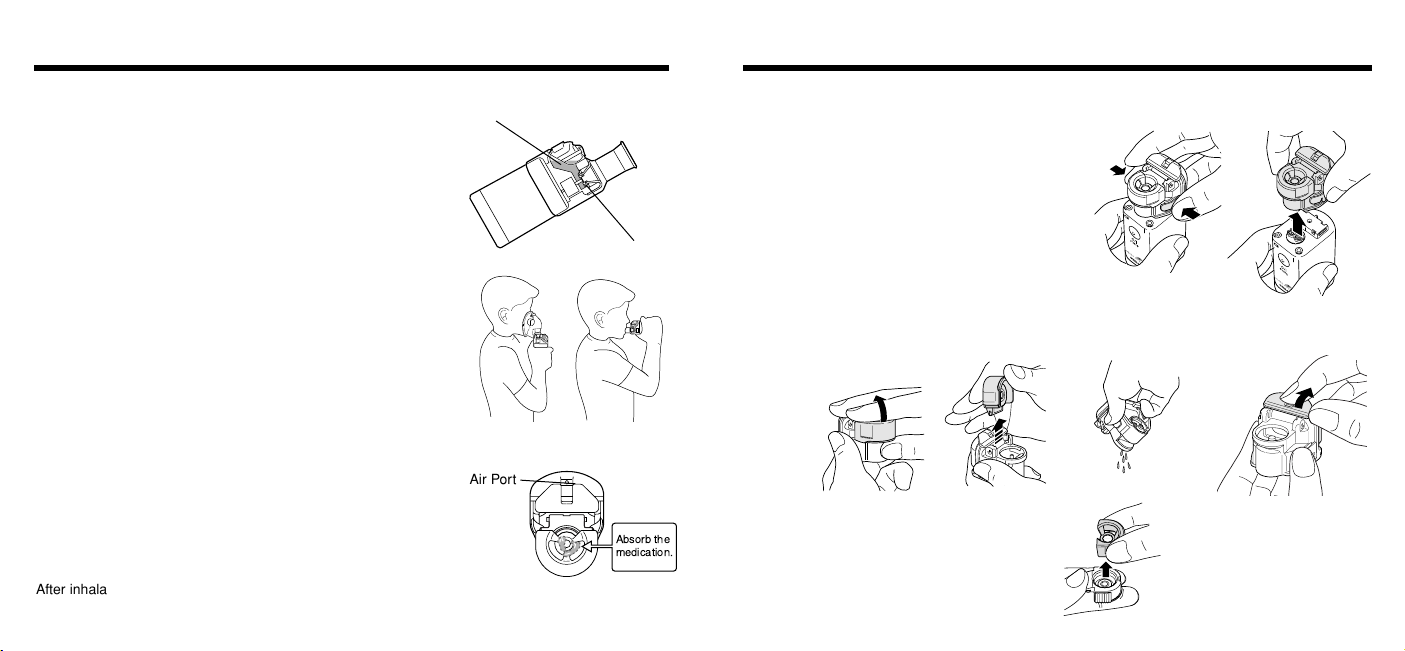
How to inhale with the OMRON MicroAIR U22
!Caution: Only use type and amount of medications as prescribed
and instructed by your doctor.
1. Slightly tilt the unit as illustrated in the figure.
In this position, the vibrator is immursed in the
medication and nebulisation will start after power on.
After the vibrator has been immursed in the medication,
the unit can be used under any angle.
!Caution: In some positions (e.g. upright), nebulisation may
stop after a short while. In that case, briefly tilt the unit again
in order to re-immerse the vibrator in the medication.
2. Place the mouthpiece in your mouth or place the mask over
mouth and nose.
Always be calm and relaxed when you inhale. Breathe in slowly
and deeply so that the medication can reach deep in to the
bronchial tubes. Hold your breath briefly, then breathe out slowly
while removing the mouthpiece from your mouth. Do not breathe
too quickly. Pause when you feel like having a rest.
You may synchronise the nebulisation with your inhalation/exhalation cycles by using the unit in ‘manual nebulisation mode’. Refer to
page 13.
Note:
If high-viscosity medication is used, nebulisation may be reduced.
If excessive medication collects on the mesh, nebulisation may
stop. In that case, turn off the power and remove the mask adapter.
Absorb the medication by means of a lint-free cloth.
!Caution: Do not poke the mesh with a cotton swap or a pin;
the mesh may be permanently damaged.
Medication
Vibrator
Air Port
After inhalation always switch off the nebuliser by pressing the O/ I button.
When an AC adapter was used, disconnect the AC from the electrical outlet.
Absorb the
medication.
Page 9
1716
How to disinfect the unit each day
Note: if the device is not cleaned and disinfected correctly and as frequently as indicated, microorganisms may remain in the unit, causing risk of infection.
The medication container, mesh cap, mouthpiece, mask and mask adapter should be disinfected
• before using the unit for the first time,
• after the unit has not been used for a long period of time, or
• daily during normal use.
Before disinfection, always first clean the parts as described in the section “How to clean the unit
after each use” on the previous page.
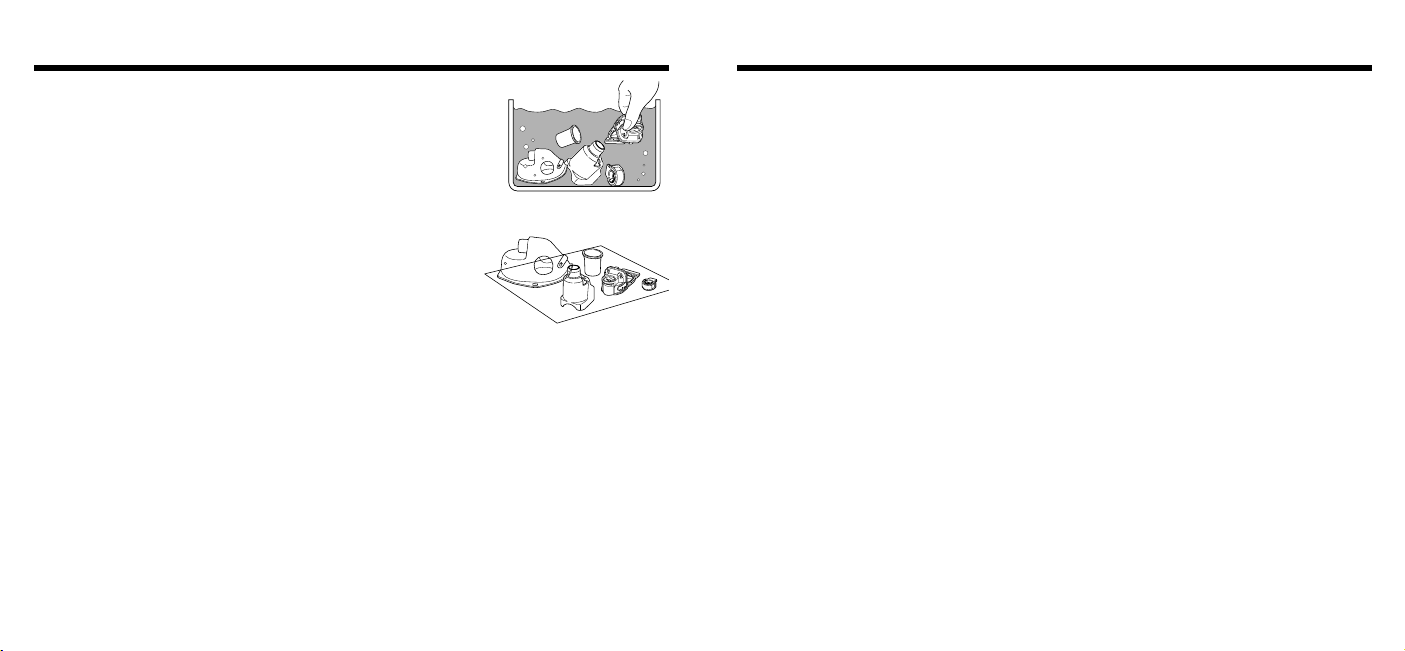
Disinfection of the individual parts can be done, using one of the following methods:
1. Disinfection by boiling.
Note: Main unit, medication container and flexible mask can NOT be boiled. For these parts, use
other methods, as described below.
Mesh-cap, mouthpiece and mask-adapter can be disinfected by boiling in distilled water. After 10
to 30 minutes of boiling, shake off excessive water from the parts and let them air dry on a clean,
lint free (paper) towel.
2. Disinfection by using alcohol.
All parts can be disinfected by using alcohol.
Note: Alcohol is highly flammable; do not use alcohol in close vicinity of open fire; do not smoke.
Soak the parts (NOT the main unit) in 70% ethyl alcohol for approx. 1 minute. Shake off exces
sive alcohol from the parts and let them air dry on a clean, lint free (paper) towel.
Alternatively, disinfect all parts by wiping them off with a lint-free cloth, soaked in alcohol.
3. Disinfection by commercially available disinfectant.
Note: Do NOT soak the main unit in any disinfectant.
Do not use disinfectant containing Sodium (Natrium) Hypochlorite; this may affect the metal parts.
For disinfection of the parts, refer to the instructions as supplied by the manufacturer of the disinfectant. After disinfection, thoroughly rinse the parts with warm tap water. Shake off excessive
water from the parts and let them air dry on a clean, lint free (paper) towel.
How to clean the unit after each inhalation
5. Wash the parts (not the main unit!) in a warm soapy solution.
Rinse the parts in warm tap water to remove the soap residue.
Some types of medications can easily remain on the mesh, therefore pay
close attention during washing.
Do not touch the mesh with a cotton swab, or with a pin.
6. Shake off excessive water from the parts and let them air dry on a
clean, lint free (paper) towel.
7. Clean the main unit and it’s electrodes by wiping it off with a (moistened) gauze.
Use a dry gauze to wipe the main unit dry.
Do not use volatile agents, such as benzene or thinner.
8. Assemble the unit, refer to page 10.
9. Store the unit in a dry, clean place.
Page 10

1918
Troubleshooting
The nebulisation rate
is extremely low
Trouble Possible cause Corrective action
Batteries are low (the orange
battery low indicator flashes).
Replace the batteries with new
ones. Refer to page 8.
The mesh is stained or clogged. 1. Clean the mesh by boiling. Refer
to page 15.
2. Replace the mesh cap with a new
one. Refer to page 10.
The green power indicator does not turn on
and the unit does not
nebulise.
The batteries are low. Replace the batteries with new
ones. Refer to page 8.
The capacity of rechargeable
batteries is low.
Charge the batteries with a commercially available recharger.
The batteries are inserted in the
wrong direction.
Re-insert the batteries in the correct
direction. Refer to page 8.
The AC adapter is not correctly
connected to the main unit.
Remove the AC adapter from the
main unit and connect it correctly.
Remove the medication container
from the main unit and install correctly. Refer to page 11.
The medication container is not
installed correctly to the main unit.
Tilt the main unit in order to
immerse the vibrator in the medication.
The vibrator is not immursed in the
medication.The green power
indicator turns on but
the unit does not
nebulise.
The medication container is not
filled with medication.
Fill with medication. Refer to page 11
The mesh is broken.
Replace with a new one. Refer to
page 10.
The mesh cap is a consumeable part.
Omron recommends to exchange the mesh cap after approximately 1 year.
In case the unit nebulises poorly even after boiling in water (refer to “Disinfection by boiling”), replace
the mesh cap.
Remove the mesh cap and install a new one as described on page 10 (section “How to assemble the
unit and fill the medication container”).
How to replace the mesh cap
Page 11

21
20
Specifications
This device complies with the provisions of the EC directive 93/42/EEC (Medical Device Directive).
Product name: Electronic mesh nebuliser
Model name: OMRON NE-U22
Power source: 3 VDC (two alkaline penlite batteries/
Type AA/LR6)
2.4 VDC (two NiMH rechargeable batteries)
AC adapter (optional) 230 VAC, 50 Hz
Power consumption: Approx. 1.5 W
Ultrasonic frequency: Approx. 180 KHz
Nebulisation rate: Average 0.4 - 0.5 ml/minute*
Particle size (MMAD)**: Approx. 5 µm*
Capacity of the medication container: 7 ml max.
Residual volume: approx. 0.1 ml
External dimensions: Approx. 38 (W) x 104 (H) x 51 (D) mm
Weight: Approx. 97 gr (excl. batteries)
Battery life: Approx. 8 days (30 minutes each day)
Operating conditions: 10˚ ~ 40˚C, 30%~85% RH
Contents of the package: Main unit, main unit cover, medication container, mesh cap, mask adapter,
mouthpiece, flexible child mask, flexible adult mask, 2 batteries (AA/LRG), instruction manual,
warranty card, soft pouch
*Values measured with 0.9% NaCl solution and under temperature of 23˚C; specifications may vary
with medication used and environmental conditions.
**MMAD: Mass Median Aerodynamic Diameter.
MMAD is independantly measured at Bradford University, UK, Dr.John Dennis, according to the
European nebuliser standard EN13544-1.
Documentation and/or specifications subject to change without prior notification.
Read the instruction
manual carefully
=class ll
O/I =power off/on
EU-representative:
OMRON Healthcare Europe B.V.
Kruisweg 577
2132 NA Hoofddorp
=Type B
Troubleshooting
The green power indicator turns on but the
unit does not nebulise.
Trouble Possible cause Corrective action
If the unit does not nebulise properly after checking the possible causes above, contact your OMRON dealer.
Medication or water has collected
on the electrodes on the main unit.
Remove the medication or water.
Refer to page 15.
Excessive medication is collected
on the mesh
Remove excessive medication.
Refer to page 17.
Replacement parts and accessories:
Meshcap: P040014
AC-adapter: A040004
Flexible adult mask: A040002
Flexible child mask: A040003
Mask adapter: P040015
Mouthpiece: P040016
Main unit cover: P040012
0197
Page 12

1
Gebrauchsanweisung
• English
• Deutsch
• Nederlands
Page 13

3
Sicherheitsvorschriften
• Dieser Vernebler ist ein medizinisches Gerät. Verwenden Sie Medikamente ausschließlich
entsprechend der Anweisungen und Vorschriften Ihres Arztes.
• Desinfizieren Sie den Vernebler vor der ersten Verwendung und bei regelmäßigem Gebrauch min-
destens einmal täglich. Entsprechende Anweisungen zur Desinfektion des Gerätes finden Sie auf
Seite 17.
• Reinigen Sie den Vernebler nach jeder Inhalation. Entsprechende Anweisungen zur Reinigung
des Gerätes finden Sie auf Seite 15.
• Verwenden Sie den Vernebler ausschließlich für den beabsichtigten Zweck: zur Inhalationstherapie.
Jegliche andere Form der Verwendung ist eine unsachgemäße Benutzung und stellt aus
diesem Grund eine Gefahr dar.
• Lassen Sie den Vernebler und den Netzadapter* niemals unbeaufsichtigt in der Nähe von
Personen liegen, die beaufsichtigt werden müssen (z.B. Personen mit Behinderungen oder Kinder).
• Der Vernebler umfasst keine Komponenten, die vom Benutzer zu reparieren oder zu warten sind.
Nehmen Sie den Vernebler im Falle von Schwierigkeiten nicht mehr in Gebrauch und wenden Sie
sich an Ihren OMRON-Händler.
• Reinigen Sie die Basiseinheit und den Netzadapter* niemals mit Wasser; tauchen Sie sie niemals
in Wasser.
• Lassen Sie niemals Medikamente auf die Basiseinheit oder den Netzadapter* fallen oder tropfen.
Sollte dies dennoch geschehen, dann wischen Sie das Medikament schnell ab.
• Setzen Sie den Vernebler oder den Netzadapter* niemals heftigen Stößen aus.
• Obwohl dieses Gerät den Vorschriften der EMV-Richtlinie (Richtlinie für elektomagnetische
Ver tr äglichkeit) entspricht, empfehlen wir dennoch, die Verwendung in der Nähe anderer elektrischer Geräte zu vermeiden.
• Achten Sie darauf, dass die elektrischen Spezifikationen an der Unterseite des Netzadapters* mit
Ihrer Wechselstrom-Voltzahl und Frequenz übereinstimmen.
• Entfernen Sie das Netzadapterkabel vor der Reinigung oder bei Nichtverwendung des Verneblers
stets von der Basiseinheit*.
• Stecken Sie den Netzadapter* niemals mit feuchten Händen in die Steckdose. Das gleiche gilt für
das Herausziehen des Steckers aus der Steckdose.
• Halten Sie das Netzadapterkabel außer Reichweite von heißen oder erhitzten Oberflächen.
• Der Netzadapter* enthält keine Komponenten, die vom Benutzer zu reparieren oder zu warten sind.
Öffnen Sie den Adapter keinesfalls. Im Falle von Schwierigkeiten möchten wir Sie bitten, den
Vernebler nicht mehr zu verwenden und sich mit Ihrem OMRON-Händler in Verbindung zu setzen.
• Bewahren Sie diese Gebrauchsanweisung für zukünftige Verwendung auf.
* optional
2
Inhaltsangabe
Sehr geehrte Kundin,
Sehr geehrter Kunde,
vielen Dank für den Kauf des OMRON MicroAIR U22 Verneblers. Sie haben sich hiermit für ein qualitativ hochwertiges und innovatives Gerät entschieden, bei dessen Entwicklung vor allem der
Zuverlässigkeit, der einfachen Bedienung und der Benutzerfreundlichkeit große Aufmerksamkeit
gewidmet wurde. Vor der ersten Verwendung des Verneblers empfehlen wir Ihnen, diese
Gebrauchsanweisung gründlich durchzulesen. Sollten Sie dennoch Fragen bezüglich der Verwendung des OMRON MicroAIR U22 haben, so können Sie sich unter der auf der Verpackung oder in
dieser Bedienungsanleitung angegebenen Adresse mit dem OMRON Kundendienst in Verbindung
setzen. Unsere Mitarbeiter stehen Ihnen dort gerne zur Verfügung.
OMRON Healthcare Europe.
Sicherheitsvorschriften . . . . . . . . . . . . . . . . . . . . . . . . . . . . . .3
Merkmale und Vorteile . . . . . . . . . . . . . . . . . . . . . . . . . . . . . .4
Packungsinhalt des MicroAIR U22 . . . . . . . . . . . . . . . . . . . . .5
Bezeichnungen und Funktionen der Komponenten . . . . . . . . .6
Einsetzen und Auswechseln der Batterien . . . . . . . . . . . . . . .8
Vorbereitung der Stromversorgung . . . . . . . . . . . . . . . . . . . . .9
Aufbau der Einheit und Füllen des Medikamentenbehälters .10
Auswahl des Vernebelungsmodusses . . . . . . . . . . . . . . . . . .13
Inhalation mit dem MicroAIR U22 . . . . . . . . . . . . . . . . . . . . .14
Reinigung der Einheit nach jeder Inhalation . . . . . . . . . . . . .15
Tägliche Desinfektion des Geräts . . . . . . . . . . . . . . . . . . . . .17
Austauschen der Filterabdeckung . . . . . . . . . . . . . . . . . . . . .18
Problemlösungen . . . . . . . . . . . . . . . . . . . . . . . . . . . . . . . . .19
Spezifikationen . . . . . . . . . . . . . . . . . . . . . . . . . . . . . . . . . . .21
Page 14

5
Packungsinhalt des MicroAIR U22
Die Verpackung enthält die folgenden Komponenten:
Schutzhaube
der Basiseinheit
Basiseinheit
Medikamentenbehälter
MundstückMaskenadapter
Verneblermembran-
abdeckung
• Batterien (2x AA/LR6)
• Gebrauchsanweisung
• Garantieschein
Optionale Komponente (nicht inbegriffen, wenden Sie sich an Ihren OMRON-Händler)
Netzadapter
Flexible Kindermaske Flexible
Erwachsenenmaske
Aufbewahrungstasche
Batterien
4
Merkmale und Vorteile
Der Micro AIR U22 erzeugt Aerosol, indem ein flüssiges Medikament durch feine Löcher in die neu
entwickelte Verneblermembran mit Metalllegierung gepresst wird.
Diese einzigartige Technik bietet folgende Merkmale und Vorteile:
Tragbar, Taschenformat
Das Gerät passt in jede Hand- oder Aktentasche. Bis zu 4 Stunden Laufzeit mit nur zwei MignonBatterien, wodurch Ihre Medikation in Reichweite ist, wo immer Sie sich befinden und was immer Sie
tun.
Inhalation ist aus verschiedenen Winkeln möglich.
Das Gerät ermöglicht Inhalation mit stabiler Sprühwirkung aus verschiedenen Winkeln. Dadurch kann
das Gerät sogar in Liegeposition oder für ein Baby/Kind, das im Arm gehalten wird, verwendet werden.
Geräuschloser Betrieb
Die geräuschlose Funktion des Geräts ermöglicht eine diskrete Anwendung.
Keine lauten, erschreckenden Geräusche und daher ruhige Behandlung, sogar bei einem schlafenden Kind, möglich.
Einfache Ein-Knopf-Bedienung
Mit einer Vielzahl von Medikamenten anwendbar
Geringer Medikamentenverlust und geringe Rückstände.
Page 15

7
Bezeichnungen und Funktionen der
Komponenten
9. Abdeckung des Medikamentenfachs
Die Abdeckung ist vor der Reinigung des
Medikamentenfachs zu öffnen.
10. Medikamentenfach
Das Medikamentenfach enthält das
Medikament (max. 7 ml)
11. Knopf zur Lösung des Medikamentenbehälters
Beim Eindrücken beider Knöpfe kann der
Medikamentenbehälter entfernt werden.
12. Elektroden
Die Elektroden verbinden die Basiseinheit mit
dem Vibrator.
13. Batterieanzeige
Wenn die Batterien verbraucht sind, blinkt ein
orangenes Licht auf.
14. EIN/AUS-Knopf
15. Elektroden
Die Elektroden verbinden den Vibrator mit der
Basiseinheit.
16. Stromanzeige
Wenn das Gerät am Netz angeschlossen ist,
leuchtet ein grünes Licht auf.
17. Basiseinheit
Schutzabdeckung
der Batterie
Verbindung zum
Netzadapter
Unteransicht
Griff zur Entfernung der
Abdeckung
der Batterie
Schutzabdeckung der
Basiseinheit
Die Schutzabdeckung
schützt die Basiseinheit.
6
Bezeichnungen und Funktionen der
Komponenten
1. Verneblermembranabdeckung
Die Verneblermembranabdeckung umfasst
eine Verneblermembran mit einer Metalllegierung für die Vernebelung.
2. Vernebelungsausgang
Am Vernebelungausgang tritt das vernebelte Medikament aus.
3. Verneblermembran-Abdeckungsschutz
Der Verneblermembran-Abdeckungsschutz
schützt die Verneblermembran.
4. Verneblermembran
Eine effiziente Vernebelung wird durch
die Verwendung winziger Poren erreicht.
Berühren Sie die zerbrechlichen
Komponenten auf keinen Fall mit den
Fingern! Versuchen Sie nicht, die
Verneblermembran mit einem Wattestäbchen oder einer Nadel zu reinigen!
5. Lufteintritt
Der Lufteintritt stabilisiert die Vernebelung.
6. Medikamenteneintritt
Das Medikament kann am Medikamenteneintritt nach Abnehmen der Verneblermembranabdeckung eingefüllt werden.
7. Vibrator
Das Endstück des Vibrators bewegt sich
mit einer sehr hohen Frequenz, wodurch
es das Medikament durch die Poren der
Verneblermembran drückt.
8. Griff zur Fixierung der Abdeckung
des Medikamentenfachs
Anhand des Griffs lässt sich die Abdeckung des Medikamentenfachs öffnen.
1
2
4
3
5
6
8
7
9
10
11
15
12
13
16
14
17
Abbildung Aufsicht
Verneblermembranabdeckung Unteransicht
Unteransicht
Page 16

9
Vorbereitung der Stromversorgung
Verwendung des Netzadapters
Der Netzadapter ist optionales Zubehör.
Bringen Sie die Basiseinheit auf der Netzadapterverbindung an. Drücken Sie kräftig, bis ein Klicken
erfolgt.
Stecken Sie den Stecker des Netzadapters in die
Steckdose.
Zur Entfernung des Netzadapters von der Basiseinheit
müssen Sie den Stecker aus der Steckdose ziehen
und den Netzadapter entriegeln, indem Sie die Knöpfe
an beiden Seiten eindrücken.
8
Einsetzen und Auswechseln der Batterien
Einsetzen der Batterien:
1. Entfernen Sie die Schutzabdeckung der Batterien, indem Sie
den Griff leicht in Pfeilrichtung drehen. (1)
2. Setzen Sie die Batterien danach entsprechend der Angaben an
der Innenseite des Batteriefachs ein.
3. Bringen Sie die Schutzabdeckung der Batterie wieder an, indem
Sie den Deckel richtig positionieren und mit dem Daumen andrücken, bis ein Klicken ertönt.
Batterielebensdauer und Austauschen der Batterien
Die Einheit kann mit Alkalinebatterien oder mit aufladbaren Nickelhydrid-Batterien
betrieben werden. Je nach Kapazität und Zustand der Batterien kann die Einheit, ausgehend von
einer Verwendung von 30 Minuten täglich, bis zu 8 Tage mit einem Satz Batterien betrieben werden.
• Wenn die Batterienanzeige aufblinkt, müssen die Batterien ausgewechselt werden. Ersetzen Sie die beiden alten Batterien durch neue.
• Der (optionale) Netzadapter funktioniert nicht als Batterieladegerät; aufladbare
Batterien müssen in einem externen Batterieladegerät aufgeladen werden.
• Entfernen Sie die Batterien, wenn die Einheit über einen längeren Zeitraum
nicht verwendet wird. Wenn dies nicht erfolgt, besteht die Gefahr von
Beschädigungen durch Auslaufen der Batterie.
• Die Batterien müssen als chemischer Abfall entsorgt werden; geben Sie sie bei
Ihrem Verkaufspunkt oder bei einer anderen geeigneten Sammelstelle ab.
Anmerkungen:
Page 17

11
Aufbau der Einheit und Füllen des
Medikamentenbehälters
4. Füllen Sie den Medikamentenbehälter
entsprechend der Abbildung. Hierfür
eignet sich eine Pipette. Die maximale
Kapazität beträgt 7 ml.
5. Installieren Sie die
Verneblermembranabdeckung.
Berühren Sie nicht die
Verneblermembran!
Die Verneblermembranabdeckung verschließt
den Medikamentenbehälter. Vergewissern Sie
sich, dass die Abdeckung
sicher befestigt ist.
Installieren Sie den Medikamentenbehälter in der Basiseinheit.
Clicks.
Klick
10
Aufbau der Einheit und Füllen des
Medikamentenbehälters
Wenn Sie die Einheit zum ersten Mal oder nach einer langen Zeit verwenden, müssen Sie den
Medikamentenbehälter, die Verneblermembran, den Maskenadapter, das Mundstück und die Maske
reinigen und desinfizieren. Entsprechende Anweisungen finden Sie auf Seite 15.
1.Setzen Sie die Batterien ein oder verwenden sie den (optionalen)
Netzadapter, siehe Seite 8, 9.
2. Nehmen Sie den Medikamentenbehälter von der Basiseinheit. Hierfür
müssen Sie die Knöpfe an beiden Seiten eindrücken. Hierdurch
lösen Sie den Klemmmechanismus. Heben Sie den Medikamentenbehälter an, indem Sie die Knöpfe an beiden Seiten eindrücken,
um die Verbindung zu unterbrechen.
Knöpfe zur Lösung des
Medikamentenbehälters
Klappen Sie die Verneblermembranabdeckung hoch,
indem Sie den Daumen
unter den Rand ansetzen.
3. Entfernen Sie die Vernebler-
membranabdeckung, indem
Sie den Daumen unter den
Rand anbringen, vorsichtig
nach oben drücken und die
Abdeckung zurückklappen,
bis sie vertikal nach oben
steht, und dann in aufrechter
Position anheben.
Halten Sie die Medikamtenbehälter entsprechend der Abbildung fest.
Berühren Sie nicht die
Verneblermembran!
Page 18

13
Auswahl des Vernebelungsmodusses
Kontinuierlicher Vernebelungsmodus
Wenn Sie den EIN/AUS (O/I) Knopf betätigen und innerhalb etwa 1 Sekunde wieder loslassen, vernebelt die
Einheit im kontinuierlichen Modus.
Wenn Sie den EIN/AUS (O/I) Knopf erneut betätigen,
hört die Einheit auf zu vernebeln.
Die grüne Stromanzeige leuchtet während der
Vernebelung auf.
Manueller Vernebelungsmodus
Wenn Sie den EIN/AUS (O/I) Knopf etwa 2 Sekunden
oder länger gedrückt halten, vernebelt die Einheit im
manuellen Vernebelungsmodus.
Die Einheit vernebelt nur, wenn Sie den EIN/AUS (O/I)
Knopf gedrückt halten und hält an, wenn Sie den Knopf
loslassen. In diesem Modus können Sie die Vernebelung
auf Ihren Atmungsrhythmus einstellen und somit den
unnötigen Verlust von Medikamenten minimieren.
Die grüne Stromanzeige leuchtet während der
Vernebelung auf.
12
Aufbau der Einheit und Füllen des
Medikamentenbehälters
7.Installieren Sie den Maskenadapter auf der Basiseinheit.
8.Installieren Sie die Maske oder das Mundstück auf dem Maskenadapter.
Das Gerät ist nun gebrauchsfertig.
Im folgenden Kapitel finden Sie die Anweisungen zur Auswahl des Vernebelungsmodusses und zur
Inhalation.
Page 19

15
Reinigung der Einheit nach jeder Inhalation
Hinweis: Wenn das Gerät nicht gründlich und regelmäßig gesäubert und desinfiziert wird, können
Mikroorganismen in dem Gerät verbleiben und Infektionen verursachen.
Die folgenden Komponenten müssen nach jeder Verwendung gesäubert werden:
Medikamentenbehälter, Verneblermembranabdeckung,
Maskenabdeckung, Mundstück und Maske.
1. Entfernen Sie den Maskenadapter von der
Basiseinheit.
2. Entfernen Sie das Medikamentenbehälter von der
Basiseinheit.
3. Entfernen Sie die Verneblermembranabdeckung vom Medikamentenbehälter, öffnen Sie das
Medikamentenfach und entfernen Sie das Medikament. Es empfiehlt sich, destilliertes Wasser zu
vernebeln, um Medikamentenreste nach der Benutzung aus der Verneblermembran zu entfernen.
4. Entfernen Sie die Hülle von der
Verneblermembranabdeckung.
Achtung: Berühren Sie nicht die
Verneblermembran!
14
Inhalation mit dem MicroAIR U22
Achtung: Verwenden Sie nur die Medikamententypen und –mengen, die Ihnen vom Arzt verschrieben worden sind.
1. Kippen Sie die Einheit wie abgebildet leicht zur Seite. In dieser
Position ist der Vibrator vollständig in das Medikament getaucht
und beginnt die Vernebelung, sobald der Strom eingeschaltet wird.
Nachdem der Vibrator in das Medikament getaucht wurde, kann die
Einheit in jedem Neigungswinkel verwendet werden.
Achtung: In manchen Positionen (z.B. aufrecht) kann die
Vernebelung nach einem kurzen Zeitraum anhalten. In diesem Fall
muss die Einheit erneut leicht gekippt werden, damit der Vibrator
wieder vollständig in das Medikament getaucht wird.
2. Nehmen Sie das Mundstück in Ihren Mund oder setzen Sie die
Maske über Ihren Mund und Ihre Nase.
Bleiben Sie während der Inhalation immer ruhig und entspannt.
Atmen Sie langsam und tief ein, damit das Medikament tief bis in
Ihre Bronchien gelangt. Halten Sie Ihren Atem kurze Zeit an und
atmen Sie danach langsam aus, während Sie das Mundstück aus
Ihrem Mund herausnehmen. Atmen Sie nicht zu schnell. Machen
Sie eine Pause, wenn Sie merken, dass Sie sich ausruhen
müssen. Sie können die Vernebelung auf Ihren Atmungsrhythmus
einstellen, indem Sie den „manuellen Vernebelungsmodus“ verwenden. Siehe Seite 13.
Anmerkung: Bei der Verwendung eines Medikamentes mit einer
hohen Viskosität, kann die Vernebelungsstärke abnehmen.
Wenn zuviel vom Medikament auf der Verneblermembran zurück-
bleibt, kann die Vernebelung anhalten. In diesem Fall müssen Sie
den Strom abschalten und den Maskenadapter entfernen. EntfernenSie die Flüssigkeit mit einem sauberen flusenfreien(Papier-)Tuch.
Achtung: Verwenden Sie niemals ein Wattestäbchen oder eine
Nadel; die Verneblermembran kann hierdurch dauerhaft
beschädigt werden.
Medikament
Vibrator
Lufteintritt
Schalten Sie den Vernebler nach der Inhalation stets durch Betätigung des EIN/AUS (O/I) Knopfes
aus. Wenn ein Netzadapter verwendet wird, müssen Sie den Netzadapter aus der Steckdose ziehen.
Entfernen
Sie zurück-
gebliebene
Flüssigkeit
Absorb the
medication.
Page 20

17
Tägliche Desinfektion des Geräts
Hinweis: Wenn das Gerät nicht gründlich und regelmäßig gesäubert und desinfiziert wird, können
Mikroorganismen in dem Gerät verbleiben und Infektionen verursachen.
Vor der Desinfektion immer zuerst die Teile reinigen, wie im Abschnitt “Reinigung des Geräts nach
jeder Anwendung” auf der vorhergehenden Seite beschrieben.
Die Desinfektion der einzelnen Teile kann durch Anwendung einer der folgenden Methoden
vorgenommen werden:
1. Desinfektion durch Abkochen.
Hinweis: Haupteinheit, Medikamentenbehälter und flexible Maske können NICHT
gekocht werden.
Für diese Teile andere, im folgenden beschriebene Methoden verwenden.
Verneblermembran, Mundstück und Masken-Adapter können durch Abkochen mit destilliertem
Wasser desinfiziert werden.
Nach 10 bis 30 Minuten Kochen überschüssiges Wasser von den Teilen abschütteln und sie auf
einem sauberen flusenfreien (Papier-)Tuch lufttrocknen lassen.
2. Desinfektion mit Alkohol.
Alle Teile können unter Verwendung von Alkohol desinfiziert werden.
Hinweis: Alkohol ist leicht entzündbar; Alkohol nicht in unmittelbarer Nähe von offenem Feuer verwenden; nicht rauchen.
Die Teile (NICHT
die Haupteinheit) für etwa 1 Minute in 70 % Ethylalkohol einweichen. Über-
schüssigen Alkohol von den Teilen abschütteln und diese auf einem sauberen flusenfreien
(Papier-)Tuch lufttrocknen lassen. Wahlweise alle Teile durch Abwischen mit einem in Alkohol
getränkten, flusenfreien Tuch desinfizieren.
3. Desinfektion mit handelsüblichen Desinfektionsmitteln
Hinweis: Die Haupteinheit NICHT
in Desinfektionsmittel einweichen.
Keine Desinfektionsmittel verwenden, die Sodium (Natrium) Hypochlorit enthalten; dies kann die
Metallteile beschädigen.
Zur Desinfektion der Teile die Anweisungen des Herstellers des Desinfektionsmittels befolgen. Die
Teile nach der Desinfektion gründlich mit warmem Wasser abspülen. Überschüssiges Wasser von
den Teilen abschütteln und sie auf einem sauberen, flusenfreien (Papier-)Tuch lufttrocknen lassen.
16
Reinigung der Einheit nach jeder Inhalation
5. Die Einzelteile (nicht die Haupteinheit!) in einer warmen Seifenlösung
waschen.Teile danach mit warmem Leitungswasser abspülen, um die
Seifenreste zu entfernen.
Manche Medikamentypen können Rückstände auf der
Verneblermembran hinterlassen. Achten Sie daher hierauf beim
Waschen.
Berühren Sie die Verneblermembran nicht mit einem Wattestäbchen
oder einer Nadel.
7. Schütten Sie das überflüssige Wasser von den Komponenten und lassen Sie sie auf einem
sauberen weißen (Papier)Tuch an der Luft trocknen.
Reinigen Sie die Basiseinheit und die Elektroden mit einem feuchten weichen Tuch.
8. Setzen Sie die Einheit wieder zusammen. Siehe Seite 10.
9. Bewahren Sie die Einheit an einem trockenen, sauberen Ort auf.
Page 21

19
Problemlösungen
Die Vernebelung ist
sehr schwach.
Problem Mögliche Ursache Lösung des Problems
Die Batterien sind verbraucht (das
orangene Licht brennt).
Tauschen Sie die Batterien gegen
neue aus. Siehe Seite 8.
Die Verneblermembran ist verschmutzt oder verstopft.
1. Säubern Sie die Verneblermembran
durch Kochen. Siehe Seite 15.
2.Tauschen Sie die Verneblermembran
gegen einen neue aus. Siehe Seite 10.
Die grüne
Stromanzeige schaltet
sich nicht ein und die
Einheit vernebelt nicht.
Die Batterien sind leer. Tauschen Sie die Batterien gegen
neue aus. Siehe Seite 8.
Die Kapazität der aufladbaren
Batterien ist zu gering.
Laden Sie die Batterien erneut im
Aufladegerät auf.
Die Batterien wurden falsch gepolt
eingesetzt
Legen Sie die Batterien erneut richtig
gepolt ein. Siehe Seite 8.
Der Netzadapter ist nicht korrekt an
der Basiseinheit angeschlossen.
Entfernen Sie den Netzadapter von
der Basiseinheit und schließen Sie
ihn korrekt an.
Entfernen Sie den Medikamentenbehälter
von der Basiseinheit und installieren Sie
ihn auf die korrekte Weise.Siehe Seite 11.
Der Medikamentenbehälter ist nicht
korrekt in der Basiseinheit installiert.
Kippen Sie den Medikamentenbehälter, damit der Vibrator vollständig
in das Medikament getaucht wird.
Der Vibrator ist nicht vollständig in
das Medikament getaucht.Die grüne Stromanzeige leuchtet auf
und die Einheit
vernebelt nicht.
Im Medikamentenfach befindet
sich kein Medikament.
Füllen Sie den Medikamentenbehälter mit dem Medikament.
Die Verneblermembran ist defekt.
Tauschen Sie die Verneblermembran gegen einen neue aus. Siehe
Seite 11.
18
Die Verneblermembranabdeckung kann ausgetauscht werden.
OMRON empfiehlt, die Verneblermembranabdeckung einmal jährlich auszutauschen.
Sollte die Verneblermembran auch nach dem Abkochen in Wasser (siehe auch “Desinfektion durch
Kochen”) noch schlecht funktionieren, Verneblermembran auswechseln.
Entfernen Sie die Verneblermembranabdeckung und installieren Sie eine neue.
Verneblermembranabdeckung entsprechend der Beschreibung auf Seite 10 (Kapitel: “Aufbau der
Einheit und Füllen des Medikamentenfaches”).
Austauchen der Verneblermembranabdeckung
Page 22

21
Spezifikationen
Dieses Gerät entspricht den Vorschriften der EG-Richtlinie 93/42/EEC (Richtlinie für Medizinprodukte).
Produktbezeichnung: Electronic mesh nebuliser
Modellbezeichnung: OMRON NE-U22
Stromversorgung: 3 VDC (zwei Alkalinebatterien/ Typ AA/LR6)
2.4 VDC (zwei aufladbare NiMH-Batterien)
Netzadapter (optional) 230 VAC, 50 Hz
Stromverbrauch: etwa 1.5 W
Vibratorfrequenz: etwa 180 KHz
Vernebelungsrate: Durchschnitt 0.4 - 0.5 ml/Minute oder mehr*
Größe der vernebelten Teilchen (MMAD)**: 5 µm**
Kapazität des Medikamentenfachs: max. 7 ml
Restinhalt: 0,1 ml
Außenmaße: 38 (W) x 104 (H) x 51 (D) mm
Gewicht: 97 g (ohne Batterien)
Lebensdauer der Batterien: 8 Tage (30 Minuten pro Tag)
Betriebsbedingungen: 10o~ 40o C, 30 % ~ 85 % RH
Lieferumfang: Basiseinheit, Schutzhaube der Basiseinheit, Medikamentenbehälter, Verneblermembranabdeckung, Maskenadapter, Mundstück, flexible Kindermaske, flexible Erwachsenenenmaske, 2
Batterien (AA/LR6), Gebrauchsanweisung, Garantieschein, Aufbewahrungstasche.
*Werte gemessen mit 0,9 % NaCl und bei einer Temperatur von 23oC; Spezifikationen können sich
benutzter Medikation und Umweltbedingungen ändern.
**MMAD: Mass Median Aerodynamic Diameter. Uabhängig durchgeführte Messungen an der Bradford
Universität, GB, Dr. John Dennis, gemäß des europäischen Standards für Vernebler EN13544-1.
Ver änderungen der Dokumentation und/oder sonstiger Spezifikationen vorbehalten.
Gebrauchsanweisung
sorgfältig durchlesen
=Klasse 2
O/I=Strom ein/aus
EU-Vertretung:
OMRON Healthcare Europe B.V.
Kruisweg 577
2132 NA Hoofddorp
=Typ B
20
Problemlösungen
Die grüne Stromanzeige leuchtet auf und
die Einheit vernebelt
nicht.
Problem Mögliche Ursache Lösung des Problems
Sollte die Einheit nach dem Durchlaufen obengenannter möglicher Ursachen nicht ordnungsgemäß
vernebeln, dann wenden Sie sich an Ihrem OMRON-Händler.
Auf der Elektrode der Basiseinheit
befindet sich Wasser oder Medikament.
Entfernen Sie das Medikament
oder das Wasser. Siehe Seite 15.
Überschüssiges Medikament wird
auf der Verneblermembran gesammelt.
Überschüssiges Medikament entfernen. Siehe Seite 17.
Ersatzteile und Zubehör:
Filterabdeckung: P040014
Netzadapter: A040004
Flexible Erwachsenenmaske (MAF): A040002
Flexible Kindermaske (MPF): A040003
Maskenadapter: P040015
Mundstück: P040016
Schutzhaube der Basiseinheit:: P040012
0197
Page 23

1
Gebruiksaanwijzing
• English
• Deutsch
• Nederlands
Page 24

3
Veiligheidsvoorschriften
• Deze vernevelaar is een medisch apparaat. Gebruik medicijnen alleen volgens voorschrift van uw
arts.
• Desinfecteer de vernevelaar alvorens hem de eerste keer te gebruiken en tenminste één maal per
dag wanneer u hem gebruikt. Zie pagina 17 voor instructies betreffende de desinfectering.
• Maak de vernevelaar schoon na iedere inhalatie. Zie pagina 15 voor instructies betreffende het
schoonmaken.
• Gebruik de vernevelaar uitsluitend voor het beoogde doel: voor inhalatietherapie. Iedere andere
vorm van gebruik duidt op een ongeschikt gebruik en is om die reden gevaarlijk.
• Laat de vernevelaar en de net-adapter* nooit onbeheerd achter bij mensen die toezicht nodig
hebben (d.w.z. verstandelijk gehandicapten of kinderen).
• De vernevelaar bevat geen onderdelen die door de gebruiker te repareren of te onderhouden zijn.
Als er problemen zijn wordt u verzocht de vernevelaar niet meer te gebruiken en contact op te
nemen met de OMRON dealer.
• Was de basiseenheid en de net-adapter* nooit met water; dompel ze nooit onder in water.
• Laat nooit medicijnen op de basiseenheid of de net-adapter* vallen of druppelen. Als dit toch
gebeurt, veegt het medicijn dan snel af.
• Stel de vernevelaar of de net-adapter* niet bloot aan hevige schokken.
• Hoewel dit apparaat voldoet aan de voorschriften van de EMC (Elektromagnetische Compatibiliteit
richtlijn, wordt toch aangeraden het gebruik in de nabijheid van andere elektrische apparaten te vermijden.
• Zorg ervoor dat de elektrische specificaties op de onderkant van de net-adapter* overeenkomen
met uw AC voltage en frequentie.
• Maak de AC kabel altijd los van de net-adapter* voor u de vernevelaar schoonmaakt of wanneer u
de vernevelaar niet gebruikt.
• Stop de net-adapter* nooit in het stopcontact met natte handen. Hetzelfde geldt voor de verwijde-
ring uit het stopcontact.
• Houdt de AC kabel uit de buurt van hete of verhitte oppervlaktes.
• De net-adapter* bevat geen onderdelen die door de gebruiker te repareren of te onderhouden zijn. •
Open de adapter* onder geen enkele voorwaarde. Als er problemen zijn, wordt u verzocht te stop-
pen met het gebruik en contact op te nemen met uw OMRON dealer.
• Bewaar deze handleiding voor gebruik in de toekomst.
*optioneel
2
Inhoudsopgave
Beste klant,
Dank u zeer voor het aanschaffen van de OMRON MicroAIR U22 vernevelaar. Met het aanschaffen
van de OMRON MicroAIR U22, heeft u gekozen voor een kwalitatief hoogstaand, innovatief apparaat. Gedurende de ontwikkeling ervan, heeft men in het bijzonder aandacht besteed aan betrouwbaarheid, bedieningsgemak en gebruiksvriendelijkheid. Alvorens de vernevelaar de eerste keer te
gebruiken, raden we u aan deze handleiding zorgvuldig te lezen. Als u nog vragen heeft omtrent het
gebruik van de OMRON MicroAIR U22, kunt u contact opnemen met de OMRON consumentenservice onder het adres dat vermeld is op de verpakking of in deze handleiding. Zij zullen u graag
helpen.
OMRON Healthcare Europe.
Veiligheidsvoorschriften . . . . . . . . . . . . . . . . . . . . . . . . . . . . . . . . . . . . . . . .3
Eigenschappen en voordelen van de MicroAIR U22 . . . . . . . . . . . . . . . . . .4
Inhoud van de MicroAIR U22 verpakking . . . . . . . . . . . . . . . . . . . . . . . . . . .5
Namen en functies van de onderdelen . . . . . . . . . . . . . . . . . . . . . . . . . . . .6
Het aanbrengen of vervangen van de batterijen . . . . . . . . . . . . . . . . . . . . .8
Het gebruik van de net-adapter . . . . . . . . . . . . . . . . . . . . . . . . . . . . . . . . . .9
Het opbouwen van de eenheid en het vullen van de medicijnhouder . . . . .10
Het selecteren van de vernevelingsmodus . . . . . . . . . . . . . . . . . . . . . . . . .13
Het inhaleren met de MicroAIR U22 . . . . . . . . . . . . . . . . . . . . . . . . . . . . .14
Het reinigen van de eenheid na iedere inhalatie . . . . . . . . . . . . . . . . . . . .15
Het dagelijks desinfecteren van de eenheid . . . . . . . . . . . . . . . . . . . . . . . .17
Het vervangen van de vernevelkap . . . . . . . . . . . . . . . . . . . . . . . . . . . . . .18
Problemen oplossen . . . . . . . . . . . . . . . . . . . . . . . . . . . . . . . . . . . . . . . . .19
Specificaties . . . . . . . . . . . . . . . . . . . . . . . . . . . . . . . . . . . . . . . . . . . . . . .21
Page 25

5
Inhoud van de MicroAIR U22 verpakking
De verpakking bevat de volgende onderdelen:
beschermhoes van
de basiseenheid
basiseenheid
medicijnhouder
mondstukmaskeradapter
Vernevelkapje
(met verne-
velmembraan)
batterijen (2x AA/LR6)
handleiding
garantiebewijs
Optioneel onderdeel (niet inbegrepen, neem contact op met uw OMRON dealer)
net-adapter
Kinder Masker Volwassenen
Masker
Tasje
Batterijen
4
Eigenschappen en voordelen
In de MicroAIR U22 vindt verneveling plaats door het persen van vloeibare medicatie door de zeer
fijne gaatjes in een membraan. Dit nieuw ontwikkeld vernevelmembraan is gemaakt van een metaallegering. Dit persen vindt plaats middels een titanium trilelement dat op hoge frequentie werkt. Deze
unieke technologie biedt de volgende voordelen:
Handig zakformaat
Het apparaatje past in elke handtas of attachékoffer. Het werkt maar liefst 4 uur op twee penlite-batterijen en zorgt ervoor dat u uw medicijnen altijd en overal bij de hand hebt.
Inhaleren onder verschillende hoeken
Met dit apparaatje is inhalatie onder verschillende hoeken mogelijk zonder dat de verneveling daardoor beïnvloed wordt. Het apparaat kan zelfs in bed gebruikt worden of toegepast worden voor een
baby of klein kind dat in de armen van de verzorger ligt.
Geluidloos
Het apparaat werkt geluidloos en discreet.
Het maakt geen geluiden waar kinderen van kunnen schrikken. Zo kunnen medicijnen zelfs bij een
slapend kind worden toegediend zonder het te wekken.
Eenvoudige éénknopsbediening
Geschikt voor een breed scala aan medicijnen
Minimale verspilling en residu’s
Page 26

7
Namen en functies van de onderdelen
10. Medicijnhouder
Bevat het medicijn (max. 7 ml)
11. Ontgrendelknop van de medicijnhouder
De medicijnhouder kan verwijderd worden door
de knoppen aan weerszijden in te drukken wor
den.
12. Elektrodes
Verbinden de basiseenheid met de oscillator
13. Batterij-indicator
Een oranje lichtje knippert wanneer de batterijen leeg raken.
14. AAN/UIT knop
15. Elektrodes
Verbinden de oscillator met de basiseenheid.
16. Stroomindicator
Een groen lichtje gaat aan wanneer de stroom
is aangesloten.
17. Basiseenheid
Beschermkap van de batterij
Verbindt de
net-adapter
Gezien van onderaf
Hendel om de
batterijkap te
verwijderen
Beschermkap
basiseenheid
Beschermt de
basiseenheid
6
Namen en functies van de onderdelen
1. Vernevelkapje
Bevat een membraan van een metaallegering voor verneveling.
2. Vernevelingspoort
Hieruit komt het vernevelde medicijn
3. Beschermkapje
Beschermt het vernevelmembraan
4. Vernevelmembraan
Efficiënte verneveling wordt bewerkstelligd door het gebruik van minuscule
poriën. Raak onder geen voorwaarde dit
fragiele onderdeel met uw vingers aan!
Probeer het niet schoon te maken met
een wattenstaafje of naald!
5. Luchtpoort
Stabiliseert de verneveling.
6. Medicatiepoort
Medicijn kan hier bijgevuld worden door
het vernevelkapje te openen.
7. Oscillator
Het uiteinde van deze oscillator beweegt
met een hele hoge frequentie en perst
daardoor het medicijn door de poriën
van het vernevelmembraan.
8. Klepje om de medicijnhouderkap
vast te zetten
Opent de medicijnhouderkap
9. Medicijnhouderkap
Dient geopend te worden voor het
schoonmaken van de medicijnhouder.
1
2
4
3
5
6
8
7
9
10
11
15
12
13
16
14
17
figuur gezien van bovenaf
Vernevelkapje gezien
van onderaf
gezien van onderaf
Page 27

9
Het gebruik van de net-adapter
De net-adapter is een optioneel toebehoren.
Plaats de basiseenheid op de net-adapterverbinding.
Duw stevig tot hij klikt.
Stop de stekker van de net-adapter in het stopcontact.
Om de net-adapter los te maken van de basiseenheid,
moet u de stekker uit het stopcontact halen en de netadapter ontgrendelen door aan beide zijden op de
knoppen te drukken.
8
Het aanbrengen of vervangen van de batterijen
Het aanbrengen van de batterijen:
1. Verwijder de batterij beschermkap door de hendel een beetje in
de richting van de pijl te draaien.
2. Breng de batterijen aan volgens de polariteit zoals die is afgebeeld aan de binnenkant van de batterijhouder.
3. Plaats de batterijbeschermkap terug door er en met uw duimen
op te duwen tot u een klik hoort.
Levensduur van de batterijen en het vervangen van de batterijen
De eenheid kan functioneren op alkaline batterijen of op nikkel-metaal-hydride
(NIMH) oplaadbare batterijen. Al naar gelang de capaciteit en toestand van de batterijen, kan de
eenheid tot 8 dagen functioneren op een set batterijen, gebaseerd op een gebruik van 30 minuten
per dag.
• Wanneer de batterij indicator oranje knippert, moet u de batterijen vervangen. Vervang beide batterijen door nieuwe.
• De (optionele) net-adapter functioneert niet als batterij-oplader;
oplaadbare batterijen moeten herladen worden in een externe
batterij oplader.
• Verwijder de batterijen wanneer de eenheid voor langere periode niet in gebruik is. Wanneer dit niet gebeurt bestaat er gevaar
voor schade door lekkage van de batterij.
• Batterijen dienen te worden behandeld als chemisch afval; ze
dienen te worden ingeleverd bij het verkoopadres of andere
daarvoor geschikte verzamelplaatsen.
Opmerkingen:
Page 28

11
Het opbouwen van de eenheid en het vullen van
de medicijnhouder
4. Vul de medicijnhouder zoals geïllustreerd.
Een druppelaar is hier erg geschikt voor.
De maximale capaciteit is 7 ml.
5. Installeer de vernevelkap.
Raak het vernevelmembraan niet aan!
De vernevelkap sluit de
medicijnhouder af.
Controleer of de vernevelkap goed is geplaatst.
6. Installeer de medicijnhouder op de basiseenheid.
Clicks.
klik
10
Het opbouwen van de eenheid en het vullen van
de medicijnhouder
Wanneer u de eenheid voor de eerste keer of na een lange periode gebruikt, dient u de medicijnhouder, vernevelmembraan, masker adapter, het mondstuk en het masker schoon te maken en te
desinfecteren. Zie pagina’s 15 voor de benodigde instructies.
1. Breng de batterijen aan of gebruik de (optionele) net-adapter, zie
pagina 8 en 9.
2. Verwijder de medicijnhouder van de basiseenheid. Om dit te doen
dient u te duwen op de knoppen aan beide zijden. Hiermee maakt u
het klemmechanisme los.
Knoppen om de
medicijnhouder los
te maken
Klap de filterkap omhoog
door uw duim onder de
rand te plaatsen
3. Verwijder de vernevelkap
door uw duim onder de rand
te plaatsen, voorzichtig
omhoog te duwen en de kap
terug te klappen totdat hij
recht omhoog staat, en dan
rechtstandig omhoog te tillen.
Houdt de medicijnhouder vast
zoals geïllustreerd.
Raak het vernevelmembraan
niet aan!
Page 29

13
Het selecteren van de vernevelingsmodus
Aaneengesloten vernevelingsmodus
Als u op de AAN/UIT (O/I) knop drukt en binnen
ongeveer 1 seconde loslaat, vernevelt de eenheid in
aaneengesloten modus.
Als u nog een keer op de O/I knop drukt, stopt de eenheid met vernevelen.
De groene stroomindicator brandt tijdens de verneveling.
Handmatige vernevelingsmodus
Als u de AAN/UIT (O/I) knop gedurende ongeveer 2 seconden of meer vasthoudt, vernevelt de eenheid in handmatige vernevelingsmodus.
De eenheid vernevelt alleen wanneer u op de (O/I) knop
blijft drukken en stopt wanneer u de knop loslaat. In
deze modus kunt u de verneveling synchroniseren met
uw ademhalingscyclus en daarmee onnodig verlies van
medicijnen minimaliseren.
De groene stroomindicator brandt tijdens de verneveling.
12
Het opbouwen van de eenheid en het vullen van
de medicijnhouder
7.Installeer de maskeradapter op de basiseenheid
8. Installeer het masker of mondstuk op de maskeradapter
Het apparaat is nu klaar voor gebruik.
Lees in het volgende hoofdstuk verder over hoe de vernevelingsmodus te selecteren en hoe te
inhaleren.
Page 30

15
Het reinigen van de eenheid na iedere inhalatie
NB: Indien het apparaat niet op de juiste wijze en regelmatig gereinigd en gedesinfecteerd wordt,
kunnen er micro-organismen in het apparaat achterblijven met mogelijk risico van infectie.
De volgende onderdelen dienen te worden gereinigd na ieder gebruik:
Medicijnhouder, vernevelkap, maskeradapter, mondstuk
en masker.
1. Verwijder de maskeradapter van de basiseenheid.
2. Verwijder de medicijnhouder van de basiseenheid.
3. Verwijder de vernevelkap van de medicijnhouder, verwijder het medicijn en open de medicijnhouderkap. Geadviseerd wordt schoon water te vernevelen om medicatie te verwijderen die in de
maasgaatjes kan zijn achtergebleven na het legen van de medicijnhouder.
4. Verwijder het beschermkapje van
de vernevelkap.
Let op: raak het vernevelmembraan niet aan!
14
Het inhaleren met de MicroAIR U22
Let op: gebruik medicijnen alleen volgens voorschrift van uw arts.
1. Kantel de eenheid enigszins zoals is getoond in de illustratie. In
deze positie is de oscillator ondergedompeld in het medicijn en de
verneveling zal starten wanneer de stroom wordt ingeschakeld.
nadat de oscillator ondergedompeld is in het medicijn, kan de eenheid onder iedere hoek gebruikt worden.
Let op: in sommige posities (bijv. rechtop) kan de verneveling stoppen na een korte periode. In dat geval dient u de eenheid weer
enigszins te kantelen zodat de oscillator weer opnieuw ondergedompeld wordt in het medicijn.
2. Plaats het mondstuk in uw mond of plaats het masker over mond
en neus.
Blijf altijd kalm en ontspannen wanneer u inhaleert. Adem langzaam en diep in zodat het medicijn diep in uw bronchiën komt.
Houdt uw adem even vast, en adem daarna langzaam uit terwijl u
het mondstuk verwijdert uit uw mond. Adem niet te snel. Pauzeer
wanneer u voelt dat u rust nodig heeft. U kunt de verneveling synchroniseren met uw ademhaling door gebruik te maken van de
‘handmatige vernevelingsmodus’. Zie pagina 13.
Opmerking: als een medicijn met een hoge viscositeit wordt
gebruikt kan de verneveling afnemen.
Als er te veel van het medicijn achterblijft op het vernevelingsmembraan, kan de verneveling stoppen. In dat geval dient u het apparaat uit te zetten en de maskeradapter te verwijderen. Neem de
vloeistof op met behulp van een pluisvrije (papieren) handdoek.
Let op: gebruik nooit een wattenstaafje of een naald; het vernevelmembraan kan hierdoor permanent beschadigd worden.
Medicatie
Oscillator
Luchtpoort
Zet na de inhalatie altijd de vernevelaar uit door op de O/I knop te drukken. Wanneer een net-adapter
werd gebruikt, dient u de net-adapter uit het stopcontact te halen.
Verwijder
de overtollige medicatie
Absorb the
medication.
Page 31

17
Het dagelijks desinfecteren van de eenheid
NB: Indien het apparaat niet regelmatig en op de juiste wijze gereinigd en gedesinfecteerd wordt,
kunnen er micro-organismen in het apparaat achterblijven met alle risico’s van infectie van dien.
Alvorens het apparaat te desinfecteren moet u eerst alle onderdelen reinigen zoals beschreven in het
hoofdstuk over reinigen na gebruik (zie pagina 15).
U kunt de afzonderlijke onderdelen volgens (een van) de onderstaande methoden desinfecteren:
1. Desinfecteren door uitkoken
N.B.: U kunt de basiseenheid, het medicijnenreservoir en het flexibele masker NIET uitkoken.
Voor deze onderdelen moet u een van de onderstaande methoden gebruiken. Het vernevelkapje,
het mondstuk en de maskeradapter kunt u desinfecteren door ze in gedestilleerd water uit te
koken.
Laat de onderdelen 10 tot 30 minuten in het kokende water liggen. Neem ze eruit, schud het overtollige water ervan af en laat ze drogen op een schone, pluisvrije (papieren) handdoek.
2. Desinfecteren met alcohol
U kunt alle onderdelen met alcohol desinfecteren.
N.B.: Alcohol is licht ontvlambaar; gebruik geen alcohol in de nabijheid van open vuur; rook niet tijdens het werken met alcohol.
Laat de onderdelen (BEHALVE de basiseenheid) gedurende ongeveer een minuut in een
oplossing van 70% ethylalcohol liggen. Schud er daarna de overtollige alcohol vanaf en laat ze
drogen op een schone, pluisvrije (papieren) handdoek.
U kunt de onderdelen eventueel ook desinfecteren door ze schoon te vegen met een pluisvrije, in
alcohol gedrenkte doek.
3. Desinfecteren met een in de handel verkrijgbaar desinfecteermiddel
N.B.: Dompel de basiseenheid NIET onder in het desinfecteermiddel. Gebruik geen desinfecteermiddel dat natriumhypochloriet bevat: dit kan de metalen onderdelen aantasten.
Desinfecteer de onderdelen volgens de instructies van de fabrikant van het desinfecteer middel.
Spoel de onderdelen na het desinfecteren goed af met warm kraanwater. Schud er daarna het
overtollige water vanaf en laat ze drogen op een schone, pluisvrije (papieren) handdoek.
16
Het reinigen van de eenheid na iedere inhalatie
5. Was de onderdelen (niet de basiseenheid!) in warm zeepsop af. Spoel
daarna de onderdelen onder warm kraanwater af om de zeepresten te
verwijderen.
Sommige typen medicijnen kunnen makkelijk achterblijven op het vernevelmembraan, let daar dus op bij het wassen.
Raak het vernevelmembraan niet aan met een wattenstaafje of een
naald.
6. Schud het overtollige water van de onderdelen en laat ze drogen aan
de lucht op een schone, witte (papieren) handdoek.
7. Maak de basiseenheid en de elektroden schoon door ze af te vegen met een vochtig gaasje.
8. Zet de eenheid weer in elkaar. Zie pagina 10.
9. Zet de eenheid weg op een droge, schone plaats.
Page 32

19
Problemen oplossen
De verneveling is zeer
laag
Probleem Mogelijke oorzaak Oplossing
De batterijen zijn bijna leeg (het
oranje lichtje brandt)
Vervang de batterijen met nieuwe.
Zie pagina 8.
Het vernevelmembraan is vuil of
verstopt.
1. Maak het vernevelmembraan
schoon door hem te koken. Zie
pagina 15.
2. Vervang het vernevelkapje door
een nieuwe. Zie pagina 10.
De groene stroomindicator gaat niet aan en
de eenheid vernevelt
niet.
De batterijen zijn leeg.
Vervang de batterijen met nieuwe.
Zie pagina 8.
De capaciteit van oplaadbare bat-
terijen is te laag.
Laad de batterijen opnieuw op in
een oplader.
De batterijen zijn verkeerd om
geïnstalleerd.
Installeer de batterijen opnieuw in
de juiste richting. Zie pagina 8.
De net-adapter is niet correct op de
basiseenheid aangesloten.
Verwijder de net-adapter van de
basiseenheid en sluit hem correct aan.
Verwijder de medicijnhouder van de
basiseenheid en installeer hem correct. Zie pagina 11.
De medicijnhouder is niet correct
geïnstalleerd in de basiseenheid.
Kantel het apparaat om de oscillator
onder te dompelen in het medicijn.
De oscillator is niet ondergedom-
peld in het medicijn.De groene stroomindicator gaat niet
aan en de eenheid
vernevelt niet.
Er zit geen medicijn in de medicijn-
houder.
Vul de houder met medicijn.
Het vernevelmembraan is defect.
Vervang het vernevelkapje door een
nieuwe. Zie pagina 10.
18
De vernevelkap is een vervangbaar onderdeel.
Omron raadt aan de vernevelkap jaarlijks te vervangen.
In geval het apparaat zelfs na het uitkoken van het vernevelkapje in water slecht vernevelt (zie
“Desinfecteren door uitkoken”) moet u het vernevelkapje vervangen.
Verwijder de vernevelkap en installeer een nieuwe vernevelkap zoals beschreven op pagina 10.
(hoofdstuk: “Het opbouwen van de eenheid en het vullen van de medicijnhouder”).
Het vervangen van de vernevelkap
Page 33

21
Specificaties
Dit apparaat voldoet aan de voorschriften van de EG richtlijn 93/42/EEC ( Medical Device Directive).
Productnaam: Electronic mesh nebuliser
Modelnaam: OMRON NE-U22
Voedingsbron: 3 VDC (twee alkaline penlite batterijen/ Type
AA/LR6) 2.4 VDC (twee NiMH oplaadbare batterijen)
net-adapter (optioneel) 230 VAC, 50 Hz
Elektrische consumptie: ongeveer 1.5 W
Ultrasonische frequentie: ongeveer 180 KHz
Vernevelingsratio: Gemiddelde 0.4 - 0.5 ml/minuut *
Grootte van de vernevelde deeltjes (MMAD)**: ongeveer 5 µm
Capaciteit van de medicijnhouder: 7 ml max.
Residu-volume: ca. 0,1 ml.
Externe afmetingen: ongeveer 38 (B) x 104 (H) x 51 (D) mm
Gewicht: ongeveer 97 gr. (excl. batterijen)
Levensduur van batterijen: ongeveer 8 dagen (30 minuten per dag)
Gebruiksomstandigheden: 10o~ 40o C, 30% ~ 85% RH
Inhoud van de verpakking: Basiseenheid, basiseenheidovertrek, medicijnhouder, vernevelkap,
masker adapter, mondstuk, flexibel kindermasker, flexibel volwassenenmasker, 2 batterijen (AA/LR6),
gebruiksaanwijzing, garantiebewijs, zacht tasje.
*Waarden gemeten met 0,9% NaCl en onder een temperatuur van 23o C; specificaties kunnen variëren met
andere medicijnen en omgevingsomstandigheden.
**MMAD: Mass Median Aerosol Diameter. Onafhankelijk gemeten aan de Bradford Universiteit, UK, Dr. John
Dennis, volgens de Europese vernevelaar standaard EN13544-1.
Documentatie en/of andere specificaties zijn onderhevig aan verandering zonder voorafgaand bericht.
lees de handleiding zorgvuldig
=klasse 2
O/I =AAN/UIT
EU-representative:
OMRON Healthcare Europe B.V.
Kruisweg 577
2132 NA Hoofddorp
=Type B
20
Problemen oplossen
De groene stroomindicator gaat niet aan
en de eenheid vernevelt niet.
Probleem Mogelijke oorzaak Oplossing
Als de eenheid niet naar behoren verneveld na het nagaan van alle bovengenoemde mogelijke
oorzaken, neemt u dan contact op met uw OMRON dealer.
Er zit water of medicijn op de elektroden van de basiseenheid.
Verwijder het medicijn of het water.
Zie pagina 15.
Overtollig medicijn blijft achter op
het vernevelmembraan.
Maak het vernevelmembraan regelmatig schoon. Zie pagina 17.
Reserve delen en accessoires:
Vernevelkapje : P040014
AC-adapter: A040004
Flexibele volwassenen masker: A040002
Flexibele kinder masker: A040003
Maskeradapter: P040015
Mondstuk: P040016
Beschermhoes: P040012
0197
 Loading...