

Page 1

Omnia F/XE
Specially engineered for podcast and le origination
INSTALLATION AND OPERATIONAL MANUAL
SEPTEMBER 2011
Omnia ● 1241 Superior Avenue East, Cleveland, Ohio 44114 USA
TEL: +1 216.241.7225 ● FAX: +1 216.241.4103 ● www.omniaaudio.com
Page 2

Page 3

| 1
1
Omnia F/XE – About
Omnia F/XE brings the power of Omnia Audio processing to the file system. With the ability to batch
process existing media as well as processing new, incoming audio, Omnia F/XE can prepare all media for
broadcast.
MPEG License & Music Copyright
Musical compositions and sound recordings are creative works that are protected by the copyright laws
of the United States (title 17, U.S. Code) and other countries. Under U.S. law, the owner of a copyright
has the exclusive right to (and to authorize others to) reproduce the work, use parts of the work in a new
creation, distribute the work in whole or in part, and to publicly display or perform the work (including on
web pages and through webcasting). With few exceptions, it is illegal to reproduce, distribute or broadcast
a sound recording without the permission of the copyright owner. It is your responsibility to comply with
the copyright laws of the United States and other countries in which you broadcast and to pay all applicable
royalties to the copyright owners when you become a webcaster.
There have been recent amendments to the copyright law regarding webcasting of sound recordings. These
new provisions allow webcasting under the terms of a statutory license, as a way to help webcasters get
permission without having to go to each sound recording’s owner. The statutory license, however, has
strict requirements that you must follow. Some of these requirements include the payment of license fees,
limitations on the number of songs from the same album or artist that may be played in a three hour period
(called the sound recording performance complement); a prohibition on publishing advance playlists;
and a requirement to identify the song, artist and album on the website. There are other requirements as
well. The Recording Industry Association of America provides quite a bit of information on copyright law
as it applies to webcasting, and both ASCAP and BMI have created license agreements that they are willing
to grant to webcasters that they believe conform to the provisions of the new copyright rules for webcasting. For additional information on the statutory license and other aspects of webcasting, please visit the
following sites:
The U.S. Copyright Office
www.copyright.gov
The Recording Industry Association of America
www.riaa.com/issues/music/webcasting
ASCAP
www.ascap.com/weblicense/webintro.html
BMI
www.bmi.com/iama/webcaster/index.asp
Software Licensing and Registration
Omnia F/XE software must be activated with a license code for production use. If Omnia F/XE is run
unlicensed, it will operate in Demo Mode. A license is provided when the Omnia F/XE software is purchased. If a license code is not available or has been lost, please contact your sales representative or Omnia
Audio support staff.
Page 4

Page 5
| 3
2
Getting Started
System Requirements
♦ Windows XP or later.
♦ Minimum 128MB RAM.
♦ 20MB free hard-drive space
The Omnia F/XE application runs on 32-bit or 64-bit versions of Windows XP or later.
Software Installation
The Omnia F/XE installer be a single file installer named OMNIAFXE.MSI. Double-click the installer
application file to install Omnia F/XE.
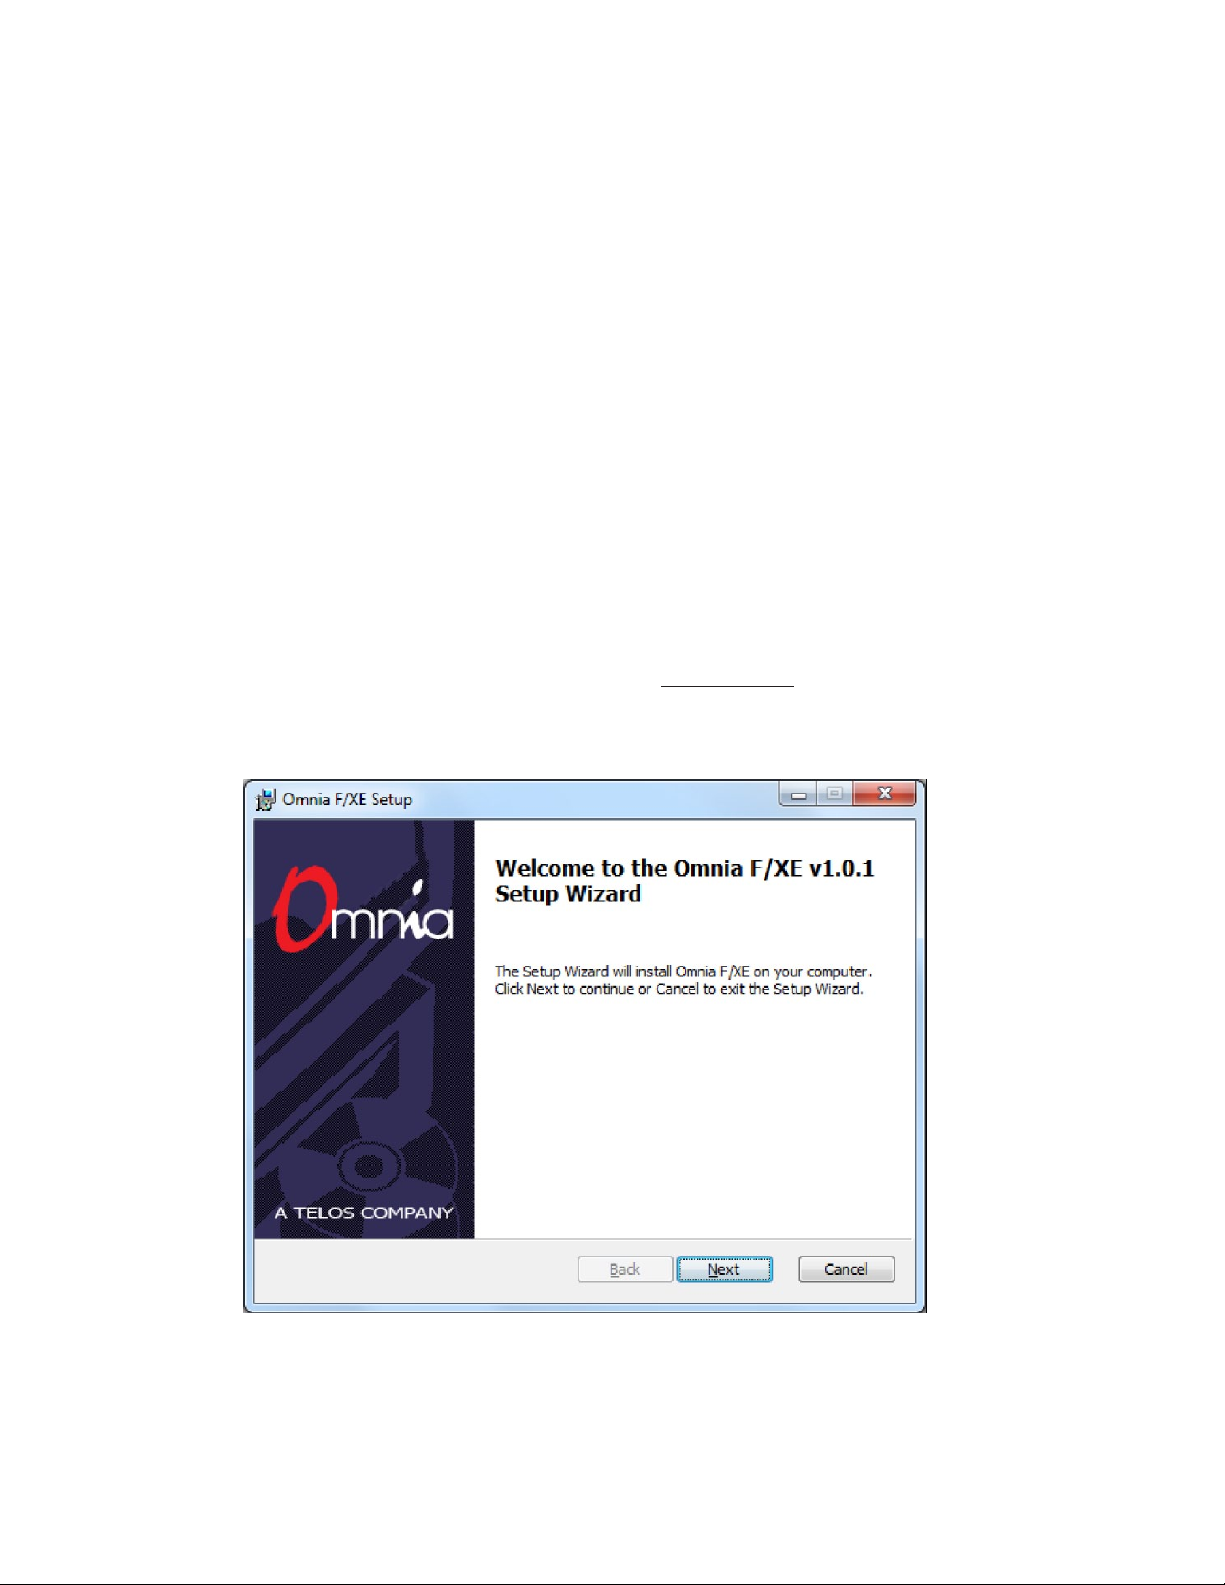
When you install Omnia F/XE for the first time you will be prompted by the following window:
Click the Next button. The License Agreement dialog will be displayed.
Page 6
4 | Section 2
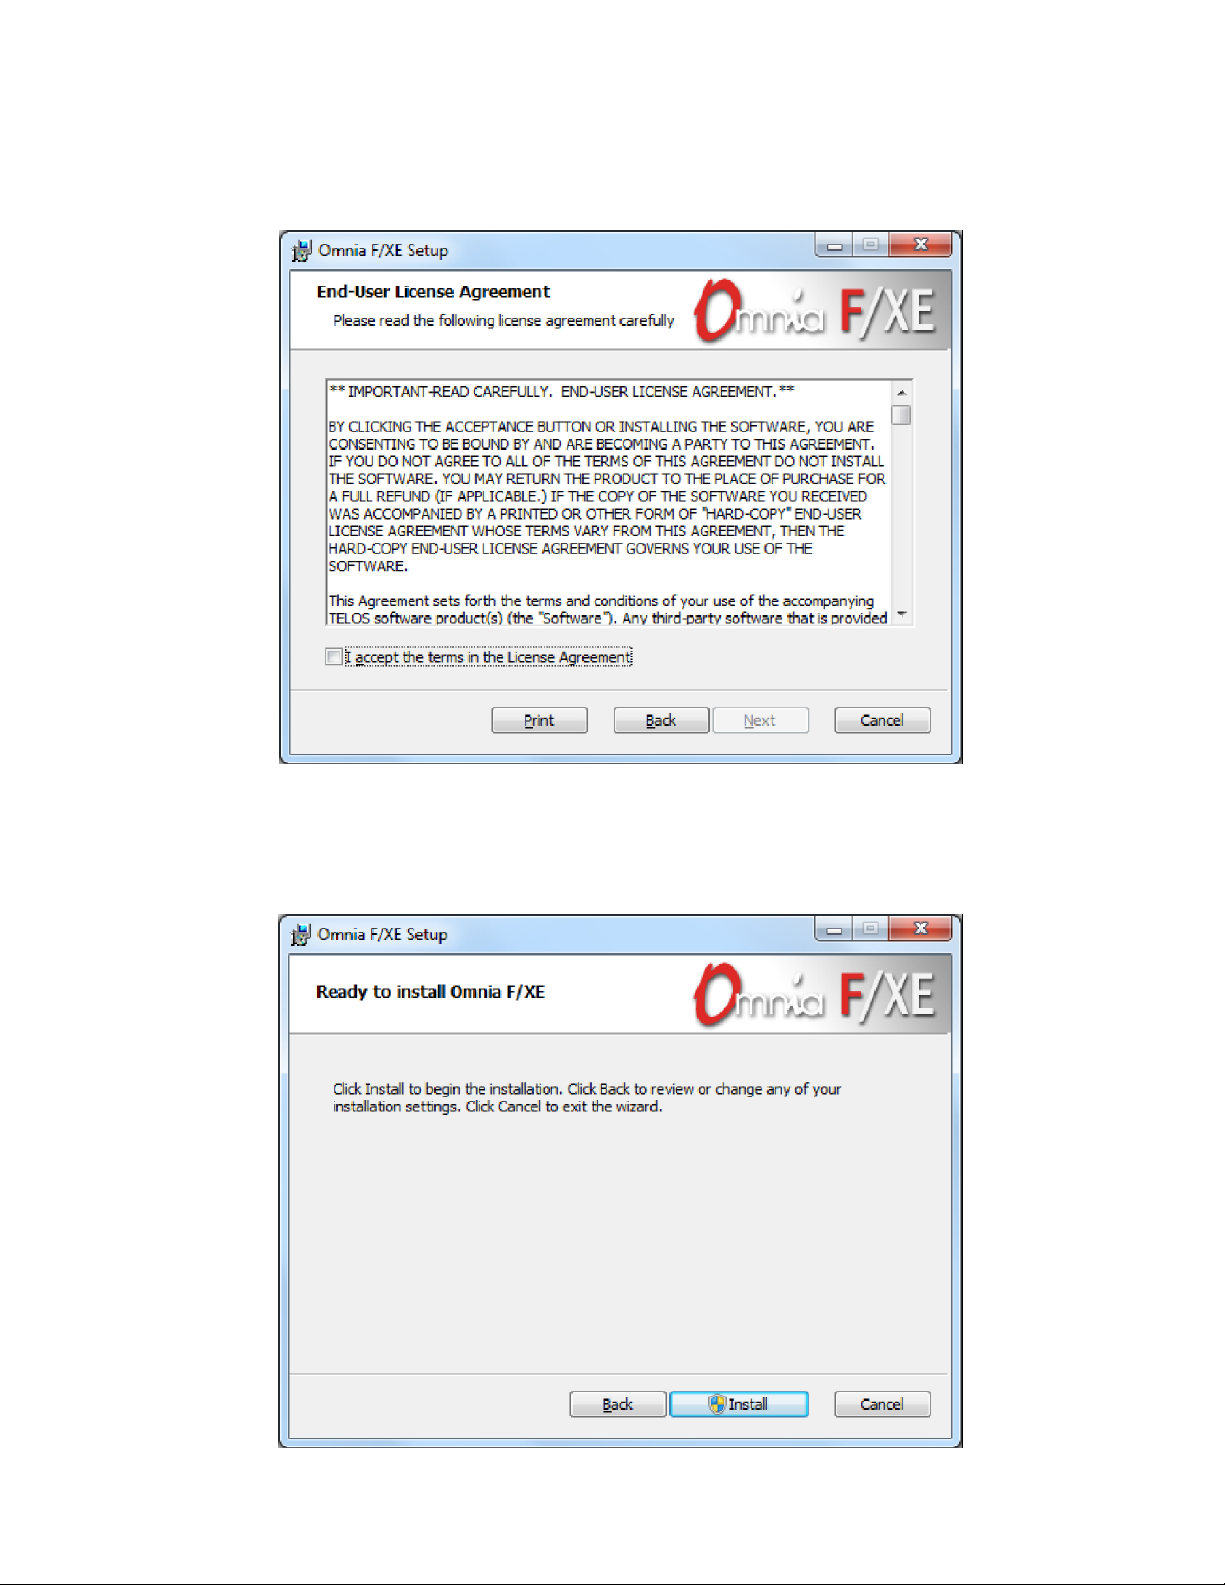
Use the scroll bar to review the full text of the license agreement displayed. If terms are agreeable,
click the “I accept...” check box then click Next to continue, otherwise, click Cancel to exit the installer.
Press the Next button when the final confirmation dialog is presented:
Page 7
GETTING STARTED | 5
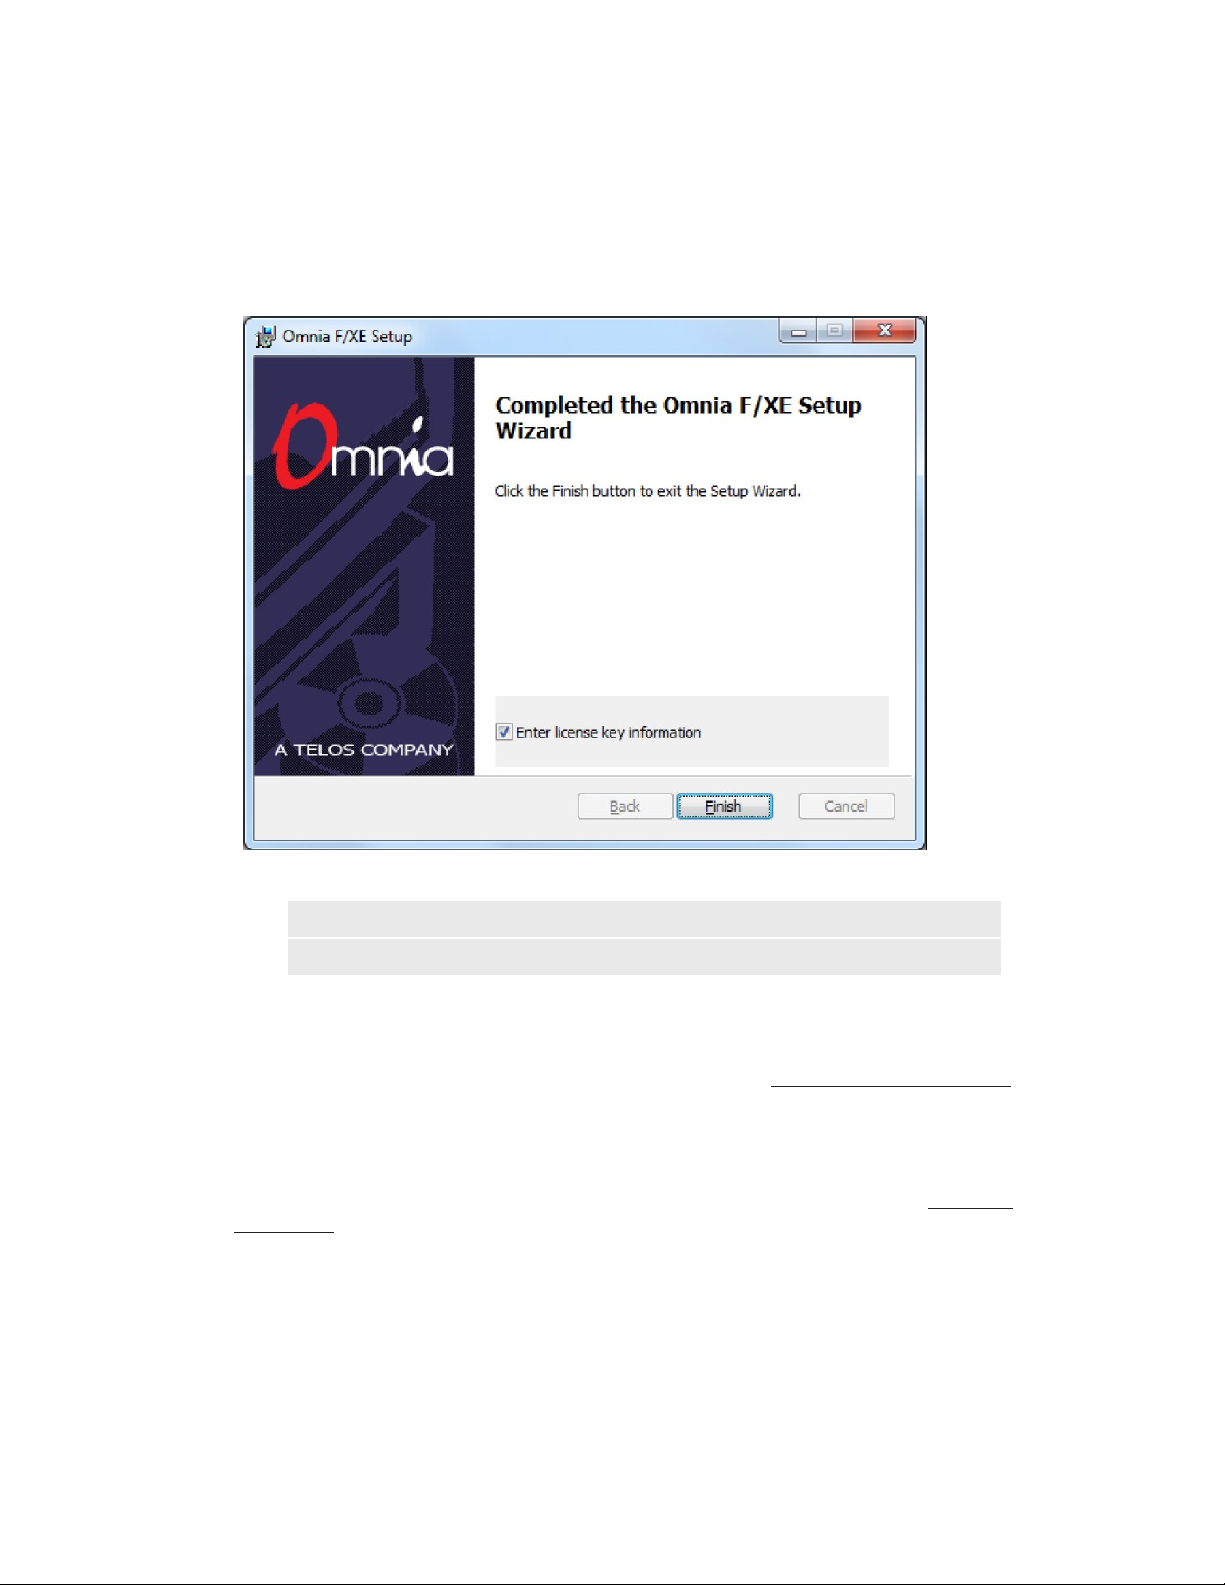
At the end of installation the installer can automatically register the software if a license is available. Leave
the “Enter license...” check box checked to enter license information or uncheck it if upgrading or if the
software is already licensed:
NOTE:
If you need to install a new version of Omnia F/XE, always uninstall the previous version rst.
Your application settings will be preserved.
Program Shortcuts
During installation, Omnia F/XE installs the following shortcuts under ALL PROGRAMS\OMNIA FXE in
addition to the File Processor, Folder Bot, and Preset Editor:
Locate OptionsBatch.xml File
Omnia F/XE’s BatchAXE command line processor reads all settings from a single file named OPTIONSBATCH.XML. This option opens a Windows Explorer window in the directory where the OptionsBatch.
xml file is located. This file uses Extensible Markup Language (XML) format for configuration. When
BatchAXE command line processor is used you can change options by editing OptionsBatch.xml.
Locate Logs Directory
The Locate Logs shortcut opens the System Logs directory. By default, a new log file is created each day. The
system logs are kept for 30 days, after which the oldest file is purged. The logs are the first place to check
when something is not working as anticipated. Additionally, if a problem occurs which requires technical
assistance, sending the log file for the day when the problem occurred will often be helpful.
Page 8

6 | Section 2
Locate Presets Directory
The Locate Presets shortcut in the start menu will open the folder containing the Omnia F/XE processing
preset files. The Preset Files are text files generated by the Omnia F/XE Preset Editor application containing
the parameters for a particular processing preset.
Enter License Information
Omnia F/XE’s license information application can be used if license information was not entered during
the setup or if a new license needs to be entered. Omnia F/XE will run in demo mode if no license is entered,
however, a hissing noise will be added after 20 seconds of file processing.
File Processor, Folder Bot or Preset Editor
These are shortcuts to Omnia F/XE main applications. Each application will be described in a separate
section in this manual below.
Page 9
| 7
3
Omnia F/XE File Processor
File Processor is an application which can process audio files using the Omnia F/XE’s 3-band audio processing engine. File Processor uses the presets stored on the computer and can decode and encode MP2, MP3,
WAV and AAC file formats. Files can be added to multiple processing instances each with different settings
to be later started and processed all together.
Getting Started
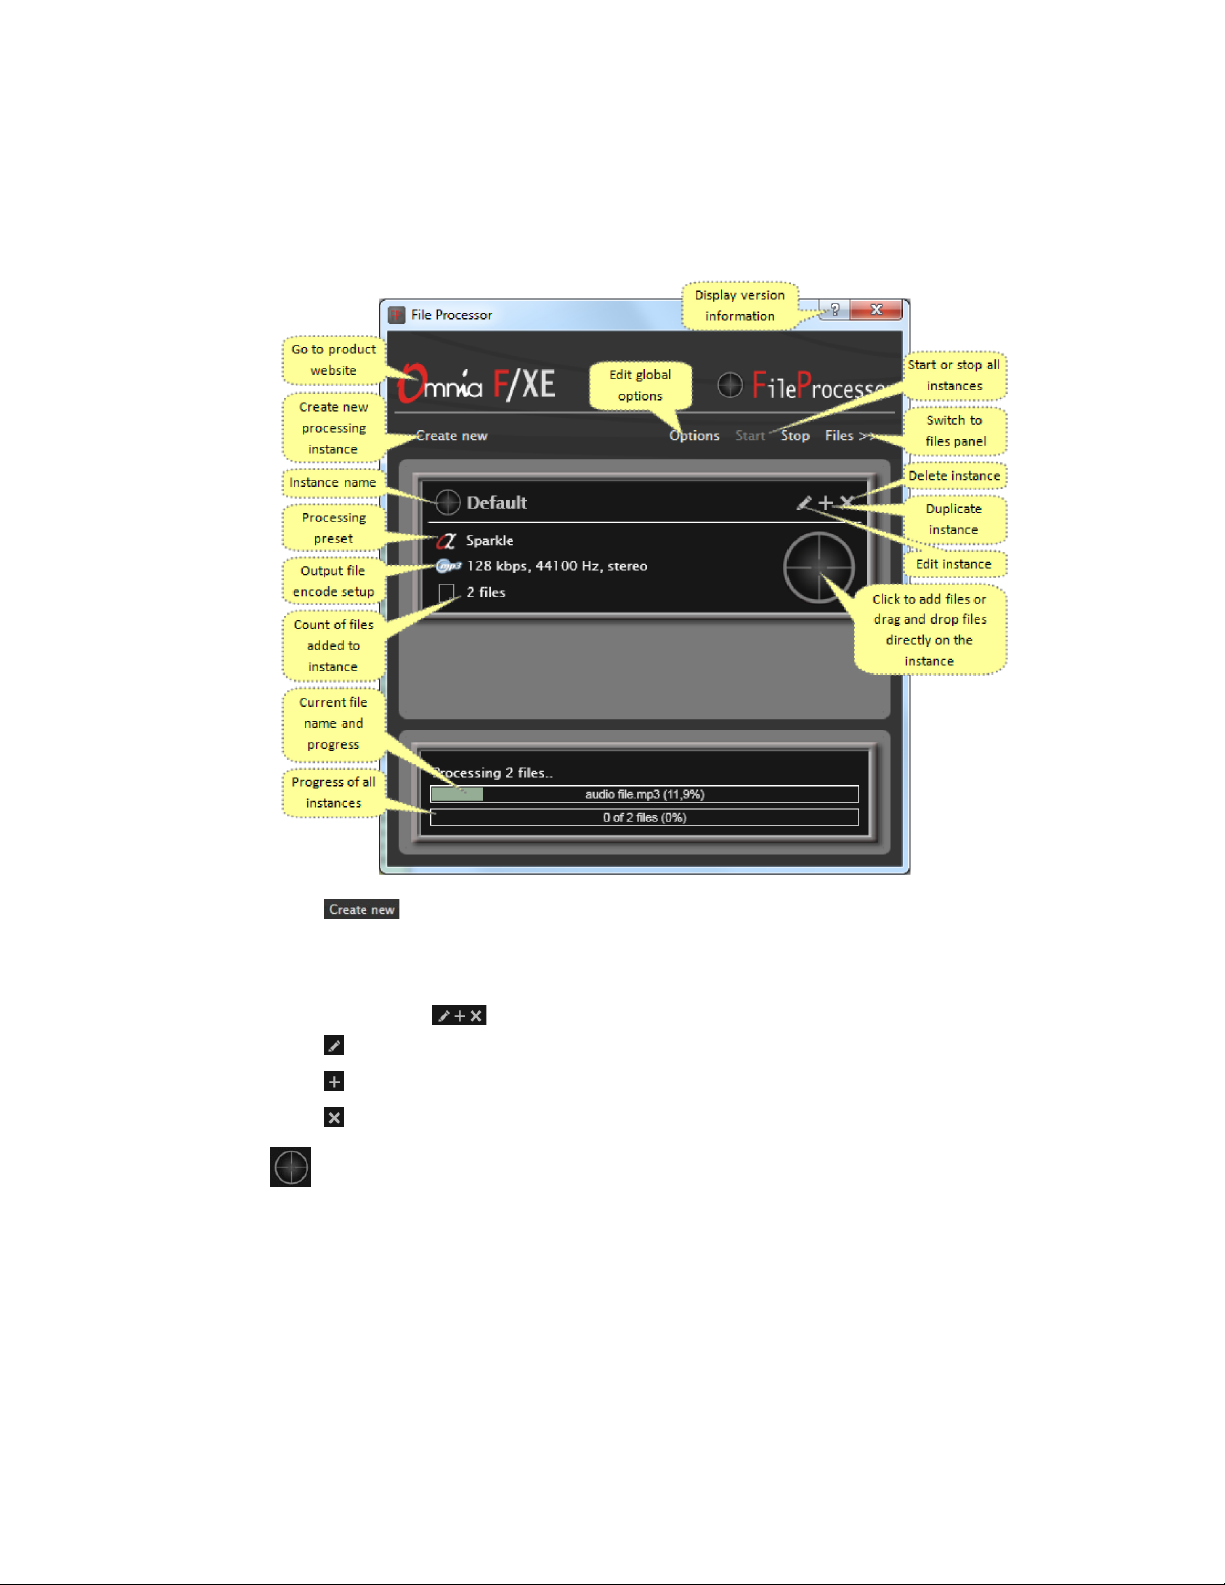
When the File Processor is launched, the File Processor window will open. If it is the first time that the File
Processor has been run, there will already be a Default Processor Instance visible in the main area of the File
Processor application window.
File Processor includes three panels that can be switched from the main toolbar using the >> or << buttons
♦ Main panel
♦ Files panel
♦ Log Information panel
The File Processor window’s main toolbar contains the Start and Stop controls for all instances contained
within File Processor, and the global Options button. The Omnia F/XE File Processor version info and
license status can be displayed via the window’s help
selector.
The File Processor window contains the following controls which will show above the panel:
♦ Start or stop all instances with the Start and Stop buttons.
♦ Edit File Processor’s global options with the Options button.
Page 10
8 | Section 3
Main Panel
♦ Create a new File Processor instance with the Create new button.
The Main panel contains a window for each configured File Processor instance. Within each instance are
the following controls:
Instance Editing
♦ Edit instance
♦ Duplicate instance
♦ Delete instance
File Target can be used as a button to open a file dialog or as a target for the drop of a drag from
Windows Explorer. Each instance will provide its own target.
Page 11
OMNIA F/XE FILE PROCESSOR | 9
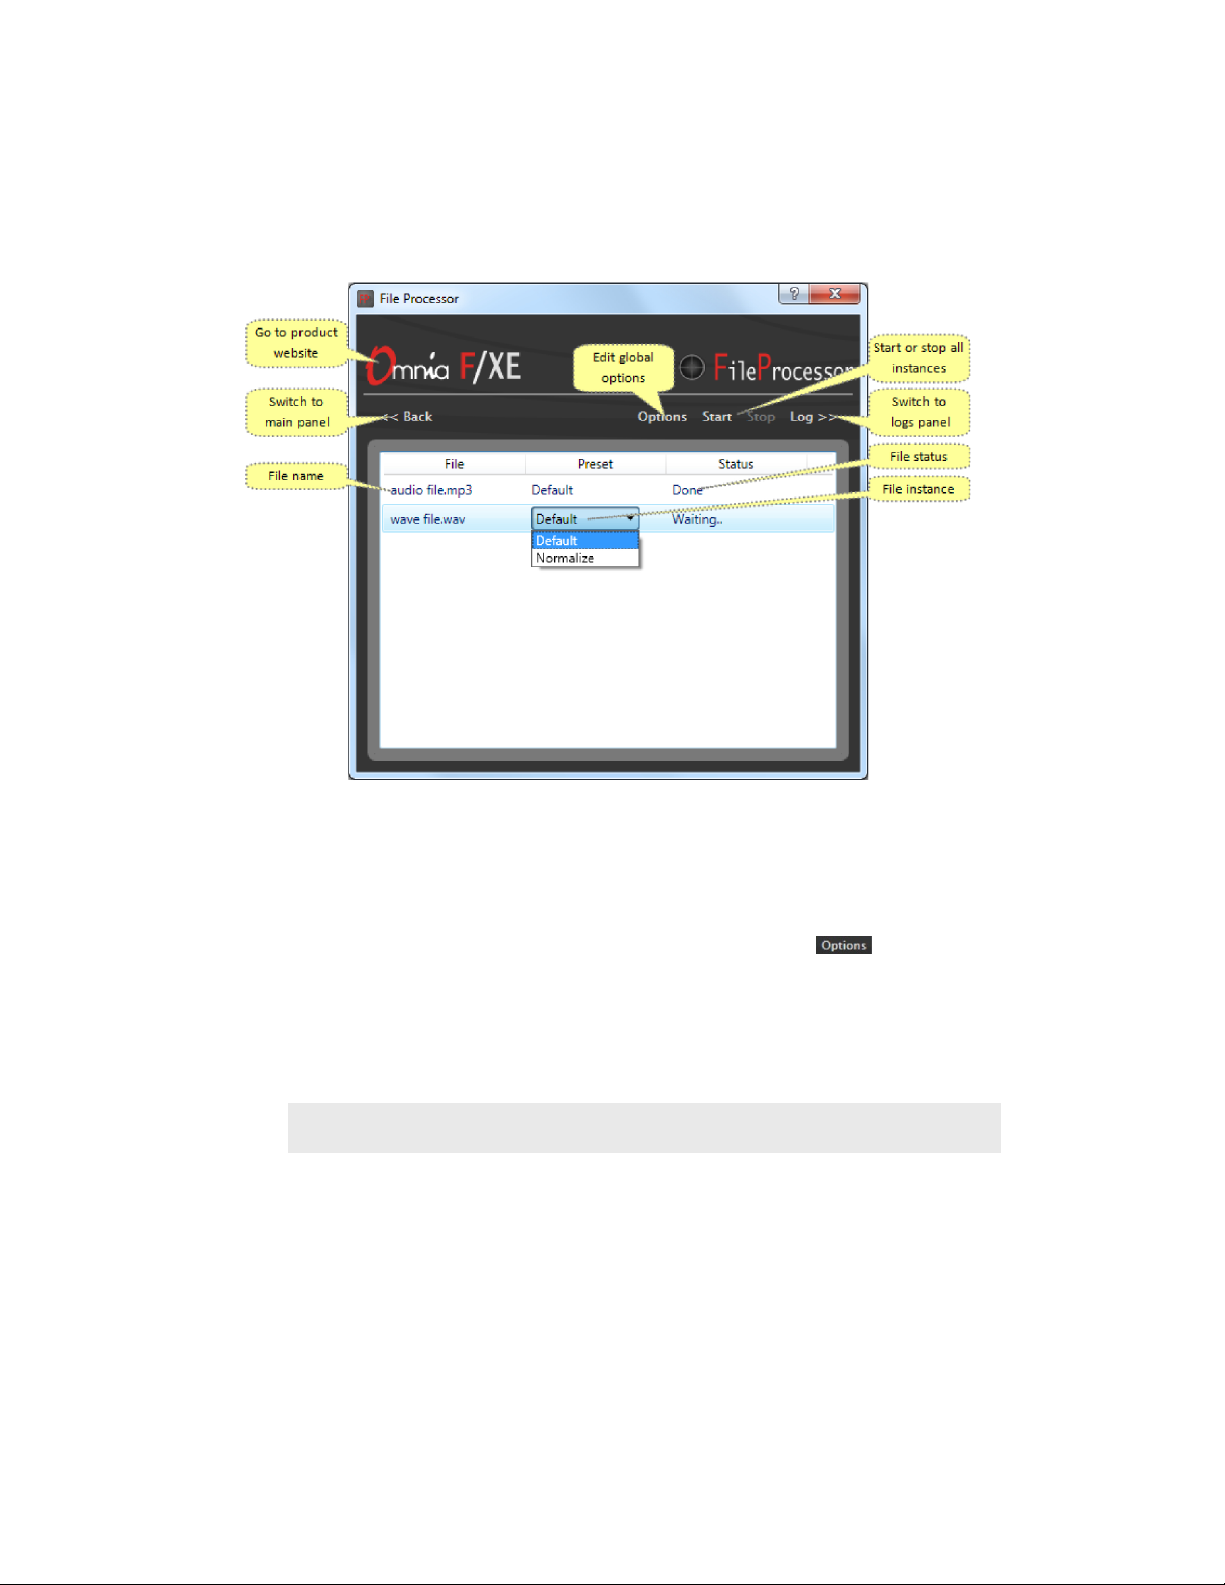
Files Panel
Files panel allows doing the following:
♦ Change the processing instance for files which are not yet started to process with menu at the
“Preset” column
♦ Add new files by dragging and dropping them from windows file explorer
♦ Edit global options described in the section of this manual below with button
♦ Go to the product website when clicked on Omnia F/XE logo
Once the files are loaded into the panel, each file in the list will provide a selector to choose between all
configured instances.
Note:
Before any processing can be started on the les, the Preset must be set for each le.
All active processing can be started and stopped with the Start and Stop buttons in the FileProcessor menu bar.
The status column of each file will show the current status of processing for that file.
♦ Waiting.. Either a preset has not been selected for the file or the FileProcessor has not been started.
♦ Processing.. File Processor is currently processing the listed file.
♦ Done. File Processor has completed work on the listed file.
Page 12
10 | Section 3
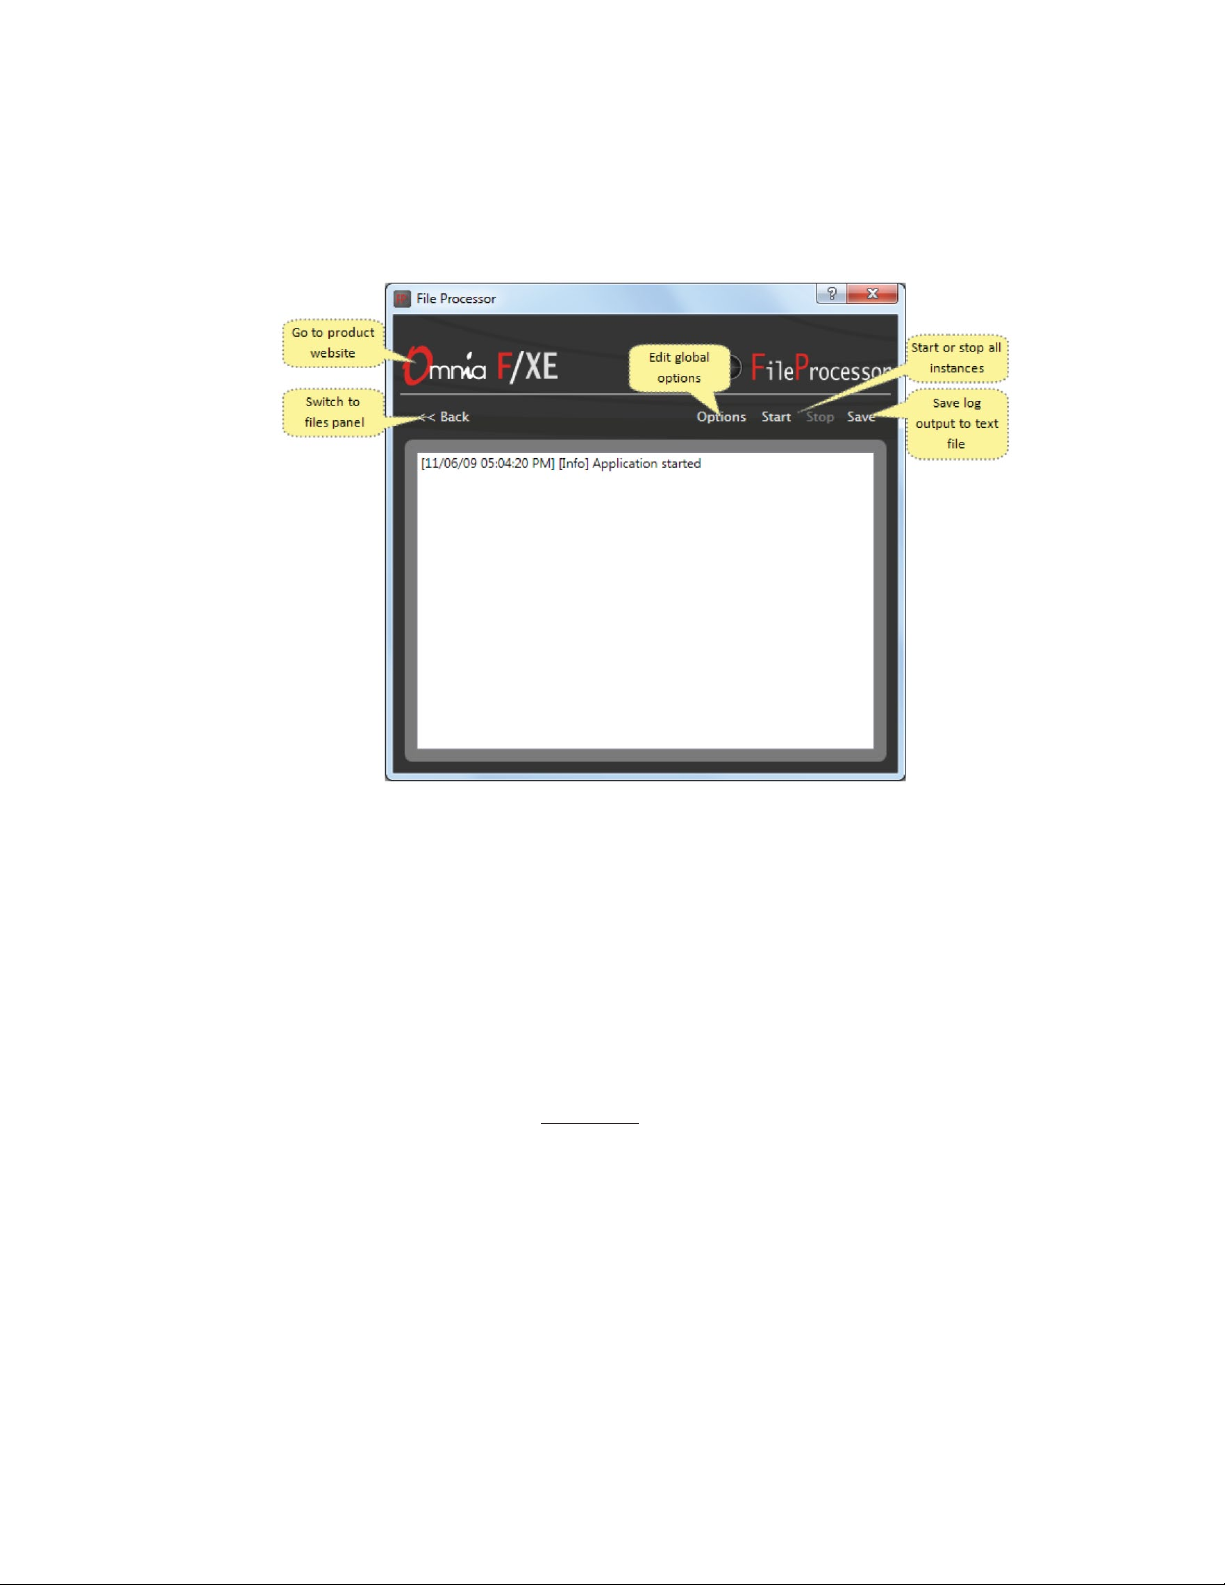
Logs panel
In the Logs panel, the application log events are displayed. There are three types of events: information messages,
warnings and errors. Each type is color coded to allow easier to distinguish them – warnings are orange,
errors are red and information messages are black.
Creating or Editing a Processing Instance
In order to prepare audio for broadcast, processing is used to prepare the audio for airplay. Whether the
audio will be archived, automated, or used as a one-off piece, processing can systematically maintain a common sound throughout the digital audio collection. Omnia Audio’s proven audio processing can be used to
lock down a common denominator for each digital collection to which the media is being added.
When installed to a new system File Processor provides the “Default” processing instance. The default preset
uses Sparkle Omnia processing preset and 128 kbps 44100 Hz stereo MP3
instance will try to output the file to C:\OUTPUT folder. If the folder does not already exist, the instance will
log an error due to being unable to write the output folder and not complete the process.
The instance name can consist of numbers, English alphabet letters, space, and characters “-” or “_”. The
name cannot be blank and must be unique within the list of other instances.
file as output. By default this
Page 13
OMNIA F/XE FILE PROCESSOR | 11
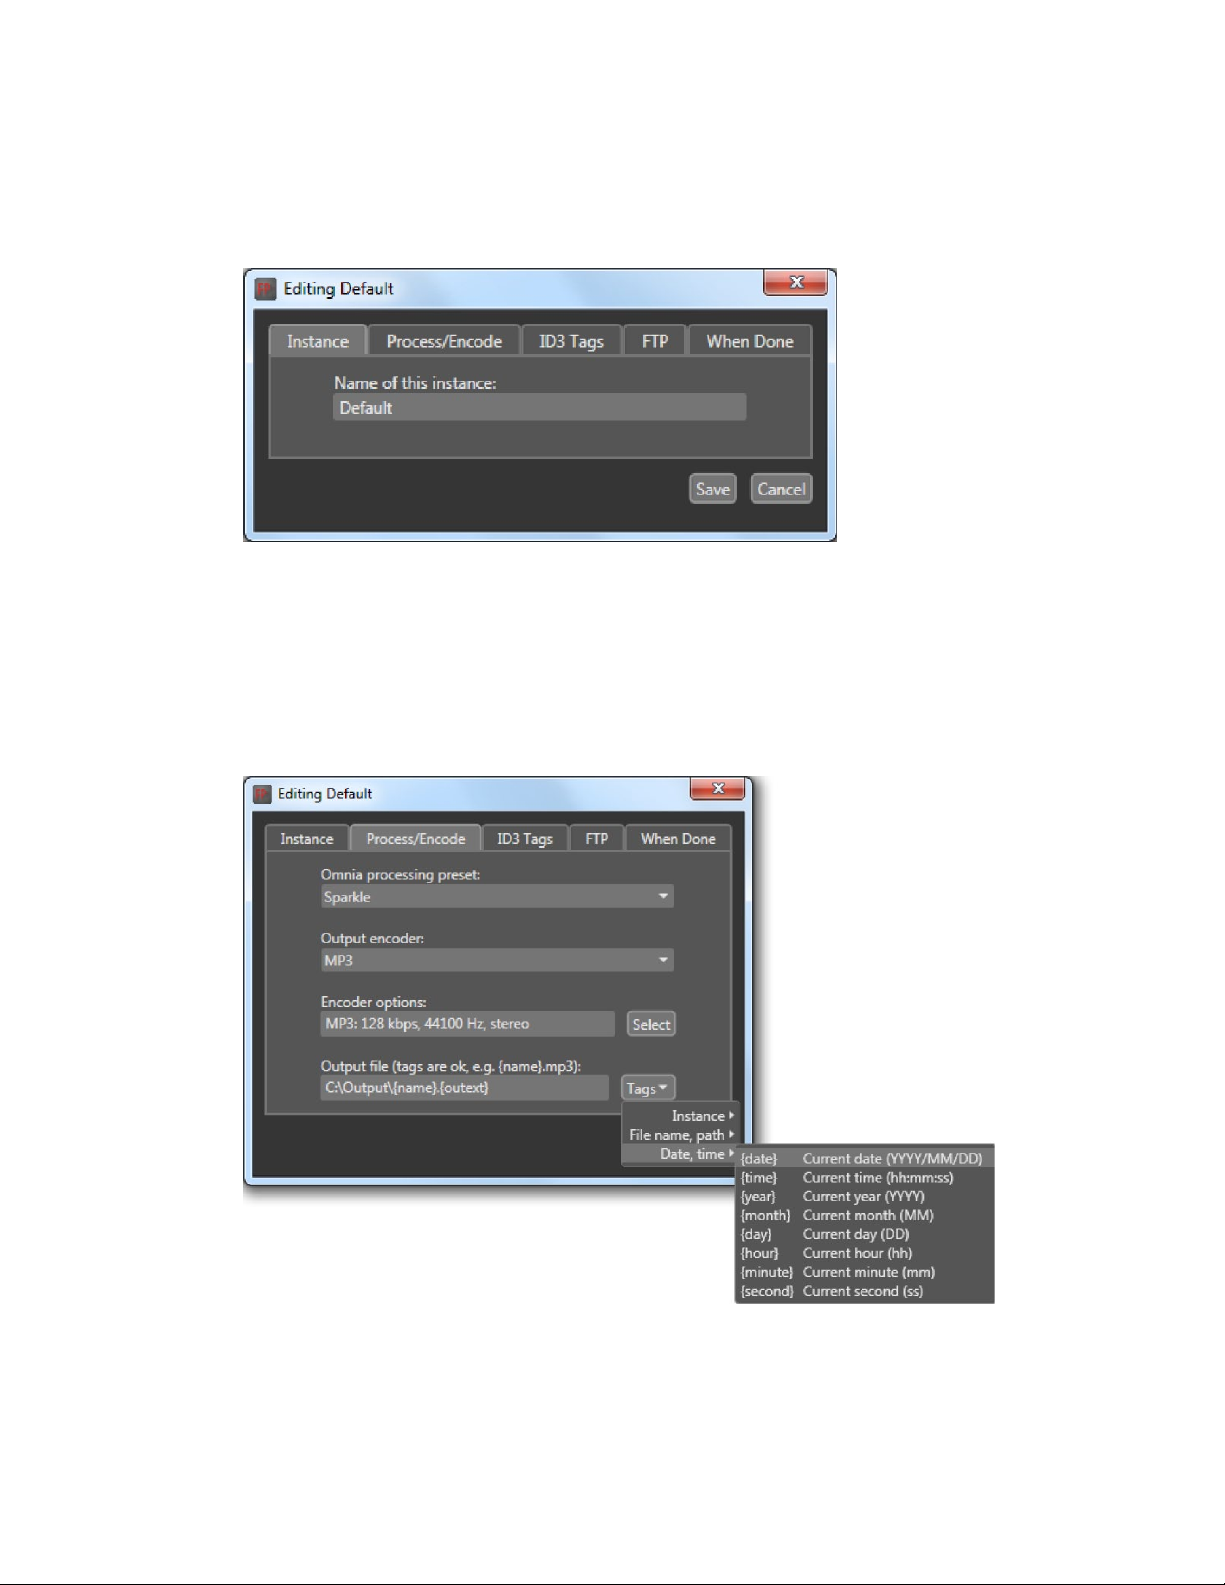
When creating a new processing instance or editing an existing one, a tabbed dialog will be displayed:
Instance
The instance name information tab is where the File Processor instance can be named. The instance name
can consist of numbers, English alphabet letters, space and characters “-” or “_”. Names cannot be blank and
must be unique within the list of other instances.
Process/Encode
The Process/Encode tab allows you to select the preferred Omnia processing preset. The processing presets
can be added by Omnia F/XE Preset Editor described in another section of this manual. The output encoder
can be selected between AAC, MP3 or PCM WAV. Each encoder has different output parameter sets which
can be chosen with “Select” button.
Page 14
12 | Section 3
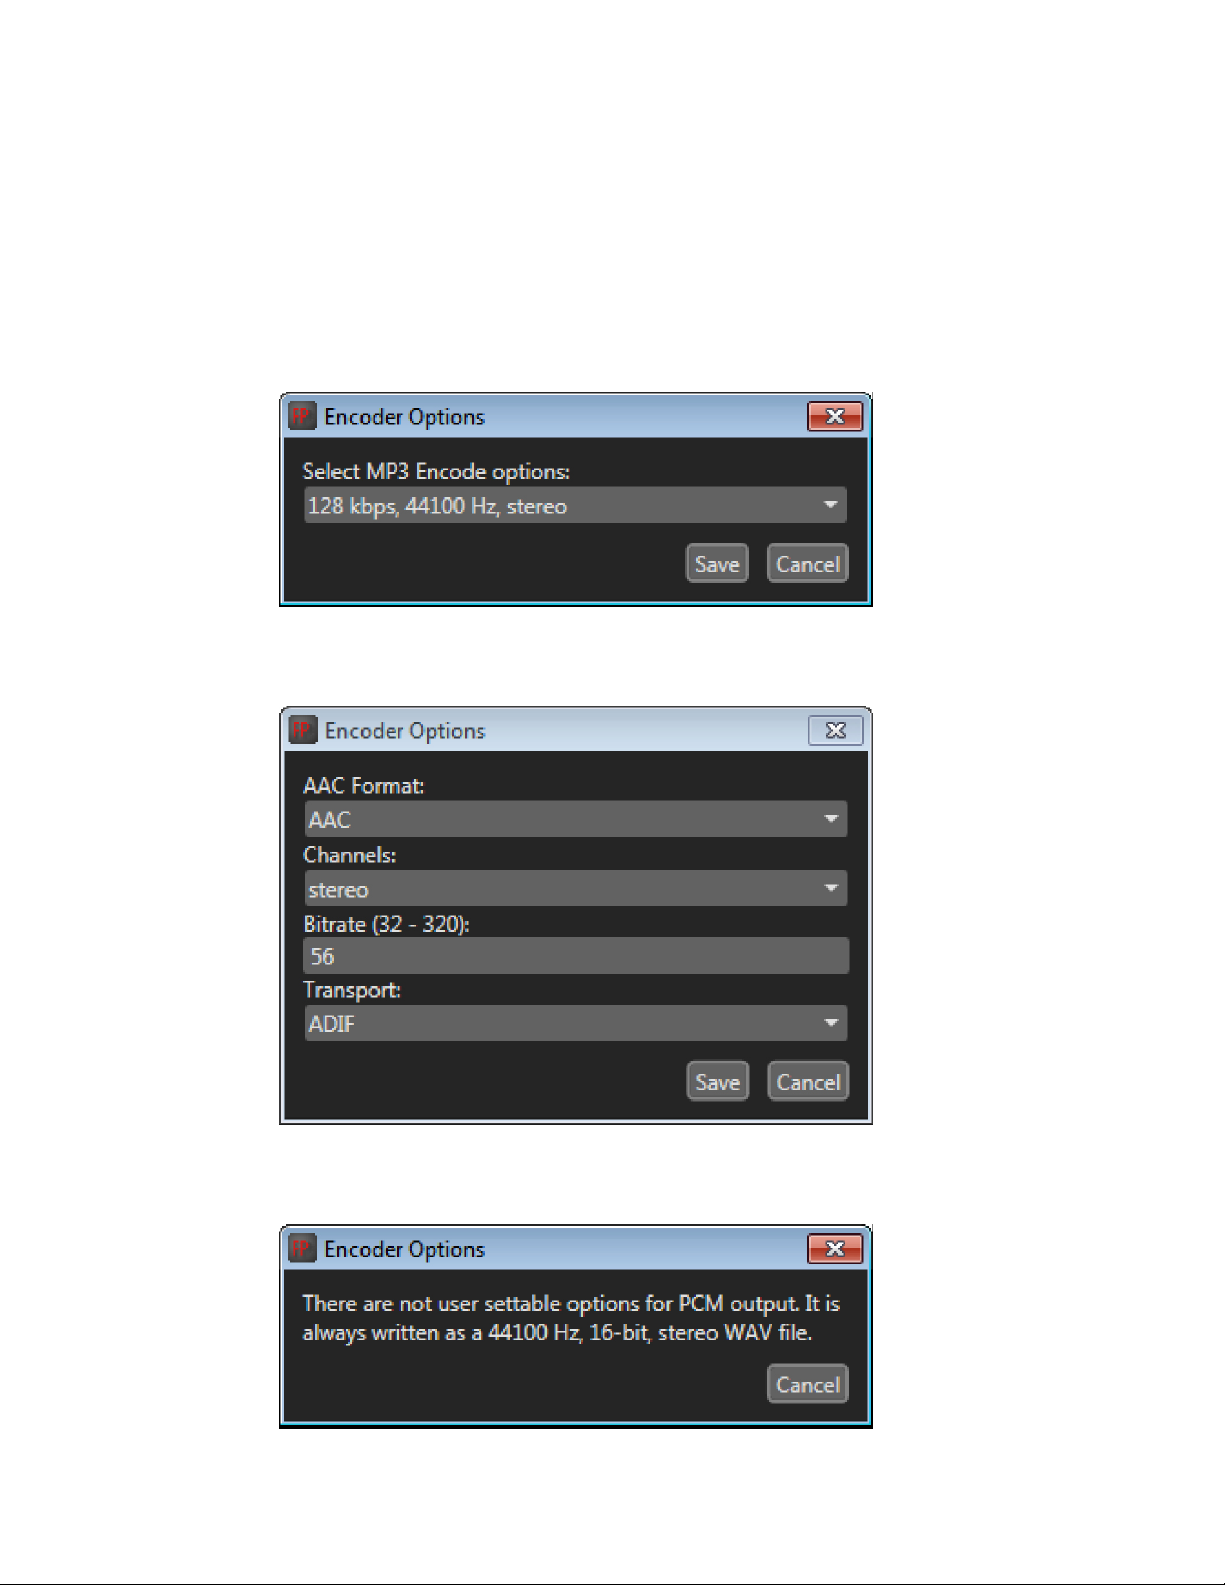
The Output encoder can be selected between AAC, MP3 or PCM. Each of the encoders has different output
parameter sets which can be adjusted with “Select” button which will open each of the codec’s respective
Encoder Options window.
MP3:
ACC:
WAV:
Page 15

OMNIA F/XE FILE PROCESSOR | 13
The WAV encoder does not employ digital compression and therefore does not require any
compression encoder settings.
The output file path and name can be entered on the last input box. Output folder must exist, otherwise
output files will not be created. File name and path can consist of tags which can be accessed using the
“Tags” menu. When clicked, the tag will be inserted at the current caret position of the file name input box.
Note:
Omnia processing presets can be customized via the Omnia F/XE Preset Editor application
described in another section of this manual.
ID3 Tags
Audio media files contain metadata in the form of ID3 tags. File Processor allows metadata tags to be written
to output files based upon configuration files and the tags already in the file.
AAC and MP3 files can contain ID3 tags which can set various information of the output file like artist,
album, title, date, time, etc. To add ID3 tags check the “Write ID3 tags information” check box and add tags
to the ID3 tags list with “Add” button. A new tag options dialog is displayed:
Page 16

14 | Section 3
Tag name can be chosen from a list while tag value can consist of constant string or string with file or
date specific tags chosen from “Tags” menu. For example “date” ID3 tag would probably consist of value
“{date}”. The same value as “{date}”can be made by using value of “{year}/{month}/{day}”.
File Processor is able to parse XML metadata files associated with an input file or common to all files. To
associate XML metadata files with an input file, use {drive}, {path} and {name} tags to specify the XML
file location based on input file location.
XML metadata files are parsed by the application and the data they contain is made available as named tags.
The following example explains this better. Consider a source metadata file with the following content:
<XMLDAT>
<Category>Classic Rock 80s</Category>
<Title>GEMINI DREAM</Title>
<Artist>Moody Blues</Artist>
</XMLDAT>
The <Artist> element is inside the <XMLDAT> root element. To refer to the artist element we would use the
following tag: {XMLDAT/Artist}. The title element is available as {XMLDAT/Title}. Note that the tags are
not case sensitive. We could have used {xmldat/title} to refer to the same field. To use the value provided by
XML, type it in the Tag value text box of the Tag Options dialog:
Page 17

OMNIA F/XE FILE PROCESSOR | 15
FTP
Here you can define FTP destinations to which the processed files will be uploaded. Destination options
include the title, host IP address or named address, port, user name, password, folder and file name. File
name can consist of tags that can be added using the Tags menu.
Page 18

16 | Section 3
When Done
The When Done tab allows the setting of source and destination file options. These options define what to
do with the files after the processing is finished. Files can be left as are, moved or deleted. If the output file is
to be moved, the destination folder path should be entered.
Setting global options
File Processor allows the setting of options common to all processing instances. The options dialog consists
of three tabs. In the first tab enables automatic processing of the added files:
Global
When this option is selected, files which are dropped or added to the instance will be processed automatically. When processing is active, additional files cannot be added to any instances. When using automatic
start, the files must be dropped or added together. Additional files cannot be added until the current batch
of processing is completed.
Page 19

OMNIA F/XE FILE PROCESSOR | 17
E-Mail
The e-mail tab allows the setting of an email address for sending errors or warnings generated by the processor:
When “Send error/warning…” check box is checked, File Processor will send an error report to the
specified e-mail address. SMTP server information must be entered to send e-mail. Most configurations will
work with just SMTP server address information but if an SMTP authentication is required it can be entered
in SMTP user and password fields. An option for secure communication (SSL) is available if the SMTP
server requires it.
Page 20

18 | Section 3
Log Options
Log options allows File Processor to write application logs to a specified folder:
When this option is selected you can define output folder, file prefix and extension to use for log files. The
current date will be added to the log file prefix in the form of YYYYMMDD resulting in the file named File
Processor_YYYYMMDD.log for the input data shown above.
Page 21

| 19
4
Omnia F/XE Folder Bot
Folder Bot is an application which can automatically process incoming audio files using Omnia F/XE’s,
3-band audio processing engine. Folder Bot uses the presets stored on the computer and can encode and
decode MP2, MP3, WAV and AAC file formats. Folder Bot can be configured to watch folders and detect
when new files are added. When new audio files are discovered, they are then automatically processed and
transcoded using the specific Omnia preset and output codec settings as set per that particular Folder Bot
instance.
Getting Started
Folder Bot includes two panels that can be switched using button with >> or << in the main window navigation bar, the main panel and log information panel.
Main Panel
The Main panel contains controls for the following actions:
♦ Switch to log panel
♦ Create a new Folder bot instance
♦ Edit global options
♦ Software version and license information are available with the main window’s help button
Page 22

20 | Section 4
Instance Editing
Instance Control
The power indicator displays the status of a particular Folder Bot instance. The power indicator will
light red when an instance is active. When a Folder Bot instance is processing a file and the power button is
engaged, the indicator light will start blinking. In this state the instance will be switched off when processing
is complete. To abort a file which is currently processing, press the power button again to stop the instance.
Logs panel
♦ Edit instance
♦ Duplicate instance
♦ Delete instance
♦ Start or stop all Folder Bot instances
♦ Go to the product website when clicked on Omnia F/XE logo
♦ Start or stop specific instance with button
The Logs panel displays any messages generated by Folder Bot instances. There are three types of events:
information messages, warnings and errors. Each log type is colored according to the type of message. Warnings
are orange, errors are red and information messages are black.
Page 23

OMNIA F/XE FOLDER BOT | 21
Creating or Editing a Folder Bot Instance
When creating or editing a new Folder Bot instance, the Edit Instance window will appear. The Folder Bot
instance window contains all configurations pertaining to the particular Folder Bot instance which is being
edited.
Instance
Set the name and the source folder for the Folder Bot instance in the Instance tab. The instance name can
consist of numbers, English alphabet letters, space and characters “-” or “_”. The name cannot be blank and
must be unique from all other instances.
The “Folder to watch for new files” field should be set to the watch folder. When the Instance is active, all
audio files which match the “File name filter” in this folder will be processed by the Folder Bot instance. The
name filter must be defined for all instances. To select all audio media which can be recognized by Folder
Bot, use the default filter “*.*” to process all files with any extension. If only a particular file type should be
processed, enter the file name filter with the desired extension as in “*.wav” or “*.mp3”. If more advanced
filters are required for the input filter parameter, regular expressions can be used. Additional information
about constructing regular expression strings and syntax can be found at www.regular-expressions.info/.
Page 24

22 | Section 4
Process/Encode
The Process/Encode tab allows the Omnia processing preset to be selected. Any processing presets which
have been constructed in the Omnia F/XE Preset Editor can be selected as the default processor for the
Folder Bot instance. The output encoder can create AAC, MP3 or PCM audio files. Depending upon which
output encoder is selected, the Select button will open a window to set options for that encoder.
The output file path and name can be selected with the “Output file:” field. The output folder must exist or
out files will not be created and an error will be logged. The file name and path can consist of various tags
which will represent information about the particular file being processed. The available tags which can be
used are available under the Tags option. When selected, the desired tag will be automatically inserted at the
current cursor position in the file name input box.
Page 25

OMNIA F/XE FOLDER BOT | 23
ID3 Tags
Audio media files contain metadata, or additional information about the audio, in ID3 tags contained within
the file. The Tag Options tab can set various parameters for constructing the metadata of the output file like
artist, album, title, date, time, etc.
To add ID3 tags to processed files, check the “Write ID3 tags information” in the ID3 tags window and add
all of the desired tags to be added by the instance to the file. Multiple tags can be added by selecting the
“Add” button. This will display a new tag options dialog where the particular tag can be selected:
Page 26

24 | Section 4
The ID3 tag name can be chosen from a list and the value for that tag can consist of a persistent string for all
files processed by the instance, or specific tags can be chosen from “Tags” menu to access existing tags in the
source file or associated templates. For example, a “date” ID3 tag can contain the tag value “{date}.” The
same value as “{date}”can be made by using the values of “{year}/{month}/{day}”.
Folder Bot is able to parse XML metadata files associated with an input file or common to all files. To associate
XML metadata files with an input file, use {drive}, {path} and {name} tags to specify the XML file location
based on the input file location.
XML metadata files are parsed by Folder Bot and the data which the files contain is made available as named
tags. Here is an example XML metadata source file:
<XMLDAT>
<Category>Classic Rock 80s</Category>
<Title>GEMINI DREAM</Title>
<Artist>Moody Blues</Artist>
</XMLDAT>
The <Artist> element is inside the <XMLDAT> root element. To refer to the artist element in the XML file
in Folder Bot, use the tag {XMLDAT/Artist}, constructing the tag value field using the tags as they appear
in the XML file. The title element would be available to Folder Bot as {XMLDAT/Title}. The tags are not case
sensitive, {xmldat/title} can also be used to refer to the same field. To use the value provided by XML, type it
in the Tag value text box of the Tag Options window:
Page 27

OMNIA F/XE FOLDER BOT | 25
FTP
Output files can be delivered to multiple and remote locations via File Transfer Protocol [FTP] when processing
is complete. The FTP window allows FTP destinations to be configured. Destination options include:
♦ The name of the particular FTP destination
♦ Host IP address or named address for the destination FTP server
♦ Port for the destination server
♦ User name
♦ Password
♦ Output folder
♦ Output file name
The Output file name can consist of tags which can be added using the “Tags” menu.
Page 28

26 | Section 4
When Done
The final Instance panel can define what to do with the files after the processing is finished.
Files can be left alone, moved or deleted. If files are to be moved, the destination folder path should be
entered below the selected option.
Page 29

OMNIA F/XE FOLDER BOT | 27
Setting global options
Folder Bot contains options common to all processing instances which can be set in the Global Options window.
E-mail
Log messages in Folder Bot can be delivered by e-mail in addition to being logged locally. Check the “Send
error/warning messages by email” to configure log delivery by e-mail. To use the e-mail logs service, enter
the SMTP server information. Most configurations will work with just SMTP server address information
but if an SMTP authentication is required, credentials can be entered in the SMTP user and password fields.
An option of secure communication (SSL) is also available if required by the SMTP server.
Page 30

28 | Section 4
Log
When the “Write log information to file” option is selected and an output folder is defined, all Folder Bot logs
will be saved to the folder. A file prefix and extension can be used for log files. The current date will be added to
the log file prefix in the form of YYYYMMDD resulting in the file named prefix_YYYYMMDD.log.
Page 31

| 29
5
Omnia F/XE Preset Editor
Preset Editor is an application which allows changing and configuring Omnia processor preset settings
while playing an audio file processed with new settings in real time. Omnia Preset Editor uses the presets
stored on the computer and can decode MP2, MP3 and WAV file formats.
Fine Tuning the Omnia F/XE processor
The objective of Omnia F/XE is to provide dramatic sonic improvements to audio files right out of the box.
Presets can be slightly adjusted to create a more “custom” sound, or significantly adjusted to modify the
parameter settings to create a unique “signature sound.”
Loudness and Fatigue
Getting the most out of the Omnia F/XE processor (or any other processor for that matter) starts with
knowing the objectives beforehand, and knowing where tradeoffs can be made. If the goal is to create a hot
master and obtain extreme amounts of detail and quality, keep in mind that there are limits. Reaching one
goal is usually at the expense of the other. There will always be individuals who feel that louder, at any cost,
is better, however the added distortion from the endless and pointless pursuit of raw loudness may generate
negative effects on listeners.
Omnia F/XE is definitely capable of generating moment-to-moment loudness; it has the muscle. It also
maintains that famous Omnia clarity sought after by top engineers all over the world. Omnia F/XE can be
used to create good, competitive loudness while maintaining a higher degree of quality.
Clarify the Processing Objectives
Whether better overall quality or specific spectral improvements is sought, articulating the goals is the first
step. Is more loudness or “presence” preferred in the final master or stream? When adjusting processing,
please give thought—real thought, to how the final master will sound. What do we mean by that? Well, if
the desire is to add loudness, and in most cases it probably will be, decide on the degree of loudness sought.
The Adjustment Procedure
1. Review the objectives.
2. Once up and running, start with a degree of processing that is similar to what is normally used, and
then, if desired, become more aggressive. A careful approach is less likely to draw hasty, or even
negative, opinions.
3. Listen for a while, then adjust, and listen for a while again. Try to avoid the temptation to continuously “fiddle” with adjustments, just moments after getting the system running. Remember that the
operation should be evaluated over time, not moment to moment.
Page 32

30 | Section 5
4. While making changes to the system, we recommend that hasty or radical changes not be made.
5. Use the “sleep on it method.” Spend time adjusting and then listening, and when the system gets to a
Getting the Sound You Want
If the desire is to process aggressively, here are some suggestions that should help achieve that goal.
Conversely, if the objective is to increase sound quality, we have other suggestions as well! Omnia F/XE is
designed to minimize the impact of the quality vs. loudness trade-off.
Also, do not make too many different adjustments all at once. If too many parameters are changed at
one time, it is hard to determine which change made the difference heard which can be frustrating.
In order to become comfortable with the new sound, learn the limits of each control. We suggest
making changes in increments of no more than +0.5 dB or -1 dB, or in 1 or 2 step increments. Try
turning different functions on and off. Working this way, it’s easier to get a better feel for the sound
that the Omnia F/XE is capable of producing.
point where it sounds good, stop. While making changes to processing, there does come a time when
ears become less and less sensitive to the adjustments being performed. Ears tire, and that’s why
spreading the adjustment period over a number of days is recommended. If what’s been done still
sounds good after a time, stop adjusting. If not, continue with small iterations until satisfied. Each
day, the discrepancies become smaller and fewer adjustments will be necessary.
We recommend that before starting the process of cranking it up just for the sake of raw loudness, try to decide what sonic characteristics are lacking in the final sound. In many instances, it’s not just about increasing the drive to the limiter. It can be as simple as creating an illusion of added loudness by changing a single
time-constant parameter. There are even known instances where the use of stereo enhancement created the
necessary apparent loudness. Please don’t bite at the first temptation to crank the system. Sometimes the
old adage of less is more can be the best plan.
Before delving into alternative processing possibilities, please give the next brief section some thought. It
may help provide some needed direction in the overall processing plan.
A Word about Loudness
Making this confession is a little like telling your parents you dented the car. But here it goes: It’s OK for the
final mix to be loud…very loud!
In the past, loudness was a problem due to the limitations of the processors of the day. In the quest for
ultimate loudness, processing was probably either adjusted (or modified) well outside of the old processor’s “safe” range, or pushed to the 0dBfs ceiling level in the signal chain, thus forcing the acceptance of
byproducts of the interactions and conflicts among them.
Omnia F/XE has changed all of that. Omnia processing has been designed to look at the incoming audio,
and know how to make the final mix consistently loud, and without the artifacts or grunge created by any
older processors. Omnia F/XE makes loudness an effortless exercise.
It’s also OK for the master to not sound loud, yet sound incredibly musical and grunge-free, because the
Omnia F/XE provides the choice. It is a system that maximizes the audio quality of the signal, yet at the
same time satisfies the competitive requirements.
Quality versus Loudness
The trade-off between quality and loudness is primarily determined by choices made in the limiting
and clipping sections. While each function alone will generate added loudness, they each have different
advantages, as well as side effects.
Page 33

OMNIA F/XE PRESET EDITOR | 31
When excessive limiting is used, intermodulation distortion is increased, making the audio sound “mushy”,
and “smeared.” The added short term density can also cause the audio to be “tight”, “squashed”, or “dense.”
The “dynamics” artifacts caused by excessive limiting might sound like “pumping,” “breathing.” The rule
for limiting is “a little goes a long way!”
When excessive clipping is used, harmonic distortion is increased. The audio level is in effect “running into
the brick wall.” Too much clipping can cause the audio to sound “broken-up,” “torn,” “rough,” or “edgy.”
The harder the limiters and clippers are driven, the louder the audio perception. However, increased
intermodulation and/or harmonic distortion may be encountered.
The following sections are provided to assist in designing the personality of your sound. There is no precise
recipe for setting up audio processing. While there are some basic fundamentals which can be used to get
started toward the desired sound, it may require a concerted effort with extended listening and subtle
processing changes over time to achieve the ultimate goal. Just remember to set goals, take time, and adjust
methodically.
Increasing Loudness
Try to resist the temptation to just crank up the aggressive processing sections, like the limiters. Limiters
will add loudness of course, but usually at the cost of quality. Many times, building a little more RMS level in
the AGC sections will do the trick instead, and with no obvious sonic penalties. Here are some suggestions
on where to begin to make changes [best implemented in the order provided]:
1. Alter the following parameters in the AGC sections:
♦ Increase the AGC Drive to the WB (wideband) AGC section.
◊ Increase the Drive to each band of the Multiband AGC screen.
◊ Increase the Release time settings in each band to make it operate faster.
2. Drive the Final Limiter section harder.
3. A combination of the above steps, but in small increments. In this situation, resist the temptation to
make too many changes at once. When multiple changes are made, it becomes difficult to determine
why the result of an adjustment did or did not make sense. Focus on one specific area of the sound at
a time. Once that area is satisfactory, move the focus to the next area as needed.
Based upon the above suggestions, experiment with different styles of processing. Some prefer to have processing be perceptibly loud, but dynamic. This may give the illusion of loudness, retaining detail and clarity,
and reducing listener fatigue. This can be done by centering efforts in the multiband section, and avoiding
heavy use of the final limiter. One trick that works well is to use fast release times in the multiband limiters,
but do not produce more than 5 dB - 7 dB of gain reduction. This keeps the IM distortion of the limiters to
a minimum, and doesn’t “over-squash” the sound. Adjusted in this manner, the Limiter sections are relied
upon to generate higher, long-term RMS levels, which translates into increases in perceived loudness.
If the quest is to produce a “loud and proud” signature, then the limiters should be leaned upon a bit more.
Loudness at all costs is usually the reason for moving the processing in a direction like this. Using larger
amounts of drive to the multiband limiters, along with faster release times will generate a signal of high
short-term density. The effect of the processing set in this manner is that the audio is consistently loud at all
times . . . a wall of sound. The drawback is that the density can cause fatigue.
Note:
While Omnia F/XE is designed to minimize fatigue, it is capable of generating large amounts
of density that could eventually lead to fatigue. Be careful!
Page 34

32 | Section 5
Adding more detail: When loudness isn’t the last word
Now that the audio has been “squashed,” look at what it takes to undo a heavily processed signal. Reversing
the procedures listed above will typically work best:
1. Reduce the drive to the Final Limiter.
2. Back off on the influence of the multiband stages:
3. Ease up on the Wideband-AGC sections:
Backing off the Limiting sections first will allow the processing to retain a level of competitive loudness
while enhancing quality and the overall dynamic texture will be affected less. Start with reducing the
Limiter amount in 0.5 dB steps. It’s surprising how much detail can be restored from just a small change of
0.5 dB. Generally, changes in the Limiter drives will have the most noticeable effect on quality, but it will
also affect the relative loudness level, too. Find a “happy medium” that’s right for the desired sound.
♦ Reduce the amount of Drive to each band in the multiband.
♦ Reduce the release times to slow down recovery.
♦ Reduce the Drive to the WB AGC.
♦ Reduce the release time to operate slower.
Equalization Changes
Tailoring the shape of the overall audio spectrum can be done in three different sections:
1. The relative drive settings in the multiband AGC menu. These controls set the drive levels of the
multiband AGC sections.
2. The settings of the multiband Mixer controls.
3. Adjusting the Mixer.
The first two options will provide noticeable change in EQ. We suggest the first option. In this case, an
EQ change is still followed by a dynamically controlled stage. Therefore any excessive EQ change can be
‘undone’ by the subsequent AGC.
The last option, adjusting the Mixer, is designed to provide a final minor trim to the spectrum. If you’ve
noticed that we calibrated these controls in 0.10 dB steps, then you know what we mean when we say these
controls are for fine trim! Since this stage is after all of the dynamic AGC and Limiting, a radical change in
level in the Mixer will result in additional and possibly excessive limiting of audio in that band. We suggest
that changes implemented here be limited to no more than about 1.0 dB. Naturally, the decrease in mix level
can be done to any desired amount.
Thunder Bass
Omnia F/XE has the power to shake the walls with low end! If the source material has it, Omnia F/XE will
put it in the mix. Making changes to this characteristic is done using the following parameters, and for
maximum effectiveness, in the order listed:
1. In the Enhance Menu, increase the amount of Deep Bass boost.
2. In the Enhance Menu, increase the amount of Phat Bass boost.
3. 3. Increase the drive to the LF AFC with the appropriate control in the LO AGC screen.
Page 35

OMNIA F/XE PRESET EDITOR | 33
4. Speed up the Release times of the LF LO AGC section.
5. Slightly increase the Low control in the Mixer section
When it comes to processing, moderation is the key. If all of the above steps are utilized in the pursuit of
more bass, then severe low frequency over-enhancement can occur. Excessive bass boost can produce the
illusion that the presence and high frequencies have been lost. They are still there, but are being acoustically
masked by the lower frequencies.
Note:
An increase in the Enhance Menu’s Bass boost functions alone will provide more than sufcient enhancement to the low end.
Reducing Codec Artifacts
Dynamics processing is an extremely useful tool that will reduce audible artifacts from lossy-compression
codecs. High frequencies tend to be the first perceptible annoyances, followed by that swishy-swirly water
like sound that’s quite common at lower bitrates. These artifacts can be reduced, and in some cases eliminated, when the audio processor is applied as a tool.
Generally, it’s understood that as codec bitrates are reduced, so is the audio bandwidth. Omnia F/XE contains selectable low pass filters in the Output section. Reducing the audio bandwidth through filtering will
help. Additionally, the upper band of processing can be reduced in the MIX section, which will allow that
band to act as a dynamic governor. Operating the HF Band in the slow release time will reduce HF density
which improves intelligibility as the encoder masking algorithm is not loaded as heavily with HF content.
Page 36

34 | Section 5
Getting Started
Preset Editor includes panels which switch when a preset is being edited. There is the main panel and preset
settings panel.
Main Panel
The Main Panel will show all processor presets currently saved on the local computer. Omnia F/XE initially
installs with a number of presets already available. The Preset Editor Main panel provides the following
controls for all configured presets:
♦ Add, copy, rename or delete the selected preset
♦ Edit the selected preset and open the preset settings panel
♦ Open global options
♦ The main window help button will show software version and license status for Preset Editor
Page 37

OMNIA F/XE PRESET EDITOR | 35
Preset Settings
The Preset settings window is where a particular processing preset can be created and/or edited. The Preset
settings panel contains the following controls in the navigation bar:
♦ Switch back to preset list
♦ Save the modified preset
The Preset Editor allows a source file to be loaded into the encoder so that processing presets can be heard
while processing adjustments are made.
♦ Select playback file with “Select File”
♦ Start or stop playback with “Play” or “Stop”
♦ Set start and end markers for playing only a part of file loop with or button
♦ The software version and license status are available with the main window help button
Page 38

36 | Section 5
Setting Sound Output Device
The sound output device can be selected in global Options.
To select the device use the drop down menu which lists all the sound output devices found on the computer.
Playing an Audio File
After selecting the audio file with “Select file” button, the file name and path is displayed above the progress
indicator. The whole file or a part of the file can be played by selecting the start and the end of the desired
audio selection with triangular markers.
When the marker is moved, the time information of its position is displayed. When the selected part or
the whole audio file is finished playing it is automatically looped until the stop button is pressed. When the
markers are used, the minimum length of the loop is one second.
The Preset Editor
All audio processing adjustments are performed in the Preset Editor. A preset is simply a large table of values
representing all of the control values for every control listed in the menu tree. When a preset is chosen, the
control values are loaded into the processing structure, reconfiguring the Omnia F/XE processor.
Presets allow different processing setups to be quickly loaded into the system. Numerous factory presets
have been provided for use as starting points for customizing the desired sound. The factory presets are
provided as starting points, but they are not the only presets which can be used. Use the provided presets as
a starting point and then customize the preset to achieve the desired sound.
The Preset Editor has three main areas:
1. On the upper left side is the signal block diagram. Clicking one of the blocks will display the corresponding parameter controls in the main area below.
2. In the upper right side is the meter section.
3. Below the block diagram and the meter section is the parameter controls and the bypass switch. Use
the sliders, knobs and switches to change the parameter values.
Page 39

OMNIA F/XE PRESET EDITOR | 37
Understanding The Bar graphs and Indicators
The bar graphs indicate more than just level information. The texture and density of the audio signal can be
observed, based upon the dynamic action of the bar graphs, and peak-responding “pills”. The “pills” at the
end of the input and output meters indicate peak level. The bar section represents the RMS average of the
signal. Wide dynamic range will display a separation between the pills and the bar, whereas signal with little
peak information will cause the pills to ride on the crest of the bar graph. The bar graphs can indicate up to
25 dB of gain reduction.
The bar graphs provide a wealth of information about the processing control in Omnia F/XE. The
algorithms automatically adapt the style of compression/limiting control being employed on a momentby-moment basis. This can be deduced if the metering is studied over time. During normal operation, the
indicators will have a dynamic “bounce.” Every now and then, the processor will react quickly and show a
larger amount of gain reduction. The meter response is very fast, but the action will recover very slowly, and
return to “rest” with the main bar graph. This action will be easily noticed on material that is very dynamic
in texture.
Another feature unique to Omnia F/XE is processor “Hold”. During brief pauses in audio, the bar graphs
will “freeze” and the GATE indicators will show the processor has entered the Hold mode of the algorithm.
This is most easily noticed when there is a “dry” voice being processed.
The Input/Output level meters will change from green to red whenever the level exceeds –12dBfs. The pills
will also change color on the Input/Output displays. The dynamic processing section the pills maintain the
same color.
Note:
The input and output levels are displayed relative to 0dB full scale (0dBfs). The 0 indicator
on the input/output bar graphs represents every available bit of signal level is being used.
Additional level at this point will create distortion.
Page 40

38 | Section 5
Interpreting the Gain Reduction Meter Displays
Through careful observation of the processing bar graphs, significant information can be acquired and
analyzed about the audio signal on a moment-by-moment basis. The bar shows the average value of the gain
reduction, while the floating pill indicates the peak value of gain reduction.
Since the processing algorithms in Omnia F/XE ‘adapt’ to the audio, the processor is capable of performing
many different processing functions at different times. The processing display bar graphs may appear to
indicate different kinds of operation with different program material. This behavior is primarily based on
dynamic range differences in the applied program material. For program material that is already processed
or lacking dynamic range, the bar graphs will indicate differently than with material that possesses a high
degree of dynamic range. This is because audio signals that lack dynamic range, whether naturally or by previous processing, will possess a lower peak to average ratio. Conversely, audio signals with a wide dynamic
range possess a higher peak to average ratio. The Omnia F/XE adapts differently to each case.
For program material that has low dynamic range (or high RMS and low peak levels), there will be more
activity in the WB-AGC sections and less activity in the Multiband Processors. This behavior is due to
the WB-AGC response to high RMS energy, while the Multiband section is reacting to lower peak energy.
Sometimes the Multiband section may not indicate any action at all. For Omnia F/XE, this is normal
behavior. Examples of this behavior might be seen with heavily processed commercials or music, or with
music passages of sustained level. A good example is the Aerosmith CD “Pump.” This recording has very
little dynamic range. Try any up-tempo selection from this disk and you will see the Wideband-AGC section
make initial adjustments along with small amounts of limiting. Once adjusted, the Wideband-AGC section
will stay deep in gain reduction, although with little movement, and action within the limiters will be
minimal.
When the programming has wide dynamic range (low RMS and high peak levels), the opposite will occur.
The Multiband section becomes active, while the WB-AGC section will appear not to respond as much. During these events, the Multiband sections could be working aggressively, while the WB-AGC section indicates
little activity. Good examples of programming able to cause this behavior are vocal passages, live voice,
classical music, or passages with high transient levels. Good test examples are almost anything classical, as
well as almost anything by Steely Dan.
The WB-AGC section is designed to operate much more slowly than the Multiband sections, primarily
because of the nature of each function. Remember that the WB-AGC section operates on the program’s RMS
energy. During gain calculations, the incoming program’s average level is established, and gain adjustments,
if needed, are made based on those calculations. In this situation, the WB-AGC sections will appear to move
slower as it makes changes over relatively long time periods.
The intent of the Multiband section is to normalize the spectral balance and provide control of the peak
levels. Peak energy must be detected and adjusted in a quick and accurate manner while, at the same time,
not interfering with the sonic integrity of the audio signal. For this reason, the Multiband sections operate
faster, with special background instructions to govern their behavior, and strictly on an as-needed basis.
Page 41

OMNIA F/XE PRESET EDITOR | 39
Since the processing displays are capable of providing a wide range of information, setting up the system
based on any specified meter indications is not recommended. Instead, set up the processing by listening to
judge the sound. The meters only analyze the signals and aid in adjusting the specific parameters needed to
achieve the desired sonic results. Like a speedometer, the meters are a guide, not the road.
The red ticks that appear above the WB (Wideband AGC), L (Low-Band AGC), M (Mid-Band AGC),
and H (High-Band AGC) bar graphs are the GATE indicators. These ticks display GATE activity. The GATE
function is described above in the section titled Understanding the Bar graphs and Indicators.
Processing Adjustments
The processing adjustments are the heart of the processor. The block diagram below depicts the flow of the
audio signal and illustrates the processing functions that are available to adjust. A mouse-click on button
will provide access to that function.
Input
Selecting the Input button will display the input section sub-menu. There are adjustments for the left and
right channels. Dragging the slider-bar will adjust the respective level. There is 30dB range of adjustment
which is between -20dB and +10dB.
Using normal program audio, a correct gain setting results in peak indications (the “bouncing balls”)
hitting -12 dBFS (where the level meters turn red) or a little higher. This corresponds to system headroom
of 12 dB. Adjustment for more headroom is possible (lower indications), but setting the input level for less
headroom (higher meter indications) is strongly discouraged.
Page 42

40 | Section 5
WB-AGC (WideBand AGC)
A flexible wideband leveler section provides smooth, transparent control of the input program. This is
achieved through two significant Omnia innovations, a dual referenced release gate and a hidden, intelligent “makeup” gain algorithm. The dual gate reference is a unique process that correlates the dynamics of
the audio input signal to a “rolling” reference level, and from that information makes conditional decisions
affecting the character of the release function.
A hidden, make-up gain control signal determines when the amplitude of the input program suddenly falls
to a reduced level. It then adjusts the side chain gain in order to “fill in” the softer program passages so that
the average level is increased. This allows the AGC function to operate with slower time constants, while
significantly increasing the average audio level. These slower overall time constants yield lower intermodulation distortion, contributing to Omnia’s trademark sound.
Using classical music for an example, the orchestra often plays forte, and then enters abruptly into a quiet
passage. Conventional AGC algorithms would hold the softer passage down until it was able to slowly
recover at the static release time setting, making such passages nearly inaudible at normal listening levels.
Omnia F/XE’s makeup gain function allows a hidden, faster time constant to provide quick recovery, but
only during the softer passage. As soon as the orchestra starts to play louder, the “makeup” time constant
yields control back to the primary AGC circuit, returning gain to the previous platform level. This sophistication preserves the dynamic integrity of the signal while greatly enhancing the listenability of the program.
This is the first processing section within the Omnia F/XE, so the controls in this section affect the overall
signal, its density, and hence affect every other processing section following it. The job of the Wideband
AGC is to erase long-term audio level fluctuations, while doing so in a very unobtrusive manner. This submenu provides a few parameters that tailor the action of this section.
Drive
Drive sets the audio level which enters the WB-AGC. Increasing the Drive will produce more compression.
This control is calibrated between –6dB and +6dB, and adjusts the signal level into the Wideband AGC. It
should be adjusted to net approximately 12dB of gain reduction with typical programming. Too little gain
reduction can defeat the “leveling” function of the Wideband AGC. Too much gain reduction has little
additional benefit. Nominal gain reduction values for the Wideband AGC are between 10 and 15dB.
Release
Release controls the speed of recovery for any given amount of gain reduction. Faster action yields less
dynamic range and the presence of more density to the audio. The Release control sets the time constants in
relative terms using Slow, Medium, and Fast. Because the time constants are program-dependent, calibrating these controls in absolute time values (ms/dB) would be useless—therefore we use simple terminology.
Page 43

OMNIA F/XE PRESET EDITOR | 41
Gate
When gate is set to ON, it will freeze the gain at the last level of processing action that occurred before
the audio signal fell below the threshold of operation. This control helps to minimize “pumping” and the
increase of background noise during pauses in programming.
Bass
The bass section contains the Bass EQ controls. In the Omnia F/XE’s unique signal processing architecture,
these controls are placed in their optimal position — just before the multiband processor sections. Each of
the Deep Bass and Phat Bass controls can boost the level up to 12 dB. Be careful here not to overdrive the
following sections or over emphasize these lower frequency ranges. When used properly this specialized
low frequency enhancement tools can deliver the thunderous bass and warmth that the Omnia is known for,
and it can do so without making the sound muddy.
Deep Bass EQ
In order to achieve thunderous bass, the Omnia F/XE has a deep base setting. Up to 12 dB of “thunder” can
be added to the audio. This is not a simple bass boost, but a rather sophisticated concept that takes into consideration the time alignment of the low frequencies as they pass through the entire system. It allows a loud,
clean low end, with absolutely no sacrifice to the overall loudness of your signal. The deep bass function is a
shelf boost at 85 Hz, utilizing a phase compensated 12dB/octave slope to emulate the EQ function.
Phat Bass EQ
Phat Bass is a unique enhancement that adds filtered harmonics of the lower registers to the upper bass
frequencies. The algorithm extracts information contained in the initial attack to do its work, and low
frequency texture is therefore emphasized. Older recordings sound fuller (or phatter) with the added
illusion of loudness. Phat Bass EQ also helps radios with small speakers sound like they have more bass than
they actually do.
X-Over
Phase Linear, Time Aligned Crossover
Most multiband audio processors make a compromise in the crossover area in order to provide a flat
dynamic frequency response. This is done to avoid audible peaks or dips in the recombined frequency
response as the individual band gains change during processing. In an effort to minimize this problem, most
processors use a fixed phase-offset in the crossovers. While such treatment helps to minimize frequency
response peaks and dips, it also results in a loss of phase linearity, increasing “smearing’, and reducing
musical clarity.
Page 44

42 | Section 5
In Omnia F/XE’s implementation, the crossover network is carefully time-aligned so that the recombined
spectrum remains flat, regardless of the amount of gain control being applied within any band. This true
phase linear response assures that harmonic overtones are not displaced in time. The result is a truer, more
natural, and more musical Omnia sound. The crossover frequencies are not adjustable.
Multiband AGC Sections
The Multiband AGC sections are similar in character to the wideband AGC described above, but they are
expanded to three bands. This section has the ability to significantly add power and loudness to the audio
while tailoring and pre-processing it for delivery to the final limiter section. The system uses different
algorithms for each of the bands;
As with any multiband processor, improper adjustment can exaggerate noise at high frequencies, particularly with older recordings that possess a good deal of tape hiss. This can especially occur if the highest AGC
band is driven so that significant gain reduction occurs, and the band’s gating control is set to the lower end
of the scale. During audio segments that have little or no HF content, the AGC will try to increase its gain in
an effort to restore treble balance. Even during periods when the gate function is in the default Freeze mode,
the problem might still exist with some programming.
♦ The low and mid bands use a feedback configuration, which produces a larger, warmer sound on
lower frequencies.
♦ The high band utilizes a feed forward design that maintains a more open, natural and musical texture
on higher frequencies.
Since the user parameters are the same for all three bands, only the LF Band will be detailed here.
Drive
Drive sets the audio level that enters the WB-AGC. Increasing the Drive will produce more compression.
This control is calibrated between –6dB and +6dB, and adjusts the signal level into the Wideband AGC.
Drive should be adjusted to net approximately 12dB of gain reduction with typical programming. Too little
gain reduction can defeat the “leveling” function of the Wideband AGC. Too much gain reduction has little
additional benefit. Nominal gain reduction values for the Wideband AGC are between 10 and 15dB.
Release
Release controls the speed of recovery for any given amount of gain reduction. Faster action yields less
dynamic range and the presence of more density to the audio. The Release control sets the time constants in
relative terms using Slow, Medium, and Fast. Because the time constants are program-dependent, calibrating these controls in absolute time values (ms/dB) would be useless—therefore simple terminology is used.
Page 45

OMNIA F/XE PRESET EDITOR | 43
GATE
When gate is set to ON, it will freeze the gain at the last level of processing action that occurred before the
audio signal falls below the threshold of operation. This control helps to minimize “pumping” and the
increase of background noise during pauses in programming.
MIX
The three multiband processors are mixed back together in the mix section. Use care in adjusting this
section, as too much level from one particular band may cause an excessive amount of emphasis to that
range of frequencies. Such adjustment may also drive the final limiter bands in that range of frequencies too
hard, causing the sound to become unnatural, dense, and squashed. As explained earlier, if equalization of
the sound is desired, it should be performed using the drive levels in the multiband section. The mixer is
primarily intended for minor “EQ” changes to the overall sound. There is a +/-6dB range of adjustment for
each band.
Final Limiter
Omnia F/XE employs a look-ahead limiter to provide absolute and precision peak control. This limiter has
been designed to minimize processing side-affects like Inter-Modulation Distortion (IMD), which are usually
associated with limiters of this type. Using an innovative design that cancels inter-modulation products
before they develop allows the limiter to sound extremely transparent. The limiting function is derived
using numerous control signals that monitor one another.
This type of peak controller is used instead of a clipper because it does not generate the same high levels of
Total Harmonic Distortion (THD) as a clipper does. THD causes added difficulties in a coded audio system,
as the harmonics generated from the clipping action, create added artifacts in the encoder. These are
especially annoying at high frequencies.
On the other hand, a look-ahead limiter, yields extremely low levels of THD, although it will create some
IMD components which allows the audio coder to operate with minimal sonic artifacts.
There are tradeoffs in how each of these peak controllers sound when they are set to produce added loudness. When a clipper is pushed, the audio may appear edgier. This is from the added harmonic content. In
contrast, the look-ahead limiter will appear busier, or dense, as the action of the control signal may be heard
when more limiting is applied.
Page 46

44 | Section 5
Limiter Drive
Limiter drive is where the loudness versus quality is most evident. This limiter’s adjustment range is +/-3
dB, in 0.1dB steps. It is advisable to make minor changes, primarily as the ‘loudness fine tuner’.
Note:
The limiter drive provides signicant power adjustment to the overall signal.
Output
The peak output level adjustment is done using the individual left and right output controls. The control
range is from –26dB to +6dB of gain. This level is normally set to the maximum input level, or just below it,
of the device that the Omnia F/XE is connected to.
Output Filter
For webcasting applications, especially at lower bitrates, it is sometimes desirable to reduce the audio
bandwidth. This is particularly useful if you are using a low cost sound card to feed and external encoder as
the filtering in many sound cards in inadequate. A pull-down menu provides eight different filter response
curves that can reduce the spectrum down to 4kHz.
Bypass
The processing can be bypassed simply by clicking on the bypass button located in the lower right hand
corner of the processing panels. This is a simple and fast method to compare the before and after effects of
the processing.
 Loading...