

Page 1
Omnia A/XE
Processed Audio Encoding For Windows
USER’S MANUAL
Manual Version 1.3 for software version 1.12 and later
January 27, 2010
Page 2

Omnia A/XE Manual
© 2009 TLS Corporation. Published by Omnia/TLS Corporation. All rights reserved.
Trademarks
Omnia, the Omnia logo, and Omnia A/XE are trademarks of TLS Corporation. All other
trademarks are the property of their respective holders.
Notice
All versions, claims of compatibility, trademarks, etc. of hardware and software products
not made by Omnia mentioned in this manual or accompanying material are informational
only. Omnia makes no endorsement of any particular product for any purpose, nor claims
any responsibility for operation or accuracy.
We reserve the right to make improvements or changes in the products described in this
manual, which may affect the product specifications, or to revise the manual without notice.
Updates
We routinely release new software versions to add features and fix bugs. Check the Omnia
web site for the latest. We encourage you to sign-up for the email notification service
offered on the site.
Feedback
We welcome feedback on any aspect of the Omnia A/XE software or this manual. In
the past, many good ideas from users have made their way into software revisions or new
products. Please contact us with your comments.
We support you...
By email workdwide: support@omniaaudio.com
e Omnia Web site is at http://www.omniaaudio.com
By phone/Fax in the USA: Customer service is available from 9:30 AM to 6:00 PM USA
Eastern Time, Monday through Friday at +1 216.241.7225. Fax: +1 216.241.4103.
By phone/Fax in Europe. Service is available from Omnia Europe in Germany at +49 81 61
42 467.
10 9 8 7 6 5 4 3 2 1
Page 3

Table of Contents
Introduction 1
Software Installation 3
Getting Started 9
We support you... . . . . . . . . . . . . . . . . . . . . . . . . . . . . .i
Motivation . . . . . . . . . . . . . . . . . . . . . . . . . . . . . . . . . 1
System Requirements . . . . . . . . . . . . . . . . . . . . . . . . . . . . 3
Starting the Installer . . . . . . . . . . . . . . . . . . . . . . . . . . . . 3
If you received Omnia A/XE on CD-ROM... . . . . . . . . . . . . . . . . . 3
If you downloaded the Omnia A/XE installer... . . . . . . . . . . . . . . . 4
The Installation Process . . . . . . . . . . . . . . . . . . . . . . . . . . . 4
Application Overview . . . . . . . . . . . . . . . . . . . . . . . . . . . . 9
Program Shortcuts . . . . . . . . . . . . . . . . . . . . . . . . . . . . . 9
Congure Omnia A/XE . . . . . . . . . . . . . . . . . . . . . . . . . . 9
Locate Options.xml File . . . . . . . . . . . . . . . . . . . . . . . . . 10
Locate Logs Directory . . . . . . . . . . . . . . . . . . . . . . . . . . 10
Locate Presets Directory . . . . . . . . . . . . . . . . . . . . . . . . . 10
Virtual Audio Cable Control Panel . . . . . . . . . . . . . . . . . . . . . 10
IP Audio Driver Control Panel . . . . . . . . . . . . . . . . . . . . . . . 10
Connecting to Omnia A/XE . . . . . . . . . . . . . . . . . . . . . . . . . . 11
Change the Default Password . . . . . . . . . . . . . . . . . . . . . . . . 12
Enter the License Information . . . . . . . . . . . . . . . . . . . . . . . . 13
Create Audio Sources . . . . . . . . . . . . . . . . . . . . . . . . . . . . 15
Create an Audio Processor . . . . . . . . . . . . . . . . . . . . . . . . . . 16
Create an AAC or MP3 Encoder . . . . . . . . . . . . . . . . . . . . . . . . 17
Troubleshooting Omnia A/XE . . . . . . . . . . . . . . . . . . . . . . . . . 17
Verify the Omnia A/XE Service . . . . . . . . . . . . . . . . . . . . . . 18
Page 4

iii |
Check the Firewall Exception List . . . . . . . . . . . . . . . . . . . . . 19
Check the Port Number . . . . . . . . . . . . . . . . . . . . . . . . . 19
Can’t remember the password? . . . . . . . . . . . . . . . . . . . . . . 19
MPEG License & Music Copyright . . . . . . . . . . . . . . . . . . . . . . . 19
Omnia A/XE Control Panel 21
Audio Processor Instance . . . . . . . . . . . . . . . . . . . . . . . . . 22
AAC Encoder . . . . . . . . . . . . . . . . . . . . . . . . . . . . . . 22
MP3 Encoder . . . . . . . . . . . . . . . . . . . . . . . . . . . . . . 23
Instance Functions . . . . . . . . . . . . . . . . . . . . . . . . . . . . 23
License Manager 25
Adding a License Code . . . . . . . . . . . . . . . . . . . . . . . . . . . . 25
Manual License Activation . . . . . . . . . . . . . . . . . . . . . . . . . . 26
Support . . . . . . . . . . . . . . . . . . . . . . . . . . . . . . . . . . 27
Audio Source Manager 29
Create Audio Source . . . . . . . . . . . . . . . . . . . . . . . . . . . . . 29
Delete Audio Source . . . . . . . . . . . . . . . . . . . . . . . . . . . . . 30
Audio Processor Instance 31
AAC Encoder 33
Create the Encoder . . . . . . . . . . . . . . . . . . . . . . . . . . . . . 33
Deliver the Encoded Stream . . . . . . . . . . . . . . . . . . . . . . . . . 34
HTTP Stream Server . . . . . . . . . . . . . . . . . . . . . . . . . . . 35
Send to SHOUTcast server . . . . . . . . . . . . . . . . . . . . . . . . 35
Send to Wowza Media server . . . . . . . . . . . . . . . . . . . . . . . 36
MP3 Encoder 37
Create the Encoder . . . . . . . . . . . . . . . . . . . . . . . . . . . . . 37
Deliver the Encoded Stream . . . . . . . . . . . . . . . . . . . . . . . . . 38
HTTP Stream Server . . . . . . . . . . . . . . . . . . . . . . . . . . . 39
Send to SHOUTcast server . . . . . . . . . . . . . . . . . . . . . . . . 39
Send to Windows Media server . . . . . . . . . . . . . . . . . . . . . . 40
Page 5

OMNIA A/XE MANUAL | IV
Preset Manager 41
Managing Presets . . . . . . . . . . . . . . . . . . . . . . . . . . . . . . 41
Add Preset . . . . . . . . . . . . . . . . . . . . . . . . . . . . . . . 42
Copy Preset . . . . . . . . . . . . . . . . . . . . . . . . . . . . . . . 42
Edit Preset . . . . . . . . . . . . . . . . . . . . . . . . . . . . . . . 42
Rename Preset . . . . . . . . . . . . . . . . . . . . . . . . . . . . . 42
Delete Preset . . . . . . . . . . . . . . . . . . . . . . . . . . . . . . 42
Backup Presets . . . . . . . . . . . . . . . . . . . . . . . . . . . . . . . 42
Processing Audio 43
The Preset Editor . . . . . . . . . . . . . . . . . . . . . . . . . . . . . . 43
Understanding The Bar graphs and Indicators . . . . . . . . . . . . . . . . . 44
Interpreting the Gain Reduction Meter Displays. . . . . . . . . . . . . . . 45
Processing Adjustments . . . . . . . . . . . . . . . . . . . . . . . . . . . 46
Input . . . . . . . . . . . . . . . . . . . . . . . . . . . . . . . . . . 46
WB-AGC (WideBand AGC) . . . . . . . . . . . . . . . . . . . . . . . . 47
Bass . . . . . . . . . . . . . . . . . . . . . . . . . . . . . . . . . . 48
X-Over . . . . . . . . . . . . . . . . . . . . . . . . . . . . . . . . . 49
Multiband AGC Sections . . . . . . . . . . . . . . . . . . . . . . . . . 49
MIX . . . . . . . . . . . . . . . . . . . . . . . . . . . . . . . . . . 50
Final Limiter . . . . . . . . . . . . . . . . . . . . . . . . . . . . . . 51
Output . . . . . . . . . . . . . . . . . . . . . . . . . . . . . . . . . 51
Bypass . . . . . . . . . . . . . . . . . . . . . . . . . . . . . . . . . 52
Fine Tuning Omnia A/XE . . . . . . . . . . . . . . . . . . . . . . . . . . . 52
About Loudness and Fatigue . . . . . . . . . . . . . . . . . . . . . . . 52
Clarify Your Processing Objectives . . . . . . . . . . . . . . . . . . . . . 53
The Adjustment Procedure . . . . . . . . . . . . . . . . . . . . . . . . 53
Getting the Sound You Want . . . . . . . . . . . . . . . . . . . . . . . 53
A Word about Loudness . . . . . . . . . . . . . . . . . . . . . . . . . 54
Quality versus Loudness . . . . . . . . . . . . . . . . . . . . . . . . . 54
Increasing Loudness . . . . . . . . . . . . . . . . . . . . . . . . . . . 55
Adding More Detail—When Loudness Isn’t the Last Word . . . . . . . . . . 55
Equalization Changes . . . . . . . . . . . . . . . . . . . . . . . . . . 56
Page 6

v |
Thunder Bass . . . . . . . . . . . . . . . . . . . . . . . . . . . . . . 56
Reducing Codec Artifacts . . . . . . . . . . . . . . . . . . . . . . . . . 57
Metadata 59
Metadata Manager . . . . . . . . . . . . . . . . . . . . . . . . . . . . . 59
Scheduler 61
System Options 63
System Logs 65
SHOUTcast Streaming 67
Sending A/XE Streams to SHOUTcast Compatible Servers . . . . . . . . . . . . 68
SHOUTcast Compatible Streaming Servers . . . . . . . . . . . . . . . . . . . 68
Steamcast . . . . . . . . . . . . . . . . . . . . . . . . . . . . . . . 68
SHOUTcast . . . . . . . . . . . . . . . . . . . . . . . . . . . . . . . 76
ICEcast . . . . . . . . . . . . . . . . . . . . . . . . . . . . . . . . . 77
Using a PC Player to Listen . . . . . . . . . . . . . . . . . . . . . . . . . . 79
Hardware Players . . . . . . . . . . . . . . . . . . . . . . . . . . . . . . 79
Wowza Media Server 81
Congure Omnia A/XE . . . . . . . . . . . . . . . . . . . . . . . . . . . . 81
Congure Wowza Server . . . . . . . . . . . . . . . . . . . . . . . . . . . 82
Test the Connection . . . . . . . . . . . . . . . . . . . . . . . . . . . . . 82
Managing the Omnia A/XE Service 85
Firewall Setup 87
Page 7

1 Introduction
e audio industry employs dynamics signal processing for many aspects within a broadcast
station, recording studio, mastering facility, and numerous other requirements. From simple
compression of a microphone channel, to special desired effects in the production studio,
and on through the creation of dial-dominance in the transmission path, processing has always been hardware-based. Even with the evolution of digital signal processing (DSP), most
processors are still physical boxes that engineers, producers, and program directors tweak as
they desire to achieve that signature sound. But where is it all headed as technology moves
into more of a software-based world? e personal computer has revolutionized our culture,
and it now can provide us with the required machine cycles of power to accomplish many of
the tasks we ask DSP chips to perform.
We introduce to you to Omnia A/XE a versatile audio processing and encoding platform
that is available as a pure software utility! Our Omnia processors dominate the airwaves the
world over. e products that have helped us achieve this success are based upon innovative
ideas in the area of dynamics audio processing and Omnia A/XE brings these ideas to your
PC.
Omnia A/XE offers what other rack mountable, or PC based hard-card products do, but it
doesn’t require the overhead of these other products. It makes use of the increased processing power available inside today’s faster PC’s. Off the shelf PC’s now contain more than
enough power to perform audio dynamics processing and encoding, serving up multiple
processed and encoded streams from within a single computer or web-server.
Motivation
ere are thousands of Internet radio-station-like audio webcasters. Like their over-the-air
counterparts, these can all benefit from dynamics processing. Every radio station uses audio
processing and there is no reason to believe that webcasters wouldn’t want it, too. Television
stations also employ processing, just as Internet video services will, as they grow in sophistication.
e growing power of PCs makes it possible to have multiple audio processors and encoders
on one PC. As network bandwidth increases, there will likely be more webcasters entering
the fray – and more concern about audio quality as these services become more mainstream.
Effective processing divides audio into multiple frequency bands and dynamically adjusts
levels to be optimum for the following transmission medium. On the surface, this is a
simple function. But to get the sound appropriately optimized without adding or aggravating undesirable codec “artifacts” is a tricky blend of art and science involving many
trade-offs. Expert ears coupled with audio design expertise are required to get this work
accomplished – and these are rare combined skills.
Transmitting audio on the Internet requires bitrate compression (data reduction). Uncompressed stereo audio would require 25x more capacity than possible over a 56kbps modem
connection. Even broadband connections require compression so that the audio doesn’t take
Page 8

2 | Introduction
up all of the available capacity, leaving nothing for web surfing or companion video content.
e perceived quality of audio that undergoes this compression is very much improved
with the addition of dynamics processing. e benefit is unambiguously dramatic. Every
potential customer who has had a demonstration prefers the sound of processed audio.
Omnia A/XE is a stand-alone software signal processor and MPEG encoder (MP3 and
AAC). It does not require a dedicated PC hardware card to operate as it utilizes the host
processor inside the computer. Omnia A/XE was designed as a Windows service for 24/7
Internet streaming. e dynamics processing algorithms are based upon the highly successful Omnia.3net, which is a hardware-based DSP audio processor.
Omnia A/XE performs internal calculations with precision sufficient to guarantee 24-bit
dynamic range. Omnia A/XE employs the following processing architecture:
♦ Wideband AGC
♦ 3 Band Combined Compressor/Limiter
♦ HF EQ
♦ Adjustable Bandwidth Lowpass Filter
♦ Final Look-Ahead Limiter
♦ A web browser based graphical user interface provides access to all user settings and
presents all feedback information.
Page 9

2 Software Installation
is chapter describes the steps involved in installing Omnia A/XE on your PC. e
Omnia A/XE installer includes a Virtual Audio Cable driver and a copy of the Axia
IP-Audio driver. e sections below describe when to install the included drivers.
System Requirements
♦ Windows XP or later.
♦ Minimum 512MB RAM.
♦ 20MB free hard-drive space
♦ Network Interface Card
e Omnia A/XE application runs on 32-bit or 64-bit versions of Windows XP or later.
e Virtual Audio Cable driver and the IP-Audio driver will only work on 32-bit versions
of Windows. If you need to use one or both drivers then you will need to install Omnia
A/XE on a 32-bit version of Windows.
Starting the Installer
If you received Omnia A/XE on CD-ROM...
If you received the software on CD-ROM, please insert the disk in one of the PC’s
CD-ROM drives. If autorun is enabled for the drive then the following window will be
displayed:
Page 10
4 | Software Installation
If autorun is not enabled, then use Windows Explorer to view the contents of the Omnia
A/XE CD-ROM and double-click the Setup.exe application found on the disk.
When the above Omnia A/XE Setup window appears, click the Install Omnia A/XE
button.
If you downloaded the Omnia A/XE installer...
If you downloaded the Omnia A/XE installer then you should have a single file named
omniaaxe.msi. Double-click this file to start the installer.
The Installation Process
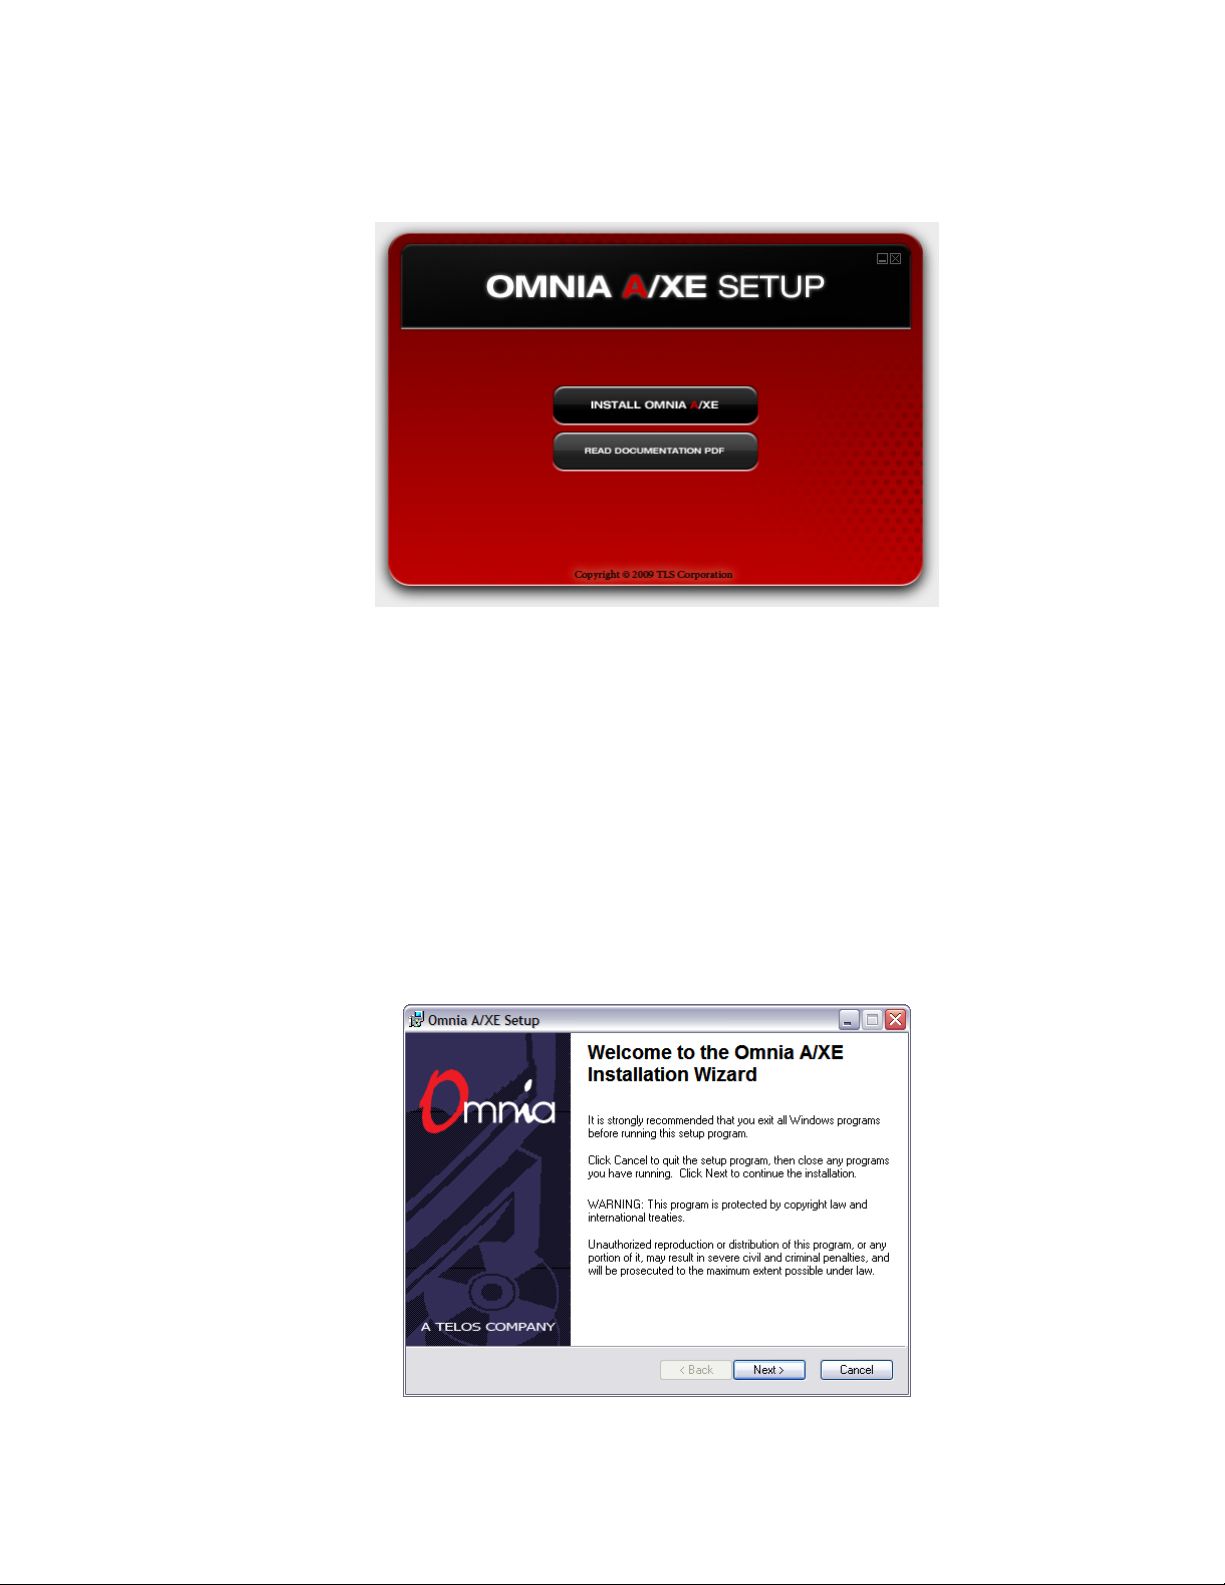
When you install Omnia A/XE for the first time you will be prompted by the following
window:
Click the Next button. e License Agreement dialog will be displayed.
Page 11
THE INSTALLATION PROCESS | 5
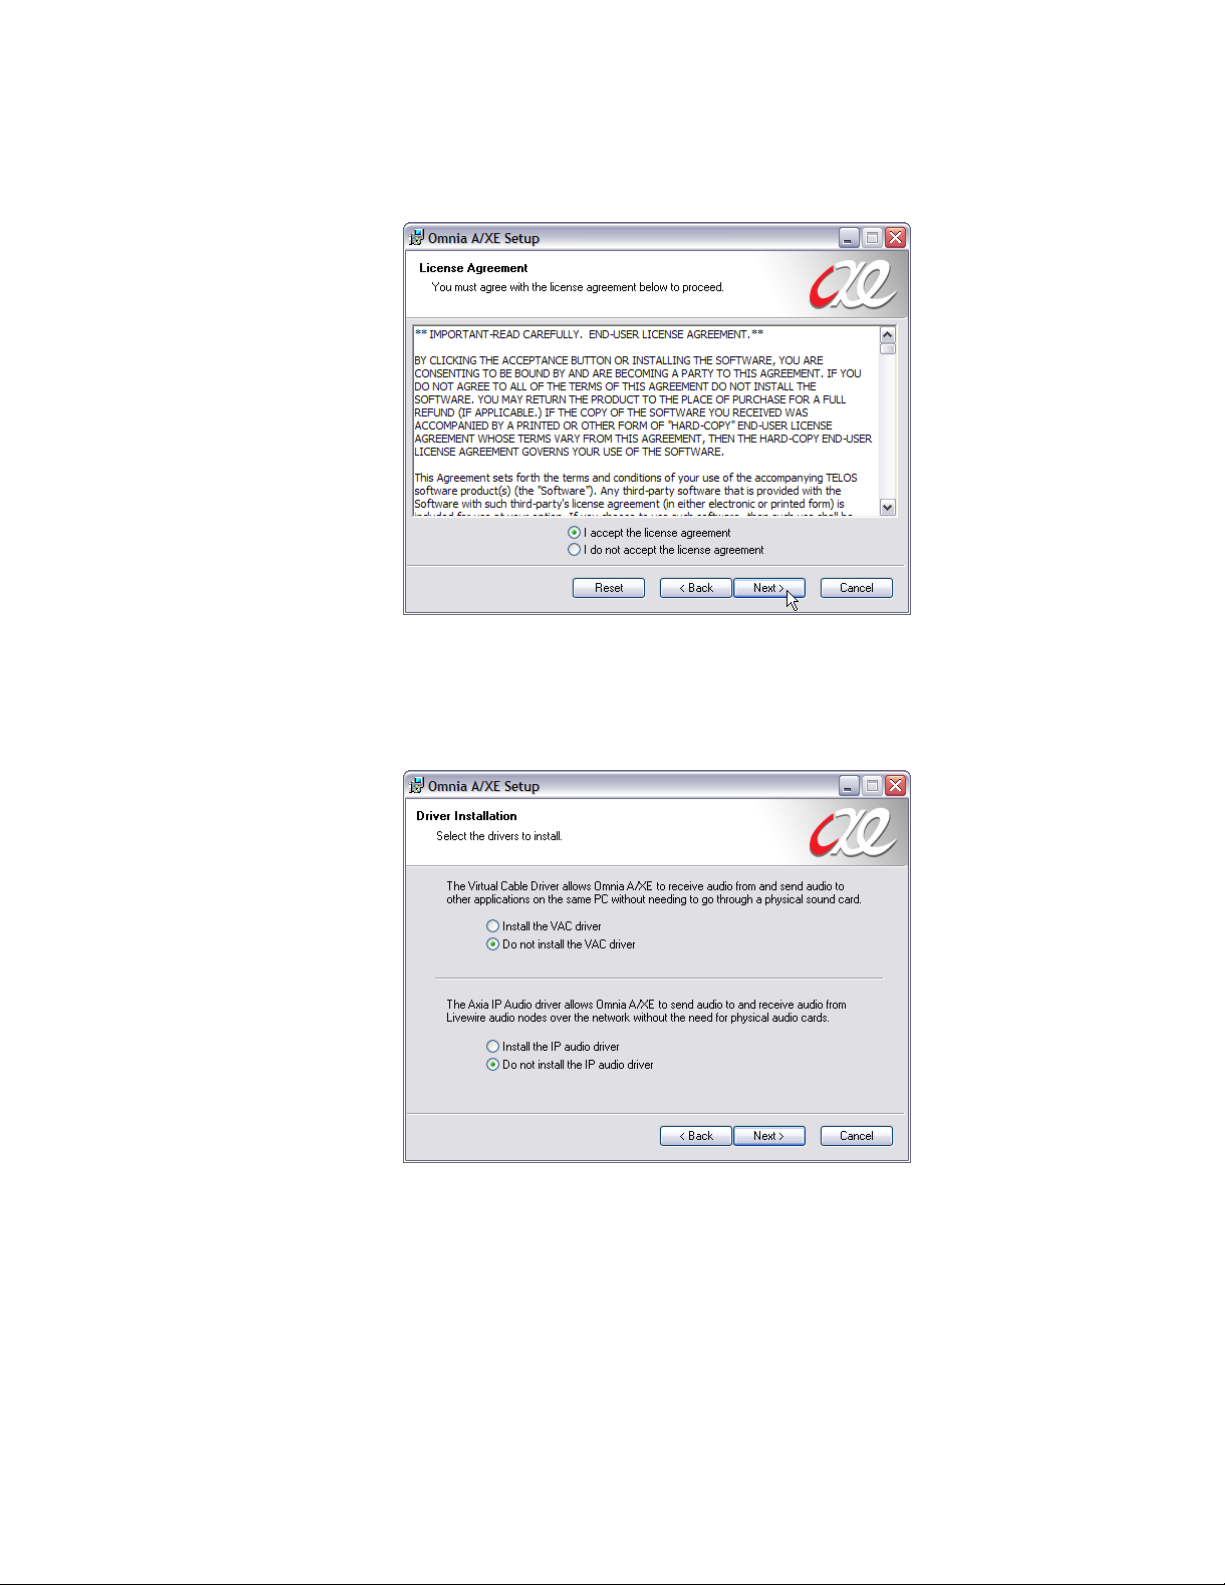
Use the scroll bar to review the full text of the license agreement displayed. If you accept
the agreement click the “I accept...” radio button then click Next to continue. If you do not
accept the license agreement, click Cancel to exit the installer.
Once you click the Next button the driver installation dialog will be displayed:
On this dialog you are given the choice to install the Virtual Audio Cable driver and the
Axia IP-Audio driver. Read on to find out if you should install these drivers.
Virtual Audio Cable driver: As the name suggests, the Virtual Audio Cable driver forms
“patch” cables that allows Omnia A/XE to exchange audio with other applications on the
same PC without the need for a physical sound card. If you plan to send audio to Omnia
A/XE from another application or from Omnia A/XE to another application (e.g. a
third-party encoder) on the same PC then you should choose to install the Virtual Audio
Cable driver.
IP-Audio driver: e Axia IP-Audio driver allows a PC to exchange audio with Livewireenabled devices directly over the network, without the need for physical sound cards. If you
Page 12
6 | Software Installation
wish to send audio from a Livewire-enabled audio device to Omnia A/XE or from A/XE
to the device then you should install the IP-Audio driver.
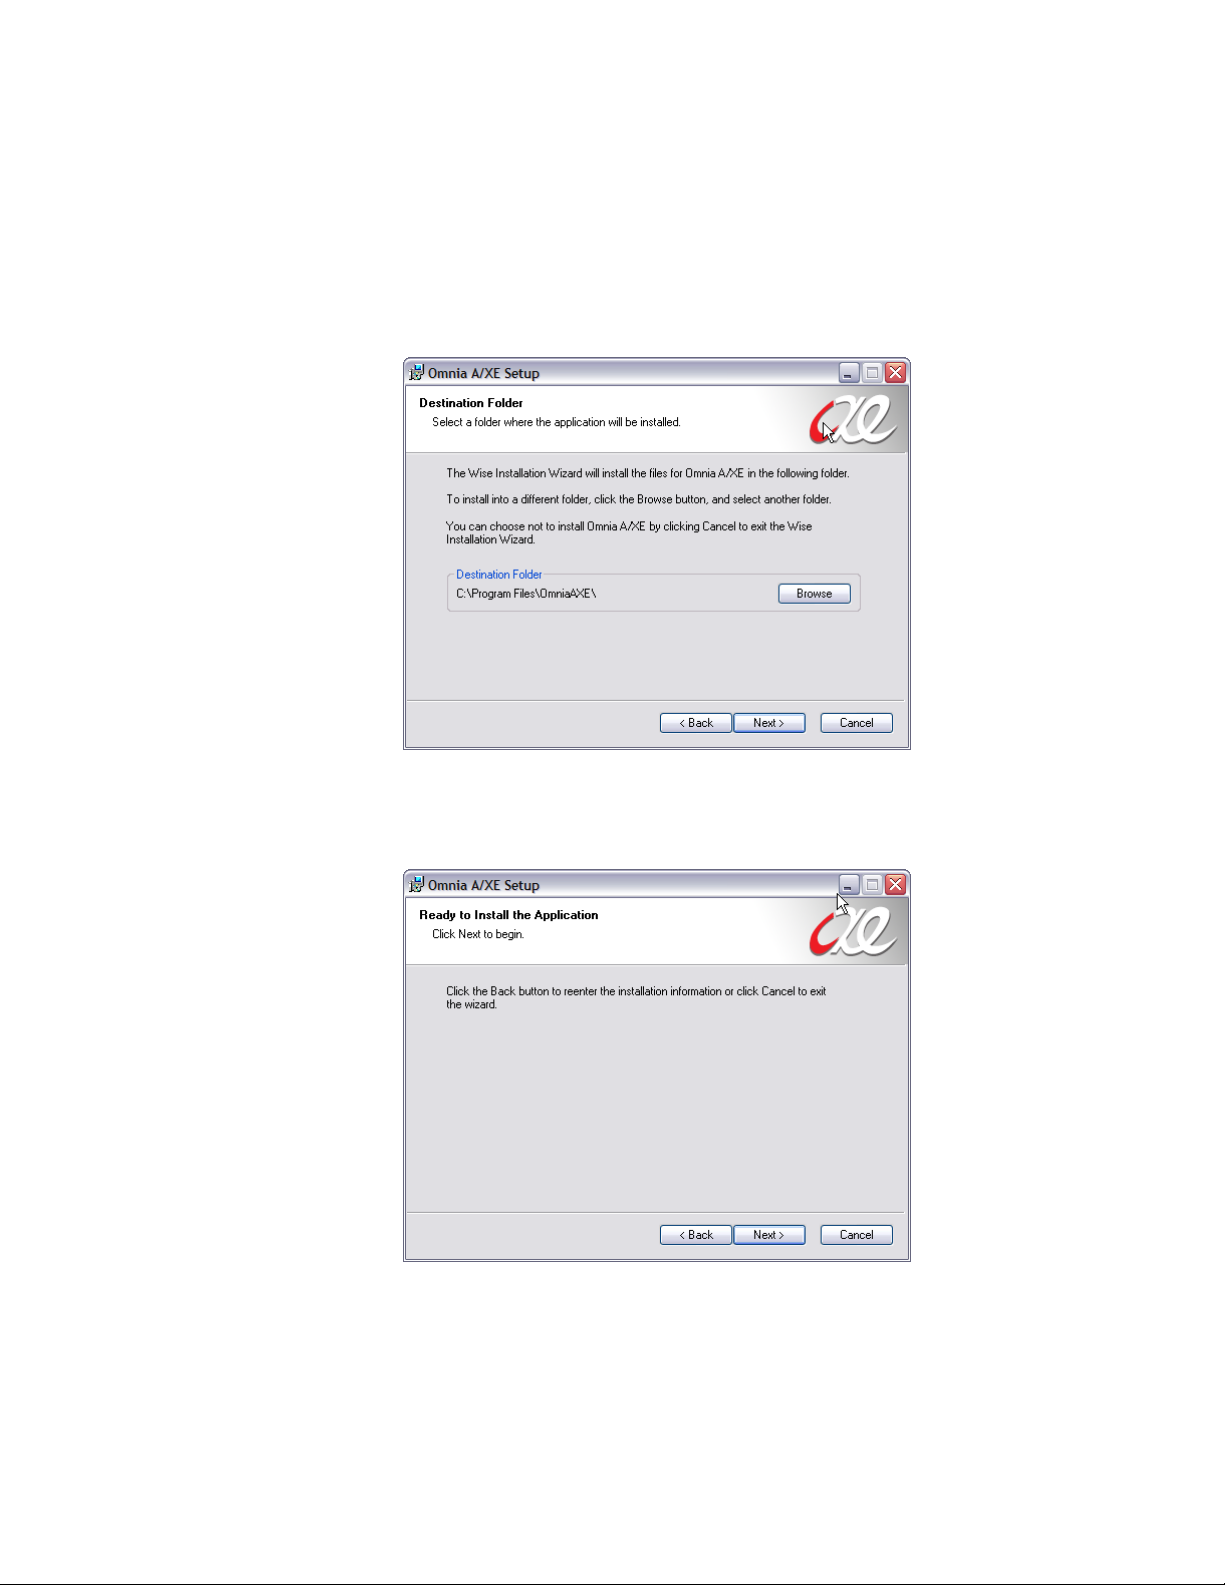
Once you have made your driver installation choices, click the Next button to continue
with the installation. You will be prompted for the location where the software should be
installed.
e default installation location offered in the dialog is appropriate in most cases. If you
need to change it, click the Browse button and select a different location. When done, click
Next to continue. e final confirmation dialog will be presented:
If you need to make any changes to the choices you have made on the previous dialogs, click
the Back button and make the desired changes. Click Next to begin the installation.
A progress dialog will be displayed as the application files are copied to your PC. If you
chose to install the drivers, Windows may display a warning dialog similar to the one below:
Page 13

THE INSTALLATION PROCESS | 7
is warning is from Windows 7. Other versions of Windows may display different looking
warning messages. Please select “Install this driver software anyway” to make sure that the
drivers are properly installed. Once the installer finishes, your Omnia A/XE software is
ready for use.
NOTE: If you need to install a new version of Omnia A/XE, always uninstall the previous version first.
Your application settings will be preserved. If you previously had the drivers installed, it is important to
reboot the PC after uninstalling A/XE and before you install a new version. This will ensure that the old
driver versions are properly removed.
Page 14

Page 15

3 Getting Started
is chapter will guide you through the steps required to configure your PC and Omnia
A/XE. e information presented illustrates the Windows Vista® operating system but the
process should very similar on other versions of Windows.
Application Overview
Omnia A/XE is designed to run as a Windows service. A service is an application that runs
in the background without direct user interaction. e benefit of running in the background
is improved security and reliability; a user does not need to be logged on the PC for the
application to run and as long as the PC is on and Windows is initialized, Omnia A/XE is
running in the background.
e application configuration and management is done via an Internet browser (i.e. Internet
Explorer, Firefox, Google Chrome, etc.) either from the same computer or from any other
computer that can reach the Omnia A/XE PC over the network. If the Omnia A/XE PC
has an active firewall you must configure the firewall to allow A/XE to talk to the network.
Please take a look at the Firewall Setup chapter for details on how to add Omnia A/XE
to the firewall’s exception list. During the initial application setup, it may be helpful to
temporarily disable the firewall until you are able to connect to Omnia A/XE.
Since Omnia A/XE is always running in the background, there may be times that you need
to shut it down or restart it. is is accomplished through the Service manager control panel
applet. e Managing Omnia A/XE Service chapter describes how to accomplish this task.
Program Shortcuts
During installation, Omnia A/XE installs the following shortcuts under Programs:
Configure Omnia AXE, Locate Options.xml file, Locate Logs directory, Locate Presets
directory and Documentation. If you installed the Virtual Audio Cable driver then you
will also find a shortcut to Virtual Audio Cable Control Panel and if you installed the Axia
IP-Audio driver then you will find a shortcut to IP Audio Driver Control Panel. Each
shortcut (except for Documentation) is described below.
Congure Omnia A/XE
is shortcut opens a browser window pointing to the Omnia A/XE administrative web
interface. e shortcut reads the Omnia A/XE configuration information from Options.xml
(where all application settings are stored) and passes the port used by A/XE to the browser.
Selecting this shortcut should open the browser to the login page of Omnia A/XE. e
Connecting to Omnia A/XE section later in this chapter describes the login process in
more detail.
Page 16

10 | Getting Started
Locate Options.xml File
Omnia A/XE stores all settings to a single file named Options.xml. is option opens a
Windows Explorer window in the directory where the Options.xml file is located. As you
may have guessed from the file extension, the file uses the Extensible Markup Language
(XML) format for its contents. While you may use a text editor (e.g. Notepad.exe) to view
the file contents we recommend that you do not make direct edits to the file unless it is for a
special reason.
Once you have setup all your audio sources, encoders and streams, you may want to make a
backup copy of the Options.xml file. Also, if you decide to move Omnia A/XE to a different PC moving the Options.xml file will save you some time configuring the application on
the new PC.
Locate Logs Directory
is option opens a Windows Explorer window in the directory where Omnia A/XE writes
the system log files. A new file is created for each 24 hour period and logs are kept for 30
days. After 30 days the oldest file is deleted to make room for new log files. While you may
retrieve the logs through the web interface if you have direct access to the Omnia A/XE
it may be more convenient to access the files in the directory where they are stored. When
something is not working right, the log files may show you the reason why. If you encounter
a problem and need to contact support, sending the log file for the day when the problem
occurred will speed up the resolution process.
Locate Presets Directory
is options opens a Windows Explorer window in the directory where Omnia A/XE
stores the processing presets. All processing presets are stored in individual presets files.
Copies of the default presets that ship with the application and any presets that you may
have created will be found in the presets directory. While we do not recommend that you
edit the files manually, you may want to access the presets directory for backup or to copy
presets from one PC to another.
NOTE: If you need to restore a preset to the default parameters you can find backups of the original
presets shipped with the application in the Program Files\OmniaAXE\Presets directory. Please
not modify the presets in this directory. Instead, copy them to the ProgramData directory.
Virtual Audio Cable Control Panel
e Virtual Audio Cable (VAC) control panel configures parameters for the VAC driver. By
default, eight virtual audio device instances (“cables”) are installed. If you need to adjust this
number to more or less devices you can use the VAC control panel to adjust this number.
IP Audio Driver Control Panel
e IP-Audio driver control panel configures the Livewire audio channels to send or
receive from network. Please see the IP-Audio driver’s user guide under the Documentation
shortcut for additional information.
Page 17
CONNECTING TO OMNIA A/XE | 11
Connecting to Omnia A/XE
By default, Omnia A/XE will use HTTP port 80 for administration. If this port is in use by
another application, A/XE will select another available port. For this reason we recommend
that for the first time you connect to Omnia A/XE from the same PC where A/XE is
installed.
1. Select the Configure Omnia AXE shortcut from the Omnia A/XE program shortcuts.
is will open your default browser application to connect to A/XE. is shortcut is
aware of the port used by the A/XE and will pass this information to the browser.
Troubleshooting Tip: If the browser displays a “Page not found” error, please refer to the Troubleshooting Omnia A/XE Startup section further in this chapter.
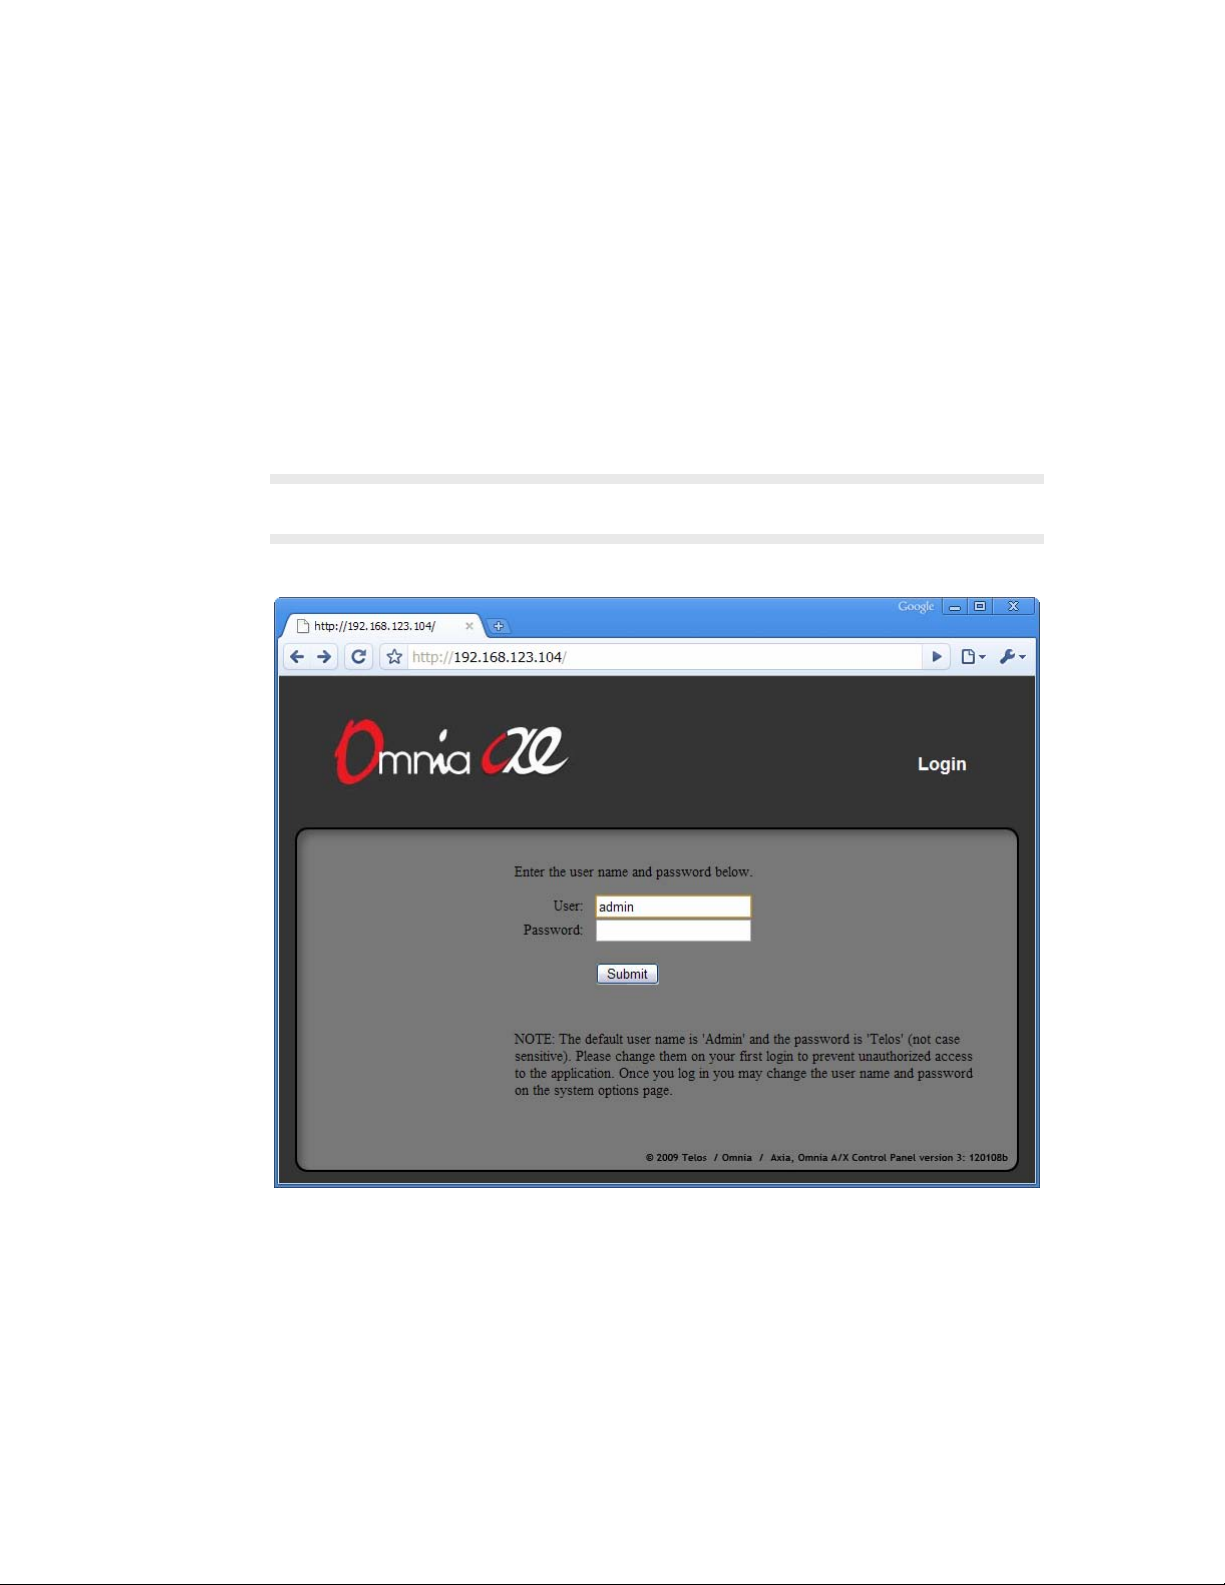
2. You should see the following login page in appear in your browser:
3. Enter “admin” for the user name and “Telos” (not case sensitive) as the default password
then click the Submit button.
4. If the user name and password were entered correctly then you should see the main
application control panel:
Page 18
12 | Getting Started
You are now logged in to Omnia A/XE.
Change the Default Password
One of the first things you should do is change the default password. Skipping this step
could give other access to your Omnia A/XE application.
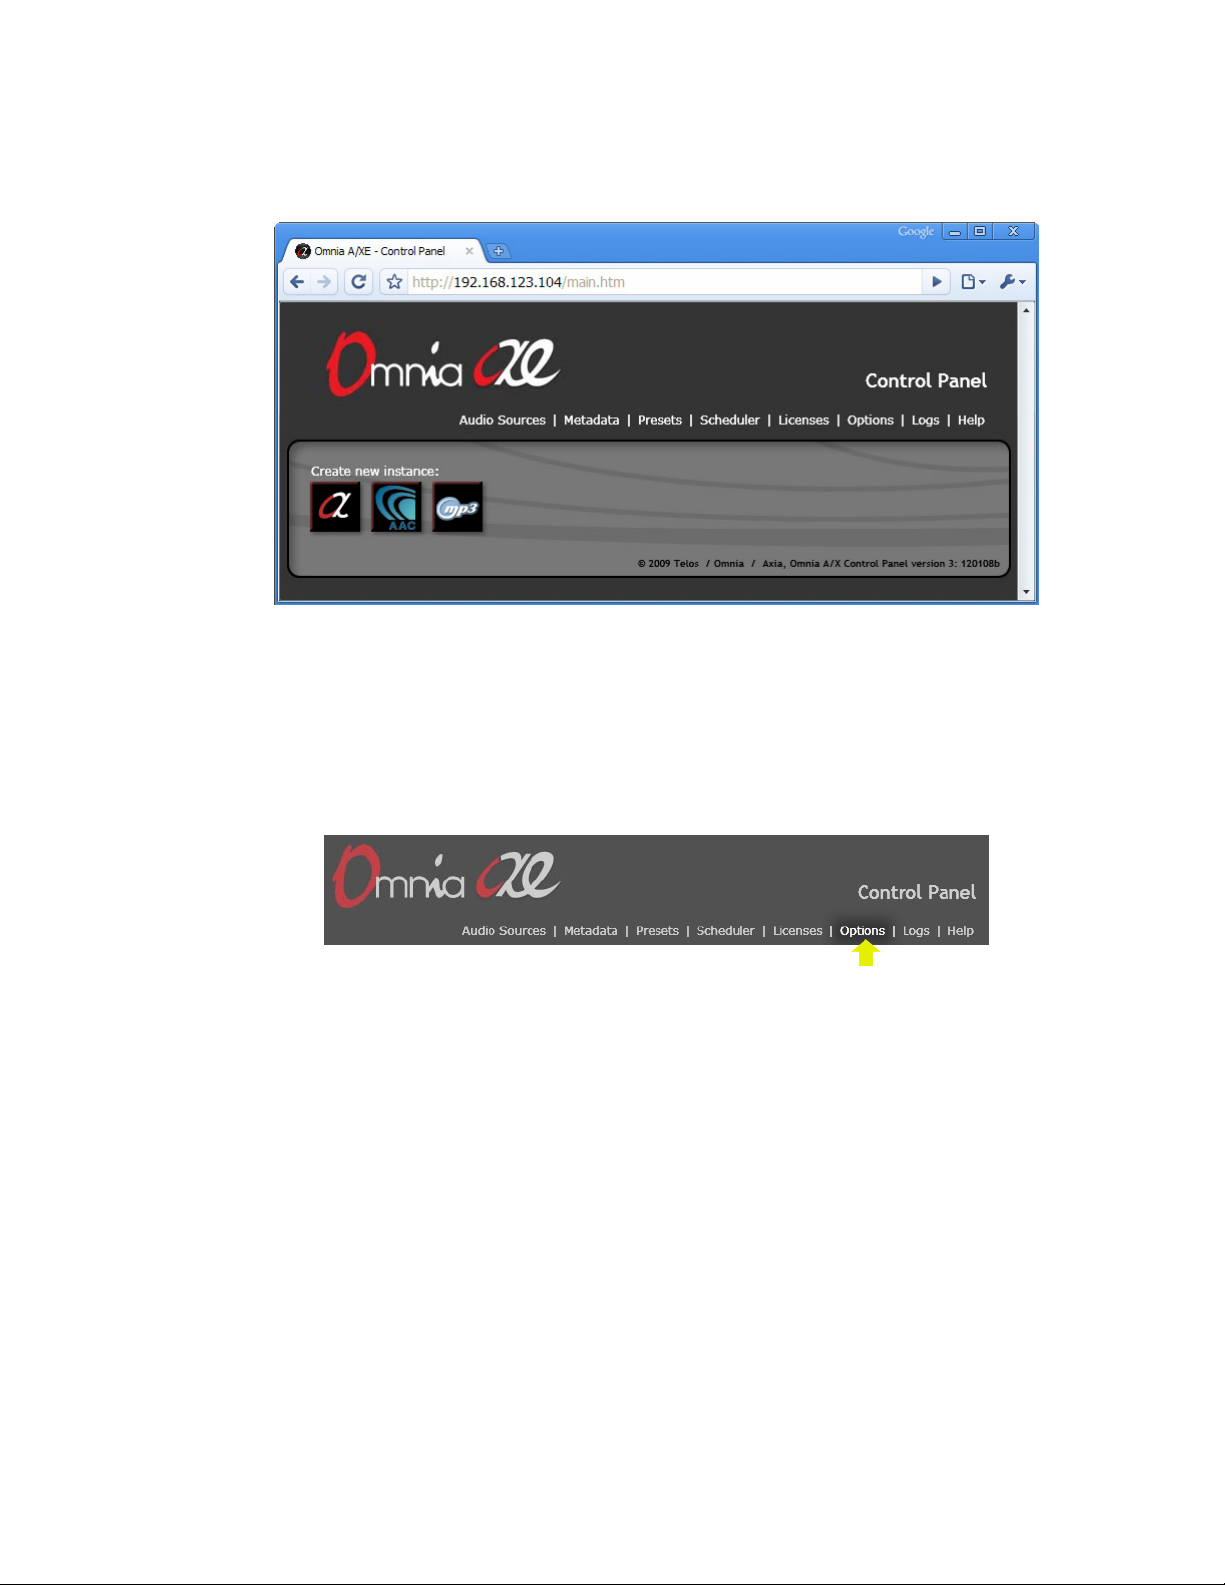
1. Click the Options link in the top part of the Control Panel window:
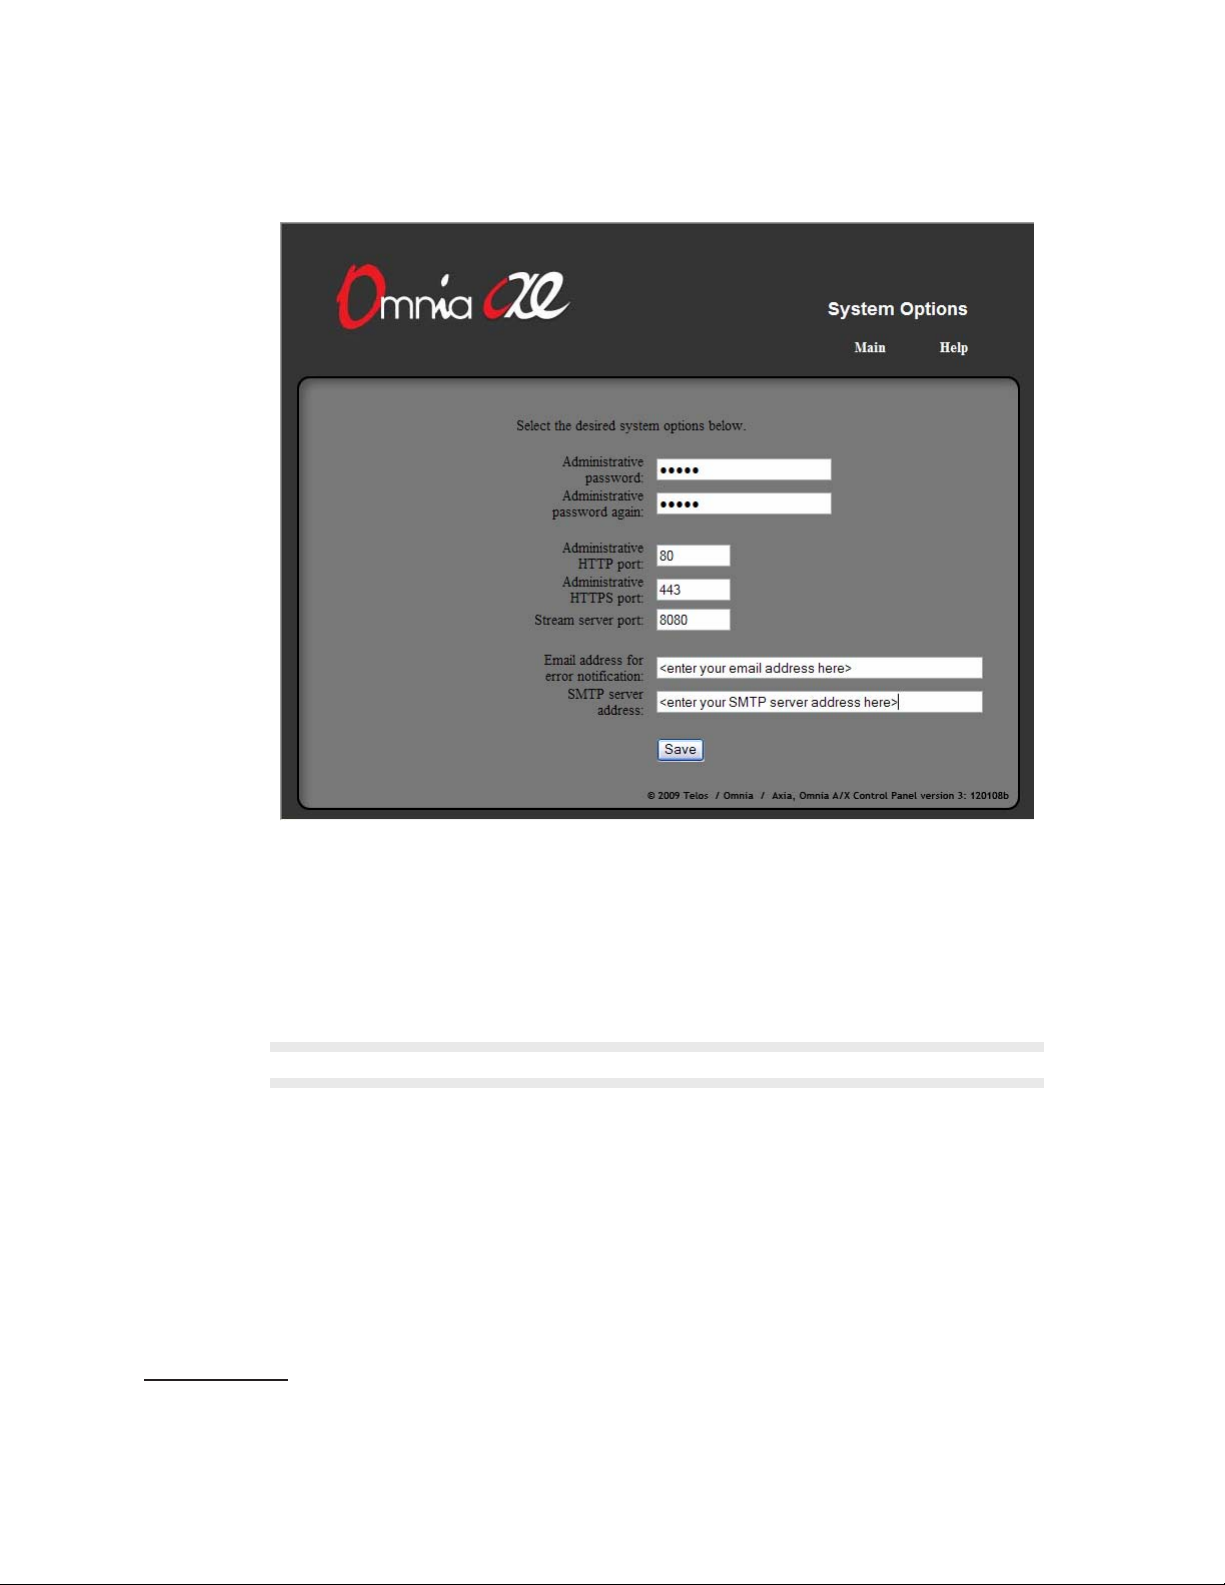
2. e System Options windows will be displayed:
Page 19
ENTER THE LICENSE INFORMATION | 13
3. Change the Administrative password field to a password of your choice then enter it
again in the Retype password field.
4. While you are on this page you have the choice of changing the administrative HTTP
and HTTPS (secure HTTP) ports as well as the Stream server port
should work fine; you should change them only if you need to address a particular
problem.
NOTE: The port changes only take effect when the Omnia A/XE service is restarted!
5. e last two fields under System Options allow you to enter a notification email address
and an SMTP server address. e application uses this information to notify you by
email in case of application errors. Fill in these fields if you wish to use the notification
feature.
6. Click the Save button to make the changes permanent. is will return you to the
Control Panel page.
Enter the License Information
Before creating audio sources or encoders you will need to enter the license code(s) you
received with Omnia A/XE on the Licenses page. e licenses entered limit the number of
1 e Stream server uses the HTTP protocol to make streams available for playback using most common
media players. is lightweight server is intended for monitoring the encoded stream by only a few listeners. It is not intended to serve a large number of streams. Please see the help link on the MP3 or AAC
encoder pages for more details.
1
. e default values
Page 20
14 | Getting Started
audio sources you can use in the application.
NOTE: When you enter a license code, A/XE will contact a secure Telos server to activate the code on your
PC. If the PC is not usually connected to the Internet, you may want to connect it temporarily while you
are entering the license code(s). This will allow the activation process to take place automatically. If
this is not possible, then you have the option to activate the license from another PC. Please read the
Manual Activation section in the License Manager chapter for the full details.
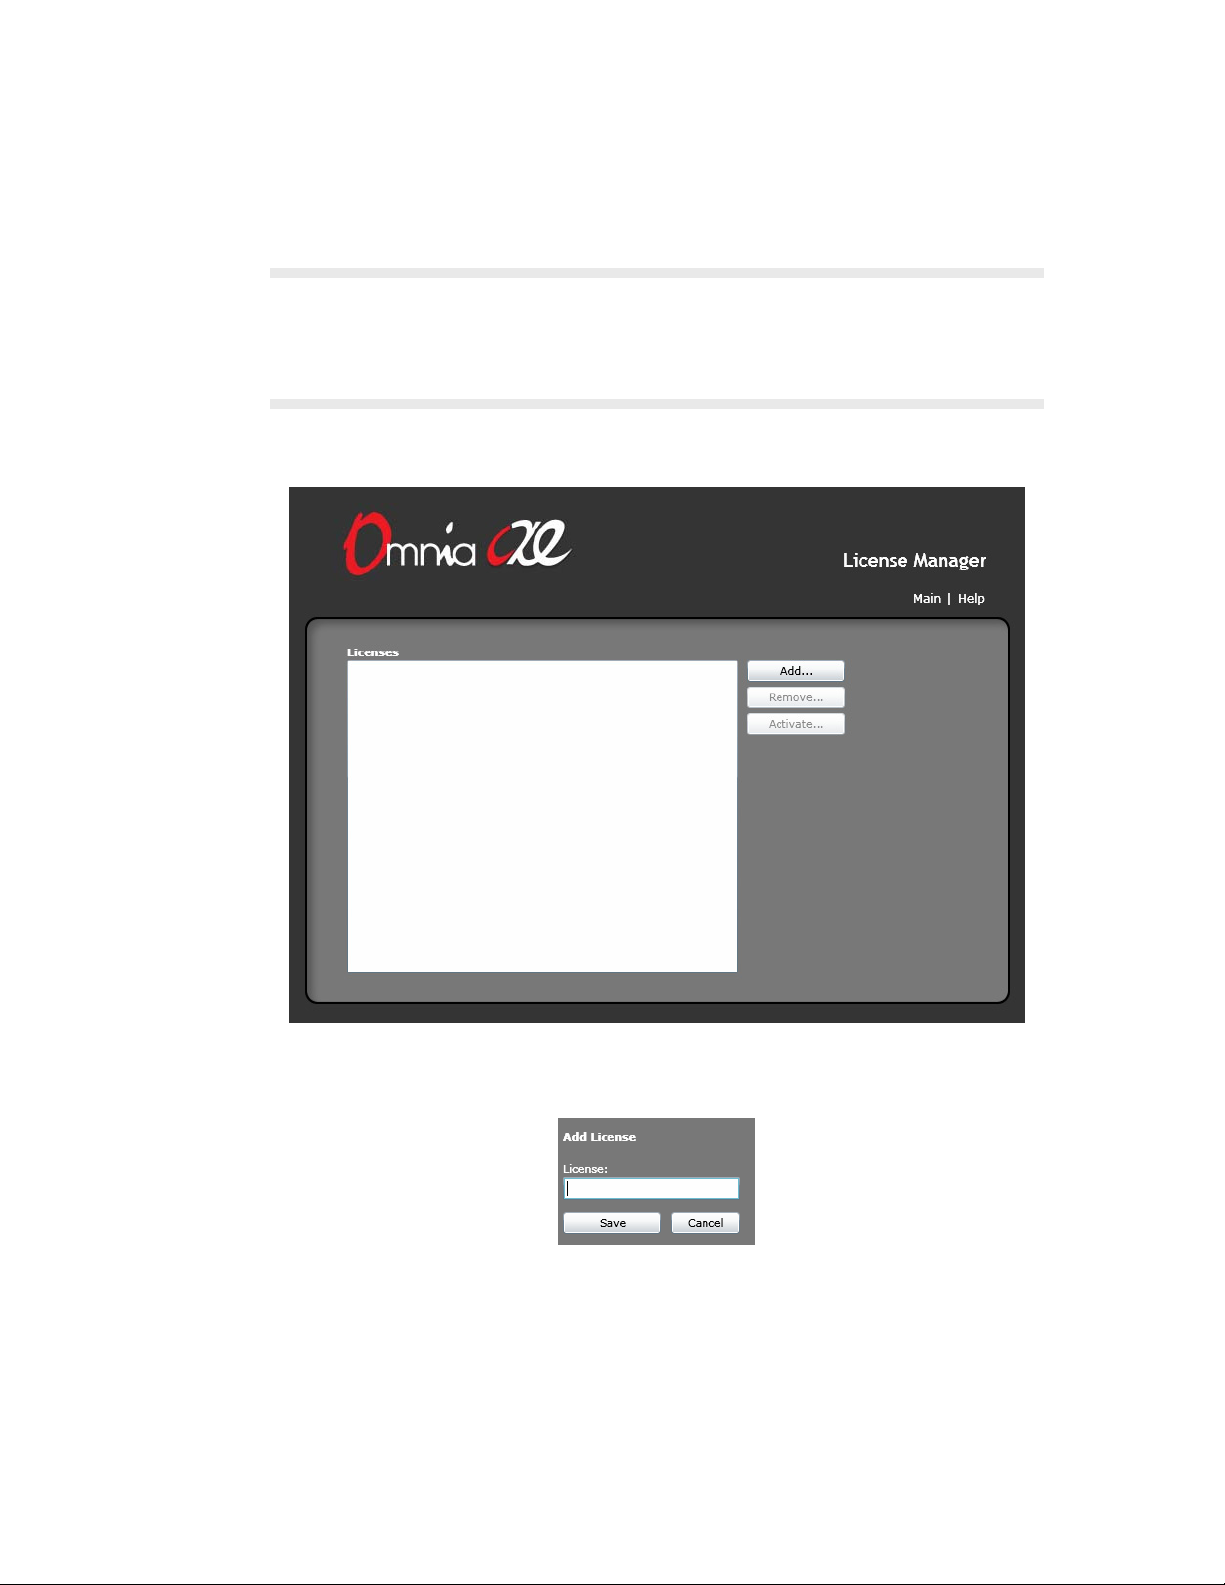
1. Click the Licenses link at the top of the Control Panel page. e License Manager
page will be displayed:
2. Click the Add… button. Enter your license code in the License field then click the Save
button.
3. e code you entered will show up in the Licenses list on the left. Next to the license
code you will see additional text describing the state of the license. e text will initially
say “Pending activation” then after 10-15 seconds it should change to “OK”. Repeat step
2 for each license code you have received. If all license codes have an “OK” status then
skip step 4 below and jump to the Create Audio Sources section.
4. If you see an error message next to the license code, please check the license string to
make sure it matches the one you received. If the error is “Activation failed” or similar
Page 21
CREATE AUDIO SOURCES | 15
then refer to the License Manager chapter to learn how to activate your license manually.
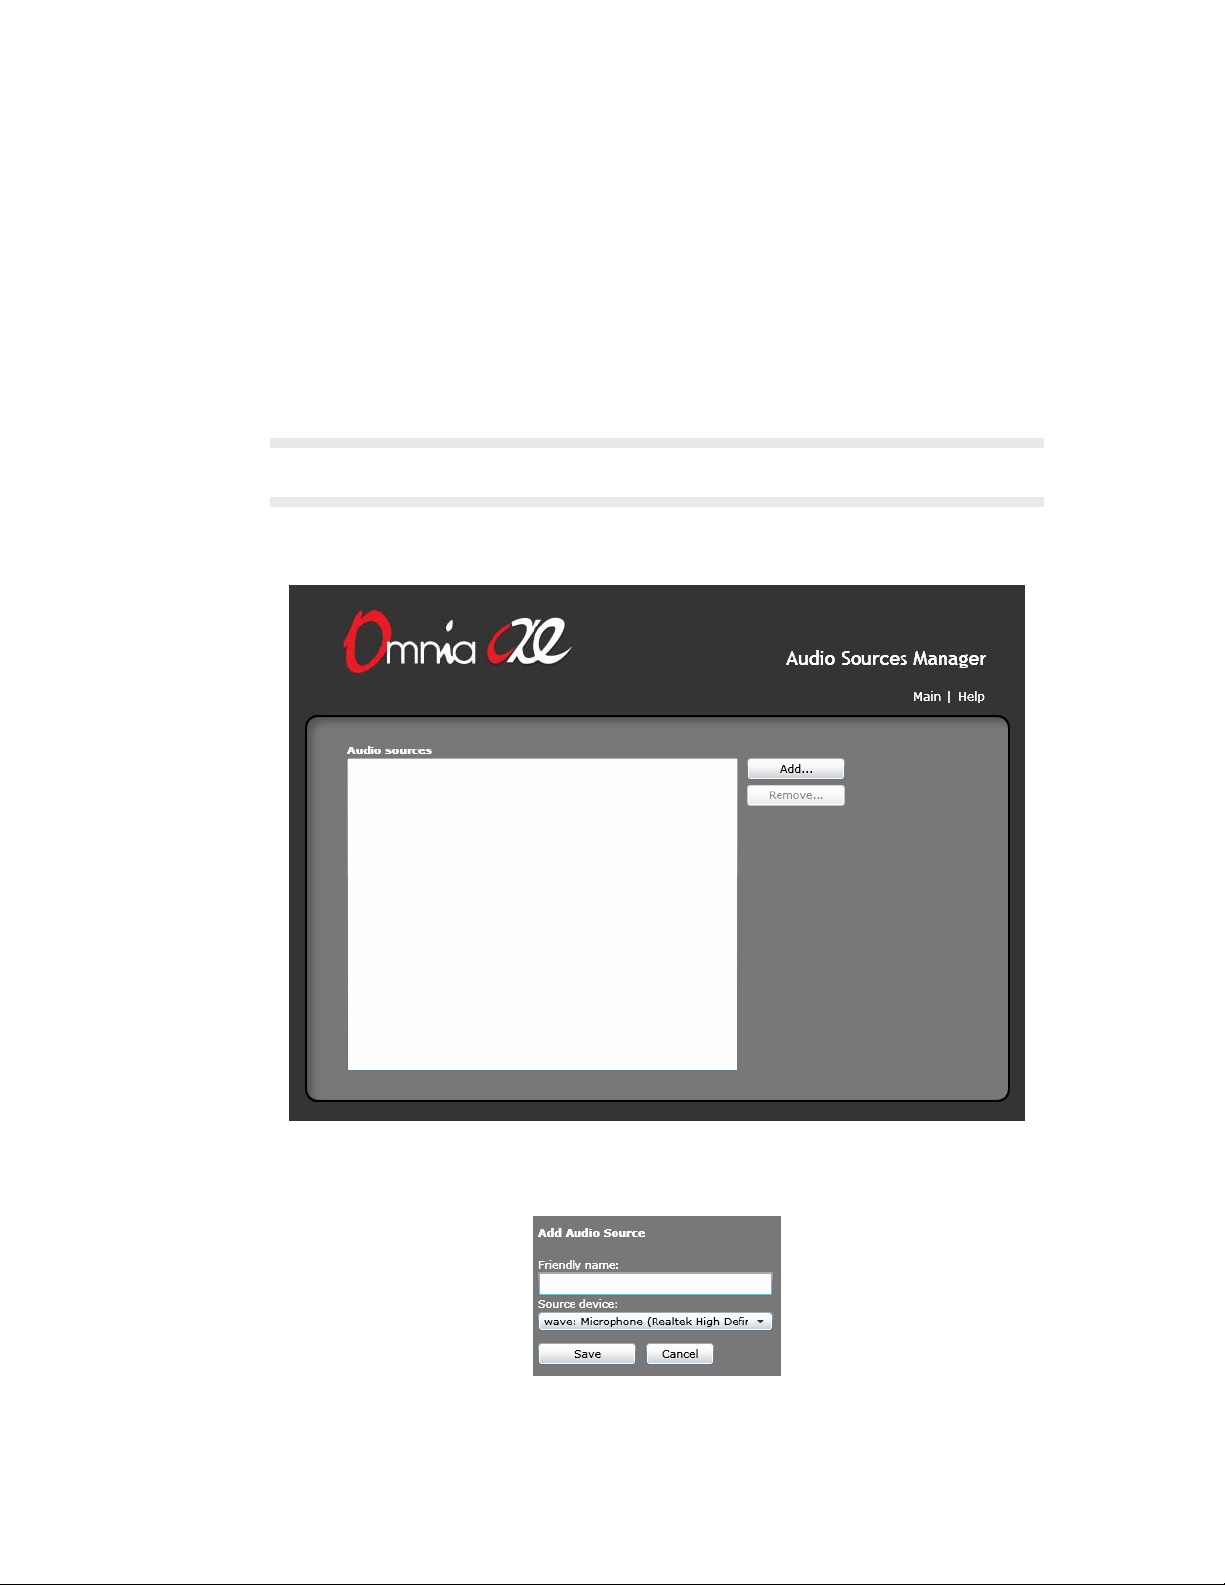
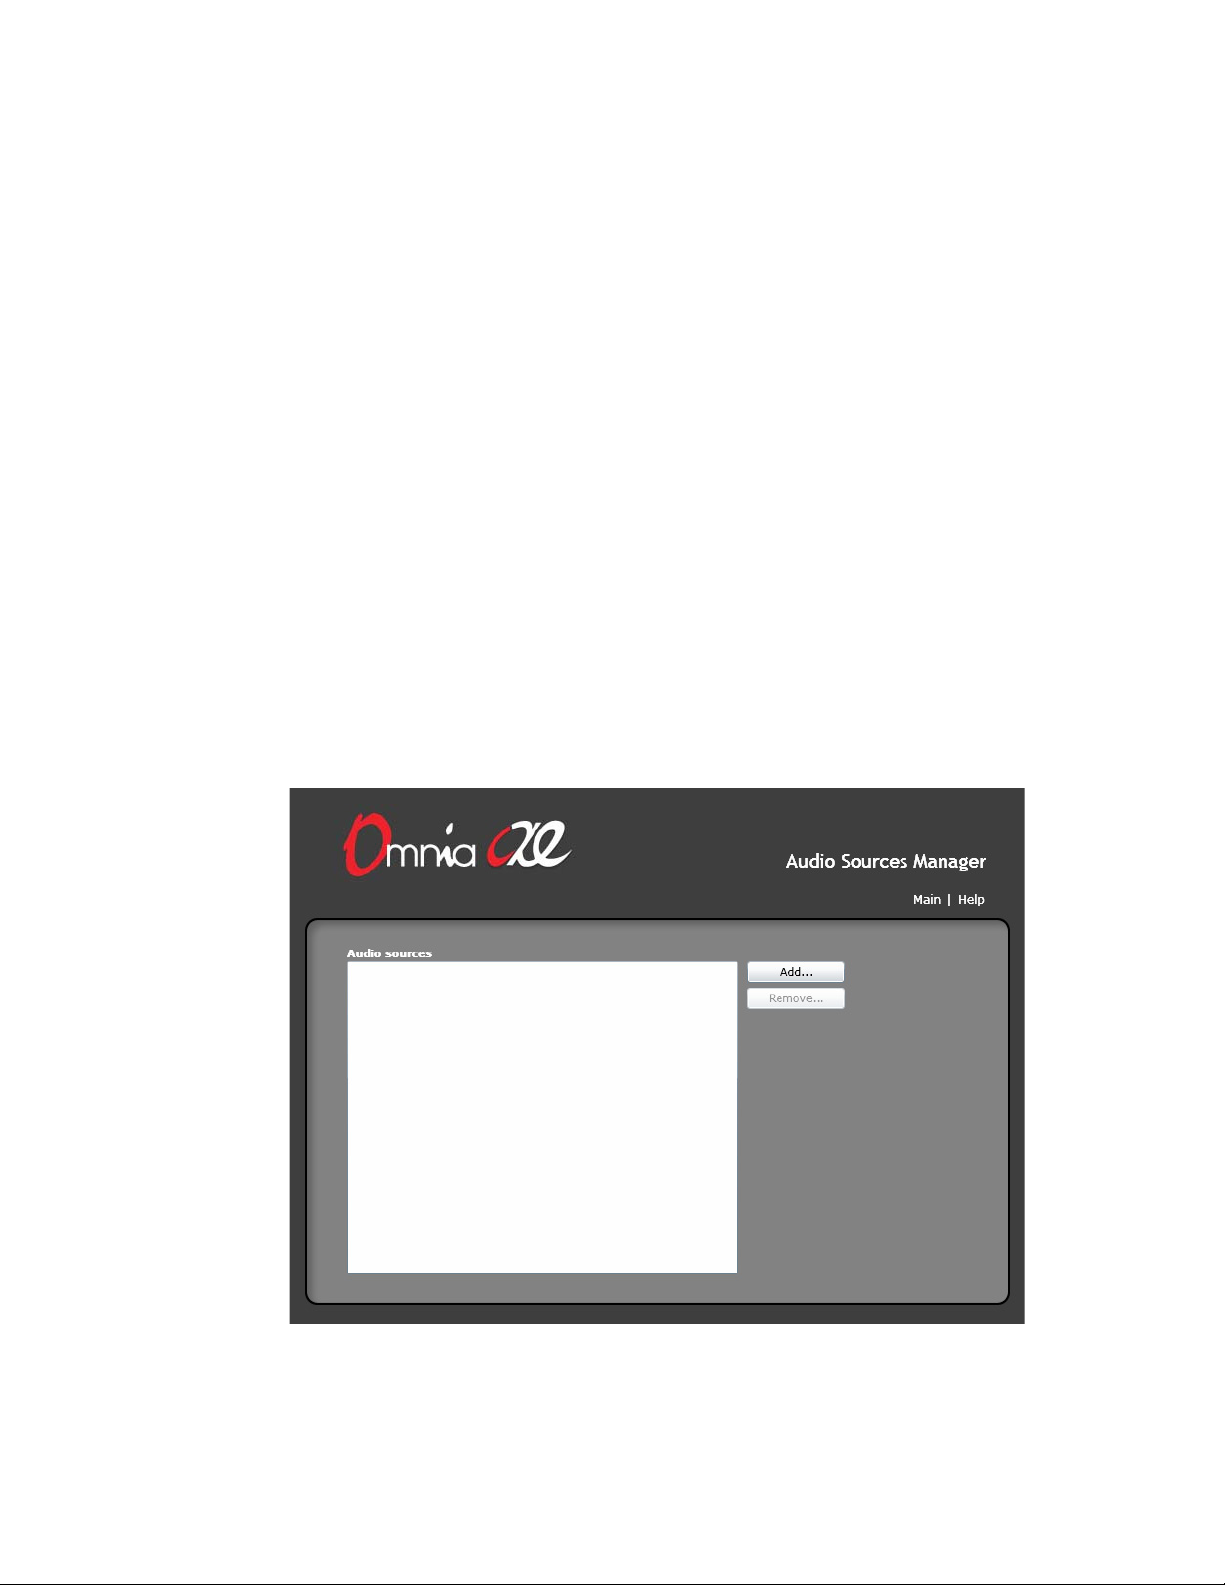
Create Audio Sources
e Audio Sources Manager allows you to select the input audio device(s) you wish to use
with Omnia A/XE. Since the Windows audio device names are often not very descriptive,
you have the opportunity to assign each audio device a friendly name. is name is then
used throughout the rest of the application to refer to the audio source.
NOTE: You will only be able to create audio sources once you have successfully activated your license
code on the Omnia A/XE PC.
1. On the Control Panel page, click the Audio Sources link at the top of the window. e
Audio Sources Manager page will be displayed:
2. Click the Add… button. Select the audio device you wish to use from the Source device
drop down list. Enter a name for it in the Friendly name field then click Save.
3. Repeat step 2 for each audio source you wish to use. You may see a message indicating
that the audio device limit has been reached for the license codes entered in the applica-
Page 22
16 | Getting Started
tion. If you see this message and still need additional audio sources, please purchase an
additional license.
4. When done, click the Main link or use the Back button to return to the Control Panel
page.
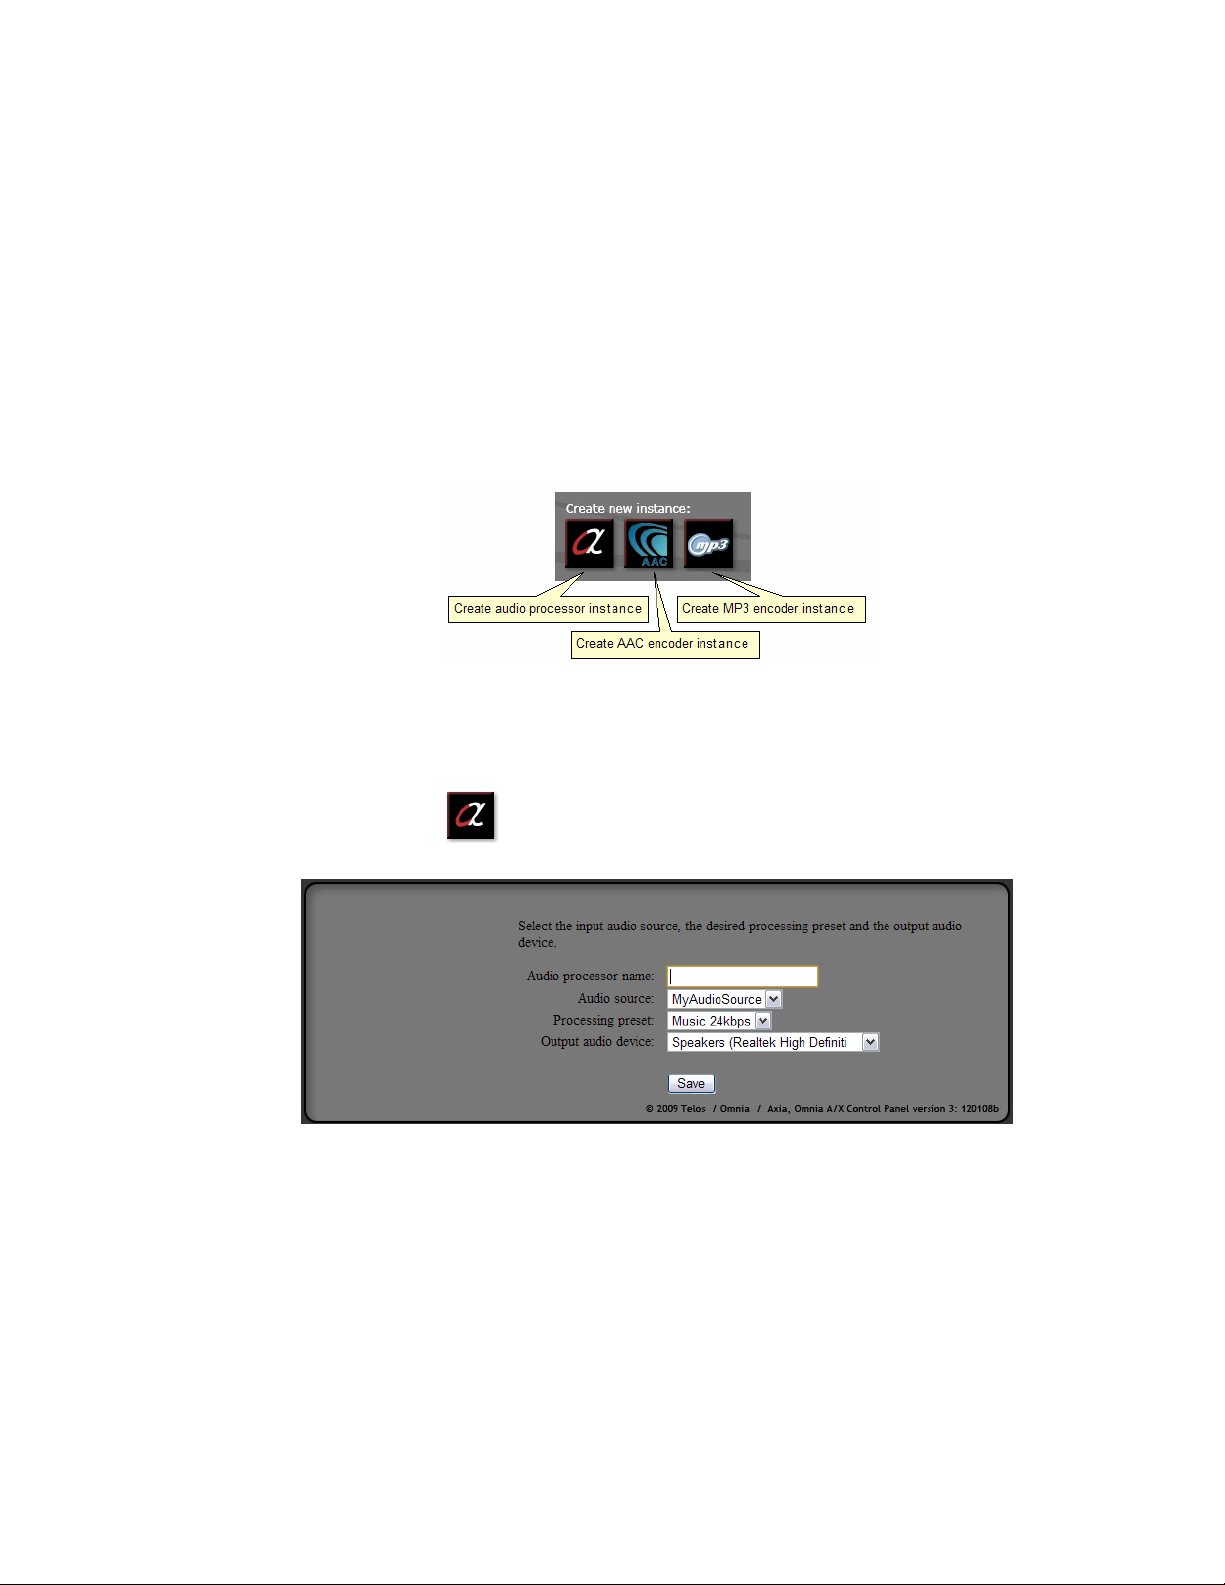
Create an Audio Processor
e three buttons on the Control Panel page allow you to create audio processor instances
and AAC or MP3 encoder instances. You may create multiple instances of each to suit your
needs.
An audio processor instance accepts audio from an audio source, applies Omnia processing
to it then sends it out to an audio device on the PC. If you need to create an audio processor
then follow the steps below.
1. Click this button to create an audio processor instance. e following page will be
displayed:
2. Enter a name for the audio processor. You may use letters and digits along with underscore characters if needed. Please do not use other special characters in the name.
3. In the Audio source drop down select the audio source you wish to use. Select the
processing preset from the Processing preset drop down then the output audio device
from the Output audio device drop down list.
4. Click the Save button. You have just created an audio processor instance. When the
Control Panel page is displayed you will see the audio processor instance you have just
created:
Page 23

CREATE AN AAC OR MP3 ENCODER | 17
5. Click the start/stop button to start this audio processor instance. e power LED
will light up and the meters should show some activity. You should also hear audio being
played through the output audio device.
6. Click the edit button to modify the instance’s properties. Note that if an instance is
active any changes will only take effect when the instance is restarted.
7. Click the icon found next to the preset name if you wish to edit the audio processing
parameters (see the Processing Audio chapter for more information).
8. Click the delete button if you wish to delete this instance.
Create an AAC or MP3 Encoder
Clicking the Create AAC instance button or the Create MP3 instance
button on the Control Panel takes you to the AAC or MP3 encoder configuration page.
On this page you create an AAC or MP3 encoder instance for a selected audio source.
NOTE: You may create multiple encoder instances even for the same audio source, perhaps using
different encoding parameters or different processing presets.
For each encoder instance you may deliver the encoded stream through the local stream
server, to a SHOUTcast-compatible server, a Wowza® media server or Windows Media®
server.
NOTE: The AAC and MP3 encoders are described in detail in the AAC Encoder and MP3 Encoder chapters
found later in this manual.
Once created, each instance will show up on the Control Panel page very similar to the
audio processor instance shown above.
Troubleshooting Omnia A/XE
While attempting to connect to Omnia A/XE you may get a “Page not found” error in your
web browser. is section describes the steps involved in determining where the problem
lies. e main tasks are:
Page 24
18 | Getting Started
1. Make sure that the Omnia A/XE service is running.
2. Verify that Omnia A/XE is added to your firewall’s exception list.
3. Double-check the port number used by Omnia A/XE’s web administration.
Each task is described in more detail below. e examples illustrate the steps on the
Windows Vista® operating system. If you use another Windows version the steps should be
similar.
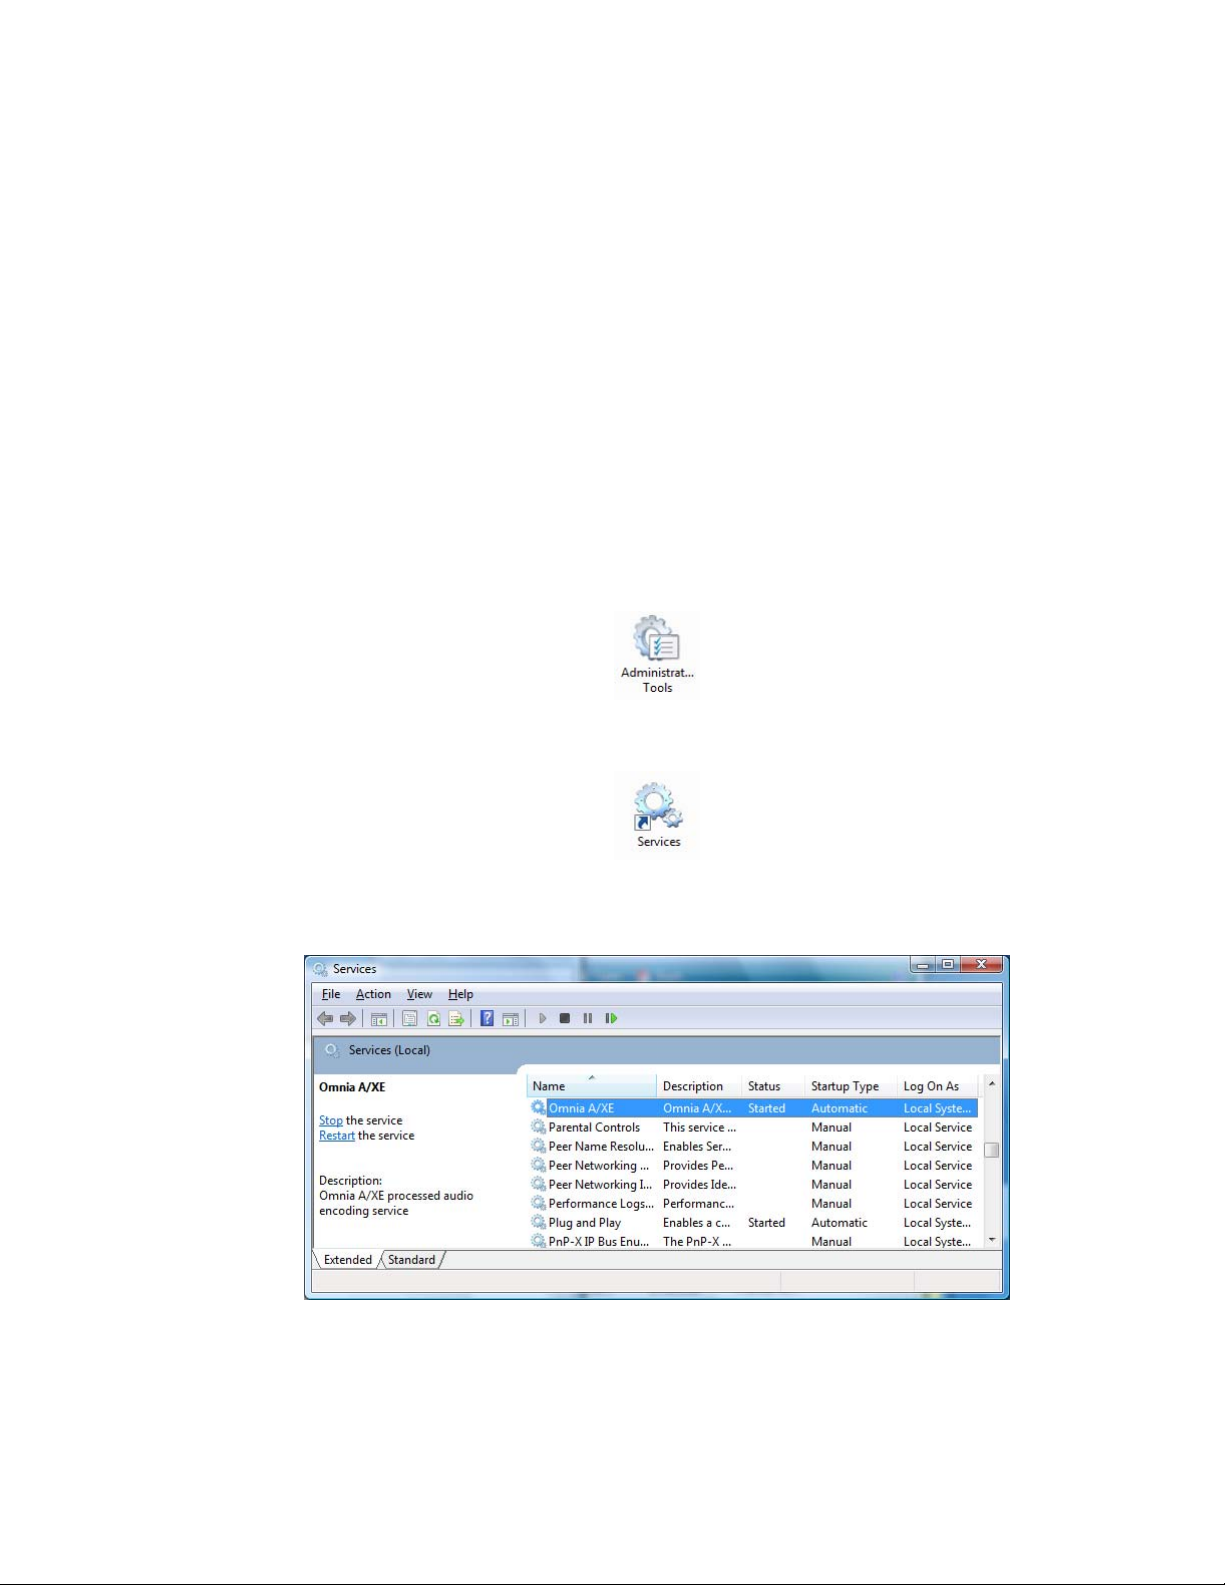
Verify the Omnia A/XE Service
Omnia A/XE application runs as a Windows service. Services run in the background and
present no user interface. You may start and stop Windows services by using the Service
Manager control panel applet.
1. Open the Control Panel from the Start menu on the task bar. Open the Administra-
tive Tools applet from the panel:
2. In the Administrative Tools window that just opened up, open the Services applet:
3. A list of services installed on your PC will show up. Scroll down in the list until you find
the Omnia A/XE entry:
4. Check the status for the entry. If it is “Started” then skip the next step and jump ahead
to the next section.
5. If the status is not “Started” then we’re going to start the service. Right-click the Omnia
A/XE entry and select Start from the popup menu. Once you see “Started” in the status
column we can close the Services window and go on to the next task.
Page 25

MPEG LICENSE & MUSIC COPYRIGHT | 19
Check the Firewall Exception List
If you have a firewall installed on your PC it may block Omnia A/XE from reaching the
network. Omnia A/XE will only be able to function properly once it has been added to
the firewall’s exception list. If you are using the Windows firewall please see the Firewall
Configuration chapter for details. If you are using another firewall you will need to consult
your firewall’s documentation.
Once Omnia A/XE has been added to the firewall’s exception list try to connect to the
application again (using the Configure Omnia AXE shortcut). If the problem still persists
read the next section.
Check the Port Number
By default Omnia A/XE uses port 80 for configuration. If port 80 was already in use by
another application or Omnia A/XE was previously configured to use another port you may
have trouble connecting to the application.
1. Use the Configure Omnia AXE shortcut to launch your browser. When the browser
comes up you will see either the Omnia A/XE login page or a “Page not found” error.
2. If you see the login page when you use the Configure Omnia AXE shortcut but are not able to see it when you connect from another PC then
look at the address bar of the browser. You will see the address listed as
http://localhost or as http://localhost:port_number. When you connect from
another PC you will need to enter the address as http://ip_address_of_axe_pc (or
http://ip_address_of_axe_pc:port_number if a port number was displayed).
3. If you see a “Page not found” error even when you use the Configure Omnia AXE
shortcut then you should restart the Omnia A/XE service. It may be possible that the
configuration port number has been changed but service has not yet been restarted. Port
number changes only take effect when the application is restarted.
e port number, along with all configuration information, is stored in the Options.xml file.
It the steps above did not solve the problem, you may want to open the Options.xml file
with a text editor. Look for an entry named httpport and check the value parameter, this
will be the administrative port number.
If none of the above steps resolve the problem, please call the 24/7 support line at +1-216622-0247 or send an email to support@omniaaudio.com.
Can’t remember the password?
If the password was changed and now you can’t remember it you can find it in the
Options.xml file. Open the file with a text editor and look for an entry named adminpass.
e value parameter indicates the password currently set.
MPEG License & Music Copyright
Musical compositions and sound recordings are creative works that are protected by the
copyright laws of the United States (title 17, U.S. Code) and other countries. Under
U.S. law, the owner of a copyright has the exclusive right to (and to authorize others to)
reproduce the work, use parts of the work in a new creation, distribute the work in whole or
in part, and to publicly display or perform the work (including on web pages and through
webcasting). With few exceptions, it is illegal to reproduce, distribute or broadcast a sound
Page 26

20 | Getting Started
recording without the permission of the copyright owner. It is your responsibility to comply with
the copyright laws of the United States and other countries in which you broadcast and to pay all
applicable royalties to the copyright owners when you become a webcaster.
ere have been recent amendments to the copyright law regarding webcasting of sound recordings.
ese new provisions allow webcasting under the terms of a statutory license, as a way to help
webcasters get permission without having to go to each sound recording’s owner. e statutory
license, however, has strict requirements that you must follow. Some of these requirements include
the payment of license fees, limitations on the number of songs from the same album or artist
that may be played in a three hour period (called the sound recording performance complement);
a prohibition on publishing advance playlists; and a requirement to identify the song, artist and
album on the website. ere are other requirements as well. e Recording Industry Association of
America provides quite a bit of information on copyright law as it applies to webcasting, and both
ASCAP and BMI have created license agreements that they are willing to grant to webcasters that
they believe conform to the provisions of the new copyright rules for webcasting. For additional
information on the statutory license and other aspects of webcasting, please visit the following sites:
e U.S. Copyright Office
http://www.copyright.gov
e Recording Industry Association of America
http://www.riaa.com/issues/music/webcasting
ASCAP
http://www.ascap.com/weblicense/webintro.html
BMI
http://www.bmi.com/iama/webcaster/index.asp
Page 27
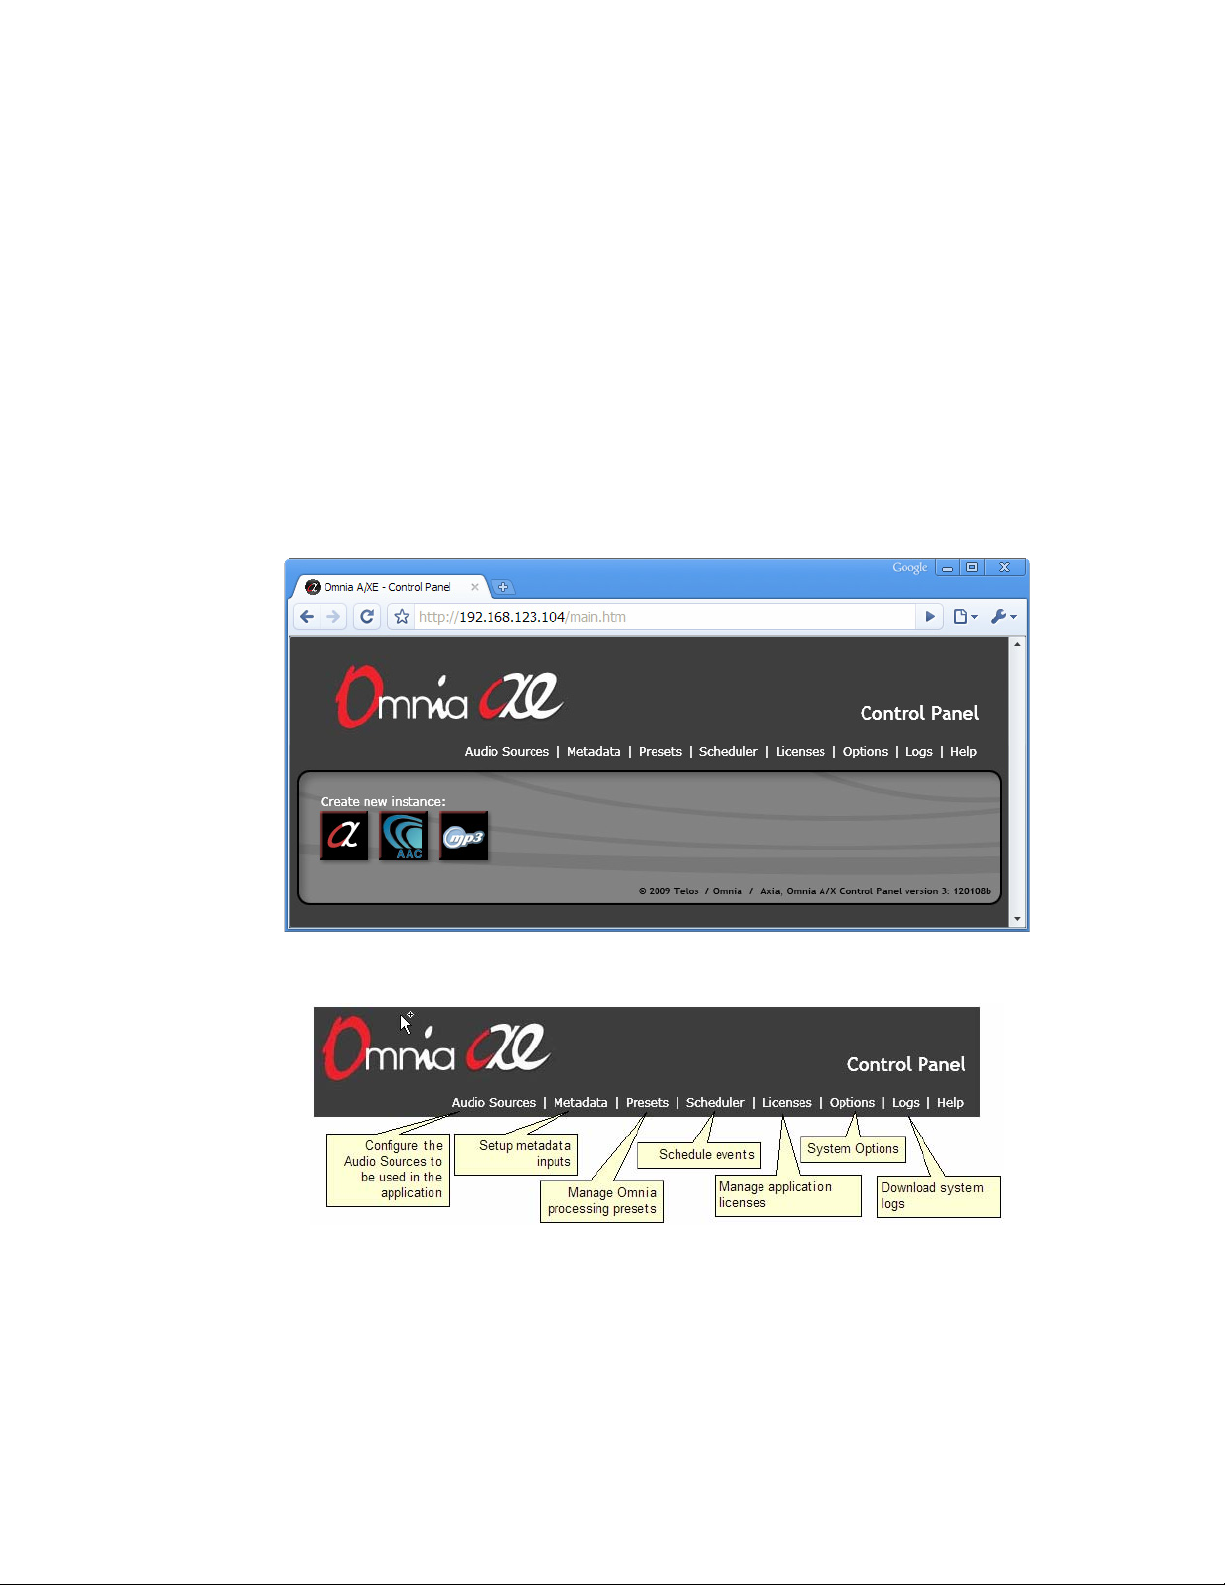
4 Omnia A/XE Control Panel
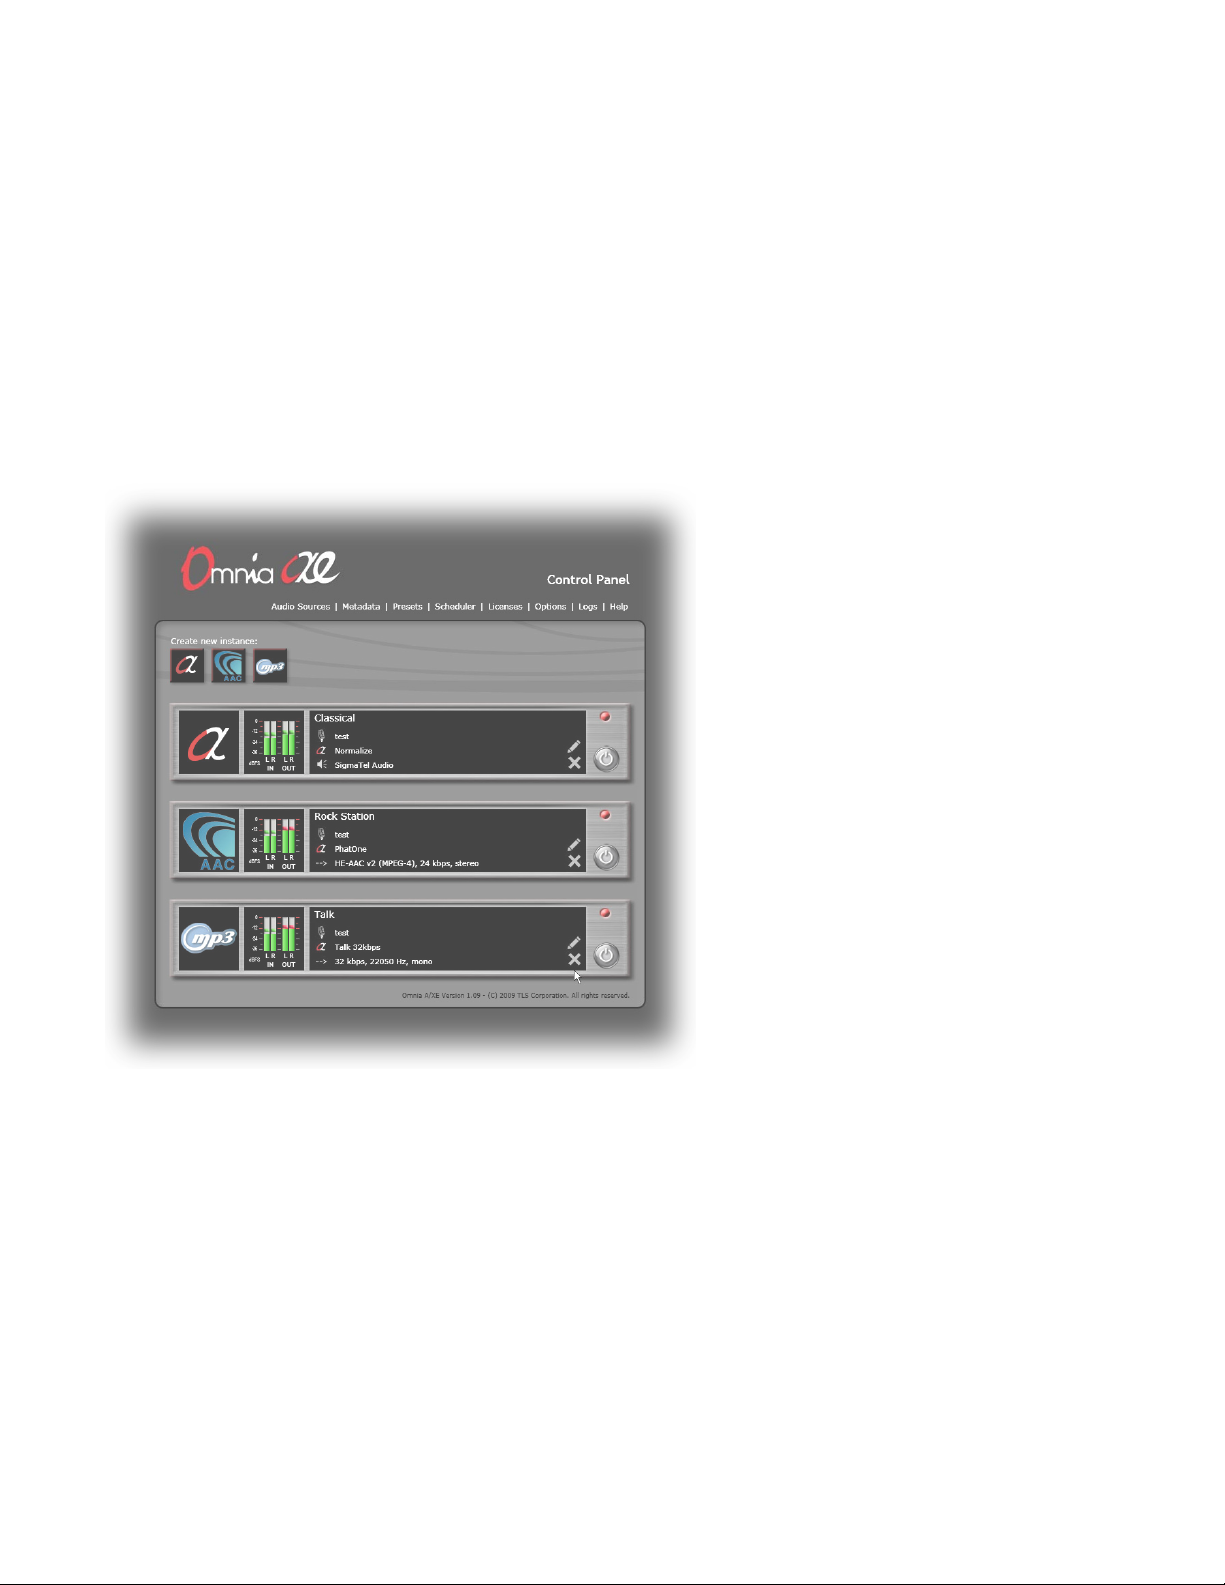
e Control Panel is the main application page. is page displays all audio processing and
encoding instances, the audio meters and processing presets assigned. On this page you can
create additional audio processing or encoder instances, delete existing ones and start/stop
individual instances. When you first start the application it will look like the image below:
e menu at the top of the page allows you to access other application areas:
e buttons on the gray panel create new audio processor, AAC or MP3 encoder instances:
Page 28

Audio
Source
Audio
Processor
Output Audio
Device
Source
audio data
Processed
audio data
Audio
Source
Audio
Processor
AAC
Encoder
Source
audio data
Processed
audio data
SHOUTcast /
Icecast Servers
Internal
Stream Server
Wowza Server
AAC encoded
streams
Media player
Media player
Flash player
22 | Omnia A/XE Control Panel
e sections below briefly describe the Audio Processor, AAC and MP3 encoder instances.
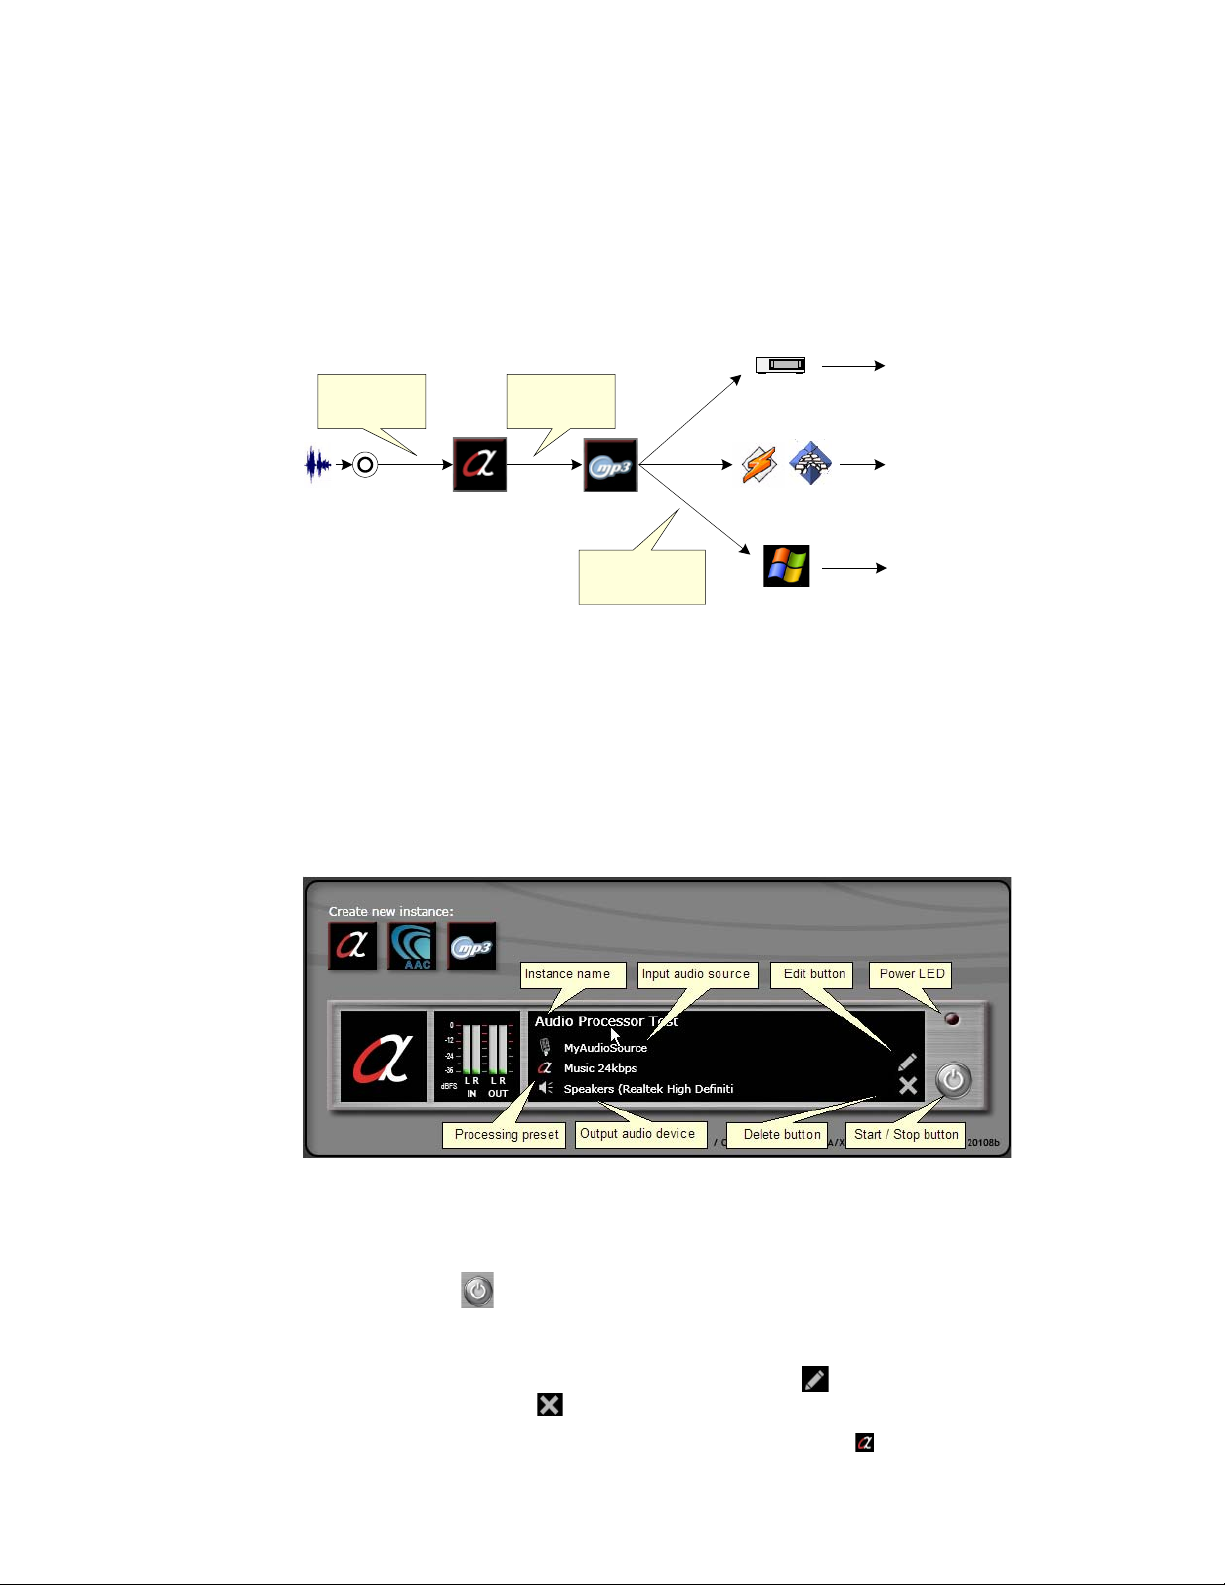
Audio Processor Instance
e Audio Processor instance accepts audio from an audio source, processes it then sends
the processed audio to an output device:
e output audio device can be either a sound card installed in the PC, a Virtual Audio
Cable device or an Axia IP-Audio device. Please see the Audio Processor Instance chapter
for more details.
AAC Encoder
e AAC Encoder instance accepts audio from a source, processes it, encodes it to AAC,
then sends the encoded stream to one or more servers you specify:
It is important to note that the encoded stream can be sent simultaneously to multiple servers. e servers then replicate the stream to the clients. e AAC Encoder chapter describes
in more detail how to create and configure an AAC Encoder instance.
Page 29
Audio
Source
Audio
Processor
MP3
Encoder
Source
audio data
Processed
audio data
SHOUTcast /
Icecast Servers
Internal
Stream Server
Windows Media
Server
MP3 encoded
streams
Media player
Media player
Windows
Media player
| 23
MP3 Encoder
e MP3 Encoder instance is very similar to the AAC Encoder instance. It accepts audio
from an audio source, processes it, then encodes it to MP3 and feeds the encoded audio to
one or more media servers:
Just as with the AAC encoder, you may send the encoded stream to multiple server
simultaneously. e servers then replicate the stream to the end clients. Please see the MP3
Encoder chapter for more details on creating and configuring MP3 encoder instances.
Instance Functions
Once an instance has been created, it will appear stacked under the buttons as shown in the
image below:
is image shows an Audio Processor instance. e AAC and MP3 encoder instances look
very similar except for the identifying logo in the box on the left side.
Click the Start / Stop
will light up and the meters will indicate the audio activity if the audio source is receiving
audio.
If you need to make changes to an instance then click the Edit
instance by clicking the Delete icon.
When an instance is active, you may click the Processing preset icon to edit the audio
processing parameters.
button to start or stop an instance. When on, the power LED
icon. You may delete an
Page 30

Page 31

5 License Manager
e License Manager keeps track of the application licenses and allows you to Add,
Remove and Activate them. You may enter more than one license on one PC. e licenses
entered limit the number of audio sources you can use in the application. Before creating
audio sources or encoders, you will need to enter the license code(s) you received with
Omnia A/XE on the License Manager page.
Adding a License Code
1. Click the Licenses link at the top of the Control Panel page. e License Manager
page will be displayed:
2. Click the Add… button. Enter your license code in the License field then click the Save
button.
Page 32

26 | License Manager
3. e code you entered will show up in the Licenses list on the left. Next to the license
code you will see additional text describing the state of the license. e text will initially
say “Pending activation” then, after 10-15 seconds, it should change to “OK”. Repeat step
2 for each license code you have received. If all license codes have an “OK” status then
you are done. Otherwise keep reading for other options.
4. If you see an error message next to the license code, first check the license string to make
sure it matches the one you received. If the error shown is “Activation failed” then refer
to the following section to learn how to activate your license manually.
Manual License Activation
e automatic activation may fail if the PC on which Omnia A/XE has been installed is
not connected to the Internet. e manual activation method allows you to activate your
license from another PC that is connected to the Internet.
1. Select the license number that failed to activate from the list then click the Activate...
button.
2. e license activation page will be displayed:
Page 33

SUPPORT | 27
3. Copy the request code displayed in the first text box. You will need to take this code to
a PC that has an Internet connection. A simple way to accomplish this is to select the
code text with the mouse, press CTRL-C to copy it to the clipboard then paste it to a
text file using Notepad.exe. en save the file to a USB drive and take it to the PC with
the Internet connection.
4. On the PC with the Internet connection, open your browser and point it to
https://secure.telos-systems.com. Enter the request code you obtained from the A/XE
PC on the page that appears then click the Submit button. e next page will display
your activation code. Copy the activation code displayed. You will need to take the
activation code back to your Omnia A/XE PC.
NOTE: The activation code always begins and ends with ##, two pound characters. Make sure to copy
these characters as well.
5. On the Omnia A/XE PC, enter the activation code in the second text box on the
License Activation page then click the Save button. If the activation code was correct
you should see the following page:
Your license has now been activated.
Support
If you need assistance, please call the 24/7 support line at +1-216-622-0247 or send an
email to support@omniaaudio.com.
Page 34

Page 35
6 Audio Source Manager
On the Audio Source Manager page, you select the input audio device(s) you wish to use
with Omnia A/XE. Since the Windows audio device names are often not very descriptive,
you have the opportunity to assign each audio device a friendly name. is name is then
used throughout the rest of the application to refer to the audio source. e number of
audio sources you may create is limited by the license(s) you have purchased and entered in
A/XE. Please make sure to enter your license codes before you attempt to create new audio
sources.
Create Audio Source
Follow these steps to create one or more audio sources.
1. On the Control Panel page, click the Audio Sources link at the top of the window. e
Audio Sources Manager page will be displayed:
2. Click the Add… button. Select the audio device you wish to use from the Source device
drop down list. Enter a name for it in the Friendly name field then click Save.
Page 36

30 | Audio Source Manager
3. Repeat step 2 for each audio source you wish to use. If you attempt to add more audio
sources than your license allows, a message indicating this condition will be displayed. If
you need additional audio sources, please consider purchasing another A/XE license.
4. When done, click the Main link or use the Back button to return to the Control Panel
page.
Delete Audio Source
When you no longer need an audio source, you may remove it from the application. Before
removing an audio source, make sure it is not being used by an audio processor or encoder
instance. To remove the audio source, select it from the list then click the Remove button.
Page 37

7 Audio Processor Instance
Audio
Source
Audio
Processor
Output Audio
Device
Source
audio data
Processed
audio data
An audio processor instance accepts audio from an audio source, applies Omnia processing
to it then sends it out to an audio device on the PC.
is can be used to deliver the processed audio to another device through a physical sound
card, to a Livewire device through the Axia IP-Audio driver or to another application on
the same PC through the Virtual Audio Cable driver.
Follow the steps below to create an audio processor instance:
1. Click the Create Audio Processor Instance button on the control panel . e
following dialog will be displayed:
2. Enter a name for the audio processor. You may use letters, digits, space and underscore
characters. Please do not use other special characters in the name.
3. In the Audio source drop down, select the audio source you wish to use. is will be one
of the audio sources previously defined on the Audio Sources page.
4. Select the processing preset you wish to apply to this audio stream from the Processing
preset drop down.
5. Select the output audio device from the Output audio device drop down list. Select
a sound card here if you wish to monitor the audio or select a Virtual Audio Cable
Page 38

| 32
instance if you wish to send the stream to another application on the same PC. Configure the other application to read the audio from the same Virtual Audio Cable device
(you can tell device instances apart by the device number embedded in the device name).
6. Click the Save button and you have just created an audio processor instance. It will now
be displayed on the Control Panel page.
Page 39

8 AAC Encoder
Audio
Source
Audio
Processor
AAC
Encoder
Source
audio data
Processed
audio data
SHOUTcast /
Icecast Servers
Internal
Stream Server
Wowza Server
AAC encoded
streams
Media player
Media player
Flash player
An AAC Encoder instance accepts data from an audio source, processes and encodes it, and
makes it available to SHOUTcast-compatible or Wowza Media servers.
e encoded stream can also be made available through the HTTP stream server built into
the application. e internal stream server is intended for monitoring the stream by a very
small number of listeners. It is not designed to feed a large number of clients.
Create the Encoder
Click the Create AAC Instance button on the A/XE control panel page to create
an AAC encoder. e AAC encoder dialog page will be displayed. Follow the steps below to
create an AAC encoder instance.
Page 40

34 | AAC Encoder
1. Enter a name for this AAC encoder instance. e name may contain letters, digits,
spaces and underscore characters but it should not contain other special characters.
2. Select the audio source to use from the drop down list.
3. Next, select the audio processing preset you wish to use.
4. Select the AAC encode format and channels (mono or stereo). e choices made limit
the minimum and maximum bitrate that can be used. Enter the bitrate in the Bitrate
field and select the stream transport mode if needed by the end client used. e default
mode of ADTS should work fine in most instances.
Deliver the Encoded Stream
We are now ready to define how this stream will be delivered. Click the Select stream type
to add... button and from the drop down list select the desired stream delivery method:
e following sections describe each delivery method in more detail. When you are done
adding the stream delivery methods make sure to click the Save encoder button to save all
your changes.
Page 41

DELIVER THE ENCODED STREAM | 35
HTTP Stream Server
e HTTP server choice will send the stream to the Omnia A/XE’s built in stream server.
is server will allow you to monitor the encoded stream directly from the source PC. is
is often helpful in troubleshooting server connections or just as a quick way to test that
everything is working as expected. e HTTP server is also useful when adjusting audio
processing parameters as the audio delay should be smaller than listening to the stream
delivered through an external server. As mentioned previously, the internal stream server is
not intended to support large numbers of listeners. Always use a dedicated media server to
deliver the streams to large numbers of listeners.
When you select this choice you will see the following HTTP Server Stream dialog:
1. Enter a friendly stream name in the first text box. You may use letters, digits, spaces and
the underscore character in the name but please avoid special characters.
2. Next, select a resource ID for the stream. e resource ID will become part of the URL
you will use to reach this stream. For example, if the stream server is active on port 8080
and you use a resource ID of “stream1” then you would listen to this stream by entering
http://ip_address_of_pc:8080/stream1 in your media player. e Full stream URL will
display an example of the full URL you can use to listen to this stream.
3. When done, click the Save button. e stream will appear in the streams list on the left.
Send to SHOUTcast server
is option will send the stream to a SHOUTcast-compatible server.
1. Enter a friendly stream name. You may use letters and numbers but please avoid special
characters.
2. Select a metadata source from the drop down list. If no metadata sources have yet been
Page 42

36 | AAC Encoder
defined then the list will be empty.
3. Enter the address of the SHOUTcast server and a server password if one is used.
4. Next, enter a stream name that will be advertised on the SHOUTcast server and a
stream genre if desired.
5. When done, click the Save button. e stream will appear in the streams list on the left.
Send to Wowza Media server
When delivering a stream to Wowza media server, Omnia A/XE acts as a server. e
Wowza server is configured to connect to Omnia A/XE, read the stream and then make
it available to clients. Please see the Wowza Media Server chapter for details on how to
configure the Wowza server.
1. Enter a friendly stream name. You may use letters and numbers but please avoid special
characters.
2. Select a metadata source from the drop down list. If no metadata sources have yet been
defined then the list will be empty.
3. Enter the local port number where the Wowza server will connect to receive the stream.
e full stream URL will be displayed below the port number field. is is the URL that
has to be configured on the Wowza server to be able to connect to Omnia A/XE.
4. When done, click the Save button. e stream will appear in the streams list on the left.
Page 43

9 MP3 Encoder
Audio
Source
Audio
Processor
MP3
Encoder
Source
audio data
Processed
audio data
SHOUTcast /
Icecast Servers
Internal
Stream Server
Windows Media
Server
MP3 encoded
streams
Media player
Media player
Windows
Media player
An MP3 Encoder instance accepts data from an audio source, processes it, encodes it to
MPEG Layer-3 and makes it available to SHOUTcast-style or Windows Media servers.
e encoded stream can also be made available through the HTTP stream server built into
the application. e internal HTTP server is intended for monitoring the stream by a very
small number of listeners. It is not designed to feed a large number of clients.
Create the Encoder
Click the Create MP3 Instance on A/XE’s control panel page. e MP3 Encoder
page will be displayed. Follow the steps below to create an MP3 encoder instance.
Page 44
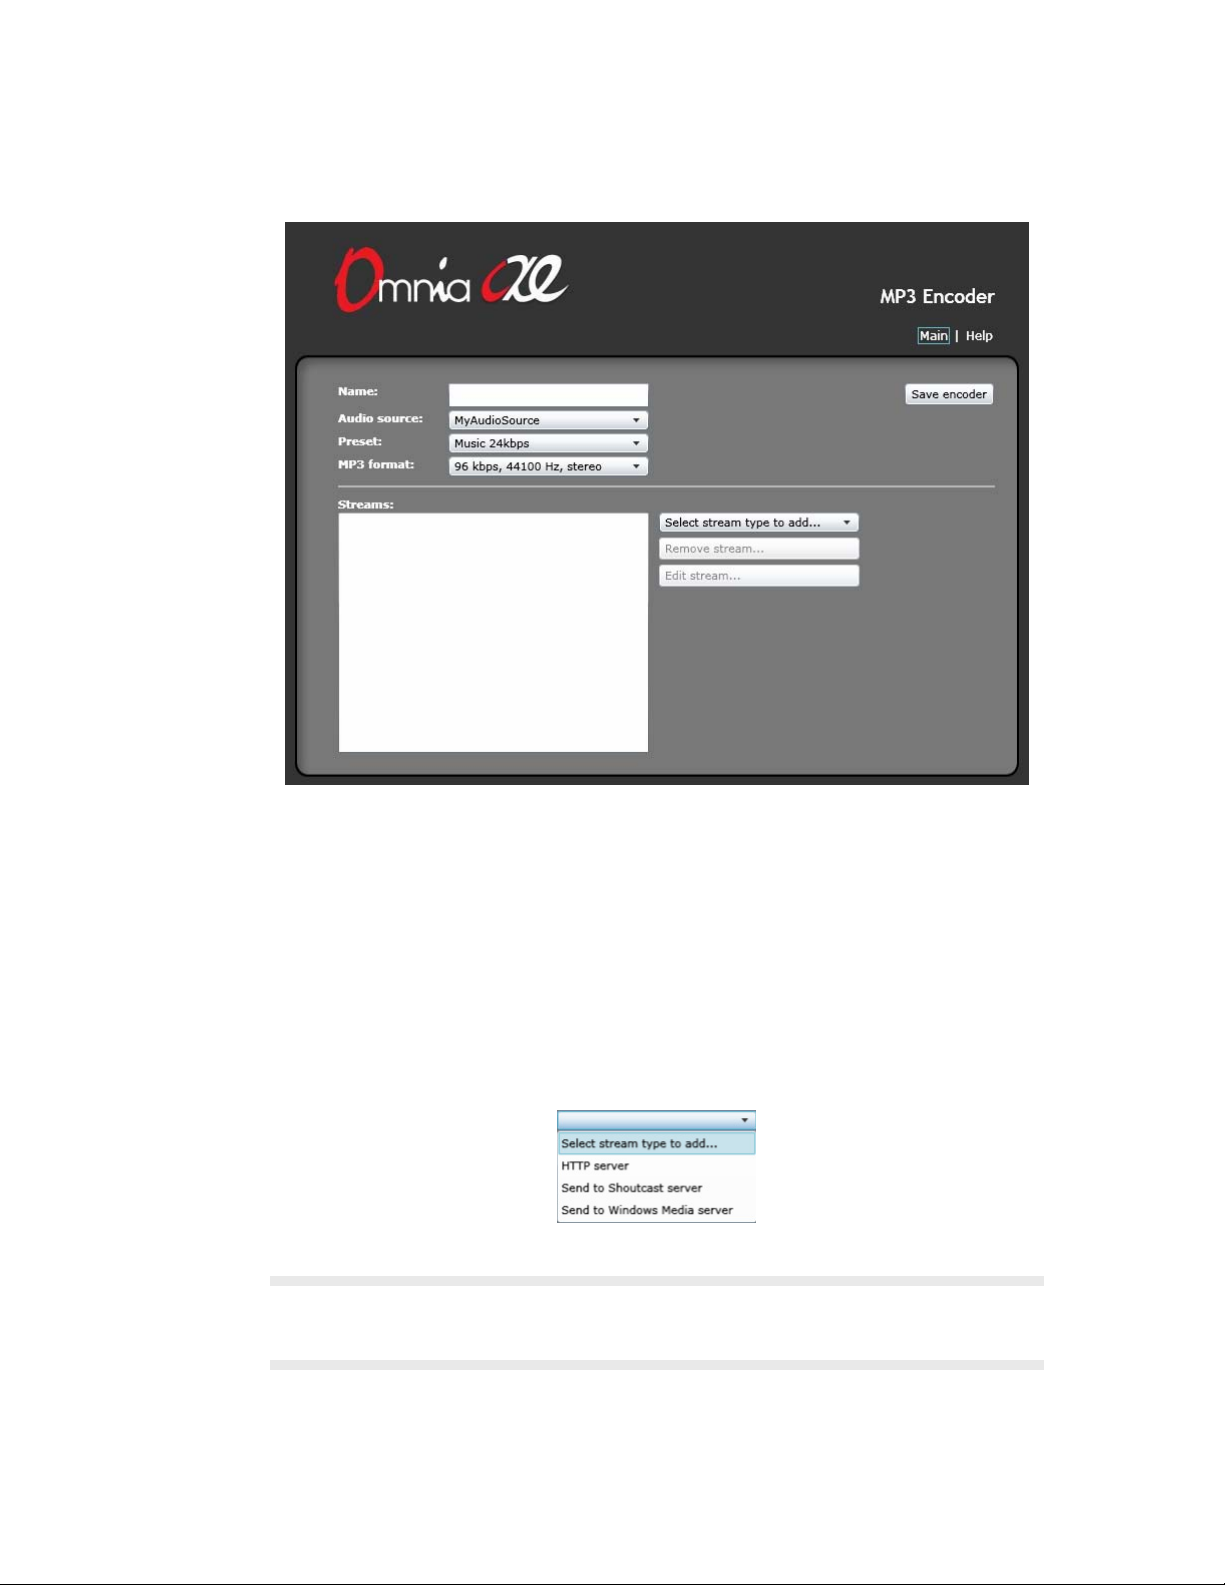
38 | MP3 Encoder
1. Enter a name for this MP3 encoder instance. e name may contain letters, digits,
spaces and underscore characters but it should not contain any other special characters.
2. Select the audio source to use from the drop down list.
3. Next, select the audio processing preset you wish to use.
4. Select the MP3 encode format from the MP3 format drop down list.
Deliver the Encoded Stream
We are now ready to define how this stream will be delivered. Click the Select stream type
to add... button and from the drop down list select the desired stream delivery method:
NOTE: If the Send to Windows Media server option is not displayed in the drop down list
then the Windows Media plug-in failed to load. The most likely cause is that the WMVCORE.DLL is not
installed on your PC. Installing the latest version of Windows Media player should resolve this issue.
e following sections describe each delivery method in more detail. When you are done
adding the stream delivery methods make sure to click the Save encoder button to save all
your changes.
Page 45

DELIVER THE ENCODED STREAM | 39
HTTP Stream Server
e HTTP server choice will send the stream to the Omnia A/XE’s built in stream server.
Using this server you can monitor the encoded stream directly from the source PC. is
is often helpful in troubleshooting server connections or just as a quick way to test that
everything is working as expected. e HTTP server is also useful when adjusting audio
processing parameters as the audio delay should be smaller than listening to the stream
delivered through SHOUTcast or Windows Media server.
When you select this choice you will see the following HTTP Server Stream dialog:
1. Enter a friendly stream name in the first text box. You may use letters, digits, spaces and
underscore characters in the name but please avoid other special characters.
2. Next, select a resource ID for the stream. e resource ID will become part of the URL
you will use to reach this stream. For example, if the stream server is active on port 8080
and you use a resource ID of “stream1” then you would listen to this stream by entering
http://ip_address_of_pc:8080/stream1 in your media player. e Full stream URL will
display an example of the full URL you can use to listen to this stream.
3. When done, click the Save button. e stream will appear in the streams list on the left.
Send to SHOUTcast server
is option will send the stream to a SHOUTcast-compatible server. Please see the
SHOUTcast Streaming chapter for details on how to configure the SHOUTcast server
that will receive the stream.
1. Enter a friendly stream name. You may use letters, numbers, spaces and underscores but
please avoid other special characters. is name is used internally to refer to this stream.
2. Select a metadata source from the drop down list. If no metadata sources have yet been
Page 46

40 | MP3 Encoder
defined then the list will be empty. e metadata source will insert stream tags received
from an automation system or another application.
3. Enter the address of the SHOUTcast server and a server password if one is used.
4. Next, enter a stream name that will be advertised on the SHOUTcast server and a
stream genre if desired.
5. When done, click the Save button. e stream will appear in the streams list on the left.
Send to Windows Media server
Windows Media server can accept the stream either in push or pull mode. In push mode
the encoder establishes a connection to the server and sends the stream out. In pull mode
the encoder accepts connections from the server (or other clients). You may choose either or
both delivery methods at the same time.
1. Enter a friendly stream name. You may use letters, numbers and underscores but please
avoid other special characters.
2. If you wish to use the pull mode then click the first Use checkbox. Enter a local port
where the application will accept media requests for this stream. is port number must
not already be in use by A/XE or another application. Next, enter the maximum number
of clients that can request the stream simultaneously. is should be a small number,
perhaps around 5 or 10 or so.
3. If you wish to also push the stream to a Windows Media server click the second Use
checkbox and enter the address of the Windows Media server.
4. When done, click the Save button. e stream will appear in the streams list on the left.
Page 47

10 Preset Manager
Using Preset Manager you may add, copy, edit, rename and delete presets. A “preset” is simply a table of values for the audio parameters that control the audio processing. When you
choose a preset, the control values are loaded into the processing structure, reconfiguring the
Omnia A/XE audio processor. Presets allow different processing setups to be quickly loaded
into the system. A set of factory presets have been provided for you to use as starting points
for customizing your sound.
NOTE: We recommend that you do not modify the factory presets. Instead, make a copy of the factory
preset you wish to experiment with, then edit the copy. This way you always have the factory preset
available as a reference point.
Managing Presets
Click the Presets menu link to get to the Preset Manager page. e Preset Manager displays
a list of all audio processing presets available in Omnia A/XE and the buttons on the right
represent the actions you can apply to the presets.
Page 48

42 | Preset Manager
Add Preset
Click the Add... button to create a new preset with the default parameter values. Enter the
name of the preset at the prompt then click the Save button. Once added, you may edit the
preset parameters by selecting the preset from the list and clicking the Edit... button.
Copy Preset
If you need to create a new preset it may be more convenient to copy an existing preset as
your starting point. Select the preset you wish to copy from the list and click the Copy...
button. At prompt, enter the new name for the preset then click the Save button.
Edit Preset
Click the Edit... button when a preset is selected to access the Preset Editor. e Preset
Editor allows you to modify all preset parameters. Please see the Processing Audio chapter
for details on adjusting the audio processing parameters.
NOTE: When you edit a preset by clicking the Edit... button in Preset Manager the audio meters will not
be active since there is no audio data being processed. A better way is to assign the preset you wish to
edit to an audio processor instance, start the processor instance then click the preset edit button ( )
on the main control panel page. You will be able to edit the preset and get audio and visual feedback on
the parameter adjustments.
Rename Preset
Select the preset you wish to rename from the preset list then click the Rename... button.
Enter the new name for the preset then click the Save button. Make sure the preset is not
being used by an audio processor or encoder instance before renaming it.
Delete Preset
Select the preset you wish to delete from the preset list then click the Delete... button.
When prompted, confirm the delete and the preset file will be erased. Please note that there
is no UNDO for this option. Once a preset is deleted, it is gone. For this reason, it is a good
idea to create backup copies of the preset files.
Backup Presets
After adjusting the audio processing parameters to get the “just right” sound you may want
to take a minute and create a backup copy of your processing presets. e presets are stored
in separate files in an application data directory. e path of this directory is different for
different Windows versions (only Microsoft knows why). To help locate this directory we
provide a program menu entry named Locate Presets Directory. Clicking this entry will
open an Explorer window in the presets directory. Once there, you can make backup copies
of your presets to another location: a network drive, USB drive or memory stick.
Page 49

11 Processing Audio
Omnia A/XE’s audio processing is the Omnia3.net processor implemented in software. e
algorithms in Omnia A/XE are exactly the same as the rack mountable hardware counterpart. e only difference is the number of parameters to adjust is limited. If you are familiar
with Omnia.3net, then Omnia A/XE is even easier to understand.
Omnia A/XE’s audio processing is intuitive and easy to use. Applying audio will activate
movement on the bar graphs, and this is confirmation that processing is occurring. Before
making adjustments, it helps to know how to interpret the metering displays.
The Preset Editor
All audio processing adjustments are performed in the Preset Editor. A “preset” is simply
a large table of values representing all of the control values for every control listed in the
menu tree. When you choose a preset, the control values are loaded into the processing
structure, reconfiguring the Omnia A/XE.
Presets allow different processing setups to be quickly loaded into the system. Numerous
factory presets have been provided for you to use as starting points for customizing your
sound. Omnia/Telos does not warrant in any way that these presets are de facto standards
for the names that we used when we designed them. e factory presets were created as
starting points, but they are not engraved in stone! Always rely on our factory presets to get
you started. en, once you find the preset that most closely matches the sound you’re after,
you can customize more to your liking.
You can get to the Preset Editor in one of two ways. e first is by clicking the A/X icon
on an active audio processor or encoder instance:
e second is by clicking the Edit button in Preset Manger. Please note that if you edit a
preset from the Preset Manager then the meters will not be active since you are only editing
the preset file. For this reason we recommend that you always edit a preset that is in use by
an active processor or encoder instance. is way you can get both visual and audio feedback
in response to your changes.
e Preset Editor has three main areas:
1. On the upper left side you will find the signal block diagram. Clicking one of the blocks
will display the corresponding parameter controls in the main area below.
2. In the upper right side you will see the meter section. e meters will not be active if you
Page 50

44 | Processing Audio
are editing a preset file through the Preset Manager.
3. Below the block diagram and the meter section you will find the parameter controls and
the bypass switch. Use the sliders, knobs and switches to change the parameter values.
Understanding The Bar graphs and Indicators
e bar graphs are capable of indicating more than just level information. e texture and
density of the audio signal can be observed, based upon the dynamic action of the bar
graphs, and peak-responding “pills”. Of interest are the “pills” at the end of the input and
output meters, as they indicate peak level. e bar section represents the RMS average of
the signal. Wide dynamic range will display a separation between the pills and the bar,
whereas signal with little peak information will cause the pills to ride on the crest of the bar
graph. e bar graphs can indicate up to 25 dB of gain reduction.
e bar graphs provide a wealth of information about the processing control in Omnia
A/XE. e algorithms automatically adapt the style of compression/limiting control being
employed on a moment-by-moment basis. is can be deduced if the metering is studied
Page 51

UNDERSTANDING THE BAR GRAPHS AND INDICATORS | 45
over time. During normal operation, the indicators will have a dynamic “bounce” that you
will be able to get a feel for. Every now and then, you will see the processor react quickly
and show a larger amount of gain reduction. Notice that the response is very fast. is
action will recover very slowly, and return to “rest” with the main bar graph. is action will
be easily noticed on material that is very dynamic in texture. More on this below.
Another feature unique to Omnia A/XE is processor “Hold”. During brief pauses in audio,
the bar graphs will “freeze” and the GATE indicators will show the processor has entered
the Hold mode of the algorithm. is is most easily noticed when there is a “dry” voice
being processed.
e Input/Output level meters will change from green to red whenever the level exceeds
–12dBfs. e pills also change color on the Input/Output displays. In the dynamic processing section the pills maintain the same color.
Note: The input and output levels are displayed relative to 0dB full scale (0dBfs). The 0 indicator on the
input/output bar graphs means that every available bit of signal level is being used at that time! There
is nothing more in the level department, except to create distortion… nasty sounding distortion!
Interpreting the Gain Reduction Meter Displays
rough careful observation of the processing bar graphs, significant information can be
acquired and analyzed about the audio signal on a moment-by-moment basis. e bar
shows the average value of the gain reduction, while the floating pill indicates the peak
value of gain reduction.
Since the processing algorithms in Omnia A/XE ‘adapt’ to the audio, it is capable of
performing many different processing functions at different times. e processing display
bar graphs may appear to indicate different kinds of operation with different program material. is behavior is primarily based on dynamic range differences in the applied program
material. For program material that is already processed or lacking dynamic range, the bar
graphs will indicate differently than with material that possesses a high degree of dynamic
range. is is because audio signals that lack dynamic range, naturally or by previous
processing, will possess a lower peak to average ratio. Conversely, audio signals with a wide
dynamic range possess a higher peak to average ratio. e Omnia A/XE adapts differently
to each case.
For program material that has low dynamic range (or high RMS and low peak levels),
there will be more activity in the WB-AGC sections and less activity in the Multiband
Processors. is behavior is due to the WB-AGC response to high RMS energy, while the
Multiband section is reacting to lower peak energy. Sometimes the Multiband section may
not indicate any action at all. For Omnia A/XE, this is completely normal! Examples of
this behavior might be seen with heavily processed commercials or music, or with music
passages of sustained level. A good example is the Aerosmith CD “Pump.” is recording
has very little dynamic range. Try any up-tempo selection from this disk and you will see
the Wideband-AGC section make initial adjustments along with small amounts of limiting.
Page 52

46 | Processing Audio
Once adjusted, the Wideband-AGC section will stay deep in gain reduction, although with
little movement, and action within the limiters will be minimal.
When the programming has wide dynamic range (low RMS and high peak levels), the
opposite will occur. e Multiband section becomes active, while the WB-AGC section
will appear not to respond as much. During these events, the Multiband sections could be
working aggressively, while the WB-AGC section indicates little activity. Good examples
of programming able to cause this behavior: vocal passages, live voice, classical music, and
passages with high transient levels. Good test examples: almost anything classical, as well as
almost anything by Steely Dan!
Also keep in mind that the WB-AGC section is designed to operate much more slowly
than the Multiband sections, primarily because of the nature of each function. Remember
that the WB-AGC section operates on the program’s RMS energy. During gain calculations, the incoming program’s “average” level is established, and gain adjustments, if needed,
are made based on those calculations. is is why the WB-AGC sections will appear to
move slower as it makes changes over relatively long time periods.
e intent of the Multiband section is to normalize the spectral balance and provide control
of the peak levels. Peak energy must be detected and adjusted in a quick and accurate
manner while, at the same time, not interfering with the sonic integrity of the audio signal.
For this reason, the Multiband sections operate faster, with special background instructions
to govern their behavior, and strictly on an as-needed basis.
Since the processing displays are capable of providing a wide range of information, we do
not recommend setting up the system based on any specified meter indications. Instead, we
recommend setting up the processing by using your ears to judge the sound. We’ve provided
the meters only to analyze the signals and aid you in adjusting the specific parameters
needed to achieve your desired sonic results. Like a speedometer, the meters are a guide, not
the road!
e red ticks that appear above the WB (Wideband AGC), L (Low-Band AGC), M (MidBand AGC), and H (High-Band AGC) bar graphs are the GATE indicators. ey display
GATE activity. e GATE function is described above in the section titled “Understanding
the Bar graphs and Indicators”.
Processing Adjustments
Here’s where the action is! A block diagram depicts the flow of the audio signal, and
illustrates the processing functions that are available to adjust. A mouse-click on button will
provide access to that function.
Input
A mouse-click on the Input button displays the input section sub-menu. ere are adjustments for the individual Left/Right channels. Drag the slider-bar to adjust the respective
Page 53

PROCESSING ADJUSTMENTS | 47
level. ere is a 30dB range of adjustment between –20dB and +10dB.
Using normal program audio, a correct gain setting results in peak indications (the
“bouncing balls”) hitting -12 dBFS (where the level meters turn red) or a little higher. is
corresponds to system headroom of 12 dB. You may adjust for more headroom if you wish
(lower indications), but setting the input level for less headroom (higher meter indications)
is strongly discouraged.
WB-AGC (WideBand AGC)
A very flexible wideband leveler section provides smooth, transparent control of the input
program. is is achieved through two significant Omnia innovations, a dual referenced
release gate and a hidden, intelligent “makeup” gain algorithm. e dual gate reference is a
unique process that correlates the dynamics of the audio input signal to a “rolling” reference
level, and from that information makes conditional decisions affecting the character of the
release function.
A hidden, Make-Up Gain, control signal determines when the amplitude of the input
program suddenly falls to a reduced level. It then adjusts the side chain gain in order to “fill
in” the softer program passages so that the average level is increased. is allows the AGC
function to operate with slower time constants, while significantly increasing the average
audio level. ese slower overall time constants yield lower intermodulation distortion,
contributing to Omnia’s trademark sound.
Using Classical music for an example, the orchestra often plays forte, and then enters
abruptly into a quiet passage. Conventional AGC algorithms would hold the softer passage
down until it was able to slowly recover at the static release time setting, making such
passages nearly inaudible at normal listening levels. Omnia A/XE’s makeup gain function
allows a hidden, faster time constant to provide quick recovery, but only during the softer
passage. As soon as the orchestra starts to play louder, the “makeup” time constant yields
control back to the primary AGC circuit, returning gain to the previous platform level. is
sophistication preserves the dynamic integrity of the signal while greatly enhancing the
listenability of the program.
is is the first processing section within the Omnia A/XE, so the controls in this section
affect the overall signal, its density, and hence affect every other processing section following
it. e job of the Wideband AGC is to erase long-term audio level fluctuations, while doing
so in a very unobtrusive manner. is sub-menu provides a few parameters that tailor the
action of this section.
Page 54

48 | Processing Audio
Drive: e sets the audio level that enters the WB-AGC. Increasing the Drive will produce
more compression. is control is calibrated between –6dB and +6dB, and adjusts the signal
level into the Wideband AGC. It should be adjusted to net approximately 12dB of gain
reduction with typical programming. Too little gain reduction can defeat the “leveling”
function of the Wideband AGC. Too much gain reduction has little additional benefit.
Nominal gain reduction values for the Wideband AGC are between 10 and 15dB.
Release: Controls the speed of recovery for any given amount of gain reduction. Faster
action yields less dynamic range and the presence of more density to the audio. e Release
control sets the time constants in relative terms using Slow, Medium, and Fast. Because the
time constants are program-dependent, calibrating these controls in absolute time values
(ms/dB) would be useless—therefore we use simple terminology.
GATE: When set to ON, it will freeze the gain at the last level of processing action that
occurred before the audio signal fell below the threshold of operation. is control helps to
minimize “pumping”, and the increase of background noise during pauses in programming.
Clicking OK after adjusting any of the parameters in this section will save the change and
close the sub-menu.
Bass
is section contains the Bass EQ controls. In the Omnia A/XE’s unique signal processing
architecture, these controls are placed in their optimal position — just before the multiband
processor sections. Each of the Deep Bass and Phat Bass controls can boost the level up to
12 dB. Be careful here not to overdrive the following sections or over emphasize these lower
frequency ranges. When used properly this specialized low frequency enhancement tools
can deliver the thunderous bass and warmth that the Omnia is known for, and it can do so
without making the sound muddy.
Page 55

PROCESSING ADJUSTMENTS | 49
Deep Bass EQ: For those who demand thunderous bass, the Omnia A/XE has it! Up to
12 dB of “thunder” can be added to shake your walls! is is not a simple bass boost, but
a rather sophisticated concept that takes into consideration the time alignment of the low
frequencies as they pass through the entire system. It allows a loud, clean low end, with
absolutely no sacrifice to the overall loudness of your signal. e Deep Bass function is a
shelf boost at 85 Hz, utilizing a phase compensated 12dB/octave slope to emulate the EQ
function.
Phat Bass EQ: Phat Bass is a unique enhancement that adds filtered harmonics of the lower
registers to the upper bass frequencies. e algorithm extracts information contained in
the initial attack to do its work, and low frequency texture is therefore emphasized. Older
recordings sound fuller (or phatter) with the added illusion of loudness. Phat Bass EQ also
helps radios with small speakers sound like they have more bass than they actually do.
X-Over
Phase Linear, Time Aligned Crossover: Most multiband audio processors make a compromise in the crossover area in order to provide a flat dynamic frequency response. is is
done to avoid audible peaks or dips in the recombined frequency response as the individual
band gains change during processing. In an effort to minimize this problem, most processors use a fixed phase-offset in the crossovers. While such treatment helps to minimize
frequency response peaks and dips, it also results in a loss of phase linearity, increasing
“smearing’, and reducing musical clarity.
In Omnia A/XE’s implementation, the crossover network is carefully time-aligned so
that the recombined spectrum remains flat, regardless of the amount of gain control being
applied within any band. is true phase linear response assures that harmonic overtones are
not displaced in time. e result: the truer, more natural, and more musical Omnia sound.
e crossover frequencies are not adjustable.
Multiband AGC Sections
Similar in character to the wideband AGC described above, but expanded to three bands,
this section has the ability to significantly add power and loudness to the audio while
tailoring and pre-processing it for delivery to the final limiter section. e system uses
different algorithms for each of the bands: e low and mid bands use a feedback configuration, which produces a larger, warmer sound on lower frequencies. e high band utilizes
a feedforward design that maintains a more open, natural and musical texture on higher
frequencies.
As with any multiband processor, improper adjustment can exaggerate noise at high
frequencies, particularly with older recordings that possess a good deal of tape hiss. is can
especially occur if the highest AGC band is driven so that significant gain reduction occurs,
and the band’s gating control is set to the lower end of the scale. During audio segments
that have little or no HF content, the AGC will try to increase its gain in an effort to restore
treble balance. Even during periods when the gate function is in the default Freeze mode,
the problem might still exist with some programming.
Since the user parameters are the same for all three bands, only the LF Band will be
detailed here.
Page 56

50 | Processing Audio
Drive: e sets the audio level that enters the WB-AGC. Increasing the Drive will produce
more compression. is control is calibrated between –6dB and +6dB, and adjusts the signal
level into the Wideband AGC. It should be adjusted to net approximately 12dB of gain
reduction with typical programming. Too little gain reduction can defeat the “leveling”
function of the Wideband AGC. Too much gain reduction has little additional benefit.
Nominal gain reduction values for the Wideband AGC are between 10 and 15dB.
Release: Controls the speed of recovery for any given amount of gain reduction. Faster
action yields less dynamic range and the presence of more density to the audio. e Release
control sets the time constants in relative terms using Slow, Medium, and Fast. Because the
time constants are program-dependent, calibrating these controls in absolute time values
(ms/dB) would be useless—therefore we use simple terminology.
GATE: When set to ON, it will freeze the gain at the last level of processing action that
occurred before the audio signal fell below the threshold of operation. is control helps to
minimize “pumping”, and the increase of background noise during pauses in programming.
MIX
is is where the three multiband processors are mixed together. Use care in adjusting this
section, as too much level from one particular band may cause an excessive amount of emphasis to that range of frequencies. Such adjustment may also drive the final limiter bands
in that range of frequencies too hard, causing the sound to become unnatural, dense, and
squashed. As explained earlier, if your desire is to “EQ” the sound, you should perform that
function using the drive levels in the multiband section. e mixer is primarily intended for
minor “EQ” changes to the overall sound. ere is a +/-6dB range of adjustment for each
band.
Page 57

PROCESSING ADJUSTMENTS | 51
Final Limiter
Omnia A/XE employs a lookahead limiter to provide absolute and precision peak control.
is limiter has been designed to minimize processing side-affects like IMD, which are
usually associated with limiters of this type. Using an innovative design that cancels intermodulation products before they develop, allows this limiter to sound extremely transparent.
e limiting function is derived using numerous control signals that monitor one another.
is type of peak controller is used instead of a clipper because it does not generate the
same high levels of THD as a Clipper does. THD causes added difficulties in a coded audio
system, as the harmonics generated from the clipping action, create added artifacts in the
encoder. ese are especially annoying at high frequencies.
On the other hand, a lookahead limiter, yields extremely low levels of THD, although it
will create some IMD component, and this allows the audio coder to operate with minimal
sonic artifacts.
ere are tradeoffs in how each of these peak controllers sound when they are set to
produce added loudness. When a clipper is pushed, the audio may appear edgier. is is
from the added harmonic content. In contrast, the lookahead limiter will appear busier, or
dense as the action of the control signal may be heard, when more limiting is applied.
Limiter Drive: Here is where the loudness versus quality is most evident! is limiter’s
adjustment range is +/-3 dB, in 0.1dB steps. It is advisable to make minor changes, primarily as the ‘loudness fine tuner’. Be careful; there is a lot of available power here!
Output
e peak output level adjustment is done using the individual Left/Right output controls.
e control range is from –26dB to +6dB of gain. is level is normally set to the maximum
input level, or just below it, of the device that the Omnia A/XE is connected to.
Page 58

52 | Processing Audio
Output Filter: For webcasting applications, especially at lower bitrates, it is sometimes
desirable to reduce the audio bandwidth. is is particularly useful if you are using a low
cost sound card to feed and external encoder as the filtering in many sound cards in inadequate. A pull-down menu provides eight different filter response curves that can reduce
the spectrum down to 4kHz.
Bypass
e processing can be bypassed simply by clicking on the BYPASS button located in
the lower right hand corner of the processing panels. is is a simple and fast method to
compare the before and after affects of the processing.
Fine Tuning Omnia A/XE
Our goal is to provide dramatic sonic improvements by Omnia A/XE right out of the box.
We know that you will want to tailor one or more of the presets slightly to create a more
“custom” sound, or you might really delve in and significantly modify the parameter settings
to create their own unique “signature sound.”
About Loudness and Fatigue
If you’re an audio processing expert, you’ll find what we’ve included within the Omnia
A/XE to be powerful tools. If you’re new to audio processing, we recommend proceeding
with caution and with knowledge of your goals.
Getting the most out of your Omnia A/XE processor (or any other processor for that
matter) starts with knowing your objectives beforehand, and knowing where you can make
tradeoffs. If your goal is to create a hot master and obtain extreme amounts of detail and
quality, keep in mind that there are limits. Reaching one goal is usually at the expense of
the other. ere will always be those individuals who feel that louder, at any cost, is better.
e added distortion from the endless and pointless pursuit of raw loudness may generate
negative effects on listeners. Be careful.
Having said all of this, we firmly believe that Omnia A/XE will get you closer to your
ideal than any other processor or combination of processors available today. It is definitely
capable of generating moment-to-moment loudness; it has the muscle. It also maintains
Page 59

FINE TUNING OMNIA A/XE | 53
that famous Omnia clarity sought after by top engineers all over the world. We encourage
all end-users to utilize the power of the Omnia A/XE to create good, competitive loudness
while maintaining a higher degree of quality.
Clarify Your Processing Objectives
Whether one is seeking better overall quality or specific spectral improvements, try to
articulate and write down your goals. Do you want a little more loudness or “presence” in
the final master or stream? Are there certain characteristics of the sound of other recordings
that you like, want to emulate, or just surpass? Are there any you want to avoid? When
adjusting processing, please give thought—real thought, to how you’d like your final master
to sound. What do we mean by that? Well, if your desire is to add loudness, and in most
cases it probably will be, decide on the degree of loudness that you want.
The Adjustment Procedure
1. Review your objectives.
2. Once you’re up and running, start with a degree of processing that is similar to what
you’d normally use and then, if desired, become more aggressive. A careful approach is
less likely to draw hasty, or even negative, opinions.
3. Listen for a while, then adjust, and listen for a while again. Try to avoid the temptation to continuously “fiddle” with adjustments, just moments after getting the system
running. Remember that you should evaluate the operation over time, not moment to
moment!
4. While making changes to the system, we recommend that you do not make hasty or
radical changes. Also, do not make too many different adjustments all at once. If too
many parameters are changed at one time, it is hard to determine which change made
the difference you may hear. at can be frustrating, whether the change made your
station sound better or worse. Take your time. In order for you to become comfortable
with your new sound, you should learn the limits of each control. We suggest making
changes in increments of no more than +0.5 dB or -1 dB, or in 1 or 2 step increments.
Try turning different functions on and off. Working this way, you will be able to get a
better feel for the sound that the Omnia A/XE is capable of producing.
5. Use the “sleep on it method:” Spend time adjusting and then listening, and when the
system gets to a point where it sounds good, stop! While making changes to processing,
there does come a time when the ears become less and less sensitive to the adjustments
you’re performing. Ears tire, and that’s why spreading the adjustment period over a
number of days is recommended. If what you’ve done still sounds good after you have
“slept on it,” stop adjusting. If you’re not quite there yet, continue with small iterations
until you’re satisfied. If you are homing in on your goals, you’ll find that each day the
discrepancies become smaller and you’re making fewer adjustments.
6. When you get it where you like it, stop and enjoy!
Getting the Sound You Want
If you believe that your desire is to process aggressively, here are some suggestions that
should help you achieve that goal. Conversely, if you have the rare luxury to strive for
increased sound quality, we have suggestions for you too! Omnia A/XE is designed to
minimize the impact of the quality vs. loudness trade-off.
Page 60

54 | Processing Audio
We recommend that before starting the process of cranking it up just for the sake of raw
loudness, try to decide what sonic characteristics you feel are lacking in your final sound.
In many instances, it’s not just about increasing the drive to the limiter. It can be as simple
as creating an illusion of added loudness by changing a single time-constant parameter.
ere are even known instances where the use of stereo enhancement created the necessary
apparent loudness. Please don’t bite at the first temptation to crank the system. Sometimes
the old adage of less is more really applies!
Before delving into alternative processing possibilities, please give the next brief section
some thought. It may help provide you with some needed direction in your overall processing plan.
A Word about Loudness
Making this confession is a little like telling your parents you dented the car. But here it
goes: It’s OK for your final mix to be loud…very loud!
In the past, loudness was a problem due to the limitations of the processors of the day. In
the quest for ultimate loudness, you probably either adjusted (or modified) your old processor well outside of its “safe” range, or pushed the 0dBfs ceiling level in the signal chain and
accepted the byproducts of the interactions and conflicts among them.
Omnia A/XE has changed all of that! It’s been designed to look at the incoming audio, and
know how to make your final mix consistently loud, and without the artifacts or grunge
created by your current processor. Omnia A/XE makes loudness an effortless exercise.
One more confession. It’s also OK for your master to not sound loud, yet sound incredibly
musical and grunge-free, because the Omnia A/XE has given you the choice. It is a system
that maximizes the audio quality of your signal, yet at the same time satisfies your competitive requirements.
Quality versus Loudness
e trade-off between quality and loudness is primarily determined by how you choose
to use the limiting and clipping sections. While each function alone will generate added
loudness, they each have different advantages, as well as side effects.
When excessive limiting is used, intermodulation distortion is increased, making the audio
sound “mushy”, and “smeared.” e added short term density can also cause the audio to be
“tight”, “squashed”, or “dense.” e “dynamics” artifacts caused by excessive limiting might
sound like “pumping,” “breathing.” e rule for limiting is “a little goes a long way!”
When excessive clipping is used, harmonic distortion is increased. e audio level is in effect
“running into the brick wall.” Too much clipping can cause the audio to sound “broken-up,”
“torn,” “rough,” or “edgy.” As you might imagine, the harder the limiters and clippers are
driven, the louder the audio perception. However, you are also much more likely to encounter increased intermodulation and/or harmonic distortion.
e following sections are provided to assist you in designing the personality of your sound.
As we said earlier, there is no precise recipe for setting up audio processing. While there are
some basic fundamentals that you can use to get started toward the sound that you desire, it
may require a concerted effort with extended listening and subtle processing changes over
time to achieve your ultimate goal. Just remember to know your goals, take your time, and
adjust methodically.
Page 61

FINE TUNING OMNIA A/XE | 55
Increasing Loudness
Try to resist the temptation to just crank up the aggressive processing sections, like the
limiters. ose will add loudness of course, but usually at the cost of quality. Many times,
building a little more RMS level in the AGC sections will do the trick instead, and with
no obvious sonic penalties. e following are some suggestions on where to begin to make
changes. We suggest that you them in the order described.
1. Alter the following parameters in the AGC sections:
• Increase the AGC Drive to the WB (wideband) AGC section.
• Increase the Drive to each band of the Multiband AGC screen.
• Increase the Release time settings in each band to make it operate faster.
2. Drive the Final Limiter section harder.
3. A combination of the above steps, but in small increments! It might sound crazy, but it’s
true! In this situation, resist the temptation to make too many changes at once. When
that occurs, it becomes difficult to determine why the result of an adjustment did or did
not make sense. Focus on one specific area of your sound at a time. Once that area is
satisfactory, then move the focus to the next area, as needed.
Based upon the above suggestions, you can experiment with different styles of processing.
Some prefer to have their processing be perceptibly loud, but dynamic. is may give the
illusion of loudness, retaining detail and clarity, and reducing listener fatigue. is can be
done by centering your efforts in the multiband section, and avoiding heavy use of the
final limiter. One trick that works well is to use fast release times in the multiband limiters,
but do not let them produce more than 5 dB - 7 dB of gain reduction. is keeps the IM
distortion of the limiters to a minimum, and doesn’t “over-squash” your sound. Adjusted in
this manner, the Limiter sections are relied upon to generate higher long-term RMS levels,
which translates into increases in perceived loudness.
If the quest is to produce a “loud and proud” signature, then the limiters should be leaned
upon a bit more. Loudness at all costs is usually the reason for moving the processing in a
direction like this. Using larger amounts of drive to the multiband limiters, along with faster
release times will generate a signal of high short-term density. e effect of the processing
set in this manner is that the audio is consistently loud at all times . . . a wall of sound. e
drawback is that the density can cause fatigue. While Omnia A/XE is designed to minimize
fatigue, it is capable of generating large amounts of density that could eventually lead to
fatigue. Be careful!
Adding More Detail—When Loudness Isn’t the Last Word
Now that we’ve “squashed the grape,” lets look at what it takes to undo a heavily processed
signal. Basically, just reversing the procedures listed above will do the trick:
1. Reduce the drive to the Final Limiter.
2. Back off on the influence of the multiband stages:
• Reduce the amount of Drive to each band in the multiband.
• Reduce the Release times to slow down recovery.
3. Ease up on the Wideband-AGC sections:
• Reduce the Drive to the WB AGC.
Page 62

56 | Processing Audio
• Reduce the Release time to operate slower.
Backing off the Limiting sections first will allow the processing to retain a level of competitive loudness while enhancing quality, and the overall dynamic texture will be affected less.
Start with reducing the Limiter amount in 0.5 dB steps. It’s surprising how much detail can
be restored from just a small change of 0.5 dB. Generally, changes in the Limiter drives will
have the most noticeable effect on quality, but it will also affect the relative loudness level,
too. You’ll need to find a “happy medium” that’s right for you.
Equalization Changes
Tailoring the shape of the overall audio spectrum can be done in three different sections:
1. e relative drive settings in the multiband AGC menu. ese controls set the drive
levels of the multiband AGC sections.
2. e settings of the multiband Mixer controls.
3. Adjusting the Mixer.
e first two options will provide noticeable change in EQ. We suggest you use the first option. In this case, an EQ change is still followed by a dynamically controlled stage. erefore
any excessive EQ change can be ‘undone’ by the subsequent AGC.
e last option, adjusting the Mixer, is designed to provide a final minor trim to the
spectrum. If you’ve noticed that we calibrated these controls in 0.10 dB steps, then you
know what we mean when we say these controls are for fine trim! Since this stage is after
all of the dynamic AGC and Limiting, a radical change in level in the Mixer will result in
additional and possibly excessive limiting of audio in that band. We suggest that changes
implemented here be limited to no more than about 1.0 dB. Naturally, the decrease in mix
level can be done to any desired amount.
Thunder Bass
Omnia A/XE has the power to shake the walls with low end! If your source material has it,
Omnia A/XE will put it in the mix, and with muscle! Making changes to this characteristic
is done using the following parameters, and for maximum effectiveness, in the order listed:
1. In the Enhance Menu, increase the amount of Deep Bass boost.
2. In the Enhance Menu, increase the amount of Phat Bass boost.
3. Increase the drive to the LF AFC with the appropriate control in the LO AGC screen.
4. Speed up the Release times of the LF LO AGC section.
5. Slightly increase the Low control in the Mixer section
When it comes to processing, moderation is the key! If all of the above steps are utilized in
the pursuit of more bass, then severe low frequency over-enhancement can occur. Excessive
bass boost can produce the illusion that the presence and high frequencies have been lost.
ey are still there, but are being acoustically masked by the lower frequencies.
Generally, an increase in the Enhance Menu’s Bass boost functions alone will provide more
than sufficient enhancement to the low end.
Page 63

FINE TUNING OMNIA A/XE | 57
Reducing Codec Artifacts
Dynamics processing is an extremely useful tool that will reduce audible artifacts from
lossy-compression codecs. High frequencies tend to be the first perceptible annoyances,
followed by that swishy-swirly water like sound that’s quite common at lower bitrates. ese
artifacts can be reduced, and in some cases eliminated, when the audio processor is applied
as a tool.
Generally, it’s understood that as codec bitrates are reduced, so is the audio bandwidth.
Omnia A/XE contains selectable low pass filters in the Output section. Reducing the
audio bandwidth through filtering will help. Additionally, the upper band of processing can
be reduced in the MIX section, which will allow that band to act as a dynamic governor.
Operating the HF Band in the slow release time will reduce HF density which improves
intelligibility as the encoder masking algorithm is not loaded as heavily with HF content.
Page 64

Page 65

12 Metadata
Audio
Processor
Encoder
Stream
Sender
Metadata
Receiver
Metadata
Filter
Audio
Metadata
Tags
Tagged & encoded
audio stream
e metadata subsystem gives you the option to tag your audio stream with “now playing”
information. Metadata tagging currently works only with internally encoded streams
delivered to SHOUTcast and Wowza servers. If you use a third-party encoder with Omnia
A/XE then you will need to consult that encoder’s documentation for metadata tagging.
e diagram below shows how the metadata is received and combined with the encoded
audio stream:
e metadata is received from an external system over TCP/IP on a specific port. e
metadata receiver passes the information to the metadata filter for parsing. Once the filter
detects a complete record, it sends the tagging information to the Stream Sender which
includes it in the stream being sent out.
TECH NOTE: Metadata filters are small mini-programs that translate the data received from an external
source to tags that the stream sender can understand. Each filter is a separate file stored in the Filters
subdirectory under the program’s data directory (the same directory where Options.xml is found). These
mini-programs are written using the Lua programming language. If you would like to try your hand at
creating a custom filter please start by having a look at the filters that ship with the program. To learn
more about the Lua programming language have a look at http://www.lua.org.
Metadata Manager
On the Metadata Manager page you configure the metadata receivers you wish to use with
Omnia A/XE. e same metadata receiver can be used by multiple streams.
Page 66

60 | Metadata
1. Click the Add... button to add a metadata receiver. e following dialog will be displayed:
2. Enter a friendly name for this metadata receiver. is is the name that will be displayed
in the stream configuration window so use a name that is short and descriptive. Please
use only letters, digits, underscore and space characters in the name.
3. In the port field, enter the TCP/IP port number that will accept the metadata connection from other systems.
4. In the filter drop down list, select one of the available filters then click the Save button.
e metadata receiver should now appear in the list.
e metadata receiver becomes active as soon as it is created and remains active as long as
the Omnia A/XE service is running.
Page 67

13 Scheduler
e scheduler is able to start, stop audio processor instances or encoders and change an
instance’s processing preset at specified times. is is useful if you want to encode and
stream only certain shows. If you need to process one show differently than another, you can
use the scheduler to change audio processing presets.
Click the Scheduler menu option on Omnia A/XE’s Control Panel page. is will navigate
to the Schedule Manager page:
e Schedule Events list displays all the events you have created so far. When you select an
event from the list, the event commands are displayed in the Commands area.
Click the Add... button to create a new event. In the Add dialog enter a name for the event.
Keep the names descriptive but use only letters, digits, underscore and space characters. Do
not use other special characters.
Next, enter the time for the event (in 24-hour, HH:MM:SS format) and click the check
boxes for the days of the week when the event should be active.
Page 68

62 | Scheduler
e scheduler works by executing commands you enter in the Commands text box. As of
program version 1.11, Omnia A/XE recognizes the following commands:
InstanceStart(“instance_name”)
Use this command to start the instance named instance_name.
InstanceStop(“instance_name”)
is command will stop the instance named instance_name.
InstanceLoadPreset(“instance_name”,”preset_name”)
Use this command to load the preset named preset_name into the instance named
instance_name.
You may add multiple commands by entering each command on a separate line. For
example, you could start an instance then load a certain preset for it. Or you could start or
stop multiple instances at the same time.
Page 69

14 System Options
On the System Options page you can change the administrative password, the ports used
by the application and the notification email address and server where Omnia A/XE sends
messages when it encounters an error.
1. Change the Administrative password field to a password of your choice then enter it
again in the Administrative password again field.
2. You may change the administrative HTTP and HTTPS (secure HTTP) ports as well
as the stream server port
only if you need to address a particular problem. You will need to restart the Omnia
A/XE service for the port change to take effect.
3. In the last two fields under System Options you can enter an email address and SMTP
server address. Omnia A/XE uses this information to notify you by email in case of
application errors.
1 e Stream server uses the HTTP protocol to make streams available for playback using most media
players. is lightweight server is intended for monitoring the encoded stream by a small number of
listeners. It is not intended to serve a large number of streams.
1
. e default values should work fine; you should change them
Page 70

64 | System Options
4. Click the Save button to make the changes permanent. is returns you to the Control
Panel page.
Page 71

15 System Logs
Omnia A/XE writes system messages to log files. A new log file is created for each 24 hour
period and the files are kept for 30 days. After 30 days the oldest file is deleted to make
room for new log files. You may retrieve the logs through the web interface or, if you have
direct access to the Omnia A/XE PC, by directly accessing the files in the directory where
they are stored. When something is not working right, the log files may show you the
reason why. If you encounter a problem and need to contact support, sending the log file for
the day when the problem occurred will speed up the resolution process.
Retrieving a log through the web interface is a rather simple affair. e steps below show
you how:
1. On the Control Panel page, click the Logs menu option.
2. e System Logs page is displayed. e available logs are listed on the page.
3. Right-click on the log you wish to retrieve and select Save Link As... (or Save As... on
some browsers) to save the file to your PC.
Page 72

66 | System Logs
e logs are plain text files and can be opened and viewed with any text editor (e.g. Notepad.exe).
Page 73

16 SHOUTcast Streaming
Audio
Source
Audio
üüüü
Encoder
Source
audio data
Processed
audio data
SHOUTcast /
Icecast Servers
Internal
Stream Server
Wowza Server
Encoded
streams
Media player
Media player
Flash player
Windows Media Server
Windows
Media Player
Omnia A/XE
Omnia A/XE performs audio processing and encoding and requires a media server to send
the encoded stream to large numbers of listeners. While A/XE does have a built-in stream
server, it is intended for stream monitoring and can only support a small number of connections. SHOUTcast (yes, that is the way it is spelled), Steamcast, or other SHOUTcast
protocol compatible servers are commonly used for this application.
For delivering audio over a LAN or private network, Omnia A/XE and server can run
together on the same PC. For public streaming over the Internet, Omnia A/XE typically
runs in the place where the audio is generated (e.g. a studio) and the server is in a place
where a lot of bandwidth is available such as an Internet collocation site.
Streams that are served by SHOUTcast protocol servers can be heard on Winamp, Apple
iTunes, XMMS, VLC, Foobar, MS Windows Media Player, and many other PC software
players. Many hardware players are also on the market. Among the most popular are
Logitech’s SlimPlayer, and Freecom’s network player.
e original idea for the SHOUTcast server is that it was to accept an audio input from
the Winamp player which has a special ‘DSP’ plug-in. But since Nullsoft, the company that
designed both Winamp and SHOUTcast, published the specifications for the interface,
encoders like the Omnia A/XE can connect, as well. e server ‘thinks’ A/XE is a Winamp
player.
If you are planning to make public broadcasts via the Internet and you don’t want the hassle
of running your own server, or if you don’t have enough network bandwidth, you can host
your broadcast through a third party that will handle the streaming for you. You can search
the Internet for the streaming host solution that fits your needs. e SHOUTcast forums
would be a good place to start.
Page 74

68 | SHOUTcast Streaming
Sending A/XE Streams to SHOUTcast Compatible Servers
It is easy to send an MP3 or AAC encoded stream to a SHOUTcast compatible server.
When you define the encoder, create an output stream by selecting the “Send to SHOUTcast server” option. You will be presented with the following dialog:
1. Fill in the friendly stream name in the first text box. is is the name used internally to
store the stream information and for display purposes so you can use any name here. e
name may contain letters, digits and the space and underscore characters. Do not use
other special characters in the stream name.
2. Select a metadata source that will be used to “tag” the stream. A/XE will insert the tags
received into the stream so that they may be displayed by compatible players.
3. Enter the server address and port number where the address and port are separated by
a colon character. For example, if the address is 192.168.1.25 and the port is 8000, you
would enter 192.168.1.25:8000 in the address field.
4. Enter the server password in the password field.
5. Next, enter the stream name and the genre to be sent to the server.
6. Click the Save button.
e stream output definition is complete. When you start the encoder, A/XE will attempt
to connect to the SHOUTcast compatible server and deliver the encoded stream to it.
SHOUTcast Compatible Streaming Servers
Following are the specific set-up details for Steamcast and general information about
alternate server possibilities. e website associated with each provides a wealth of information, including user forums and other resources.
Steamcast
We’ve had the most experience with this server. It runs on both Windows and Linux, does
all that usually needs to be done, and is very efficient with regard to both CPU and memory
usage.
Steamcast is a freeware streaming media server that extends the capabilities of the Icecast2/
SHOUTcast framework. e creators of Steamcast intend for the project to be format/codec agnostic and want to support as many encoding, listening and client systems as possible.
Steamcast is currently available for Microsoft Windows, FreeBSD, and Linux.
Steamcast was created by Jay Krivanek of Radio Toolbox and was first introduced in 2004.
Page 75

SHOUTCAST COMPATIBLE STREAMING SERVERS | 69
e project has been in a beta state ever since, though many users have had success in
production situations.
One of the features that sets Steamcast apart from other systems is the included web
interface that allows for management of sources and clients. e server also supports a
wide variety of source encoders and players that encompass other projects like Icecast2 and
SHOUTcast. e server also supports multiple publishing points/mount points which can
all stream on the same instance and ports. e support of the Icecast2 YP listing specification also allows the server to list on multiple listing services which helps to promote a
web broadcast. Steamcast’s backend XML sheets are supported by other services such as
LoudCity for royalty requirements and the interface is also utilized by several IRC and
PHP projects to include stats in varying listener locations.
Installing and Using Steamcast
Download the server software from www.steamcast.com.
Windows Installation Procedure: Simply extract the .zip file to a folder (C:\Program Files\
Steamcast\). Once extracted, you can create a shortcut to steamcast.exe on your desktop and
edit the steamcast.conf file with your favorite text editor. e steamcast.conf file must be
in the same folder as the steamcast.exe file. Once your changes are made and saved back to
steamcast.conf you can start steamcast by double clicking either the shortcut or executable.
Unix Installation Procedure: To extract the tar.gz file you can gunzip the distribution file
then un-tar the archive. Using a text editor such as vi or pico, open the steamcast.conf file
and edit it to your needs. It does not matter where the server runs or what user the server
runs under as long as that user has read/write access to the extracted files and the current
working directory. To execute steamcast simply issue the command ‘./steamcast’
Running under Windows, you will see something like the command-line window below:
e first line shows that the configuration file has been successfully loaded. e second that
the mime types file has loaded. Neither the .vip nor .ban files were present. e PID value
was loaded from a .pid file. e encoder has not yet been enabled, so we see that the server
Page 76

70 | SHOUTcast Streaming
is listening for, but has not yet found a source connection. It is also listening for player
connections, but of course there are, as of yet, none.
Steamcast Configuration
You configure Steamcast by editing the .conf text file. Here, we will show you an example
configuration to work with a typical A/XE application. e text below is from the author
of the software, who includes these comments in his sample .conf file. As you can see, he
carefully explains all of the items. Following is a set-up for up to 16-channel streaming.
; Steamcast Conguration File
; ================================
; This is the default Steamcast server conguration le, feel free to use
; it as a template for your server’s conguration. All lines beginning with ;
; or blank are ignored by the server’s conguration parser.
; Server Conguration
; ====================
; PortBase [*8000]: The port that Steamcast will listen for connections on, generally it is
; acceptable to just leave this at the default, change it if you use port
; 8000 and/or 8001 for some other server. Ports < 1024 are reserved, so try to
; stay above that.
PortBase=9800
; MaxUser: The maximum amount of streaming clients Steamcast should
; handle, this is a global setting for all multimedia connections. Set this
; to a smart number. Setting this too high could cause your network connection
; to be ooded and cause real problems for all end users. In 0.9.7 this conguration
; option became optional. Set this to set hard limits on max listener counts, otherwise
; cumulative SourceUserMax will be used to determine the overall UserMax.
MaxUser=20
; MaxBandwidth: This is the maximum amount of out-going bandwidth allowed by Steamcast
; in units of kilo-bits per second. This is a soft limit so it is possible for the server to exceed this
; limit due to the average bandwidth system some enforcement latency may occur as well. A
; setting of zero disables this feature.
; MaxBandwidth=0
; IPMaxUser [*0]: The maximum amount of streaming clients Steamcast should
; handle per IP, this is a global setting for all multimedia connections.
; A setting of 0 disables this feature.
; IPMaxUser=0
; LogFile [None|*steamcast.log]: The location you would like Steamcast to store
; it’s log le, setting this to ‘None’ or blank disables this feature. You can use use variable
; templates to control the name of the log in real time. View the Readme for a full list of
; variables available. Ex: %m-%d-%Y-steamcast.log to have steamcast create a different log
; every day.
LogFile=steamcast.log
; MimeFile [None|*mime.types]: The location of your mime types le. The mime types le is
; critical in the implementation and usage of the on-demand capabilities of the server. This le
; also enables steamcast’s auto extension feature so that the server will assign the correct
; extension to your mount points based on the audio format/codec in use.
MimeFile=mime.types
; BanFile [None|*steamcast.ban]: Use this variable to specify the location of your ban le. The
; ban le contains information about pre-existing bans. If the ban le does not exist, steamcast
; will attempt to create it. A setting of None disables saving or loading of ban information.
BanFile=steamcast.ban
; VipFile [None|*steamcast.vip]: The le used to load pre-existing vip information. VIP’s are
Page 77

SHOUTCAST COMPATIBLE STREAMING SERVERS | 71
; IPs and users designated as having a higher privilege level then average users. A setting of
; None disables saving or loading of ban information.
VipFile=steamcast.vip
; ScreenLog [*Yes|No]: Setting this to Yes will allow steamcast to output log information
; the the screen in CLI environments.
ScreenLog=Yes
; RealtimeLog [*Yes|No]: Setting this to Yes will allow steamcast to output Realtime statistical
; information to the screen in CLI environments.
RealtimeLog=Yes
; YPLog [*Yes|No]: Enable the logging of YP Touches. This setting has no effect on
; YP Errors, or YP Add or YP Removes. It will only hide logging of Successful touches
; when set to No.
YPLog=Yes
; PidFile [None|*steamcast.pid]: The le location you would like Steamcast to store
; it’s PID or Process ID, setting this to ‘None’ or blank disables this feature.
; Regardless of this setting, Process ID’s will be stored in the Log on each startup.
PidFile=steamcast.pid
; NameLookups [Yes|*No]: Setting NameLookup to Yes will have Steamcast
; do a reverse dns lookup on each connection made to the server. High Trafc servers
; should leave this setting disabled until I can come up with a better threading method.
NameLookups=No
; ShowLastSongs [*20]: This setting tells steamcast how many stream related meta updates
; to store in history. This capability was added for compatibility with reporting agencies.
; A Setting of 1 through 50 is acceptable.
ShowLastSongs=20
; ClientTimeout [*30]: Number of seconds a listener/viewer should stay connected while no
; source exists for thier mount.
ClientTimeout=30
; User Conguration
; ==================
; AdminUser & Admin Pass: This is the credentials that allow full control of the server remotely
; so be very careful in determining what to put here. Essentially with these settings
; a user would be able to connect to the server using a CNTRL application and use
; the server as if they are sitting in front of it. Please make sure that admin passwords are
; different from mount passwords in SHOUTcast compatibility mode. Encoders passwords take
; precedence in the event they are, this is for compatibility and security reasons.
AdminUser=telos1
AdminPass=telos1
; Source Conguration
; ====================
; Each source that you wish to allow on the server needs to be congured
; here rst. The parser will read strait down the le so if you have
; multiple source mounts and you declare a new mount before nishing
; conguration of another, then those congurations after the new
; declaration will go to the new mount.
; SourceMount: This is the mount you would like to create, if you set
; this to /ghey then you would be able to access this mount by
; going to http://localhost:8000/ghey It is critical that you
; make sure to include the slash at the beginning.
SourceMount=/stream1
; SourceUser: The last SourceMount declared will require this Username
; in order to become a source for this mount. Note: if you are running
Page 78

72 | SHOUTcast Streaming
; this mount in shoutcast compatibility mode, this is not required. However
; it’s best to set this anyhow as it allows your encoder users to administrate
; their mounts from a CNTRL app or web panel.
SourceUser=telos
; SourcePass: This is the last Source Mount’s password, this is required
; for all connecting encoders. Mounts without passwords are invalid.
SourcePass=telos1
; SourceUserMax [*5]: This particular mount’s UserMax, if all of your source
; UserMaxes combined exceed the global UserMax then the UserMax takes presedence.
SourceUserMax=5
; SourceRelay: This particular mount will pull data from the location specied below.
; If you publish both servers on yp.shoutcast.com and wish that they cluster at that
; yp server then enter your relay url without http:// or trailing path or slashes
; like the example below. It is now permissable to make a list out of this variable
; to have in effect fallback masters in the event one is unavailable.
; SourceRelay=audio.str3am.com:4080
; SourceDisconnectWait: [*10]: Allows you to control the wait time in seconds between
; reconnect attempts if a relay fails. Values from 1 and up are acceptable.
; SourceDisconnectWait=10
; SourceDirectory: This mount will be an on-demand mount for steamcast. Any directory
; location is acceptable here. This aspect of Steamcast still needs alot of work. So stay tuned.
; SourceDirectory=./content
; SourceGateway: The location of a le you want to be played before the stream begins for each
; listener. Use %s and Steamcast will only look for les with a matching extension. Files must
; be the same in everyway with the stream currently playing.
; SourceGateway=/intro.%s
; SourceBackup: This is the mount you would like listeners directed to in the
; event that this source becomes unavailable. These two mounts must be completely
; identical bitstreams in order for this feature to work properly.
; SourceBackup=/live_back
; SourceBitrateLimit: Set this to have Steamcast choke sources that exceed a
; certain average data rate. This value is based on actual data transfer and not any particular
; format headers. This is a great way to control users in community or hosting
; environments. Default is no limits. Steamcast waits 20 seconds into a connect before
; limiting, the choke takes affect after a source goes 10% over the limit.
; SourceAvgBitrateLimit=128
; SourceIsSC [*Yes|No]: Setting this to Yes will allow source applications
; which do not have a username capability to use the last source
; declared anyway.
SourceIsSC=Yes
; SourceNameFormat: Provides a new Stream name either derived from the source or
; completely replacing the sources option. This title is used in client media players and
; publishing outlets. You can use %s anywhere in the title to have the encoder’s option included
; into the nal stream name.
; SourceNameFormat=%s powered by Steamcast
; SourceIsDefault [*Yes|No]: Setting this to Yes will make this particular
; mount available globally. There can be only one global mount. This
; is also the only mount that will be able to list at shoutcast.com
SourceIsDefault=Yes
; SourceIP: Setting this to a dotted IP address will make this particular
; mount available at the root of steamcast (much like SHOUTcast) for the IP
; specied here. Note: You must own the IP you place here. Inaccurate
; settings will have no effect. This setting essentially will allow you to
; list multiple source points in the SHOUTcast directory. It is not neccessary
Page 79

SHOUTCAST COMPATIBLE STREAMING SERVERS | 73
; to set this setting if you only own one IP. Setting this for any Source will
; disable the SourceIsDefault ag on any mount.
; SourceIP=123.45.67.89
; SourceAuth: [Yes|*No]: Allows you to setup HTTP Basic Authorization on this
; mount point. All Authentication is currently le based. Please see steamauth.txt
; SourceAuth overrides the public bit and will force all SourceAuth’d streams to be
; private.
; SourceAuth=No
; SourceAuthMax: [*0]: Allows you to set the maximum amount of connections per
; authenticated
; user. A setting of 0 is interpreted as unlimited.
; SourceAuthMax=0
; SourceListenerTimer: [*0]: Allows you to specify the amount of time a client can stay
; connected in minutes. A value of 0 disables this feature and allows clients to stay connected
; for an unlimited amount of time.
; SourceListenerTimer=0
; SourcePublic: [*Default|Always|Never]: Allows you to specify whether to override the source’s
; public bit setting. When set to Always a source mount will list on directory services regardless
; of the encoder’s specied preference. When set to Never the source mount will refuse to list on
; directory services. The default of... Default (heh) sets the source to let the encoder decide
; listing preference.
; SourcePublic=Default
; SourcePublicRelays: [*Yes|No]: Whether servers which relay steamcast should list on directory
; services.
; SourcePublicRelays=Yes
; SourceRawKey: Set this variable to the key you would like passed in a parameter string to
; access the raw data stream in HTTP form. This is great for things such as Flash. If you use
; the example below then access to the raw data stream (unprotected by user-agent lters) can
; be obtained by passing http://localhost:8000/mountname.mp3?rawdata to the player, as always
; substitute the address with your specic implementation. Leaving this option blank or
; commented disables this capability.
; SourceRawKey=rawdata
; SourceBuffUtil [*100]: This value allows you to control the start position
; of connecting clients within the buffer. 0 would effectively set a new connecting
; client to the write point of the buffer giving a more real-time like experience
; although due to the way the internet really works it can never be truely real-time.
; Setting this to 100 would start them all the way at the back of the buffer which
; gives most clients no buffer wait times. It is highly recommended that you not mess
; with this parameter except in instances where the bitrate of the stream is extremely
; low and you require an interactive experience from the users connected to the server.
; (i.e. A talk show or other low bitrate interactive live program) Most other broadcasts
; SHOULD NOT CHANGE THIS SETTING!!! Doing so will make the connecting users
; feel like they are on dialup in 1996 listening to Real Player. :)
SourceBuffUtil=1
; Directory Conguration
; =======================
;Directory=http://www.steamcast.com/sbin/yp.php
;Directory=http://dir.xiph.org/cgi-bin/yp-cgi
; Advanced Conguration
; ======================
; Do not mess with these conguration values unless you know what you are
; doing, typically these are settings which should not need adjusting. But
; are here for those users who feel they need more control over how the
; server behaves.
; ServIP [*Any]: This option allows you to control which interface or IP Steamcast
; should bind to. Setting this option will limit which IP clients can connect through.
; ANY (case sensitive) will allow steamcast to bind to all and any ip interfaces available.
; ServIP=ANY
Page 80

74 | SHOUTcast Streaming
; SrcIP [*Any]: SrcIP is the IP that Steamcast will listen for source connections. For
; instance setting this option to 127.0.0.1 will limit SHOUTcast source connection attempts
; to only from the the machine steamcast resides on. ANY (case sensitive) will allow
; steamcast to bind to all and any ip interfaces available.
; SrcIP=ANY
; ThreadPool [*5]: Set this to control the amount of available threads for incoming clients.
; Generally you should not have to change this setting. Setting anything below 2 is not allowed,
; due to severe loss of performance. Setting this too high will mean more memory and overhead
; will be needed to load the server, be sensible if you must change this number. While you are
; allowed to set a number as high as 100 anything over 10 is generally considered excessive.
; ThreadPool=5
; MetaInterval [*8192]: Set this to control the meta data interval in bytes for audio types that
; utilize the Icy Meta Data protocol. This is a server wide option. Technical notes: Excessive
; CPU and unlistenable streams may result if you set this value too low. Steamcast will go no
; lower then 1024bytes.
; MetaInterval=8192
; if I could smile I would.
; We’ve congured one source; now we’ll do all the others, following the same pattern...
; Stream 2 is MPEG AAC. We have to use the .aac sufx so that player will know what decoder
; to use
SourceMount=/stream2.aac
SourceUser=telos2
SourcePass=telos2
SourceUserMax=5
SourceIsDefault=No
SourceMount=/stream3.mp3
SourceUser=telos3
SourcePass=telos3
SourceUserMax=5
SourceIsDefault=No
SourceMount=/stream4.mp3
SourceUser=telos4
SourcePass=telos4
SourceUserMax=5
SourceIsDefault=No
SourceMount=/stream5.mp3
SourceUser=telos5
SourcePass=telos5
SourceUserMax=5
SourceIsDefault=No
SourceMount=/stream6.mp3
SourceUser=telos6
SourcePass=telos6
SourceUserMax=5
SourceIsDefault=No
SourceMount=/stream7.mp3
SourceUser=telos7
SourcePass=telos7
SourceUserMax=5
SourceIsDefault=No
SourceMount=/stream8.mp3
SourceUser=telos8
SourcePass=telos8
SourceUserMax=5
SourceIsDefault=No
Page 81

SHOUTCAST COMPATIBLE STREAMING SERVERS | 75
SourceMount=/stream9.mp3
SourceUser=telos9
SourcePass=telos9
SourceUserMax=5
SourceIsDefault=No
SourceMount=/stream10.mp3
SourceUser=telos10
SourcePass=telos10
SourceUserMax=5
SourceIsDefault=No
SourceMount=/stream11.mp3
SourceUser=telos11
SourcePass=telos11
SourceUserMax=5
SourceIsDefault=No
SourceMount=/stream12.mp3
SourceUser=telos12
SourcePass=telos12
SourceUserMax=5
SourceIsDefault=No
SourceMount=/stream13.mp3
SourceUser=telos13
SourcePass=telos13
SourceUserMax=5
SourceIsDefault=No
SourceMount=/stream14.mp3
SourceUser=telos14
SourcePass=telos14
SourceUserMax=5
SourceIsDefault=No
SourceMount=/stream15.mp3
SourceUser=telos15
SourcePass=telos15
SourceUserMax=5
SourceIsDefault=No
SourceMount=/stream16.mp3
SourceUser=telos16
SourcePass=telos16
SourceUserMax=5
SourceIsDefault=No
Web Interface
To use the Web interface on the same PC where Steamcast is running, open a Web browser
and point it to: http://localhost:9800. e number after the colon is the IP port number,
which we have set via the Steamcast configuration file to 9800 in our example. You can
also use a browser on a remote machine, by entering the host PC’s IP number in place of
‘localhost’. Here is a screenshot of the Steamcast Web interface, showing one stream and
one active listener:
Page 82

76 | SHOUTcast Streaming
For administration, you will need to enter a user name and password. ese are the ones you
entered in the steamcast.conf file.
SHOUTcast
e SHOUTcast DNAS (Distributed Network Audio Software) server is available for
Windows, Linux, and Mac OSX at: www.shoutcast.com. It is freeware, but not open
source. is was the server that started it all, developed by Nullsoft, the people who created
Winamp. e software is now in the hands of AOL, who don’t seem to be investing much
in its continued development. Neverthess, it gets the job done.
Here are the user instructions, taken from the SHOUTcast site:
Windows 95/98/ME/NT/2000/XP:
1. Download the SHOUTcast DNAS application for Windows.
2. Once the download has finished, extract all the files into a folder and create a shortcut for
SC_SERV.EXE on the Desktop.
3. Start up the SHOUTcast Radio server by double-clicking on SC_SERV.EXE
4. Click on the “Edit Config” menu option located at the top. is will start the default text
editor, opening the configuration file for SHOUTcast DNAS application. Follow all the
directions that are written into the configuration file.
5. Once you are done making changes, save the file, close the editor, and restart the
SHOUTcast Radio DNAS application.
UNIX, LINUX, FreeBSD and MAC OSX:
1. Download the SHOUTcast DNAS application version appropriate to your system by
proceeding to this link.
2. Unzip the distribution and un-tar the archive.
3. Use a text editor to configure the sc_serv.conf file
Page 83

SHOUTCAST COMPATIBLE STREAMING SERVERS | 77
4. Note that the user you run the server as requires read access to the config file, and write
access for the files you define for file storage and log storage.
Configuration File
Like Steamcast, the SHOUTcast Radio Server configuration file contains several options
that can be changed. See the SHOUTcast website for details.
ICEcast
Icecast is a free streaming media project maintained by the Xiph.org Foundation. It also
refers specifically to the server program which is part of the project. e main website for
information and download is: http://www.icecast.org. Kerry Cox offers an excellent online
“book” devoted to Icecast at: http://www.gnuware.com/icecast/.
Icecast was created by Jack Moffitt and Barath Raghavan to provide an open source audio
streaming server that anyone could modify, use, and tinker with.Version 2 was started in
2001, a ground-up rewrite aimed at multi-format support and scalability.
e Icecast server is capable of streaming MP3 and AAC over the SHOUTcast protocol.
(AAC is only supported in version 2.2.0 and newer.) It runs on both Linux and Windows.
Icecast is generally regarded as being the most sophisticated and capable of the streaming
servers, especially for users who want to use Linux and are comfortable with command-line
interfaces. It supports detailed reporting of audience statistics. For simple in-house distribution applications, Icecast might be over-the-top. But for serious public Internet radio
station-like streaming, this might be just what you need.
As of the writing of this manual, we have not yet tested Icecast in our lab, but there is no
reason why it shouldn’t work. W. Cox, an A/XE customer, sent us the following details on
configuring Icecast:
Short version is you have to tell IceCast that you are sending it a ShoutCast style stream. I
did that by adding this to my main icecast config file:
<listen-socket>
<port>8000</port>
<shoutcast-mount>/example.aac</shoutcast-mount>
</listen-socket>
e mount and port obviously have to match what you have the encoder [A/XE] setup to
output...
Here is the long version: a big copy and paste from the icecast manual describing this in
more detail:
e following shows how we can extend a single listen-socket to work with shoutcast style
source clients. ere are two issues shoutcast source clients have over icecast source clients,
one is the lack of mountpoint and the second is the requirement of two ports. Both of these
issues are handled by a simple addition in the listen-socket.
<listen-socket>
Page 84

78 | SHOUTcast Streaming
<port>8000</port>
<shoutcast-mount>/live.mp3</shoutcast-mount>
</listen-socket>
As before, the port specified is allocated but this time the shoutcast-mount implicity defines
a second listening socket whose port number is always one higher than the port defined,
this also informs icecast of which mountpoint the shoutcast source client on this socket will
be using. Using this approach you can allow multiple shoutcast source clients to connect at
the same time.
e following is just to show the longer approach to defining shoutcast compatability.
<shoutcast-mount>/live.nsv</shoutcast-mount>
<-- You may have multiple <listen-socket> elements -->
<listen-socket>
<port>8000</port>
</listen-socket>
<listen-socket>
<port>8001</port>
<shoutcast-compat>1</shoutcast-compat>
</listen-socket>
Note that multiple listen-socket sections may be configured in order to have icecast2 listen
on multiple network interfaces or multiple ports. If a bind-address is not specified for a
particular listen-socket, then the socket will be bound to all interfaces (including IPv6 if
available).
For most people, the bind-address option will not be required and often confuses people.
Configuration Options
port
e TCP port that will be used to accept client connections.
bind-address
An optional IP address that can be used to bind to a specific network card. If not supplied,
then it will bind to all interfaces.
shoutcast-mount
An optional mountpoint setting to be used when shoutcast DSP compatible clients connect.
e default global setting is /stream but can be overridden here to use an alternative name
which may include an extension that some clients require for certain formats. Defining this
within a listen-socket group tells icecast that this port and the subsequent port are to be
used for shoutcast compatible source clients. is is an alternative to the shoutcast-compat
approach as this implicitly defines the second listening socket and allows for specifying
multiple sockets using different mountpoints for shoutcast source clients. e shoutcastmount outside of a listen-socket group is the global setting of the mountpoint to use.
Page 85

USING A PC PLAYER TO LISTEN | 79
shoutcast-compat
is optional flag will indicate that this port will operate in ’shoutcast-compatibility’ mode.
Due to major differences in the source client connection protocol, if you wish to use any
of the shoutcast DJ tools, you will need to configure at least one socket as shoutcastcompatible. Note that when in this mode, only source clients (and specifically shoutcast
source clients) will be able to attach to this port. All listeners may connect to any of the
ports defined without this flag. Also, for proper Shoutcast DSP compatibility, you must
define a listen socket with a port one less than the one defined as ’shoutcast-compat’. is
means if you define 8001 as shoutcast-compat, then you will need to define a listen port of
8000 and it must not also be defined as shoutcast-compat. See the example config file in the
distribution for more info.
Using a PC Player to Listen
We will use the Windows Media Player 11 for our first test with the Steamcast server
configured as above. Open the player, right click, go to the File menu and select Open
URL.... is window will appear:
Enter the IP and port, then the stream name. Because the player is running on the same
machine as the server in this case, ‘localhost’ is entered as the IP number. Were you to
be listening on a another machine, you would enter the server’s IP number, like this:
http://198.168.1.107:9800/stream1.mp3. e stream name is the one that was configured in
the steamcast.conf file. Click OK .
After some buffering time, you should have audio. Normally, a user would not have to enter
the URL. Rather, this would be a link embedded in a web page.
We have tested MP3 streams with the WM player, Winamp, VLC player, Foobar, and
iTunes. AAC streams will work on the players that support AAC decoding, which are all of
the above except WM player.
(We’ve noticed that Winamp seems to have a bug playing ‘localhost’ URLs, but it works
fine on a remote machine.)
Hardware Players
You can also play the streams on a variety of hardware devices. We’ve tested with the
Logitech ‘Slimplayer’ and a few others. e device needs to support the codec you have
chosen. MP3 has universal support, with AAC decoding being available on only a subset of
Page 86

80 | SHOUTcast Streaming
devices.
Most hardware players are unable to open URLs directly. ey need an intermediate server
that drives the program listing on the device and translates the audio stream format, if
necessary. e Logitech needs ‘Slimserver’ and many others need a server that conforms to
the UPnP standard. is software could run on the same machine as the streaming server.
Page 87

17 Wowza Media Server
e Wowza Media server is a robust and high performance server capable of streaming
AAC to Adobe Flash clients. is means that the end listener does not need to have a
specific audio player installed on their PC but can listen to the audio stream using the Flash
browser plug-in.
When streaming to a Wowza server, Omnia A/XE uses the ICY protocol acting as a
SHOUTcast server. e Wowza server is then configured for SHOUTcast stream replication as shown in the image below:
Congure Omnia A/XE
When creating an AAC stream you can specify Wowza as a stream destination. When you
select this option, the following dialog is displayed:
1. Enter a friendly name for the stream. is name is used internally and for display
purposes so you may use any name. Please use only letters, digits, space and underscore
characters in the name.
2. Select a metadata source to tag the stream.
3. Enter a local port number that is not already in use. is is the port number that the
Wowza server will use to receive this stream.
4. Click the Save button when done. When this encoder is started, the stream will be made
available to your Wowza server for replication.
Page 88

82 | Wowza Media Server
Congure Wowza Server
Configuring the Wowza server involves copying a number of configuration files to specific
locations within the application folder. By default, the Wowza server (v1.6.0) is installed to
the following location:
Follow the steps below to configure your Wowza server to read a stream from Omnia
A/XE:
5. Stop the Wowza server, if running.
6. In the conf directory, create a directory named omniaaxe.
7. Copy the Application.xml file from the examples\SHOUTcast\conf\shoutcast
directory to the conf\omniaaxe directory you created in the previous step.
8. In the application directory, create an empty directory named omniaaxe.
9. Restart the Wowza server. Configuration is done.
Test the Connection
We’re now going to test the newly created stream. e Wowza server also comes with flash
player examples that you can modify to suit your needs. We’re going to use the SHOUTcast
example player to test the connection from Wowza to Omnia A/XE.
1. Open (double-click) the shoutcast.html file found in the examples\SHOUTcast\client
directory. e following page will be displayed:
Page 89

TEST THE CONNECTION | 83
2. In the Server field, enter rtmp://wowza_server_ip\omniaaxe. Replace the wowza_server_ip with the address of the Wowza server. Since we are testing on the same PC as the
server, we can just enter localhost for the server address as shown in the screen image
above.
3. In the URL field, enter http://axe_ip_address:axe_port where axe_ip_address is the IP
address of the PC where Omnia A/XE is running. e port is the port you configured in
Omnia A/XE when you created the Wowza stream output.
4. Click the Play button. If all is configured properly you should be able to hear the audio
stream processed and encoded by Omnia A/XE. e large white box above the Server
filed will display the metadata information if you supplying this to Omnia A/XE.
Additional information about Wowza is available on the Wowza Media web
site at http://www.wowzamedia.com/. A quick start guide is available from
http://www.wowzamedia.com/quickstart.html. e forums are always a good source of
information at http://www.wowzamedia.com/forums/.
Page 90

Page 91

18 Managing the Omnia A/XE Service
Omnia A/XE runs as a Windows service. Services run in the background and present no
user interface as regular applications would. Windows services are started and stopped by
using the Service Manager control panel applet.
e steps below illustrate how to use the Service Manager applet to start and stop the
Omnia A/XE service. e screen images are from Windows Vista® but the steps should be
very similar for other versions of Windows.
1. Open Windows Control Panel from the Start menu on the task bar. Double-click the
Administrative Tools icon on the panel:
2. When the Administrative Tools window just opens up, double-click the Services
applet:
3. A list of services installed on your PC will show up. Scroll down in the list until you find
the Omnia A/XE entry:
4. Right-click the Omnia A/XE entry. From the popup menu displayed you may choose
the Start or Stop options to control the service.
Page 92

Page 93

19 Firewall Setup
Omnia A/XE requires access to the network for configuration and to deliver the encoded
audio streams. If your PC has an active firewall, you will need to configure the firewall to
not block Omnia A/XE.
e example below describes the firewall configuration on Windows Vista®. If you use a
different firewall, the steps should be similar but please consult your firewall’s documentation for details.
1. Go to Windows’ Control Panel and open the Windows Firewall:
2. In the Windows Firewall dialog, click the Allow a program through Windows Firewall
link on the left side of the window:
3. If you see a security prompt, select Continue. e Windows Firewall Settings dialog will
be displayed. Select the Exceptions tab (if not already selected):
Page 94
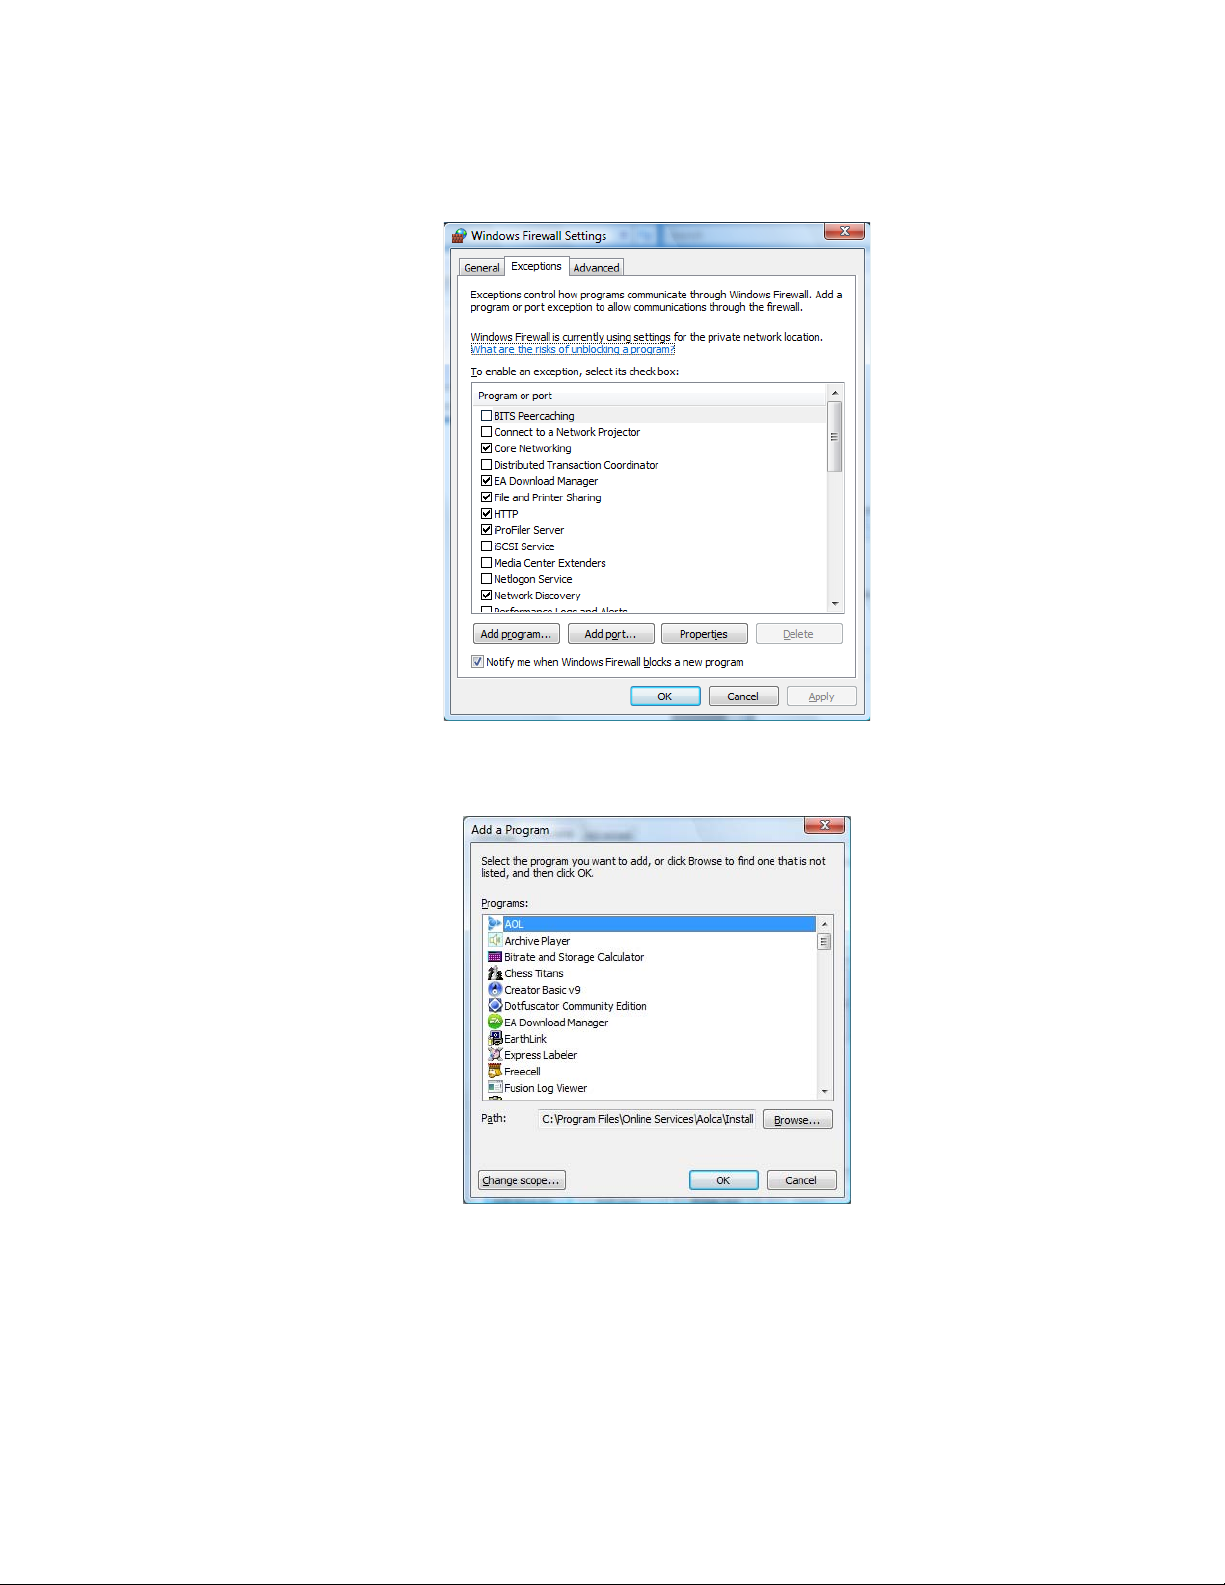
88 | Firewall Setup
4. On the Exceptions tab, click the Add program… button. e a program list will be
displayed:
5. e first time you open this dialog Omnia A/XE will not appear in the list. Click the
Browse… button and the Browse dialog will be displayed:
Page 95

| 89
6. Navigate to the folder where Omnia A/XE is installed. e default folder is Pro-
gramFiles\OmniaAXE. In this folder select the OmniaAX.exe file and click the Open
button.
7. Click the OK button on the following dialog and now you will be back at the Windows
Firewall Settings dialog. You should now see a new entry labeled OmniaAX.exe with
a checkmark next to it. You are now done. Click OK to close the dialog and close the
Windows Firewall applet. Omnia A/XE should now be able to access the network.
Page 96

 Loading...