

Page 1

User’s Guide
omega.com
e-mail: info@omega.com
For latest product manuals:
omegamanual.info
Page 2

Servicing North America:
U.S.A.: One Omega Drive, Box 4047
ISO 9001 Certified Stamford, CT 06907-0047
Tel: (203) 359-1660
FAX: (203) 359-7700
e-mail: info@omega.com
Canada: 976 Bergar
Laval (Quebec) H7L 5A1, Canada
Tel: (514) 856-6928
FAX: (514) 856-6886
e-mail: info@omega.ca
For immediate technical or application assistance:
U.S.A. and Canada: Sales Service: 1-800-826-6342/1-800-TC-OMEGA
®
Customer Service: 1-800-622-2378/1-800-622-BEST
®
Engineering Service: 1-800-872-9436/1-800-USA-WHEN
®
Mexico: En Espan˜ol: (001) 203-359-7803
e-mail: espanol@omega.com
FAX: (001) 203-359-7807
info@omega.com.mx
Servicing Europe:
Czech Republic: Frystatska 184, 733 01 Karvina´, Czech Republic
Tel: +420 (0)59 6311899
FAX: +420 (0)59 6311114
Toll Free: 0800-1-66342
e-mail: info@omegashop.cz
Germany/Austria: Daimlerstrasse 26, D-75392 Deckenpfronn, Germany
Tel: +49 (0)7056 9398-0
FAX: +49 (0)7056 9398-29
Toll Free in Germany: 0800 639 7678
e-mail: info@omega.de
United Kingdom: One Omega Drive, River Bend Technology Centre
ISO 9002 Certified Northbank, Irlam, Manchester
M44 5BD United Kingdom
Tel: +44 (0)161 777 6611
FAX: +44 (0)161 777 6622
Toll Free in United Kingdom: 0800-488-488
e-mail: sales@omega.co.uk
OMEGAnet®Online Service Internet e-mail
omega.com info@omega.com
It is the policy of OMEGA Engineering, Inc. to comply with all worldwide safety and EMC/EMI
regulations that apply. OMEGA is constantly pursuing certification of its products to the European New
Approach Directives. OMEGA will add the CE mark to every appropriate device upon certification.
The information contained in this document is believed to be correct, but OMEGA accepts no liability for any
errors it contains, and reserves the right to alter specifications without notice.
WARNING: These products are not designed for use in, and should not be used for, human applications.
Page 3

Table of contents Page
1. Device description and intended use ............................................................................................................... 2
1.1. Functional principle .......................................................................................................................................... 2
1.2. Component overview........................................................................................................................................2
2. Safety instructions ............................................................................................................................................ 2
2.1. Qualified personnel .......................................................................................................................................... 3
2.2. Special safety instructions................................................................................................................................ 3
3. Material specifications of wetted components ................................................................................................. 4
4. Flow switch installation..................................................................................................................................... 4
4.1. Mechanical installation ..................................................................................................................................... 4
4.2. Electrical connection ........................................................................................................................................ 6
5. Adjusting the switching unit .............................................................................................................................. 7
5.1. Type of contact................................................................................................................................................. 7
5.2. Flow switch....................................................................................................................................................... 7
6. Maintenance and repairs.................................................................................................................................. 8
7. Shut-down and disposal................................................................................................................................... 8
8. Technical data .................................................................................................................................................. 9
8.1. Technical data flow switch version..................................................................................................................9
8.2. Maximum flow rate of the flow switch............................................................................................................... 9
1
Page 4
Device description and intended use
1. Device description and intended use
Flow switches are designed for minimum or maximum monitoring of liquid flows. The operational safety of the
supplied equipment is only guaranteed if it is operated according to its intended use (flow monitoring of liquids).
The specified limit values (see the chapter entitled “Technical data“) should never be exceeded.
It is your responsibility to select a technology which is suitable for your specific application, to install it correctly, to
carry out tests and to maintain all the components.
Various device versions are manufactured. The respective type plate displays the version of each device.
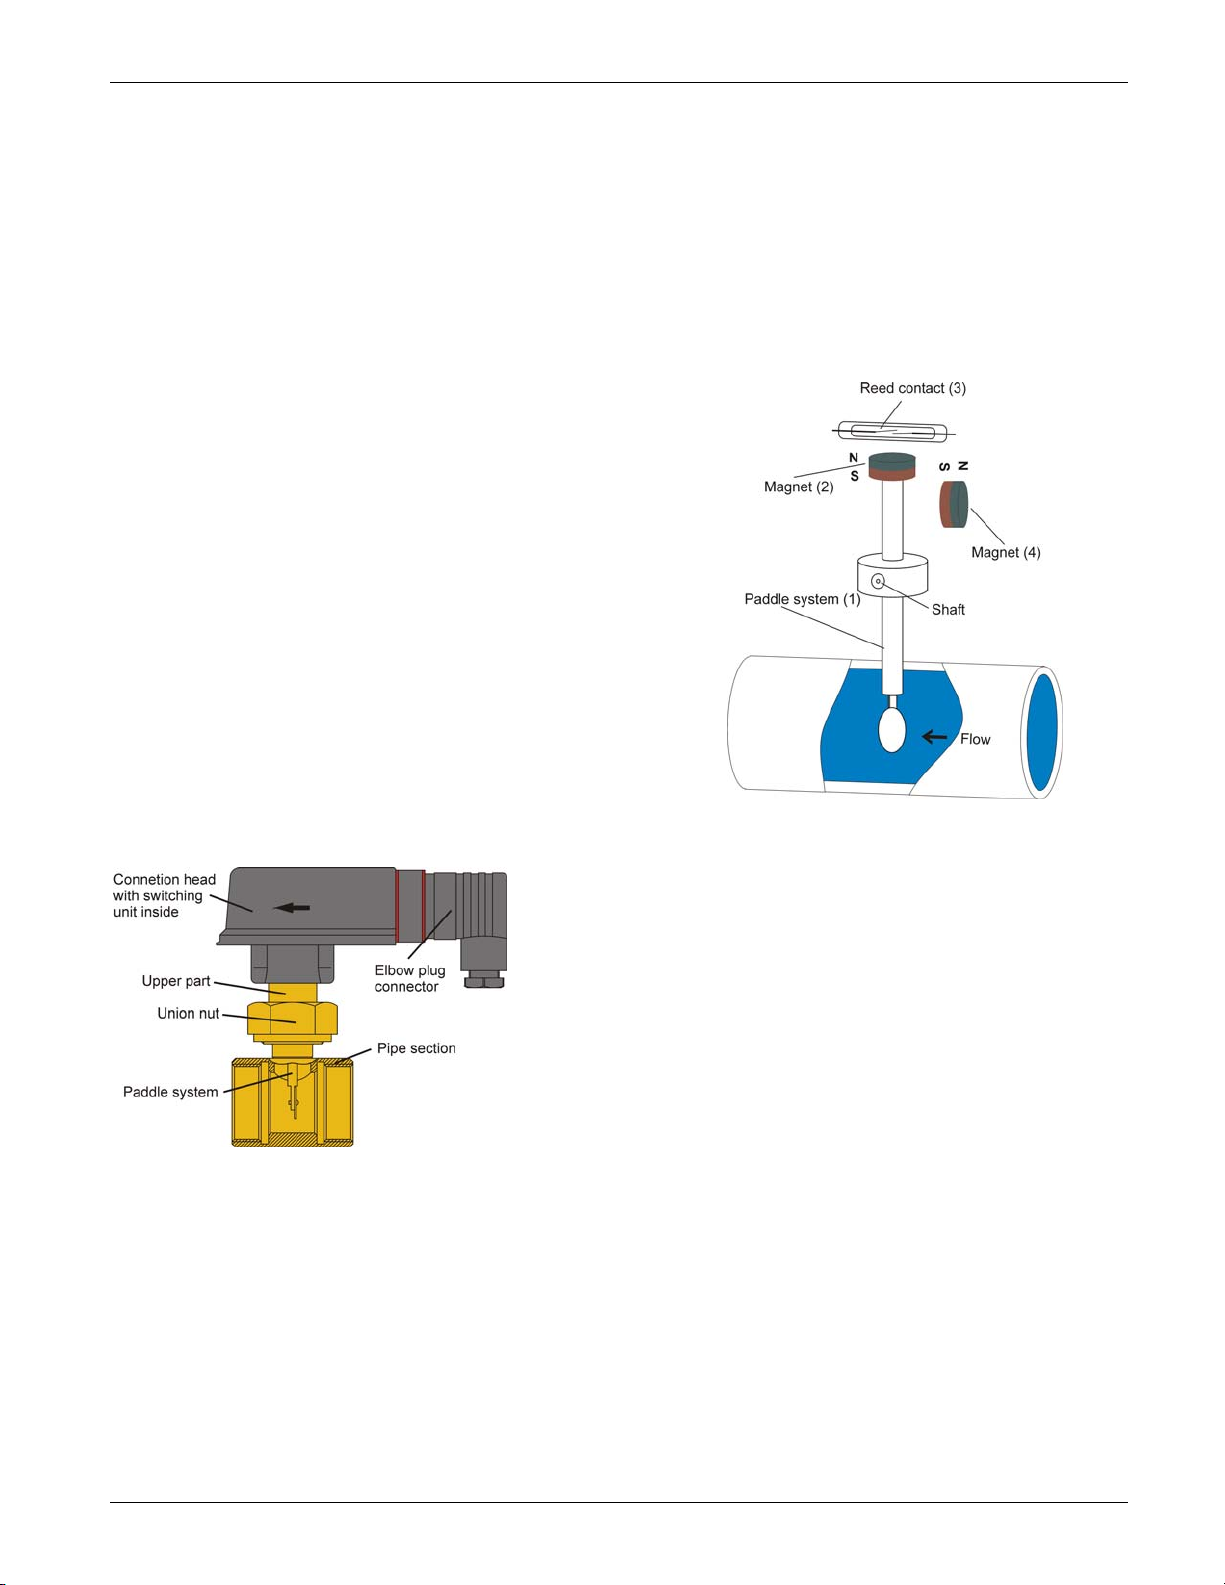
1.1. Functional principle
The flow switch consists of a paddle system (1) which has a
permanent magnet (2) located at its upper end. A reed contact (3)
is positioned outside the flow above this magnet. A second,
magnet (4) with opposite polarity is used to create a reset force.
The paddle system is moved once it comes into contact with the
flow which is to be monitored. The magnet (2) changes its position
in relation to the reed contact (3). The contact opens/closes
depending on the contact type (see chapter 5).
As soon as the flow is interrupted, the paddle returns to its original
position and the reed contact opens/closes depending on the
contact type (see chapter 5).
1.2. Component overview
2. Safety instructions
Always read these operating instructions carefully prior to installing the new product. Always adhere to the
instructions contained herein, especially the safety instructions, otherwise there is a potential risk of personal
injury and damage to instruments and plants.
Even though we provides assistance through personal consultation or the respective literature, it is the
responsibility of the customers to determine the suitability of the product for the specific application.
The flow switches are state-of-the-art devices. This concerns switching point accuracy, functioning and safe
operation of the device.
However, professional and safety conscious conduct of the operator is required to ensure safe operation.
2
Page 5

Safety instructions
2.1. Qualified personnel
• The personnel entrusted with installing, operating and maintaining the flow switches have to be suitably
qualified; the required knowledge can be gained via training courses or appropriate on-the-job instruction. The
personnel have to be familiar with the contents of these instructions, which have to be available to them at all
times.
• The electrical connection should only be carried out by a fully qualified electrician.
• All work has to be carried out in accordance with existing national regulations on accident prevention and
safety at work and with any internal regulations of the operator, even if they are not specified in these
instructions.
2.2. Special safety instructions
• The operational safety of the supplied equipment is only guaranteed if it is operated according to its intended
use. The specified limit values (see the chapter entitled “Technical data“) should never be exceeded.
• To avoid damages to the flow switch and the monitored system, only use flow switches for minimum or
maximum monitoring of the flow of liquids.
• Always follow and adhere to the flow switch installation instructions.
• Never operate the flow switch in systems which have a greater flow rate than the specified max. flow rate
(see the chapter entitled “Technical data”, details of the max. flow rate). Otherwise it will cause irreparable
damage to the flow switch.
• Prior to flow switch installation, ensure that all the materials of the flow switch are chemically and
mechanically-resistant to the medium which is to be monitored and to all external factors.
• Ensure that the medium is free from magnetic particles.
• Suitable measures should be taken to prevent the medium from freezing.
If the flow switch is to be used in ambient temperatures of < 39.2 °F, do not carry out any operation
beforehand with pure water, e.g. a test run. Residual water in the flow switch can result in frost damage.
• No greases, oils etc. should be used during the installation of the FSW 300 devices due to the material
resistance.
• Ensure that the max. specified operating pressure is not exceeded.
• Never remove a flow switch or its upper parts from a pipe system under pressure.
• If the medium which is to be monitored is very hot, the flow switches or their connection fittings will also
become very hot. In this case, neither touch the flow switch nor place any heat-sensitive objects in its vicinity.
• Protect the flow switch against external magnetic fields in the immediate vicinity, since these can impair
device functioning.
• The technical data of special versions (customised versions) can deviate from the details in these instructions.
Please observe the details on the type plate.
• Caution: Danger of death due to high voltages!
Always de-energize the system before connecting the connector cable.
• It is prohibited to remove or make type plates or any other information attached to the equipment
indecipherable, otherwise all warranties and the responsibility of the manufacturer no longer apply.
CAUTION: Ensure that the maximum electrical contact load specified on the type plate is never exceeded;
otherwise the reed contact integrated in the switching unit will be damaged.
The switching capacity is reduced with inductive loads. Details of the protective circuit can be requested from the
manufacturer.
If problems or questions arise, please contact:
3
Page 6

Material specifications of wetted components
3. Material specifications of wetted components
Type FSW 301, 302, 303, 304 FSW 305, 306, 307
Upper part 2. 0401 PPO (NORYL)
Paddle
system
Round head rivet ---------- ---------Bushings PPO (NORYL) PPO (NORYL)
Axle 1.4571 1.4571 / PPO
Pipe section *1 none or brass PVC
Screw-in insert *2 2.0401 1.4571
Seal NBR NBR
V seal EPDM EPDM / PPO
Magnet Hard ferrite Hard ferrite
*1) only for flow switch with pipe section
*2) only for flow switch for direct installation, screw connection
*3) Type FSW 301 (Trimmable paddle) has a stainless steel sleeve (1.4571)
PPO (NORYL) *3 PPO (NORYL) *3
4. Flow switch installation
4.1. Mechanical installation
4.1.1. General installation instructions
⇒ When choosing the installation site, ensure that the specified limit values (see “Technical data”) are not
exceeded.
⇒ Select suitable measures to prevent the medium from freezing.
If the flow switch is to be used in ambient temperatures of < 39.2 °F, do not carry out any operation
beforehand with pure water, e.g. a test run. Residual water in the flow switch can result in frost damage.
⇒ Firstly, clean the pipe system in which the flow switch is to be installed and remove any magnetic particles,
e.g. welding residue.
⇒ The straight in- and outlet pipe (in front of and behind the flow switch) has to be at least
5 x ID.
⇒ The nominal installation position of the flow switch is an “upright
standing position” in horizontal pipework.
⇒ The switches should only be installed in a vertical position, deviation
max. 45° (Fig. 1).
⇒ Please contact the manufacturer if other installation positions are
desired.
⇒ Please make sure that there are no external magnetic fields in the
immediate vicinity of the flow switch, since these can impair device
functioning (Fig. 2).
⇒ There is an arrow on the flow switch. Ensure that this arrow is
parallel with the pipe shaft and is facing in the direction of flow
during installation (Fig. 2).
⇒ The brass and stainless steel union nuts ¾“BSP have a tightening
torque of 18.439 ... 22.127 ft lb.
⇒ The plastic union nuts have a tightening torque of 5.163 ... 5.901 ft
lb.
Fig. 1
Fig. 2
4
Page 7

Flow switch installation
4.1.2. Flow switch for direct installation
⇒ During flow switch installation, ensure that the paddle does not touch the wall of the pipe.
⇒ Carry out installation of your device type as described in the table below.
Flow switch type Installation type and instructions
FSW 301 Installation in sockets with a ½” NPT female thread
Caution: Please observe the installation height
dimensions
FSW 301 (Trimmable paddle)
Important:
In order to shorten the paddle to the
Nut size 32
¾” BSP
required length, use a side cutter.
When cutting, hold the paddle tight
above the cut surface.
Nut size
male thread
½” NPT, 14 mm
Welding nipple
with female thread
27,
½” NPT
Fig. 4
Installation in sockets with a ½” NPT female thread,
should only installed vertically in horizontal pipes.
Caution: Always observe the installation height
dimensions
4.1.3. Flow switch with pipe section
⇒ Install the flow switch pipe section just like a valve
in the existing pipe.
⇒ The pipe section has a NPT thread connection
female according to the nominal diameter. Make
sure that the correspondent part has the same
NPT thread connection male.
⇒ Counterhold! When tightening the correspondent
part use only the wrench flat of the flow switch.
Fig. 5
5
Page 8

4.2. Electrical connection
4.2.1. General electrical connection information
⇒⇒ C
AUTION: Danger of death due to high voltages!
Always de-energize the system before conne
AUTION: Ensure that the maximum electrical contact load specified on the type plate is never exceeded;
⇒⇒ C
otherwise the reed contact integrated in the switching unit will be damaged.
The switching capacity is reduced with inductive loads. Details on the protective circuit can be requested from
the manufacturer.
4.2.2. Elbow plug connector EN 175301-803-A
⇒⇒ Loosen the central screw (po
s. 6) M3x35 and disconnect the junction box EN 175301-803-A
Fig. 6 Fig. 7 Fig. 8 Fig. 9
(pos. 2) from the conne
⇒⇒ Use a s
crewdriver or similar tool to press out the core (pos. 8) of the junction box (Fig. 7).
ctor (pos. 1) (Fig. 6). Pull the central screw out of the junction box.
⇒⇒ Loosen the screw connection M16x1.5 (pos. 5, Fig. 8).
⇒⇒ Feed the connecting cable into the junction box via the s
and the rubber insert (pos. 9) and subsequently conne
(see Fig. 9).
ss the core (pos. 8) until it locks into position in the junction box (pos. 2).
re
⇒⇒ P
⇒⇒ Tighten the cable gland M16x1.5 (pos. 5).
cting the wires of the mains cable.
crew connection (pos. 5), the clamping ring (pos. 10)
ct the wires as displayed in the connection diagram
Adjusting the switching unit
⇒⇒ Place the junction box (pos. 2) on the connector (pos. 1) and retighten the central screw (pos. 6).
⇒⇒ To guarantee the protection class IP 65 according to EN 60529, the applied connecting cable has to have a
sheathing diameter of between 0.177 and 0.393 inch.
⇒⇒ Furthermore, ensure that all the conne
Flow s
witch
Fig. 10
6
ctor seals (pos. 3, 4 and 9) have been correctly inserted.
Page 9

Flow switch installation
4.3 Installation instructions for PVC pipe:
1. Note the flow direction arrow on the flow
switch and install with the arrow pointing in
the direction of flow.
2. Position the switch + glue-in adapter + gasket
securely into the pvc pipe tee without
using adhesive.
3. Inspect inside the pipe to ensure that the paddle
moves freely without contacting the walls of the pipe.
4. Mark the glue-in adapter so that you can re-install
it back into the ideal position after the adhesive
is applied.
5. Remove the switch & adapter, apply the adhesive
to the adapter & re-insert it to the position previously
marked.
6. After the glue is cured, assemble the gasket & switch.
Tighten the union nut to a max of 5.9 ft lbs
(aprox. hand tight).
5. Adjusting the switching unit
5.1. Type of contact
Standard contact:
The switching unit of the control switch enables two types of contact:
1. Normally open contac
2. Normally closed contact: “WHITE” or “BLUE” arrow on the switching unit
The following table explains the two types of contact:
Type of contact Setting Flow rate: Electric contact
Normally open contact RED ar
Normally closed contact WHITE or BLUE arrow
If not otherwise agreed with the customer, the switching unit is factory set as a normally open contact, i.e. the reed
contact opens if the set switching point is exceeded.
5.2. Flow switch
⇒⇒ In order to adjust the switching unit, open the cover of the switching head (Fig. 13)
t: “RED” arrow on the switching unit
row
increasing closing
decreasing o
increasing opening
d
ecreasing c
pening
losing
Fig.13
⇒⇒ Subsequently loosen the locking screw (2.5 hexagon socket screw for the brass and stainless steel version or
recessed h
visible at the entry of the switching contact guide for a desired make contact (Fig. 14) or break contact (Fig.
15) respectively.
7
ead screw for the plastic version) and position the switching unit until the red or white arrow are
Page 10

Maintenance and repairs
⇒ The fine adjustment of the switching point can be carried out on the basis of the arrow length:
Movement towards the arrow head: Switching point is set to lower flow rate.
Movement towards the arrow tail: Switching point is set to higher flow rate.
⇒ Carefully retighten the locking screw.
⇒ We recommend you to use lacquer / threadlocker to secure the locking screw of the switching unit after
carrying out individual adjustments.
⇒ Close the cover until it locks into place.
Adjustment of the switching unit is not required if a desired ex works switching point setting has been agreed with
the customer.
Fig. 14 Fig. 15
6. Maintenance and repairs
The flow switch is maintenance-free and cannot be repaired by the user. In the unlikely event of a defect, the
device has to be returned to the manufacturer for repair work.
7. Shut-down and disposal
⇒ Never remove a flow switch or its upper part from a system under pressure.
⇒ Remove all the electrical connections and dismount the flow switch.
⇒ The flow switch consists of various materials (see “Chapter 3”). Never dispose of the flow switch in domestic
waste (refer to the crossed out waste bin displayed on the type plate).
⇒ Return the flow switch to the manufacturer for correct disposal.
8
Page 11

Technical data
8. Technical data
⇒ The technical data of special versions (customised versions) can deviate from the details in these
instructions. Please observe the details on the type plate.
8.1. Technical data
Series FSW 301, 302, 303, 304 FSW 305, 306, 307
Nominal pressure 362.6 psi * 145 psi *
Max. medium temperature
(the medium should never freeze)
Ambient temperature
(do not store at <4 °F)
Max. switching current 1 A
Max. switching voltage 230 VAC, 48 VDC
Max. switching capacity 26 VA, 20 W
Protection class II
Degree of protection IP 65
Max. permanent temperature load of the
cable
Connecting cable length
Cable cross-shaped section
Tolerance of the switching point ranges
*Reduced pressure level for devices with copper pipe section. Please observe the details on the type plate!
230 °F 212 °F
176 °F,
212 °F (optional)
⎯
221 °F (optional)
⎯
⎯
±15 %
158 °F
158 °F
4.92 ft
AWG 21
8.2. Maximum flow rate of the flow switch
⇒ The max. permissible flow rate can deviate from the specified limit values for customised versions.
Flow switch with pipe section
The maximum specifications relate to water as the medium and a continuous flow rate.
Brass/Stainless steel pipe section
FSW 301, 302, 303, 304 FSW 305, 306, 307
Size / process connection Max. flow rate [GPM] Max. flow rate [GPM]
1
/4'' NPT 11.7 . / .
3
/8'' NPT 15.6 . / .
1
/2'' NPT 17.4 7.8
3
/4'' NPT 46.8 20.8
1'' NPT 50.7 33.8
11/4'' NPT 62.4 . / .
11/2'' NPT 104 . / .
2'' NPT 104 . / .
Flow switch for direct installation
Series FSW301
Thread
connection
(mounting length 4.37 inch)
1
/2'' NPT
Insert in size Max flow rate [GPM]
4'' 440
6'' 660
8'' 880
9
Page 12

WARRANTY/ DISCLAIMER
OMEGA ENGINEERING, INC. warrants this unit to be free of defects in materials and
workmanship for a period of 13 months from date of purchase. OMEGA’s WARRANTY adds
an additional one (1) month grace period to the normal one (1) year product warranty to
cover handling and shipping time. This ensures that OMEGA’s customers receive maximum
coverage on each product.
If the unit malfunctions, it must be returned to the factory for evaluation. OMEGA’s Customer
Service Department will issue an Authorized Return (AR) number immediately upon phone or
written request. Upon examination by OMEGA, if the unit is found to be defective, it will be
repaired or replaced at no charge. OMEGA’s WARRANTY does not apply to defects resulting
from any action of the purchaser, including but not limited to mishandling, improper
interfacing, operation outside of design limits, improper repair, or unauthorized modification.
This WARRANTY is VOID if the unit shows evidence of having been tampered with or shows
evidence of having been damaged as a result of excessive corrosion; or current, heat, moisture
or vibration; improper specification; misapplication; misuse or other operating conditions
outside of OMEGA’s control. Components in which wear is not warranted, include but are not
limited to contact points, fuses, and triacs.
OMEGA is pleased to offer suggestions on the use of its various products. However,
OMEGA neither assumes responsibility for any omissions or errors nor assumes
liability for any damages that result from the use of its products in accordance with
information provided by OMEGA, either verbal or written. OMEGA warrants only
that the parts manufactured by the company will be as specified and free of
defects. OMEGA MAKES NO OTHER WARRANTIES OR REPRESENTATIONS OF ANY
KIND WHATSOEVER, EXPRESSED OR IMPLIED, EXCEPT THAT OF TITLE, AND ALL
IMPLIED WARRANTIES INCLUDING ANY WARRANTY OF MERCHANTABILITY AND
FITNESS FOR A PARTICULAR PURPOSE ARE HEREBY DISCLAIMED. LIMITATION OF
LIABILITY: The remedies of purchaser set forth herein are exclusive, and the total
liability of OMEGA with respect to this order, whether based on contract, warranty,
negligence, indemnification, strict liability or otherwise, shall not exceed the
purchase price of the component upon which liability is based. In no event shall
OMEGA be liable for consequential, incidental or special damages.
CONDITIONS: Equipment sold by OMEGA is not intended to be used, nor shall it be used: (1)
as a “Basic Component” under 10 CFR 21 (NRC), used in or with any nuclear installation or
activity; or (2) in medical applications or used on humans. Should any Product(s) be used in or
with any nuclear installation or activity, medical application, used on humans, or misused in
any way, OMEGA assumes no responsibility as set forth in our basic WARRANTY/DISCLAIMER
language, and, additionally, purchaser will indemnify OMEGA and hold OMEGA harmless from
any liability or damage whatsoever arising out of the use of the Product(s) in such a manner.
RETURN REQUESTS/INQUIRIES
Direct all warranty and repair requests/inquiries to the OMEGA Customer Service Department.
BEFORE RETURNING ANY PRODUCT(S) TO OMEGA, PURCHASER MUST OBTAIN AN
AUTHORIZED RETURN (AR) NUMBER FROM OMEGA’S CUSTOMER SERVICE DEPARTMENT
(IN ORDER TO AVOID PROCESSING DELAYS). The assigned AR number should then be
marked on the outside of the return package and on any correspondence.
The purchaser is responsible for shipping charges, freight, insurance and proper packaging to
prevent breakage in transit.
FOR WARRANTY
RETURNS, please have
the following information available BEFORE
contacting OMEGA:
1. Purchase Order number under which
the product was PURCHASED,
2. Model and serial number of the product
under warranty, and
3. Repair instructions and/or specific
problems relative to the product.
FOR NON-WARRANTY REPAIRS,
consult
OMEGA for current repair charges. Have the
following information available BEFORE
contacting OMEGA:
1. Purchase Order number to cover the
COST of the repair,
2. Model and serial number of the
product, and
3. Repair instructions and/or specific problems
relative to the product.
OMEGA’s policy is to make running changes, not model changes, whenever an improvement is possible.
This affords our customers the latest in technology and engineering.
OMEGA is a registered trademark of OMEGA ENGINEERING, INC.
© Copyright 2007 OMEGA ENGINEERING, INC. All rights reserved. This document may not be copied, photocopied,
reproduced, translated, or reduced to any electronic medium or machine-readable form, in whole or in part, without
the prior written consent of OMEGA ENGINEERING, INC.
Page 13

Where Do I Find Everything I Need for
Process Measurement and Control?
OMEGA…Of Course!
Shop online at omega.com
TEMPERATURE
䡺⻬
Thermocouple, RTD & Thermistor Probes, Connectors, Panels & Assemblies
䡺⻬
Wire: Thermocouple, RTD & Thermistor
䡺⻬
Calibrators & Ice Point References
䡺⻬
Recorders, Controllers & Process Monitors
䡺⻬
Infrared Pyrometers
PRESSURE, STRAIN AND FORCE
䡺⻬
Transducers & Strain Gages
䡺⻬
Load Cells & Pressure Gages
䡺⻬
Displacement Transducers
䡺⻬
Instrumentation & Accessories
FLOW/LEVEL
䡺⻬
Rotameters, Gas Mass Flowmeters & Flow Computers
䡺⻬
Air Velocity Indicators
䡺⻬
Turbine/Paddlewheel Systems
䡺⻬
Totalizers & Batch Controllers
pH/CONDUCTIVITY
䡺⻬
pH Electrodes, Testers & Accessories
䡺⻬
Benchtop/Laboratory Meters
䡺⻬
Controllers, Calibrators, Simulators & Pumps
䡺⻬
Industrial pH & Conductivity Equipment
DATA ACQUISITION
䡺⻬
Data Acquisition & Engineering Software
䡺⻬
Communications-Based Acquisition Systems
䡺⻬
Plug-in Cards for Apple, IBM & Compatibles
䡺⻬
Datalogging Systems
䡺⻬
Recorders, Printers & Plotters
HEATERS
䡺⻬
Heating Cable
䡺⻬
Cartridge & Strip Heaters
䡺⻬
Immersion & Band Heaters
䡺⻬
Flexible Heaters
䡺⻬
Laboratory Heaters
ENVIRONMENTAL
MONITORING AND CONTROL
䡺⻬
Metering & Control Instrumentation
䡺⻬
Refractometers
䡺⻬
Pumps & Tubing
䡺⻬
Air, Soil & Water Monitors
䡺⻬
Industrial Water & Wastewater Treatment
䡺⻬
pH, Conductivity & Dissolved Oxygen Instruments
M0000/0007
 Loading...