

Page 1

U
ser’s
Guide
Shoponline
at
omega.com
e-mail:
info@omega.com
For
latest
product
manuals:
omegamanual.info
FMG600 Series
Electroma
g
netic Flow Meters
Page 2

OMEGA
net
®
Onli
ne Service
I
nternet e-ma
il
omega.com info@omega.com
Ser
vicing
NorthAmerica:
U.S.A.: One Omega Drive, P.O. Box 4047
ISO
9001
Certified
Stamford, CT 06907-0047
TEL: (203) 359-1660
FAX: (203) 359-7700
e-mail: info@omega.com
Canada: 976 Bergar
L
aval (Quebec) H7L 5A1, Canada
TEL: (514) 856-6928
FAX: (514) 856-6886
e-mail:
info@omega.ca
For
immediate
technicalorapplication
assistance:
U.S.A. and Canada: Sales Service:
1-800-826-6342/1-800-TC-OMEGA
®
Customer
Service:
1-800-622-2378/1-800-622-BEST
®
Engineering
Service:
1-800-872-9436/1-800-USA-WHEN
®
Mexico: En Espan˜ ol: (001) 203-359-7803
e-mail: espanol@omega.com
FAX: (001) 203-359-7807
info@omega.com.mx
Ser
vicing
Eur
ope:
Czech Republic: Frystatska 184, 733 01 Karvin
á
, Czech Republic
TEL:+420 (0)59 6311899
FAX: +420 (0)59 6311114
Toll Free: 0800-1-66342
e-mail: info@omegashop.cz
Germany/Austria: Daimlerstrasse 26, D-75392 Deckenpfronn, Germany
TEL:
+49
(0)7056 9398-0
FAX:
+49
(0)7056 9398-29
Toll Free in Germany: 0800 639 7678
e-mail:
info@omega.de
United Kingdom: One Omega Drive, River Bend Technology Centre
ISO
9002
Certified
Northbank, Irlam, Manchester
M44 5BD United Kingdom
TEL:
+44
(0)161 777 6611
FAX:
+44
(0)161 777 6622
Toll Free in United Kingdom: 0800-488-488
e-mail: sales@omega.co.uk
Itisthe
policy ofOMEGA
Engineering,
Inc.to
comply
with
all
worldwide
safety
and EMC/EMI
regulations
that
apply.
OMEGAisconstantly
pursuing
certificationofits
products
to the
European
New
Approach
Directives.
OMEGA
will
add
theCEmark to
every appropriate device
upon
certification.
The
information contained in
this
documentisbelievedtobe
correct,
but
OMEGA
acceptsnoliability for
any
errors
it
contains,
and
reserves
the
righttoalter
specifications
without
notice.
W
ARNING:
These
products
are
not
designed
for
use
in,
and
should
notbeused
for,
human
applications.
Page 3

Design, Assembly and Service Manual
Induction flow meter FMG600 series
Page 1 of 44
Content
1. APPLICATION ............................................................................................................................................. 2
2. MEASUREMENT PRINCIPLE ..................................................................................................................... 2
3. TECHNICAL DESCRIPTION ....................................................................................................................... 3
3.1. GENERAL .................................................................................................................................................................. 3
3.2. METER DESIGN ........................................................................................................................................................... 3
3.2.1. Remote version ............................................................................................................................................... 3
3.2.2. Compact version .............................................................................................................................................. 4
4. TECHNICAL PARAMETERS ....................................................................................................................... 5
4.1. FLOW SENSOR ............................................................................................................................................................ 5
4.1.1. Selection of correct sensor size ....................................................................................................................... 5
4.1.2. Operational pressure of measured liquid .......................................................................................................... 6
4.1.3. Selection of electrode material ......................................................................................................................... 6
4.1.4. Sensor tube lining............................................................................................................................................. 6
4.1.5. Compact or remote meter version? .................................................................................................................. 6
4.1.6. Dimensions of flanged sensor .......................................................................................................................... 7
4.1.7. Dimensions Tri Clover sensor .......................................................................................................................... 8
4.1.8. Flow sensor specifications ............................................................................................................................... 9
4.2. ELECTRONIC UNIT BOX ................................................................................................................................................ 9
4.2.1. Electronic unit specifications .......................................................................................................................... 10
5. METER APPLICATION RULES..............................................................................................................................................11
5.1. SENSOR PLACEMENT IN PIPING ................................................................................................................................... 11
5.2. SENSOR GROUNDING ................................................................................................................................................ 14
5.2.1. Flanged version .............................................................................................................................................. 14
5.2.2 Tri Clover ......................................................................................................................................................... 15
6. FLOW METER INSTALLATION AND OPERATIONAL START ............................................................... 16
6.1. SENSOR INSTALLATION .............................................................................................................................................. 16
6.2. ELECTRIC CONNECTIONS OF INDUCTION FLOW METER ................................................................................................... 17
6.2.1. Connection to power source .......................................................................................................................... 17
6.2.2. Output signal connections ............................................................................................................................. 18
6.3. CONNECTION BETWEEN SENSOR AND ELECTRONIC UNIT (REMOTE VERSION) ...................... 18
6.4. CONNECTION BETWEEN SENSOR AND ELECTRONIC UNIT (REMOTE METER VERSION, PROTECTION CLASS IP 68) .................. 19
6.5. OPERATIONAL START ................................................................................................................................................ 19
6.5.1 Operational start .............................................................................................................................................. 19
6.5.2. Operational data ............................................................................................................................................. 20
6.5.3.1. Display formats of aggregate values .......................................................................................................... 22
6.5.3.2. Data reset ................................................................................................................................................... 22
7. PROGRAMMING........................................................................................................................................ 23
7.1. PROGRAMMING OF THE BASIC MENU ITEMS .................................................................................................................. 24
7.1.1. Displayed data ............................................................................................................................................... 24
7.1.2. Samples ........................................................................................................................................................ 25
7.1.3. Analog output ................................................................................................................................................ 26
7.1.4. Output function .............................................................................................................................................. 29
7.1.5. Electrode cleaning .......................................................................................................................................... 34
7.1.6. Serial line ...................................................................................................................................................... 35
7.1.7. Production data ............................................................................................................................................. 37
7.1.8. Dose setting .................................................................................................................................................. 39
7.1.9. Zero setting ................................................................................................................................................... 40
7.1.10. 100 percent ................................................................................................................................................. 40
7.1.11. Exit .............................................................................................................................................................. 40
7.2. THE PARAMETER SETTING MENU ................................................................................................................................ 42
7.3. THE PRODUCTION DATA MENU ................................................................................................................................... 43
8. STANDARD TESTS ................................................................................................................................... 44
9. CALIBRATION AND VERIFICATION TESTS ........................................................................................... 44
Page 4

Design, Assembly and Service Manual
Induction flow meter FMG600 series
Page 2 of 44
1. APPLICATION
Flow meters FMG600 SERIES are primarily used for measuring instantaneous flow rate and volume of water
or similar liquids passed through the meter. Flow meters shall only be used in standard non-explosive
environments.
Any installation of flow meter must be in conformity with technical conditions mentioned in this manual.
Measurements can be done in both flow directions, with high measurement accuracy over a wide range of
flow rates 0.33 to 32.8 ft/s (0.1 to 10 m/s). The minimum required conductivity of the measured medium is 20
µS/cm.
The measurement evaluation electronic unit includes a two-line alphanumeric display to show the measured
values where various operational parameters of the meter can be selected by means of an associated
keyboard. Available are two passive binary outputs (frequency, pulse and limit values), one active current
output and an output to connect a digital communication line. All meter functions and output parameters can
be reset during the meter operation.
Should the need arise; the user may combine any sensor of the FMG600 series with any electronic units
without re-calibration of the meter on a test stand. The only thing that needs be done is to enter into the
electronic unit memory the calibration constants and excitation frequency of the selected sensor; these data
are given on the rating plate of the sensor. The value of threshold flow rate shall be set between 0.5 and 1%
of the specified maximum flow rate.
2. MEASUREMENT PRINCIPLE
The function of an induction flow meter is based on Faraday’s induction law. The meter sensor consists
of a non-magnetic and non-conductive tube with two embedded measuring electrodes to pick up the induced
voltage. To create an alternating magnetic field, two coils are fitted onto the tube in parallel with the plane
defined by the active parts of the measuring electrodes. Now if a conductive liquid flows across magnetic
field B, voltage U will appear on the measuring electrodes proportional to the flow velocity v and the
conductor length l.
U = B x l x v
U induced voltage
B magnetic flux density
l distance between the measuring electrodes
v liquid flow velocity
Page 5
As the magnetic flux density and distance between the electrodes are constant, the induced voltage is
proportional to the liquid flow velocity in the tube. The value of the volume flow rate can then be readily
determined as a product of the flow velocity and square section of the tube, Q = v x S.
Design, Assembly and Service Manual
Induction flow meter FMG600 series
Page 3 of 44
3. TECHNICAL DESCRIPTION
3.1. General
The induction flow meter consists of a sensor through which the measured liquid flows and an electronic unit
where the low-level signal from the sensor is modified to a standardized form suitable for further processing
in various industrial electronic devices. The output signal is proportional to the volume flow rate of the
measured liquid. The only factor limiting the application of induction flow meters is the requirement that the
measured liquid shall be conductive and non-magnetic. The induction flow meter can be designed either as
a compact device or with the sensor separated from the associated electronic unit. In the former case, the
electronic unit is fitted directly onto the meter sensor, in the latter case it is connected to the sensor by
special cable.
The sensor design shall take into consideration the type of the measured liquid and its operational
parameters. To facilitate fitting into the liquid piping, the sensor can be provided with end flanges, threaded,
or it maybe of a flangeless design. The supply voltage, types of output signal and communication interface
can be selected according to the customer requirements.
The basic configuration of induction flow meter includes two insulated passive binary outputs (each with
an opt coupler including a transistor output), insulated RS485 communications, dry relay, 4-20 mA output
and the USB communication interface. This USB interface is not insulated as it is used for factory calibration
purposes only. Optional accessories to this basic configuration are INPUT1 and OUTPUT3 for batching (all
with galvanic separation) –B, empty pipe detection -EPT.
Upon fastening the connecting wires into the respective terminals, make sure to tighten the bolts holding the
lid of the electronic unit and seal the cable glands. Fit blinds into the unused gland openings.
3.2. Meter design
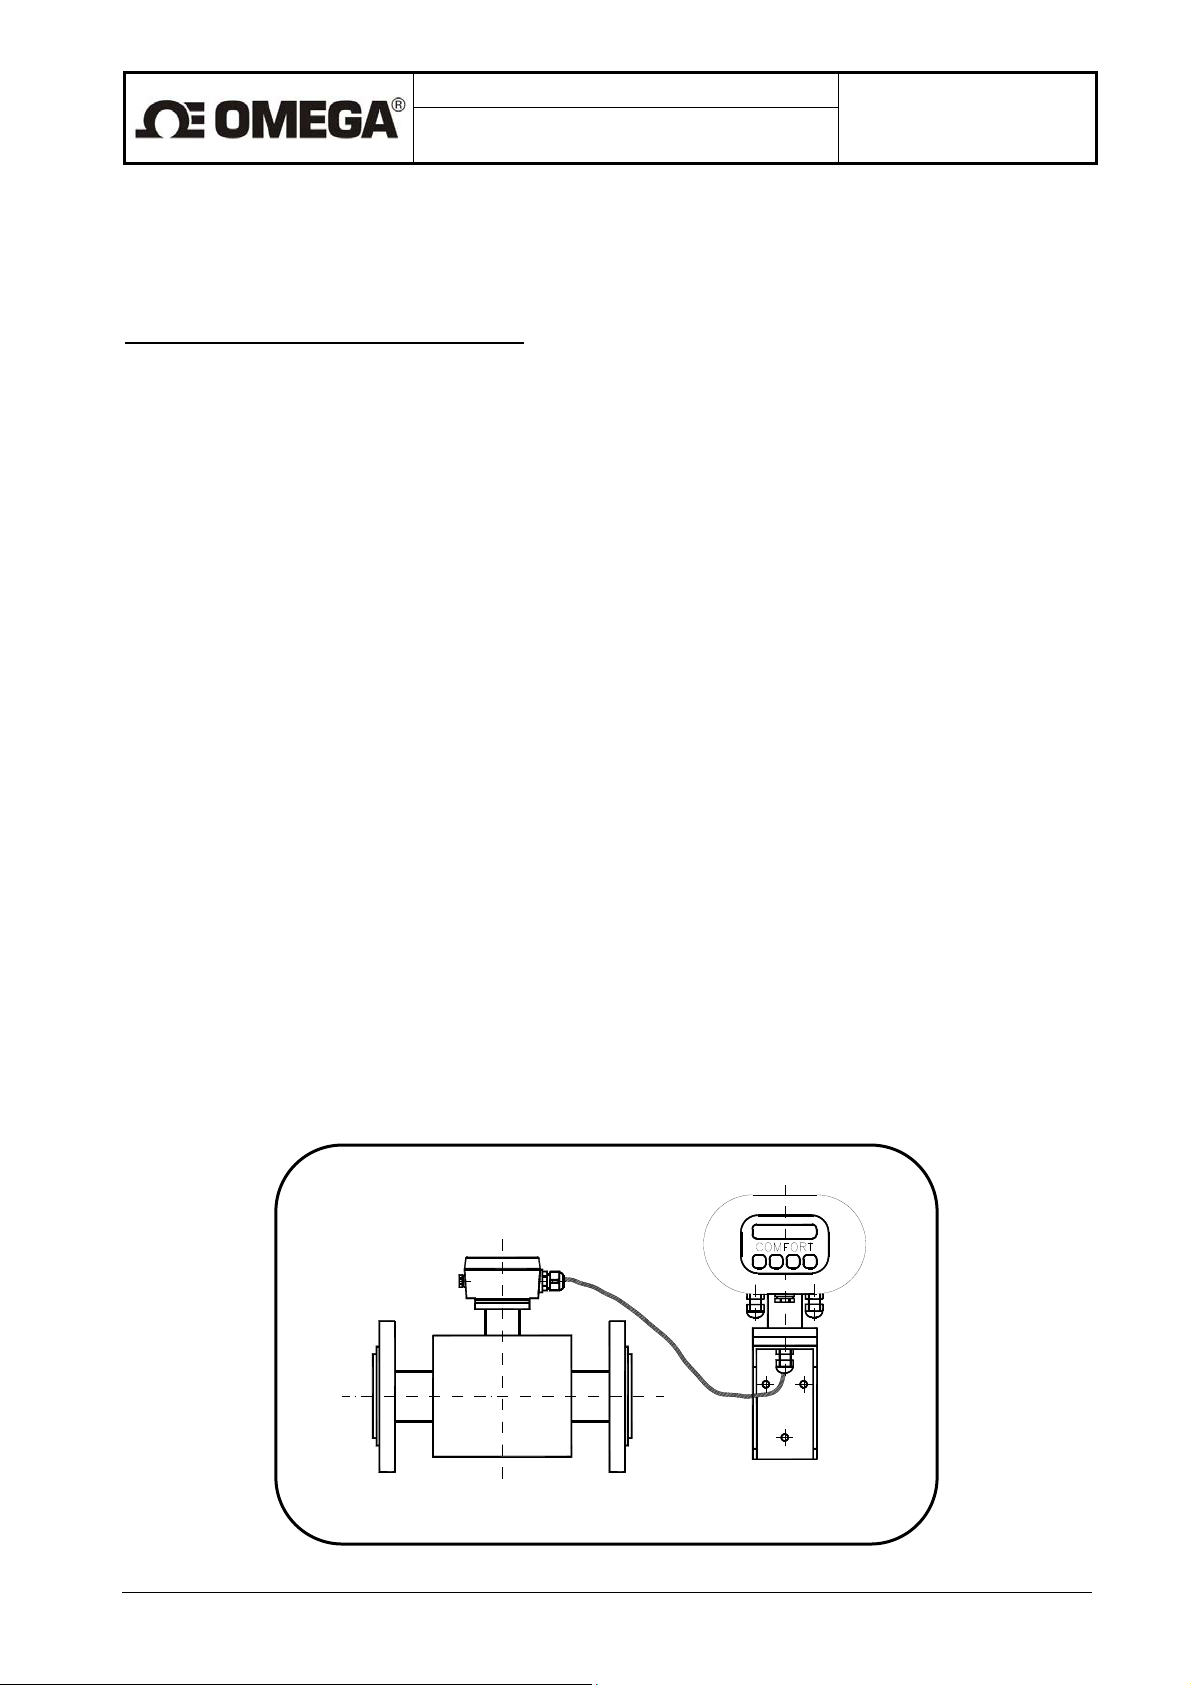
3.2.1. Remote version
Flanged sensor connected by a cable with the associated separate electronic unit.
Page 6
Design, Assembly and Service Manual
Induction flow meter FMG600 series
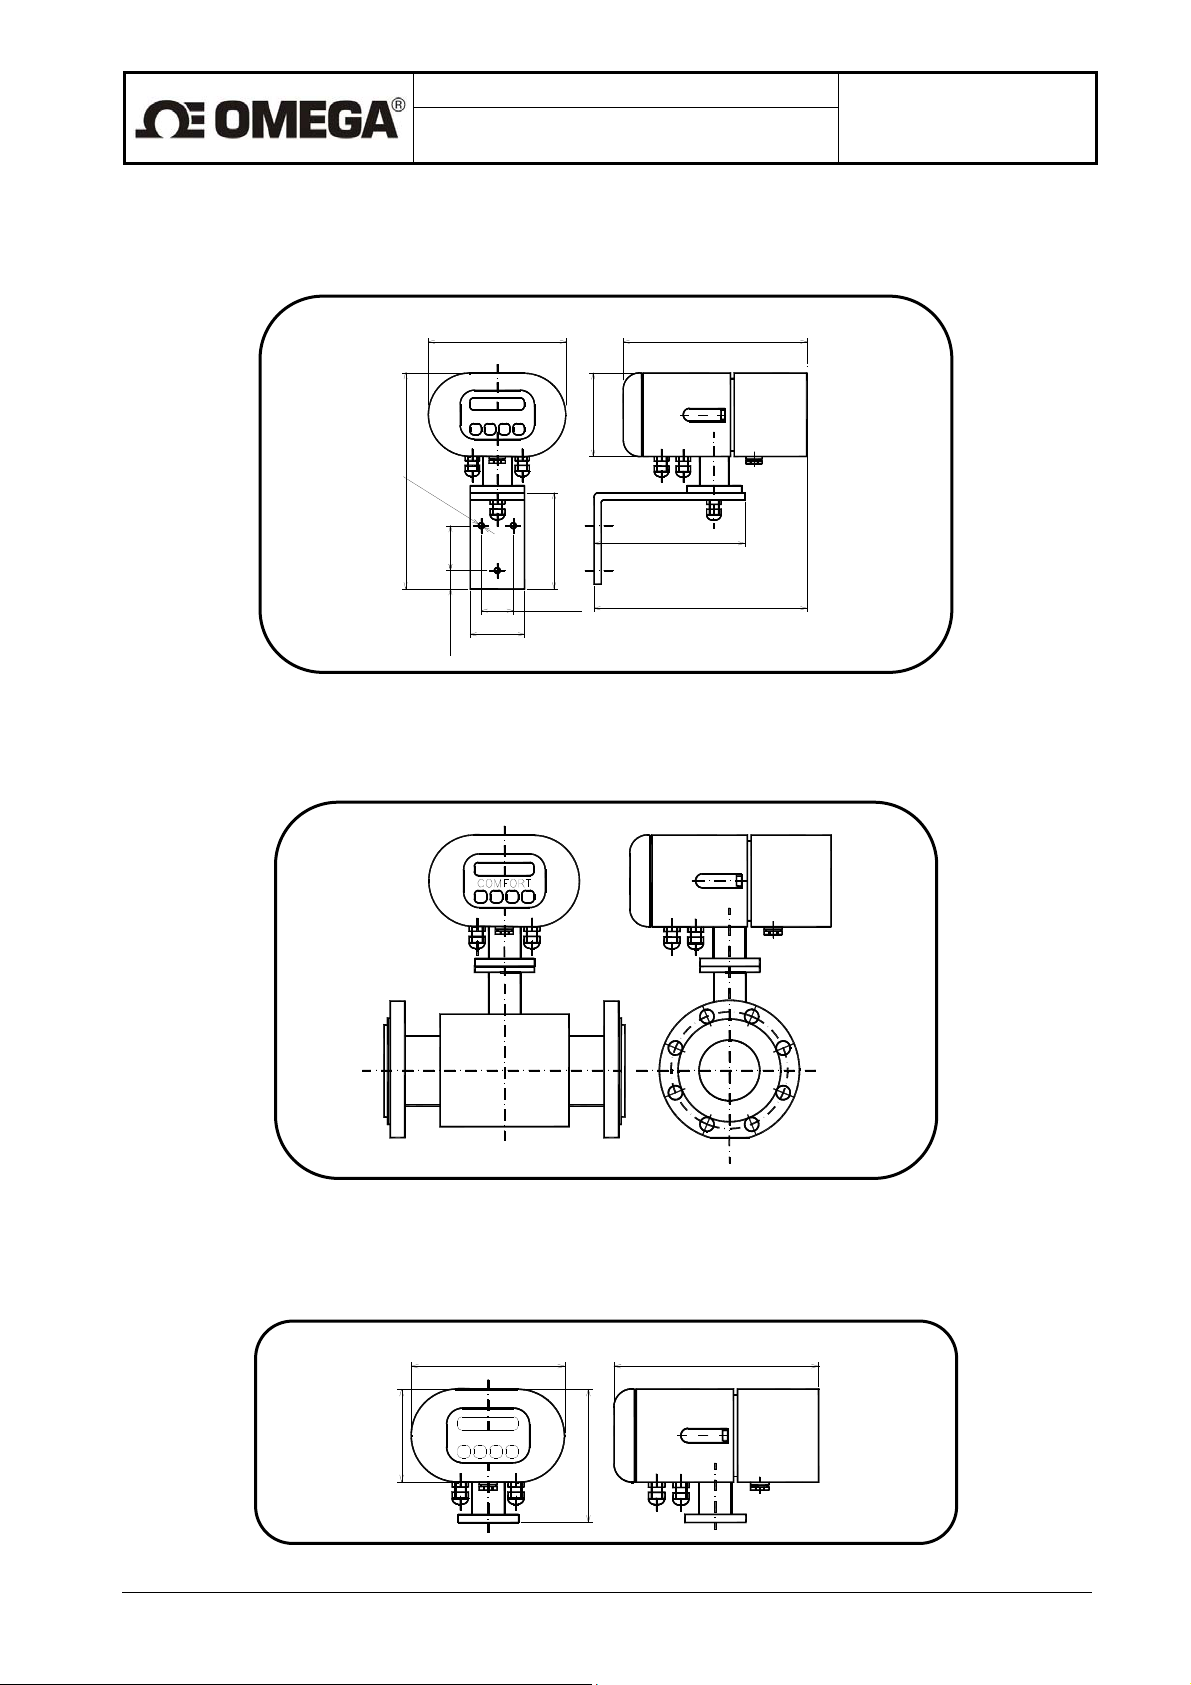
Dimensions of the box to accommodate separate electronic unit and the mounting bracket
7,9" (200)6" (152)
9,6" (245)
O
0
,
2
5
"
(
6
,
4
)
2" (50)
3,5" (90)
6,8" (173)
5,3" (135)
0,8" (20)
1,4" (35)
2,4" (60)
9,45" (243)
Page 4 of 44
3.2.2. Compact version
Compact design solution for a flanged sensor with associated electronic unit
Dimensions of the box to accommodate a compact version of the flow meter
COMFORT
3,5" (90)
5,3" (135)
7,9" (200)6" (152)
Page 7
3
r
Design, Assembly and Service Manual
Induction flow meter FMG600 series
Page 5 of 44
4. TECHNICAL PARAMETERS
4.1. Flow sensor
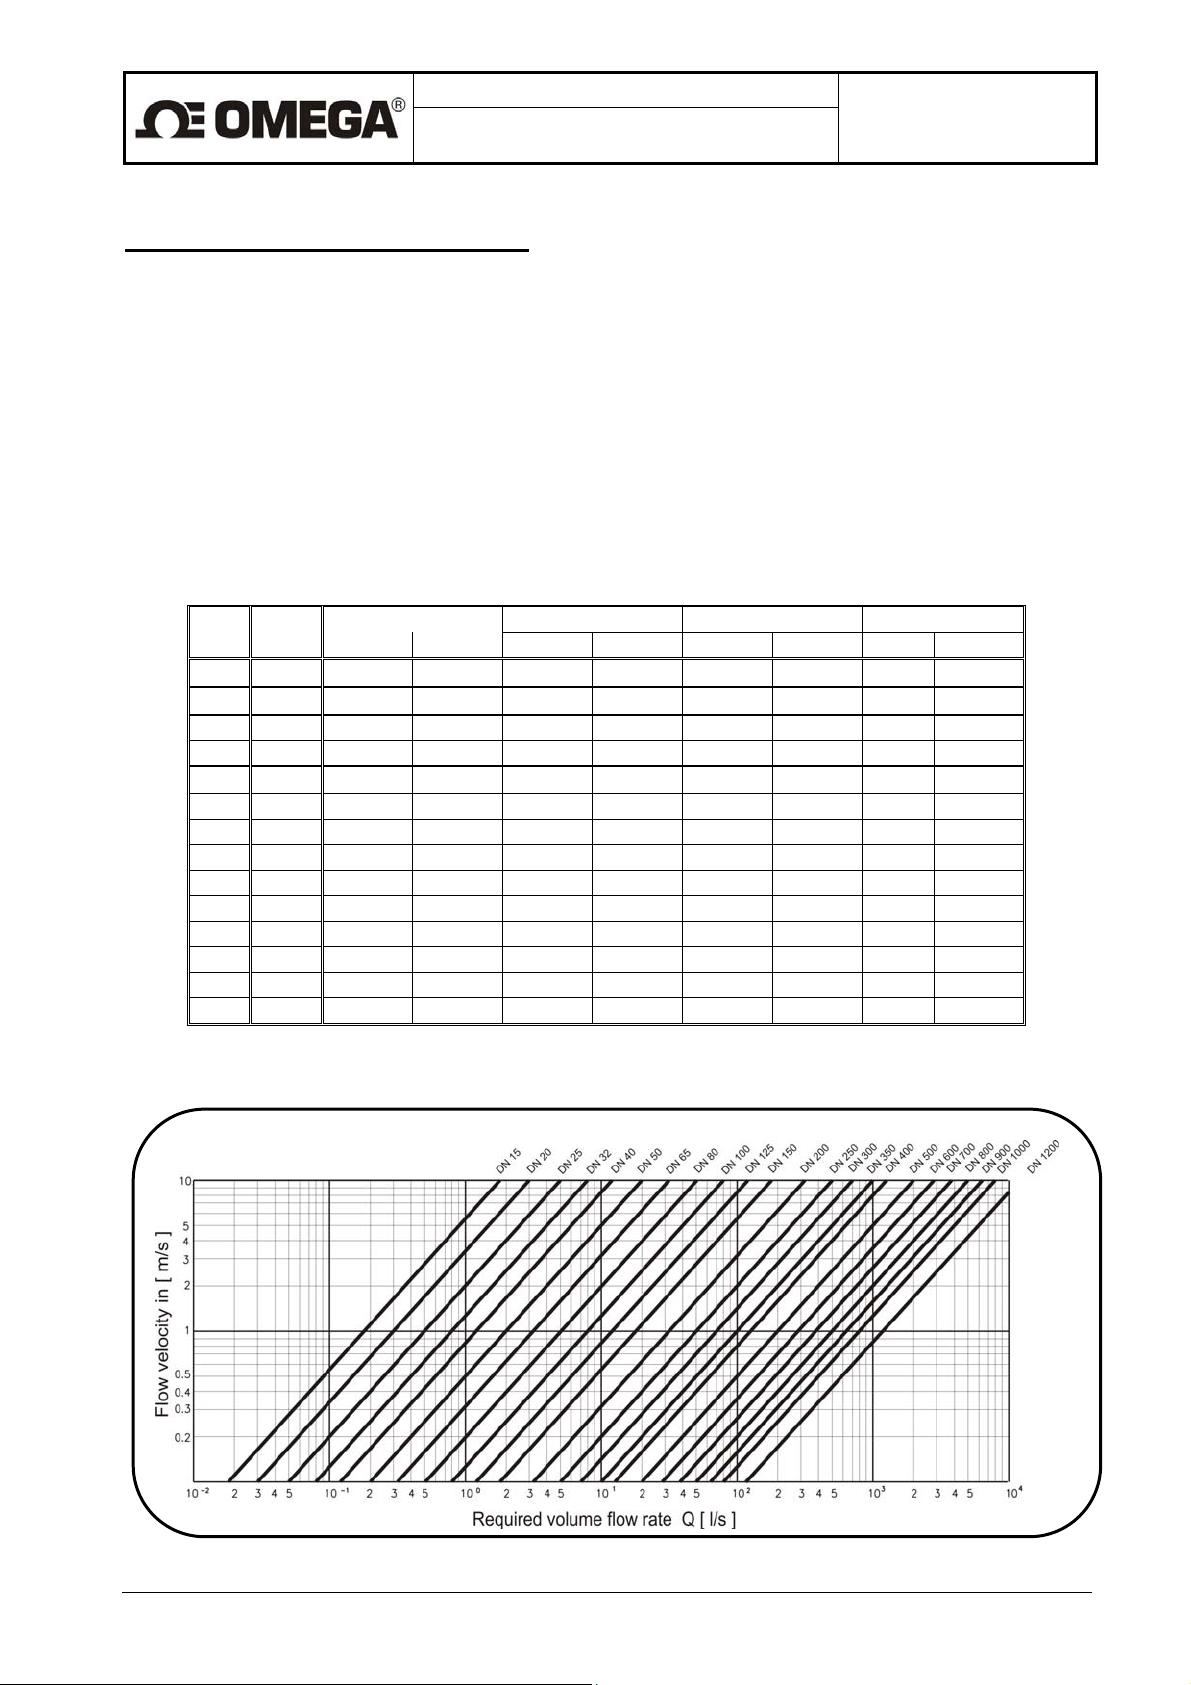
4.1.1. Selection of correct sensor size
The following table shows minimum and maximum flow rates for various sensor sizes and flow velocities
ranging from 0.33 to 32.81 ft/s (0.1 to 10 m/s). The operational flow-velocity range is best to choose 1.64 to
16.40 ft/s (0.5 to 5 m/s), see the diagram below. For lower flow velocities, the measurement accuracy is
worse while at higher flow velocities the turbulences at contact edges may cause undesirable interference.
Minimum and maximum flow rates for various sensor sizes
DIN
Operational flow rates and flow velocities for various sensor sizes
ANSI GPM l / s GPH m
inches
DN
15
20
25 1 0.79 79 0.05 5 47.6 4755 0.18 18
32 1 ¼40
50 2 3.17 317 0.2 20 190 19020 0.72 72
65 2 ½
80 3 7.93 793 0.5 50 475.5 47552 1.8 180
100 4
125 5
150 6 28.62 2862 1.8055 180.55 1717 171711
200 8
250 10 79.25 7925 5 500 4755 475523 18 1800
300 12 111 11100 7 700 6657 665732 25.2 2520
Qmin Qmax Qmin Qmax Qmin Qmax Qmin Qmax
0.29 29 0.018 1.8 17.2 1712 0.065 6.5
0.528 52.8 0.0333
1.32 132 0.0833
1.98 198 0.125 12.5 118.9 11888 0.45 45
5.28 528 0.3333
12.33 1233 0.7777 77.77 739.6 73962
18.93 1893 1.1944 119.44 1136 113594
50.63 5063 3.194
3.33 31.7
8.33 79.3
33.33 317
319.4 3038
1
½
¾
½
3167 0.12 12
7925 0.30 30
31700 1.2 120
303764
/ hou
2.8 280
4.3 430
6.5 650
11.5 1150
Page 8
g
–
Design, Assembly and Service Manual
Induction flow meter FMG600 series
Page 6 of 44
4.1.2. Operational pressure of measured liquid
The standard versions of flow sensors have the following pressure rating:
Sensor size Pressure ratin
DN 15
DN 300 1/2” and 12” PN 10 (1.0 MPa) 145 PSI
4.1.3. Selection of electrode material
Standard electrodes made of Hastelloy C4. However, in special applications it may be necessary to select a
different material. On request, Omega can supply electrodes made of tantalum -TGE.
4.1.4. Sensor tube lining
Teflon
Teflon (PTFE) lining is a universal solution for highly corrosive liquids and temperatures ranging from -4 °F
to 302 °F (–20 to +150°C). Typical applications are in the chemical and food processing industries.
4.1.5. Compact or remote meter version?
Temperature of the liquid is lower than 122 °F (50°C): It is possible to use both, compact or remote
version. Using of the version is only question of the layout or customer wish.
Temperature of the liquid is higher than 122 °F (50°C): Must be used remote version!
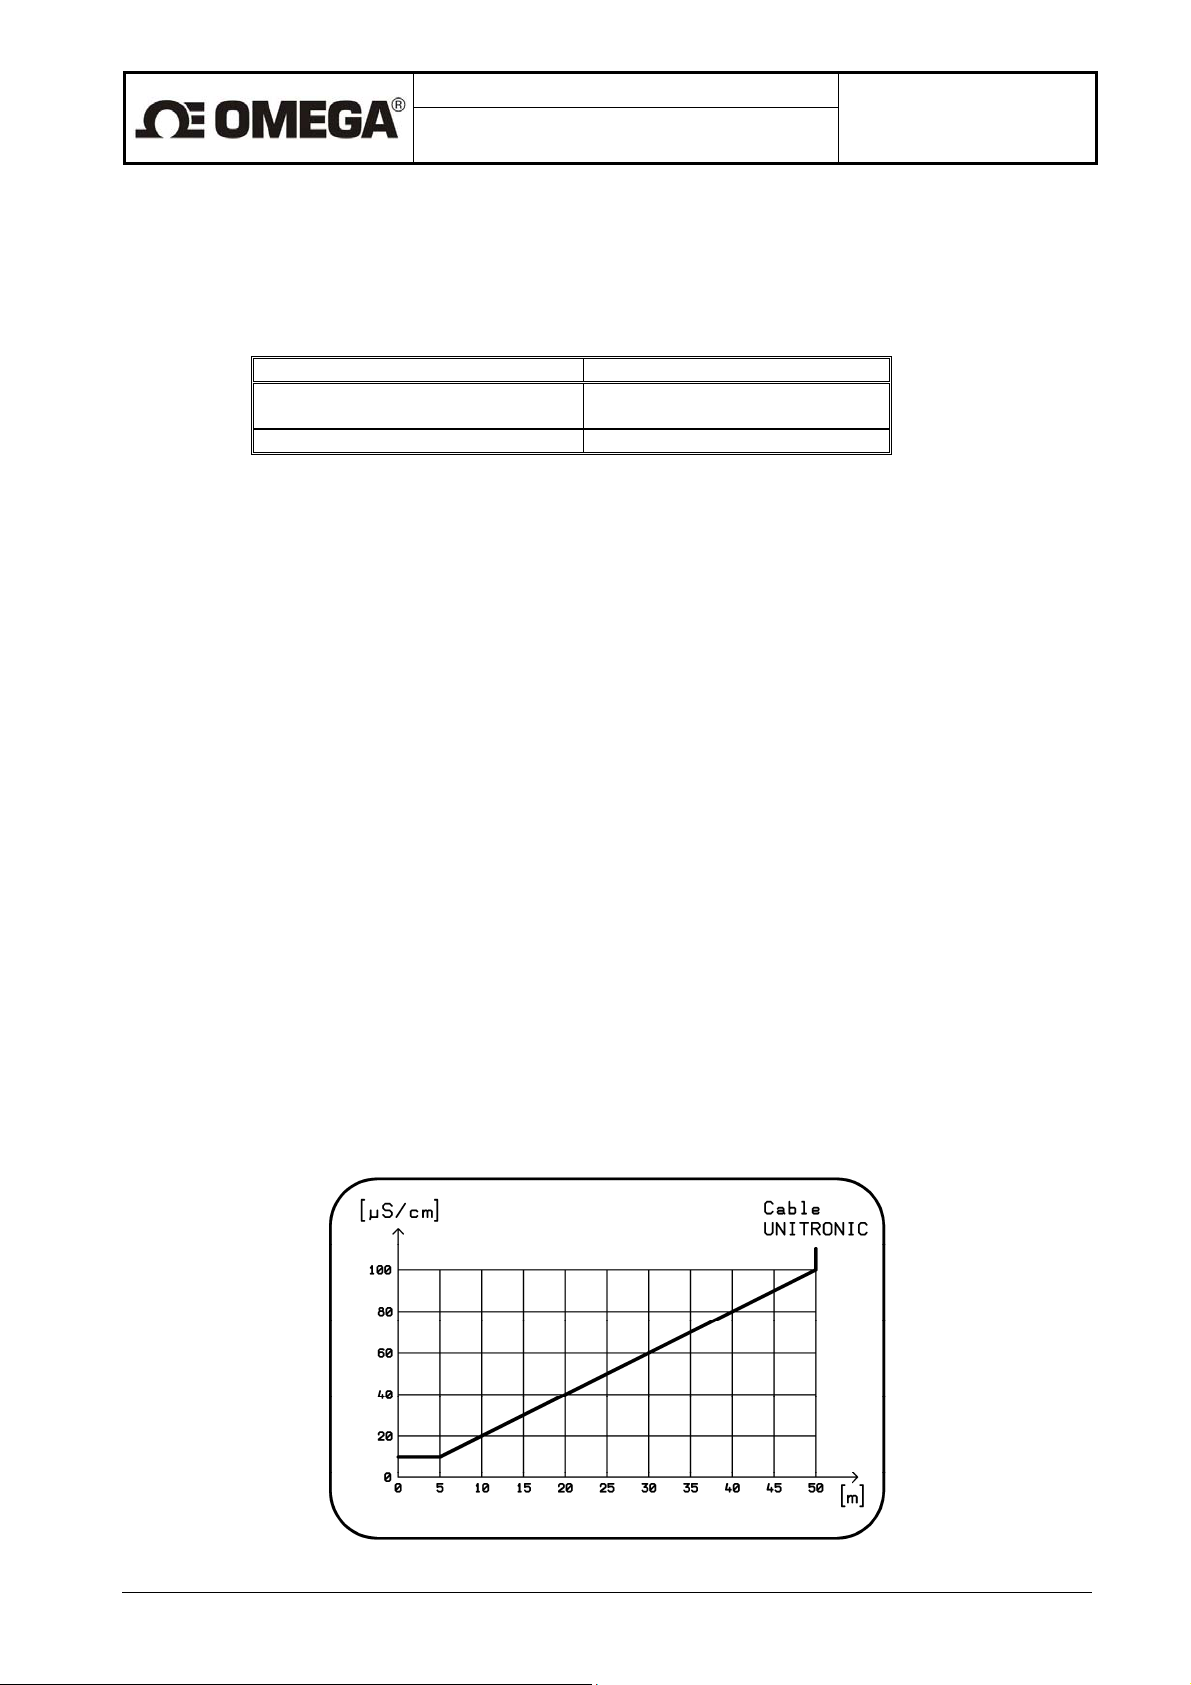
To prevent electromagnetic interference via the connecting cable, the sensor and separate electronic unit
of the meter in the remote version should be located as close as possible to each other. The maximum cable
length depends on the conductivity of the measured liquid (see the following diagram). Standard cable length
is 19,7" (6 m). .
Page 9
Design, Assembly and Service Manual
Induction flow meter FMG600 series
Page 7 of 44
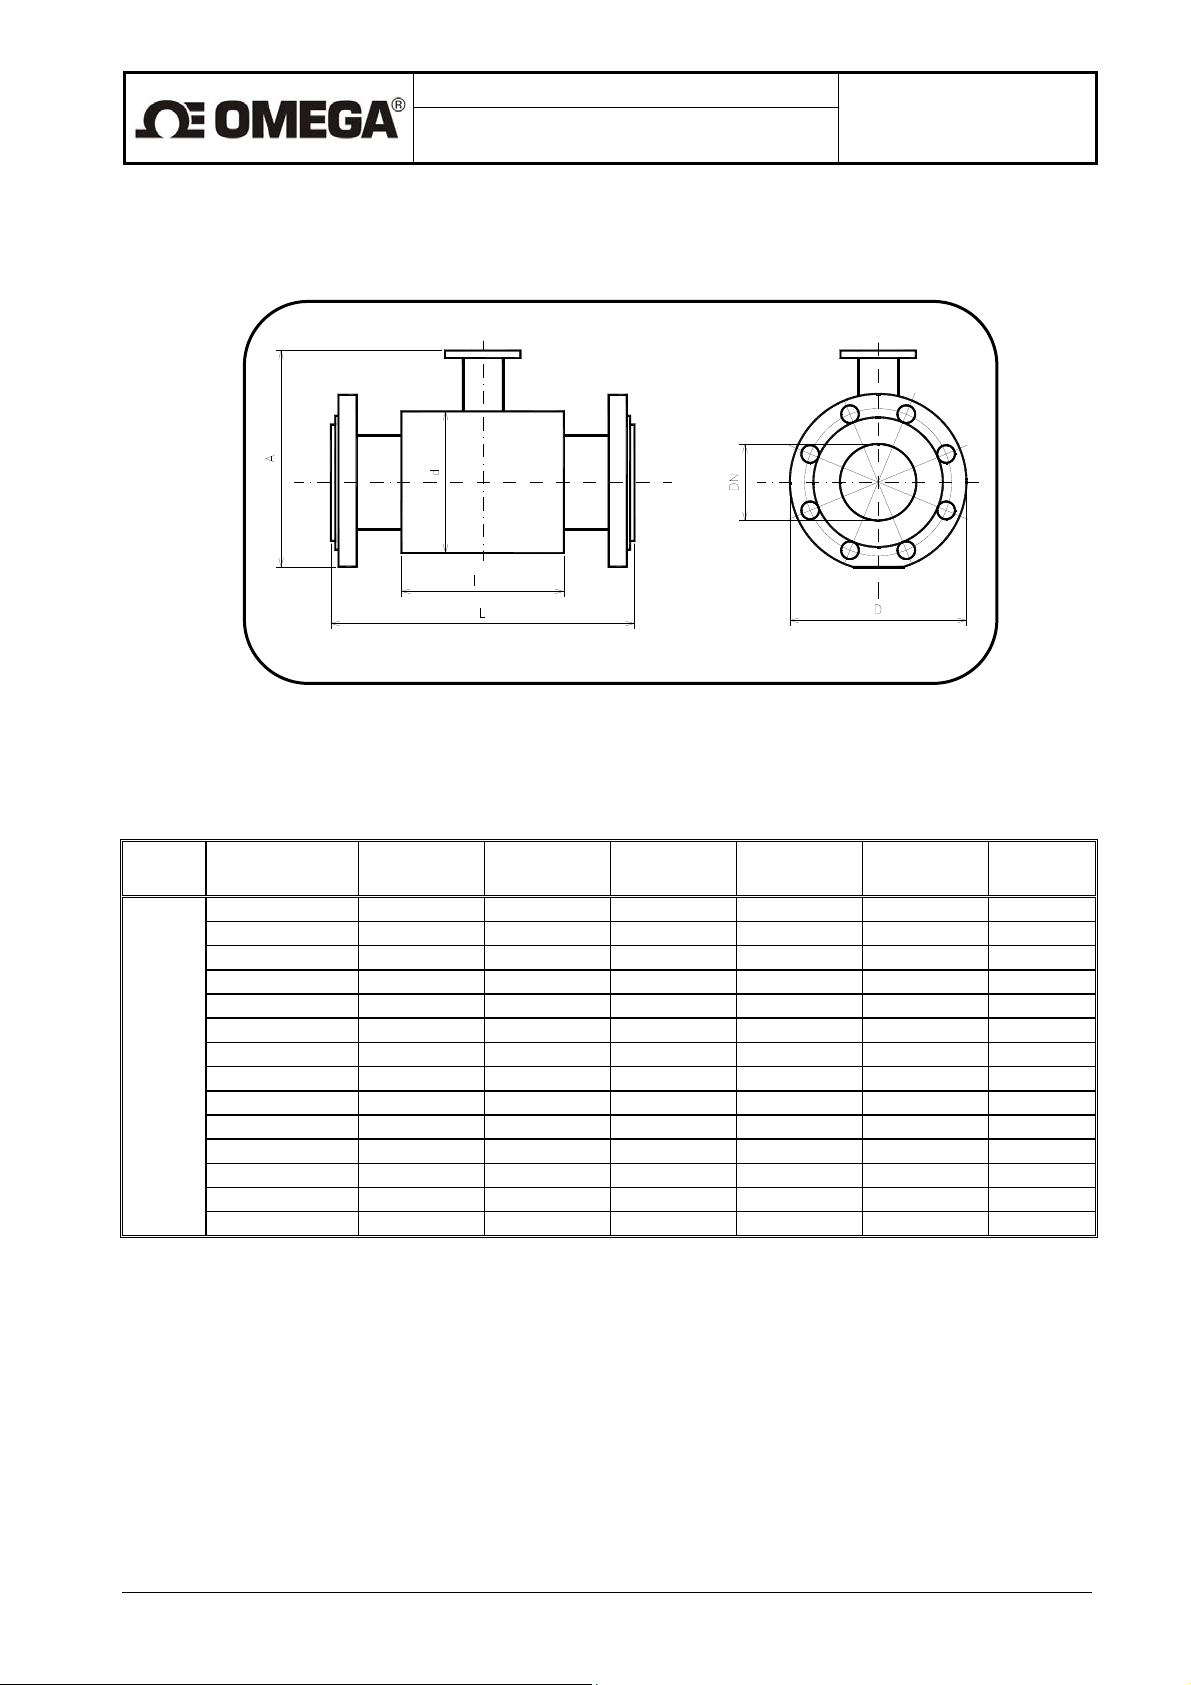
4.1.6. Dimensions of flanged sensor
Sensor dimensions for various rated diameters Line size (DN)
Flanges according standard ANSI B 16.5 150 lb/sq.in.
Nom. size DN
½" (15) 3.5 (89) 2.4 (62) 6.5 (164) 7.9 (200) 2.6 (66)
¾" (20) 3.9 (99) 2.4 (62) 6.7 (170) 7.9 (200) 2.6 (66)
1" (25) 4.3 (108) 2.8 (72) 7.1 (180) 7.9 (200) 3.8 (96)
1 ¼" (32) 4.6 (117) 3.2 (82) 7.8 (199) 7.9 (200) 3.8 (96)
1 ½" (40) 5.0 (127) 3.6 (92) 8.2 (209) 7.9 (200) 3.8 (96)
2" (50) 6.0 (152) 4.2 (107) 8.8 (223) 7.9 (200) 3.8 (96)
PN10 2 ½" (65) 7.0 (178) 5.0 (127) 9.6 (244) 7.9 (200) 3.8 (96)
3" (80) 7.5 (191) 5.6 (142) 10.2 (260) 7.9 (200) 3.8 (96)
4" (100) 9.0 (229) 6.4 (162) 11.0 (280) 9.8 (250) 3.8 (96)
5" (125) 10.0 (254) 7.6 (192) 12.2 (310) 9.8 (250) 5.0 (126)
6" (150) 11.0 (279) 8.6 (218) 13.4 (340) 11.8 (300) 5.0 (126)
8" (200) 13.5 (343) 10.8 (274) 15.7 (398) 13.8 (350) 8.3 (211)
10" (250) 16.0 (406) 14.6 (370) 18.9 (480) 17.7 (450) 8.3 (211)
12" (300) 19.0 (483) 16.5 (420) 21.1 (535) 19.7 (500) 12.6 (320)
* Dimension A (sensor height) is net of the electronic unit box (or terminal box in the remote meter
version).
Weights of the sensors are only approximate.
D
Inches (mm) d Inches (mm)
A*
Inches (mm)L Inches (mm) l Inches (mm)
Weight
lb (kg)
7 (3)
7 (3)
7 (3)
9 (4)
9 (4)
13 (6)
20 (9)
31 (14)
35 (16)
42 (17)
55 (26)
91 (41)
120 (54)
170 (77)
Page 10
3
r
Design, Assembly and Service Manual
Induction flow meter FMG600 series
Page 8 of 44
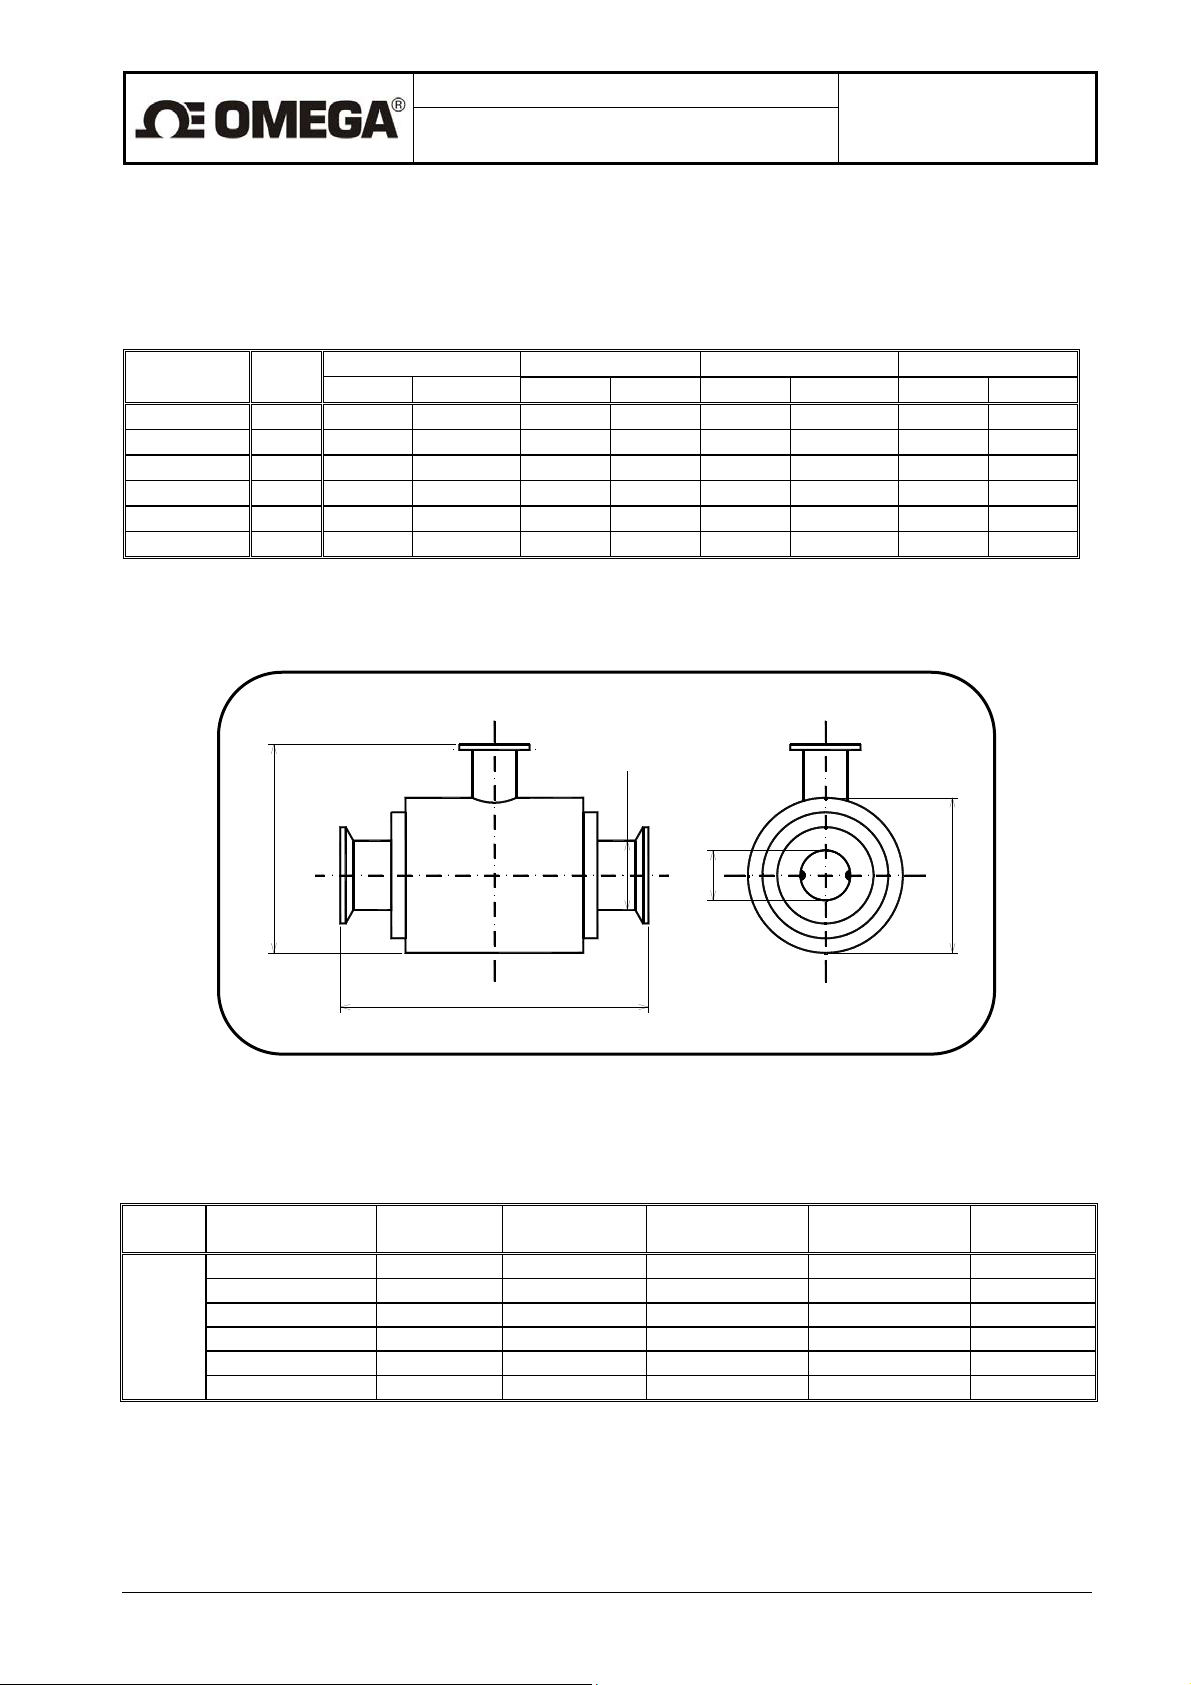
4.1.7. Dimensions Tri Clover sensor
Tri-Clover
Size DN/OD
Inch (mm)
ID GPM l / s GPH m
mm
Qmin Qmax Qmin Qmax Qmin Qmax Qmin Qmax
½ (12.70) 9.40 0.1094 11.0001 0.0069 0.6940 6.564 660.006 0.0248 2.4984
¾ (19.05) 15.75
0.3091 30.8812 0.0195
1.9483 18.546
1852.872 0.0702 7.0139
1 (25.40) 22.1 0.6087 60.8018 0.0384 3.8360 36.522 3648.108 0.1382 13.8096
1 ½ (38.10) 34.8 1.5074 150.7603 0.0951 9.5115 90.444 9045.618 0.3424 34.2414
2 (50.80) 47.5 2.8087 280.8756 0.1772 17.7205 168.522 16852.536 0.6379 63.7938
2 ½ (63.50) 60.2
4.5110 451.1493 0.2846
28.4631 270.660
27068.958 1.0246 102.4672
OD Outer Diameter
ID Inner Diameter
A
DN/OD
ID
L
Sensor dimensions for various rated diameters Line size (DN)
Flanges according Tri Clover
OD Outer Diameter
ID Inner Diameter
Size DN/OD
Inches (mm)
inches (mm)D Inches (mm)
½" (12.70) 0,37 (9.40)
ID
A*
Inches (mm)
L
Inches (mm)
2.9 (74) 5.6 (143) 5.4 (137)
¾" (19.05) 0,62 (15.75) 2.9 (74) 5.6 (143) 5.4 (137)
PN10
1" (25.40) 0,87 (22.1)
1 ½" (38.10) 1,37 (34.8)
2" (50.80) 1,87 (47.5)
2.9 (74) 5.6 (143) 5.4 (137)
3.7 (94) 6.4 (163) 5.4 (137)
4.1 (104) 6.8 (173) 5.4 (137)
2 ½" (63.50) 2,37 (60.2) 5.1 (129) 7.8 (199) 7.6 (192)
* Dimension A (sensor height) is net of the electronic unit box (or terminal box in the distributed meter
version).
Weights of the sensors are only approximate.
/ hou
D
Weight
lb (kg)
3.5 (1.6)
3.5 (1.6)
3.7 (1.7)
4.8 (4.8)
()
()
Page 11
g
)
(
)
–
y
Design, Assembly and Service Manual
Induction flow meter FMG600 series
Page 9 of 44
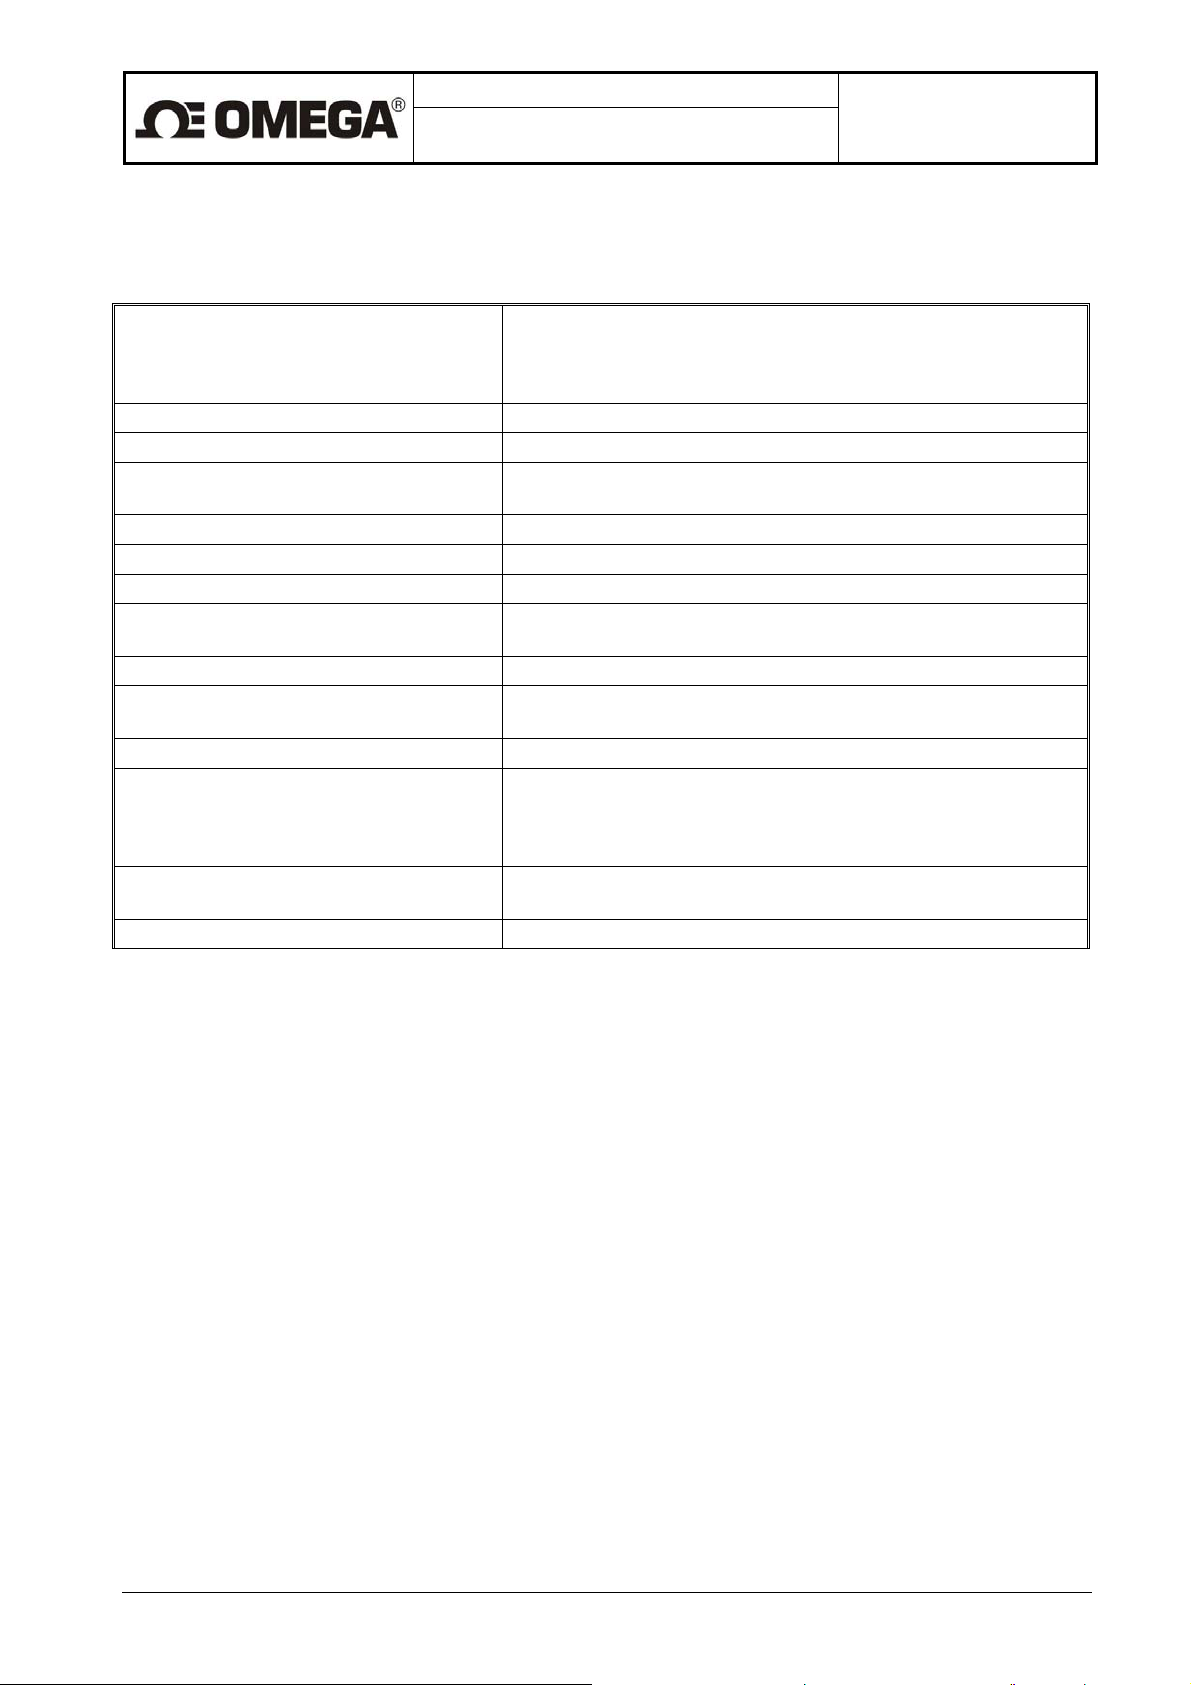
4.1.8. Flow sensor specifications
Sensor size Flanged sensors, ½ “ to 12 “ (DN 15 to DN 300)
Tri Clover, ½ " to 2 ½ "
Operational pressure PN 10 (1.0 MPa) for DN 15 to 300, Tri Clover
Mechanical connection Flanges acc. to 150# ANSI B
Tri Clover
grounding On flanges
Grounding rings
roundingelectrode
Limit flow velocities of measured liquid From 0.33 to 32.81 ft/s (0.1 m/s to 10 m/s)
Maximum temperature of measured liquid up to 302 ºF (150 ºC
Minimum conductivity of measured liquid 20 S/cm
Empty pipe alarm Optional from 2 “ (DN 50)-EPT
Lining Teflon
PTFE
Measuring electrodes Hastelloy C4 standard
Platinum/gold -GGE
Tantalum
TGE
Protection class IP 67
Storage temperature 14 to 158 ºF (-10 ºC to +70 ºC) at max. relative air
humidit
70%
4.2. Electronic unit box
The signal-processing electronic unit is accommodated in a cast aluminum box coated on the surface with
paint of hue RAL 1017. The box is held by four M5 bolts with hexagonal socket heads. Upon loosening the
bolts slightly the box can be rotated around horizontal axis through ±180°. At the rear of the box is a terminal
board under a lid held in position by six bolts with hexagonal socket heads. At the rear bottom part of the box
there are cable glands and a special valve preventing condensation of the air humidity inside the box. The
unused gland openings shall be blinded. The front panel of the box is fitted with a two-line backgroundilluminated display unit and a four-button membrane keyboard.
Prior to putting the meter in service, check the correct sealing of all active glands, blinding of the unused
ones and tightening of the bolts holding the terminal board lid.
Page 12
(
Design, Assembly and Service Manual
Induction flow meter FMG600 series
Page 10 of 44
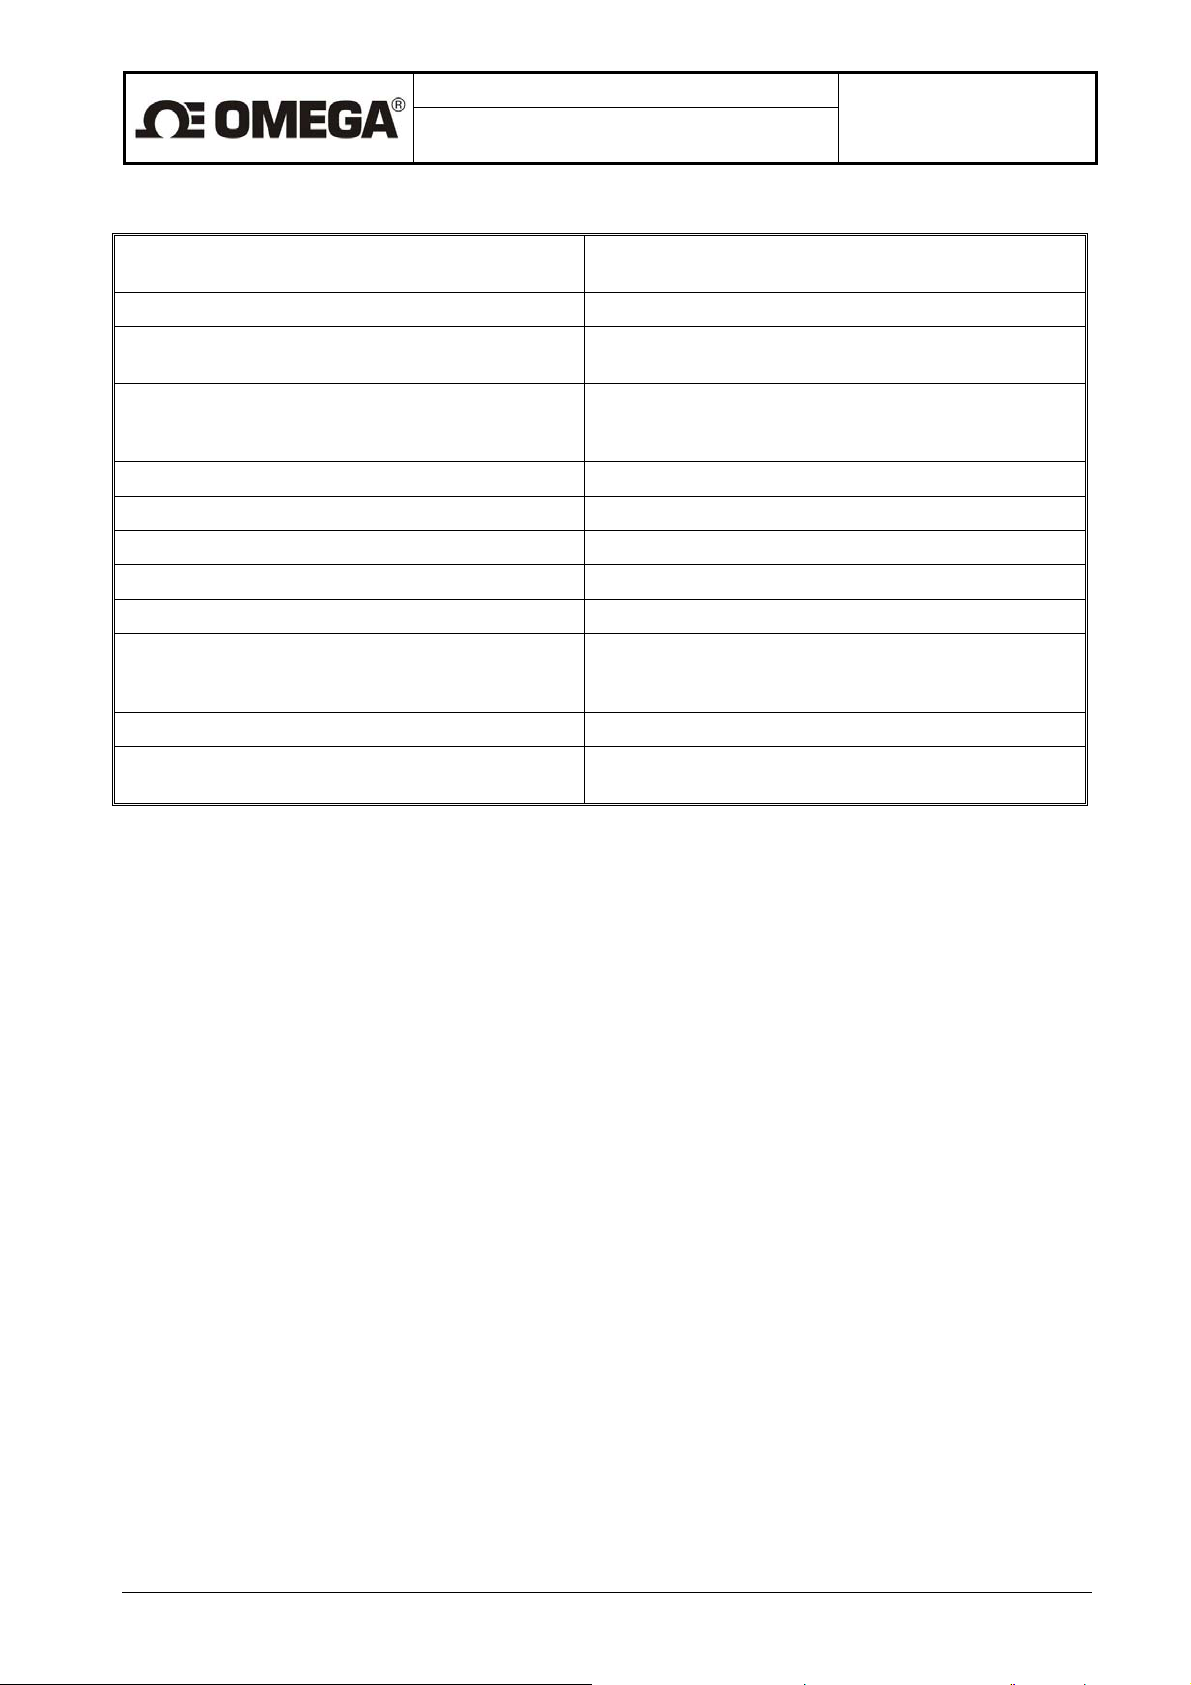
4.2.1. Electronic unit specifications
Power source 230 V~ (+10 % / -15 %) / 50 ÷ 60 Hz optional
115 V~ (+10 % / -15 %) / 50 ÷ 60 Hz optional
24 V~ (+10 % / -15 %) / 50 ÷ 60 Hz optional
24 V =
Power consumption 15 VA
Line fuse T250 mA, T2,0 A (with power supply 24 V)
Electric shock protection according to
Automated disconnection from power source in TN-S network
standard CSN 332000-4-41
Box material Aluminum casting
Weight 6.6 lb (3.0 kg)
Ambient temperature 23 to 131 ºF (-5 °C to 55 °C) (protected from direct sun light)
Storage temperature 14 to 158 ºF (-10 °C to 70 °C) at relative air humidity not
exceeding 70 %
Flow velocity range 0.33 to 32.8 ft/s ( 0.1 to 10 m/s)
Maximum flow error 0.2 % for 10 to 100 % Qmax
0.5 % for 5 to 100 % Qmax
Zero adjustment Standard
Output 1 - passive output, insulated
Output 2 - passive output, insulated
Relay output
Active current output, insulated
Binary multi-function optocoupler 30 V/50 mA
Binary multi-function optocoupler 30 V/50 mA
Binary multi-function relay 30V DC /0,3 A,
Analog 0 (4) to 20 mA, max. Load 1000 Ohm
Serial communication ports USB (not insulated) for factory calibration only
RS 485 (insulated)
Protection class IP 67
±10 %)Standard
Page 13
Design, Assembly and Service Manual
Induction flow meter FMG600 series
Page 11 of 44
5. METER APPLICATION RULES
5.1. Sensor placement in piping
No chemical injection or batching unit (such as chlorine compound injector) should be located at the input
side of the sensor. The insufficient homogeneity of the flowing liquid may affect the flow-rate values indicated
by the meter.
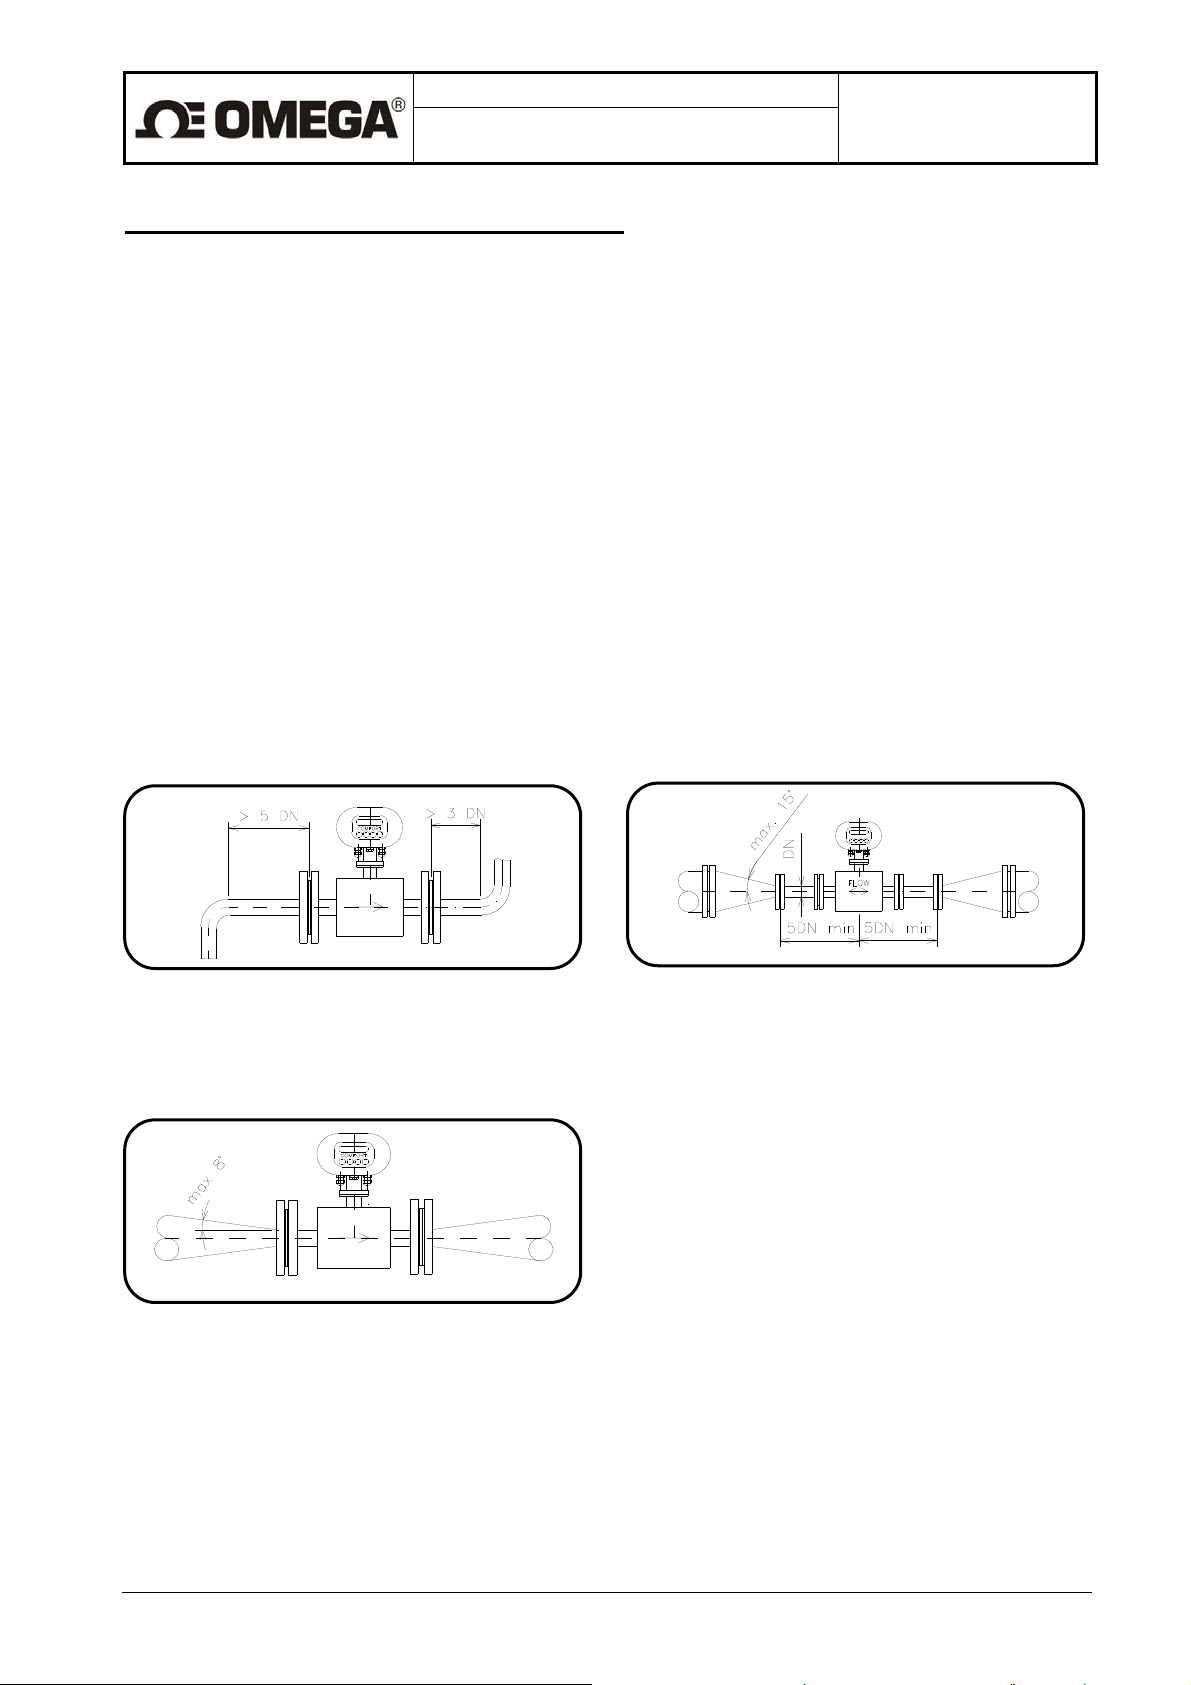
The meter performance will be the best if the liquid flow in the piping is well stabilized; therefore it is
necessary to observe specific rules for the sensor placement in piping. In the contact planes between the
sensor and the adjoining piping sections should be no edges as these would cause flow turbulence. Make
sure that straight piping sections are provided before and after the sensor; their required length is
proportional to the inner diameter of the piping concerned.
If more than one flow-disturbing element such as pipe bend or fitting is located near the sensor, the required
length of straight piping section on the sensor side concerned should be multiplied by the quantity
of such elements.
In the cases of bi-directional flow-rate measurement, the same conditions concerning flow stability shall be
met at the input and output sides of the sensor.
Required straight piping sections Pipe narrowing
.
In the case where the pipeline nominal size is bigger
than nominal size of flow meter, it is necessary to use
conical reduction with the maximum slope 15°. In the
case of bi-directional flow, conical reduction must be
installed on both sides, both with minimum straight
piping 5 DN. In the case of horizontal installation,
eccentric reduction must be use to prevent bubbling.
Pipe narrowing sections with angles not exceeding 8° can be taken for straight sections (see picture above)
Page 14
Design, Assembly and Service Manual
Induction flow meter FMG600 series
Page 12 of 44
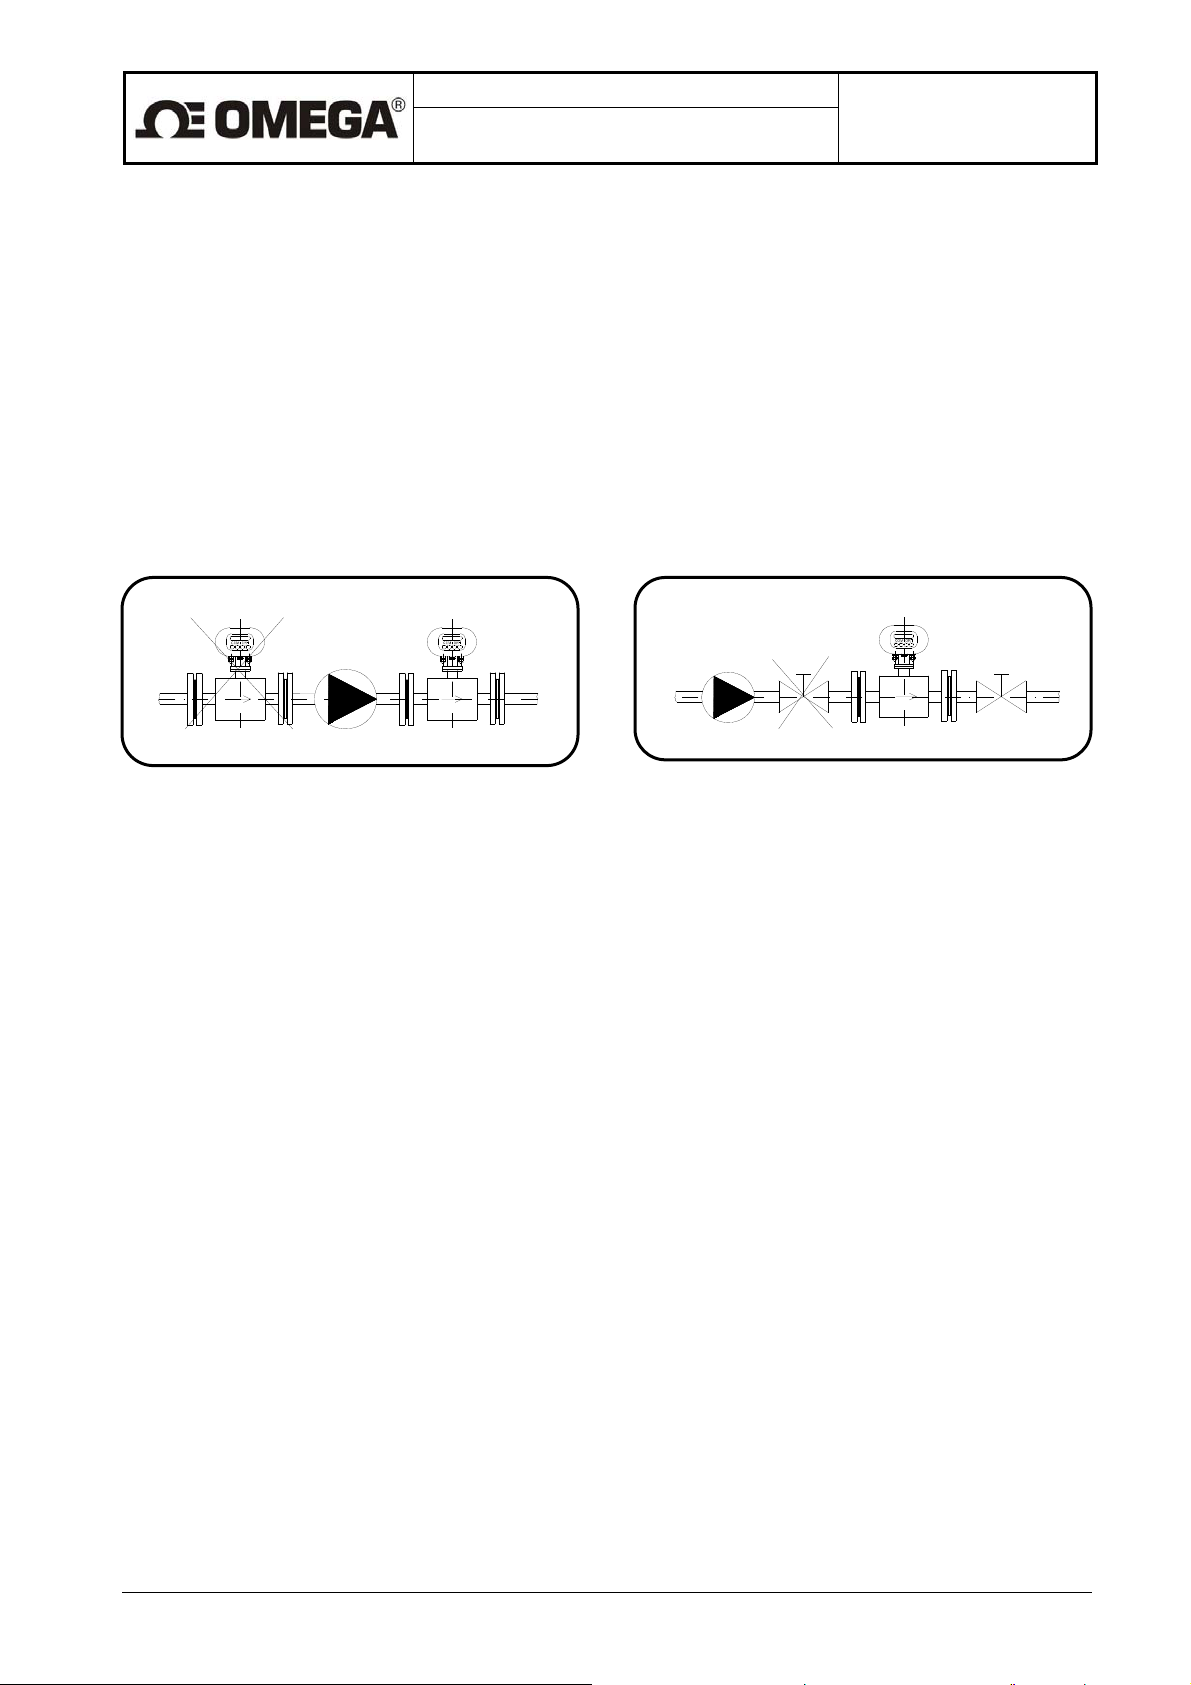
In the cases where the liquid is pumped, the flow sensor shall always be placed at the output side of the
pump to prevent underpressure in the piping which might damage the sensor. The required length of the
straight piping section between the pump and sensor is then at least 25 DN.
Pump in the piping Closing valve in the piping
For the same reason, the sensor shall be always placed before the closing valve in the piping.
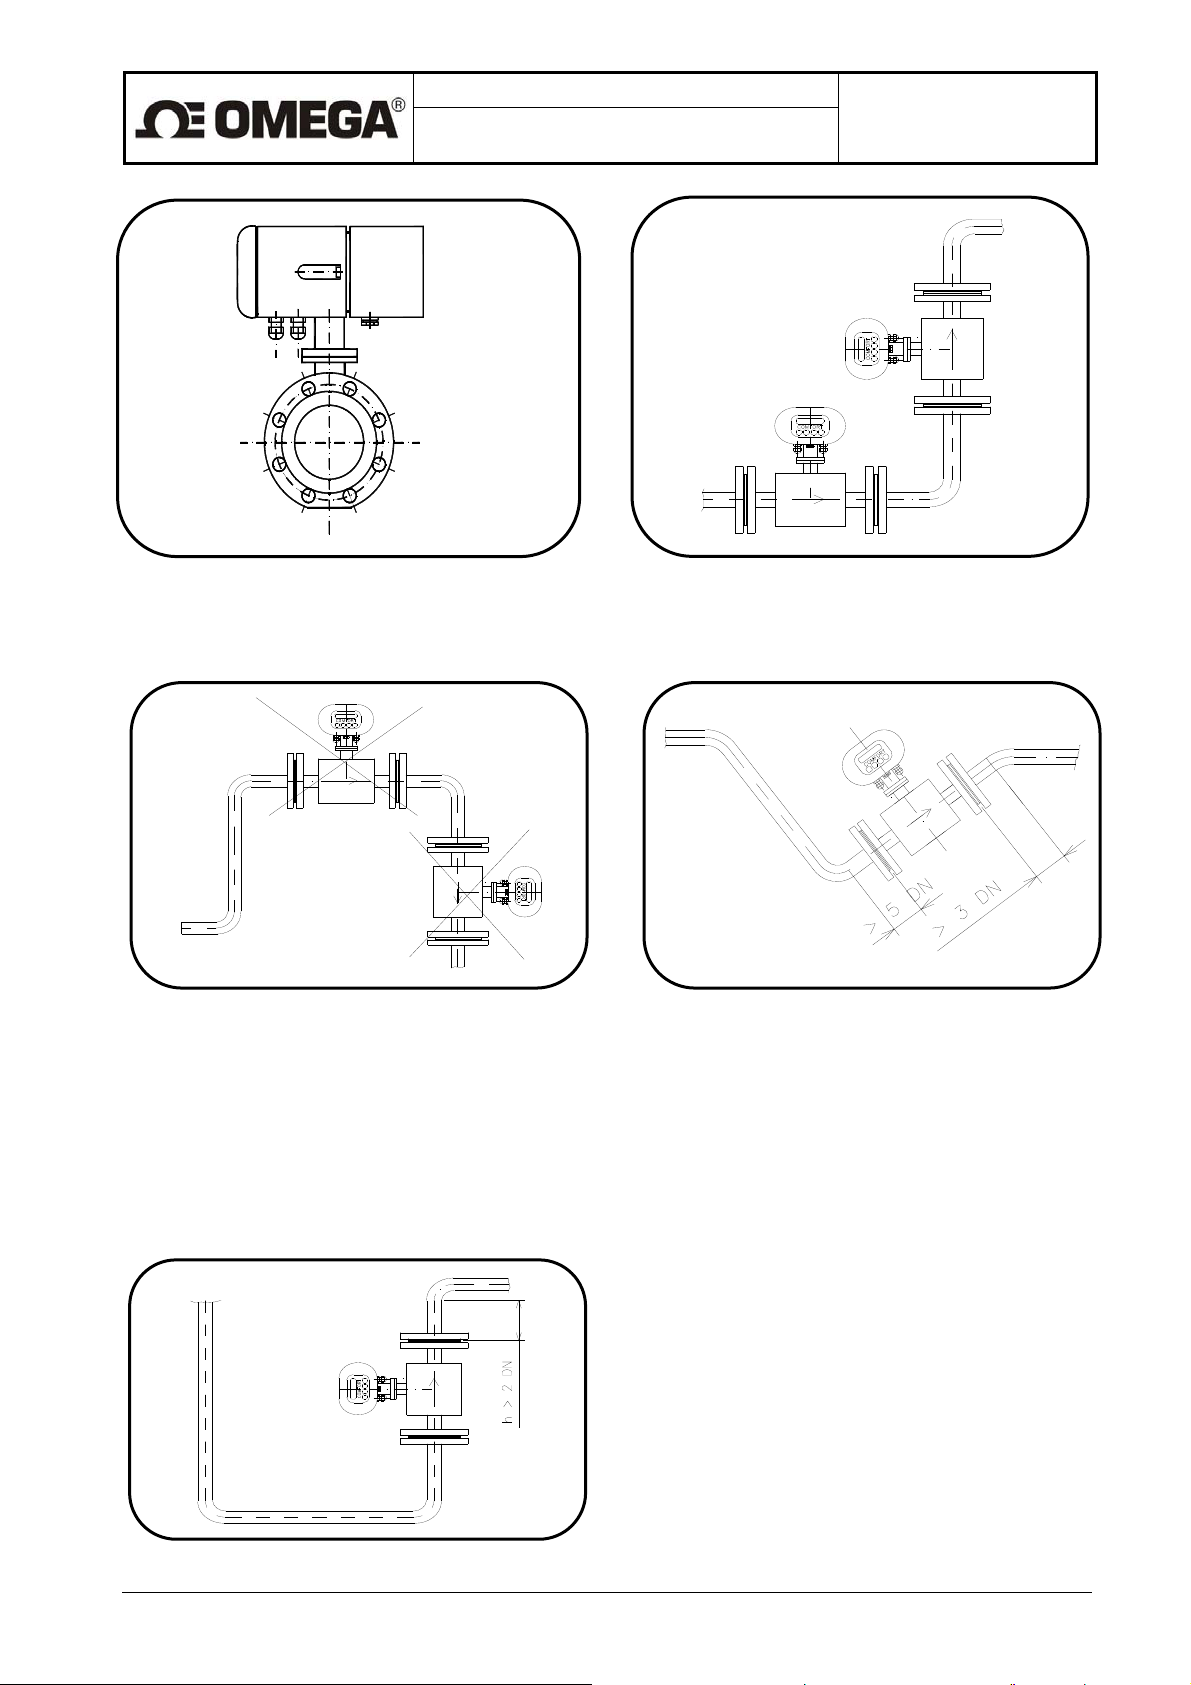
The sensor can be fitted in the piping in either horizontal or vertical position. However, make sure that the
electrode axis is always horizontal and, if the sensor is mounted in a horizontal position, the flange section
for attachment of the electronic unit box faces upwards.
Page 15
Design, Assembly and Service Manual
Induction flow meter FMG600 series
Page 13 of 44
Elektrode
axis
Electrode axis Sensor mounted in a vertical position
In the cases where the sensor is mounted in a vertical position, the flow direction shall always be upwards.
Risk of liquid aeration Permanent flooding of sensor
To ensure correct meter function at all times, the measured liquid shall completely fill up the sensor and no
air bubbles shall be permitted to accumulate or develop in the sensor tube. Therefore the sensor shall never
be placed in the upper pocket of the piping or in a vertical piping section where the flow direction is
downwards.
In piping systems where complete flooding of the piping cannot always be guaranteed, consider placing the
sensor in a bottom pocket where full flooding is sure.
If the sensor is located near a free discharge point, such point shall be by at least 2 DN higher than the top
part of the sensor.
Sensor placement near free discharge point
Page 16

Design, Assembly and Service Manual
Induction flow meter FMG600 series
Page 14 of 44
Make sure that the adjoining piping is clamped/supported as close to the sensor as possible, to prevent
vibrations and damage to the sensor.
Undesirable sensor vibrations Sensor bypass
In applications where continuous liquid flow is essential, a bypass shall be provided to allow for sensor
servicing. A sensor bypass may be also reasonable solution in the cases where, to dismantle the flow sensor
from the piping, liquid from a very long piping section would have to be discharged.
5.2. Sensor earthing
The correct meter function requires that the sensor and adjoining piping sections be connected by lowimpedance earthing conductors to the earth potential and the protection conductor of the power source. The
overall arrangement shall be such that the potentials of the measured liquid at the sensor input and output
sides are close to the ground.
5.2.1. Flanged version
With a flanged sensor installed in conductive piping, the flanges shall be electrically connected and the
piping put to the earth.
Flange earthing connection Earthing rings
Should the adjoining piping sections be non-conductive, grounding rings or similar arrangement shall be
used to ensure that the electric potential of the measured liquid is put to the earth.
With a remote version, it is recommended to electrically connect flow sensor with electronics housing box
with conductors AWG10 or AWG12 to assure stabilization of the electric potentials.
Page 17

Design, Assembly and Service Manual
Induction flow meter FMG600 series
Page 15 of 44
5.2.2 Tri Clover
Tri Clover Flange earthing connection Additional earthing
With a remote version, it is recommended to electrically connect flow sensor with electronics housing box
with conductors AWG10 or AWG12 to assure stabilization of the electric potentials.
Page 18

Design, Assembly and Service Manual
Induction flow meter FMG600 series
Page 16 of 44
6. FLOW METER INSTALLATION AND OPERATIONAL START
The meter installation work shall be performed in strict observance of the procedures and rules described
in this manual.
To prevent undesirable interference, the power cables shall be laid at least 10“ (25 cm) away from all signal
cables. The signal cables include the cable connecting the sensor and the associated electronic unit (in the
case of a remote meter version), signal output cables and the cable of the RS 485 communication line. All
cables shall be laid outside the thermal insulation layer on the piping. Only shielded conductors shall be used
to connect the output signals and the RS 485 line where the shielding shall be connected to the ground
potential only on the side of the control system.
In applications where high levels of electromagnetic field interference at the measuring location can be
expected (e.g. in the vicinity of power frequency converters), the remote meter version should be avoided. In
these cases it is also recommended to include a filter in the power supply line to the electronic unit.
Filter specification: The filter suppresses spread of the undesirable high frequency disturbances from power
supply cable into the flow meter. It is possible to find standard product of any filter producer. Use filter with
desired protection, or install filter inside of the box with protection. Filter should be as near to the converter,
as possible. Keep all security standards.
Operating voltage: 115 V/60 Hz (250V/50Hz)
Nominal current: 0,5A and more
Losses: 10 kHz 10 to 20 dB
10MHz 40dB
6.1. Sensor installation
The measurement point chosen for the sensor installation should ensure that the internal part of the sensor
is fully flooded with the measured liquid at all times. Any, if partial, emptying or aeration of sensor
in operation shall be avoided. If the sensor is mounted in vertical position, the only permitted liquid flow
direction is upwards. No thermal insulation shall be used on the sensor body.
Sensor must never be under thermal insulation. If flow meter is installed in the pipeline with thermal
insulation, this insulation must be interrupted and sensor must be out of the insulation.
The internal diameters of the piping, connecting flanges and the sensor tube shall be identical. The flange
faces shall be perpendicular to the piping. The input and output piping sections including seals shall be
perfectly aligned, with no protruding edges. In the case of a non-conductive piping, use grounding rings
on both sides of the sensor.
The arrow on the sensor body shall indicate the liquid flow direction (positive flow direction).
Upon loosening the four bolts holding the electronic unit box in position on the sensor, the box can be rotated
through ±180°. The same system for the box rotation can be used if the box is mounted on a bracket
attached to a vertical support plate or wall.
Do not expose the electronics box to straight sunshine, for outdoor installation use cove or shield - it is
not in the normal scope of supply.
Page 19

Design, Assembly and Service Manual
Induction flow meter FMG600 series
Page 17 of 44
6.2. Electric connections of induction flow meter
The terminals for connecting cables can be accessed upon removal of a cover at the rear part of the box
housing the electronic unit. The cover is held by six socket-head bolts. A schematic diagram of the
connections is shown on the rear side of the cover. Note: USB is for factory calibration only.
Examples of labels showing power supply (line voltage or 24VDC source) and meter signal interconnection
6.2.1. Connection to power source
Terminal 24V 115V 230V/AC/50 ÷ 60 Hz Terminal 24V/DC
PE PE grounding conductor PE PE grounding conductor
N N neutral conductor M M middle conductor
U L phase conductor C L+ +24 V
To connect the power source, use a standard cable of three conductors of square section, not exceeding
3 x AWG 16 (1,5 mm
temperature of at least 194 ºF (90 ºC). Only cables with outer diameters from 0.16" to 0.31“(4 to 8 mm) can
be used with grommet. Using of other diameters of cables cause breaking of protection IP67.
The earthing conductor shall be longer than the phase and neutral conductors. This is a safety requirement
as in the case of loosening the cable clamping in the gland, the earthing conductor shall be the last to be
disconnected from the terminal.
The power supply line shall be protected by an overcurrent circuit breaker. A seal should be applied on the
breaker to prevent unauthorised handling. The electronic unit has no independent power switch.. The
recommended rating of the overcurrent circuit breaker is 4 to 6 A.
2
). For ambient temperatures over 122 ºF (50 ºC), use a cable with rated operating
Page 20

t
t
y
t
A
A
A
Design, Assembly and Service Manual
Induction flow meter FMG600 series
Page 18 of 44
6.2.2. Output signal connections
Terminal Polarity Function Comments
1 Switching contac
2 Central contact Output rela
3 Break contac
4 - pole Current output
5 + pole
6 Conductor B (-) RS 485
7 Conductor A (+)
8
9
10
11
node (+) Dosing (optional)
Cathode (-)
Optocoupler. collector (+) Dosing (optional)
Optocoupler emitter (-)
12 Optocoupler collector (+)
13 Optocoupler emitter (-)
14 Optocoupler collector (+)
15 Optocoupler collector (-)
Change-over contac
Binary input 1
Binary output 3
Binary output 2
Binary output 1
Optocoupler contacts.
0,3 A, 30 VDC
ctive output, loading Rz max. 1000 .
No external power source needed.
To be directly connected
to the communication line.
Passive input. 5 VDC, 10 mA.
Passive output, requires external power
source and loading resistor..
Passive output, requires external power
source and loading resistor.
Passive output, requires external power
source and loading resistor.
The output terminals can be connected to other electronic equipment using standard shielded signal cables.
For connecting between output terminal and other device can be used shielded data cable with diameter
0.12 to 0.26 “ (3 to 6,5 mm) and intersection AWG 20 to AWG 16 (0,5 to 1,5 mm
2
). For connection of output
signals and communication is necessary to use shielded cables. Shielding must be connected only on one
side of the control system.
After finishing connection, screw up all screws of covers and ensure that it is fixed well. Plug up all unused
grommets and check, that used grommets are tight.
6.3. Connection between sensor and electronic unit (remote version)
In a compact version of the meter, this connection is internal. With a remote meter version, the electronic unit
shall be connected to the associated sensor be means of a special cable supplied attached on the electronic
unit side. On the sensor side, connect the cable wires paying attention to the wire insulation colors and the
terminal identification labels.
Special cable UNITRONIC Cy PiDy 3x2x0.25 length up to 50m, temperature up to 70°C:
Brown BN
Blue BU B
White WH C
Green GN D
Yellow YE E
Yellow and green GNYE Shielding
Pink PK W2
Gray GY W1
Page 21

Design, Assembly and Service Manual
Induction flow meter FMG600 series
Page 19 of 44
6.4. Connection between sensor and electronic unit (remote meter
version, protection class IP 68)
In the IP 68 version of the flow sensor, the terminal box is sealed by cast plastic and the connecting cable is
fixed on the sensor side. On the electronic unit side, the cable is provided with a screw-on connector with its
mating part mounted on the electronic unit bracket. To prevent unauthorised handling, this connector can be
sealed. The hole for the seal wire is provided in the bracket.
6.5. Operational start
6.5.1 Operational start
The induction flow meter of either compact or remote design shall first be fitted mechanically and then the
power supply and output terminals interconnected. Then switch on the power voltage. For a short while, the
meter display will read WELCOME TO OMEGA FMG600 SERIES. Then one of the items of the DISPLAYED
DATA menu will appear.
Page 22

Design, Assembly and Service Manual
Induction flow meter FMG600 series
Page 20 of 44
6.5.2. Operational data
The meter includes a two-line alpha-numeric display of 2 x 16 characters with
a background illumination. The display illumination function works in a power-saving mode where the
illumination is automatically switched off 120 seconds following the last push-button action. On depressing
any push-button, the display background illumination is reactivated.
The keyboard includes four push-button provided with the following symbols:
1. Push-button
2. Push-button
3. Push-button
4. Push-button
The meter display makes possible reading of up to nine different types of data. To switch to the desired type
of data, use pushbuttons
To display temporary data, depress push-button
display mode.
1. Flow rate
Average flow rate determined from the specified number of samples.
Flowrate
120.678 m3/h
Display reading: Flow rate
2. Total volume +
The total volume of the measured fluid passed through the meter sensor in the direction of the arrow on the
sensor body since the measurement start, or the temporary volume, i.e. the volume of fluid passed since the
last resetting of the temporary volume + data.
Total volume +
1234.567 m3
Display reading: Total volume +
3. Total volume -
The total volume of the measured fluid passed in the direction against the arrow on the sensor body since
the measurement started, or the temporary volume since the last resetting of the temporary volume – data.
Total volume -
123.456 m3
Display reading: Total volume –
, the “roller” push-button, direction downwards
, movement upwards, in the direction of the arrow
, password entry push-button
, also referred to as the “enter” push-button
(direction downwards) and (direction upwards).
. Depress push-button again to return to the total data
Temp. volume +
765.432 m3
Temp. volume -
65.321 m3
Page 23

4. Total difference
The difference between fluid volumes passed in the positive (+) and negative (-) directions since the
measurement start, or temporary difference from the last resetting of the temporary difference data.
Total difference
1111.111 m3
Display reading: Total difference
5. Operational time
The length of the time period, in hours and minutes, counted from the first meter start, or the length of the
temporary time period measured since the last resetting of the temporary time data.
Operational time
12345:55 h:m
Display reading: Operational time
Upon switching off the induction flow meter, the data readings under items 3, 4, 5 and 6 are stored at the
EEPROM unit and restored upon each new meter start.
6. Percentage flow rate
Flow rate information in the form of a horizontal bar whose length corresponds to the flow rate value in per
cent of a selected 100% value (need not necessarily be the same as the maximum flow rate for the given
sensor). The figure on the right side offers the digital form of the same information. The minus sign before
the figure indicates negative flow data.
Percent.flowrate
_____ - 20%
Display reading: Per cent flow rate
7. Last error
Abbreviated text of the last error message.
Last error
7:sensor discon.
Display reading: Last error
In the case of a meter error, the display will immediately show a message including a short description of the
error concerned. Upon depressing push-button
abbreviated error message and error code are stored in the “previous errors” register. While an error is
indicated, the measurement functions continue undisturbed. In the cases of errors E6 and E7, zero flow rate
is indicated throughout the error condition duration.
The user may review earlier error codes and messages up to 255 previous error messages stored in the
error register. To access this function, depress push-button
E-XXX YYY/ZZZ are: XXX the error code, YYY error ordinal number, and ZZZ the total number of error
codes stored in the register. To page in the list use push-button
depress push-button
. Error register is reset with switching power on.
Design, Assembly and Service Manual
Induction flow meter FMG600 series
Temp.difference
700.111 m3
Temporary time
543:21 h:m
Last error
E-007 015/015
, the meter will return to the data display mode, while the
(previous error display). In the data format
Page 21 of 44
. To return to the data display mode,
Page 24

The error messages are:
E0: No error.
E1: Error in CRC EEPROM. Incorrect data check sum in the EEPROM unit. This error may occur when the
processor, following a power failure, does not manage to store all data in the EEPROM unit.
E2: OUT1 (multi-functional output) is in the impulse mode of operation and the memory block storing the
unsent impulses overflows.
E3: OUT2 (multi-functional output) is in the impulse mode of operation and the memory block storing the
unsent impulses overflows.
E4: Multifunctional output RELAY is set for pulse output and there is memory of pulses overflow.
E5: WDOG: the processor reset due to the overflow condition in the timer controlling the length of the
programming loop.
E6: Not fully flooded piping.
E7: Open current loop in the impulse generation circuitry of the meter sensor.
E8: Error in +5 V power line.
E9: Error in +24 V power line.
E10: Error in -5 V power line.
E11: Actual flow rate exceeded the selected Imax value.
E12: Failure in frame receipt confirmation while communicating via the RS 232 serial line.
E13: Not processed
Error indication mode enabled: error information is displayed and entered into the error register. Some errors
result in setting the indicated flow rate at zero.
Error indication mode disabled: the error information is entered into the error register.
8. Dosing
Dosing is visible and functional provided this data display mode has been selected.
The selected fluid volume (dose) will wait for the active initiation signal to be brought to terminals 8-9. As
soon as such signal is received, a count towards zero will commence. Upon reaching zero, OUT3 will close.
The dosing action can be repeated by depressing push-button
set the required dose, follow the respective procedure in the programming menu.
Dosing mode
500.00 l
Display reading: Dosing mode
Design, Assembly and Service Manual
Induction flow meter FMG600 series
. To interrupt dosing, use push-button . To
Page 22 of 44
6.5.3.1. Display formats of aggregate values
If the displayed value occupies more than 11 digit places including the decimal point, the calculated value
will be displayed alternately with the selected measurement unit.
6.5.3.2. Data reset
The user is not permitted to reset the aggregate data values under items 3, 4, 5 or 6. Resetting is only
possible with running (“temporary”) values associated with items 3, 4 5 and 6 accessible via push-button
(another depression of push-button
temporary value is displayed, depress push-button
push-button
button
temporary value, depress any of push-buttons
value mode, depress push-button
temporary values will be unaffected.
to reset the temporary value. By depressing any of push-buttons and after that push-
, return to the total value display mode. If you stop the temporary mode and wish not to reset the
, will return the display to the total value display mode). When a
to discontinue the temporary value mode, and depress
, whereby the count continues. To return to the total
. This procedure will reset the edited temporary value only, the other
Page 25

Design, Assembly and Service Manual
Induction flow meter FMG600 series
Page 23 of 44
7. PROGRAMMING
The induction flow meter can be programmed in two ways: using a computer connected to the serial meter
interface, or using its own keyboard. The following description concerns the keyboard (push-button)
programming procedures.
The keyboard includes four push-buttons provided with the following symbols:
1. Push-button
2. Push-button
3. Push-button
back in the menu;
4. Push-button
In any menu, the selected item is on the first line with the first character blinking.
Entry the programming mode, movement within a menu and data saving
To enter the programming mode, depress push-button
against unauthorized action by a password (a four-digit number) that needs be entered before accessing the
basic programming menu. Upon delivery, from the manufacturing plant, every new meter has a password of
0000.
Password
0000
Display reading: Password
With a new meter, enter password 0000 and confirm by push-button
your own password, enter the same and confirm by depressing push-button
programming mode, the password can be changed without any limitation.
Use the push-button
will return to the left side of the line. The cursor is a short horizontal line to be placed under the character we
wish to edit/change.
Use the push-button
direction downwards. Upon reaching the last character in the character series available, the first eligible
character will reappear.
Upon completing the editing action, confirm your choice by push-button
password, the display will read “Incorrect password Try again” while the program will return to the data
display mode.
Password OK
Press any key
Display reading: confirmation of correct password entry: Password OK. Press any key.
With the display reading “Password OK Press any key”, depress any push-button (preferably
basic programming menu.
, the “roller” push-button, direction downwards;
, movement to the right in the direction of the arrow, direction upwards;
, password entry push-button, movement upwards in the direction of the arrow, movement
, also referred to as the “enter” push-button (command confirmation).
and then . The programming mode is protected
. Provided you have already chosen
. Prior to leaving the
to move the cursor to the right. Upon reaching the extreme right position, the cursor
to change the selected character in the direction upwards, or push-button in the
. Should you enter an incorrect
) to enter the
Page 26

A
Design, Assembly and Service Manual
Induction flow meter FMG600 series
Page 24 of 44
The two-line display will always show two of the following basic menu options:
Displayed data
Samples
nalog output
Output function
Electrode clean
Serial line
Production data
Dose setting
Zero setting
100 percent
Exit
Display reading: the basic menu
Use push-buttons
and to move upwards and downwards in the menu. As in any meter menu, the
selected item is on the first display line with the initial character blinking.
Depress push-button
depress push-button
to enter a subordinated menu, or to edit an item. When in a subordinated menu,
to return to the higher-level menu (the “Escape” function). When in the basic menu,
the Escape command will bring forth the possibility to terminate the programming mode via the selection
of the “Exit” item of the basic menu.
7.1. Programming of the basic menu items
7.1.1. Displayed data
The “Displayed data” menu allows the operator to choose which parameters are to be displayed. Using
push-buttons
cancelled.
Menu: Displayed data, depress
The two-line display unit will always show two of the items from the following menu. Use push-buttons
to page upwards and downwards through the menu items.
Menu: Displayed data, depress
Display line 1 will read “Do not display”, line 2 “l/s …. l“. Use push-buttons
menu items. If you choose “Do not display”, depress
display If you wish to display “Total volume +”, select the”Total Volume +” item on the menu; depress pushbutton
skip line 1,(Do not display) and select line 2, “l/s …. l“ (flow-rate unit … volume unit). Using pushbuttons
selection by depressing
(downwards) and
depressing
and , select parameters from the following list. The Flow Rate display cannot be
and
Flow rate
Total volume +
Total volume Total difference
Operational time
Percent. Flow rate
Last error
Dosing mode
/ Total volume depress
and to go up and down in the
to return to the “Displayed data” menu. If you wish to
(downwards) and (upwards), select the desired flow-rate and volume units and confirm the
. The display line 1 will then show “0” and line 2 “0.0“.Using push-buttons
(upwards), select the desired number of decimal positions, confirm the selection by
and return to the “Displayed data” menu.
Page 27

Design, Assembly and Service Manual
Induction flow meter FMG600 series
Page 25 of 44
Comment:
The measurement unit selected for “Flow Rate” is automatically set for all other flow-rate quantities referred
to in the Programming menu.
The measurement unit selected for “Total Volume +” is automatically set for all other flow-volume quantities
in the Programming menu.
The measurement units for the “Total Volume –“ and “Total Difference” quantities can be selected as need
be, and their selection will not affect any other measured quantities to be set within the Programming menu.
Table of flow-rate and volume units Table of decimal positions
l/s …. l 0
l/min …. l 0.0
l/h …. l 0.00
m3/s …. m3 0.000
m3/min…. m3 0.0000
m3/h …. m3 0.00000
GPS …. G 0.000000
GPM …. G
GPH …. G
User-specified units
When defining a user-specific unit, it is necessary to enter a conversion constant (a multiple of the standard
flow-rate or volume units – “l/s” or “l”, then depress
define number of decimal positions, depress
and return to the “Displayed data” menu.
, define the unit name (six characters), depress ,
Example: the desired flow rate unit is US barell per second; the conversion constant is 0.006283811; unit
name bl/s; number of decimal positions 0.000.
The same procedures apply to parameter setting with Flow rate, Total volume +, Total volume – and Total
difference.
While setting the parameters of Operational time, Per cent flow rate, Last error and Dosing, the options to
select from are only “DISPLAY” and “NO DISPLAY”.
To leave the “Displayed data” mode and return to the basic programming menu, depress push-button
.
7.1.2. Samples
The number of samples N, on the basis of which the average flow rate value is determined, can be set within
the range of 1 to 255. While the measurement frequency is 6.25Hz (or 3.125, 1 or 0.5Hz), fast (step)
changes in the flow rate will be smoothened within the interval of 0.08 to 20.40s (0.16 to 40.80s, 0.5 to
127.5s or 1 to 255s). The averaging feature is useful in the cases where the flow through the meter sensor is
unstable, the fluid is turbulent or where there are air bubbles trapped in the fluid flow.
The averaging function helps suppress fast changes in the fluid flow rate. Average flow rate as measured
and displayed is the parameter used to calculate other meter outputs.
Page 28
Design, Assembly and Service Manual
Induction flow meter FMG600 series
Page 26 of 44
Current flow rate
Average flow rate
Sampling
Suppression of step changes in flow rate
Menu: Number of samples, depress
The display will read “Number of samples xxx“. Replace xxx by a number from the range of 1 to 255 (usually
25). Move the cursor using push-button
Confirm the selection by push-button
, and increase/decrease number using or , respectively.
. The display will then read “Value entered Press any key”. Press
or any other push-button.. This action will take you to the basic menu.
7.1.3. Analog output
Setting options
Connected to terminals 4 and 5 is a programmable current output. It is an active current output, insulated
from other meter parts. The maximum output load is 1,000. Depending on the fluid-flow characteristics , the
output can be used in four different modes of operation (see the graphs below) and in two selectable
measurement ranges.
The two-line display unit will always show two of the items from the following menu. Use push-buttons and
to page downwards and upwards through the menu items.
Menu: Analog output, depress
0..+Q Output
0..-Q Output
|Q| Output
–Q..+Q Output
Fixed current
In all operational modes excepting the “Fixed current” mode the current output range can be user defined.
Menu: Analog output, depress / Output 0..+Q, depress
Output 0.. 20 mA
Output 4.. 20 mA
Selection of current output
Menu: Analog output, depress
Imax
The current output setting consists of defining flow rate Qmax corresponding to Imax. Move the cursor using
push-button
, and increase/decrease the Qmax value using push-buttons and . Select the desired
/ Output 0..+Q, depress / Output 0.. 20 mA, depress / Flow rate for
Page 29

Design, Assembly and Service Manual
Induction flow meter FMG600 series
Page 27 of 44
Qmax and confirm the setting by depressing . The display will then read “Value entered Press any key”.
Press any key, preferable the
pusch-button. This action will take you back to the main programming
menu, item “Analog output”.
In the “Fixed current” mode, the output current can be set within the range of 0 to 20mA. This mode is used
for meter servicing purposes.
Menu: Analog output, depress
Move the cursor using push-button
/ Fixed current, depress / Fixed current 0.. 20 mA
, and increase/decrease the current value using push-buttons and
. Select the desired current value and confirm the setting by depressing . The display will then read
“Value entered Press any key”. Pres any key, preferably
. This action will take you back to the main menu,
item “Analog output”. At the same time, the defined current will start to flow through the output circuit.
The following graphs show the relationships between current I and flow rate Q for various operational
modes.
Output current for 0 ...+Q Output current for 0 ...-Q
Output current for |Q| Output current for –Q ...+Q
Page 30

Design, Assembly and Service Manual
Induction flow meter FMG600 series
Page 28 of 44
Examples of analog output interconnections
Q+ Q-
Equipment with a current input Equipment with current inputs
Outputs 1 and 2 serving the purpose of
identifying fluid flow direction.
Multifunctional outputs programmed to identify the fluid flow direction and negate the flow direction, will
divide the analog output operated in the “Absolute Flow Rate Value” mode into two outputs, one for each
flow direction.
Page 31

Design, Assembly and Service Manual
Induction flow meter FMG600 series
Page 29 of 44
Equipment with voltage input Current output connected as a voltage
source to feed the (passive) output 2
The output voltage for the associated equipment is defined as the voltage drop on resistor R. It holds:
U = I R.
For the voltage range of 0.. 10V, select R = 500 and the analog current output range 0.. 20mA. Resistor R
shall be placed as close to the input terminals of the co-operating (controlled) equipment as possible. The
maximum voltage (voltage drop on the resistor) is 10V. The input impedance of the controlled equipment
shall be at least 100 times higher than that of resistor R.
The interconnection of the current output as an auxiliary power source for the binary outputs is shown in the
above picture. This arrangement assumes that the current output is not used for the purposes of flow rate
indicator. Here the current output needs be set in the “Fixed current” mode of operation. The voltage drop on
resistor Ri is used as supply voltage for the binary output (via resistor Rz). The input impedance of the
associated equipment shall be at least 10 times higher than that of resistor Rz, while Rz shall be at least
10 times higher than Ri. It holds: Ri < Rz < input impedance of the associated equipment.
Technical specifications of analog output
The analog output is controlled by a 12-bit DA converter. The operational range 0 to 20mA is divided into
4,096 steps. One step (1LSB) therefore corresponds to about 0.005mA (0.025% of 20mA). This resolution
applies to all output ranges. The current range 4 ... 20mA is software-defined with the converter steps
reduced accordingly. The maximum voltage at the current output is 20V; the maximum resistance of the
current loop is 1,000.
7.1.4. Output function
The configuration of the induction flow meter includes two binary multifunctional outputs, electrically isolated
by means of optocouplers. The output transistors of the optocouplers are accessible via terminals 12-13 and
14-15. These are passive outputs that need external power source. Alternatively they can be powered by the
analog output in the fixed-current mode as described above. The binary outputs can be loaded and
repeatedly switch on and off currents 1 to 50mA.
Default settings: Output 1: frequency output, Output 2: pulse output.
Flow meter can be equipped with an output relay, designated in the menu as item "Relay functions".
Electrically isolated relay contacts are accessible via terminals 1-2-3. For impulse output, both the impulse
width and the minimum gap length are set at 0,5 s. To ensure correct functioning of the impulse function, it is
necessary to set the outputimpulse constant (the fluid volume per impulse) so that the memory block of
unsentimpulses would never overflow.
Page 32

Design, Assembly and Service Manual
Induction flow meter FMG600 series
Page 30 of 44
Menu: Output function, depress
The display will offer the following selection:
OUT1 function
OUT2 function
RELAY function
The two-line display unit will always show two of the items from the following menu. Use push-buttons
and
to page downwards and upwards through the menu items.
Menu: Output function, depress
/ Output 1 function, depress
The two-line display unit will always show two of the items from the respective menu. Use push-buttons
to page downwards and upwards through the menu items.
and
The output functions available are shown in the following table:
Frequency can not be used for relay output
Permanently open
Perm. closed
|Q| pulses
Q+ pulses
Q- pulses
Q+ frequency
Q- frequency
|Q| frequency
Fixed frequency
Negative flow
Non-neg. flow
Error occurred
No error occurred
Q>Q lim.
Q<Q lim.
|Q|>Q lim.
|Q|<Q lim.
Cleaning
Not cleaning
Permanently closed (open)
These modes are only used for servicing purposes.
Menu: Output function, depress
depress
/ Output 1 (2) function, depress /Permanently closed (open),
This will return the display to the menu item “Output 1 Function” or “Output 2 Function”.
To return to the basic programming menu, depress push-button
.
Page 33

Design, Assembly and Service Manual
Induction flow meter FMG600 series
Page 31 of 44
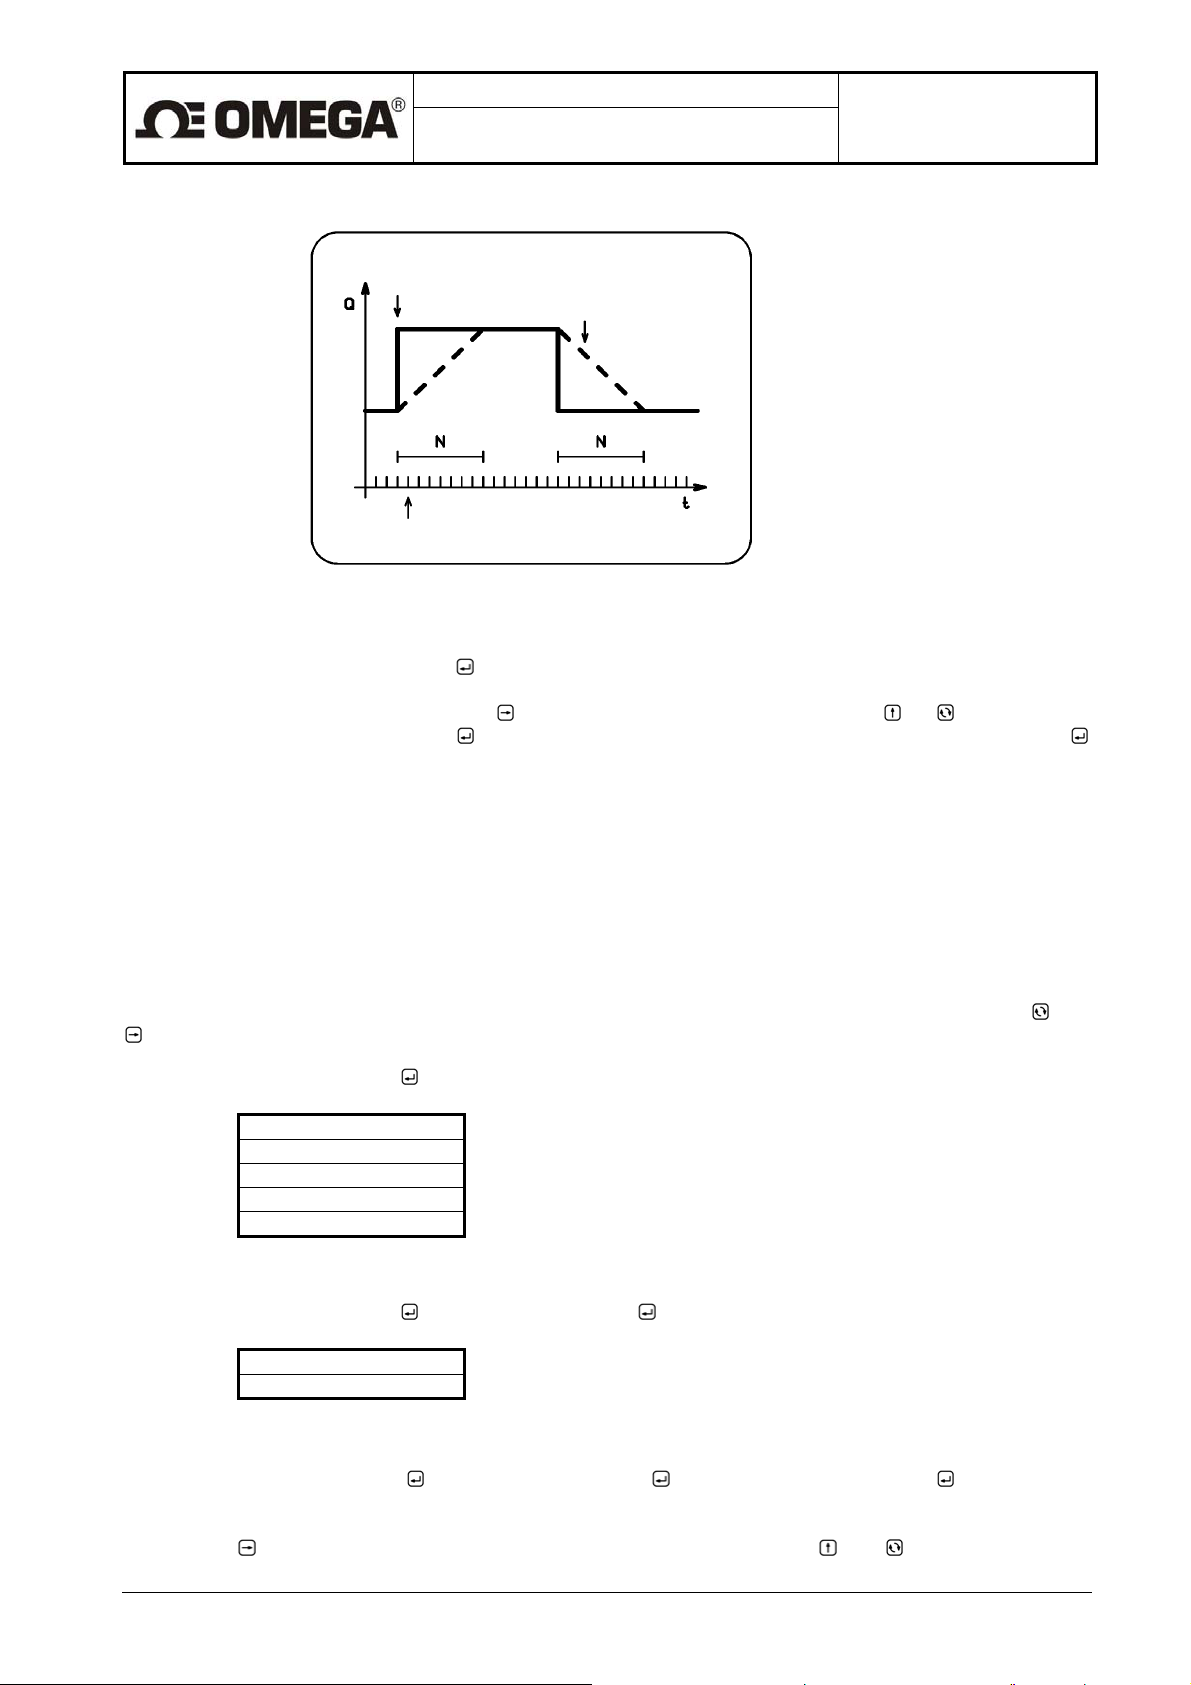
Pulse outputs
In any of the pulse modes, an pulse will be generated as soon as a defined (preset) fluid volume passes
through the meter sensor. The impulse mode requires specification of the following
three parameters: pulse width “t
“, minimum time gap between two successive impulses “t
U
“ and fluid
D
volume per impulse “V”.
This mode provides for integration of the flow rate
values in time. As soon as a preset fluid volume V
passes through the meter, an impulse of width t
generated. After each impulse, a gap of at least t
follows. If, after elapsing of the t
period, fluid volume
D
U
is
D
V has not yet passed through the sensor, the output
remains inactive. If the volume passed is equal to or
greater than V, another impulse plus gap are
immediately generated. Should the preset volume V
pass before the end of the previous impulse, the nongenerated impulse will be stored in a accumulator with
the capacity of 255 impulses. Should the impulse
accumulator overflow, an error message will be
generated. To ensure correct functioning of the meter
impulse function, it is necessary to set the impulse
output parameters so that the expected impulse
frequency shall correspond to the impulse width and
gap length selected.
Pulse generation principle
It holds: maximum pulse frequency = 1 / ( tU + tD)
The volume per impulse parameter can be set within the range of 0.001 to 1,000,000 liters. The pulse width
and gap length can be set at 10 to 2,550ms in steps of 10ms. The setting procedure consists
of selecting numbers from 1 to 255 on the meter display. Multiplied by 10, the figure shows the impulse width
or gap length in milliseconds.
From the above it follows that the maximum impulse frequency is 50 per sec.
Regarding the flow rate conditions (see below), impulses can be generated in three different modes. During
the tU periods, the output is closed.
Impulse frequency Impulse frequency Impulse frequency
Flow rate Flow rate Flow rate
Impulses for |Q| Impulses for Q+ Impulses for Q-
Page 34

Design, Assembly and Service Manual
Induction flow meter FMG600 series
Page 32 of 44
Menu: Output function, depress / Output 1 (2) function, depress / Pulses for |Q|, depress .
The display will read “Pulse width [1] xxx“. Move the cursor using push-button
values at various “x” positions using push-buttons
when multiplied by 10, will give the pulse width in ms. Depress
Press any key”. Press any key, preferably
Move the cursor using push-button
. The display will then show the message “Gap length [1] xxx“.
, and increase/decrease the values using push-buttons or ,
or , respectively. Replace xxx by a figure which,
. The display will read “Value entered
, and increase/decrease the
respectively. Replace xxx by a figure which, when multiplied by 10, will give the gap length in ms. Depress
. The display will read “Value entered Press any key”. Press any key, preferably
show the message “Volume per pulse [1] xxxxxxx“. Move the cursor using push-button
increase/decrease the “x” values using push-buttons
or , respectively. Replace xxxxxxx by a figure
. The display will then
, and
equal to the desired fluid volume per pulse. This figure is elsewhere referred to as the impulse constant or
impulse number. Depress
preferably
. This will return the display to the menu items “Output 1 function” or Output 2 function”. To
return to the basic menu, depress push-button
. The display will read “Value entered Press any key”. Press any key,
.
Pulse number selection for FMG600 SERIES
Dimension Qmax Imp.number
Qmax
coefficient Imp.number
Inches (DN) l/s l/imp GPM gallon/imp.
½ “ 15 1.8 1
¾ “ 20 3.33 1
1“ 25 5 1
- 32 8.33 5
1½“ 40 12.5 5
2“ 50 20 5
- 65 33.33 10
3“ 80 50 10
4“ 100 77.77 50
- 125 119.44 50
6“ 150 180.55 50
8“ 200 319.4 100
10“ 250 500 100
12“ 300 700 500
28.53058
52.78157
79.25161
132.03318
198.12903
317.00644
528.29124
792.51611
1232.67956
1893.16249
2861.77568
5062.59292
7925.16112
11095.22557
3.785412 1
3.785412 1
3.785412 1
3.785412 1
3.785412 1
18.92706 5
18.92706 5
18.92706 5
18.92706 5
37.85412 10
37.85412 10
189.2706 50
189.2706 50
189.2706 50
1 gallonUS = 3.785412 l
pulse width = 100 ms
minimum gap length = 100 ms
f <= 5Hz
0.264172037 gall = 1 l
15.85032224 gall/min = 60 l/min
Impulse number selection for FMG600 SERIES for sensors Tri Clover
Dimension Qmax Imp.number
Qmax
coefficient Imp.number
Inches mm l/s l/imp GPM gallon/imp.
½ “ 12.70 0.6940 1
¾ “ 19.05 1.9483 1
1“ 25.40 3.8360 1
1½“ 38.10 9.5115 5
2“ 50.80 17.7205 5
2½“ 63.50 28.4631 10
11.0001
30.8812
60.8018
150.7603
280.8756
451.1493
3.7854 1
3.7854 1
3.7854 1
3.7854 1
18.9270 5
18.9270 5
Page 35

Design, Assembly and Service Manual
Induction flow meter FMG600 series
Page 33 of 44
Frequency outputs
In the frequency modes, the output signals will be impulses of impulse-to-gap ratio 1:1. The frequency range
available is from 1Hz to 10kHz.
Comment:
The electronic unit of the meter includes only one frequency generator. It is therefore impossible
to select different frequencies for each output, or combine the fixed-frequency mode at one output with
frequency related to flow rate mode at the other output. On the other hand, the operator may select the
frequency related to flow rate mode in the positive direction at one output with that in the negative direction
at the other output, with the same frequency-to-flow-rate ratios.
Regarding the flow rate conditions, the frequency outputs can be operated in three different modes (see
below).
Frequency for Q+ Frequency for Q- Frequency for |Q|
Menu: Output function, depress
The display will read “Flow rate per 1kHz xxxx“. Move the cursor using push-button
increase/decrease the values at various “x” positions using push-buttons
by a figure representing the maximum flow rate. Depress
key”. Press any key, preferably
/ Output 1 (2) function, depress / Frequency for Q+, depress .
, and
or , respectively. Replace xxxx
. The display will read “Value entered Press any
. This will return the display to the menu items “Output 1 function” or
“Output 2 function”.
The fixed-frequency mode is used for servicing purposes only. The required frequency is set in Hz within the
range of 1 to 10,000 in steps of 1Hz.
Menu: Output function, depress
The display will read “Fixed frequency xxxxx“. Move the cursor using push-button
“x” values using push-buttons
frequency in Hz. Depress
/ Output 1 (2) function, depress / Fixed frequency, depress .
, increase/decrease the
or , respectively. Replace xxxxx by a figure equal to the desired
. The display will read “Value entered Press any key”. Pres any key, preferably
. This action will return the display to the menu items “Output 1 Function” or “Output 2 Function”.
To return to the basic menu, depress push-button
.
Negative (non-negative) flow direction
This mode is used to identify the flow direction. In the case of negative flow direction, the output is closed
(open).
Menu: Output function, depress
direction, depress
.
/ Output 1 (2) function, depress / Negative (Non-negative) flow
The display will return to the menu items “Output 1 Function” or “Output 2 Function”.
To return to the basic programming menu, depress push-button
.
Error (no error) condition
In the case of a meter error, the output will close (open) and stay so as long as the error condition exists.
Menu: Output function, depress
/ Output 1 (2) function, depress / Error (No error) condition, press
Page 36

Design, Assembly and Service Manual
Induction flow meter FMG600 series
Page 34 of 44
The display will return to the menu items “Output 1 Function” or “Output 2 Function”.
To return to the basic menu, depress push-button
.
Exceeding (dropping below) the limit values of flow rate
In the cases of exceeding (dropping below) the preset flow-rate limit values, the output will close (open).
Upon return within the normal operating range, the output will open (close) again with a preset hysteresis.
Regarding the flow rate conditions, there are four different modes of operation:
Q > Q lim. Q < Q lim.
IQI > Q lim. IQI < Q lim.
Menu: Output function, depress
The display will read “Flow rate limit [1] xxxxxx“. Move the cursor using push-button
increase/decrease the values at various “x” positions using push-buttons
/ Output 1 (2) function, depress / Q > Q lim., depress
, and
or , respectively. Replace
xxxxxx by a figure equal to the flow rate which, when exceeded, should cause the output to close. Depress
. The display will read “Value entered Press any key”. Press any key, preferably . The display will then
show the message “Hysteresis [1] xxxx”. Move the cursor using push-button
“x” values using push-buttons
between the closing and opening output functions. Depress
any key”. Press any key, preferably
or , respectively. Replace xxxx by a figure representing hysteresis,
. The display will read “Value entered Press
. The display will return to the menu items “Output 1 function” or
, and increase/decrease the
“Output 2 function”.
To return to the basic menu, depress push-button
.
Electrode cleaning in progress (No cleaning)
While the electrode cleaning process is in progress, the output is closed (open).
Menu: Output function, depress
depress
/ Output 1 (2) function. depress / Cleaning in progress (No cleaning),
The display will return to the menu items “Output 1 Function” or “Output 2 Function”.
To return to the basic menu, depress push-button
.
7.1.5. Electrode cleaning
During the meter operation, non-conducting substances may accumulate in the form of a layer on the sensor
electrodes. This increases the contact resistance between the electrode and the measured fluid and results
in decreased measurement accuracy. The FMG600 SERIES flow meter offers a sensor electrode cleaning
function without sensor dismantling. The cleaning method is based on the electro-chemical phenomenon
Page 37

Design, Assembly and Service Manual
Induction flow meter FMG600 series
Page 35 of 44
where the electrodes are connected to an AC voltage source causing the accumulated layer to dissolve in
the measured fluid. It is recommended that the cleaning process be repeated in regular intervals.
One cleaning cycle lasts 1 minute. Measurements are discontinued during the cleaning action while the
immediately preceding flow conditions are being simulated. The cleaning action can be indicated using the
multifunctional outputs. While the cleaning process is in progress, message "Cleaning Electrodes" can be
seen on the top display line. The bottom line shows last value of the selected measured quantity. As soon as
the cleaning action is over, the meter resumes normal measurements.
There are several ways of initiating the electrode cleaning cycle:
Menu: Electrode cleaning, depress
Cleaning OFF
Single cycle
During Power ON
Periodic [day]
The two-line display unit will always show only two of the four menu items. Use push-buttons
page downwards and upwards through the menu items. Select the desired item and depress
and to
. The display
will return to the basic menu, item “Electrode Cleaning”...
Upon selecting the “Single cycle” option, the cleaning process will immediately start. On completion of the
cleaning cycle, the meter will return to the “Cleaning OFF” status.
The selection “During Power ON” implies that a cleaning process will be initiated wherever line voltage is
switched on. In the “Periodic [Day]” mode of operation, cleaning processes will be initiated automatically in
regular intervals to be chosen by the user from the range 1 to 255 days. The time counting process will
always start upon setting a new cleaning period.
Comment:
When using a supply voltage source 24V AC/DC, the electrode cleaning function is inoperative.
Menu: Electrode cleaning, depress
The display will read “Cleaning [Day] xxx“. Move the cursor using push-button
values using push-buttons
or , respectively. Replace xxx by a number from 1 to 255 (days). Depress .
The display will read “Value entered Press any key”. Press any key, preferably
/ Periodic [day], depress
, increase/decrease the “x”
. This action will return the
display to the basic programming menu, item “Electrode Cleaning”.
7.1.6. Serial line
The meter is provided with a serial communication interface, intended for servicing purposes. In the standard
configuration, the USB port is implemented. Electrically insulated port RS 485 is included on special request.
Serial port USB
This port is accessible through USB type B connector. Interconnection to the computer is facilitated by
means of a cable provided with USB type A connector at one end and USB type B connector at the other
end.
The USB port is not insulated from the other meter circuits; it is primarily intended for servicing purposes.
Permanent operational use is not recommended.
Serial port RS 485
The RS 485 port is optional accessory of the induction meter. It is electrically insulated from the other meter
circuitry and allows for interconnection of up to 31 flow meters to a common communication network. The
maximum length of the connecting two-wire twisted cable is 3,937 ft (1,200m). If repeaters are used, the
Page 38

A
Design, Assembly and Service Manual
Induction flow meter FMG600 series
Page 36 of 44
number of meter stations and cable length can further be increased. The cable wires are to be connected to
terminals 6 and 7.
The flow meter found at the end of the communication network shall be provided with jumper W1 with
a terminal resistor 120 R. Jumper W1 is located on the terminal board FNS5 between the terminal strip and
lightning arrestor
flow meter 1 flow meter 2 flow meter 3 flow meter 4
Connection of flow meters to an RS 485 communication line
Communication
Communication consists of individual data packets. To ensure correct function of a communication network,
each station must have a different address. On delivery, all induction flow meters will have the following
setting of communication parameters: Address 1, Group 1, Speed 9600Bd, Parity SL.
Communication uses the Floset 2.0 program package.
The communication protocol is not included in this brochure; it can be obtained from the meter manufacturer
on request.
Menu: Serial line, depress
ddress
Group
Baud rate
Parity
The two-line display will always show two of the menu items. To page through the menu, use push buttons
(direction upwards) and (downwards). Select the desired item and depress .
Menu: Serial line, depress
/ Address, depress
The display will read “Address xxx”. Replace “xxx” by a number from 1 to 255, being the meter address.
Depress
. The display will show the message “Value entered Press any key”. Press any key, preferably
. This command will take you back to the Serial Line menu.
Menu: Serial line, depress
/ Group, depress
The display will read “Group xxx”. Replace “xxx” by a number from 1 to 255, being the designation of a group
of induction meters. Depress
any key, preferably
. This command will take you back to the Serial Line menu.
. The display will show the message “Value entered Press any key”. Press
Page 39

Design, Assembly and Service Manual
Induction flow meter FMG600 series
Page 37 of 44
Menu: Serial line, depress / Baud rate, depress
All equipment connected to a particular communication line branch shall use the same communication
speed. There are five optional selections of speed:
1200Bd
2400Bd
4800Bd
9600Bd
19200Bd
38400Bd
The two-line display will always show two of the menu items. To page through the menu, use push buttons
(direction upwards) and (downwards). Select the desired item and depress . This action will bring
the display to the Serial Line menu.
Menu: Serial line, depress
/ Parity, depress
Parity -Parity SL
Parity SS
Parity LS
Parity LL
The two-line display will always show two of the menu items. To page through the menu, use push buttons
(direction upwards) and (downwards). Select the desired item and depress . This action will bring
the display to the Serial Line menu.
To return to the basic programming menu, item Serial Line, depress push-button
.
7.1.7. Production data
The first three menu items, i.e. Production Data, Series Number and Software, give basic information on the
induction flow meter concerned and as such cannot be edited. The remaining items, i.e. Sensor Constants,
Excitation Frequency, Suppressed Flow Rate, Language, Sensor Number, Sensor DN, Errors, Dose
Correction, Flow Direction and Base Frequency can be changed by the user.
Menu: Production data, depress
Production date
Serial number
Software
Sensor constants
Excitation freq.
Suppressed flow
Language
Sensor number
Sensor DN
Errors
Dose correction
Flow direction
Base frequency
The two-line display will always show two selected menu items. To page through the menu items, depress
repeatedly push-buttons
depress
.
(direction downwards) and (upwards). To select a particular menu item,
Menu: Production data, depress
/ Production date, depress
Page 40

–
Design, Assembly and Service Manual
Induction flow meter FMG600 series
Page 38 of 44
The display will read “Production date dd mm rrrr”. This information cannot be edited. To return to the
Production data menu, depress any push-button, for example
. The menu will reappear on the display.
Menu: Production data, depress
/ Serial number, depress
The display will read “Serial number xxxxxrr”. This information cannot be edited. To return to the Production
data menu, depress any push-button, for example
. The menu will reappear on the display.
Menu: Production data, depress
/ Software, depress
The display will read “Software v.xxxxx/xx”. This information cannot be edited. To return to the Production
data menu, depress any push-button, for example
. The menu will reappear on the display.
Menu: Production data, depress
/ Sensor constants, depress
Constant 1
Constant 2
To page through the menu items, use push-buttons
desired item and depress
value, use push-button
using push-buttons
. The constant value will appear on the display. Should you wish to change this
to place the cursor under the selected figure and increase/decrease the same
and , respectively. The sensor constants shall be set at the values given on the
(direction downwards) and (upwards). Select the
sensor rating plate. Unless this not the case, the flow meter calibration is incorrect.
Menu: Production data, depress
/ Sensor constants, depress / Constant 1, depress
The display will read “Sensor constant 1 xxxxxxxxx“. The value was set during the meter calibration at the
manufacturing plant and it should not be changed. Depress
any key”. Press any key, preferably
. This command will cause the menu Constant 1 / Constant 2 to
. The display will read “Value entered Press
reappear on the display. The same procedure applies to setting the value of Constant 2. To return to the
Production data menu, depress push-button
.
Menu: Production data, depress
/ Excitation frequency, depress
6.25 Hz
1
2 – 3.125 Hz
3 – 1.0 Hz
4 – 0.5 Hz
To page through the menu items, use push-buttons
desired frequency and depress
.
(direction downwards) and (upwards). Select the
Menu: Production data, depress
/ Excitation freq., depress / 2 – 3.125 Hz, depress
The Manufacturing data menu will reappear on the display with the item “Excitation frequency” on the first
line.
Menu: Production data, depress
/ Suppressed flow, depress
The display will read “Suppressed flow xxxxx“. This parameter is usually set at 0.5% Qmax and may be
increased in cases where it can be demonstrated that while no fluid flows through the meter sensor, the
meter indicates a non-zero flow rate. Using push-button
increase/decrease the selected figure by push-buttons
equal to the desired value of suppressed flow rate. Depress
any key”. Press any key, preferably
. The Production data menu will reappear on the display with the item
move the cursor to the desired position and
and , respectively. Replace xxxx by a number
. The display will read “Value entered Press
“Suppressed flow rate” selected.
Menu: Production data, depress
/ Language, depress
Page 41

Design, Assembly and Service Manual
Induction flow meter FMG600 series
Page 39 of 44
The display will read “[CZ] Czech / [EN] English“. To page through the menu items, use push-buttons
(direction downwards) and
(upwards). Select the desired language and depress . The Production data
menu will appear on the display with the Language option on the first line.
Menu: Production data, depress
The display will read “Sensor number”. Using push-button
increase/decrease the selected figure by push-buttons
series number (maximum 10 digits). Depress
any key, preferably
. The Production data menu will reappear on the display with the Sensor Number item
/ Sensor number, depress
move the cursor to the desired position and
and , respectively. Enter the sensor production
. The display will read “Value entered Press any key”. Press
selected.
Menu: Production data, depress
The display will read “Sensor DN”. Using push-button
increase/decrease the selected figure by push-buttons
(maximum 10 digits). Depress
preferably
. The Production data menu will reappear on the display with the Sensor DN item selected.
/ Sensor DN, depress
move the cursor to the desired position and
and , respectively. Enter the sensor dimension
. The display will read “Value entered Press any key”. Press any key,
Menu: Production data, depress
/ Errors, depress
The display will read „1: Error EEPROM, 2: Overflow OUT1“. Scrolling in menu is possible using pushbuttons
With buttons
another error. When finished, depress
(down) and (up). Scroll to desired error and depress . Display will read „Active, Non-active“.
and set desired error feature and depress . Then you can continue with setting of
and return to item "Errors".
Menu: Production data, depress
, Dose correction, depress
The display will read “Dose Correction xxxxx”. The value specified here will be added or subtracted from the
earlier specified dose size. Move the cursor by repeated actuation of push-button
value by push-buttons
and (increase/decrease). The five “x” should be replaced by a figure
representing the dose correction in the given volume units. Confirm your selection by depressing
display will read “Value Entered Press Any Key”. Depress
. This takes you back to the Production Data
, and set the desired
. The
menu, item “Dose Correction”.
Menu: Production data, depress
/ Flow direction, depress
The first display line will show “A B”, the second line “A B”. The first line applies. Select the correct
information by push-button
Depress
. The Production Data menu will appear on the display with the “Flow Direction” item selected.
, then depress . The display will read “Value Entered Press Any Key”.
Menu: Production data, depress
/ Base frequency, depress
The display will read “Base Frequency LXXX”. Move the cursor by repeated depressing of push-button
and set the desired value by push-buttons
figure equal to the base frequency in Hz specified in the table shown in section 7.1.4. Then depress
display will read “Value Entered Press Any Key”. Depress
and (increase/decrease). The X-es should be replaced by a
. The
. This takes you back to the Production Data
menu, item “Base frequency”.
To return to the basic programming menu, item “Production data”, depress push-button
.
,
7.1.8. Dose setting
The dosing mode is operational provided the Display item is selected from the “Displayed Data” menu. The
dosing mode allows for measurement of the preset fluid volume (dose). The external initiation command
shall be brought to the input of optocoupler IN1. As soon as the preset dose has passed through the meter
probe, the output optocoupler (OUT3) will close. The dosing process will be repeated with every new
external initiation signal brought to the input of optocoupler IN1. Depress push-button
dosing process currently in progress. Following that, the next dosing process can be initiated at any time.
Menu: Dose setting, depress
The display will read “Dose Size xxxxx“. Using push-button
position and increase/decrease the selected figure by push-buttons
a number equal to the dose size. Depress
move the cursor to the desired decimal
and , respectively. Replace xxxx by
. The display will read “Value Entered Press Any Key”. Press
to discontinue the
Page 42

any key, preferably . The basic programming menu will reappear on the display with the “Dose Setting”
item selected.
Design, Assembly and Service Manual
Induction flow meter FMG600 series
Page 40 of 44
7.1.9. Zero setting
The zero-setting function is useful in the cases where the actual flow rate is very small (e.g. due to leakage
in closed valves) and for all practical purposes equal to zero. This function can only be used with meters in a
single flow-direction application. Should you open the zero-setting programming mode by mistake (not
wishing to change the zero setting), proceed using the Cancel-Zero setting sequence of commands.
Menu: Zero setting, depress
The display will read “Setting Completed” and show the flow rate as indicated by the meter prior to entry to
the programming mode. Make a note of this value as it cannot be otherwise reconstructed once the new zero
setting has been completed. Depress
“Zero Setting” item selected.
The new zero setting will become effective upon leaving the meter programming mode. At the same time,
three flashing exclamation marks will appear on the display showing the actual flow rate values.
Flowrate !!!
110.7 m3/h
The flow-rate display image with the zero setting effective
The actual zero setting can be changed at any time by repeating the above “Zero Setting” procedure.
Cancellation of the actual zero flow-rate setting:
Menu: Zero setting, depress
The display will read “Setting Completed” and show the flow rate as indicated by the meter prior to entry to
the programming mode. Depress
remain unchanged. Depress
Setting” item selected. The cancellation of zero setting will take effect upon leaving the meter programming
mode. The three flashing exclamation marks on the flow-rate display will disappear.
. The basic programming menu will reappear on the display with the
. The display will read “Setting Cancelled” while the flow-rate value will
. The basic programming menu will reappear on the display with the “Zero
7.1.10. 100 percent
Default value of the “100 Percent” quantity is Qmax as specified for the sensor DN(see the table of minimum
and maximum flow rates in-section 4.1.1.). This default value can be reset, in particular in cases where the
actual maximum flow rate is lower than Qmax.
Menu: 100 percent, depress
The display will read “100 percent xxxx“. Using push-button
position and increase/decrease the selected figure by push-buttons
a number equal to the flow rate identified with 100%. Depress
Press any key”. Press any key, preferably
move the cursor to the desired decimal
and , respectively. Replace xxxx by
. The display will read “Value entered
. The basic programming menu will reappear on the display.
7.1.11. Exit
Select “Exit” to leave the programming mode and protect the meter from any unauthorized programming
action.
Menu: Exit, depress
Page 43

Design, Assembly and Service Manual
Induction flow meter FMG600 series
Page 41 of 44
EXIT
New password
Page through the menu using push-buttons
item appears on the first line with the first character blinking. Select “EXIT” and depress
read “Write to EEPROM Press any key“, usually
the data display menu will appear on the display. Use push-buttons
(direction downwards) and (upwards). The selected menu
. The display will
. The meter programming mode will be terminated and
and to page downwards and
upwards through the menu items.
Select “New password” to cancel the existing password and define a new password enabling entry into the
Parameter setting mode.
Menu: Exit, depress
The display will read “Password 0000“. Using push-button
and increase/decrease the selected figure by push-buttons
and depress
. The display will read “Value entered Press any key”. Press any key, preferably . The Exit
menu will reappear on the display. Select the EXIT item and depress
EEPROM Depress any key”. Press any key, preferably
/ New password, depress
move the cursor to the desired decimal position
and , respectively. Enter the new password
. The display will read “Write to
. This command will terminate the programming
mode and bring the data display menu on the meter display. Unless the programming procedure is
terminated in this way, the flow meter parameters will not be protected by a password. Page through the
menu items using push-buttons
(direction downwards) and (upwards).
Page 44
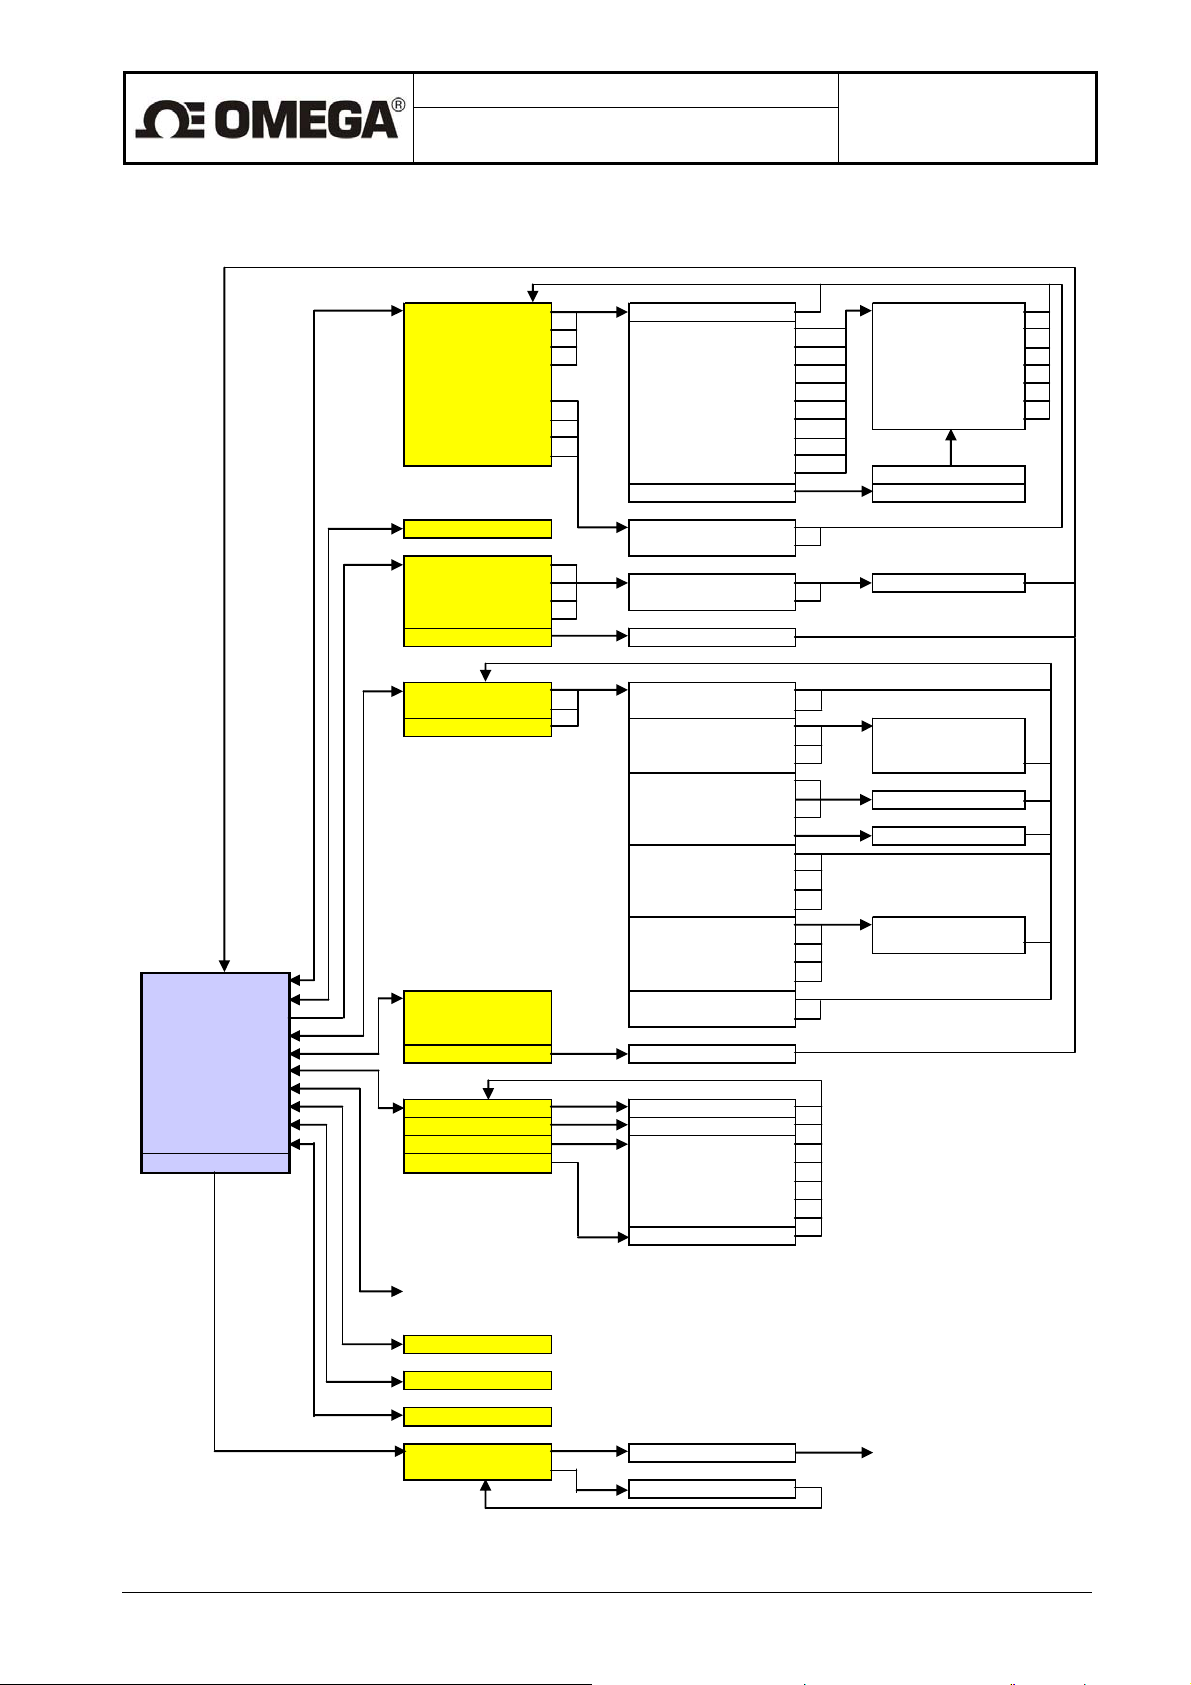
Design, Assembly and Service Manual
Induction flow meter FMG600 series
7.2. The Parameter setting menu
Flowrate Do not d isplay 0
Total volume + l/s 0.0
Total volume - l/min 0.00
Total difference l/hour 0.000
Operational time m3/min 0.00000
Percent flowrate m3/hour 0.000000
Last error GPS
Dosing mode GPM
Page 42 of 44
m3/s 0.0000
GPH "Units"
User-s Multiplier
Samples 1-255 Display
0..+Q Output
0..-Q Output Output 0..20 mA Flowrate at Imax
|Q| Output Output 4..20 mA
-Q..+Q Output
Fixed current Fixed current 0.20 mA
OUT 1 function Permanently open
OUT 2 function Perm. Closed
RELAY function |Q| pulses Pulse length
AFTER PASSWORD Error occurred
ENTRY No error occurred
BASIC PROGRAMMING Q < Q lim Hysteresis
MENU |Q| > Q lim
Displaed data |Q| < Q lim
Samp les OFF Cleaning
Analog output Only once Not cle aning
Output func tion During P owe r ON
Elecrode clean Periodic [day] Periodic [day]
Serial line
Produc tion data
Dose setting Adress Address 1..255
Zero setting Group Group 1 ..255
100 percent Baud rate 1200 Bd, 2400 Bd
Exit Parity 4800 Bd
Do not d isplay
Q+ pulse s Pause le ngth
Q- pulse s Vol./pulse
Q+ frequency
Q- frequency Flowrate at 1 kHz
|Q| frequency
Fixed frequency Fixed frequency Hz
Negative flow
Non-neg. Flow
Q > Q lim Flow limit
9600 Bd
19200 Bd
38400 Bd
Parity --, sl, ss, ls, ll
Production Data menu
Dose size
Executed
100 percent
EXIT Staving to EEPROM Programming end
New password Return to the selected
Password data display mode
Page 45
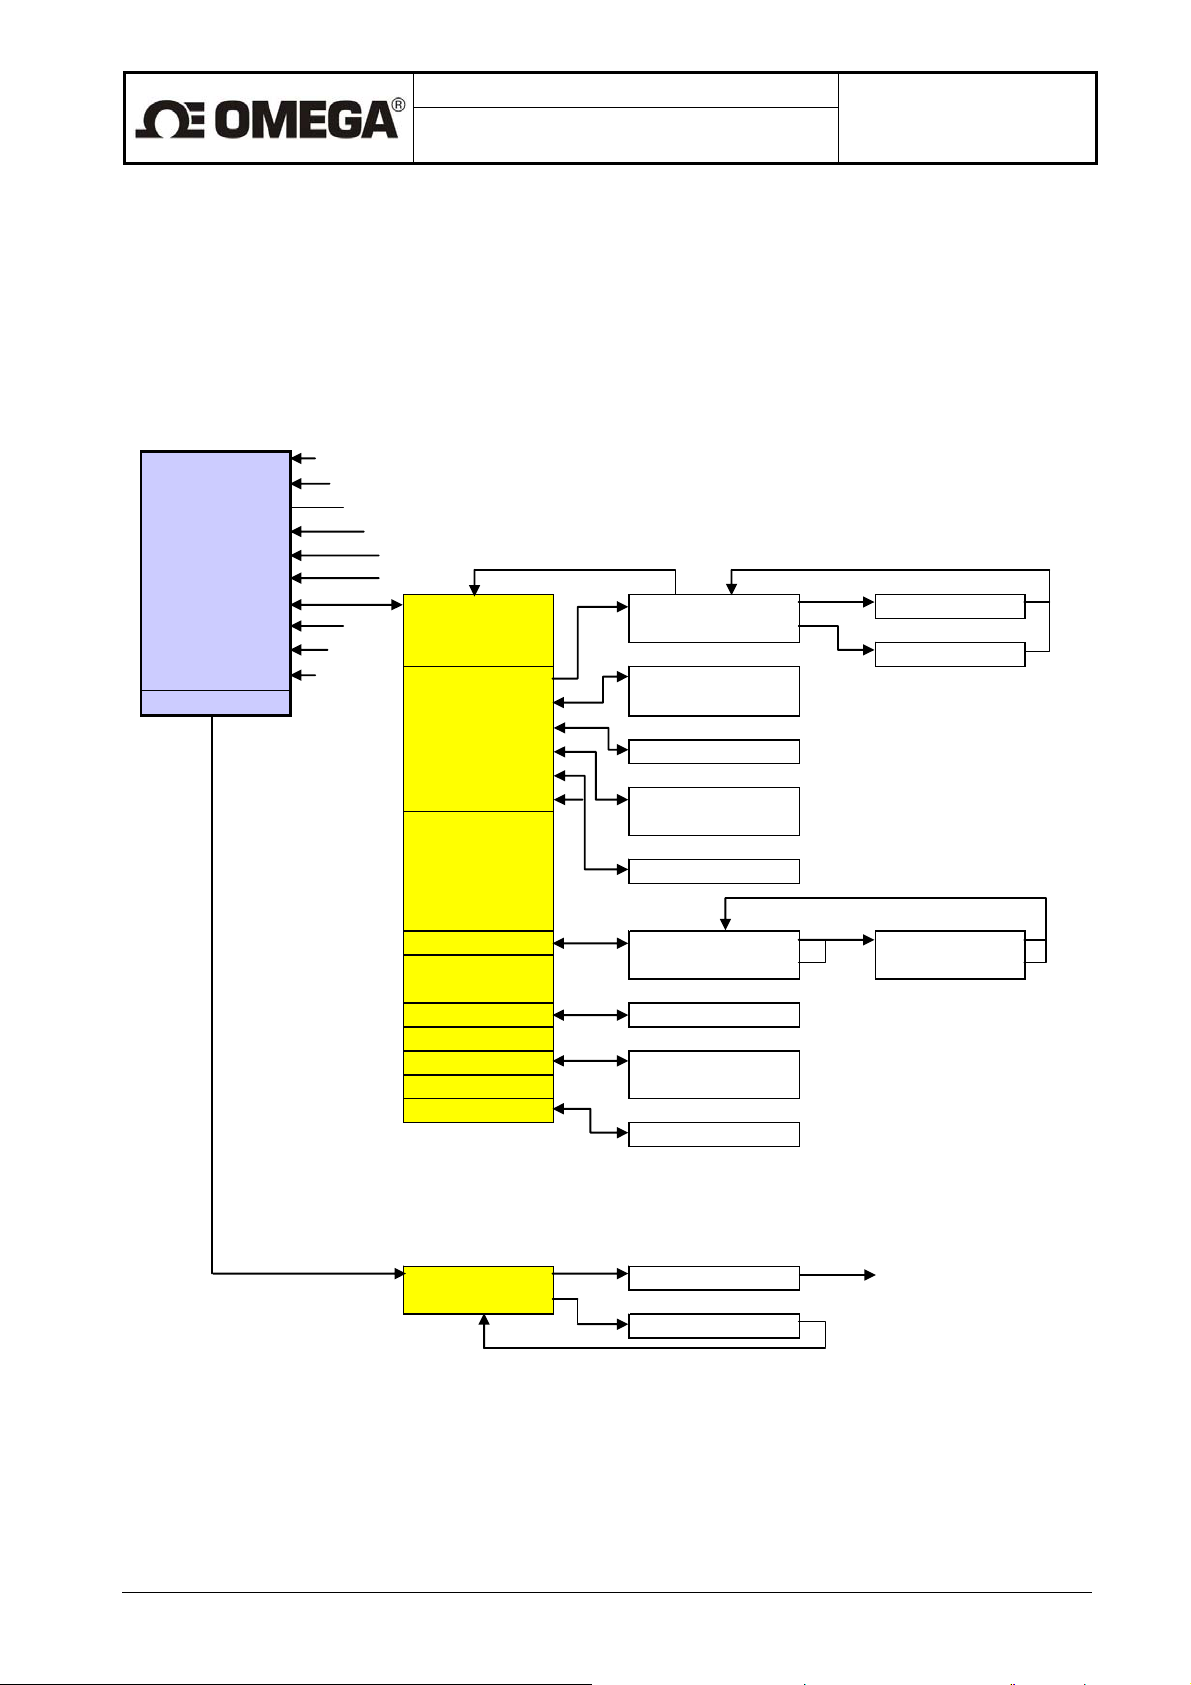
Design, Assembly and Service Manual
Induction flow meter FMG600 series
7.3. The Production Data menu
AFTER PASSWORD
ENTRY
BASIC PROGRAMMING
MENU
Displayed data
Samples
Analog output
Output func tion
Electrode clean
Serial line
Productio n data Productio n date Constant 1 Co nstant 1
Dose setting Serial number Constant 2
Zero setting Sof tware Cons tant 2
100 percent Sensor constants 1 6.25 Hz 2 3.125 Hz
Exit Excitation freq. 3 1.0 Hz 4 0.5 Hz
Suppressed flow
Languag e Supp res se d f low
Sensor number
Sensor DN CZ Czech EN Englich
…
Page 43 of 44
……….
Errors 1: … Enabled
13: … Disabled
Dose Correction
Flow Direction
Base Frequency
EXIT Saving to EEPROM Programming end
New password Retrn to the selected
…….
A
B
――→
A
B
←―→
Base Frequency Hz
Password data display mode
Page 46

Design, Assembly and Service Manual
Induction flow meter FMG600 series
Page 44 of 44
8. STANDARD TESTS
Each finished product is thoroughly checked to establish the product completeness and compliance with the
manufacturer’s quality assurance standards. Subsequently the product functions are tested according to
specifications of the approved test directions and subject to at least 15-hour burn-in operation cycle.
9. CALIBRATION AND VERIFICATION TESTS
The FMG600 SERIES induction flow meters are supplied from the manufacturing plant calibrated at three
points on the meter characteristic.
Page 47

W
ARRANTY/
DISCLAIMER
OMEGA
ENGINEERING,
INC.
warrants
this
unittobe
freeofdefectsinmaterials
and
workmanship
for
a
period
of
13
months
from
date
of purchase.
OMEGA’sW
ARRANTY
addsanadditional
one
(1)
month
grace
period
to the
normal
one
(1)
year
product
warrantytocover
handling
and
shipping
time.
This
ensures
that
OMEGA’scustomers
receive
maximum
coverageoneach product.
If
the
unit
malfunctions,itmust
be
returned
to the
factory for
evaluation.
OMEGA’sCustomer
Service
Department
will
issueanAuthorized
Return
(AR)
number
immediately
upon
phoneorwritten
request.
Upon
examinationbyOMEGA,if
the
unitisfoundtobe
defective,itwill
be
repairedorreplacedatno
charge.
OMEGA’sW
ARRANTY
does
not
applytodefects
resulting
from
any
actionofthe
purchaser,including
but not
limitedtomishandling, improper
interfacing,
operation
outside of
design
limits,
improper
repair
,
or
unauthorized
modification.
ThisWARRANTYisVOIDifthe
unit
shows
evidence of
having been
tampered
withorshows
evidence of
having been
damagedasa
resultofexcessive corrosion;
or
current,
heat,
moisture
or
vibration;
improper
specification;
misapplication;
misuse
or
other
operating
conditions outside of
OMEGA’scontrol.
Componentsinwhich
wearisnot
warranted,
include
but
are
not
limitedtocontact
points,
fuses,
and
triacs.
OMEGA
is
pleased
to
offer
suggestions
on
the
use
of
its
various
products. However,
OMEGA
neither assumes responsibility
for
any omissions
or
errors
nor
assumes
liability
for
any
damages
that
result
from
the
use
of
its
products in
accordance
with
information
provided
by
OMEGA,
either verbal
or written.
OMEGA
warrants
only
that the
parts
manufactured
by
the
company
will
beasspecified
and
freeofdefects.
OMEGA
MAKES
NO
OTHERWARRANTIES
OR
REPRESENTATIONS
OF
ANY
KIND
WHA
TSOEVER,
EXPRESSED
OR
IMPLIED,
EXCEPT
THA
T
OF
TITLE,
AND
ALL
IMPLIED W
ARRANTIES
INCLUDING
ANY
W
ARRANTY
OF
MERCHANT
ABILITY
AND
FITNESS
FOR
APART
ICULAR
PURPOSE
ARE
HEREBY
DISCLAIMED.
LIMITATION OF
LIABILITY:The
remedies
of
purchaser
set
forth
herein
are
exclusive,
and
the total
liability
of
OMEGA
with
respect
to
this order,whether
based
on
contract,
warranty,negligence,
indemnification,
strict
liability
or otherwise,
shall
not
exceed the
purchase
priceofthe
com ponent
up on
wh i ch
li a b i lityisba s ed. In
no
even t
sha l l
OM EGA
be
lia b l e
for
consequential, incidentalorspecial
damages.
CONDITIONS:
Equipment
soldbyOMEGAisnotintendedtobeused,norsh
allitbe
used:
(1)asa
“Basic
Component”
under10CFR21(NRC),
usedinor
with
any
nuclear
installationoractivity;or(2)
in medical
applicationsorused
on
humans.
Should
any
Product(s)
be
usedinor
with
any
nuclear
installation
or
activity,medical
application,
usedonhumans,ormisusedinany
way,OMEGA
assumesnoresponsibility
as
set
forthinour
basicWARRANTY/DISCLAIMER
language,
and,
additionally,purchaser
will
indemnify
OMEGA
and hold
OMEGAharmless
from
any
liabilityordamage
whatsoever
arising
outofthe
useofthe
Product(s)insuchamanner
.
RETURN
REQUESTS/INQUIRIES
Direct
all
warranty
and
repair requests/inquiries
to the
OMEGA
Customer
Service
Department.
BEFORE
RETURNING
ANY
PRODUCT(S)
TO
OMEGA,
PURCHASER
MUST
OBT
AIN
AN AUTHORIZED
RETU
R
(A R )
NUM B E R
FROM
OMEGA’SCUSTO M E R
SER
VIC E DE PARTMEN T
(I N
ORDE R
TO
A
VOID
PROCESSING
DELA
YS).
The
assigned
AR
number
should
thenbemarkedonthe
outside of
the
return
package
andonany
correspondence.
The
purchaserisresponsible
for
shipping
charges,
freight,
insurance
and
proper
packagingtoprevent breaka
g
FORWARRANTY
RETURNS,
please
have
the
following information
available
BEFORE
contacting
OMEGA:
1.
Purchase
Order
number
under
which
the
product
wa
s
PURCHASED,
2.
Model
and
serial
numberofthe
product
under
warranty,and
3.
Repair
instructions and/or
specific
problems
relative
to theproduct.
FOR
NON-WARRANTY
REPAIRS,
consult
OMEGA
for current repair
charges.
Have
the
following
information
available
BEFORE
contacting
OMEGA:
1.
Purchase
Order
numbertocover
the
COST
of
the
repair
,
2.
Model
and
serial
numberofthe
product,
and
3.
Repair
instructions and/or
specific
problems
relative
to the
product.
OMEGA’s
policyistomake
running
changes, not
model
changes, whenever
an improvementispossible.
This
affords
our
customers
the
latest
in technology
and
engineering.
OMEGAisa
registered
trademarkofOMEGA
ENGINEERING,
INC.
©
Copyright
2005
OMEGA
ENGINEERING,
INC.
All
rights
reserved.
This
document
may
notbecopied, photocopied,
reproduced,
translated,orreducedtoany
electronic
mediumormachine-readable form, in wholeorin
part,
without
the prior
written
consent ofOMEGA
ENGINEERING,INC.
Page 48

W
here
DoIFind
Ever
ythingINeed
for
Pr
ocess
Measurement
and
Contr
ol?
OM
EGA…Of
Course!
Shop
online
at
omega.com
TEMPERA
TURE
Thermocouple, RTD & Thermistor Probes, Connectors, Panels & Assemblies
Wire: Thermocouple, RTD & Thermistor
Calibrators & Ice Point References
Recorders,
Controllers & Process Monitors
Infrared Pyrometers
PRESSURE,
STRAIN
AND
FORCE
Transducers & Strain Gages
Load Cells & Pressure Gages
Displacement Transducers
Instrumentation & Accessories
FLOW/LEVEL
Rotameters, Gas Mass Flowmeters & Flow Computers
Air Velocity Indicators
Turbine/Paddlewheel
Systems
Totalizers & Batch Controllers
pH/CONDUCTIVITY
pH Electrodes, Testers & Accessories
Benchtop/Laboratory
Meters
Controllers, Calibrators, Simulators & Pumps
Industrial pH & Conductivity Equipment
DATA
ACQUISITION
Data Acquisition & Engineering Software
Communications-Based
Acquisition Systems
Plug-in Cards for Apple, IBM & Compatibles
Datalogging Systems
Recorders, Printers & Plotters
HEA
TERS
Heating Cable
Cartridge & Strip Heaters
Immersion
& Band Heaters
Flexible Heaters
Laboratory Heaters
ENVIRONMENT
AL
MONITORING
AND
CONTROL
Metering & Control Instrumentation
Refractometers
Pumps & Tubing
Air, Soil & Water Monitors
Industria
l Water
&
Wastewater Treatment
M-4269/0609
 Loading...