Omega Products CN2120 Installation Manual

OMEGAnet® On-Line Service
www.omega.com
ServicingServicing
Servicing
ServicingServicing
North America:North America:
North America:
North America:North America:
USA:
ISO 9001 Certified
One Omega Drive, Box 4047
Stamford CT 06907-0047
Tel: (203) 359-1660
FAX: (203) 359-7700
e-mail: info@omega.com
Canada:
976 Bergar
Laval (Quebec) H7L 5A1, Canada
Tel: (514) 856-6928
FAX: (514) 856-6886
e-mail: info@omega.ca
Internet e-mail
info@omega.com
For immediate technical orFor immediate technical or
For immediate technical or
For immediate technical orFor immediate technical or
application assistance:application assistance:
application assistance:
application assistance:application assistance:
USA and Canada:
Sales Service: 1-800-826-6342 / 1-800-TC-OMEGA
Customer Service: 1-800-622-2378 / 1-800-622-BEST
Engineering Service: 1-800-872-9436 / 1-800-USA-WHEN
TELEX: 996404 EASYLINK: 62968934 CABLE: OMEGA
Mexico:
En Español: (001) 203-359-7803
FAX: (001) 203-359-7807
e-mail: espanol@omega.com
info@omega.com.mx
®
®
®

Servicing Europe:Servicing Europe:
Servicing Europe:
Benelux:
Postbus 8034, 1180 LA Amstelveen
The Netherlands
Tel: (31) 20 3472121 FAX: (31) 20 6434643
Toll Free in Benelux: 0800 0993344
e-mail: sales@omegaeng.nl
Czech Republic:
Frystatska 184, 733 01 Karviná, Czech Republic
Tel:+420(0)59 6311899 FAX:+420(0)59 6311114
Toll Free: 0800-1-66342
e-mail: info@omegashop.cz
It is the policy of OMEGA to comply with all worldwide safety and EMC/EMI regulations that apply. OMEGA is constantly pursuing certification of its products to
the European New Approach Directives. OMEGA will add the CE mark to every appropriate device upon certification. The information contained in this document
is believed to be correct, but OMEGA Engineering, Inc. accepts no liability for any errors it contains, and reserves the right to alter specifications without notice.
WARNING: These products are not designed for use in, and should not be used for, human applications.
Direct all warranty and repair requests/inquiries to the OMEGA Customer Service Department. BEFORE RETURNING ANY PRODUCT(S) TO OMEGA,
PURCHASER MUST OBTAIN AN AUTHORIZED RETURN (AR) NUMBER FROM OMEGA’S CUSTOMER SERVICE DEPARTMENT (IN ORDER TO
AVOID PROCESSING DELAYS). The assigned AR number should then be marked on the outside of the return package and on any correspondence. The
purchaser is responsible for shipping charges, freight, insurance and proper packaging to prevent breakage in transit.
FOR WARRANTY RETURNS, please have the following information
available BEFORE contacting OMEGA:
1.Purchase Order number under which the product was PURCHASED,
2.Model and serial number of the product under warranty, and
3.Repair instructions and/or specific problems relative to the product.
OMEGA’s policy is to make running changes, not model changes, whenever an improvement is possible. This affords our customers the latest in technology and
engineering.OMEGA is a registered trademark of OMEGA ENGINEERING, INC.
© Copyright 2003 OMEGA ENGINEERING, INC. All rights reserved. This document may not be copied, photocopied, reproduced, translated, or reduced to any
electronic medium or machine-readable form, in whole or in part, without the prior written consent of OMEGA ENGINEERING, INC.
France:
11, rue Jacques Cartier, 78280 Guyancourt, France
Tel: +33 (0)1 61 37 29 00 FAX: +33 (0)1 30 57 54 27
Toll Free in France: 0800 466 342
e-mail: sales@omega.fr
Germany/Austria:
Daimlerstrasse 26, D-75392
Deckenpfronn, Germany
Tel: 49 (0)7056 9398-0 FAX: 49 (0)7056 9398-29
Toll Free in Germany: 0800 82 66342
e-mail: info@omega.de
Servicing Europe:Servicing Europe:
RETURN REQUESTS / INQUIRIESRETURN REQUESTS / INQUIRIES
RETURN REQUESTS / INQUIRIES
RETURN REQUESTS / INQUIRIESRETURN REQUESTS / INQUIRIES
FOR NON-WARRANTY REPAIRS, consult OMEGA for current repair charges.
Have the following information available BEFORE contacting OMEGA:
1. Purchase Order number to cover the COST of the repair,
2. Model and serial number of the product, and
3.Repair instructions and/or specific problems relative to the product.
United Kingdom: ISO 9002 Certified
One Omega Drive
River Bend Technology Centre
Northbank, Irlam, Manchester
M44 5BD, United Kingdom
Tel: +44 (0)161 777-6611
FAX: +44 (0)161 777-6622
Toll Free in United Kingdom: 0800-488-488
e-mail: info@omega.co.uk

OMEGA ENGINEERING, INC. warrants this unit to be free of defects in materials and workmanship for a period of 13 months from date of purchase. The OMEGA
WARRANTY/DISCLAIMER
Warranty adds an additional one (1) month grace period to the normal one (1) year product warranty to cover handling and shipping time. This ensures that OMEGA’s
customers receive maximum coverage on each product.
If the unit malfunctions, it must be returned to the factory for evaluation. OMEGA’s Customer Service Department will issue an Authorized Return (AR) number
immediately upon phone or written request. Upon examination by OMEGA, if the unit is found to be defective, it will be repaired or replaced at no charge. OMEGA’s
WARRANTY does not apply to defects resulting from any action of the purchaser, including but not limited to mishandling, improper interfacing, operation outside of
design limits, improper repair, or unauthorized modification. This WARRANTY is VOID if the unit shows evidence of having been tampered with or shows evidence
of having been damaged as a result of excessive corrosion; or current, heat, moisture or vibration; improper specification; misapplication; or misuse or other operating
conditions outside of OMEGA’s control. Components which wear are not warranted, including but not limited to contact points, fuses, and triacs.
OMEGA is pleased to offer suggestions on the use of its various products. However, OMEGA neither assumes responsibility for any omissions or errors
nor assumes liability for any damages that result from the use of its products in accordance with information provided by OMEGA, either verbal or
written. OMEGA warrants only that the parts manufactured by it will be as specified and free of defects. OMEGA MAKES NO OTHER WARRANTIES OR
REPRESENTATIONS OF ANY KIND WHATSOEVER, EXPRESS OR IMPLIED, EXCEPT THAT OF TITLE, AND ALL IMPLIED WARRANTIES INCLUDING
ANY WARRANTY OF MERCHANTABILITY AND FITNESS FOR A PARTICULAR PURPOSE ARE HEREBY DISCLAIMED. LIMITATION OF LIABILITY: The
remedies of purchaser set forth herein are exclusive, and the total liability of OMEGA with respect to this order, whether based on contract, warranty,
negligence, indemnification, strict liability or otherwise, shall not exceed the purchase price of the component upon which liability is based. In no event
shall OMEGA be liable for consequential, incidental or special damages.
CONDITIONS: Equipment sold by OMEGA is not intended to be used, nor shall it be used: (1) as a “Basic Component” under 10 CFR 21 (NRC), used in or with any
nuclear installation or activity; or (2) in medical applications or used on humans. Should any Product(s) be used in or with any nuclear installation or activity, medical
application, used on humans, or misused in any way, OMEGA assumes no responsibility as set forth in our basic WARRANTY/ DISCLAIMER language, and,
additionally, purchaser will indemnify OMEGA and hold OMEGA harmless from any liability or damage whatsoever arising out of the use of the Product(s) in such a
manner.
®

Where Do I Find Everything I Need for Process MeasurementWhere Do I Find Everything I Need for Process Measurement
Where Do I Find Everything I Need for Process Measurement
Where Do I Find Everything I Need for Process MeasurementWhere Do I Find Everything I Need for Process Measurement
and Control? OMEGA…Of Course!and Control? OMEGA…Of Course!
and Control? OMEGA…Of Course!
and Control? OMEGA…Of Course!and Control? OMEGA…Of Course!
Shop online at www.omega.comShop online at www.omega.com
Shop online at www.omega.com
Shop online at www.omega.comShop online at www.omega.com
TEMPERATURETEMPERATURE
TEMPERATURE
TEMPERATURETEMPERATURE
! Thermocouple, RTD & Thermistor Probes, Connectors, Panels &
Assemblies
! Wire: Thermocouple, RTD & Thermistor
! Calibrators & Ice Point References
! Recorders, Controllers & Process Monitors
! Infrared Pyrometers
PRESSURE, STRAIN AND FORCEPRESSURE, STRAIN AND FORCE
PRESSURE, STRAIN AND FORCE
PRESSURE, STRAIN AND FORCEPRESSURE, STRAIN AND FORCE
! Transducers & Strain Gages
! Load Cells & Pressure Gages
! Displacement Transducers
! Instrumentation & Accessories
FLOW/LEVELFLOW/LEVEL
FLOW/LEVEL
FLOW/LEVELFLOW/LEVEL
! Rotameters, Gas Mass Flowmeters & Flow Computers
! Air Velocity Indicators
! Turbine/Paddlewheel Systems
! Totalizers & Batch Controllers
pH/CONDUCTIVITYpH/CONDUCTIVITY
pH/CONDUCTIVITY
pH/CONDUCTIVITYpH/CONDUCTIVITY
! pH Electrodes, Testers & Accessories
! Benchtop/Laboratory Meters
! Controllers, Calibrators, Simulators & Pumps
! Industrial pH & Conductivity Equipment
DATA ACQUISITIONDATA ACQUISITION
DATA ACQUISITION
DATA ACQUISITIONDATA ACQUISITION
! Data Acquisition & Engineering Software
! Communications-Based Acquisition Systems
! Plug-in Cards for Apple, IBM & Compatibles
! Datalogging Systems
! Recorders, Printers & Plotters
HEATERSHEATERS
HEATERS
HEATERSHEATERS
! Heating Cable
! Cartridge & Strip Heaters
! Immersion & Band Heaters
! Flexible Heaters
! Laboratory Heaters
ENVIRONMENTAL MONITORINGENVIRONMENTAL MONITORING
ENVIRONMENTAL MONITORING
ENVIRONMENTAL MONITORINGENVIRONMENTAL MONITORING
AND CONTROLAND CONTROL
AND CONTROL
AND CONTROLAND CONTROL
! Metering & Control Instrumentation
! Refractometers
! Pumps & Tubing
! Air, Soil & Water Monitors
! Industrial Water & Wastewater Treatment
! pH, Conductivity & Dissolved Oxygen Instruments

INDEXINDEX
INDEX
INDEXINDEX
MOUNTING REQUIREMENTS .................................................... 1
OUTLINE AND CUT OUT DIMENSIONS ..................................... 2
CONNECTION DIAGRAMS........................................................ 3
PRELIMINARY HARDWARE SETTINGS ................................... 18
SECURITY CODE SETTING MODE .......................................... 22
RUN TIME AND CONFIGURATION MODES ............................. 25
GENERAL NOTE ABOUT GRAPHIC SYMBOLS
USED FOR MNEMONIC CODE VISUALIZATION. .............. 25
KEYBOARD DESCRIPTION.............................................. 26
CONFIGURATION MODE ........................................................ 27
MONITOR MODE............................................................. 28
MODIFY MODE ................................................................ 29
RUN TIME MODE .................................................................... 67
PRELIMINARY ................................................................. 67
CONTROL PARAMETERS ............................................... 68
CONTROL PARAMETERS PROTECTION ......................... 68
CONTROL PARAMETERS MODIFICA TION. ...................... 68
PROGRAMMER MODE ..........................................................100
BARGRAPH DESCRIPTION ............................................103
INDICATORS ..................................................................104
DISPLAY FUNCTION DURING
PROGRAMMER MODE ................................................... 105
OUTPUT POWER OFF FUNCTION .................................108
CLOCK CALENDAR .......................................................109
OUT FAILURE DETECTION FUNCTION (OFD).................. 110
SERIAL LINK.................................................................. 110
LAMP TEST ...................................................................111
MANUAL MODE .............................................................111
DIRECT ACCESS TO THE SET POINT ............................112
GENERAL NOTES ABOUT PROGRAM EDITING .............113
EDIT MODE ....................................................................113
SIMPLE PROGRAM MANAGEMENT ...............................121
LINKED PROGRAM MANAGEMENT ...............................124
HOW TO CHECK A PROGRAM......................................125
HOW TO RUN A PROGRAM (SIMPLE OR LINKED) ........126
ACTIONS AVAILABLE DURING RUNNING MODE ...........127
CONTOLLER MODE .............................................................. 130
DISPLAY FUNCTION DURING
CONTROLLER MODE..................................................... 131
INDICATORS FUNCTION DURING
CONTROLLER MODE..................................................... 133
DIRECT ACCESS TO THE SET POINT ............................133
SMART FUNCTION ........................................................134
OUTPUT POWER OFF FUNCTION .................................135
ERROR MESSAGES ..............................................................136
GENERAL INFORMATIONS....................................................141
MAINTENANCE ......................................................................150
DEFAUL T P ARAMETERS........................................................ A.1
CODING .............................................................................. A.15
MOUNTING REQUIREMENTSMOUNTING REQUIREMENTS
MOUNTING REQUIREMENTS
MOUNTING REQUIREMENTSMOUNTING REQUIREMENTS
This instrument is intended for permanent installation, for indoor
use only, in an electrical panel which encloses the rear
housing, exposed terminals and wiring on the back.
Select a location, for instrument mounting, where minimum
vibrations are present and the ambient temperature is within 0
and 50 °C (32 and 122 °F).
The instrument can be mounted on a panel up to 15 mm thick
with a cutout of 92 x 45 mm (PKP) or 92 x 92 mm (MKP).
For outline and cutout dimensions refer to Fig. 2.
The surface texture of the panel must be better than 6,3 µm.
The instrument is shipped with rubber panel gasket.
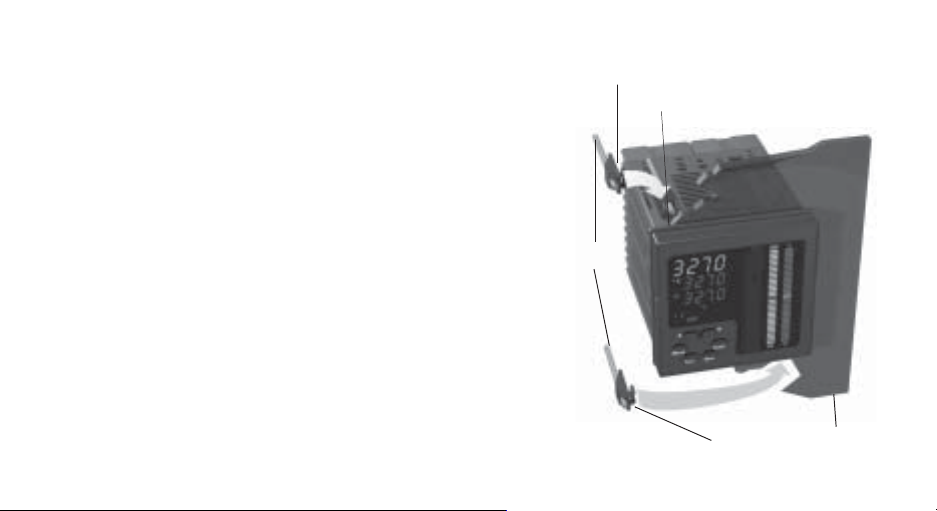
To assure the IP65 and NEMA 4 protection, insert the panel
gasket between the instrument and the panel as shown in fig.
1.
While holding the instrument against the panel proceed as
follows:
1) insert the gasket in the instrument case;
2) insert the instrument in the panel cutout;
3) pushing the instrument against the panel;
4) insert the mounting brackets as shown in fig.1;
5) with a screwdriver, turn the screws with a torque between 0.3
and 0.4 Nm.
bracket
Gasket
Screws
Fig. 1
1
bracket
Panel
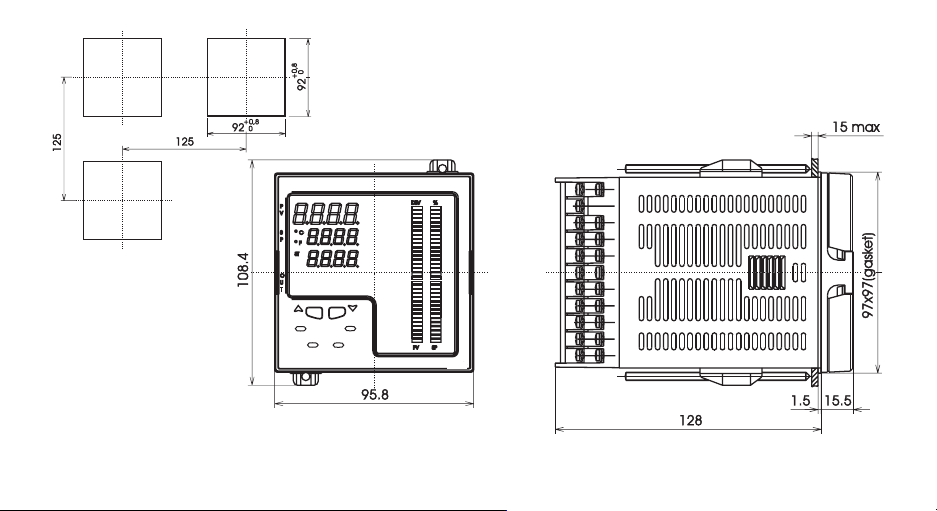
Fig. 2 OUTLINE AND CUT-OUT DIMENSIONS FOR MKP MODEL
2
CONNECTION DIAGRAMSCONNECTION DIAGRAMS
CONNECTION DIAGRAMS
CONNECTION DIAGRAMSCONNECTION DIAGRAMS
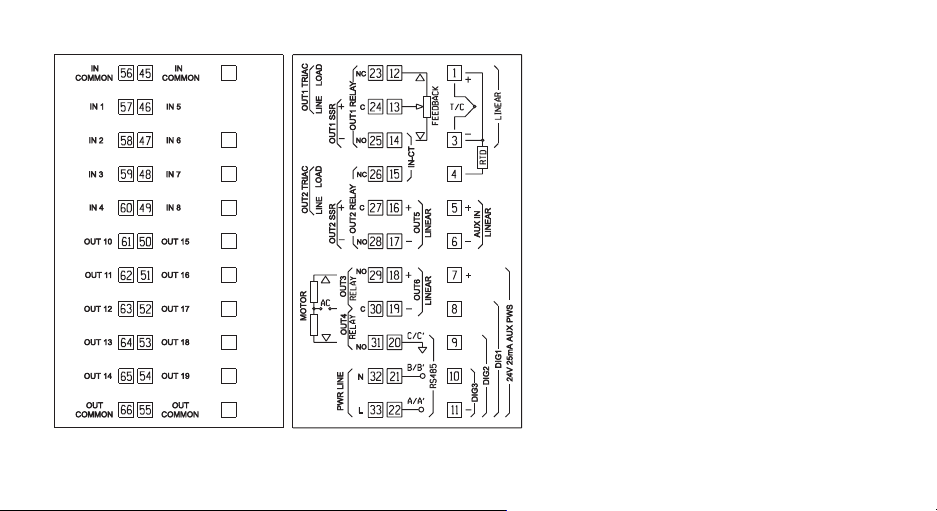
Fig. 3 REAR TERMINAL BLOCK
Connections are to be made with the instrument
housing installed in its proper location.
A) MEASURING INPUTSA) MEASURING INPUTS
A) MEASURING INPUTS
A) MEASURING INPUTSA) MEASURING INPUTS
NOTENOTE
NOTE: Any external component (like zener
NOTENOTE
barriers etc.) connected between sensor and input
terminals may cause errors in measurement due to
excessive and/or not balanced line resistance or
possible leakage currents.
3
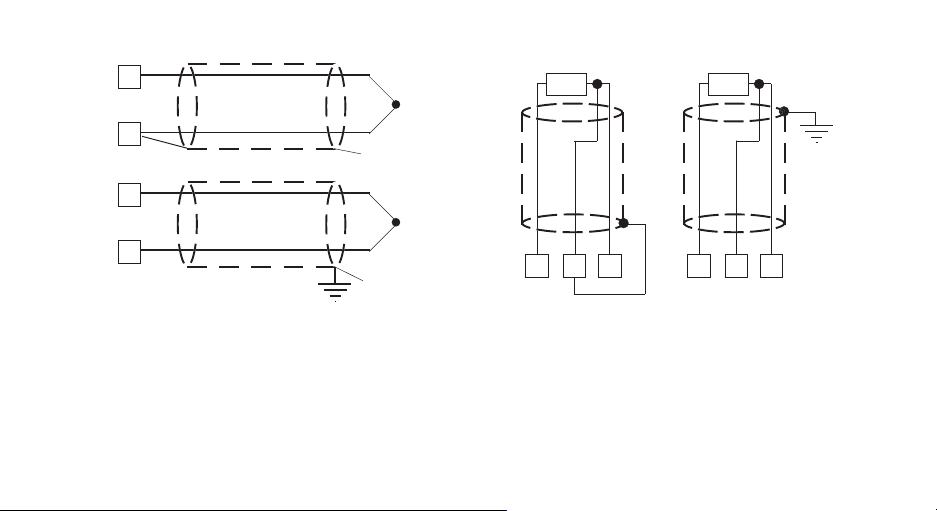
A.1) TC INPUTA.1) TC INPUT
A.1) TC INPUT
A.1) TC INPUTA.1) TC INPUT
1
+
_
3
1
+
_
3
Shield
Shield
A.2) RTD INPUTA.2) RTD INPUT
A.2) RTD INPUT
A.2) RTD INPUTA.2) RTD INPUT
RTD
4
3 4
RTD
1
3
1
Fig. 4 THERMOCOUPLE INPUT WIRING
NOTESNOTES
NOTES:
NOTESNOTES
1) Don’t run input wires together with power cables.
2) For TC wiring use proper compensating cable preferable
shielded.
3) When a shielded cable is used, it should be connected at
one point only.
Fig. 5 RTD INPUT WIRING
NOTESNOTES
NOTES:
NOTESNOTES
1) Don’t run input wires together with power cables.
2) Pay attention to the line resistance; a high line resistance
may cause measurement errors.
3) When shielded cable is used, it should be grounded at one
side only to avoid ground loop currents.
4) The resistance of the 3 wires must be the same.
4
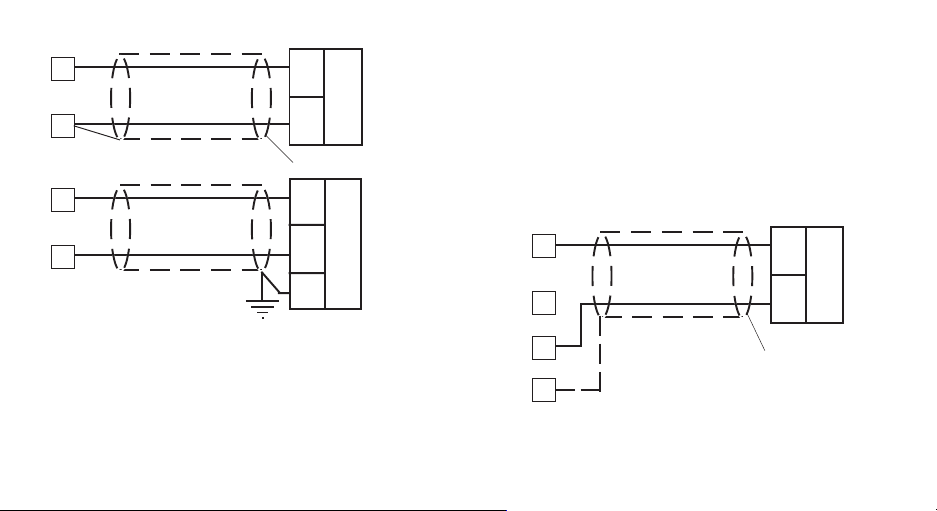
A.3) LINEAR INPUTA.3) LINEAR INPUT
A.3) LINEAR INPUT
A.3) LINEAR INPUTA.3) LINEAR INPUT
1
3
1
3
+
_
Shield
+
_
G
mA,
mV
or
V
mA
mV
or
V
3) When shielded cable is used, it should be grounded at one
side only to avoid ground loop currents.
4) The input impedance is equal to:
< 5 Ω for 20 mA input
> 1 MΩ for 60 mV input
> 200 kΩ for 5 V input
> 400 kΩ for 10 V input
A.4) 2, 3 AND 4-WIRE TRANSMITTER INPUTA.4) 2, 3 AND 4-WIRE TRANSMITTER INPUT
A.4) 2, 3 AND 4-WIRE TRANSMITTER INPUT
A.4) 2, 3 AND 4-WIRE TRANSMITTER INPUTA.4) 2, 3 AND 4-WIRE TRANSMITTER INPUT
1
3
_
TX
+
Fig. 6 mA, mV AND V INPUTS WIRING
NOTESNOTES
NOTES:
NOTESNOTES
1) Don’t run input wires together with power cables.
2) Pay attention to the line resistance; a high line resistance
may cause measurement errors.
7
Shield
11
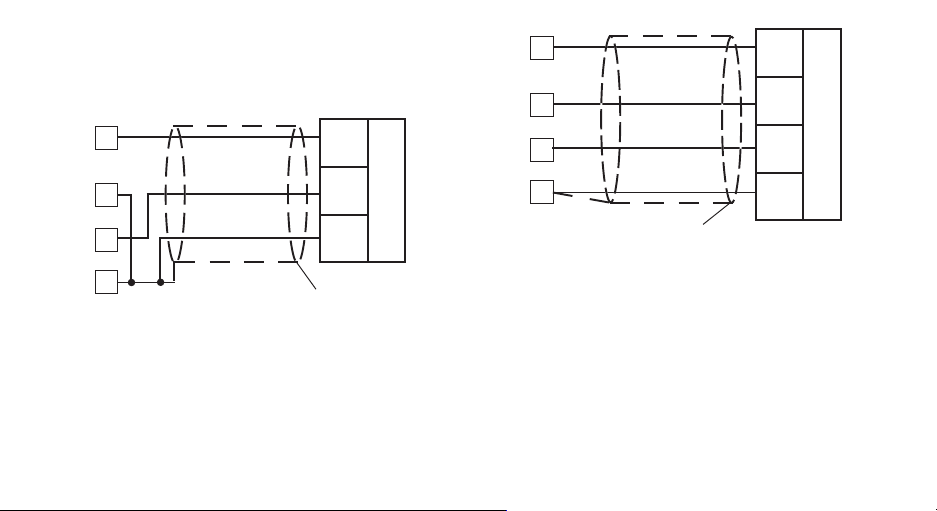
Fig. 7.A INPUTS WIRING FOR 2-WIRE TRANSMITTER
5
1
Out
+
Out
3
1
3
7
Out
PWR
+
GND
TX
7
11
Shield
_
PWR
+
PWR
_
TX
11
Fig. 7.B INPUTS WIRING FOR 3-WIRE TRANSMITTER
Shield
Fig. 7.C INPUTS WIRING FOR 4-WIRE TRANSMITTER
NOTESNOTES
NOTES:
NOTESNOTES
1) Don’t run input wires together with power cables.
2) Pay attention to the line resistance; a high line resistance
may cause measurement errors.
3) When shielded cable is used, it should be grounded at one
side only to avoid ground loop currents.
4) The input impedance is lower than 5 Ω (20 mA input)
6
B) AUXILIARY INPUTB) AUXILIARY INPUT
B) AUXILIARY INPUT
B) AUXILIARY INPUTB) AUXILIARY INPUT
5
6
+
mA
or
_
V
Shield
5
6
+
mA
_
or
V
G
Fig. 8 AUXILIARY INPUT WIRING
NOTESNOTES
NOTES:
NOTESNOTES
1) This input is
reinforced insulation between instrument output and power
supply must be assured by the external instrument.
2) Don’t run input wires together with power cables.
3) Pay attention to the line resistance; a high line resistance
may cause measurement errors.
not isolated not isolated
not isolated from measuring input. A double or
not isolated not isolated
4) When shielded cable is used, it should be grounded at one
side only to avoid ground loop currents.
5) The input impedance is equal to:
< 5 Ω for 20 mA input
> 200 kΩ for 5 V input
> 400 kΩ for 10 V input
C) LOGIC INPUTSC) LOGIC INPUTS
C) LOGIC INPUTS
C) LOGIC INPUTSC) LOGIC INPUTS
DIG. 1
8
DIG. 2
9
DIG. 3
10
11
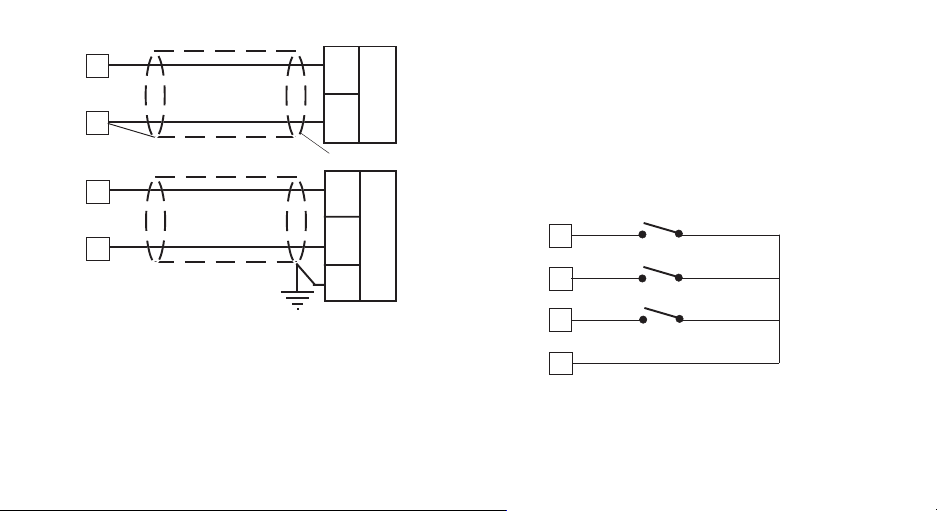
Fig. 9.A - LOGIC INPUTS DIG 1, 2, 3 WIRING
7
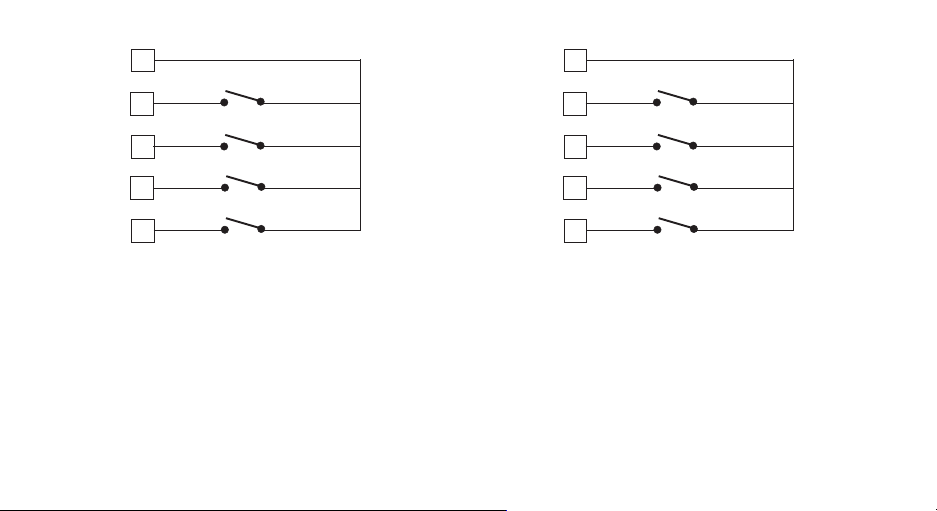
56
57
58
59
60
IN 1
IN 2
IN 3
IN 4
56
57
58
59
60
IN 5
IN 6
IN 7
IN 8
Fig. 9.B - LOGIC INPUTS IN 1, 2, 3 and 4 WIRING
Fig. 9.C - LOGIC INPUTS IN 5, 6, 7 and 8 WIRING
NOTESNOTES
NOTES:
NOTESNOTES
1) Do not run logic input wiring together with power cables.
2) Use an external dry contact capable of switching 0.5 mA,
5 V DC.
3) The instrument needs 110 ms to recognize a contact status
variation.
4) The logic inputs are
A double or reinforced insulation between instrument input
and power line must be assured by the external element.
8
NOT NOT
NOT isolated by the measuring input.
NOT NOT

D) CURRENT TRANSFORMER INPUTD) CURRENT TRANSFORMER INPUT
D) CURRENT TRANSFORMER INPUT
D) CURRENT TRANSFORMER INPUTD) CURRENT TRANSFORMER INPUT
14
Current
15
Load
Fig. 10 CURRENT TRANSFORMER INPUT WIRING
This input allows you to measure and display the current
running in the load, driven by a time proportional control output,
during the ON and OFF periods of the output cycle time. By this
feature it is also available the "Output failure detection" function
(see page 110).
NOTESNOTES
NOTES:
NOTESNOTES
1) This input is
2) Do not run current transformer input wiring together with AC
power cables.
not isolated not isolated
not isolated from measuring input.
not isolated not isolated
transformer
3) The minimum active period to perform this measurement is
equal to 120 ms.
4) The input impedance is equal to 20 Ω.
9
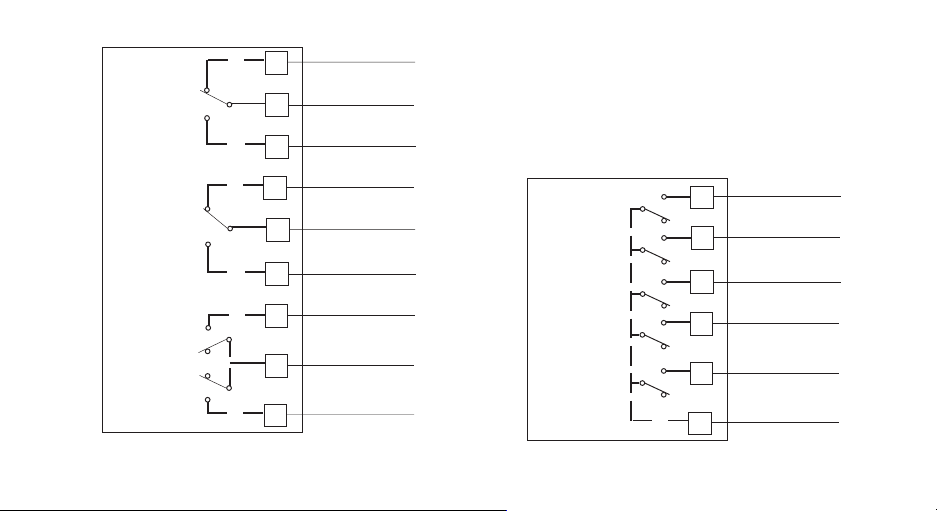
E.1) RELAY OUTPUTSE.1) RELAY OUTPUTS
E.1) RELAY OUTPUTS
E.1) RELAY OUTPUTSE.1) RELAY OUTPUTS
23
OUT 1
24
25
26
OUT 2
27
28
29
OUT 3
30
OUT 4
31
Fig. 11.A RELAY OUTPUTS 1,2,3 and 4 WIRING
NC
C
NO
NC
C
NO
NO - OUT 3
C - OUT 3/4
NO - OUT 4
The outputs from OUT 1 to OUT 4 are equipped with relays
having contact rating equal to 3A/250V AC on resistive load.
WARNINGWARNING
WARNING: When OUT 3 and 4 are used as independent relay
WARNINGWARNING
outputs the addition of the two currents must not exceed 3 A.
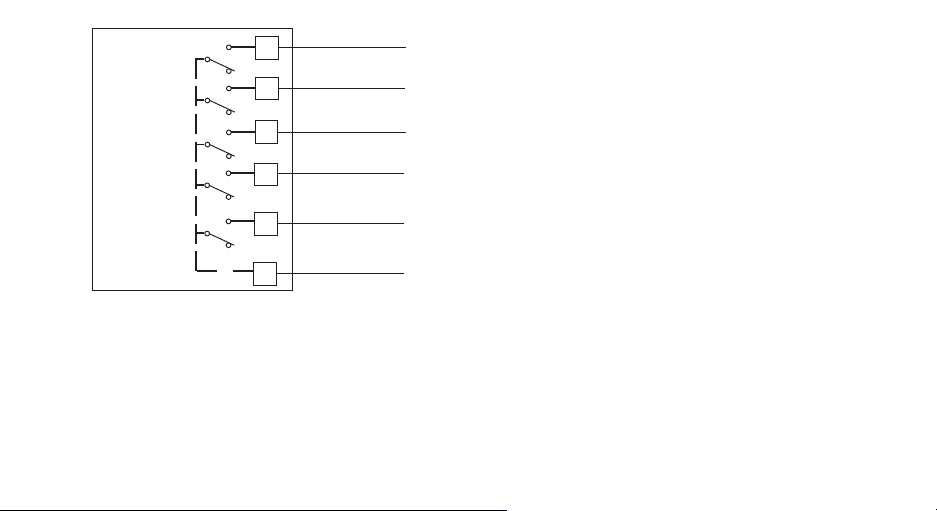
NO OUT 10
OUT 10
OUT 11
OUT 12
OUT 13
OUT 14
COMMON
Fig. 11.B RELAY OUTPUTS 10 to 14 WIRING
10
61
62
63
64
65
66
NO OUT 11
NO OUT 12
NO OUT 13
NO OUT 14
COMMON
OUT 15
OUT 16
OUT 17
OUT 18
OUT 19
COMMON
50
51
52
53
54
55
NO OUT 15
NO OUT 16
NO OUT 17
NO OUT 18
NO OUT 19
COMMON
GENERAL NOTES ABOUT RELAY OUTPUT WIRINGGENERAL NOTES ABOUT RELAY OUTPUT WIRING
GENERAL NOTES ABOUT RELAY OUTPUT WIRING
GENERAL NOTES ABOUT RELAY OUTPUT WIRINGGENERAL NOTES ABOUT RELAY OUTPUT WIRING
1) To avoid electrical shock, connect power line at the end of
the wiring procedure.
2) For power connections use No 16 AWG or larger wires rated for
at last 75 °C.
3) Use copper conductors only.
4) Don’t run input wires together with power cables.
For all relay outputs, the number of operations is 1 x 10⁵ at
specified rating.
All relay contacts are protected by varistor against inductive load
with inductive component up to 0.5 A.
The following recommendations avoid serious problems which
may occur, when using relay output for driving inductive loads.
Fig. 11.C RELAY OUTPUTS 15 to 19 WIRING
The outputs from OUT 10 to 19 are equipped with relays having
contact rating equal to 0.5A/250V AC on resistive load.
INDUCTIVE LOADSINDUCTIVE LOADS
INDUCTIVE LOADS
INDUCTIVE LOADSINDUCTIVE LOADS
High voltage transients may occur switching inductive loads.
Through the internal contacts these transients may introduce
disturbances which can affect the performance of the
instrument.
For all the outputs, the internal protection (varistor) assures a
correct protection up to 0.5 A of inductive component.
11
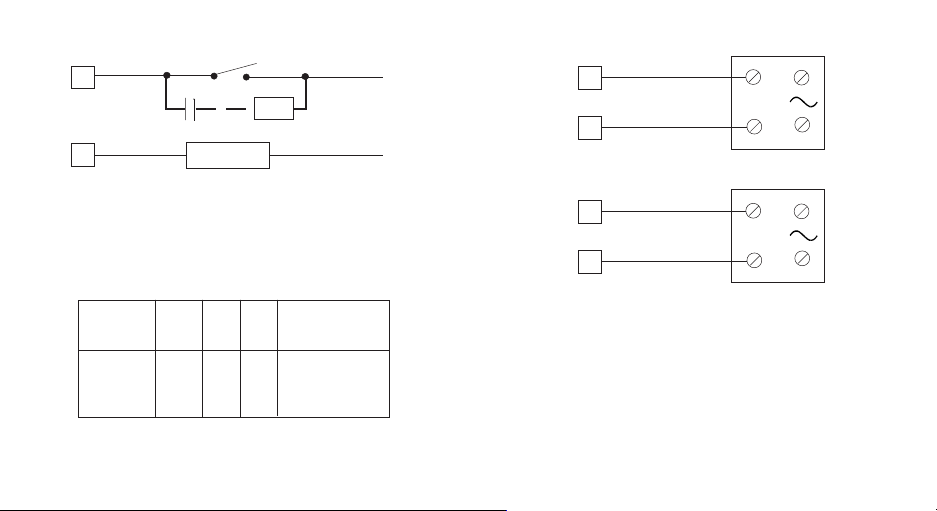
The same problem may occur when a switch is used in series
with the internal contacts as shown in Fig. 12.
C
R
LINE
LOAD
Fig. 12 EXTERNAL SWITCH IN SERIES WITH THE
INTERNAL CONTACT
In this case it is recommended to install an additional RC
network across the external contact as shown in Fig. 12
The value of capacitor (C) and resistor (R) are shown in the
following table.
C
LOAD
(mA)
<40 m A
<150 mA
<0.5 A
Anyway the cable involved in relay output wiring must be as far
away as possible from input or communication cables.
(µF)
0.047
0.1
0.33
R
(Ω)
100
22
47
P.
(W)
1/2
2
2
OPERATING
VOLTAGE
260 V AC
260 V AC
260 V AC
E.2) VOLTAGE OUTPUTS FOR SSR DRIVEE.2) VOLTAGE OUTPUTS FOR SSR DRIVE
E.2) VOLTAGE OUTPUTS FOR SSR DRIVE
E.2) VOLTAGE OUTPUTS FOR SSR DRIVEE.2) VOLTAGE OUTPUTS FOR SSR DRIVE
24
OUT 1
+
_
25
27
OUT 2
+
_
28
Fig. 13 SSR DRIVE OUTPUT WIRING
Logic level 0Logic level 0
Logic level 0: Vout < 0.5 V DC.
Logic level 0Logic level 0
Logic level 1Logic level 1
Logic level 1:
Logic level 1Logic level 1
14 V
+ 20 % @ 20 mA
24 V
+ 20 % @ 1 mA.
Maximum current = 20 mA.
12
+
__
_
__
SOLID STATE
RELAY
+
__
_
__
SOLID STATE
RELAY
NOTENOTE
NOTE: This output is not isolated.
NOTENOTE
A double or reinforced insulation between instrument output
and power supply must be assured by the external solid state
relay.
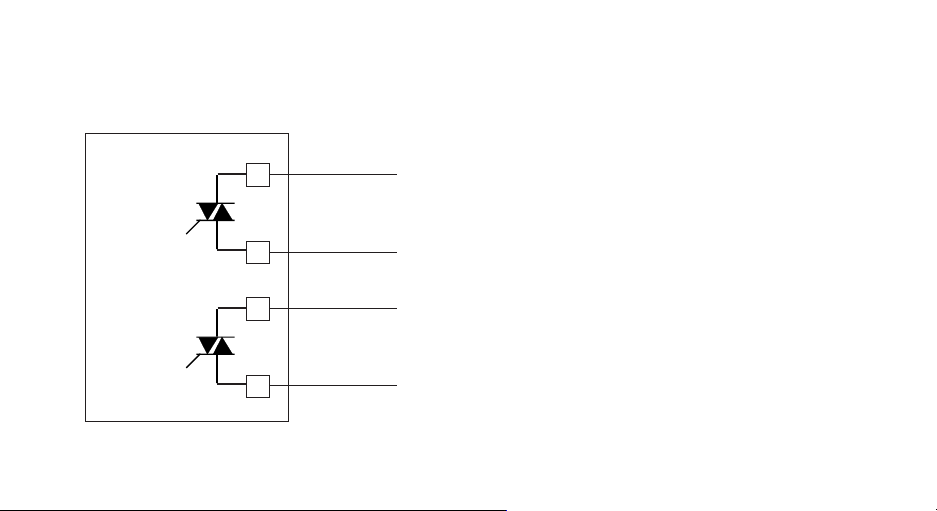
E.3) TRIAC OUTPUTSE.3) TRIAC OUTPUTS
E.3) TRIAC OUTPUTS
E.3) TRIAC OUTPUTSE.3) TRIAC OUTPUTS
24
Line
OUT 1
23
Load
Switching modeSwitching mode
Switching mode: isolated zero crossing type.
Switching modeSwitching mode
Rated currentRated current
Rated current: from 50 mA to 1 A.
Rated currentRated current
Rated voltageRated voltage
Rated voltage: from 24 V
Rated voltageRated voltage
60Hz)
Load typeLoad type
Load type: resistive load only
Load typeLoad type
NOTESNOTES
NOTES 1) To avoid electrical shock, connect power line at
NOTESNOTES
the end of the wiring procedure.
2) For power connections use No 16 AWG or larger
wires rated for at last 75 °C.
3) Use copper conductors only.
4) Don’t run input wires together with power cables.
5) This output is not fuse protected. Please, provide it
externally using a fuse with a I2t equal to128.
to 240 V
RMS
-10 % +15 % (50/
RMS
27
OUT 2
26
Fig. 14 TRIAC OUTPUT WIRING
Line
Load
13
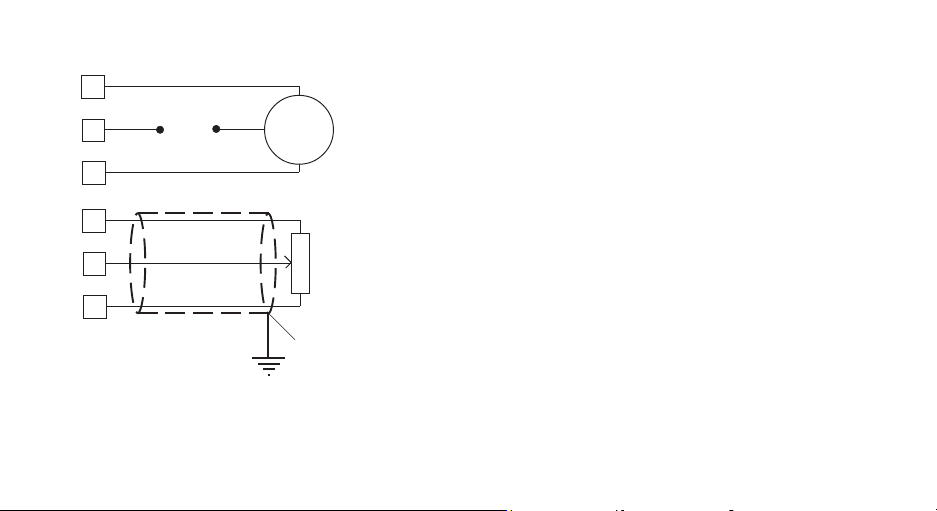
E.4) SERVOMOTOR OUTPUTE.4) SERVOMOTOR OUTPUT
E.4) SERVOMOTOR OUTPUT
E.4) SERVOMOTOR OUTPUTE.4) SERVOMOTOR OUTPUT
! (Open the valve)
29
30
31
" (Close the valve)
12
Power
line
Servo-
motor
! (Open)
13
14
Fig. 15 SERVOMOTOR OUTPUT WIRING
" (Close)
Shield
Feedback
potentiometer
The two relay output must be interlocked (see chapter
"Preliminary hardware setting" paragraph "Out 3 and 4
selection").
NOTESNOTES
NOTES:
NOTESNOTES
1) Before connecting the instrument to the power line, make sure
that line voltage and the load current are in accordance with the
contact rating (3A/250V AC on resistive load).
2) To avoid electric shock, connect power line at the end of the
wiring procedure.
3) For servomotor connections use No 16 AWG or larger wires
rated for at last 75 °C.
4) Use copper conductors only.
5) Don’t run input wires together with power cables.
6) For feedback potentiometer, use shielded cable with the shield
connected to the earth at one point only.
7) The relay outputs are protected by varistors against
inductive load with inductive component up to 0.5 A.
14
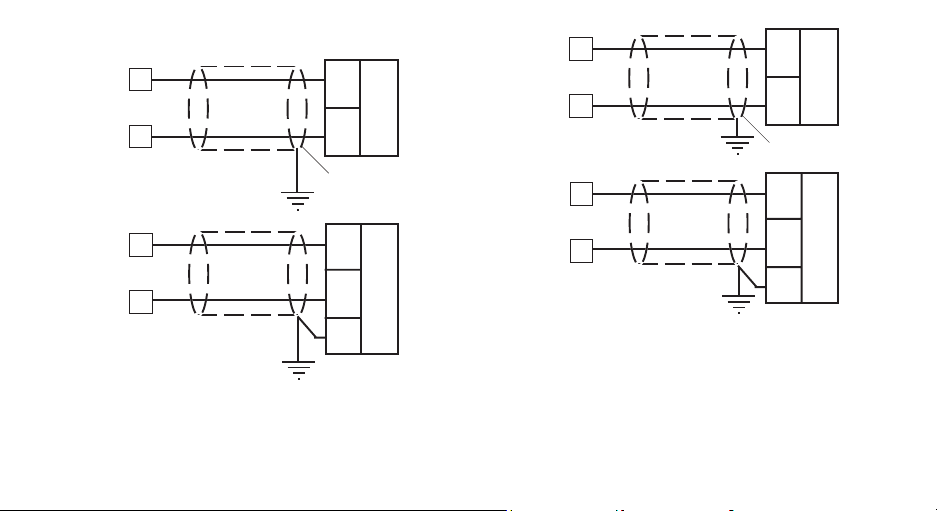
E.5) ANALOG OUTPUTSE.5) ANALOG OUTPUTS
E.5) ANALOG OUTPUTS
E.5) ANALOG OUTPUTSE.5) ANALOG OUTPUTS
+
16
OUT 5
_
17
+
16
OUT 5
_
17
+
_
Shield
+
_
20 mA20 mA
OUT 6
OUT 6
18
19
18
19
+
+
_
20 mA
_
Shield
+
_
+
_
20 mA
G
Fig. 16.A OUTPUT 5 WIRING
G
Fig. 16.B OUTPUT 6 WIRING
NOTENOTE
NOTE:
NOTENOTE
1) Do not run analog output wirings together with AC power
cables.
2) Out 5 and 6 are isolated outputs.
3) The maximum load is equal to 600 Ω.
15
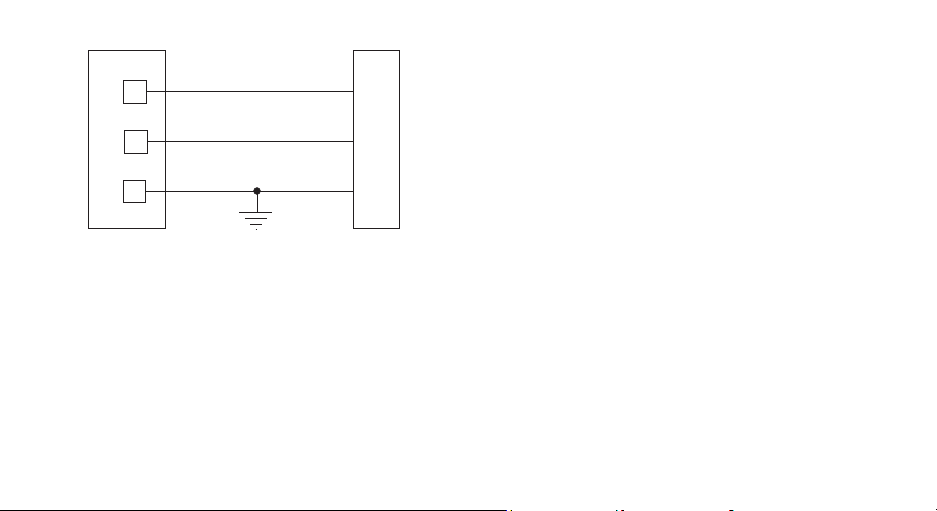
F) SERIAL INTERFACEF) SERIAL INTERFACE
F) SERIAL INTERFACE
F) SERIAL INTERFACEF) SERIAL INTERFACE
I
N
S
T
R
U
M
E
N
T
Fig. 17 - RS-485 WIRING
The cable length must not exceed 1.5 km at 9600 BAUD.
NOTESNOTES
NOTES:
NOTESNOTES
1) This is an isolated RS-485 serial interface.
2) The following report describes the signal sense of the
voltage appearing across the interconnection cable as
defined by EIA for RS-485.
a) The ” A ” terminal of the generator shall be negative with
respect to the ” B ” terminal for a binary 1 (MARK or OFF) state.
b) The ” A ” terminal of the generator shall be positive with
respect to the ” B ” terminal for a binary 0 (SPACE or ON).
22
21
20
A/A'
B/B'
COMMON
A'/A
B'/B
M
A
S
T
E
R
3) The EIA standard establishes that by RS-485 interface it is
possible to connect up to 30 devices with one remote master
unit.
The serial interface of these instruments is based on “High
input impedance” transceivers; this solution allows you to
connect up to 127 devices (based on the same transceiver
type) with one remote master unit.
16

G) POWER LINE WIRINGG) POWER LINE WIRING
G) POWER LINE WIRING
G) POWER LINE WIRINGG) POWER LINE WIRING
N (L2)
32
POWER LINE 100 V to
240 V A.C (50/60Hz)
L (L1)
or 24 V AC/DC
Line
Neutral
33
Fig. 18 POWER LINE WIRING
NOTESNOTES
NOTES:
NOTESNOTES
1) Before connecting the instrument to the power line, make sure
that line voltage corresponds to the description on the identification label.
2) To avoid electrical shock, connect power line at the end of the
wiring procedure.
3) For supply connections use No 16 AWG or larger wires rated for
at last 75 °C.
4) Use copper conductors only.
5) Don’t run input wires together with power cables.
6) For 24 V DC the polarity is a not care condition.
7) The power supply input is fuse protected by a sub miniature
fuse rated T, 1A, 250 V.
When fuse is damaged, it is advisable to verify the power supply
circuit, so that it is necessary to send back the instrument to
your supplier.
8) The safety requirements for Permanently Connected
Equipment say:
- a switch or circuit-breaker shall be included in the building
installation;
- it shall be in close proximity to the equipment and within
easy reach of the operator;
- it shall be marked as the disconnecting device for the
equipment.
NOTENOTE
NOTE: a single switch or circuit-breaker can drive more than
NOTENOTE
one instrument.
9) When a neutral line is present please connect it to the 32
terminal.
17
PRELIMINARY HARDWARE SETTINGSPRELIMINARY HARDWARE SETTINGS
PRELIMINARY HARDWARE SETTINGS
PRELIMINARY HARDWARE SETTINGSPRELIMINARY HARDWARE SETTINGS
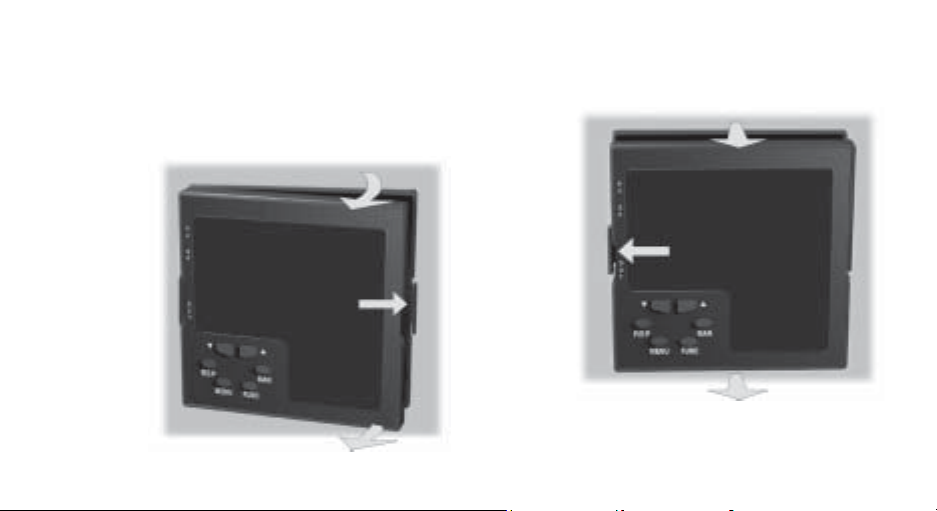
How to remove the instrument from its caseHow to remove the instrument from its case
How to remove the instrument from its case
How to remove the instrument from its caseHow to remove the instrument from its case
1) Switch off the instrument.
2) Push gently the lock A on the right.
3) While the lock A is maintained out, slide out the right side of
the instrument (see fig. 19.a)
B
4) Push gently the lock C on the left.
5) While the lock C is maintained out, slide out the instrument
(see fig. 19.b)
D
C
A
D
Fig. 19.a Fig. 19.b
B
18
MAIN INPUT SELECTIONMAIN INPUT SELECTION
MAIN INPUT SELECTION
MAIN INPUT SELECTIONMAIN INPUT SELECTION
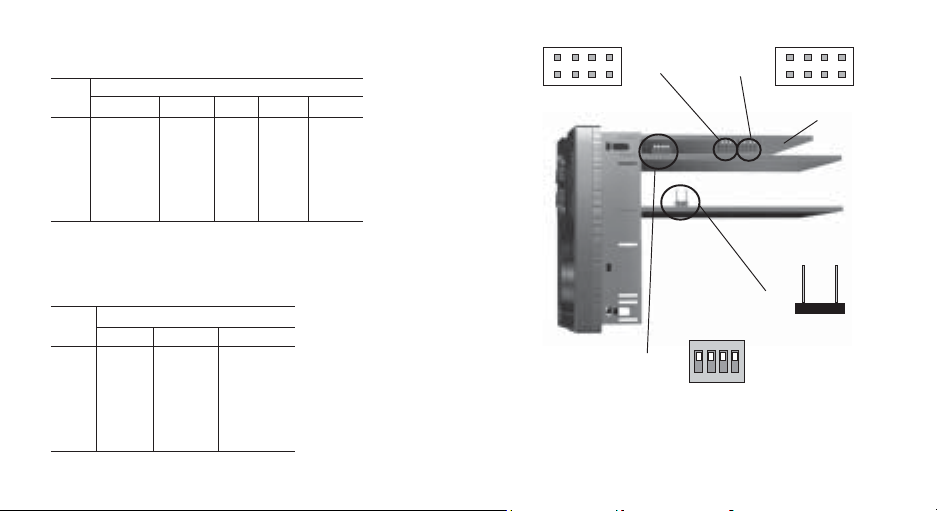
Set J103 (see fig. 20) according to the desired input type as
shown in the following table.
J103 INPUT TYPE
T/C, RTD 60 mV 5 V 10 V 20 mA
1-2 open open close open open
3-4 open open close close open
5-6 open open open open close
7-8 open open open open close
5-7 close close open close open
6-8 close close open open open
AUXILIARY INPUT SELECTION (option)AUXILIARY INPUT SELECTION (option)
AUXILIARY INPUT SELECTION (option)
AUXILIARY INPUT SELECTION (option)AUXILIARY INPUT SELECTION (option)
Set J102 (see fig. 20) according to the desired input type as
shown in the following table.
J102 INPUT TYPE
5 V 10 V 20 mA
1-2 close open open
3-4 close close open
5-6 open open close
7-8 open open close
5-7 open close open
6-8 open open open
1 3 5 7
J102
2 4 6 8
1 3 5 7
J103
2 4 6 8
CPU
card
J205
ON DIP
V301
1 2 3 4
Fig. 20
19
OUTPUT 3 AND 4 SELECTIONOUTPUT 3 AND 4 SELECTION
OUTPUT 3 AND 4 SELECTION
OUTPUT 3 AND 4 SELECTIONOUTPUT 3 AND 4 SELECTION
Output 3 and 4 can be set as:
- 2 independent relay outputs
- 1 servomotor output with interlocked contact.
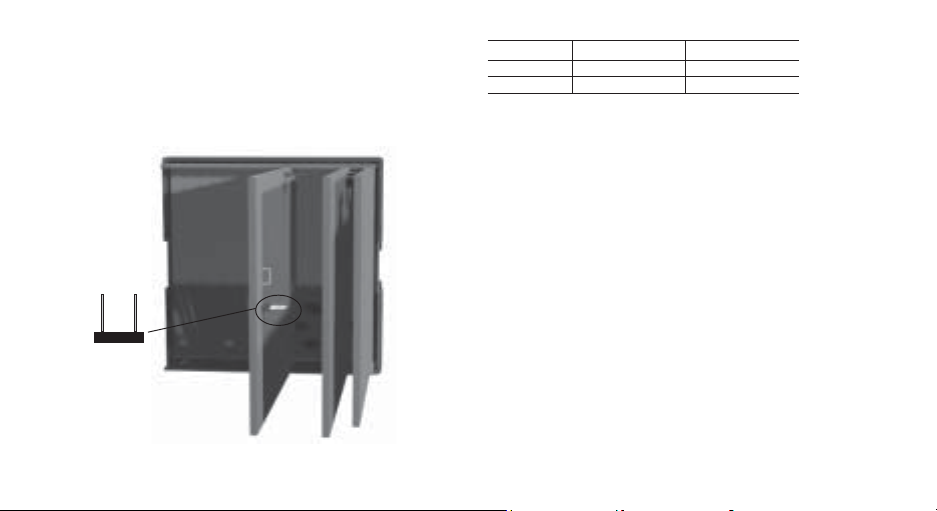
Set J204 (see fig. 21) and J205 (see fig. 20) according to the
desired output type as shown in the following table.
J204
Fig.21
Output J 204 J 205
Relay close open
Servo open close
NOTENOTE
NOTE: when the servomotor close loop or the servomotor open
NOTENOTE
loop with valve position indication outputs is required, it will be
necessary to set also V301 (see "IN CT/Feedback selection"
paragraph)
IN CT / FEEDBACK SELECTIONIN CT / FEEDBACK SELECTION
IN CT / FEEDBACK SELECTION
IN CT / FEEDBACK SELECTIONIN CT / FEEDBACK SELECTION
This instrument can use the "IN CT" input or the "Feedback"
input; the two inputs are not contemporarily.
The current transformer input allows you to measure and
display the current running in a load driven by a time proportional control output during the ON and OFF periods of the
output cycle time. By this feature it is also available the "Out
failure detection" function (see page 111).
The feedback input is used when the servomotor close loop or
the servomotor open loop with valve position indication outputs
is required.
20
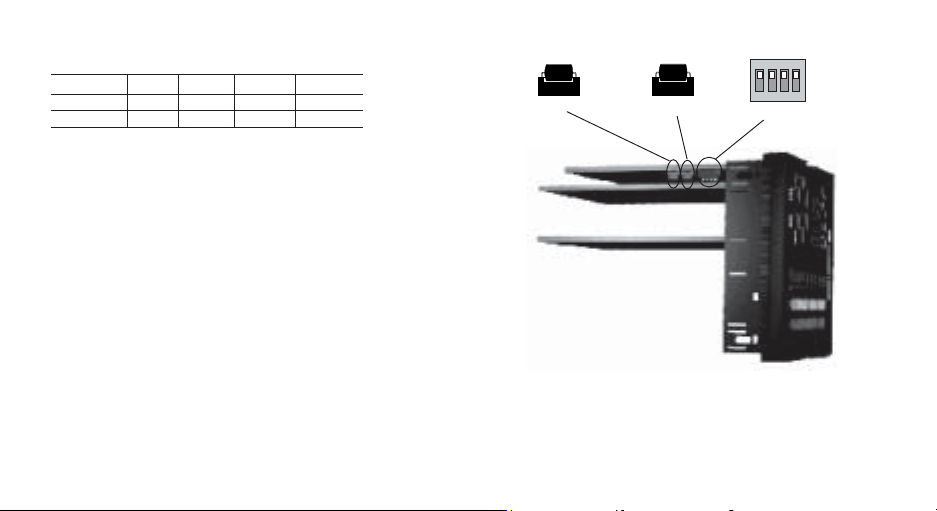
To select the desired input type, set V301 (see fig. 20) as
detailed in the following table:
Input V301.1 V301.2 V301.3 V301.4
IN CT ON OFF ON ON
Feedback OF F ON OFF ON
OPTION CHECKOPTION CHECK
OPTION CHECK
OPTION CHECKOPTION CHECK
This instrument can be supplied with several options.
Two integrated circuits (KY101 and KY103), located as shown
in fig. 22 and inserted in a socket, give you the possibility to
verify if your instrument is equipped with the desired option.
When KY101 is present the auxiliary input and the digital inputs
are present.
When KY103 is present the auxiliary power supply option is
present.
ON DIP
KY101
KY103
1 2 3 4
V101
Fig. 22
21

Operative mode and Hardware lockOperative mode and Hardware lock
Operative mode and Hardware lock
Operative mode and Hardware lockOperative mode and Hardware lock
By V101 (see fig 22) it is possible to select one of the following
operative modes:
a) run time mode without configuration mode
b) run time and configuration modes
c) security code setting mode
Set V101 according to the following table:
Modes V101.1 V101.2 V101.3 V101.4
a OFF ON ON ON
b OFF ON OFF ON
c OFF ON OFF OFF
All the others switch combinations are reserved.
SECURITY CODE SETTING MODESECURITY CODE SETTING MODE
SECURITY CODE SETTING MODE
SECURITY CODE SETTING MODESECURITY CODE SETTING MODE
General notesGeneral notes
General notes
General notesGeneral notes
The instrument parameters are divided in two families and each
family is divided in groups.
- The first family encompasses all the run time parameters.
- The second family comprises all the configuration parameters.
A specific security code enables the parameter modification of
each family.
For run time parameters, it is possible to select which groups of
them will be protected by the security code and in this case, it
is necessary to set the run time security code before to modify
one or more parameters of a protected group.
The configuration security code protects all configuration
parameters and it will be necessary to set the configuration
security code before to start the configuration parameters
modification.
For configuration parameters an hardware lock is also
available.
22
Security code settingSecurity code setting
Security code setting:
Security code settingSecurity code setting
1) Remove the instrument from its case.
2) Set the internal dip switch V101 as follows:
- V101.1 = OFF- V101.2 = ON
- V101.3 = OFF- V101.4 = OFF
3) Re-insert the instrument.
4) Switch on the instrument. The display will show:
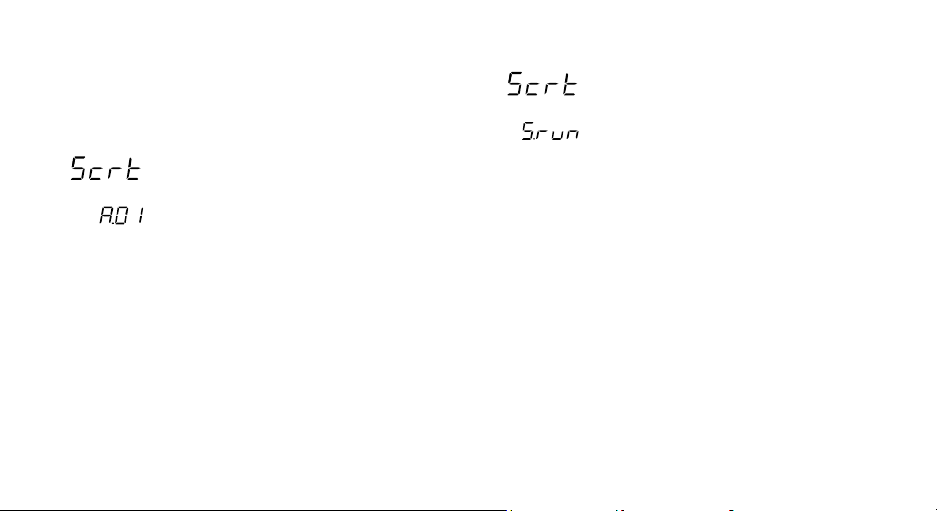
The upper display shows that the security code setting mode
is selected while the lower display shows the firmware
version.
5) Push the FUNC pushbutton.
Run time security codeRun time security code
Run time security code
Run time security codeRun time security code
The display will show:
NoteNote
Note: the middle display shows the current status of the run
NoteNote
time security code ("0", "1" or "On").
By ! and " push-button, set "S.run" parameter as follows:
0 No protection (it is ever possible to modify all run
time parameters);
1 ever protected (it is never possible to modify a run
time parameter);
from 2 to 250 security code for run time parameter
protection.
NOTESNOTES
NOTES:
NOTESNOTES
1) The selected value of a security code cannot be displayed
anymore and, coming back to the "S.run" parameter, the
display will show :
- "On" when "S.run" is different from 0 or 1
- "0" when "S.run" is equal to 0
- "1" when "S.run" is equal to 1.
When the security code is forgotten, a new value can be set.
2) When "S.run" is different from 0 or 1, the "run time default "
23
and the "run time hidden" groups are ever protected by
security code.
Run time groups protected by security codeRun time groups protected by security code
Run time groups protected by security code
Run time groups protected by security codeRun time groups protected by security code
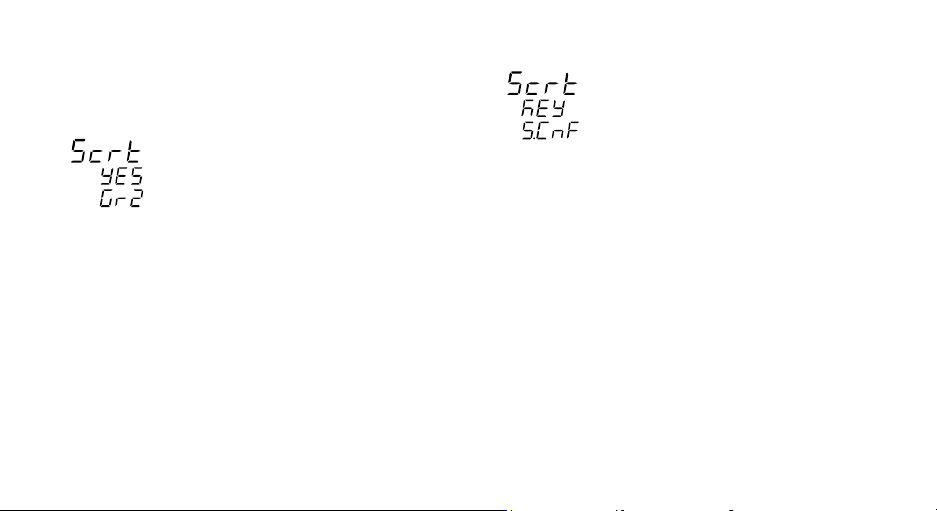
The display will show:
By this parameter it is possible to set if the run time group 2 will
be protected or not by the run time security code.
By ! and " push-button, set "Gr2" parameter as follows:
nO No protection (it is always possible to modify run time
group 2 parameters)
Ye s the run time group 1 parameter modification will be
protected by security code.
Push the FUNC push-button; the instrument memorizes the
new setting and goes to the next parameter.
NOTESNOTES
NOTES:1)This selection may be carried out only if a run time
NOTESNOTES
security code has been set (from 2 to 250).
2) The above described selection may be repeated for
all groups of the run time mode.
Configuration security codeConfiguration security code
Configuration security code
Configuration security codeConfiguration security code
The display will show:
NoteNote
Note: the middle display shows the current status of the
NoteNote
configuration security code ("0", "1" or "On").
By ! and " push-button, set "S.CnF" parameter as follows:
0 No protection (it is ever possible to modify all
configuration parameters);
1 ever protected (it is never possible to modify a
configuration parameter);
from 2 to 250 security code for configuration parameter
protection.
NOTENOTE
NOTE: the selected value of a security code cannot be
NOTENOTE
displayed anymore and, coming back on the "S.CnF"
parameter, the display will show "On" when "S.CnF" is
different from 0 or 1, "0" when "S.CnF" is equal to 0,
"1" when "S.CnF" is equal to 1.
When the security code is forgotten, a new value can
be set.
24
 Loading...