

Page 1
INSTRUCTION MANUAL FOR OMEGA
ELECTRIC OVEN
OO65SXR
Page 2

Page 3
READ THE INSTRUCTION BOOKLET BEFORE INSTALLING AND USING THE APP
It is important that you retain these instructions, proof of purchase as well as other important documents
about this product for future reference.
The manufacturer will not be responsible for any damage to property or to persons caused by incorrect
installation or improper use of the appliance.
Due to continual product development, Omega reserves the right to alter specifications and appearances without
notice.
LIAN
CE.
CONTENTS
IMPORTANT SAFETY WARNINGS .......................................................................................................1-2
APPLIANCE DETAILS .............................................................................................................................. 2
ELECTRICAL CONNECTION .................................................................................................................2-3
REPLACING THE LAMP .......................................................................................................................... 3
INSTALLATION ....................................................................................................................................... 4
OPERATING INSTRUCTIONS ...............................................................................................................5-7
CLEANING .............................................................................................................................................. 7
REMOVING OVEN DOOR ....................................................................................................................... 8
TROUBLESHOOTING .............................................................................................................................. 7
TRANSPORTATION ................................................................................................................................ 8
WARRANTY ........................................................................................................................................... 9
DISPOSAL INFORMATION
• Most of the packaging materials are recyclable. Please dispose of these materials through your local
recycling depot or by placing them into appropriate collection containers.
• If you wish to discard this product, please contact your local authorities and ask for the correct method of
disposal.
Page 4
IMPORTANT SAFETY WARNINGS
IMPORTANT: Read the assembly instruction section and safety precautions of this booklet carefully before
removing the contents of this carton.
1. This appliance is not intended for use by persons (including children) with reduced physical, sensory or
mental capabilities, or lack of experience or knowledge, unless they have been given supervision or
instructions concerning the use of the appliance by a person responsible for their safety. Young children
should be supervised to ensure that they do not play with the appliance.
2. In certain circumstances electrical appliances may be a safety hazard.
3. Do not place heavy objects in or on these appliances, use for storage or let children play/swing from the
door. These appliances are designed for cooking food only.
4. This appliance is designed for domestic household use only and for the cooking of domestic food products.
Use as a commercial appliance will void the warranty. It should not be used in a marine environment or
outdoors.
5. This appliance is supplied with a 15-amp plug.
6. If the electrical supply cord is damaged, either when being installed or after installation, it must be replaced
by the manufacturer, its service centre or similarly a qualified person in order to prevent a hazard.
7. The electrical connection must be accessible after installation. The appliance must be electrically isolated
before any maintenance can be performed.
8. Electrical connection must be made as per local wiring rules and regulations. Do not disconnect the
appliance with wet hands or bare feet, and do not disconnect the power cord with extreme force. If the
electricity supply is restricted, means of an all-pole disconnection must be accessible and incorporated in the
fixed wiring in accordance with the wiring rules.
9. Always grasp the oven door in the centre of the handle as the areas around the door edges may be hot due
to the escape of hot air.
10. Ensure that the kitchen is well ventilated or mechanical ventilation is in use while cooking with this appliance.
11. Do not store or use flammable materials or aerosols near the oven. Items made from aluminium, plastic or
plastic film should also be kept away from the appliance, as they may fuse to the surface.
12. Never line the oven bottom with aluminium foil, as the consequent accumulation of heat could compromise
the cooking and even damage the enamel.
13. WARNING – Accessible parts will become hot when in use. Young children should be kept away. During use
the oven becomes hot. Care should be taken to avoid touching heating elements inside the oven. Do not
touch any components during this time, as they may be hot and can cause burns. Use heat resistant cooking
gloves where possible when moving food and cooking utensils in and out of the oven.
14. Cleaning may only be commenced on the appliance once it has cooled down (best slightly warm). The
appliance should be disconnected from the power outlet or turned off at your isolation switch before
commencing any cleaning process. Do not use a steam jet or any other high pressure cleaning equipment to
clean the appliance. Follow oven cleaner directions if these are being used. WARNING: Ensure the
appliance is switched off before replacing the lamp to avoid the possibility of electric shock.
15. Wash all accessories in hot soapy water or in a dishwasher, wipe dry with a paper or cloth towel. If you use
your oven for an extended period of time, condensation may form. Dry it using a soft dry cloth.
16. When the appliance is not being used, the knobs must be kept in the ‘OFF’ position.
17. Where this appliance is installed in a caravan, it shall NOT be used as a space heater.
18. Do not modify this appliance.
19. Do not use harsh abrasive cleaners or sharp metal scrapers to clean the glass oven door glass as it can
scratch the surface, which may result in the glass shattering. Clean the glass door using warm damp cloth
and dry it with a soft cloth.
1
Page 5

Voltage:
240V 50Hz
Rated Input Power:
2300W
Length (mm)
Width (mm)
Height (mm)
594
556
594
LOCAL AUTHORITY REQUIREMENTS
damage which the manufacturer accepts no responsibility.
IMPORTANT SAFETY WARNINGS
20. All cabinetry and materials used in the installation must be able to withstand a minimum temperature of
100°C above the ambient temperature of the room it is located in, whilst in use. Certain types of vinyl or
laminate kitchen furniture are particularly prone to heat damage or discolouration at temperatures outside the
guidelines given above. Any damage caused by the appliance being installed without adhering to the
temperature limits set out above will be the liability of the owner.
21. This appliance must be correctly installed by a suitably qualified person, strictly in accordance with the
manufacturer’s instructions. Please see the specific section of this booklet that refers to installation.
22. The appliance must be installed and put in operation by an authorised technician under the conditions
provided by the manufacturer in this manual. The manufacturer cannot be held responsible for any damage
that might occur due to faulty installation.
23. The values indicated on the printed documents found on the product are values obtained in laboratory
environment according to relevant standards. These values may vary according to the usage and
environment conditions of product.
24. This oven must not be installed behind a decorative door in order to avoid overheating.
APPLIANCE DETAILS
This information can be found on the rating plate (data label) affixed to the inside of the door jamb.
ELECTRICAL CONNECTION
Installation is only permitted by a licensed electrician, and carried out according to
instructions provided by the manufacturer. Incorrect installation might cause harm and
Before connecting the oven to the mains power supply, make sure that:
- The supply voltage corresponds to the specifications on the data
plate on the front of the oven.
- The mains supply has an efficient earth (ground) connection
complying with all applicable laws and regulations. Correct earthing
(grounding) is a legal requirement.
The power cable should never reach a temperature 50° C above ambient
temperature at any point along its length.
If a fixed appliance is not provided with a power cable and plug, or some other
device permitting it to be disconnected from the mains electricity supply, with a
gap between the contacts big enough to guarantee class III overvoltage protection, then such a device must be
fitted to the power supply in compliance with the regulations governing electrical installations. The socket or switch
must be easily reachable with the oven fully installed.
2
Page 6

Cable Types and Minimal Diameters
SASO
H05RR-F 3x1.5 mm²
H05RR-F 3x2.5 mm²
H05VV-F 3x1.5 mm²
H05VV-F 3x2.5 mm²
H05RN-F 3x1.5 mm²
H05RN-F 3x2.5 mm²
H05V2V2-F 3x1.5 mm²
H05V2V2-F 3x2.5 mm²
Voltage:
240V 50Hz
Power Rating:
25W
Connection Type:
E14
ELECTRICAL CONNECTION
REPLACING THE LAMP
IMPORTANT: The oven lamp must have these exact features:
Before proceeding, disconnect the appliance from the main electricity supply.
• To prevent damage, place a tea cloth in the oven.
• Unscrew the glass cover of the light.
• Unscrew the old light bulb and replace it with the new one.
• Put back the glass cover and remove the tea cloth.
• Connect the appliance to the main electricity supply.
3
Page 7

INSTALLATION
Preparation for Installation and Use
Manufactured with best quality parts and materials, this modern, functional and practical oven will meet your needs
in all respects. Make sure to read the manual to obtain successful results so as not to experience any problems in
the future. The information given below contains rules that are necessary for correct positioning and service
operations. They should be read without fail, especially by the technician who will position the appliance.
Choosing a Location
There are several factors to consider when choosing a place for your oven. Make sure to take into account our
recommendations below in order to prevent any problems and dangerous situations which might arise.
When choosing a place for the oven, attention should be paid to ensure there are no flammable or combustible
materials in the close vicinity, such as curtains, oil, cloth etc. which quickly catch fire.
Furniture surrounding the oven or cooktop must be made of materials resistant to temperatures of at least 100°C.
If there is a drawer below the oven, a protective board must be placed between the oven and drawer.
A cooling fan draws air in from the appliance sides to cool the outer surfaces and removes excess steam through
the front of the oven (above the door). This fan will continue to operate for some time after the cooking sequence
has finished. Ventilation space must be allowed beside and behind the oven; failure to do so can cause damage to
both the appliance and surrounding cupboards.
Flush Fitting
The oven can be installed under a bench or in a cooking column. The figure below shows the installation
dimensions. Make sure that surrounding materials are heat resistant. Align the oven centrally with respect to the
side walls of the units surrounding it and fix it in place with the screws and Allen screws provided.
4
Page 8
OPERATING INSTRUCTIONS
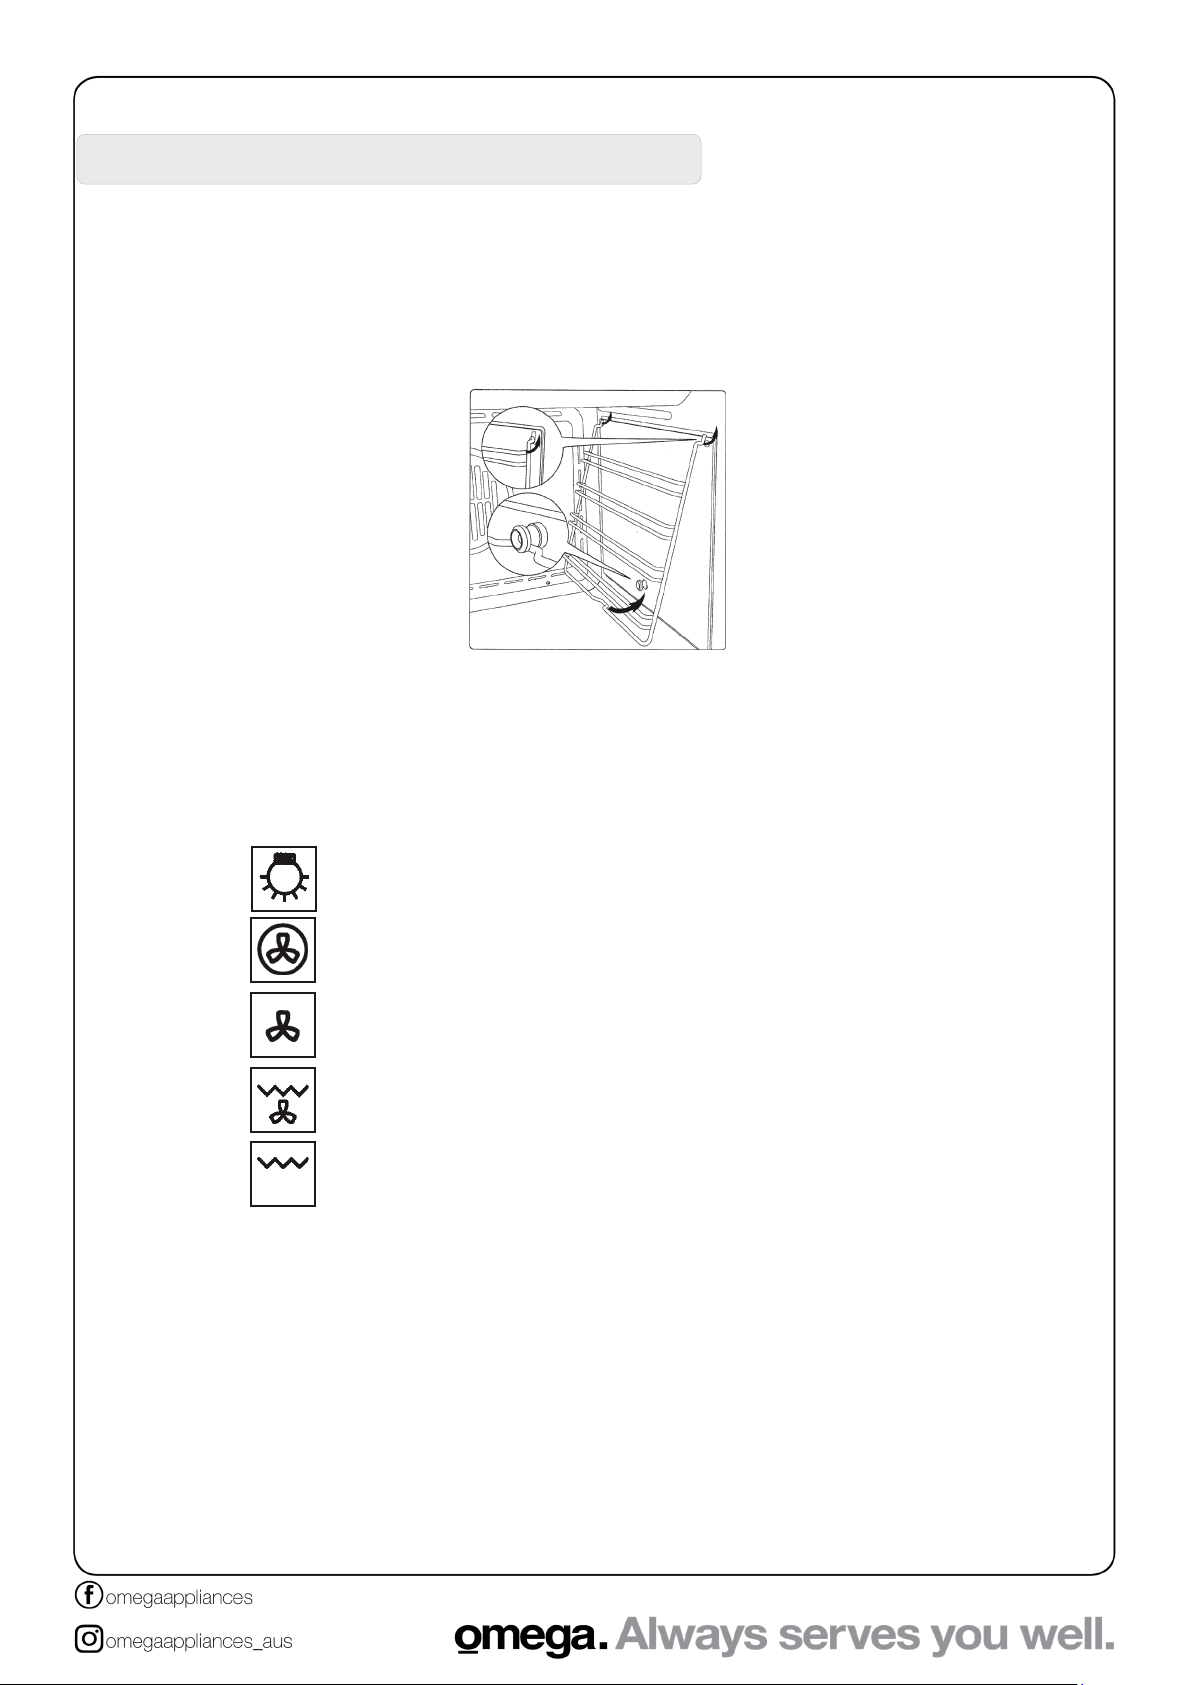
First Use
Clean the oven thoroughly with soapy water and rinse well. To remove the lateral frames from smooth-walled
ovens, proceed as shown in the figure below.
Operate the oven for about 30 minutes at maximum temperature to burn off all traces of grease which might
otherwise create unpleasant smells when cooking.
Important:
As a safety precaution, before cleaning the oven, always disconnect the plug from the power socket or the power
cable from the oven. Do not use acid or alkaline substances to clean the oven (lemon juice, vinegar, salt, tomatoes
etc.). Do not use chlorine based products, acids or abrasive products to clean the painted surfaces of the oven.
Control Panel Functions
Oven light (stays on while oven is in use).
Circular heating element with fan. Thermostat setting from 50°C to MAX.
Fan for defrosting. Thermostat setting at 0°C.
Double top heating element with fan (large area grill). Thermostat setting from
50°C to 200°C.
Double top heating element (large area grill). Thermostat setting from 50°C to
200°C.
5
Page 9

Selector
Use the Selector to select the cooking program to use.
Cooking Timer
cooking timer to the left to the symbol.
OPERATING INSTRUCTIONS
It is not essential to preheat the oven, but you are advised to do so when cooking pastries.
Fan Cooking
For this type of cooking a fan positioned at the back allows the circulation of hot air inside the oven, creating
uniform heat. In this way cooking is more rapid than conventional cooking. It is a suitable method for cooking
dishes on more than one shelf, especially when the food is of different types (fish, meat etc.)
Defrosting
By selecting one of the fan cooking functions and setting the thermostat to zero, the fan allows cold air to circulate
inside the oven. In this way frozen food can be rapidly defrosted.
Grill Cooking
Use the grill to grill or brown foods. Some ovens may be equipped with an electric motor, spit and skewers for
turning on the spit. Place the shelf with the food to be cooked in the 1
oven for 5 minutes. Turn the thermostat to a temperature between 50°C and 200°C.
st
or 2nd position from the top. Pre-heat the
Cooling Fan (If supplied)
The fan is positioned on the upper part of the oven and creates a circle of cooling air on the inside of the furniture
and through the door of the oven.
It is turned on when the temperature of the outer shell of the oven reaches 60°C. By switching on the oven with the
thermostat at 200°C the fan starts working after approx.10 min.
It is turned off when the temperature of the outer shell of the oven descends under 60°C. By switching off the oven
with the thermostat at 200°C the fan stops working after approx. 30 min.
Thermostat
Use the thermostat to set the cooking temperature you need. The thermostat can be
adjusted from 50°C to 250°C.
First, turn the cooking selector to the required cooking function and the thermostat to
the desired cooking temperature. Then, to set end of cooking time, turn the cooking
timer to the right and to the desired time. First turn the knob fully clockwise, and then
turn it back to the desired alarm time. A buzzer sounds at the end of the timed cooking
period, and the oven switches itself off. To set only the start of cooking, turn the
6
Page 10
NOTE: Cleaning and maintenance operations must only be carried out when the
isolation switch before commencing any cleaning process.
CLEANING
oven is cool.
The appliance should be disconnected from the power outlet or turned off at your
Cleaning the oven exterior:
Before starting to clean your oven, be sure that all control buttons are off and your appliance has cooled. Unplug
the appliance.
Do not use cleaning materials containing particles that might scratch the enameled and painted parts of your oven.
Use cream cleaners or liquid cleaners, which do not contain particles. As these cleaners may damage the surfaces,
do not use caustic creams, abrasive cleaning powders, rough wire wool or hard tools. In the event of any excess
liquids spilling over your oven surface during cleaning, clean up immediately so as to prevent possible damage to
the enamel or metal surface. Do not use steam cleaners for cleaning the oven.
Cleaning the interior of the oven:
Make sure to unplug the oven before starting to clean it. You will obtain best results if you clean the oven interior
while the oven is slightly warm (the oven should not be operating). Remove the side wire racks first (if supplied).
Wipe your oven with a soft piece of cloth (e.g. dish cloth) dampened with warm soapy water after each use, rinse
cloth in warm water then wipe oven again and finish by wiping with a dry cloth. It is also recommended to wipe
clean the oven door and rubber seal. For a complete cleaning process, use dry and powder type oven cleaners,
following the oven cleaning product’s instructions.
TROUBLESHOOTING
If the oven does not operate:
• The oven may be unplugged from the power source or switched off at the power source.
• The household fuse has blown or household power supply is off.
• The timer may not be set correctly.
If the oven does not heat:
• The heat may not be set correctly with the oven’s temperature setting.
If the interior lighting lamp does not light:
• The lamps are defective. If they are defective, you can change them following the instructions within this
manual.
Cooking (if lower-upper part does not cook equally):
• Control the shelf locations, cooking period and heat values according to the manual.
Unit smoking when first used:
• This is a result of protective oils being removed and is to be expected with a first use.
If you have any further problems with your product, please call your Authorised Service Centre.
7
Page 11

REMOVING OVEN DOOR
TRANSPORTATION
Keep the original carton of the product and use this packaging if the item needs to be transported. Follow the
transport signs on the carton.
Place paper between the upper cover and cooking panel, cover the upper cover and tape to the side surfaces of
oven.
Tape cardboard or paper onto the inside face of the glass as it will be susceptible to damage from the trays. Use
cardboard covers for the wire grill and trays in your oven. Also tape the oven’s covers to the side walls.
If the original carton is unavailable, take measures to protect the external surfaces (glass and painted surfaces) of
oven against possible blows, as well as the above.
8
Page 12
AUSTRALIAN AND NEW ZEALAND PRODUCT WARRANTY
STATEMENT OF STANDARD WARRANTY CONDITIONS
IN AUSTRALIA
Email: customercare@shriro.com.au
IN NEW ZEALAND
Email: customercare@monacocorp.co.nz
AUSTRALIAN CUSTOMERS
Our goods come with guarantees that cannot be excluded under the Australian Consumer Law. You are entitled to a replacement or refund for a
major failure and for compensation for any other reasonably foreseeable loss or damage. You are also entitled to have the goods repaired or
replaced if the goods fail to be of acceptable quality and the failure does not amount to a major failure.
NEW ZEALAND CUSTOMERS
Nothing herein contained shall be construed in any way as excluding or limiting your rights under the Consumer Guarantee Act 1993.
OUR WARRANTY
This product is also covered by the manufacturer's warranty set out in this document (Our Warranty).
Our Warranty is for a period of twenty four (24) months from the date of purchase. This is in addition to (and does not exclude, restrict or modify)
any rights or remedies to which you may already be entitled to under the Australian consumer law or the New Zealand Consumer Guarantee act
1993 relating to this product. Our warranty (which is subject to the conditions below) covers rectification free of charge of any fault arising from
defective materials or components or faulty workmanship. The product will be repaired or replaced at the option of Omega.
Our warranty is subject to the following conditions:
1. That the purchaser contact Omega prior to any product repair.
2. That the purchaser carefully follows all instructions provided with the product and complies with all relevant electrical & plumbing
regulations in their State when installing the product.
3. That the purchaser carefully follows the instructions provided in the owner's handbook relating to the proper use and care of the
product and does not use the product for any purpose other than the DOMESTIC use for which it has been designed. If the appliance
is used in commercial applications or for rental purposes, Our Warranty is limited to a warranty of Twelve (12) months covering all
parts with Three (3) months on any labour cost of service or repair.
WHAT IS COVERED: By Our Warranty
During the warranty period, Omega or its authorised Service Centre will, at no extra charge, if your appliance is readily accessible without the
need of special equipment and subject to the terms and conditions of this warranty, repair or replace any parts which it considers defective.
WHAT IS NOT COVERED: By Our Warranty
1. Products installed damaged or incomplete or not in compliance with the relevant electrical & plumbing regulations in their State.
2. Normal wear and tear e.g. cleaning, light globes, filters etc.
3. Failure resulting from power surges and electrical storms.
4. Insect or vermin infestation.
5. Unauthorised repairs or use of non- genuine Omega parts.
6. Any failure caused by the product not being used in accordance with the instruction and the installation manual provided with the
product.
7. Misuse or abuse, including failure to properly maintain or service.
8. The clearing of blockages in pumps and hoses.
9. Damage which occurs during delivery or installation.
10. Claims to product surface coating due to liquid or solid spill-overs, accidental damage or damage caused from cleaning products not
recommended by Omega.
HOW TO CLAIM YOUR WARRANTY
Please refer to our website address below for Omega in Australia or New Zealand to register your warranty online.
If you are contacting Omega regarding any warranty claims and spare parts inquiries, please make sure you have the following information on
hand:
1. Product Name/Model Number
2. Serial Number/s
3. Purchase Date (as per invoice or proof of purchase)
4. Purchased From
5. Warranty Registration Number
www.omegaappliances.com.au/customer/warranty
Omega is division of Shriro Australia PTY LTD
ABN 28 002 386 129
Customer care: 1300 739 033
www.omegaappliances.co.nz/customer
Omega is division of Monaco Corporation Limited
(Member of Shriro Australia PTY LTD)
Phone: (09) 415 6000
9
 Loading...