

Page 1
DIGITAL CAMERA
STYLUS TOUGH-8000 /
μ
TOUGH-8000
Basic Manual
ENGLISH 2
FRANÇAIS 32
ESPAÑOL 62
DEUTSCH 92
РУССКИЙ 122
Page 2

ContentsContents
Preparing the Camera ...........................3
¾
Checking the contents of the box ............3
Attaching the camera strap ......................3
Loading the battery and the
xD-Picture Card™ (sold separately) into
the camera ...............................................3
Charging the battery ................................4
Using a microSD card/microSDHC card
(sold separately) ......................................6
Setting the date and time .........................6
Changing the display language ...............7
¾
Shooting, Viewing, and Erasing ...........8
Shooting with optimum aperture value
and shutter speed (
Viewing images .......................................9
Erasing images during playback
(Single image erase) .............................10
Using Shooting Modes ........................11
¾
Using the best mode for the shooting
s
scene (
Enhancing skin tone and texture
b
mode) .......................................12
(
Shooting with automatic settings
A
mode) .........................................12
(
Shooting movies (
K
mode) .................8
mode) ...............................11
n
mode) ..................13
Using Shooting Functions ..................14
¾
Using the optical zoom ..........................14
Using the fl ash .......................................14
Adjusting the brightness
(Exposure compensation) ......................15
Shooting closeups (Macro shooting) .....15
Using the self-timer ................................16
Quickly calling and using shooting
functions ................................................16
¾
Printing .................................................17
¾
Using OLYMPUS Master 2...................18
¾
Appendix ..............................................20
Using a microSD Attachment .................20
Important information about water and
shock resistant features .........................20
SAFETY PRECAUTIONS ......................22
SPECIFICATIONS .................................28
● Thank you for purchasing an Olympus digital
camera. Before you start to use your new
camera, please read these instructions carefully
to enjoy optimum performance and a longer
service life. Keep this manual in a safe place for
future reference.
● We recommend that you take test shots to
get accustomed to your camera before taking
important photographs.
The reference pages are based on the Instruction Manual (provided CD-ROM). Please see the CD-ROM
Instruction Manual for your reference.
2
EN
● In the interest of continually improving products,
Olympus reserves the right to update or modify
information contained in this manual.
● The screen and camera illustrations shown in this
manual were produced during the development
stages and may differ from the actual product.
Page 3
Preparing the Camera
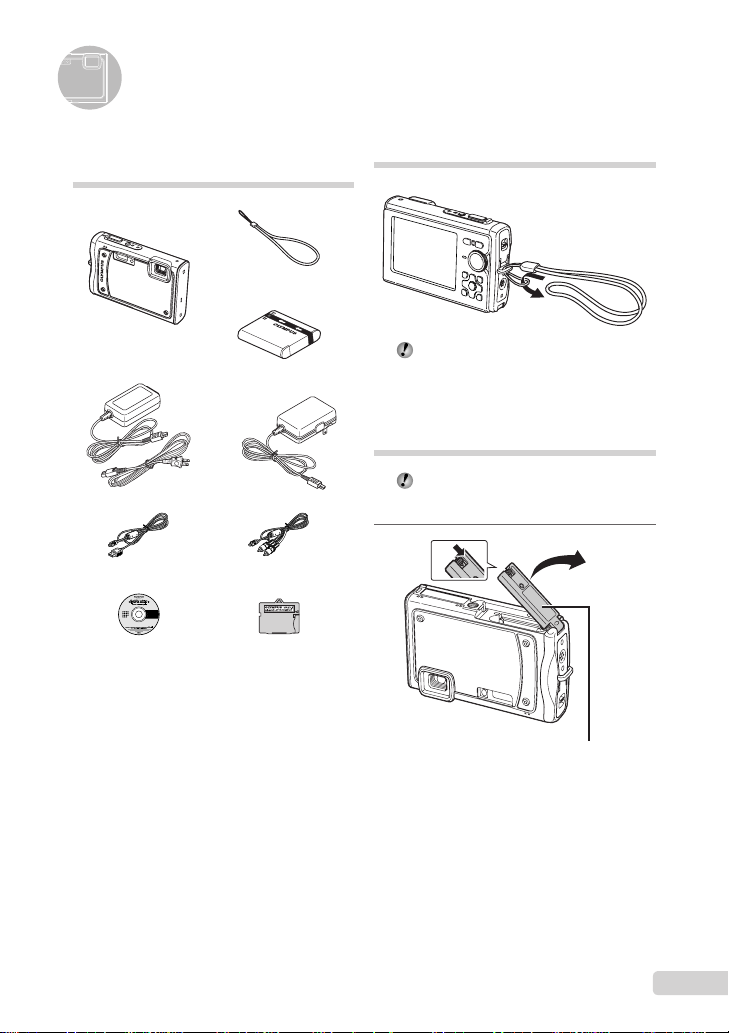
Checking the contents of the box
Strap
Digital camera
LI-50B Lithium Ion Battery
or
AC adaptor (F-1AC)
USB cable AV cable
OLYMPUS Master 2
CD-ROM
Other accessories not shown: Instruction Manual,
warranty card
Contents may vary depending on purchase location.
microSD Attachment
Attaching the camera strap
Pull the strap tight so that it does not come
loose.
Loading the battery and the xD-Picture Card™ (sold separately) into the camera
Do not insert anything other than an
xD-Picture Card or the microSD Attachment
into the camera.
1
1
Battery/card compartment cover
2
EN
3
Page 4

2
Battery lock knob
The battery has front side and back side.
Insert the battery in the correct direction
as illustrated. If the battery is not inserted
correctly, the camera does not operate.
Insert the battery while sliding the battery
lock knob in the direction of the arrow.
Sliding the battery lock knob in the direction
of the arrow to unlock, and then remove the
battery.
Be sure to turn off the camera when you
open or close the battery/card compartment
cover.
3
NotchIndex area
4
This camera allows the user to take pictures
using the internal memory even when
no xD-Picture Card (sold separately) is
inserted. “Using an xD-Picture Card” (p. 66)
“Number of storable pictures (still pictures)/
continuous recording length (movies) in
the internal memory and xD-Picture card”
(p. 67)
To remove the xD-Picture Card
12
Press in the card until it clicks and comes
out slightly, and then grasp the card to pull it
out.
Insert the card straight in until it clicks into
place.
Do not touch the contact area on the card.
4
EN
Charging the battery
The included AC adaptor (F-1AC/with an
AC cable or plug-in type) differs depending
on the region where you purchased the
camera. If you received a plug-in type AC
adaptor, plug it directly into an AC outlet.
The included AC adaptor (F-1AC) has been
designed to be used only for charging.
Make sure that operations such as shooting,
viewing images and so on are not being
used while the AC adaptor is connected to
the camera.
Page 5
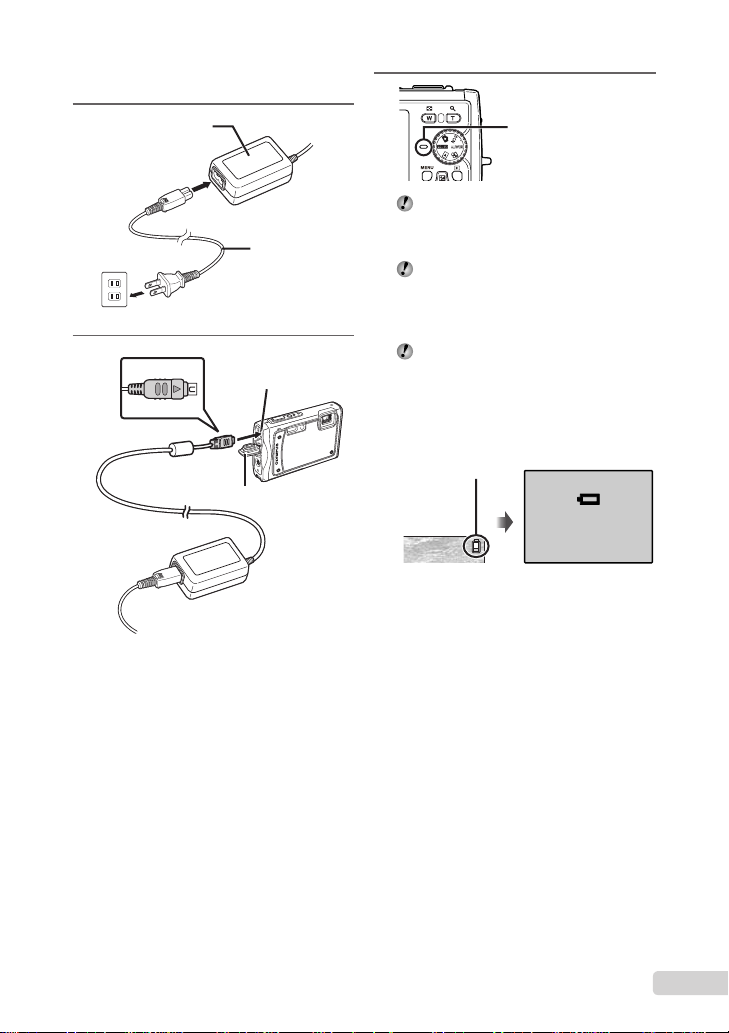
Example: AC adaptor with an AC cable
1
AC outlet
AC adaptor
AC cable
2
Multi-connector
Connector cover
3
Charging indicator
Lights (orange) : Charging
Lights (blue) : Charged
Battery comes partially charged. Before
use, be sure to charge the battery until the
charging indicator goes off (for approx.
2.5 hours).
If the charging indicator does not light
or it blinks, there may be cases in which
the connections are not correct, or the
battery, camera, and/or AC adaptor may be
damaged.
For details on the battery and the AC
adaptor, see “Battery, AC adaptor (included),
Charger (sold separately)” (p. 64).
When to charge the battery
Charge the battery when the error message
shown below appears.
Flashes in red
BATTERY EMPTY
Monitor top right Error message
EN
5
Page 6

Using a microSD card/ microSDHC card (sold separately)
microSD card/microSDHC card (hereinafter
referred to as “microSD card”) is also compatible
with this camera by using the microSD
Attachment.
“Using a microSD Attachment” (p. 68)
1
Insert the microSD card into the
Attachment.
Setting the date and time
The date and time set here are saved to image
fi le names, date prints, and other data.
1
Press the n button to turn on
the camera.
The date and time setting screen is displayed
●
when the date and time are not set.
X
YM
D TIME
---- -- -- -- --
YMD
Insert the card to
the end.
2
Insert the microSD Attachment into
the camera.
Notch
To remove the microSD card
Pull the microSD card straight out.
Do not touch the contact area on the
microSD Attachment and microSD card.
MENU
CANCEL
Date and time setting screen
2
Use EF to select the year for [Y].
X
YM
D TIME
-- -- -- --
2009
MENU
CANCEL
3
Press H to save the setting for [Y].
X
YM
DTIME
-- -- -- --
2009
MENU
CANCEL
YMD
YMD
6
EN
Page 7
4
As in steps 2 and 3, use EFGH
and the o button to set
[M] (month), [D] (day), and
[TIME] (hours and minutes), and
[Y/M/D] (date order).
For precise time setting, press the o button
as the time signal strikes 00 seconds.
To change the date and time, adjust the
setting from the menu. [X] (Date/time)
(p. 46)
To check the date and time
Press the g button while the camera is
turned off. The current time is displayed for
approx. 3 seconds.
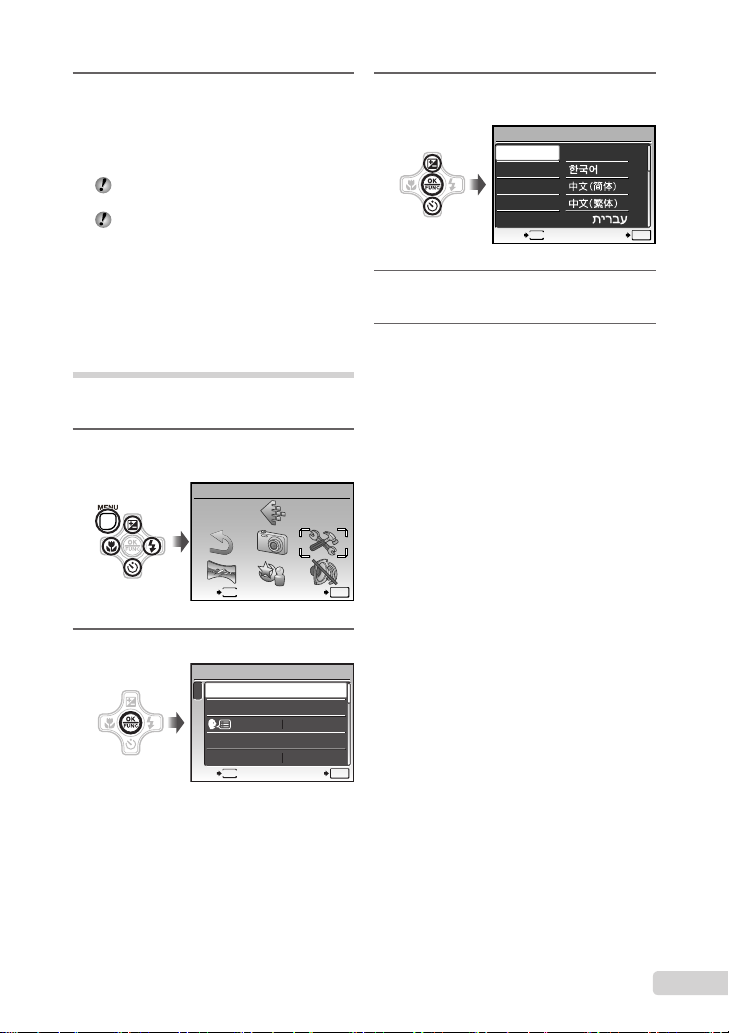
Changing the display language
The language for the menu and error messages
displayed on the monitor is selectable.
1
Press the m button, and press
EFGH to select [E] (SETUP).
SETUP
3
Use EF to select [W] and
press the o button.
W
ENGLISH
FRANCAIS
DEUTSCH
ESPAÑOL
ITALIANO
4
Use EFGH to select your
ུࢊ
MENU
language and press the o button.
5
Press the m button.
OK
SETBACK
2
Press the o button.
SETUP
1
2
3
4
MENU
EXIT SET
MEMORY FORMAT
BACKUP
PW ON SETUP
MENU COLOR
MENU
EXIT SET
ENGLISH
NORMAL
OK
OK
7
EN
Page 8

Shooting, Viewing, and Erasing
1/400
F3.5
Shooting with optimum aperture value and shutter speed (K mode)
In this mode, automatic camera shooting can
be used while also allowing changes to a wide
range of other shooting menu functions, such as
exposure compensation, white balance, and so
on when needed.
1
Set the mode dial to K.
2
Press the n button to turn on
the camera.
Number of storable
still pictures (p. 67)
P
12
M
N
ORM
Monitor
(standby mode screen)
Press the n button again to turn off
the camera.
IN
4
3
Hold the camera, and compose the
shot.
Monitor
Horizontal grip
Vertical grip
When holding the camera, take care not to
cover the flash with your fingers, etc.
4
Press the shutter button halfway
P
1/400 F3.5
down to focus on the subject.
When the camera focuses on the subject, the
●
exposure is locked (shutter speed and aperture
value are displayed), and the AF target mark
changes to green.
●
The camera was unable to focus if the AF target
mark fl ashes red. Try focusing again.
P
8
EN
Press halfway
“Focusing” (p. 61)
1/400
AF target mark
Shutter speed
F3.5
Aperture value
Page 9

5
1/400
F3.5
To take the picture, gently press
the shutter button all the way down
while being careful not to shake the
camera.
P
Viewing images
1
Set the mode dial to q.
Frame number
Press fully
1/400
F3.5
Image review screen
To view images during shooting
Pressing the q button enables playback of
images. To return to shooting, either press
the q button again or press the shutter
button halfway down.
You can operate the camera by tapping the
body when [TAP CONTROL] is [ON].
[TAP CONTROL] (p. 49)
To shoot movies
“Shooting movies (A mode)” (p. 21)
2009.08.26 12:30
Playback image
2
Use EFGH to select an image.
Displays
10 frames before
the current image
Displays previous
image
The display size of the images can be
changed. “Index view, calendar view, and
close-up view” (p. 27)
Displays next
image
Displays
10 frames after
the current
image
To play back movies
Select a movie, and press the o button.
2009.08.26 12:30
OK
MOVIE PLAY
Movie
12
N
ORM
100-0001
IN
100-0004
IN
M
1
4
EN
9
Page 10

Operations during movie playback
2009.08.26
12:30
100-0004
00:12/00:34
2009.08.26
12:30
100-0004
00:14/00:34
ERASE
NO
Volume: During playback, press EF.
Fast-forward/rewind: Select with GH.
Each time a button is pressed, the playback
speed cycles through 2x, 20x, and standard
(1x) speed in the direction of the pressed
button.
Pause: Press the o button.
Erasing images during playback (Single image erase)
1
Press the D button when the
playback image to be erased is
displayed.
ERASE
IN
2009.08.26
Elapsed time/
Total recording time
First (last) frame/frame advance:
During pause, press E to display the fi rst
frame, and press F to display the last
frame. Playback is reversed while G is
pressed, playback occurs normally while H
is pressed. Press the o button to resume
playback.
IN
During playback
2009.08.26
IN
During pause
To stop movie playback
Press the m button.
12:30
100-0004
00:12/00:34
12:30
100-0004
00:14/00:34
/
YES
NO
MENU
2
Press E to select [YES], and press
SETCANCEL
the o button.
[K ERASE] (p. 40)
OK
10
EN
Page 11

Using Shooting Modes
This section describes the available shooting
modes. Depending on the mode, some settings
can be changed. For details on the functions
that can be adjusted, see “Menus for Shooting
Functions” on page 29.
Using the best mode for the
shooting scene (s mode)
1
Set the mode dial to s.
PORTRAIT
MENU
EXIT
An explanation of the selected mode is displayed
●
while the E button is pressed and held.
2
Use EF to select the best
shooting mode for the scene, and
press the o button.
Icon indicating
the scene mode
that is set
12
M
N
ORM
To change to another scene mode, use the
menu. [O SCENE MODE] (p. 33)
SET
OK
IN
To take underwater photos
Select [T UNDERWATER SNAPSHOT],
[k UNDERWATER WIDE1],
[l UNDERWATER WIDE2]
[H UNDERWATER MACRO].
When the mode dial is set to s during
underwater shooting (i.e., while the
underwater sensor is responding), the above
mentioned 4 modes appear before other
modes.
*1
When set to [l UNDERWATER WIDE2],
the focus distance is automatically fi xed to
approx. 5.0 m (16.4 ft.).
Be sure to use an underwater case when
using the camera at depths exceeding 10 m
(32.8 ft.).
When [MANOMETER] (p. 48) is set to
[ON], the altitude/water depth (atmospheric/
hydraulic pressure) appears on the shooting
standby mode screen as a rough guide.
“Shooting mode display” (p. 8)
“Important information about water and
shock resistant features” (p. 68)
To lock the focus distance for
underwater shoots (AF lock)
When [T UNDERWATER SNAPSHOT],
[k UNDERWATER WIDE1], or,
[H UNDERWATER MACRO] is selected,
press F.
^ mark
4
12
M
N
ORM
To cancel, press F again to clear the
^ mark.
*1
,
AFL
IN
4
EN
11
Page 12
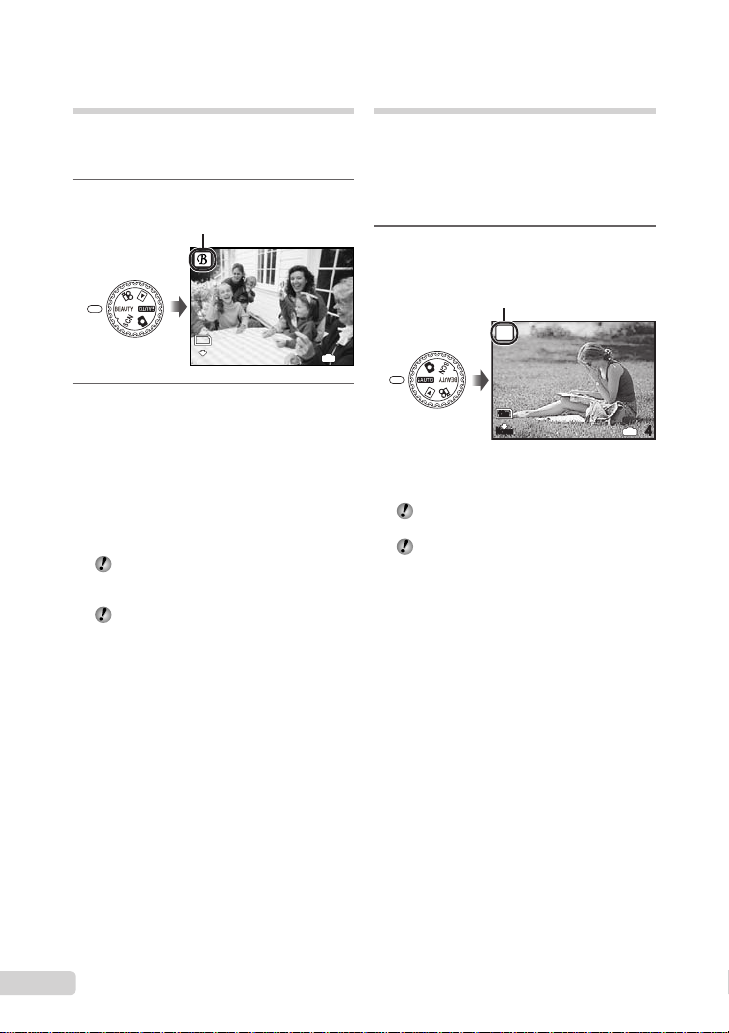
Enhancing skin tone and
12
M
4
N
ORM
texture (b mode)
The camera fi nds a person’s face and gives the
skin a smooth, translucent look for taking the
picture.
1
Set the mode dial to b.
b mode indicator
12
M
N
ORM
2
Point the camera toward the
subject. Check the frame appearing
around the face detected by the
camera, and then press the shutter
button to take the picture.
The unedited image and edited image are both
●
saved.
●
If the image cannot be retouched, only the
unedited image is saved.
For some subjects, the frame may not
appear, may take some time to appear, or
the editing may not be effective.
The [IMAGE SIZE] of the retouched image
is limited to [J] or lower.
IN
Shooting with automatic
settings (A mode)
The camera will automatically select the optimal
shooting mode for the scene. This is a fully
automatic mode that allows you to take a picture
suited to the scene by simply pressing the
shutter button. Settings in the shooting function
menu are not available in A mode.
1
Set the mode dial to A.
The indicator changes to
the icon for the scene mode
selected by the camera.
i
AUTO
4
12
M
N
ORM
Press the shutter button halfway down or press the
●
g button to check which shooting mode the
camera has automatically selected.
In some cases, the camera may not select
the desired shooting mode.
When the camera cannot identify which is
the optimal mode, P mode will be selected.
IN
4
12
EN
Page 13

Shooting movies (n mode)
00:35
QVGA
15
00:34
REC
Audio is recorded with the movie.
1
Set the mode dial to n.
A mode indicator
QVGA
15
To zoom while shooting a movie
The optical zoom is not available while
shooting a movie.
Use [DIGITAL ZOOM] (p. 31).
To shoot a movie with digital image
stabilization
[DIS MOVIE MODE] (p. 32)
2
Press the shutter button halfway
down to focus on the subject, and
gently press the button all the way
down to start recording.
Lights red during shooting
REC
Press halfway
IN
00:35
Press fully
Remaining recording time (p. 67)
3
Gently press the shutter button all
00:34
the way down to stop recording.
13
EN
Page 14
Using Shooting Functions
OK
SET
FLASH AUTO
In addition to the wide variety of shooting modes,
the camera has functions that broaden the
expressive range and shooting options available
to the photographer.
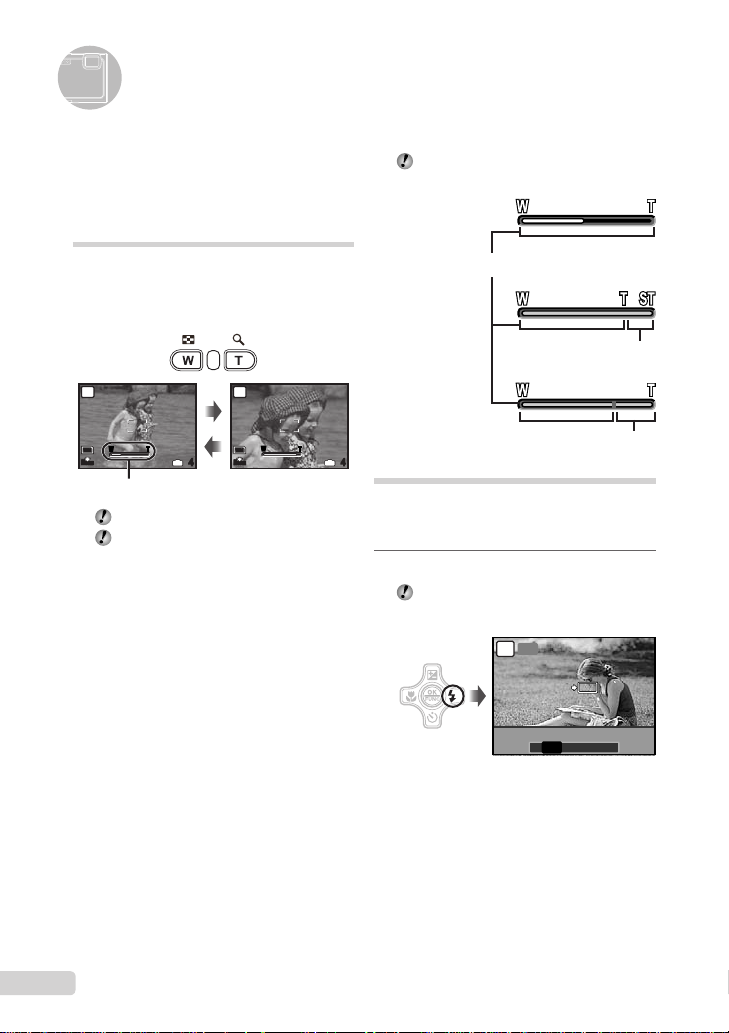
Using the optical zoom
Pressing the zoom button adjusts the shooting
range.
Pressing the wide (W)
P
W T
12
M
N
ORM
Zoom bar
Optical zoom: 3.6×, Digital zoom: 5.0×.
Use of [IMAGE STABILIZER] (Still image)/
[DIS MOVIE MODE] (Movie) (p. 32) is
recommended when shooting with the
telephoto zoom.
To take larger images without reducing
image quality
[FINE ZOOM] (p. 31)
To take larger images
[DIGITAL ZOOM] (p. 31)
button
IN
4
Pressing the telephoto
(T) button
P
W T
12
M
N
ORM
IN
4
The zoom bar appearance identifi es the
status of the fi ne zoom/digital zoom.
When using
optical zoom
Optical zoom range
When using
fi ne zoom
Fine zoom range
When using
digital zoom
Digital zoom range
Using the fl ash
The fl ash functions can be selected to best
match the shooting conditions and render the
desired image.
1
Press the # button.
You can operate the camera by tapping the
body when [TAP CONTROL] is [ON].
[TAP CONTROL] (p. 49)
AUTO
P
OK
SET
FLASH AUTO
! # $
AUTO
14
EN
Page 15

2
0.0
+0.3
+0.7
+1.0
OK
SET
OFF
Use GH to select the setting option,
and press the o button to set.
Item Description
FLASH AUTO
REDEYE
FILL IN
FLASH OFF The fl ash does not fi re.
The fl ash fi res automatically in
low-light or backlight conditions.
This emits pre-fl ashes to reduce
the occurrence of red eye in your
photos.
The fl ash fi res regardless of the
available light.
Shooting closeups (Macro shooting)
This function enables the camera to focus and
shoot subjects at close distances.
1
Press the & button.
You can operate the camera by tapping the
body when [TAP CONTROL] is [ON].
[TAP CONTROL] (p. 49)
SET
OFFOFF
OK
P
Adjusting the brightness (Exposure compensation)
The standard brightness (appropriate exposure)
set by the camera based on the shooting mode
(except for A) can be adjusted brighter or
darker to obtain a desired shot.
1
Press the F button.
EXPOSURE COMP.
0.0
+0.7
Exposure compensation value
2
Use EFGH to select the desired
brightness image, and press the
o button.
+0.3
+1.0
OFF
% &
OFF
2
Use GH to select the setting option,
and press the o button to set.
Item Description
OFF Macro mode is deactivated.
MACRO
SUPER
MACRO
S-MACRO
*3*4
LED
*1
When the zoom is at the widest (W) position.
*2
When the zoom is at the most telephoto (T) position.
*3
The zoom is automatically fi xed.
*4
[ISO] (p. 30) is automatically fi xed to [AUTO].
The fl ash (p. 22) and zoom (p. 22) cannot
This enables shooting as close as
10 cm/3.9 in.
the subject.
This enables shooting as close
as 2 cm/0.8 in. to the subject.
Subjects at 50 cm/19.7 in. or
*3
farther cannot be brought into
focus.
The LED illuminator lights the area
7 to 20 cm (2.8 to 7.9 in.) from the
lens, while the shutter button is
pressed halfway down.
be set when [%] or [O] is selected.
*1
(30 cm/11.8 in.*2) to
EN
15
Page 16
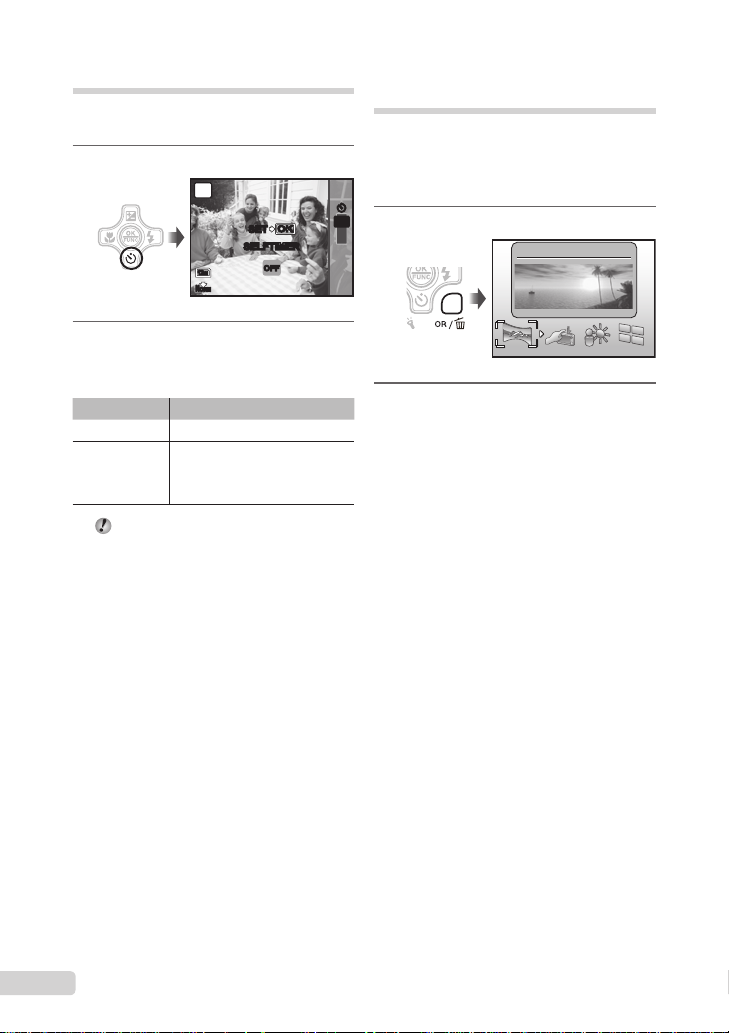
Using the self-timer
After the shutter button is pressed all the way
down, the picture is taken after a time delay.
1
Press the Y button.
P
OKOK
SET
SELFTIMER
12
M
N
ORM
2
Use EF to select the setting
option, and press the o button to
set.
Item Description
OFF This cancels the self-timer.
The self-timer lamp turns on for
ON
Self-timer shooting is automatically canceled
approx. 10 seconds, and then
blinks for approx. 2 seconds, and
then the picture is taken.
after one shot.
To cancel the self-timer after it starts
Press the Y button again.
OFF
Quickly calling and using shooting functions
The following menu functions can be quickly
called and used.
[PANORAMA] (p. 34)• [SHADOW ADJ] (p. 33)•
[TAP CONTROL] (p. 49)• [MULTI WINDOW] (p. 26)•
YYY
OFF
1
Press the o/D button.
ON
2
Use GH to select the menu
function, and press the o button to
set.
To use the effects preview screen
(Multi window)
Selecting an option from [ZOOM],
[EXPOSURE COMP.], [WB] or [ESP/n]
shows 4 preview images that refl ect the
adjusted values of the selected shooting
function. Use EFGH to select the
desired image, and press the o button.
PANORAMA
16
EN
Page 17

Printing
Direct printing (PictBridge*1)
By connecting the camera to a PictBridgecompatible printer, you can print images directly
without using a computer.
To fi nd out if your printer supports PictBridge,
refer to the printer’s instruction manual.
*1
PictBridge is a standard for connecting digital
cameras and printers of different makers and
printing out pictures directly.
The printing modes, paper sizes, and other
parameters that can be set with the camera
vary depending on the printer that is used.
For details, refer to the printer’s instruction
manual.
For details on the available paper types,
loading paper, and installing ink cassettes,
refer to the printer’s instruction manual.
Printing images at the printer’s standard settings [EASY PRINT]
1
Display the image to be printed on
the monitor.
“Viewing images” (p. 17)
Printing can also be started when the
camera is turned off. After performing Step
2, use EF to select [EASY PRINT], press
the o button. Use GH to select an image,
and press the o button.
2
Turn on the printer, and then
connect the printer and camera.
H button
Multi-connector
USB cable (supplied)
Connector cover
EASY PRINT START
PC / CUSTOM PRINT
3
Press H to start printing.
4
To print another image, use GH
to select an image, and press the
o button.
To exit printing
After a selected image is displayed on the
screen, disconnect the USB cable from the
camera and printer.
OK
OK
PRINTEXIT
17
EN
Page 18
Using OLYMPUS Master 2
System requirements and installation of OLYMPUS Master 2
Install the OLYMPUS Master 2 software by
referring to the included installation guide.
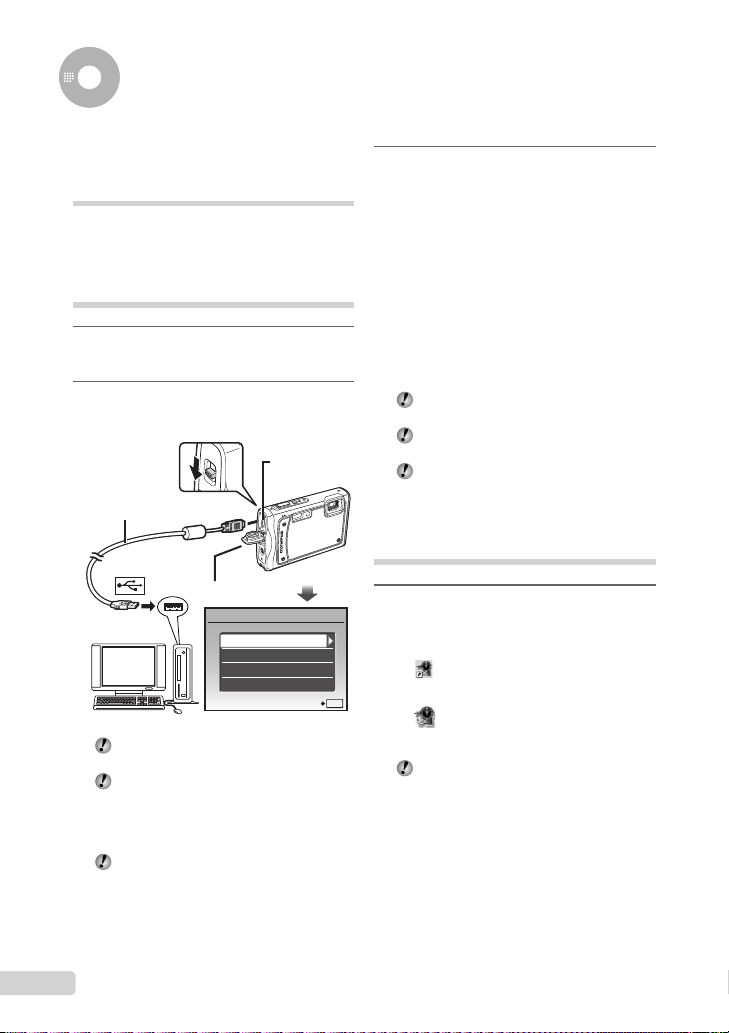
Connecting the camera to a computer
1
Make sure the camera is turned off.
The monitor is off.
●
2
Connect the camera to a computer.
The camera automatically turns on.
●
Multi-connector
USB cable (supplied)
Connector cover
USB
PC
EASY PRINT
CUSTOM PRINT
EXIT
You can charge the battery by selecting
[EXIT] and pressing the o button.
The [USB] screen above does not appear
and charging may automatically start in
cases where there is an insuffi cient charge
or the camera is connected to a computer
via a USB hub.
Locate the position of the USB port by
referring to your computer’s instructions
manual.
SET
3
Use EF to select [PC], and press
the o button.
The computer automatically detects the camera as
●
a new device on the fi rst connection.
Windows
After the computer detects the camera, a
message indicating the completion of the
setting appears. Confi rm the message and
click “OK”. The camera is recognized as a
removable disk.
Macintosh
When iPhoto started, exit iPhoto and start
OLYMPUS Master 2.
While the camera is connected to the
computer, shooting functions are disabled.
Connecting the camera to a computer via a
USB hub may cause unstable operation.
When [MTP] is set for the submenu that
appears by pressing H after selecting [PC]
in Step 3, images cannot be transferred to a
computer using OLYMPUS Master 2.
Starting OLYMPUS Master 2
1
Double-click the OLYMPUS Master 2
icon.
Windows
appears on the desktop.
OK
Macintosh
appears in the OLYMPUS Master 2 folder.
Browse window appears after starting the
●
software.
When you start OLYMPUS Master 2 for the
fi rst time after installation, “Default Settings”
and “Registration” screens appear. Follow
the instructions on the screen.
18
EN
Page 19

Operating OLYMPUS Master 2
When OLYMPUS Master 2 is started, Quick
Start Guide appears on the screen that
helps you to handle the camera without any
question. When the Quick Start Guide is not
displayed, click
the Guide.
For details on the operation, refer to the help
guide of the software.
in the toolbar to show
Transferring and saving images without using OLYMPUS Master 2
This camera is compatible with the USB Mass
Storage Class. You can transfer and save the
image data on your computer while the camera
and the computer are connected.
System requirements
Windows : Windows 2000 Professional/
Macintosh : Mac OS X v10.3 or later
On a computer running Windows Vista, if
Even if a computer has USB ports, proper
XP Home Edition/
XP Professional/Vista
[MTP] is set for the submenu that appears
by pressing H after selecting [PC] in Step 3
of “Connecting the camera to a computer”
(p. 57), Windows Photo Gallery will become
available.
operation is not guaranteed in the following
cases.
Computers with USB ports installed using an
●
expansion card, etc.
●
Computers without a factory-installed OS and
home-built computers
EN
19
Page 20

Appendix
Using a microSD Attachment
Do not use the attachment with Olympus
digital cameras that do not support this
microSD Attachment, as well as with other
brands of digital cameras, computers,
printers, and other devices that support
xD-Picture Card. Doing so not only may
damage the pictures taken, but may also
result in the malfunction of the device.
If the microSD card cannot be removed,
do not use force. Contact authorized
distributors/service centers.
Cards compatible with this camera
microSD card/microSDHC card
For a list of tested microSD cards, please
visit our website (http://www.olympus.com/).
Sending images
You can send images to a computer or
printer by using the USB cable provided with
the camera.
To send data to other devices, remove
the attachment from the camera and use
a commercially available microSD card
adapter.
Handling precautions
Do not touch the contact area of the
attachment or microSD card. Doing so
may cause failure in reading the images.
When fi ngerprints or stains are found on
the contact area, wipe the area with a soft
dry cloth.
Important information about water and shock resistant features
Water resistance: The waterproof feature is
warranted*1 to operate at depths up to 10 m
(32.8 feet) for up to one hour. The waterproof
feature may be compromised if the camera is
subject to substantial or excessive impact.
Shock resistance: The anti-shock feature
warrants*2 the operation of the camera against
accidental impact incurred from everyday use
of your digital compact camera. The anti-shock
feature does not unconditionally warrant all
defective operation or cosmetic damage.
Cosmetic damage, such as scratches and dents,
are not covered under the warranty.
As with any electronic device, proper care
and maintenance are required to preserve
the integrity and operation of your camera. To
maintain camera performance, please take your
camera to the nearest Olympus Authorized
Service Center to have it inspected after
any major impact. In the event the camera is
damaged as a result of negligence or misuse,
the warranty will not cover costs associated
with the service or repair of your camera. For
additional information on our warranty, please
visit to the Olympus website for your local area.
Please observe the following care instructions
for your camera.
*1 As determined by Olympus pressure testing
equipment in accordance with IEC Standard
Publication 529 IPX8 - This means that the
camera can be used normally under water
at a specifi ed water pressure.
*2 This anti-shock performance is confi rmed by
Olympus’ testing conditions in accordance
with MIL-STD-810F, Method 516.5,
Procedure IV (Transit Drop Test). For more
details of Olympus’ testing conditions,
please refer to the Olympus website for your
local area.
20
EN
Page 21

Before Use:
•
Check the camera for foreign material
including dirt, dust or sand.
•
Be sure to close the battery/card compartment
cover and connector cover fi rmly so that each
lock makes clicking sound.
•
Do not open the battery/card compartment
cover and connector cover with wet hands,
while under water, or in a damp or dusty
environment (e.g. beach).
After Use:
•
Be sure to wipe off any excess water or debris
after using the camera under water.
•
After the camera is used under seawater,
immerse the camera in a bucket containing
fresh water for about 10 minutes (with
the battery/card compartment cover and
connector cover fi rmly closed). After
that, dry the camera in a shade with good
ventilation.
•
Water drops may be observed on the inner
surface of the battery/card compartment
cover or connector cover after you open
each cover. If any water drops are found,
be sure to wipe them off before using the
camera.
Notes after use
Foreign materials may be attached to the
•
periphery of the lens cover from using the
camera in conditions with foreign materials
such as dirt, dust or sand, or when the lens
cover is not moving smoothly. If you continue
to use the camera in such conditions, the lens
could become damaged or the lens cover
could stick causing additional damage to the
camera. To avoid such damage, wash the
camera using the following method.
1 Insert the battery and close the battery/
card compartment cover and connector
cover fi rmly so that each lock makes the
clicking sound.
2 Fill a bucket with fresh water, immerse
the camera in the bucket with the lens
surface downward and shake the camera
thoroughly.
3 Press the n button several times in
the water and close/open the lens cover
repeatedly.
4 Furthermore, shake the camera further
with the cover opened.
Follow the Steps 1 to 4, then check if the
lens cover moves smoothly.
If the lens cover does not move smoothly,
rinse the lens face by placing it directly under
a strong stream of tap water and pressing the
n button repeatedly.
Storage and Maintenance
Do not leave the camera in an environment at
•
high temperature (40°C (104°F) or more) or at
low temperature (-10°C (14°F) or less). Failure
to do so may break down water resistance.
Do not use chemicals for cleaning, rust
•
prevention, anti-fogging, repairing, etc. Failure
to do so may break down water resistance.
Do not leave the camera in water for a long
•
time. Failure to do so will cause damage to
the camera’s appearance and/or deteriorate
water resistance.
In order to preserve the water resistant
•
feature, as with any underwater housing,
it is recommended that the waterproof
packing (and seals) are replaced annually.
For the Olympus distributors or service
stations where the waterproof packing can
be replaced, visit Olympus website for your
local area.
EN
21
Page 22

Closing Battery/card compartment cover
and Connector cover
Battery/card compartment cover
Connector cover
SAFETY PRECAUTIONS
CAUTION
RISK OF ELECTRIC SHOCK
DO NOT OPEN
CAUTION: TO REDUCE THE RISK OF ELECTRICAL
SHOCK, DO NOT REMOVE COVER (OR BACK).
NO USER-SERVICEABLE PARTS INSIDE.
REFER SERVICING TO QUALIFIED OLYMPUS
SERVICE PERSONNEL.
An exclamation mark enclosed in a
triangle alerts you to important operating
and maintenance instructions in the
DANGER If the product is used without observing
WARNING If the product is used without observing the
CAUTION If the product is used without observing the
WARNING!
TO AVOID THE RISK OF FIRE OR ELECTRICAL SHOCK,
NEVER DISASSEMBLE, EXPOSE THIS PRODUCT TO
WATER OR OPERATE IN A HIGH HUMIDITY ENVIRONMENT.
documentation provided with the product.
the information given under this symbol,
serious injury or death may result.
information given under this symbol, injury
or death may result.
information given under this symbol, minor
personal injury, damage to the equipment,
or loss of valuable data may result.
The included accessories (e.g. AC adaptor)
do not offer shock or water resistance.
22
EN
General Precautions
Read All Instructions — Before you use the
product, read all operating instructions. Save all
manuals and documentation for future reference.
Cleaning — Always unplug this product from the
wall outlet before cleaning. Use only a damp
cloth for cleaning. Never use any type of liquid or
aerosol cleaner, or any type of organic solvent to
clean this product.
Attachments — For your safety, and to avoid
damaging the product, use only accessories
recommended by Olympus.
Water and Moisture — For precautions on
products with weatherproof designs, read the
weatherproofi ng sections.
Location — To avoid damage to the product, mount
the product securely on a stable tripod, stand,
or bracket.
Power Source — Connect this product only to the
power source described on the product label.
Lightning — If a lightning storm occurs while using
an AC adapter, remove it from the wall outlet
immediately.
Foreign Objects — To avoid personal injury, never
insert a metal object into the product.
Heat — Never use or store this product near any
heat source such as a radiator, heat register,
stove, or any type of equipment or appliance that
generates heat, including stereo amplifi ers.
Page 23

Handling the Camera
WARNING
Do not use the camera near fl ammable or
•
explosive gases.
Do not use the fl ash and LED on people
•
(infants, small children, etc.) at close range.
You must be at least 1 m (3 ft.) away from the
•
faces of your subjects. Firing the fl ash too close
to the subject’s eyes could cause a momentary
loss of vision.
Keep young children and infants away from
•
the camera.
Always use and store the camera out of the
•
reach of young children and infants to prevent
the following dangerous situations which could
cause serious injury:
Becoming entangled in the camera strap,
•
causing strangulation.
Accidentally swallowing the battery, cards or
•
other small parts.
Accidentally fi ring the fl ash into their own eyes
•
or those of another child.
Accidentally being injured by the moving parts
•
of the camera.
Do not look at the sun or strong lights with the
•
camera.
Do not use or store the camera in dusty or
•
humid places.
Do not cover the fl ash with a hand while fi ring.
•
Do not insert anything into the microSD
•
Attachment other than the microSD card.
This attachment is exclusive for use of microSD
cards only. Other types of cards cannot be
installed.
Do not insert anything other than an xD-Picture
•
Card or the microSD Attachment into the
camera
If you insert a card by mistake, such as a microSD
card, do not use force. Contact authorized
distributors/service centers.
CAUTION
Stop using the camera immediately if you
•
notice any unusual odors, noise, or smoke
around it.
Never remove the batteries with bare hands,
•
which may cause a fi re or burn your hands.
Do not leave the camera in places where it may
•
be subject to extremely high temperatures.
Doing so may cause parts to deteriorate and, in
•
some circumstances, cause the camera to catch
fi re. Do not use the charger or AC adapter if it is
covered (such as a blanket). This could cause
overheating, resulting in fi re.
Handle the camera with care to avoid getting a
•
low-temperature burn.
When the camera contains metal parts,
•
overheating can result in a low-temperature
burn. Pay attention to the following:
When used for a long period, the camera will
•
get hot. If you hold on to the camera in this
state, a low-temperature burn may be caused.
In places subject to extremely cold
•
temperatures, the temperature of the camera’s
body may be lower than the environmental
temperature. If possible, wear gloves when
handling the camera in cold temperatures.
Be careful with the strap.
•
Be careful with the strap when you carry the
•
camera. It could easily catch on stray objects
and cause serious damage.
Do not touch the metallic parts of the camera
•
for a long period of time at low temperatures.
This may damage your skin. At low
•
temperatures, handle the camera while wearing
gloves.
EN
23
Page 24

Battery Handling Precautions
Follow these important guidelines to
prevent batteries from leaking, overheating,
burning, exploding, or causing electrical
shocks or burns.
DANGER
•
The camera uses a lithium ion battery specifi ed
by Olympus. Charge the battery with the specifi ed
AC adaptor or charger. Do not use any other AC
adaptors or chargers.
•
Never heat or incinerate batteries.
•
Take precautions when carrying or storing
batteries to prevent them from coming into contact
with any metal objects such as jewelry, pins,
fasteners, etc.
•
Never store batteries where they will be
exposed to direct sunlight, or subjected to high
temperatures in a hot vehicle, near a heat source,
etc.
•
To prevent causing battery leaks or damaging their
terminals, carefully follow all instructions regarding
the use of batteries. Never attempt to disassemble
a battery or modify it in any way, solder, etc.
•
If battery fl uid gets into your eyes, fl ush your eyes
immediately with clear, cold running water and
seek medical attention immediately.
•
Always store batteries out of the reach of small
children. If a child accidentally swallows a battery,
seek medical attention immediately.
WARNING
Keep batteries dry at all times.
•
To prevent batteries from leaking, overheating,
•
or causing a fi re or explosion, use only batteries
recommended for use with this product.
Insert the battery carefully as described in the
•
operating instructions.
If rechargeable batteries have not been recharged
•
within the specifi ed time, stop charging them and
do not use them.
Do not use a battery if it is cracked or broken.
•
If a battery leaks, becomes discolored or
•
deformed, or becomes abnormal in any other way
during operation, stop using the camera.
If a battery leaks fl uid onto your clothing or skin,
•
remove the clothing and fl ush the affected area
with clean, running cold water immediately. If
the fl uid burns your skin, seek medical attention
immediately.
Never subject batteries to strong shocks or
•
continuous vibration.
•
CAUTION
•
Before loading, always inspect the battery carefully
for leaks, discoloration, warping, or any other
abnormality.
•
The battery may become hot during prolonged
use. To avoid minor burns, do not remove it
immediately after using the camera.
•
Always unload the battery from the camera before
storing the camera for a long period.
Caution for Usage Environment
To protect the high-precision technology contained
•
in this product, never leave the camera in the
places listed below, no matter if in use or storage:
Places where temperatures and/or humidity
•
are high or go through extreme changes.
Direct sunlight, beaches, locked cars, or near
other heat sources (stove, radiator, etc.) or
humidifi ers.
In sandy or dusty environments.
•
Near fl ammable items or explosives.
•
In wet places, such as bathrooms or in the rain.
•
When using products with weatherproof designs,
read their manuals as well.
In places prone to strong vibrations.
•
Never drop the camera or subject it to severe
•
shocks or vibrations.
When mounted on a tripod, adjust the position of
•
the camera with the tripod head. Do not twist the
camera.
Do not touch electric contacts on cameras.
•
Do not leave the camera pointed directly at the
•
sun. This may cause lens or shutter curtain
damage, color failure, ghosting on the CCD, or
may possibly cause fi res.
Do not push or pull severely on the lens.
•
Before storing the camera for a long period,
•
remove the batteries. Select a cool, dry location
for storage to prevent condensation or mold from
forming inside the camera. After storage, test the
camera by turning it on and pressing the shutter
button to make sure that it is operating normally.
Always observe the operating environment
•
restrictions described in the camera’s manual.
The altitude/depth measurement function is
•
not approved by an offi cial institution. Use the
readings only for your reference.
24
EN
Page 25

Battery Handling Precautions
This camera uses a lithium ion battery specifi ed by
•
Olympus. Do not use any other type of battery.
If the battery’s terminals get wet or greasy, camera
•
contact failure may result. Wipe the battery well
with a dry cloth before use.
Always charge a battery when using it for the fi rst
•
time, or if it has not been used for a long period.
When operating the camera with battery power
•
at low temperatures, try to keep the camera and
spare battery as warm as possible. A battery that
has run down at low temperatures may be restored
after it is warmed at room temperature.
The number of pictures you can take may vary
•
depending on the shooting conditions or battery.
Before going on a long trip, and especially before
•
traveling abroad, purchase extra batteries. A
recommended battery may be diffi cult to obtain
while traveling.
Please recycle batteries to help save our planet’s
•
resources. When you throw away dead batteries,
be sure to cover their terminals and always
observe local laws and regulations.
LCD Monitor
•
Do not push the monitor forcibly; otherwise the
image may become vague, resulting in a playback
mode failure or damage to the monitor.
•
A strip of light may appear on the top/bottom of the
monitor, but this is not a malfunction.
•
When a subject is viewed diagonally in the
camera, the edges may appear zigzagged on the
monitor. This is not a malfunction; it will be less
noticeable in playback mode.
•
In places subject to low temperatures, the LCD
monitor may take a long time to turn on or its
color may change temporarily. When using the
camera in extremely cold places, it is a good idea
to occasionally place it in a warm place. An LCD
monitor exhibiting poor performance due to low
temperatures will recover in normal temperatures.
•
The LCD used for the monitor is made with
high-precision technology. However, black spots
or bright spots of light may appear constantly on
the LCD monitor. Due to its characteristics or the
angle at which you are viewing the monitor, the
spot may not be uniform in color and brightness.
This is not a malfunction.
Legal and Other Notices
Olympus makes no representations or warranties
•
regarding any damages, or benefi t expected by
using this unit lawfully, or any request from a third
person, which are caused by the inappropriate use
of this product.
Olympus makes no representations or warranties
•
regarding any damages or any benefi t expected
by using this unit lawfully which are caused by
erasing picture data.
EN
25
Page 26

Disclaimer of Warranty
Olympus makes no representations or warranties,
•
either expressed or implied, by or concerning any
content of these written materials or software, and
in no event shall be liable for any implied warranty
of merchantability or fi tness for any particular
purpose or for any consequential, incidental or
indirect damages (including but not limited to
damages for loss of business profi ts, business
interruption and loss of business information)
arising from the use or inability to use these
written materials or software or equipment. Some
countries do not allow the exclusion or limitation of
liability for consequential or incidental damages,
so the above limitations may not apply to you.
Olympus reserves all rights to this manual.
•
Warning
Unauthorized photographing or use of
copyrighted material may violate applicable
copyright laws. Olympus assumes no
responsibility for unauthorized photographing,
use or other acts that infringe upon the rights of
copyright owners.
Copyright Notice
All rights reserved. No part of these written
materials or this software may be reproduced
or used in any form or by any means, electronic
or mechanical, including photocopying and
recording or the use of any type of information
storage and retrieval system, without the prior
written permission of Olympus. No liability
is assumed with respect to the use of the
information contained in these written materials
or software, or for damages resulting from
the use of the information contained therein.
Olympus reserves the right to alter the features
and contents of this publication or software
without obligation or advance notice.
For customers in Europe
“CE” mark indicates that this product complies
with the European requirements for safety,
health, environment and customer protection.
“CE” mark cameras are intended for sales in
Europe.
This symbol [crossed-out wheeled bin WEEE
Annex IV] indicates separate collection of waste
electrical and electronic equipment in the EU
countries. Please do not throw the equipment
into the domestic refuse.
Please use the return and collection systems
available in your country for the disposal of this
product.
This symbol [crossed-out wheeled bin Directive
2006/66/EC Annex II] indicates separate
collection of waste batteries in the EU countries.
Please do not throw the batteries into the
domestic refuse. Please use the return and
collection systems available in your country for
the disposal of the waste batteries.
Use Only Dedicated Rechargeable Battery,
Battery Charger and AC adaptor
We strongly recommend that you use only the
genuine Olympus dedicated rechargeable battery,
battery charger and AC adaptor with this camera.
Using a non-genuine rechargeable battery, battery
charger and/or AC adaptor may result in fi re or
personal injury due to leakage, heating, ignition or
damage to the battery. Olympus does not assume
any liability for accidents or damage that may
result from the use of a battery, battery charger
and/or AC adaptor that are not genuine Olympus
accessories.
Provisions of warranty
1 If this product proves to be defective, although
it has been used properly (in accordance with
the written Safety Precautions and Operating
instructions supplied with it), during a period
of two years from the date of purchase from
an authorized Olympus distributor within the
business area of Olympus Imaging Europa GmbH
as stipulated on the website: http://www.olympus.
com this product will be repaired, or at Olympus’s
option replaced, free of charge. To claim under
this warranty the customer must take the product
and this Warranty Certifi cate before the end
of the two year warranty period to the dealer
where the product was purchased or any other
Olympus service station within the business area
of Olympus Imaging Europa GmbH as stipulated
on the website: http://www.olympus.com. During
the one year period of the World Wide Warranty
the customer may turn the product in at any
Olympus service station. Please notice that not in
all countries such Olympus service station exists.
26
EN
Page 27

2 The customer shall transport the product to the
dealer or Olympus authorized service station
at his own risk and shall be responsible for any
costs incurred in transporting the product.
3 This warranty does not cover the following
and the customer will be required to pay repair
charge, even for defects occurring within the
warranty period referred to above.
Any defect that occurs due to mishandling
a.
(such as an operation performed that is not
mentioned in the Safety Precautions or other
sections of the instructions, etc.)
Any defect that occurs due to repair,
b.
modifi cation, cleaning, etc. performed by
anyone other than Olympus or an Olympus
authorized service station.
Any defect or damage that occurs due to
c.
transport, a fall, shock, etc. after purchase of
the product.
Any defect or damage that occurs due to fi re,
d.
earthquake, fl ood damage, thunderbolt, other
natural disasters, environmental pollution and
irregular voltage sources.
Any defect that occurs due to careless or
e.
improper storage (such as keeping the
product under conditions of high temperature
and humidity, near insect repellents such as
naphthalene or harmful drugs, etc.), improper
maintenance, etc.
Any defect that occurs due to exhausted
f.
batteries, etc.
Any defect that occurs due to sand, mud, etc.
g.
entering the inside of the product casing.
When this Warranty Certifi cate is not returned
h.
with the product.
When any alterations whatsoever are made
i.
to the Warranty Certifi cate regarding the year,
month and date of purchase, the customer’s
name, the dealer’s name, and the serial
number.
When proof of purchase is not presented with
j.
this Warranty Certifi cate.
4 This Warranty applies to the product only; the
Warranty does not apply to any other accessory
equipment, such as the case, strap, lens cap and
batteries.
5 Olympus’s sole liability under this warranty shall
be limited to repairing or replacing the product.
Any liability for indirect or consequential loss or
damage of any kind incurred or suffered by the
customer due to a defect of the product, and
in particular any loss or damage caused to any
lenses, fi lms, other equipment or accessories
used with the product or for any loss resulting
from a delay in repair or loss of data, is excluded.
Compelling regulations by law remain unaffected
by this.
Notes regarding warranty maintenance
1 This warranty will only be valid if the Warranty
Certifi cate is duly completed by Olympus or an
authorized dealer or other documents contain
suffi cient proof. Therefore, please make sure
that your name, the name of the dealer, the
serial number and the year, month and date
of purchase are all completed or the original
invoice or the sales receipt (indicating the
dealer’s name, the date of purchase and product
type) is attached to this Warranty Certifi cate.
Olympus reserves the right to refuse free-ofcharge service if neither Warranty Certifi cate is
completed nor the above document is attached or
if the information contained in it is incomplete or
illegible.
2 Since this Warranty Certifi cate will not be re-
issued, keep it in a safe place.
* Please refer to the list on the website: http://www.
olympus.com for the authorized international
Olympus service network.
Trademarks
IBM is a registered trademark of International
•
Business Machines Corporation.
Microsoft and Windows are registered trademarks
•
of Microsoft Corporation.
Macintosh is a trademark of Apple Inc.
•
xD-Picture Card™ is a trademark.
•
microSD is a trademark of the SD Association.
•
All other company and product names are
•
registered trademarks and/or trademarks of their
respective owners.
The standards for camera fi le systems referred to
•
in this manual are the “Design rule for Camera File
system/DCF” standards stipulated by the Japan
Electronics and Information Technology Industries
Association (JEITA).
EN
27
Page 28

SPECIFICATIONS
Camera
Product type : Digital camera (for shooting and displaying)
Recording system
Still pictures : Digital recording, JPEG (in accordance with Design rule for Camera File
Applicable standards : Exif 2.2, Digital Print Order Format (DPOF), PRINT Image Matching III,
Sound with still pictures : Wave format
Movie : AVI Motion JPEG
Memory : Internal memory
No. of effective pixels : 12,000,000 pixels
Image pickup device : 1/2.33” CCD (primary color fi lter), 12,700,000 pixels (gross)
Lens : Olympus lens 5.0 to 18.2 mm, f3.5 to 5.1
Photometric system : Digital ESP metering, spot metering system
Shutter speed : 4 to 1/2000 sec.
Shooting range : 0.5 m (1.6 ft.) to ∞ (W/T) (normal)
Monitor : 2.7” TFT color LCD display, 230,000 dots
Flash charge time : Approx. 3.5 sec. (for full fl ash discharge at room temperature using a
Connector : Multi-connector (DC-IN jack USB connector, A/V OUT jack)
Automatic calendar system : 2000 up to 2099
Water resistance
Type : Equivalent to IEC Standard publication 529 IPX8 (under OLYMPUS test
Meaning : Camera can normally be used under water at a specifi ed water
Dust resistance : IEC Standard publication 529 IP6X (under OLYMPUS test conditions)
Operating environment
Temperature : -10 °C to 40 °C (14 °F to 104 °F) (operation)/
Humidity : 30 % to 90 % (operation)/10 % to 90 % (storage)
Power supply : One Olympus lithium ion battery (LI-50B) or Olympus AC adapter
Dimensions : 95.0 mm (W) × 61.7 mm (H) × 21.5 mm (D) (3.7 × 2.4 × 0.8 in.)
Weight : 182 g (5.9 oz) (excluding battery and card)
system (DCF))
PictBridge
xD-Picture Card (16 MB to 2 GB) (TypeH/M/M+, Standard)
microSD card/microSDHC card (with the supplied microSD Attachment)
(equivalent to 28 to 102 mm on a 35mm camera)
0.1 m (0.3 ft.) to ∞ (W), 0.3 m (1.0 ft.) to ∞ (T) (macro mode)
0.02 m (0.8 in.) to 0.5 m (1.6 ft.) (W only) (super macro mode)
0.07 m (2.8 in.) to 0.2 m (0.7 ft.) (W only) (S-macro LED mode)
new fully charged battery)
conditions), available in 10 m (32.8 feet) deep water
pressure.
-20 °C to 60 °C (-4 °F to 140 °F) (storage)
(D-7AC/separately sold)
(excluding protrusions)
“Shadow Adjustment Technology” function contains patented
technologies from Apical Limited.
28
EN
Page 29

Lithium ion battery (LI-50B)
Product type : Lithium ion rechargeable battery
Model No. : LI-50BA/LI-50BB
Standard voltage : DC 3.7 V
Standard capacity : 925 mAh
Battery life : Approx. 300 full charges (varies on usage)
Operating environment
Temperature : 0°C to 40°C (32°F to 104°F) (charging)/
Dimensions : 34.4 mm (W) × 40.0 mm (H) × 7.0 mm (D) (1.4 × 1.6 × 0.3 in.)
Weight : Approx. 20 g (0.7 oz)
-10°C to 60°C (14°F to 140°F) (operation)/
-10°C to 35°C (14°F to 95°F) (storage)
AC adaptor (F-1AC)
Model No. : F-1AC-1/F-1AC-2/F-1AC-3
Power requirements : AC 100 to 240 V (50/60 Hz)
Output : DC 5 V, 700 mA
Charging time : Approx. 2.5 hours
Operating environment
Temperature : 0°C to 40°C (32°F to 104°F) (operation)/
Dimensions : 48.0 mm (W) × 60.0 mm (H) × 21.0 mm (D) (1.9 × 2.4 × 0.8 in.) (F-1AC-1)/
Weight : Approx. 80.0 g (2.8 oz) (F-1AC-1)/
Connecting cord
length
Using in low temperatures
Low temperature operation of the optional Olympus xD-Picture Card and lithium ion battery are guaranteed to
0°C (32°F). However, the following have been tested for use with this product in temperatures up to -10°C (14°F).
-20°C to 60°C (-4°F to 140°F) (storage)
39.0 mm (W) × 67.0 mm (H) × 21.0 mm (D) (1.5 × 2.6 × 0.8 in.) (F-1AC-2)/
50.0 mm (W) × 70.0 mm (H) × 21.0 mm (D) (2.0 × 2.8 × 0.8 in.) (F-1AC-3)
Approx. 70.0 g (2.5 oz) (F-1AC-2)/
Approx. 90.0 g (3.2 oz) (F-1AC-3)
: Approx. 1.5 m (4.9 ft.)
Olympus xD-Picture Card
Standard
TypeM/M+
TypeH
Olympus lithium ion battery
LI-50B
The number of storable still pictures is reduced in low temperatures.●
16MB 32MB 64MB 128MB 256MB 512MB 1GB 2GB
999999
9999
9999
9 Operation confi rmed
EN
29
Page 30

microSD Attachment
Product type : Attachment for microSD card
Operating Environment
Temperature : -10°C to 40°C (14 to 104°F) (operation)/
Humidity : 95% and below (operation)/85% and below (storage)
Dimensions : 25.0 mm (W) x 20.3 mm (H) x 1.7 mm (D) (1.0 × 0.8 × 0.07 in.)
Weight : Approx. 0.9 g (0.03 oz)
Design and specifi cations subject to change without notice.
-20°C to 65°C (-4 to 149°F) (storage)
(Handle:2.2 mm (0.09 in.))
30
EN
Page 31

MEMO
EN
31
Page 32

ContenuContenu
Préparer l’appareil photo ....................33
¾
Vérifi er le contenu de la boîte ................33
Fixer la courroie .....................................33
Insérer la batterie et la carte xD-Picture
Card™ (vendue séparément) dans
l’appareil photo ......................................33
Charger la batterie .................................34
Utiliser une carte microSD/carte
microSDHC (vendue séparément) ........36
Régler la date et l’heure ........................36
Changer la langue d’affi chage ...............37
¾
Prise de vue, affi chage et
effacement ............................................38
Prendre des photos avec une valeur
d’ouverture et une vitesse d’obturation
optimales (mode
K
) .............................38
Affi cher les photos .................................39
Effacer des photos pendant la lecture
(effacement d’une seule photo) .............40
¾
Utiliser les modes prise de vue ..........41
Utiliser le mode le plus approprié pour la
scène de prise de vue (mode
Améliorer le teint et la texture de la peau
b
(mode
) .......................................42
Prendre des photos avec les réglages
automatiques (mode
Enregistrer des vidéos (mode
A
)...................42
s
n
) .....41
) .........43
Utiliser les fonctions de prise
¾
de vue ...................................................44
Utiliser le zoom optique .........................44
Utiliser le fl ash .......................................44
Ajuster la luminosité
(compensation d’exposition) ..................45
Prise de vue en gros plan (gros plan) ....45
Utiliser le retardateur .............................46
Appeler et utiliser rapidement des
fonctions de prise de vue .......................46
¾
Imprimer ...............................................47
¾
Utiliser OLYMPUS Master 2 ................48
¾
Appendice ............................................50
Utiliser un Adaptateur microSD .............50
Informations importantes relatives aux
fonctions d’étanchéité à l’eau et de
résistance aux chocs .............................50
PRÉCAUTIONS DE SÉCURITÉ ...........52
CARACTÉRISTIQUES ..........................58
● Nous vous remercions d’avoir acheté un appareil
photo numérique Olympus. Avant de commencer
à utiliser votre nouvel appareil photo, veuillez lire
attentivement ces instructions afi n d’optimiser ses
performances et sa durée de vie. Conservez ce
manuel dans un endroit sûr pour pouvoir vous y
référer ultérieurement.
● Nous vous recommandons de prendre des
photos-test pour vous habituer à votre appareil
avant de commencer à prendre de vraies photos.
Les pages de référence sont celles du Manuel d’instructions (CD-ROM fourni). Veuillez vous reporter au
Manuel d’instructions du CD-ROM.
32
FR
● En vue de l’amélioration constante de nos
produits, Olympus se réserve le droit d’actualiser
ou de modifi er les informations contenues dans
ce manuel.
● Les captures d’écran et les illustrations de
l’appareil photo présentées dans ce manuel
ont été réalisées au cours des phases de
développement et peuvent ne pas correspondre
au produit réel.
Page 33

Préparer l’appareil photo
Vérifi er le contenu de la boîte
Courroie
Appareil photo
numérique
Batterie au lithium-ion
LI-50B
ou
Adaptateur secteur (F-1AC)
Câble USB Câble AV
CD-ROM OLYMPUS
Master 2
Autres accessoires non illustrés : Manuel
d’instructions, carte de garantie
Le contenu est susceptible de varier en fonction de
l’endroit où l’appareil est acheté.
Adaptateur microSD
Fixer la courroie
Tendez la courroie afi n qu’elle ne soit pas
relâchée.
Insérer la batterie et la carte
xD-Picture Card™ (vendue
séparément) dans l’appareil
photo
N’insérez dans l’appareil photo rien
d’autre qu’une carte xD-Picture Card ou le
l’Adaptateur microSD.
1
1
Couvercle du compartiment de la
batterie/carte
2
FR
33
Page 34

2
Touche de verrouillage de la batterie
La batterie possède une face avant et une
face arrière. Insérez la batterie dans le
bon sens, tel qu’illustré. L’appareil photo
ne fonctionne pas si la batterie n’est pas
insérée correctement.
Insérez la batterie tout en faisant glisser la
touche de verrouillage de la batterie dans le
sens de la fl èche.
Faites glisser la touche de verrouillage de
la batterie dans le sens de la fl èche pour
déverrouiller, puis retirez la batterie.
N’oubliez pas d’éteindre l’appareil photo
avant d’ouvrir ou de fermer le couvercle du
compartiment de la batterie/carte.
3
EncocheZone d’index
4
Cet appareil photo permet à l’utilisateur de
prendre des photos à l’aide de la mémoire
interne même lorsque aucune carte
xD-Picture Card (vendue séparément) n’est
insérée. “Utiliser une carte xD-Picture Card”
(p. 66)
“Nombre de photos pouvant être stockées
(images fi xes)/durée d’enregistrement
continue (vidéos) dans la mémoire interne
et la carte xD-Picture Card” (p. 67)
Pour retirer la carte xD-Picture Card
12
Enfoncez la carte jusqu’à ce qu’elle émette
un léger bruit sec et sorte légèrement, puis
saisissez-la pour l’enlever.
Charger la batterie
L’adaptateur secteur fourni (F-1AC/avec
câble d’alimentation ou de type enfi chable)
varie suivant la région où l’appareil photo
est acheté. Si vous avez reçu un adaptateur
secteur de type enfi chable, branchez-le
Insérez la carte bien droit jusqu’à ce qu’elle
se mette en place avec un léger bruit sec.
Ne touchez pas la zone de contact de la
carte.
34
FR
directement sur une prise de courant.
L’adaptateur secteur fourni (F-1AC) est
conçu exclusivement pour la charge.
Assurez-vous qu’aucune opération telle que
la prise de vue et l’affi chage d’image n’est
exécutée pendant que l’adaptateur secteur
est connecté à l’appareil photo.
Page 35

Exemple : Adaptateur secteur avec
câble d’alimentation
1
2
Prise de
courant
Adaptateur
secteur
Câble
d’alimentation
Connecteur multiple
Couvercle du connecteur
3
Indicateur de charge
Allumé (orange) :
chargement en cours
Allumé (bleu) :
chargement terminé
La batterie est livrée en partie chargée.
Avant l’utilisation, vous devez charger
la batterie jusqu’à ce que l’indicateur
de charge s’éteigne (au bout d’environ
2,5 heures).
Si l’indicateur de charge ne s’allume pas ou
s’il clignote, les connexions peuvent ne pas
être effectuées correctement, ou la batterie,
l’appareil photo et/ou l’adaptateur secteur
peut être abîmé(e).
Pour plus de détails sur la batterie et
l’adaptateur secteur, voir “Batterie,
adaptateur secteur (fourni), chargeur (vendu
séparément)” (p. 64).
Quand faut-il charger la batterie ?
Chargez la batterie quand le message
d’erreur ci-dessous apparaît.
Clignote en rouge
BATTERIE VIDE
Coin supérieur droit
de l’écran
Message d’erreur
FR
35
Page 36

Utiliser une carte microSD/
carte microSDHC (vendue
séparément)
La carte microSD/carte microSDHC (ciaprès désignées “carte microSD”) sont aussi
compatibles avec cet appareil si l’Adaptateur
microSD est utilisé.
“Utiliser un Adaptateur microSD” (p. 68)
1
Insérez la carte microSD dans
l’Adaptateur.
Insérez la carte
à fond.
2
Insérez l’Adaptateur microSD dans
l’appareil photo.
Encoche
Pour retirer la carte microSD
Régler la date et l’heure
La date et l’heure que vous réglez ici sont
sauvegardées pour les noms de fi chier d’image,
les impressions de date et autres données.
1
Appuyez sur la touche n pour
allumer l’appareil photo.
L’écran de réglage de la date et de l’heure
●
s’affi che si ces dernières ne sont pas réglées.
X
AM
JHEURE
---- -- -- -- --
MENU
ANNULE
Écran de réglage de la date et
de l’heure
2
Utilisez EF pour sélectionner
l’année sous [A].
X
AM
-- -- -- --
2009
MENU
ANNULE
3
Appuyez sur H pour sauvegarder le
réglage de [A].
X
AMJ
JHEURE
AMJ
AM
J HEURE
-- -- -- --
2009
MENU
Retirez la carte microSD en la maintenant
droite.
Ne touchez pas la zone de contact de
l’Adaptateur microSD ou de la carte
microSD.
36
FR
ANNULE
AMJ
Page 37

4
Tout comme aux étapes 2 et 3,
utilisez EFGH et la touche
o pour régler [M] (mois), [J] (jour),
[HEURE] (heures et minutes) et
[A/M/J] (ordre des dates).
Pour régler l’heure avec précision, appuyez
sur la touche o lorsque le signal de temps
atteint 00 seconde.
Pour changer la date et l’heure, effectuez le
réglage depuis le menu. [X] (Date/heure)
(p. 46)
Pour vérifi er la date et l’heure
Appuyez sur la touche g alors que l’appareil
photo est éteint. L’heure actuelle s’affi che
environ 3 secondes.
Changer la langue d’affi chage
Vous pouvez sélectionner la langue pour le
menu et les messages d’erreur qui s’affi chent
sur l’écran.
1
Appuyez sur la touche m,
puis appuyez sur EFGH pour
sélectionner [E] (REGLAGE).
REGLAGE
3
Utilisez EF pour sélectionner
[W], puis appuyez sur la
touche o.
W
4
Utilisez EFGH
ENGLISH
FRANCAIS
DEUTSCH
ESPAÑOL
ITALIANO
RETOUR
ུࢊ
MENU
pour sélectionner
la langue et appuyez sur la touche
5
Appuyez sur la touche m.
CONF
OK
o.
MENU
QUITTE CONF
2
Appuyez sur la touche o.
REGLAGE
1
FORMATER
2
SAUVEGARDER
3
4
CONFIG ON
COULEUR MENU
MENU
QUITTE
FRANCAIS
NORMAL
CONF
OK
OK
37
FR
Page 38

Prise de vue, affi chage et effacement
1/400
F3.5
Prendre des photos avec une
valeur d’ouverture et une
vitesse d’obturation optimales
(mode K)
Dans ce mode, vous pouvez utiliser la fonction
de prise de vue automatique tout en ayant
accès, lorsque nécessaire, à la modifi cation
d’une vaste gamme d’autres fonctions
dans le menu de prise de vue, telles que la
compensation d’exposition, la balance des
blancs, etc.
1
Réglez la molette mode sur K.
2
Appuyez sur la touche n pour
allumer l’appareil photo.
Nombre de photos
pouvant être stockées
P
12
M
N
ORM
Écran
(écran de mode de veille)
Appuyez sur la touche n une nouvelle
fois pour éteindre l’appareil photo.
(p. 67)
IN
3
Tenez l’appareil photo et cadrez la
photo à prendre.
Écran
Tenue horizontale
Tenue verticale
Lorsque vous tenez l’appareil photo,
évitez de cacher le fl ash avec le doigts ou
autrement.
4
Enfoncez le déclencheur à mi-
course pour faire la mise au point
sur le sujet.
Une fois la mise au point effectuée sur le sujet,
●
l’appareil verrouille l’exposition (la vitesse
d’obturation et la valeur d’ouverture s’affi chent)
et le repère de mise au point automatique (AF)
4
devient verte.
●
Si le repère de mise au point automatique (AF)
clignote en rouge, cela signifi e que l’appareil photo
n’a pas réussi à faire la mise au point. Reprenez
la mise au point.
P
P
1/400 F3.5
38
FR
Enfoncez à
mi-course
“Mise au point” (p. 61)
1/400
F3.5
Repère de mise au point
automatique (AF)
Vitesse d’obturation
Valeur d’ouverture
Page 39

5
1/400
F3.5
Pour prendre la photo, enfoncez
doucement le déclencheur jusqu’au
fond, en prenant soin de ne pas
secouer l’appareil photo.
P
Affi cher les photos
1
Réglez la molette mode sur q.
Nombre de photos
Enfoncez
complètement
1/400
F3.5
Écran d’aperçu de photo
Pour affi cher les photos pendant la
prise de vue
La pression sur la touche q permet
d’affi cher les photos. Pour revenir au mode
prise de vue, appuyez de nouveau sur la
touche q ou enfoncez le déclencheur à
mi-course.
Vous pouvez faire fonctionner l’appareil
photo en tapotant le boîtier lorsque
[TAP CONTROL] est sur [ACTIVE].
[TAP CONTROL] (p. 49)
Pour enregistrer des vidéos
“Enregistrer des vidéos (mode A)” (p. 21)
N
2009.08.26 12:30
Photo lue
2
Utilisez EFGH pour sélectionner
100-0001
une photo.
Reculez de 10
photos
Affi chez la photo
précédente
Vous pouvez modifi er la taille d’affi chage
des photos. “Vue d’index, vue de calendrier
et vue en gros plan” (p. 27)
Affi chez la photo
suivante
Avancez de 10
photos
Pour faire la lecture des vidéos
Sélectionnez une vidéo et appuyez sur la
touche o.
2009.08.26 12:30
OK
LECT MOVIE
Vidéo
12
ORM
IN
100-0004
IN
M
1
4
FR
39
Page 40

Opérations lors de la lecture de fi lm
2009.08.26
12:30
100-0004
00:12/00:34
2009.08.26
12:30
100-0004
00:14/00:34
EFFACER
NON
Volume : Pendant la lecture, appuyez sur
EF.
Avance rapide/recul : Faites votre
sélection à l’aide de GH. La vitesse de
lecture change chaque fois que vous
appuyez sur une touche, suivant le cycle de
vitesse de lecture 2x, 20x et normale (1x),
dans le sens correspondant à la touche sur
laquelle vous appuyez.
Pause : Appuyez sur la touche o.
2009.08.26
12:30
Durée écoulée/
Durée
d’enregistrement
totale
Première (dernière) image/avancer
d’une image : Pendant la pause, appuyez
sur E pour affi cher la première image, et
sur F pour affi cher la dernière image. La
lecture s’effectue en sens inverse lorsque
vous appuyez sur G, la lecture s’effectue
normalement lorsque vous appuyez sur H.
Appuyez sur la touche o pour poursuivre
la lecture.
Pendant la lecture
Pendant la pause
IN
00:12/00:34
2009.08.26
IN
00:14/00:34
100-0004
12:30
100-0004
/
Pour arrêter la lecture de vidéos
Appuyez sur la touche m.
Effacer des photos pendant
la lecture (effacement d’une
seule photo)
1
Appuyez sur la touche D alors que
la photo à effacer s’affi che.
EFFACER
OUI
NON
MENU
2
Appuyez sur E
pour sélectionner
[OUI], puis appuyez sur la touche
[K EFFACER] (p. 40)
CONFANNULE
IN
OK
o.
40
FR
Page 41

Utiliser les modes prise de vue
Cette section décrit les modes prise de vue
disponibles. En fonction du mode, certains
réglages peuvent être modifi és. Pour plus de
détails sur les fonctions réglables, reportezvous à “Menus des fonctions de prise de vue”,
page 29.
Utiliser le mode le plus
approprié pour la scène de
prise de vue (mode s)
1
Réglez la molette mode sur s.
PORTRAIT
MENU
QUITTE
L’explication du mode sélectionné s’affi che
●
lorsque vous appuyez sur la touche E de manière
continue.
2
Utilisez EF pour sélectionner le
mode prise de vue le mieux adapté
à la scène, puis appuyez sur la
touche o.
Icône indiquant
le mode
de scène
sélectionné
CONF
Pour prendre des photos sous l’eau
Sélectionnez [T PHOTOS SOUS L’EAU],
[k SOUS-MARIN LARGE 1],
[l SOUS-MARIN LARGE 2]
[H SOUS-MARIN MACRO].
Si la molette mode est réglée sur s
pendant la prise de photos sous l’eau (c’està-dire pendant que le détecteur sous-marin
répond), les 4 modes mentionnés ci-dessus
apparaissent avant les autres modes.
*1
Lors du réglage sur [l SOUS-MARIN
LARGE 2], la distance de mise au point est
automatiquement réglée sur environ 5,0 m.
Vous devez utiliser un caisson étanche
lorsque vous utilisez l’appareil photo à des
profondeurs supérieures à 10 m.
Lorsque [MANOMETRE] (p. 48) est réglé
sur [OUI], l’altitude ou la profondeur d’eau
(pression atmosphérique/hydraulique)
apparaît sur l’écran du mode de veille de la
OK
prise de vue, en tant que guide approximatif.
“Affi chage du mode prise de vue” (p. 8)
“Informations importantes relatives aux
fonctions d’étanchéité à l’eau et de
résistance aux chocs” (p. 68)
*1
,
Pour verrouiller la distance de mise au
point pour une prise de vue sous l’eau
(verrou AF)
Lorsque [T PHOTOS SOUS L’EAU],
[k SOUS-MARIN LARGE 1] ou [H SOUSMARIN MACRO] est sélectionné, appuyez
sur F.
Repère ^
AFL
12
M
N
ORM
Pour passer à un autre mode de scène,
utilisez le menu. [O MODE SCENE] (p. 33)
IN
4
Pour annuler, appuyez de nouveau sur F
pour faire disparaître le repère ^.
12
M
N
ORM
IN
4
41
FR
Page 42

Améliorer le teint et la texture
12
M
4
N
ORM
de la peau (mode b)
L’appareil photo détecte le visage d’une
personne et donne à la peau un aspect lisse et
translucide pour prendre la photo.
1
Réglez la molette mode sur b.
Indicateur de mode b
12
M
N
ORM
2
Pointez l’appareil photo vers le
sujet. Vérifi ez le cadre qui s’affi che
autour du visage détecté par
l’appareil photo, puis enfoncez le
déclencheur pour prendre la photo.
L’image non modifi ée et l’image modifi ées sont
●
enregistrées.
●
Si l’image ne peut pas être retouchée, seule
l’image non modifi ée est enregistrée.
Pour certains sujets, il se peut que le cadre
n’apparaisse pas, qu’il mette un certain
temps à apparaître ou que les retouches ne
puissent pas s’activer.
Le réglage [TAILLE IMAGE] de l’image
retouchée est limité à [J] ou inférieur.
IN
Prendre des photos avec
les réglages automatiques
(mode A)
L’appareil photo sélectionne automatiquement
le mode prise de vue optimal pour la scène.
Il s’agit d’un mode entièrement automatique
vous permettant de prendre une photo
adaptée à la scène en appuyant simplement
sur le déclencheur. Les réglages du menu
des fonctions de prise de vue ne sont pas
disponibles en mode A.
1
Réglez la molette mode sur A.
L’indicateur prend la forme de
l’icône du mode de scène de
4
Enfoncez le déclencheur à mi-course ou appuyez
●
sur la touche g pour vérifi er le mode prise de
vue sélectionné automatiquement par l’appareil
photo.
Dans certains cas, il se peut que l’appareil
photo ne sélectionne par le mode de prise
de vue souhaité.
Lorsque l’appareil photo ne peut pas
identifi er le mode optimal à utiliser, il
sélectionne le mode P.
vue sélectionné par l’appareil
photo.
i
AUTO
12
M
N
ORM
IN
4
42
FR
Page 43

Enregistrer des vidéos
00:35
QVGA
15
00:34
REC
(mode n)
L’audio est enregistré avec la vidéo.
1
Réglez la molette mode sur n.
Indicateur de mode A
QVGA
15
Pour zoomer pendant l’enregistrement
de vidéos
Le zoom optique n’est pas disponible
lorsque vous enregistrez des vidéos.
Utilisez [ZOOM NUM] (p. 31).
Pour enregistrer des vidéos avec la
stabilisation des images numériques
[MODE VIDEO] (p. 32)
2
Enfoncez le déclencheur à mi-
course pour faire la mise au
point sur le sujet, puis appuyez
doucement jusqu’au fond pour
lancer l’enregistrement.
Allumé en rouge pendant la
prise de vue
REC
Enfoncez à
mi-course
IN
00:35
Enfoncez
complètement
Durée d’enregistrement restante (p. 66)
3
Enfoncez doucement le
00:34
déclencheur jusqu’au fond pour
arrêter l’enregistrement.
43
FR
Page 44

OK
CONF
FLASH AUTO
Utiliser les fonctions de prise de vue
En plus d’une vaste gamme de modes prise de
vue, des fonctions sont également disponibles
pour ouvrir de plus vastes possibilités
d’expression et permettre d’exploiter la plage de
prise de vue pour vos photos.
Utiliser le zoom optique
En appuyant sur la touche de zoom vous pouvez
ajuster la plage de prise de vue.
Appuyer sur la touche
grand angle (W)
P
W T
12
M
N
ORM
Barre de zoom
Zoom optique : 3,6×, Zoom numérique : 5,0×.
Il est recommandé d’utiliser
[STABILISATEUR] (images fi xes)/[MODE
VIDÉO] (vidéos) (p. 32) lors de la prise de
vue avec le zoom téléobjectif.
Prendre des photos plus grandes sans
réduire la qualité d’image
[ZOOM FIN] (p. 31)
Prendre des photos plus grandes
[ZOOM NUM] (p. 31)
IN
4
Appuyer sur la touche
de téléobjectif (T)
P
W T
12
M
N
ORM
IN
4
L’apparence de la barre de zoom identifi e
l’état du zoom fi n ou du zoom numérique.
Lors de
l’utilisation du
zoom optique
Plage de zoom optique
Lors de
l’utilisation du
zoom fi n
Plage de
Lors de
l’utilisation
du zoom
numérique
zoom fi n
Plage de zoom
numérique
Utiliser le fl ash
Vous pouvez sélectionner la fonction de fl ash la
mieux adaptée aux conditions de prise de vue
afi n d’obtenir la photo désirée.
1
Appuyez sur la touche #.
Vous pouvez faire fonctionner l’appareil
photo en tapotant le boîtier lorsque
[TAP CONTROL] est sur [ACTIVE].
[TAP CONTROL] (p. 49)
AUTO
P
OK
CONF
44
FR
FLASH AUTO
! # $
AUTO
Page 45

2
0.0
+0.3
+0.7
+1.0
OK
CONF
OFF
Utilisez GH pour sélectionner
l’option de réglage, puis appuyez
sur la touche o pour valider.
Option Description
FLASH AUTO
YEUX ROUGE
FLASH FORCÉ
PAS D FLASH Le fl ash n’est pas émis.
Le fl ash est émis automatiquement
à faible éclairage ou à contre-jour.
L’appareil émet un pré-fl ash pour
limiter l’apparition du phénomène
des yeux rouges sur vos photos.
Le fl ash est émis quel que soit
l’éclairage disponible.
Ajuster la luminosité
(compensation d’exposition)
Vous pouvez augmenter ou réduire la luminosité
normale (exposition adéquate) réglée par
l’appareil photo en fonction du mode prise de
vue (saut pour A) afi n d’obtenir la photo
vraiment désirée.
1
Appuyez sur la touche F.
COMPENS D’EXPO
0.0
+0.7
Valeur de compensation d’exposition
2
Utilisez EFGH pour sélectionner
la luminosité désirée pour la photo,
puis appuyez sur la touche o.
+0.3
+1.0
Prise de vue en gros plan
(gros plan)
Cette fonction permet à l’appareil photo de faire
la mise et point et de prendre en photo des
sujets de très près.
1
Appuyez sur la touche &.
Vous pouvez faire fonctionner l’appareil
photo en tapotant le boîtier lorsque
[TAP CONTROL] est sur [ACTIVE].
[TAP CONTROL] (p. 49)
P
2
Utilisez GH pour sélectionner
l’option de réglage, puis appuyez
sur la touche o pour valider.
Option Description
DESACTIVE Le mode gros plan est désactivé.
GROS PLAN
SUPER
MACRO
S-MACRO
*3*4
LED
*1
Lorsque le zoom est réglé sur la largeur maximale
(W).
*2
Lorsque le zoom est sur le réglage maximal de
téléobjectif (T).
*3
Le zoom est automatiquement fi xé.
*4
[ISO] (p. 30) est automatiquement réglé sur [AUTO].
Permet de prendre en photo le
sujet d’aussi près que 10 cm
*2
(30 cm
Permet de prendre en photo le
sujet d’aussi près que 2 cm. Il
n’est pas possible de faire la mise
*3
au point sur les sujets distants de
50 cm ou plus.
Le faisceau lumineux éclaire la
zone située à une distance de 7
à 20 cm de l’objectif pendant que
vous enfoncez le déclencheur à
mi-course.
Il n’est possible de régler ni le fl ash (p. 22)
ni le zoom (p. 22) lorsque [%] ou [O] est
sélectionné.
OFFOFF
OK
CONF
OFF
% &
OFF
*1
).
FR
45
Page 46

Utiliser le retardateur
La photo n’est prise qu’un certain temps après
que vous avez enfoncé le déclencheur jusqu’au
fond.
1
Appuyez sur la touche Y.
P
OKOK
CONF
RETARDATEUR
12
M
N
ORM
2
Utilisez EF pour sélectionner
l’option de réglage, puis appuyez
sur la touche o pour valider.
Option Description
OFF Annule le retardateur.
Le voyant du retardateur s’allume
ON
La prise de vue avec retardateur est
pendant environ 10 secondes,
clignote pendant environ 2
secondes, puis la photo est prise.
automatiquement annulée après une prise
de vue.
Pour annuler le retardateur après son
déclenchement
Appuyez de nouveau sur la touche Y.
OFF
Appeler et utiliser rapidement
des fonctions de prise de vue
Les fonctions de menu suivantes peuvent être
appelées et utilisées rapidement.
[PANORAMIQUE]
• [OMBRE AJUS]
(p. 34)
[TAP CONTROL] (p. 49)• [FENETRE MULTI]
YY
OFF
1
ON
Appuyez sur la touche o/D.
2
Utilisez GH pour sélectionner la
fonction de menu, puis appuyez sur
la touche o pour régler.
Pour utiliser l’écran d’aperçu d’effets
(Fenêtre multiple)
Sélectionnez une option entre [ZOOM],
[COMPENS D’EXPO], [WB] ou [ESP/n]
pour affi cher 4 images d’aperçu qui refl ètent
les valeurs ajustées de la fonction de prise
de vue sélectionnée. Utilisez EFGH
sélectionner la photo désirée, puis appuyez
sur la touche
o.
•
(p. 33)
•
(p. 26)
PANORAMIQUE
pour
46
FR
Page 47

Imprimer
Impression directe
(PictBridge*1)
En connectant l’appareil photo à une imprimante
compatible PictBridge, vous pouvez imprimer
les photos directement sur cette dernière sans
utiliser d’ordinateur.
Pour savoir si votre imprimante prend en charge
PictBridge, reportez-vous à son mode d’emploi.
*1
PictBridge est une norme d’interconnexion des
appareils photo numériques et des imprimantes
de différents fabricants et d’impression directe des
images.
Les modes d’impression, formats de papier
et autres paramètres réglables sur l’appareil
photo varient suivant l’imprimante utilisée.
Pour plus de détails, reportez-vous au mode
d’emploi de l’imprimante.
Pour plus de détails sur les types de papier
disponibles, sur l’insertion du papier et sur
l’installation des cassettes d’encre, reportezvous au mode d’emploi de l’imprimante.
Imprimer des photos avec les
réglages normaux d’imprimante
[IMPRESSION FACILE]
1
Affi chez la photo à imprimer sur
l’écran.
“Affi cher les photos” (p. 17)
L’impression peut aussi être lancée
quand l’appareil photo est éteint. Après
l’exécution de l’étape 2, utilisez EF pour
sélectionner [IMPRESSION FACILE], puis
appuyez sur la touche o. Utilisez GH pour
sélectionner une photo, puis appuyez sur la
touche o.
2
Allumez l’imprimante puis
connectez-la à l’appareil photo.
Touche
H
Connecteur multiple
Câble USB (fourni)
Couvercle du connecteur
IMPRESSION FACILE DEMARRER
PC / IMPRESSION SPÉCIALE
3
Appuyez sur H pour lancer
l’impression.
4
Pour imprimer une autre photo,
utilisez GH pour sélectionner
la photo, puis appuyez sur la
touche o.
Pour quitter l’impression
Une fois la photo sélectionnée affi chée
sur l’écran, déconnectez le câble USB de
l’appareil photo et de l’imprimante.
OK
OK
IMPRESSIONQUITTE
47
FR
Page 48

Utiliser OLYMPUS Master 2
Confi guration système requise
et installation d’OLYMPUS
Master 2
Installez le logiciel OLYMPUS Master 2 en
vous reportant au guide d’installation fourni.
Connecter l’appareil photo à
un ordinateur
1
Assurez-vous que l’appareil photo
est éteint.
L’écran est éteint.
●
2
Connectez l’appareil photo à un
ordinateur.
●
L’appareil photo s’allume de lui-même.
Connecteur
multiple
Câble USB (fourni)
Couvercle du connecteur
USB
PC
IMPRESSION FACILE
IMPRESSION SPÉCIALE
QUITTER
Vous pouvez charger la batterie en
sélectionnant [QUITTER] puis en appuyant
sur la touche o.
L’écran [USB] ci-dessus n’apparaît pas
et il se peut que la charge commence
automatiquement si la charge est
insuffi sante ou si l’appareil photo
est connecté à un ordinateur via un
concentrateur USB.
Trouvez l’emplacement du port USB de
destination en vous reportant au mode
d’emploi de l’ordinateur.
48
FR
CONF
3
Utilisez EF pour sélectionner
[PC], puis appuyez sur la touche o.
L’ordinateur détecte lui-même l’appareil photo
●
en tant que nouveau périphérique à la première
connexion.
Windows
●
Une fois l’appareil photo détecté par
l’ordinateur, un message indiquant la fi n du
réglage apparaît. Confi rmez le message et
cliquez sur “OK”. L’appareil photo est reconnu
en tant que disque amovible.
Macintosh
Si iPhoto est en cours d’exécution, quittez
iPhoto et lancez OLYMPUS Master 2.
Les fonctions de prise de vue sont
désactivées pendant que l’appareil photo
est connecté à l’ordinateur.
La connexion de l’appareil photo à un
ordinateur via un concentrateur USB peut
entraîner un fonctionnement instable.
Lorsque [MTP] est réglé pour le sous-menu
qui apparaît lorsque l’on appuie sur H après
avoir sélectionné [PC] à l’étape 3, il n’est
pas possible de transférer les photos sur un
ordinateur à l’aide d’OLYMPUS Master 2.
Lancer OLYMPUS Master 2
1
Double-cliquez sur l’icône
d’OLYMPUS Master 2.
Windows
OK
apparaît sur le bureau.
Macintosh
apparaît dans le dossier OLYMPUS Master 2.
La fenêtre Parcourir apparaît après le
●
démarrage du logiciel.
La première fois que vous lancez
OLYMPUS Master 2 après l’installation,
les écrans “Réglages par défaut” et
“Enregistrement” apparaissent. Suivez les
instructions à l’écran.
Page 49

Utiliser OLYMPUS Master 2
Au démarrage d’OLYMPUS Master 2, le
Guide de mise en route apparaît sur l’écran
pour vous aider à utiliser l’appareil sans la
moindre question. Si le Guide de mise en
route n’apparaît pas, cliquez sur
boîte d’outils pour l’affi cher.
Pour plus de détails sur l’utilisation, reportezvous au guide d’aide du logiciel.
dans la
Transférer et sauvegarder des
photos sans OLYMPUS Master 2
Cet appareil photo est compatible avec la
catégorie mémoire de masse USB. Vous pouvez
transférer et sauvegarder les données d’image
sur votre ordinateur lorsque l’appareil photo y
est connecté.
Confi guration système requise
Windows : Windows 2000 Professional/
Macintosh : Mac OS X v10.3 ou plus récent
Sur un ordinateur tournant sous Windows
Même si l’ordinateur est doté de ports USB,
XP Home Edition/
XP Professional/Vista
Vista, si [MTP] est réglé pour le sous-menu
qui apparaît lorsque l’on appuie sur H
après avoir sélectionné [PC] à l’étape 3 de
“Connecter l’appareil photo à un ordinateur”
(p. 57), Windows Photo Gallery sera
disponible.
le bon fonctionnement n’est pas garanti
dans les cas suivants.
Ordinateurs avec des ports USB installés à
●
l’aide d’une carte d’extension, etc.
●
Ordinateurs sans système d’exploitation
installé en usine et ordinateurs assemblés
FR
49
Page 50

Appendice
Utiliser un Adaptateur
microSD
Ne pas utiliser l’Adaptateur sur un appareil
photo numérique Olympus qui ne prend
pas en charge cet Adaptateur microSD,
ni sur les autres marques d’appareils
photo numériques, sur les ordinateurs,
imprimantes et autres appareils qui
prennent en charge les cartes xD-Picture
Card. Non seulement vous risqueriez
d’abîmer les photos prises, mais cela peut
aussi provoquer un dysfonctionnement sur
l’appareil.
Si la carte microSD ne sort pas, ne la retirez
pas par la force. Informez-vous auprès d’un
distributeur ou centre de service agréé.
Cartes compatibles avec cet appareil
photo
Carte microSD/carte microSDHC
Pour la liste des cartes microSD dont le
fonctionnement a fait l’objet de tests, visitez
notre site Web (http://www.olympus.com/).
Envoyer des photos
Vous pouvez envoyer des photos sur un
ordinateur ou une imprimante à l’aide du
câble USB fourni avec l’appareil photo.
Pour envoyer les données vers d’autres
appareils, retirez l’Adaptateur de l’appareil
photo et utilisez un adaptateur de carte
microSD disponible en magasin.
Précautions de manipulation
Ne pas toucher la zone de contact de
l’Adaptateur ou de la carte microSD. Cela
risquerait de causer l’échec de la lecture des
photos. Lorsqu’il y a des empreintes digitales
ou des taches sur la zone de contact,
essuyez-les avec un chiffon doux et sec.
50
FR
Informations importantes
relatives aux fonctions
d’étanchéité à l’eau et de
résistance aux chocs
Étanchéité à l’eau : le fonctionnement de la
fonction de résistance à l’eau est garanti*
profondeur de 10 mètres maximum pendant une
heure maximum. Il est possible que la fonction
de résistance à l’eau ne soit plus aussi effi cace
si l’appareil photo est soumis à des chocs
importants ou excessifs.
Résistance aux chocs : la fonction antichoc
2
le fonctionnement de l’appareil photo
garantit*
numérique en cas d’impact accidentel survenu
dans le cadre de l’utilisation normale de l’appareil
photo. La fonction antichoc ne constitue
pas une garantie inconditionnelle en cas de
fonctionnement incorrect ou de détériorations
extérieures. Les détériorations extérieures,
telles que les rayures et les bosses, ne sont pas
couvertes par la garantie.
T out comme n’importe quel dispositif électronique,
un entretien et une maintenance adaptés sont
nécessaires à la préservation de l’intégrité et
du fonctionnement de l’appareil photo. Afi n de
préserver les performances de l’appareil photo,
en cas d’impact important, demandez au centre
de services agréé Olympus le plus proche
d’inspecter votre appareil photo. Si l’appareil
photo est endommagé suite à une négligence
ou une utilisation inadaptée, la garantie ne
couvrira pas les frais associés à l’entretien ou
à la réparation de l’appareil photo. Pour plus
d’informations au sujet de notre garantie, veuillez
consulter le site Web Olympus de votre pays.
Veuillez respecter les consignes d’entretien
suivantes lors de l’utilisation de votre appareil
photo.
*1 Comme indiqué par l’équipement de
vérifi cation de la pression Olympus,
conformément à la norme IEC, publication
529 IPX8. L’appareil photo peut ainsi
être utilisé sous l’eau à la pression d’eau
indiquée.
*2 Cette fonction antichoc est confi rmée par
des vérifi cations effectuées par Olympus
conformément aux conditions détaillées
dans la norme MIL-STD-810F, méthode
516.5, procédure IV (essai d’impact de
transit). Pour plus de détails au sujet des
vérifi cations effectuées par Olympus,
veuillez vous reporter au site Web Olympus
de votre pays.
1
à une
Page 51

Avant utilisation :
Vérifi ez que l’appareil photo ne contient pas de
•
corps étrangers (saleté, poussière et sable inclus).
Veillez à fermer le couvercle du compartiment de la
•
batterie/
carte
verrouillage doit émettre un “clic”.
N’ouvrez pas le couvercle du compartiment de
•
la batterie/carte et le couvercle du connecteur
avec des mains mouillées, sous l’eau ou dans
un environnement humide ou poussiéreux (à
la plage, par exemple).
Après utilisation :
•
Veillez à essuyer l’eau ou les résidus encore
présents sur l’appareil photo après utilisation
de l’appareil photo sous l’eau.
•
Après utilisation de l’appareil photo dans
de l’eau de mer, plongez l’appareil photo
dans un seau contenant de l’eau fraîche
pendant environ 10 minutes (le couvercle
du compartiment de la batterie/carte et le
couvercle du connecteur doivent être bien
fermés). Faites ensuite sécher l’appareil
photo dans un lieu ombragé et bien aéré.
•
Il est possible que des gouttes d’eau
apparaissent sur la surface interne du
couvercle du compartiment de la batterie/
carte ou du couvercle du connecteur lors
de l’ouverture du couvercle. Si des gouttes
d’eau sont visibles, veillez à les essuyer
avant d’utiliser l’appareil photo.
Remarques pour après l’utilisation
Des corps étrangers peuvent adhérer à la
•
périphérie du couvercle de l’objectif lorsque
vous utilisez l’appareil photo dans des
conditions où des corps étrangers comme
de la saleté, de la poussière ou du sable
sont présents, ou lorsque le couvercle de
l’objectif ne bouge pas régulièrement. Si vous
continuez à utiliser l’appareil photo dans ces
conditions, cela pourrait endommager l’objectif
ou le couvercle de l’objectif pourrait rester
collé, entraînant un dommage supplémentaire
pour l’appareil photo. Pour éviter un tel
dommage, lavez l’appareil photo en utilisant la
méthode suivante.
et le couvercle du connecteur. Chaque
1 Insérez la batterie et fermez le couvercle
du compartiment de la batterie/carte
et le couvercle du connecteur. Chaque
verrouillage doit émettre un “clic”.
2 Remplissez un seau d’eau fraîche,
plongez l’appareil dans le seau avec
la surface de l’objectif vers le bas et
secouez bien l’appareil photo.
3 Appuyez plusieurs fois sur la touche
n dans l’eau et ouvrez et refermez
plusieurs fois le couvercle de l’objectif.
4 De plus, secouez encore l’appareil photo
avec le couvercle ouvert.
Suivez les étapes 1 à 4, puis vérifi ez que le
couvercle de l’objectif fonctionne correctement.
Si le couvercle de l’objectif ne bouge pas
facilement, rincez la surface de l’objectif en le
plaçant directement sous le puissant jet d’eau
d’un robinet et appuyez plusieurs fois sur la
touche n.
Stockage et entretien
Ne laissez pas l’appareil photo dans un
•
environnement où la température est élevée
(40°C ou plus) ou faible (-10°C ou moins),
faute de quoi l’appareil photo risque de ne plus
être étanche à l’eau.
N’utilisez pas de produits chimiques dans le
•
cadre du nettoyage, contre l’apparition de la
corrosion ou de la buée, lors des réparations,
etc. Faute de quoi l’appareil photo risque de
ne plus être étanche à l’eau.
Ne laissez pas l’appareil photo trop
•
longtemps dans l’eau, faute de quoi le
boîtier de l’appareil photo risque d’être
endommagé et/ou l’appareil photo risque
de ne plus être étanche à l’eau.
Tout comme avec n’importe quel appareil
•
utilisé sous l’eau, afi n de préserver
l’étanchéité à l’eau de l’appareil photo,
nous vous recommandons de remplacer le
kit d’étanchéité à l’eau (et les joints) tous
les ans.
Pour connaître les centres de services et
des distributeurs Olympus auxquels vous
pouvez vous adresser pour remplacer le kit
d’étanchéité à l’eau, consultez le site Web
Olympus de votre pays.
FR
51
Page 52

Fermeture du couvercle du compartiment
de la batterie/carte et du couvercle du
connecteur
Couvercle du compartiment de
la batterie/carte
Couvercle du connecteur
Les accessoires inclus (par ex : l’adaptateur
secteur) n’offrent aucune résistance aux
chocs ou à l’eau.
PRÉCAUTIONS DE SÉCURITÉ
ATTENTION
RISQUE DE DÉCHARGE
NE PAS OUVRIR
ATTENTION : POUR RÉDUIRE LE RISQUE DE DÉCHARGE
ÉLECTRIQUE, NE RETIRER NI LA PARTIE ANTÉRIEURE NI
AUCUNE PIÈCE À L’INTÉRIEUR NE PEUT ÊTRE RÉPARÉE
SE RÉFÉRER À DU PERSONNEL DE DÉPANNAGE QUALIFIÉ
AVERTISSEMENT !
POUR ÉVITER LES RISQUES D’INCENDIE OU DE DÉCHARGE
ÉLECTRIQUE, NE JAMAIS DÉMONTER, EXPOSER CE
PRODUIT À L’EAU NI LE FAIRE FONCTIONNER DANS UN
ENVIRONNEMENT TRÈS HUMIDE.
Lire toutes les instructions — Avant d’utiliser
Nettoyage — Toujours débrancher ce produit de la
Accessoires — Pour votre sécurité, et pour éviter
Eau et humidité — Pour les précautions sur des
Emplacement — Pour éviter d’endommager
Alimentation — Ne raccorder ce produit qu’à la
POSTÉRIEURE DU BOÎTIER.
PAR L’UTILISATEUR.
POUR UNE RÉPARATION.
Le point d’exclamation à l’intérieur d’un
triangle vous alerte sur certains points
importants concernant le maniement et
l’entretien de l’appareil fi gurant dans la
DANGER Si le produit est utilisé sans respecter les
AVERTISSEMENT
ATTENTION Si le produit est utilisé sans observer les
documentation fournie avec le produit.
informations données sous ce symbole,
des blessures graves, voire mortelles
pourraient en résulter.
Si le produit est utilisé sans respecter les
informations données sous ce symbole,
des blessures voire la mort pourraient
en résulter.
informations données sous ce symbole,
des blessures, des dommages à l’appareil
ou des pertes de données pourraient en
résulter.
Précautions générales
l’appareil, lire toutes les instructions de
fonctionnement. Sauvegarder tous les manuels et
la documentation pour s’y référer ultérieurement.
prise de courant avant nettoyage. N’utiliser qu’un
chiffon humide pour le nettoyage. Ne jamais
utiliser de produits de nettoyage liquides ou
aérosols, ni de solvants organiques pour nettoyer
ce produit.
d’endommager le produit, n’utiliser que des
accessoires recommandés par Olympus.
produits avec une conception imperméable, lire
les sections imperméabilisation.
l’appareil, monter le produit solidement sur un
trépied ou un sabot stable.
source d’alimentation décrite sur l’étiquette du
produit.
52
FR
Page 53

Foudre — Si un orage éclate pendant l’utilisation
d’un adaptateur secteur, le débrancher
immédiatement de la prise de courant.
Entrée d’objets — Pour éviter des blessures,
ne jamais introduire d’objet métallique dans le
produit.
Chaleur — Ne jamais utiliser ni ranger ce produit
près d’une source de chaleur telle qu’un
radiateur, un accumulateur de chaleur, un poêle
ou tout type d’appareil qui génère de la chaleur,
comprenant les amplifi cateurs.
Maniement de l’appareil
AVERTISSEMENT
Ne pas utiliser l’appareil à proximité de gaz
•
infl ammables ou explosifs.
Ne pas utiliser le fl ash ou la LED de très près
•
sur des personnes (bébés, jeunes enfants,
etc.).
Vous devez être au moins à 1 m des visages
•
de vos sujets. Déclencher le fl ash trop près
des yeux du sujet pourrait causer une perte
momentanée de la vision.
Ne pas laisser l’appareil à la portée des
•
enfants.
Toujours utiliser et ranger l’appareil hors de la
•
portée des jeunes enfants et des bébés pour
empêcher les situations dangereuses suivantes
qui pourraient causer des blessures graves :
S’enrouler dans la courroie de l’appareil,
•
causant la strangulation.
Avaler accidentellement la batterie, des cartes
•
ou d’autres petites pièces.
Déclencher accidentellement le fl ash dans
•
leurs yeux ou ceux d’un autre enfant.
Se blesser accidentellement par des parties
•
en mouvement de l’appareil.
Ne pas regarder le soleil ni de la lumière
•
puissante avec l’appareil.
Ne pas utiliser ni ranger l’appareil dans des
•
endroits poussiéreux ou humides.
Ne pas couvrir le fl ash avec une main pendant
•
le déclenchement.
N’insérez dans l’Adaptateur microSD rien
•
d’autre que la carte microSD.
Cet Adaptateur est réservé à l’usage exclusif de
la carte microSD. D’autres types de cartes ne
peuvent pas y être installés.
N’insérez dans l’appareil photo rien d’autre
•
qu’une carte xD-Picture Card ou l’Adaptateur
microSD.
Si vous y insérez une carte par erreur, telle que la
carte microSD, ne forcez pas. Veuillez contacter le
service SAV ou les distributeurs autorisés.
ATTENTION
Arrêter immédiatement d’utiliser l’appareil si
•
vous remarquez une odeur, un bruit anormal
ou de la fumée provenant de l’appareil.
Ne jamais retirer les batteries les mains nues, ce
•
qui pourrait vous brûler les mains.
Ne pas laisser l’appareil dans des endroits où
•
il pourrait être soumis à des températures très
élevées.
Ceci pourrait causer une détérioration
•
de certaines pièces et, dans certaines
circonstances, l’appareil pourrait prendre feu.
Ne pas utiliser le chargeur ni un adaptateur
secteur s’il est couvert (par exemple par
une couverture). Ce qui pourrait causer une
surchauffe, débouchant sur un incendie.
Manipuler l’appareil soigneusement afi n
•
d’éviter une brûlure à basse température.
Lorsque l’appareil contient des parties
•
métalliques, une surchauffe peut déboucher sur
une brûlure à basse température. Faire attention
aux points suivants :
Utilisé pendant une longue durée, l’appareil
•
devient chaud. Si vous tenez l’appareil
dans ces conditions, une brûlure à basse
température risque de se produire.
Dans des endroits sujets à des températures
•
très froides, la température du boîtier
de l’appareil peut être plus basse que la
température ambiante. Si possible, mettre des
gants en tenant l’appareil à des températures
basses.
Faire attention avec la courroie.
•
Faire attention avec la courroie en portant
•
l’appareil. Elle peut facilement s’accrocher à des
objets sur le passage et causer des dommages
sérieux.
Ne pas toucher les parties métalliques de
•
l’appareil photo pendant une longue durée
lorsqu’il fait froid.
Votre peau peut être blessée. À des
•
températures basses, tenez l’appareil photo
avec des gants.
FR
53
Page 54

Précautions de manipulation de la
batterie
Veuillez suivre ces consignes importantes
pour éviter le coulage du liquide de la
batterie, une génération de chaleur, des
brûlures, une explosion, ou de causer des
décharges électriques ou brûlures.
DANGER
•
L’appareil photo utilise une batterie au lithiumion spécifi ée par Olympus. Chargez la batterie
avec l’adaptateur secteur ou le chargeur spécifi é.
N’utilisez aucun autre adaptateur secteur ou
chargeur.
•
Ne jamais chauffer ni mettre au feu la batterie.
•
Prendre des précautions en transportant ou
rangeant la batterie pour éviter qu’elle vienne en
contact avec des objets métalliques comme des
bijoux, des épingles à cheveux, des agrafes, etc.
•
Ne jamais ranger la batterie dans un lieu où elle
serait exposée en plein soleil, ou sujette à des
températures élevées dans un véhicule chaud,
près d’une source de chaleur, etc.
•
Pour éviter de causer des coulages de liquide
de la batterie ou d’endommager ses bornes,
respecter scrupuleusement toutes les instructions
concernant l’usage de la batterie. Ne jamais tenter
de démonter une batterie ni la modifi er de quelque
façon que ce soit, ni la souder, etc.
•
Si du liquide de la batterie entrait dans vos yeux, les
laver immédiatement avec de l’eau claire et froide du
robinet et consulter immédiatement un médecin.
•
Toujours ranger la batterie hors de la portée
des jeunes enfants. Si un enfant avale
accidentellement une batterie, consulter
immédiatement un médecin.
AVERTISSEMENT
Maintenir à tout moment la batterie au sec.
•
Pour éviter un coulage du liquide de la batterie,
•
une génération de chaleur ou de causer un
incendie ou une explosion, n’utiliser que la batterie
recommandée pour l’usage avec ce produit.
Introduire soigneusement la batterie comme décrit
•
dans les instructions de fonctionnement.
Si les batteries rechargeables n’ont pas été
•
rechargées au bout de la durée spécifi ée, arrêter
de les charger et ne pas les utiliser.
Ne pas utiliser une batterie si elle est
•
endommagée ou cassée.
Si la batterie coule, devient décolorée ou déformée,
•
ou devient anormale sous d’autres aspects pendant
le fonctionnement, arrêter d’utiliser l’appareil.
Si du liquide de la batterie coule sur vos vêtements
•
ou sur votre peau, retirer le vêtement et laver
immédiatement la zone affectée avec de l’eau
claire et froide du robinet. Si le liquide vous brûle
la peau, consulter immédiatement un médecin.
Ne jamais soumettre la batterie à des chocs
•
violents ni à des vibrations continues.
54
FR
ATTENTION
Avant sa mise en place, toujours contrôler
•
soigneusement la batterie pour des coulages,
décoloration, gauchissement ou toutes autres
anormalités.
La batterie peut devenir chaude pendant une
•
utilisation prolongée. Pour éviter des brûlures
mineures, ne pas la retirer immédiatement après
avoir utilisé l’appareil.
Toujours retirer la batterie de l’appareil avant de le
•
ranger pour une longue durée.
Précautions pour l’environnement
d’utilisation
Pour protéger la technologie de haute précision
•
contenue dans ce produit, ne jamais laisser
l’appareil dans les endroits indiqués ci-dessous,
que ce soit en utilisation ou pour le rangement :
Endroits où les températures et/ou l’humidité
•
sont élevées ou passent par des changements
extrêmes. En plein soleil, à la plage, dans des
voitures fermées, ou près d’autres sources
de chaleur (poêle, radiateur, etc.) ou des
humidifi cateurs.
Dans des endroits sablonneux ou poussiéreux.
•
Près de produits infl ammables ou explosifs.
•
Dans des endroits humides, telle qu’une salle
•
de bain ou sous la pluie. En utilisant des
produits avec une conception imperméable, lire
également leurs manuels.
Dans des endroits prédisposés à de fortes
•
vibrations.
Ne jamais laisser tomber l’appareil ou le soumettre
•
à des chocs violents ou à des vibrations.
Lorsque l’appareil est monté sur un trépied, ajuster
•
sa position avec la tête du trépied. Ne pas faire
tourner l’appareil.
Ne pas toucher les contacts électriques de
•
l’appareil.
Ne pas laisser l’appareil pointé directement vers
•
le soleil. Cela pourrait endommager l’objectif ou le
rideau de l’obturateur, altérer les couleurs, générer
des images fantômes sur le CCD, ou pourrait
éventuellement provoquer un incendie.
Ne pas pousser ni tirer violemment l’objectif.
•
Avant de ranger l’appareil pour une longue durée,
•
retirer la batterie. Choisir un endroit frais et sec
pour le rangement pour prévenir la formation de
condensation ou de moisissure dans l’appareil.
Après rangement, vérifi er le fonctionnement de
l’appareil en le mettant en marche et en appuyant
sur le déclencheur pour s’assurer qu’il fonctionne
normalement.
Toujours respecter les restrictions d’environnement
•
de fonctionnement décrites dans le manuel de
l’appareil photo.
La fonction de mesure de l’altitude/profondeur
•
n’est pas approuvée par une institution offi cielle.
Utiliser ces mesures seulement comme référence.
Page 55

Précautions pour la manipulation de
la batterie
Cet appareil photo utilise une batterie au lithium-
•
ion spécifi ée par Olympus. Ne pas utiliser de
batterie d’un autre type.
Si les bornes de la batterie deviennent humides
•
ou grasses, un mauvais contact risque de se
produire. Essuyer la batterie correctement avec un
chiffon sec avant utilisation.
Toujours charger une batterie pour l’utiliser
•
la première fois, ou si elle n’a pas été utilisée
pendant une longue période.
En faisant fonctionner l’appareil photo sur batterie
•
à des températures basses, essayer de maintenir
l’appareil photo et la batterie de rechange au
chaud dans la mesure du possible. La batterie qui
s’épuise à basses températures peut se rétablir
après l’avoir réchauffée à la température normale.
Le nombre de photos que vous pouvez prendre
•
peut varier selon les conditions de prise de vue et
de la batterie.
Avant de partir pour un long voyage, en particulier
•
avant de partir à l’étranger, acheter des batteries
de rechange. Une batterie recommandée peut être
diffi cile à obtenir en voyageant.
Veuillez recycler les batteries pour préserver les
•
ressources de notre planète. Quand vous jetez
des batteries mortes, s’assurer de recouvrir les
bornes et toujours respecter la réglementation
locale.
Écran ACL
•
Ne pas forcer sur l’écran ACL, sinon l’image risque
de devenir vague en provoquant une panne en
mode d’affi chage ou en endommageant l’écran
ACL.
•
Une bande de lumière risque d’apparaître en haut
et dans le bas de l’écran ACL, mais ce n’est pas
un mauvais fonctionnement.
•
Si un sujet est visionné en diagonale dans
l’appareil, les bords peuvent apparaître en
zigzag sur l’écran ACL. Ce n’est pas un mauvais
fonctionnement ; ce sera moins perceptible en
mode d’affi chage.
•
Dans des endroits à basses températures,
l’écran ACL peut prendre un certain temps
pour s’allumer ou sa couleur risque de changer
momentanément. Pour utiliser l’appareil dans des
endroits extrêmement froids, il est recommandé
de le préserver du froid en le maintenant au chaud
entre les prises de vue. Un écran ACL montrant
des performances médiocres à cause du froid
fonctionnera correctement en revenant à des
températures normales.
•
L’écran à cristaux liquides utilisé pour l’écran
ACL est produit avec une technologie de haute
précision. Toutefois, des points noirs ou lumineux
peuvent apparaître constamment sur l’écran
ACL. À cause de ses caractéristiques ou selon
l’angle sous lequel vous visionnez l’écran ACL,
les points peuvent ne pas être uniformes en
couleur ni en luminosité. Ce n’est pas un mauvais
fonctionnement.
Remarques juridiques et autres
Olympus décline toute responsabilité ou garantie
•
pour les pertes subies et les bénéfi ces manqués,
de même que pour les créances de tiers en
découlant, consécutifs à l’utilisation incorrecte de
cet appareil.
Olympus décline toute responsabilité ou garantie
•
pour les pertes subies et les bénéfi ces manqués,
consécutifs à l’effacement de prises de vue.
FR
55
Page 56

Restrictions relatives à la garantie
Olympus décline toute responsabilité ou garantie,
•
expresse ou implicite, pour ou relative au contenu
de la présente documentation écrite ou du
logiciel, et ne pourra en aucun cas être tenu pour
responsable de toute autre garantie implicite
de commercialisation ou d’adaptation à des fi ns
particulières, ou pour les dommages encourus,
qu’ils soient directs, imprévus ou indirects
(notamment non limités aux dommages dus à
une perte fi nancière, une interruption d’activité
ou la perte de données professionnelles) suite
à l’utilisation ou la restriction ou impossibilité
d’utilisation de la documentation écrite, du logiciel
ou du matériel. Certains pays n’autorisent pas
l’exclusion ni la limitation de la responsabilité de
tels dommages, indirects ou imprévus, de sorte
que les limitations ci-dessus peuvent ne pas vous
concerner.
Olympus se réserve tous droits sur ce manuel.
•
Avertissement
Toute reproduction photographique ou usage
illicite de matériel protégé par des droits
d’auteur peut violer des lois applicables
sur les droits d’auteur. Olympus n’assume
aucune responsabilité quant à la reproduction
photographique illicite, l’usage ou tout autre acte
interdit portant atteinte aux droits d’auteur.
Note relative aux droits d’auteur
Tous droits réservés. Toute reproduction partielle
ou intégrale de cette documentation écrite ou
du logiciel, par quelque procédé que ce soit ou
sous quelque forme que ce soit, électronique
ou mécanique, y compris par reproduction
photographique ou enregistrement et par
l’usage de quelque moyen de stockage et de
récupération des informations que ce soit, n’est
permise sans autorisation écrite et préalable
d’Olympus. Aucune responsabilité ne sera
assumée quant à l’utilisation des informations
contenues dans la documentation écrite ou
du logiciel, ou pour des dommages résultant
de l’utilisation des informations contenues
ici. Olympus se réserve le droit de modifi er
les caractéristiques et le contenu de cette
publication ou du logiciel sans obligation ni
préavis.
Pour les utilisateurs en Europe
La marque “CE” indique que ce produit est
conforme aux normes européennes en matière
de sécurité, de santé, d’environnement et de
protection du consommateur. Les appareils photo
marqués “CE” sont prévus pour la vente en Europe.
Le symbole [poubelle sur roue barrée d’une croix
WEEE annexe IV] indique une collecte séparée
des déchets d’équipements électriques et
électroniques dans les pays de l’UE.
Veuillez ne pas jeter l’équipement dans les
ordures domestiques.
À utiliser pour la mise en rebut de ces types
d’équipements conformément aux systèmes de
traitement et de collecte disponibles dans votre pays.
Ce symbole [Poubelle rayée conformément à la
directive annexe 2006/66/EC annexe II] indique
que la collecte des batteries usagées se fait
séparément dans les pays EU. Veuillez ne pas
jeter les batteries dans les ordures ménagères.
Veuillez utiliser les systèmes de collection
disponibles dans votre pays pour l’enlèvement
des batteries usagées.
Précaution sur l’utilisation de la batterie,
du chargeur de batterie et de l’adaptateur
secteur
Il est vivement recommandé de n’utiliser que la
batterie, le chargeur de batterie et l’adaptateur secteur
spécifi ques, qui sont disponibles comme accessoires
d’origine Olympus, avec cet appareil photo.
L’utilisation d’une batterie, d’un chargeur de batterie
et/ou d’un adaptateur secteur qui ne sont pas d’origine
risque de provoquer un incendie ou des blessures
à cause d’un coulage de liquide, d’une surchauffe,
d’une combustion ou d’un endommagement de la
batterie. Olympus n’assume aucune responsabilité
pour les accidents et dommages à cause de l’utilisation
d’une batterie, d’un chargeur de batterie et/ou d’un
adaptateur secteur autres que les accessoires d’origine
Olympus.
Conditions d’obtention de la garantie
1
Si le produit s’avère défectueux malgré une
manipulation correcte (conforme aux instructions
indiquées dans les Précautions de sécurité et dans
le mode d’emploi fourni) dans un délai de deux ans
à partir de la date d’achat auprès d’un distributeur
Olympus agréé, ce produit sera réparé ou remplacé
au choix de Olympus gratuitement au sein du secteur
d’activité de Olympus Imaging Europa GmbH défi ni
sur le site Web http://www.olympus.com. Pour toute
demande de réparation sous garantie, le client doit
apporter le produit et la présente carte de garantie
avant la fi n de la période de deux ans de garantie au
revendeur auquel il a acheté le produit ou à tout autre
centre de service après-vente agréé Olympus dans le
secteur d’activité de Olympus Imaging Europa GmbH
défi ni sur le site Web http://www.olympus.com. Le
client peut retourner le produit à n’importe quel centre
de service après-vente Olympus agréé pendant une
56
FR
Page 57

période d’un an à partir de la date d’achat, en cas de
réparations, conformément à la garantie internationale.
Veuillez noter que de tels centres de service aprèsvente Olympus n’existent pas dans certains pays.
2 Le client est responsable des risques du transport
du produit chez un distributeur Olympus ou dans
un centre de service après-vente Olympus, tous
les frais de transport sont à sa charge.
3 Pendant la période de garantie, les frais
engendrés par des réparations sont à la charge
du client dans les cas ci-dessous :
Tout dommage résultant d’une manipulation
a.
non conforme (non mentionnée dans les
précautions de sécurité ou d’autres sections
des instructions, etc.).
Tout dommage résultant d’une réparation,
b.
d’une modifi cation, d’un nettoyage, etc., non
effectués par Olympus ou un centre de service
après-vente Olympus.
Tout dommage causé par un transport non
c.
conforme, une chute, un choc, etc. après
achat du produit.
Tout défaut ou dommage résultant d’un
d.
incendie, tremblement de terre, inondation,
intempéries et autres catastrophes naturelles,
pollution, alimentation électrique non
conforme.
Tout dommage résultant d’un stockage
e.
non conforme ou négligent (températures
excessives, humidité excessive, proximité
d’insecticides tels que naphtaline ou produits
chimiques nocifs, etc.) ou d’un entretien non
conforme.
Tout dommage résultant de batteries usagées,
f.
etc.
Tout dommage causé par l’intrusion de sable,
g.
boue, etc. à l’intérieur de l’appareil.
Non-présentation de la présente garantie pour
h.
la réparation.
Modifi cations faites sur la présente carte de
i.
garantie concernant l’année, le mois et le jour
de l’achat, les noms du client et du revendeur,
le numéro de série, etc.
Non-présentation d’un justifi catif d’achat
j.
(ticket de caisse) en même temps que la
présente garantie.
4 Cette garantie concerne uniquement le produit
lui-même. Elle ne couvre pas les autres pièces
telles que sac de transport, courroie, couvercle
de l’objectif, batteries, etc.
5
La seule obligation de Olympus dans le cadre de
la présente garantie se limite à la réparation ou
au remplacement du produit. Toute responsabilité
pour perte ou dommage indirect ou accessoire de
quelque nature que ce soit supporté par le client à
cause d’un défaut du produit est exclue, notamment
en cas de perte ou dommage causé à des objectifs,
fi lms, autres matériels ou accessoires utilisés
avec le produit ou de perte fi nancière quelconque
résultant d’un retard en réparation ou de la perte de
données. La présente disposition ne déroge pas à
la législation contraignante en vigueur.
Remarques sur l’établissement de la
carte de garantie
1
Cette garantie ne sera valide que si la carte de
garantie est dûment complétée par Olympus ou un
revendeur agréé ou si d’autres documents contiennent
une justifi cation suffi sante. Par conséquent, veuillez
vous assurer que votre nom, le nom du revendeur,
le numéro de série et la date d’achat (année, mois,
jour) fi gurent intégralement et lisiblement sur la carte
de garantie et que le contrat d’achat original ou le
justifi catif d’achat (indiquant le nom et l’adresse
du revendeur, la date d’achat et la désignation du
produit) est joint à la présente garantie. Olympus se
réserve le droit de refuser une prestation de service
après-vente gratuite si les informations portées sur la
carte de garantie sont incomplètes ou illisibles ou si
les documents mentionnés précédemment ne sont
pas joints ou si les informations qu’ils contiennent sont
incomplètes ou illisibles.
2 Cette carte de garantie ne sera pas remplacée,
aussi conservez-la avec le plus grand soin.
* Veuillez vous reporter au site Web http://www.
olympus.com pour connaître la liste du réseau
international des centres de services autorisés
Olympus.
Marques déposées
IBM est une marque déposée de la société
•
International Business Machines Corporation.
Microsoft et Windows sont des marques de la
•
société Microsoft Corporation.
Macintosh est une marque de Apple Inc.
•
xD-Picture Card™ est une marque déposée.
•
microSD est une marque de commerce de SD
•
Association.
Tous les autres noms de sociétés et appellations
•
de produits sont des marques, déposées ou non,
des propriétaires respectifs.
Les normes pour les systèmes de fi chiers d’appareil
•
photo indiquées dans ce manuel sont les normes
“Design rule for Camera File system/DCF” stipulées
par l’association JEITA (Japan Electronics and
Information Technology Industries Association).
FR
57
Page 58

CARACTÉRISTIQUES
Appareil photo
Type de produit : Appareil photo numérique (prise de vue et affi chage)
Système d’enregistrement
Photos : Enregistrement numérique, JPEG (conforme à la norme DCF (Design
Normes applicables : Exif 2.2, Digital Print Order Format (DPOF), PRINT Image Matching III,
Images fi xes avec son : Format Wave
Vidéo : AVI Motion JPEG
Mémoire : Mémoire interne
Nombre de pixels effectifs : 12 000 000 de pixels
Capteur d’image : CCD (fi ltre de couleur primaire) de 1/2,33” à 12 700 000 de pixels (brut)
Objectif : Objectif Olympus 5,0 à 18,2 mm, f3,5 à 5,1
Système de mesure : Mesure ESP numérique, système de mesure ponctuelle
Vitesse d’obturation : 4 à 1/2000 sec.
Portée de prise de vue : 0,5 m à ∞ (W/T) (normal)
Écran : Écran ACL couleur 2,7” TFT, 230 000 points
Durée de chargement du fl ash : Environ 3,5 sec. (pour une décharge complète du fl ash à température
Connecteur : Connecteur multiple (Prise DC-IN, connecteur USB, prise A/V OUT)
Calendrier automatique : de 2000 à 2099
Étanchéité à l’eau
Type : Équivalent à la norme IEC, publication 529 IPX8 (sous conditions de
Description : L’appareil photo peut être utilisé sous l’eau à la pression d’eau indiquée.
Résistance à la poussière : Équivalent à la norme IEC, publication 529 IP6X (sous conditions
Conditions de fonctionnement
Température : -10 °C à 40 °C (fonctionnement)/-20 °C à 60 °C (stockage)
Humidité : 30 % à 90 % (fonctionnement)/10 % à 90 % (stockage)
Alimentation : Une batterie au lithium-ion Olympus (LI-50B) ou adaptateur secteur
Dimensions : 95,0 mm (L) × 61,7 mm (H) × 21,5 mm (P) (hors saillies)
Poids : 182 g (hors batterie et carte)
rule for Camera File system - règle de conception du système de
fi chiers de l’appareil photo))
PictBridge
xD-Picture Card (16 Mo à 2 Go) (TypeH/M/M+, Standard)
carte microSD/carte microSDHC (avec l’Adaptateur microSD fourni)
(équivalent à 28 à 102 mm sur un appareil photo 35 mm)
0,1 m à ∞ (W), 0,3 m à ∞ (T) (mode gros plan)
0,02 m à 0,5 m (W uniquement) (mode super gros plan)
0,07 m à 0,2 m (W uniquement) (mode S-macro LED)
ambiante à une nouvelle batterie totalement chargée)
test OLYMPUS), profondeur d’eau de 10 mètres
de test OLYMPUS)
Olympus (D-7AC/vendu séparément)
La fonction “Shadow Adjustment Technology” (technologie
d’ajustement des ombres) contient des technologies brevetées par
Apical Limited.
58
FR
Page 59

Batterie au lithium-ion (LI-50B)
Type de produit : Batterie au lithium-ion rechargeable
Modèle n° : LI-50BA/LI-50BB
Tension standard : 3,7 V CC
Capacité standard : 925 mAh
Durée de vie de la batterie : Environ 300 rechargements complets (varie selon l’utilisation)
Conditions de fonctionnement
Dimensions : 34,4 mm (L) × 40,0 mm (H) × 7,0 mm (P)
Poids : Environ 20 g
Température : 0 °C à 40 °C (chargement)/
-10 °C à 60 °C (fonctionnement)/
-10 °C à 35 °C (stockage)
Adaptateur secteur (F-1AC)
Modèle n° : F-1AC-1/F-1AC-2/(F-1AC-3)
Alimentation requise : 100 à 240 V CA (50/60 Hz)
Sortie : 5 V CC, 700 mA
Durée de chargement : Environ 2,5 heures
Conditions de fonctionnement
Dimensions : 48,0 mm (L) × 60,0 mm (H) × 21,0 mm (P) (F-1AC-1)/
Poids : Environ 80,0 g (F-1AC-1)/
Longueur du câble de connexion : Environ 1,5 m
Utilisation à basse température
Le fonctionnement à basse température de la carte Olympus xD-Picture Card en option et de la batterie au
lithium-ion Olympus est garanti jusqu’à 0 °C. Toutefois, les tests suivants ont été effectués pour une utilisation
avec ce produit à des températures allant jusqu’à -10 °C.
Température : 0 °C à 40 °C (fonctionnement)/-20 °C à 60 °C (stockage)
39,0 mm (L) × 67,0mm (H) × 21,0 mm (P) (F-1AC-2)/
50,0 mm (L) × 70,0 mm (H) × 21,0 mm (P) (F-1AC-3)
Environ 70,0 g (F-1AC-2)/
Environ 90,0 g (F-1AC-3)
Olympus xD-Picture Card
Standard
TypeM/M+
TypeH
Batterie au lithium-ion Olympus
LI-50B
Le nombre de photos pouvant être stockées est réduit lorsque les températures sont basses.●
16 Mo 32 Mo 64 Mo 128 Mo 256 Mo 512 Mo 1 Go 2 Go
999999
9999
9999
9 Fonctionne correctement
FR
59
Page 60

Adaptateur microSD
Type de produit : Adaptateur pour cartes microSD
Conditions de fonctionnement
Température : -10 °C à 40 °C (fonctionnement)/-20 °C à 65 °C (stockage)
Humidité : 95 % et moins (fonctionnement)/85 % et moins (stockage)
Dimensions : 25,0 mm (L) x 20,3 mm (H) x 1,7 mm (P) (poignée : 2,2 mm)
Poids : Environ 0,9 g
La conception et les caractéristiques peuvent être modifi ées sans préavis.
60
FR
Page 61

MEMO
FR
61
Page 62

ÍndiceÍndice
Preparación de la cámara ...................63
¾
Comprobación de los contenidos de la
caja ........................................................63
Colocación de la correa de la cámara ...63
Inserción de la batería y de la tarjeta
xD-Picture Card™ (vendida aparte) en la
cámara ...................................................63
Carga de la batería ................................64
Uso de la tarjeta microSD/ tarjeta
microSDHC (vendida aparte) ................66
Confi guración de la fecha y la hora .......66
Cambio del idioma de la pantalla ..........67
¾
Toma, visualización y borrado ...........68
Toma con valor de apertura y velocidad
de obturador óptimas (modo
K
) ..........68
Visualización de imágenes ....................69
Borrado de imágenes durante la
reproducción (Borrado de una imagen) ...70
¾
Uso de los modos de toma .................71
Uso del mejor modo para la escena de
toma (modo
Mejora de textura y tono de piel
(modo
Toma con ajustes automáticos
(modo
Toma de vídeos (modo
● Le agradecemos la adquisición de esta
cámara digital Olympus. Antes de empezar
a usar su nueva cámara, lea atentamente
estas instrucciones para obtener un máximo
rendimiento y una mayor duración. Guarde
este manual en un lugar seguro para futuras
consultas.
● Antes de tomar fotografías importantes, le
recomendamos que realice varias tomas de
prueba para familiarizarse con el uso de su
cámara.
s
) .................................71
b
) .......................................72
A
) .........................................72
n
) ...................73
¾
Uso de las funciones de toma ............74
Uso del zoom óptico ..............................74
Uso del fl ash ..........................................74
Ajuste del brillo
(Compensación de la exposición) ...............75
Toma de primeros planos
(Macrofi lmación) ....................................75
Uso del disparador automático ..............76
Cómo llamar y utilizar funciones de toma
de manera rápida ..................................76
¾
Impresión .............................................77
Uso del programa
¾
OLYMPUS Master 2..............................78
Apéndice ..............................................80
¾
Uso de un Adaptador microSD ..............80
Información importante acerca de
las funciones de impermeabilidad y
resistencia a los golpes .........................80
PRECAUCIONES DE SEGURIDAD .....82
ESPECIFICACIONES ...........................88
● Con el fi n de mejorar continuamente sus
productos, Olympus se reserva el derecho a
actualizar o modifi car la información incluida en
este manual.
● Las ilustraciones de las pantallas y de la cámara
que aparecen en este manual fueron hechas
durante el proceso de desarrollo y pueden diferir
del producto real.
Las páginas de referencia corresponden al Manual de instrucciones (en el CD-ROM suministrado).
Véase el Manual de instrucciones del CD-ROM para realizar las consultas pertinentes.
62
ES
Page 63

Preparación de la cámara
Comprobación de los
contenidos de la caja
Correa
Cámara digital
Batería de ion de litio
LI-50B
o
Adaptador de CA (F-1AC)
Cable USB Cable AV
CD-ROM OLYMPUS
Master 2
Otros accesorios no mostrados: Manual de
instrucciones, tarjeta de garantía.
Los contenidos pueden variar dependiendo del lugar
de compra.
Adaptador microSD
Colocación de la correa de la
cámara
Tire de la correa para que quede apretada y
no se suelte.
Inserción de la batería y de
la tarjeta xD-Picture Card™
(vendida aparte) en la cámara
No introduzca nada que sea distinto de la
tarjeta xD-Picture Card o del Adaptador
microSD en la cámara.
1
1
Cubierta del compartimento de la batería/tarjeta
2
ES
63
Page 64

2
Botón de bloqueo de la batería
La batería tiene una parte anterior y otra
posterior. Inserte la batería en la dirección
correcta según se muestra en la fi gura. Si la
batería no está bien insertada, la cámara no
funciona.
Inserte la batería al tiempo que desliza
el botón de bloqueo de la batería en la
dirección de la fl echa.
Desliza el botón de bloqueo de la batería en
la dirección de la fl echa para desbloquear la
batería, y a continuación extráigala.
Asegúrese de apagar la cámara antes de
abrir o cerrar la cubierta del compartimento
de la batería/tarjeta.
3
MuescaÁrea de índice
4
Esta cámara permite al usuario tomar fotos
usando la memoria interna aunque no haya
ninguna tarjeta xD-Picture Card (vendida
aparte) insertada. “Uso de una tarjeta
xD-Picture Card” (p. 66)
“Número de fotografías almacenables
(imágenes fi jas)/duración de la grabación
continua (vídeos) en la memoria interna y
en la tarjeta xD-Picture Card” (p. 67)
Para extraer la tarjeta xD-Picture Card
12
Presione la tarjeta hasta que emita un
chasquido y sea parcialmente expulsada, y
luego agarre la tarjeta para extraerla.
Carga de la batería
El adaptador de CA incluido (F-1AC/
adaptador de CA con un cable de CA o tipo
enchufe) varía según la región en la que se
adquirió la cámara. Si recibió un adaptador
de CA tipo enchufe, enchufe el cargador
directamente en la tomacorriente de CA de
Insértela derecha hasta que encaje en su
posición con un chasquido.
No toque el área de contacto de la tarjeta.
64
ES
la pared.
El adaptador de CA incluido (F-1AC) ha sido
diseñado exclusivamente para la carga.
Asegúrese de no realizar tomas, visualizar
imágenes, etc. con la cámara cuando el
adaptador de CA esté conectado.
Page 65

Ejemplo: Adaptador de CA con cable
de CA
1
Tomacorriente
de CA
2
Adaptador
de CA
Cable de CA
Multiconector
Tapa del conector
3
Indicador de carga
Iluminado (naranja):
Cargándose
Iluminado (azul):
Carga completada
La batería viene parcialmente cargada.
Antes de usarla, asegúrese de cargar la
batería hasta que el indicador de carga se
apague (al cabo de 2,5 horas aprox.).
Si el indicador de carga no se enciende o
parpadea, puede ocurrir que las conexiones
estén mal hechas o que la batería, la
cámara o el adaptador de CA estén
estropeados.
Para obtener detalles sobre la bateriá y
el adaptador de CA, consulte el apartado
“Batería, adaptador de CA (incluido),
cargador (vendido aparte)” (p.64).
Cuándo cargar la batería
Cargue la batería cuando aparezca el
siguiente mensaje de error.
Parpadea en rojo
BATER. AGOT ADA
Esquina superior
derecha del monitor
Mensaje de error
ES
65
Page 66

Uso de la tarjeta microSD/
tarjeta microSDHC (vendida
aparte)
La tarjeta microSD/tarjeta microSDHC (en
adelante denominada “tarjeta microSD”) también
es compatible con esta cámara mediante el
Adaptador microSD.
“Uso de un Adaptador microSD” (p. 68)
1
Inserte la tarjeta microSD en el
Adaptador.
Inserte la tarjeta
hasta el fondo.
2
Inserte el Adaptador microSD en la
cámara.
Muesca
Confi guración de la fecha y la
hora
La fecha y la hora confi guradas aquí se
guardan en los nombres de archivos de imagen,
impresiones de fechas, y otros datos.
1
Presione el botón n para
encender la cámara.
Cuando la fecha y la hora no están confi guradas,
●
aparece la pantalla de confi guración
correspondiente.
X
AM
DHORA
---- -- -- -- --
MENU
CANCEL.
Pantalla de confi guración de
fecha y hora
2
Use EF para seleccionar el año
[A].
X
AM
DHORA
-- -- -- --
2009
MENU
CANCEL.
AMD
AMD
Para extraer la tarjeta microSD
Extraiga la tarjeta microSD.
No toque el área de contacto del Adaptador
microSD y de la tarjeta microSD.
66
ES
3
Presione H para guardar la
confi guración de [A].
X
AM
D HORA
-- -- -- --
2009
MENU
CANCEL.
AMD
Page 67

4
Como en los pasos 2 y 3, use
EFGH y el botón o para
establecer [M] (mes), [D] (día),
[HORA] (horas y minutos) y [A/M/D]
(orden de fecha).
Para la confi guración precisa del tiempo,
presione el botón o cuando la señal
horaria alcanza los 00 segundos.
Para cambiar la fecha y la hora, realice el
ajuste desde el menú. [X] (Fecha/hora)
(p. 46)
Para comprobar la fecha y la hora
Presione el botón g con la cámara
apagada. La hora actual se muestra durante
unos 3 segundos.
Cambio del idioma de la
pantalla
El idioma del menú y de los mensajes de error
que aparecen en el monitor es seleccionable.
1
Presione el botón m, y presione
EFGH para seleccionar
[E] (CONFIGURAC.).
CONFIGURAC.
3
Use EF para seleccionar [W]
y presione el botón o.
W
ENGLISH
FRANCAIS
DEUTSCH
ESPAÑOL
ITALIANO
ATRÁS
4
Use EFGH para seleccionar el
MENU
ུࢊ
ACEPT.
idioma y presione el botón o.
5
Presione el botón m.
OK
SALIR ACEPT.
2
Presione el botón o.
CONFIGURAC.
1
2
3
4
SALIR ACEPT.
MENU
FORMATEAR
BACKUP
PW ON SETUP
MENÚ COLOR
MENU
ESPAÑOL
NORMAL
OK
OK
67
ES
Page 68

Toma, visualización y borrado
1/400
F3.5
Toma con valor de apertura
y velocidad de obturador
óptimas (modo K)
En este modo, se puede usar la toma
automática de la cámara al tiempo que se
permiten cambios en una amplia gama de otras
funciones del menú de toma, tales como la
compensación de la exposición, el balance del
blanco, etc., en caso necesario.
1
Ajuste el disco de modo en la
posición K.
2
Presione el botón n para
encender la cámara.
Número de imágenes
fi jas almacenables
P
12
M
N
ORM
Monitor
(pantalla del modo de espera)
Presione de nuevo el botón n para
apagar la cámara.
(p. 67)
IN
3
Apunte la cámara y encuadre la
toma.
Monitor
Empuñadura horizontal
Empuñadura vertical
Al sujetar la cámara, tenga cuidado de no
tapar el fl ash con los dedos, etc.
4
Presione el botón disparador
hasta la mitad de su recorrido para
enfocar el objeto.
Cuando la cámara enfoca el objeto, se fi ja
●
la exposición (se muestran la velocidad del
obturador y el valor de apertura), y la marca de
destino AF cambia de color al verde.
●
Si la marca de destino AF parpadea en rojo,
signifi ca que la cámara no se ha podido enfocar.
4
Intente volver a enfocar.
P
Presione hasta
la mitad
Velocidad del obturador
“Enfoque” (p. 61)
P
1/400 F3.5
1/400
F3.5
Marca de destino AF
Valor de apertura
68
ES
Page 69

5
1/400
F3.5
Para tomar la fotografía, presione el
botón disparador suavemente hasta
el fi nal de su recorrido con cuidado
de no mover la cámara.
P
Visualización de imágenes
1
Ajuste el disco de modo en la
posición q.
Número de fotograma
Presione
completamente
1/400
F3.5
Pantalla de revisión de
imágenes
Para ver las imágenes durante la toma
Al presionar el botón q se habilita la
reproducción de imágenes. Para regresar a
la toma, o bien presione de nuevo el botón
q o bien presione el botón disparador
hasta la mitad de su recorrido.
Puede manejar la cámara con toques
cuando [CONTROL TOQUE] esté [ON].
[CONTROL TOQUE] (p. 49)
Para tomar vídeos
“Toma de vídeos (modo A)” (p. 21)
N
2009.08.26 12:30
Imagen reproducida
2
Use EFGH para seleccionar una
100-0001
imagen.
Muestra los
10 fotogramas
anteriores a la
imagen vigente
Muestra la
imagen anterior
El tamaño de las imágenes en pantalla
puede cambiarse. “Vista de índice, vista de
calendario, y vista de cerca” (p. 27)
Muestra la
imagen siguiente
Muestra los
10 fotogramas
siguientes a la
imagen vigente
Para reproducir vídeos
Seleccione un vídeo y presione el botón o.
2009.08.26
OK
REP. VIDEO
Vídeo
12
ORM
IN
12:30
100-0004
IN
M
1
4
ES
69
Page 70

Operaciones durante la reproducción
2009.08.26
12:30
100-0004
00:12/00:34
2009.08.26
12:30
100-0004
00:14/00:34
BORRAR
NO
de vídeos
Volumen: Durante la reproducción,
presione EF.
Avance rápido y rebobinado:
Seleccione con GH. Cada vez que
se presiona un botón, la velocidad de
reproducción recorre el ciclo 2x, 20x, y 1x
(velocidad estándar) en la dirección del
botón presionado.
Pausa: Presione el botón o.
2009.08.26
IN
Tiempo transcurrido/
tiempo total de
grabación
Primer (último) fotograma/avance
de fotogramas: Durante la pausa,
presione E para mostrar el primer
fotograma, y presione F para mostrar
el último fotograma. Mientras se presiona
el botón G se invierta la reproducción, la
reproducción normal se produce al presionar
H. Presione el botón o para reanudar la
reproducción.
Durante la reproducción
Durante la pausa
00:12/00:34
2009.08.26
IN
00:14/00:34
12:30
100-0004
12:30
100-0004
/
Borrado de imágenes durante
la reproducción (Borrado de
una imagen)
1
Presione el botón D cuando
aparezca en pantalla la imagen de
reproducción que desee borrar.
BORRAR
SI
NO
MENU
ACEPT.CANCEL.
2
Presione E para seleccionar [SI], y
presione el botón o.
[K BORRAR] (p. 40)
IN
OK
Para detener la reproducción del vídeo
Presione el botón m.
ES
70
Page 71

Uso de los modos de toma
Esta sección describe los modos de toma
disponibles. Dependiendo de las condiciones
de toma, algunos ajustes pueden cambiarse.
Para más información sobre las funciones
que pueden ajustarse, consulte los “Menús de
funciones de toma” en la página 29.
Uso del mejor modo para la
escena de toma (modo s)
1
Ajuste el disco de modo en la
posición s.
RETRATO
MENU
SALIR
Aparece una explicación del modo seleccionado si
●
se mantiene apretado el botón E.
2
Use EF para seleccionar el
mejor modo de toma para la escena,
y presione el botón o.
Icono que
indica el modo
de escena
establecido
12
M
N
ORM
Para cambiar a otro modo de escena, use el
menú. [O MODE ESCENA] (p. 33)
ACEPT.
IN
Para tomar fotos bajo el agua
Seleccione
[T INSTANTÁNEA SUBMARINA],
[k SUBACUÁTICO AMPLIO.1],
[l SUBACUÁTICO AMPLIO.2]
[H SUBACUÁTICO MACRO].
Cuando el disco de modo está ajustado
en s durante la toma subacuática (es
decir, mientras el sensor subacuático está
respondiendo), los 4 modos mencionados
arriba aparecen antes de los demás modos.
*1
Cuando la cámara está ajustada en
[l SUBACUÁTICO AMPLIO.2], la distancia
focal está automáticamente establecida en
aprox. 5,0 m.
Asegúrese de colocar unas carcasas
estancas para usar la cámara a
profundidades superiores a los 10 m.
Cuando el [MANÓMETRO] (p. 48) está
ajustado en [ON], la altitud/profundidad
OK
subacuática (presión atmosférica/hidráulica)
aparece en la pantalla del modo de espera
de toma como guía aproximada. “Pantalla
del modo de toma” (p. 8)
“Información importante acerca de las
funciones de impermeabilidad y resistencia
a los golpes” (p. 68)
*1
,
Para bloquear la distancia focal en
una toma subacuática (bloqueo AF)
Cuando esté seleccionado
[T INSTANTÁNEA SUBMARINA],
[k SUBACUÁTICO AMPLIO.1], o
[H SUBACUÁTICO MACRO], presione
F.
4
Marca ^
12
M
N
ORM
Para cancelarlo, presione F de nuevo
para quitar la marca ^.
AFL
IN
4
ES
71
Page 72

Mejora de textura y tono de
12
M
4
N
ORM
piel (modo b)
La cámara encuentra la cara de una persona y
le da a la piel un aspecto translúcido, liso para
hacer la fotografía.
1
Ajuste el disco de modo en la
posición b.
Indicador de modo b
12
M
N
ORM
2
Apunte la cámara en dirección al
objeto. Compruebe el marco que
aparece en torno a la cara detectada
por la cámara, y a continuación
presione el botón disparador para
tomar la foto.
Se guardan tanto la imagen editada como sin
●
editar.
●
Si la imagen no se puede retocar, sólo se guarda
la imagen sin editar.
En algunos objetos, el marco puede no
aparecer, puede tardar en aparecer o puede
que la edición no sea efectiva.
El [TAMAÑO] de la imagen retocada está
limitado a [J] o más bajo.
IN
Toma con ajustes automáticos
A
(modo
La cámara selecciona automáticamente el
modo de toma óptimo para la escena. Se trata
de un modo totalmente automático que permite
tomar fotografías adecuadas para la escena
pulsando simplemente el botón disparador. Las
confi guraciones en el modo de función de toma
no están disponibles en el modo A.
1
Ajuste el disco de modo en la
posición A.
4
Presione el botón disparador levemente o
●
presione el botón g para comprobar el
modo de toma que la cámara ha seleccionado
automáticamente.
Es posible que en algunos casos la cámara
no pueda seleccionar el modo de toma
deseado.
Si la cámara no puede identifi car el modo
más óptimo se seleccionará el modo P.
)
El indicador cambia de icono de
acuerdo con el modo de escena
seleccionado por la cámara.
i
AUTO
12
M
N
ORM
IN
4
72
ES
Page 73

Toma de vídeos (modo n)
00:35
QVGA
15
00:34
REC
Se grabará audio con el vídeo.
1
Ajuste el disco de modo en la
posición n.
Indicador de modo n
QVGA
15
Para usar el zoom durante la toma de
vídeos
El zoom óptico no está disponible cuando se
toman vídeos.
Use [ZOOM DIG.] (p. 31).
Para tomar un vídeo con estabilización
de la imágen digital
[DIS MOD VÍDEO] (p. 32)
2
Presione el botón disparador
hasta la mitad de su recorrido para
enfocar el objeto, y presiónelo
suavemente hasta el fondo para
empezar a grabar.
Iluminada de rojo durante la toma
REC
Presione hasta
la mitad
IN
00:35
Presione
completamente
3
Presione suavemente el botón
Tiempo de grabación restante (p. 66)
00:34
disparador hasta el fondo para
detener la grabación.
73
ES
Page 74

OK
ACEPT.
FLASH AUTO
Uso de las funciones de toma
Además de la amplia variedad de modos de
toma, la cámara posee funciones que aumentan
el repertorio expresivo y las opciones de toma
disponibles para el fotógrafo.
Uso del zoom óptico
Presionando el botón del zoom se ajusta el
intervalo de toma.
Pulsación hacia el
extremo de ángulo
abierto (W)
P
W T
12
M
N
ORM
Barra de zoom
Zoom óptico: 3,6×, Zoom digital: 5,0×.
Se recomienda el uso de [ESTABIL IMAG]
(imágenes fi jas)/[DIS MOD VÍDEO] (vídeos)
(p. 32) para realizar tomas con el zoom de
telefoto.
Toma de imágenes de mayor tamaño
sin reducir la calidad de imagen
[ZOOM PRECISO] (p. 31)
Toma de imágenes de mayor tamaño
[ZOOM DIG.] (p. 31)
IN
4
Pulsación hacia el
extremo de
telefoto (T)
P
W T
12
M
N
ORM
IN
El aspecto de la barra de zoom identifi ca el
estado del zoom preciso/zoom digital.
Cuando se usa
el zoom óptico
Intervalo de zoom óptico
Cuando se
usa el zoom
preciso
Cuando se usa
el zoom digital
4
Uso del fl ash
Las funciones de fl ash pueden seleccionarse
para ajustarse mejor a las condiciones de la
toma y producir la imagen deseada.
1
Presione el botón #.
Puede manejar la cámara con toques
cuando [CONTROL TOQUE] esté [ON].
[CONTROL TOQUE] (p. 49)
AUTO
P
ACEPT.
Intervalo de
zoom preciso
Intervalo de
zoom digital
OK
74
ES
FLASH AUTO
! # $
AUTO
Page 75

2
0.0
+0.3
+0.7
+1.0
OFF
OK
ACEPT.
Use GH para seleccionar la opción
de ajuste, y presione el botón o
para establecerlo.
Elemento Descripción
El fl ash se dispara
FLASH AUTO
OJOS ROJOS
DE RELLENO
APAGADO El fl ash no se dispara.
automáticamente en
circunstancias de poca luz y de
contraluz.
Emite destellos previos para
reducir el efecto de ojos rojos en
las fotos.
El fl ash se dispara
independientemente de la luz
disponible.
Ajuste del brillo
(Compensación de la exposición)
El brillo estándar (exposición apropiada)
establecido por la cámara basándose en el
modo de toma (excepto por A) puede
ajustarse con más o menos brillo para obtener la
toma deseada.
1
Presione el botón F.
COMP. DE EXP.
0.0
+0.7
Valor de compensación de la
exposición
2
Use EFGH para seleccionar
la imagen con el brillo deseado, y
presione el botón o.
+0.3
+1.0
Toma de primeros planos
(Macrofi lmación)
Esta función permite a la cámara enfocar y
fi lmar objetos a corta distancia.
1
Presione el botón &.
Puede manejar la cámara con toques
cuando [CONTROL TOQUE] esté [ON].
[CONTROL TOQUE] (p. 49)
ACEPT.
) del objeto.
OFF
% &
OFFOFF
OK
OFF
*1
P
2
Use GH para seleccionar la opción
de ajuste, y presione el botón o
para establecerlo.
Elemento Descripción
OFF Desactiva el modo macro.
MACRO
SUPER
MACRO
LED S-MACRO
*1
Cuando el zoom está en la posición más amplia
(W).
*2
Cuando el zoom está en la posición de telefoto (T).
*3
El zoom está automáticamente fi jado.
*4
[ISO] (p. 30) se fi ja automáticamente en [AUTO].
Permite la toma desde una
distancia de hasta 10 cm
*2
(30 cm
Permite la toma desde una
distancia de 2 cm del objeto. No
*3
pueden enfocarse objetos situados
a más de 50 cm.
El iluminador LED ilumina el área
entre 7 y 20 cm del objetivo,
*3*4
cuando el botón disparador se
presiona hasta la mitad.
El fl ash (p. 22) y el zoom (p. 22) no pueden
ajustarse cuando está seleccionado [%] o
[O].
ES
75
Page 76

Uso del disparador automático
Después de presionar el botón disparador hasta
abajo del todo, la fotografía se toma al cabo de
una cierta demora.
1
Presione el botón Y.
P
ACEPT.
TEMPORIZADOR
12
M
N
ORM
2
Use EF para seleccionar la
OFF
opción de ajuste, y presione el
botón o para establecerlo.
Elemento Descripción
OFF Cancela el disparador automático.
La luz del disparador automático
ON
El modo de disparador automático se
se enciende durante unos 10
segundos, luego parpadea durante
unos 2 segundos, y a continuación
se toma la fotografía.
cancela de forma automática tras una toma.
Para cancelar el disparador
automático una vez ajustado
Presione de nuevo el botón Y.
YY
OFF
OKOK
Cómo llamar y utilizar
funciones de toma de manera
rápida
Se pueden utilizar las siguientes funciones y
agilizar su invocación.
[PANORAMA]
• [AJ SOMBRA]
(p. 34)
[CONTROL TOQUE]
• [MULTI VENTANA] (p. 26)•
(p. 49)
ON
1
Presione el botón o/D.
2
Use GH para seleccionar la función
de menú, y presione el botón o
para establecerlo.
Para usar la pantalla de
previsualización de efectos
(Multi ventana)
Al seleccionar una opción en [ZOOM],
[COMP. DE EXP.], [WB] o [ESP/n]
aparecen 4 imágenes de previsualización
que refl ejan los valores de la función de
toma seleccionada. Use EFGH para
seleccionar la imagen deseada, y presione
el botón o.
•
(p. 33)
PANORAMA
76
ES
Page 77

Impresión
Impresión directa
(PictBridge*1)
Si se conecta la cámara a una impresora
compatible con PictBridge, se podrán imprimir
imágenes directamente sin necesidad de usar
un ordenador.
Para averiguar si su impresora es compatible
con PictBridge, consulte el manual de
instrucciones de la impresora.
*1
PictBridge es el estándar para conectar cámaras
digitales e impresoras de diferentes fabricantes e
imprimir fotografías directamente.
Los modos de impresión, tamaños de
papel y demás parámetros que pueden
confi gurarse con la cámara varían según la
impresora que se utilice. Para más detalles,
consulte el manual de instrucciones de la
impresora.
Para obtener información sobre los tipos
de papel disponibles, la alimentación de
papel, y la instalación de cartuchos de tinta,
consulte el manual de instrucciones de la
impresora.
Impresión de imágenes conforme
a la confi guración estándar de la
impresora [IMPR.SIMPLE]
1
Muestre la imagen que desee
imprimir en el monitor.
“Visualización de imágenes” (p. 17)
La impresión también puede iniciarse con
la cámara apagada. Después de ejecutar el
Paso 2, use EF para seleccionar [IMPR.
SIMPLE], y presione el botón o. Luego
use GH para seleccionar una imagen, y
presione el botón o.
2
Encienda la impresora y luego
conéctela a la cámara.
Botón H
Multiconector
Cable USB (suministrado)
Tapa del conector
IMPR.SIMPLE INICIO
PC / IMPR.PERSONAL
3
Presione H para empezar a
OK
imprimir.
4
Para imprimir otra imagen, use GH
para seleccionar una imagen, y
presione el botón o.
Para salir de la impresión
Después de que la imagen seleccionada
aparezca en pantalla, desconecte el cable
USB que une la cámara y la impresora.
OK
IMPRIMIRSALIR
77
ES
Page 78

Uso del programa OLYMPUS Master 2
Requisitos del sistema e
instalación de OLYMPUS
Master 2
Instale el software OLYMPUS Master 2
consultando la guía de instalación incluida.
Conexión de la cámara a un
ordenador
1
Asegúrese de que la cámara esté
apagada.
El monitor está apagado.
●
2
Conecte la cámara a un ordenador.
La cámara se enciende automáticamente.
●
Multiconector
Cable USB (suministrado)
Tapa del conector
USB
PC
IMPR.SIMPLE
IMPR.PERSONAL
SALIR
Se puede cargar la batería seleccionando
[SALIR] y presionando el botón o.
La pantalla [USB] de arriba no aparece y la
carga podría comenzar automáticamente en
aquellos casos en los que haya una carga
insufi ciente o la cámara esté conectada a
un ordenador mediante un concentrador
USB.
Localice el puerto USB de destino
consultando el manual de instrucciones de
su ordenador.
ACEPT.
3
Use EF para seleccionar [PC], y
presione el botón o.
El ordenador detecta automáticamente la cámara
●
como un nuevo dispositivo al conectarla por
primera vez.
Windows
Una vez que el ordenador detecta la
cámara, aparece un mensaje indicando que
la confi guración ha fi nalizado. Confi rme el
mensaje y haga clic en “OK”. La cámara es
detectada como un disco extraíble.
Macintosh
Cuando se inicie iPhoto, salga de iPhoto e
inicie OLYMPUS Master 2.
Mientras la cámara está conectada al
ordenador, las funciones de toma están
inhabilitadas.
La conexión de la cámara a un ordenador a
través de un concentrador USB puede crear
problemas de funcionamiento.
Cuando [MTP] está ajustado para el
submenú que aparece al presionar H tras
seleccionar [PC] en el Paso 3, las imágenes
no pueden transferirse a un ordenador por
medio de OLYMPUS Master 2.
Inicio de OLYMPUS Master 2
1
Haga doble clic en el icono de
OLYMPUS Master 2.
OK
Windows
Aparece en el escritorio.
Macintosh
Aparece en la carpeta de OLYMPUS
Master 2.
La ventana de exploración aparece después
●
de iniciar el software.
Cuando inicie por primera vez el programa
OLYMPUS Master 2 tras la instalación,
aparecerá la pantalla “Valores por defecto”
y “Registro”. Siga las instrucciones en
pantalla.
78
ES
Page 79

Manejo de OLYMPUS Master 2
Cuando se inicia OLYMPUS Master 2,
aparecerá en pantalla la Guía de inicio
rápido que le ayudará a manejar la cámara
sin ninguna duda. Si la Guía de inicio rápido
no aparece, haga clic en
herramientas para mostrar la Guía.
Para obtener más detalles sobre el manejo,
consulte la guía de ayuda del software.
en la barra de
Transferencia y
almacenamiento de imágenes
sin usar OLYMPUS Master 2
Esta cámara es compatible con la Clase de
Almacenamiento Masivo USB. Puede transferir
y guardar los datos de imágenes en su
ordenador mientras la cámara y el ordenador
están conectados.
Requisitos del sistema
Windows : Windows 2000 Professional/
Macintosh : Mac OS X v10.3 o superior
En un ordenador con Windows Vista, si se
Aunque un ordenador disponga de puertos
XP Home Edition/
XP Professional/Vista
ajusta [MTP] en el submenú que aparece
al presionar H tras seleccionar [PC] en el
Paso 3 de “Conexión de la cámara a un
ordenador” (p. 57), se podrá acceder a
Windows Photo Gallery.
USB, el funcionamiento correcto no está
garantizado en los casos siguientes.
Ordenadores con puertos USB instalados
●
mediante una tarjeta de expansión etc.
●
Ordenadores sin un SO instalado de fábrica y
ordenadores de fabricación casera.
ES
79
Page 80

Apéndice
Uso de un Adaptador microSD
No use el Adaptador con cámaras digitales
Olympus que no sean compatibles con este
Adaptador microSD, ni con otras marcas de
cámaras digitales, ordenadores, impresoras
y otros dispositivos compatibles con la
tarjeta xD-Picture Card. De lo contrario,
no sólo pueden dañarse las fotografías
tomadas, sino que también puede averiarse
el dispositivo.
Si no puede extraer la tarjeta microSD, no
use la fuerza. Póngase en contacto con
los distribuidores o centros de asistencia
autorizados.
Tarjetas compatibles con esta cámara
T arjeta microSD/Tarjeta microSDHC
Para obtener una lista de tarjetas microSD
comprobadas, visite nuestro sitio web
(http://www.olympus.com/).
Envío de imágenes
Se pueden enviar imágenes a un ordenador
o impresora mediante el cable USB
suministrado con la cámara.
Para enviar datos a otros dispositivos,
quite el acoplador de la cámara y use un
adaptador de tarjetas microSD disponible en
el mercado.
Precauciones de manipulación
No toque el área de contacto del adaptador
o de la tarjeta microSD. De lo contrario se
podrían producir fallos en la lectura de las
imágenes. Si aparecen huellas dactilares o
manchas en el área de contacto, límpiela
con un paño suave y seco.
Información importante
acerca de las funciones de
impermeabilidad y resistencia
a los golpes
Impermeabilidad: La función de
impermeabilidad está garantizada*1 para
profundidades de hasta 10 m durante
un máximo de una hora. La función de
impermeabilidad se podría ver afectada si se
somete la cámara a impactos excesivos.
Resistencia a los golpes: La función
de resistencia a los golpes garantiza*2 el
funcionamiento de la cámara contra golpes
accidentales producidos por el uso diario
de la cámara digital compacta. La función
de resistencia a los golpes no garantiza
incondicionalmente cualquier defecto de
funcionamiento ni daño cosmético. Los daños
cosméticos, tales como los rasguños y las
abolladuras, no están cubiertos por la garantía.
Como con cualquier dispositivo electrónico,
la cámara debe ser tratada con cuidado para
conservar su integridad y buen funcionamiento.
Para mantener el rendimiento de la cámara, si
recibe algún impacto importante hágala revisar
por un centro de servicio técnico autorizado
de Olympus. En caso de que la cámara se
estropee por uso negligente o incorrecto, la
garantía no cubrirá los costes derivados del
servicio o reparación de la cámara. Para obtener
información adicional sobre nuestra garantía,
visite el sitio web de Olympus de su zona
geográfi ca.
Tome las siguientes precauciones con su
cámara.
*1 Tal como lo determinan las pruebas de
presión sobre según la norma IEC 529
IPX8 – Esto quiere decir que una cámara
se puede sumergir a una presión de agua
determinada.
*2 Este rendimiento antigolpes está confi rmado
por las condiciones de las pruebas
Olympus con MIL-STD-810F, Método 516.5,
Procedimiento IV (Transit Drop Test). Para
conocer más detalles sobre las condiciones
de las pruebas Olympus, visite el sitio web
Olympus de su zona geográfi ca.
80
ES
Page 81

Antes de usarla:
•
Compruebe que en la cámara no haya
partículas extrañas, tales como tierra, polvo
o arena.
•
Asegúrese de cerrar la cubierta del
compartimento de la batería/tarjeta y la tapa
del conector fi rmemente hasta que cada cierre
haga clic.
•
No abra la cubierta del compartimento de la
batería/tarjeta ni la tapa del conector con las
manos mojadas, especialmente si está bajo el
agua o en un entorno húmedo o polvoriento
(por ejemplo, en la playa).
Después de usarla:
•
Asegúrese de limpiar cualquier exceso de
agua o restos después de usar la cámara bajo
el agua.
•
Después de usarla en el mar, sumerja
la cámara en un cubo con agua dulce
durante unos 10 minutos (con la cubierta
del compartimento de la batería/tarjeta y
la tapa del conector fi rmemente cerradas).
Después, seque la cámara a la sombra en
un lugar bien ventilado.
•
Al abrir la cubierta del compartimento de la
batería/tarjeta o la tapa del conector, podría
encontrase gotas de agua en la superfi cie
interior. Si se encuentran gotas de agua,
asegúrese de limpiarlas con un paño seco
antes de usar la cámara.
Notas para después de usarla
Es posible que se haya adherido cualquier
•
material extraño a la periferia de la tapa del
objetivo tras haber utilizado la cámara en
condiciones con materias extrañas como
tierra, polvo o arena, o cuando la tapa
del objetivo no se mueva suavemente. Si
continuase utilizando tal cámara, el objetivo
podría dañarse o es posible que la tapa no
pudiera quitarse, causando otros fallos en la
cámara. Para evitar tal fallo, lave la cámara
usando el siguiente método.
1 Inserte la batería y cierre la cubierta del
compartimento de la batería/tarjeta y
el conector fi rmemente hasta que cada
cierre haga clic.
2 Llene un cubo con agua dulce, sumerja
la cámara en el cubo con la superfi cie del
objetivo hacia abajo, y agite enteramente
la cámara.
3 Presione el botón n varias veces
en el agua y abra/cierre repetidamente la
tapa del objetivo.
4 Además, agite más la cámara con la tapa
abierta.
Siga los Pasos del 1 al 4 y, a continuación,
compruebe si la tapa del objetivo se mueve
con facilidad.
Si la tapa del objetivo no se mueve con
facilidad, coloque la cara del objetivo debajo
de un chorro de agua a presión y pulse varias
veces el botón n.
Almacenamiento y mantenimiento
No deje la cámara en ambientes a alta
•
temperatura (40°C o más) o a baja
temperatura (-10°C o menos). Podría
deteriorar la impermeabilidad de la cámara.
No utilice químicos para limpiar, impedir la
•
oxidación o el empañamiento de la cámara,
etc. Podría deteriorar la impermeabilidad de
la cámara.
No deje la cámara sumergida en agua
•
durante mucho tiempo. Podría deteriorar
la apariencia y/o la impermeabilidad de la
cámara.
A fi n de conservar la impermeabilidad de
•
la cámara, como con cualquier carcasa
submarina, se recomienda reemplazar
anualmente la carcasa (y los sellos).
Para ver una lista de los distribuidores
Olympus en los que puede reemplazar
la carcasa submarina, visite el sitio web
Olympus de su zona geográfi ca.
ES
81
Page 82

Cierre de la cubierta del compartimento
de la batería/tarjeta y la tapa del conector
Cubierta del compartimento de
la batería/tarjeta
Tapa del conector
Los accesorios incluidos (por ejemplo, el
adaptador de CA) no son impermeables ni
resistentes a los golpes.
PRECAUCIONES DE SEGURIDAD
PRECAUCIÓN
RIESGO DE DESCARGAS
ELÉCTRICAS
NO ABRIR
PRECAUCIÓN: PARA REDUCIR EL RIESGO DE DESCARGAS
ELÉCTRICAS, NO RETIRE LA CUBIERTA (O PARTE
TRASERA). EN EL INTERIOR NO HAY PIEZAS QUE EL
USUARIO PUEDA REPARAR.
REMITA LA REPARACIÓN A PERSONAL DE SERVICIO
ESPECIALIZADO OLYMPUS.
El signo de admiración dentro de un
triángulo equilátero tiene como fi nalidad
alertar al usuario de la existencia de
importantes instrucciones de operación
y mantenimiento en la documentación
PELIGRO Si el producto es utilizado sin observar
ADVERTENCIA
PRECAUCIÓN
¡ADVERTENCIA!
PARA EVITAR EL RIESGO DE INCENDIO O DESCARGAS
ELÉCTRICAS, NUNCA DESMONTE NI EXPONGA ESTE
PRODUCTO AL AGUA NI LO UTILICE EN UN ENTORNO
MUY HÚMEDO.
Precauciones Generales
Lea todas las instrucciones — Antes de utilizar
este producto, lea todas las instrucciones
operativas. Guarde todos los manuales y la
documentación para futuras consultas.
Limpieza — Siempre desenchufe el producto de
la toma de corriente antes de limpiarlo. Para la
limpieza use sólo un paño húmedo. Nunca use
limpiadores líquidos o aerosoles, ni solventes
orgánicos de ningún tipo para limpiar este
producto.
Accesorios — Para su seguridad y evitar daños
al producto, utilice únicamente los accesorios
recomendados por Olympus.
Agua y humedad — En las precauciones de los
productos diseñados a prueba de la intemperie,
consulte las secciones de resistencia a la
intemperie en sus respectivos manuales.
Ubicación — Para evitarle daños al producto,
monte el producto sobre un trípode, caballete o
soporte estable.
suministrada con el producto.
la información representada bajo este
símbolo, podría causar serias lesiones
o muerte.
Si el producto es utilizado sin observar
la información representada bajo este
símbolo, podría causar serias lesiones
o muerte.
Si el producto es utilizado sin observar
la información representada bajo este
símbolo, podría causar lesiones personales
menores, daños al equipo, o pérdida de
datos importantes.
82
ES
Page 83

Fuentes de alimentación — Conecte este producto
únicamente con la fuente de alimentación
descrita en la etiqueta del producto.
Rayos — Si se produce una tormenta eléctrica
mientras está utilizando el adaptador de CA,
retírelo de la toma de corriente inmediatamente.
Objetos extraños — Para evitar daños personales,
nunca inserte objetos de metal en el producto.
Calentadores — Nunca utilice ni guarde este
producto cerca de fuentes de calor, tales como
radiadores, rejillas de calefacción, estufas o
cualquier tipo de equipo o aparato generador de
calor, incluyendo amplifi cadores estéreo.
Manejo de la cámara
ADVERTENCIA
No utilice la cámara cerca de gases
•
infl amables o explosivos.
No utilice el fl ash ni el LED a corta distancia de
•
las personas (bebés, niños pequeños, etc.).
Cuando dispare el fl ash, deberá mantener, por
•
lo menos, una distancia de 1 m de la cara de
los sujetos. El disparo demasiado cercano de
los ojos del sujeto podrá causarle la pérdida de
visión momentánea.
Mantenga a los niños alejados de la cámara.
•
Utilice y guarde siempre la cámara fuera
•
del alcance de los niños, para prevenir las
siguientes situaciones de peligro que podrían
causarles serias lesiones:
Enredarse con la correa de la cámara,
•
ocasionando asfi xia.
Ingerir accidentalmente una pila, tarjetas, u
•
otras piezas pequeñas.
Disparar el fl ash accidentalmente hacia sus
•
propios ojos o hacia los ojos de otro niño.
Lesionarse accidentalmente con las piezas
•
móviles de la cámara.
No mire al sol ni a luces fuertes a través de la
•
cámara.
No utilice ni guarde la cámara en lugares
•
polvorientos o húmedos.
No cubra el fl ash con la mano mientras efectúa
•
el disparo.
No introduzca nada que sea distinto de la
•
tarjeta microSD al Adaptador de microSD.
Este Adaptador es exclusivo solamente para su
uso con tarjetas microSD. No se pueden instalar
otros tipos de tarjetas.
No introduzca nada que sea distinto de la
•
tarjeta xD-Picture Card o del Adaptador
microSD en la cámara
Si introduce una tarjeta por error, como una
tarjeta microSD, no utilice la fuerza. Póngase en
contacto con centros autorizados de distribución/
reparación.
PRECAUCIÓN
Interrumpa inmediatamente el uso de la
•
cámara si percibe algún olor, ruido o humo
extraño alrededor de la misma.
Nunca retire las pilas con las manos
•
descubiertas, ya que podría causar un incendio
o quemarle las manos.
No deje la cámara en lugares donde pueda
•
estar sujeta a temperaturas extremadamente
altas.
Si lo hace puede provocar el deterioro de las
•
piezas y, en algunas circunstancias, provocar
que se prenda fuego. No utilice el cargador
o el adaptador CA si está cubierto (por
ejemplo con una manta). Esto podría causar
recalentamiento, resultando en incendio.
Manipule la cámara con cuidado para evitar
•
una quemadura de leve.
Ya que la cámara contiene partes metálicas,
•
el recalentamiento puede resultar en una
quemadura de baja temperatura. Preste
atención a lo siguiente:
Cuando la utilice durante un largo período,
•
la cámara se recalentará. Si mantiene a la
cámara en este estado, podría causar una
quemadura de baja temperatura.
En lugares sujetos a temperaturas
•
extremadamente bajas, la temperatura de la
carcasa de la cámara puede ser más baja
que la temperatura ambiente. Si es posible,
póngase guantes cuando manipule la cámara
en temperaturas bajas.
Tenga cuidado con la correa.
•
Tenga cuidado con la correa cuando transporte
•
la cámara. Podría engancharse en objetos
sueltos y provocar daños graves.
No toque las partes metálicas de la cámara de
•
forma prolongada a bajas temperaturas.
Puede dañarse la piel. Si la temperatura es
•
baja, utilice la cámara con guantes puestos.
ES
83
Page 84

Precauciones acerca del uso de la
batería
Siga estas importantes indicaciones
para evitar que se produzcan fugas,
recalentamientos, incendios o explosión de
la batería, o que cause descargas eléctricas
o quemaduras.
PELIGRO
•
La cámara utiliza una batería de iones de litio
especifi cada por Olympus. Cargue la batería con
el adaptador CA o cargador especifi cados. No
utilice otros adaptadores CA o cargadores.
•
Nunca caliente ni incinere las baterías.
•
Tome precauciones al transportar o guardar las
baterías a fi n de evitar que entren en contacto con
objetos metálicos, tales como alhajas, horquillas,
cierres, etc.
•
Nunca guarde las baterías en lugares donde
queden expuestas a la luz solar directa o sujetas
a altas temperaturas en el interior de un vehículo
con calefacción, cerca de fuentes de calor, etc.
•
Para evitar que ocurran fugas de líquido de
las baterías o daños de sus terminales, siga
cuidadosamente todas las instrucciones
respectivas al uso de las baterías. Nunca intente
desarmar una pila ni modifi carla de ninguna
manera, realizar soldaduras, etc.
•
Si el fl uido de la batería penetrara en sus ojos,
lávelos de inmediato con agua corriente fresca y
limpia, y solicite atención médica inmediatamente.
•
Siempre guarde las baterías fuera del alcance
de los niños menores. Si un niño ingiere una
batería accidentalmente, solicite atención médica
inmediatamente.
ADVERTENCIA
Conserve la batería siempre seca.
•
Para evitar que ocurran fugas de líquido,
•
recalentamiento de la batería, o que cause
incendio o explosión, utilice únicamente la batería
recomendada para el uso con este producto.
Inserte la pila cuidadosamente, tal como se
•
describe en el manual de instrucciones.
Si las baterías recargables no han sido recargadas
•
dentro del tiempo especifi cado, interrumpa la
carga y no las utilice.
No utilice una batería si está rajada o quebrada.
•
Si se producen fugas de líquido, decoloración
•
o deformación de la batería, o cualquier otra
anormalidad durante la operación, interrumpa el
uso de la cámara.
Si el fl uido de la pila entrara en contacto con
•
su ropa o con su piel, quítese la ropa y lave de
inmediato la parte afectada con agua corriente
fresca y limpia. Si el fl uido quemara su piel, solicite
atención médica inmediatamente.
Nunca exponga la batería a fuertes impactos ni a
•
vibraciones continuas.
PRECAUCIÓN
•
Antes de colocarla, siempre inspeccione la batería
atentamente para verifi car si no se producen fugas
de líquido, decoloración, deformación o cualquier
otra anomalía.
•
Las baterías pueden recalentarse durante el uso
prolongado. Para evitar quemaduras menores,
no la retire inmediatamente después de utilizar
la cámara.
•
Siempre retire la batería de la cámara antes de
guardar la cámara por un largo tiempo.
Precaución sobre el ambiente de uso
Para proteger la tecnología de alta precisión
•
contenida en este producto, nunca deje la cámara
en los lugares listados abajo, durante su uso o
almacenamiento:
Lugares donde la temperatura y/o humedad
•
sea(n) alta(s) o sufra(n) cambios extremos.
Luz solar directa, playas, vehículos cerrados, o
cerca de fuentes de calor (estufas, radiadores,
etc.) o humidifi cadores.
En ambientes arenosos o polvorientos.
•
Cerca de productos infl amables o explosivos.
•
En lugares húmedos, tales como cuartos de
•
baño o bajo la lluvia. Cuando utilice productos
diseñados a prueba de la intemperie, lea
también sus manuales.
En lugares propensos a fuertes vibraciones.
•
Jamás deje caer la cámara ni la someta a fuertes
•
impactos o vibraciones.
Cuando la cámara está montada en un trípode,
•
ajuste la posición de la cámara con la cabeza del
trípode. No gire la cámara.
No toque las partes eléctricas de contacto de la
•
cámara.
No deje la cámara apuntada directamente al sol.
•
Esto puede causar daños en el objetivo o en la
cortina del obturador, fallos en el color, aparición
de imágenes fantasma en el CCD o puede causar
un posible incendio.
No presione ni tire del objetivo forzadamente.
•
Antes de guardar la cámara por un largo tiempo,
•
retire la batería. Seleccione un lugar fresco y seco
para guardarla a fi n de evitar la condensación o
formación de moho en el interior de la cámara.
Después de un tiempo de almacenamiento,
pruebe la cámara, encendiéndola y presionando
el botón disparador, para asegurarse de que está
funcionando normalmente.
Observe siempre las restricciones del ambiente
•
de funcionamiento descritas en el manual de la
cámara.
La función de medición de la altitud/profundidad
•
no está aprobada por una institución ofi cial. Utilice
estas medidas solo como referencia.
84
ES
Page 85

Precauciones al manipular la batería
Esta cámara utiliza una batería de iones de litio
•
especifi cada por Olympus. No utilice ningún otro
tipo de batería.
Si los terminales de la batería se humedecen o
•
engrasan, los contactos de la cámara pueden
resultar en fallos. Limpie bien la batería con un
paño seco antes de usarlo.
Cargue siempre la batería antes de usarla por
•
primera vez, o si no se ha utilizado la batería
durante un período largo.
Cuando opere la cámara con la batería en bajas
•
temperaturas, trate de mantener la cámara y la
batería de repuesto tan tibias como sea posible.
La batería utilizada en temperaturas bajas puede
ser recuperada después de ser climatizada en
temperatura ambiente.
El número de fotografías que se puede tomar
•
puede variar dependiendo de las condiciones de
la toma o de la batería.
Antes de salir a un largo viaje, y especialmente
•
si viaja al extranjero, adquiera baterías extras.
Una batería recomendada puede ser difícil de
conseguir durante el viaje.
Sírvase reciclar las baterías para ayudar a
•
conservar los recursos del planeta. Cuando
deseche las baterías en desuso, asegúrese de
cubrir los terminales y siempre tenga en cuenta
las regulaciones y leyes locales.
Monitor LCD
•
No ejerza demasiada presión sobre el monitor
puesto que de lo contrario, la imagen puede
ser difusa y ocasionar un fallo del modo de
reproducción o dañar el monitor.
•
Un rayo de luz puede aparecer en la parte
superior/inferior del monitor, pero esto no es un
fallo.
•
Cuando se visualiza un objeto diagonalmente en
la cámara, los bordes pueden aparecer en zigzag
en el monitor. Esto no es un fallo; y será menos
notorio en el modo de reproducción.
•
En lugares sujetos a bajas temperaturas,
el monitor LCD puede tardar más tiempo
en encenderse o su color puede cambiar
temporalmente. Cuando use la cámara en lugares
extremadamente fríos, sería una buena idea
colocarla ocasionalmente en lugares cálidos. La
iluminación defi ciente del monitor LCD debido a
temperaturas bajas se recuperará en temperaturas
normales.
•
La pantalla de cristal líquido (LCD) utilizada
para el monitor está hecha con tecnología de
alta precisión. Sin embargo, pueden aparecer
constantemente puntos de luz negros o brillantes
en el monitor LCD. Debido a sus características o
al ángulo en el cual está visualizando el monitor, el
punto puede no ser uniforme en color y brillo. Esto
no es una anomalía.
Avisos legales y otros
Olympus no asume la responsabilidad ni ofrece
•
garantías con respecto a cualquier daño o
benefi cio que pudiera surgir del uso legal de
esta unidad o cualquier petición de una tercera
persona, que sea causada por el uso inapropiado
de este producto.
Olympus no asume la responsabilidad ni ofrece
•
garantías con respecto a cualquier daño o
benefi cio que pudiera surgir del uso legal de esta
unidad, que sea causado por el borrado de datos
de imágenes.
ES
85
Page 86

Descargo de responsabilidad de
garantías
•
Olympus no asume la responsabilidad ni ofrece
garantías, escritas o implícitas, con respecto
al contenido de este material escrito o del
software, ni tampoco en ningún caso asumirá la
responsabilidad por ninguna garantía implicada
en la comercialización o conveniencia para algún
propósito particular, o algún perjuicio consecuente,
fortuito o indirecto (que incluye, pero no se
restringe a los perjuicios causados por pérdida de
benefi cios comerciales, interrupciones comerciales
y pérdidas de informaciones comerciales) que
pudiera surgir del empleo o incapacidad de
uso de este material escrito, del software o del
equipo. Algunos países no permiten la exclusión
o limitación de responsabilidad por perjuicios
consecuentes o fortuitos, de manera que las
limitaciones anteriormente mencionadas puedan
no ser aplicables a Ud.
•
Olympus se reserva todos los derechos de este
manual.
Advertencia
El fotografi ado no autorizado o el uso de
material protegido por los derechos de
autor puede violar las leyes aplicables de
los derechos de autor. Olympus no asume
ninguna responsabilidad por el fotografi ado
no autorizado, por el uso, u otros actos que
violen los derechos de los propietarios de tales
derechos de autor.
Aviso sobre la protección de los
derechos de autor
Todos los derechos son reservados. Ninguna
parte de este material escrito o del software
podrá ser reproducida o utilizada de ninguna
forma ni bajo ningún medio, electrónico
o mecánico, incluyendo el fotocopiado y
la grabación o el uso de cualquier tipo de
sistema de almacenamiento y recuperación
de información sin la autorización previa y por
escrito de Olympus. No se asume ninguna
responsabilidad con respecto al uso de la
información contenida en este material escrito
o en el software, ni por perjuicios resultantes
del uso de la información en estos contenida.
Olympus se reserva el derecho de modifi car
las características y el contenido de esta
publicación o del software sin aviso previo ni
obligación alguna.
86
ES
Para los clientes de Europa
La marca “CE” indica que este producto cumple
con los requisitos europeos sobre protección al
consumidor, seguridad, salud y protección del
medio ambiente. Las cámaras con la marca “CE”
están destinadas a la venta en Europa.
Este símbolo [un contenedor de basura tachado
con una X en el Anexo IV de WEEE] indica que
la recogida de basura de equipos eléctricos y
electrónicos deberá tratarse por separado en los
países de la Unión Europea. No tire este equipo
a la basura doméstica.
Para el desecho de este tipo de equipos utilice
los sistemas de devolución al vendedor y de
recogida que se encuentren disponibles.
Este símbolo [Directiva 2006/66/EC Anexo
II sobre contenedores] indica que se deben
separar las pilas usadas en los países de la UE.
Por favor no tire las pilas en la basura normal.
Por favor utilice los sistemas de reciclaje que
existan en su país para tirar las pilas.
Precaución con el uso de la batería
recargable, cargador de batería y
adaptador CA
Se recomienda enfáticamente usar solamente la
batería recargable, cargador de batería y adaptador
CA especifi cados, que se disponen con esta cámara
como accesorios originales Olympus.
El uso de una batería recargable, cargador de
batería y/o adaptador CA que no sean originales,
puede resultar en incendios o lesiones personales,
debido a la fuga de fl uido, calentamiento, encendido
o daños a la batería. Olympus no asume ninguna
responsabilidad por accidentes y daños debido al uso
de una batería, cargador de batería y/o adaptador CA
que no sean accesorios originales Olympus.
Condiciones de la garantía
1 Si este producto sufre algún defecto, a pesar de
haber sido usado apropiadamente (de acuerdo
con las instrucciones de las Precauciones de
Seguridad suministrado con el mismo), durante
un período de dos años desde la fecha de la
compra a un distribuidor Olympus autorizado, que
se halle dentro del área comercial de Olympus
Imaging Europa GmbH como fi gura en el sitio
web: http://www.olympus.com será reparado, o a
opción de Olympus reemplazado, libre de cargos.
Para reclamar bajo esta garantía el cliente
deberá entregar el producto y este Certifi cado de
Garantía antes de fi nalizar el período de garantía
de dos años, al distribuidor donde fue comprado
el producto o a cualquier Centro de Servicio
Olympus, dentro del área comercial de Olympus
Imaging Europa GmbH como fi gura en la página
web: http://www.olympus.com. Durante un
período de un año de la Garantía Internacional el
cliente puede presentar el producto a cualquier
Centro de Servicio Olympus. Tenga en cuenta
que no en todos los países existe un Centro de
Servicio Olympus.
Page 87

2 El coste del transporte del producto al
establecimiento vendedor o servicio técnico
autorizado correrá a cuenta del comprador.
3 Por otra parte, incluso dentro del período de
garantía, el comprador deberá pagar los gastos
de reparación en los siguientes casos:
Cualquier defecto que se produzca debido
a.
al uso indebido (tal como una operación
no mencionada en las Precauciones de
seguridad).
Cualquier defecto que se produzca debido
b.
a una reparación, modifi cación, limpieza
por otros que no sean los servicios técnicos
Olympus.
Cualquier defecto o daño debido a un
c.
transporte no adecuado, a golpes, etc.
después de la compra del producto.
Cualquier defecto o daño que se produzca
d.
por incendios, terremotos, inundaciones,
tempestades u otros desastres naturales,
contaminación ambiental y fuentes irregulares
de tensión.
Cualquier defecto que se produzca por
e.
descuido o almacenamiento inadecuado
(tal como guardar el producto en lugares
con alta temperatura y humedad, cerca de
insecticidas, tales como naftalina, o productos
químicos nocivos, y otros), mantenimiento
inadecuado, etc.
Cualquier daño que se produzca debido a
f.
pilas gastadas, etc.
Daños producidos por penetrar arena, barro,
g.
etc. en el producto.
Cuando el producto no vaya acompañado de
h.
este Certifi cado de Garantía.
Cuando el Certifi cado de Garantía presente la
i.
menor alteración relativa al año, mes y fecha
de la compra, el nombre del cliente, el nombre
del distribuidor o el número de serie.
Cuando el justifi cante de compra no sea
j.
presentado con este certifi cado de garantía.
4 Esta garantía cubre sólo el propio producto:
otros accesorios y equipo, tal como el estuche, Ia
correa, la tapa del objetivo, las pilas, etc. no son
cubiertos por la misma.
5 La responsabilidad de Olympus bajo esta
garantía queda limitada únicamente a la
reparación y reemplazo del producto. Cualquier
responsabilidad por pérdida o daño indirectos o
consecuentes de cualquier tipo que sea incurrido
o sufrido por el cliente debido a un defecto del
producto, y en particular cualquier pérdida o daño
ocasionado a cualquier objetivo, vídeo u otro
equipo o accesorio usado con este producto, o
ante cualquier pérdida resultante de un retraso
en la reparación o pérdida de datos, queda
excluida explícitamente. Ello no afecta a las
disposiciones fi jadas por la ley.
Notas relativas a las condiciones de
la garantía
1 Esta garantía solamente será válida si el
Certifi cado de Garantía ha sido rellenado
debidamente por Olympus o un distribuidor
autorizado o exista cualquier otro documento
que contenga una prueba sufi ciente. Por lo
tanto, asegúrese de que su nombre, el nombre
del distribuidor, el número de serie y el año,
mes y fecha de la compra, se encuentren
todos completos y se adjunte la factura de
compra/venta original (indicando el nombre
del distribuidor, la fecha de compra y tipo
de producto) al Certifi cado de Garantía.
Olympus se reserva el derecho de rechazar un
servicio gratuito si el Certifi cado de Garantía
es incompleto o ilegible y si no se adjunta el
documento anteriormente citado o sus datos son
incompletos o ilegibles.
2 En caso de pérdida de la garantía original, ésta
no será sustituida por otra. Rogamos pues la
guarde en un lugar seguro.
* Para obtener información sobre la red
internacional de servicio técnico Olympus,
consulte el sitio web http://www.olympus.com.
Marcas comerciales
IBM es una marca registrada de International
•
Business Machines Corporation.
Microsoft y Windows son marcas registradas de
•
Microsoft Corporation.
Macintosh es una marca comercial de Apple Inc.
•
xD-Picture Card™ es una marca comercial.
•
microSD es una marca registrada de la asociación
•
SD.
Todos los demás nombres de compañías y
•
productos son marcas registradas y/o marcas
comerciales de sus respectivos propietarios.
Las normas para sistemas de archivos de cámara
•
referidas en este manual son las “Normas de
Diseño para Sistema de Archivos de Cámara/
DCF” estipuladas por la Asociación de Industrias
Electrónicas y de Tecnología de Información de
Japón (JEITA).
ES
87
Page 88

ESPECIFICACIONES
Cámara
Tipo de producto : Cámara digital (para fotografía y reproducción)
Sistema de grabación
Fotografías : Grabación digital, JPEG (según las Normas de diseño para sistema de
Estándares aplicables : Exif 2.2, Formato de reserva de impresión digital (DPOF), PRINT Image
Sonido con fotografías : Formato WAVE
Vídeo : AVI Motion JPEG
Memoria : Memoria interna
Núm. de píxeles efectivos : 12.000.000 píxeles
Dispositivo de captura de imagen : CCD de 1/2,33” (fi ltro de colores primarios), 12.700.000 píxeles (brutos)
Objetivo : Objetivo Olympus de 5,0 a 18,2 mm, f3,5 a 5,1
Sistema fotométrico : Medición ESP digital, sistema de medición por puntos
Velocidad de obturación : 4 a 1/2000 seg.
Alcance de fotografía : 0,5 m a ∞ (W/T) (normal)
Monitor : Pantalla LCD TFT en color de 2,7”, 230.000 puntos
Tiempo de carga del fl ash : Aprox. 3,5 seg. (para descarga completa del fl ash a temperatura
Conector : Multiconector (jack DC-IN, conector USB, toma A/V OUT)
Sistema de calendario
automático
Resistencia al agua
Tipo : Equivalente a la norma IEC 529 IPX8 (bajo las condiciones de ensayo
Signifi cado : Normalmente, la cámara se puede utilizar bajo el agua a una presión
Resistencia al polvo : Equivalente a la norma IEC 529 IP6X (bajo las condiciones de ensayo
Entorno de funcionamiento
Temperatura : -10°C a 40°C (funcionamiento) / -20°C a 60°C (almacenamiento)
Humedad : 30 % a 90 % (funcionamiento) /10 % a 90 % (almacenamiento)
Fuente de alimentación : Una batería de iones de litio Olympus (LI-50B) o un adaptador de CA
Dimensiones : 95,0 mm (anchura) × 61,7 mm (altura) × 21,5 mm (prof.)
Peso : 182 g (sin la batería ni la tarjeta)
archivos de cámara (DCF))
Matching III, PictBridge
xD-Picture Card (16 MB a 2 GB) (TypeH/M/M+, Standard)
Tarjeta microSD/tarjeta microSDHC (con el Adaptador microSD
subministrado)
(equivalente a 28 a 102 mm en una cámara de 35 mm)
0,1 m a ∞ (W), 0,3 m a ∞ (T) (modo macro)
0,02 m a 0,5 m (sólo W) (modo supermacro)
0,07 m a 0,2 m (sólo W) (modo LED S-macro)
ambiente usando unas baterías nuevas completamente cargadas)
: 2000 hasta 2099
de OLYMPUS), disponible a 10 m de profundidad
específi ca.
de OLYMPUS)
Olympus (D-7AC/vendido aparte)
(sin incluir los salientes)
La función “Shadow Adjustment Technology” (tecnología de ajuste de
sombras) contiene tecnologías patentadas de Apical Limited.
88
ES
Page 89

Batería de iones de litio (LI-50B)
Tipo de producto : Batería recargable de iones de litio
Nº de modelo : LI-50BA/LI-50BB
Voltaje estándar : CC 3,7 V
Capacidad estándar : 925 mAh
Duración de la batería : Aprox. 300 recargas completas (varía según el uso)
Entorno de funcionamiento
Dimensiones : 34,4 mm (anchura) × 40,0 mm (altura) × 7,0 mm (prof.)
Peso : Aprox. 20 g
Temperatura : 0°C a 40°C (durante la carga) /
-10°C a 60°C (funcionamiento) /
-10°C a 35°C (almacenamiento)
Adaptador de CA (F-1AC)
Nº de modelo : F-1AC-1/F-1AC-2/F-1AC-3
Alimentación : CA de 100 a 240 V (50/60 Hz)
Salida : CC 5 V, 700 mA
Tiempo de carga : Aprox. 2,5 horas
Entorno de funcionamiento
Dimensiones : 48,0 mm (anchura) × 60,0 mm (altura) × 21,0 mm (prof.) (F-1AC-1) /
Peso : Aprox. 80,0 g (F-1AC-1) /
Longitud del cable de conexión : Aprox. 1,5 m
Utilización a bajas temperaturas
El funcionamiento a baja temperatura de la tarjeta opcional Olympus xD-Picture Card y la batería de iones de litio
está garantizado hasta 0°C. Sin embargo, se han comprobado las siguientes funciones para su utilización con
este producto en temperaturas de hasta -10°C.
Temperatura : 0°C a 40°C (funcionamiento) / -20°C a 60°C (almacenamiento)
39,0 mm (anchura) × 67,0 mm (altura) × 21,0 mm (prof.) (F-1AC-2) /
50,0 mm (anchura) × 70,0 mm (altura) × 21,0 mm (prof.) (F-1AC-3)
Aprox. 70,0 g (F-1AC-2) /
Aprox. 90,0 g (F-1AC-3)
Olympus xD-Picture Card
Standard
TypeM/M+
TypeH
Batería de iones de litio Olympus
LI-50B
El número de fotografías almacenables se reduce a bajas temperaturas.●
16 MB 32 MB 64 MB 128 MB 256 MB 512 MB 1 GB 2 GB
999999
9999
9999
9 Operación confi rmada
ES
89
Page 90

Adaptador microSD
Tipo de producto : Adaptador para tarjeta microSD
Entorno de funcionamiento
Temperatura : -10°C a 40°C (funcionamiento) / -20°C a 65°C (almacenamiento)
Humedad : 95% y menos (funcionamiento) / 85% y menos (almacenamiento)
Dimensiones : 25,0 mm (anchura) x 20,3 mm (altura) x 1,7 mm (prof.) (Asa: 2,2 mm)
Peso : Aprox. 0,9 g
El diseño y las especifi caciones están sujetas a cambios sin previo aviso.
90
ES
Page 91

MEMO
ES
91
Page 92

InhaltsverzeichnisInhaltsverzeichnis
Vorbereiten der Kamera ......................93
¾
Überprüfen des Verpackungsinhalts......93
Anbringen des Trageriemens ................93
Einsetzen des Akkus und einer xD-Picture
Card™ (separat erhältlich)
in die Kamera ........................................93
Laden des Akkus ...................................94
Verwendung einer microSD-Karte/
microSDHC-Karte (separat erhältlich) ...96
Einstellen von Datum und Uhrzeit .........96
Ändern der Anzeigesprache .................97
¾
Aufnahme, Anzeige und Löschen von
Bildern ..................................................98
Aufnehmen mit den optimalen
Einstellungen von Blendenwert und
Verschlusszeit (
Anzeigen von Bildern .............................99
Löschen von Bildern während der
Wiedergabe (Löschen eines einzelnen
Bilds) ....................................................100
¾
Verwenden der verschiedenen
Aufnahmemodi ..................................101
Wahl des für die Aufnahmesituation
optimal geeigneten Motivprogramms
s
-Modus) ......................................101
(
Optimieren von Hautfarbe und -struktur
b
(
K
-Modus) ...................98
-Modus) ...................................102
Aufnehmen mit automatischen
A
Einstellungen (
Filmaufnahmen (
¾
Verwenden der
-Modus)...............102
n
-Modus) ................103
Aufnahmefunktionen .........................104
Verwendung des optischen Zooms .....104
Verwendung des Blitzes ......................104
Ändern der Bildhelligkeit
(Belichtungskorrektur) .........................105
Nahaufnahmen (Makrofunktion) ..........105
Verwendung des Selbstauslösers .......106
Schnelles Aufrufen und Verwenden von
Aufnahmefunktionen ............................106
¾
Drucken ..............................................107
¾
Verwenden der Software
OLYMPUS Master 2............................108
¾
Anhang ...............................................110
Verwendung des microSD-Adapter .....110
Wichtige Informationen zu Wasser- und
Stossfestigkeitseigenschaften .............110
SICHERHEITSHINWEISE ...................112
TECHNISCHE DATEN ........................118
● Wir bedanken uns für den Kauf einer Olympus
Digitalkamera. Bitte lesen Sie diese Anleitung vor
Gebrauch Ihrer neuen Kamera sorgfältig durch,
um eine einwandfreie Handhabung und lange
Nutzungsdauer zu gewährleisten. Bewahren Sie
diese Anleitung bitte an einem sicheren Ort auf.
● Wir empfehlen Ihnen, vor wichtigen Aufnahmen
Probeaufnahmen zu erstellen, damit Sie sich mit
der Bedienung und den Funktionen der Kamera
vertraut machen können.
Die Nummern der Bezugsseiten beziehen sich auf die Bedienungsanleitung (auf der mitgelieferten CDROM enthalten). Bitte schlagen Sie in der Bedienungsanleitung der CD-ROM nach.
92
DE
●
Olympus behält sich im Sinne einer ständigen
Produktverbesserung das Recht vor, die in
diesem Handbuch enthaltenen Informationen
jederzeit zu aktualisieren oder zu verändern.
● Die Bildschirm- und Kameraabbildungen
in diesem Handbuch wurden während des
Herstellungsprozesses erstellt, und können vom
aktuellen Produkt abweichen.
Page 93

Vorbereiten der Kamera
Überprüfen des
Verpackungsinhalts
Trageriemen
Digitalkamera
Lithium-Ionen-Akku LI-50B
oder
Netzteil (F-1AC)
USB-Kabel AV-Kabel
OLYMPUS Master 2
CD-ROM
Überprüfen des mitgelieferten Zubehörs:
Bedienungsanleitung, Garantiekarte.
Der Verpackungsinhalt richtet sich nach der Region, in
der Sie Ihre Kamera gekauft haben.
microSD-Adapter
Anbringen des Trageriemens
Ziehen Sie den Trageriemen fest, damit er
sich nicht lösen kann.
Einsetzen des Akkus und einer
xD-Picture Card™ (separat
erhältlich) in die Kamera
Setzen Sie ausschließlich eine xD-Picture
Card oder den microSD-Adapter in die
Kamera ein.
1
1
Akku-/Kartenfachdeckel
2
DE
93
Page 94

2
Akkuverriegelung
Die Vorderseite und die Rückseite weisen
unterschiedliche Markierungen auf.
Setzen Sie den Akku mit der in der obigen
Abbildung gezeigten Ausrichtung in das
Akkufach ein. Wenn der Akku nicht richtig
eingesetzt ist, funktioniert die Kamera nicht.
Schieben Sie die Akkuverriegelung in
Pfeilrichtung der Abbildung, während Sie
den Akku einsetzen.
Zum Entfernen des Akkus schieben Sie
die Akkuverriegelung in Pfeilrichtung der
Abbildung, und ziehen Sie den Akku aus
dem Fach.
Achten Sie stets darauf, die Kamera
auszuschalten, bevor Sie den Akku-/
Kartenfachdeckel öffnen oder schließen.
3
4
Wenn keine xD-Picture Card (separat
erhältlich) eingesetzt ist, werden die mit der
Kamera aufgenommenen Bilder im internen
Speicher aufgezeichnet. „Verwendung einer
xD-Picture Card“ (S. 66)
„Anzahl der speicherbaren Einzelbilder
(Standbilder)/Kontinuierliche Aufnahmedauer
(Filme) im internen Speicher und auf der
xD-Picture Card“ (S. 67)
Entfernen der xD-Picture Card
12
KerbeIndexbereich
Drücken Sie auf die Hinterkante der Karte,
bis ihre Arretierung freigegeben wird und die
Karte ausgeschoben wird, und ziehen Sie
sie dann aus dem Steckplatz.
Laden des Akkus
Das mitgelieferte Netzteil (F-1AC/mit
Netzkabel oder integriertem Netzstecker)
richtet sich nach dem Land, in dem die
Kamera erworben wurde. Wenn ein
kabelloses Netzteil zum Lieferumfang
Halten Sie die Karte senkrecht, und
schieben Sie sie gerade in den Steckplatz,
bis sie hörbar einrastet.
Berühren Sie nicht den Kontaktbereich auf
der Karte.
94
DE
Ihrer Kamera gehört, schließen Sie den
integrierten Netzstecker direkt an eine
Netzsteckdose an.
Das mitgelieferte Netzteil (F-1AC) ist
ausschließlich zum Laden des Akkus
vorgesehen. Während das Netzteil an die
Kamera angeschlossen ist, dürfen keine
Bedienungsvorgänge wie Aufnahme,
Wiedergabe usw. ausgeführt werden.
Page 95

Beispiel: Netzteil mit Netzkabel
1
Netzteil
3
Ladezustandsanzeige
Leuchtet (orange):
Ladevorgang fi ndet statt
Leuchtet (blau):
Ladevorgang ist
abgeschlossen
Netzsteckdose
2
Netzkabel
Multi-Konnektor
Buchsenabdeckung
Beim Kauf der Kamera ist der Akku nur
teilweise geladen. Bitte laden Sie den Akku
vor der ersten Benutzung (ca. 2,5 Stunden).
Wenn die Ladezustandsanzeige nicht
leuchtet oder blinkt, kann dies darauf
zurückzuführen sein, dass die Anschlüsse
nicht korrekt hergestellt wurden oder eine
Beschädigung von Akku, Kamera und/oder
Netzteil vorliegt.
Einzelheiten zu Akku und Netzteil fi nden Sie
im Abschnitt „Akku, Netzteil (mitgeliefert),
Ladegerät (separat erhältlich)“ (S. 64).
Zeitpunkt zum Laden des Akkus
Wenn die nachstehend abgebildete
Fehlermeldung auf dem Bildschirm
erscheint, muss der Akku geladen werden.
Blinkt rot
BATTERIE LEER
LCD-Monitor oben
rechts
Fehlermeldung
DE
95
Page 96

Verwendung einer microSDKarte/microSDHC-Karte
(separat erhältlich)
Nach Einsetzen in einen microSD-Adapter
können microSD-Karten/microSDHC-Karten (im
folgenden nur noch „microSD-Karte“) ebenfalls
mit dieser Kamera verwendet werden.
„Verwendung des microSD-Adapter“ (S. 68)
1
Setzen Sie die microSD-Karte in den
Adapter ein.
Schieben Sie die
Karte bis zum
Anschlag in den
Adapter.
2
Setzen Sie den microSD-Adapter in
den Kartensteckplatz ein.
Kerbe
Einstellen von Datum und
Uhrzeit
Nachdem Sie die in diesem Abschnitt
beschriebene Einstellung der Uhr vorgenommen
haben, werden das Datum und die Uhrzeit
gemeinsam mit Dateinamen, Datumsausdruckund anderen Daten abgespeichert.
1
Drücken Sie die n-Taste, um
die Kamera einzuschalten.
Wenn die Uhr noch nicht eingestellt wurde,
●
erscheint daraufhin der Einstellbildschirm für
Datum und Uhrzeit.
X
JM
TZEIT
---- -- -- -- --
---- -- -- -- --
MENU
ZURÜCK
Bildschirm für Einstellung von
Datum und Uhrzeit
2
Betätigen Sie EF zur Wahl des
Jahres unter [J].
X
JM
TZEIT
-- -- -- --
2009
MENU
ZURÜCK
JMT
JMT
Entfernen der microSD-Karte
Ziehen Sie die microSD-Karte gerade
heraus.
Berühren Sie nicht den Kontaktbereich des
microSD-Adapters und der microSD-Karte.
96
DE
3
Drücken Sie H, um die unter
[J] eingegebene Einstellung zu
speichern.
X
JM
TZEIT
-- -- -- --
2009
MENU
ZURÜCK
JMT
Page 97

4
Betätigen Sie EFGH und die
o-Taste auf gleiche Weise wie in
Schritt 2 und 3, um den [M] (Monat),
den [T] (Tag), die Uhrzeit [ZEIT]
(in Stunden und Minuten) und das
[J/M/T] (Anzeigeformat des Datums)
einzustellen.
Zur genauen Einstellung der Uhrzeit
drücken Sie die o-Taste, wenn das
Zeitsignal 00 Sekunden anzeigt.
Datum und Uhrzeit können Sie in folgendem
Menü einstellen. [X]
(Datum/Zeit) (S. 46)
Überprüfen von Datum und Uhrzeit
Drücken Sie die g-Taste bei ausgeschalteter
Kamera. Daraufhin wird die Uhrzeit ca. 3
Sekunden lang angezeigt.
Ändern der Anzeigesprache
Sie können die Sprache wählen, in der die
Menüs und Fehlermeldungen auf dem LCDMonitor angezeigt werden.
1
Drücken Sie die m-Taste,
und anschließend EFGH, um
[E] (EINRICHTEN) zu wählen.
EINRICHTEN
3
Betätigen Sie EF zur Wahl von
[W], und drücken Sie dann die
o-Taste.
W
ENGLISH
FRANCAIS
DEUTSCH
ESPAÑOL
ITALIANO
ZURÜCK EINST.
4
Betätigen Sie EFGH zur Wahl
ུࢊ
MENU
der gewünschten Sprache, und
drücken Sie dann die o-Taste.
5
Drücken Sie die m-Taste.
OK
ZURÜCK EINST.
2
Drücken Sie die o-Taste.
EINRICHTEN
FORMATIEREN
1
2
DATENSICHER.
3
4
STARTBILD
MENÜFARBE
ZURÜCK EINST.
MENU
MENU
DEUTSCH
NORMAL
OK
OK
97
DE
Page 98

Aufnahme, Anzeige und Löschen von
1/400
F3.5
Bildern
Aufnehmen mit den
optimalen Einstellungen
von Blendenwert und
Verschlusszeit (K-Modus)
In diesem Modus kann die Funktion für
automatische Kameraaufnahme verwendet
werden, während Änderungen der Einstellungen
von anderen Funktionen des Aufnahmemenüs
wie Belichtungskorrektur, Weißabgleich, usw.
möglich sind.
1
Stellen Sie die
Programmwählscheibe auf K.
2
Drücken Sie die n-Taste, um
die Kamera einzuschalten.
Anzahl der
speicherbaren
Einzelbilder (S. 67)
P
12
M
N
ORM
LCD-Monitor
(Aufnahmebereitschafts-
Bildschirm)
Drücken Sie die n-Taste, um die
Kamera auszuschalten.
3
Visieren Sie das Motiv mit der
Kamera an, und wählen Sie den
gewünschten Bildausschnitt.
LCDMonitor
Querformat
Hochformat
Achten Sie beim Halten der Kamera darauf,
den Blitz nicht mit den Fingern usw. zu
verdecken.
4
Drücken Sie den Auslöser halb, um
P
1/400 F3.5
das Motiv scharfzustellen.
Sobald das Motiv scharfgestellt ist, wird die
●
Belichtung gespeichert (Verschlusszeit und
Blendenwert werden angezeigt), und die Farbe der
AF-Markierung wechselt auf Grün.
●
Wenn die AF-Markierung rot blinkt, bedeutet
IN
4
dies, dass eine Scharfstellung nicht möglich war.
Versuchen Sie in einem solchen Fall, die Schärfe
erneut zu speichern.
P
Halb drücken
„Scharfstellung“ (S. 61)
1/400
AF-Markierung
Verschlusszeit
F3.5
Blendenwert
98
DE
Page 99

5
1/400
F3.5
Um die Aufnahme zu machen,
drücken Sie den Auslöser langsam
vollständig durch, während Sie die
Kamera möglichst ruhig halten.
P
Vollständig
durchdrücken
1/400
F3.5
Kontroll-Bildschirm
Anzeigen des letzten Bildes
Sie können das soeben aufgenommene Bild
anzeigen, indem Sie die q-Taste drücken.
Um mit dem Fotografi eren fortzufahren,
drücken Sie entweder die q-Taste erneut,
oder Sie drücken den Auslöser halb nach
unten.
Sie können die Kamera steuern, indem Sie
auf ihr Gehäuse klopfen, wenn
[TOUCH CONTROL] auf [EIN] steht.
[TOUCH CONTROL] (S. 49)
Aufnehmen von Filmen
„Filmaufnahmen (A-Modus)“ (S. 21)
Anzeigen von Bildern
1
Drehen Sie die
Programmwählscheibe auf q.
Bildnummer
2009.08.26 12:30
Wiedergabebild
2
Betätigen Sie EFGH zur Wahl
eines Bilds.
Anzeige der 10
Bilder vor dem
aktuellen Bild
Anzeige des
vorigen Bilds
Bilder können während der Wiedergabe
verkleinert und vergrößert werden.
„Indexanzeige, Kalenderanzeige und
Wiedergabe mit Ausschnittsvergrößerung“
(S. 27)
Wiedergabe von Filmen
Wählen Sie den gewünschten Film, und
drücken Sie dann die o-Taste.
Anzeige des
nächsten Bilds
Anzeige der 10
Bilder nach dem
aktuellen Bild
12
N
ORM
100-0001
IN
M
1
FILM-WIEDERG.
2009.08.26
OK
Film
12:30
100-0004
IN
DE
4
99
Page 100

Bedienungsvorgänge während der
2009.08.26
12:30
100-0004
00:12/00:34
2009.08.26
12:30
100-0004
00:14/00:34
BILD LÖSCHEN
NEIN
Filmwiedergabe
Lautstärke: Betätigen Sie während der
Wiedergabe EF.
Suchlauf vorwärts/rückwärts: Wählen
Sie die gewünschte Einstellung mit GH.
Bei jeder Betätigung einer dieser Tasten
wechselt die Wiedergabegeschwindigkeit
in der Reihenfolge 2x, 20x und 1x
(Normalgeschwindigkeit) in der Richtung der
gedrückten T aste.
Pause: Drücken Sie die o-Taste.
2009.08.26
Verstrichene Zeit/
Verbleidende
Aufnahmezeit
Erstes (letztes) Bild/EinzelbildWeitergabe: Drücken Sie E im
Pausenzustand, um das erste Bild des
Films anzuzeigen, und F, um das letzte
Bild anzuzeigen. Der Film wird rückwärts
wiedergegeben, wenn G gedrückt wird,
und normal, wenn H gedrückt wird. Um
die normale Filmwiedergabe fortzusetzen,
drücken Sie die o-Taste.
Während der Wiedergabe
Im Pausenzustand
IN
00:12/00:34
2009.08.26
IN
00:14/00:34
100-0004
100-0004
/
Beenden der Filmwiedergabe
Drücken Sie die m-Taste.
Löschen von Bildern während
der Wiedergabe (Löschen
eines einzelnen Bilds)
1
Wenn das zu löschende Bild
angezeigt wird, drücken Sie die
D-Taste.
BILD LÖSCHEN
12:30
2
Betätigen Sie E zur Wahl von [JA],
und drücken Sie dann die o-Taste.
[K LÖSCHEN] (S. 40)
12:30
MENU
JA
NEIN
IN
OK
EINST.ZURÜCK
100
DE
 Loading...