

Page 1
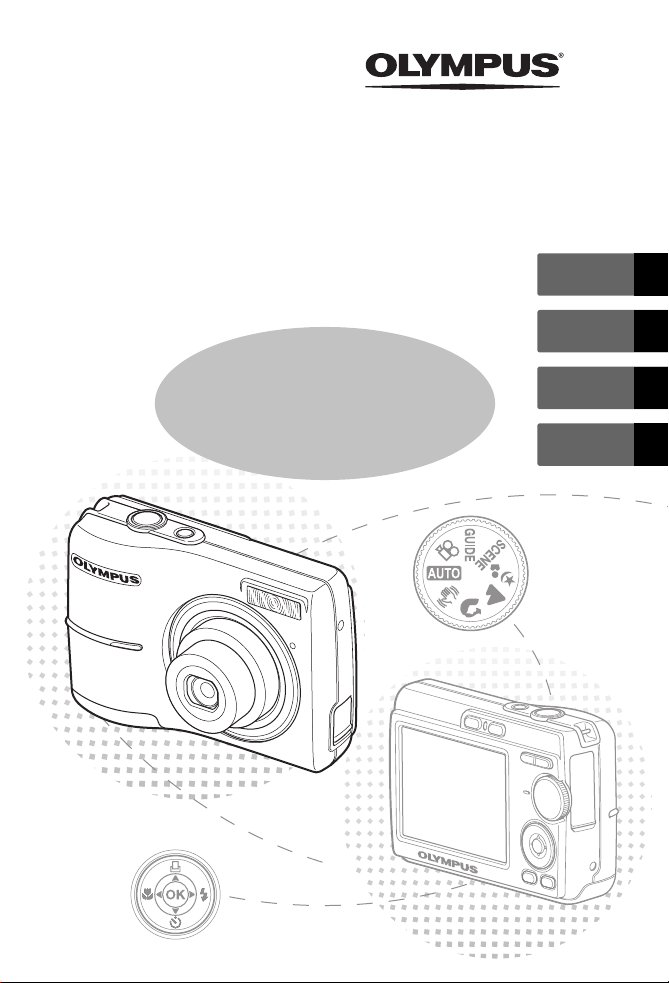
DIGITAL CAMERA
FE-170/X-760
ENGLISH 2
FRANÇAIS 28
Basic
Manual
ESPAÑOL 54
PORTUGUÊS
80
Page 2

Table of Contents
Gather these items (box contents).......................................................3
Insert the batteries................................................................................4
Turn on the power ................................................................................5
Set date and time ..................................................................................6
Select a Language .................................................................................8
Shoot ......................................................................................................9
En
View pictures .......................................................................................10
Basic Operation ...................................................................................11
Shooting Mode Buttons .......................................................................... 11
Mode Dial............................................................................................... 12
SCENE Modes......................................................................................... 12
Macro Mode........................................................................................... 13
Flash Modes............................................................................................ 13
Self-Timer ............................................................................................... 14
Power Save Feature................................................................................. 14
Menus and Settings ............................................................................15
Top Menu............................................................................................... 15
Erase All Pictures ..................................................................................... 15
Connecting the Camera ......................................................................16
Playback on a TV..................................................................................... 16
Direct Printing (PictBridge)....................................................................... 17
Transfer Images ...................................................................................18
OLYMPUS Master Software................................................................20
Specifications.......................................................................................21
Safety Precautions...............................................................................22
Before using your camera, read this manual carefully to ensure correct use.
We recommend that you take test shots to get accustomed to your camera before
taking important photographs.
Please observe the safety precautions at the end of this manual.
The images of the LCD screen and illustrations of the camera used in this manual
may differ from the actual product.
2
Page 3
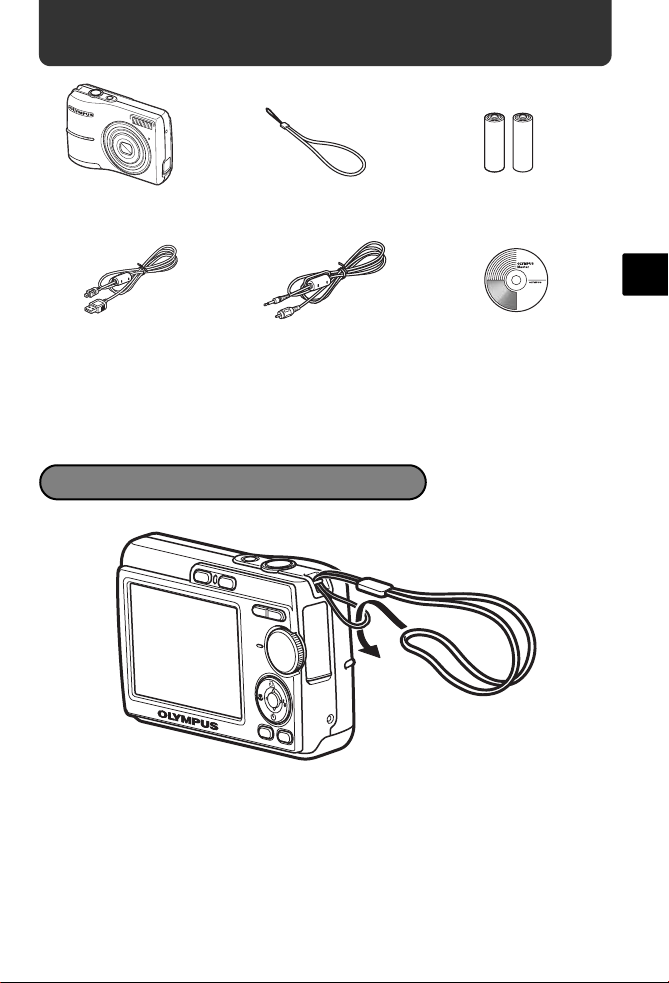
Gather these items (box contents)
Digital camera Strap AA batteries
USB cable
Video cable OLYMPUS Master CD-ROM
Other items • Basic manual (this manual)
• Advanced manual
• Warranty card
Contents may vary depending on purchase location.
(2)
Attach the strap
En
( Pull the strap tight so that it does not come loose.
3
Page 4
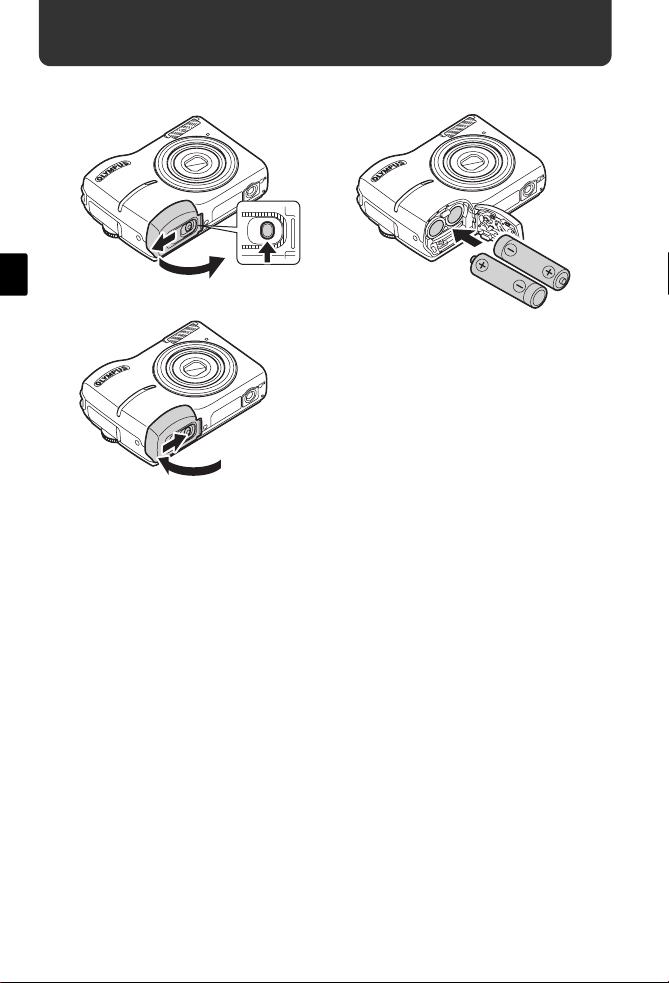
Insert the batteries
a. Insert the batteries into the camera
En
2
3
6
5
( For details on inserting an optional xD-Picture Card (hereinafter called the
card), please refer to Advanced Manual.
1
4
4
Page 5
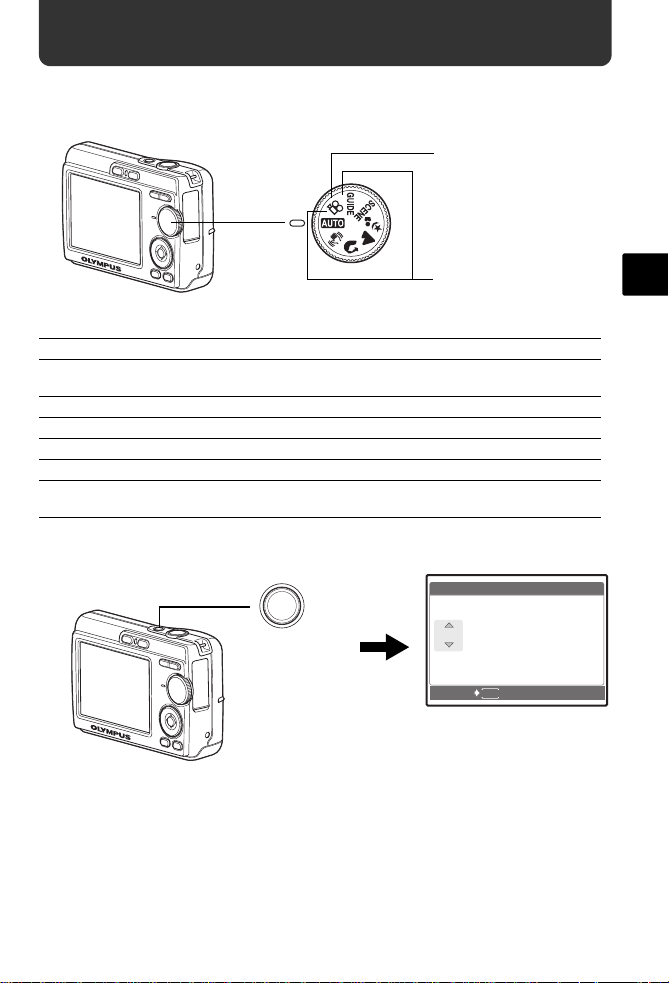
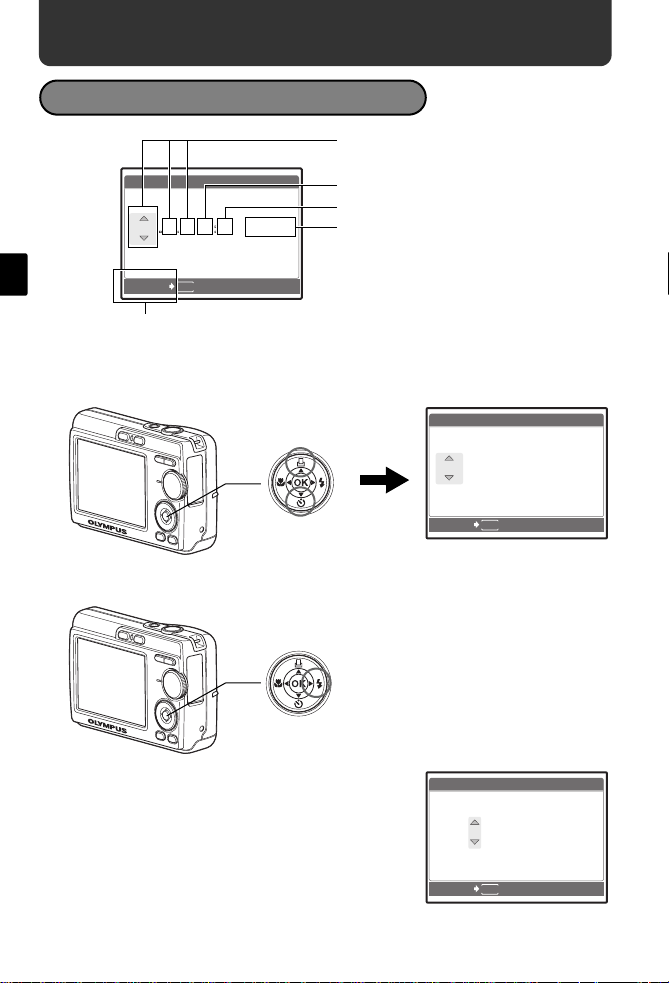
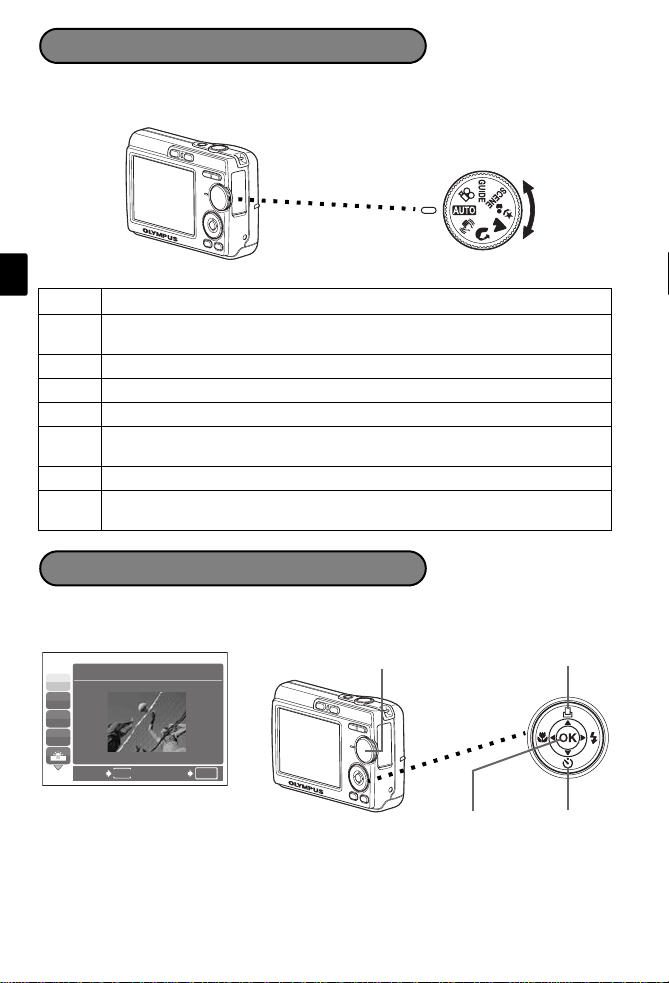
Turn on the power
Y/ M / D
Y M D T I M E
----.--.-- --:--
This section explains how to turn on the camera in shooting mode.
a. Set the mode dial to h
When shooting movies
When shooting still pictures
Still picture shooting modes
h The camera determines the optimum settings and shoots the picture.
h This function reduces the blur caused by a moving subject or camera
movement when taking pictures.
B Suitable for taking pictures of people.
E Suitable for taking pictures of landscapes.
M Suitable for taking pictures of people at night.
f Shoot pictures by selecting a scene mode according to the situation.
g You can set the items you want by doing the settings according to the
shooting guide displayed on the screen.
b. Press the o button
X
Y M D TIME
o button
----.--.-- --:--
CANCEL
This screen appears if the date and
time have not been set.
( To turn off the camera, press the o button again.
MENU
Y/M/D
En
5
Page 6
Set date and time
Y/ M / D
Y M D T I M E
----.--.-- --:--
2006
.--.-- --:--
Y M D T I M E
Y/ M / D
2006
.-- --:--
Y M D T I M E
Y/ M / D
About the date and time setting screen
Y-M-D (Year-Month-Day)
En
X
Y M D TIME
----.--.-- --:--
MENU
CANCEL
Cancel the setting
Y/M/D
Hour
Minute
Date format (Y-M-D, M-D-Y, D-M-Y).
a. Press the O< button and NY button to select [Y].
( The first two digits of the year are fixed.
O< button
NY button
X
Y M D TIME
2006
.--.-- --:--
MENU
CANCEL
b. Press the Y# button.
Y# button
Y/M/D
c. Press the O< button and the
NY button to select [M].
6
X
Y M D TIME
2006
.
0808.-- --:--
MENU
CANCEL
Y/M/D
Page 7
d. Press the Y# button.
2006
--:--
Y M D T I M E
Y/ M / D
2006
30
Y M D T I M E
Y/ M / D
2006
30
Y/ M / D
Y M D T I M E
2816
2112
IN
e. Press the O< button and the
NY button to select [D].
f. Press the Y# button.
g. Press the O< button and the
NY button to select “hour” and
“minute”.
X
Y M D TIME
2006
.
0808.
2626 --:--
MENU
CANCEL
X
Y M D TIME
2006
.
0808.
2626
1212:
Y/M/D
En
Y/M/D
30
CANCEL
h. Press the Y# button.
i. Press the O< button and NY
button to select year, month and
date.
X
Y M D TIME
2006
.
0808.
CANCEL
j. After all items have been set, press i.
( The time is displayed in the 24-hour format.
( For a more accurate setting, you can press i when the time signal hits 00
seconds.
HQHQ2816
i button
MENU
2626
MENU
1212:
[ ]
2112
×
OK
SET
Y/M/D
30
OK
SET
[
]
IN
44
7
Page 8

Select a Language
PANORAMA
EXPOSURE
COMP.
SILENT
MODE
IMAGE
QUALITY
SETUP
RESET
SETUP
a. Press the MENU button to
display the top menu.
RESET
MENU
PANORAMA
IMAGE
QUALITY
EXPOSURE
COMP.
SETUP
SILENT
MODE
SETEXIT
OK
En
MENU Button
b. Press the Y# button to select
[SETUP] and then press the i
button.
Y# Button
c. Press the NY button to select
W and then press the i
button.
d. Press the NY button and the
O< button to select a language
and then press the i button.
O< Button
NY Button
8
i Button
1
MEMORY FORMAT
2
BACKUP
W
PIXEL MAPPING
K/qK/q
MENU
BACK
W
ENGLISH
FRANCAIS
DEUTCH
ESPANOL
MENU
BACK
• You can add other languages to
your camera with the provided
OLYMPUS Master software.
Please refer to the Advanced
Manual.
ENGLISH
NO
SET
SET
OK
OK
Page 9

En
9
Page 10
View pictures
12:30
'06.08.26
100 - 0001
HQ
IN
a. Press the q button.
q button
[
En
Arrow pad
Next picture
Previous picture
Erase pictures
a. As described in a. above, display the picture you
want to erase.
b. Press the S button.
IN
]
'06.08.26
HQ
12:30
100-0001
1
S button
c. Press the O< button to select [YES] and press i.
10
OK
Page 11
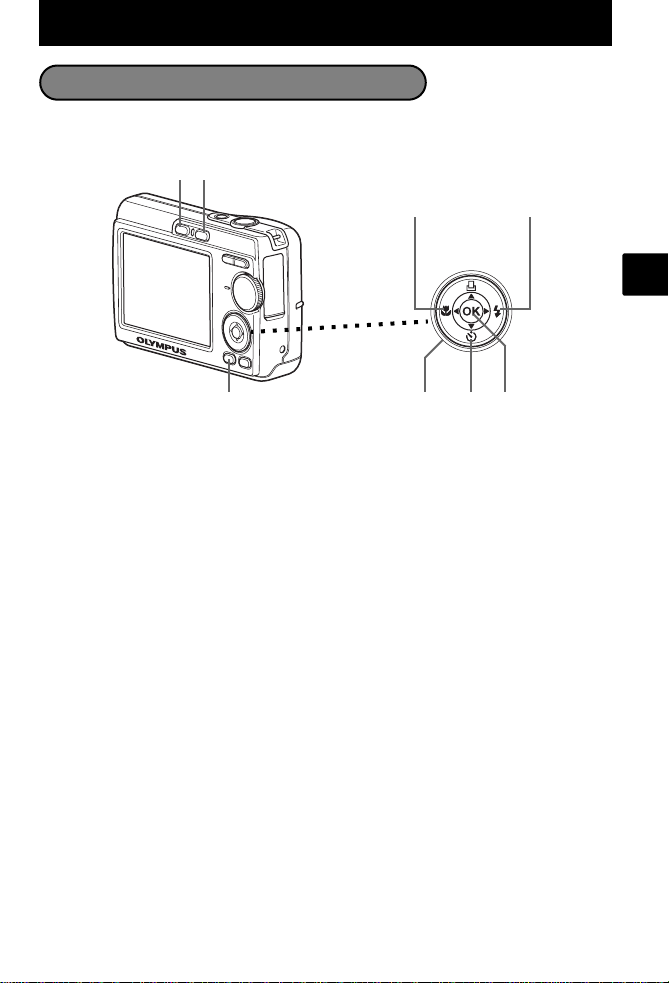
Basic Operation
Shooting Mode Buttons
While in shooting mode, use these buttons for quick access to some of the more
commonly used features.
76
1
2
8
3
45
1 MENU button
Displays the top menu on the monitor.
2 X& button (Macro Mode)
Use macro or super macro mode when taking close-up pictures such as of a flower.
3 Y# button (Flash Mode)
Select from 4 flash modes - AUTO, ! Red-eye reduction, # Fill-in flash, or $ Flash
off.
4 i button
Press to confirm settings.
5 NY button (Self-timer)
Select the self-timer to delay the shot approximately 12 seconds from when the shutter
button is pressed.
6 K button (Shooting)
Selects the shooting mode.
7 q button (Playback)
Selects the playback mode.
8 Arrow pad (ONXY)
Selects scenes, playback pictures and menu items.
En
11
Page 12
Mode Dial
Set the desired mode and turn the camera on. You may select the desired mode before
or during use.
En
Suitable for taking regular pictures.
h
This function reduces the blur incurred by a moving subject or camera
h
movement when taking pictures.
B Suitable for taking portrait pictures.
l Suitable for taking pictures of landscapes and other outdoor scenes.
M Suitable for taking pictures of your subject against a distant background.
This function lets you select from 10 situation–related modes set to the shooting
SCENE
conditions.
n This function lets you record movies.
You can set the desired setting following the shooting guide displayed on the
GUIDE
monitor.
SCENE Modes
Select the shooting mode depending on an object.
1 Set the mode dial to SCENE, and select the other scene.
Mode Dial
j
N
W
R
1
SPORT
O Button
BACK
MENU
SET
OK
2 Press O/N to select the scene modes and press i.
12
N Buttoni Button
Page 13

Shooting SCENE Modes
• C SPORT • S SUNSET • V CUISINE
• N INDOOR • X FIREWORKS • d DOCUMENTS
• W CANDLE • P BEHIND GLASS • i AUCTION
• R SELF PORTRAIT
Macro Mode
& This mode lets you take pictures as close as 10 cm (3.9 in.) to your subject. (Most
wide-angle side)
% Use this mode to take pictures as close as 5 cm (2.0 in.) to your subject. In % mode,
the position of the zoom lens is fixed.
1 Press X& repeatedly to select [&] or [%] and press i.
Flash Modes
1 Press Y# repeatedly to select the flash mode and press i.
2 Press the shutter button halfway.
When the flash is set to fire, the # mark lights.
3 Press the shutter button completely to take the picture.
Icon Flash Mode Description
AUTO
Auto flash The flash fires automatically in low light or backlight
Red-eye
!
reduction flash
Fill-in flash The flash fires regardless of the available light.
#
Flash off The flash does not fire even in low light conditions.
$
conditions.
The red-eye reduction flash mode significantly reduces this
phenomenon by emitting pre-flashes before firing the
regular flash.
En
13
Page 14

Self-Timer
1 Press NY to select [Y] and press i.
2 Press the shutter button completely to take the
picture.
The self-timer lamp lights for approximately 10 seconds
after the shutter button is pressed, then starts blinking.
After blinking for approximately 2 seconds, the picture
is taken.
En
To save battery power, the camera automatically enters sleep mode and stops
operating if not used for approximately 3 minutes. Press the shutter button or
zoom lever to reactivate the camera.
If the camera is not operated for 15 minutes after the camera enters sleep mode,
it automatically retracts the lens and turns off. To resume operation, turn on the
power again.
Power Save Feature
14
Page 15
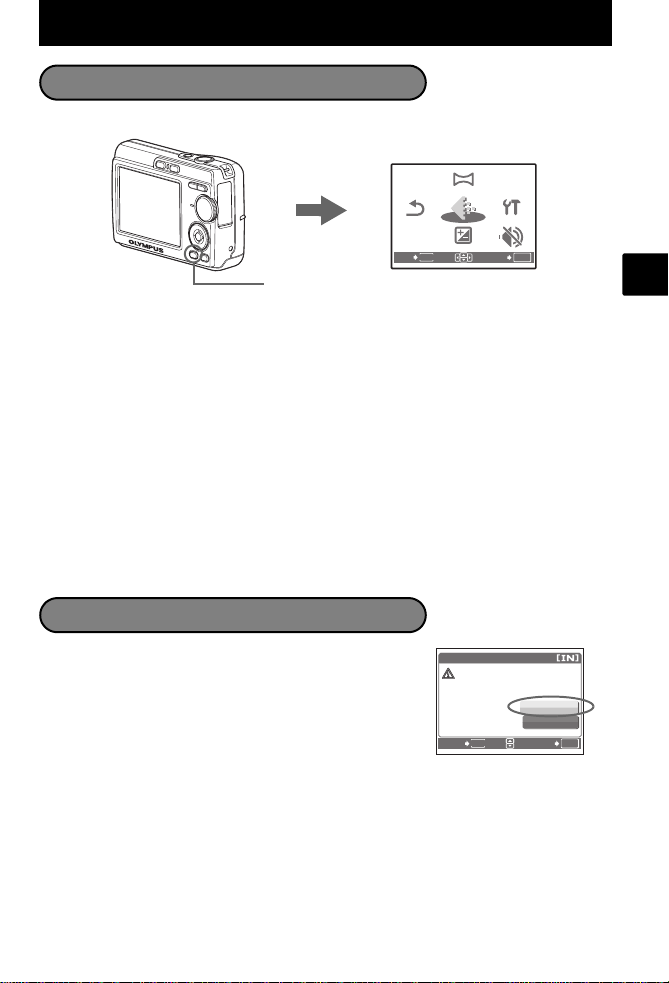
Menus and Settings
PANORAMA
EXPOSURE
COMP.
SILENT
MODE
IMAGE
QUALITY
SETUP
RESET
YES
CAUTION ERASING ALL
Top Menu
1 Press MENU to display the top menu.
MENU
2 Use the arrow pad (O/N/X/Y) to select menu items, and press i to set them.
PANORAMA
Panorama shooting lets you create a panoramic picture, using the OLYMPUS Master
software from the provided CD-ROM. An Olympus xD-Picture Card is required for
panorama shooting.
RESET
Return the changed shooting functions back to default settings.
IMAGE QUALITY
Set the image quality of the picture you will shoot according to its intended purpose.
SETUP
Set the date, time, language, and operation sound, etc.
EXPOSURE COMP. (Exposure Compensation)
Use this setting to overexpose (+) or underexpose (-) a picture.
SILENT MODE
Mute operational sounds that occur during shooting and playback.
Top menu in shooting mode
PANORAMA
IMAGE
QUALITY
EXPOSURE
COMP.
SETUP
SILENT
MODE
SETEXIT
OK
RESET
MENU
En
Erase All Pictures
1 Press MENU in playback mode to display the top
menu and select [ERASE] > [ALL ERASE].
2 Select [YES], and press i.
All the pictures are erased.
ALL ERASE
CAUTION ERASING ALL
MENU
BACK
YES
NO
SET
OK
15
Page 16
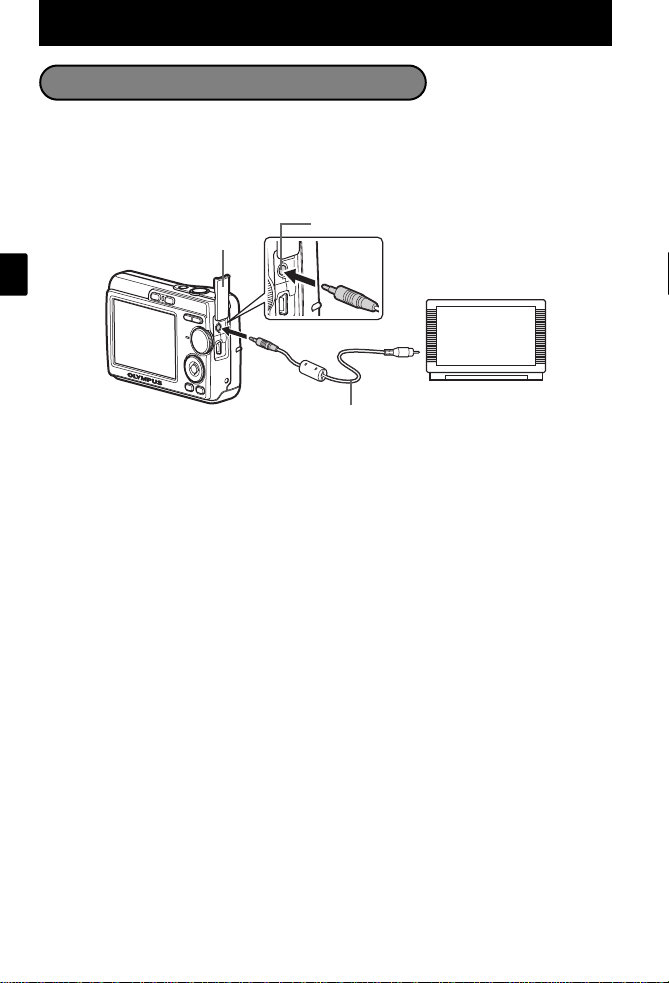
Connecting the Camera
Playback on a TV
Use the video cable provided with the camera to playback recorded images on your
TV. Both still pictures and movies can be played back.
1 Make sure that the TV and camera are turned off. Connect the video out
connector on the camera to the video input terminal on the TV using the video
cable.
Connector Cover
En
2 Turn the TV on and set it to the video input mode.
For details of switching to video input, refer to your TV’s instruction manual.
3 Turn on the camera and then press q to enter playback mode.
The last picture taken is displayed on the TV. Use the arrow pad (O/N/X/Y) to select
the picture you want to display.
VIDEO OUT Connector
Video Cable
Connect to the TV’s video
input (yellow) terminal.
16
Page 17
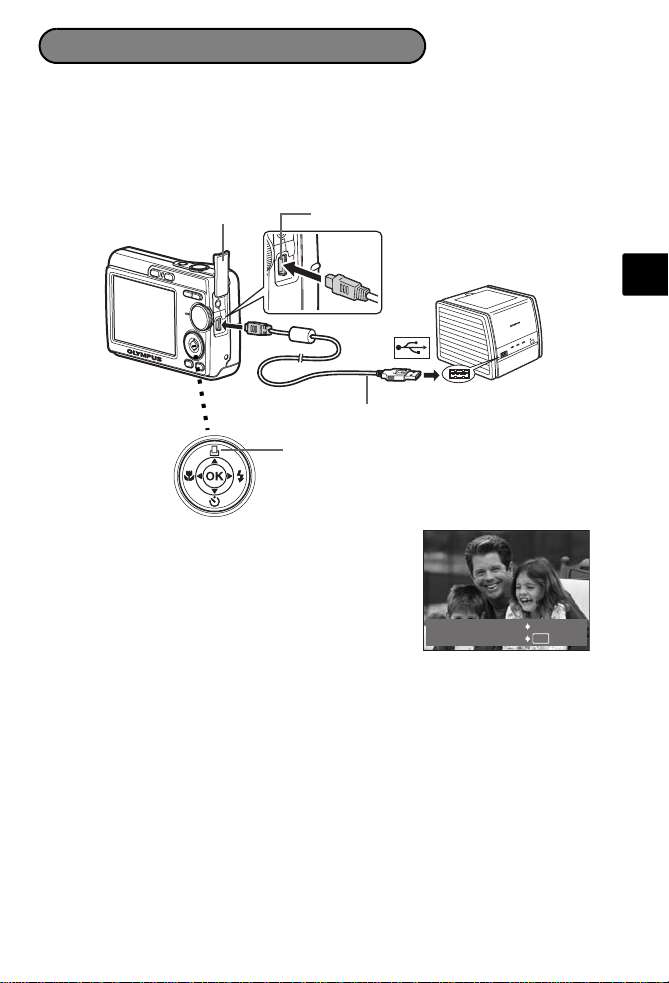
Direct Printing (PictBridge)
Using the provided USB cable, you may connect your camera directly to a PictBridge
compatible printer such as the Olympus P-11 to make prints. You can print a picture
with simple operations.
1 In playback mode, display the picture you want to print out on the monitor.
2 Connect one end of the provided USB cable into the camera’s USB connector and
the other end into the printer’s USB connector.
Connector Cover
3 Press <.
Printing starts.
When printings finished, disconnect the USB cable
from the camera with the picture selection screen
displayed.
USB Connector
< Button
USB Cable
EASY PRINT START
PC
/
CUSTOM PRINT
<
OK
En
17
Page 18
Transfer Images
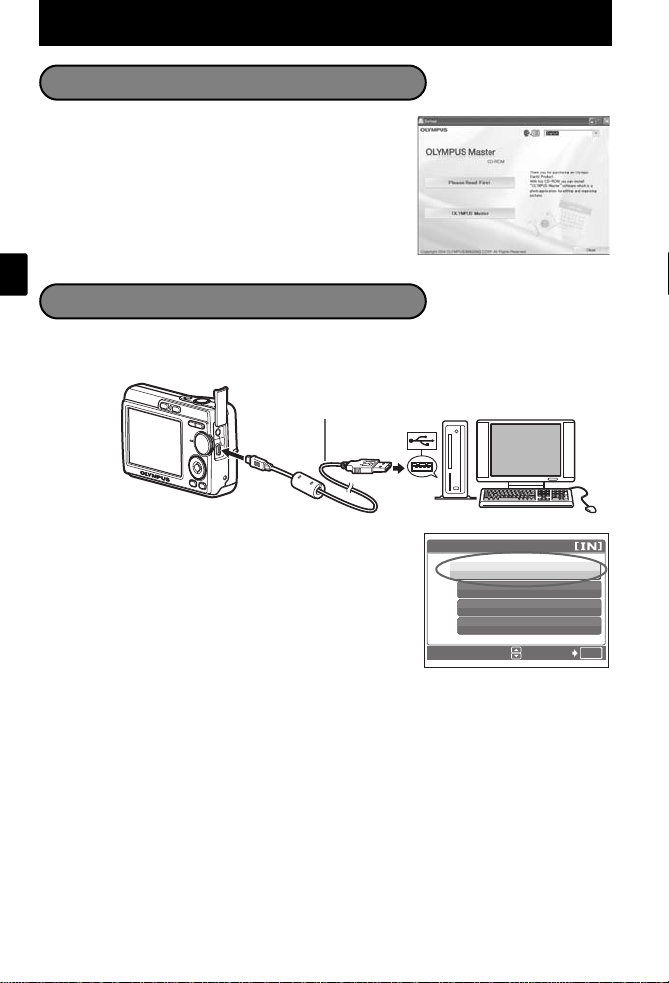
Install the software
1 Insert the OLYMPUS Master CD-ROM.
2 Windows: Click the “OLYMPUS Master“
Macintosh: Double-click the “Installer“ icon.
3 Simply follow the on-screen instructions.
En
Connect the camera to the computer
1 Connect the camera and computer using the USB cable (included).
The monitor will turn on automatically.
button.
USB Cable
2
2 Select [PC] on the monitor, and press i.
Your PC will now recognize your camera as a
removable storage drive.
18
1
USB
PC
EASY PRINT
CUSTOM PRINT
EXIT
OK
SET
Page 19

Transfer images to the computer
1 With the camera now connected, open
OLYMPUS Master.
The [Transfer Images] window is displayed.
[Transfer Images] window
2 Select the images you want to transfer, and
click the [Transfer Images] button.
If the [Transfer Images] window is not displayed automatically:
a. Click the “Transfer Images” icon on the
OLYMPUS Master main menu.
b. Click the “From Camera” icon.
[Transfer Images] button
En
Tips
• For more detailed information regarding camera setup and usage, please refer to
the camera’s “Advanced Manual” provided on CD-ROM.
• For more details on using the OLYMPUS Master software, please refer to the
(electronic) reference manual located in the OLYMPUS Master folder on your hard
drive. For additional assistance, refer to the “Help” file in the OLYMPUS Master
software.
19
Page 20

OLYMPUS Master Software
OLYMPUS Master Software: Use this software to download
pictures from the camera, view, organize, retouch, e-mail and
print your digital pictures and movies and more! This CD also
contains the complete software reference manual in Adobe
Acrobat (PDF) format.
(System Requirements
OS Windows 98SE/Me/2000 Professional/XP or Mac OS X (10.2 or later)
CPU Pentium III 500 MHz/Power PC G3, or faster
RAM 128 MB or more (256 MB or more recommended)
En
Hard Disk 300 MB or more free space
Connection USB port
Monitor 1024 × 768 pixels resolution or more with minimum 65,536 colors
For the latest support information, visit the Olympus website
(http://www.olympus.com/digital)
(Upgrade (OLYMPUS Master Plus)
In addition to the functions in OLYMPUS Master, the OLYMPUS Master Plus features
movie editing, album printing, contact sheet printing, HTML album, free stitch
panorama, CD/DVD writing functions, and a lot more, allowing you to greatly expand
your digital photograph capabilities.
You can upgrade your software to OLYMPUS Master Plus via the Internet.
You need to have OLYMPUS Master installed in a computer with an Internet
connection.
(Windows), 32,000 colors (Macintosh)
User Registration
Register your camera when you install OLYMPUS Master to activate your
warranty, receive notifications of software and camera firmware updates, and
more.
20
Page 21

Specifications
(Camera
Product type : Digital camera (for shooting and displaying)
Recording system
Still pictures : Digital recording, JPEG (DCF compatible)
Applicable
standards
Movie : QuickTime Motion JPEG compatible
Memory : Internal memory
No. of effective pixels : 6,000,000 pixels
Image pickup device : 1/2.5" CCD (primary color filter),
Lens : Olympus lens 6.3 to 18.9 mm, F3.1 to 5.9
Photometric system : Center-weighted metering
Shutter speed : 2 to 1/2000 sec.
Shooting range : 0.5 m (1.7 ft.) to ∞ (W), 0.9 m (3.0 ft.) to ∞ (T) (normal
Monitor: : 2.5" TFT color LCD display, 153,600 pixels
Outer connector : DC-IN jack, USB connector, VIDEO OUT jack
Automatic calendar
system
Operating environment
Temperature : 0 to 40°C (32°F to 104°F) (operation)/-20 to 60°C (-4°F to
Humidity : 30 to 90% (operation)/10 to 90% (storage)
Power supply : AA batteries 2 each (Oxyride batteries/Alkaline battery/
Dimensions : 90 mm (W) × 62.5 mm (H) × 22.5 mm (D) (3.5 × 2.5 × 0.9
Weight : 124 g (4.4 oz) (without battery and card)
: Exif 2.2, DPOF, PRINT Image Matching III, PictBridge
xD-Picture Card (16 MB to 1 GB)
6,200,000 pixels (gross)
(equivalent to 38 to 114 mm on 35 mm film)
mode)
0.1 m (0.3ft.) to ∞ (W), 0.6 m (2.0 ft.) to ∞ (T) (macro mode)
0.05 m (2.0 in.) to ∞ (super macro mode)
: Automatic update from 2000 to 2099
140°F) (storage)
NiMH battery) or specified AC adapter
in.) (excluding protrusions)
En
Please note that design and specification improvements may result in unannounced
changes.
21
Page 22

Safety Precautions
CAUTION
RISK OF ELECTRIC SHOCK
DO NOT OPEN
CAUTION: TO REDUCE THE RISK OF ELECTRICAL SHOCK, DO NOT
REMOVE COVER (OR BACK). NO USER-SERVICEABLE PARTS INSIDE.
REFER SERVICING TO QUALIFIED OLYMPUS SERVICE PERSONNEL.
An exclamation mark enclosed in a triangle alerts you to important operating and
maintenance instructions in the documentation provided with the product.
En
DANGER
WARNINGS
CAUTION
WARNING!
TO AVOID THE RISK OF FIRE OR ELECTRICAL SHOCK, NEVER DISASSEMBLE, EXPOSE THIS PRODUCT TO WATER
OR OPERATE IN A HIGH HUMIDITY ENVIRONMENT.
General Precautions
Read All Instructions — Before you use the product, read all operating instructions.
Save all manuals and documentation for future reference.
Cleaning — Always unplug this product from the wall outlet before cleaning. Use
only a damp cloth for cleaning. Never use any type of liquid or aerosol cleaner, or
any type of organic solvent to clean this product.
Attachments — For your safety, and to avoid damaging the product, use only
accessories recommended by Olympus.
Water and Moisture — For precautions on products with weatherproof designs,
read the weatherproofing sections.
Location — To avoid damage to the product, mount the product securely on a stable
tripod, stand, or bracket.
Power Source — Connect this product only to the power source described on the
product label.
Lightning — If a lightning storm occurs while using an AC adapter, remove it from
the wall outlet immediately.
Foreign Objects — To avoid personal injury, never insert a metal object into the
product.
Heat — Never use or store this product near any heat source such as a radiator, heat
register, stove, or any type of equipment or appliance that generates heat,
including stereo amplifiers.
If the product is used without observing the information given under this symbol, serio us
injury or death may result.
If the product is used without observing the information given under this symbol, in jury or
death may result.
If the product is used without observing the information given under this symbol , minor
personal injury, damage to the equipment, or loss of valuable data may result.
22
Page 23

Safety Precautions
Handling the Camera
WARNING
( Do not use the camera near flammable or explosive gases.
( Do not use the flash on people (infants, small children, etc.) at
close range.
• You must be at least 1 m (3 ft.) away from the faces of your subjects. Firing the
flash too close to the subject’s eyes could cause a momentary loss of vision.
( Keep young children and infants away from the camera.
• Always use and store the camera out of the reach of young children and
infants to prevent the following dangerous situations which could cause
serious injury:
• Becoming entangled in the camera strap, causing strangulation.
• Accidentally swallowing the battery, cards or other small parts.
• Accidentally firing the flash into their own eyes or those of another child.
• Accidentally being injured by the moving parts of the camera.
( Do not look at the sun or strong lights with the camera.
( Do not use or store the camera in dusty or humid places.
( Do not cover the flash with a hand while firing.
CAUTION
( Stop using the camera immediately if you notice any unusual
odors, noise, or smoke around it.
• Never remove the batteries with bare hands, which may cause a fire or burn
your hands.
( Never hold or operate the camera with wet hands.
( Do not leave the camera in places where it may be subject to
extremely high temperatures.
• Doing so may cause parts to deteriorate and, in some circumstances, cause the
camera to catch fire. Do not use the charger or AC adapter if it is covered (such
as a blanket). This could cause overheating, resulting in fire.
( Handle the camera with care to avoid getting a low-temperature
burn.
• When the camera contains metal parts, overheating can result in a lowtemperature burn. Pay attention to the following:
• When used for a long period, the camera will get hot. If you hold on to the
camera in this state, a low-temperature burn may be caused.
• In places subject to extremely cold temperatures, the temperature of the
camera’s body may be lower than the environmental temperature. If
possible, wear gloves when handling the camera in cold temperatures.
( Be careful with the strap.
• Be careful with the strap when you carry the camera. It could easily catch on
stray objects - and cause serious damage.
En
23
Page 24

Safety Precautions
Battery Handling Precautions
Follow these important guidelines to prevent batteries from leaking,
overheating, burning, exploding, or causing electrical shocks or burns.
DANGER
• Use only the Olympus brand NiMH batteries and fitting charger.
• Never heat or incinerate batteries.
• Take precautions when carrying or storing batteries to prevent them from coming
En
into contact with any metal objects such as jewelry, pins, fasteners, etc.
• Never store batteries where they will be exposed to direct sunlight, or subjected to
high temperatures in a hot vehicle, near a heat source, etc.
• To prevent causing battery leaks or damaging their terminals, carefully follow all
instructions regarding the use of batteries. Never attempt to disassemble a battery
or modify it in any way, by soldering, etc.
• If battery fluid gets into your eyes, flush your eyes immediately with clear, cold
running water and seek medical attention immediately.
• Always store batteries out of the reach of small children. If a child accidentally
swallows a battery, seek medical attention immediately.
WARNING
• Keep batteries dry at all times.
• To prevent batteries from leaking, overheating, or causing a fire or explosion, use
only batteries recommended for use with this product.
• Never mix batteries (old and new batteries, charged and uncharged batteries,
batteries of different manufacture or capacity, etc.).
• Do not charge alkaline or lithium batteries if they are not rechargeable.
• Insert the battery carefully as described in the operating instructions.
• Do not use batteries if their body is not covered by the insulating sheet or if the
sheet is torn, as this may cause fluid leaks, fire, or injury.
24
Page 25

Safety Precautions
CAUTION
• Do not remove batteries immediately after using the camera. Batteries may
become hot during prolonged use.
• Always unload the battery from the camera before storing the camera for a long
period.
• The following AA batteries cannot be used.
Batteries whose bodies
are only partially or not
at all covered by an
insulating sheet.
Batteries whose terminals are raised, but
not covered by an
insulating sheet.
• If NiMH batteries are not charged within the specified time, stop charging them
and do not use them.
• Do not use a battery if it is cracked or broken.
• If a battery leaks, becomes discolored or deformed, or becomes abnormal in any
other way during operation, stop using the camera.
• If a battery leaks fluid onto your clothing or skin, remove the clothing and flush the
affected area with clean, running cold water immediately. If the fluid burns your
skin, seek medical attention immediately.
• Never subject batteries to strong shocks or continuous vibration.
Batteries whose
terminals are flat and not
completely covered by
an insulating sheet.
(Such batteries cannot
be used even if the terminals are partially
covered.)
En
25
Page 26

For customers in North and South America
For customers in USA
Declaration of Conformity
Model Number : FE-170/X-760
Trade Name : OLYMPUS
Responsible Party :
Address : 3500 Corporate Parkway, P.O. Box 610, Center Valley,
Telephone Number : 484-896-5000
Tested To Comply With FCC Standards
FOR HOME OR OFFICE USE
Th is device c omplies with Part 15 of the FCC rules. Operation is subject to the following two
conditions:
(1) This device may not cause harmful interference.
En
(2) This device must accept any interference received, including interference that may cause
undesired operation.
For customers in Canada
This Class B digital apparatus meets all requirements of the Canadian Interference-Causing
Equipment Regulations.
PA 18034-0610, U.S.A.
Trademarks
• IBM is a registered trademark of International Business Machines Corporation.
• Microsoft and Windows are registered trademarks of Microsoft Corporation.
• Macintosh is a trademark of Apple Computer Inc.
• ImageLink/EasyShare are trademarks of the Eastman Kodak Company.
• xD-Picture Card™ is a trademark.
• All other company and product names are registered trademarks and/or
trademarks of their respective owners.
• The standards for camera file systems referred to in this manual are the “Design
Rule for Camera File System/DCF” standards stipulated by the Japan Electronics
and Information Technology Industries Association (JEITA).
26
Page 27

Memo
27
Page 28

Tabla de contenidos
Reúna estos componentes (contenido de la caja).............................55
Inserte las pilas ....................................................................................56
Encendido ............................................................................................57
Ajuste de la fecha y hora ....................................................................58
Seleccionar un idioma .........................................................................60
Disparar................................................................................................61
Ver las fotografías...............................................................................62
Utilización básica.................................................................................63
Botones del modo de fotografía.............................................................. 63
Disco de modo........................................................................................ 64
Modos de SCENE (Escenas)..................................................................... 64
Es
Modo macro........................................................................................... 65
Modos de flash ....................................................................................... 65
Obturador automático ............................................................................ 66
Función de ahorro de energía.................................................................. 66
Menús y ajustes...................................................................................67
Menú superior ........................................................................................ 67
Borrar todas las fotografías ..................................................................... 67
Conexión de la cámara........................................................................68
Reproducción en un televisor .................................................................. 68
Impresión directa (PictBridge) .................................................................. 69
Transferencia de imágenes.................................................................70
Software OLYMPUS Master................................................................72
Especificaciones ...................................................................................73
Precauciones de seguridad .................................................................74
Antes de utilizar la cámara, lea atentamente este manual para poder utilizarla
correctamente.
Antes de tomar fotografías importantes, le recomendamos que realice varias
tomas de prueba para familiarizarse con el uso de su cámara.
Le rogamos observe todas las precauciones de seguridad que figuran al final de
este manual.
Las imágenes de la pantalla LCD y las ilustraciones de la cámara que se usan en
este manual pueden diferir del producto real.
54
Page 29

Reúna estos componentes (contenido de la caja)
Cámara digital Correa Pilas tipo AA
Cable USB
Cable de señal de
vídeo
Otros artículos • Manual básico (este manual)
• Manual avanzado
• Tarjeta de garantía
Los contenidos pueden variar dependiendo del lugar
de compra.
OLYMPUS Master CD-ROM
(2)
Colocación de la correa
Es
( Tire de la correa para que quede apretada y no se suelte.
55
Page 30

Inserte las pilas
a. Inserte las pilas en la cámara
Es
2
3
6
5
( Para obtener más información sobre cómo insertar la tarjeta xD-Pircture Card
opcional (en lo sucesivo denominada la tarjeta), consulte el Manual
avanzado.
1
4
56
Page 31

Encendido
A / M / D
A M D H O R A
----.--.-- --:--
En esta sección se explica cómo encender la cámara en modo de fotografía.
a. Sitúe el disco de modo en h
Para grabar videos
Para hacer fotografías
Modos de toma de fotografías
h La cámara realiza los ajustes óptimos y toma la fotografía.
h Esta función reduce el efecto borroso que produce el movimiento del
B Adecuado para fotografiar personas.
E Apropiado para fotografiar paisajes.
M Adecuado para fotografiar personas por la noche.
f Tome fotografías mediante la selección de un modo de escena según
g Puede ajustar las opciones que desee configurándolas según la guía de
b. Presione el botón o
sujeto o la cámara al tomar fotografías.
la situación.
fotografía que aparece en la pantalla.
Botón o
X
A M D HORA
----.--.-- --:--
A/M/D
Es
( Para apagar la cámara, presione el botón o de nuevo.
MENU
CANCEL.
Esta pantalla aparece si no se ha
ajustado la fecha y la hora.
57
Page 32

Ajuste de la fecha y hora
A / M / D
A M D H O R A
----.--.-- --:--
A / M / D
A M D H O R A
2006
.--.-- --:--
A / M / D
A M D H O R A
2006
.-- --:--
Acerca de la pantalla de ajuste de la fecha y hora
A-M-D (Año-Mes-Día)
X
A M D HORA
----.--.-- --:--
MENU
CANCEL.
Para cancelar el ajuste
A/M/D
Hora
Minuto
Formato de fecha (A-M-D, M-D-A, D-M-A).
a. Presione los botones O< y NY para seleccionar [A].
Es
( Los dos primeros dígitos del año son fijos.
Botón O<
Botón NY
X
A M D HORA
2006
.--.-- --:--
MENU
CANCEL.
b. Presione el botón Y#.
Botón Y#
A/M/D
c. Presione los botones O< y NY
para seleccionar [M].
58
X
A M D HORA
2006
.
1111.-- --:--
MENU
CANCEL.
A/M/D
Page 33

d. Presione el botón Y#.
A / M / D
A M D H O R A
2006
--:--
A / M / D
A M D H O R A
2006
30
A / M / D
A M D H O R A
2006
30
e. Presione los botones O< y N Y
para seleccionar [D].
f. Presione el botón Y#.
g. Presione los botones O< y NY
para seleccionar “hora” y
“minuto”.
X
A M D HORA
2006
.
0808.
2626 --:--
MENU
CANCEL.
X
A M D HORA
2006
.
0808.
2626
1212:
A/M/D
A/M/D
30
MENU
CANCEL.
h. Presione el botón Y#.
i. Presione los botones O< y NY
para seleccinar el año, el mes y la
fecha.
X
A M D HORA
2006
.
0808.
2626
MENU
CANCEL.
1212:
j. Una vez ajustadas todas las opciones, presione i.
( La hora se muestra en el formato de 24 horas.
( Para un ajuste más preciso, puede presionar i cuando el reloj marque 00
segundos.
Botón i
30
ACEPT.
ACEPT.
OK
Es
A/M/D
OK
59
Page 34

Seleccionar un idioma
COMP.
EXP.
MODO
SILENC.
a. Presione el botón MENU para ver
el menú superior.
Botón MENÚ
RE-
STAURAR
MENU
PANORAMA
CALIDAD
IMAGEN
COMP.
EXP.
ACEPT.SALIR
CONFI-
GURAC.
MODO
SILENC.
OK
b. Presione el botón Y# para
seleccionar [CONFIG.] y luego
presione el botón i.
Es
Botón Y#
c. Presione el botón NY para
seleccionar W y luego
presione el botón i.
d. Presione los botones NY y O<
para seleccionar un idioma y
luego presione el botón i.
Botón O<
Botón NY
Botón i
CONFIGURAC.
1
FORMATEAR
2
BACKUP
W
MAPEO PÍX.
K/qK/q
MENU
ATRÁS
W
ENGLISH
FRANCAIS
DEUTCH
ESPANOL
MENU
A
TRÁS
• Se pueden añadir otros idiomas a
la cámara con el software
OLYMPUS Master suministrado.
Consulte el Manual avanzado.
ESPAÑOL
NO
ACEPT.
ACEPT.
OK
OK
60
Page 35

Disparar
2816
2112
IN
2816
2112
IN
a. Sujete la cámara
Sujeción horizontal Sujeción vertical
[ ]
[
]
IN
HQHQ2816
2112
×
44
b. Enfoque
c. Dispare
Botón
obturador
Presionar a medias
Presionar a
fondo
Coloque esta marca sobre el sujeto.
[ ]
HQHQ2816
Aparecerá el número de
fotografías que puede almacenar.
El piloto verde indica que el enfoque y la
exposición están bloqueados.
×
2112
Es
[
]
IN
44
61
Page 36

Ver las fotografías
12:30
'06.08.26
100 - 0001
HQ
IN
a. Presione el botón q.
Botón q
[
]
Teclas de control
Fotografía siguiente
Fotografía anterior
Es
Borrar las imágenes
a. Como se explica en el punto a. anterior, visualice la
fotografía que desea borrar.
b. Presione el botón S.
Botón S
IN
BORRAR
MENU
ATRÁS
'06.08.26
HQ
12:30
100-0001
SI
NO
ACEPT.
1
OK
c. Presione el botón O< para seleccionar [SI] y luego
presione i.
BORRAR
Botón O<
SI
NO
ACEPT.
OK
62
Botón i
ATRÁS
MENU
Page 37

Utilización básica
Botones del modo de fotografía
En el modo de fotografía, puede usar estos botones para acceder rápidamente a las
funciones más habituales.
1 Botón MENU
Muestra el menú superior en el monitor
2 Botón X& (modo macro)
Utilice el modo macro o supermacro cuando tome fotografías de primeros planos, por
ejemplo, de una flor.
3 Botón Y# (modo de flash)
Seleccione uno de los 4 modos de flash: Automático, ! Reducción de ojos rojos,
# Flash de relleno o bien $ Flash desactivado.
4 Botón i
Presione para confirmar los ajustes.
5 Botón NY (Obturador automático)
Seleccione el obturador automático para retrasar la toma 12 segundos
aproximadamente desde el momento de presionar el botón obturador.
6 Botón K (fotografía)
Selecciona el modo de fotografía.
7 Botón q (reproducción)
Seleccina el modo de reproducción.
8 Teclas de control (ONXY)
Selecciona escenas, reproduce fotografías y selecciona opciones de menú.
Es
63
Page 38

Disco de modo
Seleccione el modo deseado y encienda la cámara. Los modos se pueden seleccionar antes
de encender la cámara o durante su uso.
Adecuado para hacer fotografías habituales.
h
Esta función reduce la posibilidad de que las fotografías salgan borrosas debido
h
al movimiento del sujeto o de la cámara.
B Adecuado para hacer fotografías de retratos.
Es
l Adecuada para fotografiar paisajes y otras escenas exteriores.
M Adecuado para hacer fotografías del sujeto contra un fondo distante.
Esta función le permite seleccionar entre 10 modos de situación configurados
f
según las condiciones de fotografía.
n Esta función le permite filmar vídeos.
g
Puede ajustar el ajuste deseado siguiendo la guía de fotografía que aparece en
el monitor.
Modos de SCENE (Escenas)
Elija el modo de fotografía según un objeto.
1 Sitúe el disco de modo en f y seleccione la otra escena.
Disco de modo
j
N
W
R
1
DEPORTE
S
ATRÁS
MENU
ACEPT.
OK
Botón O
Botón NBotón i
2 Presione O/N para seleccionar los modos de escenas y luego presione i.
64
Page 39

Modos de ESCENA para fotografía
• C DEPORTE • S PUESTA SOL • V COCINA
• N INTERIORES • X FUEG.ARTIF. • d DOCUMENTOS
• W VELAS • P VITRINA • i SUBASTA
• R AUTO - RETRATO
Modo macro
& Este modo le permite fotografiar a una distancia de 10 cm del sujeto. (Lado de gran
angular máximo)
% Utilice este modo para tomar fotografías a una distancia de 5 cm del sujeto. En el
modo %, la posición del objetivo zoom está fijada.
1 Presione X& varias veces para seleccionar [&] o [%] y presine i.
Modos de flash
1 Presione Y# varias veces para seleccionar el modo de flash y luego presione i.
2 Presione a medias el botón obturador.
Si el flash está ajustado para dispararse, se ilumina la marca #.
3 Presione el botón obturador a fondo para tomar la fotografía.
Icono Modo de flash Descripción
AUTO
Flash automático El flash se dispara automáticamente en condiciones de
Flash con
!
reducción de
ojos rojos
Flash de relleno El flash se dispara independientemente de la luz
#
Flash
$
desactivado
baja iluminación o de contraluz.
El modo de flash con reducción de ojos rojos reduce
significativamente este fenómeno emitiendo destellos
previos antes de dispararse el flash normal.
disponible.
El flash no se dispara, aun en condiciones de baja
iluminación.
65
Es
Page 40

Obturador automático
1 Presione NY para seleccionar [Y] y luego
presione i.
2 Presione el botón obturador a fondo para tomar la
fotografía.
El LED del obturador automático se ilumina durante
unos 10 segundos después de presionar el botón
obturador, luego empieza a parpadear. Tras parpadear
durante 2 segundos aproximadamente, se toma la
fotografía.
LED del obturador
Función de ahorro de energía
Para ahorrar energía, la cámara entra automáticamente en el modo de reposo y
deja de funcionar si no se utiliza durante 3 minutos. Presione el botón obturador
o la palanca de zoom para reactivar la cámara.
Si la cámara no se utiliza durante 15 minutos después de entrar en el modo de
Es
reposo, se retrae automáticamente el objetivo y se apaga. Para volver a utilizarla,
enciéndala otra vez.
automático
66
Page 41

Menús y ajustes
Menú superior
1 Presione MENU para abrir el menú superior.
MENU
ACEPT.SALIR
OK
2 Utilice las teclas de control (O/N/X/Y) para seleccionar opciones de menú, y
presione i para ajustarlas.
PANORAMA
Le permite crear fotografías panorámicas mediante el software OLYMPUS Master del
CD-ROM suministrado. Para tomar fotografías panorámicas hace falta una tarjeta
Olympus xD-Picture Card.
RESTAURAR
Restaure los valores de los ajustes de fábrica.
CALIDAD IMAGEN
Ajuste la calidad de la imagen que va a capturar según la finalidad de la fotografía.
CONFIGURAC.
Ajuste la fecha y la hora, el idioma, el sonido de funcionamiento, etc.
COMP. EXP. (Compensación de la exposición)
Utilice este ajuste para aumentar (+) o reducir (-) la exposición de una fotografía.
MODO SILENC.
Silencia los sonidos de funcionamiento que se producen durantes las operaciones de
fotografía y reproducción.
Es
Borrar todas las fotografías
1 Presione MENU en modo de reproducción para
ver el menú superior y seleccione [BORRAR] >
[BORRAR TODO].
2 Seleccione [SI] y presione i.
Se borran todas las fotografías.
67
Page 42

Conexión de la cámara
Reproducción en un televisor
Emplee el cable de vídeo suministrado con la cámara para reproducir imágenes
grabadas en el televisor. Puede reproducir tanto fotografías como vídeos.
1 Compruebe que el televisor y la cámara estén apagados. Conecte el conector de
salida de video de la cámara al terminal de entrada de vídeo del televisor usando
el cable de vídeo suministrado.
Tapa del conector
Es
2 Encienda el televisor y cambie al modo de entrada de vídeo.
Para obtener más información sobre la manera de cambiar la entrada de vídeo, consulte
el manual de instrucciones del televisor.
3 Encienda la cámara y presione q para entrar en el modo de reproducción.
En el televisor aparecerá la última fotografía tomada. Utilice las flechas de control (O/N/
X/Y) para seleccionar la fotografía que desea ver.
Conector de salida de video
Conecte al terminal de entrada
de vídeo (amarillo) del televisor.
Cable de vídeo
68
Page 43

Impresión directa (PictBridge)
Usando el cable USB suministrado, puede conectar la cámara a una impresora
compatible con PictBridge, como la Olympus P-11, para imprimir fotografías. Puede
imprimir una fotografía mediante operaciones sencillas.
1 En el modo de reproducción, localice en el monitor la fotografía que desea
imprimir.
2 Conecte un extremo del cable USB suministrado al conector USB de la cámara y
el otro extremo al conector USB de la impresora.
Tapa del conector
3 Presione <.
Se inicia la impresión.
Cuando haya terminado, desconecte el cable USB
de la cámara con la pantalla de selección de
fotografías activa.
Conector USB
Botón <
Cable USB
IMPR.SIMPLE INICIO
PC / IMPR.PERSONAL
<
OK
Es
69
Page 44

Transferencia de imágenes
Instalar el software
1 Inserte el CD-ROM de OLYMPUS Master.
2 Windows: Haga clic en el botón “OLYMPUS
Macintosh: Haga doble clic en el icono
3 Siga las instrucciones en pantalla.
Conecte la cámara a un ordenador
1 Conecte la cámara y el ordenador usando el cable USB (incluido).
El monitor se encenderá automáticamente.
Es
Master“.
“Installer“.
Cable USB
2
2 Seleccione [PC] en el monitor y presione i.
Ahora el ordenador reconocerá su cámara como una
unidad de almacenamiento extraíble.
70
1
USB
PC
IMPR.SIMPLE
IMPR.PERSONAL
SALIR
OK
ACEPT.
Page 45

Transfiera las imágenes al ordenador
1 Ahora, con la cámara conectada, abra el
programa OLYMPUS Master.
Aparece la ventana [Transferir imágenes].
Ventana [Transferir imágenes]
2 Seleccione las imágenes que desea
transferir y haga clic en el botón [Transferir
imágenes].
Botón [Transferir imágenes]
Si no aparece automáticamente la ventana [Transferir imágenes]:
a. Haga clic en el icono “Transferencia de
imágenes” en el menú principal de
OLYMPUS Master.
b. Haga clic en el icono “Desde cámara”.
Es
Consejos
• Para obtener información más detallada acerca de la configuración y el uso de la
cámara, consulte el “Manual Avanzado” de la cámara que se incluye en el CDROM.
• Para más información sobre el uso del software OLYMPUS Master, consulte el
manual (electrónico) de referencia instalado en la carpeta OLYMPUS Master de su
disco duro. Si necesita ayuda adicional, consulte el archivo “Ayuda” del software
OLYMPUS Master.
71
Page 46

Software OLYMPUS Master
Software OLYMPUS Master: ¡Utilice este software para
descargar fotografías desde la cámara, ver, organizar, retocar,
imprimir y mandar por correo electrónico e imprimir sus fotos
digitales, vídeos y mucho más! Este CD también contiene el
manual de referencia del software completo en formato
Adobe Acrobat (PDF).
(Requisitos del sistema
SO
CPU Pentium III 500 MHz/Power PC G3, o superior
RAM 128 MB o más (se recomienda 256 MB o más)
Disco duro 300 MB de espacio libre o más
Conexión Puerto USB
Monitor 1024 × 768 píxeles de resolución o más con un mínimo de 65.536
Es
Para obtener la información de asistencia más actualizada, visite el sitio Web de
Olympus
(http://www.olympus.com/digital)
Windows 98SE/Me/2000 Professional/XP o Mac OS X (10.2 o
posterior)
colores (Windows), 32.000 colores (Macintosh)
(Actualización (OLYMPUS Master Plus)
Además de las funciones de OLYMPUS Master, la versión OLYMPUS Master Plus
incluye funciones como la edición de vídeo, impresión de álbumes, impresión de
hojas de contactos, álbum HTML, panorama de pegado libre, escritura en CD/DVD y
mucho más, permitiéndole ampliar considerablemente sus posibilidades en fotografía
digital.
Puede actualizar su software a la versión OLYMPUS Master Plus a través de Internet.
Es necesario tener instalado OLYMPUS Master en un ordenador con conexión a
Internet.
Registro de usuario
Registre su cámara cuando instale OLYMPUS Master para activar su garantía,
recibir notificaciones sobre actualizaciones de software y firmware de la
cámara, y mucho más.
72
Page 47

Especificaciones
(Cámara
Tipo de producto : Cámara digital (para fotografía y reproducción)
Sistema de grabación
Fotografías : Grabación digital, JPEG (compatible con DCF)
Estándares aplicables : Exif 2.2, DPOF, PRINT Image Matching III, PictBridge
Vídeo : Compatible con QuickTime Motion JPEG
Memoria : Memoria interna
Núm. de píxeles
efectivos
Dispositivo de captura de
imagen
Objetivo : Objetivo Olympus de 6,3 a 18,9 mm, de F3,1 a 5,9
Sistema fotométrico : Sistema de medición centrada
Velocidad de obturación : 2 a 1/2000 seg.
Alcance de fotografía : 0,5 m a ∞ (W), 0,9 m a ∞ (T) (normalo)
Monitor: : Pantalla LCD TFT en color de 2,5", 153.600 píxeles
Conector exterior : Jack DC-IN, conector USB, toma VIDEO OUT.
Sistema de calendario
automático
Entorno de funcionamiento
Temperatura : 0 a 40°C (funcionamiento)/-20 a 60°C (almacenamiento)
Humedad : 30 a 90 % (funcionamiento)/10 a 90 % (almacenamiento)
Fuente de alimentación : 2 baterías tipo AA cada una (baterías Oxyride/baterías
Dimensiones : 90 mm (An) × 62,5 mm (Al) × 22,5 mm (Pr) (sin salientes)
Peso : 124 g (sin batería ni tarjeta)
xD-Picture Card (16 MB - 1 GB)
: 6.000.000 píxeles
: 1/2,5" CCD (filtro de colores primarios),
6.200.000 píxeles (en tatal)
(equivalente a un objetivo de 38 a 114 mm en una película
de 35 mm)
0,1 m a ∞ (W), 0,6 m a ∞ (T) (modo macro)
0,05 m a ∞ (modo supermacro)
: Actualización automática desde 2000 a 2099
alcalinas/baterías NiMH) o un adaptador de CA especificado
Es
Tenga presente que los cambios por mejoras de diseño y especificaciones pueden
realizarse sin aviso previo.
73
Page 48

Precauciones de seguridad
PRECAUCIÓN
RIESGO DE DESCARGAS
ELÉCTRICAS
NO ABRIR
PRECAUCIÓN
CUBIERTA (O PARTE TRASERA). EN EL INTERIOR NO HAY PIEZAS QUE EL USUARIO PUEDA
REPARAR. REMITA LA REPARACIÓN A PERSONAL DE SERVICIO ESPECIALIZADO OLYMPUS.
PELIGRO
ADVERTENCIA
PRECAUCIÓN
Es
¡ADVERTENCIA!
PARA EVITAR EL RIESGO DE INCENDIO O DESCARGAS ELÉCTRICAS, NUNCA DESMONTE NI EXPONGA ESTE
PRODUCTO AL AGUA NI LO UTILICE EN UN ENTORNO MUY HÚMEDO.
Precauciones Generales
Lea todas las instrucciones — Antes de utilizar este producto, lea todas las
instrucciones operativas. Guarde todos los manuales y la documentación para
futuras consultas.
Limpieza — Siempre desenchufe el producto de la toma de corriente antes de
limpiarlo. Para la limpieza use sólo un paño húmedo. Nunca use limpiadores
líquidos o aerosoles, ni solventes orgánicos de ningún tipo para limpiar este
producto.
Accesorios — Para su seguridad y evitar daños al producto, utilice únicamente los
accesorios recomendados por Olympus.
Agua y humedad — En las precauciones de los productos diseñados a prueba de la
intemperie, consulte las secciones de resistencia a la intemperie en sus respectivos
manuales.
Ubicación — Para evitarle daños al producto, monte el producto sobre un trípode,
caballete o soporte estable.
Fuentes de alimentación — Conecte este producto únicamente con la fuente de
alimentación descrita en la etiqueta del producto.
Rayos — Si se produce una tormenta eléctrica mientras está utilizando el adaptador
de CA, retírelo de la toma de corriente inmediatamente.
Objetos extraños — Para evitar daños personales, nunca inserte objetos de metal
en el producto.
Calentadores — Nunca utilice ni guarde este producto cerca de fuentes de calor,
tales como radiadores, rejillas de calefacción, estufas o cualquier tipo de equipo o
aparato generador de calor, incluyendo amplificadores estéreo.
74
: PARA REDUCIR EL RIESGO DE DESCARGAS ELÉCTRICAS, NO RETIRE LA
El signo de admiración dentro de un triángulo equilátero tiene como finalidad alertar al
usuario de la existencia de importantes instrucciones de operación y mantenimiento en la
documentación suministrada con el producto.
Si el producto es utilizado sin observar la información representada bajo este símbolo, podría
causar serias lesiones o muerte.
Si el producto es utilizado sin observar la información representada bajo este símbolo, podría
causar serias lesiones o muerte.
Si el producto es utilizado sin observar la información representada bajo este símbolo, podría
causar lesiones personales menores, daños al equipo, o pérdida de datos importantes.
Page 49

Precauciones de seguridad
Manejo de la cámara
ADVERTENCIA
( No utilice la cámara cerca de gases inflamables o explosivos.
( No utilice el flash a corta distancia de las personas (especialmente
niños menores y mayores, etc.).
• Cuando dispare el flash, deberá mantener, por lo menos, una distancia de 1 m
de la cara de los sujetos. El disparo demasiado cercano de los ojos del sujeto
podrá causarle la pérdida de visión momentánea.
( Mantenga a los niños menores y mayores alejados de la cámara.
• Utilice y guarde siempre la cámara fuera del alcance de los niños menores y
mayores, para prevenir las siguientes situaciones de peligro que podrían
causarles serias lesiones:
• Enredarse con la correa de la cámara, ocasionando asfixia.
• Ingerir accidentalmente una batería, tarjetas, u otras piezas pequeñas.
Disparar el flash accidentalmente hacia sus propios ojos o hacia los ojos de otro niño.
•
• Lesionarse accidentalmente con las piezas móviles de la cámara.
( No mire al sol ni a luces fuertes a través de la cámara.
( No utilice ni guarde la cámara en lugares polvorientos o
húmedos.
( No cubra el flash con la mano mientras efectúa el disparo.
PRECAUCIÓN
( Interrumpa inmediatamente el uso de la cámara si percibe algún
olor, ruido o humo extraño alrededor de la misma.
• Nunca retire las baterías con las manos descubiertas, ya que podría causar un
incendio o quemarle las manos.
( Nunca sujete ni utilice la cámara con las manos mojadas.
( No deje la cámara en lugares donde pueda estar sujeta a
temperaturas extremadamente altas.
• Si lo hace puede provocar el deterioro de las piezas y, en algunas
circunstancias, provocar que se prenda fuego. No utilice el cargador o el
adaptador CA si está cubierto (por ejemplo con una frazada). Esto podría
causar recalentamiento, resultando en incendio.
(
Manipule la cámara con cuidado para evitar una quemadura de leve.
•
Ya que la cámara contiene partes metálicas, el recalentamiento puede resultar en
una quemadura de baja temperatura. Preste atención a lo siguiente:
•
Cuando utilice la cámara durante un largo período, ésta se recalentará. Si mantiene
la cámara en este estado, podría causar una quemadura de baja temperatura.
•
En lugares sujetos a temperaturas extremadamente bajas, la temperatura de la
carcasa de la cámara puede ser más baja que la temperatura ambiente. Si es
( Tenga cuidado con la correa.
posible, póngase guantes cuando manipule la cámara en temperaturas bajas.
• Tenga cuidado con la correa cuando transporte la cámara. Podría engancharse
en objetos sueltos y provocar daños graves.
Es
75
Page 50

Precauciones de seguridad
Precauciones acerca del uso de la batería
Siga estas importantes indicaciones para evitar que se produzcan fugas,
recalentamientos, incendios o explosión de la batería, o que cause descargas
eléctricas o quemaduras.
PELIGRO
• Utilice únicamente baterías NiMH de la marca Olympus y el cargador
correspondiente.
• Nunca caliente ni incinere las pilas.
• Tome precauciones al transportar o guardar las pilas a fin de evitar que entren en
contacto con objetos metálicos, tales como alhajas, horquillas, cierres, etc.
• Nunca guarde las pilas en lugares donde queden expuestas a la luz solar directa o
sujetas a altas temperaturas en el interior de un vehículo con calefacción, cerca de
fuentes de calor, etc.
• Para evitar que ocurran fugas de líquido de las pilas o daños de sus terminales, siga
Es
cuidadosamente todas las instrucciones respectivas al uso de las pilas. Nunca
intente desarmar una pila ni modificarla de ninguna manera, por soldadura, etc.
• Si el fluido de la pila penetrara en sus ojos, lávelos de inmediato con agua corriente
fresca y limpia, y solicite atención médica inmediatamente.
• Siempre guarde las pilas fuera del alcance de los niños menores. Si un niño ingiere
una pila accidentalmente, solicite atención médica inmediatamente.
ADVERTENCIA
• Conserve las pilas siempre secas.
• Para evitar que ocurran fugas de líquido, recalentamiento de las pilas, o que causen
incendio o explosión, utilice únicamente las pilas recomendadas para este
producto.
• Nunca mezcle las pilas (pilas nuevas con usadas, pilas cargadas con descargadas,
pilas de distinta marca o capacidad, etc.).
• No intente cargar las baterías alcalinas o la pila de litio si no son recargables.
• Inserte la batería con cuidado como se describe en las instrucciones operativas.
• No utilice baterías si el cuerpo no está cubierto con una lámina aislante o si dicha
lámina está perforada, ya que podría provocar fugas de líquido, incendio o lesión.
76
Page 51

Precauciones de seguridad
PRECAUCIÓN
• No retire las baterías inmediatamente después de utilizar la cámara. Las baterías
pueden recalentarse durante el uso prolongado.
• Siempre retire la batería de la cámara antes de guardar la cámara por un largo
tiempo.
• Las siguientes pilas AA no pueden ser utilizadas.
Pilas parcialmente
cubiertas o no
cubiertas totalmente
por una hoja aislante.
• Si las pilas de NiMH no se recargan dentro del tiempo especificado, interrumpa la
recarga de las mismas y no las use.
• No utilice una pila si está rajada o quebrada.
• Si se producen fugas de líquido, decoloración o deformación de la batería, o
cualquier otra anormalidad durante la operación, interrumpa el uso de la cámara.
• Si el fluido de la pila entrara en contacto con su ropa o con su piel, quítese la ropa
y lave de inmediato la parte afectada con agua corriente fresca y limpia. Si el fluido
quemara su piel, solicite atención médica inmediatamente.
• Nunca exponga la pila a fuertes impactos ni a vibraciones continuas.
Pilas con terminales en relieve, pero no
cubiertos por una hoja
aislante.
Pilas con terminales
planos, pero no
completamente
cubiertos por una hoja
aislante (Tales pilas no
pueden ser usadas
aunque los terminales
- estén parcialmente
cubiertos).
Es
77
Page 52

Para los clientes de Norte y Sudamérica
Para clientes de Estados Unidos
Declaración de conformidad
Número de modelo : FE-170/X-760
Marca comercial : OLYMPUS
Parte responsable :
Dirección : 3500 Corporate Parkway, P.O. Box 610, Center Valley,
Número de teléfono: 484-896-5000
Este equipo cumple con la normativa FCC
PARA EL USO EN EL HOGAR O LA OFICINA
Este equipo cumple con la Parte 15 de la normativa FCC. Su uso está sujeto a las dos
condiciones siguientes:
(1) Este equipo no debe causar interferencias dañinas.
(2) Este equipo debe aceptar cualquier interferencia recibida, incluidas las interferencias
que puedan causar un funcionamiento no deseado.
Para clientes de Canadá
Este equipo digital de Clase B cumple con los requisitos de la normativa canadiense sobre
equipos que provocan interferencias.
Es
Marcas comerciales
PA 18034-0610, U.S.A.
• IBM es una marca registrada de International Business Machines Corporation.
• Microsoft y Windows son marcas registradas de Microsoft Corporation.
• Macintosh es una marca comercial de Apple Computer Inc.
• ImageLink y EasyShare son marcas comerciales de Eastman Kodak Company.
• xD-Picture Card™ es una marca comercial.
• Todos los demás nombres de compañías y productos son marcas registradas y/o
marcas comerciales de sus respectivos propietarios.
• Las normas para sistemas de archivos de cámara referidas en este manual son las
“Normas de Diseño para Sistema de Archivos de Cámara/DCF” estipuladas por la
Asociación de Industrias Electrónicas y de Tecnología de Información de Japón
(JEITA).
78
Page 53

Memo
79
Page 54

Memo
105
Page 55

Memo
106
Page 56

Memo
107
Page 57

 Loading...