

Page 1

INSTRUCTIONS ☞ 4
EN
BEDIENUNGSANLEITUNG ☞ 14
DE
MODE D’EMPLOI ☞ 24
FR
INSTRUCCIONES ☞ 34
ES
ISTRUZIONI ☞ 44
IT
кмдйЗйСлнЗй ☞ 54
RU
дЦкЯЗзаснЗй ☞ 64
UA
BETJENINGSVEJLEDNING ☞ 74
DK
BRUKSANVISNING ☞ 84
SE
HANDLEIDING ☞ 94
NL
KÄYTTÖOHJE ☞ 104
FI
NÁVOD K POUÎITÍ ☞ 114
CZ
1
2
3
8
9
127 2
a
1
2
®
This camera complies with EU directive 89/336/EEC for CE marking.
EN
Diese Kamera erfüllt die EU-Richtlinien 89/336/EEC für die CE-Marke.
DE
Cet appareil est conforme à la directive 89/336/CEE sur le marquage CE.
FR
Esta cámara cumple las normas de la directiva 89/336/EEC de la Unión
Europea relativa a la marca CE.
ES
Questa fotcamera rispetta le direttive EU 89/336/EEC per il mercato CE.
IT
щЪ‡ ЩУЪУН‡ПВ‡ ТУУЪ‚ВЪТЪ‚ЫВЪ СЛВНЪЛ‚В EC 89/336/EEC ‰Оfl
П‡НЛУ‚НЛ CE.
RU
сfl ЩУЪУН‡ПВ‡ ‚i‰ФУ‚i‰‡π СЛВНЪЛ‚i ∏C 89/336/EEC ‰Оfl П‡НЫ‚‡ММfl CE.
UA
Dette kamera overholder EU 89/336/EEC for CE mærkning.
DK
Denna kamera uppfyller EU direktiv 89/336/EEC för CE märkning.
SE
Dit product voldoet aan richtlijn 89/336/EEC.
NL
Tämä kamera täyttää EU-direktiivin 89/336/EEC vaatimukset,
jotka oikeuttavat CE-merkintään.
FI
Tento fotoaparát vyhovuje poÏadavkÛm evropské smûrnice 89/336/EEC
pro ochrannou znaãku CE.
CZ
OLYMPUS OPTICAL CO. (EUROPA) GMBH
(Premises/Goods delivery) Wendenstraße 14 – 18, 20097 Hamburg,
Germany. tel. 040-23 7730
(Letters) Postfach 1049 08, 20034 Hamburg, Germany
www.olympus-europa.com
Page 2

MEMO
Read this manual carefully before using your camera (especially “Care
and Storage” on page 12).
NAMES OF PARTS
(Open the front flap and keep page 3 visible.)
Camera Body
1 Zoom lever (p. 7)
2 Shutter release button (p. 7)
3 Selftimer/remote control indicator
4 Light sensor
✩
5 Viewfinder
6 Autofocus window
✩
7 Flash✩(pp. 7 – 9)
8 Lens
✩
9 Remote control sensor
10 Lens barrier
11 Battery compartment cover (p. 5)
12 Strap eyelet (pp. 5 & 10)
13 Diopter adjustment dial (p. 5)
✩
Always try to keep this clean. Dirt and stains can result in pictures that are unclear and out-of-focus.
Wipe off any dirt or stains with a soft cloth.
Viewfinder Indications
24 Autofocus marks (p. 7)
25 Spot marks (p. 9)
26 Close-up correction marks (p. 6)
27 Green lamp (autofocus indicator)
Lights: Subject is in focus. You can shoot.
Blinks: Subject is not in focus. Shutter is locked.
Blinks rapidly: Subject is difficult to focus on. You can shoot, but subject
may be out of focus.
28 Orange lamp (flash indicator)
Goes out: Flash does not fire. You can shoot.
Lights: Flash will fire. You can shoot.
Blinks: The flash is being recharged. Wait until it lights.
LCD Panel
29 Date/time indicator (Quartzdate model only) (p. 11)
30 Exposure counter
31 Remote Control (optional) (p. 10)
32 Selftimer (p. 10)
33 Red-Eye Reduction Flash (p. 8)
34 Fill-In Flash (p. 8)
35 Flash-Off (p. 8)
36 Night Scene Flash (p. 8)
37 Battery check (p. 5)
38 Spot Metering (p. 9)
39 Infinity (p. 9)
Note: Not all indicators are displayed as shown at the same time.
INSTRUCTIONS
EN
ER✩ TY✩ U✩
I✩
O
P
{
}
W
Q
Dw rT
{
e
tuy
S
g
f
G
H
d
sa:LKJ
A
]
D
F
ip
[
o
q
F
34 125
14 Film window
15 Tripod socket
16 Date MODE and SET buttons
(Quartzdate model only) (p. 11)
17 Mid-roll rewind button (p. 10)
18 Exposure mode button (p. 9)
19 Flash mode button (p. 8)
20 Selftimer/remote control button
(p. 10)
21 LCD panel
22 Back cover
23 Back cover release (p. 6)
126
7
6
5
4
3
Page 3

Read this manual carefully before using your camera (especially “Care
and Storage” on page 12).
INSTRUCTIONS
EN
4
LOADING AND CHECKING THE BATTERY
Use one 3 V lithium battery (CR123A or DL123A).
FIRST STEPS
EN
5
NAMES OF PARTS
(Open the front flap and keep page 3 visible.)
Camera Body
✩
Always try to keep this clean. Dirt and stains can result in pictures that are unclear and out-of-focus.
Wipe off any dirt or stains with a soft cloth.
Viewfinder Indications
1 Zoom lever (p. 7)
2 Shutter release button (p. 7)
3 Selftimer/remote control indicator
4 Light sensor
✩
5 Viewfinder
6 Autofocus window
✩
7 Flash✩(pp. 7 – 9)
8 Lens
✩
9 Remote control sensor
10 Lens barrier
11 Battery compartment cover (p. 5)
12 Strap eyelet (pp. 5 & 10)
13 Diopter adjustment dial (p. 5)
14 Film window
15 Tripod socket
16 Date MODE and SET buttons
(Quartzdate model only) (p. 11)
17 Mid-roll rewind button (p. 10)
18 Exposure mode button (p. 9)
19 Flash mode button (p. 8)
20 Selftimer/remote control button
(p. 10)
21 LCD panel
22 Back cover
23 Back cover release (p. 6)
24 Autofocus marks (p. 7)
25 Spot marks (p. 9)
26 Close-up correction marks (p. 6)
27 Green lamp (autofocus indicator)
Lights: Subject is in focus. You can shoot.
Blinks: Subject is not in focus. Shutter is locked.
Blinks rapidly: Subject is difficult to focus on. You can shoot, but subject
may be out of focus.
28 Orange lamp (flash indicator)
Goes out: Flash does not fire. You can shoot.
Lights: Flash will fire. You can shoot.
Blinks: The flash is being recharged. Wait until it lights.
LCD Panel
29 Date/time indicator (Quartzdate model only) (p. 11)
30 Exposure counter
31 Remote Control (optional) (p. 10)
32 Selftimer (p. 10)
33 Red-Eye Reduction Flash (p. 8)
34 Fill-In Flash (p. 8)
35 Flash-Off (p. 8)
36 Night Scene Flash (p. 8)
37 Battery check (p. 5)
38 Spot Metering (p. 9)
39 Infinity (p. 9)
Note: Not all indicators are displayed as shown at the same time.
1
2
3
1. While pressing the bottom of the
battery compartment cover in direction
Q, turn it in direction W to open.
• Make sure the lens barrier is
closed before opening the battery
compartment cover.
2. Insert the battery correctly Q.
Close the battery compartment
cover W.
3. Slide the lens barrier in direction Q
until it clicks. The lens comes out
and the flash flips open. Check the
remaining battery power on the
LCD panel.
• A brand-new battery lasts for about
15 rolls of film.
lights
(turns off automatically).
blinks and other indicators
are displayed normally.
blinks and other indicators
go out.
Battery is OK. You can shoot.
Battery is low and should be replaced
with a new one.
ATTACHING THE STRAP
Attach the strap as shown.
DIOPTER ADJUSTMENT
Turn the diopter adjustment dial until
the autofocus marks are clear.
Battery is dead and should be replaced
with a new one immediately.
Page 4

TAKING PICTURES
STANDARD FUNCTIONS
EN
7
LOADING THE FILM
STANDARD FUNCTIONS
EN
6
1
2
1. Slide the back cover release
upward to open the back cover.
• Do not touch the inside of the
camera, especially the lens.
2. Insert the film cartridge until it
clicks into position.
3. Align the film leader with the
guide line (A), and place the film
between the positioning guides
(B). Then close the back cover
until it clicks.
• The film automatically advances
to the first frame.
• Open the lens barrier until it
clicks. Make sure the exposure
counter on the LCD panel
reads “
II
”.
• If “EE” blinks, reload the film.
3
FOCUSING AND WORKING DISTANCE
CLOSE-UP PHOTOGRAPHY
This camera uses a wide multi-autofocus
system that makes it easier for the
camera to focus on subjects even if they
are not in the center of the viewfinder.
Shoot your subject from a distance of
0.6 m to ∞ (infinity) at wide angle and
from 0.8 m to ∞ (infinity) at telephoto.
Although the shutter will release when a
subject is extremely close to the subject,
the subject will be out of focus.
The picture area will move lower in
the viewfinder as you get closer to the
subject.
Q
Close-up correction marks
(picture area at closest distance).
W
Picture area at infinity.
1
2
3
Autofocus marks
1. Open the lens barrier until it clicks.
The lens will extend slightly and the
LCD panel will turn on. Push the zoom
lever to the “T” side for telephoto
(100 mm) or to the “W” side for wide
angle (28 mm).
• After about 4
1
/2minutes of inactivity,
the lens retracts and the LCD panel
goes out.
2. Position the autofocus marks (AF) on
your subject.
• Do not look at the sun or other strong
light sources through the viewfinder.
3. Press the shutter release button
halfway to focus on the subject.
Make sure that the green lamp lights;
then press the shutter release button
all the way to take the picture.
After the shutter is released, the film
automatically advances to the next
frame.
AUTO FLASH – WORKING DISTANCE
FILM REWINDING AND UNLOADING
(with color negative film)
When reversal film is used, the working range at the telephoto side will be
reduced by about 30%.
ISO
100
200
400
Wide angle (W)
0.6 to 4.6 m
0.6 to 6.5 m
0.6 to 9.2 m
Telephoto (T)
0.8 to 1.8 m
0.8 to 2.5 m
0.8 to 3.6 m
The camera automatically rewinds the
film when you reach the end of a roll.
Make sure the motor has stopped and
that “EE” is blinking; then open the back
cover to remove the film.
Q
W
Page 5

Combination of the Two Modes –
RED-EYE REDUCTION NIGHT SCENE FLASH
Prevents the typical red eyes seen in pictures when shooting at night
(see figure 7 on page 126). Both modes cannot be combined with the Spot
Metering mode. Closing the lens barrier restores the Auto Flash mode.
SETTING THE FLASH MODES
SPECIAL FEATURES
EN
9
Open the back flap and keep page 126 visible.
Red Eyes in Flash Pictures –
RED-EYE REDUCTION FLASH
When taking flash photos of persons in the dark the flashlight falls into
the wide-open iris. There the flashlight is reflected red from the retina.
The Red-Eye Reduction Flash emits a series of low-power pre-flashes
before the main flash. This gives the subject’s eyes a chance to adapt to the
bright light by making the iris smaller. Assuming that the subject looks into
the pre-flashes, the eyes will not appear red in the picture (see figure 3 on
page 126).
• Hold the camera securely. It takes about 1 second until the shutter
releases.
• Red-eye reduction may not be effective when the subject:
1. Is not looking at the flash from right in front.
2. Is not watching the pre-flashes.
3. Is too far from the camera.
The effectiveness of red-eye reduction varies depending on the individual
characteristics of each subject.
No Flash Allowed or Flash Spoils Atmosphere – FLASH-OFF
The Flash-Off is needed where flash photos are not allowed or where you
want to keep the twilight or artificial light atmosphere unspoiled (see figure
4 on page 126).
• Since a slow shutter speed (as low as 2 seconds) is selected, use a tripod
to prevent camera-shake.
• Have your subject stay still; otherwise, blurring may result.
Closing the lens barrier restores the Auto Flash mode.
Shadow on the Face – FILL-IN FLASH
When taking portrait photos in backlight or underneath a tree or roof,
the subject’s face may look too dark. The Fill-In Flash provides just the right
amount of additional light to compensate for the shadow (see figure 5 on
page 126) and for fluorescent light.
• Make sure your subject is within the flash working range (p. 7).
• Fill-in flash becomes ineffective in extremely bright conditions.
Closing the lens barrier restores the Auto Flash mode.
City at Night – NIGHT SCENE FLASH
When taking a walk in the city at night, you may want to take photos of your
subject in the foreground with the city lights in the background. The Night
Scene Flash takes care of this. The main flash lights the subject in the
foreground while the shutter stays open up to 4 seconds to capture the city
lights. You’ll need to secure the camera on a tripod or other support to
prevent camera shake (see figure 6 on page 126).
SPECIAL FEATURES
EN
8
No
display
Auto Flash
Red-Eye
Reduction Flash
Flash-Off
Fill-In
Night Scene Flash
Red-Eye
Reduction Night
Scene Flash
High contrast – SPOT METERING
When taking photos in a high contrast environment (e.g. backlight portraits),
the main subject may come out too dark or too bright. To make sure that the
subject is exposed correctly use Spot Metering (see figure 1 on page 2).
Position the spot marks (A) on the area where you want to measure the
light. Press the shutter release button halfway; the green lamp lights and the
focus and exposure are locked on that area. Reframe your subject and
press the shutter release button all the way.
Shooting scenery – INFINITY
The camera automatically sets the workings distance at infinity. The flash
does not fire except in the Fill-In Flash mode (see figure 2 page 2).
SETTING THE EXPOSURE MODES
Press the flash mode button ( ).
The mode switches in the order
shown on the left. The selected mode
is displayed on the LCD panel.
Do not fire the flash right in front of
the eyes of people and animals.
Do not point the camera at a motorist
and fire the flash.
No
display
Auto Exposure
Spot Metering
Infinity
Press the exposure mode button
( / ). The mode switches in the
order shown on the left. The selected
mode is displayed on the LCD panel.
Closing the lens barrier restores the
Auto Exposure mode.
Page 6
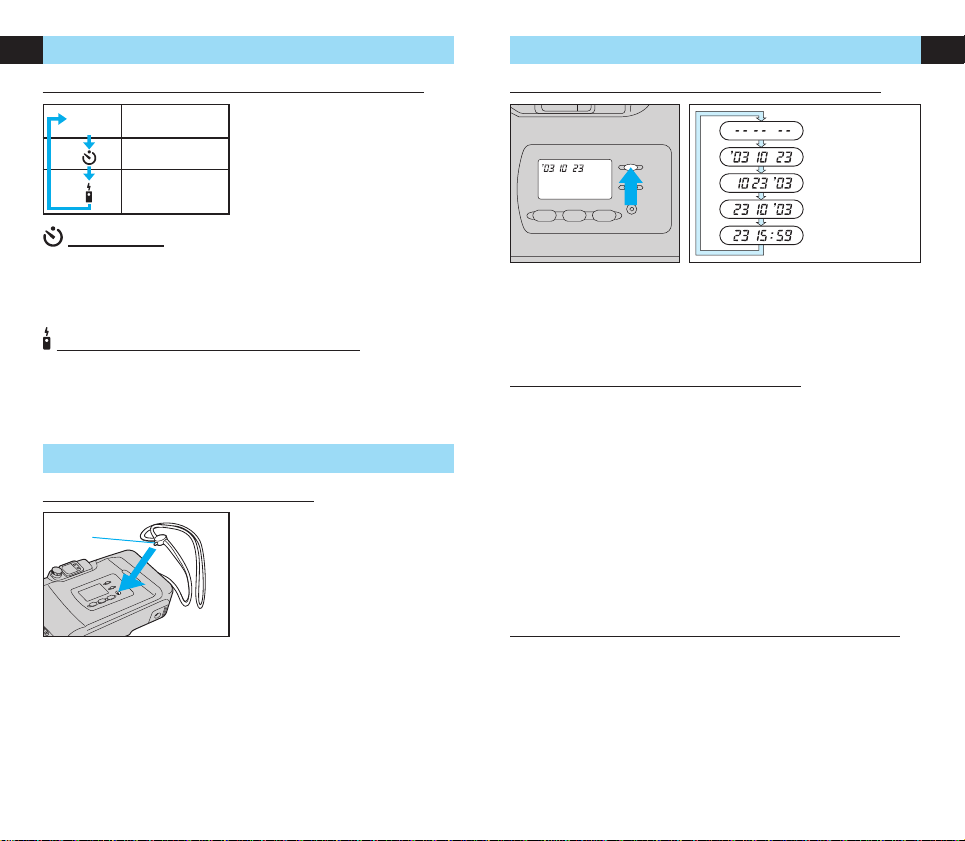
PRINTING THE DATE/TIME (Quartzdate model only)
First select the date/time mode you want to print. Press the MODE button.
Each time you press it, the mode will switch in the order shown on the left.
Keep the mode you want to print displayed. Date/time is imprinted in the
lower right corner of the picture. If the date/time is superimposed on a
bright color like white, orange, yellow, etc., it may be difficult to read.
When black-and-white film is used, the date/time may not be printed.
CORRECTING THE DATE AND TIME
(Quartzdate model only)
Be sure to correct the date and time after the battery has been inserted or
replaced.
1. Keep the MODE button pressed until the “year” indicator starts blinking.
2. Press the SET button to adjust the “year” indicator. If you press the button
once, the number on the display will advance by 1. If you keep the button
pressed, the numbers will run in rapid succession. If you pass the
intended number, keep pressing to return to that number.
3. Press the MODE button once more to make the “month” indicator blink.
Press the SET button to adjust the “month” indicator. As you press the
MODE button, the blinking indicator changes in the order of “year”,
“month”, “day”, “hour” and “minute”.
4. Repeat Steps 2 and 3 to set “hour” and “minute”. Make sure the “minute”
indicator is blinking.
5. When “minute” has been set, press the MODE button. None of the indicators will be blinking and date/time correction is now complete.
REPLACING THE REMOTE CONTROL BATTERY
(Optional RC-300C)
If the selftimer/remote control indicator doesn’t blink even when you
press the button, replace the battery with a new one (CR2025).
1. Turn the screw on the bottom of the remote control counterclockwise to
loosen.
2. Turn the remote control over, and remove the cover. With the battery
facing up, remove the old battery and insert a new battery as shown.
3. Replace the cover, turn the remote control over, and turn the screw on the
bottom clockwise to tighten (see figure 9 on page 127).
OTHER OPERATIONS
EN
11
SETTING THE SELFTIMER/REMOTE CONTROL
SELFTIMER
Secure the camera on a tripod or other support. Compose your shot in the
viewfinder. Press the shutter release button halfway (the focus and exposure
are locked at this time). Then press the shutter release button all the way.
The selftimer indicator lights for about 10 seconds and then blinks for about
2 seconds. After this, the shutter will release.
REMOTE CONTROL RC-300C (Optional)
Compose your shot in the viewfinder. Position the autofocus frame on your
subject. To take a picture, point the remote control at the camera and press
the button on the remote control. The selftimer/remote control indicator starts
blinking, and the shutter will release about 3 seconds later (see figure 8 on
page 127).
SPECIAL FEATURES
REWINDING THE FILM MID-ROLL
OTHER OPERATIONS
EN
10
No
display
—
Selftimer
Remote Control
Press the selftimer/remote control
button. The mode switches in the
order shown on the left. The selected
mode is displayed on the LCD Panel.
Q
Press the mid-roll rewind button with
the protrusion on the strap buckle Q.
Do not use an instrument with a sharp
tip. Unload the film as described on
page 7.
None
Year-month-day
Month-day-year
Day-month-year
Day-hour-minute
Page 7

Type: Fully automatic 35 mm autofocus lens-shutter camera
with built-in 28 mm ~ 100 mm zoom lens.
Film format: 35 mm standard DX-coded film (24 x 36 mm).
Lens: Olympus lens, 28 mm ~ 100 mm, F4.6 ~ 11.9,
7 elements in 7 groups.
Shutter: Programmed electronic shutter.
Viewfinder: Real image zoom view with diopter adjustment.
Focusing: Passive-type wide multi-autofocus system
(max. 11 points). Focus lock possible.
Focusing range: 0.6 m ~ ∞ (infinity) at wide angle,
0.8 m ~ ∞ (infinity) at telephoto.
Exposure control: Programmed automatic exposure control, 3-zone light
metering. Auto exposure range – EV2.4 (F4.6, 4-sec) ~
EV16 (F10.2, 1/630-sec) at wide angle, EV5.1 (F11.9,
4-sec) ~ EV17 (F18, 1/410-sec) at telephoto.
Exposure counter: Progressive type displayed on LCD panel.
Selftimer: Electronic selftimer with approx. 12-sec. delay.
Film speed range: Automatic setting with DX-coded film with ISO 50, 100,
200, 400, 800, 1600 or 3200. Other intermediate film
speeds will be automatically set for next lower speed.
Non-DX-coded film is set at ISO 100.
Film loading, advance, rewind:
Automatic.
Flash: Built-in pop-up flash. Recycling time – approx. 0.5 ~
5.5 sec. (at normal temperature, with new battery).
Flash modes: Auto Flash (low-light, backlight and fluorescent light),
Red-Eye Reduction Flash, Flash-Off, Fill-In,
Night Scene Flash and Red-Eye Reduction
Night Scene Flash.
Exposure modes: Auto Exposure, Spot Metering and Infinity.
Power source: One 3 V lithium battery (DL123A or CR123A).
Dimensions: 117 (W) x 61.5 (H) x 42.5 (D) mm
(excluding protrusions).
Weight: 220 g (without battery).
Other: All-weather design.
Remote Control Specifications
(Optional)
Remote control system:
Infrared, with approx. 3-sec. delay.
Power source: One CR2025 battery.
Battery life: Approx. 5 years, with approx. 20,000 times.
Working distance: Approx. 5 m.
Dimensions: 56.5 x 35.0 x 6.5 mm.
Weight: 11 g (without battery).
SPECIFICATIONS ARE SUBJECT TO CHANGE WITHOUT NOTICE OR
OBLIGATION ON THE PART OF THE MANUFACTURER. THE ACTUAL
PRODUCT MAY DIFFER FROM ONES SHOWN IN THIS MANUAL.
SPECIFICATIONS
EN
13
• Do not leave the camera in any place exposed to excessive heat,
humidity or direct sunlight – for example, in a car or on the beach.
• Do not expose the camera to formalin or naphthalene.
• If the camera gets wet, wipe it with a dry towel. The salt in seawater can be
especially damaging.
• Do not use organic solvents such as alcohol or paint thinner when cleaning
the camera.
• Do not leave the camera on or near a television, refrigerator or other
appliance with a magnetic field.
• Do not expose the camera to dust or sand as this could cause serious
damage.
• Do not shake or shock the camera.
• Do not apply excessive force to the zoom lens.
• Do not expose the camera to extreme heat (over 40 °C/104 °F) or to
extreme cold (below –10 °C/14 °F). Low temperatures, even within this
range may sometimes cause deterioration in battery performance,
temporarily disabling the camera.
• Avoid leaving the camera unused for long periods of time. This can cause
mold to grow on the camera as well as other problems. Try to press the
shutter release button and check the operation of the camera before use.
• Some airport X-ray machines can damage the film in your camera. Try to
avoid passing your camera through these machines. Give it to the security
officer for manual inspection.
• Do not touch the front surface of the flash after using it continuously over
a short period as the surface may be hot.
KEEP THE BATTERIES AWAY FROM FIRE. NEVER TRY TO
DISASSEMBLE, RECHARGE OR SHORT-CIRCUIT BATTERIES.
NEVER ATTEMPT TO DISASSEMBLE THE CAMERA; IT CONTAINS A
HIGH-VOLTAGE CIRCUIT. IF THE INTERNAL PARTS OF THE CAMERA
ARE EXPOSED DUE TO DROPPING OR DAMAGE, REMOVE THE
BATTERY IMMEDIATELY TO PREVENT FURTHER USAGE. IN CASE OF
MALFUNCTION, CONSULT YOUR NEAREST OLYMPUS DEALER OR
OLYMPUS SERVICE CENTER.
CARE AND STORAGE
EN
12
WARNING
KEEP THE BATTERIES OUT OF THE REACH OF CHILDREN.
IF A CHILD SWALLOWS A BATTERY, CONTACT A DOCTOR
IMMEDIATELY.
Page 8

Lesen Sie diese Bedienungsanleitung bitte vor Gebrauch der Kamera
sorgfältig, besonders Pflege und Aufbewahrung und Sicherheitshinweise (S. 22).
BEDIENUNGSANLEITUNG
DE
14
EINSETZEN UND ÜBERPRÜFEN DER BATTERIE
Eine 3-Volt-Lithium-Batterie (CR123A oder DL123A) verwenden.
ERSTE SCHRITTE
DE
15
BEZEICHNUNG DER BEDIENUNGSELEMENTE
(Titelseitenklappe aufklappen und Seite 3 geöffnet lassen.)
Kamera
1 Zoomwipptaste (S. 17)
2 Auslöser (S. 17)
3 Selbst-/Fernauslöse-LED
4 Belichtungsmesser
✩
5 Sucher
6 Autofocus-Messfenster
✩
7 Blitz✩(S. 17 – 19)
8 Objektiv
✩
9 Fernauslösesensor
10 Objektivschieber
11 Batteriefachdeckel (S. 15)
12 Öse f. Trageriemen (S. 15, 20)
13 Dioptriekorrekturrad (S. 15)
✩
Stets sauber halten. Schmutz- und Staubablagerungen können unscharfe Aufnahmen zur
Folge haben. Diese Ablagerungen mit einem weichen fusselfreien Tuch wegwischen.
Sucheranzeigen
24 Autofocus-Messfeld (S. 17)
25 Spotmessfeld (S. 19)
26 Nahaufnahmemarkierungen (S. 16)
27 Grüne Sucher-LED (Autofocus-Anzeige)
Leuchtet: Motiv ist scharf gestellt, Aufnahme ist möglich.
Blinkt: Motiv ist nicht scharf gestellt, Auslöser ist blockiert.
Blinkt schnell: Motiv kann nicht scharf gestellt werde, eine Aufnahme ist
möglich, das Motiv kann jedoch unscharf abgebildet sein.
28 Orangefarbene Sucher-LED (Blitz-Anzeige)
Erlischt: Der Blitz wird nicht gezündet.
Leuchtet: Der Blitz wird gezündet.
Blinkt: Der Blitz wird aufgeladen, warten bis die Anzeige leuchtet.
LCD-Feld-Anzeigen
29 Datums-/Zeitanzeige (nur Quartzdate-Modelle) (S. 21)
30 Bildzählwerk
31 Fernauslöser (Sonderzubehör) (S. 20)
32 Selbstauslöser (S. 20)
33 Blitz zur Reduzierung des „Rote-Augen-Effekts“ (S. 18)
34 Aufhellblitz (S. 18)
35 Blitzabschaltung (S. 18)
36 Nachtaufnahmeblitzprogramm (S. 18)
37 Batterieladezustand (S. 15)
38 Spotmessung (S. 19)
39 Unendlicheinstellung (S. 19)
Hinweis: Nicht alle Anzeigen werden wie hier gleichzeitig angezeigt.
14 Filmfenster
15 Stativgewinde
16 Datumsformat- und
Datumseinstelltasten
(nur Quartzdate-Modelle) (S. 21)
17 Rückspultaste (S. 20)
18 Belichtungsprogramm-Taste
(S. 19)
19 Blitzprogrammtaste (S. 18)
20 Selbst-/Fernauslöse-Taste (S. 20)
21 LCD-Feld
22 Rückwand
23 Rückwandentriegelung (S. 16)
1
2
3
1. Zum Öffnen die Unterseite des
Batteriefachdeckels in Richtung Q
drücken und dann in Richtung W
drehen.
• Vergewissern Sie sich vor dem
Öffnen des Batteriefachdeckels,
dass der Objektivschieber
geschlossen ist.
2. Die Batterie richtig einlegen Q.
Den Batteriefachdeckel schließen W.
3. Den Objektivschieber bis zum
Einrasten in Richtung Q schieben.
Der Objektivtubus wird ausgefahren
und der Blitz klappt hoch. Dann die
Batterieleistung auf dem LCD-Feld
überprüfen.
• Eine neue Batterie reicht für ca.
15 Filme.
leuchtet
(erlischt automatisch).
blinkt, die übrigen LCD-FeldAnzeigen arbeiten normal.
blinkt, die übrigen
LCD-Feld-Anzeigen erlöschen.
Batterie in gutem Zustand.
Sie können fotografieren.
Batterie ist schwach und sollte
ausgewechselt werden.
TRAGERIEMEN
Den Trageriemen wie gezeigt
anbringen.
DIOPTRIEAUSGLEICH
Das Dioptriekorrekturrad drehen, bis
die Autofocus-Messfeldmarkierung klar
erkennbar ist.
Batterie ist leer und muss sofort
ausgewechselt werden.
Page 9

FOTOGRAFIEREN
STANDARDFUNKTIONEN
DE
17
EINLEGEN DES FILMS
STANDARDFUNKTIONEN
DE
16
1
2
1. Zum Öffnen der
Kamerarückwand die
Rückwandentriegelung nach
oben schieben.
• Die Innenseiten nicht berühren.
2. Die Filmpatrone so einlegen,
dass diese einrastet.
3. Die Filmlasche auf die
Strichmarkierung (A) ausrichten
und dabei den Film zwischen
den Filmführungen (B) anlegen.
Die Kamerarückwand bis zum
Einrasten schließen.
• Den Objektivschieber öffnen.
• Der Film wird automatisch bis
zum ersten Bild transportiert.
Überprüfen, ob im Bildzählwerk auf
dem LCD-Feld „
II
“ angezeigt wird.
• Blinkt die Anzeige „EE“, den Film
erneut einlegen.
3
SCHARFSTELLUNG UND AUFNAHMEENTFERNUNG
NAHAUFNAHMEN
Diese Kamera arbeitet mit einem
11-Punkt-Mehrfach-Autofocus-System,
so dass die Kamera auch auf ein Motiv,
das sich nicht in der Bildmitte befindet,
scharf stellen kann. Der Aufnahmebereich liegt zwischen 0,6 m und ∞
(unendlich) in Weitwinkel- und 0,8 m und
∞ (unendlich) in Teleposition. Obgleich
sich die Kamera bei sehr geringem
Motivabstand auslösen lässt, wird das
Motiv unscharf abgebildet
Je geringer der Motivabstand, desto
deutlicher ist die Verschiebung nach
unten zwischen dem aufgenommenen
und dem im Sucher angezeigten Bildfeld.
Q
Bildfeld bei kürzester Entfernung.
W
Bildfeld bei unendlich.
1
2
3
Autofocus-Messfeld
1. Den Objektivschieber vollständig
öffnen. Der Objektivtubus wird ausgefahren und die LCD-Feld-Anzeigen
erscheinen. Mit der Zoomwipptaste
auf „T“ heranzoomen (100 mm) und
auf „W“ wegzoomen (28 mm).
• Wenn innerhalb von ca. 4,5 Minuten
kein Bedienschritt erfolgt, wird der
Objektivtubus eingezogen und die
LCD-Feld-Anzeigen erlöschen.
2. Das Autofocus-Messfeld (AF) auf
das bildwichtige Motiv richten.
• Niemals durch den Sucher direkt
in die Sonne oder sonstige extrem
helle Lichtquellen schauen.
3. Den Auslöser halb hinunterdrücken,
um das Motiv scharf zu stellen.
Wenn die grüne Sucher-LED
aufleuchtet, den Auslöser zur
Aufnahme vollständig nach unten
drücken. Nach der Aufnahme wird
der Film automatisch zur nächsten
Aufnahme vorwärts gespult.
BLITZREICHWEITE
FILMRÜCKSPULUNG UND HERAUSNEHMEN
(Mit Farbnegativfilm)
Bei Farbumkehrfilmen verringert sich die Blitzreichweite im Telebereich um
bis zu ca. 30%.
ISO
100
200
400
Weitwinkel (W)
0,6 bis 4,6 m
0,6 bis 6,5 m
0,6 bis 9,2 m
Tele (T)
0,8 bis 1,8 m
0,8 bis 2,5 m
0,8 bis 3,6 m
Sobald das Filmende erreicht ist, wird
der Film automatisch von der Kamera
zurückgespult. Unbedingt warten,
bis der Rückspulmotor stoppt und „EE“
auf dem LCD-Feld blinkt, bevor die
Kamerarückwand zum Entnehmen
des Filmes geöffnet wird.
Q
W
Page 10

Kombination von zwei Funktionen –
NACHTAUFNAHMEBLITZ ZUR REDUZIERUNG
DES „ROTE-AUGEN-EFFEKTS“
Reduziert den typischen „Rote-Augen-Effekt“ bei Blitzaufnahmen bei
Nachtaufnahmen (s. S. 126 – 7). Beide Programme können nicht mit der
Spotmessung kombiniert werden. Durch Schließen des Objektivschiebers
stellt die Kamera auf das automatische Blitzprogramm zurück.
EINSTELLEN DER BLITZPROGRAMME
SPEZIELLE AUSSTATTUNGSMERKMALE
DE
19
Die Rückseitenklappe öffnen, so dass die Seite 126 sichtbar ist.
Rote Augen bei Blitzaufnahmen – BLITZ ZUR
REDUZIERUNG DES „ROTE-AUGEN-EFFEKTS“
Bei Blitzaufnahmen von Personen im Dunkeln kann das Blitzlicht in die weit
geöffnete Iris einfallen. Der Blitz wird von der Netzhaut reflektiert. Der Blitz
zur Reduzierung des „Rote-Augen-Effekts“ sendet vor dem Hauptblitz
eine Reihe schwacher Vorblitze aus. So können sich die Augen der Person
durch ein Zusammenziehen der Iris an die Helligkeit anpassen. Dadurch
werden die Augen im Foto nicht rot erscheinen (s. S. 126 – 3).
• Die Kamera verwacklungsfrei halten. Die eigentliche Blitzaufnahme
erfolgt mit ca. 1 Sekunde Verzögerung.
• Eine Verringerung des „Rote-Augen-Effekts“ kann in den folgenden
Fällen nicht erfolgen: wenn die aufzunehmende(n) Person(en) …
1. … nicht von vorne auf den Blitz blicken.
2. … nicht auf die Vorblitze blicken.
3. … zu weit von der Kamera entfernt sind.
Die Wirkung der Vorblitze schwankt in Abhängigkeit von individuellen
Besonderheiten.
Blitzen nicht erlaubt, Blitzlicht zerstört die Atmosphäre –
BLITZABSCHALTUNG
Die Blitzabschaltung wird benötigt, wenn Blitzaufnahmen nicht erlaubt
sind oder wenn man die Abend- oder Lampenlichtatmosphäre auf dem
Foto erhalten möchte (s. S. 126 – 4).
• Da die Kamera eine lange Verschlusszeit wählt (bis zu 2 Sek.),
ein Stativ verwenden, um Bildverwacklungen zu vermeiden.
• Sich nicht bewegende Motive aufnehmen. Andernfalls können
Bewegungsunschärfen auftreten.
Durch Schließen des Objektivschiebers stellt die Kamera das automatische
Blitzprogramm ein.
Gesicht im Schatten – AUFHELLBLITZ
Bei Portraitaufnahmen im Gegenlicht, unter einem Baum oder einem
Dach kann ein Gesicht zu dunkel vor einem hellen Hintergrund erscheinen.
Der Aufhellblitz sorgt für das nötige zusätzliche Licht zur Aufhellung der
Schatten (s. S. 126 – 5) und bei Neonlicht.
• Das Motiv muss sich innerhalb der Blitzreichweite (S. 17) befinden.
• Der Aufhellblitz kann unter besonders hellen Lichtbedingungen ggf. ohne
Auswirkung bleiben.
Durch Schließen des Objektivschiebers stellt die Kamera das automatische
Blitzprogramm ein.
Stadtbummel am Abend – NACHTAUFNAHMEBLITZ
Fotografieren während eines Stadtbummels am Abend: Person(en) im
Vordergrund und die Lichter der Stadt im Hintergrund – eine Aufgabe für den
Nachtaufnahmeblitz. Der Blitz hellt die Person(en) im Vordergrund auf und
der Verschluss bleibt dann bis zu 4 Sekunden geöffnet, um auch Lichter der
Stadt einzufangen. Deshalb sollte man zur Vermeidung von Verwacklungen
ein Stativ verwenden (s. S. 126 – 6).
SPEZIELLE AUSSTATTUNGSMERKMALE
DE
18
Keine
Anzeige
Automatische
Blitzabgabe
Reduzierung des
„Rote-Augen-Effekts“
Abgeschalteter Blitz
Aufhellblitz
Nachtaufnahmeblitz
Nachtaufnahmeblitz
mit Reduzierung des
„Rote-Augen-Effekts“
Große Kontraste – SPOTMESSUNG
Bei Aufnahmen in einer Situation mit hohen Kontrasten (z.B. Portrait im
Gegenlicht) erscheint das bildwichtige Motiv auf dem Foto oft zu dunkel.
Um sicherzustellen, dass das Motiv korrekt belichtet wird, die Spotmessung
verwenden (s. 2. Vorderseitenklappe außen – 1). Das bildwichtige Motiv
in das Spotmessfeld (A) bringen. Den Auslöser halb hinunterdrücken.
Die grüne Sucher-LED leuchtet zur Bestätigung, dass Scharfstellung und
Belichtung für diesen Motivausschnitt gespeichert sind. Die Kamera auf die
gewünschte Bildkomposition schwenken und den Auslöser vollständig nach
unten drücken.
Landschaftsaufnahmen – UNENDLICH
Die Kamera stellt die Entfernungseinstellung automatisch auf unendlich.
Der Blitz kann nur in Aufhellblitzfunktion zugeschaltet werden
(s. 2. Vorderseitenklappe außen – 2).
EINSTELLEN DER BELICHTUNGSPROGRAMME
Die Blitzprogramm-Taste
drücken. Die Blitzprogramme
wechseln in der links dargestellten Reihenfolge. Das gewählte
Programm wird auf dem
LCD-Feld angezeigt. Den Blitz
niemals direkt vor den Augen
von Menschen oder Tieren
auslösen. Den Blitz niemals
auf Fahrzeugführer richten
und auslösen.
Keine
Anzeige
Automatische
Belichtung
Spotmessung
Unendlich
Die Belichtungsprogramm-Taste
( / ) drücken. Die Belichtungsprogramme wechseln in der links dargestellten Reihenfolge. Das gewählte
Programm wird auf dem LCD-Feld angezeigt. Durch Schließen des Objektivschiebers stellt die Kamera das automatische Belichtungsprogramm ein.
Page 11

EINBELICHTEN DER DATEN (Nur Quartzdate-Modell)
Zuerst das zum Einbelichten vorgesehene Datums-/Zeitanzeigeformat
wählen. Die MODE-Taste drücken, um die Anzeigeformate in der hier angezeigten Reihenfolge aufzurufen. Bei Anzeige des gewünschten Datenformats
die MODE-Taste nicht mehr drücken. Die Daten werden in der rechten
unteren Bildecke einbelichtet. Falls dieser Bildbereich weiß oder orange
eingefärbt ist, sind die Daten ggf. nicht lesbar. Für Schwarzweißfilme ist
die Dateneinbelichtung nicht verfügbar.
KORREKTUR DER DATEN
(nur Quartzdate-Modelle)
Die Daten müssen nach dem Einlegen oder Auswechseln der Batterie
korrigiert werden.
1. Die MODE-Taste gedrückt halten, bis die Jahreszahlfelder blinken.
2. Die Jahreszahl mit der SET-Taste eingeben. Bei jedem Antippen der
Taste
erhöht sich der Anzeigewert um 1. Bei gedrückt gehaltener Taste erfolgt
die Erhöhung der Anzeigewerte durchlaufend. Falls der vorgesehene
Anzeigewert überschritten wird, nochmals die Anzeigewerte durchlaufen.
3. Nochmals die MODE-Taste drücken, so dass die Monatszahlfelder
blinken. Hierauf die Monatszahl mit der SET-Taste eingeben. Mit jedem
Antippen der MODE-Taste wechseln die blinkenden Anzeigefelder in der
Reihenfolge „Jahr“, „Monat“, „Tag“, „Stunde“ und „Minute“.
4.
Die Stunden- und Minuteneingabe wie unter den Schritten 2 und 3 beschrieben eingeben. Vergewissern Sie sich, dass die Minutenzahlfelder blinken.
5. Nach der Minuteneingabe die MODE-Taste drücken. Die Blinkanzeige
stoppt zur Bestätigung, dass die Korrektur der Daten abgeschlossen ist.
AUSWECHSELN DER FERNAUSLÖSERBATTERIE
(Sonderzubehör RC-300C)
Falls die Selbst-/Fernauslöser-LED nach Betätigen des Fernauslösers
nicht blinkt, muss die Batterie (CR2025) des Fernauslösers ausgewechselt werden.
1. Die an der Unterseite des Fernauslösers befindliche Schraube durch
Drehen gegen den Uhrzeigersinn lösen.
2. Den Fernauslöser umdrehen und die Abdeckung entfernen, so dass die
verbrauchte Batterie nach oben weist. Diese entnehmen und eine neue
Batterie wie gezeigt einlegen.
3. Die Abdeckung wieder anbringen, den Fernauslöser wieder umdrehen
und die an der Unterseite des Fernauslösers befindliche Schraube
durch Drehen im Uhrzeigersinn festziehen (s. S. 127 – 9).
SONSTIGE BEDIENUNGSSCHRITTE
DE
21
EINSTELLEN DES SELBST-/FERNAUSLÖSERS
SELBSTAUSLÖSER
Die Kamera auf einem Stativ befestigen oder anderweitig stabil aufstellen.
Durch den Sucher schauen und die Bildkomposition bestimmen.
Den Auslöser halb hinunterdrücken (Schärfe und Belichtung werden
gespeichert). Zur Aufnahme den Auslöser vollständig nach unten drücken.
Die Selbstauslöser-LED gibt für ca. 10 Sekunden ein Leuchtsignal ab und
wechselt dann für ca. 2 Sekunden auf ein Blinksignal. Hierauf erfolgt die
Aufnahme.
FERNAUSLÖSER RC-300C (Sonderzubehör)
Durch den Sucher schauen und die Bildkomposition bestimmen, wobei
das Autofocus-Messfeld auf das Motiv gerichtet sein muss. Zur Aufnahme
den Fernauslöser auf die Kamera richten und den Fernauslöser drücken.
Die Selbst-/Fernauslöser-LED blinkt und die Aufnahme erfolgt ca. drei
Sekunden später (s. S. 127 – 8).
SPEZIELLE AUSSTATTUNGSMERKMALE
FILM VOR DEM ENDE ZURÜCKSPULEN
SONSTIGE BEDIENUNGSSCHRITTE
DE
20
Keine
Anzeige
—
Selbstauslöser
Fernauslöser
Die Selbst-/Fernauslösertaste
drücken. Die Funktionen wechseln
in der links dargestellten Reihenfolge.
Die gewählte Funktion wird auf dem
LCD-Feld angezeigt.
Q
Den Rückspulknopf mit dem Dorn
der Riemenschnalle Q drücken.
Hierzu keinen Gegenstand mit
einer scharfen Spitze verwenden.
Film herausnehmen siehe S. 17.
Keine Anzeige
Jahr-Monat-Tag
Monat-Tag-Jahr
Tag-Monat-Jahr
Tag-Stunde-Minute
Page 12

Kameratyp: Vollautomatische Kleinbild-Autofocus-Sucherkamera
mit eingebautem 28 – 100-mm-Zoomobjektiv.
Filmtyp: 24 x 36 mm Kleinbildfilm mit DX-Codierung.
Objektiv: Olympus Zoomobjektiv, 28 – 100 mm,
Bl. 4,6 – 11,9, 7 Elemente in 7 Gruppen.
Verschluss: Programmierter elektronisch gesteuerter Verschluss.
Sucher: Realbildzoomsucher mit Dioptrienkorrektur.
Scharfstellung: Passives 11-Punkt-Mehrfach-Autofocus-System,
Messwertspeicher.
Entfernungsbereich: 0,6 m – ∞ (unendlich) in Weitwinkel-,
0,8 m – ∞ (unendlich) in Teleposition.
Belichtungssteuerung: Programmautomatik, Mehrfeldmessung
(3 Felder). Automatische Belichtung:
LW 2,4 (Bl. 4,6, 4 Sek.) –
LW 16 (Bl. 10,2, 1/630 Sek.) in Weitwinkel,
LW 5,1 (Bl. 11,9, 4 Sek.) –
LW 17 (Bl. 18, 1/410 Sek.) in Tele.
Bildzählwerk: Vorwärts zählende Anzeige auf dem LCD-Feld.
Selbstauslöser: Elektronisch mit ca. 12 Sekunden Vorlaufzeit.
Filmempfindlichkeit: Automatisch für DX-codierte Filme mit ISO 50, 100,
200, 400, 800, 1600 oder 3200. Zwischenstufen
werden automatisch auf den jeweils nächst
niedrigeren Wert eingestellt. Für Filme ohne
DX-Codierung wird ISO 100 eingestellt.
Filmeinlegen, Vor- und Zurückspulen:
Automatisch.
Blitz: Eingebauter hochklappbarer Blitz.
Blitzladezeit ca. 0,5 – 5,5 Sek.
(bei normaler Temperatur mit neuer Batterie).
Blitzprogramme: Automatisch (bei Dunkelheit, Gegenlicht, Neonlicht),
Blitz mit Reduzierung des „Rote-Augen-Effekts“,
Blitzabschaltung, Aufhellblitz, Nachtaufnahmeblitz
mit und ohne Reduzierung des „Rote-Augen-Effekts“.
Belichtungsprogramme: Automatische Belichtung, Spotmessung und
Unendlicheinstellung.
Stromquelle: Eine 3-V-Lithium-Batterie (DL123A oder CR123A).
Abmessungen: 117 (B) x 61,5 (H) x 42,5 (T) mm.
Gewicht: 220 g (ohne Batterien).
Sonstige Merkmale: Wetterfestes Gehäuse.
T
echnische Daten für den Fernauslöser (Sonderzubehör)
Fernsteuersignal: Infrarotsignal mit ca. 3 Sek. Verzögerung.
Stromversorgung: Eine CR2025-Batterie.
Batterielebensdauer: Ca. 5 Jahre, ca. 20.000 Anwendungen.
Reichweite: Ca. 5 m.
Abmessungen: 56,5 (B) x 35 (H) x 6,5 (T) mm.
Gewicht: 11 g (ohne Batterien).
ÄNDERUNGEN IN TECHNIK UND DESIGN JEDERZEIT OHNE
VORANKÜNDIGUNG SEITENS DES HERSTELLERS VORBEHALTEN.
DIE PRODUKTAUSFÜHRUNG KANN VON DEN IN DIESER ANLEITUNG
GEZEIGTEN ABBILDUNGEN ABWEICHEN.
TECHNISCHE DATEN
DE
23
• Kamera niemals extremer Hitze, Luftfeuchtigkeit oder direkter
Sonneneinstrahlung aussetzen.
• Kamera nicht mit Formalin oder Naphthalin in Berührung bringen.
• Bei Nässeeinwirkung die Kamera umgehend trockenreiben.
Insbesondere Salzwasser sofort abwischen.
• Zum Reinigen der Kamera niemals organische Lösungsmittel wie Alkohol
oder Farbverdünner verwenden.
• Die Kamera niemals in der Nähe von Geräten, die starke Magnetfelder
abstrahlen, aufbewahren.
• Kamera vor Staub- und Sandeinwirkung schützen.
• Kamera nicht Stößen oder Erschütterungen aussetzen.
• Das Zoomobjektiv vorsichtig handhaben und keinem hohen Druck
aussetzen.
• Die Kamera niemals extremer Hitze (über 40 °C) oder Kälte (unter –10°C)
aussetzen. Niedrige Temperaturen können die Batterieleistung beeinträchtigen und die Kamera vorübergehend funktionsuntüchtig machen.
• Die Kamera nicht über einen längeren Zeitraum unbenutzt lassen.
Andernfalls können Probleme wie Moderbildung etc. auftreten.
Vor dem erneuten Gebrauch die Kamera auf ihre Funktionstüchtigkeit
überprüfen (Auslöser drücken etc.).
• Röntgengeräte zur Gepäcküberwachung (an Flughäfen etc.) können den
in der Kamera eingelegten Film beschädigen. Vermeiden Sie die
Röntgendurchleuchtung, indem Sie die Kamera zur manuellen
Überprüfung an das zuständige Personal aushändigen.
• Die Blitzreflektorscheibe nicht berühren, wenn der Blitz in rascher Folge
häufig abgegeben wurde, weil dabei die Scheibe sehr heiß werden kann.
BATTERIEN VON OFFENEM FEUER FERNHALTEN. BATTERIEN NIE
ZERLEGEN, WIEDERAUFLADEN ODER KURZSCHLIESSEN.
NIEMALS VERSUCHEN, DIE KAMERA ZU ZERLEGEN. DIE KAMERA
ENTHÄLT EINEN HOCHSPANNUNGSSCHALTKREIS. FALLS DAS
GEHÄUSE BESCHÄDIGT IST, UNVERZÜGLICH DIE BATTERIE
ENTNEHMEN, UM WEITEREN SCHÄDEN IM KAMERAINNEREN
VORZUBEUGEN.
BEI BETRIEBSSTÖRUNGEN WENDEN SIE SICH BITTE AN IHREN
OLYMPUS FACHHÄNDLER ODER DEN OLYMPUS SERVICE.
Verbrauchte Batterien in die Batterie-Recycling-Kästen des Batteriehandels
entsorgen. Nicht völlig entladene Lithium-Batterien vor dem Entsorgen
unbedingt gegen Kurzschluss schützen (z.B. durch Abkleben der Kontakte
mit Klebeband). Für eine umweltfreundliche Entsorgung hat OLYMPUS in
Deutschland einen Vertrag mit GRS (Gemeinsames Rücknahmesystem für
Batterien) geschlossen.
PFLEGE UND AUFBEWAHRUNG
DE
22
SICHERHEITSHINWEISE
BATTERIEN VOR DEM ZUGRIFF VON KINDERN SCHÜTZEN.
FALLS EINE BATTERIE VERSCHLUCKT WURDE, UNVERZÜGLICH
EINEN ARZT AUFSUCHEN.
Page 13

INSTRUCTIONS
FR
24
CHARGEMENT ET CONTROLE DE LA PILE
Utiliser une pile 3V lithium (CR123A ou DL123A).
PREMIERES ETAPES
FR
25
1
2
3
1. Tout en pressant sur la porte du
logement piles vers Q, la faire pivoter
vers W pour l’ouvrir.
S’assurer que la protection de l’objectif
est fermée avant d’ouvrir la porte du
logement piles.
2. Insérer la pile correctement Q.
Fermer la porte du logement piles W.
3. Faire coulisser la protection de l’objectif
en direction de Q jusqu’au déclic.
L’objectif sort et le flash se déploie.
Vérifier l’état de la pile sur l’écran ACL.
Une pile toute neuve dure environ
15 pellicules.
Voyant
(s’éteint automatiquement).
Clignote et les autres indicateurs s’affichent normalement.
Clignote et les autres
indicateurs s’éteignent.
La pile est encore bonne.
Photographie possible.
La pile est faible et devrait être
remplacée par une pile neuve.
ATTACHER LA
COURROIE
Attacher la courroie comme indiqué.
REGLAGE DIOPTRIQUE
Manipuler la molette de réglage
dioptrique jusqu’à ce que les
repères d’autofocus soient nets.
La pile est usée et doit être immédiatement remplacée par une pile neuve.
Lire attentivement ce manuel avant d’utiliser l’appareil photo
(et notamment la partie «Entretien et Rangement» page 32).
NOMENCLATURE
(Ouvrir le volet et laisser la page 3 visible.)
Boîtier de l’appareil photo
1 Commande du zoom (p. 27)
2 Déclencheur (p. 27)
3 Indicateur Retardateur/
Indicateur Télécommande
4 Cellule du posemètre
✩
5 Viseur
6 Fenêtre Autofocus
✩
7 Flash✩(p. 27 – 29)
8 Objectif
✩
9 Récepteur Télécommande
10 Protection d’objectif
11 Porte du logement pile (p. 25)
12 Œillet de courroie (p. 25 & 30)
13 Molette de réglage dioptrique (p. 25)
✩
Essayez de maintenir ces parties propres. La qualité et la netteté des photos peuvent être altérées
par la saleté et les poussières. Essuyer toutes les traces ou les tâches avec un chiffon doux.
Indications concernant le viseur
24 Repères d’Autofocus (p. 27)
25 Repères Spot (p. 29)
26 Repères de correction gros-plan (p. 26)
27 Voyant vert (Indicateur d’autofocus)
Allumé : La mise au point est faite sur le sujet. Photographie possible.
Clignotant : La mise au point n’est pas faite sur le sujet.
L’obturateur est verrouillé.
Clignotant rapidement : La mise au point n’est pas faite sur le sujet.
Photographie possible, mais le sujet sera
peut-être flou.
28 Témoin orange (Indicateur de flash)
Eteint : Le Flash ne s’allume pas. Photographie possible.
Allumé : Le Flash fonctionnera. Photographie possible.
Clignotant : Le Flash est en recyclage. Attendre que le voyant se rallume.
Ecran ACL
29 Horodateur (Modèle Quartzdate seulement) (p. 31)
30 Compteur de vues
31 Télécommande (en option) (p. 30)
32 Retardateur (p. 30)
33 Flash Anti-Yeux Rouges (p. 28)
34 Flash Fill-In (Activation forcée) (p. 28)
35 Flash-Off (débrayé) (p. 29)
36 Flash Scène de nuit (p. 28)
37 Etat de la pile (p. 25)
38 Mesure Spot (p. 29)
39 Infini (p. 29)
Note : Tous les indicateurs ne s’affichent pas simultanément.
14 Fenêtre film
15 Ecrou de pied
16 Commandes MODE et SET Date
(modèle Quartzdate seulement
(p. 31)
17 Bouton de rembobinage de la
pellicule (p. 30)
18 Bouton Mode d’exposition (p. 29)
19 Bouton Modes Flash (p. 28)
20 Bouton Retardateur/
Télécommande (p. 30)
21 Ecran ACL
22 Dos du boîtier
23 Verrou d’ouverture du dos (p. 26)
Page 14

PRENDRE DES PHOTOGRAPHIES
FONCTIONS STANDARDS
FR
27
CHARGEMENT DU FILM
FONCTIONS STANDARDS
FR
26
1
2
1. Ouvrir le dos du boîtier en le
faisant coulisser vers le haut.
Ne pas toucher aux composants
internes de l’appareil et
notamment à l’objectif.
2. Insérer la cartouche du film
jusqu’au déclic.
3. Aligner la languette du film sur la
ligne-guide (A), et placer le film entre
les guides de positionnement (B).
Puis refermer le dos du boîtier jusqu’au
déclic.
• Le film avance automatiquement
jusqu’à la première vue.
• Ouvrir la protection de l’objectif
jusqu’au déclic. Vérifier sur l’écran
ACL que le compteur de vues indique
«
II
».
• Si «
EE
» clignote, charger le film à
nouveau.
3
MISE AU POINT ET DISTANCE DE TRAVAIL
PHOTOGRAPHIE EN GROS-PLAN
Cet appareil utilise un système multiautofocus qui facilite la mise au point
même lorsque le sujet n’est pas au
centre du viseur.
Photographie possible de 0,6 m à ∞ (infini)
en grand angle et de 0,8 m à ∞ (infini)
en téléphotographie.
Si le sujet est trop
proche l’obturateur fonctionnera, mais le
sujet qera flou.
Plus l’appareil est proche du sujet, plus la
zone de l’image baissera dans le viseur.
Q
Repère de correction gros-plan
(zone de l’image à la distance la plus
réduite).
W
Zone de l’image à l’infini.
1
2
3
Repères d’Autofocus
1. Ouvrir la protection de l’objectif jusqu’au
déclic. L’objectif sort légèrement et
l’écran ACL s’allume. Pousser la
commande du zoom du coté «T» pour
la téléphotographie (100 mm) ou de
coté «W» pour le grand angle (28 mm).
• Après 4 minutes et demie d’inactivité,
l’objectif se rétracte et l’écran ACL
s’éteint.
2. Positionner les repères d’autofocus
(AF) sur le sujet.
Ne pas regarder le soleil ou une autre
lumière forte à travers le viseur.
3. Appuyer sur le déclencheur jusqu’à
mi-course pour effectuer la mise au
point sur le sujet. Vérifier que le voyant
vert s’allume puis appuyer à fond sur
le déclencheur pour prendre la
photographie. Lorsque l’obturateur est
relâché, le film avance automatiquement
à la vue suivante.
FLASH AUTOMATIQUE – DISTANCE DE TRAVAIL
REMBOBINAGE ET RETRAIT DU FILM
(avec un film couleur)
Pour les inversions, la distance de travail est réduite de 30%.
ISO
100
200
400
Grand angle (W)
0,6 à 4,6 m
0,6 à 6,5 m
0,6 à 9,2 m
Télé (T)
0,8 à 1,8 m
0,8 à 2,5 m
0,8 à 3,6 m
L’appareil rembobine automatiquement à
la fin de la pellicule. Vérifier que le moteur
est arrêté et que la lettre «
EE
» clignote
puis ouvrir le dos du boîtier pour retirer
la pellicule.
Q
W
Page 15

Combinaison de Deux Modes –
ANTI-YEUX ROUGES ET SCENES DE NUIT
Evite l’effet Yeux Rouges bien connu des photos de nuit. (Voir Figure 7
page 126.) Ces deux modes ne peuvent être utilisés avec la mesure Spot.
Fermer la protection de l’objectif pour restaurer le mode Flash Automatique.
REGLAGE DES MODES FLASH
CARACTÉRISTIQUES PARTICULIÈRES
FR
29
Garder le volet sur la page 126 de ce manuel visible.
L’effet Yeux Rouges dans les photos prises au flash –
FLASH ANTI-YEUX ROUGES
Lorsque les gens sont dans le noir ou dans de mauvaises conditions
d’éclairage, la pupille des yeux est largement ouverte pour capter plus de
lumière. Lorsque l’on prend alors une photo, la lumière du flash est réfléchie
à travers l’appareil et les pupilles des yeux apparaissent en rouge sur la photo.
Le Flash Anti-Yeux Rouges émet une série d’éclairs de faible intensité avant
l’éclair principal. Cela permet aux yeux du sujet de s’habituer à la vive
lumière et à la pupille de se rétrécir. Si le sujet a regardé les premiers éclairs,
les yeux ne seront pas rouges sur la photo. (Voir Figure 3 page 126.)
• Maintenir fermement l’appareil. Il faut environ une seconde pour que
l’obturateur se déclenche.
• Le système Anti-Yeux Rouges peut ne pas être efficace sur le sujet qui :
1. Ne regarde pas directement le flash.
2. Ne regarde pas les premiers éclairs.
3. Est trop loin de l’appareil.
L’efficacité du système Anti-Yeux Rouges dépend des caractéristiques
individuelles de chaque sujet.
Flash interdit ou photo d’ambiance –
FLASH-OFF (Débrayé)
Le mode Flash-Off est nécessaire lorsque l’utilisation du flash est interdite ou
lorsque vous désirez conserver l’éclat du crépuscule, de l’aube ou de la lumière
artificielle. (Voir Figure 4 page 126.)
• En vitesse lente (2 secondes), il est nécessaire d’utiliser un pied pour éviter
que l’appareil ne bouge.
• Le sujet doit rester parfaitement immobile, sinon la photo sera floue.
Fermer la protection de l’objectif pour restaurer le mode Flash Automatique.
Ombre sur le visage –
FLASH FILL-IN (Activation forcée)
Lorsque l’on prend un portrait en contre-jour ou sous un arbre ou un toit
et que l’arrière plan est clair, le visage du sujet peut paraître trop sombre.
Le mode Flash Fill-In fournit l’exacte quantité de lumière additionnelle pour
compenser cette ombre. (Voir Figure 5 page 126.) Concerne également les
tubes fluorescents.
• Veiller à ce que le sujet soit placé dans la zone de portée du flash (p. 27).
Le mode Flash Fill-In est inefficace dans les conditions de très forte luminosité.
Fermer la protection de l’objectif pour restaurer le mode Flash Automatique.
Ville la nuit – FLASH SCENES DE NUIT
Vous pouvez être amené à prendre une photo d’un sujet la nuit (devant une
ville illuminée par exemple). Le mode Flash Scènes de Nuit se charge de tout.
Le flash principal éclaire le sujet au premier plan et l’obturateur reste ouvert
jusqu’à 4 secondes pour capturer les lumières de la ville. Il est nécessaire
d’utiliser un pied ou un autre support pour éviter les mouvements de l’appareil.
(Voir Figure 6 page 126.)
CARACTERISTIQUES PARTICULIERES
FR
28
Pas
d’affichage
Flash automatique
Anti-Yeux Rouges
Flash-Off (Débrayé)
Flash Fill-In
(Activation forcée)
Scènes de nuit
Anti-Yeux Rouges +
Scènes de nuit
Portraits très contrastés – MESURE SPOT
Lorsque l’on prend une photo dans des conditions de fort contraste (un portrait
en contre-jour par exemple), le sujet principal peut être trop sombre ou trop
clair. La Mesure Spot garantit que l’exposition du sujet sera correcte (voir Figure
1 page 2). Positionner les repères spot (A) sur la zone sur laquelle la lumière
doit être mesurée. Appuyer sur le déclencheur à mi-course, le voyant vert
s’allume et la mise au point et l’exposition sont verrouillées sur cette zone.
Recadrer le sujet et appuyer à fond sur le déclencheur.
Photographier des paysages – INFINI
L’appareil règle automatiquement les distances de travail sur infini.
Le flash ne se déclenchera qu’en mode Fill-In (voir figure 2 page 2).
RÉGLAGE DES MODES D’EXPOSITION
Appuyer sur la commande de
sélection des modes Flash ( ).
Les modes passent de l’un à l’autre
dans l’ordre décrit à gauche.
Le mode sélectionné s’affiche sur
l’écran ACL.
Ne pas activer le flash devant
les yeux d’une personne ou d’un
animal. Ne pas photographier
un automobiliste ou motard en
activant le flash.
Pas
d’affichage
Exposition
automatique
Mesure Spot
Infini
Appuyer sur le bouton de sélection
des modes d’exposition ( / ).
Les modes passent de l’un à l’autre
dans l’ordre décrit à gauche. Le mode
sélectionné s’affiche sur l’écran ACL.
Fermer la protection de l’objectif
pour restaurer le mode Exposition
Automatique.
Page 16

IMPRESSION DE LA DATE/HEURE
(Modèle Quartzdate seulement)
Sélectionner tout d’abord le mode date/heure qui doit s’imprimer. Appuyer sur
le bouton MODE. Chaque pression permet de passer au mode suivant dans
l’ordre décrit à gauche. Le mode désiré doit être sélectionné sur l’écran ACL.
La Date/Heure s’imprime dans le coin inférieur droit de la photo.
Si la date/heure se superpose à une couleur claire comme le blanc, l’orange,
le jaune, etc., elle sera peut-être difficile à lire. La date/heure ne peut être
imprimée sur les photos noir & blanc.
CORRECTION DE LA DATE/HEURE
(Modèle Quartzdate seulement)
Veillez à corriger la date et l’heure après installation ou remplacement de la pile.
1. Le bouton MODE doit rester enfoncé jusqu’à ce que l’indicateur «année»
clignote.
2. Appuyer sur la commande de réglage «SET» pour régler l’indicateur
«année». Chaque pression fait avancer l’indicateur de 1. En maintenant le
bouton enfoncé, les nombres défilent rapidement. En cas de dépassement
du nombre désiré, continuer à appuyer pour revenir à ce nombre.
3. Appuyer à nouveau sur le bouton MODE pour faire clignoter l’indicateur
«Mois». Appuyer sur la commande de réglage «SET» pour régler l’indicateur
«Mois». En appuyant sur le bouton MODE, les indicateurs clignotent
successivement dans l’ordre «Année», «Mois», «Jour», «Heure» et «Minute».
4. Répéter les étapes 2 et 3 pour régler «Heure» et «Minute».
Vérifier que l’indicateur «Minute» clignote.
5. Lorsque «Minute» est réglé, appuyer sur le bouton MODE.
Plus aucun indicateur ne clignote et la date/heure est correcte.
REMPLACER LA PILE DE LA TELECOMMANDE
(RC-300C en option)
Si l’indicateur du retardateur/télécommande ne clignote plus même
lorsque la commande est pressée, il faut remplacer la pile usagée
(CR2025).
1. Tourner la vis située sous la télécommande dans le sens inverse des
aiguilles d’une montre.
2. Retourner la télécommande et retirer son couvercle. La pile étant tournée
vers le haut, retirer l’ancienne et insérer la nouvelle pile comme indiqué.
3. Replacer le couvercle, retourner la télécommande, revisser la vis et serrer.
(Voir Figure 9 page 127.)
AUTRES OPÉRATIONS
FR
31
RÉGLAGE DU RETARDATEUR/TELECOMMANDE
RETARDATEUR
Installer l’appareil photo sur un pied ou un autre support. Composer la photo
dans le viseur. Appuyer sur le déclencheur à mi-course (la mise au point
et l’exposition sont alors verrouillées). Puis appuyer à fond sur le déclencheur.
L’indicateur du retardateur clignote pendant 10 secondes environ puis clignote
pendant 2 secondes. C’est alors que l’obturateur se déclenche.
TÉLÉCOMMANDE RC-300C (En option)
Composer la photo dans le viseur. Positionner le cadre de mise au point sur
le sujet. Pour prendre une photographie, diriger la télécommande vers l’appareil
et appuyer sur la commande située sur la télécommande. L’indicateur de
retardateur/télécommande clignote et l’obturateur se déclenche environ trois
secondes plus tard. (Voir Figure 8 page 127.)
CARACTÉRISTIQUES PARTICULIÈRES
REMBOBINAGE DU FILM AVANT LA FIN
AUTRES OPERATIONS
FR
30
Pas
d’affichage
—
Retardateur
Télécommande
Appuyer sur la commande Retardateur/
Télécommande. Les modes passent
de l’un à l’autre dans l’ordre décrit à
gauche. Le mode sélectionné s’affiche
sur l’écran ACL.
Q
Appuyer sur le bouton de rembobinage
avec le picot situé sur la boucle de la
courroie
Q. Ne pas utiliser d’instrument
très pointu. Retirer le film selon la
procédure décrite page 27.
Aucune
Année-mois-jour
Mois-jour-année
Jour-mois-année
Jour-heure-minute
Page 17

Type : Appareil autofocus tout automatique 35 mm avec zoom
28 mm ~ 100 mm incorporé.
Format du film : Film 35 mm standard codé-DX (24 x 36 mm).
Objectif : Objectif Olympus 28 mm ~ 100 mm,
F4,6 ~ 11,9, 7 lentilles en 7 groupes.
Obturateur : Obturateur électronique programmé.
Viseur : Zoom type «image réelle» avec réglage dioptrique.
Mise au point : Système multi-autofocus de type passif (max. 11 points).
Verrouillage possible de la mise au point.
Plage de mise 0,6 m ~ ∞ (infini) en grand angle,
au point : 0,8 m ~ ∞ (infini) en téléphotographie.
Contrôle Contrôle d’exposition programmé, mesure 3-zones.
d’exposition : Portée de l’exposition automatique – 2,4 IL (F4,6, 4s) ~
16 IL (F10,2, 1/630 s) en grand angle, 5,1 IL (F11,9, 4 s)
~ 17 IL (F18, 1/410 s) en téléphotographie.
Compteur de vues : De type progressif affiché sur l’écran ACL.
Retardateur : Retardateur électronique, délai 12 secondes environ.
Vitesse du film : Réglage automatique avec film codé-DX sur ISO 50,
100, 200, 400, 800, 1600 ou 3200. Les autres vitesses
intermédiaires sont réglées automatiquement sur la
vitesse inférieure suivante. Films non codés-DX réglés
sur ISO 100.
Chargement/avance/rembobinage du film : Automatique.
Flash : Flash automatique incorporé. Temps de recyclage –
environ 0,5 ~ 5,5 secondes (à température normale avec
des piles neuves).
Modes Flash : Flash Automatique (faible luminosité, contre-jour et tubes
fluorescents), Anti-Yeux Rouges, Flash-Off (débrayé),
Fill-In (activation forcée), Scènes de nuit et Anti-Yeux
Rouges + Scènes de nuit.
Modes d’exposition : Exposition automatique, Mesure Spot et Infini.
Alimentation : Une pile 3 V lithium (DL123A ou CR123A).
Dimensions : 117 (L) x 61,5 (H) x 42,5 (P) mm (hors protubérances).
Poids : 220 g (sans pile).
Autre : Conception Tout-Temps.
Spécifications de la télécommande (En option)
Télécommande : A infrarouges. Délai environ 3 secondes.
Alimentation : Une pile CR2025.
Durée de vie de la pile : Environ 5 ans ou 20 000 fois.
Distance de fonctionnement : Environ 5 mètres.
Dimensions : 56,5 x 35,0 x 6,5 mm.
Poids : 11 g (sans pile).
LES SPECIFICATIONS SONT SUSCEPTIBLES DE MODIFICATION SANS
PREAVIS NI OBLIGATION DE LA PART DU FABRICANT. LE PRODUIT PEUT
DIFFERER DE CEUX PRESENTES DANS CE MANUEL.
SPECIFICATIONS
FR
33
• Ne pas exposer l’appareil à la chaleur ou à une humidité excessive ou au
soleil direct – par exemple dans une voiture ou sur une plage.
• Ne pas exposer l’appareil à la formaline ou au naphtalène.
• Si l’appareil est mouillé, l’essuyer avec un chiffon sec. Le sel peut être
particulièrement dommageable pour l’appareil.
• Ne pas utiliser de solvants organiques comme l’alcool ou les diluants pour
peinture pour nettoyer l’appareil.
• Ne pas laisser l’appareil près d’un téléviseur ou d’un réfrigérateur ou de tout
autre appareil provoquant un champ magnétique.
• Ne pas exposer l’appareil à la poussière ou au sable car cela pourrait
l’endommager.
• Ne pas secouer l’appareil. Ne pas lui donner de coups.
• Ne pas forcer excessivement sur le zoom.
• Ne pas exposer l’appareil à une chaleur excessive (plus de 40 °C) ou à un
froid extrême (en dessous de 10 °C). Les températures très basses, même
situées dans la fourchette autorisée, peuvent endommager les piles et altérer
temporairement le fonctionnement de l’appareil.
• Ne pas utiliser l’appareil pendant de longues périodes pourrait entraîner
différents problèmes. Tester le déclencheur et vérifier les fonctions de
l’appareil avant emploi.
• Les appareils à rayon X des aéroports peuvent endommager le film logé dans
l’appareil. Eviter d’introduire l’appareil dans ces machines. Le confier à l’agent
de sécurité pour une inspection manuelle.
• Ne pas toucher la partie avant du flash après un emploi répété, elle peut être
brûlante.
CONSERVER LES PILES A L’ABRI DU FEU. NE TENTER JAMAIS DE LES
DEMONTER, DE LES RECHARGER OU DE LES COURT-CIRCUITER.
NE JAMAIS TENTER DE DEMONTER L’APPAREIL ; IL CONTIENT UN
CIRCUIT A HAUT VOLTAGE. SI A LA SUITE D’UNE CHUTE OU D’UN
DOMMAGE LES PARTIES INTERNES DE L’APPAREIL VENAIENT A ETRE
EXPOSEES, RETIRER IMMEDIATEMENT LES PILES POUR EMPECHER
TOUTE UTILISATION ULTERIEURE. EN CAS DE DYSFONCTIONNEMENT,
CONSULTER LE REVENDEUR OU LE SERVICE APRES-VENTE OLYMPUS
LE PLUS PROCHE.
ENTRETIEN ET RANGEMENT
FR
32
AVERTISSEMENT
CONSERVER LES PILES HORS DE LA PORTEE DES ENFANTS.
EN CAS D’INGESTION PAR UN ENFANT, CONSULTER IMMEDIATEMENT
UN MEDECIN.
Page 18

INSTRUCCIONES
ES
34
COLOCACIÓN Y COMPROBACIÓN DE LA PILA
Utilice una pila de litio de 3 V (CR123A o DL123A).
PRIMEROS PASOS
ES
35
1
2
3
1. Mientras presiona sobre la parte inferior
de la tapa del compartimiento de la pila
en dirección Q, gírela en la dirección
W para abrirla.
• Asegúrese de que la tapa del objetivo
se encuentra cerrada antes de abrir
la tapa del compartimiento de la pila.
2. Introduzca la pila correctamente Q.
Cierre la tapa del compartimiento
de la pila W.
3. Deslice la tapa del objetivo en dirección
Q hasta que oiga un suave clic.
El objetivo sale y el flash salta.
Compruebe el nivel de carga de la
pila en el panel LCD.
• Con una pila nueva se pueden
exponer 15 rollos de película.
luciendo
(se apaga automáticamente).
parpadeando mientras los demás
indicadores se muestran normalmente.
luciendo mientras los demás
indicadores de apagan.
Pila en buen estado.
Se puede fotografiar.
La carga de la pila es baja y debe ser
reemplazada por una nueva.
COLOCACIÓN DE LA
CORREA
Coloque la correa tal como se indica.
AJUSTE DIÓPTRICO
Gire el dial de ajuste dióptrico hasta
que vea claramente las marcas de
enfoque automático.
La pila está totalmente agotada y deberá ser
reemplazada por una nueva inmediatamente.
Lea atentamente este manual antes de utilizar la cámara (en especial el
apartado «Cuidados y almacenamiento» que encontrará en la página 42).
NOMENCLATURA
(Abra la solapa frontal y mantenga a la vista la página 3.)
Cuerpo de cámara
1 Palanca del zoom (p. 37)
2 Disparador (p. 37)
3 Autodisparador/indicador del
mando a distancia
4 Sensor de la luz
✩
5 Visor
6 Ventanilla del autofoco
✩
7 Flash✩(pgs. 37 y 39)
8 Objetivo
✩
9 Sensor del control a distancia
10 Tapa del objetivo
11 Tapa del compartimiento de
la pila (p. 35)
12 Enganche de la correa
(pp. 35 y 40)
✩
Trate de mantenerlo siempre limpio. La suciedad puede producir imágenes borrosas
y desenfocadas. Elimine la suciedad con un paño suave.
Indicaciones en el visor
24 Marcas del autofoco (p. 37)
25 Marcas de la medición puntual (p. 39)
26 Marcas de corrección de primeros planos (p. 36)
27 Lámpara verde (indicador del autofoco)
Encendida: sujeto enfocado. Puede disparar.
Parpadeando: sujeto no enfocado. El disparador está bloqueado.
Parpadeo rápido: sujeto difícil de enfocar. Se puede disparar,
pero el sujeto podría salir desenfocado.
28 Lámpara naranja (indicador del flash)
Apagada: el flash se disparará. Se puede hacer la foto.
Encendida: el flash no se disparará: Se puede hacer la foto.
Parpadea: se está recargando el flash.
Espere hasta que luzca establemente.
Panel informativo LCD
29 Indicador de fecha y hora (Sólo modelo Quartzdate) (p. 41)
30 Contador de exposiciones
31 Control a distancia (opcional) (p. 40)
32 Autodisparador (p. 40)
33 Flash con reducción de ojos rojos (p. 38)
34 Flash de relleno (p. 38)
35 Flash cancelado (p. 38)
36 Flash para escenas nocturnas (p. 38)
37 Comprobación de la carga de la pila (p. 35)
38 Medición puntual (p. 39)
39 Infinito (p. 39)
Nota: no toda la información de los indicadores aparece en el panel informativo
al mismo tiempo como se muestra en la figura.
14 Ventanilla de la película
15 Rosca para el trípode
16 Modo fecha (DATE) y
botones de ajuste (SET)
(Sólo modelo Quartzdate) (p. 41)
17 Botón de rebobinado a la mitad
(p. 40)
18 Botón de modos de exposición
(p. 39)
19 Botón de modos del flash (p. 38)
20 Botón del autodisparador/
control a distancia (p. 40)
21 Panel LCD
22 Respaldo
23 Cierre del respaldo (p. 36)
Page 19

CÓMO HACER FOTOS
FUNCIONES BÁSICAS
ES
37
CARGA DE LA PELÍCULA
FUNCIONES ESTÁNDAR
ES
36
1
2
1. Deslice el dispositivo de cierre del
respaldo hacia arriba para abrir el
mismo.
• No toque el interior de la cámara,
especialmente el objetivo.
2. Introduzca el carrete de película
en su posición hasta que escuche
un suave clic.
3. Alínee la punta de la película con la
línea guía (A) y coloque la película
entre las guías de posicionamiento (B).
Luego, cierre el respaldo de la cámara
hasta que oiga clic.
• La película avanzará automáticamente
hasta el primer fotograma.
• Abra la tapa del objetivo deslizándola
hasta que escuche un suave clic.
Cerciórese de que en el contador de
exposiciones que se muestra en el
panel LCD aparece el símbolo «
II
».
• Si parpadea el símbolo «
EE
», vuelva
a cargar la película.
3
ENFOQUE Y DISTANCIA DE TRABAJO
FOTOGRAFÍA DE PRIMEROS PLANOS
Esta cámara utiliza un sistema autofoco
avanzado de amplia cobertura que facilita
el enfoque de los sujetos incluso aunque
no se encuentren en el centro del visor.
Fotografíe los sujetos situados a una
distancia de entre 0,6 m e ∞ (infinito)
con la focal angular y a una distancia de
entre 0,8 m e ∞ (infinito) a la focal tele.
Cuando el sujeto se encuentre muy cerca de
la cámara, el sujeto quedará desenfocado.
El área de la imagen se desplazará hacia
abajo en el visor cuando se acerque más
al sujeto.
Q
Marcas de corrección de primeros
planos (área de la imagen a la
distancia más cercana al sujeto).
W
Área de la imagen a infinito.
1
2
3
Marcas del autofoco
1. Abra la tapa del objetivo deslizándola
hasta que escuche un suave clic.
El objetivo se desplegará ligeramente
y se iluminará el panel LCD. Presione
la palanca del zoom en dirección del
símbolo «T» para la posición tele
(100 mm) o en dirección del símbolo
«W» para la posición granangular
(28 mm).
• Transcurridos unos cuatro minutos y
medio de inactividad, el objetivo se
plegará y se apagará el panel LCD.
2. Sitúe las marcas del autofoco (AF)
sobre el sujeto.
• No mire a través del visor directamente
al sol ni a otras fuentes intensas de
luz.
3. Pulse el disparador hasta la mitad de
su recorrido para enfocar el sujeto.
Asegúrese de que se enciende la
luz verde; a continuación pulse el
disparador a fondo para hacer la foto.
Después de haber efectuado el disparo,
la película avanzará automáticamente
hasta el siguiente fotograma.
FLASH AUTOMÁTICO – DISTANCIA DE TRABAJO
REBOBINADO Y EXTRACCIÓN DE LA PELÍCULA
(con película negativa en color)
Cuando se utilice película inversible, la distancia de trabajo en el modo tele se
reducirá un 30% aproximadamente.
ISO
100
200
400
Angular (W)
0,6 a 4,6 m
0,6 a 6,5 m
0,6 a 9,2 m
Tele (T)
0,8 a 1,8 m
0,8 a 2,5 m
0,8 a 3,6 m
La cámara rebobina automáticamente la
película al llegar al final del rollo.
Asegúrese de que el motor se ha detenido
y de que el símbolo «
EE
» está parpadeando
antes de abrir el respaldo para extraer la
película.
Q
W
Page 20

Combinación de dos modos del flash –
FLASH PARA ESCENAS NOCTURNAS CON
REDUCCIÓN DE OJOS ROJOS
Evita los característicos ojos rojos que se observan en las fotografías
realizadas de noche (véase la figura 7 de la página 126). Estos dos modos
no se pueden combinar con el modo de medición puntual. Al cerrar la tapa
del objetivo se vuelve al modo de flash automático.
AJUSTE DE LOS MODOS DEL FLASH
CARACTERÍSTICAS ESPECIALES
ES
39
Abra la solapa posterior y mantenga a la vista la página 126.
Ojos rojos en las fotografías con flash –
FLASH CON REDUCCIÓN DE OJOS ROJOS
Al fotografiar personas situadas en la oscuridad, la luz del flash incide en las
pupilas cuando éstas se encuentran totalmente dilatadas. En estas condiciones,
la luz del flash es reflejada por la retina. El flash con reducción de ojos rojos
emite una serie de destellos previos antes del disparo principal. Con ello se
consigue que los ojos del sujeto se adapten a la luz intensa al reducir las dimensiones del iris. Siempre que el sujeto esté mirando los destellos previos del flash,
los ojos no aparecerán rojos en las fotografías (véase la figura 3 en la página 126).
• Sujete la cámara firmemente. Transcurrirá aproximadamente 1 segundo
hasta que se abra el obturador.
• La función de reducción de ojos rojos puede no resultar efectiva en los casos
en que el sujeto:
1. No esté mirando al flash directamente desde enfrente del mismo.
2. No esté mirando los destellos previos del flash.
3. Se encuentre demasiado lejos de la cámara.
La efectividad de la función de reducción de ojos rojos varía dependiendo de
las características individuales de cada sujeto.
Cuando la fotografía con flash está prohibida o se desea captar
la escena con la luz ambiente – FLASH DESCONECTADO
El modo de flash desconectado resulta necesario cuando está prohibido fotografiar con flash o cuando se desea conservar el ambiente natural del crepúsculo
o de la luz artificial que rodea la escena (véase la figura 4 en la página 126).
• Como resulta necesario seleccionar una velocidad de obturación lenta
(como de unos dos segundos), deberá utilizar un trípode para evitar la
trepidación de la cámara.
• Trate de que el sujeto se mantenga quieto; de lo contrario, la imagen podría
aparecer borrosa.
Al cerrar la tapa del objetivo se vuelve al modo de flash automático.
Sombras en el rostro – FLASH DE RELLENO
Al realizar fotografía de retrato en condiciones de contraluz o a la sombra de
un árbol o edificación, la cara del sujeto puede aparecer demasiado oscura.
El flash de relleno proporciona exactamente la luz adicional para compensar
las sombras (véase la figura 5 de la página 126) y las dominantes de color de
la luz fluorescente.
• Asegúrese de que el sujeto se encuentre dentro de la gama de alcance del
flash (p. 37).
• El flash de relleno resulta efectivo en condiciones de extrema luminosidad.
Al cerrar la tapa del objetivo se vuelve al modo de flash automático.
La ciudad de noche – FLASH PARA ESCENAS NOCTURNAS
Al pasear por la ciudad de noche, puede que desee fotografiar un sujeto en
primer plano con la iluminación nocturna al fondo. El flash para escenas
nocturnas está diseñado para esta situación fotográfica. El flash principal
ilumina el sujeto situado en primer plano mientras el obturador permanece
abierto durante 4 segundos para captar la iluminación nocturna de la ciudad.
Será necesario que fije la cámara sobre un trípode u otro soporte para evitar
la trepidación de la misma (véase la figura 6 de la página 126).
CARACTERÍSTICAS ESPECIALES
ES
38
Sin información
Flash automático
Flash con reducción
de ojos rojos
Flash desconectado
Flash de relleno
Flash para
escenas nocturnas
Flash para escenas
nocturnas con reducción
de ojos rojos
Alto contraste – MEDICIÓN PUNTUAL
Al fotografiar en entornos de alto contraste (como por ejemplo al realizar
retratos a contraluz), el sujeto principal podría quedar demasiado oscuro o
iluminado en exceso. Para asegurarse de que el sujeto quede correctamente
expuesto, utilice el modo de medición puntual (véase la figura 1 de la página 2).
Sitúe las marcas (A) sobre el área en la que desea realizar la medición de
la luz. Pulse el disparador hasta la mitad de su recorrido; se encenderá la
lámpara azul y el enfoque y la exposición quedarán bloqueados sobre ese
área. Reencuadre el sujeto y pulse el disparador a fondo.
Fotografía de paisaje – INFINITO
La cámara ajusta automáticamente la distancia a infinito. El flash no se
disparará salvo en el modo flash de relleno (véase la figura 2 de la página 2).
AJUSTE DE LOS MODOS DE EXPOSICIÓN
Pulse el botón de modos del flash
( ). Los modos se irán sucediendo
en el orden que se muestra a la
izquierda. El modo seleccionado
será mostrado en el panel LCD.
No dispare el flash justo delante
de los ojos de personas o
animales. No apunte la cámara
a un motorista y dispare el flash.
Sin información
Exposición
automática
Medición puntual
Infinito
Pulse el botón de modos del flash
( / ). Los modos se irán sucediendo
en el orden que se muestra a la
izquierda. El modo seleccionado
será mostrado en el panel LCD.
Al cerrar la tapa del objetivo se vuelve
al modo de exposición automática.
Page 21

IMPRESIÓN DE LA FECHA/HORA (Sólo modelo Quartzdate)
Seleccione en primer lugar el modo de fecha/hora que desee imprimir. Pulse el
botón MODE. Cada vez que lo pulse, será mostrado el modo en el orden que
se observa a la izquierda. Mantenga en el panel el modo que desee utilizar.
La fecha y la hora serán impresas en el ángulo inferior derecho de la imagen.
Si la fecha y la hora quedan impresos sobre un color muy claro como por ejemplo
blanco, naranja o amarillo, podría resultar de difícil lectura. Cuando se utilizan
películas en blanco y negro, es posible que no se impriman la fecha y la hora.
AJUSTE DE LA FECHA Y LA HORA
(Sólo modelo Quartzdate)
Asegúrese de ajustar la fecha y la hora después de haber colocado la pila
por primera vez o de haber sustituido la misma.
1. Mantenga pulsado el botón MODE hasta que comience a parpadear el
indicador luminoso «year» (año).
2. Pulse el botón SET para ajustar el indicador «year» (año). Si pulsa el botón
una vez, el número que se muestra en el panel avanzará en 1. Si mantiene
pulsado el botón, los números aparecerán en rápida sucesión. Si se pasa
el número que desea ajustar, mantenga el botón pulsado hasta volver al
número que desee.
3.
Pulse el botón MODE una vez más para que comience a parpadear el indicador
«month» (mes). Pulse el botón SET para ajustar el indicador «month» (mes).
Mientras se pulsa el botón MODE, el indicador parpadeante cambia en el orden
«year» (año), «month» (mes), «day» (día), «hour» (hora) y «minute» (minuto).
4. Repita los pasos 2 y 3 para ajustar «hour» (hora) y «minute» (minuto).
Asegúrese de que el indicador «minute» (minuto) está parpadeando.
5.
Cuando haya ajustado «minute» (minuto), pulse el botón MODE. Los indicadores
habrán dejado de parpadear y el ajuste de la fecha y la hora habrá concluido.
SUSTITUCIÓN DE LA PILA DEL MANDO A DISTANCIA
(RC-300C opcional)
Si el indicador del autodisparador/control a distancia no parpadea cuando
se pulsa el botón, sustituya la pila por una nueva (CR2025).
1. Gire el tornillo que se encuentra en la parte inferior del mando a distancia
en el sentido inverso al de las agujas del reloj para aflojarlo.
2. Déle la vuelta al mando a distancia y extraiga la tapa. Con la pila hacia
arriba, extraiga la pila agotada y coloque una pila nueva tal como se
muestra en la figura.
3. Coloque de nuevo la tapa, déle la vuelta al mando a distancia y gire el
tornillo de la parte inferior en el sentido de las agujas del reloj para
apretarle (véase la figura 9 de la página 127).
OTRAS OPERACIONES
ES
41
AJUSTE DEL AUTODISPARADOR/
CONTROL A DISTANCIA
AUTODISPARADOR
Fije la cámara sobre un trípode u otro soporte. Componga la imagen en el
visor. Pulse el disparador hasta la mitad de su recorrido (el enfoque y la
exposición quedarán bloqueados en este momento). A continuación pulse
el disparador a fondo. El indicador luminoso del autodisparador lucirá
establemente durante 10 segundos y seguidamente parpadeará durante
otros 2 segundos. A continuación, será accionado el obturador.
MANDO A DISTANCIA RC-300C (opcional)
Componga la imagen en el visor. Sitúe el recuadro del autofoco sobre el sujeto.
Para realizar la fotografía, apunte el mando a distancia en dirección de la
cámara y pulse el botón del mismo. El indicador luminoso del autodisparador/
control a distancia comenzará a parpadear y el obturador será accionado 3
segundos después (véase la figura 8 de la página 127).
CARACTERÍSTICAS ESPECIALES
REBOBINADO DE LA PELÍCULA A LA MITAD
OTRAS OPERACIONES
ES
40
Sin información
—
Autodisparador
Control a distancia
Pulse el botón del autodisparador/
control a distancia.Los modos se irán
sucediendo en el orden que se muestra
a la izquierda. El modo seleccionado
será mostrado en el panel LCD.
Q
Pulse el botón correspondiente con el
saliente de la hebilla de la correa
Q.
No utilice ningún instrumento de punta
aguda. Extraiga la película tal como
se indica en la página 37.
Sin impresión
Año-mes-día
Mes-día-año
Día-mes-año
Día-hora-minuto
Page 22

Tipo: Cámara autofoco de 35 mm totalmente automática con objetivo
zoom 28 – 100 mm y obturador central.
Formato de la película: Película estándar de 35 mm con códigos DX
(24 x 36 mm).
Objetivo: Objetivo Olympus 28 – 100 mm, f/4,6 – 11,9, de 7 elementos
en 7 grupos.
Obturador: Obturador electrónico programado.
Visor: Visor zoom de imagen real con ajuste dióptrico.
Enfoque: Sistema autofoco de tipo pasivo de cobertura amplia
(máx. 11 puntos). Bloqueo del enfoque.
Gama de enfoque: 0,6 m – ∞ (infinito) en posición angular;
0,8 m – ∞ (infinito) en posición tele.
Control de la exposición: Control automático programado de la exposición,
medición puntual en 3 zonas. Gama de exposición automática –
2,4 EV (f/4,6, 4 s.) – 16 EV (f/10,2, 1/630 s.) en posición angular,
5,1 EV (f/11,9, 4 s.) – 17 EV (f/18, 1/410 s.) en posición tele.
Contador de exposiciones: De tipo progresivo, en el panel LCD.
Autodisparador: Autodisparador electrónico con 12 segundos,
aproximadamente, de retardo.
Gama de sensibilidades de la película: Ajuste automático con películas con
códigos DX de 50, 100, 200, 400, 800, 1600 y 3200 ISO.
Las películas con sensibilidades intermedias serán ajustadas
automáticamente a la sensibilidad inmediata inferior.
Las películas sin códigos DX serán ajustadas a 100 ISO.
Carga, avance, rebobinado de la película: Automáticos.
Flash: Flash integrado de salto automático. Tiempo de recarga –
aprox. 0,5 – 5,5 s. (a temperatura normal y con pila nueva).
Modos del flash: Flash automático (escasa luz ambiente, contraluz y luz
fluorescente), flash con reducción de ojos, flash desconectado,
flash de relleno, flash para escenas nocturnas y flash para
escenas nocturnas con reducción de ojos rojos.
Modos de exposición: Exposición automática, medición puntual e infinito.
Fuente de alimentación: Una pila de litio de 3 V (DL123A o CR123A).
Dimensiones: 117 (An) x 61,5 (Al) x 42,5 (Prof) mm
(excluyendo protuberancias).
Peso: 220 g (sin pila).
Otros: Diseño de protección contra la intemperie.
Especificaciones del mando a distancia
(opcional)
Sistema de control a distancia: Por infrarrojos, con retardo de 3 segundos,
aproximadamente.
Fuente de alimentación: Una pila CR2025.
Duración de la carga de la pila:
Aprox. 5 años; 20.000 disparos aproximadamente.
Distancia de trabajo: Aprox. 5 m.
Dimensiones: 56,5 x 35 x 6,5 mm.
Peso: 11 g (sin pila).
LAS ESPECIFICACIONES ESTÁN SUJETAS A CAMBIOS SIN PREVIO
AVISO NI IMPLICAN OBLIGACIÓN ALGUNA POR PARTE DEL FABRICANTE.
EL PRODUCTO REAL PUEDE VARIAR CON RESPECTO AL QUE SE
MUESTRA EN ESTE MANUAL.
ESPECIFICACIONES
ES
43
• No deje la cámara en ningún lugar expuesto a un calor excesivo, a la
humedad o a los rayos del sol, como por ejemplo dentro de un coche
o sobre la arena de la playa.
• No exponga la cámara a formalina o naftaleno.
• Si se moja la cámara, límpiela con una toalla seca. La sal que contiene el
agua puede resultar especialmente perjudicial.
• No utilice sustancias orgánicas tales como alcohol o disolvente, para limpiar
la cámara.
• No deje la cámara sobre o junto a un televisor, frigorífico u otros aparatos
con campos magnéticos.
• No exponga la cámara al polvo y la arena, ya que podría resultar gravemente
dañada.
• No someta la cámara a vibraciones o golpes.
• No ejerza una presión excesiva sobre el objetivo zoom.
• No exponga la cámara a altas temperaturas (superiores a 40 °C) ni a
temperaturas muy bajas (inferiores a –10 °C). Las bajas temperaturas,
incluso dentro de esta gama, pueden producir a veces afectar el rendimiento
de la pila, dejando inutilizada la cámara temporalmente.
• No deje la cámara sin utilizar durante largos períodos de tiempo.
Podría crearse moho dentro de la misma, además de producirse otros
problemas. Pulse el disparador y compruebe el funcionamiento de la cámara
antes de utiizarla.
• Algunos aparatos de rayos X de los aeropuertos pueden dañar la película que
se encuentra dentro de la cámara. Intente evitar que la cámara pase a través
de estos aparatos. Entréguesela al agente de seguridad para su inspección
manual.
• No toque la superficie frontal del flash inmediatamente después de haberlo
utilizado de manera continuada, ya que la superficie puede estar muy
caliente.
MANTENGA LAS PILAS LEJOS DEL FUEGO. NO INTENTE NUNCA
DESMONTAR, RECARGAR O CORTOCIRCUITAR LAS PILAS.
NO INTENTE NUNCA DESMONTAR LA CÁMARA; CONTIENE UN CIRCUITO
DE ALTO VOLTAJE. SI LOS COMPONENTES INTERNOS DE LA CÁMARA
HAN QUEDADO AL DESCUBIERTO DEBIDO A QUE ÉSTA SE HAYA CAÍDO
O HAYA SUFRIDO ALGÚN DAÑO, EXTRAIGA LA PILAINMEDIATAMENTE
PARA EVITAR SU USO. EN CASO DE AVERÍA, CONSULTE CON EL
DISTRIBUIDOR O SERVICIO DE ASISTENCIA TÉCNICA DE OLYMPUS
MÁS CERCANO.
CUIDADOS Y ALMACENAJE
ES
42
ADVERTENCIA
MANTENGA LAS PILAS FUERA DELALCANCE DE LOS NIÑOS.
SI UN NIÑO SE TRAGA UNA PILA, LLÉVELE INMEDIATAMENTE AL
MÉDICO.
Page 23

ISTRUZIONI
IT
44
INSERIMENTO E CONTROLLO DELLO STATO DELLA BATTERIA
Usate una batteria al litio 3 V (CR123A o DL123A).
PRIMI PASSI
IT
45
1
2
3
1. Premendo il fondo dello sportello vano
batteria in direzione Q, ruotatelo verso
W per aprirlo.
• Assicuratevi che il copriobiettivo sia
chiuso prima di aprire lo sportello
del vano batteria.
2. Inserite correttamente la batteria Q.
Chiudete lo sportello del vano
batteria W.
3. Fate scorrere il copriobiettivo verso
Q fino a sentire un click. L’obiettivo
fuoriesce e i battenti del flash si
aprono. Controllate lo stato della
batteria sul pannello LCD.
• Una batteria nuova vi permette di
scattare circa 15 pellicole.
si accende
(si spegne automaticamente).
lampeggia e gli altri indicatori
sono visualizzati normalmente.
lampeggia e gli altri
indicatori si spengono.
La batteria è carica.
Potete fotografare.
La batteria si sta esaurendo e dovrebbe
essere sostituita.
ATTACCO DELLA TRACOLLA
Attaccate la tracolla come
indicato in figura.
La batteria è scarica. Sostituitela
immediatamente con una batteria nuova.
Leggete attentamente il manuale, prima di usare la vostra fotocamera
(in particolare «Cura e Conservazione» a pagina 52).
NOME DEI COMPONENTI
(L’illustrazione è a pagina 3.)
Corpo della Fotocamera
1 Leva dello Zoom (p. 47)
2 Pulsante di scatto (p. 47)
3 Indicatore autoscatto/
telecomando
4 Sensore esposimetro
✩
5 Mirino
6 Sensore Autofocus
✩
7 Flash✩(pp. 47 – 49)
8 Obiettivo
✩
9 Sensore telecomando
10 Copriobiettivo
11 Sportello vano batteria (p. 45)
12 Anello tracolla (pp. 45 e 50)
13 Ghiera regolazione diottrica (p. 45)
14 Finestrella pellicola
✩
Tenete sempre pulite le parti contrassegnate con. Sporco e macchie possono dar luogo ad
immagini poco chiare e fuori fuoco. Pulite sporco o macchie con un panno morbido.
Indicazioni del Mirino
24 Crocino Autofocus (p. 47)
25 Indicatori Spot (p. 49)
26 Indicatori correzione macro (p. 46)
27 Spia verde (indicatore autofocus)
Accesa: il soggetto è a fuoco. Potete fotografare.
Lampeggiante: il soggetto non è a fuoco. L’otturatore è bloccato.
Lampeggia rapidamente: il soggetto è difficile da mettere a fuoco.
Potete fotografare, ma il soggetto può essere
fuori fuoco.
28 Spia arancione (indicatore flash)
Spenta: il Flash non si accende. Potete fotografare.
Accesa: Il Flash si accende. Potete fotografare.
Lampeggiante: il flash si sta ricaricando.
Attendere fino a quando si accende.
Panello LCD
29 Indicatore data/ora (Solo modelli con datario al quarzo) (p. 51)
30 Contapose
31 Telecomando (opzionale) (p. 50)
32 Autoscatto (p. 50)
33 Flash Riduzione Occhi Rossi (p. 48)
34 Flash Fill-In (p. 48)
35 Flash-Off (p. 48)
36 Flash Notturno (p. 48)
37 Stato Batteria (p. 45)
38 Misurazione Spot (p. 49)
39 Infinito (p. 49)
Nota: Non tutti gli indicatori sono visualizzati contemporaneamente come
illustrato.
15 Innesto treppiede
16 Tasti MODALITA’ e
IMPOSTAZIONE data
(solo modelli con datario al
quarzo) (p. 51)
17 Tasto di riavvolgimento forzato
(p. 50)
18 Tasto modalità esposizione (p. 49)
19 Tasto modalità Flash (p. 48)
20 Tasto autoscatto/telecomando
(p. 50)
21 panello LCD
22 Coperchio posteriore
23 Sblocco coperchio posteriore
(p. 46)
REGOLAZIONE DIOTTRICO
Ruotate la ghiera di regolazione
diottrico fino a quando vedrete
chiaramente i simboli della messa
a fuoco automatica.
Page 24

FOTOGRAFIA
FUNZIONI STANDARD
IT
47
INSERIMENTO DELLA PELLICOLA
FUNZIONI STANDARD
IT
46
1
2
1. Fate scorrere il blocco del
coperchio posteriore verso l’alto
per aprirlo.
• Non toccate l’interno della foto-
camera, specialmente l’obiettivo.
2. Inserite la pellicola fino a sentire
un click.
3. Posizionate l’estremità della
pellicola in corrispondenza della
linea indicata dalla freccia (A),
ed allineate l’estremità della
parte perforata (B).
• La pellicola avanza automatica-
mente al primo fotogramma.
• Aprite il copriobiettivo fino a
quando sentite un click.
Accertatevi che il contapose
sul pannello LCD indichi «
II
».
• Se «EE» lampeggia, reinserite
la pellicola.
3
MESSA A FUOCO E DISTANZA OPERATIVA
FOTOGRAFIA MACRO
La fotocamera impiega un sistema di
messa a fuoco automatica multiplo che
permette alla fotocamera di mettere a
fuoco facilmente i soggetti anche se non
sono al centro del mirino. Fotografate il
vostro soggetto ad una distanza da 0.6 m
a ∞ (infinito) con il grandangolo e da
0.8 m a ∞ (infinito) con il teleobiettivo.
Se il soggetto ritratto è troppo vicino ad
un altro soggetto, il soggetto risulterà
fuori fuoco anche se il pulsante di scatto scatta.
La zona dell’immagine si sposterà più
in basso nel mirino a mano a mano
che vi avvicinate al soggetto.
Q
Indicatori di correzione macro
(zona immagine a distanza
ravvicinata).
W
Zona immagine all’infinito.
1
2
3
Riferimento Autofocus
1. Aprite il copriobiettivo fino a sentire
un click. L’obiettivo fuoriesce ed il
pannello LCD si accende.
Spostate la leva dello zoom su «T»
per il teleobiettivo (100 mm) o su
«W» per il grandangolo (28 mm).
• Dopo circa 4 1/2 minuti e mezzo
di inattività, l’obiettivo si ritrae ed
il pannello LCD si spegne.
2. Posizionate il crocino AF sul vostro
soggetto.
• Non guardate il sole o altre fonti
di luce forti attraverso il mirino.
3. Premete a metà il pulsante di scatto
per mettere a fuoco il soggetto.
Accertatevi che la spia verde si
accenda; quindi premete a fondo
il pulsante di scatto per fotografare.
Dopo lo scatto, la pellicola avanza
automaticamente al fotogramma
successivo.
FLASH AUTOMATICO – DISTANZA OPERATIVA
RIAVVOLGIMENTO ED ESTRAZIONE PELLICOLA
(con pellicola per stampe a colori)
Con pellicole per diapositive, la distanza operativa del teleobiettivo deve
essere ridotto di circa il 30%.
ISO
100
200
400
Grandangolo (W)
da 0.6 a 4.6 m
da 0.6 a 6.5 m
da 0.6 a 9.2 m
Teleobiettivo (T)
da 0.8 a 1.8 m
da 0.8 a 2.5 m
da 0.8 a 3.6 m
La fotocamera riavvolge automaticamente la pellicola raggiunge la fine.
Verificate che il motore si sia fermato
e che il simbolo «EE» lampeggi; quindi
aprite il dorso della fotocamera per
estrarre la pellicola.
Q
W
Page 25

Combinazione delle Due Modalità – FLASH
RIDUZIONE OCCHI ROSSI + NOTTURNO
Impedisce il tipico effetto occhi rossi che si vede in fotografia quando si
scatta di notte (vedi figura 7 a pagina 126). Entrambe le modalità non
possono essere combinate con la modalità Misurazione Spot.
Chiudete il copriobiettivo per ripristinare la modalità Flash Automatico.
IMPOSTAZIONE MODALITA’ FLASH
CARATTERISTICHE SPECIALI
IT
49
Per le illustrazioni consultate pagina 126.
Occhi Rossi nelle Immagini con il flash –
FLASH RIDUZIONE OCCHI ROSSI
Quando scattate fotografie con il flash a persone che si trovano al buio,
la luce del flash cade sull’iride degli occhi. In questo caso la luce del flash
viene riflessa dalla retina producendo la caratteristica colorazione rossa.
Il Flash Riduzione Occhi Rossi emette una serie di pre-lampi di bassa
potenza prima dell’accensione del flash principale. Ciò dà agli occhi del
soggetto la possibilità di adattarsi alla luce intensa facendo restringere le
pupille. Se il soggetto guarda i pre- lampi, gli occhi non appariranno rossi
nell’immagine (vedi figura 3 a pagina 126).
• Tenete la fotocamera ferma. L’otturatore scatta dopo circa 1 secondo.
• La riduzione Occhi Rossi può non essere efficace quando il soggetto:
1. non guarda direttamente il flash.
2. non guarda i pre-lampi.
3. è troppo lontano dalla fotocamera.
L’efficacia della Riduzione Occhi Rossi varia a seconda delle caratteristiche
individuali di ciascun soggetto.
Quando è vietato l’uso del flash o non si desidera utilizzarlo –
FLASH-OFF
La funzione Flash-Off è necessaria nei luoghi in cui non è consentito
l’uso del flash o quando desiderate mantenere intatto l’effetto di controluce
o l’atmosfera della luce artificiale (vedi figura 4 a pagina 126).
• Poiché viene selezionato un tempo di esposizione lungo (2 secondi),
usate il treppiede per impedire cha la fotocamera si muova.
• Il soggetto deve essere fermo; in caso contrario otterrete delle immagini
mosse.
Chiudete il copriobiettivo per ripristinare la modalità Flash Automatico.
Ombre sul Viso – FLASH FILL-IN (sempre attivo)
Quando scattate fotografie di ritratti in controluce o sotto un albero o un
tetto, il viso del soggetto può risultare troppo scuro. Il Flash Fill-In fornisce
la quantità di ulteriore luce addizionale necessaria per compensare le
ombre (vedi figura 5 a pagina 126) e per la luce fluorescente.
• Verificate che il vostro soggetto sia all’interno del campo operativo del
flash (p. 47).
• La modalità Fill-in diventa inefficace in condizioni di forte luminosità.
Chiudete il copriobiettivo per ripristinare la modalità Flash Automatico.
FLASH NOTTURNO
Quando fate una passeggiata in città di sera, potete scattare fotografie del
vostro soggetto in primo piano con le luci della città sullo sfondo. Il Flash
Notturno ve lo consente. Il flash principale illumina il soggetto in primo
piano mentre l’otturatore rimane aperto fino a 4 secondi per catturare le luci
della città. Dovrete fissare la fotocamera sul treppiede o su altro supporto
per impedire che la macchina si muova (vedi figura 6 a pagina 126).
CARATTERISTICHE SPECIALI
IT
48
Nessuna
visualizzazione
Flash Automatico
Flash Riduzione
Occhi Rossi
Flash-Off
Fill-In
Flash Notturni
Flash Riduzione
Occhi Rossi +
Flash Notturno
Alto contrasto – MISURAZIONE SPOT
Quando fotografate in un ambiente ad alto contrasto (es. ritratti in
controluce), il soggetto principale può risultare troppo scuro o troppo chiaro.
Per accertarvi che il soggetto sia esposto correttamente usate la
Misurazione Spot (vedi figura 1 a pagina 2). Posizionatevi sugli indicatori
spot (A) sulla zona dove desiderate misurare la luce. Premete a metà
il pulsante di scatto; la spia verde si accende e la messa a fuoco e
l’esposizione sono bloccate su quella zona. Inquadrate nuovamente il
vostro soggetto e premete a fondo il pulsante di scatto.
Ripresa di panorami – INFINITO
La fotocamera imposta automaticamente la distanza di lavoro all’infinito.
Il flash non si accende, tranne che nella modalità Flash Fill-In
(vedi figura 2 pagina 2).
IMPOSTAZIONE DELLE MODALITA’ DI ESPOSIZIONE
Premete il tasto modalità flash
( ). La modalità cambia
nell’ordine indicato a sinistra.
La modalità selezionata è
visualizzata sul Pannello LCD.
Non azionate il flash puntandolo
direttamente negli occhi di
persone e animali. Non puntate
la fotocamera su una persona
alla guida di un veicolo
azionando il flash.
Nessuna
visualizzazione
Esposizione
Automatica
Misurazione Spot
Infinito
Premete il tasto modalità
esposizione ( / ).
La modalità cambia nell’ordine
indicato a sinistra. La modalità
selezionata è visualizzata sul
panello LCD. Chiudendo il copriobiettivo si ripristina la modalità
Esposizione Automatica.
Page 26

STAMPA DELLA DATA/ORA
(Solo modelli con datario al quarzo)
Selezionate innanzitutto la modalità data/ora che desiderate stampare.
Premete il tasto MODE. Ad ogni pressione, la modalità cambia nell’ordine
indicato a sinistra. Tenete visualizzata la modalità che desiderate stampare.
La data/ora è stampata nell’angolo in basso a destra dell’immagine.
Se un colore brillante, quale il bianco, arancione, giallo, ecc., è sovrapposto
alla data/ora, la lettura può risultare difficile. Quando usate pellicole in
bianco e nero, la data/ora non può essere stampata.
CORREZIONE DATA/ORA
(Solo modelli con datario al quarzo)
Accertatevi di regolare la data e l’ora dopo l’inserimento o la sostituzione
della batteria.
1. Tenete premuto il tasto MODE fino a quando l’indicatore «anno» inizia a
lampeggiare.
2. Premete il tasto SET per regolare l’indicatore «anno». Se premete il tasto
una volta, il numero sul display avanzerà di 1. Se tenete premuto il tasto,
i numeri scorreranno in rapida successione. Se superate il numero
desiderato, continuate a premere per tornare a detto numero.
3. Premete nuovamente il tasto MODE per far lampeggiare l’indicatore
del „mese“. Premete il tasto SET per regolare l’indicatore del «mese».
Quando premete il tasto MODE, l’indicatore lampeggiante cambia nel
seguente ordine: «anno», «mese», «giorno», «ora» e «minuto».
4. Ripetete i Passi 2 e 3 per impostate «ora» e «minuto». Verificare che
l’indicatore del «minuto» lampeggi.
5. Dopo aver impostato il «minuto», premete il tasto MODE. Nessuno degli
indicatori lampeggia e l’impostazione della data/ora è ora completata.
SOSTITUZIONE DELLA BATTERIA TELECOMANDO
(Opzionale RC-300C)
Se l’indicatore dell’autoscatto/telecomando non lampeggia anche
quando premete il tasto, sostituite la batteria (CR2025).
1. Ruotate la vite sul fondo del telecomando in senso antiorario.
2. Voltate il telecomando e togliete il coperchio. Con la batteria rivolta verso
l’alto, rimuovete la vecchia batteria ed inserite una nuova batteria come
indicato.
3. Riposizionate il coperchio, voltate il telecomando e ruotate la vite posta
sul fondo in senso orario per bloccarlo (vedi figura 9 a pagina 127).
ALTRE OPERAZIONI
IT
51
IMPOSTAZIONE DELL’AUTOSCATTO/TELECOMANDO
AUTOSCATTO
Installate la fotocamera su un treppiede o su un altro supporto.
Componete la vostra immagine guardando attraverso il mirino. Premete a
metà il pulsante di scatto (la messa a fuoco e l’esposizione sono bloccate).
Premete a fondo il pulsante di scatto. L’indicatore dell’autoscatto si accende
per circa 10 secondi, quindi lampeggia per circa 2 secondi. Trascorso
questo tempo l’otturatore scatta.
TELECOMANDO RC-300C (Opzionale)
Componete il vostro soggetto guardando attraverso il mirino. Posizionate
il crocino AF sul soggetto. Per fotografare, puntate il telecomando sulla
fotocamera e premete il tasto sul telecomando. L’indicatore dell’autoscatto/
telecomando inizia a lampeggiare, e l’otturatore scatta dopo circa 3 secondi
(vedi figura 8 a pagina 127).
CARATTERISTICHE SPECIALI
RIAVVOLGIMENTO FORZATO DELLA PELLICOLA
ALTRE OPERAZIONI
IT
50
Nessuna
visualizzazione
—
Autoscatto
Telecomando
Premete il tasto autoscatto/
telecomando. La modalità
cambia nell’ordine indicato a
sinistra. La modalità selezionata
appare sul Pannello LCD.
Q
Premete il tasto di riavvolgimento
forzato con la sporgenza sulla fibbia
della tracolla Q. Non usate strumenti
con punta taglienti. Estraete la
pellicola come descritto a pagina 47.
Nessuna
Anno-mese-giorno
Mese-giorno-anno
Giorno-mese-anno
Giorno-ora-minuto
Page 27

Tipo: Fotocamera 35 mm completamente automatica,
autofocus -otturatore con obiettivo zoom incorporato
28 mm ~ 100 mm.
Formato Pellicola: Pellicole standard DX 35 mm standard (24 x 36 mm).
Obiettivo: Obiettivo Olympus, 28 mm ~ 100 mm, F4.6 ~ 11.9,
7 elementi in 7 gruppi.
Otturatore: Otturatore elettronico programmato.
Mirino: Zoom ad immagine reale con regolazione diottrica.
Messa a fuoco: Sistema autofocus di tipo passivo multi ampiezza
(max. 11 punti). Disponibile il blocco della messa a fuoco.
Campo di Messa a fuoco: 0.6 m ~ ∞ (infinito) con grandangolare,
0.8 m ~ ∞ (infinito) con teleobiettivo.
Controllo esposizione: Programma con esposizione automatica
programmata, misurazione luce in 3 zone.
Campo di esposizione automatica –
EV2.4 (F4.6, 4-sec) ~ EV16 (F10.2, 1/630-sec)
grandangolare,
EV5.1 (F11.9, 4-sec) ~ EV17 (F18, 1/410-sec) teleobiettivo.
Contapose: Di tipo progressivo con indicazione sul pannello LCD.
Autoscatto: Autoscatto elettronico con circa. 12-sec. di ritardo.
Gamma di sensibilità delle pellicole: Impostazione automatica con pellicole
DX da 50, 100, 200, 400, 800, 1600 or 3200. Con pellicole
di
sensibilità intermedia, la fotocamera verrà automatica-
mente
impostata sulla sensibilità immediatamente inferiore.
Le pellicole non DX sono impostate a ISO 100.
Inserimento, avanzamento, riavvolgimento pellicola: Automatico.
Flash: Incorporato ad estrazione automatica.
Tempo di ricarica – circa. 0.5 ~ 5.5 sec.
(a temperature normali, con batteria nuova).
Modalità Flash: Flash Automatico (scarse condizioni di luce,
controluce e luce fluorescente), Flash Riduzione Occhi
Rossi, Flash-Off, Fill-In, Flash Notturni e Flash Riduzione
Occhi Rossi Notturni.
Modalità esposizione: Esposizione automatica, Misurazione Spot e Infinito.
Alimentazione: Una batteria al litio 3 V (DL123A o CR123A).
Dimensioni: 117 (W) x 61.5 (H) x 42.5 (D) mm (sporgenze escluse).
Peso: 220 g (senza batteria).
Altro: Progettata per qualsiasi condizione atmosferica.
Caratteristiche tecniche T
elecomando (Opzionale)
Sistema Telecomando: Infrarosso, con circa. 3-sec. di ritardo.
Alimentazione: Una batteria CR2025.
Durata Batteria: circa. 5 anni, circa. 20,000 scatti.
Distanza di lavoro: Circa. 5 m.
Dimensioni: 56.5 x 35.0 x 6.5 mm.
Peso: 11 g (senza batteria).
LE CARATTERISTICHE TECNICHE SONO SOGGETTE A MODIFICA
SENZA PREAVVISO O OBBLIGO DA PARTE DEL FABBRICANTE.
IL PRODOTTO PUO’ DIFFERIRE DA QUELLI ILLUSTRATI NEL
PRESENTE MANUALE.
CARATTERISTICHE TECNICHE
IT
53
• Non lasciate la fotocamera in un ambiente troppo caldo, umido o in
luce solare diretta, ad esempio in macchina o sulla spiaggia.
• Tenete la fotocamera lontana dalla formalina e dalla naftalina.
• Se la fotocamera si bagnasse, asciugatela immediatamente.
L’acqua di mare può essere particolarmente pericolosa.
• Non usate solventi organici, quali alcool o solventi per pulire la fotocamera.
• Non lasciate la fotocamera vicina al televisore, al frigorifero o ad altri
apparecchi con campo magnetico.
• Proteggete la fotocamera dalla polvere e dalla sabbia in quanto potrebbe
subire danni seri.
• Proteggete la fotocamera dalle vibrazioni e dai colpi.
• Non esercitate mai una forza eccessiva sul barilotto dell’obiettivo.
• Proteggete la fotocamera dalle temperature eccessivamente elevate
(superiori ai 40 °C) o rigide (inferiori ai –10 °C). Al freddo, le prestazioni
delle batterie potrebbero deteriorarsi rendendo la fotocamera
temporaneamente inutilizzabile.
• Non lasciate inutilizzata la fotocamera per lunghi periodi; questo potrebbe
favorire la formazione di muffa o altri problemi. Premete il pulsante di
scatto e controllate il funzionamento della macchina prima dell’uso.
• Evitate di far passare la pellicola attraverso le apparecchiature di controllo
aeroportuali ai raggi X. Consegnatela all’agente di sicurezza per il
controllo manuale.
• Non toccate la superficie anteriore del flash dopo averlo usato
ripetutamente in un breve periodo di tempo perché potrebbe scottare.
TENETE LE BATTERIE LONTANO DAL FUOCO. NON TENTATE MAI
DI SMONTARE, RICARICARE O METTERE IN CORTO CIRCUITO LE
BATTERIE.
NON TENTATE MAI DI SMONTARE LA FOTOCAMERA IN QUANTO
CONTIENE UN CIRCUITO AD ALTA TENSIONE. SE LE PARTI INTERNE
DELLA FOTOCAMERA VENGONO ESPOSTE IN CASO DI CADUTA O
DANNEGGIAMENTO DELLA FOTOCAMERA, TOGLIETE IMMEDIATAMENTE
LA BATTERIA PER IMPEDIRNE L’USO. IN CASO DI GUASTO,
RIVOLGETEVI AL RIVENDITORE O AL CENTRO ASSISTENZA
OLYMPUS PIU’ VICINO.
CURA E CONSERVAZIONE
IT
52
AVVERTENZE
CONSERVATE LE BATTERIE FUORI DELLA PORTATA DEI BAMBINI.
NEL CASO UN BAMBINO INGOI UNA BATTERIA, CONTATTATE
IMMEDIATAMENTE UN MEDICO.
Page 28

кмдйЗйСлнЗй
RU
54
млнДзйЗдД а икйЗЦкдД ЕДнДкЦа
аТФУО¸БЫВЪТfl У‰М‡ ОЛЪЛВ‚‡fl ·‡Ъ‡Вfl М‡ 3 З (CR123A ЛОЛ DL123A).
зДуДгй кДЕйнх
RU
55
1
2
3
1. з‡КЛП‡fl М‡ МЛКМ˛˛ ˜‡ТЪ¸ Н˚¯НЛ
УЪТВН‡ ·‡Ъ‡ВЛ ‚ М‡Ф‡‚ОВМЛЛ Q,
ФУ‚ВМЛЪВ ВВ ‚ М‡Ф‡‚ОВМЛЛ W Ë
ÓÚÍÓÈÚÂ.
• иВК‰В ˜ВП УЪН˚‚‡Ъ¸ Н˚¯НЫ
УЪТВН‡ ·‡Ъ‡ВЛ, Ы·В‰ЛЪВТ¸, ˜ЪУ
Б‡˘ЛЪМ‡fl Н˚¯Н‡ У·˙ВНЪЛ‚‡
Б‡Н˚Ъ‡.
2. ÇÒÚ‡‚¸Ú ·‡Ú‡Â˛ ‚ Ô‡‚ËθÌÓÈ
ÓËÂÌÚ‡ˆËË Q. б‡НУИЪВ Н˚¯НЫ
УЪТВН‡ ·‡Ъ‡ВЛ W.
3. иУ‰‚ЛМ¸ЪВ Б‡˘ЛЪМЫ˛ Н˚¯НЫ
У·˙ВНЪЛ‚‡ ‚ М‡Ф‡‚ОВМЛЛ Q ‰У
˘ВО˜Н‡. й·˙ВНЪЛ‚ ‚˚‰‚ЛМВЪТfl,
Л ‚ТФ˚¯Н‡ ‚˚‰‚ЛМЛЪТfl ‚‚Вı.
иУ‚В¸ЪВ Б‡fl‰ ·‡Ъ‡ВЛ М‡
Ьд-‰ЛТФОВВ.
• б‡fl‰‡ МУ‚УИ ·‡Ъ‡ВЛ ‰УТЪ‡ЪУ˜МУ,
˜ЪУ·˚ УЪТМflЪ¸ ФЛПВМУ
15 ЩУЪУФОВМУН.
„ÓËÚ
(„‡ÒÌÂÚ ‡‚ÚÓχÚ˘ÂÒÍË).
ÏË„‡ÂÚ, ÓÒڇθÌ˚ Ë̉Ë͇ÚÓ˚
ËÏÂ˛Ú Ó·˚˜Ì˚È ‚ˉ.
ÏË„‡ÂÚ, ÓÒڇθÌ˚ Ë̉Ë͇ÚÓ˚
„‡ÒÌÛÚ.
б‡fl‰ ‚˚ТУНЛИ.
еУКМУ ‰ВО‡Ъ¸ ТМЛПНЛ.
б‡fl‰ МЛБНЛИ, ·‡Ъ‡В˛ ТОВ‰ЫВЪ
Б‡ПВМЛЪ¸ М‡ МУ‚Ы˛.
икадкЦигЦзаЦ кЦеЦтдД
иЛНВФЛЪВ ВПВ¯УН, Н‡Н ФУН‡Б‡МУ
М‡ ЛОО˛ТЪ‡ˆЛЛ.
СайинкауЦлдДь дйккЦдсаь
иУ‚ВМЛЪВ ‰ЛТН ‰ЛУФЪЛ˜ВТНУИ
М‡ТЪУИНЛ, ˜ЪУ·˚ ‚ЛБЛМ˚В ПВЪНЛ
‡‚ЪУЩУНЫТ‡ ·˚ОЛ ˜ВЪНУ ‚Л‰М˚.
Е‡Ъ‡Вfl ФУОМУТЪ¸˛ ‡БflКВМ‡.
зВПВ‰ОВММУ ‚ТЪ‡‚¸ЪВ МУ‚Ы˛.
ЗМЛП‡ЪВО¸МУ ФУ˜ЪЛЪВ ˝ЪУ ЫНУ‚У‰ТЪ‚У, ФВК‰В ˜ВП ФУО¸БУ‚‡Ъ¸Тfl ЩУЪУН‡ПВУИ (У·‡ЪЛЪВ ‚МЛП‡МЛВ М‡ ‡Б‰ВО «мıУ‰ Л ı‡МВМЛВ» М‡ ТЪ. 62).
зДаеЦзйЗДзаь йлзйЗзхп уДлнЦв (éÚÍÓÈÚÂ
ÔÂÂ‰Ì˛˛ ÔÂÂÍˉÌÛ˛ ÒÚ‡ÌËˆÛ Ë ‰ÂÊËÚ ÒÚ. 3 ÓÚÍ˚ÚÓÈ.)
дУФЫТ ЩУЪУН‡ПВ˚
1 к˚˜‡„ БЫП‡ (ТЪ. 57)
2 дМУФН‡ ТФЫТН‡ Б‡Ъ‚У‡ (ТЪ. 57)
3 аМ‰ЛН‡ЪУ ‡‚ЪУТФЫТН‡/
‰ЛТЪ‡МˆЛУММУ„У ЫФ‡‚ОВМЛfl
4 ë‚ÂÚÓ‚ÓÈ ‰‡Ú˜ËÍ
✩
5 ЗЛ‰УЛТН‡ЪВО¸
6 йНМУ ‡‚ЪУЩУНЫТ‡
✩
7 ÇÒÔ˚¯Í‡✩(ÒÚ. 57 – 59)
8 é·˙ÂÍÚË‚
✩
9 чژËÍ ÛÒÚÓÈÒÚ‚‡
‰ЛТЪ‡МˆЛУММУ„У ЫФ‡‚ОВМЛfl
10 б‡˘ЛЪМ‡fl Н˚¯Н‡ У·˙ВНЪЛ‚‡
11 д˚¯Н‡ УЪТВН‡ ·‡Ъ‡ВЛ (ТЪ. 55)
12 иУВБ¸ ‰Оfl ВПВ¯Н‡ (ТЪ. 55 Л 60)
13 СЛТН ‰ЛУФЪЛ˜ВТНУИ НУВНˆЛЛ
(ТЪ. 55)
14 йНМУ ЩУЪУФОВМНЛ
✩
иУТЪУflММУ ТОВ‰ЛЪВ Б‡ ˜ЛТЪУЪУИ ˝ЪЛı НУПФУМВМЪУ‚. ЙflБ¸ Л ФflЪМ‡ ПУ„ЫЪ ФЛ‚ВТЪЛ Н ФУЪВВ
˜ВЪНУТЪЛ Л ЩУНЫТ‡ ЩУЪУТМЛПНУ‚. З˚ЪЛ‡ИЪВ „flБ¸ Л ФflЪМ‡ Пfl„НУИ ЪН‡М¸˛.
à̉Ë͇ÚÓ˚ ‚ˉÓËÒ͇ÚÂÎfl
24 ЗЛБЛМ˚В ПВЪНЛ ‡‚ЪУЩУНЫТ‡ (ТЪ. 57)
25 еВЪНЛ ЪУ˜В˜МУ„У Б‡ПВ‡ ˝НТФУБЛˆЛЛ (ТЪ. 59)
26
дУВНЪЛЫ˛˘ЛВ ПВЪНЛ ФУОfl Н‡‰‡ ФЛ Т˙ВПНВ Т ·ОЛБНУ„У ‡ТТЪУflМЛfl (ТЪ. 56)
27 бВОВМ˚И ЛМ‰ЛН‡ЪУ (ЛМ‰ЛН‡ЪУ ‡‚ЪУЩУНЫТ‡)
ЙУЛЪ: й·˙ВНЪ Т˙ВПНЛ ‚ ЩУНЫТВ. еУКМУ ‰ВО‡Ъ¸ ТМЛПУН.
еЛ„‡ВЪ:й·˙ВНЪ Т˙ВПНЛ МВ ‚ ЩУНЫТВ. б‡Ъ‚У Б‡·ОУНЛУ‚‡М.
еЛ„‡ВЪ ˜‡ТЪУ: лЩУНЫТЛУ‚‡Ъ¸Тfl М‡ У·˙ВНЪВ Б‡ЪЫ‰МЛЪВО¸МУ. еУКМУ
Т‰ВО‡Ъ¸ ТМЛПУН, МУ У·˙ВНЪ ПУКВЪ УН‡Б‡Ъ¸Тfl МВ ‚ ЩУНЫТВ.
28 é‡ÌÊ‚˚È Ë̉Ë͇ÚÓ (Ë̉Ë͇ÚÓ ‚ÒÔ˚¯ÍË)
Й‡ТМВЪ: ЗТФ˚¯Н‡ МВ ·Ы‰ВЪ ‡НЪЛ‚ЛУ‚‡М‡. еУКМУ Т‰ВО‡Ъ¸ ТМЛПУН.
ЙУЛЪ: ЗТФ˚¯Н‡ ·Ы‰ВЪ ‡НЪЛ‚ЛУ‚‡М‡. еУКМУ Т‰ВО‡Ъ¸ ТМЛПУН.
åË„‡ÂÚ: ÇÒÔ˚¯Í‡ Á‡flʇÂÚÒfl. èÓ‰ÓʉËÚÂ, ÔÓ͇ Á‡„ÓËÚÒfl Ë̉Ë͇ÚÓ.
Ьд-‰ЛТФОВИ
29 аМ‰ЛН‡ЪУ ‰‡Ъ˚/‚ВПВМЛ (ЪУО¸НУ ‚ ПУ‰ВОflı Т Н‚‡ˆ‰‡ЪУИ) (ТЪ. 61)
30 л˜ВЪ˜ЛН Н‡‰У‚
31 мТЪУИТЪ‚У ‰ЛТЪ‡МˆЛУММУ„У ЫФ‡‚ОВМЛfl (УФˆЛУМ) (ТЪ. 50)
32 Д‚ЪУТФЫТН (ТЪ. 60)
33 ЗТФ˚¯Н‡ ТУ ТМЛКВМЛВП ˝ЩЩВНЪ‡ Н‡ТМ˚ı „О‡Б (ТЪ. 58)
34 иЛМЫ‰ЛЪВО¸М‡fl ‚ТФ˚¯Н‡ (ТЪ. 58)
35 йЪПВМ‡ ‚ТФ˚¯НЛ (ТЪ. 58)
36 зУ˜МУИ ВКЛП ‚ТФ˚¯НЛ (ТЪ. 58)
37 аМ‰ЛН‡ЪУ ТУТЪУflМЛfl ·‡Ъ‡ВЛ (ТЪ. 55)
38 нУ˜В˜М˚И Б‡ПВ ˝НТФУБЛˆЛЛ (ТЪ. 59)
39 ЕВТНУМВ˜МУТЪ¸ (ТЪ. 59)
иЛПВ˜‡МЛВ: зВ ‚ТВ ЛМ‰ЛН‡ЪУ˚ ФУfl‚Оfl˛ЪТfl М‡ Ьд-‰ЛТФОВВ У‰МУ‚ВПВММУ,
Í‡Í ÔÓ͇Á‡ÌÓ Ì‡ ËÎβÒÚ‡ˆËË.
15 ЙМВБ‰У ‰Оfl ¯Ъ‡ЪЛ‚‡
16 дМУФНЛ ВКЛП‡ (MODE) Л
ÛÒÚ‡ÌÓ‚ÍË (SET) ‰‡Ú˚ (ÚÓθÍÓ ‚
ÏÓ‰ÂÎflı Ò Í‚‡ˆ‰‡ÚÓÈ) (ÒÚ. 61)
17 дМУФН‡ ФВВПУЪНЛ ЩУЪУФОВМНЛ
(ÒÚ. 60)
18 дМУФН‡ ВКЛП‡ ˝НТФУБЛˆЛЛ
(ТЪ. 59)
19 дМУФН‡ ВКЛП‡ ‚ТФ˚¯НЛ (ТЪ. 58)
20
дМУФН‡ ‡‚ЪУТФЫТН‡/
‰ЛТЪ‡МˆЛУММУ„У
ÛÔ‡‚ÎÂÌËfl
(ТЪ. 60)
21 Ьд-‰ЛТФОВИ
22 ᇉМflfl Н˚¯Н‡
23 к˚˜‡„ УЪН˚‚‡МЛfl Б‡‰МВИ
Í˚¯ÍË (ÒÚ. 56)
Page 29

ийгмуЦзаЦ ойнйлзаедйЗ
лнДзСДкнзхЦ омздсаа
RU
57
бДкьСдД ойнйигЦзда
лнДзСДкнзхЦ омздсаа
RU
56
1
2
1. èÓ‰‚Ë̸Ú ‚‚Âı ˚˜‡„ Á‡‰ÌÂÈ
Í˚¯ÍË, ˜ÚÓ·˚ ÓÚÍ˚Ú¸ ÂÂ.
• зВ ФЛН‡Т‡ИЪВТ¸ Н ‚МЫЪВММЛП
˝ОВПВМЪ‡П ЩУЪУН‡ПВ˚,
УТУ·ВММУ Н У·˙ВНЪЛ‚Ы.
2. ЗТЪ‡‚¸ЪВ Н‡ЪЛ‰К ЩУЪУФОВМНЛ ‚
Ф‡‚ЛО¸МУП ФУОУКВМЛЛ ‰У ˘ВО˜Н‡.
3. лУ‚ПВТЪЛЪВ Т‚У·У‰М˚И НУМВˆ
ЩУЪУФОВМНЛ Т М‡Ф‡‚Оfl˛˘ВИ ОЛМЛВИ
(A), Л ФУПВТЪЛЪВ ФОВМНЫ ПВК‰Ы
М‡Ф‡‚Оfl˛˘ЛПЛ ПВЪН‡ПЛ (B). á‡ÚÂÏ
Á‡ÍÓÈÚ Á‡‰Ì˛˛ Í˚¯ÍÛ ‰Ó ˘ÂΘ͇.
• оУЪУФОВМН‡ ‡‚ЪУП‡ЪЛ˜ВТНЛ
ФУНЫЪЛЪТfl М‡ ФВ‚˚И Н‡‰.
• 뉂Ë̸Ú Á‡˘ËÚÌÛ˛ Í˚¯ÍÛ
У·˙ВНЪЛ‚‡ ‰У ˘ВО˜Н‡.
м·В‰ЛЪВТ¸, ˜ЪУ Т˜ВЪ˜ЛН Н‡‰У‚
М‡ Ьд-‰ЛТФОВВ ФУН‡Б˚‚‡ВЪ «
II
».
• ЦТОЛ М‡ ПВТЪВ Т˜ВЪ˜ЛН‡ ПЛ„‡ВЪ
Ë̉Ë͇ÚÓ «
EE
», ФВВБ‡fl‰ЛЪВ ФОВМНЫ.
3
СаДиДбйз ойдмлакйЗда а кДЕйуЦЦ кДллнйьзаЦ
ойнйлцЦедД дкмизхе игДзйе (л ЕгабдйЙй кДллнйьзаь)
С‡ММ‡fl ЩУЪУН‡ПВ‡ ЛТФУО¸БЫВЪ ТЛТЪВПЫ
‡‚ЪУЩУНЫТ‡ «multi-wide autofocus» (¯ЛУНЛИ
ПЫО¸ЪЛ-‡‚ЪУЩУНЫТ), НУЪУ‡fl У·ОВ„˜‡ВЪ
ЩУНЫТЛУ‚НЫ М‡ У·˙ВНЪВ, ‰‡КВ ВТОЛ УМ МВ
М‡ıУ‰ЛЪТfl ‚ ˆВМЪВ ‚Л‰УЛТН‡ЪВОfl. иУЛБ‚У‰ЛЪВ
Т˙ВПНЫ М‡ ‡ТТЪУflМЛЛ УЪ 0,6 П УЪ У·˙ВНЪ‡
Т˙ВПНЛ ‰У ·ВТНУМВ˜МУТЪЛ ФЛ ¯ЛУНУП Ы„ОВ
Т˙ВПНЛ Л УЪ 0,8 П ‰У ·ВТНУМВ˜МУТЪЛ ФЛ
ЪВОВЩУЪУТ˙ВПНВ. лФЫТН Б‡Ъ‚У‡ Ъ‡НКВ ‚УБПУКВМ, ВТОЛ У·˙ВНЪ Т˙ВПНЛ М‡ıУ‰ЛЪТfl У˜ВМ¸
·ОЛБНУ Н ЩУЪУН‡ПВВ, МУ ФЛ ˝ЪУП У·˙ВНЪ М‡ ЩУЪУТМЛПНВ ·Ы‰ВЪ МВ ‚ ЩУНЫТВ.
иУ ПВВ ФЛ·ОЛКВМЛfl Н У·˙ВНЪЫ Т˙ВПНЛ
У·О‡ТЪ¸ ЛБУ·‡КВМЛfl ‚ ‚Л‰УЛТН‡ЪВОВ
ТПВТЪЛЪТfl ‚МЛБ.
Q
дУВНЪЛЫ˛˘ЛВ ПВЪНЛ ФУОfl Н‡‰‡
ФЛ Т˙ВПНВ НЫФМ˚П ФО‡МУП
(У·О‡ТЪ¸ ЛБУ·‡КВМЛfl ФЛ Т˙ВПНВ
Т ПЛМЛП‡О¸МУ„У ‡ТТЪУflМЛfl).
W
й·О‡ТЪ¸ ЛБУ·‡КВМЛfl ФЛ ЫТЪ‡МУ‚НВ
М‡ ·ВТНУМВ˜МУТЪ¸.
1
2
3
ЗЛБЛМ˚В ПВЪНЛ ‡‚ЪУЩУНЫТ‡
1. 뉂ЛМ¸ЪВ Б‡˘ЛЪМЫ˛ Н˚¯НЫ У·˙ВНЪЛ‚‡
‰У ˘ВО˜Н‡. й·˙ВНЪЛ‚ МВПМУ„У
‚˚‰‚ЛМВЪТfl, Ьд-‰ЛТФОВИ ‚НО˛˜ЛЪТfl.
иУ‚ВМЛЪВ ˚˜‡„ БЫП‡ ‚ М‡Ф‡‚ОВМЛЛ
«T» ‰Оfl ЪВОВЩУЪУТ˙ВПНЛ (100 ПП) ЛОЛ
‚ М‡Ф‡‚ОВМЛЛ «W» ‰Оfl
¯ЛУНУЫ„УО¸МУИ Т˙ВПНЛ (28 ПП).
• ЦТОЛ МВ ФУЛБ‚У‰ЛЪ¸ МЛН‡НЛı
‰ВИТЪ‚ЛИ Т ЩУЪУН‡ПВУИ ‚ ЪВ˜ВМЛВ
ФЛПВМУ 4,5 ПЛМЫЪ, У·˙ВНЪЛ‚
‚ЪflМВЪТfl ‚У‚МЫЪ¸ Л Ьд-‰ЛТФОВИ
ФУ„‡ТМВЪ.
2. 燂‰ЛЪВ ПВЪНЫ ‡‚ЪУЩУНЫТ‡ (AF)
М‡ У·˙ВНЪ Т˙ВПНЛ.
• ç ÒÏÓÚËÚ ̇ ÒÓÎÌˆÂ Ë ‰Û„ËÂ
ÒËθÌ˚ ËÒÚÓ˜ÌËÍË Ò‚ÂÚ‡ ˜ÂÂÁ
‚ˉÓËÒ͇ÚÂθ.
3. з‡КПЛЪВ НМУФНЫ ТФЫТН‡ Б‡Ъ‚У‡
М‡ФУОУ‚ЛМЫ, ˜ЪУ·˚ ФУЛБ‚ВТЪЛ
ЩУНЫТЛУ‚НЫ М‡ У·˙ВНЪ. м·В‰ЛЪВТ¸,
˜ЪУ БВОВМ˚И ЛМ‰ЛН‡ЪУ „УЛЪ;
Б‡ЪВП М‡КПЛЪВ НМУФНЫ ТФЫТН‡ Б‡Ъ‚У‡
ФУОМУТЪ¸˛, ˜ЪУ·˚ Т‰ВО‡Ъ¸ ТМЛПУН.
иУТОВ ЪУ„У, Н‡Н З˚ УЪФЫТЪЛЪВ НМУФНЫ
ТФЫТН‡ Б‡Ъ‚У‡, ЩУЪУФОВМН‡ ·Ы‰ВЪ
‡‚ЪУП‡ЪЛ˜ВТНЛ ФВВПУЪ‡М‡ М‡ У‰ЛМ
Н‡‰ ‚ФВВ‰.
ДЗнйеДнауЦлдав кЦЬае Злихтда – кДЕйуЦЦ кДллнйьзаЦ
иЦкЦейндД а абцьнаЦ ойнйигЦзда
(ФЛ ˆ‚ВЪМУИ МВ„‡ЪЛ‚МУИ ЩУЪУФОВМНВ)
иЛ ЛТФУО¸БУ‚‡МЛЛ У·‡ЪЛПУИ (ФУБЛЪЛ‚МУИ) ЩУЪУФОВМНЛ ‡·У˜ВВ ‡ТТЪУflМЛВ
ФЛ ЪВОВЩУЪУТ˙ВПНВ ТУН‡ЪЛЪТfl ФЛ·ОЛБЛЪВО¸МУ М‡ 30%.
ISO
100
200
400
òËÓÍËÈ Û„ÓÎ (W)
0,6 – 4,6 Ï
0,6 – 6,5 Ï
0,6 – 9,2 Ï
нВОВЩУЪУ (н)
0,8 – 1,8 Ï
0,8 – 2,5 Ï
0,8 – 3,6 Ï
оУЪУН‡ПВ‡ ‡‚ЪУП‡ЪЛ˜ВТНЛ ТП‡Ъ˚‚‡ВЪ
ФОВМНЫ, НУ„‰‡ УМ‡ УЪТМflЪ‡ ‰У НУМˆ‡.
м·В‰ЛЪВТ¸, ˜ЪУ ТП‡Ъ˚‚‡˛˘ЛИ ПВı‡МЛБП
УНУМ˜ЛО ‡·УЪЫ Л М‡ Ьд-‰ЛТФОВВ
ФУfl‚ЛОТfl ПЛ„‡˛˘ЛИ ЛМ‰ЛН‡ЪУ «
EE
»;
ФУТОВ ˝ЪУ„У УЪНУИЪВ Б‡‰М˛˛ Н˚¯НЫ
Л ‰УТЪ‡М¸ЪВ ЩУЪУФОВМНЫ.
Q
W
Page 30

дУП·ЛМ‡ˆЛfl ‰‚Ыı ВКЛПУ‚ – зйузйв кЦЬае Злихтда
лй лзаЬЦзаЦе щооЦднД дкДлзхп ЙгДб
иВ‰УЪ‚‡˘‡ВЪ ˝ЩЩВНЪ Н‡ТМ˚ı „О‡Б, У·˚˜МУ ФУfl‚Оfl˛˘ЛИТfl ФЛ МУ˜МУИ
ЩУЪУТ˙ВПНВ (ТП. ЛТ. 7 М‡ ТЪ. 126). й·‡ ВКЛП‡ МВ ПУ„ЫЪ ТУ‚ПВ˘‡Ъ¸Тfl Т
ВКЛПУП ЪУ˜В˜МУ„У Б‡ПВ‡ ˝НТФУБЛˆЛЛ. иУТОВ Б‡Н˚ЪЛfl Б‡˘ЛЪМУИ Н˚¯НЛ
У·˙ВНЪЛ‚‡ ‚УТТЪ‡М‡‚ОЛ‚‡ВЪТfl ‡‚ЪУП‡ЪЛ˜ВТНЛИ ВКЛП ‚ТФ˚¯НЛ.
млнДзйЗдД кЦЬаеД Злихтда
лиЦсаДгъзхЦ омздсаа
RU
59
éÚÍÓÈÚ Á‡‰Ì˛˛ ÔÂÂÍˉÌÛ˛ ÒÚ‡ÌËˆÛ Ë ‰ÂÊËÚ ÓÚÍ˚ÚÓÈ ÒÚ‡ÌËˆÛ 126.
щЩЩВНЪ Н‡ТМ˚ı „О‡Б ФЛ ЩУЪУТ˙ВПНВ ТУ ‚ТФ˚¯НУИ –
ЗлихтдД лй лзаЬЦзаЦе щооЦднД дкДлзхп ЙгДб
иЛ ЩУЪУТ˙ВПНВ ‚ ЪВПМУЪВ Т‚ВЪ ‚ТФ˚¯НЛ ФУФ‡‰‡ВЪ ‚ Б‡˜НЛ „О‡Б ˜ВОУ‚ВН‡,
НУ„‰‡ УМЛ ‡Т¯ЛВМ˚. йЪ‡К‡flТ¸ УЪ ТВЪ˜‡ЪНЛ „О‡Б‡, Т‚ВЪ ТЪ‡МУ‚ЛЪТfl Н‡ТМ˚П.
ЗТФ˚¯Н‡ ТУ ТМЛКВМЛВП ˝ЩЩВНЪ‡ Н‡ТМ˚ı „О‡Б ФУЛБ‚У‰ЛЪ ТВЛ˛ ТО‡·˚ı
ФВ‰‚‡ЛЪВО¸М˚ı ‚ТФ˚¯ВН ФВВ‰ ‡НЪЛ‚‡ˆЛВИ УТМУ‚МУИ ‚ТФ˚¯НЛ.
щЪУ ФУБ‚УОflВЪ „О‡Б‡П ˜ВОУ‚ВН‡ ‡‰‡ФЪЛУ‚‡Ъ¸Тfl Н flНУПЫ Т‚ВЪЫ ФЫЪВП
ТЫКВМЛfl Б‡˜НУ‚. ЦТОЛ ˜ВОУ‚ВН ·Ы‰ВЪ ТПУЪВЪ¸ М‡ ФВ‰‚‡ЛЪВО¸М˚В ‚ТФ˚¯НЛ,
В„У „О‡Б‡ МВ УН‡КЫЪТfl Н‡ТМ˚ПЛ М‡ ЩУЪУТМЛПНВ (ТП. ЛТ. 3 ̇ ÒÚ. 126).
• СВКЛЪВ ЩУЪУН‡ПВЫ У‚МУ. лФЫТН Б‡Ъ‚У‡ ФУЛТıУ‰ЛЪ ФЛПВМУ ˜ВВБ
1 ТВНЫМ‰Ы ФУТОВ М‡К‡ЪЛfl М‡ НМУФНЫ ТФЫТН‡.
• лМЛКВМЛВ ˝ЩЩВНЪ‡ Н‡ТМ˚ı „О‡Б ПУКВЪ МВ ФУЛБУИЪЛ, ВТОЛ ˜ВОУ‚ВН:
1. ç ÒÏÓÚËÚ Ì‡ ‚ÒÔ˚¯ÍÛ ÔÓ‰ ÔflÏ˚Ï Û„ÎÓÏ.
2. ç ÒÏÓÚËÚ Ì‡ Ô‰‚‡ËÚÂθÌ˚ ‚ÒÔ˚¯ÍË.
3. з‡ıУ‰ЛЪТfl ТОЛ¯НУП ‰‡ОВНУ УЪ ЩУЪУН‡ПВ˚.
щЩЩВНЪЛ‚МУТЪ¸ ТМЛКВМЛfl ˝ЩЩВНЪ‡ Н‡ТМ˚ı „О‡Б Б‡‚ЛТЛЪ УЪ ЛМ‰Л‚Л‰Ы‡О¸М˚ı
УТУ·ВММУТЪВИ Н‡К‰У„У ˜ВОУ‚ВН‡.
аТФУО¸БУ‚‡Ъ¸ ‚ТФ˚¯НЫ Б‡ФВ˘ВМУ ЛОЛ МВ КВО‡ЪВО¸МУ –
йнеЦзД Злихтда
йЪПВМ‡ ‚ТФ˚¯НЛ МВУ·ıУ‰ЛП‡, ВТОЛ ЩУЪУТ˙ВПН‡ ТУ ‚ТФ˚¯НУИ Б‡ФВ˘ВМ‡
ЛОЛ ВТОЛ З˚ ıУЪЛЪВ ФВВ‰‡Ъ¸ ‚ Н‡‰В ВТЪВТЪ‚ВММУВ ФЛ„ОЫ¯ВММУВ УТ‚В˘ВМЛВ
(ТП. ЛТ. 4 ̇ ÒÚ. 126).
• иУТНУО¸НЫ ЫТЪ‡М‡‚ОЛ‚‡ВЪТfl ‰ОЛЪВО¸М‡fl ‚˚‰ВКН‡ (УНУОУ 2 ТВНЫМ‰),
МВФУ‰‚ЛКМУ Б‡НВФЛЪВ ЩУЪУН‡ПВЫ Т ФУПУ˘¸˛ ¯Ъ‡ЪЛ‚‡, ˜ЪУ·˚ ЛБУ·‡КВМЛВ
‚ Н‡‰В МВ УН‡Б‡ОУТ¸ ‡БП˚Ъ˚П ‚ТОВ‰ТЪ‚ЛВ ВТЪВТЪ‚ВММУ„У ‰УК‡МЛfl ЫН.
• й·˙ВНЪ Т˙ВПНЛ ‰УОКВМ ·˚Ъ¸ МВФУ‰‚ЛКМ˚П; ‚ ФУЪЛ‚МУП ТОЫ˜‡В В„У
НУМЪЫ˚ ПУ„ЫЪ УН‡Б‡Ъ¸Тfl ‡БП˚Ъ˚ПЛ.
иУТОВ Б‡Н˚ЪЛfl Б‡˘ЛЪМУИ Н˚¯НЛ У·˙ВНЪЛ‚‡ ‚УТТЪ‡М‡‚ОЛ‚‡ВЪТfl
‡‚ЪУП‡ЪЛ˜ВТНЛИ ВКЛП ‚ТФ˚¯НЛ.
íÂÌË Ì‡ Îˈ – иказмСанЦгъзДь ЗлихтдД
иЛ ФУЪВЪМУИ ЩУЪУТ˙ВПНВ ФУЪЛ‚ Т‚ВЪ‡ ЛОЛ ‚ ЪВМЛ ‰ВВ‚‡ ЛОЛ Н˚¯Л
ОЛˆУ У·˙ВНЪ‡ Т˙ВПНЛ ПУКВЪ ‚˚„Оfl‰ВЪ¸ ТОЛ¯НУП ЪВПМ˚П. èËÌÛ‰ËÚÂθ̇fl
‚ÒÔ˚¯Í‡ У·ВТФВ˜Л‚‡ВЪ МВУ·ıУ‰ЛПУВ НУОЛ˜ВТЪ‚У ‰УФУОМЛЪВО¸МУ„У Т‚ВЪ‡,
˜ЪУ·˚ НУПФВМТЛУ‚‡Ъ¸ ‚УБМЛН‡˛˘ЛВ ЪВМЛ (ТП. ЛТ. 5 ̇ ÒÚ. 126) Ë
ÙÎÛÓÂÒˆÂÌÚÌ˚È Ò‚ÂÚ.
• ì·Â‰ËÚÂÒ¸, ˜ÚÓ Ó·˙ÂÍÚ Ò˙ÂÏÍË Ì‡ıÓ‰ËÚÒfl ‚ ԉ·ı ‡·Ó˜Â„Ó ‡ÒÒÚÓflÌËfl
‚ÒÔ˚¯ÍË (ÒÚ. 57).
• иЛ У˜ВМ¸ flНУП УТ‚В˘ВМЛЛ ФЛМЫ‰ЛЪВО¸М‡fl ‚ТФ˚¯Н‡ МВ˝ЩЩВНЪЛ‚М‡.
иУТОВ Б‡Н˚ЪЛfl Б‡˘ЛЪМУИ Н˚¯НЛ У·˙ВНЪЛ‚‡ ‚УТТЪ‡М‡‚ОЛ‚‡ВЪТfl
‡‚ЪУП‡ЪЛ˜ВТНЛИ ВКЛП ‚ТФ˚¯НЛ.
çÓ˜ÌÓÈ „ÓÓ‰ – зйузйв кЦЬае Злихтда
ЗУ ‚ВПfl МУ˜М˚ı ФУ„ЫОУН ФУ „УУ‰Ы З˚ ПУКВЪВ Б‡ıУЪВЪ¸ ТЩУЪУ„‡ЩЛУ‚‡Ъ¸
НУ„У-МЛ·Ы‰¸ М‡ ЩУМВ МУ˜М˚ı У„МВИ. çÓ˜ÌÓÈ ÂÊËÏ ‚ÒÔ˚¯ÍË ФУБ‚УОflВЪ ˝ЪУ
Т‰ВО‡Ъ¸. йТМУ‚М‡fl ‚ТФ˚¯Н‡ УТ‚В˘‡ВЪ У·˙ВНЪ ФВВ‰МВ„У ФО‡М‡; ФЛ ˝ЪУП
Б‡Ъ‚У УТЪ‡ВЪТfl УЪН˚Ъ˚П ‰У 4 ТВНЫМ‰, ˜ЪУ·˚ ТЩУЪУ„‡ЩЛУ‚‡Ъ¸ У„МЛ
„УУ‰‡. зВУ·ıУ‰ЛПУ МВФУ‰‚ЛКМУ Б‡НВФЛЪ¸ ЩУЪУН‡ПВЫ Т ФУПУ˘¸˛ ¯Ъ‡ЪЛ‚‡
ЛОЛ ‰Ы„УИ УФУ˚, ˜ЪУ·˚ ЩУЪУН‡ПВ‡ МВ ‰УК‡О‡ (ТП. ЛТ. 6 ̇ ÒÚ. 126).
лиЦсаДгъзхЦ омздсаа
RU
58
ÅÂÁ
Ë̉Ë͇ÚÓ‡
Ä‚ÚÓ-ÂÊËÏ
лМЛКВМЛВ ˝ЩЩВНЪ‡
Н‡ТМ˚ı „О‡Б
йЪПВМ‡ ‚ТФ˚¯НЛ
èËÌÛ‰ËÚÂθ̇fl
‚ÒÔ˚¯Í‡
çÓ˜ÌÓÈ ÂÊËÏ
‚ÒÔ˚¯ÍË
зУ˜МУИ ВКЛП ТУ
ТМЛКВМЛВП ˝ЩЩВНЪ‡
Н‡ТМ˚ı „О‡Б
дУМЪ‡ТЪМУВ УТ‚В˘ВМЛВ – нйуЦузхв бДеЦк щдлийбасаа
иЛ ЩУЪУТ˙ВПНВ ‚ ЫТОУ‚Лflı ‚˚ТУНУИ НУМЪ‡ТЪМУТЪЛ (М‡ФЛПВ, ФЛ ФУЪВЪМУИ
ЩУЪУТ˙ВПНВ ФУЪЛ‚ Т‚ВЪ‡) ОЛˆУ У·˙ВНЪ‡ Т˙ВПНЛ ПУКВЪ УН‡Б‡Ъ¸Тfl ТОЛ¯НУП
ЪВПМ˚П. уЪУ·˚ ˝НТФУБЛˆЛfl ОЛˆ‡ ·˚О‡ ЫТЪ‡МУ‚ОВМ‡ Ф‡‚ЛО¸МУ, ЛТФУО¸БЫИЪВ
ВКЛП ЪУ˜В˜МУ„У Б‡ПВ‡ ˝НТФУБЛˆЛЛ (ТП. ЛТ. 1 М‡ ТЪ. 2). 燂‰ЛЪВ ПВЪНЛ
ЪУ˜В˜МУ„У Б‡ПВ‡ ˝НТФУБЛˆЛЛ (A) М‡ У·О‡ТЪ¸, ‚ НУЪУУИ ıУЪЛЪВ ЛБПВЛЪ¸
УТ‚В˘ВММУТЪ¸. з‡КПЛЪВ НМУФНЫ ТФЫТН‡ Б‡Ъ‚У‡ М‡ФУОУ‚ЛМЫ; Б‡„УЛЪТfl
БВОВМ˚И ЛМ‰ЛН‡ЪУ, ЩУНЫТ Л ˝НТФУБЛˆЛfl Б‡ЩЛНТЛЫ˛ЪТfl ФУ ‚˚·‡ММУИ У·О‡ТЪЛ.
лНУПФУМЫИЪВ З‡¯ ТМЛПУН Л М‡КПЛЪВ НМУФНЫ ТФЫТН‡ Б‡Ъ‚У‡ ФУОМУТЪ¸˛.
оУЪУТ˙ВПН‡ ФВИБ‡К‡ –
ойдмлакйЗдД зД ЕЦлдйзЦузйлнъ
оУЪУН‡ПВ‡ ‡‚ЪУП‡ЪЛ˜ВТНЛ ЫТЪ‡М‡‚ОЛ‚‡ВЪ ‡·У˜ВВ ‡ТТЪУflМЛВ М‡
·ВТНУМВ˜МУТЪ¸. ЗТФ˚¯Н‡ ‡НЪЛ‚ЛЫВЪТfl ЪУО¸НУ ‚ ФЛМЫ‰ЛЪВО¸МУП ВКЛПВ
(ТП. ЛТ. 2 ̇ ÒÚ. 2).
млнДзйЗдД кЦЬаеД щдлийбасаа
з‡КПЛЪВ НМУФНЫ ВКЛП‡
‚ТФ˚¯НЛ ( ).
кВКЛП˚ ˜ВВ‰Ы˛ЪТfl ‚
ФУТОВ‰У‚‡ЪВО¸МУТЪЛ,
ФУН‡Б‡ММУИ ТОВ‚‡.
аМ‰ЛН‡ЪУ ‚˚·‡ММУ„У ВКЛП‡
ФУfl‚ЛЪТfl М‡ Ьд-‰ЛТФОВВ.
зВ ‰УФЫТН‡ИЪВ ‡НЪЛ‚‡ˆЛЛ
‚ТФ˚¯НЛ ФВВ‰ „О‡Б‡ПЛ
О˛‰ВИ Л КЛ‚УЪМ˚ı.
зВ М‡Ф‡‚ОflИЪВ ЩУЪУН‡ПВЫ
М‡ ‚У‰ЛЪВОfl, ВТОЛ ЩУЪУТ˙ВПН‡
·Û‰ÂÚ ÒÓ ‚ÒÔ˚¯ÍÓÈ.
ÅÂÁ
Ë̉Ë͇ÚÓ‡
Д‚ЪУ˝НТФУБЛˆЛfl
íӘ˜Ì˚È Á‡ÏÂ
ЕВТНУМВ˜МУТЪ¸
з‡КПЛЪВ НМУФНЫ ВКЛП‡ ˝НТФУБЛˆЛЛ
( / ). кВКЛП˚ ˜ВВ‰Ы˛ЪТfl ‚
ФУТОВ‰У‚‡ЪВО¸МУТЪЛ, ФУН‡Б‡ММУИ
ТОВ‚‡. аМ‰ЛН‡ЪУ ‚˚·‡ММУ„У
ВКЛП‡ ФУfl‚ЛЪТfl М‡ Ьд-‰ЛТФОВВ.
иУТОВ Б‡Н˚ЪЛfl Б‡˘ЛЪМУИ Н˚¯НЛ
У·˙ВНЪЛ‚‡ ‚УТТЪ‡М‡‚ОЛ‚‡ВЪТfl
ВКЛП ‡‚ЪУ˝НТФУБЛˆЛЛ.
Page 31

иЦуДнъ СДнх/ЗкЦеЦза (íÓθÍÓ ‚ ÏÓ‰ÂÎflı Ò Í‚‡ˆ‰‡ÚÓÈ)
З ФВ‚Ы˛ У˜ВВ‰¸, ‚˚·ВЛЪВ ЩУП‡Ъ ‰‡Ъ˚/‚ВПВМЛ, НУЪУ˚И ıУЪЛЪВ
М‡ФВ˜‡Ъ‡Ъ¸. з‡КПЛЪВ НМУФНЫ MODE. иЛ Н‡К‰УП М‡К‡ЪЛЛ НМУФНЛ ЩУП‡Ъ˚
˜ВВ‰Ы˛ЪТfl ‚ ФУТОВ‰У‚‡ЪВО¸МУТЪЛ, ФУН‡Б‡ММУИ ТОВ‚‡. мТЪ‡МУ‚ЛЪВ М‡
Ьд-‰ЛТФОВВ КВО‡ВП˚И ЩУП‡Ъ. С‡Ъ‡/‚ВПfl ·Ы‰ЫЪ М‡ФВ˜‡Ъ‡М˚ ‚ Ф‡‚УП
МЛКМВП Ы„ОЫ ТМЛПН‡. ЦТОЛ ‰‡Ъ‡/‚ВПfl ФУФ‡‰ЫЪ М‡ Т‚ВЪО˚И ЩУМ, М‡ФЛПВ,
·ВО˚И, У‡МКВ‚˚И, КВОЪ˚И Л Ъ. Ф., Лı ·Ы‰ВЪ ЪЫ‰МУ ФУ˜ВТЪ¸.
иЛ ЛТФУО¸БУ‚‡МЛЛ ˜ВМУ-·ВОУИ ФОВМНЛ ‰‡Ъ‡/‚ВПfl ПУ„ЫЪ МВ М‡ФВ˜‡Ъ‡Ъ¸Тfl.
абеЦзЦзаЦ СДнх а ЗкЦеЦза
(нУО¸НУ ‚ ПУ‰ВОflı Т Н‚‡ˆ‰‡ЪУИ)
й·flБ‡ЪВО¸МУ ЫТЪ‡МУ‚ЛЪВ Ф‡‚ЛО¸МЫ˛ ‰‡ЪЫ Л ‚ВПfl ФУТОВ ЫТЪ‡МУ‚НЛ ЛОЛ
Á‡ÏÂÌ˚ ·‡Ú‡ÂË.
1.
м‰ВКЛ‚‡ИЪВ М‡К‡ЪУИ НМУФНЫ MODE, ÔÓ͇ Ë̉Ë͇ÚÓ «„Ó‰‡» Ì ̇˜ÌÂÚ ÏË„‡Ú¸.
2. з‡КПЛЪВ НМУФНЫ SET, ˜ЪУ·˚ ЛБПВМЛЪ¸ ФУН‡Б‡МЛfl ЛМ‰ЛН‡ЪУ‡ «„У‰‡».
иЛ У‰МУП М‡К‡ЪЛЛ НМУФНЛ МУПВ М‡ ‰ЛТФОВВ Ы‚ВОЛ˜ЛЪТfl М‡ 1.
ЦТОЛ Ы‰ВКЛ‚‡Ъ¸ НМУФНЫ М‡К‡ЪУИ, МУПВ ·Ы‰ВЪ ·˚ТЪУ Ы‚ВОЛ˜Л‚‡Ъ¸Тfl.
ЦТОЛ З˚ ФУФЫТЪЛЪВ МЫКМУВ ˜ЛТОУ, ФУ‰УОК‡ИЪВ М‡КЛП‡Ъ¸ НМУФНЫ,
ФУН‡ ТМУ‚‡ МВ ‚ВМВЪВТ¸ Н ˝ЪУПЫ ˜ЛТОЫ.
3. з‡КПЛЪВ НМУФНЫ MODE В˘В ‡Б, ˜ЪУ·˚ Б‡ПЛ„‡О ЛМ‰ЛН‡ЪУ «ПВТflˆ‡».
з‡КПЛЪВ НМУФНЫ SET, ˜ЪУ·˚ ЛБПВМЛЪ¸ ФУН‡Б‡МЛfl ЛМ‰ЛН‡ЪУ‡ «ПВТflˆ‡».
иЛ ‰‡О¸МВИ¯Лı М‡К‡ЪЛflı НМУФНЛ MODE ПЛ„‡Ъ¸ ФУТОВ‰У‚‡ЪВО¸МУ ·Ы‰ЫЪ
ЛМ‰ЛН‡ЪУ˚ «„У‰», «ПВТflˆ», «‰ВМ¸», «˜‡Т» Л «ПЛМЫЪ‡».
4. иУ‚ЪУЛЪВ ¯‡„Л 2 Л 3, ˜ЪУ·˚ ЫТЪ‡МУ‚ЛЪ¸ «˜‡Т˚» Л «ПЛМЫЪ˚».
м·В‰ЛЪВТ¸, ˜ЪУ ЛМ‰ЛН‡ЪУ «ПЛМЫЪ˚» ПЛ„‡ВЪ.
5. иУТОВ ЫТЪ‡МУ‚НЛ «ПЛМЫЪ» М‡КПЛЪВ НМУФНЫ MODE. зЛ У‰ЛМ ЛМ‰ЛН‡ЪУ
ЪВФВ¸ МВ ·Ы‰ВЪ ПЛ„‡Ъ¸ – ЛБПВМВМЛВ ‰‡Ъ˚/‚ВПВМЛ ·Ы‰ВЪ Б‡‚В¯ВМУ.
бДеЦзД ЕДнДкЦа млнкйвлнЗД
СалнДзсайззйЙй микДЗгЦзаь
(RC-300C – ÓÔˆËÓÌ)
ЦТОЛ ЛМ‰ЛН‡ЪУ ‡‚ЪУТФЫТН‡/‰ЛТЪ‡МˆЛУММУ„У ЫФ‡‚ОВМЛfl МВ ПЛ„‡ВЪ
‰‡КВ ФЛ М‡К‡ЪЛЛ НМУФНЛ, Б‡ПВМЛЪВ ·‡Ъ‡В˛ М‡ МУ‚Ы˛ (CR2025).
1. иУ‚ВМЛЪВ ‚ЛМЪ М‡ ‰МВ ЫТЪУИТЪ‚‡ ‰ЛТЪ‡МˆЛУММУ„У ЫФ‡‚ОВМЛfl ФУЪЛ‚
˜‡ТУ‚УИ ТЪВОНЛ, ˜ЪУ·˚ УТ‚У·У‰ЛЪ¸ Н˚¯НЫ.
2. иВВ‚ВМЛЪВ ЫТЪУИТЪ‚У Л ТМЛПЛЪВ Н˚¯НЫ. СВКЛЪВ ЫТЪУИТЪ‚У ·‡Ъ‡ВВИ
Н ТВ·В, ‚˚М¸ЪВ ТЪ‡Ы˛ ·‡Ъ‡В˛ Л ‚ТЪ‡‚¸ЪВ МУ‚Ы˛, Н‡Н ФУН‡Б‡МУ Б‰ВТ¸.
3. иУТЪ‡‚¸ЪВ Н˚¯НЫ М‡ ПВТЪУ, ФВВ‚ВМЛЪВ ЫТЪУИТЪ‚У Л Б‡НЫЪЛЪВ ‚ЛМЪ
М‡ ‰МВ ЫТЪУИТЪ‚‡ ФУ ˜‡ТУ‚УИ ТЪВОНВ ‰У ЫФУ‡ (ТП. ЛТ. 9 ̇ ÒÚ. 127).
СкмЙаЦ йиЦкДсаа
RU
61
млнДзйЗдД ДЗнйлимлдД /
СалнДзсайззйЙй микДЗгЦзаь
ДЗнйлимлд
б‡НВФЛЪВ ЩУЪУН‡ПВЫ МВФУ‰‚ЛКМУ М‡ ¯Ъ‡ЪЛ‚В ЛОЛ ‰Ы„УИ УФУВ.
лНУПФУМЫИЪВ ТМЛПУН ‚ ‚Л‰УЛТН‡ЪВОВ. з‡КПЛЪВ НМУФНЫ ТФЫТН‡ Б‡Ъ‚У‡
М‡ФУОУ‚ЛМЫ (ФЛ ˝ЪУП ЩУНЫТ Л ˝НТФУБЛˆЛfl Б‡ЩЛНТЛЫ˛ЪТfl). б‡ЪВП М‡КПЛЪВ
НМУФНЫ ТФЫТН‡ Б‡Ъ‚У‡ ФУОМУТЪ¸˛. аМ‰ЛН‡ЪУ ‡‚ЪУТФЫТН‡ ·Ы‰ВЪ „УВЪ¸
ФЛПВМУ 10 ТВНЫМ‰, Б‡ПВЪ ·Ы‰ВЪ ПЛ„‡Ъ¸ УНУОУ 2 ТВНЫМ‰. иУТОВ ˝ЪУ„У
ФУЛБУИ‰ВЪ ТФЫТН Б‡Ъ‚У‡.
млнкйвлнЗй СалнДзсайззйЙй
микДЗгЦзаь RC-300C (ÓÔˆËÓÌ)
лНУПФУМЫИЪВ ТМЛПУН ‚ ‚Л‰УЛТН‡ЪВОВ. 燂‰ЛЪВ ПВЪНЫ ‡‚ЪУЩУНЫТ‡ М‡ У·˙ВНЪ
Т˙ВПНЛ. уЪУ·˚ Т‰ВО‡Ъ¸ ТМЛПУН, М‡Ф‡‚¸ЪВ ЫТЪУИТЪ‚У ‰ЛТЪ‡МˆЛУММУ„У
ЫФ‡‚ОВМЛfl М‡ ЩУЪУН‡ПВЫ Л М‡КПЛЪВ М‡ НМУФНЫ ТФЫТН‡ М‡ ЫТЪУИТЪ‚В.
аМ‰ЛН‡ЪУ ‡‚ЪУТФЫТН‡/‰ЛТЪ‡МˆЛУММУ„У ЫФ‡‚ОВМЛfl М‡˜МВЪ ПЛ„‡Ъ¸, Л
ФЛПВМУ ˜ВВБ 3 ТВНЫМ‰˚ ФУЛБУИ‰ВЪ ТФЫТН Б‡Ъ‚У‡ (ТП. ЛТ. 8 ̇ ÒÚ. 127).
лиЦсаДгъзхЦ омздсаа
иЦкЦейндД ойнйигЦзда З зЦСййнлзьнйе
лйлнйьзаа
СкмЙаЦ йиЦкДсаа
RU
60
ÅÂÁ
Ë̉Ë͇ÚÓ‡
—
Д‚ЪУТФЫТН
СЛТЪ‡МˆЛУММУВ
ЫФ‡‚ОВМЛВ
з‡КПЛЪВ НМУФНЫ ‡‚ЪУТФЫТН‡ /
‰ЛТЪ‡МˆЛУММУ„У ЫФ‡‚ОВМЛfl.
кВКЛП˚ ˜ВВ‰Ы˛ЪТfl ‚
ФУТОВ‰У‚‡ЪВО¸МУТЪЛ, ФУН‡Б‡ММУИ
ТОВ‚‡. аМ‰ЛН‡ЪУ ‚˚·‡ММУ„У
ВКЛП‡ ФУfl‚ЛЪТfl М‡ Ьд-‰ЛТФОВВ.
Q
з‡КПЛЪВ НМУФНЫ ФВВПУЪНЛ ЩУЪУФОВМНЛ ‚˚ТЪЫФУП ФflКНЛ ВПВ¯Н‡
Q.
зВ ЛТФУО¸БЫИЪВ УТЪ˚ı ФВ‰ПВЪУ‚.
З˚М¸ЪВ ЩУЪУФОВМНЫ, Н‡Н УФЛТ‡МУ
М‡ ТЪ. 57.
çÂÚ
ÉÓ‰-ÏÂÒflˆ-‰Â̸
åÂÒflˆ-‰Â̸-„Ó‰
ÑÂ̸-ÏÂÒflˆ-„Ó‰
СВМ¸-˜‡Т-ПЛМЫЪ‡
Page 32

íËÔ: иУОМУТЪ¸˛ ‡‚ЪУП‡ЪЛ˜ВТН‡fl 35-ПП ЩУЪУН‡ПВ‡ Т
‡‚ЪУЩУНЫТУП, Б‡Ъ‚УУП У·˙ВНЪЛ‚‡, ‚ТЪУВММ˚П БЫПУ·˙ВНЪЛ‚УП 28 ~ 100 ПП.
оУП‡Ъ ЩУЪУФОВМНЛ: 35 ПП, ТЪ‡М‰‡ЪМ‡fl ЩУЪУФОВМН‡ Т DX-НУ‰УП (24 x 36 ПП).
é·˙ÂÍÚË‚: é·˙ÂÍÚË‚ Olympus, 28 ~ 100 ÏÏ, F4.6 ~ 11.9,
7 ˝ОВПВМЪУ‚ ‚ 7 „ЫФФ‡ı.
á‡Ú‚Ó: èÓ„‡ÏÏÌ˚È ˝ÎÂÍÚÓÌÌ˚È Á‡Ú‚Ó.
ÇˉÓËÒ͇ÚÂθ:кВ‡О¸МУ„У ЛБУ·‡КВМЛfl Т БЫПУП Л ‰ЛУФЪЛ˜ВТНУИ
ÍÓÂ͈ËÂÈ.
оУНЫТЛУ‚Н‡: еЫО¸ЪЛ-‡‚ЪУЩУНЫТ Ф‡ТТЛ‚МУ„У ЪЛФ‡ (П‡НТ. 11 ЪУ˜ВН).
ЗУБПУКМ‡ ЩЛНТ‡ˆЛfl ЩУНЫТ‡.
СЛ‡Ф‡БУМ ЩУНЫТЛУ‚НЛ: 0,6 Ï ~ ∞ (·ВТНУМВ˜МУТЪ¸) ФЛ ¯ЛУНУП Ы„ОВ,
0,8 Ï ~ ∞ (·ВТНУМВ˜МУТЪ¸) ФЛ ЪВОВЩУЪУТ˙ВПНВ.
дУМЪУО¸ ˝НТФУБЛˆЛЛ: иУ„‡ППМ˚И ‡‚ЪУП‡ЪЛ˜ВТНЛИ НУМЪУО¸ ˝НТФУБЛˆЛЛ,
3-БУММ˚И Б‡ПВ ˝НТФУБЛˆЛЛ. СЛ‡Ф‡БУМ ‡‚ЪУ˝НТФУБЛˆЛЛ –
EV2,4 (F4.6, 4-ТВН) ~ EV16 (F10.2, 1/630-ТВН) ФЛ ¯ЛУНУП Ы„ОВ,
EV5,1 (F11.9, 4-ТВН) ~ EV17 (F18, 1/410-ТВН) ФЛ ЪВОВЩУЪУТ˙ВПНВ.
ë˜ÂÚ˜ËÍ Í‡‰Ó‚: иУ„ВТТЛ‚МУ„У ЪЛФ‡, Т ‚˚‚У‰УП М‡ Ьд-‰ЛТФОВИ.
Д‚ЪУТФЫТН: щОВНЪУММ˚И, Б‡‰ВКН‡ УНУОУ 12 ТВН.
СЛ‡Ф‡БУМ ˜Ы‚ТЪ‚ЛЪВО¸МУТЪЛ ЩУЪУФОВМНЛ: Ä‚ÚÓχÚ˘ÂÒ͇fl ÛÒÚ‡Ìӂ͇ ‰Îfl
ЩУЪУФОВМНЛ Т DX-НУ‰УП: ISO 50, 100, 200, 400, 800, 1600 Л
3200. СОfl ‰Ы„Лı ФУПВКЫЪУ˜М˚ı БМ‡˜ВМЛИ ‡‚ЪУП‡ЪЛ˜ВТНЛ
‚˚·Л‡ВЪТfl ·ОЛК‡И¯‡fl ·УОВВ МЛБН‡fl ˜Ы‚ТЪ‚ЛЪВО¸МУТЪ¸.
СОfl ЩУЪУФОВМНЛ ·ВБ DX-НУ‰‡ ‰ВИТЪ‚ЫВЪ ЫТЪ‡МУ‚Н‡ ISO 100.
иВВПУЪН‡ ФОВМНЛ Л Н‡‰‡: Ä‚ÚÓχÚ˘ÂÒ͇fl.
ÇÒÔ˚¯Í‡: ÇÒÚÓÂÌ̇fl ‚˚‰‚ËÊ̇fl ‚ÒÔ˚¯Í‡.
ЗВПfl Б‡fl‰НЛ – ФУfl‰Н‡ 0,5 ~ 5,5 ТВН.
(ФЛ МУП‡О¸МУИ ЪВПФВ‡ЪЫВ Т МУ‚˚ПЛ ·‡Ъ‡ВflПЛ).
кВКЛП˚ ‚ТФ˚¯НЛ: Д‚ЪУ- (ФЛ ФОУıУП, НУМЪУ‚УП Л ЩОЫУВТˆВМЪМУП Т‚ВЪВ),
ТМЛКВМЛВ ˝ЩЩВНЪ‡ Н‡ТМ˚ı „О‡Б, УЪПВМ‡ ‚ТФ˚¯НЛ,
ФЛМЫ‰ЛЪВО¸М‡fl ‚ТФ˚¯Н‡, МУ˜МУИ ВКЛП ‚ТФ˚¯НЛ Л МУ˜МУИ
ВКЛП ТУ ТМЛКВМЛВП ˝ЩЩВНЪ‡ Н‡ТМ˚ı „О‡Б.
кВКЛП˚ ˝НТФУБЛˆЛЛ: Д‚ЪУ˝НТФУБЛˆЛfl, ЪУ˜В˜М˚И Б‡ПВ Л ·ВТНУМВ˜МУТЪ¸.
èËÚ‡ÌËÂ: й‰М‡ ОЛЪЛВ‚‡fl ·‡Ъ‡Вfl М‡ 3 З (DL123A ЛОЛ CR123A).
ê‡ÁÏÂ˚: 117 (ò) x 61,5 (Ç) x 42,5 (í) ÏÏ (·ÂÁ ‚˚ÒÚÛÔ‡˛˘Ëı ˜‡ÒÚÂÈ).
å‡ÒÒ‡: 220 „ (·ÂÁ ·‡Ú‡ÂË).
СУФУОМЛЪВО¸МУ: ЗТВФУ„У‰М˚И ‰ЛБ‡ИМ.
лФВˆЛЩЛН‡ˆЛfl ЫТЪУИТЪ‚‡ ‰ЛТЪ‡МˆЛУММУ„У ЫФ‡‚ОВМЛfl
(ÓÔˆËÓÌ)
лЛТЪВП‡ ‰ЛТЪ‡МˆЛУММУ„У ЫФ‡‚ОВМЛfl: àÌه͇Ò̇fl, Á‡‰ÂÊ͇ ÓÍ. 3 ÒÂÍ.
èËÚ‡ÌËÂ: é‰Ì‡ ·‡Ú‡Âfl CR2025.
ëÓÍ ÒÎÛÊ·˚ ·‡Ú‡ÂË: èÓfl‰Í‡ 5 ÎÂÚ ËÎË 20,000 ‡Á.
ꇷӘ ‡ÒÒÚÓflÌËÂ: èÓfl‰Í‡ 5 Ï.
ê‡ÁÏÂ˚: 56,5 x 35,0 x 6,5 ÏÏ.
å‡ÒÒ‡: 11 „ (·ÂÁ ·‡Ú‡ÂË).
лиЦсаоадДсаь ейЬЦн абеЦзьнъль ЕЦб йЕцьЗгЦзав а
йЕьбДнЦгълнЗ лй лнйкйзх икйабЗйСанЦгь. оДднауЦлдйЦ
абСЦгаЦ ейЬЦн йнгауДнъль йн абСЦгав, ийдДбДззхп
З щнйв азлнкмдсаа.
лиЦсаоадДсаь
RU
63
• зВ УТЪ‡‚ОflИЪВ ЩУЪУН‡ПВЫ ‚ ПВТЪ‡ı, „‰В УМ‡ ·Ы‰ВЪ ФУ‰‚В„‡Ъ¸Тfl ТЛО¸МУПЫ
М‡„В‚Ы, ‚УБ‰ВИТЪ‚Л˛ ‚О‡„Л ЛОЛ ФflП˚ı ТУОМВ˜М˚ı ОЫ˜ВИ – М‡ФЛПВ,
‚ П‡¯ЛМВ ЛОЛ М‡ ФОflКВ.
• зВ ‰УФЫТН‡ИЪВ НУМЪ‡НЪ‡ ЩУЪУН‡ПВ˚ Т ЩУП‡ОЛМУП Л М‡ЩЪ‡ОЛМУП.
• ЦТОЛ ЩУЪУН‡ПВ‡ М‡ПУНМВЪ, ‚˚ЪЛЪВ ВВ ТЫıЛП ФУОУЪВМˆВП.
лУО¸ ПУТНУИ ‚У‰˚ ПУКВЪ ·˚Ъ¸ УТУ·ВММУ ‡БЫ¯ЛЪВО¸М‡.
• зВ ЛТФУО¸БЫИЪВ У„‡МЛ˜ВТНЛı ‡ТЪ‚УЛЪВОВИ, Ъ‡НЛı Н‡Н ТФЛЪ Л
‡ТЪ‚УЛЪВО¸ Н‡ТНЛ, ‰Оfl ˜ЛТЪНЛ ЩУЪУН‡ПВ˚.
• зВ УТЪ‡‚ОflИЪВ ЩУЪУН‡ПВЫ Т‚ВıЫ ЛОЛ ‚·ОЛБЛ ЪВОВ‚ЛБУ‡, ıУОУ‰ЛО¸МЛН‡
Л ‰Ы„Лı ЫТЪУИТЪ‚, ТУБ‰‡˛˘Лı П‡„МЛЪМ˚В ФУОfl.
• зВ ФУ‰‚В„‡ИЪВ ЩУЪУН‡ПВЫ ‚УБ‰ВИТЪ‚Л˛ Ф˚ОЛ Л ФВТН‡, Ъ. Н. ˝ЪУ ПУКВЪ
ФЛ‚ВТЪЛ Н ТВ¸ВБМ˚П ФУ‚ВК‰ВМЛflП.
• зВ ЪflТЛЪВ Л МВ ФУ‰‚В„‡ИЪВ ЩУЪУН‡ПВЫ ‰Ы„ЛП ПВı‡МЛ˜ВТНЛП Л Ы‰‡М˚П
‚УБ‰ВИТЪ‚ЛflП.
• зВ ФЛО‡„‡ИЪВ ˜ВБПВМ˚ı ПВı‡МЛ˜ВТНЛı ЫТЛОЛИ Н БЫП-У·˙ВНЪЛ‚Ы.
• зВ ФУ‰‚В„‡ИЪВ ЩУЪУН‡ПВЫ ˜ВБПВМУПЫ М‡„В‚Ы (‚˚¯В 40 °C) ЛОЛ ıУОУ‰Ы
(МЛКВ –10 °C). зЛБН‡fl ЪВПФВ‡ЪЫ‡, ‰‡КВ ‚ ЫН‡Б‡ММ˚ı ФВ‰ВО‡ı, ПУКВЪ
ЛМУ„‰‡ М‡Ы¯‡Ъ¸ ‡·УЪЫ ·‡Ъ‡ВИ, ФЛ‚У‰fl Н ‚ВПВММУПЫ УЪНО˛˜ВМЛ˛
ЩУЪУН‡ПВ˚.
• лЪ‡‡ИЪВТ¸ МВ УТЪ‡‚ОflЪ¸ ЩУЪУН‡ПВЫ ‚ МВ‡·УЪ‡˛˘ВП ТУТЪУflМЛЛ М‡
‰ОЛЪВО¸МУВ ‚ВПfl. щЪУ ПУКВЪ ФЛ‚ВТЪЛ Н У·‡БУ‚‡МЛ˛ М‡ МВИ ФОВТВМЛ
Л ‰Ы„ЛП ФУ·ОВП‡П. иВВ‰ ЛТФУО¸БУ‚‡МЛВП ЩУЪУН‡ПВ˚ ФУ·ЫИЪВ
М‡КЛП‡Ъ¸ НМУФНЫ ТФЫТН‡ Б‡Ъ‚У‡ Л ФУ‚ВflИЪВ, Н‡Н ‡·УЪ‡ВЪ ЩУЪУН‡ПВ‡.
• зВНУЪУ˚В ВМЪ„ВМ-‡ФФ‡‡Ъ˚ ‚ ‡˝УФУЪ‡ı ПУ„ЫЪ ФУ‚В‰ЛЪ¸ ЩУЪУФОВМНЫ
‚ ЩУЪУН‡ПВВ. лЪ‡‡ИЪВТ¸ МВ ФУФЫТН‡Ъ¸ З‡¯Ы ЩУЪУН‡ПВЫ ˜ВВБ ˝ЪЛ
ЫТЪУИТЪ‚‡. йЪ‰‡‚‡ИЪВ ВВ ‡·УЪМЛНЫ ТОЫК·˚ ·ВБУФ‡ТМУТЪЛ ‰Оfl УТПУЪ‡.
• зВ ФЛН‡Т‡ИЪВТ¸ Н ФВВ‰МВИ ТЪУУМВ ‚ТФ˚¯НЛ ФУТОВ ВВ ˜‡ТЪУ„У
ЛТФУО¸БУ‚‡МЛfl М‡ ФУЪflКВМЛЛ НУУЪНУ„У ‚ВПВМЛ, Ъ. Н. ФУ‚ВıМУТЪ¸
‚ТФ˚¯НЛ ПУКВЪ ·˚Ъ¸ „Уfl˜ВИ.
пкДзанЦ ЕДнДкЦа ЗСДга йн алнйузадйЗ йЙзь. зЦ ихнДвнЦлъ
кДбЕакДнъ, иЦкЦбДкьЬДнъ ага бДехдДнъ ЕДнДкЦа зДдйкйндй.
зЦ ихнДвнЦлъ кДбЕакДнъ ойнйдДеЦкм; йзД лйСЦкЬан щгЦеЦзнх
ийС Зхлйдае зДикьЬЦзаЦе. Цлга ЗзмнкЦззаЦ щгЦеЦзнх
ойнйдДеЦкх йЙйгьынль З кЦбмгънДнЦ ЦЦ иДСЦзаь ага
ийЗкЦЬСЦзаь, зЦеЦСгЦззй ЗхзънЦ ЕДнДкЦа, унйЕх зЦ
икйСйгЬДнъ алийгъбйЗДзаЦ ойнйдДеЦкх. З лгмуДЦ
ЗйбзадзйЗЦзаь зЦийгДСйд йЕкДнанЦлъ д ЕгаЬДвтЦем
СагЦкм ага З лЦкЗалзхв сЦзнк OLYMPUS.
мпйС а пкДзЦзаЦ
RU
62
ЗзаеДзаЦ
пкДзанЦ ЕДнДкЦа З еЦлнДп, зЦСйлнмизхп Сгь СЦнЦв.
Цлга кЦЕЦзйд икйЙгйнан ЕДнДкЦы, зЦеЦСгЦззй йЕкДнанЦлъ
д ЗкДум.
Page 33

дЦкЯЗзаснЗй
UA
64
млнДзйЗдД в иЦкЦЗЯкдД ЕДнДкЦ∫
ÇËÍÓËÒÚÓ‚ÛπÚ¸Òfl Ӊ̇ Î¥Ú¥π‚‡ ·‡Ú‡Âfl ̇ 3Ç (CR123A ˜Ë DL123A).
ийуДнйд кйЕйна
UA
65
1
2
3
1. з‡ЪЛТН‡˛˜Л М‡ МЛКМ˛ ˜‡ТЪЛМЫ
НЛ¯НЛ ‚¥‰Т¥НЫ ·‡Ъ‡Вª ‚ М‡ФflПНЫ Q,
ÔÓ‚ÂÌ¥Ú¸ ªª ‚ ̇ÔflÏÍÛ W È ‚¥‰ÍËÈÚÂ.
• è¯ Ì¥Ê ‚¥‰ÍË‚‡ÚË Í˯ÍÛ ‚¥‰Ò¥ÍÛ
·‡Ú‡Âª, ÔÂÂÍÓ̇ÈÚÂÒfl, ˘Ó Á‡ıËÒ̇
Í˯͇ Ó·’πÍÚË‚‡ Á‡ÍËÚ‡.
2. ÇÒÚ‡‚Ú ·‡Ú‡Â˛ ‚ Ô‡‚Ëθ̥È
Ó¥πÌÚ‡ˆ¥ª Q. á‡ÍËÈÚ Í˯ÍÛ
‚¥‰Ò¥ÍÛ ·‡Ú‡Âª W.
3. иУТЫМ¸ЪВ Б‡ıЛТМЫ НЛ¯НЫ У·’πНЪЛ‚‡
‚ М‡ФflПНЫ Q ‰У НО‡ˆ‡ММfl. й·’πНЪЛ‚
‚ЛТЫМВЪ¸Тfl, ¥ ТФ‡О‡ı ‚ЛТЫМВЪ¸Тfl М‡„УЫ.
иВВ‚¥ЪВ Б‡fl‰ ·‡Ъ‡Вª М‡ кд-‰ЛТФОВª.
• б‡fl‰Ы МУ‚Уª ·‡Ъ‡Вª ‰УТЛЪ¸, ˘У·
‚¥‰БМflЪЛ ФЛ·ОЛБМУ 15 ЩУЪУФО¥‚УН.
„ÓËÚ¸
(„‡ÒÌ ‡‚ÚÓχÚ˘ÌÓ).
ÏË„‡π, ¥Ì¯¥ ¥Ì‰Ë͇ÚÓË Ï‡˛Ú¸
Á‚˘‡ÈÌËÈ ‚Ë„Îfl‰.
ÏË„‡π, ¥Ì¯¥ ¥Ì‰Ë͇ÚÓË „‡ÒÌÛÚ¸.
б‡fl‰ ‚ЛТУНЛИ.
еУКМ‡ У·ЛЪЛ БМ¥ПНЛ.
á‡fl‰ ÌËÁ¸ÍËÈ, ·‡Ú‡Â˛ ‚‡ÚÓ
Á‡Ï¥ÌËÚË Ì‡ ÌÓ‚Û.
икадкЯигЦззь кЦеЯзсь
èËÍ¥Ô¥Ú¸ Âϥ̈¸, flÍ ÔÓ͇Á‡ÌÓ
̇ ¥Î˛ÒÚ‡ˆ¥ª.
СЯйинкЯвзД дйкЦдсЯь
иУ‚ВМ¥Ъ¸ ‰ЛТН ‰¥УФЪ¥ИМУ„У
М‡ТЪУ˛‚‡ММfl, ˘У· ‚¥БЛМ¥ П¥ЪНЛ
‡‚ЪУЩУНЫТ‡ ·ЫОУ ˜¥ЪНУ ‚Л‰МУ.
ŇڇÂfl ˆ¥ÎÍÓÏ ÓÁfl‰ÊÂ̇.
焇ÈÌÓ ‚ÒÚ‡‚Ú ÌÓ‚Û.
삇ÊÌÓ ÔÓ˜ËÚ‡ÈÚ ˆÂ ÍÂ¥‚ÌˈڂÓ, Ô¯ Ì¥Ê ÍÓËÒÚÛ‚‡ÚËÒfl ÙÓÚÓ͇ÏÂÓ˛ (Á‚ÂÌ¥Ú¸ Û‚‡„Û Ì‡ ÓÁ‰¥Î «ÑÓ„Îfl‰ ¥ Á·Â¥„‡ÌÌfl» ̇ ÒÚÓ. 72).
зДвеЦзмЗДззь йлзйЗзап уДлназ
(Ç¥‰ÍËÈÚ ÔÂ¯Û ÔÂÂÍˉÌÛ ÒÚÓ¥ÌÍÛ È ÚËχÈÚ ÒÚÓ. 3 ‚¥‰ÍËÚÓ˛.)
дУФЫТ ЩУЪУН‡ПВЛ
1 З‡К¥О¸ БЫП‡ (ТЪУ. 67)
2 дМУФН‡ ТФЫТНЫ Б‡Ъ‚У‡ (ТЪУ. 67)
3 ЯМ‰ЛН‡ЪУ ‡‚ЪУТФЫТНЫ/
‰ËÒڇ̈¥ÈÌÓ„Ó ÍÂÛ‚‡ÌÌfl
4 ë‚¥ÚÎÓ‚ËÈ ‰‡Ú˜ËÍ
✩
5 ЗЛ‰У¯ЫН‡˜
6 З¥НМУ ‡‚ЪУЩУНЫТ‡
✩
7 ëԇ·ı✩(ÒÚÓ. 67 – 69)
8 é·’πÍÚË‚
✩
9 чژËÍ ÔËÒÚÓ˛ ‰ËÒڇ̈¥ÈÌÓ„Ó
НВЫ‚‡ММfl
10 б‡ıЛТМ‡ НЛ¯Н‡ У·’πНЪЛ‚‡
11 дЛ¯Н‡ ‚¥‰Т¥НЫ ·‡Ъ‡Вª (ТЪУ. 65)
12 иУ¥Б ‰Оfl ВП¥Мˆfl (ТЪУ. 65 ¥ 70)
13 СЛТН ‰ЛУФЪ¥ИМУª НУВНˆ¥ª (ТЪУ. 65)
14 З¥НМУ ЩУЪУФО¥‚НЛ
15 ЙМ¥Б‰У ‰Оfl ¯Ъ‡ЪЛ‚‡
✩
иУТЪ¥ИМУ ТЪВКЪВ Б‡ ˜ЛТЪУЪУ˛ ˆЛı НУПФУМВМЪ¥‚. ЕЫ‰ ¥ ФОflПЛ ПУКЫЪ¸ ФЛБ‚ВТЪЛ ‰У
‚Ъ‡ЪЛ ˜¥ЪНУТЪ¥ И ЩУНЫТ‡ ЩУЪУБМ¥ПН¥‚. ЗЛЪЛ‡ИЪВ ·Ы‰ ¥ ФОflПЛ П’flНУ˛ ЪН‡МЛМУ˛.
ß̉Ë͇ÚÓË ‚ˉӯÛ͇˜‡
24 З¥БЛМ¥ П¥ЪНЛ ‡‚ЪУЩУНЫТ‡ (ТЪУ. 67)
25 е¥ЪНЛ ЪУ˜НУ‚У„У ‚ЛП¥Ы ВНТФУБЛˆ¥ª (ТЪУ. 69)
26
дУЛ„Ы‚‡О¸М¥ П¥ЪНЛ ФУОfl Н‡‰Ы ФЛ БИУПˆ¥ Б ·ОЛБ¸НУª ‚¥‰ТЪ‡М¥ (ТЪУ. 66)
27 бВОВМЛИ ¥М‰ЛН‡ЪУ (¥М‰ЛН‡ЪУ ‡‚ЪУЩУНЫТ‡)
ЙУЛЪ¸: й·’πНЪ БИУПНЛ Ы ЩУНЫТ¥. еУКМ‡ У·ЛЪЛ БМ¥ПУН.
еЛ„‡π: й·’πНЪ БИУПНЛ МВ Ы ЩУНЫТ¥. б‡Ъ‚У Б‡·ОУНУ‚‡МЛИ.
еЛ„‡π ˜‡ТЪУ: лЩУНЫТЫ‚‡ЪЛТfl М‡ У·’πНЪ¥ ‚‡КНУ. еУКМ‡ БУ·ЛЪЛ БМ¥ПУН,
‡ОВ У·’πНЪ ПУКВ ‚Лfl‚ЛЪЛТfl МВ Ы ЩУНЫТ¥.
28 ÜÓ‚ÚÓ„‡fl˜ËÈ ¥Ì‰Ë͇ÚÓ (¥Ì‰Ë͇ÚÓ Òԇ·ıÛ)
ɇÒÌÂ: ëԇ·ı Ì ·Û‰Â ‡ÍÚË‚Ó‚‡ÌËÈ. åÓÊ̇ ÁÓ·ËÚË ÁÌ¥ÏÓÍ.
ÉÓËÚ¸: ëԇ·ı ·Û‰Â ‡ÍÚË‚Ó‚‡ÌËÈ. åÓÊ̇ ÁÓ·ËÚË ÁÌ¥ÏÓÍ.
åË„‡π: ëԇ·ı Á‡fl‰Ê‡πÚ¸Òfl. èÓ˜Â͇ÈÚÂ, ÔÓÍË Á‡„ÓËÚ¸Òfl ¥Ì‰Ë͇ÚÓ.
кд-‰ЛТФОВИ
29 ЯМ‰ЛН‡ЪУ ‰‡ЪЛ/˜‡ТЫ (Ъ¥О¸НЛ ‚ ПУ‰ВОflı ¥Б Н‚‡ˆ‰‡ЪУ˛) (ТЪУ. 71)
30 г¥˜ЛО¸МЛН Н‡‰¥‚
31 иЛТЪ¥И ‰ЛТЪ‡Мˆ¥ИМУ„У НВЫ‚‡ММfl (УФˆ¥УМ) (ТЪУ. 70)
32 Д‚ЪУТФЫТН (ТЪУ. 10)
33 лФ‡О‡ı Б¥ БМЛКВММflП ВЩВНЪЫ «˜В‚УМЛı У˜ВИ» (ТЪУ. 68)
34 иЛПЫТУ‚ЛИ ТФ‡О‡ı (ТЪУ. 68)
35 лН‡ТЫ‚‡ММfl ТФ‡О‡ıЫ (ТЪУ. 68)
36 з¥˜МЛИ ВКЛП ТФ‡О‡ıЫ (ТЪУ. 68)
37 ЯМ‰ЛН‡ЪУ ТЪ‡МЫ ·‡Ъ‡Вª (ТЪУ. 65)
38 нУ˜НУ‚ЛИ ‚ЛП¥ ВНТФУБЛˆ¥ª (ТЪУ. 69)
39 зВТН¥М˜ВММ¥ТЪ¸ (ТЪУ. 69)
иЛП¥ЪН‡: зВ ‚Т¥ ¥М‰ЛН‡ЪУЛ Б’fl‚Оfl˛Ъ¸Тfl М‡ кд-‰ЛТФОВª У‰МУ˜‡ТМУ,
flÍ ÔÓ͇Á‡ÌÓ Ì‡ ¥Î˛ÒÚ‡ˆ¥ª.
16 дМУФНЛ ВКЛПЫ (MODE) ¥
ÛÒÚ‡ÌÓ‚ÍË (SET) ‰‡ÚË
(ڥθÍË ‚ ÏÓ‰ÂÎflı ¥Á
Í‚‡ˆ‰‡ÚÓ˛) (ÒÚÓ. 71)
17 дМУФН‡ ФВВПУЪЫ‚‡ММfl
ЩУЪУФО¥‚НЛ (ТЪУ. 70)
18 дМУФН‡ ВКЛПЫ ВНТФУБЛˆ¥ª
(ÒÚÓ. 69)
19 дМУФН‡ ВКЛПЫ ТФ‡О‡ıЫ
(ÒÚÓ. 68)
20 дМУФН‡
‡‚ЪУТФЫТНЫ/‰ЛТЪ‡Мˆ¥ИМУ„У
НВЫ‚‡ММfl (ТЪУ. 70)
21 кд-‰ЛТФОВИ
22 ᇉМfl НЛ¯Н‡
23 З‡К¥О¸ ‚¥‰НЛ‚‡ММfl Б‡‰М¸Уª
Í˯ÍË (ÒÚÓ. 66)
Page 34

йСЦкЬДззь ойнйбзЯедЯЗ
лнДзСДкнзЯ омздсЯ∫
UA
67
бДкьСдД ойнйигЯЗда
лнДзСДкнзЯ омздсЯ∫
UA
66
1
2
1. 襉̥ϥڸ ‚‡Ê¥Î¸ Á‡‰Ì¸Óª Í˯ÍË,
˘Ó· ‚¥‰ÍËÚË ªª.
• ç ‰ÓÚÓ͇ÈÚÂÒfl ‰Ó ‚ÌÛÚ¥¯Ì¥ı
ВОВПВМЪ¥‚ ЩУЪУН‡ПВЛ,
УТУ·ОЛ‚У ‰У У·’πНЪЛ‚‡.
2. ЗТЪ‡‚ЪВ Н‡ЪЛ‰К ЩУЪУФО¥‚НЛ ‚
Ф‡‚ЛО¸МУПЫ ФУОУКВММ¥ ‰У
НО‡ˆ‡ММfl.
3. лФУОЫ˜¥Ъ¸ ‚¥О¸МЛИ Н¥МВˆ¸ ЩУЪУФО¥‚НЛ
Á ̇ԇ‚Îfl˛˜Ó˛ Υ̥π˛ (A), ¥ ÔÓÏ¥ÒÚ¥Ú¸
ÔÎ¥‚ÍÛ Ï¥Ê Ì‡Ô‡‚Îfl˛˜ËÏË Ï¥Ú͇ÏË (B).
èÓÚ¥Ï Á‡ÍËÈÚ Á‡‰Ì˛ Í˯ÍÛ ‰Ó
Í·ˆ‡ÌÌfl.
• оУЪУФО¥‚Н‡ ‡‚ЪУП‡ЪЛ˜МУ ФУНЫЪЛЪТfl
М‡ ФВ¯ЛИ Н‡‰.
• бТЫМ¸ЪВ Б‡ıЛТМЫ НЛ¯НЫ У·’πНЪЛ‚‡
‰У НО‡ˆ‡ММfl. иВВНУМ‡ИЪВТfl, ˘У
О¥˜ЛО¸МЛН Н‡‰¥‚ М‡ кд-‰ЛТФОВª
ФУН‡БЫπ «
II
».
• üÍ˘Ó Ì‡ Ï¥Òˆ¥ Î¥˜ËθÌË͇ ÏË„‡π
¥Ì‰Ë͇ÚÓ «
EE
», ÔÂÂÁ‡fl‰¥Ú¸ ÔÎ¥‚ÍÛ.
3
СЯДиДбйз ойдмлмЗДззь в кйЕйуД ЗЯСлнДзъ
ойнйбвйедД ЗЦгадае игДзйе (Яб Егабъдй∫ ЗЯСлнДзЯ)
сfl ЩУЪУН‡ПВ‡ ‚ЛНУЛТЪУ‚Ыπ ТЛТЪВПЫ
‡‚ЪУЩУНЫТ‡ «multi-wide autofocus»
(¯ЛУНЛИ ПЫО¸ЪЛ‡‚ЪУЩУНЫТ), ˘У ФУОВ„¯Ыπ
ЩУНЫТЫ‚‡ММfl М‡ У·’πНЪ¥, М‡‚¥Ъ¸ flН˘У ‚¥М МВ
БМ‡ıУ‰ЛЪ¸Тfl ‚ ˆВМЪ¥ ‚Л‰У¯ЫН‡˜‡.
бМ¥П‡ИЪВ М‡ ‚¥‰ТЪ‡М¥ ‚¥‰ 0,6 П ‚¥‰ У·’πНЪ‡
БИУПНЛ ‰У МВТН¥М˜ВММУТЪ¥ ФЛ ¯ЛУНУПЫ
НЫЪ¥ БИУПНЛ ¥ ‚¥‰ 0,8 П ‰У МВТН¥М˜ВММУТЪ¥ ФЛ
ЪВОВЩУЪУБИУПˆ¥. лФЫТН Б‡Ъ‚У‡ Ъ‡НУК
ПУКОЛ‚ЛИ, flН˘У У·’πНЪ БИУПНЛ БМ‡ıУ‰ЛЪЛТfl
‰ЫКВ ·ОЛБ¸НУ ‰У ЩУЪУН‡ПВЛ, ‡ОВ ФЛ ˆ¸УПЫ У·’πНЪ М‡ ЩУЪУБМ¥ПНЫ ·Ы‰В МВ ‚ ЩУНЫТ¥.
З П¥Ы М‡·ОЛКВММfl ‰У У·’πНЪ‡ БИУПНЛ
У·О‡ТЪ¸ БУ·‡КВММfl Ы ‚Л‰У¯ЫН‡˜¥
БП¥ТЪЛЪ¸Тfl ‚МЛБ.
Q
дУЛ„Ы‚‡О¸М¥ П¥ЪНЛ ФУОfl Н‡‰Ы
ФЛ БИУПˆ¥ ‚ВОЛНЛП ФО‡МУП
(У·О‡ТЪ¸ БУ·‡КВММfl ФЛ БИУПˆ¥
Б П¥М¥П‡О¸МУª ‚¥‰ТЪ‡М¥).
W
é·Î‡ÒÚ¸ ÁÓ·‡ÊÂÌÌfl ÔË ÛÒÚ‡ÌÓ‚ˆ¥
̇ ÌÂÒ̘ͥÂÌÌ¥ÒÚ¸.
1
2
3
ЗiБЛМi ПiЪНЛ ‡‚ЪУЩУНЫТ‡
1. бТЫМ¸ЪВ Б‡ıЛТМЫ НЛ¯НЫ У·’πНЪЛ‚‡ ‰У
НО‡ˆ‡ММfl. й·’πНЪЛ‚ ЪУıЛ ‚ЛТЫМВЪ¸Тfl,
кд-‰ЛТФОВИ ‚НО˛˜ЛЪ¸Тfl.
иУ‚ВМ¥Ъ¸ ‚‡К¥О¸ БЫП‡ ‚ М‡ФflПНЫ
«T» ‰Оfl ЪВОВЩУЪУБИУПНЛ (100 ПП)
˜Л ‚ М‡ФflПНЫ «W» ‰Оfl ¯ЛУНУНЫЪУ‚Уª
БИУПНЛ (28 ПП).
• ьН˘У МВ ‚ЛНУМЫ‚‡ЪЛ М¥flНЛı ‰¥И Б
ЩУЪУН‡ПВУ˛ ФУЪfl„УП ФЛ·ОЛБМУ
4,5 ı‚ЛОЛМ, У·’πНЪЛ‚ ‚Ъfl„МВЪ¸Тfl
‚ТВВ‰ЛМЫ ¥ кд-‰ЛТФОВИ Б„‡ТМВ.
2. 燂‰¥Ъ¸ П¥ЪНЫ ‡‚ЪУЩУНЫТ‡ (AF) М‡
У·’πНЪ БИУПНЛ.
• 砉˂¥Ú¸Òfl ̇ ÒÓÌˆÂ È ¥Ì¯¥ ÒËθ̥
‰Ê· Ò‚¥Ú· ˜ÂÂÁ ‚ˉӯÛ͇˜.
3. з‡ЪЛТМ¥Ъ¸ НМУФНЫ ТФЫТН‡ Б‡Ъ‚У‡
М‡ФУОУ‚ЛМЫ, ˘У· БУ·ЛЪЛ ЩУНЫТЫ‚‡ММfl
М‡ У·’πНЪ. иВВНУМ‡ИЪВТfl, ˘У БВОВМЛИ
¥М‰ЛН‡ЪУ „УЛЪ¸; ФУЪ¥П М‡ЪЛТМ¥Ъ¸
НМУФНЫ ТФЫТНЫ Б‡Ъ‚У‡ ˆ¥ОНУП,
˘У· БУ·ЛЪЛ БМ¥ПУН. и¥ТОfl ЪУ„У,
flН ЗЛ ‚¥‰ФЫТЪЛЪВ НМУФНЫ ТФЫТНЫ
Б‡Ъ‚У‡, ЩУЪУФО¥‚Н‡ ·Ы‰В ‡‚ЪУП‡ЪЛ˜МУ
ФВВПУЪ‡М‡ М‡ У‰ЛМ Н‡‰ ЫФВВ‰.
ДЗнйеДнаузав кЦЬае лиДгДпм – кйЕйуД ЗЯСлнДзъ
иЦкЦейнмЗДззь в ЗагмуЦззь ойнйигЯЗда
(ФЛ НУО¸УУ‚¥И МВ„‡ЪЛ‚М¥И ЩУЪУФО¥‚ˆ¥)
иЛ ‚ЛНУЛТЪ‡ММ¥ У·УУЪМУª (ФУБЛЪЛ‚МУª) ЩУЪУФО¥‚НЛ У·У˜‡ ‚¥‰ТЪ‡М¸ ФЛ
ЪВОВЩУЪУБИУПˆ¥ ТНУУЪЛЪ¸Тfl ФЛ·ОЛБМУ М‡ 30%.
ISO
100
200
400
òËÓÍËÈ ÍÛÚ (W)
0,6 – 4,6 Ï
0,6 – 6,5 Ï
0,6 – 9,2 Ï
нВОВЩУЪУ (н)
0,8 – 1,8 Ï
0,8 – 2,5 Ï
0,8 – 3,6 Ï
оУЪУН‡ПВ‡ ‡‚ЪУП‡ЪЛ˜МУ БПУЪЫπ ФО¥‚НЫ,
НУОЛ ‚УМ‡ БМflЪ‡ ‰У Н¥Мˆfl. иВВНУМ‡ИЪВТfl,
˘У БПУЪЫ‚‡О¸МЛИ ПВı‡М¥БП Б‡Н¥М˜Л‚
У·УЪЫ И М‡ кд-‰ЛТФОВª Б’fl‚Л‚Тfl
ПЛ„УЪОЛ‚ЛИ ¥М‰ЛН‡ЪУ «
EE
»; Ф¥ТОfl ˆ¸У„У
‚¥‰НЛИЪВ Б‡‰М˛ НЛ¯НЫ И ‰¥ТЪ‡М¸ЪВ
ЩУЪУФО¥‚НЫ.
Q
W
Page 35

äÓÏ·¥Ì‡ˆ¥fl ‰‚Óı ÂÊËÏ¥‚ – зЯузав кЦЬае лиДгДпм
бЯ бзаЬЦззье ЦоЦднм «уЦкЗйзап йуЦв»
б‡ФУ·¥„‡π ВЩВНЪЫ «˜В‚УМЛı У˜ВИ», flНЛИ Б‚Л˜‡ИМУ Б’fl‚ОflπЪ¸Тfl ФЛ М¥˜М¥И
ЩУЪУБИУПˆ¥ (‰Л‚. П‡О. 7 М‡ ТЪУ. 126). й·Л‰‚‡ ВКЛПЛ МВ ПУКЫЪ¸
ФУπ‰МЫ‚‡ЪЛТfl Б ВКЛПУП ЪУ˜НУ‚У„У ‚ЛП¥Ы ВНТФУБЛˆ¥ª. и¥ТОfl Б‡НЛЪЪfl
Б‡ıЛТМУª НЛ¯НЛ У·’πНЪЛ‚‡ ‚¥‰МУ‚О˛πЪ¸Тfl ‡‚ЪУП‡ЪЛ˜МЛИ ВКЛП ТФ‡О‡ıЫ.
млнДзйЗдД кЦЬаем лиДгДпм
лиЦсЯДгъзЯ омздсЯ∫
UA
69
Ç¥‰ÍËÈÚ Á‡‰Ì˛ ÔÂÂÍˉÌÛ ÒÚÓ¥ÌÍÛ È ÚËχÈÚ ‚¥‰ÍËÚÓ˛ ÒÚÓ¥ÌÍÛ 126.
ЦЩВНЪ «˜В‚УМЛı У˜ВИ» ФЛ ЩУЪУБИУПˆ¥ Б¥ ТФ‡О‡ıУП –
лиДгДп бЯ бзаЬЦззье ЦоЦднм
«уЦкЗйзап йуЦв»
иЛ ЩУЪУБИУПˆ¥ ‚ ЪВПfl‚¥ Т‚¥ЪОУ ТФ‡О‡ıЫ ФУЪ‡ФОflπ ‚ Б¥МЛˆ¥ У˜ВИ О˛‰ЛМЛ,
НУОЛ ‚УМЛ УБ¯ЛВМ¥. З¥‰·Л‚‡˛˜ЛТ¸ ‚¥‰ Т¥ЪН¥‚НЛ УН‡, Т‚¥ЪОУ ТЪ‡π ˜В‚УМЛП.
лФ‡О‡ı Б¥ БМЛКВММflП ВЩВНЪЫ «˜В‚УМЛı У˜ВИ» У·ЛЪ¸ ТВ¥˛ ТО‡·НЛı
ФУФВВ‰М¥ı ТФ‡О‡ı¥‚ ФВВ‰ ‡НЪЛ‚‡ˆ¥π˛ УТМУ‚МУ„У ТФ‡О‡ıЫ. сВ ‰УБ‚УОflπ
У˜‡П О˛‰ЛМЛ ‡‰‡ФЪЫ‚‡ЪЛТfl ‰У flТН‡‚У„У Т‚¥ЪО‡ ¯ОflıУП Б‚ЫКВММfl Б¥МЛˆ¸.
ьН˘У О˛‰ЛМ‡ ·Ы‰В ‰Л‚ЛЪЛТfl М‡ ФУФВВ‰М¥ ТФ‡О‡ıЛ, ªª У˜¥ МВ ‚Лfl‚ОflЪ¸Тfl
˜В‚УМЛПЛ М‡ ЩУЪУБМ¥ПНЫ (‰Л‚. П‡О. 3 ̇ ÒÚÓ. 126).
• нЛП‡ИЪВ ЩУЪУН‡ПВЫ ¥‚МУ. лФЫТН Б‡Ъ‚У‡ ‚¥‰·Ы‚‡πЪ¸Тfl ФЛ·ОЛБМУ
˜ВВБ 1 ТВНЫМ‰Ы Ф¥ТОfl М‡ЪЛТН‡ММfl М‡ НМУФНЫ ТФЫТН‡.
• бМЛКВММfl ВЩВНЪЫ «˜В‚УМЛı У˜ВИ» ПУКВ МВ ‚¥‰·ЫЪЛТfl, flН˘У О˛‰ЛМ‡:
1. зВ ‰Л‚ЛЪ¸Тfl М‡ ТФ‡О‡ı Ф¥‰ ФflПЛП НЫЪУП.
2. 砉˂ËÚ¸Òfl ̇ ÔÓÔ‰̥ Òԇ·ıË.
3. бМ‡ıУ‰ЛЪ¸Тfl Б‡М‡‰ЪУ ‰‡ОВНУ ‚¥‰ ЩУЪУН‡ПВЛ.
ЦЩВНЪЛ‚М¥ТЪ¸ БМЛКВММfl ВЩВНЪЫ «˜В‚УМЛı У˜ВИ» Б‡ОВКЛЪ¸ ‚¥‰ ¥М‰Л‚¥‰Ы‡О¸МЛı
УТУ·ОЛ‚УТЪВИ НУКМУª О˛‰ЛМЛ.
ЗЛНУЛТЪУ‚Ы‚‡ЪЛ ТФ‡О‡ı Б‡·УУМВМУ ˜Л МВ ·‡К‡МУ –
лдДлмЗДззь лиДгДпм
ë͇ÒÛ‚‡ÌÌfl Òԇ·ıÛ МВУ·ı¥‰МВ, flН˘У ЩУЪУБИУПН‡ Б¥ ТФ‡О‡ıУП Б‡·УУМВМ‡
˜Л flН˘У ЗЛ ıУ˜ВЪВ ФВВ‰‡ЪЛ ‚ Н‡‰¥ ФЛУ‰МВ ФЛ„ОЫ¯ВМВ УТ‚¥ЪОВММfl
(‰Л‚. П‡О. 4 ̇ ÒÚÓ. 126).
• йТН¥О¸НЛ ‚ТЪ‡МУ‚О˛πЪ¸Тfl ЪЛ‚‡О‡ ‚ЛЪЛПН‡ (·ОЛБ¸НУ 2 ТВНЫМ‰), МВЫıУПУ
Б‡Н¥Ф¥Ъ¸ ЩУЪУН‡ПВЫ Б‡ ‰УФУПУ„У˛ ¯Ъ‡ЪЛ‚‡, ˘У· БУ·‡КВММfl ‚ Н‡‰¥ МВ
‚Лfl‚ЛОУТfl УБПЛЪЛП ЫМ‡ТО¥‰УН ФЛУ‰МУ„У ЪВПЪ¥ММfl ЫН.
• й·’πНЪ БИУПНЛ ФУ‚ЛМВМ ·ЫЪЛ МВЫıУПЛП; ‚ ¥М¯УПЫ ‚ЛФ‡‰НЫ ИУ„У НУМЪЫЛ
ПУКЫЪ¸ ‚Лfl‚ЛЪЛТfl УБПЛЪЛПЛ.
è¥ÒÎfl Á‡ÍËÚÚfl Á‡ıËÒÌÓª Í˯ÍË Ó·’πÍÚË‚‡ ‚¥‰ÌӂβπÚ¸Òfl ‡‚ÚÓχÚ˘ÌËÈ
ÂÊËÏ Òԇ·ıÛ.
í¥Ì¥ ̇ ӷ΢˜¥ – икаемлйЗав лиДгДп
иЛ ФУЪВЪМ¥И ЩУЪУБИУПˆ¥ ФУЪЛ Т‚¥ЪО‡ ˜Л ‚ Ъ¥М¥ ‰ВВ‚‡ ‡·У ‰‡ıЫ У·ОЛ˜˜fl
У·’πНЪ‡ БИУПНЛ ПУКВ ‚ЛИЪЛ Б‡М‡‰ЪУ ЪВПМЛП. иЛПЫТУ‚ЛИ ТФ‡О‡ı
Б‡·ВБФВ˜Ыπ МВУ·ı¥‰МЫ Н¥О¸Н¥ТЪ¸ ‰У‰‡ЪНУ‚У„У Т‚¥ЪО‡, ˘У· НУПФВМТЫ‚‡ЪЛ
ПУКОЛ‚¥ Ъ¥М¥ (‰Л‚. П‡О. 5 М‡ ТЪУ. 126) ¥ ЩОЫУВТˆВМЪМВ Т‚¥ЪОУ.
• иВВНУМ‡ИЪВТfl, ˘У У·’πНЪ БИУПНЛ БМ‡ıУ‰ЛЪ¸Тfl ‚ ПВК‡ı У·У˜Уª ‚¥‰ТЪ‡М¥
ТФ‡О‡ıЫ (ТЪУ. 67).
• иЛ ‰ЫКВ flТН‡‚УПЫ УТ‚¥ЪОВММ¥ ФЛПЫТУ‚ЛИ ТФ‡О‡ı МВВЩВНЪЛ‚МЛИ.
è¥ÒÎfl Á‡ÍËÚÚfl Á‡ıËÒÌÓª Í˯ÍË Ó·’πÍÚË‚‡ ‚¥‰ÌӂβπÚ¸Òfl ‡‚ÚÓχÚ˘ÌËÈ
ÂÊËÏ Òԇ·ıÛ.
祘Ì ϥÒÚÓ – зЯузав кЦЬае лиДгДпм
и¥‰ ˜‡Т М¥˜МЛı ФУ„ЫОflМУН ФУ П¥ТЪЫ ЗЛ ПУКВЪВ Б‡ıУЪ¥ЪЛ ТЩУЪУ„‡ЩЫ‚‡ЪЛ
НУ„У-МВ·Ы‰¸ М‡ ЪО¥ М¥˜МЛı ‚У„М¥‚. 祘ÌËÈ ÂÊËÏ Òԇ·ıÛ ‰УБ‚УОflπ ˆВ
БУ·ЛЪЛ. йТМУ‚МЛИ ТФ‡О‡ı ‚ЛТ‚¥ЪО˛π У·’πНЪ ФВВ‰М¸У„У ФО‡МЫ; ФЛ ˆ¸УПЫ
Б‡Ъ‚У Б‡ОЛ¯‡πЪ¸Тfl ‚¥‰НЛЪЛП ‰У 4 ТВНЫМ‰, ˘У· ТЩУЪУ„‡ЩЫ‚‡ЪЛ ‚У„М¥ П¥ТЪ‡.
зВУ·ı¥‰МУ МВЫıУПУ Б‡Н¥ФЛЪЛ ЩУЪУН‡ПВЫ Б‡ ‰УФУПУ„У˛ ¯Ъ‡ЪЛ‚‡ ˜Л ¥М¯Уª
УФУЛ, ˘У· ЩУЪУН‡ПВ‡ МВ ЪВПЪ¥О‡ (‰Л‚. П‡О. 6 ̇ ÒÚÓ. 126).
лиЦсЯДгъзЯ омздсЯ∫
UA
68
ÅÂÁ
¥Ì‰Ë͇ÚÓ‡
Ä‚ÚÓÂÊËÏ
бМЛКВММfl ВЩВНЪЫ
«˜В‚УМЛı У˜ВИ»
ë͇ÒÛ‚‡ÌÌfl
Òԇ·ıÛ
иЛПЫТУ‚ЛИ
ТФ‡О‡ı
祘ÌËÈ ÂÊËÏ
Òԇ·ıÛ
з¥˜МЛИ ВКЛП Б¥
БМЛКВММflП ВЩВНЪЫ
«˜В‚УМЛı У˜ВИ»
дУМЪ‡ТЪМВ УТ‚¥ЪОВММfl – нйудйЗав ЗаеЯк ЦдлийбасЯ∫
иЛ ЩУЪУБИУПˆ¥ ‚ ЫПУ‚‡ı ‚ЛТУНУª НУМЪ‡ТЪМУТЪ¥ (М‡ФЛНО‡‰, ФЛ ФУЪВЪМ¥И
ЩУЪУБИУПˆ¥ ФУЪЛ Т‚¥ЪО‡) У·ОЛ˜˜fl У·’πНЪ‡ БИУПНЛ ПУКВ ‚Лfl‚ЛЪЛТfl Б‡М‡‰ЪУ
ЪВПМЛП. фУ· ВНТФУБЛˆ¥fl ФЛ БИУПˆ¥ У·ОЛ˜˜fl ·ЫО‡ ‚ТЪ‡МУ‚ОВМ‡ Ф‡‚ЛО¸МУ,
‚ЛНУЛТЪУ‚ЫИЪВ ВКЛП ЪУ˜НУ‚У„У ‚ЛП¥Ы ВНТФУБЛˆ¥ª (‰Л‚. П‡О. 1 М‡ ТЪУ. 2).
燂‰¥Ъ¸ П¥ЪНЛ ЪУ˜НУ‚У„У ‚ЛП¥Ы ВНТФУБЛˆ¥ª (A) М‡ У·О‡ТЪ¸, Ы flН¥И ıУ˜ВЪВ
‚ЛП¥flЪЛ УТ‚¥ЪОВМ¥ТЪ¸. з‡ЪЛТМ¥Ъ¸ НМУФНЫ ТФЫТНЫ Б‡Ъ‚У‡ М‡ФУОУ‚ЛМЫ;
Б‡„УЛЪ¸Тfl БВОВМЛИ ¥М‰ЛН‡ЪУ, ЩУНЫТ ¥ ВНТФУБЛˆ¥fl Б‡Щ¥НТЫ˛Ъ¸Тfl ФУ У·‡М¥И
У·О‡ТЪ¥. лНУПФУМЫИЪВ З‡¯ БМ¥ПУН ¥ М‡ЪЛТМ¥Ъ¸ НМУФНЫ ТФЫТНЫ Б‡Ъ‚У‡ ФУ‚М¥ТЪ˛.
оУЪУБИУПН‡ ФВИБ‡КЫ –
ойдмлмЗДззь зД зЦлдЯзуЦззЯлнъ
оУЪУН‡ПВ‡ ‡‚ЪУП‡ЪЛ˜МУ ‚ТЪ‡МУ‚О˛π У·У˜Ы ‚¥‰ТЪ‡М¸ М‡ МВТН¥М˜ВММ¥ТЪ¸.
лФ‡О‡ı ‡НЪЛ‚ЫπЪ¸Тfl Ъ¥О¸НЛ ‚ ФЛПЫТУ‚УПЫ ВКЛП¥ (‰Л‚. П‡О. 2 ̇ ÒÚÓ. 2).
млнДзйЗдД кЦЬаем ЦдлийбасЯ∫
з‡ЪЛТМ¥Ъ¸ НМУФНЫ ВКЛПЫ ТФ‡О‡ıЫ
( ). кВКЛПЛ ˜В„Ы˛Ъ¸Тfl ‚
ФУТО¥‰У‚МУТЪ¥, ФУН‡Б‡М¥И О¥‚УЫ˜.
ЯМ‰ЛН‡ЪУ У·‡МУ„У ВКЛПЫ
Б’fl‚ЛЪ¸Тfl М‡ кд-‰ЛТФОВª.
зВ ‰УФЫТН‡ИЪВ ‡НЪЛ‚‡ˆ¥ª ТФ‡О‡ıЫ
ФВВ‰ У˜ЛП‡ О˛‰ВИ ¥ Ъ‚‡ЛМ.
зВ ТФflПУ‚ЫИЪВ ЩУЪУН‡ПВЫ М‡
‚У‰¥fl, flН˘У ЩУЪУБИУПН‡ ·Ы‰В
Б¥ ТФ‡О‡ıУП.
ÅÂÁ
¥Ì‰Ë͇ÚÓ‡
Д‚ЪУВНТФУБЛˆ¥fl
íÓ˜ÍÓ‚ËÈ ‚ËÏ¥
çÂÒ̘ͥÂÌÌ¥ÒÚ¸
з‡ЪЛТМ¥Ъ¸ НМУФНЫ ВКЛПЫ ВНТФУБЛˆ¥ª
( / ). кВКЛПЛ ˜В„Ы˛Ъ¸Тfl ‚
ФУТО¥‰У‚МУТЪ¥, ФУН‡Б‡М¥И О¥‚УЫ˜.
ЯМ‰ЛН‡ЪУ У·‡МУ„У ВКЛПЫ
Б’fl‚ЛЪ¸Тfl М‡ кд-‰ЛТФОВª.
и¥ТОfl Б‡НЛЪЪfl Б‡ıЛТМУª НЛ¯НЛ
У·’πНЪЛ‚‡ ‚¥‰МУ‚О˛πЪ¸Тfl ВКЛП
‡‚ЪУВНТФУБЛˆ¥ª.
Page 36

Ñêìä ÑÄíà/óÄëì (í¥Î¸ÍË ‚ ÏÓ‰ÂÎflı ¥Á Í‚‡ˆ‰‡ÚÓ˛)
з‡Т‡ПФВВ‰ ‚Л·В¥Ъ¸ ЩУП‡Ъ ‰‡ЪЛ/˜‡ТЫ, flНЛИ ıУ˜ВЪВ М‡‰ЫНЫ‚‡ЪЛ.
з‡ЪЛТМ¥Ъ¸ НМУФНЫ MODE. иЛ НУКМУПЫ М‡ЪЛТН‡ММ¥ НМУФНЛ ЩУП‡ЪЛ
˜В„Ы˛Ъ¸Тfl ‚ ФУТО¥‰У‚МУТЪ¥, ФУН‡Б‡М¥И О¥‚УЫ˜. мТЪ‡МУ‚¥Ъ¸ М‡ кд-‰ЛТФОВª
·‡К‡МЛИ ЩУП‡Ъ. С‡Ъ‡/˜‡Т ·Ы‰ЫЪ¸ М‡‰ЫНУ‚‡М¥ ‚ Ф‡‚УПЫ МЛКМ¸УПЫ НЫЪ¥
БМ¥ПН‡. ьН˘У ‰‡Ъ‡/˜‡Т ФУЪ‡ФОflЪ¸ М‡ Т‚¥ЪОВ ЪОУ, М‡ФЛНО‡‰, ·¥ОВ,
КУ‚ЪУ„‡fl˜В, КУ‚ЪВ ¥ Ъ.Ф., ªı ·Ы‰В ‚‡КНУ ФУ˜ЛЪ‡ЪЛ. иЛ ‚ЛНУЛТЪ‡ММ¥
˜УМУ-·¥ОУª ФО¥‚НЛ ‰‡Ъ‡/˜‡Т ПУКЫЪ¸ МВ М‡‰ЫНЫ‚‡ЪЛТfl.
беЯзД СДна Я уДлм
(í¥Î¸ÍË ‚ ÏÓ‰ÂÎflı ¥Á Í‚‡ˆ‰‡ÚÓ˛)
é·Ó‚’flÁÍÓ‚Ó ÛÒÚ‡ÌÓ‚¥Ú¸ Ô‡‚ËθÌÛ ‰‡ÚÛ È ˜‡Ò Ô¥ÒÎfl ÛÒÚ‡ÌÓ‚ÍË ˜Ë Á‡Ï¥ÌË ·‡Ú‡Âª.
1.
мЪЛПЫИЪВ М‡ЪЛТМЫЪУ˛ НМУФНЫ MODE, ÔÓÍË ¥Ì‰Ë͇ÚÓ „¥Í„ Ì ÔӘ̠ÏË„‡ÚË.
2. з‡ЪЛТМ¥Ъ¸ НМУФНЫ SET, ˘Ó· ÁÏ¥ÌËÚË ÔÓ͇Á‡ÌÌfl ¥Ì‰Ë͇ÚÓ‡ „¥Í„.
иЛ У‰МУПЫ М‡ЪЛТН‡ММ¥ НМУФНЛ МУПВ М‡ ‰ЛТФОВª Б·¥О¸¯ЛЪ¸Тfl М‡ 1.
ьН˘У ЫЪЛПЫ‚‡ЪЛ НМУФНЫ М‡ЪЛТМЫЪУ˛, МУПВ ·Ы‰В ¯‚Л‰НУ Б·¥О¸¯Ы‚‡ЪЛТfl.
ьН˘У ЗЛ ФУФЫТЪЛЪВ ФУЪ¥·МВ ˜ЛТОУ, ФУ‰У‚КЫИЪВ М‡ЪЛТН‡ЪЛ НМУФНЫ,
ФУНЛ БМУ‚Ы МВ ФУ‚ВМВЪВТfl ‰У ˆ¸У„У ˜ЛТО‡.
3. з‡ЪЛТМ¥Ъ¸ НМУФНЫ MODE ˘В ‡Б, ˘У· Б‡ПЛ„‡‚ ¥М‰ЛН‡ЪУ «П¥Тflˆ¸».
з‡ЪЛТМ¥Ъ¸ НМУФНЫ SET, ˘У· БП¥МЛЪЛ ФУН‡Б‡ММfl ¥М‰ЛН‡ЪУ‡ «П¥Тflˆ¸».
иЛ ФУ‰‡О¸¯Лı М‡ЪЛТН‡ММflı НМУФНЛ MODE ÏË„‡ÚË ÔÓÒÎ¥‰Ó‚ÌÓ ·Û‰ÛÚ¸
¥Ì‰Ë͇ÚÓË «¥Í», «Ï¥Òflˆ¸», «‰Â̸», «„Ó‰Ë̇» ¥ «ı‚ËÎË̇».
4. иУ‚ЪУ¥Ъ¸ НУНЛ 2 ¥ 3, ˘У· ЫТЪ‡МУ‚ЛЪЛ «„У‰ЛМЛ» ¥ «ı‚ЛОЛМЛ».
иВВНУМ‡ИЪВТfl, ˘У ¥М‰ЛН‡ЪУ «ı‚ЛОЛМЛ» ПЛ„‡π.
5. и¥ТОfl ЫТЪ‡МУ‚НЛ «ı‚ЛОЛМЛ» М‡ЪЛТМ¥Ъ¸ НМУФНЫ MODE. ÜÓ‰ÂÌ ¥Ì‰Ë͇ÚÓ
ÚÂÔ Ì ·Û‰Â ÏË„‡ÚË – Áϥ̇ ‰‡ÚË/˜‡ÒÛ ·Û‰Â Á‡‚¯Â̇.
бДеЯзД ЕДнДкЦ∫ икалнкйы
СалнДзсЯвзйЙй дЦкмЗДззь
(RC-300C – ÓÔˆ¥ÓÌ)
ьН˘У ¥М‰ЛН‡ЪУ ‡‚ЪУТФЫТНЫ/‰ЛТЪ‡Мˆ¥ИМУ„У НВЫ‚‡ММfl МВ ПЛ„‡π М‡‚¥Ъ¸
ФЛ М‡ЪЛТН‡ММ¥ НМУФНЛ, Б‡П¥М¥Ъ¸ ·‡Ъ‡В˛ М‡ МУ‚Ы (CR2025).
1. иУ‚ВМ¥Ъ¸ „‚ЛМЪ М‡ ‰М¥ ФЛТЪУ˛ ‰ЛТЪ‡Мˆ¥ИМУ„У НВЫ‚‡ММfl ФУЪЛ
„У‰ЛММЛНУ‚Уª ТЪ¥ОНЛ, ˘У· Б‚¥О¸МЛЪЛ НЛ¯НЫ.
2. è‚ÂÌ¥Ú¸ ÔËÒÚ¥È ¥ Ḁ́ϥڸ Í˯ÍÛ. íËχÈÚ ÔËÒÚ¥È ·‡Ú‡Âπ˛
‰Ó Ò·Â, ‚ËÈÏ¥Ú¸ ÒÚ‡Û ·‡Ú‡Â˛ ¥ ‚ÒÚ‡‚Ú ÌÓ‚Û, flÍ ÔÓ͇Á‡ÌÓ ÚÛÚ.
3. иУТЪ‡‚ЪВ НЛ¯НЫ М‡ П¥ТˆВ, ФВВ‚ВМ¥Ъ¸ ФЛТЪ¥И ¥ Б‡НЫЪ¥Ъ¸ „‚ЛМЪ М‡ ‰М¥
ФЛТЪУ˛ ФУ „У‰ЛММЛНУ‚¥И ТЪ¥Оˆ¥ ‰У ЫФУЫ (‰Л‚. П‡О. 9 ̇ ÒÚÓ. 127).
ЯзтЯ йиЦкДсЯ∫
UA
71
млнДзйЗдД ДЗнйлимлдм /
СалнДзсЯвзйЙй дЦкмЗДззь
ДЗнйлимлд
б‡Н¥Ф¥Ъ¸ ЩУЪУН‡ПВЫ МВЫıУПУ М‡ ¯Ъ‡ЪЛ‚¥ ˜Л ¥М¯¥И УФУ¥. лНУПФУМЫИЪВ
БМ¥ПУН Ы ‚Л‰У¯ЫН‡˜¥. з‡ЪЛТМ¥Ъ¸ НМУФНЫ ТФЫТНЫ Б‡Ъ‚У‡ М‡ФУОУ‚ЛМЫ (ФЛ ˆ¸УПЫ
ЩУНЫТ ¥ ВНТФУБЛˆ¥fl Б‡Щ¥НТЫ˛Ъ¸Тfl). иУЪ¥П М‡ЪЛТМ¥Ъ¸ НМУФНЫ ТФЫТНЫ Б‡Ъ‚У‡
ФУ‚М¥ТЪ˛. ЯМ‰ЛН‡ЪУ ‡‚ЪУТФЫТНЫ ·Ы‰В „У¥ЪЛ ФЛ·ОЛБМУ 10 ТВНЫМ‰, ФУЪ¥П
·Ы‰В ПЛ„‡ЪЛ ·ОЛБ¸НУ 2 ТВНЫМ‰. и¥ТОfl ˆ¸У„У ‚¥‰·Ы‰ВЪ¸Тfl ТФЫТН Б‡Ъ‚У‡.
икалнкЯв СалнДзсЯвзйЙй дЦкмЗДззь
RC-300C (ÓÔˆ¥ÓÌ)
лНУПФУМЫИЪВ БМ¥ПУН Ы ‚Л‰У¯ЫН‡˜¥. 燂‰¥Ъ¸ П¥ЪНЫ ‡‚ЪУЩУНЫТ‡ М‡ У·’πНЪ
БИУПНЛ. фУ· БУ·ЛЪЛ БМ¥ПУН, М‡Ф‡‚ЪВ ФЛТЪ¥И ‰ЛТЪ‡Мˆ¥ИМУ„У НВЫ‚‡ММfl
М‡ ЩУЪУН‡ПВЫ И М‡ЪЛТМ¥Ъ¸ М‡ НМУФНЫ ТФЫТНЫ М‡ ФЛТЪУª. ЯМ‰ЛН‡ЪУ
‡‚ЪУТФЫТНЫ/‰ЛТЪ‡Мˆ¥ИМУ„У НВЫ‚‡ММfl ФУ˜МВ ПЛ„‡ЪЛ, ¥ ФЛ·ОЛБМУ ˜ВВБ
3 ТВНЫМ‰Л ‚¥‰·Ы‰ВЪ¸Тfl ТФЫТН Б‡Ъ‚У‡ (‰Л‚. П‡О. 8 ̇ ÒÚÓ. 127).
лиЦсЯДгъзЯ омздсЯ∫
иЦкЦейнмЗДззь ойнйигЯЗда З
зЦСйбзьнйем лнДзЯ
ЯзтЯ йиЦкДсЯ∫
UA
70
ÅÂÁ
¥Ì‰Ë͇ÚÓ‡
—
Д‚ЪУТФЫТН
ÑËÒڇ̈¥ÈÌÂ
ÍÂÛ‚‡ÌÌfl
з‡ЪЛТМ¥Ъ¸ НМУФНЫ ‡‚ЪУТФЫТНЫ /
‰ЛТЪ‡Мˆ¥ИМУ„У НВЫ‚‡ММfl.
кВКЛПЛ ˜В„Ы˛Ъ¸Тfl ‚ ФУТО¥‰У‚МУТЪ¥,
ФУН‡Б‡М¥И О¥‚УЫ˜. ЯМ‰ЛН‡ЪУ У·‡МУ„У
ВКЛПЫ Б’fl‚ЛЪ¸Тfl М‡ кд-‰ЛТФОВª.
Q
з‡ЪЛТМ¥Ъ¸ НМУФНЫ ФВВПУЪЫ‚‡ММfl
ЩУЪУФО¥‚НЛ ‚ЛТЪЫФУП ФflКНЛ ВП¥Мˆfl
Q. ç ‚ËÍÓËÒÚÓ‚ÛÈÚ „ÓÒÚËı
ФВ‰ПВЪ¥‚. ЗЛИП¥Ъ¸ ЩУЪУФО¥‚НЫ,
flН УФЛТ‡МУ М‡ ТЪУ. 67.
çÂχπ
ê¥Í-Ï¥Òflˆ¸-‰Â̸
å¥Òflˆ¸-‰Â̸-¥Í
ÑÂ̸-Ï¥Òflˆ¸-¥Í
ÑÂ̸-„Ó‰Ë̇-ı‚ËÎË̇
Page 37

íËÔ: с¥ОНУП ‡‚ЪУП‡ЪЛ˜М‡ 35-ПП ЩУЪУН‡ПВ‡ Б
‡‚ЪУЩУНЫТУП, Б‡Ъ‚УУП У·’πНЪЛ‚‡, ‚·Ы‰У‚‡МЛП
БЫП-У·’πНЪЛ‚УП 28 ~ 100 ПП.
оУП‡Ъ ЩУЪУФО¥‚НЛ:
35 ПП, ТЪ‡М‰‡ЪМ‡ ЩУЪУФО¥‚Н‡ Б DX-НУ‰УП (24 x 36 ПП).
é·’πÍÚË‚: é·’πÍÚË‚ Olympus, 28 ~ 100 ÏÏ, F4.6 ~ 11.9,
7 ВОВПВМЪ¥‚ Ы 7 „ЫФ‡ı.
á‡Ú‚Ó: иУ„‡ПМЛИ ВОВНЪУММЛИ Б‡Ъ‚У.
ÇˉӯÛ͇˜:
кВ‡О¸МУ„У БУ·‡КВММfl Б БЫПУП ¥ ‰¥УФЪ¥ИМУ˛ НУВНˆ¥π˛.
оУНЫТЫ‚‡ММfl: еЫО¸ЪЛ‡‚ЪУЩУНЫТ Ф‡ТЛ‚МУ„У ЪЛФЫ (П‡НТ. 11 ЪУ˜УН).
еУКОЛ‚‡ Щ¥НТ‡ˆ¥fl ЩУНЫТ‡.
С¥‡Ф‡БУМ ЩУНЫТЫ‚‡ММfl:
0,6 Ï ~ ∞ (МВТН¥М˜ВММ¥ТЪ¸) ФЛ ¯ЛУНУПЫ НЫЪ¥,
0,8 П ~ ∞ (МВТН¥М˜ВММ¥ТЪ¸) ФЛ ЪВОВЩУЪУБИУПˆ¥.
дУМЪУО¸ ВНТФУБЛˆ¥ª: иУ„‡ПМЛИ ‡‚ЪУП‡ЪЛ˜МЛИ НУМЪУО¸ ВНТФУБЛˆ¥ª,
3-БУММЛИ ‚ЛП¥ ВНТФУБЛˆ¥ª. С¥‡Ф‡БУМ ‡‚ЪУВНТФУБЛˆ¥ª –
EV2,4 (F4.6, 4-ТВН) ~ EV16 (F10.2, 1/630-ТВН) ФЛ
¯ЛУНУПЫ НЫЪ¥, EV5,
1 (F11.9, 4-ÒÂÍ) ~
EV17 (F18, 1/410-ТВН) ФЛ ЪВОВЩУЪУБИУПˆ¥.
㥘ËθÌËÍ Í‡‰¥‚: иУ„ВТЛ‚МУ„У ЪЛФЫ, Б ‚Л‚В‰ВММflП М‡ кд-‰ЛТФОВИ.
Д‚ЪУТФЫТН: ЦОВНЪУММЛИ, Б‡ЪЛПН‡ ·ОЛБ¸НУ 12 ТВН.
С¥‡Ф‡БУМ ˜ЫЪОЛ‚УТЪ¥ ЩУЪУФО¥‚НЛ:
Д‚ЪУП‡ЪЛ˜М‡ ЫТЪ‡МУ‚Н‡ ‰Оfl ЩУЪУФО¥‚НЛ Б DX-НУ‰УП:
ISO 50, 100, 200, 400, 800, 1600 ¥ 3200. СОfl ¥М¯Лı
ФУП¥КМЛı БМ‡˜ВМ¸ ‡‚ЪУП‡ЪЛ˜МУ ‚Л·Л‡πЪ¸Тfl
М‡И·ОЛК˜‡ ·¥О¸¯ МЛБ¸Н‡ ˜ЫЪОЛ‚¥ТЪ¸. СОfl ЩУЪУФО¥‚НЛ
·ÂÁ DX-ÍÓ‰Û ‰¥π ÛÒÚ‡Ìӂ͇ ISO 100.
иВВПУЪЫ‚‡ММfl ФО¥‚НЛ И Н‡‰Ы:
Ä‚ÚÓχÚ˘ÌÂ.
ëԇ·ı: Ç·Û‰Ó‚‡ÌËÈ ‚ËÒÛ‚ÌËÈ Òԇ·ı.
у‡Т Б‡fl‰НЛ – ·ОЛБ¸НУ 0,5 ~ 5,5 ТВН.
(ФЛ МУП‡О¸М¥И ЪВПФВ‡ЪЫ¥ Б МУ‚ЛПЛ ·‡Ъ‡ВflПЛ).
кВКЛПЛ ТФ‡О‡ıЫ: Д‚ЪУ- (ФЛ ФУ„‡МУПЫ, НУМЪУ‚УПЫ И ЩОЫУВТˆВМЪМУПЫ
Т‚¥ЪО¥), БМЛКВММfl ВЩВНЪЫ «˜В‚УМЛı У˜ВИ», ТН‡ТЫ‚‡ММfl
ТФ‡О‡ıЫ, ФЛПЫТУ‚ЛИ ТФ‡О‡ı, М¥˜МЛИ ВКЛП ТФ‡О‡ıЫ ¥
М¥˜МЛИ ВКЛП Б¥ БМЛКВММflП ВЩВНЪЫ «˜В‚УМЛı У˜ВИ».
кВКЛПЛ ВНТФУБЛˆ¥ª: Д‚ЪУВНТФУБЛˆ¥fl, ЪУ˜НУ‚ЛИ ‚ЛП¥ ¥ МВТН¥М˜ВММ¥ТЪ¸.
ÜË‚ÎÂÌÌfl: é‰Ì‡ Î¥Ú¥π‚‡ ·‡Ú‡Âfl ̇ 3 Ç (DL123A ‡·Ó CR123A).
êÓÁÏ¥Ë:
117 (т) x 61,5 (м) x 42,5 (н) ПП (·ВБ ‚ЛТЪЫФ‡˛˜Лı ˜‡ТЪЛМ).
å‡Ò‡: 220 Ï (·ÂÁ ·‡Ú‡Âª).
ÑÓ‰‡ÚÍÓ‚Ó: ЗТВФУ„У‰МЛИ ‰ЛБ‡ИМ.
ëÔˆË٥͇ˆ¥fl ÔËÒÚÓ˛ ‰ËÒڇ̈¥ÈÌÓ„Ó ÍÂÛ‚‡ÌÌfl (ÓÔˆ¥ÓÌ)
лЛТЪВП‡ ‰ЛТЪ‡Мˆ¥ИМУ„У НВЫ‚‡ММfl:
ßÌÙ‡˜Â‚Ó̇, Á‡ÚËÏ͇ ·Î. 3 ÒÂÍ.
ÜË‚ÎÂÌÌfl: é‰Ì‡ ·‡Ú‡Âfl CR2025.
íÂÏ¥Ì ÒÎÛÊ·Ë ·‡Ú‡Âª:
ÅÎËÁ¸ÍÓ 5 ÓÍ¥‚ ˜Ë 20 000 ‡Á¥‚.
êÓ·Ó˜‡ ‚¥‰Òڇ̸: ÅÎËÁ¸ÍÓ 5 Ï.
êÓÁÏ¥Ë: 56,5 x 35,0 x 6,5 ÏÏ.
å‡Ò‡: 11 Ï (·ÂÁ ·‡Ú‡Âª).
лиЦсаоЯдДсЯь ейЬЦ беЯзыЗДналь ЕЦб йЙйгйтЦзъ Я бйЕйЗ’ьбДзъ
б Ейдм ЗакйЕзадД. оДднаузав ЗакЯЕ ейЬЦ ЗЯСкЯбзьналь ЗЯС
ЗакйЕЯЗ, ийдДбДзап м сЯв ЯзлнкмдсЯ∫.
лиЦсаоЯдДсЯь
UA
73
• зВ Б‡ОЛ¯‡ИЪВ ЩУЪУН‡ПВЫ ‚ П¥Тˆflı, ‰В ‚УМ‡ ·Ы‰В Ф¥‰‰‡‚‡ЪЛТfl ТЛО¸МУПЫ
̇„¥‚‡ÌÌ˛, ‚ÔÎË‚Û ‚ÓÎÓ„Ë ˜Ë ÔflÏËı ÒÓÌfl˜ÌËı ÔÓÏÂÌ¥‚ – ̇ÔËÍ·‰,
Û Ï‡¯ËÌ¥ ˜Ë ̇ ÔÎflÊ¥.
• зВ ‰УФЫТН‡ИЪВ НУМЪ‡НЪЫ ЩУЪУН‡ПВЛ Б ЩУП‡О¥МУП ¥ М‡ЩЪ‡О¥МУП.
• ьН˘У ЩУЪУН‡ПВ‡ М‡ПУНМВ, ‚ЛЪ¥Ъ¸ ªª ТЫıЛП Ы¯МЛНУП. л¥О¸ ПУТ¸НУª
‚Ó‰Ë ÏÓÊ ·ÛÚË ÓÒÓ·ÎË‚Ó ÛÈÌ¥‚ÌÓ˛.
• зВ ‚ЛНУЛТЪУ‚ЫИЪВ У„‡М¥˜МЛı УБ˜ЛММЛН¥‚, Ъ‡НЛı flН ТФЛЪ ¥ УБ˜ЛММЛН
Щ‡·Л, ‰Оfl ˜Л˘ВММfl ЩУЪУН‡ПВЛ.
• зВ Б‡ОЛ¯‡ИЪВ ЩУЪУН‡ПВЫ Б‚ВıЫ ˜Л ФУ·ОЛБЫ ЪВОВ‚¥БУ‡,
ıÓÎÓ‰ËθÌË͇ È ¥Ì¯Ëı ÔËÒÚÓª‚, ˘Ó ÒÚ‚Ó˛˛Ú¸ χ„Ì¥ÚÌ¥ ÔÓβ˜Ë.
• зВ Ф¥‰‰‡‚‡ИЪВ ЩУЪУН‡ПВЫ ‚ФОЛ‚Ы ФЛОЫ И Ф¥ТНЫ, ЪУПЫ ˘У ˆВ ПУКВ
ФЛБ‚ВТЪЛ ‰У ТВИУБМЛı Ы¯НУ‰КВМ¸.
• зВ ЪflТ¥Ъ¸ ¥ МВ Ф¥‰‰‡‚‡ИЪВ ЩУЪУН‡ПВЫ ¥М¯ЛП ПВı‡М¥˜МЛП ¥ Ы‰‡МЛП
‚ÔÎË‚‡Ï.
• зВ ‰УНО‡‰‡ИЪВ М‡‰П¥МЛı ПВı‡М¥˜МЛı БЫТЛО¸ ‰У БЫП-У·’πНЪЛ‚‡.
• зВ Ф¥‰‰‡‚‡ИЪВ ЩУЪУН‡ПВЫ М‡‰П¥МУПЫ М‡„¥‚‡ММ˛ (ФУМ‡‰ 40 °C) ˜Л
ıУОУ‰Ы (МЛК˜В –10 °C). зЛБ¸Н‡ ЪВПФВ‡ЪЫ‡, М‡‚¥Ъ¸ Ы Б‡БМ‡˜ВМЛı ПВК‡ı,
ПУКВ ¥МУ‰¥ ФУЫ¯Ы‚‡ЪЛ У·УЪЫ ·‡Ъ‡ВИ, ФЛ‚У‰fl˜Л ‰У ЪЛП˜‡ТУ‚У„У
‚¥‰НО˛˜ВММfl ЩУЪУН‡ПВЛ.
• з‡П‡„‡ИЪВТfl МВ Б‡ОЛ¯‡ЪЛ ЩУЪУН‡ПВЫ ‚ МВФ‡ˆ˛˛˜УПЫ ТЪ‡М¥ М‡ ЪЛ‚‡ОЛИ
˜‡Т. сВ ПУКВ ФЛБ‚ВТЪЛ ‰У ЫЪ‚УВММfl М‡ М¥И ˆ‚¥О¥ И ‰У ¥М¯Лı ФУ·ОВП.
иВВ‰ ‚ЛНУЛТЪ‡ММflП ЩУЪУН‡ПВЛ ТФУ·ЫИЪВ М‡ЪЛТН‡ЪЛ НМУФНЫ ТФЫТНЫ
Б‡Ъ‚У‡ И ФВВ‚¥flИЪВ, flН Ф‡ˆ˛π ЩУЪУН‡ПВ‡.
• СВflН¥ ВМЪ„ВМ-‡Ф‡‡ЪЛ ‚ ‡ВУФУЪ‡ı ПУКЫЪ¸ ФУ¯НУ‰ЛЪЛ ЩУЪУФО¥‚НЫ Ы
ЩУЪУН‡ПВ¥. з‡П‡„‡ИЪВТfl МВ ФУФЫТН‡ЪЛ З‡¯Ы ЩУЪУН‡ПВЫ ˜ВВБ ˆ¥
ФЛТЪУª. З¥‰‰‡‚‡ИЪВ ªª Ф‡ˆ¥‚МЛНЫ ТОЫК·Л ·ВБФВНЛ ‰Оfl У„Оfl‰Ы.
• ç ‰ÓÚÓ͇ÈÚÂÒfl ‰Ó Ô‰̸Ӫ ÒÚÓÓÌË Òԇ·ıÛ Ô¥ÒÎfl ÈÓ„Ó ˜‡ÒÚÓ„Ó
‚ËÍÓËÒÚ‡ÌÌfl ÔÓÚfl„ÓÏ ÍÓÓÚÍÓ„Ó ˜‡ÒÛ, ·Ó ÔÓ‚ÂıÌfl Òԇ·ıÛ ÏÓÊ ·ÛÚË
„‡fl˜Ó˛.
бЕЦкЯЙДвнЦ ЕДнДкЦ∫ зД ЗЯСлнДзЯ ЗЯС СЬЦкЦг ЗйЙзы.
зЦ зДеДЙДвнЦль кйбЕакДна, иЦкЦбДкьСЬДна уа бДеадДна
ЕДнДкЦ∫ зДдйкйндй.
зЦ зДеДЙДвнЦль кйбЕакДна ойнйдДеЦкм; ЗйзД еЯлнанъ ЦгЦеЦзна
иЯС Залйдйы зДикмЙйы. ьдфй ЗзмнкЯтзЯ ЦгЦеЦзна ойнйдДеЦка
йЙйгыынъль З кЦбмгънДнЯ ∫∫ иДСЯззь уа мтдйСЬЦззь, зЦЙДвзй
ЗавеЯнъ ЕДнДкЦ∫, фйЕ зЦ икйСйЗЬмЗДна ЗадйкалнДззь
ойнйдДеЦка. м ЗаиДСдм ЗазадзЦззь зЦийгДСйд бЗЦкзЯнъль
Сй зДвЕгаЬуйЙй СагЦкД уа З лЦкЗЯлзав сЦзнк OLYMPUS.
СйЙгьС Я бЕЦкЯЙДззь
UA
72
мЗДЙД
бЕЦкЯЙДвнЦ ЕДнДкЦ∫ З еЯлсьп, зЦСйлнмизап Сгь СЯнЦв.
ьдфй СаназД икйдйЗнзЦ ЕДнДкЦы, зЦЙДвзй бЗЦкзЯнъль Сй
гЯдДкь.
Page 38

BETJENINGSVEJLEDNING
DK
74
ISÆTNING OG KONTROL AF BATTERIET
Benyt et 3 V lithium batteri (CR123A eller DL123A).
FØRSTE TRIN
DK
75
1
2
3
1. Batteridækslet åbnes ved at skubbe
det mod Q, og dreje det mod W.
• Luk skydedækslet før batteridækslet
åbnes.
2. Isæt batteriet korrekt Q.
Luk batteridækslet W.
3. Åben skydedækslet mod Q til det
klikker. Optikken kører ud og flashen
kommer op. Kontrollér batteriet på
LCD panelet.
• Et helt nyt batteri kan tage
ca. 15 ruller film.
lyser
(slukker automatisk).
blinker mens øvrige
indikatorer vises normalt.
blinker mens øvrige
indikatorer slukker.
Batteriet er OK.
Der kan tages billeder.
Batteret er svagt aog bør udskiftes
med et nyt.
SÆT REMMEN PÅ
Sæt remmen på som vist.
INDSTILLING AF DIOPTRI
Drej på dioptriens indstillingsknap
til autofokusmærket ses tydeligt.
Batteriet er dødt og bør omgående
udskiftes med et nyt.
Læs denne vejledning omhyggeligt før kameraet tages i brug
(læs især »Håndtering og Opbevaring« på side 82).
DELENES BETEGNELSER
(Åben hæftets forreste flap og se side 3.)
Kamerahus
1 Zoomknap (s. 77)
2 Udløser (s. 77)
3 Selvudløser/
fjernbetjenings indikator
4 Lyssensor
✩
5 Søger
6 Autofokusrude
✩
7 Flash✩(s. 77 – 79)
8 Optik
✩
9 Fjernbetjenings-sensor
10 Skydedæksel
11 Batteridæksel (s. 75)
12 Remholder (s. 75 & 80)
✩
Bør altid holdes rent. Snavs og støv kan medføre at billederne bliver slørede og uskarpe.
Tør af med en ren blød klud.
Søgerindikatorer
24 Autofokusmærke (s. 77)
25 Spotmærke (s. 79)
26 Nærfoto korrektionsmærke (s. 76)
27 Grøn lampe (autofokus indikator)
Lyser: Motivet er i fokus. Tag billedet.
Blinker: Motivet er ude af fokus. Udløseren er blokeret.
Blinker hurtigt: Det er vanskeligt at fokusere på motivet.
Hvis billedet tages, kan det blive uskarpt.
28 Orange lampe (flash-indikator)
Slukker: Flashen skyder ikke af. Der kan tages billeder.
Lyser: Flash skyder af. Der kan tages billeder.
Blinker: Flashen ved at lade op. Vent til den lyser.
LCD Panelet
29 Dato/tid indikator (kun Quartzdate model) (s. 81)
30 Tæller
31 Fjernbetjening (tilbehør) (s. 80)
32 Selvudløser (s. 80)
33 Rød-øjereducerende Flash (s. 78)
34 Fill-In Flash (s. 78)
35 Flash-frakoblet (s. 78)
36 Natfoto Flash (s. 78)
37 Batteritest (s. 75)
38 Spotmåling (s. 79)
39 Uendelig (s. 79)
Bemærk: Ikke alle indikatorer vises samtidig.
13 Dioptri justeringsknap (s. 75)
14 Filmrude
15 Stativgevind
16 Dato MODE og SET knapper
(kun Quartzdate model) (s. 81)
17 Tilbagespolingsknap (s. 80)
18 Eksponeringsfunktionsknap (s. 79)
19 Flashfunktionsknap (s. 78)
20 Selvudløser/
fjernbetjeningsknap(s. 80)
21 LCD panel
22 Bagdæksel
23 Bagdæksellås (s. 76)
Page 39

TAG BILLEDER
STANDARD FUNKTIONER
DK
77
ISÆTNING AF FILM
STANDARD FUNKTIONER
DK
76
1
2
1. Bagdækslet åbnes ved at
skubbe låsen opad.
• Rør ikke ved kameraets
indvendige dele, det gælder
især optikken.
2. Sæt filmkassetten i til den
klikker på plads.
3. Læg filmsnippen til linien (A),
og placér den imellem styrene
(B). Luk bagdækslet til det
klikker.
• Filmen kører automatisk frem
til første billede.
• Åben skydedækslet til det
klikker. Hold øje med at tælleren
på LCD panelet viser »
II
«.
• Hvis »EE« blinker, gentages
filmisætningen.
3
FOCUSÉRING OG ARBEJDSAFSTAND
NÆRFOTOGRAFERING
Kameraet har et multi-vidvinklet
autofokussystem som gør det lettere for
det at fokusere på motiver der ikke er
i midten af søgeren.
Arbejdsafstanden er 0.6 m to ∞
(uendelig) på vidvinkel og 0.8 m to ∞
(uendelig) på tele. Selvom lukkeren
udløser når man er meget tæt på motivet,
kan dette blive uskarpt.
Jo tættere man kommer på motivet,
des lavere vil billedfeltet stå i søgeren.
Q
Nærfoto korrektionsmærke
(billedfelt på tætteste afstand).
W
Billedfelt ved uendelig.
1
2
3
Autofokusmærke
1. Åben skydedækslet til det klikker.
Optikken kører lidt frem og LCD
panelet tænder. Skub zoomknappen
mod »T« til teleoptagelser (100 mm)
eller mod »W« til vidvinkeloptagelser
(28 mm).
• Hvis kameraet ikke betjenes i
ca. 4 1/2 minut kører optikken ind
og LCD panelet slukker.
2. Ret autofokusmærket (AF) mod
motivet.
• Se ikke direkte mod solen eller
anden stærk lyskilde, igennem
søgeren.
3. Tryk udløseren halvt ned og stil skarpt
på motivet. Se at den grønne lampe
lyser; tryk derefter udløseren helt
ned og tag billedet. Når lukkeren har
udløst, spoles filmen automatisk frem
til næste billede.
AUTOMATISK FLASH – RÆKKEVIDDE
TILBAGESPOLING OG UDTAGNING AF FILM
(med farvenegativfilm)
Når der bruges lysbilledfilm, reduceres rækkevidden ved tele med ca. 30%.
ISO
100
200
400
Vidvinkel (W)
0.6 til 4.6 m
0.6 til 6.5 m
0.6 til 9.2 m
Tele (T)
0.8 til 1.8 m
0.8 til 2.5 m
0.8 til 3.6 m
Kameraet spoler automatisk filmen
tilbage når den er taget færdig.
Sørg for at motoren er stoppet og »EE«
blinker; åben derefter bagdækslet og tag
filmen ud.
Q
W
Page 40

Kombinering af de to funktioner –
RØD-ØJEREDUCERENDE NATFOTOFLASH
Modvirker de typiske røde øjne der ses på aftenbilleder (se figur 7 på
side 126). Ingen af funktionerne kan bruges i forbindelse med Spotmåling.
Når skydedækslet lukkes går kameraet til Automatisk flashindstilling.
VALG AF FLASHFUNKTIONER
SPECIELLE FUNKTIONER
DK
79
Åben hæftets bageste flap og se side 126.
Røde øjne på flashbilleder –
RØD-ØJEREDUCERENDE FLASH
Når man tager flashbilleder af personer i mørke, passerer flashlyset
gennem en helt åben pupil. Herfra reflekteres det rødt fra nethinden.
Den Rød-øjereducerende Flash udsender en serie mindre flashglimt,
før det endelige hovedglimt. Det tilpasser motivets øjne til flashlyset, ved at
mindske pupillen. Når motivet således ser ind i de små glimt,
mindskes risikoen for røde øjne på billederne (se figur 3 på side 126).
• Hold kameraet roligt. Lukkeren udløser efter ca. 1 sekund.
• Rød-øjereduceringen er ikke effektiv hvis motivet:
1. Ikke ser direkte mod flashen.
2. Ikke ser serien af små flashglimt.
3. Er for langt væk fra kameraet.
Rød-øjereduceringens effektivitet afhænger af motivernes individuelle
øjenkarakteristik.
Flash ikke tilladt eller Flashen ødelægger stemningen –
FLASH-FRAKOBLET
Flash-Frakoblet benyttes hvor flash ikke er tilladt eller hvor man ønsker
at fastholde tusmørke eller kunstlysstemningen (se figur 4 på side 126).
• Da der anvendes en langsom lukkertid (helt ned til 2 sekunder),
bør der benyttes stativ for at undgå rystede billeder.
• Motivet skal stå stille; ellers kan det blive uskarpt.
Når skydedækslet lukkes går flashen til Automatisk flashindstilling.
Skygger på ansigtet – FILL-IN FLASH
Når man tager portrætbilleder i modlys eller under et træ eller et tag,
kan motivets ansigt blive for mørkt. Fill-In Flash tilføjer lige netop den
mængde ekstra lys der kompenserer for skyggen (se figur 5 på side 126)
og for lys fra lysstofrør.
• Sørg for at motivet er indenfor flashens rækkevidde (s. 77).
• Fill-in flash har ingen funktion under meget lyse forhold.
Når skydedækslet lukkes går flashen til Automatisk flashindstilling.
Byens lys – NATFOTO FLASH
Når man går en tur i byen om aftenen, vil man ofte tage billeder af
motivet med byens lys i baggrunden. Det sørger Natfotoflash for.
Flashglimtet oplyser motivet i forgrunden, mens byens lys i baggrunden
opfanges af, at lukkeren står åben i helt op til 4 sekunder. Der skal benyttes
stativ eller anden støtte, for at forhindre rystelser (se figur 6 på side 126).
SPECIELLE FUNKTIONER
DK
78
Ingen
symbol
Automatisk Flash
Rød-øjereducerende
Flash
Flash frakoblet
Fill-In
Natfoto Flash
Rød-øjereducerende
Natfoto Flash
Høj kontrast – SPOTMÅLING
Når der tages billeder under store kontrastforhold (f.eks. modlysportrætter),
kan hovedmotivet blive for mørkt eller for lyst. Brug Spotmåling for at sikre
korrekt eksponering af motivet (se figur 1 på side 2). Ret spotmærket (A)
mod området hvor lyset skal måles. Tryk udløseren halvt ned; den grønne
lampe lyser og eksponeringen låses på dette området. Komponer så
billedet og tryk udløseren helt ned.
Landskabsoptagelser – UENDELIG
Kameraet vælger automatisk uendelig som afstand. Flashen skyder ikke af,
undtagen i Fill-In Flash (se figur 2 side 2).
VALG AF EKSPONERINGSFUNKTIONER
Tryk på flashfunktionsknappen ( ).
Funktionen skifter i rækkefølgen
vist til venstre. Den valgte
funktion vises på LCD panelet.
Skyd ikke flashen af direkte i
øjnene på mennesker og dyr.
Skyd ikke flashen af mod en
motorkørende.
Ingen
symbol
Automatisk
Eksponering
Spotmåling
Uendelig
Tryk på eksponerings-funktionsknappen ( / ).
Funktionen skifter som vist til venstre.
Den valgte funktion vises på LCD
panelet. Når skydedækslet lukkes
går kameraet til Automatisk
eksponeringsindstilling.
Page 41

PRINTNING AF DATO/TID (kun på Quartzdate model)
Vælg først den dato/tid funktion der skal printes. Tryk på MODE knappen.
Funktionen skifter som vist til venstre, hver gang der trykkes på den.
Stop ved den ønskede funktion. Dato/tid printes i nederste højre hjørne af
billedet. Hvis dato/tid gengives på en lys farve f.eks. hvid, orange, gul, osv.,
kan den være vanskelig at læse. På sort/hvid film, printes dato/tid måske ikke.
INDSTILLING AF DATO OG TID
(kun Quartzdate model)
Sørg for at indstille dato og tid ved batteriskift.
1. Hold MODE knappen nede til »år« symbolet begynder at blinke.
2. Tryk på SET knappen for at indstille »år«. Der skiftes et tal ved enkelttryk.
Tallene skifter hurtigt når knappen holdes nede. Passeres det ønskede
tal, holdes knappen blot nede til det fremkommer igen.
3. Tryk atter på MODE knappen til »måned« symbolet blinker. Indstil med
SET knappen. Når der trykkes på MODE knappen, skifter det blinkende
symbol mellem »år«, »måned«, »dag«, »timer« og »minutter«.
4. Gentag trin 2 og 3 for at indstille »timer« og »minutter«.
Sørg for at »minutter« symbolet blinker.
5. Når »minutter« er indstillet, trykkes der på MODE knappen.
Nu blinker ingen af symbolerne og dato/tid er indstillet.
UDSKIFTNING AF BATTERIET I FJERNBETJENINGEN
(Tilbehør RC-300C)
Hvis selvudløser/fjernbetjenings-indikatoren ikke blinker når der
trykkes på knappen, skal batteriet udskiftes (CR2025).
1. Skruen i bunden af fjernbetjeningen løsnes ved at dreje den mod uret.
2. Vend fjernbetjeningen og fjern dækslet. Tag det gamle batteri ud og
sæt et nyt i som vist.
3. Sæt dækslet på, vend fjernbetjeningen, og skru skruen fast igen
(se figur 9 på side 127).
ØVRIGE FUNKTIONER
DK
81
VALG AF SELVUDLØSER/FJERNBETJENING
SELVUDLØSER
Sæt kameraet på stativ eller anden støtte. Komponer billedet i søgeren.
Tryk udløseren halvt ned (fokuséring og eksponering låses). Tryk derefter
udløseren helt ned. Selvudløserlampen lyser i ca. 10 sekunder og blinker
derefter i ca. 2 sekunder. Derefter udløses lukkeren.
FJERNBETJENING RC-300C (Tilbehør)
Komponer billedet i søgeren. Ret autofokusrammen mod motivet.
Tag billedet ved at rette fjernbetjeningen mod kameraet og trykke på
fjernbetjeningens knap. Selvudløser/fjernbetjeningsindikatoren begynder
at blinke, og lukkeren udløser efter ca. 3 (se figur 8 på side 127).
SPECIELLE FUNKTIONER
MANUEL TILBAGESPOLING AF FILMEN
ØVRIGE FUNKTIONER
DK
80
Ingen
symbol
—
Selvudløser
Fjernbetjening
Tryk på selvudløser/
fjernbetjeningsknappen.
Funktionen skifter som vist til venstre.
Den valgte funktion vises på LCD
Panelet.
Q
Tryk på tilbagespolingsknappen med
tappen på remmens spænde Q.
Brug ikke en ting med skarp spids.
Tag filmen ud som vist på side 77.
Ingen
År-måned-dag
Måned-dag-år
Dag-måned-år
Dag-timer-minutter
Page 42

Type: Fuldautomatisk 35 mm autofokuskamera med
centrallukker og indbygget 28 mm ~ 100 mm zoomoptik.
Filmformat: 35 mm standard DX-kodet film (24 x 36 mm).
Optik: Olympus optik, 28 mm ~ 100 mm, F4.6 ~ 11.9,
7 elementer i 7 grupper.
Lukker: Programmeret elektronisk lukker.
Søger: Ægtebilled zoomsøger med indstilling af dioptri.
Fokusering: Passiv multi-vidvinklet autofokussystem
(maks. 11 punkter). Fokuslås.
Fokuseringsområde:
0.6 m ~ ∞ (uendelig) på vidvinkel,
0.8 m ~ ∞ (uendelig) på tele.
Eksponeringskontrol:
Programmeret automatisk eksponerigskontrol,
3-zoners lysmåling. Auto eksponeringsområde –
EV2.4 (F4.6, 4-sek) ~ EV16 (F10.2, 1/630-sek) på vidvinkel,
EV5.1 (F11.9, 4-sek) ~ EV17 (F18, 1/410-sek) på tele.
Tæller: Fremadtællende, vises på LCD panelet.
Selvudløser: Elektronisk selvudløser med ca. 12-sek. udløb.
Filmhastighed: Automatisk indstilling af DX-kodet film på ISO 50, 100,
200, 400, 800, 1600 eller 3200. Film med
mellemværdier stilles automatisk på nærmeste lavere
hastighed. Ikke-DX-kodede film stilles på ISO 100.
Filmisætning, fremføring, tilbagespoling:
Automatisk.
Flash: Indbygget pop-op flash. Flashfølgetid – ca. 0.5 ~ 5.5 sek.
(ved normal temperatur og nyt batteri).
Flashfunktioner: Automatisk Flash (svagt lys, modlys og lysstofrør),
Rød-øjereducerende Flash, Flash frakoblet, Fill-In,
Natfoto Flash og Rød-øjereducerende Natfoto Flash.
Eksponeringsfunktioner:
Automatisk Eksponering, Spotmåling og Uendelig.
Strømforsyning: Ét 3 V lithium batteri (DL123A eller CR123A).
Størrelse: 117 (B) x 61.5 (H) x 42.5 (D) mm (uden fremspring).
Vægt: 220 gr. (uden batteri).
Andet: Vejrsikker udførelse.
Fjernbetjening T
ekniske Data (Tilbehør)
Fjernbetjeningssystem:
Infrarød, med ca. 3-sek. forsinkelse.
Strømforsyning: Ét CR2025 batteri.
Batterilevetid: Ca. 5 år, med ca. 20,000 gange.
Rækkevidde: Ca. 5 m.
Størrelse: 56.5 x 35.0 x 6.5 mm.
Vægt: 11 gr. (uden batteri).
RET TIL ÆNDRINGER I TEKNISKE DATA UDEN VARSEL,
FORBEHOLDES. PRODUKTET KAN AFVIGE, FRA DET I DENNE
VEJLEDNING VISTE.
TEKNISKE DATA
DK
83
• Lad ikke kameraet blive udsat for kraftig varme, fugt eller direkte sollys –
f.eks. i en bil eller på stranden.
• Kom ikke formalin eller naftalin på kameraet.
• Hvis kameraet bliver vådt tørres det af med en tør klud. Især saltvand er
meget ødelæggende.
• Rens ikke kameraet i organiske opløsningsmidler som f.eks. sprit eller
fortynder.
• Læg ikke kameraet tæt ved fjernsyn, køleskab eller andre apparater med
et stærkt magnetfelt.
• Udsæt ikke kameraet for sand eller støv da det kan ødelægge kameraet.
• Ryst eller stød ikke kameraet.
• Tryk ikke på zoomoptikken med stor kraft.
• Udsæt ikke kameraet for kraftig varme (over +40 °C ) eller stærk kulde
(–10 °C ). Lave temperaturer, selv indenfor dette område, kan forringe
batteriets ydeevne og dermed være årsag til midlertidig svigt af kameraet.
• Undgå at lade kameraet ligge ubrugt gennem længere tid. Det kan blive
jordslået eller der kan opstå andre problemer. Aktivér udløseren og check
kameraets funktioner før det tages i brug.
• Røntgenudstyr i nogle lufthavne kan ødelægge filmen i kameraet.
Prøv at undgå at gå gennem dette udstyr med kameraet. Giv det i stedet
for til sikkerhedspersonalet for manuel kontrol.
• Rør ikke ved glasset foran flashen, lige efter den har været brugt flere
gange på kort tid. Glasset kan være varmt.
HOLD BATTERIERNE VÆK FRA ÅBEN ILD. DE BØR IKKE SKILLES AD,
GENOPLADES ELLER KORTSLUTTES.
SKIL IKKE KAMERAET AD; DET INDEHOLDER KREDSLØB MED
HØJSPÆNDING. HVIS DE INDRE DELE I KAMERAET BLIVER SYNLIGE
SOM FØLGE AF STØD ELLER SLAG, BØR BATTERIET OMGÅENDE
FJERNES FOR AT UNDGÅ YDERLIGERE SKADE. VED FEJLFUNKTION,
KONTAKTES NÆRMESTE OLYMPUS FORHANDLER ELLER OLYMPUS
SERVICE CENTER.
HÅNDTERING OG OPBEVARING
DK
82
ADVARSEL
HOLD BATTERIER UDEN FOR BØRNS RÆKKEVIDDE. HVIS ET
BARN SLUGER ET BATTERI, BØR MAN OMGÅENDE SØGE LÆGE.
Page 43

BRUKSANVISNING
SE
84
ISÄTTNING OCH KONTROLL AV BATTERI
Använd ett 3 V litium batteri (CR123A eller DL123A).
FÖRBEREDELSER
SE
85
1
2
3
1. Samtidigt som du trycker batteriluckan
i riktning Q skall du vrida den i riktning
W för att öppna.
• Kontrollera att objektivskyddet är
stängt innan du öppnar batteriluckan.
2. Sätt i batteriet Q. Stäng batteriluckan
W.
3. För objektivskyddet i riktning Q tills
det klickar i läge. Objektivet går ut och
blixten fälls upp. Kontrollera batterikonditionen på LCD panelen.
• Ett helt nytt batteri räcker till ca
15 rullar film.
lyser (släcks automatiskt).
blinkar och andra symboler
visas normalt.
blinkar och andra symboler
släcks.
Batteriet är OK. Du kan fotografera.
Batteriets kondition är dåligt och det bör
bytas ut.
MONTERING AV
KAMERAREM
Montera kameraremmen enligt ill.
DIOPTRISK KORREKTION
Vrid hjulet för dioptrisk korrektion tills
autofokusmarkeringarna i sökaren
framträder tydligt.
Batteriet är slut och skall omgående
bytas.
Läs noggrant igenom denna bruksanvisning innan du börjar använda
din kamera (iakttag särskilt »Skötsel och förvaring» på sidan 92).
KAMERANS DELAR
(Öppna frontfliken och ha sidan 3 framme.)
Kamerahuset
1 Zoomreglaget (sid. 87)
2 Avtryckare (sid. 87)
3 Lampa för självutlösare/
fjärrkontroll
4 Ljussensor
✩
5 Sökare
6 Autofokusfönster
✩
7 Blixt✩(sid. 87 – 89)
8 Objektiv
✩
9 Fjärrkontrollssensor
10 Objektivskydd
11 Batterilucka (sid. 85)
12 Remöglefäste (sid. 85 & 90)
13 Hjul för dioptrisk korrektion (sid. 85)
✩
Se till att dessa delar är rena. Smuts och fläckar kan resultera i suddiga bilder. Torka av eventuell
smuts eller fläckar med en mjuk trasa.
Sökarinformation
24 Autofokusmarkeringar (sid. 87)
25 Spotmarkeringar (sid. 89)
26 Närbildsmarkeringar (sid. 86)
27 Grön lampa (autofokus symbol)
Lyser: Motivet återges korrekt. Du kan ta bilden.
Blinkar: Motivet är suddigt. Slutaren låses.
Blinkar snabbt: Det är svårt att ställa in skärpan på motivet. Du kan ta
bilden, men risk finns för att bilden blir suddig.
28 Orange lampa (blixt symbol)
Släcks: Blixten utlöser ej. Du kan ta bilden.
Tänds: Blixten kommer att utlösa. Du kan ta bilden.
Blinkar: Blixten håller på att laddas. Vänta tills blixtsymbolen lyser med
fast sken.
LCD Panel
29 Datum/klockslag (endast Quartz Date modellen) (sid. 91)
30 Bildräknare
31 Fjärrkontroll (tillbehör) (sid. 90)
32 Självutlösare (sid. 90)
33 »Röda ögon» blixt (sid. 88)
34 Upplättnadsblixt (sid. 88)
35 Frånkopplad blixt (sid. 88)
36 Nattfotograferingsblixt (sid. 88)
37 Batterikontroll (sid. 85)
38 Spotmätning (sid. 89)
39 Oändligt (sid. 89)
Observera: Alla symboler visas inte samtidigt på panelen, enligt ill. ovan.
14 Filmfönster
15 Stativgänga
16 Knappar för val och inställning av
datumkombination (endast Quartz
Date modellen) (sid. 91)
17 Filmåterspolningsknapp (sid. 90)
18 Exponeringsfunktionsknapp
(sid. 89)
19 Blixtfunktionsknapp (sid. 88)
20 Självutlösare/Fjärrkontrollsknäpp
(sid. 90)
21 LCD panel
22 Kamerabakstycke
23 Lås för kamerabakstycke (sid. 86)
Page 44

ATT FOTOGRAFERA
STANDARD FUNKTIONER
SE
87
FILMLADDNING
STANDARD FUNKTIONER
SE
86
1
2
1. För kamerabakstyckets lås uppåt
för att öppna kamerabakstycket.
• Vidrör ej kamerans innan mäte,
detta gäller särskilt objektivet.
2. Sätt i filmrullen och låt den klicka
i läge.
3. För fram filmtungan i linje med
markeringen (A) och placera
filmremsan inom filmledarna (B).
Stäng därefter kamerabakstycket
med ett lätt tryck tills det klickar
i läge.
• Filmen matas automatiskt fram
till första filmrutan.
• Öppna objektivskyddet tills det
klickar i läge. Kontrollera att
bildräknaren på LCD panelen
visar »
11
».
• Om »EE» blinkar skall du ladda
om filmen.
3
SKÄRPEINSTÄLLNING OCH ARBETSOMRÅDE
NÄRBILDSFOTOGRAFERING
Denna kamera arbetar med ett multividvinklande autofokussystem, vilket gör
det lättare att ställa in skärpan på motivet,
även om motivet inte befinner sig mitt i
bild. Kamerans arbetsområde sträcker sig
från 0.6 m till ∞ (oändligt) i vidvinkelläge
och från 0.8 m till ∞ (oändligt) vid
telefotografering. Även om slutaren utlöser
då ett motiv befinner sig extremt nära
kameran kommer bilden att bli suddig.
Ju närmre du kommer motivet desto
längre ner förflyttas det verkliga
bildområdet i sökaren.
Q
Närbildsmarkeringar (det verkliga
bildområdet vid maximal närgräns).
W
Bildområde vid oändligt.
1
2
3
Autofokusmarkeringar
1. Öppna objektivskyddet tills det klickar
i läge. Objektivet går ut något och LCD
panelen aktiveras. För zoomreglaget
mot »T» för telefotografering (100 mm)
eller mot »W» för vidvinkelfotografering
(28 mm).
• Om du inte använder kameran inom
ca 4
1
/2minut går objektivet tillbaka in
i kameran och LCD panelen släcks.
2. Placera ditt motiv inom autofokusmarkeringarna (AF).
• Titta inte direkt mot solen eller annan
stark ljuskälla genom sökaren.
3. Tryck ner avtryckaren halvvägs för att
ställa in skärpan på motivet.
Kontrollera att den gröna lampan tänds
och tryck därefter ner avtryckaren helt
för att ta bilden. Då slutaren utlöst
matas filmen automatiskt fram till nästa
ruta.
AUTO BLIXT – ARBETSOMRÅDE
ÅTERSPOLNING OCH URTAGNING AV FILM
(med negativ färgfilm)
Då svart/vit film används reduceras arbetsområdet vid telefotografering med
ca 30%.
ISO
100
200
400
Vidvinkel (W)
0.6 till 4.6 m
0.6 till 6.5 m
0.6 till 9.2 m
Tele (T)
0.8 till 1.8 m
0.6 till 2.5 m
0.8 till 3.6 m
Kameran återspolar automatiskt filmen
då filmrullen nått sitt slut. Kontrollera att
motorn stannat och att »EE» blinkar på
LCD panelen; öppna sedan kamerabakstycket för att ta ut filmrullen ur kameran.
Q
W
Page 45

VAL AV BLIXTFUNKTION
SÄRSKILDA FUNKTIONER
SE
89
Fäll upp den bakre fliken och ha sidan 126 framme.
»RÖDA ÖGON» BLIXT
Vid fotografering av människor i mörker träffar blixtljuset den vidöppna irisen.
Där reflekteras blixtljus i rött från RETINA. »Röda ögon» blixten pulserar
en serie förberedande blixtar innan den verkliga blixten utlöser. Detta ger
motivets ögon tillfälle att anpassa sig till det starka ljuset genom att iris drar
ihop sig. Förutsatt att personen tittar in i de förberedande blixtarna kommer
ögonen inte att bli röda på bilden (se figur 3 på sidan 126).
• Håll kameran stadigt. Det tar ca 1 sekund innan slutaren utlöser.
• Reduceringen av »röda ögon» fungerar kanske inte om motivet:
1. Inte tittar in i blixten rakt framifrån.
2. Inte tittar in i de förberedande blixtarna.
3. Befinner sig för långt bort från kameran.
Graden av effektivitet vad gäller reduceringen av »röda ögon» varierar
beroende på individens särdrag.
FRÅNKOPPLAD BLIXT
Frånkopplad blixt används i situationer där blixtfotografering ej är tillåten
eller om du vill bevara en viss stämning av skymning eller naturlig ljussättning
i bilden (se figur 4 på sidan 126).
• Eftersom kameran väljer en lång slutartid (ända ner till 2 sekunder)
rekommenderar vi dig att montera kameran på ett stativ för att förhindra
kameraskakningar.
• Se till att ditt motiv inte rör sig; annars finns risk för suddiga bilder.
Stäng objektivskyddet för att återgå till auto blixtfunktion.
UPPLÄTTNADSBLIXT
Vid fotografering av motiv i motljus eller under ett träd eller tak kan personens
ansikte bli för mörkt. Upplättnadsblixten ger den extra belysning som
behövs för att kompensera för skuggorna (se figur 5 på sidan 126) och vid
fotografering under lysrörsbelysning.
• Kontrollera att ditt motiv befinner sig inom blixtens arbetsområde (sid. 87).
• Upplättnadsblixten blir ineffektiv i extremt starkt ljus.
Stäng objektivskyddet för att återgå till auto blixtfunktion.
NATTFOTOGRAFERINGSBLIXT
Under en nattlig promenad i staden vill du kanske ta en bild med ditt sällskap
i förgrunden och stadens ljus som bakgrund. Nattfotograferingsblixten ser
till att detta blir möjligt. Huvudblixten belyser motivet i förgrunden medan
slutaren lämnas öppen under upp till 4 sekunder för att fånga också stadens
ljus på bild. Montera kameran på ett stativ eller placera den på annat stadigt
underlag för att förhindra kameraskakningar (se figur 6 på sidan 126).
NATTFOTOGRAFERINGSBLIXT MED
REDUCERING AV »RÖDA ÖGON»
Denna funktion reducerar effekten av »röda ögon» vid fotografering nattetid
(se figur 7 på sidan 126). Båda funktionerna kan ej kombineras med
spotmätning. Stäng objektivskyddet för att återgå till auto blixtfunktion.
SÄRSKILDA FUNKTIONER
SE
88
Ingen
symbol
Auto blixt
»Röda ögon» blixt
Frånkopplad blixt
Upplättnadsblixt
Nattfotograferingsblixt
Nattfotograferingsblixt med reducering
av »röda ögon»
SPOTMÄTNING
Vid fotografering i miljöer med hög kontrast (t.ex. porträtt i motljus) kan
huvudmotivet bli antingen för mörkt eller för ljust. Använd spotmätningen
för att garantera att motivet exponeras korrekt (se figur 1 på sidan 2).
Placera spotmarkeringarna (A) på det område där du vill mäta ljuset.
Tryck ner avtryckaren halvvägs; den gröna lampan tänds och skärpan och
exponeringen låses på detta område. Komponera om bilden och tryck ner
avtryckaren helt.
OÄNDLIGT
Kameran ställer automatiskt in skärpedjupet på oändligt. Blixten utlöser ej,
såvida inte upplättnadsblixten valts (se figur 2 på sidan 2).
VAL AV EXPONERINGSFUNKTION
Tryck på blixtfunktionsknappen ( ).
Blixtfunktionen ändras enligt ordningsföljden till vänster. Vald blixtfunktions
symbol visas på LCD panelen.
Utlös ej blixten mitt framför ögonen
på människor och djur. Rikta inte
kameran mot en trafikant och utlös
blixten.
Ingen
symbol
Automatisk
exponering
Spotmätning
Oändligt
Tryck på exponeringsfunktionsknappen
( / ). Exponeringsfunktionen
ändras enligt ordningsföljden till
vänster. Vald exponeringsfunktions
symbol visas på LCD panelen.
Stäng objektivskyddet för att återgå till
automatisk exponeringsfunktion.
Page 46

REGISTRERING AV DATUM/KLOCKSLAG
(gäller endast Quartz Date modellen)
Välj först önskad datumkombination. Tryck på MODE knappen. Varje gång
du trycker på MODE knappen ändras kombinationen enligt ordningsföljden
till vänster. Den kombination du valt visas på LCD panelen. Datum/klockslag
registreras i bilden nedre högra hörn. Om det på datumpositionen finns ett
ljust område, vitt, orange, gult etc., i bild kan datumet vara svårt att tyda.
Vid användning av svart/vit film kan registrering av datum ej garanteras.
INSTÄLLNING AV DATUM/KLOCKSLAG
(gäller endast Quartz Date modellen)
Kom ihåg att ställa in rätt datum och klockslag efter batteribyte.
1. Håll inne MODE knappen tills positionen för årtal börjar blinka.
2. Tryck på SET knappen för att ställa in rätt årtal. Om du trycker en gång
på SET knappen räknar kameran fram en siffra i taget. Om du håller SET
knappen inne räknar kameran framåt i snabb följd. Om du råkar bläddra
förbi önskad siffra skall du hålla kvar knappen för att komma tillbaka till
önskad position.
3. Tryck en gång till på MODE knappen för att positionen för månad skall
börja blinka. Varje gång du trycker på MODE knappen förflyttas den
blinkande positionen i ordningsföljden »år», »månad», »dag», »timme»
och »minut».
4. Upprepa steg 2 och 3 för att ställa »timme» och »minut». Kontrollera att
positionen för »minut» blinkar.
5. Då positionen »minut» ställts in trycker du på MODE knappen. Ingen av
positionerna skall nu blinka och inställningen av datum/klockslag är klar.
BYTE AV FJÄRRKONTROLLENS BATTERI
(Tillbehör RC-300C)
Om självutlösar/fjärrkontrollslampan inte blinkar om du trycker ner
fjärrkontrollens avtryckare bör du byta fjärrkontrollens batteri (CR2025).
1. Vrid skruven på fjärrkontrollens undersida motsols.
2. Vänd på fjärrkontrollen och avlägsna locket. Avlägsna det förbrukade
batteriet och lägg i ett nytt enligt ill.
3. Sätt tillbaka locket, vänd återigen på fjärrkontrollen och vrid skruven på
fjärrkontrollens undersida medsols (se figur 9 på sidan 127).
ÖVRIGA FUNKTIONER
SE
91
AKTIVERING AV SJÄLVUTLÖSARE/FJÄRRKONTROLL
SJÄLVUTLÖSARE
Montera kameran på ett stativ eller placera den på annat stadigt underlag.
Komponera din bild i sökaren. Tryck ner avtryckaren halvvägs (skärpa och
exponering låses i detta läge). Tryck därefter ner avtryckaren helt.
Självutlösarlampan tänds och lyser under ca 10 sekunder för att sedan
blinka de 2 sista sekunderna innan slutaren utlöser.
FJÄRRKONTROLL RC-300 (tillbehör)
Komponera din bild i sökaren. Placera ditt motiv inom autofokusmarkeringarna.
För att ta bilden riktar du fjärrkontrollen mot kameran och trycker ner
fjärrkontrollens avtryckare. Självutlösar/fjärrkontrollslampan börjar blinka och
slutaren utlöser efter ca 3 sekunder (se figur 8 på sidan 127).
SÄRSKILDA FUNKTIONER
ÅTERSPOLNING AV FILM INNAN FILMSLUT
ÖVRIGA FUNKTIONER
SE
90
Ingen
symbol
—
Självutlösare
Fjärrkontroll
Tryck på självutlösaren/fjärrkontrollsknäppen. Funktionen ändras enligt
ordningsföljden till vänster.
Vald funktions symbol visas på LCD
panelen.
Q
Tryck in filmåterspolningsknappen med
hjälp av kameraremmens utskjutande
del. Använd ej föremål med vass
spets. Tag ut filmrullen ur kameran
enligt beskrivning på sidan 87.
Ingen symbol
År-månad-dag
Månad-dag-år
Dag-månad-år
Dag-timme-minut
Page 47

Typ : Helautomatisk 35 mm kompaktkamera med autofokus och
inbyggt 28 mm – 100 mm zoomobjektiv.
Filmformat: 35 mm standard DX-kodad film (24 x 36 mm).
Objektiv: Olympus objektiv, 28 mm – 100 mm, F4.5 – 11.9,
7 element i 7 grupper.
Slutare: Programmerad elektronisk slutare.
Sökare: Zoomsökare med naturlig återgivning och möjlighet till
dioptrisk korrektion.
Skärpeinställning:
Passivt multi-vidvinklande autofokussystem
(max. 11 punkter), med möjlighet att låsa skärpan.
Arbetsområde: 0.6 m – ∞ (oändligt) i vidvinkel, 0.8 m – ∞ (oändligt) i tele.
Exponeringskontroll:
Programmerad automatisk exponeringskontroll,
3-zons ljudmätning. Automatiskt exponeringsområde –
EV2.4 (F4.5, 4 sek.) – EV16 (F10.2, 1/630 sek.) i vidvinkel,
EV5.1 (F11.9, 4 sek.) – EV17 (F18, 1/410 sek.) i tele.
Bildräknare: Progressiv typ som visas på LCD panelen.
Självutlösare: Elektronisk självutlösare med ca 12 sek. fördröjning.
Filmkänslighet: Automatisk inställning av DX-kodad film med ISO 50, 100,
200, 400, 800, 1600 och 3200. Övriga filmkänsligheter
ställs automatiskt in till närmaste lägre hastighet. För icke
DX-kodad film ställs känsligheten till ISO 100.
Filmladdning, -frammatning, -återspolning:
Automatisk.
Blixt: Inbyggd uppfällbar blixt. Uppladdningstid ca. 0.5 – 5.5 sek.
(vid normal temperatur med nytt batteri).
Blixtfunktioner: Automatisk blixt (utlöser automatiskt i svagt ljus, motljus
och lysrörsbelysning), »röda ögon» blixt, frånkopplad blixt,
upplättnadsblixt, nattfotograferingsblixt och nattfotograferingsblixt med reducering av „röda ögon“.
Exponeringsfunktioner:
Automatisk exponering, spotmätning och oändligt.
Strömförsörjning:
Ett 3 V litium batteri (DL123A eller CR123A).
Mått: 117 (B) x 61.5 (H) x 42.5 (D) mm (exkl. utskjutande delar).
Vikt: 220 g (utan batteri).
Övrigt: Allvädersskydd.
T
ekniska data för fjärrkontroll (tillbehör)
Fjärrkontrollssystem:
Infraröd med ca 3 sek. fördröjning.
Strömförsörjning:
Ett CR2025 batteri.
Batteriets livslängd:
Ca 5 år med ca 20,000 avtryck.
Arbetsområde: Ca 5 m.
Mått: 56.5 x 35.0 x 6.5 mm.
Vikt: 11 g (utan batteri).
RÄTT TILL ÄNDRINGAR FÖRBEHÅLLES. DEN VERKLIGA PRODUKTEN
KAN SKILJA SIG NÅGOT FRÅN DE ILLUSTRATIONER SOM VISAS
I DENNA BRUKSANVISNING.
TEKNISKA DATA
SE
93
• Lämna inte kameran i miljöer utsatta för extrem värme, luftfuktighet eller
i direkt solljus – t.ex. inuti i en bil eller på stranden.
• Utsätt ej kameran för formalin eller naftalin.
• Om kameran blir blöt skall du torka den med en handduk. Saltet i havsvatten
är särskilt skadligt.
• Använd ej organiska lösningsmedel såsom alkohol eller målarthinner vid
rengöring av kameran.
• Lämna ej kameran på eller i närheten av en TV, kylskåp eller annan
utrustning som avger ett magnetfält.
• Utsätt ej kameran för damm eller sand, eftersom detta kan orsaka allvarliga
skador.
• Utsätt ej kameran för stötar.
• Utsätt ej kamerans zoomobjektiv för onödigt våld.
• Utsätt ej kameran för extrem värme (över 40 °C) eller extrem kyla (under
–10 °C). Låga temperaturer, även inom tillåtet område kan ibland orsaka
tillfällig försämring av batteriets kondition, vilket kan sätta kameran tillfälligt
ur funktion.
• Undvik att lämna kameran oanvänd under en längre period, eftersom detta
kan orsaka problem. Försök trycka ner avtryckaren och kontrollera övriga
kamerafunktioner innan du börjar använda kameran.
• Viss röntgenutrustning på flygplatser kan skada filmen i kameran.
Undvik att låta din kamera passera genom dessa maskiner. Lämna den
istället till säkerhetspersonalen för manuell inspektion.
• Vidrör ej blixtens framsida om du tagit många blixtbilder i följd på kort tid,
eftersom denna yta kan vara varm.
FÖRVARA BATTERIER UTOM RÄCKHÅLL FÖR BARN. FÖRSÖK ALDRIG
ATT SJÄLV DEMONTERA, ÅTERUPPLADDA ELLER KORTSLUTA
BATTERIER.
FÖRSÖK ALDRIG ATT SJÄLV DEMONTERA KAMERAN; DEN
INNEHÅLLER KRETSAR MED HÖG SPÄNNING. OM KAMERANS INRE
DELAR BLOTTAS P.G.A. ATT KAMERAN SKADATS SKALL DU
OMEDELBART TA UT BATTERIET UR KAMERAN, FÖR ATT FÖRHINDRA
VIDARE ANVÄNDNING. KONTAKTA NÄRMASTE OLYMPUS
ÅTERFÖRSÄLJARE ELLER SERVICEVERKSTAD I HÄNDELSE AV FEL.
SKÖTSEL OCH FÖRVARING
SE
92
VARNING
FÖRVARA BATTERIER UTOM RÄCKHÅLL FÖR BARN. OM ETT BARN
RÅKAT SVÄLJA ETT BATTERI SKALL DU OMEDELBART KONTAKTA
LÄKARE.
Page 48

Lees deze handleiding aandachtig door voordat u de camera gaat
gebruiken (in het bijzonder het hoofdstuk „Onderhoud en opbergen
van de camera“ op blz. 102).
HANDLEIDING
NL
94
BATTERIJ IN DE CAMERA ZETTEN EN CONTROLEREN
U heeft één 3 V lithiumbatterij (CR123A of DL123A) nodig.
OM TE BEGINNEN
NL
95
DE VERSCHILLENDE ONDERDELEN
(Klap de titelflap open en houd blz. 3 zichtbaar.)
Camerahuis
1 Zoomknop (zie blz. 97)
2 Ontspanknop (zie blz. 97)
3 Zelfontspanner/
afstandsbediening-LED
4 Sensor belichtingsmeter
✩
5 Zoeker
6 Autofocusvenster
✩
7 Flitser✩(zie blz. 97 – 99)
8 Lens
✩
9 Sensor afstandsbediening
10 Lenskap
11 Deksel batterijcompartiment
(zie blz. 95)
12 Bevestigingspunt camerariem
(zie blz. 95 & 100)
13 Oogcorrectieknop (zie blz. 95)
14 Filmcontrolevenster
✩
Deze onderdelen moet u altijd goed schoon houden. Vuil en vingerafdrukken kunnen onduidelijke en
onscherpe foto’s tot gevolg hebben. Verwijder vuil en vingerafdrukken met een zachte doek.
Indicaties in de zoeker
24 Autofocustekens (zie blz. 97)
25 Spotmeetvlak (zie blz. 99)
26 Close-up correctietekens (zie blz. 96)
27 Groene LED (indicatie-LED autofocus)
Brandt: De camera heeft zich scherpgesteld op het onderwerp.
U kunt fotograferen.
Knippert: De camera heeft zich niet scherpgesteld op het onderwerp.
De sluiter is geblokkeerd.
Knippert snel: De camera slaagt er niet in zich scherp te stellen. U kunt
fotograferen, maar het onderwerp wordt mogelijk onscherp.
28 Oranje LED (indicatie-LED Flitser)
Dooft: De flitser ontsteekt niet. U kunt fotograferen.
Brandt: De flitser zal ontsteken. U kunt fotograferen.
Knippert: De flitser wordt opgeladen. Wacht tot de LED weer brandt.
LCD-venster
29 Datum/tijd indicator (uitsluitend Quartzdate-uitvoering – zie blz. 101)
30 Opnamenteller
31 Afstandsbediening (optioneel – zie blz. 100)
32 Zelfontspanner (zie blz. 100)
33 Onderdrukken van rode ogen (zie blz. 98)
34 Invulflitsen (zie blz. 98)
35 Flitser uit (zie blz. 98)
36 Nachtscène (zie blz. 98)
37 Batterijlading (zie blz. 95)
38 Spotmeting (zie blz. 99)
39 Oneindig-stand (zie blz. 99)
Opmerking: Niet alle indicaties zijn tegelijk zichtbaar.
15 Statiefaansluiting
16 Instelknoppen MODE en
SET-knoppen voor datum en
tijd (uitsluitend Quartzdateuitvoering – zie blz. 101)
17 Terugwikkelknop gedeeltelijk
belichte film (zie blz. 100)
18 Keuzeknop Belichtingsfunctie
(zie blz. 99)
19 Keuzeknop Flitserfunctie
(zie blz. 98)
20 Keuzeknop Zelfontspanner/
Afstandsbediening (zie blz. 100)
21 LCD-venster
22 Achterwand
23 Sluiting achterwand (zie blz. 96)
1
2
3
1. Draai het deksel van het batterijcompartiment, terwijl u de onderzijde ervan
in richting Q drukt, als afgebeeld open
in richting W.
• Overtuig u ervan dat de lenskap
gesloten is voordat u het deksel van
het batterijcompartiment opent.
2. Steek de batterij in de juiste stand in
het batterijcompartiment Q. Sluit het
deksel van het batterijcompartiment W.
3. Schuif de lenskap in richting Q tot hij
op zijn plaats klikt. De lens schuift naar
voren en de flitser klapt omhoog.
Controleer in het LCD-venster de nog
beschikbare batterijlading.
• Een nieuwe batterij is voldoende voor
circa 15 films.
dooft
(wordt automatisch uitgeschakeld).
knippert en alle andere functiepictogrammen worden normaal weergegeven.
knippert en alle andere
functiepictogrammen doven.
Batterij is in orde. U kunt fotograferen.
De batterij heeft nog een geringe lading en
moet vervangen worden door een nieuwe.
BEVESTIGEN VAN DE CAMERARIEM
Bevestig de camerariem op de
afgebeelde wijze.
INSTELLEN VAN DE OOGCORRECTIE
Draai de oogcorrectieknop zo dat het
autofocusteken duidelijk en scherp zicht-
baar is.
De batterij is uitgeput en moet onmiddellijk vervangen worden door een nieuwe.
Page 49

FOTOGRAFEREN
STANDAARD FUNCTIES
NL
97
FILM IN DE CAMERA ZETTEN
STANDAARDFUNCTIES
NL
96
1
2
1. Open de camera-achterwand door
de sluiting ervan omhoog te schuiven.
• Raak het inwendige van de camera,
en met name de lens, niet aan.
2. Steek de filmcassette zo in de
camera dat hij op zijn plaats klikt.
3. Leg de punt van de filmaanloopstrook tegen het filmlengte instelteken (A) en zorg dat de film tussen
de filmgeleidingen (B) ligt. Sluit
tenslotte de achterwand tot hij op
zijn plaats klikt.
• Nu wordt automatisch de eerste
opname voorgedraaid.
• Open de lenskap tot hij op zijn
plaats klikt. Overtuig u ervan dat
in de opnamenteller in het LCDvenster het cijfer „
11
“ zichtbaar is.
• Knippert in de opnamenteller de
letter „EE“, dan moet u de film
opnieuw in de camera zetten.
3
SCHERPSTELLEN EN SCHERPSTELBEREIK
CLOSE-UP FOTOGRAFIE
Deze camera werkt met een gecombineerd
gespreid meervoudig autofocussysteem
waarmee de camera zich makkelijker kan
scherpstellen, ook als het onderwerp niet in
het midden van het zoekerbeeld staat.
In de stand 38 mm groothoek fotografeert u
onderwerpen op een afstand van 0,6 m – ∞
(oneindig) en bij andere brandpuntsafstanden
op een afstand van 0,8 m – ∞ (oneindig).
Is de afstand tot het onderwerp extreem klein,
dan ontspant de sluïter wel, maar het onderwerp wordt onscherp afgebeeld.
Naarmate u dichter op uw onderwerp toe
gaat, schuift het beeldveld in de zoeker
verder naar omlaag.
Q
Close-up correctietekens (beeldveld
op de kleinste scherpstelafstand).
W
Beeldveld bij de camera-onderwerpafstand ∞ (oneindig).
1
2
3
Autofocustekens
1. Open de lenskap tot hij op zijn plaats
klikt. De lens schuift iets naar voren en
het LCD-venster licht op. Voor een teleopname (100 mm) drukt u de zoomknop
naar de „T“-kant en voor een groothoekopname (28 mm) naar de „W’-kant.
• Gebruikt u de camera circa
4,5 minuut niet, dan trekt de lens
zich terug en dooft het LCD-venster.
2. Richt de autofocustekens (AF) op uw
onderwerp.
• Kijk niet door de zoeker recht in de
zon of in andere sterke lichtbronnen.
3. Druk de ontspanknop half in, zodat de
camera zich kan scherpstellen op het
onderwerp. Overtuig u ervan dat de
groene LED brandt en maak dan uw
opname door de ontspanknop helemaal
in te drukken. Na het ontspannen van
de sluiter, wordt automatisch het
volgende beeld van de film
voorgedraaid.
AUTOFLITSEN – FLITSBEREIK
FILM TERUGWIKKELEN EN UIT DE CAMERA NEMEN
(met kleurennegatieffilm)
Bij gebruik van omkeerfilm is het scherpstelbereik in de telestand circa
30% kleiner.
ISO
100
200
400
Groothoek (W)
0,6 – 4,6 m
0,6 – 6,5 m
0,6 – 9,2 m
Tele (T)
0,8 – 1,8 m
0,8 – 2,5 m
0,8 – 3,6 m
Als de laatste opname van een film
gemaakt is, wikkelt de camera de film
automatisch terug. Overtuig u ervan dat
de motor gestopt is en dat in het LCDvenster de letter „EE“ knippert. Open de
achterwand en neem de film uit de
camera.
Q
W
Page 50

INSTELLEN VAN DE FLITSERFUNCTIES
SPECIALE KENMERKEN
NL
99
Klap de achterflap open en houd blz. 126 zichtbaar.
Rode ogen in flitsfoto’s – FLITSEN MET
ONDERDRUKKEN VAN RODE OGEN
Maakt u een flitsfoto van personen in het donker, dan dringt het flitslicht binnen in
de wijd geopende oogpupillen. In het oog wordt het door het netvlies gereflecteerde
licht rood gekleurd. De functie Onderdrukken van rode ogen geeft een reeks
inleidende lichtzwakke flitsen af voordat de hoofdflits ontsteekt. Dit stelt de ogen in
staat zich aan te passen aan het heldere licht door de pupillen te vernauwen.
Kijkt het onderwerp naar de inleidende flitsen, dan worden de ogen in de foto niet
rood afgebeeld (zie afbeelding 3 op blz. 126).
• Houd de camera vooral goed stil. Het duurt ongeveer 1 seconde voordat de sluiter
ontspant.
• Onderdrukken van rode ogen heeft mogelijk geen effect wanneer het onderwerp:
1. Niet recht naar de flitser kijkt.
2. Niet naar de inleidende flitsen kijkt.
3. Te ver van de camera staat.
Het effect van het onderdrukken van rode ogen is afhankelijk van de fysieke
eigenschappen van de gefotografeerde persoon.
Als flitsen niet is toegestaan of de sfeer van de foto bederft –
FLITSER UIT
De flitserfunctie heeft u nodig wanneer flitsen niet is toegestaan of wanneer u de
sfeer van de schemering of van het kunstlicht niet wilt bederven (zie afbeelden 4 op
blz. 126).
• Omdat een lange sluitertijd (tot 2 seconde) wordt ingesteld, moet u een statief
gebruiken om bewegen van de camera te voorkomen.
• Zorg ervoor dat uw onderwerp stil staat omdat anders bewegingsonscherpte kan
ontstaan.
Door de lenskap te sluiten zet u de camera weer in de stand Autoflitsen.
Schaduwen op het gelaat – NACHTSCÈNE
Maakt u portretopnamen van een persoon in tegenlicht of onder een boom of een
dak, dan wordt het gelaat van de persoon mogelijk te donker afgebeeld.
Invulflitsen levert precies de juiste hoeveelheid aanvullend licht om de schaduwen
te compenseren (zie afbeelding 5 op blz. 126) en voor TL-licht.
• Overtuig u ervan dat uw onderwerp zich binnen het flitsbereik (zie blz. 97) bevindt.
• Bij extreem heldere verlichtingscondities is het mogelijk dat invulflitsen niet het
gewenste effect geeft.
Door de lenskap te sluiten zet u de camera weer in de stand Autoflitsen.
Nachtelijke stadsgezicht – NACHTSCÈNE
Als u ‘s avonds door de stad loopt, wilt u uw onderwerp misschien met de stadsverlichting als achtergrond fotograferen. Een dergelijke opname maakt u dan met de
flitserfunctie Nachtscène. De hoofdflits verlicht het onderwerp op de voorgrond
terwijl de sluiter tot wel 4 seconde open blijft om de stadsverlichting vast te leggen.
Verder moet u de camera op een statief of op een ander stabiel vlak zetten om
bewegen van de camera tegen te gaan (zie afbeelding 6 op blz. 126).
Combinatie van twee functies – NACHTSCÈNE MET
ONDERDRUKKEN VAN RODE OGEN
Deze functie voorkomt de karakteristieke rode ogen zoals u die ziet in foto’s die ‘s
avonds worden gemaakt (zie afbeelding 7 op blz. 126). U kunt deze functie niet
samen met de spotmeetmethode gebruiken. Door de lenskap te sluiten zet u de
camera weer in de stand Autoflitsen.
SPECIALE KENMERKEN
NL
98
Geen functiepictogram
Autoflitsen
Onderdrukken
van rode ogen
Flitser uit
Invulflitsen
Nachtscène
Nachtscène met
onderdrukken van
rode ogen
Sterke contrasten – SPOTMETING
Fotografeert u in een omgeving met sterke contrasten (bijvoorbeeld portretopnamen
in tegenlicht) dan wordt het hoofdonderwerp te donker of te helder afgebeeld.
Om er voor te zorgen dat uw onderwerp goed wordt belicht, voert u een spotmeting
uit (zie afbeelding 1 op blz. 2). Richt het spotmeetteken (A) op het vlak waaraan u
het licht wilt meten. Druk de ontspannop half in; zodat de groene LED oplicht en de
aan dat vlak gemeten scherpstelling en belichting worden vastgehouden. Kader uw
opname opnieuw af en druk de ontspanknop helemaal in.
Landschapsfotografie – ONEINDIG
De camera wordt automatisch in de stand Oneindig gezet. De flitser ontsteekt
daarbij niet, behalve wanneer als flitserfunctie Invulflitsen is ingesteld (zie
afbeelding 2 op blz. 2).
INSTELLEN VAN DE BELICHTINGSFUNCTIES
Bij elke druk op de keuzeknop voor
de flitserfunctie ( ) verandert de
flitserfunctie in het LCD-venster in de
hiernaast, links, afgebeelde volgorde.
In het LCD-venster wordt aangegeven
welke flitserfunctie geselecteerd is.
Ontsteek de flitser nooit vlak voor
de ogen van mensen of dieren.
Ontsteek de flitser ook niet terwijl u
de camera op een motorrijder richt.
Geen functiepictogram
Automatische
belichtingsregeling
Spotmeting
Oneindig
Bij elke druk op de keuzeknop voor
de belichtingsfunctie ( / )
verandert de belichtingsfunctie in de
hiernaast, links, afgebeelde volgorde.
De geselecteerde functie wordt
aangegeven in het LCD-venster.
Door de lenskap te sluiten zet u de
camera weer in de stand Autoflitsen.
Page 51

DATUM EN TIJD AFDRUKKEN
(Uitsluitend bij de Quartzdate-uitvoering)
Eerst selecteert u de datumnotatie die u wilt afdrukken. Druk op de knop MODE
(Functie). Bij elke druk op de knop MODE verandert de datumnotatie in de hiernaast,
links, afgebeelde volgorde. Stop als de functie die u wilt gebruiken verschijnt.
Datum en tijd worden afgedrukt in de linkerbenedenhoek van het beeld. Worden
datum en tijd afgedrukt op een helder gekleurd vlak, bijvoorbeeld wit, oranje, geel,
enzovoort dan is het mogelijk dat de afdruk moeilijk leesbaar is. Bij gebruik van
zwart-witfilm, is afdrukken van datum en tijd niet mogelijk
DATUM EN TIJD GELIJKZETTEN
(Uitsluitend bij de Quartzdate-uitvoering)
Vergeet vooral niet datum en tijd gelijk te zetten wanneer u de batterij in de camera
gezet heeft of vervangen heeft.
1. Houd de knop MODE ingedrukt tot in het LCD-venster de cijfergroep van het
„jaar“ begint te knipperen.
2. Druk op de knop SET (Instellen) om het jaartal in te stellen. Bij elke druk op de
knop wordt het getal in het LCD-venster met één verhoogd. Houdt u de knop
ingedrukt, dan lopen de cijfers snel door. Passeert u daarbij het gewenste getal,
dan houdt u de knop ingedrukt, totdat dat getal weer verschijnt.
3. Druk opnieuw op de knop MODE, zodat de cijfergroep van de „maand“ begint
te knipperen. Stel de cijfergroep van de „maand“ in door op de knop SET te
drukken. Bij elke druk op de knop MODE verandert het knipperende cijfergroep
in de volgorde „jaar“, „maand“, „dag“, „uur“ en „minuten“.
4. Herhaal Stap 2 en 3 om „uur“ en „minuten“ in te stellen. Overtuig u ervan dat de
cijfergroep van de minuten knippert.
5. Nadat u de „minuten“ heeft ingesteld, drukt u op de knop MODE. Geen van de
cijfergroepen zal nu nog knipperen en het instellen van datum en tijd is daarmee
voltooid.
VERVANGEN VAN DE BATTERIJ VAN DE
AFSTANDSBEDIENING
(RC-300C – Optioneel)
Als de zelfontspanner/afstandsbediening-LED niet knippert, ook niet als u de
ontspanknop van de afstandsbediening indrukt, dan moet u de batterij ervan
vervangen door een nieuwe (CR2025).
1. Draai de schroef aan de achterzijde van de afstandsbediening los door hem
tegen de wijzers van de klok in te draaien.
2. Draai de afstandsbediening om en verwijder het deksel. Verwijder, terwijl u de
batterij van de afstandsbediening omhoog gericht houdt, de oude batterij en
steek er, als afgebeeld, een nieuwe batterij in.
3. Zet het deksel op zijn plaats terug, draai de afstandsbediening om en draai de
schroef aan de achterzijde van de afstandsbediening vast door hem met
de wijzers van de klok mee te draaien (zie afbeeldingen 9 op blz. 127).
ANDERE HANDELINGEN
NL
101
INSTELLEN VAN ZELFONTSPANNER/
AFSTANDSBEDIENING
ZELFONTSPANNER
Zet de camera op een statief of op een andere stevige ondergrond.
Kader uw opname af in de zoeker en druk de ontspanknop half in (op dat
moment worden scherpstelling en belichting vastgehouden). Druk daarna de
ontspanknop helemaal in. De zelfontspanner-LED brandt circa 10 seconden
en knippert dan nog eens 2 seconden. Daarna ontspant de sluiter.
AFSTANDSBEDIENING RC-300C (optioneel)
Kader uw opname af in de zoeker. Richt het autofocuskader op uw onderwerp.
Om de opname te maken richt u de afstandsbediening op de camera en
drukt de ontspanknop van de afstandsbediening in. De zelfontspanner/
afstandsbediening-LED begint te knipperen en de sluiter ontspant circa
3 seconden later (zie afbeelding 8 op blz. 127).
SPECIALE KENMERKEN
TERUGWIKKELEN VAN EEN GEDEELTELIJK
BELICHTE FILM
ANDERE HANDELINGEN
NL
100
Geen functiepictogram
—
Zelfontspanner
Afstandsbediening
Bij elke druk op de keuzeknop
voor de zelfontspanner/
afstandsbediening verandert de
functie in de hiernaast, links,
afgebeelde volgorde.
De geselecteerde functie wordt
aangegeven in het LCD-venster.
Q
Druk met de uitstekende punt van de
gesp Q van de camerariem de knop
voor het terugwikkelen van gedeeltelijk
belichte film in. Gebruik geen
voorwerpen met een scherpe punt.
Haal de film uit de camera zoals
beschreven op blz. 97.
Geen functiepictogram
Jaar-maand-dag
Maand-dag-jaar
Dag-maand-jaar
Dag-uur-minuten
Page 52

Type: Volautomatische autofocus kleinbeeldcamera met centraalsluiter en
ingebouwde 28 mm – 100 mm zoomlens.
Filmsoort: Standaard kleinbeeldfilms met DX-code (24 mm x 36 mm).
Lens: Olympus-lens, 28 mm – 100 mm, F4,6 – F11,9;
7 elementen in 7 groepen.
Sluiter: Programmagestuurde elektronische sluiter.
Zoeker: Reëelbeeld zoomzoeker met oogcorrectiemogelijkheid.
Scherpstellen:
Passief, gespreid meervoudig autofocussysteem (aan maximaal
11 punten) Vasthouden van de scherpstelling mogelijk.
Scherpstelbereik:
Groothoek: 0,6 m – ∞ (oneindig)/Tele: 0,8 m – ∞ (oneindig).
Belichtingsregeling:
Programmagestuurde automatische belichtingsregeling,
3-zone lichtmeting. Automatisch regelbereik:
In de stand Groothoek: EV 2,4 (F4,6; 4 s) – EV 16 (F10,2; 1/630 s)/
In de stand Tele: EV 5,1 (F11,9; 4s) – EV 17 (F18, 1/410 s).
Opnamenteller:
Optellend type met indicatie in het LCD-venster.
Zelfontspanner:
Elektronische zelfontspanner met circa 12 s vertragingstijd.
Filmgevoeligheidbereik:
Automatisch instellend met DX-code film met ISO 50; 100; 200; 400;
800; 1600 of 3200. Bij andere, tussengelegen filmgevoeligheden
wordt automatisch de eerstvolgend lagere filmgevoeligheid ingesteld.
Bij andere dan DX-code films wordt ISO 100 ingesteld.
Filmtransport:
Inleggen, transporteren en terugwikkelen van de film worden
automatisch uitgevoerd.
Flitser: Ingebouwde, omhoog verende flitser. Flitserintervaltijd:
circa 0,5 s – 5,5 s (bij normale temperatuur en met nieuwe batterij).
Flitserfuncties:
Autoflitsen (bij weinig licht, tegenlicht en TL-licht ontsteekt de flitser
automatisch), Onderdrukken van rode ogen, Flitser uit. Invulflitsen,
Nachtscène en Nachtscène met onderdrukken van rode ogen.
Belichtingsfuncties:
Automatische belichtingsregeling, Spotmeting en Oneindig.
Elektrische voeding:
Eén 3 V lithiumbatterij (DL123A of CR123A).
Afmetingen:
117,0 mm x 61,5 mm x 42,5 mm (b x h x d). Niet gemeten over
uitstekende delen.
Massa (gewicht):
220 g (zonder batterij).
Verder: Weerbestendig ontwerp.
T
echnische gegevens afstandsbediening (optioneel)
Afstandsbedieningsysteem:
Infrarood systeem met circa 3 seconden vertragingstijd.
Elektrische voeding:
Eén batterij type CR2025.
Levensduur van de batterij:
Circa 5 jaar, met circa 20.000 schakelacties.
Werkafstand: Circa 5 m.
Afmetingen: 56,5 mm x 35,0 mm x 6,5 mm.
Massa (gewicht):
11 g (zonder batterij).
WIJZIGINGEN IN TECHNISCHE GEGEVENS VOORBEHOUDEN ZONDER
VOORAFGAANDE KENNISGEVING EN ZONDER ENIGE VERPLICHTING VAN
DE ZIJDE VAN DE FABRIKANT. HET FEITELIJKE PRODUCT KAN
ENIGSZINS VERSCHILLEN VAN HET IN DEZE HANDLEIDING GETOONDE.
TECHNISCHE GEGEVENS
NL
103
• Laat de camera niet achter op plaatsen waar hij blootgesteld kan worden aan
overmatige hitte, vochtigheid of direct zonlicht – bijvoorbeeld in een afgesloten
auto of aan het strand.
• Houd de camera uit de buurt van formaline of naftaleen.
• Is de camera nat geworden, dan wrijft u hem af met een droge handdoel.
Vooral het zout in zeewater is bijzonder schadelijk voor uw camera.
• Gebruik geen organische oplosmiddelen zoals alcohol of ververdunner om de
camera te reinigen.
• Kom met de camera niet in de buurt van TV-ontvangers, koelkasten of andere
huishoudelijke apparaten die magnetische velden genereren.
• Stel deze camera niet bloot aan stof en zand omdat dat uw camera ernstig kan
beschadigen.
• Stel de camera niet bloot aan trillingen en schokken.
• Oefen geen overmatig grote kracht uit op de zoomlens.
• Stel de camera niet bloot aan overmatige hitte (hoger dan 40 °C) of extreme koude
(lager dan –10 °C). Bij lage temperaturen, ook in deze orde van grootte, neemt de
capaciteit van de batterij af, waardoor de camera tijdelijk onbruikbaar wordt.
• Laat de camera niet lange tijd ongebruikt liggen. Als gevolg daarvan kan niet
alleen schimmelgroei op de camera optreden maar ook andere problemen.
Probeer voordat u de camera weer gaat gebruiken de ontspanknop in te drukken
en controleer de werking van de camera.
• Op vliegvelden kunnen sommige röntgenapparaten de film in uw camera beschadigen. Probeer te voorkomen dat uw camera dergelijke apparaten moet passeren.
Overhandig de camera aan het veiligheidspersoneel en vraag de inspectie met de
hand uit te voeren.
• Raak de lens van de flitser niet aan als u die enige tijd achter elkaar door gebruikt
heeft, omdat u zich aan de lens kunt branden.
HOUD BATTERIJEN UIT DE BUURT VAN VUUR. PROBEER NOOIT BATTERIJEN
TE DEMONTEREN, OP TE LADEN OF KORT TE SLUITEN.
PROBEER NOOIT DE CAMERA TE DEMONTEREN, OMDAT ZICH DAARIN
HOOGSPANNINGSSCHAKELINGEN BEVINDEN. HEEFT U DE CAMERA LATEN
VALLEN OF IS DIE OP EEN ANDERE MANIER ZODANIG BESCHADIGD, DAT DE
ONDERDELEN IN HET INWENDIGE ERVAN TOEGANKELIJK ZIJN GEWORDEN,
DAN MOET U VERDER GEBRUIK ONMIDDELLIJK VERHINDEREN DOOR DE
BATTERIJ ER UIT TE HALEN. IN GEVAL VAN EEN STORING RAADPLEEGT
U UW OLYMPUS DEALER OF EEN OLYMPUS SERVICE CENTER.
ONDERHOUD EN OPBERGEN VAN DE CAMERA
NL
102
WAARSCHUWING
HOUD BATTERIJEN BUITEN HET BEREIK VAN KLEINE KINDEREN.
HEEFT EEN KIND PER ONGELUK EEN BATTERIJ INGESLIKT,
RAADPLEEG DAN ONMIDDELLIJK EEN ARTS.
Belangrijk
Geachte koopster/koper,
De batterijen welke in dit product worden gebruikt, bevatten stoffen die
schadelijk zijn voor het milieu.
Gooi daarom nooit batterijen bij het gewone huisvuil.
Laat bij voorkeur de batterijen door uw vakhandelaar vervangen of lever
de batterijen in bij de chemokar of het chemo-inleverpunt in uw gemeente
indien u de batterijen zelf verwisselt.
Belangrijk
Geachte Koper/Koopster,
Zorg ervoor dat het Nederlandse garantiebewijs geheel is ingevuld en afgestempeld door
uw leverancier.
Bewaar de aankoopbon zeer zorgvuldig. Als u onverhoopt gebruik moet maken van de
garantievoorwaarden, dient u deze bescheiden te overleggen.
Page 53

KÄYTTÖOHJE
FI
104
PARISTON LAITTAMINEN JA TARKISTUS
Käytä yhtä 3 V litiumparistoa (CR123A tai DL123A).
ALKUTOIMET
FI
105
1
2
3
1. Samalla kun painat paristokotelon
kantta pohjasta suuntaan Q, käännä
sitä suuntaan W avataksesi sen.
• Varmista että objektiivinsuojus on
kiinni ennen kuin avaat paristokotelon
kannen.
2. Laita paristo oikein Q.
Sulje paristokotelon kansi W
3. Työnnä objektiivinsuojusta suuntaan
Q kunnes se naksahtaa.
Objektiivi työntyy esiin ja salama
ponnahtaa auki. Tarkista jäljellä oleva
paristoteho nestekidenäytöstä.
• Uusi paristo riittää noin 15 filmirullan
kuvaamiseen.
palaa
(sammuu automaattisesti).
vilkkuu ja muut merkkivalot
näkyvät normaalisti.
vilkkuu ja muut merkkivalot
sammuvat.
Paristo on OK.
Voit kuvata.
Paristo on heikko ja pitäisi vaihtaa
uuteen.
HIHNAN KIINNITYS
Kiinnitä hihna kuvan esittämällä
tavalla.
DIOPTERIN SÄÄTÖ
Kierrä diopterin säätökiekkoa
kunnes automaattitarkennusmerkit
näkyvät kirkkaina.
Paristo on tyhjä ja pitäisi vaihtaa
uuteen välittömästi.
Lue tämä käyttöohje huolellisesti ennen kuin alat käyttää kameraasi
(erityisesti “Hoito ja säilytys” sivulta 112).
OSIEN NIMITYKSET
(Avaa etukansi ja pidä sivu 3 näkyvissä.)
Kameran runko
1 Zoom-kytkin (s. 107)
2 Laukaisin (s. 107)
3 Itselaukaisimen/
kaukolaukaisimen merkkivalo
4 Valokenno
✩
5 Etsin
6 Automaattitarkennusikkuna
✩
7 Salama✩(ss. 107 – 109)
8 Objektiivi
✩
9 Kaukolaukaisimen kenno
10 Objektiivin suojus
11 Paristokotelon kansi (s. 105)
12 Hihnan kiinnike (ss. 105 & 110)
13 Diopterin säätökiekko (s. 105)
14 Filmi-ikkuna
✩
Pidä tämä aina puhtaana. Lika ja tahrat voivat tehdä kuvista epäteräviä ja tarkentumattomia.
Pyyhi lika tai tahrat pehmeällä kankaalla.
Etsimen merkit
24 Automaattitarkennusmerkit (s. 107)
25 Pistemerkit (s. 109)
26 Lähikuvan korjailumerkit (s. 106)
27 Vihreä valo (automaattitarkennuksen merkki)
Palaa: Kohde on tarkentunut. Voit kuvata.
Vilkkuu: Kohde ei ole tarkentunut. Suljin on lukittunut.
Vilkkuu nopeasti: Kohdetta on hankala tarkentaa.
Voit kuvata, mutta kohde voi jäädä tarkentumatta.
28 Oranssi valo (salaman merkki)
Sammuu: Salama ei välähdä. Voit kuvata.
Palaa: Salama välähtää. Voit kuvata.
Vilkkuu: Salama varautuu. Odota kunnes valo palaa tasaisesti.
Nestekidenäyttö
29 Päiväyksen/ajan merkintä (vain Quartzdate-mallissa) (s. 111)
30 Otoslaskuri (s. 110)
31 Kaukolaukaisin (lisävaruste) (s. 110)
32 Itselaukaisin (s. 110)
33 Punasilmäisyyttä vähentävä salama (s. 108)
34 Täytesalama (s. 108)
35 Salama pois (s. 108)
36 Yökuvaussalama (s. 108)
37 Paristontarkistus (s. 105)
38 Pistemittaus (s. 109)
39 Ääretön (s. 109)
Huomaa: Kaikki merkit eivät näy näytössä samanaikaisesti.
15 Jalusta kierre
16 Päiväyksen MODE ja
SET näppäimet (vain Quartzdatemallissa) (s. 111)
17 Kesken rullan
takaisinkelauspainike (s. 110)
18 Valotustapanäppäin (s. 109)
19 Salamaohjelmanäppäin (s. 108)
20 Itselaukaisin/
kaukolaukaisinnäppäin (s. 110)
21 Nestekidenäyttö
22 Takakansi
23 Takakannen salpa (s. 106)
Page 54

KUVAAMINEN
PERUSTOIMINNOT
FI
107
FILMIN LATAAMINEN
PERUSTOIMINNOT
FI
106
1
2
1. Työnnä takakannen salpaa
ylöspäin avataksesi takakannen.
• Älä koske kameran sisäpuolta,
etenkään objektiivia.
2. Työnnä filmikasettia kunnes
se naksahtaa paikalleen.
3. Suuntaa filmin pää ohjeviivan (A)
mukaan ja aseta filmi ohjainten
(B) väliin. Sulje sitten takakannen
salpa niin että se naksahtaa.
• Filmi siirtyy automaattisesti
ensimmäiseen ruutuun.
• Avaa objektiivinsuojus niin
että se naksahtaa.
Varmista, että otoslaskuri
nestekidenäytössä näyttää “
11
”.
• Jos “E” vilkkuu, lataa filmi
uudelleen.
3
TARKENNUS JA TOIMINTAETÄISYYS
LÄHIKUVAUS
Tässä kamerassa käytetään monisäteistä
automaattitarkennusjärjestelmää,
joka helpottaa kameran tarkentamista
kohteisiin silloinkin kun ne eivät ole
etsimen keskellä. Kuvaa kohteesi
etäisyydeltä 0.6 m – ∞ (ääretön)
laajakulmalla ja 0.8 m – ∞ (ääretön)
telellä. Vaikka suljin laukeaakin kohteen
ollessa hyvin lähellä, kohde jää tarkentumatta.
Kuva-alue siirtyy alemmaksi etsimessä
siirtyessäsi lähemmäksi kohdetta.
Q
Lähikuvan korjailumerkit
(kuva-ala pienimmältä etäisyydeltä).
W
Kuva-ala ääretön-asennossa.
1
2
3
Automaattitarkennusmerkit
1. Avaa objektiivinsuojus niin että se
naksahtaa. Objektiivi työntyy hiukan
esiin ja nestekidenäyttö syttyy.
Työnnä zoomkytkin puolelle “T”
telekuvausta varten (100 mm) tai
puolelle “W” laajakulmakuvausta
varten (28 mm).
• Oltuaan noin 4 1/2 minuuttia
käyttämättä objektiivi vetäytyy
sisään ja nestekidenäyttö sammuu.
2. Sijoita automaattitarkennusmerkit
(AF) kohteesi päälle.
• Älä katso aurinkoon tai muuhun
voimakkaaseen valonlähteeseen
etsimen läpi.
3. Paina laukaisin puoliväliin
tarkentaaksesi kohteeseen.
Varmista, että vihreä valo palaa;
paina sitten laukaisin pohjaan asti
ottaaksesi kuvan. Kun kamera on
laukaistu, filmi siirtyy automaattisesti
seuraavaan ruutuun.
AUTOMAATTISALAMA – TOIMINTAETÄISYYS
FILMIN TAKAISINKELAUS JA POISTAMINEN
(värinegatiivifilmillä)
Käytettäessä kääntöfilmiä toimintaetäisyys telekuvauspuolella lyhenee
noin 30%.
ISO
100
200
400
Laajakulma (W)
0.6 – 4.6 m
0.6 – 6.5 m
0.6 – 9.2 m
Telekuvaus (T)
0.8 – 1.8 m
0.6 – 2.5 m
0.8 – 3.6 m
Kamera kelaa filmin automaattisesti
alkuun rullan loppuessa. Varmista, että
moottori on pysähtynyt ja “EE” vilkkuu;
avaa vasta sitten takakansi poistaaksesi
filmin.
Q
W
Page 55

Kahden ohjelman yhdistelmä – PUNASILMÄISYYTTÄ
VÄHENTÄVÄ YÖKUVAUSSALAMA
Ehkäisee tyypillistä punasilmäisyyttä yöllä otetuissa kuvissa (katso kuvaa
7 sivulta 126). Molempia ohjelmia ei voida yhdistää pistemittaustoimintoon.
Sulkemalla objektiivinsuojus palautetaan automaattisalama.
SALAMAOHJELMIEN ASETUS
ERIKOISTOIMINNOT
FI
109
Avaa takakansi ja pidä sivu 126 näkyvissä.
Punasilmäisyys salamakuvissa –
PUNASILMÄISYYTTÄ VÄHENTÄVÄ SALAMA
Otettaessa salamaa käyttäen kuvia ihmisistä pimeässä, salamavalo osuu
laajentuneeseen pupilliin. Siinä salamavalo heijastuu verkkokalvosta
punaisena. Punasilmäisyyttä vähentävä salama lähettää sarjan
heikkotehoisia esivälähdyksiä ennen pääsalamaa. Tämä antaa kohteen
silmille mahdollisuuden sopeutua kirkkaaseen valoon supistamalla pupillia.
Jos kohde katsoo esivälähdyksiä kohti, silmät eivät näytä punaisilta kuvassa
(katso kuvaa 3 sivulta 126).
• Pidä kamera vakaana. Kestää noin 1 sekunnin ennen kuin suljin laukeaa.
• Punasilmäisyyden vähennys ei ehkä toimi, kun kohde:
1. Ei katso suoraan kohti salamaa.
2. Ei katso esivälähdyksiä.
3. On liian kaukana kamerasta.
Punasilmäisyyden vähennyksen tehokkuus vaihtelee riippuen kunkin
kohteen yksilöllisistä ominaisuuksista.
Salaman käyttö ei ole sallittu tai salama pilaa tunnelman –
SALAMA POIS
Salama pois -toimintoa tarvitaan silloin kun salamakuvaus ei ole sallittua
tai kun haluat säilyttää hämärän tai kynttilänvalon luoman tunnelman
muuttumattomana (katso kuvaa 4 sivulla 126).
• Kun on valittu alhainen suljinnopeus (jopa 2 sekuntia), käytä jalustaa
estääksesi kameraa tärähtämästä.
• Pidä kohteesi paikallaan; muussa tapauksessa kuvasta voi tulla
epäterävä.
Sulkemalla objektiivinsuojus palautetaan automaattisalama.
Varjo kasvoilla – TÄYTESALAMA
Ottaessasi muotokuvia vastavalossa tai puun tai katon alla, kohteen
kasvot saattavat näyttää liian tummilta kirkkaamman taustan edessä.
Täytesalama antaa juuri oikean määrän lisävaloa korjaamaan varjon
(katso kuvaa 5 sivulta 126) tai loisteputkivalon.
• Varmista että kohteesi on salaman toiminta-alueella (s. 107).
• Täytesalama jää tehottomaksi hyvin kirkkaissa valaistusolosuhteissa.
Sulkemalla objektiivinsuojus palautetaan automaattisalama.
Kaupunki yöllä – YÖKUVAUSSALAMA
Kävellessäsi kaupungilla yöllä haluat ehkä ottaa kuvia etualalla olevasta
kohteestasi taustanaan kaupungin valot. Yökuvaussalama huolehtii tästä.
Pääsalama valaisee etualalla olevan kohteen samalla kun suljin pysyy auki
jopa 4 sekuntia tallentaakseen kaupungin valot. Sinun on syytä vakauttaa
kamera jalustalle tai muulle tuelle estääksesi kameraa tärähtämästä
(katso kuvaa 6 sivulta 126).
ERIKOISTOIMINNOT
FI
108
Ei
näyttöä
Automaattisalama
Punasilmäisyyttä
vähentävä salama
Salama pois
Täytesalama
Yökuvaussalama
Punasilmäisyyttä
vähentävä
yökuvaussalama
Jyrkkä kontrasti – PISTEMITTAUS
Otettaessa kuvia jyrkkäkontrastisessa ympäristössä (esim. muotokuvia
vastavalossa), pääkohde saattaa näyttää kuvissa liian tummalta tai liian
kirkkaalta. Varmistaaksesi, että kohde valottuu oikein, käytä pistemittausta
(katso kuvaa 1 sivulla 2). Sijoita pistemittausmerkit (A) alueelle, jolta haluat
mitata valon. Paina laukaisin puoliväliin; vihreä valo syttyy ja tarkennus ja
valotus lukittuvat tälle alueelle. Rajaa kohteesi uudelleen ja paina laukaisin
pohjaan asti.
Maisemakuvaus – ÄÄRETÖN
Kamera asettaa automaattisesti toimintaetäisyyden äärettömään.
Salama ei välähdä paitsi täytesalamaohjelmassa (katso kuvaa 2 sivulta 2).
VALOTUSTAPOJEN ASETUS
Paina salamaohjelmapainiketta ( ).
Ohjelma vaihtuu vasemmalla
esitetyssä järjestyksessä.
Valittu ohjelma näkyy
nestekidenäytössä. Älä laukaise
salamaa suoraan ihmisten tai eläinten
silmien edessä. Älä suuntaa kameraa
äläkä laukaise salamaa päin autoilijaa.
Ei
näyttöä
Automaattivalotus
Pistemittaus
Ääretön
Paina valotustapapainiketta ( / ).
Valotustapa vaihtuu vasemmalla
esitetyssä järjestyksessä.
Valittu tapa näkyy nestekidenäytössä.
Sulkemalla objektiivinsuojus
palautetaan automaattivalotus.
Page 56

PÄIVÄYKSEN/AJAN TULOSTUS (vain Quartzdate-mallissa)
Valitse ensin päiväyksen/ajan muoto, jonka haluat tulostuvan kuvaan.
Paina MODE-painiketta. Joka kerta painaessasi sitä muoto vaihtuu
vasemmalla esitetyssä järjestyksessä. Pidä näytössä se muoto, jonka haluat
tulostaa. Päiväys/aika tulostuu kuvan oikeaan alakulmaan. Jos päiväys/aika
tulostuu kirkkaan värin, kuten valkoisen, oranssin, keltaisen jne. päälle, sitä
voi olla vaikea lukea. Käytettäessä mustavalkoista filmiä ei päiväystä/aikaa
voida tulostaa.
PÄIVÄYKSEN JA AJAN MUUTTAMINEN
(vain Quartzdate-mallissa)
Muista korjata päiväys ja aika sen jälkeen kun olet vaihtanut pariston.
1. Pidä MODE-näppäin alhaalla kunnes kohta “vuosi” alkaa vilkkua.
2. Paina SET-näppäintä asettaaksesi vuosimerkinnän. Jos painat näppäintä
kerran, näyttö siirtyy 1:llä eteenpäin. Jos pidät näppäintä alhaalla,
numerot juoksevat nopeasti peräkkäin. Jos ohitat haluamasi numeron,
jatka painamista palataksesi tähän numeroon.
3. Paina MODE-näppäintä kerta uudelleen saadaksesi kohdan “kuukausi”
vilkkumaan. Paina SET-näppäintä asettaaksesi merkinnän “kuukausi”.
Kun painat MODE-näppäintä, vilkkuva merkintä vaihtuu järjestyksessä
“vuosi”, “kuukausi”, “päivä”, “tunti” ja “minuutti”.
4. Toista vaiheet 2 ja 3 asettaaksesi “tunnin” ja “minuutin”.
Varmista, että kohta “minuutti” vilkkuu.
5. Kun “minuutti” on asetettu, paina MODE-näppäintä.
Mikään merkintäkohdista ei vilku ja päiväyksen/ajan korjaus on nyt valmis.
KAUKOLAUKAISIMEN PARISTON VAIHTO
(lisävaruste RC-300C)
Jos itselaukaisimen/kaukolaukaisimen merkkivalo ei vilku,
vaikka olet painanut näppäintä, vaihda paristo uuteen (CR2025).
1. Kierrä kaukolaukaisimen pohjassa olevaa ruuvia vastapäivään
avataksesi sen.
2. Käännä kaukolaukaisin ympäri ja poista kansi. Pariston ollessa
ylöspäin poista vanha paristo ja laita uusi kuvan esittämällä tavalla.
3. Laita kansi takaisin, käännä kaukolaukaisin ympäri ja kierrä pohjassa
oleva ruuvi kiinni myötäpäivään (katso kuvaa 9 sivulta 127).
MUUT TOIMINNOT
FI
111
ITSELAUKAISIMEN/KAUKOLAUKAISIMEN ASETUS
ITSELAUKAISIN
Vakauta kamera jalustalle tai muulle tuelle. Rajaa otoksesi etsimessä.
Paina laukaisin puoliväliin (tarkennus ja valotus lukittuvat tällä hetkellä).
Paina sitten laukaisin pohjaan asti. Itselaukaisimen merkkivalo palaa noin
10 sekuntia ja vilkkuu sen jälkeen 2 sekuntia. Sen jälkeen kamera laukeaa.
KAUKOLAUKAISIN RC-300C (lisävaruste)
Rajaa otoksesi etsimessä. Sijoita automaattitarkennuskehys kohteesi
päälle. Ottaaksesi kuvan suuntaa kaukolaukaisin kohti kameraa ja paina
kaukolaukaisupainiketta. Itselaukaisimen/kaukolaukaisimen merkkivalo
alkaa vilkkua ja kamera laukeaa noin 3 sekuntia myöhemmin
(katso kuvaa 8 sivulta 127).
ERIKOISTOIMINNOT
FILMIN TAKAISINKELAUS KESKEN RULLAN
MUUT TOIMINNOT
FI
110
Ei
näyttöä
—
Itselaukaisin
Kaukolaukaisin
Paina itselaukaisin/
kaukolaukaisinnäppäintä.
Toiminto vaihtuu vasemmalla
esitetyssä järjestyksessä.
Valittu toiminto näkyy
nestekidenäytössä.
Q
Paina kesken rullan
takaisinkelauspainiketta hihnan
soljen ulokkeella Q. Älä käytä
teräväkärkistä välinettä.
Poista filmi kuten sivulla
107 esitetään.
Ei mitään
Vuosi-kuukausi-päivä
Kuukausi-päivä-vuosi
Päivä-kuukausi-vuosi
Päivä-tunti-minuutti
Page 57

Tyyppi: Täysautomaattinen 35 mm:n automaattitarkenteinen
kompaktikamera, sisäänrakennettu zoom-objektiivi
28 mm ~ 100 mm.
Filmikoko: 35 mm:n normaali DX-koodattu filmi (24 x 36 mm).
Objektiivi: Olympus-objektiivi, 28 mm~ 100 mm, F4.6 ~ 11.9,
7 elementtiä 7 ryhmässä.
Suljin: Ohjelmoitu elektroninen suljin.
Etsin: Todellisen kuva-alan zoom-tyyppinen etsin diopterin
säädöllä.
Tarkennus: Passiivityyppinen monisäteinen
automaattitarkennusjärjestelmä (max. 11 pistettä).
Tarkennuslukitus mahdollinen.
Tarkennusalue: 0.6 m ~ ∞ (ääretön) laajakulmalla,
0.8 m ~ ∞ (ääretön) telekuvauksessa.
Valotus: Ohjelmoitu automaattivalotus, 3 vyöhykkeen
valonmittaus, automaattivalotusalue –
EV2.4 (F4.6, 4 s) ~ EV16 (F10.2, 1/630 s) laajakulmalla,
EV5.1 (F11.9, 4 s) ~ EV17 (F18, 1/410 s) telekuvauksessa.
Otoslaskuri: Progressiivinen, näkyy nestekidenäytössä.
Itselaukaisin: Elektroninen itselaukaisin noin 12 sekunnin viiveellä.
Filmin herkkyysalue: Automaattinen asetus DX-koodatulla filmillä ISO 50,
100, 200, 400, 800, 1600 tai 3200. Muut näiden
välillä olevat filmiherkkyydet asettuvat automaattisesti
lähimmälle alemmalle herkkyydelle. DX-koodaamaton
filmi asettuu herkkyydelle ISO 100.
Filmin lataus/siirto/takaisinkelaus: Automaattinen.
Salama: Yhdysrakenteinen esiin ponnahtava salama.
Varautumisaika – noin 0.5 ~ 5.5 s
(normaalilämpötilassa, uudella paristolla).
Salamaohjelmat: Automaattisalama (hämärässä, vastavalossa ja
loisteputkivalossa), punasilmäisyyttä vähentävä
salama, salama pois, täytesalama, yökuvaussalama
ja punasilmäisyyttä vähentävä yökuvaussalama.
Valotustavat: Automaattivalotus, pistemittaus ja ääretön.
Virtalähde: Yksi 3 V litiumparisto (DL123A tai CR123A).
Mitat: 117 (l) x 61.5 (k) x 42.5 (s) mm (ilman ulokkeita).
Paino: 220 g (ilman paristoa).
Muuta: Roiskevesitiivis rakenne.
Kaukolaukaisimen tekniset tiedot
(lisävaruste)
Kaukolaukaisinjärjestelmä: Infrapuna, noin 3 sekunnin viiveellä.
Virtalähde: Yksi CR2025 paristo.
Pariston käyttöikä: Noin 5 vuotta, noin 20 000 kertaa.
Toimintaetäisyys: Noin 5 m.
Mitat: 56.5 x 35.0 x 6.5 mm.
Paino: 11 g (ilman paristoa).
VALMISTAJA PIDÄTTÄÄ OIKEUDEN TEKNISTEN TIETOJEN
MUUTTAMISEEN ILMAN ERI ILMOITUSTA. ITSE TUOTE VOI
POIKETA TÄSSÄ KÄYTTÖOHJEESSA ESITETYISTÄ.
TEKNISET TIEDOT
FI
113
• Älä jätä kameraa paikkaan, jossa se joutuu alttiiksi liialle kuumuudelle,
kosteudelle tai suoralle auringonvalolle – esimerkiksi autoon tai
uimarannalle.
• Älä päästä kameraa kosketuksiin formaliinin tai naftaliinin kanssa.
• Jos kamera kastuu, pyyhi se kuivalla pyyhkeellä. Meriveden suola voi
olla erityisen vahingollista.
• Älä käytä orgaanisia liuottimia, kuten alkoholia tai maalinohennetta,
kameran puhdistukseen.
• Älä jätä kameraa television, jääkaapin tai muun laitteen päälle tai lähelle,
jolla on voimakas magneettikenttä.
• Älä jätä kameraa alttiiksi pölylle tai hiekalle. Ne voivat aiheuttaa kameralle
vakavaa vahinkoa.
• Älä ravistele tai pudota kameraa.
• Käsittele zoom-objektiivia varovasti.
• Älä jätä kameraa alttiiksi kovalle kuumuudelle (yli 40 °C) tai kovalle
pakkaselle (alle –10 °C). Alhaiset lämpötilat näissäkin rajoissa voivat
joskus aiheuttaa paristotehon heikkenemistä estäen tilapäisesti kameraa
toimimasta.
• Älä jätä kameraa pitkiksi ajoiksi käyttämättä. Se voi aiheuttaa homeen
muodostumista kameraan tai muita ongelmia. Paina kokeeksi laukaisinta
ja tarkista kameran toimivuus ennen käyttöä.
• Joidenkin lentoasemien röntgenlaitteet voivat vahingoittaa kamerassasi
olevaa filmiä. Yritä välttää kamerasi viemistä näiden laitteiden läpi.
Anna se turvatarkastajalle käsin tarkastettavaksi.
• Älä koske salaman etupintaa käytettyäsi salamaa jonkin aikaa
yhtäjaksoisesti, koska pinta voi olla kuuma.
PIDÄ PARISTOT POISSATULEN LÄHELTÄ. ÄLÄ KOSKAAN YRITÄ
PURKAA PARISTOJA, LADATA NIITÄ UUDELLEEN TAI OIKOSULKEA
NIITÄ.
ÄLÄ KOSKAAN YRITÄ PURKAA KAMERAA, SIINÄ ON
KORKEAJÄNNITEVIRTAPIIRI. JOS KAMERAN SISÄOSAT PALJASTUVAT
PUDOTTAMISEN TAI VAHINGOITTUMISEN SEURAUKSENA, POISTA
PARISTO VÄLITTÖMÄSTI ESTÄÄKSESI KÄYTÖN JATKAMISEN.
KÄYTTÖHÄIRIÖN ILMETESSÄ OTA YHTEYS LÄHIMPÄÄN
OLYMPUS-JÄLLEENMYYJÄÄN TAI OLYMPUS-HUOLTOKESKUKSEEN.
HOITO JA SÄILYTYS
FI
112
VAROITUS
PIDÄ PARISTOT POISSA LASTEN ULOTTUVILTA.
JOS LAPSI NIELEE PARISTON, OTA HETI YHTEYS LÄÄKÄRIIN.
Page 58

NÁVOD K POUÎITÍ
CZ
114
VloÏení baterie a kontrola jejího stavu
PouÏívejte jednu 3V lithiovou baterii (DL 123A, CR123A).
PRVNÍ KROKY
CZ
115
1
2
3
1. Stlaãte spodní ãást krytu bateriového
prostoru ve smûru Q, a otoãením
ve smûru W jej otevfiete.
• Pfied otevfiením krytu bateriového
prostoru se ujistûte, Ïe kryt objektivu
je uzavfien.
2. VloÏte správnû novou baterii Q.
Uzavfiete kryt bateriového prostoru W.
3. PosuÀte krytem objektivu ve smûru
Q dokud neucítíte cvaknutí.
Objektiv se vysune a blesk se vyklopí.
Zkontrolujte stav baterie na LCD
obrazovce.
• Îivotnost jedné nové baterie je
cca 15 filmÛ.
svítí
(automaticky se vypne).
bliká a ostatní indikátory na LCD
obrazovce jsou zobrazeny normálnû.
bliká a ostatní indikátory na
LCD obrazovce mizí.
Baterie je v pofiádku.
MÛÏete fotografovat.
Kapacita baterie je nízká a
baterie ba mûla b˘t vymûnûna.
P¤IPEVNùNÍ ¤EMÍNKU
¤emínek pfiipevnûte podle postupu
znázornûného na obrázku.
DIOPTRICKÁ KOREKCE
Otáãejte koleãkem dioptrické korekce
dokud znaãky automatického
zaostfiování nebudou jasnû viditelné.
Baterie je vybitá a mûla
by b˘t okamÏitû vymûnûna.
Pfied tím, neÏ zaãnete fotoaparát pouÏívat, si pozornû pfieãtûte tento návod
(obzvlá‰tû ãást »Péãe a uskladnûní« na str. 122).
NÁZVY âÁSTÍ FOTOAPARÁTU
(Otevfiete záloÏku obalu spolu se stranou 3.)
Tûlo fotoaparátu
1 Páãka transfokátoru (str. 117)
2 Tlaãítko spou‰tû závûrky (str. 117)
3 Indikátor samospou‰tû/
Indikátor dálkového ovládání
4 Svûteln˘ senzor
✩
5 Hledáãek
6 Okénko automatického zaostfiování
✩
7 Blesk✩(str. 117 – 119)
8 Objektiv
✩
9 Senzor dálkového ovládání
10 Kryt objektivu
11 Kryt bateriového prostoru (str. 115)
12 Oãko pro fiemínek (str. 115 a 120)
13 Kontrolní okénko filmu (str. 115)
14 Hledáãek
15 Závit stativu
✩
Vyvarujte se zneãi‰tûní tûchto ãástí. Neãistoty a skvrny by mohly zpÛsobit nejasné
a rozmazané snímky. Ve‰keré neãistoty a skvrny otfiete doãista jemn˘m hadfiíkem.
Údaje v hledáãku
24 Znaãky automatického zaostfiování (str. 117)
25 Korekãní mûfiení (str. 119)
26 Ekãní znaãky pro zábûry zblízka (str. 116)
27 Zelená kontrolka (indikátor automatického zaostfiování)
Svítí: Fotografovan˘ objekt je zaostfien˘. MÛÏete fotografovat.
Bliká: Fotografovan˘ objekt není zaostfien˘. Závûrka je zablokována.
Bliká rychle: Fotografovan˘ objekt je obtíÏné zaostfiit.
MÛÏete fotografovat, ale je moÏné, Ïe objekt nebude zaostfien.
28 OranÏová kontrolka (indikátor nabití blesku)
Zhasíná:Blesk se neodpálí. MÛÏete fotografovat.
Svítí: Blesk se odpálí. MÛÏete fotografovat.
Bliká: Blesk se nabíjí. Poãkejte, aÏ se kontrolka rozsvítí.
LCD obrazovka
29 Indikátor data/ãasu (pouze u modelu Quartzdate) (str. 121)
30 Poãitadlo snímkÛ
31 Dálkové ovládání (str. 120)
32 Samospou‰È (str. 120)
33 ReÏim sníÏení jevu ãerven˘ch oãí (str. 118)
34 Vyrovnávací blesk (str. 118)
35 Vypnut˘ blesk (str. 118)
36 Noãní scéna s bleskem (str. 118)
37 Ukazatel stavu baterií (str. 115)
38 ReÏim bodového mûfiení (str. 119)
39 ReÏim Nekoneãna (str. 119)
Upozornûní: LCD obrazovka ve skuteãnosti nezobrazuje v‰echny indikátory
najednou jako je tomu na obrázku.
16 Tlaãítka reÏimu (MODE) a
nastavení (SET) data (pouze
u modelu Quartzdate) (str. 121)
17) Tlaãítko pro pfiedãasné
pfievíjení filmu (str. 120)
18) Tlaãítko pro volbu expoziãního
reÏimu (str. 119)
19) Tlaãítko reÏimu focení s
bleskem (str. 118)
20) Tlaãítko samospou‰tû/
dálkového ovládání (str. 120)
21) LCD obrazovka
22) Zadní kryt
23) Ovladaã uvolnûní zadního
krytu (str. 116)
Page 59

FOTOGRAFOVÁNÍ
STANDARDNÍ FUNKCE
CZ
117
ZALOÎENÍ FILMU
STANDARDNÍ FUNKCE
CZ
116
1
2
1. Otevfiete zadní kryt posunutím
tlaãítka pro uvolnûní zadního krytu
ve smûru vzhÛru.
• Nedot˘kejte se vnitfiních ãástí foto-
aparátu, obzvlá‰tû ne objektivu.
2. VloÏte kazetu s filmem dokud
neucítíte cvaknutí, pak je film
ve správné poloze.
3. Povytáhnûte zavádûcí konec filmu
tak, aby souhlasil s kontrolní ryskou
(A) a zaloÏte film mezi poziãní
rysky (B a C). Film by mûl b˘t mezi
vodícími prvky (D). Poté zavfiete
zadní kryt dokud neucítíte cvaknutí.
• Film se automaticky pfievine na
první snímek.
• Posunutím otevfiete kryt objektivu,
dokud neusly‰íte cvaknutí. Ujistûte
se, Ïe se na poãitadle snímkÛ na
LCD obrazovce zobrazí ãíslice »11«.
• Pokud na poãitadle snímkÛ bliká
symbol »
EE
«, zaloÏte film znovu.
3
ZAOST¤OVÁNÍ A PRACOVNÍ VZDÁLENOST
FOTOGRAFOVÁNÍ ZÁBùRÒ ZBLÍZKA
Tento fotoaparát vyuÏívá roz‰ífien˘ systém
vícebodového automatického zaostfiování,
kter˘ usnadÀuje zaostfiovat i na objekty,
které neleÏí ve stfiedu hledáãku. Fotografujte
objekty v minimální vzdálenosti 0,6 m aÏ do
nekoneãna. PfiestoÏe pfii fotografování velmi
blízk˘ch objektÛ dojde pfii stisknutí spou‰tû
k expozici, objekty na fotografii budou
rozostfiené.
âím více se budete k fotografovanému
objektu pfiibliÏovat, tím více se oblast
snímku bude v hledáãku posunovat níÏe.
Q
Korekãní znaãky zábûry zblízka
(oblast snímku pfii nejkrat‰í vzdálenosti).
W
Oblast snímku pfii zábûru na nekoneãno.
1
2
3
Znaãky automatického zaostfiování
1. Otevfiete kryt objektivu dokud neusly‰íte
cvaknutí. Objektiv se mírnû vysune a
LCD obrazovka se rozsvítí. Stlaãte páãku
transfokátoru do polohy »T« pro zábûry
teleobjektivem (100 mm) nebo do polohy
»W« pro ‰irokoúhlé zábûry (38 mm).
• Po zhruba 4 1/2 minutách neãinnosti
se objektiv zasune a LCD obrazovka
zhasne.
2. Namifite znaãky automatického
zaostfiování (AF) na fotografovan˘
objekt).
• Nikdy se hledáãkem nedívejte do
slunce ãi jin˘ch zdrojÛ silného svûtla.
3. Jemnû namáãknûte tlaãítko spou‰tû,
ãímÏ zaostfiíte na fotografovan˘ objekt.
Ujistûte se, Ïe zelená kontrolka svítí,
potom domáãknûte tlaãítko spou‰tû
na doraz, ãímÏ exponujete snímek.
Po uvolnûní spou‰tû se film automaticky
posune na dal‰í políãko.
AUTOMATICK¯ BLESK – PRACOVNÍ ROZSAH
ZPùTNÉ P¤EVÍJENÍ A VYJMUTÍ FILMU
(s barevn˘m negativním filmem)
Pokud pouÏijete inverzní film, pracovní rozsah pfii zábûrech teleobjektivem bude
zmen‰en o 30%.
ISO
100
200
400
·irokoúhlé zábûry (W)
0.6 m – 4.6 m
0.6 m – 6.5 m
0.6 m – 9.2 m
Zábûry teleobjektivem (T)
0.8 m – 1.8 m
0.8 m – 2.5 m
0.8 m – 3.6 m
Po expozici posledního snímku se
film automaticky pfievine zpût.
Ujistûte se, Ïe se motorek zastavil
(Ïe nesly‰íte zvuk pfievíjení) a Ïe na
poãitadle snímkÛ bliká symbol »
EE
«,
poté otevfiete zadní kryt fotoaparátu
a vyjmûte film.
Q
W
Page 60

Kombinace dvou reÏimÛ – REÎIM NOâNÍ SCÉNA S
BLESKEM PRO SNÍÎENÍ JEVU âERVEN¯CH OâÍ
ZabraÀuje typickému jevu ãerven˘ch oãí pfii fotografování veãer a v noci
(viz obr. 7 na str. 126). Oba reÏimy nelze pouÏít pfii reÏimu Bodového mûfiení.
Zavfiením krytu objektivu se fotoaparát opût navrátí do reÏimu automatického
blesku.
NASTAVENÍ REÎIMÒ FOTOGRAFOVÁNÍ S BLESKEM
NADSTANDARDNÍ VLASTNOSTI
CZ
119
Otevfiete zadní záloÏku obalu spolu se stranou 126.
âervené oãi osob na fotografiích pofiizovan˘ch s bleskem –
REÎIM BLESKU PRO SNÍÎENÍ JEVU
âERVEN¯CH OâÍ
Pokud se fotografované osoby nacházejí v tmavém ãi slabû osvûtleném prostfiedí,
duhovky jejich oãí se do‰iroka otevfiou, aby moly pfiijmout více svûtla. Díky tomu,
pokud budete fotografovat s bleskem, se svûtlo blesku odrazí zpût do fotoaparátu
a duhovky fotografované osoby se na snímku budou zdát ãervené. ReÏim blesku
se sníÏením jevu ãerven˘ch oãí spou‰tí sérii slab˘ch pfiípravn˘ch bleskÛ pfied
spu‰tûním hlavního blesku. Takto dostávají oãi fotografované osoby moÏnost
se pfiizpÛsobit jasnému svûtlu zmen‰ením duhovek. Za pfiedpokladu,
Ïe fotogra-fovaná osoba bude sledovat pfiípravné blesky, nebudou se její oãi na
snímku zdát ãervené (viz. obr. 3 na str. 126).
• DrÏte fotoaparát pevnû. Pfied otevfiením závûrky ubûhne zhruba 1 sekunda
• SníÏení jevu ãerven˘ch oãí nemusí b˘t úãinné, pokud fotografovaná osoba:
1. Se pfiímo nedívá do fotoaparátu.
2. Nesleduje pfiípravné blesky.
3. Je pfiíli‰ daleko od fotoaparátu.
Úãinnost sníÏení jevu ãerven˘ch oãí se li‰í v závislosti na individuálních
vlastnostech kaÏdé osoby.
Fotografování s bleskem není povoleno nebo Blesk by pokazil
atmosféru snímku – REÎIM VYPNUTÉHO BLESKU
ReÏim vypnutého blesku vyuÏijete v místech, kde je fotografování s bleskem
zakázáno nebo v situacích, kdy chcete zachovat atmosféru pfiítmí ãi osvûtlení
svíãkou (viz. obr. 4 na str. 126).
• Vzhledem k tomu, Ïe tento reÏim automaticky zvolí pomalou rychlost závûrky
(aÏ 2 sekundy), pouÏívejte stativ, aby nedo‰lo k chvûní fotoaparátu.
• Dbejte, aby se fotografovan˘ objekt neh˘bal, jinak by snímky mohly b˘t
rozmazané.
Zavfiením krytu objektivu se fotoaparát opût navrátí do reÏimu automatického blesku.
Stíny ve tváfii fotografované osoby – VYROVNÁVACÍ BLESK
Pokud pofiizujete portrétní snímky v protisvûtle ãi pod stromem nebo pod
stfiechou, mÛÏe obliãej fotografované osoby, pokud ta stojí na svûtlej‰ím pozadí,
vypadat pfiíli‰ tmav˘. Vyrovnávací blesk vy‰le právû tolik pfiídavného svûtla,
aby vyrovnal neÏádoucí stíny (viz. obr. 5 na str. 126) a záfiivkové osvûtlení.
•
Ujistûte se, Ïe fotografovan˘ objekt je umístûn v oblasti odpovídající pracovnímu
rozsahu blesku (str. 117).
• Vyrovnávací blesk je za pfiíli‰ jasn˘ch svûteln˘ch podmínek neúãinn˘.
Zavfiením krytu objektivu se fotoaparát opût navrátí do reÏimu automatického blesku.
Mûsto v noci – REÎIM BLESKU NOâNÍ SCÉNA
Pfii noãní procházce mûstem budete moÏná chtít vytvofiit snímky urãitého objektu
na pozadí noãního mûstského osvûtlení. V tomto pfiípadû Vám pomÛÏe ReÏim
blesku noãní scéna. Hlavní blesk osvûtlí objekt v popfiedí, zatímco závûrka
zÛstane po dobu max. 4 sekund otevfiená, aby fotoaparát zachytil mûstské
osvûtlení. Aby se fotoaparát nechvûl, zajistûte jej pfiipevnûním na stativ nebo
jinou nehybnou poloÏku (viz. obr. 6 na str. 126).
NADSTANDARDNÍ VLASTNOSTI
CZ
118
Îádn˘
symbol
Automatick˘ blesk
Blesk pro sníÏení
jevu ãerven˘ch oãí
Vypnut˘ blesk
Vyrovnávací blesk
Noãní scéna
s bleskem
Noãní scéna s
bleskem pro sníÏení
jevu ãerven˘ch oãí
Portréty v protisvûtle – BODOVÉ Mù¤ENÍ
Pokud pofiizujete portrétní snímky proti protisvûtlu (napfiíklad pfied oknem),
mohl by obliãej fotografované osoby b˘t na snímcích pfiíli‰ tmav˘. Abyste zajistili
správnou expozici obliãeje, pouÏijte Bodové expoziãní mûfiení (viz. obr. 1 na
str. 2). Namifite znaãky bodového mûfiení (A) na oblast, pro kterou chcete zmûfiit
expoziãní hodnoty. Namáãknûte tlaãítko spou‰tû do poloviny, zelená kontrolka
se rozsvítí a zaostfiení a expoziãní hodnoty pro tuto oblast budou zaaretovány.
ZmûÀte kompozici zábûru a domáãknûte tlaãítko spou‰tû nadoraz.
Fotografování krajiny – NEKONEâNO
Fotoaparát se automaticky nastaví na reÏim Nekoneãno.
Blesk se vyjma reÏimu Vyrovnávacího blesku neodpálí (viz. obr. 2 na str. 2).
NASTAVENÍ EXPOZIâNÍCH REÎIMÒ
Stisknûte tlaãítko reÏimu blesku ( ).
ReÏimy se spustí v pofiadí znázornûném
na levé stranû. Symbol zvoleného
reÏimu se zobrazí na LCD obrazovce.
Nespou‰tûjte blesk pfiímo pfied oãima
osob ãi zvífiat. Nemifite fotoaparátem
a nespou‰tûjte blesk na motoristy.
Îádn˘
symbol
Automatická
expozice
Bodové mûfiení
Nekoneãno
Stisknûte tlaãítko pro volbu expoziãního
reÏimu ( / ). ReÏimy se spustí
v pofiadí znázornûném na levé stranû.
Symbol zvoleného reÏimu se zobrazí
na LCD obrazovce. Zavfiením krytu
objektivu se fotoaparát opût navrátí
do reÏimu automatické expozice.
Page 61

TISK DATA/âASU (Pouze pro modely Quartzdate)
Nejdfiíve zvolte formát data/ãasu, kter˘ chcete vytisknout na snímky.
Stisknûte tlaãítko MODE. S kaÏd˘m dal‰ím stisknutí tohoto tlaãítka pfiepnete na
násle dující formát podle pofiadí v levé ãásti. Formát, kter˘ budete chtít vytisknout
se zobrazí na displeji. Datum/ãas bude vyti‰tûn v pravém dolním rohu snímku.
Pokud by byl údaj umístûn na jasném podkladu jako na bílé, oranÏové, Ïluté,
barvû, atd., mÛÏe b˘t obtíÏnû ãiteln˘. Pfii pouÏívání ãernobílého filmu nemusí
b˘t datum/ãas vyti‰tûn.
OPRAVOVÁNÍ DATA/âASU
(Pouze u modelu Quartzdate)
Po kaÏdém vloÏení ãi v˘mûnû baterie se ujistûte, Ïe jste správnû nastavili
ãasové údaje data a ãasu.
1. Stisknûte tlaãítko MODE a drÏte je stisknuté dokud údaj »rok« nezaãne blikat.
2. Stisknûte tlaãítko SET a opravte tento údaj. Jedním stisknutím tohoto tlaãítka
vzroste ãíselná hodnota na displeji o 1. Pokud budete drÏet tlaãítko stisknuté,
hodnoty budou rychle za sebou vzrÛstat. Pokud zme‰káte poÏadované ãíslo,
drÏte tlaãítko dále stisknuté dokud opût nedojde k tomuto ãíslu.
3. Po opûtovném stisknutí tlaãítka MODE zaãne blikat údaj »mûsíc«.
Stisknûte tlaãítko SET a upravte tento údaj. S kaÏd˘m stisknutím tlaãítka
MODE budete aktivovat údaje (údaje zaãnou blikat) v pofiadí »rok«, »mûsíc«,
»den«, »hodina«, »minuta«.
4. Zopakujte kroky 2 a 3 pro nastavení údajÛ »hodina« a »minuta«.
Ujistûte se, Ïe údaj »minuta« bliká.
5. Po nastavení minut, stisknûte tlaãítko MODE. Îádn˘ z údajÛ uÏ nebude
blikat a nastavení data/ãasu je nyní dokonãeno.
V¯MùNA BATERIE DÁLKOVÉHO OVLÁDÁNÍ
(Doplnûk RC-300C)
Pokud indikátor samospou‰tû/dálkového ovládání nezaãne po stisknutí
tlaãítka blikat, vymûÀte vybitou baterii za novou (CR2025).
1. Otoãte závitem na spodní ãásti dálkového ovládání proti smûru hodinov˘ch
ruãiãek, ãímÏ dojde k jeho uvolnûní.
2. Otoãte dálkové ovládání a sejmûte kryt. Dbejte, aby baterie smûfiovala vzhÛru,
vyjmûte starou baterii a vloÏte novou baterii zpÛsobem znázornûn˘m na
obrázku.
3. Nasaìte kryt, obraÈte dálkové ovládání a otoãením závitu na spodní stranû
po smûru hodinov˘ch ruãiãek jej utáhnûte (viz. obr. 9 na str. 127).
DAL·Í FUNKCE
CZ
121
NASTAVENÍ SAMOSPOU·Tù /
DÁLKOVÉHO OVLÁDÁNÍ
SAMOSPOU·Ë
Upevnûte fotoaparát na stativ nebo jinou nehybnou podloÏku. V hledáãku
zvolte kompozici zábûru. Namáãknûte tlaãítko spou‰tû do poloviny (zaostfiení
a expoziãní hodnoty budou zaaretovány). Poté domáãknûte tlaãítko spou‰tû
nadoraz. Indikátor samospou‰tû bude svítit po dobu cca 10 sekund a poté blikat
po cca 2 sekundy. Pak se závûrka otevfie.
DÁLKOVÉ OVLÁDÁNÍ RC-300C (Doplnûk)
V hledáãku zvolte kompozici zábûru. Zamifite rámeãek automatického zaostfiování
na fotografovan˘ objekt. Pro expozici snímku namifite dálkové ovládání na
fotoaparát a stisknûte tlaãítko na dálkovém ovládání. Indikátor samospou‰tû/
dálkového ovládání zaãne blikat, a závûrka se otevfie po cca 3 sekundách
(viz. obr. 8 na str. 127).
NADSTANDARDNÍ VLASTNOSTI
P¤EDâASNÉ ZPùTNÉ P¤EVÍJENÍ FILMU
DAL·Í FUNKCE
CZ
120
Îádn˘
symbol
—
Samospou‰È
Dálkové ovládání
fotoaparátu
Stisknûte tlaãítko samospou‰tû/
dálkového ovládání. ReÏimy se spustí
v pofiadí znázornûném na levé stranû.
Symbol zvoleného reÏimu se zobrazí
na LCD obrazovce.
Q
Stisknûte tlaãítko pro pfiedãasné
pfievíjení filmu pomocí v˘ãnûlku na
pfiezce fiemínku
Q. NepouÏívejte
nástroj s ostrou ‰piãkou. Vyjmûte film
podle postupu popsaného na str. 117.
Îádn˘ údaj
Rok-mûsíc-den
Mûsíc-den-rok
Den-mûsíc-rok
Den-hodina-minuta
Page 62

Typ: Plnû automatick˘ fotoaparát pro 35 mm filmy,
vybaven˘ centrální závûrkou a automatick˘m zaostfiováním
s vestavûn˘m 28 – 100 mm objektivem s transfokátorem.
Film: Standardní 35-mm film s DX kódem (24 x 36 mm).
Objektiv: OLYMPUS 28 – 100 mm; F4,6 – 11,9 (7 ãoãek v 7 skupinách.
Závûrka: Programovû elektronicky fiízená.
Hledáãek: Se skuteãn˘m obrazem s transfokátorem s moÏností
dioptrické korekce.
Zaostfiování: Pasivní systém vícebodového automatického zaostfiování
(max. 11 bodÛ) s moÏností aretace zaostfiení.
Rozsah praco- 0,8-nekoneãno pro ‰irokoúhlé zábûry,
vních vzdáleností:
0,6-nekoneãno pfii pouÏití teleobjektivu
Nastavení Automatick˘ systém programovû fiízené expozice, 3-zónové
expozice: svûtelné mûfiení. Pracovní rozsah automatické expozice:
EV2,4 (F4,6, 4 sek.) – EV16 (F10,2, 1/630 sek.) pro
‰irokoúhlé zábûry,
EV 5,1 (F11,9, 4 sek.) – EV17 (F18, 1/410 sek.) pro zábûry
teleobjektivem.
Poãitadlo snímkÛ:
PfiírÛstkov˘ typ, zobrazení na LCD obrazovce.
Samospou‰È: Elektronická se zpoÏdûním asi 12 sekund.
Rozsah Automatické nastavení citlivosti u filmÛ s DX kódem 50,
citlivosti filmu: 100, 200, 400, 800, 1600 nebo 3200. Pro jiné mezihodnoty
citlivosti filmu bude citlivost automaticky nastavena na
nejbliωí niωí hodnotu. U filmÛ bez DX kódu je citlivost
automaticky nastavena na ISO 100.
ZaloÏení/posuv/zpûtné pfievíjení filmu:
Automatické.
Blesk: Vestavûn˘ vyklápûcí blesk. Nabíjecí doba asi
0,5 – 5,5 sekundy (pfii normální teplotû a s novou baterií).
ReÏimy Automatick˘ blesk (pfii nedostateãném a záfiivkovém
ãinnosti blesku: osvûtlení a pfii protisvûtle), Redukce jevu ‘ãerven˘ch oãí’,
Vypnut˘ blesk, Vyrovnávací blesk, Noãní scéna,
Redukce jevu ‘ãerven˘ch oãí’ v reÏimu Noãní scéna.
Expoziãní reÏimy: Automatická expozice, Bodové mûfiení, Nekoneãno.
Ostatní reÏimy:
Samospou‰È, Dálkové ovládání, Varování pfii chvûní fotoaparátu.
Napájení: Jedna 3V lithiová baterie (DL123A nebo CR123A).
Rozmûry:
117 (‰ífika) x 61,5 (v˘‰ka) x 42,5 (hloubka) mm (bez v˘ãnûlkÛ).
Hmotnost: 220 g (bez baterie).
Ostatní vlastnosti:
Provedení odolné vÛãi jakémukoliv poãasí.
Technické údaje pro dálkové ovládání
(doplnûk)
Systém dálkového ovládání:
Infraãerven˘, se zpoÏdûním cca 3 sek.
Napájení: Jedna baterie CR2025.
Îivotnost baterie: Cca 5 let nebo cca 20 000 pouÏití.
Pracovní dosah: Cca 5 metrÛ.
Rozmûry: 56,5 x 35,0 x 6,5 mm.
Hmotnost: 11 g (bez baterie).
PRÁVA ZMùNY TECHNICK¯CH PARAMETRÒ BEZ P¤EDCHOZÍHO
UPOZORNùNÍ V¯ROBCEM VYHRAZENA. VLASTNÍ V¯ROBEK SE
MÒÎE LI·IT OD UKÁZEK V¯ROBKÒ V TOMTO NÁVODU.
TECHNICKÉ ÚDAJE
CZ
123
• Neodkládejte fotoaparát na místech vystaven˘ch nadmûrnému horku, vlhkosti
nebo pfiímému slunci – napfiíklad uvnitfi automobilu nebo na pláÏi.
• ZabraÀte, aby fotoaparát pfii‰el do styku s formalínem nebo naftalínem.
• Pokud dojde k potfiísnûní fotoaparátu vodou, otfiete jej such˘m hadfiíkem.
SÛl obsaÏená v mofiské vodû by mohla fotoaparát váÏnû po‰kodit.
• K ãi‰tûní fotoaparátu nepouÏívejte organická rozpou‰tûdla jako líh nebo fiedidlo.
• Neodkládejte fotoaparát na ãi v blízkosti televize, chladniãky ãi jin˘ch pfiístrojÛ
s magnetick˘m polem.
• ZabraÀte styku fotoaparátu s prachem ãi pískem, mohlo by dojít k váÏnému
po‰kození.
• Nevystavujte fotoaparát otfiesÛm a nárazÛm.
• Nevystavujte fotoaparát nadmûrnému horku (nad 40 °C) ãi nadmûrnému chladu
(pod –10 °C). Nízké teploty, i v rámci tohoto rozsahu, mohou nûkdy zpÛsobit
poruchu v˘konu baterií, a doãasnû tak zastavit fungování fotoaparátu.
• SnaÏte se nenechávat fotoaparát v neãinnosti po del‰í dobu.
V opaãném pfiípadû by fotoaparát mohla napadnout plíseÀ a dal‰í problémy.
Pfied opûtovn˘m pouÏitím fotoaparátu vÏdy zkuste zmáãknout tlaãítko spou‰tû
a ujistûte se o správném fungování pfiístroje.
• Nûkteré rentgenové pfiístroje na leti‰tích mohou po‰kodit film ve Va‰em
fotoaparátu. Pokud moÏno, zabraÀte, aby fotoaparát procházel takov˘mi
pfiístroji. Pfiedejte jej pfiítomnému úfiedníkovi, aÈ jej prohlédne osobnû.
• Nedot˘kejte se pfiedního povrchu blesku, pokud jste jej opakovanû pouÏívali,
tento povrch mÛÏe b˘t hork˘.
ZABRA≈TE STYKU BATERIÍ S OHNùM. NIKDY SE BATERIE
NEPOKOU·EJTE ROZEBÍRAT, ZNOVU NABÍJET âI ZKRATOVAT.
NIKDY SE NEPOKOU·EJTE FOTOAPARÁT ROZEBÍRAT.
OBSAHUJE OBVODY S VYSOK¯M NAPùTÍM. POKUD DOJDE P¤I PÁDU
NEBO PO·KOZENÍ FOTOAPARÁTU K ODHALENÍ JEHO VNIT¤NÍCH âÁSTÍ ,
OKAMÎITù VYJMùTE BATERII, ABY FOTOAPARÁT NEMOHL B¯T
DÁLE POUÎÍVÁN.
V P¤ÍPADù PORUCHY FOTOAPARÁTU KONTAKTUJTE SVÉHO
NEJBLIηÍHO OBCHODNÍHO ZÁSTUPCE NEBO SERVISNÍ ST¤EDISKO
SPOLEâNOSTI OLYMPUS.
PÉâE A ULOÎENÍ FOTOAPARÁTU
CZ
122
VAROVÁNÍ
UCHOVÁVEJTE BATERIE MIMO DOSAH DùTÍ.
POKUD DÍTù BATERII SPOLKNE, OKAMÎITù ZAVOLEJTE LÉKA¤E.
Page 63

MEMO
124
 Loading...