

Page 1

Page 2

Introduction
Thank you for purchasing this Olympus product.
Before you start to use your new Olympus product, please read these instructions
carefully to enjoy optimum performance.
Note
• The contents of this software and this manual may not be reproduced in whole or in
part except for personal use. It may not be transferred without permission.
• Olympus accepts no responsibility for losses suffered by the customer or a third party
as a result of use of this software.
• While every care has been taken in the preparation of this manual, if you find any
errors, omissions, or points which are unclear, please contact an authorized
Olympus service center.
• This software is only guaranteed to operate in the specified operating environment.
• The software specifications and the content of this manual are subject to change
without notice. For the latest information, visit the Olympus web site at:
http://www.olympus.com
© 2004 OLYMPUS IMAGING CORP.
Trademarks
• Macintosh is a registered trademark of Apple Computer, Inc. in the USA and other countries.
• Windows® is a registered trademark of Microsoft Corporation in the USA and other
countries.
®
• Adobe
• Other company and product names appearing in this manual are trademarks or
System Requirements
• OLYMPUS Studio has the following system requirements.
and Adobe Photoshop® are trademarks of Adobe Systems Incorporated.
registered trademarks of their respective owners.
Macintosh
OS Mac OS 9.1 - 9.2.2, Mac OS X 10.1.3 - 10.3
(IEEE1394 (FireWire)/USB1.1/USB2.0 interface)
CPU Power PC G3 500MHz or higher
RAM 192 MB or more for applications (Mac OS X: 256 MB or more)
Hard disk capacity 100 MB or more (for installation)
Connector IEEE1394 (FireWire) port (IEEE1394 (FireWire) interface)
USB port (USB interface)
Compatible only with standard-equipped ports
Monitor 1024 × 768 dots or higher, 32,000 colors or more (1,677
million colors recommended), multi monitor compatible
Windows
OS Windows Me/2000/XP (IEEE1394 interface)
Windows 98SE/Me/2000/XP (USB1.1 interface)
Windows 2000/XP (USB2.0 interface)
Browser Internet Explorer 6 Service Pack 1 or later
CPU Pentium III 500MHz or higher
RAM 128 MB or more (256 MB or more recommended)
Hard disk capacity 100 MB or more (for installation)
Connector IEEE1394 port (IEEE1394 interface)
USB port (USB interface)
Monitor 1024 × 768 dots or higher, 65,536 colors or more (1,677
million colors recommended), multi monitor compatible
Page 3

Quick Reference
OLYMPUS Studio Overview P.12
This section describes the functions and features of OLYMPUS Studio.
OLYMPUS Studio Workflow P.14
This section provides a visual overview of how to use OLYMPUS Studio.
OLYMPUS Studio Windows P.18
This section provides an introduction to the browse window, image edit
window, and camera control window, and briefly describes how these
windows are used together.
Starting OLYMPUS Studio P.24
This section describes how to start OLYMPUS Studio.
Browse Window P.33
This section describes how to view and sort images in the three display modes
and how to use Light Box Mode and other functions in the browse window.
Image Edit Window P.136
This section describes how to use the RAW Development Settings, Resize,
Distortion Correction, Rotate/Flip, Brightness & Contrast, and other image
edit window functions.
Camera Control Window P.201
This section describes how to shoot images from a computer, how to change
shooting settings and apply those settings to the camera, and other camera
control window functions.
Update Firmware P.249
This section describes how to update OLYMPUS E-System firmware.
OLYMPUS Studio Preferences P.253
This section describes how to configure the operating environment for use in
all windows, including how to select the file type displayed, set the interval at
which images are displayed in the slide show, set up multi monitor viewing,
and customize sorting checkmarks.
Appendices P.273
This section includes a list of menus, a glossary, an index, and technical
support information.
3
Page 4

How to use this manual
This indicates a menu bar operation.
The dialog boxes and windows displayed
in this manual are based upon the
Macintosh version of this software. These
displays and the names of button may
differ in the Windows version.
Where the displays greatly differ between
the two versions, both displays are used.
These tables are
used to describe
the various
information for
settings in each
dialog box.
This indicates a button in a dialog box.
4
Page 5
How to use this manual
This indicates a button in a dialog box.
This indicates an item in a dialog box.
This is the title of
the section within
a chapter.
This is the title of
the chapter.
This indicates reference pages
describing details or associated
information.
This symbol indicates important information on
factors which may lead to errors or operational
problems. It also warns of operations that should
be absolutely avoided.
This symbol indicates useful functions and information
that will help you get the most out of your software.
This sample page is only for your reference. It may differ from the explanation in the actual
page.
z Using Help
You can display help information with either of the following operations.
• Click the [?] button (Macintosh) or [Help] button (Windows) on a dialog box.
• Select [OLYMPUS Studio Help] from the [Help] menu on a window.
5
Page 6

Contents
Introduction ........................................................................................... 2
Quick Reference.................................................................................... 3
How to use this manual ........................................................................ 4
Using Help .................................................................................................5
Contents................................................................................................. 6
OLYMPUS Studio Overview 12
OLYMPUS Studio Workflow 14
OLYMPUS Studio Windows 18
Relationship between the windows ...................................................................18
Browse window .................................................................................................19
Browse Mode...........................................................................................19
View Mode...............................................................................................20
Light Box Mode........................................................................................21
Image edit window.............................................................................................22
Camera control window.....................................................................................23
Starting OLYMPUS Studio 24
Connecting the camera and computer.............................................. 24
Starting OLYMPUS Studio.................................................................. 26
Macintosh ................................................................................................26
Windows ..................................................................................................26
Closing OLYMPUS Studio .................................................................. 27
Macintosh ................................................................................................27
Windows ..................................................................................................27
Disconnecting the camera from the computer................................. 28
Automatically starting OLYMPUS Studio ......................................... 30
Browse Window 33
Starting and closing the browse window ......................................... 33
Macintosh ................................................................................................33
Windows ..................................................................................................33
Transferring images............................................................................ 34
[Transfer Images] dialog box.............................................................................34
Transferring images from the camera ...............................................................36
6
Page 7

Contents
Transferring images from the media .................................................................39
Image display ...................................................................................... 42
Browse Mode ....................................................................................................42
View Mode.........................................................................................................44
Light Box Mode .................................................................................................46
Toolbar functions...............................................................................................48
Selecting the display mode ...............................................................................50
Using the thumbnail display area...................................................... 51
Thumbnail border ..............................................................................................51
Displaying thumbnail list....................................................................................53
Setting thumbnail border display items .............................................................53
Setting the display order of the thumbnail images ............................................54
Setting the display size of the thumbnail images ..............................................54
Full Screen Display / Slide Show ....................................................... 55
Full Screen Display ...........................................................................................55
Slide Show ........................................................................................................58
Displaying images with Multi Monitor ............................................... 59
Rotating images .................................................................................. 60
Using sorting checkmarks ................................................................. 62
Adding a sorting checkmark..............................................................................62
Sorting Method..................................................................................................64
Using collection areas ........................................................................ 66
Dividing images.................................................................................................68
Confirming and saving divided images..............................................................70
Confirming images...................................................................................70
Saving images .........................................................................................72
Using the image comparison area..................................................... 74
Image comparison area.....................................................................................74
Displaying images in the image comparison area.............................................77
Dragging and dropping an image ............................................................77
Double-clicking an image.........................................................................78
Using the [Add by selecting] checkbox ....................................................79
Using the [Add once] checkbox ...............................................................79
Using the [Add next image] button...........................................................80
Deleting images from the image comparison area ..................................81
Showing image information ............................................................... 82
Displaying the properties area...........................................................................82
Editing comments..............................................................................................86
Editing the shooting date...................................................................................87
RAW Development .............................................................................. 88
Launching a registered application................................................... 93
Using folders and files........................................................................ 94
Creating a new folder ........................................................................................94
Moving files to a new subfolder .........................................................................95
Renaming files and folders................................................................................96
7
Page 8

Contents
Renaming files simultaneously..........................................................................98
Rename Rule...........................................................................................98
Copying a file...................................................................................................103
Copying an image ...........................................................................................104
Moving a file ....................................................................................................105
Converting the file format ................................................................................106
Creating a folder shortcut................................................................................109
Deleting a shortcut from the shortcut area.............................................110
Renaming a shortcut..............................................................................110
Finding an image............................................................................... 111
Deleting an image ............................................................................. 113
Printing an image .............................................................................. 114
Printing types...................................................................................................114
[Print] dialog box..............................................................................................116
Printer settings ................................................................................................118
Macintosh ..............................................................................................118
Windows ................................................................................................119
Photo printing ..................................................................................................120
Index printing...................................................................................................124
Contact sheet printing .....................................................................................128
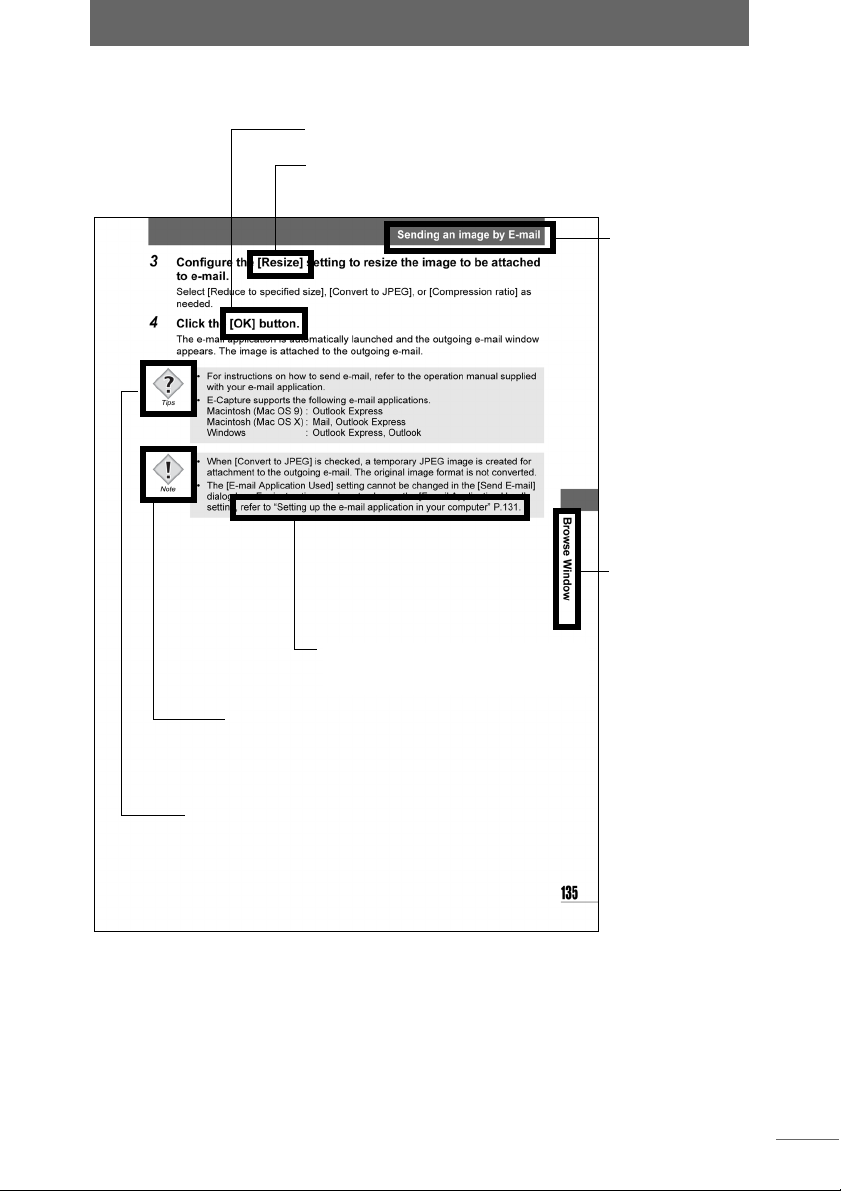
Sending an image by E-mail ............................................................ 131
Setting up the e-mail application in your computer .........................................131
Macintosh (Mac OS 9)...........................................................................131
Macintosh (Mac OS X)...........................................................................132
Windows ................................................................................................133
Attaching an image to outgoing e-mail............................................................134
Image Edit Window 136
Starting and closing the image edit window .................................. 136
Macintosh ..............................................................................................136
Windows ................................................................................................137
Image edit window ............................................................................ 138
Toolbar functions.............................................................................................140
Opening images ................................................................................ 142
Image display .................................................................................... 145
Zooming in/out and moving the image in the image display window ..............145
Displaying the navigator..................................................................................148
Displaying RGB and coordinate information ...................................................149
Displaying the properties.................................................................................150
Editing images................................................................................... 151
Image processing bar and image processing palette......................................151
Using the image processing bar......................................................................153
RAW Development Settings............................................................................155
Resize .............................................................................................................158
Distortion Correction........................................................................................159
8
Page 9

Contents
Shading Comp. ...............................................................................................160
Noise Reduction..............................................................................................161
Filter ................................................................................................................162
Rotate / Flip.....................................................................................................164
Tone Curve......................................................................................................165
Brightness & Contrast .....................................................................................166
Gamma Correction..........................................................................................167
Color Balance..................................................................................................168
Sharpness .......................................................................................................169
Hue, Saturation & Lightness............................................................................170
Insert Text .......................................................................................................171
Crop.................................................................................................................174
Auto Tone Correction ......................................................................................176
Red-Eye Reduction .........................................................................................177
Saving/reading settings.................................................................... 178
Saving an image processing file......................................................................178
Reading an image processing file ...................................................................180
Batch Processing.............................................................................. 182
Editing IPTC information .................................................................. 186
Displaying and editing IPTC information for the selected image.....................186
Displaying and editing the [General] tab................................................189
Displaying and editing the [Keywords] tab.............................................190
Displaying and editing the [Categories] tab ...........................................191
Displaying and editing the [Origin] tab ...................................................192
Applying IPTC information to a separate image..............................................193
Launching a registered application................................................. 194
Saving images ................................................................................... 195
Save ................................................................................................................195
Save As...........................................................................................................195
Saving all images ............................................................................................199
Camera Control Window 201
PC Master mode....................................................................................201
Camera Master mode............................................................................201
Starting and closing the camera control window .......................... 202
Macintosh ..............................................................................................202
Windows ................................................................................................203
Camera Control Window .................................................................. 205
Using the preview area....................................................................................208
Preview information area.................................................................................210
Shooting images ............................................................................... 211
PC Master mode and Camera Master mode...................................................211
Shooting images in PC Master mode..............................................................214
Shooting images in Camera Master mode......................................................217
Connecting and shooting with several cameras ....................................219
9
Page 10

Contents
Setting the file name........................................................................................220
File Naming Rule ...................................................................................220
Camera settings ................................................................................ 222
Settings ...........................................................................................................222
General setting items.............................................................................222
Advanced setting items..........................................................................223
Configuring the general setting items..............................................................225
Changing the settings............................................................................227
Configuring advanced setting items ................................................................228
Changing the settings............................................................................238
Displaying advanced setting items in the camera control window.........240
Saving the shooting and camera setup ...........................................................241
Using a saved setting file to change all camera settings.......................242
Time lapse photography................................................................... 244
Other settings.................................................................................... 247
Update Firmware 249
OLYMPUS Studio Preferences 253
Making OLYMPUS Studio preferences ........................................... 253
Setting the [General] tab .................................................................. 255
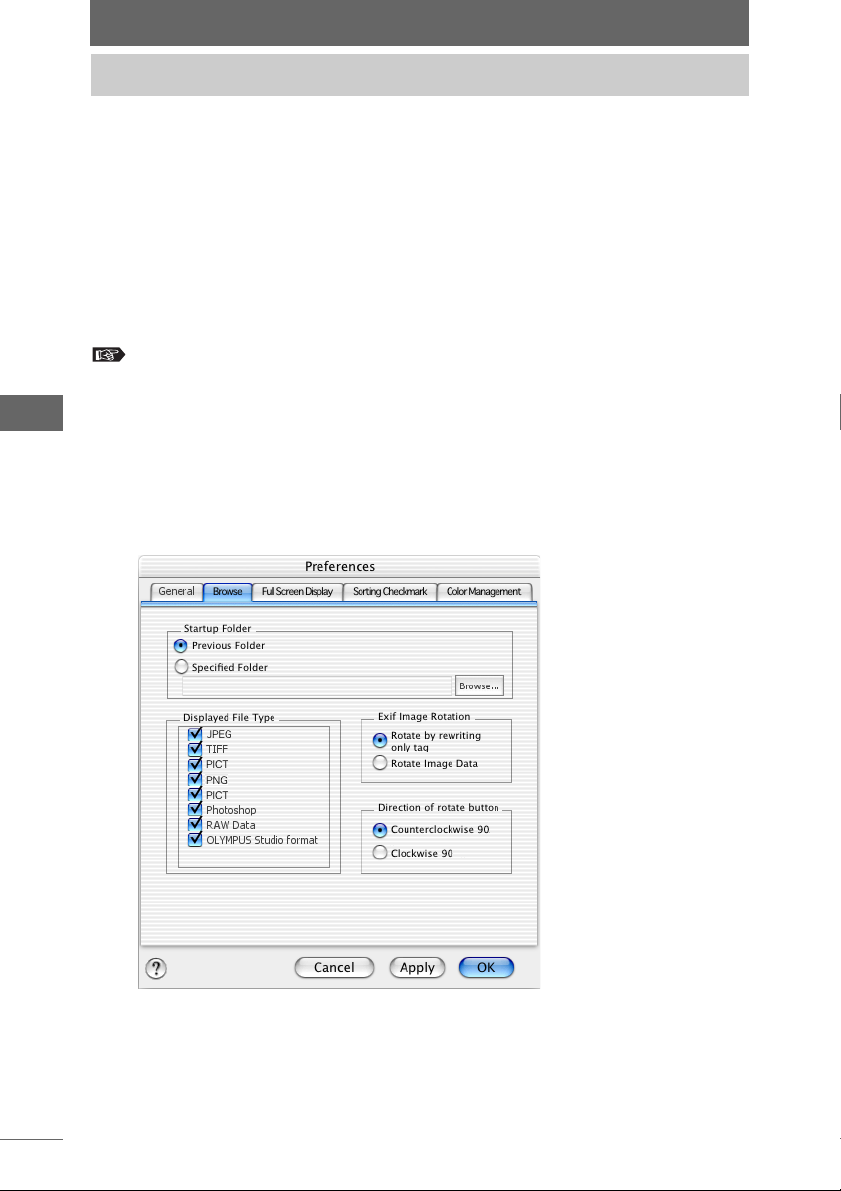
Setting the [Browse] tab................................................................... 257
Setting the [Full Screen Display] tab............................................... 259
Setting the [Sorting Checkmark] tab............................................... 262
Setting the [Color Management] tab ............................................... 265
Confirming the OS profile settings...................................................................265
Checking the setting of the profile used when displaying images
on the monitor .................................................................................265
Checking the setting of the profile used when printing images..............268
Setting the [Color Management] tab................................................................271
Appendices 273
List of menus..................................................................................... 273
Browse window ...............................................................................................273
[File] menu.............................................................................................273
[Edit] menu.............................................................................................274
[View] menu...........................................................................................275
[Tools] menu..........................................................................................277
[Help] menu ...........................................................................................277
Image edit window...........................................................................................278
[File] menu.............................................................................................278
[Edit] menu.............................................................................................279
10
Page 11

Contents
[View] menu...........................................................................................280
[Image] menu.........................................................................................281
[Tools] menu..........................................................................................282
[Window] menu......................................................................................283
[Help] menu ...........................................................................................283
Camera control window...................................................................................284
[File] menu.............................................................................................284
[Edit] menu.............................................................................................284
[View] menu...........................................................................................285
[Camera] menu......................................................................................286
[Tools] menu..........................................................................................287
[Help] menu ...........................................................................................287
Glossary of terms.............................................................................. 288
Index................................................................................................... 290
11
Page 12

OLYMPUS Studio Overview
OLYMPUS Studio is a software developed to support the workflow of professional
photographers that use Olympus digital cameras.
The following describes the special features of OLYMPUS Studio.
Using OLYMPUS Studio to operate the camera
OLYMPUS Studio comes with PC Master mode and Camera Master mode, which
OLYMPUS Studio Overview
enable you to select whether to shoot images and configure the camera settings
from your computer or the camera. In both modes, images are saved directly to the
computer.
For more information, refer to “Camera Control Window” P.201.
Using OLYMPUS Studio to transfer and view images
You can use OLYMPUS Studio to transfer and view shot images. By connecting
the camera to the computer with a connection cable, you can transfer images from
the camera. You can also use a card reader or other device to transfer images from
the camera's memory card.
For more information, refer to “Transferring images” P.34.
Using OLYMPUS Studio to select images
OLYMPUS Studio provides display modes and functions to help you select the
desired images by sorting and refining the large number of images.
OLYMPUS Studio contains very useful image selection functions, such as sorting
checkmarks to help refine your selection, an image comparison area to provide a
detailed comparison of images, and collection areas used to divide images.
For more information, refer to “Browse Window” P.33.
Using OLYMPUS Studio to edit images
OLYMPUS Studio provides various functions and tools for image editing.
OLYMPUS Studio editing functions include RAW Development Settings and HighSpeed RAW development, which are used to process RAW data, an image
processing palette, which is used to resize and crop images and adjust the
brightness, color balance, and sharpness, and Batch Processing, which enables
you to edit several images at the same time.
You can also use OLYMPUS Studio to register Photoshop or other software as a
registered application and then open this software directly in OLYMPUS Studio and
use it to edit images.
For more information, refer to “Image Edit Window” P.136.
12
Page 13

OLYMPUS Studio Overview
Using OLYMPUS Studio to manage, print, and send
images by E-mail
OLYMPUS Studio enables you to manage transferred and edited images by sorting
them into folders. OLYMPUS Studio can also be used to create new folders, move
images, and rename several file names at the same time.
You can use OLYMPUS Studio to print images with photo printing, index printing,
and contact sheet printing.
You can also use OLYMPUS Studio to attach images to outgoing E-mail.
For more information, refer to “Using folders and files” P.94,
“Printing an image” P.114,
“Sending an image by E-mail” P.131.
Using OLYMPUS Studio to update firmware
By connecting the camera to the computer, you can update the firmware for the
OLYMPUS E-System body, lens, and flash (if applicable) using an internet access
connection.
For more information, refer to “Update Firmware” P.249.
Customizing OLYMPUS Studio
OLYMPUS Studio can be used to configure the shared operating environment for
use with all windows in OLYMPUS Studio. You can customize OLYMPUS Studio
and, for example, select the desired color and design for the sorting checkmarks.
For more information, refer to “OLYMPUS Studio Preferences” P.253.
OLYMPUS Studio Overview
13
Page 14

OLYMPUS Studio Workflow
There are various possible workflows when using OLYMPUS Studio. OLYMPUS
Studio offers strong support for digital work when shooting images with a digital
camera. In terms of shooting images, for example, you can connect the camera to
the computer and shoot an image by pressing the shutter button on the camera, or
you can shoot an image by clicking a button on the computer screen. In both cases,
the image is transferred directly to the computer. There are also several methods
you can use to filter through the hundreds of images you take to choose the best
few. You can use selection functions to efficiently sort, compare, and divide up a
thousand images at a time.
OLYMPUS Studio Workflow
Camera Settings
Change the
camera settings
in the OLYMPUS
Studio camera
control window
Shooting/Transferring Images
Connect the camera to the computer with a
connection cable, and transfer the images
to the computer
Use a card reader or other device to
transfer the images from the media to the
computer
Press the shutter
button on the camera
to shoot an image
Use the computer to control the
camera and shoot images
Images are
saved directly to
the computer
Viewing/
Selecting
Images
14
Images are saved directly to the computer
• Connect the camera to the computer with a
USB or IEEE1394 (FireWire) cable.
• Transfer the images to the computer.
Page 15

OLYMPUS Studio Workflow
Viewing/Selecting Images
Display the transferred images in the browse window. Select
images as needed. Various display modes and useful functions
can be used to select the images.
You can also go directly to image editing without selecting
images.
z Sort the images with sorting checkmarks
You can add sorting checkmarks to the images to display only
those images with the same sorting checkmark.
Adding a red
sorting checkmark
z Compare the images in the image comparison area
Change the display mode to Light Box Mode and compare
several images side-by-side in the image comparison area.
Only those images
with a red sorting
checkmark are
displayed
OLYMPUS Studio Workflow
Image
Editing
z Divide the images into collection areas
The images can be divided into collection areas A and B.
Place the image into
collection area A
15
Page 16
OLYMPUS Studio Workflow
OLYMPUS Studio Workflow
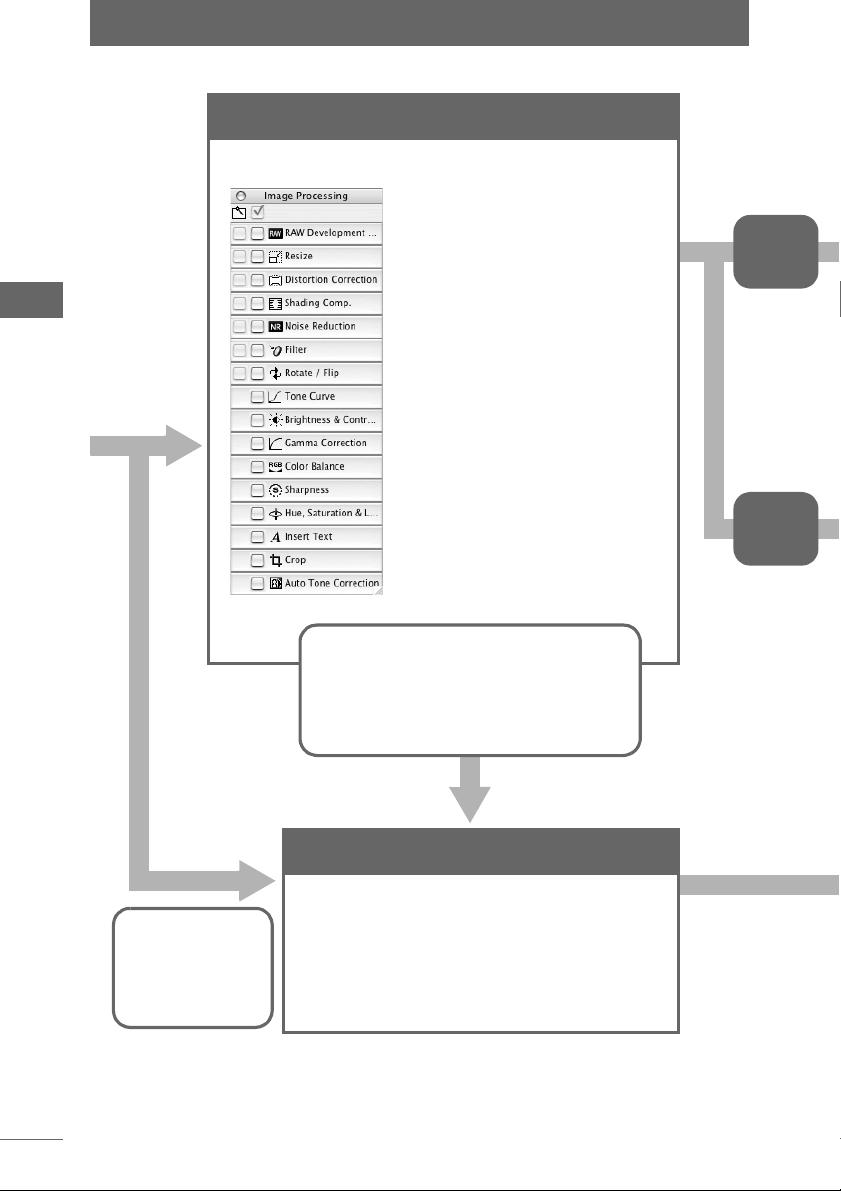
Editing Images with OLYMPUS Studio
Edit the image in the image edit window.
Use any of the 16 editing
functions.
• RAW data can be
processed using RAW
Development Settings.
• Batch Processing can be
used to edit several images
at the same time.
• You can save edited
settings in a separate file
and then manage and apply
those settings as needed.
Saving/
Printing
Images
Select
another
image
16
You can launch a
registered
application in the
browse window.
You can launch Photoshop or another
registered application in the image edit
window.
You can also make a setting so that once
an image is saved, it is opened with a
registered application.
Editing Images with a Registered Application
By registering Photoshop or another image editing
software application as a registered application,
you can launch and edit with that application in
OLYMPUS Studio.
Page 17
OLYMPUS Studio Workflow
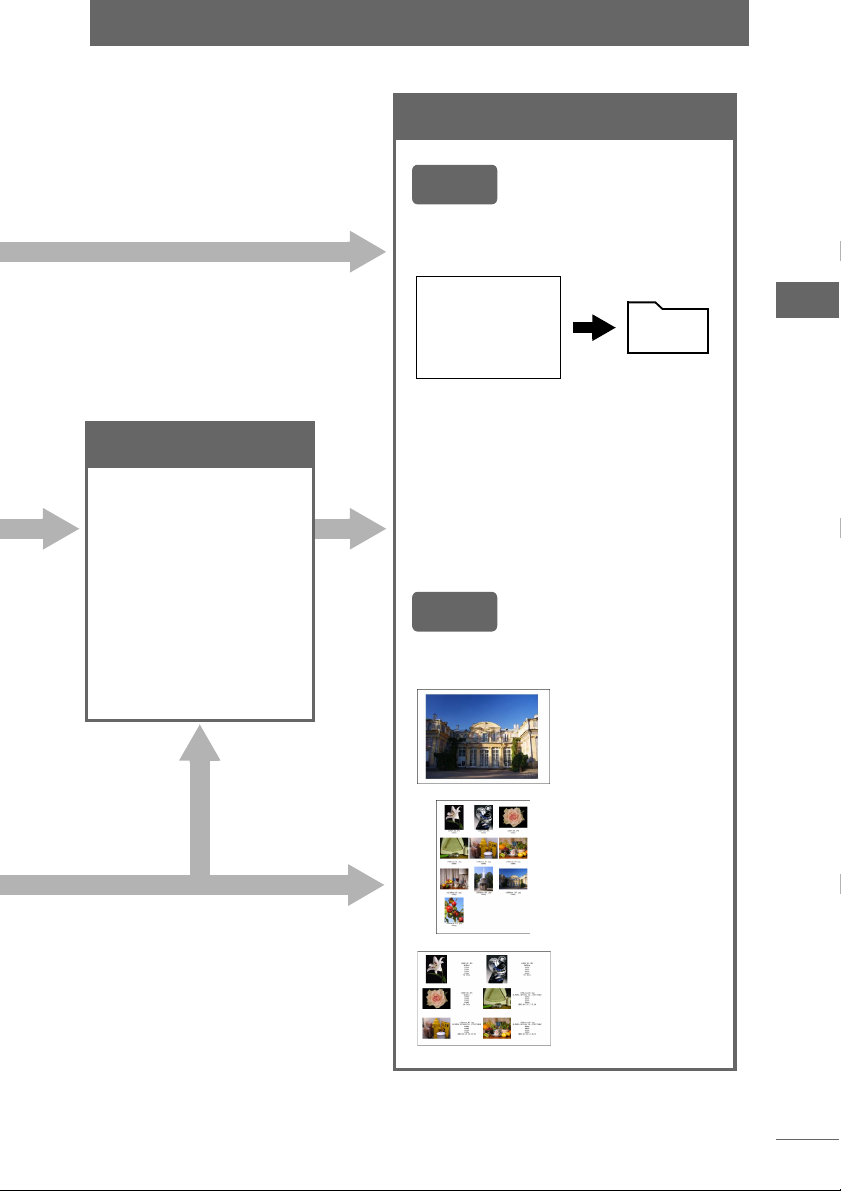
Saving/Printing Images
Saving
• Create a new folder to manage the
images.
Selecting Images
After image editing, data
can be further selected if
needed.
• Sort the images with
sorting checkmarks.
• Compare the images in
the image comparison
area.
• Divide the images into
collection areas.
Browse
window
A selected image can be moved
to and saved in a new folder.
• Rename all file names at the same time.
Serial numbers can be added to the file
names for easier organization.
• The file format can be converted at the
same time.
Folder
Printing
Select from three types of printing.
Photo printing
Index printing
OLYMPUS Studio Workflow
Contact sheet
printing
17
Page 18

OLYMPUS Studio Windows
OLYMPUS Studio is comprised of three windows: the browse window, image edit
window, and camera control window.
The following provides an overview of the windows and a description of their
functions.
Relationship between the windows
Image Edit Window
OLYMPUS Studio Windows
• Select [Open Image Edit Window]
from the [Edit] menu.
• Click the [Open Image Edit Window]
icon on the toolbar.
Set the PC mode
of the camera to
[STORAGE] and
turn on the power.
Start
OLYMPUS
Studio
Browse Window
• Browse Mode
• View Mode
• Light Box Mode
• Select [Launch
registered application]
from the [Tools] menu.
• Click the [Launch registered
application] icon on the toolbar.
• Check [Open registered
application after saving] in the
[Batch Processing] or [Save As]
dialog box.
• Select [Launch registered
application] from the [Edit]
menu.
• Click the [Launch registered
application] icon on the toolbar.
• Select [Exit] from
the [File] menu.
Registered
application
(Photoshop,
etc.)
Close
OLYMPUS
Studio
18
• Select [Open Camera Control
Window] from the [Tools]
menu.
• Click the [Open Camera
Control Window] icon on the
toolbar.
Set the PC mode of the
camera to [CONTROL]
and turn on the power.
• Select [Open Browse Window]
from the [File] menu.
• Double-click an image in the
thumbnail display area.
Camera Control
Window
• Select [Exit] from the
[File] menu.
Page 19

Browse window
The browse window displays the image files in a folder selected in the folder tree.
This window has three display modes: Browse Mode, View Mode, and Light Box
Mode.
z Browse Mode
You can use this mode to select a folder containing saved images and display
those images in a thumbnail list. This mode is useful in viewing at the same time all
images shot.
You can also add sorting checkmarks to the images, sort the images into groups,
and display just those images with the same sorting checkmark in the thumbnail
display area.
OLYMPUS Studio Windows
The properties area can be displayed to enable you to view the shooting
information and histogram of the image.
With the properties area displayed
19
Page 20

Browse window
z View Mode
You can use this mode to select an image from the thumbnail display area and
zoom in on that image. This mode is useful in viewing individual images.
OLYMPUS Studio Windows
The properties area can be displayed to enable you to view the shooting
information and histogram of the image.
20
With the properties area displayed
Page 21

Browse window
z Light Box Mode
You can use this mode to select several images from the thumbnail display area
and view them side-by-side in the image comparison area. This mode is useful in
comparing and reviewing similar images.
Selected images can be divided and temporarily saved in collection areas A and B,
and these images can later be saved together in separate folders.
OLYMPUS Studio Windows
21
Page 22

Image edit window
The image edit window is used to edit images. This window provides RAW
Development Settings as well as various image editing functions to resize, crop,
and adjust the brightness, color balance, and sharpness of the image. To edit an
image, click an editing item on the image processing bar to display the image
processing palette. The image processing palette can then be used to make editing
operations.
You can also use the Batch Processing function to edit several images at the same
time.
OLYMPUS Studio Windows
Once registered, another image editing application software can be used to edit
images in this window. A registered application can be used in the browse window
as well as in the image edit window.
22
Page 23

Camera control window
In the camera control window, PC Master mode or Camera Master mode is
selected and images are shot.
In PC Master mode, images are shot by clicking the [AF Shooting] and [Shooting]
buttons in this window. Shot images are then saved directly to the computer. The
displayed camera settings can be changed directly in this window.
In Camera Master mode, images are shot and the camera settings are changed
using the camera. Shot images, however, are saved directly to the computer.
OLYMPUS Studio Windows
23
Page 24
Starting OLYMPUS Studio
Connecting the camera and computer
To transfer images from the camera or configure the camera settings from the
computer, the camera must first be connected to the computer with a USB or
IEEE1394 (FireWire) cable. You do not need to connect the camera and the
computer if you only want to browse and edit images already saved in the
computer.
1 Select the camera mode.
1 Turn on the camera by turning the power switch on the camera to ON.
2 Press the menu button.
The menu appears on the monitor.
Starting OLYMPUS Studio
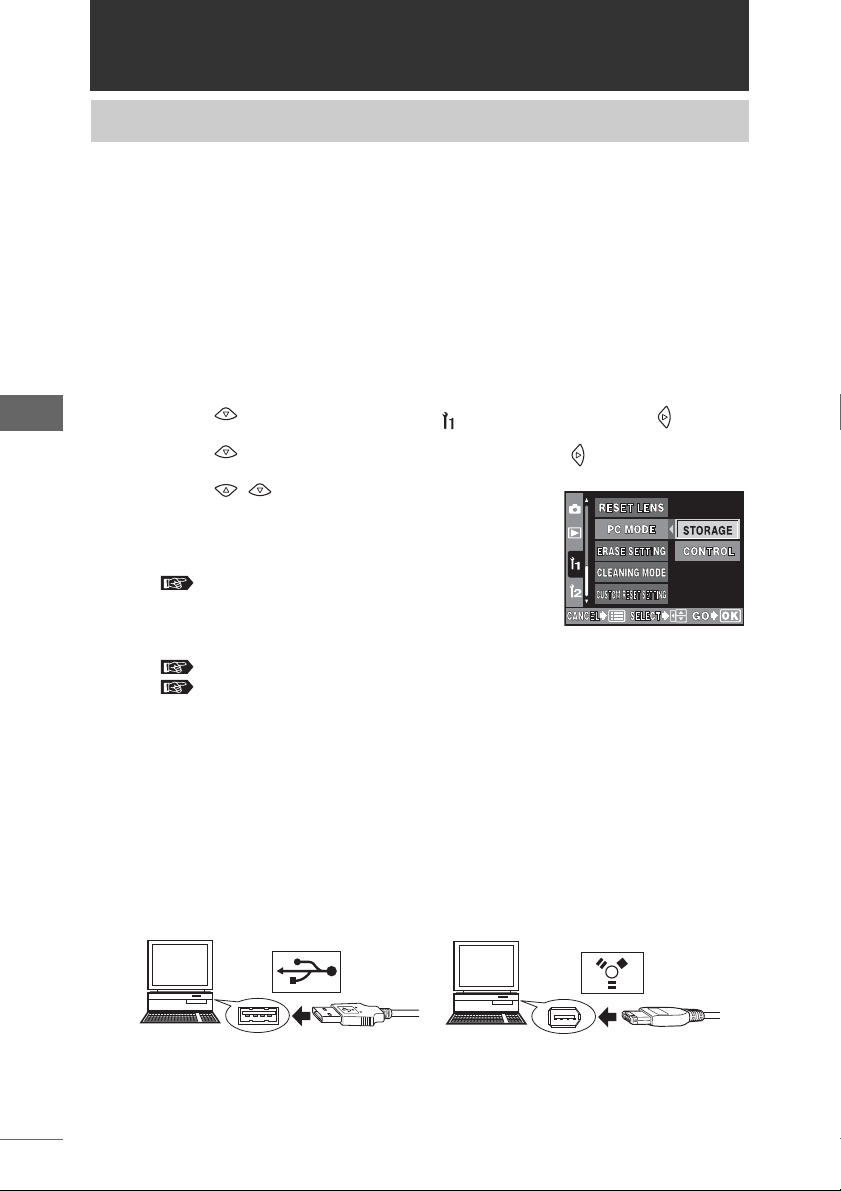
3 Press on the arrow pad until [ ] is selected, and press .
4 Press until [PC MODE] is selected, and press .
5 Press to select [STORAGE] or
[CONTROL].
Set to [STORAGE] if you want to transfer images
from the camera using the browse window.
“Transferring images” P.34
Set to [CONTROL] if you want to use the camera
control window to shoot images or configure camera
settings from the computer, or update firmware.
“Starting and closing the camera control window” P.202
“Update Firmware” P.249
6Press [OK].
The camera mode is now set.
2 Turn off the camera by turning the power switch on the camera
to OFF.
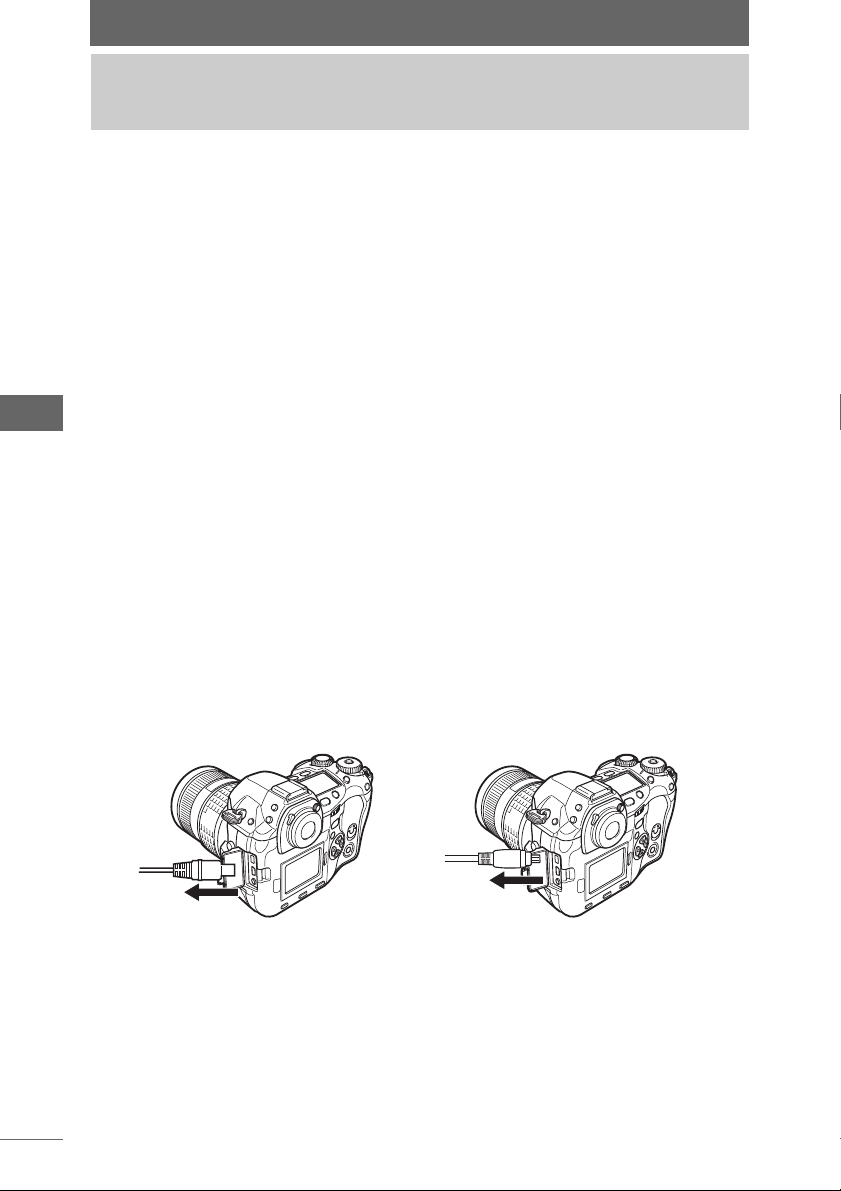
3 Connect the cable to the USB or IEEE1394 (FireWire) port on the
computer.
Example of connecting a USB cable Example of connecting an IEEE1394
(FireWire) cable
24
Page 25

Connecting the camera and computer
4
Connect the cable to the USB or IEEE1394 (FireWire) interface on
the camera.
Example of connecting a USB cable Example of connecting an IEEE1394
(FireWire) cable
5 Turn on the camera by turning the power switch on the camera
to ON.
The computer recognizes the camera.
• Do not add or remove another USB or IEEE 1394 (FireWire) device to or from
the computer when the computer is connected to the camera. Doing so may
Note
Tips
cause a malfunction on the camera or a problem with OLYMPUS Studio.
• You can set OLYMPUS Studio to automatically start when the camera is
connected to the computer and the camera is turned on.
“Automatically starting OLYMPUS Studio” P.30
• For instructions on how to connect the camera and computer or insert the
media to the computer, refer to the operation manual provided with your
camera.
• For information on setting the camera mode, refer to the operation manual
provided with your camera.
Starting OLYMPUS Studio
25
Page 26

Starting OLYMPUS Studio
Start OLYMPUS Studio and either the browse window or camera control window
appears.
z Macintosh
Displaying the browse window
• Open [OLYMPUS Studio] in the folder in which OLYMPUS Studio is installed and
double-click [OLYMPUS Studio].
• Double-click the [OLYMPUS Studio] icon on the desktop.
(Only in Mac OS 9)
Displaying the camera control window
• Open [OLYMPUS Studio] in the folder in which OLYMPUS Studio is installed and
Starting OLYMPUS Studio
double-click [OLYMPUS Studio Camera Control].
• Double-click the [OLYMPUS Studio Camera Control] icon on the desktop. (Only in
Mac OS 9)
z Windows
Displaying the browse window
• From the [Start] menu on the taskbar, select [Programs > OLYMPUS Studio >
OLYMPUS Studio].
• Double-click the [OLYMPUS Studio] icon on the desktop.
Displaying the camera control window
• From the [Start] menu on the taskbar, select [Programs > OLYMPUS Studio >
OLYMPUS Studio Camera Control].
• Double-click the [OLYMPUS Studio Camera Control] icon on the desktop.
26
Page 27

Closing OLYMPUS Studio
Close the browse window or camera control window and OLYMPUS Studio.
z Macintosh
1 Select [Exit] from the [File] menu of the browse window or select
[Close Camera Control Window] from the [File] menu of the
camera control window.
The browse window or camera control window closes.
z Windows
1 Select [Exit] from the [File] menu of the browse window or
camera control window.
The browse window or camera control window closes.
Closing OLYMPUS Studio in Mac OS X
• Select [Close OLYMPUS Studio] from the [OLYMPUS Studio] menu of either
Note
the browse window or camera control window.
• Select [Close Camera Control Window] from the [File] menu of the camera
control window.
Starting OLYMPUS Studio
27
Page 28
Disconnecting the camera from the computer
If you operated OLYMPUS Studio with the camera connected to the computer,
disconnect the camera from the computer when you are finished using OLYMPUS
Studio.
1 Confirm that the card access lamp on the camera is not flashing.
2 Use the Remove Hardware function.
Perform the following depending on your OS.
Macintosh
Drag the [NO_NAME] icon (in Mac OS X) or [untitled] icon (in Mac OS 9) on the
desktop to the Trash.
Before removing the connection cable, be sure that the card access lamp on the
Starting OLYMPUS Studio
camera is not flashing.
Windows Me/2000/XP
Click the Remove Hardware icon displayed on the taskbar at the bottom right of
the computer screen and select the displayed message.
• When you click the Remove Hardware icon, the warning message “Cannot stop
the camera” may appear. If this occurs, confirm that image data is not being
transferred from the camera and then remove the USB cable.
Windows 98 SE
Right-click [Removable Disk] in My Computer and select [Eject].
Before removing the connection cable, be sure that the card access lamp on the
camera is not flashing.
3 Remove the USB or IEEE1394 (FireWire) cable from the camera.
28
Page 29

Disconnecting the camera from the computer
4 Remove the USB or IEEE1394 (FireWire) cable from the
computer.
5 Turn off the camera.
• Be sure to use the Remove Hardware function on the computer before turning
off the camera. If you do not use the Remove Hardware function before turning
Note
off the camera, the image data may become lost.
• When using the Remove Hardware function, the warning message “Cannot
stop the camera” may appear. If this occurs, confirm that image data is not
being transferred from the camera and then remove the USB or IEEE1394
(FireWire) cable.
Starting OLYMPUS Studio
29
Page 30
Automatically starting OLYMPUS Studio
OLYMPUS Studio can be automatically started when the camera is connected to
the computer and the camera is turned on.
The window that appears when OLYMPUS Studio is started varies depending
on the PC mode of the camera mode setting.
• When the PC mode of the camera is set to [STORAGE]:
The browse window and [Transfer Images] dialog box appear.
• When the PC mode of the camera is set to [CONTROL]:
The camera control window appears.
Auto Start of OLYMPUS Studio can be set in the preferences.
“OLYMPUS Studio Preferences” P.253
1 Set up Auto Start of OLYMPUS Studio in advance.
Starting OLYMPUS Studio
You can skip this step if Auto Start is already set up.
1 Select [Preferences] from the [Tools] menu of the browse window, image
edit window, or camera control window.
The [Preferences] dialog box appears.
[Preferences] dialog box
30
Page 31

Automatically starting OLYMPUS Studio
2 Click the [General] tab.
[General] tab page in the [Preferences] dialog box
“Setting the [General] tab” P.255
Starting OLYMPUS Studio
3 Click [When connected to camera] in [Auto Start].
To automatically start OLYMPUS Studio when the media with stored images is
inserted into the computer, select [When connected to camera and using DCF
media].
4 Click the [OK] button.
The Auto Start setting is complete and the [Preferences] dialog box closes.
After completing the Auto Start setting, close OLYMPUS Studio.
2 Turn on the camera.
3 Set the camera to [STORAGE] or [CONTROL].
4 Connect the camera to the computer with a USB or IEEE1394
(FireWire) cable.
“Connecting the camera and computer” P.24
31
Page 32

Automatically starting OLYMPUS Studio
OLYMPUS Studio starts and either the browse window or camera control window
appears.
• When [When connected to camera and using DCF media] is selected in Auto
Start, OLYMPUS Studio also starts if a DCF (Design rule for Camera File
Tips
Note
Starting OLYMPUS Studio
System)-compliant storage media (CompactFlash, xD-Picture Card, or other
recordable media) is inserted in the computer. When OLYMPUS Studio starts,
the browse window and [Transfer Images] dialog box appear.
• The factory default setting of Auto Start is OFF. If Auto Start is not set to ON,
OLYMPUS Studio does not automatically start even if the camera is connected
to the computer and the power on the camera is turned on.
In Windows XP, when a camera in Storage Mode is connected to the computer
or a storage media is inserted in the computer, the [Auto Play] dialog box
appears regardless of the [Auto Start] setting. Select [OLYMPUS Studio] from
the list and click the [OK] button to display the browse window.
• In Windows XP, [When connected to camera and using DCF media] is grayed
out and cannot be selected.
• For instructions on how to connect the camera and computer or insert the
media to the computer, refer to the operation manual provided with your
camera.
• For information on setting the camera mode, refer to the operation manual
provided with your camera.
32
Page 33

Browse Window
Starting and closing the browse window
You can use the browse window to transfer images to a computer and display
transferred images. The following describes how to start and close the browse
window.
z Macintosh
Starting
1 Open [OLYMPUS Studio] in the folder in which OLYMPUS Studio
is installed, and double-click the [OLYMPUS Studio] icon, or
double-click the [OLYMPUS Studio] icon on the desktop.
The browse window appears.
Closing
1 Select [Exit] from the [File] menu.
In Mac OS X, select [Close OLYMPUS Studio] from the [OLYMPUS Studio] menu.
z Windows
Starting
1 From the [Start] menu on the taskbar, select [Programs >
OLYMPUS Studio > OLYMPUS Studio], or double-click the
[OLYMPUS Studio] icon on the desktop.
The browse window appears.
Closing
1 Select [Exit] from the [File] menu.
• You can set the browse window to start automatically when the camera is
connected to the computer or when the media is inserted in the computer.
Tips
“Automatically starting OLYMPUS Studio” P.30
Browse Window
33
Page 34

Transferring images
Images can be transferred from the camera or media to the computer. This is done
by using the [Transfer Images] dialog box in the browse window.
The following describes how to transfer images from the camera and media.
[Transfer Images] dialog box
The [Transfer Images] dialog box is used to configure the settings when
transferring images from the camera or media.
[Transfer Images] dialog box
Browse Window
Item Description
Transfer Source
Camera The transfer source is set to [Camera]. If several cameras are
Media The transfer source is set to [Media]. If several media are
Folder Tree Displays the tree of the transfer source camera or media. You
Select All Images Check this box to specify all images displayed in the thumbnail
Automatically delete
image after
transferring
Number of images
and file size
connected, select the desired source camera ID from the pulldown list on the right.
inserted in the computer, select the desired source media from
the pull-down list on the right.
can select the image transfer source from the folder tree.
display area.
Check this box to automatically delete images from the transfer
source after the images have been transferred to the computer.
Displays the total number and file size of the images selected
in the thumbnail display area.
34
Page 35

Transferring images
Thumbnail Display
Area
Transfer Destination
Folder Tree Displays the tree of the transfer destination. Select the image
[Create New Folder] Creates a new subfolder in a drive or folder selected in the
[Browse Shortcut] Click this to display a list of registered shortcuts. When a
Automatically create
folder on shooting
date
Transfer Images
[Start] Starts the image transfer.
[Refresh] The thumbnail display area is updated with the current images
[Close] Closes the [Transfer Images] dialog box.
• You can set the [Transfer Images] dialog box in the browse window to open
automatically when the camera is connected to the computer or when the
Tips
media is inserted in the computer.
The images inside the folder selected in the folder tree are
displayed in a list.
transfer destination from the folder tree.
folder tree.
shortcut is selected from the list, the selected position on the
folder tree jumps to the destination of the shortcut link.
“Creating a folder shortcut” P.109
Check this box to automatically create subfolders labeled with
the shooting date inside the folder selected in the folder tree
and then transfer the images to the appropriate subfolders
according to the shooting date.
in the transfer source folder.
“Automatically starting OLYMPUS Studio” P.30
Browse Window
35
Page 36

Transferring images
Transferring images from the camera
Images can be transferred from the camera to the computer by a USB cable or
IEEE1394 (FireWire) cable. Only Olympus digital cameras can be used to transfer
images to OLYMPUS Studio.
For details on camera mode operations and connecting the
camera to the computer, or removing the camera from the
computer, refer to “Starting OLYMPUS Studio” P.24.
1 Turn on the camera and set the PC mode of the camera to
[STORAGE].
2 Connect the camera to the computer with a USB or IEEE1394
(FireWire) cable.
3 Select [Get Image] from the [Tools] menu of the browse window
or click the [Get Image] icon on the toolbar.
Browse Window
“Image display” P.42
The [Transfer Images] dialog box appears.
[Transfer Images] dialog box
4 Click [Camera] from [Transfer Source].
If several cameras are connected, select the desired source camera ID ([Camera
#1], [Camera #2], ...) from the pull-down list.
A list of subfolders in the [DCIM] folder appears in the transfer source folder tree.
36
Page 37

Transferring images
5 From the transfer source folder tree, select the folder containing
the images that you want to transfer.
The images inside the folder are displayed in a list in the thumbnail display area
on the right-hand side of the window.
• When [DCIM] is selected from the folder tree, the contents of all subfolders in
the DCIM folder are displayed in the thumbnail display area.
Tips
6 Select the images that you want to transfer in the thumbnail
display area.
Check [Select All Images] to select all images displayed in the thumbnail display
area.
To select several images, select the images while pressing the following key.
• Macintosh (Mac OS 9) : [Shift] key
• Macintosh (Mac OS X): [Shift] or [Command] key
• Windows : [Ctrl] key
7 Select the transfer destination folder from the transfer
destination folder tree.
8 Click the [Start] button.
The [Get Image] dialog box appears indicating that the transfer of images has
begun.
[Get Image] dialog box - Transferring images
Browse Window
When the image transfer is complete, the following dialog box appears.
[Get Image] dialog box - Transfer complete
Click the [Open Transfer Destination Folder] button to close the [Transfer Images]
dialog box and display the transferred images inside the folder in the thumbnail
display area of the browse window.
37
Page 38

Transferring images
Note
Tips
Browse Window
• During the image transfer, do not turn off the camera, open the card cover of
the camera, or disconnect the connection cable. Doing so may cause a
malfunction on the camera or a problem with OLYMPUS Studio.
• Do not add or remove a hardware device to or from the computer when the
computer is connected to the camera. Doing so may cause a malfunction on
the camera or a problem with OLYMPUS Studio.
• If an existing file in the transfer destination folder has the same name as one of
the files you want to transfer, the [Overwrite] dialog box appears. In the
[Overwrite] dialog box, you can select one of the following methods for
transferring images.
[Skip] : Skips this image and transfers the next image.
[Overwrite] : Transfers and overwrites the image.
[Add Serial Number] : Adds a serial number to the end of the file name and
transfers the image with a different name.
[Apply to All] : Applies the same image transfer method selected to all
files with the same name.
• If an Olympus USB or IEEE1394 (FireWire) storage class camera is connected
to the computer, both the camera and the media can be specified as transfer
sources.
38
Page 39

Transferring images
Transferring images from the media
You can transfer images from the media to the computer.
1 Insert the media into the computer or appropriate adapter.
For details on inserting the media, refer to the operation manual provided with the
camera.
2 Select [Get Image] from the [Tools] menu of the browse window
or click the [Get Image] icon on the toolbar.
“Image display” P.42
The [Transfer Images] dialog box appears.
[Transfer Images] dialog box
Browse Window
3 Click [Media] from [Transfer Source].
If several media are inserted in the computer, select the drive name of the transfer
source from the pull-down list.
The pull-down list only displays the drives with media recorded in conformity with
the DCF (Design rule for Camera File system) standard.
4 From the folder tree of the transfer source, select the folder
containing the images that you want to transfer.
The images inside the folder are displayed in a list in the thumbnail display area
on the right-hand side of the window.
39
Page 40

Transferring images
5 Select the images that you want to transfer in the thumbnail
display area.
Check [Select All Images] to select all images displayed in the thumbnail display
area.
To select several images, select the images while pressing the following key.
• Macintosh (Mac OS 9) : [Shift] key
• Macintosh (Mac OS X): [Shift] or [Command] key
• Windows : [Ctrl] key
6 Select the transfer destination folder from the transfer
destination folder tree.
7 Click the [Start] button.
The [Get Image] dialog box appears indicating that the transfer of images has
begun.
[Get Image] dialog box - Transferring images
Browse Window
When the image transfer is complete, the following dialog box appears.
40
[Get Image] dialog box - Transfer complete
Click the [Open Transfer Destination Folder] button to close the [Transfer Images]
dialog box and display the transferred images inside the folder in the thumbnail
display area of the browse window.
Page 41

Note
Transferring images
• If an existing file in the transfer destination folder has the same name as one
of the files you want to transfer, the [Overwrite] dialog box appears. In the
[Overwrite] dialog box, you can select one of the following methods for
transferring images.
[Skip] : Skips this image and transfers the next image.
[Overwrite] : Transfers and overwrites the image.
[Add Serial Number] : Adds a serial number to the end of the file name and
transfers the image with a different name.
[Apply to All] : Applies the same image transfer method selected to all
files with the same name.
Browse Window
41
Page 42

Image display
The browse window has three display modes: Browse Mode, View Mode, and Light
Box Mode. When you open the browse window, it appears in Browse Mode.
The following describes the different parts and functions of the browse window for
each display mode.
Browse Mode
This display mode is suited to browse and manage multiple images.
When you select the folder that contains the images that you want to display from
the folder tree, the images are displayed in a thumbnail list. When you select an
image from the thumbnail display area, the shooting information and image
information of the selected image are displayed in the properties area. You can
also add sorting checkmarks to the images, sort the images into groups, and
display just those images with the same sorting checkmark in the thumbnail display
area.
Browse Mode
Browse Window
68
1
2
7
42
9
3
4
5
10 11
12
Page 43

Image display
Number Item Description Ref. Page
— Menu Bar The menu used in the browse window
P.273
appears. This is the same for Browse
Mode, View Mode, and Light Box Mode.
1 Toolbar*
1
The various buttons can be used for
P.48
switching display modes, printing, and
other functions. This is the same for
Browse Mode, View Mode, and Light Box
Mode.
2 Folder Tree Displays the computer drives and folders
P.53
as a tree.
3 [Create New Folder] Creates a new subfolder in a drive or folder
P.94
selected in the folder tree.
4 Create Shortcut A shortcut to the folder displayed in the
P.109
folder tree is created.
5 Shortcut Area*
1
Displays the shortcuts created with the
P.109
[Create Shortcut] button.
6 Thumbnail Display
Area
7 Sorting Checkmark Click the [Red], [Yellow], or [Blue] icons to
Displays the images inside the folder
selected in the folder tree in a list.
P.53
P.62
separate the images into different groups.
Only those images with the same sorting
checkmark can be displayed in the
thumbnail display area.
1
8 Collection Area*
This area is used to temporarily save
P.66
images selected from the thumbnail display
area. Collection areas A and B can be used
to divide the images into different collection
areas and save the images together in
separate folders.
9 Properties Area*
Displays the histogram, shooting
P.82
2
information such as shutter speed, image
information such as shooting date/time,
and other information.
10 [Refresh] The thumbnail display area is updated with
—
the current images in the selected folder.
11 Status Box Displays information related to the images
—
in the thumbnail display area (total number
or file size of images). You can select
display items from the pull-down list.
12 Sorting Palette*
The images in the thumbnail display area
P.64
1
are shown or hidden according to the
sorting checkmark. A combination of
checkmarks can be used to create various
sorting methods.
1
Use the [View] menu to show or hide this item.
*
2
Use the [File] menu to show or hide this item.
*
Browse Window
43
Page 44

Image display
View Mode
This display mode can be used to enlarge and view an image in more detail.
Images selected from the thumbnail display area are displayed in the single image
view area.
View Mode
43675
1
Browse Window
2
8 9 10 11 12 13 14 15
16
Number Item Description Ref. Page
1 Thumbnail Display
Area
2 [Refresh] The thumbnail display area is updated with
3 Single Image View
Area
4 Status Box Displays information (file name, shooting
5 Rotate The image can be rotated 90 degrees
Displays a list of images in the selected
folder. The path name of the folder is
displayed at the top of the area.
the current images in the selected folder.
Displays an image selected from the
thumbnail display area.
date, display position, or display
magnification) for the image displayed in
the single image view area. You can select
display items from the pull-down list.
clockwise or counterclockwise.
44
P.53
—
—
—
P.60
Page 45

Image display
6 Collection Button Click the collection button [A] or [B] to
7 Sorting Checkmark Click the [Red], [Yellow], or [Blue] icons to
8 Fit image to screen The display magnification is automatically
9 Display actual size Displays the image at its actual size in the
10 Zoom Out Mode The cursor changes to the magnifying
11 Zoom In Mode The cursor changes to the magnifying
12 Scroll Mode The cursor changes to the hand tool. Drag
13 Previous Image Displays the previous image displayed in
14 Display position/
total number of
images in folder
15 Next Image Displays the next image displayed in the
16 Properties Area*
1
Use the [File] menu to show or hide this item.
*
divide an image either to collection area A
and/or B. The collection areas are used to
temporarily save divided images. The
saved images are displayed when Browse
Mode or Light Box Mode is selected as the
display mode.
separate the images into different groups.
Only those images with the same sorting
checkmark can be displayed in the
thumbnail display area.
adjusted to display the image so as to fit
the entire single image view area.
single image view area.
glass (–). When this cursor is placed over
an image in the single image view area and
clicked, the display zooms out on the
image.
glass (+). When this cursor is placed over
an image in the single image view area and
clicked, the display zooms in on the image.
this tool over the image in the single image
view area to scroll the image.
the single image view area. The images
are displayed in the order of the images in
the thumbnail display area.
Indicates the number of the image
displayed in the single image view area in
the order that it is displayed in the
thumbnail display area.
single image view area. The images are
displayed in the order of the images in the
thumbnail display area.
1
Displays the histogram, shooting
information such as shutter speed, image
information such as shooting date/time,
and other information.
P.67
P.62
—
—
—
Browse Window
—
—
—
—
—
P.82
45
Page 46

Image display
Light Box Mode
This convenient display mode can be used to compare and select similar images.
The images that you want to compare can be arranged together in the image
comparison area and selected images can be divided into collection areas.
Light Box Mode
3
1
Browse Window
2
4
56
Number Item Description Ref. Page
1 Image Comparison
Area
2 Thumbnail Display
Area
3 Collection Areas This area is used to temporarily save
4 Properties Area*
Images in the thumbnail display area can
be registered to this area by drag and drop.
This is used when comparing several
images. You can choose from a two or
four-split screen display.
Displays a list of images in the selected
folder. The path name of the folder is
displayed at the top of the area.
images selected from the thumbnail display
area or image comparison area. Collection
areas A and B can be used to divide the
images into different collection areas and
save the images together in separate
folders.
1
Displays the histogram, shooting
information such as shutter speed, image
information such as shooting date/time,
and other information.
46
P.74
P.53
P.66
P.82
Page 47

Image display
5 [Refresh] The thumbnail display area is updated with
6 Status Box Displays information related to the images
1
Use the [File] menu to show or hide this item.
*
the current images in the selected folder.
in the thumbnail display area (number of
images and file size). You can select
display items from the pull-down list.
—
—
Browse Window
47
Page 48

Image display
Toolbar functions
The following describes the functions of the toolbar buttons. For details of the
functions, refer to the provided reference pages.
Toolbar
Button Item Description Ref. Page
Browse Window
Browse Mode Changes the display mode to Browse
View Mode Changes the display mode to View
Light Box Mode Changes the display mode to Light
Full Screen Display /
Slide Show
Properties Displays or hides the histogram and
Display Collection Area Displays or hides collection areas A
Sorting Checkmark
Display
Open Image Edit
Window
Launch registered
application
RAW Development This is used for the development
Batch Processing Opens the batch processing dialog
Open Camera Control
Window
Rename All Several image names can be
Print Prints the selected image. P.114
Mode.
Mode.
Box Mode.
Displays the selected image at full
screen. The images in the selected
folder are displayed in order one
image at a time.
shooting information of the selected
image.
and B.
Displays or hides the sorting palette,
which is used to change the sorting
method, and the sorting checkmark
on the thumbnail border.
Opens the image edit window. P.136
Starts the application software
specified in the preferences.
processes of RAW data.
box.
Opens the camera control window. P.201
renamed according to the rename
rule.
P.42
P.44
P.46
P.55, 58
P.82
P.66
P.64
P.93,
194
P.88
P.182
P.98
48
Get Image Transfers images from the camera or
media to the computer.
Convert Format Converts the image save format and
saves it.
P.34
P.106
Page 49

Image display
Tips
Send E-mail Resizes the selected image and
P.131
attaches it to an E-mail.
Preferences This can be used to customize the
P.253
sorting checkmarks and set the color
management.
Help Displays the online help. P.277
• The toolbar buttons can be deleted and the button icons can be resized.
1 Select [Customize Toolbar] from the [Tools] menu.
The [Customize Toolbar] dialog box appears.
2 Add or delete toolbar buttons.
To add a toolbar button, select the button you want to add from the [Available
toolbar buttons] list and click the [Add] button. To delete a toolbar button,
select the button you want to delete from the [Current toolbar buttons] list
and click the [Remove] button. You can use the [Move Up] and [Move Down]
buttons to change the order of the toolbar buttons.
3 Change the size of the button icons.
Select [Large Icons] or [Small Icons] from the [Icon options] pull-down list.
4 After completing the operations, click the [Close] button.
Browse Window
49
Page 50

Image display
Selecting the display mode
The display mode of the browse window can be changed to enable you to browse,
select, and compare images.
1 Select [Browse Mode], [View Mode], or [Light Box Mode] from
the [View] menu, or click the [Browse Mode], [View Mode], or
[Light Box Mode] icon on the toolbar.
• You can double-click an image in the thumbnail display area of the browse
window in Browse Mode to change the display mode to View Mode. You can
Tips
Browse Window
double-click an image in the single image display area in View Mode to change
the display mode to Browse Mode.
• The image can also be displayed at full screen.
“Full Screen Display” P.55
50
Page 51

Using the thumbnail display area
The thumbnail display area can be displayed in Browse Mode, View Mode, or Light
Box Mode in the browse window.
The following describes how to use the thumbnail display area.
Thumbnail border
The reduced images shown in the thumbnail display area are called thumbnail
images. Each thumbnail image is displayed within a thumbnail border. The
thumbnail border displays not only a reduced image, but also image information
such as the file name, shooting date, etc. You can also rotate the image and add
sorting checkmarks here.
Thumbnail border
12 3 4
Browse Window
5
6
Number Item Description Ref. Page
1 Rotate Button Click this to rotate the image in the
2 RAW Icon This is displayed when the image has RAW
3 Collection Icon This is displayed when an image is
4 Sorting Checkmark Adds a sorting checkmark. P.62
5 File Name Displays the file name. P.53
6 Shooting Date Displays the shooting date. P.53
7 Shooting
Information
direction of the arrow. Click this while
pressing the [Shift] key to rotate the image
in the opposite direction.
data.
registered in the collection area.
Displays shooting information such as
shutter speed, aperture value, exposure
compensation, ISO, white balance, and
white balance compensation.
7
P.60
—
P.68
P.53
51
Page 52

Using the thumbnail display area
• If there is a folder within the selected folder, a subfolder
icon appears on the thumbnail border. You can show
Tips
or hide the subfolder icon.
“Setting thumbnail border display items” P.53
Browse Window
Subfolder Icon
52
Page 53

Using the thumbnail display area
Displaying thumbnail list
1 In Browse Mode, select a folder from the folder tree area.
The images in the selected folder are displayed in a list in the thumbnail display
area.
Browse window (Browse Mode)
Browse Window
Setting thumbnail border display items
The file name, shooting date, shooting information, rotate button, RAW icon,
sorting checkmark, and folder can be displayed on the thumbnail border. The file
name and shooting date cannot be displayed with shooting information on the
thumbnail border at the same time.
1 On [Thumbnail List Items] in the [View] menu, check the item
you want to display.
53
Page 54

Using the thumbnail display area
Setting the display order of the thumbnail images
The thumbnail images can be displayed in the order of the file name, shooting date,
sorting checkmark, or format. The thumbnail images can also be arranged in
ascending or descending order.
1 Select the display order from [Arrange] on the [View] menu.
2 Select [Ascending Order] or [Descending Order] from [Arrange]
on the [View] menu.
• When sorted by shooting date/time, sorting checkmark, or format, the
thumbnail images are listed in the alphabetical order of their file names.
Tips
Setting the display size of the thumbnail images
You can select from five display sizes: Smallest (80 × 80 pixels), Small (120 × 120
pixels), Medium (160 × 160 pixels), Large (200 × 200 pixels), and Largest (240 ×
Browse Window
240 pixels).
1 Select the display size from [Thumbnail Display Size] on the
[View] menu.
54
Page 55

Full Screen Display / Slide Show
The following describes how to display images in Full Screen Display, Slide Show,
and Multi Monitor by using Browse Mode, View Mode, and Light Box Mode in the
browse window.
Full Screen Display
This displays the selected image at full screen. The buttons on the tool palette
displayed with this function can be used to delete and enlarge images, add sorting
checkmarks, and provide other tools.
1 Select [Full Screen Display / Slide Show] from the [View] menu
or click the [Full Screen Display / Slide Show] icon on the
toolbar.
Select the image to display at full screen from the thumbnail display area, single
image view area, or collection area and then select [Full Screen Display / Slide
Show] or click the icon.
The image is displayed at full screen.
Full Screen Display
Browse Window
55
Page 56

Full Screen Display / Slide Show
Other operations to display an image at full screen
The following operations can also be used to display an image at full screen.
• Select an image from the thumbnail display area, single image view area, or
collection area, and then double-click the image while pressing the [Shift] key.
• Select an image from the thumbnail display area, single image view area, or
collection area, and then press the [Enter] key while pressing the [Shift] key.
• Double-click an image in the image comparison area.
Canceling Full Screen Display
Full Screen Display can be cancelled with either of the following operations.
• Press the [Esc] key.
• Double-click the image.
Tool palette
Tool palette
12345 6 789 1011 12 131415161718
Browse Window
Number Item Description Ref. Page
1 Delete Deletes the image. —
2 Fit image to screen The display magnification is
automatically adjusted to display the
image so as to fit the entire screen.
3 Display actual size Displays the image at its actual size. —
4 Zoom Out Mode The cursor changes to the magnifying
glass (–). Click the image to zoom out.
5 Zoom In Mode The cursor changes to the magnifying
glass (+). Click the image to zoom in.
6 Display Magnification Shows the current display
magnification. Select the display
magnification from the pull-down list to
zoom in or out on an image.
7 Scroll Mode The cursor changes to the hand tool.
Drag this tool over the image to scroll
the image.
8 Rotate The image can be rotated 90 degrees
clockwise or counterclockwise.
9 Collection Button Divides the image displayed in the
single image view area into collection
areas.
10 Sorting Checkmark Click the [Red], [Yellow], or [Blue] icons
to separate the images into different
groups. Only those images with the
same sorting checkmark can be
displayed in the thumbnail display area.
—
—
—
—
—
P.60
P.67
P.62
56
Page 57

Full Screen Display / Slide Show
11 Tool Palette Full Display This can be used to display the entire
tool palette or hide part of the tool
palette.
12 Status Box Displays information (file name,
shooting date, display position, or
display magnification) for the image
displayed at full screen. You can select
display items from the pull-down list.
13 First image Displays the first image in the
thumbnail display area in the order of
display.
14 Previous Image Displays the previous image in the
thumbnail display area in the order of
display.
15 Slide Show The images in a selected folder are
displayed in order at a fixed interval.
16 Next Image Displays the next image in the
thumbnail display area in the order of
display.
17 Last image Displays the last image in the
thumbnail display area in the order of
display.
18 Hide Tool Palette Hides the tool palette. —
• An image in the collection area cannot be deleted when it is displayed at full
screen.
Note
• The [Previous Image] and [Next Image] buttons cannot be used to display the
previous or next image when an image in the image comparison area is
displayed at full screen.
—
—
—
—
P.58
—
—
Browse Window
Tips
• The menu appears when you click (click while pressing the [Control] key in
Macintosh, right-click in Windows) an image displayed at full screen. The menu
has the same functions as the tool palette.
• When using the Multi Monitor setting, you can double-click an image in the
thumbnail display area in Browse Mode to display the selected image at full
screen on a separate monitor.
“Displaying images with Multi Monitor” P.59
• You can set the margins and the color of the margins between the image and
the screen. “Setting the [Full Screen Display] tab” P.259
57
Page 58

Full Screen Display / Slide Show
Slide Show
The images in the same folder as the image currently displayed at full screen are
displayed in order at a fixed interval. As the default setting, the images are
displayed at 5-second intervals.
1 Display an image at full screen.
“Full Screen Display” P.55
2 Click the [Slide Show] icon on the tool palette.
The slide show begins.
The [Slide Show] icon automatically changes to the [Pause] icon.
Pausing the slide show
Click the [Pause] icon on the tool palette during the slide show to pause.
• Images in the image comparison area cannot be used with the slide show.
• Some of the functions on the tool palette cannot be used during the slide show.
Note
Browse Window
Tips
• The interval at which the images are displayed can be changed.
“Setting the [Full Screen Display] tab” P.259
• The slide show can be configured to replay from the first image after the last
image is displayed (Loop Playback).
“Setting the [Full Screen Display] tab” P.259
58
Page 59

Displaying images with Multi Monitor
If you are using more than one monitor, you can display an image at full screen on
a separate monitor. Multi Monitor can be configured in the preferences.
“Setting the [Full Screen Display] tab” P.259
Images can be displayed at full screen on multiple monitors in the following
situations.
• When an image is selected from the thumbnail display area in Browse Mode and
then displayed at full screen.
• When an image is displayed in the single image display area in View Mode.
• When the camera control window is used to take pictures.
• When configuring Multi Monitor, some of the functions on the tool palette
displayed on separate monitors cannot be used. Use the tool palette on the
Note
monitor that is operating OLYMPUS Studio (main monitor).
Browse Window
59
Page 60

Rotating images
Click the [Rotate] button on the thumbnail border or select [Rotate Image] from the
menu bar to rotate images.
Lossless rotation of JPEG images
Tips
1 Select the image that you want to rotate from the thumbnail
Browse Window
2 Select [Clockwise 90°], [Counterclockwise 90°], or [180°] from
• With OLYMPUS Studio, JPEG images can be rotated without having to recompress the JPEG image data. This is called “lossless rotation”. Because
JPEG is a irreversible compression method in which the data is degraded at
the time of compression, when a compressed image is rotated and saved,
noise characteristic to JPEG appears in the image. In a lossless rotation,
however, the JPEG image can be rotated without being recompressed.
If, however, the JPEG image data that is rotated does not have height and
width as a multiple of 8, the lossless rotation is not performed immediately.
Instead, a dialog box appears, prompting you to select the processing method.
You can select either to have the image cropped and then perform a lossless
rotation or have the image rotated normally without being cropped.
display area.
To select several images, select the images while pressing the following key.
• Macintosh (Mac OS 9) : [Shift] key
• Macintosh (Mac OS X) : [Shift] or [Command] key
• Windows : [Ctrl] key
[Rotate Image] on the [Edit] menu. You can also repeatedly click
the [Rotate] button in the thumbnail border until the desired
rotation position is reached.
The selected image is rotated in the specified direction.
60
Thumbnail border
Click the [Rotate]
button
• When rotating a RAW image file, the displayed image is rotated, but the image
data is not changed. The rotation information is recorded as image information.
Note
The image is rotated
Page 61

Tips
Rotating images
• When the [Rotate] button on the thumbnail border is clicked, the image is
rotated 90 degrees counterclockwise. The function of the [Rotate] button can
be changed to rotate the image 90 degrees clockwise.
“Setting the [Browse] tab” P.257
• To rotate the image in the opposite direction, click the [Rotate] button while
pressing the [Shift] key.
• In rotating Exif image, you can configure the setting to either change the image
information and rotate the actual image data or change the image information
without rotating the actual image data. “Setting the [Browse] tab” P.257
Browse Window
61
Page 62

Using sorting checkmarks
The sorting checkmark function can be used to sort your images into three
categories.
The sorted images can then be displayed by category in the thumbnail display area
in all display modes of the browse window.
• Add a sorting checkmark • Sorted display by sorting
Browse Window
checkmark
Adding a sorting checkmark
Sorting checkmarks appear at the top right of the thumbnail border. Red, yellow,
and blue icons are used as the default sorting checkmarks. Clicking one of the
three colored icons adds a sorting checkmark to an image and sorts that image.
1 Click a sorting checkmark on the thumbnail border.
Click one of the three colored icons.
You can also add a sorting checkmark by pressing the [1], [2], or [3] key.
When several images are selected and a sorting checkmark is added, the same
sorting checkmark is added to all the images.
To select several images, select the images while pressing the following key.
• Macintosh (Mac OS 9) : [Shift] key
• Macintosh (Mac OS X) : [Shift] or [Command] key
• Windows : [Ctrl] key
62
Page 63

Using sorting checkmarks
Note
Tips
Click a sorting
checkmark
• If the sorting checkmarks are not displayed on the thumbnail border, select
[Thumbnail List Items > Sorting Checkmark] from the [View] menu.
“Setting thumbnail border display items” P.53
• Only one type of sorting checkmark can be added to an image.
• Sorting checkmarks cannot be changed or added to images on read-only
media (such as a CD-ROM).
• In the single image view area, a sorting checkmark can be added to an image
displayed in single image view by using the sorting checkmark icons at the top
right of that area. “View Mode” P.44
• A sorting checkmark can also be added from the tool palette in Full Screen
Display. “Full Screen Display” P.55
Sorted image
Canceling a sorting checkmark
1 Click the sorting checkmark you want to cancel.
Sorted image
The sorting checkmark
is canceled
Browse Window
Note
Tips
Sorting checkmark data files
• The sorting checkmark information is stored in a data file. This data file is
created automatically when a sorting checkmark is added, and the file is stored
in the folder containing the image with the sorting checkmark.
• Please note that when deleting a sorting checkmark data file with different
application software, the sorting checkmark attached to the image disappears.
• The sorting checkmark icons can be customized with your favorite color or
symbol. “Setting the [Sorting Checkmark] tab” P.262
• The data files that contain the sorting checkmark information can be deleted all
at once. “Setting the [Sorting Checkmark] tab” P.262
63
Page 64

Using sorting checkmarks
Sorting Method
The sorting palette can be used to display the images in the thumbnail display area
by the type of sorting checkmark. By using the sorting palette, you can easily select
the image display for each type of sorting checkmark on the toolbar.
1 Select [Sorting Checkmark Display > Show Sorting Palette] from
the [View] menu or click the [Sorting Checkmark Display] icon
on the toolbar.
Browse Window
The sorting palette appears at the bottom of the window.
2 Use the sorting palette to change the display of the thumbnail
display area.
Sorting palette
[ALL] : Displays all images within a folder.
[Red] : Displays only those images with a [Red] sorting checkmark.
[Yellow] : Displays only those images with a [Yellow] sorting checkmark.
[Blue] : Displays only those images with a [Blue] sorting checkmark.
[None] : Displays only those images without a sorting checkmark.
64
Page 65

Tips
Using sorting checkmarks
• You can change the display by selecting several options from the sorting
palette. Select [Red] or [Blue], for example, to display images with [Red] or
[Blue] sorting checkmarks in the thumbnail display area.
• If [Red], [Yellow], [Blue], and [None] are all selected on the sorting palette,
[ALL] is automatically selected and all images in the folder are displayed in the
thumbnail display area.
Browse Window
65
Page 66

Using collection areas
The browse window has collection areas where you can save images in the
thumbnail display area temporarily. Collection areas A and B can be used to divide
and organize the images.
The collection areas are temporary areas and do not change the location where the
images are saved. To save the images by collection, move or copy the images to
separate folder manually.
The display method and format of displaying the collection areas differ depending
on the display mode.
1 Select an image in the thumbnail display area and place it in
collection area A and/or B.
“Dividing images” P.68
2 Confirm the images divided into collection areas A and B.
“Confirming images” P.70
3 Copy or move the confirmed images to a separate folder.
Browse Window
“Saving images” P.72
66
Page 67

Using collection areas
z Using the collection areas in Browse Mode
Select [Display Collection Area] from the [View] menu or click the [Display
Collection Area] icon on the toolbar to display the collection areas. When the
collection areas are hidden, the collection buttons at the bottom of the window can
be used to divide the images.
• Display collection areas
Collection areas Collection button
Browse Window
• Hide collection areas
Collection buttons
z Using the collection areas in View Mode
The collection areas disappear in View Mode. Click the collection buttons at the top
right of the single image view area to divide the images.
Collection buttons
z Using the collection areas in Light Box Mode
The same collection areas in Browse Mode are displayed. The collection areas
cannot be hidden in this display mode.
67
Page 68

Using collection areas
Dividing images
The images in the thumbnail display area can be divided into collection areas.
1 Drag and drop the images in the thumbnail display area to the
collection areas, or select the images and click the [A] or [B]
collection buttons.
Collection areas
Browse Window
68
A collection area icon appears on the thumbnail border.
Thumbnail border
Page 69

Using collection areas
The collection buttons can be used to divide images even when the collection
areas are hidden. Click the [A] or [B] collection button or drag and drop the images
to the area where the number of files is displayed next to the collection buttons.
Collection areas are hidden
Removing an image from a collection area
Select the image that you want to remove from the collection area and perform one
of the following operations.
• Drag and drop the image to the thumbnail display area.
• Select [Delete] from the [File] menu.
• Press the [Delete] key.
Browse Window
Note
Tips
• When you exit the browse window, the collections are not retained. The next
time the browse window is opened, the collection areas will be empty.
• Images can be moved between collection areas by dragging and dropping
them. Images can be copied from one collection area to another by dragging
and dropping the images while pressing the [Option] key in Macintosh or the
[Ctrl] key in Windows.
• One image can be placed into both collection areas A and B.
69
Page 70

Using collection areas
Confirming and saving divided images
Images registered in the collection areas can be confirmed by displaying the
images in a list. An entire collection of images can also be copied or moved to a
separate folder as needed.
Images are confirmed and saved in the collection areas. Images cannot be
confirmed or saved in View Mode or when the collection areas are not shown.
Collection areas
Browse Window
z Confirming images
1 Click the [Confirm] button in a collection area.
The registered images are displayed in a thumbnail list.
Click the [Back] button at the bottom right of the window to return to the original
display mode.
70
Page 71

Using collection areas
2 Double-click the thumbnail of an image to enlarge and confirm.
The Collection View Mode appears.
Double-click the single image view area or press the [Esc] key to return to the
original display mode.
Collection View Mode
Collection View Mode
Tips
• The images registered in the collection areas are displayed in a window similar
to that of View Mode. The Collection View Mode can be used to enlarge
images and view detailed information about the images.
“View Mode” P.44
Browse Window
71
Page 72

Using collection areas
z Saving images
1 Click the [Save] button in a collection area.
The [Selecting Collection] dialog box appears.
[Selecting Collection] dialog box
Browse Window
Item Description
Where Select where you want to save the selected file.
[Browse Shortcut] Click this to display a list of registered shortcuts. When a
shortcut is selected from the list, the selected position on the
folder tree jumps to the destination of the shortcut link.
“Creating a folder shortcut” P.109
Folder Tree Select the destination folder.
[New Folder] Click this to create a new folder in which to save the selected
file. Creates a new subfolder in a drive or folder selected in the
folder tree.
Selection Method Select [Copy] or [Move] for the method of saving the image.
Please note that if you select [Move], the image is deleted from
the original saved location.
[Cancel] Cancels the collection selection.
[OK] The image is copied or moved to the folder selected in the
folder tree.
72
Page 73

Using collection areas
2 Select the destination folder.
You can create a new folder. Click the [New Folder] button to create a new
subfolder in the selected drive or folder.
3 Select the selection method.
Click the [Copy] or [Move] button.
4 Click the [OK] button.
The images in the collection area are saved in the selected folder or a newly
created subfolder.
• When [Move] is selected in step 3 for an image registered in both of the
collection areas A and B, the image is copied.
Note
• A confirmation message appears when [Move] is selected for image files in
read-only media. When the [OK] button is clicked on the confirmation message,
the image file is copied (not moved).
• If you exit the browse window without saving the images divided into the
collection areas, a warning message appears indicating that the result of this
collection process will be lost.
Browse Window
73
Page 74

Using the image comparison area
101111
13
The image comparison area can be used to display images selected from the
thumbnail display area side-by-side. This function is useful for comparing and
examining several images in order to select the best image.
The image comparison area is used in Light Box Mode.
“Selecting the display mode” P.50
Image comparison area
The following describes the part names and functions of the image comparison
area.
Light Box Mode
Browse Window
1
74
2 3 4 5 6 7 8 9 10
2 3 4 5 6 7 8 9 10 11 12 13
Horizontal two-split screen layout
121213
Page 75

Using the image comparison area
Number Item Description
1 Image Comparison
Area
2 Fit image to screen The display magnification is automatically adjusted to
3 Display actual size Displays the image at its actual size.
4 Zoom Out Mode The cursor changes to the magnifying glass (–). Click
5 Zoom In Mode The cursor changes to the magnifying glass (+). Click
6 Scroll Mode The cursor changes to the hand tool. Drag this tool
7 Pointer Tool This is used to select images and drag and drop
8 Link Display When checked, the operations (zoom in, scroll, etc.)
9 Pushpin You can save a desired image that you compared or
10 Add by selecting When checked, an image can be registered in the
11 Add once When checked, several images can automatically be
12 [Add next image] The next image in the thumbnail display area is
Images in the thumbnail display area can be
registered and displayed, and multiple images can be
compared. The numbers of the image comparison
areas are displayed. If the display layout is a two-split
screen, numbers 1 and 2 appear. If it is a four-split
screen, numbers 1, 2, 3, and 4 appear. The display
layout can be changed with the [Change Display
Layout] button.
display the image so as to fit the entire image
comparison area.
the image to zoom out.
the image to zoom in.
over the image to scroll the image. Move the cursor
while pressing the [Shift] key to temporarily change
the cursor to the pointer tool.
images to the collection area.
applied for one image in the image comparison area
are shared with the other images in the image
comparison area. The current scroll position in each
comparison area, however, cannot be changed even
if checked. To compare several images shot with the
same composition but at different settings, for
example, you can display the images in the image
comparison area and then use this function to zoom
in on the same part of the image for comparison.
Operating while pressing the [Shift] key temporarily
disables the function.
an image for comparison in the image comparison
area. Click the [Pushpin] button and a [Pushpin] icon
appears in the image comparison area. Other images
cannot be registered in this image comparison area.
Click the [Pushpin] button again or click the [Pushpin]
icon to remove the icon.
image comparison area simply by selecting (clicking)
that image in the thumbnail display area.
registered in the comparison area without the Pushpin
icons simply by selecting an image.
registered in the image comparison area.
Browse Window
75
Page 76

Using the image comparison area
Browse Window
13 [Change Display
Layout]
The layout of the image comparison area can be set
to a vertical two-split screen ( ), horizontal two-split
screen ( ), or a four-split screen ( ).
76
Page 77

Using the image comparison area
Displaying images in the image comparison area
Images in the thumbnail display area can be registered and displayed in the image
comparison area.
You can register an image with any of the following five methods.
• Drag and drop an image.
• Double-click an image.
• Check [Add by selecting] checkbox.
• Check [Add once] checkbox.
• Click the [Add next image] button.
Please take note of the following when displaying an image to the image
comparison area.
• The area shown with a red border is the area where the image is added.
Therefore, before registering the image, select the area to which you want to
register an image with a red border.
• An image can be freely registered to the desired area by drag and drop without
having to select the image comparison area.
• An image cannot be registered to an area marked with a pushpin.
• An image cannot be registered to more than one area.
z Dragging and dropping an image
You can drag and drop an image to register it in the image comparison area.
1 Drag and drop an image in the thumbnail display area to the
image comparison area.
You can also select and drag and drop several images.
Browse Window
Light Box Mode
77
Page 78

Using the image comparison area
The selected image is registered in the image comparison area.
Browse Window
Tips
• When an image is registered to the image comparison area, the image
comparison area number appears above (during four-split screen) or on the left
(during two-split screen) of the thumbnail border. When the display is changed
from four-split screen to two-split screen and areas 3 and 4 are hidden, these
areas become grayed out.
z Double-clicking an image
You can double-click an image to register it in the image comparison area.
1 Select the image comparison area to register the image.
2 Double-click the image in the thumbnail display area.
The selected image is registered in the image comparison area.
78
Page 79

Using the image comparison area
z Using the [Add by selecting] checkbox
An image can be registered in the image comparison area simply by selecting
(clicking) an image in the thumbnail display area.
1 Check [Add by selecting].
2 Select the image comparison area to register the image.
3 Select (click) an image in the thumbnail display area.
The selected image is registered in the image comparison area.
z Using the [Add once] checkbox
Several images can be registered in the image comparison area simply by
selecting a single image.
1 Check [Add once].
2 Select the image comparison area to register the image.
“2” is selected here.
Browse Window
79
Page 80

Using the image comparison area
3 Select (click) an image in the thumbnail display area.
The successive images selected in the thumbnail display area are displayed in the
image comparison areas following the number selected in the previous step. In
this example, the images are registered in image comparison areas 2, 3, 4, and
then 1.
Browse Window
z Using the [Add next image] button
Each time the [Add next image] button is clicked, an image next to the currently
selected image in the thumbnail display area is registered in the image comparison
area. This is convenient when used with the [Pushpin] button.
1 Click the [Add next image] button.
The next image in the thumbnail display area is registered in the selected image
comparison area. The [Add next image] button can be repeatedly clicked until you
find an image you want to compare.
80
Page 81

Using the image comparison area
2 When you find the desired image, click the [Pushpin] button.
The [Pushpin] icon appears on the image in the selected image comparison area.
The next image comparison area is then selected automatically.
;
3 Click the [Add next image] button again.
The next image following the image selected in the thumbnail display area is
registered in the image comparison area selected in step 2 above. The [Add next
image] button can be repeatedly clicked until you find an image you want to
compare.
Browse Window
z Deleting images from the image comparison area
The following describes how to delete images registered in the image comparison
area in order to free up more space.
1 Select an image in the image comparison area and press the
[Delete] key.
The image in the comparison area is deleted.
• After using the image comparison area to select the best image, that image can
be placed into a collection area and copied or moved to a separate folder.
Tips
“Dividing images” P.68, “Confirming and saving divided images” P.70
81
Page 82

Showing image information
Image information such as the image histogram, shutter speed and image size in
the thumbnail display area is displayed in the properties area. The properties area
display is hidden by default. The properties area can be shown or hidden for each
display mode (Browse Mode, View Mode, and Light Box Mode) in the browse
window.
The information displayed varies depending on the camera and recording format.
Shooting information displays the shooting settings for the camera. The display
may differ from the information displayed when editing images on OLYMPUS
Studio.
Displaying the properties area
1 In the thumbnail display area, select the image that you want to
display with the properties.
2 Select [Properties] from the [File] menu or click the [Properties]
Browse Window
icon on the toolbar.
The properties area appears on the right-hand side of the window in Browse
Mode, View Mode, or Light Box Mode.
If another image is selected while the properties area is displayed, the information
in the properties area changes.
82
Page 83

Showing image information
Properties area
Item Description
Histogram Displays the luminance distribution of the image. When the
distribution is concentrated to the left of the left-hand line, this
indicates that the image appears mostly black. When the
distribution is concentrated to the right of the right-hand line,
this indicates that the image appears mostly white.
[General] tab General information is displayed by hardware information,
shooting information, and image information. The shooting
date and comments can be edited in the [General] tab.
Shooting information displays the shooting settings for the
camera. The display may differ from the information displayed
when editing images on OLYMPUS Studio.
[Exif] tab All Exif tag information for images shot with an Exif camera is
displayed.
Browse Window
83
Page 84

Showing image information
[General] tab
Click the [ ] icon to the left of each category title to show or hide that category.
[General] tab page
Browse Window
The information displayed in each category is as follows.
Hardware information
File Name, Model Name, Camera ID, Lens Information
Shooting information
Focal Length, Shutter, F.No., Exposure Compensation, Flash (+Flash
Compensation)*, White balance (+White balance compensation)*, Saturation,
Contrast, Sharpness, Color Space, Shooting Mode (+AE Lock)*, Metering Mode,
ISO Sensitivity, Focus Mode, Macro, Drive
* The information in parentheses is only displayed when settings are available.
Image information
Format, Image Size, Color Depth, File Size, File Location, Date Updated, Shooting
Date, Comments
84
Page 85

Showing image information
[Exif] tab
The information displayed in the [Exif] tab is as follows.
Image title, Image input equipment manufacturer, Image input equipment model,
Orientation of image, File change date and time, Exposure time, F number,
Exposure program, ISO speed rating, Exif version, Date and time of original data
generation, Date and time of digital data generation, Exposure bias, Maximum lens
aperture, Metering mode, Light source, Flash, Lens focal length, User comments,
Supported Flashpix version, Color space information, Custom image processing,
Exposure mode, White balance, Digital zoom ratio, Scene capture type, Gain
control, Contrast, Saturation, Sharpness etc.
[Exif] tab page
Browse Window
Note
• Some items may not be displayed in the properties area depending on the
recording format of the file and camera.
85
Page 86

Showing image information
Editing comments
Comments can be added and edited for Exif-JPEG, Exif-TIFF and RAW data image
files.
1 Display the image information from the [General] tab of the
properties area and click the [Edit] button for the comments.
The [Edit Comment] dialog box appears.
[Edit Comment] dialog box
Browse Window
Comments Enter comments here. You can enter up to 117 single-byte
[Cancel] Cancels comment editing.
[OK] The comment you entered is saved.
Item Description
characters. If a comment is already entered, the comment is
displayed.
2 Enter a comment in the comment column and click the [OK]
button.
The entered comment appears in the properties area.
• If the image is in Exif-JPEG or Exif-TIFF format, you may not be able to add
comments depending on the recording status of the file.
Note
86
Page 87

Showing image information
Editing the shooting date
The shooting date in Exif-JPEG, Exif-TIFF, and RAW data image files can be
changed.
1 Display the image information from the [General] tab of the
properties area and click the [Modify] button for the shooting
date.
The [Correct shooting date] dialog box appears.
[Correct shooting date] dialog box
Item Description
Current Date & Time Displays the previously set shooting date.
New Date This is used to change the shooting date. Select the date
from the pull-down list and set the time with the and
buttons.
[Cancel] Cancels any changes to the shooting date.
[OK] The changes to the shooting date are saved.
Browse Window
2 Set the new date and click the [OK] button.
The changed shooting date appears in the properties area.
87
Page 88

RAW Development
RAW data is developed and processed and the results are saved in an image file.
Only RAW (*.orf) files are affected. Multiple RAW data can also be processed at the
same time.
RAW data is unprocessed data to which white balance, sharpness, contrast, color
conversion, and other development processes have not been applied.
1 Select an image with RAW data.
You can only select image files with RAW Data (*.orf) format.
2 Select [RAW Development] from the [Edit] menu, or click the
[RAW Development] icon in the toolbar.
The [RAW Development] dialog box appears.
[RAW Development] dialog box
Browse Window
88
Note
• RAW development can only be used with images in RAW format. When an
image with a different format is selected, [RAW Development] is grayed out and
cannot be configured.
Page 89

RAW Development
3 Configure each item.
The same settings are applied to all RAW data selected in step 1 above.
Item Description
Preview Area Displays the results of the configured development processes.
When several RAW data images are selected in the thumbnail
display area, [ ] and [ ] can be clicked to select the
image you want to preview.
Default Settings Check this box to return all setting items to the default setting.
At the beginning the box is checked, but is automatically
removed when the settings are changed.
Exposure
Compensation
White balance Adjusts the white balance of the image.
Contrast Adjusts the contrast of the image.
Sharpness Adjusts the sharpness of the image.
Saturation Adjusts the saturation of the image.
Adjusts the exposure of the image.
You can manually adjust the exposure by dragging the slider to
the left or right. The exposure value can be set from –2.0 to
+2.0 in increments of 0.1 EV. You can also directly enter the
exposure value.
• Shooting Setting:
Check this box to set the white balance for shooting.
If a preset white balance setting is selected, the value is
shown such as [5300K +3 STEP]. If the one touch white
balance setting is selected, the value is shown as [One
Touch WB1]. The display varies depending on the model.
• Color Temperature Setting:
You can manually adjust the color temperature by dragging
the slider to the left or right. It can be set from [2000K] to
[10000K] in increments of 100K. You can also directly enter
the value.
Fine Adjustment: You can manually adjust the color
temperature by dragging the slider to the left or right. It can
be set in 21 steps from [–10] to [+10].
• Gray Point Specification:
Click the [Eyedropper tool] button to change the mouse
cursor to the eyedropper tool. Click the desired area on the
image in the preview area to specify a gray point. (The
average RGB value for the area clicked is displayed in [R],
[G], and [B].)
You can manually adjust the contrast by dragging the slider to
the left or right. The contrast can be set in 11 steps from
[–5] to [+5].
You can manually adjust the sharpness by dragging the slider
to the left or right. The sharpness can be set in 11 steps from
[–5] to [+5].
You can manually adjust the saturation by dragging the slider
to the left or right. The saturation can be set in 11 steps from
[–5] to [+5].
Browse Window
89
Page 90

RAW Development
Color Space Sets the color space of the image.
Noise Cancellation Makes the necessary adjustments to cancel image noise.
False Color
Suppression
RAW Development
Engine
[Cancel] Cancels the RAW development settings.
[Save] Displays the [Specify Destination] dialog box to select the file
Browse Window
Select [sRGB], [Adobe RGB], or [ProPhoto RGB] from the list
for the color space.
You can manually adjust the noise cancellation by dragging the
slider to the left or right. It can be set in 11 steps from [0] to
[10]. You can only set this function when [High Function] is
selected for [RAW Development Engine].
Adjusts the chromatic aberration of the image.
You can manually adjust the false color suppression by
dragging the slider to the left or right. It can be set in 11 steps
from [0] to [10]. You can only set this function when [High
Function] is selected for [RAW Development Engine].
Configures the processing when RAW data is opened.
• High Speed:
RAW data is developed in High Speed mode.
• High Function:
RAW data is developed in High Function mode.
name and format after development processes are applied to
an image.
90
Page 91

RAW Development
4 Click the [Save] button.
The [Specify Destination] dialog box appears.
[Specify Destination] dialog box
Item Description
Folder Click the [Browse] button to specify the destination of the
File Name Select either of the following naming conventions.
Format From the list, specify the format of the image to be saved.
Compression ratio This can only be specified when [Exif-JPEG] or [JPEG] is
Comments Check this box to enter a comment when saving the file.
Open registered
application after
saving
image.
• Original File Name:
The files are saved with the same names as the image
files for development processing.
If a different file format is selected in [Format], the files
are saved as separate files with a different extension.
• Optional File Name:
Check this box to automatically name and save the file.
You can also click the [File Naming Rule] button to
display the [File Naming Rule] dialog box and set a
rename rule.
selected as the file format in [Format]. Select [High Quality],
[Standard Quality], or [Low Quality].
This box can only be checked when [Exif-JPEG] or [Exif-TIFF]
is selected as the file format in [Format]. This option is grayed
out when another file format is selected.
Check this box to automatically display the developed and
processed images with the registered application.
“Launching a registered application” P.194
Browse Window
91
Page 92

RAW Development
[Start] Applies development processes with configured settings.
[Cancel] Cancels the specifying of the destination.
5 Specify an item and click the [Start] button.
When the [Start] button is clicked, the configured development processes are
applied and the image is saved using the settings in the [Specify Destination]
dialog box.
Browse Window
92
Page 93

Launching a registered application
Images can also be opened and edited in other image editing application software.
You must first register the application software you want to launch in the
preferences.
1 Select an image in the thumbnail display area you want to open
with a registered application software.
To select several images, select the images while pressing the following key.
• Macintosh (Mac OS 9) : [Shift] key
• Macintosh (Mac OS X) : [Shift] or [Command] key
• Windows : [Ctrl] key
2 Select [Launch registered application] from the [Edit] menu or
click the [Launch registered application] icon on the toolbar.
The registered application software is launched.
The image is displayed with the launched application software.
For instructions on how to operate the application software, refer to the operation
manual supplied with your application software.
Pre-registering an application
• You must first register the application software. Select [Preferences] from the
Note
Tips
[Tools] menu to display the [Preferences] dialog box and register the
application software. “Setting the [General] tab” P.255
• RAW image files will be developed by OLYMPUS Studio using the regular
settings before being opened in the registered application.
Browse Window
93
Page 94

Using folders and files
You can change the file names of images transferred to a computer for easier
reference and organize the images by dividing them into new folders. The following
describes how to use folders and files to organize your images.
Creating a new folder
1 Set the display mode to Browse Mode.
“Selecting the display mode” P.50
2 In the folder tree, select the drive or folder in which you want to
create a new folder.
Browse Window
3 Select [Create New Folder] from the [File] menu.
A new subfolder is created in the selected drive or folder.
4 Enter a name for the new folder.
94
Page 95

Using folders and files
Moving files to a new subfolder
You can create a new subfolder inside a folder in which the selected file is saved
and then move that file to the subfolder.
1 Set the display mode to Browse Mode.
“Selecting the display mode” P.50
2 Select the file in the thumbnail display area that you want to
move.
To select several images, select the images while pressing the following key.
• Macintosh (Mac OS 9) : [Shift] key
• Macintosh (Mac OS X) : [Shift] or [Command] key
• Windows : [Ctrl] key
Browse Window
3 Select [Move selected file to new subfolder] from the [File] menu.
A new folder labeled [Destination Folder] is created inside the folder in which the
selected file is saved, and the selected file is then moved to that subfolder.
4 Enter a name for the destination folder.
• In Windows, a confirmation message appears if read-only files are included
among the files to be moved. Click the [Yes] button to move all read-only files.
Note
• Files in read-only media cannot be moved.
95
Page 96

Using folders and files
Renaming files and folders
1 Select the folder or file in the thumbnail display area with the
name you want to change.
Browse Window
2 Select [Rename] from the [File] menu.
The [Rename] dialog box appears.
[Rename] dialog box
Item Description
Current Name Displays the original name.
New Name Enter a new name here.
[Cancel] Cancels the name change.
[OK] Changes the name.
96
Page 97

3 Enter a new name in the [New Name] field.
4 Click the [OK] button.
The name of the selected folder or file is changed.
• Names of files in read-only media cannot be changed.
• If the name entered in the [New Name] field already exists, an error message
Note
Tips
will appear.
• Folder names can be changed directly on the folder tree.
• In Windows, you can select a folder or file and press the [F2] key to change the
name.
Using folders and files
Browse Window
97
Page 98

Using folders and files
Renaming files simultaneously
The names of several files can be renamed at the same time. This can be done by
configuring the rename rule. The renaming of all files can be used to easily identify
files with the same shooting date by the file name and add serial numbers to the file
names.
z Rename Rule
A file name is configured into three blocks: [Prefix], [Base], and [Suffix]. Optional
separator characters can be placed between the blocks. The extension is the same
as that of the original extension.
Any of the following six types can be selected for each block. Depending on the
item, after it is selected, additional strings may be entered or selected from a box.
None Selected when the block is not set.
Original File Name Uses the current file name.
Optional String Enter or select a new file name. This is entered directly into the
Browse Window
Shooting Date Configures the shooting date. Select one of the following six
Shooting Date &
Time
Serial Number Configures a serial number up to 9999. Select the starting
box displayed at the bottom or selected from past input strings.
A maximum of five input strings can be displayed in and
selected from the pull-down list.
shooting date formats from the box displayed at the bottom.
The date updated is displayed for files without a recorded
shooting date.
• [YYYYMMDD]
• [YYMMDD]
• [MMDDYYYY]
• [MMDDYY]
• [DDMMYYYY]
• [DDMMYY]
Configures the shooting date and time. Select one of the
following six shooting date/time formats from the box displayed
at the bottom. The date/time updated is displayed for files
without a recorded shooting date/time.
• [YYYYMMDD_HHMMSS]
• [YYMMDD_HHMMSS]
• [MMDDYYYY_HHMMSS]
• [MMDDYY_HHMMSS]
• [DDMMYYYY_HHMMSS]
• [DDMMYY_HHMMSS]
number and number of digits (maximum of four) from the two
boxes displayed at the bottom. If the selected number of digits
is not sufficient for a file, another digit is automatically added to
the file name.
98
Page 99

Using folders and files
• If [Digits] for the serial number is set to [4] and more than four digits are
required, an error message appears. Click the [OK] button and reset the digits
Note
Tips
or starting number.
• If the configured file name already exists in the same folder, a serial number is
automatically added to the suffix of the new file name.
Example: When files Snap_0001.jpg and Snap_0003.jpg exist in the same
folder.
File names to be changed File names after all files are renamed
Snap_0001.jpg Æ Snap_0001_01.jpg
Snap_0002.jpg Æ Snap_0002.jpg
Snap_0003.jpg Æ Snap_0003_01.jpg
1 Select the group of files in the thumbnail display area that you
want to rename.
To select several images, select the images while pressing the following key.
• Macintosh (Mac OS 9) : [Shift] key
• Macintosh (Mac OS X) : [Shift] or [Command] key
• Windows : [Ctrl] key
Browse Window
99
Page 100

Using folders and files
2 Select [Rename All] from the [File] menu or click the [Rename
All] icon on the toolbar.
The [Rename All] dialog box appears.
[Rename All] dialog box
Browse Window
Item Description
Rename Rule You can select from six items for the [Prefix], [Base],
F (separator characters) Enter separator characters for each block. If nothing is
(Optional string setting box) Displayed when [Optional String] is selected for a
(Shooting date setting box) Displayed when [Shooting Date] is selected for a block.
(Shooting date/time setting
box)
Number From Displayed when [Serial Number] is selected for a block.
Digits Displayed when [Serial Number] is selected for a block.
Current Name Displays the selected file name.
New Name Displays the file name given according to the
and [Suffix] blocks. Depending on the item, information
may be entered in or selected from the box.
entered, no separator characters will be used. One
single-byte or double-byte character can be entered for
each separator character.
block. Directly enter a string or select a previously
entered string from the pull-down list.
Select the shooting date format from the pull-down list.
Displayed when [Shooting Date & Time] is selected for
a block. Select the shooting date/time format from the
pull-down list.
Enter the starting number of the serial number.
Enter the number of digits for the serial number.
configured rename rule.
100
 Loading...