

Page 1
DIGITAL CAMERA
SP-700
ENGLISH 2
FRANÇAIS 28
Basic
Manual
ESPAÑOL 54
Page 2

Table of Contents
CAMERA DIAGRAM ...............................................................................3
BEFORE YOU BEGIN...............................................................................4
GETTING STARTED.................................................................................4
Step 1 Get Started .................................................................................... 4
Step 2 Take a Picture................................................................................. 6
Step 3 Review or Erase a Picture................................................................ 7
En
Step 4 Transfer Images.............................................................................. 8
BASIC OPERATION ...............................................................................10
Holding the Camera................................................................................ 10
Mode Switch........................................................................................... 10
Shooting Mode Buttons .......................................................................... 11
SCENE Modes ......................................................................................... 12
Macro Mode........................................................................................... 12
Self-Timer ............................................................................................... 12
Flash Modes............................................................................................ 13
Power Save Feature................................................................................. 13
MENUS AND SETTINGS .......................................................................14
Top Menu............................................................................................... 14
Erase All Pictures ..................................................................................... 15
Select a Language ................................................................................... 15
Monitor Symbols & Icons......................................................................... 16
Thumbnail (Index) Display........................................................................ 17
CONNECTING THE CAMERA................................................................18
Playback on a TV..................................................................................... 18
Direct Printing (PictBridge)....................................................................... 19
OLYMPUS Master SOFTWARE ............................................................20
SPECIFICATIONS...................................................................................21
SAFETY PRECAUTIONS ........................................................................23
Before using your camera, read this manual carefully to ensure correct use.
We recommend that you take test shots to get accustomed to your camera before
taking important photographs.
Please observe the safety precautions at the end of this manual.
2
Page 3
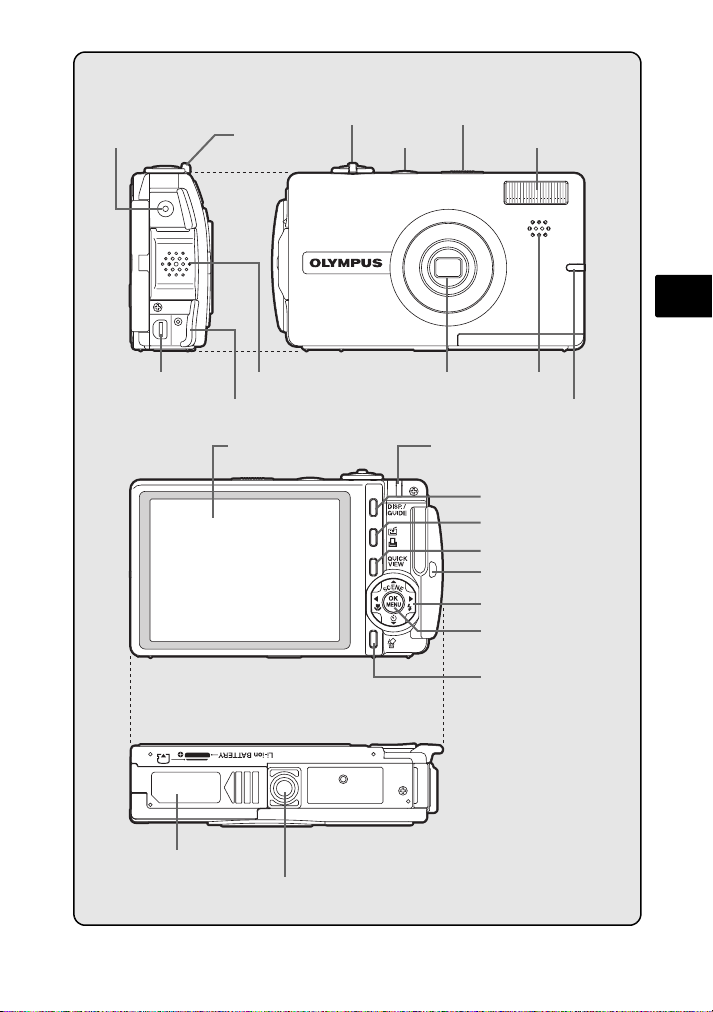
DC-IN Jack
CAMERA DIAGRAM
Zoom Lever
Shutter Button
o Button
Mode Switch
Flash
En
Multi-Connector
Battery Compartment/Card Cover
Speaker
Connector Cover
Monitor
Tripod Socket
Lens
Power/Card Access Lamp
Microphone
Self-Timer Lamp
DISP./GUIDE Button
z/< Button
(Custom/Print)
QUICK VIEW Button
Strap Eyelet
Arrow Pad (O/N/X/Y)
Z Button (OK/MENU)
S Button (Erase)
3
Page 4
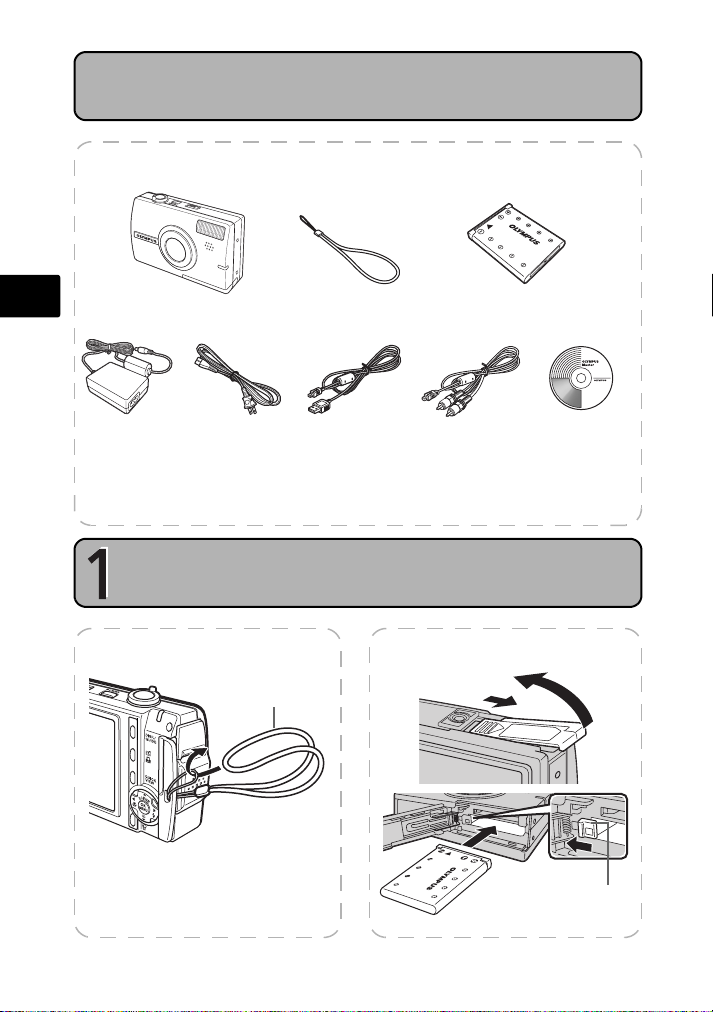
BEFORE YOU BEGIN
Gather these items (box contents)
En
Digital Camera Strap LI-40B Lithium Ion Battery
AC Adapter
(S-D-1AC)
Power Cable USB Cable AV Cable
Items not shown: Advanced Manual (CD-ROM), Basic Manual (this manual),
warranty card. Contents may vary depending on purchase location.
GETTING STARTED
GET STARTED
a. Attach the strap
Strap
1
Pull the strap tight so that it does
not come loose.
b. Insert the battery
Slide
1
Insert
3
OLYMPUS Master
Software CD-ROM
Lift
2
Battery lock knob
4
Page 5
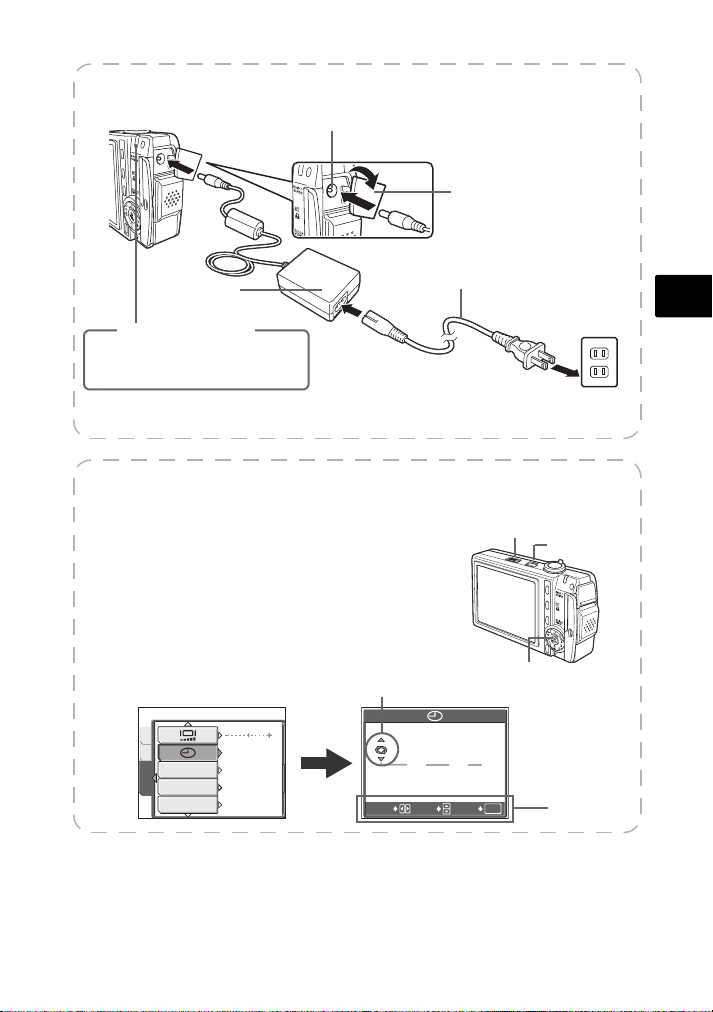
c. Charge the battery (recommended*)
DC-IN Jack
1
AC Adapter
Power/Card Access Lamp
Blinking red slowly : Charging
Off: Charging complete
(Charging time: Approx. 120 minutes)
*Battery comes partially charged.
2
Power Cable
d. Set the date and time
1 Set the mode switch to K and press the
o button to turn it on.
2 Press Z to display the top menu, and select
[MODE MENU] > [SETUP] > [X].
3 Press O/N to set an item. Press X/Y to select
the next field.
Date format
CAM
MEM
DUAL TIME
VIDEO OUT
SETUP
SETUP
u
’05.01.01
00:00
OFF
NTSC
ON
SELECT
2005
Y M D
Connector cover
Pull the connector cover
forward and then turn it.
3
Mode Switch
Z Button
.
01
.
01
:
00
00
OK
GOSET
AC Wall Outlet
o Button
Operation
guide
En
5
Page 6
En
6M
6M
6M
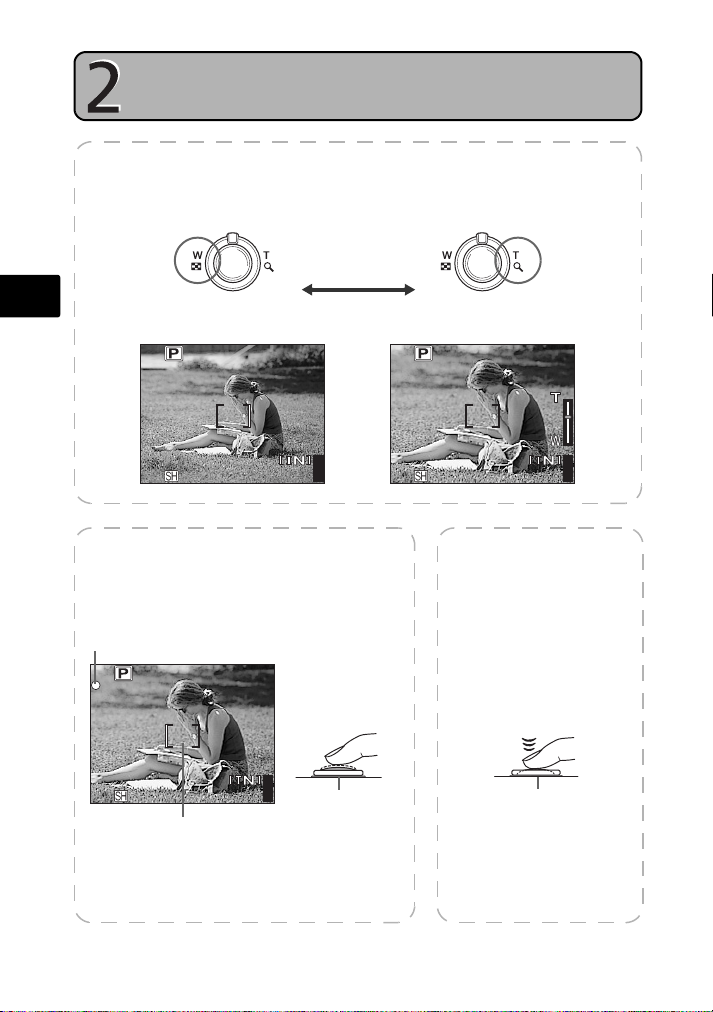
TAKE A PICTURE
a. Zoom
Zoom Out: Zoom In:
6M
b. Focus
1 Using the monitor, place the AF target
mark over your subject.
Green Lamp
6M
AF Target Mark
2 Press and hold the shutter button halfway
to lock the focus.
The green lamp indicates the focus is locked.
6
44
44
(Pressed Halfway)
Shutter Button
6M
44
c. Take the picture
1 Press the shutter
button completely to
take the picture.
(Pressed Completely)
Shutter Button
Page 7
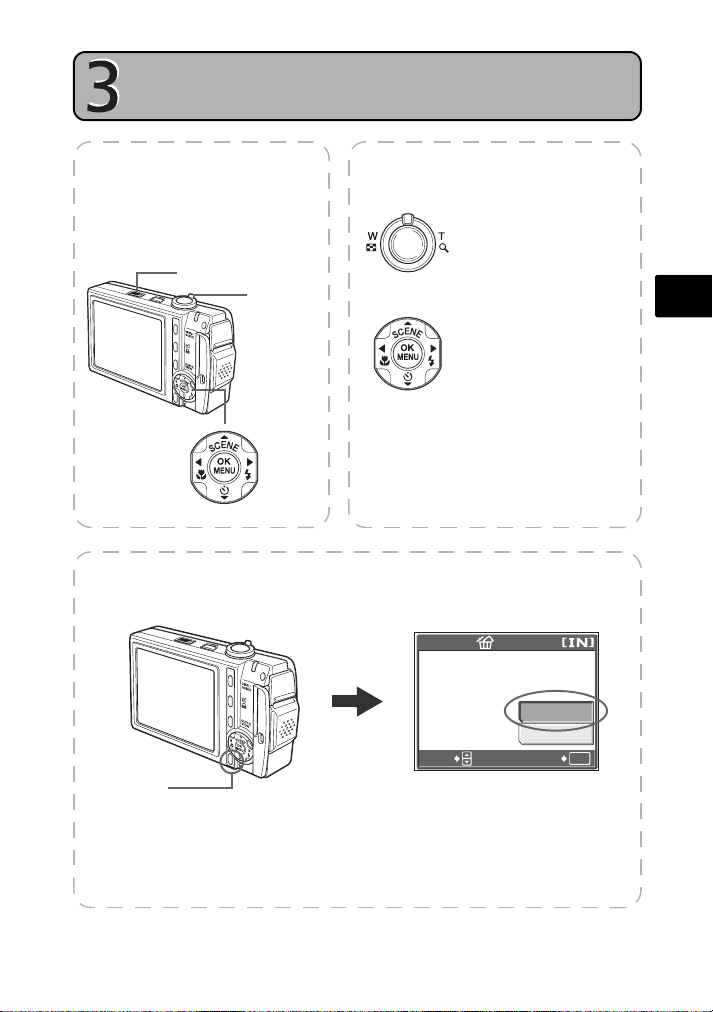
REVIEW OR ERASE A PICTURE
a. Set the mode
switch to q
The last picture taken will be
displayed.
Mode Switch
Zoom Lever
Prev. Picture Next Picture
Arrow Pad
c. To erase a picture
S Button
b. Take a closer look
Turn the zoom lever
towards T to enlarge
the picture 10x
(closeup playback) and
turn it towards W to
reduce the picture.
Press Z to return to
the original size.
Press O/N or X/Y to
scroll around.
Set the mode switch to K or A to
return to the shooting mode.
ERASE
YES
NO
SELECT
GO
OK
En
1 Display the picture you want to
erase.
2 Press the S button.
3 Select [YES], and press Z.
The picture is permanently erased.
7
Page 8
En
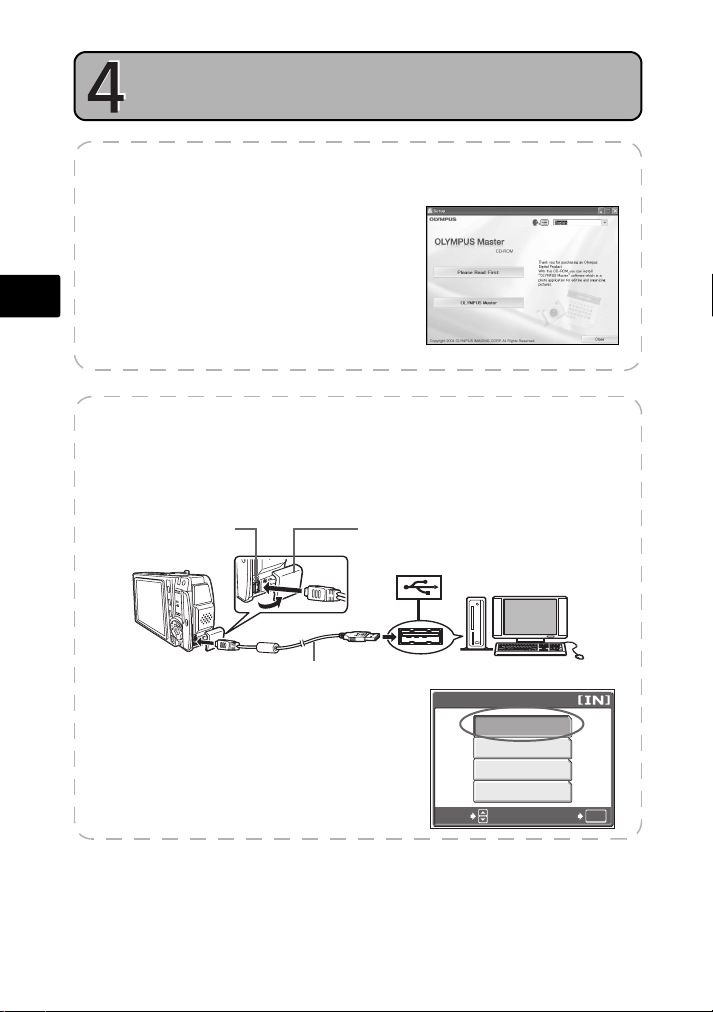
TRANSFER IMAGES
a. Install the software
1 Insert the OLYMPUS Master CD-ROM.
2 Windows: Click the “OLYMPUS
Macintosh: Double-click the
3 Simply follow the on-screen
instructions.
b. Connect the camera to the computer
1 Connect the camera to the computer using the USB cable provided with
the camera.
The camera monitor will turn on automatically.
Multi-Connector
Master“ button.
“Installer“ icon.
Connector cover
Pull the connector cover
forward and then turn it.
1
2
USB cable
2 Select [PC] on the monitor, and press Z.
Your PC will now recognize your camera as a
removable storage drive.
8
SELECT
USB
P C
EASY PRINT
CUSTOM PRINT
EXIT
GO
OK
Page 9
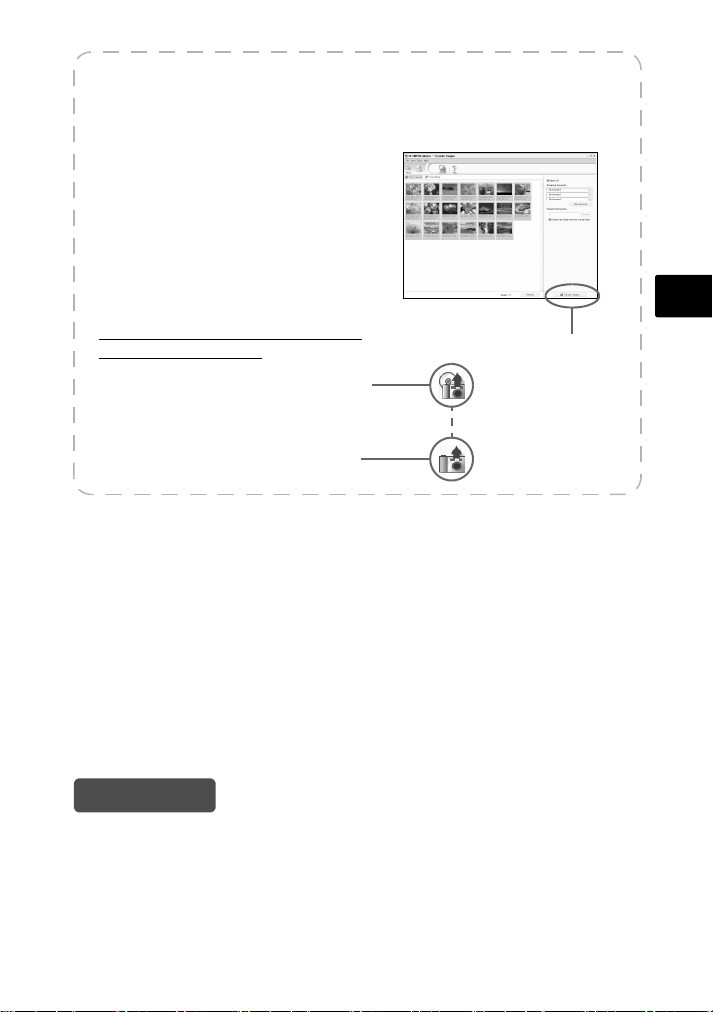
c. Transfer images to the computer
1 With the camera now connected,
open OLYMPUS Master.
The [Transfer Images] window is
displayed.
2 Select the images you want to
transfer, and click the [Transfer
Images] button.
If the [Transfer Images] window is not
displayed automatically:
a. Click the “Transfer Images” icon
on the OLYMPUS Master main
menu.
b. Click the “From Camera” icon.
[Transfer Images] window
En
[Transfer Images] button
Tips
• For more detailed information regarding camera setup and usage, please refer to
the camera’s “Advanced Manual” provided on CD-ROM.
• For more details on using the OLYMPUS Master software, please refer to the
(electronic) reference manual located in the OLYMPUS Master folder on your hard
drive. For additional assistance, refer to the “Help” file in the OLYMPUS Master
software.
9
Page 10

BASIC OPERATION
Holding the Camera
Pictures can sometimes appear blurred as the result of moving the camera while the
shutter button is being pressed.
To prevent the camera from moving, hold the camera firmly with both hands while
keeping your elbows at your sides. When taking pictures with the camera in the
vertical position, hold the camera so that the flash is positioned above the lens. Keep
En
your fingers and the strap away from the lens and flash.
Horizontal grip Vertical grip
Mode Switch
To take pictures and adjust shooting settings set the mode switch to K or A to
enter the shooting mode. To display, edit or erase pictures, set the mode switch to
q to enter the playback mode.
10
Shooting modes
Set the mode switch to K
to take still pictures or n
to record movies.
Playback mode
Set the mode switch to this
position to view pictures.
Page 11

Shooting Mode Buttons
While in shooting mode, use these buttons for quick access to some of the more
commonly used features.
13
2
4
1 QUICK VIEW button
The last picture taken is displayed on the monitor.
2 z (custom) button
Sets the function assigned to the custom button. (See Advanced Manual provided on
CD-ROM to set the customer button)
3 DISP./GUIDE button
Press the DISP./GUIDE button repeatedly to display the composition guide lines and
histogram.
Select a menu item, and press the DISP./GUIDE button to display an explanation of its
function.
4 X& button (Macro Mode)
Use macro or super macro mode when taking close-up pictures such as of a flower.
5 OSCENE (SCENE SELECT) button
Select the scene mode best suited to the light conditions and the effect you want to
achieve.
6 Y# button (Flash Mode)
Select from 5 flash modes – Auto, Red-eye reduction, Fill-in flash, Red-eye fill-in or
Flash off.
7 Z button (OK/MENU)
Press this button to display camera menu options (described on next pages). This
button is also used to confirm selections.
8 NY button (Self-timer)
Select the self-timer to delay the shot approximately 12 seconds from when the shutter
button is pressed.
5
867
En
11
Page 12

SCENE Modes
1 Press the OSCENE button in shooting mode.
1OKPROGRAMAUTO
P
h
B
F
D
SELECT
En
2 Press O/N to select a scene mode, and press Z.
GO
O SCENE Button
Shooting Scene Modes
• PROGRAM AUTO • NIGHT+P0RTRAIT • MUSEUM • BEACH
• REDUCING BLUR • INDOOR • CUISINE • SNOW
• PORTRAIT • CANDLE • BEHIND GLASS •
• LANDSCAPE • SELF PORTRAIT • DOCUMENTS •
•
LANDSCAPE+PORTRAIT•AVAILABLE LIGHT PORTRAIT
• NIGHT SCENE • SUNSET •
• SPORT • FIREWORKS •
• AUCTION •
SHOOT & SELECT1
SHOOT & SELECT2
UNDER WATER WIDE1
UNDER WATER WIDE2
UNDER WATER MACRO
Macro Mode
& You can take pictures as close as 10 cm from the subject (if optical zoom is set to
maximum wide position).
% Use this mode to take pictures as close as 1 cm/0.4 in. to your subject. In % mode,
the position of the zoom lens is fixed.
1 Select [&] or [%] by repeatedly pressing X&.
If not used for approximately 2 seconds, the camera applies the current settings, and the
setting screen disappears.
Self-Timer
1 Press NY to set [Y ON].
If not used for approximately 2 seconds, the camera
applies the current settings, and the setting screen
disappears.
2 Press the shutter button fully to take the picture.
The self-timer lamp lights for approximately 10 seconds
after the shutter button is pressed, then starts blinking.
After blinking for approximately 2 seconds, the picture
is taken.
12
Self-Timer Lamp
Page 13

Flash Modes
1 Select the flash mode by repeatedly pressing Y#.
If not used for approximately 2 seconds, the camera applies the current settings, and the
setting screen disappears.
2 Press the shutter button halfway.
When the flash is set to fire, the # mark lights.
3 Press the shutter button completely to take the picture.
Flash working range:
W (max.): Approx. 0.3 to 2.6 m (1.0 to 8.5 ft.)
T (max.): Approx. 0.5 to 2.1 m (1.6 to 6.9 ft.)
Icon Flash Mode Description
No
indication
H
Auto flash The flash fires automatically in low light or backlight
Red-eye
!
reduction flash
Fill-in flash The flash fires regardless of the available light.
#
Red-eye fill-in This is a combination of the red-eye reduction flash and fill-
$ Flash off The flash does not fire even in low light conditions.
conditions.
The red-eye reduction flash mode significantly reduces this
phenomenon by emitting pre-flashes before firing the
regular flash.
in flash functions. The flash is always fired regardless of
available light and pre-flashes are fired to reduce red-eye.
En
Power Save Feature
To save battery power, the camera automatically enters the sleep mode and stops
operating after a certain period of non-operation. Operate the shutter button or
zoom lever to reactivate the camera. You can adjust the amount of time before
the camera enters sleep mode.
If the camera is not operated for 10 minutes after the camera enters sleep mode,
it automatically closes the lens cover and turns off. To resume operation, turn on
the power again.
13
Page 14

MENUS AND SETTINGS
COMPARE
& SHOOT
MULTI
-SHOT
RESET
IMAGE
QUALITY
CANCEL
MODE
MENU
WHITE
BALANCE
EXP.
COMP.
ISO
IMAGE
STABI-
LIZER
COMPARE
& SHOOT
RESET
IMAGE
QUALITY
CANCEL
MODE
MENU
WHITE
BALANCE
EXP.
COMP.
ISO
CANCEL
ALBUM
CALENDAR
ERASE
SLIDE
SHOW
COMPOSE
IMAGE
ADJUST
IMAGE
EDIT
IMAGE
MODE
MENU
MOVIE
PLAY
INDEX
PLAY
EDIT
CANCEL
ALBUM
CALENDAR
ERASE
SLIDE
SHOW
MODE
MENU
CANCEL
UNDO
ENTRY
ROTATION
PROTECT
ALBUM
MENU
CLOSE
ALBUM
SEL.
ALBUM
SELECT
TITLE
IMAGE
SLIDE
SHOW
MOVIE
PLAY
INDEX
PLAY
CANCEL
UNDO
ENTRY
PROTECT
ALBUM
MENU
CLOSE
ALBUM
SEL.
ALBUM
SLIDE
SHOW
Top Menu
1 Press Z to display the camera’s menu on the
monitor.
2 Use the arrow pad (O/N/X/Y) and Z to navigate
and select menu items.
For explanation of each function, refer to the “Advanced
En
Manual”.
For shooting still pictures For shooting movies
COMPARE
& SHOOT
IMAGE
QUALITY
WHITE
BALANCE
For playing back still pictures For playing back movies
COMPOSE
IMAGE
ALBUM
SLIDE
SHOW
For playing back still picture albums
SEL.
ALBUM
CLOSE
ALBUM
SLIDE
SHOW
14
MULTI
-SHOT
CANCEL
EXP.
COMP.
ADJUST
IMAGE
CANCEL
CALENDAR
SELECT
TITLE
IMAGE
CANCEL
ROTATION
RESET
MODE
MENU
ISO
EDIT
IMAGE
MODE
MENU
ERASE
UNDO
ENTRY
ALBUM
MENU
PROTECT
COMPARE
& SHOOT
IMAGE
QUALITY
WHITE
BALANCE
INDEX
PLAY
ALBUM
SLIDE
SHOW
For playing back movie albums
SEL.
ALBUM
CLOSE
ALBUM
SLIDE
SHOW
IMAGE
STABILIZER
CANCEL
EXP.
COMP.
MOVIE
PLAY
CANCEL
CALENDAR
MOVIE
PLAY
CANCEL
INDEX
PLAY
RESET
MODE
MENU
ISO
EDIT
MODE
MENU
ERASE
UNDO
ENTRY
ALBUM
MENU
PROTECT
Page 15

Erase All Pictures
1 While in playback mode, Press Z and select
[ERASE] > [ALL ERASE].
2 Select [YES] and press Z.
All the pictures are erased.
ALL ERASE
CAUTION ERASING ALL
YES
NO
SELECT
GO
OK
Select a Language
You can select a language for on-screen display. Available languages vary depending
on the area where you purchased this camera.
1 Press Z to display the top menu, and select
[MODE MENU] > [SETUP] > [W].
2 Select a language and press Z.
SELECT
ENGLISH
FRANCAIS
ESPAÑOL
PORTUGUES
GO
OK
En
15
Page 16

Monitor Symbols & Icons
+2.0
ISO
400
6M
00:36
+2.0
(Monitor – Shooting Mode
1 2
3
4
5
6
7
ISO
+2.0
400
15
16
17
8
18
19
44
En
10
9
6M
1211 1413
Items Indications
1 Shooting modes W, B, F, D, G, U, C, etc.
2 Exposure compensation -2.0 – +2.0
3 Battery check e = full power, f = low power
4 Green lamp { = Auto Focus Lock
Flash standby # (Lit)
5
Camera movement warning
Flash charge
Macro mode
6
Super macro mode
Drive
7
Camera movement compensation
8 Flash mode !, #, H, $
9 Recording sound R
10 Self-timer Y
11 Dual time l
12 Record mode B 6M, f 2M, F, etc.
13 AF target mark [ ]
Number of storable still pictures
14
Remaining recording time
15 Spot metering
16 ISO ISO 64, ISO 100, ISO 400, etc.
17 White balance 5, 3, 1, >
18 Current memory [IN] (internal memory), [xD] (card)
19 Memory gauge a, b, c, d (maximum reached)
# (Blinks)
&
%
o, j, V
h
4
00:36
5
1 2
3
4
6
7
8
9
9
10
11
12
MovieStill picture
+2.0
00:36
00:36
1413
17
18
16
Page 17

(Monitor – Playback mode
10
12
30
ISO
400
2816
2112
SIZE
100
0004
10
6M
100
0004
00
00
36
640
480
SIZE
12
30
10
1 2 34
10
100
SIZE
’0505.
-
0004
:
2816
1010.
8
Still picture
2626 12
10
×
ISO
2112
2.0
+
400
:
65
6M
30
4
7
9
10
11
12
13
14
0004
640
2626 12
:
0000 /
4 651
7
9
480
×
11
:
30
13
:
00
36
14
2 3
10
-
100
8
SIZE
’0505.
:
1010.
00
Movie
Items Indications
1 Battery check
= full power, f = low power
e
2 Album -
3 Current memory [IN] (internal memory), [xD] (card)
Print reservation/Number of prints
4
Movie
<×10
n
5 Sound record H
6 Protect 9
7 Record mode B 6M, f 2M, F, etc.
8 File number M100-0004
9 Image size 2816 × 2112, 1600 × 1200, 640 × 480, etc.
10 Exposure compensation -2.0 – +2.0
11 White balance WB AUTO, 5, 3, 1, >
12 ISO ISO 64, ISO 100, ISO 400, etc.
13 Date and time ’05.10.26 12:30
Number of frames
14
Elapsed time/Total recording time
4
00:00/00:36
Thumbnail (Index) Display
This function lets you show several pictures at the same time on the monitor when
reviewing pictures.
1 Turn the zoom lever twice to the W.
Use the arrow pad (O/N/X/Y) to select a picture and
press Z to display it in single frame playback.
Turn tne zoom lever to change the index to 4, 9, 16 or
25 frames.
Index display
En
17
Page 18

CONNECTING THE CAMERA
Playback on a TV
Use the AV cable provided with the camera to playback recorded images on your TV.
Both still pictures and movies can be played back.
1 Make sure that the TV and camera are turned off. Connect the multi-connector
on the camera to the video and audio input terminals on the TV using the
En
provided AV cable.
Multi-connector
AV cable
2 Turn the TV on and set it to the video input mode.
For details of switching to video input, refer to your TV’s instruction manual.
3 Set the mode dial to q and press the o button to turn the camera on.
The last picture taken is displayed on the TV. Use the arrow pad (O/N/X/Y) to select
the picture you want to display.
Connector cover
Pull the connector cover
forward and then turn it.
Connect to the TV’s video
input (yellow) and audio
input (white) terminals.
18
Page 19

Direct Printing (PictBridge)
Using the provided USB cable, you may connect your camera directly to a PictBridge
compatible printer such as the Olympus P-11 to make prints. You can print a picture
with simple operations.
1 In playback mode, display the picture you want to print out on the monitor.
2 Connect one end of the provided USB cable into the camera’s multi-connector
and the other end into the printer’s USB connector.
Connector cover
Multi-Connector
USB Cable< Button
3 Turn on the printer’s power.
4 Press the < button.
Printing starts.
Do not disconnect the USB cable while printing
pictures.
Pull the connector cover
forward and then turn it.
En
EASY PRINT START
PC / CUSTOM PRINT
OK
19
Page 20

OLYMPUS Master SOFTWARE
OLYMPUS Master Software: Use this software to download
pictures from the camera, view, organize, retouch, e-mail and
print your digital pictures and movies and more! This CD also
contains the complete software reference manual in Adobe
Acrobat (PDF) format.
(System Requirements
En
OS Windows 98SE/Me/2000 Professional/XP or Mac OS X (10.2 or later)
CPU Pentium III 500 MHz/Power PC G3, or faster
RAM 128 MB or more (256 MB or more recommended)
Hard Disk 300 MB or more free space
Connection USB port
Monitor 1024 × 768 pixels resolution or more with minimum 65,536 colors
For the latest support information, visit the Olympus website
(http://www.olympus.com/digital)
(Upgrade (OLYMPUS Master Plus)
In addition to the functions in OLYMPUS Master, the OLYMPUS Master Plus features
movie editing, album printing, contact sheet printing, HTML album, free stitch
panorama, CD/DVD writing functions, and a lot more, allowing you to greatly expand
your digital photograph capabilities.
You can upgrade your software to OLYMPUS Master Plus via the Internet.
You need to have OLYMPUS Master installed in a computer with an Internet
connection.
(Windows), 32,000 colors (Macintosh)
User Registration
Register your camera when you install OLYMPUS Master to activate your
warranty, receive notifications of software and camera firmware updates, and
more.
20
Page 21

SPECIFICATIONS
(Camera
Product type : Digital camera (for shooting and displaying)
Recording system
Still pictures : Digital recording, JPEG (in accordance with Design rule for
Applicable
standards
Sound with still
pictures
Movie : QuickTime Motion JPEG
Memory : Internal memory
No. of storable pictures
<Still pictures (Without sound)>
Record mode Image size
B SUPER HIGH6M
e HIGH 4M 2288 × 1712 9 15
f HIGH 2M 1600 × 1200 15 24
L BASIC 1M 1024 × 768 36 58
E E-MAIL VGA 640 × 480 57 90
<Movie (Without sound)>
Record mode Image size
F FINE
F STANDARD
G EXTENDED
No. of effective pixels : 6,000,000 pixels
Image pickup device : 1/2.5" CCD (primary color filter), 6,180,000 pixels (gross)
Lens : Olympus lens 6.3 to 18.9 mm, f3.3 to 4.0
Photometric system : Digital ESP metering, spot metering system
Shutter speed : 4 to 1/2000 sec.
Shooting range :
Camera File system (DCF))
: Exif 2.2, Digital Print Order Format (DPOF), PRINT Image
Matching III, PictBridge
: Wave format
xD-Picture Card (16 MB to 1GB)
Number of storable
still pictures
(when using the
2816 × 2112 6 10
640 × 480
(30 frames/sec.)
320 × 240
(30 frames/sec.)
160 × 120
(30 frames/sec.)
(equivalent to 38 to 114 mm on a 35 mm camera)
0.3 m (1.0 ft.) to ) (W)
0.6 m (2.0 ft.) to ) (T) (normal)
0.1 m (0.3 ft.) to ) (W)
0.5 m (1.6 ft.) to ) (T) (macro mode)
0.01 m (0.4 in.) to ) (zoom lock) (super macro mode)
internal memory)
Remaining recording time
(when using the internal
memory)
5 sec. 8 sec.
15 sec. 24 sec.
66 sec. 105 sec.
Number of storable
still pictures
(when using a 16 MB
xD-Picture Card)
Remaining recording time
(when using a 16 MB xD-
Picture Card)
En
21
Page 22

Monitor : 3" TFT color LCD display, 230,000 pixels
Outer connector : DC-IN jack
Automatic calendar system
Operating environment
Temperature : 0°C to 40°C (32°F to 104°F) (operation)/
Humidity : 30% to 90% (operation)/10% to 90% (storage)
Power supply :
Dimensions :
Weight : Approx. 140 g (4.9 oz) (without battery and card)
(Lithium ion battery (LI-40B)
En
Product type : Lithium ion rechargeable battery
Standard voltage : DC 3.7 V
Standard capacity : 660 mAh
Battery life : Approx. 300 full recharges (varies on usage)
Operating environment
Temperature : 0°C to 40°C (32°F to 104°F) (charging)/
Dimensions : 31.5 × 39.5 × 6 mm (1.2 × 1.6 × 0.2 in.)
Weight : Approx. 15 g (0.5 oz)
USB connector/AV OUT jack (multi-connector)
: 2000 up to 2099
-20°C to 60°C (-4°F to 140°F) (storage)
One Olympus lithium ion battery (LI-40B) or Olympus AC adapter
97.5 mm (W) × 56.5 mm (H) × 24.5 mm (D)
(3.8 × 2.2 × 1.0 in.) (excluding protrusions)
0°C to 60°C (32°F to 140°F) (operation)/
-20°C to 35°C (-4°F to 95°F) (storage)
(AC adapter (S-D-1AC)
Power requirements : AC 100 to 240 V (50 to 60 Hz)
Output : DC 5 V, 2A
Charging time : Approx. 120 min.
Operating environment
Temperature : 0°C to 40°C (32°F to 104°F) (operation)/
Dimensions : 46 × 26 × 68 mm (1.8 × 1.0 × 2.7 in.)
Weight : Approx. 165 g (5.8 oz)
9 VA (100 V) to 16 VA (240 V)
-20°C to 60°C (-4°F to 140°F) (storage)
Design and specifications subject to change without notice.
22
Page 23

SAFETY PRECAUTIONS
CAUTION
RISK OF ELECTRIC SHOCK
DO NOT OPEN
CAUTION: TO REDUCE THE RISK OF ELECTRICAL SHOCK, DO NOT
REMOVE COVER (OR BACK). NO USER-SERVICEABLE PARTS INSIDE.
REFER SERVICING TO QUALIFIED OLYMPUS SERVICE PERSONNEL.
An exclamation mark enclosed in a triangle alerts you to important operating and
maintenance instructions in the documentation provided with the product.
DANGER
WARNINGS
CAUTION
WARNING!
TO AVOID THE RISK OF FIRE OR ELECTRICAL SHOCK, NEVER DISASSEMBLE, EXPOSE THIS PRODUCT TO WATER
OR OPERATE IN A HIGH HUMIDITY ENVIRONMENT.
If the product is used without observing the information given under this symbol, serio us
injury or death may result.
If the product is used without observing the information given under this symbol , injury or
death may result.
If the product is used without observing the information given under this sym bol, minor
personal injury, damage to the equipment, or loss of valuable data may result.
General Precautions
Read All Instructions — Before you use the product, read all operating instructions.
Save all manuals and documentation for future reference.
Cleaning — Always unplug this product from the wall outlet before cleaning. Use
only a damp cloth for cleaning. Never use any type of liquid or aerosol cleaner, or
any type of organic solvent to clean this product.
Attachments — For your safety, and to avoid damaging the product, use only
accessories recommended by Olympus.
Water and Moisture — For precautions on products with weatherproof designs,
read the weatherproofing sections.
Location — To avoid damage to the product, mount the product securely on a stable
tripod, stand, or bracket.
Power Source — Connect this product only to the power source described on the
product label.
Lightning — If a lightning storm occurs while using an AC adapter, remove it from
the wall outlet immediately.
Foreign Objects — To avoid personal injury, never insert a metal object into the
product.
Heat — Never use or store this product near any heat source such as a radiator, heat
register, stove, or any type of equipment or appliance that generates heat,
including stereo amplifiers.
En
23
Page 24

SAFETY PRECAUTIONS
Handling the Camera
WARNING
( Do not use the camera near flammable or explosive gases.
( Do not use the flash on people (infants, small children, etc.) at
close range.
• You must be at least 1 m (3 ft.) away from the faces of your subjects. Firing the
flash too close to the subject’s eyes could cause a momentary loss of vision.
( Keep young children and infants away from the camera.
En
• Always use and store the camera out of the reach of young children and
infants to prevent the following dangerous situations which could cause
serious injury:
• Becoming entangled in the camera strap, causing strangulation.
• Swallowing the battery, xD-Picture Card or other small parts.
• Accidentally firing the flash into their own eyes or those of another child.
• Accidentally being injured by the moving parts of the camera.
( Do not look at the sun or strong lights with the camera.
( Do not use or store the camera in dusty or humid places.
( Do not cover the flash with a hand while firing.
CAUTION
( Stop using the camera immediately if you notice any unusual
odors, noise, or smoke around it.
• Never remove the batteries with bare hands, which may cause a fire or burn
your hands.
( Never hold or operate the camera with wet hands.
( Do not leave the camera in places where it may be subject to
extremely high temperatures.
• Doing so may cause parts to deteriorate and, in some circumstances, cause the
camera to catch fire. Do not use the charger or AC adapter if it is covered (such
as a blanket). This could cause overheating, resulting in fire.
( Handle the camera with care to avoid getting a low-temperature
burn.
• When the camera contains metal parts, overheating can result in a lowtemperature burn. Pay attention to the following:
• When used for a long period, the camera will get hot. If you hold on to the
camera in this state, a low-temperature burn may be caused.
• In places subject to extremely cold temperatures, the temperature of the
camera’s body may be lower than the environmental temperature. If
possible, wear gloves when handling the camera in cold temperatures.
( Be careful with the strap.
• Be careful with the strap when you carry the camera. It could easily catch on
stray objects - and cause serious damage.
24
Page 25

SAFETY PRECAUTIONS
Battery Handling Precautions
Follow these important guidelines to prevent batteries from leaking,
overheating, burning, exploding, or causing electrical shocks or burns.
DANGER
• The camera uses a lithium ion battery specified by Olympus. Charge the battery
with the specified charger. Do not use any other chargers.
• Never heat or incinerate batteries.
• Take precautions when carrying or storing batteries to prevent them from coming
into contact with any metal objects such as jewelry, pins, fasteners, etc.
• Never store batteries where they will be exposed to direct sunlight, or subjected to
high temperatures in a hot vehicle, near a heat source, etc.
• To prevent causing battery leaks or damaging their terminals, carefully follow all
instructions regarding the use of batteries. Never attempt to disassemble a battery
or modify it in any way, by soldering, etc.
• If battery fluid gets into your eyes, flush your eyes immediately with clear, cold
running water and seek medical attention immediately.
• Always store batteries out of the reach of small children. If a child accidentally
swallows a battery, seek medical attention immediately.
WARNING
• Keep batteries dry at all times.
• To prevent batteries from leaking, overheating, or causing a fire or explosion, use
only batteries recommended for use with this product.
• Insert the battery carefully as described in the operating instructions.
• If rechargeable batteries have not been recharged within the specified time, stop
charging them and do not use them.
• Do not use a battery if it is cracked or broken.
• If a battery leaks, becomes discolored or deformed, or becomes abnormal in any
other way during operation, stop using the camera.
• If a battery leaks fluid onto your clothing or skin, remove the clothing and flush the
affected area with clean, running cold water immediately. If the fluid burns your
skin, seek medical attention immediately.
• Never subject batteries to strong shocks or continuous vibration.
CAUTION
• Before loading, always inspect the battery carefully for leaks, discoloration,
warping, or any other abnormality.
• The battery may become hot during prolonged use. To avoid minor burns, do not
remove it immediately after using the camera.
• Always unload the battery from the camera before storing the camera for a long
period.
En
25
Page 26

For customers in North and South America
For customers in USA
Declaration of Conformity
Model Number : SP-700
Trade Name : OLYMPUS
Responsible Party :
Address : Two Corporate Center Drive, P.O. Box 9058, Melville, NY
Telephone Number : 1-631-844-5000
Tested To Comply With FCC Standards
FOR HOME OR OFFICE USE
Th is dev ice co mplie s with Part 1 5 of th e FC C rules. Operation is subject to the following two
conditions:
(1)This device may not cause harmful interference.
En
(2)This device must accept any interference received, including interference that may cause
undesired operation.
For customers in Canada
This Class B digital apparatus meets all requirements of the Canadian Interference-Causing
Equipment Regulations.
11747-9058 U.S.A.
Trademarks
• IBM is a registered trademark of International Business Machines Corporation.
• Microsoft and Windows are registered trademarks of Microsoft Corporation.
• Macintosh is a trademark of Apple Computer Inc.
• xD-Picture Card™ is a trademark.
• All other company and product names are registered trademarks and/or
trademarks of their respective owners.
• The standards for camera file systems referred to in this manual are the “Design
Rule for Camera File System/DCF” standards stipulated by the Japan Electronics
and Information Technology Industries Association (JEITA).
26
Page 27

Memo
27
 Loading...