

CS1132000000
–
A0702
EN INSTRUCTIONS 2
FR MODE D’EMPLOI
25
ES INSTRUCCIONES
49
PO INSTRUÇÕES
73
CH
97
KR
121
2 3
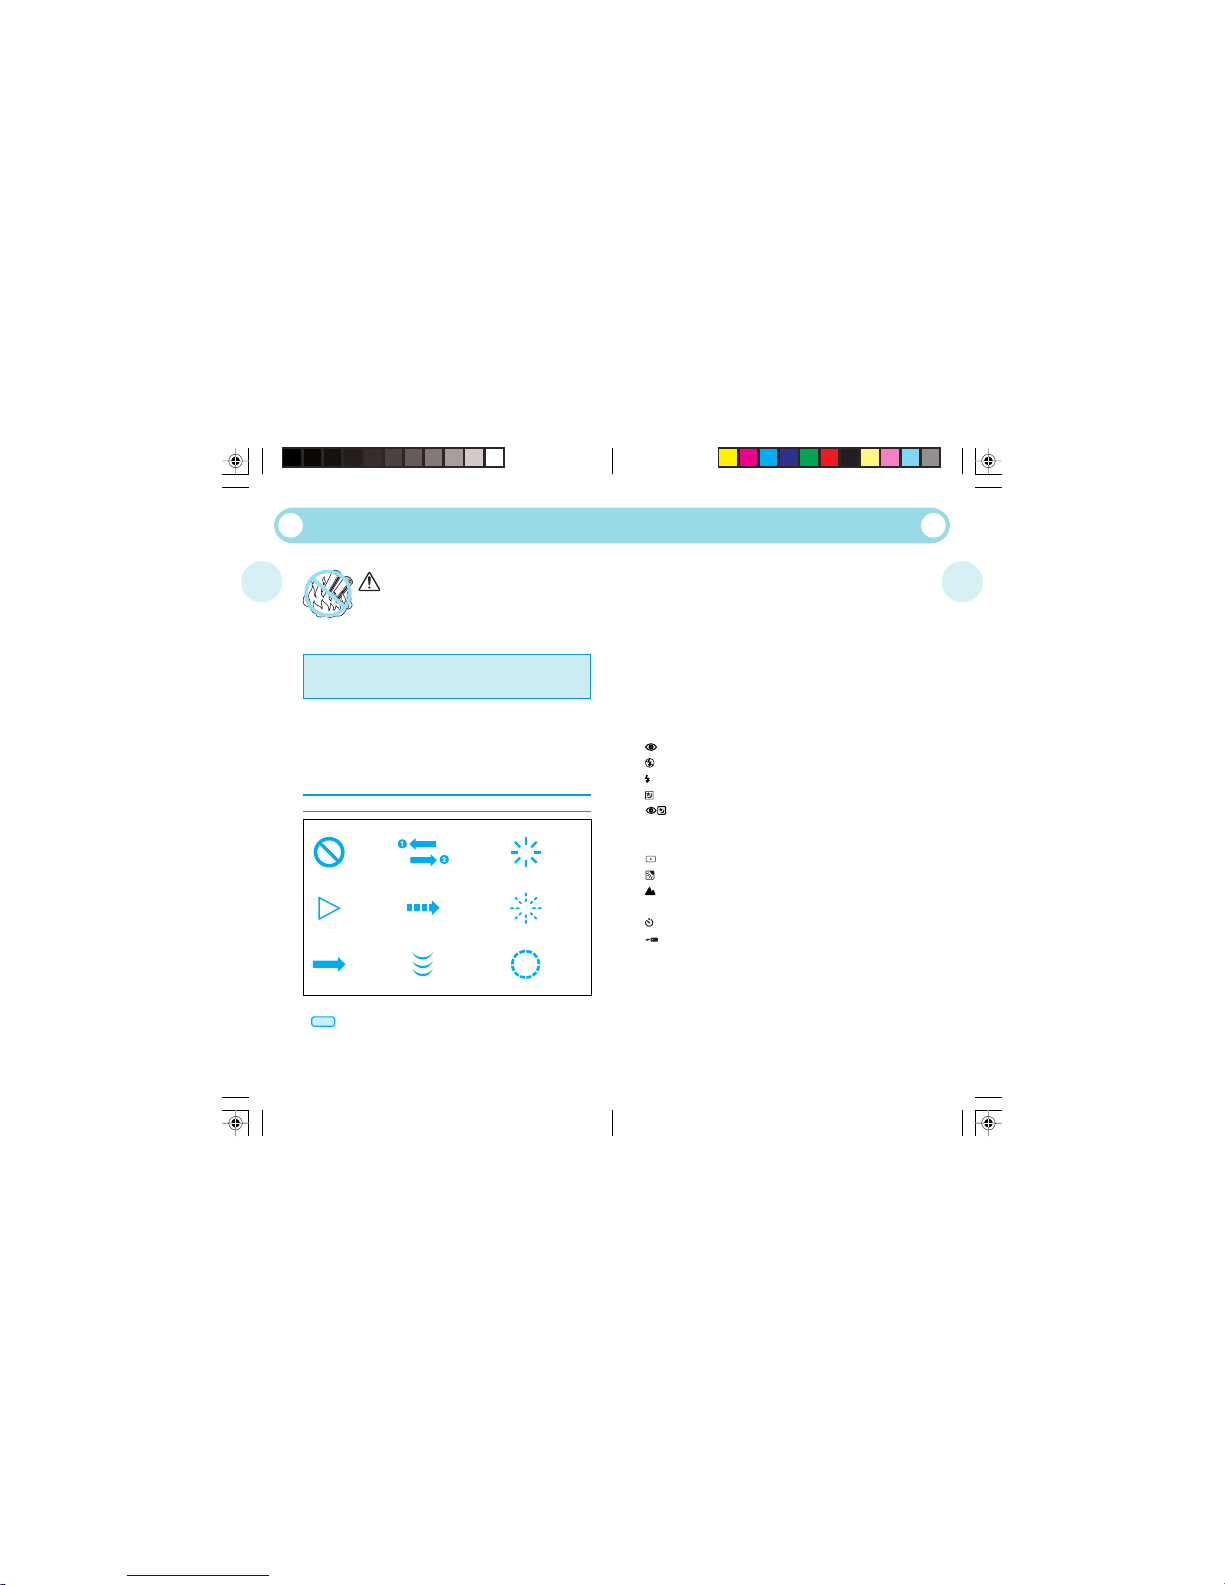
WARNING
Read this manual carefully before using your camera.
Indicates circumstances under which mishandling
resulting from ignoring this symbol could result in
personal injury or property damage.
KEEP THE BATTERIES AWAY FROM FIRE. NEVER TRY TO
DISASSEMBLE, RECHARGE, OR SHORT-CIRCUIT BATTERIES.
KEEP THE BATTERIES OUT OF THE REACH OF CHILDREN. IF A
CHILD SWALLOWS A BATTERY, CONTACT A DOCTOR
IMMEDIATELY.
NEVER ATTEMPT TO DISASSEMBLE THE CAMERA; IT CONTAINS A
HIGH-VOLTAGE CIRCUIT. IF THE INTERNAL PARTS OF THE CAMERA
ARE EXPOSED DUE TO DROPPING OR DAMAGE, REMOVE THE
BATTERIES IMMEDIATELY TO PREVENT FURTHER USAGE.
IN CASE OF MALFUNCTION, CONSULT YOUR NEAREST OLYMPUS
DEALER OR OLYMPUS SERVICE CENTER.
Symbols used in this manual:
Incorrect
Manual
operation
Operation
order
Automatic
operation
Order
Attention
Indicator
on
Indicator
blinking
Depress
halfway
앫 Pay particular attention to items in this manual enclosed in boxes
.
앫 Products shown in pictures and illustrations may be slightly different
from the actual unit.
Names of parts
Camera body ...................................................................... 4
Viewfinder display/LCD panel ............................................. 5
Using the strap ....................................................................... 6
Loading and checking the battery ........................................... 6
Loading the film ..................................................................... 7
Taking pictures ....................................................................... 8
After shooting ....................................................................... 10
Unloading the film ................................................................ 10
Flash photography
Setting the flash mode ..................................................... 11
Auto Flash ........................................................................ 12
Red-Eye Reduction Flash ............................................ 12
Flash-Off ...................................................................... 13
Fill-In Flash .................................................................... 13
Night Scene Flash ........................................................ 14
Red-Eye Reduction Night Scene Flash ..................... 14
Exposure modes
Setting the exposure mode .............................................. 15
Spot Metering ............................................................. 15
Backlight Compensation .............................................. 16
Infinity ......................................................................... 16
Using the selftimer/remote control
Selftimer ....................................................................... 17
Remote control (Optional) .......................................... 17
RC-300C (Optional) .............................................................. 18
Correcting the date and time (Quartzdate models only) ........ 19
Printing the date/time (Quartzdate models only) ................. 20
Care and storage .................................................................. 21
Specifications ....................................................................... 22
CONTENTS

4 5
Lights
Blinks
Blinks
rapidly
You can shoot
You can’t
shoot
You can shoot
while using
caution
The subject is in focus. Press the shutter
release button all the way to take the picture.
The subject is not in focus. The shutter will not
release even if you press the shutter release
button all the way.
The subject is difficult for the autofocus to lock
on. Although the shutter releases, the subject
may be out of focus.
Goes out
Lights
Blinks
You can shoot
You can shoot
You can’t
shoot
The flash doesn’t fire, and the shutter releases.
The flash fires, and the shutter releases.
The flash is being recharged. The shutter
doesn’t release.
NAMES OF PARTS — Camera Body
NAMES OF PARTS — Viewfinder Display/LCD Panel
LCD panel
Zoom lever
Shutter release button
Light sensor夡 Viewfinder
Autofocus window夡
Flash夡
Lens夡
Lens barrier
Selftimer/remote
control indicator
Remote control
sensor
Strap eyelet
夡Always tr y to keep this clean. Dirt and stains can
result in pictures that are unclear and out-of-focus.
Wipe off any dirt or stains with a soft cloth.
Back cover release
Orange lamp
Green lamp
Viewfinder
Date MODE and SET buttons
(Quartzdate models only)
Film window
Battery compartment cover
Mid-roll rewind
button
Tripod socket
Exposure mode
button
Flash mode button
Selftimer/remote control button
Back cover
Viewfinder Display
Autofocus marks
Spot marks
Close-up correction marks
Green lamp
Orange lamp
Orange lamp
Green lamp
3 Date/time indicator
(Quartzdate models only)
4 Spot Metering
5 Backlight Compensation
6 Infinity
7 Night Scene Flash
8 Flash-Off
9 Fill-In Flash
0 Red-Eye Reduction Flash
! Selftimer
@ Exposure counter
LCD Panel
1 Battery check
2 Remote Control
1
23 45
6
7
890!@
Note: Not all indicators are displayed as shown in actual use.
6 7
Battery is OK. You can shoot
.
Battery is low and will need
to replace within the next few
photos.
Battery is dead and must be
replaced with a new one
immediately.
lights (turns off
automatically).
blinks and other
indicators are displayed
normally.
blinks and other
indicators go out.
1
2
3
1
2
USING THE STRAP
Attach the strap as shown.
LOADING AND CHECKING THE BATTERY
Use one 3 V lithium battery (CR2).
1. Slide the back cover release upward
to open the back cover.
Do not touch the inside of the
camera, especially the lens.
2. Insert the film cartridge until it
clicks into position.
ISO400 film is recommended. If you
are going to use non-DX-coded film,
use ISO100 film.
LOADING THE FILM
3. Position the end of the film leader
ahead of the line pointed to with the
arrow (A), and align the edge of the
perforated section (B) with (C).
Make sure that the film is
positioned correctly between the
positioning guides (D). Then close
the back cover until it clicks. Make
sure the back cover release has
returned to the lower position.
The film automatically advances to
the first frame.
Correct
Incorrect
4. Open the lens barrier until it clicks.
Make sure the exposure counter on
the LCD panel reads “
”.
If “
” blinks, reload the film.
3
1. While pressing the bottom of the
battery compartment cover
1, lift
it as indicated to open
2.
Make sure the lens barrier is closed
before opening the battery
compartment cover.
2. Insert the battery correctly
1.
Close the battery compartment
cover
2.
A new battery lasts for about 10 rolls
of film.
3. Slide the lens barrier as indicated
1 until it clicks. Check the battery
power as noted on the LCD panel.
4

8 9
1
2
3
Autofocus marks
Wide Multi-Autofocus System
Close-up Correction
Picture area
Close-up correction marks
Picture area
1. Open the lens barrier until it clicks.
The lens will extend slightly and the
LCD panel and viewfinder will turn
on. Compose your shot. Push the
zoom lever to the “T” side for
telephoto (105mm) or to the “W”
side for wide angle (38mm).
After about 4 minutes and 30
seconds of inactivity, the lens retracts
and the LCD panel goes out.
2. Position the autofocus marks on
your subject.
Do not look at the sun or other
strong light sources through
the viewfinder.
3. Press the shutter release button
halfway to focus on the subject.
After making sure that the green
lamp lights, press the shutter
release button all the way to take the
picture. After the shutter is released,
the film automatically advances to
the next frame.
TAKING PICTURES
This camera uses a wide multiautofocus system that makes it easier
for the focus to lock on the subject
even if it’s not in the center of the
frame.
Working Distance
The distance to your subject is 0.8 m (2.6 ft) to infinity at 38 mm wide
angle and 0.6 m (2.0 ft) to infinity at other focal lengths.
앫 If the green indicator blinks, the shutter cannot be released.
앫 Although the shutter will release when a subject is extremely close to
the camera , the subject will be out of focus.
앫 In some cases, the autofocus may be unable to lock onto a subject.
At 0.6 m (2.0 ft) camera-to-subject
distance
At other camera-to-subject
distance
The picture area moves down so that it is inside the close-up correction
marks in the viewfinder when the distance to your subject is 0.6 m (2.0 ft).

10 11
Mode display
Flash mode Function
No
display
FLASH PHOTOGRAPHY
Setting the Flash Mode
This camera has six flash modes. Choose the mode best
suited to the photographic conditions and your requirements.
How to select the mode
Press the flash mode button ( ). The
mode switches in the order shown
below. The selected mode is displayed
on the LCD panel.
앫 Do not fire the flash right in front of the eyes of people and
animals.
앫 Do not point the camera at a motorist and fire the flash.
To rewind the film before the end of the roll
UNLOADING THE FILM
1
12
Slide the lens barrier cover slightly
towards direction
1. The lens will
automatically start retracting, and the
LCD panel will turn off. Make sure the
lens has completely retracted; then
close the lens barrier all the way.
AFTER SHOOTING
The camera automatically rewinds the film when you reach the end of a
roll. Make sure the motor has stopped and that “
” is blinking 1; then
open the back cover to remove the film
2.
Press the mid-roll rewind button with
the protrusion on the strap buckle. Do
not use an instrument with a sharp tip.
Strap buckle
Automatically fires in the dark, with
backlighting, or under fluorescent
lighting.
Significantly reduces the phenomenon
of “red-eye” (when a subject’s eyes
appear red in flash photography).
Use this when you want to prevent the
flash from firing.
Fires regardless of available light.
Use this to take pictures of a subject
with a night scene in the background.
Use a tripod to prevent camera shake.
Use this to take pictures of people
with a night scene background while
reducing “red-eye.”
Use a tripod to prevent camera shake.
Auto Flash
Red-Eye
Reduction
Flash
Flash-Off
Fill-In
Night Scene
Flash
Red-Eye
Reduction
Night Scene
Flash

12 13
FLASH PHOTOGRAPHY
Flash-Off
FLASH PHOTOGRAPHY
Fill-In Flash
Use this mode in situations where flash photography is not
desired or is prohibited and in twilight or night scenes.
Closing the lens barrier restores the Auto Flash mode.
앫 Since a slow shutter speed (as low as 2 seconds) is selected, use a
tripod to prevent camera shake.
앫 Have your subject stay still; otherwise, blurring may result.
Use this mode to compensate for a shadow cast on the
subject’s face or to shoot in backlit conditions or under
fluorescent light.
ISO Wide angle (W) Telephoto (T)
100 0.8 to 3.2 m (2.6 to 10.5 ft) 0.6 to 1.6 m (2.0 to 5.2 ft)
200 0.8 to 4.5 m (2.6 to 14.8 ft) 0.6 to 2.3 m (2.0 to 7.5 ft)
400 0.8 to 6.4 m (2.6 to 21.0 ft) 0.6 to 3.2 m (2.0 to 10.5 ft)
Flash working range (with color negative film)
Eyes appear red.
FLASH PHOTOGRAPHY
Auto Flash
1. Press the shutter release
button to make sure the
orange lamp lights.
2. Press the shutter release
button all the way to take
the picture.
FLASH PHOTOGRAPHY
Red-Eye Reduction Flash
A series of low-power pre-flashes before the main flash
accustoms the subject’s eyes to the light and helps prevent
their eyes from appearing red in a photograph.
앫
Hold the camera securely. It takes about 1 second until the shutter releases.
앫
Red-eye reduction may not be effective when the subject:
1. Is not looking at the flash from right in front.
2. Is not watching the pre-flashes.
3. Is too far from the camera.
The effectiveness of red-eye reduction varies depending on the individual
characteristics of each subject.
Note: When reversal film is used, the working range at the telephoto
side will be reduced by about 30%.
1 2
Closing the lens barrier restores the Auto Flash mode.
앫 Make sure your subject is within the flash working range (p.12).
앫 Fill-in flash becomes ineffective in extremely bright conditions.

14 15
Mode display Exposure mode
Function
Spot marks
Use this mode in ordinary situations.
To precisely set the focus and
exposure for each subject.
To shoot a backlit subject.
To shoot scenery through a window.
Auto
Exposure
Spot
Metering
Backlight
Compensation
Infinity
No
display
EXPOSURE MODES
Setting the Exposure Mode
This camera has four exposure modes. Choose the mode
that best suits the conditions and your requirements.
How to select the mode
Press the flash exposure button
(
). The mode switches in the order
shown below. The selected mode is
displayed on the LCD panel.
Press the shutter release button
halfway; the green lamp lights and the
focus and exposure are locked on that
area. Reframe your subject and press
the shutter release button all the way.
Spot Metering
Position the spot marks on the area where you want to
measure the light.
Closing the lens barrier restores the Auto Exposure mode.
FLASH PHOTOGRAPHY
Night Scene Flash
FLASH PHOTOGRAPHY
Red-Eye Reduction Night Scene Flash
Use this mode to clearly shoot a subject in the foreground
and a night scene in the background.
Closing the lens barrier restores the Auto Flash mode.
앫 Since a slow shutter speed (as low as 4 seconds) is selected both
in the Night Scene Flash and Red-Eye Reduction Night Scene Flash
modes, use a tripod to prevent camera shake.
앫 This mode cannot be combined with the Spot Metering mode.
Closing the lens barrier restores the Auto Flash mode.
앫 Since a slow shutter speed (as low as 4 seconds) is selected both
in the Night Scene Flash and Red-Eye Reduction Night Scene Flash
modes, use a tripod to prevent camera shake.
앫 This mode cannot be combined with the Spot Metering mode.
Use this mode to take pictures of people with a night scene
background while reducing “red-eye.” Except for the preflashes, this mode is the same as the Night Scene Flash mode.

16 17
5m (16.4 ft)
3.5m (11.5 ft)
30˚
20˚
Selftimer
Secure the camera on a tripod or other support. Compose your shot in
the viewfinder. Press the shutter release button halfway (the focus and
exposure are locked at this time). Then press the shutter release button
all the way. The selftimer indicator lights for about 10 seconds and then
blinks for about 2 seconds. After this, the shutter will release.
Compose your shot in the viewfinder.
Position the autofocus frame on your
subject. To take a picture, point the
remote control at the camera and
press the button on the remote
control. The selftimer/remote control
indicator starts blinking, and the
shutter will release about 3 seconds
later.
Remote Control (Optional)
USING THE SELFTIMER/REMOTE CONTROL
Exposure is compensated to +1.5 EV
overexposure to normal.
Backlight Compensation
This mode is useful when your subject is backlit or when
there is a white background (such as a snow-covered
landscape) behind your subject. The foreground will also be
rendered brightly.
Closing the lens barrier restores the Auto Exposure mode.
Infinity
The camera automatically sets the working distance at infinity.
The flash does not fire except in the
Fill-In Flash mode.
Closing the lens barrier restores the Auto Exposure mode.
Mode display Mode
No display
————————
Selftimer
Remote Control
How to select the mode
Press the selftimer/remote control
button (
). The mode switches in
the order shown below. The selected
mode is displayed on the LCD panel.

18 19
1
2
3
4
5
1. Keep the MODE button pressed
until the “year” indicator starts
blinking.
Be sure to correct the date and time after the batteries have
been inserted or replaced.
2. Press the SET button to adjust the
“year” indicator. If you press the
button once, the number on the
display will advance by 1. If you
keep the button pressed, the
numbers will run in rapid
succession. If you pass the
intended number, keep pressing to
return to that number.
3. Press the MODE button once more
to make the “month” indicator
blink. Press the SET button to
adjust the “month” indicator. As
you press the MODE button, the
blinking indicator changes in the
order of “year”, “month”, “day”,
“hour” and “minute”.
4. Repeat Steps 2 and 3 to set “hour”
and “minute”. Make sure the
“minute” indicator is blinking.
5. When “minute” has been set, press
the MODE button. None of the
indicators will be blinking and date/
time correction is now complete.
CORRECTING THE DATE AND TIME
(Quartzdate models only)
1
2
3
R
E
M
O
T
E
C
O
N
T
R
O
L
R
C
-3
0
0
C
1. Turn the screw on the bottom of the
remote control counterclockwise to
loosen.
If the selftimer/remote control indicator doesn’t blink even
when you press the button, replace the battery with a new
one (CR2025).
How to replace the battery of the remote control (RC-300C)
2. Turn the remote control over, and
remove the cover. With the battery
facing up, remove the old battery
and insert a new battery as shown.
3. Replace the cover, turn the remote
control over, and turn the screw on
the bottom clockwise to tighten.
RC-300C (Optional)

20 21
앫Do not leave the camera in any place exposed to excessive heat,
humidity or direct sunlight — for example, in a car or on the
beach.
앫Do not expose the camera to formalin or naphthalene.
앫If the camera gets wet, wipe it with a dry towel. The salt in
seawater can be especially damaging.
앫Do not use organic solvents such as alcohol or paint thinner
when cleaning the camera.
앫Do not leave the camera on or near a television, refrigerator or
other appliance with a magnetic field.
앫Do not expose the camera to dust or sand as this could cause
serious damage.
앫Do not shake the camera.
앫Do not apply excessive force to the zoom lens.
앫Do not expose the camera to extreme heat (over 40°C/104°F) or
to extreme cold (below –10°C/14°F). Low temperatures, even
within this range may sometimes cause deterioration in battery
performance, temporarily disabling the camera.
앫Avoid leaving the camera unused for long periods of time. This
can cause mold to grow on the camera as well as other
problems. Try to press the shutter release button and check the
operation of the camera before use.
앫Some airport X-ray machines can damage the film in your
camera. Try to avoid passing your camera through these
machines. Give it to the security officer for manual inspection.
앫Do not touch the front surface of the flash after using it
continuously over a short period as the surface may be hot.
CARE AND STORAGE
Press the MODE button. As you press it, the mode will switch in the
order shown below.
Keep the mode you want to print displayed.
First select the date/time mode you want to print.
• The date unit uses the same power source as the main unit.
• Be sure to correct the date and time after the batteries are replaced.
• The date/time is imprinted in the lower right corner of the picture.
• If the date/time is superimposed on a bright color like white,
orange, yellow, etc., it may be difficult to read.
• The date/time may not be imprinted correctly on the frame(s) after
the specified final exposure of the film.
• When black-and-white film is used, the date/time may not be
printed.
None
Year-month-day
Month-day-year
Day-month-year
Day-hour-minute
PRINTING THE DATE/TIME
(Quartzdate models only)

22 23
Flash modes: Auto Flash (automatic flash activation in low-light,
backlight and fluorescent light), Red-Eye Reduction
Flash (same as auto otherwise), Flash-Off (flash
override with shutter speed extended to 2-sec. max.),
Fill-In (forced activation), Night Scene flash (with
shutter speed extended to 4-sec. max.) and Red-Eye
Reduction Night Scene Flash (with shutter speed
extended to 4-sec. max.)
Exposure modes:
Auto Exposure, Spot Metering, Backlight Compensation
and Infinity.
Battery check: Displayed on LCD panel.
Power source: One 3 V lithium battery (CR2).
Dimensions: 101 (W) x 57 (H) x 42 (D) mm (4.0 x 2.2 x 1.7 in).
Weight: 210 g (7.4 oz) (without battery) .
Other: All-weather design.
쮿
Date Unit Specifications (Quartzdate model)
Types of data recording:
(1) None. (2) Year-month-day. (3) Month-day-year.
(4) Day-month-year. (5) Day-hour-minute.
External display of recorded data:
Continuous LCD panel display.
Automatic calendar function:
To year 2035.
쮿
Remote Control Specifications (Optional)
Remote control system:
Infrared.
Power source: One CR2025 battery.
Battery life: Approx. 5 years.
Usage: Approx. 20,000 times.
Working distance: Approx. 5 m (16.4 ft).
Dimensions: 56.5 (W) x 35.0 (H) x 6.5 (D) mm (2.2 x 1.4 x 0.3 in).
Weight: 11 g (0.4 oz) (without battery).
SPECIFICATIONS ARE SUBJECT TO CHANGE WITHOUT NOTICE OR
OBLIGATION ON THE PART OF THE MANUFACTURER. THE ACTUAL
PRODUCT MAY DIFFER FROM ONES SHOWN IN THIS MANUAL.
SPECIFICATIONS
Type: Fully automatic 35 mm autofocus lens-shutter
camera with built-in 38 ~ 105 mm zoom lens.
Film format: 35 mm standard DX-coded film (24 x 36 mm).
Lens: Olympus lens, 38 ~ 105 mm, F5.6 ~ 11.3, 8 elements
in 7 groups.
Shutter: Programmed electronic shutter.
Viewfinder: Real image zoom viewfinder [with autofocus marks,
close-up correction marks, green lamp (autofocus
indicator) and orange lamp (flash indicator)].
Focusing: Multi-wide advanced combination autofocus system
(max. 11 points). Focus lock possible. Focusing
range: 0.6 m (2.0 ft) ~ ∞ (infinity) at telephoto, 0.8 m
(2.6 ft) ~ ∞ (infinity) at wide angle.
Exposure control: Programmed automatic exposure control, 3-zone
light metering. Auto exposure range: EV3 (F5.6, 4-
sec) ~ EV16 (F10.8, 1/570-sec) at wide angle, EV5
(F11.3, 4-sec) ~ EV17 (F17, 1/430-sec) at telephoto.
Exposure counter:Progressive type displayed on LCD panel.
Selftimer: Electronic selftimer with approx. 12-sec. delay.
Remote control: Infrared remote control unit with approx. 3-sec.
delay.
Film speed range: Automatic setting with DX-coded film (ISO50, 100,
200, 400, 800, 1600 or 3200). Other intermediate
film speeds will be automatically set for next lower
speed. Non-DX-coded film is set at ISO100.
Film loading: Automatic loading. (Automatically advances to first
frame when camera back is closed.)
Film advance: Automatic film winding.
Film rewind: Automatic film rewind (automatic rewind activation at
end of film, automatic rewind stop). Rewind possible
at any point with mid-roll rewind button.
Flash: Built-in flash. Recycling time: Approx. 0.5 ~ 6.0 sec.
(at normal temperature, with new battery). Flash
working range: 0.8 ~ 3.2 m (2.6 ~10.5 ft) at wide
angle and 0.6 ~ 1.6 m (2.0 ~ 5.2 ft) at telephoto with
ISO 100 color negative film; 0.8~ 6.4 m (2.6 ~ 21.0
ft) at wide angle and 0.6 ~ 3.2 m (2.0 ~ 10.5 ft) at
telephoto with ISO400 color negative film.
 Loading...