

Olympus 120550 - Stylus 150 - Camera, m-III 150 Instructions Manual
EN INSTRUCTIONS 2
FR MODE D’EMPLOI
25
ES INSTRUCCIONES
49
PO INSTRUÇÕES
73
CH
97
KR
121
CS1374000000–
A1103
2 3
WARNING
Read this manual carefully before using your camera.
Indicates circumstances which could result in
personal injury or property damage.
KEEP THE BATTERIES AWAY FROM FIRE. NEVER TRY TO
DISASSEMBLE, RECHARGE, OR SHORT-CIRCUIT BATTERIES.
KEEP THE BATTERIES OUT OF THE REACH OF CHILDREN. IF A
CHILD SWALLOWS A BATTERY, CONTACT A DOCTOR
IMMEDIATELY.
NEVER ATTEMPT TO DISASSEMBLE THE CAMERA; IT CONTAINS A
HIGH-VOLTAGE CIRCUIT. IF THE INTERNAL PARTS OF THE CAMERA
ARE EXPOSED DUE TO DROPPING OR DAMAGE, REMOVE THE
BATTERY IMMEDIATELY TO PREVENT FURTHER USAGE.
IN CASE OF MALFUNCTION, CONSULT YOUR NEAREST OLYMPUS
DEALER OR OLYMPUS SERVICE CENTER.
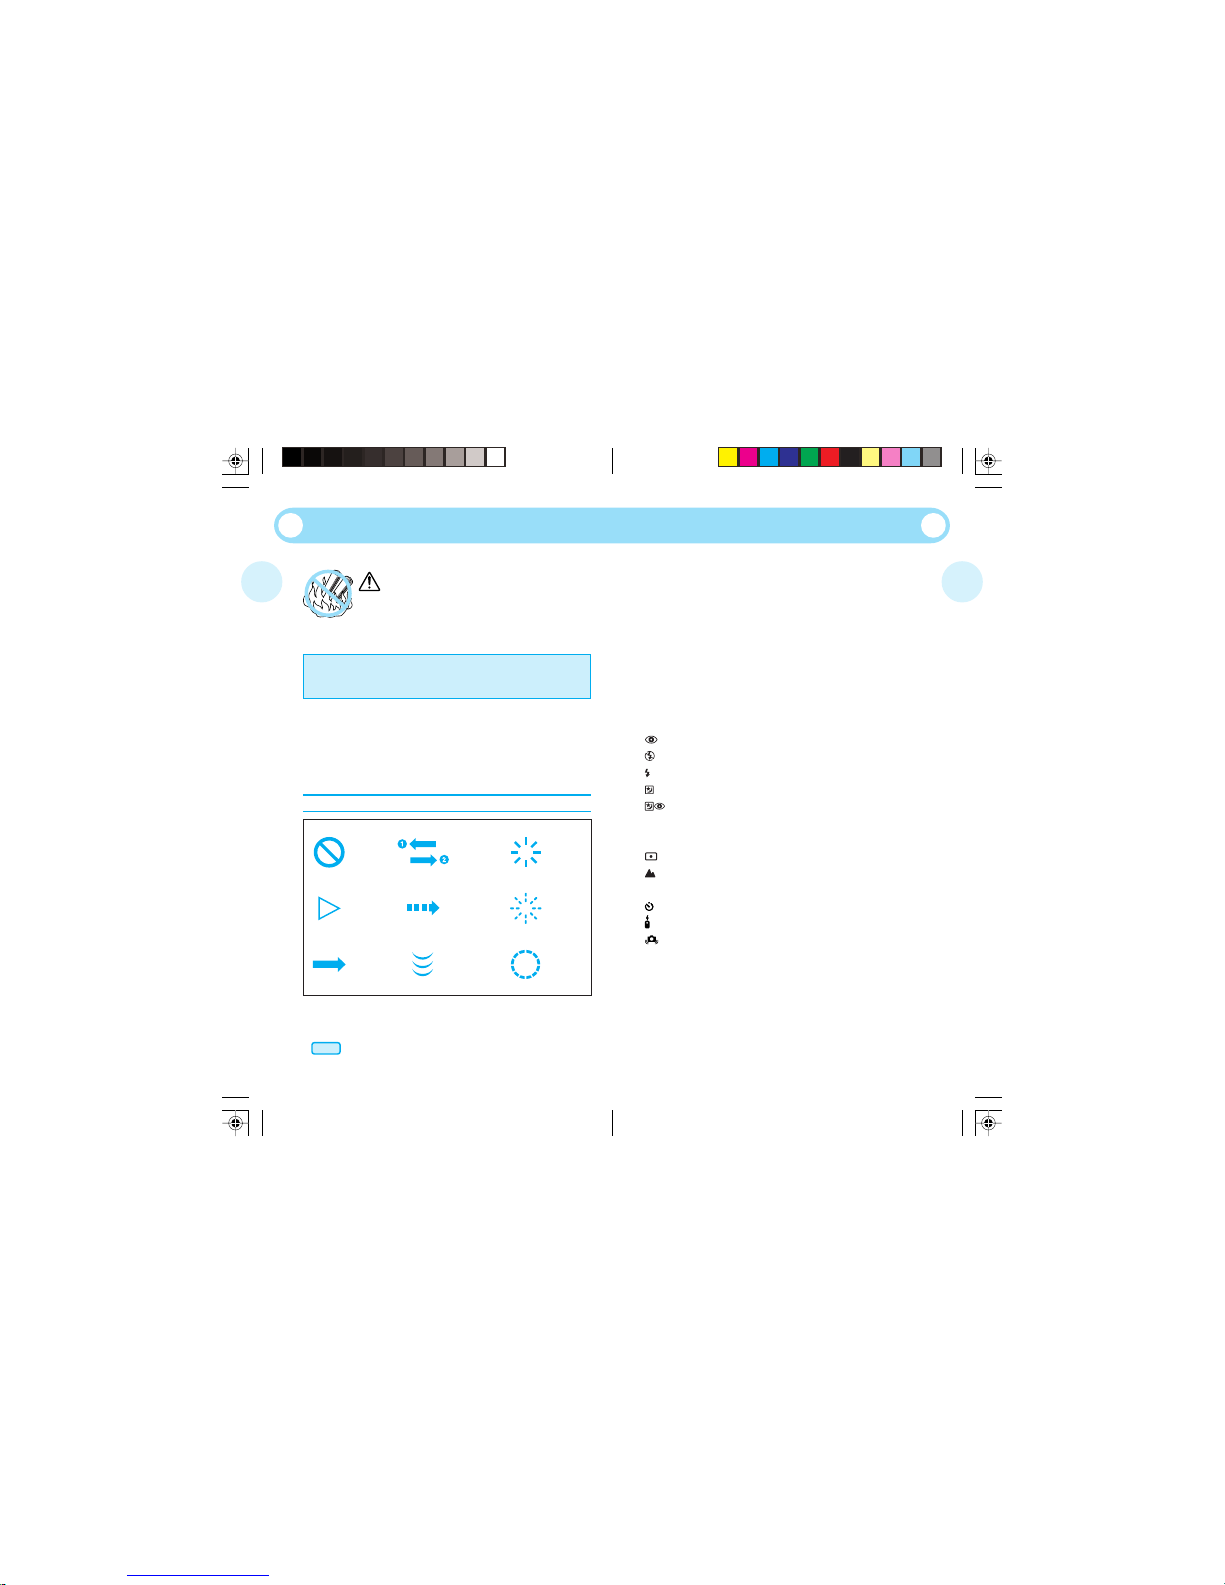
Symbols used in this manual:
Incorrect
Manual
operation
Operation
order
Automatic
operation
Order
Attention
Indicator
on
Indicator
blinking
Depress
halfway
앫Products shown in pictures and illustrations may be slightly different
from the actual unit.
앫Pay particular attention to items in this manual enclosed in boxes
.
Names of parts
Camera body ...................................................................... 4
Viewfinder display/LCD panel ............................................. 5
Using the strap/Diopter adjustment ........................................ 6
Loading and checking the battery ........................................... 7
Loading the film ..................................................................... 8
Taking pictures ....................................................................... 9
Unloading the film ................................................................ 10
Flash photography
Setting the flash mode ..................................................... 11
Auto Flash ........................................................................ 12
Red-Eye Reduction Flash ............................................ 12
Flash-Off ...................................................................... 13
Fill-In Flash .................................................................... 13
Night Scene Flash ........................................................ 14
Red-Eye Reduction Night Scene Flash ...................... 14
Exposure modes
Setting the exposure mode .............................................. 15
Spot Metering ............................................................. 15
Infinity ......................................................................... 15
Selftimer/Remote Control/Camera Shake Indicator
Selftimer ....................................................................... 16
Remote Control (optional) ............................................. 16
Camera Shake Indicator .............................................. 17
RC-300C (optional) .............................................................. 18
Correcting the date and time (Quartzdate models only) ........ 19
Printing the date/time (Quartzdate models only) .................. 20
Care and storage .................................................................. 21
Specifications ....................................................................... 22
CONTENTS
2756 Q50N_EN 03.6.3, 10:13 AM2-3
4 5
6
8
9
!
@#$%
0
7
^
&
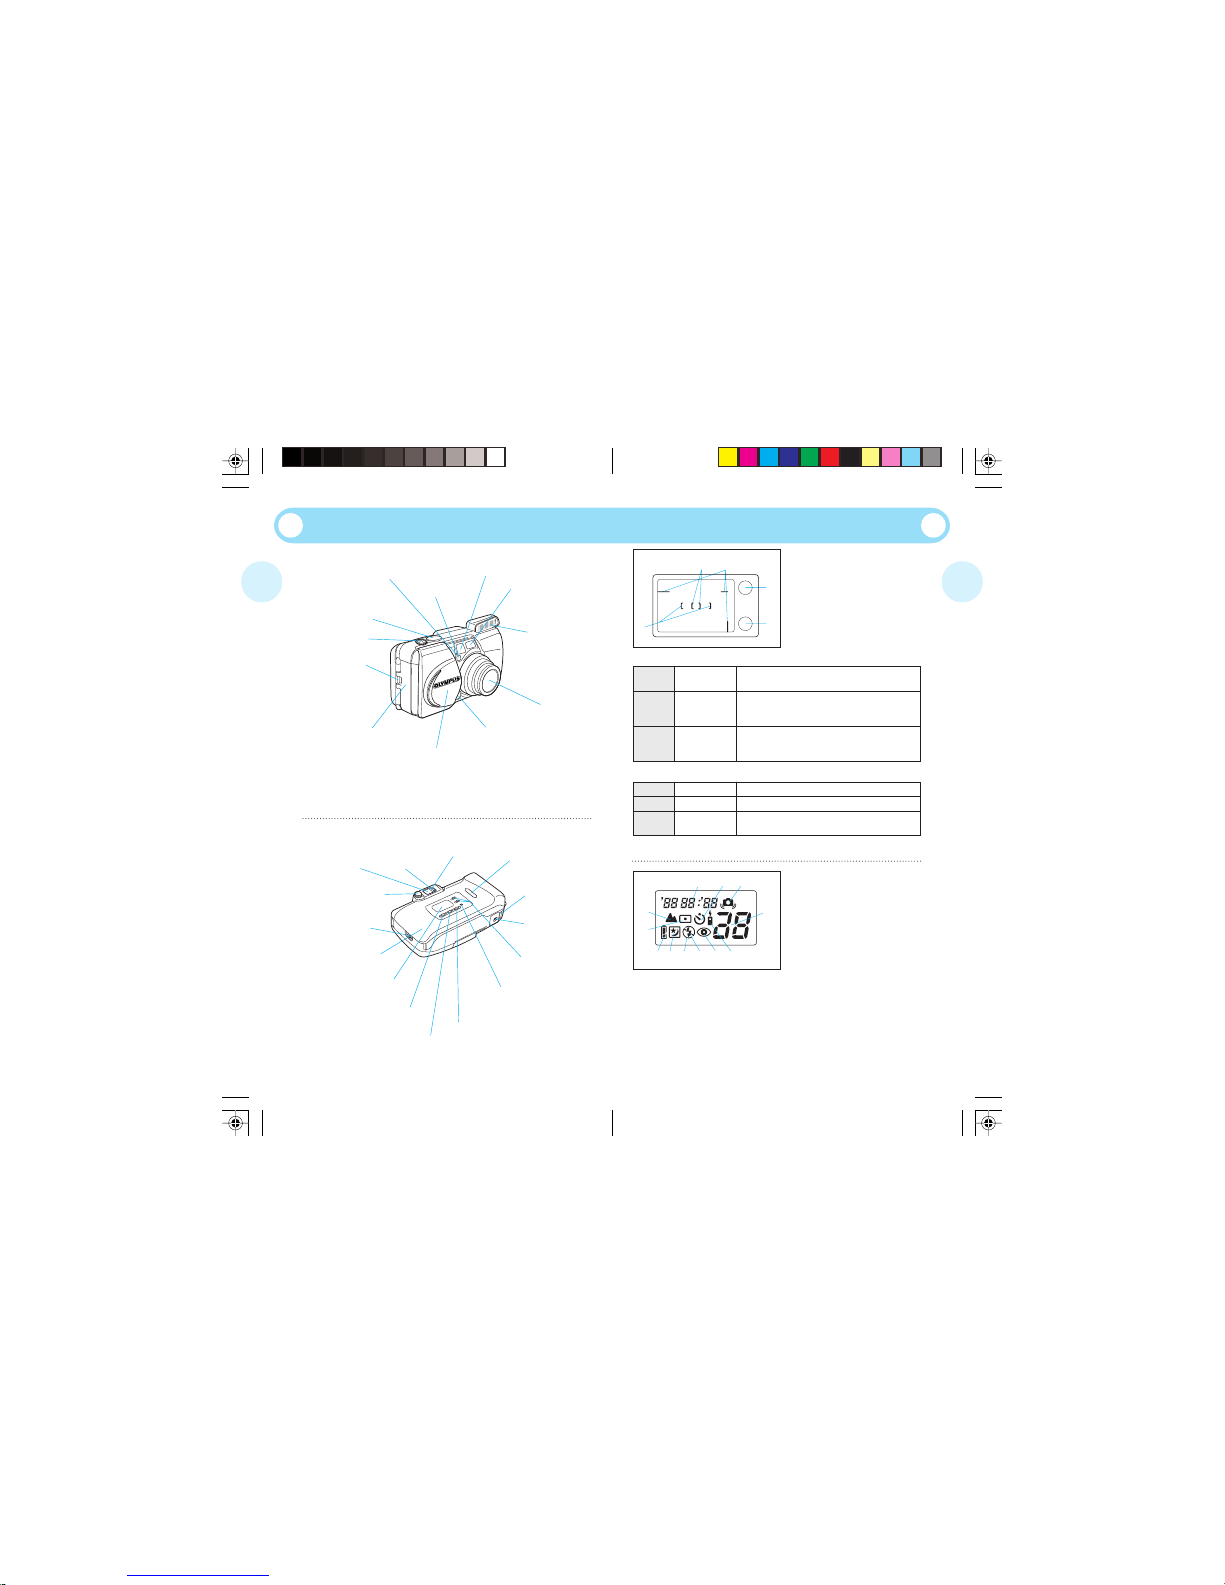
NAMES OF PARTS — Camera Body
Zoom lever
Shutter release button
Selftimer indicator/remote
control indicator
Light sensor夡
Viewfinder
Autofocus window夡
Flash夡
Lens夡
Remote control sensor夡
Lens barrier
Battery compartment
cover
Strap eyelet
夡Always tr y to keep this clean. Dirt and stains can
result in pictures that are unclear and out-of-focus.
Wipe off any dirt or stains with a soft cloth.
Back cover
release
Viewfinder
Battery
compartment
cover
Diopter
adjustment dial
Green lamp
Orange lamp
Film window
Tripod socket
Date MODE and
SET buttons
(Quartzdate
models only)
Mid-roll
rewind button
Exposure mode button
Flash mode button
Selftimer/remote
control button
LCD panel
Back cover
NAMES OF PARTS — Viewfinder Display/LCD Panel
Viewfinder Display
1 Autofocus marks
2 Spot marks
3 Close-up correction marks
Lights
Blinks
Blinks
rapidly
You can shoot
You can’t
shoot
You can shoot
while using
caution
The subject is in focus. Press the shutter
release button all the way to take the picture.
The subject is not in focus. The shutter will not
release even if you press the shutter release
button all the way.
The subject is difficult for the autofocus to lock
on. Although the shutter releases, the subject
may be out of focus.
4 Green lamp
5 Orange lamp
* Shooting is not possible when the green lamp is blinking.
Goes out
Light
Blinks
You can shoot*
You can shoot*
You can’t
shoot
The flash doesn’t fire, and the shutter releases.
The flash fires, and the shutter releases.
The flash is being recharged. The shutter
doesn’t release.
LCD Panel
6 Date/time indicator
(Quartzdate models only)
7 Camera Shake Indicator
8 Exposure counter
9 Remote Control
0 Selftimer
! Red-Eye Reduction Flash
@ Fill-In Flash
# Flash-Off
$ Night Scene Flash
% Battery check
^ Spot Metering
& Infinity
Note: Not all indicators are displayed as shown in actual use.
4
5
1
2
3
2756 Q50N_EN 03.6.3, 10:13 AM4-5
6 7
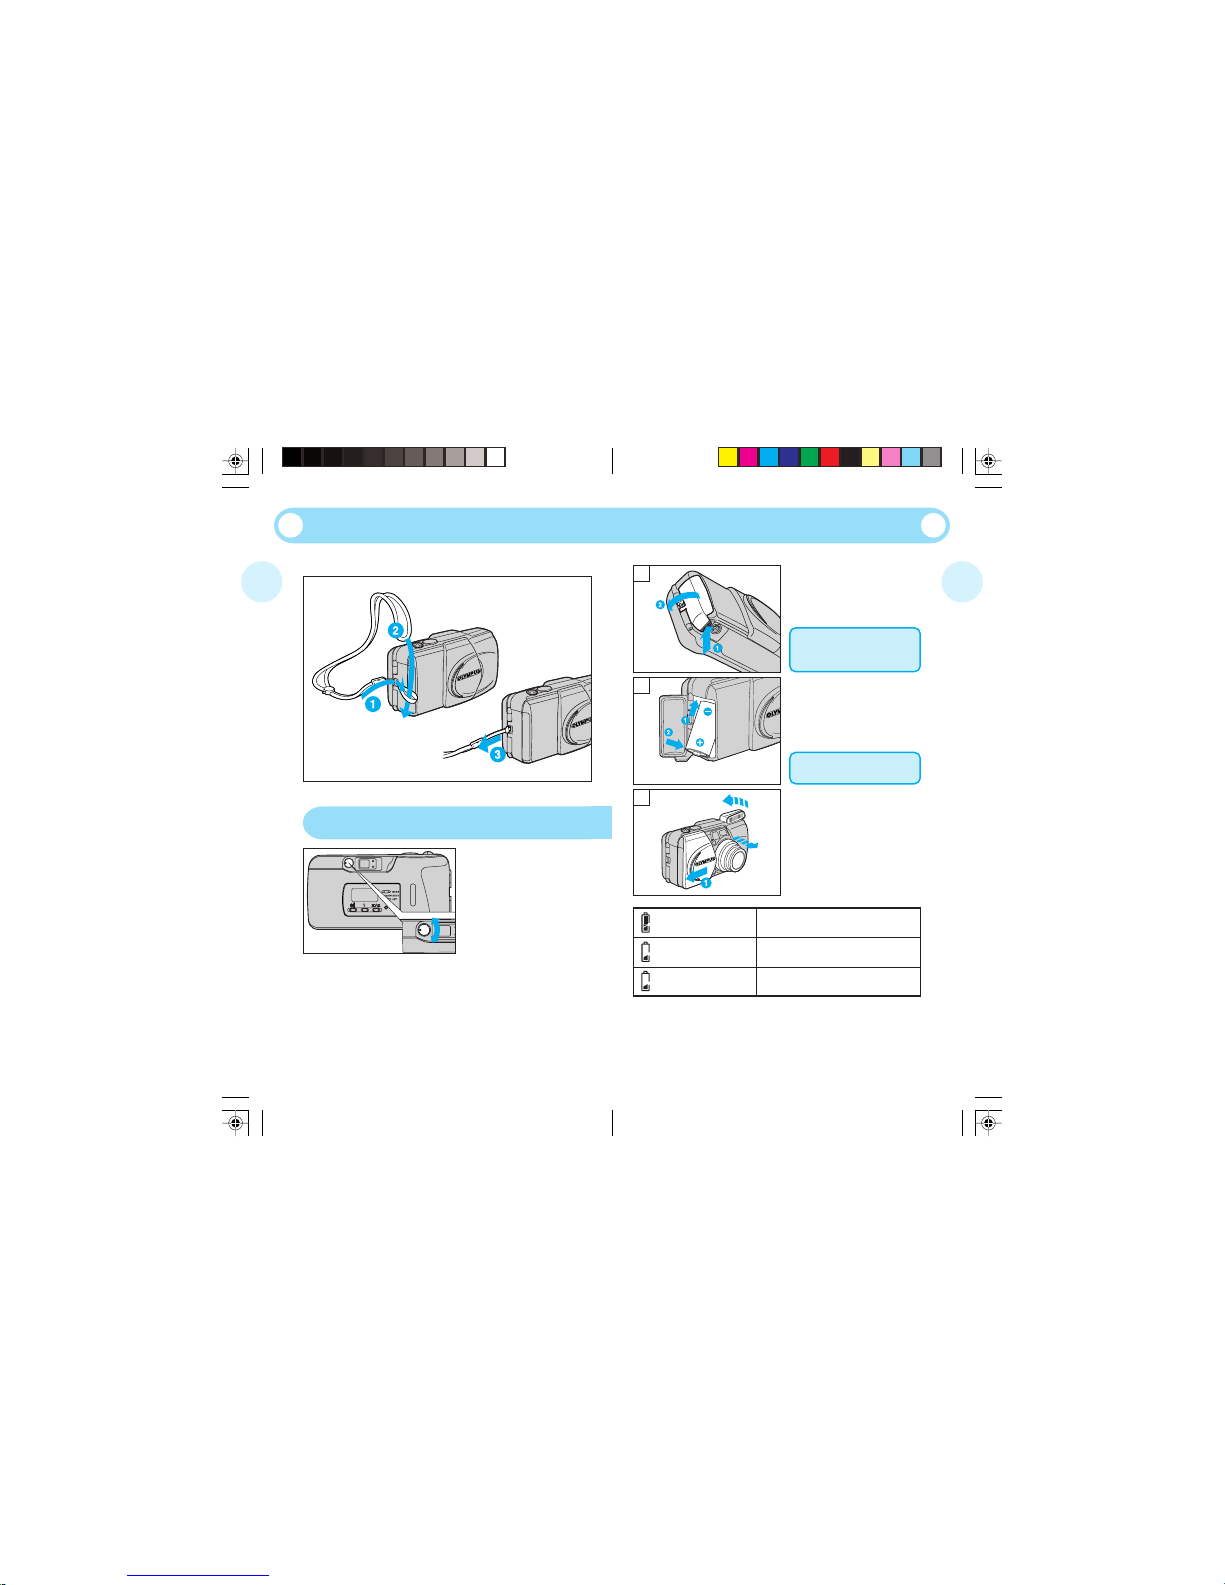
Battery is OK. You can shoot.
Battery is low and will need to be replaced
within the next few photos.
Battery is dead and must be replaced with
a new one immediately.
lights (turns off
automatically).
blinks and other indicators
are displayed normally.
blinks and other indicators
go out.
2
3
Use one 3 V lithium battery (CR123A or DL123A).
1. While pressing the bottom of
the battery compartment
cover in direction
1, turn it
in direction
2 to open.
USING THE STRAP
Attach the strap as shown.
Turn the diopter
adjustment dial until the
autofocus marks are
clear.
If you are nearsighted, turn the
dial up. If you are farsighted,
turn it down.
DIOPTER ADJUSTMENT
LOADING AND CHECKING THE BATTERY
Make sure the lens barrier is
closed before opening the
battery compartment cover.
2. Insert the battery correctly.
Close the battery compartment cover.
A brand-new battery lasts for
about 15 rolls of film.
3. Slide the lens barrier in
direction 1 until it clicks.
Check the remaining battery
power on the LCD panel.
1
2756 Q50N_EN 03.6.3, 10:13 AM6-7
 Loading...