

Page 1
http://www.olympus.com/
VM013502
MAUSB-200
USB Read/Write Memory Adapter
Start Guide
Introduction
Thank you for purchasing our product. The MAUSB-200 USB
Read/Write Memory Adapter (hereinafter referred to as “the
adapter”) is designed exclusively for reading and writing data to an
xD-Picture Card
transfer large amounts of data to and from the card quickly and
easily using a computer equipped with a USB port.
Before using the adapter, read this Start Guide carefully.
For more details, refer to the Reference Manual (PDF file) on the
OLYMPUS web site or contact our Customer Support.
MAUSB-200 Reference Manual: http://www.olympus.co.jp/en/
support/imsg/digicamera/download/manual/#mausb
Every effort has been made to ensure that the information in this
leaflet is correct. If you find errors or anything else questionable,
please contact our Customer Support.
Olympus shall not be liable for any damages, passive damages,
or demands from a third party resulting from improper use of the
adapter.
For customers in North and South America
For customers in USA
Declaration of Conformity
Model Number : MAUSB-200
Trade Name : OLYMPUS
Responsible Party :
Address : 2 Corporate Center Drive, P.O. Box 9058, Melville,
NY 11747-9058 U.S.A.
Telephone Number : 631-844-5000
Tested To Comply With FCC Standards
FOR HOME OR OFFICE USE
This device complies with Part 15 of the FCC rules. Operation is subject to the
following two conditions:
(1) This device may not cause harmful interference.
(2) This device must accept any interference received, including interference
that may cause undesired operation.
For customers in Canada
This Class B digital apparatus meets all requirements of the Canadian
Interference-Causing Equipment Regulations.
For customers in Europe
This symbol [crossed-out wheeled bin WEEE Annex IV] indicates separate
collection of waste electrical and electronic equipment in the EU countries.
Please do not throw the equipment into the domestic refuse.
Please use the return and collection systems available in your country for
the disposal of this product.
Please follow the precautions below to ensure proper use and to
avoid injury to yourself or others and damage to property.
Signs used in this section
WAR NING
CAUTION
TM
(hereinafter referred to as “card”). You can
“CE” mark indicates that this product complies with the European
requirements for safety, health, environment and customer protection.
Safety Precautions <Be Sure to Read This Section>
If the adapter is used without observing the
information given under this sign, injury or death
may result.
If the adapter is used without observing the information
given under this sign, minor personal injury, damage to
the equipment, or loss of valuable data may result.
Symbols requiring a specific action
Mandatory
Unplug from power outlet
Symbols prohibiting a specific action
Prohibited
Do not disassemble
WARNING
Keep the adapter away from infants or toddlers as it
could be accidentally swallowed. If this happens, call a
doctor, emergency or poison control center immediately.
Do not disassemble or modify the adapter. Doing so may
cause an electric shock, fire, equipment failure, or accident.
Do not spill liquid or let metallic objects or anything
flammable get inside the adapter. This could result in a fire,
electric shock, equipment failure, or accident.
Do not insert anything other than the card into the card
slot. Doing so may cause equipment failure or fire.
If any devices make strange noises or produce smoke, or
if a foreign object gets inside the adapter, turn off the
device connected to the adapter and unplug it from the
power outlet. Then contact your dealer or authorized
Olympus service center.
Before cleaning the adapter, disconnect the USB
connector from the PC. Cleaning the adapter while it is still
connected to the PC via the USB connector may cause an
electric shock.
Shinjuku Monolith, 3-1 Nishi-Shinjuku 2-chome,
Shinjuku-ku, Tokyo, Japan
Customer support (Japanese language only):
Tel . 0 426-42-7499
What’s included
The MAUSB-200 Start Guide is
included with the adapter.
Make sure all the following
items are included.
If any items are missing,
immediately inform the shop
where you purchased the
adapter.
Start Guide (this leaflet)
Two Co rp orate Center Drive, P.O. Box 9058,
Melville, NY 11747-9058 U.S.A.
Tel. 1-631-844-5000
24/7 online automated help:
http://www.olympusamerica.com/support
Phone customer support: Tel. 1-888-553-4448 (Toll-free)
MAUSB-200
(Adapter and
Cap)
Cap
Wendenstr. 14-18, D-20097 Hamburg, Germany
Tel : +49 40-23 77 3-0 / Fax: +49 40-23 07 61
Technical Customer Suppor t: Please visit our
homepage: http://www.olympus-europa.com
or call NUMBER: 00800 - 67 10 83 00 (Toll-free)
+49 180 5-67 10 83 or +49 40-237 73 899 (Charged)
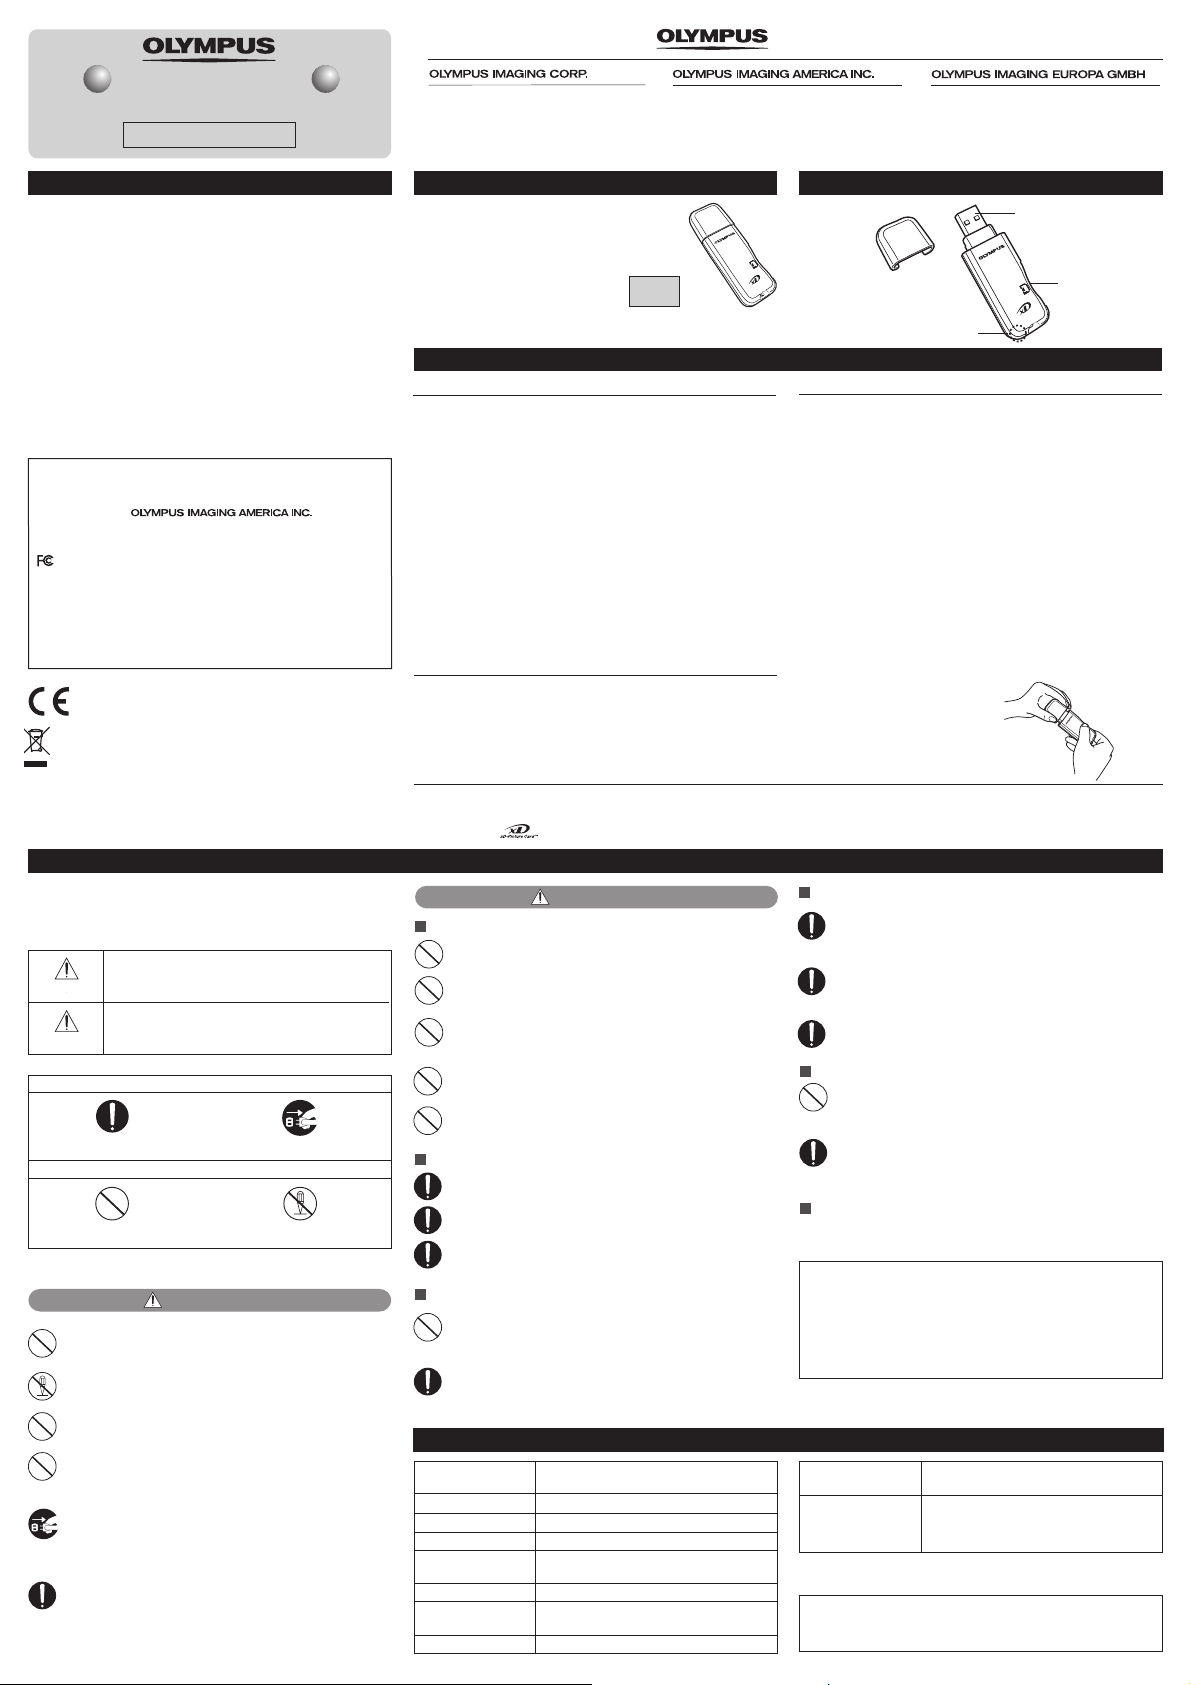
Names of parts
USB connector
Adapter
Status lamp
Card slot
Before getting started
System requirements
Your computer must conform to the following minimum standards in
order to use it with the adapter.
Supported computers
● Any computer equipped with a USB interface as standard
(USB Ver. 2.0 or Ver. 1.1 compliant)
Compatible operating systems
● Windows 98/98SE/Me/2000 Professional
(hereinafter referred to as Windows 2000)/XP
● Mac OS 9.0 - 9.2.2/X (v10.1.2 or later)
● Versions of Windows 98/Me upgraded from Windows 3.1/95, or
Windows 2000 upgraded from Windows 95/NT 4.0/NT 3.51
may not work properly. In this case, you may need to reinstall
your OS.
● Windows 98/98SE requires you to install a device driver. You
can download this from OLYMPUS web site.
MAUSB-200 Device Driver: http://www.olympus.co.jp/en/
support/imsg/digicamera/download/software/#mausb
Supported cards
xD-Picture Card
16MB/32MB/64MB/128MB/256MB/512MB/1GB (3.3 V)
Trademarks
●
Microsoft and Windows are either registered trademarks or trademarks of Microsoft Corporation in the United States and/or other countries.
●
Apple, Mac, Macintosh, Mac OS are trademarks of Apple Computer, Inc., registered in the U.S. and other countries.
●
xD-Picture Card and other company and product names are registered trademarks and/or trademarks of their respective owners in Japan and/or other
countries.
CAUTION
Precautions on Operating and Storage Environment
Avoid using or storing the adapter in extremely hot or cold
places.
Avoid using or storing the adapter in places with excessive
dirt and dust, or in direct sunlight.
Avoid using or storing the adapter in places with strong
vibrations or on unstable surfaces. This may cause equipment
failure.
Avoid using the adapter near the objects with strong
magnetism (motors, transformers, televisions, speakers,
magnets, etc.). This may cause malfunctions.
Avoid using the adapter in a sealed environment.
Precautions on Transportation
Before transporting the adapter, make sure that the card has
been removed.
Pack the adapter so as not to allow foreign objects get inside
the card slot.
This adapter is a precision instrument. Do not expose it to
vibrations, shocks, or impacts.
Cleaning Precautions
Do not apply organic solvent such as thinner, benzine, or
insecticide to the adapter. This may cause the surface of the
adapter to deteriorate and its coating to peel off.
Use a soft cloth to wipe the adapter. If it is very dirty, wipe it
with a soft cloth moistened with a small amount of diluted
neutral detergent first, then wipe off any moisture with a dry
cloth.
Precautions
Before using the adapter, make sure there is adequate space
around the computer’s USB port so that the adapter can be
connected properly. Plugging in the adapter forcibly may damage
the adapter and/or USB port.
In some cases, depending on
environment (i.e. hardware, software, and device drivers), the
adapter may not work properly.
The adapter may not function properly when connected to a PC
via a USB port on a USB hub, keyboard or display. In this case,
connect the adapter directly to the computer’s USB port.
Do not pull the card out of the card slot, or unplug the
adapter while the status lamp is blinking. Doing so may
destroy data on the card or damage the card.
The adapter does not support computer power-saving functions.
Tu rn off the power-saving function before you use the adapter
your
computer.
with
It is not possible to connect two or more MAUSB-200 adapters to
a single PC at the same time.
Do not swing the strap while attaching it to the adapter. Avoid
banging the adapter against hard objects.
To attach the cap, align the front
of the cap with the front of the
adapter and slide it into place.
your
computer system’s operating
Card Handling Precautions
Be sure to format the card on a digital camera regularly.
For details on formatting with a camera, refer to the camera’s
instruction manual.
If your camera does not recognize a card formatted on
another device, re-format the card with your camera.
(Cards formatted with non-DOS formatting systems are not
recognized by the adapter.)
The contacts on the card are exposed. Take extra care when
you handle it.
USB Connector Handling Precautions
Do not touch the terminal end of the USB connector. Doing so
may cause the adapter and/or the PC to fail.
When disconnecting the adapter from the computer’s USB
port, hold the connector firmly and pull it out gently to unplug
it.
Other Precautions
Carefully read “Precautions” in “Before getting started” in this leaflet.
Notes on formatting the card
● When formatting the xD-Picture Card, make sure that there is
no important data on it. Existing data will not be usable after
the card has been formatted.
● You must format the card on a digital camera regularly. If the
card inserted into the adapter has been formatted with the
connected computer, it may not be recognized by a digital camera.
Specifications
Supported Cards xD-Picture Card 3.3 V
Interface
Operating voltage
Consumption current
Operating environment
Storage environment
Dimensions
(L x W x H)
Weight
16/32/64/128/256/512MB/1GB
USB Ver. 2.0 or Ver. 1.1
5V ±10% (Powered via USB port)
0.5A Max.
Temperature: 0˚C - 40˚C (41˚F - 104˚F)
Humidity: 20% - 80% (No condensation)
Tem perature: –20˚C - 60˚C (–4˚F - 140˚F)
Main unit: 71.0 mm x 25.0 mm x 10.1 mm
(Not including the cap and protrusions)
Main unit: Approx. 13 g Cap: Approx. 2 g
Supported computers
Supported operating
systems
Windows 98/98SE requires you to install a device driver.
*
● The specifications are subject to change without prior notice.
● For the latest information, visit the OLYMPUS web site:
http://www.olympus.com/
Any computer equipped with a USB interface as standard
(USB Ver. 2.0 or Ver. 1.1 compliant)
Any of the following pre-installed operating systems
Windows 98
Windows 2000 Professional Windows XP
Mac OS 9.0 - 9.2.2 Mac OS X (v10.1.2 or later)
Windows 98SE
*
Windows Me
*
Page 2
Using the adapter (for Windows/Macintosh)
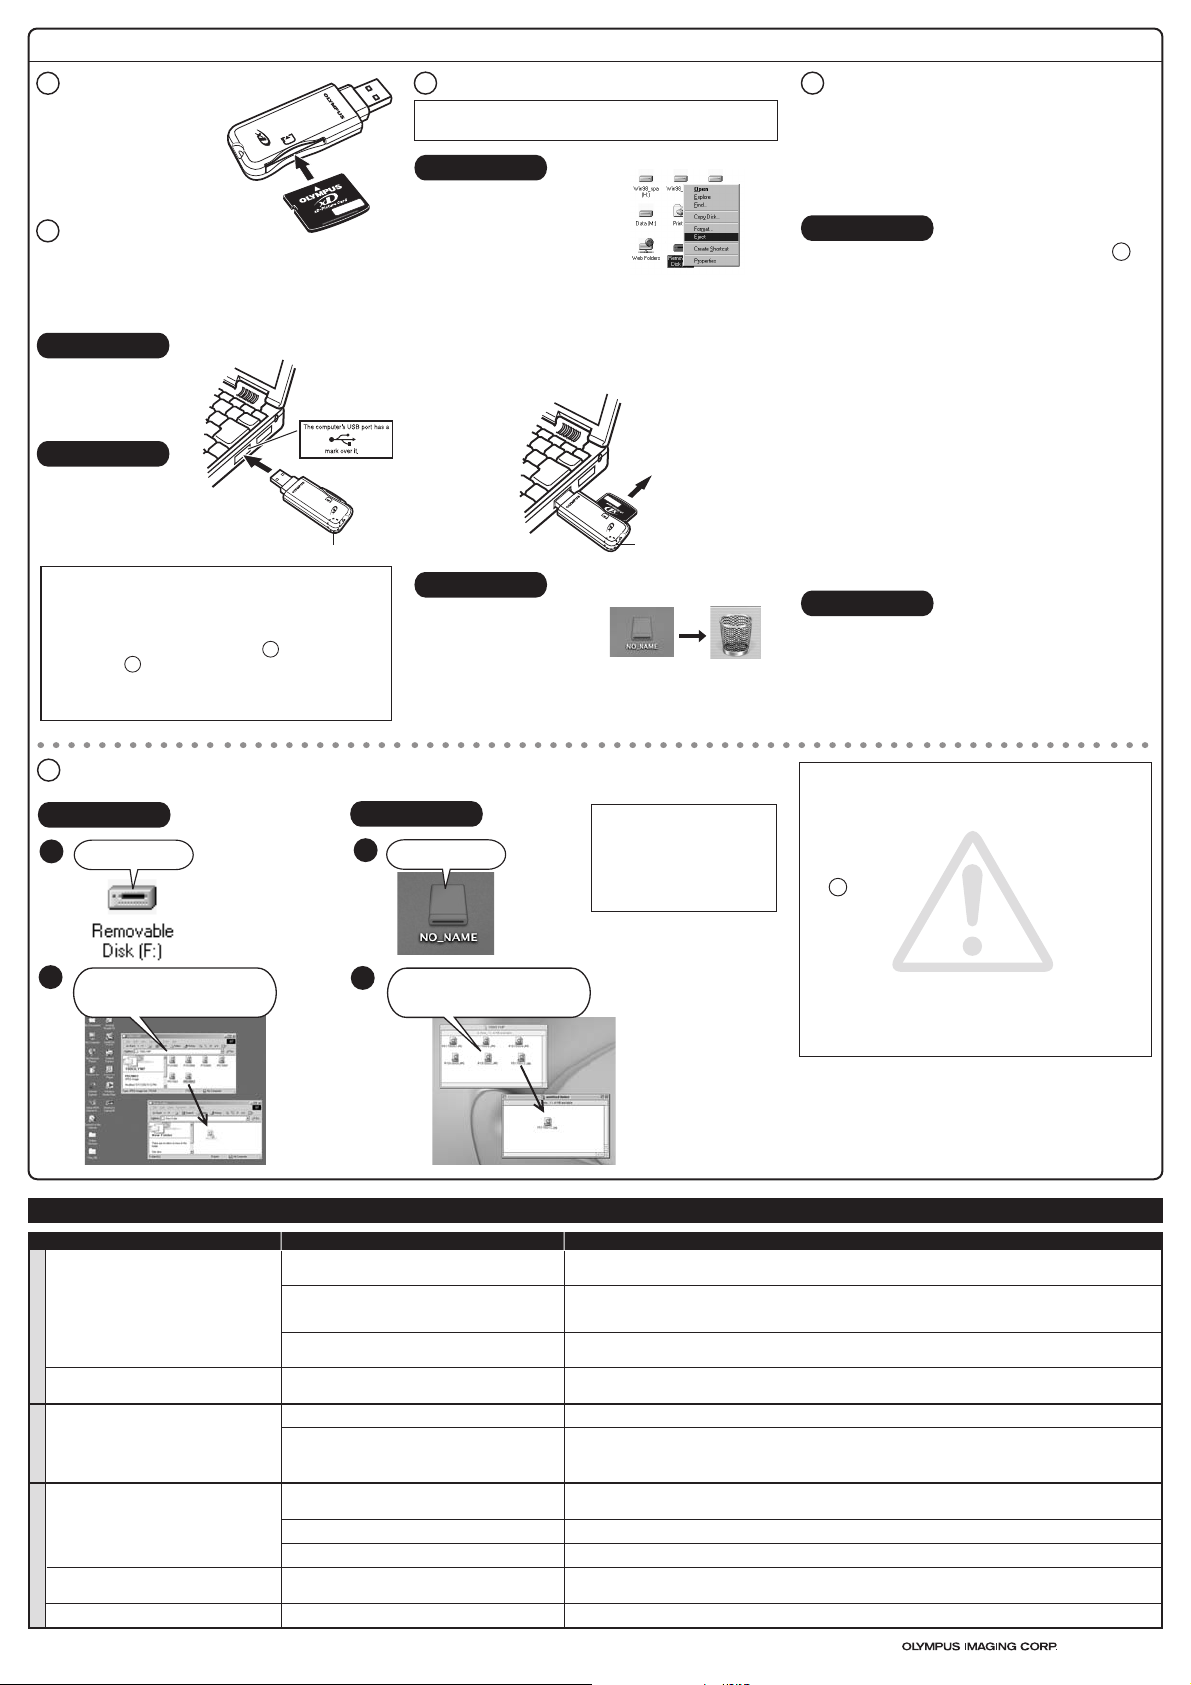
Insert a card into the
1
adapter.
Make sure the card is level and
that the gold-colored contact
area is facing down. Insert the
card all the way into the card slot.
Connect the adapter to
2
the computer.
Connect the adapter’s connector to the computer’s USB port. (You
can plug in the USB connector while the computer is in use.)
The status lamp lights up. (When there is no card in the adapter,
the status lamp does not light.)
For Windows
When the adapter is recognized
by the computer, the
[Removable Disk] icon will be
added to [My Computer].
USB Port
(Type A)
For Macintosh
When the card is inserted
correctly and the adapter is
recognized by the computer, the
card icon appears on the
desktop.
Status lamp
Lights : When the adapter is connected to the computer and
is ready to use.
Blinks : When reading/writing to a card.
Goes out : When there is no card in the adapter, or when
performing the procedure* in “ 3 Remove the card.”
or “ 4 Disconnect the adapter from the computer”.
* Depending on your Mac OS version, the status lamp may go
out when you drag & drop the card’s icon onto the Trash icon.
Goes out after lighting : When the card is not recognized.
Status lamp
Remove the card.
3
Attention!: If you do not follow the steps below, the data on the
card may be damaged.
For Windows
1. Double-click [My Computer]
on the desktop.
2. Right-click the corresponding
[Removable Disk] icon, then
click [Eject] in the pop-up
menu.
● The card will not be ejected when [Eject] is clicked in this step.
● If you are using a Windows 2000/XP and you want to remove
the card, log on with the user name [Administrator] or a user
name with administrator privileges. Without these privileges,
you cannot perform [Eject] operation.
3. Make sure that the lamp is NOT on, then pull the card out of the
card slot as shown in the illustration.
Pull the card out.
Status lamp
For Macintosh
Drag & drop the card’s icon onto
the Trash icon. Make sure that
the status lamp is NOT blinking,
then pull the card out of the card
slot as shown in the above illustration.
Disconnect the adapter from the
4
computer.
● You can unplug the adapter with the computer’s power on.
(You do not need to turn off the computer, restart it, or put it in
the sleep mode.)
Close all software programs that are using data on the card
●
(e.g. graphics applications). Otherwise, you cannot perform this
step.
For Windows
If a card is inserted in the adapter, follow steps 1 and 2 in “ 3
Remove the card”.
[Windows 98/98SE]
Make sure that the status lamp is NOT on, then unplug the
adapter from the computer’s USB port.
[Windows Me/2000/XP]
1. Left-click the [Safely Remove Hardware] icon on the taskbar.
● The message that appears with the [Safely Remove
Hardware] icon may differ depending on the computer you
are using.
2. A message titled [Safely remove USB Mass Storage Device Drive (K:)] appears on the taskbar. Click on it.
● The drive letter (K:) above will differ depending on the
computer you are using.
3. Make sure that the status lamp is NOT on, then click the [OK]
button.
● For Windows XP, the message appears in the
balloon help.
4. Unplug the adapter from the computer’s USB port.
For Macintosh
1. Drag & drop the card’s icon onto the Trash icon.
2. Make sure that the status lamp is NOT blinking.
3. Unplug the adapter from the computer’s USB port.
Copy files.
5
For Windows
1
Double-click
2
Drag & drop the files onto the
hard drive or other storage
medium.
You can copy files the same way as you would copy files from a floppy disk, etc. Simply drag & drop the
original files you want to copy onto the hard drive or other storage medium.
For Macintosh
1
Double-click
Double-click [My Computer],
then double-click the
corresponding [Removable
Disk] icon.
2
Drag & drop the files onto the
hard drive or other storage
medium.
Troubleshooting
PROBLEM CAUSE SOLUTIONS
The [Removable Disk] icon does not appear after
installation and connection.
[!] or [?] appears in Device Manager.
Windows
The adapter does not recognize the card.
[Please insert a disk into drive.] appears.
No card icon appears on the computer’s screen. The card is not inserted correctly.
Macintosh
The status lamp does not light. The adapter is not connected correctly to the computer’s
Common
The status lamp goes out after lighting.
You can read a card, but not write to it.
Printed in Japan
The adapter’s USB connector is not connected properly to
the computer.
The Universal Serial Bus Controller is disabled.
(Only for Windows Me/2000/XP)
The USB port is disabled in the BIOS settings.
The card is not inserted correctly.
File Exchange is not installed on your computer. (Mac OS 9)
USB port.
The power supply from the USB port is insufficient.
The card is not inserted correctly.
The card is not recognized correctly.
There is a problem with the card.
Double-click the
corresponding
icon.
Notes on inserting/removing a card
(For Windows/Macintosh)
Drag & Drop
●
To perform a drag & drop, press
and hold the mouse button over
the selected file(s), then move
the mouse (drag) to the desired
location and release the button
to copy (drop).
Insert the USB connector fully into the computer’s USB port to ensure that it is firmly connected.
Change the Controller settings on [Universal Serial Bus Controllers] by selecting [Start] - [Setting] (only for Windows Me/2000) [Control Panel] - [System] - [Hardware] - [Device Manager]. ([X] appears on the controller’s name. Select [Enable] by right-clicking
from the pop-up menu.)
Set the USB port to “Enable” in the BIOS settings. Take extra care when making this setting, referring to your computer’s instruction
manual.
Make sure the card is properly oriented (front/reverse face, top/bottom part), then insert it slowly into the adapter until it is secure.
Make sure the card is properly oriented (front/reverse face, top/bottom part), then insert it slowly into the adapter until it is secure.
You must have File Exchange (provided with Mac OS) to read/write a DOS/Windows formatted card.
(Check Control Panels under the Apple menu to see if File Exchange is installed. For more details, refer to Mac OS [Help].)
Make sure that the adapter is facing the right way and connect it to the computer’s USB port firmly.
If you are using a USB hub, connect the adapter directly to the computer’s USB port.
Make sure the card is properly oriented (front/reverse face, top/bottom part), then insert it slowly into the adapter until it is secure.
Disconnect the adapter from the computer, pull the card out of the adapter, then wipe the contact area with a dry cloth, and insert
the card again. If the problem persists, the card may be damaged.
Save the data to another storage medium, then use the new card for writing.
● NEVER pull a card out of the card slot or unplug the
adapter from the computer while the status lamp is
blinking. Doing so may destroy the data on the card or the
card itself, or cause the computer to malfunction.
● When removing a card, be sure to follow the procedure in
“ 3 Remove the card”. Otherwise, the data on the card
may be damaged.
● Before removing a card, close all software programs that
are using data on the card (e. g. Explorer, graphics
applications).
● DO NOT apply force to the computer’s USB port or the
adapter when removing/inserting a card from/into the
adapter if it is directly connected to the computer’s USB
port.
● Make sure that the card is facing the right way.
● DO NOT insert the card at an angle. Forcing a card in
diagonally may damage the adapter and/or the card.
© 2004-2005
All rights reserved.
 Loading...