

Page 1

Functions for Online Printing
and Photo Sharing
CAMEDIA Master 4.3/Pro
Plugin Functions
Operating Instructions
Page 2

Table of Contents
Introduction.................................................................................... 3
Note ............................................................................................................ 3
Trademarks................................................................................................. 3
How to Use This Manual............................................................................. 4
Terminology...................................................................................... 4
Help information................................................................................ 4
Overview......................................................................................... 5
Features...................................................................................................... 5
Online printing function ..................................................................... 5
Photo sharing function ...................................................................... 5
System Requirements................................................................................. 6
Main Menu........................................................................................ 7
Online Printing............................................................................... 8
Online Print Window ................................................................................... 8
Using Online Printing ................................................................................ 10
Selecting other services.................................................................. 12
Photo Sharing.............................................................................. 13
Photo Share Window ................................................................................ 13
Using Photo Sharing ................................................................................. 15
Registering your user ID ................................................................. 18
Overview of access limitations........................................................ 19
Appendixes .................................................................................. 20
Technical Support..................................................................................... 20
File Formats.............................................................................................. 21
Functions Supported................................................................................. 21
2
Page 3

Introduction
Thank you for purchasing this Olympus product.
Please read these instructions carefully in order to get the best results.
Note
The contents of this software and manual may not be reproduced in whole or in
part except for personal use. It may not be transferred without permission.
Olympus can accept absolutely no responsibility in respect of losses suffered
by the customer or a third party as a result of use of this software.
While every care has been taken in the preparation of this manual, if you find
any points which are unclear, errors, or omissions, please contact an
authorized Olympus service center.
This software is only guaranteed to operate in the specified operating
environment.
The software specifications and the content of this manual are subject to change
without notice. For the latest information, visit the Olympus web site at:
http://www.olympus.com
© 2004 OLYMPUS CORPORATION
Trademarks
• Windows is a registered trademark of Microsoft Corporation in the USA and
other countries.
• Adobe and Acrobat are registered trademarks, and Acrobat Reader is a
trademark of Adobe Systems Incorporated.
• OFOTO, Ofoto and all graphics, logos and service names are trademarks of
Ofoto or its parent company, Eastman Kodak Company.
• Other company and product names appearing in this manual are trademarks
or registered trademarks of their respective owners.
3
Page 4

How to Use This Manual
This manual describes how to use the online printing and photo sharing plugin
functions of CAMEDIA Master 4.3/Pro, however, certain explanations need to
be complemented by referring to the operating instructions of CAMEDIA
Master/Pro (4.2SE or later) installed in your computer.
This manual is organized with a section for each function. You can read these
independently for a thorough understanding of particular functions. Once you
are familiar with the functions, you can use the help information for extra
explanations while using the functions.
Terminology
The following terms appear throughout this manual.
File
A file is the unit in which data is handled on a computer or digital camera. The
following type of files are used with these plugin functions.
• Image files
Thumbnail
This refers to the reduced images used as an index.
Help information
To access the help information, use any of the following methods:
• In the main menu, click the [Help] button .
• In any window, click the [Help] tool button and select [Index].
• In any dialog box, click the help button .
4
Page 5
Overview
Features
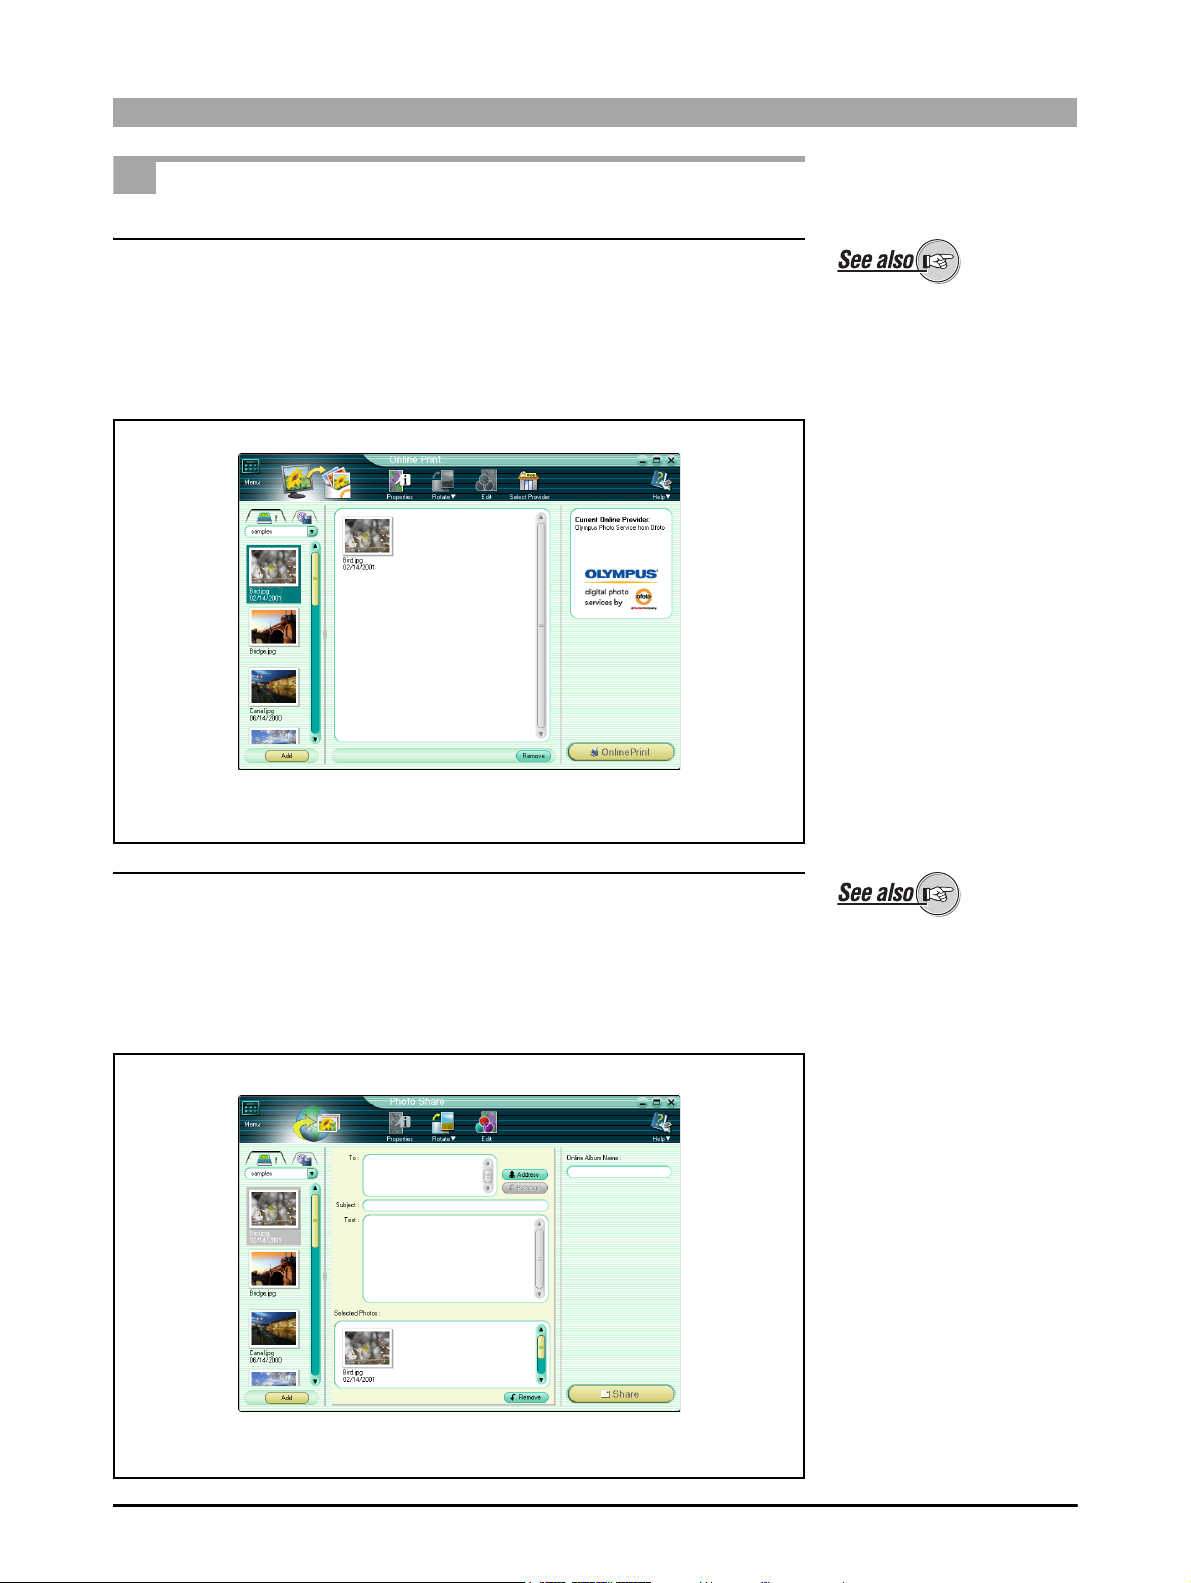
Online printing function
This function connects CAMEDIA Master/Pro (4.2SE or later) to the online
print services of a photo service dealer through an Internet connection and
provides easy and seamless online print ordering processes through the
window. The online print service selected will send your photos to the address
you specify in the order.
Online Print window
About the online printing
function, see also “Online
Printing” (page 8).
Photo sharing function
This function is for making personal online albums of digital photo collections.
These are stored on the Olympus Digital Print Service (powered by Ofoto)
server. Your photos can be enjoyed online with friends and family. You may
have more than one online photo album. As with physical photo albums, you
can title, rearrange, and view them any time you want.
Photo Share window
About the photo sharing
function, see also “Photo
Sharing” (page 13).
5
Page 6

System Requirements
This software only operates on a computer with a preinstalled Windows
operating system (Not available for Macintosh).
This software is designed to run in the following systems.
Windows version
OS Windows 98/98SE/Me/2000 Professional*/XP**
Browser Internet Explorer 5.0 or later
CPU Pentium II or later (Pentium III or later recommended)
RAM 128 MB or more (256 MB or more recommended)
Monitor Minimum 800 × 600 pixel resolution
Minimum 65,536 colors
* This software is compatible with 2000 Professional only.
** This software is compatible with Windows XP Professional and Home
Edition.
• For information on support for the latest versions of operating systems, visit
the Olympus web site (http://www.olympus.com).
This software only operates
on a computer with
preinstalled CAMEDIA Master
4.2SE (or later).
To use this function, your
computer must already be set
up with an Internet
connection. For more details,
refer to the operating
instructions provided with
your computer or Internet
service provider.
To access the online help, a
web browser is required.
6
Page 7
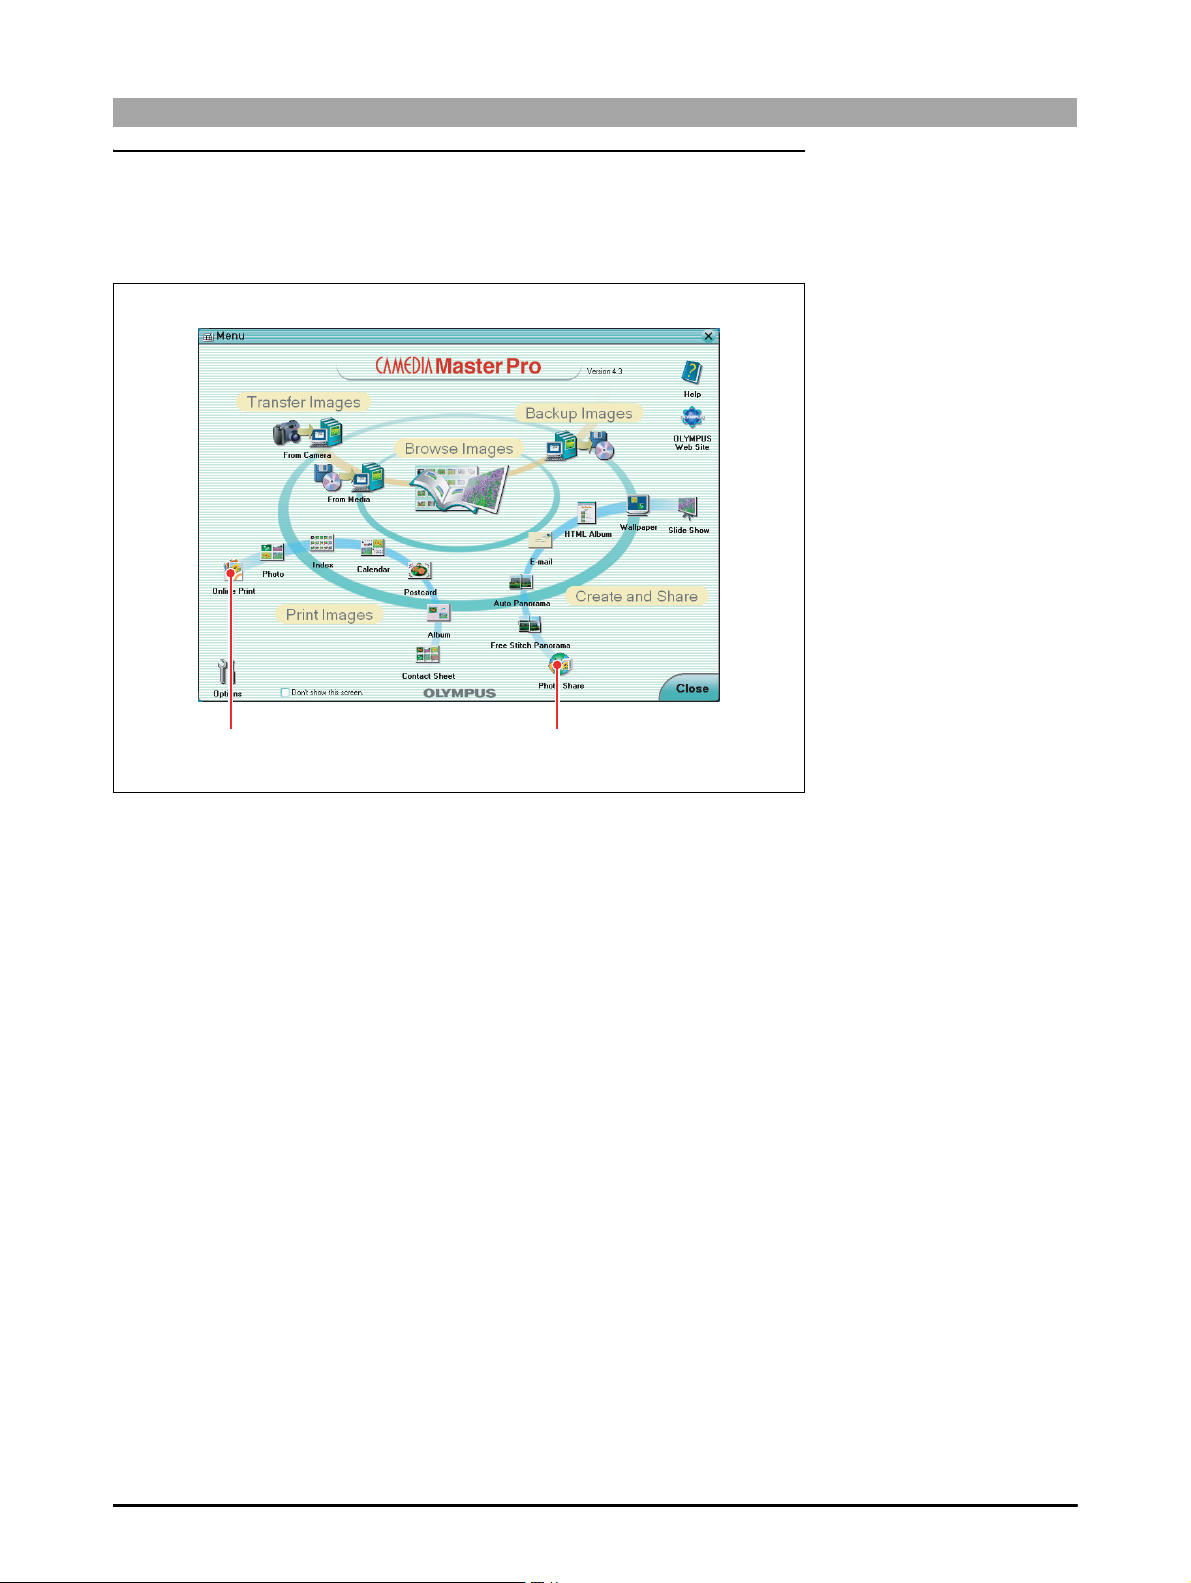
Main Menu
The online printing and photo sharing functions are displayed as easily
recognizable icons on the main menu. Click the icons to start the respective
functions as illustrated below.
1 Online Print button 2 Photo Share button
1 Online Print button
This displays the Online Print window (page 8).
2 Photo Share button
This displays the Photo Share window (page 13).
7
Page 8

Online Printing
Online Print Window
To open the Online Print window, do one of the following.
• In the main menu, click the [Online Print] button.
• In the album window, click the [Print] tool button and select [Online Print].
1 Image display area
2 Display source selection tab
3 Tool buttons
4 Online service information area
For details on the album
window, see also “Browsing
Images” in the CAMEDIA
Master/Pro (4.2SE or later)
operating instructions.
8 Online Print button
7 Remove button
6 Preview display area
5 Add button
1 Image display area
This shows thumbnails of the images in the selected album or folder.
2 Display source selection tab
This switches between the album display and the folder tree display.
For details on source
selection, see also “Album
display and folder tree
display” in the CAMEDIA
Master/Pro (4.2SE or later)
operating instructions.
8
Page 9

3 Tool buttons
The following tool buttons are provided.
Menu/Back
Properties
Rotate
Edit
Select Provider
• Menu/Back
Returns to the main menu or album window.
• Properties
Displays the properties information for the image file selected in the
image display area.
• Rotate
Rotates the image selected in the preview display area.
• Edit
Displays an image editing window for editing the image selected in
the preview display area.
• Select Provider
Displays the print service selection window.
• Help
Displays Help information for the Online Print window.
Help
For details on the image
editing window, see also
“Image Editing Window” in the
CAMEDIA Master/Pro (4.2SE
or later) operating
instructions.
4 Online service information area
This shows the online print service information (e.g. the name of the
service, Logo) being selected.
5 Add button
This adds the images selected in the image display area into the preview
display area.
6 Preview display area
Drag the image you want to print online to the window. When the connection
is established, the online print service’s print order window is displayed.
7 Remove button
This removes the selected image from the preview display area.
8 Online Print button
This uploads the images you selected and the print order window appears.
9
Page 10

Using Online Printing
Thumbnails
23
Rotate button
Select Provider button
Edit button
To use this function, your
computer must already be set
up with an Internet
connection. For more details,
refer to the operating
instructions provided with
your computer or Internet
service provider.
34
Remove button
1 To open the Online Print window, do one of the following.
• In the main menu, click the [Online Print] button.
• In the album window, click the [Print] tool button and select [Online
Print].
The Online Print window appears.
2 Select the album or folder containing the images you want to print.
A thumbnail display appears in the image display area.
For details on the album
window, see also “Browsing
Images” in the CAMEDIA
Master/Pro (4.2SE or later)
operating instructions.
If you access the Online Print
window from the album
window, the images selected
in the album window appear
in the preview display area.
For details on source
selection, see also “Album
display and folder tree
display” in the CAMEDIA
Master/Pro (4.2SE or later)
operating instructions.
Only images in a format
supported by CAMEDIA
Master/Pro (4.2SE or later)
can be displayed in the
thumbnail display. Sound files
(“sound link” function) and
movie files are not displayed.
10
Page 11

3 To select images, do one of the following.
• Select an image in the image display area and click the [Add] button.
•
Drag an image from the image display area onto the preview display area.
You cannot drag the same
image twice.
4 Repeat step 3, to add images onto the preview display area.
To rotate an image
In the preview display area, select the image you want to rotate, and click
the [Rotate] tool button, then select [Clockwise 90°], [Counterclockwise
90°], or [180°].
To edit an image
In the preview display area, select the image you want to edit, and click
the [Edit] tool button to open the image editing window.
To remove an image from the preview display area
Select the image you want to remove, and click the [Remove] button.
To select other services
If you want to select a service other than the service displayed in the
online service information area, press the [Select Provider] tool button.
Refer to “Selecting other services” (page 12).
5 Click the [Online Print] button.
The JPEG format conversion progress dialog box appears.
After the conversion, the print order window appears.
You can also drag images
from other web sites if the
image is in a format that is
supported by CAMEDIA
Master/Pro (4.2SE or later).
For details on the image
editing window, see also
“Image Editing Window” in the
CAMEDIA Master/Pro (4.2SE
or later) operating
instructions.
Only images in JPEG format
can be handled by the
integrated service. If you
select images that are not in
JPEG format, JPEG format
conversion starts when the
[Online Print] button is clicked.
About the integrated service,
refer to “Selecting other
services” (page 12)
If you select RAW image files,
development processing is
needed. Refer to “RAW
Development Processing” in
the CAMEDIA Master/Pro
(4.2SE or later) operating
instructions.
11
Page 12

The following information is needed to complete the order.
•Print size
• Shipping address
• Preferred shipping method
• Credit card information
For information on how to fill the print order, follow the instructions
displayed on the print order window.
Selecting other services
1 After selecting images, click the [Select Provider] tool button.
The print service selection window appears.
2 Select “Show only integrated service” or “Show all services.”
• Selecting “Show only integrated service”: The integrated online
print services (e.g. Olympus Digital Print Service powered by Ofoto)
that allow you to purchase prints through the preview display area
appear in the selection.
• Selecting “Show all services”: All online print services (including
integrated services) appear in the selection.
3 From the selection list, choose one of the online print service providers.
When you select a service that is not an integrated service, your web
browser will automatically display the selected online print service’s web
page so you can order your prints.
12
Page 13

Photo Sharing
Photo Share Window
To open the Photo Share window, do one of the following.
• In the main menu, click the [Photo Share] button.
• In the album window, click the [Create] tool button and select [Photo Share].
1 Image display area
2 Display source selection tab
3 Tool buttons
4 To:
5 Address button
6 Subject:
For details on the album
window, see also “Browsing
Images” in the CAMEDIA
Master/Pro (4.2SE or later)
operating instructions.
7 Online Album Name:
9 Text:
8 Add button
0 Selected Photos:
q Remove button
1 Image display area
This shows thumbnails of the images in the selected album or folder.
2 Display source selection tab
This switches between the album display and the folder tree display.
w Share button
For details on source
selection, see also “Album
display and folder tree
display” in the CAMEDIA
Master/Pro (4.2SE or later)
operating instructions.
13
Page 14

3 Tool buttons
The following tool buttons are provided.
Properties
Menu/Back
• Menu/Back
Returns to the main menu or album window.
• Properties
Displays the properties information for the image file selected in the
image display area.
• Rotate
Rotates the image selected in the selected photos area.
• Edit
Displays an image editing window for editing the image selected in
the selected photos area.
• Help
Displays Help information for the Photo Share window.
Rotate
4 To:
For entering the recipients’ e-mail address.
Edit
Help
For details on the image
editing window, see also
“Image Editing Window” the
CAMEDIA Master/Pro (4.2SE
or later) operating
instructions.
5 Address button
This opens the [Address book] dialog box.
6 Subject:
For entering the subject (greeting, title, etc.) of the e-mail.
7 Online Album Name:
For entering the online album name. The online album name is also used as
the album name on the server.
8 Add button
This adds the images selected in the image display area into the selected
photos area.
9 Tex t:
For entering your personal message.
0 Selected Photos:
Drag the image you want to share online to the selected photos area.
q Remove button
This removes the selected image from the selected photos area.
w Share button
This uploads the images you selected to the server for making online
albums.
14
Page 15

Using Photo Sharing
Rotate button
Thumbnails
23
Edit button
65 7
To use this function, your
computer must already be set
up with an Internet
connection. For more details,
refer to the operating
instructions provided with
your computer or Internet
service provider.
To use this function, your
computer must already be set
up to send and receive emails. (You will need an
Internet service provider,
network software, etc.) For
more details, refer to the
operating instructions
provided with your computer
or Internet service provider.
3
Remove button
8
1 To open the Photo Share window, do one of the following.
• In the main menu, click the [Photo Share] button.
• In the album window, click the [Create] tool button and select [Photo
Share].
The Photo Share window appears.
2 Select the album or folder containing the images you want to share.
A thumbnail display appears in the image display area.
3 To select images, do one of the following.
• Select an image in the image display area, and click the [Add] button.
• Drag an image from the image display area to the selected photos area.
For details on the album
window, see also “Browsing
Images” in the CAMEDIA
Master/Pro (4.2SE or later)
operating instructions.
If you accessed the Photo
Share window from the album
window, the images in the
selected album or folder
appear in the image display
area.
For details on source
selection, see also “Album
display and folder tree
display” in the CAMEDIA
Master/Pro (4.2SE or later)
operating instructions.
Only images in a format
supported by CAMEDIA
Master/Pro (4.2SE or later)
can be displayed in the
thumbnail display. Sound files
(“sound link” function) and
movie files are not displayed.
15
Page 16

4 Repeat step 3, for all the images you want to share.
To rotate an image
In the selected photos area, select the image you want to rotate, and
click the [Rotate] tool button, then select [Clockwise 90°],
[Counterclockwise 90°], or [180°].
To edit an image
In the selected photos area, select the image you want to edit, and click
the [Edit] tool button to open the image editing window.
To remove an image from the selected photos area
Select the image you want to remove, and click the [Remove] button.
5 Enter the online album name.
6 Set the addressee.
1) Click the [Address] button.
This opens the [Address Book] dialog box.
For details on the image
editing window, see also the
CAMEDIA Master/Pro (4.2SE
or later) operating
instructions.
Address selection
Remove button
OK button
Add button
2) Select the addressee, and click the [Add] button.
This adds the selected addressee to the addressee list.
If the e-mail address is not in
the address book, refer to
“Saving e-mail addresses in
the address book” in the
CAMEDIA Master/Pro (4.2SE
or later) operating
instructions.
16
Page 17

To remove an addressee from the list
Select the addressee you want to remove, and click the [Remove]
button.
3) Click the [OK] button.
The selected addressee appears in the “To:” area of the Photo Share
window.
7 Enter the subject and message text.
Before going to step 8, make sure the address, subject, and online album
name area are filled in and the image files are attached. If you go to step
8 without entering all information, an error message will appear.
8 Click the [Share] button.
The JPEG format conversion progress dialog box appears.
The [Log In to Your Olympus Ofoto account] dialog box appears.
9 Enter your e-mail address and password, and click the [OK] button.
To save the password, check the [Save Password] box.
Image files start uploading.
Only images in JPEG format
can be handled by the
Olympus Digital Print Service
(powered by Ofoto) server. If
you select images that are not
in JPEG format, JPEG format
conversion starts when the
[Share] button is clicked.
If you select RAW image files,
development processing is
needed. Refer to “RAW
Development Processing” in
the CAMEDIA Master/Pro
(4.2SE or later) operating
instructions.
If you access Olympus Digital
Print Service powered by
Ofoto for the first time, you
have to register your user ID
to login to the server. Refer to
“Registering your user ID”
(page 18).
Recipients will receive an e-mail with the access information and online
album names. Now your friends and family can enjoy sharing the album
you created. Refer to “Overview of access limitations” (page 19) before
using the photo sharing function because there are differences in
usability depending on the user status.
17
Page 18

Registering your user ID
When accessing the Olympus Digital Print Service powered by Ofoto for the
first time, you must set up your account. The following information is needed to
complete the order.
• E-mail Address (You cannot enter the e-mail address you have already
registered.)
• Password
• Re-type your Password (Type your password again.)
• User name (Fill in the “First Name:” area.)
1 When the [Log In to Your Olympus Ofoto account] dialog box appears,
click the [Join Now] button.
The following dialog box appears.
2 Read all the terms in the service agreement, and if you agree, check the
[Agree] box and click the [OK] button.
The following dialog box appears.
18
Page 19

3 Fill in your e-mail address, password (Type your password again in the
“Re-type your Password” area), and your user name.
If you want to have the news mail delivered to you, click the check box
before clicking the [OK] button.
If your user ID is successfully registered, the image files start uploading.
If registration is not successful, an error message will appear. Follow the
instructions to finish registering the user ID.
Overview of access limitations
The table below describes the photo sharing functions that you and the people
whom you have sent an e-mail to for sharing your album can use depending
on the user status.
Registered user (own album): When a registered user is viewing their own
album
Registered user (other album): When a registered user is viewing someone
else’s album
Guest user: An unregistered user
Available functions Registered user
(Own album)
Make online album √ ––
Edit online album (Delete
album, Add image, Delete
image, Copy image)
Share online album √√–
Login by link in e-mail N/A √√
Display thumbnail index √√√
Enlarge image (One of the
image in the thumbnail
index)
View slide show √√√
Edit images in album
(crop, red-eye reduction,
rotate, instant fix, flip,
effects, borders)
Order prints online √√–
Access online photo
service
√ ––
√√√
√ ––
√ ––
Registered user
(Other album)
Guest user
(Available: √, Not available: –, Not Applicable: N/A)
19
Page 20

Appendixes
Technical Support
Contact for inquiries relating to this software.
OLYMPUS CORPORATION
Shinjuku Monolith, 3-1 Nishi-Shinjuku 2-chome, Shinjuku-ku, Tokyo, Japan
OLYMPUS AMERICA INC.
Two Corporate Center Drive, Melville, NY 11747-3157, U.S.A.
Tel. 631-844-5000
Technical Support (USA)
24/7 online automated help: http://www.olympusamerica.com/support
Phone customer support: Tel. 1-888-553-4448 (Toll-free)
Our Phone customer support is available from 8 a.m. to 10 p.m. (Monday to Friday) ET
E-Mail: distec@olympus.com
Olympus software updates can be obtained at: http://www.olympus.com/digital
20
Page 21

File Formats
Type Format Supported operations
Images Exif-JPEG (*.jpg) Display and saving
Exif-TIFF (*.tif) Display and saving
JFIF-JPEG (*.jpg) Display and saving
TIFF (*.tif) Display and saving
Bitmap (*.bmp) Display and saving (Windows version only)
RAW Data (*.orf) Display
PNG Display
PSD Display
• RAW
Format recorded when using Olympus digital cameras that support
RAW format
Functions Supported
Window name Function Ver sion
4.3 Pro
Online Print Online printing √√
Photo Share Photo sharing √√
21
Page 22

OLYMPUS CORPORATION
VT900401
 Loading...