

Page 1

BELLA
Kurzanleitung
Quick Reference Manual
Istruzioni sommarie
Die ausführliche Bedienungsanleitung nden Sie im Internet.
A detailed operating manual is available online.
Le istruzioni d’uso complete sono disponibili su internet.
www.olympia-vertrieb.de
Page 2
Inhalt
Sicherheitshinweise . . . . . . . . . . . . . . . . . . . . . . .3
Erste Schritte . . . . . . . . . . . . . . . . . . . . . . . . . . . . .7
Übersicht . . . . . . . . . . . . . . . . . . . . . . . . . . . . . . . .8
Verpackungsinhalt. . . . . . . . . . . . . . . . . . . . . . . .10
Mobiltelefon bedienen . . . . . . . . . . . . . . . . . . . . .17
Notruffunktion (SOS) . . . . . . . . . . . . . . . . . . . . . .24
Technische Eigenschaften . . . . . . . . . . . . . . . . .27
Entsorgung . . . . . . . . . . . . . . . . . . . . . . . . . . . . .28
Pegehinweise. . . . . . . . . . . . . . . . . . . . . . . . . . .29
Garantie . . . . . . . . . . . . . . . . . . . . . . . . . . . . . . . .30
Konformitätserklärung . . . . . . . . . . . . . . . . . . . .31
Page 3
Sicherheitshinweise
Bewahren Sie sich vor körperlichen Schäden und beachten Sie die
Hinweise!
Warnung! Es besteht die Gefahr eines elektrischen Schlags!
Niemals selbst das Mobiltelefon oder Komponenten öffnen
oder reparieren. Niemals blanke Kontakte mit metallischen
Gegenständen berühren. Niemals mit nassen Händen den
Ladeadapter stecken oder lösen.
Warnung! Es besteht Erstickungsgefahr! Von Kindern
fernhalten! Halten Sie Verpackungs- und Schutzfolien sowie
Akkus von Kindern fern. Bewahren Sie das Mobiltelefon und
Zubehör außerhalb der Reichweite von Kindern auf. Kleinkinder könnten Kleinteile oder Akkus verschlucken. Falls ein Akku
verschluckt wird, ist umgehend ein Arzt aufzusuchen.
3
Page 4

Vorsicht! Explosionsgefahr durch unsachgemäßes Austau-
Verletzungsgefahr für die Netzhaut. Die LED der
Verletzungsgefahr für die Netzhaut. Die LED der
schen oder Entnehmen des Akkus! Ersetzen Sie den Akku nur
durch einen vom Hersteller freigegebenen Typ und entsorgen
Sie den Akku fachgerecht.
Vorsicht! Entfernen Sie den Akku nicht, während das
Mo biltelefon geladen wird. Das Mobiltelefon kann dadurch
beschädigt werden. Entfernen Sie das Ladekabel von Ihrem
Mobiltelefon, bevor Sie den Akku austauschen oder entnehmen.
Vorsicht! Verletzungsgefahr für die Netzhaut. Die LED der
Taschenlampe ist sehr hell und kann Ihre Augen schädigen.
Blicken Sie nicht direkt in die LED der Taschenlampe, wenn die
Taschenlampe eingeschaltet ist.
4
Page 5
Vorsicht! Reduzieren Sie die Belastung durch Funkwellen.
Verwenden Sie bei längeren Telefonaten ein passendes
Headset. Bewahren Sie das Mobiltelefon nicht in Kopfnähe auf.
Vorsicht! Der Rufton wird über den Lautsprecher wiederge-
geben. Nehmen Sie zuerst den Anruf an und halten Sie dann
das Mobiltelefon an Ihr Ohr. So vermeiden Sie eine eventuelle
Schädigung des Gehörs.
Wichtig! Verwenden Sie das Mobiltelefon nicht in verbotenen
Bereichen! Verbotene Bereiche können z. B. Krankenhäuser,
Tankstellen, Flugzeuge u. ä. sein. Befolgen Sie die örtlichen
Vorschriften!
Wichtig! Bei der Absicherung für Notfälle nicht allein auf das
Mobiltelefon verlassen! Aus technischen Gründen ist es nicht
möglich, in jeder Situation sichere Verbindungen zu garantieren.
5
Page 6
Wichtig! Schützen Sie Ihr Gerät gegen Nässe, Staub,
Flüssigkeiten, Chemikalien, Dämpfe, Hitze und direkte Sonneneinstrahlung. Ihr Mobiltelefon ist nicht wasserdicht, halten Sie
es trocken.
Wichtig! Verwenden Sie ausschließlich das Originalzubehör.
Schließen Sie nur vom Hersteller freigegebenes Zubehör an.
Telefonieren während einer Autofahrt ist nur unter Beachtung
landesspezischer Regelungen erlaubt.
6
Page 7

Erste Schritte
Lesen Sie die Bedienungsanleitung aufmerksam und gehen Sie
wie beschrieben vor. So können Sie alle Funktionen zu Ihrer
Zufriedenheit nutzen.
Bestimmungsgemäße Verwendung
Dieses Mobiltelefon ist geeignet für die Verwendung innerhalb eines
Mobilfunknetzes. Jede andere Verwendung gilt als nicht bestimmungsgemäß. Eigenmächtige Veränderungen oder Umbauten sind
nicht zulässig. Öffnen Sie das Gerät in keinem Fall selbst und führen
Sie keine eigenen Reparaturversuche durch.
7
Page 8

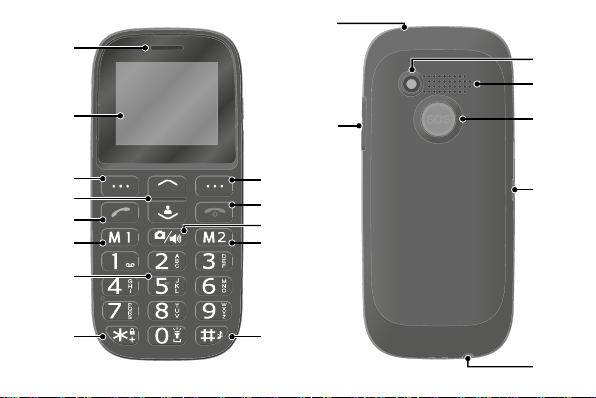
Übersicht
Die nebenstehende Abbildung zeigt Ihnen Ihr Mobiltelefon im Detail.
Machen Sie sich mit allen Bedienelementen vertraut, bevor Sie Ihr
Mobiltelefon in Betrieb nehmen.
1 Lautsprecher 11 Schnellzugriff
2 Display 12 Favoritentaste M2
3 Softkey links 13 Taste Raute
4 Navigationstaste 14 Taschenlampe (LED)
5 Taste Annehmen 15 Taste für Lautstärke
6 Favoritentaste M1 16 Kamera
7 Tastatur 17 Lautsprecher
8 Taste Stern 18 Notruf-Taste (SOS)
9 Softkey rechts 19 microUSB-Anschlussbuchse
10 Taste Auegen 20 Kopfhörer-Anschlussbuchse
8
Page 9
1
20
14
2
15
16
17
18
3
4
5
6
7
8
9
10
11
12
13
19
9
Page 10

Verpackungsinhalt
Prüfen Sie den Verpackungsinhalt Ihres Mobiltelefons, bevor Sie Ihr
Mobiltelefon in Betrieb nehmen. Sollte etwas fehlen oder beschädigt
sein, wenden Sie sich an unseren Service.
■ Mobiltelefon Bella
■ Akku
■ Ladeadapter
■ Ladeschale
■ USB-Anschluss-
kabel
■ Kurzanleitung
10
Page 11

SIM-Karte einlegen
Bevor Sie Ihr Mobiltelefon verwenden können,
müssen Sie Ihre SIM-Karte (nicht im Lieferumfang
enthalten) in Ihr Mobiltelefon einlegen. Verwenden Sie nur SIM-Karten im abgebildeten Format
(Mini-SIM). Bereits ausgebrochene micro- oder
nano-SIM-Karten können zu Kontaktproblemen
oder Funktionsausfällen führen. Wenn Sie eine
micro- oder nano-SIM-Karte verwenden möchten,
benötigen Sie einen entsprechenden Adapter.
S I M 1
1 Nehmen Sie die Akkufachabdeckung ab. Nutzen Sie dafür die Aus-
sparung an der unteren Seite der Akkufachabdeckung.
2 Setzen Sie Ihre SIM-Karte in den Steckplatz SIM 1 ein. Achten Sie
dabei auf die Ausrichtung der SIM-Karte.
11
Page 12
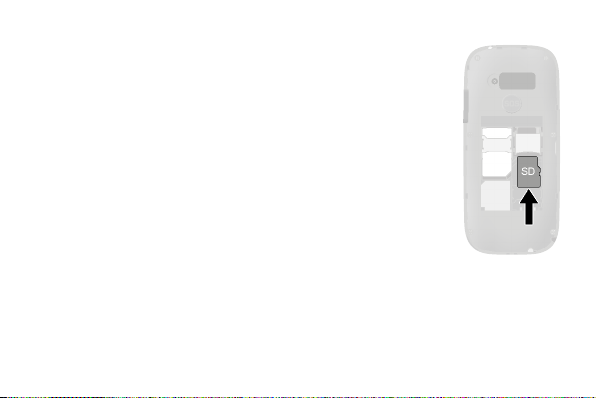
microSD-Speicherkarte einlegen
Wenn Sie den Speicher Ihres Mobiltelefons erweitern möchten, können Sie eine microSD-Speicherkarte (nicht im Lieferumfang enthalten) mit bis zu
32 GB Speicher in Ihr Mobiltelefon einlegen. Eine
microSD-Speicherkarte benötigen Sie bspw., wenn
Sie die Kamera verwenden möchten.
1 Legen Sie die microSD-Speicherkarte wie abge-
bildet mit den Kontakten nach unten in das Fach
ein. Achten Sie dabei auf die Ausrichtung der
microSD-Speicherkarte.
12
S D
Page 13

Akku einlegen
Bevor Sie Ihr Mobiltelefon verwenden können,
legen Sie den mitgelieferten Akku in Ihr Mobiltelefon ein.
1 Legen Sie den Akku wie abgebildet ein. Achten
Sie dabei auf die Ausrichtung des Akkus.
2 Setzen Sie die Akkufachabdeckung auf. Die
Akkufach abdeckung rastet hörbar ein.
13
Page 14
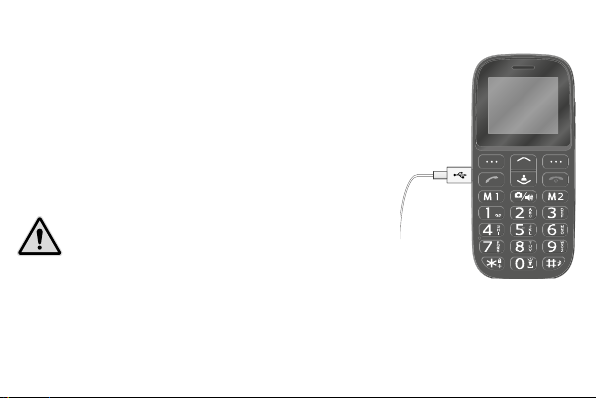
Akku auaden
1 Schließen Sie das Netzteil des Ladeadapters
an eine ordnungsgemäß installierte Steckdose an.
2 Schließen Sie den microUSB-Stecker an die
microUSB-Anschlussbuchse Ihres Mobiltelefons an. Der microUSB-Stecker ist verpolungssicher.
Vorsicht! Entfernen Sie den Akku
nicht, während das Mo biltelefon geladen
wird. Entfernen Sie das Ladekabel von Ihrem
Mobiltelefon, bevor Sie den Akku austauschen oder entnehmen.
3 Wenn der Akku Ihres Telefons vollständig geladen ist, trennen Sie
die Verbindung zur Stromversorgung.
14
Page 15

Akku auaden mit Ladeschale
1 Schließen Sie das Netzteil des Ladeadap-
ters an eine ordnungsgemäß installierte
Steckdose an.
2 Schließen Sie den microUSB-Stecker
an die microUSB-Anschlussbuchse der
Ladeschale an. Der microUSB-Stecker ist
verpolungssicher.
3 Stellen Sie das Mobiltelefon in die Lade-
schale.
4 Wenn der Akku Ihres Telefons vollständig
geladen ist, trennen Sie die Verbindung zur
Stromversorgung. So können Sie Ihren Stromverbrauch reduzieren.
15
Page 16

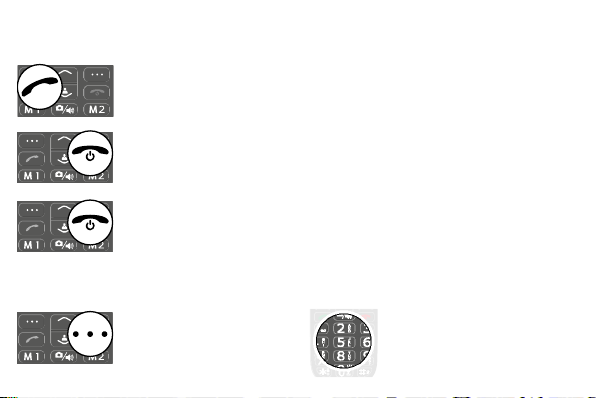
Mobiltelefon einschalten
Drücken Sie die Taste Auegen für 3 Sekunden. Ihr
Mobiltelefon wird eingeschaltet. Nach kurzer Zeit zeigt
das Display den Startbildschirm.
Mobiltelefon ausschalten
Drücken Sie die Taste Auegen für 3 Sekunden. Ihr
Mobiltelefon wird ausgeschaltet. Das Display er lischt.
Wenn Ihr Mobiltelefon ausgeschaltet ist, können Sie die
Notruffunktion (über die Notruf-Taste Ihres Mobiltelefons)
nicht nutzen.
16
Page 17

Mobiltelefon bedienen
Navigieren Sie mit den folgenden Tasten durch das Menü Ihres Mobiltelefons. Einige Tasten haben je nach Menü eine doppelte Belegung.
Detaillierte Informationen erhalten Sie in der ausführlichen Bedie-
nungsanleitung unter www.olympia-vertrieb.de
Navigieren Sie im Menü.
Verwerfen Sie Einstellungen oder navigieren Sie eine
Menüebene zurück. Auf dem Startbildschirm: Bildwahl
öffnen.
Öffnen Sie ein Untermenü oder bestätigen Sie Ihre
Eingaben.
17
Page 18
Wenn Sie Anrufe annehmen, beenden oder abweisen möchten,
verwenden Sie dafür die folgenden Tasten:
Nehmen Sie einen eingehenden Anruf an oder beginnen
Sie ein Gespräch.
Beenden Sie ein laufendes Gespräch.
Weisen Sie einen eingehenden Anruf ab.
Wenn Sie Rufnummern bzw. Ziffern eingeben oder Eingaben löschen
möchten, verwenden Sie dafür die folgenden Tasten:
Löschen Sie
Eingaben.
18
Geben Sie Ziffern bzw.
Buchstaben ein.
Page 19
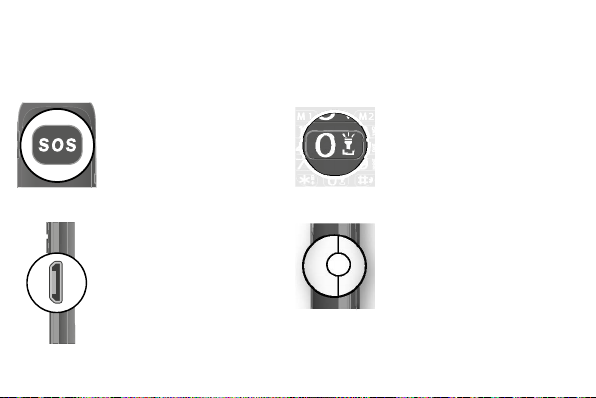
Die Bedienelemente an der Seite bzw. an der Unterseite Ihres
Telefons haben die folgenden Funktionen:
Lösen Sie einen
Notruf an gespeicherte Rufnummern
aus.
Laden Sie den Akku
Ihres Mobiltelefons
bzw. stellen Sie eine
Verbindung zu einem
Computer her.
Schalten Sie die
Taschenlampe Ihres
Mobiltelefons ein
bzw. aus.
Verbinden Sie
Kopfhörer, bspw. für
das Radiohören oder
das Telefonieren
während einer
Autofahrt.
19
Page 20

Die wichtigsten Funktionen im Überblick
In den folgenden Bedienschritten sehen Sie eingerahmte Texte. Diese
Rahmen symbolisieren Texte, die Sie im Display Ihres Mobiltelefons
sehen.
Sprache einstellen
1 Drücken Sie den linken Softkey, um das Hauptmenü zu öffnen.
2 Navigieren Sie zu ┣Einstellungen┫ è ┣Telefon┫ è ┣Sprache┫.
3 Wählen Sie Ihre Sprache aus.
Uhrzeit und Datum einstellen
1 Drücken Sie den linken Softkey, um das Hauptmenü zu öffnen.
2 Navigieren Sie zu ┣Einstellungen┫ è ┣Telefon┫ è ┣Uhrzeit und Datum┫ è
┣Uhrzeit und Datum einstellen┫ .
3 Geben Sie die aktuelle Uhrzeit und das aktuelle Datum ein.
4 Wählen Sie ┣Speichern┫ , um die Einstellung zu übernehmen.
20
Page 21

Kontakte zum Telefonbuch hinzufügen
Speichern Sie bis zu 300 Kontakte in Ihrem Telefonbuch.
1 Drücken Sie den linken Softkey, um das Hauptmenü zu öffnen.
2 Navigieren Sie zu ┣Telefonbuch┫ è ┣Neuer Kontakt┫ è ┣Neuer Kontakt┫.
3 Wählen Sie einen Speicherort (┣SIM Karte┫ bzw. ┣zum Telefon┫) .
4 Geben Sie den Namen und die Rufnummer ein.
5 Wählen Sie ┣Optio...┫ è ┣Speichern┫. Der neue Kontakt ist gespeichert.
Kontakte aus dem Telefonbuch anrufen
1 Drücken Sie den linken Softkey, um das Hauptmenü zu öffnen.
2 Navigieren Sie zu ┣Telefonbuch┫.
3 Wählen Sie den gewünschten Kontakt.
4 Drücken Sie die Taste Annehmen. Die Rufnummer wird gewählt.
21
Page 22

Bildwahl
Weisen Sie bis zu acht Ihrer favorisierten Kontakte Bilder zu. Diese
Bilder werden im Bildwahl-Menü angezeigt. Durch Auswählen dieser
Bilder wird die dem Kontakt zugeordnete Rufnummer angerufen. Detaillierte Informationen erhalten Sie in der ausführlichen Bedienungs-
anleitung unter www.olympia-vertrieb.de.
Kontakte zur Bildwahl hinzufügen
5 Navigieren Sie zu ┣Bildwahl-Kontakt┫.
6 Wählen Sie einen beliebigen Eintrag aus und wählen Sie ┣Bear...┫.
7 Geben Sie Namen und Rufnummer des Bildwahl-Kontakt ein.
8 Wählen Sie ┣Optio...┫ è ┣Speichern┫. Der neue Bildwahl-Kontakt ist ge-
speichert.
22
Page 23

Über Bildwahl anrufen
1 Drücken Sie den rechten Softkey, um das Menü der Bildwahl zu
öffnen.
2 Wählen Sie den gewünschten Bildwahl-Kontakt aus. Der Bildwa-
hl-Kontakt wird angerufen.
Bild zu Bildwahl-Kontakt hinzufügen
Wenn Sie einem Bildwahl-Kontakt ein Bild hinzufügen möchten,
können Sie entweder die Kamera Ihres Mobiltelefons verwenden oder
ein Bild von Ihrem Computer auf Ihr Mobiltelefon übertragen. Dafür
benötigen Sie eine microSD-Speicherkarte.
3 Navigieren Sie zu ┣Bildwahl-Kontakt┫.
4 Wählen Sie den gewünschten Bildwahl-Kontakt aus.
5 Wählen Sie ┣Optio...┫ è ┣Bearbeiten┫ è ┣Bildwahl┫ è ┣Optio...┫ è ┣Wählen┫.
6 Weisen Sie mit dem Datei-Manager ein Bild zu oder nehmen Sie
ein Foto mit der Kamera Ihres Mobiltelefons auf.
23
Page 24

7 Drücken Sie den linken Softkey und bestätigen Sie Ihre Einstellun-
gen mit ┣Speichern┫.
Notruffunktion (SOS)
Die Notruf-Taste (SOS) Ihres Mobiltelefons hat eine Notruffunktion.
Halten Sie die Notruf-Taste (SOS) ca. 3 Sekunden lang gedrückt,
wird ein Notruf ausgelöst. Dabei ertönt ein Alarmsignal und es werden
Notruf-Kurzmitteilungen an gespeicherte Rufnummern gesendet. Anschließend werden die gespeicherten Rufnummern im Freisprechmodus nacheinander angerufen.
Speichern Sie bis zu 5 Rufnummern, die Sie der Notruffunktion zuweisen möchten. Detaillierte Informationen zur Notruffunktion erhalten Sie
in der ausführlichen Bedienungsanleitung unter
www.olympia-vertrieb.de.
24
Page 25

Notruffunktion einschalten
1 Drücken Sie den linken Softkey, um das Hauptmenü zu öffnen.
2 Navigieren Sie zu ┣Einstellungen┫ è ┣SOS-Einstellungen┫ è ┣SOS-Alarm┫.
3 Drücken Sie den linken Softkey und wählen Sie ┣Ein┫.
Rufnummer zur Notruffunktion hinzufügen
1 Drücken Sie den linken Softkey, um das Hauptmenü zu öffnen.
2 Navigieren Sie zu ┣Einstellungen┫ è ┣SOS-Einstellungen┫ è ┣SOS-Rufnummern┫.
Weisen Sie keine ofziellen Notrufnummern zu. Ein Fehlalarm
verursacht erhebliche Kosten, die zu Ihren Lasten gehen können.
3 Wählen Sie einen freien Speicherplatz und geben Sie die Rufnum-
mer ein bzw. wählen Sie einen Kontakt aus Ihrem Telefonbuch.
4 Drücken Sie den linken Softkey und bestätigen Sie Ihre Einstellun-
gen mit ┣OK┫ .
25
Page 26

Bluetooth
Mit der Funktion Bluetooth, einem Standard zur Datenübertragung
über Funk, können Sie beispielsweise einen kompatiblen Kopfhörer
kabellos mit Ihrem Mobiltelefon verbinden.
Bluetooth einschalten
Schalten Sie die Funktion Bluetooth ein, wenn Sie kompatible Geräte
mit Ihrem Mobiltelefon verbinden möchten.
1 Drücken Sie den linken Softkey, um das Hauptmenü zu öffnen.
2 Navigieren Sie zu ┣Einstellungen┫ è ┣Bluetooth┫ è ┣Bluetooth┫ è ┣Status┫.
3 Drücken Sie den linken Softkey und schalten Sie die Funktion
Bluetooth ┣Ein┫.
Detaillierte Informationen zu Bluetooth erhalten Sie in der ausführli-
chen Bedienungsanleitung unter www.olympia-vertrieb.de
26
Page 27

Technische Eigenschaften
Frequenzband GSM: 850 / 900 / 1800 / 1900 MHz
Sendeleistung (max.) GSM: 1,58 W
Stromversorgung Eingang: 100 - 240 V, 50 - 60 Hz, 0,5 A
Akku 3,7 V, 600 mAh, bis zu 350 h Stand-by, bis zu
Display 1,77″ LCD mit Hintergrundbeleuchtung
Abmessungen ca. 118 x 54 x 10,8 mm
Gewicht ca. 68 g inkl. Akku
zul. Umgebungsbedingungen
Anschlüsse microUSB, 3,5-mm-Klinkenbuchse
Bluetooth: 2,402 - 2,480 GHz
Bluetooth: 2,51 mW
Ausgang: 5 V, 500 mAh
6 h Gesprächsdauer, max. 2 h Ladedauer
-10 °C bis 45 °C bei 30 % bis 75 % Luftfeuchte
27
Page 28

Entsorgung
Wollen Sie Ihr Gerät entsorgen, bringen Sie Ihr Gerät zur
Sammelstelle Ihres kommunalen Entsorgungsträgers
(z. B. Wertstoffhof). Nach dem Elektro- und Elektronikgerätege-
setz sind Besitzer von Altgeräten gesetzlich verpichtet, alte
Elektro- und Elektronikgeräte einer getrennten Abfallerfassung
zuzuführen. Das Symbol bedeutet, dass Sie das Gerät auf keinen Fall
in den Hausmüll werfen dürfen! Gefährdung von Gesundheit und
Umwelt durch Akkus! Akkus nie öffnen, beschädigen, verschlucken
oder in die Umwelt gelangen lassen. Akkus können giftige und
umweltschädliche Schwermetalle enthalten. Sie sind gesetzlich
verpichtet, Akkus beim batterievertreibenden Handel bzw. über die
vom zuständigen Entsorgungsträger bereitgestellten Sammelstellen
zu entsorgen. Die Entsorgung ist unentgeltlich.
Verpackungsmaterialien entsorgen Sie entsprechend den
lokalen Vorschriften.
28
Page 29

Pegehinweise
Reinigen Sie die Gehäuseoberächen mit einem weichen und
fusselfreien Tuch. Verwenden Sie keine Reinigungs- oder
Lösungsmittel.
29
Page 30

Garantie
Die Garantiezeit beträgt 24 Monate.
Die Garantiezeit beginnt ab Kaufdatum. Bitte bewahren Sie den Kaufbeleg und die Originalverpackung auf. Sollte ein Problem auftreten,
wenden Sie sich an unseren Service-Partner
Transimex Service GmbH
Krabbenweg 14
26388 Wilhelmshaven
Telefon
0180 5 007514
Mail
obs_kundendienst@transimex.de
30
(Kosten aus dem dt. Festnetz bei Drucklegung: 14 ct/Min., mobil maximal 42 ct/Min.)
Page 31

Konformitätserklärung
Hiermit erklärt die Olympia Business Systems Vertriebs GmbH, Zum
Kraftwerk 1, 45527 Hattingen, dass sich dieses Gerät in Übereinstimmung mit den grundlegenden Anforderungen und den anderen
relevanten Vorschriften der Richtlinie 2014/53/EG bendet.
Das CE-Kennzeichen auf den Geräten bestätigt die Konformi-
tät. Die Konformitätserklärung zu diesem Produkt
nden Sie unter http://productip.com/?f=6abc3
31
Page 32

Content
. . . . . . . . . . . . . . . . . . . . . . .
. . . . . . . . . . . . . . . . . . . . . . . .
. . . . . . . . . . . .
. . . . . . . . . . . . . . . . .
. . . . . . . . . . . . . . . . . . . . . .
. . . . . . . . . . . . . . . . .
Safety Instructions . . . . . . . . . . . . . . . . . . . . . . .33
First Steps . . . . . . . . . . . . . . . . . . . . . . . . . . . . . .37
General View . . . . . . . . . . . . . . . . . . . . . . . . . . . .38
Package Contents . . . . . . . . . . . . . . . . . . . . . . . .40
Operating the Mobile Phone . . . . . . . . . . . . . . . .47
Emergency Call Function (SOS) . . . . . . . . . . . .54
Technical Properties . . . . . . . . . . . . . . . . . . . . . .57
Disposal . . . . . . . . . . . . . . . . . . . . . . . . . . . . . . . .58
Care Instructions . . . . . . . . . . . . . . . . . . . . . . . . .59
Warranty . . . . . . . . . . . . . . . . . . . . . . . . . . . . . . . .60
Declaration of Conformity . . . . . . . . . . . . . . . . .61
32
Page 33

Safety Instructions
Avoid any personal injury by paying attention to the following informa-
tion!
Warning! Risk of electric shock! Never attempt to open and
repair the mobile phone or accessories yourself. Never touch
bare contacts with metallic objects. Never plug in or unplug the
charging adapter when your hands are wet.
Warning! Risk of suffocation! Keep out of reach of children!
Keep packaging materials and protective foils as well as
batteries out of reach of children. Keep the mobile phone and
any accessories out of reach of children. Small children can
swallow small parts or batteries. If a battery is swallowed, seek
medical assistance immediately.
33
Page 34

caution! Risk of explosion through improper replacement or
removal of the battery! Only replace the battery by a type
approved by the manufacturer and dispose of the battery
according to the applicable laws.
caution! Do not remove the battery while the mobile phone
is being charged. This could damage the phone. Disconnect
the charging cable from the mobile phone before changing or
removing the battery.
caution! Risk of injury to the retina. The LED for the torch is
very bright and could cause damage to eyes. Never look
directly into the LED torch beam when the torch is switched on.
34
Page 35

caution! Reduce exposure to radio waves! Use an appropri-
ate headset for longer calls. Do not keep the mobile phone
near your head.
caution! The ring tone is issued via the loudspeaker. Take
an incoming call rst and then hold the mobile phone to your
ear. This prevents any possible hearing damage.
important! Do not use the phone in prohibited areas! Prohib-
ited areas could include hospitals, petrol stations, aeroplanes,
etc. Please observe local regulations!
important! With regard to emergencies, do not rely on the
mobile phone alone! For technical reasons, it is not possible to
guarantee a reliable connection in every situation.
35
Page 36

important! Protect the device from moisture, dust, liquids,
chemicals, vapours, heat and direct sunlight. The phone is not
waterproof; therefore, keep it dry.
important! Only use original accessories. Only connect
accessories approved by the manufacturer. Telephoning while
driving is only permitted when the applicable legal regulations
are observed.
36
Page 37

First Steps
Read the instruction manual carefully and proceed as described. This will enable you to use all the functions to your full
satisfaction.
Intended Use
This mobile phone is designed for use within a mobile phone network.
Any other use is considered unintended use. Unauthorised modication or alterations are not permitted. Under no circumstances open the
device or complete any repair work yourself.
37
Page 38

General View
The following illustration shows details of the mobile phone. Familiarise yourself with all the operating elements before starting to use the
mobile phone.
1 Loudspeaker 11 Quick Access
2 Display 12 Favorites key M2
3 Softkey, left 13 Hash key
4 Navigation key 14 Torch lamp (LED)
5 Call key 15 Volume key
6 Favorites key M1 16 Camera
7 Keypad 17 Loudspeaker
8 Star key 18 Emergency call key (SOS)
9 Softkey, right 19 MicroUSB connection port
10 On-hook key 20 Headphone connection port
38
Page 39

1
20
14
2
15
16
17
18
3
4
5
6
7
8
9
10
11
12
13
19
39
Page 40

Package Contents
Before starting up the mobile phone, check the package contents. If
anything is missing or damaged, please contact our Service department.
■ Bella mobile phone
■ Battery
■ Charging adapter
■ Charging cradle
■ USB connection cable
■ Quick Reference Manual
40
Page 41

Inserting the SIM Card
Before you can start to use the mobile phone,
you must insert your SIM card (not included in the
equipment supplied) in the phone. Only use SIM
cards of the size illustrated (mini SIM). Micro or
nano cards which have already been broken out
can cause contact problems or malfunctions. If
you want to use a micro or nano SIM card, you will
need an appropriate adapter.
S I M 1
1 Remove the battery compartment cover. Use the
recess at the bottom of the battery compartment cover.
2 Insert the SIM card in the slot labelled SIM 1. Ensure the SIM card is
aligned correctly.
41
Page 42

Inserting the MicroSD Memory Card
If you want to increase the memory capacity of the
mobile phone, you can insert a microSD memory
card (not included in the equipment supplied) with
a memory of up to 32 GB in the mobile phone. A
microSD memory card is necessary, for instance,
when you want to use the camera.
1 Place the microSD memory card with the
contacts facing down in the compartment, as
illustrated. Ensure the microSD memory card is
aligned correctly.
42
S D
Page 43

Inserting the Battery
Before you can use the mobile phone, you must
insert the battery supplied in the mobile phone.
1 Insert the battery as illustrated. Ensure the bat-
tery is aligned correctly.
2 Replace the battery compartment cover. The
battery compartment cover latches audibly into
place.
43
Page 44

Charging the Battery
1 Connect the power adapter plug on the
charging adapter to a properly installed power
socket.
2 Connect the microUSB plug to the microUSB
connection port on the mobile phone. The
microUSB plug is protected against reverse
polarity.
caution! Do not remove the battery
while the mobile phone is being charged.
Disconnect the charging cable from the mobile
phone before changing or removing the battery.
3 When the phone battery is fully charged, disconnect the connection
to the power supply.
44
Page 45

Charging the battery, charging cradle
1 Connect the power adapter plug on the
charging adapter to a properly installed
power socket.
2 Connect the microUSB plug to the micro-
USB connection port on the charging
cradle. The microUSB plug is protected
against reverse polarity.
3 Place the mobile phone in the charging
cradle.
4 When the phone battery is fully charged,
disconnect the connection to the power
supply. This reduces power consumption.
45
Page 46

Switching On the Mobile Phone
Press the On-hook key for 3 seconds. The mobile
phone is switched on. The start screen appears in the
display after a short time.
Switching Off the Mobile Phone
Press the On-hook key for 3 seconds. The mobile
phone is switched off. The display goes out.
When the mobile phone is switched off, you cannot use
the emergency call function (via the SOS key on the
mobile phone).
46
Page 47

Operating the Mobile Phone
Use the following keys to navigate through the menus provided by the
mobile phone. Some keys are assigned two functions depending on
the menu. Further information is available online in the detailed operating manual at www.olympia-vertrieb.de
Navigating in the menu.
Discard the settings or navigate one menu level back.
On the start screen: Open the Caller Picture menu.
Open a submenu or conrm your entries.
47
Page 48

When you want to take, end or reject calls, use the following keys:
Take an incoming call or begin a conversation.
End a call in progress.
Reject an incoming call.
When you want to enter phone numbers and digits or delete entries,
use the following keys:
48
Delete entries.
Enter digits and letters.
Page 49

The operating elements on the sides or rear of the phone are
assigned the following functions:
Trigger an emergency call to the stored
phone numbers.
Charge the mobile
phone battery or
establish a connection to a computer.
Switch the torch
integrated in the
phone on and off.
Connect the headphones, e.g. to listen
to the radio or take a
call while driving a
car.
49
Page 50

Overview of the Most Important Functions
Framed texts are provided in the following operating steps. These
frames indicate texts which can appear in the display of the mobile
phone.
Setting the language
1 Press the left-hand softkey to open the main menu.
2 Navigate to ┣Settings┫ è ┣Phone settings┫ è ┣Language┫.
3 Select the required language.
Setting the time and date
1 Press the left-hand softkey to open the main menu.
2 Navigate to ┣Settings┫ è ┣Phone settings┫ è ┣Set date and time┫ è
┣Set date and time┫ .
3 Enter the current time and date.
4 Select ┣Save┫ to activate the setting.
50
Page 51

Adding a contact to the phone book
You can store up to 300 contacts in the phone book.
1 Press the left-hand softkey to open the main menu.
2 Navigate to ┣Phonebook┫ è ┣Add new contact┫ è ┣Add new contact┫.
3 Select a storage location (┣To SIM┫ or ┣To phone┫) .
4 Enter the name and phone number.
5 Select ┣Option┫ è ┣Save┫ . The new contact is saved.
Dialling contacts from the phone book
1 Press the left-hand softkey to open the main menu.
2 Navigate to ┣Phonebook┫.
3 Select the required contact.
4 Press the Call key. The number is dialled.
51
Page 52

Dialling Picture Contacts
You can assign a picture to each of your eight favourite contacts.
These pictures are displayed in the Caller Picture menu. On selecting
a picture, the phone number of the contact assigned to the picture is
dialled. Further information is available online in the detailed operating
manual at www.olympia-vertrieb.de.
Adding contacts to the caller picture menu
1 Navigate to ┣Photo contact┫.
2 Select the entry you want, and select ┣Edit┫.
3 Enter the name and phone number of the picture contact.
4 Select ┣Option┫ è ┣Save┫ . The new picture contact is saved.
52
Page 53

Dialling via the picture menu
1 Press the right-hand softkey to open the Caller Picture menu.
2 Select the required picture contact. The picture contact is dialled.
Adding a picture to the caller picture contacts
When you want to assign a picture to a contact, you can either use the
camera integrated in the mobile phone or transfer a picture stored on
your computer to the mobile phone. In this case, you need a microSD
memory card.
3 Navigate to ┣Photo contact┫.
4 Select the required picture contact.
5 Select ┣Option┫ è ┣Edit┫ è ┣Caller picture┫ è ┣Option┫ è ┣Select┫.
6 Use the File Manager to assign a picture or take a photo with the
camera integrated in the mobile phone.
7 Press the left-hand softkey and conrm your settings with ┣Save┫ .
53
Page 54

Emergency Call Function (SOS)
The emergency call key (SOS) on your mobile phone has an emergency call function. Press and hold the emergency call key (SOS)
for approx. 3 seconds to trigger an emergency call. An alarm signal
sounds and emergency text messages are sent to stored phone
numbers. After that, the respective phone numbers stored are dialled
in succession in handsfree mode.
You can store up to 5 phone numbers which can be assigned to the
emergency call function. Further information on the SOS function is
available online in the detailed operating manual at
www.olympia-vertrieb.de.
54
Page 55

Activating the emergency call function
1 Press the left-hand softkey to open the main menu.
2 Navigate to ┣Settings┫ è ┣SOS settings┫ è ┣SOS alarm┫.
3 Press the left-hand softkey and select ┣On┫.
Adding a phone number to the emergency call function
1 Press the left-hand softkey to open the main menu.
2 Navigate to ┣Settings┫ è ┣SOS settings┫ è ┣SOS numbers┫.
Do not assign any ofcial emergency call service numbers. A false
alarm can lead to considerable costs which could be charged to
you.
3 Select a free storage location and enter the required phone number
or select a contact from the phone book.
4 Press the left-hand softkey and conrm your settings by selecting
┣OK┫ .
55
Page 56

Bluetooth
The Bluetooth function, a standard for data transfer via wireless communication, can be used to connect a compatible headphone to the
mobile phone without the need for any cables.
Activating Bluetooth
Switch the Bluetooth function on when you want to connect compatible devices to your mobile phone.
1 Press the left-hand softkey to open the main menu.
2 Navigate to ┣Settings┫ è ┣Connectivity┫ è ┣Bluetooth┫ è ┣Power┫.
3 Press the left-hand softkey and switch the Bluetooth function ┣On┫.
Further information on the Bluetooth function is available online in the
detailed operating manual at www.olympia-vertrieb.de
56
Page 57

Technical Properties
Frequency band GSM: 850 / 900 / 1,800 / 1,900 MHz
Sending power
(max.)
Power supply Input: 100 - 240 V, 50 - 60 Hz, 0.5 A
Battery 3.7 V, 600 mAh, up to 350 hours standby,
Display 1.77″ LCD with back-lighting
Dimensions Approx. 118 x 54 x 10.8 mm
Weight Approx. 68 g incl. battery
Ambient conditions -10 °C to 45 °C at 30% to 75% humidity
Connections MicroUSB, 3.5 mm jack socket
Bluetooth: 2,402 - 2,480 GHz
GSM: 1.58 W
Bluetooth: 2.51 mW
Output: 5 V, 500 mAh
up to 6 hours talk time, max. charging time
approx. 2 h
57
Page 58

Disposal
In order to dispose of your device, take it to a collection point
provided by your local public waste authorities (e.g. recycling
centre). According to laws on the disposal of electronic and
electrical devices, owners are obliged to dispose of old
electronic and electrical devices in a separate waste container. The
symbol indicates that the device must not be disposed of in normal
domestic waste! Risk to health and the environment through
batteries! Never open, damage or swallow batteries or allow them to
pollute the environment. Batteries may contain toxic, ecologically
hazardous heavy metals. You are legally obliged to dispose of
batteries and power packs at a battery retailer or in the corresponding
containers provided at collection points by local public waste authorities. Disposal is free of charge.
Packaging materials must be disposed of according to local
regulations.
58
Page 59

Care Instructions
Clean the housing surfaces with a soft, uff-free cloth. Do not use any
solvents or cleaning agents.
59
Page 60

Warranty
Dear customer,
we are pleased that you have chosen this equipment.
In the case of a defect, please return the device together with the
receipt and original packing material to the point of sale.
60
Page 61

Declaration of Conformity
Olympia Business Systems Vertriebs GmbH, Zum Kraftwerk 1,
45527 Hattingen hereby declares that this device fulls the basic
requirements and other relevant provisions stipulated in the Directive
2014/53/EC.
The CE marks on the devices conrm their conformity. The
Declaration of Conformity for this product is
available at http://productip.com/?f=6abc3
61
Page 62

62
Contenuto
Indicazioni di sicurezza. . . . . . . . . . . . . . . . . . . .63
Primi passi . . . . . . . . . . . . . . . . . . . . . . . . . . . . . .67
Vista generale . . . . . . . . . . . . . . . . . . . . . . . . . . .68
Contenuto della confezione . . . . . . . . . . . . . . . .70
Comandare il telefonino . . . . . . . . . . . . . . . . . . .77
Funzione di chiamata d’emergenza (SOS) . . . .84
Dati tecnici . . . . . . . . . . . . . . . . . . . . . . . . . . . . . .87
Smaltimento . . . . . . . . . . . . . . . . . . . . . . . . . . . . .88
Consigli per la cura . . . . . . . . . . . . . . . . . . . . . . .89
Garanzia . . . . . . . . . . . . . . . . . . . . . . . . . . . . . . . .90
Page 63

Indicazioni di sicurezza
Evitare lesioni siche e osservare le indicazioni!
aVVertenza! Pericolo di scosse elettriche! Non aprire o
riparare mai autonomamente il telefonino o suoi componenti.
Non sorare mai i contatti a nudo con oggetti metallici. Non
introdurre mai mani bagnate nell’adattatore di carica, né
scollegarlo mai con mani bagnate.
aVVertenza! Pericolo di soffocamento! Tenere lontano dalla
portata dei bambini! Tenere lontano le pellicole protettive e
d'imballaggio come pure le batterie dalla portata dei bambini.
Conservare il telefonino e gli accessori lontano dalla portata
dei bambini. I bambini piccoli potrebbero ingerire componenti
minuti o batterie. In caso di ingestione di una batteria, consulta-
re immediatamente un medico.
63
Page 64

attenzione! Pericolo di esplosione dovuto alla sostituzione
o all’estrazione non corretta della batteria ricaricabile! Sostitui-
re la batteria ricaricabile solo con un tipo di batteria autorizzato
dal produttore e smaltire la batteria esausta secondo quanto
prescritto.
attenzione! Non rimuovere la batteria mentre il telefonino è
in fase di carica. Un simile intervento potrebbe danneggiare il
telefonino. Rimuovere il cavo di carica dal telefonino prima di
sostituire o estrarre la batteria ricaricabile.
attenzione! Pericolo di lesioni per la retina. Il LED della
torcia è molto luminoso e può danneggiare gli occhi dell'utiliz-
zatore. Non puntare gli occhi direttamente sul LED della torcia
con torcia inserita.
64
Page 65

attenzione! Ridurre le sollecitazioni dovute alle onde radio.
Utilizzare durante la conduzione di lunghe conversazioni un
headset idoneo. Non conservare il telefonino vicino alla testa.
attenzione! Il segnale di chiamata è riprodotto dall'altopar-
lante. Accettare la chiamata sempre prima di avvicinare il
telefonino all'orecchio. In questo modo si evitano eventuali
danni all'udito.
importante! Non utilizzare il telefonino in zone in cui se ne
vieta l’uso! Zone soggette al divieto d’uso del telefonino sono
ad es. ospedali, stazioni di rifornimento carburante, aerei e
simili. Seguire le indicazioni previste sul luogo!
importante! Non afdarsi unicamente al funzionamento del
telefonino per assicurare possibili interventi d’emergenza! Per
motivi tecnici non è possibile garantire un corretto collegamen-
to in qualsiasi circostanza e situazione.
65
Page 66

importante! Proteggere l'apparecchio da umidità, polvere,
liquidi, sostanze chimiche, vapori, calore e raggi solari diretti. Il
telefonino non è a tenuta d’acqua, mantenerlo asciutto.
importante! Utilizzare esclusivamente accessori e dotazioni
originali. Collegare solo gli accessori consigliati dal produttore.
La conduzione di telefonate durante un viaggio in macchina è
consentita solo dietro osservanza delle norme e disposizioni
valide nel rispettivo paese di impiego.
66
Page 67

Primi passi
Leggere attentamente e osservare le istruzioni d'uso. In questo
modo sarà possibile usufruire di tutte le funzioni in modo
soddisfacente.
Impiego conforme agli usi previsti
Il presente telefonino è preposto all'uso in una rete di telefonia mobile.
Qualsiasi altro impiego è considerato improprio. Non sono ammesse modiche o variazioni arbitrarie. Non aprire per nessuna ragione
l'apparecchio autonomamente e non svolgere riparazioni di propria
iniziativa.
67
Page 68

Vista generale
La seguente gura illustra il telefonino in dettaglio. Si consiglia di
familiarizzare con gli elementi di comando prima di mettere in funzione
il telefonino.
1 Altoparlante 11 Accesso rapido
2 Display 12 Tasto dei preferiti M2
3 Softkey a sinistra 13 Tasto Cancelletto
4 Tasto di navigazione 14 Torcia (LED)
5 Tasto Accettare 15 Tasto per volume
6 Tasto dei preferiti M1 16 Fotocamera
7 Tastierino 17 Altoparlante
8 Tasto Asterisco 18 Tasto di chiamata d'emegenza (SOS)
9 Softkey a destra 19 Presa per microUSB
10 Tasto Riagganciare 20 Presa per auricolare
68
Page 69

1
20
14
2
15
16
17
18
3
4
5
6
7
8
9
10
11
12
13
19
69
Page 70

Contenuto della confezione
Vericare il contenuto della confezione del telefonino prima di metterlo
in funzione. In caso dovesse mancare qualcosa o risultare danneggiato, si prega di rivolgersi al nostro servizio di assistenza.
■ Telefonino Bella
■ Batteria
■ Adattatore di carica
■ Basetta di carica
■ Cavo di allacciamento USB
■ Istruzioni sommarie
70
Page 71

Inserire la scheda SIM
Prima di poter utilizzare il telefonino è necessario
inserire la propria scheda SIM (non inclusa nella
confezione) nel telefonino. Utilizzare solo schede
SIM nel formato rafgurato (mini SIM). Schede
micro SIM o nano SIM già staccate potrebbero causare problemi di contatto o pregiudicare il corretto
funzionamento del dispositivo. Se si intende utilizzare una scheda micro SIM o nano SIM, è necessario ricorrere ad un apposito adattatore.
S I M 1
1 Rimuovere il coperchio del vano batteria. Servirsi della rientranza
sul lato inferiore del coperchio del vano batteria.
2 Inserire la propria scheda SIM nello slot SIM 1. Tenere in parti-
colare conto dell’orientamento della scheda SIM.
71
Page 72

Inserire la scheda microSD
Se si intende ampliare la memoria del proprio telefonino, è consentito inserire una scheda memoria
microSD supplementare (non inclusa nella confezione) con no a 32 GB di memoria. La scheda memoria microSD è ad esempio necessaria qualora si
volesse utilizzare la fotocamera.
1 Inserire la scheda memoria microSD nell’allog-
giamento, come rafgurato, con i contatti rivolti
in basso. Tenere in particolare conto dell’orientamento della scheda memoria microSD.
72
S D
Page 73

Inserire la batteria
Prima di poter utilizzare il telefonino è necessario
inserire nel telefonino la batteria ricaricabile fornita
in dotazione.
1 Inserire la batteria come rafgurato. Tenere in
particolare conto dell’orientamento della batteria.
2 Applicare il coperchio del vano batteria. Il co-
perchio del vano batteria scatta in posizione in
maniera udibile.
73
Page 74

Caricare la batteria
1 Collegare l’alimentatore dell’adattatore di
carica ad una presa elettrica installata correttamente.
2 Collegare il connettore microUSB alla
porta microUSB del proprio telefonino. Il
connettore microUSB è realizzato in modo da
escludere un’inversione della polarità.
attenzione! Non rimuovere la batteria
mentre il telefonino è in fase di carica.
Rimuovere il cavo di carica dal telefonino prima
di sostituire o estrarre la batteria ricaricabile.
3 Una volta che la batteria del telefonino è completamente carica,
scollegare l'apparecchio dall'alimentazione elettrica.
74
Page 75

Caricare la batteria con basetta di ricarica
1 Collegare l’alimentatore dell’adattatore
di carica ad una presa elettrica installata
correttamente.
2 Collegare il connettore microUSB alla
porta microUSB della basetta di ricarica. Il
connettore microUSB è realizzato in modo
da escludere un’inversione della polarità.
3 Riporre il telefonino nella basetta di ricari-
ca.
4 Una volta che la batteria del telefonino è
completamente carica, scollegare l'apparecchio dall'alimentazione elettrica. In questo modo è possibile
limitare il consumo di energia elettrica.
75
Page 76

Accendere il telefonino
Premere il tasto Riagganciare per 3 secondi. Il telefonino viene inserito. Poco dopo il display visualizza la
schermata iniziale.
Spegnere il telefonino
Premere il tasto Riagganciare per 3 secondi. Il telefonino viene disinserito. Il display si spegne.
Con telefonino disinserito non è possibile utilizzare la
funzione di chiamata d'emergenza (tramite con tasto di
chiamata d'emergenza del proprio telefonino).
76
Page 77

Comandare il telefonino
Navigare con i seguenti tasti nel menu del proprio telefonino. A seconda del menu in cui ci si trova, ad alcuni tasti sono abbinate doppie
funzioni. Ulteriori informazioni sono riportate nelle istruzioni d'uso
complete disponibili su www.olympia-vertrieb.de
Navigare nel menu.
Annullare le impostazioni oppure navigare nel menu
indietro di un livello. Sulla schermata iniziale: aprire la
funzione di chiamata contatto tramite foto.
Aprire un sottomenu o confermare le proprie immissioni.
77
Page 78

Per accettare, concludere o respingere telefonate, utilizzare i seguenti
tasti:
Accettare una chiamata in arrivo o avviare una conversazione.
Concludere una chiamata in corso.
Respingere una chiamata in arrivo.
Per immettere un numero telefonico o delle cifre o per cancellare
immissioni errate, utilizzare i seguenti tasti:
Cancellare le
immissioni.
78
Immettere cifre o
lettere.
Page 79

Gli elementi di comando presenti al lato o in basso al telefonino
hanno le seguenti funzioni:
Lanciare una
chiamata d'emergenza chiamando i
numeri memorizzati.
Caricare la batteria
del telefonino o
instaurare un
collegamento con un
computer.
Accendere o
spegnere la torcia
del proprio telefoni-
no.
Collegare l'auricolare
ad es. per ascoltare
la radio o per
telefonare durante
un viaggio in
macchina.
79
Page 80

Riepilogo delle funzioni più importanti
Nei seguenti passaggi ricorrono alcuni testi incorniciati. Queste cornici
simbolizzano testi visualizzati sul display del proprio telefonino.
Impostare la lingua
1 Premere il softkey a sinistra per aprire il menu principale.
2 Navigare alla voce ┣Impostazioni┫ è ┣Telefono┫ è ┣Lingua┫.
3 Selezionare la propria lingua.
Impostare orario e data
1 Premere il softkey a sinistra per aprire il menu principale.
2 Navigare alla voce ┣Impostazioni┫ è ┣Telefono┫ è ┣Ora e Data┫ è
┣Imposta ora e data┫ .
3 Inserire la data e l’orario attuali.
4 Selezionare ┣Salva┫ per assumere l'impostazione.
80
Page 81

Aggiungere contatti alla rubrica
Salvare no a 300 contatti nella propria rubrica.
1 Premere il softkey a sinistra per aprire il menu principale.
2 Navigare alla voce ┣Rubrica┫ è ┣Aggiungi nuovo contatto┫ è
┣Aggiungi nuovo contatto┫.
3 Selezionare una posizione di memoria (┣Alla SIM┫ o ┣Su Telefono┫) .
4 Inserire il nome e il numero telefonico.
5 Selezionare ┣Opzioni┫ è ┣Salva┫ . Il nuovo contatto è salvato.
Chiamare contatti presenti in rubrica
1 Premere il softkey a sinistra per aprire il menu principale.
2 Navigare alla voce ┣Rubrica┫.
3 Selezionare il contatto richiesto.
4 Premere il tasto Accettare. Il numero di chiamata è selezionato.
81
Page 82

Chiamata contatto tramite foto
Abbinare una foto a un massimo di 8 dei propri contatti preferiti. Le
foto abbinate sono visualizzate nel menu Chiamata contatto tramite
foto. Alla selezione di queste foto corrisponde la composizione del
numero telefonico rispettivamente abbinato. Ulteriori informazioni
sono riportate nelle istruzioni d'uso complete disponibili su www.
olympia-vertrieb.de.
Aggiungere contatti per la chiamata contatto tramite foto
1 Navigare alla voce ┣Immagine co...┫.
2 Selezionare un contatto a piacere, quindi selezionare ┣Modifica┫.
3 Immettere il nome e il numero telefonico del contatto da chiamare
tramite foto.
4 Selezionare ┣Opzioni┫ è ┣Salva┫ . Il nuovo contatto da chiamare tramite
foto è memorizzato.
82
Page 83

Chiamare il contatto tramite foto
1 Premere il softkey a destra per aprire la funzione di chiamata
contatto tramite foto.
2 Selezionare il contatto da chiamare tramite foto. Il contatto è chia-
mato tramite foto.
Aggiungere la foto alla funzione di chiamata contatto
tramite foto
In caso si volesse usufruire della funzione di chiamata contatto tramite
foto, è possibile riprendere una foto con la fotocamera del proprio
telefonino oppure trasferire una foto dal proprio PC sul telefonino.
3 Navigare alla voce ┣Immagine co...┫.
4 Selezionare il contatto da chiamare tramite foto.
5 Selezionare ┣Opzioni┫ è ┣Modifica┫ è ┣Immagine chiamante┫ è ┣Opzioni┫ è┣Selez..┫.
6 Aggiungere una foto attraverso il File manager oppure riprendere
una foto con la fotocamera del proprio telefonino.
83
Page 84

1 Premere il softkey a sinistra e confermare le proprie impostazioni
con ┣Salva┫ .
Funzione di chiamata d’emergenza (SOS)
Il tasto di chiamata d'emergenza (SOS) del telefonino è dotato
di funzione di chiamata d'emergenza. Tenere premuto il tasto di
chiamata d'emergenza (SOS) per ca. 3 secondi per lanciare una
chiamata d'emergenza. Si avverte un segnale di allarme e il telefonino
invia un messaggio breve d’emergenza ai numeri telefonici precedentemente salvati. I numeri telefonici memorizzati sono quindi chiamati
uno dopo l’altro con vivavoce inserito.
Salvare no a 5 numeri di chiamata da abbinare alla funzione di chiamata d’emergenza. Ulteriori informazioni sulla funzione di chiamata
d'emergenza sono riportate nelle istruzioni d'uso complete disponibili
su www.olympia-vertrieb.de.
84
Page 85

Attivare la funzione di chiamata d'emergenza
1 Premere il softkey a sinistra per aprire il menu principale.
2 Navigare alla voce ┣Impostazioni┫ è ┣SOS┫ è ┣Stato┫.
3 Premere il softkey a sinistra e selezionare ┣Acceso┫.
Aggiungere un numero telefonico alla funzione di
chiamata d'emergenza
1 Premere il softkey a sinistra per aprire il menu principale.
2 Navigare alla voce ┣Impostazioni┫ è ┣SOS┫ è ┣Numeri SOS┫.
Non associare numeri di pronto intervento pubblici. Un falso
allarme è legato a considerevoli costi messi in conto al proprio
recapito.
3 Selezionare una posizione di memoria libera e immettere il numero
telefonico ovvero selezionare un contatto.
4 Premere il softkey a sinistra e confermare le impostazioni con ┣OK┫ .
85
Page 86

Bluetooth
Con la funzione Bluetooth, uno standard della trasmissione di dati via
radio, è ad esempio possibile collegarsi senza li al proprio telefonino
attraverso un auricolare compatibile.
Attivare la funzione Bluetooth
Attivare la funzione Bluetooth qualora si volesse collegare un dispositivo compatibile con il proprio telefonino.
1 Premere il softkey a sinistra per aprire il menu principale.
2 Navigare alla voce ┣Impostazioni┫ è ┣Connettività┫ è ┣Bluetooth┫ è ┣Bluetooth┫.
3 Premere il softkey a sinistra e selezionare per la funzione Blueto-
oth ┣Acceso┫.
Ulteriori informazioni su Bluetooth sono riportate nelle istruzioni d'uso
complete disponibili su www.olympia-vertrieb.de
86
Page 87

Dati tecnici
Banda di frequenza GSM: 850 / 900 / 1800 / 1900 MHz
Potenza di trasmissione (max.)
Alimentazione elettri-caIngresso: 100 - 240 V, 50 - 60 Hz, 0,5 A
Batteria 3,7 V, 600 mAh, no a 350 h in stand-by, no
Display LCD da 1,77″ retroilluminato
Dimensioni ca. 118 x 54 x 10,8 mm
Peso ca. 68 g inclusa batteria
Condizioni
ambientali ammesse
Collegamenti microUSB, presa jack da 3,5 mm
Bluetooth: 2,402 - 2,480 GHz
GSM: 1,58 W
Bluetooth: 2,51 mW
Uscita: 5 V, 500 mAh
a 6 h di autonomia di conversazione, max. 2 h
durata di carica
da -10 °C a 45 °C con 30%-75% di umidità
dell'aria
87
Page 88

Smaltimento
Per smaltire l'apparecchio, consegnarlo in un punto di raccolta
istituito dalla propria società di smaltimento riuti comunale (ad
es. centro di riciclo materiali). Secondo quanto previsto dalla
legge sugli apparecchi elettrici ed elettronici, i proprietari di
apparecchi esauriti sono per legge tenuti alla consegna di tutti gli
apparecchi elettrici ed elettronici presso un centro di rilievo riuti in
raccolta differenziata. Il simbolo indica che non è assolutamente
consentito smaltire l'apparecchio assieme ai normali riuti domestici!
Batterie e pile possono provocare danni alla salute e all'ambiente! Non aprire, danneggiare, ingerire o disperdere mai nell'ambiente le
batterie. Le batterie ricaricabili possono contenere metalli pesanti
nocivi e dannosi per l'ambiente. Per legge sussiste l'obbligo di
consegnare batterie e pile presso rivenditori di batterie o centri di
riciclo utilizzando gli appositi contenitori di raccolta e provvedendo in
tal modo al corretto smaltimento. Lo smaltimento è gratuito.
88
Page 89

Smaltire confezioni ed imballaggi in base a quanto indicato dalle
norme in vigore a livello locale.
Consigli per la cura
Pulire le superci dell'apparecchio con un panno morbido e antipelucchi. Non utilizzare mai detergenti o solventi.
89
Page 90

Garanzia
Caro cliente,
ci congratuliamo con Lei per aver scelto questo apparecchio. In caso
di difetti la preghiamo di ritornare l’apparecchio, completo di imballo
originale e scontrino di acquisto, al punto vendita dove è stato effettuato l’acquisto.
90
Page 91

Dichiarazione di conformità
Olympia Business Systems Vertriebs GmbH, Zum Kraftwerk 1,
45527 Hattingen dichiara che il presente apparecchio è conforme ai
requisiti essenziali e alle altre norme pertinenti stabiliti dalla Direttiva
2014/53/CE.
Il marchio CE sugli apparecchi attesta la conformità dei
prodotti. La dichiarazione di conformità relativa al
presente prodotto è disponibile su
http://productip.com/?f=6abc3
91
Page 92

Wir behalten uns inhaltliche und technische Änderungen vor.
Art. Nr. 2214 / Version 2017.10
Subject to change without prior notice.
Art. No. 2214 / Version 2017.10
Con riserva di modiche tecniche e al contenuto.
Cod. n. 2214 / Versione 2017.10
www.olympia-vertrieb.de
 Loading...