

Page 1

&AcSIMILE
OFX 1200
INSTRUCTIONS
Part Number 055992P
Page 2

PUBLICATION ISSUED BY:
Olivetti Lexikon, S.p.A.
Documentazione
77, Via Jervis - 10015 Ivrea (Italy)
Copyright © 1996, Olivetti
All rights reserved
The manufacturer reserves the right to carry out modifications to the product described in this manual at
any time and without any notice.
This product satisfies the basic requirements of Electromagnetic Compatibility and Safety required by the
Directives:
• 89/336/CEE of 3rd May, 1989 with subsequent modifications (Directive 92/31/CEE of 28th April, 1992
and Directive 93/68/CEE of 22nd July, 1993);
• 73/23/CEE of 19th February, 1973 with subsequent modifications (Directive 93/68/CEE of 22nd July,
1993);
as having been designed in conformity with the requirements of the following Reference Norms:
• EN 55022 (Limits and methods of measurements of radio interference characteristics of Information
Technology Equipment);
• EN 50082-1 (Electromagnetic Compatibility - Generic Immunity Standard - Part 1: Residential,
commercial and light industry);
• EN 60555-2 (Disturbance in supply systems caused by household appliances and similar equipment -
Part 2: Harmonics);
• EN 60950 (Safety of information technology equipment, including electrical business equipment).
Conformity with the above basic requirements is certified by means of the Mark shown on the
product.
The Mark was introduced in 1995.
Your attention is drawn to the following actions that could compromise the characteristics of the product:
• incorrect electrical supply;
• incorrect installation; incorrect or improper use, or, in any case, not in accordance with the warnings
given in the User Manual supplied with the product;
• replacement of original components or accessories with others of a type not approved by the
manufacturer, or carried out by unauthorized personnel.
ATTENZIONE: QUESTA APPARECCHIATURA DEVE ESSERE COLLEGATA A TERRA
WARNING: THIS EQUIPMENT MUST BE EARTHED.
ATTENTION : CETTE UNITE DOIT ETRE CONNECTEE A LA TERRE.
ACHTUNG: DIESES GERÄT MUSS EINEN ERDUNGSANSCHLUSS HABEN.
ATENCION: ESTE EQUIPO DEBE ESTAR CONECTADO A UNA TOMA DE TIERRA.
APPARATET MÅ KUN TILKOBLES JORDET STIKKONTAKT.
APPARATEN SKALL ANSLUTAS TILL JORDAT NÄTUTTAG.
LAITE ON LIITETTÄVÄ MAADOITETTUUN PISTORASIAAN.
LEDEREN MED GRØN/GUL ISOLATION MÅ KUN TILSLUTTES EN KLEMME MÆRKET .
The wall socket must be easily accessible and in close proximity. To disconnect the machine from the
electrical power supply, remove the power cable plug from the wall socket.
Page 3

FOR U.S.A. USERSFOR U.S.A. USERS
FOR U.S.A. USERS
FOR U.S.A. USERSFOR U.S.A. USERS
FCC Regulation
In accordance with FCC regulations, the following information relates to the information required to be
supplied on a fax.
Part 68, Section 68.381 (c) (3) of FCC Regulations states the following:
"Telephone facsimile machines: identification of the sender of the message. It shall be unlawful for any
person within the United States to use a computer or other electronic device to send any message via a
telephone facsimile machine unless such message clearly contains, in a margin at the top or bottom of each
transmitted page or on the first page of the transmission, the date and time it is sent and an identification of
the business, other entity, or individual sending the message and the telephone number of the sending
machine or such business, other entity, or individual. Telephone facsimile machines manufactured on and
after December 20, 1992 must clearly mark such identifying information on each transmitted message".
NOTE: This equipment has been tested and found to comply with the limits for a Class B digital device
pursuant to Part 15 of the FCC Rules.
These limits are designated to provide reasonable protection against interference in a residential installation.
This equipment generates, uses and can radiate radio frequency energy and, if not installed and used in
accordance with the instructions, may cause harmful interference to radio communications.
However, there is no guarantee that interference will not occur in a particular installation.
If this equipment does cause harmful interference to radio or television reception, which can be determined
by turning the equipment off and on, the user is encouraged to try to correct the interference by one or more
of the following measures:
- Reorient or relocate the receiving antenna.
- Increase the separation between the equipment and receiver.
- Connect the equipment into an outlet of a circuit different from that to which the receiver is connected.
- Consult the dealer or an experienced radio/TV technician for assistance.
Changes or modification not expressly approved by the party responsible for compliance could void the
user’s authority to operate the equipment.
Connecting of peripherals requires the use of grounded shielded signal cables.
This equipment complies with Part 68 of the FCC rules. On the rear of this equipment is a label that contains,
among other information, the FCC Registration Number and Ringer Equivalence Number (REN) for this
equipment. You must, upon request, provide this information to your telephone company.
Nuovo-1 22/09/00, 14.413
Page 4

This equipment uses the following USOC jacks: RJIIC
The REN is used to determine the quantity of devices that may be connected to the telephone line. Excessive
RENs on the telephone line may result in the devices not ringing in response to an incoming call. In most,
but not all areas, the sum of the RENs should not exceed five (5.0). To be certain of the number of devices
that may be connected to the line, as determined by the total RENs, contact the telephone company to
determine the maximum REN for the calling area.
If this equipment causes harm to the telephone network, the telephone company will notify you in advance
that temporary discontinuance of service may be required. If advance notice is not practical, the telephone
company will notify the customer as soon as possible. Also, you will be advised of your right to file a complaint
with the FCC if you believe it is necessary.
The telephone company may make changes in its facilities, equipment operations, or procedures that could
affect the operation of the equipment. If this happens, the telephone company will provide advance notice
in order for you to make the necessary modifications in order to maintain uninterrupted service.
If trouble is experienced with this equipment, please contact Olivetti Office U.S.A. 1-800-2222310 for repair
and warranty information. If the trouble is causing harm to the telephone network, the telephone company
may request you to remove the equipment from the network until the problem is resolved.
No repairs may be done by the customer.
This equipment cannot be used on a telephone company-provided coin service.
Connection to a Party Line Service is subject to state tariffs.
This equipment is hearing-aid compatible.
When programming and/or making test calls to emergency numbers:
• Remain on the line and briefly explain to the dispatcher the reason for the call.
• Perform such activities in the off-peak hours such as early mornings or late evenings.
FOR AUSTRALIAN AND NEW ZEALAND USERSFOR AUSTRALIAN AND NEW ZEALAND USERS
FOR AUSTRALIAN AND NEW ZEALAND USERS
FOR AUSTRALIAN AND NEW ZEALAND USERSFOR AUSTRALIAN AND NEW ZEALAND USERS
This operation of this equipment on the same line as telephones or other equipment with audible warning
devices or automatic ring detectors will give rise to bell tinkle or noise and may cause false tripping of the
ring detector. Should such problems occur, the user is not to contact Telecom Faults Service.
Not all standard telephones will respond to incoming ringing when connected to the extension socket.
Nuovo-1 22/09/00, 14.414
Page 5

FOR CANADIAN USERSFOR CANADIAN USERS
FOR CANADIAN USERS
FOR CANADIAN USERSFOR CANADIAN USERS
INDUSTRY CANADA NOTICE
The Load Number of this modem is 3.
The standard connecting arrangement code for this equipment as specified in CP-01, Section 1.8.3 is
CA11A.
The Load Number assigned to each terminal device denotes the percentage of the total load to be connected
to a telephone loop that is used by the device to prevent overloading. The termination on a loop may consist
of any combination of devices subject only to the requirement that the total of the load numbers of all devices
does not exceed 100.
This digital apparatus does not exceed the Class B limits for radio noise emissions from digital apparatus
as set out in the interference-causing equipment standard entitled "Digital Apparatus", ICES-003 of the
Industry Canada.
Cet appareil numérique respecte les limites de bruits radioélectriques applicables aux appareils numériques
de Classe B prescrites dans la norme sur le matériel brouilleur: "Appareils Numeriques", NMB-003 édictée
par le ministre des Communications.
The Industry Canada label identifies certified equipment. This certification means that the equipment meets
certain telecommunications network protective operational and safety requirements. Industry Canada does
not guarantee the equipment will operate to the user's satisfaction.
Before installing this equipment, users should ensure that it is permissible to be connected to the facilities
of the local telecommunications company. The equipment must also be installed using an acceptable method
of connection. In some cases, the company's inside wiring associated with a single line individual service
may be extended by means of a certified connector assembly (telephone extension cord). The customer
should be aware that compliance with the above conditions may not prevent degradation of service in some
situations.
Repairs to certified equipment should be made by an authorized Canadian maintenance facility designated
by the supplier. Any repairs or alterations made by the user to this equipment, or equipment malfunctions,
may give the telecommunications company cause to request the user to disconnect the equipment.
Users should ensure for their own protection that the electrical ground connections of the power utility,
telephone lines and internal metallic water pipe system, if present, are connected together. This precaution
may be particularly important in rural areas.
CAUTION: Users should not attempt to make such connections themselves, but should contact the
appropriate electric inspection authority, or electrician, as appropriate.
Nuovo-1 22/09/00, 14.415
Page 6

FOR U.K. USERSFOR U.K. USERS
FOR U.K. USERS
FOR U.K. USERSFOR U.K. USERS
Notice for Connection to the public telecommunications network
1. BABT Certificate Number/Approval Number for the OFX (1000/1200): see label on the rear of the
machine.
2. This terminal equipment is intended for connection to the public telecommunications network via the
LJU cable shown on pages 13 and 14 of these instructions.
3. This terminal equipment complies with the following approval requirements:
a) Automatic dialling facilities.
b) Automatic storage of last number dialled.
c) Call Progress Monitor facility.
d) Automatic repeat attempt facility.
e) Automatic answering of incoming call.
f) DTMF (tone) dialling.
4. The following facilities are also supported:
a) Storage of telephone numbers for retrieval by a predeterminated code.
b) Operation in the presence or absence of Initial or Secondary Proceed Indication (Dial Tone).
c) Pulse dialling.
NB: Although this equipment can use either loop disconnect or DTMF signalling, only the
performance of the DTMF signalling is subject to regulatory requirements for correct
operation. It is therefore strongly recommended that the equipment is set to use DTMF
signalling for access to public or private emergency services. DTMF signalling also provides
faster call set up.
d) Automatic Fax/Phone recognition facility.
e) Automatic Fax/Telephone Answering Device recognition.
f) Integral Digital Telephone Answering Device (OFX1200 only).
5. An approved simple telephone and/or an approved telephone answering device (OFX1000) can be
series connected to the public telecommunications network via the supplied LJU cable. The LJU socket
allows access to a TNV circuit and is intended for the connection to the telecommunications network
only.
6. The parallel comminications connector, on the rear of the apparatus, is for the indirect connection to
the public telecommunications network of suitable equipment (Personal Computer). Do not connect
equipment that will result in signals at the point of connection to the public telecommunications network
that do not conform to the physical parts of the public network access requirements. Always follow the
suppliers Instructions For Use provided with the parallel communications kit.
Nuovo-1 22/09/00, 14.416
Page 7
7. The connection to the telecommunications network must be unplugged before the mains earth is
disconnected. The connection to the telecommunications network must not be hard wired.
8. This apparatus is not suitable as an extension to a payphone, for use on shared service lines, or for use
on I+1 carrier systems.
9. The user must ensure that all telephone numbers programmed into the dialling memories are entered
correctly.
10. This apparatus is suitable for primary connection to a direct exchange line, or secondary connection
to a direct exchange line via a compatible PABX (Private Automatic Branch Exchange). Contact your
supplier for details of compatible PABX's.
NB.: It cannot be guaranteed that the apparatus will operate under all possible conditions of connection
to a PABX. Any cases of difficulty should be referred in the first instance to the supplier of the
apparatus.
11. Ringer Equivalence Number (REN) = 3
The REN is a customer guide indicating approximately the maximum number of items of apparatus that
should be connected simultaneously to the line. The sum of the REN's of the individual items should
not exceed 4. The REN value of most telephones is assumed to be 1 unless otherwise marked.
Therefore, only 1 telephone and the facsimile machine should be connected to the line.
12. The voltage drop introduced by this apparatus between the public telecommunications network and the
associated telephone or telephone answering device (connected via the LJU connector) at a current
of 40mA is 0.4 Volts.
APPLICATION FOR INSTALLATION OF B.T. SOCKETS
This form may only be required if the wiring is owned by B.T.
If you require suitable sockets for connection of this apparatus, complete this form and send
it to your local British Telecom sales office at the address listed in your telephone book.
To: BRITISH TELECOM
I require ........................ sockets for connection of the following equipment
Title FACSIMILE MACHINE
Model OFX 1200
Approval No. See label on the rear of the machine
Name
Address
........................................................................................................................................
........................................................................................................................................
........................................................................................................................................
Telephone number ..............................................................................................................
Date Signed ..................................................................
Nuovo-1 22/09/00, 14.417
..........................
Page 8

OFX 1200 - QUICK REFERENCE GUIDE
KEYS FOR THE MANAGEMENT OF MENUS, SUB-MENUS AND PARAMETERS
FUNCTION to select items in menus and sub-menus which can be scrolled forward only, i.e. from
the first to the last item and back to the first again.
START to confirm items in menus, sub-menus, parameters and relative values:
• when you confirm a menu item you move on to the corresponding sub-menu level.
• when you confirm a sub-menu item you access the corresponding parameters.
• when you confirm a parameter or the relative value you move ahead to the next
parameter.
> < to select the values of a given parameter by scrolling forward or backward through the
available list or to position on the characters that represent the value of the parameter in
question. In this latter case, after positioning you will be prompted to input the value from
the numeric keypad.
STOP to exit all operating functions.
CHANGING THE DATE AND TIME
1. Press FUNCTION to select the “Fax config.” menu
2. Press START to select the “Various parameters” sub-menu
3. Press FUNCTION to select “Print parameters”
4. Press FUNCTION to select the “Date and time” sub-menu
5. Press START to select the date format
6. Press START to select the time format
7. Press START to display the current date and time
8. Type in the new date and time in full
9. Press START to confirm
STORING YOUR STATION NAME AND NUMBER
1. Press FUNCTION repeatedly until you reach the installation menu.
2. Press START. The display will present the tel. line set-up sub-menu
3. Press FUNCTION twice to access the STATION NAME menu.
4. Press START.
5. For example, to enter the name “SMITH” press key 7 until the letter “S” is displayed and then move the
cursor to the right by pressing > and, in this new position, press key 6 to display the letter “M”, etc. until
the name has been fully entered.
IF...
• you want to move the cursor to the left, press <
• you want to delete the name completely press CLEAR
• you want to enter upper case letters press A ↔↔ a when the cursor is on a lower case letter
• you want to enter special symbols press * and/or #
• you want to enter a space, simply move the cursor with the > key without entering the letter.
☞
Page 9

6. Press START to confirm. The display will present the telephone number parameter.
7. Press START. The display will present the parameter for entering the telephone number.
8. Type the number, complete with codes, from the numeric keypad.
9. Confirm with START.
TRANSMISSION
1. Insert the document into the ADF.
2. Press HOOK, enter the recipient’s fax number on the numeric keypad.
3. Wait for the connection tone and then press START.
4. When the transmissionis completed, press FUNCTION repeatedly until you reach the “Pringt Report”
menu to generate a transmission report printout.
5. Press START. The display will present the first parameter “LAST TX REP.”.
6. Press START. The transmission report will be printed. When the printout is terminated the displaywill
restore the original operating mode message.
USING THE FAX MACHINE AS A NORMAL COPIER
1. Insert the document in the ADF.
2. Press START.
PRINTING PROGRAMMED ONE TOUCH DIAL AND SPEED DIAL DATA
1. With the display showing the PRINT CONFIG sub-menu, press START.
2. Press > until you reach printing of the programmed ONE TOUCH or SPEED DIAL options.
3. Press START.
MANUAL TRANSMISSION REPORT
1. Press FUNCTION to select the Print Report menu.
2. Press START. The display will present the first option “LAST TX REP.”.
3. Press START
JOURNAL
1. Press FUNCTION to select the Print Report menu
2. Press START. The display will present the first option “LAST TX REP.”.
3. Press > repeatedly until you reach the JOURNAL option.
4. Press START.
TELEPHONE ANSWERING DEVICE
− To listen to the incoming messages recorded on the TAD, press >/II.
− To move from the current message to the next, press >>I/MEMO.
− To move from the current message to the previous one, press I<<.
− To erase a single message, press CANCEL while playing it.
− To erase all the messages after you have listened to them, press CANCEL.
− To record a memo, press >>I/MEMO, press START and then record your message.
− To erase the memo, press CANCEL while playing it.
Printed in Taiwan Part Number 054975U
Page 10

POCKET GUIDE - Remote Control of the answering machine
BUTTONS OPERATIONS
# 0
# 1
# 2
# 3
# 4
# 5
# 6
# 7
Aborts the function in progress and exits from remote control mode.
Plays unplayed messages.
Plays all messages.
While playing a message, repeats the previous one. At the end of the message,
repeats the message that has just been played.
Skips from the current message to the next one.
Erases the current message.
Erases all messages that have already been played.
Provides access to set-up parameters.
Printed in Taiwan Part Number 055266E
Programmed Access Codes:......................................................
BUTTONS PROGRAMMING
Aborts the function in progress.
0
Switches from TAD/FAX RX mode to FAX/TEL RX mode.
1
Switches from TAD/FAX RX mode to AUTOMATIC RX mode.
2
Enables TAD/FAX RX mode.
3
Records OGM #1.
4
Records OGM #2.
5
Closes and confirms the OGM #1 or #2 recorded.
6
Disables the recording of incoming messages.
7
Enables the recording of incoming messages.
8
Page 11

CONTENTS
HINTS FOR RAPID USE
BEFORE USE............................................................................................................................................3
INTRODUCTION .........................................................................................................................................3
HOW TO USE THIS MANUAL.....................................................................................................................3
HOW TO CONSULT PROCEDURE CHARTS ............................................................................................4
TITLE OF PROCEDURE.............................................................................................................................4
OVERVIEW OF THE FACSIMILE MACHINE AND ITS COMPONENTS ....................................................5
CONNECTION AND INITIAL SET-UP.............................................................................................11
CONNECTION TO THE TELEPHONE LINE AND ELECTRICAL POWER SUPPLY................................12
HANDSET FEATURES AND INSTALLATION OF ITS SUPPORT............................................................15
LOADING PAPER FOR PRINTING RECEIVED FAXES AND COPIES....................................................18
INSTALLATION OF DOCUMENT EXIT SUPPORTS ................................................................................20
INSTALLING THE PRINT HEAD...............................................................................................................21
BASIC FUNCTIONS ..............................................................................................................................23
CHANGING THE DATE AND TIME...........................................................................................................23
STATION NAME AND NUMBER...............................................................................................................25
DOCUMENT TRANSMISSION..................................................................................................................28
RECEIVING A FAX IN AUTOMATIC MODE..............................................................................................29
USING THE FAX MACHINE AS A SIMPLE COPIER................................................................................31
MENUS, SUB-MENUS AND PARAMETERS................................................................................33
PROGRAMMING LEVELS ........................................................................................................................33
LIST OF MENUS AND SUB-MENUS ........................................................................................................34
MACHINE OPERATION MODES..............................................................................................................37
PARAMETER PROGRAMMING
WHAT IS MEANT BY PROGRAMMING?......................................................................................41
LAYOUT AND DESCRIPTION...................................................................................................................41
INSTALLATION PARAMETERS .......................................................................................................43
LIST AND DESCRIPTIONS.......................................................................................................................43
PROGRAMMING CHART AND DESCRIPTION OF THE SUB-MENU: TEL. LINE SET-UP .....................45
PROGRAMMING EXAMPLE: TEL. LINE SET-UP.....................................................................................46
PROGRAMMING CHART AND DESCRIPTION OF THE SUB-MENU: LANGUAGE................................48
PROGRAMMING CHART AND DESCRIPTION OF THE SUB-MENU: STATION NAME .........................48
PROGRAMMING CHART AND DESCRIPTION OF THE SUB-MENU: PHONE NUMBER.......................49
PROGRAMMING CHART AND DESCRIPTION OF THE SUB-MENU: DIAGNOSTICS ...........................49
PROGRAMMING CHART AND DESCRIPTION OF THE SUB-MENU: PRINT INSTALL..........................50
PROGRAMMING CHART AND DESCRIPTION OF THE SUB-MENU: SERVICE PARAM.......................51
CONTENTS IX
Page 12

CONFIGURATION PARAMETERS ..................................................................................................53
LIST AND DESCRIPTIONS.......................................................................................................................53
PROGRAMMING CHART AND DESCRIPTION OF THE SUB-MENU: VARIOUS SETTINGS .................55
PROGRAMMING CHART AND DESCRIPTION OF THE SUB-MENU: PRINTER PARAMET. .................56
PROGRAMMING CHART AND DESCRIPTION OF THE SUB-MENU: DATE AND TIME.........................57
PROGRAMMING CHART AND DESCRIPTION OF THE SUB-MENU: ONE TOUCH DIAL......................58
PROGRAMMING CHART AND DESCRIPTION OF THE SUB-MENU: CODED SPEED DIAL .................59
PROGRAMMING CHART AND DESCRIPTION OF THE SUB-MENU: PRINT OUT SET-UP...................60
PROGRAMMING CHART AND DESCRIPTION OF THE SUB-MENU: HEAD MAINTENANCE ...............60
USING THE OTHER FUNCTIONS
DIALLING..................................................................................................................................................63
HOW TO PROGRAM THE ONE TOUCH KEYS........................................................................................64
HOW TO PROGRAM SPEED DIAL CODES.............................................................................................67
HOW TO PRINT THE PROGRAMMED ONE TOUCH DIAL AND SPEED DIAL DATA.............................70
DIALLING METHODS FOR MAKING A TELEPHONE CALL (DOCUMENT NOT INSERTED).................71
DIALLING METHODS FOR SENDING A FAX (DOCUMENT INSERTED)................................................71
SPECIAL DIALLING FUNCTIONS.............................................................................................................72
REDIALLING..............................................................................................................................................72
TRANSMISSION .....................................................................................................................................73
TRANSMISSION METHODS.....................................................................................................................73
DOCUMENTS THAT CAN BE TRANSMITTED .........................................................................................73
ADJUSTING THE CONTRAST AND RESOLUTION OF TRANSMITTED DOCUMENTS .........................74
TRANSMISSION FOLLOWING MANUAL DIALLING................................................................................75
TRANSMISSION USING THE ONE TOUCH KEYS...................................................................................76
HOW TO TRANSMIT A DOCUMENT USING THE SPEED DIAL CODES................................................77
HOW TO PROGRAM DELAYED TRANSMISSION...................................................................................79
HOW DELAYED TRANSMISSION TAKES PLACE...................................................................................80
AUTOREDIAL............................................................................................................................................81
USING THE REDIAL KEY .........................................................................................................................83
RECEPTION.............................................................................................................................................85
RECEPTION METHODS ...........................................................................................................................85
RECEIVED DOCUMENT PRINTING SET-UP PROCEDURES.................................................................86
AUTOMATIC RECEPTION MODE.............................................................................................................86
MANUAL RECEPTION MODE...................................................................................................................87
AUTOMATIC FAX/PHONE RECOGNITION MODE...................................................................................88
REMOTE CONTROL RECEPTION............................................................................................................89
POLLING...................................................................................................................................................91
PROGRAMMING THE FAX MACHINE TO POLL A DOCUMENT (POLLING IN RECEPTION)................92
HOW A POLLED DOCUMENT IS RECEIVED ..........................................................................................93
HOW A POLLED DOCUMENT IS TRANSMITTED ...................................................................................94
X CONTENTS
Page 13

THE TELEPHONE ANSWERING DEVICE....................................................................................97
MESSAGES...............................................................................................................................................97
LIST AND MEANING OF MENUS AND SUB-MENUS ..............................................................................98
PROGRAMMING CHART AND DESCRIPTION OF THE SUB-MENU: PLAY OGM #1 ..........................100
PROGRAMMING CHART AND DESCRIPTION OF THE SUB-MENU: RECORD OGM #1....................100
PROGRAMMING CHART AND DESCRIPTION OF THE SUB-MENU: FORWARD MESSAGES ..........101
PROGRAMMING CHART AND DESCRIPTION OF THE SUB-MENU: REC.FORW.ANNOUNC ...........102
PROGRAMMING CHART AND MEANING OF THE SUB-MENU: ANNOUNCE ONLY...........................102
PROGRAMMING CHART AND DESCRIPTION OF THE SUB-MENU: SYNTH.ANNOUNCE.................103
PROGRAMMING CHART AND DESCRIPTION OF THE SUB-MENU: DAY OF THE WEEK.................104
PROGRAMMING CHART AND DESCRIPTION OF THE SUB-MENU: ICM REC. TIME ........................104
PROGRAMMING CHART AND DESCRIPTION OF THE SUB-MENU: ACCESS CODE........................105
PROGRAMMING CHART AND DESCRIPTION OF THE SUB-MENU: TOLL SAVER............................106
PROGRAMMING CHART AND DESCRIPTION OF THE SUB-MENU: PRINT TAD SET-UP.................106
HOW TO PLAY, RECORD AND REPLACE OUTGOING MESSAGES...................................................107
HOW TO PROGRAM THE TAD TO FORWARD MESSAGES TO A REMOTE LOCATION...................109
HOW TO PROGRAM THE TAD ONLY TO ANSWER .............................................................................111
HOW TO RECORD MEMOS...................................................................................................................112
HOW TO PLAY AND ERASE INDIVIDUAL INCOMING MESSAGES OR MEMOS................................112
HOW TO ERASE ALL INCOMING MESSAGES AND MEMOS ..............................................................113
HOW TO FORWARD MESSAGES TO A REMOTE LOCATION.............................................................113
SYNTHESIZED MESSAGES...................................................................................................................114
HOW A FAX IS RECEIVED IN TAD/FAX RX MODE...............................................................................115
HOW TO CONTROL THE TAD FROM A REMOTE LOCATION.............................................................117
HOW TO RECORD OUTGOING MESSAGES FROM A REMOTE LOCATION......................................118
REPORTS ...............................................................................................................................................119
DESCRIPTION AND USE OF THE MENU: PRINT OUT REPORT........................................................119
AUTOMATIC TRANSMISSION REPORT................................................................................................120
MANUAL TRANSMISSION REPORT......................................................................................................121
JOURNAL................................................................................................................................................122
POWER FAILURE REPORT...................................................................................................................123
MAINTENANCE, ACCESSORIES AND SIGNALS
ROUTINE MAINTENANCE ...............................................................................................................127
REMOVING A JAMMED DOCUMENT ....................................................................................................127
REMOVING JAMMED PRINTING PAPER..............................................................................................128
REPLACING THE PRINT CARTRIDGE..................................................................................................130
REPLACING THE PRINT HEAD .............................................................................................................132
AUTOMATIC CHECKING AND CLEANING OF THE PRINT NOZZLES.................................................134
CLEANING THE OPTICAL SCANNER....................................................................................................135
CLEANING THE PRINT HEAD AND MANUAL CHECKING OF THE NOZZLES....................................136
CLEANING THE ELECTRICAL CONTACTS ON THE PRINT HEAD......................................................138
CLEANING THE PRINT HEAD CLEANING RIBBON..............................................................................139
AUTOMATIC SHEET FEEDER ADJUSTMENT.......................................................................................140
CONTENTS XI
Page 14

SIGNALS, ERROR MESSAGES, TECHNICAL SPECIFICATIONS....................................141
ACOUSTIC SIGNALS..............................................................................................................................141
ERROR LED............................................................................................................................................141
MESSAGES ON THE DISPLAY ..............................................................................................................142
TRANSMISSION REPORT MESSAGES.................................................................................................144
JOURNAL AND DISPLAY MESSAGES...................................................................................................145
TECHNICAL SPECIFICATIONS AND GENERAL CHARACTERISTICS.................................................147
INDEX .......................................................................................................................................................149
XII CONTENTS
Page 15

HINTS FOR RAPID USE
Page 16

BEFORE USE
Before you start to use your facsimile machine, we recommend that you take a little time to study this
manual in order to learn about the features of the machine and how to make the most of the functions it
provides.
INTRODUCTION
The facsimile machine, or more simply the "fax machine", is a communication tool capable of transmitting
and receiving documents in the form of text, drawings and photographs over the telephone line.
Its main functions are to reproduce an original document and send a faithful copy to a remote location and
to receive documents transmitted in the same way.
The only requirements for this operation are that the remote location is equipped with a fax machine
connected to a telephone line.
The fax machine uses an “ink-jet printing system” which allows you to adjust the definition of transmitted or
copied documents. Note that the fax machine uses plain paper instead of thermal paper and can also be
used as a simple copier.
The use of plain paper offers a number of advantages insofar that documents may be filed without
photocopying them and problems commonly associated with thermal paper such as fading, darkening or
curling are effectively eliminated.
Other functions include delayed fax transmission or receiving at preset times and automatic printing of
activity reports or journals.
Your new fax machine is built to the highest quality standards and incorporates the very latest technology to
provide a complete range of advanced functions which are nonetheless extremely simple to use.
HOW TO USE THIS MANUAL
This manual describes how to set up and operate the facsimile machine. Follow the instructions carefully in
order to make the best use of your machine.
This manual comprises 4 chapters divided into 13 sections.
In the first chapter, HINTS FOR RAPID USE, the section entitled BASIC FUNCTIONS gives all the
necessary instructions for normal operations, i.e. sending, receiving and copying documents.
The section MENUS, SUB-MENUS AND PARAMETERS is particularly important as it provides the user
with an overview of the various functions and how they are accessed.
The second chapter, PARAMETER PROGRAMMING, explains how to personalise your fax machine as
required by memorising the operating conditions necessary to automate various procedures.
The remaining chapters, USING THE OTHER FUNCTIONS and MAINTENANCE, ACCESSORIES AND
SIGNALS complete the product information by providing the user with progressive and systematic notions
of the fax machine.
BEFORE USE 3
Page 17
HOW TO CONSULT PROCEDURE CHARTS
The manual is organised in independent charts each dealing with a different procedure or function of the
fax machine, complete with examples where necessary. These sections can be consulted in any order. All
references to other sections are clearly indicated.
An example of a chart is given below.
TITLE OF PROCEDURE
The title is followed by a brief description of the procedure, and, where necessary, an example.
v This symbol marks the part of the text specifying the conditions that must exist prior to following the
procedure (if this part is not included, the procedure does not require any specific conditions). In some
cases this part may also include an illustration of the display.
1. This part of the section refers to the steps in the procedure. In
addition to the step and text number an illustration of the display
is given, or, in some cases, a drawing.
IF...
• this part of the text tells you how to prevent and correct errors
or describes other actions possible at this step in the
procedure.
• the procedure does not require it, this part of the text is not
included.
2. Where two alternative operations are possible they are shown as
follows:
− choose the first
or
− choose the second.
HOW THE DISPLAY IS ILLUSTRATED IN THE MANUAL:
MENU
SUB-MENU OR
OPERATION MODE
PARAMETER
4 BEFORE USE
Page 18

OVERVIEW OF THE FACSIMILE MACHINE AND ITS COMPONENTS
PRODUCT OVERVIEW
Compact and versatile - your new fax incorporates an ink-jet printing system, an easy-to-use console and
an operator display.
Basic functions:
TRANSMISSION
RECEPTION
COPYING
The special features of the new fax guarantee:
QUALITY
The ink-jet printing system (bubble ink jet) combined
with the contrast adjustment feature guarantees high quality
documents.
ECONOMY
The use of plain paper instead of thermal paper
eliminates the problems encountered with thermal paper such
as fading, darkening and curling. And there’s no need to
photocopy the documents you receive for filing purposes.
BEFORE USE 5
Page 19

Package contents
In addition to the fax machine, which is supplied with a power cord, the package includes a box containing
the following accessories:
1. Telephone connection cord
2. A plug for the country of destination (some countries only)
3. Print head with interchangeable ink cartridge
4. Extendible exit support for transmitted/copied documents
5. Exit support for received/copied documents
6. Automatic sheet feeder
7. Document holder
8. “Quick Reference Guide” sheet
9. Instruction manual (this manual)
10. Handset support
11. Handset
Important:
Remove the protective plastic film from the keypad.
Accessory installation and connection of the fax machine are described in the section, CONNECTION AND
INITIAL SET-UP.
6 BEFORE USE
Page 20
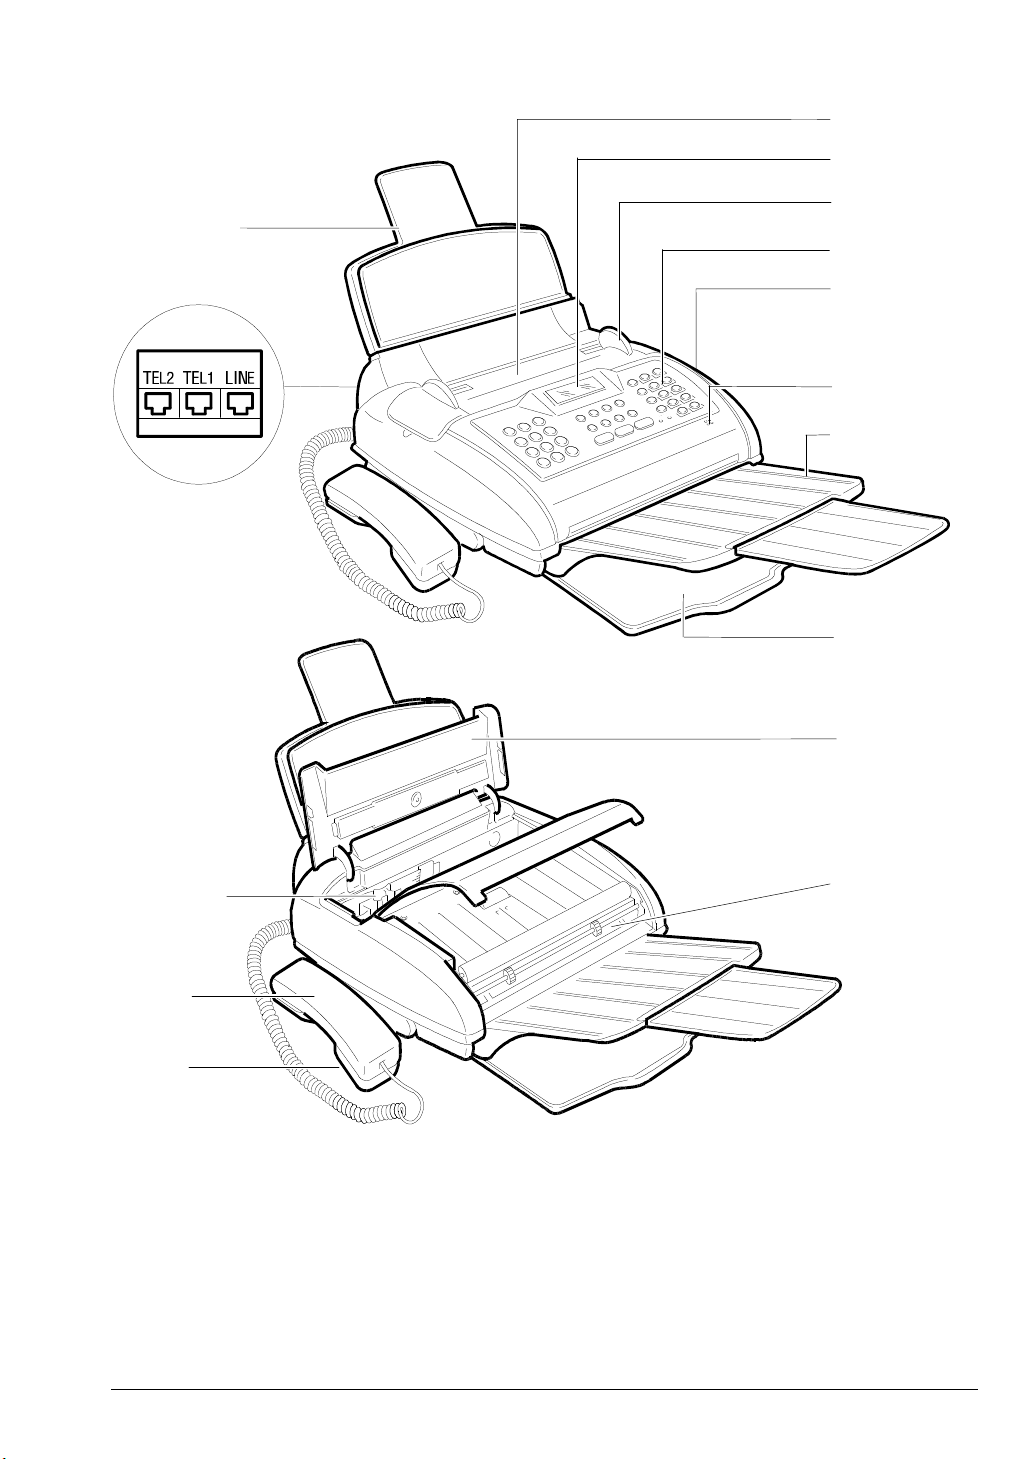
COMPONENTS
1.
4
10
1
7
5
6
15
14
2
3
8
13
12
Key:
Automatic document feeder (ADF) for original
documents to send and copy
2. Extendible exit support for original documents
3. Exit support for received/copied documents
4. Automatic sheet feeder (ASF)
5. Paper guides
6. Operator console
7. Display
8. Print head with interchangeable ink cartridge
9
11
9. Print head compartment cover
10. Connection sockets
11. Optical scanner
12. Handset support
13. Handset
14. Microphone
15. Speaker
BEFORE USE 7
Page 21
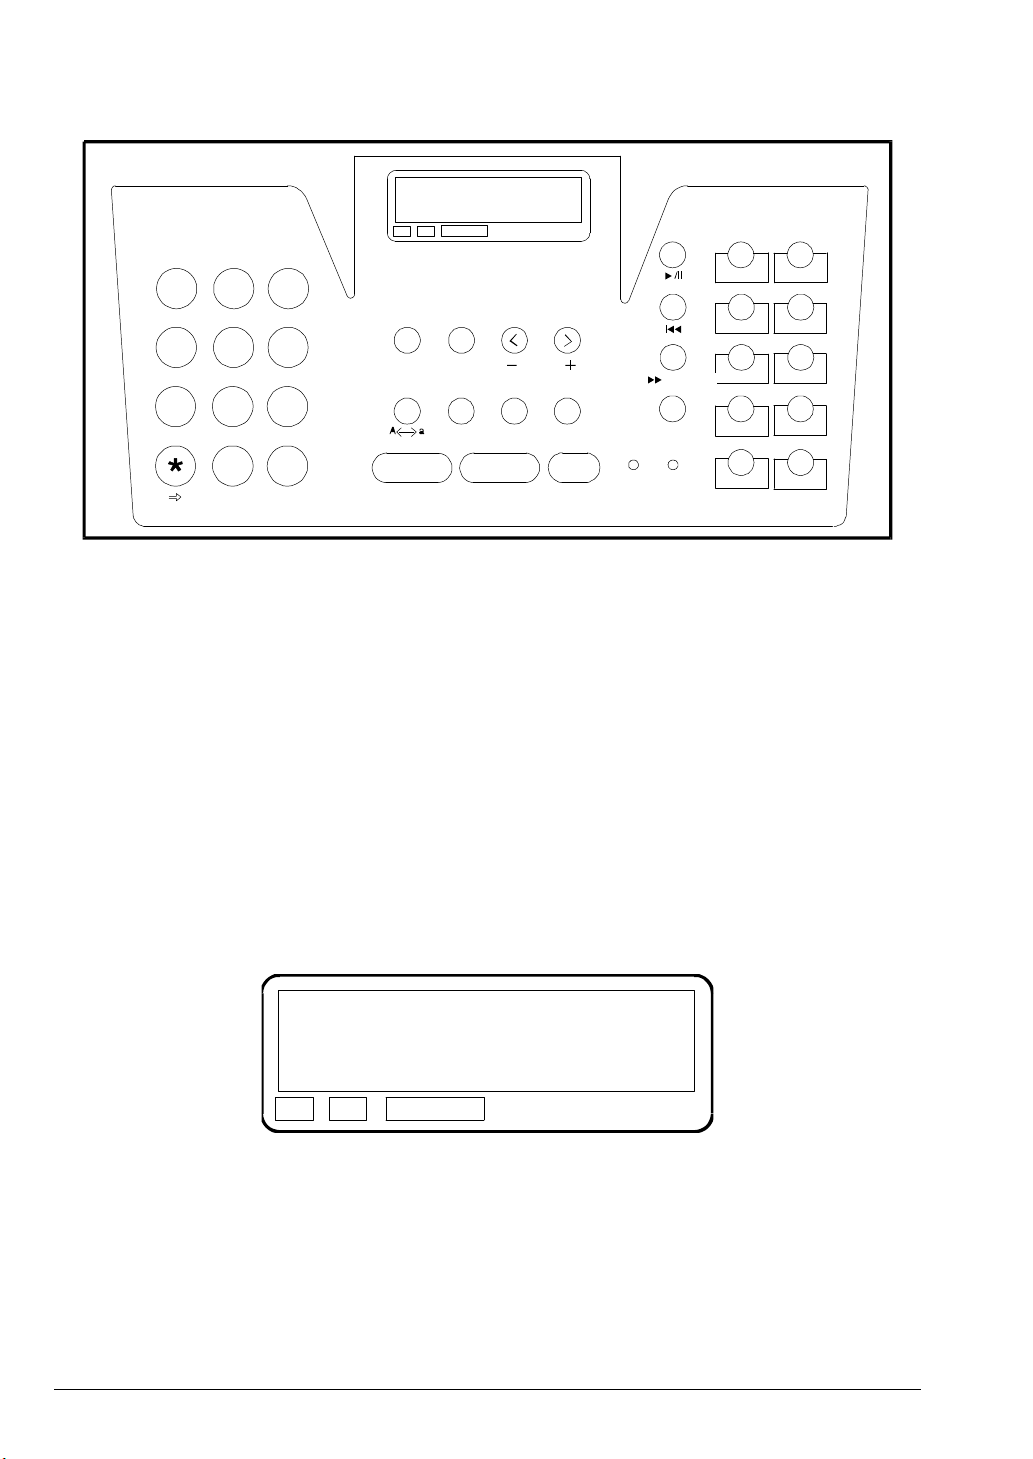
OPERATOR CONSOLE
4
5
6
321
789
0
07
08
#
HALF TONES
FINE
STD
ABC DEF
FINE
HALF TONES
STD.
01 02
RX MODE
RESOL. CONTR.
04
03
GHI
PRS
P T
JKL
TUV
QZ &...
MNO
WXY
FUNCTION CLEAR
S. DIAL LAST TX EXT. HOLD
REDIAL PAUSE 2. TONE
HOOK
VOLUME
START STOP
ERROR
I/MEMO
CANCEL
MESSAGES
0605
1009
IMPORTANT:
If the layout of the console shown above does not correspond to that on your machine, see the console
layout illustrated on the page preceding the Index (at the end of this manual).
The operator console comprises:
• 11 function keys in the centre (HOOK, START, STOP, S. DIAL, LAST TX, EXT., HOLD, FUNCTION,
RX MODE, RESOL., CONTR.) 7 of which have a dual function (CLEAR, VOLUME +, VOLUME-, A ↔↔ a,
REDIAL, PAUSE, 2. TONE)
• 4 function keys on the left-hand side for operating the telephone answering device: >/II, I<<, >>I/MEMO,
CANCEL
• 12 numerical keys on the left for setting digits and characters and 10 one touch dialling keys on the right
• A liquid crystal alphanumeric display
• An error indication light
• A TAD message indication light
DISPLAY
Liquid crystal display comprising two lines of 16 characters each.
Displays input alphanumeric characters and provides information and error messages to guide the user
through the various operations.
The three printed abbreviations shown under the display indicate the three resolution levels with which the
optical scanner (see later in this section) scans the documents fed into the fax machine.
• STD: indicates the standard resolution required for clearly defined characters.
• FINE: indicates the resolution required for small characters.
• HALF TONES: indicates the resolution required for images.
8 BEFORE USE
Page 22
KEY FUNCTIONS
Numeric keys
0 to 9
*
#
FUNCTION
RX MODE
CLEAR
RESOL.
VOLUMECONTR.
VOLUME +
SPEED DIAL
A ↔↔ a
LAST TX
REDIAL
EXT.
PAUSE
HOLD
2. TONE
HOOK
Used for dialling fax or telephone numbers and for selecting
letters.
Scrolls forwards through the sequence of special characters and
symbols. When pressed during dialling in pulse mode it allows you to
proceed in multi-frequency mode (tone).
Scrolls backward through the sequence of special characters and
symbols.
Used to access the various menus and sub-menus.
Used to change the document reception setting. Deletes incorrect
entries and programming errors.
Selects the document scanning resolution by the optical scanner and
decreases speaker volume after pressing the HOOK key.
Adjusts the print contrast for transmission/copying of dark or light
documents; increases speaker volume after pressing the HOOK key.
Used to dial numbers stored under abbreviated codes;
selects upper or lower case letters.
Displays the result of the last transmission;
redials the last fax or telephone number called.
Enables you to dial an external number if your fax is connected to a
switchboard; inserts a pause between the digits of the code and the
number
Sets the line on hold during a telephone call; detects a second tone
during dialling when connected to certain types of exchange.
Provides line tones, through the built-in loudspeaker, when dialling the
fax or telephone number required;
START
Starts fax transmission, manual reception or copying; confirms the
selected menu function on the display, and moves you on to the next
step in the programming sequence.
STOP
Interrupts the current operation; resets an error condition.
ONE-TOUCH KEYS
Dial the telephone or fax numbers stored under the corresponding
one-touch key.
01 TO 10
ERROR
MESSAGE
>/II
I<<
>>I / MEMO
CANCEL
Lights up to indicate an error condition.
Lights up when there are old messages on the TAD.
Blinks when there are new messages that have not yet been played
back.
In stand-by mode, irrespective of whether there is a document on the
facsimile machine or not, it plays the messages received on the TAD.
When pressed while you are listening to a message, it acts as a
pause/resume key.
When pressed once, it immediately repeats the message that you are
listening to from the start.
When pressed while you are listening to incoming messages, it moves
on to the next message. In stand-by mode, it enables the answering
device for use as an ordinary cassette recorder.
In stand-by mode, irrespective of whether there is a document on the
facsimile machine or not, if pressed twice, it clears all old messages
from the TAD. When pressed while listening to a message, it erases the
current message
BEFORE USE 9
Page 23

Dual function key access:
Dual function keys perform one function or the other in accordance with the relative operating conditions as
explained later in the manual during examination of the relative functions.
PRINTER
This is the device which prints the documents received or copied by the fax machine. It uses a "Bubble Ink
Jet” printing system in which microscopic ink particles are projected onto the paper from nozzles on the
print head to obtain perfect reproduction of the original document.
Two types of print head may be used:
• with interchangeable ink cartridge (supplied in the pack)
• disposable
OPTICAL SCANNER
This device optically scans the original document containing the text or images to be transmitted. The page
is illuminated by a series of LEDs (Light Emitting Diodes) and the light beams are reflected back to sensors
at varying intensity according to the characteristics of the image. The sensors convert the reflected light
beams into electrical signals, and these are then converted into internationally recognised digital codes.
MEMORY
The fax machine memory comprises electronic chips powered by an automatic recharge battery. The
memory is divided into two main sections.
• data memory:
The data memory contains machine set-up information such as installation and configuration
parameters and programming data. This information is retained indefinitely in the memory, even when
the fax machine is disconnected from the mains.
• document memory:
With a maximum storage capacity of about ten pages.
If the fax machine runs out of paper or ink while a document is being received, the document will be
stored in the memory. When normal operating conditions are resumed, the document stored on hold in
the memory will be printed. Until normal conditions are restored, no other documents will be stored in
the memory.
During document reception, the printing speed may be lower than reception speed. In this case, the
document is partially stored in the memory before printing.
Even in the event of a power failure, the data memorised in the document memory is maintained for
several hours.
• voice memory:
Records the messages on the telephone answering device. One part of the memory is used for the
outgoing messages, i.e. the messages you record yourself and the other is used for storing incoming
messages, i.e. those left by callers. The total recording time is 10 min (4Mbits). The messages are
retained in the memory for several hours (at least ten) by a battery in the event of a power failure. The
battery can be completely recharged by leaving the machine powered on for 30 hours.
10 BEFORE USE
Page 24

CONNECTION AND INITIAL SET-UP
This chapter describes the preliminary operations to be carried out before the machine can be used. These
operations comprise connection to the telephone line, connection to the power supply, turning on the fax,
loading paper into the sheet feeder, installation of the printer cartridge and setting up of the extendible exit
support for transmitted documents.
Correct positioning
• Place the machine on a stable, flat surface near an existing telephone socket where possible to avoid
having to install another one.
• Allow sufficient space for the circulation of air and the correct installation of the document exit support to
avoid unnecessary paper accumulation.
• Do not expose the machine to direct sunlight/excessive heat sources or install it in places subject to
excessive humidity/dust or in the vicinity of radio/television appliances.
WARNING:
• The fax machine is not equipped with an ON/OFF switch. The power socket must be easily accessible
and near the machine.
• Only use mains outlets with an earth connection.
For further information and technical characteristics, consult the final section SIGNALS, ERROR
MESSAGES AND TECHNICAL SPECIFICATIONS.
IMPORTANT:
The manufacturer declines all responsibility for improper use, incorrect installation, connection to
unauthorised appliances or tampering by unauthorised personnel.
CONNECTION AND INITIAL SET-UP 11
Page 25

CONNECTION TO THE TELEPHONE LINE AND ELECTRICAL POWER SUPPLY
Before connecting the fax machine to the electrical power supply, it must be connected to the telephone
line.
Since the connection of a telephone, fax or answering machine or other device to the telephone line is
regulated by laws that vary from one country to another, the information which follows illustrates a generic
connection (case 1) and a specific connection for Germany and Austria (case 2).
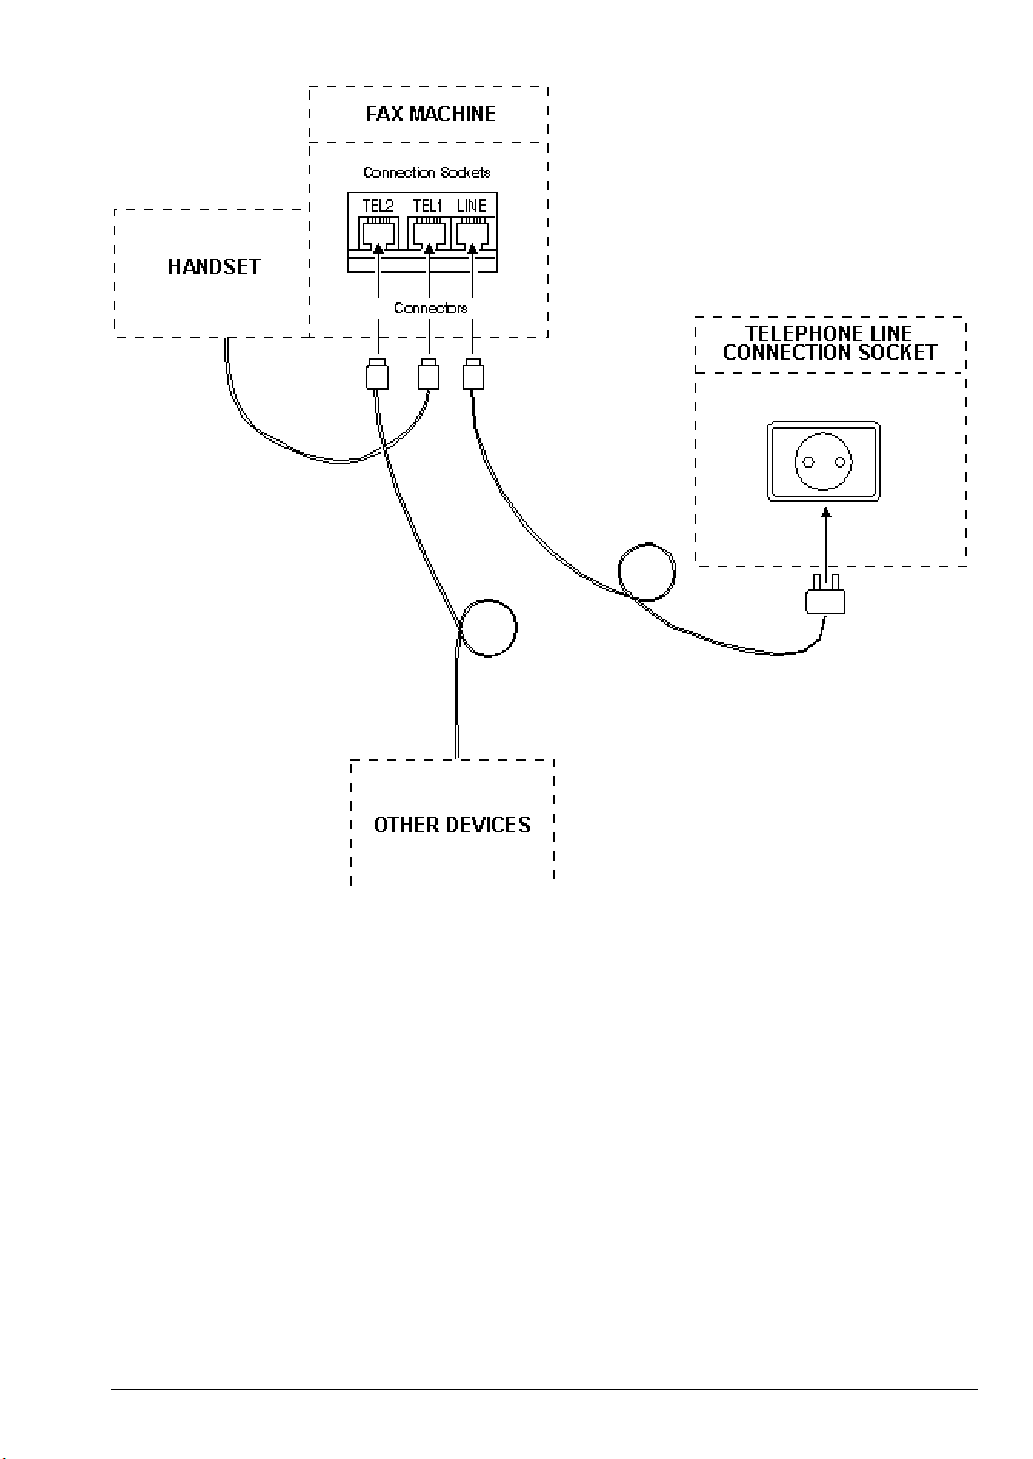
CONNECTION TO THE TELEPHONE LINE (CASE 1)
The connection between the fax machine and telephone line is made using the cable provided. Do not use
other cables, otherwise the fax machine may not work properly.
Fax machine
1. Insert the “miniature” connector (which is small and transparent) of the telephone line connection
cable into the “LINE” socket on the fax machine. You will hear a click which indicates that it has
been inserted correctly (see the diagram which follows). The fax’s connection sockets are situated
on the rear left-hand side of the casing. The TEL1 and TEL2 sockets cannot be used in some
countries.
2. Insert the plug (which differs from one country to another) at the other end of the cable into the
telephone line wall socket (see the diagram which follows).
IF..
• the network to which the fax machine is connected has more than one socket connected in
series, the fax machine must be connected to the primary socket.
Handset:
1. Remove the precut cover, if present, from the connection socket (TEL1) on the fax machine, then
insert the "miniature" connector of the telephone cable into this socket. You will hear a click when it
has been inserted correctly (see the diagram which follows).
Other devices:
1. Remove the precut cover from the connection socket (TEL2) on the fax machine, then insert the
"miniature" connector of the additional device into this socket (in some countries, this connection
is not allowed).
12 CONNECTION AND INITIAL SET-UP
Page 26
CONNECTION TO THE TELEPHONE LINE (CASE 2)
Fax Machine
The connection between the fax machine and telephone line is made using the cable provided. Do not use
other cables, otherwise the fax machine may not work properly.
1. Insert the "western" connector (which is small and transparent) of the telephone line connection
cable into the "LINE" socket on the fax machine. You will hear a click when it is correctly inserted
(see the diagram which follows).
The fax’s connection sockets are situated on the rear left-hand side of the casing. The socket
marked TEL2 must not be used.
2. Insert the "TAE" connector at the other end of the cable into the telephone line wall socket
marked "N" (see the diagram which follows).
Telephone supplied
1. Remove the precut cover, if present, from the connection socket (TEL1) on the fax machine,
then insert the "western" connector of the telephone cable into this socket. You will hear a click
when it is correctly inserted (see the diagram which follows).
CONNECTION AND INITIAL SET-UP 13
Page 27
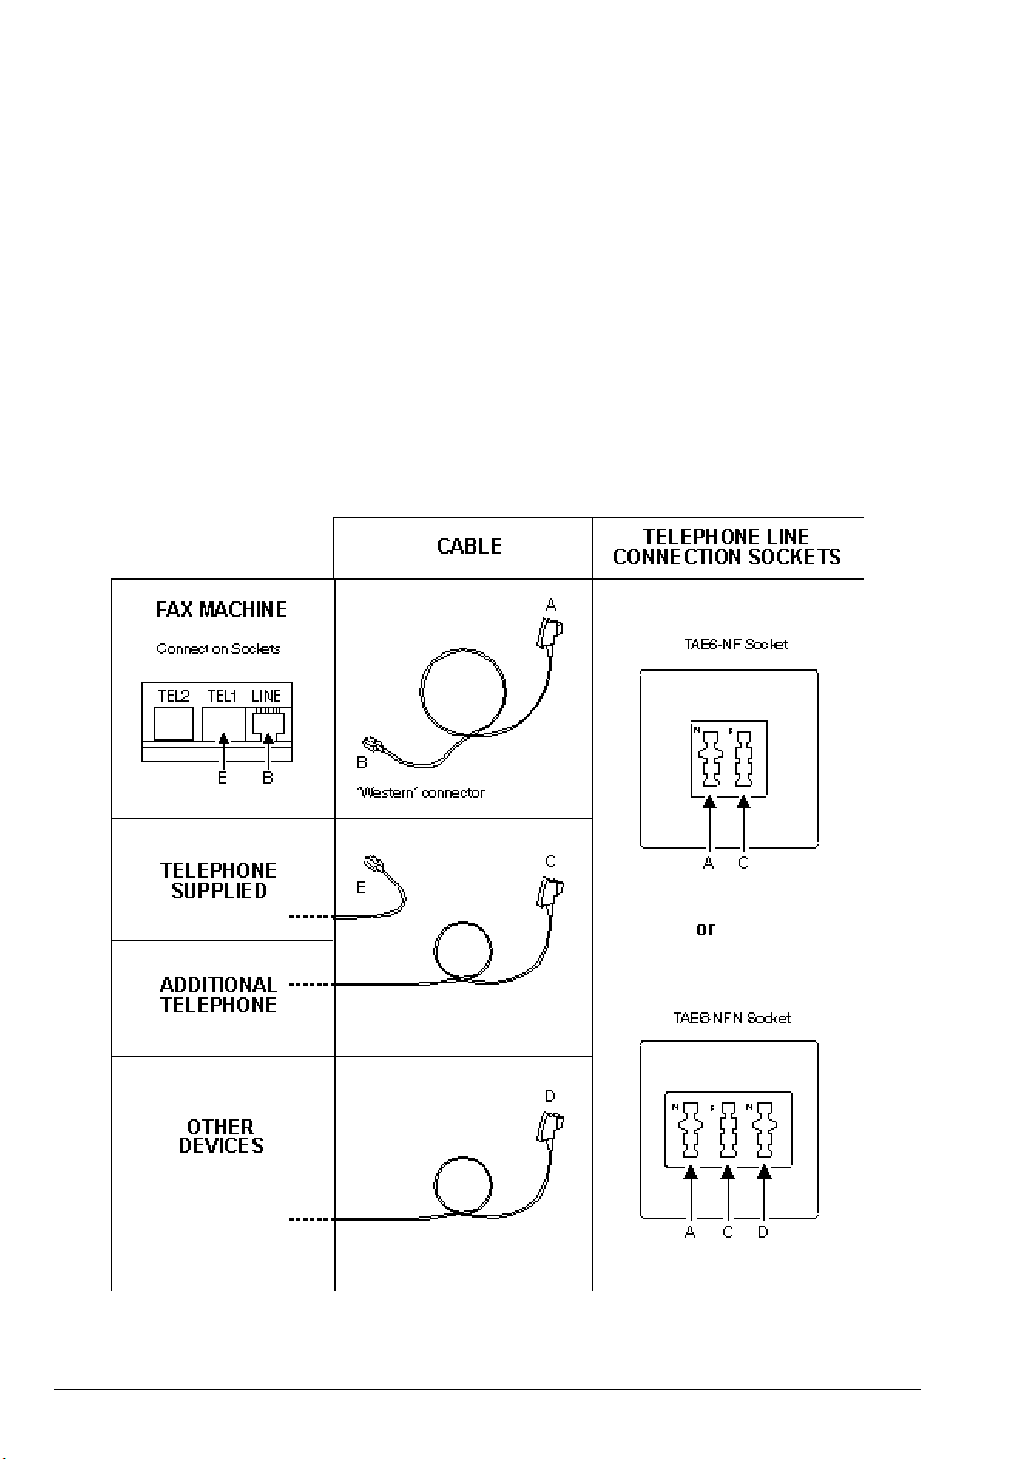
Additional telephone
1. Insert the "TAE" connector of the telephone cable into the telephone line wall socket marked "F"
(see the diagram below).
Other devices
1. Insert the "TAE" connector of the additional device into the telephone line wall socket marked "N"
(see the diagram below).
IF..
• you do not have a TAE6 socket yet, contact Telekom or your telephone system manager.
• the telephone supplied is not connected, the additional telephone and other devices will not
work.
• the network to which the fax machine is connected has more than one socket connected in
series, the fax machine must be connected to the primary socket.
14 CONNECTION AND INITIAL SET-UP
Page 28
CONNECTION TO THE ELECTRICAL POWER SUPPLY
2.
The fax machine is powered with a voltage of 230V. It may therefore be installed anywhere providing other
devices that could cause interference to the reception and transmission of documents are not connected to
the same power outlet.
1. Insert the plug on the power cable into the wall power socket.
IF...
if you want to power off the fax completely, you must unplug the power cable from the power
socket as the fax machine has no power switch.
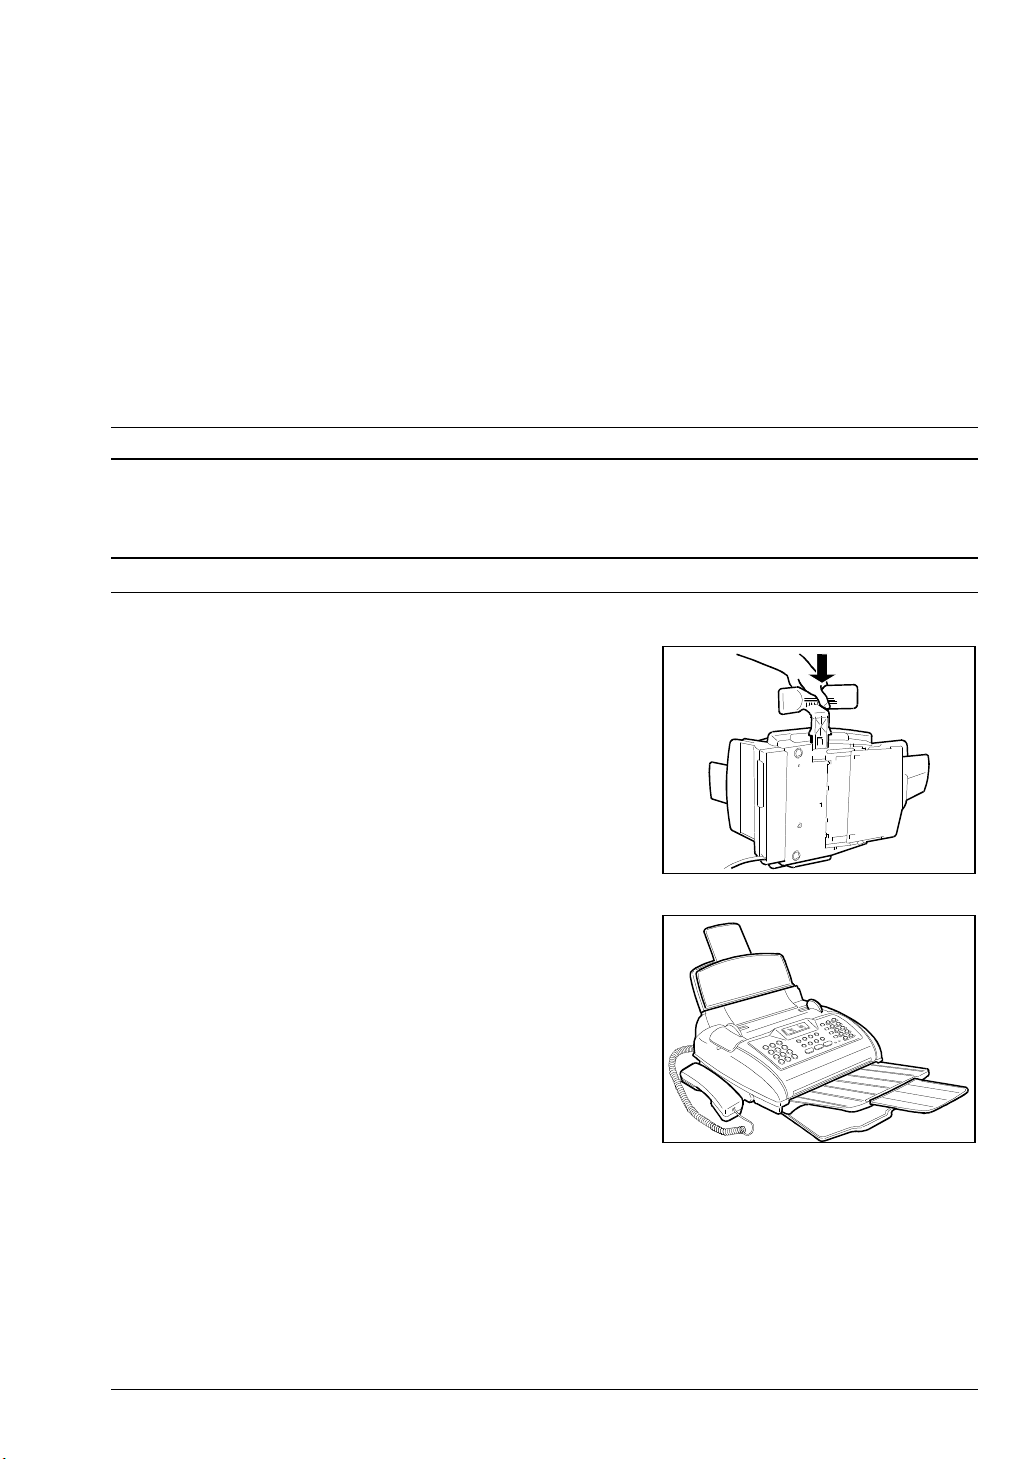
HANDSET FEATURES AND INSTALLATION OF ITS SUPPORT
The handset supplied with the fax machine is a compact device with the last number redial function. The
ideal place for the handset is on its support which is extremely easy to install.
v
1. Rest the fax machine on either of its sides and then insert
the telephone support in its guides.
Return the fax to its normal position and place the
handset on its support.
CONNECTION AND INITIAL SET-UP 15
Page 29
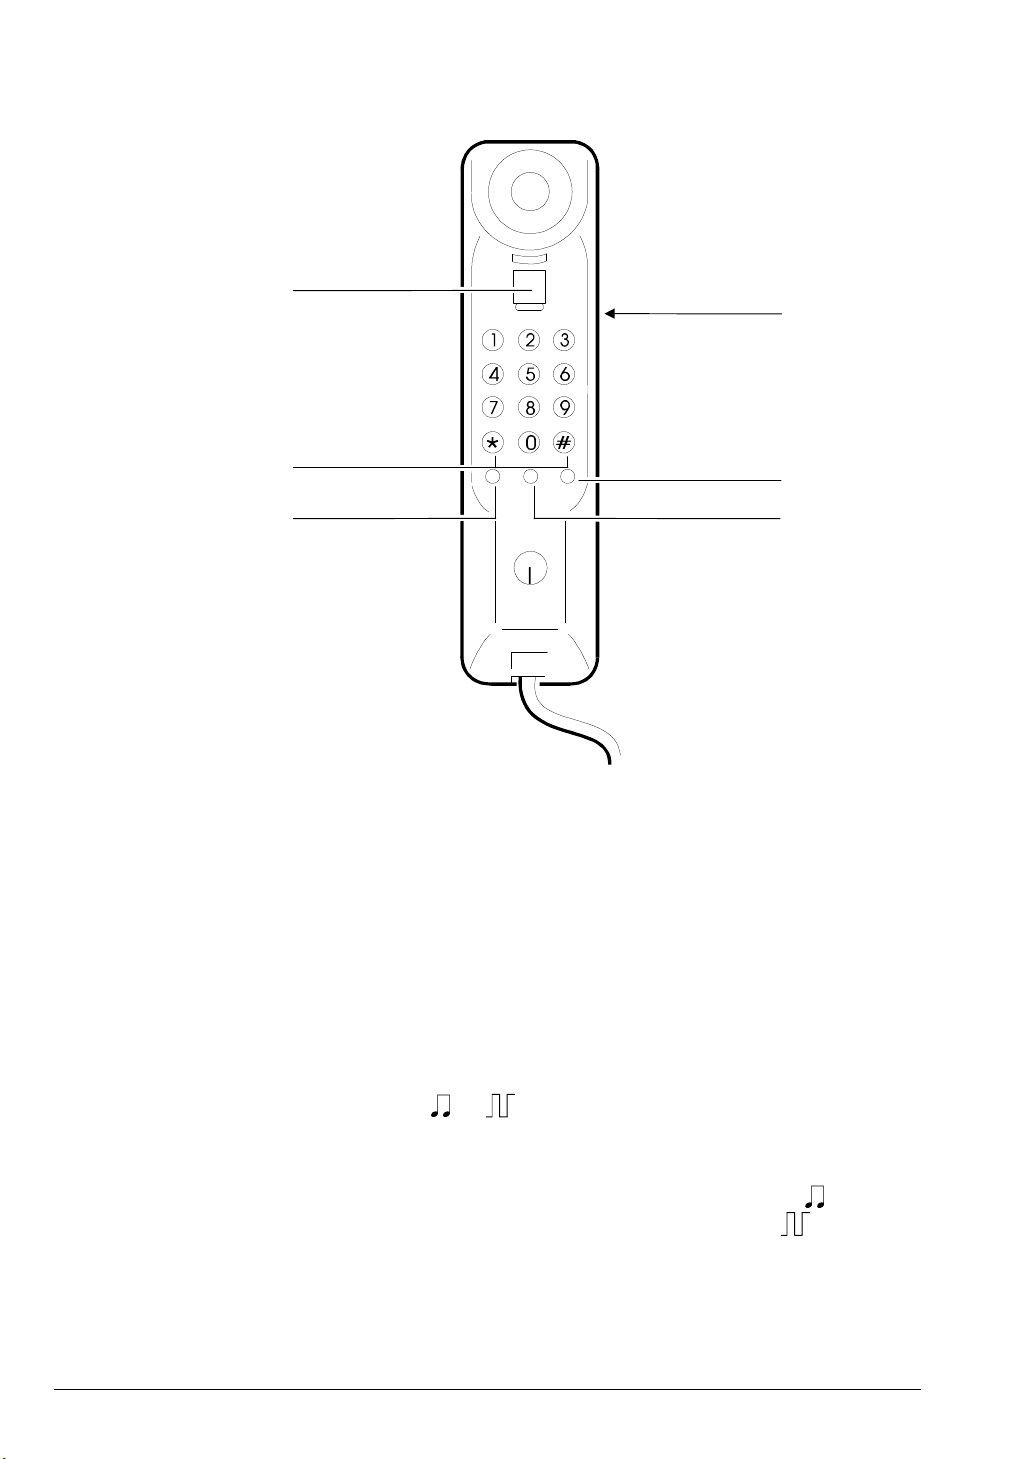
Location of controls and buttons:
6
1
5
4
1. Tone/pulse
2. Redial
3. Pause
4. Call forwarding
5. ✻ and # buttons
6. Hook key
Connection
The procedure for connecting the handset to the fax was described in the previous section.
2
3
Setting the modulation method
• Set the Tone/pulse selector (1) to position or according to the modulation method used.
IF...
you are not sure which modulation method is used, set the tone/pulse selector to and try
dialling a number. If the dialling tone is not interrupted, set the selector to position . It should
now be possible to make the call.
16 CONNECTION AND INITIAL SET-UP
Page 30

OPERATION
The handset is used for making and answering calls, in the same way as a conventional telephone.
The telephone also provides the following additional functions:
Call forwarding function
This function is useful if you want to forward an incoming call to another extension number or if you want to
put the call on hold while you speak to a person at some other extension number.
• Press the redial button (4)
• Wait until you hear a dialling tone
• Dial the desired extension number
• Place the handset back on the hook when the other operator answers or press the button (4) again to
resume your conversation with the caller once the other operator has been consulted or if the desired
extension is busy or does not answer.
Last number redial function
The last number dialled is stored automatically in the memory. To redial, proceed as follows:
• Lift the handset and wait for the dialling tone.
• Press the button (2). The last number dialled will be redialled automatically. The last number dialled will
stay in the memory until another number is dialled, so the redialling procedure can be repeated as many
times as required.
IF...
• you want to insert a pause in dialling a telephone number, press the button (3). If the pause
is not long enough, more than one can be inserted in a sequence by pressing the button (3)
as many times as required.
This function is particularly useful for making international calls. The last number redial
function also includes any pauses inserted.
Mixed dialling
If the Tone/pulse selector (1) is set to (pulse dialling), the ✻ and # button can be used for switching
from pulse to tone dialling.
SPECIAL NETWORK SERVICES
✻ and # buttons
These buttons are used for special functions of public or private exchanges. They can only be used in tone
dialling mode.
The call forwarding button
On some public networks, this button must be pressed before special services can be used. For further
details about the special services of public or private exchanges, contact your local operator.
WARNING:
In some countries, there may be slight differences in shape and available functions between the telephone
supplied and the one shown in this manual.
CONNECTION AND INITIAL SET-UP 17
Page 31

LOADING PAPER FOR PRINTING RECEIVED FAXES AND COPIES
The machine comes equipped with an automatic sheet feeder (ASF). The ASF contains the paper used for
printing received faxes or copying documents when the machine is used as a simple copier only. The ASF
(not applicable in all countries) will accept the following paper size: A4 (210x297 mm) as well as US Letter
(216x272 mm) and US Legal (216x349 mm) following suitable adjustment. The feeder may be adjusted to
accommodate different paper sizes as explained in Automatic Sheet Feeder Adjustment in the ROUTINE
MAINTENANCE section.
This heading explains how to fit the sheet feeder and load paper for printing received faxes and copies. The
insertion of original documents for transmission is explained in the section BASIC FUNCTIONS in the
heading: Document transmission.
1. Fit the sheet feeder in its housing.
2. Tilt the front cover of the sheet feeder forward to load the
paper.
18 CONNECTION AND INITIAL SET-UP
Page 32

3.
Holding the sheets by the top edge, drop them into the
sheet feeder without folding or forcing them. The sheet
feeder can accommodate a maximum of 70 sheets and
will not accept excess sheets.
IF...
• you add more sheets to those already in the feeder,
take care to load the fresh sheets under the existing
ones.
4. Close the front cover of the sheet feeder.
CONNECTION AND INITIAL SET-UP 19
Page 33

INSTALLATION OF DOCUMENT EXIT SUPPORTS
1.
There are two document supports: the extendible support for original transmitted or copied documents and
the exit support for received or copied documents.
Both supports are contained in the accessory box for subsequent installation on the fax machine.
Insert the original document exit support in the special
side slots provided.
2. Lay the fax machine on its right hand side and insert the
exit support for received/copied documents in the guides
under the fax machine until it clicks into place.
20 CONNECTION AND INITIAL SET-UP
Page 34

INSTALLING THE PRINT HEAD
1.
Installing the print head is a quick and simple operation but which nonetheless requires a little care.
v The fax machine must be connected to the electrical supply.
Open the printer cover, inserting your fingers in the
recesses on the sides.
2. Remove the print head from its box and, holding it by the
finger grip provided, remove the protective film from the
print nozzles.
☞
CONNECTION AND INITIAL SET-UP 21
Page 35

IMPORTANT:
3.
Do not detach the cartridge from the print head.
IMPORTANT:
Avoid touching the electrical contacts and the nozzles.
Fit the print head into its housing with the electrical
contacts facing the front of the machine.
NO
NO
4. Push the print head in the direction of the arrow and then
close the print head compartment.
The fax starts a print test (see Automatic Checking and
Cleaning of the Print Nozzles in the ROUTINE
MAINTENANCE section).
IF...
• the message "CHECK PRINT HEAD" appears, first
remove the cartridge and then install it again, applying
a little more pressure if necessary.
If the message persists, call Customer Service.
22 CONNECTION AND INITIAL SET-UP
Page 36

BASIC FUNCTIONS
This chapter explains how to use the basic functions of the fax machine: how to modify the time and date,
program the user's name and number, send, receive and copy a document.
CHANGING THE DATE AND TIME
When the machine is powered up, it automatically performs a quick self-test procedure before assuming its
normal operating condition.
The display shows the date and time. The user can adjust the date and time, which will then be updated
automatically. The date and time together with your identification will be printed at the top of each
document you send. This chart tells you how to change the date and time.
v When the power is connected the fax is on. The display shows the
current operating mode, which at this point indicates that the machine is
ready to receive a fax. The display also shows the date and time set on
the machine's internal clock. The date shown in the displays in this
manual is adopted as an example.
1. Press FUNCTION to select the "FAX SET-UP” menu.
2. Press START.
3. Press FUNCTION.
4. Press FUNCTION.
5. Press START.
The display shows the format in which the date is displayed, i.e.:
days, month, year. The date in our example is shown in this
format.
AUTOMATIC RX
20-02-95 09:22
FAX SET-UP
FUNC/START/STOP
VARIOUS SETTINGS
FUNC/START/STOP
PRINTER PARAMET.
FUNC/START/STOP
DATE AND TIME
FUNC/START/STOP
FORMAT: DD/MM/YY
START/STOP/ß/à
IF...
• you want to change the date format press the < / > keys and
refer to the section CONFIGURATION PARAMETERS
heading: Programming chart and description of the sub-menu:
date and time.
☞
BASIC FUNCTIONS 23
Page 37

6. Press START.
The display shows the selected time format, in this case the
24 hour clock format.
IF...
• you want to select a different time format (12 hour clock),
press the < / > keys.
FORMAT: 24 H
START/STOP/ß/à
7. Press START.
The display shows the current date and time. The cursor flashes
under the first digit of the date.
IF...
• the date format selected is the 12 hour format, the letter “p”
(post meridian) or letter “a” (ante meridian) is displayed. To
pass from one letter to the next, press FUNCTION.
8. Use the numerical keys to enter the correct date and time (e.g.
21-02-1995 10:30). Each time you enter a number the cursor
moves to the next digit on the right.
IF...
• you only wish to change certain digits, move the cursor to the
desired position using the < / > keys and overwrite the existing
number with the correct number.
9. To confirm the change, press START.
The display will now show the next sub-menu. The date and time
programming sequence is now over. The new date and time will
be updated automatically and printed at the head of each
document you send.
IF...
• if you want to terminate the programming session and return
to the original operating mode press STOP.
DD/MM/YY HH:MM
20-02-95 09:22
DD/MM/YY HH:MM
21-02-95 10:30
ONE TOUCH DIAL
FUNC/START/STOP
24 BASIC FUNCTIONS
Page 38

STATION NAME AND NUMBER
In addition to changing the date and time you can also enter and store your fax number and your station
name i.e. your name or any name you choose in order to identify the machine. This information will be
stored until the next time you make a modification, and is printed at the head of each document you send.
A maximum of 16 alphanumeric characters may be selected one at a time using the numerical keys as
indicated in the table below:
KEYS: DIGITS AND
CHARACTERS
key 1 1 key 6 6 M N O
key 2 2 A B C key 7 7 P R S
key 3 3 D E F key 8 8 T U V
key 4 4 G H I key 9 9 W X Y
key 5 5 J K L key 0 0 Q Z
DIGIT AND CHARACTER MANAGEMENT RULES:
Each key selects the characters within its range in a cyclic sequence. The number is first selected
followed by the characters with each subsequent depression of the key.
To change letters from upper case to lower case and vice versa, input the relative letter and press key A↔↔ a.
To confirm the character selected, press the > key: the cursor moves one space to the right.
To correct an error, position the cursor at the relative character using the > and < keys and overwrite the
correct character.
Using keys * and #, it is also possible to input the symbols displayed in the following tables. The second
table indicates the symbols for different languages if the fax is programmed for foreign language display
messages.
KEYS: DIGITS AND
CHARACTERS
Symbols: . + ? - / : * space % ! [[ ]] ^ ‘ { } ; < > = @ # $ & , ` ( ) .
Key * : generates symbols by scrolling “forwards”
Key # : generates symbols by scrolling “backwards”
SPECIFIC NATIONAL SYMBOLS
German:
French:
Swedish:
Ä Ö Ü ß
Ç è é
ä å ö Ä Å Ö
Danish:
Spanish:
Portuguese:
å Å æ Æ ø Ø
°
Ç Ñ ¿
Ç ç ã Ã Õ á ú
☞
BASIC FUNCTIONS 25
Page 39

v The display shows the operating mode with the date and time.
AUTOMATIC RX
21-02-95 10:30
1. Press FUNCTION repeatedly until the Installation menu appears.
IF...
• you make a mistake, press
STOP and then repeat the procedure.
2. Press START
The display shows the first sub-menu.
3. Press FUNCTION twice.
The display will show the STATION NAME sub-menu.
4. Press START.
5. For example, to enter the name SMITH, press key 7 repeatedly
to display the letter “S”. Then press > to move the cursor one
space to the right and, in the new position, press key 6 to display
the letter “M”.
Enter the remaining letters in the same way.
IF...
• you want to move the cursor back to the left press <
INSTALLATION
FUNC/START/STOP
TEL. LINE SET-UP
FUNC/START/STOP
STATION NAME
FUNC/START/STOP
TYPE YOUR NAME
TYPE YOUR NAME
SMITH
• you want to delete the name entirely press CLEAR
• you want to enter upper case letters press A ↔↔ a with the
cursor positioned on a lower case letter or vice versa to obtain
lower case letters
• you want to enter special symbols press * and/or #
• you want to enter a space, simply move the cursor to the right
with the > key without entering a character.
6. Press START to confirm.
The display shows the parameter relative to the telephone number.
IF...
• this parameter does not appear, this is because it is not
applicable in the country in which the fax is used.
26 BASIC FUNCTIONS
PHONE NUMBER
FUNC/START/STOP
Page 40

7. Press START to confirm.
The display shows the telephone number input parameter.
TYPE YOUR NUMBER
8. Input the number complete with international code using the
numerical keypad (e.g. 0039 125 534218)
When entering the international code, note that you must type the *
key to generate the zeros. E.g., to get the number 0039-0125526419, press:
1) the * key instead of “00”. The display will show the symbol +.
This symbol is also generated in print form instead of the two
digits “00” .
2) Type 39.
3) Enter a space by moving the cursor with the > key
4) Type in 125 without the “0”.
5) Enter another space and type in the number 526419.
9. Confirm with START.
The display will show the Diagnostics sub-menu. The procedure
is now terminated. Your number will remain stored in the memory
until it is changed and it will be printed on all the faxes you send.
IF...
• you wish to return to the original fax machine conditions, press STOP.
TYPE YOUR NUMBER
+39 125 534218
DIAGNOSTICS
FUNC/START/STOP
BASIC FUNCTIONS 27
Page 41

DOCUMENT TRANSMISSION
The fax machine scans the contents of the original document, converts them into a coded signal and then
transmits this signal to a remote fax machine which prints a copy. The document is transmitted after the
recipient’s fax number is dialled as explained in the section entitled TRANSMISSION. This heading explains
the transmission procedure following manual dialling.
v The display shows the operating mode with the date and time.
1. Place the document into the document feeder face down. Then
adjust the document guides to the width of your document (see
the relative heading in the section TRANSMISSION).
After a few seconds the end of the document is automatically fed
into the feeder.
The display shows an arrow pointing to STD thus indicating that
standard print mode is selected.
IF...
• you want to change the print mode see TRANSMISSION.
2. Press HOOK, dial the destination fax number on the numeric
keypad.
IF...
• the fax is connected to a private switchboard (PABX) and you
must dial an external number, press the EXT. key before
dialling the number. The letter “e” (external) will appear on the
display. Connection to the external telephone line will be
carried out according to the mode in which it was programmed
(prefix, earth, flash) in the “TEL. LINE SET-UP” sub-menu. See
the Programming Example: Tel. Line Set-Up sequence in the
INSTALLATION PARAMETERS section.
AUTOMATIC RX
21-02-95 10:30
DOCUMENT READY
ê NORMAL
TYPE NUMBER
3. Wait until you hear the connection tones emitted by the
destination fax machine and press START.
Transmission will begin. On completion of transmission the
display shows "TX COMPLETED " for a few seconds before
returning to the original operating mode display.
IF...
• the destination fax machine is not programmed for automatic
reception, the destination user will answer the call, in which
case, you must pick up the handset and ask the user to press
START on his/her machine, after which you can press START
on your own machine.
28 BASIC FUNCTIONS
TX COMPLETED
Page 42

• you want to interrupt transmission at any point:
1) Press STOP. The display will alternate between the
operating mode message and the message prompting you
to press STOP to remove the document (REMOVE
DOCUMENT, PRESS STOP).
2) Press STOP again. The document will be ejected and the
display will alternate between the operating mode message
and the message indicating that transmission has been
interrupted. If the document to be removed comprises
more than one sheet, manually remove all the sheets
above the one that is already inserted in the ADF, then
press STOP to expel also the first sheet.
3) Press STOP again to return to the original machine
operating mode.
4. Press FUNCTION until you have selected the “Print Out Report”
menu in order to print out the transmission report.
5. Press START.
The display shows the first parameter.
PRINT OUT REPORT
FUNC/START/STOP
PRINT: TX REPORT
START/STOP/ß/à
6. Press START.
The transmission report is now printed. On completion of printing
the display returns to the original machine operating mode.
IF...
• you require a transmission report printout every time you
transmit a document, refer to the section CONFIGURATION
PARAMETERS in Programming chart and description of the
sub-menu: Various settings.
PRINTING
STOP
RECEIVING A FAX IN AUTOMATIC MODE
This type of reception is preferable when your fax and telephone use two different telephone lines.
With automatic mode reception the fax will receive documents automatically without supervision. The fax
machine is already preset for automatic mode reception, although you can select alternative reception
modes by setting up the fax machine as explained in the section: RECEPTION.
The following chart explains the automatic reception procedure.
v The display shows the initial operating mode, i.e. automatic reception
mode.
AUTOMATIC RX
21-02-95 12:25
☞
BASIC FUNCTIONS 29
Page 43

1. When a call arrives the machine prepares to receive a fax.
The display shows the message “CONNECTING” followed by the
number of the remote fax machine or, if previously programmed,
the name of the remote sender.
After the fax has been received the display will show “RX
COMPLETED” and then the machine status
.
IF...
• the paper or ink runs out, the paper gets jammed or the printer
cover is opened during reception, reception is interrupted,
printing of the document in reception will be interrupted, the
relative message is displayed and the document is temporarily
stored in memory. Once the problem has been remedied, the
machine will resume printing. The display shows the message
“CONNECTING” followed by the number of the remote fax
machine or, if previously programmed, the name of the remote
sender.
• the paper jams, printing of the document in reception is
interrupted and you are prompted to press STOP. Once the
problem has been remedied, the machine will resume printing.
• you want to interrupt reception at any time:
1) Press STOP. The display will alternate between the
operating mode message and a message indicating that
reception has been interrupted. The portion of the
document that has already been received will be printed.
2) Press STOP again to return to the original machine
operating mode.
CONNECTING
AUTOMATIC RX
21-02-95 12:25
30 BASIC FUNCTIONS
Page 44

USING THE FAX MACHINE AS A SIMPLE COPIER
The fax machine may also be used to make copies. The copying function is influenced by the contrast
setting, resolution and paper size.
Only one copy of the original document may be made at a time.
v The display shows the operating mode with the date and time.
1. Place the document in the document feeder
After a few seconds the document is automatically drawn into the
feeder and the relative message is displayed.
2. Press START.
The document will be copied.
IF...
• you want to make another copy repeat the operation from step 1.
• you want to interrupt the copying operation:
1) Press STOP. The display will alternate between the
operating mode message and a prompt asking you to
press STOP to remove the document (REMOVE
DOCUMENT, PRESS STOP).
2) Press STOP a second time to eject the document.
AUTOMATIC RX
21-02-95 08:41
DOCUMENT READY
ê NORMAL
COPYING
ê NORMAL
BASIC FUNCTIONS 31
Page 45

MENUS, SUB-MENUS AND PARAMETERS
As already described in the section dealing with the basic functions, the fax machine displays messages
which allow you to access and program various functions.
The messages displayed are organised in Menus which access Sub-menus which in turn are divided into
Parameters.
The various Menus, Sub-menus and Parameters can be accessed through certain key sequences. The
charts below present an overview of the programmable functions and a guide to accessing the menus and
sub-menus.
PROGRAMMING LEVELS
Menu, sub-menu and parameter messages are displayed as follows:
DISPLAY:
top line
bottom line
The top line displays the following:
• menu and sub-menu messages indicating the operation modes available on the fax machine.
• parameters for which a suitable value must be set in order to effect the operation mode selected.
The bottom line displays the following:
the keys enabled to manage the information displayed on the top line, i.e.:
FUNCTION press to select the menu and sub-menu messages which may only be scrolled forwards
in cyclic sequence, that is, starting with the first and ending with the last message before
returning to the first one again.
START press to confirm menu and sub-menu messages and parameter values:
• confirms a menu message to access the corresponding sub-menu
• confirms a sub-menu to access the corresponding parameters
• confirms a parameter or relative value to access the next parameter
> < press to select the values of a parameter by scrolling backward or forward through the
range available, or use to position the cursor on the characters that make up the value of a
particular parameter; in this latter case, one the position is reached you will be prompted to
enter the required value using the numeric keypad.
STOP
press to exit the operation mode selected.
☞
MENUS, SUB-MENUS AND PARAMETERS 33
Page 46

7 menus are available: 3 provide access to the sub-menus while the remaining four directly access the
parameters.
MENU MENU
ò ò
SUB-MENU PARAMETERS
ò
PARAMETERS
LIST OF MENUS AND SUB-MENUS
The following lists show the main menus and the sub-menus which can be accessed through them.
MENUS
a) FAX SET-UP
ò
b) TAD SET-UP
ò
PRINT OUT REPORT
ò
DELAYED TX
ò
POLLING RX
ò
POLLING TX
ò
c) INSTALLATION
ï
ð
The FUNCTION key allows you to scroll the menus in cyclic sequence. After selecting the last menu, the
next depression of the FUNCTION key returns you to the first one again.
Menus a, b and c access the relative sub-menus, while the other menus access the parameters directly as
indicated in the chart which follows:
34 MENUS, SUB-MENUS AND PARAMETERS
Page 47

a) FAX SET-UP b) TAD SET-UP
ò ò
VARIOUS SETTINGS
ï
PLAY OGM #1
ò ò
PRINTER PARAMET. RECORD OGM #1
ò ò
DATE AND TIME PLAY OGM #2
ò ò
ONE-TOUCH DIAL RECORD OGM #2
ò ò
CODED SPEED DIAL FORWARD MESSAGES
ò ò
PRINT OUT SET-UP REC.FORW.ANNOUNC
ï
ò ò
HEAD MAINTENANCE
ð
ANNOUNCE ONLY
ò
SYNTH.ANNOUNCE
ò
DAY OF THE WEEK
ò
ICM REC. TIME
ò
ACCESS CODE
ò
TOLL SAVER
ò
PRINT TAD SET-UP
ð
☞
MENUS, SUB-MENUS AND PARAMETERS 35
Page 48

c) INSTALLATION
ò
TEL. LINE SET-UP
ò
LANGUAGE
ò
STATION NAME
ò
PHONE NUMBER
ò
DIAGNOSTIC
ò
PRINT INSTALL.
ï
ò
SERVICE PARAM.
The START key confirms selection of the menu and enters the relevant sub-menu.
The FUNCTION key allows you to scroll the sub-menus in cyclic sequence. After selecting the last submenu, the next depression of the FUNCTION key returns you to the first one again.
PRINT OUT REPORT DELAYED TX
ð
ò ò
PARAMETERS PARAMETERS
ò ò
The START key confirms the menu selection and accesses the parameters directly if there is no
corresponding sub-menu. It also serves to confirm the setting of the selected parameter.
The various parameters which can be accessed from the menus and sub-menus are not shown in this
chart. These will be explained in due course in the sections dealing with the relative procedures.
36 MENUS, SUB-MENUS AND PARAMETERS
Page 49

POLLING TX POLLING RX
ò ò
PARAMETERS PARAMETERS
ò ò
The START key confirms the menu selection and accesses the parameters directly if there is no
corresponding sub-menu. It also serves to confirm the setting of the selected parameter.
The various parameters which can be accessed from the menus and sub-menus are not shown in this
chart. These will be explained in due course in the sections dealing with the relative procedures.
MACHINE OPERATION MODES
Some display messages refer to machine operation modes. These messages indicate the conditions
assumed by the machine while it is waiting for the user to select a function. Such messages are generally
displayed each time you press STOP. Machine operation mode displays also include messages indicating
an operating condition currently in progress.
The following chart lists the initial machine operation modes:
AUTOMATIC RX
20-02-95 10:30
ï
The fax is set up for automatic reception. All procedures in
the manual start from this machine operation mode.
ò
TAD/FAX RX
20-02-95 10:30
The fax is set up for reception with an external telephone
answering machine.
ò
MANUAL RX
20-02-95 10:30
The fax is set up for manual reception.
ò
PHONE/FAX RX
20-02-95 10:30
The RX MODE key allows you to scroll through the machine operating modes listed above.
IMPORTANT:
If you stop entering selections or pressing keys on the fax machine during any type of procedure for
a certain period of time, the machine will automatically return to the original operation mode.
ð
The fax is set up for reception with recognition of the type of
call (fax or telephone).
MENUS, SUB-MENUS AND PARAMETERS 37
Page 50

PARAMETER PROGRAMMING
Page 51

WHAT IS MEANT BY PROGRAMMING?
To use the fax machine efficiently and in accordance with your personal requirements you will need to
program it before proceeding.
Programming refers to the possibility of setting up the machine parameters with a series of values that will
subsequently define the way in which the various functions are performed. For example, depending on the
type of programming, the fax display messages can be shown in any one of the various languages
available, or you can set certain telephone or fax numbers which can be dialled simply by pressing one key,
as in the “One touch dial” mode.
The fax parameters already contain the preset programming values. The user can freely alter these values
to personalise the fax programming to match his or her needs. The preset or ‘factory set’ programming
values, however, can be restored whenever necessary.
LAYOUT AND DESCRIPTION
The following information describes:
PARAMETER PROGRAMMING OPERATIONS
Programming is mainly carried out by means of the Installation
parameters and the Configuration parameters which are accessed from
the menus shown in the adjacent boxes.
These parameters make it possible to print out the programmed values so
that the user can keep a global check on the factory set values and the
personalised values.
Fax programming is not restricted to installation and set-up parameters.
Specialised functions such as Delayed transmission, Polling
transmission, Polling reception and TAD settings can be programmed
in the parameters accessed from the menus shown in the adjacent
column.
INSTALLATION
FAX SET-UP
DELAYED TX
POLLING TX
POLLING RX
TAD SET-UP
The following sections present the INSTALLATION PARAMETERS and the CONFIGURATION
PARAMETERS while the other parameters, regarding delayed transmission and polling reception, are dealt
with in the TRANSMISSION and POLLING sections.
WHAT IS MEANT BY PROGRAMMING? 41
Page 52

INSTALLATION PARAMETERS
The installation parameters contain data that determine the type of operation of the fax machine, and once
programmed, they rarely need to be changed.
These data consist of the programmed settings, such as the language in which the messages are to be
displayed or the type of telephone line on which the machine is used.
The installation parameters, in combination with the more frequently modified configuration parameters,
provide the basic information which the fax machine needs to operate correctly. The parameters are
already set with a number of values which can subsequently be freely modified by the user according to
requirements.
An updated summary of both the preset values and those set by the user may be printed if required.
In some countries not all of these parameters can be programmed by the user. All the parameters available
and the relative procedures for their modification are indicated in this section.
LIST AND DESCRIPTIONS
The following is a list of the installation parameter menus and sub-menus with a brief description of each.
SOURCE: ACCESS:
AUTOMATIC RX
21-02-95 10:30
INSTALLATION
ò
TEL. LINE SET-UP
ò
LANGUAGE
ò
STATION NAME
Press FUNCTION to select the FAX SET-UP menu and then press
FUNCTION again until you select the INSTALLATION menu.
Press START to confirm and select the TEL. LINE SET-UP submenu. Now press FUNCTION to select the subsequent sub-menus.
This is the menu from which you can select the sub-menus for the
installation parameters.
Allows you to select the type of telephone line (public line or private
switchboard).
Lets you select the language in which the messages are to be displayed
and printed.
Allows you to enter the name which you choose to identify the machine
(max. 16 characters.).
ò
PHONE NUMBER
Allows you to enter your telephone number.
ò
☞
INSTALLATION PARAMETERS 43
Page 53

DIAGNOSTICS
ò
Allows you to enable or disable diagnostics or installation parameter testing
by a remote fax machine at the Customer service centre.
PRINT INSTALL.
ò
SERVICE PARAM.
This is not a programming sub-menu. Allows you to select and
simultaneously print both the preset values and those set by the user.
Allows entry of a password to access the service parameters. Access to
these parameters is only permitted to the authorised service engineer.
44 INSTALLATION PARAMETERS
Page 54

PROGRAMMING CHART AND DESCRIPTION OF THE SUB-MENU: TEL. LINE SETUP
TEL. LINE SET-UP
ò
PRIV. LINE (PBX) PUBL. LINE (PSTN)
ò
PBX DIAL: PULSE PBX DIAL: TONE
ò
EXT. LINE: PREFIX EXT. LINE: EARTH EXT. LINE: FLASH
ò
TYPE PREFIX:
(0-9): 0
ò
PSTN DIAL: PULSE PSTN DIAL: TONE
ò
REMOTE START: ON REMOTE START: OFF
ò
TYPE CODE
CODE (0/9, * ) **
ò
RING COUNT: 01 RING COUNT: 02 RING COUNT: 04 RING COUNT: 08
ò
FAX/TEL TIMER:15 FAX/TEL TIMER:20 FAX/TEL TIMER:30 FAX/TEL TIMER:40
ò
SILENCE LAPSE: 4 SILENCE LAPSE: 6 SILENCE LAPSE: 8 SILENCE LAPSE: 10
START: Confirms selection of the sub-menu TEL. LINE SET-UP and moves down to the associated
parameters. Confirms a parameter and the relative value and moves on to the next parameter.
< / > : To select the value of a parameter by scrolling forward and backward through the values available.
Alternatively used to position the cursor on the characters that make up the value of a particular
parameter; in this latter case, once the position is reached you will be prompted to enter the
required value.
STOP: Interrupts the programming procedure and returns to the original operating mode display.
INSTALLATION PARAMETERS 45
Page 55

PROGRAMMING EXAMPLE: TEL. LINE SET-UP
This parameter is to be set in accordance with the type of telephone line on which the fax machine is to be
used. The fax machine may be connected to a public line, as is most likely the case, or to a private
switchboard. This section describes the options available for the two line types. The last 16 options are only
available in certain countries.
This chart gives an example programming sequence. Follow the instructions referring to the chart on the
previous page.
v The display shows the machine operating mode with date and time.
1. Press FUNCTION to select the “INSTALLATION” menu.
2. Press START to select the “TEL. LINE SET-UP” sub-menu.
3. Press START.
The display proposes the first option regarding the type of
telephone line to which the machine is to be connected.
The machine may be connected to a public line (PSTN: Public
Switch Telephone Network) or a private exchange (PBX: Private
Branch Exchange). For our example we chose the private line
option as this the more complex case.
IF...
• you select the public line (most frequent case) press START
and pass on to step 7.
• you want to interrupt the programming procedure press STOP.
AUTOMATIC RX
21-02-95 10:30
INSTALLATION
FUNC/START/STOP
TEL. LINE SET-UP
FUNC/START/STOP
PUBL. LINE (PSTN)
START/STOP/ß/à
4. To select the private line press >.
5. Confirm your selection by pressing START.
The display shows the first of the two dialling mode options (tone
or pulse). In our example we choose the tone dial option.
To select either of these two options press > or <.
6. Confirm your selection by pressing START.
The display now shows the first of the three options for external
dialling (prefix, earth or flash). In this example we choose external
dialling with prefix.
To select one of the three options press > or <.
IF...
• you selected the “earth” or “flash” external dialling option, pass
directly to step 8.
46 INSTALLATION PARAMETERS
PRIV. LINE (PBX)
START/STOP/ß/à
PBX DIAL: TONE
START/STOP/ß/à
EXT. LINE: PREFIX
START/STOP/ß/à
Page 56

7. Confirm your selection by pressing START.
The display will now prompt you to enter the prefix.
TYPE PREFIX
(0-9): 0
8. Enter the prefix (max 3 digits) from the numeric keypad and press
START.
The display now shows the first of the two public line dialling
mode parameters (tone or pulse). In this example we choose
tone dialling.
To select one of the two options press > or <.
9. Press START.
The display proposes the remote start parameter (ON or OFF)
(refer to the relative part of the section RECEPTION). In this
example we choose ON.
To select one of these two options press > or <.
IF..
• you selected OFF, pass directly to step 11.
10. Press START.
The display shows the message prompting you to input the multifrequency code that you wish to use for the remote start function
(a digit between 0 and 9 and the character * ).
11. Enter the code of your choice and press START.
The display proposes the parameter for the number of rings (1, 2,
4, 8) emitted by the fax machine on reception of a document. In
our example we choose 1 ring.
To select the desired option press > or <.
PSTN DIAL: TONE
START/STOP/ß/à
REMOTE START: ON
START/STOP/ß/à
TYPE CODE
CODE (0-9, * ) **
RING COUNT: 01
START/STOP/ß/à
IF...
• this option is not displayed, it is because it is not available in
the country in which the fax machine is to be used.
12. Press START.
The display now proposes the parameter relative to the pause
time that the fax must use before presetting for document
reception. This is related to the PHONE/FAX reception mode.
During this interval the fax emits an intermittent acoustic signal. In
the example we choose 15 seconds.
To select the desired option press > or <.
IF...
• this option is not displayed, it is because it is not available in
the country in which the machine is to be used.
FAX/TEL TIMER:15
START/STOP/ß/à
☞
INSTALLATION PARAMETERS 47
Page 57

13. Confirm your selection by pressing START.
The display now proposes the of the silence lapse parameters
(the available options are: 4, 6, 8, 10 seconds). This parameter
applies when the fax machine is to be used in conjunction with an
answering machine. In our example we choose 6 seconds.
To select the desired parameter press > or <.
IF...
• this option is not displayed, it is because it is not available in
the country in which the machine is to be used.
SILENCE LAPSE: 6
START/STOP/ßß/àà
14. Press START.
The display now passes to the next installation parameters submenu.
LANGUAGE
FUNC/START/STOP
PROGRAMMING CHART AND DESCRIPTION OF THE SUB-MENU: LANGUAGE
LANGUAGE
a) ò
GERMAN PORTUGUESE SPANISH SWEDISH
DANISH DUTCH ENGLISH FRENCH
ITALIAN
START: Confirms selection of the sub-menu and moves down to the associated parameters. Confirms a
parameter and the relative value and moves on to the next parameter.
< / > : To select the value of a parameter by scrolling forward and backward through the values available.
Alternatively used to position the cursor on the characters that make up the value of a particular
parameter; in this latter case, once the position is reached you will be prompted to enter the
required value.
STOP: Interrupts the programming procedure and returns to the original operating mode display.
DESCRIPTION:
a) Allows you to select the language in which the messages are displayed and printed.
PROGRAMMING CHART AND DESCRIPTION OF THE SUB-MENU: STATION NAME
STATION NAME
ò
a)
48 INSTALLATION PARAMETERS
TYPE YOUR NAME
Page 58

START: Confirms selection of the sub-menu and moves down to the associated parameters. Confirms a
parameter and the relative value and moves on to the next parameter.
< / > : To select the value of a parameter by scrolling forward and backward through the values available.
Alternatively used to position the cursor on the characters that make up the value of a particular
parameter; in this latter case, once the position is reached you will be prompted to enter the
required value.
STOP: Interrupts the programming procedure and returns to the original operating mode display.
DESCRIPTION:
a) This parameter allows you to enter the name with which you chose to identify the fax machine. This
name will be printed at the head of each document you send.
PROGRAMMING CHART AND DESCRIPTION OF THE SUB-MENU: PHONE NUMBER
a)
PHONE NUMBER
ò
b)
START: Confirms selection of the sub-menu and moves down to the associated parameters. Confirms a
parameter and the relative value and moves on to the next parameter.
< / > : To select the value of a parameter by scrolling forward and backward through the values available.
Alternatively used to position the cursor on the characters that make up the value of a particular
parameter; in this latter case, once the position is reached you will be prompted to enter the
required value.
STOP: Interrupts the programming procedure and returns to the original operating mode display.
DESCRIPTION
a) Allows you to enter your telephone number.
b) Enter the number with which you choose to identify the fax machine. This number will be printed at the
head of each document you send.
PROGRAMMING CHART AND DESCRIPTION OF THE SUB-MENU: DIAGNOSTICS
TYPE YOUR NUMBER
DIAGNOSTICS
ò
a)
REMOTE DIAG.: ON REMOTE DIAG.:OFF
ò
b)
INSTALLATION PARAMETERS 49
LINE MONITOR: ON LINE MONITOR: OFF
☞
Page 59

START: Confirms selection of the sub-menu and moves down to the associated parameters. Confirms a
parameter and the relative value and moves on to the next parameter.
< / > : To select the value of a parameter by scrolling forward and backward through the values available.
Alternatively used to position the cursor on the characters that make up the value of a particular
parameter; in this latter case, once the position is reached you will be prompted to enter the
required value.
STOP: Interrupts the programming procedure and returns to the original operating mode display.
DESCRIPTION:
a) This parameter allows you to enable or disable telediagnostic testing from a remote terminal. In more
simple terms, this allows the user to choose whether to authorise remote monitoring of his/her fax
machine. If this function is enabled (ON), the remote terminal can interrogate the fax machine, receive
information about its operation and change its settings.
More specifically, the remote terminal can:
set the fax machine’s installation parameters
The remote terminal displays the fax machine’s installation parameters in order to check and, if
necessary, modify the parameter values.
perform diagnostic testing
the remote terminal monitors information concerning configuration parameters, the last journal and
transactional statistics (connection conditions, errors detected, number of pages transmitted and
received etc.). Analysis of these data allows the remote terminal to modify the value of certain
parameters if required by remote control in order to guarantee the optimum performance of your fax
machine.
b) The parameter also provides line monitor selection. If the line monitor function is selected, the user will
be able to monitor the signals exchanged between the local and remote fax machines during the initial
connection phase.
PROGRAMMING CHART AND DESCRIPTION OF THE SUB-MENU: PRINT INSTALL.
PRINT INSTALL.
ò
a)
START: Confirms selection of the sub-menu and moves down to the associated parameters. Confirms a
parameter and the relative value and moves on to the next parameter.
< / > : To select the value of a parameter by scrolling forward and backward through the values available.
Alternatively used to position the cursor on the characters that make up the value of a particular
parameter; in this latter case, once the position is reached you will be prompted to enter the
required value.
STOP: Interrupts the programming procedure and returns to the original operating mode display.
DESCRIPTION:
a) This parameter allows you to print out a list of the parameter settings. By printing the parameter settings
you can make a global check on the relative values. Selecting "EXIT" allows you to exit this function
without printing to pass to the next sub-menu.
PRINT OUT: START PRINT OUT: EXIT
50 INSTALLATION PARAMETERS
Page 60

PROGRAMMING CHART AND DESCRIPTION OF THE SUB-MENU: SERVICE
PARAM.
SERVICE PARAM.
ò
a)
START: Confirms selection of the sub-menu and moves down to the associated parameters. Confirms a
parameter and the relative value and moves on to the next parameter.
< / > : To select the value of a parameter by scrolling forward and backward through the values available.
Alternatively used to position the cursor on the characters that make up the value of a particular
parameter; in this latter case, once the position is reached you will be prompted to enter the
required value.
STOP: Interrupts the programming procedure and returns to the original operating mode display.
DESCRIPTION:
a) Unlike the other parameters, this parameter may only be set by an authorised engineer. This parameter
can only be accessed by entering a secret PASSWORD to access the purely technical settings of the
fax machine.
TYPE PASSWORD
INSTALLATION PARAMETERS 51
Page 61

CONFIGURATION PARAMETERS
Configuration means adapting the fax machine to your particular needs. It entails programming parameters
and functions which, once stored in the memory, may be used to automate certain operations. The settings
of the configuration parameters, in combination with the installation parameters, determine how your
machine operates in various conditions.
The difference between the installation parameters and the configuration parameters is that the latter are
normally changed more frequently.
Like the installation parameters, the configuration parameters are already set with a number of values
which can subsequently be freely modified by the user according to requirements.
An updated summary of both the preset values and those set by the user may be printed if required.
LIST AND DESCRIPTIONS
The following is a list of the configuration parameter menus and sub-menus with a brief description of each.
The charts in the following pages explain how to program these parameters.
SOURCE: ACCESS:
AUTOMATIC RX
21-02-95 10:30
FAX SET-UP
ò
VARIOUS SETTINGS
ò
PRINTER PARAMET.
ò
DATE AND TIME
ò
Press FUNCTION to select the FAX SET-UP menu.
Confirm with START to select the VARIOUS SETTINGS submenu and then press FUNCTION to select the following sub-menus.
This is the menu from which you can select the various sub-menus for the
configuration parameters.
Allows you to select error correction mode (ECM), transmission report
printout, transmission speed, the position in which your station name is
printed on transmitted documents, scan resolution and beeper volume.
Allows you to select the print mode for received/copied documents.
Allows you to select the format in which the date and time are displayed
and to change the date and time settings.
ONE TOUCH DIAL
Allows you to store frequently used fax or telephone numbers in the
memory of your machine so that you may then dial them by pressing a
single key.
ò
☞
CONFIGURATION PARAMETERS 53
Page 62

CODED SPEED DIAL
ò
Allows you to store frequently used fax and telephone numbers under an
abbreviated two-digit code. These numbers can then be dialled simply by
pressing the corresponding two digits.
PRINT OUT SET-UP
ò
HEAD MAINTENANCE
This is not a programming sub-menu. Allows you to print a complete list
of all the configuration parameter settings.
Allows you to select automatic cleaning and testing of the print head.
54 CONFIGURATION PARAMETERS
Page 63

PROGRAMMING CHART AND DESCRIPTION OF THE SUB-MENU: VARIOUS SETTINGS
VARIOUS SETTINGS
ò
a)
ECM: ON ECM: OFF
ò
b)
TX REPORT: OFF TX REPORT: ALWAYS FAILED TX REPORT
ò
c)
TX SPEED 9600 TX SPEED 4800
ò
d)
HEADER INSIDE HEADER OUTSIDE
ò
e)
COPY/TX RES. STD COPY/TX RES. FINE
ò
f)
BUZZER VOL.: LOW BUZZER VOL.: HIGH
START: Confirms selection of the sub-menu and moves down to the associated parameters. Confirms a
parameter and the relative value and moves on to the next parameter.
< / > : To select the value of a parameter by scrolling forward and backward through the values available.
Alternatively used to position the cursor on the characters that make up the value of a particular
parameter; in this latter case, once the position is reached you will be prompted to enter the
required value.
STOP: Interrupts the programming procedure and returns to the original operating mode display.
DESCRIPTION:
a) Allows you to enable or disable ECM (Error Correction Mode) which corrects transmission errors caused
by line interference. This function only works if it is enabled on both the communicating fax machines.
When it is selected the letter “E” will be shown on the display (last character in the first line after the
number or name of the correspondent).
b) Allows you enable or disable printing of the transmission report. If the third parameter is selected, the
fax machine will only print a transmission report in the case of failed transmission.
c) Allows you to select the speed at which the fax is transmitted (9600 or 4800 bits per second). 4800 bps
transmission is recommended on lines subject to interference.
d) Allows you to select the printing position of the sender’s name and number and the time: outside the
text area immediately below the top edge of the sheet or inside the text area slightly lower than in the
previous case.
e) Allows you to select the type of scanning for the document to be transmitted or copied: standard or fine
resolution.
f) Adjusts the audible signal volume.
Reference sections: BASIC FUNCTIONS, REPORTS, TRANSMISSION, RECEPTION.
CONFIGURATION PARAMETERS 55
Page 64

PROGRAMMING CHART AND DESCRIPTION OF THE SUB-MENU: PRINTER PARAMET.
PRINTER PARAMET.
ò
a)
SIZE: A4 SIZE: LETTER SIZE: LEGAL
ò
b)
REDUCTION: OFF REDUCTION 94% REDUCTION 80%
REDUCTION 76% REDUCTION 70%
ò
c)
START: Confirms selection of the sub-menu and moves down to the associated parameters. Confirms a
parameter and the relative value and moves on to the next parameter.
< / > : To select the value of a parameter by scrolling forward and backward through the values available.
Alternatively used to position the cursor on the characters that make up the value of a particular
parameter; in this latter case, once the position is reached you will be prompted to enter the
required value.
STOP: Interrupts the programming procedure and returns to the original operating mode display.
SURPLUS: ON SURPLUS: OFF SURPLUS: AUTO
DESCRIPTION:
a) Allows you to select the paper size. The sheet feeder should then be set to the selected size.
b) For document reception, allows you to automatically reduce the area occupied by the text of the printed
document in relation to the selected percentage. In this way a document may be reduced to a single or
fewer pages.
c) Allows you to print information which does not fit on the paper size selected for the received document
on an additional sheet. If you select parameter “SURPLUS: AUTO”, the fax machine will always print
the text which overruns the set paper size on an additional sheet, as long as this text is more than 8 mm
long.
Reference sections: BASIC FUNCTIONS, RECEPTION.
56 CONFIGURATION PARAMETERS
Page 65

PROGRAMMING CHART AND DESCRIPTION OF THE SUB-MENU: DATE AND TIME
DATE AND TIME
ò
a)
FORMAT: DD/ MM/ YY FORMAT: MM/DD/YY FORMAT: YY/ MM /DD
ò
b)
FORMAT: 24 H FORMAT: 12 H
ò
c)
START: Confirms selection of the sub-menu DATE AND TIME and moves down to the associated
parameters. Confirms a parameter and the relative value and moves on to the next parameter.
< / > : To select the value of a parameter by scrolling forward and backward through the values available.
Alternatively used to position the cursor on the characters that make up the value of a particular
parameter; in this latter case, once the position is reached you will be prompted to enter the
required value.
STOP: Interrupts the programming procedure and returns to the original operating mode display.
DD/MM/YY HH:MM
14-06-95 10:30
DESCRIPTION:
a) Allows you to select the desired date format.
b) Allows you to select the desired time format. Once the time format parameter has been selected, the
flashing cursor appears so that you can change the date and time.
c) Allows you to type in the new date and time.
Reference section: BASIC FUNCTIONS.
CONFIGURATION PARAMETERS 57
Page 66

PROGRAMMING CHART AND DESCRIPTION OF THE SUB-MENU: ONE TOUCH DIAL
ONE TOUCH DIAL
ò
a)
TYPE ONE TOUCH
KEY: 01-10
ò
b)
c) ò ò
01: FAX NO. 01: TEL NO.
d) ò
SPEED 9600 SPEED 4800
FAX NO. TEL NO.
ò
e)
OVERSEAS OFF OVERSEAS ON
ò
f)
01: NAME
ò
g)
START: Confirms selection of the sub-menu and moves down to the associated parameters. Confirms a
parameter and the relative value and moves on to the next parameter.
< / > : To select the value of a parameter by scrolling forward and backward through the values available.
Alternatively used to position the cursor on the characters that make up the value of a particular
parameter; in this latter case, once the position is reached you will be prompted to enter the
required value.
STOP: Interrupts the programming procedure and returns to the original operating mode display.
• Access to the FAX NO. or TEL NO. parameter is automatic without pressing START.
DESCRIPTION:
a) Prompts for the number (from 01 to 10) of the one touch key you wish to program.
b) Allows you to enter the fax or telephone number to be stored under the previously selected one touch key.
c) Displays the flashing cursor to allow you to enter a number.
d) If you entered a fax number, you are now prompted for the transmission speed.
e) Attenuates interference on overseas calls.
f) Displays the flashing cursor to allow you to enter the name.
g) Lets you choose whether or not to program another one touch key.
EDIT ANOTHER YES EDIT ANOTHER NO
Reference section: DIALLING.
58 CONFIGURATION PARAMETERS
Page 67

PROGRAMMING CHART AND DESCRIPTION OF THE SUB-MENU: CODED SPEED DIAL
CODED SPEED DIAL
ò
a)
TYPE SPEED NO.
(01-32):
ò
b)
c) ò ò
01: FAX NO. 01: TEL NO.
d) ò
SPEED 9600 SPEED 4800
FAX NO. TEL NO.
ò
e)
OVERSEAS: OFF OVERSEAS: ON
ò
f)
01: NAME
ò
g)
START: Confirms selection of the sub-menu and moves down to the associated parameters. Confirms a
parameter and the relative value and moves on to the next parameter.
< / > : To select the value of a parameter by scrolling forward and backward through the values available.
Alternatively used to position the cursor on the characters that make up the value of a particular
parameter; in this latter case, once the position is reached you will be prompted to enter the
required value.
STOP: Interrupts the programming procedure and returns to the original operating mode display.
• Access to the FAX NO. or TEL NO. parameter is automatic without pressing START.
DESCRIPTION:
a) Prompts for the number, from 01 to 32, of the speed dial code you wish to program using the numeric
keypad.
b) Allows you to enter the fax or telephone number to be stored under the previously selected speed dial code.
c) Displays the flashing cursor so that you can enter the number.
d) If you entered a fax number, allows you to select the transmission speed.
e) Attenuates line interference on overseas calls.
f) Displays the flashing cursor so that you can enter the name.
g) Allows you to choose whether or not to program another speed dial code
EDIT ANOTHER YES EDIT ANOTHER NO
Reference section: DIALLING.
CONFIGURATION PARAMETERS 59
Page 68

PROGRAMMING CHART AND DESCRIPTION OF THE SUB-MENU: PRINT OUT SET-UP
PRINT OUT SET-UP
a) ò
PRINT OUT: EXIT PRINT SETTINGS PRINT: ONE TOUCH PRINT: SPEED DIAL
ò
b)
START: Confirms selection of the sub-menu PRINT OUT SET-UP and moves down to the associated
parameters. Confirms a parameter and the relative value and moves on to the next parameter.
< / > : To select the value of a parameter by scrolling forward and backward through the values available.
Alternatively used to position the cursor on the characters that make up the value of a particular
parameter; in this latter case, once the position is reached you will be prompted to enter the
required value.
STOP: Interrupts the programming procedure and returns to the original operating mode display.
• Selection of the "PRINTING" option starts the print out of the selected information.
DESCRIPTION:
a) Allows you to exit the function without printing and to pass to the next sub-menu.
Selects printing of the configuration parameter settings.
Selects printing of the numbers programmed under the one touch keys.
Selects printing of the numbers stored under the speed dial codes.
b) Indicates “Printing” which may be interrupted by pressing STOP.
PRINTING
STOP
PROGRAMMING CHART AND DESCRIPTION OF THE SUB-MENU: HEAD MAINTENANCE
HEAD MAINTENANCE
ò
a)
START: Confirms selection of the sub-menu HEAD MAINTENANCE and moves down to the associated
parameters. Confirms a parameter and the relative value and moves on to the next parameter.
< / > : To select the value of a parameter by scrolling forward and backward through the values available.
Alternatively used to position the cursor on the characters that make up the value of a particular
parameter; in this latter case, once the position is reached you will be prompted to enter the
required value.
STOP: Interrupts the programming procedure and returns to the original operating mode display.
DESCRIPTION:
a) Allows you to select automatic cleaning of the print head.
Reference section: ROUTINE MAINTENANCE.
60 CONFIGURATION PARAMETERS
CLEANING: OFF CLEANING: ON
Page 69

USING THE OTHER FUNCTIONS
Page 70

DIALLING
What is meant by dialling
Dialling refers to the input of the recipient’s telephone number or fax number.
Uses of dialling
Dialling a phone number provides a normal telephone connection either using the telephone connected to
the machine or from the numeric keypad on the fax machine itself.
Dialling a fax number serves to transmit a document. You can dial a fax number either using the telephone
connected to the machine or from the numeric keypad on the fax machine. See section: TRANSMISSION.
TELEPHONE NUMBER TELEPHONE CALL
DIALLING
FAX NUMBER FAX TRANSMISSION
Different dialling methods
There are a number of different ways in which you can dial a phone number or fax number. These are
divided into manual and automatic methods and can, in turn, be subdivided.
Manual dialling:
• Dialling the phone or fax number directly from the telephone connected to the fax machine.
• Dialling the phone or fax number from the numeric keypad on the fax machine.
Automatic dialling:
• One touch dialling (available after programming). You can store frequently used phone or fax numbers
in the machine's memory by programming the one touch keys. These numbers can then be dialled
simply by pressing the corresponding key.
• Speed dialling (available after programming). You can also store fax or phone numbers under two-digit
codes. These numbers can then be dialled by pressing the SPEED DIAL key and entering the code.
DIALLING 63
Page 71

HOW TO PROGRAM THE ONE TOUCH KEYS
One touch keys provide automatic high speed dialling of fax and telephone numbers. To use this function
you must first program the ten one touch keys (01 - 10) with the phone or fax numbers you use most
frequently. The 10 keys can be programmed by entering either a fax or a telephone number for each. Once
these keys have been programmed, an electronic agenda is created which contains up to 10 telephone
numbers and 10 fax numbers selected by pressing the corresponding key. When a given key is pressed
the system will dial the corresponding fax number if there is a document in the feeder and the
corresponding telephone number if there is no document (Refer to the charts at the end of this section).
The one touch keys are programmed in the configuration parameters (see section: CONFIGURATION
PARAMETERS, heading: Programming chart and description of the sub-menu: one touch dial).
Along with the fax and phone numbers, you can also store additional information under the one touch keys.
The following table lists all the parameters that may be programmed for a one touch key together with the
memory capacity for each parameter and a programming example..
One touch dial parameters:
PARAMETERS CAPACITY PROGRAMMING EXAMPLE
Fax number Max. 38 digits 780249
Phone number. Max. 38 digits 564321
Speed 4800/9600 9600 bps, 4800 bps 9600 bps
Overseas ON/OFF ON
Name Max. 16 characters Jones
Example:
The following example describes the procedure for programming the one
touch key 01 with the information contained in the above table.
v The display shows the operating mode with time and date.
1. Press FUNCTION to select the “FAX SET-UP” menu.
2. Press START to select VARIOUS SETTINGS and then press
FUNCTION until you select the ONE TOUCH DIAL sub-menu.
3. Press START.
The display shows the cursor at the point in which the key to be
programmed must be entered.
4. Press the one touch key “01”.
AUTOMATIC RX
21-02-95 10:30
FAX SET-UP
FUNC/START/STOP
ONE TOUCH DIAL
FUNC/START/STOP
TYPE ONE TOUCH
KEY: 01-10
FAX NO.
START/STOP/ß/à
64 DIALLING
Page 72

5. Press START.
The display shows the cursor at the point in which the fax number
is to be entered.
IF...
• a number is already stored under this key, it will appear on
the display.
01: FAX NO.
6. Enter 780249 and press START.
IF...
• a previously programmed fax number is displayed, overwrite it
with the new number.
• you make a mistake when entering the number, you can move
the cursor back to an incorrect digit by pressing < and then
enter the correct digit.
• you want to delete the entire fax number press CLEAR.
• the new number is shorter than the previously entered number,
first delete the previous number by pressing CLEAR.
• special functions are required, see the Special Dialling
Functions procedures.
7. Confirm the proposed transmission speed by pressing START.
8. Confirm that the number is an overseas number by pressing
START.
Selecting ON for the overseas option reduces the echo effect of
overseas lines.
The cursor appears at the point in which the name is to be entered.
SPEED 9600
START/STOP/ß/à
OVERSEAS ON
START/STOP/ß/à
07: NAME
IF...
• a name is already programmed for this key, it will be displayed.
9. Enter “Jones” from the keypad in the way described in the
heading Station name and number in the section BASIC
FUNCTIONS, then confirm by pressing START.
The name of the destination party has no effect as regards
dialling but is useful as a reminder of who the number refers to.
IF...
• a previously programmed name is displayed, simply overwrite
it with the new name.
• you wish to return to the initial state of the fax machine, press
STOP.
EDIT ANOTHER YES
START/STOP/ß/à
☞
DIALLING 65
Page 73

10. Press START to confirm that you wish to memorise also the
telephone number. The display will show the original message.
IF...
• you do not want to memorise the telephone number, press
STOP.
TYPE ONE TOUCH
KEY: 01-10
11. Repeat step 4 pressing the key 01 again. At step 5, after
pressing START, this time select the TEL NO. option and
confirm with START.
At step 6 enter the phone number 564321 and confirm by
pressing START. As there is no need to repeat the next steps,
you can terminate the programming procedure at this point by
pressing STOP.
You have now programmed key 01 with all the information in the
table, including the fax and phone numbers.
IF...
• you do not want to memorise the telephone number, press
STOP.
• you want to make sure that all the information has been
entered correctly, you can repeat the procedure and check it
on the display.
• you want to change any of the information stored, repeat the
procedure and overwrite with the new information.
AUTOMATIC RX
21-02-95 10:30
66 DIALLING
Page 74

HOW TO PROGRAM SPEED DIAL CODES
In addition to the one touch keys, your fax machine also provides the facility to store a further 32 fax or
phone numbers under the speed dial codes (01-32). The 32 codes are programmed by selecting a phone
number and fax number for each one. Once these keys have been programmed, an electronic agenda is
created which contains up to 32 telephone numbers and 32 fax numbers which can be dialled by pressing
the speed dial key and inputting the programmed code. When you press the speed dial key followed by
the programmed code either the fax number or the telephone number will be dialled depending on whether
or not there is a document in the feeder (refer to the charts at the end of this section).
Speed dial codes are programmed in the configuration parameters (see section: CONFIGURATION
PARAMETERS, heading: Programming chart and description of the sub-menu: Coded Speed Dial).
Along with the fax and phone numbers you can also store additional information under the speed dial
codes. The following table lists all the parameters that may be programmed for a single speed dial code
together with the memory capacity and a programming example..
Coded speed dial parameters:
PARAMETERS CAPACITY PROGRAMMING EXAMPLE
Fax number Max. 38 digits 780300
Phone number Max. 38 digits 123456
Speed 4800/9600 9600 bps, 4800 bps 9600 bps
Overseas YES/NO YES
Name Max. 16 characters Brown
An example is given below:
Example:
The following example describes how to program the speed dial code 01 with the information given in the
table above.
v The display shows the operating mode with time and date.
AUTOMATIC RX
21-02-95 10:30
1. Press FUNCTION to select the “FAX SET-UP” menu.
FAX SET-UP
FUNC/START/STOP
2. Press START to select VARIOUS SETTINGS and then press
FUNCTION until you select the CODED SPEED DIAL sub-menu.
3. Press START.
The display shows the cursor at the point at which you must enter
the code to be programmed.
4. Enter 01 from the numeric keypad.
CODED SPEED DIAL
FUNC/START/STOP
TYPE SPEED NO.
(01-32):
FAX NO.
START/STOP/ß/à
☞
DIALLING 67
Page 75

5. Press START.
The display shows the cursor at the point at which you must enter
the fax number.
IF...
• a fax number is already stored under this code, it will appear
on the display.
01: FAX NO.
6. Enter 780300 and press START.
IF...
• a previously programmed fax number is displayed, overwrite it
with the new number.
• you make a mistake entering the number, move the cursor
back to the incorrect digit using < and overwrite with the
correct digit.
• you want to delete the entire original number, press CLEAR.
• the new number is shorter than the previously entered one,
first delete the previous number with CLEAR.
• special functions are required, see the Special Dialling
Functions procedures.
7. Confirm the proposed transmission speed by pressing START.
8. Confirm that the number is an overseas number by pressing
START.
Selecting ON for the OVERSEAS option reduces the echo effect
on overseas lines.
The cursor is displayed at the point at which you must enter the
name.
SPEED 9600
START/STOP/ß/à
OVERSEAS ON
START/STOP/ß/à
01: NAME
IF...
• a name is already stored under this code, it will appear on the
display.
9. Enter "Brown" in the manner described in the heading: Station
name and number in the section BASIC FUNCTIONS, then
confirm by pressing START.
The name of the destination party has no effect on dialling but
serves as a useful reminder.
IF...
• a previously programmed name is displayed, overwrite it with
the new name.
68 DIALLING
EDIT ANOTHER YES
START/STOP/ß/à
Page 76

10. Confirm the EDIT ANOTHER option by pressing START so that
you may also enter a phone number for the same code. The
display will show the original message.
IF...
• you do not wish to memorise a telephone number, press
STOP.
TYPE SPEED NO.
(01-32):
11. Repeat step 4 and enter the code 01 again. At step 5, after
pressing START, select the TEL NO. option and confirm by
pressing START.
At step 6, enter the phone number 124456 and confirm by
pressing START. As there is no need to repeat the next steps,
you may terminate the programming procedure at this point by
pressing STOP.
You have now programmed under the code 01 all the information
in the table, including the fax and telephone number.
IF...
• you do not wish to memorise the telephone number, press
STOP.
• you want to make sure that all the information has been
entered correctly, you can repeat the procedure and check it
on the display.
• you want to change any of the information stored, repeat the
procedure and overwrite with the new information.
AUTOMATIC RX
21-02-95 10:30
DIALLING 69
Page 77

HOW TO PRINT THE PROGRAMMED ONE TOUCH DIAL AND SPEED DIAL
DATA
You can print out a list of all the information stored under the 10 one touch keys and the 32 speed dial
codes in order to check which keys and codes have been programmed with which numbers, and the
corresponding names, transmission speeds, etc.. This function also serves to show which keys or codes
have been utilised and which are still available.
This list can be printed from the configuration parameters (see the section: CONFIGURATION
PARAMETERS, heading: programming chart and description of sub-menu: Print Out Set-Up). The present
heading, however, provides further explanation of this operation.
v The display shows the operating mode with time and date.
1. Press FUNCTION to select the “FAX SET-UP” menu.
2. Press START to select VARIOUS SETTINGS and then press
FUNCTION until you select the PRINT OUT SET-UP sub-menu.
3. Press START.
4. Press > repeatedly to display PRINT: ONE TOUCH.
IF...
• you want print the list of speed dial codes, press > again.
5. Press START.
The fax machine will start printing the list in numerical order.
AUTOMATIC RX
21-02-95 10:30
FAX SET-UP
FUNC/START/STOP
PRINT OUT SET-UP
FUNC/START/STOP
PRINT SETTINGS
START/STOP/ß/à
PRINT: ONE TOUCH
START/STOP/ß/à
PRINTING
STOP
The symbol “-” denotes that no data have been programmed for
that particular parameter. Keys or codes which have not been
programmed do not appear in the printout. After the printout, the
display will show the original machine operating mode.
IF...
• none of the keys (or codes) have been programmed, the
display shows the message “AGENDA EMPTY” for a few
seconds and then returns to the starting condition.
6. Repeat the procedure from step 1 and when you get to step 4
select PRINT: SPEED DIAL.
70 DIALLING
Page 78

DIALLING METHODS FOR MAKING A TELEPHONE CALL (DOCUMENT NOT INSERTED)
Dialling of a phone or fax number depends on whether or not there is a document in the document feeder.
If there is a document inserted then the machine will assume that the number dialled is a fax number. If no
document is inserted, the machine will assume that the number is a phone number.
The chart below illustrates the various methods for dialling a telephone number.
FROM THE
TELEPHONE
MANUAL
DIALLING FROM THE FAX
MACHINE
AUTOMATIC ONE TOUCH
DIALLING
SPEED DIAL
By dialling the phone number on the telephone.
By pressing HOOK, dialling the phone number from the
fax machine keypad and lifting the handset.
By pressing a programmed one touch key and START.
By pressing the SPEED DIAL key and the programmed
code.
DIALLING METHODS FOR SENDING A FAX (DOCUMENT INSERTED)
The chart below illustrates the various dialling methods you can use to send a fax.
FROM THE
TELEPHONE
MANUAL
DIALLING FROM
THE FAX
MACHINE
By dialling the fax number on the telephone and pressing
START.
By dialling the fax number from the fax machine keypad
and pressing START.
By pressing HOOK, dialling the fax number from the fax
machine keypad and pressing START.
AUTOMATIC ONE TOUCH By pressing a programmed one touch key.
DIALLING
SPEED DIAL
DIALLING 71
By pressing the SPEED DIAL key and entering the
programmed code.
Page 79

SPECIAL DIALLING FUNCTIONS
In the manual dialling phase, it is possible to use the following functions directly:
Change of the Frequency Mode
• By pressing the * key, it is possible to dial a number in “multi-frequency” mode (i.e. tone) instead of
decadic mode (i.e. pulse). When this function is activated, the “*” symbol will appear on the display.
Connection to an External Line
• By pressing the EXT. key before dialling a number, connection can be made to an external telephone
line according to the mode in which it was programmed (prefix, earth, flash). This function is used when
a fax is connected to a private switchboard (PABX). When this function is activated, the letter “e”
(external) will appear on the display.
Pause
• By pressing the PAUSE key during the dialling of a number, that is between one number and another,
the fax inserts a pause before dialling the following digits of the selected number.
Second Tone
• By pressing the 2. TONE key during the dialling of a number, the fax detects a second tone from the
exchange. This function is used for the connection to particular telephone exchanges. When this
function is activated, the “:” symbol will appear on the display.
NOTE:
By programming these special functions in Speed Dial Codes and One Touch Keys, they are also used
by automatic dialling.
REDIALLING
A telephone or fax number is redialled when the initial connection is unsuccessful whether due to an error
on the fax machine or on the telephone line or because the line is engaged. Redialling of the fax or
telephone number is tied to whether a document is inserted in the fax. If a document is inserted, redialling
of the fax number is carried out otherwise it is the telephone number. Redialling is performed automatically
by the fax machine or manually with the REDIAL key at the discretion of the user.
NOTE:
As the most frequent use of the dialling procedures is to send faxes, and as they are thus closely linked to
transmission, further explanation of these procedures will be given in the section TRANSMISSION.
72 DIALLING
Page 80

TRANSMISSION
This chapter describes all the methods that you can use to transmit a document. Transmission operations
are closely linked with the dialling procedures.
TRANSMISSION METHODS
Transmission following manual dialling:
• With this method you insert a document and, using the phone or fax machine numeric keypad, dial the
destination fax number.
Transmission following automatic dialling (one touch and speed dialling):
• With this method you insert a document and, using the duly programmed one touch key or speed dial
code, select the destination fax number.
Delayed transmission:
• Delayed transmission allows you to program the transmission of a fax for a preset time.
DOCUMENTS THAT CAN BE TRANSMITTED
Your fax machine will send any document provided that it is within the minimum and maximum size limits
accepted by the scanner (maximum size: 216 width x 600 mm length; minimum size: 148 mm width x 148
mm length), with thickness between 007 mm and 0.14 mm.
To ensure that the entire contents of the document are transmitted, the right and left margins should be at
least 1 mm wide. The automatic document feeder support can accommodate up to 10 sheets. Documents
whose dimensions are smaller than the above limits can be transmitted following insertion in a transparent
document file.
Do not send documents which are:
• crumpled or folded
• rolled or damp
• torn
• on glossy paper
• with punched holes
• on carbon paper
• transparencies
• with paper clips or staples
In all these cases you should first photocopy the original document and send a copy or use the transparent
document holder.
TRANSMISSION 73
Page 81

ADJUSTING THE CONTRAST AND RESOLUTION OF TRANSMITTED DOCUMENTS
Before sending a fax you can make certain adjustments to optimise reading of the document by the optical
scanner and hence the print quality at the receiving station.
You can adjust the contrast to obtain lighter or darker tones by means of the CONTR. key and adjust the
resolution of the image or text by means of the RESOL. key to obtain improved character definition by
setting higher or lower resolution depending on the type of text or images in the document.
ADJUSTING THE CONTRAST:
NORMAL DOCUMENT READY
Setting for easily legible pages NORMAL
CONTR.
To select the various settings press CONTR.
LIGHT DOCUMENT READY
Setting for dark pages LIGHT
DARK DOCUMENT READY
Setting for light pages DARK
ADJUSTING THE RESOLUTION:
STD DOCUMENT READY
Setting for easily legible text ê
RESOL.
FINE DOCUMENT READY
Setting for small text ê
HALF TONES DOCUMENT READY
Setting for pages containing images ê ê
(photographs, drawings, etc.) FINE HALF TONES
STD
FINE
To select the various settings press RESOL.
• The HALF TONES setting enables the fax machine to distinguish the grey shades in a photograph. This
setting optimises the distribution of grey tones in the image and it is automatically accompanied by the
FINE setting so that when one is selected then also the other is selected.
• If a page contains both text and graphic images, the machine is capable of distinguishing between them
and will optimise reproduction of the text through the FINE setting and the images through the HALF
TONES setting.
Contrast and/or resolution variations during a transmission or copying operation take effect from the sheet
immediately after the sheet currently being scanned. A variation is only possible in the document reading
phase.
74 TRANSMISSION
Page 82

TRANSMISSION FOLLOWING MANUAL DIALLING
When a document is inserted in the document feeder, the machine waits for you to dial the destination fax
number. The procedure for transmission by manual dialling is as follows:
• By dialling the destination fax number on the telephone and pressing START.
• By dialling the destination fax number on the keypad of the fax machine and pressing START.
• By pressing HOOK, dialling the destination fax number on the fax machine keypad and pressing
START.
Transmission by any of the manual dialling procedures is described in the earlier section: BASIC
FUNCTIONS in the heading: Document transmission. The following chart describes the procedure in more
detail.
v The display shows the initial operating mode.
1. Insert the document face down, without forcing it, in the slot of
the document feeder. Adjust the guides to the width of the paper.
The arrow on the display points to STD to indicate that standard
resolution is selected.
IF...
• you want to change the resolution, see the heading: Adjusting
the contrast and resolution of transmitted documents.
2. Dial the fax number:
− From the telephone: lift the telephone handset, wait for the
dialling tone and then dial the number on the telephone. The
display will show the relative message.
or
− Dial the fax number from the keypad of the fax machine.
or
− Press HOOK and dial the fax number on the keypad of the fax
machine. Wait for the dialling tone. In this case the machine
will reproduce the dialling tones on the line.
AUTOMATIC RX
09-03-95 16:20
DOCUMENT READY
ê NORMAL
OFF HOOK
09-03-95 16:20
TYPE NUMBER
TYPE NUMBER
IF...
• the fax is connected to a private switchboard and an external
number must be dialled, press the EXT. key before dialling the
number. The letter “e” external will appear on the display.
• the external number comprises one or more codes, dial them
as normal, and where required, press PAUSE to set a time
delay between the code digits and those of the number. In this
condition, the letter “p” is displayed.
• it is necessary to wait for a tone from the exchange before
dialling the entire number, press the 2 TONE key. In this case,
the “:” symbol will appear on the display.
☞
TRANSMISSION 75
Page 83

3. Press START.
The machine will start to send the document. On completion of
the transmission the display will show "TX COMPLETED” for a
few seconds before returning to the initial operating mode
display.
IF...
• the destination number was dialled from a telephone, on
completion of transmission, the fax machine emits a
continuous acoustic signal. To stop the acoustic signal,
replace the handset or press STOP. In the first case, the
connection is terminated and the fax machine returns to the
initial operating mode; in the second case, the fax machine
remains connected so that the user can talk to the person
called, or transmit another document, if he so desires.
• the transmission report function is selected (see section:
REPORTS), the machine will print out a report advising you of
the status of the transmission.
• you want to interrupt transmission at any point:
1) Press STOP. The display alternately indicates the machine
operation mode message and a message prompting you to
press STOP to remove the document (REMOVE
DOCUMENT, PRESS STOP).
2) Press STOP again. The document will be ejected and the
display will alternate between the machine operation mode
message and a message indicating that the transmission
has been interrupted. If the document to be removed
comprises more than one sheet, manually remove all the
sheets above the one in the ADF and then press STOP to
also eject the first sheet.
3) Press STOP again to return to the original operation mode.
CONNECTING
ê NORMAL
TRANSMISSION USING THE ONE TOUCH KEYS
You can also use the one touch keys to send a fax. When you insert the document in the automatic
document feeder, the fax machine waits for you to dial the destination fax number.
At this point all you have to do to start transmission is:
• Press the programmed one touch key.
v The display shows the initial operating mode.
1. Insert the document face down in the document feeder slot.
Adjust the guides to the width of the paper.
The arrow on the display points to STD to indicate that standard
resolution is selected.
IF...
• you want to change the resolution setting, see the heading:
Adjusting the contrast and resolution of transmitted
documents.
76 TRANSMISSION
AUTOMATIC RX
09-03-95 16:20
DOCUMENT READY
ê NORMAL
Page 84

2. Press the relevant one touch key, e.g. key 07.
The display will show the number memorised for the 07 key.
IF...
• a name has also been stored, this will appear on the display.
• a number has not been entered for this key, a message will be
displayed to this effect.
FAX CALL
345678907861
3. The machine will automatically start to transmit the document. On
completion of the transmission, the message “TX COMPLETED”
will appear for a few seconds followed by the initial operating
mode display.
IF...
• the transmission report function is selected (see section:
REPORTS), the machine will print out a report advising you of
the status of the transmission.
• if you want to interrupt transmission at any point:
1) Press STOP. The display alternately indicates the machine
operation mode message and a message prompting you to
press STOP to remove the document (REMOVE
DOCUMENT, PRESS STOP).
2) Press STOP again. The document will be ejected and the
display will alternate between the machine operation mode
message and a message indicating that the transmission
has been interrupted. If the document to be removed
comprises more than one sheet, manually remove all the
sheets above the one in the ADF and then press STOP to
also eject the first sheet.
3) Press STOP again to return to the original operation mode.
CONNECTING
ê NORMAL
HOW TO TRANSMIT A DOCUMENT USING THE SPEED DIAL CODES
You may also use the speed dial function to send a fax.
When you insert a document in the document feeder, the fax machine waits for you dial the fax number.
At this point, all you have to do is:
• Press the SPEED DIAL key and enter the programmed 2-digit code.
v The display shows the initial operating mode.
AUTOMATIC RX
09-03-95 16:20
☞
TRANSMISSION 77
Page 85

1. Insert the document face down in the document feeder slot
without forcing it. Adjust the guides to the width of the paper.
The arrow on the display points to STD to indicate that standard
resolution is selected.
IF...
• you want to change the resolution setting, see the previous
heading: Adjusting the contrast and resolution of transmitted
documents
DOCUMENT READY
ê NORMAL
2. Press the SPEED DIAL key.
The display indicates the relative code message.
IF...
• there is no document in the automatic document feeder, a telephone
call message is displayed.
3. Enter the programmed code (e.g.: 01). The fax machine will start
transmission. At the end of the transmission the display will show the
message “TX COMPLETED” and then the initial machine operation
mode.
or
Press </> to scroll through the codes on the display in order to
select the one required and then press START. The fax machine
will start the transmission.
When the > key is pressed for the first time, the code 01 is displayed.
The display shows the fax number stored in the code.
IF...
• a name has also been stored, this will appear on the display.
• a number has not been programmed under this code, a message will
be displayed to this effect.
• transmission report printing is enabled (see the section REPORTS),
the report will be printed following the relative display message.
• you wish to interrupt the procedure during the transmission:
1) Press STOP. The display alternately indicates the machine
operation mode message and a message prompting you to press
STOP to remove the document (REMOVE DOCUMENT, PRESS
STOP).
2) Press STOP again. The document will be ejected and the display
will alternate between the machine operation mode message and
a message indicating that the transmission has been interrupted.
If the document to be removed comprises more than one sheet,
manually remove all the sheets above the one in the ADF and
then press STOP to also eject the first sheet.
3) Press STOP again to return to the original operation mode.
FAX CALL
(01-32) / ß/à
01: SPEED DIAL
780300
78 TRANSMISSION
Page 86

HOW TO PROGRAM DELAYED TRANSMISSION
The option to send a document at a preset time helps avoid problems associated with the different time
zones should you have to send a document thousands of miles and also helps contain costs since you can
opt to send documents at cheap rate times.
In order to transmit a document at a preset time first decide the time at which you want transmission to take
place and the dialling method you want to use. This information must then be programmed. The document
to be transmitted must be left in the document feeder from the moment the machine is programmed to the
moment it is transmitted.
v The display shows the initial operating mode.
1. Insert the document.
2. Press FUNCTION repeatedly until DELAYED TX is displayed.
3. Press START.
The display prompts you to program the dialling method which is
to be used to send the fax. You can choose to dial the number
manually from the keypad or automatically using a one touch key
or speed dial code.
4. Select the dialling method as follows:
− Enter the fax number from the keypad on the fax machine.
The number will appear on the display. (e.g.: 234567).
or
− Press the relevant one touch key (e.g.: 07). The number will
appear on the display (e.g.: 780249).
or
AUTOMATIC RX
09-03-95 16:20
DOCUMENT READY
ê NORMAL
DELAYED TX
FUNC/START/STOP
TYPE FAX NUMBER
NUM/TOUCH/SPEED
TYPE NUMBER
234567
07: ONE TOUCH
780249
− Press SPEED DIAL.
The display will prompt you to enter the required code. Enter
the code (e.g.: 01) and press START.
The number, or, if present, the name programmed under the
code will be displayed.
IF...
• on pressing a one touch key or selecting a speed dial code,
the message "NOT PROGRAMMED" appears, press another
key or press STOP to terminate the programming procedure
and program the key following the instructions in the section:
DIALLING.
TRANSMISSION 79
TYPE SPEED NO.
(01-32) / ß/à
Page 87

5. Press START.
The display now prompts you to enter the time at which the fax is
to be transmitted.
The machine now prints a special delayed transmission report
containing the programmed parameters.The report is printed
automatically, independently of the installation or configuration
parameters, and helps remind the user that the document in the
fax machine is waiting for delayed transmission and therefore must
not be removed.
At this point the delayed transmission programming procedure is
complete. To see how this transmission takes place, refer to the
following heading.
HH:MM
TYPE TIME
PRINT DELAY. TX
STOP
HOW DELAYED TRANSMISSION TAKES PLACE
Once a delayed transmission operation has been programmed at the time and using the dial mode
required, the fax machine will automatically send the document at the preset time. Remember that the
document must be inserted in the document feeder from the beginning of the programming procedure and
must not be removed before the preset transmission time.
Example:
The following example describes the case of delayed transmission of a document programmed for 16:40.
v The delayed transmission has been programmed. The document is in the ADF ready for transmission.
1. With the document inserted, the display shows the time
programmed for transmission.
IF...
• you press STOP the delayed transmission is cancelled. In this
case it will have to be reprogrammed.
2. At the preset time, the fax machine dials the programmed
number (e.g. 123456). The display shows DIALLING.
IF...
• the fax machine detects an error, a message will be displayed
to this effect. The fax will then automatically redial the number
in the manner described in the heading Autoredial.
3. After dialling, the machine will make the connection. The display
shows the destination number, or, if programmed, the name of
the destination party. The machine will then start transmission.
On completion of the transmission, the display will show “TX
COMPLETED” for a few seconds and then the operating mode.
AUTOMATIC RX
TX AT 16:40
DIALLING
123456
CONNECTING
ê NORMAL
AUTOMATIC RX
09-03-95 16:42
80 TRANSMISSION
Page 88

IF...
• after having programmed the delayed transmission the paper
or ink runs out so that there is a document, or part of a
document, stored in the memory, it will be impossible to start
delayed transmission until normal conditions are restored.
• the transmission report function is selected (see section:
REPORTS), the machine will print out a report after displaying
the relative message.
• you want to interrupt transmission at any point:
1) Press STOP. The display alternately indicates the machine
operation mode message and a message prompting you to
press STOP to remove the document (REMOVE
DOCUMENT, PRESS STOP).
2) Press STOP again. The document will be ejected and the
display will alternate between the machine operation mode
message and a message indicating that the transmission
has been interrupted. If the document to be removed
comprises more than one sheet, manually remove all the
sheets above the one in the ADF and then press STOP to
also eject the first sheet.
3) Press STOP again to return to the original operation mode.
AUTOREDIAL
Autoredial occurs when a document fails to be sent either because the destination number is engaged or
because of some error condition.
Redialling may occur in two ways:
• Automatically by the fax machine
• Manually by pressing REDIAL
Autoredial may occur in the following conditions:
• Destination number originally dialled manually from the fax machine keypad, without previously pressing
HOOK.
• Destination number originally dialled automatically (one touch or speed dial).
Autoredial will not occur in the following conditions:
• Destination number originally dialled from the telephone.
• Destination number originally dialled from the fax machine keypad after having pressed HOOK.
This heading describes how the fax machine automatically redials a number and how the user can make a
further attempt at connection by pressing REDIAL.
v An attempt at transmission has failed following manual or automatic dialling (see conditions above). The
document is still in the ADF ready for transmission.
☞
TRANSMISSION 81
Page 89

1. With the document inserted in the ADF, the display shows
AUTOREDIAL and a seconds counter which will progressively
count down until it reaches zero.
AUTOREDIAL CCC
123456
2. When the seconds counter is reset to zero, the machine redials
the destination number (e.g. 123456) to make a further attempt
at connection.
3. After dialling, the machine will attempt connection. The display
shows the destination number, or, if programmed, the name of
the destination party. The machine then transmits the document.
On completion of the transmission, the message
“TRANSMISSION COMPLETED” is displayed, followed by the
operating mode.
IF...
• The connection is not made, the fax will make a number of
further attempts as envisaged by legislation in force. If there is
still no connection, an error message will be displayed and, if
this function is enabled, a failed transmission report will be
printed.
• the transmission report function is selected (see section:
REPORTS), the machine will print out a report after displaying
the relative message.
• you want to interrupt transmission at any point:
1) Press STOP. The display alternately indicates the machine
operation mode message and a message prompting you to
press STOP to remove the document (REMOVE
DOCUMENT, PRESS STOP).
2) Press STOP again. The document will be ejected and the
display will alternate between the machine operation mode
message and a message indicating that the transmission
has been interrupted. If the document to be removed
comprises more than one sheet, manually remove all the
sheets above the one in the ADF and then press STOP to
also eject the first sheet.
3) Press STOP again to return to the original operation mode.
DIALLING
123456
CONNECTING
ê NORMAL
AUTOMATIC RX
09-03-95 16:45
82 TRANSMISSION
Page 90

USING THE REDIAL KEY
You can use the REDIAL key in the following situations:
• An autoredial has already been attempted without success. In this case you can use the REDIAL key to
make a further attempt.
• You want to send a second document to the same destination number. In this case the first document
was transmitted successfully.
v The fax is in transmission mode (document inserted) after a failed
attempt at transmission, or has successfully completed a transmission.
1. Insert the document.
2. Press REDIAL.
With a document inserted, the display shows the result of the
last transmission
3. Press REDIAL again.
The fax redials the destination fax number (e.g. 123456) and
attempts connection.
4. After dialling, the machine will make the connection. The display
shows the destination number, or, if programmed, the name of
the destination party. The machine will then start transmission.
On completion of the transmission the display will show “TX
COMPLETED” for a few seconds and then the operating mode.
AUTOMATIC RX
09-03-95 18:02
DOCUMENT READY
ê NORMAL
LAST TX ERR.
123456
LAST TX OK
123456
DIALLING
123456
CONNECTING
ê NORMAL
AUTOMATIC RX
09-03-95 18:03
IF...
• the transmission report function is selected (see section:
REPORTS), the machine will print out a report after displaying
the relative message.
• you want to interrupt transmission at any point:
1) Press STOP. The display alternately indicates the machine
operation mode message and a message prompting you to
press STOP to remove the document (REMOVE
DOCUMENT, PRESS STOP).
2) Press STOP again. The document will be ejected and the
display will alternate between the machine operation mode
message and a message indicating that the transmission
has been interrupted. If the document to be removed
comprises more than one sheet, manually remove all the
sheets above the one in the ADF and then press STOP to
also eject the first sheet.
3) Press STOP again to return to the original operation mode.
TRANSMISSION 83
Page 91

RECEPTION
This section describes the various methods of reception that can be adopted on the fax machine.
The fax machine is initially set for automatic reception.
Automatic reception mode is indicated by the display illustrated on the
right. You can change the reception method at any time by pressing RX
MODE.
AUTOMATIC RX
09-03-95 13:41
RECEPTION METHODS
The fax machine can receive documents in the following modes:
Automatic reception:
• When the machine is set to this operating mode, it will only respond to fax calls. The document is
received automatically, without requiring your presence. This reception mode is recommended when the
user has two separate lines, one for the fax machine and one for the telephone. In this way there is no
interference between the two types of call (telephone and fax). The fax machine is supplied preset for
this operation mode.
Manual reception:
• When the machine is set to this reception mode, you must be present to answer the call. When the
phone rings, lift the handset and listen to determine whether it is a fax or telephone call. This reception
mode is recommended when the fax machine and telephone are both connected to the same line. This
system is also better suited to situations where there is not a high number of incoming faxes that
interfere with the ordinary telephone calls.
Reception with automatic recognition of fax and telephone calls:
• With the fax machine set to this reception mode, the machine is capable of automatically distinguishing
between telephone and fax calls for the reception of a document and will respond accordingly. This is
the ideal reception mode to use when the fax machine and telephone are connected to the same line,
being more practical than Manual reception mode.
Remote control reception:
• When the fax machine is connected to a telephone network with more than one telephone socket,
reception can be activated from a telephone connected to a socket distant from the fax machine.
RECEPTION 85
Page 92

RECEIVED DOCUMENT PRINTING SET-UP PROCEDURES
Received document printing is controlled by the relative sub-menu shown
opposite. See section: CONFIGURATION PARAMETERS.
Format: The paper size set for the fax machine corresponds to the value set for the sheet feeder. The
preset values may nonetheless vary in accordance with the destination country of the fax
machine. In Italy the machine is preset to use A4 paper.
Depending on the paper size used, the actual print dimensions may vary. The printed area is
always slightly less than the actual size of the sheet.
The table below indicates the ratio between paper size and actual print dimensions:
PAPER SIZE PRINTED AREA: MARGINS:
A4 (210 X 297) mm (208 X 289.8) mm Top: 2 mm. Bottom: 5.2 mm. Sides: 1 mm
Letter (215.9 X 279.4) mm (207.9 X 273) mm Top: 2 mm. Bottom: 4.4 mm. Sides: 4 mm
Legal (215.9 X 355.6) mm (207.9 X 348.6) mm Top: 2 mm. Bottom: 4.4 mm. Sides: 4 mm
Reduction: By reducing the size of the printed area of a received document, you can reduce the total
number of pages.
PRINTER PARAMET.
Surplus: Received documents which exceed the specified printing limits may be managed using the
surplus function. By selecting YES, the surplus is managed and the text area exceeding the
accepted print dimensions overlaps onto the following pages.
By selecting NO, the surplus text is not considered.
AUTOMATIC RECEPTION MODE
This reception mode is best used when the fax machine and the telephone are connected to two separate
lines.
In this mode, the machine will receive incoming faxes autonomously without requiring your presence.
This reception mode is described more fully in the section BASIC FUNCTIONS, heading: Receiving a fax in
automatic mode.
86 RECEPTION
Page 93

MANUAL RECEPTION MODE
This reception mode requires your presence to receive the calls.
In manual reception, you answer the call and decide whether it is a telephone or fax call. In the latter case,
you press START to receive the document.
v The display shows the initial operating state with the date and time.
The machine is currently set to automatic reception mode.
1. Press RX MODE to select manual reception mode.
2. When the telephone rings, lift the handset. If somebody is trying
to send you a fax you will hear an intermittent tone.
3. Press START.
The display first shows a message indicating that the connection
is being made, and then information relative to the incoming fax.
The fax is now being received.
4. Replace your handset. On completion of the reception, the
display will show the message RX COMPLETED for a few
seconds, before returning to the initial operating mode.
IF...
• the paper or ink runs out or there is a paper jam or the printer
cover is opened during reception, reception is interrupted, the
relative message is displayed and the document is temporarily
stored in the memory. Once the problem has been remedied,
the machine will resume reception of the fax.
• you want to interrupt reception at any time:
1) Press STOP. The display will alternate between the
operating mode message and ”RX INTERRUPTED” and a
message prompting you to press STOP.
2) Press STOP again to return to the original machine
operating mode.
AUTOMATIC RX
09-03-95 13:41
MANUAL RX
09-03-95 13:41
OFF HOOK
09-03-95 13:41
CONNECTING
MANUAL RX
09-03-95 13:41
RECEPTION 87
Page 94

AUTOMATIC FAX/PHONE RECOGNITION MODE
When set to this mode, after a certain number of rings the fax machine will connect to the line and is then
able to distinguish between telephone and fax calls. This operating mode is recommended when the fax
machine and telephone both use the same line.
Set-up of the automatic fax/phone recognition mode is indicated in this chart.
v The display shows the initial operating mode, i.e., automatic reception.
1. Press RX MODE repeatedly to select the PHONE/FAX reception
mode.
If the call is a telephone call:
The fax recognizes that it is a telephone call, emits an acoustic
signal and plays outgoing message #2 (see the TELEPHONE
ANSWERING DEVICE section). The display prompts you to pick
up the handset.
IF...
• the line is mute, press STOP.
• you do not answer within the time period set in the section:
INSTALLATION PARAMETERS, (see Programming Chart and
Description of Sub-Menu: Tel. Line Set-Up), during which, an
acoustic signal is given, the fax will automatically prepare to
receive a fax and the message FAX CALL will be displayed.
If the call is a fax call:
The fax recognizes that it is a fax call and prepares to receive a
document. The display shows the message CONNECTING
followed by the number of the remote fax, or, if programmed, the
name of the sender.
After the document has been received, the message “RX
COMPLETED” will appear for a few seconds followed by the
operating mode.
AUTOMATIC RX
09-03-95 10:40
PHONE/FAX RX
09-03-95 10:40
LIFT HANDSET
09-03-95 10:40
CONNECTING
PHONE/FAX RX
09-03-95 10:40
IF...
• the paper or ink runs out, the paper jams or the printer cover is
opened during reception, reception is interrupted, the relative
message is displayed and the document is temporarily stored
in memory. Once the problem has been remedied, the
machine will resume printing.
• you want to interrupt reception at any time:
1) Press STOP. The display will alternate between the
message RX INTERRUPTED and the message prompting
you to press STOP.
2) Press STOP to return to the initial operating mode.
88 RECEPTION
Page 95

REMOTE CONTROL RECEPTION
When the fax machine is connected to a telephone installation with several socket in series, you can start
fax reception using a telephone connected to a socket at a distance from the fax machine. This type of
remote control of the fax is called remote start.
In order to start reception from the telephone, a telephone with tone dialling must be used and the
parameter REMOTE START: ON, in the sub-menu: TEL LINE SETUP (INSTALLATION menu, see section:
INSTALLATION PARAMETERS), must be selected, and the relative code must be set.
When these settings have been made, you can activate remote reception by pressing the * button on the
telephone followed by the programmed code. This manoeuvre is comparable to pressing the START key
on the fax machine.
If the fax machine is connected to a telephone installation with several socket in parallel, to connect to the
line, you must press buttons * and # on the telephone before pressing * and the programmed code.
Warning:
To perform this function with telephones that use both pulse and tone dialling, connected to a system that
uses pulse dialling, press the * key twice followed by the programmed code.
Example:
1. Your fax machine is connected to a single fax-telephone line but you have more than one telephone
socket and the telephone is located at a distance from the fax.
2. You receive a telephone call that specifies that a document is about to be transmitted. During the phone
call the fax set-up for automatic mode reception is interrupted.
3. With the telephone close to the fax machine, to activate reception of the document, keep the handset
off the hook and press START on the fax. With the telephone distant from the fax, you can use the
remote start facility to activate document reception by pressing the * button on the telephone followed
by the programmed code.
4. Once you have replaced the handset, the fax will receive the document. When the operation is
terminated, the machine returns to the original operating mode (Automatic reception).
RECEPTION 89
Page 96

POLLING
The polling facility enables one fax machine to request the transmission of a document at a preset time
from a remote fax machine.
The party who makes the polling request must:
• Make arrangements with the remote party regarding the time that the document is to be polled, so that
he/she may insert the document in the remote machine at the right time.
• Set his/her fax machine to receive a document, programming the
dialling method to be used to call the remote machine and the time at
which the document is to be received. These parameters are to be
programmed from the POLLING RX menu.
The party transmitting the document to be polled must:
• Insert the document in his/her fax machine before the polling call so that
it is ready for automatic transmission. The parameters for this operation
are to be programmed from the POLLING TX menu.
Polling conditions common to both parties:
• Transmission may take place without requiring the presence of either party.
• The call will be charged to the party who receives the document (who makes the polling request), not
the party who sends the document.
• Needless to say, either fax machine may make the polling request or send the polled document.
POLLING RX
POLLING TX
Important:
The following charts show an example of polling communication from the standpoints of the person
making the polling request, who will therefore receive the polled document, and the person who makes
the transmission of the polled document.
Although the two charts are separate, they are strictly related so you should read them both.
POLLING 91
Page 97

PROGRAMMING THE FAX MACHINE TO POLL A DOCUMENT (POLLING IN RECEPTION)
Before you can poll a document from a remote machine, you must first set your machine to receive the
document. This entails programming the dialling method to be used to call the remote machine and the
time at which the document is to be transmitted.
Note that selecting the polling function excludes selection of the delayed transmission function, i.e. you
cannot select both these functions simultaneously.
v You have arranged with the remote party the time at which the
document is to be polled (e.g. 17:30).
1. Press START.
The display shows a message asking you to program the type of
dialling you wish to utilise to call the fax number of the remote
machine at the set time.
You may choose between manual dialling (entering the number
from the fax machine keypad) or automatic (one touch or speed
dial).
2. Program the fax number as follows:
− Enter the fax number of the remote party on the keypad of the
fax machine.
The display shows the name, if programmed, or the number
entered (e.g. 780249)
or
− Press the relative one touch key (e.g. 07).
The display will show the stored number (e.g. 780249).
or
− Press SPEED DIAL
The display will prompt you to enter the required code. Enter
the code (e.g. 01) and press START. The display will show
the name associated with the code (if programmed).
POLLING RX
TYPE FAX NUMBER
NUM/TOUCH/SPEED
TYPE NUMBER
780249
07: ONE TOUCH
780249
TYPE SPEED NO.
(01-32)/ß/à
IF...
• on pressing a one touch key or setting a speed dial code, the
message “Not programmed”, appears, press another key, or
press STOP to quit the programming procedure and then
program the key following the instructions given in the section:
DIALLING.
92 POLLING
Page 98

3. Press START.
The display prompts you to enter the time at which the document
is to be polled (e.g. 17:30).
TYPE TIME
HH:MM
4. After entering the time, the display will show the operating mode
with the time programmed for polling.
The fax machine is now programmed to receive a document at
17:30 from the remote fax with the number 780249.
For a description of what happens at the moment of transmission,
see the following chart.
AUTOMATIC RX
POLL RX 17:30
HOW A POLLED DOCUMENT IS RECEIVED
If the remote party has inserted the document in his/her fax machine, the party who made the polling
request will receive the document at the preset time.
Example:
This example considers the reception of a document programmed for polling at 17:30.
v The polling request has been programmed. The machine displays the
operating mode and the programmed polling time (e.g. 17:30).
1. At the preset time, the fax machine will dial the number of the
remote machine (e.g. 780249). A message is displayed to this
effect.
2. After dialling the number, the machine establishes the
connection. The display shows the remote fax number or, if
programmed, the name associated with the number.
The document is then transmitted.
After receipt of the document the display will show the message
“RX COMPLETED” for a few seconds before returning to the
operating mode display.
IF...
• the transmission report function is selected (see the section
REPORTS), the machine will print out a report after the
relative display message.
• the document is not transmitted, this may be because the
remote party failed to insert it in the remote fax machine. The
display will show an error message to this effect.
AUTOMATIC RX
POLL RX 17:30
DIALLING
780249
CONNECTING
AUTOMATIC RX
09-03-95 17:30
☞
POLLING 93
Page 99

IF..
• the paper is out or the print head runs out of ink, the fax will
not proceed with the connection until the problem has been
rectified.
• the paper is out or gets jammed, the print head runs out of ink
or the cover is opened during reception, the display shows a
message and the document is temporarily stored in the
memory. When the problem has been remedied the fax
machine resumes printing of the document.
• you want to interrupt transmission at any point:
1) Press STOP. The display alternately indicates the
message “RX INTERRUPTED” and the message
prompting you to press STOP.
2) Press STOP again to return to the original operating mode.
HOW A POLLED DOCUMENT IS TRANSMITTED
The remote party (i.e. the party to whom the polling request is made), must insert the document in his/her
fax machine ready for automatic transmission at the preset time (e.g. 17:30).
This section explains the polling operation from the point of view of the remote party.
v The display shows the initial operating mode.
1. Insert the document face down, without forcing it, in the slot of
the ADF. Adjust the guides to the width of the paper.
The display shows an arrow pointing to STD indicating that
standard resolution is selected.
IF...
• you want to change the resolution setting, see
TRANSMISSION, heading: Adjusting the contrast and
resolution of transmitted documents.
2. Press FUNCTION.
3. Press START.
4. Press START.
AUTOMATIC RX
09-03-95 18:48
DOCUMENT READY
ê NORMAL
POLLING TX
FUNC/START/STOP
POLLING TX
START/STOP
AUTOMATIC RX
POLLING TX SET
94 POLLING
Page 100

5. The other fax machine makes the call at 17:30. At the end of the
transmission the message “TX COMPLETED” will appear on the
display for a few seconds followed by the initial operating mode.
IF...
• the transmission report function is selected (see the section
REPORTS), the machine will print out a report after the
relative display message.
• you want to interrupt transmission at any point:
1) Press STOP. The display alternately indicates the machine
operation mode message and a message prompting you to
press STOP to remove the document (REMOVE
DOCUMENT, PRESS STOP).
2) Press STOP again. The document will be ejected and the
display will alternate between the machine operating mode
message and a message indicating that transmission has
been interrupted. If the document to be removed comprises
more than one sheet, manually remove all the sheets
above the one in the ADF and then press STOP to also
eject the first sheet.
3) Press STOP again to return to the original operating mode.
CONNECTING
ê NORMAL
POLLING 95
 Loading...