

Page 1

OFX 120
INSTRUCTIONS
ENGLISH
G3 Desk-top Facsimile machine
••
• Easy to use
••
••
• Printing on thermal paper
••
••
• One-touch dialling & speed code dialling
••
••
• Automatic FAX/TEL switch
••
••
• Connector for extension telephone or
••
answering device
A5
B5
A4
Page 2

PUBLICATION ISSUED BY:
Olivetti Lexikon S.p.A.
Documentazione
77, Via Jervis - 10015 Ivrea (Italy)
Copyright
©
1996, by Olivetti
All rights reserved
This product satisfies the basic requirements of Electromagnetic Compatibility and Safety required by the
Directives:
• 89/336/CEE of 3rd May 1989 with subsequent modifications (Directive 92/31/CEE of 28th April 1992 and
Directive 93/68/CEE of 22nd July 1993);
• 73/23/CEE of 19th February 1973 with subsequent modifications (Directive 93/68/CEE of 22nd July 1993);
as having been designed in conformity with the requirements of the following Reference Norms:
• EN 55022 (
Technology Equipment
• EN 50082-1 (
and light industry
• EN 60555-2 (
2: Harmonics
• EN 60950 (
Conformity with the above basic requirements is certified by means of the
product.
The
Mark was introduced in 1995.
Your attention is drawn to the following actions that could compromise the characteristics of the product:
• incorrect electrical supply;
• incorrect installation; incorrect or improper use, or, in any case, not in accordance with the warnings given
in the User Manual supplied with the product;
• replacement of original components or accessories with others of a type not approved by the manufacturer,
or carried out by unauthorized personnel.
Limits and methods of measurements of radio interference characteristics of Information
);
Electromagnetic Compatibility - Generic Immunity Standard - Part 1: Residential, commercial
);
Disturbance in supply systems caused by household appliances and similar equipment - Part
);
Safety of information technology equipment, including electrical business equipment
Mark shown on the
).
ATTENZIONE: QUESTA APPARECCHIATURA DEVE ESSERE COLLEGATA A TERRA
WARNING: THIS EQUIPMENT MUST BE EARTHED.
ATTENTION: CETTE UNITE DOIT ETRE CONNECTEE A LA TERRE.
ACHTUNG: DIESES GERÄT MUSS EINEN ERDUNGSANSCHLUSS HABEN.
ATENCION: ESTE EQUIPO DEBE ESTAR CONECTADO A UNA TOMA DE TIERRA.
APPARATET MÅ KUN TILKOBLES JORDET STIKKONTAKT.
APPARATEN SKALL ANSLUTAS TILL JORDAT NÄTUTTAG.
LAITE ON LIITETTÄVÄ MAADOITETTUUN PISTORASIAAN.
LEDEREN MED GRØN/GUL ISOLATION MÅ KUN TILSLUTTES EN KLEMME MÆRKET
To disconnect the machine completely from the electricity supply, pull the power cord plug out of the
mains outlet. The mains outlet must be nearby and easy to access.
WARNINGWARNING
WARNING
WARNINGWARNING
Olivetti Lexikon S.p.A. reserve the right to make changes to the product described in this manual at any time
and without notice.
.
Page 3

READ FIRST THESE IMPORTANT RECOMMENDATIONS ....
I am a high-quality product and satisfy all the
essential requirements laid down by the directives listed on the facing page.
To maintain my high level of quality and excellent performance I need, like all other products,
a little cooperation from you but I will repay you
with long faithful service. All you have to do is
respect the few general recommendations that
follow.
WHERE TO PUT ME ...
• Place me on a
vibrations
causing damage to others as well as myself.
• Keep me
sources
kitchen, swimming pool or other rooms with
wet floors. Remember also that I am allergic
to dust, direct sunlight and excessive heat
sources.
• Keep me
: never take me to the bathroom,
electronic devices that could cause interference
• Do not surround me with books, documents
or objects that occupy the space I need for
ventilation ... making my temperature rise! I
work best in rooms with a temperature of
to 35
80%
such as radios, televisions, etc.
°°
°
C
and a
°°
.
flat stable surface free of
so that I don't fall off and risk
away from water or vapour
at a distance from electrical or
°°
5
°
°°
relative humidity of 20% to
HOW TO SUPPLY ME ...
• I have a power cable
grounded plug
If my plug does not fit into your power socket
or the socket has no ground connection, call
your electrician and get him to adapt your
system to the regulations in force.
• Make sure that the
accessible
that it does not get trodden on.
• Make sure that the
, which serves to protect me.
and leaves a free passage, so
of your electrical system
voltage and frequency specifications indi-
complete with a
power cable
is
easily
voltage and frequency
correspond to the
cated on my rear plate.
•
Never connect me to a multiple socket or
extension cable
connected: a bad electrical contact may
cause me to overheat and even lead to a fire
or electric shocks.
to which another device is
HOW TO MAINTAIN ME ...
• When it's time to clean me,
the power socket
cloth and
such as
avoid
solvents, alcohol, benzine
sive materials
•
Never place any foreign bodies (including liquids)
come into contact with powered parts, a fire
or electric shocks may result.
inside me: if they accidentally
, wipe me with a damp
using corrosive substances
.
unplug me from
HOW TO REP AIR ME ...
•
Never try to repair or adjust me if you have
not been trained to do so
my casing, you may risk getting an electric
shock or injuring yourself in some other way.
To be safe, call a qualified service engineer.
• When any parts have to be replaced (includ-
C
ing accessories), make sure that you use
exclusively original materials approved
by the manufacturers
als may annul my approval for connection to
the telephone network and my safety features, and create the risks of fire and electric
shocks mentioned previously.
• If any of the situations listed below occur,
unplug me from the power socket
call a qualified service engineer:
. the power cable or its plug are damaged
or worn
. I have been knocked about and my cas-
ing is damaged
. any sort of liquid has got inside me (even
if I have just been out in the rain!)
. you have noticed a marked deterioration
: if you remove
: using other materi-
or
abra-
ENGLISH
and
- i -
Page 4

in my performance
. I don't respond correctly to the instruc-
tions given in this manual. If this happens,
simply follow the procedures described in
the manual for the function that is causing problems: operations carried out incorrectly or on components that have
nothing to do with the problem may cause
damage that will often make the service
engineer's job more difficult.
HO W TO USE ME CORRECTLY ..
sion telephone
work manager.
of a type approved by the net-
• Before putting me to work,
all the instructions
which I advise you to keep close at hand so
that you can consult it when necessary.
• I am designed to be managed in compliance
with the telephone network management
regulations in force in your country. I am also
designed to satisfy a large number of your
personal requirements.
With these
connected me to the telephone line and set
your telephone number, I can carry out the
"
essential functions
copy
You can access all the other "
tary features
indispensable but are useful for customizing
my operation,
"main features"
documents.
", which may not be absolutely
by programming the relevant
given in this manual,
":
carefully read
, once you have
send, receive
supplemen-
and
parameters.
• If you plan to leave me idle for a long period
of time, please unplug me from the power
socket: that will protect me from any accidental interference or voltage surges that may
occur.
ABOUT MY HANDSET ...
In the event of a voltage drop or power failure,
you will not be able to make telephone calls because my dialling keypad will be disabled but you
will be able to answer calls because
set is always active
If you really cannot do without me, even under
these conditions, you must connect an
.
my hand-
exten-
- ii -
Page 5

CONTENTS
HOW TO INSTALL ME 1
FIRST OF ALL WHAT'S IN THE PACKA GING....... 1
MY DISTINGUISHING MARKS .............................. 1
TO CONNECT ME TO THE TELEPHONE LINE.... 2
TO FILL ME UP WITH PAPER............................... 2
TO FIT ON MY HANDSET ..................................... 3
HOW TO SET ME UP ... 4
THE CONSOLE IN SET-UP MODE ........................ 4
THE SEY-UP PARAMETERS................................. 5
TO SET YOUR NAME ............................................ 6
TO SET MY FAX NUMBER .................................... 7
TO CHANGE THE DATE AND TIME...................... 7
TO ENABLE THE TRANSMISSION REPORT ...... 8
TO CHANGE THE REMOTE CONTROL CODE.... 8
TO CHANGE THE RING COUNT........................... 9
TO CHANGE FAX/TEL RECOGNITION .............. 10
TO CHANGE THE LANGUAGE........................... 10
TO ENABLE RECOGNITION OF SILENCE ON
THE LINE ........................................................ 11
TO CHANGE THE DIAL MODE ........................... 11
TO CHANGE THE TRANSFER MODE................. 12
TO PR OGRAM ONE-T OUCH DIALLING............. 24
TO PROGRAM SPEED DIALLING ...................... 25
... FOR A FEW EXTRA FUNCTIONS 27
THECONSOLE FOR EXTRA FUNCTIONS ......... 27
TO SEND A DOCUMENT USING ONE-TOUCH
DIALLING ....................................................... 28
TO SEND A DOCUMENT USING CODED SPEED
DIALLING ....................................................... 28
TO KEEP ME IN GOOD WORKING ORDER 29
TO CLEAN THE FEED ROLLERS....................... 29
TO CLEAN THE OPTICAL READER .................. 29
TO CLEAN THE THERMAL PRINT HEAD.......... 29
TO CLEAN THE CASING ..................................... 30
TO REMOVE JAMMED DOCUMENTS................ 30
TO SOLVE MINOR PROBLEMS.......................... 30
THE JOURNAL ....................................................31
THE TELEPHONE LIST ....................................... 31
ERROR CODES ................................................... 32
SIGNALS AND MESSAGE S................................ 33
Audible signals ...................................................... 33
Error messages ..................................................... 33
ENGLISH
... FOR THE MAIN FUNCTIONS 13
THE CONSOLE FOR THE MAIN FUNCTIONS ... 13
WHAT DOCUMENTS YOU CAN USE ................. 15
Dimensions ............................................................ 15
Recommendations................................................. 15
TO MAKE A COPY... ............................................ 16
TO SEND A DOCUMENT..................................... 16
Special dialling conditions ..................................... 18
If I can't send the document .................................. 18
The transmission report......................................... 19
TO RECEIVE A DOCUMENT ............................... 19
Manual reception ................................................... 20
Automatic reception............................................... 21
Reception with the TAD enabled ........................... 22
HOW TO PROGRAM ME ... 23
THE CONSOLE IN PROGRAMMING MODE....... 23
APPENDIX 35
THE COMPLETE CONSOLE ............................... 35
THE AUDIBLE SIGNALS..................................... 37
MY TECHNICAL D ATA ........................................ 37
WHERE I TOLD YOU ABOUT ... 39
- iii -
Page 6
HOW TO INSTALL ME
HOW TO INSTALL ME
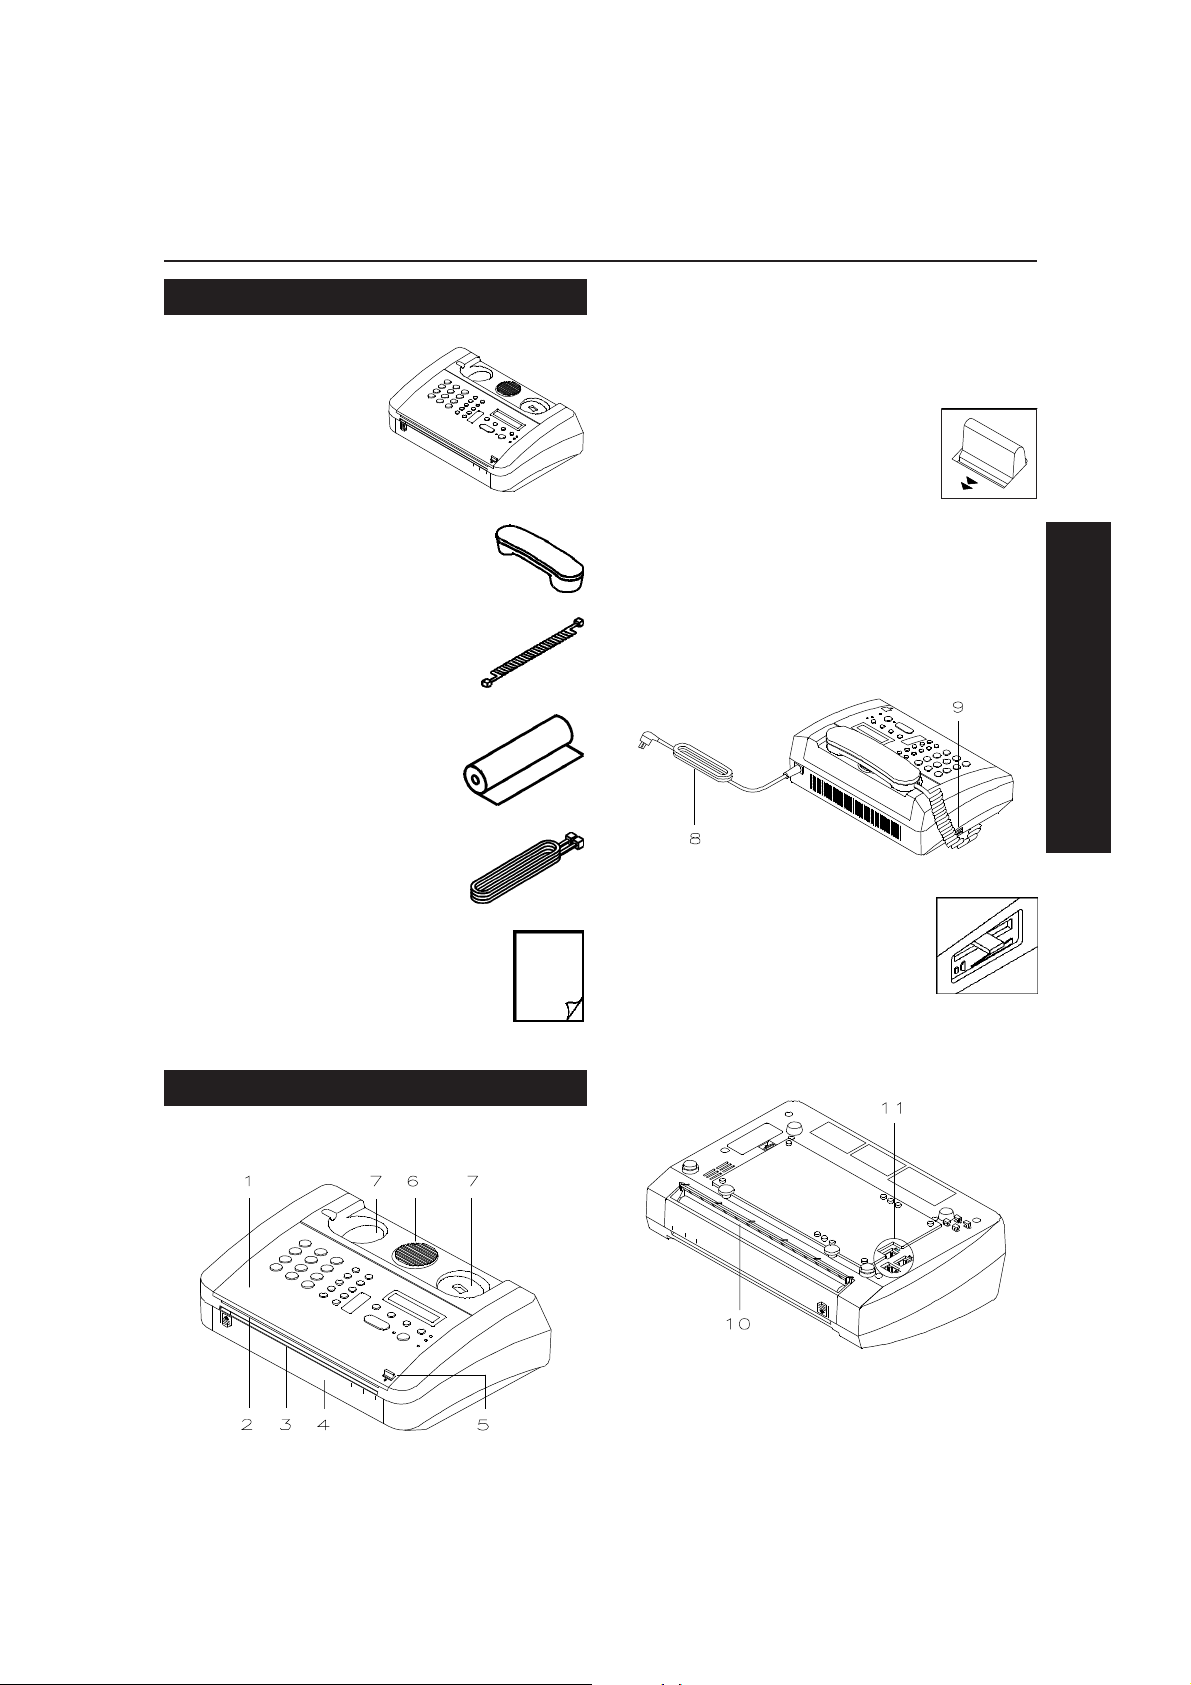
FIRST OF ALL WHAT'S IN THE PACKA GING
••
• Facsimile machine
••
A5
B5
A4
••
• Handset
••
••
• Handset cable
••
••
• Thermal paper roll
••
••
• Telephone cable
••
1 Console
2 Copy and received document output
3 Document input
4 Front cover
5 Top cover release lever for
access to thermal paper roll
compartment
6 Speaker
7 Handset base
From the rear ...
ENGLISH
8 Power cable
••
• This instructions manual.
••
MY DISTINGUISHING MARKS
From the front ...
A5
B5
A4
9 Ring volume control
From below ...
A4
B5
A5
10 Document output
- 1 -
Page 7
HOW TO INSTALL ME
11 Connector jacks:
LINE for telephone cable
TEL1 for handset cable
TEL2 for extension telephone or answering
device.
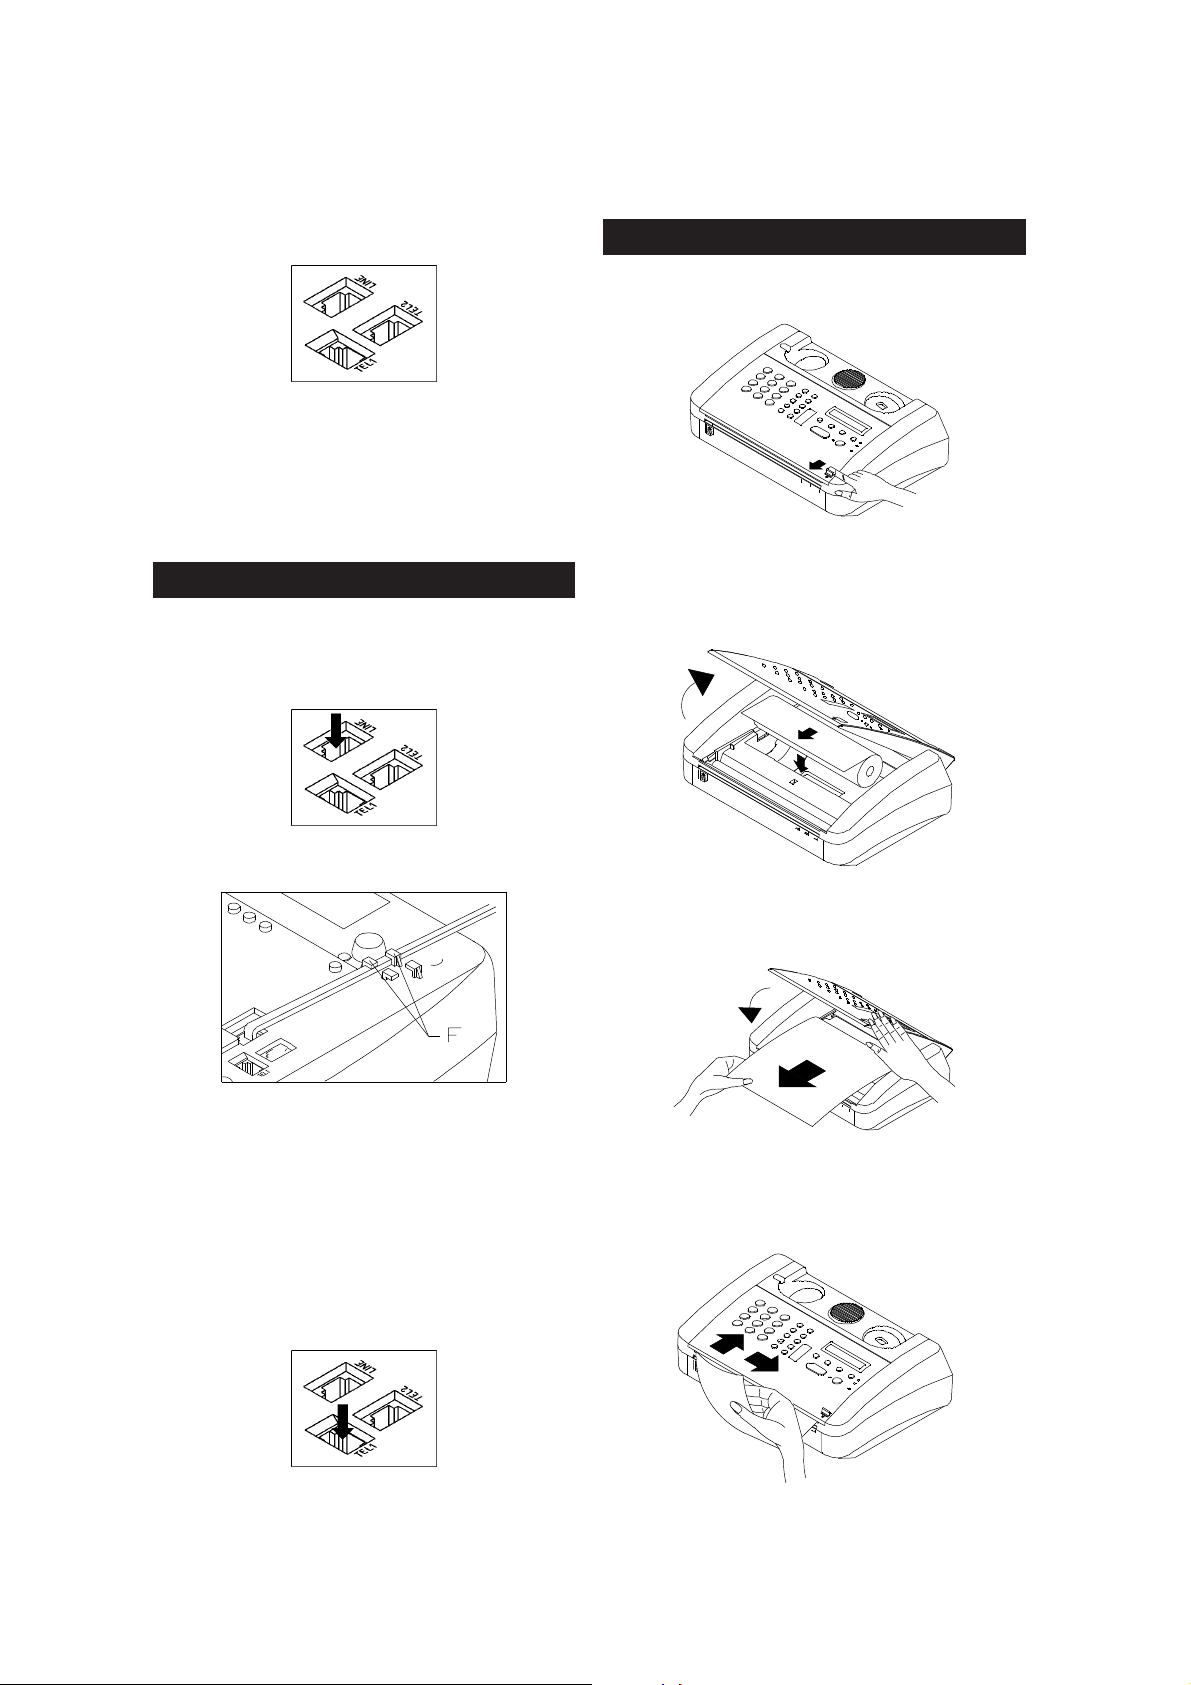
TO CONNECT ME TO THE TELEPHONE LINE
1 Turn me upside down
2 Insert one end of the telephone cable into
the LINE jack
TO FILL ME UP WITH PAPER ...
1 Release the top cover by pressing the lever
A5
B5
A4
2 Push the top cover to the rear and insert the
thermal paper roll so that it unwinds from the
top of the roll
and fix the cable between the catches F
3 Insert the other end of the telephone cable
into the wall power outlet or, with a multisocket telephone system, into the main
socket.
4 Insert one end of the handset cable into the
TEL1 socket and put me the right way up
again.
3 Unroll about 20 cm of paper and push the
top cover down until it locks into position
B5
A4
4 Tear off any surplus paper along the edge of
the top cover.
- 2 -
Page 8
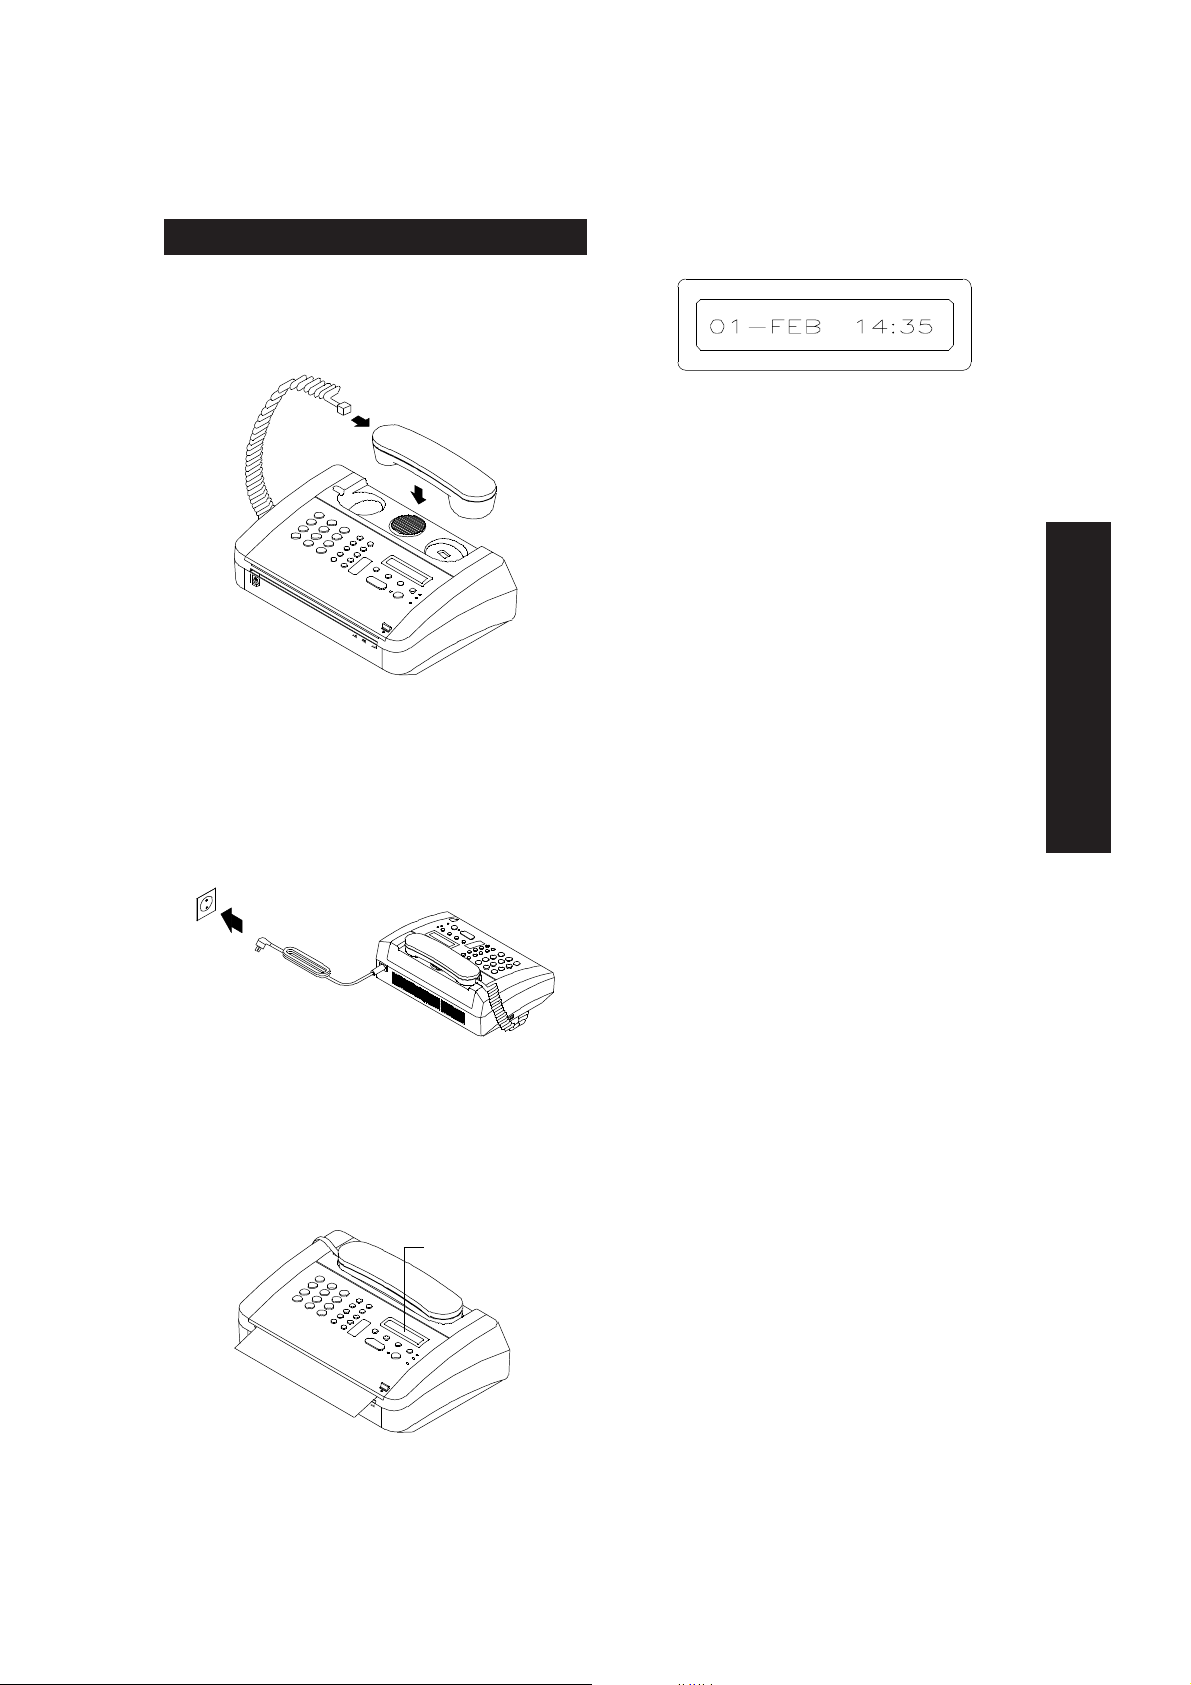
TO FIT ON MY HANDSET ...
1 Insert the other end of the cable into the
handset socket and place the handset on its
base
HOW TO INSTALL ME
••
• The current date and time are then dis-
••
played:
to tell you that I am ready to be set up as
described in the following chapter.
NOTE
Should the messages appear is a language
other than your own, start by setting the corresponding configuration parameter: SELECT LANGUAGE.
NOTE
Whenever you have to open the top cover
(for example, to replace the thermal paper
roll), lift the handset off its base
2 Plug the power cable to the power outlet to
supply me with power:
••
• The display shows the following mes-
••
sages WARM START and PAPER CYCLE in
sequence and then a few centimetres of
thermal paper are fed out.
DISPLAY
ENGLISH
- 3 -
Page 9

HOW TO SET ME UP ...
HOW TO SET ME UP...
I only need a few setup parameters, nearly all of
which are already set, in order to work properly.
All you have to do is set
your name
(though this is not strictly necessary) and
your telephone number
which identifies me as a subscriber to the telephone service.
If you like, you can
change the default values
of the other parameters to suit them to your operating requirements. →
THE CONSOLE IN SET-UP MODE
2 45 6 12
SPEED DIAL
1 2
4
7
5
8
3
6
9
REDIAL
PAUSE
EXT/R
VOL.
01
02
02
All parameters are set using the console. This
section
to set me up
only describes the keys you will need
(those marked with the larger num-
bers).
Some keys perform different functions accord-
ing to the operating mode I am in:
S
stand-by
mode, that is, when I'm rest-
ing.
F
set-up
mode, that is, after the FUNCTION
key has been pressed
A complete description of the console is provided
in the appendix at the end of this manual.
+
-
FUNCTION CONTR.
RESOL. RX MODE
FAX.
TAD
HOOK 03
P T
*
0
#
1 Number Keys
F To enter any numeric or alphabetical data.
3 SPEED DIAL Key
F To change the type of character associ-
ated with the number keys: capitals, small
letters or digits.
IN USE ERROR
15 16 18
7 FUNCTION Key
S To enter set-up mode.
F To select menus and parameters.
8 CONTR. Key
F To move backwards to digits and charac-
ters when entering numbers and names.
- 4 -
20
Page 10

HOW TO SET ME UP ...
9 Display
To display on a line of 16 characters:
••
• Date and time
••
••
• Resolution
••
••
• Contrast
••
••
• Menu items and parameters
••
••
• Error messages.
••
10 RESOL. Key
F To move forwards to digits and charac-
ters while entering numbers and names.
11 RX MODE Key
F To delete numbers and names while en-
tering them.
13 ¬ and # Keys
F To select special characters (symbols)
"forwards" (¬) or "backwards" (#) while
entering the name.
14EXT/R Key
F To enter the international code "+" while
entering the telephone number.
17 START/COPY Key
F To confirm menus, parameters and val-
ues.
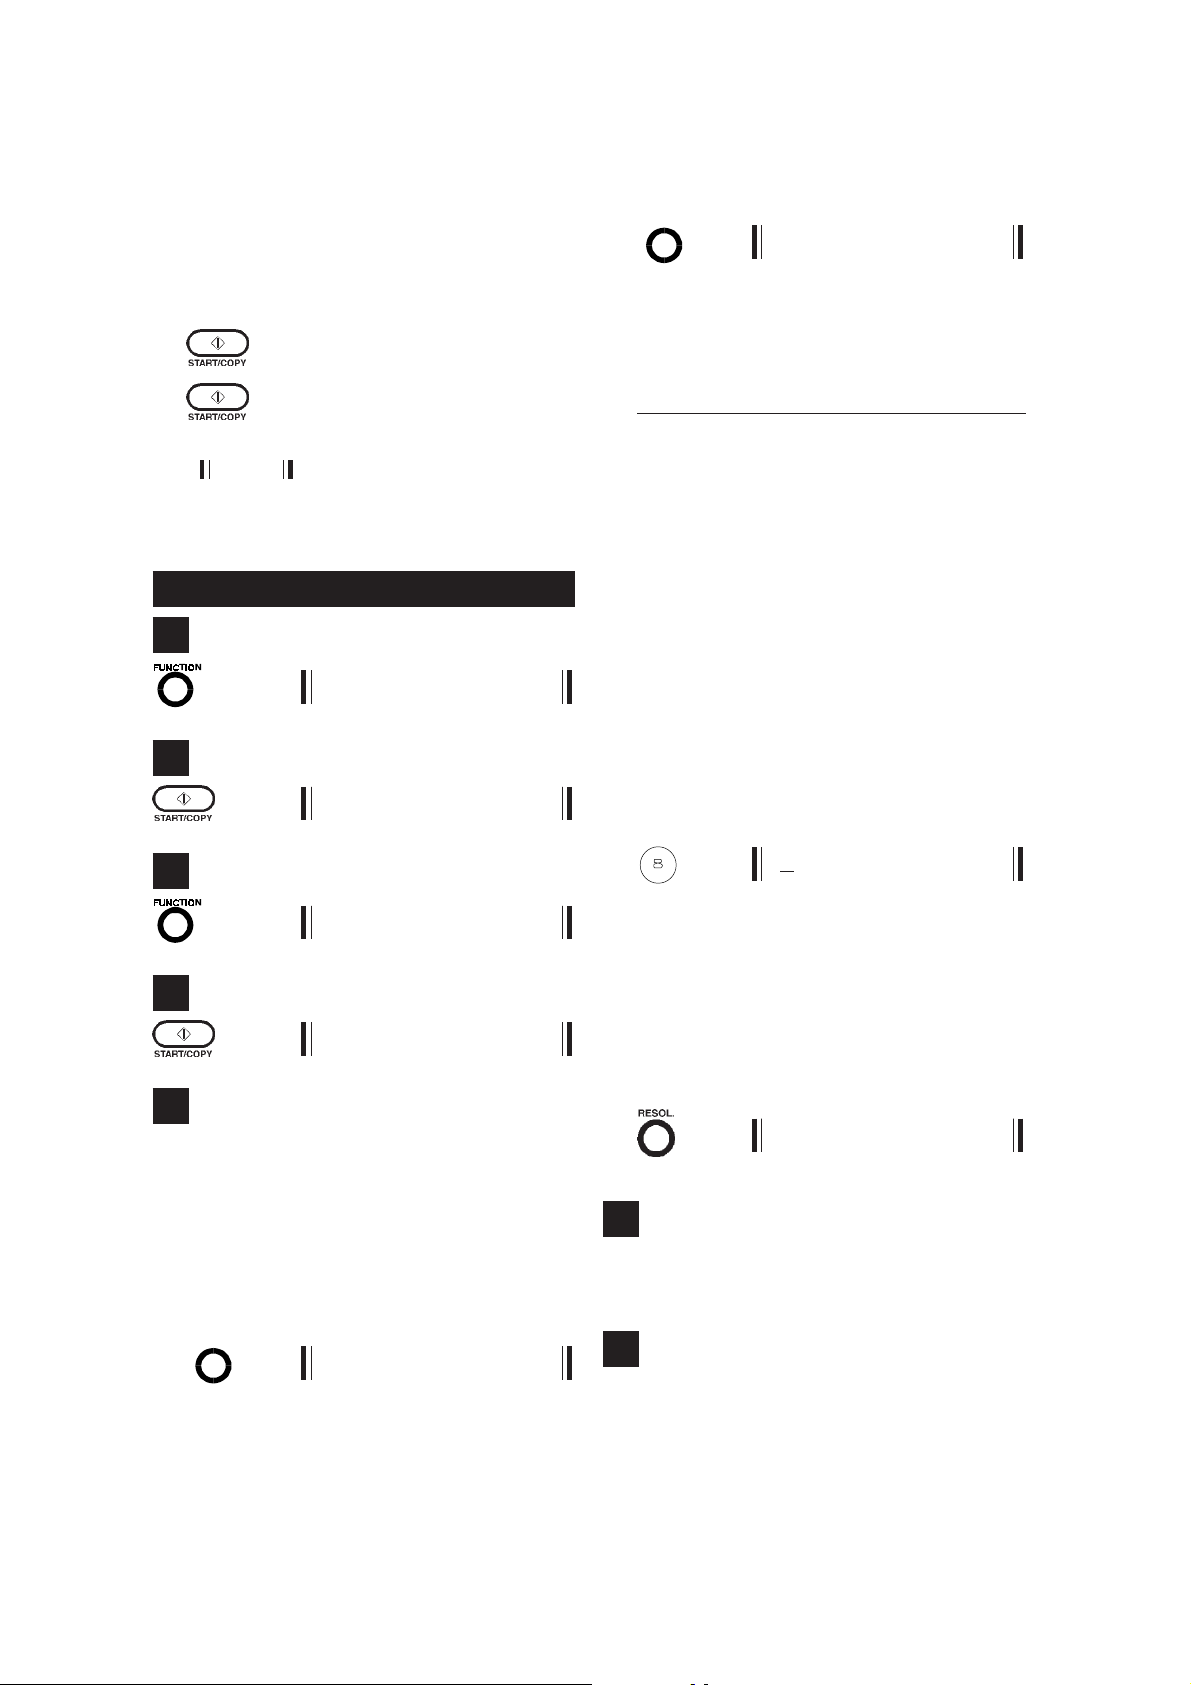
THE SET-UP PARAMETERS
The set-up parameters are organized in part
under the SETTING menu, which appears on
the display when you press the FUNCTION key
once
in stand-by mode, and in part under the
CONFIGURATION menu, which appears on the
display when you press the FUNCTION key
times
consecutively.
To run through the items on a menu, press the
START/COPY key to access the first parameter,
and then the FUNCTION key until the parameter to
be set appears on the display and then the START/
COPY key to display the
The parameters and values are listed in the following order:
value of the parameter
three
SETTING
DATE/TIME
01-02-96 14:25
YOUR NAME?
_ A
YOUR FAX NO.
_
CONFIGURATION
PRINT TX REPORT
ON /OFF
REMOTE CONTROL
ACT. NO. #*7 0-9
RING COUNT
RING COUNT:2 2-6
FAX/TEL SWITCH
ON /OFF
SELECT LANGUAGE
ENGLISH /RESOL
.
ENGLISH
19 STOP Key
F To set me back in stand-by mode.
SILENCE
ON /OFF
DIAL MODE
PULSE /TONE
TRANSFER MODE
EARTH /FLASH
The last parameter, TRANSFER MODE, only
applies
appears on the models sold in these countries.
- 5 -
to some countries
and therefore only
Page 11
HOW TO SET ME UP ...
NOTE
To simplify the description of the set-up procedures, the following graphical conventions
are used:
Press this key
X Press this key
The MESSAGE that appears on the
once
.
X times
.
display
( ) when the key is pressed is indicated beside the key.
TO SET YOUR NAME ...
1
SETTING
2
DATE/TIME
3
SPEED DIAL
2 _ 1
••
• Select the
••
number key
whose group of char-
acters includes the one you want to enter:
key Aa1
1 1
2ABC abc 2
3 DEF def 3
4 GHI ghi 4
5 JKL jkl 5
6 MNO mno 6
7 PQRS pqrs 7
8 TUV tuv 8
9 WXYZ wxyz 9
0 0
¬ and # both contain the following special
characters:
! " # $ % & ' ( ) * + , - . / :
; < = > ? @ [ \ ] ^ _ ' space
••
• Press the number key until the
••
character
you want to enter (for example, V) appears:
TUV
3 VA
that
YOUR NAME?
4
_A
5
Enter the letters in your
choosing them from those available by pressing
the relevant number keys, as described below:
••
• Select the
••
to set:
type of character
capitals
(indicated on the right-hand
side of the display by A, and for which I am
already set),
and
digits
SPEEDDIAL
small letters
(indicated by 1):
_ a
or:
name
, one by one,
that you want
(indicated by a)
NOTE
For special characters, press the ¬ key to
move forwards or the # key to move backwards through them.
••
• Confirm the character selected; the cursor
••
moves right to the position of the next character:
V_ A
6
Repeat the four operations described in step 5
for each character in your name (for a
of 20 characters
, including spaces).
maximum
7
Having entered your name, check that it is correct by scrolling through all the characters with
the cursor:
- 6 -
Page 12
••
• if there are no errors, confirm the name; the
••
next parameter will appear on the display:
YOUR FAX NO.
••
• if any of the characters are incorrect:
••
- move the cursor to the incorrect character, for example:
SMIDH_ A
2 SMIDH A
- enter the correct character as explained
in step 5:
TUV
SMITHA
NOTE
You can also clear the entire entry:
RX MODE
_ A
and then enter the name again.
HOW TO SET ME UP ...
4
_
5
Select and confirm the digits in the
number
one (for a
spaces), using the number keys in the same way
as for the name:
that has been assigned to me one by
maximum of 20 digits
02396748
NOTE
You can also insert the
(+) before the telephone number:
+
international code
telephone
, including
6
Having entered the telephone number, check that
it is correct and, if there are any mistakes, correct them in the same way as described for the
name.
ENGLISH
8
Set me back in stand-by mode:
0 1-FEB 14 : 25
TO SET MY FAX NUMBER ..
1
SETTING
2
DATE/TIME
3
2 YOUR FAX NO.
7
Set me back in stand-by mode:
0 1-FEB 14 : 25
TO CHANGE THE DATE AND TIME ...
1
SETTING
2
DATE/TIME
3
DD-MM-YY HH:MM
0 1-02-96 14:25
- 7 -
Page 13

HOW TO SET ME UP ...
4
Move the cursor forwards:
X 0 1-02-96 14:25
or backwards to the digit to be changed:
X 0 1-02 - 9 6 14 : 2 5
5
Enter the correct digit by pressing the
crresponding number key:
TUV
0 8-02 - 96 14 : 25
6
Confirm the digit selected; the next parameter
appears on the display:
YOUR NAME?
1
3 CONF I GURATION
2
PRINT TX REPORT
3
ON /OFF
4
or ON /OFF
5
Confirm your choice; the next parameter appears
on the display:
REMOTE CONTROL
NOTE
If you entered an invalid number, for example, 14 as the month, or 71 as the number of
minutes, the following message appears:
ERROR !
prompting you to enter the correct value.
7
Set me back in stand-by mode:
0 7-FEB 14 : 25
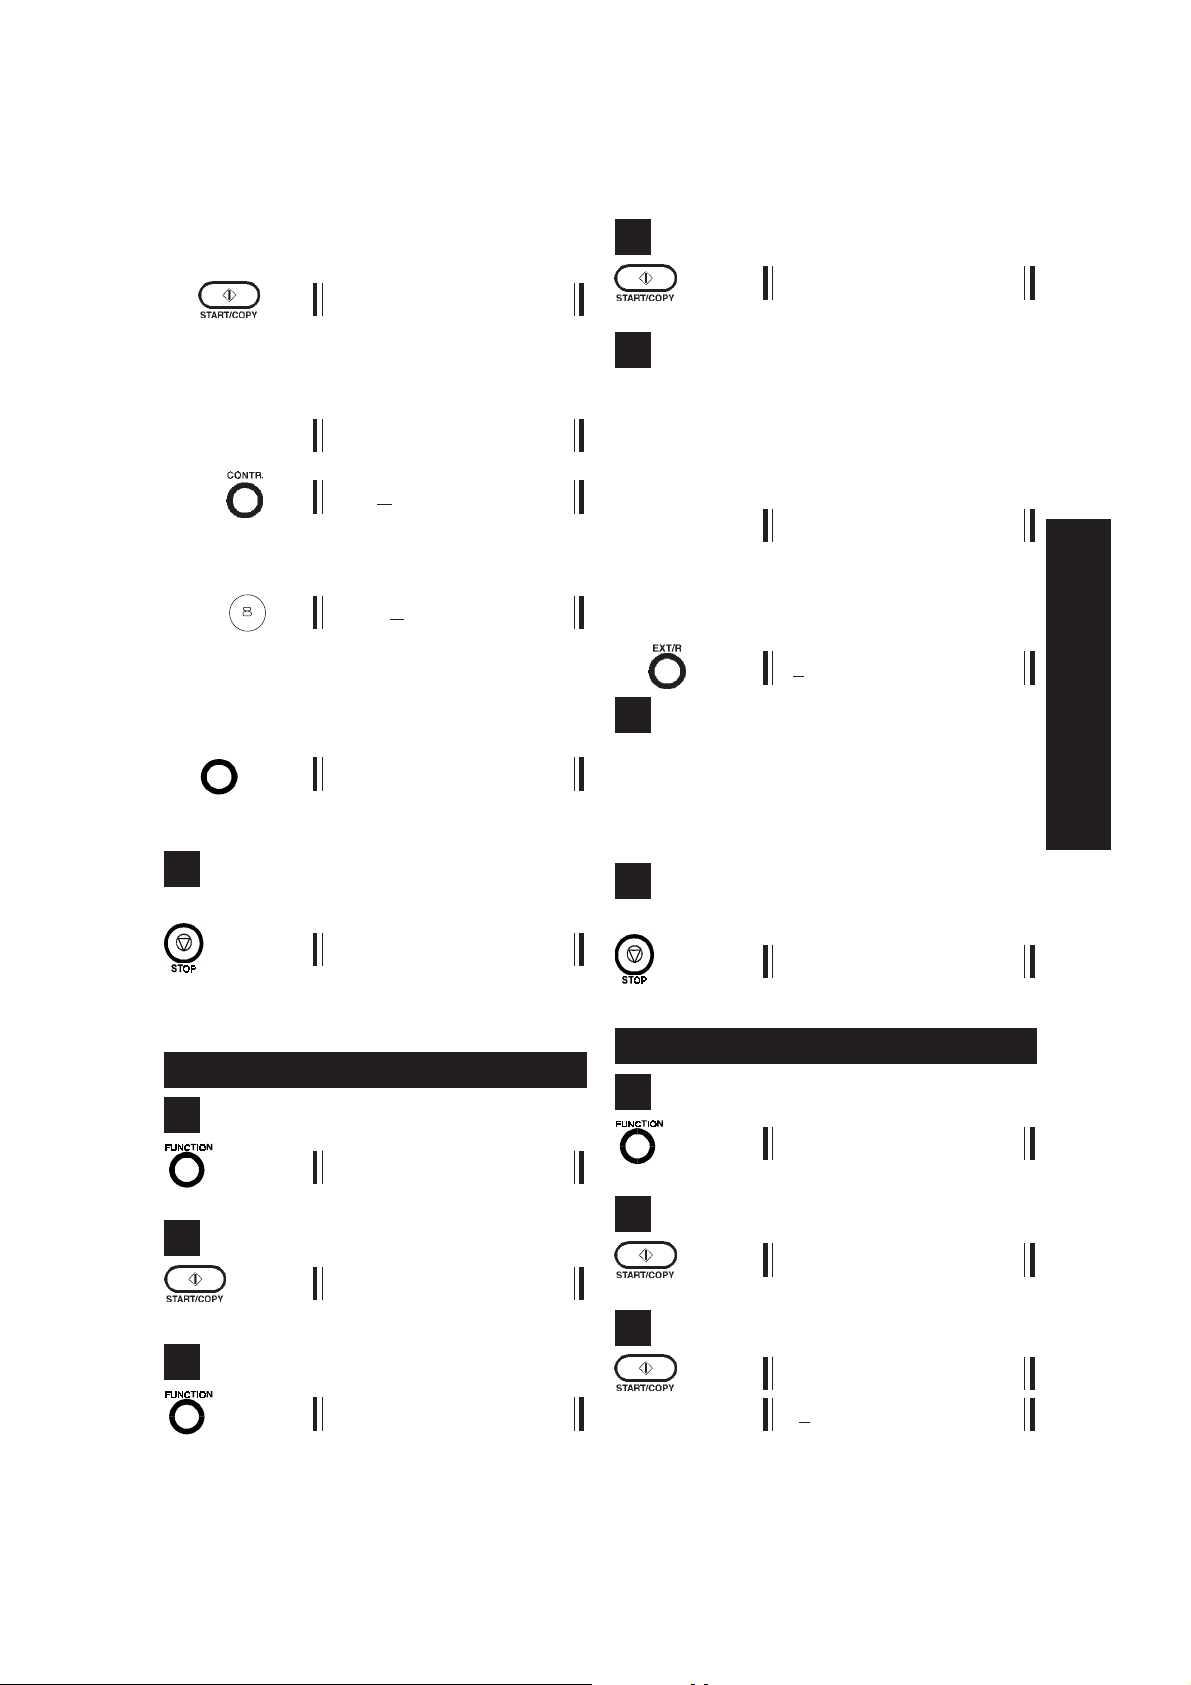
TO ENABLE THE TRANSMISSION REPORT..
You can set me to automatically print a report
after each document sent, to check that the transaction was carried out successfully.
6
Set me back in stand-by mode:
0 7-FEB 14 : 25
TO CHANGE THE REMOTE CONTROL
CODE
If I am connected (via the TEL2 socket or a multiple telephone system socket) to one or more
telephone extensions that operate in
and are set for
is received from a correspondent who wants to
send you a fax, you can
it by typing the code # * 7 on the same extension
telephone. You can
of this code using digits 0 to 9.
NOTE
If I am also connected to a
swering device
digit other than those used for the remote
control of the answering device.
manual reception
instruct me to receive
change the numeric part
, it is advisable to choose a
tone mode
, when a call
telephone an-
- 8 -
Page 14
HOW TO SET ME UP ...
J
1
3 CONF I GURATI ON
2
PRINT TX REPORT
3
REMOTE CONTROL
4
ACT. NO. : # * 70-9
5
Change the value of the digit using the corresponding number key:
TUV
ACT. NO. : # * 80-9
TO CHANGE THE RING COUNT ..
When I am set for
facsimile machine calls me, I automatically start
receiving
after 2 rings
automatic reception
.
, and a
1
3 CONF I GURATI ON
2
PRINT TX REPORT
3
2 RING COUNT
4
RING COUNT:22-6
ENGLISH
6
Confirm the digit selected; the next parameter
appears on the display:
RING COUNT
7
Set me back in stand-by mode:
0 7-FEB 14 : 25
IMPORTANT
The remote control code can also be used in
the following cases:
••
• by any of your correspondents to get me
••
to receive a fax; for example, if my answering device is enabled
••
• by yourself, to get any of your correspond-
••
ents' fax machines to receive providing it
is preset to recognize your code.
5
Change the ring count by pressing the corresponding number key:
KL
RING COUNT:52-6
6
Confirm the digit selected; the next parameter
appears on the display:
FA X / T E L SWITCH
7
Set me back in stand-by mode:
0 7-FEB 14 : 25
- 9 -
Page 15

HOW TO SET ME UP ...
TO CHANGE FAX/TEL RECOGNITION ...
When I am set for
automatically recognize whether I am being
called by a facsimile machine (FAX) or a telephone (TEL):
••
• if it is a
••
cally prepare for reception
••
• if it is a
••
and then, if my receiver is not lifted, I will
automatically prepare to receive a document.
You can make me behave differently, as follows:
••
•
by cancelling recognition
••
(OFF): in this case, I will behave as though I
were an ordinary facsimile machine:
facsimile machine
telephone
automatic reception
, I will automati-
, I will ring for 30 seconds,
of the telephone
, I can
1
3 CONF I GURATI ON
2
PRINT TX REPORT
7
Set me back in stand-by mode:
0 7-FEB 14 : 25
TO CHANGE THE LANGUAGE ..
I am preset to display messages in the language
spoken in your country. If you like, you can select any of the language listed in alphabetical
order.
1
3 CONF I GURATI ON
2
PRINT TX REPORT
3
3
3 F A X / TEL SWITCH
4
ON /OFF
5
o ON /OFF
6
Confirm the type of recognition selected; the next
parameter appears on the display:
SELECT LANGUAGE
4 SELECT LANGUAGE
4
ENGLISH / RESOL
5
Choose the language by moving backwards:
X SPAN ISH /RESOL
or forwards through the list:
X GERMAN / RESOL
6
Confirm the language selected; the next parameter appears on the display:
S I LENCE
- 10 -
Page 16

HOW TO SET ME UP ...
7
Set me back in stand-by mode:
0 7-FEB 14 : 25
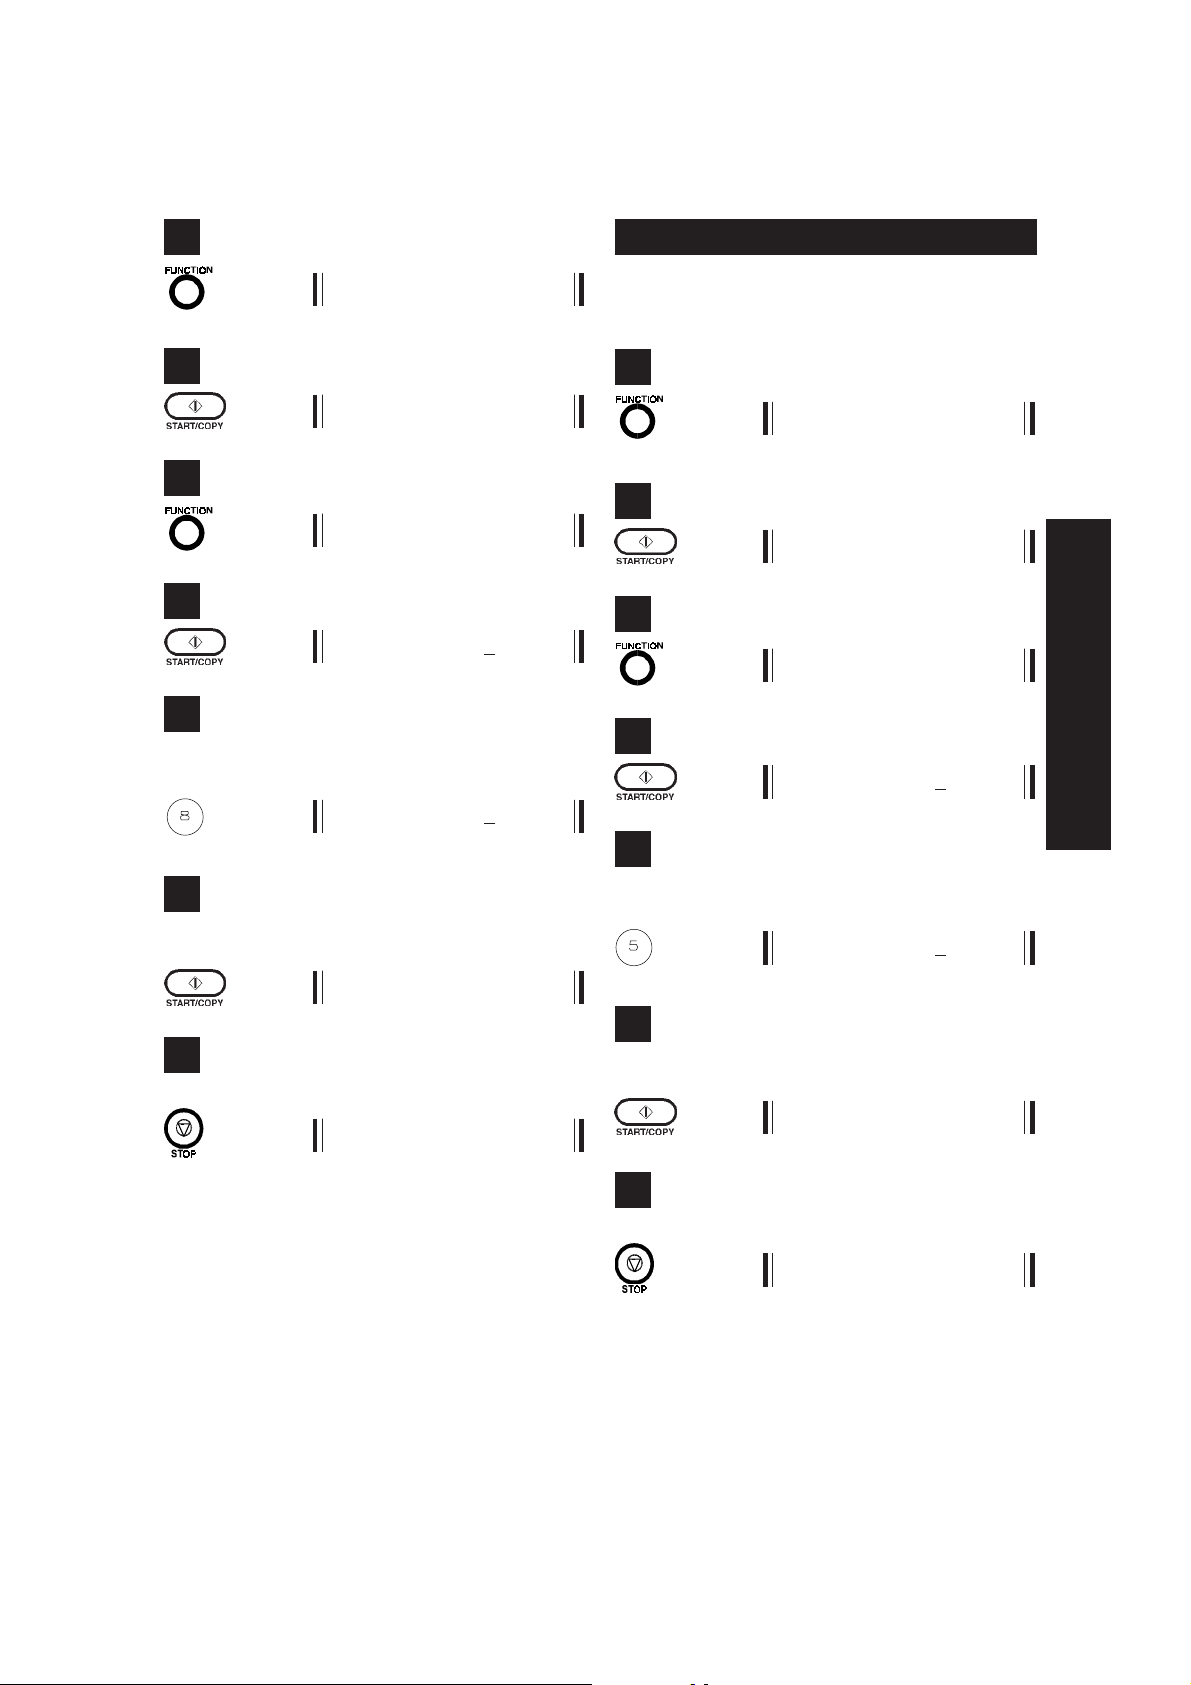
TO ENABLE RECOGNITION OF SILENCE
ON THE LINE ...
If you have connected me to a telephone answering device and have set me to record incoming messages on it, I am not capable of receiving documents sent by facsimile machines
in manual mode without emitting the characteristic signal that identifies them (these facsimile
machines are normally old ones).
To get round this problem, you must set me to
recognize "silence on the line":
1
3 CONF I GURATI ON
7
Set me back in stand-by mode:
0 7-FEB 14 : 25
NOTE
If I continue not to receive documents, even
if I am set to recognize "silence on the line",
call a service engineer.
TO CHANGE THE DIAL MODE
The
dial mode
the telephone exchange that manages the line
to which you have connected me:
••
•
pulse
••
set
••
•
tone or multifrequency
••
You must therefore
eter
: if in doubt over the mode to be chosen, call
the telephone network manager.
is a characteristic parameter of
dialling, the mode for which I am pre-
dialling.
adapt me to this param-
ENGLISH
2
PRINT TX REPORT
3
5 S I LENCE
4
ON /OFF
5
o ON /OFF
6
Confirm the setting made; the next parameter
appears on the display:
DIAL MODE
1
3 CONF I GURATI ON
2
PRINT TX REPORT
3
6 DIAL MODE
4
PULSE/ T O NE
5
or PULSE/ TONE
- 11 -
Page 17

HOW TO SET ME UP ...
6
Confirm the dial mode selected; the next parameter appears on the display:
TRANSFER MODE
7
Set me back in stand-by mode:
0 7-FEB 14 : 25
TO CHANGE THE TRANSFER MODE ...
As mentioned previously, this parameter is only
available
If you are installing me on a private branch exchange, the method for
line
change:
••
•
••
in some countries
is a characteristic parameter of the ex-
earth
access, for which I am preset
.
accessing the public
5
or EARTH/ FLASH
6
Confirm the transfer mode selected; the next
parameter appears on the display:
DATE /TIME
7
Set me back in stand-by mode:
0 7-FEB 14 : 25
••
•
flash
••
You must therefore
eter
the private exchange manager.
access.
adapt me to this param-
: if in doubt over the choice to be made, call
1
3 CONF I GURATI ON
2
PRINT TX REPORT
3
7 TRANSFER MODE
4
EARTH/FLA SH
- 12 -
Page 18

... FOR THE MAIN FUNCTIONS
... FOR THE MAIN FUNCTIONS
Now that I have a
name
and
telephone number
,
you can use me to:
••
•
copy
••
••
•
••
••
•
••
documents
send
documents
receive
documents
as well as an ordinary telephone.
The console is also used for activating the main
functions. This section
you need
to activate them.
only describes the keys
Some keys perform different functions accord-
THE CONSOLE FOR MAIN FUNCTIONS
23 7
SPEED DIAL
1 2
4
7
3
5
8
6
9
REDIAL
PAUSE
EXT/R
VOL.
02
02
+
-
01
ing to the operating mode I am in:
C
Communication
mode, that is, while
sending or receiving documents
L
Hook
mode, that is, after pressing the
HOOK key or lifting the handset
S
Stand-by
mode, that is, when I am rest-
ing.
A complete description of the console is provided
in the appendix at the end of this manual.
FUNCTION CONTR.
RESOL. RX MODE
FAX.
TAD
ENGLISH
HOOK 03
P T
0
#
1 Number keys
L To dial the telephone number.
4 REDIAL key
L To automatically redial the last telephone
number dialled.
IN USE ERROR
16
5 VOL. + key
L To increase the volume of the audible sig-
nals.
6 VOL. - key
L To reduce the volume of the audible sig-
nals.
- 13 -
Page 19

... FOR THE MAIN FUNCTIONS
8 CONTR. key
S To set the contrast (only if there is a docu-
ment in the feeder).
9 Display
To display on a line of 16 characters:
••
• Date and time
••
••
• Resolution
••
••
• Contrast
••
••
• Operator and error messages
••
••
• Telephone numbers.
••
10 RESOL. Key
S To set the resolution (only if there is a
document in the feeder).
11 RX MODE Key
S To select the reception mode.
In addition, only if enabled by the telephone network manager:
••
• Followed by a telephone number, to
••
transfer the call in progress to another
correspondent.
••
• Followed by a numeric code, to access
••
the corresponding supplementary telephone service.
15 HOOK Key
S To enter hook mode: it is equivalent to
lifting the handset.
C To exit hook mode: it is equivalent to hang-
ing up the handset.
17 START/COPY Key
••
L
• To start sending a document.
••
••
• To start receiving a document manu-
••
ally.
••
S
• To start copying a document.
••
••
• To start feeding thermal paper.
••
12 FAX - TAD LED Indicators
Depending on when they are on or off, these
LEDs indicate the
using the RX MODE key:
Reception FAX TAD
••
• manual
••
••
• automatic
••
••
• TAD
••
reception
mode selected
13 ¬ and # Keys
L To dial remote control codes.
14 EXT/R Key
••
L
• To access the public line from a pri-
••
vate branch exchange in pulse mode
(in some countries only).
18 IN USE LED Indicator
It lights up to indicate that I'm in hook mode
or communication mode.
19 STOP Key
••
S
• To stop the current copying operation.
••
••
• To unload a document from the feeder.
••
••
• To turn off the ERROR LED indicator
••
C To abort the current transmission or re-
ception.
20 ERROR LED Indicator
Lights up when an operating error has occurred or when I am not ready to work.
- 14 -
Page 20

... FOR THE MAIN FUNCTIONS
NOTE
To simplify the description of the procedure,
the following graphical conventions are used
in addition to those adopted earlier:
Insert the document with the side
to be copied or sent facing upwards:
Lift the handset.
Hang up the handset.
Type on the numeric keypad.
Incoming call.
Recommendations
So as to avoid damage that could put me out of
order and invalidate my guarantee, make sure
that the documents that you want to use
of
:
••
• staples
••
••
• paper clips
••
••
• adhesive tape
••
••
• wet Tip-ex or glue.
••
NEVER USE
••
•
rolled-up paper
••
••
•
wafer thin paper
••
are free
ENGLISH
WHAT DOCUMENTS YOU CAN USE
Dimensions
••
•
Width
••
••
•
Length
••
••
•
Thickness
••
min 128 mm
max 216 mm
min 100 mm
max 600 mm
min 0.08 mm
max 0.13 mm
••
•
torn paper
••
••
•
wet or damp paper
••
••
•
small pieces of paper
••
••
•
crumpled paper
••
••
•
carbon paper
••
.
- 15 -
Page 21

... FOR THE MAIN FUNCTIONS
TO MAKE A COPY ...
If this diagram is not enough for you:
••
• HALFTONE, if the document contains
••
shaded areas
2 NORMAL HALFTONE
:
→→
→
→→
read the more detailed instructions below:
→→
→
→→
1
Make sure that the handset is on the hook:
0 7-FEB 14 : 25
2
DOCUMENT FEEDING
NORMAL S T ANDARD
3
Set the
appear on the copy, as specified below:
••
• NORMAL, if the document is
••
••
• DARK, if the document is
••
contrast
, i.e. how light and dark areas
light nor too dark
NORMAL ST ANDARD
neither too
:
particularly light
NOTE
If you do not set the resolution, the copy will
be made automatically with the FINE setting.
5
Start making the copy:
COPY NORM F I N
Once I have copied the document, I emit five
short beeps (lasting a total of
during this time, you can insert another document for copying. If you do not, I return to standby
mode:
0 7-FEB 14 : 25
NOTE
••
• Having made the copy, I always return to
••
the initial contrast and resolution settings
NORMAL and STANDARD, respectively.
••
• If you want to abort the copying opera-
••
tion in progress, press the STOP key: the
:
document will be unloaded automatically.
about 5 seconds
):
DARK STANDARD
••
• LIGHT, if the document is
••
2 LIGHT STANDARD
particularly dark
4
Set the
as specified below:
••
• FINE, if the document contains
••
resolution
characters
, i.e. the definition of the copy,
or
drawings
NORMAL F I NE
:
very small
:
TO SEND A DOCUMENT ...
If this diagram is not enough for you:
→→
→ or
→→
read the more detailed instructions below:
- 16 -
→→
→
→→
→→
→
→→
Page 22

... FOR THE MAIN FUNCTIONS
1
Make sure that I'm in stand-by mode:
0 7-FEB 14 : 25
2
DOCUMENT FEEDING
NORMAL ST ANDARD
3
Set the
way as for making a copy. If the document to be
sent is a normal text, leave the STANDARD resolution setting.
contrast
and
resolution
in the same
4
Engage the line:
or TEL. MODE
The IN USE LED lights up.
5
Dial the
whom you want to send your document (you can
dial an unlimited number of digits):
••
• if your correspondent's facsimile machine is
••
••
• if it is set for
••
number
set for
the
facsimile answering tone
spondent will answer and you must ask him
to press the
chine, and then wait for the
to select the correspondent to
02396748_
automatic reception
, you will hear
manual reception
start key
on his facsimile ma-
facsimile tone
, your corre-
6
TRANSMITTING
As soon as a connection has been established
with your correspondent, his or her number appears on my display:
02396748
followed by the transmission features:
TX NORM STD P00 1
where P001 indicates the number of the page
I'm sending.
NOTE
Your correspondent's number may
respond
correspondent did not set his fax number
correctly) or
all
number).
to the number you dialled (if the
may not even be displayed at
(if the correspondent did not set his fax
7
If you engaged the line by lifting the handset,
hang it up:
TX NORM STD P00 1
8
Once I have sent the document, I emit five short
beeps (lasting a total of
ing which time you can insert another document
to be sent. If you do not, I return automatically to
stand-by mode.
NOTE
••
• Once I have sent the document, I always
••
restore the initial contrast and resolution
.
settings to NORMAL and STANDARD,
respectively.
about 5 seconds
not cor-
ENGLISH
): dur-
NOTE
If I am connected to a private line or the correspondent uses tone dialling (multifrequency), see the section entitled "Special
dialling conditions".
- 17 -
In addition, if you have enabled me to do
so (as explained in the previous section),
I print the
planation of which is provided later on in
this manual.
transmission report
, an ex-
Page 23

... FOR THE MAIN FUNCTIONS
••
• If you want to abort the transmission in
••
progress, press the STOP key: while the
document is being unloaded I will
matically print the transmission report
••
• If the
••
volume of the tones emitted
the correspondent's facsimile machine
seems
using the VOL.+ and VOL.- keys, respectively.
too low
or
too high
, regulate it
auto-
by
3 Your correspondent does not answer
If your correspondent is busy, you can recall
.
him without having to dial the number again.
I always store the last number dialled and
you can redial it simply by pressing the relevant key:
02396748
Special dialling conditions
Under the conditions that follow, modify the procedure for dialling the number described in step
5.
1 I am connected to a private line
••
• Access the
••
cedure required by your exchange:
meric code
pulse (EARTH
pressing the EXT/R key.
••
• Dial your correspondent's number:
••
2 Your correspondent uses tone dialling
(multifrequency)
If I am set for pulse dialling (see "To change
the dial mode") and you have to send a
document to a correspondent that uses tone
dialling:
public line
following the pro-
nu-
or (in some countries only)
or
FLASH
02396748
) obtained by
NOTE
I also offer abbreviated dialling procedures,
called
speed dialling
ling
, for which I must be programmed as
described in the section entitled "How to
program me".
and
one-touch dial-
If I can't send the document
1 Sometimes, due to errors on the line such
as excessively intense traffic or other kinds
of interference, the document sent is received
incorrectly by your correspondent's machine,
which requests you to resend it.
In these cases, it is advisable to resend the
document at a
send documents at a speed of
p
er second), which you can halve (
after following steps 1, 2 and 3 of the ordinary transmission procedure.
slower speed
9600 bps (b
. I normally
its
4800 bps
3a
5 SEND HALF SPEED
)
••
• Change
••
fore dialling the number:
••
• Dial your correspondent's number:
••
NOTE
Once I have finished sending the document
I always restore the dial mode for which I
was set.
your dial mode
*
temporarily be-
008863* _
008863* 9835_
3b
ON /OFF
3c
or ON /OFF
3d
NORMAL STANDARD
- 18 -
Page 24

... FOR THE MAIN FUNCTIONS
E
E
Now continue from step 4 of the transmission procedure.
NOTE
After each document sent at half speed, I
always restore my speed to 9600 bps.
2 If
the document is not sent
due to line er-
rors or other problems, I switch on the ER-
ROR LED and automatically print
mission report
code
indicating the cause of the error (you
, which contains an
the trans-
will find a list of all error codes in the chapter
entitled "To keep me in good working or-
der ...). Having printed the report, I automatically switch off the ERROR indicator and
unload any unsent document.
3 If you send an
excessively long document
(longer than 600 mm), I automatically stop
sending the document when this length is
reached and I emit
nals
to inform you of the error.
3 to 5 short audible sig-
error
••
• DURATION Duration of transmission (in
••
hours, minutes and seconds).
••
• REMOTE ID Fax number set on the facsimile
••
machine of the correspondent
you called.
••
• PAGES Total number of pages that you
••
sent.
••
• RESULT Result of transmission:
••
- OK: if the document was sent
successfully
- XX-XX: if the document was
not sent due to the cause indicated by the error code
xx.xx:
ENGLISH
The transmission report
As mentioned previously,
the transmission report in the following cases:
••
• if you
••
enabled
me for this function in set-up
mode
••
• if you
••
interrupted transmission
ing the STOP key
••
• if a line or operating
••
The report contains the following information:
••
• DATE Date on which you sent the
••
document.
••
• START TIME Time at which you started
••
sending the document.
I automatically print
by press-
error
occurred.
TO RECEIVE A DOCUMENT ...
You can set me to receive documents sent by
your correspondents in
the FAX and TAD LED indicators:
••
•
••
Manual
you are
reception, for all occasions in which
present
ing call (the default mode I am set to):
••
•
Automatic
••
reception, for all occasions in
which you are
ceive documents:
RX MOD
••
• Reception
••
with the telephone answering
device enabled
of these devices to me:
RX MOD
2
three ways
, indicated by
and can answer an incom-
absent
but you want to re-
, if you have connected one
- 19 -
Page 25

... FOR THE MAIN FUNCTIONS
Manual reception
If this diagram is not enough for you:
→→
→
→→
read the more detailed instructions below.
→→
→
→→
→ →
→
→ →
1
0 7-02-96 14: 25
2
Engage the line:
TEL. MODE
3
••
• If you hear the facsimile tone or if the corre-
••
spondent asks you to receive a document:
1 If you engage the line from an
telephone
TEL2 socket or a multiple telephone sys-
tem socket, you can instruct me to receive
from this remote telephone providing it
works with
quency):
, which you connected to my
tone dialling
extension
(multifre-
1
2
Engage the line:
3
Enter the remote control code:
*
RECEIVING
02396748
RX STD
I start receiving and, when I have received
the document, I automatically return to standby mode:
0 7-FEB 14 : 25
••
• If your correspondent just called for a chat,
••
at the end of the conversation:
0 7-FEB 14 : 25
NOTE
... remembering that the
be the one that you set in set-up mode
(see "How to change the remote con-
trol code ..."); I will get ready to receive
a document straight away:
2 If you have to
ent's call
••
•
••
••
• Dial the
••
••
•
••
transfer the correspond-
to an extension telephone:
tension telephone
code digit
number
of the ex-
must
- 20 -
Page 26

Automatic reception
E
E
How I behave in automatic reception:
RX MOD
... FOR THE MAIN FUNCTIONS
depends on my
document is received. Use the diagram shown below:
If it is a FACSIMILE call
configuration, who is calling me
After the set number of rings
FAX/TEL SWITCH = ON FAX/TEL SWITCH = OFF
↓↓
↓
↓↓
↓↓
↓
↓↓
.
The correspondent has just called
for a chat
conversation you can hang up.
↓↓
↓
↓↓
If it is a TELEPHONE call
↓↓
↓
↓↓
I emit a signal for
30 seconds
↓↓
↓
↓↓
→→
→ The correspondent asks you
→→
↓↓
↓
↓↓
: at the end of the
→ 30 seconds have elapsed
to receive a document
→→
→→
and whether you are
present or not
↓↓
↓
↓↓
→→
→
→→
→→
→
→→
→→
→
→→
when the
ENGLISH
Reception with the TAD enabled
If you have connected a telephone answering
device (TAD) to me, first of all make sure that:
••
• the
••
number of rings
activated is
Whenever you set me to receive with the TAD
enabled:
RX MOD
2
I get ready to answer automatically
rings
you set in set-up mode. Consequently, if the
number of rings for the TAD is
greater than 6
vated
less than 6
, irrespective of the number of rings that
.
after which the TAD is
.
, the TAD
will never be acti-
after 6
equal to or
••
• an
answering message
••
30 seconds has been recorded on the TAD,
for example:
Please leave a message after the
beep. If you want to send a fax,
press the start key or type the code
hash-asterisk-7.
••
• the code # ¬ 7 does not correspond to any
••
specific command on the TAD: if it does,
change the digit
(see "How to change the remote control
code ...").
••
• the TAD is
••
With this type of reception, my behaviour depends on
diagram below:
- 21 -
switched on
who is calling me
lasting no more than
of the code in set-up mode
.
, as shown in the
Page 27

... FOR THE MAIN FUNCTIONS
The correspondent that called listens to the message recorded on the TAD
After the number of rings set for the TAD
↓↓
↓
↓↓
↓↓
↓
↓↓
If it is a If the caller wants If the caller just
FACSIMILE call to
↓↓
↓
↓↓
The caller presses the The caller
↓↓
↓
↓↓
send a fax
in manual mode
↓↓
↓
↓↓
start key
↓↓
↓
↓↓
wants to have a
message
↓↓
↓
↓↓
chat
↓↓
↓
↓↓
leaves a
after the beep
- 22 -
Page 28

HOW TO PROGRAM ME ...
HOW TO PROGRAM ME ...
As mentioned in the "Special dialling conditions"
section (see "To send a document ..."), you can
program me to carry out abbreviated dialling procedures:
••
•
One-touch dialling
••
••
•
Speed dialling
••
.
The console is also used for programming me
and in this section I will
you need
to do this. →
only describe the keys
THE CONSOLE IN PROGRAMMING MODE
456 12
3
SPEED DIAL
1 2
4
7
3
5
8
6
9
REDIAL
PAUSE
EXT/R
VOL.
02
02
+
-
01
Some keys perform different functions according to the operating mode I am in:
S
stand-by
mode, that is, when I am rest-
ing.
F
set-up
mode, that is, after the FUNCTION
key has been pressed.
A complete description of the console is provided
in the appendix at the end of this manual.
FUNCTION CONTR.
RESOL. RX MODE
FAX.
TAD
ENGLISH
HOOK 03
P T
*
0
#
1 Number Keys
F To enter any numeric or alphabetical data.
2 PAUSE Key
F To enter a "pause" while programming
one-touch and speed dialling numbers.
15
7 FUNCTION Key
S To enter set-up mode.
F To select menus and parameters.
8 CONTR. Key
F To move backwards to numbers and char-
acters while entering numbers and
names.
- 23 -
IN USE ERROR
18
20
Page 29

HOW TO PROGRAM ME ...
9 Display
To display on a line of 16 characters:
••
• Date and time
••
••
• Menu items and parameters
••
••
• Operator and error messages
••
••
• Telephone numbers.
••
10 RESOL. Key
F To move forwards to digits and charac-
ters while entering numbers and names.
11 RX MODE Key
F To delete numbers and names while en-
tering them.
13 * and # Keys
F To select special characters (symbols)
forwards (*) or backwards (#) while entering the name.
19 STOP Key
F To set me back in stand-by mode.
TO PROGRAM ONE-TOUCH DIALLING ...
You can
keys (01, 02, 03) a
will be automatically dialled during transmission
after you press the key.
assign
each of the one-touch dialling
telephone number
which
1
Make sure that I am in stand-by mode:
0 7-FEB 14 : 25
2
2 SPEED DIAL EDIT
3
EDIT ONE TOUCH
4
14 EXT/R Key
••
F
• To assign the programmed number the
••
possibility to access the public line from
the private branch exchange (only in
some countries).
••
• To set the international code "+" while
••
entering the telephone number.
16 One-Touch Dialling Keys 01-02-03
F To assign the programmed telephone
number themselves.
17 START/COPY Key
F To confirm menus, parameters and val-
ues.
SELECT 1-TOUCH
5
Press the
want to assign the telephone number (for example, 01):
one-touch dialling key
1-TOUCH NO. : 0 1
FAX NO./TEL. NO.
which you
6
Choose the
that you want to enter:
or FAX NO./TEL. NO.
type of number (fax
or
telephone
7
_
)
- 24 -
Page 30

HOW TO PROGRAM ME ...
8
Dial the
lowing possible variants.
1 If I am connected to a
number
••
• Set the
••
public line:
-
numeric code
or (only in some countries):
-
pulse (EARTH
••
• Set
••
••
• Dial your corresponent's number:
••
as in transmission, with the fol-
private line
transfer mode
0_
>_
one or two pauses
2 >--_
> - - 57290_
for access to the
or
FLASH
:
10
Choose whether to program another key:
SELECT 1-TOUCH
:
or exit from programming mode:
or EDIT ANOTHER?Y / N
11
EDIT CODED NO.
The next parameter appears on the display:
)
12
Set me back in stand-by mode:
0 7-FEB 14 : 25
ENGLISH
TO PROGRAM SPEED DIALLING ...
You can
keys (01 ÷ 10) a
automatically dialled during transmission after
you press the relevant pair.
assign
each of the 10 pairs of number
telephone number
that will be
2 If the correspondent belongs to
ephone district
pause
between the international code, area
code and number of the correspondent:
0032- 2 -22358
3 If the correspondent uses tone dialling (mul-
tifrequency), set a
dial mode
*
, it is advisable to set
temporary change of the
before the number:
008863* _
another tel-
9
Confirm the telephone number:
EDIT ANOTHER?Y/N
Follow the one-touch dialling procedure with the
following variant:
a
1
Make sure that I am in stand-by mode:
0 7-FEB 14 : 25
2
2 SPEED DIAL EDIT
3
EDIT ONE-TOUCH
4
EDIT CODED NO.
- 25 -
Page 31

HOW TO PROGRAM ME ...
5
CODED NO. : 01 1 - 10
6
Press the
to assign the telephone number (for example,
03):
pair of number keys
_
NOTE
If you pressed an invalid pair of keys (for example, 00 or 13), I display the following message for a few seconds:
and then I prompt you to choose another pair:
which you want
ERROR !
CODED KEY : 01 1 - 10
7
Continue as in the case of one-touch dialling
(starting from step 8).
- 26 -
Page 32

... FOR A FEW EXTRA FUNCTIONS
... FOR A FEW EXTRA FUNCTIONS
If you have programmed the
keys
(01, 02, 03) and the pairs of number keys
(01 - 10) for
coded speed dialling
one-touch dialling
, you can use
these keys to speed up dialling whenever you
send a document.
The console is used for this, too. In this section,
I'll only describe the
keys you need to do this
Some keys perform different functions according to the operating mode I am in: →
CONSOLE FOR THE EXTRA FUNCTIONS
2 45 6 7 12
1 2
3
C
Communication
mode, that is, while
sending or receiving documents
L
Hook
mode, that is, after pressing the
HOOK key or lifting the handset
S
stand-by
.
ing.
mode that is, when I am rest-
A complete description of the console is provided in the appendix at the end of this manual.
11
ENGLISH
13
5
8
0
6
9
#
14
4
7
1 Number keys
L To enter the pair of numbers for the de-
sired coded speed dialling number.
3 SPEED DIAL Key
L To be followed by a pair of number keys
(01÷10), to automatically dial the associated telephone number.
15
8 CONTR. Key
S To set the contrast (only if there is a docu-
ment in the feeder).
9 Display
To display on a line of 16 characters:
••
• Date and time
••
••
• Resolution
••
- 27 -
Page 33

... FOR A FEW EXTRA FUNCTIONS
••
• Contrast
••
••
• Operator and error messages
••
••
• Telephone numbers.
••
10 RESOL. Key
S To select the resolution (only if there is a
document in the feeder).
16 One-Touch Dialling Keys 01-02-03
L To automatically dial the telephone
number associated to them.
17 START/COPY Key
L To start sending the document.
As with normal transmission (see "To send a
document ..."), you can set the
resolution
As soon as you have pressed the desired onetouch dialling key (in the example, 01), I show
the digits of the number that you have assigned
with the key and start dialling them one at a time.
NOTE
As the one-touch dialling keys can be assigned either fax or telephone numbers, the
number dialled depends on whether the document is present or not:
••
•
••
••
•
••
before starting to send the document.
no document present
number
document present
dialled.
is dialled
, the
contrast
, the
telephone
fax number
and
is
18 IN USE LED Indicator
Lights up when I'm in hook mode or communication mode.
19 STOP Key
••
S
• To unload a document from the feeder.
••
••
• To switch off the ERROR LED indicator.
••
C To abort the transmission or reception in
progress.
20 ERROR LED Indicator
Indicates that an operating error has occurred
or that I am not ready to work.
TO SEND A DOCUMENT USING
ONE-TOUCH DIALLING ...
This time, this diagram is all you need:
When you have finished dialling, the document
is sent in the ordinary way.
TO SEND THE DOCUMENT USING
CODED SPEED DIALLING ...
This diagram is all you need:
SPEED DIAL
→→
→
→→
As with normal transmission (see "To send a
document ..."), you can set the
the
resolution
ment.
As soon as you have pressed the desired pair of
number keys (in the example, 07), I show the
digits of the number that you have assigned the
pair and start dialling them one by one.
Once you have finished dialling, the document is
sent in the ordinary way.
→→
→ 0 7
→→
before you start to send the docu-
→→
→
→→
contrast
and
→→
→
→→
→→
→
→→
- 28 -
Page 34

TO KEEP ME IN GOOD WORKING ORDER
TO KEEP ME IN GOOD WORKING ORDER
To ensure I maintain my high level of performance, you must respect the
recommendations
that you read at the start of this manual about
periodically cleaning
••
•
feed rollers
••
••
•
optical reader
••
••
•
thermal print head
••
••
•
casing
••
and
removing jammed documents
the following parts:
.
For any minor problems that may result from
using me incorrectly, see the relevant section later
in the manual.
TO CLEAN THE FEED ROLLERS ..
1 Unplug me from the power socket and tel-
ephone socket.
2 Release the top cover by pressing the lever:
4 Pull forward the front cover 1, clean the ther-
mal paper feed roller 2 and the document
roller 3, using a mixture of water and alcohol
in equal parts:
TO CLEAN THE OPTICAL READER ...
1 Unplug me from the power socket and tel-
ephone socket.
2 Release the top cover and pull the front cover
forwards.
3 Push the document feed roller 3 upwards until
it locks in position, then clean the optical
reader 4 underneath using the mixture of
water and alcohol:
ENGLISH
A5
B5
A4
3 Open the top cover and remove the thermal
paper roll from its compartment:
A5
B5
A4
TO CLEAN THE THERMAL PRINT HEAD ...
1 Unplug me from the power socket and tel-
ephone socket.
2 Unlock and open the top cover.
- 29 -
Page 35

TO KEEP ME IN GOOD WORKING ORDER
3 Clean the thermal print head T located be-
low the front edge of the console, using the
mixture of water and alcohol:
A5
B5
A4
TO CLEAN THE CASING ...
1 Unplug me from the power socket and tel-
ephone socket.
2 Use exclusively a lintfree
ened with washing-up liquid diluted in water.
soft cloth
, damp-
→
TO REMOVE JAMMED DOCUMENTS ...
While copying or sending a document, a document may get jammed; if this happens, I will emit
3 to 5 short beeps
message:
1 Press the STOP key: the document will be
unloaded automatically.
2 If the document is not unloaded automati-
cally, remove it manually by pulling gently:
and display the following
DOCUMENT JAM
A4
TO SOLVE MINOR PROBLEMS ...
Use the list that follows as a guide to help you solve minor problems.
PROBLEM SOLUTION
I show no signs of life.
The document is not fed in
properly.
I cannot send documents.
I don't receive in automatic
mode.
I cannot copy or receive.
I produce completely blank
copies.
Check that I am
Check that the document conforms to the recommendations listed
in the section entitled "What documents you can use".
••
• Check that the
••
••
• The
••
line
I am set for manual reception: set me for
reception with my
••
• Check that neither the
••
jammed
••
• You are using unsuitable thermal paper: check the paper charac-
••
teristics listed in the "Appendix".
Position the document correctly with the
upwards
.
connected to the power socket
document is not jammed
is
busy
: wait for it to be free and then try again.
telephone answering device enabled
document nor the thermal paper is
.
.
.
automatic
reception or
.
side to be copied facing
- 30 -
Page 36

My failure to send or receive documents may be
caused by situations not present in the list, which
I indicate by means of an
Transmission Report (described earlier in the
section entitled "To send a document ...") and
the Journal which I'll show you in the following
section.
error code
on the
THE JOURNAL
The journal contains the data for the
transactions
ception), which I keep in my memory, and is
printed:
••
•
automatically
••
tion, clearing the data printed from my
memory
••
•
on request
••
carried out (transmission and re-
, after the
:
twentieth
last 20
transac-
1
Make sure that I am in stand-by mode:
TO KEEP ME IN GOOD WORKING ORDER
THE TELEPHONE LIST
The telephone list contains all the fax and telephone numbers programmed for one-touch and
speed dialling numbers, and is only printed
request
:
on
1
Make sure that I am in stand-by mode:
0 7-02 - 96 14 : 25
2
4 REPORT
ENGLISH
0 7-02 - 96 14 : 25
2
4 REPORT
3
JOURNAL
4
PRINTING
The journal is printed and contains the same
information as the trasnmission report plus
the following item:
TRANS. Type of transaction:
- TX, for transmission
- RX, for reception.
3
JOURNAL
2
TEL. NO. LIST
3
PRINTING
I start printing the telephone list:
- 31 -
Page 37

TO KEEP ME IN GOOD WORKING ORDER
ERROR CODES
Error codes are represented by
••
• the
••
••
• the
••
1 GENERAL ERRORS
2 CONNECTION PROBLEMS
first group
second group
CODE CAUSE OF ERROR WHAT TO DO ...
1-01 The top cover is not firmly closed. Close the top cover.
1-02 Jammed document. Remove the document.
1-04 The thermal paper has run out. Replace the paper roll.
1-05 The thermal print head has overheated. Let me rest for 5 minutes.
1-07 A line error has occurred. Repeat the transaction.
1-08 You pressed the STOP key during a transaction. Repeat the transaction.
2-01 The line is busy. Try again when the line is free.
2-02 Your correspondent does not answer or is not a fax. Try again.
of digits indicates the
of digits indicate the
two groups of digits
general type
cause
of the error.
separated by a hyphen:
of error
2-03 The number was not dialled. Try again.
3 COMMUNICATION ERRORS
3-01 - 3-02 - 3-03 - 3-42 - 3-05 - 3-06 - 3-07 - 3-08 - 3-10 Try again at half speed.
3-10 - 3-11 - 3-12 - 3-13 - 3-14 - 3-15 - 3-16
4 RECEPTION ERRORS
3-20 - 3-21 - 3-22 - 3-23 - 3-24 Call your correspondent again.
4-01 I disconnected from the line because your correspon- Call your correspondent again.
4-02 dent delayed sending the document.
4-03 I received an incomplete document because Call your correspondent again.
a line error occurred during transmission.
4-04 The print quality of the document is unsatisfactory. Call your correspondent again.
- 32 -
Page 38

TO KEEP ME IN GOOD WORKING ORDER
SIGNALS AND MESSAGE S
The problems that I have described are generally accompanied by
sages
on the display.
audible signals
or
mes-
Audible Signals
1 From 3 to 5 brief signals
••
• Communication error.
••
••
• Excessively long document.
••
••
• Jammed document.
••
••
• No thermal paper left.
••
••
• Print head overheated.
••
••
• Top cover not firmly closed.
••
2 Continuous Signal
I am asking you to hang up, if you forgot to
do so at the end of any operation that required you to lift the handset (transmission
or reception).
3 DOCUMENT FEEDING
••
• Whenever you insert a document to be
••
sent or copied.
••
• You are trying to set a transmission at half
••
speed without having inserted the document: press the STOP key, insert the
document and try again.
4 DOCUMENT JAM
A document jammed while you were copying or sending a document: press the STOP
key and then, if the document is not unloaded
automatically, pull the front cover forwards
and remove the jammed document.
5 EJECT DOC.
While I am unloading a document that got
jammed or was not sent successfully.
6 EMPTY!
ENGLISH
In the appendix to this manual, you will find a
complete list of all audible signals.
Error Messages
The messages are listed in alphabetical order
and I have indicated what you can do to correct
the error.
1 CHECK PAPER
The thermal paper roll is not present or has
run out: open the top cover and insert a new
paper roll.
2 COMM. TROUBLE
A line error occurred during transmission: try
again.
You have not yet sent or received any documents, so there is no data in my memory.
7 ERROR !
You set an invalid date or time: repeat the
setting with correct values.
8 FRONT COVER OPEN
You forgot to close the front cover after removing a jammed document: close it.
9 HANG UP HANDSET
You did not hang up at the end of an operation that required you to lift the handset: hang
up.
- 33 -
Page 39

TO KEEP ME IN GOOD WORKING ORDER
10 PAPER JAM
The thermal paper jammed while you were
copying or receiving a document: open the
top cover and remove the paper.
- 34 -
Page 40

APPENDIX
THE COMPLETE CONSOLE
C
Communication
am sending or receiving a document
F
Set-up
key has been pressed. →
mode, that is, after the FUNCTION
mode, that is, when I
APPENDIX
L
Hook mode
has been pressed or the handset has
been lifted
S
Stand-by
ing.
, that is, after the HOOK key
mode, that is, when I am rest-
1 2
4
7
*
5
8
0
3
6
9
#
1 Number Keys
L To dial the telephone number.
F To enter numeric or alphabetical data.
2 PAUSE Key
L To insert a "pause" when dialling the tel-
ephone number.
ENGLISH
F To change the type of character associ-
ated with the number keys: capitals, small
letters or digits.
4 REDIAL Key
L To automatically redial the last telephone
number that you dialled.
F To insert a "pause" when programming
one-touch and coded speed dialling numbers.
3 SPEED DIAL Key
L Followed by a pair of number keys
(01÷10), to automatically dial the associated telephone number.
5 VOL. + Key
S To increase the volume of the audible sig-
nals.
6 VOL. - Key
S To reduce the volume of the audible sig-
nals.
- 35 -
Page 41

APPENDIX
7 FUNCTION Key
S To enter set-up mode.
F To choose menus and parameters.
8 CONTR. Key
S To set the contrast (only if there is a docu-
ment in the feeder).
F To move backwards to digits and charac-
ters while setting numbers and names.
9 Display
To display on a line of 16 characters:
••
• Date and time
••
••
• Resolution
••
••
• Contrast
••
••
• Menu items and parameters
••
••
• Operator and error messages
••
••
• Telephone numbers.
••
Reception FAX TAD
••
• manual
••
••
• automatic
••
••
• TAD
••
13 * and # Keys
L To enter remote control codes.
F To select special characters (symbols)
forwards (*) or backwards (#) while setting the name.
14 EXT/R Key
L To access the public line from the private
branch exchange in pulse mode (in some
countries only).
••
F
• To assign the programmed number the
••
possibility to access the public line from
the private branch exchange.
••
• To insert the international code "+"
••
while setting the telephone number.
10 RESOL. Key
S To set the resolution (only if there is a
document on the feeder).
F To move forwards to digits and charac-
ters while entering numbers and names.
11 RX MODE Key
S To select the reception mode.
F To delete number and names while set-
ting them.
12 FAX - TAD LED Indicators
They come on or go off to indicate the
ception mode
key:
selected using the RX MODE
C Only if enabled by the telephone network
manager:
••
• Followed by a telephone number, to
••
transfer an incoming call to another
correspondent.
••
• Followed by a numeric code, to access
••
the corresponding supplementary telephone service.
15 HOOK Key
S To enter hook mode: it is equivalent to
lifting the handset.
C To exit from hook mode: it is equivalent to
hanging up the handset.
re-
16 One-Touch Dialling Keys 01-02-03
L To automatically select the associated
telephone number.
- 36 -
Page 42

APPENDIX
F To assign the programmed telephone
number themselves.
17 START/COPY Key
••
L
• To start sending a document.
••
••
• To start receiving a document manu-
••
ally.
••
S
• To start copying a document.
••
••
• To start feeding thermal paper.
••
F To confirm menus, parameters and val-
ues.
18 IN USE LED Indicator
Lights up when I am in hook mode or communication mode.
19 STOP Key
••
S
• To stop the current copying operation
••
••
• Document jammed.
••
••
• Thermal paper has run out.
••
••
• Print head has overheated.
••
••
• Top cover not firmly closed.
••
3 From 5 to 7 short signals
On completion of all transmission or copying
operations: while these signals are emitted,
for a total duration of about 5 seconds, you
can insert the next document if you have to
send or copy more than one sheet.
4 30-Second Signal
Incoming telephone call when I am set to
recognize FAX/TEL calls.
5 Continuous Signal
I am asking you to hang up the handset.
ENGLISH
••
• To unload a document from the feeder.
••
••
• To turn off the ERROR LED indicator.
••
F To set me in stand-by mode again.
C To abort the current transmission or re-
ception.
20 ERROR LED Indicator
Lights up when an operating error has occurred or when I am not ready to work.
THE AUDIBLE SIGNALS
1 A short signal
••
• When I am powered on.
••
••
• On completion of all functions.
••
2 From 3 to 5 short signals
••
• Communication error.
••
MY TECHNICAL D A T A
Dimensions (in mm) and weight
1 2 3
485
7
*
STORE SPEED DIAL
PT
REDIAL
6
01
PAUSE
FUNCTION CONTRAST
02
EXT/R
9
#
0
295
RESOL. RX MODE
TALK ERRORHOOK 03
FAX.
TAD
117.5
3 kg
205
••
• Document too long
••
- 37 -
Page 43

APPENDIX
Communication features
••
• Telephone network public/private
••
••
• Compatibility CCITT G3
••
••
• Communication speed 9600 bps
••
••
• Compression method MH
••
Power supply characteristics
••
• Voltage 230 V
••
••
• Frequency 50/60 Hz
••
••
• Power consumption:
••
- in stand-by mode 10 W
- during trasmission of document
with 30% black 30 W
- during reception of document
with 30% black 35 W
- during copying of document
with 30% black 50 W
- during copying of document
completely black 110 W
••
• Relative humidity 20% ÷ 80%
••
••
• Operating temperature 5°C ÷ 35°C
••
Characteristics of documents
••
• Dimensions
••
••
• Thickness 0.08 ÷ 0.13 mm
••
Characteristics of thermal paper
••
• Dimensions
••
Characteristics of optical reader
••
• Type of reader Contact image sensor
••
••
• Maximum scanning width 210 mm
••
••
• Scanning resolution:
••
- horizontal 8 dots per mm
- vertical STANDARD 3.85 lines per mm
- vertical FINE 7.7 lines per mm
Transmission characteristics
••
• Transmission time (for sample letter with
••
STANDARD resolution) about 20 s
Reception characteristics
••
• Printing on thermal paper.
••
••
• Thickness 0.059 ÷ 0.069 mm
••
- 38 -
Page 44

WHERE I TOLD YOU ABOUT ...
WHERE I TOLD YOU ABOUT ...
A
Access to the public line .........................12-18
Audible signals ........................................ 33-37
Audible signal volume ........................ 13-18-35
Automatic reception ................................ 10-21
C
Casing .......................................................... 30
Changing dial mode temporarily .............18-25
Communication mode ........................13-27-35
Connector sockets ......................................... 2
Console .................................. 1-4-13-23-27-35
Contrast ....................................................... 16
Copying a document .................................... 16
Copy/received document output .................... 1
D
Date and time................................................. 7
Display ........................................................... 3
Documents .............................................. 15-38
Document input .............................................. 1
Document output............................................ 1
Document jam ......................................... 30-33
E
Error codes .................................................. 32
Handset cable ................................................ 2
Hook mode......................................... 13-27-35
I
IN USE LED indicator ........................14-17-28
J
Journal ......................................................... 31
L
Language ..................................................... 10
M
Manual reception..................................... 19-20
Minor problems ............................................ 30
N
Name.............................................................. 6
O
One-touch dialling (programming)................ 24
Optical reader ......................................... 29-38
P
Pause in dialling ........................................... 25
Power supply................................................ 32
Private branch exchange ...................12-18-25
Private line ......................................... 12-18-25
Pulse (EARTH/FLASH)......................12-18-25
Pulse dialling ................................................ 11
ENGLISH
ERROR LED indicator .......................14-19-37
Error messages............................................ 33
Extension telephone..................................8-20
F
Fax number.................................................... 7
FAX-TAD LED indicators...............14-19-21-36
FAX/TEL recognition .................................... 10
Feed rollers .................................................. 29
Front cover ................................................ 1-29
H
Handset.......................................................... 3
R
Redialling...................................................... 18
Remote control............................................. 20
Remote control code................................. 8-20
Resolution .................................................... 16
Ring count ................................................. 9-21
Ring volume ................................................... 1
S
Sending at half speed .................................. 18
Set-up mode.........................................4-23-35
- 39 -
Page 45

WHERE I TOLD YOU ABOUT ...
Set-up parameters ......................................... 5
Silence on line.............................................. 11
Speaker .......................................................... 1
Speed dialling (programming) ...................... 25
Stand-by mode.......................... 4-13-23-27-35
T
Technical data .............................................. 37
Telephone answering device ................ 8-11-21
Telephone cable ............................................. 2
Telephone list ............................................... 31
Thermal paper........................................... 2-38
Thermal print head ....................................... 29
Tone dialling ................................................. 1 1
Top cover release lever .................................. 1
Transferring a call ........................................ 20
Transmission ................................................ 16
Transmission report .................................. 8-19
Transmission with one-touch dialling ........... 28
Transmission with speed dialling ................. 28
- 40 -
 Loading...