

Page 1

Facsimile
OFX 1100
INSTRUCTIONS
Page 2

Part Number 056831N-01
Page 3
PUBLICATION ISSUED BY:
Olivetti Lexikon, S.p.A.
Documentazione
Via Jervis, 77 - 10015 Ivrea (Italy)
Copyright © 1997, Olivetti
All rights reserved
The manufacturer reserves the right to carry out modifications to the product described in this manual
at any time and without any notice.
The mark affixed to the product certifies that the
product satisfies the basic quality requirements.
Your attention is drawn to the following actions that could compromise the characteristics of the product:
• incorrect electrical supply;
• incorrect installation; incorrect or improper use, or, in any case, not in accordance with the warnings
given in the User Manual supplied with the product;
• replacement of original components or accessories with others of a type not approved by the
manufacturer, or carried out by unauthorized personnel.
ATTENZIONE: QUESTA APPARECCHIATURA DEVE ESSERE COLLEGATA A TERRA
WARNING: THIS EQUIPMENT MUST BE EARTHED.
ATTENTION : CETTE UNITE DOIT ETRE CONNECTEE A LA TERRE.
ACHTUNG: DIESES GERÄT MUSS EINEN ERDUNGSANSCHLUSS HABEN.
ATENCION: ESTE EQUIPO DEBE ESTAR CONECTADO A UNA TOMA DE TIERRA.
APPARATET MÅ KUN TILKOBLES JORDET STIKKONTAKT.
APPARATEN SKALL ANSLUTAS TILL JORDAT NÄTUTTAG.
LAITE ON LIITETTÄVÄ MAADOITETTUUN PISTORASIAAN.
LEDEREN MED GRØN/GUL ISOLATION MÅ KUN TILSLUTTES EN KLEMME MÆRKET
.
The wall socket must be easily accessible and in close proximity. To disconnect the machine from the
electrical power supply, remove the power cable plug from the wall socket.
Page 4
- Cut off and keep - Cut off and keep - Cut off and keep - Cut off and keep - Cut off and keep - Cut off and keep - Cut off and keep - Cut off and keep - Cut off and keep - Cut off and keep -
QUICK REFERENCE GUIDE
CHANGING DATE AND TIME ENTERING YOUR NAME AND FAX NUMBER TRANSMITTING A DOCUMENT
TO MAKE ONE OR MORE COPIES
Page 5

QUICK REFERENCE GUIDE
TRANSMITTING A DOCUMENT FROM
MEMORY
CHANGING/REST ARTING//CANCELLING A
TRANSMISSION FROM MEMORY
PRINTING TRANSMISSION, ACTIVITY AND
BRO ADCAST TRANSMISSION REPORTS
Page 6

READ THESE IMPORT ANT RECOMMEND A TIONS FIRST ...
The fax machine that you have purchased is a high
quality product satisfying all requisites indicated in
the guidelines on the previous pages.
For its best use you should follow the general recommendations indicated hereafter.
these settings and the ones indicated in the manual
may not always be the same: it is suggested that you
print them out before making any modifications.
MAINTENANCE ...
• When cleaning the fax, first of all disconnect it
LOCA TION ...
• Place the fax machine on a stable, flat surface
with no vibrations, in order to avoid falls which
could cause injury to people or damage to the
product.
• Keep the fax away from water or steam sources,
excessive heat sources and dusty rooms. Also,
do not expose it to direct sunlight.
• Keep the fax away from other electrical or electronic appliances which may generate interferences, e.g. radio, television, etc.
• Do not surround the fax with books, documents
or objects which reduce the space necessary for
air circulation. Ideal environmental conditions for
its location are from 5°C to 35°C with a humidity
rate between 20% and 80%.
• Never introduce foreign bodies (liquids included)
• Never try to repair the fax if you do not have the
• When you replace components (accessories in-
CONNECTION TO THE ELECTRICAL POWER
SUPPL Y ...
• The fax machine is provided with a power cable
with a grounded plug. If your wall power socket
does not allow plug insertion or if it does not have
a ground, get in touch with a qualified electrician
to update your electrical mains outlet to the current standards.
• Make sure that the power cable is easily accessible without impeding the passage, avoiding treading on, or tripping over it.
• Make sure that power voltage and frequency of
the electrical outlet correspond to the power voltage and frequency values indicated on the rear
plate of the fax machine.
• Never connect the fax to a multiple plug or to an
extension cable which already has another appliance connected: poor electrical contact may
cause overheating and originate fire or electrical
shocks.
• If any of the following conditions occur, discon-
• Before operating with your fax machine, read
CONNECTION TO THE TELEPHONE LINE ...
As the connection of the fax machine, telephone,
answering machine and other devices to a telephone
line is subject to national standards, please refer to
the regulations in force in your own country.
• The fax machine has already been set for opera-
• If you do not use the fax machine for long peri-
INST ALLATION AND SET -UP PARAMETERS ...
At national level, the settings and set-up parameters
for each installation may change according to the
requirements or individual user needs. Therefore,
from the electrical power supply. Use only a dampened cloth. Do not use corrosive substances, such
as solvents, alcohol, petrol or abrasive components.
in the fax machine: their accidental contact with
powered parts may cause a fire or electric shocks.
REPAIRS ...
necessary competence: by removing the outer
casing, you may risk electrical shocks or other
injury. Always call a qualified service technician.
cluded), make sure that you use only original material approved by the manufacturer. Use of other
material might compromise the safety features,
besides being a cause of fire and electrical shocks.
nect the fax from the power supply and contact a
qualified service technician:
- the power cable, or its plug are damaged or
worn
- the outer casing is damaged
- liquid has been poured inside by accident (rain
included!)
- the fax machine does not respond correctly to
the instructions given on this manual. In this
case, carry out only the adjustments indicated
for the function which is causing the problem.
Incorrect or unauthorized intervention may
cause damage which requires additional work
for the service technician.
FOR CORRECT USE ...
carefully all the instructions contained in this
manual. Keep the manual for further consultation.
tion according to the standards of the telephone
network within your country.
ods it should be disconnected from the power
supply to avoid damage from power surges and
peaks.
Page 7

INDEX
HOW TO INSTALL 1
PACKAGE CONTENTS ... ........................................1
INSTALLING ... ......................................................... 1
CONNECTING TO THE ELECTRICAL
POWER SUPPLY AND TELEPHONE LINE ... ......... 2
Connecting to the electrical power supply ... .......... 2
Connecting the Fax Machine ... ..............................2
Connecting the Telephone/Answering Machine... .. 2
LOADING PAPER ... .................................................3
CHANGING THE DATE AND TIME ... ......................3
INSTALLING THE PRINT HEAD ... ..........................4
ONLY YOUR NAME AND YOUR FAX NUMBER
ARE MISSING ... ...................................................... 5
Setting the name ... .................................................. 5
Setting the fax number ... ........................................ 6
Name and fax number position ... ........................... 6
Changing the position ... .......................................... 6
IF THE TRANSMISSION IS NOT
SUCCESSFUL ... ....................................................15
RECEIVING A DOCUMENT ... .............................. 15
RECEPTION MODES ... ........................................1 6
Manual reception ... ............................................... 1 6
Automatic reception ... ........................................... 16
Automatic reception with call type recognition ... .. 1 6
Receiving with an external answering device ... ... 1 7
USING THE TELEPHONE CONNECTED
TO THE SAME LINE ... ..........................................1 8
Transmitting a document by dialling the
number on the telephone ... .................................. 1 8
MAKING A COPY ... ............................................... 1 9
PROGRAMMING ONE-TOUCH DIAL AND
SPEED DIALLING ... ..............................................1 9
One-touch dial ... .................................................... 1 9
Speed dialling ... .....................................................2 1
TRANSMITTING WITH ONE-TOUCH DIAL ... ...... 2 1
CONFIGURING THE F AX TO THE
TELEPHONE LINE 7
CONNECTING TO A PUBLIC LINE ........................ 7
CONNECTING TO A PRIVATE LINE (PBX) ........... 8
FOR EVERYD AY USE 9
WHICH DOCUMENTS YOU CAN USE ................. 10
INSERTING THE DOCUMENT IN ADF... ..............10
TRANSMITTING A DOCUMENT ... ....................... 1 0
PARTICULAR DIALLING CASES ... .......................1 1
TRANSMITTING A DOCUMENT AT A
PRE-SET TIME ......................................................12
CHANGING/CLEARING A PRE-SET DELAYED
TRANSMISSION ... ............................................... 13
TRANSMITTING A DOCUMENT FROM THE
MEMORY ... ............................................................ 13
CHANGING/RESENDING/CLEARING A
PRE-SET MEMORY TRANSMISSION ... ...............1 4
TRANSMITTING WITH SPEED DIALLING ... ....... 2 2
CALLING WITH ONE-TOUCH DIAL ... ..................2 2
CALLING WITH SPEED DIALLING ... ...................2 2
PRINTING REPORTS AND LISTS ... .................... 2 2
Reports ... ............................................................... 22
Enabling/disabling automatic printing of
transmission report and error report .... ............... 2 3
Enabling/disabling automatic printing of
broadcast report ... ................................................ 2 3
Enabling/disabling automatic printing of data
relative to delayed transmission ... ........................ 2 4
Printing on request the transmission report,
the activity and broadcast report ............................ 24
How to interprete the reports ... .............................. 24
Lists......................................................................... 25
Printing the set-up parameters ............................... 25
Printing the configuration parameters list,
the data stored in the one-touch dial keys and the
speed dialling codes... ............................................ 25
i
Page 8

FOR A MORE SOPHISTICA TED USE 26
ADJUSTING THE SHEET FEEDER ...................... 26
REDUCING THE PRINT AREA OF A
RECEIVED DOCUMENT ... ................................... 27
RECEIVING A DOCUMENT LONGER THAN
THE PAPER SIZE ... ..............................................2 7
ADJUSTING THE CONTRAST AND
RESOLUTION OF A DOCUMENT TO BE
TRANSMITTED OR COPIED ... ............................ 2 8
SETTING AUTOMATIC RESOLUTION ... .............. 2 8
ENABLING/DISABLING THE RE-SENDING OF A
FAILED TRANSMISSION FROM MEMORY ... ...... 29
TRANSMITTING/RECEIVING A DOCUMENT
WITH THE POLLING FACILITY ... ........................ 2 9
What is polling ... ....................................................2 9
Diagnostic result interpretation .............................. 38
CLEANING THE ELECTRICAL CONTACTS
OF THE PRINT HEAD ... ........................................3 9
CLEANING THE PRINT HEAD PAD ... ..................4 0
CLEANING THE OPTICAL READER ... .................4 0
CLEANING THE CASING ... .................................. 4 1
REMOVING JAMMED DOCUMENTS ... ............... 4 1
REMOVING JAMMED PAPER ... ...........................4 2
SOLVING SMALL PROBLEMS ... .......................... 43
ERROR CODES ... .................................................4 4
SIGNALS AND MESSAGES ... .............................. 45
Acoustic signals ... .................................................. 4 5
Error messages on display ... ................................ 4 5
Making the transmission request
(polling for reception) ... ......................................... 2 9
Changing/deleting a previously set polling
reception operation ... ............................................ 30
Programming the fax machine to poll a
document (polling in transmission) ... ................... 30
HEARING THE CONNECTION TONES ... .............30
ADJUSTING THE LINE TONES
VOLUME ... ............................................................. 3 1
ADJUSTING THE VOLUME OF ACOUSTIC
SIGNALS ... ............................................................ 31
REDUCING THE SPEED TRANSMISSION ... .......3 1
ENABLING/DISABLING THE ECM MODE ... ........3 2
ENABLING/DISABLING TELEDIAGNOSIS ... ...... 3 2
SPEEDING UP ONE-TOUCH DIAL FOR
TELEPHONE CALLS ... .........................................3 3
CHANGING THE REMOTE CONTROL CODE ... . 3 3
CHANGING THE NUMBER OF RINGS ................3 4
CHANGING THE BEEPER DURATION ... .............3 4
APPENDIX 47
OTHER ACOUSTIC SIGNALS ... ........................... 4 7
OTHER MESSAGES ON DISPLAY ... ....................47
TECHNICAL DATA ... ..............................................4 8
EXAMPLE STANDARD FORM ITU-TS TEST
SHEET N°1 (SLEREXE LETTER) ..........................4 9
WHERE WE TALKED ABOUT 50
CONSOLE (Fold-out)
CHANGING THE SILENCE LAPSE ... ...................3 5
KEEPING IT EFFICIENT 36
REPLACING THE INK CARTRIDGE ... ................. 3 6
REPLACING THE PRINT HEAD ... ........................3 7
PRINT HEAD CLEARING PROCEDURE AND
MANUAL NOZZLE TESTING ... ............................ 3 8
ii
Page 9
1
TEL 2TEL1 LINE
10
2
4
3
5
12
6
7
8
9
11
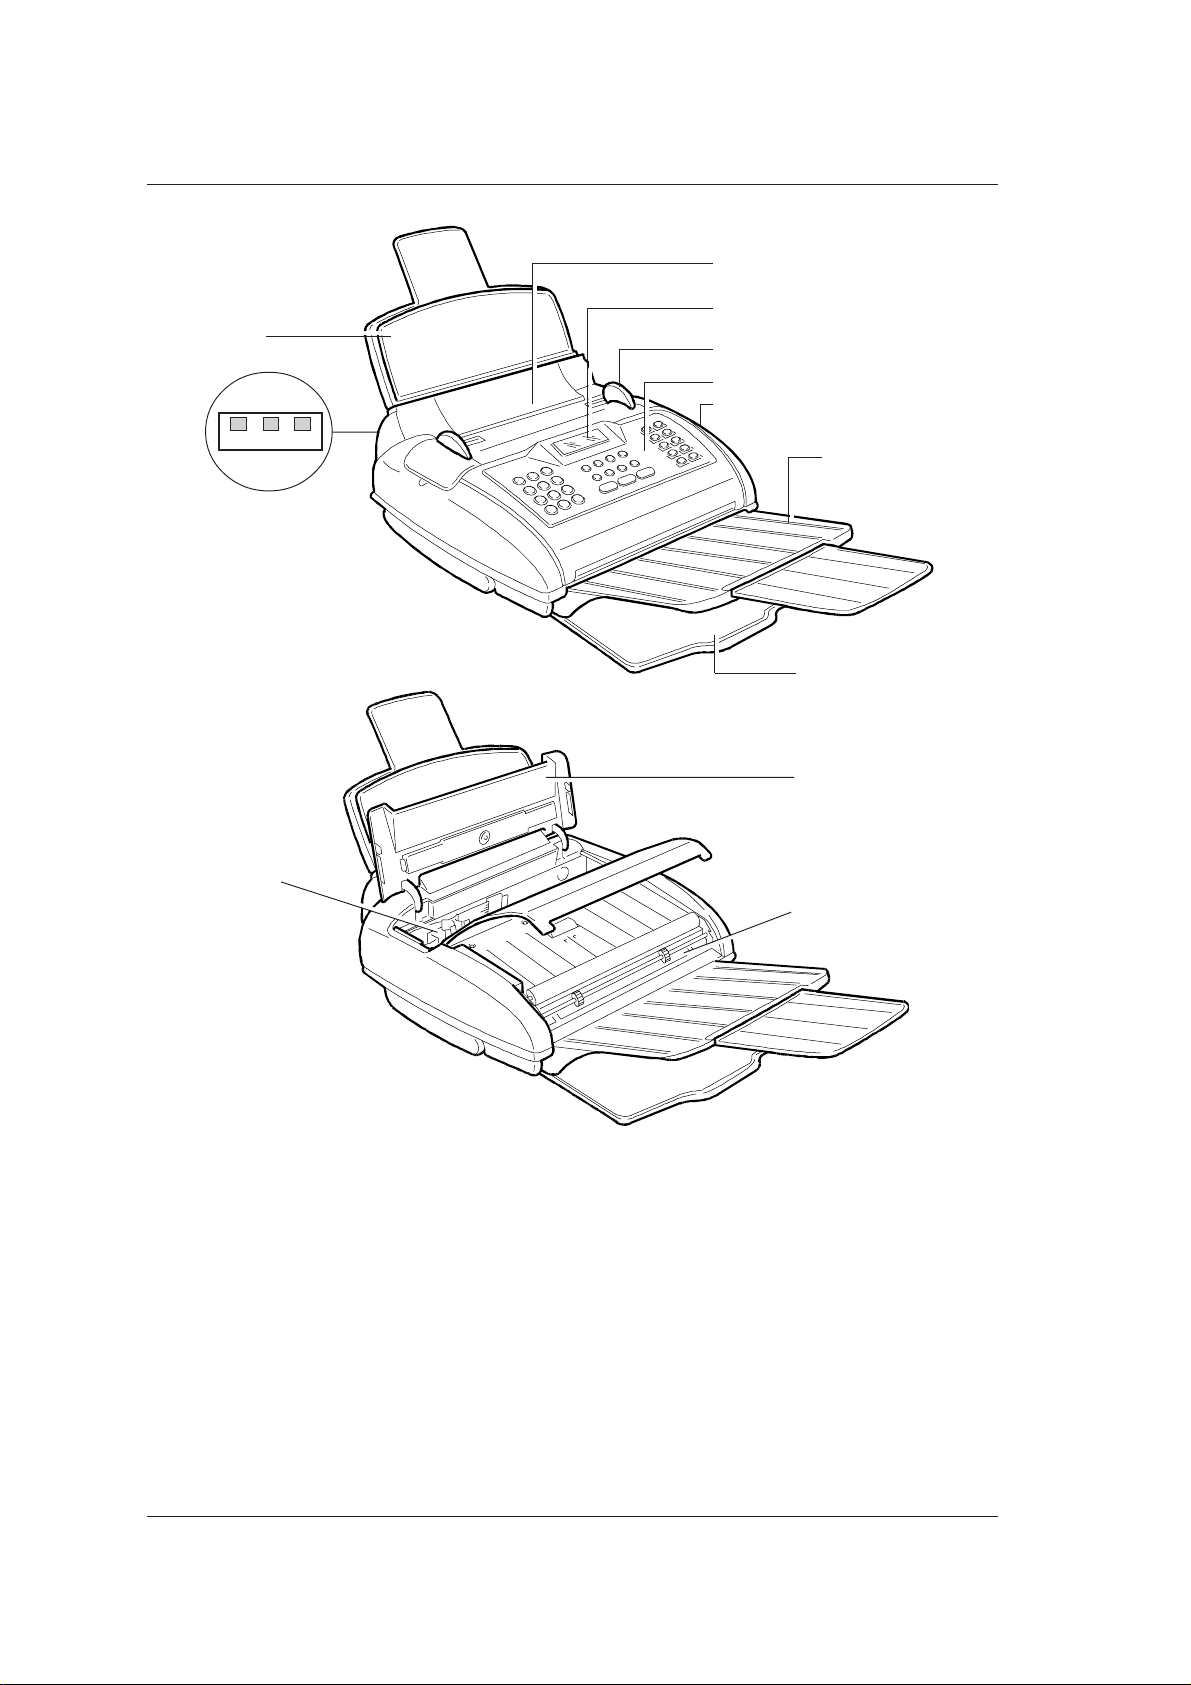
1. Plain paper sheet feeder (ASF) adjustable according to the following paper formats: A4, Letter and Legal.
Maximum capacity: 70 sheets.
2. Automatic document feeder for transmitted/copied documents (ADF). Maximum capacity: 10 sheets A4, A5,
Letter and Legal.
3. Paper guide. Adjustable according to the transmitted/copied document width.
4. Display
5. Operator console
6. Extendible exit support for original documents
7. Exit support for received/copied documents
8. Print head compartment cover
9. Print head compartment
10. Connection sockets
11. Optical scanner
12. Loudspeaker
Page 10
HO W T O INSTALL
P A CKA GE CONTENTS ...
In addition to the fax machine, which is supplied with
a power cord, in the package you will find:
• Telephone connection cord
• An extension plug (with socket)
• Print head with interchangeable ink cartridge
• Extendible exit support for original documents
• Exit support for received/copied documents
• Automatic sheet feeder
• Document holder
• Instruction manual (this manual).
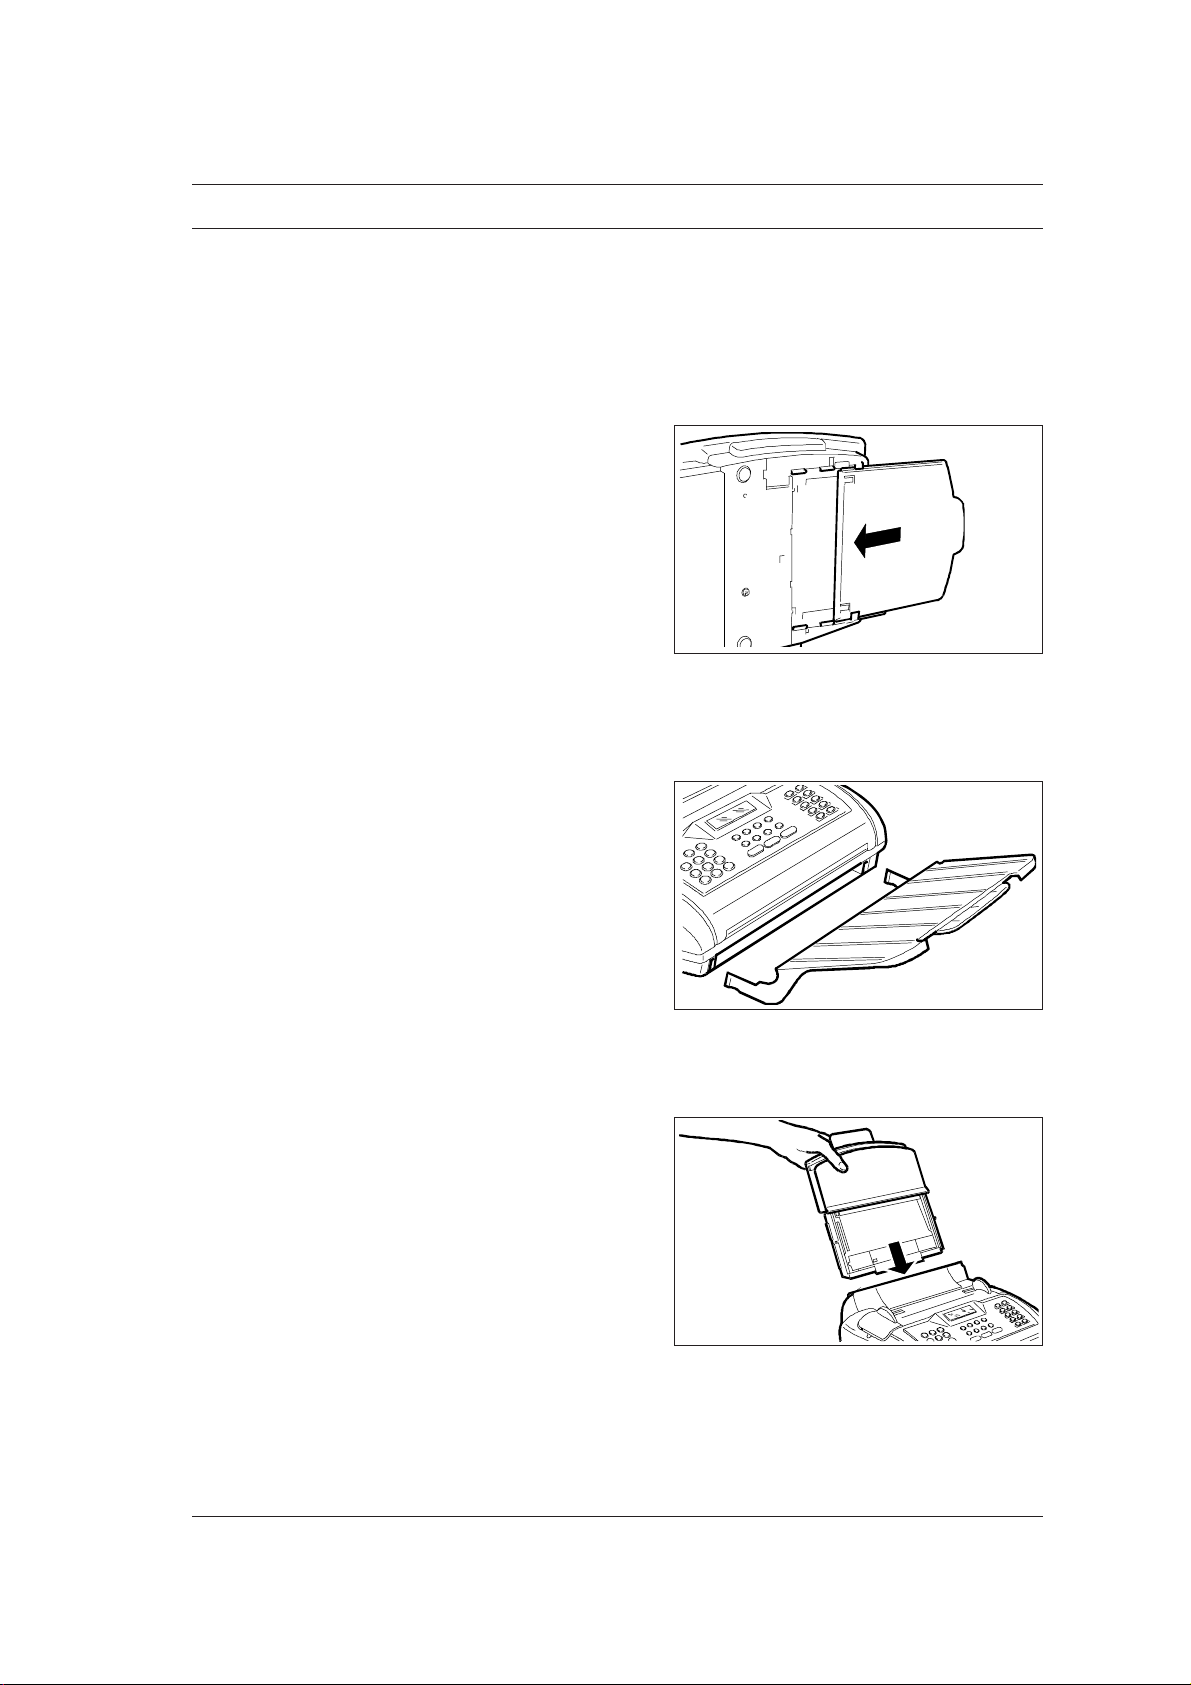
INST ALLING ...
1. Rest the fax machine on its right side and inser t
2. Insert the extendible exit support for original docu-
the exit support for received/copied documents
in the guides on the base, pushing it until it clicks.
ments in the side slots on the lower front.
3. Insert the sheet feeder in its housing on the rear.
1
Page 11
CONNECTING T O THE ELECTRICAL POWER
SUPPLY AND TELEPHONE LINE ...
Connecting to the electrical power supply ...
1. Plug the power cord into the wall power socket.
The fax machine automatically performs a quick
self-test procedure to check that its components
operate properly , the displa y will then show the message "AUTOMATIC RX" in the upper line and, alternately, the messages "ADD PAPER" and "CHECK
PRINT HEAD" in the lower line.
The fax machine will be connected permanently,
ready to receive and transmit documents 24 hours
a day.
If you want to switch it off, you must unplug the
power cable from the electrical power supply as
the fax machine does not have an on-off switch.
If by accident, the displayed messages are not
written in the language of your country, select the
desired "LANGUAGE" among those available, by
pressing in sequence the following keys:
FUNCTION (eight times), START, FUNCTION, START, </> until you select the desired
language and then START.
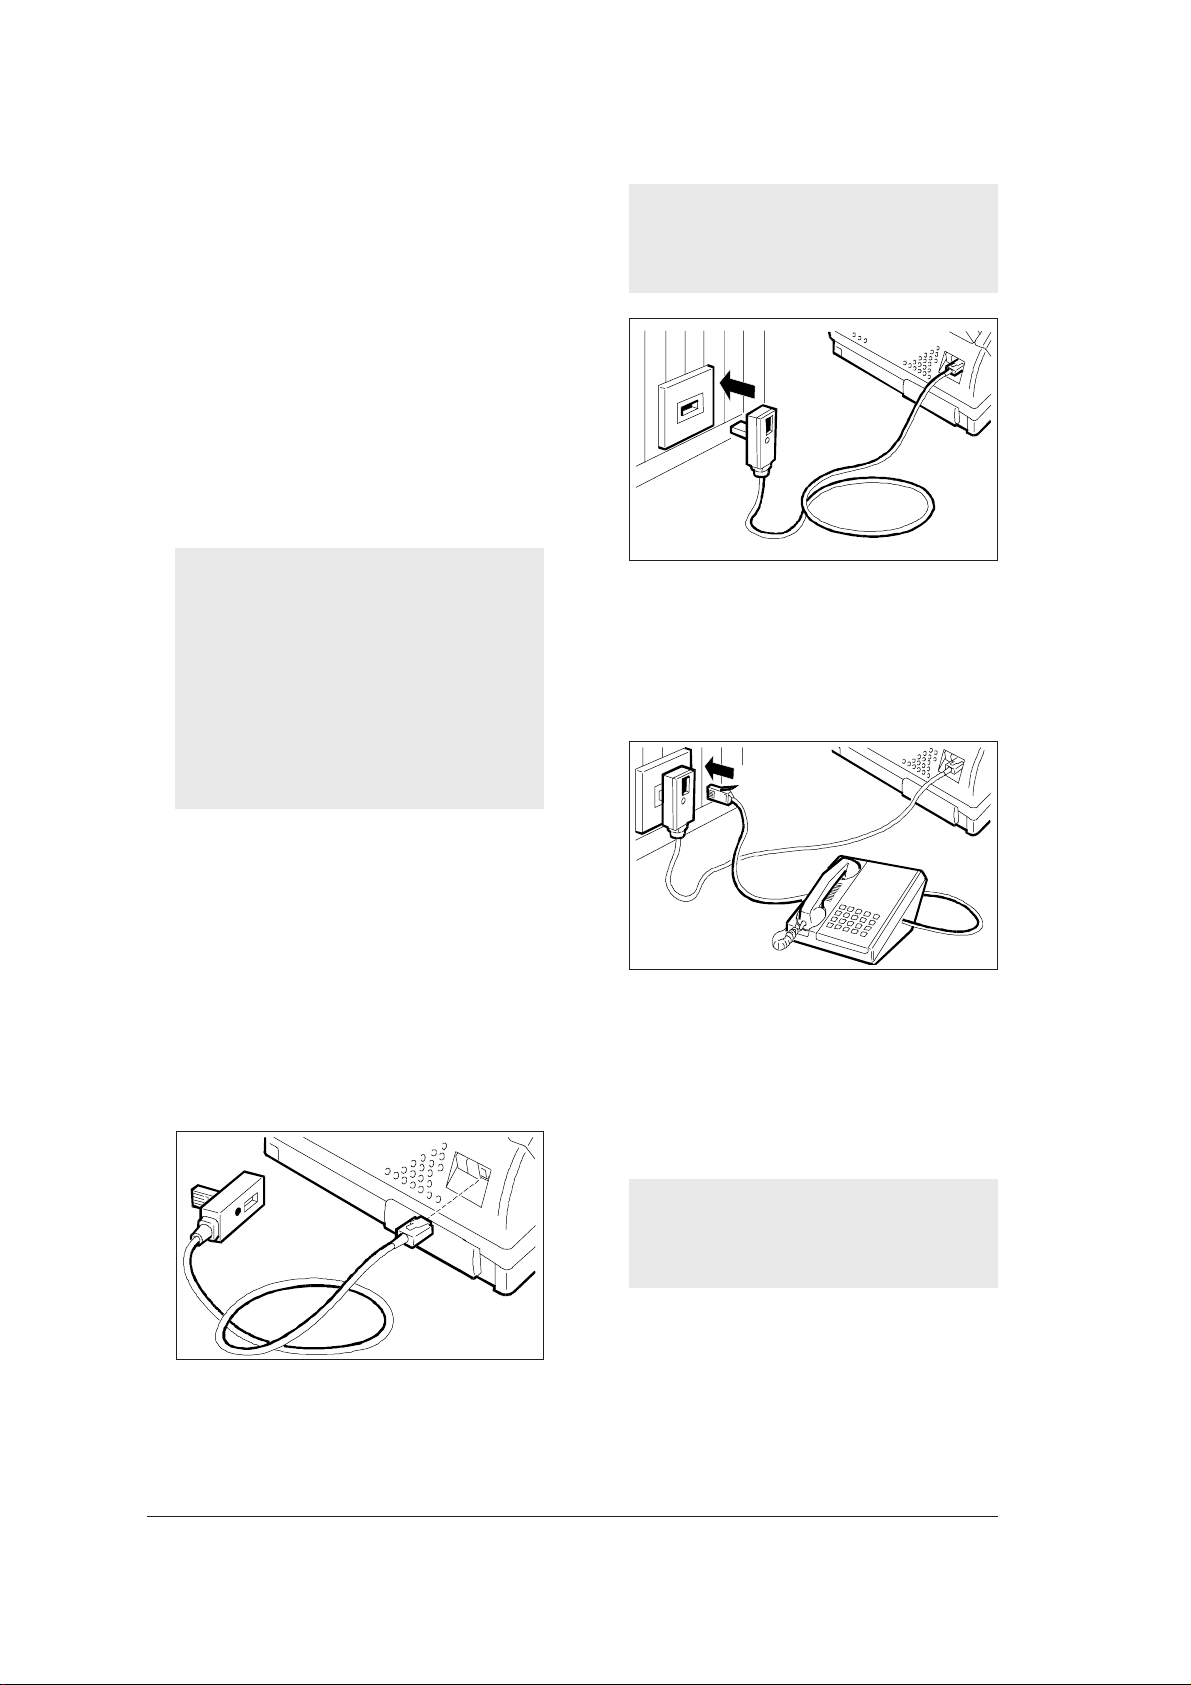
Connecting the T elephone/Answering
Machine...
1. Plug the telephone cord or the answering ma-
If the network to which the fax machine is connected has more than one socket connected
in series, you must connect the fax machine
to the primary socket.
chine cord into the socket on the extension plug.
Connecting the Fax Machine ...
The connection between the fax machine and the
telephone line should be made using the cord provided. Do not use other cords, otherwise the fax machine may not work properly.
1. Insert the miniature connector (which is small and
transparent) of the telephone line connection cord
into the "LINE" socket on the fax machine. You
will hear a click which indicates that it has been
inserted correctly.
2. Insert the extension plug at the other end of the cord
into the telephone line wall socket.
In some countries telephone, answering machines or other equipment can be connected via
sockets TEL1 and TEL2 located at the back left-hand
side of the fax machine (covered by tear-off flaps).
For further information refer to the standards in force
in your country .
If the network to which the fax machine is connected has more than one socket connected
in series, you must use an approved model
of telephone.
2
Page 12
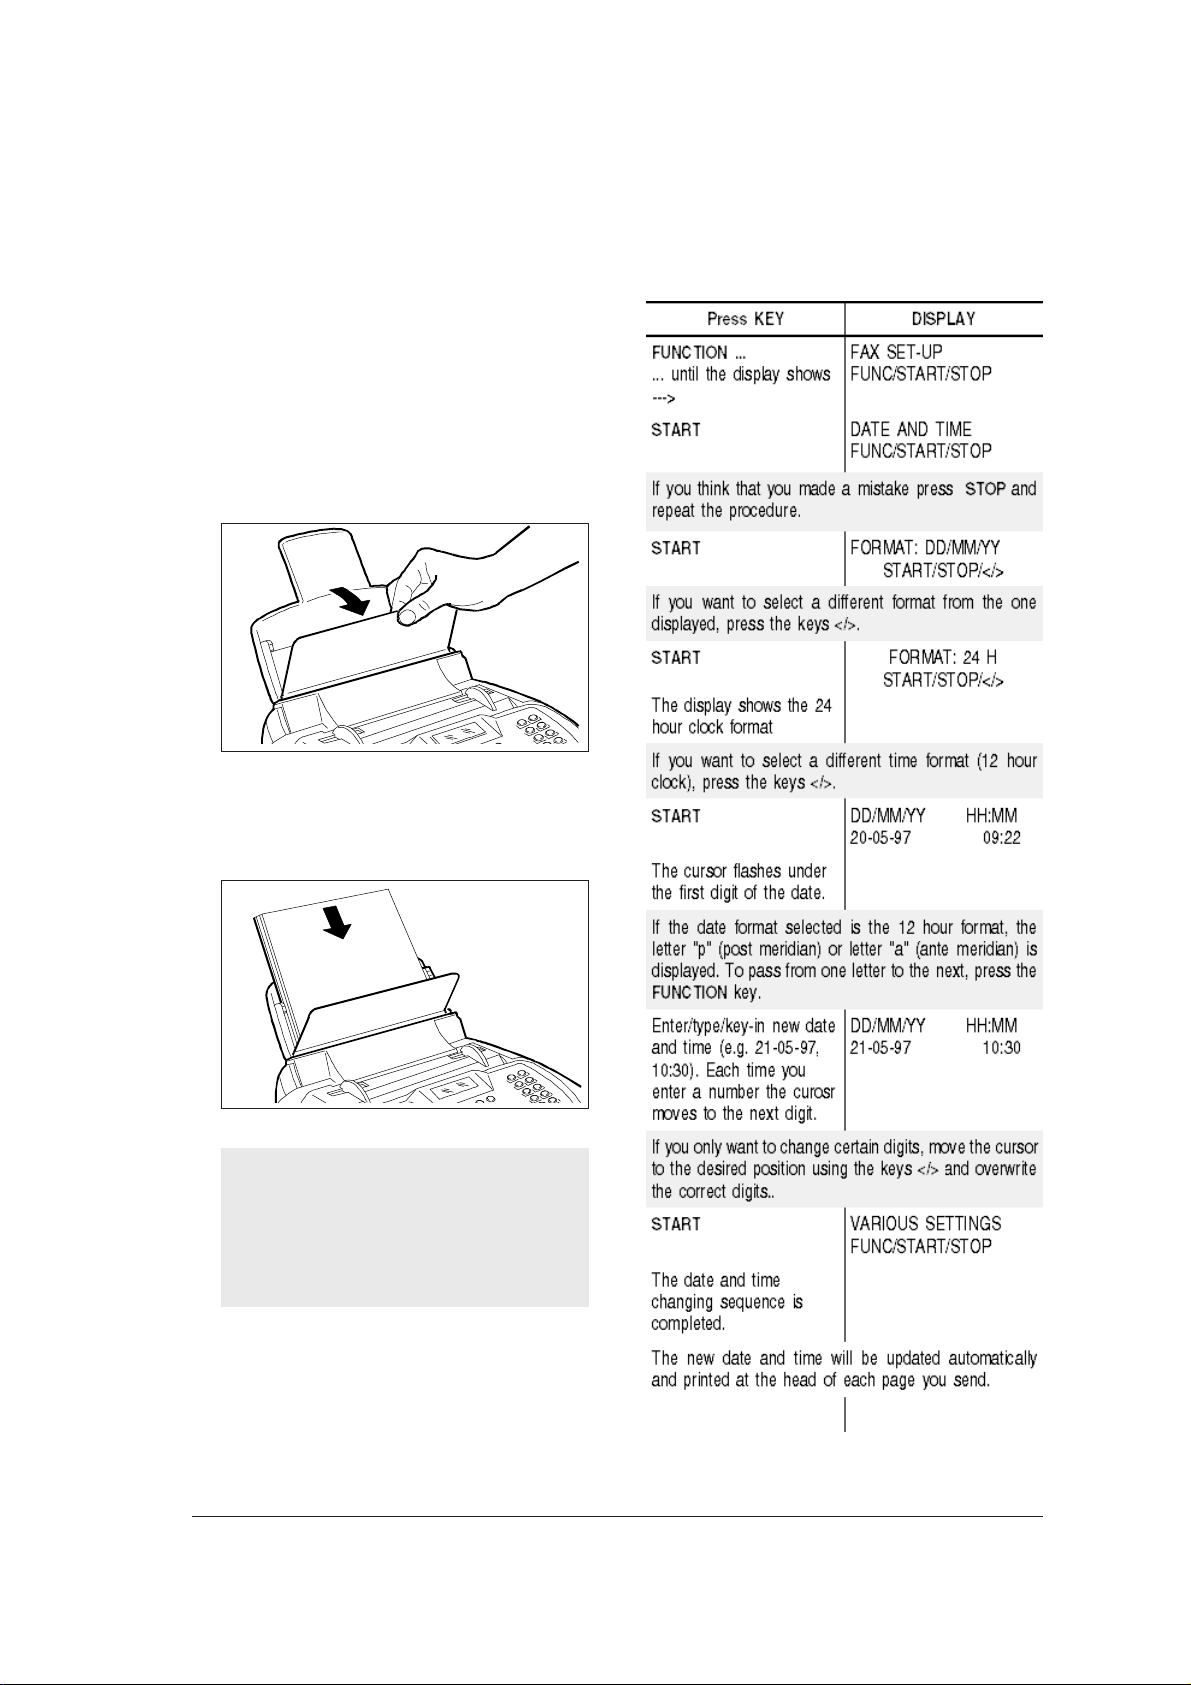
LOADING PAPER ...
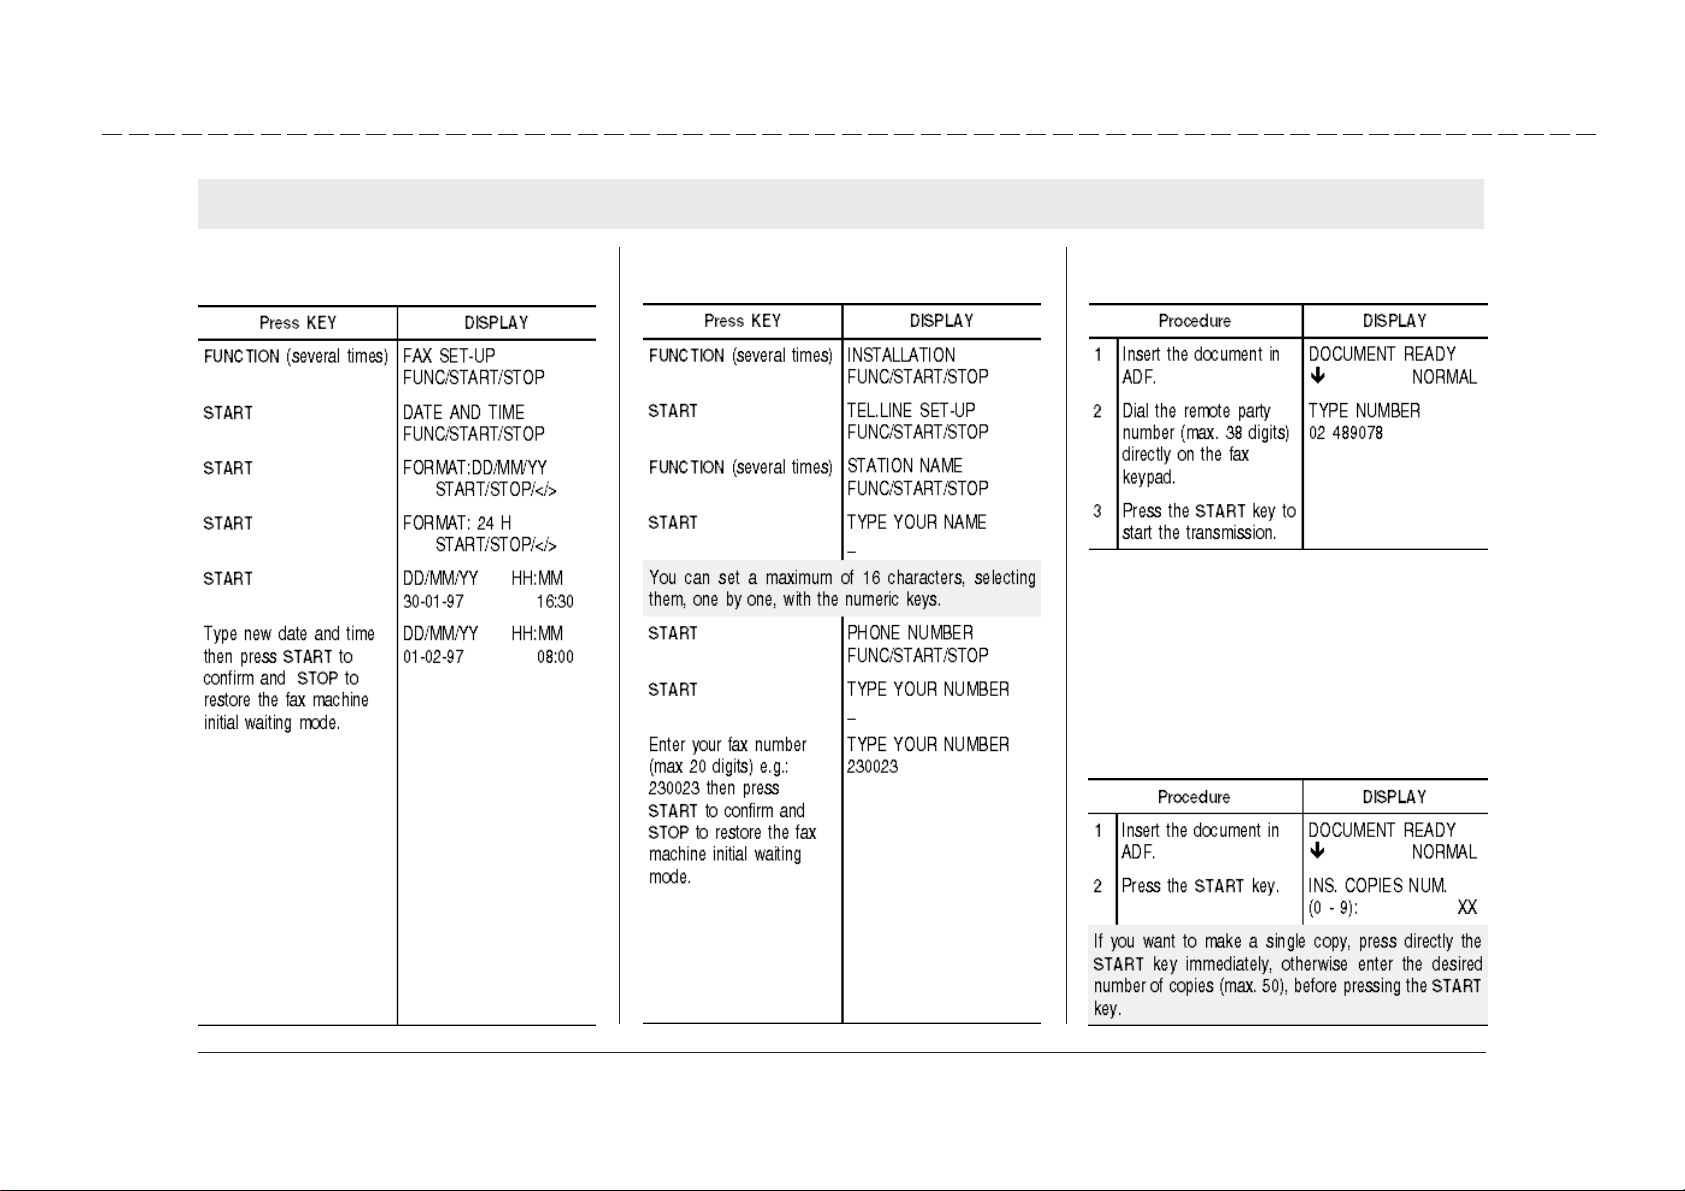
CHANGING THE D ATE AND TIME ...
The automatic sheet feeder (ASF) can contain a maximum of 70 sheets which are used for printing received
documents or for copying any kind of original document. The sheet feeder is set to accommodate A4
paper size (210 x 297 mm) but, by a suitable adjustment (see "Sheet Feeder Adjustment", section "For
a more sophisticated use") it can also accommodated US Letter (216 x 272 mm) and US Legal (216
x 349) paper sizes.
1. Tilt forward the front cover of the sheet feeder.
2. Holding the sheets by the top edge, drop them
into the sheet feeder without folding or forcing
them and then close the cover.
If the date and time shown on display are not correct,
you can modify them at any time.
If you add more sheets in the sheet feeder,
take care to load the fresh sheets under and
not over the existing ones.
After loading the sheets in the sheet feeder, the
lower row of the display will show date and time.
F
3
Page 13

Please remember that the waiting mode indicates
that the fax machine is in one of a series of non-
operating conditions before an operating mode
is selected, therefore the display does not always
show the same message.
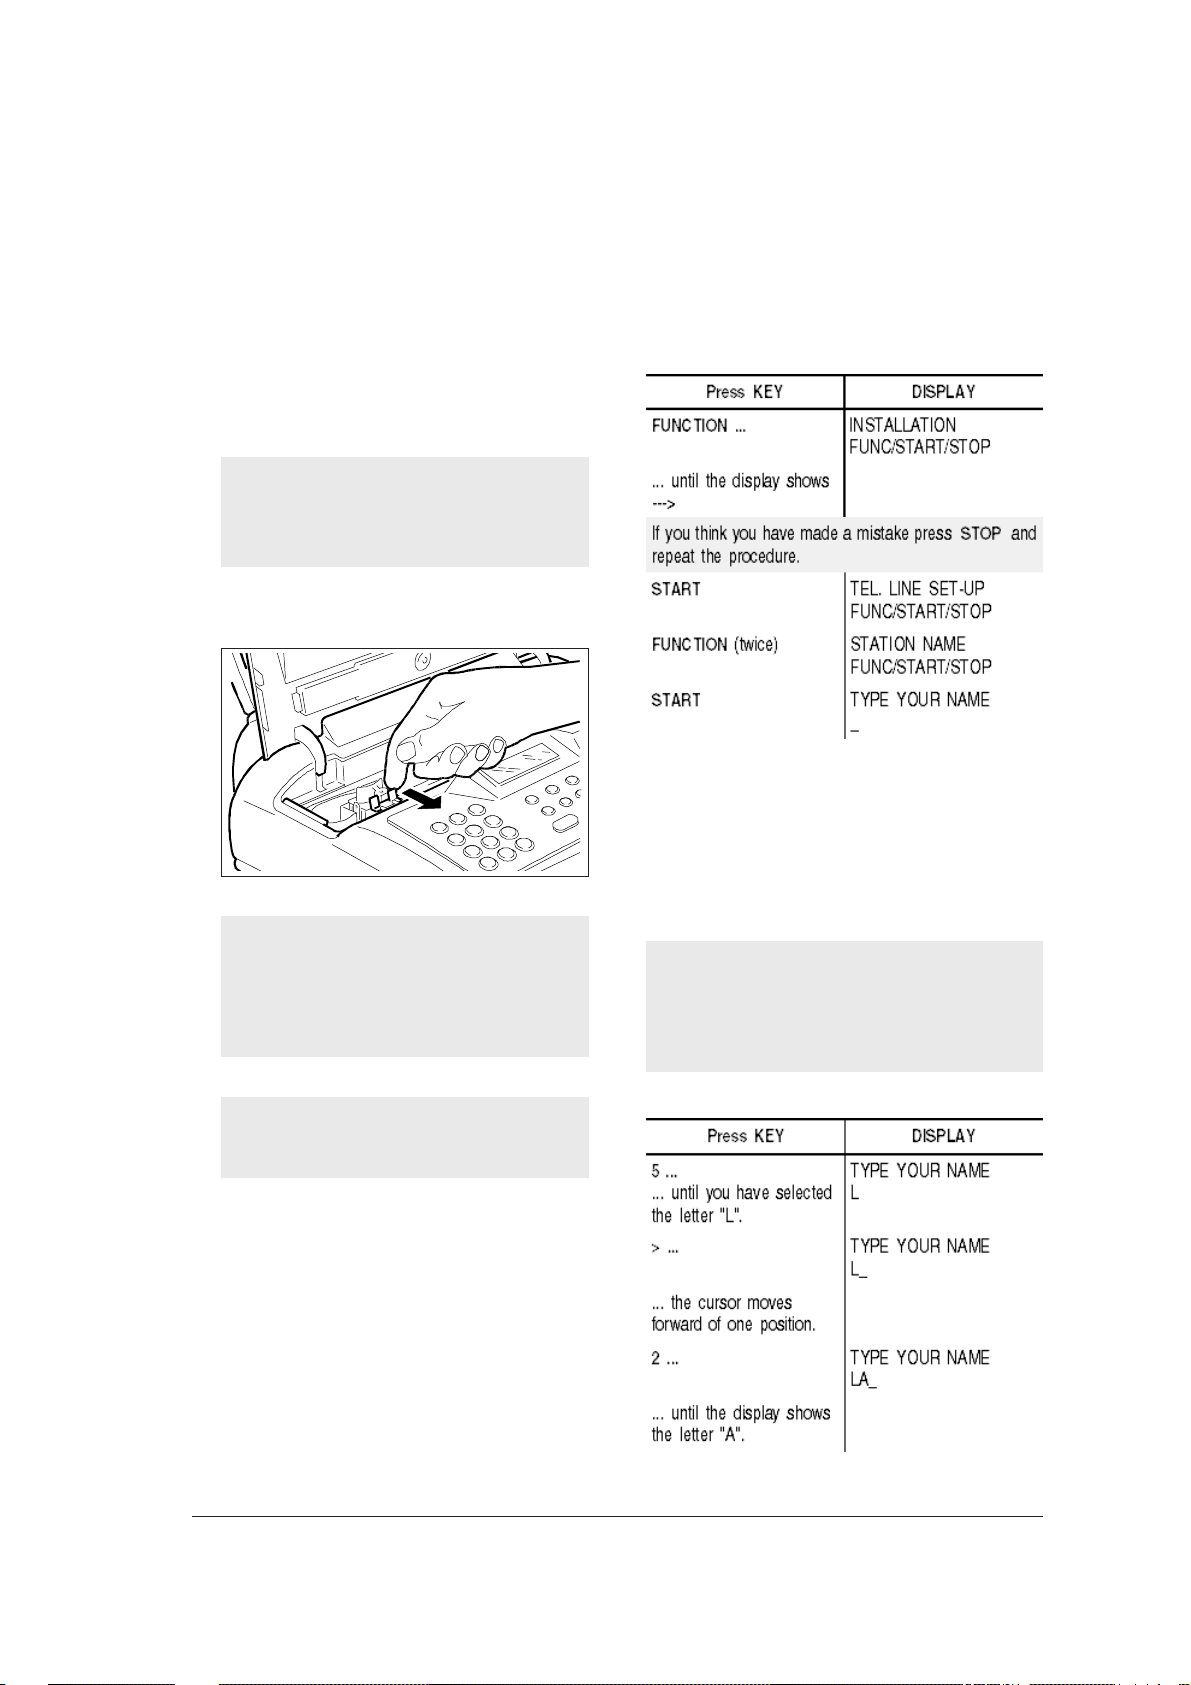
INSTALLING THE PRINT HEAD ...
Avoid touching the nozzles and the electrical contacts and, if the print head has an
interchangeable cartridge, do not remove the
print head ink cartridge.
NO!
1. Open the print cover, positioning your fingers in
the recesses on the sides.
3. Insert the print head in its housing with the electrical
4. Push the print head in the direction of the arrow
2. Remove the print head from its box and, holding
it by its finger grip, remove the protective film from
the print nozzles.
NO!
contacts towards the front part of the fax machine.
until you hear a click, this means that it has been
inserted correctly. Close the print head compartment cover.
4
Page 14
When the cover is closed, the fax automatically
performs a nozzles test and then carries out a
print test which contains: graphic and text graduated scale. When the test is completed, the display will show the message "CHECK PRINT
1=EXIT 0=REPEAT":
•
press 1 if you think that the print quality is acceptable; the fax machine returns to the initial mode.
•
press 0 if you think that the print quality is not acceptable; the fax machine carries out the control
again and reprints the test.
If the display shows the message "CHECK
PRINT HEAD", try to remove and re-insert the
print head pushing it strongly. If the message
persists, call the technical service.
To release the print head (cartridge included),
push the levers in the direction of the arrow.
Print head replacement
If the print head provided with your fax has an
interchangeable ink cartridge, you can change
the cartridge up to 6 times before replacing
the whole print head.
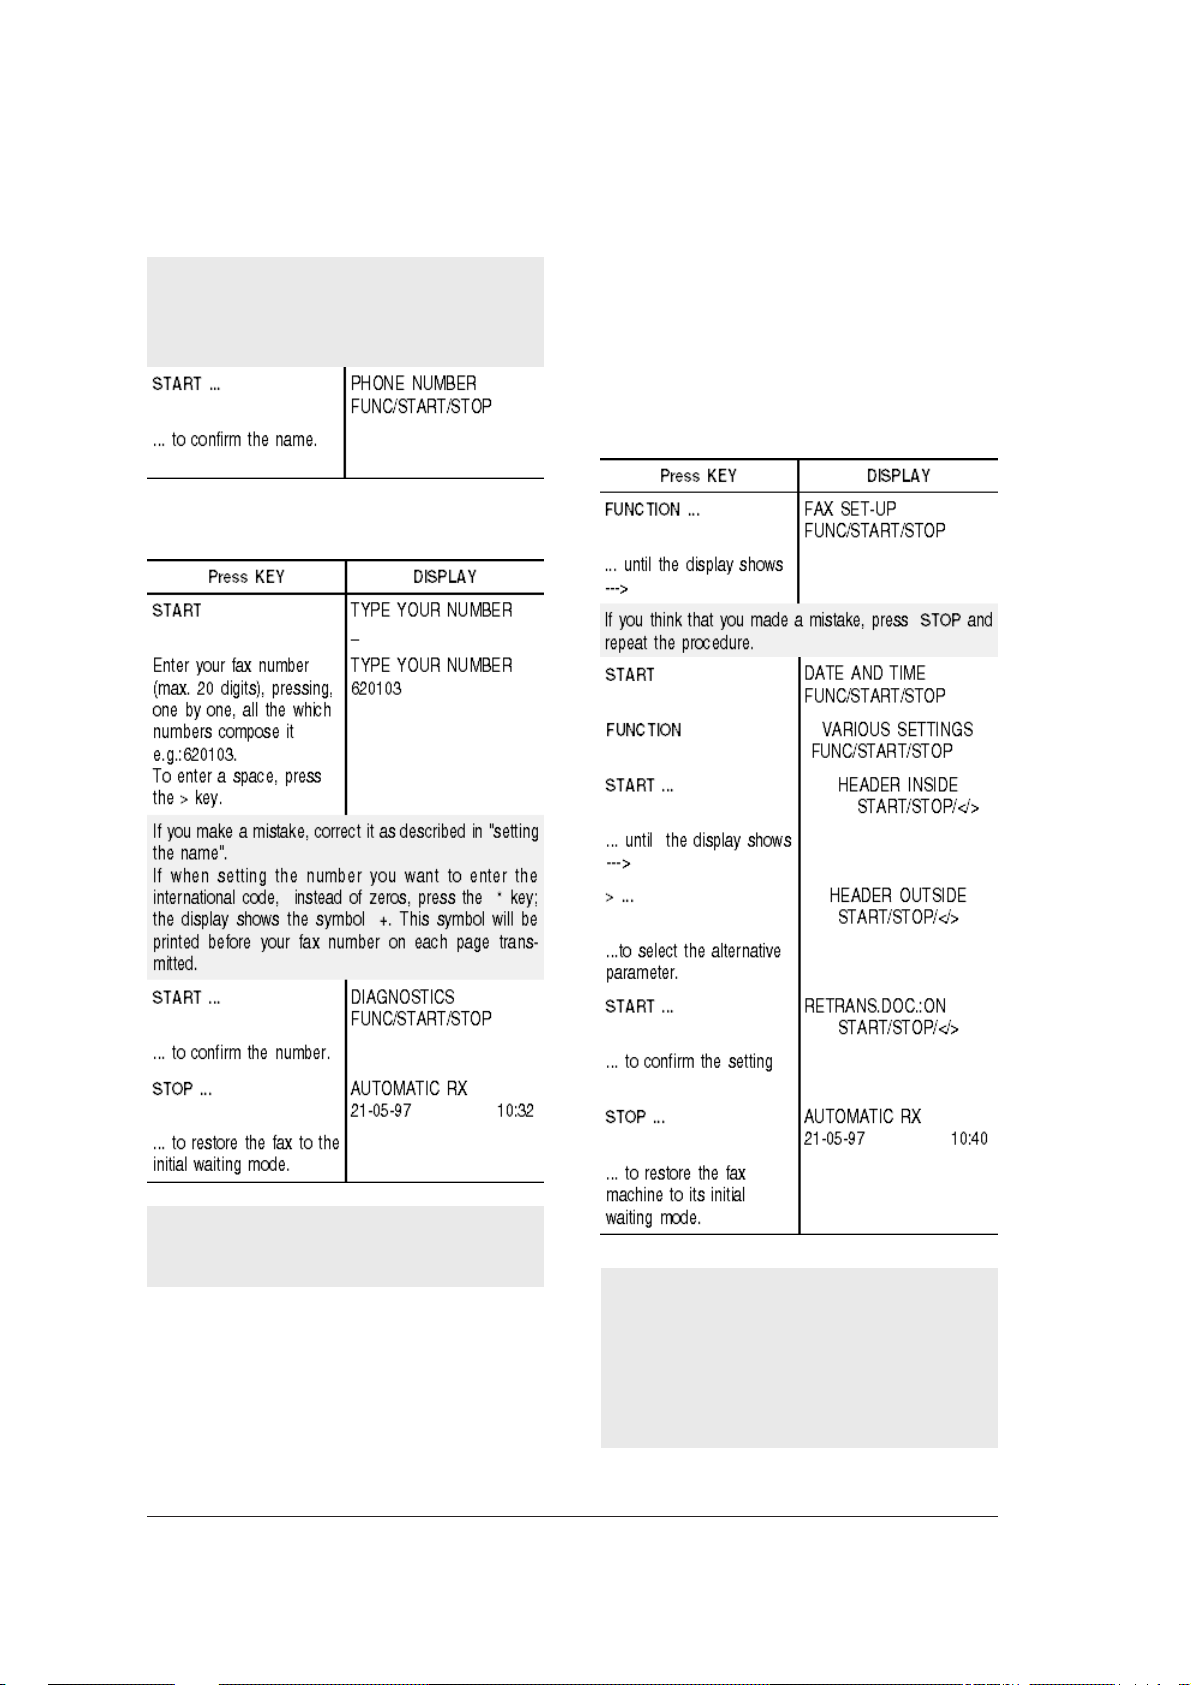
ONLY YOUR NAME AND YOUR FAX NUMBER
ARE MISSING ...
Once set, the name and number (sender identification) will remain unchanged, unless it is modified, and
will appear on every fax page transmitted.
Setting the name ...
You can enter a maximum of 16 characters by selecting them, one by one, using the numeric keys.
Each numeric key selects cyclically the characters
present in its repertor y (see console left side), star ting from the numeric character and proposing the
next character each time it is pressed. By pressing
the keys * and # you can enter a variety of symbols
in your name, i.e.
If you want to change a capital letter into a small
letter or viceversa, press the A <> a key after
entering the letter required. If you want to enter
an empty space, simply move the cursor with the >
key without entering any character.
To replace both the ink car tridge and the pr int
head refer to the chapter "To keep it effi-
cient".
For example, to enter the name "LARA":
F
5
Page 15
Continue in the same way until your name is completed, then check its correctness by scrolling the
cursor (keys </>) along the characters.
If there is an error, position the cursor on the wrong
character and overwrite the correct character; if
you want to cancel the name completely, press
CLEAR.
Name and fax number position ...
The information in the heading of the document to
be transmitted (name, fax number, date and time and
number of pages) can be shown either outside the
text area, just below the upper edge of the page, or
inside the text area and slightly lower down.
Your fax machine has been set up to transmit this
information within the text area.
Changing the position ...
Setting the fax number ...
As the fax machine is provided with back-up batteries, it is able to retain programmed data in
memory if there is a power failure.
6
After connecting your fax machine to the telephone line and electrical power supply, and after
performing all the instructions indicated in this
chapter, you must also adapt it to the features
of the telephone exchange which handles the
line to which it is connected. See chapter "Con-
figuring the fax to the telephone line".
Page 16
CONFIGURING THE F AX TO THE TELEPHONE LINE
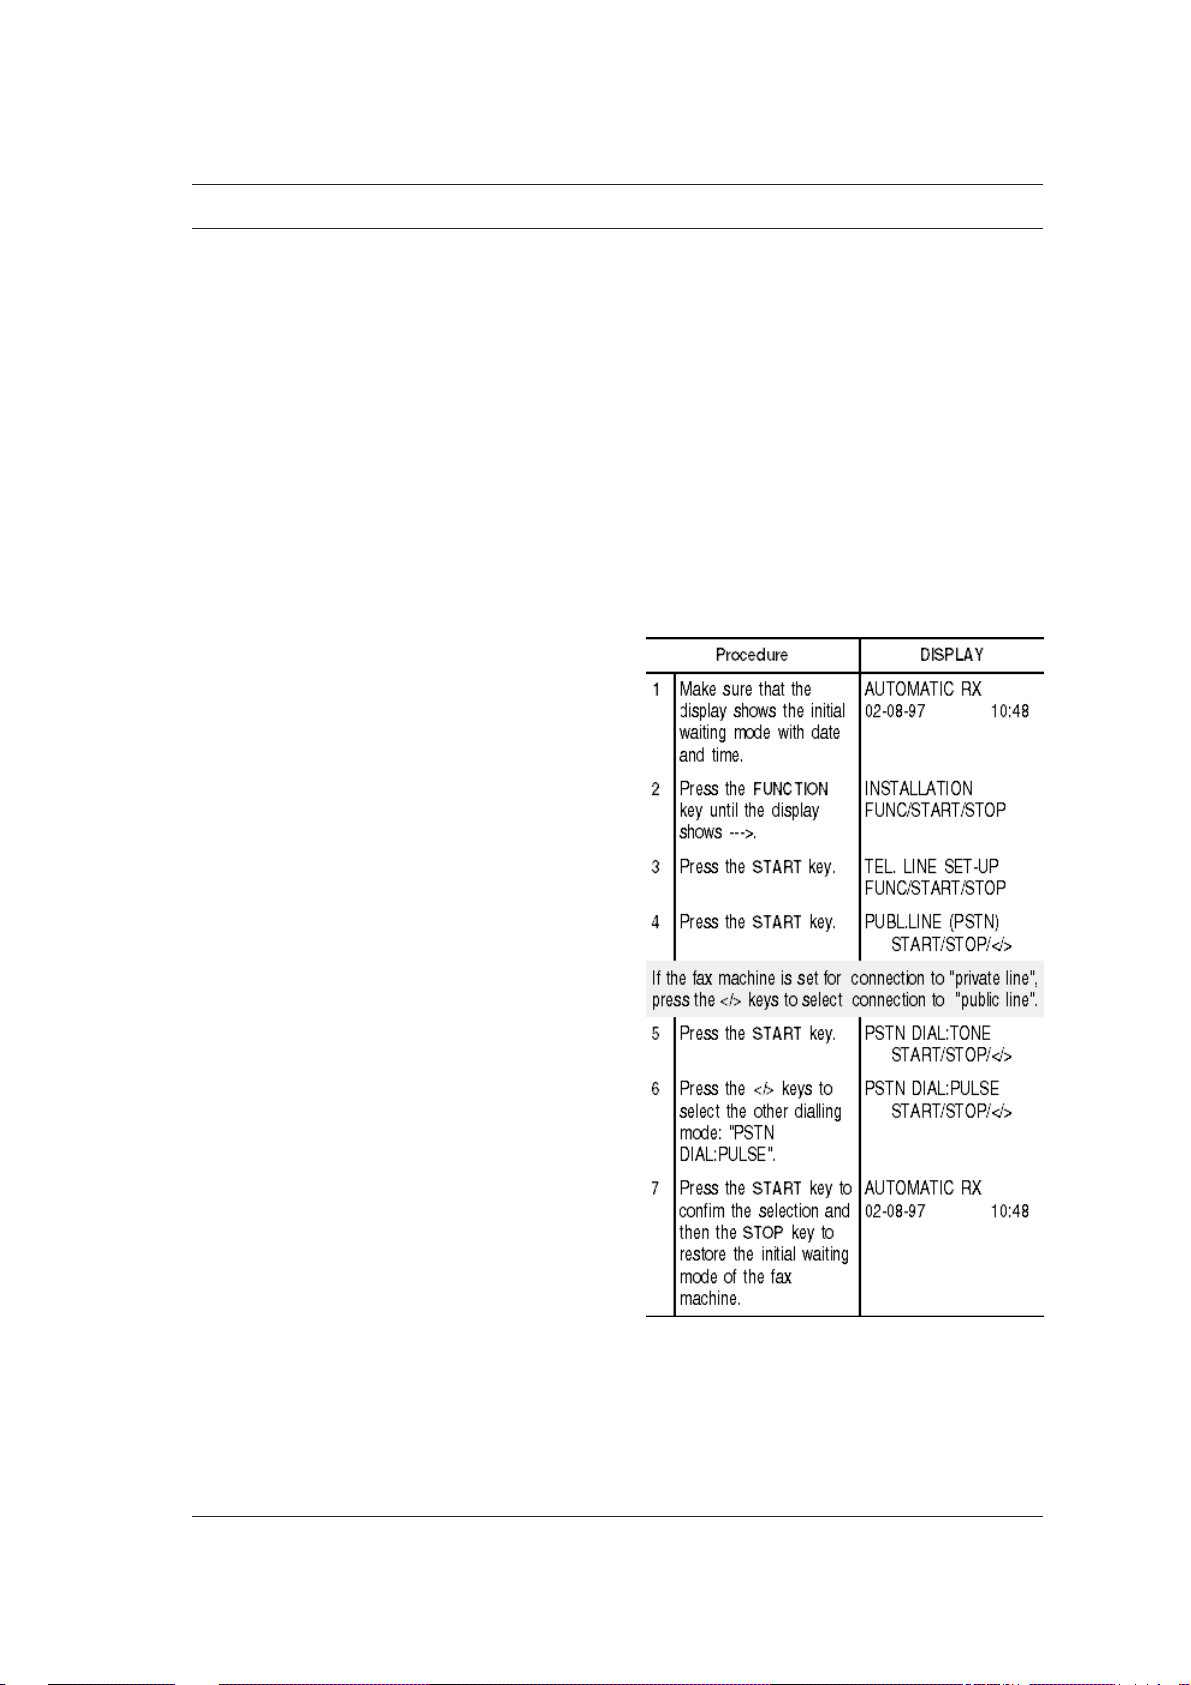
CONNECTING T O A PUBLIC LINE ...
The fax machine is already set to be connected to a
public line. In any case, check that:
• the "PUBLIC LINE" parameter is selected
• the dialling mode selected (pulse = DECADIC or
tone = multifrequency) corresponds to that of
the public telephone exchange managing the line
to which the fax machine has been connected. If
in doubt about the selection to be made, ask the
public telephone network manager.
Proceed as follows:
7
Page 17
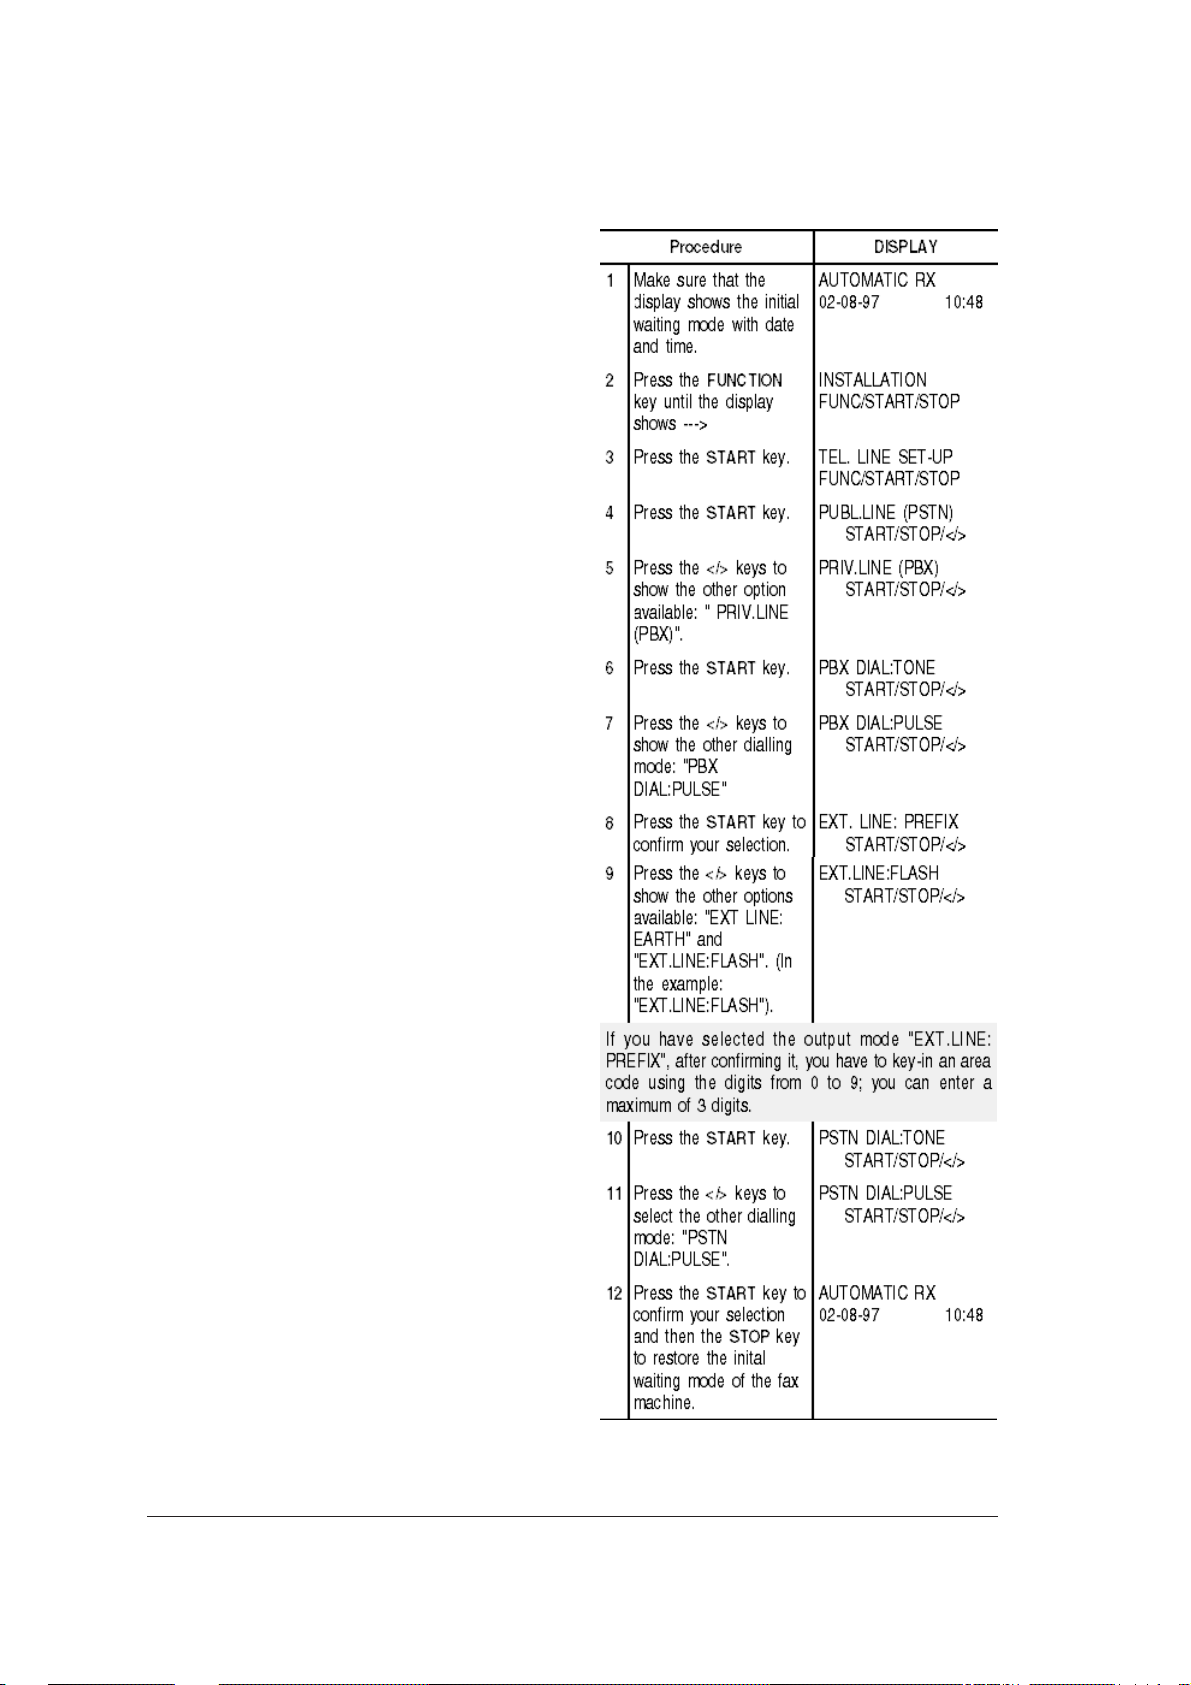
CONNECTING TO A PRIV ATE LINE (PBX) ...
To connect your fax machine to a private line and to
be able to use it also on a public line, you have to:
• select the "PRIVATE LINE" parameter.
• set the dialling mode (pulse or tone) to the one
used by the private telephone exchange (switchboard) managing the line to which the fax machine has been connected. If in doubt about the
selection to be made, ask the private telephone
network manager.
• set the output mode (area code, ground or flash)
to access the public telephone exchange from the
private telephone exchange (switchboard).
• adjust the dialling type (pulse or tone) to the one
used by the public telephone exchange.
Proceed as follows:
8
Page 18
FOR EVERYDAY USE
Now that your fax machine has a name and a number,
you can use it for:
• transmitting documents (also with the delayed
mode, from the memory, or using the polling
method)
• receiving documents (also using the polling meth-
od)
• copying documents
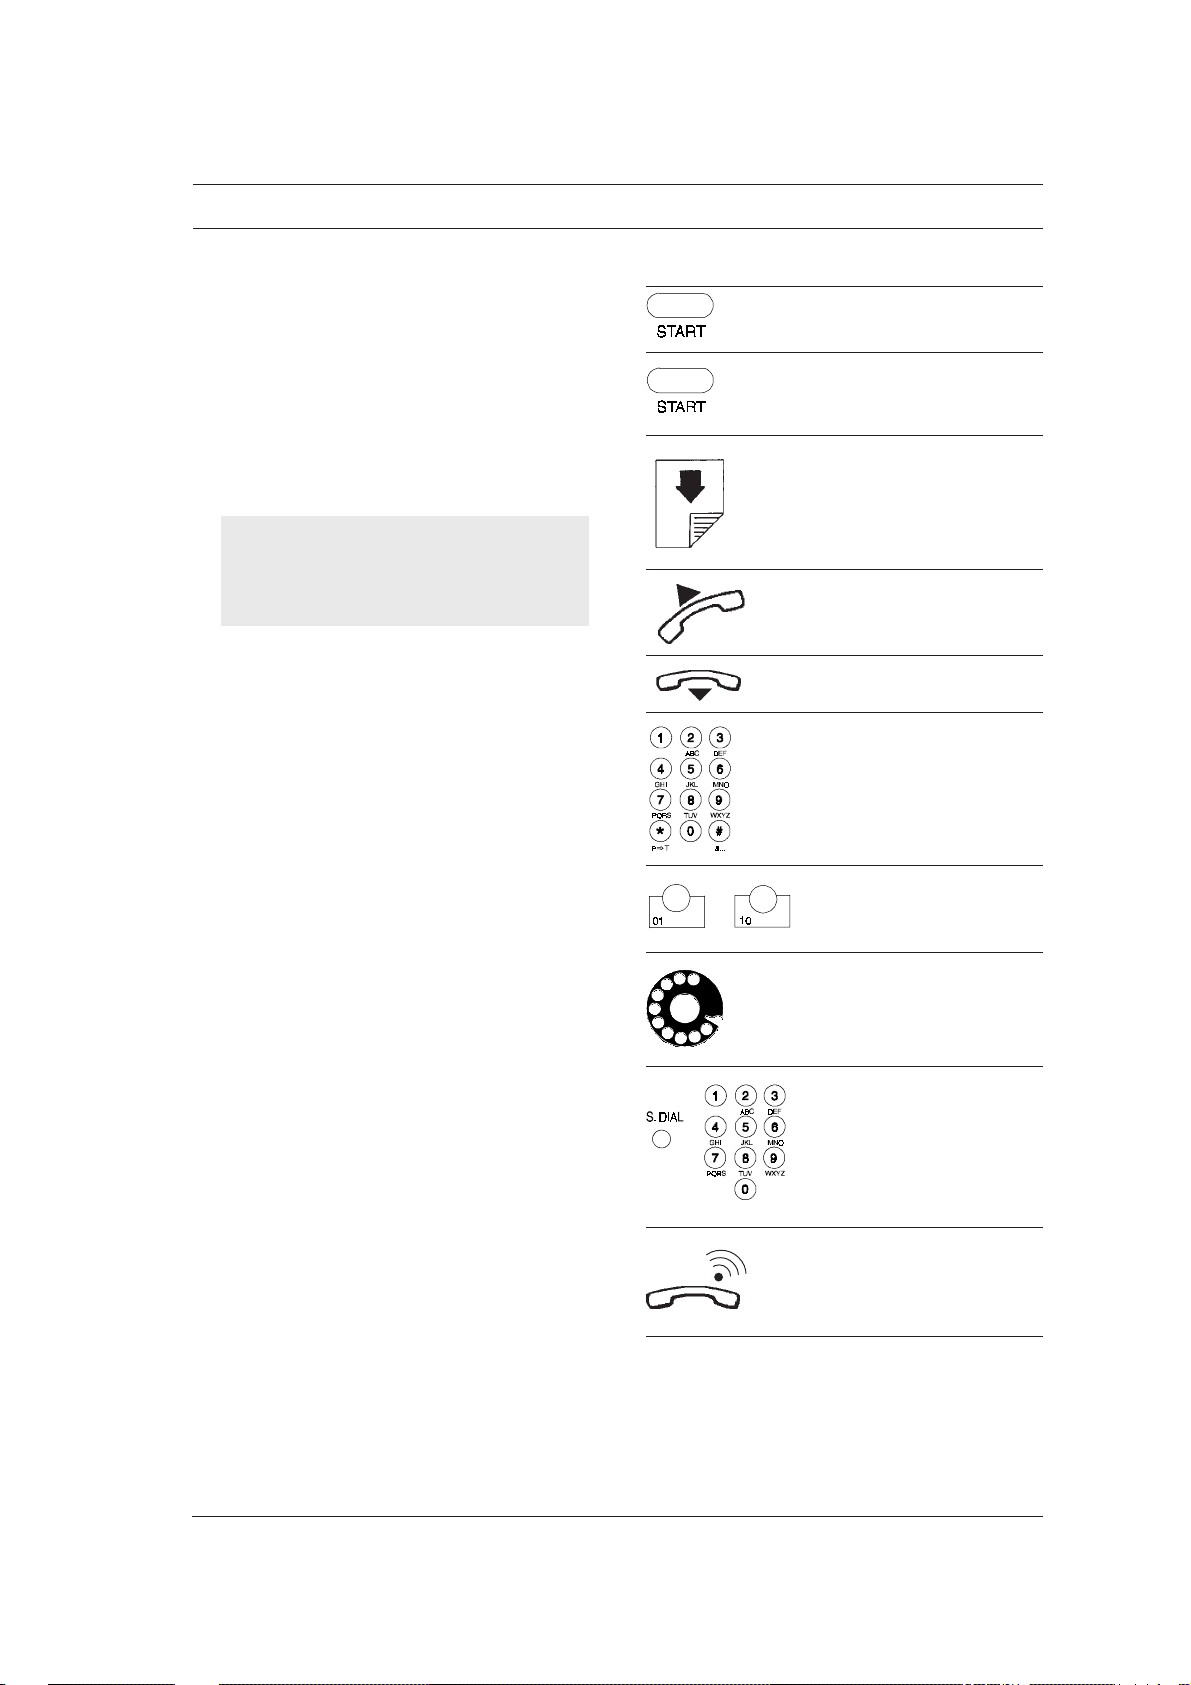
From now on, to simplify the procedures described, the following graphic representations
will be used at the beginning of each procedure:
Press this key once.
X
Press this key X times.
Insert the document with
the transmitting or copying side face down (max
10 pages at a time).
Lift the receiver.
Replace the receiver.
Dial on the numeric
keypad.
÷
Press a one-touch dial
key.
Dial the number on the
connected telephone.
Press the S. DIAL key
and enter a speed dialling
code.
Incoming call.
9
Page 19
WHICH DOCUMENTS YOU CAN USE ...
INSERTING THE DOCUMENT IN ADF...
Dimensions
• Width min. 148 mm - max. 216 mm
• Length min. 216 mm - max. 600 mm
• Thickness min. 0.07 mm - max. 0.14 mm
Documents with non standard formats should be
trasmitted using the appropriate transparent folder ; if
the document consists of more than one sheet, insert
manually each sheet.
Recommendations
In order to avoid damage that could set your fax machine
out of order and that could invalidate its guarantee, make
sure that the documents you to use have no:
• staples
• clips
• adhesive tape
• corrective ink or glue not yet dried.
NEVER USE
rolled paper
Insert the document face down, without forcing it,
in the document feed slot for original documents
(ADF), then regulate the paper guides according to
its width.
After a few seconds the document border will be automatically inserted inside the ADF .
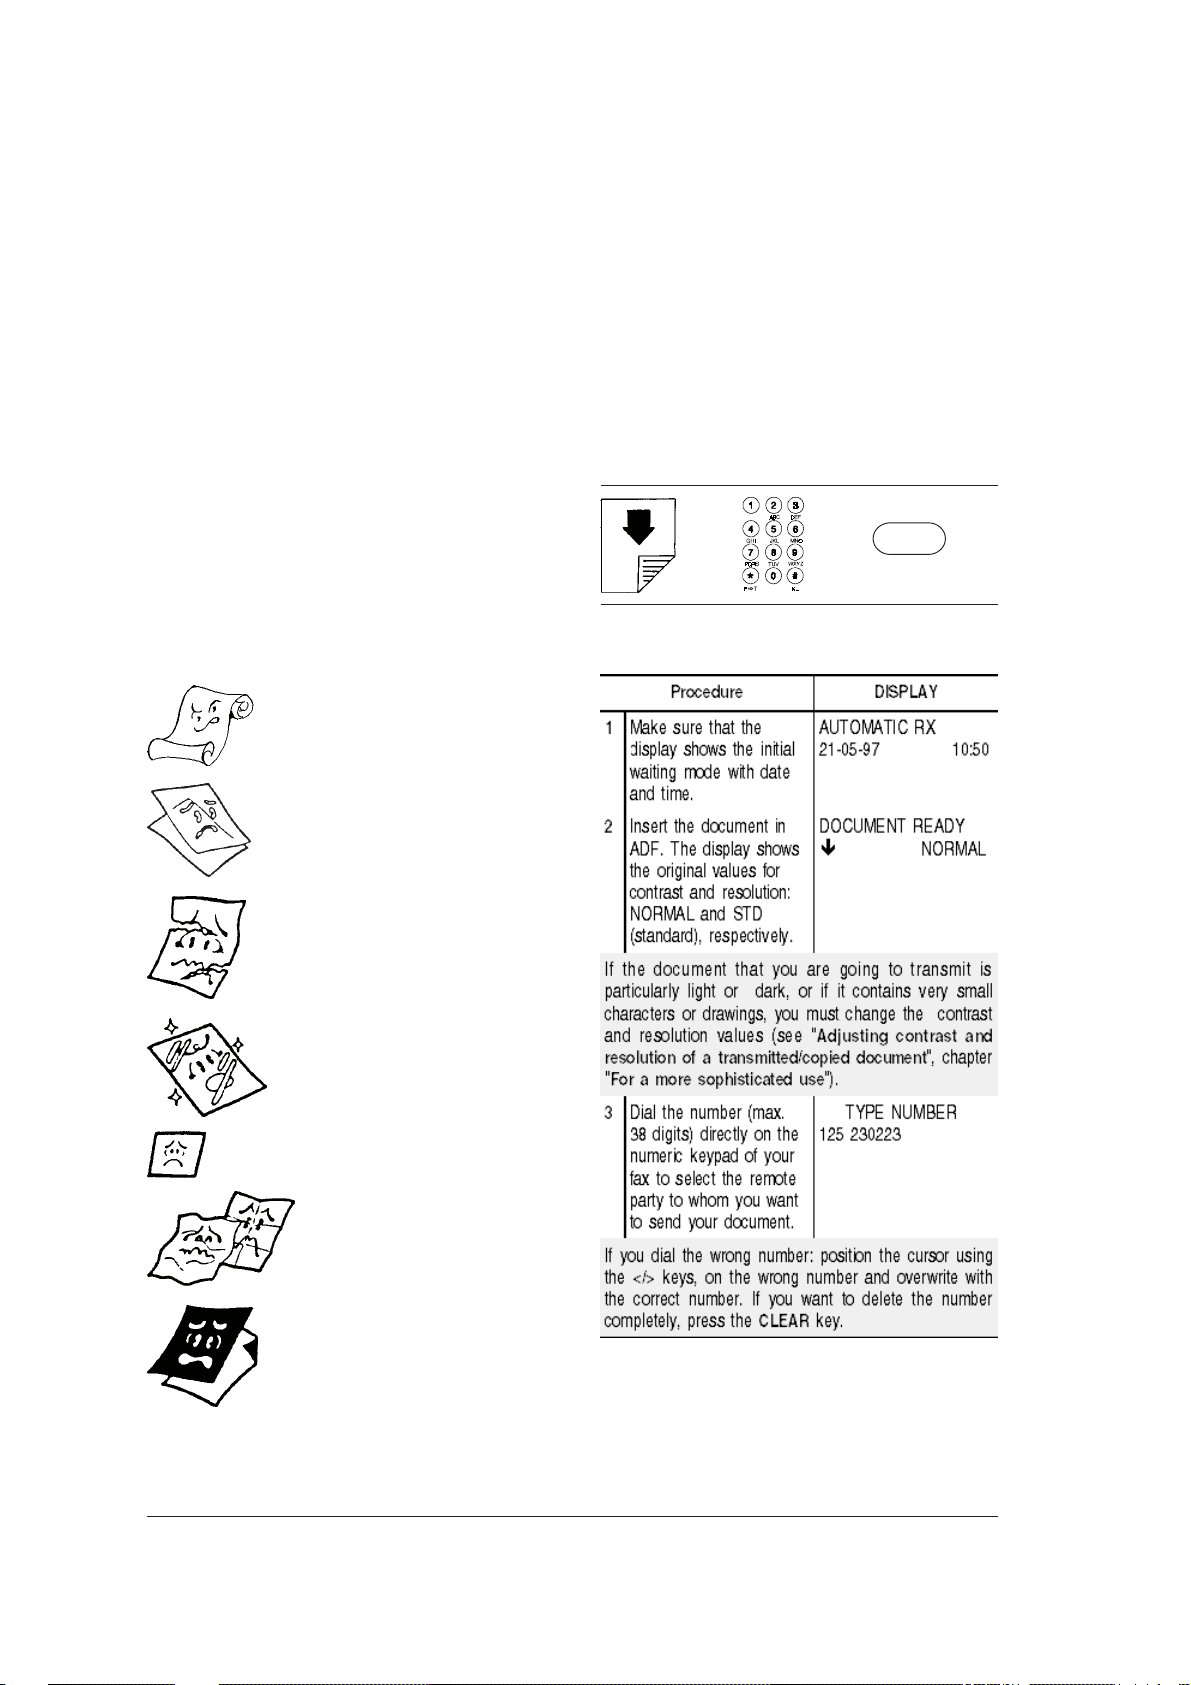
TRANSMITTING A DOCUMENT ...
If this diagram is not enough:
read the following instructions:
è è
START
paper that is too thin
torn paper
wet or moist paper
paper that is too small
crumpled paper
carbon paper
.
In all these cases you must photocopy the document
and transmit the copy or use the appropriate transparent folder.
10
Page 20

IF ...
- the fax machine is connected to a private line
(pbx) and you want to access to the public line
(pstn)
- you want to modify temporarily the dialling mode
- the remote party belongs to another area code
- you want to enable the selected number to
detect a second tone
- you want to listen to the line tones while dialling
- you want to use speed dialling procedures
... see "Particular dialling cases".
If the mode requested by your telephone exchange is different from the one set on your fax
machine, programme it according to the requested
external connection mode (see "Connecting it
to a private line (PBX)", chapter ("Configuring
the fax to the telephone line").
2. To modify temporarily the dialling mode
If the fax machine is set up for pulse dialling you
can modify temporarily the dialling mode by pressing the P > T key either before or whilst dialling
the number.
At the end of the transmission, the fax machine
will always restore the pre-set dialling mode.
3. The transmission is not successful despite
the automatic redial attempts
If transmission is not successful despite the automatic redial attempts, you can call the remote
party without having to redial its number. The fax
machine stores the last number dialled, so you
can redial the number simply by pressing the RE-
DIAL key twice.
When the transmission is ended, if enabled to, the
fax machine prints the transmission report see
"Printing reports and lists" for its interpretation.
If connection is not made because of line anomalies or because the remote party number is engaged, the fax machine redials automatically
the number for three times.
If you want to interrupt the transmission in
progress, press the STOP key twice: the first time
to interrupt the transmission; the second to eject
the document from ADF and restore the fax machine to its initial waiting mode.
If the document to be removed consists of more
than one sheet, before pressing STOP to eject
the first one, remove manually all the other
sheets.
4. The remote party belongs to another area
5. The remote party is connected to a telephone
6. If you want to listen to the line tones while
PARTICULAR DIALLING CASES ...
In the following cases, the procedure to dial the
number described at step 3 changes.
1. The fax machine is connected to a private line
(pbx)
Connect to the public line by pressing the EXT.
key, before dialling the number. The display will
show an "e" (external).
code
If the remote party belongs to another area code,
when using pulse dialling, it is better to insert a
pause (PAUSE key) between the international
code, the area code and the remote party number.
exchange to which the access is between by
means of second tone detection
To enable the dialled number to detect a second
tone of the telephone exchange, press the
2.TONE while dialling the number. The display will
show ":" (this feature is enabled only in cer-
tain countries).
dialling
The fax machine is already enabled to listen both
to the connection signals and to the line tones. If
this is not the case, read the following proce-
dure or see "Listening to the connection signals", chapter "For a more sophisticated use".
11
Page 21

If this diagram is not enough:
è
read the following instructions:
7. If you want to use rapid dialling procedures
The fax machine also has rapid dial features: onetouch dial and speed dialling. To use these fea-
tures, you must programme them as described
in the section "Programming one-touch dial and
speed dialling".
Once you have programmed them, it will be suf-
ficient to press just one key (one-touch dial) or
a key followed by a two-digit numeric code
(speed dialling) to dial a number (see "Trans-
mitting with one-touch dial" and "Transmitting
with speed dialling").
TRANSMITTING A DOCUMENT A T A PRE-SET
TIME ...
This function allows you to avoid time zone problems if the remote party is thousands of miles away
and also allows you to avoid paying high tariffs by
choosing times with less traffic on the telephone lines.
You can program your fax machine to transmit a document at a pre-set time (delayed transmission) both
from ADF (see following procedure) and from
memory (see the section " Transmitting a document
from the memory").
If you select transmission from memory, without leaving the document in ADF, you can transmit and copy
other documents even after having programmed a
delayed transmission.
12
Page 22

CHANGING/CLEARING A PRE-SET DELAYED
TRANSMISSION ...
TRANSMITTING A DOCUMENT FROM THE
MEMORY ...
The fax machine has a memory which allows you
to send documents at a pre-set time (delayed trans-
mission), to receive documents even if there is no
paper or if the ink ran out and to transmit a docu-
ment to several remote parties (max. 10): broadcasting transmission.
The fax machine will only allow you to memorise
one transmission at a time.
F
13
Page 23

• Status Status of transmission
Besides the above-mentioned parameters, to help
you identify the stored document, the fax prints a
The fax machine automatically cancels all memorised transmissions after successful transmission.
Once set, transmission from memory can be:
• modified only if not already being transmitted,
• re-sent only if programmed to do so should transmission fail (see “Enabling/Disabling the Re-
sending of a Failed Transmission from Memory” chapter “For a more sophisticated use"),
• cancelled at any time.
See procedure in next section. You can also request
the print-out of the relative parameters. The parameter print-out contains the following information:
• Doc N. Reference number of the
stored document. This
number associates a document to each transmission (single or broadcasting) operated from the
memory.
• Pages Total number of pages of
the stored document.
• Set for: Date and time at which the
transmission from memory
(single or broadcasting)
will be executed.
• Act. n. Progressive number of
each transmission stored
in the memory. In case of
broadcasting, the number
increases for each single
transmission associated
with the broadcast.
• Selected number Fax number on the remote
fax that you have called.
• Date/Time Date and time at which the
transmission was carried
out from the memory. In
case of broadcasting, it will
indicate the date and time
at which each transmission
associated with the broadcasting has been carried
out.
small portion of its text.
CHANGING/RESENDING/CLEARING A PRESET MEMORY TRANSMISSION ...
from the memory. In case
of broadcasting transmission, the status of each
single transmission associated with the broadcasting will be indicated.
14
Page 24

IF THE TRANSMISSION IS NOT
• Automatic reception. This reception mode (the
SUCCESSFUL ...
1. Sometimes, because problems such as overloaded
telephone lines or other types of disturbance, the transmitted document received by the remote party is garbled retransmit it.
In this case, it is better to retransmit the document at a lower speed. The fax nor mally transmits at a speed of 9600 bps (bit per second), you
can this speed half (4800 bps), following the procedure described in the section “Reducing the
transmission speed”, chapter “For a more sophisticated use”.
2. If the transmission is not carried out because
of line or fax anomalies, the ERROR led lights
and the fax beeps; in this case, the fax machine
prints automatically the transmission report (see
the section “Printing reports and lists”), in which
the error code indicates the cause (you will find
a list of all the error codes in chapter “Keeping it
efficient”).
When the print-out of the transmission report is
completed, press the STOP key to eject the original document from ADF. If the document to be
removed consists of more than one sheet, remove
manually all the sheets except the one that has
been already inserted in ADF, then press the
STOP key to eject the first one.
If you have set a transmission from memory, you
can try to re-send it (see the previous section).
• Automatic reception with call type recogni-
• External telephone answering device recep-
standard setting for your fax machine) is more
indicated when you have two telephone con-
nection lines, one for the telephone and the other for the fax only. In this way there is no interference between the two call flows (telephone and
fax calls).
tion. This reception mode, more practical then
the manual one, is ideal when you have only one
telephone line for the fax machine and the telephone.
tion. With this reception mode, the answering device receives the calls, records any messages
from your remote party and permits the fax to
receive any documents sent to you.
The fax machine, thanks to its memory, will be
able to receive even if:
• the paper, the ink or the print head run out
• the print head compartment cover is open.
If when receiving a document, you run out of
paper, the paper jams, you run out of ink or
you open the print head compartment cover,
the printing is interrupted. The display shows the
appropriate message and the document that you
are receiving is temporarily recorded in the
memory. Once the error is corrected, the fax machine resumes printing.
3. If you attempt to transmit a document that is
too long (more than 600 mm) or if the document jams during the transmission, the fax ma-
chine interrupts automatically the transmission
and beeps to warn you.
RECEIVING A DOCUMENT ...
You can set your fax machine to receive the documents sent by your remote party in four different
ways. You can access the mode required by pressing the RX MODE key.
• Manual reception, for situations in which you are
present and you personally answer the incoming calls. This reception models advisable when
the fax and the telephone are connected to a sin-
gle telephone line and the incoming document
flow is not very high so there is not much inter-
ference with telephone calls.
If you want to interrupt the reception in progress,
press the STOP key twice; the first time to interrupt reception; the second time to restore the fax
to the initial waiting mode.
If you receive a document which is too long
(longer than the paper size used for reception),
you can programme your fax to print on another
sheet the excess text (see "Receiving a docu-
ment longer than the paper size", chapter "For
a more sophisticated use").
You can also reduce the print area of a received
document (see "Reducing the print area of a
received document", chapter "For a more sophisticated use").
For further information regarding the reception
mode, refer to the specific section.
15
Page 25

RECEPTION MODES ...
Manual reception ...
If this diagram is not enough:
If your telephone installation has sev eral sockets and
the connected telephone is not near the fax machine,
you can enable the latter for remote reception, as
long as the telephone works with tone dialling
(multifrequency):
è è è
read the following instructions:
START
• Connect to the line, lifting the telephone receiver.
• Press the * key on the telephone, followed by
the remote control code. Remember that the
code number must be the one you programmed
previously (see “Changing the remote con-
trol code”, chapter “For a more sophisticat-
ed use”).
Automatic reception ...
The fax receives the documents automatically without
your intervention.
The fax machine is already programmed to receive
the documents in automatic mode. Should this not
be the case, press the RX MODE key until the display shows “AUTOMATIC RX”.
The reception procedure is explained in the previous
section (Manual reception).
Automatic reception with call type
recognition ...
You telephone and fax machine are connected to the
same telephone line. You have programmed the fax
machine, by pressing the RX MODE key, to receive
with this mode (the display must show “PHONE/FAX
RX”).
The behaviour of the fax in this reception mode will
depend on the caller. The procedure is illustrated in
the following diagram:
If the remote party called only to talk to you, at
the end of the conversation:
16
Page 26

After two rings (*)
PHONE/FAX RX enabled
A FAX MACHINE is
calling
Your fax machine is set
to receive automatically .
A TELEPHONE is
calling
Your fax machine
beeps for 20 seconds
(*). The displa y sho ws
"LIFT THE RECEIVER "
If you pick up the telephone receiver before the
second ring and hear the fax connection tone press
the ST AR T button and hang up the receiver. Your
fax machine is now ready to receive.
If your telephone installation has several sock-
ets, you can set your fax machine for remote
reception as explained in the “Manual Reception” section.
If your telephone installation has several sockets and, after the second ring of a telephone call,
your fax machine has started to receive the fax
automatically as you did not pick up the receiver
within 20 seconds, you can still connect to the line
on the telephone, if it works with tone dialling.
• pick up the receiver and press the keys * e # on
the telephone (to get a line).
Receiving with an external answering device ...
20 seconds have
passed and you have
not lifted th receiver.
Your fax is set to receive automaticaly. It
will wait to receive a
document for about 30
seconds, then it will
return to the initial
waiting mode.
The remote party called
just to talk to you: at the
end of the conversation,
replace the receiver
The remote party asks
you to receive
START
Your fax is set to recieve.
(*) You can modify both the number of rings and the
beep duration, (see “Changing the number of
rings” and “Changing the beeper duration” chap-
ter “For a more sophisticated use”).
If your fax machine has an answering device and, by
pressing the RX MODE, you have set it to operate in
this reception mode (the display must show “TAD/
FAX RX”), make sure that:
• the answering device is switched on.
• the answering device will start working after less
than 10 rings.
Whenever you set your fax for reception with an
external answering device, the fax machine will
automatically be set to answer after 10 rings.
Consequently, if the number or rings of the answering device is equal or to 10, the answering
device will never be able to work.
• the silence lapse (the time after which the answering device interrupts the connection if it does
not hear either an answering message or the
connection tones) set on the answering device is
longer than the one set on the fax machine (3
seconds; to change it, see "Changing the silence
lapse", chapter "For a more sophisticated
use").
• message recorded in the answering device does
not exceed 15-20 seconds e.g.:
Leave a message after the beep or press the start
key on your fax machine to transmit a document.
17
Page 27

In this reception mode, the behaviour of your fax machine depends on the caller, as shown in the follow-
T ransmitting a document by dialling the
number on the telephone ...
ing diagram:
If this diagram is not enough:
After the number of rings of the answering device
è
è è
START
The remote party who called listens to the prerecorded
message on the answering device
If a FAX MACHINE called
Your fax machine is automatically set for
reception.
If a remote
party called to
send a fax .
The remote
party presses
the transmission start key .
Your fax machine is automatically set for
reception.
If a remote
party called
just to talk.
The remote
party leaves a
message after
the beep.
read the following instructions:
USING THE TELEPHONE CONNECTED TO THE
SAME LINE ...
If a telephone is connected to the same line to which
you have connected your fax machine, you can use
the fax to:
• call a remote party using the rapid dialling procedures programmed on your fax machine see
"Programming speed dialling and one-touch
dial" and in particular "Calling with speed dial-
ling" and "Calling with one-touch dial".
• interrupt temporarily a telephone conversation by
pressing the HOLD key. The conversation is restored as soon as you press this key again.
• transmit a document (see the following procedure).
18
If the end of the transmission, the fax beeps continuously, to switch off the beep or
press the STOP key. In the first case, the fax machine interrupts the connection and returns to the
initial waiting mode, in the second case, it holds
the line so that you can talk with your remote party
or transmit another document.
Page 28

MAKING A COPY ...
PROGRAMMING ONE-TOUCH DIAL AND
SPEED DIALLING ...
As already mentioned, you can also use the fax machine as a photocopier. Quality of the copy obtained
depends on the contrast and resolution values that
you will select before making the copy. The fax machine can make one or more copies of the same document according to the paper format selected (see
"Adjusting the sheet feeder", chapter "For a more
sophisticated use").
As already mentioned in "Particular dialling cases"
(see "Transmitting a document") you can pro-
gramme the fax machine to carry out the following
dialling procedures:
• One-touch dial
• Speed dialling
If this diagram is not enough:
è
read the following instructions:
START
One-touch dial ...
You can associate a fax number, a name and a telephone number to each of the 10 one-touch dial keys.
The number/name stored will be selected automatically
when you press the corresponding key.
Associating a fax number:
F
19
Page 29

Associating a telephone number:
Associating a name:
At this point you can continue the procedure from step
12 or programme another one-touch dial key by
pressing the START button and repeating the proce-
dure in step 6.
If you like, you can associate only a telephone
number to a one-touch dial key without storing a fax
number.
Follow the procedure "Associating a fax number"
until step 6, then proceed as follows:
20
Page 30

Speed dialling ...
Using a series of codes (01-32) you can store more
fax and telephone numbers, and names that will
be automatically selected by pressing the S. DIAL
key and the appropriate key code.
Associating a fax number:
Same procedure as for the one-touch dial; steps 4, 5
and 6 vary as follows:
If you want, you can print the information stored
in the 10 one-touch dial keys and in the 32
speed dialling codes (see the section "Printing reports and lists"). In this way, you can check
the correctness of the stored numbers (fax and
telephone) and the other information (remote party
name, transmission speed, etc.). You can also
check which keys/codes have been programmed
Associating a name:
and which ones are still free.
Same procedure as for one-touch dial.
Associating a telephone number:
Same procedure as for one-touch dial; steps 12 and
13 vary as follows:
As for the one-touch dial, if you like it , you can asso-
ciate to a speed dialling code only a telephone
number without storing a fax number.
Follow the procedure "Associating a fax number"
for one-touch dial (taking into account the changes
for speed dialling) until step 6; then proceed ad follows:
TRANSMITTING WITH ONE-T OUCH DIAL ...
Insert the document and press the one-touch dial
key.
As for normal transmission (see "Transmitting a
document"), you can set contrast and resolution
before starting the transmission operation.
As soon as you press the one-touch dial key (in the
example 01), the fax machine shows the associated
fax number.
Once the number has been dialled, transmission proceeds as described in "Transmitting a document".
è
01
21
Page 31

TRANSMITTING WITH SPEED DIALLING ...
PRINTING REPORTS AND LISTS ...
Reports ...
è
è
0
è
1
By printing reports, the fax machine gives you the
opportunity to check the outcome of all the operations executed (transmissions and receptions), the
Insert the document, press the S.DIAL key and then
enter the speed dialling code you require.
As for normal transmission (see "Transmitting a
document"), you can set contrast and resolution
before starting the transmission operation.
As soon as you have pressed the S.DIAL key followed by the speed dialling code (in the example 01),
the fax machine shows the associated fax number.
number of documents handled and other useful information. Some reports are always printed automatically you can programme others to be periodically and automatically or upon your request.
The following list identifies the types of reports: for
their printing and interpretation, see the corresponding paragraphs:
Once the number has been dialled, transmission proceeds as described in "Transmitting a document".
• Power failure report: always printed automati-
CALLING WITH ONE-TOUCH DIAL ...
• Activity report: contains the data referring to the
è
01
START
è
or (if programmed, see “Speeding up one-touch
dial of telephone calls” chapter “For a more so-
• Last transmission report: contains the data re-
phisticated use”):
01
è
• Error report: also contains the data referring to
Press the one-touch dial key. Press START and lift
the receiver.
As soon as you press the one-touch dial key (in the
example 01), the fax machine shows the associated
fax number. If the remote party is free, pick up the
• Last broadcasting report: contains the data re-
receiver as soon as he replies and speak.
CALLING WITH SPEED DIALLING ...
cally if a power failure occurs during a recep-
tion or transmission operation.
last 42 transactions (transmissions and receptions); the fax machine stores them and the report is printed automatically (after 42nd operation, with subsequent delete of the store data) or
upon your request.
ferring to the last transmission. You can programme it to be printed automatically after each
transmission or upon your request.
the last transmission but it is printed automatically only after an unsuccessful transmission
attempt. The fax machine is set to print automati-
cally this kind of report; if you want to disable it,
see the corresponding paragraph.
ferring to the last broadcast transmission. Yo u
can programme it to be printed automatically
after each broadcast transmission or upon your
request.
è0è1è
START
è
Press the S.DIAL key, enter the speed dialling code,
press START and lift the receiver.
As soon as you press the S.DIAL key and enter the
speed dial code (in the example, 01), the fax shows the
associated fax number .
If the remote party is free, pick up the receiver as
soon as he replies and speak.
22
Page 32

Enabling/disabling automatic printing of
transmission report and error report ....
Enabling/disabling automatic printing of
broadcast report ...
23
Page 33

Enabling/disabling automatic printing of data
relative to delayed transmission ...
Printing on request the transmission report,
the activity and broadcast report ...
How to interprete the reports ...
The reports contain the following information:
• Act. n. Progressive number of transactions
(transmissions/receptions). In case
of stored broadcast transmission, the
number increases for each single transmission associated with the broadcast.
• Type T ype of operation:
- TX , TX ECM, TX POLL or TX POLL
ECM for transmission
- RX , RX ECM, RX POLL or RX POLL
ECM for reception.
• Doc.N. Reference number of the stored
document. This number associates
the document with each transmission (single or broadcast) carried out
by the memory.
• Dialled
number Number of the fax machine you
called.
Corresponds to the number you selected only if the remote party has se
his fax machine number correctly. Otherwise, it may be different or lacking.
• Received Id Name identifying the fax machine of
the remote party you called.
The name appears only if the remote
party has set it on his fax machine.
• Date/Time Date and time of transaction.
• Duration Duration of transaction (in minutes
and seconds).
• Pages Total number of transmitted/received
pages.
24
Page 34

• Result Result of transaction:
- OK: if the transaction ended successfully
- XX ERROR CODE: if the transaction was not executed/completed.
For the meanings of the error
codes (see "Error codes", chapter "Keeping the fax efficient").
Printing the configuration parameters list, the
data stored in the one-touch dial keys and the
speed dialling codes...
Lists...
You can obtain at any time print-out of the lists of
the set-up and configuration parameters as well
as a print-out of data stored in the speed dialling
codes and in the one-touch dial keys.
When you request the print-out of the set-up and
configuration parameters, you can have an updated
report of both the pre-set values and the values you
have set from time to time according to your requirements.
Printing the set-up parameters ...
25
Page 35

FOR A MORE SOPHISTICATED USE
ADJUSTING THE SHEET FEEDER ...
As already mentioned in the section "Loading paper" (see the chapter "How to install"), the sheet
feeder is set to accommodate the A4 (210 x 297
mm) paper size, but you can adjust it also to the US
Letter (216 x 279 mm) or US Legal (216 x 356 mm
paper size).
1. Remove the sheet feeder.
2. Remove the sheet feeder cover using a coin as a
lever on one of the sides supports (fig. A). Release the lower part of the two internal sides by
means of the coin (fig. B) and position them according to the paper size that you want to use:
on the internal guides (1) for the A4 paper size;
on the external guides (2) for the Letter and Legal paper sizes.
A
3. Refit the cover and insert the sheet feeder in its
4. Close the cover.
After adjusting the sheet feeder, to guarantee the
correct working of your fax machine, you must
also check that the page format set on your fax co-
incides with the one you want to use.
housing, then tilt the cover and insert the sheets
of the corresponding paper size. (max. 70).
26
B
Page 36

REDUCING THE PRINT AREA OF A RECEIVED
DOCUMENT ...
RECEIVING A DOCUMENT LONGER THAN
THE PAPER SIZE ...
The fax machine allows you to reduce the print area
of a received document up to 70% of the original
paper size. The reduction values available are 94%,
80%, 76% and 70%. The appropriate value to select
depends on the paper size used: A4 = 94%, Letter =
89%, Legal = No (disabled).
The reduction value set-up on your fax machine is
94%.
If you receive a document longer than the paper size
in the fax, you can make your fax print, on another
sheet, the remaining text.
27
Page 37

ADJUSTING THE CONTRAST AND
SETTING AUT OMA TIC RESOLUTION ...
RESOLUTION OF A DOCUMENT T O BE
TRANSMITTED OR COPIED ...
Before transmitting or copying a document you can
make certain adjustments in order to optimize the
print quality.
In particular, you can adjust the print contrast by
means of the CONTR. key for choosing lighter or
darker tones and the RESOL. key to adjust the resolution of the characters by setting higher or lower
resolution values depending on the type of text or
images in the document.
Select the type of contrast as follows:
• NORMAL, if the document is neither too light nor
too dark . The upper row of display shows "DOCUMENT READY" and the lower "NORMAL".
• LIGHT, if the document is particularly dark. The
upper row of display shows "DOCUMENT
READY" and the lower, "LIGHT".
• DARK, if the document is particularly light. The
upper row of display shows "DOCUMENT
READY" and the lower, "DARK".
When the fax machine has finished a transmission or a copy, it always restores the default contrast value: NORMAL.
If you have not selected the resolution before trans-
mitting or copying a document, the fax machine will
automatically transmit or copy based on the pre-
set value (in this case: STANDARD).
If you like, you can set the fax machine to transmit or
copy automatically with FINE resolution using the
following procedure:
Select the type of resolution as follows:
• STD (STANDARD), if the document is easily
readable. The upper row of display shows
"DOCUMENT READY " and the lower row, an
arrow in correspondence with the indication "STD"
on the console.
• FINE, if the document contains very small char-
acters or drawings. The upper row of display
shows "DOCUMENT READY " and the lower row,
an arrow in correspondence with the indication
"FINE" on the console.
• HALF TONES, if the document contains shades.
The upper row of display shows "DOCUMENT
READY " and the lower row, an arrow in correspondence with the indication "HALF TONES" on
the console.
If you do not select the resolution type, the fax
machine automatically carries out the transmission or the copy based on the pre-set values (see
the section“ Setting Automatic Resolution”).
28
Page 38

ENABLING/DISABLING THE RE-SENDING OF
A F AILED TRANSMISSION FROM MEMOR Y ...
Making the transmission request (polling for
reception) ...
Make arrangements with your remote party regarding the time that the document is to be polled, so that
he may insert the document to be transmitted. After
that, set your fax machine to receive the document,
programming the dialling method to be used to call
the remote party and the time at which the document is to be received.
Follow the procedure below:
TRANSMITTING/RECEIVING A DOCUMENT
WITH THE POLLING F A CILITY ...
What is polling ...
It is a transmission request that one fax machine
makes to another so that the latter sends the requested document automatically at a preset time.
The main characteristics of polling communications
are:
• the user receiving the document requests the
transmission. This means that a user may connect to another fax machine and make it to send
him a document automatically (per-set) even if
there is no user on the other end of the line.
• the transaction is charged to the party who
requests the transmission (i.e.: is the user who
receives the document) and to the sender.
29
Page 39

Changing/deleting a previously set polling
reception operation ...
Programming the fax machine to poll a
document (polling in transmission) ...
HEARING THE CONNECTION TONES ...
The fax machine has already been set so that you
can hear the connection tones exchanged between
your fax machine and the remote party, as well as
the dialling tones during the dialling mode. If this is
not the case, programme it as follows:
30
Page 40

ADJUSTING THE LINE TONES
VOLUME ...
ADJUSTING THE V OLUME OF A COUSTIC
SIGNALS ...
REDUCING THE SPEED TRANSMISSION ...
The fax machine usually transmits at a speed of 9600
bps (bit per second). The transmission speed at 4800
bps is advisable on disturbed telephone lines.
31
Page 41

ENABLING/DISABLING THE ECM MODE ...
ENABLING/DISABLING TELEDIAGNOSIS ...
ECM (Error Correction Mode) is a system for correcting errors caused by line interference. This function is effective only if it has been enabled both on
your fax and on the that of the remote party. It is
highlighted by a "E" on the display.
The fax machine is already set to transmit with this
mode but you can set it to transmit normally as follows:
Using telediagnosis you can authorize a remote terminal, managed by a specialized technician to control the operation of your fax machine.
The fax machine is already set for the remote diagnostic function. If you want to disactivate it, proceed
as follows:
32
Page 42

SPEEDING UP ONE-TOUCH DIAL FOR
TELEPHONE CALLS ...
For security reasons the fax machine is set to carry
out one-touch dial only after the START key has been
pressed.
If you wish to deactivate the protection proceed as
follows:
CHANGING THE REMO TE CONTROL CODE ...
If the fax machine is connected to a secondary telephone operating in tone dialling and set for manu-
al reception or for automatic reception with rec-
ognition of the call type, whenever a remote party
calls to send a document, you can control its re-
ception by entering the code * * on the same secondary telephone. This operation is similar to pressing the START key on your fax.
You can replace the second asterisk of this code
with a digit from 0 to 9.
If your fax is also connected a an external an-
swering device, you should use a digit different
from the one used for the remote control of the
answering machine.
Proceed ad follows:
33
Page 43

CHANGING THE NUMBER OF RINGS ...
CHANGING THE BEEPER DURATION ...
This feature is enabled only in certain countries.
If set to automatic reception with call type recognition (see specific section in chapter "For everyday use"), when there is an incoming call, the fax
machine will recognize automatically after two rings
whether the call comes from another fax machine
(FAX) or from a telephone (TEL).
If you like, you can change the number of rings as
follows:
When the fax machine is set to automatic recep-
tion with call type recognition, it behaves as follows:
• If a fax is calling, it will receive automatically after
• if a telephone device is calling, it will beep for
If you like it, you can change the beeper duration as
follows:
the set number of rings
20 seconds, after which, if you have still not lifted
the receiver, it will receive automatically.
34
Page 44

CHANGING THE SILENCE LAPSE ...
Remember that if the silence lapse set on the an-
swering device is inferior to that set on your fax,
the latter will never be able to function automatically
in reception as the answering device starts operating first and as the fax does not hear any answering
message, within the set time lapse, it interrupts the
connection.
You must decrease the value of the silence lapse
on your fax so that it can connect to the line first.
To change the silence lapse value on your fax, proceed as follows:
35
Page 45

KEEPING IT EFFICIENT
To ensure the correct functioning of your fax machine,
refer to the recommendations at the beginning of
this manual. These recommendations concern the
replacement of accessories, (ink cartridge and pr int
head) and the periodical cleaning of the following
parts:
• print head nozzles
• print head electric contacts
• print head pad
• optical reader
• casing
and the removal of both jammed documents and
jammed paper.
For other problems, refer to the paragraph “Solving
small problems ...”
1. Lift the print head compar tment cover, positioning your fingers in the recesses on the sides.
REPLACING THE INK CARTRIDGE ...
When the ink in the cartridge runs out, the display
shows the message "OUT OF INK". At this point you
have to:
• replace the ink cartridge if the print head is fitted
with an interchangeable cartridge
or
• replace the print head if the print head used is
of the disposable type.
If the fax machine is fitted with an interchange-
able ink cartridge, this may be replaced up to 6
times after which the printing quality will deterio-
rate. In this case, you must replace the entire print
head (see appropriate paragraph).
2. Release the ink car tridge by its lever.
3. Remove the cartridge.
36
Page 46

4. Remove the new cartridge from its packing and
peal off the protective film.
NO!
Do not touch the inked area.
2. Release the print head (including the car tridge, if
the print head has an interchangeable cartridge)
by pressing on the levers and then remove it from
its housing.
5. Insert immediately the car tridge in its housing
and press it until the lever clicks into place to indicate that it is correctly inserted. Close the print
head compartment cover.
REPLACING THE PRINT HEAD ...
1. Lift the pr int head compar tment cover, positioning
your fingers in the recesses on the sides.
3. Remove the new print head from its packing and,
holding it by its finger grip, peel off the protective
film from the nozzles.
Avoid touching both the nozzles and the
electric contacts and, if the print head has an
interchangeable cartridge, do not detach the
ink cartr idge from the pr int head.
NO!
37
Page 47

NO!
4. Inser t the pr int head in its compartment with the
electric contacts towards the front of the machine.
When the cover is closed the fax machine performs automatically the nozzles checking and
the print test (already described in “Inserting a
print head”, chapter “How to install”).
PRINT HEAD CLEARING PROCEDURE AND
MANUAL NOZZLE TESTING ...
If the print quality deteriorates you can quickly clear
the print head and test the nozzles with a print out showing their condition.
5. Push the print head in the direction indicated by
the arrow until it clicks into place to indicate that it
is correctly inserted. Close the print head compartment cover.
If the replaced print head is of the disposable
type, and you have replaced it because the
ink ran out, your machine recognizes automatically the replacement and the following message appears on the display: “NEW PRINT
HEAD? 1=YES, 0=NO”.
If the replaced print head is of the disposable
type, and you have replaced it because the
print quality deteriorates, follow the clearing
procedure below to allow your machine to
recognize the new print head.
38
Diagnostic result interpretation
The print test carried out by the fax machine contains a numbered scale and a message concerning the operating status of the nozzles, the result may
be:
Correct continuous line
The message concerning the print head nozzles is:
"NOZZLES OK" this means that the print head is
correctly inserted and all electrical contacts are
working.
Page 48

Defective
CLEANING THE ELECTRICAL CONTACTS OF
THE PRINT HEAD ...
The message concerning the print head nozzles is:
"NOZZLES OK" this means that there is a mechani-
cal problem. In this case, consult the table below:
1. The fax machine must be switched off . Lift the
head compartment cover, positioning your fingers
in the recesses on the sides.
2. Release the pr int head (including the cartridge if
Defective
The message concerning the print head nozzles is:
"NOZZLES DAMAGED", this means that there is
an electrical problem. If this is the case, consult the
table below:
3. Remove the print head.
it is an interchangeable ink cartridge head) using
the levers.
39
Page 49

4. Clean the electric contacts using a slightly damp
cloth.
2. Move the print head as shown in the figure.
Do not touch the print head nozzles.
5. With the slightly damp cloth, clean also the electrical contacts on the print carriage, then reinsert the
print head and close the print head compartment
cover.
CLEANING THE PRINT HEAD PAD ...
1. With the fax machine switched off, lift the print
head compartment cover, positioning your fingers
in the recesses on the sides.
3. Clean the print head pad with a dry cotton wool
bud, then close the print head compartment
cover.
CLEANING THE OPTICAL READER ...
40
Dust accumulating on the optical reader glass may
cause document scanning problems. To avoid this
problem, you must clean the glass every now and
again as described below:
1. With the fax machine switched off, lift the op-
erator console.
Page 50

2. Release the lever positioned on the roller left side
and remove the roller. Clean the roller with a cloth
to remove any dust.
3. Clean the optical reader glass using a cloth
dampened with a product specifically designed
for cleaning glass, and then carefully wipe it dry.
Do not pour or spray the cleaning product directly
on the glass.
Reinsert the roller and lower the operator console
again.
REMOVING JAMMED DOCUMENTS ...
During transmission or copying, a document may
jam (this condition is indicated on display by the mes-
sage: "REMO VE DOCUMENT, PRESS STOP"). In this
case, try to eject the document by pressing the STOP
key. If the document is not ejected automatically,
remove it manually as indicated below:
1. Raise the operator console and remove any docu-
2. Release the roller (see “Cleaning the optical
ment remaining in the feeder.
reader”) and remove the jammed document.
To check if the optical reader is clean, make
a copy with a blank page. If the copy presents
vertical lines but the optical reader results perfectly clean, contact a qualified technical service technician.
3. Replace the roller, lower the operator console and
CLEANING THE CASING ...
1. Disconnect the fax machine from the power supply.
2. Use only a soft lint-free cloth, dampened with diluted
washing-up liquid.
replace the documents in the document feeder.
41
Page 51

REMOVING JAMMED PAPER ...
If the paper jam in the paper insertion area:
The paper for printing received documents or copying the document may jam (this condition is indicated
on display with the message: "PAPER ERROR,
PRESS STOP"). In this case, try to eject the sheet
by pressing the STOP key. If the sheet is not ejected
automatically, remove it manually as indicated here
below:
If the paper jam in the received/copied documents exit area:
1. Remove the exit support for original documents.
1. Rotate the front cover of the feeder.
2. Remove the jammed sheet.
2. Remove the jammed sheet and replace the exit
support for or iginal documents.
If you cannot remove the jamed sheet in the
manner described, repeat the same procedure
after first removing the feeder.
3. Close the front cover of the feeder.
42
Page 52

SOL VING SMALL PROBLEMS ...
The following list may be useful as a guide to solving
small problems.
If the fax machine does not transmit or receive
documents, this may also depend on other causes.
They will be indicated with an error code in the
"Transmission report" and in the "Activity re-
port", see "Printing lists and reports", chapter
"For everyday use ".
43
Page 53

ERROR CODES ...
The error codes are printed both on the transmision and actvity reports and are represented by two digits
indicating the cause of the error. On the activity report,due to lack of space only the code is indicated without any
message.
44
Page 54

SIGNALS AND MESSAGES ...
Message : “CHECK PRINT HEAD”, “PRESS STOP”
Any problems which may occur are normally indi-
cated by acoustic signals (sometimes accompanied
by visual signals: ERROR led on) or by error mes-
sages on the display.
In the appendix of this manual, you will find a list of
the acoustic signals and display messages, which
do not indicate an error condition.
Some nozzles on the print head have been damaged
resulting in poor print quality. Carry out the clearing
procedure for the print head (see “For Resetting the
Print Head and Manual Control of the Nozzles”)
The fax machine is still sending the document inserted in the ADF. Wait until the operation has finished.
Acoustic signals ...
Short tone for 1 second
• You have pressed the wrong key during an operating procedure.
Prolonged tone for 3 seconds plus error led on
• Operation unsuccessful.
Permanent tone plus error led on
• Handset off hook; you forgot to replace it after a
previous operation.
To switch off the "ERROR" led, press the STOP
key.
Error messages on display ...
The received document has been stored because an
error occurred during the reception operation and immediate print-out was not possible: check the type of
error (no paper or paper jam, no ink, cover open, etc.)
and correct the problem.
You have forgotten to low er the operator console: lower
it.
The last transmission was not carried out correctly.
Press the REDIAL key to re-enter the transmission or
press the STOP key and repeat the transmission.
Message: "DOC. FOR REDIAL"
Message: "DOC. IN MEMORY"
Message: "KEYBOARD OPEN!"
Message: “LAST TX ERR. XX”
The messages are listed in alphabetical order. Corrective action is indicated.
Message: "ADD PAPER!"
There is no paper in the sheet feeder: add paper.
Message: "AUTOREDIAL nnn"
The connection was not made due to errors on the line
or because the receiver was engaged. The fax machine
is waiting to carry out the automatic redial attempts.
Message : “CHECK PRINT HEAD”
The fax machine does not show the presence of the
print head because you have forgotten to insert it or
because it has not been inserted correctly. Insert or
re-insert the pr int head.
• During reception
• During transmission/copying
Message: "NEW PRINT HEAD ?", "PRESS STOP"
After inserting or replacing disposable print head, you
have f orgotten to respond to the message “NEW PRINT
HEAD?” “1=YES” “0=NO”: press the STOP key and
answer as appropriate.
Message: "MEMORY FULL"
One or more documents are in memory because
of an error during reception and have filled the
memory. Check the type of error (no paper or paper jam, no ink, cover open, etc.) and correct the
problem. The documents will automatically be
printed freeing the memory.
The document to be transmitted or copied is too
long and has filled all the memory . Divide the document into several parts.
F
45
Page 55

Message: "NOT PROGRAMMED"
Message: "RX IN MEMORY"
You have selected a speed dial code or a one-touch
dial key which has not been programmed: programme
the key or code (see “Programming the Speed di-
alling and One-touch dial” chapter “For everyday
use”).
Message: "OUT OF INK"
The ink cartridge has run out: replace the cartridge (see
“Replacing the ink cartridge”).
Message: "PAPER ERROR", "PRESS STOP"
The paper jammed during a copying or receveing operation: press the STOP key, then, if the sheet is not
ejected automatically, check where it is jammed and
remove it (see “Removing jammed paper”).
Message: "POLL. RETRY nnn"
You have set a reception polling and the connection
was not carried out because of errors on the line or
because the receiver was engaged. The fax machine
is waiting to carry out the automatic redial attempts.
Message: "PRINT. COVER OPEN"
The reception has been memorised due to an error during the reception phase which impeded the printing of the
document. Check on the lower lines of the display for the
type of error and correct the problem. If on the lower line
of the display you see the PRINTER ERROR message
you can only correct the problem when the reception has
finished.
You have interrupted the reception by pressing the
STOP key: press the STOP key again to switch off the
"ERROR" led.
An anomaly which blocked the fax machine occurred.
Switch off and then on again the fax machine. If the
error persists, switch off the fax and call the technical
support s er vice.
The transmission was not carried out correctly: press
the STOP key to switch off the "ERROR" led and repeat the transmission.
Message: "RX INTERRUPTED"
Message: "SYSTEM ERROR nn"
Message: "TX ERROR"
You have forgotten to close the print head compartment cover: close it.
Message: "REMOVE DOCUMENT ","PRESS STOP"
If the document gets jammed during copying or transmission, press the STOP key. If the document is not
key ejected automatically, lift up the console and remove it (see “Removing jammed documents”).
You have interrupted the scanning operation by pressing the STOP key: press the STOP key again to switch
off the “ERROR” led and remove the document. If the
document is not ejected automatically , remov e it manually .
Message: "RX ERROR"
The reception was not carried out correctly: press the
STOP key to switch off the "ERROR" led.
Message: "TX INTERRUPTED"
You have interrupted the transmission by pressing the
STOP: press the ST OP k ey again to s witch off the "ER-
ROR" led.
46
Page 56

APPENDIX
OTHER A COUSTIC SIGNALS ...
Short tone for 1 second
• Transaction was carried out correctly.
Intermittent tone for 20 seconds
• Inviation to lift the receiver to answer a telephone
call.
OTHER MESSA GES ON DISPLA Y ...
Message: "LIFT HANDSET"
The remote party has booked a voice communication: lift the receiver to answer the call.
Message: "CONNECTING"
The fax is carrying out the connection with your remote party fax machine.
Message: "DOCUMENT READY"
The fax is dialling the remote party.
Message: "NEW PRINT HEAD ?", "1=YES 0=NO"
You have inserted a disposable print head for the first
time or removed and then reinserted it: answer appropriately. If you answer “yes” but the print head is
not new, the fax machine will not detect the end of ink
condition.
The transmission was carried out correctly.
You have set a transmission from the memory.
There is a transmission underway.
Message: "DIALLING"
Message: "TX COMPLETED"
Message: "MEMORY TX"
Message: "TRANSMITTING ..."
Message: "TX AT HH:MM"
You have inserted correctly the document in ADF.
Message: "OFF HOOK"
You connected to the line by pressing the HOOK key
or by lifting the receiver of the connected telephone.
Message: LINE ON HOLD", "PRESS HOLD"
You have temporarily “held” a telephone conversation by pressing the HOLD key: press the HOLD key
to talk again with your remote party.
Message: "RX COMPLETED"
The reception was carried out successfully.
Message: "POLL RX HH:MM"
You have carried out a transmission request (Polling
reception).
You have set a transmission at a preset time (delayed transmission).
The last transmission was completed correctly.
Message: "CHECK PRINT OUT","1=EXIT 0=REPEAT"
The fax machine is carrying out automatically the
print head nozzles test with the subsequent print test:
from the print test, check if the print quality is acceptable and select accordingly.
Message: "LAST TX OK"
47
Page 57

TECHNICAL DATA ...
GENERAL FEATURES
• Model Desktop transceiver
• Display LCD 16 + 16 crt.
• Memory capacity (*) 21 pages
Dimensions:
• Width 324 mm
• Depth 325 mm (421 mm max.)
• Height 140.5 mm (230 mm max.)
• Weight 6.3 Kg
COMMUNICATION FEATURES
• Telephone network Public/private
• Compatibility ITU
• Communication speed 9600/7200/4800/2400
bps
• Compression methode MH, MR, MMR
POWER FEATURES
• Power voltage 220-240 VAC
(see the label on the back of the
fax machine)
• Frequency 50-60 Hz
(see the label on the back of the
fax machine)
OPTICAL READER FEATURES
• Scanning method CCD
Reading resolution
• horizontal 8 pixel/mm
• vertical STANDARD 3.85 lines/mm
• vertical FINE 7.7 lines/mm
TRANSMISSION FEATURES
• Transmission time 10 s (9600 bps) in MMR
• ADF 10 sheets A4, A5,
• Memory capacity max. 10 pages
RECEPTION FEATURES
• Printing method Printing on plain paper with
• Maximum
printing width 208 mm
• Printing paper A4 (210 mm x 297 mm),
• Paper feed Plain paper cassette
:
Letter and Legal
ink jet printer
Letter and Legal
(70 sheets 70-90 gr/m2)
Power consumption
• Stand-by 10 VA
• Power max. 48 VA
• Current 0.2 A
ENVIRONMENTAL CONDITIONS
• Temperature from 5o C to +35oC
• Relative humidity 15% - 85% (operating
(*) ITU TS format, Test Sheet No. 1 (Slerexe Letter) in standard resolution with MH compression.
48
:
(operating)
from -15 oC to +45oC
(transport)
from 0 oC to +45 oC
(storage and parking)
storage/parking )
5% - 95% (transport)
Page 58

EXAMPLE ST ANDARD FORM ITU-TS TEST SHEET N°1 (SLEREXE LETTER)
49
Page 59

COMPACT TELEPHONE - INSTALLATION
Option which has been homologated in some countries.
50
Page 60

WHERE WE TALKED ABOUT
A
Acoustic signals 47
ADF 10
Answering machine 2
ASF 3
B
Back-up batteries 6
C
Casing 41
Cleaning 36
Configuration parameters 25
Connection tone 30
Contrast 28
adjustment 28
Copying 19
one copy 19
D
Date and time 3
Display 45
error messages 45
other messages 47
E
L
Language 2
Lists 22
automatic printing
data relative to delayed transmission 24
printing
data stored in one-touch dial keys 25
set-up and configuration parameters 25
speed dialling codes 25
Loudspeaker 31
Loudspeaker volume 31
M
Memory 12, 13, 14
memory capacity 48
print-out of parameters 14
transmission from memory
changing/resending/clearing 14
transmitting a document from memory
12, 13, 14
Messages 45
error messages on display 45
other messages 47
N
Nozzles 4, 36, 37, 38, 39
manual testing 38
Number of rings 34
Electrical contacts 4, 37, 38
print carriage 40
print head 4, 39
Error codes 15, 44
Error correction mode 32
ERROR led 45
Exit support for received/copied documents 1
Extendible exit support for original documents 1
I
Initial waiting mode 4
Ink cartridge 4, 5, 36
replacing the ink cartridge 36
50
O
One-touch dial 19
telephoning with 22
transmitting with 21
Optical reader 40
cleaning 41
Original document 10
insertion in ADF 10
removal of jammed document 41
which documents can be used 10
Page 61

P
S
Package 1
Paper 3, 10
adjusting the sheet feeder 26
automatic sheet feeder 26
automatic sheet feeder (ASF) 1
loading paper 3
paper sizes 3, 10, 26
removing jammed paper 42
Polling 29
in reception 29
in transmission 30
Power cord 2
Power supply 2, 48
connecting to 2
Print head 4, 5, 36
inserting 4
replacing 37
Print head cleaning 38
Print head cleaning pad 36, 39, 40
Problems 43
R
Reception 16
automatic reception 15, 16
with call type recognition 15, 16
interrupting 15
manual 15, 16
with external answering machine 17
with external telephone answering machine
15
REDIAL 11
Remote control 16
Remote control code 33
Reports 22
how to interprete 24
printing 22
types 22
Resolution 28
adjusting 28
Selection
pulse 7, 8
tone 7, 8, 11
Sender identification 5
setting a fax number 6
setting a name 5
Set-up parameters 25
Silence lapse 35
Speed dialling
telephoning with 22
transmitting with 22
Surplus 27
T
Technical data 48
Telediagnosis 32
Telephone connected on same line 18
Telephone exchange 7
private switchboard 8
public 7
Telephone line 2, 7, 8
connecting the fax machine 2
connecting the telephone/answering machine
2
private line 8
public line 7
Transmission 11
an original 10
delayed 12, 13
from memory 13, 14
interrupting 11
with one-touch dial 21
with speed dialling 22
Transmission speed 31
reducing 15
51
Page 62

CONSOLE
Some keys may perform several functions, depending on the operational setting of the fax machine:
A Waiting mode, when the fax machine is not active.
P Programming mode (access to various menus) after pressing the FUNCTION key.
C Comnunication mode, during transmission or reception operation.
L Line mode, after pressing the HOOK key or lifting the receiver.
DISPLAY
Two lines of 16 characters, shows:
• Date and time
• Machine status , menu and sub-menu
items, parameters and relative values
• Error messages
• Resolution and contrast values f or document scanning.
NUMERIC KEYPAD (0-9)
A-L • For dialling the fax machine or tele-
phone number.
P • Sets any other numeric data.
• Selects digits and alphanumeric characters during the setting of numbers and
names.
KEY
*
P • Selects "next" special characters and
symbols during the setting of names.
• Dials remote control codes.
KEY P á T
L-A-P • Used for switching temporarily from
pulse (decadic) to tone dialling (multifrequency).
KEY #
P • Selects "previous" special characters
and symbols during the setting of
names .
FUNCTION
A • Access to programming mode.
P • Selects menus and sub-menus.
RX MODE
A • Selects reception methods.
CLEAR
P • Clears wrong settings and programming
errors.
</>
P • Select “next” or “previous” parameter
value.
RESOL.
A • Adjusts the resolution of the documents
to be transmitted/copied (only with the
document inserted in ADF).
Page 63

CONTR.
A • Adjusts the contrast of the documents
to be transmitted/copied (only with the
document inserted in ADF).
- VOLUME +
L • Adjusts the loudspeaker volume, re-
ducing or increasing it after pressing
the HOOK key.
S. DIAL
A • followed by two alphanumeric keys
(01-32), selects automatically the telephone or the fax machine number
associated to them.
A Ö a
P • During the setting of names, selects
the capital and small letter characters.
LAST TX
A • Shows the outcome at the last trans-
mission.
REDIAL
A • Redials the last fax machine number
entered (only it the document is inserted in the ADF).
• Redials the last telephone number
entered.
EXT.
A-L • Pressed before dialling the telephone
or fax machine number, grants to the
entered number the possibility of being connected with a private branch
exchange. Performs the same function for the numbers entered under
the speed dialling and the one touch
dialling.
PAUSE
A -L • Sets a pause between the digits of the
international code, the area code and
the remote party number during the
dialling of the telephone or fax machine number.
P • Performs the same function for the
numbers entered under the speed
dialling and the one touch dialling.
HOLD
L • During a telephone conversation, puts
the call on hold.
2. TONE
Function enabled only in certain countries.
A • Pressed before dialling the telephone
or fax machine number, grants to the
entered number the possibility of detecting a second exchange dialling
tone when the machine is connected
to a particular type of telephone exchange.
P • Performs the same function for the
numbers entered under the speed
dialling and the one touch dialling.
HOOK
A • Line setting: equivalent to lifting the
receiver.
START
A • Starts copying a document (only with
the document inserted in ADF).
• Starts receiving a document.
A-L • After dialling the fax machine number,
starts transmitting the document (only
with the document inserted in ADF).
P • Confirms the selection of menus, sub-
menus, parameters and relative values and moves on the next procedure.
STOP
A • Interrupts a copying operation.
• Ejects a document from ADF.
• Switches off the ERROR led.
P • Restores the fax machine waiting
mode.
• Interrupts a programming operation.
C • Interrupts a transmission or reception
operation.
ONE-TOUCH DIAL KEYS (01-10)
A • Select automatically (after program-
ming) the telephone or fax machine
number associated to them.
ERROR LED
• Signals an error during transmission
or reception.
 Loading...