

Page 1

FF
AA
CSIMILECSIMILE
F
A
CSIMILE
FF
AA
CSIMILECSIMILE
OFX 100
INTRUCTIONS
Cod. 2739880D
Page 2

PUBBLICAZIONE EMESSA DA:
Ing. C. Olivetti & C., S.p.A.
Servizi di Documentazione
Via Jervis, 77 - 10015 Ivrea (To)
Copyright © 1994 Olivetti
Tutti i diritti riservati
Si dichiara che questa apparecchiatura è
conforme alle disposizioni della direttiva CEE 87/
308 per la prevenzione ed eliminazione dei
radiodisturbi (D.M. 13 Aprile 1989).
Page 3

Contents
A. Important Safeguards.............................................................................1
B. Environment ...........................................................................................3
C. Package contents...................................................................................3
D. Taking a look at the machine parts ........................................................ 3
E. Installation instructions........................................................................... 4
F. Function descriptions .............................................................................6
a. Keys ..................................................................................................6
b. Indicators .......................................................................................... 6
c. Resolution .........................................................................................7
d. Reception..........................................................................................7
e. Alarm signals ....................................................................................8
f. Power requirements ......................................................................... 8
G. Document and paper requirements .......................................................8
a. Recommended transmittable document .......................................... 8
b. Recommended thermal paper roll.................................................... 9
H. OMR (Optical Mark Reader) setting ......................................................10
a. Use of the OMR sheet ......................................................................10
b. Complete the OMR sheet(s).............................................................10
c. To enter OMR setting mode ............................................................. 11
d. To program the OMR setting ............................................................ 12
I. Copy .......................................................................................................13
a. Copy..................................................................................................13
b. Document jam...................................................................................13
c. Paper jam ......................................................................................... 13
J. Transmission .......................................................................................... 14
a. Start transmission............................................................................. 14
b. Stop transmission .............................................................................14
c. Transmission report ..........................................................................14
d. Error code .........................................................................................15
K. Reception ...............................................................................................16
a. AUTO mode ......................................................................................16
b. TEL. mode ........................................................................................ 17
c. TAD mode: (Telephone Answering Device)......................................18
L. Voice request..........................................................................................20
a. If you wish to speak after sending or receiving a fax.......................20
b. When someone wants to speak with you.........................................20
M. Maintenance........................................................................................... 21
a. Troubleshooting ................................................................................21
b. Cleaning............................................................................................22
Page 4

A. Important Safeguards
First read all of these instructions.
• Unplug this machine from the wall outlet before cleaning. Do not use liquid
cleaners or aerosol cleaners except for the parts mentioned in the CLEANING
section. Use a damp cloth for cleaning.
• Do not use attachments which are not recommended by the manufacturer
as they may cause an electrical hazard.
• Do not use this machine near water; for example, near a bathtub, washbowl,
kitchen sink, or laundry tub in a wet basement, or near a swimming pool,
etc.
• Do not place this machine on an unstable cart, stand, or table. The machine
may fall, causing serious injury to a child or adult, and serious damage to
the appliance. Use only with a stable cart or stand recommended by the
manufacturer.
• This machine should be operated only from the type of power source indicated
on the machine label. If you are not sure of the type of power supplied to
your home, consult your local power company.
• This machine is equipped with a three-wire grounding type plug, a plug
having a third (grounding) pin. This plug will only fit into a grounding-type
power outlet. This is a safety feature. If you are unable to insert the plug
into the outlet, contact your electrician to replace your obsolete outlet. Do
not defeat the safety purpose of the grounding-type plug. Keep off the capacity
transformable or magnetic.
• You are cautioned that changes or modifications that are not expressly
approved by the party responsible for compliance could void your authority
to operate the equipment.
• Do not allow anything to rest on the power cord. Do not locate this machine
where the cord will be walked on.
• Follow all warnings and instructions marked on the machine.
• For added protection to this machine, when it is left unattended and unused
for long periods of time, unplug it from the wall outlet. This will prevent
damage to the machine due to power-line surges.
• Do not overload wall outlets and extension cords as this can result in fire or
electric shock.
• Never push objects of any kind into this machine through the cabinet slots
as they may touch dangerous voltage points or short out parts that could
result in a fire or electric shock. Never spill liquid of any kind onto the
machine.
1
Page 5

• Do not attempt to service this machine yourself, as opening or removing
covers may expose you to dangerous voltage or other hazards. Refer all
servicing to qualified service personnel.
• Unplug this machine from the wall outlet and refer servicing to qualified
service personnel under the following conditions:
* When the power cord or plug is damaged or frayed.
* If liquid has been spilled into the machine.
* If the machine has been exposed to rain or water.
* If the machine does not operate normally by following the Instructions.
Adjust only those controls that are covered by the Instructions as
improper adjustment of other controls may result in damage and will
often require extensive work by a qualified technician to restore the
machine to normal operation.
* If the machine has been dropped or the cabinet has been damaged.
* When the machine exhibits a distinct change in performance - this
indicates a need for service.
• When replacement parts are required, be sure the service technician has
used replacement parts specified by the manufacturer that have the same
characteristics as the original parts. Unauthorized substitutions may result
in fire, electric shock, or other hazards.
• Upon completion of any service or repairs to this machine, ask the service
technician to perform routine safety checks to determine that the machine
is in safe operating condition.
2
Page 6
B. Environment
1. Temperature: 5oC ~ 35oC (41oF ~ 95oF); humidity: 25% ~ 80%.
2. Place the machine horizontally on a stable surface, away from vibrations and
away from electronic machines to avoid interference, e.g.: television, radio
etc. .. .
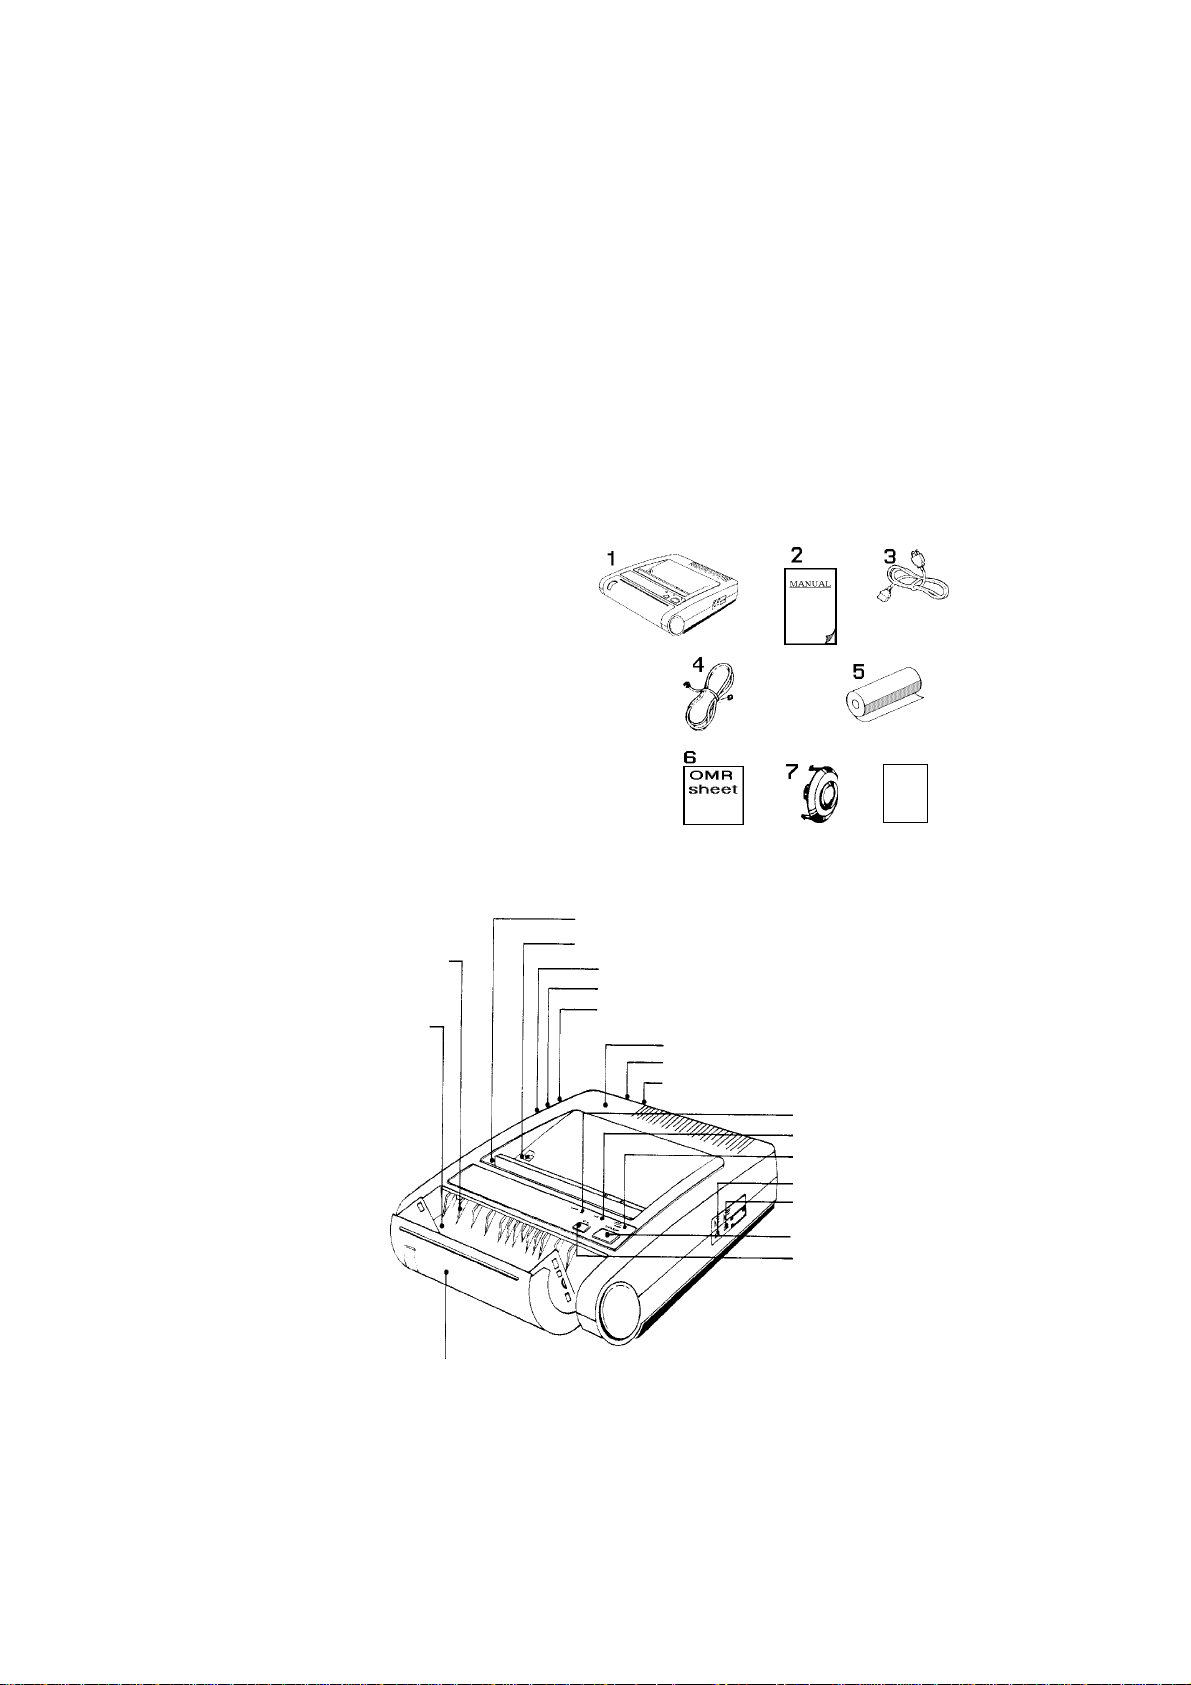
C. Package contents
1. Facsimile machine.
2. Operation manual.
3. Power cord.
4. PSTN cable.
5. Thermal paper roll. (10 m, 32')
6. OMR sheet x 3.
7. 210 paper holder. (Used with
210 mm - type thermal paper roll
8
only; except U.S.A. and
Canada Version.)
8. Special paper for cleaning.
D. Taking a look at the machine parts
Paper guide rib
Paper installation label
Paper cover
Paper cutter
Document slot
TEL 2 jack
TEL 1 jack
Line jack
Upper case
Power switch
Power cord inlet
ERROR indicator
TALK indicator
POWER/COMM. indicator
Reception switch
Resolution switch
START/COPY key
STOP key
3
Page 7
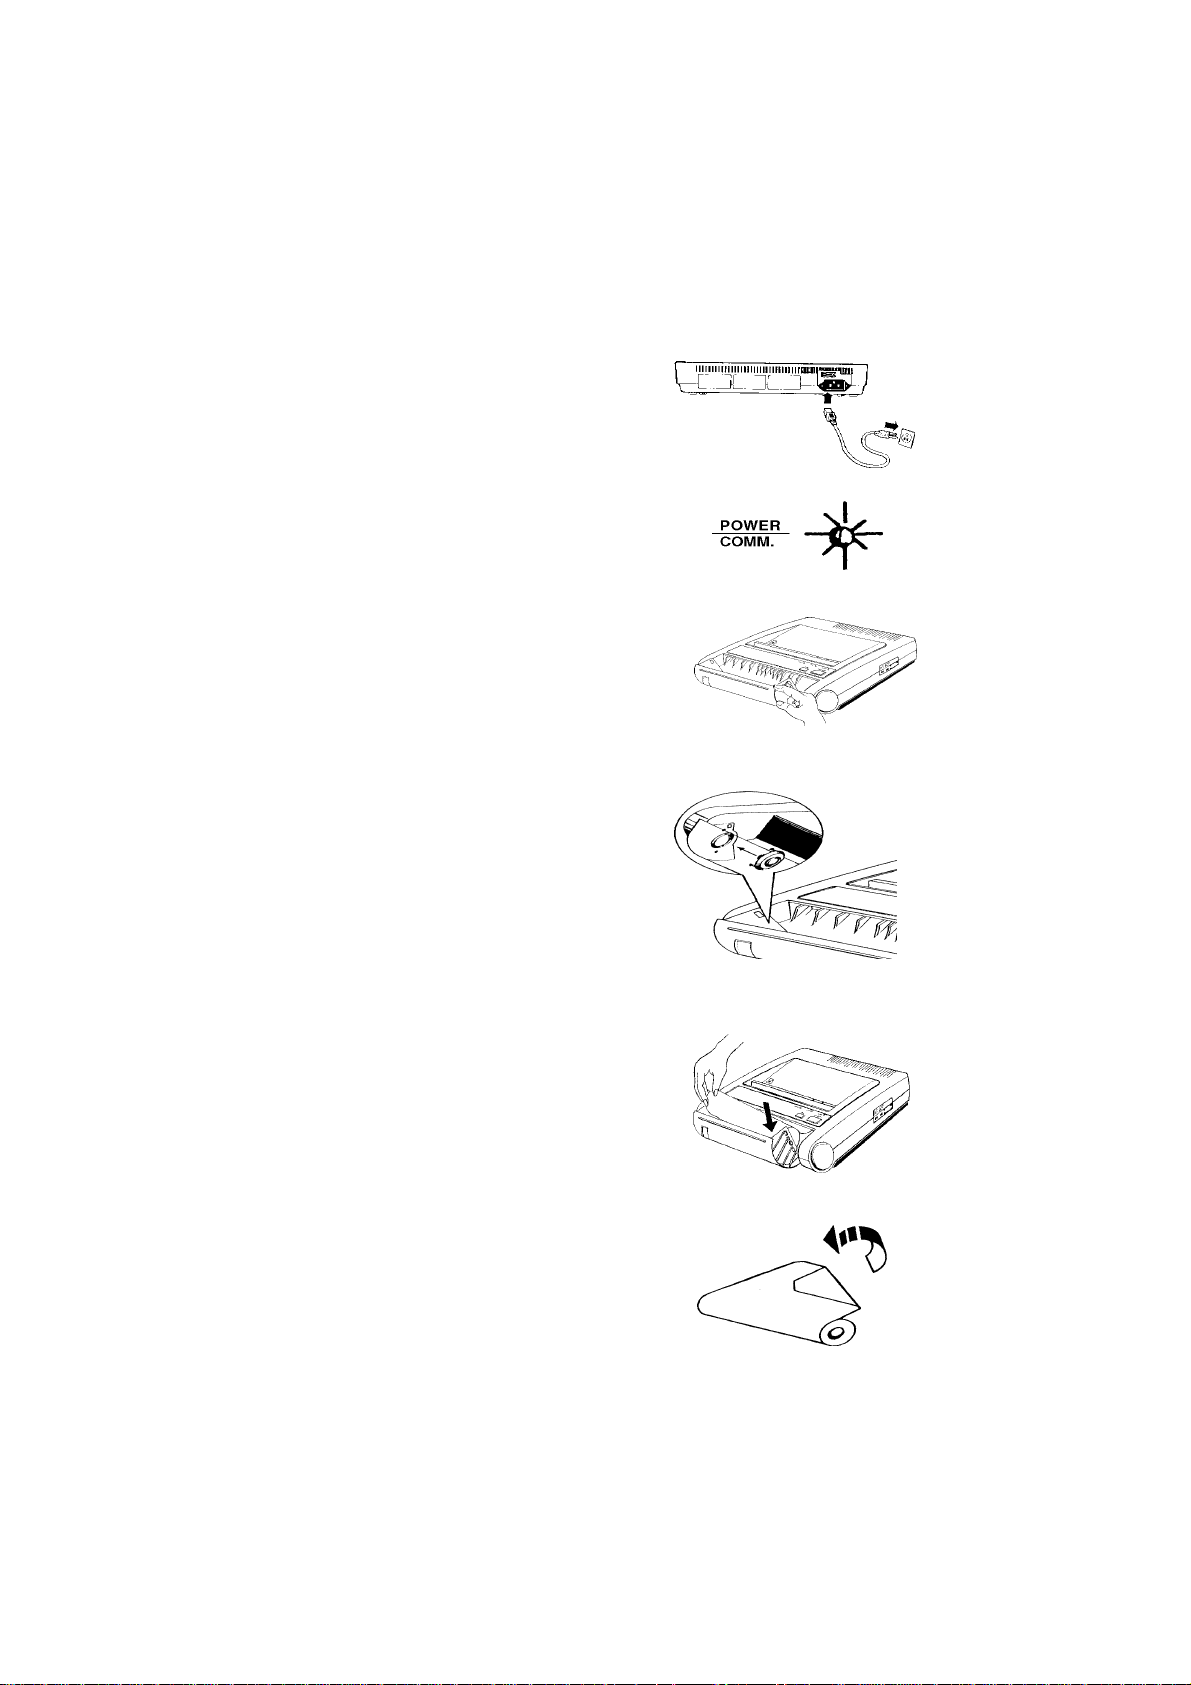
E. Installation instructions
1. Connect the power cord to the machine and
plug into a 3 pronged grounded wall outlet.
Caution: Do not use a 2 pronged adaptor.
2. Turn power switch on (located at rear of ma-
chine). “POWER/COMM” indicator will light.
3. Open the paper cover.
4. Insert the 210 paper holder before loading the
210 mm - type thermal paper roll.
5. Grip the thermal paper roll, place one end over
the paper holder on the right side, and push
against the spring to insert paper roll. (See
arrow)
Paper must unwind over the top.
6. Fold right edge of paper as shown in diagram.
4
Page 8
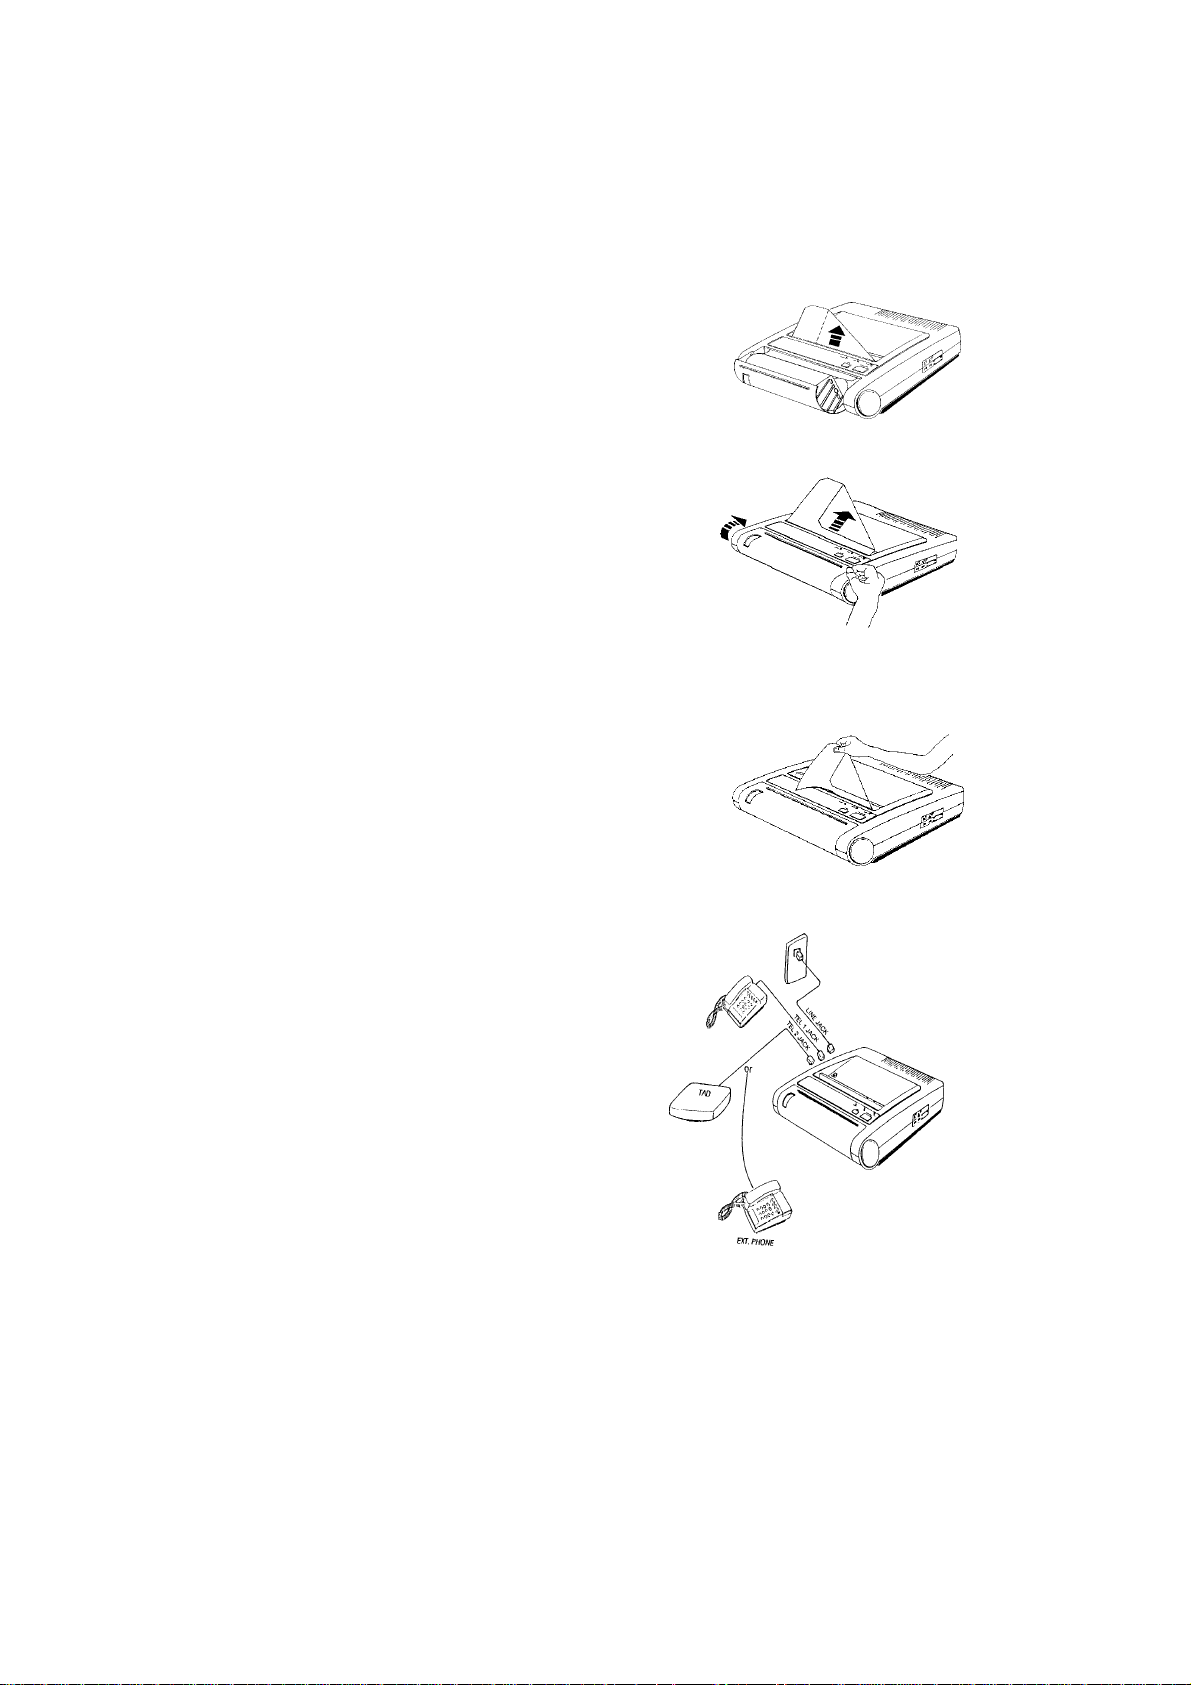
7. Insert paper between the paper guide ribs and
the upper case, and feed the paper into the slot.
8. . Wind the excess paper back, and close the
paper cover.
. Paper will be automatically fed after the cover
is closed.
9. If needed repeat step #3 to adjust the position
of paper.
10. If needed repeat step #8. Cut any excess paper
with the assistance of the paper cutting edge.
11. . Connect the PSTN cable from the LINE jack to
the phone wall outlet.
. Connect your telephone to TEL 1 jack.
. Connect your TAD (Telephone Answering
Device) or an extension telephone located at
a remote location to TEL 2 jack.
NOTE: Never ship the machine for repair with the
thermal paper roll loaded.
5
Page 9

F. Function descriptions
a. Keys:
KEY STAND BY MODE COMM. MODE
. Start transmission. (Par. J) .Talk request (toggle)
. Manual reception. (Par. K)
. Copy. (Par. I)
. Paper feed.
. Stop copy. . Stop transmission.
. Clear Comm. trouble. . Stop reception.
. Remove document from
machine.
. Clear off hook alarm.
NOTE: Press the “STOP” key to return stand by mode while the machine
is in OMR setting mode.
b. Indicators:
Indicator Lit up Blinking
. Power is on.
. Image transaction in
process.
. Off hook.
. To indicate the talk
function is in process.
. An error has occurred.
. Paper cover is
opened.
6
. Waiting for image
transmission in
communication mode.
. Talk request.
Page 10

c. Resolution:
Selected by moving the switch to the desired setting.
STANDARD FINE PICTURE
. For normal . For detailed . For picture
transmission. transmission. transmission.
(See NOTE 1) (16 - level halftone)
. Normal. . Dark.
(See NOTE 2) (See NOTE 2)
NOTE 1: When making copies, FINE mode is automatically selected in STD mode.
NOTE 2: The auto contrast control is selected together with resolution by the
machine.
d. Reception:
Selected by moving the switch to the desired setting.
AUTO TEL. TAD
. Fax telephone/ . Voice call. . For directing
automatic . For manual calls to a TAD
switching. reception. (Telephone
Answering
Device)
7
Page 11

e. Alarm signals:
1. 1 Sec. : . Action complete.
2. 3 Sec. : . Communication trouble. . Document is too long.
. Document jam. . No thermal paper.
. Paper cover is opened. (See NOTE) . TPH has overheated.
3. 5 Sec. : . Inter - page alarm.
This alarm will prompt you to load the next page when multiple
pages are being transmitted.
4. Continuous alarm : . Hang up handset alarm.
. OMR setting error.
NOTE: Alarm will sound if any key is pressed.
Never open the paper cover while the machine is activated,
especially, in transmission or OMR setting mode.
f. Power requirements:
120 ÷ 230 VAC, 50/60 Hz, 0.6/1.25 A
NOTE: For correctness of the input rating, please refer to the “power
label” located on the machine.
G. Document and paper requirements
a. Recommended transmittable document:
1. Acceptable document size:
. Width: 128 mm (5.0"); ~ 216 mm (8.5").
. Length: 120 mm (4.7") ~ 1200 mm (47.2").
. Thickness: 0.08 mm (0.003") ~ 0.13 mm (0.005").
8
Page 12

2. Never use documents that are excessively curled, thin, torn, coated, small, or
crumpled, e.g.: carbon type paper. Make a photocopy of any questionable
document and then transmit the photocopy.
3. Remove staples, paper clips, post-its, tape, etc. before loading document.
Failure to remove staples, clips, etc. from the document will cause severe
damage to the machine and void the warranty.
4. If you have used correction fluid on a document, wait until it dries before loading.
5. If you must transmit a document printed on thermal paper, fold the top edge back
1" to form a firm starting edge.
b. Recommended thermal paper roll:
1. Precautions:
. Always store in a dry, cool and dark place; away from heat, chemicals, or
uneven pressures.
. Do not use adhesives or writing materials containing alcohol or other organic
solvents on them.
2. Format:
. Length: 30 m (98') paper roll.
. Width: 210 mm (8.27") or 216 mm (8.5").
. Thickness: 0.064 mm.
. A qualified thermal paper roll must be used for
good printing result and long life of TPH.
3. Recommended thermal paper:
Only use paper recommended by your Olivetti dealer.
9
Page 13

H. OMR (Optical Mark Reader) setting
a. Use of the OMR sheet:
1. The machine comes from the factory set default value to:
(a) answer on the 2nd ring in AUTO mode,
(b) print reports in English,
(c) press “#” “*” and “7” keys to control the machine to receive messages after
in-coming call mode.
(d) not automatically receive messages if the incoming call doesn't send fax
tone,
(e) automatically switch from TEL. to FAX when the fax tone is heard,
(f) automatically switch in AUTO mode from TEL to FAX if no one answers a call
within 18 Sec.,
(g) not print a transmission report following each transmission.
2. Use the OMR sheet to program the machine according to your desires.
(See b. below)
b. Complete the OMR sheet(s):
1. Use a soft lead pencil to fill in the original OMR sheet squares for setting:
(a) Transmit Terminal Identification (TTI):
Only one square per line can be filled in each column.
- Transmission Terminal Identification (TTI):
Your company name. Up to 20 characters can be set.
(b) User selectable features:
Select one square to fill in for each function.
- Ring count (2 ~ 6 rings):
To select how many times your phone will ring before the machine will
answer in AUTO mode.
- Language selection:
Report printing will be in the language you select.
E: English, F: French, G: German, I: Italian, S: Spanish.
10
Page 14

- Remote telephone receiving code:
To select the key which is pressed after “#” and “*” key to form the remote
telephone receiving code, if the code is in conflict with your TAD control code.
- Silence detection setting:
To select to use or not use this function. If you want to use this function, you
have 3 kinds of silence time to select, 6 , 9 or 12 seconds. If a call doesn't send
fax tone after the setting time, the machine will enter fax reception mode
directly. If you select OFF, and a call doesn't send fax tone, the machine will
not enter the fax reception mode.
- TEL/FAX auto switching:
Fill in the “NO” square if the machine will be used only as a transceiver.
- TEL/FAX auto switching alarm time:
To select the alarm time for the machine to answer the call, while in AUTO
mode, if the call is not from a machine which sends a fax tone. (See Par. K)
- Transmission report:
Select whether you want (“YES”) or don't want (“NO”) a transmission report to
print following each transmission.
(c) Called Subscriber Identification (CSI):
For each row only one square can be filled in.
Your fax number: up to 20 numbers can be set.
2. Please refer to OMR sheet # 2 for characters and figures.
3. The OMR sheet can be changed by completely erasing original pencil marks.
c. To enter OMR setting mode:
1. Power on the machine: after the first beep, press the “START/COPY” key and
“STOP” key at the same time and keep them pressed. After the second beep,
release the keys.
2. The 3 indicators light up together to indicate that the machine is in OMR setting
mode.
3. “OMR SETTING REPORT” is then printed out to tell you the current setting.
11
Page 15

d. To program the OMR setting:
1. Insert the completed OMR sheet face down into the machine in the direction of the
arrow and against the left side of the document slot.
2. After pressing “START” key, the machine begins to read it. Insert the next sheet
and press “START” key again if necessary.
3. If the setting is in error, the “ERROR” indicator will flash and a continuous alarm
will sound. Re-program from step 1.
4. Press “STOP” key to exit the OMR setting mode. The “OMR SETTING REPORT”
will be printed out if an OMR sheet has been fed into the document slot. Otherwise,
the machine will go to STAND BY mode.
5. An “OMR SETTING REPORT” example:
OMR SETTING REPORT
FAX ID: 0014037123456 COMPANY NAME: ABC LTD
COMPANY/NAME : ABC LTD.
TELEPHONE NO. : 001 403 7123456
RING COUNT : 2
LANGUAGE SELECTION : ENGLISH
REMOTE CONTROL RECEPTION CODE : 7
SILENCE DETECTION : OFF
TEL/FAX AUTO SWITCHING : YES
TEL/FAX AUTO SWITCHING ALARM TIME : 18 SEC.
TRANSMISSION REPORT : NO
12
Page 16

I. Copy
a. Copy:
1. You can copy document(s) with the machine by inserting the first sheet into the
machine with face down and against the left side of the slot, and pressing
“START” key to execute.
2. Insert the next sheet into the machine within the 5 Sec. - inter - page alarm time.
3. STD resolution will be changed to FINE mode automatically during the copy
activity.
Face down. Press “START” key.
b. Document jam:
1. If you want to stop the activity, you can press “STOP” key, and the document will
be removed automatically.
2. If the document cannot be removed smoothly, use the following methods.
. Open the paper cover.
. Pull the jammed document out carefully.
. Close the cover, and then re-execute.
c. Paper jam:
1. Open the paper cover, and then pull the paper back.
2. Cut the damaged part.
3. Re-install the paper roll. (Par. E)
13
Page 17

J. Transmission
a. Start transmission:
1. Place one document at a time into the document feeder, face down. Dial fax No.,
and then press “START” key to begin transmission.
2. After the transmission of one page is completed, there will be a 5 Sec. - inter - page
alarm. Place next document into feeder during the alarm if applicable. (See Par.
F, e)
b. Stop transmission:
1. Press “STOP” key during transmission, if you want to stop all transmission activity.
2. The document is removed automatically.
c. Transmission report:
1. If there is an error, the “ERROR” indicator will light up, and the “TRANSMISSION
REPORT” will be printed automatically.
. Press “STOP” key to turn off the “ERROR” indicator.
. Press “STOP” key again to purge the document from ADF.
2. It will be automatically printed out following each transmission if you program it
by OMR setting. (See Par. H)
14
Page 18

3. Example of “TRANSMISSION REPORT”:
TRANSMISSION REPORT
FAX ID: 001 403 7123456 COMPANY NAME: ABC LTD.
REMOTE ID: 7646616
TOTAL PAGES: 01
RESULT:
ERROR CODE 4-22: POOR PICTURE QUALITY, P 01
d. Error code:
# 1-01, # 3-01, # 3-02.
Aborted.
# 4-00, # 4-01, # 4-10, # 4-11, # 4-12, # 4-13, # 4-14, # 4-20, # 4-24,
# 5-01, # 5-21, # 5-30.
Communication trouble: send again.
# 4-21, # 4-22, # 4-23.
Poor picture quality.
# 5-00, # 5-20, # 5-31.
Transmission stopped by receiving unit: send again.
# 5-10.
Remote unit is not a compatible receiver: no communication possible.
15
Page 19

K. Reception
a. AUTO mode:
The reception switch is set to AUTO. position:
Please refer to Par. G, b for the setting of TEL/FAX auto switch.
• The TEL/FAX auto switch is set to off (NO):
The fax machine will enter fax reception mode directly when a call
comes in.
• The TEL/FAX auto switch is set to on (YES):
The active procedure of the fax machine is as below:
Machine will automatically
answer after 2 ~ 6 rings.
(See Par. H, b).
If there is no fax tone..
“TALK” indicator will light up
and alarm will sound for 18
Sec..
Answer phone...
Lift handset.
If someone tells
you , they are
sending a fax, or
if there is silence...
Fax reception
(auto reception.)
If it is a fax
from a
machine
which sends
a fax tone...
If phone is not
answered within
18 seconds...
(Set by user, see
NOTE below)
Press the “START” key on the
machine, or press “#”, “*”, and “7”
keys on the external handset, then
the machine enters the fax reception
mode.
Fax reception
(Machine enters
fax mode.)
NOTE : • Machine will automatically answer after 2 ~ 6 rings. (programmed
by OMR setting)
• The reception can be stopped by pressing the “STOP” key.
• The alarm time can be programmed to 30 Sec. by OMR setting.
16
Page 20

b. TEL. mode:
When telephone rings. Lift handset.
If you are requested to receive a fax message, or if you hear fax tone or if there is
silence.
Fax reception:
Press “START” key.
Press “#” , “*” and “7” keys on
the extension phone connected to
the fax machine. (See NOTE)
or
NOTE: Remote telephone receiving:
1. This function is only possible when using a touch tone phone.
2. While the machine is in TEL. mode, and there is an in-coming call, if you
answer the call with the extension phone connected to the fax machine and
find that it is a fax call, you can press the “#”, “*”,“7” keys on the phone to
begin fax reception.
3. Please note that the third key (“7”) can be changed by OMR setting
(Par.H)
.
17
Page 21

c. TAD mode: (Telephone Answering Device)
The reception switch is set to TAD position, and the reception procedure is
as below:
Make sure that your TAD is connected to the machine, and is turned on.
The TAD will automatically answer
after some rings, which depend on
your ring count setting to the TAD,
and which must be less than your
machine's ring counter.
The caller will hear
TAD message
which should tell
caller to press the
“#” “*” “7” keys on
the phone for fax
transmission, or
leave a message
after the beep tone
(See Par. H, b).
If the caller is trying
to send a fax...
If the “caller” is
a fax which
sends a fax
tone... (See
NOTE below)
TAD is turned on.
After the caller presses
“#” “*” “7” keys on the
phone, the fax tone will
sound. The caller then
presses the “START” key
after the fax tone.
Fax reception
(Fax transmission will be
received automatically.)
If it is a voice call...
Message is recorded by TAD.
NOTE 1: If the “caller” is a fax machine which does not send a fax tone, and
the silence detection is set to:
. OFF: Its message will not be automatically received.
. 6, 9, or 12 sec.: Its message will be automatically received after the
set time.
18
Page 22

NOTE 2: If the power switch of your TAD is not turned on, the machine
will automatically enter into fax reception mode after 6 rings.
NOTE 3: Preparation for TAD:
1. Connect your TAD to TEL 2 jack.
2. Since there is no international standard for TADs, some
TADs may not be compatible with the machine.
3. Record the Out Going Message (OGM) into your TAD within
30 Sec.. Be sure that the OGM contains the following
message:
'Please leave your message, or press “#” “*” “7” key on
your phone for fax transmission after the beep tone. Press
“START” button to start transmission after hearing the fax
tone.'
4. Precaution for remote telephone receiving code:
Please check whether the remote telephone receiving code
(“#” “*” “7” keys) conflicts with your TAD control code. If
it does, please change the third key to your desired number
by OMR setting (See page 8) and record the changed
code in your OGM.
19
Page 23

L. Voice request
a. If you wish to speak after sending or receiving a fax:
Press the “START” key again during
the transaction.
(See NOTE 1)
If the remote user
(a1)
Flashing LED and 10second alarm.
(a3)
Lift handset.
responds.
The “TALK” LED will light up.
If the remote user
does not respond.
. When transmitting:
Transmission is finished.
. When receiving:
Fax mode continues.
(a2)
b. When someone wants to speak with you:
1. After the current sheet is transacted, the “TALK” LED will flash and a 10second alarm will sound. (See a1)
2. Lift handset to talk.
NOTE 1: Procedure moment:
. When transmitting: After last sheet is transmitted.
. When receiving: After current sheet is received.
NOTE 2: Press the “START” key to continue the fax transaction after the
conversation if requested by either party. The document should
be placed in the transmitting machine.
20
Page 24

M. Maintenance
a. Troubleshooting:
PROBLEM
No response.
Document is not set correctly.
Transmission is not possible.
Auto reception is not possible.
Reception and copying are not
possible.
Blank output copies.
OMR setting data lost.
CAUSE AND SOLUTION
. Check electrical wall outlet, on/off
switch, and power connection.
. Always use a transmittable document.
. Use a copied one, and avoid using
improper paper document. (Par. G)
. Check to see if a document jam has
occurred.
. Line busy: Wait for the dial tone, and
re-dial.
. TEL. mode is set; select AUTO or TAD
mode.
. Incorrect paper size; use proper thermal
paper. (Par. G)
. Rectify the paper and document jam if
they have occurred.
. Place the document face down.
. Re-execute OMR setting.
21
Page 25

b. Cleaning:
1. Scanner
If the machine will be used frequently everyday, a once - a - month cleaning is
necessary to keep the good quality of copy and transmission. The cleaning
paper can be used repeatedly, and be cleaned by the soap-suds.
. Drop some alcohol evenly on the leading edge of
the cleaning paper about 8 cm width. (For it is a
square paper, each edge can be the leading one.)
. Set the cleaning paper to the machine as the
method of document setting.
. Press the “START” key to run the copy activity.
. Grasp the end of the paper to avoid it sliding down
after the paper has being fed a little.
. Release the paper to make it feeding out after 10
~ 15 Sec..
2. Printer
In normal case, the machine will print out the full message accurately. If you find
that there are some white lines on the outgoing paper, please clean the printer
as the following way.
. Open the paper cover, and take out the thermal
paper roll.
. Turn the power off.
. Drop some alcohol evenly on the back edge of the
cleaning paper about 8 cm width.
. Insert the cleaning paper with the non-alcoholic
edge as the leading edge from the top of the paper
guide rib to the position of paper cutter.
. Pull the cleaning paper out by holding the both
sides of the leading edge.
. Refer to Installation Instructions (Par. E) to
power on and re-install the thermal paper roll.
22
 Loading...