

Page 1

Ink Jet Fax
Fax-Lab 460/480
INSTRUCTIONS
Page 2
EDITED/PUBLISHED/PRODUCED BY:
Printed in Thailand.
Olivetti, S.p.A. con unico azionista
Gruppo Telecom Italia
Direzione e coordinamento di Telecom Italia S.p.A.
Code of user manual: 259732J
Date of publication: July 2006.
Copyright © 2006, Olivetti
All rights reserved.
No parts of this manual may be photocopied, reproduced or translated into other languages without prior written
authorization from Olivetti S.p.A.
The manufacturer reserves the right to make any changes to the machine described in this manual, at any time, and
without prior warning.
This machine has been approved, under the terms of Council Decision 98/482/EC, for Europe-wide connection as a
single terminal to an analogue Public Switched Telephone System (PSTN) system.
However, due to differences between individual PSTNs in the various countries, the approval does not unconditionally
guarantee success operation of every PSTN termination point.
If you encounter any problems, you should contact your supplier immediately.
The manufacturers declare under their own responsibility that this product
complies with provisions laid down by the directive 1999/05/CE (a copy of the
certificate is included at the end of the manual).
Conformance is certified by the application of the mark to the product.
Network compatibility declaration
This product has been designed and developed to operate in the networks of all European Community countries, and
in those of Switzerland and Norway.
Full compatibility with the networks of individual countries will depend on specific national software parameters which
can be set in the product. If you encounter problems with non EC PSTN networks, contact your national technical
support service.
Your attention is drawn to the following conditions that could compromise the conformity attested above as well as the
machine’s characteristics:
• incorrect electrical supply;
• incorrect installation, erroneous or improper use, or any use that differs from what is indicated in the user manual
supplied with the machine;
• replacement of components or original parts using other types not approved by the manufacturer, or where carried
out by unauthorized persons.
The electrical socket must be near to hand and easily accessible. To disconnect the machine from the electrical power
supply, unplug it from the supply socket.
Page 3
123456789012345678901234567890121234567890123456789012345678901212345678
123456789012345678901234567890121234567890123456789012345678901212345678
123456789012345678901234567890121234567890123456789012345678901212345678
123456789012345678901234567890121234567890123456789012345678901212345678
123456789012345678901234567890121234567890123456789012345678901212345678
123456789012345678901234567890121234567890123456789012345678901212345678
123456789012345678901234567890121234567890123456789012345678901212345678
123456789012345678901234567890121234567890123456789012345678901212345678
123456789012345678901234567890121234567890123456789012345678901212345678
123456789012345678901234567890121234567890123456789012345678901212345678
123456789012345678901234567890121234567890123456789012345678901212345678
123456789012345678901234567890121234567890123456789012345678901212345678
123456789012345678901234567890121234567890123456789012345678901212345678
123456789012345678901234567890121234567890123456789012345678901212345678
123456789012345678901234567890121234567890123456789012345678901212345678
123456789012345678901234567890121234567890123456789012345678901212345678
123456789012345678901234567890121234567890123456789012345678901212345678
123456789012345678901234567890121234567890123456789012345678901212345678
123456789012345678901234567890121234567890123456789012345678901212345678
123456789012345678901234567890121234567890123456789012345678901212345678
123456789012345678901234567890121234567890123456789012345678901212345678
123456789012345678901234567890121234567890123456789012345678901212345678
123456789012345678901234567890121234567890123456789012345678901212345678
123456789012345678901234567890121234567890123456789012345678901212345678
123456789012345678901234567890121234567890123456789012345678901212345678
123456789012345678901234567890121234567890123456789012345678901212345678
123456789012345678901234567890121234567890123456789012345678901212345678
123456789012345678901234567890121234567890123456789012345678901212345678
123456789012345678901234567890121234567890123456789012345678901212345678
123456789012345678901234567890121234567890123456789012345678901212345678
123456789012345678901234567890121234567890123456789012345678901212345678
123456789012345678901234567890121234567890123456789012345678901212345678
123456789012345678901234567890121234567890123456789012345678901212345678
123456789012345678901234567890121234567890123456789012345678901212345678
123456789012345678901234567890121234567890123456789012345678901212345678
123456789012345678901234567890121234567890123456789012345678901212345678
123456789012345678901234567890121234567890123456789012345678901212345678
123456789012345678901234567890121234567890123456789012345678901212345678
123456789012345678901234567890121234567890123456789012345678901212345678
123456789012345678901234567890121234567890123456789012345678901212345678
123456789012345678901234567890121234567890123456789012345678901212345678
123456789012345678901234567890121234567890123456789012345678901212345678
S
HORT GUIDE
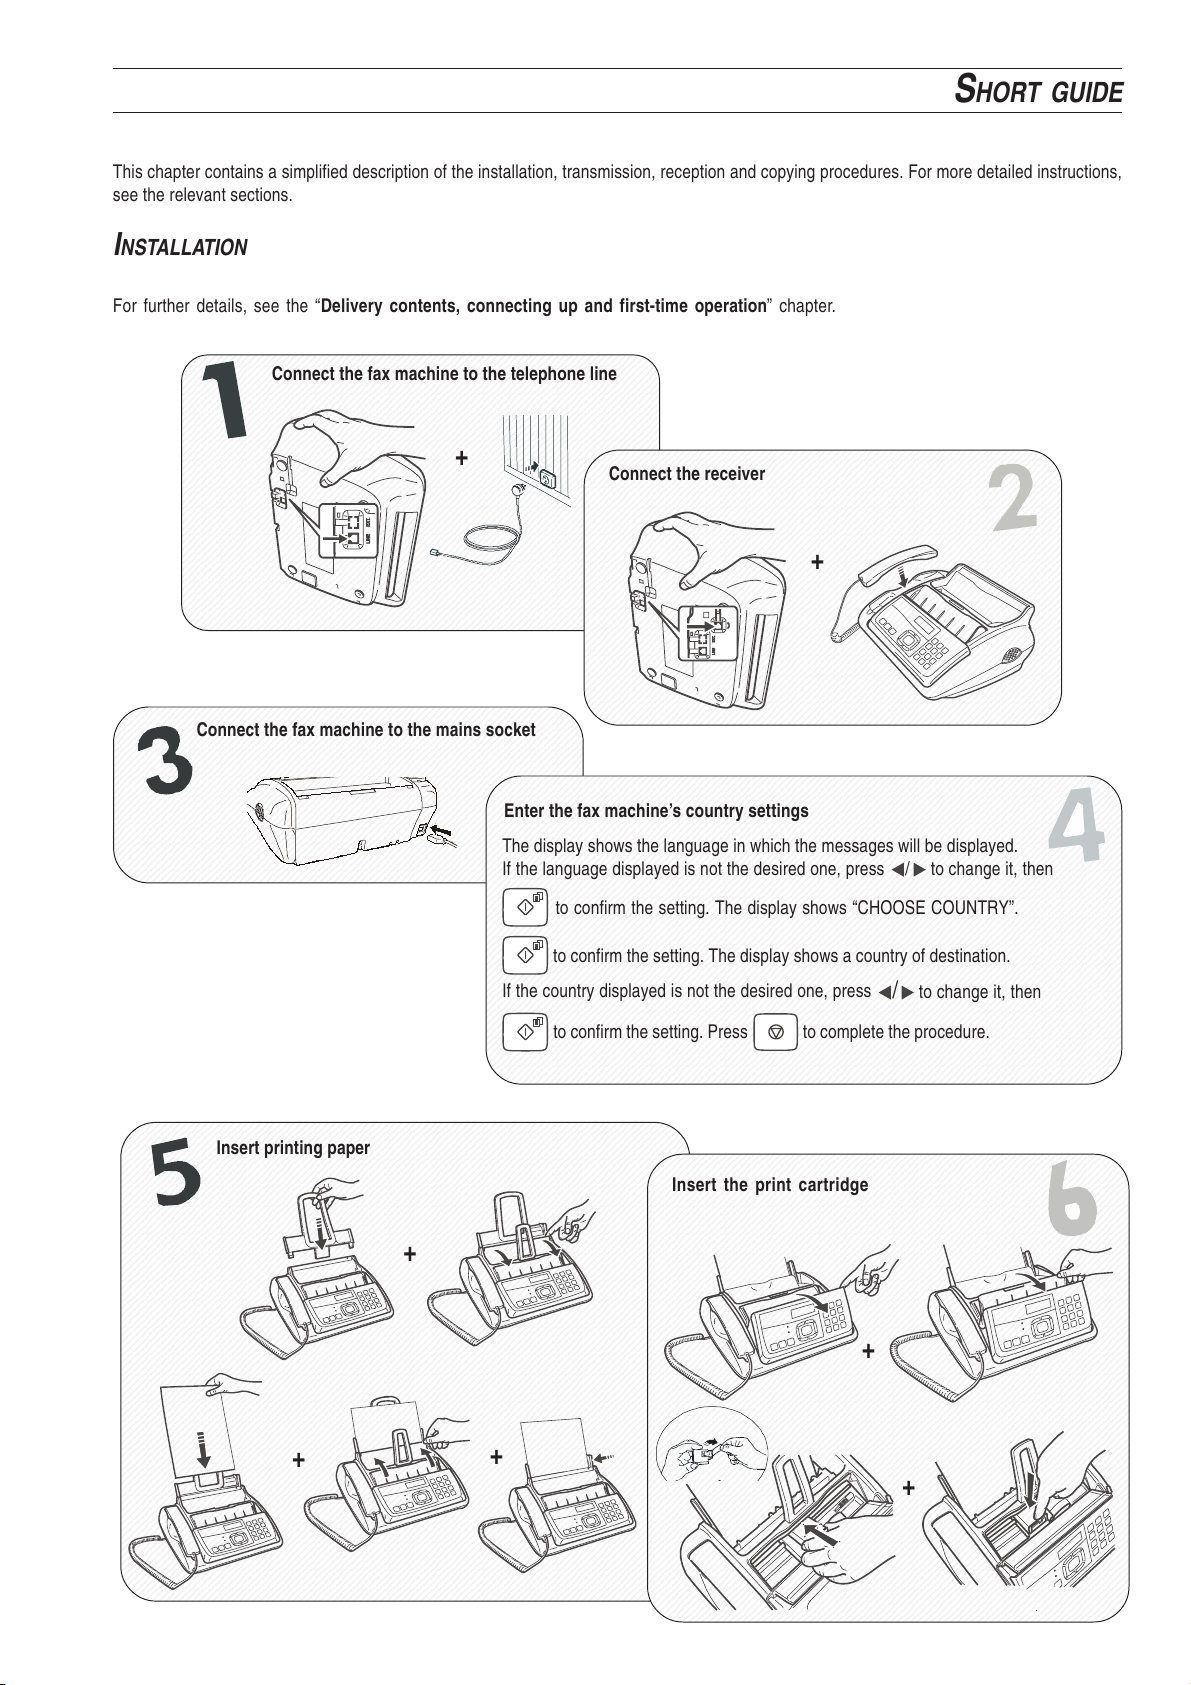
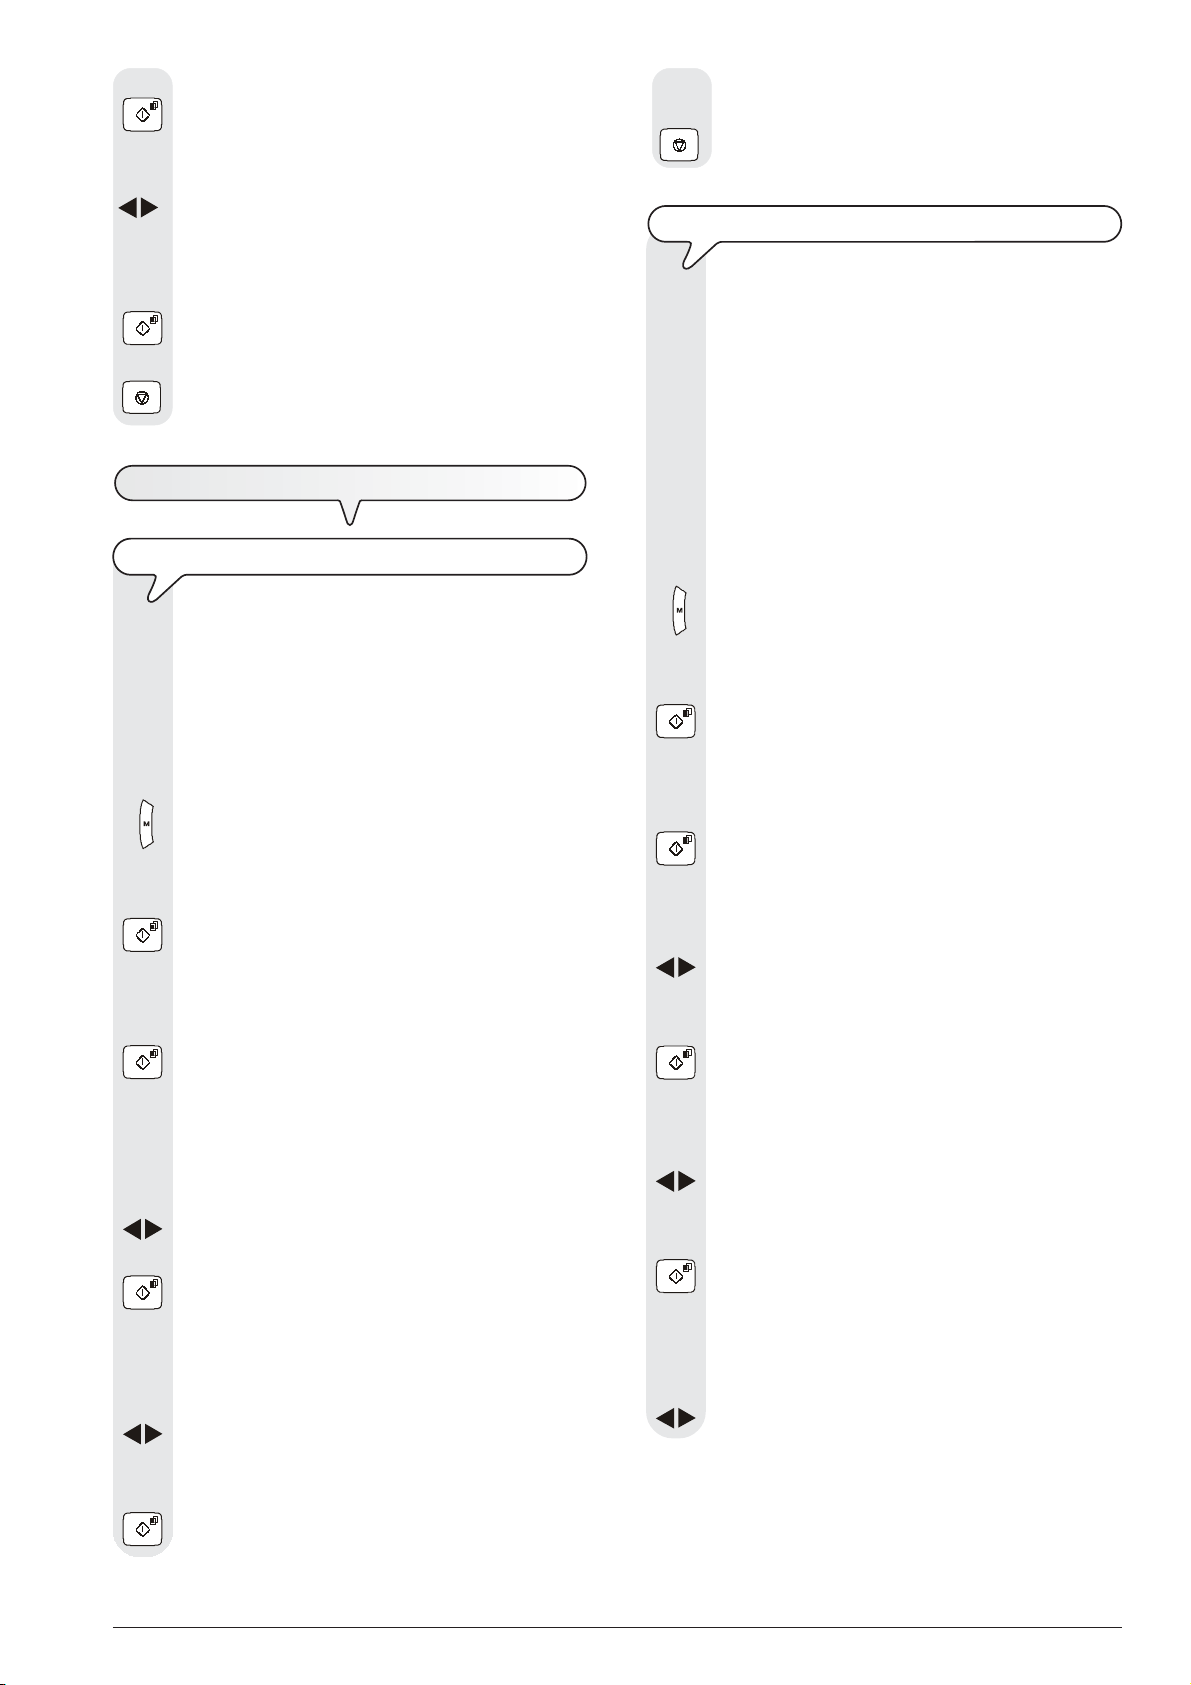
This chapter contains a simplified description of the installation, transmission, reception and copying procedures. For more detailed instructions,
see the relevant sections.
I
NSTALLATION
For further details, see the “Delivery contents, connecting up and first-time operation” chapter.
Connect the fax machine to the telephone line
+
Connect the fax machine to the mains socket
Enter the fax machine’s country settings
The display shows the language in which the messages will be displayed.
If the language displayed is not the desired one, press
to confirm the setting. The display shows “CHOOSE COUNTRY”.
to confirm the setting. The display shows a country of destination.
If the country displayed is not the desired one, press
to confirm the setting. Press to complete the procedure.
Connect the receiver
+
/ to change it, then
/ to change it, then
Insert printing paper
+
+
Insert the print cartridge
+
+
+
Page 4
12345678901234567890123456789012123456789012345678901234567890121234567
12345678901234567890123456789012123456789012345678901234567890121234567
12345678901234567890123456789012123456789012345678901234567890121234567
12345678901234567890123456789012123456789012345678901234567890121234567
12345678901234567890123456789012123456789012345678901234567890121234567
12345678901234567890123456789012123456789012345678901234567890121234567
12345678901234567890123456789012123456789012345678901234567890121234567
12345678901234567890123456789012123456789012345678901234567890121234567
12345678901234567890123456789012123456789012345678901234567890121234567
12345678901234567890123456789012123456789012345678901234567890121234567
12345678901234567890123456789012123456789012345678901234567890121234567
12345678901234567890123456789012123456789012345678901234567890121234567
12345678901234567890123456789012123456789012345678901234567890121234567
12345678901234567890123456789012123456789012345678901234567890121234567
12345678901234567890123456789012123456789012345678901234567890121234567
12345678901234567890123456789012123456789012345678901234567890121234567
12345678901234567890123456789012123456789012345678901234567890121234567
12345678901234567890123456789012123456789012345678901234567890121234567
12345678901234567890123456789012123456789012345678901234567890121234567
12345678901234567890123456789012123456789012345678901234567890121234567
12345678901234567890123456789012123456789012345678901234567890121234567
12345678901234567890123456789012123456789012345678901234567890121234567
12345678901234567890123456789012123456789012345678901234567890121234567
12345678901234567890123456789012123456789012345678901234567890121234567
12345678901234567890123456789012123456789012345678901234567890121234567
12345678901234567890123456789012123456789012345678901234567890121234567
12345678901234567890123456789012123456789012345678901234567890121234567
S
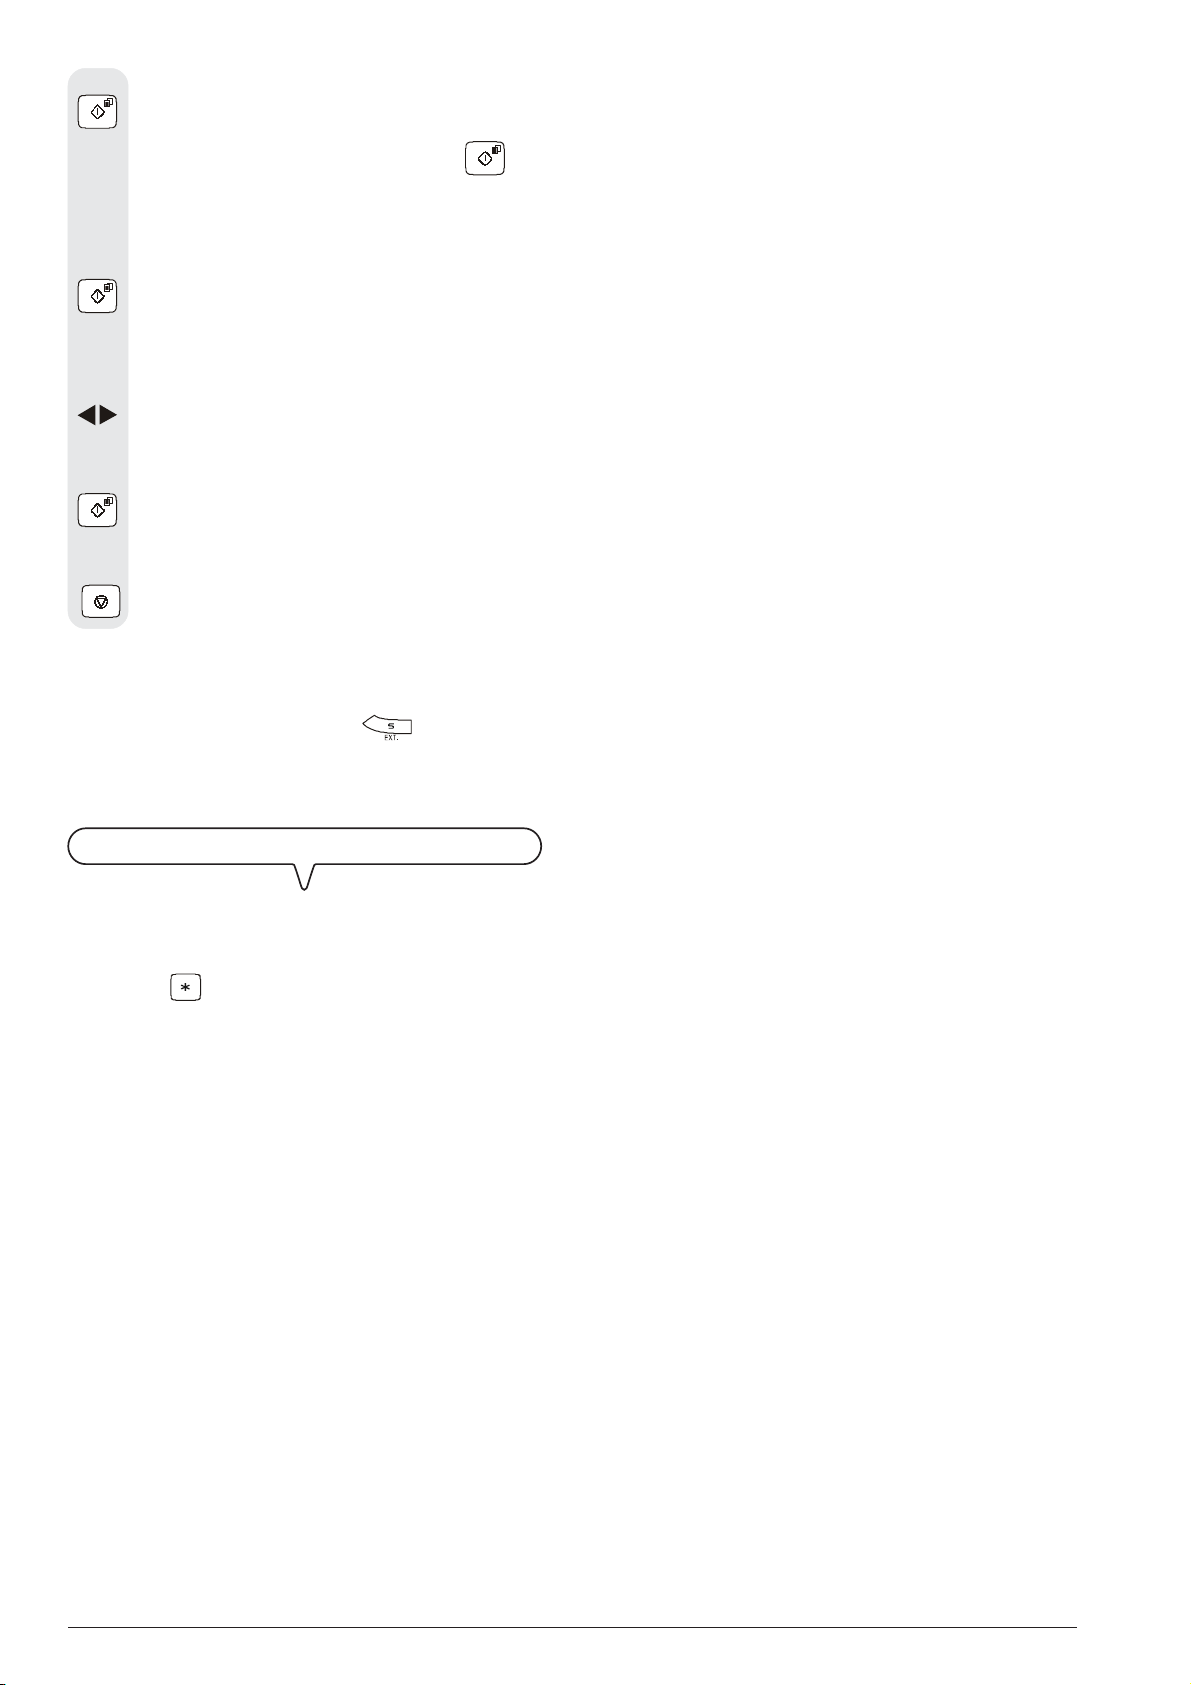
HORT GUIDE
T
RANSMITTING
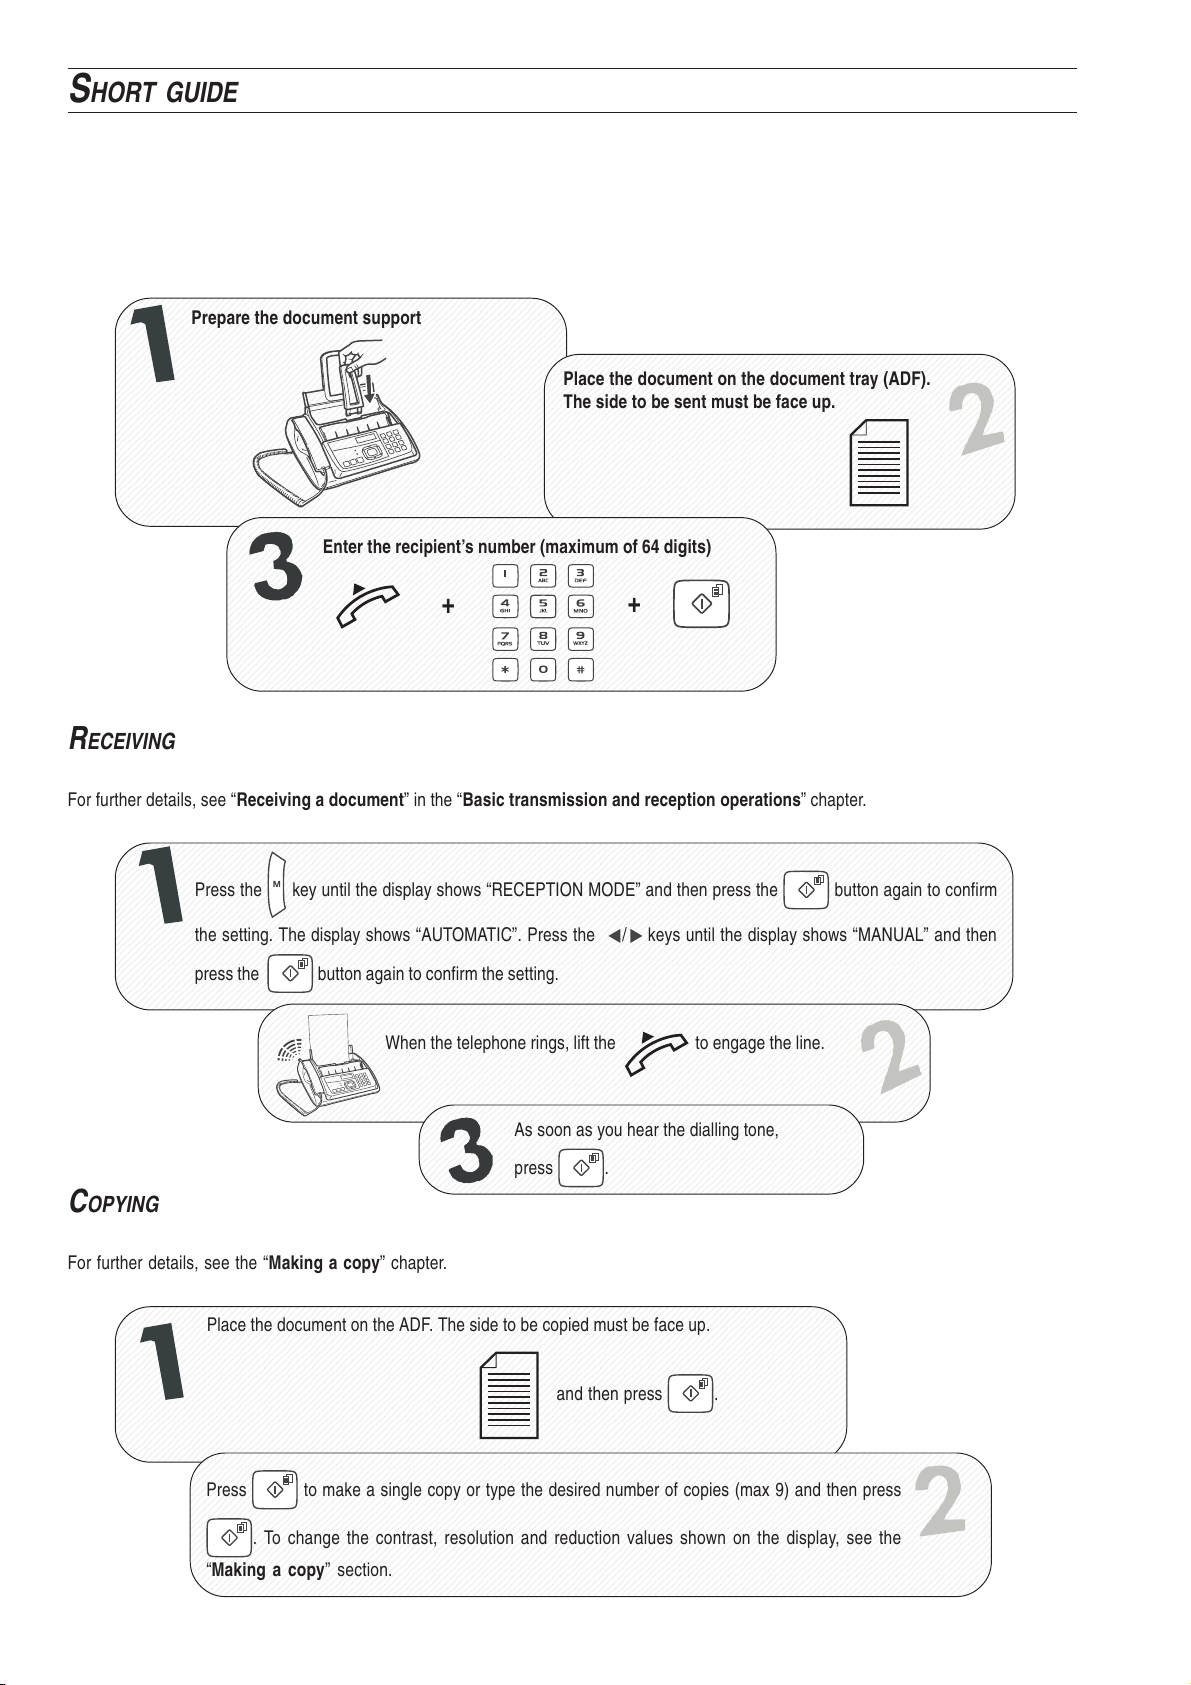
For further details, see “Transmitting a document” in the “Basic transmission and reception operations” chapter.
Prepare the document support
Place the document on the document tray (ADF).
The side to be sent must be face up.
Enter the recipient’s number (maximum of 64 digits)
+
R
ECEIVING
+
For further details, see “Receiving a document” in the “Basic transmission and reception operations” chapter.
Press the key until the display shows “RECEPTION MODE” and then press the button again to confirm
the setting. The display shows “AUTOMATIC”. Press the
press the
button again to confirm the setting.
/ keys until the display shows “MANUAL” and then
When the telephone rings, lift the to engage the line.
As soon as you hear the dialling tone,
press
.
C
OPYING
For further details, see the “Making a copy” chapter.
Place the document on the ADF. The side to be copied must be face up.
Press to make a single copy or type the desired number of copies (max 9) and then press
. To change the contrast, resolution and reduction values shown on the display, see the
“Making a copy” section.
and then press
.
Page 5

C
ONTENTS
BEFORE YOU START 1
CONSULTING THE MANUAL ....................................................... 1
ENVIRONMENTAL RECYCLING................................................... 1
SAFETY PRECAUTIONS .............................................................. 1
ABOUT THE INSTALLATION AND SETUP PARAMETERS ........... 2
DELIVERY CONTENTS, CONNECTING UP AND
FIRST-TIME OPERATION 3
PACKAGE CONTENTS ................................................................. 3
CONNECTING TELEPHONE LINE ............................................... 3
CONNECTING HANDSET ............................................................ 4
MAINS CONNECTION .................................................................. 4
MAKING IMPORTANT PREDETERMINED SETTINGS ................. 4
LANGUAGE AND COUNTRY SETTING ........................................ 4
ENTERING THE DATE AND TIME ................................................ 5
INSERTING PAPER ...................................................................... 6
INSTALLING THE PRINT CARTRIDGE ........................................ 7
CHANGING THE DATE AND TIME ............................................... 7
ENTERING NAME AND FAX NUMBER ......................................... 8
SETTING UP FOR LINE CHARACTERISTICS ............................. 9
COMPONENTS 11
CONSOLE 12
MAKING A COPY 27
WHAT DOCUMENTS CAN BE COPIED ...................................... 27
COPYING .................................................................................... 27
THE TELEPHONE ANSWERING DEVICE (TAD) 28
THE TAD CONSOLE ................................................................... 28
CHANGING, DELETING AND ACTIVATING THE ACCESS
CODE .......................................................................................... 28
OUTGOING MESSAGES AND MEMOS ....................................... 29
SETTING THE LENGTH OF MEMOS AND INCOMING
MESSAGES ................................................................................. 31
PLAYING INCOMING MESSAGES AND MEMOS ........................ 31
DELETING MESSAGES AND MEMOS ALREADY
LISTENED TO ............................................................................. 31
TRANSFERRING INCOMING MESSAGES AND MEMOS
TO A REMOTE TELEPHONE ...................................................... 32
OPERATING THE TAD FROM A REMOTE LOCATION ............... 33
SPECIAL TAD FUNCTIONS ........................................................ 33
PRINTING THE TAD CONFIGURATION PARAMETERS ............ 34
MORE SOPHISTICATED OPERATIONS 35
OTHER USEFUL RECEPTION SETTINGS ................................. 35
OTHER USEFUL TRANSMISSION SETTINGS .......................... 39
TRANSMITTING AND RECEIVING IN POLLING MODE ............. 41
TROUBLESHOOTING GUIDE 43
BASIC TRANSMISSION AND RECEPTION
OPERATIONS 14
TRANSMITTING A DOCUMENT ................................................. 14
RECEIVING A DOCUMENT ......................................................... 19
SETTING ONE-TOUCH AND SPEED DIALLING ........................ 19
PRINTING REPORTS AND LISTS .............................................. 22
IF THERE IS A POWER FAILURE................................................ 43
IF PAPER OR INK HAS RUN OUT .............................................. 43
IF TRANSMISSION IS UNSUCCESSFUL ................................... 43
MINOR PROBLEMS .................................................................... 43
ERROR CODES .......................................................................... 44
SIGNALS AND MESSAGES ......................................................... 45
MAKING A CALL 25
TELEPHONING WITH ONE-TOUCH DIALLING .......................... 25
TELEPHONING WITH SPEED DIALLING ................................... 25
TELEPHONING WITH THE HELP OF THE PHONE BOOK ......... 26
REDIALLING ONE OF THE LAST 20 INCOMING NUMBERS
OR ONE OF THE LAST 10 OUTGOING NUMBERS ................... 26
i
Page 6

C
ONTENTS
MAINTENANCE OPERATIONS 47
REPLACING PRINT CARTRIDGE .............................................. 47
RE-ENABLING THE PRINT CARTRIDGE AND
CHECKING THE NOZZLES ........................................................ 47
CLEANING THE PRINT CARTRIDGE ELECTRICAL
CONTACTS ................................................................................. 48
CLEANING OPTICAL READ HEAD ............................................. 49
CLEANING SEATING .................................................................. 49
CLEARING JAMMED DOCUMENTS ........................................... 49
CLEARING PAPER JAMS............................................................ 49
MANUFACTURER AND SERVICE 50
TECHNICAL DATA 51
INDEX 52
ii
Page 7

C
ONSULTING THE MANUAL
R
This manual describes two models of fax machine which differ
from one another in whether or not they have a built-in telephone answering device.
In the description that follows, whenever a distinction is to be
made between the two models, reference will be made to:
"Base model" and "Model with a built-in TAD".
E
NVIRONMENTAL RECYCLING
The cardboard box, the plastic present in the package and the
various parts of the fax machine may be recycled in accordance with the recycling regulations in force in your country.
Information about Directive 2002/96/CE on the treatment, collection, recycling and disposal of electric and
electronic devices and their components.
1. FOR
The disposal of electric and electronic devices as solid urban
waste is strictly prohibited: it must be collected separately.
The dumping of these devices at unequipped and unauthorized places may have hazardous effects on health and the
environment.
Offenders will be subjected to the penalties and measures laid
down by the law.
COUNTRIES IN THE EUROPEAN UNION (EU
)
ISK OF AN ELECTRIC SHOCK
• Never attempt to repair the fax machine yourself. If you remove the casing, you risk getting an electric shock or suffering
some other kind of injury. Repairs should be carried out by
qualified technical staff only.
• During storms we recommend you unplug the device
from both the power outlet and the telephone line so
as to eliminate the risk of it being damaged by lightning.
• Never pour liquids on the fax machine and avoid exposing it
to the damp.
If liquids seep inside it, unplug it immediately from the mains
power supply and the telephone line. Before using it again,
have it repaired by qualified, technical staff.
• Do not use the fax machine outside in bad weather.
• Connect the fax machine exclusively to a certified wall power
socket.
• To unplug the power cable from the wall power socket, remove the plug and refrain from yanking the cable.
• Never touch the power cable or plug with wet hands.
• Do not fold or squash the power cable. Keep it away from
heat sources.
• Before cleaning the fax machine, unplug it from the wall power
socket.
• Before using the fax machine, check that it has not been damaged or dropped. If it has, have it checked by a qualified
engineer.
B
EFORE YOU START
S
AFETY PRECAUTIONS
To dispose of our devices correctly:
a) Contact the Local Authorities, who will give you the practical
information you need and the instructions for handling the
waste correctly, for example: location and times of the waste
collection centres, etc.
b) When you purchase a new device of ours, give a used de-
vice similar to the one purchased to our dealer for disposal.
The crossed dustbin symbol on the device means that:
- when it to be disposed of, the device is to be
taken to the equipped waste collection centres
and is to be handled separately from urban
waste;
- Olivetti guarantees the activation of the treatment, collection, recycling and disposal procedures in accordance with Directive 2002/
96/CE (and subsequent amendments).
2. FOR
The treatment, collection, recycling and disposal of electric
and electronic devices will be carried out in accordance with
the laws in force in the country in question.
OTHER COUNTRIES (NOT IN THE EU
)
R
ISK OF SUFFOCATION
• The fax machine and its accessories are wrapped in plastic
so do not let children play with the packaging material.
R
ISK OF FIRE
• If you are to leave the fax machine unused for a long period
of time, you should disconnect it from the power supply: in this
way, it will be protected against the risk of damage due to
interference or power surges.
R
ISK OF ACCIDENT
• Place it on a stable, flat surface free of all vibrations so as to
avoid drops that could cause damage to the machine and
injury to persons.
• Lay the power cable so that it cannot be trodden on or tripped
over.
• Never let children use or play with the fax machine.
1
Page 8

O
PERATING PRECAUTIONS
• Keep the fax machine in a dust-free place away from sources
of water, steam and excessive heat. Do not expose it to direct
sunlight.
• Ensure that no books, documents, or other objects obstruct
normal ventilation in any way.
• Use the fax machine exclusively at a temperature of between
5°C and 35°C and a relative humidity of between 15% and
85%.
• Keep the fax machine away from other electrical and electronic appliances that may cause interference, e.g. radios,
televisions, etc.
• If a voltage drop or power failure occurs, it will not be possible
to make or receive telephone calls as the keypad will be
disabled.
• In an emergency, if you wish to make a call, you must use a
telephone certified by the telephone company, connecting it
directly to the fax machine (in countries where this is allowed)
or directly to the telephone wall socket.
• Leave enough room in front of the outlet from which documents and received/copied documents are unloaded, so that
they do not fall on the floor.
I
MPROPER USE
The fax machine was designed to send and receive documents and to copy paper documents. The machine may also
be used as a telephone. All other uses are to be considered
improper. In particular, it is never to be connected directly to
an ISDN line and, if it is, the guarantee becomes null and
void.
A
BOUT THE INSTALLATION AND SETUP
PARAMETERS
As the country default values for each installation and setup
parameter may change due to certification requirements or
specific customers’ needs, these values do not always correspond to those indicated in the manual: it is therefore advisable to print them before changing them (see "Printing re-
ports and lists", chapter "Basic transmission and reception operations").
2
Page 9
D
P
ACKAGE CONTENTS
ELIVERY CONTENTS, CONNECTING UP AND FIRST-TIME OPERATION
C
ONNECTING FAX MACHINE
In addition to the fax machine and this manual, you will find the following
parts in the package:
• The telephone line connection cable.
• The power cable.
• The telephone plug (if applicable).
• The box containing a free monochrome print cartridge provided
with the machine.
• The telephone handset.
• The document support.
• The printing paper support.
• List of freephone numbers for servicing and warranty enquiries.
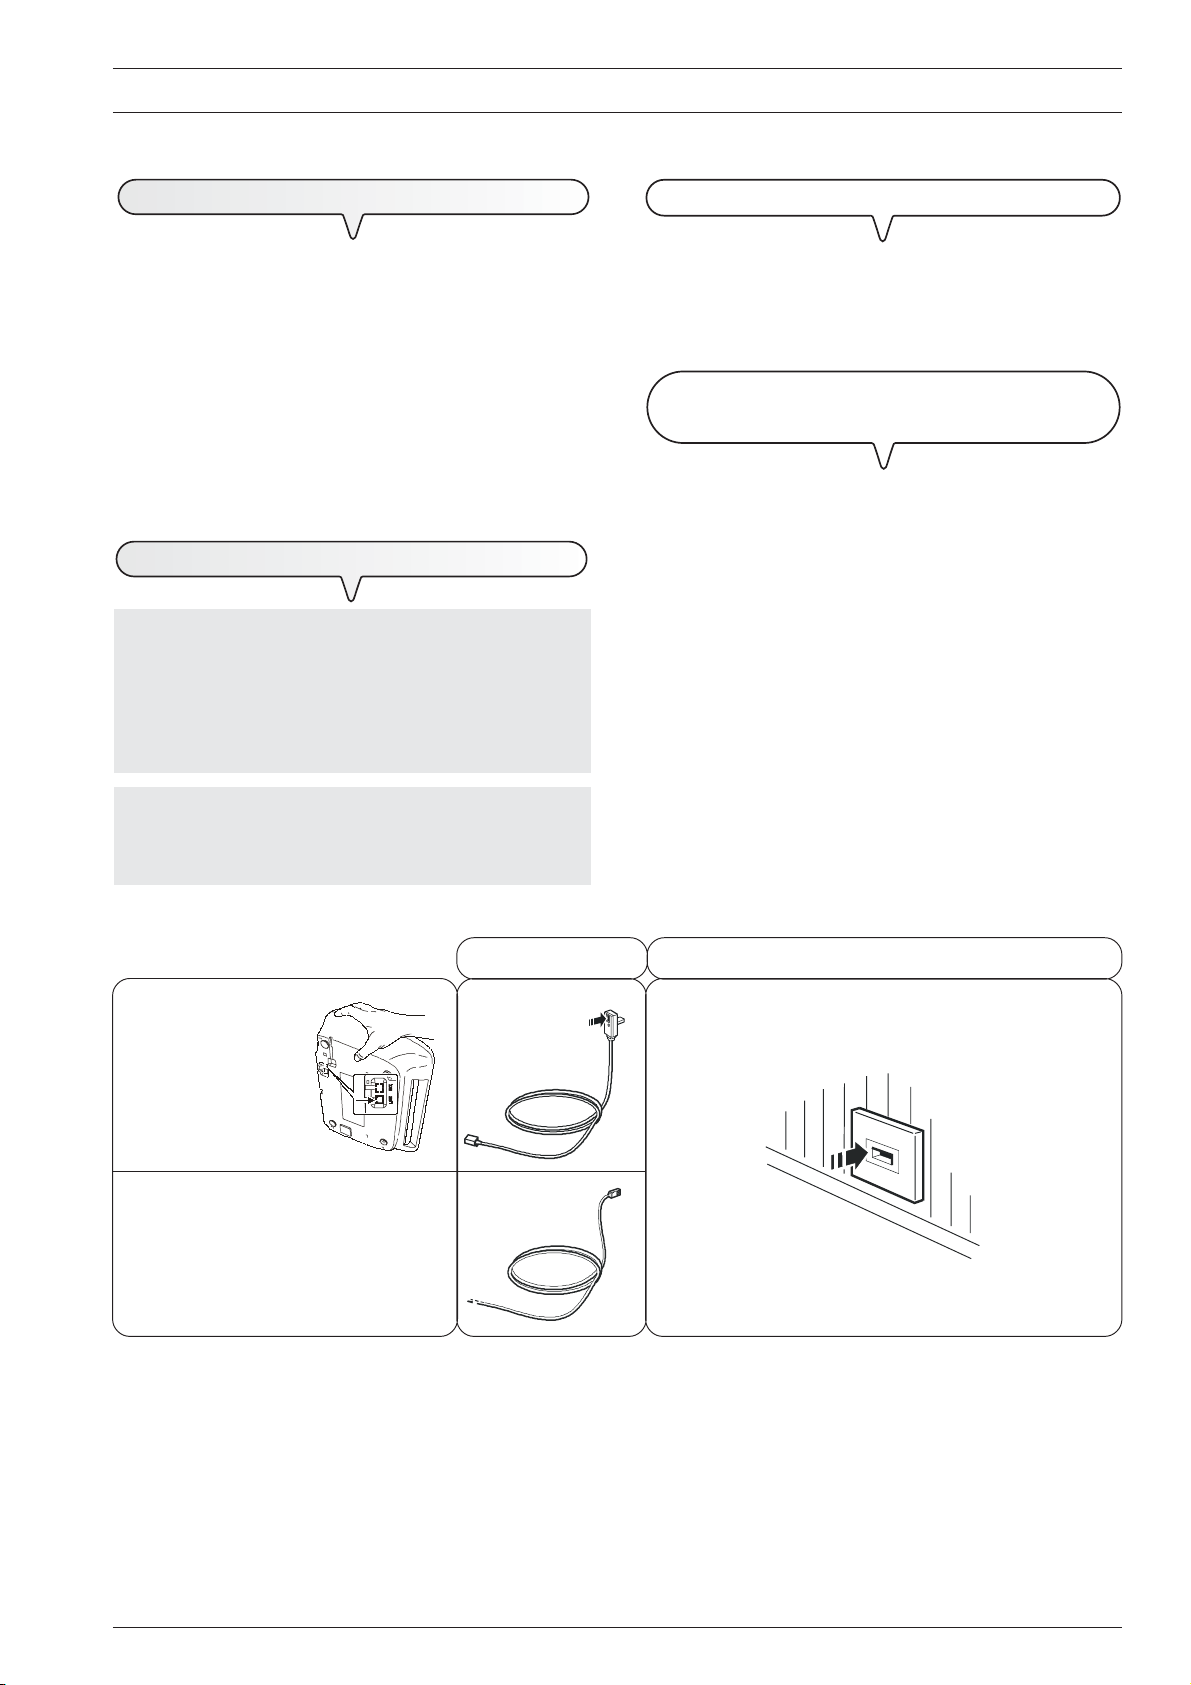
C
ONNECTING TELEPHONE LINE
The fax machine telephone line connection, additional
telephone or other devices are regulated by national
standards. These norms vary from country to country. The
following diagrams illustrate several connections. However,
if the connection to the telephone line is different in your country is
different from those shown in the diagrams, respect the regulations
in force in your country.
The fax machine is set up for connection to the public
telephone line. If you want to connect it to a private line and
you also want to use it on a public line, see “Setting up according
to line characteristics”.
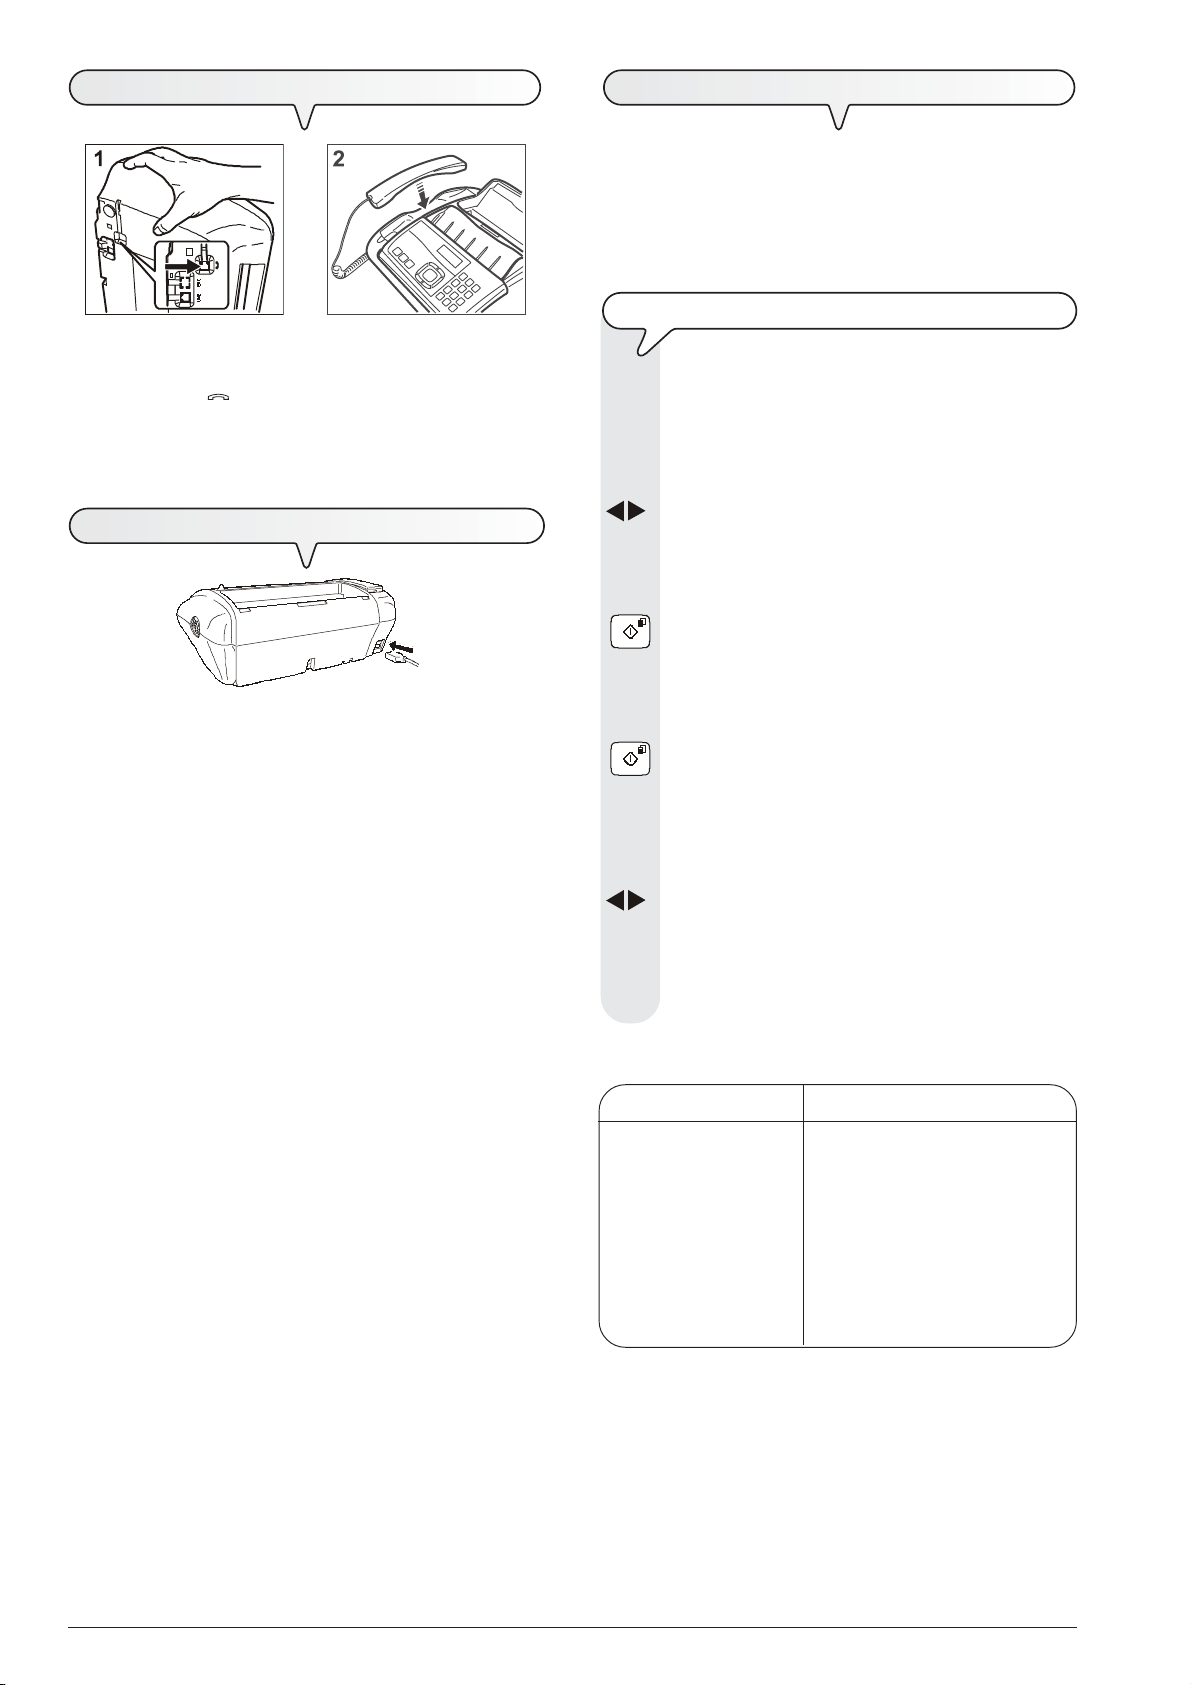
1. Lay the fax machine on its right side.
2. Insert one end of the telephone line cable into the “LINE” socket
on the base of the fax machine (see example).
3. Insert the plug on the other end of the cable into the wall telephone
line socket (see example).
C
ONNECTING THE EXTERNAL ANSWERING DEVICE (BASE
MODEL
(Connection example)
1. Insert the plug of the additional device into the wall telephone line
socket.
2. Note connection example.
ATTENTION
The additional connection socket EXT hidden in the base must not be
used for Germany and Austria. This EXT socket must not be used.
ONLY) AND AN EMERGENCY TELEPHONE
C
ONNECTION (U.K./IRELAND
F
AX
Connection sockets
E
XTERNAL ANSWERING
(
DEVICE
OR EMERGENCY TELEPHONE
BASE MODEL ONLY
)
A
)
A
C
ORD
C
C
W
ALL SOCKETS FOR CONNECTION TO TELEPHONE LINE
B
B
3
Page 10
C
ONNECTING HANDSET
M
For the fax machine to work properly, set your language and
your country.
Once the fax is connected to the mains, it automatically runs a short
function test to check that its components are working and the
language in which the messages will appear is shown on the display.
L
1. Lay the fax machine on its right side.
2. Insert the plug of the handset into the socket on the fax machine
with the symbol .
3. Fix the handset cable into the groove made for this purpose
4. Replace the fax machine in its normal position.
5. Move it into its designated position.
M
AINS CONNECTION
1. Insert the connector of the power cable into the socket on the rear
of the fax machine.
2. Insert the mains plug into the mains wall socket.
NOTE
The fax machine will remain permanently connected, ready to
receive and send documents 24 hours a day. If you want to turn
it off, pull out the power cable plug from the wall socket as the
fax machine has no power switch.
.
/
/
AKING IMPORTANT PREDETERMINED SETTINGS
ANGUAGE AND COUNTRY SETTING
The display shows the language in which the messages are
displayed. For example:
DEUTSCH
1. If the language displayed is not the desired one, press the
key:
For example:
ENGLISH
2. To confirm the setting, press the key:
The display shows:
CHOOSE COUNTRY
3. To confirm the setting, press the key:
The display shows the name of the country. For example:
DEUTSCHLAND
4. If the country displayed is not the desired one, press the
key:
For example:
U.K./IRELAND
If your country is not present among those shown on the
display, see the table below:
COUNTRY COUNTRY TO BE SELECTED
Argentina AMERICA LATINA
Chile AMERICA LATINA
Colombia AMERICA LATINA
Luxembourg BELGIUM
Mexico AMERICA LATINA
Peru AMERICA LATINA
Rest of world INTERNATIONAL
Uruguay AMERICA LATINA
Venezuela AMERICA LATINA
4
Page 11
5. To confirm the setting, press the key:
6. To exit settings, press the key:
NOTE
You can change the entries at any time.
E
NTERING THE DATE AND TIME
You must enter the date and time
- when you connect the fax machine for the first time to
the mains
- after every power failure.
The date and time can be changed at any time, see the
“Changing the date and time” section.
1. Press the key:
1. Press the + key.
2. Repeat setting the language and the country of destination
3. To confirm the settings made, press the
Having set the language and the country, the following messages will
appear on the display:
key.
AUTOMATIC
or, in the models with built-in telephone answering device, the total
number of messages received, in this case, “00” is displayed.
AUTOMATIC 00
and alternating on the lower line:
SET DATE AND TIME
CHECK CARTRIDGE
The display shows:
DATE AND TIME
2. Press the key:
The display shows:
FORMAT: DD/MM/YY
3. If you want to set another date format, press the key:
/
4. Press the key:
The display shows:
TIME FORMAT: 24 H
5. If you want to set another time format (12 hours), press the
key:
/
6. Press the key:
The display shows:
DD/MM/YY HH:MM
25-06-06 11:23 AM
7. To enter the new date and time
(e.g. 26-06-06, 12:00 AM), press the key:
-
As each digit is entered, the cursor will move to the next
one.
DD/MM/YY HH:MM
26-06-06 12:00 AM
8. You can also change single digits by positioning the cursor
at the desired position.
To do so, press the key:
/
9. To overwrite the position to be changed, press the key:
-
5
Page 12
10. To confirm the setting, press the key:
The date and time setting procedure has been completed.
The new date and time will be updated automatically and
will be printed on each page sent.
11. To return the fax machine to the initial stand-by mode,
press the key:
Remember that the stand-by mode is the status in which it is
idle and that it is the mode from which the machine can be
programmed.
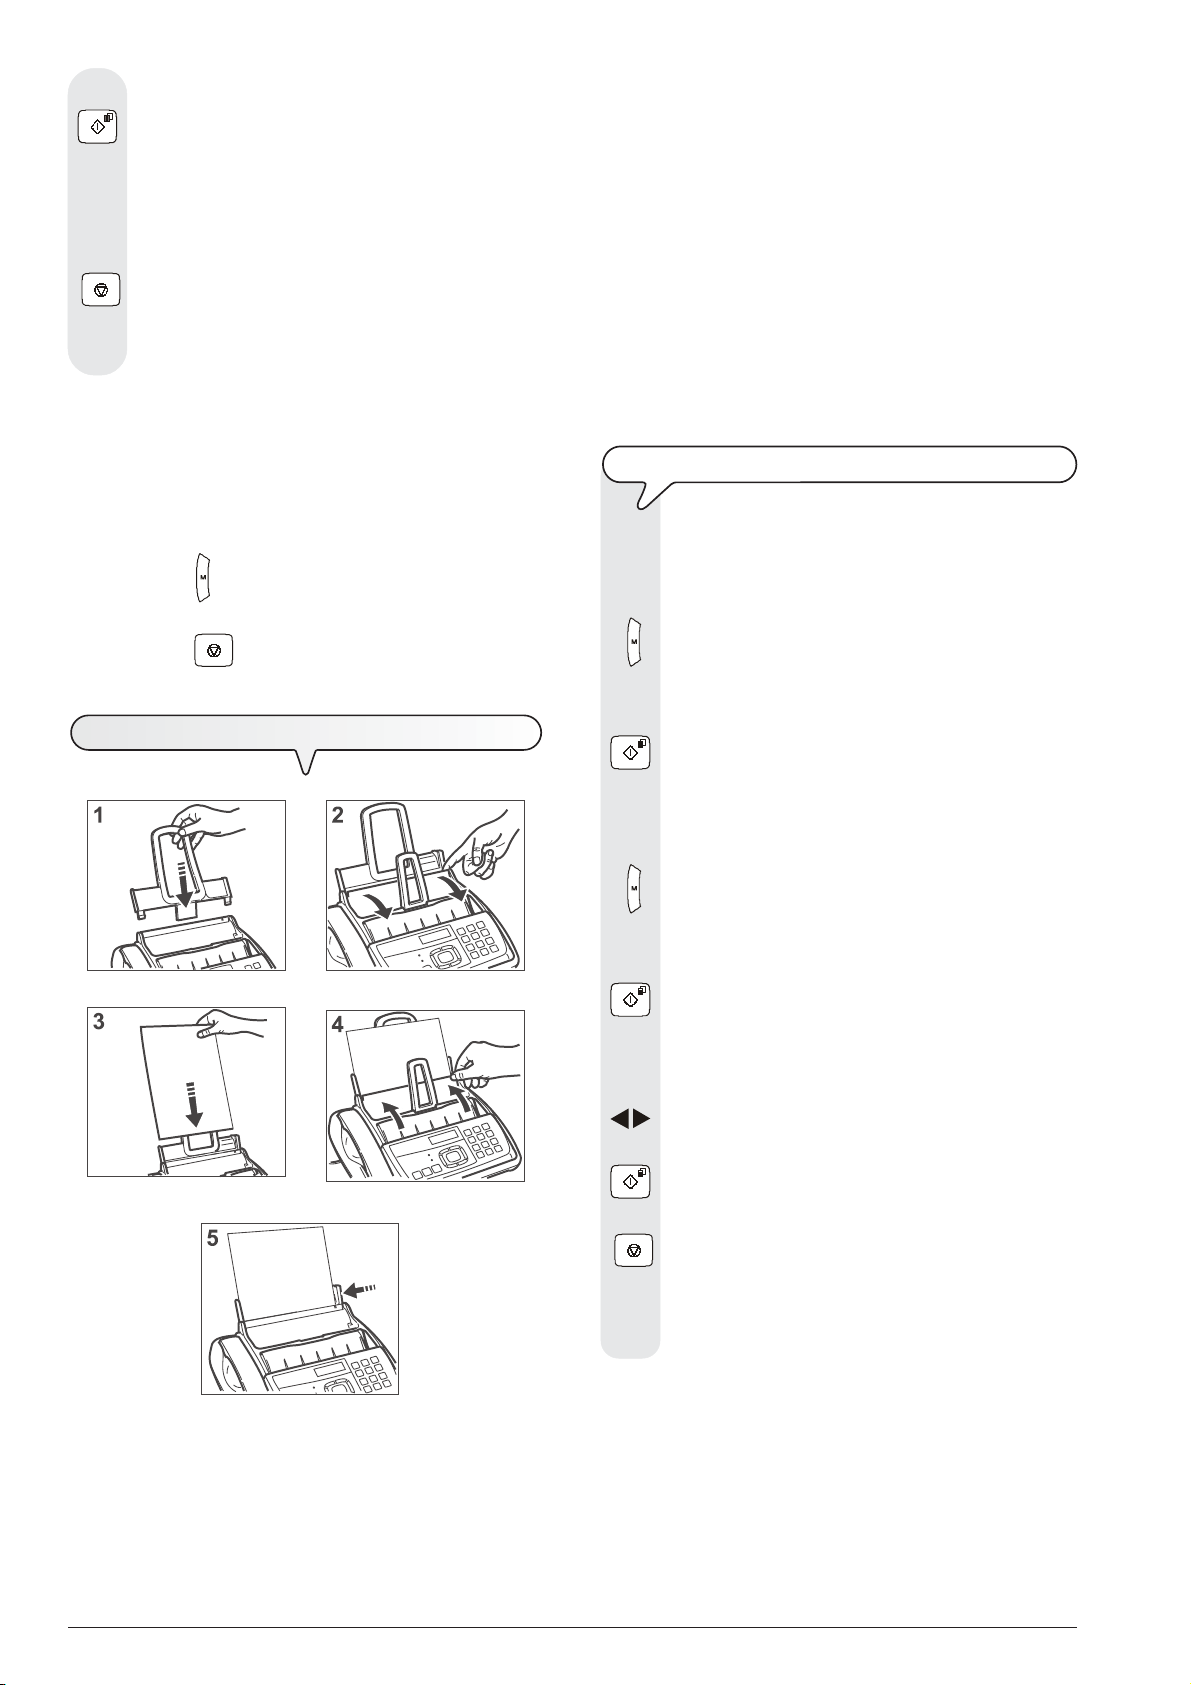
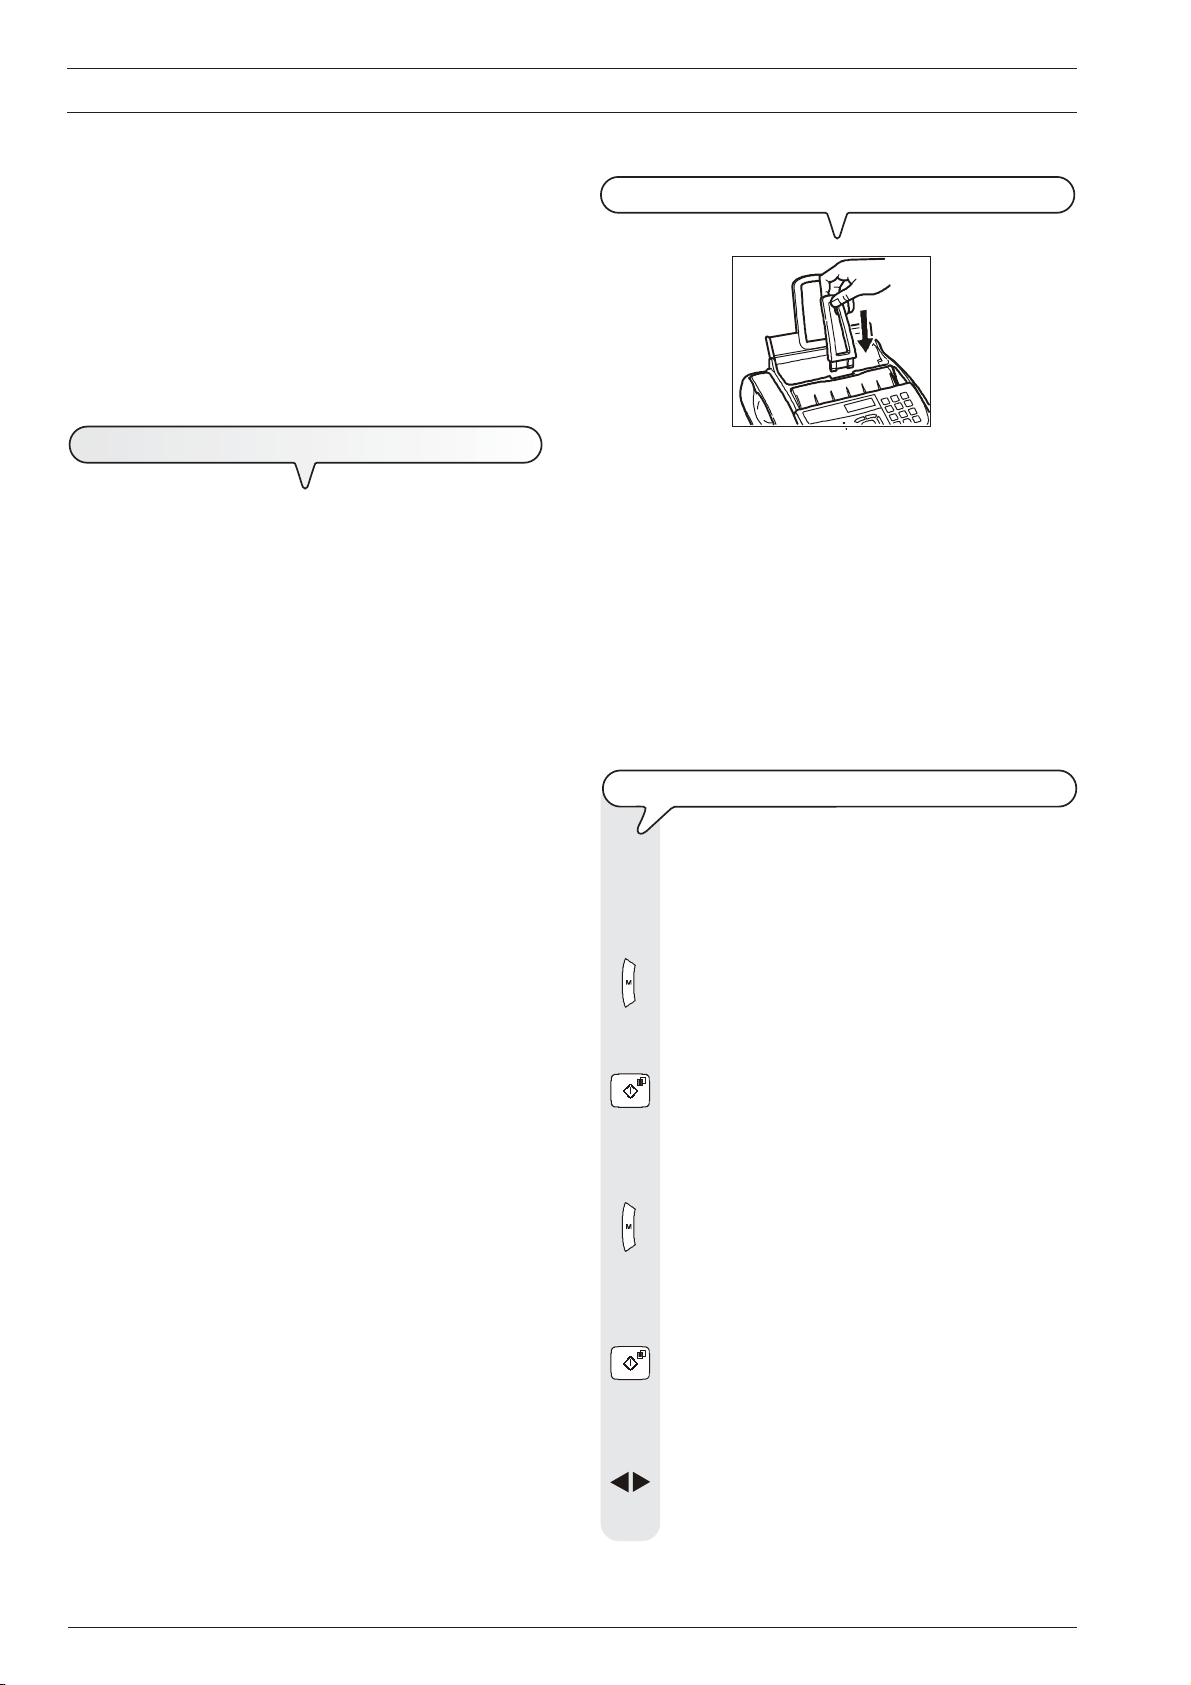
1. Push the paper support into the slots on the unit (1).
2. Push it until it clicks into position.
3. Open the automatic sheet feeder (ASF) panel as indicated by the
arrow (2).
4. Grip the sheets you want to insert by the upper edge (3).
5. Let them drop loosely into the ASF without bending them.
6. Close the ASF panel as indicated by the arrow (4).
7. Push the sheets against the left side of the ASF using the adjusting
lever (5).
NOTE
When refilling the ASF, place new sheets under and not on top of
sheets already present.
NOTE
If you have chosen the 12-hour time format, the display will show the
letter “P” (post meridian) or the letter “A” (ante meridian). The time
format can be changed in this way
J/K
1. Press the cursor keys
character to be changed.
2. Press the key
The setting is changed.
3. Press the key
was interrupted.
I
NSERTING PAPER
.
if you have made a mistake or the procedure
, to position the cursor under the
C
HECKING STANDARD PRINTING FORMAT ON FAX MACHINE
Check the printing format set matches the format of the paper
to be used. If this is not so, correct performance of the fax
machine is not guaranteed.
1. Press the key
until the display shows:
FAX SET-UP
2. Press the key:
The display shows:
DATE AND TIME
3. Press the key
until the display shows:
PRINTER PARAMET.
4. Press the key:
The display shows:
SIZE: A4
5. Press the key
/ until the desired paper format appears on the display.
6. To confirm the setting, press the key:
7. Press the key:
The display shows:
AUTOMATIC
CHECK CARTRIDGE
6
Page 13
I
NSTALLING THE PRINT CARTRIDGE
R
EACTIVATING THE PRINT CARTRIDGE AND TESTING
THE
NOTE
Once the cartridge provided with the machine has run out, remember
only to use original cartridges (see code printed at the end of
the manual).
The use of non-original or refilled cartridges makes the product's
guarantee null and void.
Once the print cartridge has been inserted, the fax machine starts the
print cartridge reactivation and nozzle check procedure. This concludes
with:
• the printing, on the sheet loaded automatically, of a diagnostic
• the display shows the message:
Print the test sheet as follows:
Check that the numeric scale is not broken at any point and that the
black areas do not present any horizontal white lines: only under these
conditions is the print cartridge inserted correctly and is working
properly.
1. Enter the value 1 if this is the case. The fax machine automatically
returns to its stand-by mode.
2. If breaks or white lines are found, enter the value 0. Reactivating
the print cartridge and testing the nozzles is then repeated.
3. If the new print test continues to be unsatisfactory, repeat the
procedure again.
4. If the print test result is satisfactory, press the
the procedure.
The fax machine returns to its stand-by mode.
NOZZLES
test sheet containing:
-a numbered scale, for checking the flow of ink and the
electrical circuits of the print cartridge nozzles.
- a group of graphics and text, so that the printing quality
may be evaluated.
“CHECK PRINT OUT”, “1=EXIT 0=REPEAT”.
key to exit from
When the print cartridge is about to run out of ink, the display
shows:
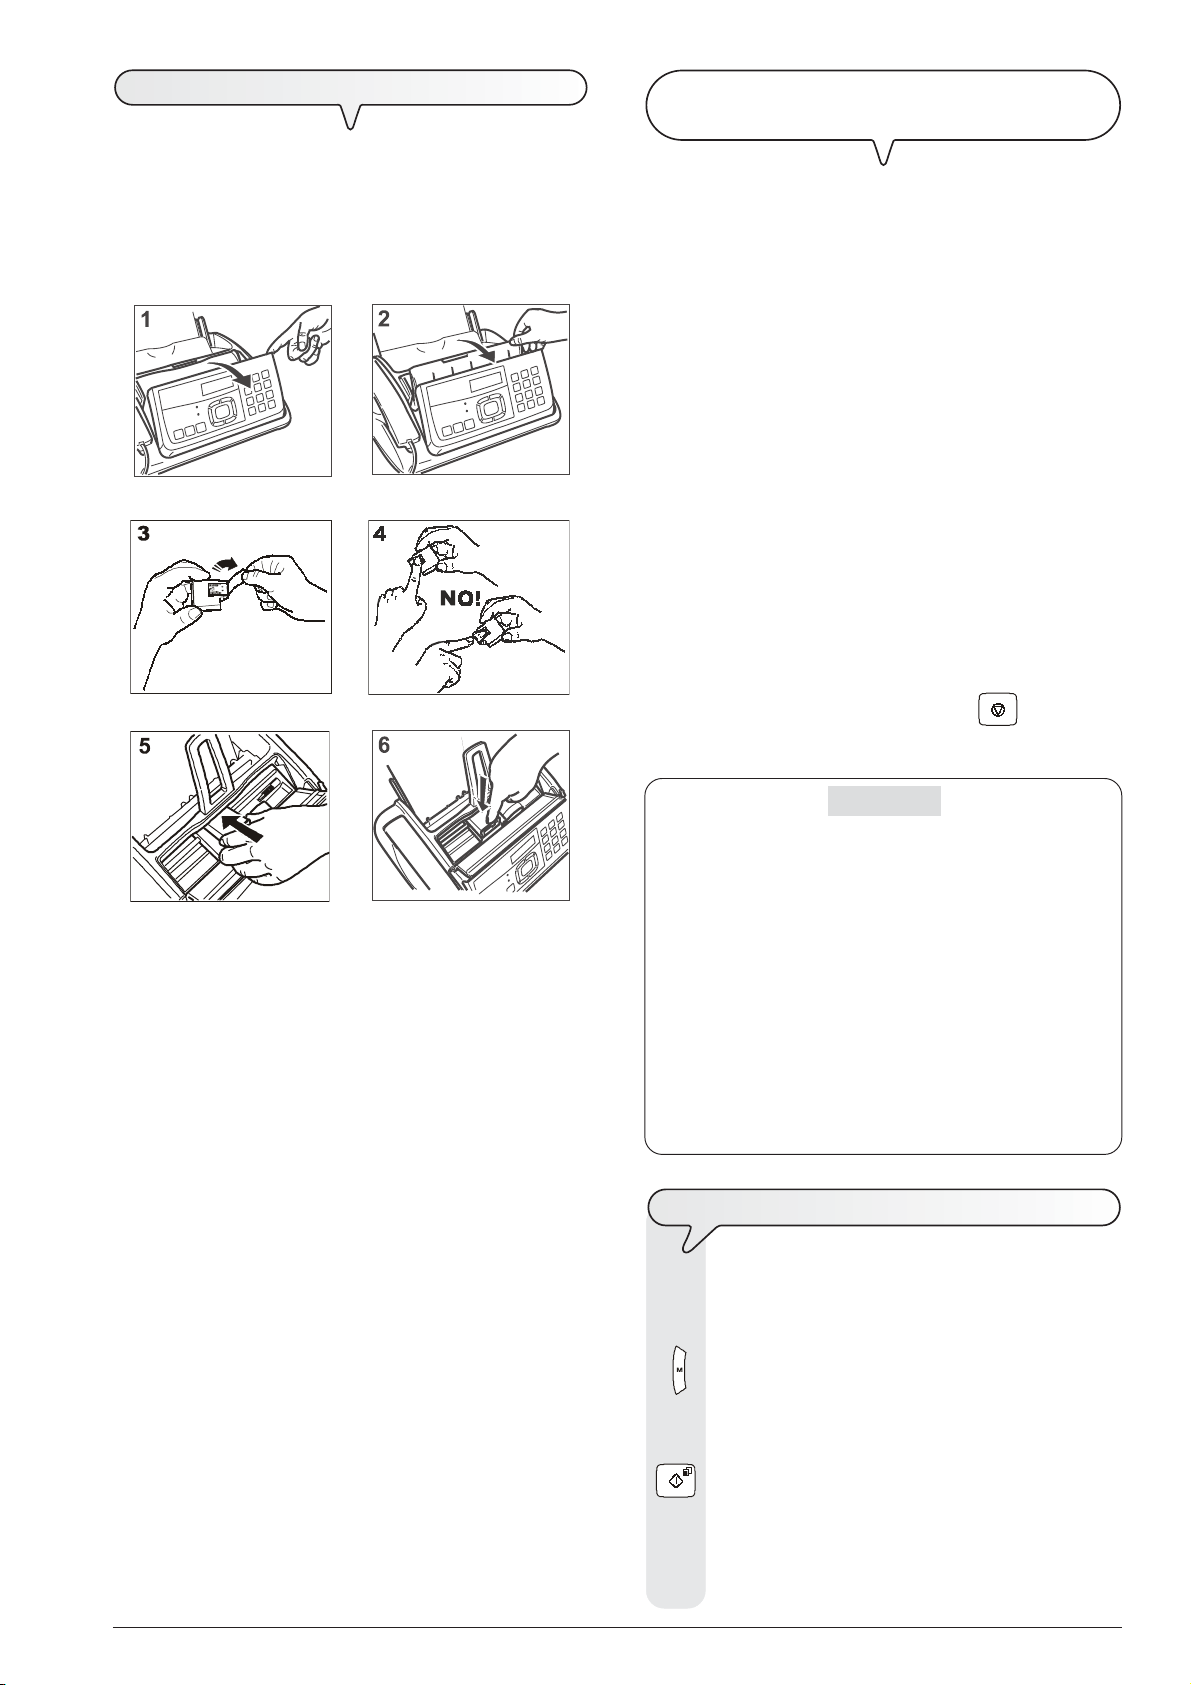
1. Flip the operating panel forwards as indicated by the arrow.
2. Lift the print cartridge compartment cover using the lever, as shown
in the figure.
3. Remove the print cartridge from its packing.
Attention:
Avoid touching the nozzles and the electrical contacts.
4. Pick up the print cartridge by its sides.
5. Remove the protective foil from the nozzles.
6. Turn the print cartridge so that the electrical contacts face
downwards.
7. Push the print cartridge into its housing.
8. Push the print cartridge until it audibly clicks into position.
9. Close the print cartridge compartment cover and the operating
panel.
At the same time the fax machine automatically prints a page to
warn you that the ink is running out and you will have to replace
the print cartridge soon.
When there is no more ink, the display shows:
To replace the print cartridge, see the section “Maintenance
operations”.
When buying new print cartridges, refer to the corresponding
codes at the end of the manual.
C
NOTE
If, after the cartridge has been installed, the "CHECK CARTRIDGE"
message appears again, try removing it and then reinserting it,
pressing it more firmly into position. If the message remains on the
display, remove the cartridge and clean the electrical contacts of the
cartridge and the carriage, see "Cleaning print cartridge electrical
contacts", section "Maintenance operations".
IMPORTANT
CARTRIDGE LOW
CHANGE CARTRIDGE
HANGING THE DATE AND TIME
If the date and time shown on the display are not correct,
you can change them at any time.
1. Press the key
until the display shows:
FAX SET-UP
2. To confirm the setting, press the key:
NOTE
To replace the print cartridge, see the section “Maintenance
operations”.
The display shows:
DATE AND TIME
From this point follow the procedure previously described
in “Entering the date and time”.
7
Page 14

E
NTERING NAME AND FAX NUMBER
Name (max. 16 letters) and number (max. 20 digits) will
remain unchanged until they are intentionally changed and
will be printed on each page received by your
correspondent’s fax machine.
1. Press the key
until the display shows:
10. To confirm the name, press the key:
The display shows:
PHONE NUMBER
Now enter the fax number as indicated below:
E
NTERING YOUR FAX NUMBER
INSTALLATION
2. Press the key:
The display shows:
TEL. LINE SET-UP
3. Press the key
until the display shows:
STATION NAME
4. Press the key:
The display shows:
TYPE YOUR NAME
You have the following ways of entering a name or logo:
You can enter letters and digits.
5. To do so, press the keys:
Press the corresponding key until the desired character
appears. After you have released the key, the cursor
automatically jumps to the position to allow you to enter the
next character.
6. To enter a space, press the key:
/
You may include a variety of special symbols, e.g. &, in
your name.
7. To do so, press the keys:
-
You can also change wrong characters by positioning the
cursor under the corresponding character.
8. To do so, press the key:
/
Now enter the correct character.
9. To delete the name completely, press the key:
1. Press the key:
The display shows:
TYPE YOUR NUMBER
2. To enter your fax machine number, press the keys:
-
3. To enter a space, press the key:
/
If you make any typing errors, correct them in the same
way as for your name.
If you are entering a country code, press the * key instead
of zeros. The + character appears on the display.
4. To confirm the fax number, press the key:
5. To return the fax machine to the stand-by mode, press the
key:
N
AME AND FAX NUMBER PRINTING POSITION
You can put information in the header of the original document
to be sent. This can be your name/logo, your fax number,
date/time and number of pages. This information is received
at the top of the page, outside the actual fax contents or
inside the text area, slightly lower down than in the previous
case.
Your fax machine is set up as default to send this information
within the text area.
Changing the position
1. Press the key
until the display shows:
8
Example:
To enter the name “LARA”, press the keys:
Until you have selected the letter “L”.
Until you have selected the letter “A”.
Until you have selected the letter “R”.
Until you have selected the letter “A”.
FAX SET-UP
2. Press the key:
The display shows:
DATE AND TIME
3. Press the key:
The display shows:
VARIOUS SETTINGS
Page 15
4. Press the key
until the display shows:
HEADER INSIDE
5. To select the other parameters, press the key:
/
The display shows:
HEADER OUTSIDE
6. To confirm the setting, press the key:
7. To return the fax machine to the stand-by mode, press the key:
S
ETTING UP FOR LINE CHARACTERISTICS
C
ONNECTING TO A PUBLIC LINE
8. To return the fax machine to the stand-by mode, press the
key
C
ONNECTING TO A PRIVATE LINE (PBX
To connect the fax machine to a private line and be able to
use it also on a public line, proceed as follows:
• Select the “PRIV.LINE (PBX)” parameter.
• Set the same dialling mode (tone or pulse) as the one
used by the private telephone exchange that manages the
line to which you have connected the fax machine. If in
doubt about the choice to be made, ask the company that
manages your private telephone network.
• Set the output mode (area code or flash) to access the
public telephone network from the private telephone network.
• Set the same dialling mode (tone or pulse) as the one
used by the public telephone exchange.
1. Press the key
)
The fax machine is already set up to be connected to a
public line. Check, however, the following points:
• The “PUBL.LINE (PSTN)” parameter is selected.
• The dialling mode parameter (tone or pulse) is compatible
with the public telephone exchange line to which you have
connected the fax machine. If in doubt about the choice to
be made, ask your public telephone company.
1. Press the key
until the display shows:
INSTALLATION
2. Press the key:
The display shows:
TEL. LINE SET-UP
3. Press the key:
The display shows:
PUBL.LINE (PSTN)
If the fax machine is set up for connection to a private line,
select the “Private Line” connection setting.
4. To do so, press the key:
/
5. To confirm the selection, press the key:
The display shows:
PSTN DIAL:TONE
6. To view the other dialling mode (in countries where it is
available), press the key:
/
PSTN DIAL:PULSE
7. To confirm the selection, press the key:
until the display shows:
INSTALLATION
2. Press the key:
The display shows:
TEL. LINE SET-UP
3. Press the key:
The display shows:
PUBL.LINE (PSTN)
4. To select the other options, press the key:
/
PRIV.LINE (PBX)
5. Press the key:
The display shows:
PSTN DIAL:TONE
6. To select the other dialling mode, press the key:
/
PSTN DIAL:PULSE
7. To confirm the selection, press the key:
The display shows:
EXT.LINE:PREFIX
8. To select the other “EXT.LINE:FLASH” option, press the
key:
/
9
Page 16
9. To confirm the selection, press the key:
If you confirmed, by pressing the key , the
“EXT.LINE:PREFIX” mode, the fax machine prompts you
to enter the number corresponding to the area code (max.
3 digits).
10. Press the key:
The display shows:
PSTN DIAL:TONE
11. To select the other dialling mode, press the key:
/
PSTN DIAL:PULSE
12. To confirm the setting, press the key:
13. To return the fax machine to the initial stand-by mode, press
the key:
NOTE
Having confirmed the dialling mode to be used by the fax machine to
connect to the public line, simply press the
the correspondent’s fax or telephone number, to gain access to it. An
“E” appears on the display.
S
IMULTANEOUS CHANGING OF DIALLING MODE
You can change the dialling mode for a single dialling operation
without having to change the setup.
1. Press the
The fax machine now changes the dialling mode for this dialling
operation. At the end of transmission, the fax machine always restores
the dialling mode set up on it.
key, before entering the fax or telephone number.
key, before dialling
10
Page 17
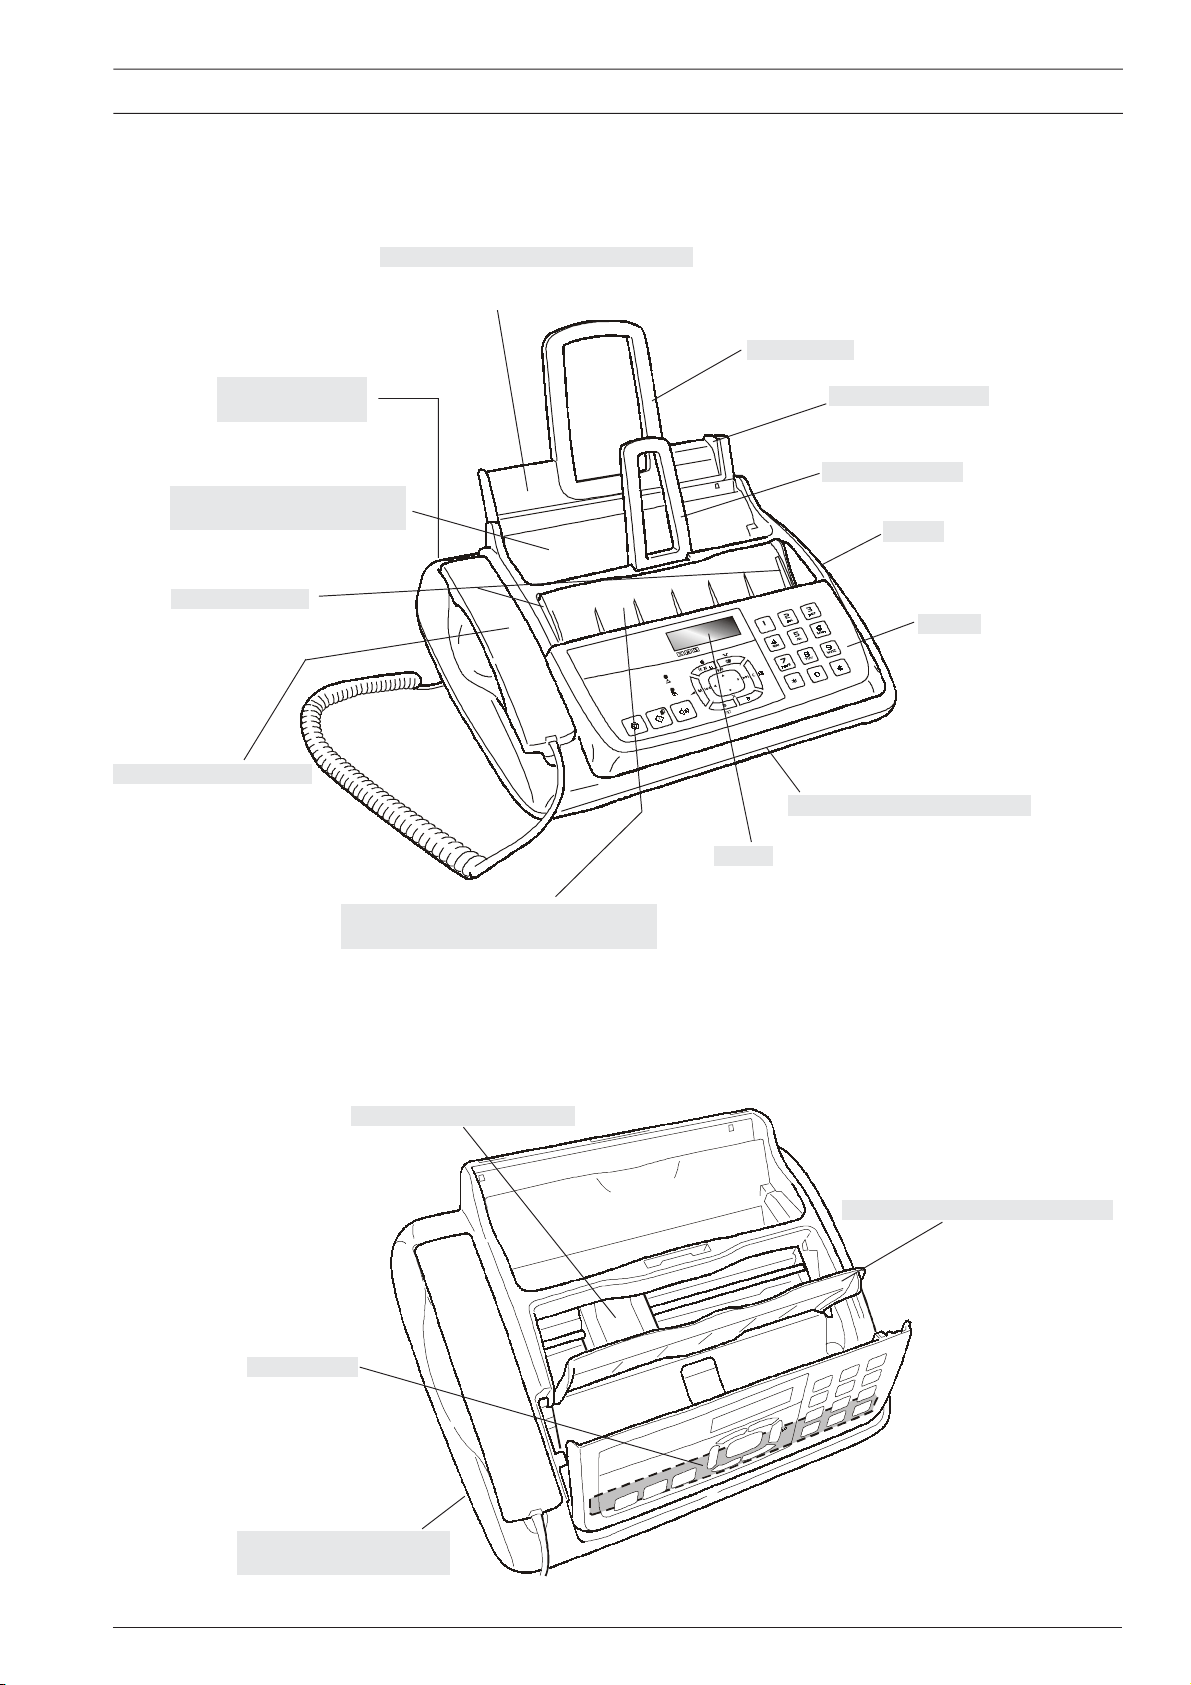
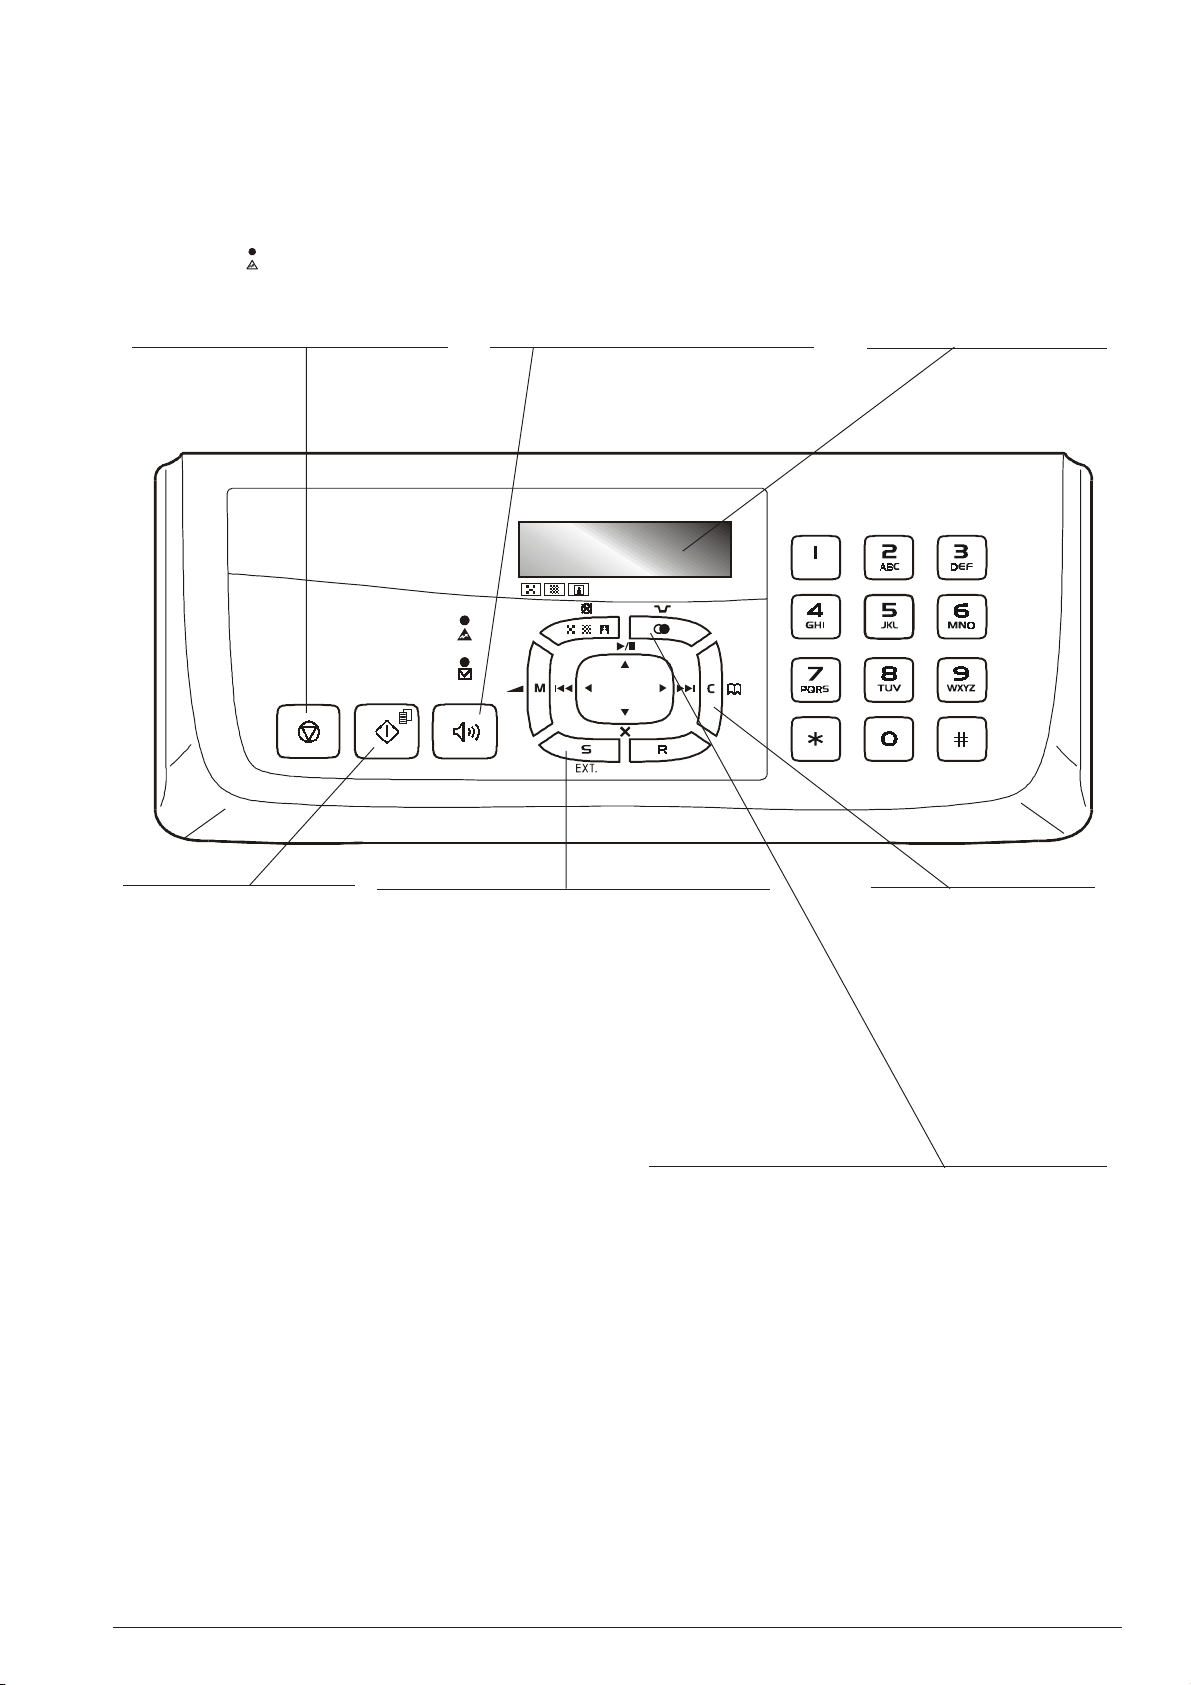
The figure shows the external and internal parts of the fax machine.
Plain paper automatic sheet feeder (ASF)
Adjustable to the following paper sizes: A4, Letter and Legal.
Maximum capacity: 100 sheets (80gr/m
2
).
Paper support
C
OMPONENTS
Connection sockets
(see base)
Received or copied document
output
Notes about paper
Built-in telephone handset
Automatic feeder for original documents to
be sent and copied (ADF)
Maximum capacity: 20 sheets A4 (80gr/m
Paper adjusting lever
Document support
Speaker
Console
Sent or copied document output
Display
2
).
Print cartridge compartment
Optical reader
Machine serial number plate
(see base)
Print cartridge compartment cover
11
Page 18
C
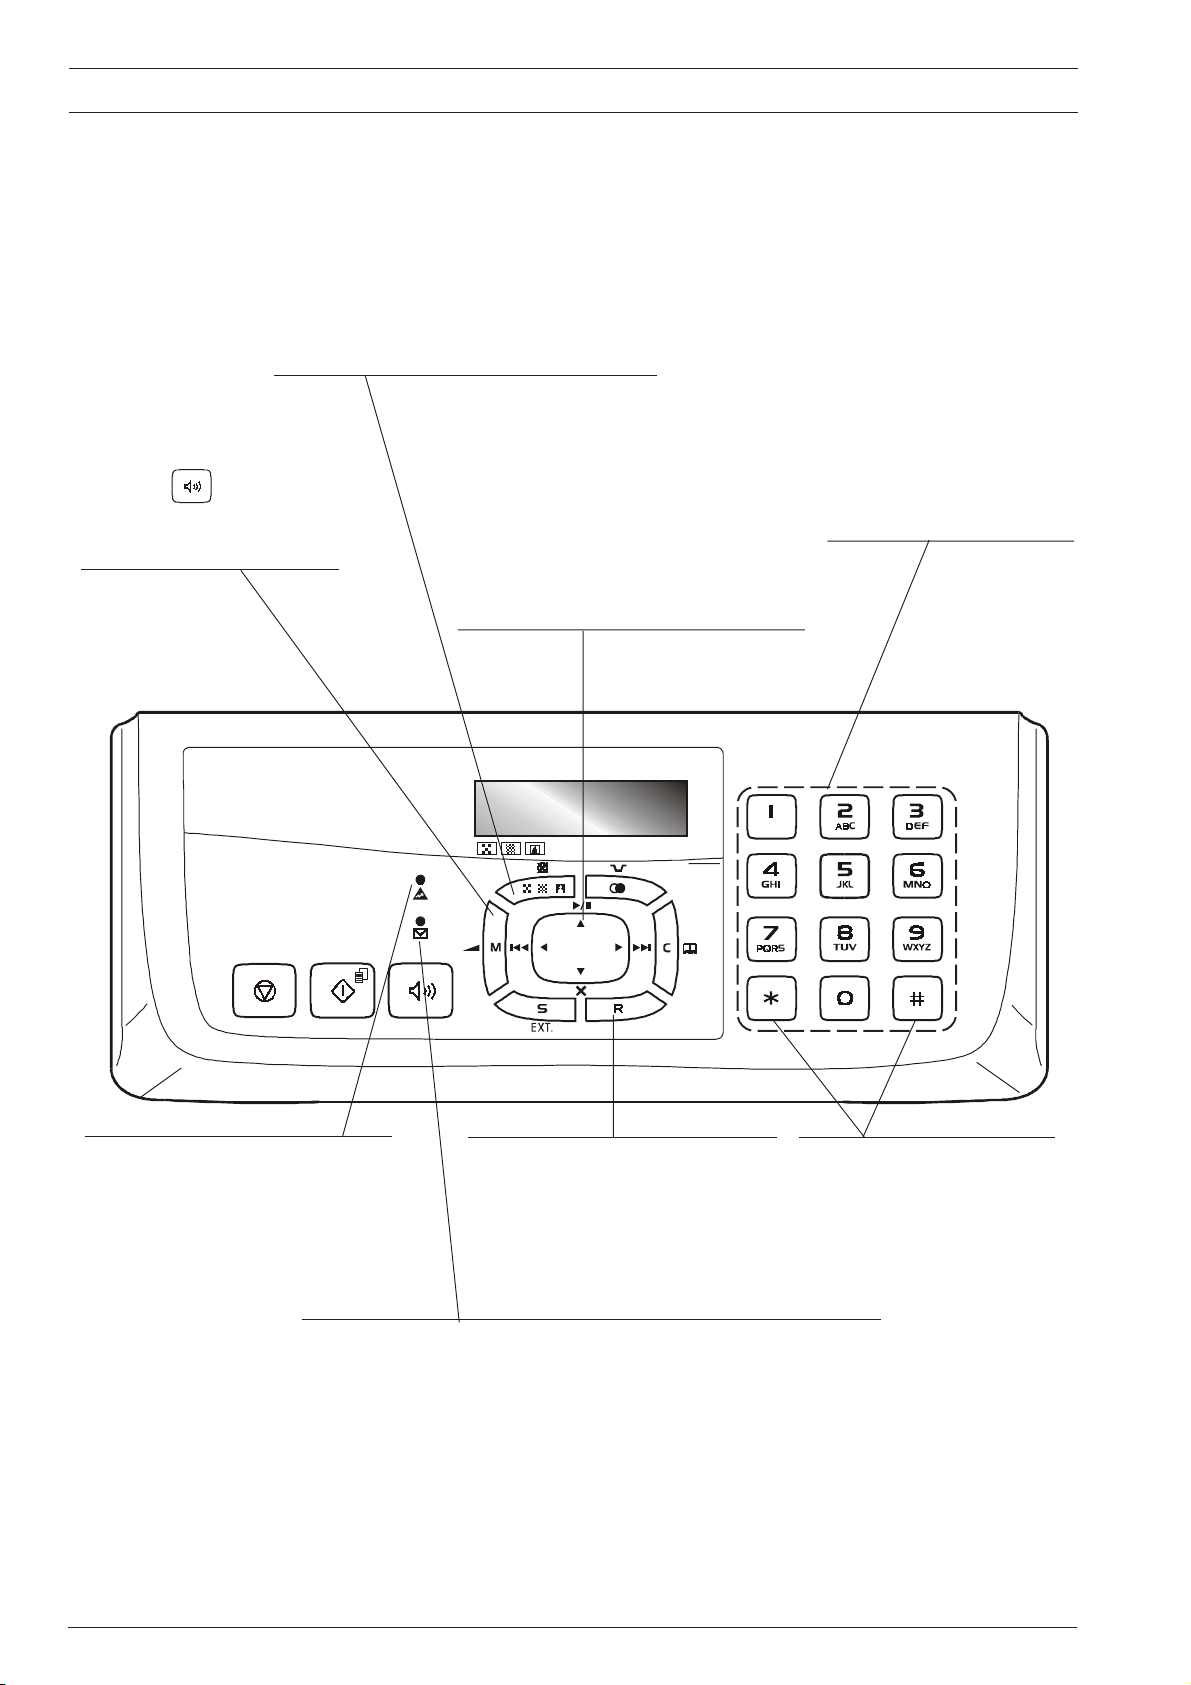
ONSOLE
• Adjusts the resolution of the documents to be sent and
copied (only with the document inserted in the ADF).
• Puts the line on hold during a telephone conversation (with
the handset off the hook).
• Turns off the microphone, during a "handsfree" telephone
call, so that the correspondent cannot hear what is said at
your end of the line.
• Gives access to programming mode.
• Selects menus and submenus.
• After the
pressed, the speaker volume is turned
up to maximum and then recommences at the lowest volume.
button has been
• Dials the fax or telephone number.
• If pressed for more than a second,
(once set) the telephone or fax
number assigned assigned to the key
is automatically dialled (one-touch
dialling function).
• Sets any numeric data.
• They scroll cyclically forwards or backwards through
the functions and related parameters on the menu.
•
Move the cursor to the "right" and to the "left" while
entering numbers and names.
M
ODEL WITH A BUILT-IN TAD ONLY
•
Used to perform TAD functions. Described in the
corresponding chapter.
• Selects digits and alphanumeric
characters during the entry of
numbers and names.
“Error” LED indicator
Signals an operating fault during transmission or
reception.
Blinking, indicates that the memory contains documents that have not been printed.
Off, indicates that the memory is empty.
M
ODEL WITH A BUILT-IN TAD ONLY
On, indicates that there are messages or memos in the memory that have already been
played.
Blinking, indicates that the memory contains documents that have not been printed, messages
or memos that have not been played.
Off, indicates that the memory is empty.
12
With the handset lifted, gives access to the special
functions made available by the network operator
and commonly known as REGISTER RECALL
(R function).
• With tone dialling, a tone is sent down
the line for special network services.
• Selects characters and special
symbols during the entry of names by
scrolling backwards and forwards.
Page 19
•
Unloads a document from the ADF.
•
Turns off the “ ” LED indicator.
•
Returns the fax machine to the stand-by mode.
•
Stops the programming, transmission, reception
or copying operation in progress.
•
Used to dial a telephone or fax number without
lifting the telephone handset.
•
Also activates the handsfree function.
Display
The display consists of two lines of 16
characters each. It shows the date and
time, menu items, error messages,
resolution and contrast values and the
total number of messages received.
•
Starts receiving a document.
•
After the fax number has been
dialled, starts sending a document
(only with the document already
inserted in the ADF).
•
Confirms the selection of menus,
submenus, parameters and their
values and moves on to the next
procedure.
•
Starts copying a document (only
with the document already
inserted in the ADF).
With the fax machine connected to a private exchange:
-
When pressed once before dialling the telephone or fax
number, access to the public line is provided. When pressed
twice, it provides access to the programmed network
operator.
With the fax machine connected to the public line:
- When pressed before dialling the telephone or fax number,
access to the programmed network operator is provided.
• Inserts a pause during the dialling of the telephone or fax number.
• Displays a list of the last 10 fax or telephone numbers dialled (outgoing
calls) or the last 20 numbers from which calls have been received
(incoming calls), irrespective of whether or not a document was present
in the ADF.
•
After two numeric keys (01-50)
have been pressed, automatically dials (once set) the
associated telephone or fax
numbers.
•
Cancels incorrect settings.
13
Page 20
B
ASIC TRANSMISSION AND RECEPTION OPERATIONS
Now that your fax machine has a name and number, it is ready to
operate and be used for the following functions:
• Transmitting documents (also in broadcast mode, from the
memory, or by polling)
• Receiving documents (also by polling)
• Making telephone calls (see the chapter “Making a call”)
• Copying documents (see chapter “Making a copy”).
T
RANSMITTING A DOCUMENT
W
HAT DOCUMENTS CAN BE TRANSMITTED
Sizes
• Breadth min. 148 mm - max. 216 mm
• Length min. 216 mm - max. 600 mm
Sheet thickness
2
(max. 20 sheets)
80 g/m
60 - 90 g/m
50 - 140 gr/m
2
(max. 10 sheets)
2
(1 sheet at a time)
1. Insert the automatic document feeder (ADF) in the openings
2. Push in the ADF until it clicks into position.
Attention:
You must not force the original.
3. Insert the document with the side to be transmitted facing upwards
The bottom edge of the original is fed into the ADF and the display
shows on the top line:
and on the bottom line, the default contrast value: NORMAL.
P
LACE THE DOCUMENT IN THE ADF
provided for this purpose.
(automatic document feed).
DOCUMENT READY
S
N
EVER USE
•
rolled paper
•
excessively thin paper
•
torn paper
•
damp or wet paper
•
excessively small paper format
•
crumpled paper
•
carbon paper
In order to avoid damaging your fax machine and invalidating your
guarantee, make sure that the documents you are to use are in good
condition and do not contain:
•
staples
• paper clips
• adhesive tape
• correcting liquid or glue that has not yet dried.
In all such cases, photocopy the document and transmit the copy.
ETTING CONTRAST AND RESOLUTION
/
Before transmitting a document you can make some
adjustments to optimise the printing quality.
S
ETTING THE CONTRAST
1. Press the key
until the display shows:
FAX SET-UP
2. Press the key:
The display shows:
DATE AND TIME
3. Press the key:
The display shows:
VARIOUS SETTINGS
4. Press the key
until the display shows:
CONTRAST:NORMAL
5. Press the key
until the other available options “DARK” and “LIGHT” are
shown.
14
Page 21

6. To confirm the selection, press the key:
7. To return the fax machine to the stand-by mode, press the
key:
Choose the type of contrast on the basis of the following criteria:
• NORMAL, if the document is neither too light nor too dark.
NORMAL appears on the bottom line of the display.
• LIGHT, if the document is excessively dark. LIGHT appears on
the bottom line of the display.
• DARK, if the document is excessively light. DARK appears on the
bottom line of the display.
TO
SET THE RESOLUTION
1. Press the key:
until the desired value appears on the display.
Choose the resolution on the basis of the following
criteria:
• STD (STANDARD) if the original contains easily readable
characters. An arrow appears on the bottom line of the
display in line with the “
• FINE if the original contains very small characters or
diagrams. An arrow appears on the bottom line of the
display in line with the “
• HALF TONES, if the document contains shaded areas.
An arrow in line with the “
with the “
bottom line of the display.
T
RANSMITTING AN ORIGINAL
1. Place the original document in the ADF.
The display shows on the top line:
” symbol printed on the console appear on the
” symbol on the console.
” symbol on the console.
” symbol and an arrow in line
DOCUMENT READY
and on the bottom line, the default contrast value: NORMAL.
The initial resolution value (even if not shown on the display)
is: “
” (standard).
If desired, change the contrast and resolution values as
described previously.
2. To select the recipient number, press the keys:
-
The recipient’s number may contain a maximum of 64 digits.
3. To start transmitting, press the key:
Note
If you want you can dial the recipient’s number using the quick dialling
procedures, see “Setting one-touch and speed dialling”, “Sending
with one-touch dialling” and “Sending with speed dialling”.
Note
To abort the current transmission, press the key . The fax
machine ejects the document from the ADF and returns to the standby mode.
If the document to be removed consists of more than one sheet, before
pressing
TO
-
to eject the first, remove all the others by hand.
TRANSMIT AND HEAR THE DIALLING TONES
1. Place the original document in the ADF.
The display shows on the top line:
DOCUMENT READY
and on the bottom line, the default contrast value: NORMAL.
The initial resolution value (even if it is not shown on the
display) is: “
If you want, change the contrast and resolution values as
described previously.
2. If you want to hear the dialling tone, press the key:
The display shows:
” (standard).
ON LINE
And the length of the transmission in minutes and seconds in
the top right-hand corner.
3. To select the recipient number, press the keys:
The recipient’s number may contain a maximum of 64 digits.
4. As soon as you hear the tone of the recipient’s fax machine,
press the key:
Transmission commences and the message
“CONNECTING” appears on the display.
If the document is sent correctly, once this operation has
been completed, the display will show the message “TX
COMPLETED” for a few seconds.
If the document is transmitted correctly, once this operation
has been completed, the display will show the message “TX
COMPLETED” for a few seconds.
Comment
If you have entered any incorrect digits: position the cursor, using the
|/}
keys, to the incorrect digit and overwrite it with the correct one. If
you want to delete the number altogether, press the key.
15
Page 22

FOR
TRANSMISSION, LIFT THE HANDSET
1. Place the original document in the ADF.
The display shows on the top line:
DOCUMENT READY
and on the bottom line, the default contrast value: NORMAL.
The initial resolution value (even if it is not shown on the
display) is: “
If you want, change the contrast and resolution values as
described previously.
2. Lift the handset to engage the line.
The display shows:
” (standard).
ON LINE
and the length of the transmission in minutes and seconds in
the top right-hand corner.
3. To select the recipient number, press the keys:
-
The recipient’s number may contain a maximum of 64 digits.
If your correspondent’s fax machine is set up for automatic
reception, you will hear the fax machine signal.
If it is set up for manual reception, the correspondent
himself will answer. Ask him to press the start key on his
fax. Then wait for the fax signal.
4. To start sending, press the key:
The message “CONNECTING” appears on the display. If
the document is sent correctly, once this operation has been
completed, the display will show the message “TX
COMPLETED” for a few seconds.
T
RANSMITTING ORIGINAL AT A PRESET TIME
(
DELAYED TRANSMISSION
This function enables you to solve time zone problems if
your correspondent is located thousands of kilometres away
and to avoid paying high prices by choosing time bands
when there is less traffic on the telephone lines.
1. Place the original document in the ADF. On the upper line,
the display shows:
)
DOCUMENT READY
and on the bottom line, the default contrast value: NORMAL.
The initial resolution value (even if it is not shown on the
display) is: “
If you want, change the contrast and resolution values as
described previously.
2. Press the key
until the display shows:
” (standard).
DELAYED TX
3. Press the key:
The display shows:
TYPE TIME
HH:MM
Enter the time at which you want to transmit the document.
For example “16:50”.
4. To do so, press the keys:
-
5. Press the key:
A
UTOMATIC REDIAL
If no connection is established due to line errors or because the
recipient’s number is busy, the fax machine automatically redials
the number up to five times.
-
Note
You can cancel the “delayed transmission” setting. Do so by removing
the document from the ADF or by pressing the
The display shows:
TYPE FAX NUMBER
NUM/TOUCH/SPEED
Dial your recipient’s number in any of the available methods:
directly on the numeric keypad or using the one-touch keys
or speed dialling codes (see “Setting one-touch and
speed dialling”).
6. Press the keys:
7. To confirm the entry, press the key:
The display shows “TX SET.” for a few seconds and then:
AUTOMATIC OO
TX AT 16:50
key.
16
Note
If there is a power failure, the delayed transmission will be
cancelled.
Page 23

C
HANGING OR DELETING DELAYED TRANSMISSION ALREADY
UP
SET
1. Press the key
until the display shows:
DELAYED TX
2. Press the key:
10. To do so, press the keys:
-
Confirm the entry or the existing number displayed.
11. To do so, press the key:
The display shows:
AUTOMATIC OO
TX AT 18:00
The display shows:
ALREADY ENTERED
3. Press the key:
The display shows:
CHANGE PARAM.?
If you want to delete the previously set up transmission
| /}
setting, press the keys
SETTING?” appears on the display.
4. To confirm the deletion, press the key:
The fax machine automatically returns to the stand-by mode.
If you want to change the time at which the document is to be
sent or the number of the recipient to whom you want to
send the document, take the following steps:
5. Press the key:
The display shows:
. The message “CANCEL
TYPE TIME
16: 5 0
You can overwrite the displayed time with the new time.
6. To do so, press the keys:
-
Confirm the entry or the existing time.
7. To do so, press the key:
The display shows:
TYPE FAX NUMBER
8. If you want to set the current time, press the key:
T
RANSMITTING AN ORIGINAL TO MULTIPLE RECIPIENTS
The fax machine’s memory allows you to send a document (even
at a preset time) to multiple recipients (max. 10): “Broadcast
transmission”. See “Transmitting a document from the memory”.
T
RANSMITTING A DOCUMENT FROM THE MEMORY
1. Place the original document in the ADF.
The display shows on the top line:
DOCUMENT READY
and on the bottom line, the default contrast value: NORMAL.
The initial resolution value (even if it is not shown on the
display) is: “
If you want, change the contrast and resolution values as
described previously.
2. Press the key
until the display shows:
” (standard).
TX FROM MEMORY
3. Press the key:
The fax machine starts to store the original document. Once
saved, the display shows the message “DOC.N. XXXX” for
several seconds.
TYPE TIME
HH:MM
For example “16:50”.
4. To do so, press the keys:
-
Confirm the entry or the current time.
9. To continue with the next steps, press the key:
You can overwrite the displayed number with the new
number.
17
Page 24

5. To do so, press the key:
The display shows:
TYPE FAX NUMBER
NUM/TOUCH/SPEED
Dial your recipient’s number in any of the available methods:
directly on the numeric keypad or using the one-touch
keys or speed dialling codes (see “Setting one-touch
and speed dialling”).
6. To do so, press the keys:
-
7. Press the key:
The fax machine prompts you to enter another number:
TYPE FAX NUMBER
NUM/TOUCH/SPEED
If you want to send the document to more than one
correspondent, repeat the previous two steps for each
extra recipient.
8. To terminate the procedure, press the key:
9. If you want to send the document to one correspondent
only, simply press the key:
Once the procedure has been completed, the display shows:
AUTOMATIC 00
MEMORY TX
P
ROGRAMMED TRANSMISSION FROM THE MEMORY
,
CHANGING
1. Press the key:
REPEATING OR DELETING
until the display shows:
MEMORY TX
2. Press the key:
The display shows:
ALREADY ENTERED
3. Press the key:
The display shows:
PRINT SETTING?
You can choose the following options:
PRINT SETTING? – To print the memory transmission
parameters only. When it has finished printing, the fax
machine returns automatically to its stand-by status.
CANCEL SETTING? - To cancel the setting. The fax machine
returns to its initial stand-by status.
CHANGE PARAM.? – To change the recipient’s number or
the desired transmission time.
4. To select the other options, press the key:
/
5. To confirm the selection, press the key:
Note
If there is a power failure, the transmission from the memory
will be cancelled.
The display shows:
TYPE TIME
HH:MM
From this point on, proceed from Point No. 3 onwards of the
procedure in “Transmitting a document from the memory”.
18
Page 25

R
ECEIVING A DOCUMENT
You can set up the fax machine in four separate reception modes:
• Manual reception . For all occasions in which the user is present
and can answer the calls personally.
• Automatic reception. Automatic reception, for all occasions in
which the user is not present but wants to receive documents
anyway. This is the standard mode of your fax machine.
• Automatic reception with call type recognition. In this reception
mode, after a given number of rings (default setting: 2 rings), the
fax machine connects to the telephone line and is capable of
recognizing whether the incoming call is a fax call or a telephone
call.
• Reception with an answering device (TAD) (Model with a
built-in TAD and Base model with an external answering
device). In this reception mode, the TAD receives the calls,
records any messages left by the correspondent and, if he wants
to send you a document, enables the fax machine to receive it.
C
HOOSING RECEPTION MODE
1. Press the key
until the display shows:
RECEPTION MODE
2. Press the key:
The display shows:
AUTOMATIC
You may also view the other available options: “MANUAL”,
“PHONE/FAX” and “TAD/FAX”. This message is only
displayed if you have recorded outgoing message 1 (see
“The telephone answering device”).
3. To do so, press the key:
/
4. To confirm the entry, press the key:
5. To return the fax machine to the stand-by mode, press the
key:
3. then hang up.
The fax machine starts receiving. The display shows some
information about the reception in progress, including your
correspondent’s fax number or, if programmed, his name.
Once the document has been received, the display shows
the message “RX COMPLETED” for a few seconds. The
fax machine then returns to the stand-by mode.
A
UTOMATIC RECEPTION
After two rings, the fax machine prepares to receive a
document. The document is received as in manual reception
mode.
A
UTOMATIC RECEPTION WITH CALL TYPE RECOGNITION
(
PHONE/FAX
The action taken by the fax machine in this reception mode
depends on who is calling:
- If the caller is another fax machine, after two rings your fax
- If the caller is a telephone, after two rings, the fax machine
If you lift the receiver before the fax machine connects to
the telephone line and you hear the dialling tone, proceed
as follows:
1. Press the key
2. then hang up.
R
See the corresponding chapter.
machine automatically prepares to receive a document.
emits an acoustic signal for about 20 seconds and the
display shows “LIFT HANDSET”. If you do not lift the
receiver within these 20 seconds, the fax machine
automatically prepares to receive a document.
ECEPTION WITH AN ANSWERING DEVICE (TAD
)
Note
You can break off the reception in progress.
1. Press the
The fax machine returns to its stand-by status.
S
ETTING ONE-TOUCH AND SPEED DIALLING
key.
)
P
ROCEDURE FOR THE VARIOUS RECEPTION MODES
M
ANUAL RECEPTION
1. When the telephone rings, lift the handset to engage the
line.
The display shows:
ON LINE
2. As soon as you hear the fax machine signal or if the
correspondent asks you to receive a document:
The display shows:
CONNECTING
The fax machine is also capable of carrying out quick dialling
procedures, such as one-touch dialling and speed dialling, but these
functions must be duly set.
ONE-
TOUCH DIALLING
You can assign each of the 10 numeric keys (0 - 9) a fax
number or a telephone number and a name which will be
dialled automatically when you press this key for more than
a second.
1. Press the key
until the display shows:
FAX SET-UP
19
Page 26

2. Press the key:
The display shows:
3. Press the key
DATE AND TIME
12. To do so, press the key:
/
You can now overwrite the wrong character.
13. To delete the entire name, press the key:
until the display shows:
ONE TOUCH DIAL
4. Press the key:
The display shows:
TYPE ONE TOUCH
KEY: 0-9
5. Press the numeric key to which you want to assign the
telephone number or the fax number:
-
The display shows:
1:NUM. FAX/TEL
If a fax number or a telephone number has already been
saved, the display will show it.
Enter the recipient’s telephone or fax number (max. 64
digits).
6. Press the keys:
-
If you want to correct a digit, set the cursor under the digit
to be changed.
7. To do so, press the key:
/
You can now overwrite the wrong digit.
8. If you want to delete the complete number, press the key:
14. To confirm the entry, press the key:
The display shows:
EDIT ANOTHER YES
You can terminate the procedure at this point or program
another one-touch dialling key.
15. To interrupt the procedure, press the key:
16. To program another one-touch dialling key, press the key:
To set up, repeat the corresponding steps for recipient
number and name entry.
S
PEED DIALLING
Using codes (01 - 50) you can assign other fax numbers,
telephone numbers and names which will be automatically
dialled by pressing the
Follow the first two steps of the one-touch dialling
procedure, then:
1. Press the key
until the display shows:
key and typing the code.
If your fax machine is connected to a private line, access
the public line by pressing the key before dialling the
number.
9. To do so, press the key:
A letter “E” (external) appears on the display.
10. To confirm the entry, press the key:
The display shows:
1: NAME
If a name has already been stored, the display will show it.
Enter the recipient name (max. 16 characters) as you did
for your name (see “Entering name and fax number”,
chapter “Delivery contents, connecting up and first-
time operation”).
11. To do so, press the keys:
-
If you want to correct a character, place the cursor under
the character to be changed.
CODED SPEED DIAL
2. Press the key:
The display shows:
TYPE SPEED NO.
(01-50):
Select the code with which you want to associate the
telephone or fax number (for example
3. Press the keys:
-
The display shows:
- ).
O1:NUM. FAX/TEL
From here on, follow the one-touch dialling procedure
starting from the steps in which the number and name of the
correspondent are set.
Note
If you want, you can print the information saved on the 10 onetouch dialling keys and 50 speed dialling codes (see chapter
“Printing reports and lists”).
20
Page 27

C
HANGING A ONE-TOUCH DIALLING KEY OR SPEED DIALLING
CODE
1. Follow the one-touch dialling or speed dialling procedure
until the display shows:
- For one-touch dialling
1:NUM. FAX/TEL
- For speed dialling
O1:NUM. FAX/TEL
2. To delete the display, press the key:
S
ENDING WITH SPEED DIALING
1. Place the original document in the ADF.
The display shows on the top line:
DOCUMENT READY
and on the bottom line, the default contrast value: NORMAL.
The initial resolution value (even if it is not shown on the
display) is: “
If necessary, change the contrast and resolution values as
described in “Setting contrast and resolution”.
2. Press the key:
” (standard).
Enter the new telephone or fax number (max. 64 digits).
3. To do so, press the keys:
-
4. To confirm the entry, press the key:
The display shows:
1: NAME
or
01: NAME
5. To delete the display, press the key:
6. Enter the new name (max. 16 characters).
7. To confirm the entry, press the key:
8. To return the fax machine to the stand-by mode, press the
key:
S
ENDING WITH ONE-TOUCH DIALING
1. Place the original document in the ADF.
The display shows on the top line:
DOCUMENT READY
and on the bottom line, the default contrast value: NORMAL.
The initial resolution value (even if it is not shown on the
display) is: “
If necessary, change the contrast and resolution values as
described in “Setting contrast and resolution”.
2. Pressing the desired numeric key for more than one second:
-
The display shows the fax number stored under it. If the
name has also been saved, the display shows the latter.
Transmission then continues in the normal way.
” (standard).
The display shows:
ADDRESS BOOK
CODE OR < >
Type the desired speed dialling code, for example:
- .
3. To do so, press the keys:
-
The display shows the stored fax number. If the name has
also been saved, the display shows the latter.
Once the number has been dialled, transmission continues
in the ordinary way.
T
RANSMITTING WITH ONE-TOUCH OR SPEED DIALLING BY
SEARCHING
THE PHONE BOOK
If you do not remember the one-touch dialling key or speed
dialling code to which you assigned a given fax number,
you can start sending the document from the phone book
as follows:
1. Place the original document in the ADF.
The display shows on the top line:
DOCUMENT READY
and on the bottom line, the default contrast value: NORMAL.
The initial resolution value (even if it is not shown on the
display) is: “
If necessary, change the contrast and resolution values as
described in “Setting contrast and resolution”.
2. Press the key:
The display shows:
” (standard).
ADDRESS BOOK
CODE OR < >
Now locate the fax number or name of the correspondent
to whom you wish to send your document.
3. To do so, press the key:
/
4. To start transmission, press the key:
21
Page 28

T
RANSMITTING A DOCUMENT BY RECALLING ONE OF
LAST
20
THE
LAST
THE
1. Place the original document in the ADF. On the upper line,
INCOMING NUMBERS OR ONE OF
10
NUMBERS CALLED
the display shows:
DOCUMENT READY
and on the bottom line, the default contrast value: NORMAL.
The initial resolution value (even if it is not shown on the
display) is: “
If necessary, change the contrast and resolution values as
described in “Setting contrast and resolution”.
2. Press the key:
The display shows:
” (standard).
INCOMING CALLS
3. To program the other “OUTGOING CALLS” option, press
the key:
/
4. To confirm the selection, press the key
You can now select the fax number or name of the recipient
to whom you wish to send the document on the list of the
last 20 incoming calls or on the list of the last 10 outgoing
calls.
5. To do so, press the key:
/
6. To start sending, press the key:
P
RINTING REPORTS AND LISTS
• Last transmission report: contains information about the last
transmission and can be printed, once programmed, always and
automatically after each transmission or on request at the desired
moment.
• Failed transmission report: also contains information about the
last transmission but is printed automatically only when the
transmission has failed. The fax machine is set by default to
print this kind of report automatically. If you wish to disable it, see
the relevant paragraph.
• Last broadcast transmission request report: contains
information about the last broadcast transmission request and
can be printed, once programmed, always and automatically after
each transmission or on request at the desired moment.
I
NTERPRETING THE REPORTS
•
Act. N. Progressive number of the transactions
(transmission/reception) carried out.
•
Type Activity:
TX, TX POLLING, TX ECM for transmission.
RX, RX POLLING, RX ECM for reception.
•
Dialled Fax number of the correspondent that you
Number selected.
•
Name Name of recipient dialled. Only displayed if you
have saved it on the one-touch dialling keys or in
the speed dialling codes. This field is not printed
on the activity report.
•
Received Id Contains number (and possibly) name of recipient
dialled. This number corresponds to the number
you dialled, only if the correspondent set his own
fax number correctly. Otherwise, it may be
different or not be present at all.
•
Date/Time Date and time at which the transaction was
carried out.
•
Duration Length of transaction (in minutes and seconds).
•
R
EPORTS
By printing out reports, the fax machine enables you to check the
result of all the transactions carried out (transmission and reception),
the volume of documents handled and much other useful information.
The fax machine prints the following reports:
• Power failure report: it is always and automatically printed after
a power failure, if there are documents in the memory.
Once the operating conditions have been restored, the fax machine
will automatically print a report indicating the number of pages in
the memory up to that time that you have lost. In this case, we
recommend that you print out an activity report to be able to
recognize the number or name that sent the lost document.
• Activity report: contains information about the last 42
transactions carried out (transmission and reception operations),
which the fax machine keeps in its memory. It is printed
automatically (after the thirty-second transaction and subsequent
deletion of the stored data) or on request.
Pages Total number of pages sent/received.
•
Result Result of the transaction:
- OK: if the transaction was completed
successfully.
- ERROR CODE XX: if the transmission was
faulty. The cause is indicated by the error code
(see “Error codes”, chapter “Troubleshooting
guide”).
22
Page 29

E
NABLING AND DISABLING AUTOMATIC PRINTING OF
TRANSMISSION
AND FAILED TRANSMISSION REPORTS
3. Press the key:
1. Press the key
until the display shows:
FAX SET-UP
2. Press the key:
The display shows:
DATE AND TIME
3. Press the key:
The display shows:
VARIOUS SETTINGS
4. Press the key
until the display shows:
FAILED TX REPORT
You can choose the following options: “TX REPORT:
ALWAYS” and “TY REPORT: OFF”.
FAILED TX REPORT - the fax machine will automatically
print a report only after each failed transmission.
TX REPORT:ALWAYS - the fax machine will automatically
print a report after each transmission irrespective of the
result.
TX REPORT: OFF - the fax machine will not print any report.
5. To select one of the options, press the key:
/
6. To confirm the selection, press the key:
7. To return the fax machine to the stand-by mode, press the
key:
The display shows:
VARIOUS SETTINGS
4. Press the key
until the display shows:
BROADC. REP.:ON
5. To select the “BROADC. REP.:OFF” option, press the key:
/
6. To confirm the selection, press the key:
7. To return the fax machine to the stand-by mode, press the
key:
E
NABLING AND DISABLING AUTOMATIC PRINTING DELAYED
TRANSMISSION
1. Press the key
DATA
until the display shows:
FAX SET-UP
2. Press the key:
The display shows:
DATE AND TIME
3. Press the key:
The display shows:
VARIOUS SETTINGS
4. Press the key
E
NABLING AND DISABLING AUTOMATIC PRINTING OF
BROADCAST
1. Press the key
TRANSMISSION REPORTS
until the display shows:
FAX SET-UP
2. Press the key:
The display shows:
DATE AND TIME
until the display shows:
DELAY LIST: ON
5. To select the “DELAY LIST: OFF” option, press the key:
/
6. To confirm the selection, press the key:
7. To return the fax machine to the stand-by mode, press the
key:
23
Page 30

P
RINTING TRANSMISSION, ACTIVITY, BROADCAST
TRANSMISSION
1. Press the key
AND CALLER ID REPORTS ON REQUEST
until the display shows:
PRINT OUT REPORT
2. Press the key:
The display shows:
LAST TX REPORT
You can choose the following options: “LAST
BROAD.REP.”, “ACTIVITY REPORT”, “PRINT: ID LIST”
and “PRINT OUT:EXIT”.
3. To select one of the options, press the key:
/
4. To confirm the selection, press the key:
Having printed the report, the fax machine automatically
returns to its initial standby status.
4. Press the key:
The display shows:
PRINT: INSTALL
5. To view the other available options: “PRINT:BLACK LIST”
and “MENU EXIT”, press the key:
/
6. To confirm the selection, press the key:
note
If you chose “PRINT: INSTALL” or “PRINT:BLACK LIST”, when the
fax machine has finished printing, it returns automatically to the standby mode.
If you have chosen “MENU EXIT”, press the
fax machine to the stand-by mode.
P
RINTING CONFIGURATION PARAMETERS AND DATA
TO
RELATING
ONE-TOUCH DIALLING AND SPEED DIALLING
key to return the
Note
If you have chosen “PRINT OUT:EXIT”, press the key to
return the fax machine to the stand-by mode.
L
ISTS
At any time, you can print complete lists of the installation and
setup parameters and print the data saved in the one-touch dialling
keys and speed dialling codes.
By printing out the lists of installation and setup parameters, you will
obtain an up to date report of the default values and those that you
have set to adapt it to your operating requirements.
P
RINTING INSTALLATION PARAMETERS AND BLACKLISTED
NUMBERS
1. Press the key
until the display shows:
INSTALLATION
2. Press the key:
The display shows:
TEL. LINE SET-UP
3. Press the key
/
1. Press the key
until the display shows:
FAX SET-UP
2. Press the key:
The display shows:
DATE AND TIME
3. Press the key
until the display shows:
PRINT OUT SET-UP
4. Press the key:
The display shows:
PRINT SETTINGS
5. To view the other available options: “PRINT:ONE TOUCH”,
“PRINT:SPEED DIAL” and “PRINT OUT:EXIT”, press the
key:
6. To confirm the selection, press the key:
Having printed the report, the fax machine automatically
returns to its initial standby status.
24
until the display shows:
PRINT INSTALL.
Note
If you have chosen “PRINT OUT:EXIT”, press the key to
return the fax machine to the stand-by mode.
Page 31

M
AKING A CALL
When you engage the line by lifting the telephone handset, you
may use all the telephone functions available on ordinary telephones
sold on the market.
These also include the R function (REGISTER RECALL, activated by
pressing the key) which provides access to the special services
made available by the company that manages the telephone network.
You can also use the following functions:
• Call the correspondent using the fast dialling procedures set, see
“Telephoning with one-touch dialling” and “Telephoning with
speed dialling”.
• Momentarily hold a telephone call by pressing the
(HOLD) key. The call is resumed as soon as the same key is
pressed again.
• Activate the "handsfree" function, by pressing the
before or during a telephone call. This function is useful if you want
other persons at your end to take part in the conversation.
T
ELEPHONING WITH ONE-TOUCH DIALLING
CASE 1
Do not place the original document in the ADF.
1. Press the desired numeric key, for example, for more than
one second (in example
-
The display shows the associated telephone number that
you stored (see “Setting one-touch and speed dialling”,
chapter “Basic transmission and reception operations”).
If a name was also associated with it, the display will show
this, too.
2. Once the number has been dialled, if the correspondent is
free, you can lift the handset and start talking
or
):
key
T
- The display shows the stored telephone number (see
ELEPHONING WITH SPEED DIALLING
CASE 1
Do not place the original document in the ADF.
1. Lift the handset to engage the line.
or
to activate the handsfree function, press the key:
The display shows:
ON LINE 00:00
and the length of the call in minutes and seconds in the top
right-hand corner.
2. Press the key:
The display shows:
TEL CALL
CODE OR < >
3. Type the desired speed dialling code, for example
- . To do so, press the keys:
“Setting one-touch and speed dialling”, chapter “Basic
transmission and reception operations”). If a name
was also associated with it, the display will show this, too.
Once the number has been dialled, if the correspondent is
free you can start talking.
4. To start the dialling procedure, press the key:
Once the number has been dialled, if the correspondent is
free you can start talking.
CASE 2
Do not place the original document in the ADF.
1. Press the key:
The display shows:
to activate the handsfree function, press the key:
The display shows the length of the call in minutes and
seconds in the top right-hand corner.
CASE 2
Do not place the original document in the ADF.
1. To activate the handsfree function, press the key:
The display shows:
ON LINE 00:00
and the length of the call in minutes and seconds in the top
right-hand corner.
2. Press the desired numeric key (in example
- The display shows the associated telephone number that
you stored. If you also associated a name with it, the display
will show this, too.
):
ADDRESS BOOK
CODE OR < >
2. Type the desired speed dialling code, for example
- . To do so, press the keys:
- The display shows the stored telephone number. If a name
was also associated with it, the display will show this, too.
3. To start the dialling procedure, press the key:
4. Once the number has been dialled, if the correspondent is
free you can start talking
or
to activate the handsfree function, press the key:
The display shows the length of the call in minutes and
seconds in the top right-hand corner.
25
Page 32

T
ELEPHONING WITH THE HELP OF THE
PHONE
BOOK
CASE 1
Do not place the original document in the ADF.
1. Lift the handset to engage the line.
or
to activate the handsfree function, press the key:
The display shows:
ON LINE 00:00
and the length of the call in minutes and seconds in the top
right-hand corner.
2. Press the key:
The display shows:
TEL CALL
CODE OR < >
Select the telephone number or name of the correspondent
you want to call.
3. To do so, press the key:
/
4. To start the dialling procedure, press the key:
Once the number has been dialled, if the correspondent is
free you can start talking.
CASE 2
Do not place the original document in the ADF.
1. Press the key:
The display shows:
ADDRESS BOOK
CODE OR < >
Select the telephone number or name of the correspondent
you want to call.
2. To do so, press the key:
/
3. To start the dialling procedure, press the key:
4. Once the number has been dialled, if the correspondent is
free you can start talking
or
to activate the handsfree function, press the key:
The display shows the length of the call in minutes and
seconds in the top right-hand corner.
R
EDIALLING ONE OF THE LAST
20
INCOMING NUMBERS OR ONE OF THE
10
LAST
1. Lift the handset to engage the line.
OUTGOING NUMBERS
CASE 1
Do not place the original document in the ADF.
or
to activate the handsfree function, press the key:
The display shows:
ON LINE 00:00
and the length of the call in minutes and seconds in the top
right-hand corner.
2. Press the key:
The display shows:
INCOMING CALLS
3. To program the other “OUTGOING CALLS” option, press
the key:
/
4. To confirm the selection, press the key:
5. You can find the telephone number or name of the
correspondent you wish to call on the list of the last
20 incoming calls or on the list of the last 10 outgoing calls.
To do so, press the key:
/
6. To start the dialling procedure, press the key:
Once the number has been dialled, if the correspondent is
free you can start talking.
CASE 2
Do not place the original document in the ADF.
1. Press the key:
The display shows:
INCOMING CALLS
2. To program the other “OUTGOING CALLS” option, press
the key:
/
3. To confirm the selection, press the key:
4. You can find the telephone number or name of the
correspondent you wish to call on the list of the last
20 incoming calls or on the list of the last 10 outgoing calls.
To do so, press the key:
/
5. To start the dialling procedure, press the key:
26
6. Once the number has been dialled, if the correspondent is
free you can start talking
or
to activate the handsfree function, press the key:
The display shows the length of the call in minutes and
seconds in the top right-hand corner.
Page 33

M
AKING A COPY
W
HAT DOCUMENTS CAN BE COPIED
Before making a copy, make sure that the document respects the
characteristics described in “What documents may be used”, section
“Transmitting a document”, chapter “Basic transmission and
reception operations”.
C
OPYING
As mentioned previously, you can also use the fax machine
as a photocopier. The printing quality obtained depends
on the type of copy you want to obtain: Normal copy or
Quality copy, and the contrast and resolution values that
you select before starting the copying function.
1. Choose the type of contrast on the basis of the following
criteria:
• NORMAL, if the document is neither too light nor too
dark.
• LIGHT, if the document is too dark.
• DARK, if the document is too light.
Choose the resolution on the basis of the following criteria:
• TEXT, if the document contains easily legible text or
simple graphics.
• PHOTO, if the document contains shaded areas.
2. Place the original document in the ADF.
The display shows on the top line:
DOCUMENT READY
and on the bottom line, the default contrast value: NORMAL.
3. Press the key:
The display shows the default contrast, resolution settings
and copy type: 100%, NORMAL and TEXT, respectively.
4. Press the key:
The display shows:
COPY: HIGH QUAL.
5. To select the other “COPY:NORMAL” option, press the
key:
/
6. To confirm the selection, press the key:
9. To display the other two types of contrast available:
“CONTRAST: LIGHT” or “CONTRAST: DARK”, press the
key:
/
10. To confirm the selection, press the key:
The display shows the values that you have just selected.
At this point, simply choose the resolution you want and set
the number of copies you want to make:
11. To choose the desired resolution setting: “TEXT” or
“PHOTO”, press the key:
12. To make a single copy, press the key:
13. To make multiple copies (max. 9), enter the desired
number. To do so, press the key:
-
14. To start the copying procedure, press the key:
The fax machine saves the pages of the document one by
one before making the copies.
Note
You can break off the copying in progress. If the document consists of
more than one sheet, remove all the sheets behind the first sheet
manually. Then press the
1. To eject the first sheet from the ADF, press the
2. To return the fax machine to the stand-by mode, press the
key.
key to eject the first sheet.
key.
Note
If you want to make enlargements or reductions, lay the original in the
centre in a lengthwise direction. Use the middle step in the sheet
feeder as an orientation aid.
The maximum printing width is 204 mm and the maximum printing
The display shows:
ZOOM: 100%
7. To select the other available options: “140%”, “70%” or
“50%”, press the key:
/
8. To confirm the selection, press the key:
The display shows:
CONTRAST:NORMAL
length is 282 mm. The maximum non-printing area is: right and left
4 mm, top 3 mm and bottom 14 mm.
27
Page 34

THE
TELEPHONE ANSWERING DEVICE (TAD
)
If you have purchased the model of fax equipped with a built-in
telephone answering device you can perform the same functions
as those performed by external telephone answering devices.
You can therefore:
• record outgoing messages which will be played automatically
when you are out, to request callers to leave a message or call
back later;
• record memos;
• listen to outgoing messages;
• change outgoing messages;
• record messages left by callers when you are out, to ensure that
your calls do not get lost;
• listen to recorded messages and memos;
• delete recorded messages and memos;
• forward messages to a remote telephone;
• control the TAD from a remote location.
The TAD’s recording capacity depends on the size of the memory
available (ca. 14 mins.). The length of the messages is
programmable and may be 30 or 60 seconds, see “Setting the length
of memos and incoming messages”.
/ By pressing this key you can select the available options for
IMPORTANT
The TAD can only be enabled after recording outgoing message
1. See “Outgoing messages and memos”, and, in particular,
“Recording outgoing message 1”.
Note
In TAD/FAX reception mode, the fax machine automatically prepares
to receive when it is called by another fax machine, to prevent
documents sent to you from getting lost.
This key starts recording a memo.
Press the key to move, while playing messages and memos,
to the start of the next message or memo.
Press this key to return to a previous message or memo
while playing messages and memos. You must first have
listened to all messages or memos.
By pressing the key again, you delete messages and memos
already listened to.
INDICATOR LED (MESSAGES)
On, to indicate that there are messages or memos in the
memory that have already been played.
Blinking, to indicate that there are messages or memos in
the memory that have not yet been played.
Off, to indicate that there are no messages or memos in the
memory.
Keys required to use the TAD:
This key provides access to the TAD configuration menu
and selection of various sub-menus.
a particular value or parameter.
This key starts recording and playing. In addition, it has the
following functions: selecting the menu for configuring the
TAD, sub-menu selection, parameter and setting
confirmation, and switching to the next condition.
This key interrupts recording and playing. It additionally
breaks off the current programming activity and returns the
fax machine to its stand-by status.
Note
In addition, to prevent others from operating the TAD from a remote
location without your authorization (except to leave messages),
access has been protected by a four-digit numeric code (set by default
to “1234”) which you can change or delete at any time, see “Changing
or deleting the TAD access code”.
THE
TA D CONSOLE
This key starts playing new messages and memos. If there
are any messages or memos that you have not heard, the
procedure starts with the first unheard memo. In addition,
by pressing this key you can momentarily stop playing
messages and memos. By pressing the key again, you
resume listening.
C
ACCESS
HANGING, DELETING AND ACTIVATING THE
CODE
Use of an access code prevents
• other people from listening to your personal messages;
• and modifying the TAD configuration parameters that you
have set.
1. Press the key
until the display shows:
TAD SET-UP
2. To confirm the entry, press the key:
3. Press the key
until the display shows:
ACCESS CODE
28
Page 35

4. Press the key:
The display shows the default code “1234”:
TYPE CODE
(0 - 9): 1234
Enter the new code, for example, “0001” to change or
delete the current code.
5. To enter a new code or change the existing one, press the
keys:
-
6. To delete the code, press the key:
7. Press the key
The display shows:
PLAY UNLOCK
8. To return the fax machine to the stand-by mode, press the
key:
To protect the TAD with an access code, carry out the
above steps until the display shows “PLAY UNLOCK”. Then
proceed as follows:
You can allow only persons who know the access code to
listen to messages.
1. To do so, press the key:
/
The display shows:
PLAY LOCK
2. To confirm the selection, press the key:
The display shows:
SET-UP UNLOCK
You can allow only persons who know the access code to
program the TAD.
3. To do so, press the key:
/
The display shows:
SET-UP LOCK
4. To confirm the selection, press the key:
5. To return the fax machine to the stand-by mode, press the
key:
O
UTGOING MESSAGES AND MEMOS
You can record several different types of outgoing messages:
• OGM 1, which has a maximum length of 20 seconds, prompts the
caller to leave a message on the TAD. For example:
“You have called the telephone number ... I’m out at the moment.
You can leave a message after the beep or press the Start button
on your fax machine if you want to send a fax. Thanks”.
• OGM 2, which has a maximum length of 10 seconds, may be
recorded:
• if you are out and have selected the TAD/FAX reception mode,
to inform the caller that the answering device cannot receive
messages because its memory is full. For example:
“I’m sorry but I can only receive faxes at the moment. If you
need to speak to me, please call back later”;
• if you are in but have selected PHONE/FAX mode, to tell the
caller not to hang up, for example: For example:
“Please wait”.
• CALL TRANSFER MESSAGE, which has a maximum length of
10 seconds, to inform you on a remote telephone that there are
new messages for you on the TAD.
• To transfer unheard messages, proceed as follows:
• The TAD must first be set up correctly (see “Transferring
messages and memos to a remote telephone”).
• The functions that enable you to operate the TAD from a remote
location must be enabled (see “Operating the telephone
answering device from a remote location”).
• MEMOS (Voice), which have a length that may be programmed
to 30 or 60 seconds, for personal memos (as reminders, for
example). This message is not played when an incoming call is
received.
R
ECORDING OUTGOING MESSAGE
1. Press the key
until the display shows:
1
TAD SET-UP
2. Press the key:
3. Press the key
until the display shows:
RECORD OGM #1
4. Press the key:
The display shows:
LIFT HANDSET
5. Lift the handset:
The display shows:
TO RECORD
29
Page 36

6. To start recording the outgoing message, press the key:
The display shows:
RECORDING 19
You have 20 seconds (counted on the display from 19 to
00) to record your outgoing message.
if the message lasts less than 20 seconds, there are
three ways of ending the recording.
The recording was completed
• as soon as you stop speaking and hang up the handset,
• by pressing the
• by pressing the
If you press the
machine does not automatically play the recorded
message.
If the time available runs out, the fax machine emits a
brief beep and automatically plays back the message you
have recorded.
7. Then hang up.
8. To return the fax machine to the stand-by mode, press the
key:
key,
key.
key to stop recording, the fax
5. To return the fax machine to the stand-by mode, press the
key:
R
ECORDING OUTGOING MESSAGE
1. Press the key
until the display shows:
2
TAD SET-UP
2. Press the key:
3. Press the key
until the display shows:
RECORD OGM #2
From this point on, proceed as described in Point No. 4 of
“Recording outgoing message 1”.
Note
Bear in mind however that you only have 10 seconds.
Note
If the volume of the message is too low or too high you can regulate
it during playback, using the
level set in the top right-hand corner.
P
LAYING OUTGOING MESSAGE
1. Press the key
until the display shows:
2. Press the key:
3. Press the key
until the display shows:
4. To listen to the previously recorded outgoing message 1,
press the key:
The display shows:
When it plays to the end of the message, the fax machine
automatically prepares to record a new outgoing message
1. In this case, if you like, you can change or replace the
message recorded previously by repeating the recording
procedure. To do so, you must repeat the recording
procedure.
key. The display shows the volume
1
TAD SET-UP
PLAY OGM #1
PLAYING
L
ISTENING TO OUTGOING MESSAGE
1. Press the key
until the display shows:
TAD SET-UP
2. Press the key:
3. Press the key
until the display shows:
PLAY OGM #2
From this point on, proceed as described in Point No. 4 of
“Playing outgoing message 1” onwards.
R
ECORDING A TRANSFER MESSAGE
1. Press the key
until the display shows:
TAD SET-UP
2. Press the key:
3. Press the key
until the display shows:
REC.FORW.ANNOUNC
From this point on, proceed as described in Point No. 4 of
“Recording outgoing message 1”.
2
30
Page 37

TO
RECORD MEMOS
As mentioned previously, the telephone answering device
may be used to record one or more memos, which are
handled in the same way as incoming messages.
1. Press the key:
The display shows:
LIFT HANDSET
2. Lift the handset:
The display shows:
REC.MEMO MSG?
3. To start recording, press the key:
The display shows:
RECORDING 30
Note
You have 30 or 60 seconds at your disposal (see “Setting the
length of memos and incoming messages”) to record your memo
in the same way as OUTGOING MESSAGES 1 and 2.
P
LAYING INCOMING MESSAGES AND MEMOS
If there is one or more incoming messages in the TAD
memory that have not yet been played back, the
“MESSAGES” LED indicator blinks and the display shows
the total number of messages recorded (including memos),
for example, 03:
TAD/FAX 03
01-06-06 10:32
At this point, you can listen to all the messages including the
memos recorded in the memory. The messages not yet
listened to are numbered progressively up to a maximum of
49. Whenever a message is played, the display shows the
day and time at which the message was received.
You can listen to the message via the loudspeaker or, if it is
for example confidential, on the handset only.
1. To start listening to the messages via the loudspeaker, press
the key:
2. To listen to the messages via the handset, press the key:
3. Now lift the handset immediately:
S
ETTING THE LENGTH OF MEMOS AND
INCOMING
1. Press the key
MESSAGES
until the display shows:
TAD SET-UP
2. Press the key:
3. Press the key
until the display shows:
ICM REC.TIME
4. Press the key:
The display shows:
REC.TIME:30 SECS
5. To select the other available “REC.TIME:60 SECS” option,
press the key:
/
6. To confirm the selection, press the key:
7. To return the fax machine to the stand-by mode, press the
key:
The fax machine plays the messages, separated by a short
beep.
Having played back the last message, the fax machine emits two
short beeps and returns automatically to the stand-by mode. The
“MESSAGES” indicator LED stops blinking and remains on.
D
ELETING MESSAGES AND MEMOS ALREADY
LISTENED
You cannot delete a message or a memo until you have started
listening to it.
Incoming messages or memos that have not been played back cannot
be deleted. The memory cannot therefore be completely cleared until
all the messages and memos present in it have been played back.
D
ELETING THE MESSAGE OR MEMO YOU ARE CURRENTLY
LISTENING
1. To start listening to the messages or memos, press the key:
TO
TO
The display shows:
PLAY MSG 01 03
30-06-06 10 :47
2. To delete the messages you are currently listening to, press
the key:
31
Page 38

The TAD moves to the next message and the display shows:
PLAY MSG 01 02
30-06-06 10 :47
3. To delete the next message, press the key:
Proceed in the same way for all the messages you want to
delete.
Note
If you do not want to delete any messages, press the key:
D
ELETING ALL MESSAGES ALREADY LISTENED TO
5. To select the other “FORWARD.ONE TIME” or
“FORWARD.DAILY” options, press the key:
/
6. To confirm the selection, press the key:
The display shows:
TYPE TIME
HH:MM
Type the time at which you want the messages to be
transferred, for example: “11:45”.
7. To do so, press the keys:
-
8. To confirm the entry, press the key:
For example, there are 6 messages on the TAD of which 3
have already been played back:
1. Press the key:
The display shows:
DELETE OLD MSG?
CANCEL/
2. To delete messages already listened to, press the key:
The display shows the stand-by status and the number of
messages remaining after deletion. In this case, 3.
Note
If you do not want to delete any messages, press the key.
T
RANSFERRING INCOMING MESSAGES AND
MEMOS
TO A
If you wish, you can program the TAD to call you on a
remote telephone at a given time to let you listen to any new
messages received.
In addition to the time and number at which you wish to be
called, you can program the way in which the transfer is to
be made (once only or once a day).
1. Press the key
until the display shows:
2. Press the key:
REMOTE TELEPHONE
TAD SET-UP
The display shows:
TYPE TEL. NUMBER
Type the telephone number where you want to be called,
for example: “02 614456”.
9. To do so, press the keys:
-
10. To confirm the entry, press the key:
The display shows:
REC.FORW.ANNOUNC
At this point, you may proceed to record the transfer message
(see “Recording the transfer message”) or abort the
procedure by pressing the key.
11. To terminate the procedure, press the key:
Note
The message transfer setting is cancelled by a power failure.
Note
If you have already recorded a transfer message, the display will show
the message “PLAYING” and the TAD will play the message back.
Changing or replacing the message is described in “Recording the
transfer message”.
After you have programmed the TAD to transfer new messages to a
remote location, you can listen to them by operating the TAD in the
same way as in the “Operating the TAD from a remote location”
section.
3. Press the key
until the display shows:
4. Press the key:
The display shows:
32
FORWARD MESSAGES
FORWARDING OFF
Page 39

O
PERATING THE TAD FROM A REMOTE
S
LOCATION
You can set up the TAD for the following special functions:
You can operate the TAD not only directly using specific keys on the
fax machine console, but also from any other location. This
necessitates that the telephone used operates in tone mode, for
example: a mobile phone.
To operate the TAD remotely, you must set the fax machine in the
“TAD/FAX” reception mode and you must also type in the access
code (default value: “1234”) after listening to OUTGOING MESSAGE
1.
The remote functions available are enabled by another numeric code
consisting of one or two digits (see the table below). If the code has
two digits, it is advisable to wait for the confirmation signal
between one digit and the other.
CODE OPERATING FUNCTION
1 Plays new messages.
2 Plays all messages.
3 Repeats current message or returns to previous
message.
4 Stops playing current message and skips to next
message.
5 + 5 Deletes all played messages.
• TOLL SAVER
• ANNOUNCE ONLY
• SILENT RECEPTION OF INCOMING MESSAGES
T
OLL SAVER
PECIAL TAD FUNCTIONS
Using this function, when you access the TAD from a remote
location to listen to any messages, the fax machine will
answer as follows:
• if there are no new messages, it will answer the call two
rings after the number preset;
• if there are new messages, it will answer the call after the
preset number of rings (see “Changing the number of
rings”, chapter “More sophisticated operations”).
Therefore if you hear one ring more than the preset number,
you will know that there are no new messages and you
can hang up before the fax machine answers the call.
This function is not available in all countries.
1. Press the key
/
CODE PROGRAMMING FUNCTION
# 1 Disables the TAD/FAX reception mode and enables the
AUTOMATIC reception mode.
# 2 Sets up the fax machine for TAD/FAX reception mode.
# 3 Enables the OUTGOING MESSAGE 1 to be recorded.
# 4 Terminates and confirms the recording of OUTGOING
MESSAGE 1.
# 5 Disables the transfer of messages and memos to a
remote telephone.
# 6 Enables only the OUTGOING MESSAGE to be played.
Typing 0 after an operating sequence from 1 to 5 aborts the function
in progress.
Typing 0 after a programming sequence from #1 to #6 aborts the
programming function in progress and returns to the operating
functions. In this case, to resume the programming phase, press #
again.
To perform both the remote playback and programming functions,
you must:
• Dial the fax number from the remote telephone. The TAD will answer
by playing OUTGOING MESSAGE 1.
• Choose the function that you want to perform and type its code
with reference to the table above.
The TAD confirms the operation by emitting a beep.
until the display shows:
TAD SET-UP
2. Press the key:
3. Press the key
until the display shows:
TOLL SAVER
4. To confirm, press the key:
The display shows:
OFF
5. To select the other “ON” option, press the key:
6. To confirm the selection, press the key:
7. To return the fax machine to the stand-by mode, press the
key:
If you have set the TAD access code, at the end of OUTGOING
MESSAGE 1, type in the code:
• If the code is correct, you will hear a short beep after which you
may enter the code for the remote function.
Terminate communication using the method applicable to the
telephone you are using.
33
Page 40

O
UTGOING MESSAGE ONLY
S
ILENT RECEPTION OF INCOMING MESSAGES
Using this function, whenever an incoming call is received,
the TAD plays outgoing message 1 but does not record any
incoming messages.
You can use this function when you expect to be away for a
long time and it would not be possible to record all messages
received in your absence.
In this case, in place of the ordinary outgoing message, it is
advisable to record a different one, for example:
“From 22nd June to 19th September only faxes will be
accepted. No incoming messages will be recorded”.
1. Press the key
until the display shows:
TAD SET-UP
2. Press the key:
3. Press the key
until the display shows:
ANNOUNCE ONLY
4. To confirm, press the key:
The display shows:
ANNOUNC.ONLY:OFF
5. To select the other “ANNOUNC.ONLY:ON” option, press
the key:
/
6. To confirm the selection, press the key:
When this function is enabled, you can receive messages
confidentially. In other words, the TAD receives messages
without playing them over the speaker so that any other
persons present cannot hear your messages.
1. Press the key
until the display shows:
TAD SET-UP
2. Press the key:
The display shows:
ICM ON SPEAKER
3. Press the key:
The display shows:
ICM SPEAKER:ON
4. To select the other “ICM SPEAKER:OFF” option, press
the key:
/
5. To confirm the selection, press the key:
6. To return the fax machine to the stand-by mode, press the
key:
P
RINTING THE TAD CONFIGURATION
PARAMETERS
The display shows:
LIFT HANDSET
If you have already recorded outgoing message 1, the
display will show the message “PLAYING” and the TAD
will play it back.
If you have not yet recorded outgoing message 1, the display
will show the message “NOT RECORDED”.
7. To change the outgoing message recorded previously or
to record a new one, lift the handset:
The display shows:
TO RECORD
8. To start recording, press the key:
The display shows:
RECORDING 20
1. Press the key
until the display shows:
TAD SET-UP
2. Press the key:
3. Press the key
until the display shows:
PRINT TAD SET-UP
4. To confirm, press the key:
The display shows:
PRINT OUT:
If the display shows: “PRINT OUT: EXIT”, press the |/
keys to display the option: “PRINT OUT: ”.
5. To start printing, press the key:
}
34
Once this operation has been completed, the fax machine
automatically returns to its stand-by status.
Page 41

M
ORE SOPHISTICATED OPERATIONS
O
THER USEFUL RECEPTION SETTINGS
P
RINTING AREA FOR A RECEIVED DOCUMENT
REDUCING
1. Press the key
until the display shows:
FAX SET-UP
2. Press the key:
The display shows:
DATE AND TIME
3. Press the key
until the display shows:
PRINTER PARAMET.
4. Press the key
until the display shows:
REDUCTION:94%
Choose one of the following reduction values: “80%”, “76%”,
“70%” and “OFF”.
5. To do so, press the key:
/
6. To confirm the selection, press the key:
7. To return the fax machine to the stand-by mode, press the
key:
3. Press the key
until the display shows:
PRINTER PARAMET.
4. Press the key
until the display shows:
SURPLUS:AUTO
You can choose one of the other available settings:
“SURPLUS:OFF” or “SURPLUS:ON”.
5. To do so, press the key:
/
6. To confirm the selection, press the key:
7. To return the fax machine to the stand-by mode, press the
key:
Note
If you choose the “SURPLUS:AUTO” setting, the fax machine will
print the surplus text on another sheet providing the surplus exceeds
12 mm.
If you choose the “SURPLUS:ON” setting, the fax machine will always
print the surplus text on another sheet.
If you choose the “SURPLUS:OFF” setting, the fax machine will not
print the surplus text.
E
NABLING AND DISABLING SILENT RECEPTION
In the AUTOMATIC, PHONE/FAX and TAD/FAX reception
modes, you can set up the fax machine to receive
documents without any rings being emitted when an
incoming call is received.
When this function is enabled, the behaviour of the fax
machine depends on the reception mode selected and the
caller:
TO
RECEIVE AN OVERLONG DOCUMENT
If you receive a document that is longer than the preset
size, you can have the surplus text printed by your fax
machine on another sheet.
1. Press the key
until the display shows:
FAX SET-UP
2. Press the key:
The display shows:
DATE AND TIME
•in AUTOMATIC and TAD/FAX modes, the fax machine will
never ring when an incoming call is received;
• In PHONE/FAX mode, when an incoming call is received,
the fax machine will not ring if the caller is another fax
machine. If the call is a telephone call, the fax machine
will emit an acoustic signal, in place of the ring, to prompt
you to lift the handset.
1. Press the key
until the display shows:
INSTALLATION
2. Press the key:
The display shows:
TEL. LINE SET-UP
35
Page 42

3. Press the key:
2. Press the key:
The display shows:
ENHANCED FEATUR.
4. Press the key
until the display shows:
SILENT RX: NEVER
You can choose the following options: “SILENT
RX:ALWAYS” or “SILENT RX: DAILY”.
5. To do so, press the key:
/
6. To confirm the selection, press the key:
7. To return the fax machine to the stand-by mode, press the
key:
Note
The daily silent reception setting (“SILENT RX: DAILY”) is cancelled
by a power failure.
D
ISPLAYING CALLER ID
The display shows:
TEL. LINE SET-UP
3. Press the key:
The display shows:
ENHANCED FEATUR.
4. Press the key
until the display shows:
CALLER ID: ON
5. To select the “CALLER ID: OFF” option, press the key:
/
6. To confirm the selection, press the key:
7. To return the fax machine to the stand-by mode, press the
key:
Note
If there is a power failure, the stored date and time are lost. if this
function is enabled, the first incoming call restores the date and time.
This function, which may be activated by the telephone
company on request by the user, is only available in some
countries and conforms to the ETSI ETS 300 778-1
standard.
This function tells you immediately who is calling. In this
way, you will be able to decide in advance whether to answer
the call or not.
If the fax machine is in stand-by mode, whenever a call is
received, one of the following items of information id
always shown when this function is enabled:
• Number or name of the caller;
• PRIVATE: if the correspondent has chosen not to reveal
his identity to you;
• NOT AVAILABLE: if the correspondent is connected to a
telephone exchange that does not support this service.
If the fax machine isn’t in stand-by mode and, when an
incoming call is received, you want to know who is calling
you, you must press the
call.
It may however happen, if you are connected to a particular
kind of telephone network, that the number of the caller is
not displayed on the fax machine. If this occurs, contact
technical support for your country.
The fax machine is set up to display the caller ID. You
may however set it up not to display it, as follows:
1. Press the key
key before answering the
until the display shows:
C
HANGING NUMBER OF RINGS
This function is only enabled in some countries.
You can change the number of rings as follows:
1. Press the key
until the display shows:
INSTALLATION
2. Press the key
RING COUNT:02
You can choose between the following values: “01”, “04”,
“06”, “07” and “08”.
3. To do so, press the key:
/
4. To confirm the selection, press the key:
5. To return the fax machine to the stand-by mode, press the
key:
36
until the display shows:
INSTALLATION
Note
If you connect an external telephone answering device, make
sure that the number of rings after which the answering device is
activated is less than the one set on the fax machine.
Page 43

R
ING VOLUME: CHANGING
1. Press the key
until the display shows:
1. Press the key
until the display shows:
2. Press the key:
INSTALLATION
FAX SET-UP
2. Press the key:
The display shows:
DATE AND TIME
3. Press the key:
The display shows:
VARIOUS SETTINGS
4. Press the key
until the display shows:
RING VOLUME:HIGH
You can choose from three further options: “RING
VOLUME:LOW”, “RING VOLUME:MED”, and “RING
VOLUME:OFF”. For example: “RING VOLUME: LOW”.
5. To do so, press the key:
/
6. To confirm the selection, press the key:
7. To return the fax machine to the stand-by mode, press the
key:
The display shows:
TEL. LINE SET-UP
3. Press the key
until the display shows:
ENHANCED FEATUR.
4. Press the key
Until the display shows:
DISTINC.RING:OFF
5. Press the key
/ until the display shows:
CHANGE PATTERN
6. To confirm the selection, press the key:
The display shows:
AUTODETECT. RING
7. Call the fax machine with the desired frequency so that the
fax machine detects it.
The display shows:
RING DETECTED
8. To return the fax machine to the stand-by mode, press the
key:
E
NABLING AND DISABLING RING FREQUENCY RECOGNITION
In some countries, local telephone companies offer the
possibility of assigning the same telephone line two or
more numbers, corresponding to different users. When an
incoming call is received, a different ring frequency
indicates which user is to answer the call.
Note
This function is not available in Germany.
This function is extremely useful in the home or small offices,
where the same telephone line is shared by more than one
person.
Your fax machine is capable of “learning” one of these
frequencies (see the procedure that follows). In this way,
when a call with the specific ring frequency is received, the
fax machine (in “PHONE/FAX” and “TAD/FAX” reception
modes) prepares exclusively to receive a document.
This function is particularly useful when associated
with silent reception in that the fax machine will only ring
if the call is coming from a telephone.
We recommend you disconnect the TAD from the power
supply before carrying out the recognition procedure.
Note
If the fax machine cannot detect that particular frequency, the display
will show the message “RING NOT DETECT.”.
1. At this point, press the
C
HANGING ACOUSTIC SIGNAL LENGTH
This function is only enabled in some countries.
When the fax machine is set up for automatic reception
with recognition of the type of call, it behaves as follows:
• if it is being called by a fax machine, it will automatically
prepare to receive a document after the preset number of
rings
• if it is being called by a telephone, it will emit an acoustic
signal for a time of 20 seconds, after which, if you still
have not lifted the handset, it will automatically prepare to
receive a document.
If you want, you can change the length of the acoustic signal
as follows:
1. Press the key
until the display shows:
key and repeat the procedure.
INSTALLATION
37
Page 44

2. Press the key
C
HANGING THE FAX MACHINE REMOTE OPERATION CODE
until the display shows:
FAX/TEL TIMER:20
You can choose one of the following reaction times:
“15”, “20”, “30”, “40”,
3. To do so, repeatedly press the key:
/
4. To confirm the selection, press the key:
5. To return the fax machine to the stand-by mode, press the
key:
C
HANGING THE SILENCE LAPSE
This function is only enabled in some countries.
If no message is received within the preset time, the fax
machine automatically prepares to receive a document.
To change the preset silence lapse, proceed as follows:
1. Press the key
until the display shows:
INSTALLATION
2. Press the key
until the display shows:
SILENCE LAPSE: 6
You can choose the following silence lapses: “3”, “4”, “6”,
“8”, “10” and “OFF”
3. To do so, repeatedly press the key:
/
4. To confirm the selection, press the key:
5. To return the fax machine to the stand-by mode, press the
key:
You can enable reception on the fax machine from a remote
telephone. The fax machine must be set up for manual
reception and the remote telephone must use tone dialling.
Type in the code ** for remote fax operation on the remote
telephone. This operation has the same effect as pressing
the
You can replace the second asterisk of this code using digits
from 0 to 9.
1. Press the key
until the display shows:
key on the fax machine.
INSTALLATION
2. Press the key:
The display shows:
TEL. LINE SET-UP
3. Press the key:
The display shows the line to which the fax machine was set
to be connected, for example:
PUBL.LINE (PSTN)
4. Press the key
until the display shows:
REMOTE START:ON
5. Press the key:
The display shows the code you set previously, for example:
TYPE CODE
CODE(0/9,*) *8
Enter the new code (e.g. “*9”).
6. To do so, press the key:
-
7. To confirm the selection, press the key:
Note
If you connect an external telephone answering device, make
sure that the silence lapse after which the answering device is activated
is less than the one set on the fax machine.
Note
To disable this function
1. Press
2. To confirm the entry, press the
3. Press the
The fax machine returns to the stand-by mode.
Note
If you are connected to a private line, follow the same procedure until
the display shows “PUBL.LINE (PSTN)”, press the
“PRIV.LINE (PBX)” and then continue as described in the procedure.
38
8. To return the fax machine to the stand-by mode, press the
key:
|/}
after the fourth step to display “REMOTE START:OFF”.
key.
key.
|/}
keys to display:
Page 45

O
THER USEFUL TRANSMISSION SETTINGS
C
HANGING POSITION OF NAME AND FAX NUMBER
The information in the heading of the document to be sent
(name/logo, fax number, date and time and number of pages)
may be received by your correspondent’s fax machine
outside the text area or inside the text area.
Your fax machine is designed to send this information inside
the text area.
To change the position:
1. Press the key
until the display shows:
E
NABLING OR DISABLING NEW DOCUMENT TRANSMISSION
MEMORY
FROM
1. Press the key
until the display shows:
FAX SET-UP
2. Press the key:
The display shows:
DATE AND TIME
3. Press the key:
FAX SET-UP
2. Press the key:
The display shows:
DATE AND TIME
3. Press the key:
The display shows:
VARIOUS SETTINGS
4. Press the key
until the display shows:
HEADER INSIDE
5. To select another parameter, press the key:
/
The display shows:
HEADER OUTSIDE
6. To confirm the selection, press the key:
7. To return the fax machine to the stand-by mode, press the
key:
The display shows:
VARIOUS SETTINGS
4. Press the key
until the display shows:
RETRANS.DOC.:ON
5. To display the other “RETRANS.DOC:OFF” option, press
the key:
/
6. To confirm the selection, press the key:
7. To return the fax machine to the stand-by mode, press the
key:
L
INE MONITORING
The fax machine is set up so that you can hear the dialling
tones during the dialling phases as well as the connection
signals exchanged between your fax machine and your
correspondent’s fax machine. If this is not the case, program
the function as follows:
1. Press the key
until the display shows:
INSTALLATION
2. Press the key
until the display shows:
LINE MONITOR:OFF
3. To select the other “LINE MONITOR:ON” option, press
the key:
/
4. To confirm the selection, press the key:
5. To return the fax machine to the stand-by mode, press the
key:
39
Page 46

S
ETTING LOUDSPEAKER VOLUME
L
OWERING TRANSMISSION SPEED
If the volume of the dialling tones and connection signals is
too low or too high, regulate it using the key.
1. Press the key:
The display shows:
ON LINE
2. To raise or lower the volume of the speaker, press the key:
The display shows the volume level set in the top righthand corner.
TO
REGULATE THE BUZZER VOLUME
You can set the volume of the buzzer to “High”, “Medium”
or “Low” or switch it off.
1. Press the key
until the display shows:
FAX SET-UP
2. Press the key:
The display shows:
DATE AND TIME
3. Press the key:
The display shows:
VARIOUS SETTINGS
4. Press the key
The fax machine normally transmits at a speed of
14400 bps (bits per second). A transmission speed of
9600 or 4800 bps is recommended on telephone lines with
interference.
1. Press the key
until the display shows:
FAX SET-UP
2. Press the key:
The display shows:
DATE AND TIME
3. Press the key:
The display shows:
VARIOUS SETTINGS
4. Press the key
until the display shows:
TX SPEED 14,4
You can also choose the options: “TX SPEED 9.6” and
“TX SPEED 4.8”,
5. To do so, press the key:
/
6. To confirm the selection, press the key:
7. To return the fax machine to the stand-by mode, press the
key:
E
NABLING AND DISABLING ECM MODE
until the display shows:
BUZZER VOL.:LOW
You can select the other available options: “BUZZER
VOL.:HIGH”, “BUZZER VOL.:MED” and “BUZZER
VOL.:OFF”.
5. To do so, press the key:
/
6. To confirm the selection, press the key:
7. To return the fax machine to the stand-by mode, press the
key:
40
The ECM mode (Error Correction Mode) is a system for
correcting the errors caused by interference on the line. This
function only has effect if it has been enabled both on your
fax machine and on your correspondent’s fax machine. The
display will show the letter “E”.
The fax machine is already set up for this mode of
transmission. However, you can set it up to send documents
in normal mode, as follows:
1. Press the key
until the display shows:
2. Press the key:
The display shows:
FAX SET-UP
DATE AND TIME
Page 47

3. Press the key:
The display shows:
VARIOUS SETTINGS
4. Press the key
until the display shows:
ECM: ON
5. To display the other “ECM:OFF” option, press the key:
/
6. To confirm the selection, press the key:
7. To return the fax machine to the stand-by mode, press the
key:
T
RANSMITTING AND RECEIVING IN POLLING
MODE
W
HAT POLLING MEANS
You can confirm the current time or overwrite with a new
one, for example “06:20 PM”.
3. To overwrite the current time, press the keys:
-
4. To confirm the entry or the current time, press the key:
The display shows:
TYPE NUMBER
NUM/TOUCH/SPEED
Dial the correspondent’s number using any of the available
methods: directly on the numeric keypad or using the onetouch dialling keys or speed dialling codes.
5. For one-touch dialling or speed dialling press the keys:
-
6. To confirm the entry, press the key:
The fax machine shows the message “POLL SET” for a few
seconds and then returns automatically to the stand-by
status. The second line of the display shows: “POLL. RX:
06:20 PM”.
Note
You can cancel polling reception.
1. To do so, press the
key.
It is a transmission request that a fax machine makes to another fax
machine so that the latter sends the document requested automatically.
There are two main characteristics of communication using the polling
method:
• the user who is to receive the document requests
transmission. In other words, a user may connect to another fax
machine and request it to send a document (specifically prepared)
to him, even when the user at the other end of the line is out.
• the transaction is paid for by the person who requested
transmission (that is, the user who receives the document) and
not the person whose fax machine sends the document.
T
RANSMITTING A DOCUMENT IN POLLING MODE
(
POLLING RECEPTION
Arrange with your correspondent the time at which you intend
to make the transmission request so that he has time to put
the document to be sent in his fax machine. Then set up
your fax machine to receive the document, by programming
the dialling mode to be used to call your correspondent and
the time at which you wish to receive the document.
1. Press the key
until the display shows:
)
C
HANGING OR DELETING AN ALREADY MADE POLLING
RECEPTION
POLLING RX
2. Press the key:
The display shows:
/
TYPE TIME
HH:MM
SETTING
1. Press the key
until the display shows:
POLLING RX
2. Press the key:
The display shows:
ALREADY ENTERED
3. Press the key:
The display shows:
CHANGE PARAM.?
You can choose the following options:
CANCEL SETTING? - To cancel the setting. The fax machine
returns to its stand-by status.
CHANGE PARAM.? - To change the time at which the
transmission request is to be made or the number of the
correspondent from whom you want to receive the
document.
4. To view the other available option: “CANCEL SETTING?”,
press the key:
41
Page 48

5. To confirm the selection, press the key:
The display shows:
TYPE TIME
HH:MM
From here on, proceed as described in “Transmitting a
document in polling mode”.
P
REPARING THE DOCUMENT FOR TRANSMISSION
(
POLLING TRANSMISSION
1. Place the original document in the ADF.
The display shows on the top line:
)
DOCUMENT READY
and on the bottom line, the default contrast value: NORMAL.
The initial resolution value (even if it is not shown on the
display) is: “
If necessary, change the contrast and resolution values (see
“Setting contrast and resolution”, chapter “Basic
transmission and reception operations”).
2. Press the key:
” (standard).
until the display shows:
POLLING TX
3. Twice press the key:
The second line of the display shows: “POLLING TX SET”.
Note
You can delete the polling operation that has been set up.
1. Do so by removing the document from the ADF or by pressing the
key.
42
Page 49

IF
THERE IS A POWER FAILURE
T
ROUBLESHOOTING GUIDE
M
INOR PROBLEMS
If there is a power failure, the fax machine keeps the following
data in the memory: the numbers set for one-touch and
speed dialling and the reports, while the documents present
in the memory will be lost. The date and time are also lost.
These will have to be reset by carrying out the procedure
described in the “Setting the date and time” section of the
“Delivery contents, setting up and first-time operation”
chapter.
If the Display caller ID function is enabled, the date and
time will be restored when the next call is received.
IF
PAPER OR INK HAS RUN OUT
If, during reception, the paper runs out or gets jammed, the
ink runs out, the print cartridge compartment cover is
open, the paper support is closed or the operator
console is raised, the machine stops printing. The display
shows the relevant message and the document you are
receiving is temporarily recorded in the memory. Once the
problem has been solved, the fax machine resumes printing.
The list below may be used as a guide to the solution of minor
problems.
PROBLEM
The fax machine is not working.
The document has not been fed
in correctly.
The fax machine is not
transmitting.
The fax machine is unable to
receive automatically.
SOLUTION
Ensure that it is connected to
the mains power socket.
Check that the document
corresponds with the
recommendations
listed in the section
“What documents can be
transmitted” in chapter
“Basic transmission and
reception operations”.
Check whether the document is
jammed.
The line is busy:
Wait until it is free, then repeat
the transmission.
The fax machine is set to
manual reception:
Set to automatic reception.
IF
TRANSMISSION IS UNSUCCESSFUL
Sometimes, due to line problems such as excessively heavy
telephone traffic or any other kind of interference, the
document sent is received badly by the correspondent, who
will ask you to send it to him again.
In these cases, it is advisable to send the document again at
a slower speed. The fax machine transmits regularly at a
speed of 14400 bps (bits per second). To reduce the speed,
follow the procedure described in the “Reducing
transmission speed” section of the “More sophisticated
operations” chapter.
If transmission is unsuccessful due to errors on the line
or fax machine, the error LED “
is emitted; in this case, the fax machine automatically prints
the transmission report (see “Printing reports and lists”,
chapter “Basic transmission and reception
operations”), on which an error code indicates the cause
of the error (you will find a list of all the error codes further
on).
” lights up and a short beep
The fax machine is unable to
copy or receive.
The fax machine prints white
copies.
Check whether the
document or the
print paper is jammed.
The paper in use is
unsuitable:
check the paper characteristics
in chapter “Technical data”.
Place the document correctly
with the printed side facing
upwards
Note
Incorrect transmission or reception by the fax machine may also
depend on factors other than those listed above, which will be signalled
in the form of error codes on the Transmission report and Activity
report, see “Printing reports and lists”, chapter “Basic
transmission and reception operations”.
43
Page 50

E
RROR CODES
The error codes printed both on the transmission report and the activity
report consist of two digits indicating the cause of the error. To save
space, the two-digit code without any message is printed on the activity
report.
CODE
OK
02
03
04
05
07
08
09
10
MESSAGE
No message. Positive result.
IMPOSSIBLE CONNECTION
RECEIVER DOES NOT ANSWER
ERR. WHILE TRANSMITTING
RESEND FROM PAGE: nn
RESEND PAGES:
nn, ..... nn
DOCUMENT TOO LONG
CHECK THE DOCUMENT
STOP PRESSED
No message
CAUSE OF FAULT
The fax machine does not receive a
dialling tone, or the signals are irregular.
The correspondent does not answer or
is not a fax machine.
Transmission error. “nn” = number of
page with transmission error.
The recipient fax machine found errors
on several pages. “nn” = number of
page with transmission error.
The original document is too long. The
transmission time exceeds the time
allowed.
The optical reader cannot read the
original document.
The user aborted the transmission.
The fax machine found a reception error.
REMEDY
No remedy.
Check that the machine is correctly
attached to the line and the handset is on
the hook. Then attempt to make the
connection again.
Check the number of the correspondent.
Retransmission from the page listed in the
transmission report onwards.
Retransmission of the pages listed in the
transmission report.
Split up the original document.
Remove the document from the ADF and
place it in position again. Then repeat the
transmission procedure.
No remedy.
Inform the correspondent and ask him to
resend the document.
11
13
16
(OK)
OCC
No message
ERRORS WHILE POLLING
POWER FAILURE ON PAGE nn
No message
LINE BUSY
Printing error during reception.
Reception continued in memory and this
has become full before the end of
transmission.
The correspondent has not set up his fax
machine for polling and has not left a
document in the ADF.
Power failure during transmission or
reception.
The document has been received but the
print quality is not satisfactory.
The line is busy.
Remedy the error and wait until the
document has been printed from the
memory.
Inform the correspondent.
Retransmission from the page listed in the
report onwards.
Inform the correspondent.
Try again when the line is free.
44
Page 51

S
IGNALS AND MESSAGES
Any problems that may arise are generally indicated by acoustic
signals (accompanied, in some cases, by visual signals: error
LED “
” indicator on) or by error messages on the display.
COPY INTERRUPTED
• You aborted the copy operation by pressing the key.
• An error occurred during the document copying phase, preventing
it from being printed: check the type of error on the display and
correct it.
The fax machine also emits acoustic signals and shows messages
on the display that do not indicate an error condition.
A
COUSTIC SIGNALS
Short 1-second signal
• You pressed an incorrect key during an operating phase.
Long 3 second signal plus error LED indicator on
• Transaction not carried out correctly.
Continuous signal
• Request to hang up if you forgot to do so after an operation that
required the handset to be lifted.
You forgot to close the print cartridge compartment cover: close it.
The document received was saved because an error occurred during
the reception phase, preventing it from being printed immediately:
check the type of error (paper out or jammed, ink out, cover open,
etc.) and correct the error.
One or more documents received in the memory, due to an error that
occurred during reception, have filled the memory: check the type of
error (missing or jammed paper, ink out, cover open, etc.) and correct
it. The documents will be printed automatically thus freeing space in
the memory.
Note
To turn off the “ ” error LED indicator, press the key.
E
RROR MESSAGES ON THE DISPLAY
AUTOREDIAL NNN
No connection was established due to line errors or because the
correspondent is busy: the fax machine prepares to redial automatically.
CHANGE CARTRIDGE
The ink in the cartridge has run out: replace the print cartridge (see
“To replace the print cartridge”, chapter “Maintenance
operations”).
CHECK CARTRIDGE
• The fax machine does not detect the presence of the print cartridge
because you have forgotten to install it or you have installed it
incorrectly: install/reinstall the print cartridge.
• Some of the print cartridge nozzles are damaged and are having
a negative effect on the printing quality: clean the print cartridge
(see "Cleaning the print cartridge and testing the nozzles",
chapter "Maintenance operations").
You chose a one-touch dialling key or a speed dialling code that you
have not set: program the key or the code (see “Setting one-
touch and speed dialling”, chapter “Basic transmission and
reception operations”).
A sheet of printing paper got jammed during the copying or reception
phase: press the key. If the sheet is not unloaded automatically, check
where it is jammed and remove it (see “Removing jammed sheets
of paper”, chapter “Maintenance operations”).
You set polling reception and the connection was not established due
to line errors or because the correspondent is busy: the fax machine
prepares to redial automatically.
• A document jammed while the document was being copied or sent:
press the
automatically, remove the jammed document by hand (see
“Removing jammed documents”, chapter “Maintenance
operations”).
COVER OPEN
DOC IN MEMORY
MEMORY FULL
NOT PROGRAMMED
PAPER ERROR, PRESS
POLL.RETRY NNN
REMOVE DOCUMENT, PRESS
key then, if the document is not unloaded
CHECK DOCUMENT, PRESS
The document is not being fed correctly: reposition the document on
the ADF and press the
operation.
key to restore the fax machine’s normal
• You aborted the document scanning phase by pressing the
key.
The document was not received correctly: press the key to turn
CHECK PAPER, PRESS
• The paper in the feeder has run out: add some more and press
to clear the message from the display.
• The paper is not being fed correctly: replace the paper in the
feeder and press the
operation.
key to restore the fax machine’s normal
off the “
display.
RX ERROR
” error LED indicator and clear the message from the
45
Page 52

RX IN MEMORY
Reception continues in the memory because an error occurred during
the reception of a document, preventing it from being printed: check
the type of error on the lower line of the display and correct it.
You have put a telephone call on hold by pressing the key:
press the
correspondent.
SYSTEM ERROR NN
A fatal error has occurred on the fax machine: turn the fax machine off
and then on again. If the error persists, turn off the fax machine and
call the Customer Engineering Service.
You have set transmission from the memory.
LINE ON HOLD,
PRESS HOLD
key again to resume the conversation with the
MEMORY TX
TX ERROR
The last document was not sent correctly: to turn off the “ ” LED
indicator and clear the message from the display press the
and then send it again.
key,
WRONG CODE, PRESS
• The TAD access code is incorrect: press the key and type
the correct code.
O
THER ACOUSTIC SIGNALS
Short 1-second signal
• Transaction carried out successfully.
Intermittent 20-second signal
• Prompt to lift the handset to answer a telephone call.
O
THER DISPLAY MESSAGES
CHECK PRINT OUT
You have installed a disposable print cartridge for the first time or you
have removed and reinstalled it: select the relevant answer. If you
answer “yes” but the print cartridge is not new, the fax machine will
not detect the out of ink condition.
You have made a transmission request (Polling reception).
The fax machine is printing a report or a list.
You have activated the “handsfree” function. Hang up.
The document was received correctly.
You aborted reception by pressing the key.
The fax machine is saving the pages of the document to be copied.
1=EXIT 0=REPEAT
The fax machine has automatically tested the print cartridge nozzles
and printed out the test sheet: check whether the printing quality is
acceptable and make your choice.
You have engaged the line by lifting the handset of the telephone
connected.
NEW PRINT CART.?, 1=YES 0=NO
POLL RX: HH:MM
PRINTING
REPLACE HANDSET
RX COMPLETED
RX INTERRUPTED
STORING
TEL CALL
CONNECTING
The fax machine is connecting to your correspondent’s fax machine.
A document is being sent.
DIALLING
The fax machine is dialling the number of the correspondent you called.
A document is being sent.
DOCUMENT READY
You have inserted the document in the ADF correctly.
You have set transmission at a preset time (broadcast transmission).
LAST TX OK
The last transmission was completed successfully.
Transmission was completed successfully.
LIFT HANDSET
The correspondent has made a talk request: lift the handset to start
the conversation.
46
You aborted transmission by pressing the key.
TRANSMITTING
TRANSMITTING....
TX AT HH:MM
TX COMPLETED
TX INTERRUPTED
Page 53

M
AINTENANCE OPERATIONS
R
EPLACING PRINT CARTRIDGE
Note
If you have replaced the print cartridge because the ink ran out,
when the print cartridge compartment cover and the operator console
are closed, the fax machine will automatically recognize that the print
cartridge has been replaced and the display will show the message
“NEW PRINT CART.? 1=YES 0=NO”. Set the value 1.
At this point, the fax machine automatically cleans the print
cartridge and tests the nozzles, printing out the result of the
diagnostic test. From this point on proceed as described in “Delivery
contents, connecting up and first-time operation”.
If you replaced the print cartridge because of a deterioration in
printing quality, proceed as follows:
1. Press the key
until the display shows:
CART. MAINTEN.
2. Press the key:
The display shows:
NEW CARTRID: ON
3. Press the key:
RE-
CHECKING
1. Flip open the console (1).
2. Lift the print cartridge compartment cover using the lever (2).
3. To release the print cartridge, loosen the strap.
4. Pull the print cartridge from its seat (3).
5. Remove the new print cartridge from its package and, holding it on
both sides, peel off the film covering the nozzles (4).
Attention!
Do not touch the nozzles or electrical contacts (5)
6. Replace the print cartridge in its seat (6).
Ensure that the electrical contacts face downwards.
7. Push the print cartridge until it clicks into place, confirming correct
seating (7).
8. Close the print cartridge compartment cover and the console.
The display shows:
CLEANING: ON
The fax machine cleans the print cartridge and tests the
nozzles, printing out the result of the diagnostic test.
From this point on proceed as described in “Installing the
print cartridge“ in chapter “Delivery contents,
connecting up and first-time operation”.
ENABLING THE PRINT CARTRIDGE AND
THE NOZZLES
If, when using the fax machine normally, you notice a
deterioration in print quality, you can quickly re-enable
the print cartridge and test the nozzles by following a
procedure that ends with printing out of the diagnostic test
result.
1. Press the key
until the display shows:
CART. MAINTEN.
2. Press the key:
The display shows:
NEW CARTRID: ON
3. To program the other “NEW CARTRID: OFF” option, press
the key:
/
47
Page 54

4. To confirm the selection, press the key:
The display shows:
C
CONTACTS
CLEANING: ON
The fax machine cleans the print cartridge and tests the
nozzles, printing out the result of the diagnostic test.
Examine the diagnostic test result by consulting “Installing
the print cartridge”, chapter “Delivery contents,
connecting up and first-time operation”.
Note
You can interrupt the procedure at any time.
1. To do so, press the
key.
Note
If the quality of the test result still fails to meet your expectations after
carrying out the cleaning procedure, continue as follows, stopping
when you achieve a satisfactory printing quality:
- Make a copy of a document with the desired type of graphics or
text on the fax machine and evaluate its quality.
- Change the type of paper (the paper in use could be excessively
porous) and repeat the procedure.
- Remove and re-insert the print cartridge.
- Remove the print cartridge and check if any foreign material is
present on the nozzles. If this is the case, gently remove the foreign
material without touching the electrical contacts. Finally, reinstall
the print cartridge.
- Remove the print cartridge and clean the electrical contacts both
on the print cartridge and on the print cartridge carriage, see
“Cleaning the print cartridge electrical contacts”. Finally,
reinstall the print cartridge.
- Call the customer technical service.
1. Disconnect the fax machine from the power socket.
2. Flip open the console (1).
3. Lift the print cartridge compartment cover using the lever (2).
4. To release the print cartridge, loosen the strap.
5. Pull the print cartridge from its seat (3).
6. Clean the electrical contacts using a slightly damp cloth (4).
Attention!
You must not touch the nozzles while doing so!
7. Also clean the print cartridge carriage using a slightly damp cloth
(5).
8. Replace the print cartridge in its seat.
Ensure that the electrical contacts face downwards.
9. Push the print cartridge until it clicks into place, confirming correct
seating.
10. Close the print cartridge compartment cover and the console.
LEANING THE PRINT CARTRIDGE ELECTRICAL
48
Page 55

C
LEANING OPTICAL READ HEAD
C
LEARING PAPER JAMS
Dust accumulating on the glass surface of the optical read head may
cause problems in the scanning of documents. To avoid these
problems, the glass should be cleaned regularly. Proceed as follows:
1. Disconnect the fax machine from the power socket.
2. Flip open the console (1).
3. Clean the optical read head glass.
Use a cloth that has been moistened with a glass cleaner. Do not
spray the cleaner directly onto the glass surface.
4. Carefully dry the glass.
5. Close the console
If the paper used to print the documents received or to copy documents
becomes jammed, this condition is signalled on the display by the
message “PAPER ERROR, PRESS
Try to eject the document by pressing the
happen, remove it manually. Proceed as follows:
If the paper gets jammed in the ASF:
1. Open the ASF panel (1).
2. Remove the jammed sheet (2).
Ensure that it does not tear.
Note
To check whether the optical reader is clean, make a copy of a blank
sheet. If any vertical lines appear on the copy but the optical reader
looks perfectly clean, contact customer service.
If the paper gets jammed in the received/copied document
output:
”.
key. If this does not
C
LEANING SEATING
1. Disconnect the fax machine from the power socket.
2. Use a soft, lint-free cloth.
Moisten the cloth with a neutral detergent diluted in water.
1. Remove the jammed sheet (1).
Ensure that it does not tear.
C
LEARING JAMMED DOCUMENTS
During transmission or copying, a document may become jammed
(this condition is signalled by the display showing the message:
“REMOVE DOCUMENT, PRESS “).
Try to eject the document by pressing the
happen, remove it manually. Proceed as follows:
key. If this does not
1. Flip open the console.
2. Remove the document from the ADF.
3. Close the console.
49
Page 56

M
ANUFACTURER AND SERVICE
M
ANUFACTURER
Olivetti, S.p.A. con unico azionista
Gruppo Telecom Italia
Direzione e coordinamento di Telecom Italia S.p.A.
C
USTOMER SERVICE
If the fax machine is not working as it should, or you want to ask the
manufacturers something, call the number indicated on the "Warranty
Card".
W
ARRANTY
Refer to the "Warranty Card" provided with the product.
50
Page 57

G
ENERAL CHARACTERISTICS
R
ECEIVING SPECIFICATIONS
T
ECHNICAL DATA
Model ......................... Desktop fax machine
Display ....................... LCD 16 + 16 char.
Memory capacity ......... 2 MB
Dimensions
Width .......................... 350 mm
Depth ......................... 280 mm (***)
Height ......................... 140 mm (**)
Weight ........................ ca. 4.7 Kg
C
OMMUNICATION SPECIFICATIONS
Telephone network ..... Public/private
Compatibility .............. ITU
Communication speed ............... 14400-12000-9600-7200-4800-
2400
Data compression method ......... MH, MR, MMR
E
LECTRICAL CONNECTION SPECIFICATIONS
Voltage ....................................... 220-240 VAC or 110-240 VAC
(see data plate on base of fax
machine)
Frequency .................................. 50-60Hz (see data plate on base
of fax machine)
Power consumption:
- In stand-by mode ...................... ca. 4W
- Maximum .................................. 35W
A
MBIENT CONDITIONS
Printing system ............ Printing on plain paper, bubble ink jet
printer
Max. printing width ..............................204 mm
Printing paper...................................... A4 (210 x 297 mm)
US Letter (216 x 279 mm)
US Legal (216 x 356 mm)
Paper weight: 70-90 gr/m
2
Paper feed .................. Plain paper cassette (max 100 sheets of 80
gr/m2)
T
ELEPHONE ANSWERING DEVICE (TAD
-IN
BUILT
•
•
•
•
•
•
•
•
•
•
(*) = ITU-TS format, Test Sheet no.1 (Slerexe Letter). Standard
(**) = Height without paper support fitted.
(***) = Depth without paper support fitted.
TELEPHONE ANSWERING DEVICE
Recording capacity: ca. 14 mins.
Memo store
2 outgoing messages
“ANNOUNCE ONLY” function
“TOLL SAVER” function
Transfer message
Fast access from console and remote location
Access code
Message recording
Retention of messages if power failure.
resolution and MH compression.
) (
ONLY MODEL WITH A
)
Temperature ............... from +5 oC to +35 oC (operating)
from -15 oC to +45 oC (transport)
o
from 0
C to +45 oC (storage and stand-by)
Relative humidity ......... 15% - 85% (operating/storage/stand-by)
5% - 95% (transport)
O
PTICAL READER SPECIFICATIONS
Scanning method ................................ CIS
Scanning resolution:
- Horizontal .......................................... 8 pixel/mm
- Vertical STANDARD ......................... 3.85 lines/mm
- Vertical FINE ..................................... 7.7 lines/mm
T
RANSMISSION SPECIFICATIONS
Transmission time .................. ca. 7 secs (14400 bps) (*)
ADF capacity .......................... Manual feeding:
............................................... A4, Letter and Legal
(50gr/m2 - 140 gr/m2)
............................................... Automatic feeding:
............................................... 20 sheets A4 (80 gr/m2)
............................................... 10 sheets Letter and Legal
(80 gr/m2)
51
Page 58

I
NDEX
A
Aborting
transmission
Additional telephone
connecting
Automatic printing
broadcast report
delayed transmission
Automatic redial
15
3
23
23
16
B
Broadcast report
automatic printing
23
C
Changing
country
date
delayed transmission
dialling mode
language
TAD access code
time
Changing acoustic signal length
Changing the fax machine silence lapse
Checking
nozzles
Cleaning
electrical contacts
read head
seating
Cleaning optical read head
Cleaning read head
Cleaning seating
Clearing jammed documents
Clearing paper jam
Components 11,
Configuration parameters
Connecting
additional telephone
connecting other devices
handset
private line
public line
Connection
Examples
to mains
Connection signals
audible
listening
Contrast
settings
Copying
contrast, resolution settings and copy type
Country
changing
setting
5
7
16
10
5
28
7
37
38
7
48
49
49
49
49
49
49
49
12
24
3
3
4
9
9
3
4
39
39
15
27
5
4
Customer Service
Customer Service telephone number
Customer Service telephone number
50
50
D
Date
changing
entering
Delayed transmission
automatic printing
changing
deleting
Deleting
delayed transmission
TAD access code
Deleting memos
Delivery contents
Dialling mode
changing
Dialling tones
audible
listening
Display messages 45,
Displaying telephone number of caller
Documents
clearing jams
7
5
23
16
16
16
28
31
3
10
39
39
46
36
49
E
Electrical contacts
Environment
environmental recycling
Environmental recycling
to dispose of our devices correctly
Error
codes
44
Signals and messages
48
1
1
45
F
Fault correction
disabling
enabling
setting
Fax
automatic polling reception
Retransmitting stored fax
Fax machine
Components
Console
inserting paper
placing original in position
switching off
Fax number
changing
matching
printing position
transmitting
Fax polling
automatic
preparing
40
40
40
41
39
11
12
6
14
4
39
39
8
39
41
42
52
Page 59

Fax reception
manually enabling
Fixing errors
43
38
H
Handset
connecting
Header
changing
matching
Header line
changing
matching
4
39
39
39
39
I
Improving print quality
Incoming messages
playing
31
setting
31
silent reception
Installation and setup parameters
about the installation and setup parameters
14
34
2
L
Language
changing
setting
Lists
printing
Loudspeaker
setting volume
5
4
24
40
M
Mains connection
Maintenance
Customer Service telephone number
safety precautions
Maintenance operations
Making a copy
Manufacturer
reaching
telephone number
to contact
Memos
deleting
length of
playing
recording
4
50
1
47
27
50
50
50
31
31
31
31
N
Name
printing position
No ink
43
No paper
Nozzles
43
checking 7,
reactivating
8
47
7
O
One-touch dialling
printing configuration parameters
Originally provided
Outgoing messages
playing
recording
21
24
7
29
30
29
P
Package contents
Paper
inserting
Paper format
Phone book
Placing the original document in position
Polling reception
automatic
changing
deleting
setting
41
Predetermined settings
Print cartridge
cleaning electrical contacts
re-enabling
replacing
Print position
changing
fax number
name
8
Printing
blacklisted numbers
installation parameters
one-touch dialling configuration parameters
reports
speed dialling configuration parameters
Printing blacklisted numbers
Printing format
Printing installation parameters
Printing lists
Printing reports
Private line
connecting
Programming
transmission
Public line
connecting
3
6
6
26
14
41
41
41
4
48
47
7
8
8
24
24
24
24
24
24
6
24
24
22
9
18
9
R
Reactivating
nozzles
Receiving
basic operations
choosing mode
Receiving document
overlong
Reception
automatic
manual
telephone answering device
with answering device (TAD)
with call type recognition
7
14
19
35
19
19
external telephone answering device
36,38
19
19
53
Page 60

Redial
automatic
Reducing printing area
Remote operation
TAD
Reports
broadcast transmission request
power failure report
printing
transmission and reception transactions
transmission report
transmission reports
Retransmitting fax
Retransmitting stored fax
Ring tones
changing number
changing volume
16
35
33
22
22
24
22
22
22
39
39
36
37
S
Safety
safety precautions
improper use
operating precautions
risk of accident
risk of an electric shock
risk of fire
risk of suffocation
Safety precautions
Service telephone number
Setting
incoming messages
one-touch dialling
speed dialling
Setting the silence lapse
Setup
certification requirements
Signals
acoustic 45,
Special functions
outgoing messages only
silent reception of incoming messages
"Toll saver" function
Speed dialling 21,
printing configuration parameters
Standard printing format
Switching off
fax machine
1
2
2
1
1
1
1
1
50
31
19
20
38
2
46
34
34
33
24
24
6
4
T
TAD
activating the access code
changing the access code
console
deleting the access code
functions
recording a transfer message
recording memos
remote operation
special functions
28
28
31
33
33
28
28
28
30
Telephone connection
Telephone numbers
incoming calls
outgoing calls
viewing
Telephoning
to an incoming number
to an outgoing number
Test sheet
Time
changing
entering
Time format
To set the contrast
To set the resolution
Toll saver
Transmission
aborting
programming
unsuccessful
Transmission polling
preparing
Transmission report
transmission error
Transmission speed
lowering
setting
Transmitting
at a preset time
basic operations
formats
from the memory
original
preset time
sheet thickness
to a received number
to a transmitted number
to hear the dialling tones.
to multiple recipients
with one-touch dialling
with speed dialling
Troubleshooting
26
7
7
5
6
33
15
42
40
40
14
15
3
26
26
26
26
14
15
18
43
22
22
16
14
17
16
14
22
17
21
21
43
V
Volume
buzzer
40
changing
loudspeaker
37
40
Y
Your fax number
entering
8
22
15
54
Page 61

MANUFACTURER’S CE DECLARATION of CONFORMITY according to EN 45014
OLIVETTI S.p.A Via Jervis, 77 - IVREA (TO) - ITALY
Declares under its sole responsibility that:
this fax model distributed on the market under the Olivetti brand name
is IN COMPLIANCE with directive 99/5/EC dated 9th march 1999
fulfills the essential requirements of Electromagnetic Compatibility and of Electrical Safety as prescribed by
the Directives:
89/336/EEC dated 3rd May 1989 with subsequent amendments (Directive 92/31/EEC dated 28th April 1992
and Directive 93/68/EEC dated 22nd July 1993);
73/23/EEC dated 19th February 1973 with subsequent amendments (Directive 93/68/EEC dated 22nd July
1993),
since designed and manufactured in compliance with the following European Harmonized Standards:
EN 55022 : 1999 (Limits and methods of measurements of radio interference characteristics of Information
Technology Equipment) / Class B;
EN 61000-3-2 (Electromagnetic Compatibility (EMC) - Part 2 : Limits - Section 2 : Limits for harmonic current
emissions (equipment input current ≤ 16 A per phase);
EN 61000-3-3 (Electromagnetic Compatibility (EMC) - Part 3 : Limits - Section 3 : Limitation of voltage
fluctuations and flicker in low voltage supply systems for equipment with rated current up to and including
16A);
EN 55024 : 1998 (Electromagnetic Compatibility – Information technology equipment – Immunity
characteristics – Limits and methods of measurement);
EN 60950 –1 : 2001 (Safety of Information Technology Equipment, including electrical business equipment).
Moreover the product is in compliance with following Standards
ETSI TBR 38 : May 1998 (Requirements for a terminal equipment incorporating an analogue handset function
capable of supporting the justified case service when connected to the analogue interface of the PSTN in
Europe);
ETSI TBR 21 : January 1998 Requirements for pan-European approval for connection to the analogue Public
Switched Telephone Networks (PSTN) of TE (excluding TE supporting the voice telephony service) in which
network addressing, if provided, is by means of Dual Tone Multi Frequency (DTMF) signaling.
Compliance with the above mentioned essential requirements is shown by affixing the CE marking on the product.
Scarmagno, 15
Notes: 1) CE Marking has been affixed in 2005
2) The Quality System is in compliance with the UNI EN ISO 9000 series of Standards
Olivetti S.p.A. Sede Sociale Ivrea, Via Jervis, 77 - Cap. Soc. Euro 78.000.000 - C.C.I.A.A. Torino n. 547040 - Trib. Ivrea Reg. Soc . n.1927 - Cod. Fisc. e Part. IVA 02298700010
th
June 2005 Olivetti S.p.A.
Page 62

Page 63

ORIGINAL CONSUMABLES
Olivetti is the only European company with a proprietary ink-jet printing technology and the original ink-jet
consumables are manufactured in its home plant in Italy.
The company also produces the non-toxic inks used in the cartridges, based on chemical formulas developed and
tested in Olivetti laboratories.
The ink is one of the most critical elements in ink-jet printing. Its chemical properties are crucial, not only as regards
printing quality, but also indetermining the characteristics of the ink-drop ejected from the print cartridge and the longterm reliability of the printing system.
The design of the print cartridge hydraulic circuit, which defines the characteristics of the ink drop, is based on the
chemical and physical qualities of the ink (viscosity and surface tension).
The ink components are also important in the interaction with the media being printed, determining the dry time, colour
density and dot quality. Besides, the ink/media combination has a huge influence on the image permanence.
Olivetti inks are water-based, with a 70% ultra-pure water content. Non–toxicity is a prime criterion
in the choice of materials used to guarantee a very low pollution rate on printed documents. Olivetti
certifies all its consumables as non-toxic and environment-friendly. It issue the Material Safety Data
Sheet, an identity card describing components and providing full toxicological information,
environmental data and indications concerning waste policy. Only if you buy an Original Olivetti
Consumables you would be sure to have all above guarantees.
Look for the mark on the pack to be sure you are buying an original one. The Original Olivetti
consumables are available in all the most important Mass Merchandising Distribution Chain present in you country, as
well as Retailers and Dealers. You can easily know where to buy Olivetti cartridges just making a phone call to the
number reported on the yellow sheet (available in the fax documentation envelope).
FJ31
IS THE UNIQUE CARTRIDGE
THAT FITS IN YOUR FAX MACHINE
Page 64

259732J
 Loading...