

Page 1

d-Color MF1600 plus
d-Color MF2000 plus
User’s Guide
The Olivetti d-Color MF1600 plus and d-Color MF2000 plus
models use OKI software equivalent to the models
and MC360.
Code: 556600en
MC350
Page 2

PUBLICATION ISSUED BY:
Olivetti S.p.A.
Gruppo Telecom Italia
Via Jervis, 77 - 10015 Ivrea (ITALY)
www.olivetti.com
Copyright © 2010,
Olivetti All rights reserved
The manufacturer reserves the right to carry out modifications to the product described in this manual at any time
The mark affixed to the product certifies that the
product satisfies the basic quality requirements.
and without any notice.
ENERGY STAR is a U.S. registered mark.
The ENERGY STAR program is an energy reduction plan introduced by theUnited States Environmental Protection
Agency in response to environmental issues and for the purpose of advancing the development and utilization of
more energy efficient office equipment.
Your attention is drawn to the following actions which could compromise the conformity attested to above, as well as
the characteristics of the product:
• incorrect electrical power supply;
• incorrect installation, incorrect or improper use or use not in compliance with the warnings provided in the
User’s Manual supplied with the product;
• replacement of original components or accessories with others of a type not approved by the manufacturer, or
performed by unauthorised personnel.
All rights reserved. No part of this material may be reproduced or transmitted in any form or by any means,
electronic or mechanical, including photocopying, recording or by any information storage and retrieval
system, without permission in writing from the Publisher.
Page 3
P
REFACE
Every effort has been made to ensure that the information in this document is complete,
accurate, and up-to-date. The manufacturer assumes no responsibility for the results of
errors beyond its control. The manufacturer also cannot guarantee that changes in software
and equipment made by other manufacturers and referred to in this guide will not affect
the applicability of the inform a t ion in i t. Mention of software products manufactured by
other companies does not necessarily constitute endorsement by the manufacturer.
While all reasonable efforts have been made to make this document as accurate and helpful
as possible, we make no warranty of any kind, expressed or implied, as t o the accuracy or
completeness of the information contained herein.
Oki is a registered trademark of Oki Electric Industry Company, Ltd.
Oki Printing Solutions is a regis tered trademark of Oki Data Corporation.
Microsoft, MS-DOS and Windows are registered trademarks of Microsoft Corporation.
Apple, Macintosh, Mac and Mac OS are registered trademarks of Apple Computer.
Other product names and brand names are registered trademarks or trademarks of their
proprietors.
As an Energy Star Program Participant, the manufacturer has determined that
this product meets the Energy Star guidelines for energy efficiency.
MF1600 plus ✔ MF2000 plus ✘
This product complies with the requirements of the Council Directives 2004/
108/EC (EMC), 2006/95/EC (LVD) and 1999/5/EC (R&TTE), as amended
where applicable, on the approximation of the laws of the member states
relating to electromagnetic compatibility, low voltage and radio &
telecommunications terminal equipment.
The following cables were used to evaluate this product to achieve EMC directive
2004/108/EC compliance and configurations other than this may affect that compliance.
CABLE TYPE LENGTH
(METRE)
Power 1.8
USB 2.0
LAN 15.0
Tel 2.1
Modular 15.0
CORE SHIELD
✘✘
✔ (1Turn) ✔
✔ (3Turns) ✘
✔ (2Turns) ✘
✔✘
Page 4

C
ONTENTS
Preface . . . . . . . . . . . . . . . . . . . . . . . . . . . . . . . . . . . . . . . . . . . . . . . . . . .2
Emergency first aid . . . . . . . . . . . . . . . . . . . . . . . . . . . . . . . . . . . . . . . . . .3
Manufacturer. . . . . . . . . . . . . . . . . . . . . . . . . . . . . . . . . . . . . . . . . . . . . . .3
Importer to the EU/authorised representative. . . . . . . . . . . . . . . . . . . . .3
Environmental information . . . . . . . . . . . . . . . . . . . . . . . . . . . . . . . . . . . .3
Contents . . . . . . . . . . . . . . . . . . . . . . . . . . . . . . . . . . . . . . . . . . . . . . . . . .4
Notes, cautions and warnings . . . . . . . . . . . . . . . . . . . . . . . . . . . . . . . . . .7
About this guide . . . . . . . . . . . . . . . . . . . . . . . . . . . . . . . . . . . . . . . . . . . .8
Documentation suite . . . . . . . . . . . . . . . . . . . . . . . . . . . . . . . . . . . . . . . 8
On-line usage . . . . . . . . . . . . . . . . . . . . . . . . . . . . . . . . . . . . . . . . . . . . 9
Printing pages. . . . . . . . . . . . . . . . . . . . . . . . . . . . . . . . . . . . . . . . . . . . 9
Introduction . . . . . . . . . . . . . . . . . . . . . . . . . . . . . . . . . . . . . . . . . . . . . .10
MFP overview . . . . . . . . . . . . . . . . . . . . . . . . . . . . . . . . . . . . . . . . . . . . .11
Front view . . . . . . . . . . . . . . . . . . . . . . . . . . . . . . . . . . . . . . . . . . . . . .11
Rear view. . . . . . . . . . . . . . . . . . . . . . . . . . . . . . . . . . . . . . . . . . . . . . .12
Control panel . . . . . . . . . . . . . . . . . . . . . . . . . . . . . . . . . . . . . . . . . . . .13
Character switching. . . . . . . . . . . . . . . . . . . . . . . . . . . . . . . . . . . . . . . .14
Changing the display language . . . . . . . . . . . . . . . . . . . . . . . . . . . . . . . .15
Getting started . . . . . . . . . . . . . . . . . . . . . . . . . . . . . . . . . . . . . . . . . . . .16
Releasing the scanner lock . . . . . . . . . . . . . . . . . . . . . . . . . . . . . . . . . . .16
Switching off. . . . . . . . . . . . . . . . . . . . . . . . . . . . . . . . . . . . . . . . . . . . .16
Installing drivers and utilities . . . . . . . . . . . . . . . . . . . . . . . . . . . . . . . . .17
Windows - twain and printer drivers . . . . . . . . . . . . . . . . . . . . . . . . . .17
Mac - printer driver . . . . . . . . . . . . . . . . . . . . . . . . . . . . . . . . . . . . . .19
Fax driver (MF2000 plus only). . . . . . . . . . . . . . . . . . . . . . . . . . . . . . .20
Hotkey utility - windows only . . . . . . . . . . . . . . . . . . . . . . . . . . . . . . .21
MFP setup tool - windows only . . . . . . . . . . . . . . . . . . . . . . . . . . . . . .22
Paper recommendations. . . . . . . . . . . . . . . . . . . . . . . . . . . . . . . . . . . . .23
Cassette tray . . . . . . . . . . . . . . . . . . . . . . . . . . . . . . . . . . . . . . . . . .23
Multi purpose tray . . . . . . . . . . . . . . . . . . . . . . . . . . . . . . . . . . . . . . .23
Face down stacker. . . . . . . . . . . . . . . . . . . . . . . . . . . . . . . . . . . . . . .25
Face up stacker. . . . . . . . . . . . . . . . . . . . . . . . . . . . . . . . . . . . . . . . .25
Loading paper. . . . . . . . . . . . . . . . . . . . . . . . . . . . . . . . . . . . . . . . . . . .25
Cassette tray . . . . . . . . . . . . . . . . . . . . . . . . . . . . . . . . . . . . . . . . . .25
Multi purpose tray . . . . . . . . . . . . . . . . . . . . . . . . . . . . . . . . . . . . . . .28
Configuring your machine... . . . . . . . . . . . . . . . . . . . . . . . . . . . . . . . . . .29
Minimum configuration requirements. . . . . . . . . . . . . . . . . . . . . . . . . . . .29
Pre-configuration information . . . . . . . . . . . . . . . . . . . . . . . . . . . . . . . . .29
General . . . . . . . . . . . . . . . . . . . . . . . . . . . . . . . . . . . . . . . . . . . . . .29
Fax set up (MF2000 plus). . . . . . . . . . . . . . . . . . . . . . . . . . . . . . . . . .29
Network set up . . . . . . . . . . . . . . . . . . . . . . . . . . . . . . . . . . . . . . . . .30
Internet communication features. . . . . . . . . . . . . . . . . . . . . . . . . . . . .31
Configuration . . . . . . . . . . . . . . . . . . . . . . . . . . . . . . . . . . . . . . . . . . . .32
...from the web page . . . . . . . . . . . . . . . . . . . . . . . . . . . . . . . . . . . . .32
...from the setup tool utility . . . . . . . . . . . . . . . . . . . . . . . . . . . . . . . .33
...from the control panel . . . . . . . . . . . . . . . . . . . . . . . . . . . . . . . . . .33
Setting the fax facility . . . . . . . . . . . . . . . . . . . . . . . . . . . . . . . . . . . . . .44
Initial set up. . . . . . . . . . . . . . . . . . . . . . . . . . . . . . . . . . . . . . . . . . .44
Advanced set up . . . . . . . . . . . . . . . . . . . . . . . . . . . . . . . . . . . . . . . .45
Managing the address book . . . . . . . . . . . . . . . . . . . . . . . . . . . . . . . . . .49
Adding an email address entry to the address book. . . . . . . . . . . . . . . .49
Deleting an email address entry from the address book. . . . . . . . . . . . .49
Modifying an email address entry from the address book . . . . . . . . . . . .50
Contents > 4
Page 5

Adding a group entry to the address book . . . . . . . . . . . . . . . . . . . . . .50
Deleting a group address entry from the address book . . . . . . . . . . . . .51
Modifying a group address entry from the address book. . . . . . . . . . . . .51
Access control . . . . . . . . . . . . . . . . . . . . . . . . . . . . . . . . . . . . . . . . . . . . .52
Enabling access control . . . . . . . . . . . . . . . . . . . . . . . . . . . . . . . . . . . . .52
Logging in . . . . . . . . . . . . . . . . . . . . . . . . . . . . . . . . . . . . . . . . . . . . . .52
Logging out . . . . . . . . . . . . . . . . . . . . . . . . . . . . . . . . . . . . . . . . . . . . .52
Operation time-out . . . . . . . . . . . . . . . . . . . . . . . . . . . . . . . . . . . . . .53
Operation . . . . . . . . . . . . . . . . . . . . . . . . . . . . . . . . . . . . . . . . . . . . . . . .54
Multi-tasking. . . . . . . . . . . . . . . . . . . . . . . . . . . . . . . . . . . . . . . . . . . . .54
Loading document(s). . . . . . . . . . . . . . . . . . . . . . . . . . . . . . . . . . . . . . .55
Placing document(s) in the ADF . . . . . . . . . . . . . . . . . . . . . . . . . . . . .55
Placing document(s) on the glass . . . . . . . . . . . . . . . . . . . . . . . . . . . .56
Copying . . . . . . . . . . . . . . . . . . . . . . . . . . . . . . . . . . . . . . . . . . . . . . . . . .57
Basic operation . . . . . . . . . . . . . . . . . . . . . . . . . . . . . . . . . . . . . . . . .57
Advanced operation. . . . . . . . . . . . . . . . . . . . . . . . . . . . . . . . . . . . . .57
Scanning . . . . . . . . . . . . . . . . . . . . . . . . . . . . . . . . . . . . . . . . . . . . . . . . .59
Basic operation . . . . . . . . . . . . . . . . . . . . . . . . . . . . . . . . . . . . . . . . . . .59
Scan to e-mail . . . . . . . . . . . . . . . . . . . . . . . . . . . . . . . . . . . . . . . . .59
Scan to USB memory. . . . . . . . . . . . . . . . . . . . . . . . . . . . . . . . . . . . .60
Scan to network PC . . . . . . . . . . . . . . . . . . . . . . . . . . . . . . . . . . . . . .61
Scan to PC . . . . . . . . . . . . . . . . . . . . . . . . . . . . . . . . . . . . . . . . . . . .62
Faxing (MF2000 plus). . . . . . . . . . . . . . . . . . . . . . . . . . . . . . . . . . . . . . . 64
Basic operation . . . . . . . . . . . . . . . . . . . . . . . . . . . . . . . . . . . . . . . . . . .64
Searching the phone book . . . . . . . . . . . . . . . . . . . . . . . . . . . . . . . . .64
Sending a fax . . . . . . . . . . . . . . . . . . . . . . . . . . . . . . . . . . . . . . . . . .64
Advanced operation. . . . . . . . . . . . . . . . . . . . . . . . . . . . . . . . . . . . . . . .65
Changing the fax quality . . . . . . . . . . . . . . . . . . . . . . . . . . . . . . . . . .65
Adjusting density . . . . . . . . . . . . . . . . . . . . . . . . . . . . . . . . . . . . . . .65
Document size . . . . . . . . . . . . . . . . . . . . . . . . . . . . . . . . . . . . . . . . .66
Manual send . . . . . . . . . . . . . . . . . . . . . . . . . . . . . . . . . . . . . . . . . . .66
Delayed send . . . . . . . . . . . . . . . . . . . . . . . . . . . . . . . . . . . . . . . . . .66
Fax receiving . . . . . . . . . . . . . . . . . . . . . . . . . . . . . . . . . . . . . . . . . .67
Printing a fax activity report . . . . . . . . . . . . . . . . . . . . . . . . . . . . . . . . . .69
Printing transmission reports . . . . . . . . . . . . . . . . . . . . . . . . . . . . . . . . .69
Sending a fax from your PC . . . . . . . . . . . . . . . . . . . . . . . . . . . . . . . . . .70
Adding fax numbers to the phone book . . . . . . . . . . . . . . . . . . . . . . . .72
Adding new groups to the phone book . . . . . . . . . . . . . . . . . . . . . . . . .72
Importing and exporting fax numbers . . . . . . . . . . . . . . . . . . . . . . . . .73
Printing settings in Windows . . . . . . . . . . . . . . . . . . . . . . . . . . . . . . . . .74
Printing preferences in windows applications . . . . . . . . . . . . . . . . . . . . . .74
Setup tab . . . . . . . . . . . . . . . . . . . . . . . . . . . . . . . . . . . . . . . . . . . . .74
Job options tab . . . . . . . . . . . . . . . . . . . . . . . . . . . . . . . . . . . . . . . . .75
Colour tab . . . . . . . . . . . . . . . . . . . . . . . . . . . . . . . . . . . . . . . . . . . .76
Setting from windows control panel. . . . . . . . . . . . . . . . . . . . . . . . . . . . .77
General tab . . . . . . . . . . . . . . . . . . . . . . . . . . . . . . . . . . . . . . . . . . .77
Advanced tab . . . . . . . . . . . . . . . . . . . . . . . . . . . . . . . . . . . . . . . . . .77
2-sided printing. . . . . . . . . . . . . . . . . . . . . . . . . . . . . . . . . . . . . . . . . . .79
Printing settings in Mac OS X . . . . . . . . . . . . . . . . . . . . . . . . . . . . . . . . .81
Setting printing options . . . . . . . . . . . . . . . . . . . . . . . . . . . . . . . . . . . . .81
Setting printing options - saving driver settings . . . . . . . . . . . . . . . . . . . .81
Changing the default printer and paper size . . . . . . . . . . . . . . . . . . . . . . .82
Page setup options . . . . . . . . . . . . . . . . . . . . . . . . . . . . . . . . . . . . . . . .82
Print options. . . . . . . . . . . . . . . . . . . . . . . . . . . . . . . . . . . . . . . . . . . . .83
Copies & pages . . . . . . . . . . . . . . . . . . . . . . . . . . . . . . . . . . . . . . . . .83
Layout . . . . . . . . . . . . . . . . . . . . . . . . . . . . . . . . . . . . . . . . . . . . . . .83
Contents > 5
Page 6

Paper handling . . . . . . . . . . . . . . . . . . . . . . . . . . . . . . . . . . . . . . . . .84
ColorSync. . . . . . . . . . . . . . . . . . . . . . . . . . . . . . . . . . . . . . . . . . . . .84
Cover page. . . . . . . . . . . . . . . . . . . . . . . . . . . . . . . . . . . . . . . . . . . .85
Paper source. . . . . . . . . . . . . . . . . . . . . . . . . . . . . . . . . . . . . . . . . . .85
Print quality . . . . . . . . . . . . . . . . . . . . . . . . . . . . . . . . . . . . . . . . . . .85
Colour . . . . . . . . . . . . . . . . . . . . . . . . . . . . . . . . . . . . . . . . . . . . . . .86
Printer setup options . . . . . . . . . . . . . . . . . . . . . . . . . . . . . . . . . . . . . . .87
Printer options . . . . . . . . . . . . . . . . . . . . . . . . . . . . . . . . . . . . . . . . .87
Print control . . . . . . . . . . . . . . . . . . . . . . . . . . . . . . . . . . . . . . . . . . .88
Summary . . . . . . . . . . . . . . . . . . . . . . . . . . . . . . . . . . . . . . . . . . . . .88
General printing . . . . . . . . . . . . . . . . . . . . . . . . . . . . . . . . . . . . . . . . . . .89
Printing on different media. . . . . . . . . . . . . . . . . . . . . . . . . . . . . . . . . . .89
Printing on legal paper. . . . . . . . . . . . . . . . . . . . . . . . . . . . . . . . . . . .89
Printing on envelopes. . . . . . . . . . . . . . . . . . . . . . . . . . . . . . . . . . . . .89
Setting other printing options . . . . . . . . . . . . . . . . . . . . . . . . . . . . . . . . .89
Fit to page printing . . . . . . . . . . . . . . . . . . . . . . . . . . . . . . . . . . . . . .89
Printing multiple pages to one sheet . . . . . . . . . . . . . . . . . . . . . . . . . .90
Printing color documents in black and white . . . . . . . . . . . . . . . . . . . . .92
Cancelling a print job. . . . . . . . . . . . . . . . . . . . . . . . . . . . . . . . . . . . . . .92
Colour printing . . . . . . . . . . . . . . . . . . . . . . . . . . . . . . . . . . . . . . . . . . . .93
Factors that affect the appearance of prints . . . . . . . . . . . . . . . . . . . . . . .93
Tips for printing in colour . . . . . . . . . . . . . . . . . . . . . . . . . . . . . . . . . . . .94
Printing photographic images . . . . . . . . . . . . . . . . . . . . . . . . . . . . . . .94
Printing from Microsoft Office applications . . . . . . . . . . . . . . . . . . . . . .94
Printing specific colours (e.g. a company logo) . . . . . . . . . . . . . . . . . . .94
Adjusting the brightness or intensity of a print . . . . . . . . . . . . . . . . . . .94
Accessing the colour matching options. . . . . . . . . . . . . . . . . . . . . . . . . . .95
Setting the colour matching options . . . . . . . . . . . . . . . . . . . . . . . . . . . .95
Using the colour swatch feature . . . . . . . . . . . . . . . . . . . . . . . . . . . . . . .96
Using the colour correct utility . . . . . . . . . . . . . . . . . . . . . . . . . . . . . . . .96
Maintenance . . . . . . . . . . . . . . . . . . . . . . . . . . . . . . . . . . . . . . . . . . . . . .97
Replacing consumable items. . . . . . . . . . . . . . . . . . . . . . . . . . . . . . . . . .97
Consumable order details. . . . . . . . . . . . . . . . . . . . . . . . . . . . . . . . . . . .97
Toner cartridge replacement. . . . . . . . . . . . . . . . . . . . . . . . . . . . . . . . . .98
Image drum replacement. . . . . . . . . . . . . . . . . . . . . . . . . . . . . . . . . . .102
Transfer belt replacement . . . . . . . . . . . . . . . . . . . . . . . . . . . . . . . . . .104
Fuser replacement. . . . . . . . . . . . . . . . . . . . . . . . . . . . . . . . . . . . . . . .109
Cleaning. . . . . . . . . . . . . . . . . . . . . . . . . . . . . . . . . . . . . . . . . . . . . . .111
...the LED head. . . . . . . . . . . . . . . . . . . . . . . . . . . . . . . . . . . . . . . . 111
...the paper path in the ADF . . . . . . . . . . . . . . . . . . . . . . . . . . . . . . .113
...the underside of the ADF. . . . . . . . . . . . . . . . . . . . . . . . . . . . . . . . 113
...the document glass . . . . . . . . . . . . . . . . . . . . . . . . . . . . . . . . . . .114
Installing additional memory . . . . . . . . . . . . . . . . . . . . . . . . . . . . . . . .115
Troubleshooting . . . . . . . . . . . . . . . . . . . . . . . . . . . . . . . . . . . . . . . . . .120
Clearing paper jams . . . . . . . . . . . . . . . . . . . . . . . . . . . . . . . . . . . . . . 120
In the scanner ADF section... . . . . . . . . . . . . . . . . . . . . . . . . . . . . . .120
In the printer section... . . . . . . . . . . . . . . . . . . . . . . . . . . . . . . . . . .121
Dealing with unsatisfactory printing. . . . . . . . . . . . . . . . . . . . . . . . . . . .126
Dealing with unsatisfactory copying. . . . . . . . . . . . . . . . . . . . . . . . . . . .127
Fax problem checklist (MF2000 plus) . . . . . . . . . . . . . . . . . . . . . . . . . . .128
Specifications . . . . . . . . . . . . . . . . . . . . . . . . . . . . . . . . . . . . . . . . . . . .130
Index . . . . . . . . . . . . . . . . . . . . . . . . . . . . . . . . . . . . . . . . . . . . . . . . . . .131
Contents > 6
Page 7

N
OTES, CAUTIONS AND WARNINGS
NOTE
A note provides additional information to supplement the main text.
CAUTION!
A caution provides additional information which, if ignored, may
result in equipment malfunction or damage.
WARNING!
A warning provides additional information which, if ignored, may
result in a risk of personal injury.
For the protection of your product, and in order to ensure that you benefit from its full
functionality, this model has been designed to operate only with genuine original toner
cartridges. Any other toner cartridge may not operate at all, even if it is described as
“compatible”, and if it does work, your product's performance and print quality may be
degraded.
Use of non-genuine products may invalidate your warranty.
Specifications subject to change without notice. All trademarks acknowledged.
Notes, cautions and warnings > 7
Page 8

A
BOUT THIS GUIDE
D
OCUMENTATION SUITE
This guide is part of a suite of online and printed documentation provided to help you
become familiar with your product and to make the best use of its many powerful features.
The documentation is summarised below for reference and is found on the DVD unless
indicated otherwise:
> Installation Safety booklet: provides information for safe use of your product.
This is a paper document that is packaged with the product and should be read before
setting up your machine.
> Set-up Guide: describes how to unpack, connect and turn on your product.
This is a paper document that is packaged with the product.
> User’s Guide: helps you become familiar with your product and make the best use
of its many features. Also included are guidelines for troubleshooting and
maintenance to ensure that it performs at its best.
> Network Guide: helps you become familiar with the funct ion ali ty of the built in
network interface card.
> Installation Guides: accompany consumable items and optional accessories to
describe how to install them.
These are paper documents that are packaged with the consumables and optional
accessories.
> On-line Help: on-line information accessible from the printer driver and utility
software.
About this guide > 8
Page 9
ON-
LINE USAGE
This guide is intended to be read on screen using Adobe Reader. Use the navigation and
viewing tools provided in Adobe Reader.
There are many cross-references within this book, each highlighted as blue text. When you
click on a cross-reference the display will instantly jump to the part of the manual
containing the referenced material.
By using the button in Adobe Reader, you can navigate directly back to where you were
before.
You can access specific information in two ways:
> In the list of bookmarks down the left hand side of your screen, click on the topic of
interest to jump to the required topic. (If the bookmarks are not available, use the
“Contents” on page 4.)
> In the list of bookmarks, click on Index to jump to the Index. (If the bookmarks are
not available, use the “Contents” on page 4.) Find the term of interest in the
alphabetically arranged index and click on the associated page number to jump to
the page containing the term.
P
RINTING PAGES
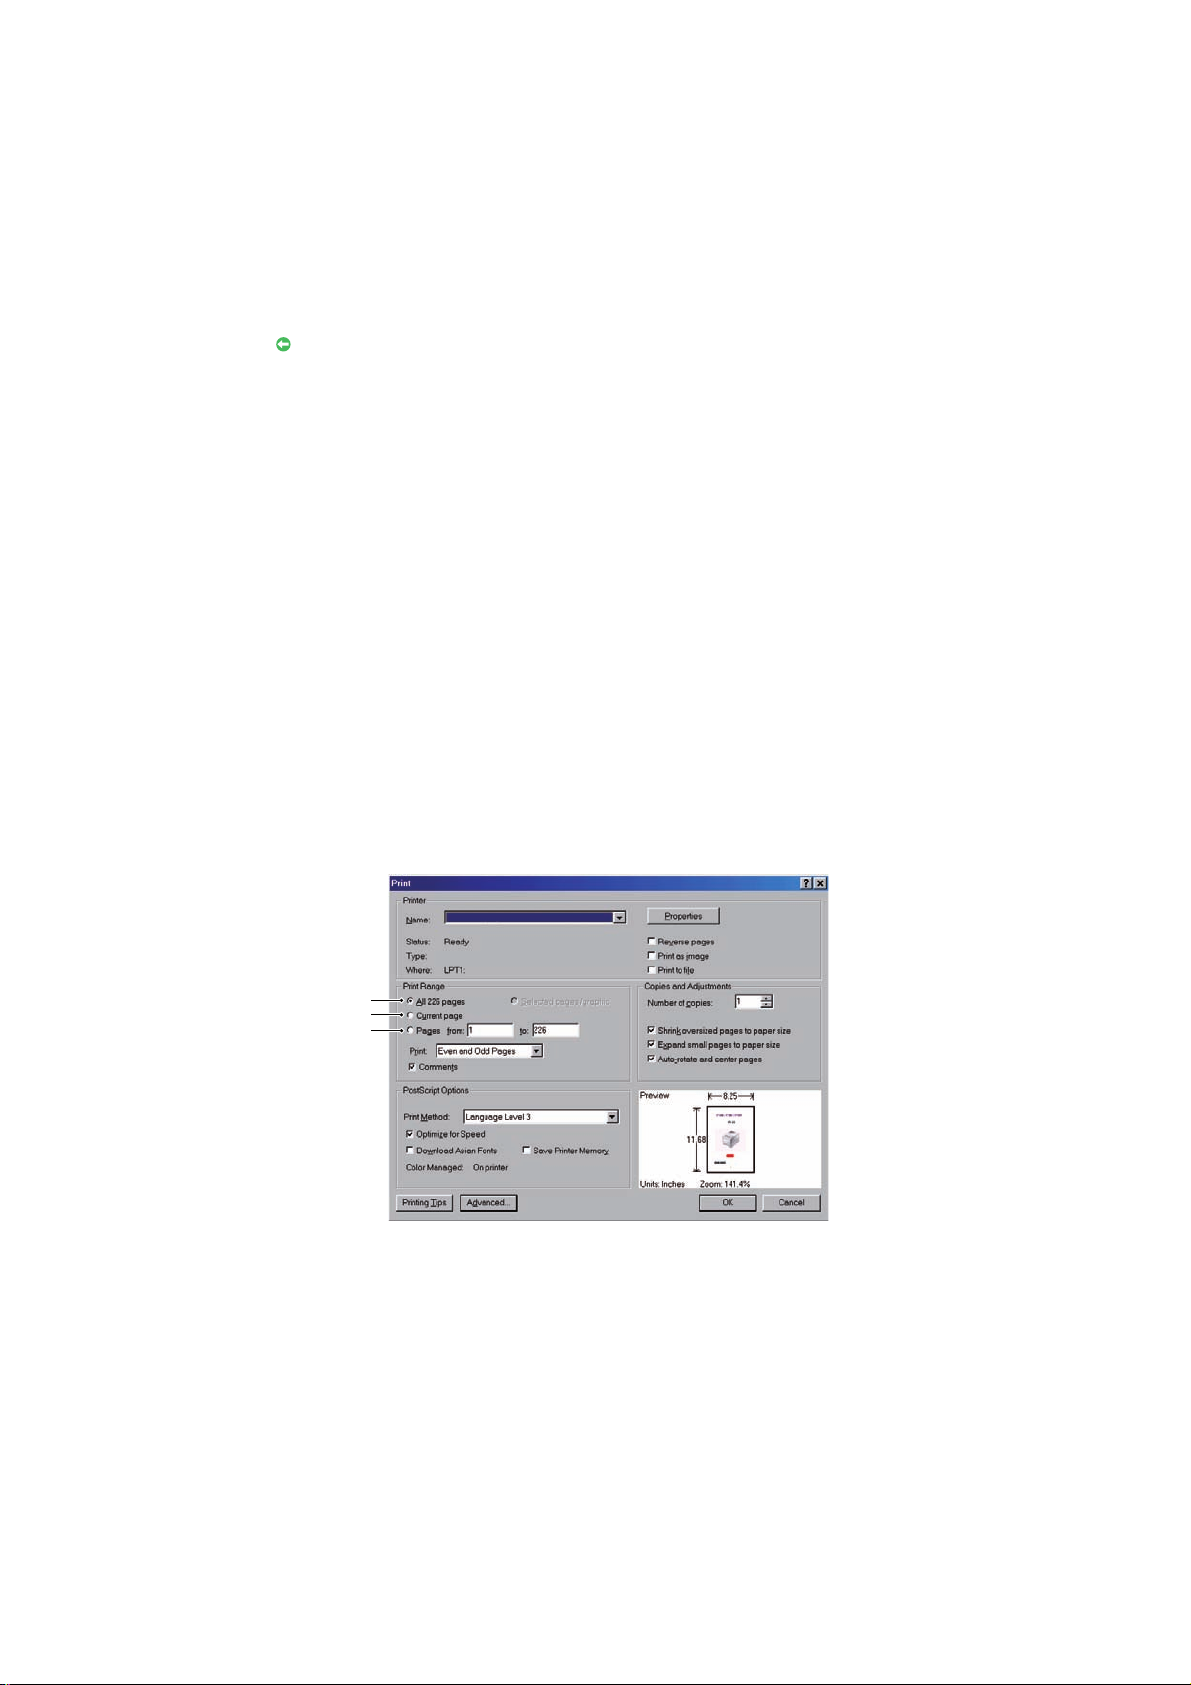
The whole manual, individual pages, or sections may be printed. The procedure is:
1. From the toolbar, select File > Print (or press the Ctrl + P keys).
2. Choose which pages you wish to print:
(a) All pages, (1), for the entire manual.
(b) Current page, (2), for the page at which you are looking.
1
2
3
(c) Pages from and to, (3), for the range of pages you specify by entering their
page numbers.
(d) Click OK.
About this guide > 9
Page 10

I
NTRODUCTION
Congratulations on choosing this Multi Function Product (MFP). It has been designed with
advanced features, to give you clear, vibrant colour prints and crisp black and white pages
at high speed, on a range of office print media.
With this MFP, you can instantly scan paper-based documents and deliver the electronic
image to various destinations including email addresses, printers, ftp servers, facsimile
machines, USB memory stick, or someone else's computer on the network.
Your MFP includes these features:
> ProQ2400 Multi-level technology produces subtle tones and smooth gradations of
colour to lend photographic quality to your documents.
> Hotkey utility - enables the MFP to receive one key touch commands from a locally
connected computer (Windows only).
> 600 x 600dpi and 1200 x 600dpi (dots per inch) print resolution for high quality
image production.
> 300 x 300 (standard) and 600 x 600dpi (high) copy resolution.
> Banner Printing (MF2000 plus).
> Single Pass Colour Digital LED technology for high speed processing of your printed
pages.
> High speed USB 2.0 interface.
> 10Base-T and 100Base-TX network connection lets you share this resource among
users on your office network.
> Scan to E-mail - Connected to an Ethernet network and a SMTP server, this MFP
allows you to transmit document(s) over the internet via e-mail.
> Scan to Network PC - Allows you to send scanned documents to a server or a
personal computer's file folder over an intranet with F TP (File Transfer Protocol),
CIFS (Common Internet File System) protocol. The scan to filing feature removes
the need for the mail server to handle large attachments.
> Scan to Fax (MF2000 plus) - Allows you to send and receive scanned documents to/from
another facsimile machine.
> Scan to memory - Scan to USB memory.
> Digital Copying - An intuitive control panel, makes digital copying fast and easy.
> Network/PC Printing - When conne ct ed to a Network, the MFP is able to perform
network or PC printing.
> Multiple Pages Sending - With the Auto Document Feeder, the MFP allows a stack of
up to 50 page document(s) to be continuously scanned.
> Simplified Operator panel
> Address Book/Profiles Managing - This provides a convenient way to manage all the
e-mail addresses and profiles (filing destinations). The MFP’s Setup Tool utility
allows you to create up to 100 e-mail addresses and several filing destinations to
manage your document.
The following optional feature is available: 256MB additional memory, to allow the printing
of more complex pages.
Introduction > 10
Page 11

MFP
F
OVERVIEW
RONT VIEW
1
2
3
4
5
6
9
8
7
1. Scanner bed. 6. Output stacker, face down. Standard
printed copy delivery point. Holds up to
150 sheets of 80g/m².
2. Automatic Document Feeder (ADF) Unit. 7. Standard paper tray with level indicator.
3. ADF Paper Tray. Max. 50 sheets A4 at
60 - 120g/m².
4. Document Cover. 9. USB Memory port.
5. Operator Control Panel.
Holds up to 250 sheets of 80g/m².
8. Multi purpose feeder tray (shown
closed). Used for feeding heavier paper
stocks, envelopes and other special media.
Also used for manual feeding of single
sheets when required and Banner printing.
MFP overview > 11
Page 12

R
EAR VIEW
This view shows the connection panel and the rear output stacker.
7
8
LAN TEST
TEL
LINE
12 3 546
1. USB connection. 5. IEC (CE22) AC power connection.
2. Local Area Network connection. 6. AC Power ON/OFF switch.
3. MF2000 plus: Local Telephone handset connection. 7. Automatic Document Feeder (ADF).
4. MF2000 plus: Telephone line connection. 8. Rear paper stacker (closed).
When the rear paper stacker is folded down, paper exits through the rear of the printer and
is stacked here face up. This is mainly used for heavy print media. When used in
conjunction with the multi purpose feed tray, the paper path through the printer is
essentially straight. This avoids bending the paper around curves in the paper path and
enables feeding of up to 203g/m² media.
MFP overview > 12
Page 13
C
ONTROL PANEL
abcd@d
Done
a b c d e f g h i
j k l m n o p q r
s t u v w x y z
9
8a
1
1. Keypad Used to enter numbers, upper-case /lower-case letters and symbols in the
Entry Line. Refer to “Character switching” on page 14 for further details.
2. LEFT key When in switching Mode:
Returns the display to the Fun ction Se lect ion sc reen or Scan Sub Functi on
Selection screen from the Stand-by screen.
When Setting up:
Increments the value of the tree structure.
3. UP Key When setting up or in switching Mode:
Moves the cursor UP.
4. DOWN Key When setting up or in switching Mode:
Moves the cursor DOWN.
5. ENTER Key When switching Mode:
Used to confirm the Mode selected.
Used to start Push Scan (If Push Scan is selected, the Executing Push Scan
screen appears).
When Setting up:
Decrements the value of the tree structure.
Increments the value of the tree structure as the set value is confirmed.
When entering PIN ID:
Used to confirm the PIN ID entered.
23456
7
8b
6. RIGHT Key When in switching Mode:
Used to confirm the Mode selected.
Used to start Push Scan (If Push Scan is selected, the Executing Push Scan
screen appears).
When Setting up:
Decrements the value of the tree structure.
Increments the value of the tree structure as the set value is confirmed.
7. LCD display 128 x 64 dot.
8. START Key
(a = colour;
b= monochrome)
When entering PIN ID, used to confirm the PIN ID entered.
Executes the function selected.
Executes Copy.
Executes Scan to E-mail/ USB Memory/ Network PC.
Executes Fax Send.
Executes Fax Manual Receive.
Recovery from Error/Warning states.
When pressed from the Screen Entry screen, confirms the characters or
functions selected.
MFP overview > 13
Page 14

abcd@d
Done
a b c d e f g h i
j k l m n o p q r
s t u v w x y z
9
8a
1
9. STOP Key Stops the function being executed.
Stops Copy.
Stops Scan to E-mail/ USB Memory/ Network PC.
Stops Fax Send.
Cancels Print Job.
Recover from Error/Warning states:
Used to confirm error messages (when an error that does not need
recovery operation has occurred).
Recovering from Error/Warning states.
Forces a return to the Mode Selection screen from each Stand-by screen
(all settings shown on the Stand-by screen return to User Default values).
C
HARACTER SWITCHING
23456
7
8b
Numbers, upper and lower case letters and symbols can be entered using the keypad. Press
the key multiple times to switch between characters.
NOTE
When pressing multiple times, you must re-press the key within 2 seconds of
the previous press.
The example below is based on English being the display language:
KEY AVAILABLE CHARACTER
11 -> 1
2 a -> b -> c -> A -> B -> C -> 2
3 d -> e -> f -> D -> E -> F -> 3
4 g -> h -> i -> G -> H -> I -> 4
5 j -> k -> l -> J -> K -> L -> 5
6 m -> n -> o -> M -> N -> O -> 6
7 p -> q -> r -> s -> P -> Q -> R -> S -> 7
8 t -> u -> v -> T -> U -> V -> 8
9 w -> x -> y -> z -> W -> X -> Y -> Z -> 9
0 SP (space) -> 0 -> SP (space)
* @ -> * -> @
# . -> _ -> - -> P -> SP (space) -> + -> ! -> “ -> $ -> % -> & -> ‘ -> (
-> ) -> , -> / -> : -> ; -> < -> = -> > -> ? -> [ -> £ -> ] -> ^ -> #
MFP overview > 14
Page 15

C
HANGING THE DISPLAY LANGUAGE
The default language used by your MFP for display messages is English. If required, this
can be changed using the Panel Language Setup utility.
MFP overview > 15
Page 16
G
ETTING STARTED
R
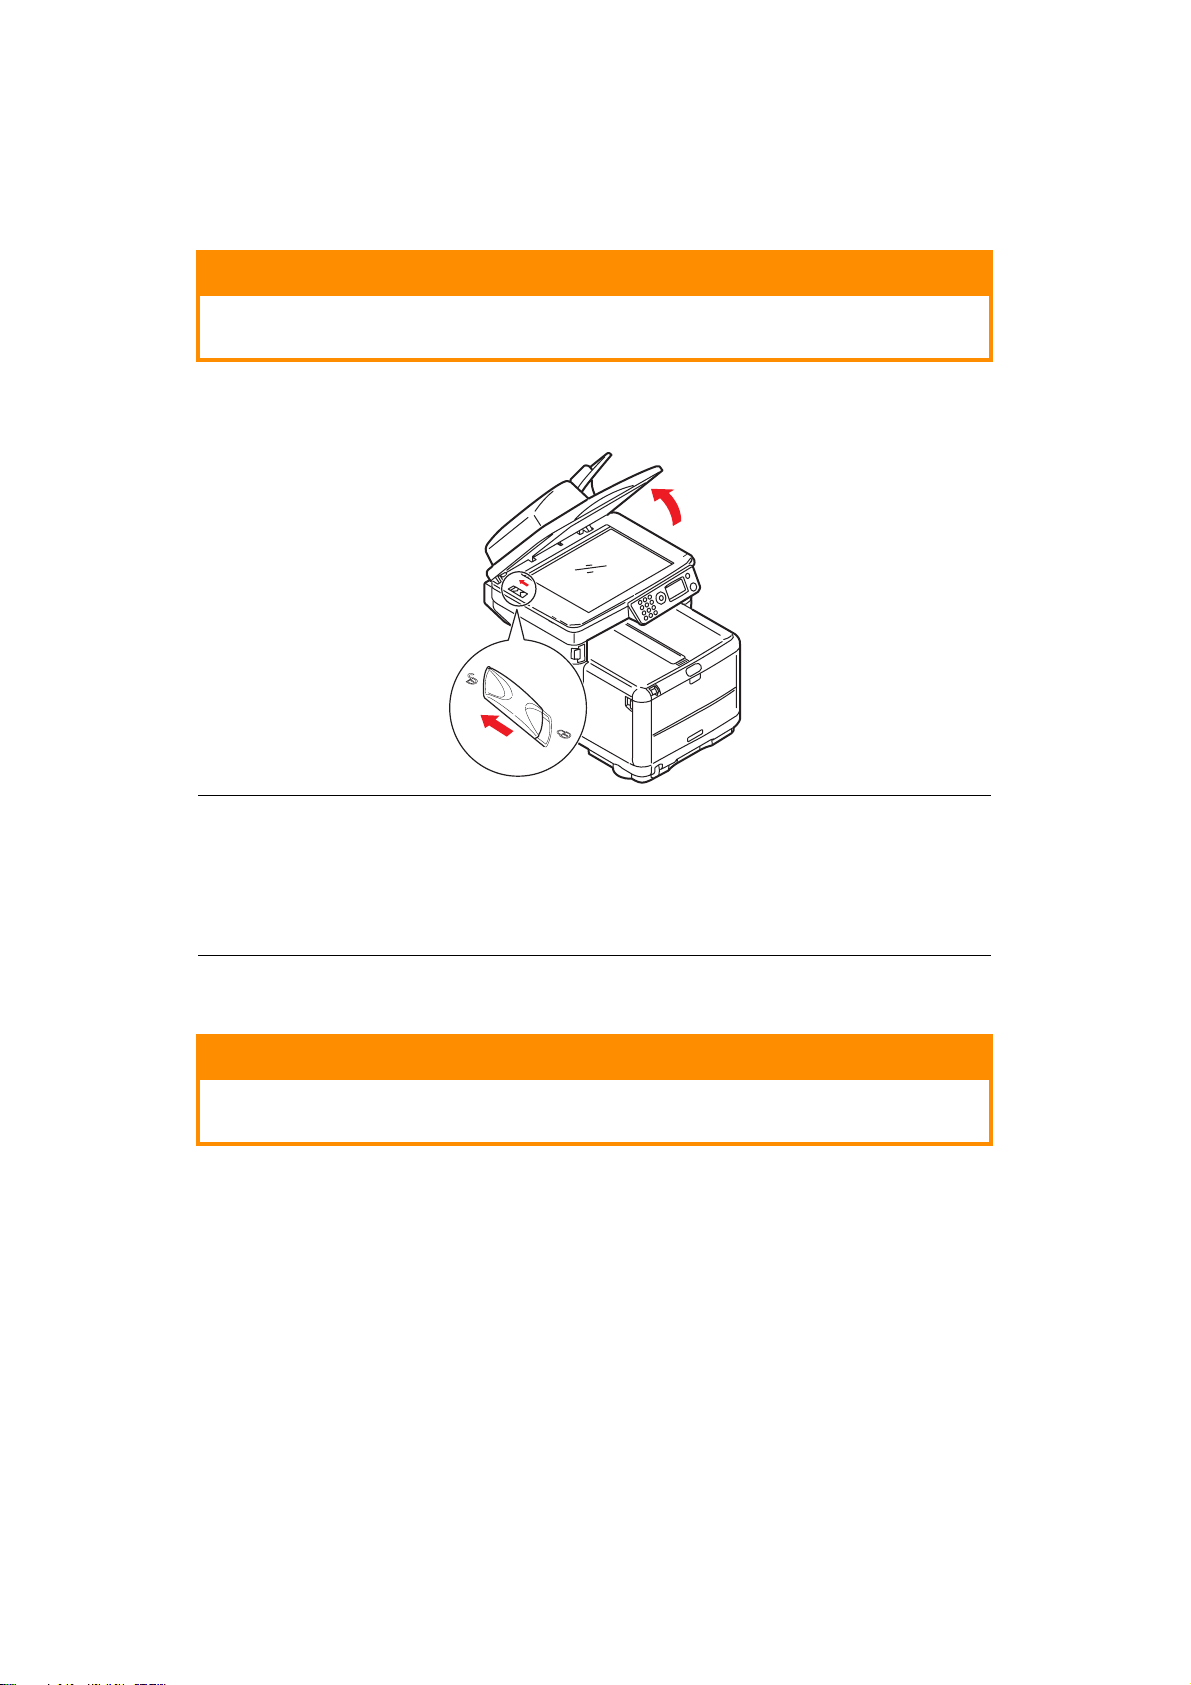
ELEASING THE SCANNER LOCK
CAUTION!
Make sure the scanner is in the UNLOCKED position before
operating.
1. Open the document cover.
2. Move scan lock lever to UNLOCKED position.
NOTE
If you need to transport or move your MFP for any reason;
1. Ensure the scanning head is in the left most position, then turn off the
MFP.
2. Move the scan lock lever to the LOCKED position.
S
WITCHING OFF
CAUTION!
Do not turn off the power switch suddenly as this may damage your
MFP.
1. Press the Down arrow button on the control panel to highlight Menu, press Enter to
select.
2. Press the Down arrow button on the control panel to highlight System Shutdown,
press Enter to select.
3. Press Enter to execute.
4. At the prompt, turn the power switch OFF.
Getting started > 16
Page 17

I
NSTALLING DRIVERS AND UTILITIES
Install the appropriate drivers for your connection type:
> Network connection; install the printer driver
> USB connection; install the printer driver and the TWAIN driver
NOTE
Mac OS X; install the printer driver only.
NOTE
You must be logged on as an administrator or a member of the Administrators
group in order to complete this procedure. If your computer is connected to a
network, network policy settings may also prevent you from completing this
procedure.
NOTE
If you are connecting your printer to a Power Mac G5, make sure the USB
cable is compatible with USB 2.0. If you use a USB 1.1-only compatible cable,
you may experience problems such as errors or the printer not receiving the
job.
The installation instructions below refer to USB connection. For network connection details
refer to the Network Guide.
If you are running Windows Server 2003 or Server 2008, you may need to follow these
steps to ensure the WIA service starts when using the TWAIN driver and Hotkey Utility:
NOTE
In the case of Server 2008, Desktop Experience needs to be installed.
1. Click Start > Administrative Tools > Services.
2. Double-click Services.
3. Double-click Windows Image Acquisition (WIA).
4. From the Startup type menu, select Automatic.
5. Under Service status, click Start.
6. Click OK.
W
INDOWS
-
TWAIN AND PRINTER DRIVERS
The TWAIN driver is used for “Pull Scanning”, i.e. Initiating a scan from your PC via
software. Compare this to “Push Scanning” where you start the scan by pressing a button
on the MFP's front panel. The TWAIN driver only works via USB connections. This means
it's not possible to control the scanner over the network from your PC.
There are two different ways of installing the TWAIN and printer drivers:
1. Not plugging the printer in yet, but running the driver installer program from the
DVD-ROM. This installs the TWAIN (scanner driver) and printer drivers. Once the
printer is switched on and plugged in, the installation is complete.
Getting started > 17
Page 18

2. Plugging the printer in first and performing a “Plug and play” type of installation. In
this case you must install the TWAIN driver first.
NOTE
> The driver installer program is the recommended installation method.
> “Plug and play” installation only applies when connecting to your machine
via USB.
Plug and play installation
The MFP is a “dual device” - Windows sees it as a scanner and a printer. This means when
the MFP is plugged into a PC using a USB cable, you'll be prompted to install 2 different
drivers; the TWAIN (scanner) driver first and then the printer driver.
1. Attach the printer to a USB port of your computer.
2. Switch on the printer.
3. Insert the DVD. If DVD autoboots, cancel the dialogue.
The ‘New Hardware Found' dialogue will display.
If you do not see the ‘New Hardware Found' dialogue, please check that power and
USB cables are connected properly, and the printer is switched on.
4. Install TWAIN driver first.
a
c
b
d
Getting started > 18
Page 19

5. Next install the printer driver.
MAC -
a
c
PRINTER DRIVER
d
b
The information in this secti o n is ba s ed on Mac OS X Leopard (10.5). Other versions may
appear slightly different, but the principles are the same.
1. Insert the DVD-ROM and run the driver installer program.
2. Follow the on-screen instructions to install the printer driver.
3. Attach the printer to a USB port of your computer.
4. Switch on the printer.
5. Choose Apple Menu > System Preferences > Print & Fax.
6. If the printer is already in th e li s t of pri nt e rs , cl ic k “-” to remove it.
NOTE
This is necessary as Leopard may not be using the correct printer driver
files.
7. Click “+” to add a new printer.
8. Click More Printers.
9. Choose OKI USB from the pop-up menu.
Getting started > 19
Page 20

10. Select your printer model and click Add.
11. The printer is added to the list of printers.
12. Restart your computer.
FAX
DRIVER
The fax driver allows you to send faxes directly from your computer without printing the
document first.
Windows XP has built-in fax support - you can use your computer's modem to send faxes
directly from your computer.
With fax driver you are sending the fax data from your computer to the MFP, and then
the MFP automatically sends the document.
(MF2000 plus
ONLY
)
Installing the fax driver
This is installed as part of the driver installer wizard.
Getting started > 20
Page 21
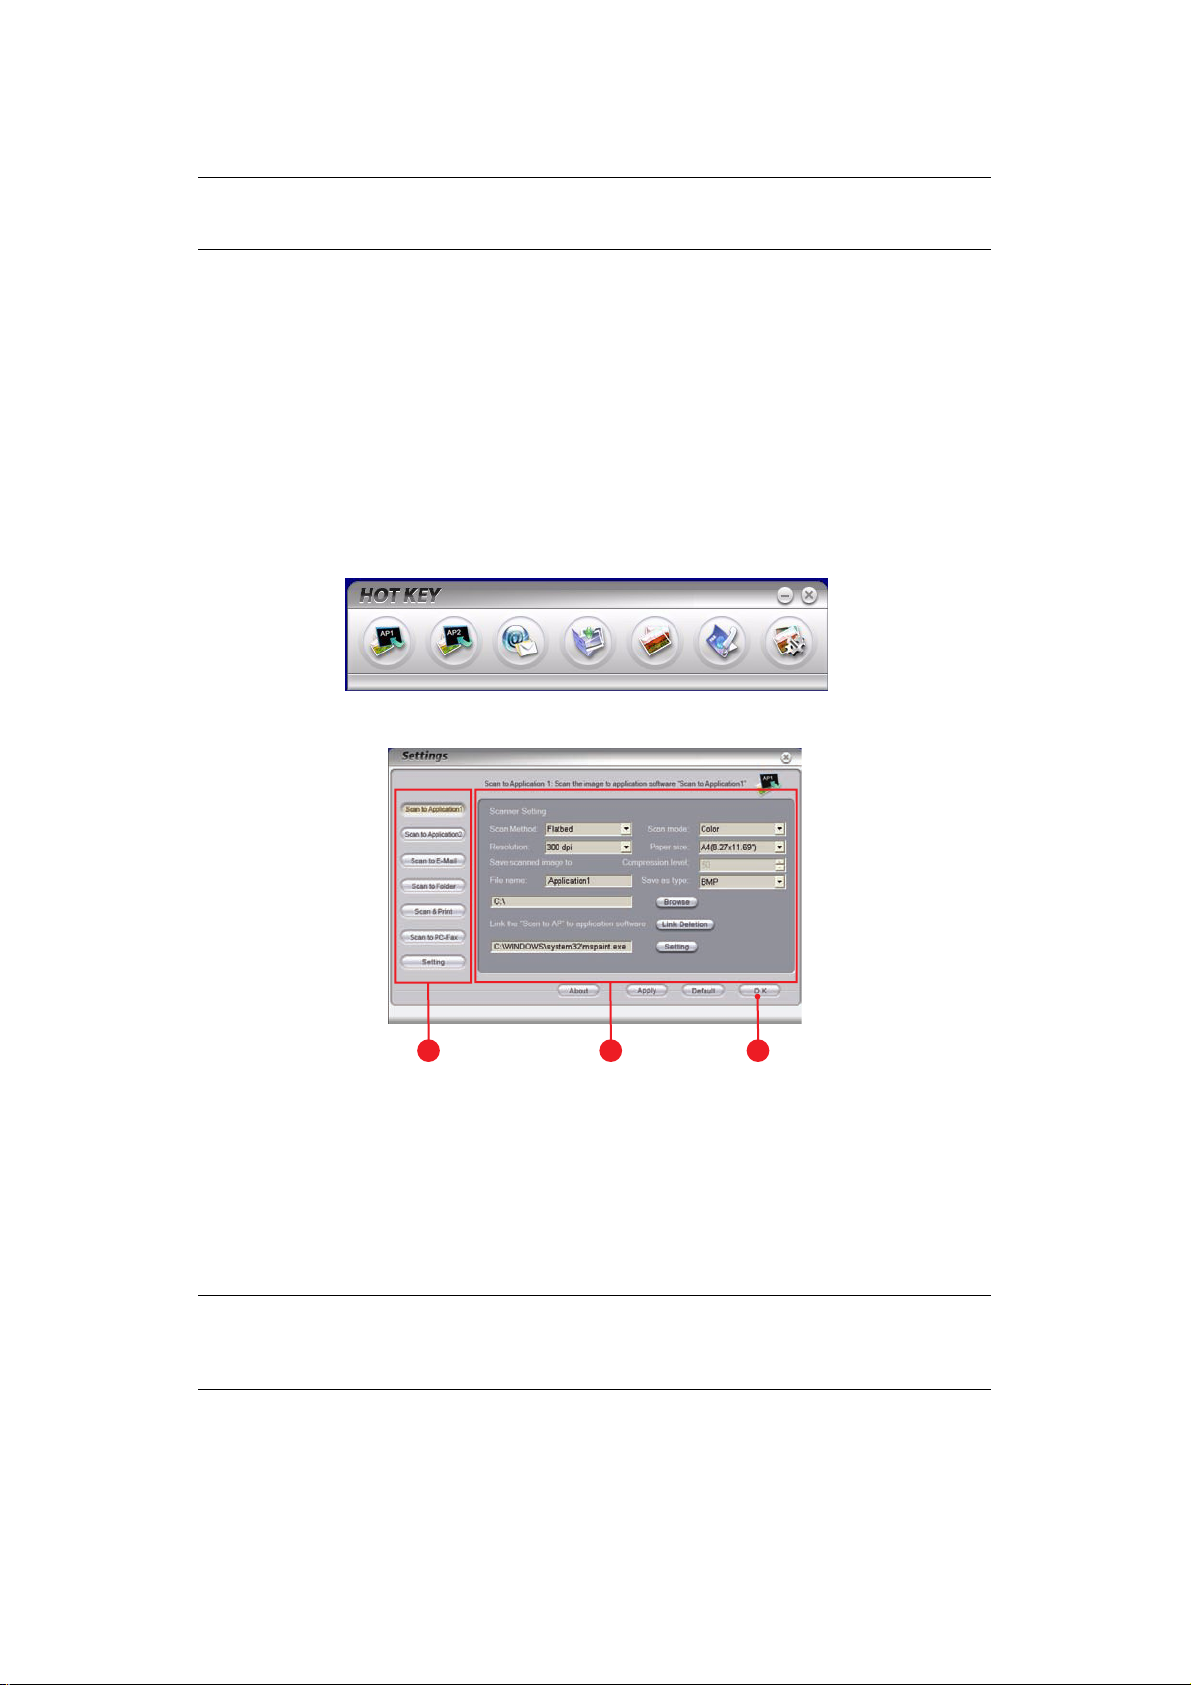
H
OTKEY UTILITY
-
WINDOWS ONLY
NOTE
The Hotkey utility only works via USB connections.
The Hotkey utility enables the MFP to receive one key touch commands from a locally
connected computer (“Pull Scan”).
Installation of the Hotkey utility is optional and can be found on the DVD under the Utilities
folder.
Information on using the Hotkey utility can be found in “Scan to PC” on page 62.
Setting up the Hotkey Utility
1. Install the Hotkey utility from the DVD:
Set-up will place a “Hotkey” icon on your desktop.
2. Double-click this icon to open the Hotkey console.
3. Select Settings. The following screen displays.
1
2 3
4. Select the function yo u want to set in section (1).
5. Set the parameters for this function in section (2).
6. When you have completed settings, press OK (3).
The Utility will return to the Hotkey console.
7. To use Hotkey in PC mode (i.e. push scanning), it must be set as the program to
handle scanner events:
NOTE
The following example uses Windows XP. The steps may vary if you are using
any other operating system, but the principle is the same.
(a) Select Start > Control Panel.
(b) Double-click Scanners and Cameras.
(c) Right-click the MFP icon and click Properties.
(d) Select the Events tab.
Getting started > 21
Page 22
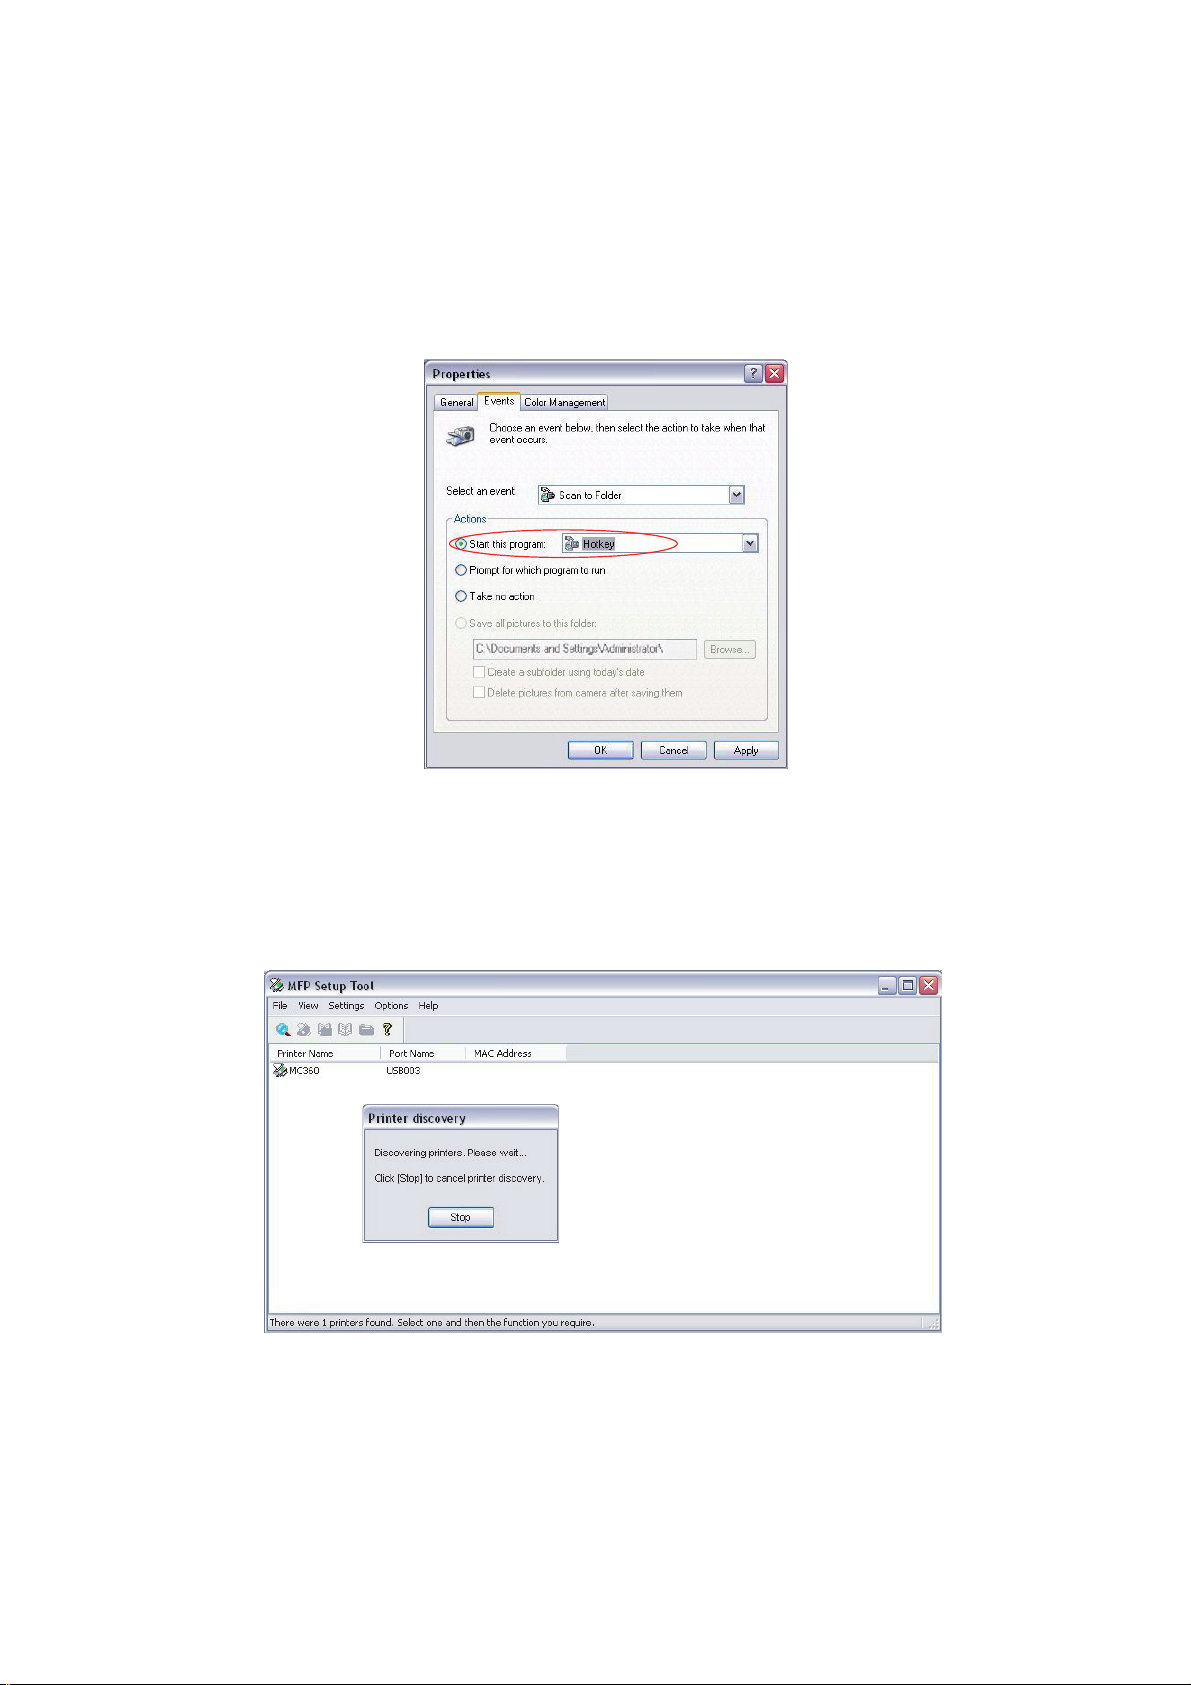
(e) Choose an event from the Select an event drop-down menu.
(f) In the Actions field, click Start this program and choose HotKey from the
drop-down menu.
(g) Click Apply.
(h) Repeat steps e to g for each event, e.g. Scan to Application, E-mail, Folder and
PC-Fax.
(i) Click OK to confirm.
MFP
SETUP TOOL
Installation of the MFP setup utility is optional and can be found on the DVD under the
Utilities folder.
The MFP setup tool can discover MF1600 plus/MF2000 plus devices over USB or network
connections. To discover, select File > Printer Discovery.
The MFP setup tool allows you to configure your MFP. Refer to “Pre-configuration
information” on page 29 for detailed instructions.
-
WINDOWS ONLY
Getting started > 22
Page 23

P
APER RECOMMENDATIONS
Your MFP will handle a variety of print media, including a range of paper wei ghts and sizes.
This section provides general advice on choice of media, and explains how to use each type.
The best performance will be obtained when using standard 75~90g/m² paper designed
for use in copiers and laser printers. A suitable type is Color Copy by Mondi.
Use of heavily embossed or very rough textured paper is not recommended.
Pre-printed stationery can be used, but the ink must not offset when exposed to the high
fuser temperatures used in the printi ng p roc es s .
Envelopes should be free from twist, curl or other deformations. They should also be of the
rectangular flap type, with glue that remains intact when subjected to hot roll pressure
fusing used in this type of printer. Window envelopes are not suitable.
Labels should also be of the type recommended for use in copiers and laser printers, in
which the base carrier page is entirely covered by labels. Other types of label stock may
damage the printer due to the labels peeling off during the printing process. A suitable type
is Avery White Laser Label types 7162, 7664, 7666 (A4), or 5161 (Letter).
Use of transparencies is not recommended.
CAUTION!
Transparencies will melt in the fuser and damage your machine.
C
ASSETTE TRAY
The Cassette Tray can handle paper weights of 64g/m² to 176g/m². The Cassette Tray is
ideal for printing A4 documents of more than 1 page in length.
SIZE DIMENSIONS
A6 105 x 148mm
A5 148 x 210mm
B5 182 x 257mm
Executive 184.2 x 266.7mm
A4 210 x 297mm
Letter 215.9 x 279.4mm
Legal 13in. 216 x 330mm
Legal 13.5in. 216 x 343mm
Legal 14in. 216 x 356mm
WEIGHT (G/M2)
Light 64-74g/m²
Medium 75-104g/m²
Heavy 105-120g/m²
If you have identical paper stock loaded in the multi purpose tray, you can have the printer
automatically switch to the other tray when the current tray runs out of paper. When
printing from Windows applications, this function is enabled in the driver settings. When
printing from other systems, this function is enabled in the Print Menu.
M
ULTI PURPOSE TRAY
The multi purpose tray can handle the same media sizes as the cassette trays but in
weights of 75g/m² to 203g/m². For very heavy paper stock, use the face up (rear) paper
stacker. This ensures that the paper path through the printer is almost straight.
Getting started > 23
Page 24
The multi purpose tray can feed paper widths as small as 105mm and lengths up to
1200mm (banner printing - MF2000 plus only).
For paper lengths exceeding 356mm (Legal 14in.) use paper stock between 90g/m² and
128g/m² and the face up (rear) paper stacker.
When using the multi purpose tray, feed each sheet of paper or envelope one-by-one,
rather than stacking them. This helps to avoid paper jams.
Watermarked or headed paper should be loaded print side up and top edge into the printer.
MF1600 plus
MF2000 plus
SIZE DIMENSIONS
A6 105 x 148mm
A5 148 x 210mm
B5 182 x 257mm
Executive 184.2 x 266.7mm
A4 210 x 297mm
Letter 215.9 x 279.4mm
Legal 13in. 216 x 330mm
Legal 13.5in. 216 x 343mm
Legal 14in. 216 x 356mm
Custom sizes 216 x 356mm
SIZE DIMENSIONS
A6 105 x 148mm
A5 148 x 210mm
B5 182 x 257mm
WEIGHT (G/M2)
Light 64-74g/m²
Medium 75-104g/m²
Heavy 105-120g/m²
Ultra
heavy: 121-203g/m²
WEIGHT (G/M2)
Executive 184.2 x 266.7mm
A4 210 x 297mm
Letter 215.9 x 279.4mm
Legal 13in. 216 x 330mm
Legal 13.5in. 216 x 343mm
Legal 14in. 216 x 356mm
Custom sizes 216 x 356mm
Banner 210 x 900mm
215 x 900mm
215 x 1200mm
COM-9 Envelope 98.4 x 225.4mm
COM-10 Envelope 104.7 x 241.3mm
Monarch Envelope 98.4 x 190.5mm
C5 162 x 229mm
Light 64-74g/m²
Medium 75-104g/m²
Heavy 105-120g/m²
Ultra
heavy: 121-203g/m²
Getting started > 24
Page 25
F
ACE DOWN STACKER
The face down stacker on the top of the printer can hold up to 150 sheets of 80g/m²
standard paper and can handle paper stocks up to 120g/m². Pages printed in reading order
(page 1 first) will be sorted in reading order (last page on top, facing down).
F
ACE UP STACKER
The face up stacker at the rear of the printer should be opened and the tray extension
pulled out when required for use. In this condition paper will exit via this path, regardless
of driver settings.
The face up stacker can hold up to 10 sheets of 80g/m² standard paper and can handle
stocks up to 203g/m².
Always use this stacker and the multi purpose feeder for paper stocks heavier than
120g/m².
L
OADING PAPER
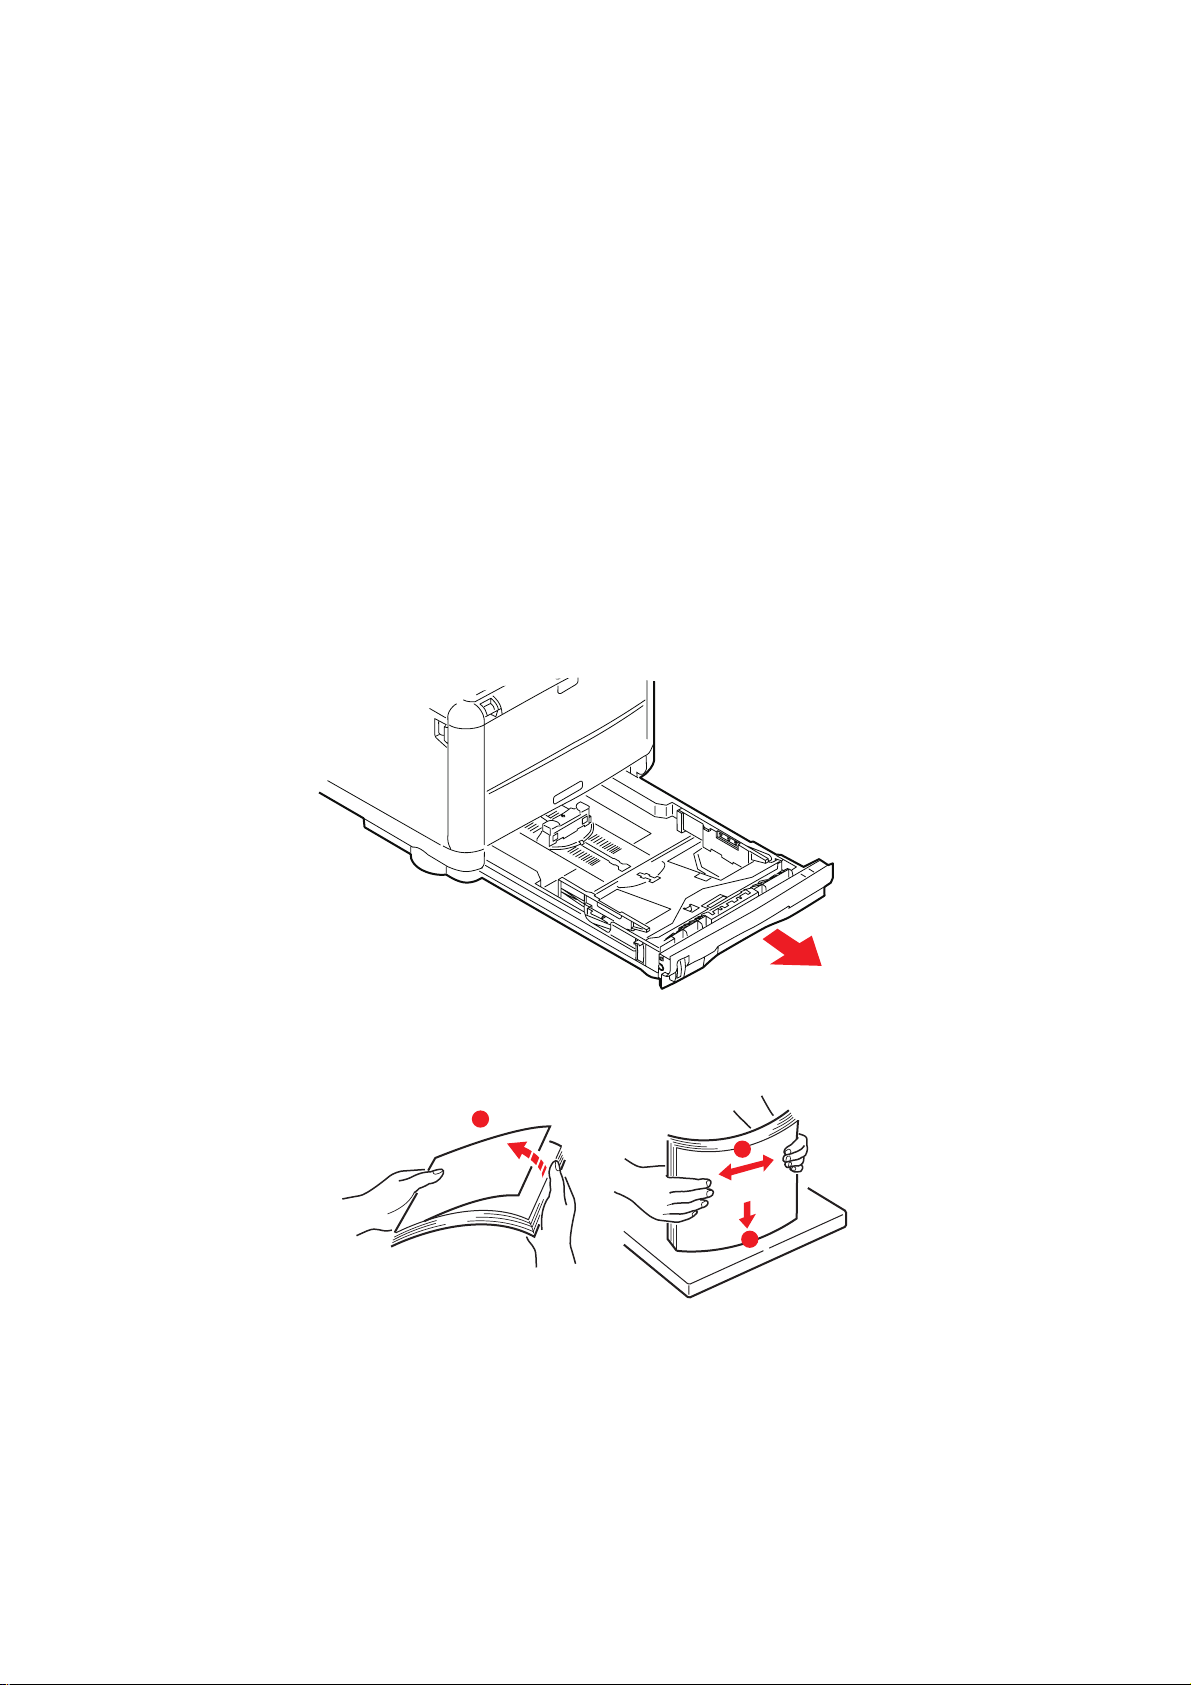
C
ASSETTE TRAY
1. Remove the paper tray from the machine.
2. Fan the paper to be loaded at the edges (a) and in the middle (b) to ensure that all
sheets are properly separated, then tap the edges of the stack on a flat surface to
make it flush again (c).
a
b
c
3. Load the tray with paper.
Getting started > 25
Page 26
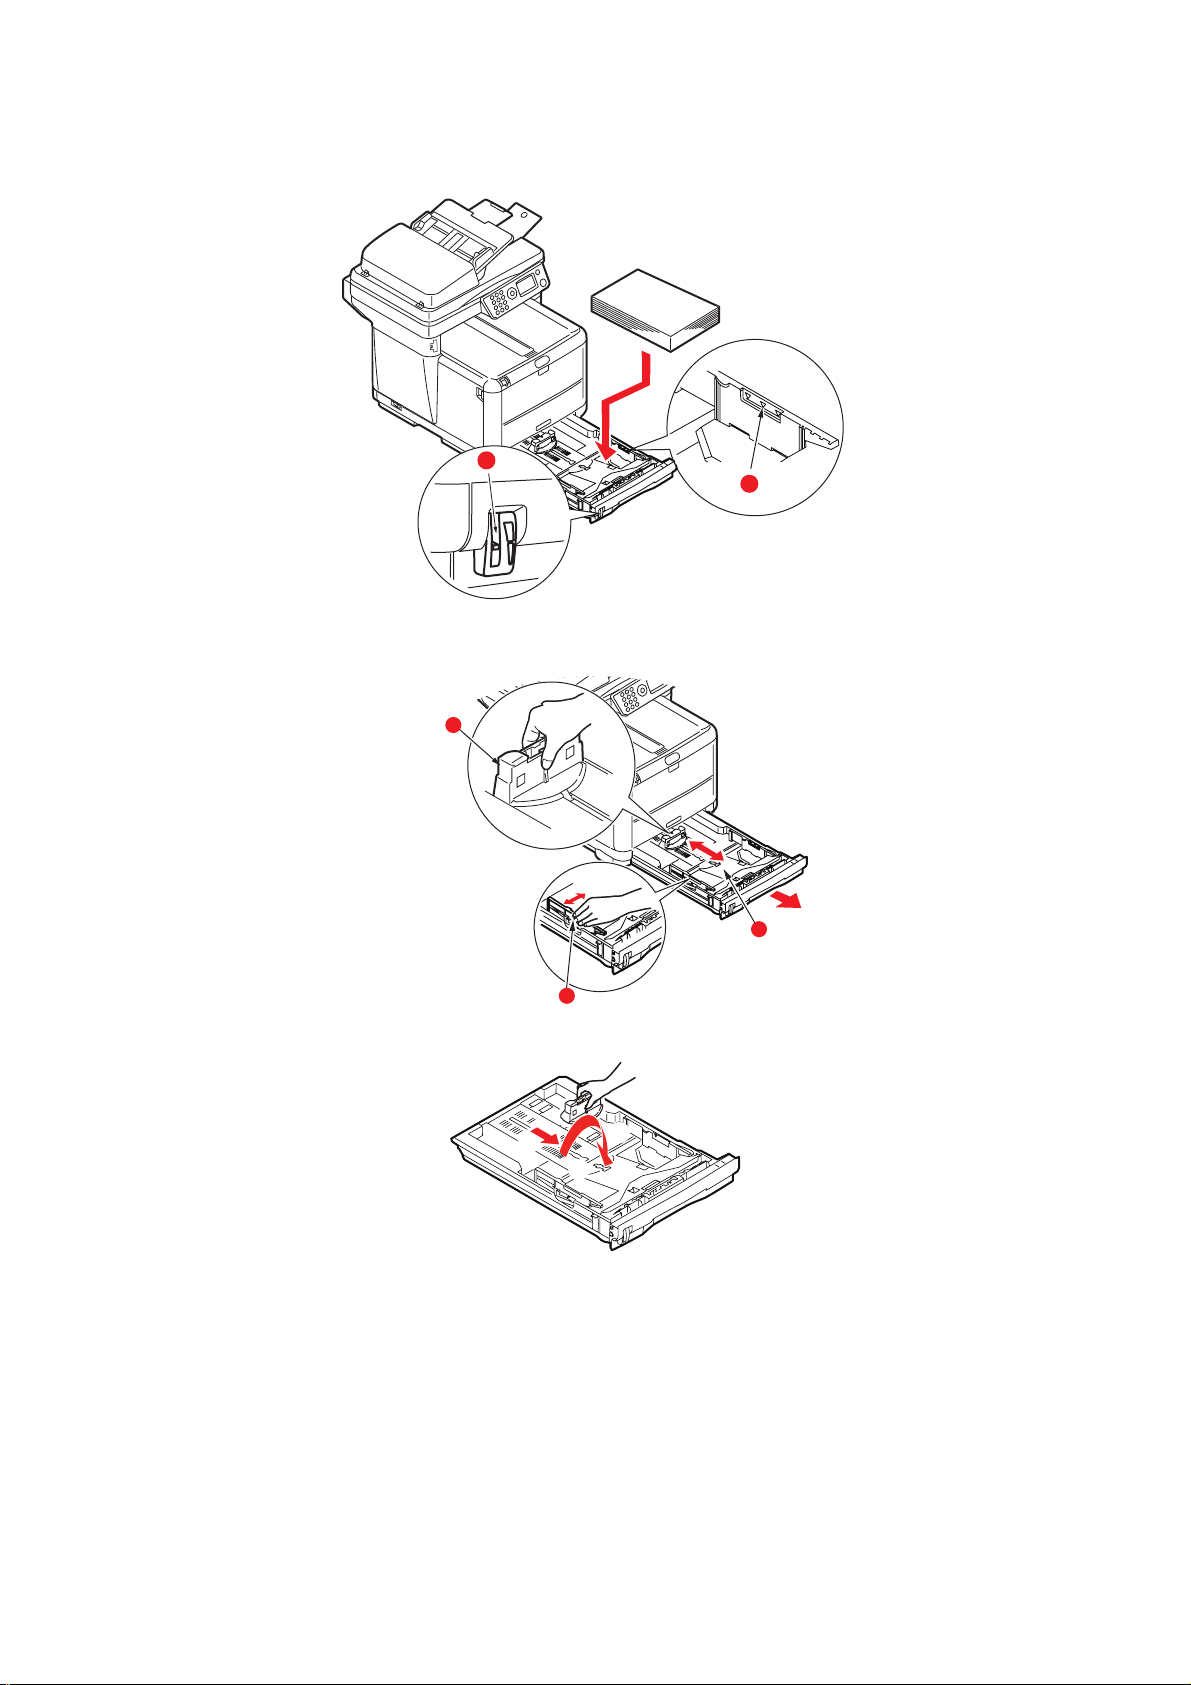
Use the level indicators (a and b) as a guide. For letter headed paper load face down
a
b
c
with top edge towards the front of the printer.
b
a
4. Adjust the rear stopper (a) and paper guides (b) to the si ze of paper bei ng used. A6
paper uses area (c).
5. If you are using A6 paper, re-position the rear paper guide to the front slot.
Getting started > 26
Page 27
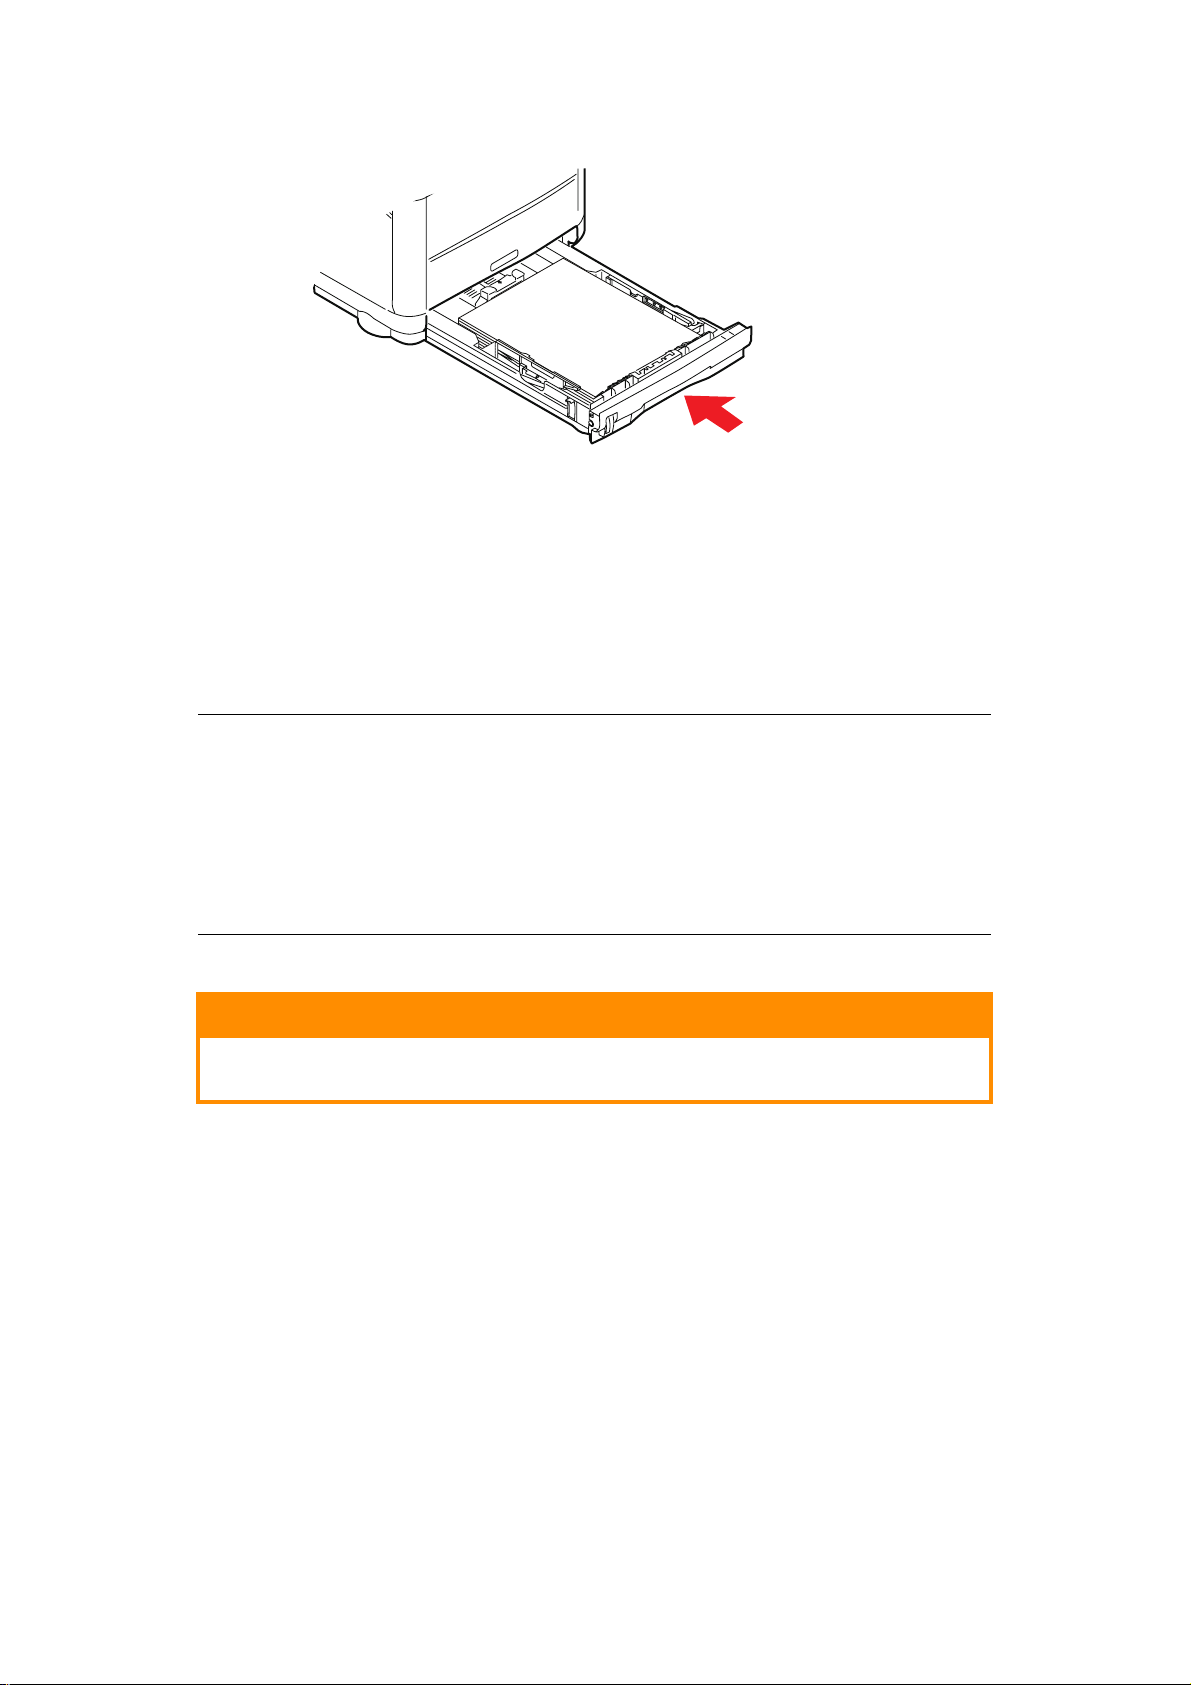
6. Close the cassette tray gently.
To prevent paper jams:
> Do not leave space between the paper and the guides and rear stopper.
> Do not overfill the paper tray. Capacity depends on the type of paper stock.
> Do not load damaged paper.
> Do not load paper of different sizes or typ es at th e same time.
> Do not pull the paper tray out during printing.
> Close the paper tray gently.
NOTE
> For face down printing, make sure the face up (rear) stacker is closed (the
paper exits from the top of the printer). Stacking capacity is
approximately 150 sheets, depending on paper weight.
> For face up printing, make sure the face up (rear) stacker is open and the
paper support is extended. Paper is stacked in reverse order and tray
capacity is approximately 10 sheets, depending on paper weight.
> Always use the face up (rear) stacker for heavy paper (card stock, etc.).
CAUTION!
Do not open or close the rear paper exit while printing as it may
result in a paper jam.
Getting started > 27
Page 28
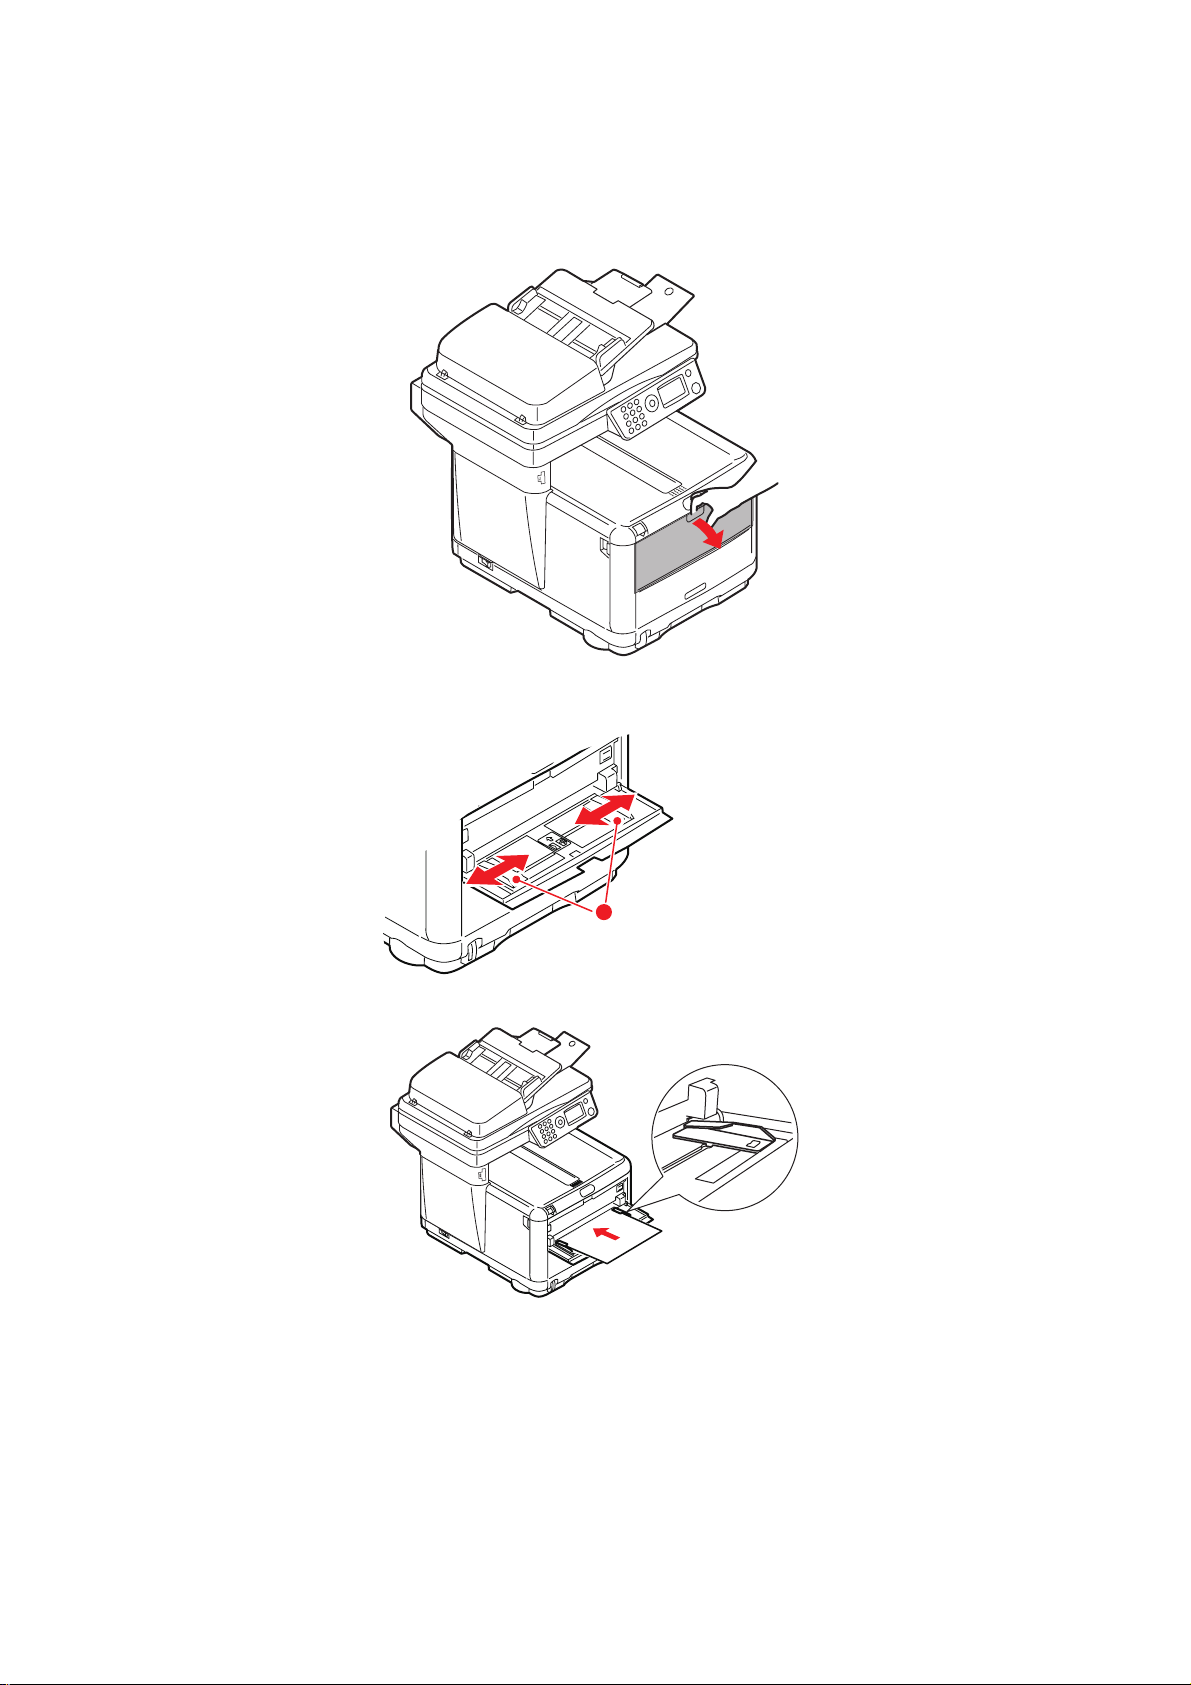
M
a
ULTI PURPOSE TRAY
The multi purpose tray is used for printing on media such as envelopes, non-standard
media, A5, A6, and heavyweight paper (see “Multi purpose tray” on page 23).
1. Open the multi purpose tray.
2. Adjust the paper guides (a) to the size of paper you are going to print on, using the
markings on the paper platform.
3. Position a sheet of paper on the paper platform so that it is gripped in place.
> Load your chosen media one sheet at a time.
> When printing on headed paper load the paper into the multi purpose tray with
pre-printed side up and top edge into the printer.
> An envelope should be loaded face up with top edge to the left and short edge
facing into the printer.
4. Set the correct paper size for the multi purpose tray in the Printer Menu. See
page 41.
Getting started > 28
Page 29

C
ONFIGURING YOUR MACHINE
M
INIMUM CONFIGURATION REQUIREMENTS
To make the best of this MFP, the following configuration is required:
...
To send faxes (MF2000 plus):
A PSTN telephone line connection.
To send e-mails:
> TCP/IP network.
> A SMTP and an optional POP3 server.
> Default “From” Address (this MFP’s Address).
To file document(s) via intranet
> FTP or CIFS Protocol environment.
> Windows 2000, Windows XP, Windows Vista, or FTP server.
PRE-
CONFIGURATION INFORMATION
G
ENERAL
Ensure that you have the relevant permission/PIN numbers before commencing.
The Factory set default passwords/PIN are:
Administrator aaaaaa
PIN 000000
Network (web page) last 6 figures of MAC address
NOTE
The administrator password should be changed and maintained by the system
administrator.
FAX
SET UP
Your MFP has to be set up properly to allow faxing from the machine. The following
parameters must be set before using the fax function:
> Date and time
> Country code
> Local phone number
> Sender ID
(MF2000 plus)
See “Initial set up” on page 44 for details.
NOTE
If you ran the driver installer program from the DVD-ROM you may have
already set the time zone, date and time via the Panel Language Setup utility.
Configuring your machine... > 29
Page 30

N
ETWORK SET UP
The MFP has to be set up properly on your network to perform scan to e-mail and other
functions. In order for other network devices to find the MFP on the network, the following
network parameters have to be set:
IP Address Set:
IP Address: . . .
Subnet mask:. . .
Gateway IP:. . .
DNS server:. . .
SMTP server:. . .
SMTP port:25
POP3 server: . . .
POP3 Port:110
Explanation:
1. IP Address Set:
Choose Auto to obtain IP/subnet/gateway addresses automatically from DHCP
server. After changing setting from Manual to Auto, the MFP will automatically reboot
the network card.
2. IP Address:
This is the Internet Protocol (IP) address assigned to your machine by your network
administrator.
NOTE
An IP (Internet Protocol) address uniquely identifies a host connection to an
IP network. The System administrator or network designer assigns the IP
address. The IP address consists of two parts, one identifying the network and
the one identifying your node. The IP address is usually written as four
numbers separated by periods. Each number can be zero to 255. For example,
10.1.30.186 could be an IP address.
3. Subnet Mask:
This is the net mask address assigned by your network administrator.
4. Gateway IP:
This is the gateway IP address assigned by your network administrator.
5. SMTP Server:
NOTE
SMTP (Simple Mail Transfer Protocol) is the main communication protocol used
to send and receive e-mail on the Internet.
This is the IP address of your SMTP Mail Server assigned by your network
administrator.
6. SMTP Port:
The port number of your SMTP Mail Server.
Configuring your machine... > 30
Page 31

7. DNS server:
NOTE
DNS (Domain Name System). The DNS server identifies hosts via names
instead of IP addresses. If the DNS server is available on your network, you
can enter the domain name instead of digits for your SMTP or POP3 servers,
such as Pegasus.com.tw instead of 120.3.2.23.
This is the IP address of DNS Server assigned by your network administrator.
8. POP3 Server:
The IP address of your POP3 server.
9. POP3 Port
The port number of your POP3 Server.
Enter the DNS name, or IP and port number of your POP3 server if your mail server
requires POP3 authentication, before sending e-mails from the machine.
NOTE
POP3 (Post Office Protocol3) is a service that stores and serves e-mails for
various client machines that are not connected to the Internet 24 hours a day.
E-mails are held in POP3 until you log on.
I
NTERNET COMMUNICATION FEATURES
Scan to e-mail
The MFP allows you to deliver your scanned document to e-mail addresses on the network.
The document is first scanned and converted to a standard PDF, JPEG or TIFF file format
and then transmitted to remote recipients simultaneously as an e-mail attachment.
When you send an e-mail to someone using this MFP it uses Simple Mail Transfer Protocol
(SMTP) to transfer your outgoing e-mails to your SMTP mail server, and then send these
e-mails to your recipients via the internet.
Setting up an SMTP server
This section explains setting up a server.
1. Using the Down arrow key, scroll to Menu and press Enter.
2. Using the Down arrow key, scroll to Admin Setup and press Enter.
3. Using the arrow keys and on-screen keypad, enter the Administrator password.
Highlight Done and press Enter.
4. Using the Down arrow key, scroll to Network Setup and press Enter.
5. Press Enter to select the Mail Server Setup menu.
6. Using the Down arrow key, scroll to SMTP server and press Enter.
7. Enter your IP address.
NOTE
Numbers are entered using the keypad.
When a number is entered from the keypad, the number currently displayed
is cleared and the number just entered is displayed as the first digit. When
another number is entered, the first number entered moves to the left, and so
on.
You can increment/decrement the digits using the Up/Down arrow keys.
Configuring your machine... > 31
Page 32

8. To confirm, press the Enter key.
NOTE
To cancel the IP address, press the Stop key until you exit the menu without
saving the changes.
C
ONFIGURATION
There are a number of configuration options available which allow you to change the
scanner, fax and printer settings to suit your own needs. There are three methods of
configuring your MFP:
> From the MFP’s web page.
> From the MFP’s Setup Tool utility.
> From the MFP control panel.
For illustration purposes only, the configuration options shown are as accessed via the
control panel.
...
FROM THE WEB PAGE
Type the IP address of the MFP in the URL field of your browser and then press Enter. The
MFP web page displays. For example: http://10.18.207.102
NOTE
The Administrative settings are blocked by a password. Refer to “Pre-
configuration information” on page 29.
Configuring your machine... > 32
Page 33

...
FROM THE SETUP TOOL UTILITY
If you have not already done so, install the setup tool utility as described in “MFP setup tool
- windows only” on page 22.
NOTE
The Administrative Settings are blocked by a password. Refer to “Pre-
configuration information” on page 29.
...
FROM THE CONTROL PANEL
1. Press the Down arrow key (1) on the control panel until Menu is highlighted, then
press Enter (2).
2. Press the Down arrow key (1) until Admin Setup is highlighted, then press Enter
(2).
2
abcd@d
Done
a b c d e f g h i
j k l m n o p q r
s t u v w x y z
1
NOTE
The Admin Setup option is blocked by a password. Refer to “Pre-configuration
information” on page 29.
Configuring your machine... > 33
Page 34

Copy function
This is the default mode on Power up, with Access Control disabled. Use the Down arrow
key to select other functions and Enter to select an option.
Default option (if relevant) is highlighted.
LEVEL 2 DESCRIPTION OPTIONS
Copies: Number of copies required (default 1) 1 to 99
100% Reduce/enlarge copy A4->A5
Leg14->Let
Leg13.5->Let
Leg13->Let
A4->B5
Fit to page
100%
B5->A4
Let->Leg13
Let->Leg13.5
Let->Leg14
A5->A4
Custom
A4 Printer section paper size Legal13, Legal13.5,
Legal14, Letter, A4, A5,
B5
Mixed Resolution Mixed, Photo,
Density: 0 Density of print -3 ~ 0 ~ +3
Tray1 Selects cassette Tray or Manual feeder Tray 1,
Collate: Sets collate function on or off On, Off
1in1 Selects how many prints per page (n-up) 1in1, 2in1, 4in1(Hor.),
E.E: Edge Erase: This sets the peripheral areas of the
document to block out.
M.S-R: Margin Shift - Right: This sets the amount to shift the
document image to the right.
M.S-B: Margin Shift - Bottom: This sets the amou nt to shift
the document up.
HiRes.Mixed, HiRes.Photo
Manual Feeder
4in1(Ver.)
0, 6, 13, 19, 25mm
0, 6, 13, 19, 25mm
0, 6, 13, 19, 25mm
Configuring your machine... > 34
Page 35

Scan/scan to function
Use the Down arrow key to select this function and Enter to select option.
E-mail
LEVEL 2 DESCRIPTION OPTIONS
Check
Address
Reply to: Choose Email “Reply to” Address Book:
Destination Choose Address from: Address Book:
Subject Choose from the default subject list (set by the
File Name A file name should be entered for the scanned
Displays the default address (set by the
administrator).
administrator) or enter a subject.
images.
This file name can be entered in Key Pad Mode.
Up to 64 characters can be entered as text, except
for the following;
\ / : * ? " < > |
Screen Entry:
Number:
LDAP: Name
Screen Entry:
Number:
LDAP: Name
Subject List
Screen Entry
N/A
Address:
Method: AND/OR
Address:
Method: AND/OR
Density Select density. -3, -2, -1, 0, 1, 2, 3
Document
size
File
Format(Color)
File
Format(B/W)
Select document size. A4
Letter
Legal
Select file format. PDF
TIFF
JPEG
Select file format. PDF
TIFF
Configuring your machine... > 35
Page 36

Network PC
LEVEL 2 DESCRIPTION OPTIONS
NOTE
The MFP must be connected to a Network server to enable Scan to Network
PC to be set up.
Profiles can be created and managed using the machine’s web page or the MFP
Setup Tool.
Profile If any profiles have been created the list will be
displayed. Max 20 profiles can be created.
PC
LEVEL 2 DESCRIPTION OPTIONS
Email Scan to Email and save file
Folder Scan to PC based folder
Application Scan to Application1
Fax Scan to Facsimile and save fi le
Fax function (MF2000 plus)
LEVEL 2 DESCRIPTION OPTIONS
Check Dest. Displays the selected destination fax number
Fax No. Input a destination fax number
Phone Book Select address from the phone book
Standard Select the transmission resolution Standard
Fine
Extra Fine
Photo
Density Select density. -3, -2, -1, 0, 1, 2, 3
A4 Select document size A4
Letter
Legal
Delayed
Time
Select transmission time dd/mm/yy
hh:mm
Configuring your machine... > 36
Page 37

Menu function
LEVEL 2 ITEM DESCRIPTION/OPTIONS
View
Information
Print Count Color Pages Displays the number of colour pages printed
Monochrome
Pages
Tray1 Displays the number of pages printed from the
Manual Feeder Displays the number of pages printed via the
Scan Count Total Pages self explanatory
Pages Scanned self explanatory
Total AD F Pages self explanatory
ADF Pages
scanned
Fax Count
(MF2000 plus only)
Supplies Life Black Toner self explanatory
Pages Sent self explanat ory
Pages Received self explanatory
Sending Times self explanatory
Receiving
Times
Cyan Toner self explanatory
Displays the number of mono pages printed
paper cassette tray
Manual paper tray
self explanatory
self explanatory
Magenta Toner self explanatory
Yellow Toner self explanatory
Black Drum self explanatory
Cyan Drum self explanatory
Magenta Drum self explanatory
Yellow Drum self explanatory
Belt self explanatory
Fuser self explanatory
Network IP Address
Subnet Mask
Gateway
Address
MAC Address
NIC Program
Version
NIC Default
Version
Configuring your machine... > 37
Page 38

LEVEL 2 ITEM DESCRIPTION/OPTIONS
View
Information
cont.
Print
Information
System Serial Number
Asset Number
CU Version
PU Version
Scanner
Version
Fax Version
Total Memory
Flash Memory
Configuration Execute Prints out a report of the machine’s
Network
Information
Demo Page DEMO1 Execute Prints a Demonstration
MFP Usage
Report
Supplies Status
Report
Execute Prints out a report of the Network configuration
Execute Copies (1 to 99) Prints a full report of
Execute Prints a report of the status of all consumables
configuration
page
the machine usage
Admin Setup System Setup Access Control Enable/Disable
Power Save Time 5/15/30/60/240
minutes
Return to Stand-by
Time
Default Mode Copy/Scan/Fax
Unit of Measure inch/millimeter
Date Format mm/dd/yyyy,
Report Full Print On/Off
Panel Contrast -10 ~ 0 ~ +10
20/40/60/120/180
seconds
dd/mm/yyyy,
yyyy/mm/dd
Configuring your machine... > 38
Page 39

LEVEL 2 ITEM DESCRIPTION/OPTIONS
Admin Setup
cont.
Network Setup Network TCP/IP Enable/Disable
IP Address Set Auto/Manual
IP Address
Subnet Mask
Gateway Address
DNS Server Primary
DNS Server
Secondary
Web Enable/Disable
SNMP Enable/Disable
Hub Link Setting Auto Negotiate/
Factory Defaults? Execute
Printer Setup Copies 1 - 999
Media Check Enable/Disable
Mono-Print
Speed
Auto/Color Speed/Normal Speed
100Base-TX Full/
100Base-TX Half/
10Base-T Full/
10Base-T Half
X Dimension 100 ~ 210 ~ 216 millimeter
Y Dimension 148 ~ 297 ~ 1200 millimeter
Scanner Setup Job Build
Scanning
Email Setup Add “To” Address On/Off
On/Off
Default File Name user defined
Subject List #00
#01
#02
#03
#04
Default From user defined
Separation Limit 1/3/5/10/30mB/No
limit
Auto Trans. Report On/Off
Configuring your machine... > 39
Page 40

LEVEL 2 ITEM DESCRIPTION/OPTIONS
Admin Setup
cont.
Mail Server
Setup
LDAP Server
Setup
SMTP Server user defined
SMTP Port 25
POP3 Server user defined
POP3 Port 110
Authentication
Method
Login Name user defin ed
Password user defined
Server Settings LDAP Server user defined
Attributes Name1 cn
No/SMTP/POP
Port Number 389
Timeout 10 ~ 30 ~ 120
Max. Entries 100
Search Root user defined
Name2 sn
Name3 givenName
Mail Address mail
Fax Setup
(MF2000 plus)
Additional Filter
Authentication Method:
Anonymous
Simple User ID
Password
Clock
Adjustment
Basic Setup Service Bit On/Off
dd/mm/yyyy
hh:mm
Country Code Select the country in
Local Phone No. <enter>
Sender ID <enter>
MCF(Single Location) On/Off
MCF(Multi Location) On/Off
Error MCF On/Off
Image in MCF On/Off
H/Modem Rate 33.6 Kbps
Use Up & Down arrow
keys to set and Right
arrow key to advance.
which the MFP is
situated.
28.8 Kbps
14.4 Kbps
9.6 Kbps
4.8 Kbps
TAD Mode Type1, Type2, Type3
Configuring your machine... > 40
Page 41

LEVEL 2 ITEM DESCRIPTION/OPTIONS
Admin Setup
cont.
Fax Setup
(MF2000 plus)
cont.
Memory Setup Receive buffer size Auto/0.5/1/2/4/8
Change Password Select “New password” and enter
Basic Setup
cont.
Fax Line Setup Redial Tries 0 ~ 2 ~ 10 tries
Tel Priority Mode On/Off
CNG Detection On/Off
T/F Timer Prg. 20seconds, 35seconds
Remote Re ceive No. Off, 000, 111, 222,
333, 444, 555, 666,
777, 888, 999, ***,
###
Ring Response 1 ring/ 5/10/15/20
seconds
Speaker Volume Off/Low/Middle/High
Soft Ringer Volume Off/Low/Middle/High
Redial Interval 1 ~ 3 ~ 6 minutes
Dial Tone Detection On/Off
Busy Ton e D etection On/Off
MF(Tone)/DP(Pulse) DP/MF
megabyte
Reset Settings Execute
Scanner Counter Clear Pages Scanned Execute
Printer Menu Tray
Configuration
ADF Pages Scanned Execute
Manual feed On/Off
Tray1 Config Paper Size A4/A5/A6/B5/Legal14/
Legal13.5/Legal13/
Letter/Executive/
Custom
Media Type Plain/Letterhead/
Bond/Recycled/Rough/
Glossy
Media Weight Light/Medium/Heavy
Manual Feeder
Config
Paper Size A4/A5/A6/B5/Legal14/
Legal13.5/Legal13/
Letter/Executive/
Custom/Com-9
Envelope/Com-10
Envelope/Monarch
Envelope/DL Envelope/
C5 Envelope
Media Type Plain/Letterhead/
Labels/Bond/Recycled/
Card Stock/Rough/
Glossy
Media Weight Medium/Heavy/Ultra
Configuring your machine... > 41
Heavy
Page 42

LEVEL 2 ITEM DESCRIPTION/OPTIONS
Printer Menu
cont.
Copy Menu Copies 1-99
Printer Adjust Manual Timeout Off/30/60/120/180/240/300 secs.
Wait Timeout Off/5/10/20/30/40/50/60/90/120/150/180/
210/240/270/300 secs.
Low Toner Continue/Stop
Jam Recovery On/Off
Paper Black
Setting
Paper Colour
Setting
SMR Setting -3 ~ 0 ~ +3
BG Setting -3 ~ 0 ~ +3
Print Position
Adjust
Drum Cleaning On/Off
Reduce/Enlarge A4>A5 / Leg14>Let / Leg13.5>Let /
X Adjust -2.00 ~ 0.00 ~ +2.00 millimeter
Y Adjust -2.00 ~ 0.00 ~ +2.00 millimeter
-2 ~ 0 ~ +2
-2 ~ 0 ~ +2
Leg13>Let / A4>B5 / Fit to Page / 100% /
B5>A4 / Let>Leg13 / Let>Leg13.5 /
Let>Leg14 /A5>A4 / Custom
Scanner
Menu
Mode Mixed / Photo / HiRes.Mixed / HiRes.Photo
Density -3/-2/-1/0/+1/+2/+3
Input Tray Tray1/Manual Feeder
Collate On/Off
N-up 1in1/2in1/4in1(Hor.)/4in1(Ver.)
Edge Erase 0/6/13/19/25mm
Margin Shift Right 0/6/13/19/25mm
Margin Shift Bottom 0/6/13/19/25mm
Scan to Email Density -3/-2/-1/0/+1/+2/+3
Document size A4/Letter/Legal
Color Format File Format PDF/TIFF/JPEG
Compression Rate
file format PDF or
JPEG:
file format TIFF:
Resolution 100/150/200/300 dpi
B/W Format Grayscale On/Off
File Format PDF/TIFF
Low/Medium/High
Raw
Compression Rate G3/G4/Raw
Resolution 100/150/200/300/
Configuring your machine... > 42
400/600 dpi
Page 43

LEVEL 2 ITEM DESCRIPTION/OPTIONS
Scanner
Menu (cont.)
Fax Menu
(MF2000 plus
only)
Address Book Email Address #00 to #99
Group Address G00 to G19
Scan to USB
Memory
Auto Receive Fax
Density -3/-2/-1/0/+1/+2/+3
Document Size A4/Letter/Legal
Color Format File Format PDF/TIFF/JPEG
Compression Rate
file format PDF or
file format TIFF:
Resolution 100/150/200/300 dpi
B/W Format Grayscale On/Off
File Format PDF/TIFF
Compression Rate G3/G4/Raw
Resolution 100/150/200/300/
Default File
Name
Manual
Tel/Fax
TAD
JPEG:
Low/Medium/High
Raw
400/600 dpi
Mode Standard/Fine/Extra Fine/Photo
Density -3/-2/-1/0/+1/+2/+3
Document Size A4/Letter/Legal
Phone Book Speed Dial #00 to #99
Group Dial G00 to G09
Calibration Auto Density Mode Auto/Manual
Adjust Density Execute
Adjust Registration Execute
Cyan Reg. Fine Adj. -3 ~ 0 ~ +3
Magenta Reg. Fine Adj. -3 ~ 0 ~ +3
Yellow Re g. Fine Adj. -3 ~ 0 ~ +3
System
Shutdown
Execute
Configuring your machine... > 43
Page 44

S
ETTING THE FAX FACILITY
I
NITIAL SET UP
The following parameters must be set before using the fax function on your MFP:
> Date and time
> Country code
> Local phone number
> Sender ID
There are other parameters that can be adjusted to suit your personal preferences later if
required, refer to fax set up table for details (See “Advanced set up” on page 45).
To set fax parameters:
1. Using the Down arrow key, scroll to Menu and press Enter.
2. Using the Down arrow key, scroll to Admin Setup and press Enter.
3. Using the arrow keys and on-screen keypad, enter the Administrator password.
Highlight Done and press Enter.
4. Using the Down arrow key, scroll to Fax Setup and press Enter.
5. Press Enter to select the Clock Adjustment menu.
6. Using the arrow keys and keypad, enter the time and date.
NOTE
Use the Right and Left arrow keys to move between digits.
7. Press Enter to confirm.
8. Using the Down arrow key, scroll to Basic Setup and press Enter.
9. Using the Down arrow key, scroll to Country Code and press Enter.
10. Using the arrow keys, scroll to the country in which the MFP is situated and pres s
Enter to confirm.
11. Using the Down arrow key, scroll to Local Phone No. and press Enter.
12. Using the k e ypad or arrows keys and the on-screen keypad, type in the local phone
number.
13. Highlight Done and press Enter.
14. Using the Down arrow key, scroll to
15. Using the keypad or arrows keys and the on-screen keypad, type in the sender ID.
16. Highlight Done and press Enter.
17. Press the Left arrow key to exit the menu.
NOTE
If required, set the dialling method for your region (Pulse or Tone). Refer to
“MF(Tone)/DP(Pulse)” on page 41.
If connecting the machine through a private branch exchange (PBX) line, you
must also specify a dial prefix to allow the machine to obtain an external line
before dialling. Refer to “Connecting to a PBX” on page 46.
Sender ID and press Enter.
Configuring your machine... > 44
Page 45

A
DVANCED SET UP
Your machine offers a multitude of features which reduce the time required for manual
operation and make fax communications more efficient.
Adding a speed dial entry to the phone book
The machine can hold up to 100 speed dial numbers in the phone book. To add a new speed
dial number to the phone book:
1. Using the Down arrow key, scroll to Menu and press Enter.
2. Using the Down arrow key, scroll to Fax Menu and press Enter.
3. Using the Down arrow key, scroll to Phone Book and press Enter.
4. Press Enter to select Speed Dial.
5. Using the arrow keys, scroll to the required speed dial entry position and press
Enter.
6. Press Enter to select Fax No..
7. Using the keypad, type in the destination fax number and press Enter.
NOTE
If the destination fax number has an “extension number”, press the “#” button
three times to insert a pause (-) between numbers. The machine will enter a
pause when dialling. See “Character switching” on page 14.
The maximum length of number is 32 digits.
8. Press Enter to select Name.
9. Using the keypad or arrows keys and the on-screen keypad, type in the name.
NOTE
The maximum length of name is 16 characters.
10. Highlight Done and press Enter.
11. Using the Down arrow key, scroll to Done and press Enter to confirm and add your
entry to the phone book.
12. Press the Left arrow key to exit the menu.
Adding a group entry to the phone book
The machine can hold up to 10 group dial settings. To add a new group dial number to the
phone book:
1. Using the Down arrow key, scroll to Menu and press Enter.
2. Using the Down arrow key, scroll to Fax Menu and press Enter.
3. Using the Down arrow key, scroll to Phone Book and press Enter.
4. Using the Down arrow key, scroll to Group Dial and press Enter.
5. Using the arrow keys, scroll to the required group dial entry position and press
Enter.
6. Press Enter to select Speed Dial List.
7. Scroll through the list of speed dial entries and press Enter to mark (*). When all
required entries are selected, press the Left arrow key.
8. Press Enter to select Group Name.
Configuring your machine... > 45
Page 46

9. Using the keypad or arrows keys and the on-screen keypad, type in the name.
NOTE
The maximum length of name is 16 characters.
10. Highlight Done and press Enter.
11. Using the Down arrow key, scroll to Done and press Enter to confirm and add your
entry to the phone book.
12. Press the Left arrow key to exit the menu.
Deleting a speed dial entry from the phone book
To delete a speed dial entry from the phone book:
1. Using the Down arrow key, scroll to Menu and press Enter.
2. Using the Down arrow key, scroll to Fax Menu and press Enter.
3. Using the Down arrow key, scroll to Phone Book and press Enter.
4. Press Enter to select Speed Dial List.
5. Using the arrow keys, scroll to the required speed dial and press Enter.
6. Using the Down arrow key, scroll to Clear and press Enter.
7. Using the Up arrow key, scroll to Yes and press Enter.
8. Press the Left arrow key to exit the menu.
Deleting a group dial entry from the phone book
To delete a group dial entry from the phone book:
1. Using the Down arrow key, scroll to Menu and press Enter.
2. Using the Down arrow key, scroll to Fax Menu and press Enter.
3. Using the Down arrow key, scroll to Phone Book and press Enter.
4. Using the Down arrow key, scroll to Group Dial and press Enter.
5. Using the arrow keys, scroll to the required group dial and press Enter.
6. Using the Down arrow key, scroll to Clear and press Enter.
7. Using the Up arrow key, scroll to Yes and press Enter.
8. Press the Left arrow key to exit the menu.
Connecting to a PBX
Private branch exchanges (PBXs) are private telephone systems used to route calls
internally, for example, in a company. When dialling a telephone number, if a prefix is
required to open an outside line, the line is connected to a PBX. If this MFP is going to be
connected to a PBX, press the # key three times to insert a “-”, then type in the destinat ion
fax number. This will ensure the MFP waits until an outside line is available b efore dialling
the rest of the number.
Configuring your machine... > 46
Page 47

Automatic redial
You can set the fax to automatically redial if the initial fax transmission fails. The machine
will redial on:
> Line busy
> No answer
> Communication error
To set auto-redial:
1. Using the Down arrow key, scroll to Menu and press Enter.
2. Using the Down arrow key, scroll to Admin Setup and press Enter.
3. Using the arrow keys and on-screen keypad, enter the Administrator password.
Highlight Done and press Enter.
4. Using the Down arrow key, scroll to Fax Setup and press Enter.
5. Using the Down arrow key, scroll to Fax Line Setup and press Enter.
6. Press Enter to select the Redial Tries.
7. Using the arrow keys, select the required number of redial attempts (between 0 and
10), then press Enter to confirm.
8. Using the Down arrow key, scroll to Redial Interval and press Enter.
9. Using the arrow keys, select the required redial interval (between 1 and 6 minutes),
then press Enter to confirm.
10. Press the Left arrow key to exit the menu.
Reception mode
You can change the way your MFP handles incoming fax transmissions and telephone calls
(if you have a telephone handset connected) depending on your office requirements.
Choose from:
> Fax
> Manual
> Tel/Fax
> TAD
To change the reception mode:
1. Using the Down arrow key, scroll to Menu and press Enter.
2. Using the Down arrow key, scroll to Fax Menu Setup and press Enter.
3. Press Enter to select Auto Receive.
4. Using the arrow keys, select the required reception mode and press Enter.
5. Press the Left arrow key to exit the menu.
Configuring your machine... > 47
Page 48

Adding a telephone handset
If you want to add a telephone handset to your MFP, connect the line to the Tel socket (in
certain countries it may be necessary to use a telephone plug adaptor).
You will also need to update the telephone settings to set the ring response:
1. Using the Down arrow key, scroll to Menu and press Enter.
2. Using the Down arrow key, scroll to Admin Setup and press Enter.
3. Using the arrow keys and on-screen keypad, enter the Administrator password.
Highlight Done and press Enter.
4. Using the Down arrow key, scroll to Fax Setup and press Enter.
5. Using the Down arrow key, scroll to Basic Setup and press Enter.
6. Using the Down arrow key, scroll to Ring Response and press Enter.
7. Using the arrow keys, select the required response setting (between 1 ring and 20
seconds) and press Enter.
8. Press the Left arrow key to exit the menu.
NOTE
You must also set the reception mode to the appropriate setting. See
“Reception mode” on page 47.
NOTE
If the telephone handset is in use (off hook), dialling for speech purposes is
not available using the MFP keypad or speed dial keys.
Configuring your machine... > 48
Page 49

M
ANAGING THE ADDRESS BOOK
The following section describes how to add/remove/modify Email addresses to/from the
Address Book.
A
DDING AN EMAIL ADDRESS ENTRY TO THE ADDRESS BOOK
The machine can hold up to 100 email addresses in the address book. To assign a new email
address to the address book:
1. Using the Down arrow key, scroll to Menu and press Enter.
2. Using the Down arrow key, scroll to Scanner Menu and press Enter.
3. Using the Down arrow key, scroll to Address Book and press Enter.
4. Press Enter to select Email Address.
5. Using the arrow keys, scroll to the required email address entry position and press
Enter.
6. Press Enter to select Address.
7. Using the keypad or arrows keys and the on-screen keypad, type in the new email
address.
NOTE
The maximum length of address is 80 characters.
8. Highlight Done and press Enter.
9. Press Enter to select Name.
10. Using the keypad or arrows keys and the on-screen keypad, type in the name.
NOTE
The maximum length of name is 16 characters.
If you do not enter a name, this column remains blank.
11. Highlight Done and press Enter.
12. Using the Down arrow key, scroll to Done and press Enter to confirm and add your
entry to the address book.
13. Press the Left arrow key to exit the menu.
D
ELETING AN EMAIL ADDRESS ENTRY FROM THE ADDRESS BOOK
To delete an email address entry from the address book:
1. Using the Down arrow key, scroll to Menu and press Enter.
2. Using the Down arrow key, scroll to Scanner Menu and press Enter.
3. Using the Down arrow key, scroll to Address Book and press Enter.
4. Press Enter to select Email Address.
5. Using the arrow keys, scroll to the required email address and press Enter.
6. Using the Down arrow key, scroll to Clear and press Enter.
7. Using the Up arrow key, scroll to Yes and press Enter.
8. Press the Left arrow key to exit the menu.
Configuring your machine... > 49
Page 50

M
ODIFYING AN EMAIL ADDRESS ENTRY FROM THE ADDRESS BOOK
To edit an email address entry from the address book:
1. Using the Down arrow key, scroll to Menu and press Enter.
2. Using the Down arrow key, scroll to Scanner Menu and press Enter.
3. Using the Down arrow key, scroll to Address Book and press Enter.
4. Press Enter to select Email Address.
5. Using the arrow keys, scroll to the required email address and press Enter.
6. If required, press Enter to select Address. Update the details:
(a) Using the keypad or arrow keys and on-screen keypad, edit the email address.
(b) Highlight Done and press Enter.
7. If required, use the Down arrow key to scroll to Name and press Enter. Update the
details:
(a) Using the keypad or arrow keys and on-screen keypad, edit the email name.
(b) Highlight Done and press Enter.
8. Using the Down arrow key, scroll to Done and press Enter.
9. Press the Left arrow key to exit the menu.
A
DDING A GROUP ENTRY TO THE ADDRESS BOOK
The machine can hold up to 20 group addresses. To add a new group address to the address
book:
1. Using the Down arrow key, scroll to Menu and press Enter.
2. Using the Down arrow key, scroll to Scanner Menu and press Enter.
3. Using the Down arrow key, scroll to Address Book and press Enter.
4. Using the Down arrow key, scroll to Group Address and press Enter.
5. Using the arrow keys, scroll to the required group address entry position and press
Enter.
6. Press Enter to select Address List.
7. Scroll through the list of email address entries and press Enter to mark (*). When
all required entries are selected, press the Left arrow key.
8. Press Enter to select Group Name.
9. Using the keypad or arrows keys and the on-screen keypad, type in the name.
NOTE
The maximum length of name is 16 characters.
If you do not enter a Group name, Group name column remains blank.
10. Highlight Done and press Enter.
11. Using the Down arrow key, scroll to Done and press Enter to confirm and add your
entry to the address book.
12. Press the Left arrow key to exit the menu.
Configuring your machine... > 50
Page 51

D
ELETING A GROUP ADDRESS ENTRY FROM THE ADDRESS BOOK
To delete a group address entry from the address book:
1. Using the Down arrow key, scroll to Menu and press Enter.
2. Using the Down arrow key, scroll to Scanner Menu and press Enter.
3. Using the Down arrow key, scroll to Address Book and press Enter.
4. Using the Down arrow key, scroll to Group Address and press Enter.
5. Using the arrow keys, scroll to the required group address and press Enter.
6. Using the Down arrow key, scroll to Clear and press Enter.
7. Using the Up arrow key, scroll to Yes and press Enter.
8. Press the Left arrow key to exit the menu.
M
ODIFYING A GROUP ADDRESS ENTRY FROM THE ADDRESS BOOK
To edit a group address entry from the address book:
1. Using the Down arrow key, scroll to Menu and press Enter.
2. Using the Down arrow key, scroll to Scanner Menu and press Enter.
3. Using the Down arrow key, scroll to Address Book and press Enter.
4. Using the Down arrow key, scroll to Group Address and press Enter.
5. Using the arrow keys, scroll to the required group address and press Enter.
6. If required, press Enter to select Address List. Update the details:
(a) Using the arrow keys, scroll through the list and modify as required. Press Enter
to remove any address from the group listing; the “*” will be removed from the
address.
(b) Press the Left arrow key to exit the list.
7. If required, use the Down arrow key to scroll to Group Name and press Enter.
Update the details:
(a) Using the keypad or arrow keys and on-screen keypad, edit the email name.
(b) Highlight Done and press Enter.
8. Using the Down arrow key, scroll to Done and press Enter.
9. Press the Left arrow key to exit the menu.
Configuring your machine... > 51
Page 52

A
CCESS CONTROL
The operation and functionality of this machine can be limited to authorised personnel only
by the simple introduction of a 4-9 digit PIN (Personal Identification Number). This is known
as Access Control. The greater the number of digits in the PIN - the more secure it is.
Your MFP supports the following PIN types:
> Administrator PIN; This is the PIN for the system administrator(s).
If a PIN is registered as an administrator, the Admin password entry screen is
displayed, and, when an Admin password is entered, it will be authenticated as an
administrator.
> User PIN; This is PIN for general users.
If a PIN is registered as a general user, the function selection screen is displayed, also
after PIN entry, the function selection screen is displayed.
After using the machine, you will be expected to log out, leaving the machine in access
control mode, unable to be used by unauthorised users.
E
NABLING ACCESS CONTROL
Access Control Enable/Disable is switched in Menu > Admin Setup > System Setup >
Access Control.
If your administrator has enabled access control on your machine, it will automatically start
up in access control mode. You will not be able to use it until you have provided valid login
information.
With access control set to enable, the display reverts to the System Setup screen
immediately following the setting change. If one of the functions such as Print, Fax Send
or PC Scan is running however, the display will only revert to the System Setup screen
when the task has been completed.
L
OGGING IN
1. If the Enter PIN screen is displayed, use the keypad to enter your PIN.
2. Press Enter (or the Start button) to confirm.
NOTE
> A valid PIN consists of 4 to 9 digits.
> Numbers entered are not displayed on-screen, they are replaced by '*'.
> If the PIN entered is invalid, “Incorrect Password” is displayed for 3
seconds and the display reverts to the Enter PIN screen.
3. At the Enter Password screen, use the on-screen keypad to enter your password.
4. Use the Up arrow key to highlight Done and press Enter to confirm.
L
OGGING OUT
When you have finished using the machine, make sure you log out:
NOTE
With Access Control enabled, Logout options are displayed in the Menu on the
Mode Selection screen.
1. Using the Down arrow key, highlight Logout and then press Enter.
The Confirm Logout screen is displayed.
Access control > 52
Page 53

2. Using the Down arrow key, highlight Yes and then press Enter to confirm.
The display reverts to the Enter PIN screen.
NOTE
When the MFP control panel is left inactive for a prescribed length of time, the
display automatically reverts to the Enter PIN screen if Access Control is
enabled.
O
PERATION TIME-OUT
> When the MFP control panel is left inactive for a prescribed length of time (Operati on
Time-out), the display automatically reverts to the Idle screen if Access Control is
disabled.
> If an error state occurs, Operation Time-out is disabled.
> After Operation Time-out, the display automatically reverts to the Enter PIN screen
if Access Control is enabled.
> The length of the Operation Time-out depends on the setting in Menu Mode >
Admin Setup > System Setup > Return to Standby Time.
Access control > 53
Page 54

O
PERATION
With its intuitive control panel, this Multi Function Product (MFP) is designed to be easy to
use.
NOTE
If Access Control has been enabled, you will first have to enter your Password/
PIN.
M
ULTI-TASKING
Your machine can handle more than one task at a time. The table below details which
combination of tasks can be performed.
2
1ST
COPY SCAN TO
N
D
EMAIL/
MEMORY
FAX
(SCAN)
FAX
(SEND)
FAX
(RECEIVE)
PRINT
(FAX)
PRINT
(USB/
NETWORK)
Copy - No No No Yes
Scan to
No - No No Yes
email/
Yes
Yes
a
a
Yes
Yes
a
a
memory
Fax (scan) No No -NoYes
Fax (send)
Yes
b
Yes
b
Yes - No
Yes
Yes
a
a
Yes
Yes
a
a
Fax (receive) Yes Yes Yes No -YesYes
Print (fax)
Print (USB/
network)
Yes
Yes
b
b
Yes
Yes
b
b
Yes No -
Yes No Yes
Yes
Yes
a
a
Yes
Yes
a
a
a. Data is accepted but printing is halted until the 1st action is complete.
b. Operation is accepted but scanning is halted until the 1st action is complete.
Physically impossible
Operation > 54
Page 55

L
OADING DOCUMENT(S
The MFP can scan/copy/send document(s) either from the ADF (Automatic Document
Feeder) or on the glass. If you need to send multiple pages, load your papers in the ADF.
The ADF can hold up to 50 pages at one time.
If you need to scan/copy/send pages from books, newspaper clippings, or paper with
wrinkles or curls, place them on the glass.
P
LACING DOCUMENT(S) IN THE
Before using the ADF, please make sure that your paper meets the following specifications:
> Document(s) can range in size from 4.5 x 5.5 inches (114.3 x 139.7mm) to 8. 5 x 14
inches (215.9 x 355.6mm).
> Document(s) can range in weight from 16 to 28 lbs (60 - 120 g/m
0.006" sheet thickness.
> Document(s) should be square or rectangular and in good condition (not fragile or
worn).
> Document(s) should be free of curl, wrinkle, tears, wet ink, or punch holes.
> Document(s) should be free of staples, paper clips, paper sticky notes.
> Keep the glass clean and without any documents left on it.
)
ADF
²
) and 0.002" to
NOTE
To transmit irregular types of document(s), place the document(s) on the
glass or make a copy first and then transmit the copy instead.
1. If you have multiple pages, fan the pages to avoid paper jams. The ADF holds up to
50 pages at one time.
a
b
c
2. Place the document with the text face UP in the ADF and make sure that the top of
each page is fed in first.
3. Adjust the Paper Guides to centre the document in the ADF.
Operation > 55
Page 56

P
LACING DOCUMENT(S) ON THE GLASS
1. Open the document cover.
2. Place your document with the text fac e DOW N on the glass and align the top of the
page to the upper-left corner.
3. Close the document cover.
Operation > 56
Page 57

C
OPYING
NOTE
Factory default setting is Copy mode.
B
ASIC OPERATION
1. Place your document(s) with the text face Up in the ADF or face Down on the glass.
2. Set your scanning options as required. For further details refer to the following
sections.
3. Then press the Start button (monochrome or colour option).
NOTE
When using the ADF, in order to prevent paper jams, if you wish to cancel the
copy process, press the Stop/Cancel button once to stop the process and a
second time to eject the paper.
A
DVANCED OPERATION
Using the options available you can alter the copy output to suit your needs:
1. Press Enter button.
2. Select required parameter with Down arrow key and press Enter.
3. Using Up or Down arrow keys, select value and press Enter.
Options are (factory default settings in bold text):
MENU ITEM OPTIONS
Copies 1 - 99
Reduce/Enlarge Pre-determined:
A4>A5, Leg14>Let, Leg13.5>Let, Leg13>Let, A4>B5, Fit to
page, 100%, B5>A4, Let>Leg13, Let>Leg13.5, Let>Leg14,
A5>A4, Custom
Custom 1% increments: 25% - 400%
Mode Mixed, Photo, HiRes.Mixed, HiRes.Photo
Density -3, -2, -1, 0, +1, +2, +3
Input Tray Tray 1, Manual Feeder
Collate On, Off
N-up
Edge Erase 0.00 in, 0.25 in, 0.50 in, 0.75 in, 1.00 in or
Margin Shift Right 0.00 in, 0.25 in, 0.50 in, 0.75 in, 1.00 in or
1in1, 2in1, 4in1 (horizontal), 4in1 (vertical)
0 mm, 6 mm, 13 mm, 19 mm, 25 mm
0 mm, 6 mm, 13 mm, 19 mm, 25 mm
b
c
a
Margin Shift Bottom 0.00 in, 0.25 in, 0.50 in, 0.75 in, 1.00 in or
0 mm, 6 mm, 13 mm, 19 mm, 25 mm
a. N-up can only be changed from 1in1 if paper size is set to A4 or Letter and
documents are scanned from the ADF. Collate always defaults to “OFF”, Reduce/
enlarge to “100%”, Edge erase to “0mm (0.001i n)” and Margin shift-Right/Bottom
to 0 mm (0.00in).
Copying > 57
d
Page 58

b. The setting displayed, mm or inch, depends on the setting in Admin Setup -
System Setup - Unit of Measure in Menu Mode. If Edge Erase is set to other than
“0 mm” or “0.00 in,” Reduce/Enlarge always defaults to “100%,” N-up to “1in1,”
and Margin Shift-Right/Bottom to “0 mm (0.00 in)”.
c. Any parts of the image that do not fit on the paper as a result of this setting, are
not printed. The setting displayed, mm or inch, depends on the setting in Admin
Setup - System Setup - Unit of Measure in Menu Mode. If Margin Shift-Right is set
to other than “0 mm” or “0.00 in,” Edge Erase always defaults to “0mm (0.00in)”
and Reduce/Enlarge can be set only to less than 100%.
d. Any parts of the image that do not fit on the paper as a result are printed. The
setting displayed, mm or inch, depends on the setting in Admin Setup - System
Setup - Unit of Measure in Menu Mode. If Margin Shift-Bottom is set to other than
“0 mm” or “0.00 in,” Edge Erase always defaults to “0mm (0.00in)” and Reduce/
Enlarge can be set only to less than 100%.
4. Press the Left arrow key to return to the start menu.
Copying > 58
Page 59

S
CANNING
B
ASIC OPERATION
1. Place your document(s) with the text face Up in the ADF or face Down on the glass.
2. Select Scan mode using the Down arrow button on the control panel.
3. Press Enter.
4. Press the Down arrow key and select the scan destination from the following
options:
> E-mail
> USB memory
> Network PC
> PC
5. Set your scanning options as required. For further details refer to the following
sections.
6. Then press the Start button (monochrome or colour option).
NOTE
When using the ADF, in order to prevent paper jams, if you wish to cancel the
copy process, press the Stop/Cancel button once to stop the process and a
second time to eject the paper.
S
CAN TO E-MAIL
1. Place your document(s) with text face UP in the ADF or face DOWN on the glass.
2. Using the Down arrow key, scroll to Scan and press Enter.
3. Press Enter to select Email.
4. Using the Up arrow key, scroll to Reply To and press Enter.
5. Set the reply address from either:
> Address Book - select from the address book entries
> Screen Entry - enter directly using the keypad
> Number - enter an address or group address number
> LDAP - select from a Lightweight Directory Access Protocol (LDAP) Server
If prompted, select Continue and change address, otherwise select Done.
6. Using the Down arrow key, scroll to Destination and press Enter.
7. Set the destination address(s) from either:
> Address Book - select from the address book entries
> Screen Entry - enter directly using the keypad
> Number - enter an address or group address number
> LDAP - select from a Lightweight Directory Access Protocol (LDAP) Server
If prompted, select Continue and add additional addresses, otherwise select Done.
8. Using the Down arrow key, scroll to Subject and press Enter.
Scanning > 59
Page 60

9. Set the subject from either:
> Subject List
> Screen Entry
10. Using the Down arrow key, scroll to File Name and press Enter.
11. Using the keypad or arrow keys and the on-screen keypad, type in the file name.
12. Highlight Done and press Enter.
13. If required, adjust the density setti ng:
(a) Using the Down arrow key, scroll to Density and press Enter.
(b) Highlight the required setting and press Enter.
14. If required, adjust the document size:
(a) Using the Down arrow key, scroll to *A4 and press Enter.
(b) Highlight the required setting and press Enter.
15. If required, adjust the file format:
> If you are sending a colour file;
(i) Using the Down arrow key, scroll to File Format(Color) and press
Enter.
(ii) Highlight the required setting and press Enter.
> If you are sending a black and white file;
(i) Using the Down arrow key, scroll to File Format(B/W) and press Enter.
(ii) Highlight the required setting and press Enter.
16. Press the Start button.
S
CAN TO
USB
MEMORY
NOTE
This option is only available if USB Memory is plugged into the USB port on the
front of the machine.
NOTE
The default file format, compression rate and resolution can be changed if
required. See “Scan to USB Memory” on page 43.
1. Plug the USB memory into the USB port at the front of the machine.
2. Place your document(s) with text face UP in the ADF or face DOWN on the glass.
3. Using the Down arrow key, scroll to Scan and press Enter.
4. Using the Down arrow key, scroll to USB Memory and press Enter.
5. Press Enter to select File Name.
Scanning > 60
Page 61

6. Using the keypad or arrows keys and the on-screen keypad, type in the name.
NOTE
Up to 64 characters (Single byte character) can be entered.
If you do not enter a file name, the default file name is used. See “Default File
Name” on page 43.
If you do not enter a file name, and you have not specified a default file name,
the file name used by the machine default is “Image” (each subsequent file
will increment, image00001, image00002, and so on.).
7. Highlight Done and press Enter.
8. If required, you can alter the density setting and/or document size:
(a) Use the Down arrow key scroll to the required setting and press Enter.
(b) Select the appropriate value and press Enter.
(c) Press the colour or mono Start button.
(d) Press the Enter button to sel ect OK or use the Down arrow key then press the
Enter button to Cancel the operation.
NOTE
If the name of the file to be written to be USB Memory already exists you will
be asked whether you wish to
Save File?
> OK - The file will replace the one that already exists (limited to one file).
>
Rename - Enables you to rename the file.
> Cancel - This cancels file writing.
(e) To continue scanning further sheets, place your document(s) with text face UP
in the ADF or face DOWN on the glass and press the Start button to continue
or press Enter to complete and finish.
NOTE
When scanning multiple documents from the ADF, or on the Flatbed from Job
Build Scanning with File Format set to Jpeg, the image file is divided by page
and saved. The file name is “file name entered-###,” with ### being a
number between 000 and 999 automatically allocated to each page.
Document will be scanned to the root directory on the USB memory.
On completion, a confirmation message displays.
9. Remove the USB memory from the machine.
S
CAN TO NETWORK
PC
Before sending your document to a file server, profiles should be set up first to speed up
the process. A profile contains a list of filing parameters such as your filing protocol,
directory, file name and other scanning parameters. Add a new profile by either entering
the machine’s web page or installing and starting the Network Setup Tool on the DVD-ROM
supplied.
NOTE
You can create up to 20 profiles.
1. Place your document(s) with text face UP in the ADF or face DOWN on the glass.
2. Using the Down arrow key, scroll to Scan and press Enter.
Scanning > 61
Page 62

3. Using the Down arrow key, scroll to Network PC and press Enter.
The file server profile list is displayed. If no profiles exist, the profile list is blank.
4. Using the arrow keys, scroll to the required profile (filing destination) and press
Enter.
5. Press the colour or mono Start button.
S
CAN TO
PC
NOTE
Ensure that the Hotkey Utility is installed and set up first. Refer to “Hotkey
utility - windows only” on page 21.
The scanner function can be controlled from either the MFP (Push Scan) or from the PC (Pull
Scan).
Push scan
1. Place your document(s) with text face UP in the ADF or face DOWN on the glass.
2. Using the Down arrow key, scroll to Scan and press Enter.
3. Using the Down arrow key, scroll to PC and press Enter.
4. The Push Scan screen displays four options. Using the arrow keys, scroll to the
required function and press Enter:
(a) Email
When the Email function is selected, the Hotkey Utility executes PC Scan in
accordance with your settings for “Scan to Email”. The scanned image data is
saved in the specified folder and is ready for the software to send as an
attachment. Complete the data on screen and send.
(b) Folder
When the Folder function is selected the Hotkey Uti l ity executes PC Scan in
accordance with your settings for “Scan to Folder”. The scanned image data is
saved in the specified folder.
(c) Application
When the Application function is selected the PC's Hotkey Utility executes PC
Scan in accordance with your settings for “Scan to Applic ation1”. The scanned
image data is opened in the application specified by the Hotkey Utility for
Application 2.
(d) Fax
When the Fax function is selected, the Hotkey Utility executes PC Scan in
accordance with your settings for “Scan to PCFax”. The scanned image data is
Scanning > 62
Page 63

saved in the specified folder and is ready for the software to send as an
attachment. Complete the data on screen and send.
5. Press the colour or mono Start button.
Pull scan
Double click the Hotkey Icon on your desktop. The Hotkey console (below) displays.
The functions below, can now be controlled from the PC:
> Scan to Application1
> Scan to Application2
> Scan to Email
> Scan to Folder
> Scan & Print
> Scan to PCFax
> Settings
As the cursor passes over an icon, the parameters set for that icon appear in a text box
(except, of course, “Settings”). A single click will select that option.
Besides the “Settings” option, there are two others available in Pull Scan - “Scan to
Application2” and “Scan & Print”.
> “Scan to Application2” works exactly the same as scan to Application1, simply
allowing an alternative application to be selected.
> “Scan & Print” allows you to scan to any printer available to your PC, including the
MFP’s printer.
> The “Settings” option allows you to set the parameters for all options.
Scanning > 63
Page 64

F
AXING
B
ASIC OPERATION
S
EARCHING THE PHONE BOOK
To search the contents of the phone book you can either:
> Use the arrow keys to scroll through the list and highlight the required entry.
> Using the keypad to type in a search character, for example the first letters of the
(MF2000 plus)
NOTE
Lists of Speed Dials and Group Dials that have been added to the Phone Book
are displayed in the order Group Dial (G00~09) and Speed Dial(#00~#99).
name. Destinations whose initial character matches the entered charact er appear in
the screen.
NOTE
You can switch between numbers, upper-case/lower-case letters, and symbols
by pressing the same key multiple times. When pressing multiple times, you
must re-press the key within 2 seconds of the previous press.
Refer to “Character switching” on page 14 for further details.
S
ENDING A FAX
1. Place your document(s) with the text face Up in the ADF or face Down on the glass.
2. Using the Down arrow key, scroll to Fax and press Enter.
3. Enter the destination fax number by either:
(a) Selecting Fax No. and typing in the number using the numeric keypad.
NOTE
You can type in a destination number in full or type in a speed dial or group
dial number.
> To enter a speed dial; press the “#” key then enter the two-digit speed
dial number, for example “#29”.
> To enter a group dial; press the “*” key then enter the one-digit group
dial number, for example “*3”.
Fax number and ID registered in the selected dial number are displayed.
(i) Press Enter.
(ii) At the Continue prompt, select More to add additional numbers or Done
to confirm.
(b) Selecting Phone Book and selecting the number from the phone book entries.
(i) Search the phone book entries, refer to “Searching the phone book” on
page 64.
(ii) Repeat until all required entries are selected.
(iii) Press the Left arrow key to exit the list.
4. If required, press the Up arrow key and scroll to Check Dest. to view/edit the list of
fax numbers:
> Press Enter to remove an entry from the list (no longer displays * next to the
entry).
Faxing > 64
Page 65

> Press the Left arrow key to exit the list.
5. Press the Start button to send your document(s).
NOTE
If you wish to cancel faxing, press Stop to abort the operation.
Fax transmissions are sent in black and white only.
A
DVANCED OPERATION
C
HANGING THE FAX QUALITY
The machine is preset to “Standard”. If required, you can select Fine, Extra Fine or Photo
to improve the fax quality.
To change the fax quality:
1. Follow “Sending a fax” process steps 1 to 4.
2. Using the Down arrow key, scroll to *Standard and press Enter.
3. Using the Down arrow key, scroll to the required quality setting and press Enter.
4. Press the Start button to send your document(s).
NOTE
After you have completed your fax operation, the machine will automatically
return to the preset value.
A
DJUSTING DENSITY
The machine is preset to the “Normal” level of density. If your original document comes
with a lighter or darker contrast, you can improve the quality by adjusting the density
setting.
To change density:
1. Follow “Sending a fax” process steps 1 to 4.
2. Using the Down arrow key, scroll to Density: 0 and press Enter.
3. Using the Down arrow key, scroll to the required density setting and press Enter.
4. Press the Start button to send your document(s).
NOTE
After you have completed your fax operation, the machine will automatically
return to the preset value.
Faxing > 65
Page 66

D
OCUMENT SIZE
The machine is preset to “A4” size.
To change document size:
1. Follow “Sending a fax” process steps 1 to 4.
2. Using the Down arrow key, scroll to *A4 and press Enter.
3. Using the Down arrow key, scroll to the required document size and press Enter.
4. Press the Start button to send your document(s).
NOTE
After you have completed your fax operation, the machine will automatically
return to the preset value.
M
ANUAL SEND
NOTE
You must have an external handset installed. See “Adding a telephone
handset” on page 48.
The manual send function allows you to fax documents instantly without scanning to
memory first. This is especially useful if you are already using the telephone handset for a
voice call or the machine memory has already accumulated a number of fax jobs.
1. Place your document(s) with the text face Up in the ADF or face Down on the glass.
2. Using the external telephone, dial the required fax number.
3. Using the Down arrow key, scroll to Fax and press Enter.
4. Press the Start button to send your document(s).
“Manual TX Start” is displayed while the document is being scanned, this will change
to “Sending” during transmission.
D
ELAYED SEND
The delayed send function allows you to fax documents at a specific date and time.
To set the fax to delay send:
1. Follow “Sending a fax” process steps 1 to 4.
2. Using the Down arrow key, scroll to Delayed Time and press Enter.
3. Using the keypad and arrows keys, enter the required date and time and press
Enter.
4. Press the Start button to scan and store your documents ready for sending at the
specified time.
Faxing > 66
Page 67

FAX
RECEIVING
Your MFP is set to receive faxes automatically, if you wish to change the reception mode
refer to “Reception mode” on page 47 for details.
Automatic fax receive (default mode)
When the MFP is in automatic fax receive mode:
> When ringing - Receiving Start is displayed on screen.
> While it is receiving a Fax - Fax Receiving, sender's Fax no., and the number of
received pages are displayed until the reception of data from all pages is completed.
> Upon completion of Fax Receiving - Sender's Fax no., the total number of received
pages, and Receiving OK are displayed for 3 seconds, and the display changes to
the Mode Selection screen.
> When the machine is printing Faxed images, the screen displays are the same as
those for printing.
NOTE
Cancelling is disabled while the machine is receiving a fax.
If fax receiving fails, an error message displays until you press the Stop button:
> If an error occurs while a fax is being received, fax communication-related errors are
displayed.
> If an error occurs while a fax is printing, error messages displayed are the same as
those in print mode.
Manual receive
NOTE
A telephone handset must be connected before using the manual receive
function.
Upon receiving an incoming call, the telephone handset will ring:
1. Lift the telephone handse t .
2. Press the Start button on the MFP.
3. Replace the telephone handset.
The fax will print out.
Refer to “Reception mode” on page 47 for details on enabling manual receive mode.
TEL/FAX automatic switching
Telephone/Fax Mode (T/F): When incoming calls are a mixture of fax and telephone calls,
your best choice is the Telephone/Fax mode. In this mode, the machine detects whether
the incoming call is a fax or voice call.
When the call is from another fax machine, your machine will switch to fax mode and
receive the message. When the call is a voice call, your machine will ring like a telephone.
If you do not answer, your machine will switch back to fax mode to allow the calling party
to manually send a fax.
Refer to “Reception mode” on page 47 for details on enabling telephone/fax mode.
Faxing > 67
Page 68

TAD interface
Telephone Answering Device Mode (TAD): Use this mode if you want the machine and a
telephone answering machine to share the same phone line. Like Telephone/Fax mode, the
Telephone Answering Device mode detects whether an incoming call is a fax or voice call.
Refer to “Adding a telephone handset” on page 48 for more information.
To set up TAD mode:
1. Using the Down arrow key, scroll to Menu and press Enter.
2. Using the Down arrow key, scroll to Admin Setup and press Enter.
3. Using the arrow keys and on-screen keypad, enter the Administrator password.
Highlight Done and press Enter.
4. Using the Down arrow key, scroll to Fax Setup and press Enter.
5. Using the Down arrow key, scroll to Basic Setup and press Enter.
6. Using the Down arrow key, scroll to TAD Mode and press Enter.
7. Select the appropriate setting; Type1, Type2, Type3.
8. Press the Left arrow key to exit the menu.
Refer to “Reception mode” on page 47 for details on enabling TAD mode.
Remote receiving
If you have an external telephone handset connected to your fax machine, you can instruct
your fax machine to begin receiving by entering a three-digit code on your telephone
keypad. This feature is useful when you answer a call on the external telephone, but need
to switch the line over to your fax machine.
1. Using the Down arrow key, scroll to Menu and press Enter.
2. Using the Down arrow key, scroll to Admin Setup and press Enter.
3. Using the arrow keys and on-screen keypad, enter the Administrator password.
Highlight Done and press Enter.
4. Using the Down arrow key, scroll to Fax Setup and press Enter.
5. Using the Down arrow key, scroll to Basic Setup and press Enter.
6. Using the Down arrow key, scroll to Remote Receive No. and press Enter.
7. Select the appropriate setting; Off, 000, 111, 222, 333, 444, 555, 666, 777, 888,
999, ***, ###.
8. Press the Left arrow key to exit the menu.
Refer to “Remote Receive No.” on page 41.
Faxing > 68
Page 69

P
RINTING A FAX ACTIVITY REPORT
1. Using the Down arrow key, scroll to Menu and press Enter.
2. Using the Down arrow key, scroll to Admin Setup and press Enter.
3. Using the arrow keys and on-screen keypad, enter the Administrator password.
Highlight Done and press Enter.
4. Press Enter to select System Setup.
5. Using the Down arrow key, scroll to Report Full Print and press Enter.
6. Using the Up arrow key, scroll to On and press Enter.
7. Press the Left arrow key twice to exit the menu.
8. Using the arrow keys, scroll to Print Information and press Enter.
9. Using the Down arrow key, scroll to FAX Activity Report and press Enter.
10. Press Enter to execute.
P
RINTING TRANSMISSION REPORTS
1. Using the Down arrow key, scroll to Menu and press Enter.
2. Using the Down arrow key, scroll to Admin Setup and press Enter.
3. Using the arrow keys and on-screen keypad, enter the Administrator password.
Highlight Done and press Enter.
4. Using the Down arrow key, scroll to Fax Setup and press Enter.
5. Using the Down arrow key, scroll to Basic Setup and press Enter.
6. Using the Down arrow key, navigate to the required report and press Enter to
select. Choose from:
> MCF(Single Location) - this prints a transmission report after each fax.
> MCF(Multi Location) - this prints a summary report detailing which numbers
were successful and any that failed.
> Error MCF - this prints a report after each failed fax transmission.
> Image in MCF - this includes an image of the fax on each transmission report.
7. Using the Up arrow key, scroll to On and press Enter.
8. Press the Left arrow key to exit the menu.
Faxing > 69
Page 70

S
ENDING A FAX FROM YOUR
NOTE
You must have the fax driver installed on your PC.
1. From your application’s File menu, select Print.
2. In the Select Printer window, highlight the fax driver option.
3. Press the Preferences button to display the fax driver window.
PC
4. On the Setup tab:
(a) Select the appropriate media size from the drop-down menu.
(b) Set the resolution quality to Fine, Normal or Fast.
(c) Set the orientation to Portrait or Landscape.
5. On the Cover Sheet tab:
(a) Set the cover sheet usage settings as appropriate.
(b) Select a cover sheet format.
6. On the Sender tab:
(a) Enter your name.
(b) Enter your fax number.
(c) Enter comments if required.
(d) If required select the Add an outside call number checkbox and enter the
Outside call number as appropriate.
Faxing > 70
Page 71

7. On the Recipient tab:
(a) Click the Recipient... button.
(b) Select a fax number from the Phone book panel on the right hand side. R efer
to “Adding fax numbers to the phone book” on page 72.
(c) Press the Add button to add this number to the recipient list.
(d) Repeat b and c as required to create the recipient list.
(e) If you need to remove a number from the recipient list, highlight the appropriate
name and then press the Delete button.
(f) Once you have completed your list, press the OK button to close the Select
Recipients window.
8. Press the OK button to close the fax driver window.
9. Press OK to start sending your fax.
Faxing > 71
Page 72

A
DDING FAX NUMBERS TO THE PHONE BOOK
To add a fax destination number to the phone book:
1. From your application’s File menu, select Print.
2. In the Select Printer window, highlight the fax driver option.
3. Press the Preferences button to display the fax driver window.
4. Click the Phone book... button.
The phone book screen displays.
5. Select FAX number -> New (FAX number).
6. Type in the fax number destination Name.
7. Type in the required FAX number.
8. If required, type in a Comment.
9. Press the OK button to save.
A
DDING NEW GROUPS TO THE PHONE BOOK
To add a new group to the phone book:
1. From your application’s File menu, select Print.
2. In the Select Printer window, highlight the fax driver option.
3. Press the Preferences button to display the fax driver window.
4. Click the Phone book... button.
The phone book screen displays.
5. Select FAX number -> New (Group).
6. Type in the Group name.
7. If required, type in a Comment.
Faxing > 72
Page 73

8. Add recipients to the group list:
NOTE
Maximum 100 recipients in any one group.
(a) Select a fax number from the Phone book panel on the right hand side.
NOTE
You can add a new fax number directly by clicking the New (FAX number)...
button and adding an entry to the phone book panel.
(b) Press the Add-> button to add this number to the group list.
(c) Repeat steps a and b as required to create the group list.
(d) If you need to remove a number from the recipient list, highlight the appropriate
name and then press the <-Delete button.
9. Once you have completed you r list, press t h e OK button to close the New Group
window.
I
MPORTING AND EXPORTING FAX NUMBERS
By using the import and export functions, you can manage fax numbers in a phone book
created on another computer.
1. In Windows:
XP: select Start > Control Panel > Printer and Other Hardware > Printers and
Faxes.
Server 2003: select Start > Printers and Faxes.
2000: select Start > Settings > Printers.
2. Right-click your machine icon and select Printer Preferences.
3. In the Setup tab, click the Phone Book button.
4. From the pull-down menu, click Tool > Export.
5. In the Export File screen, enter a name for the file and click the Save button. The
phone book is saved.
6. Import the saved phone book file to the other computer:
(a) In the fax driver installed on the computer that the phone book file was
imported, start the phone book in the same way, and click Tool > Import in
the menu.
(b) In the Import File screen, select a phone book file to import. When the Open
button is clicked, data is imported to the phone book.
NOTE
Registration of groups cannot be exported. (Destinations included in the group
are exported.)
If the same name is already included in the phone book of the fax driver to
import, it is skipped.
Faxing > 73
Page 74

P
RINTING SETTINGS IN
Your printer’s operator panel menus provide access to many options.
The Windows printer driver also contains settings for many of these ite ms. Where items in
the printer driver are the same as those in the operator panel menus, and you print
documents from Windows, the settings in the Windows printer driver will override those
items in the operator panel menus.
The illustrations in this chapter show Windows XP. Other Windows versions may appear
slightly different, but the principles are the same.
P
RINTING PREFERENCES IN WINDOWS APPLICATIONS
When you choose to print your document from a Windows
application program a print dialogue box appears. This
dialogue usually specifies the name of the printer on which
you will print your document. Next to the printer name is a
Properties button.
When you click Properties a new window opens which
contains a short list of the printer settings available in the
driver, which you can choose for this document.
The settings available from within your application are only those which you may want to
change for specific applications or documents. Settings you change here will usually only
last for as long as the particular application program is running.
W
INDOWS
S
ETUP TAB
When you click the Properties button from your application’s Print dialogue, the driver
window opens to allow you to specify your printing preferences for the current document.
1
2
3
4
5
6
7
1. Paper size should be the same as the page size of your document (unless you wish
to scale the printout to fit another size), and should also be the same as the size of
paper you will feed into the printer.
2. You can choose the source of the paper to feed, which may be Tray 1 (the standard
paper tray) or the multi purpose feeder. You can also click on the appropriate part of
the screen graphic to select your preferred tray.
3. The setting for paper weight should match the type of paper on which you intend to
print.
4. A variety of document finishing options can be selected, such as normal one page
per sheet, or N-up (where N can be any number up to 16) for printing scaled down
pages at more than one page per sheet. Booklet printing prints two pages per sheet
on each side of the paper so that when folded they make up a booklet. Refer to “2-
sided printing” on page 79.
Printing settings in Windows > 74
Page 75

Poster printing will print large pages as tiles spread over multiple sheets.
5. For two-sided printing, you can choose to flip the page by t he long edge or the short
edge. Refer to “2-sided printing” on page 79.
6. If you have changed some printing preferen ces before and saved them as a set, you
can recall them to avoid having to set them individually each time you need them.
7. A single on-screen button restores the default settings.
JOB
OPTIONS TAB
1. The output resolution of the printed page can be set as follows.
> The ProQ2400 setting prints at 600 x 600dpi x 2 bit. This option requires the most
printer memory and takes the longest to print.
> The Fine/Detail setting prints at 1200 x 600dpi and is adequate for all but the
most discerning applications.
> The Normal setting prints at 600 x 600dpi and is suitable for most draft
documents, where print quality is less critical.
2. You can pri nt watermark text behind the main page image. This is useful for marking
documents as draft, confidential, etc.
3. You can sel ect up to 999 copi es to print cons ec utively, although you will need to top
up the paper tray during such a long print run.
4. Page orientation can be set to either portrait (tall) or landscape (wide).
5. You printed pages can be scaled to fit larger or smaller stationery.
6. Clicking the Advanced button gives you access to further settings. For example, you
can elect to have black areas printed using 100%K toner (a more matte
appearance).
7. A single on-screen button restores the default settings.
8. The quality of photographic images can be improved.
Printing settings in Windows > 75
Page 76

C
OLOUR TAB
1
2
4
3
5
1. Control over the colour output of your printer may be performed automatically, or
for advanced control, by manual adjustment. The automatic setting will be
appropriate in most cases. The other options in this window only become visible
when you select a choice other than Auto.
2. You can choose from a range of colour matching options, depending on the image
source for your document. For example, a photograph taken on a digital camera
might require different colour matching to a business graphic created in a
spreadsheet application. Again, for most general purpose use, automatic is the best
choice.
3. Printed output may be made lighter or darker, or the colours made more saturated
and vibrant as required.
4. Black areas may be printed using 100% cyan, magenta and yellow (composite
black), giving a more glossy appearance, or using only black toner (true black),
giving a more matte appearance. Choosing the automatic setting allows the driver to
make the most appropriate choice depending on image content.
5. A single on-screen button restores the default settings.
Printing settings in Windows > 76
Page 77

S
ETTING FROM WINDOWS CONTROL PANEL
When you open the driver properties window directly from Windows, rather than from
within an application program, a somewhat more extensive range of settings is provided.
Changes made here will generally affect all documents you print from Windows
applications, and will be remembered from one Windows session to the next.
G
ENERAL TAB
1
23
1. This area lists some of the main features of your printer.
2. This button opens the same windows as described earlier for items which can be set
from within application programs. Changes you make here, however, will become
the new default settings for all Windows applications.
3. This button prints a test page to ensure that your printer is working.
A
DVANCED TAB
1
2
3
4
5
6
7
8
9
10
11
1. You can specify which times of day your printer will be available.
2. Indicates current priority, from 1 (lowest) to 99 (highest). Highest priority
documents will print first.
3. Specifies that documents should be spooled (stored in a special print file) before
being printed. The document is then printed in the background, al lowing your
application program to become available more quickly.
4. This specifies that printing should not start until the last page has been spooled. If
your application program needs a lot of time for further computation in the middle of
Printing settings in Windows > 77
Page 78

printing, causing the print job to pause for more than a short period, the printer
could prematurely assume that the document has finished. Selecting this option
would prevent that situation, but printing will be compl eted a litt le later, as the start
is delayed.
5. This is the opposite choice to the one above. Printing starts as soon as possible after
the document begins spooling.
6. This specifies that the document should not be spooled, but printed directly. Your
application will not normally be ready for further use until the print job is complete.
This requires less disk space on your computer, since there is no spool file.
7. Directs the spooler to check the document setup and match it to the printer setup
before sending the document to print. If a mismatch is detected, the document is
held in the print queue and does not print until the printer setup is changed and the
document restarted from the print queue. Mismatched documents in the queue will
not prevent correctly matched documents from printing.
8. Specifies that the spooler should favour documents which have completed spooling
when deciding which document to print next, even if completed documents are lower
priority than documents which are still spooling. If no documents have completed
spooling, the spooler will favour larger spooling documents over shorter ones. Use
this option if you want to maximise printer efficiency. When this option is disabled
the spooler chooses documents based only on their priority settings.
9. Specifies that the spooler should not delete documents after they are completed.
This allows documents to be re submitted to the printer from the spooler instead of
printing again from the application program. If you use this option frequently it will
require large amounts of disk space on your computer.
10. Specifies whether advanced features, such as booklet printing, page order and
pages per sheet, are available, depending on your printer. For normal printing keep
this option enabled. If compatibility problems occur you can disable the feature.
However, these advanced options may then not be available, even though the
hardware might support them.
11. This button provides access to the same setup windows as when printing from
applications. Changes made via the Windows Control Panel become the Windows
default settings.
Printing settings in Windows > 78
Page 79

2-
SIDED PRINTING
To carry out 2-sided, or Manual Duplex Printing you must pass paper through the printer
twice. You can carry out 2-sided printing using the Cassette Tray or the Multi Purpose Tray.
2-sided Printing is supported on Windows operating systems only.
Manual duplex printing using the cassette tray
1. Ensure that there is enough paper in the cassette tray to carry out the print job.
2. Select File > Print and click the Properties button. In the 2-sided printing drop
down menu, select either “Long Edge” or “Short Edge” according to your printing
preferences. If you require further information, click the Duplex Help button. Then,
Click the Print button.
3. Every second page of your document is printed first. When this is complete, a
message appears on the printer display, prompting you to:
Print/Install paper/Tray 1/Duplex request/Press START button
4. Open the Cassette Tray.
5. Take the printed paper from the output stacker, turn it as shown so that the printed
side is facing UP, then place it in the cassette tray.
ca b
6. Close the Cassette Tray and press the START button as requested on the printer
display.
The message window should disappear from your screen and the document finishes
printing the remaining pages.
Printing settings in Windows > 79
Page 80

Manual duplex printing using the Multi Purpose Tray
NOTE
When using the Multi Purpose Tray, feed pages one sheet at a time.
1. Select File > Print to display the Print dialog box.
2. Click the Properties button. On the 2-sided printing drop down menu, select either
Long Edge or Short Edge according to your printing preferences. If you require
further information, click the Duplex Help button.
3. Position the paper guides on the Multi Purpose Tray according to the paper size.
4. Place one sheet of paper in the Multi Purpose Tray. The paper is automatically
gripped in position.
5. When the page has printed, take it from the output stacker.
5
6
6. Set the page in the Multi Purpose Tray with the printed side facing DOWN as shown.
Ensure that the paper is gripped in place.
7. Press the START button.
8. Repeat S teps 4 to 7 to print the remaining pages of your document.
Printing settings in Windows > 80
Page 81

P
RINTING SETTINGS IN
The information in this section is based on Mac OS X Tiger (10.4). Other versions may
appear slightly different, but the principles are the same.
S
ETTING PRINTING OPTIONS
You can choose your printer and select options for how you want your documents to print
from the Print dialog box.
To set your printer options:
1. Open the document you want to print.
2. To change the paper size or page orientation, select File > Page Setup. For a
description of each option, see “Page setup options” on page 82.
M
AC
OS X
3. Close the Page Setup dialog box.
4. Select File > Print.
5. Select your printer from the Printer drop-down menu.
6. To change any printer driver settings, select the required options from the Settings
drop-down menu. You can select more options from the Copies & Pages menu. For a
description of these options, see “Print options” on page 83.
7. Click the Print button.
S
ETTING PRINTING OPTIONS
You can save a set of printer driver options to use for future documents.
1. Open the document you want to print.
-
SAVING DRIVER SETTINGS
Printing settings in Mac OS X > 81
Page 82

2. To change the paper size or page orientation, select File > Page Setup.
3. Select Save As Default from the Settings drop-down menu.
4. Select File > Print.
5. To save the current printer driver settings as a preset, select Save As from the
Preset menu.
6. Enter a name for your preset and click OK.
C
HANGING THE DEFAULT PRINTER AND PAPER SIZE
The following steps describe how to change your defaul t printer and the paper size options.
1. Select Apple menu > System Preferences.
2. Click the Print & Fax icon.
3. Select your printer in the Selected Printer in Print Dialog drop-down menu.
4. Select your required paper size in the Default Size in Page Setup drop-down menu.
P
AGE SETUP OPTIONS
This section provides a description of the page setup options available to you.
Page Attributes
You can select Save As Default to use the current Page Setup settings as a standard for
all documents.
Format for
Allows you to select your printer model before changing options such as Paper size and
Orientation.
Paper Size
Select a paper size to match your document and the paper loaded in the printer. The paper
margin is 4.2mm at all edges. To s p ec if y your own paper sizes, select Manage Custom
Sizes...
Printing settings in Mac OS X > 82
Page 83

Scale
You can scale documents up or down to fit onto different paper sizes. To fit your document
on a specific paper size, select Options in the Paper Handling drop-down menu in the
Print Options dialog box (see “Print options” on page 83).
Orientation
You can select a portrait or landscape option. When using landscape, you can rotate the
document 180 degrees.
P
RINT OPTIONS
C
OPIES
&
PAGES
Copies
This option allows you to enter the number of copies to print. If you select Collate, all
pages of the document will print before the next copy prints.
Pages
You can select whether to print all pages of a document or just a section of it.
L
AYOUT
Pages per sheet
You can shrink multiple pages and print them on a single sheet of paper. For example,
choosing 4-up will tile four of your document's pages across a single sheet of paper.
You can control the order in which the documents are tiled and also choose to surround
each document page with a border.
Printing settings in Mac OS X > 83
Page 84

Scheduler
This option lets you choose whether to print your document immediately, or defer printing
until later. You can also assign a priority to a print job.
These features are useful if you are printing large documents that take a long time to print.
P
APER HANDLING
Page order
You can choose to print your document in the normal page order (1,2,3..) or reverse order
(..3,2,1).
Print
This option allows you to choose whether to print only odd or even numbered pages. This
is useful if you are using manual duplex for wh ich you first print all odd pages, re-insert the
paper in the printer and then print all even pages.
Destination paper size
Scale documents to fit on the size of paper in your printer. For example, you can take a
document formatted for A3 and print it on A4 paper using an A4 printer.
C
OLORSYNC
Color conversion
For Color Conversion, Standard is the only option available for your printer model.
Printing settings in Mac OS X > 84
Page 85

Quartz Filter
Choose a Quartz filter if you wish to apply a special effect to your print job, such as Sepia
or Blue Tone.
C
OVER PAGE
Choosing a cover page may help you to identify your printed document in a large pile of
paper. This is useful in a busy office with many people sharing the printer.
P
APER SOURCE
This option allows you to select the paper tray to use for your print job.
P
RINT QUALITY
Print quality
Use this option to selects the print resolution. The ProQ2400 setting produces the best
graphic images, but these images can take longer to print.
Photo Enhance
Use Photo Enhance to significantly improve quality when printing images. The printer
driver analyses any photographic images and processes them to improve the overall
appearance. This setting cannot be used together with the “ProQ2400” print quality setting.
Printing settings in Mac OS X > 85
Page 86

Toner Saving
Toner saving uses less toner when printing your document. This is best suited to draft text
documents as it lightens the print significantly.
C
OLOUR
Colour mode
Color matching
COLOUR DESCRIPTION
Monitor (6500K) Perceptual Optimised for printing photos. Colours are
Monitor (6500K) Vivid Optimised for printing photos, but with even
Monitor (9300K) Optimised for printing graphics from
Digital Camera Results will vary depending on the subject
COLOUR MODE DESCRIPTION
Advanced Colour The driver selects the most appropriate color
settings.
Manual Allows you to manually adjust colour and
black and white settings or select.
Grayscale Convert all colours to shades of gr ey.
printed with emphasis on saturation.
more saturated colours.
applications such as Microsoft Office.
Colours are printed with emphasis on
Lightness.
and conditions the image was taken.
sRGB The printer reproduces the sRGB colour
space. This might be useful if colour
matching from an sRGB input device such
as a scanner or digital camera.
Black Finish
Use this option to control the way black is printed in colour documents. Select Composite
Black (CMYK) to use all 4 toner colours to represent black. This option is recommended
Printing settings in Mac OS X > 86
Page 87

for color photos. Select True Black (K) to use 100% black toner to represent black. This
option is recommended for text and business graphics.
Brightness / Saturation
This option allows you to increase brightness for a lighter print. Modify saturation to change
the strength (or purity) of a colour.
If the printed colours are too strong, reduce saturation and increase brightness. As a
general rule, reduce saturation by the same amount as you increase brightness. For
example, if you reduce saturation by 10, increase brightness by 10 to compensate.
P
RINTER SETUP OPTIONS
P
RINTER OPTIONS
Media weight
Select the thickness or type of paper in the printer. It is important to set this correctly as
it affects the temperature at which the toner is fused to the paper. For example, if you are
printing on normal A4 paper, do not select Labels or Transparency as this may cause toner
smearing and paper jams.
Paper size check
Select Paper Size check if you want the printer to warn you when the document paper size
is different from the paper in the printer.
A warning message is displayed and printing continues when you load the correct paper in
the paper tray and press ONLINE. When this option is deselected, the printer uses the
paper loaded in the selected tray regardless of the document size.
Always create 100% black (K) toner
Select this option if you want the printer to always use only black (K) toner when printing
pure black (RGB = 0,0,0). This is effective even when Composite Black (CMYK) is selected
in the colour options.
Run maintenance cycle before printing
Depending on printing habits and usage patterns, running the maintenance cycle before
printing may ensure the best possible print quality. This feature uses the printer's image
drums and transfer belt. The life of these printer consumables may be shortened if the
printer runs a maintenance cycle frequently.
Printing settings in Mac OS X > 87
Page 88

P
RINT CONTROL
If you are using the Windows Print Control Server software to manage printers, enter your
assigned user name and ID. This information is sent to the printer with your print job and
is recorded by the printer.
S
UMMARY
This option displays a summary of all selected print options for the current job.
Printing settings in Mac OS X > 88
Page 89

G
ENERAL PRINTING
P
RINTING ON DIFFERENT MEDIA
This section describes how to print on material other than normal A4 paper.
P
RINTING ON LEGAL PAPER
When printing on legal paper you need to change the media settings for the printer
software to get the best results.
You can either set a default d river for each type of media or you can change the print media
settings through your Windows printer properties or Mac Print option s any time you print
on different media.
P
RINTING ON ENVELOPES
NOTE
Do not use envelopes with clear windows. Use paper envelopes only. See
“Paper recommendations” on page 23.
1. In either the cassette tray or the Multi Purpose Tray, adjust the paper guides using
the indicators marked on the printer.
2. Place your envelopes in the tra y, face up with the short edge facing into the printer
and the flap to the right. Do not add more than 10 envelopes at a time.
3. From your operating system, access the print media menu and select your envelope
size.
4. Print in the usual manner for your operating system software.
S
ETTING OTHER PRINTING OPTIONS
This section briefly describes how to set printing options for your particular print job.
FIT TO
You can choose to print your document on larger or smaller sized paper depending on the
size of print media available to you.
PAGE PRINTING
Windows
1. In the driver’s Setup tab, click the Paper Feed Options button.
General printing > 89
Page 90

2. Check the Fit to Page checkbox.
3. Choose the scaling factor you need from the Conversions drop-down list.
Mac OS X
1. Select Paper Handling (1).
1
2
3
2. Check the Scale to Fit Paper Size checkbox (2).
3. Choose the paper size you need from the drop-down list (3).
P
RINTING MULTIPLE PAGES TO ONE SHEET
This feature scales the page size of your document for printing and reproduces several
pages per sheet.
This is useful when you simply want to proof your page layout, or distribute your document
in a more compact format. It saves paper, bulk, weight and cost.
1 2
1
2
3
4
3 4
General printing > 90
Page 91

Windows
1. In the driver’s Setup tab, choose the number of pages (N-up) you want to print on
each sheet. 1-up is normal, 16-up is maximum.
4-up
2. Click Options to choose from the available options for this feature.
From here you can choose the page printing order, the page layout, whether you want
printed page borders, and a binding margin if you need it.
Mac OS X
1. Select Layout (1).
1
2
3
4
2. From the Pages per Sheet menu (2), select the number of pages you want to fit
onto a single sheet of paper.
3. If required, change the direction (3) the document pages are laid out on each sheet
of paper.
4. If required, you can surround each page with a border (4).
General printing > 91
Page 92

P
RINTING COLOR DOCUMENTS IN BLACK AND WHITE
You can save both time and toner by printing color documents in black and white. Access
the Color tab and select the Greyscale option before printing your document.
WINDOWS
C
ANCELLING A PRINT JOB
MAC
You can cancel a print job from your software application, from the print queue or by using
the STOP button on your printer.
PRINTING STATE HOW TO CANCEL
Document has not
started printing
Document is waiting in a
print queue
Document has started
printing
Try to cancel printing job within software application.
Delete print job from Print Queue. You can access the print
queue from the System Tray in Windows or the Print Center
Queue in Mac.
Press the STOP button on your printer. Any pages that are
already moving through the printer will be printed. You will
need to press STOP for each print job you wish to stop.
General printing > 92
Page 93

C
OLOUR PRINTING
The printer drivers supplied with your MFP provide several controls for changing the colour
output. For general use the automatic settings will suffice, providing reasonable default
settings that will produce good results for most documents.
Many applications have their own colour sett ings, and these may override the settings in
the printer driver. Please refer to the documentation for your software application for
details on how that particular program’s colour management functions.
F
ACTORS THAT AFFECT THE APPEARANCE OF PRINTS
If you wish to manually adjust the colour settings in your printer driver, please be aware
that colour reproduction is a complex topic, and there are many factors to take into
consideration. Some of the most important factors are listed below.
Differences between the range of colours
a monitor or printer can reproduce
> Neither a printer nor a monitor is capable of reproducing the full range of colours
visible to the human eye. Each device is restricted to a certain range of colours. In
addition to this, a printer cannot reproduce all of the colours display ed on a monitor,
and vice versa.
> Both devices use very different technologies to represent colour. A monitor uses
Red, Green and Blue (RGB) phosphors (or LCDs), a printer uses Cyan, Magenta,
Yellow and Black (CMYK) toner or ink.
> A monitor can display very vivid colours such as intense reds and blues and these
cannot be easily produced on any printer using toner or ink. Similarly, there are
certain colours, (some yellows for example), that can be printed, but cannot be
displayed accurately on a monitor. This disparity between monitors and printers is
often the main reason that printed colours do not match the colours displayed on
screen.
Viewing conditions
A print can look very different under different lighting conditions . For example, the colours
in a print may look different when viewed standing next to a sunlit window, compared to
how they look under standard office fluorescent lighting.
Printer driver colour settings
The driver settings for Manual colour can change the appearance of a print. There are
several options available to help match the printed colours with those displayed on screen.
Monitor settings
The brightness and contrast controls on your monitor can change how your document looks
on-screen. Additionally, your monitor’s colour temperature influences how “warm” or “cool”
the colours look.
There are several settings found on a typical monitor:
> 5000k Wa rmest; yellowish lighting, typically used in graphic art environm ents.
> 6500k Cooler; approximates daylight conditions.
> 9300k Cool; the default setting for many monitors and television sets.
(k = degrees Kelvin, a measurement of temperature.)
Colour printing > 93
Page 94

How your software application displays colour
Some graphics applications such as Corel Draw or Adobe Photoshop may display colour
differently from “Office” applications such as Microsoft Word. Please see your application’s
on-line help or user manual for more information.
Paper type
The type of paper used can also significantly affect the printed colour. For example, a
printout on recycled paper can look duller than one on specially formulated glossy paper.
T
IPS FOR PRINTING IN COLOUR
The following guidelines may help you to achieve good colour output from your printer.
P
RINTING PHOTOGRAPHIC IMAGES
Use the Monitor (6500k) Perceptual setting.
If the colours look too dull, try the Monitor (6500k) Vivid or Digital Camera settings.
P
RINTING FROM MICROSOFT OFFICE APPLICATIONS
Use the Monitor (9300k) setting. This may help if you are having problems with specific
colours from applications such as Microsoft Excel or Microsoft Powerpoint.
P
RINTING SPECIFIC COLOURS (E.G. A COMPANY LOGO
There are 2 utilities on your DVD-ROM that can help match specific colours:
> Colour Correct Utility
> Colour Swatch Utility
A
DJUSTING THE BRIGHTNESS OR INTENSITY OF A PRINT
If the print is too light/dark, you can use the Brightness control to adjust it.
If the colours are too intense/not intense enough, use the Saturation control.
)
Colour printing > 94
Page 95

A
CCESSING THE COLOUR MATCHING OPTIONS
The colour matching options in the printer driver can be used to help match your printed
colours to the ones displayed on your monitor or from some other source, such as a digital
camera.
To open colour matching options from the W indows Control Panel:
1. Open the Printers window (called “Printers and Faxes” in
Windows XP).
2. Right-click the printer name and choose Properties.
3. Click the Printing Preferences button (1).
1
To open colour matching options from within a Windows application:
1. Choose File > Print… from the application’s menu bar.
2. Click the Properties button next to the printer name.
S
ETTING THE COLOUR MATCHING OPTIONS
1. On the Colour tab select Advanced Colour (1) for colour matching.
1
2
WINDOWS
1
2
MAC
2. Choose the Manual colour setting (2) and select from the following options:
(a) Monitor (6500k) Perceptual
Optimised for printing photographs. Colours are printed with emphasis on
saturation.
(b) Monitor (6500k) Vivid
Optimised for printing photographs, but with even more saturated colours than
the Monitor (6500k) Perceptual setting.
(c) Monitor (9300k)
Optimised for printing graphics from applications such as Microsoft Office.
Colours are printed with emphasis on Lightness.
(d) Digital Camera
Optimised for printing photographs taken with a digital camera.
Your results will vary depending on the subject and the conditions under which
the photograph was taken.
(e) sRGB
The printer will try to reproduce the sRGB colour space. This may be useful if
colour matching from an sRGB input device such as a scanner or digital camera.
Colour printing > 95
Page 96

U
SING THE COLOUR SWATCH FEATURE
To use the Colour Swatch feature, you must install the Colour Swatch Utility. This is
supplied on the DVD-ROM that you received with your printer.
The Colour Swatch function prints charts which contain a range of sample colours. Note that
this is not the full range of colours that the printer can produce. Listed on each sample
colour are the corresponding RGB (Red, Green, Blue) values. This can be used to pick
specific colours in applications that allow you to choose your own RGB values. Simply click
the Colour Swatch button (1) and choose from the options available.
1
An example of using the Colour Swatch function:
You wish to print a logo in a particular shade of red. The steps you would follow are:
1. Print a colour swatch, then select the shade of red that best suits your needs.
2. Take a note of the RGB value for the particular shade that you liked.
3. Using your program’s colour picker, enter these same RGB values, and change the
logo to that colour.
The RGB colour displayed on your monitor may not necessarily match what was printed on
the colour swatch. If this is the case, it is probably due to the difference between how your
monitor and printer reproduce colour. Here, it is unimportant since your primary objective
is to print the required colour.
U
SING THE COLOUR CORRECT UTILITY
The Colour Correct Utility is provided on your DVD-ROM.
The Colour Correct utility has the following features:
> Office palette colours can be individually adjusted. This is useful if you want to
change how a specific colour is printed.
> Colours can be adjusted by changing Hue, Saturation and Gamma. This is useful if
you wish to change the overall colour output.
Once these colour adjustments have been made, the new settings can be selected from the
printer driver Colour tab.
To select adjustments made with the Colour Correct Utility:
1. From your application program, click File and point to Print.
2. Click Properties. This displays the printer driver options.
3. Click the Colour tab.
4. Click Advanced Colour.
5. Click User Defined.
Select the colour adjustment you made with the Colour Correct Utility.
Colour printing > 96
Page 97

M
AINTENANCE
R
EPLACING CONSUMABLE ITEMS
This section explains how to replace consumable items when due. As a guide, the life
expectancy of these items is:
> Toner
Starter cartridge:
The machine is shipped with sufficient black, cyan, magenta and yellow toner for
1,000 A4 pages, of which 500 A4 pages of toner are used to fill the image drum (500
A4 pages remaining).
Replacement cartridge:
Black: Replacement cartridges have a capacity of approximately 2,500 pages (A4
single-sided printing with area coverage rate 5%, 3 pages/job).
C, M & Y: Replacement cartridges have a capacity of approximately 2,500 pages (A4
single-sided printing with area coverage rate 5%, 3 pages/job).
> Image drum — 20,000 pages (calculated on typical office usage of 3 A4 pages per
job).
> Transfer belt — Approximately 50,000 A4 pages at 3 pages per job.
> Fuser — Approximately 30,000 A4 pages (MF1600 plus), 50,000 A4 pages (MF2000 plus).
Only use genuine original consumables to ensure the best quality and performance from
your hardware. Non original products may damage your printer's performance and
invalidate your warranty.
C
ONSUMABLE ORDER DETAILS
ITEM LIFE
Toner, black 2,500 A4 @ 5%
Toner, cyan 2,500 A4 @ 5%
Toner, magenta 2,500 A4 @ 5%
Toner, yellow 2,500 A4 @ 5%
Image drum, black 20,000 A4 pages*
Image drum, cyan 20,000 A4 pages*
Image drum, magenta 20,000 A4 pages*
Image drum, yellow 20,000 A4 pages*
Fuser - MF1600 plus 30,000 A4 pages
Fuser - MF2000 plus 50,000 A4 pages
Transfer belt 50,000 A4 @ 3/job
* Average life: 20% pages at continuous print, 50% pages at 3 pages per job and 30% pages at 1 page
per job.
Maintenance > 97
Page 98

T
<
<
<
<
ONER CARTRIDGE REPLACEMENT
CAUTION!
To avoid toner wastage and possible toner sensor errors, do not
change the- toner cartridge(s) until “TONER EMPTY” is displayed
through the Status Monitor.
The toner used in this printer is a very fine dry powder. It is contained in four cartridges:
one each for cyan, magenta, yellow and black.
Have a sheet of paper handy so that you have somewhere to place the used cartridge while
you install the new one.
Dispose of the old cartridge responsibly by placing it i nside the pack that the new one came
in. Follow any regulations, recommendations, etc., which may be in force concerning waste
recycling.
If you do spill any toner powder, lightly brush it off. If this is not enough, use a cool, damp
cloth to remove any residue.
Do not use hot water, and NEVER use solvents of any kind. They will make stains
permanent.
WARNING!
If you inhale any toner or get it in your eyes, drink a little water or
bathe your eyes liberally in cold water. Seek medical attention
immediately.
1. Lift the scanner.
Maintenance > 98
Page 99

2. Press the cover release (a) and open the top cover of the printer (b) fully.
1
2
3
4
b
a
WARNING!
If the printer has been powered on, the fuser will be hot. This area
is clearly labelled. Do not touch.
3. Note the positions of the 4 cartridges.
1. Cyan cartridge 3. Yellow cartridge
2. Magenta cartridge 4. Black cartridge
Maintenance > 99
Page 100

4. Carry out one of the following:
(a) If you are replacing a toner cartridge that has been supplied with your printer
(release lever has 3 positions), pull the coloured toner release lever on the
cartridge to be replaced towards the front of the printer, in the direction of the
arrow, but stop at the central (upright) position.
1
(b) If you are replacing any other toner cartridge (lever has 2 positions), pull the
coloured toner release lever (1) on the cartridge to be replaced fully towards
the front of the printer.
5. Lift the right-hand end of the cartridge and then draw the cartridge to the right to
release the left-hand end as shown above, and withdraw the toner cartridge from
the printer.
6. Put the cartridge down gently on to a piece of paper to contain any toner spillage.
CAUTION!
The green image drum surface is very delicate and light sensitive.
Do not touch it and do not expose it to normal room light for more
than 5 minutes. If the drum unit needs to be out of the printer for
longer than this, please wrap the cartridge inside a black plastic
bag to keep it away from light. Never expose the drum to direct
sunlight or very bright room lighting.
7. Remove the new cartridge from its box but leave its wrapping material in place for
the moment.
Maintenance > 100
 Loading...