

Page 1
User’s guide
Page 2

Page 3

Contents
Machine Overview ..........................................................................................................................5
Front View .........................................................................................................................................................5
Rear View..........................................................................................................................................................6
Operator Panel................................................................................................................................7
Keys and LED’s .................................................................................................................................................7
Liquid Crystal Display (LCD) ..............................................................................................................................8
The Print Head................................................................................................................................9
Replacing the Print Head...................................................................................................................................9
Aligning the Print Head ....................................................................................................................................10
Automatic Alignment Following Insertion/Replacement of the Print Head...................................................................10
Alignment from the Printer Monitor Printer Care Card................................................................................................10
Alignment from the Print Care Menu .........................................................................................................................11
If You Hav e Trouble Installing the Print Head: .................................................................................................11
Cleaning the Print Head ...................................................................................................................................12
Cleaning the Print Head Using the Clean Function .................................................................................................... 12
Cleaning the Print Head from the Print Care Menu .................................................................................................... 12
Cleaning the Electrical Contacts of the Print Head.....................................................................................................13
Cleaning the Electrical Contacts of the Print Carriage................................................................................................13
Cleaning the Print Head Nozzles............................................................................................................................... 13
Taking Care of the Print Head..........................................................................................................................14
Print Test.........................................................................................................................................................15
Print Test Using the Test Function ............................................................................................................................ 15
Print Test Using the Print Care Menu ........................................................................................................................15
Demo Page......................................................................................................................................................15
Printing Media...............................................................................................................................16
Loading Paper .................................................................................................................................................16
Loading Paper into the Automatic Sheet Feeder........................................................................................................ 16
Settings .................................................................................................................................................................... 17
Loading Paper into the Bypass Feeder...................................................................................................................... 18
Paper Sizes and Types....................................................................................................................................19
1. Paper Sizes: ......................................................................................................................................................... 19
2. Paper Types: ........................................................................................................................................................20
Print Media Settings..................................................................................................................................................20
3. Unit Weight of the Paper....................................................................................................................................... 21
Precautions......................................................................................................................................................21
Copying.........................................................................................................................................22
Making Simple Copies.....................................................................................................................................22
Personalizing Your Copies...............................................................................................................................23
Using the Operator Panel..........................................................................................................................................23
Using the Menu.........................................................................................................................................................25
Menu Items...............................................................................................................................................................25
Copying Extra Thick Documents......................................................................................................................26
The Software.................................................................................................................................27
The Printer Monitor..........................................................................................................................................27
What is the Printer Monitor? .....................................................................................................................................27
How to Access the Printer Monitor ............................................................................................................................27
Printer Monitor Functions.......................................................................................................................................... 28
Printer Properties.............................................................................................................................................29
How to Open “Printer Properties” .............................................................................................................................. 29
On-Line Help Guides .......................................................................................................................................30
How to Access the Printer Driver On-Line Help .........................................................................................................30
How to Access the Troubleshooting On-line Help ......................................................................................................30
Uninstalling the Software .................................................................................................................................31
iii
Page 4

Printing ......................................................................................................................................... 32
Before Printing .............................................................................................................................................................. 32
Selecting the Machine as the Output Device............................................................................................................... 32
Personalizing Your Printing Parameters ..................................................................................................................... 33
Information About the Driver Settings.......................................................................................................................... 33
The scanner.................................................................................................................................. 34
Before Using the Scanner............................................................................................................................................ 34
Scan to File................................................................................................................................................................... 34
Scan to Mail .................................................................................................................................................................. 34
Generic Scan................................................................................................................................................................ 34
Preventive Maintenance .............................................................................................................. 35
General Care ................................................................................................................................................................ 35
Safety .......................................................................................................................................................................35
Use...........................................................................................................................................................................35
Printer Care Functions.................................................................................................................................................. 37
Eliminating Paper Jams ............................................................................................................................................... 38
If the sheet is already outside the printing area:.........................................................................................................38
If the sheet is jammed inside one of the feeders: .......................................................................................................38
Transporting the Machine............................................................................................................................................. 39
Servicing........................................................................................................................................................................ 39
Troubleshooting .......................................................................................................................... 40
Status messages .......................................................................................................................................................... 50
Error messages ............................................................................................................................................................ 50
Product characteristics ............................................................................................................... 51
Basic features ............................................................................................................................................................... 51
Copier module .............................................................................................................................................................. 52
Printer module .............................................................................................................................................................. 52
Scanner module ........................................................................................................................................................... 52
Consumables ............................................................................................................................... 53
Print Heads ................................................................................................................................................................... 53
Print Supports ............................................................................................................................................................... 53
iv
Page 5
Machine Overview
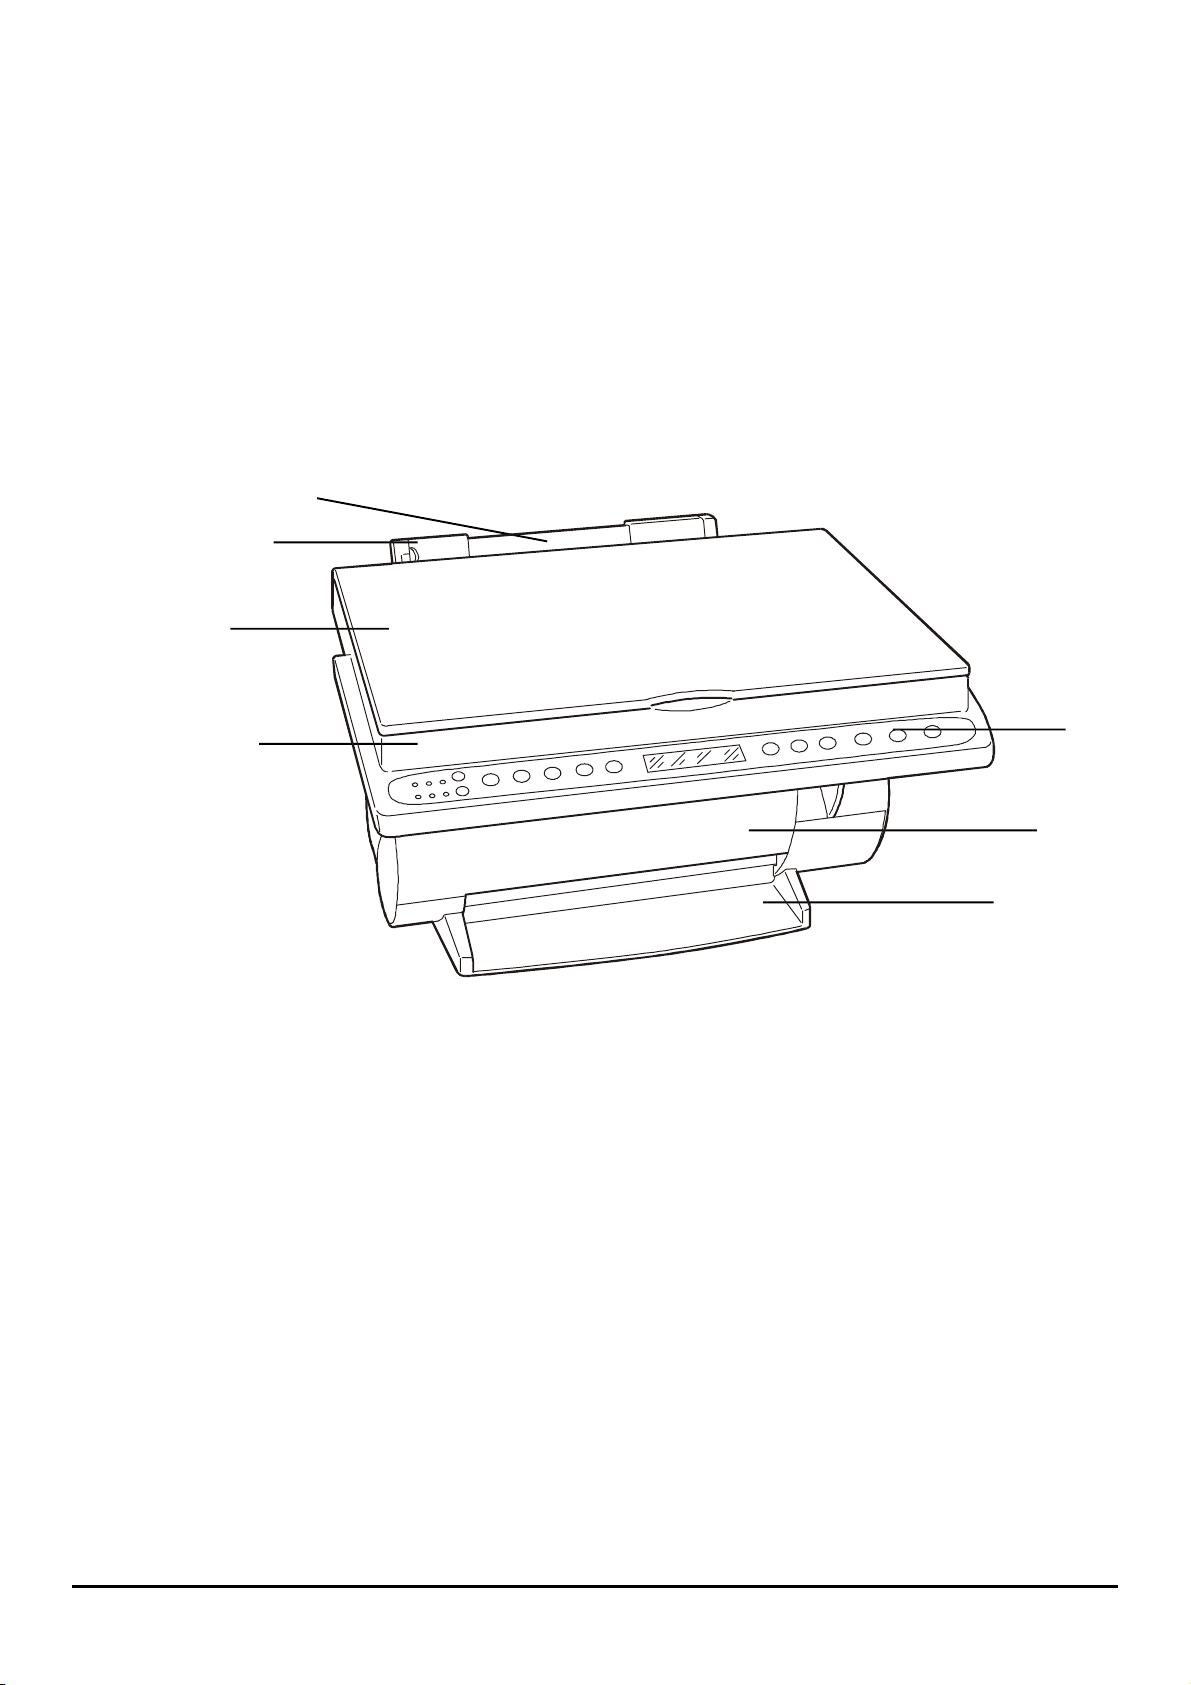
The figures below illustrate the main components of the machine.
Front View
1
Automatic sheet feeder: contains the paper or other printing media loaded automatically on receipt of a print or
copy command.
2
Side paper guide: aligns the sheets according to their width.
3
Copier/scanner cover (closed).
4
Copier/scanner module: in which the document to be copied or scanned is to be inserted.
5
Operator panel: contains the buttons and LED’s used to perform copying operations.
6
Print head compartment cover (closed).
7
Paper output tray.
3
1
2
4
5
6
7
Machine Overview 5
Page 6
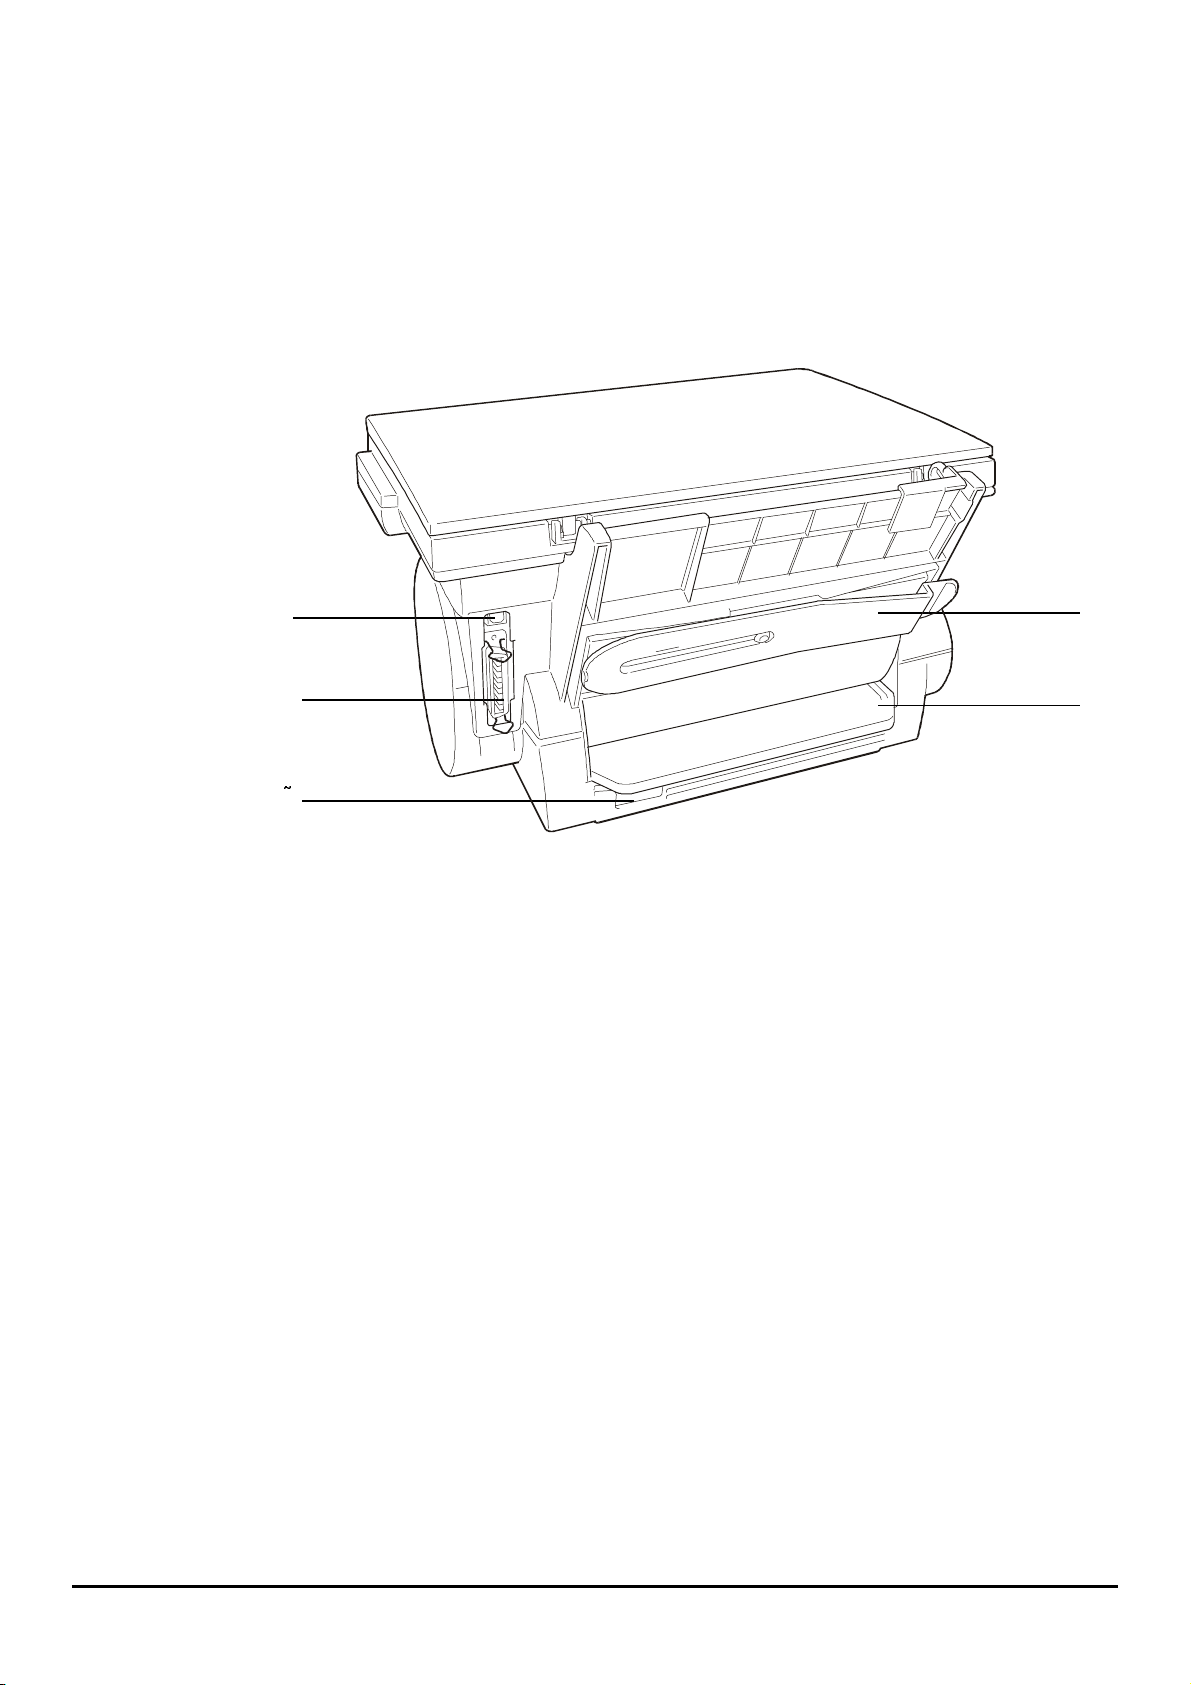
Rear View
8
USB port: used for a serial connection with the machine (as an alternative to the parallel cable connection).
9
Paper support for the automatic sheet feeder: holds the paper or other printing media loaded into the automatic
sheet feeder.
10
Parallel port: used for a parallel connection with the machine (as an alternative to the USB cable connection).
11
Bypass feeder: used to load special printing media or single sheets into the machine.
12
Power cable socket: used to connect the machine to the electrical power supply.
13
Serial number of the machine (on the base of the machine – to be indicated in service calls)
8
10
12
9
11
¢
6 Machine Overview
Page 7
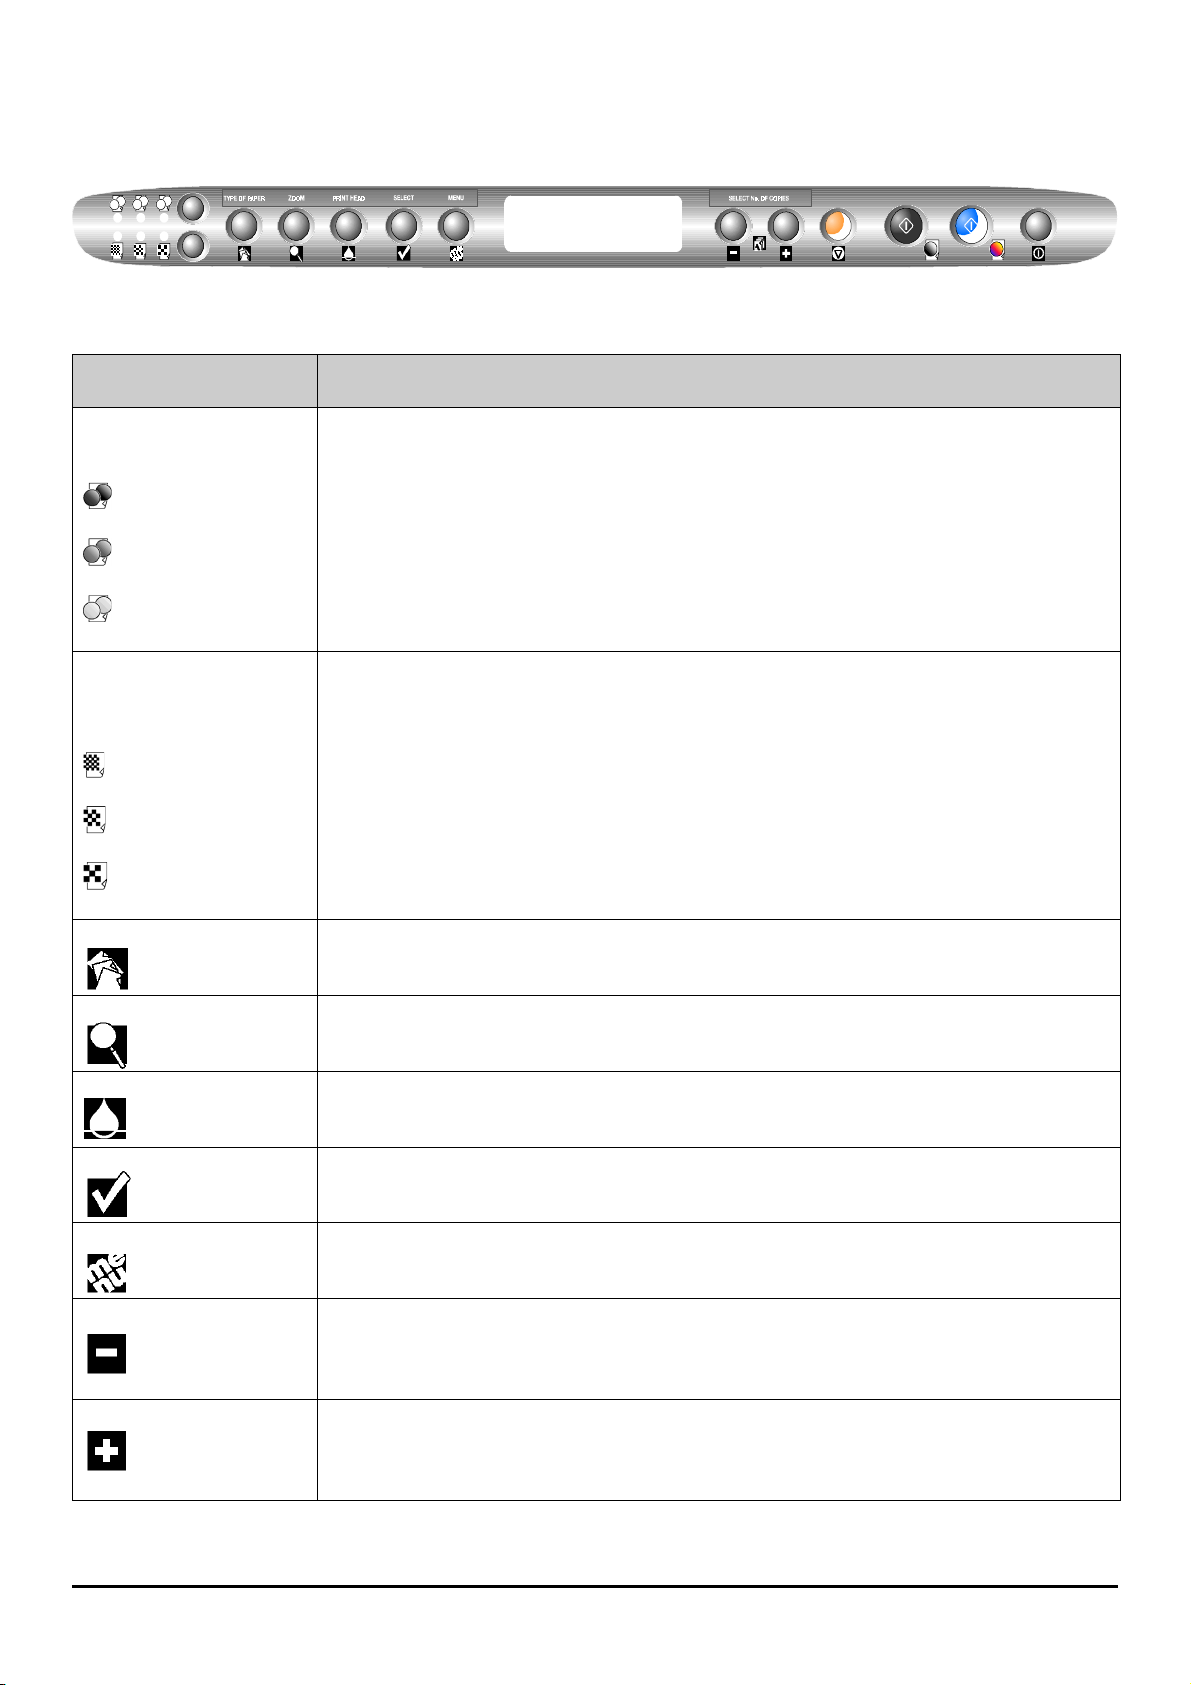
Operator Panel
The operator panel comprises a set of keys and LED’s used to control and check the machine’s operating conditions.
The messages that appear on the LCD indicate the current operating conditions.
Keys and LED’s
Key and/or
LED’s
Intensity
One of the following LED’s lit:
Saturated,
Normal,
Pale
Quality
One of the following three LED’s
lit:
High Quality,
Normal,
Draft
Type of paper Selects the type of paper to be used (PLAIN, GLOSSY, PHOTOGRAPHIC, COATED, TRANSPARENCIES,
Zoom Selects a percentage value for the scale in which the image is to be represented (max. 400% , min. 25% ).
Print head
Select On the menu, confirms the selection shown on the LCD.
Menu
Minus (-) Decreases by one the number of copies set or activates the 2 on 1 function (copies 2 originals onto a single sheet of
Plus (+) Increases by one the number of copies set or activates the 2 on 1 function (copies 2 originals onto a single sheet of
Selects a value for the intensity of the copy colour.
Selects a value for the copy quality.
TRANSFERS).
Moves the print carriage to and from the insertion/removal position. If pressed after inserting/replacing the print head,
it starts the alignment procedure.
Used to access/browse through the parameter menu (see Menu items).
A4 paper).
On the menu: moves backwards through the list of values for the selected parameter.
A4 paper).
On the menu: moves forwards through the list of values for the selected parameter.
Function
Machine Overview 7
Page 8
Key and/or
LED’s
Clear
B/N copy (grey key)
Colour copy (purple key)
Power button
Cancels the current copying operation.
Resets the number of copies set.
When pressed twice, restores the factory default values.
On the menu, exits from the menu.
Starts a black and white copying operation.
Starts a colour copying operation.
Turns the machine on/off
Function
Liquid Crystal Display (LCD)
The liquid crystal display with 2 lines and 16 characters constantly shows the machine’s operating conditions
(machine status and error messages).
The display also shows the various programmable functions and the control functions present on the Menu, which
may be selected by pressing the corresponding key on the operator panel.
8 Machine Overview
Page 9
The Print Head
You can use the colour print head provided or a black print head, which may be ordered separately.
This chapter describes the following procedures:
Replacing the print head
•
Aligning the print head
•
Cleaning the print head
•
Taking care of print heads
•
Replacing the Print Head
1.
If you are using the machine as a photocopier, press
operator panel.
If you are working in multifunctional mode, click on the Printer
Monitor
The print carriage will move to the insertion/removal position.
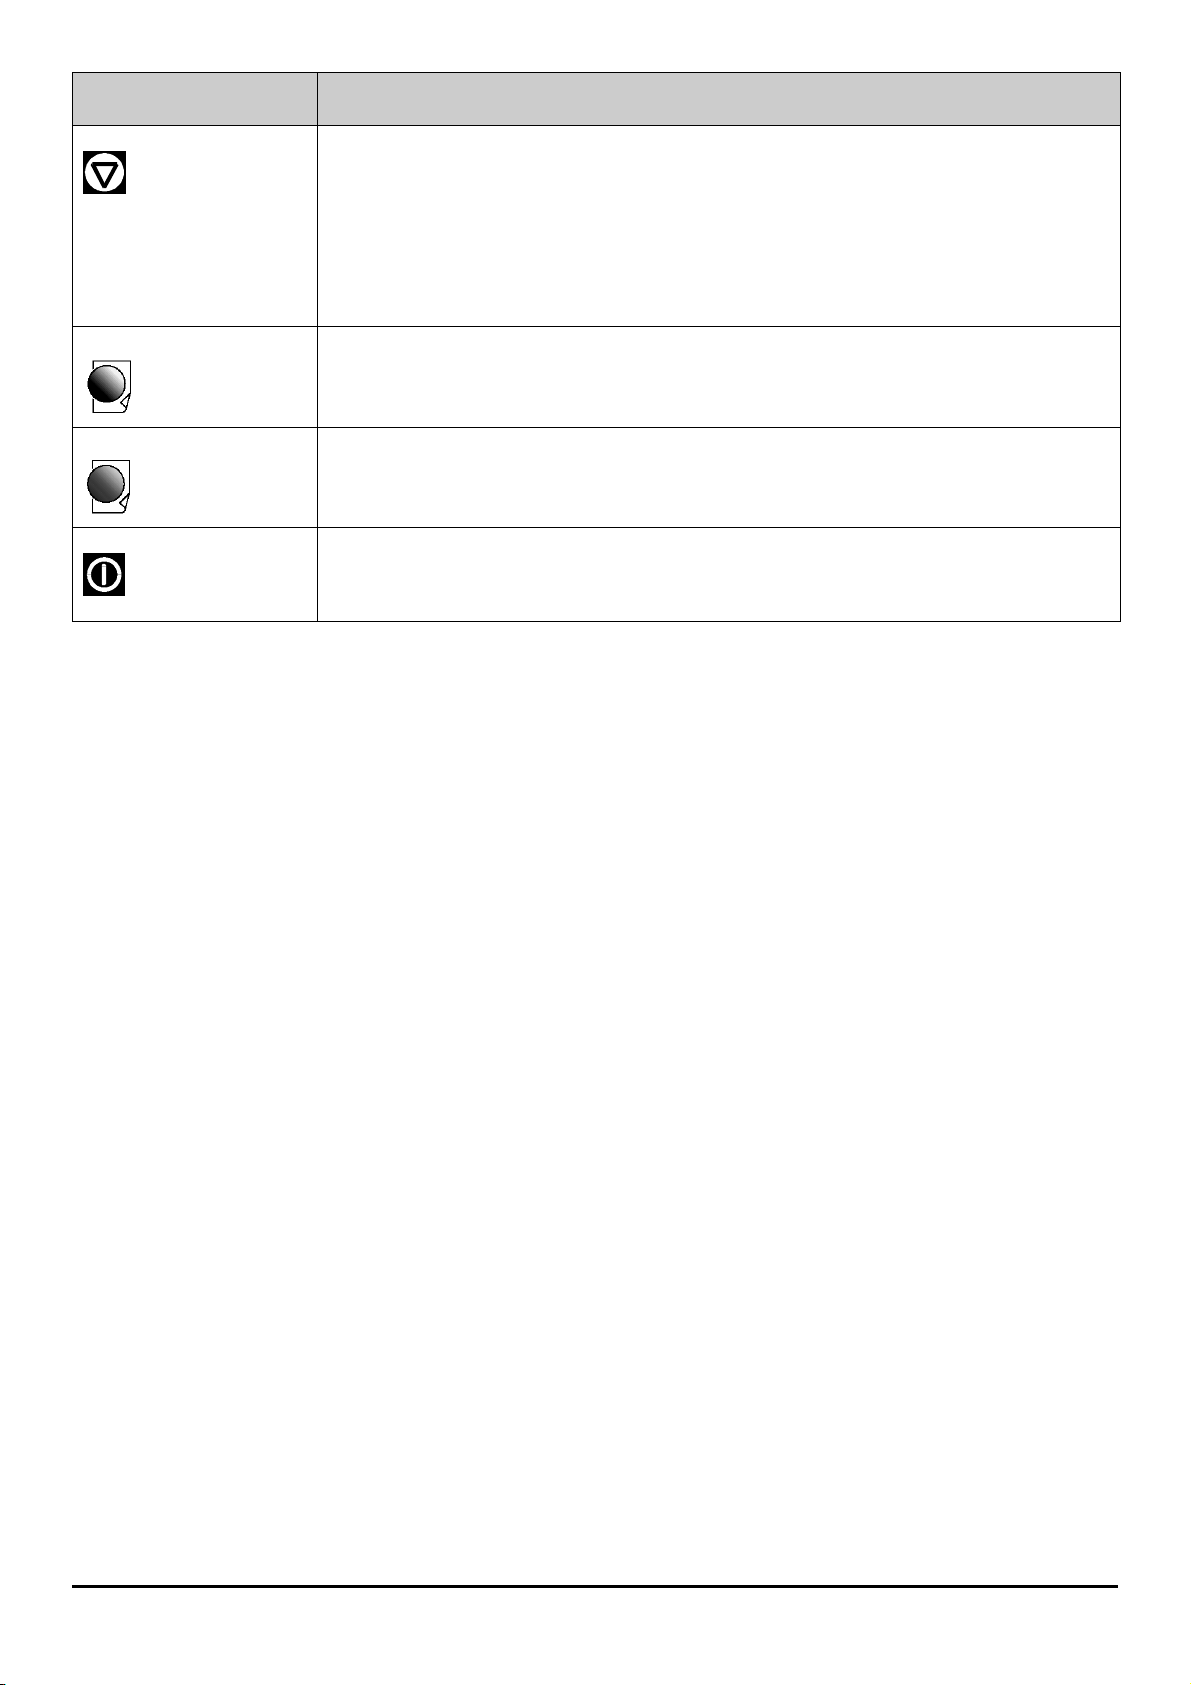
2.
Open the machine’s front cover by pushing it to the left, to gain
access to the print carriage compartment.
3.
By pushing the tab on the rear part of the print head seat backwards
(1), release (2) and remove the worn print head (3).
4.
Open the sealed print head pack and remove the print head
from it.
5.
Peel off the protective film.
Take care not to touch the electrical contacts (gold plate) or the print nozzles, and do not rest the
print head on them.
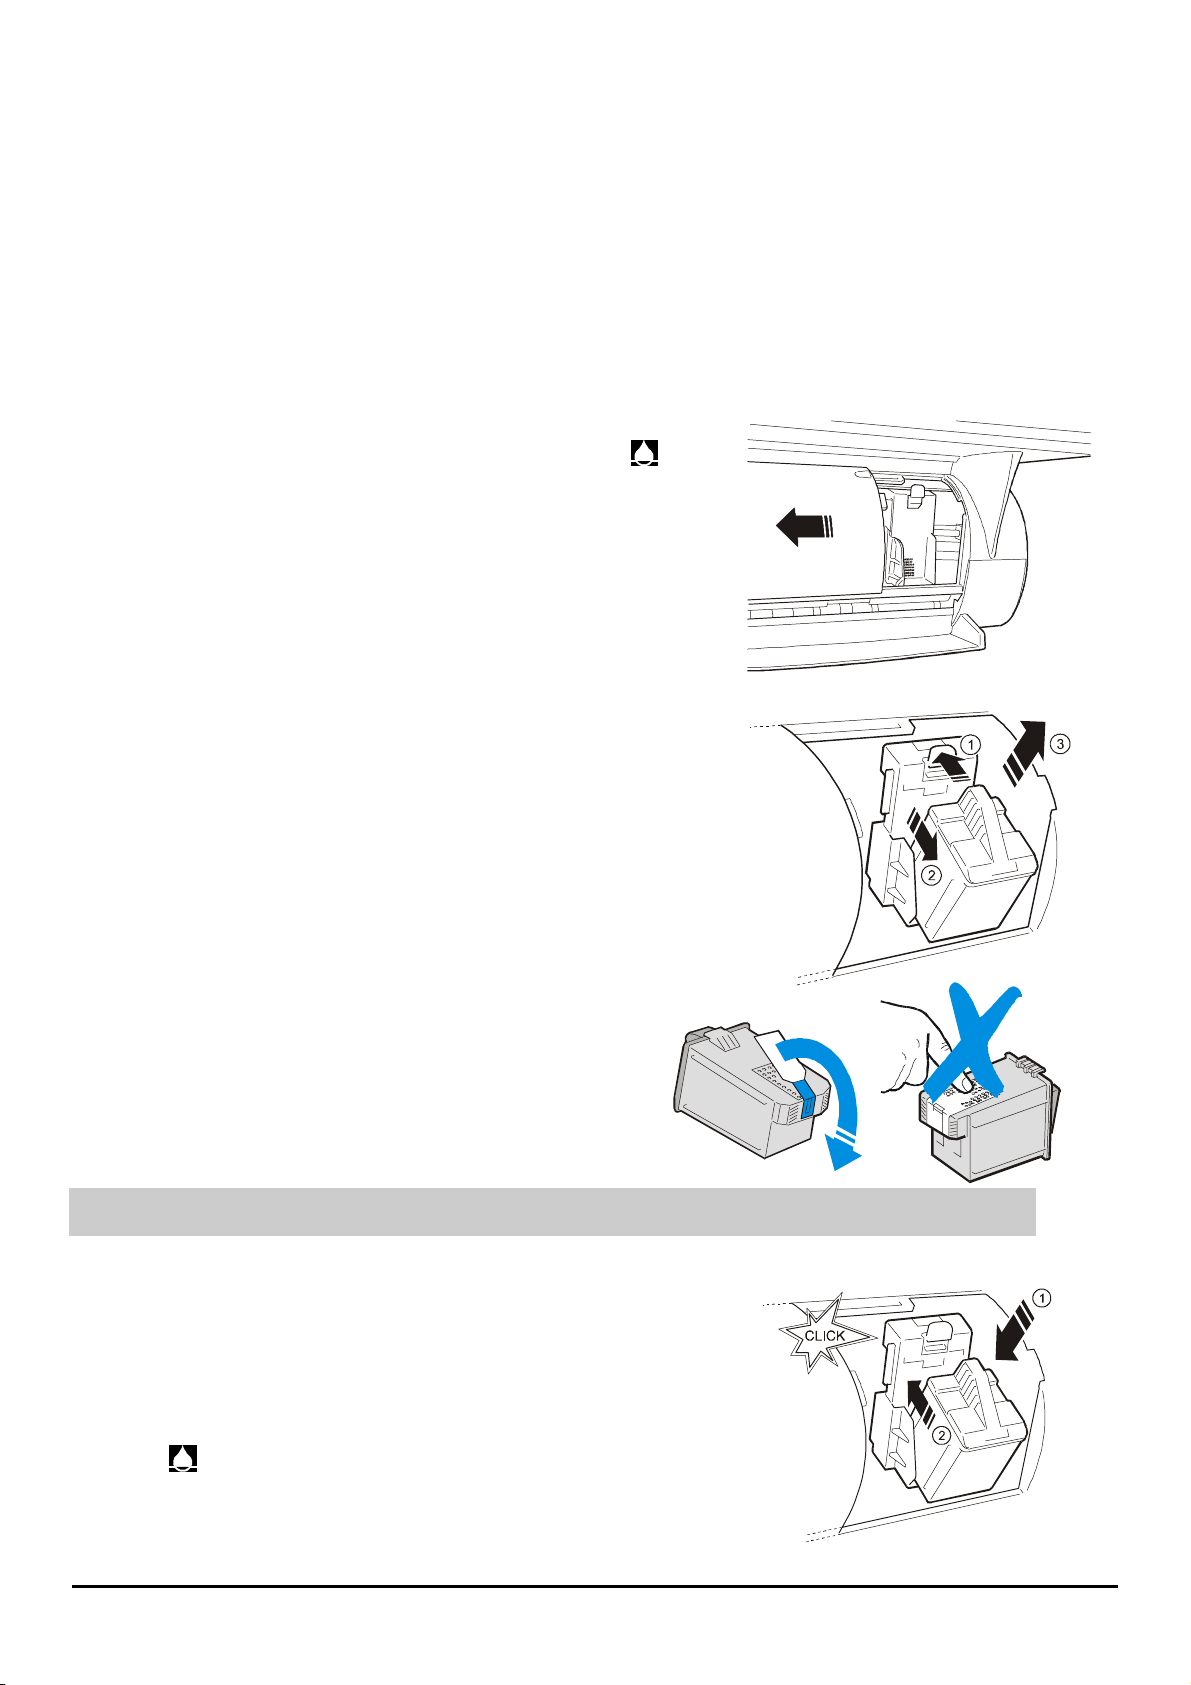
6.
With the gold electrical contacts facing the rear of the machine, insert
the print head.
7.
Fix the print head in position in the print carriage by pressing it towards
the rear of the machine until it clicks into position, then close the cover
by pushing it to the right.
8.
Press
PLEASE WAIT on the bottom line.
Printer Care
: the LCD shows INIT. PRINT HEAD on the top line, and
tab and click on the
Change
button).
on the
The Print Head 9
Page 10
9.
At the end of the initialisation cycle (witch lasts about one minute and a half), the LCD shows NEW HEAD? on
the top line, and -=NO +=YES on the bottom line.
10.
Press
-=NO +=YES.
If you have trouble installing the print head, see the “Maintenance”
section of this manual.
on the operator panel; the LCD shows ALIGNMENT?
Aligning the Print Head
A message prompting you to align the print heads appears on the LCD whenever the print head is
removed/replaced/inserted in the machine.
The alignment function may also be activated at any time:
•
using the
•
from the Print care menu of the operator panel.
If the alignment procedure is aborted, the machine will restore the default parameter settings.
Make sure that there are at least two sheets of paper in the ASF.
Align
function on the printer monitor
Printer Care card
;
Automatic Alignment Following Insertion/Replacement of the Print Head
1.
If you press
the LCD shows the message ALIGNMENT PLEASE WAIT, and the machine prints a test page with the header
“Test 1 : Two-way alignment
2.
The LCD shows CHOOSE VALUE x (default value) -+. If the alignment that corresponds to “x” on the test page
represents the best solution, press
3.
The LCD shows the message CONFIRMATION PLEASE WAIT. The machine prints another test page with the
header “
100% PLAIN).
(YES) in response to the ALIGNMENT? -=NO +=YES message, after inserting the print head,
”.
. If it does not, select a different value using or , than press .
Confirm alignment
“, then automatically exits to READY TO COPY status (the LCD shows COPIES 1
Alignment from the Printer Monitor Printer Care Card
1.
Click on the Printer Monitor
2.
Click on the
3.
A confirmation message appears on the PC screen. Click on OK and then follow the instructions that appear on
the screen.
The machine prints a test page with the header
to “x” on the test page represents the best solution, click on OK. If it does not, type a different value on your PC
keyboard and click on OK. The machine prints another test page with the header “
exits automatically from the alignment procedure.
Align
button.
Printer Care
tab.
“Test 1 : Two-way alignment
”. If the alignment that corresponds
Confirm alignment
“, and then
10 The Print Head
Page 11

Alignment from the Print Care Menu
1.
Press on the operator panel until PRINT CARE MENU appears on the LCD.
2.
Press .
3.
Press until the PRINT HEAD ALIGNMENT message appears.
4.
Press .
5.
The LCD shows the ALIGNMENT PLEASE WAIT message, and then exits from the alignment procedure as
described in the “
Automatic Alignment Following Insertion/Replacement of the Print Head
” section.
If You Have Trouble Installing the Print Head:
•
Make sure that the print carriage is in the print head loading position (on the right-hand side of the machine, with
the possibility of access to the release lever).
•
Check that the print head compartment is clean and free of foreign bodies.
•
Make sure that the print head is correctly inserted (print head contacts against the print carriage contacts).
•
NEVER force the print head into its compartment. If you have trouble inserting the print head, remove it
completely and repeat the installation procedure.
The Print Head 11
Page 12

Cleaning the Print Head
The print head is cleaned automatically at regular intervals when the machine is turned on. This operation keeps the
print head nozzles clean to ensure an appropriate flow of ink.
The cleaning function may also be started, at any time:
•
Using the
•
Using the Print Care menu on the operator panel.
If the problem found in the print quality is not eliminated using the
operations:
Clean the electrical contacts of the print head
•
Clean the electrical contacts of the print carriage
•
Clean the print head nozzles manually
•
Clean
function on the Printer Monitor
Cleaning the Print Head Using the Clean Function
1.
Click on the Printer Monitor
2.
Click on the
3.
A confirmation message appears on the PC screen. Click on OK and then follow the instructions that appear on
the screen.
Clean
button.
Printer Care
tab.
Printer Care
card;
Clean
function, proceed with the following
Cleaning the Print Head from the Print Care Menu
1.
Press on the operator panel until PRINT CARE MENU appears on the LCD.
2.
Press .
3.
Press until HEAD CLEANING appears
4.
Press .
5.
The LCD shows the message HEAD CLEANING PLEASE WAIT, and then carries out the alignment procedure as
described in the “
Automatic Alignment Following Insertion/Replacement of the Print Head
” section.
12 The Print Head
Page 13
Cleaning the Electrical Contacts of the Print Head
Remove the print head from the machine (see “Replacing the Print
1.
Head”.
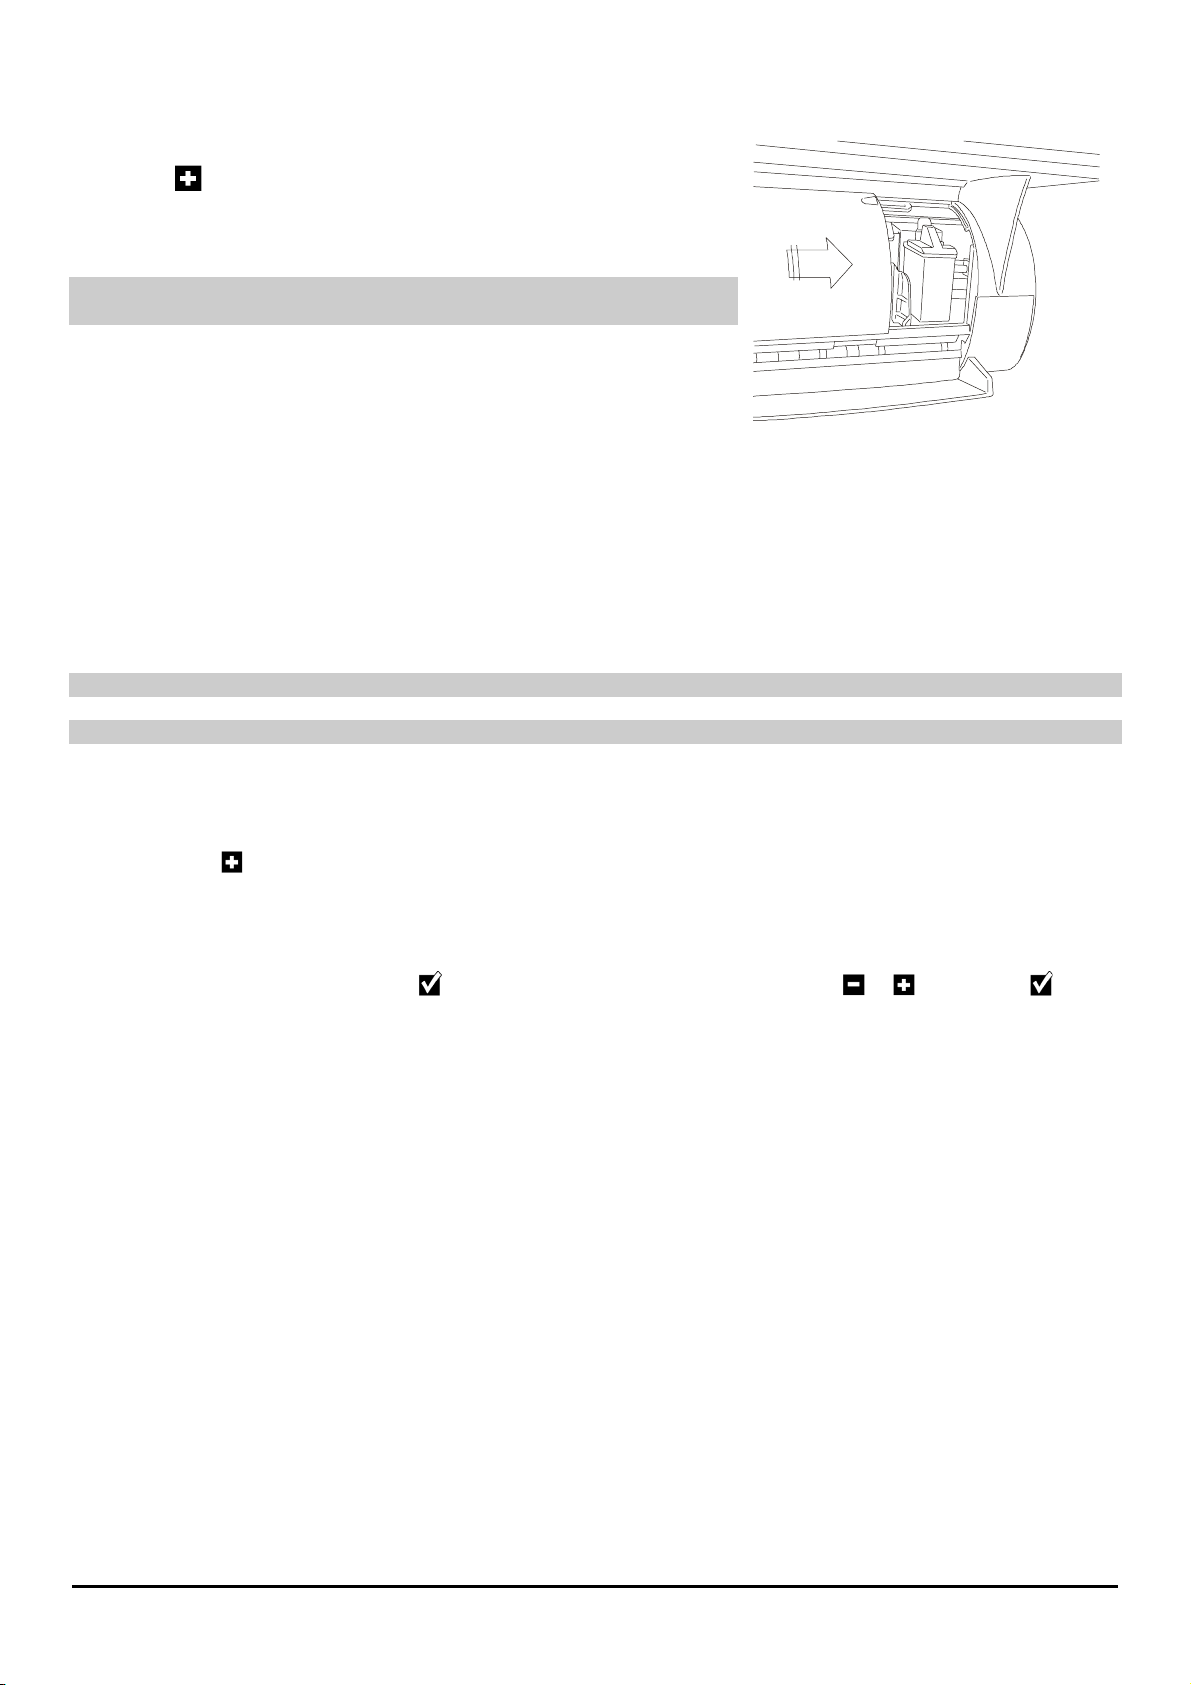
Using a slightly damp, lint-free cloth, clean the electrical contacts (gold
2.
plate) of the print head, wiping from the bottom upwards, as shown in
the figure.
Take care not to touch the print head nozzles.
Reinsert the print head in the machine, closing the front cover.
3.
Carry out
4.
Test
the print head alignment
page to check the print quality.
procedure and then print the
Cleaning the Electrical Contacts of the Print Carriage
1.
Remove the print head from the machine (see “Replacing the Print Head” and put it in a safe place.
Take care not to touch the electrical contacts or print nozzles, and do not place the print head on them.
2.
Turn off the machine and disconnect it from the power socket.
3.
Using a clean, dry cloth, clean the print carriage contacts.
4.
Reinsert the print head in the machine and close the front cover.
5.
Carry out the
print head alignment
procedure and then print the
page to check the print quality.
Test
Cleaning the Print Head Nozzles
This procedure is ONLY to be carried out as a last resort, before replacing the entire print head.
Dampen a paper handkerchief with distilled water and wring it out to
1.
eliminate any surplus liquid.
Remove the print head from the machine (see “Replacing the Print
2.
Head”).
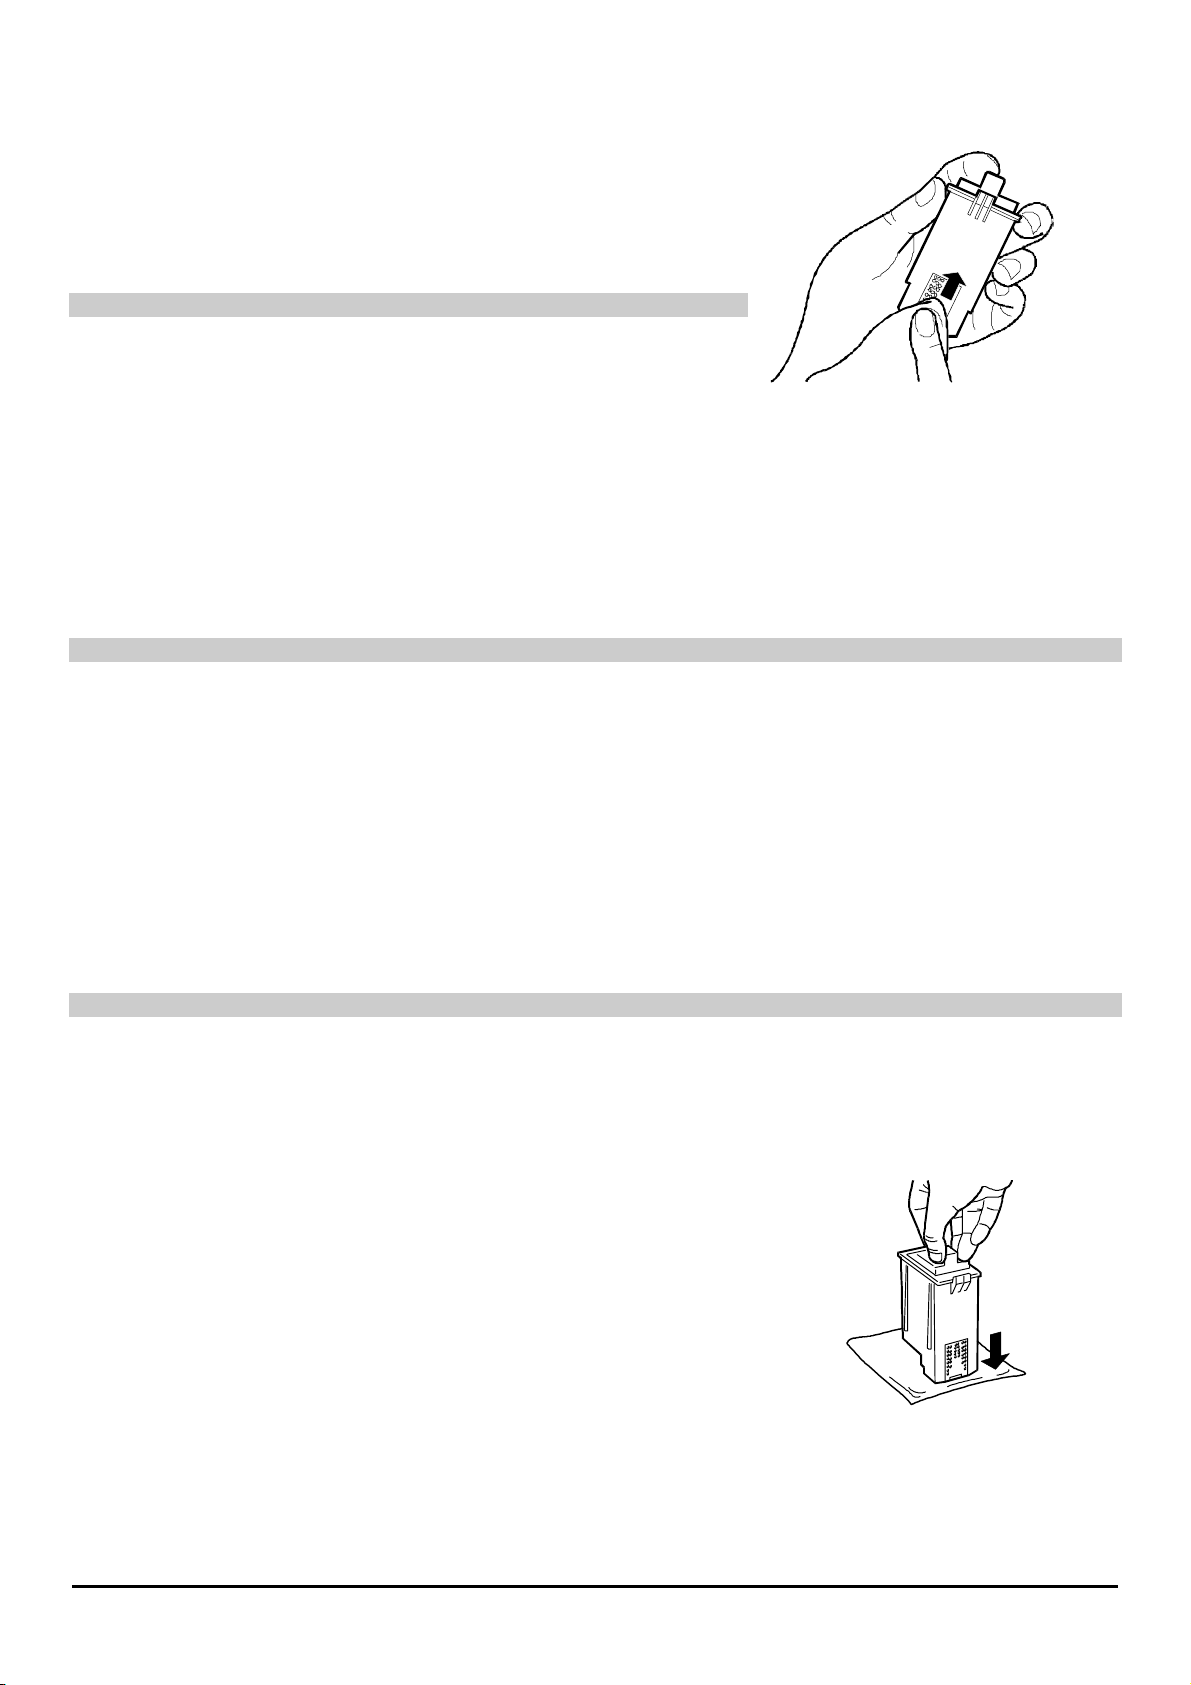
Holding the print head with the nozzles pointing downwards, tap it
3.
gently against the handkerchief.
Repeat this operation a few times, pressing the print head at different
4.
points of the handkerchief to clean the nozzles thoroughly.
Reinsert the print head in the machine, closing the front cover.
5.
Carry out the
6.
page to check the print quality.
print head alignment
procedure and then print the
Test
The Print Head 13
Page 14

Taking Care of the Print Head
•
Keep the print head in its sealed bag until it is to be used.
•
Before inserting the print head, remember to peel off the protective film.
•
Take care to insert the print head correctly in the print carriage (print head contacts against print carriage
contacts).
•
Take care not to stain yourself as the ink is resistant to detergents.
•
DO NOT try to fill the print head with ink as this will damage the print head and the printer itself.
•
DO NOT shake the print head. If the print head does not print correctly, clean as described in the
Print Head
Before turning off the machine, check that the print carriage is in its rest position. To ensure that this is the
case, always remember to turn the machine off before the computer.
section.
Cleaning the
14 The Print Head
Page 15

Print Test
The Test page contains technical data about the version and settings of the machine and the print head functions.
The print test may be started at any time:
•
Using the
•
using the Print care menu on the operator panel.
Test
function on the Printer Monitor
Print Test Using the Test Function
1.
Click on the Printer Monitor
2.
Click on the
3.
A confirmation message will appear on the PC screen. Click on OK.
Test
button.
Printer Care
Print Test Using the Print Care Menu
tab.
Printer Care
card;
1.
Press on the operator panel until PRINT CARE MENU appears on the LCD.
2.
Press .
3.
Press until the display shows PRINT HEAD TEST.
4.
Press .
5.
The LCD shows the message PRINT HEAD TEST PLEASE WAIT, and then executes the print test.
Demo Page
The demo page is your machine’s presentation page.
You can start printing the demo page at any time, using the
1.
Click on the Printer Monitor
2.
Click on the
3.
A confirmation message will appear on the PC screen. Click on OK.
Demo
button.
Printer Care
tab
Demo
function on the Printer Monitor
Printer Care
card.
The Print Head 15
Page 16

Printing Media
Loading Paper
Paper may be loaded:
into the automatic sheet feeder
•
into the bypass feeder
•
inserted in this feeder has printing priority over those present in the automatic sheet feeder.
: you can use this device to insert a single sheet or sheet of special paper. The sheet
Loading Paper into the Automatic Sheet Feeder
The automatic sheet feeder can hold up to 50 sheets of plain paper with a unit weight of 80 g/m
1.
Pull the paper support on the rear of the machine casing to the far right
and set it in a v ertical position.
The paper support is best suited to the use of A4 and Letter formats.
2.
Move the side guide of the automatic sheet feeder to the far left,
holding the guide catch pressed between you thumb and index finger.
3.
Flick through the sheets of paper to be loaded.
4.
Align the sheets on the right along the fixed guide and insert them in
the feeder as far as they will go inside the printer.
The surface to be used for printing must be placed face up. This is
particularly important when using paper with a treated printing
surface.
: you can load up to 50 sheets of plain paper,
2
16 Printing Media
Page 17

5.
Keeping the mobile guide catch pressed between your thumb and
index finger, move it against the left edge of the sheets.
Make sure that paper is not held too tightly or too loosely.
6.
Press on the operator panel to check that the paper is fed correctly
through the machine.
Settings
The PAPER SIZE parameter, accessed by pressing the key on the operator panel, is used to select the A4,
LETTER and LEGAL formats only; the other formats may be selected from the Print Driver
Check the printer’s
1.
2.
3.
4.
Printer Properties
Open
Check the values of the parameters set.
If you are printing in colour on A4 paper, the optimum parameter settings are those set by default, so all you have
to do is click on the
Copies
the
Click on the OK button.
Start printing your document.
Settings
printed).
card:
, by following the instructions given in
Restore Defaults (Print Quality: Speed/Ink Saving
Opening Printer Properties
button and the
Settings
.
Reverse Order
card.
option for
Printing Media 17
Page 18

Loading Paper into the Bypass Feeder
If you hav e to manually insert
1.
Check on the Printer Driver
•
Open
Printer Properties
•
Select
•
Click on the OK button.
2.
Start printing your document.
3.
A message on the Printer Monitor
LCD will signal when the paper runs out.
Load the sheet and check that it is perfectly aligned
between the side guide and against the feed rollers.
Push it into the machine until it is picked up by the
feeder rollers.
If you want to use the bypass feeder
execute the print command without loading the sheet (following the procedure described in
into the Bypass Feeder
Manual paper source
a series of single sheets
Settings
, following the instructions in
.
).
card, that
Status
card and the
for one sheet only
:
Manual paper source
Opening Printer Properties
, while
Automatic paper feed
is selected:
.
is set, you can simply
Loading Paper
18 Printing Media
Page 19

Paper Sizes and Types
The machine is capable of handling the following paper sizes and types :
1. Paper Sizes:
Size Dimensions Top margin Bottom margin
(*)
Single sheets
A4 (**) 8.27 x 11.7 inches
A5 5.85 x 8.27 inches
U.S. letter (**) 8.5 x 11 inches
U.S. legal (**) 8.5 x 14 inches
U.S. Executive 7.25 x 10.5 inches
U.S. Folio 8.5 x 13 inches
U.S. Statement 5.5 x 8.5 inches
B5 7.2x10.1 inches
Postcards
U.S. 4x6
postcards
U.S. 5x8
postcards
A6 postcards 4.135 x 5.85 inches
Envelopes
U.S. # 10 4.12 x 8.88 inches
C5 6.38 x 9.0 inches
DL 4.33 x 8.66 inches
C6 4.46 x 6.37 inches
B6 4.92 x 6.93 inches
B5 envelope 6.93 x 9.84 inches
Monarch 3.875 x 7.50 inches
User-defined
Minimum (***) 3.875 x 5.85 inches
Maximum (***) 8.5 x 14 inches
0.04 inches
210 x 297 mm
148.5 x 210 mm
216 x 279 mm
216 x 356 mm
184 x 267 mm
216 x 330.2 mm
139.7 x 215.9 mm
182 x 256 mm
4 x 6 inches
102 x 152 mm
5 x 8 inches
127 x 203 mm
105 x 148.5 mm
105 x 225 mm
162.0 x 228.8 mm
110 x 220 mm
114 x 162 mm
125 x 176 mm
176 x 250 mm
98.43 x 190 mm
98.43 x 148.5 mm
215.9 x 355.6 mm
1.00 mm
0.04 inches
1.00 mm
0.04 inches
1.00 mm
0.04 inches
1.00 mm
0.04 inches
1.00 mm
0.04 inches
1.00 mm
0.04 inches
1.00 mm
0.04 inches
1.00 mm
0.04 inches
1.00 mm
0.04 inches
1.00 mm
0.04 inches
1.00 mm
0.04 inches
1.00 mm
0.04 inches
1.00 mm
0.04 inches
1.00 mm
0.04 inches
1.00 mm
0.04 inches
1.00 mm
0.04 inches
1.00 mm
0.04 inches
1.00 mm
0.04 inches
1.00 mm
0.04 inches
1.00 mm
0.71 inches
18.00 mm
0.71 inches
18.00 mm
0.71 inches
18.00 mm
0.71 inches
18.00 mm
0.71 inches
18.00 mm
0.71 inches
18.00 mm
0.71 inches
18.00 mm
0.71 inches
18.00 mm
0.71 inches
18.00 mm
0.71 inches
18.00 mm
0.71 inches
18.00 mm
0.71 inches
18.00 mm
0.71 inches
18.00 mm
0.71 inches
18.00 mm
0.71 inches
18.00 mm
0.71 inches
18.00 mm
0.71 inches
18.00 mm
0.71 inches
18.00 mm
0.71 inches
18.00 mm
0.71 inches
18.00 mm
(*) The top margin indicated in the table is for colour printing. For printing in black and white, the bottom margin is 13
mm.
(**) Paper sizes also handled from operator panel (Menu, Paper Size)
(***) Plain paper.
Left margin Right
margin
0.13 inches
3.30 mm
0.13 inches
3.30 mm
0.25 inches
6.35 mm
0.25 inches
6.35 mm
0.13 inches
3.30 mm
0.13 inches
3.30 mm
0.13 inches
3.30 mm
0.167 inches
4.2 mm
0.13 inches
3.30 mm
0.13 inches
3.30 mm
0.13 inches
3.30 mm
0.4 inches
10.16 mm
0.4 inches
10.16 mm
0.4 inches
10.16 mm
0.4 inches
10.16 mm
0.4 inches
10.16 mm
0.4 inches
10.16 mm
0.4 inches
10.16 mm
0.25 inches
6.35 mm
0.25 inches
6.35 mm
0.13 inches
3.30 mm
0.13 inches
3.30 mm
0.25 inches
6.35 mm
0.25 inches
6.35 mm
0.13 inches
3.30 mm
0.13 inches
3.30 mm
0.13 inches
3.30 mm
0.167 inches
4.2 mm
0.13 inches
3.30 mm
0.13 inches
3.30 mm
0.13 inches
3.30 mm
0.4 inches
10.16 mm
0.4 inches
10.16 mm
0.4 inches
10.16 mm
0.4 inches
10.16 mm
0.4 inches
10.16 mm
0.4 inches
10.16 mm
0.4 inches
10.16 mm
0.25 inches
6.35 mm
0.25 inches
6.35 mm
Printing Media 19
Page 20

2. Paper Types:
To ensure a consistently high print quality, it is advisable to use exclusively the printing media recommended by the
Consumables
, if you want to print on non-standard paper sizes. You can load up to 50 sheets (plain
). The use of unsuitable printing media may cause problems with paper feed
, for greeting cards, place cards, menus, wine lists and advertising leaflets.
printer manufacturers (see
and/or a low printing quality.
Plain paper
Use high-quality office or photocopying paper.
You can load up to 50 sheets at a time into the automatic sheet feeder.
Special printing/copying media
For any kind of special printing media, read carefully the instructions printed on the pack.
•
Photographic paper
This kind of paper has a glossy coat that gives your printouts a professional appearance. Use it to obtain
photographs of an excellent quality, customized calendars, certificates, artistic graphics.
You can insert 5 sheets at a time in the automatic sheet feeder.
•
Transparencies
Only transparencies specifically recommended for ink jet printers are capable of absorbing the ink correctly. Use
them to prepare excellent overhead projector presentations.
Insert one at a time.
•
Glossy paper
This type of paper has a similar surface to that used in the photography industry. Use it to obtain printouts with
clear, bright colours of photographic quality.
You can load up to 5 sheets at a time in the automatic sheet feeder.
•
Coated paper
This type of paper has a printing surface with an extremely high quality finish. Use it to obtain colour pictures of
an excellent quality, “computer art”.
You can load up to 10 sheets at a time in the automatic sheet feeder.
•
T-shirt transfers
Only the T-shirts specifically recommended for ink jet printers are capable of absorbing the ink correctly. Use
them to obtain hot transfers for T-shirts, mouse pads, umbrellas
Insert one at a time.
•
Envelopes
•
Postcards and other kinds of cards
You can load up to 10 cards at a time in the automatic sheet feeder.
•
User-defined paper sizes
paper) at a time in the automatic sheet feeder.
•
Banners
Before inserting the banner, carefully tear off any perforated side strips.
, for printing addresses. You can load up to 5 envelopes at a time in the automatic sheet feeder.
(continuous module) to produce panoramic photographs, calendars, coloured decorations.
Print Media Settings
Once you have loaded the printing media in the machine, always check and, if necessary, set the PAPER SIZE,
PAPER TYPE and PAPER FEED values.
Define the values of these parameters using the
“Loading Paper into the Automatic Sheet Feeder”), or, if you are making a local copy, use the operator panel (
of paper
The use of
The PAPER SIZE parameter, which may be accessed by pressing the key on the operator panel, is used
to select the A4, LETTER and LEGAL formats only; the other formats may be selected on the Printer Driver
Settings
key for the paper types;
Banners
card.
is to be indicated under
key to access the paper sizes).
Menu
Settings
Paper feed
20 Printing Media
card of Printer Properties (see the “Settings” section of
Type
.
Page 21

3. Unit Weight of the Paper
min max
g/m
Single sheets
Unit weight recommended for single sheets *: 70 19 90 24
Envelopes
Unit weight recommended for envelopes: 70 19 80 21
Postcards
Unit weight recommended for postcards: 100 27 135 36
* For the best results, we recommend the use of single sheets with a unit weight of 80 g/m
2
lb. g/m
2
lb.
2
.
Precautions
•
The use of low-quality paper may result in a poor print quality.
•
Check that the sheets are fed without obstructions and that their play is neither excessive nor insufficient.
•
The sheets and envelopes must not be folded, crumpled or torn, as these irregularities could cause a jam or
obstruct their insertion. Use exclusively paper in perfect condition that satisfies the requirements indicated in the
printer’s technical characteristics.
•
Only load one type of paper at a time in the feeders
•
Printing on both sides of the sheet increases the risk of jams or feed problems, and may result in blotching of the
printout with ink.
•
NEVER
•
If you are using special printing media,
•
To remove sheets or add other sheets in addition to those already loaded in the automatic sheet feeder, the entire
paper loading cycle
When you are using special printing media, read carefully the instructions provided by the manufacturers on the
pack.
try to print on the side of envelopes with the closure.
print on the side indicated as the printing surface.
ONLY
MUST BE REPEATED
.
Printing Media 21
Page 22

Copying
Making Simple Copies
With the machine installed and turned on, as soon as the LCD shows the message
1.
Open the document glass cover.
2.
Place your original on the document glass, aligning it with the
scale on the left.
3.
Close the document glass cover.
4.
Using the operator panel, select the desired number and type of
copies (for further details, see the following section).
COPIES: 1 100% PLAIN
:
5.
Press
you require.
or , according to your original and the type of copy
22 Copying
Page 23

Personalizing Your Copies
The machine enables you to personalize your copies directly from the operator panel or by changing the parameter
settings on the menu as described in the corresponding section of this chapter.
Using the Operator Panel
The selections made directly from the operator panel are not saved and are lost when
is pressed twice, after the
timeout set on the DEFAULT SETTINGS (AUTO CLEAR TIMER) menu, or when the machine is turned off.
1.
Colour Intensity key
This function is used to make a blank and white copy lighter or darker, and to saturate or soften colour on the copies
made. There are three intensity values available (the corresponding LED lights up).
2.
Copy Quality key
This function is used to set the copy quality to BEST QUALITY, NORMAL or DRAFT, according to the type of
document you require (the corresponding LED lights up).
The DRAFT quality is ONLY available if you have set PLAIN paper.
3.
Type of Paper Key
This key is used to select the type of paper on which the copies are to be printed (PLAIN, GLOSSY, PHOTO,
COATED, TRANSPARENCIES, T-SHIRTS).
Setting the PAPER TYPE:
PLAIN
Set
GLOSSY or PHOTO
Set
COATED
Set
TRANSPARENCIES
Set
T-SHIRTS
Set
paper for simple documents, letters and marketing graphics.
paper for the final version of photographs.
for computer drawings and quality colour pictures.
to make films to be used on overhead projectors.
to make pictures and patterns for T-shirt transfers.
4.
ZOOM Key (Reduction/Enlargement)
By pressing this key, you can select one of the following default values, displayed cyclically on the LCD.
1:1
Autoscale
1 to 1 copy; LCD shows 100%. (default value)
Automatic reduction of the original so that it fits onto the output copy page, including the
margins (LCD displays 91%).
Minimum
A4>A5
A5>A4
Maximum
Clone
Reduction: LCD displays 25%.
Reduction: the LCD shows 70%.
8.5>5.5
(
if the LETTER/LEGAL paper formats are selected – LCD shows 78%).
Enlargement: the LCD shows 141%.
5.5>8.5
(
if the LETTER paper format is selected - LCD shows 129%).
Enlargement: LCD shows 400%.
With a selected paper format, prints as many pictures of the original as the paper format will
hold (default value: max. 100% with 1 per page). The LCD shows CLONE.
In addition, having pressed this key, you can set your own reduction/enlargement ratio, using or ; the LCD
shows the ratio selected (max. 400%, min. 25%). Press
to confirm the desired value.
Copying 23
Page 24

How to set the CLONE function:
1.
Press
until CLONE appears on the second line of the LCD, and press .
2.
Place your original on the document glass, aligning it with the scale on the left edge.
3.
Press
or .
4.
Set the original paper size, using the
or key, and press .
5.
Set the number of CLONES per page, using the
or key.
6.
Press
or .
The default values for the single functions (excluding PAPER) will be restored after the time-out
(RIPRISTINO AUTO) or when the machine is turned on again.
24 Copying
Page 25

Using the Menu
The
key gives access to a submenu of settings to help you to define how you want your copies. Once selected
and confirmed, the settings may be saved as default values and will be restored when the machine is turned on or
reset. This menu also contains a set of maintenance functions that are described in the
Preventive Maintenance
section.
•
How to access the menu
With the machine in stand-by (COPIES:.....1….100%.....PLAIN), press
on the operator panel.
•
How to move on the menu
To move from one parameter to another on the menu, use
1.
on the operator panel, and then press to
select the function displayed and/or access the values of the parameter displayed.
To select a value for a parameter, use
2.
To confirm selection of the value for the parameter, press
3.
or on the operator panel.
on the operator panel.
•
How to exit from the menu
To exit from any function or the entire menu, press
on the operator panel.
•
How to restore the factory settings
You can restore the factory settings at any time, by selecting the
RESTORE FACTORY SETTINGS
function from
the Menu.
Menu Items
Parameter/Function Default setting Other values/Submenu items
PAPER SIZE A4 LETTER, LEGAL
BACKGRND REMOVAL * YES (ACTIVE) NO (INACTIVE)
OPTIMIZATION SPEED QUALITY
COLOUR ADJUST. ** NORMAL PALE, SATURATED
FACTORY SETTINGS MENU
LANGUAGE:
COPY QUALITY
COPY BRIGHTNESS
AUTO CLEAR TIMER
AUTO OFF MODE
RESTORE FACTORY SETTINGS
PRINT CARE MENU INK LEVEL: COLOUR:nnn%; B/W:nnn%
* BACKGRND REMOVAL: we recommend you leave the default value (SI) for documents of texts only, and select
NO for photographs and graphics.
** COLOUR ADJUST : this parameter controls the intensity of the colour selected using the corresponding key on the
operator panel. The default value (NORMAL) gives the standard range of colour; the value PALE, a lower range of
intensity; and the value SATURATED, a higher range of intensity.
ENGLISH FRANCAIS; DEUTSCH; ITALIANO; PORTOGUES; ESPANOL; SVENSKA; SUOMI;
NORSK; DANSK; NEDERLANDS;
DRAFT NORMAL; BEST
NORMAL DARK; LIGHT
120 SEC NO; 30 SEC; 60 SEC; 90 SEC
30 MIN 4 HOURS; 8 HOURS; NEVER; 12 MIN
PRINT HEAD ALIGNMENT
PRINT HEAD CLEANING
PRINT TEST PAGE
Copying 25
Page 26

Copying Extra Thick Documents
1.
If the document you wish to copy is very thick (e.g. a book), you can
remove the cover, lifting it straight up without tilting it.
2.
Place your original on the document glass, aligning it with the scale
on the left edge.
3.
Using the operator panel, select the number and type of copies you
require (for further details, see the following section).
4.
Press
require.
5.
Once you have finished making copies, return the glass cover to its
normal position by reassembling the hinges and lowering the cover
onto the body of the machine without tilting it.
or , according to your original and the type of copy you
26 Copying
Page 27

The Software
The machine comes with all the software you need to print and scan documents. The machine supports the
operating systems Windows® 95, 98, Me, NT4.0, 2000 and XP:
•
Windows® 95/98/Me/NT4.0/2000/XP with a parallel cable.
•
Windows® 98/Me/2000/XP with a USB cable.
The drivers and documentation files copied to the hard disk during the software installation procedure will
occupy about 20 MB of space on the hard disk.
The Printer Monitor
What is the Printer Monitor?
The Printer Monitor is an easy-to-use on-line help consisting of a set of functions to assist you in using the machine
as a printer. You can display the Printer Monitor by clicking on the corresponding icon. The Printer Monitor enables
you to:
•
View the operating status of the printer on your PC screen while printing a document. The Printer Monitor
indicates the proportion of the document printed, and gives messages for any error conditions (
•
Perform the control functions necessary to keep the printer in optimum operating conditions (
The Printer Monitor is displayed (or ”run minimized”) when a printing process is sent to the machine.
The Printer Monitor is made up of two cards:
1. The Status card
2. The Printer Care card
Status card
The
conditions.
If an error is signalled and you click on the Troubleshooting button on the Status card, the context-driven
help page will be displayed, thus enabling you to solve the problem.
Printer Care card
The
• Install, replace, align and clean the print head
• Print a demo page and a test page
• Access the on-line
See also the
is used to view the current status of a printing process in progress and indicates any error
indicates the amount of ink left and may be used to:
Driver Help
Printer Monitor
sections of the
Troubleshooting
and
Driver Help
help guides.
.
Job Status
Printer Care
),
).
How to Access the Printer Monitor
To access the Printer Monitor, proceed as follows:
1.
Click on
2.
Click on
OR
1.
Click on
2.
Click on the name of the printer to highlight it.
3.
Click the right mouse button.
4.
Start the Printer Monitor selecting the corresponding option on the menu that appears.
The Software 27
Start
, then highlight
Printer Monitor
Start
, highlight
Programs
.
Settings
and
and click on
Printer name
Printers
on the submenu that appears.
on the submenu that appears.
Page 28

Printer Monitor Functions
Status card
Click on the
(Printing, printer in stand-by, error condition).
Printer Care card
Click on the
functions:
Print head check
The drawing gives a rough indication of the level of ink present in the print head.
New Print Head
Click on the corresponding button ONLY when you insert a NEW print head.
Change
Click on
Align
Click on
appear on the operator panel, using the keys on the panel to select/confirm the alignment values (this function
requires at least two sheets of paper).
Clean
Click on
instructions that appear on the screen.
Test
Click on
head, current parameter settings). Follow the instructions that appear on the LCD. The print test requires at least
one sheet of paper.
Demo
Click on
LCD. The demo function requires one sheet of paper.
How Do I...
Click on
of the printer.
Status tab
Printer Care tab
Change
Align
Clean
Test
Demo
How Do I...
to move the print carriage to the insertion/rest position.
to print the test pages that confirm
before replacing the print head, if you have noticed a deterioration in the printing quality. Follow the
to obtain a printout of the printer’s functional characteristics (firmware version, conditions of the print
to obtain a printout of the machine’s presentation page. Follow the instructions that appear on the
located at the top of the screen to display the machine’s current operating conditions
situated at the top of the screen to access the following control and maintenance
bidirectional printing precision
to open the operator manual containing the instructions and tips to help you take best advantage
. Then follow the instructions that
28 The Software
Page 29

Printer Properties
Settings
The
•
Define the printing quality
•
Adjust the colours and printing intensity
•
Select the paper media and paper size
•
Select the orientation of the printed page
•
Restore the factory settings.
card of the
How to Open “Printer Properties”
“Printer Properties” can be opened from inside an application or from Windows.
Opening the application
Nearly all applications enable you to open
1. From the
2. In the dialog box that appears, click on the
3. Change the settings as required.
Opening from Windows
Printer properties may be opened directly from Windows. In this case, the changed settings are applied to the printing
processes of all applications (unless they are changed within the application itself).
The opening procedure is as follows:
1. Click on
2. Click the right mouse button on the printer icon.
3. Click on
File
menu of the application select
Start
and select
Properties
Printer Properties
Settings,
on the shortcut menu.
dialog box is used to:
Printer Properties
and then
, by carrying out the following procedure:
Set Printer
Properties (Set, Options
Printers
.
(or
Printer
).
) button according to the application.
The Software 29
Page 30

On-Line Help Guides
In addition to this manual, the following
Printer Driver on-line help
1.
Troubleshooting
2.
How to Access the Printer Driver On-Line Help
Direct access from Windows 95/98/Me/NT/2000/XP
1. Click on
2. Select
3. Click on the
Contextual access from the printer driver’s Settings card
1. Open
Click on the
or
or
or
the ? onto the parameter selected and click.
Contextual access from the Printer Monitor card
1. Open the
2. Click on the
or
Start
.
Programs
Printer properties
Help
, select the parameter of the card you wish to modify and press the
, select the parameter of the card you wish to modify and click the
, select the parameter of the card you wish to modify, click on
Printer Monitor
, click on the
and then
On-line help
button in the bottom right-hand corner,
Help
button in the bottom right-hand corner, for each of the Printer Monitor cards,
On-line help
“Printer name”
icon.
(see
(see How to Access the Printer Monitor).
on line help
How to Open Printer Properties
button on the Printer Monitor
is available:
.
).
F1
key on your computer keyboard
right mouse button
? in the top right-hand corner
Printer Care card
of the card, drag
How to Access the Troubleshooting On-line Help
Direct access from Windows
1. Click on
2. Select
3. Click on the
Contextual access from the Printer Monitor
1. Open the
2. Click on the
the
or
Help.
Start
.
Programs
Printer Monitor
problem corresponding to the error message displayed
, click on the
and then
Troubleshooting
Troubleshooting
Troubleshooting
“Printer name”
icon.
How to Access the Printer Monitor
(see
button on the
button on the Printer Monitor
.
Status card
).
of the Printer Monitor, to be guided to the solution to
on the card,
Printer Care card
, to access the first page of the
30 The Software
Page 31

Uninstalling the Software
If any problems that arise while a document is being printed or scanned are not put right by the normal checking
procedures, it may be necessary to reinstall the drivers.
To do this, click on the
enable you to remove all the files loaded from the CD and/or created on the PC during the software installation
procedure completely and correctly. You may then proceed to reinstall them.
Uninstall
icon/s created during the initial software installation procedure. This procedure will
The Software 31
Page 32

Printing
Before Printing
To use the machine as a printer, proceed as follows:
1.
Carry out the full machine installation procedure (see the
2.
Make sure that the machine is on and active (the LCD must show the message
3.
Make sure that the printer driver settings suit your requirements.
4.
Make sure that the machine is selected as the output device for printing.
At this point:
1.
Start a word processor or desktop publishing application.
2.
Open or create the document you wish to print, then edit and save it.
3.
Select your application’s
4.
A window containing the printer settings will appear on your PC screen.
5.
Select the paper type, size and source, as well as the number of copies you want to print (for further details, see
the next section),
Print
command.
make sure that the machine is selected as the printer to be used
Installation
leaflet provided with the machine).
COPIES: 1 100% PLAIN
, and click on OK.
).
Selecting the Machine as the Output Device
The machine is normally set as the default output device during the printer driver installation procedure. If you have
not made this selection yet, you can do so now, by clicking on
Highlight the
If you do not want to set the machine as the default printer, you can simply select it when you execute the print
command.
printer icon
, click the right mouse button and then select
Start
, highlight
Set as default
Settings
.
and click on
Printers
.
32 Printing
Page 33

Personalizing Your Printing Parameters
Always make sure that the
printing media you wish to use. In particular, the printer driver’s colour adjustment is specifically set for the single
media handled by the printer. If the settings of these parameters are incorrect a deterioration in printing quality may
result.
1.
To access the printer driver settings:
In the Desktop window, click on
on the machine’s printer driver icon, and click on
2.
Click on the
A screen appears presenting all the parameters that may be used to make printer settings.
A full description of these functions is provided in the on-line documentation installed together with the printer
driver.
3.
Any changes made to the parameter settings require confirmation before being saved. To confirm the new
settings, click on the
4.
Click on OK to exit from the Properties card and save the customized parameters or press
the Properties card without saving the changes made.
Printer Monitor
The
Restore Defaults
The
Settings
button gives immediate access to the Printer Care and Status functions.
Paper type, Paper size
Start
, highlight
tab.
Apply
button at the bottom of the screen.
button, situated at the bottom of the screen, restores the factory settings.
Source
and
Settings
Properties
printer driver settings suit the characteristics of the
and then click on
to access the driver’s properties.
Printers
. Click the right mouse button
Cancel
to exit from
Information About the Driver Settings
The information available about the parameters on the
•
If the mouse pointer is left to hover over any parameter for more than 3 seconds, a visual indication of the
parameter’s function will be displayed. This indication disappears as soon as you move the mouse.
or
•
Select the desired parameter and click the right mouse button.
or
•
Select ? in the top right-hand corner of the card, and drag it to the desired parameter.
or
•
Click on the
Settings
Help
button in the bottom right-hand corner of the card. In this case, you can access the entire
card section.
Settings
card may be accessed in several ways:
Printing 33
Page 34

The scanner
You have a special application for scanning a document and saving it to a file, or converting a scan directly into an
attachment to a mail (to do this you will need to have an e-mail application installed).
Before Using the Scanner
Before you can use the machine as a scanner, you must:
•
Carry out the full machine installation procedure (see the
•
Make sure that the machine is turned on and active; the LCD must show the message
PLAIN
).
Scan to File
Scan to file
The
1.
Make sure that the machine and the PC are turned on, then place the document you are scanning on the
machine’s glass exposure surface.
2.
Click on the machine icon on the right-hand side of the Windows task bar
displayed.
Click on the
3.
the parameters and scan the document.
Once the scan has been completed, the driver dialog box will be closed and another will appear enabling you to
4.
save the file created.
Follow the instructions that appear on the display.
5.
function is used to scan a document and save it on your PC:
Scan to file
item; the TWAIN scanning driver dialog box will be displayed thus enabling you to set
Installation
leaflet provided with the machine).
COPIES: 1 100%
: a drop-down menu will be
Scan to Mail
The
Scan to mail
1.
Make sure that the machine and the PC are turned on, then place the document you want to send as an
attachment on the machine’s glass exposure surface.
2.
To activate the
drop-down menu will be displayed.
3.
Click on the
4.
Once the scan has been completed, the dialog box will be closed and the dialog box of your e-mail
application will be displayed, with the document already inserted as an attachment.
You can modify the settings of the attached document (e-mail subject, name of attachment, format of attachment)
and the scanning settings (resolution and type of scan):
Click on the machine and envelope icon on the right side of the Windows taskbar
1.
A screen containing the items you can customize will be displayed.
2.
Set the values of interest to you for the document that you attach to your e-mail.
3.
If the file format set is JPEG and the document is black and white, it will be scanned in grey tones.
function is used to scan a document and attach it to an e-mail:
Scan to mail
Scan to mail
function, click on the machine icon on the right side of the Windows taskbar : a
item; the document scanning dialog box will be displayed.
.
Generic Scan
You can scan a document without using the
Start your scanning application (which must however be TWAIN-compatible).
1.
Place the document you want to scan on the machine’s glass exposure surface.
2.
Select your machine as the source machine.
3.
Start acquiring the image (by selecting the relevant option).
4.
Click on the scan button in the scanning application dialog box.
5.
Once the scan has been completed, the image will be displayed on the page of your application.
6.
Scan to file
34 The scanner
function:
Page 35

Preventive Maintenance
The machine is designed to require minimum maintenance. Some simple operations should however be carried out
regularly so as to ensure its correct functioning.
General Care
Safety
The machine and its supplies were designed and tested to meet strict safety requirements that ensure they conform
to the safety and environmental protection regulations laid down by the competent authorities.
All instructions and warnings giv en on the machine or provided together with it
!
Symbol:
The machine
may be left permanently on.
The machine
type of power supply available, call your local electricity board.
The machine
•
Do not
•
Do not
The ON/OFF switch does not remove all power from the machine. The power cable should be unplugged to
ensure that no power is present inside the machine.
The use of extensions and adapters is not recommended and should therefore be avoided.
= Warning
has an energy saving feature that reduces the consumption of current when it is idle. The machine
is to be connected to a power supply of the type indicated on the data plate. If you are not sure of the
is to be installed close to an independent, easily accessible electrical power socket.
place any object on its power cable.
position the machine in such a way that the cable could get trodden on.
must be respected
.
Use
Location
To ensure that the machine operates reliably and provides a satisfactory copying quality, you should:
•
Place the machine on a flat, uniform surface in a well-ventilated room, close to an independent electrical power
socket and in such a way that all its parts are easily accessible.
−
Do not
−
Do not
−
Do not
−
Do not
•
Recommended environmental conditions:
– Temperature: from 15° to 35° C / from 60° to 95°F.
– Humidity: from 20% to 80%.
Avoid installing the printer in a place where it is exposed to:
– Direct sunlight.
– Sudden changes in temperature or humidity.
Care
•
Do not remove the print head from the machine unless you wish to replace it.
•
Do not place heavy objects, clips or staples on the machine’s surfaces.
•
Do not pour liquids of any kind onto the machine.
•
Always keep the cover closed irrespective of whether the system is working or idle.
•
Avoid staring at the scanner lamps: these lamps produce an intense light which will not damage your eyesight but
may cause temporarily impaired vision.
place the machine on trolleys or unstable surfaces or supports.
place the machine close to or on top of radiators.
install the machine inside other systems without adequate ventilation.
use the machine near water, in other damp places or outdoor env ironments.
Preventive Maintenance 35
Page 36

Cleaning
Always unplug the machine from the power socket before proceeding to clean it.
•
Clean the document glass every day and whenever the need arises.
•
Clean the machine casing regularly to prevent dust accumulating on it.
•
Wipe with a soft, slightly damp, lint-free cloth.
Never
–
Never
–
use aerosol detergents.
spray or pour liquids directly onto the machine but onto the cloth.
36 Preventive Maintenance
Page 37

Printer Care Functions
Press
Press
INK LEVEL
When the LCD shows
the print heads.
Press
ALIGN PRINT HEADS
This function should be performed whenever you insert, remove or replace a print head (see
Heads
When the LCD shows this function, by pressing
Once the alignment function has been completed, the machine will exit automatically from the menu.
CLEAN PRINT HEADS
When the LCD shows this function, by pressing
cycle. During the operation, the LCD shows
Once the cleaning function has been completed, the machine will exit automatically from the menu.
TEST PRINT HEADS
When the LCD shows this function, press
shows the message
firmware version and the conditions of the black and colour print heads.
Once the page has been printed, the machine will exit automatically from the menu.
DIAGNOSTICS
When the LCD shows this function, it also shows the number of pages printed (COPIES COUNTER). If you press
the LCD shows SCANNER COUNTER (number of scans). If you press
version of the machine with the date (REL. X.XX V.XXX DD/MM/YY).
on the operator panel to access the menu. Continue to press until the LCD shows
to access the submenu, which contains five functions.
INK LEVEL
to exit from the menu.
).
PRINTING…
, by pressing
. The print test contains technical information about the printer emulation, the
on the operator panel, you can check the percentage of ink left in
on the operator panel, you can start the alignment procedure.
on the operator panel, you can execute a print head cleaning
CLEANING...
on the operator panel to print the test page. While printing, the LCD
.
again, the LCD will show the release and
PRINTER CARE
Replacing Print
.
,
Preventive Maintenance 37
Page 38

Eliminating Paper Jams
If the sheet is already outside the printing area:
1.
Remove the jammed sheet, pulling it gently forwards towards the output.
2.
Examine the sheets in the automatic sheet feeder and, if necessary, eliminate any crumpled or torn sheets.
3.
Repeat the paper loading procedure.
If the sheet is jammed inside one of the feeders:
1.
Cancel the current printing operation on the Printer Monitor Status card and suspend the ones present in the
printing queue.
2.
Turn off the printer and unplug it from the power socket.
3.
Remove the jammed sheet by pulling it gently from the rear of the feeder.
4.
Examine the sheets in the automatic sheet feeder and, if necessary, eliminate any crumpled or torn sheets.
5.
Repeat the paper loading procedure.
6.
Reconnect the printer to the power socket and turn it on again.
7.
Repeat the print command and reactivate those present in the printing queue.
For a description of the paper loading procedure, see
Loading Paper
.
38 Preventive Maintenance
Page 39

Transporting the Machine
If the machine has to be transported for any reason, it is important to take the following precautions:
•
Always make sure that the print carriage is in its rest position. To ensure that this is the case, always turn the
machine off
•
Unplug all cables.
•
If possible, pack the machine in its original packaging.
•
Take care not to drop the machine.
BEFORE
the PC.
Servicing
In any calls made to the technical support service, it is important to provide the following information:
•
Machine model,
•
serial number,
•
date of purchase.
Preventive Maintenance 39
Page 40

Troubleshooting
If you have had problems while you were setting up your multifunctional copier, check that you have followed the
instructions as given. If a repetition of the instructions is unsuccessful, see the appropriate topic in this section.
If you have problems operating your multifunctional copier, or are unable to perform the operation you require, first
check that you have followed correctly the instructions given in this manual. If, after repeating the procedure, you still
have a problem, consult the following
During normal operation, an error condition will be signalled on the LCD and/or by the corresponding light indicators
and/or an error message on your PC screen.
If you detect serious mechanical damage to or a failure in the multifunctional copier, do not attempt to repair
it yourself! CALL YOUR LOCAL HELPLINE.
Problem
Missing or damaged parts. Contact your retailer immediately.
Problems and solutions
Cause
table.
Solution
Multifunctional copier is not
powered (the quality and intensity
LED’s and the LCD are not on).
When you press the ON/OFF
switch on the multifunctional
copier, there is no reaction.
Printer care functions in the Printer
Monitor are not active.
Machine failure (whole or partial). System error. Switch off the multifunctional copier, wait a few seconds and then switch
Problems with paper
Multifunctional copier is not connected
properly to the power supply.
Multifunctional copier is not connected
properly.
Multifunctional copier is not connected
properly.
Check that the multifunctional copier is connected properly to the
•
electrical power supply socket.
Check that the multifunctional copier is switched on.
•
Check that the interface cable between the multifunctional copier and
•
the computer is connected correctly to both ports.
Check that there are no error messages indicated on the LCD/PC
•
screen or by any of the light indicators on the operator panel. If there
are, correct the error condition.
Check that you have configured your application correctly (see the
•
On-Line Guide loaded with your driver, and your application manual).
Try switching the multifunctional copier off and then on again.
•
If you are unable to correct an error condition, switch off the
•
multifunctional copier, disconnect it and call your local helpline.
Check that the interface cable between the multifunctional copier and the
computer is connected correctly to both ports.
the multifunctional copier on again.
If the failure condition persists, switch off and disconnect completely the
multifunctional copier and call your local helpline.
CHECK PAPER message on the
LCD.
CLEAR PAPER JAM message on
the LCD.
No paper. There is no paper in the paper tray.
Load paper, following the instructions given in “
Paper jam. If the sheet is already outside the printing area
1. Remove the jammed sheet, pulling it gently forwards towards the
output.
2. Examine the sheets in the automatic sheet feeder and, if
necessary, eliminate any crumpled or torn sheets.
3. Repeat the paper loading procedure.
Loading paper
”.
40 Troubleshooting
Page 41

If the sheet is jammed inside one of the feeders:
1. Cancel the current printing operation on the Printer Monitor Status
card and suspend the ones present in the printing queue.
2. Turn off the printer and unplug it from the power socket.
3. Remove the jammed sheet by pulling it gently from the rear of the
feeder.
4. Examine the sheets in the automatic sheet feeder and, if
necessary, eliminate any crumpled or torn sheets.
5. Repeat the paper loading procedure
6. Reconnect the printer to the power socket and turn it on again
7. Repeat the print command and reactivate those present in the
printing queue.
For a description of the paper loading procedure, see
Make sure that there is not too much paper in the input tray.
•
Check that the paper is positioned correctly in the input tray.
•
Check that the size and weight of the paper you are using are within
•
the limits allowed.
Make sure the correct paper size, type and source is selected in the
•
Paper/Output tab of the Printer Monitor and/or in the Features
menu.
Copy/print media is not loaded. The copy/print media you are using is:
1. too thick,
2. successive sheets are stuck
together,
3. has not been loaded correctly in
the input tray.
Copy/print media repeatedly jams
or the multifunctional copier tears
the corners.
2. The wrong size copy/ print media
Copied/Printed document is not
ejected.
More than one sheet of copy/ print
media is fed at a time.
1. The copy/print media is not held
correctly in the input tray.
is loaded.
3. The leading edge of the copy/print
media is damaged or bent, or the
media is not in perfect condition.
1. Multifunctional copier/ computer
switched off before copy/print
operation is completed.
2. Paper jam.
The media you are using has not been
fanned sufficiently.
Remove all the copy/print media from the input tray and:
1. Check that it is within the specifications indicated for the media type
you are using,
2. Fan it thoroughly before reloading it in the input tray,
3. Reload it in the input tray and close the margin guides so that it
feeds without being held too tight or too loose.
1. Make sure the lateral guide on input tray is positioned correctly
against the paper edges.
2. Load the correct copy/print media size in input tray OR select the
correct setting for the currently loaded paper using the Paper key on
the operator panel/in Properties in multifunctional copier printer
driver.
3. Remove the sheet(s) that have caused the jam; remove all the
media from the input tray; check for and removed damaged or
curled paper; reload media in input tray.
1. Switch on multifunctional copier/computer. In some cases, your
computer may still have the copy/print job queued. You will be
request to confirm OK to complete. Otherwise, you will have to
start the copy/print job from the beginning.
2. See previous item 3.
Remove all the copy/print media from the input tray and fan it thoroughly
before reloading it.
Loading Paper
.
Troubleshooting 41
Page 42

Printing on the media is crooked. Media has not been loaded correctly in
the input tray.
Problems with print head
Remove all the copy/print media from the input tray, then reload it,
closing the lateral guide so that it feeds without being held too tight or too
loose.
Lines or dots are missing from the
copied/printed characters.
The electrical contacts are dirty. Remove the print head and clean the electrical contacts both on the head
Copied/printed characters are faint. One or more of the print jets are
Print head is not inserted correctly in
the carriage.
obstructed.
Remove and re-insert the print head, making sure it is fixed correctly in
the carriage.
and in the carriage. Re-insert the head, fixing it correctly.
Perform the
Clean
function.
Problems when copying
No pages copied. Multifunctional copier not powered.
No paper in the input tray.
Shipment blocks/tape still in place. Remove blocks/tape.
Blank page copied. Protective tape still on the print head. Remove the protective tape covering the head nozzles.
Document to be copied is not face-
down on the document glass.
Print head is out of ink. The print head may need replacing. The best way to check this is to print
Settings made on operator panel
are not retained.
Copying job is taking too long. Best copy selected. Change the speed and quality of your copy job: Best is the slowest
Colour copying is selected, but the
The copier is not ready to operate. When you first switch on the multifunctional copier, it requires some time
The document glass is dirty. Dirty document glass slows down the copy process. Clean the glass and
Poor quality copies
Copies are faded or
colours are dull.
Copy Quality setting is inadequate. Press the Copy Quality button to select better copy quality.
Settings have not been memorised. To save your current settings as defaults:
document to be copied is black and
white.
Incorrect paper type setting.
Switch on your multifunctional copier.
Make sure there is paper in the input tray.
Make sure the document you are copying is placed print-side down on
the document glass.
a test page. If one or more of the colours do(es) not print, replace the
print head.
Remember to align the print head whenever you replace it.
1. Press the Menu button on the operator panel until “Default Settings”
appears,
2. Choose the appropriate settings
3. Press Select to memorise each setting,
4. Press Clear to exit from the menu.
The operator panel light indicators/LCD will now show the settings you
have made.
setting but has the highest quality. Draft is the fastest setting and has the
lowest quality.
If the copy job is already running, press the Clear button to cancel it.
Press the B/W Copy button.
to warn up.
The LCD will indicate when the multifunctional copier is ready to copy.
restart your job.
Make sure that the paper type selected on the front panel display is the
same as the type of paper actually loaded in your multifunctional copier.
42 Troubleshooting
Page 43

Colour Intensity setting is inadequate. Press the Colour Intensity button to select better colour intensity.
Print head needs replacing. Check the print head by printing the test page. If necessary, replace the
print head.
Remember to align the print head whenever you replace it.
Glass and/or under-side of copier cover
is/are dirty.
Poor quality original. Some types of originals, such as newsprint or newspaper photos do not
Repetitive patterns are
visible on the copy
Incorrect Paper Type setting Make sure that the paper type indicated on the LCD is the same as the
The print head jets may be clogged Run the Clean function: if the copy quality does not improve, remove and
Paper wrinkled and very wet
Page has very dark colours Press the Colour Intensity button on the operator panel to lighten the
White lines on the copy
Copied image seems to have
shifted or jumped
Copies streaked, smeared, or with
Document being copied is already a
copy, not an original.
Paper Type setting does not
correspond to the media loaded in the
input tray (e.g. Paper Type is
Transparent but Plain paper is loaded
in the input tray.)
The original has been folded. Countercrease the fold or place a book on top of the original to minimise
Copier cover was lifted or uneven
pressure was applied to it during
copying.
Copying on the wrong side of the paper Make sure to put the paper/print media is print-side down.
horizontal lines
Incorrect image placement on page
or edges cut off
Wrong enlargement ratio The enlargement ratio currently selected is making the copy too large or
Wrong paper size The paper size setting currently selected does not correspond to that
Copies are crooked Original not placed correctly on the
Lateral guide on the ASF is not position
Original not positioned correctly on
copier glass.
copier glass.
correctly against the paper/media
edges.
Clean the glass and/or the underside of the copier cover with a soft,
damp cloth.
copy well.
When material is reprinted, repetitive patterns may be visible on the
copy. Try to eliminate the patterns by reducing the copy size or by
placing the document at an angle on the glass.
type of paper actually loaded in your multifunctional copier.
clean the print head manually, then print a test page.
If necessary, replace the print head.
Remember to align the print head whenever you replace it.
Change the Paper Type setting OR load the input tray with paper
indicated by the current setting.
copy.
the fold.
Copy again, and do not to lift or press down on the copier cover while the
copy is being made.
Make sure the original is aligned both horizontally and vertically with the
scale at the edge of the document glass.
too small. Correct the setting.
loaded in the input tray. Load the correct paper size OR change the
setting.
Align the original correctly against the scale at the edge of the document
glass.
Position the guides correctly.
Troubleshooting 43
Page 44

Problems when printing
Print test did not run. Multifunctional copier not ready to print. Switch off the multifunctional copier, wait a few seconds and then switch
it on again. Repeat the selection from Menu using the operator panel or
click the appropriate button in the Printer Care tab in the Printer Monitor.
No paper in input tray.
The LCD shows CHECK PAPER.
Load paper/printing media in the paper tray, following the instructions
given in “
Loading paper
”.
Print head not inserted correctly or is
out of ink
The LCD shows INSERT PRINT HEAD.
Remove and/or re-insert the print head correctly, following the
instructions given in the Installation sheet, or in the “
heads
” paragraph.
Replacing the print
Print head contact/jets require cleaning. Run the Clean function from the Printer Monitor and/or clean the print
head contact/jets (see
Cleaning the print heads
).
No pages exit from the
multifunctional copier
No paper/printing media in the paper
Multifunctional copier produces a
blank page
Print head out of ink or print jets on
Incorrect text/image placement on
page:
Colours not aligned correctly
Printout is slanted
or skewed
Text or graphics are cut off at the
edges of the page
Incorrect paper size. Check that the document you are printing will fit on the paper size you are
Portrait / Landscape Check that the page orientation selected is the correct one.
Paper not held correctly. Make sure the adjustable lateral paper guide of the paper tray is closed
Multifunctional copier is not selected as
output device.
tray.
Print head still has its protective tape. Remove the print head from the multifunctional copier
Open the Printers folder, click the multifunctional copier icon and then,
from the File menu, click Set As Default.
The LCD shows CHECK PAPER.
Load paper/printing media, following the instructions given in “
paper
”.
Loading
and remove the
protective tape.
Always remove the protective tape from a new the print head
BEFORE inserting the head in the multifunctional copier. Failure to
do so may render the print head unusable and/or cause damage to
your multifunctional copier.
Try printing the test page to verify the print head condition, and if
head require cleaning.
Wrong page orientation. Check that the page orientation selected in your software program
Print head is not aligned correctly. Remember to align the print head whenever you replace it.
Non-approved paper type or paper not
held correctly.
Incorrect margin settings Make sure margin settings for the document do not exceed the print line
necessary replace the empty head .
matches the page orientation setting in the Properties dialog box of your
multifunctional copier driver, and that these both correspond to the page
size you are using.
Make sure that the paper is of a manufacturer-approved type and that it
is loaded correctly in the paper tray and that the adjustable lateral guide
is properly closed against the paper.
Load only
sure this type is selected in the corresponding Properties dialog
box in your multifunctional copier driver.
length for the paper size you are using.
using.
properly against the paper.
ONE
type of paper at a time in the paper tray and make
44 Troubleshooting
Page 45

Poor print quality:
Printout is faded or colours
are dull
Non-approved paper type or wrong
Low ink level Check the ink level in the print heads (in the Printer Care tab in the
Blocked print jet or dirty electrical
Colours are bleeding into each
Ink is smearing onto white (blank)
Printing on wrong side of media Make sure you are printing on the correct surface of the print media.
Too much ink printed If the printed page is wrinkling due to too much ink, try reducing the Print
Print jets dirty Check the print head condition. If necessary, run the Clean function to
Ink is not filling the text or graphics
completely
Print jets/electrical contacts dirty Check the print head condition. If necessary, run the Clean function to
Low ink level Check the ink level in the print head. If necessary, replace the print
Character outlines in the text are
not smooth
Non-approved paper type
Wrong Print Quality setting
Paper Type setting
contacts on the print head
Wrong/incompatible Paper Type/Print
other
Quality settings
Document handled before ink was
areas
completely dry
Wrong Paper Type selected Check that you have selected the correct Paper Type setting for the type
You are not using a TrueType font
Unless you are printing draft copies, you should select the Normal or
Quality print quality setting in the Properties dialog box of your
multifunctional copier.
Check that the Paper Type setting selected in the Properties dialog box
of your multifunctional copier driver corresponds to the paper/media you
are using.
Always use manufacturer-approved paper types and printing media.
Printer Monitor). Replace the print head if necessary.
Run the Clean function to clear the print head jets and/or clean the print
head contacts.
Make sure that Paper Type and Print Quality settings are compatible.
Some Paper Type settings (such as Transparency) and Print Quality
settings (such as Best) require more ink than others. For example, if you
are printing on transparencies, make sure you have chosen
Transparencies as your Paper Type.
Always use manufacturer-approved paper types and printing media.
Always give the printed document time to dry. If necessary, remove it
from the output tray as soon as it exits from the multifunctional copier
and leave it to dry elsewhere before handling it.
Always use manufacturer-approved paper types and printing media.
Quality setting.
clear the jets.
of print media you are using.
Always use manufacturer-approved paper types and printing media.
clear the jets and/or clean the contacts.
head.
Remember to align the print heads whenever you replace them.
Check the type of font you are using in your document. Using TrueType
fonts you can ensure that your multifunctional copier is able to print
smooth character outlines. When selecting a font for your document, look
for the TrueType icon.
Paper that is heavily textured or does not accept ink well can cause
graphics and text to print poorly.
Always use manufacturer-approved paper types and printing media.
Troubleshooting 45
Page 46

White lines appear between
Print head is not aligned Align the print head.
adjacent black and colour areas, or
black and colour overlap
Page content is incomplete/
incorrect
Meaningless characters printed
Fault in document file
Multifunctional copier/computer
Wrong fonts printed
Font is not sized correctly Assic Make sure you correctly format the fonts you're using. E.g.: in a
Colours not reproduced correctly
Media/setting mismatch Check that the media on which you are printing is that selected in the
Wrong Image Setting selected
Printing job is taking too long Best (Quality) printout selected Change the speed and quality of your print: Best (Quality) is the slowest
Wrong paper type selected If you selected the wrong paper type, it may slow down the print process.
Another printer is selected Check that your multifunctional copier is selected as the current printer.
Open the Printers folder, click the multifunctional copier icon and then,
from the File menu, click Set As Default.
Check that your document file is not corrupted.
communication problem
Font in document is not handled by the
multifunctional copier or is not a
TrueType font.
Low ink level Check the ink level in the colour print head. If one or more of the colours
Try turning the multifunctional copier off for a few seconds; delete all print
jobs from the print queue on your computer. Switch on the multifunctional
copier and try printing again. If this doesn't correct the problem, turn it
and the computer off for a few seconds, turn them both back on
(multifunctional copier first), and then try printing again.
Check whether the font that is printing incorrectly is available in your
software program (by looking in the Text Font drop-down list) and that it is
a TrueType font. When selecting a font, always look for the TrueType
icon.
paint program, format the words in the font size you want; do not enlarge
them by dragging and sizing.
have run out, you must replace the colour print head.
Remember to align the print heads whenever you replace them.
driver settings.
Greyscale may be selected in the multifunctional copier Properties
•
dialog box. To print in colour, change this setting.
The hue or tone of colour is not correct. Select Automatic in Image
•
Settings in the multifunctional copier Properties dialog box.
setting but has the highest quality. Draft is the fastest setting and has the
lowest quality.
Select the paper type setting that corresponds to the content of the input
tray OR remove the paper currently in the tray and load that
corresponding to the paper type setting.
Problems when scanning
Preview of the scanned document
does not appear on screen.
Original not placed correctly on the
Shipment block/tape still in place.
Copy/print job is running. Wait for the copy or print job to be completed before scanning.
Place the original face down and align it correctly against the scale at the
scanner glass.
edge of the document glass.
Remove block/tape.
46 Troubleshooting
Page 47

Multifunctional copier not selected as
the Input device or wrong scanner
selected.
Multifunctional copier is not connected
properly.
Scan quality is poor
Printout is faded or colours
Scanner lamp is too dim. The scanner lamp requires replacing.
are dull
Multifunctional copier is not connected
properly.
Glass and/or under-side of scanner
cover is/are dirty.
Poor quality original. Some types of originals, such as newsprint or newspaper photos do not
Repetitive patterns are visible
Wrong printer type specified. Make sure that your multifunctional copier is selected as your current
when the scanned picture is
printed
Incorrect picture type selected. Your scanner application allows you to differentiate between image types.
Document being scanned is not an
original.
Diagonal lines
look ragged
Wrong printer type specified. Make sure that your multifunctional copier is selected as your current
Original not positioned correctly on the
scanner glass.
Select multifunctional copier as the default scanner.
Check that the interface cable between the multifunctional copier and the
computer is connected correctly to both ports.
Call your local helpline. DO NOT attempt to change the lamp yourself.
Check that the interface cable between the multifunctional copier and the
computer is connected correctly to both ports.
Clean the glass and/or the underside of the scanner cover with a soft,
damp cloth.
scan well.
printer. If you are printing to a printer other than multifunctional copier,
you must select that printer type within the scanning software.
Always select the type that corresponds to or most closely fits the image
you wish to scan. E.g. If the original picture was identified as a drawing,
select Photograph as its picture type and then print the picture to see if
this setting improves the quality.
Note: More memory is needed for a photograph than a drawing, and the
photograph may include areas of grey that were not in the original
drawing.
Try to eliminate the patterns by reducing the copy size or by placing the
document at an angle on the glass.
Position the original correctly, aligning it with the scale at the edge of the
glass.
printer. If you are printing to a printer other than multifunctional copier,
you must select that printer type within the scanning software.
Note: It may not be possible for your scanner application to
eliminate ragged edges when scanning for a low-resolution printer
or for the screen.
Scanned picture on screen is not
very good
Poor quality original. Your scanner application may not be able to recognise the characters
Scanner cover open. The scanner cover must be closed the entire time you are scanning.
Document being scanned is not an
original.
Try to eliminate the patterns by reducing the copy size or by placing the
document at an angle on the glass.
and process them correctly. You may see joined characters in the
scanned document. Joined characters are two or more characters that
appear as one, such as when an “m” appears in place of “rn”. This
problem occurs when the page has a coloured background or the font
creates tightly spaced characters (for example, Times Roman.)
Troubleshooting 47
Page 48

Glass and/or under-side of scanner
cover is/are dirty.
Poor screen image. To display pictures as accurately as possible on your screen, the screen
Clean the glass and/or the underside of the scanner cover with a soft,
damp cloth.
resolution should be a high number of colours (for example, 256 colours).
To change the screen resolution, see your computer settings in Control
Panel (in My Computer/Main of Program Manager).
Note: The screen image is not always an accurate representation of
the printed picture. Try printing your picture to see if the quality is
better than the screen.
Scanned image lacks detail when
Incorrect settings. Try selecting a different picture type or a different print or scan resolution.
printed.
Something on the page is missing
or incorrect.
Poor character recognition
Wrong picture is being scanned
Moving selection border in the preview
Glass and/or under-side of scanner
Poor quality original.
Unusual fonts or mixed fonts and sizes
in the original document.
Poor contrast in the original document. Documents with grey text or black text on a grey background may not
Missing text Text colour in documents, particularly blue, yellow and most pastels, can
Wrong picture on glass.
Original picture or page moved or
removed from the glass
area outlines the wrong picture
cover is/are dirty.
You may also see split characters in the scanned document. Split
characters occur when one character is read as two or more, such as iii
for m. This can occur when several iterations of photocopying reduce the
contrast between the printed text and the page. To fix the problem,
photocopy the page to darken it before scanning.
If the original you are trying to scan has unusual or very small fonts, your
scanner application may process them inaccurately.
scan very well because of poor contrast. Try lightening the document by
using the Copy Intensity button on the operator panel and then copying
the document. Re-scan the copy using your scanner application.
cause the text to blend into the background, and the text may not be
processed correctly by your scanner application. It may not be possible
to scan and edit this text.
Check to make sure the document you want to scan is placed print-side
down on the glass and aligned correctly with the scale at the glass edge.
Ensure that the document does not move or that it is not removed from
the glass between the time you preview scan and when you click the
Scan button. Accurate scanning depends on the page remaining in the
same place.
The selection border allows you to indicate the area you want scanned
and reduces the scanning time. It also helps you manage the size of the
files created when you save scanned pictures.
Make sure the selection border in the preview area outlines the correct
picture. If a selection border is not drawn, the whole page is scanned
during the final scan.
Clean the glass and/or the underside of the scanner cover with a soft,
damp cloth.
48 Troubleshooting
Page 49

Scan job is taking too long. Wrong cable. Call your local dealer.
Large colour original. The larger and more coloured the original document is, the longer it will
take to scan. In this case, the file will be bigger and will occupy more
space on the PC’s hard disk; for example:
A 1"x1" colour picture at 300 dpi occupies about 270 kbytes,
•
The same colour picture at 600 dpi occupies about 1Mbytes,
•
The same colour picture at 4800 dpi occupies about 69 Mbytes.
•
Troubleshooting 49
Page 50

Status messages
Multifunctional copier status
Stand-by mode
stand-by COPIES: No of copies
stand-by and power saver condition COPIES: No of copies
sleep
Copy mode
copying COPYING
Print mode
PC connected COPIES: No of copies
Printing PC PRINTING
Copy operation started during a print job NOT ALLOWED
Copying while a print job is paused NOT ALLOW ED
COPY button pressing during a print job NOT ALLOWED
Scan mode
PC connected PC SCANNING
SCANNING PC SCANNING
Message on LCD
scale % Type of paper
scale % Type of paper
LCD off
scale % No in progress/quantity
scale % Type of paper
Error messages
Multifunctional copier status
Stand-by mode
Change print head NEW HEAD?
No print head CHECK PRINT HEAD
Other brand of print head CHECK PRINT HEAD
Copy mode
Paper jam PAPER JAM
No paper/paper misfeed CHECK PAPER
Wrong print head WRONG PRINT HEAD
CLEAR pressed PLEASE WAIT
Print mode
Change print head NEW HEAD?
Paper jam PAPER JAM
No paper/paper misfeed CHECK PAPER
Wrong print head WRONG PRINT HEAD
Message on LCD
- = NO + = YES
PRESS CONFIRMATION
ABORTING COPY
- = NO + = YES
PRESS CONFIRMATION
PRESS CONFIRMATION
50 Troubleshooting
Page 51

Product characteristics
Basic features
Description
Output Technique
Print heads
Paper Handling
Automatic Feeder Capacity
(A4/Letter size)
Paper Type
Paper Weight
Paper Size
Graphic Resolution
Product Certification
Recommended Operating
Environment
Sound level
Desk-top colour copier, flatbed scanner and thermal (bubble) ink-jet printer
with PC software drivers
Thermal ink jet, with water-resistant ink
Black non-refillable (optional)
4-colour non-refillable
Automatic through automatic feeder
Plain paper: up to 50 sheets (80 g/m
Envelopes: up to 5 envelopes (80 g/m
Plain office paper
Transparencies
High resolution glossy/coated papers
Envelopes
Note cards
T-shirt transfers
Banner
Single sheets: 60 to 135 g/m
Envelopes: 75 to 90 g/m
Note cards: 110 to 200 g/m
Special printing media (Coated, Glossy): up to 150 g/m
Transparencies: 90 - 125 µm
Single sheets: A4, A5, US Letter, US Legal, US Executive, A6, B5, Folio,
Statement
Envelopes: COM-10, DL, C6, C5, B6, B5 Env elope, Monarch
Note cards: 4 x 6 in, 5 x 8 in, A6
User-defined: min. 4 x 5.8 in; max. 8.5 x 14 in
Up to 1200 x 1200 dpi
For USA and Canada
Safety regulations:
FCC
cCSAus IEC 1950
For EEC:
Safety regulations
“CE” marking
GS Tüv
Electromagnetic compatibility
“CE” marking
EN 55022 Class B
EN 50082-1 (1997)
EN 61000-3-2
EN 61000-3-3
Temperature: 60 to 95
Relativ e Humidity: 20% - 80%
< 52 dB in high quality printing mode
2
- 21 lb. paper)
2
paper)
2
(16 - 36 lbs.)
2
(20 -24 lb.)
2
(29 - 53 lbs.)
2
(40 lb.)
:
:
o
F - 15 to 35 oC
Product characteristics 51
Page 52

Electrical
Characteristics
Physical
Characteristics
Copier module
Copying Speed
Counter
Multicopies
Power supply voltage
115 VAC - 240 VAC – 15% + 10%; 50 - 60 Hz
Power absorbed
multifunctional copier off - max. 2,63 watt
multifunctional copier in sleep mode – 11 watt
typical printer operation – 23 watt
typical scanner operation - 31 watt
Height 9,05 in(230mm)
Width 13,78 in(350mm)
Depth 5,90 in (150mm)
Weight 12,1 lbs. (5,5 kg)
Black: Up to 7 copies per minute
Colour Up to 3 copies per minute
Total number of pages printed
up to 50
:
:
Printer module
Throughput
Printer Memory
Interfaces
N.B.: this value may vary depending on the print mode, the software application
and/or the type of computer used.
Windows environment: up to 7 pages per minute (black)
2 Mbytes incorporated RAM
0.5 Mbytes input buffer
Parallel (Centronics) IEEE 1284
USB
Scanner module
Technology
Scanning method
Max. scan size
Software modules
CIS
Flatbed - 1 pass
A4 / US Letter
Twain driver
52 Product characteristics
Page 53

Consumables
Oliv etti consumables can be purchased in your local point of sale or from authorised Olivetti dealer nearest you.
For information about accessories, you can call Olivetti Tecnost dealers directly, in individual countries.
Print Heads
Print heads can be ordered with the following part numbers:
Type Part number
XP11: black single-block print head, normal capacity B0288 Q
XP01: black siingle-block print head, high capacity B0217 G
XP13: 4-colour single-block print head, normal capacity B0315 A
XP03: 4-colour single-block print head, high capacity B0261 L
A print head case (code B0251 J) is available for users who wish to use a black print head as well as the colour print
head provided.
Print Supports
In order to obtain the best printing quality, both colour and black and white, use the print supports that can be ordered
with the following part numbers:
Type
Oliv etti Lexikon common paper B0187 T
Oliv etti Lexikon JP High Resolution coated paper B0093 Y
Oliv etti Lexikon JP Premium High Resolution coated paper B0249 Y
Oliv etti Lexikon JP High Resolution Transparencies B0036 W
Oliv etti Lexikon Photo Glossy (polyester) paper B0035 V
Oliv etti Lexikon JP Premium paper B0090 H
Oliv etti Lexikon JP Iron-on transfers B0094 Z
Oliv etti Lexikon sticker labels B0185 Z
Oliv etti Lexikon Business Cards B0177 G
Oliv etti Lexikon Greeting Cards B0175 E
Oliv etti Lexikon audio cassette cards B0176 F
Part number
Consumables 53
 Loading...