

Page 1
Page 2
PUBLICATION ISSUED BY:
Olivetti Lexikon, S.p.A.
Documentazione
77, Via Jervis - 10015 Ivrea (Italy)
Copyright © 2000, Olivetti
All rights reserved
Copia9915F_Front.p65 13/04/00, 14.122
Page 3
COPIA 9915D
COPIER OPERATION MANUAL
cover1-eng.p65 12/04/00, 12.011
Page 4
Caution
This product contains a low power laser device. To
ensure continued safety do not remove any cover or
attempt to gain access to the inside of the product.
Refer all servicing to qualified personnel.
VAROITUS!
LAITTEEN KÄYTTÄMINEN MUULLA KUIN TÄSSÄ
KÄYTTÖOHJEESSA MAINITULLA TAVALLA
SAATTAA ALTISTAA KÄYTTÄJÄN
TURVALLISUUSLUOKAN 1 YLITTÄVÄLLE
NÄKYMÄTTÖMÄLLE LASERSÄTEILYLLE.
VARNING
OM APPARATEN ANVÄNDS PÅ ANNAT SÄTT ÄN I
DEN-NA BRUKSANVISNING SPECIFICERATS,
KAN ANVÄN-DAREN UTSÄTTAS FÖR OSYNLIG
LASER-STRÅLNING, SOM ÖVERSKRIDER
GRÄNSEN FÖR LASERKLASS 1.
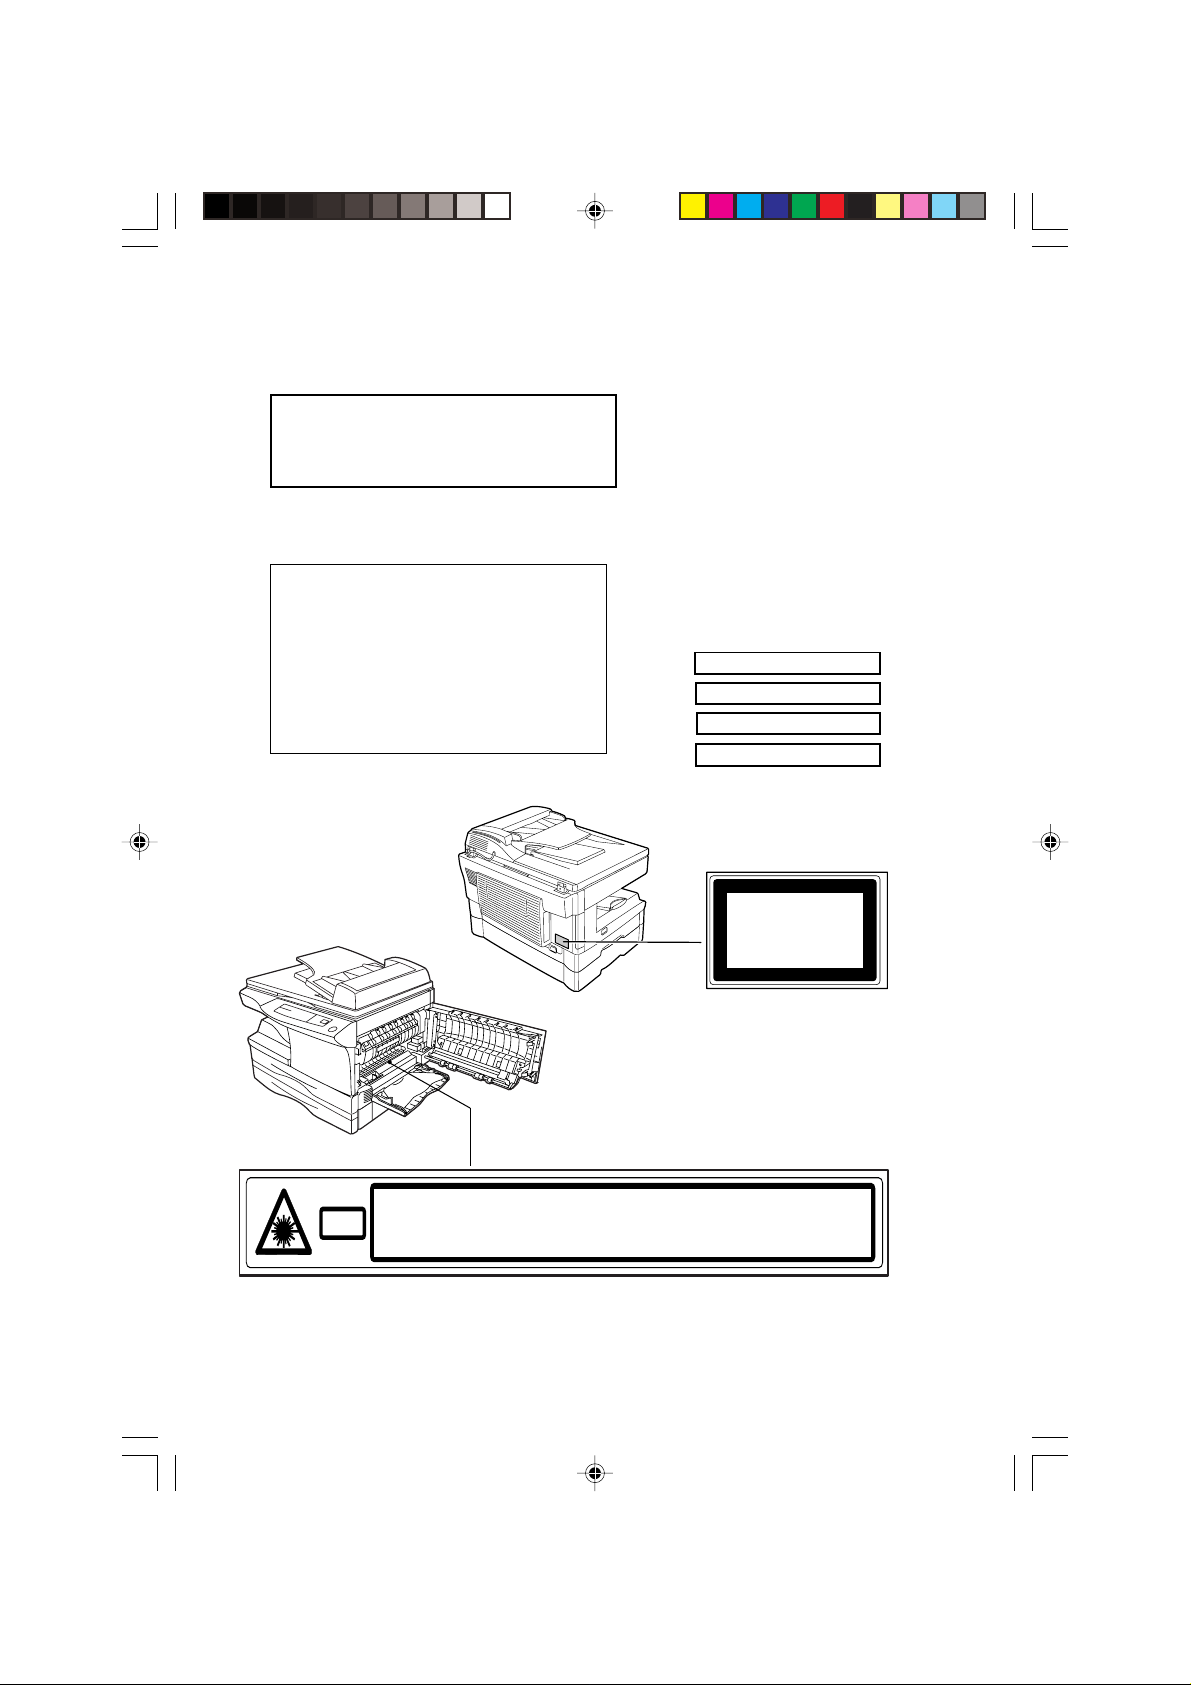
CLASS 1 LASER PRODUCT
LASER KLASSE 1
LUOKAN 1 LASERLAITE
KLASS 1 LASERAPPARAT
Class 1
Laser Product
Laser Klasse 1
INVISIBLE LASER RADIATION WHEN OPEN AND INTERLOCKS DEFEATED.
CAUTION
AVOID EXPOSURE TO BEAM.
UNSICHTBARE LASERSTRAHLUNG WENN ABDECKUNG GEÖFFNET UND
VORSICHT
Laserstrahl
cover2-eng.p65 12/04/00, 14.481
SICHERHEITSVERRIEGELUNG ÜBERERÜCKT. NICHT DEM STRAHL AUSSETZEN.
USYNLIG LASERSTRÅLING VED ÅBNING, NÅR SIKKERHEDSAFBRYDERE ER
ADVARSEL
UDE AF FUNKTION. UNDGA UDSAETTELSE FOR STRÅLING.
USYNLIG LASERSTRÅLING NÅR DEKSEL ÅPNES OG SIKKERHEDSLÅS BRYTES.
UNNGÅ EKSPONERING FOR STRÅLEN.
ADVERSEL
OSYNLIG LASERSTRÅLNING NÄR DENNA DEL ÄR ÖPPNAD OCH SPÄRRAR ÄR
VARNING
URKOPPLADE. STRÅLEN ÄR FARLIG. BETRAKTA EJ STRÅLEN.
AVATTAESSA JA SUOJALUKITUS OHITETTAESSA OLET ALTTIINA NÄKYMÄTÖNTÄ
VARO!
LASERSÄTEILYLLE. ÄLÄ KATSO SÄTEESEEN.
Page 5
Required in Appendix ZB of BS 7002 (En 60 950) – United Kingdom
MAINS PLUG WIRING INSTRUCTIONS
The mains lead of this equipment is already fitted with a mains plug which is either a
non-rewireable (moulded) or a rewireable type. Should the fuse need to be replaced,
a BSI or ASTA approved fuse to BS1362 marked
or and of the same rating as
the one removed from the plus must be used.
Always refit the fuse cover after replacing the fuse on the moulded plug. Never use
the plug without the fuse cover fitted.
In the unlikely event of the socket outlet in your home not being compatible with the
plug supplied either cut-off the moulded plug (If this type is fitted) or remove by
undoing the screws if a rewireable plug is fitted and fit an appropriate type observing
the wiring code below.
DANGER: The fuse should be removed from the cut-off plug and the plug destroyed
immediately and disposed of in a safe manner. Under no circumstances shold the
cut-off plug be inserted elsewhere into a 13A socket outlet as a serious electric shock
may occur.
To fit an appropriate plug to the mains lead, follow the instructions below:
IMPORTANT: The wires in this mains lead are coloured in accordance with the
following code:
GREEN-AND-YELLOW: Earth
BLUE: Neutral
BROWN: Live
As the colours of the wires in this mains lead may not correspond with coloured
markings identifying the terminals in your plug, proceed as follows:
The wire which is coloured GREEN-AND-YELLOW must be connected to the terminal
in the plug which is marked with the letter E, or by the safety earth symbol
, or
coloured green or green-and-yellow.
The wire which is coloured BLUE must be connected to the terminal which is marked
with the letter N or coloured black.
The wire which is coloured BROWN must be connected to the terminal which is
marked with the letter L or coloured red.
If you have any doubt, consult a qualified electrician.
In some areas, the "POWER" switch positions are marked "I" and "0" on the copier
instead of "ON" and "OFF".
CAUTION: For a complete electrical disconnection, pull out the main plug.
The socket-outlet shall be installed near the equipment and shall be easily
accessible.
cover2-eng.p65 12/04/00, 14.482
Page 6

paginabianca.p65 05/05/00, 11:261
Page 7

CONTENTS
1 GETTING STARTED
INTRODUCTION 3
CAUTIONS 4
MAIN FEATURES 5
PART NAMES 6
OPERATION PANEL 7
SYSTEM INSTALLATION 8
CAUTIONS ON HANDLING 9
LOADING COPY PAPER 10
2 MAKING COPIES
NORMAL COPYING 13
-Stream feeding mode 17
EXPOSURE ADJUSTMENT/PHOTO COPYNG 18
REDUCTION/ENLARGEMENT/ZOOM 19
BYPASS FEED (including special paper) 20
TWO-SIDED COPYING 21
SPECIAL FUNCTIONS
3
DESCRIPTION OF SPECIAL FUNCTIONS 23
TONER SAVE MODE 24
USER PROGRAMS 25
- Setting the power save modes, auto clear time, and
stream feeding mode 25
DISPLAYING TOT AL NUMBER OF COPIES 26
contents-eng.p65 12/04/00, 14.431
1
Page 8

SUPPLIES AND USER MAINTENANCE
4
TD CARTRIDGE REPLACEMENT 27
DRUM CARTRIDGE REPLACEMENT 29
USER MAINTENANCE 30
– Cabinet 30
– Original table and original cover 31
– Transfer charger 31
– When system is not in use 32
SYSTEM TROUBLE?
5
MISFEED REMOV AL 33
– A Misfeed in the paper feed area 34
– B Misfeed in the fusing area 35
– C Misfeed in the transport area 36
– D Misfeed in the lower paper feed area 37
– E Misfeed in the R-SPF 38
MAINTENANCE REQUIRED 39
TROUBLESHOOTING 40
STATUS INDICATORS 41
AUTOMA TIC EXPOSURE ADJUSTMENT 42
APPENDIX
6
SPECIFICATIONS 43
SUPPLIES 45
– Types and sizes of copy paper 45
– Supply part numbers 46
7
INDEX
2
contents-eng.p65 13/04/00, 10.092
Page 9
GETTING STARTED
This chapter provides basic information for using the system.
1
INTRODUCTION
This system has been designed to provide intuitive operating ease while requiring
a minimum amount of space. To get full use of all system features, be sure to
familiarize yourself with this manual and the system.
For quick reference during system use, keep this manual in a handy location.
This system can be used as a laser printer. This manual describes only
the system features. For description of the printer feature, see the
separate manual.
Conventions used in this manual
In this manual, the following icons are used to provide the user with information
pertinent to the use of the system.
Warns the user that injury to the user or damage to the system
may result if the contents of the warning are not properly
followed.
Cautions the user that damage to the system or one of its
components may result if the contents of the caution are not
properly followed.
Notes provide information relevant to the system regarding
specifications, functions, performance, operation and such, that
may be useful to the user.
Getting started
Indicates a letter displayed in the display. (Please refer to page
41 for a detailed explanation).
cap1-eng.p65 12/04/00, 11.203
3
Page 10
1
Getting started
CA UTIONS
Follow the cautions below when using this system.
●
The fusing area is hot. Exercise care in this area when removing
misfed paper .
●
Do not look directly at the light source. Doing so may damage
your eyes.
●
Do not switch the system rapidly on and off. After turning the
system off, wait 10 to 15 seconds before turning it back on.
●
System power must be turned off before installing any supplies.
●
Place the system on a firm, level surface.
●
Do not install the system in a humid or dusty location.
●
When the system is not used for long time, for example for
consecutive holidays, turn the power switch off and remove the
power cord from the outlet.
●
When moving the system, be sure to turn the power switch off and
remove the power cord from the outlet.
●
Do not cover the system with a dust cov er, cloth or plastic film while
the power is on. Doing so may prevent heat radiation, damaging the
system.
Use of controls or adjustments or performance of procedures other
than those specified herein may result in hazardous radiation
exposure.
4
cap1-eng.p65 12/04/00, 11.204
As an ENERGY STAR P artner, OLIVETTI has determined that this
product meets the
R
ENERGY STAR guidelines f or energy efficiency .
R
Page 11

MAIN FEA TURES
1 Powerful laser capabilities
●
High speed 15 PPM laser printing.
●
The latest PCL is included.
●
600 dpi quality printing.
2 High-speed laser copying
●
Since warm-up time is zero, copying can be started immediately after the power
switch is turned on.
●
First-copy time is only 9.6 seconds (normal mode).
●
Copying speed is 15 copies/min., which adapts to business use, allowing
improvement of working efficiency .
3 High-quality digital image
●
In addition to the automatic exposure mode, the manual exposure can be adjusted
in five steps.
●
The photo mode copying function allows clear copying of delicate halftone original
images such as monochrome photos and color photos.
4 Substantial copying functions
●
Zoom copying from 50% to 200% in 1% increments can be performed.
●
Continuous copying of maximum 99 sheets can also be performed.
●
Automatic document feeding through the reversing single pass feeder (R-SPF).
●
T oner sav e mode reduces toner consumption by approximately 10%.
●
User programs allow setting/modification of functions f or customer’s needs.
5 Scan once/ Print many
●
This system is equipped with a 1-page memory buffer. This memory allows the
system to scan an original once only and make up to 99 copies. This f eature allows
for improved w orkflow, reduced operating noise from the system and reduced w ear
and tear on the scanning mechanism. This feature pro vides for a higher reliability .
6 Environmentally friendly design
●
Paper output tray is housed in the system for space saving.
●
Preheat mode and auto power shut-off mode are provided to reduce power
consumption in standby mode.
1
Getting started
cap1-eng.p65 12/04/00, 11.205
5
Page 12
1
()
Getting started
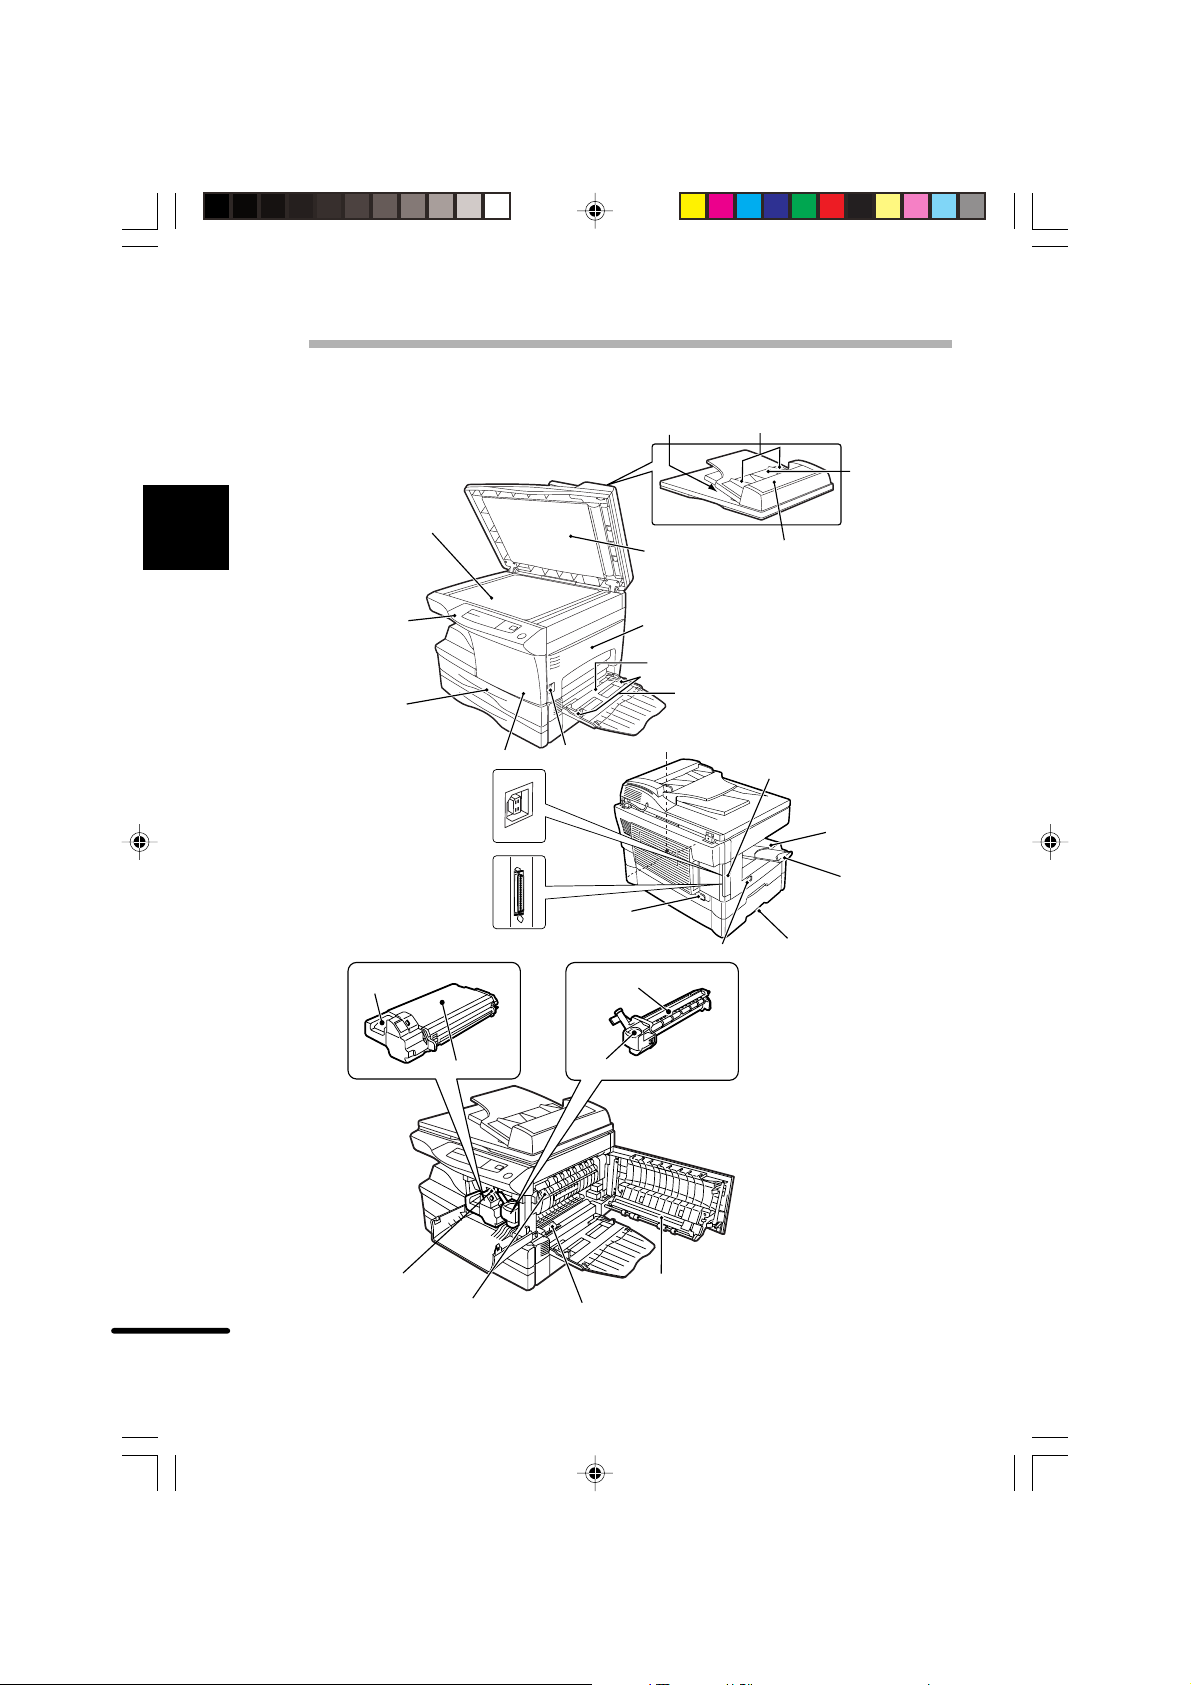
P AR T NAMES
Original table
R-SPF exit area (DM-1505)
Original cover
Original guides
Document
feeder tray
Feeding roller cover
Operation
panel
Paper tray
TD cartridge lock release
button
Front cover
TD cartridge
Side cover
open button
Power cord socket
Drum cartridge
Drum cartridge handle
Side cover
Bypass tray
Bypass tray guides
Handle
Power switch
PCL printer interface
Paper output
tray
Paper output tray
extension
Handle
Paper feed roller
6
cap1-eng.p65 12/04/00, 11.206
Fusing unit
release lever
Transfer charger
Charger cleaner
Page 13

OPERA TION P ANEL
AA
A
A5 A4
A
A5
A4
A4
B4
1
1 Original to copy key and indicators
2 Exposure mode selector key and indicators
Use to sequentially select the exposure modes:
AUTO, MANUAL or PHOTO. Selected mode is shown
by a lit indicator. (p. 18)
3 Light and dark keys and exposure indicators
Use to adjust the MANUAL or PHOTO exposure
level. Selected exposure level is shown by a lit
indicator. (p. 18)
Use to start and terminate user program setting.
(p. 25)
4 Alarm indicators
5 R-SPF indicator (p. 15)
6 R-SPF misfeed indicator (p. 38)
7 Copy ratio selector key and copy ratio
8 Zoom indicator (p. 19)
: Drum replacement required indicator
(p. 29)
: Misfeed indicator (p. 33)
: TD cartridge replacement required indicator
(p. 27)
: Maintenance indicator (p. 39)
indicators
Use to sequentially select preset reduction/
enlargement copy ratios.
Selected copy ratio is shown by a lit indicator.
(p. 19)
3456
2
T wo-sided copies from
one-sided originals.
T urn on Long Edge or
T urn on Short Edge can
be selected.
T wo-sided copies from
two-sided originals. (Can
be selected only when
the R-SPF is used)
Single-sided copies from
two-sided originals. (Can
be selected only when
the R-SPF is used)
u
i
7
89
o
9 Copy ratio display (%) key (p. 19)
0 Display
Displays the specified copy quantity, zoom
copy ratio, user program code, and error
code.
q ON LINE indicator
Lights up when the machine is used as a
printer.
w ON LINE key
Changes between the on-line and off-line
modes.
e DAT A indicator
Indicates that the printer is receiving or
processing print data.
r Power save indicator
Lights up when the system is in a power
save mode. (p. 23, 25)
u Tray select key
Use to select a paper feed station (paper
tray or bypass tray). (p. 10, 20)
i Paper feed location indicators
Light up to show the selected paper feed
station.
o Zoom keys
Use to select any reduction or enlargement
copy ratio from 50% to 200% in 1%
increments. (p. 19)
p Copy quantity keys
●
Use to select the desired copy quantity
(1 to 99). (p. 17)
●
Use to make user program entries.
(p. 25)
ü Clear key
●
Press to clear the display , or press during
a copy run to terminate copying. (p. 17)
●
Press and hold down during standby to
display the total number of copies made
to date. (p. 26)
Print key and ready indicator
+
●
Copying is possible when the indicator is
on.
●
Use to set a user program.
0
p
q
r
w
e
1
Getting started
+
ü
cap1-eng.p65 12/04/00, 11.207
7
Page 14
1
Getting started
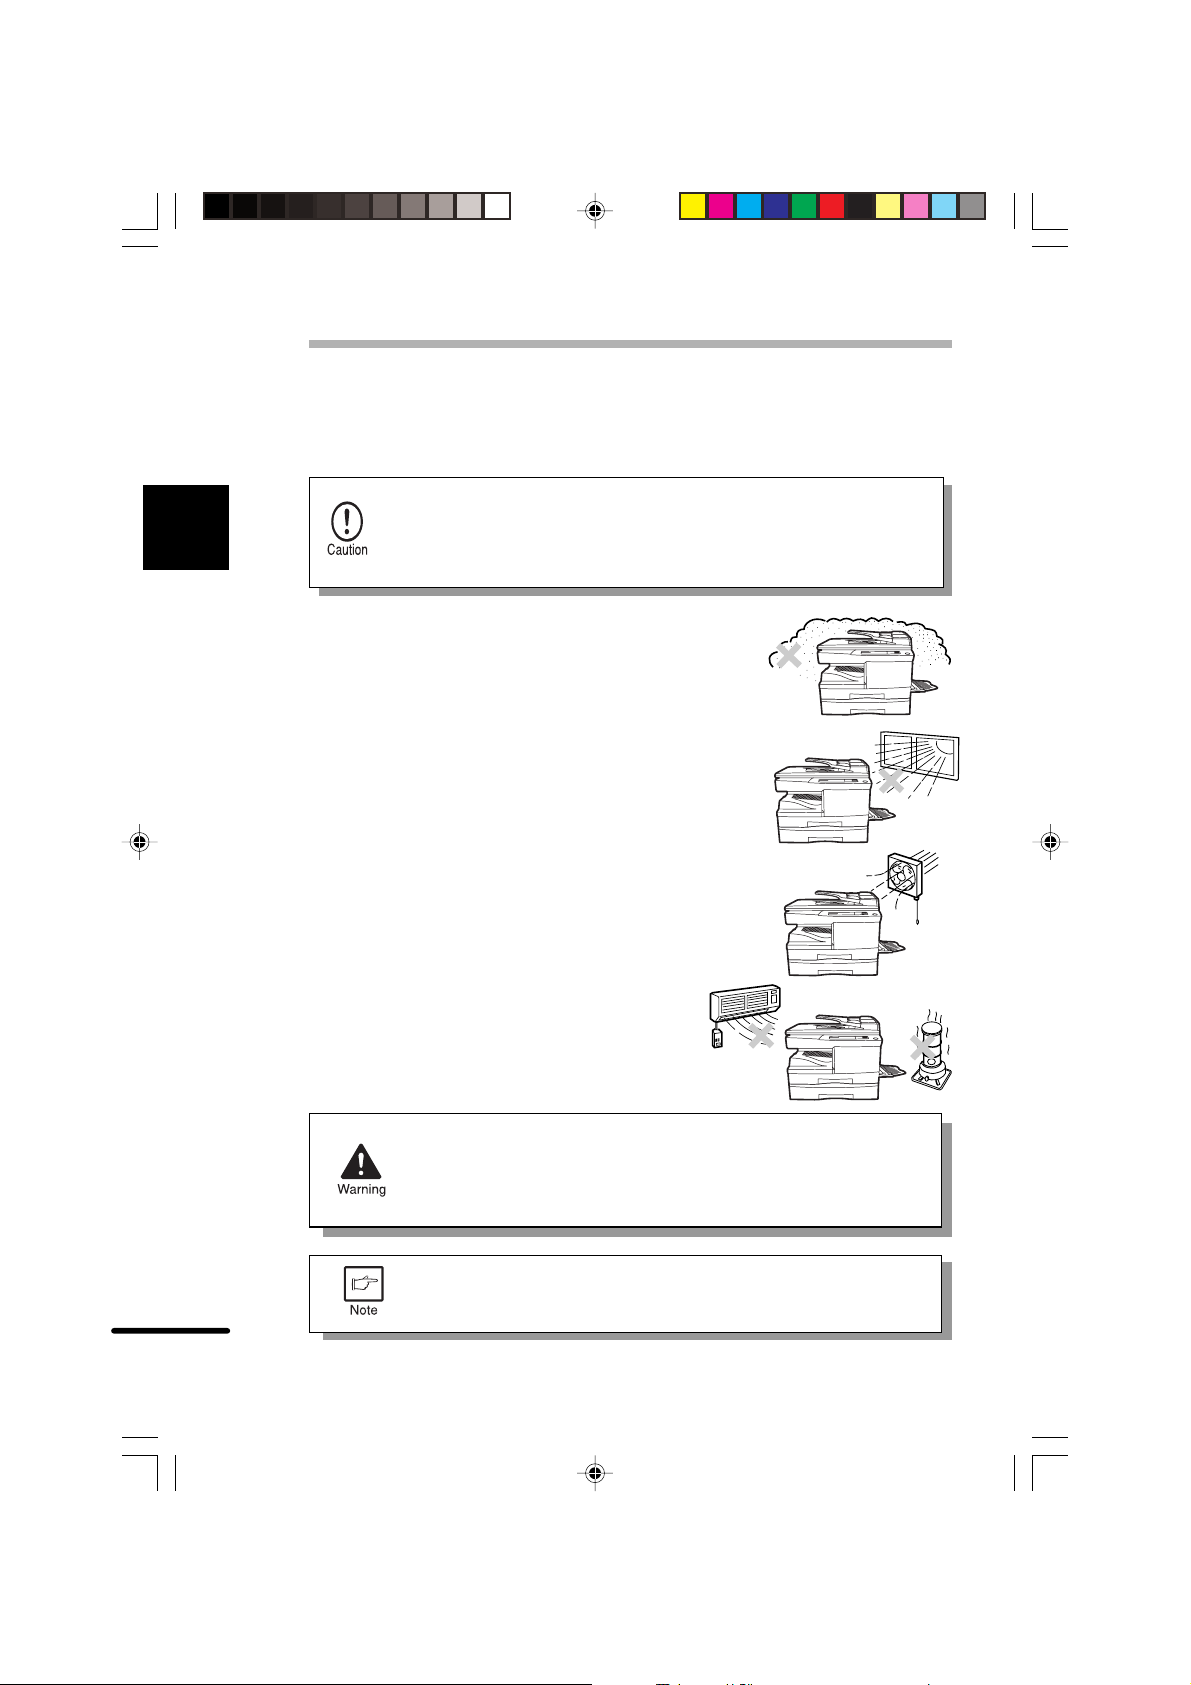
SYSTEM INST ALLA TION
Improper installation may damage the system. Please note the following during
initial installation and whenever the system is moved.
If the Copia 9915D is moved from a cool place to a warm place,
condensation may form inside the system. Operation in this condition
will cause poor copy quality and malfunctions. Leave the system at
room temperature for at least 2 hours before use.
Do not install your Copia 9915D in areas that are:
●
damp, humid, or very dusty
●
exposed to direct sunlight
●
poorly ventilated
●
subject to extreme temperature
or humidity changes, e.g., near
an air conditioner or heater.
The system should be installed near an accessible power outlet
for easy connection.
Be sure to connect the power cord only to a power outlet that
meets the specified voltage and current requirements.
Also make certain the outlet is properly grounded.
Connect the system to a power outlet which is not used for other electric
appliances. If a lighting fixture is connected to the same outlet, the light
may flicker .
8
cap1-eng.p65 12/04/00, 11.208
Page 15
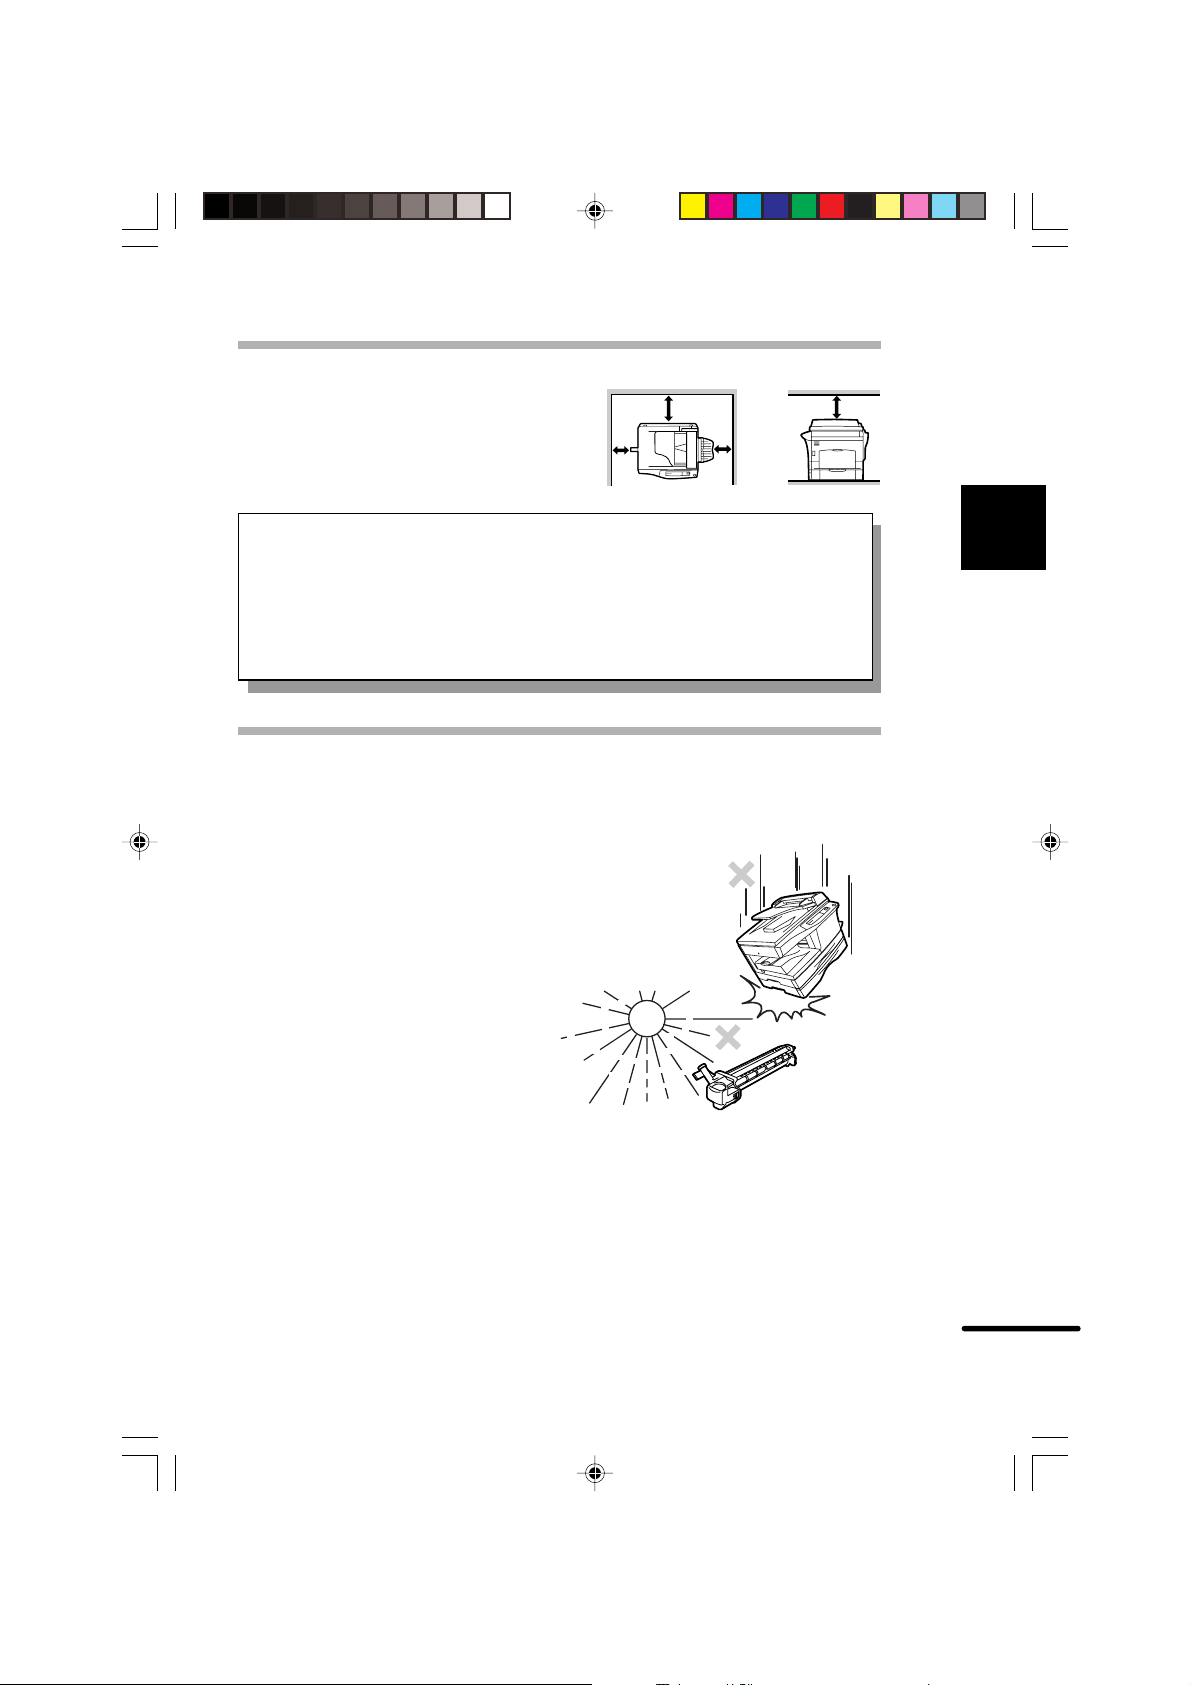
20cm
20cm
10cm
10cm
Be sure to allow the required
space around the machine
for servicing and proper
ventilation.
SYSTEM INST ALLA TION
A small amount of ozone is produced within the system during operation.
The emission level is insufficient to cause any health hazard.
NOTE:
The present recommended long term exposure limit for ozone is 0.1 ppm
(0.2 mg/m3) calculated as an 8 hr. time-weighted average concentration.
Howev er , since the small amount that is emitted may ha ve an objectionable
odor, it is advisable to place the system in a ventilated area.
CA UTIONS ON HANDLING
Be careful in handling the system as follows to maintain the performance of this
system.
Do not drop the system,
subject it to shock or strike it
against any object.
Do not expose the drum
cartridge to direct sunlight.
Doing so will damage the surface
(green portion) of the drum
cartridge, causing poor print
quality.
1
Getting started
Store spare supplies such as drum cartridges and TD cartridg es in a
dark place without removing from the package before use.
If they are exposed to direct sunlight, poor print quality may result.
Do not touch the surface (green portion) of the drum cartridge.
Doing so will damage the surface of the cartridge, causing poor print quality.
9
cap1-eng.p65 12/04/00, 11.209
Page 16

LO ADING COPY P APER
This system is equipped with two paper trays. Load copy paper into the
two paper trays.
1
Getting started
Raise the handle of the paper tray and pull the paper tray out until it
stops.
Adjust the paper guides on the paper tray to the copy paper width and
length.Squeeze the lever of paper guide
match with the width of the paper.
Move paper guide
to the appropriate slot as marked on the tray.
and slide the guide to
Paper guide B
10
cap1-eng.p65 12/04/00, 11.2010
Paper guide A
Page 17
LOADING COPY PAPER
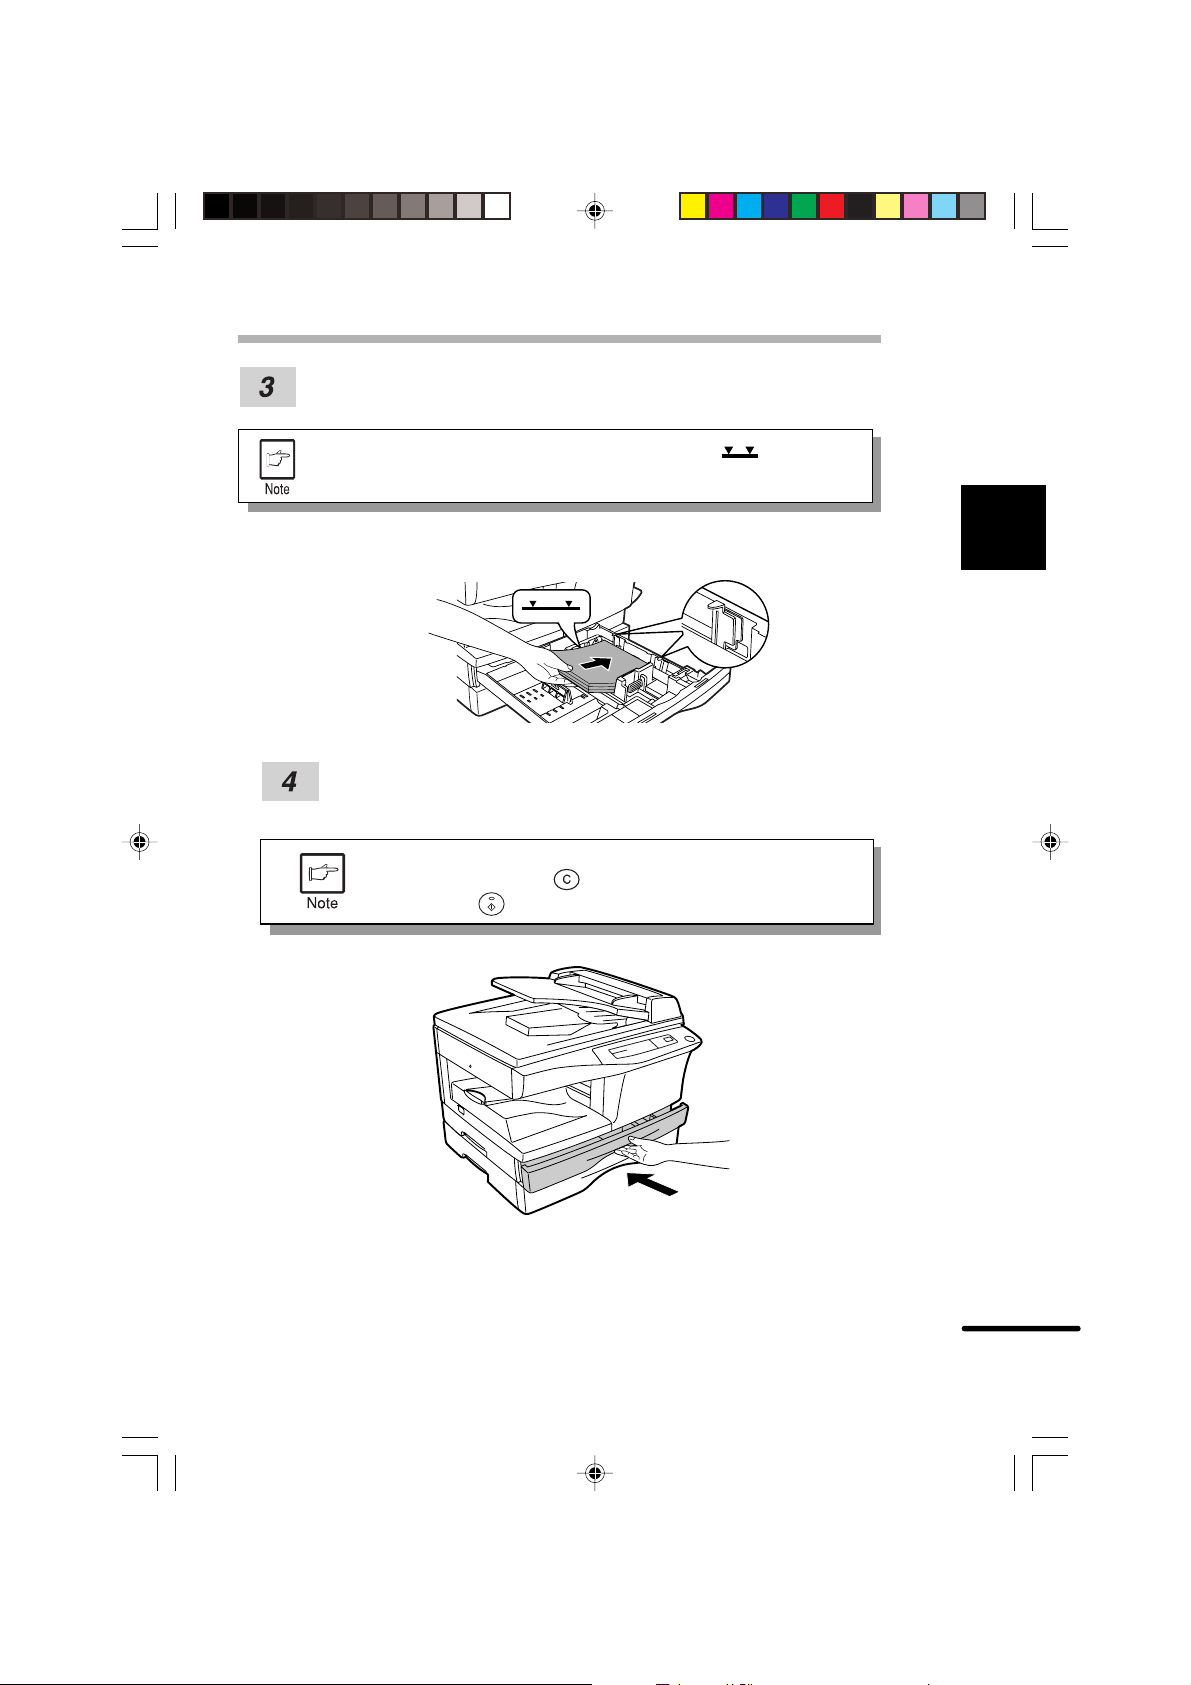
Fan the copy paper and inser t it into the tray. Make sure the edges go
under the corner hooks.
Do not load paper above the maximum height line ( ). Exceeding
the line will cause a paper misfeed.
Gently push the paper tray back into the system.
After loading copy paper , to cancel the blinking “P” without restarting
copying, press the clear (
and the ready (
) indicator will light up.
) key . The “P” in the display will go out
1
Getting started
cap1-eng.p65 12/04/00, 11.2111
11
Page 18

1
Getting started
Notes
12
cap1-eng.p65 12/04/00, 11.2112
Page 19

MAKING COPIES
This chapter describes basic copying functions and some other copying functions
using the bypass tray.
NORMAL COPYING
The system has a document input stations- a reversing single pass feeder (RSPF) for automatic document feeding and an original table for manual handling
of documents. The R-SPF are designed to hold up to 30 originals measuring from
A5 to B4 in the weight range of 52 to 90g/m2.
When copying from the R-SPF, two-sided originals can be copied automatically
without having to manually turn them over.
Automatic two-sided copying can also be performed with this system. When
copying from one-sided originals to two-sided copies, copying orientation can be
selected between Turn on Long Edge and Turn on Short Edge.
A
A A
A A
A
Turn on Long Edge Turn on Short Edge
●
When making two-sided copies from the original table, only A4 size
copies can be made. When making two-sided copies from the R-SPF,
letter, legal, and inv oice sizes can be used. Non-standard size paper
cannot be used.
●
When making two-sided copies from the R-SPF , a m ultiple number of
copies cannot be set.
●
When making two-sided copies, the bypass tray cannot be used.
●
When using two-sided invoice size originals from the R-SPF, be sure
to place them in the landscape orientation. Otherwise, an original
misfeed will occur .
A
A
2
Making copies
cap2-eng.p65 12/04/00, 11.3513
13
Page 20

2
Making copies
NORMAL COPYING
Use the tray select ( ) key to select the desired tray. Ensure that
paper of the desired size is set in the paper tray. See page 10, LO ADING
COPY PAPER. When copying onto paper larger than A4 size, pull out
the paper output tray extension.
Press the Print key.
The ready (
●
The system will enter a power save mode once the set time has
elapsed without any system operation after the last copy of a run is
made or power is turned on. To copy from the power save modes,
proceed as described on page 23.
The settings of the power save modes can be modified. See page 25,
USER PROGRAMS.
●
The system will return to the initial settings a preset amount of time
after the last copy is made. The preset amount of time (auto clear
time) can be changed. See page 25, USER PROGRAMS.
) indicator will light up.
Place the original(s) face up in the document feeder tray or face down
on the original table.
A. When using the R-SPF:
(1) Make sure that no original is left on the original table.
(2) Adjust the original guides to the size of originals.
(3) Set the originals face up in the document feeder tray.
14
cap2-eng.p65 12/04/00, 11.3514
Page 21

NORMAL COPYING
●
Before loading originals in the document feeder tra y , be sure to remove
any staples or paper clips from them.
●
Before placing curled or wavy originals into the document feeding
tray , be sure to flatten them. If not, original misfeeds ma y result.
●
The R-SPF ( ) indicator on the operation panel will light up. If this
indicator does not light up, the originals are not properly set the
R-SPF is not properly closed.
●
Badly damaged originals may misfeed in the R-SPF. It is recommended
that such originals be copied from the original table.
●
Special originals such as transparency film should not be fed through
the R-SPF, but should be placed directly on the original table.
●
Image loss (max. 4mm) can occur at the leading and trailing edges of
the copies. Also image loss (max. 4.5mm in total) can occur along the
other edges of the copies. It can be 6mm max. at the trailing edge of
the second copy of two-sided copying.
2
Making copies
B. When using the original table:
(1) Open the original cover.
(2) Place an original face down on the original table. Align it with
the original scale and the centering (
cover. Go then to step 6.
Original scale
mark
When copying a book or an original which has been folded or a
crumpled original, press down the original cover slightly. If the
original cover is not securely closed, the copies may be striped
or blurred.
cap2-eng.p65 12/04/00, 11.3515
) mark. Close the original
15
Page 22

2
Making copies
NORMAL COPYINGNORMAL COPYING
NORMAL COPYING
NORMAL COPYINGNORMAL COPYING
Select the desired original to copy mode.
AA
..
When copying in the one-sided to one-sided mode:When copying in the one-sided to one-sided mode:
A
.
When copying in the one-sided to one-sided mode:
AA
..
When copying in the one-sided to one-sided mode:When copying in the one-sided to one-sided mode:
Ensure that no indicator is lit among the original to copy
indicators.
B.B.
When copying in a one-sided to two-sided mode:When copying in a one-sided to two-sided mode:
B.
When copying in a one-sided to two-sided mode:
B.B.
When copying in a one-sided to two-sided mode:When copying in a one-sided to two-sided mode:
Use the original to copy key to select the desired one-sided to
two-sided copying mode (Turn on Long Edge or Turn on Shor t
Edge). See the illustrations on page 13.
C.C.
When copying in the two-sided to two-sided mode:When copying in the two-sided to two-sided mode:
C.
When copying in the two-sided to two-sided mode:
C.C.
When copying in the two-sided to two-sided mode:When copying in the two-sided to two-sided mode:
Use the original to copy key to select the two-sided to two-sided
copying mode. The originals must be set in the R-SPF before this
mode can be set (step 3).
D.D.
When copying in the two-sided to one-sided mode:When copying in the two-sided to one-sided mode:
D.
When copying in the two-sided to one-sided mode:
D.D.
When copying in the two-sided to one-sided mode:When copying in the two-sided to one-sided mode:
Use the original to copy key to select the two-sided to one-sided
copying mode. The originals must have been set in the R-SPF in
step 3.
A book, an original which has been
folded, or a crumpled original
A
Ensure that the desired paper tray is selected.
●
Paper sizes that can be used in the duplex mode are A4, letter, legal,
and invoice. (When copying from the original table in the duplex mode,
only A4 size paper can be used.)
●
The bypass tray cannot be used in the duplex mode.
1616
16
1616
cap2-eng.p65 03/05/00, 16:2716
B
C
B
D
Page 23

NORMAL COPYING
Set the number of copies using the two copy quantity ( , ) keys.
●
Press the clear ( ) key to clear an entry if a mistake is made.
●
A single copy can be made with the initial setting, i.e., when “0” is
displayed.
●
Press the left copy quantity key to
set the tens digit from 1 to 9.
●
Press the right copy quantity key
to set the units digit from 0 to 9. This
key will not change the tens digit.
Tens digit Units digit
Press the print ( ) key.
●
T o display the n umber of copies made during a continuous run, press
the left copy quantity key.
●
To stop copying in the middle of a run, press the clear ( ) key.
Copying will stop and the number in the display will be reset to “0”.
2
Making copies
When making two-sided copies from the original table, place the second
original on the original table and press the print (
●
To cancel two-sided copying after scanning the first original, press
the clear (
) key.
) key.
Stream feeding mode
The stream feeding mode allows easy operation of continuous copying from the
R-SPF. If the stream feeding mode has been enabled using user program No.4,
the R-SPF ( ) indicator will blink for approximately 5 seconds after the last original
has been fed by the R-SPF. While this indicator is blinking, any new originals
placed in the document feeder tray will be fed and copied automatically. If the
stream feeding mode has been disabled, the print (
each time the originals are set even immediately after completion of a copy run
from the R-SPF. The default setting of the stream feeding mode is “ON”. See page
25, USER PROGRAMS.
cap2-eng.p65 12/04/00, 11.3517
) key must be pressed
17
Page 24

2
Making copies
NORMAL COPYING
EXPOSURE ADJUSTMENT/PHOT O COPYING
Copy density adjustment is not required for most originals in the automatic
exposure mode. To adjust the copy density manually or to copy photographs, the
exposure level can be adjusted in five steps manually.
Set the original and check the copy paper size.
Use the exposure mode selector key to select either the manual ( )
mode or photo (
Use the light ( ) and dark ( ) keys to adjust the exposure level.
If exposure level 2 is selected, the two left-handmost indicators for that
level will light up simultaneously. Also, if level 4 is selected, the two
right-handmost indicators for that level will light up simultaneously.
) mode.
Set the number of copies using the copy quantity ( , ) keys and
press the print (
18
cap2-eng.p65 12/04/00, 11.3518
) key.
Page 25

NORMAL COPYING
REDUCTION/ENLARGEMENT/ZOOM
Three preset reduction ratios and two enlargement ratios are available for
selection. The zoom function enables copy ratio selection from 50% to 200% in
1% increments.
Set the original and check the copy paper size.
Use the copy ratio selector key and/or zoom ( , ) keys to select the
desired copy ratio.
●
T o verify a zoom setting without changing the z oom ratio, press and
hold down the copy ratio displa y (%) key . When the key is released,
the display will return to the copy quantity display.
●
T o reset the ratio to 100%, press the copy r atio selector key repeatedly
until the 100% indicator lights up.
To select a preset copy ratio : To select a zoom ratio :
Preset reduction and enlargement When a zoom ( or ) key is
ratios are: pressed, the ZOOM indicator
50%, 70%, 81%, 141%, and 200% will light up and the zoom ratio
will be displayed in the display.
2
Making copies
To decrease or increase the zoom ratio rapidly, press and hold
down the
reduction or enlargement ratios. To move beyond these ratios,
release the key and then press and hold it down again.
Set the number of copies using the copy quantity ( , ) keys and
press the print (
cap2-eng.p65 12/04/00, 11.3619
or key. Ho wever the value will stop at the preset
B
B
) key.
19
Page 26

BYPASS FEED (including special paper)
The bypass tray can automatically feed up to 50 sheets of standard copy paper
and can also feed special papers such as transparency film and labels one sheet
at a time. Copy paper measuring from A6 to A4 and in the weight range of 52 to
128 g/m2 can be used in this tray. (For paper weighing from 104 to 128 g/m2, A4 is
the maximum size.)
Place the original(s) face up in the document feeder tray or face down
on the original table.
2
Making copies
The original image must be smaller than the paper or media for
copying. If the original image is bigger than the paper or media,
this may cause smudges on the edges of the copies.
Open the bypass tray and extend the tray.
To close the bypass tray,
perform step1 and then step
2 in the illustration and push
the round projections at the
right of the tray until the tray
clicks into place.
Set the paper guides to the copy paper width. Insert the copy paper
(print face down) all the way into the bypass tray.
●
Paper must be fed narrow side into the feed slot.
●
T ransparency film, labels, and other special purpose papers must be
fed individually .
●
When copying onto transparency film, remov e each copy promptly.
Do not let copies stack up.
●
When loading an envelope, make sure that it is straight and flat.
20
cap2-eng.p65 12/04/00, 11.3620
Page 27

TWO-SIDED COPYING
Print face
Press the tray select ( ) key to select the b ypass tra y. Set the number
of copies if using standard copy paper. Press the print (
) key.
2
TWO-SIDED COPYING
Two-sided copying can be made on this system using the bypass tray.
Example:The following two originals will be copied onto two sides of copy paper.
Face up or face down
Face up
First original
Place the first original on the original table and make a copy. The first
copy can be made using either the paper tray or the bypass tray.
Replace the first original with the second original on the original table
and close the original cover. Make sure that the first and second originals
are oriented in the same way on the original table.
Second original
Face down
Making copies
cap2-eng.p65 12/04/00, 11.3621
21
Page 28
2
Making copies
TWO-SIDED COPYING
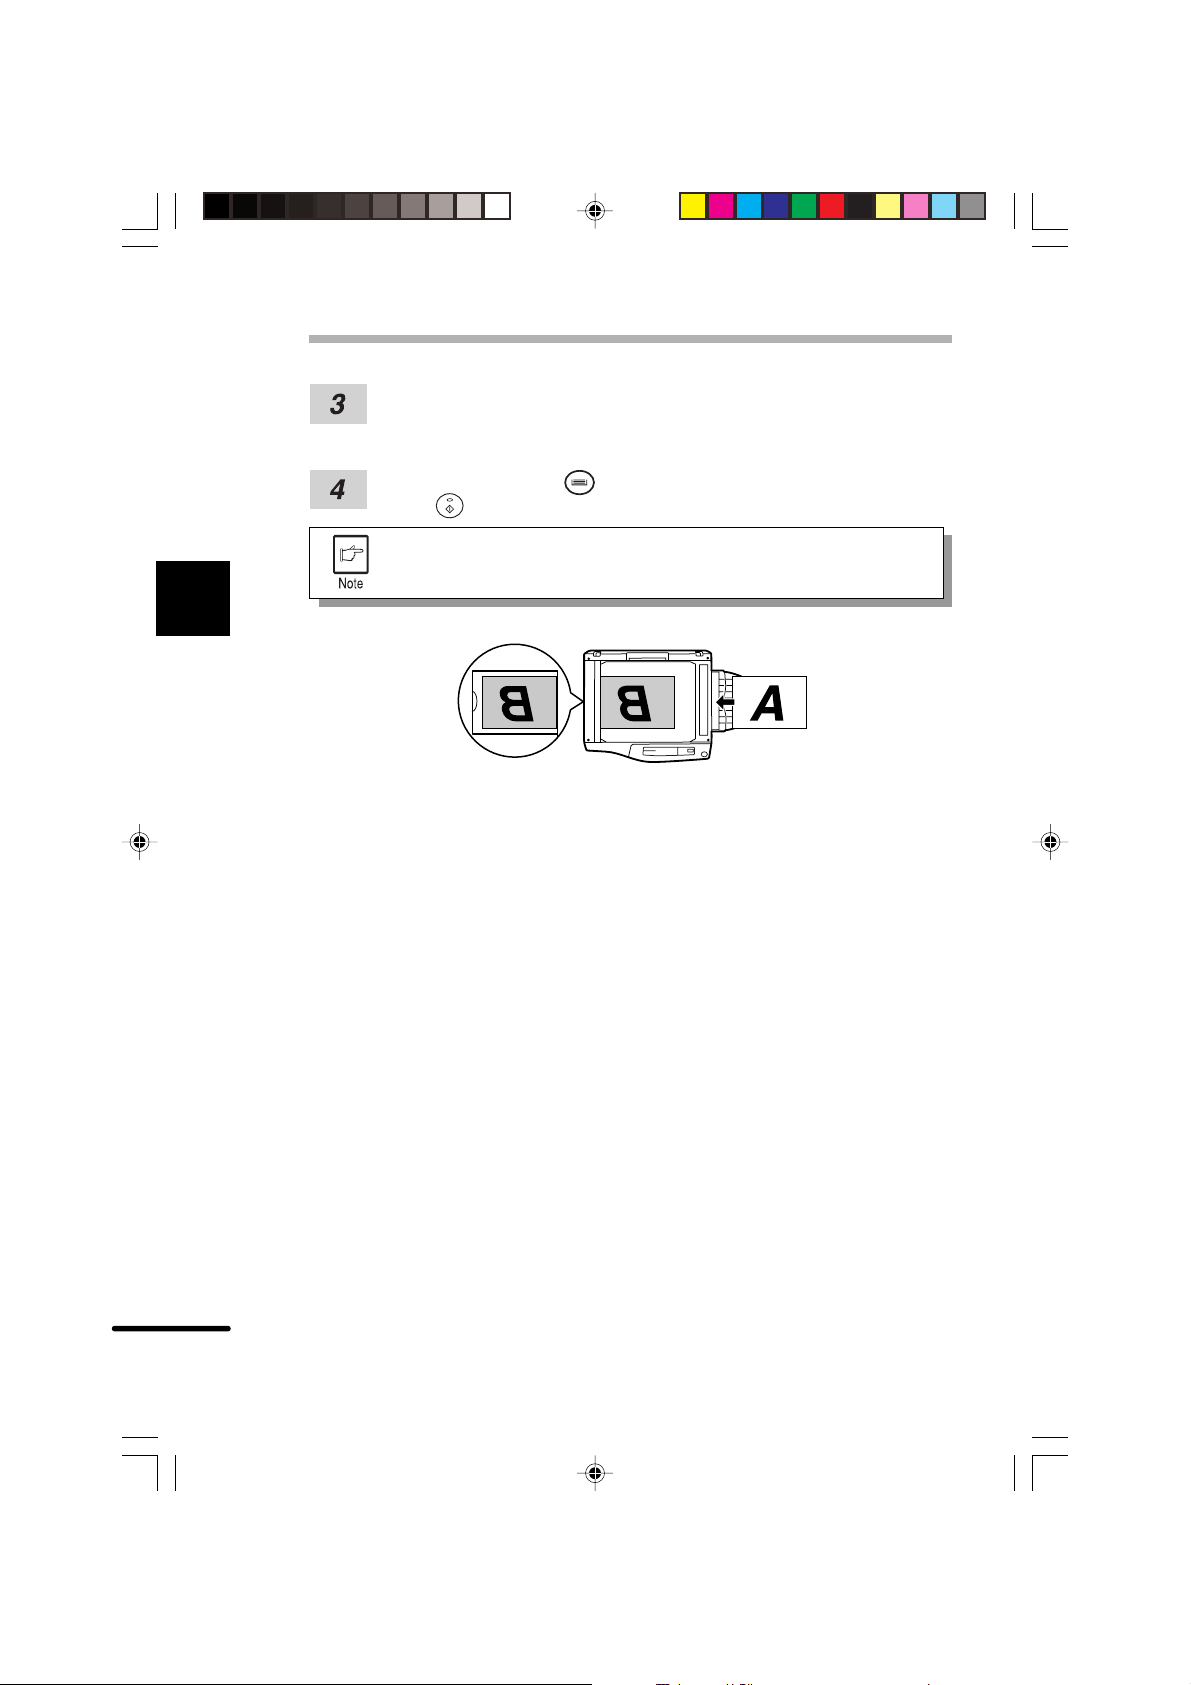
For tablet binding, turn the first copy over left to right as shown below.
For booklet binding, turn the first copy over top to bottom (not shown).
Feed the first copy into the bypass tray.
Press the tray select ( ) key to select the bypass tray and press the
print (
) key.
Be sure to feed the copy paper one sheet at a time.
22
cap2-eng.p65 12/04/00, 11.3622
Page 29

SPECIAL FUNCTIONS
DESCRIPTION OF SPECIAL FUNCTIONS
Toner save mode
Reduces toner consumption by approximately 10%.
Power save modes (page 25)
The system has two power save modes of operation: preheat mode and auto
power shut-off mode.
●
Preheat mode
When the system enters the preheat mode, the power save (
and other indicators will remain on or off as before. In this condition, the fuser in the
system is maintained at a lower heat level, thereby saving power. To copy from the
preheat mode, make desired system selections and press the print (
normal copying procedure.
●
Auto power shut-off mode
When the system enters the auto power shut-off mode, the power save (
will light up and other indicators will go out. The auto power shut-off mode sa ves more
power than the preheat mode but requires a longer time bef ore starting copying. T o copy
from the auto power shut-off mode, press the print (
system selections and press the print (
) key using the normal copying procedure.
) indicator will light up
) key using the
) indicator
) key. Then make desired
3
Special functions
Auto clear (page 25)
The system returns to the initial settings a preset amount of time after the last copy
is made. This preset amount of time (auto clear time) can be changed.
Stream feeding mode (page 25)
For description of the stream feeding mode, see page 17.
cap3-eng.p65 12/04/00, 11.4423
23
Page 30
3
Special functions
3
T ONER SA VE MODE
Press the exposure mode selector key to select the manual ( )
mode.
Press and hold down the exposure mode selector key for approximately
5 seconds. The manual (
indicator will begin to blink. The exposure indicator marked “5” will light
up, indicating the standard toner mode is active.
To enter the toner save mode, press the light ( ) key.
The exposure indicator marked “1” will light up, indicating the toner
save mode is selected.
) indicator will go out and the photo ( )
Press the exposure mode selector key twice. The photo ( ) indicator
will stop blinking and the AUTO indicator will light up steadily. The toner
save mode is now active.
To return to the standard mode, repeat the procedure but use
the dark (
24
cap3-eng.p65 12/04/00, 11.4524
) key to select exposure level “5” in step 3.
Page 31

USER PROGRAMSUSER PROGRAMS
USER PROGRAMS
USER PROGRAMSUSER PROGRAMS
USER PROGRAMSUSER PROGRAMS
USER PROGRAMS
USER PROGRAMSUSER PROGRAMS
The user programs allow the parameters of certain functions to be set, changed,
or canceled as desired.
Setting the power save modes, auto clear time, and streamSetting the power save modes, auto clear time, and stream
Setting the power save modes, auto clear time, and stream
Setting the power save modes, auto clear time, and streamSetting the power save modes, auto clear time, and stream
feeding modefeeding mode
feeding mode
feeding modefeeding mode
Press and hold down the light ( ) and dark ( ) keys simultaneously
for more than 5 seconds until all the alarm indicators (
blink and “– –” appears in the display.
Use the left copy quantity ( ) key to select a user program number.
The selected number will blink in the left side of the display.
Press the print ( ) key. The entered program number will be steadily
lit and the currently selected parameter number for the program will
blink on the right side of the display.
Select the desired parameter using the right copy quantity ( ) key.
The entered parameter number will blink on the right of the display.
, , and )
3
Special functions
Program Mode Parameters
No.
1 Auto clear time 0 OFF 1 30 sec. 2 60 sec.
3 90 sec. 4 120 sec. 5 10 sec.
2 Preheat mode 0 30 sec. 1 60 sec. 2 90 sec.
3 Auto power shut- 0 2 min. 1 5 min. 2 15 min.
off timer 3 30 min. 4 60 min. 5 120 min.
4 Stream feeding 0 OFF 1 ON
mode
5 Auto power shut- 0 OFF 1 ON
off mode
Factory default settings are indicated with an asterisk (*).
cap3-eng.p65 23/05/00, 08:3525
*
*
*
*
*
2525
25
2525
Page 32

Press the print ( ) key. The right-hand number in the display will be
steadily lit and the entered value will be stored.
To change the setting or to set another mode, press the clear
(
) key. The system will return to step 2.
Press the light ( ) or dark ( ) key to return to the normal copy mode.
3
Special functions
3
DISPLA YING TO T AL NUMBER OF COPIES
Use the following procedure to display the total number of copies.
Press the clear ( ) key to reset the display to zero.
Press and hold down the clear ( ) key for approximately 5 seconds.
The total number of copies will appear in two steps, each with three
digits.
Example: Total number of copies is 1,234.
26
cap3-eng.p65 12/04/00, 11.4526
Page 33

SUPPLIES AND USER
MAINTENANCE
This chapter describes how to replace the TD cartridge and the drum cartr idge.
Be sure to use only genuine OLIVETTI parts and supplies.
TD CARTRIDGE REPLA CEMENT
The TD cartridge replacement required ( ) indicator will light up when toner is
needed. If copying is continued while the
become lighter until the system stops and the indicator begins blinking. Replace
the old TD cartridge by following the procedure given below.
●
After the system stops, it may be possible to make a few more copies
by taking the TD cartridge out of the system, shaking it horizontally ,
then reinstalling it. If copying is not possible after this operation, replace
the TD cartridge.
●
During a long copy run of a dark original, the ready ( ) indicator
may blink, the
toner is left. The system will f eed toner up to 2 minutes and then the
ready (
copying.
indicator light up, and the system stop, even though
) indicator will light up. Press the print ( ) key to restart
indicator is lit, copies will gradually
4
Supplies and user maintenance
Ensure that the bypass tray is open and then open the side cover while
pressing the side cover open button.
Then, push gently on both sides of the front cover to open the cover.
cap4-eng.p65 12/04/00, 11.5827
27
Page 34

TD CARTRIDGE REPLACEMENT
Gently pull the TD cartridge out while pressing the lock release button.
Dispose of the old TD cartridge in accordance with local regulations.
Remove a new TD cartr idge from its bag and remove the protective
paper. Hold the cartridge on both sides and shake it horizontally four or
five times.
Hold the tab of the protective cover and pull the tab to your side to
remove the cover.
4
Supplies and user maintenance
Gently insert the TD cartridge until it locks in place.
Lock release button
4 or 5 times
Close the front cover and then the side cover by pressing the round
projections near the side cover open button. The
and the ready (
When closing the covers, be sure to close the front cover securely
and then close the side cover. If the covers are closed in the
wrong order, the covers may be damaged.
28
cap4-eng.p65 12/04/00, 11.5828
indicator will go out
) indicator will light up.
Page 35

DRUM CARTRIDGE REPLA CEMENT
The useful life of the drum cartridge is approximately 18,000 copies. When the
internal counter reaches approximately 17,000 copies, the drum replacement
required (
cartridge will be needed soon. When the indicator begins to blink, the system will
stop operating until the cartridge is replaced. Replace the drum cartridge at this
time.
) indicator will light up indicating that replacement of the drum
Do not remove the protective cover on the drum portion (black
paper) of a new drum cartridge before use. The cover protects
the drum against external light.
Ensure that the bypass tray is open and then open the side cover while
pressing the side cover open button.
Then, push gently on both sides of the front cover to open the cover.
4
Supplies and user maintenance
Gently pull the TD cartridge out while pressing the lock release button.
To remove the TD car tr idge, see page 28, step 2.
Hold the handle of the drum cartridge and gently pull the cartridge out.
Dispose of the old drum cartridge in accordance with local regulations.
cap4-eng.p65 12/04/00, 11.5829
29
Page 36

DRUM CARTRIDGE REPLACEMENT
Remove a new drum cartridge from its bag and remove the protective
cover. Install the drum cartridge into the machine.
Do not touch the surface of the drum (green portion) of the
cartridge. Doing so may cause smudges on the copies.
Gently install the TD cartridge. To install the TD cartridge, see page 27,
TD CARTRIDGE REPLACEMENT.
Close the front cover and then the side cover by pressing the round
4
Supplies and user maintenance
projections near the side cover open button. The drum replacement
required (
up.
When closing the covers, be sure to close the front cover securely
and then close the side cover. If the covers are closed in the
wrong order, the covers may be damaged.
) indicator will go out and the ready ( ) indicator will light
USER MAINTENANCE
Proper care is essential in order to get clean, sharp copies. Be sure to take a few
minutes to regularly clean the system.
Before cleaning, be sure to turn the power switch off and remove
the power cord from the outlet.
Do not use thinner, benzene or other volatile cleaning agents.
Doing so may cause deformation, discoloration, deterioration or
malfunction.
Cabinet
Wipe the cabinet with a soft, clean cloth.
30
cap4-eng.p65 12/04/00, 11.5830
Page 37

USER MAINTENANCE
Original table and original cover
Stains on the glass, cover or R-SPF roller will also be copied. Wipe the glass,
cover and R-SPF roller with a soft, clean cloth. If necessary, dampen the cloth with
a glass cleaner.
Original table Original cover
SPF /
R-SPF roller
R-SPF roller
Transfer charger
If copies start becoming streaky or blotchy, the transfer charger may be dirty.
Clean the charger using the following procedure.
Turn the power switch off.
Ensure that the bypass tray is open and then open the side cover while
pressing the side cover open button.
Take the charger cleaner out by holding the tab.
Set the charger cleaner onto the right end of the transfer charger, gently
slide the cleaner to the left end, and then remove it. Repeat this operation
two or three times.
Slide the charger cleaner from the right end to the left end along
the groove of the transf er charger . If the cleaner is stopped on the
way, smudges on copies may occur.
4
Supplies and user maintenance
cap4-eng.p65 12/04/00, 11.5831
31
Page 38

USER MAINTENANCE
Return the charger cleaner to its original position. Close the side cover
by pressing the round projections near the side cover open button.
Turn the power switch on.
When system is not in use
4
Supplies and user maintenance
To prevent entry of dust and foreign matter, store the system as follows.
Remove the power cord and secure the system using tape (four
locations).
32
cap4-eng.p65 12/04/00, 11.5832
Page 39

SYSTEM TROUBLE?
This chapter describes misfeed removal and troubleshooting.
MISFEED REMOVAL
When a misfeed occurs, the machine will stop and either the misfeed indicator
) or will blink in the display.
(
If a misfeed occurs when using the R-SPF, a number may appear in the display
after a minus sign. This indicates the number of the originals that must be returned
to the document feeder tray after a misfeed. Return the required number of originals.
Then this number will disappear when copying is resumed or the clear (
pressed.
When the R-SPF misfeeds an original sheet, the system will stop and the R-SPF
misfeed (
a misfeed of originals in the R-SPF, see “E: Misfeed in the R-SPF” on page 38.
) indicator will blink, while the misfeed ( ) indicator will remain off. For
If the lower side cover is opened while the power switch is in
the on position, the misfeed (
not indicate a misfeed. Close the lower side cover to turn the
indicator off.
) indicator will blink. This does
) key is
5
System trouble?
Ensure that the bypass tray is open and then open the side cover while
pressing the side cover open button.
cap5-eng.p65 12/04/00, 14.0233
33
Page 40

5
System trouble?
MISFEED REMOV AL
Check the misfeed location. Remove the misfed paper following the
instructions for each location in the illustration below.
If
blinks in the display, proceed to “A: Misfeed in the paper feed
area”.
If the misfed paper is seen from
this side, proceed to "C Misfeed
in the transport area". (p. 36)
If paper is misfed here, proceed to "D Misfeed in the
lower paper feed area". (p. 35)
A: Misfeed in the paper feed area
Gently remove the misfed paper from the paper feed area as shown in
the illustration. When
not seen from the paper feed area, pull out the paper tray and remove
the misfed paper . If the paper cannot be remov ed, proceed to “B: Misf eed
in the fusing area”.
The fusing unit is hot. Do not touch the fusing unit when removing
misfed paper. Doing so may cause a burn or other injury.
blinks in the display and the misfed paper is
If paper is misfed here, proceed to "B
Misfeed in the fusing area". (p. 35)
If paper is misfed here, proceed to "A
Misfeed in the paper feed area".
●
Do not touch the surface of the drum (green portion) of the drum
cartridge when removing the misfed paper. Doing so may
damage the drum and cause smudges on copies.
●
If the paper has been fed through the bypass tra y, do not remove
the misfed paper back through the bypass tray. Toner on the
paper may stain the paper transport area, resulting in smudges
on copies.
Close the side cover by pressing the round projections near the side
cover open button. The misfeed (
(
) indicator will light up.
34
cap5-eng.p65 12/04/00, 14.0234
) indicator will go out and the ready
Page 41

B: Misfeed in the fusing area
Lower the fusing unit release lever by rotating it all the way as shown in
the illustration.
While you are lowering the fusing unit release lever, it will not
move smoothly at a location on the way. However, be sure to
lower the lever by rotating it all the way to the location where it
will not rotate as shown in the right illustration.
Fusing unit release lever
Gently remove the misfed paper from under the fusing unit as shown in
the illustration. If the paper cannot be removed, proceed to “C: Misfeed
in the transport area”.
MISFEED REMOV AL
The fusing unit is hot. Do not touch the fusing unit when removing
misfed paper. Doing so may cause a burn or other injury.
●
Do not touch the surface of the drum (green portion) of the
drum cartridge when removing the misfed paper. Doing so
may cause smudges on copies.
●
Remove the misfed paper as shown in the illustration. Do not
remove it by pulling it through the fuser as this may transfer
unfixed toner to the transport area, resulting in smudges on
subsequent copies.
Raise the fusing unit release lever and then close the side cover by
pressing the round projections near the side cover open button. The
misfeed (
) indicator will go out and the ready ( ) indicator will light up.
5
System trouble?
35
cap5-eng.p65 12/04/00, 14.0235
Page 42

5
System trouble?
MISFEED REMOV AL
C: Misfeed in the transport area
Lower the fusing unit release lever by rotating it all the way as shown in
the illustration.
While you are lowering the fusing unit release lever, it will not
move smoothly at a location on the way. However, be sure to
lower the lever by rotating it all the way to the location where
it will not rotate as shown in the right illustration.
Fusing unit release lever
Push gently on both sides of the front cover to open the cover.
Rotate the feeding roller in the direction of the arrow and gently remove
the misfed paper from the exit area.
36
cap5-eng.p65 12/04/00, 14.0236
Feeding roller
Page 43

Raise the fusing unit release lever, close the front cover and then close
the side cover by pressing the round projections near the side cover
open button. The misfeed (
indicator will light up.
When closing the covers, be sure to close the front cover securely
and then close the side cover. If the covers are closed in the
wrong order, the covers may be damaged.
) indicator will go out and the ready ( )
D: Misfeed in the lower paper feed area
Open the lower side cover (under the bypass tray) and remove the
misfed paper.
If
blinks and the misfed paper is not seen from the area of the lower
side cover, pull out the lower paper tray and remove the misfed paper.
Then close the lower paper tray.
MISFEED REMOV AL
5
System trouble?
Close the lower side cover.
Close the side cover by pressing the round projections near the side
cover open button. The misfeed (
(
) indicator will light up.
cap5-eng.p65 12/04/00, 14.0237
) indicator will go out and the ready
37
Page 44

MISFEED REMOV AL
E: Misfeed in the R-SPF
An original misfeed may occur at one of three locations. If the misfed original can
be seen only in the document feeder tray proceed to (A) below. If the original can
be seen in the exit area proceed to (B) below. If the misfed original cannot be seen
in the document feeder tray or the exit area proceed to (C) below.
(A) Open the feeding roller cover and pull the original gently to the left and out
from the document feeder tray. Close the feeding roller cover. Open and
close the original cover to clear the R-SPF misfeed (
If the misfed original cannot be easily removed, proceed to (C).
(B) Open the original cover and rotate the roller rotating knob to remove the
misfed original from the exit area. For small size originals may be more
easily removed if the reversing tray is removed first.
If the misfed original cannot be easily removed, proceed to (C).
) indicator.
Feeding roller cover
5
System trouble?
38
Roller rotating knob
With the R-SPF, after removing the misfed original from the exit
area, be sure to insert the reversing tray into the exit area until it
locks in place.
cap5-eng.p65 12/04/00, 14.0238
Page 45

MISFEED REMOV AL
(C) If the original does not move easily into the exit area remove it in the direction
of the arrow while rotating the knob.
A number may appear in the display after a minus sign,
indicating the number of the originals that must be returned
to the document feeder tray.
Clear the misfeed and return the required number of
originals. Then press the print (
) key to resume copying.
5
System trouble?
MAINTENANCE REQUIRED
When indicator lights up, service by an authorized OLIVETTI service technician
is required. Contact your OLIVETTI dealer as soon as possible.
cap5-eng.p65 12/04/00, 14.0339
39
Page 46

5
System trouble?
TROUBLESHOOTING
If any problem occurs, chec k the list below bef ore contacting y our OLIVETTI dealer.
Problem Possible cause
Copier plugged in?
System does not
operate.
Blank copies
Power save ( )
indicator on.
Copies are too
dark or too light.
Dust, dirt,
smudges appear
on copies.
Striped copies
Paper misfeeds
frequently.
Images rub off
the copy easily.
Power switch on?
Side cover closed
securely?
Front cover closed?
Is the original placed face
down on the original table or
face up in the SPF / R-SPF?
Is the system in the auto
power shut-off mode?
Is the system in the
preheat mode?
Is original image too dark
or too light?
Is the system in the
automatic exposure
mode?
Is the copier in the photo
exposure mode?
Original table or original
cover dirty?
Original smudged or
blotchy?
Is transfer charger clean?
Non-standard paper used?
Paper curled or damp?
Pieces of paper inside
copier?
Paper guides in the paper
tray not set properly?
Too much paper in the
paper tray or bypass tray?
Is the copy paper too
heavy?
Paper damp?
R-SPF?
Solution
Plug the copier into a grounded
outlet.
Turn the power switch on.
Gently close the side cover.
Gently close the front cover and
then close the side cover.
Place the original face down on
the original table or face up in
R-SPF?
the SPF / R-SPF.
Press the print ( ) key to cancel
the auto power shut-off mode.
Press any key to cancel the
preheat mode.
Adjust the exposure manually.
Adjust the automatic exposure
level.
Cancel the photo exposure
mode.
Clean regularly.
Use a clean original.
Clean the transfer charger.
Use standard paper. If using
special papers, feed the paper
through the bypass tray.
Store copy paper flat in the
wrapper in a dry location.
Remove all pieces of misfed
paper.
Set the guides properly
depending on the paper size.
Remove excessive paper from
the tray.
Use copy paper within the
specified range.
Replace with dry copy paper. If
the copier is not used for long
time, remove the paper from the
paper tray and store it in its
wrapper in a dry location.
See
page
_
14
_
_
14
23
23
18
42
18
31
_
31
45
_
33
10
11
45
45
40
cap5-eng.p65 12/04/00, 14.0340
Page 47
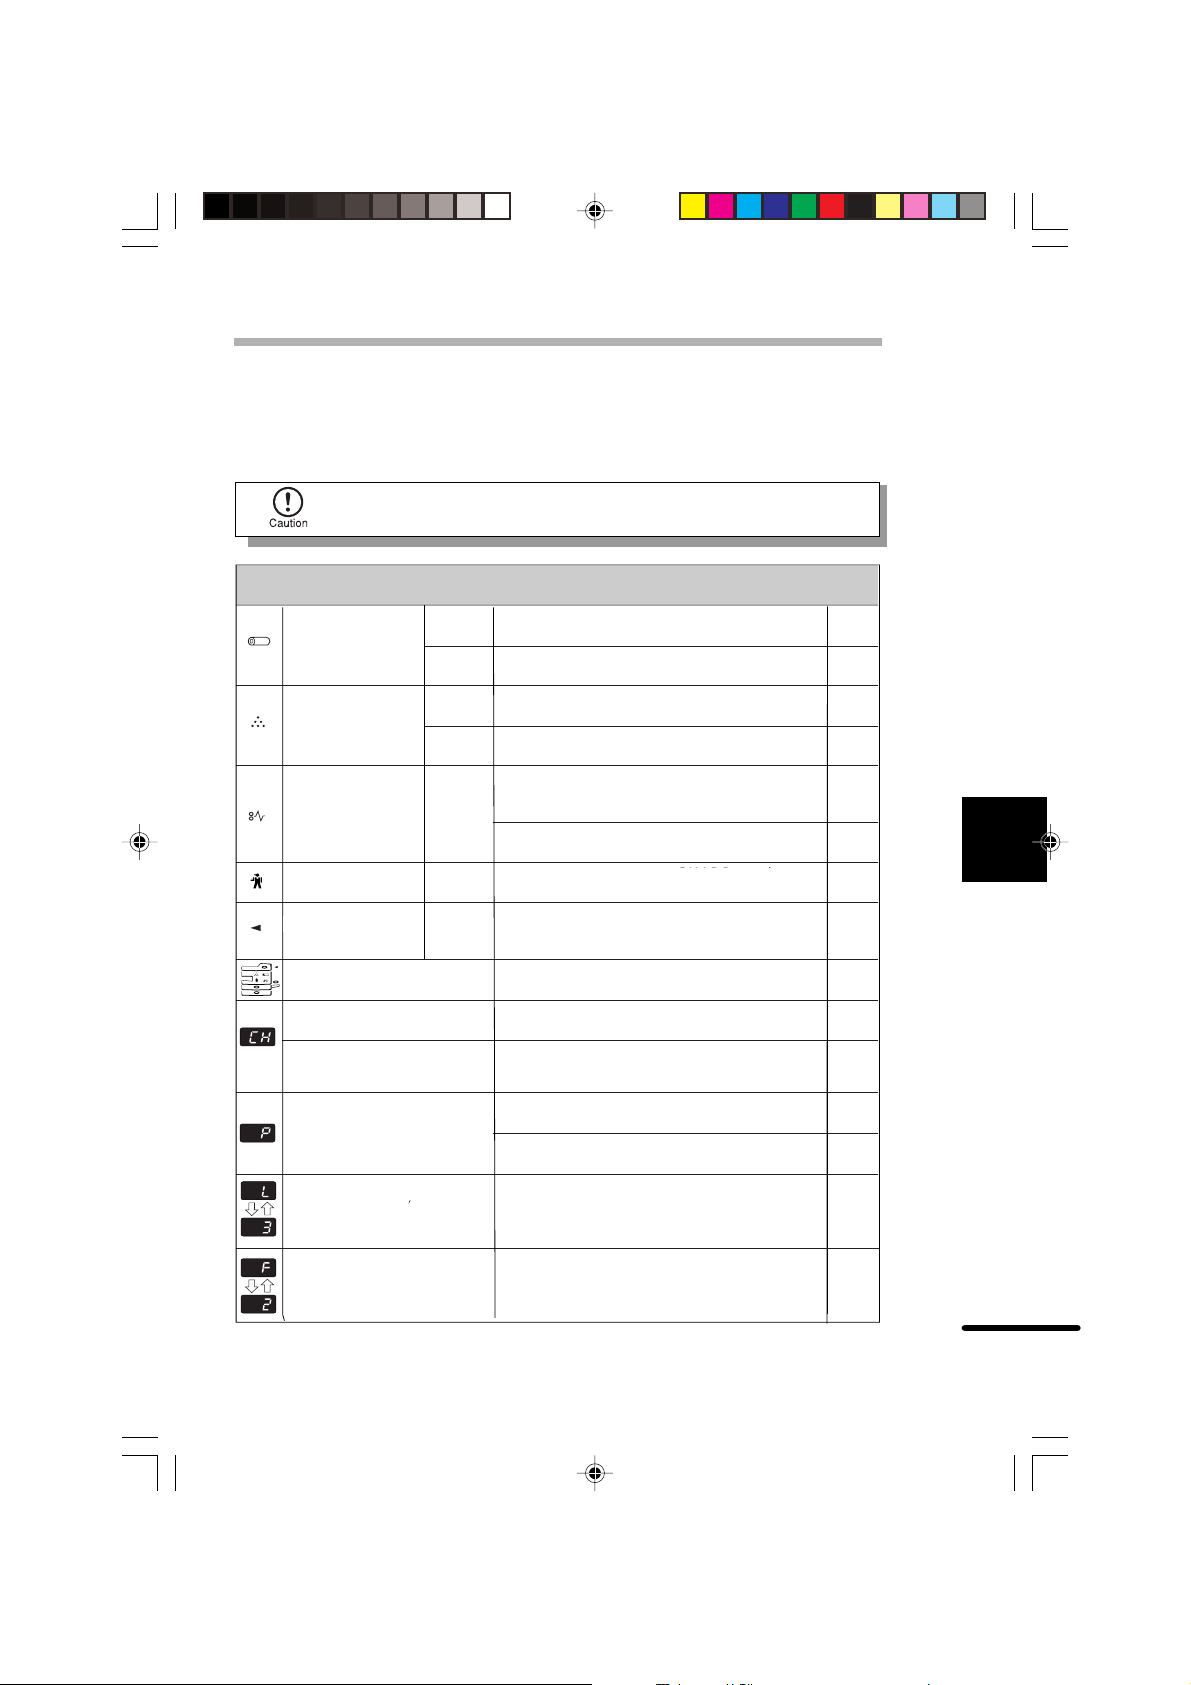
STATUS INDICATORS
When the following indicators light up or blink on the operation panel or the
following alphanumeric code appear in the display, solve the prob lem immediately
referring to both the table below and the relevant page.
Be sure to use only genuine OLIVETTI parts and supplies.
Indication
Steadily
Drum replacement
required indicator
TD cartridge
replacement
required indicator
Misfeed indicator
Maintenance
indicator
SPF / R-SPF
R-SPF
misfeed indicator
The paper tray indicator is
blinking.
"CH" is blinking in the display.
"CH" is steadily lit in the
display.
"P" is blinking in the display.
A letter and a number appear
alternately.
A letter and a number appear
alternately.
lit
Blinking
Steadily
lit
Blinking
Blinking
Steadily
lit
Blinking
Cause and remedy
Replacement of drum cartridge will be needed
soon. Obtain a new cartridge.
Drum cartridge must be replaced. Replace it
with a new one.
Replacement of TD cartridge will be needed
soon. Obtain a new cartridge.
TD cartridge must be replaced. Replace it with
a new one.
A misfeed has occurred. Remove the misfed
paper referring to the description of "Misfeed
removal."
The lower side cover may be open. If so, close
it.
Service by an authorized SHARP service
technician is required.
An original misfeed has occurred in the SPF /
R-SPF. Remove the misfed originals referring to
the description of "Misfeed in the SPF / R-SPF".
The paper tray is not installed properly.
Push the tray into the copier securely.
The TD cartridge is not installed. Check if the
cartridge is installed.
Side cover is open. Close the side cover
securely by pressing the round projections
near the side cover open button.
Paper tray or bypass tray is empty. Load copy
paper.
A misfeed has occurred in the paper tray or
bypass tray. Remove the misfed paper.
The copier will not function. Turn the power
switch off, remove the power cord from the
outlet, and contact your authorized Service
representative.
You will not be able to use the toner cartridge
anymore (Toner Cartridge End of Life). Contact
your authorized Service representative.
OLIVETTI service
R-SPF”.
See
page
_
29
_
27
33
_
39
38
_
28
_
10
33
_
_
5
System trouble?
cap5-eng.p65 12/04/00, 14.0341
41
Page 48

5
System trouble?
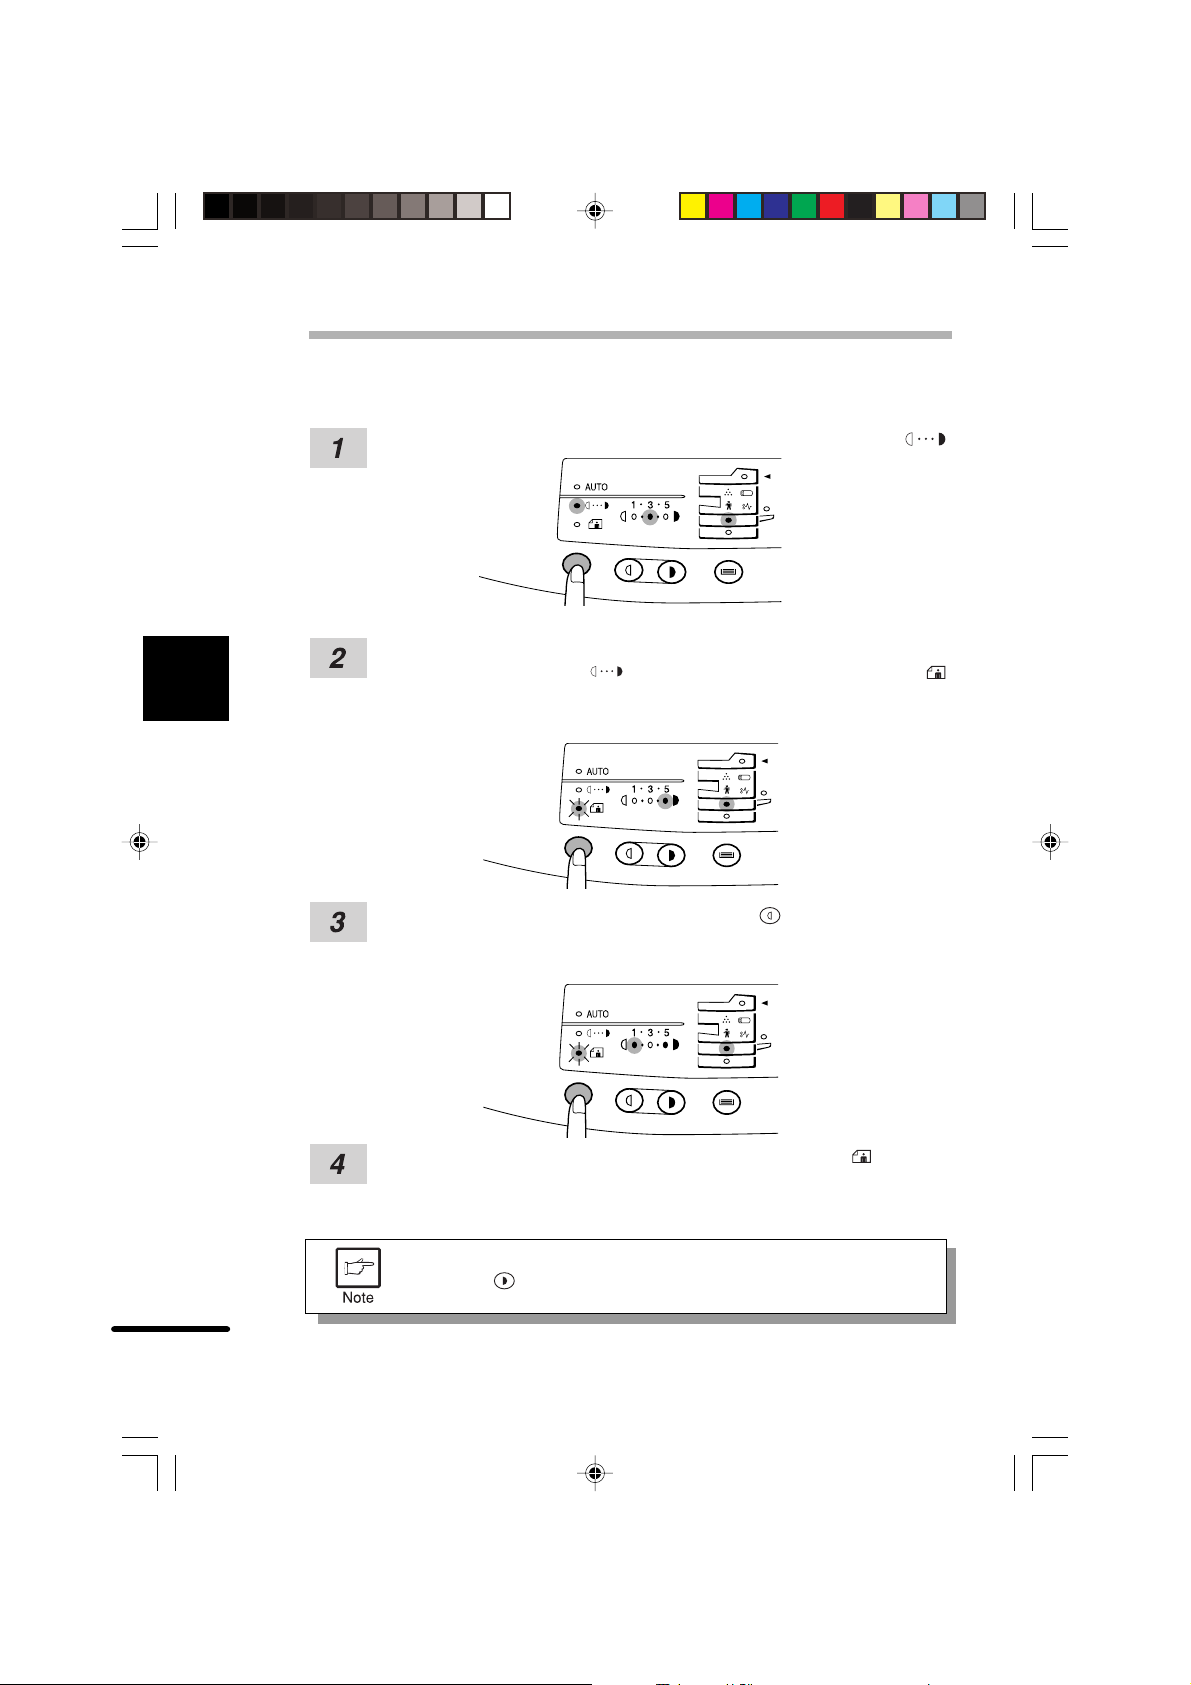
AUTOMATIC EXPOSURE ADJUSTMENT
The automatic exposure level can be adjusted to suit your copying needs. This
level is set for copying from the original table and copying from the R-SPF
respectively.
When adjusting the automatic exposure level for copying from the
R-SPF, place an original in the document feeder tray and make sure
that the SPF / R-SPF (
When adjusting the level for copying from the original table, make sure
that no original is left in the document feeder tray.
Press the exposure mode selector key to select the photo ( ) mode.
Press and hold down the exposure mode selector key for approximately
5 seconds. The photo (
will begin to blink. One or two exposure indicators corresponding to the
automatic exposure level which has been selected will light up.
) indicator lights up.
) indicator will go out and the AUTO indicator
Press the light ( ) or dark ( ) key to lighten or darken the automatic
exposure level as desired.
If exposure level 2 is selected, the two left-handmost indicators for that
level will light up simultaneously. Also, if level 4 is selected, the two
right-handmost indicators for that level will light up simultaneously.
Press the exposure selector key. The AUTO indicator will stop blinking
and light up steadily.
This automatic exposure level will remain in effect until you change
it again by this porcedure.
42
cap5-eng.p65 12/04/00, 14.0342
Page 49

APPENDIX
SPECIFICATIONS
T ype Desktop laser document system
Copy system Dry, electrostatic tr ansfer
Originals Sheets, bound documents
Original size Max. B4 (A5 to B4 for R-SPF)
Copy sizes A6 to A4 (Feed copy paper lengthwise only.)
Image loss:
Max. 4 mm (leading and trailing edges)
Max. 4.5 mm (along the other edges in totals)
Max. 6 mm (the trailing edge of the second
copy of two-sided copying)
Copy speed 15 copies/min. (one sided copying)
Continuous copying Max. 99 copies; subtractive counter
First-copy time 9.6 sec. (normal copying mode)
Copy ratio Variable: 50% to 200% in 1% increments
(total 151 steps)
Fixed: 50%,70%, 81%, 100%, 141%, 200%
Exposure system Original table: Moving optical source, slit exposure
(stationary platen) with automatic exposure
R-SPF: Moving original
Copy paper feed T wo paper tra ys with automatic feed (250 sheets); one
bypass tray with 50-sheet automatic feed capability
Fusing system Heat rollers
Development system Magnetic brush development
Light source Xenon lamp
Resolution Scan: 400 dpi
Output: 600 dpi
cap6-eng.p65 12/04/00, 14.3443
6
Appendix
43
Page 50

6
Appendix
SPECIFICA TIONS
Gradation Scan : 256 levels
Output : 2 levels
Memory 6 MB
Pow er supply Local voltage ±10% (For the copier power supply
requirements, see the name plate located on the back
of the unit)
Power consumption 1000 W
Overall dimensions 809 mm (W) x 483 mm (D)
Weight 26 kg approximately
TD and drum cartridges included
Copier dimensions 518 mm (W) x 483 mm (D) x 465 mm (H)
Operating conditions T emper ature: 10°C to 30°C
Humidity: 20% to 85%
Noise level Sound Power Le vel LWA
Copying: 71 [dB (A)], Standby: Background noise level
Sound Pressure Level LPA (bystander positions)
Copying: 40 [dB (A)], Standby: Background noise level
Noise emission measurement in accordance with ISO
7779.
First-copy time may differ depending on operating conditions, such as powersupply voltage and room temperature.
As a part of our policy of continuous improvement, OLIVETTI reserves
the right to make design and specification changes for product
improvement without prior notice. The perf ormance specification figures
indicated are nominal values of production units. There may be some
deviations from these values in individual units.
44
cap6-eng.p65 12/04/00, 14.3444
Page 51

SUPPLIES
Types and sizes of copy paper
For best results, use only paper recommended by OLIVETTI.
Type of paper Type of media Size
feeding
Paper tray Standard paper A4
B5
A5
Weight
50 to
80g/m
Letter
Legal
Invoice
Bypass tray Standard paper and A4
thick paper B5
A5
A6
52 to
128g/m2**
Letter
Legal
Invoice
Special Transparency A 4
media film Letter
Envelope * Commercial 10
Monarch
International DL
International C5
* Do not use envelopes that have metal clasps, plastic snappers, string closures,
windows, linings, self-adhesiv e, patches or synthetic materials. These will cause
physical damage to the system.
** For paper weighing from 104 to 128g/m
through the bypass tray.
●
Special papers such as transparency film and labels must be fed one sheet at a
time through the bypass tray.
2
, A4 is the maximum size that can be fed
2
6
Appendix
Proper storage
1. Store the supplies in a location that is:
●
clean and dry,
●
at a stable temperature,
●
not exposed to direct sunlight.
2. Store copy paper in the wrapper and lying flat.
●
Paper stored out of the wrapper or in packages standing on end may curl or get
damp, resulting in paper misfeeds.
cap6-eng.p65 12/04/00, 14.3445
45
Page 52

SUPPLIES
Supply part numbers
When ordering supplies, please use the correct part numbers as listed below.
Be sure to use only genuine OLIVETTI parts and supplies.
For best copying results, be sure to use only OLIVETTI Genuine Supplies
which are designed, engineered, and tested to maximize the life and
performance of OLIVETTI systems. Look for the Genuine Supplies label
on the toner package.
Supply list
Supply Part number Usable life
TD cartridge B0265Q Approx. 6,000 or 5,000 sheets *
Drum cartridge B0266R Approx. 18,000 sheets
6
Appendix
* 6,000 sheets: Based on copying onto letter-type paper at 5% toned area
5,000 sheets: Based on copying onto letter-type paper at 6% toned area
(The life of the TD cartridge which has been included in the Copia 9915D at the
factory is approximately 5,000 sheets. (6% toned area))
46
cap6-eng.p65 12/04/00, 14.3546
Page 53

INDEX
A
Auto clear ...................................... 23, 25
Automatic exposure adjustment ........... 42
Auto power shut-off mode .............. 23, 25
B
Bypass tray ......................................... 20
C
Cautions ................................................ 4
Cautions on handling .............................. 9
Charger cleaner ................................... 31
Copying
- normal ............................................... 13
- reduction/enlargement ....................... 19
- through bypass tray........................... 20
- two-sided ........................................... 21
Copy paper .......................................... 45
Copy quantity....................................... 17
Copy ratio ............................................ 19
D
Dark key.............................................. 18
Document feeder tray .......................... 14
Drum cartridge
- indicator......................................... 7, 41
- replacement....................................... 29
E
Enlargement......................................... 19
Exposure adjustment ........................... 18
F
Features ................................................ 5
Fixed copy ratio ................................... 19
Fusing unit release lever .................. 6, 35
I
Installation
- location ................................................ 8
L
Light key ............................................ 1 8
Loading copy paper ........................... 1 0
M
Maintenance
- user maintenance ............................ 3 0
- maintenance required indicator .... 7, 39
Manual exposure ............................... 18
Manual feeding ...................................20
Misfeed removal
-fusing area........................................ 35
- lower paper feed area ......................37
- paper feed area ............................... 34
- transport area.................................. 36
N
Names
- operation panel .................................. 7
- part.................................................... 6
O
ON LINE indicator ................................7
Operation panel
- part names ........................................ 6
Original cover ......................................6
Original guides ............................... 6, 15
Original table .................................. 6, 15
P
Paper
- loading ............................................. 10
- special .............................................45
- specifications................................... 43
Paper feed area ................................. 34
Paper output tray ................................. 6
Paper output tray extension ........... 6, 14
Paper size ......................................... 45
Paper transport area .......................... 36
Paper tray...................................... 6, 10
Part names .......................................... 6
Photo mode.................................... 7, 18
Po wer on............................................ 14
7
Index
cap7-eng.p65 12/04/00, 14.3847
47
Page 54

INDEX
Power sa ve modes ........................ 23, 25
Pow er switch.................................... 6, 14
Preheat mode ................................ 23, 25
Print key ..........................................7, 17
R
Ready indicator......................................7
Reduction ............................................19
Replacement
- drum cartridge ...................................29
- TD cartridge.......................................27
Reversing single pass feeder (R-SPF) 13
S
Special paper .......................................45
Specifications
- paper ................................................. 45
- system ..............................................43
Status indicators .................................. 41
- storage of supply ...............................45
System trouble? ................................... 33
T
TD cartridge
- indicator......................................... 7, 41
-replacement........................................27
T oner sav e mode ................................. 24
T otal number of copies.........................26
Transfer charger .............................. 6, 31
Troubleshooting ...................................40
T wo-sided co ying ................................. 16
U
User maintenance
7
Index
- cabinet...............................................30
- original cover .....................................31
- original table.......................................31
- transfer charger................................. 31
Z
Zoom ................................................... 19
48
cap7-eng.p65 12/04/00, 14.3848
 Loading...