

Page 1
Page 2

COPIA 9915D
PRINTER OPERA TION MANU AL
PAGE 1-1 1-27
DEUTSCHENGLISH FRANÇAIS ESPAÑOL ITALIANO
DRUCKERBEDIENUNGSANLEITUNG
SEITE 2-1 2-27
MODE D’EMPLOI DE L’IMPRIMANTE
PAGE 3-1 3-27
MANUAL DE INSTR UCCIONES DE LA
IMPRESORA
PÁGINA 4-1 4-27
MANUALE DI ISTR UZIONI DELLA
ST AMP ANTE
PAGINA 5-1 5-27
GEBRUIKSAANWIJZING PRINTER
PAGINA 6-1 6-27
NEDERLANDS
Page 3

CONTENTS
1 GETTING STARTED
2 PRINTING
ENGLISH
ENGLISH
INTRODUCTION 1-2
MAIN FEATURES 1-3
MAKING FLOPPY DISKS FROM CD-ROM 1-3
CONNECTING THE INTERFACE CABLE 1-4
INSTALLING THE PRINTER DRIVER SOFTWARE 1-6
– Description of the printer driver 1-6
– Checking the hardware and software requirements 1-6
– Installing the printer driver 1-6
– Copia 9915D PCL printer driver group 1-12
PRINTING A PAGE 1-13
– Executing printing 1-13
– Indicators and key on the operation panel 1-14
SETTING PRINT CONDITIONS FROM PRINTER DRIVER 1-15
2-SIDED PRINTING 1-17
TEST PRINTING 1-18
PRINTER TROUBLE?
3
TROUBLESHOOTING 1-19
– Printing problems 1-19
STATUS MONITOR 1-21
UNINSTALLING PRINTER DRIVER 1-23
APPENDIX
4
SPECIFICATIONS 1-24
PARALLEL INTERFACE 1-25
USB INTERFACE 1-26
INSTALLED FONT LIST 1-27
1-1
Page 4
1
ENGLISH
This chapter provides basic information for using the OLIVETTI Copia 9915D printer and its
features.
Getting started
INTRODUCTION
The Copia 9915D can be used as a copier and a laser printer. This manual describes only the
printer features of the machine. To use the Copia 9915D as a copier and to learn additional
information which relates to both the copier and printer features, see the copier manual. To get
full use of all printer features, familiarize yourself with this manual.
For quick reference during printer use, keep this manual in a handy location.
Conventions used in this manual
In this manual, the following icons are used to provide the user with information pertinent to the
use of the machine.
GETTING STARTED
Cautions the user that damage to the machine or one of its components may
result if the contents of the caution are not properly followed.
Notes provide information relevant to the machine regarding specifications,
functions, performance, operation and such, that may be useful to the user.
●
When you try to execute printing while copying is being performed, printing
will be executed after copying is finished.
●
When you try to make a copy while printing is being performed, printing will
be interrupted and you can make a copy. Printing will be resumed after copying
is finished.
Trademark acknowledgments
Windows, MS-DOS and Windows NT are trademarks of Microsoft Corporation in the U.S.A.
and other countries.
IBM, PC/AT and OS/2 are trademarks of International Business Machines Corporation.
PCL is a trademark of Hewlett-Packard Company.
All other trademarks and copyrights are the property of their respective owners.
1-2
Page 5
MAIN FEATURES
Printing from Windows 3.1x*, Windows 95, Windows 98**, and Windows
NT 4.0 applications
* The PCL6 printer driver is not available in Windows 3.1 environment.
** USB is supported on Windows 98 pre-installed only.
●
High-speed and high-quality printing can be performed from Windows 3.1x, Windows 95,
Windows 98, and Windows NT 4.0 applications using the OLIVETTI Copia 9915D PCL
printer driver.
High-speed printing at 15 pages/min.
●
First print time is approximately 9.6 seconds.
●
Print speed is 15 pages/min., when printing multiple pages.
MAKING FLOPPY DISKS FROM CD-ROM
If your computer is not equipped with a CD-ROM drive, the printer driver data in the CD-ROM
can be copied to floppy disks using a different computer (PC equipped with a CD-ROM drive).
You can then install the printer driver on your computer from floppy disks.
ENGLISH
Getting started
Windows 95/Windows 98/Windows NT 4.0:
Double-click My Computer, Copia 9915D and Makedisk.
1
Double-click Makedisk.exe.
2
Follow the on-screen instructions.
3
Windows 3.1x:
Double-click the File Manager in the Main window of Program Manager and select
1
CD-ROM and the Makedisk directory.
Double-click Makedisk.exe.
2
Follow the on-screen instructions.
3
1-3
Page 6
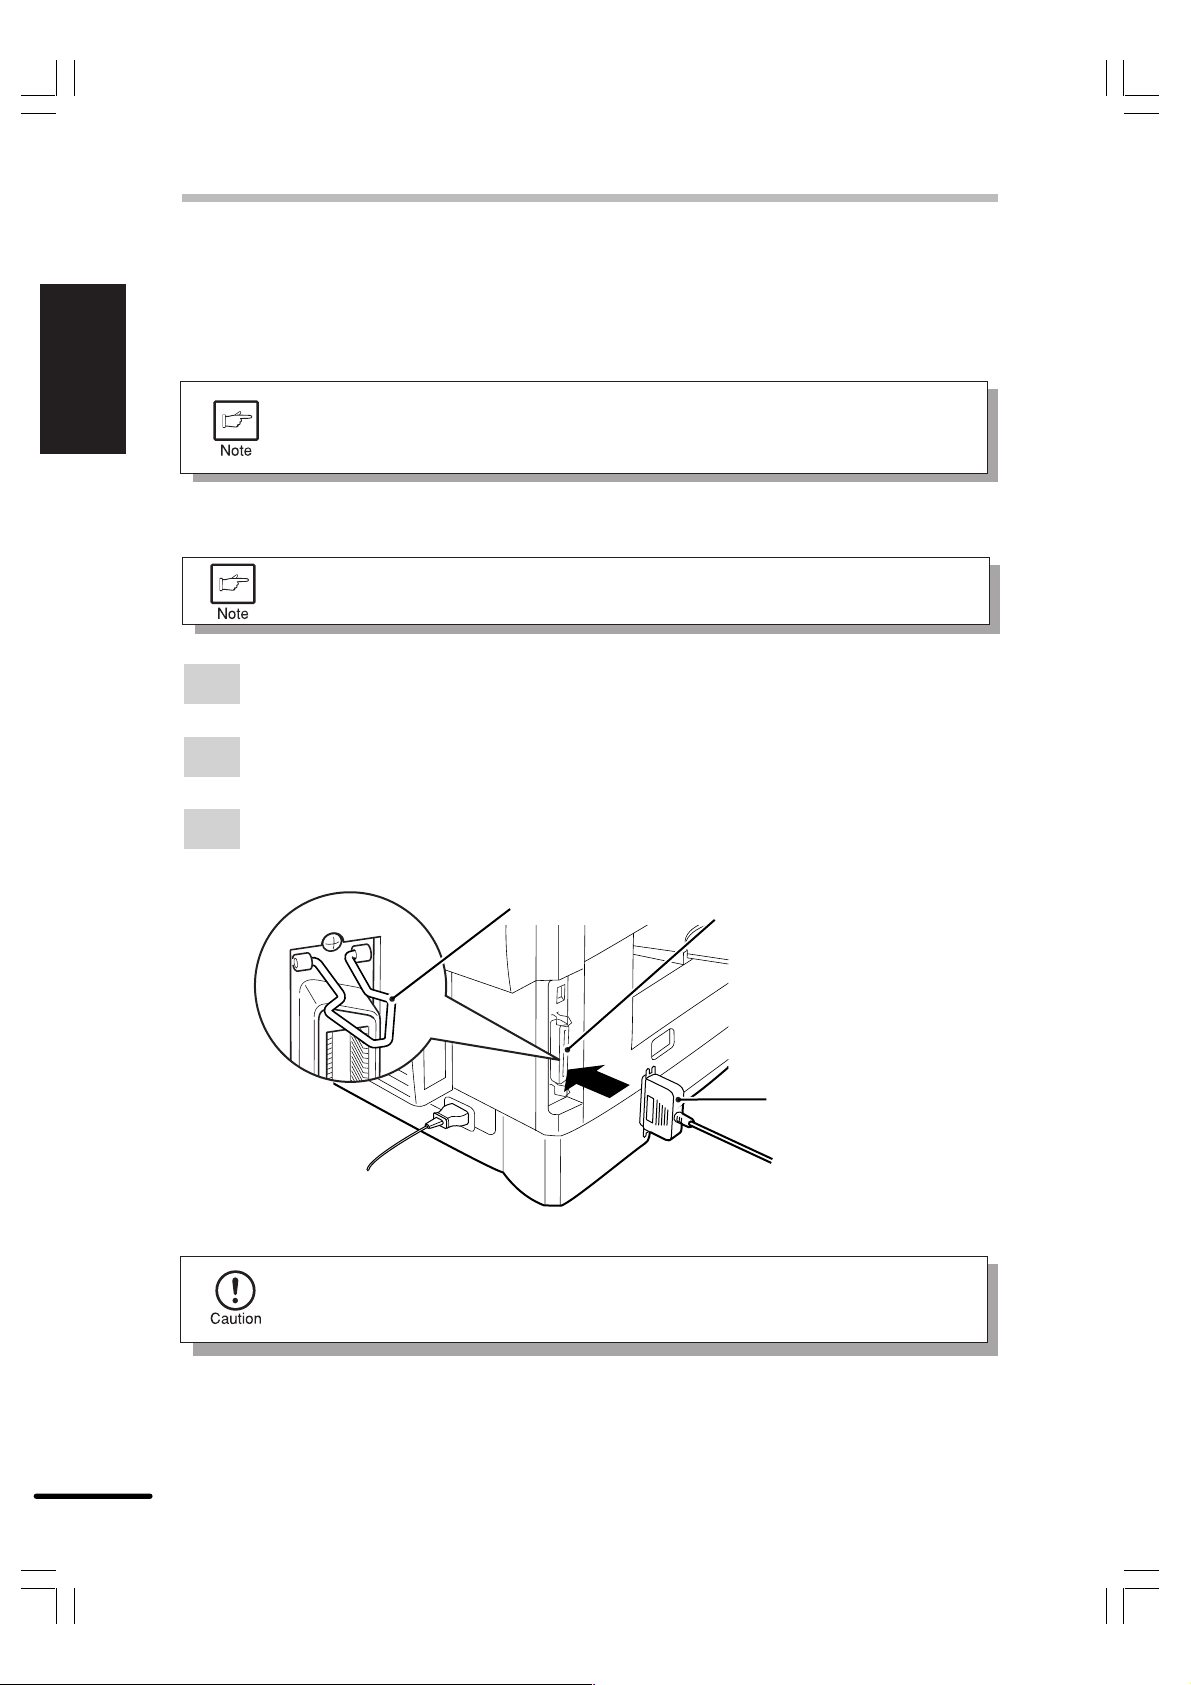
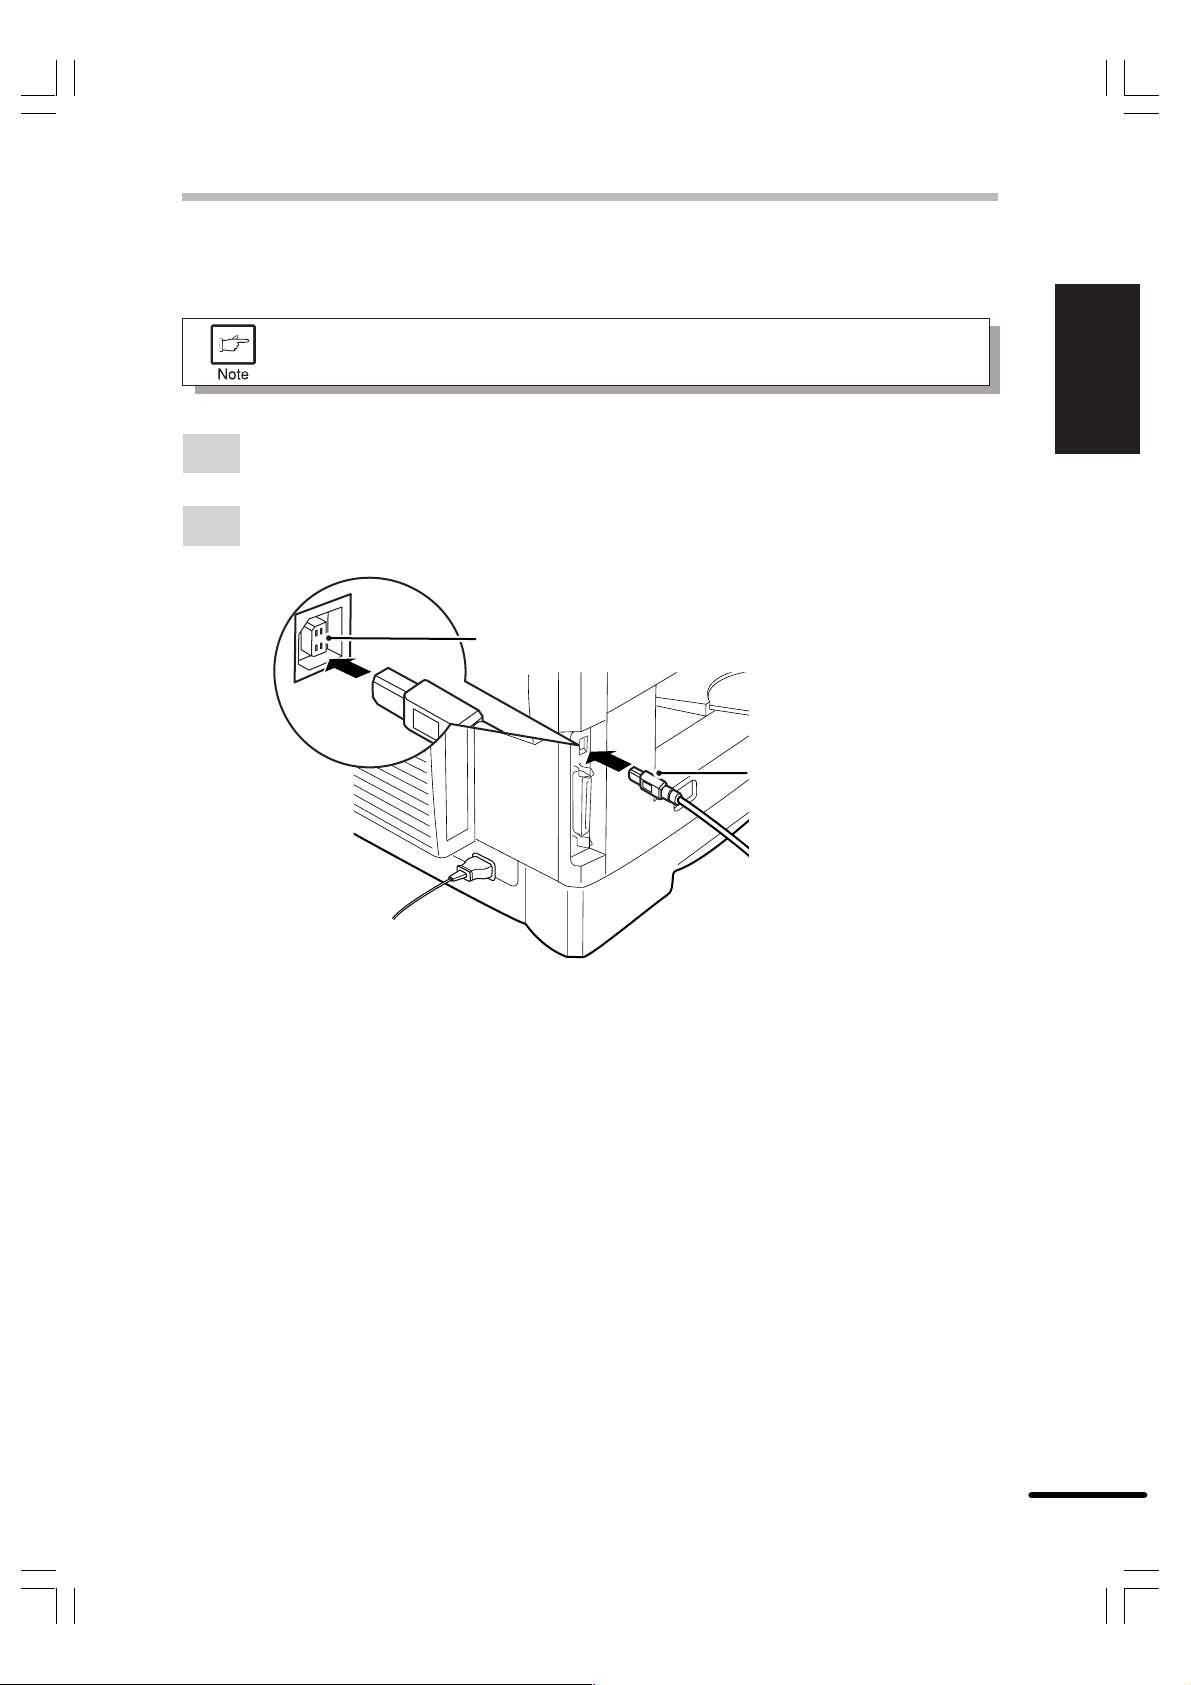
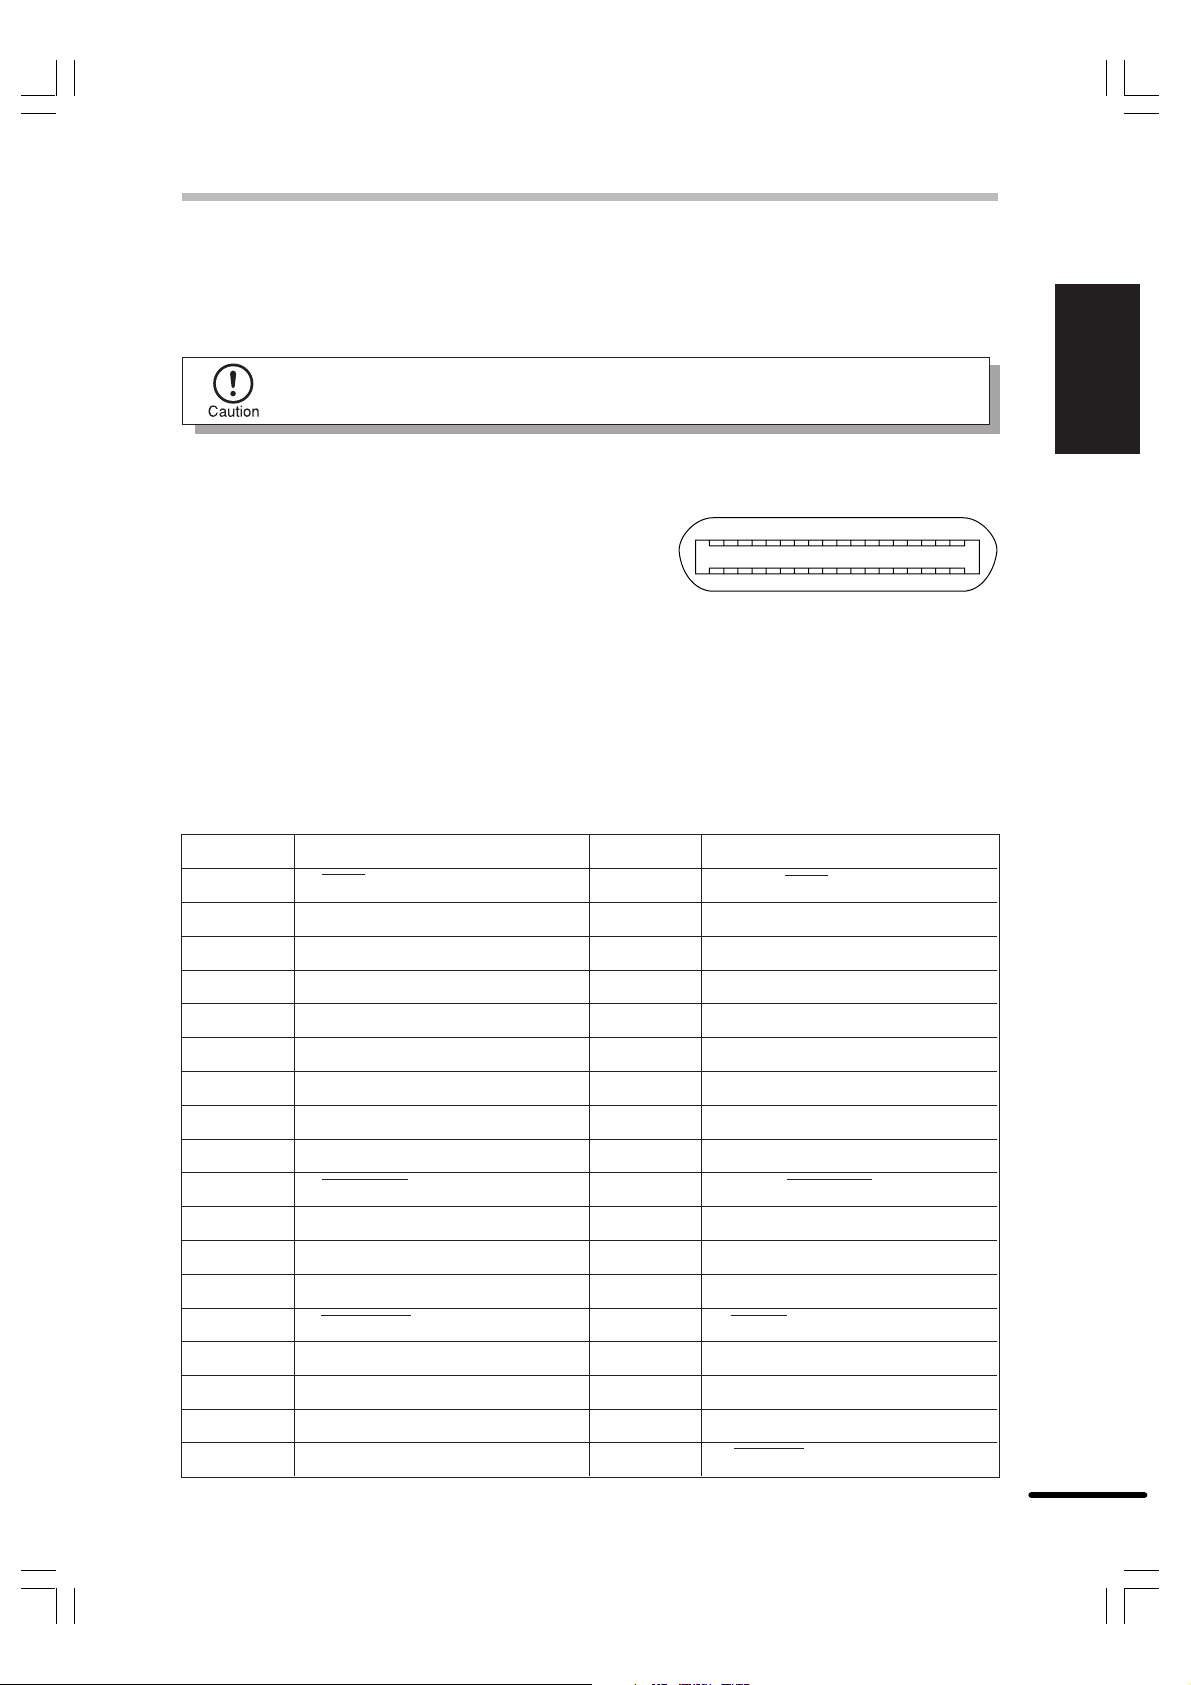
CONNECTING THE INTERFACE CABLE
ENGLISH
Getting started
To use the Copia 9915D as a laser printer connect it to your computer using either a parallel
interface cable or a USB interface cable. (You can use a USB interface cable only if your personal
computer has Windows 98 pre-installed)
When using the parallel interface
You cannot use both the USB interface and the parallel interface at the same
time. If you connect both interfaces at the same time, the USB interface takes
precedence.
Use an IEEE 1284 compliant parallel interface cable (2 m (6 feet) maximum length).
For specifications of the parallel interface, see page 1-25.
Check that the power switches of both the printer and the computer are in the OFF
1
position.
Plug the parallel interface cable into the printer interface connector. Fasten the two bail
2
clips at the side of the printer connector to hold the interface connector in place.
Plug the other end of the cable into the parallel interface connector on your computer.
3
(Refer to your computer manual for details.)
Bail clip
The printer sends and receives data bi-directionally and at high speed. Some
switch boxes and pass-through devices cannot support high-speed, bi-directional
transfer of data, and using them may cause printing errors.
Parallel interface connector
Interface connector
Cable
1-4
Page 7
CONNECTING THE INTERFACE CABLE
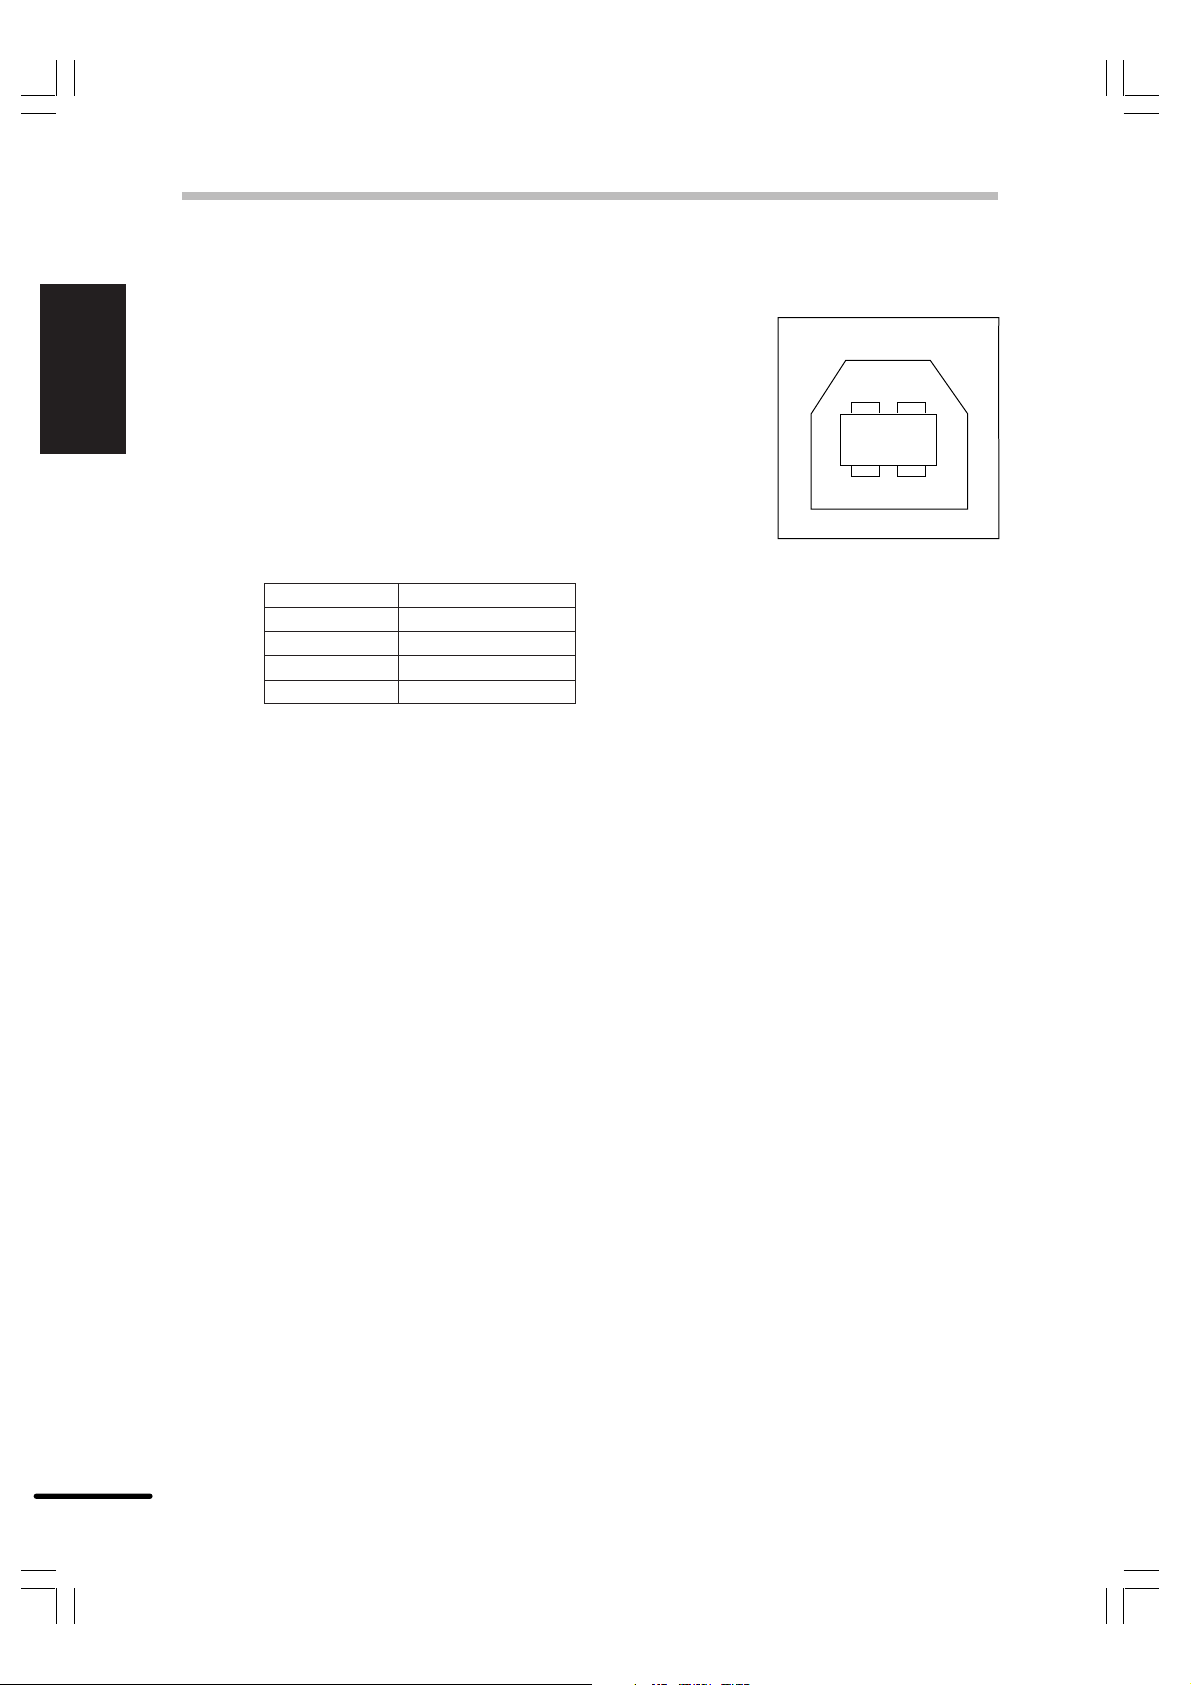
When using the USB interface
Use a shielded twisted pair cable (2 m (6 feet) maximum length).
For specifications of the USB interface, see page 1-26.
Plug the USB interface cable into the printer USB interface connector.
1
Plug the other end of the cable into the USB interface connector on your computer.
2
(Refer to your computer manual for details.)
ENGLISH
Getting started
USB interface connector
Interface connector
Cable
1-5
Page 8
INSTALLING THE PRINTER DRIVER SOFTWARE
ENGLISH
Getting started
Description of the printer driver
The printer driver is the software program which runs the printer. It converts the data in your file
into information that the printer can understand. It also controls communication between the
printer and computer as the data is printed.
Checking the hardware and software requirements
You will need the following hardware and software in order to install the printer driver.
Computer type IBM PC/AT or compatible computer equipped with a bi-
directional parallel or USB interface, and CD-ROM drive
Windows type
CPU 486DX 66MHz or better
Physical RAM Windows 95, Windows 3.1x: 8MB (16MB or more is
Display 640 x 480 dots (VGA) or better
Hard disk free space 10MB or more
The printer driver included in this product cannot be used under Windows NT
3.5x, OS/2, pure MS-DOS and other operating systems which are not described
above.
Windows 3.1x, Windows 95, Windows 98*, Windows NT 4.0
* USB is supported on Windows 98 preinstalled only.
recommended.)
Windows NT 4.0: 12MB (16MB or more is recommended.)
Windows 98: 16MB (32MB or more is recommended.)
1-6
The PCL6 printer driver is not available in Windows 3.1 environment.
Installing the printer driver
The software for your printer is provided on CD-ROM.
Before installing the printer driver, be sure to check the following items.
●
Is the printer connected properly to the computer?
●
Does the printer have paper?
Page 9
INSTALLING THE PRINTER DRIVER SOFTWARE
Windows 95/Windows NT 4.0 Installation Instructions:
With both the computer and the printer turned off, connect the printer to the computer with a
parallel interface cable. For connection instructions, see page 1-4.
Load paper into the paper tray of the printer. For instructions on loading paper, see the
1
section LOADING COPY PAPER in the copier operation manual.
Turn on the printer.
2
Turn on your computer and start Windows.
3
Before installing the printer driver, be sure to close all other applications which
may be open.
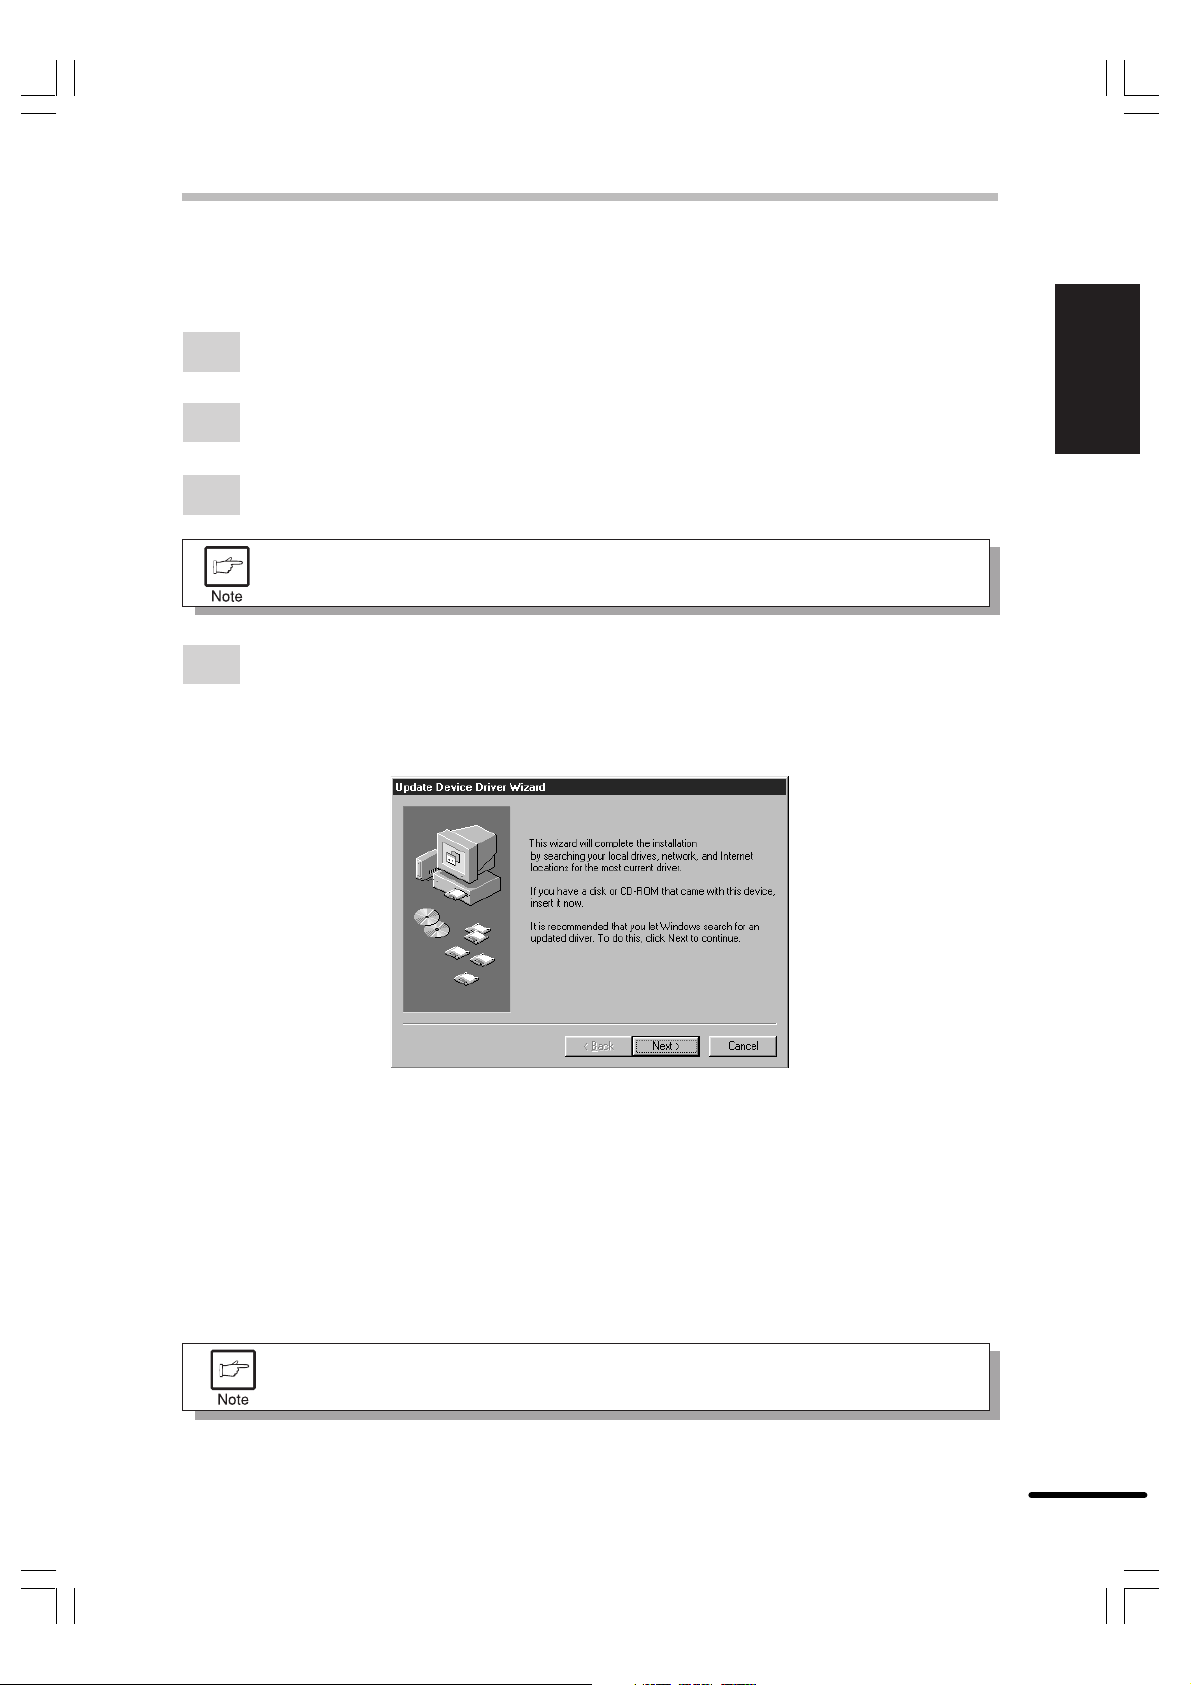
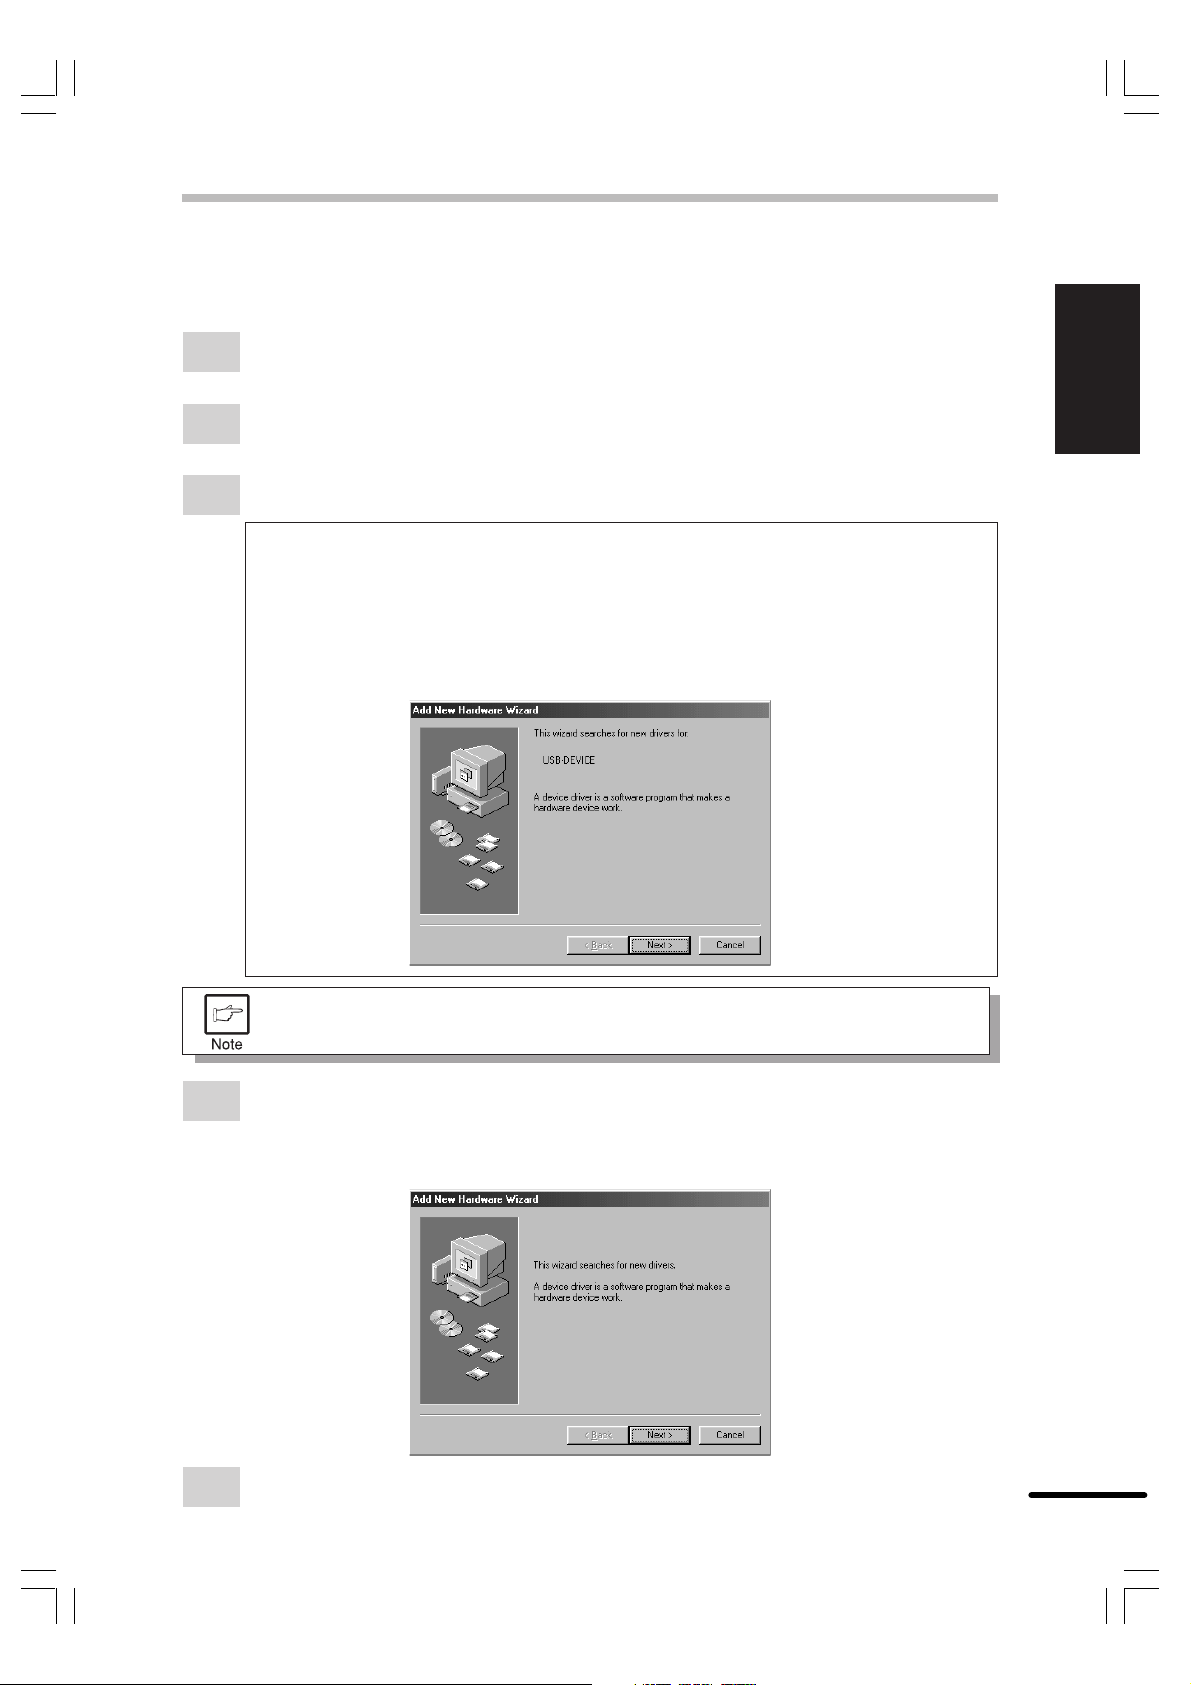
When using Windows 95 on a personal computer with plug & play*, the “Update Device
4
Driver Wizard” window will appear. Insert the installation CD-ROM into the CD-ROM
drive. Click the Next button and follow the on-screen instructions. If the “Copying Files”
window appears during this operation, enter R:\ (if the CD-ROM is designated as
drive R), click the OK button and follow the on-screen instructions.
ENGLISH
Getting started
●
If you use Windows 95 and the “New Hardware Found” window will appear, select
Driver from Disk Provided by Hardware Manufacturer and then click the OK
button. Proceed to step 6.
●
If you use Windows 95 and the screen shown above or the “New Hardware Found”
window does not appear, proceed to step 5.
●
If you use Windows NT 4.0, proceed to step 5.
* Plug & play
This feature is effective if both the computer and peripheral equipment are equipped
with IEEE 1284 compliant parallel interface.
The screen displayed depends on the version of Windows you are using.
1-7
Page 10
INSTALLING THE PRINTER DRIVER SOFTWARE
ENGLISH
Getting started
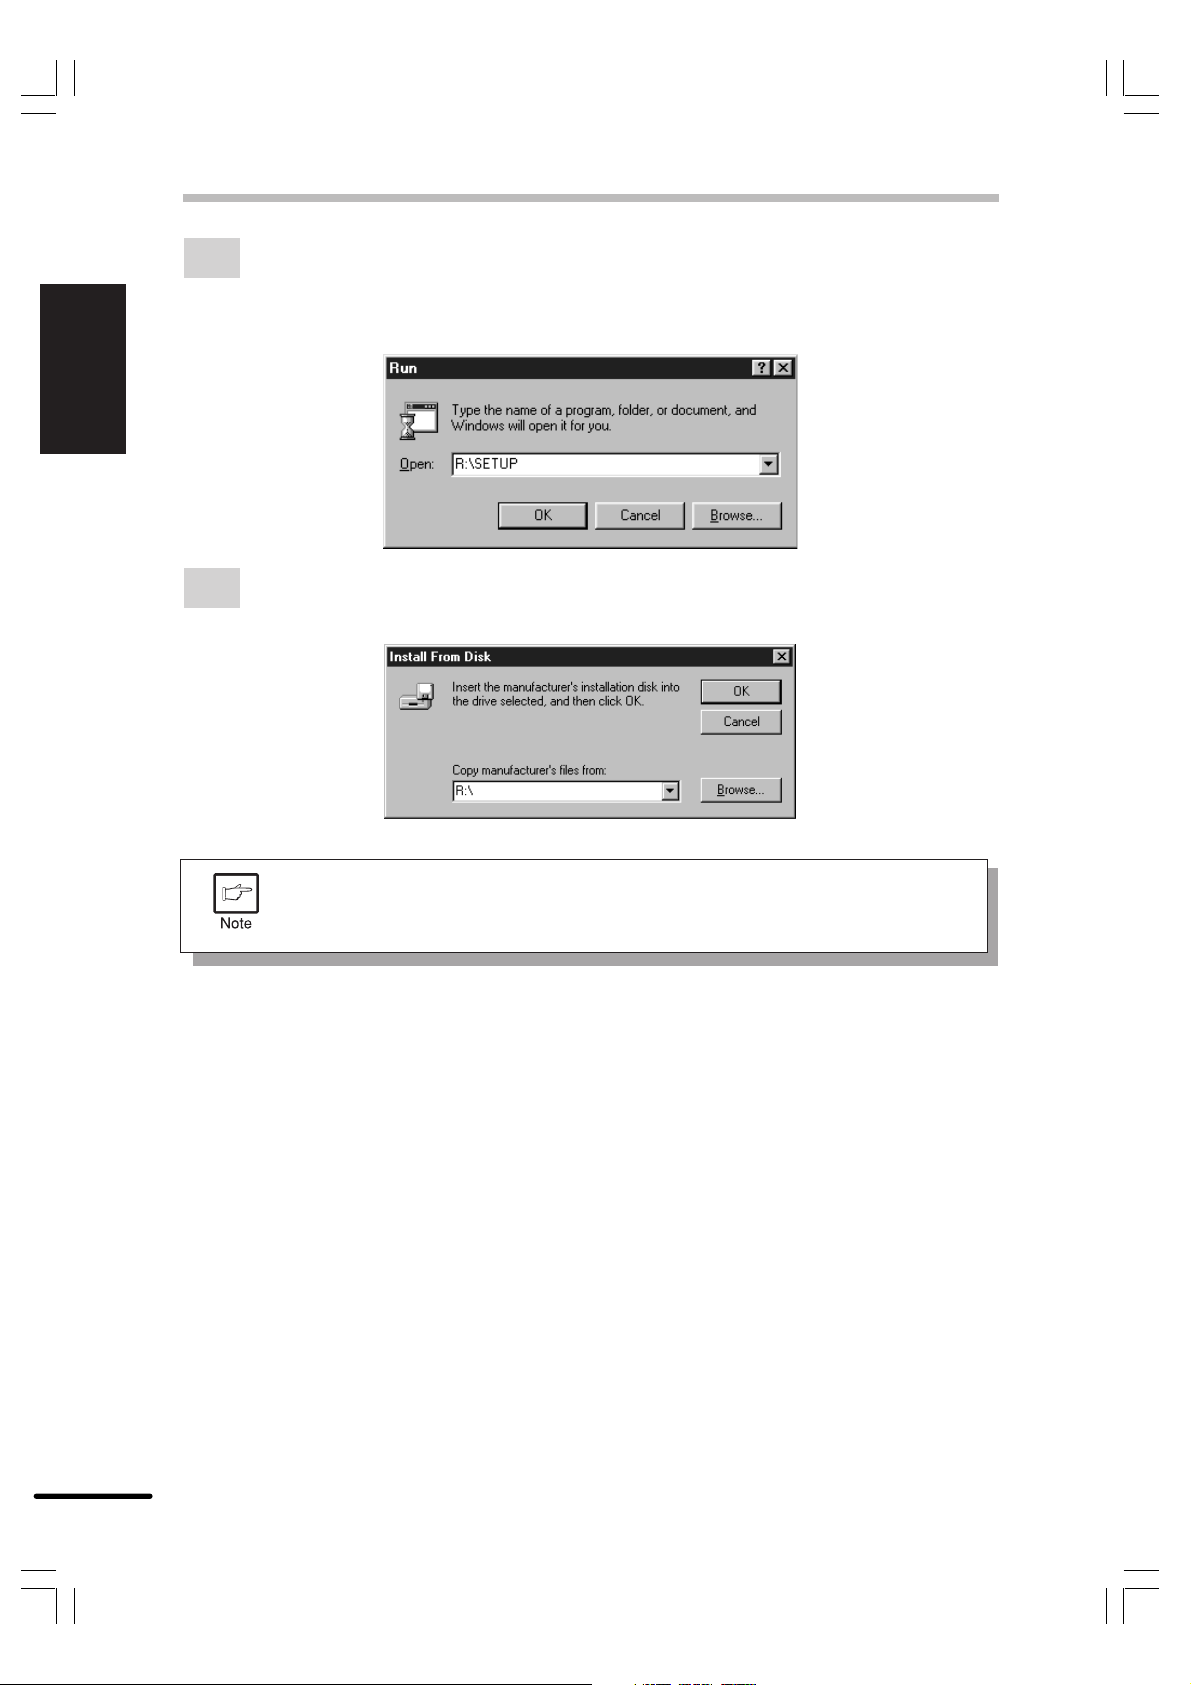
Insert the installation CD-ROM into the CD-ROM drive.
5
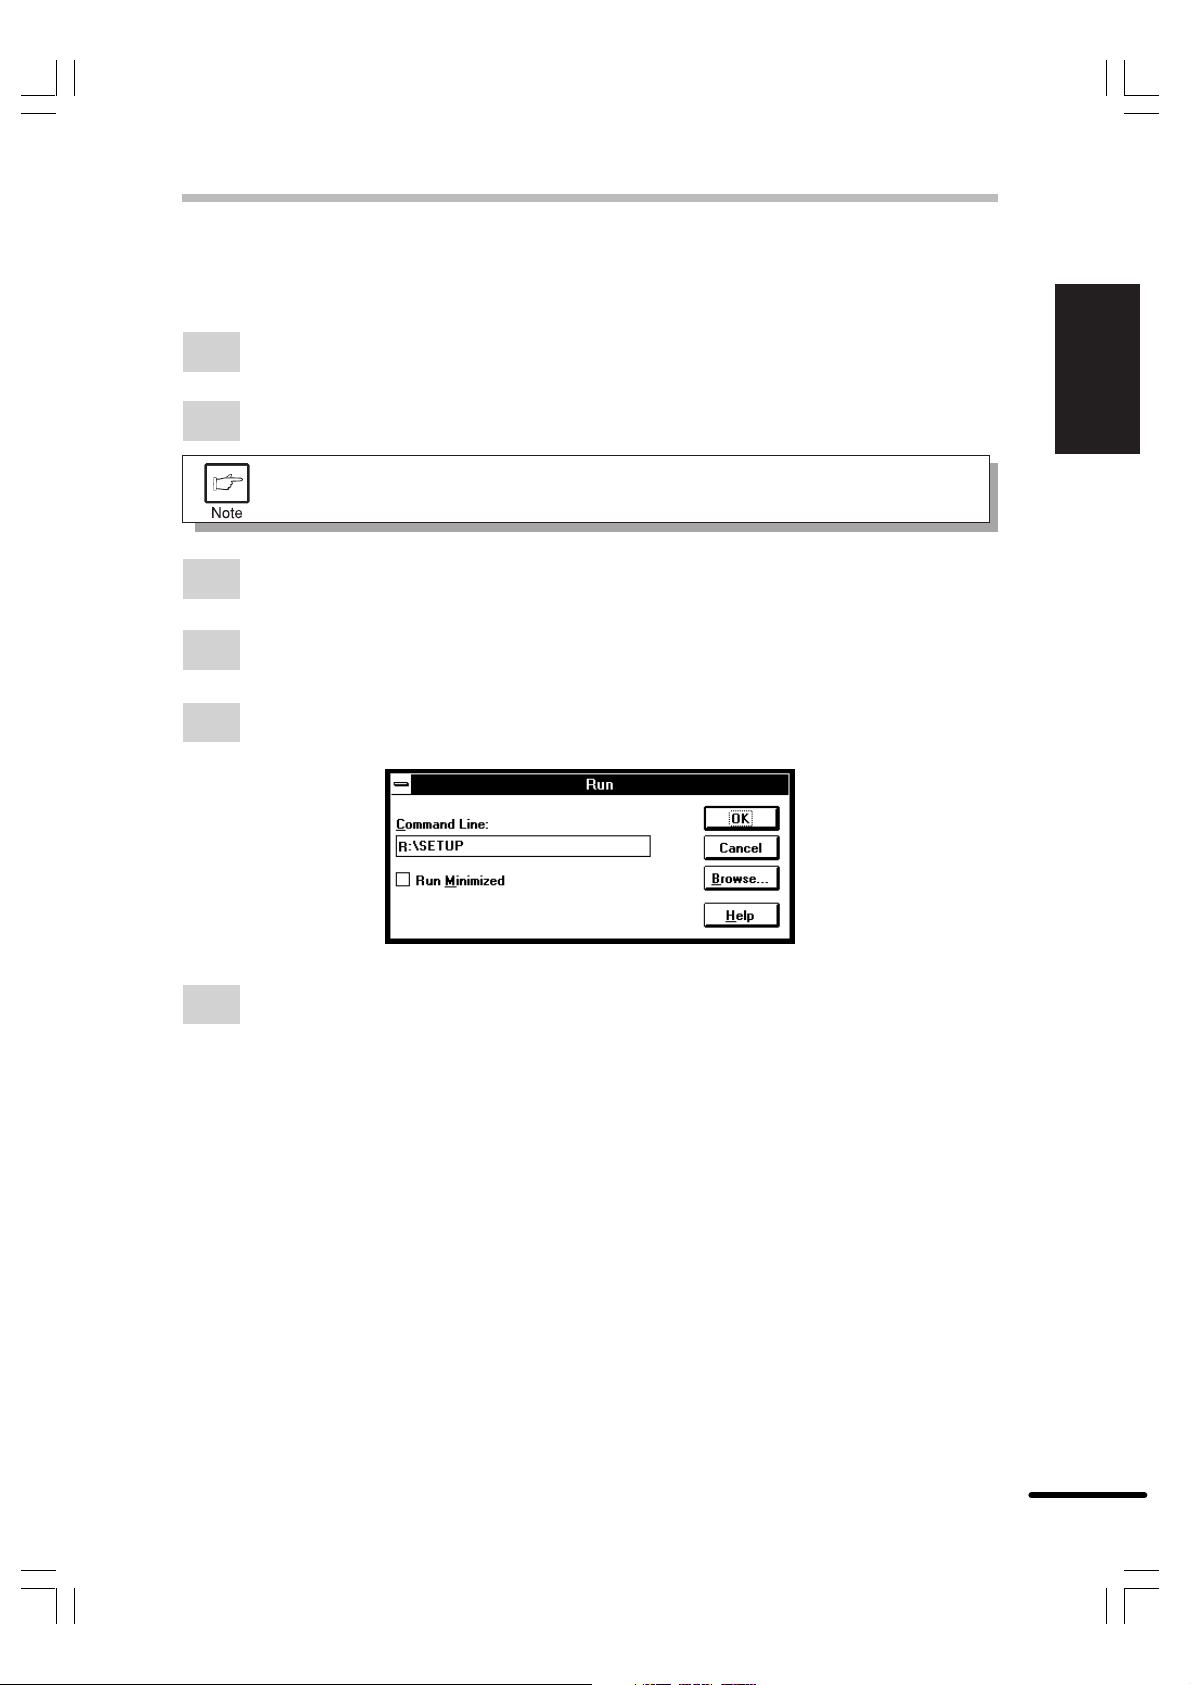
Click the Start button and select Run. When the screen shown below appears, type
R:\SETUP (if the CD-ROM is designated as drive R) and click the OK button. Follow
the on-screen instructions.
The “Install From Disk” window will appear. Insert the installation CD-ROM into the
6
CD-ROM drive. Type R:\ (if the CD-ROM is designated as drive R) and click the OK
button. Follow the on-screen instructions.
If you have any problem with the test print, see TROUBLESHOOTING on page
1-19 and check the symptoms and solutions. Print the test page again after
resolving the problem.
1-8
Page 11
INSTALLING THE PRINTER DRIVER SOFTWARE
Windows 98:
With both the computer and the Copia 9915D turned off, connect the printer to the computer with
either a parallel or a USB interface cable. For connection instructions, see pages 1-4 & 1-5.
Load paper into the paper tray of the printer. For instructions on loading paper, see the
1
section LOADING COPY PAPER found in the copier operation manual.
Turn on the printer.
2
Turn on your computer and start Windows.
3
When using the USB interface:
• Connect your personal computer and the printer using a USB interface cable if you
have not already done so. (For information about connecting the USB interface
cable, see page 1-5.)
• When the “Add New Hardware Wizard” window appears, insert the installation CDROM, click the Next button, follow the on-screen instructions, and finally click the
Finish button.
ENGLISH
Getting started
Before installing the printer driver, be sure to close all other applications which
may be open.
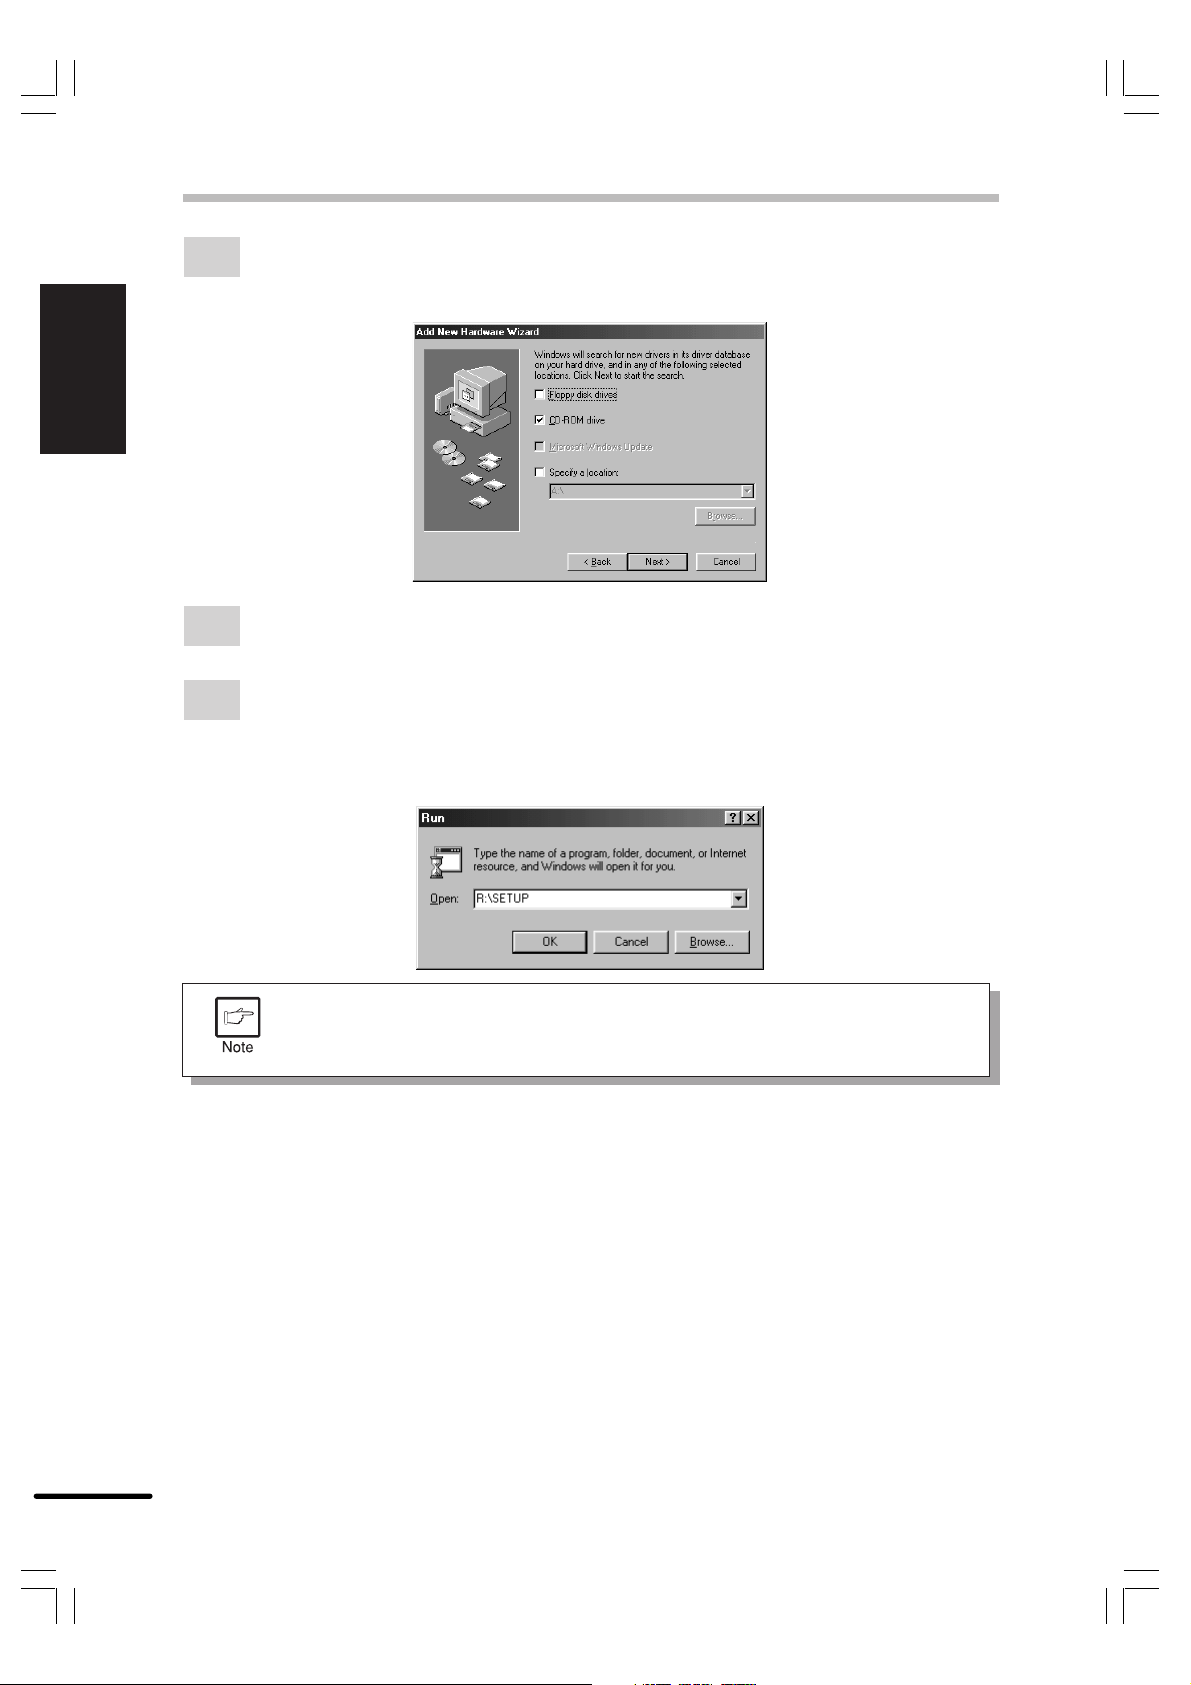
When using Windows 98 on a personal computer with plug & play*, the “Add New Hardware
4
Wizard” window will appear. Click the Next button and follow the on-screen instructions.
●
If the “Add New Hardware Wizard” window does not appear, proceed to step 8.
*Plug &play: For plug & play information, see page 1-7.
Select Search for the best driver for your device and click the Next button.
5
1-9
Page 12
INSTALLING THE PRINTER DRIVER SOFTWARE
ENGLISH
Getting started
Insert the installation CD-ROM into the CD-ROM drive. (If you are using the USB
6
interface, confirm that the installation CD-ROM is in the CD-ROM drive.) Select the
CD-ROM drive and click the Next button.
Windows driver file search will find the device “OLIVETTI Copia 9915D”. Click the Next
7
button and follow the on-screen instructions.
Insert the installation CD-ROM into the CD-ROM drive. (If you are using the USB
8
interface, confirm that the installation CD-ROM is in the CD-ROM drive.) Click the
Start button and select Run. When the window shown below appears, type R:\SETUP
(if the CD-ROM is designated as drive R) and click the OK button. Follow the onscreen instructions.
1-10
If you have any problem with the test print, see TROUBLESHOOTING on page
1-19 and check the symptoms and solutions. Print the test page again after
resolving the problem.
Page 13
INSTALLING THE PRINTER DRIVER SOFTWARE
Windows 3.1x:
With both the computer and the printer turned off, connect the printer to the computer with a
parallel interface cable. For connection instructions, see page 1-4.
Load paper into the paper tray of the printer. For instructions on loading paper, see the
1
section LOADING COPY PAPER in the copier operation manual.
Turn on the printer and then start Windows on your computer.
2
ENGLISH
Before installing the printer driver, be sure to close all other applications which
may be open.
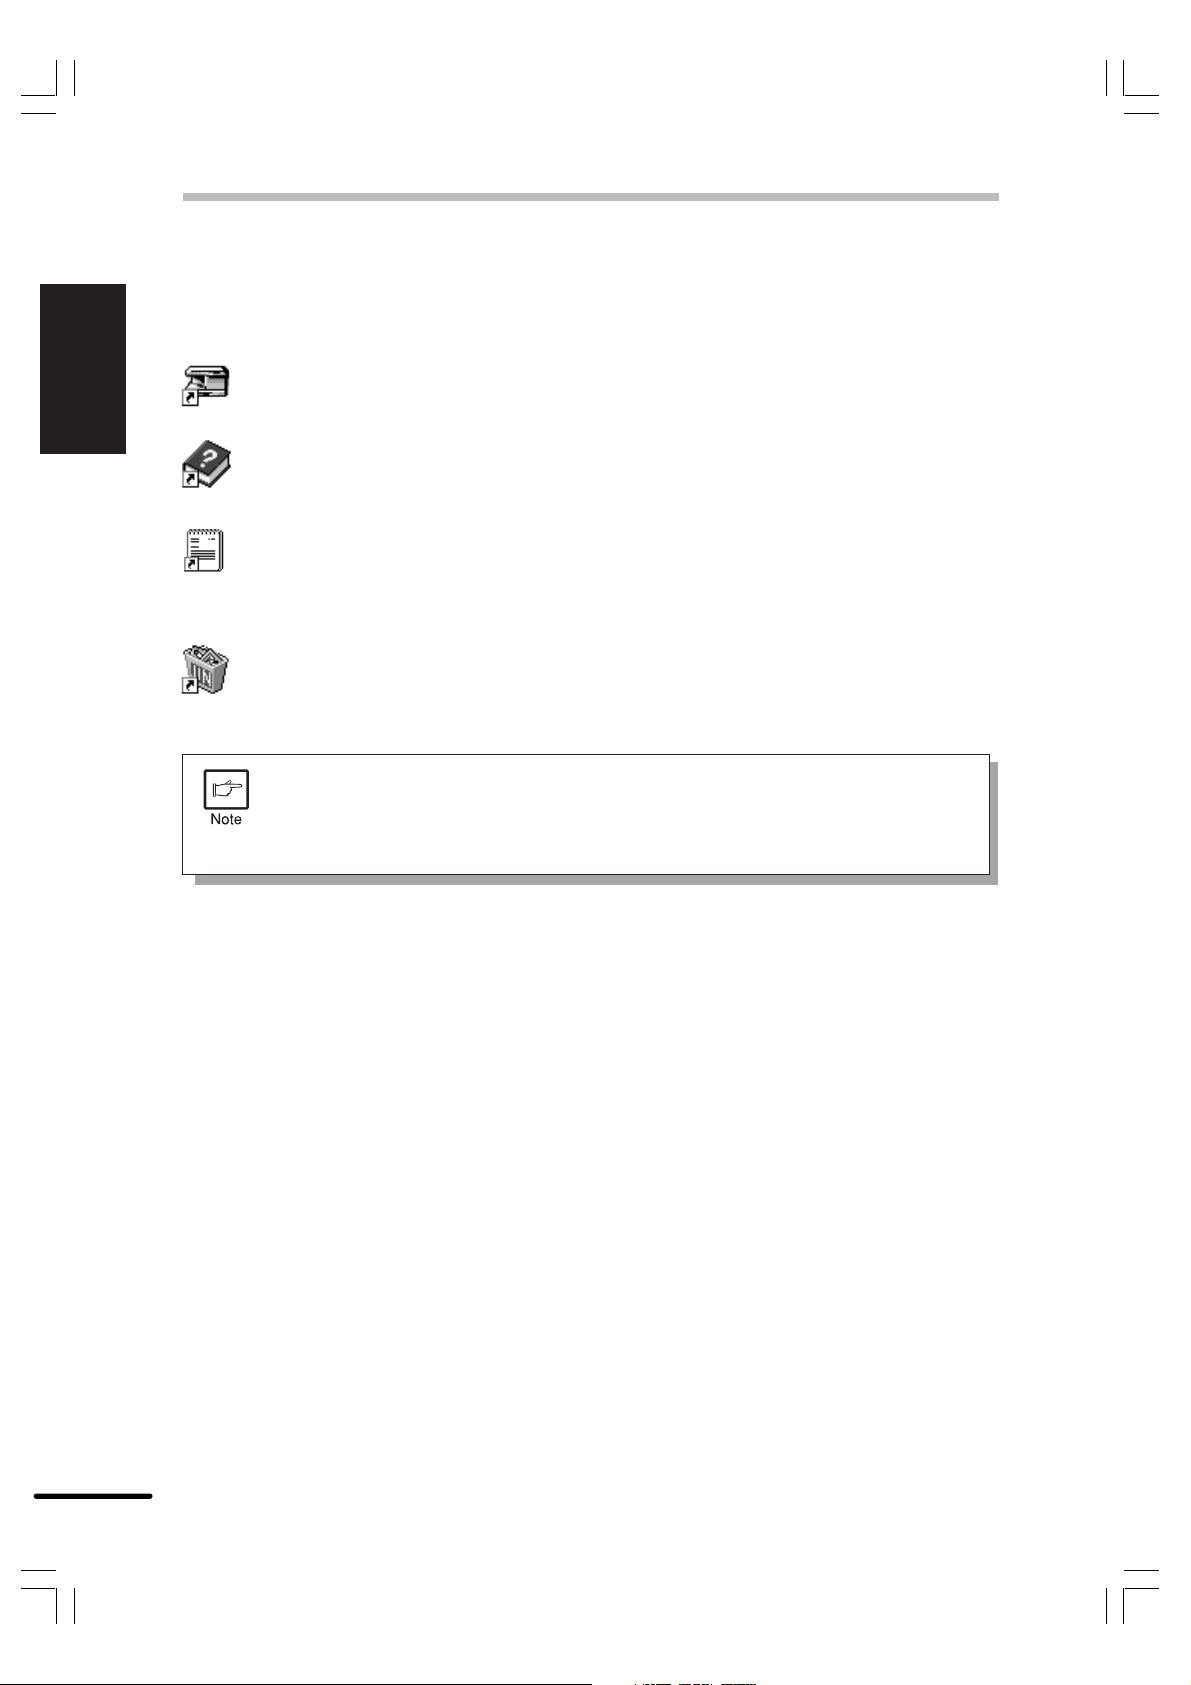
Insert the installation CD-ROM into the CD-ROM drive.
3
Choose File from the Menu bar in Program Manager, and then choose the Run...
4
command.
Type R:\SETUP (if the CD-ROM is designated as drive R) in the command line box and
5
then click the OK button.
Follow the on-screen instructions.
6
Getting started
1-11
Page 14
INSTALLING THE PRINTER DRIVER SOFTWARE
Copia 9915D PCL printer driver group
ENGLISH
When you install the printer driver, the OLIVETTI Copia 9915D PCL printer driver group is
automatically created. The printer driver group includes the following items:
Status Monitor
The Status Monitor window provides visual information about the printer state and
current job. For details, see STATUS MONITOR on page 1-21.
Getting started
Status Monitor HELP
Assistance and information for Status Monitor.
Readme
The latest information on the printer driver is included in this document. Read the Readme
first.
Uninstall Copia 9915D PCL
The printer driver can be uninstalled. If the driver is uninstalled, printing can no longer be
performed on the printer.
For proper uninstallation, be sure to use the OLIVETTI uninstall program of the printer
driver group.
●
Be sure to read the “Readme” document found in the printer driver group
before using your Copia 9915D PCL printer.
●
You cannot use both the status monitor and the Print Manager at the same
time in Windows 3.1 environment.
1-12
Page 15
2
PRINTING
PRINTING A PAGE
The printing method is described below. Read the description in the operation manual for the
application to be used.
●
Before you can use your printer, you must install the supplied OLIVETTI PCL
printer driver. Once this software has been installed, you can control the printing
of your documents from the printer driver which appears on your computer
screen. See INSTALLING THE PRINTER DRIVER SOFTWARE on page
1-6.
●
When using multiple printers, you must change the printer selection from the
control panel to change the printer to be used.
Executing printing
Ensure that paper of the desired size is loaded in the paper tray. (See the section on
1
LOADING COPY PAPER in the copier operation manual.)
To print on special paper, the bypass tray can be used. Select the bypass tray
from the printer driver. See SETTING PRINT CONDITIONS FROM PRINTER
DRIVER on page 1-15. Also see the description of bypass feed operation in the
copier operation manual. Always feed special paper one sheet at a time.
ENGLISH
Printing
Turn on the printer. The ON LINE ( ) indicator will light up.
2
Select the settings for printing such as the number of copies and paper type from the
3
application. See SETTING PRINT CONDITIONS FROM PRINTER DRIVER on page
1-15.
Before printing from your application, ensure that the OLIVETTI Copia 9915D
PCL6 or PCL5e has been selected as the printer.
It is recommended that you use the PCL6 printer driver. If you have problems
printing from older applications, stop using the PCL6 printer driver and instead
use the PCL5e printer driver.
Print the file from your software application.
4
1-13
Page 16
PRINTING A PAGE
ENGLISH
Printing
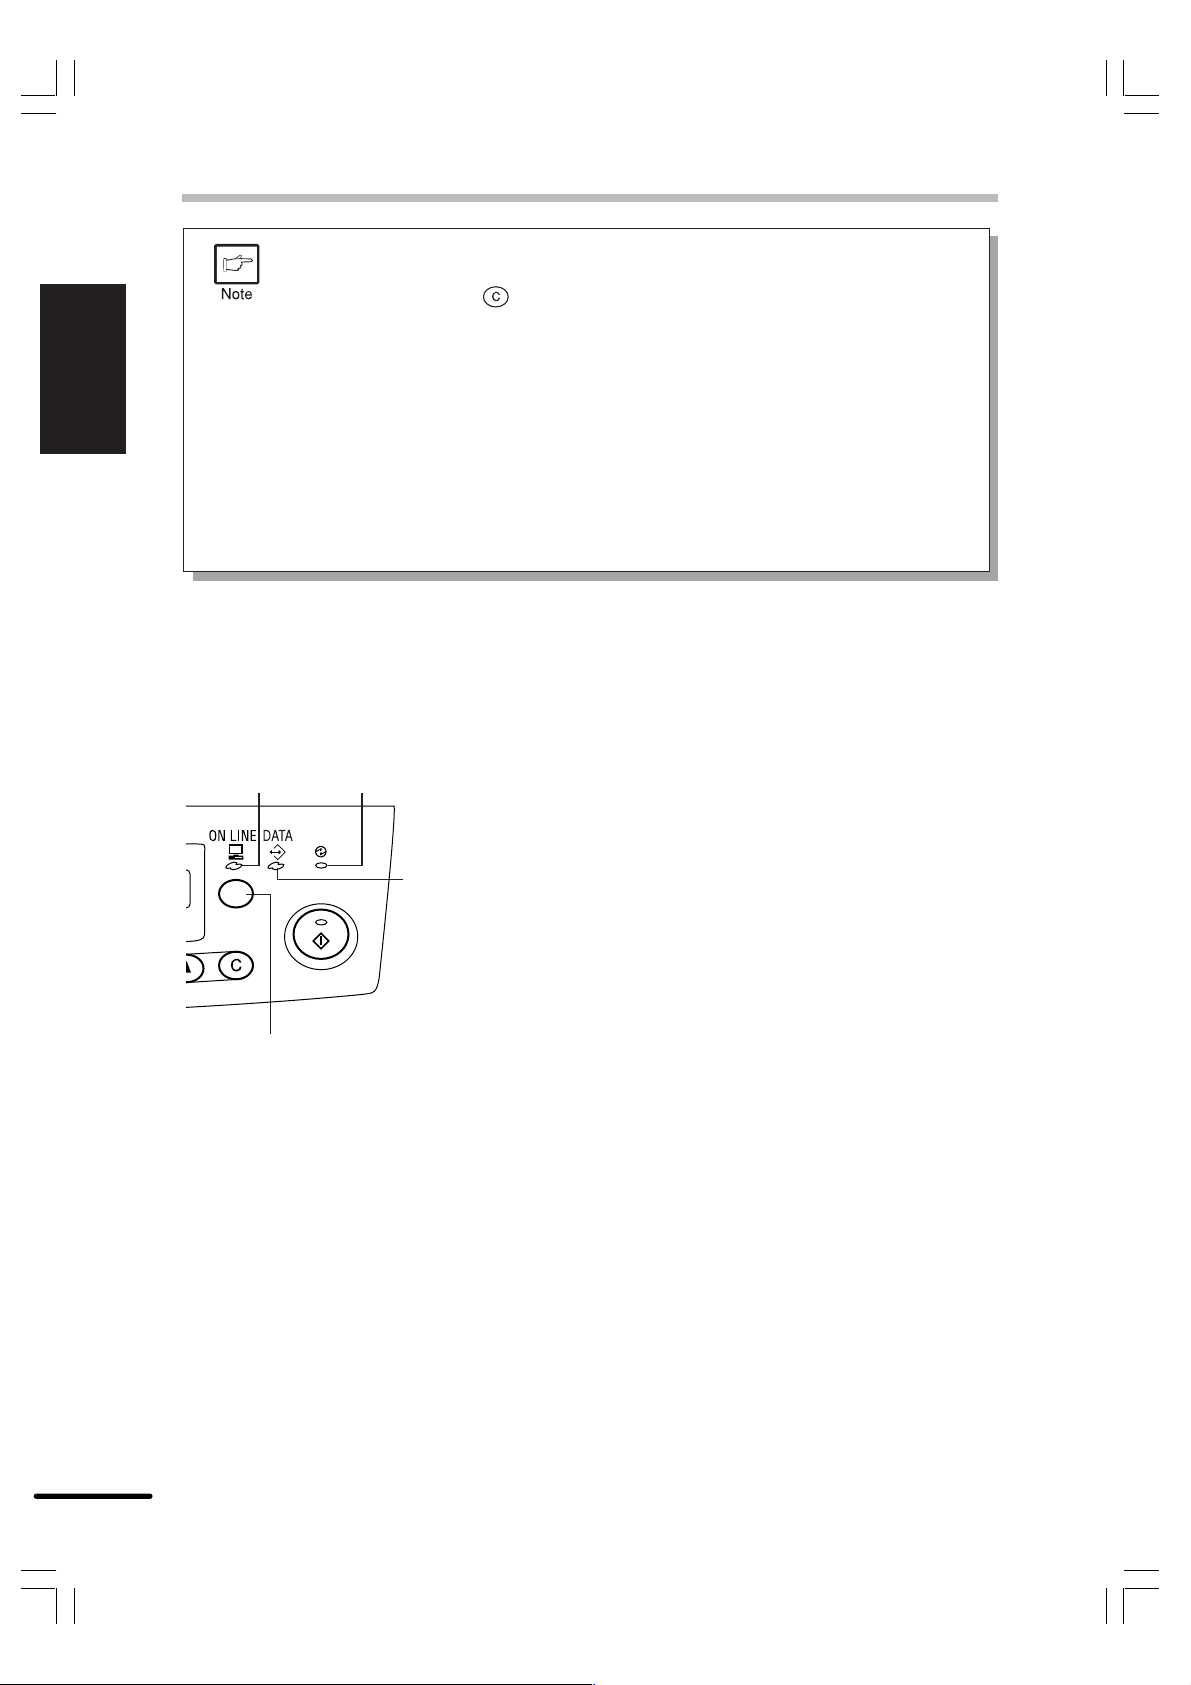
Indicators and key on the operation panel
●
If copying is being performed when printing is started, copying will continue.
After copying is complete, printing will be executed when the ON LINE key is
pressed, the clear ( ) key is pressed twice or approximately 60 seconds
(auto clear time)* elapse.
* The auto clear time varies with a user program setting. See the copier
●
Preheat mode and auto power shut-off mode will be canceled when printing
is started.
●
If the paper size specified from the software application is larger than the
paper size in the printer, part of the image that is not transferred to the paper
may remain on the surface of the drum. In this case, the underside of the
paper may become dirty. If this occurs, change to the correct size paper and
print two or three pages to clean the image.
ON LINE
indicator
operation manual.
Power save
indicator
DATA
indicator
ON LINE indicator
On: Indicates the printer is ready for printing (on-
line).
Off: Indicates the printer is off-line.
DATA indicator
On: Indicates the printer is receiving or processing
print data.
Blinking: Indicates there is print data remaining in
memory that has not yet been printed.
Off: Indicates there is no data being received or
processed.
1-14
ON LINE key
ON LINE key
Changes between the on-line and off-line modes.
Power save indicator
On: Indicates the printer is in a power save mode.
Page 17
SETTING PRINT CONDITIONS FROM PRINTER DRIVER
The setting method for items in the printer driver are described below.
Also refer to the printer driver help for more information.
Before setting the printer driver, check the following items.
●
The OLIVETTI Copia 9915D PCL6 and PCL5e printer drivers have been installed in the computer
to be used. If not, see INSTALLING THE PRINTER DRIVER SOFTWARE on page 1-6.
●
The OLIVETTI Copia 9915D PCL6 or PCL5e has been selected as the default printer on the
computer to be used.
Windows 95/Windows 98/Windows NT 4.0:
Click the Start button and then from the Settings menu item select Printers.
1
If you use Windows 95/Windows 98, right-click the OLIVETTI Copia 9915D PCL6 or
2
PCL5e icon in the Printer folder and select Properties in the menu.
If you use Windows NT 4.0, right-click the OLIVETTI Copia 9915D PCL6 or PCL5e
icon in the Printer folder and select Document defaults in the menu.
For this description, it is assumed that the mouse is configured for right hand
operation.
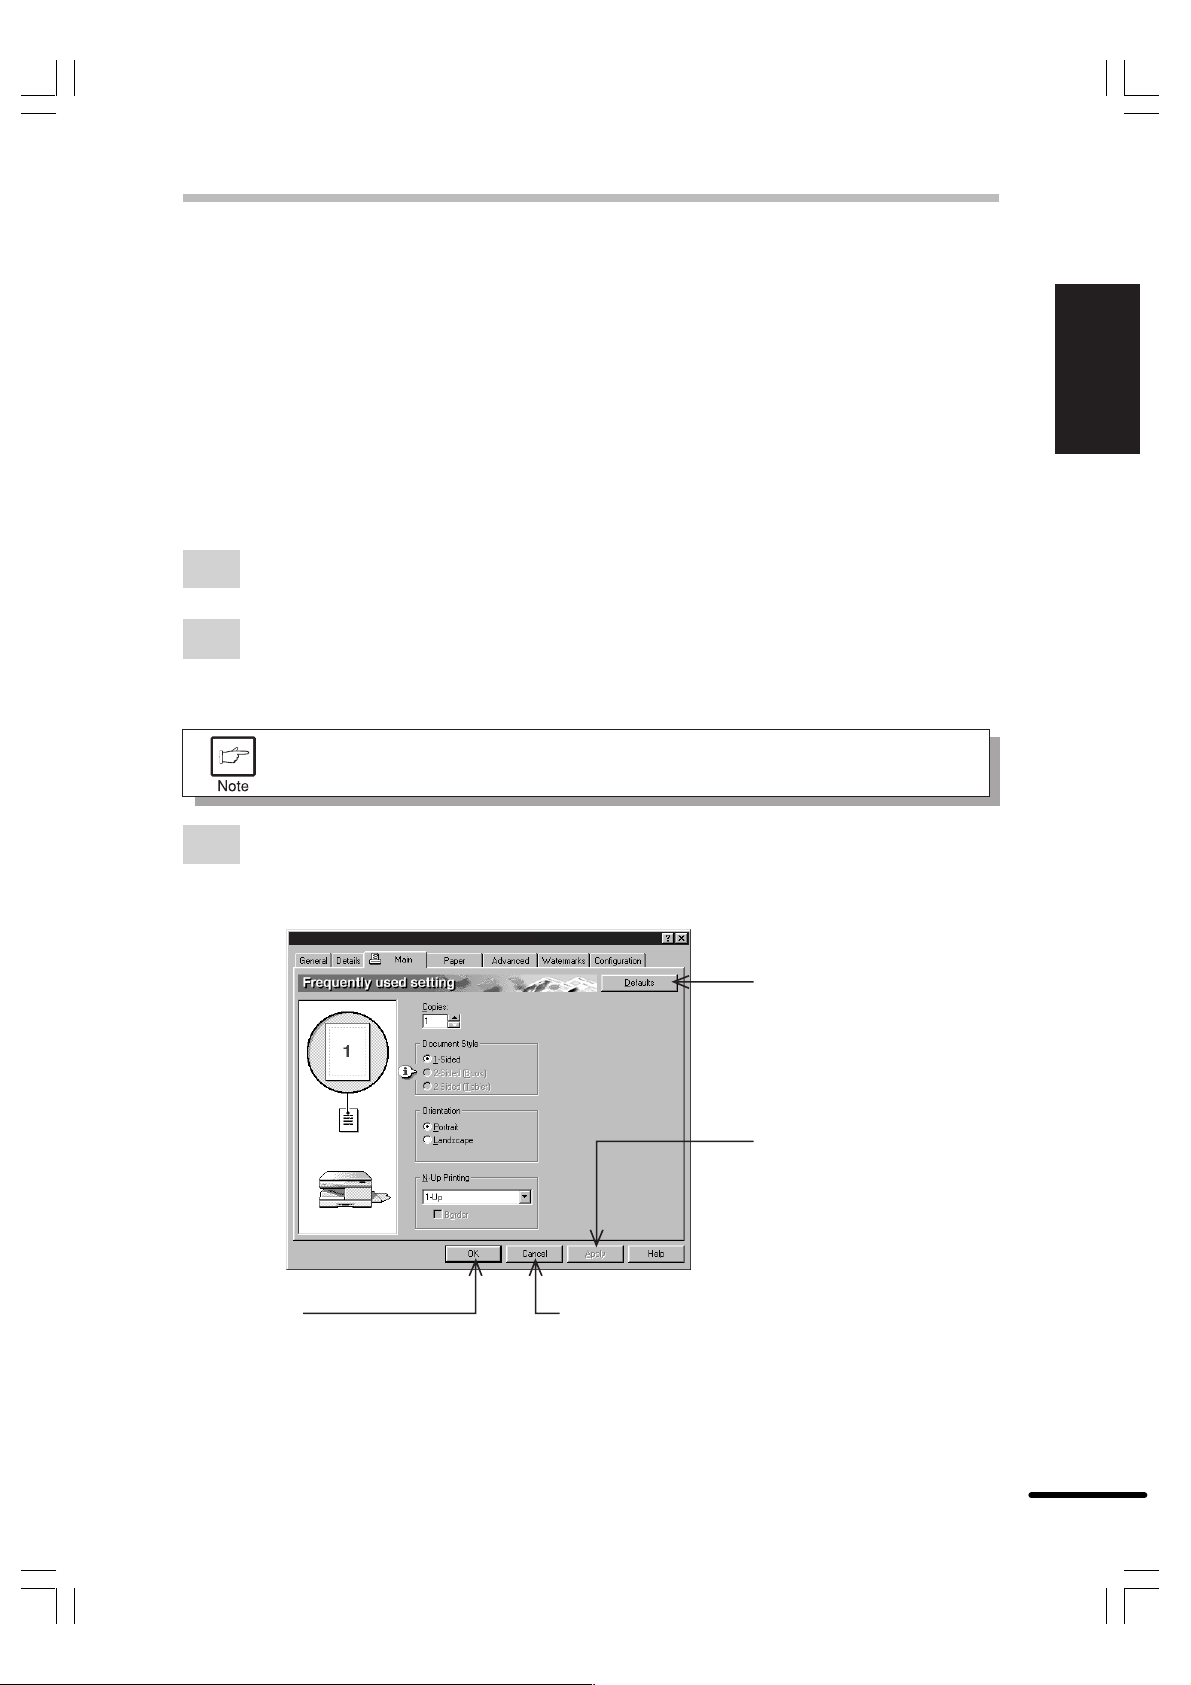
The properties of the selected OLIVETTI Copia 9915D printer driver will be displayed.
3
If you use Windows 95/Windows 98, click the Main tab to display the following screen.
ENGLISH
Printing
* Screen on Windows 95
Copia 9915D PCL 6 Properties
OK button
All driver settings which have been
selected by each tab will be saved
and the properties screen will be
closed.
Defaults button
When pressed, returns the
settings which have been
selected by each tab to
their default state.
Apply button
The settings which have
been selected by each tab
will be saved.
*
This button is not displayed
with Windows NT 4.0
Cancel button
The settings which have been selected by each
tab will be canceled and the properties screen
will be closed.
However, settings which have already been
applied will not be canceled.
1-15
Page 18
SETTING PRINT CONDITIONS FROM PRINTER DRIVER
Windows 3.1x:
ENGLISH
Printing
Double-click the Print Manager icon in the Main window of Program Manager.
1
Select Options in the Print Manager and then select Printer Setup.
2
Select OLIVETTI Copia 9915D PCL5e in the Installed Printers: and click the Setup
3
button.
The properties of the OLIVETTI Copia 9915D PCL5e will be displayed.
4
You cannot use both the status monitor and the Print Manager at the same time
in Windows 3.1 environment.
1-16
Page 19
2-SIDED PRINTING
The 2-sided printing function of this printer allows you to print on both sides of the paper.
●
Do not use envelopes, transparencies, or labels for 2-sided printing.
●
You cannot perform 2-sided printing from the bypass tray.
When the printer driver is installed you can specify 2-sided printing from the application you are
using. For 2-sided printing you must specify whether to print pages as if bound at the left
margin or the top margin.
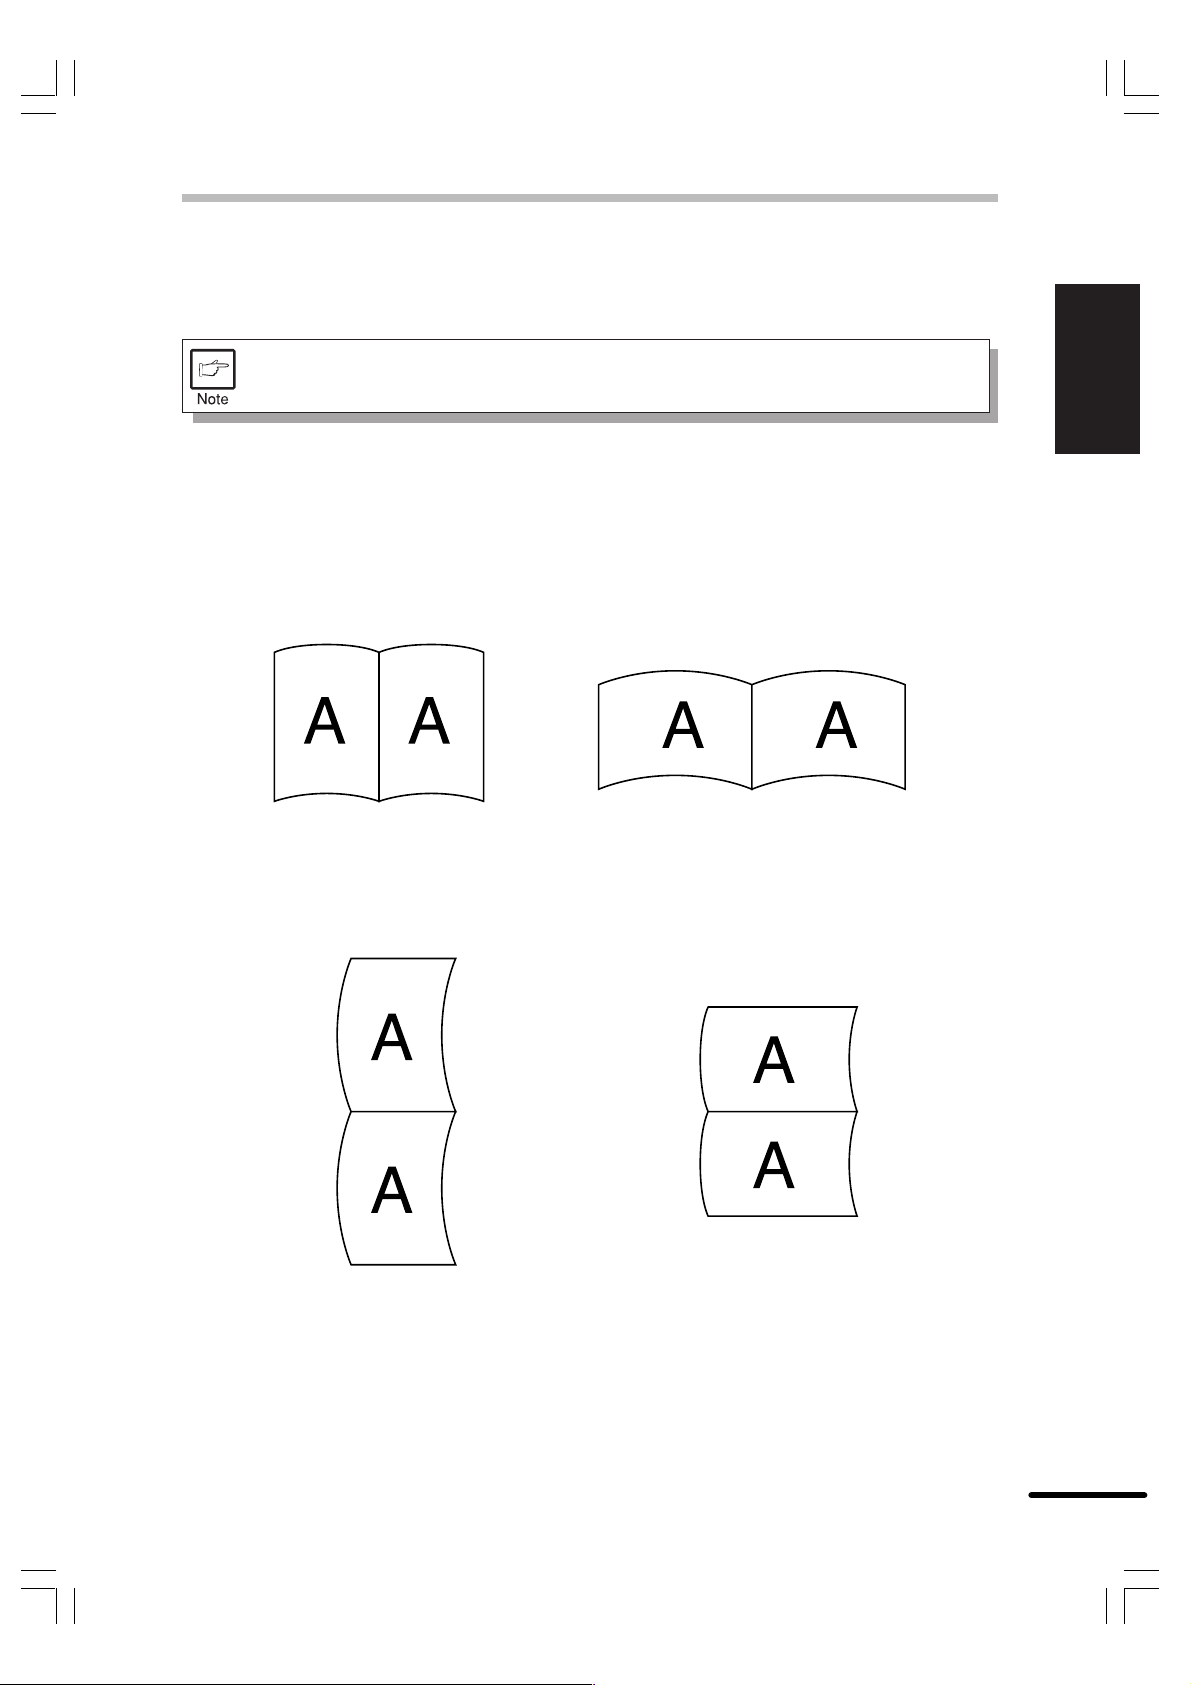
Book Binding
This setting assumes that you will be turning pages as if bound at the left margin.
Orientation Set to Portrait Orientation Set to Landscape
ENGLISH
Printing
Tablet Binding
This setting assumes that you will be turning pages as if bound at the top margin.
Orientation Set to Portrait Orientation Set to Landscape
1-17
Page 20
TEST PRINTING
ENGLISH
Printing
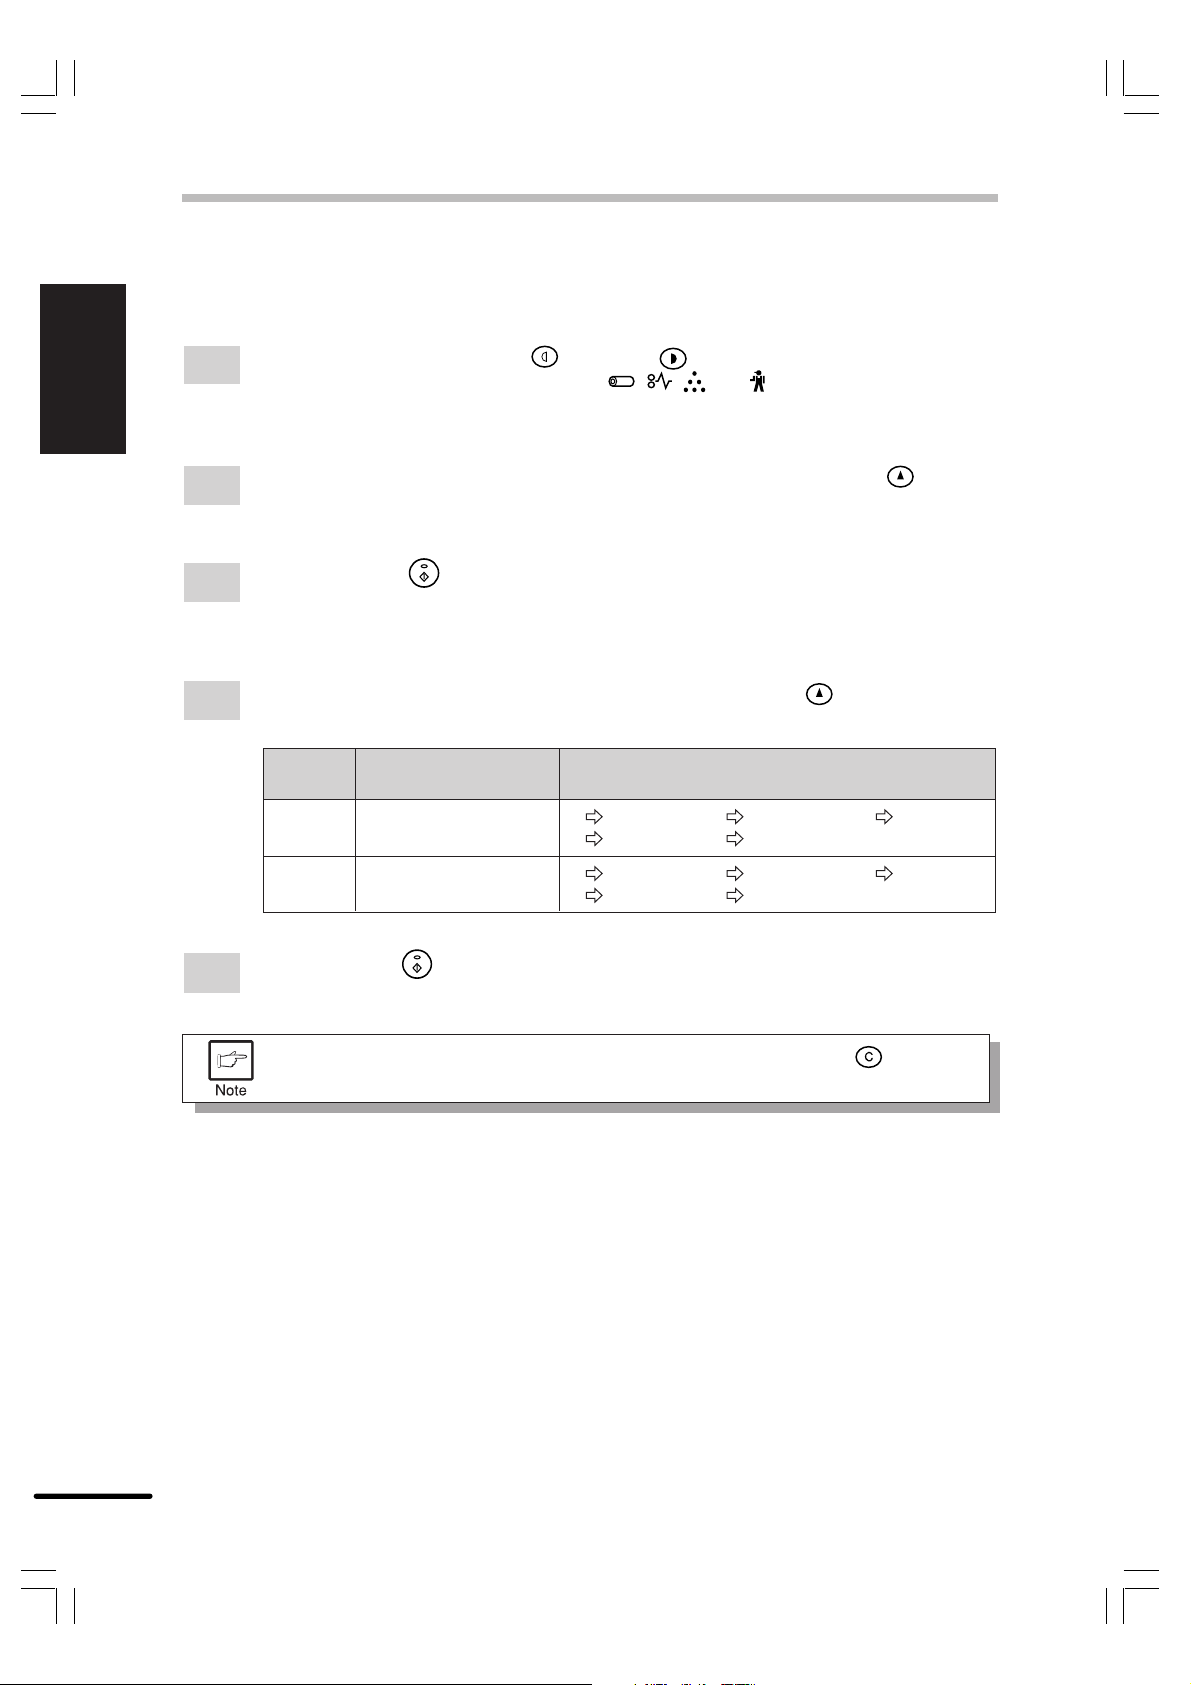
To test print the configuration page and font list, use the following procedure:
Press and hold down the light ( ) and dark ( ) keys simultaneously for more than
1
5 seconds until all the alarm indicators ( , , and ) blink and “--” appears in
the display.
Set “6” (configuration page) or “7” (font list) using the left copy quantity ( ) key. The
2
selected number will blink in the left side of the display.
Press the print ( ) key. The entered program number will be steadily lit and the
3
currently selected parameter number for the program will blink on the right side of the
display.
Select the desired parameter using the right copy quantity ( ) key. The entered
4
paramemer number will blink on the right of the display.
Program
No.
6
7
Configuration page
Font list
Mode Parameters
0 English 1 French 2 Spanish
3 Italian 4 German
0 English 1 French 2 Spanish
3 Italian 4 German
1-18
Press the print ( ) key. The test page prints.
5
To change the setting or to set another mode, press the clear ( ) key. The
printer will return to step 2.
Page 21

3
PRINTER TROUBLE?
TROUBLESHOOTING
Some problems in the Copia 9915D are common to both the copier and printer features, also
check the TROUBLESHOOTING section of the copier operation manual.
Printing problems
“Copier” in the column “See page:” indicates the description is in the copier
operation manual.
ENGLISH
Printer trouble?
Problem Possible cause Solution
Printer
driver
cannot be
installed.
The printer
does not
print.
Hard disk free space is not
sufficient for installation of
the printer driver.
The operating system is not
supported.
The interface cable might
not be connected properly.
The interface cable is
defective.
The port setting is incorrect.
The printer is not on-line.
The TD cartridge or drum
cartridge is not installed
properly.
Delete unnecessary files and
application software to increase hard
disk free space. (The driver requires
at least 10MB free space.)
Use Windows 3.1x, Windows 95,
Windows 98 or Windows NT 4.0.
Check the interface connection.
Check the cable with a computer and
printer which you know work. If
printing is still not possible, the
interface cable is defective.
Check the printer settings in the
Windows Control panel to make sure
that the print job is being sent to the
correct port (for example, LPT1).
Confirm that the ON LINE indicator is
lit. If not lit, press the ON LINE key.
Ensure that the TD cartridge and
drum cartridge are installed properly.
See
page:
1-6
1-6
1-4,
1-5
–
–
1-14
Copier*
Copier*
1
2
The printer may be
configured incorrectly.
The printer driver may be
incorrectly installed.
*1 See the section on TD CARTRIDGE REPLACEMENT.
*2 See the section on DRUM CARTRIDGE REPLACEMENT.
Check the application to make sure
that all the print settings are correct.
Reinstall the printer driver software
and try printing a test page.
–
1-6
1-19
Page 22
TROUBLESHOOTING
ENGLISH
Printer trouble?
Problem Possible cause Solution
Paper does
not feed into
the printer.
The printer
prints wrong
data or
incorrect
characters.
Printing is
too slow.
Paper is not set correctly.
Too much paper in the paper
tray.
The interface cable might
not be connected properly.
The interface cable
specifications may be
incorrect.
If using Windows 3.1x, Print
Manager may be disabled.
Insert the paper correctly.
Remove excessive paper from the
paper tray.
Check the interface cable connection.
See the interface specifications.
Double-click the Printers icon in
Control Panel and check the Use
Print Manager box.
There may be too many
applications open.
The resolution is set to
Close all unnecessary applications
before printing.
Set the resolution to 300dpi.
600dpi.
The computer may have
insufficient random-access
Install more random-access memory
(RAM) in your computer.
memory (RAM).
The printer
does not
print the full
image.
The page layout is too
complex.
Resolution is set to 600dpi.
Page orientation setting may
be incorrect.
There may be too many
applications open.
The paper in the printer may
be larger than the paper size
Simplify the page layout.
Set resolution to 300dpi.
Change the page orientation with the
printer driver.
Close all unnecessary applications
before printing.
Load the correct paper into the
printer.
specified in your application
or printer driver.
Interface cable
See the interface specifications.
specifications may be
incorrect.
The CPU specifications may
be incorrect.
The computer may have
insufficient random-access
Check that the CPU of your
computer is 486DX 66MHz or better.
Install more random-access memory
(RAM) in your computer.
memory (RAM).
See
page:
Copier*
Copier*
1-4,
1-5
1-25,
1-26
–
–
1-15
1-6
–
1-15
1-15
–
–
1-25,
1-26
1-6
1-6
3
3
1-20
*3 See the section on LOADING COPY PAPER.
Page 23
STATUS MONITOR
When printing starts, the status monitor screen will appear on the computer display. The status
monitor displays the printer state and information on the current print job.
The status monitor displays the following types of messages, Normal, Warning and Fault. If an
error message appears, check the message description below and perform the listed task.
●
“Copier” in the column “See page:” indicates the description is in the copier
operation manual.
●
You cannot use both the status monitor and the Print Manager at the same
time in Windows 3.1 environment.
Normal Messages
The following messages indicate the current state of the printer. Since these messages indicate
normal operating conditions, you need not take any action.
Message
Ready
Printing in progress
Copying in progress
The printer is idle and ready for the next print job.
A printing job is in progress.
A copying job is in progress.
Description
Warning Messages
Message
TD cartridge is near empty.
Reorder a new cartridge and
replace soon.
Drum cartridge is near end of
life. Reorder a new cartridge and
replace soon.
Description / Solution
Running out of toner. While printing can
continue, the print quality will be affected.
Reorder a new TD cartridge and replace it.
The drum cartridge is nearly spent. While printing
can continue, the print quality will be affected.
Reorder a new cartridge and replace it soon.
See
page:
Copier*
Copier*
ENGLISH
Printer trouble?
1
1
*1: See the section on SUPPLIES AND USER MAINTENANCE.
1-21
Page 24
STATUS MONITOR
Fault Messages
ENGLISH
Printer trouble?
Message
TD cartridge is empty. Replace
empty TD cartridge with a new
cartridge.
Drum cartridge is at end of life.
Replace empty drum cartridge
with a new cartridge.
Front or Side Cover open.
Close Covers.
Insert TD cartridge into the
machine
Paper Jam
Check Paper Tray : Out of Paper
or Misfeed
Check Bypass Tray : Out of
Paper or Misfeed
Clear misfeed or load paper and
press "C" to continue.
Print Image Error
The print page may be incomplete.
Lower the print resolution and
reprint the job to fix the problem.
Service Error
Switch Main Power OFF on the
product. Wait approximately 5
seconds. Switch Main Power
ON. If the Service Error
continues, Contact your
authorized SHARP dealer.
OLIVETTI dealer.
Product Communication Error
The printer is either busy,
disconnected or off ; check the
printer. To cancel the job, press
the Cancel Job button.
The printer has an invalid TD
cartridge.
Remove cartridge and replace
with a valid TD cartridge.
Description / Solution
The TD cartridge is empty. Printing cannot
continue until you replace the empty TD
cartridge with a new cartridge.
The drum cartridge is spent. Printing cannot
continue until you replace the spent drum
cartridge with a new cartridge.
One of the covers on the printer is open. Printing
cannot continue until you close the cover.
The TD cartridge is not in the printer. Insert a
TD cartridge into the printer.
A piece of paper has misfed within the printer.
Printing cannot continue until the misfed paper
is removed.
The paper tray is out of paper or the paper did not
feed correctly. Printing cannot continue until you load
the paper or clear the misfeed in the paper tray.
The bypass tray is out of paper or the paper
did not feed correctly. Printing cannot continue
until you load the paper or clear the misfeed in
the bypass tray.
The last page printed may be incomplete.
Possibly, the image is too complex.
Lower the print resolution to 300dpi and
reprint the job.
The printer has detected a fatal error condition
and cannot continue. Make a note of any
specific error conditions or codes. Then turn
the printer's power switch to OFF. Wait for five
seconds. Then turn the printer's power switch
to ON. If the error condition persists, please
contact your authorized SHARP dealer.
OLIVETTI dealer.
The computer has lost communications with
the printer. Check all connections and power
switches, including at wall socket and on
printer. To cancel the job, press the Cancel
Job button.
The printer has an invalid TD cartridge. The
printer will not function until you remove
cartridge and replace with a valid TD cartridge.
See
page:
Copier*
Copier*
–
Copier*
Copier*
Copier*
Copier*
Copier*
Copier*
1-20
–
1-4,
1-5,
1-19
–
2
3
2
4
4
5
4
6
1-22
*2: See the section on TD CARTRIDGE REPLACEMENT.
*3: See the section on DRUM CARTRIDGE REPLACEMENT.
*4: See the section on MISFEED REMOVAL.
*5: See the section on LOADING COPY PAPER.
*6: See the section on BYPASS FEED.
Page 25

UNINSTALLING PRINTER DRIVER
If the printer driver has not been installed properly or if the printer is no longer needed, uninstall
the printer driver from your computer using the following procedure.
If using Windows 95/Windows 98/Windows NT 4.0, click Start, Program, OLIVETTI
1
Copia 9915D PCL, and Uninstall Copia 9915D PCL.
If using Windows 3.1x, double-click the OLIVETTI Copia 9915D PCL icon in Program
Manager and double-click the Uninstall Copia 9915D PCL icon.
When the “Confirm File Deletion” window appears, Click the Yes button.
2
When the “Remove Programs From Your Computer” window appears, click the OK
3
button.
ENGLISH
Printer trouble?
1-23
Page 26

4
ENGLISH
SPECIFICATIONS
APPENDIX
Appendix
Resolution 600dpi or 300dpi can be selected.
Page description language PCL5e, PCL6
Installed fonts PCL6 compatible : 45 outline fonts, one bitmap font
Page orientation Portrait or landscape
First print time Approx. 9.6 seconds*
Print speed (multiple pages) Approx. 15 pages per minute (A4)
Interface port Bi-directional parallel interface (IEEE 1284 compliant)
USB (B-type) interface
Memory 8MB
* First print time may differ depending on operating conditions, such as power-supply voltage and
room temperature.
Also the time may differ depending on data quantity to be printed and applications.
As a part of our policy of continuous improvement, OLIVETTI reserves the right
to make design and specification changes for product improvement without prior
notice. The performance specification figures indicated are nominal values of
production units. There may be some deviations from these values in individual
units.
1-24
Page 27
PARALLEL INTERFACE
This printer uses a bi-directional parallel interface.
For specifications of the parallel interface of your computer, see its operation
manual.
Connector
36-pin DDK 57LE-40360-730B (D29)
female connector or equivalent connector
Cable
Shielded type bi-directional parallel
interface
For best results, use a printer interface cable
which is IEEE1284 compliant. (2 m (6 feet)
Max.)
Pin configuration
The pin numbers and signal names are
listed in the following table.
Pin No. Signal name Pin No. Signal name
1 STB 19 GND (STB RET)
18
36 19
ENGLISH
Appendix
1
2 DATA1 20 GND (DATA1 RET)
3 DATA2 21 GND (DATA2 RET)
4 DATA3 22 GND (DATA3 RET)
5 DATA4 23 GND (DATA4 RET)
6 DATA5 24 GND (DATA5 RET)
7 DATA6 25 GND (DATA6 RET)
8 DATA7 26 GND (DATA7 RET)
9 DATA8 27 GND (DATA8 RET)
10 ACKNLG 28 GND (ACKNLG RET)
11 BUSY 29 GND (BUSY RET)
12 PE (Paper End) 30 GND (PE RET)
13 SLTC 31 INPRM
14 AUTO LF 32 FAULT
15 (NC) 33 (NC)
16 GND (0 V) 34 (NC)
17 FG 35 +5V
18 +5V 36 SLTC IN
1-25
Page 28
USB INTERFACE
ENGLISH
Appendix
Connector
4-pin DDK DUSB-BRA42-T11
Type-B connector
Cable
Shielded twisted pair cable
(2 m (6 feet) Max.: high-speed transmission equivalent)
Pin configuration
The pin numbers and signal names are listed in the
following table.
Pin No. Signal name
1 +5V
2- DATA
3+DATA
4 GND
2
34
1
1-26
Page 29
®
PCL - Compatible Resident Font List
ENGLISH
Font
No.
1
2
3
4
5
6
7
8
9
10
11
12
13
14
15
16
17
18
19
20
21
22
Font name
Fixed Pitch 810 Courier Roman SWC0
™
Dutch
801 SWC
Dutch 801 Bold SWC
Dutch 801 Italic SWC
Dutch 801 Bold Italic SWC
Zapf Humanist 601 SWC
Zapf Humanist 601 Bold SWC
Zapf Humanist 601 Italic SWC
Zapf Humanist 601 Bold Italic SWC
Ribbon 131 SWC
Clarendon 701 Clarendon Condensed SWC
Swiss™ 742 SWC
Swiss 742 Bold SWC
Swiss 742 Italic SWC
Swiss 742 Bold Italic SWC
Swiss 742 Condensed SWC
Swiss 742 Condensed Bold SWC
Swiss 742 Condensed Italic SWC
Swiss 742 Condensed Bold Italic SWC
Incised 901 SWC
Incised 901 Bold SWC
Incised 901 Italic SWC
Aldine 430 Original Garamond SWC
Font
No.
23
24
25
26
27
28
29
30
31
32
33
34
35
36
37
38
39
40
41
42
43
44
45
Font name
Aldine 430 Original Garamond Bold SWC
Aldine 430 Original Garamond Italic SWC
Aldine 430 Original Garamond Bold Italic SWC
Audrey Two SWC
Flareserif 821 SWC
Flareserif 821 Extra Bold SWC
Swiss 721 SWM
Swiss 721 Bold SWM
Swiss 721 Oblique SWM
Swiss 721 Bold Oblique SWM
Dutch 801 SWM
Dutch 801 Bold SWM
Dutch 801 Italic SWM
Dutch 801 Bold Italic SWM
Symbol SWA
Wingbats SWM
Fixed Pitch 810 Courier Bold SWC
Fixed Pitch 810 Courier Italic SWC
Fixed Pitch 810 Courier Bold Italic SWC
Fixed Pitch 850 Letter Gothic 12 pitch/text SWC
Fixed Pitch 850 Letter Gothic Bold 12 pitch/text SWC
Fixed Pitch 850 Letter Gothic Italic 12 pitch/text SWC
Line Printer
Appendix
All above resident fonts in the column are licensed from Bitstream Inc. Dutch and Swiss are trademarks of Bitstream Inc. All other
trademarks and copyrights are the property of their respective owners.
See page 1-18 for the procedure to print the font examples.
1-27
Page 30

USER LICENSE TERMS FOR LEXIKON PRINTING
AND IMAGING SOFTWARE
Olivetti Lexikon S.p.A. ("Lexikon") hereby grants to the end user customer ("Customer") of the
Lexikon Printing and Imaging Software to which this document is annexed ("Software") a
nontransferable and nonexclusive license to use the Software under the following terms and
conditions.
OWNERSHIP
A. The Software (which term as used herein shall mean the set of machine readable code on any
media, including firmware, as well as the user documentation delivered to the Customer by or
behalf of Lexikon), together with the related copyright and other industrial or intellectual
property rights, are the exclusive property of Lexikon and/or of its suppliers. The Customer
acquires no title, right or interest in the Software other than the license rights granted herein.
B. The Customer shall not remove from the Software any trademark, tradename, copyright notice
or other notice, and shall be responsible for their conservation on the copies received
hereunder and for their reproduction on any backup copy of the Software or on any portion of
the same merged into other software, subject to the provisions of Section 2 below.
C. Any applicable Machineresident Diagnostic Software such as may be used to service the
Lexikon printer is specifically excluded from this User License. If permitted by Lexikon, a
separate license for any such Diagnostic Software must be obtained from Lexikon to use any
such Diagnostic Software before the use of any such software shall be allowed.
LICENSE
A. For the purposes hereof "use of Software" shall mean the copying of any portion of the
instructions or data contained in the Software by transferring or reading them from the medium
on which it is recorded into a central processing unit ("CPU") in order to operate the Lexikon
printer for which it is supplied.
B. Under the license granted to the Customer hereunder, the Customer has the right to use the
Software only on a single CPU. The Customer shall not make any other use of the Software,
without the prior written permission of Lexikon.
C. The Customer may not copy, in whole or in part, the Software, except, with respect to Software
provided on removable media such as magnetic or optical disks, for a single backup copy for
recovery in case of breakdown, provided however that such backup copy shall be used solely
on said single CPU and be subject to the terms and conditions hereof.
D. The Customer may not disassemble or decompile in whole or in part the Software, nor
otherwise analyze its codes or logical structure, except to the limited extent expressly
provided by any mandatory provisions of law.
E. The Customer may not copy, either in whole or in part, the documentation provided by Lexikon
for the use of the Software or any other printed material supplied by or on behalf of Lexikon to
the Customer.
Additional copies of this documentation may be supplied by, or on behalf of, Lexikon at its
rates in force at the time of ordering.
Page 31

DISCLAIMER OF WARRANTY AND LIMITATION OF LIABILITY
Lexikon or its suppliers give no warranties with respect to the Software licensed hereunder and all
implied warranties including any warranty of merchantability and fitness for purpose are hereby
excluded.
In no event will Lexikon or its suppliers be liable for indirect consequential, incidental or special
damages event if Lexikon has been advised of the possibility of such damages. The maximum
liability of Lexikon shall be limited to refunding the customer for the price paid for the software.
TRANSFER OF THE LICENSE
Customer may not rent or lease the Software or otherwise transfer the Software or this license to
any third party except as provided below.
Customer may transfer the Software and this license to another party on a definitive basis solely
in conjunction with the definitive transfer to such third party of the Lexikon printer unit in
connection with which the Software is used, provided that said third party agrees to accept these
license terms and conditions, and that the Customer transfers or destroys all portions of the
Software in its possession or control and does not retain any right on the Software.
Lexikon may assign or transfer its rights and obligations hereunder to Lexikon's suppliers of the
Software, to any Lexikon's affiliate or to Lexikon's successor in the business to which this license
pertains.
TERMINATION OF THE LICENSE
A. The license granted hereunder may be terminated forthwith by Lexikon by written notice to the
Customer if any of the following events occurs:
●
in case of breach by the Customer of any provisions hereof; or
●
in case of nonpayment by the Customer in due time of any sum due from the Customer in
consideration of delivery and license of the Software.
Upon termination of the license granted hereunder, Lexikon reserves the right to take any legal
action necessary to recover any damages incurred by it.
B. Upon termination of the license granted hereunder, the Customer shall refrain from any further
use of the Software, and Lexikon may require either the destruction of any copy of the
Software, in any form, in the possession of the Customer or the return of the same to Lexikon.
RE-EXPORT RESTRICTIONS
The Customer acknowledges that the Software licensed hereunder may be subject to certain
export restrictions in accordance with national and international regulations.
Therefore the Customer undertakes not to export the Software or any technical Information
received hereunder other than to USA or member countries of the European Union without having
first obtained the prior governmental consents as needed.
Page 32

Page 33

INHALT
DEUTSCH
ERSTE SCHRITTE
1
EINFÜHRUNG 2-2
HAUPTFUNKTIONEN 2-3
ERSTELLEN VON DISKETTEN VON CD-ROM 2-3
ANSCHLIESSEN DES SCHNITTSTELLENKABELS 2-4
INSTALLIEREN DER DRUCKERTREIBERSOFTWARE 2-6
– Beschreibung des Druckertreibers 2-6
– Prüfen der Hardware- und Softwareanforderungen 2-6
– Installieren des Druckertreibers 2-6
– Druckertreibergruppe des Copia 9915D PCL 2-12
DRUCKEN
2
DRUCKEN EINER SEITE 2-13
– Ausführen des Druckvorgangs 2-13
– Anzeigen und Tasten des Bedienfelds 2-14
FESTLEGEN DER DRUCKEREINSTELLUNGEN IM
DRUCKERTREIBER 2-15
DUPLEX DRUCK 2-17
TESTSEITEN DRUCKEN 2-18
DEUTSCH
DRUCKERPROBLEME?
3
PROBLEMLÖSUNG 2-19
– Druckprobleme 2-19
STATUSMONITOR 2-21
DEINSTALLIEREN DES DRUCKERTREIBERS 2-23
ANHANG
4
TECHNISCHE DATEN 2-24
PARALLELE SCHNITTSTELLE 2-25
USB SCHNITTSTELLE 2-26
LISTE DER INSTALLIERTEN SCHRIFTARTEN 2-27
2-1
Page 34

1
Dieses Kapitel enthält grundlegende Informationen zur Verwendung des Druckers OLIVETTI
Copia 9915D und zu dessen Funktionen.
DEUTSCH
EINFÜHRUNG
Der Copia 9915D kann als Kopierer und als Laserdrucker eingesetzt werden. In diesem Handbuch
werden nur die Druckerfunktionen des Geräts beschrieben. Informationen zur Verwendung des
Copia 9915D als Kopierer sowie zusätzliche Informationen zu Kopierer- und Druckerfunktionen
Erste Schritte
finden Sie in der Bedienungsanleitung des Kopierers. Machen Sie sich mit dem Inhalt dieses
Handbuchs vertraut, um alle Druckerfunktionen in vollem Umfang nutzen zu können. Bewahren
Sie dieses Handbuch an einer leicht zugänglichen Stelle auf, um es während des Druckerbetriebs
jederzeit zur Verfügung zu haben.
In diesem Handbuch verwendete Konventionen
In diesem Handbuch werden die folgenden Symbole verwendet, um dem Benutzer Informationen
zur Verwendung des Geräts zu liefern.
ERSTE SCHRITTE
Werden die Angaben des Vorsichtshinweises nicht richtig befolgt, kann dies zu
Beschädigungen des Kopierers oder einzelner Komponenten führen.
Die Hinweise liefern wichtige Informationen zu dem Kopierer bezüglich der
technischen Daten, der Funktionen, der Leistung und des Betriebs sowie
nützliche Informationen für den Anwender.
●
Wenn Sie versuchen, einen Druckvorgang auszuführen, während ein
Kopiervorgang läuft, wird der Druckvorgang erst nach Abschluß des
Kopiervorgangs ausgeführt.
●
Wenn Sie versuchen, eine Kopie anzufertigen, während ein Druckvorgang
läuft, wird der Druckvorgang unterbrochen, und Sie können die Kopie
anfertigen. Der Druckvorgang wird nach Abschluß des Kopiervorgangs wieder
aufgenommen.
Warenzeichen
Windows, MS-DOS und Windows NT sind Warenzeichen der Microsoft Corporation in den
USA und in anderen Ländern.
IBM, PC/AT und OS/2 sind Warenzeichen der International Business Machines Corporation.
PCL ist ein Warenzeichen der Hewlett-Packard Company.
Alle anderen Warenzeichen und Urheberrechte sind das Eigentum ihrer jeweiligen Inhaber.
2-2
Page 35

HAUPTFUNKTIONEN
Drucken aus Windows 3.1x*-, Windows 95-, Windows 98**- und Windows
NT 4.0-Anwendungen
* Der Druckertreiber PCL6 kann nicht unter Windows 3.1 installiert werden.
** USB wird nur unterstützt, wenn Windows 98 vorinstalliert ist.
●
Mit dem Druckertreiber OLIVETTI Copia 9915D PCL ist ein Ausdruck mit
Anwendungsprogrammen unter Windows 3.1x, Windows 95, Windows 98 und Windows
NT 4.0 mit hoher Geschwindigkeit und hoher Qualität möglich.
Hochgeschwindigkeitsdruck mit 15 Seiten/Minute
●
Die Druckzeit für die erste Seite beträgt ungefähr 9,6 Sekunden.
●
Beim Druck mehrerer Seiten beträgt die Druckgeschwindigkeit 15 Seiten/Minute.
ERSTELLEN VON DISKETTEN VON CD-ROM
DEUTSCH
Erste Schritte
Falls Ihr Computer kein CD-ROM-Laufwerk besitzt, kann der Druckertreiber mit einem anderen
Computer (mit CD-ROM-Laufwerk) von der CD-ROM auf Diskette kopiert werden. Anschließend
können Sie den Druckertreiber von Diskette auf Ihrem Computer installieren.
Windows 95/Windows 98/Windows NT 4.0:
1
2
3
Windows 3.1x:
1
2
3
Doppelklicken Sie auf Arbeitsplatz, Copia 9915D und Makedisk.
Doppelklicken Sie auf Makedisk.exe.
Befolgen Sie die Anweisungen am Bildschirm.
Doppelklicken Sie im Hauptfenster des Programm-Managers auf den Datei-Manager,
und wählen Sie CD-ROM und das Verzeichnis Makedisk aus.
Doppelklicken Sie auf Makedisk.exe.
Befolgen Sie die Anweisungen am Bildschirm.
2-3
Page 36

ANSCHLIESSEN DES SCHNITTSTELLENKABELS
Wenn Sie den Copia 9915D als Laserdrucker nutzen möchten, schließen Sie es entweder mit
einem parallelen Schnittstellenkabel oder mit einem USB-Schnittstellenkabel an Ihren Computer
an. (Ein USB-Schnittstellenkabel können Sie nur verwenden, wenn auf Ihrem Computer das
Betriebssystem Windows 98 vorinstalliert ist.)
DEUTSCH
Bei Nutzung der parallelen Schnittstelle
Erste Schritte
USB-Schnittstelle und parallele Schnittstelle können nicht gleichzeitig genutzt
werden. Falls Sie beide Schnittstellen gleichzeitig anschließen, hat die USBSchnittstelle Priorität.
Verwenden Sie ein Anschlußkabel für die parallele Schnittstelle nach IEEE 1284
(max. 2 m lang). Spezifikationen zur parallelen Schnittstelle finden Sie auf Seite
2-25.
Prüfen Sie, ob die Netzschalter von Drucker und Computer ausgeschaltet sind.
1
Schließen Sie das parallele Schnittstellenkabel an den Schnittstellenanschluß des
2
Druckers an. Schließen Sie die beiden Klammern an der Seite des Druckeranschlusses,
um den Schnittstellenstecker zu befestigen.
Schließen Sie das andere Ende des Kabels an den parallelen Schnittstellenanschluß
3
am Computer an. (Einzelheiten finden Sie im Handbuch des Computers.)
Klammer
Der Drucker sendet und empfängt Daten bidirektional und mit hoher
Geschwindigkeit. Einige Switch-Boxen und Durchgangsgeräte unterstützen
keinen bidirektionalen Hochgeschwindigkeitsdatenverkehr, ihr Einsatz kann
Druckfehler zur Folge haben.
Paralleler Schnittstellenanschluß
Schnittstellenstecker
Kabel
2-4
Page 37

Bei Nutzung der USB-Schnittstelle
Verwenden Sie ein Kabel mit geschirmten verdrillten Doppelleitern (max. 2 m
lang). Zu den technischen Daten der USB-Schnittstelle siehe Seite 2-26.
ANSCHLIESSEN DES SCHNITTSTELLENKABELS
1
Schließen Sie das USB-Schnittstellenkabel an den Steckverbinder der USBSchnittstelle am Drucker an.
DEUTSCH
2
Schließen Sie das andere Ende des Kabels an den Steckverbinder der USBSchnittstelle an Ihrem Computer an (bitte entnehmen Sie näheres hierzu dem
Computer-Handbuch).
Steckverbinder der USB-Schnittstelle
Schnittstellenstecker
Kabel
Erste Schritte
2-5
Page 38

INSTALLIEREN DER DRUCKERTREIBERSOFTWARE
Beschreibung des Druckertreibers
Der Druckertreiber ist das Softwareprogramm, das den Drucker betreibt. Er wandelt Daten in
Ihrer Datei in Informationen um, die der Drucker versteht. Des weiteren steuert er die
Kommunikation zwischen Drucker und Computer während des Drucks von Daten.
Prüfen der Hardware- und Softwareanforderungen
Zur Installation des Druckertreibers benötigen Sie folgende Hardware- und
DEUTSCH
Erste Schritte
Softwarekomponenten:
Computertyp IBM PC/AT oder kompatibler Computer mit
bidirektionaler paralleler Schnittstelle oder
USB-Schnittstelle und CD-ROM-Laufwerk.
Windows-Version Windows 3.1x, Windows 95, Windows 98*,
Windows NT 4.0
* USB wird nur unterstützt, wenn Windows 98
vorinstalliert ist.
CPU 486DX 66 MHz oder schneller
Physikalischer RAM-Speicher Windows 95, Windows 3.1x: 8 MB (16 MB oder
mehr empfohlen)
Windows NT 4.0: 12 MB (16 MB oder mehr empfohlen)
Windows 98: 16 MB (32 MB oder mehr empfohlen)
Anzeige 640 x 480 Punkte (VGA) oder besser
Freie Festplattenkapazität 10 MB oder mehr
Der mit diesem Produkt gelieferte Druckertreiber kann nicht unter Windows NT,
3.5x, OS/2, reinem MS-DOS und anderen voranstehend nicht beschriebenen
Betriebssystemen eingesetzt werden.
Der Druckertreiber PCL6 kann nicht unter Windows 3.1 installiert werden.
Installieren des Druckertreibers
Die Software für Ihren Drucker wird auf CD-ROM geliefert.
Prüfen Sie vor der Installation des Druckertreibers die folgenden Punkte:
●
Ist der Drucker richtig an den Computer angeschlossen?
●
Ist im Drucker Papier eingelegt?
2-6
Page 39

INSTALLIEREN DER DRUCKERTREIBERSOFTWARE
Hinweise zur Installation unter Windows 95/Windows NT 4.0:
Sowohl der Computer als auch der Copia 9915D müssen ausgeschaltet sein. Verbinden Sie Drucker und
Computer mit einem parallelen Schnittstellenkabel. Hinweise zum Anschließen siehe Seite 2-4.
1
2
3
4
Legen Sie Papier in das Papierfach des Druckers ein. Informationen zum Einlegen von
Papier finden Sie im Abschnitt KOPIERPAPIER EINLEGEN in der Bedienungsanleitung
des Kopierers.
Schalten Sie den Drucker ein.
DEUTSCH
Schalten Sie den Computer ein, und starten Sie Windows.
Schließen Sie vor der Installation des Druckertreibers alle anderen
möglicherweise geöffneten Anwendungen.
Erste Schritte
Wenn Sie Windows 95 auf einem PC mit Plug-and-Play*-Unterstützung verwenden,
wird der Assistent für Gerätetreiber-Updates aufgerufen. Legen Sie die InstallationsCD-ROM in das CD-ROM-Laufwerk ein. Klicken Sie auf die Schaltfläche Weiter, und
befolgen Sie die Anweisungen am Bildschirm. Geben Sie R:\ (wenn dem CD-ROM-
Laufwerk der Laufwerkbuchstabe R zugewiesen wurde) ein, wenn das Fenster „Dateien
kopieren“ während dieser Operation erscheint, und klicken Sie dann auf OK. Befolgen
Sie die Anweisungen am Bildschirm.
●
Wenn Sie mit Windows 95 arbeiten und das Fenster „Neue Hardwarekomponente
gefunden“ angezeigt wird, klicken Sie auf die Schaltfläche Treiber auf Diskette
des Hardware-Herstellers, und klicken Sie dann auf OK. Fahren Sie mit Schritt 6
fort.
●
Wenn Sie mit Windows 95 arbeiten und der voranstehend abgebildete Bildschirm
oder das Fenster „Neue Hardwarekomponente“ nicht angezeigt wird, fahren Sie
mit Schritt 5 fort.
●
Wenn Sie mit Windows NT 4.0 arbeiten, fahren Sie mit Schritt 5 fort.
* Plug-and-Play
Diese Funktion ist verfügbar, wenn Computer und Peripheriegerät mit einer IEEE
1284-kompatiblen parallelen Schnittstelle ausgestattet sind.
Die Bildschirmanzeige richtet sich nach der von Ihnen verwendeten Version
des Betriebssystems Windows.
2-7
Page 40

INSTALLIEREN DER DRUCKERTREIBERSOFTWARE
DEUTSCH
Erste Schritte
5
6
Legen Sie die Installations-CD-ROM in das CD-ROM-Laufwerk ein.
Klicken Sie auf die Schaltfläche Start, und wählen Sie Ausführen. Wenn der nachfolgend
abgebildete Bildschirm angezeigt wird, geben Sie R:\SETUP ein (falls dem CD-ROMLaufwerk der Laufwerkbuchstabe R zugewiesen wurde), und klicken Sie auf OK. Befolgen
Sie die Anweisungen am Bildschirm.
Das Fenster „Installation von Diskette“ wird aufgerufen. Legen Sie die InstallationsCD-ROM in das CD-ROM-Laufwerk ein. Geben Sie R:\ ein (wenn dem CD-ROMLaufwerk der Laufwerkbuchstabe R zugewiesen wurde), und klicken Sie dann auf
OK. Befolgen Sie die Anweisungen am Bildschirm.
Sollten Sie Probleme mit dem Testdruck haben, lesen Sie den Abschnitt
PROBLEMLÖSUNG auf Seite 2-19, und prüfen Sie die Symptome und
Lösungen. Drucken Sie die Testseite nach der Beseitigung des Problems erneut.
2-8
Page 41

INSTALLIEREN DER DRUCKERTREIBERSOFTWARE
Windows 98:
Sowohl der Computer als auch der
und Computer entweder mit einem parallelen Schnittstellenkabel oder mit einem USBSchnittstellenkabel. Hinweise zum Anschließen siehe Seiten 2-4 und 2-5.
1
Legen Sie Papier in das Papierfach des Druckers ein. Informationen zum Einlegen
von Papier finden Sie im Abschnitt KOPIERPAPIER EINLEGEN in der
Bedienungsanleitung des Kopierers.
Copia 9915D
müssen ausgeschaltet sein. Verbinden Sie Drucker
2
3
Schalten Sie den Drucker ein.
Schalten Sie den Computer ein, und starten Sie Windows.
Bei Nutzung der USB-Schnittstelle:
• Verbinden Sie Ihren Computer und den Drucker mit einem USB-Schnittstellenkabel,
falls dies noch nicht geschehen ist. (Näheres zum Anschließen des USBSchnittstellenkabels siehe Seite 2-5.)
•
Sobald das Dialogfeld „Hardware-Assistent“ erscheint, die Installations-CD einlegen,
auf die Schaltfläche Weiter klicken, den Anweisungen auf dem Bildschirm folgen
und zum Schluß auf die Schaltfläche Fertigstellen klicken.
Schließen Sie vor der Installation des Druckertreibers alle anderen
möglicherweise geöffneten Anwendungen.
DEUTSCH
Erste Schritte
4
Wenn Sie Windows 98 auf einem PC mit Plug-and-Play-Unterstützung verwenden,
wird der „Hardware-Assistent“ aufgerufen. Klicken Sie auf die Schaltfläche Weiter,
und befolgen Sie die Anweisungen am Bildschirm.
●
Wird der „Hardware-Assistent“ nicht aufgerufen, fahren Sie mit Schritt 8 fort.
* Plug-and-Play: Informationen zu Plug-and-Play finden Sie auf Seite 2-7.
2-9
Page 42

INSTALLIEREN DER DRUCKERTREIBERSOFTWARE
DEUTSCH
Erste Schritte
5
6
7
8
Wählen Sie Nach dem besten Treiber für das Gerät suchen, und klicken Sie auf
Weiter.
Legen Sie die Installations-CD-ROM in das CD-ROM-Laufwerk ein. (Falls Sie die USBSchnittstelle verwenden, muß sich die Installations-CD im CD-ROM-Laufwerk befinden.)
Wählen Sie CD-ROM-Laufwerk aus, und klicken Sie auf Weiter.
Mit der Treiberdateisuche von Windows wird der „
Klicken Sie auf die Schaltfläche Weiter, und befolgen Sie die Anweisungen am
Bildschirm.
Legen Sie die Installations-CD-ROM in das CD-ROM-Laufwerk ein. (Falls Sie die USBSchnittstelle verwenden, muß sich die Installations-CD im CD-ROM-Laufwerk
befinden.) Klicken Sie auf die Schaltfläche Start, und wählen Sie Ausführen aus.
Wenn der nachfolgend abgebildete Bildschirm angezeigt wird, geben Sie R:\SETUP
ein (falls dem CD-ROM-Laufwerk der Laufwerkbuchstabe R zugewiesen wurde), und
klicken Sie auf OK. Befolgen Sie die Anweisungen am Bildschirm.
OLIVETTI Copia 9915D
PCL“ gefunden.
2-10
Lesen Sie bei Problemen mit dem Testdruck den Abschnitt PROBLEMLÖSUNG
auf Seite 2-19.
Page 43

INSTALLIEREN DER DRUCKERTREIBERSOFTWARE
Windows 3.1x:
Sowohl der Computer als auch der Drucker müssen ausgeschaltet sein. Verbinden Sie Drucker
und Computer mit einem parallelen Schnittstellenkabel. Hinweise zum Anschließen siehe
Seite 2-4.
1
2
3
4
5
Legen Sie Papier in das Papierfach des Druckers ein. Informationen zum Einlegen von
Papier finden Sie im Abschnitt KOPIERPAPIER EINLEGEN in der Bedienungsanleitung
des Kopierers.
Schalten Sie den Drucker ein, und starten Sie dann Windows auf Ihrem Computer.
Schließen Sie vor der Installation des Druckertreibers alle anderen
möglicherweise geöffneten Anwendungen.
Legen Sie die Installations-CD-ROM in das CD-ROM-Laufwerk ein.
Wählen Sie Datei in der Menüleiste des Programm-Managers, und wählen Sie dann
den Befehl Ausführen.
Geben Sie R:\SETUP (falls dem CD-ROM-Laufwerk der Laufwerkbuchstabe R
zugewiesen wurde) in das Befehlszeilenfeld ein, und klicken Sie dann auf OK.
DEUTSCH
Erste Schritte
6
Befolgen Sie die Anweisungen am Bildschirm.
2-11
Page 44

INSTALLIEREN DER DRUCKERTREIBERSOFTWARE
Druckertreibergruppe des Copia 9915D PCL
DEUTSCH
Erste Schritte
Nach der Installation des Druckertreibers wird die Druckertreibergruppe des
Copia 9915D
PCL erstellt. Diese Gruppe von Software-Programmen bietet folgende
OLIVETTI
Funktionen:
Statusmonitor
Das Statusmonitorfenster werden Informationen über Druckerstatus und aktuellen
Druckauftrag angezeigt. Näheres hierzu siehe unter STATUSMONITOR auf Seite 2-21.
Statusmonitor-HILFE
Hilfe und Informationen für Statusmonitor.
Copia 9915D PCL deinstallieren
Es besteht die Möglichkeit, den Druckertreiber zu deinstallieren. Wenn der Treiber
deinstalliert ist, kann mit dem Drucker nicht mehr gedruckt werden. Stellen Sie zum
richtigen Deinstallieren sicher, daß Sie das OLIVETTI Deinstallationsprogramm aus der
Druckertreibergruppe verwenden.
Liesmich
Diese Datei enthält die neuesten Informationen über den Druckertreiber. Lesen Sie zuerst
die Readme-Datei.
●
Lesen Sie unbedingt die Datei „Liesmich“ in der Druckertreibergruppe, bevor
Sie Drucker
●
Unter Windows 3.1x können der Statusmonitor und der Druckmanager nicht
OLIVETTI Copia 9915D
in Betrieb nehmen.
gleichzeitig verwendet werden.
2-12
Page 45

2
DRUCKEN
DRUCKEN EINER SEITE
Nachfolgend wird die Vorgehensweise zum Drucken beschrieben. Lesen Sie die Beschreibung
ergänzend zur Bedienungsanleitung der entsprechenden Anwendung.
●
Bevor Sie den Drucker in Betrieb nehmen können, müssen Sie den im
Lieferumfang enthaltenen OLIVETTI PCL Druckertreiber installieren. Nachdem
die Software installiert ist, können Sie das Drucken Ihrer Dokumente über den
am Bildschirm angezeigten Druckertreiber steuern. Siehe INSTALLIEREN DER
DRUCKERTREIBERSOFTWARE auf Seite 2-6.
●
Werden mehrere Drucker genutzt, müssen Sie in der Systemsteuerung unter
„Drucker“ auf den gewünschten Drucker umschalten.
Ausführen des Druckvorgangs
DEUTSCH
Drucken
1
2
3
Stellen Sie sicher, daß das in das Papierfach eingelegte Papier das gewünschte Format
aufweist. (Siehe Abschnitt KOPIERPAPIER EINLEGEN in der Bedienungsanleitung
des Kopierers.)
Zum Drucken auf Sonderpapier kann der manuelle Einzug genutzt werden.
Wählen Sie den Einzug aus dem Druckertreiber. Siehe FESTLEGEN DER
DRUCKEREINSTELLUNGEN IM DRUCKERTREIBER auf Seite 2-15. Siehe
außerdem Beschreibung des manuellen Einzugs in der Bedienungsanleitung
des Kopiergeräts. Bei Sonderpapier die Blätter immer einzeln zuführen.
Schalten Sie den Drucker ein. Die ON LINE-Anzeige ( ) leuchtet auf.
Wählen Sie in der Anwendung die Einstellungen zum Drucken, wie zum Beispiel die
Anzahl der Kopien und das Papierformat. Siehe FESTLEGEN DER
DRUCKEREINSTELLUNGEN IM DRUCKERTREIBER auf Seite 2-15.
Vor dem Ausdruck mit Ihrem Anwendungsprogramm muß kontrolliert werden,
ob als Drucker OLIVETTI
Es wird empfohlen den Druckertreiber PCL6 zu verwenden. Falls beim Drucken
mit älteren Anwendungsprogrammen Probleme auftreten, sollten Sie anstelle
von PCL6 den Druckertreiber PCL5e verwenden.
Copia 9915D
PCL6 oder PCL5e eingestellt ist.
4
Drucken Sie die Datei aus Ihrer Softwareanwendung.
2-13
Page 46

DRUCKEN EINER SEITE
DEUTSCH
●
Findet während des Startens des Druckvorgangs ein Kopiervorgang statt, so
wird dieser zunächst fortgesetzt. Nach Abschluß des Kopiervorgangs beginnt
der Ausdruck, wenn die ON LINE-Taste gedrückt wird, die Rückstelltaste ( )
zweimal gedrückt wird oder nach Ablauf von ungefähr 60 Sekunden
(Zeitspanne für den automatischen Löschvorgang)*.
*
Die Auto-Clear-Zeit ist abhängig von den Einstellungen des Benutzerprogramms.
Einzelheiten entnehmen Sie bitte der Kopierer Bedienungsanleitung.
●
Der Aufwärmmodus und der Modus der automatischen Stromabschaltung
werden beim Start des Druckvorgangs abgebrochen.
●
Wenn das in der Softwareanwendung festgelegte Papierformat größer als
das im Drucker eingelegte Papierformat ist, verbleiben unter Umständen nicht
auf das Papier übertragene Teile des Dokuments auf der Trommeloberfläche.
In diesem Fall kann die Papierrückseite verschmutzen. Tritt dieser Fall ein,
geben Sie das richtige Papierformat an, und drucken Sie zur Reinigung eine
oder zwei Seiten.
Drucken
Anzeigen und Tasten des Bedienfelds
ON LINE-Anzeige
Ein: Der Drucker ist online. Daten kö nnen
ON LINEAnzeige Stromsparan zeige
Aus: Der Drucker ist offline.
übertragen und gedruckt werden.
DATA-Anzeige
Ein: Der Drucker empfängt oder verarbeitet
DATA Anzeige
Blinkt: Der Speicher enthält Restdaten, die noch nicht
Druckdaten.
gedruckt wurden.
Aus: Es werden keine Druckdaten empfangen oder
verarbeitet.
Taste ONLINE
Dient zum Umschalten zwischen den Zuständen Online
Taste ONLINE
und Offline.
Energiesparanzeige
Ein: Gibt an, daß sich der Drucker im
Energiesparmodus befindet.
2-14
Page 47

FESTLEGEN DER DRUCKEREINSTELLUNGEN IM
DRUCKERTREIBER
Im folgenden werden die Konfigurationsverfahren und -optionen des Druckertreibers beschrieben.
Für weitere Informationen wird ebenfalls auf die Hilfe des Druckertreibers verwiesen.
Prüfen Sie vor der Konfiguration des Druckertreibers folgende Punkte.
●
In dem zu verwendenden Computer sind die Druckertreiber
PCL5e installiert. Ist dies nicht der Fall, siehe INSTALLIEREN DES DRUCKERTREIBERS
auf Seite 2-6.
●
In dem zu verwendenden Computer ist der Drucker
als Standarddrucker eingestellt.
Windows 95/Windows 98/Windows NT 4.0:
OLIVETTI Copia 9915D
OLIVETTI Copia 9915D
PCL6 oder PCL5e
PCL6 und
DEUTSCH
1
2
3
Klicken Sie auf die Schaltfläche Start und treffen Sie im Menü Einstellungen die
Auswahl Drucker.
Falls Sie Windows 95/Windows 98 verwenden, klicken Sie mit der rechten Maustaste
im Ordner Drucker das Symbol
Sie aus dem angezeigten Menü Eigenschaften.
Falls Sie Windows NT 4.0 verwenden, klicken Sie mit der rechten Maustaste im Ordner
Drucker das Symbol
dem angezeigten Menü Standard-Dokumenteinstellungen.
Bei dieser Beschreibung wird vorausgesetzt, daß die Maus für den Betrieb mit
der rechten Hand konfiguriert ist.
Die Eigenschaften des Druckertreibers für den
Wenn Sie mit Windows 95/Windows 98 arbeiten, klicken Sie auf die Registerkarte
Allgemein, um folgenden Bildschirm anzeigen zu lassen.
Eigenschaften von Copia 9915D PCL 6
OLIVETTI Copia 9915D
OLIVETTI Copia 9915D
* Bildschirmanzeige in Windows 95
PCL6 oder PCL5e an und wählen Sie aus
OLIVETTI Copia 9915D
Schaltfläche „Voreinstellungen“
Bei Auswahl dieser Schaltfläche werden
die in den einzelnen Registerkarten
festgelegten Einstellungen auf die
Standardeinstellung zurückgesetzt.
Drucken
PCL6 oder PCL5e an und wählen
werden angezeigt.
Schaltfläche „OK“
Alle Treibereinstellungen in den
einzelnen Registern werden
gespeichert, und das Dialogfeld
„Eigenschaften“ wird geschlossen.
Schaltfläche „Übernehmen“
Die in den einzelnen Registerkarten
ausgewählten Einstellungen werden
gespeichert.
* Diese Schaltfläche ist in Windows NT 4.0
nicht verfügbar.
Schaltfläche „Abbrechen“
Die Einstellungen in den einzelnen Registern werden
nicht wirksam, und das Dialogfeld „Eigenschaften“ wird
geschlossen. Einstellungen, die Sie bereits zur Wirkung
gebracht haben, werden allerdings nicht aufgehoben.
2-15
Page 48

FESTLEGEN DER DRUCKEREINSTELLUNGEN IM DRUCKERTREIBER
Windows 3.1x:
DEUTSCH
Drucken
1
2
3
4
Doppelklicken Sie im Hauptfenster des Programm-Managers auf das Symbol DruckManager.
Wählen Sie im Druck-Manager Optionen und anschließend Druckerinstallation.
Wählen Sie aus der Liste des installierten Druckers
und klicken Sie auf die Schaltfläche Installieren.
Die Eigenschaften des Druckers
Unter Windows 3.1x können der Statusmonitor und der Druckmanager nicht
gleichzeitig verwendet werden.
OLIVETTI Copia 9915D
OLIVETTI Copia 9915D
PCL5e werden angezeigt.
PCL5e aus,
2-16
Page 49

DUPLEX DRUCK
Mit Hilfe der Funktion Duplex Druck können Sie eine Seite beidseitig bedrucken.
●
Briefumschläge, Folien oder Etiketten können nicht beidseitig bedruckt werden.
●
Der Duplex Druck kann nicht aus dem manuellen Einzug erfolgen.
Sobald der Drucker installiert ist, können Sie für Ihre Anwendung Duplex Druck festlegen. Falls
Sie die Funktion Duplex Druck auswählen, müssen Sie angeben, ob die Seiten so ausgedruckt
werden sollen, daß sie am linken oder am oberen Rand geheftet werden können.
Buch
Bei dieser Einstellung werden die Seiten so bedruckt, daß Sie sie am linken Rand heften und
wie bei einem Buch umblättern können.
Ausrichtung Hochformat Ausrichtung Querformat
Kalender
Bei dieser Einstellung werden die Seiten so bedruckt, daß Sie sie am oberen Rand heften und
wie bei einem Kalender umblättern können.
DEUTSCH
Drucken
Ausrichtung Hochformat Ausrichtung Querformat
2-17
Page 50

TESTSEITEN DRUCKEN
Gehen Sie für den Testdruck der Konfigurationsseite und der Schriftenliste wie folgt vor:
DEUTSCH
Drucken
1
2
3
4
Halten Sie die Hell- ( ) und die Dunkeltaste ( ) gleichzeitig für mindestens 5
Sekunden gedrückt, so daß die Alarmanzeigen ( , , und ) blinken und auf
dem Display “--” angezeigt wird.
Stellen Sie mit der Kopienzahltaste ( ) entweder “6” (Konfigurationsseite) oder “7”
(Schriftenliste) ein, so daß die eingestellte Zahl auf der linken Seite des Displays
blinkt.
Drücken Sie die Kopiertaste ( ). Die eingestellte Programmnummer leuchtet jetzt
ständig und der für das Programm eingestellte gegenwärtige Parameter blinkt auf der
rechten Seite des Displays.
Wählen Sie den gewünschten Parameter mit der Kopienzahltaste ( ), so daß die
eingegebene Parameterzahl auf der rechten Seite des Displays blinkt.
Programm
6
7
Betriebsart Parameter
Konfigurationsseite
Schriftenliste
0 Englisch 1
3
Italienisch
0 Englisch 1
3
Italienisch
4 Deutsch
4 Deutsch
Französisch
Französisch
2 Spanisch
2 Spanisch
2-18
5
Drücken Sie die Drucktaste ( ), um die Testseite auszudrucken.
Um die Einstellung zu ändern oder eine andere Betriebsart einzustellen, drücken
Sie die Rückstelltaste ( ). Der Drucker wird damit auf den Schritt 2
zurückgestellt.
Page 51

3
DRUCKERPROBLEME?
PROBLEMLÖSUNG
Einige Probleme des
Druckerfunktionen auf. Lesen Sie folglich auch den Abschnitt FEHLERSUCHE in der
Bedienungsanleitung des Kopierers.
Copia 9915D
treten sowohl mit den Kopierer- als auch mit den
Druckprobleme
Mit dem Wort „Kopierer“ in der Spalte „Siehe Seite:“ wird darauf hingewiesen,
daß die Beschreibung in der Bedienungsanleitung des Kopierers zu finden ist.
Problem
Druckertreiber
kann nicht
installiert
werden.
Der Drucker
druckt nicht.
Mögliche Ursache
Freie Festplattenkapazität reicht
für die Installation des
Druckertreibers nicht aus.
Das Betriebssystem wird nicht
unterstützt.
Das Schnittstellenkabel ist
möglicherweise nicht richtig
angeschlossen.
Das Schnittstellenkabel ist
beschädigt.
Die Anschlußeinstellung ist
falsch.
Der Drucker ist nicht online.
Die Tonerpatrone oder Die
Trommeleinheit ist nicht richtig
installiert.
Der Drucker ist möglicherweise
falsch konfiguriert.
Der Druckertreiber ist
möglicherweise falsch installiert.
Lösung
Löschen Sie alle nicht benötigten
Dateien und Anwendungsprogramme,
um Festplattenkapazität freizusetzen.
(Für den Treiber ist mindestens 10 MB
freie Festplattenkapazität erforderlich.)
Verwenden Sie Windows 3.1x, Windows
95, Windows 98 oder Windows NT 4.0.
Prüfen Sie den Schnittstellenanschluß.
Prüfen Sie das Kabel mit einem
bekanntermaßen funktionierenden
Computer und Drucker. Erfolgt immer
noch kein Druckvorgang, ist das
Schnittstellenkabel defekt.
Prüfen Sie die Druckereinstellungen in
der Windows-Systemsteuerung, um
sicherzustellen, daß der Druckauftrag
an den richtigen Anschluß gesendet
wird (z. B. LPT1).
Kontrollieren Sie, ob die ON LINEAnzeige leuchtet. Falls nicht, müssen
Sie die ON LINE-Taste drücken.
Stellen Sie sicher, daß
Entwicklereinheit und Trommeleinheit
richtig installiert sind.
Prüfen Sie, daß alle
Druckeinstellungen in der Anwendung
richtig sind.
Installieren Sie den Druckertreiber neu,
und drucken Sie eine Testseite aus.
Siehe
Seite:
2-6
2-6
2-4,2-5
—
—
2-14
Kopierer*
Kopierer*
—
2-6
DEUTSCH
Druckerprobleme?
1
2
*1 Siehe Abschnitt AUSWECHSELN DER ENTWICKLEREINHEIT.
*2 Siehe Abschnitt AUSWECHSELN DER TROMMELEINHEIT.
2-19
Page 52

PROBLEMLÖSUNG
Problem
Papier wird
nicht in den
Drucker
eingezogen.
DEUTSCH
Druckerprobleme?
Der Drucker
druckt falsche
Daten oder
Zeichen.
Der Druck
erfolgt zu
langsam.
Die halbe
Seite ist leer.
Mögliche Ursache
Papier wurde nicht richtig
eingelegt.
Es befindet sich zu viel Papier im
Behälter.
Das Schnittstellenkabel ist
möglicherweise nicht richtig
angeschlossen.
Es wird möglicherweise ein
falsches Schnittstellenkabel
verwendet.
Bei Verwendung von Windows
3.1x ist der Druck-Manager
möglicherweise deaktiviert.
Unter Umständen sind zu viele
Anwendungen offen.
Die Auflösung ist auf 600 dpi
gesetzt.
Der Computer verfügt
möglicherweise nicht über
ausreichenden RAM-Speicher
(Random Access Memory).
Die Seitengestaltung ist zu
komplex.
Die Auflösung ist auf 600 dpi
gesetzt.
Möglicherweise ist eine falsche
Seitenausrichtung angegeben.
Unter Umständen sind zu viele
Anwendungen offen.
Das im Drucker eingelegte Papier
ist möglicherweise größer als die
in der Anwendung
beziehungsweise im
Druckertreiber angegebene
Papiergröße.
Es wird möglicherweise ein
falsches Schnittstellenkabel
verwendet.
Es werden möglicherweise
falsche CPU-Angaben
verwendet.
Der Computer verfügt
möglicherweise nicht über
ausreichenden RAM-Speicher
(Random Access Memory).
Lösung
Legen Sie das Papier richtig ein.
Entfernen Sie das überschüssige
Papier aus dem Papierfach.
Prüfen Sie den Anschluß des
Schnittstellenkabels.
Siehe technische Daten der
Schnittstellen.
Doppelklicken Sie in der
Systemsteuerung auf das Symbol
„Drucker“, und aktivieren Sie das Feld
„Druck-Manager verwenden“.
Schließen Sie alle nicht benötigten
Anwendungen, bevor Sie den
Druckauftrag starten.
Setzen Sie die Auflösung auf 300 dpi.
Installieren Sie zusätzlichen RAMSpeicher (Random Access Memory) in
Ihrem Computer.
Vereinfachen Sie die Seitengestaltung.
Setzen Sie die Auflösung auf 300 dpi.
Ändern Sie die Seitenausrichtung mit
dem Druckertreiber.
Schließen Sie alle nicht benötigten
Anwendungen, bevor Sie den
Druckauftrag starten.
Legen Sie das richtige Papier in den
Drucker ein.
Siehe technische Daten der
Schnittstellen.
Prüfen Sie, ob Ihr Computer mit einem
Prozessor 486DX 66 MHz oder
schneller ausgerüstet ist.
Installieren Sie zusätzlichen RAMSpeicher (Random Access Memory) in
Ihrem Computer.
Siehe
Seite:
Kopierer*
Kopierer*
2-4, 2-5
2-25, 2-26
—
—
2-15
2-6
—
2-15
2-15
—
—
2-25, 2-26
2-6
2-6
3
3
2-20
*3 Siehe Abschnitt KOPIERPAPIER EINLEGEN.
Page 53

STATUSMONITOR
Beim Start des Druckvorgangs wird der Statusmonitorbildschirm auf dem Computerbildschirm
angezeigt. Mit dem Statusmonitor werden der Druckerstatus und Informationen zum aktuellen
Druckauftrag angezeigt.
Im Statusmonitor werden die Meldungstypen Normal, Warnung und Störung aufgeführt. Erscheint
eine Fehlermeldung, lesen Sie die nachfolgende Meldungsbeschreibung, und führen Sie die
genannten Schritte durch.
●
Mit dem Wort „Kopierer“ in der Spalte „Siehe Seite:“ wird darauf hingewiesen,
daß die Beschreibung in der Bedienungsanleitung des Kopierers zu finden ist.
●
Unter Windows 3.1x können der Statusmonitor und der Druckmanager nicht
gleichzeitig verwendet werden.
Normale Meldungen
Mit den nachfolgenden Meldungen wird der aktuelle Status des Druckers angegeben. Da diese
Meldungen normale Betriebsbedingungen anzeigen, brauchen Sie keine Maßnahmen zu ergreifen.
DEUTSCH
Druckerprobleme?
Meldung
Bereit
Druck wird erstellt
Kopie wird erstellt
Der Drucker befindet sich im Leerlauf und ist für den nächsten
Druckauftrag bereit.
Ein Druckauftrag wird momentan bearbeitet.
Ein Kopierauftrag wird momentan bearbeitet.
Beschreibung
Warnmeldungen
Meldung
Entwicklereinheit fast leer. Eine
neue Einheit bestellen und bald
ersetzen.
Trommeleinheit ist fast verbraucht.
Eine neue Einheit bestellen und
bald ersetzen.
Beschreibung / L
Der Tonerstand ist niedrig. Der Druck kann zwar
fortgesetzt werden, die Druckqualität läßt jedoch
deutlich nach. Eine neue Entwicklereinheit
bestellen und bald ersetzen.
Die Trommeleinheit ist fast verbraucht. Der Druck
kann zwar fortgesetzt werden, die Druckqualität
läßt jedoch deutlich nach. Eine neue
Trommeleinheit bestellen und bald ersetzen.
ösung
Siehe
Seite:
Kopierer*
Kopierer*
1
1
*1: Siehe Abschnitt AUFBEWAHRUNG UND ARTIKELNUMMERN VON ZUBEHÖR UND
VERBRAUCHSMATERIALIEN.
Störungsmeldungen
Meldung
Entwicklereinheit ist leer. Leere
Entwicklereinheit durch eine neue
ersetzen.
Trommeleinheit ist verbraucht. Die
alte Trommeleinheit durch eine
neue ersetzen.
Front- oder Seitenabdeckung
offen. Abdeckungen schließen.
Entwicklereinheit in das Gerät
einsetzen.
Beschreibung / L
Die Entwicklereinheit ist leer. Der Druck kann erst
nach dem Ersetzen der Entwicklereinheit wieder
aufgenommen werden.
Die Trommeleinheit ist verbraucht. Der Druck kann
erst nach dem Ersetzen der Trommeleinheit wieder
aufgenommen werden.
Eine der Druckerabdeckungen ist offen. Der Druck
kann erst nach dem Schließen der Abdeckung
wieder aufgenommen werden.
Die Entwicklereinheit befindet sich nicht im Drucker.
Eine Entwicklereinheit in den Drucker einsetzen.
ösung
Siehe
Seite:
Kopierer*
Kopierer*
—
Kopierer*
2
3
2
2-21
Page 54

STATUSMONITOR
Papierstau.
Papierfach 1 prüfen:
Kein Papier oder Papierstau.
DEUTSCH
Papierfach 2 prüfen:
Kein Papier oder Papierstau.
Druckerprobleme?
Manueller Papiereinzug:
Kein Papier oder Papierstau.
Wartungsfehler
Gerät ausschalten. Ungefähr 5
Sekunden warten. Gerät wieder
einschalten. Wenn der
Fehlercode angezeigt wird,
kontaktieren Sie bitte Ihrem
autorisierten Sharp Fachhändler.
Übertragungsfehler
Der Drucker ist entweder
beschäftigt, nicht richtig
angeschlossen oder nicht
eingeschaltet. Überprüfen Sie
die Fehlerquellen. Um den
Druckauftrag zu beenden,
klicken Sie auf "Abbrechen"
Im Gerät ist eine ungültige
Tonerkartusche installiert.
Ersetzten Sie diese durch eine
gültige Tonerkartusche.
Druckfehler
Die Seite kann unter
Umständen unvollständig sein.
Wählen Sie eineniedrigere
Auflösung und starten Sie den
Druckauftrag erneut.
Meldung
Olivetti Fachähndler.
Lösung
Ein Blatt Papier hat einen Papierstau im Drucker
verursacht. Der Druck kann erst wieder
aufgenommen werden, nachdem das gestaute
Papier entfernt wurde. Den Anweisungen zur
Beseitigung eines Papierstaus im Drucker folgen.
Papierfach 1 ist leer, oder das Papier wurde nicht
korrekt zugeführt. Da Papierfach 1 als Papierzufuhr
gewählt wurde, kann der Druck erst wieder
aufgenommen werden, wenn Papier nachgefüllt
oder der Papierstau in Papierfach 1 beseitigt wurde.
Papierfach 2 ist leer, oder das Papier wurde nicht
korrekt zugeführt. Da Papierfach 2 als Papierzufuhr
gewählt wurde, kann der Druck erst wieder
aufgenommen werden, wenn Papier nachgefüllt
oder der Papierstau in Papierfach 2 beseitigt wurde.
Der manuelle Papiereinzug ist leer, oder das Papier
wurde nicht korrekt zugeführt. Da der manuelle
Papiereinzug als Papierzufuhr gewählt wurde, kann
der Druck erst wieder aufgenommen werden, wenn
Papier nachgefüllt oder der Papierstau im manuellen
Papiereinzug beseitigt wurde.
Das Gerät hat einen nicht behebbaren Fehler
ermittelt und kann nicht fortfahren. Alle angezeigten
Fehler oder Codes notieren. Dann den Netzschalter
des Geräts auf AUS stellen und fünf Sekunden
warten. Dann den Netzschalter des Geräts auf EIN
stellen. Wenn der Fehler weiterhin auftritt,
kontaktieren Sie bitte Ihrem autorisierten Sharp
Fachhändler.
Übertragungsfehler Die Verbindung zum Drucker
ist unterbrochen. Überprüfen Sie alle
Steckverbindungen und Netzschalter. Um den
Druckauftrag zu beenden, klicken Sie auf
"Abbrechen"
Im Gerät ist eine ungültige Tonerkartusche installiert.
Das Gerät kann nicht drucken, bevor diese durch
eine gültige Tonerkartusche ersetzt wird.
Druckfehler. Die zuletzt gedruckte Seite kann unter
Umständen unvollständig sein. Möglicherweise ist
die Seitengestaltung zu komplex. Wählen Sie eine
niedrigere Auflösung und starten Sie den
Druckauftrag erneut.
Olivetti.
Siehe
Seite:
Kopierer*
Kopierer*
Kopierer*
Kopierer*
Kopierer*
Kopierer*
Kopierer*
—
2-4, 2-5,
2-19
—
2-20
4
4
5
4
5
4
6
2-22
*2: Siehe Abschnitt AUSWECHSELN DER ENTWICKLEREINHEIT.
*3: Siehe Abschnitt AUSWECHSELN DER TROMMELEINHEIT.
*4: Siehe Abschnitt PAPIERSTAUBESEITGUNG.
*5: Siehe Abschnitt KOPIERPAPIER EINLEGEN.
*6: Siehe Abschnitt MANUELLER EINZUG.
Page 55

DEINSTALLIEREN DES DRUCKERTREIBERS
Ist der Druckertreiber nicht richtig installiert oder benötigen Sie diesen Drucker nicht mehr,
deinstallieren Sie den Druckertreiber mit den folgenden Schritten von Ihrem Computer.
1
2
3
Klicken Sie bei Verwendung von Windows 95/Windows 98/Windows NT 4.0 auf Start,
Programme,
Doppelklicken Sie bei Verwendung von Windows 3.1x im Programm-Manager auf das
Symbol
Copia 9915D
Klicken Sie im Fenster „Löschen einer Datei bestätigen“ auf Ja.
Klicken Sie im Fenster „Programme vom Computer entfernen“ auf OK.
OLIVETTI Copia 9915D
OLIVETTI Copia 9915D
PCL deinstallieren.
PCL und
PCL, und doppelklicken Sie anschließend auf das Symbol
Copia 9915D
PCL deinstallieren.
DEUTSCH
Druckerprobleme?
2-23
Page 56

4
ANHANG
TECHNISCHE DATEN
DEUTSCH
Anhang
Auflösung
Seitenbeschreibungssprache PCL5e, PCL6
Installierte Schriftarten PCL6-kompatibel: 45 Konturschriften, eine Rasterschrift
Seitenausrichtung Hochformat oder Querformat
Dauer des ersten Ausdrucks Etwa 9,6 Sekunden*
Druckgeschwindigkeit Etwa 15 Seiten pro Minute (A4)
(mehrere Seiten)
Schnittstellenanschluß Bidirektionale parallele Schnittstelle
Speicher 8 MB
* Abhängig von Betriebsbedingungen wie Stromspannung und Raumtemperatur können
Abweichungen von dieser Zeitangabe auftreten.
Darüber hinaus können je nach zu druckender Datenmenge und der jeweiligen Anwendung
Schwankungen bei der Dauer des ersten Ausdrucks auftreten.
Verfügbare Auflösungen sind 600 dpi (Punkte pro Zoll)
oder 300 dpi.
(IEEE 1284-kompatibel)
USB-Schnittstelle (Typ B)
2-24
Bedingt durch fortlaufende technische Verbesserungen behält sich OLIVETTI
das Recht vor, das Design und die Spezifikationen ohne vorherige Ankündigung
ändem zu können. Die angegebenen Leistungswerte stellen die Nennwerte einer
in Serienherstellung produzierten Einheit dar. Geringe Abwerichungen bei
einzelnen Geräten sind möglich.
Page 57

PARALLELE SCHNITTSTELLE
Dieser Drucker verfügt über eine bidirektionale parallele Schnittstelle.
Technische Angaben zur Schnittstelle Ihres Computers finden Sie in der
dazugehörigen Bedienungsanleitung.
Anschluß
36polige Buchse DDK 57LE-40360-730B
(D29) oder gleichwertig
Kabel
Abgeschirmtes, bidirektionales Kabel für
parallele Schnittstelle
Die besten Ergebnisse erzielen Sie mit
einem IEEE1284-kompatiblen
Druckerkabel. (max. 2m lang)
PIN-Belegung
In nachfolgender Tabelle sind die PINNummern und Signalbezeichnungen
aufgeführt.
18
36 19
1
DEUTSCH
Anhang
PIN-Nr. Signalbezeichnung PIN-Nr. Signalbezeichnung
1 STB 19 GND (STB RET)
2 DATA1 20 GND (DATA1 RET)
3 DATA2 21 GND (DATA2 RET)
4 DATA3 22 GND (DATA3 RET)
5 DATA4 23 GND (DATA4 RET)
6 DATA5 24 GND (DATA5 RET)
7 DATA6 25 GND (DATA6 RET)
8 DATA7 26 GND (DATA7 RET)
9 DATA8 27 GND (DATA8 RET)
10 ACKNLG 28 GND (ACKNLG RET)
11 BUSY 29 GND (BUSY RET)
12 PE (Papierende) 30 GND (PE RET)
13 SLTC 31 INPRM
14 AUTO LF 32 FAULT
15 (NC) 33 (NC)
16 GND (0 V) 34 (NC)
17 FG 35 +5V
18 +5V 36 SLTC IN
2-25
Page 58

USB SCHNITTSTELLE
DEUTSCH
Anhang
Anschluß
DDK DUSB-BRA42-T11, vierpolig
Steckverbinder Typ B
Kabel
Kabel mit geschirmten verdrillten
Doppelleitern (max. 2m lang, für
Hochgeschwindigkeitsübertragung)
PIN-Belegung
In nachfolgender Tabelle sind die PINNummern und Signalbezeichnungen
aufgeführt.
PIN-Nr. Signalbezeichnung
1 +5V
2-DATA
3+DATA
4 GND
2
34
1
2-26
Page 59

LISTE DER INSTALLIERTEN SCHRIFTARTEN
Liste der residenten PCL -kompatiblen Schriftarten
Bezeichnung der SchriftartNr. Nr. Bezeichnung der Schriftart
Fixed Pitch 810 Courier Roman SWC0
1
2
3
4
5
6
7
8
9
10
11
12
13
14
15
16
17
18
19
20
21
22
™
Dutch
801 SWC
Dutch 801 Bold SWC
Dutch 801 Italic SWC
Dutch 801 Bold Italic SWC
Zapf Humanist 601 SWC
Zapf Humanist 601 Bold SWC
Zapf Humanist 601 Italic SWC
Zapf Humanist 601 Bold Italic SWC
Ribbon 131 SWC
Clarendon 701 Clarendon Condensed SWC
Swiss™ 742 SWC
Swiss 742 Bold SWC
Swiss 742 Italic SWC
Swiss 742 Bold Italic SWC
Swiss 742 Condensed SWC
Swiss 742 Condensed Bold SWC
Swiss 742 Condensed Italic SWC
Swiss 742 Condensed Bold Italic SWC
Incised 901 SWC
Incised 901 Bold SWC
Incised 901 Italic SWC
Aldine 430 Original Garamond SWC
®
23
24
25
26
27
28
29
30
31
32
33
34
35
36
37
38
39
40
41
42
43
44
45
Aldine 430 Original Garamond Bold SWC
Aldine 430 Original Garamond Italic SWC
Aldine 430 Original Garamond Bold Italic SWC
Audrey Two SWC
Flareserif 821 SWC
Flareserif 821 Extra Bold SWC
Swiss 721 SWM
Swiss 721 Bold SWM
Swiss 721 Oblique SWM
Swiss 721 Bold Oblique SWM
Dutch 801 SWM
Dutch 801 Bold SWM
Dutch 801 Italic SWM
Dutch 801 Bold Italic SWM
Symbol SWA
Wingbats SWM
Fixed Pitch 810 Courier Bold SWC
Fixed Pitch 810 Courier Italic SWC
Fixed Pitch 810 Courier Bold Italic SWC
Fixed Pitch 850 Letter Gothic 12 pitch/text SWC
Fixed Pitch 850 Letter Gothic Bold 12 pitch/text SWC
Fixed Pitch 850 Letter Gothic Italic 12 pitch/text SWC
Line Printer
DEUTSCH
Anhang
Alle oben aufgeführten residenten Schriftarten werden mit einer Lizenz von Bitstream Inc. verwendet. Dutch und Swiss sind
Warenzeichen von Bitstream Inc. Alle anderen Warenzeichen und Copyright-Vermerke sind Eigentum der jeweiligen Inhaber.
Siehe Seite 2-18 für den Ausdruck von Schriftbeispielen.
2-27
Page 60

BEDINGUNGEN FÜR DIE GEBRAUCHSLIZENZ DER
LEXIKON DRUCKER UND
BILDVERARBEITUNGSSOFTWARE
Olivetti Lexikon S.p.A. ("Lexikon") erteilt dem Endbenutzer ("Kunde") der Lexikon Drucker- und
Bildverarbeitungssoftware, mit der dieses Dokument verknüpft ist ("Software"), eine nicht
übertragbare und nicht exklusive Lizenz für die Benutzung der Software gemäß folgenden
Bestimmungen und Bedingungen.
EIGENTUM
A. Die Software (der hier verwendete Ausdruck schließt die Gesamtheit von Informationen ein,
die auf einem magnetischen oder optischen Speichermedium vom Computer gelesen werden
können, sowie die entsprechende Bedienungsanleitung und jedes andere diesbezügliche Material,
die an den Kunden von Lexikon oder im Auftrag von Lexikon geliefert wurden) sowie die
entsprechenden Urheberrechte und jedes andere Recht intellektuellen oder industriellen
Eigentums sind im Alleinbesitz von Lexikon und/oder seiner Lieferanten. Der Kunde erwirbt
kein Recht auf die Software, mit Ausnahme der hier ausdrücklich gewährten Gebrauchslizenz.
B. Der Kunde darf kein Warenzeichen, keinen Handelsnamen, kein Copyright oder andere
Mitteilungen über Rechtsvorbehalte aus der Software entfernen. Er ist für deren Erhaltung auf
den empfangenen Kopien und für ihre Reproduktion auf eventuelle Sicherungskopien der Software
oder auf eingebundene Teile derselben in einem anderen Programm, laut Artikel 2 verantwortlich.
C. Jegliche anwendbare maschinenresidente Diagnosesoftware, die zum Beispiel zur Wartung
des Lexikon Druckers verwendet werden kann, ist ausdrücklich von dieser Gebrauchslizenz
ausgeschlossen.
Wenn Lexikon dies erlaubt, muss für diese Diagnosesoftware eine separate Gebrauchslizenz
von Lexikon erworben werden, bevor diese benutzt werden darf.
LIZENZ
A. Für die Zwecke dieses Dokuments bedeutet "Softwareanwendung" das teilweise oder gesamte
Kopieren von den im Programm enthaltenen Anweisungen und Daten durch Übertragung oder
Lesen von einem Speichermedium und Eingabe in einen Computer, um einen daran
angeschlossenen Lexikon Drucker zu verwalten.
B. Gemäß der hier erstellten Lizenz hat der Kunde das Recht, die Software nur auf einem
Einzelrechner zu verwenden. Der Kunde darf die Software nicht ohne die vorherige schriftliche
Zustimmung von Lexikon anderweitig verwenden.
C. Der Kunde darf die Software weder ganz noch teilweise kopieren, mit Ausnahme einer einzigen
Sicherungskopie, die bei einem Systemausfall zur Wiederherstellung verwendet wird. Diese
Sicherungskopie darf aber nur im obengenannten Computer verwendet werden und unterliegt
ebenfalls diesen Bedingungen.
D. Der Kunde ist nicht berechtigt, die Software ganz oder teilweise zu disassemblieren oder zu
dekompilieren, seine Codes oder die logische Programmstruktur zu analysieren (ausgenommen
hiervon sind die Fälle, die ausdrücklich von den unumgänglichen Normen des geltenden Gesetzes
vorgesehen sind).
E. Der Kunde darf die Anwendungsdokumentation der Software und auch deren Teile nicht
reproduzieren und auch keine andere Dokumentation, die von Lexikon oder durch Dritte im
Auftrag von Lexikon an den Kunden geliefert wurden. Zusätzliche Kopien der genannten
Dokumentation können auf Anforderung von Lexikon oder in deren Auftrag zu den am Auftragstag
geltenden LexikonTarifen an den Kunden geliefert werden.
Page 61

GARANTIEAUSSCHLUß UND BESCHRÄNKTE HAFTUNGEN
Lexikon oder ihre Lieferanten geben dem Kunden keine Garantie für die hier lizenzierte Software
und jede darin enthaltene oder gesetzmäßige Garantie, einschließlich der Angleichungsgarantie
für besondere Zwecke, ist ausdrücklich ausgeschlossen. Lexikon und ihre Lieferanten können auf
keinen Fall für Schäden jeglicher Art haftbar gemacht werden, die maximale Haftung von Lexikon,
wenn geprüft, beschränkt sich auf die Rückzahlung des für die Software bezahlten Preises an den
Kunden.
LIZENZÜBERTRAGUNG
Der Kunde darf die Software weder verkaufen noch verleihen, vermieten oder leasen oder die
Software oder diese Lizenz einem anderen Benutzer übertragen, es sei denn zur definitiven
Übertragung zusammen mit dem Lexikon Drucker, mit dem die Software benutzt wird, und unter
der Bedingung, daß der Kunde keine Kopie behält und der erwähnte Benutzer die Bedingungen
dieser Lizenz akzeptiert.
Lexikon kann die hier vorgesehenen Rechte und Verpflichtungen an ihre Lieferanten der Software,
Filialen oder den Geschäftsnachfolger, den diese Lizenz betrifft, erteilen oder übertragen.
LIZENZWIDERRUF
A. Die hier an den Kunden erteilte Lizenz kann in folgenden Fällen von Lexikon durch eine schriftliche
Mitteilung an den Kunden mit sofortiger Wirkung widerrufen werden:
●
bei Nichtbeachtung der hier vorgesehenen Bedingungen seitens des Kunden, oder
●
bei Nichtzahlung der fälligen Summe für die Lieferung und die Lizenz der Software innerhalb
der angemessenen Fristen.
Nach dem Widerruf der hier erteilten Lizenz behält sich Lexikon das Recht vor, gerichtliche
Schritte zu unternehmen, um entstandene Schäden ersetzt zu bekommen.
B. Nach dem Widerruf der hier erteilten Lizenz hat sich der Kunde jeder weiteren Benutzung der
Software zu enthalten und Lexikon kann die Vernichtung oder die Rückerstattung jeder
Softwarekopie in jeglicher Form, die im Besitz des Kunden ist, fordern.
AUSFUHRBESCHRÄNKUNGEN
Der Kunde nimmt zur Kenntnis, dass die lizenzierte Software bestimmten Ausfuhrbeschränkungen
gemäß den nationalen und internationalen Gesetzen und Bestimmungen unterliegen kann. Der
Kunde verpflichtet sich deshalb, die Software oder jegliche damit verbundene technische Information
nicht ohne die vorherige staatliche Genehmigung in Länder außerhalb der EU auszuführen.
Page 62

Page 63

FRANÇAIS
TABLE DES MATIERES
DEMARRAGE
1
INTRODUCTION 3-2
FONCTIONS PRINCIPALES 3-3
CREATION DE DISQUETTES A PARTIR DU CD-ROM 3-3
CONNEXION DU CABLE D’INTERFACE 3-4
INSTALLATION DU LOGICIEL DU PILOTE D’IMPRIMANTE 3-6
– Description du pilote d’imprimante 3-6
– Vérification de la configuration matérielle et logicielle requise 3-6
– Installation du pilote d’imprimante 3-6
– Groupe du pilote d’imprimante Copia 9915D PCL 3-12
IMPRESSION
2
IMPRESSION D’UNE PAGE 3-13
– Exécution de l’impression 3-13
– Témoins et touche du panneau de commande 3-14
CONFIGURATION DES CONDITIONS D’IMPRESSION A PARTIR
DU PILOTE D’IMPRIMANTE 3-15
IMPRESSION RECTO VERSO 3-17
IMPRESSION D’UNE PAGE TEST 3-18
FRANÇAIS
PROBLEMES D’IMPRESSION ?
3
DEPANNAGE 3-19
– Problèmes d’impression 3-19
CONTROLE D’ETAT 3-21
DESINSTALLATION DU PILOTE D’IMPRIMANTE 3-23
ANNEXE
4
SPECIFICATIONS 3-24
INTERFACE PARALLELE 3-25
INTERFACE USB 3-26
LISTE DES POLICES INSTALLEES 3-27
3-1
Page 64

1
Ce chapitre fournit des informations de base pour l’utilisation de l’imprimante OLIVETTI Copia
9915D et de ses différentes fonctions.
INTRODUCTION
La machine OLIVETTI Copia 9915D peut être utilisée en tant que copieur ou imprimante laser.
Ce manuel ne traite que des fonctions d’imprimante de la machine. Pour utiliser la machine
Copia 9915D en tant que copieur et pour obtenir des informations supplémentaires à la fois sur
les fonctions d’imprimante et de copieur, reportez-vous au manuel du copieur. Pour une utilisation
FRANÇAIS
Démarrage
optimum de toutes les fonctions de l’imprimante, veuillez lire attentivement ce manuel. Afin de
pouvoir facilement le consulter lors de l’utilisation de l’imprimante, gardez-le à portée de main.
Conventions utilisées dans ce manuel
Les icônes suivantes sont utilisées dans ce manuel pour fournir à l’utilisateur des informations
concernant l’utilisation de la machine.
DEMARRAGE
Avertit l’utilisateur qu’un endommagement du copieur ou d’une de ses
composantes pourrait se produire si le contenu de la mise en garde n’est pas
respecté scrupuleusement.
Les remarques fournissent des informations relatives au copieur au sujet des
spécifications, des fonctions, des performances, du fonctionnement, etc., qui
peuvent être utiles à l ’opérateur.
●
Lorsque vous essayez d’imprimer un document alors qu’une tâche de copie
est en cours, l’impression n’aura lieu que lorsque la copie sera terminée.
●
Lorsque vous essayez de copier un document alors qu’une tâche d’impression
est en cours, l’impression sera interrompue pour que vous puissiez procéder
à la tâche de copie. La tâche d’impression reprendra lorsque la copie sera
terminée.
Marques déposées
Windows, MS-DOS et Windows NT sont des marques de Microsoft Corporation aux Etats-Unis
et dans d’autres pays.
IBM, PC/AT et OS/2 sont des marques commerciales de International Business Machines
Corporation.
PCL est une marque de Hewlett-Packard Company.
Toutes les autres marques et tous les copyrights appartiennent à leurs propriétaires respectifs.
3-2
Page 65

FONCTIONS PRINCIPALES
Impression à partir des applications Windows 3.1x*, Windows 95,
Windows 98** et Windows NT 4.0
* Le pilote d’imprimante PCL6 n’est pas disponible sous Windows 3.1.
** USB est pris en charge uniquement sous l'application Windows 98 pré-installée.
●
Vous pouvez procéder à une impression de grande vitesse et de haute qualité à partir
des applications Windows 3.1x, Windows 95, Windows 98 et Windows NT 4.0 en utilisant
le pilote d'imprimante PCL de la OLIVETTI Copia 9915D.
Impression grande vitesse de 15 pages/min.
●
Le premier temps d’impression est d’environ 9,6 secondes.
●
La vitesse d’impression est de 15 pages/min. lors de l’impression de plusieurs pages.
FRANÇAIS
CRÉATION DE DISQUETTES À PARTIR DU CD-ROM
Si votre ordinateur n’est pas équipé d’un lecteur de CD-ROM, les données relatives au pilote
d’imprimante se trouvant sur le CD-ROM peuvent être copiées sur des disquettes à partir d’un
autre ordinateur (équipé d’un lecteur de CD-COM). Vous pouvez alors procéder à l’installation
du pilote de votre imprimante à partir des disquettes.
Windows 95/Windows 98/Windows NT 4.0 :
Cliquez deux fois sur Poste de travail, Copia 9915D et Makedisk.
1
Cliquez deux fois sur Makedisk.exe.
2
Suivez les instructions qui apparaissent à l’écran.
3
Windows 3.1x :
Cliquez deux fois sur le Gestionnaire de fichiers dans la fenêtre principale du
1
Gestionnaire de programmes et sélectionnez le CD-ROM et le répertoire Makedisk.
Cliquez deux fois sur Makedisk.exe.
2
Suivez les instructions qui apparaissent à l’écran.
3
Démarrage
3-3
Page 66

FRANÇAIS
CONNEXION DU CABLE D’INTERFACE
Pour utiliser la OLIVETTI Copia 9915D en tant qu’imprimante laser, connectez-la à votre ordinateur
à l’aide soit du câble d’interface parallèle, soit du câble de l’interface USB. (Vous pouvez
uniquement utiliser un câble d’interface USB si Windows 98 a été installé préalablement sur
votre ordinateur personnel.)
Vous ne pouvez pas utiliser à la fois l’interface USB et l’interface parallèle.
Si vous connectez simultanément les deux interfaces, l’interface USB a priorité.
En cas d'utilisation de l'interface parallèle
Utilisez une interface parallèle conforme à la norme IEEE 1284 (2 m (6 pieds)
de longueur maximum).
Pour obtenir des spécifications relatives à l’interface parallèle, reportez-vous à
la page 3-25.
Vérifiez que les interrupteurs d’alimentation de l’imprimante et de l’ordinateur sont
1
tous deux en position d’arrêt.
Démarrage
Branchez le câble de l’interface parallèle dans le connecteur de l’interface d’imprimante.
2
Enclenchez les deux clips de sécurité situés sur les côtés du connecteur de l’imprimante
sur le connecteur pour le maintenir en place.
Connectez l’autre extrémité du câble dans le connecteur de l’interface parallèle situé
3
sur votre ordinateur (reportez-vous au manuel de l’ordinateur pour de plus amples
informations).
Clip de sécurité
L’imprimante envoie et reçoit des données de façon bidirectionnelle et à grande
vitesse. Certains périphériques de transmission et commutateurs ne peuvent
pas prendre en charge des transferts de données bidirectionnels et à grande
vitesse et leur utilisation risque d’engendrer des erreurs d’impression.
Connecteur d’interface paralléle
Connecteur d’interface
Câble
3-4
Page 67

En cas d'utilisation de l’interface USB
Utilisez un câble du type paire torsadée blindée (2 m (6 pieds) de longueur
maximum).
Les caractéristiques de l’interface USB figurent en page 3-26.
Branchez le câble de l’interface USB dans le connecteur de l’interface USB
1
d’imprimante.
Connectez l’autre extrémité du câble dans le connecteur de l’interface USB situé sur
2
votre ordinateur (reportez-vous au manuel de l’ordinateur pour de plus amples
informations).
CONNEXION DU CABLE D’INTERFACE
Connecteur d’interface USB
Connecteur d’interface
Câble
FRANÇAIS
Démarrage
3-5
Page 68

FRANÇAIS
Démarrage
INSTALLATION DU LOGICIEL DU PILOTE D’IMPRIMANTE
Description du pilote d’imprimante
Le pilote d’imprimante est le programme logiciel qui fait fonctionner l’imprimante. Il convertit les
données de votre fichier en des informations compréhensibles par votre imprimante. Il contrôle
également les communications entre l’imprimante et l’ordinateur lors de l’impression des données.
Vérification de la configuration matérielle et logicielle requise
Vous devez disposer de la configuration matérielle et logicielle suivante pour pouvoir installer le
pilote d’imprimante.
Type d’ordinateur IBM PC/AT ou ordinateur compatible équipé d’une
interface parallèle bidirectionnelle ou d'une interface
USB et d’un lecteur de CD-ROM.
Système d’exploitation Windows
Unité centrale 486DX 66 MHz ou supérieure
Mémoire vive physique
Affichage 640 points x 480 (VGA) ou supérieur
Espace disque dur disponible 10 Mo ou plus
Windows 3.1x, Windows 95, Windows 98*, Windows NT 4.0
* USB fonctionne uniquement sous l’application
Windows 98 pré-installée.
Windows 95, Windows 3.1x : 8 Mo (16 Mo ou plus recommandé)
Windows NT 4.0 : 12 Mo (16 Mo ou plus recommandé)
Windows 98 : 16 Mo (32 Mo ou plus recommandé)
Le pilote d’imprimante fourni avec ce produit ne peut pas être utilisé sous
Windows NT, 3.5x, OS/2, MS-DOS natif et autres produits non décrits ci-dessus.
Le pilote d’imprimante PCL6 n’est pas disponible sous Windows 3.1.
Installation du pilote d’imprimante
Le logiciel de votre imprimante est fourni sur CD-ROM.
Avant d’installer le pilote d’imprimante, vérifiez bien les points suivants :
●
L’imprimante est-elle bien reliée à l’ordinateur ?
●
Contient-elle du papier ?
3-6
Page 69

INSTALLATION DU LOGICIEL DU PILOTE D’IMPRIMANTE
Instructions d’installation Windows 95/Windows NT 4.0 :
Après avoir mis l’ordinateur et la OLIVETTI Copia 9915D hors tension, connectez l’imprimante
à l’ordinateur à l’aide d’un câble d’interface parallèle. Pour de plus amples informations concernant
la connexion, reportez-vous à la page 3-4.
Mettez du papier dans le magasin papier de l’imprimante. Pour effectuer cette opération,
1
reportez-vous à la section relative au CHARGEMENT DU PAPIER COPIE dans le
mode d’emploi du copieur.
Mettez l’imprimante sous tension.
2
Mettez votre ordinateur sous tension et lancez Windows.
3
Avant d’installer le pilote d’imprimante, veillez à bien fermer toutes les autres
applications qui pourraient être en cours.
Lors de l’utilisation de Windows 95 sur un PC comportant Plug & play*, la fenêtre de
4
l’assistant de mise à jour du pilote de périphérique apparaît. Insérez le CD-ROM
d’installation dans le lecteur de CD-ROM. Cliquez sur le bouton Suivant et suivez les
instructions qui apparaissent à l’écran. Si la fenêtre de copie de fichiers s’affiche lors
de cette opération, entrez R:\ (si le CD-ROM est désigné en tant qu’unité R), cliquez
sur le bouton OK et suivez les instructions qui apparaissent à l’écran.
FRANÇAIS
Démarrage
●
Si vous utilisez Windows 95 et que la fenêtre « Nouveau périphérique détecté »
apparaît, cliquez sur le bouton Pilote fourni sur la disquette du constructeur du
matériel puis cliquez sur OK. Passez à l’étape 6.
●
Si vous utilisez Windows 95 et que l’écran illustré ci-dessus ou la fenêtre « Nouveau
périphérique détecté » n’apparaît pas, passez à l’étape 5.
●
Si vous utilisez Windows NT 4.0, passez à l’étape 5.
* Plug & play
Cette caractéristique fonctionne si l’ordinateur et le périphérique sont tous deux
équipés de l’interface parallèle conforme à la norme IEEE 1284.
L’affichage de l’écran dépend de la version Windows utilisée.
3-7
Page 70

FRANÇAIS
INSTALLATION DU LOGICIEL DU PILOTE D’IMPRIMANTE
Insérez le CD-ROM d’installation dans le lecteur de CD-ROM.
5
Cliquez sur le bouton Démarrer et sélectionnez Exécuter. Lorsque l’écran illustré cidessous apparaît, entrez R:\SETUP (si le CD-ROM est désigné par la lettre R) et
cliquez sur le bouton OK. Suivez les instructions qui apparaissent à l’écran.
La fenêtre d’installation à partir de la disquette apparaît. Insérez le CD-ROM
6
d’installation dans le lecteur de CD-ROM. Entrez R:\ (si le CD-ROM est désigné par la
lettre R) et cliquez sur le bouton OK. Suivez les instructions qui apparaissent à l’écran.
Démarrage
Si vous rencontrez le moindre problème lors du test d’impression, reportez-vous à
la section DEPANNAGE, page 3-19 et vérifiez les symptômes décrits et les solutions
proposées. Imprimez à nouveau la page de test après avoir résolu le problème.
3-8
Page 71

INSTALLATION DU LOGICIEL DU PILOTE D’IMPRIMANTE
Windows 98 :
Après avoir mis l’ordinateur et la OLIVETTI Copia 9915D hors tension, connectez l’imprimante
à l’ordinateur à l’aide d’un câble d’interface parallèle ou USB. Pour de plus amples informations
concernant la connexion, reportez-vous aux pages 3-4 & 3-5.
Mettez du papier dans le magasin papier de l’imprimante. Pour cela, reportez-vous à la
1
section relative au CHARGEMENT DU PAPIER COPIE qui se trouve dans le mode
d’emploi du copieur.
Mettez l’imprimante sous tension.
2
Mettez votre ordinateur sous tension et lancez Windows.
3
Si vous utilisez l’interface USB:
• Connectez l’ordinateur à l’imprimante à l’aide d’un câble d’interface USB si vous
ne l’avez pas déjà fait. (Pour de plus amples informations concernant la connexion
d’un câble d’interface USB, reportez-vous à la page 3-5.)
• Lorsque la fenêtre « Assistant ajout de nouveau matériel » s’affiche, insérez le CD-
ROM d’installation, cliquez sur le bouton Suivant, suivez les instructions qui
apparaissent à l’écran et cliquez enfin sur le bouton Terminer.
FRANÇAIS
Avant d’installer le pilote d’imprimante, veillez à bien fermer toutes les autres
applications qui pourraient être en cours.
Lors de l’utilisation de Windows 98 sur un PC comportant Plug & play*, la fenêtre
4
«Assistant ajout de nouveau matériel» apparaît. Cliquez sur le bouton Suivant et
suivez les instructions qui apparaissent à l’écran.
●
Si la fenêtre «Assistant ajout de nouveau matériel» ne s’affiche pas, passez à l’étape 8.
*Plug & play : Pour de plus amples informations sur cette caractéristique, reportez-vous à la page 3-7.
Démarrage
3-9
Page 72

FRANÇAIS
INSTALLATION DU LOGICIEL DU PILOTE D’IMPRIMANTE
Sélectionnez l’option de Rechercher le meilleur pilote pour votre périphérique et
5
cliquez sur le bouton Suivant.
Insérez le CD-ROM d’installation dans le lecteur de CD-ROM. (Si vous utilisez l'interface
6
USB, confirmez que le CD-ROM d'installation se trouve bien dans le lecteur de CDROM.) Sélectionnez le lecteur de CD-ROM et cliquez sur le bouton Suivant.
La recherche du fichier de pilote de Windows permettra de localiser le périphérique
7
OLIVETTI Copia 9915D PCL. Cliquez sur le bouton Suivant et suivez les instructions
qui apparaissent à l’écran.
Insérez le CD-ROM d’installation dans le lecteur de CD-ROM. (Si vous utilisez l'interface
Démarrage
8
USB, confirmez que le CD-ROM d'installation se trouve bien dans le lecteur de CDROM.) Cliquez sur le bouton Démarrer et sélectionnez Exécuter. Lorsque l’écran
illustré ci-dessous apparaît, entrez R:\SETUP (si le lecteur de CD-ROM est désigné
par la lettre R) et cliquez sur le bouton OK. Suivez les instructions qui apparaissent à
l’écran.
Si vous rencontrez le moindre problème lors du test d’impression, reportezvous à la section DEPANNAGE, page 3-19.
3-10
Page 73

INSTALLATION DU LOGICIEL DU PILOTE D’IMPRIMANTE
Windows 3.1x :
Après avoir mis l’ordinateur et l’imprimante hors tension, connectez l’imprimante à l ’ordinateur à
l’aide d’un câble d’interface parallèle. Pour de plus amples informations concernant la connexion,
reportez-vous à la page 3-4.
Mettez du papier dans le magasin papier de l’imprimante. Pour des informations sur
1
cette opération, reportez-vous à la section relative au CHARGEMENT DU PAPIER
COPIE dans le mode d’emploi du copieur.
Mettez l’imprimante sous tension puis démarrez Windows sur votre ordinateur.
2
Avant d’installer le pilote d’imprimante, veillez à bien fermer toutes les autres
applications qui pourraient être en cours.
Insérez le CD-ROM d’installation dans le lecteur de CD-ROM.
3
Sélectionnez Fichier dans la barre de menus du Gestionnaire de programmes puis
4
choisissez la commande Exécuter.
Entrez R:\SETUP (si le lecteur de CD-ROM est désigné par la lettre R) dans la case
5
de ligne de commande puis cliquez sur le bouton OK.
FRANÇAIS
Démarrage
Suivez les instructions qui apparaissent à l’écran.
6
3-11
Page 74

FRANÇAIS
INSTALLATION DU LOGICIEL DU PILOTE D’IMPRIMANTE
Groupe du pilote d’imprimante Copia 9915D PCL
Une fois l’imprimante installée, le groupe du pilote d’imprimante OLIVETTI Copia 9915D
PCL sera créé. Le groupe de programmes logiciels dispose des fonctions suivantes:
AIDE du contrôle d’état
Assistance et informations sur le contrôle d’état.
Contrôle d’état
La fenêtre du contrôle d’état fournit des informations visuelles sur l’état de l’imprimante
ainsi que sur l’impression en cours. Pour de plus amples détails, reportez-vous à la
section CONTROLE D'ETAT, page 3-21.
Désinstaller Copia 9915D PCL
Le pilote d’imprimante peut être désinstallé. Si le pilote est désinstallé, vous ne pourrez
plus procéder à des tâches d’impression sur l’imprimante. Pour désinstaller correctement,
veillez à utiliser le programme de désinstallation OLIVETTI du groupe du pilote
d’imprimante.
Lisez-moi
Le présent document contient les informations les plus récentes sur le pilote d’imprimante.
Consultez tout d’abord le document Lisez-moi.
Démarrage
●
Veillez tout d’abord à lire le document « Lisez-moi » qui se trouve dans le
groupe du pilote d’imprimante avant d’utiliser votre imprimante Copia 9915D
PCL.
●
Vous ne pouvez pas utiliser le contrôle d’état et le gestionnaire d’impression
simultanément sous Windows 3.1.
3-12
Page 75

2
IMPRESSION
IMPRESSION D’UNE PAGE
La méthode d’impression est décrite ci-dessous. Lisez la description fournie avec le mode
d’emploi de l’application qui sera utilisée.
●
Avant de pouvoir utiliser votre imprimante, vous devez installer le pilote
d'imprimante OLIVETTI PCL fourni. Une fois ce logiciel installé, vous pouvez
contrôler l’impression de vos documents à partir du pilote d’imprimante qui
apparaît sur l’écran de votre ordinateur. Reportez-vous à la section
INSTALLATION DU LOGICIEL DU PILOTE D’IMPRIMANTE, page 3-6.
●
Lorsque vous utilisez plusieurs imprimantes, vous devez changer la sélection
d’imprimante depuis le Panneau de configuration pour changer l’imprimante
à utiliser.
Exécution de l’impression
Vérifiez que du papier de format désiré est chargé dans le magasin papier (reportez-vous à la
1
section relative au CHARGEMENT DU PAPIER DE COPIE dans le mode d’emploi du copieur).
Pour imprimer sur du papier spécial, vous pouvez utiliser le magasin multifeuille.
Sélectionnez le magasin multifeuille à partir du pilote d’imprimante. Reportezvous à CONFIGURATION DES CONDITIONS D’IMPRESSION A PARTIR DU
PILOTE D’IMPRIMANTE, page 3-15. Reportez-vous également à la description
de l’alimentation du magasin multifeuille dans le mode d’emploi du copieur.
Chargez toujours les feuilles de papier spécial les unes après les autres.
FRANÇAIS
Impression
Mettez l’imprimante sous tension. Le témoin en ligne ( ) s’allume.
2
Sélectionnez les paramètres d’impression, tels que le nombre de copies et le type de
3
papier, à partir de l’application. Reportez-vous à la section CONFIGURATION DES
CONDITIONS D’IMPRESSION A PARTIR DU PILOTE D’IMPRIMANTE, page 3-15.
Avant d’imprimer depuis votre application, assurez-vous que le PCL6 ou le
PCL5e de OLIVETTI Copia 9915D a été sélectionné comme imprimante.
Il est recommandé d'utiliser le pilote d’imprimante PCL6. Si vous avez des
problèmes pour imprimer à partir d’applications plus anciennes, arrêtez d’utiliser
le pilote d’imprimante PCL6 et utilisez plutôt le pilote d’imprimante PCL5e.
Imprimez le fichier à partir de votre application logicielle.
4
3-13
Page 76

IMPRESSION D’UNE PAGE
●
Si une tâche de copie est en cours lorsque l’impression est lancée, elle sera
poursuivie. Une fois cette tâche terminée, l’impression sera exécutée si vous
appuyez sur la touche en ligne, si vous appuyez deux fois sur la touche
d'effacement ( ), ou après un délai d'environ 60 secondes (délai d'effacement
automatique)*.
* Le temps d’auto effacement varie en fonction d’un programme utilisateur.
Se référer au manuel utilisateur du copieur.
●
Les modes de préchauffage et de coupure automatique de l’alimentation seront
annulés lorsque l’impression est lancée.
●
Si le format de papier spécifié dans l’application logicielle est plus grand que
celui de l’imprimante, la portion de l’image qui n’est pas transférée sur papier
risque de rester sur la surface du tambour. Le verso du papier risque alors
d’être sali. Dans ce cas, passez au format de papier approprié et imprimez
deux ou trois pages pour effacer l’image.
FRANÇAIS
Impression
Témoins et touche du panneau de commande
Témoin
en ligne
Touche en ligne
Témoin
d’économie
d’énergie
Témoin
de données
Témoin en ligne
Allumé : Indique que l’imprimante est prête à
recevoir des tâches d’impression (en ligne).
Eteint : Indique que l’imprimante est hors ligne.
Témoin de données
Allumé : Indique que l’imprimante reçoit ou traite
des données.
Clignote : Indique que des données à imprimer qui
n’ont pas encore été imprimées sont
restées en mémoire.
Eteint : Indique qu’aucune donnée n’a été reçue
ou n’est en cours d’impression.
Touche en ligne
Passe du mode en ligne au mode hors ligne et vice
versa.
Témoin d’économie d’énergie
Allumé : Indique que l’imprimante est en mode
d’économie d’énergie.
3-14
Page 77

CONFIGURATION DES CONDITIONS D’IMPRESSION
A PARTIR DU PILOTE D’IMPRIMANTE
La méthode et les différents éléments de configuration du pilote d’imprimante sont décrits cidessous.
Pour plus de détails, reportez-vous aussi à l’aide du pilote d’imprimante.
Avant de configurer le pilote d’imprimante, vérifiez les points suivants :
●
Les pilotes d’imprimante PCL6 et PCL5e de OLIVETTI Copia 9915D ont été installés dans
l’ordinateur qui sera utilisé. Si tel n’est pas le cas, reportez-vous à la section INSTALLATION
DU LOGICIEL DU PILOTE D’IMPRIMANTE, page 3-6.
●
Le PCL6 ou le PCL5e de OLIVETTI Copia 9915D est sélectionnée comme imprimante par
défaut sur l’ordinateur qui sera utilisé.
Windows 95/Windows 98/Windows NT 4.0 :
Cliquez sur le bouton Démarrer de l’ordinateur, puis sous Paramètres sélectionnez
1
Imprimantes.
Si vous utilisez Windows 95/Windows 98, cliquez avec le bouton droit de la souris
2
sur l’icône OLIVETTI Copia 9915D PCL6 ou PCL5e du dossier Imprimantes et
sélectionnez Propriétés dans le menu Imprimante.
Si vous utilisez Windows NT 4.0, cliquez avec le bouton droit de la souris sur l’icône
OLIVETTI Copia 9915D PCL6 ou PCL5e du dossier Imprimantes et sélectionnez
Valeurs par défaut du document dans le menu.
FRANÇAIS
Impression
Nous supposons ici que la souris est configurée pour un droitier.
Les propriétés du pilote d’imprimante OLIVETTI Copia 9915D apparaissent à l’écran.
3
Si vous utilisez Windows 95/Windows 98, cliquez sur l’onglet Principal pour faire
apparaître l’écran ci-dessous.
* Ecran sous Windows 95
Propriétés pour Copia 9915D PCL 6
Bouton OK
Tous les paramètres du pilote
sélectionnés dans chaque
onglet sont enregistrés et la
fenêtre des propriétés se
ferme.
Bouton Annuler
Les paramètres sélectionnés dans chaque
onglet sont annulés et la fenêtre des propriétés
se ferme. Les paramètres déjà appliqués ne
sont cependant pas annulés.
Bouton Régl. Initiaux
Lorsque vous appuyez
sur ce bouton, les
valeurs par défaut des
paramètres sélectionnés
dans chaque onglet sont
rétablies.
Bouton Appliquer
Les paramètres sélectionnées
dans chaque onglet seront
enregistrés.
* Ce bouton n’apparaît pas dans
Windows NT 4.0
3-15
Page 78

FRANÇAIS
CONFIGURATION DES CONDITIONS D’IMPRESSION A PARTIR DU PILOTE D’IMPRIMANTE
Windows 3.1x :
Cliquez deux fois sur l’icône du Gestionnaire d’impression dans le groupe principal
1
du Gestionnaire de programmes.
Sélectionnez Options dans le Gestionnaire d’impression puis Configuration de
2
l’imprimante.
Sélectionnez OLIVETTI Copia 9915D PCL5e sous Imprimantes installées et cliquez
3
sur le bouton Configurer.
Les propriétés de l’imprimante OLIVETTI Copia 9915D PCL5e apparaissent à l’écran.
4
Vous ne pouvez pas utiliser le contrôle d’état et le gestionnaire d’impression
simultanément sous Windows 3.1.
Impression
3-16
Page 79

IMPRESSION RECTO VERSO
La fonction d’impression recto verso de cette imprimante vous permet d’imprimer des deux
côtés du papier.
●
N’utilisez pas d’enveloppes, de transparents ou d’étiquettes pour imprimer recto verso.
●
Vous ne pouvez pas imprimer recto verso à partir du plateau d’alimentation auxiliaire.
Une fois que le pilote d’imprimante est installé, vous pouvez définir une impression recto
verso à partir de l’ application que vous utilisez. Pour imprimer recto verso, vous devez
préciser si vous souhaitez imprimer sur les deux faces de la feuille avec la reliure à gauche
“Recto verso (livre)” ou avec la reliure en haut “Recto verso (Bloc-notes)”.
Livre
Ce réglage implique que vous allez tourner les pages comme si elles étaient reliées par la
marge gauche.
Orientation paramétrée sur Portrait Orientation paramétrée sur Paysage
Bloc-notes
Ce réglage implique que vous allez tourner les pages comme si elles étaient reliées par la
marge supérieure.
FRANÇAIS
Impression
Orientation paramétrée sur Portrait Orientation paramétrée sur Paysage
3-17
Page 80

FRANÇAIS
Impression
IMPRESSION D’UNE PAGE TEST
Pour effectuer une impression de test de la page de configuration et de la liste des polices,
procédez comme suit:
Maintenez enfoncées simultanément les touches de clair ( ) et de foncé ( ) pendant
1
plus de cinq secondes jusqu’à ce que tous les témoins d’alarme ( , , et ) se
mettent à clignoter et que l’indication “--” apparaisse à l’affichage.
Réglez “6” (page de configuration) ou “7” (liste des polices) en utilisant la touche de
2
nombre de copies ( ) de gauche. Le numéro sélectionné clignote sur le côté gauche
de l’affichage.
.
Appuyez sur la touche de départ copie ( ). Le numéro de programme entré reste
3
continuellement allumé et le numéro du paramètre actuellement sélectionné pour le
programme clignote sur le côté droit de l’affichage.
A l’aide de la touche d’indication du nombre de copies droite ( ), sélectionnez le
4
paramètre désiré. Le numéro du paramètre entré clignote sur le côté droit de l’affichage.
No. de
Programme
6
page de configuration
Mode Paramètres
0 anglais 1 français 2 espagnol
3 italien 4 allemand
7
Appuyez sur la touche de départ copie ( ). La page test est imprimée.
5
Pour changer le réglage ou pour régler un autre mode, appuyez sur la touche
d’effacement ( ). L’imprimante retourne alors à l’étape 2.
.
liste des polices
0 anglais 1 français 2 espagnol
3 italien 4 allemand
3-18
Page 81

PROBLEMES
3
D’IMPRESSION ?
DEPANNAGE
Certains des problèmes du système Copia 9915D sont communs aux fonctions du copieur et de
l’imprimante, veuillez donc aussi consulter la section GUIDE DE DEPANNAGE du mode d’emploi
du copieur.
Problèmes d’impression
La mention « Copieur » dans la colonne « Voir page: » indique que la description
correspondante se trouve dans le mode d’emploi du copieur.
Problème
Le pilote
d’imprimante
ne peut pas
être installé.
L’imprimante
n’arrive pas à
imprimer.
Cause possible
Espace disponible sur le disque
dur insuffisant pour l’installation
du pilote d’imprimante.
Le système d’exploitation n’est
pas pris en charge.
Le câble d’interface n’est peutêtre pas connecté correctement.
Le câble d’interface est
défectueux.
Le paramétrage du port est
incorrect.
L’imprimante n’est pas en ligne.
La cartouche toner/développeur
ou le tambour n’est pas installé
correctement.
L’imprimante n’est peut-être pas
configurée correctement.
Le pilote d’imprimante n’est peutêtre pas installé correctement.
Solution
Supprimez les fichiers et les logiciels
d’application inutiles pour augmenter
l’espace disponible sur le disque dur.
(Au moins 10 Mo d’espace disponibles
sont nécessaires pour le pilote.)
Utilisez Windows 3.1x, Windows 95,
Windows 98 ou Windows NT 4.0.
Vérifiez la connexion de l’interface.
Connectez le câble sur un ordinateur et
une imprimante fonctionnant
correctement. Si vous n’arrivez toujours
pas à imprimer, le câble d’interface est
défectueux.
Vérifiez les paramètres définis dans le
Panneau de configuration de Windows
pour vous assurez que la tâche
d’impression est bien envoyée vers le
bon port (LPT1 par exemple).
Assurez-vous que le témoin en ligne
soit bien allumé. S’il n’est pas allumé,
appuyez sur la touche en ligne.
Vérifiez que les cartouches de tambour
et toner/développeur sont installées
correctement.
Vérifiez l’application pour vous assurer
que tous les paramètres d’impression
sont corrects.
Réinstallez le logiciel du pilote
d’imprimante et essayez d’imprimer
une page de test.
Voir
page :
3-6
3-6
3-4,
3-5
—
—
3-14
Copieur*
Copieur*
—
3-6
FRANÇAIS
Problèmes d’impression ?
1
2
*1
Voir la section relative au REMPLACEMENT DE LA CARTOUCHE TONER/DEVELOPPEUR.
*2 Voir la section relative au REMPLACEMENT DE LA CARTOUCHE DE TAMBOUR.
3-19
Page 82

DEPANNAGE
FRANÇAIS
Problèmes d’impression ?
Problème
Le papier
n’est pas
alimenté dans
l’imprimante.
L’imprimante
imprime des
données
erronées ou des
caractères
incorrects.
L’impression
est trop lente.
La moitié de la
page est
vierge.
Cause possible
Le papier n’est pas inséré
correctement.
Trop de papier dans le magasin
papier.
Le câble d'interface n’est peutêtre pas connecté correctement.
Les spécifications du câble sont
peut-être incorrectes.
Si vous utilisez Windows 3.1x, le
Gestionnaire d’impression est
peut-être désactivé.
Il y a peut-être trop d’applications
ouvertes.
La résolution est définie sur 600
ppp.
L’ordinateur ne dispose peut-être
pas d’assez de mémoire vive
(RAM).
La mise en page est trop complexe.
La résolution est définie sur 600
ppp.
Le paramètre d’orientation de la
page n’est peut-être pas le bon.
Solution
Insérez le papier correctement.
Enlevez le papier en surcharge du
magasin de papier.
Vérifiez le câble de connexion de
l’interface.
Reportez-vous aux spécifications
d’interface.
Cliquez deux fois sur l’icône Imprimantes
du Panneau de configuration et cochez la
case d’utilisation du Gestionnaire
d’impression.
Fermez toutes les applications inutiles
avant de procéder à l’impression.
Définissez la résolution sur 300 ppp.
Installez de la mémoire vive (RAM)
supplémentaire dans votre ordinateur.
Simplifiez la mise en page.
Définissez la résolution sur 300 ppp.
Modifiez l’orientation de la page via le
pilote d’imprimante.
Voir
page :
Copieur*
Copieur*
3-4,
3-5
3-25,
3-26
—
—
3-15
3-6
—
3-15
3-15
3
3
Il y a peut-être trop d’applications
ouvertes.
Le papier placé dans l’imprimante
est peut-être plus grand que le
format spécifié dans votre pilote
d’imprimante ou votre application.
Les spécifications du câble
d’interface sont peut-être
incorrectes.
Les spécifications de l’unité
centrale sont peut-être
incorrectes.
L’ordinateur ne dispose peut-être
pas d’assez de mémoire vive
(RAM).
Fermez toutes les applications inutiles
avant de procéder à l’impression.
Chargez le papier approprié dans
l’imprimante.
Reportez-vous aux spécifications
d’interface.
Vérifiez que l’unité centrale de votre
ordinateur a un processeur 486DX à 66
MHz ou supérieur.
Installez de la mémoire vive (RAM)
supplémentaire dans votre ordinateur.
*3 Voir la section relative au CHARGEMENT DU PAPIER COPIE.
—
—
3-25,
3-26
3-6
3-6
3-20
Page 83

CONTROLE D’ETAT
Lorsque l’impression commence, l’écran du contrôle d’état s’affiche sur l’ordinateur. Le contrôle
d’état affiche l’état de l’imprimante et des informations sur la tâche d’impression en cours.
Il affiche les types de messages suivants : habituels, avertissement ou faute. Si un message
d’erreur apparaît, consultez la description du message ci-dessous et accomplissez la tâche
indiquée.
●
La mention « Copieur » dans la colonne « Voir page : » indique que la
description correspondante se trouve dans le mode d’emploi du copieur.
●
Vous ne pouvez pas utiliser le contrôle d’état et le gestionnaire d’impression
simultanément sous Windows 3.1.
Messages habituels
Les messages suivants indiquent l’état actuel de l’imprimante. Etant donné que ces messages
indiquent des conditions de fonctionnement normal, il n’est pas nécessaire que vous preniez la
moindre mesure.
FRANÇAIS
Message
Disponible.
Impression en cours.
Copie en cours.
L’imprimante est en attente et prête pour le travail suivant.
Une impression est en cours.
Une copie est en cours.
Description
Messages d’avertissement
Message
Cartouche de toner presque vide.
Commandez une nouvelle
cartouche et remplacez la bientôt.
La cartouche tambour est en fin de
vie. Commandez une nouvelle
cartouche et remplacez la bientôt.
La cartouche de toner/développeur est vide.
L’impression peut continuer mais la qualité de
l’impression est affectée. Commandez une
nouvelle cartouche de toner pour la remplacer
prochainement.
La cartouche tambour est en fin de vie.
L
’
impression peut continuer mais la qualité de
l
’
impression est affectée. Commandez une nouvelle
cartouche pour la remplacer prochainement.
Description / Solution
Copieur*
Copieur*
*1: Voir la section relative au FOURNITURES ET ENTRETIEN PAR L’UTILISATEUR.
Problèmes d’impression ?
Voir
page :
1
1
3-21
Page 84

CONTROLE D’ETAT
Messages de faute
FRANÇAIS
Problèmes d’impression ?
Message
La cartouche de toner est vide.
Remplacez la cartouche vide par
une neuve.
La cartouche tambour est en fin
de vie. Replacez-la par une
neuve.
Porte avant ouverte ou porte
latérale ouverte. Fermer les
portes.
Insérez une cartouche de
toner/développeur dans
l’imprimante.
Incident papier.
Vérifiez magasin 1 papier : Fin
papier ou faux départ.
Vérifiez magasin 2 papier : Fin
papier ou faux départ.
Vérifiez magasin papier
manuel : Fin papier ou faux
départ.
Description / Solution
La cartouche de toner est vide. L’imprimante ne peut
plus fonctionner jusqu'à ce que la cartouche de toner /
développeur soit remplacée par une cartouche neuve.
La cartouche tambour est terminée. L’imprimante
ne peut plus fonctionner jusqu'à ce que vous
installiez par une nouvelle cartouche.
Une des portes de l’imprimante est ouverte.
L’impression ne peut pas continuer tant que la porte
n’est pas fermée.
La cartouche de toner n'est pas présente dans
l’imprimante. Insérez une cartouche de toner.
Un morceau de papier est bloqué dans l’imprimante.
L
’
impression ne peut pas continuer jusqu’à ce que le
papier bloqué soit retiré. Suivez les instructions sur
l
’
imprimante pour dégager l’incident papier.
Le magasin 1 est en fin de papier ou le papier n
’
a
pas été engagé correctement. Comme le magasin
1 est sélectionné comme source de papier,
l
’
impression ne peut pas continuer tant que vous
ne remettez pas du papier en place ou dégagez le
bourrage dans le magasin 1.
Le magasin 2 est en fin de papier ou le papier n
’
a
pas été engagé correctement. Comme le magasin
2 est sélectionné comme source de papier,
l
’
impression ne peut pas continuer tant que vous
ne remettez pas du papier en place ou dégagez le
bourrage dans le magasin 2.
Il n
’
y a plus de papier dans le magasin manuel,
ou bien le papier ne s
’
est pas engagé
correctement. Comme ce magasin est
sélectionné comme source de papier,
l
’
impression ne peut pas continuer tant que vous
ne remettez pas du papier en place ou dégagez
le bourrage dans le magasin manuel.
Voir
page :
Copieur*
Copieur*
—
Copieur*
Copieur*
Copieur*
Copieur*
Copieur*
Copieur*
Copieur*
Copieur*
2
3
2
4
4
5
4
5
4
6
3-22
*2:
Voir la section relative au REMPLACEMENT DE LA CARTOUCHE TONER/DEVELOPPEUR.
*3: Voir la section relative au REMPLACEMENT DE LA CARTOUCHE DE TAMBOUR.
*4: Voir la section relative à BLOCAGE DE PAPIER-EXTRACTION.
*5: Voir la section relative au CHARGEMENT DU PAPIER COPIE.
*6: Voir la section relative à PLATEAU D’ALIMENTATION.
Page 85

CONTROLE D’ETAT
Message
Erreur de service du produit.
Mettez l
la machine sur Arrêt. Attendez
cinq secondes. Remettez la
machine sur Marche. Si la
condition d
contactez votre revendeur
SHARP.
OLIVETTI.
Erreur de Communication Produit
L’imprimante est soit occupée,
soit déconnectée ou n
allumée ; vérifiez l
Pour annuler cette tâche,
appuyez sur le bouton
d
L’imprimante ne contient pas la
cartouche de toner adéquate.
Retirez-la et remplacez-la par
une cartouche adéquate.
Erreur d’Impression d’Image
L
être incomplète. Diminuez la
résolution d
imprimez à nouveau cette page
afin de résoudre le problème.
’
interrupteur principal de
’
erreur persiste
’
est pas
’
imprimante.
’
annulation de tâche.
’
impression de la page peut
’
impression et
Description / Solution
Le produit a détecté une condition d
et ne peut pas continuer. Notez toutes les
conditions ou codes d
l
’
interrupteur principal de la machine sur Arrêt.
Attendez cinq secondes. Remettez la machine
sur Marche. Si la condition d
veuillez contacter votre revendeur SHARP.
L
’
imprimante est soit occupée, soit déconnectée
ou n
’
est pas allumée ; vérifiez l’imprimante. Pour
annuler cette tâche, appuyez sur le bouton
d
’
annulation de tâche.
L
’
imprimante ne contient pas la cartouche de
toner adéquate. L
tant que vous n'aurez pas retirée cette cartouche
et remplacée celle-ci par une cartouche
adéquate.
La dernidère page imprimée est incomplète.
L
’
image est peut-être trop complexe. Diminuez la
résolution d
travail de nouveau.
’
imprimante et essayez d’imprimer le
’
erreur spécifiques. Mettez
’
’
imprimante ne fonctionnera pas
’
erreur grave
erreur persiste,
OLIVETTI.
Voir
page :
—
3-4,
3-5,
3-19
—
3-20
FRANÇAIS
Problèmes d’impression ?
DESINSTALLATION DU PILOTE D’IMPRIMANTE
Si le pilote d’imprimante n’est pas installé correctement ou si vous n’avez plus besoin d’utiliser
cette imprimante, désinstallez le pilote d’imprimante de votre ordinateur en vous reportant à la
procédure décrite ci-dessous.
Si vous utilisez Windows 95/Windows 98/Windows NT 4.0, cliquez sur Démarrer,
1
Programme, OLIVETTI Copia 9915D PCL et Désinstaller OLIVETTI Copia 9915D
PCL.
Si vous utilisez Windows 3.1x, cliquez deux fois sur l’icône OLIVETTI Copia 9915D
PCL du Gestionnaire de programmes puis sur l’icône de désinstallation.
Lorsque la fenêtre de confirmation de suppression de fichier apparaît, cliquez sur le
2
bouton Oui.
Lorsque la fenêtre de suppression des programmes de votre ordinateur apparaît, cliquez
3
sur la bouton OK.
3-23
Page 86

4
ANNEXE
SPECIFICATIONS
Résolution 600 ou 300 ppp
Langage de description de page
Polices installées Compatible PCL6 : 45 polices outline, une police bitmap.
Orientation de la page Portrait ou paysage
FRANÇAIS
Annexe
Premier temps d’impression Environ 9,6 secondes*
Vitesse d’impression Environ 15 pages par minute (A4)
(pages multiples)
Port d’interface
Mémoire
* Le premier temps d’impression peut varier selon les conditions de fonctionnement, telles que
la tension de l’alimentation électrique ou la température de la pièce.
Il dépend également de la quantité de données à imprimer et des applications.
PCL5e, PCL6
Interface parallèle bidirectionnelle
(conforme à la norme IEEE 1284)
Interface USB (type B)
8 Mo
3-24
OLIVETTI se réserve le droit d’apporter des modifications à la présentation et
aux caractéristiques des appareils à fin d’amélioration. Les valeurs indiquées
dans ce document sont les valeurs nominales des appareils de série mais de
légères différences peuvent être constatées d’un appareil à l’autre.
Page 87

INTERFACE PARALLELE
Cette imprimante utilise une interface parallèle bidirectionnelle.
Pour des spécifications concernant l’interface parallèle de votre ordinateur, veuillez
vous reporter à son mode d’emploi.
Connecteur
connecteur femelle de 36 broches DDK
57LE-40360-730B (D29) ou équivalent.
Câble
Interface parallèle bidirectionnelle de type
renforcé.
Pour de meilleurs résultats, utilisez un
câble d’interface d’imprimante conforme à
la norme IEEE1284. (2 m (6 pieds) max.)
Configuration des numéros
d’identification
Les numéros d’identification et les noms
de signaux sont répertoriés dans le
tableau ci-dessous.
Nº Nº
d’identification Nom de signal d’identification Nom de signal
1 STB 19 GND (STB RET)
2 DATA1 20 GND (DATA1 RET)
3 DATA2 21 GND (DATA2 RET)
4 DATA3 22 GND (DATA3 RET)
5 DATA4 23 GND (DATA4 RET)
6 DATA5 24 GND (DATA5 RET)
7 DATA6 25 GND (DATA6 RET)
8 DATA7 26 GND (DATA7 RET)
9 DATA8 27 GND (DATA8 RET)
10 ACKNLG 28 GND (ACKNLG RET)
11 BUSY 29 GND (BUSY RET)
12 PE (Paper End - Fin papier) 30 GND (PE RET)
13 SLTC 31 INPRM
14 AUTO LF 32 FAULT
15 (NC) 33 (NC)
16 GND (0 V) 34 (NC)
17 FG 35 +5V
18 +5V 36 SLTC IN
18
36 19
1
FRANÇAIS
Annexe
3-25
Page 88

IINTERFACE USB
1
2
34
FRANÇAIS
Annexe
Connecteur
4 broches DDK DUSB-BRA42-T11
Connecteur de type B
Câble
Câble de type paire torsadée blindée
(2 m (6 pieds) max. : équivalent à la
transmission à grande vitesse)
Configuration des numéros
d’identification
Les numéros d’identification et les noms
de signaux sont répertoriés dans le
tableau ci-dessous.
Nº
d’identification Nom de signal
1 +5V
2-DATA
3+DATA
4 GND
3-26
Page 89

LISTE DES POLICES INSTALLEES
Liste de polices résidentes compatibles PCL
N˚ de
police
1
2
3
4
5
6
7
8
9
10
11
12
13
14
15
16
17
18
19
20
21
22
Nom de la police
Fixed Pitch 810 Courier Roman SWC0
™
Dutch
801 SWC
Dutch 801 Bold SWC
Dutch 801 Italic SWC
Dutch 801 Bold Italic SWC
Zapf Humanist 601 SWC
Zapf Humanist 601 Bold SWC
Zapf Humanist 601 Italic SWC
Zapf Humanist 601 Bold Italic SWC
Ribbon 131 SWC
Clarendon 701 Clarendon Condensed SWC
Swiss™ 742 SWC
Swiss 742 Bold SWC
Swiss 742 Italic SWC
Swiss 742 Bold Italic SWC
Swiss 742 Condensed SWC
Swiss 742 Condensed Bold SWC
Swiss 742 Condensed Italic SWC
Swiss 742 Condensed Bold Italic SWC
Incised 901 SWC
Incised 901 Bold SWC
Incised 901 Italic SWC
Aldine 430 Original Garamond SWC
N˚ de
police
®
Nom de la police
23
Aldine 430 Original Garamond Bold SWC
24
Aldine 430 Original Garamond Italic SWC
25
Aldine 430 Original Garamond Bold Italic SWC
26
Audrey Two SWC
27
Flareserif 821 SWC
28
Flareserif 821 Extra Bold SWC
29
Swiss 721 SWM
30
Swiss 721 Bold SWM
31
Swiss 721 Oblique SWM
Swiss 721 Bold Oblique SWM
32
33
Dutch 801 SWM
Dutch 801 Bold SWM
34
35
Dutch 801 Italic SWM
36
Dutch 801 Bold Italic SWM
37
Symbol SWA
38
Wingbats SWM
39
Fixed Pitch 810 Courier Bold SWC
40
Fixed Pitch 810 Courier Italic SWC
41
Fixed Pitch 810 Courier Bold Italic SWC
42
Fixed Pitch 850 Letter Gothic 12 pitch/text SWC
Fixed Pitch 850 Letter Gothic Bold 12 pitch/text SWC
43
44
Fixed Pitch 850 Letter Gothic Italic 12 pitch/text SWC
45
Line Printer
FRANÇAIS
Annexe
Toutes les polices résidentes énumérées ci-dessus sont protégées par une licence de la société Bitstream Inc. Dutch and Swiss et
sont des marques déposé es de Bitstream Inc. Toutes les autres marques déposé es et copyrights restent la propriété de leur
propriétaire respectif.
Pour la procédure d’impression des exemples de polices, reportez-vous à la page 3-18.
3-27
Page 90

CONTRAT DE LICENCE D’UTILISATION DU PROGRAMME
D'IMPRESSION ET D'IMAGE LEXIKON
Olivetti Lexikon Spa ("Concédant") octroie au client final ("Client") du produit programme
d'impression et d'image Lexikon accompagné par ce document ("Programme") une licence non
transférable et non exclusive pour utiliser le Programme, dans le respect des termes et des
conditions exposés ci-dessous.
PROPRIETE
A. Le Programme (terme utilisé pour désigner l’ensemble des informations sur support
magnétique ou optique lisibles par l’ordinateur, le micrologiciel, la documentation d’utilisation
et tout autre matériel fourni au Client directement ou indirectement par le Concédant), tout
comme les droits d’auteur correspondants et les autres droits de propriété industrielle ou
intellectuelle, appartient exclusivement au Concédant et/ou à ses fournisseurs. Par
l'intermédiaire de cette licence d'utilisation, le Client n'acquiert aucun titre ou droit sur le
Programme, exception faite pour les droits de licence octroyés par ce document.
B. Le Client ne pourra ôter aucune marque, appellation commerciale, indication de copyright ou
autre notification qu'il trouvera sur le Programme, et est responsable de leur conservation sur
les copies reçues avec cette Licence, et de leur reproduction sur toute éventuelle copie de
sauvegarde du Programme, ou sur toute copie partielle de ce dernier au sein d'autres
programmes, dans le respect des termes exposés dans l'article 2.
C. Tout programme de diagnostic résident utilisé pour la manutention de l'imprimante Lexikon est
exclu de cette Licence d'utilisation. En cas d'octroi explicite par le Concédant, le Client devra
recevoir une licence supplémentaire pour pouvoir utiliser ce programme de diagnostic.
LICENCE
A. Dans le cadre de ce document, on entend par "utilisation du Programme" la duplication totale
ou partielle des instructions ou des données contenues dans ce programme, par lecture ou
transfert à partir du support d'enregistrement et vers un ordinateur, dans le but d'utiliser
l'imprimante Lexikon pour laquelle le Programme est fourni.
B. Ce contrat octroie au Client le droit d'utiliser le Programme sur un unique ordinateur. Sans
l'autorisation explicite du Concédant, toute autre modalité d'utilisation du Programme est
interdite.
C. Le Programme ne peut pas être copié totalement ou partiellement, sauf pour créer une unique
copie de sauvegarde du contenu des supports optiques ou magnétiques sur lesquels le
Programme est fourni, à condition que cette copie de sauvegarde soit utilisée exclusivement
sur l'unique ordinateur susmentionné, et dans le respect des termes et des conditions
exposés.
D. Le Client ne peut pas désassembler ou décompiler totalement ou partiellement le Programme,
ni analyser ses codes ou sa structure logique, dans les limites prévues par les lois en vigueur.
E. Le Client ne peut en aucun cas dupliquer totalement ou partiellement la documentation fournie
par le Concédant pour l’utilisation du Programme, ni tout autre matériel imprimé fourni
directement ou indirectement au Client par le Concédant. Des copies supplémentaires de cette
documentation peuvent être requises directement ou indirectement au Concédant, aux tarifs
en vigueur à la date d'achat.
Page 91

EXCLUSION DE GARANTIE ET LIMITE DE RESPONSABILITE
Le Concé dant ou ses Fournisseurs ne donnent aucune garantie sur le Programme dont la licence est
octroyé e par ce document, et toute garantie implicite, y compris la garantie commerciale et de conformité
pour une utilisation particuliè re, est expressé ment exclue.
Le Concé dant ou ses fournisseurs ne pourront en aucun cas ê tre considé ré s responsables de dommages
indirects, dé rivé s ou spé ciaux, mê me si le Concé dant a é té avisé de l’é ventualité de ces dommages. Dans
tous les cas, la responsabilité de la part du Concé dant se limitera au remboursement de la somme payé e
par le client pour l’achat du programme.
TRANSFERT DE LA LICENCE
Le Programme et/ou la Licence octroyé e au Client par ce document ne pourront pas ê tre cé dé s, donné s en
souslicence, loué s ou accordé s à des tiers par le Client, exception faite dans le cas suivant:
Le Client peut cé der de faç on permanente le Programme et cette licence à des tiers, exclusivement si cette
cession comprend é galement l’imprimante Lexikon sur laquelle le Programme est utilisé , et à condition que
le nouvel acqué reur accepte de souscrire les termes et conditions de cette licence, que le Client dé truise
les é ventuelles copies du Programme (totales ou partielles) en sa possession, et qu’il renonce à tout droit
sur le Programme.
Le Concé dant peut cé der ou octroyer les droits et les obligations pré vus dans ce document à ses
fournisseurs, à ses filiales ou à ses successeurs dans l’activité commerciale à laquelle cette Licence se
ré fè re.
REVOCATION DE LA LICENCE
A. La licence octroyé e par ce document peut ê tre ré voqué e avec effet immé diat par le Concé dant par
communication é crite, dans les cas suivants:
• en cas de non observance d’une disposition quelconque de ce document de la part du Client;
ou
• en cas de non rè glement à l’é ché ance é tablie des sommes dues en tant que paiement de la livraison
et de la licence d’utilisation du Programme.
En cas de ré vocation de la licence octroyé e par ce document, le Concé dant se ré serve le droit
d’entreprendre toute action lé gale qu’il estimera opportune afin de recouvrir les dommages qu’il aura
é ventuellement subis.
B. A la ré vocation de la licence octroyé e par ce document, le Client s’abstiendra de toute utilisation du
Programme, et le Concé dant pourra exiger soit la destruction des é ventuelles copies du Programme en
possession du Client, quelle que soit leur forme, soit la remise de ces copies au Concé dant.
LIMITATIONS A L’EXPORTATION
Le Client reconnaî t que le Programme dont la licence d’utilisation est octroyé e par ce document est soumis
aux normes sur l’exportation pré vues par la lé gislation nationale et internationale. Par consé quent, le Client
s’engage à ne pas exporter le Programme ou toute information technique s’y rapportant vers des pays
autres que ceux de la Communauté Europé enne, sans une autorisation pré alable des organismes
gouvernementaux compé tents.
Page 92

Page 93

CONTENIDO
1 INFORMACIÓN PRELIMINAR
ESPAÑOL
INTRODUCCIÓN 4-2
CARACTERÍSTICAS PRINCIPALES 4-3
CREACIÓN DE DISQUETES DESDE CD-ROM 4-3
CONEXIÓN DEL CABLE DE INTERFAZ 4-4
INSTALACIÓN DEL SOFTWARE DEL CONTROLADOR DE LA
IMPRESORA 4-6
– Descripción del controlador de la impresora 4-6
– Comprobación de los requisitos de hardware y software 4-6
– Instalación del controlador de la impresora 4-6
– Grupo del controlador de la impresora Copia 9915D PCL 4-12
2
IMPRESIÓN
IMPRESIÓN DE UNA PÁGINA 4-13
– Ejecución de la impresión 4-13
– Indicadores y teclas del panel de mando 4-14
CONFIGURACIÓN DE LAS CONDICIONES DE IMPRESIÓN
DESDE EL CONTROLADOR DE LA IMPRESORA 4-15
IMPRESIÓN A DOBLE CARA 4-17
PRUEBAS DE IMPRESIÓN 4-18
PROBLEMAS CON LA IMPRESORA
3
RESOLUCIÓN DE PROBLEMAS 4-19
– Problemas de impresión 4-19
MONITOR DE ESTADO 4-21
DESINSTALACIÓN DEL CONTROLADOR DE LA IMPRESORA
4
APÉNDICE
ESPECIFICACIONES 4-24
INTERFAZ PARALELO 4-25
INTERFASE USB 4-26
LISTA DE FUENTES INSTALADAS 4-27
ESPAÑOL
4-23
4-1
Page 94

1
ESPAÑOL
INFORMACIÓN PRELIMINAR
En este capítulo se ofrece información básica para utilizar la impresora OLIVETTI Copia 9915D
y sus funciones.
INTRODUCCIÓN
La Copia 9915D se puede utilizar como copiadora y como impresora láser. En este manual sólo
se describen las funciones de impresora del equipo. Si desea utilizar la Copia 9915D como
copiadora y obtener información adicional relativa a las funciones de copiadora e impresora,
consulte el manual de la copiadora. Para obtener el máximo rendimiento de todas las funciones
de impresora, consulte este manual.
Tenga siempre cerca el manual para efectuar consultas rápidas mientras utiliza la impresora.
Convenciones empleadas en el manual
En este manual se utilizan los iconos siguientes para proporcionar al usuario información relativa
al uso de este equipo.
Avisa al usuario que de la inobservancia de su contenido pueden resultar daños
a la copiadora o alguno de sus componentes.
Información preliminar
Información sobre marcas comerciales
Windows, MS-DOS y Windows NT son marcas comerciales de Microsoft Corporation en Estados
Unidos y otros países.
IBM, PC/AT y OS/2 son marcas comerciales de International Business Machines Corporation.
PCL es una marca comercial de Hewlett-Packard Company.
Todas las restantes marcas comerciales y copyrights son propiedad de sus titulares respectivos.
Las notas proporcionan información importante sobre la copiadora en lo que
respecta especificaciones, funciones, operación y otras que pueden ser de
interés y provecho para el usuario.
●
Si intenta imprimir mientras se está realizando una copia, la impresión se
ejecutará cuando termine la copia.
●
Si intenta realizar una copia mientras se está imprimiendo, la impresión se
interrumpirá y podrá realizar la copia. La impresión se reanudará cuando
termine la copia.
4-2
Page 95

CARACTERÍSTICAS PRINCIPALES
Impresión desde aplicaciones para Windows 3.1x*, Windows 95,
Windows 98** y Windows NT 4.0
* El controlador de impresora PCL6 no está disponible en el entorno de Windows 3.1.
** El USB sólo es compatible con Windows 98 preinstalado.
●
Se puede lograr imprimir a alta velocidad y con alta calidad desde aplicaciones para
Windows 3.1x, Windows 95, Windows 98 y Windows NT 4.0 usando el controlador de
impresora OLIVETTI Copia 9915D PCL.
Impresión de gran velocidad a 15 páginas/min.
●
El tiempo de la primera impresión es de unos 9,6 segundos.
●
La velocidad de impresión es de 15 páginas/min. cuando se imprimen varias páginas.
CREACIÓN DE DISQUETES DESDE CD-ROM
Si su ordenador no está provisto de una unidad de CD-ROM, los datos del controlador de la
impresora en el CD-ROM pueden copiarse en disquetes utilizando otro ordenador (uno provisto
de una unidad de CD-ROM). De esta manera, puede instalar el controlador de la impresora
desde los disquetes.
Windows 95/Windows 98/Windows NT 4.0:
Haga doble clic en Mi PC, Copia 9915D y Makedisk.
1
Haga doble clic en Makedisk.exe.
2
Siga las instrucciones de la pantalla.
3
Windows 3.1x:
Haga doble clic en el Administrador de archivos en la ventana Principal del
1
Administrador de programas y seleccione CD-ROM y el directorio Makedisk.
Haga doble clic en Makedisk.exe.
2
Siga las instrucciones de la pantalla.
3
ESPAÑOL
Información preliminar
4-3
Page 96

ESPAÑOL
CONEXIÓN DEL CABLE DE INTERFAZ
Para usar la Copia 9915D como impresora láser, conéctela a su ordenador con un cable de
interfaz paralelo o un cable de interfaz USB. (Sólo puede usar el cable de la interfaz USB si su
ordenador tiene Windows 98 preinstalado.)
No puede utilizar el conector de interfaz USB simultáneamente con el de interfaz
paralelo. En caso de que se conecten los dos al mismo tiempo, el conector de
interfaz USB tendrá preferencia.
Uso del interfaz paralelo
Use un interfaz paralelo compatible con IEEE 1284 (2 m de largo como máximo).
Para conocer las especificaciones del interfaz paralelo, consulte la página
4-25.
Compruebe que los interruptores de alimentación de la impresora y el ordenador
1
están en posición de apagado (OFF).
Conecte el cable de interfaz paralelo al conector de interfase de la impresora. Fije los
2
dos ganchos de sujeción al lado del conector de la impresora para mantener el conector
de interfase en su posición.
3
Información preliminar
Conecte el otro extremo del cable en el conector de interfase paralelo del ordenador.
(Consulte el manual del ordenador para obtener más información.)
Gancho de sujeción
Conector de interfaz paralelo
Conector de interfaz
Cable
La impresora envía y recibe datos de forma bidireccional y a gran velocidad.
Algunas cajas de distribución y dispositivos de paso a través no admiten la
transferencia de datos bidireccional y de alta velocidad, y su uso puede provocar
errores en la impresión.
4-4
Page 97

Uso de la interfaz USB
Utilice un cable de par trenzado apantallado (2 m de largo como máximo).
Para más información sobre la interfaz USB, véase la página 4-26.
Conecte el cable de interfaz USB al conector de interfaz USB de la impresora.
1
Conecte el otro extremo del cable en el conector de interfaz USB de su ordenador
2
(consulte el manual de su ordenador para más detalles).
CONEXIÓN DEL CABLE DE INTERFASE
Conector de interfaz USB
Conector de interfaz
Cable
ESPAÑOL
Información preliminar
4-5
Page 98

ESPAÑOL
INSTALACIÓN DEL SOFTWARE DEL
CONTROLADOR DE LA IMPRESORA
Descripción del controlador de la impresora
El controlador de la impresora es el programa de software que pone en funcionamiento la impresora. Convierte
los datos del archivo en información que la impresora puede entender. También controla la comunicación entre
la impresora y el ordenador mientras se imprimen los datos.
Comprobación de los requisitos de hardware y software
Deberá disponer del hardware y el software siguiente para instalar el controlador de la impresora.
Tipo de ordenador Ordenador PC/AT de IBM o compatible equipado con un
interfaz paralelo bidireccional o USB, y una unidad de
CD-ROM.
Tipo de Windows
CPU 486DX a 66 MHz o superior.
RAM física Windows 95, Windows 3.1x: 8 MB (se recomienda 16
Monitor 640 x 480 puntos (VGA) o superior.
Espacio libre en el disco duro 10 MB o más.
Windows 3.1x, Windows 95, Windows 98*, Windows NT 4.0
*
El USB sólo es compatible con Windows 98 preinstalado.
MB o más).
Windows NT 4.0: 12 MB (se recomienda 16 MB o más).
Windows 98: 16 MB (se recomienda 32 MB o más).
Información preliminar
Instalación del controlador de la impresora
El software de la impresora se suministra en el CD-ROM.
Antes de instalar el controlador de la impresora, compruebe los aspectos siguientes.
El controlador de la impresora que se incluye en este producto no se puede
utilizar con Windows NT 3.5x, OS/2, MS-DOS en estado puro y otros sistemas
operativos que no se han mencionado anteriormente.
El controlador de impresora PCL6 no está disponible en el entorno de Windows
3.1.
●
¿Está la impresora correctamente conectada al ordenador?
●
¿Hay papel en la impresora?
4-6
Page 99

INSTALACIÓN DEL SOFTWARE DEL CONTROLADOR DE LA IMPRESORA
Instrucciones de instalación para Windows 95/Windows NT 4.0:
Con el ordenador y la Copia 9915D desconectados, conecte la impresora al ordenador con un
cable de interfaz paralela. Para instrucciones sobre la conexión, vea la página 4-4.
1
Cargue papel en la bandeja de la impresora. Para cargar papel, consulte la sección
sobre CARGA DE PAPEL PARA COPIAR en el manual de uso de la copiadora.
2
3
4
Encienda la impresora.
Encienda el ordenador e inicie Windows.
Antes de instalar el controlador de la impresora, cierre todas las aplicaciones
que estén abiertas.
Si utiliza Windows 95 en un ordenador personal con Plug & Play*, aparecerá la ventana
“Asistente para actualizar el controlador de dispositivos”. Inserte el CD-ROM de
instalación en la unidad correspondiente. Haga clic en el botón Siguiente y siga las
instrucciones que aparecen en la pantalla. Si aparece la ventana “Copiando archivos”
durante este procedimiento, introduzca R:\ (si la unidad CD-ROM se designa con la
letra R) y haga clic en el botón Aceptar. Siga las instrucciones que aparecen en la
pantalla.
ESPAÑOL
Información preliminar
●
Si utiliza Windows 95 y aparece la ventana “Nuevo hardware encontrado”, haga
clic en el botón Controlador del disco proporcionado por el fabricante de
software y, a continuación, en Aceptar. Siga en el paso 6.
●
Si utiliza Windows 95 y no aparece la pantalla anterior ni la de “Nuevo hardware
encontrado”, siga en el paso 5.
●
Si utiliza Windows NT 4.0, siga en el paso 5.
* Plug & Play
Esta función resulta efectiva si tanto el ordenador como el periférico están equipados
con un interfaz paralelo compatible con IEEE 1284.
La pantalla que se visualiza depende de la versión de Windows que utilice.
4-7
Page 100

INSTALACIÓN DEL SOFTWARE DEL CONTROLADOR DE LA IMPRESORA
Inserte el CD-ROM de instalación en la unidad correspondiente.
5
Haga clic en el botón Inicio y seleccione Ejecutar. Cuando aparezca la pantalla que
se muestra a continuación, escriba R:\SETUP (si la unidad de CD-ROM se designa
con la letra R) y haga clic en el botón Aceptar. Siga las instrucciones que aparecen
en la pantalla.
Aparecerá la ventana “Instalar desde disco”. Inserte el CD-ROM de instalación en la
6
unidad correspondiente. Escriba R:\ (si la unidad de CD-ROM se designa con la letra
R) y haga clic en el botón Aceptar. Siga las instrucciones que aparecen en la pantalla.
ESPAÑOL
Información preliminar
Si tiene algún problema con la prueba de impresión, consulte RESOLUCIÓN
DE PROBLEMAS en la página 4-19 y consulte los síntomas y las soluciones.
Vuelva a imprimir la página de prueba después de solucionar el problema.
4-8
 Loading...