

Page 1
Artjet 20
This user guide contains information on
day-to-day use and care of your printer.
You will find further information about the
printer features and functions in the On-Line
Help that is loaded when you install the
driver contained in the Installation CD
supplied with the printer.
Page 2

Table of contents
Operating position ........................................... 3
Printeroperatorpanel......................................... 4
Printerstates ............................................ 4
Buttons - basic functions . . . . . . . . . . . . . . . . . . . . . . . . . . . . . . . . . . . . . . 4
Buttons - special functions . . . . . . . . . . . . . . . . . . . . . . . . . . . . . . . . . . . . . 5
Lightindicator............................................ 6
Moreaboutprintheads ........................................ 7
Replacingprintheads ....................................... 7
Print head care and precautions . . . . . . . . . . . . . . . . . . . . . . . . . . . . . . . . . . 9
Cleaningtheprintheads......................................10
Moreaboutpaperandspecialprintingmedia ...........................12
Printingmedia............................................17
papersizes...........................................17
papertypes...........................................19
paperweights .........................................20
Driver settings . . . . . . . . . . . . . . . . . . . . . . . . . . . . . . . . . . . . . . . . . . . 21
Precautions . . . . . . . . . . . . . . . . . . . . . . . . . . . . . . . . . . . . . . . . . . . . . 21
Supplies.................................................22
2 User guide
Page 3
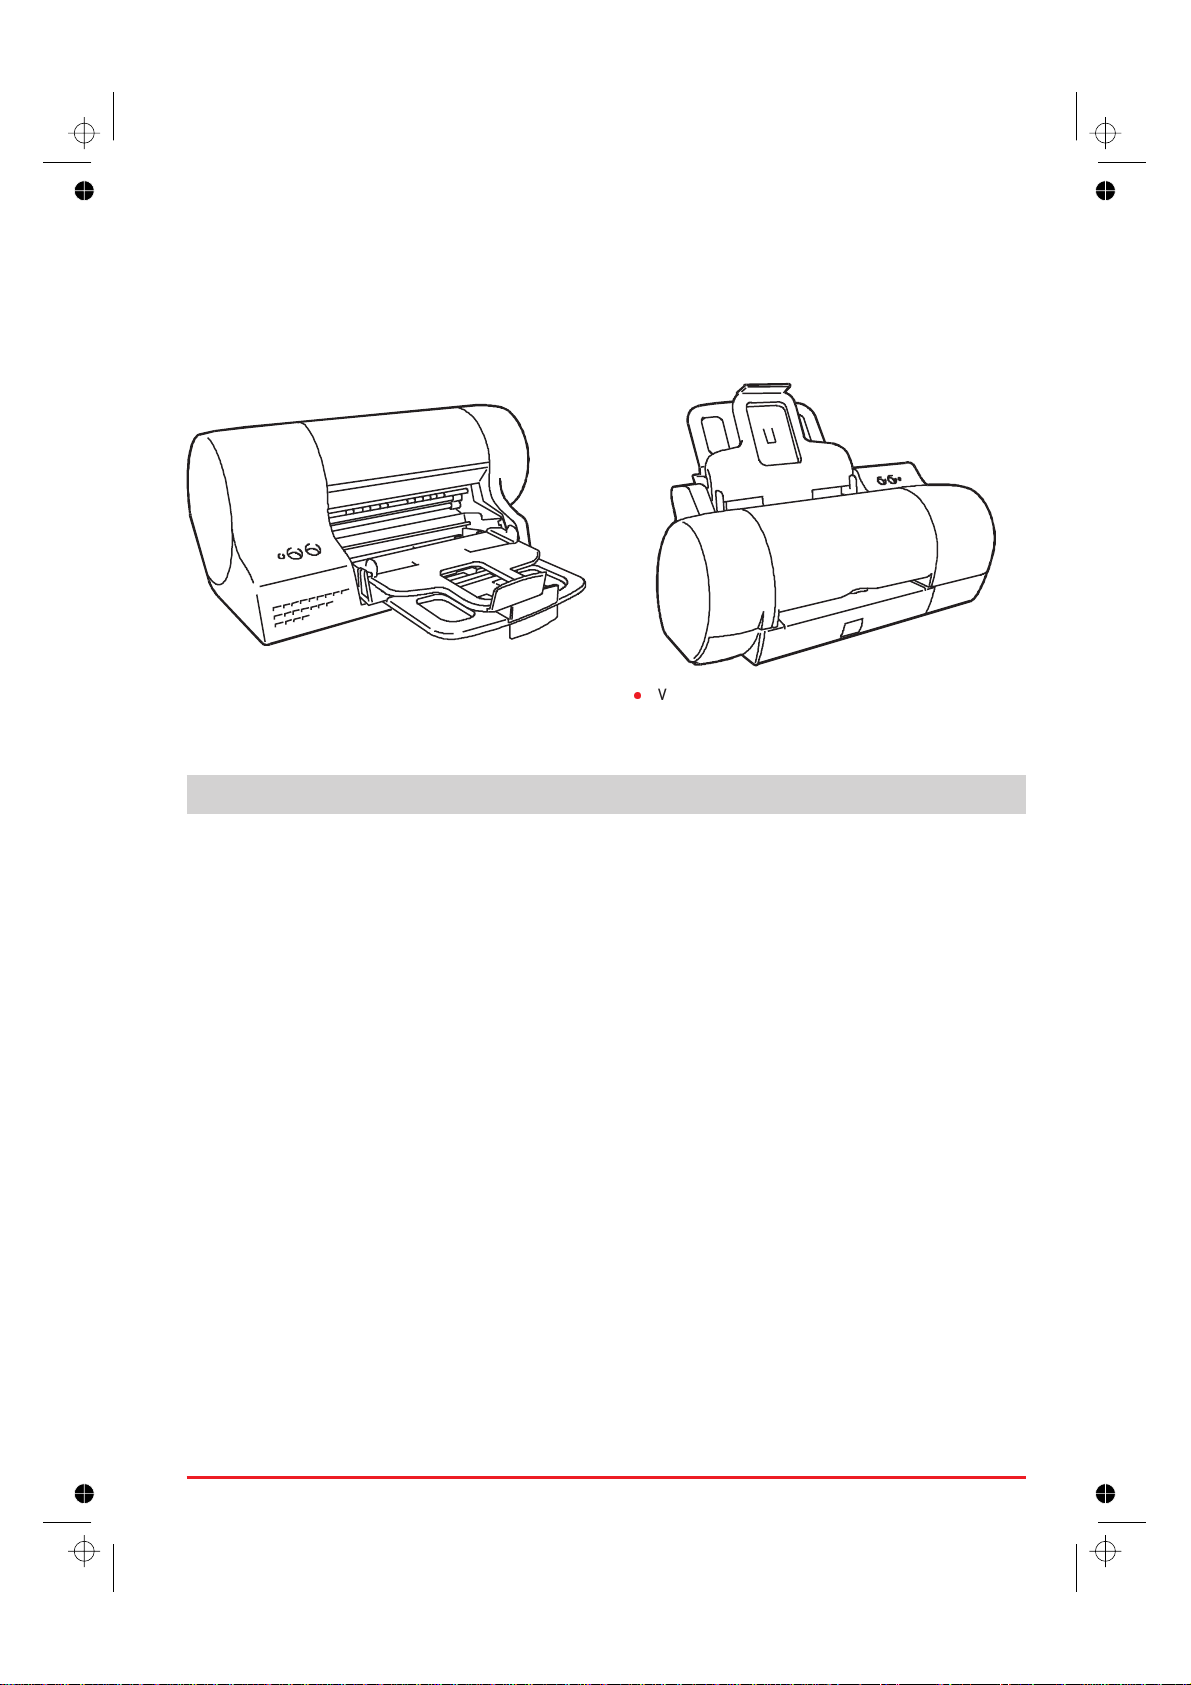
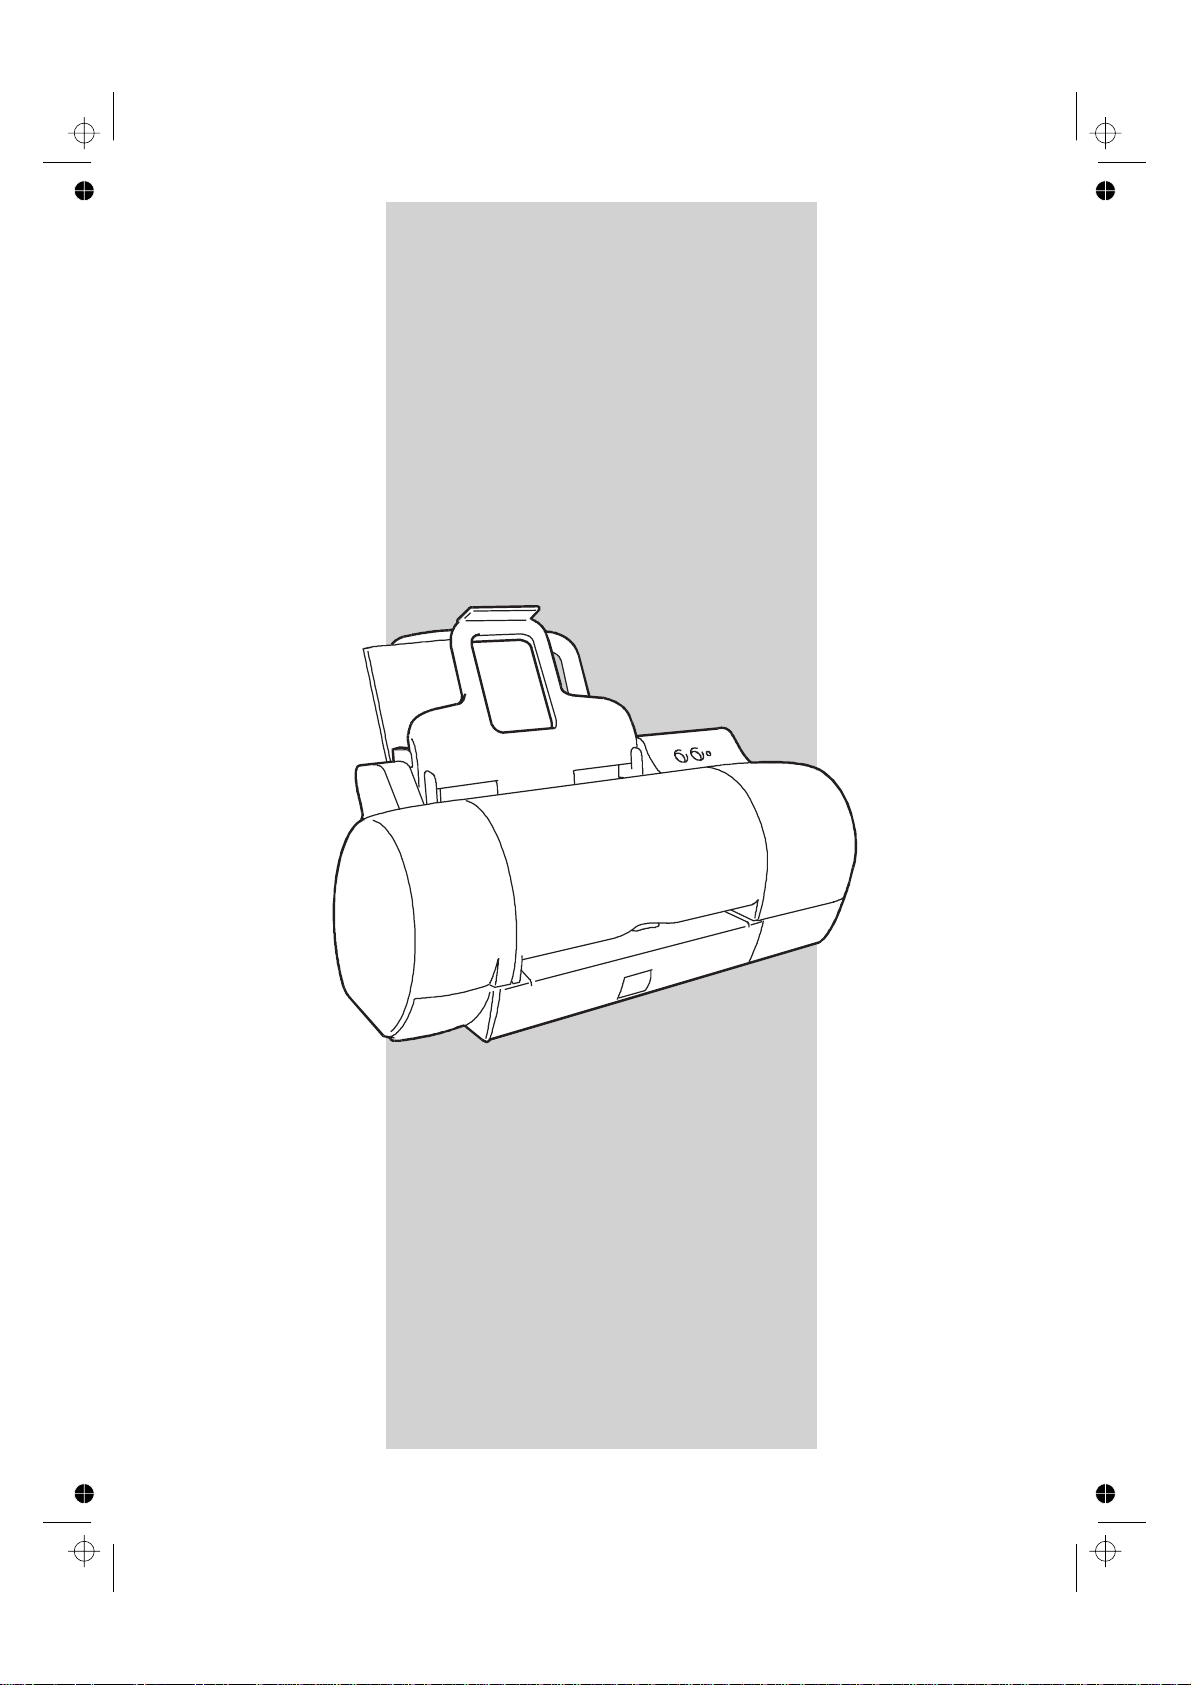
Operating position
1. Place your printer in the position most suited to your work place.
2. Click the corresponding printer position in the Options tab in the Printer Monitor.
horizontal
•
The choice of operating position does not affect the printer performance.
l
vertical
User guide 3
Page 4
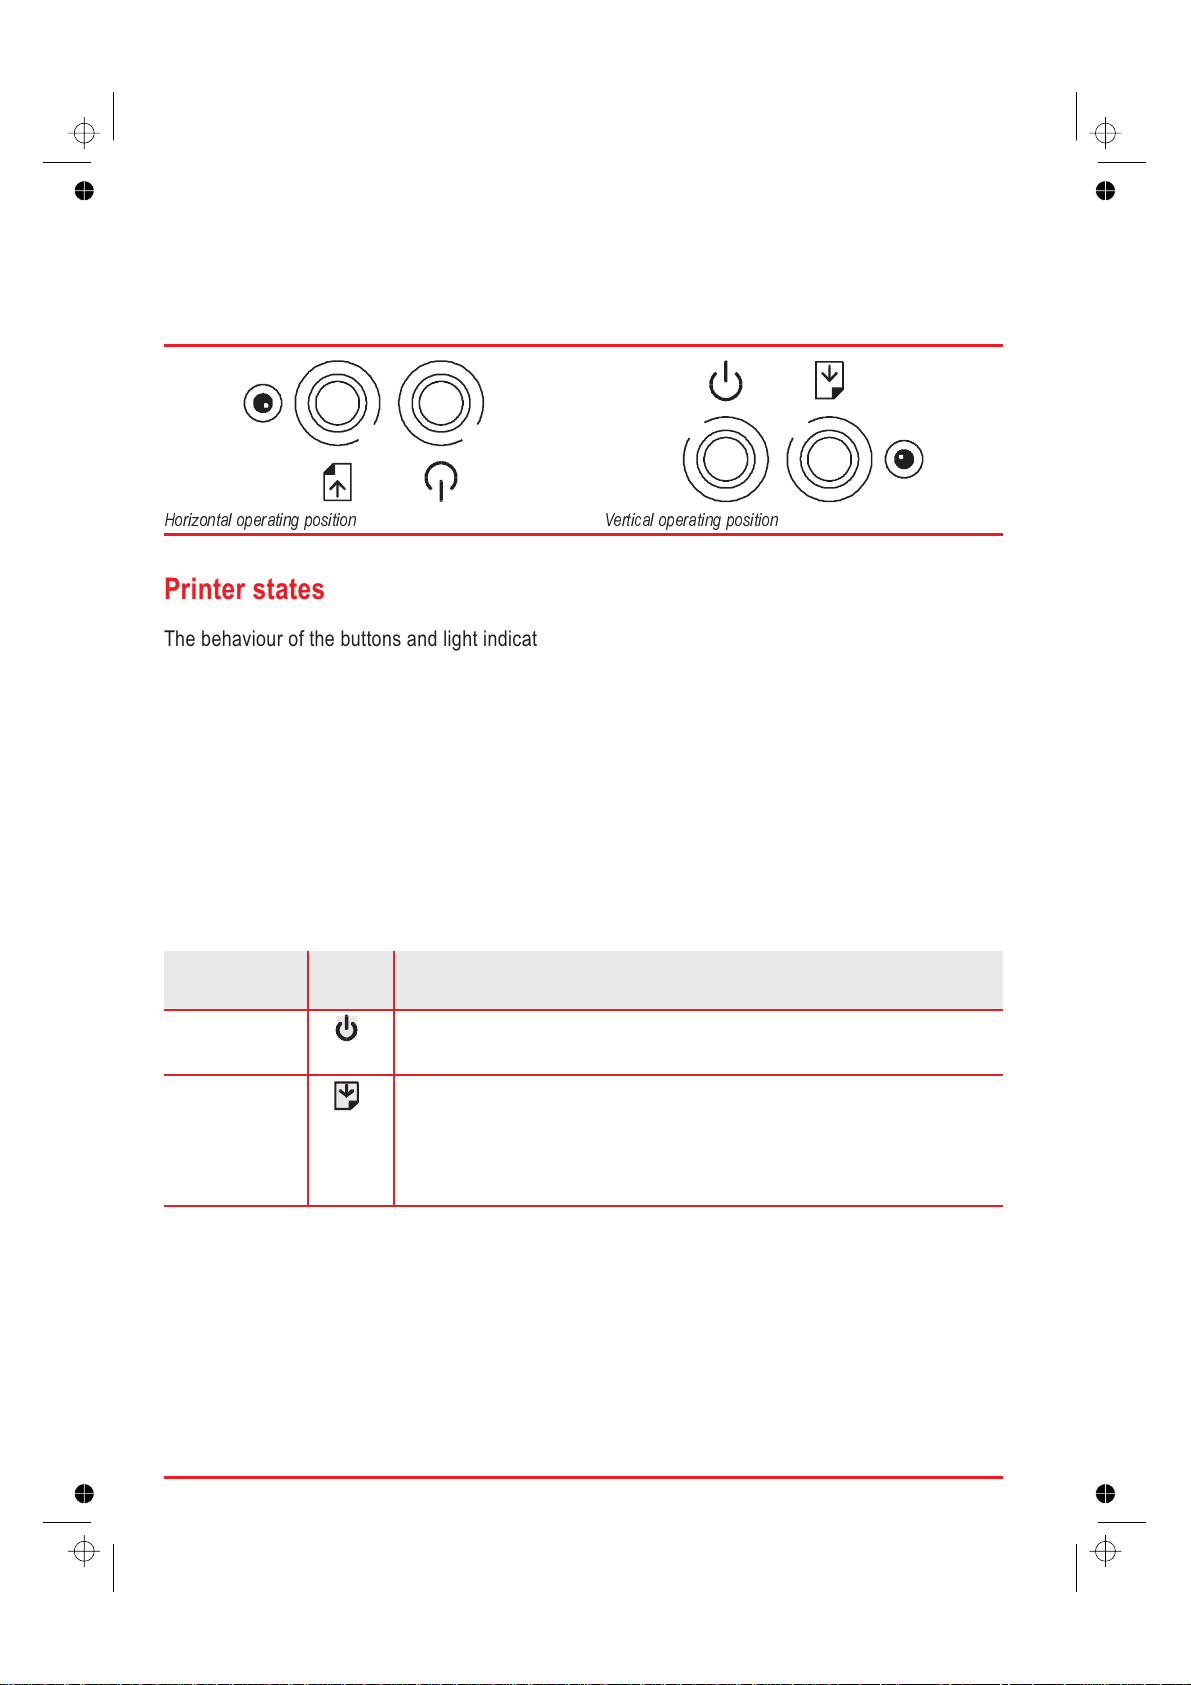
Printer operator panel
The printer operator panel has two buttons and a light indicator.
“Power”“Paper”
“Power”“Paper”
Horizontal operating position Vertical operating position
Printer states
The behaviour of the buttons and light indicator will depend on the printer’s status.
standby/sleep: no data to be printed;
•
printing: from the reception of data until the completion of its printing;
•
error: when an error has been detected and the printer is waiting for user intervention;
•
service: user-invoked mode for special functions, independent of host.
•
Buttons - basic functions
Function Button Description
Printer on/off
Power
Paper control
Paper
Toggles the printer ON/ OFF condition.
1) If a sheet of paper is already present in the printer, causes its expulsion.
2) Loads a sheet of paper in the printer ONLY after a “paper error” signal.
Once you have corrected the error condition (paper out, paper jam), press to load
a document and continue your print job.
4 User guide
Page 5
Buttons - special functions
Function Buttons Description
Print head carriage
movement
Print test Hold down Power and
Clean print heads Hold down Power and
Demo page Hold down Power and
Hex dump Hold down Power and
Hold down Power and
press Paper, then release
both buttons together
press Paper twice; then
release both buttons
together
press Paper three times;
then release both buttons
together
press Paper four times;
then release both buttons
together
press Paper seven times;
then release both buttons
together
Toggles the print head carriage loading/rest position.
The light indicator flashes with a simple ON-OFF
sequence.
This operation can also be done from the Printer Monitor.
The light indicator flashes with a two-flash sequence.
The print test is printed, after which the printer returns to
standby mode.
This operation can also be done from the Printer Monitor.
The light indicator flashes with a three-flash sequence.
A print head cleaning cycle is executed, after which the
printer returns to standby mode.
This operation can also be done from the Printer Monitor.
The light indicator flashes with a four-flash sequence.
The demo page is printed, after which the printer returns
to standby mode.
This operation can also be done from the Printer Monitor.
The light indicator flashes with a seven-flash sequence.
All data now transmitted to the printer will be printed in
its hexadecimal format.
This feature can be activated ONLY from the operator
panel and should be used only if requested by your
technical support engineer, as it can generate long
print-outs.
Clean paper feed
rollers
User guide 5
Hold down Power and
press Paper nine times;
then release both buttons
together
The light indicator flashes with a nine-flash sequence.
The paper feed rollers will start turning without loading the
paper. To clean the rollers, press lightly on them with a
clean, damp, lint-free cloth.
Toexitfromthisfunction,youmustswitchoffthe
printer.
Page 6
Light indicator
The status of the light indicator indicates the different printer conditions.
Status Condition
off The printer is not powered.
lit The printer is powered.
flashing slowly The printer is receiving data.
flashing rapidly An operating error has occurred:
Paper out condition.
Solution: Load paper (see “Loading paper ... ”intheInstallation Guide) and press
PAPER.
Paper jam condition.
Solution: Remove thejammed page(see thespecific topic in the on-line documentation
loaded when you installed the printer driver).
Print head insertion/replacement operation.
You have moved the print head carriage to the head loading position (using the button
sequence on the operator panel or the ”Change” button in the Printer Monitor).
Solution: Return the print head carriage immediately to its rest position, repeating the
button sequence, or replace the print head (see specific section in More about print
heads).
flashing very rapidly Failure condition.
Switch off the printer and disconnect it from the electrical power supply. Make sure that
the print head carriage and paper feed paths are not obstructed and then reconnect
and switch on the printer.
If the light indicator continues flashing rapidly, disconnect the printer and call the
technical support service or your dealer.
flashing with specific
variable sequence
One of the service functions (see previous table - “Buttons - special functions”).
6 User guide
Page 7
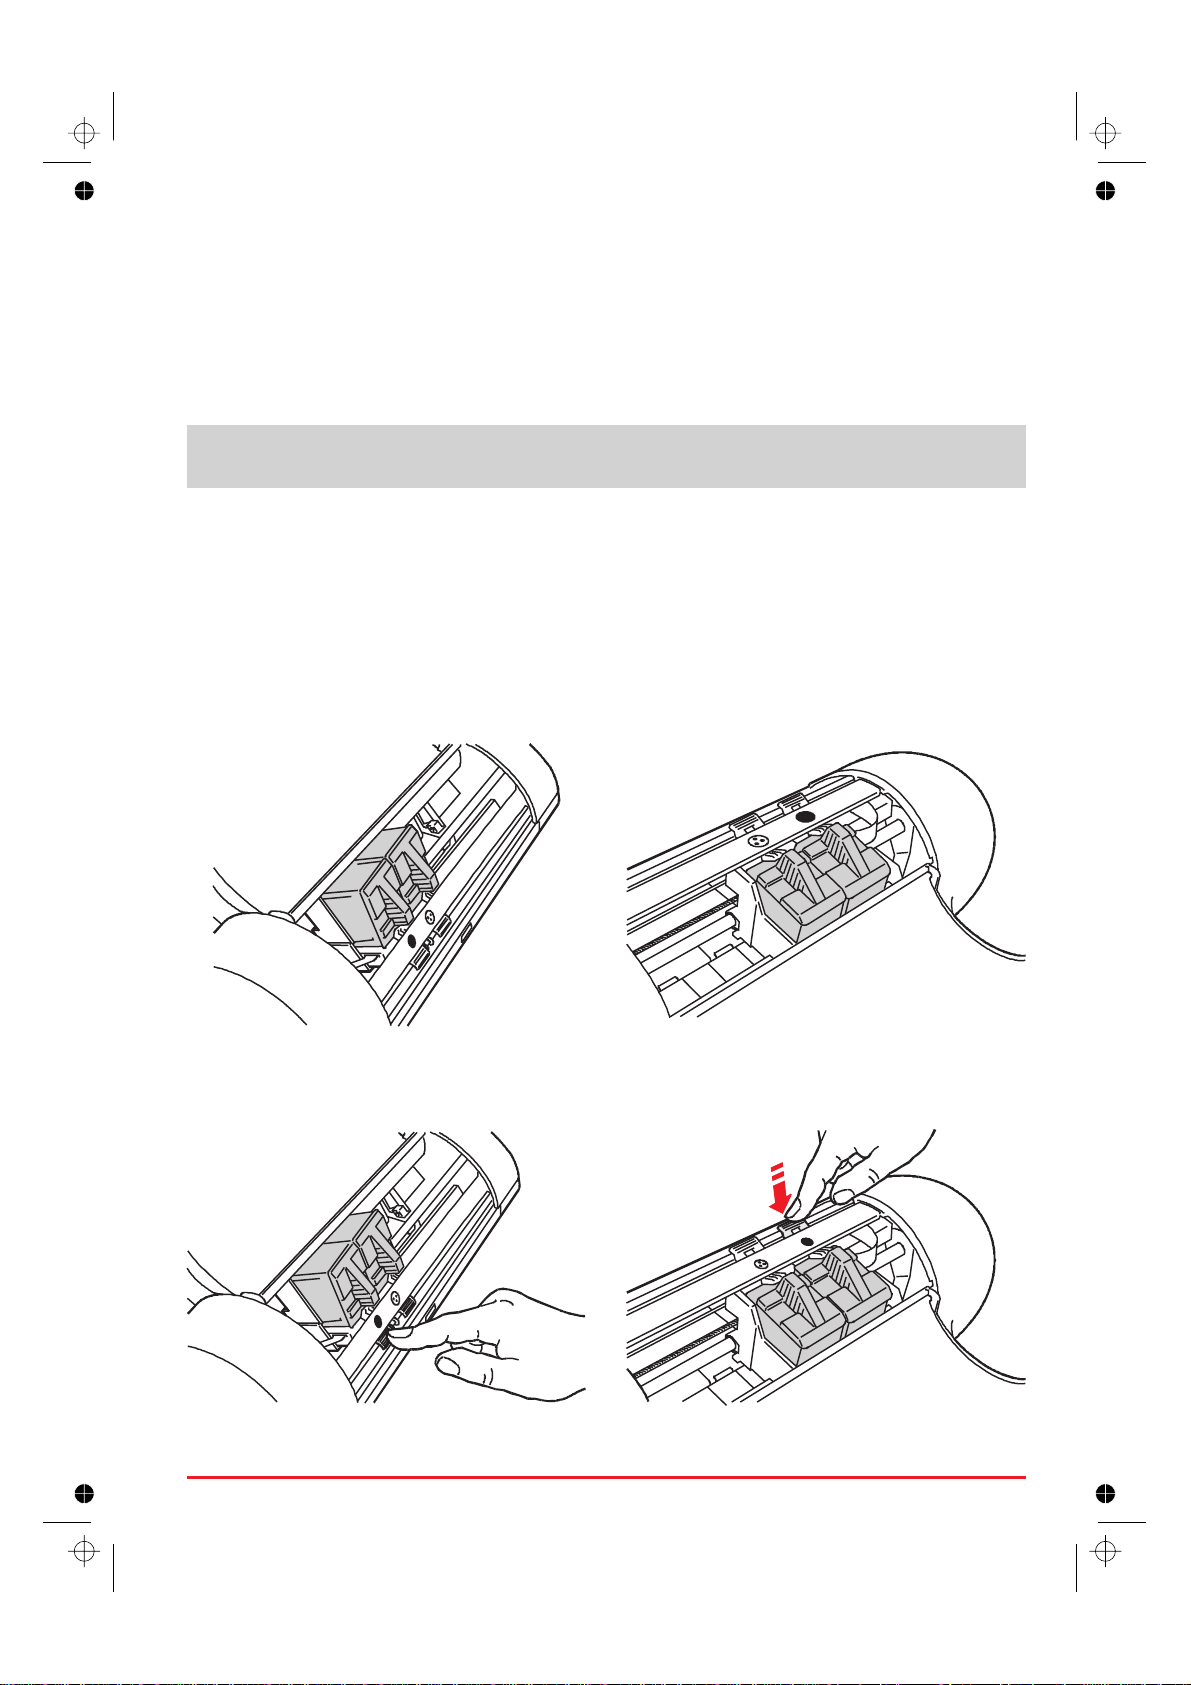
More about print heads
Replacing print heads
You should remove a print head from the printer ONLY to replace it or to repeat its insertion in the case
of faulty printing.
In the description of the operator tasks in this section, the illustrations on the left refer to the
vertical printer position, those on the right, to the horizontal position.
1. With the printer idle (in standby),
(a) open the Printer Care tab in the Printer Monitor and click on the Change button,
or
(b) press and hold the “Power” button on the operator panel and press “Paper” once; release the two
buttons together.
2. Open the top cover: the print head carriage will be in the head loading position.
3. Press the print head release lever to release either:
(a) the black print head, or
User guide 7
Page 8

(b) the colour print head.
4. Pulling upwards by the thumb and finger grip:
(a) remove the black print head,
(b) remove the colour print head.
5. Insert a new print head of the SAME type (black/colour) and close the printer cover.
6. Click on the appropriate New Head buttoninthePrinter Care tab in the Printer Monitor and then
run the Align function in the same tab.
8 User guide
Page 9

Print head care and precautions
If you have problems inserting the print head:
Make sure the print head carriage is in the print head loading position.
•
Check that the print head/chamber is clean and free of foreign bodies.
•
NEVER force the print head into the chamber; always remove it completely and repeat the entire
•
insertion operation.
If the quality of printing is not optimum, do the “Clean” operation.
Always keep the print heads sealed in their containers until they are to be used.
•
Remember to remove the protective tape before inserting the print head in the printer.
•
Take care not to get ink on your clothes; the ink in the print head stains.
•
Do NOT attempt to refill the print head with ink, as this damages the print head and the printer.
•
DO NOT shake the print head; it is not a fountain pen. If it does not print, do the cleaning operations
•
described in “Cleaning the print head ”.
Switching off your printer before your computer will guarantee that the print head carriage is in
its rest position. When the printer is powered, the print head carriage will automatically return
to its rest position and go into standby mode after approximately two minutes of inactivity.
User guide 9
Page 10

Cleaning the print heads
The print heads are cleaned automatically at regular intervals while the printer is powered. This
operation clears the print head nozzles, guaranteeing the ink flow. If you have a problem with the
printing quality that is not solved by this automatic nozzle clearing operation, you can do the same
operation, using the “CLEAN” function in the Printer Care tab in Printer Monitor.
If you have a problem with the printing quality that is not solved by the “CLEAN” feature, run a Print Test
and then proceed as follows:
1. Clean the electrical contacts
(a) Press the “Change” button in the Printer Care tab in the Printer Monitor.
(b) Open the printer cover; release and remove the print head that is causing the problem.
(c) Clean the electrical contacts (gold part) on the print headand in the housing on the print headcarriage
with a slightly damp lint-free cloth, taking care not to touch the print head nozzles.
(d) Re-insert the print head in the printer and close the printer cover.
(e) Repeat the print test.
10 User guide
Page 11

2. Clean the print nozzles
This operation MUST NOT be repeated systematically, as it will damage the print head. It should
ONLY be attempted as a last resort, before changing the print head.
(a) Dampen a tissue handkerchief with distilled water; squeeze it slightly to remove any excess water.
(b) Press the “Change” button in the Printer Care tab in the Printer Monitor.
(c) Open the printer cover; release and remove the print head that is causing the problem.
(d) Holding the print head with the nozzles facing downwards, blot it against the handkerchief, pressing
lightly.
(e) Repeat the blotting operation a few times on different areas of the handkerchief, to clean the nozzles.
(f) Reinsert the print head in the printer and close the printer cover.
(g) Print the “demo” page to check the quality of printing.
User guide 11
Page 12

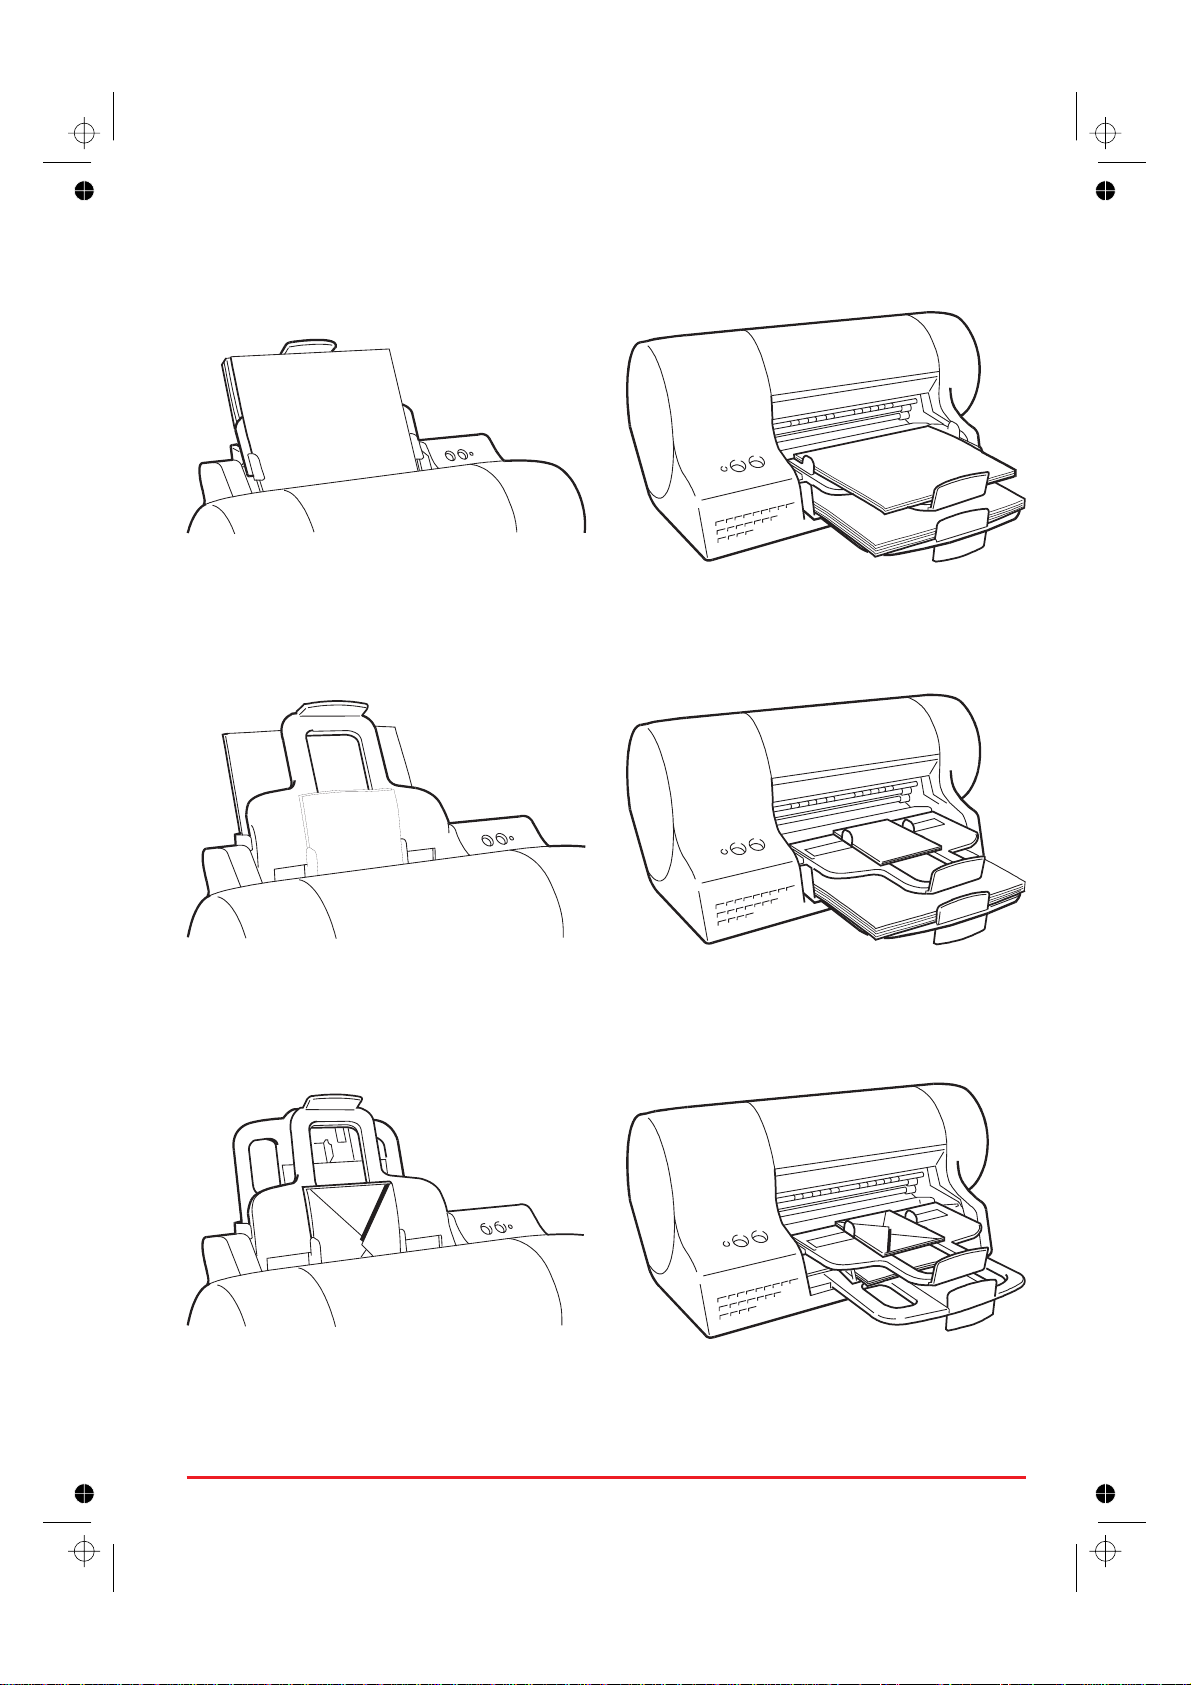
More about paper and special printing media
In the description of the operator tasks in this section, the illustrations on the left refer to the
vertical printer position, those on the right to the horizontal printer position.
You can insert up to 150 sheets of any plain paper format in the main automatic feeder, up to 10 sheets
at a time in the second automatic feeder or one sheet at a time through the manual feeder. The priority
of paper insertion is determined automatically by the printer: a single sheet in the manual feeder will
always have first priority over paper in the second and main automatic feeders, in this order.
When loading paper in the main automatic feeder, do NOT exceed the maximum level indicated
on the inside of the feeder.
When inserting paper, make sure that the printing surface is facing towards the paper tray if you
are using the main and/or second automatic feeders and facing upwards/towards you, if you are
using the manual feeder.
Standard size sheets in the main feeder (A4, Letter, Legal, Executive, ALL user-defined formats).
•
The paper loading procedure for these formats isdescribed in “Load paper”intheInstallation Guide.
Envelopes or small formats in the main feeder:
•
(a) Open the rear guide for small formats on the paper tray.
(To simplify this operation, empty and remove the output tray)
(b) Insert the envelopes/paper in the feeder, with the shorter side as the leading edge.
The paper loading procedure for these formats is described in “Loading small formats from the main
feeder”intheInstallation Guide.
12 User guide
Page 13

Banners (only from the main sheet feeder)
•
(To simplify this operation, empty and remove the output tray.)
Place the banner as a single pack in the main feeder and close the adjustable guides against the
paper edges, making sure that it is not held too tightly nor has too much play.
The leading edge must be facing into the printer, the first page must be on the top of the pack and
the printing surface must be facing towards the paper tray.
For further details, see “Loading a banner”intheInstallation Guide.
User guide 13
Page 14

Standard size pages in the second feeder.
•
The paper loading procedure for these formats is described in “Loading paper/envelopes from the
second feeder”intheInstallation Guide.
Envelopes or small formats in the second feeder.
•
The paper loading procedure for these formats is described in “Loading paper/envelopes from the
second feeder”intheInstallation Guide.
14 User guide
Page 15
Standard size pages in both the main feeder and the second feeder.
•
Standard size pages in the main feeder,andenvelopes or small formats in the second feeder.
•
Envelopes or small formats in both the main feeder and the second feeder.
•
User guide 15
Page 16
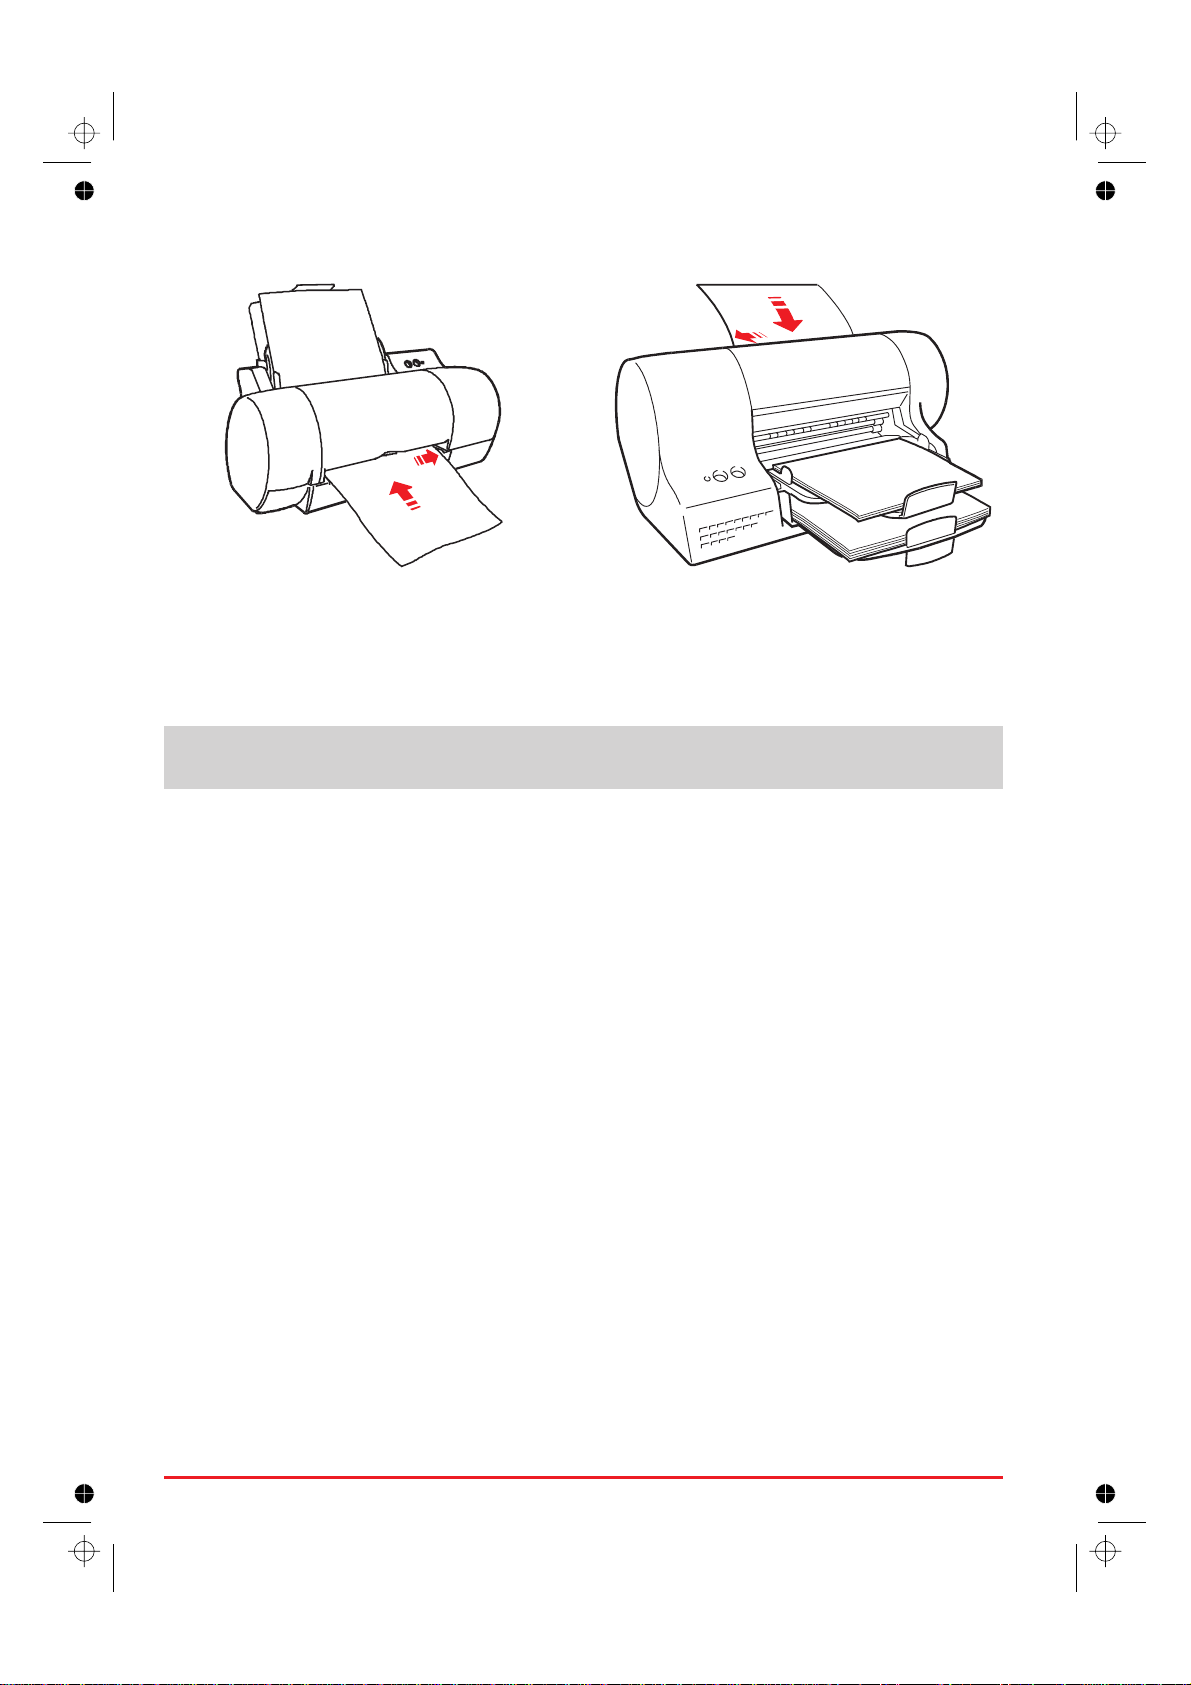
Manual single sheet feeder
•
– When the printer is vertical, align the sheet of paper with the right hand guide. The printingsurface
should be facing upwards.
– When the printer is horizontal, align the sheet of paper with the left hand guide. The printing
surface should be facing towards you.
Make sure the leading edge of the paper is against the feed rollers along its entire width - you
will hear a beep.
16 User guide
Page 17

Printing media
Paper sizes
Format Size Top Margin Bottom Margin Left Margin Right Margin
Single Sheets
A4 size 8.27 x 11.7 in
210 x 297 mm
A5 size 5.85 x 8.27 in
148.5 x 210 mm
U.S. letter 8.5 x 11 in
216 x 279 mm
U.S. legal 8.5 x 14 in
216 x 356 mm
U.S. Executive 7.25 x 10.5 in
184 x 267 mm
U.S. Folio 8.5 x 13 in
215.9 x 330.2 mm
U.S. Statement 5.5 x 8.5 in
139.7 x 215.9 mm
B5 size 7.2x10.1 in.
182 x 256 mm
Note Cards
U.S. cards. 4x6 4 x 6 in
102 x 152 mm
0.04 inch
1.00 mm
0.04 inch
1.00 mm
0.04 inch
1.00 mm
0.04 inch
1.00 mm
0.04 inch
1.00 mm
0.04 inch
1.00 mm
0.04 inch
1.00 mm
0.04 inch
1.00 mm
0.04 inch
1.00 mm
0.71 inch
18.00 mm
0.71 inch
18.00 mm
0.71 inch
18.00 mm
0.71 inch
18.00 mm
0.71 inch
18.00 mm
0.71 inch
18.00 mm
0.71 inch
18.00 mm
0.71 inch
18.00 mm
0.71 inch
18.00 mm
0.13 inch
3.30 mm
0.13 inch
3.30 mm
0.25 inch
6.35 mm
0.25 inch
6.35 mm
0.13 inch
3.30 mm
0.13 inch
3.30 mm
0.13 inch
3.30 mm
0.167 inch
4.2 mm
0.13 inch
3.30 mm
0.13 inch
3.30 mm
0.13 inch
3.30 mm
0.25 inch
6.35 mm
0.25 inch
6.35 mm
0.13 inch
3.30 mm
0.13 inch
3.30 mm
0.13 inch
3.30 mm
0.167 inch
4.2 mm
0.13 inch
3.30 mm
U.S. cards 5x8 5 x 8 in
127 x 203 mm
A6 cards 4.1 x 5.83 in
105 x 149 mm
Envelopes
U.S. # 10 4.1 x 8.88 in
105 x 225 mm
C5 6.38 x 9.0 in
162.0 x 228.8 mm
DL 4.33 x 8.66 in
110 x 220 mm
User guide 17
0.04 inch
1.00 mm
0.04 inch
1.00 mm
0.04 inch
1.00 mm
0.04 inch
1.00 mm
0.04 inch
1.00 mm
0.71 inch
18.00 mm
0.71 inch
18.00 mm
0.71 inch
18.00 mm
0.71 inch
18.00 mm
0.71 inch
18.00 mm
0.13 inch
3.30 mm
0.13 inch
3.30 mm
0.04 inch
1.00 mm
0.04 inch
1.00 mm
0.04 inch
1.00 mm
0.13 inch
3.30 mm
0.13 inch
3.30 mm
0.04 inch
1.00 mm
0.04 inch
1.00 mm
0.04 inch
1.00 mm
Page 18
Format Size Top Margin Bottom Margin Left Margin Right Margin
C6 4.46 x 6.37 in
114 x 162 mm
B6 4.92 x 6.93 in
125 x 176 mm
B5 Envelope 6.93 x 9.84 in
176 x 250 mm
Monarch 3.875 x 7.50 in
98.43 x 190 mm
User-defined
Minimum 3.875 x 5.85 in
98.43 x 148.5 mm
Maximum 8.5 x 14 in
215.9 x 355.6 mm
0.04 inch
1.00 mm
0.04 inch
1.00 mm
0.04 inch
1.00 mm
0.04 inch
1.00 mm
0.04 inch
1.00 mm
0.04 inch
1.00 mm
0.71 inch
18.00 mm
0.71 inch
18.00 mm
0.71 inch
18.00 mm
0.71 inch
18.00 mm
0.71 inch
18.00 mm
0.71 inch
18.00 mm
0.04 inch
1.00 mm
0.04 inch
1.00 mm
0.04 inch
1.00 mm
0.04 inch
1.00 mm
0.25 inch
6.35 mm
0.25 inch
6.35 mm
0.04 inch
1.00 mm
0.04 inch
1.00 mm
0.04 inch
1.00 mm
0.04 inch
1.00 mm
0.25 inch
6.35 mm
0.25 inch
6.35 mm
18 User guide
Page 19

Paper types
q Envelopes
2
You can insert 80 g/m
the second feeder. You MUST use the intermediate rear guide if you use the main feeder. The
envelopes must inserted with their short side as the leading edge, the printing side face down and the
sealing flap to the right (printer vertical) or to the left (printer horizontal). Remember to select a
landscape font for printing (in Windows® environment, you will require a TrueType font).
q Special printing media
For all types of special media, always read the instructions included with the media pack.
For optimum printing quality, you should always use the printing media specifically indicated
by the manufacturer for your printer (see Supplies for recommended media types). Use of
non-recommended printing media may result in incorrect paper feed, making it necessary to
feed the documents individually, after selecting manual feeder in the printer driver.
Coated paper
•
This type of paper has a very smooth finish on the side to be used for printing. You can insert it
either in packs of up to 50 sheets in the main feeder or 10 at a time in the second feeder.
envelopes either in packs of up to 25 in the main feeder or 3 at a time through
Glossy paper
•
This type of paper has a glossy coating, and is similar to that used used in the photo- graphic industry.
You can insert it either in packs of up to 25 in the main feeder or 5 at a time in the second feeder.
Photographic paper
•
This type of paper has a sophisticated glossy coating, and gives a professional finish to your print
job. You can insert it either in packs of up to 25 in the main feeder or 5 at a time in the second feeder.
Transparencies
•
Always use those specifically indicated for ink jet printers; they are designed to absorb the ink
correctly. You can insert them either in packs of up to 50 in the main feeder or 5 at a time in the
second feeder.
T-shirt transfers
•
Always use those specifically indicated for ink jet printers; they are designed to absorb the ink
correctly. You can insert them 5 at a time either in the main or second feeder.
q Note cards
Your printer can handle two types of note cards: plain paper and photographic paper. You can insert
plain paper cards either in packs of up to 50 in the main feeder and 5 at a time in the second feeder.
You can insert photographic paper cards in packs of up to 25 in the main feeder and 5 at a time in the
second feeder. You MUST use the intermediate rear guide if you use the main feeder.
User guide 19
Page 20

Paper weights
min. max.
Single sheets
Accepted paper weight:
Recommended paper weight:
Envelope
Accepted envelope weight:
Recommended envelope weight:
Note card
Accepted note card weight:
Recommended note card weight:
Banner
Accepted banner weight:
Recommended banner weight:
Transparencies
Accepted film thickness:
Recommended film thickness:
g/m
60
70
60
70
100
100
70
80
2
90 µm
100 µm
lbs g/m
16
19
16
19
27
27
19
21
150
90
90
80
150
135
120
100
2
125 µm
120 µm
lbs
40
24
24
21
40
36
33
27
20 User guide
Page 21

Driver settings
Always make sure that you have selected in your printer driver the Paper Source, Paper Type and
Paper Format features that correspond to the feeder and the type of printing media you intend to use.
In particular, the colour calibration in the driver is set specifically for each of the different types of media
handled, so an incorrect setting will result in unsatisfactory print-out quality.
You access the driver settings by clicking on Start, highlighting Settings, clicking Printers and then
right clicking your printer icon and then Properties.
Precautions
Sub-standard paper can affect the quality of printing.
•
Make sure the paper feeds smoothly, and that it is not held too tightly nor has too much play.
•
The sheet of paper/envelope must not be curled, crumpled or torn, otherwise it may jam or even not
•
be inserted. Always use paper in perfect condition and within the specifications defined.
Printing on both sides of the paper may increase the risk of misfeeds or paper jams and may cause
•
smudging.
If you remove the paper from or add paper to the main feeder, you MUST repeat the entire paper
•
loading operation.
When using user-defined/non-standard size formats, remember to select the appropriate paper type
•
in your printer driver (see the On-Line Documentation loaded with your printer driver).
When using user-defined/non-standard size formats, remember to select the appropriate paper type
•
in your printer driver (see the On-Line Documentation loaded with your printer driver).
For all types of special printing media, always read the instructions included with the media pack.
•
Remember that heavily printed pages tend to curl and thus not stack correctly. They also tend
to stain the rear of the page stacked over them, as they require longer to dry. You can either
select the specific option in the Printer Monitor (”Activate Dry Delay Time”) or remove these
pages as soon as they are expelled from the printer and leave them to dry singly before handling
them.
User guide 21
Page 22

Supplies
To guarantee the correct functioning of your printer and optimun print quality, you should always use
manufacturer original supplies.
Print heads
Disposable black print cartridge B0217 G
Disposable high-quality three-colour print cartridge B0218 R
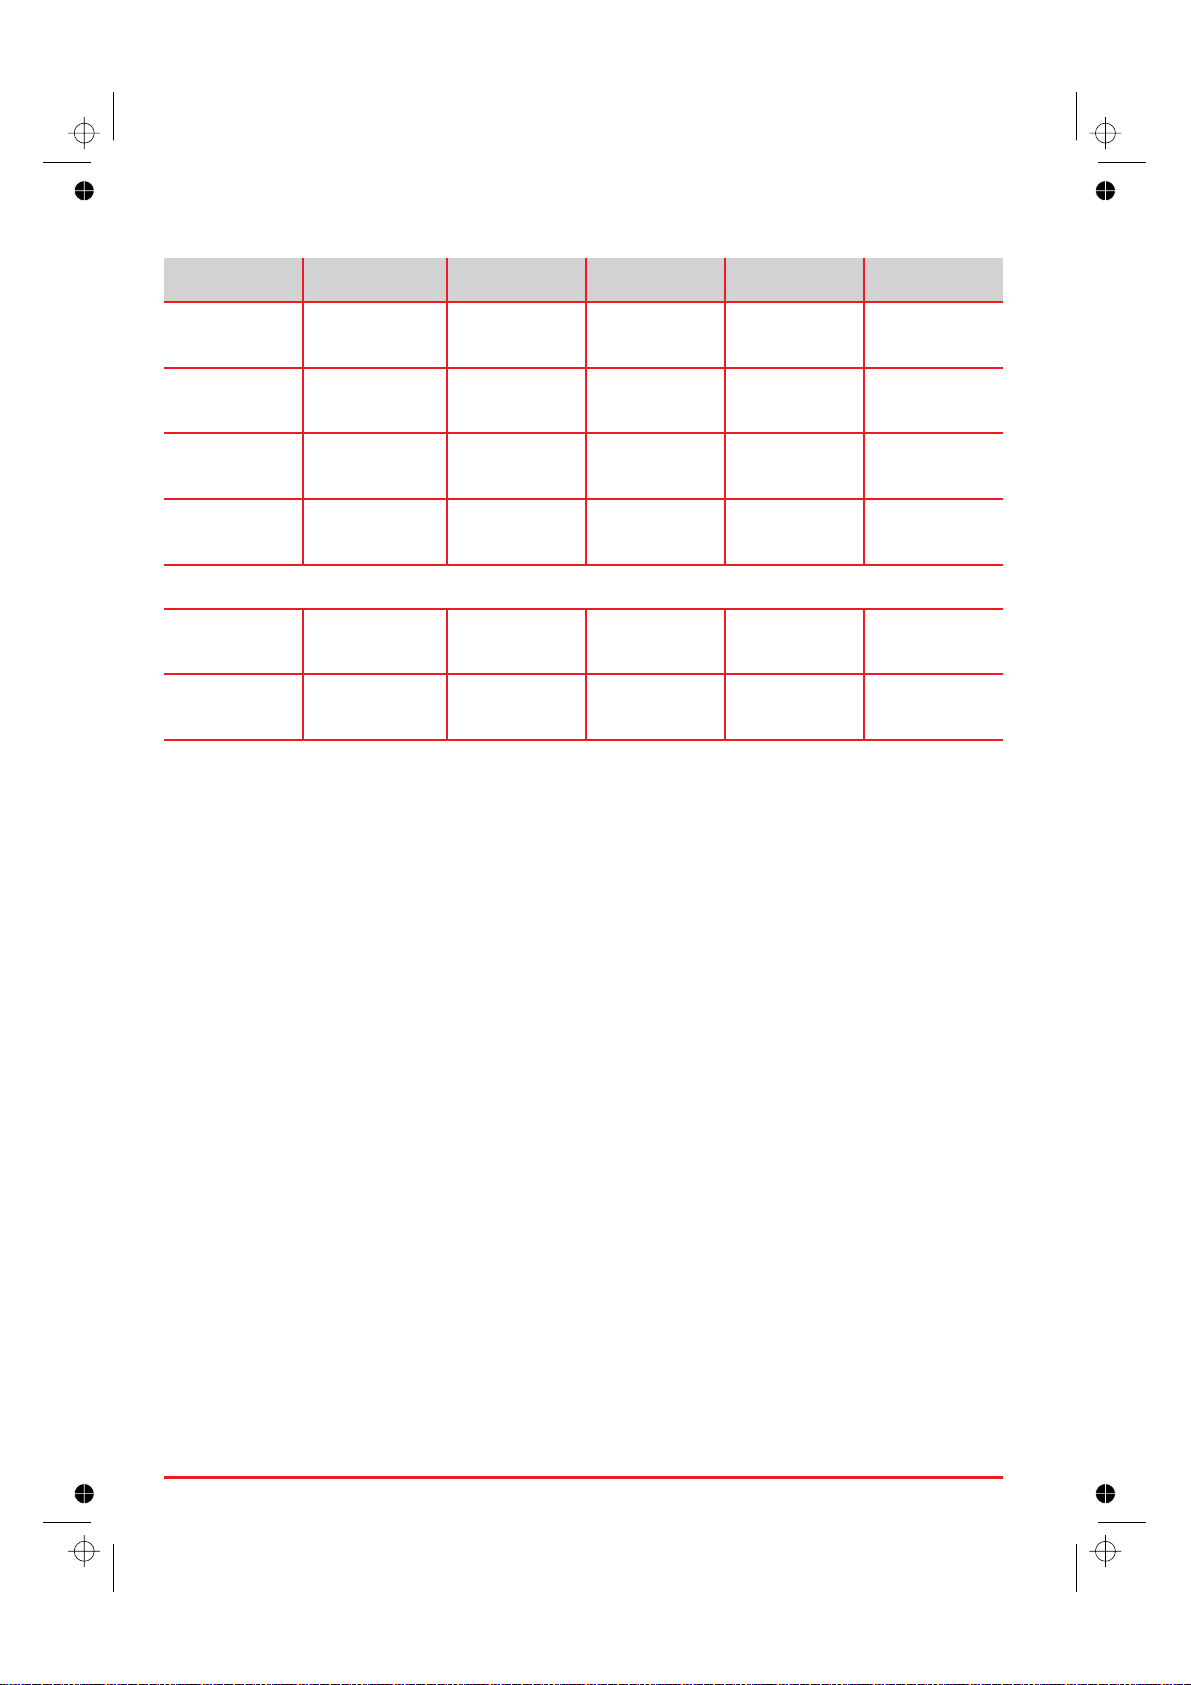
Printing media
Description Format Contents
Plain paper A4 500 sheets
Coated paper A4 100 sheets
Glossy paper A4 20 sheets
Photo glossy paper A4 20 sheets
Transparency film A4 20 sheets
T-shirt transfers A4 5 sheets
22 User guide
 Loading...