

Page 1

Color profile: Disabled
Composite Default screen
Artjet 20
Thank you for purchasing this unique dual position printer which allows you to personalise the
organisation of your working environment.
English
Vertical operating position Horizontal operating position
This manual describes how to install your printer and prepare it for use. Follow the instructions in the
installation procedure in the order they are presented.
You willfind f ur th er information about the printer features andfunctions in the On-Line Help that
is loaded when you install the dr ive r contained on the CD supplied with the p rint er
.
english.chp
Tue Feb 02 10:03:40 1999
Page 2
Color profile: Disabled
Composite Default screen
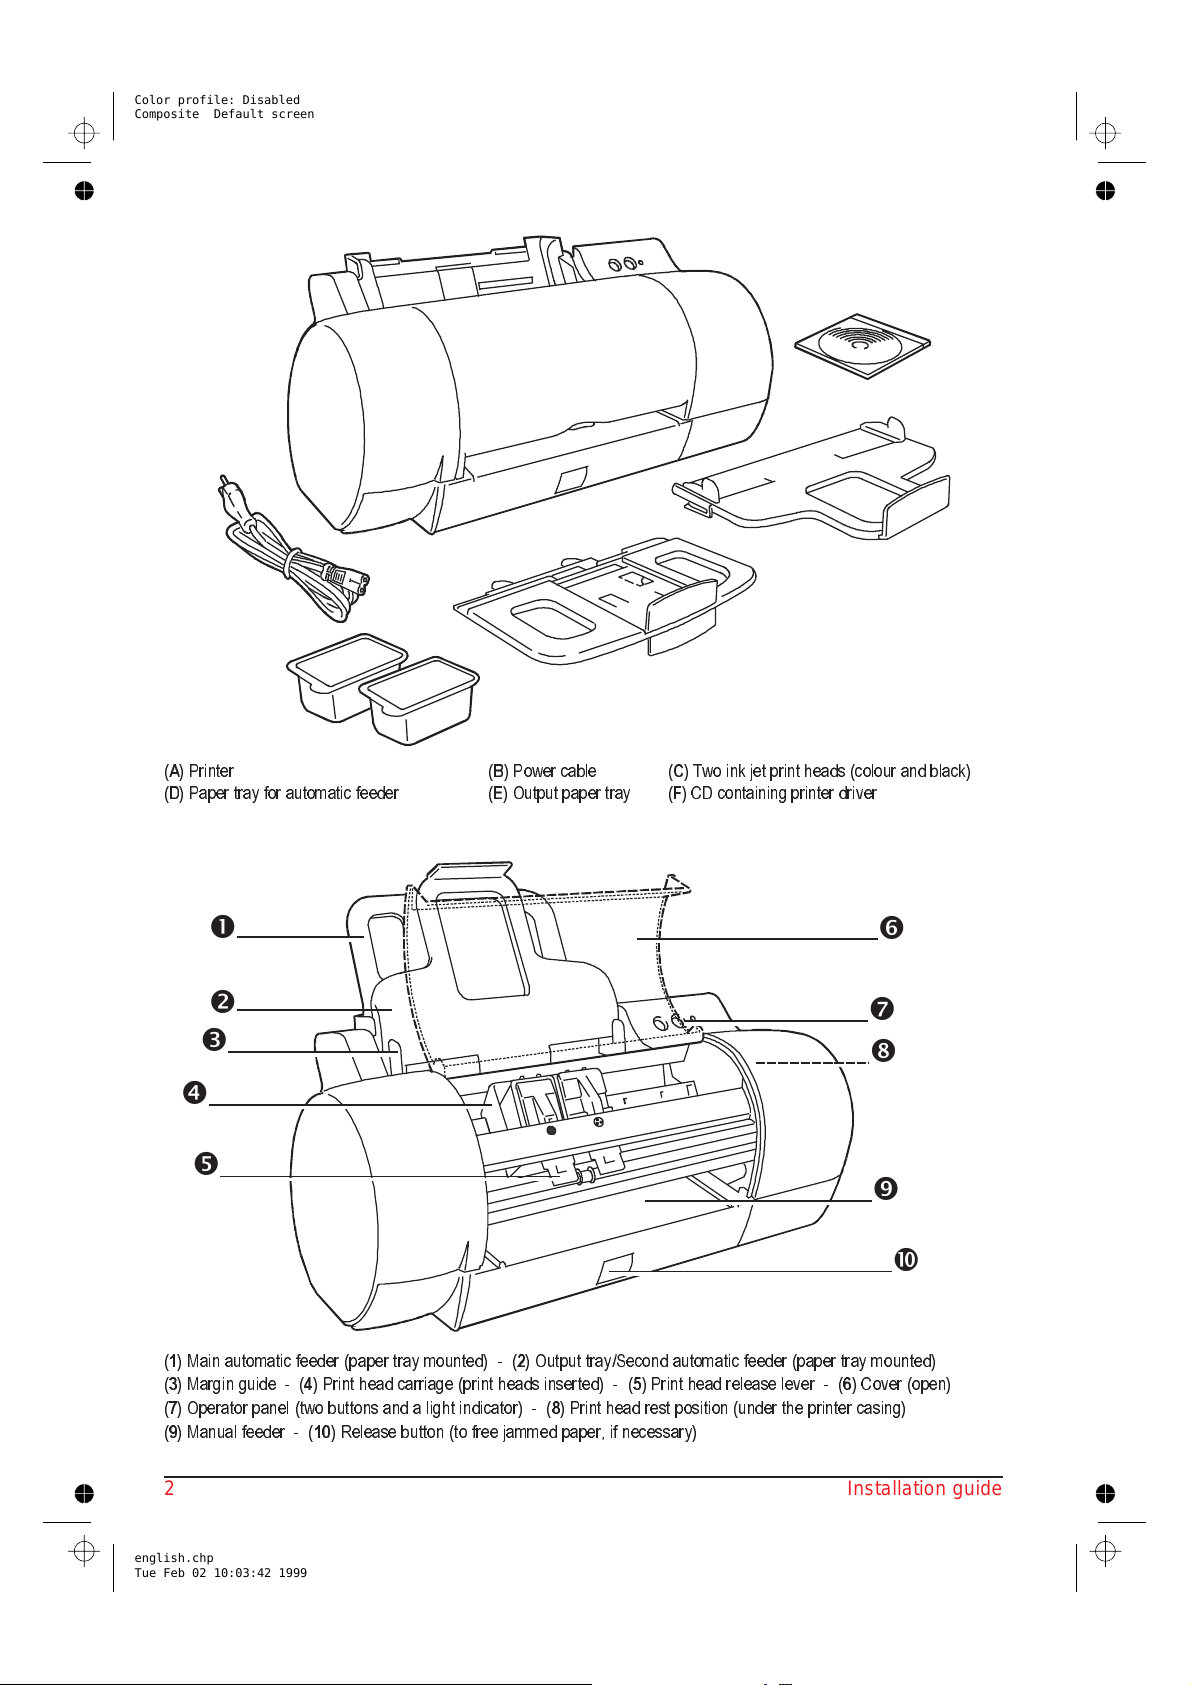
Carton contents
A
B
F
E
C
D
(A)Printer (B) Power cable (C) Two ink jet print heads (colour and black)
(D) Paper tray for automatic feeder (E) Output paper tray (F) CD containing printer driver
Presentation
(1) Main automatic feeder (paper tray mounted) - (2) Output tray/Second automatic feeder (paper tray mounted)
(3) Margin guide - (4) Print head carriage (print heads inserted) - (5) Print head release lever - (6) Cover (open)
(7) Operator panel (two buttons and a light indicator) - (8) Print head rest position (under the printer casing)
(9) Manual feeder - (10) Release button (to free jammed paper, if necessary)
2 Installation guide
english.chp
Tue Feb 02 10:03:42 1999
Page 3
Color profile: Disabled
Composite Default screen
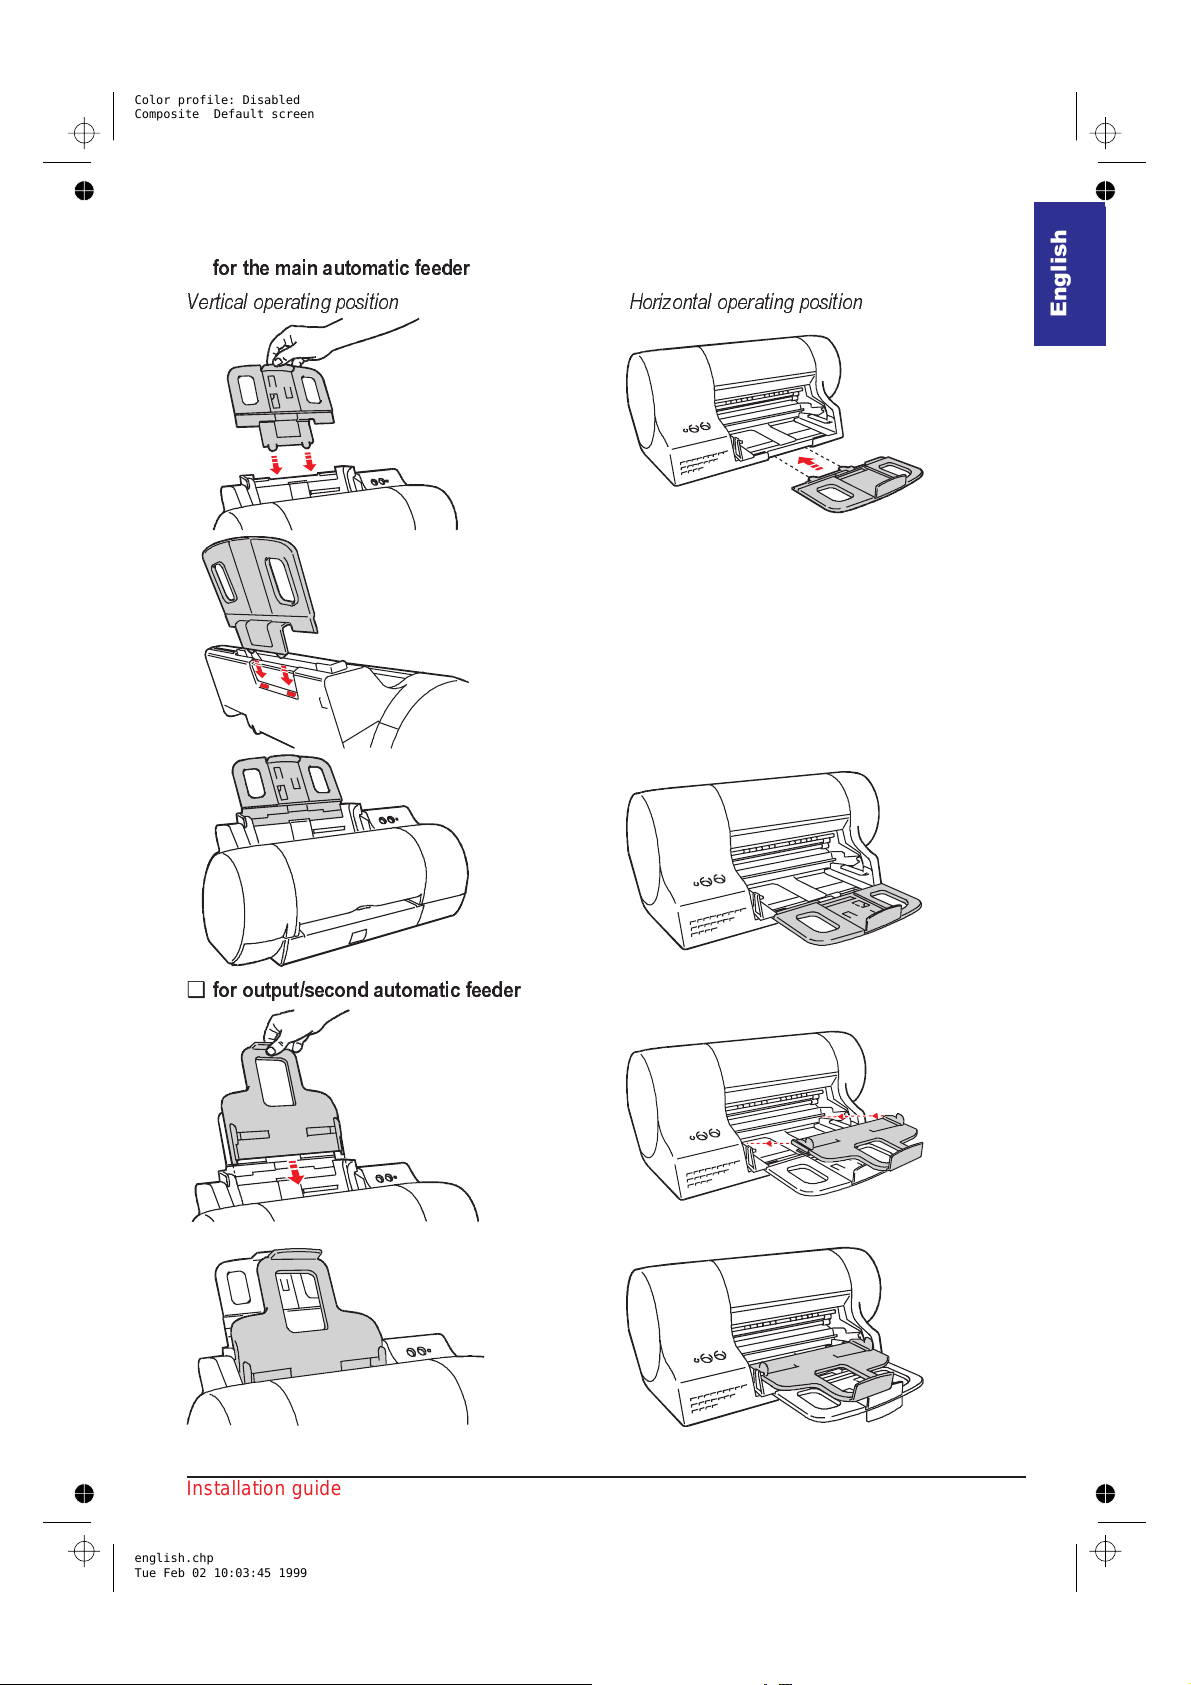
Mount the paper trays
❑
for the main automatic feeder
Vertical operating position Horizontal operating position
English
❑
for output/second automatic feeder
Installation guide 3
english.chp
Tue Feb 02 10:03:45 1999
Page 4
Color profile: Disabled
Composite Default screen
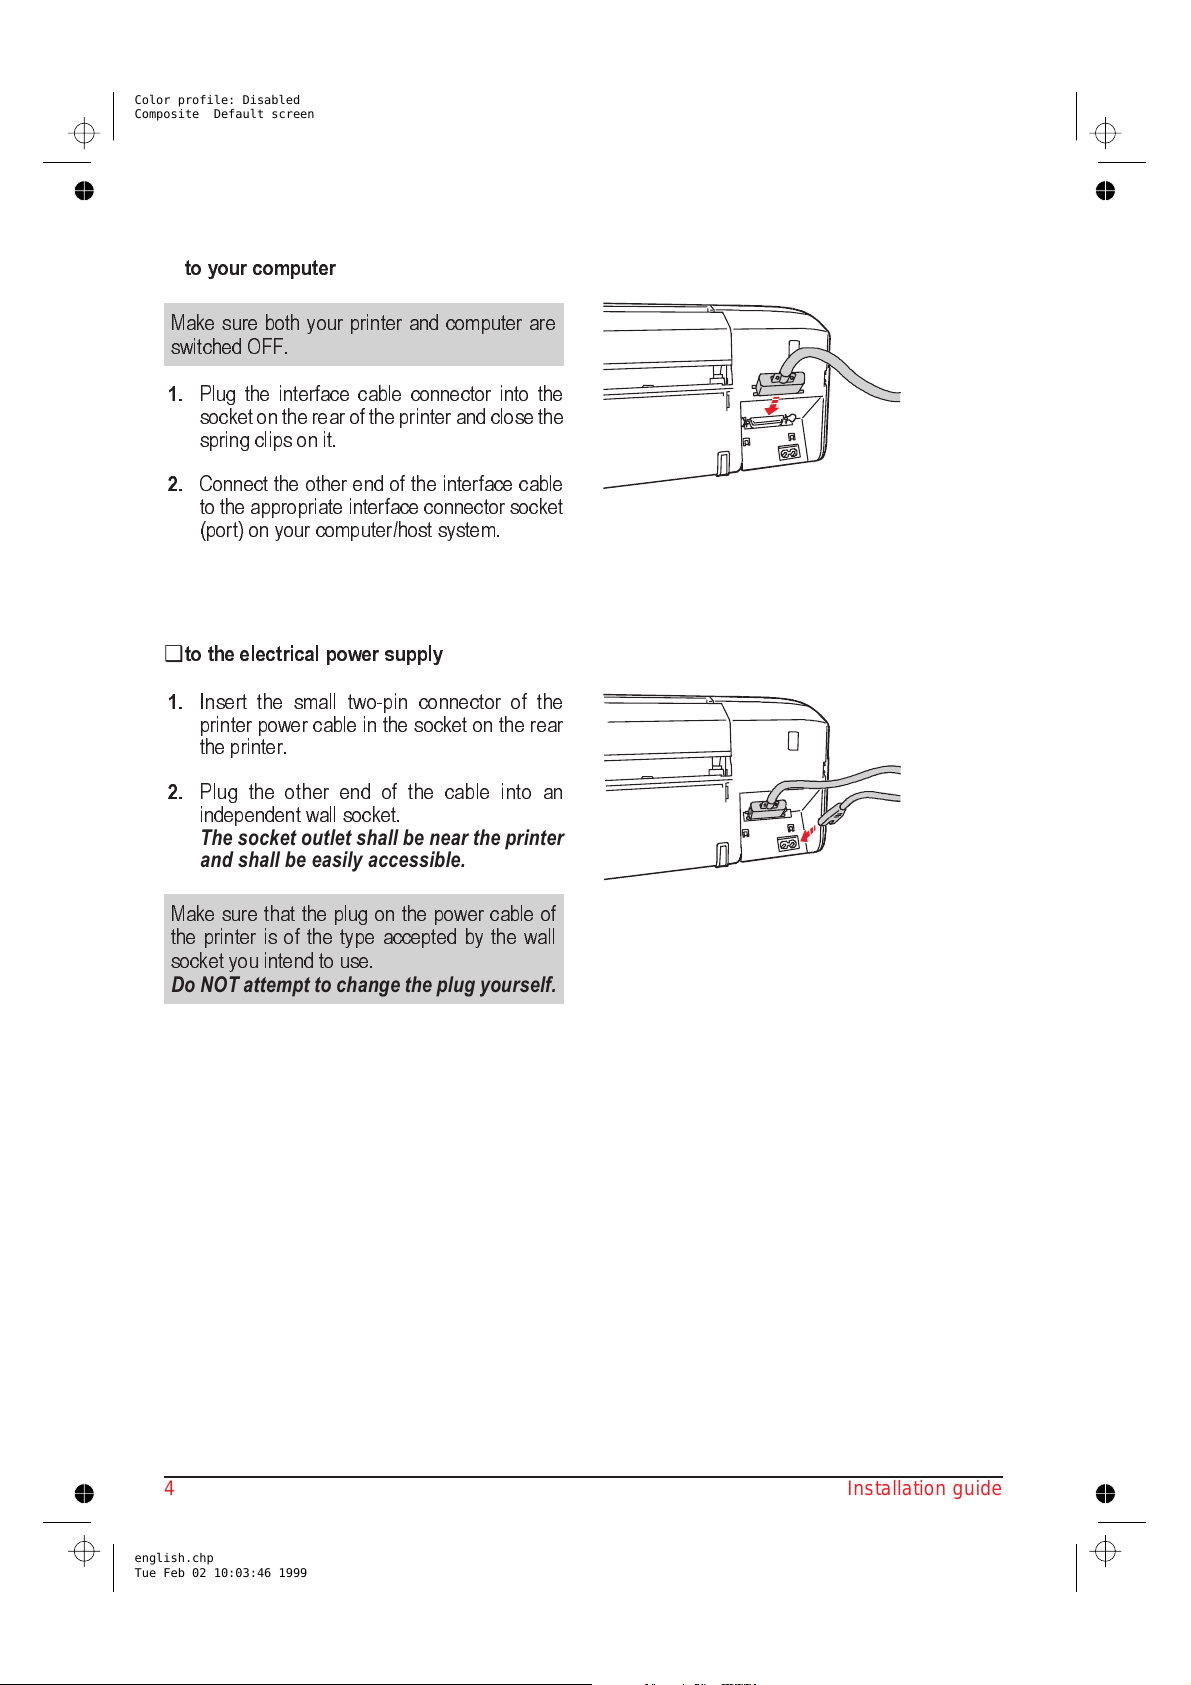
Connect the printer
❑
to your computer
Make sure both your printer and computer are
switched OFF.
1.
Plug the interface cable connector into the
socket on the rear of the printer and closethe
spring clips on it.
2.
Connect the other end of the interface cable
to the appropriate interface connector socket
(port) on your computer/host system.
❑
to the electrical power supply
1.
Insert the small two-pin connector of the
printer power cable in the sock et on the rear
the printer.
2.
Plug the o ther end of the c able into an
independent wall socket.
The socket outlet shall be near the printer
and shall be easily accessible.
Make sure that the plug on the power cable of
the printer is of the type accepted by the wall
socket you intend to use.
Do NOT attempt to change the plug yourself.
4 Installation guide
english.chp
Tue Feb 02 10:03:46 1999
Page 5
Color profile: Disabled
Composite Default screen
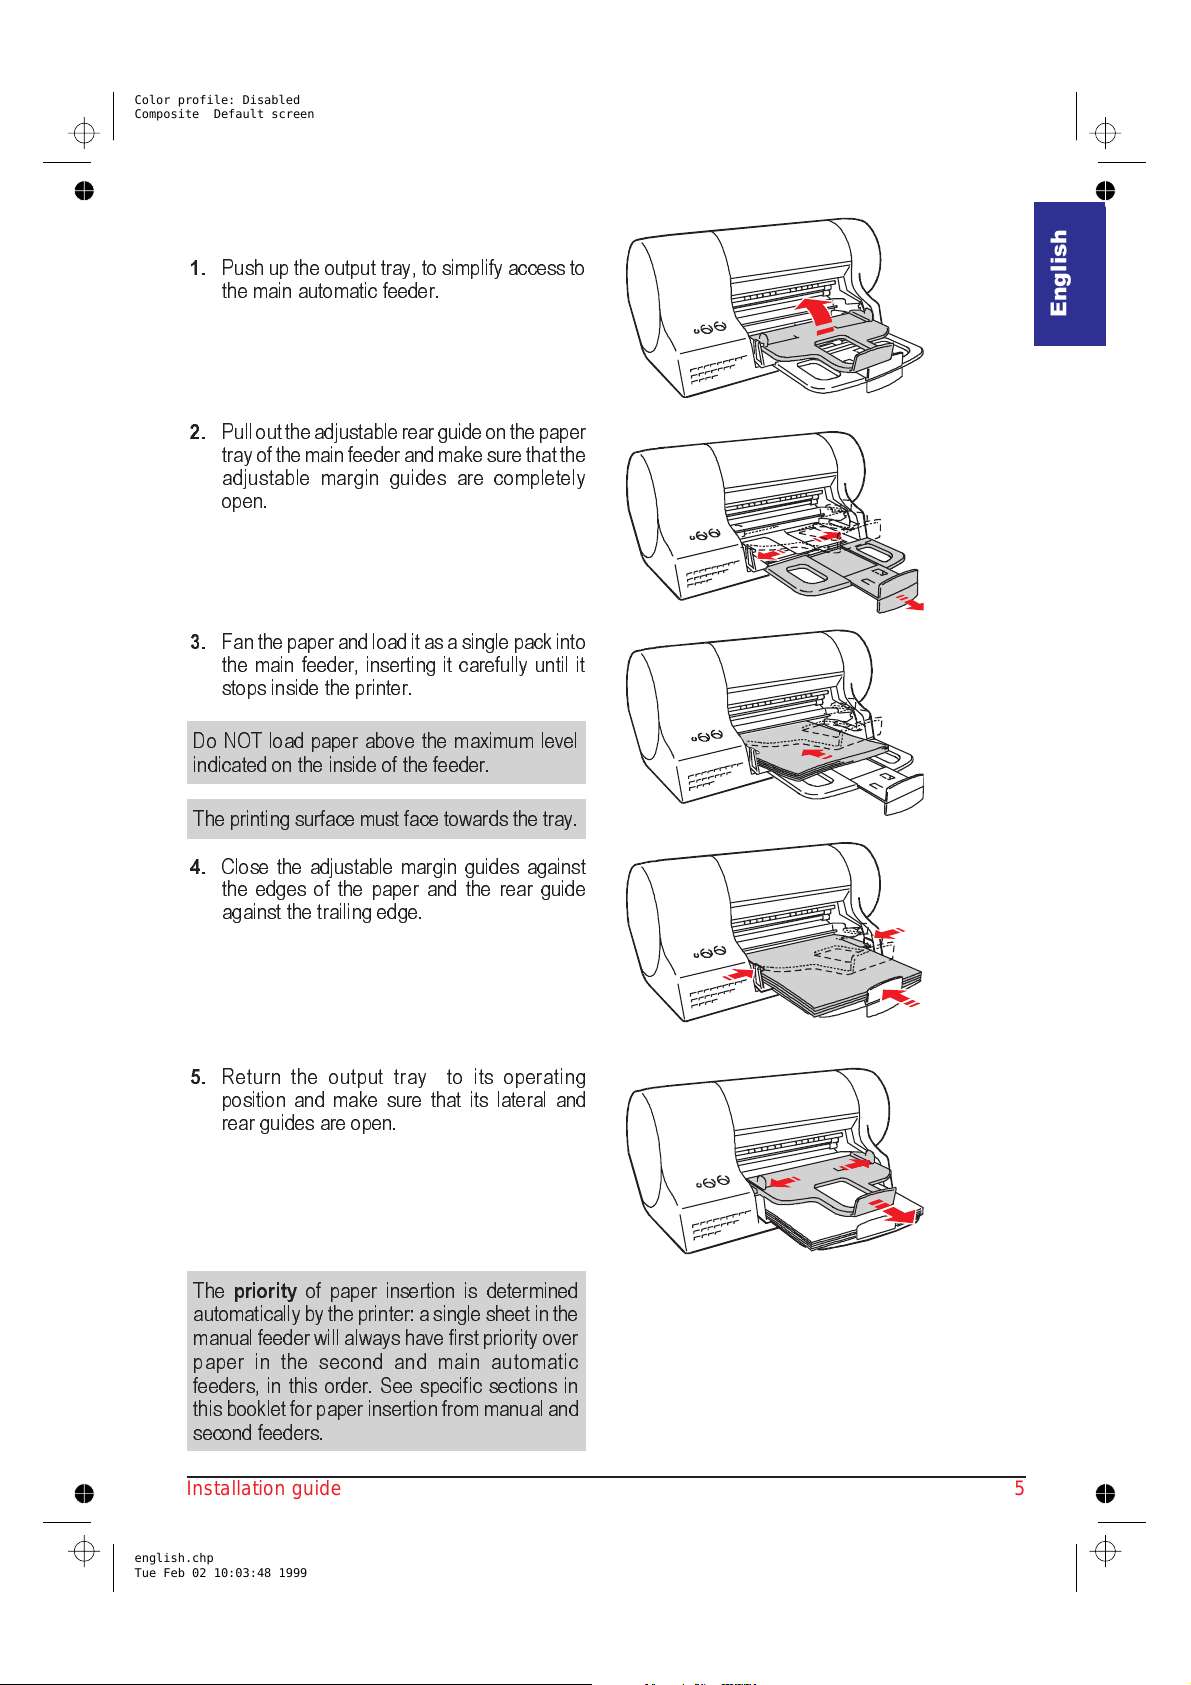
Load paper
1.
Push up the output tray, to simplify access to
the main automatic feeder.
2.
Pullouttheadjustablerear guideon the paper
trayof the main feeder and makesurethatthe
adjustable ma rgin guides are completely
open.
3.
Fan the paper andload it as asingle pack into
the main feeder, inserting it carefully until it
stops inside the printer.
English
Do NOT load paper above the maximum level
indicated on the inside of the feeder.
The printingsurface must face towards thetray.
4.
Close the adjustable margin guides against
the edges of the paper and the rear guide
against the trailing edge.
5.
Return the output tray to its operating
position and make sure that its lateral and
rear guides are open.
The
priority
of paper insertion is determined
automaticallyby the printer:a singlesheet in the
manual feeder will always havefirst priority over
paper in the second and main automatic
feeders, in this order. See specific sections in
this booklet for paper insertion from manual and
second feeders.
Installation guide 5
english.chp
Tue Feb 02 10:03:48 1999
Page 6

Color profile: Disabled
Composite Default screen
Insert the print heads
1.
Press the
printer operator panel to switch on theprinter
and open the printer cover; the print head
carriage will be in the head loading position
and the light indicator will be flashing.
2.
Open the
the print head, holding it by the thumb and
finger grip, and remove the protective film.
Do not touch either the electrical contacts
(
- gold-coloured part) or the printing
nozzles (
3.
Insert the print head in the seat on the print
head car riage indicated by the single
engraved dot so that its electrical contacts
(
) match the corresponding contactsin the
seat.
POWER
black
) nor sit the print head on them.
button ( ) on the
print head container, remove
4.
Block the print head, pushing it towards the
release lever until it clicks into place.
Repeat the above operation for the
colour
print head.
5.
When you have inserted both print heads,
close the printer cover, then press and hold
(1) and press (2); release the two but-
tons together.
The print head carriage returnsto its rest position
and the printer runs an initialisation cycle that
takes some time (the light indicator continues
flashing until the cycle is completed).
Remember to run the print head alignment
function BEFORE starting any print jobs.
21
6 Installation guide
english.chp
Tue Feb 02 10:03:51 1999
Page 7

Color profile: Disabled
Composite Default screen
Install the printer software
Switch on
themessage
onyourPCscreen,select
(Windowswillnot prompt you again)
onOK. Insert theCD containing the printerdriver
in the CD reader on your PC; the installation
procedure will start automatically. Follow the
instructions displayed on your PC screen.
If your PC does not have a CD drive, you can:
(a)
(b)
Using the diske ttes, you can then install the
printer software using the Windows® Add
printer or Plug & Play features.
first
your PC and
New hardware found
then
your printer. If
is displayed
Do not inst a ll adri ver
and click
download the printer software from the web
address :
www.olivettilexikon.com
,or
create a set of diskettes yourself, using a PC
that has a CD drive.
Complete printer installation
1.
Access the
(a)
Under Windows® 3.1/3.11
driver group by double-clicking its icon.
(b)
Under Windows® 95/Windows® 98
–
Click
the
opens.
–
Click the
2.
Click on the
printer operating position
Vertical).
The choice of operating position does not
affect the printer performance.
3.
Click on the
Printer Monitor
Start
, highlight
printer name
Printer Monitor
Options
Printer Care
,fromyourprinter
:
Programs
and then
in the sub-menu which
icon.
tab and then select the
(Horizontal or
tab and then:
English
DOS environment
Although optimised for operation in a Windows®
environment, your printer will also operate in
DOS, recognising PCL III + command codes.
This means that you can print from any DOS
application that supports this command code set.
❑
How to change the printer settings in DOS
environment
With your printer connected and switched on,
insert the CD in the reader on your PC , from the
DOS prompt, type
the CD drive). Follow the instructions displayed
on your PC screen.
a:\config.exe
(whereais
(a)
Clickboth the
NewHead
buttons, to confirm
that new print heads have been inserted.
(b)
Click the
that confirm the
printing
Align
button, to run the test pages
accuracy of bi-directional
; follow the instructions displayed
(this feature requires at least two sheets of
paper).
(c)
Click the
page
Demo
button, to print the
demo
so that you can check that the print
quality is satisfactory; follow the instructions
displayed. (This featurerequires one sheetof
paper).
Once you have done the se operations, you
can reduce the Print er M onito r t o it s icon .
Your printer is now r ea dy f or use.
Installation guide 7
english.chp
Tue Feb 02 10:03:51 1999
Page 8

Color profile: Disabled
Composite Default screen
Operator panel
Power
Paper
❑
Light indicator
Status Condition
Vertical operating position
Paper
Horizontal operating position
❑
Buttons - basic functions
Function Button Description
Printer
on/off Power
Paper
control Paper
Toggles the printer ON/OFF
condition.
1) If paper is already present
in the printer, causes its
expulsion.
2) Loads a sheet of paper in
the printer
paper error signal.
Onceyou have correctedthe
error condition (paper out,
paper jam), press to load a
document and continue your
print job.
ONLY
Power
after a
off
lit
flashing slowly
flashing rapidly
flashing very
rapidly
flashing with
specific variable
sequence
Printer not powered.
Printer powered.
Printer is receiving data.
Operating error.
Failure condition.
Print head initialisation cycle or
service function
For a description of the s pecial functions that
you can activate using the buttons on the
operator panel, see the On Line documentation
loaded when you installed the printer driver.
8 Installation guide
english.chp
Tue Feb 02 10:03:52 1999
Page 9

Color profile: Disabled
Composite Default screen
Tips on use and care
❑
General care
Place you printer in a clean, stabilised
•
environment. Dont leave it exposed to direct
sunlight or heat sources, or in dusty, dirty or
poorly-ventilated environments.
Recommended Operating Environment
Temperature: 60 to 95
Relative Humidity: 20% - 80%
Connectyourprintertoanindependentpower
•
socket.
Always use manufacturer-recommended
•
supplies and accessories.
Switch off your printer before switching off
•
your PC.
o
F - 15 to 35oC
Makesure the paper feedssmoothly, and that
•
it is notheld too tightlynor has too muchplay.
Printing on both sides of the paper may
•
increase the risk of misfeeds or paper jams
and may cause smudging.
If you remove the paper from or add paper to
•
the main feeder, you
paper loading operation.
When using user- defined/non-standard size
•
formats, remember to select the appropriate
paper type in your printer driver (see the
On-Line Documentation
printer driver).
❑
Print heads
MUST
repeat the entire
loaded with your
English
Dont let dust accumulate on your printer.
•
Use a clean, slightly damp cloth to clean the
casing. Do NOT use corrosive or abrasive
cleaners.
Dont spill anything on or in your printer.
•
If your printer does not work, DO NOT
•
ATTEMPT TO REPAIR IT YOURSELF.
❑
Paper
Use manufacturer-recommended paper and
•
printing media.
For all types of special printing media,
always read the instructions included with
the media pack.
The paper/printing media must not be damp,
•
curled, crumpled or torn,otherwise it may jam
or even not be inserted. Always use
paper/printing media in perfect condition and
within the specifications defined(see Product
Characteristics) . Sub-standard paper can
affect the quality of printing.
When loading paper/printing media, make
•
sure the printing surfaceof thepaper is facing
the correct way.
Dont load paper /printing media over the
•
max indication in the paper tray.
Remove the print heads from the pr inter only
•
to replace them.
Always keep the new print heads sealed in
•
their containers until they are to be used.
Remember to remove the protective tape
•
before inserting the print head in the printer.
Take care not to get ink on your clothes; the
•
ink in the print head stains.
Do NOT attempt to refill the print head with
•
ink, as this damages the print head and the
printer.
DO NOT shake the print head; it is not a
•
fountain pen. If it does not print, clean it,
following the procedure given in the Printer
Monitor or in the specific section in the
On-Line documentation.
If you think that the number of pages printed
•
withthecurrent print head is fewer thanusual,
try cleaning it. If the end of ink condition
persists, the print head is emptyand requires
replacing.
For further information, read the On Line
documentation loaded in your PC when you
installed the printer software.
Installation guide 9
english.chp
Tue Feb 02 10:03:52 1999
Page 10

Color profile: Disabled
Composite Default screen
Replacing print heads
1.
With the printer idle (in standby),
(a)
open the
Monitor
or
(b)
press and hold the
operator panel and press
release the two buttons together.
2.
Open the top cover: the print head car riage
will be in the head loading position.
Printer Care
and click on the
tabinthe
Change
Power
button on the
button,
Paper
Printer
onc e;
Vertical operating position Horizontal operating position
3.
Press the print head release lever to release
either:
(a)
the
black
print head, or
(b)
the
colour
print head.
10 Installation guide
english.chp
Tue Feb 02 10:03:54 1999
Page 11

Color profile: Disabled
Composite Default screen
4.
Pulling upwards by the thumb and finger grip:
(a)
remove the
(b)
remove the
black
colour
print head,
print head.
5.
Insert a new print head of the
(black/colour) and close the printer cover.
6.
Clickontheappropriate
the
Printer Care
and then run the
New Head
tab in the
Align
Printer Monitor
function in the same
tab.
SAME
button in
type
Installation guide 11
english.chp
Tue Feb 02 10:03:56 1999
Page 12

Color profile: Disabled
Composite Default screen
Loading paper/envelopes from
the second feeder
If you wish to print a few random sheets or
envelopes, you ca n do so without having to
substitute the paper size already loaded in the
main automatic feeder. The output tray doubles
as a second automatic feeder and cancontain up
to 10 sheets of paper or 3 envelopes. On
reception of a print command, the paper loaded
in the second feeder will have priority over that in
the main feeder.
1.
Remove any printed documents from the
output tray and open its rear and lateral
guides.
2.
Fan the paper/envelopes and load them as a
single pack on the tray, inserting them
carefully until they stop inside the printer,
under the output guide.
Do NOT load more that 10 sheets or 3
envelopes.
The pr inting surface must face towards the tray.
3.
Close the rear and lateral guides against the
edges of the paper/envelope.
Removethe printed document as soon asit exits
from the printer. DO NOT leave it on top of the
paper/envelopes in the second feeder.
12 Installation guide
english.chp
Tue Feb 02 10:03:57 1999
Page 13

Color profile: Disabled
Composite Default screen
Loading a single sheet manually
If you wish to print a single, or thicker, sheet of
paper, you can do so without having to substitute
the paper already loaded in the main automatic
and/or second feeders. You can insert the sheet
manually. On reception of a print command, the
paper in the manual feeder will have priority over
that in both the main and/or second feeders.
❑
Printer in horizontal operating position
Insert the sheet ofpaper,with the printingsurface
facing towards you, aligning it with the left hand
guide.
English
❑
Printer in vertical operating position
Insert the sheet ofpaper,with the printingsurface
facing upwards, aligning it with the right hand
guide.
Make sure that the leading edge of the paper is
against the feed rollers along its entire width -
you will hear a beep.
Installation guide 13
english.chp
Tue Feb 02 10:03:58 1999
Page 14

Color profile: Disabled
Composite Default screen
Loading small formats from the
main feeder
1.
Empty and tip up the output tray.
2.
Open the rear guide for small formats on the
paper tray of the main feeder and make sure
that the adjustable margin guides are
completely open.
3.
Fan the paper/envelopes and load it/them as
a single pack into the main feeder, inserting
it/them carefully until it/they stop inside the
printer.
Make sure the trailing edge is inside the
intermediate rear guide.
Do NOT load above the maximum level
indicated on the inside of the feeder.
The pr inting surface must face towards the tray.
4.
Close the adjustable margin guides against
the edges of the paper.
5.
Return the output tray to its operating
position and make sure that its lateral and
rear guides are open.
14 Installation guide
english.chp
Tue Feb 02 10:04:00 1999
Page 15

Color profile: Disabled
Composite Default screen
Disinstalling the printer driver
If you have problems printing that a re not solved
with normal printer care operations (paper and
print he ads ins erted correctly, appropriate
selections in the printer driver, etc.), it may be
necessary to re-install the printer driver.
To do this, you must first disinstall the driver, by
clicking on the specific icon created in the printer
group when you first loaded the driver. This
allows a complete and correct removal of all the
files loaded from the CD and/or created in your
PC during driver installation, permitting a correct
re-installation (see
software
).
For other problems regarding the use of print
heads, printing media, etc., refer to the specific
topics in the
On-Line Guide
Troubleshooting
loaded with your printer driver.
Installing the printer
section of the
On-line Guide
The CD containing the printer softwar e also
contains an
further information on the printer features, and
print head and paper handling. It is structured in
two parts:
and is fully contextual.
The information contained in the
is organised in
heads
screen.
To access the
specific icon in the Pr inter group created when
you loaded the printer software.
There are several ways of accessing information
on the printer settings in the Settingstab (
Printers
icon
, click
select the item required and then right click it
•
On-line Guide
How do I..
. This guide contains
. and
Troubleshooting
On-line Guide
topics
; e.g.
Paper
,
Print
, etc., and can be printed screen by
On-line Guide
, click on the
Start
, select and
Properties
right click your printer
):
English
,
or
select ? in the top right hand corner of the
•
tab and drag it on to the item required.
or
clickthe HELP button in the lowerright hand
•
corner of the tab; in this case you access the
complete s ection deali ng with the entire
Settings tab.
Installation guide 15
english.chp
Tue Feb 02 10:04:00 1999
 Loading...