

Page 1

Page 2

Edited/Published/Produced by:
Olivetti S.p.A.
Gruppo Telecom Italia
Code:522922 gb
Date of publication: October 2006
Via Jervis, 77
Ivrea (TO)
Italy
www.olivetti.com
Copyright © Olivetti, 2006
All rights reserved
ENERGY STAR is a U.S. registered mark.
The ENERGY STAR program is an energy reduction plan introduced by the United States Environmental Protection Agency in response to
environmental issues and for the purpose of advancing the development and utilization of more efficient office equipment.
Trademarks:
trademarks of Microsoft Corporation.
Other trademarks and trade names may be used in this
document to refer to either the entities claiming the
marks and names or their products. Olivetti disclaims any
proprietary interest in trademarks and trade names other
than its own.
Microsoft and Windows are registered
Page 3

CONTENTS
1 GETTING STARTED . . . . . . . . . . . . . . . . . . . . . . . . . . . . . . . . . . 1
OVERVIEW . . . . . . . . . . . . . . . . . . . . . . . . . . . . . . . . . . . . . . . . . . . . . . . . 2
ACCESSING THE ONLINE HELP . . . . . . . . . . . . . . . . . . . . . . . . . . . . . . . . . 3
SAFETY INSTRUCTIONS . . . . . . . . . . . . . . . . . . . . . . . . . . . . . . . . . . . . . . .3
INFORMATION ABOUT PRINT QUALITY AND THE WARRANTY . . . . . . . . . .3
LOCATING YOUR PRINTER’S COMPONENTS . . . . . . . . . . . . . . . . . . . . . . .4
PRINTER FRONT PANEL . . . . . . . . . . . . . . . . . . . . . . . . . . . . . . . . . . . . . . .6
PHOTO PRINTING MANAGEMENT CONSOLE . . . . . . . . . . . . . . . . . . . . . . . 8
FAX CONTROL PANEL (FAX MODEL) . . . . . . . . . . . . . . . . . . . . . . . . . . . . . 9
PLACING YOUR DOCUMENT ON THE SCANNER GLASS . . . . . . . . . . . . .10
Placing of a bulky document on the exposure bed . . . . . . . . . . . . . .10
LOADING PAPER . . . . . . . . . . . . . . . . . . . . . . . . . . . . . . . . . . . . . . . . . . .11
Loading Different Types of Paper . . . . . . . . . . . . . . . . . . . . . . . . . . .12
STATES OF THE FRONT PANEL OF THE PRINTER . . . . . . . . . . . . . . . . . . . .12
Turning On Your Printer . . . . . . . . . . . . . . . . . . . . . . . . . . . . . . . . . .12
Turning Off Your Printer . . . . . . . . . . . . . . . . . . . . . . . . . . . . . . . . . .13
CONNECTING A DIGITAL CAMERA TO YOUR PRINTER . . . . . . . . . . . . . .14
INSERTING AND REMOVING MEMORY CARDS . . . . . . . . . . . . . . . . . . . .14
Inserting a Memory Card . . . . . . . . . . . . . . . . . . . . . . . . . . . . . . . . .14
Removing a Memory Card . . . . . . . . . . . . . . . . . . . . . . . . . . . . . . . .15
ACTIVATION IN BLUETOOTH MODE (WIRELESS MODEL) . . . . . . . . . . . . .16
INSTALLING THE WI-FI SYSTEM (WIRELESS MODEL) . . . . . . . . . . . . . . . . . 17
Installation in Macintosh environment . . . . . . . . . . . . . . . . . . . . . . .17
PRINTER NETWORK CONNECTION (WIRELESS MODEL) . . . . . . . . . . . . . .18
CONNECTION OF THE PRINTER TO THE TELEPHONE NETWORK
(FAX MODEL) . . . . . . . . . . . . . . . . . . . . . . . . . . . . . . . . . . . . . . . . . .19
HOW TO INSTALL THE FAX (FAX MODEL) . . . . . . . . . . . . . . . . . . . . . . . .22
CONTENTS iii
Page 4

2 USING YOUR PRINTER WITHOUT A COMPUTER . . . . . . . . .25
COPYING A DOCUMENT . . . . . . . . . . . . . . . . . . . . . . . . . . . . . . . . . . . . 26
VIEWING PHOTOS ON YOUR PRINTER’S DISPLAY . . . . . . . . . . . . . . . . . . . 26
CREATION AND PRINTING OF THE PHOTO INDEX . . . . . . . . . . . . . . . . . . 27
HOW TO IMPROVE PRINT QUALITY OF THE PHOTOS . . . . . . . . . . . . . . . 28
PRINTING OF PHOTOS FROM MEMORY CARD OR CAMERA . . . . . . . . . . 28
PRINTING PHOTOS FROM YOUR PICTBRIDGE DIGITAL CAMERA . . . . . . . 28
PRINTING PHOTOS FROM YOUR DPOF DIGITAL CAMERA . . . . . . . . . . . . 29
PRINTING OF PHOTOS FROM A BLUETOOTH MOBILE PHONE
(WIRELESS MODEL) . . . . . . . . . . . . . . . . . . . . . . . . . . . . . . . . . . . . . 29
HOW TO SET THE PRINTER TO RECEIVE FAX MESSAGES (FAX MODEL) . . 30
Setting of reply mode . . . . . . . . . . . . . . . . . . . . . . . . . . . . . . . . . . . 30
SENDING A FAX MESSAGE (FAX MODEL) . . . . . . . . . . . . . . . . . . . . . . . . 31
Transmission from the control panel of the fax . . . . . . . . . . . . . . . . . 31
How to use the Agenda of the fax . . . . . . . . . . . . . . . . . . . . . . . . . . 31
HOW TO PRINT REPORTS (FAX MODEL) . . . . . . . . . . . . . . . . . . . . . . . . . 32
RESTORE OF FAX DATE AND TIME (FAX MODEL) . . . . . . . . . . . . . . . . . . . 32
HOW TO MODIFY FAX SETTINGS: RESOLUTION AND CLEAR/DARK
(FAX MODEL) . . . . . . . . . . . . . . . . . . . . . . . . . . . . . . . . . . . . . . . . . . 33
HOW TO ELIMINATE FAX MESSAGES FROM THE MEMORY
(FAX MODEL) . . . . . . . . . . . . . . . . . . . . . . . . . . . . . . . . . . . . . . . . . . 33
INTERRUPTION OF FAX TRANSMISSION/RECEPTION (FAX MODEL) . . . . . . 33
MODIFICATION OF THE TYPE OF RING FOR REPLY (RING DIFFERENTIATION)
(FAX MODEL) . . . . . . . . . . . . . . . . . . . . . . . . . . . . . . . . . . . . . . . . . 33
Volume adjustment . . . . . . . . . . . . . . . . . . . . . . . . . . . . . . . . . . . . . 33
3 USING YOUR PRINTER FROM A COMPUTER . . . . . . . . . . . . .35
BEFORE YOU BEGIN . . . . . . . . . . . . . . . . . . . . . . . . . . . . . . . . . . . . . . . . 36
THE TOOLBOX . . . . . . . . . . . . . . . . . . . . . . . . . . . . . . . . . . . . . . . . . . . . 36
THE PRINTER STATUS MONITOR . . . . . . . . . . . . . . . . . . . . . . . . . . . . . . . 37
PRINTING, COPYING AND SCANNING FROM THE TOOLBOX . . . . . . . . . . 38
PRINTING FROM YOUR APPLICATION USING PRINT PROPERTIES . . . . . . . 39
SCANNING AN ORIGINAL FROM YOUR APPLICATION . . . . . . . . . . . . . . . 40
SCANNING AN ORIGINAL FROM THE PRINTER FRONT PANEL . . . . . . . . . 41
TRANSFERRING FILES FROM A MEMORY CARD TO YOUR COMPUTER . . 42
HOW TO SET THE PARAMETERS TO IMPROVE PHOTO PRINT QUALITY . . 42
SETTING NETWORK CONNECTION PARAMETERS . . . . . . . . . . . . . . . . . . 43
CHAPTER CONTENTSiv
Page 5

USING THE WEB SERVER (WIRELESS MODEL) . . . . . . . . . . . . . . . . . . . . . 46
Accessing the "Web Server" Mode . . . . . . . . . . . . . . . . . . . . . . . . .46
Entering WEP keys . . . . . . . . . . . . . . . . . . . . . . . . . . . . . . . . . . . . .47
Entering WPA Coding Data . . . . . . . . . . . . . . . . . . . . . . . . . . . . . . .47
BLUETOOTH SYSTEM SETTINGS (WIRELESS MODEL) . . . . . . . . . . . . . . . .48
FAX SETTINGS FROM THE TOOLBOX PROGRAM (FAX MODEL) . . . . . . . .49
Print fax Reports . . . . . . . . . . . . . . . . . . . . . . . . . . . . . . . . . . . . . . . .49
Pause time . . . . . . . . . . . . . . . . . . . . . . . . . . . . . . . . . . . . . . . . . . . . 49
Agenda of the fax . . . . . . . . . . . . . . . . . . . . . . . . . . . . . . . . . . . . . . 49
Date and time settings . . . . . . . . . . . . . . . . . . . . . . . . . . . . . . . . . . .50
Fax installation, setting and reception . . . . . . . . . . . . . . . . . . . . . . . .50
HOW TO SEND A FAX USING THE COMPUTER (FAX MODEL) . . . . . . . . . . 51
Sending a fax message from the "Toolbox" program . . . . . . . . . . . .51
Send fax from File . . . . . . . . . . . . . . . . . . . . . . . . . . . . . . . . . . . . . .52
4 INK CARTRIDGES . . . . . . . . . . . . . . . . . . . . . . . . . . . . . . . . . 53
CHECKING INK LEVELS . . . . . . . . . . . . . . . . . . . . . . . . . . . . . . . . . . . . . . 54
Information required to purchase new ink cartridges . . . . . . . . . . . . 54
REPLACING THE INK CARTRIDGES . . . . . . . . . . . . . . . . . . . . . . . . . . . . .55
ALIGNING THE INK CARTRIDGES . . . . . . . . . . . . . . . . . . . . . . . . . . . . . . .58
Ink Cartridge Alignment Page . . . . . . . . . . . . . . . . . . . . . . . . . . . . .58
Aligning the Ink Cartridges From the Toolbox . . . . . . . . . . . . . . . . . .58
EXCHANGING BLACK AND PHOTO INK CARTRIDGES USING THE
GARAGE . . . . . . . . . . . . . . . . . . . . . . . . . . . . . . . . . . . . . . . . . . . . .59
5 MAINTENANCE AND TROUBLESHOOTING . . . . . . . . . . . . . . 61
CLEANING YOUR PRINTER . . . . . . . . . . . . . . . . . . . . . . . . . . . . . . . . . . . .62
Cleaning the Printer Casing, the Inner Side of the Scanner Cover
and the Scanner Glass . . . . . . . . . . . . . . . . . . . . . . . . . . . . . . . .62
CLEANING THE INK CARTRIDGE NOZZLES . . . . . . . . . . . . . . . . . . . . . . . . 62
TROUBLESHOOTING . . . . . . . . . . . . . . . . . . . . . . . . . . . . . . . . . . . . . . . .63
Problems During Printer Setup . . . . . . . . . . . . . . . . . . . . . . . . . . . . . 63
Problems When Powering On the Printer . . . . . . . . . . . . . . . . . . . . . 66
Printing Problems . . . . . . . . . . . . . . . . . . . . . . . . . . . . . . . . . . . . . . . 66
Copying/Scanning Problems . . . . . . . . . . . . . . . . . . . . . . . . . . . . . . .67
Meaning of the LED Indicators on the Front Panel . . . . . . . . . . . . . . 67
FAX MESSAGES . . . . . . . . . . . . . . . . . . . . . . . . . . . . . . . . . . . . . . . . . . .68
Messages during transmission . . . . . . . . . . . . . . . . . . . . . . . . . . . . .68
Error messages during reception . . . . . . . . . . . . . . . . . . . . . . . . . . . .68
General messages . . . . . . . . . . . . . . . . . . . . . . . . . . . . . . . . . . . . . .69
ERROR CODES PRINTED WITH THE FAX REPORT . . . . . . . . . . . . . . . . . . .69
Error codes in the transmission report . . . . . . . . . . . . . . . . . . . . . . . .69
Error codes in the activity report . . . . . . . . . . . . . . . . . . . . . . . . . . . .70
CLEARING PAPER JAMS . . . . . . . . . . . . . . . . . . . . . . . . . . . . . . . . . . . . .70
CONTENTS v
Page 6

6 TECHNICAL CHARACTERISTICS . . . . . . . . . . . . . . . . . . . . . . .71
GENERAL SPECIFICATIONS . . . . . . . . . . . . . . . . . . . . . . . . . . . . . . . . . . . 72
PRINTER SPECIFICATIONS . . . . . . . . . . . . . . . . . . . . . . . . . . . . . . . . . . . . 73
COPIER SPECIFICATIONS . . . . . . . . . . . . . . . . . . . . . . . . . . . . . . . . . . . . . 74
SCANNER SPECIFICATIONS . . . . . . . . . . . . . . . . . . . . . . . . . . . . . . . . . . . 74
SPECIFICATIONS OF THE FAX SYSTEM . . . . . . . . . . . . . . . . . . . . . . . . . . . 74
WI-FI SYSTEM SPECIFICATIONS . . . . . . . . . . . . . . . . . . . . . . . . . . . . . . . . 76
PAPER SPECIFICATIONS . . . . . . . . . . . . . . . . . . . . . . . . . . . . . . . . . . . . . 77
Supported Paper Types . . . . . . . . . . . . . . . . . . . . . . . . . . . . . . . . . . . 77
Supported Paper Formats and Sizes . . . . . . . . . . . . . . . . . . . . . . . . . 78
INDEX. . . . . . . . . . . . . . . . . . . . . . . . . . . . . . . . . . . . . . . . . . . . . . .79
All information included herein is subject to change without notice. Olivetti S.p.A. is not responsible for any loss or
damages, direct or indirect, arising from or related to the use of this operation manual.
MIPC (Mobile Imaging and Printing Consortium)
The MIPC is a non-profit industry association founded in 2004 by leading companies in home photo printing and the
mobile phone industry. Its mission is to promote and support the development of interoperability guidelines enabling
printing of images and other content between mobile phones and home printers. The guidelines are promoted for use
internationally to ensure a broad spectrum of products and services for mobile phone consumers.
www.mobileprinting.org.
ANY_WAY Photo Plus / Photo fax: This Mobile Printing Ready product is designed to provide easy printing from
mobile phones. This product follows Mobile Imaging and Printing Consortium (MIPC) Implementation Guidelines for
Home Printing with Mobile Terminals, Version 1.0, for PictBridge and Memory Cards.
ANY_WAY Photo Wireless Plus: This Mobile Printing Ready product is designed to provide easy printing from mobile
phones. This product follows Mobile Imaging and Printing Consortium (MIPC) Implementation Guidelines for Home
Printing with Mobile Terminals, Version 1.0, for Bluetooth, PictBridge and Memory Cards.
CHAPTER CONTENTSvi
Page 7

1GETTING STARTED
OVERVIEW
ACCESSING THE ONLINE HELP
SAFETY INSTRUCTIONS
INFORMATION ABOUT PRINT QUALITY AND THE WARRANTY
LOCATING YOUR PRINTER’S COMPONENTS
PRINTER FRONT PANEL
PHOTO PRINTING MANAGEMENT CONSOLE
FAX CONTROL PANEL (FAX MODEL)
PLACING YOUR DOCUMENT ON THE SCANNER GLASS
LOADING PAPER
STATES OF THE FRONT PANEL OF THE PRINTER
CONNECTING A DIGITAL CAMERA TO YOUR PRINTER
INSERTING AND REMOVING MEMORY CARDS
ACTIVATION IN BLUETOOTH MODE (WIRELESS MODEL)
INSTALLING THE WI-FI SYSTEM (WIRELESS MODEL)
PRINTER NETWORK CONNECTION (WIRELESS MODEL)
CONNECTION OF THE PRINTER TO THE TELEPHONE NETWORK (FAX MODEL)
HOW TO INSTALL THE FAX (FAX MODEL)
GETTING STARTED 1
Page 8

OVERVIEW
This multi-functional product performs the functions of a high quality ink-jet printer and of a flatbed
type A4 format color scanner, making it possible to print, scan and copy B/W and color documents and
images.
The multi-functional printer is equipped with two heads, black and color, for normal print and copy
operations; to print photos with a quality comparable to that of photographic laboratories, it is
advisable to replace the black head with the photographic head which is sold separately.
note: The black and color ink and photographic cartridges are also available in a High Capacity version.
The multi-functional printer can also be used without a computer to make copies and to print photos
simply connecting the digital camera to the USB interface on the front panel, inserting a memory card
in the related connector or using the Photo Index.
The installation CD contains the software for connection to the personal computer and for document
and image management; it also contains the handy Olivetti Toolbox program for fast access to all
available capabilities.
The photo wireless plus model permits direct printing of images captured with a mobile phone via
Bluetooth or use of all multi-functional printer capabilities "wireless" mode using the Wi-Fi connection:
both types of wireless connectivity are integrated.
Initial installation and any configuration of the multi-function printer are always carried out using the
USB cable. The cable can then be moved in order to work in Wi-Fi mode.
note: For installation of this model, follow the instructions provided in the WIFI INFO manual.
Con the photo fax model it is possible to send and receive B/W and color fax messages and to send
documents from a computer.
CHAPTER 12
Page 9

ACCESSING THE ONLINE HELP
This User Guide provides the basic operating information that puts you in the condition to use the
features offered by your all-in-one printer. However if you need more detailed information, read the
Online Help.
To access the Online Help:
1 Select the Help button in the dialogue boxes.
SAFETY INSTRUCTIONS
Carefully read and follow the information indicated below:
• Use only the power cord provided with this product, or a power cord authorised by the manufacturer.
• Connect the power cord to a grounded electrical outlet that is near the product and easily accessible.
• Install your printer on a flat and stable surface, at a location where no one can step on or trip over the
power cord.
• Do not use your printer near water, or with wet hands.
• Do not expose your printer to rain or moisture.
• Do not attempt to disassemble your printer.
• Observe all warnings and instructions marked on your printer.
• Read and understand all the documentation that came with your printer.
INFORMATION ABOUT PRINT QUALITY AND THE WARRANTY
To guarantee the correct operation of your printer and top quality printing, it is essential to use only
Olivetti original ink cartridges.
Olivetti declines any responsibility for damage to your printer caused by the tampering with, or refilling
of, the ink-jet cartridges. Such actions also imply forfeiture of the Warranty.
GETTING STARTED 3
Page 10
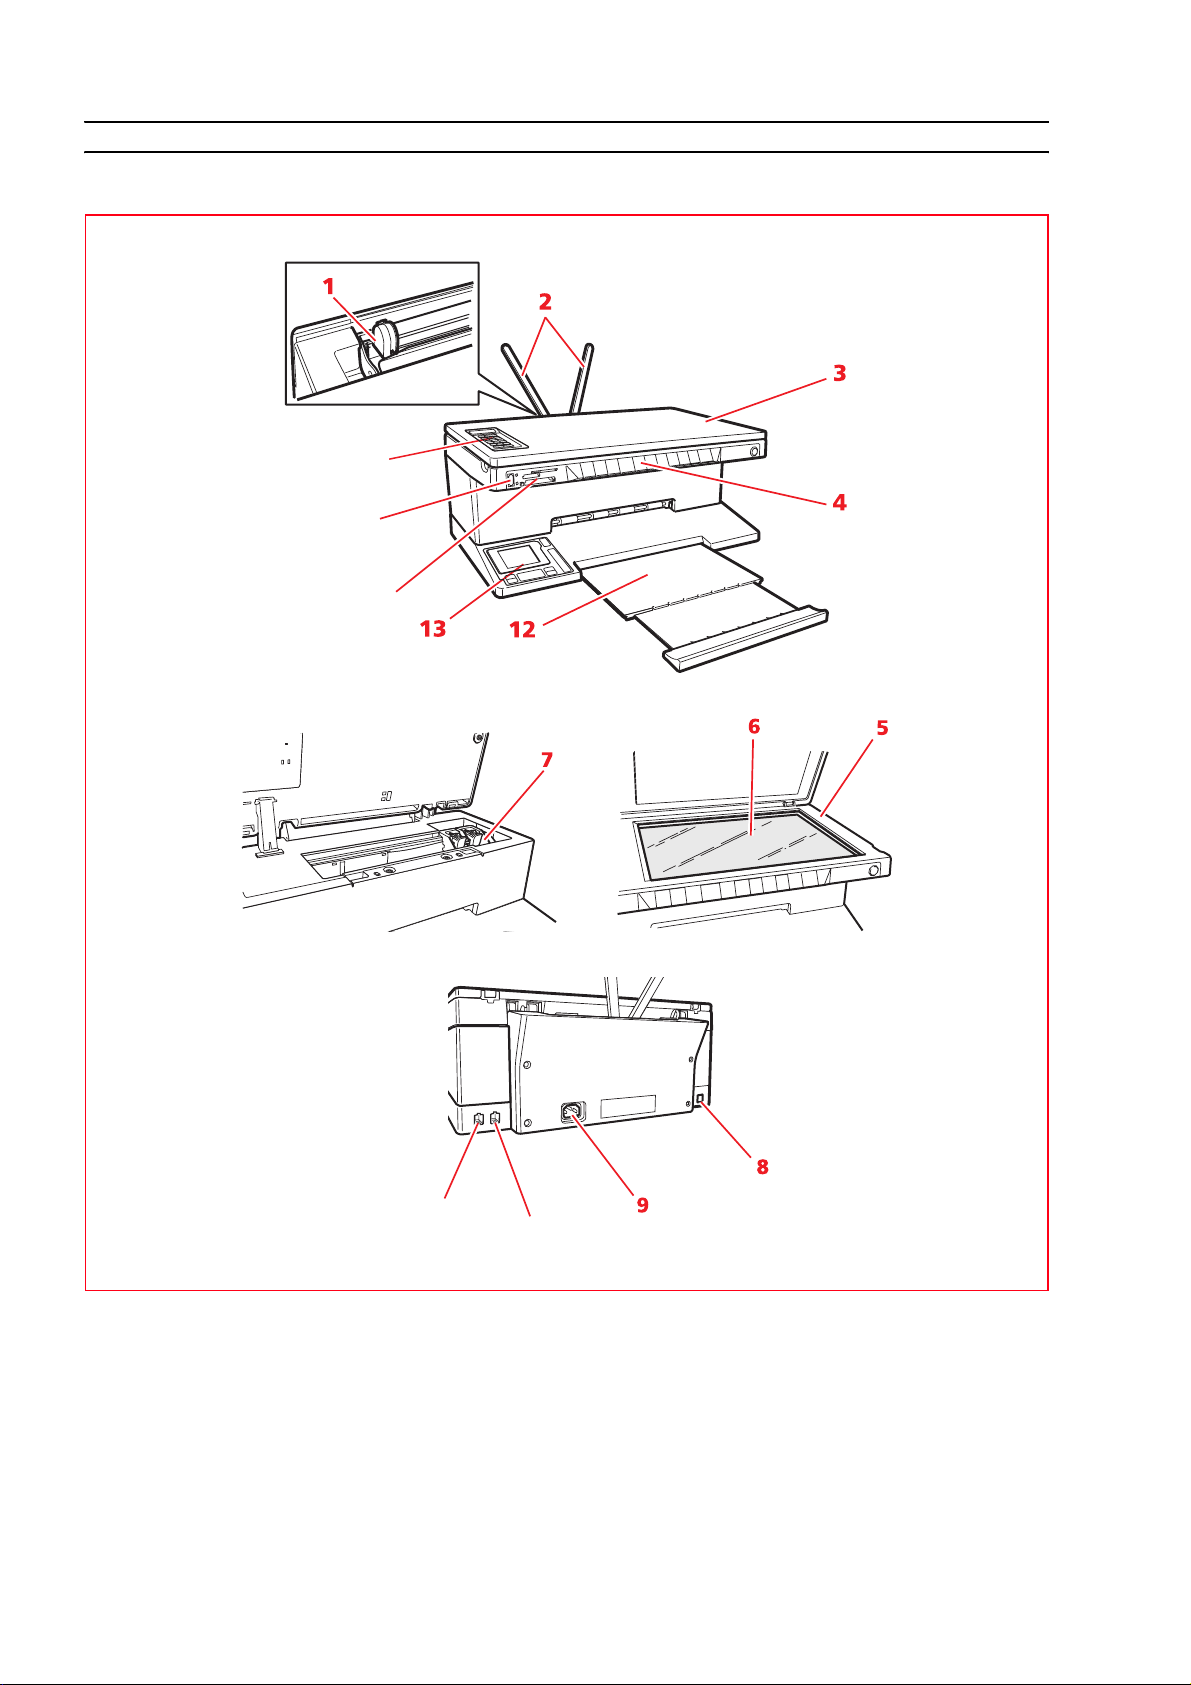
LOCATING YOUR PRINTER’S COMPONENTS
16
15
14
11
10
CHAPTER 14
Page 11

Reference Part Description
1 Paper guide Guides the paper when being fed into the printer.
2 Paper support Supports the loaded paper.
3 Extractable top cover Scanner unit cover. It can be removed to scan bulky documents
(such as books).
4 Front panel Panel used for plugging your digital camera to the printer, for
turning the printer on and off and for controlling print, copy, and
scan jobs.
5 Scanner unit Release and lift carefully to gain access to the ink cartridges.
6 Scanner glass Place your document or photo face down on this surface to copy
or scan it. See "Placing Your Document on the Scanner Glass".
7 Ink cartridge carrier Holds two ink cartridges. The colour cartridge is installed to the left,
the black (or photo, sold separately) to the right.
To change the ink cartridges, see "Replacing the Ink Cartridges".
8 High-speed USB
interface
Plug the USB cable (not included) used for connection to your
personal computer. Plug the other end of the cable to the
computer.
9 Power supply
connector
Plug the printer’s power cord, provided with the product. Plug the
other end of the power cord to a grounded electrical outlet.
note: Plug the power cord into the printer first and then into the
electrical outlet.
10 RJ11 connector Telephone signal IN line (Line in).
11 RJ11 connector Telephone signal OUT line (Ext) to connect a telephone, modem
or answering device.
12 Paper tray Supports the printed paper as it is expelled from the printer.
Extend this tray by pulling it outward.
13 LCD display and photo
printing management
console
A colour liquid crystal display where you can view the photos
stored in the memory of the digital camera or memory card
connected to the printer, and a number of buttons that allow you
to customize print jobs.
14 Memory card slots Insert your memory cards in these slots to read their contents and
select the pictures that you want to print. See "Inserting and
Removing Memory Cards".
15 USB interface Plug the USB cable from your digital camera.
16 Fax control panel
(fax model)
Panel to use the printer in fax mode (available only on the fax
model).
GETTING STARTED 5
Page 12
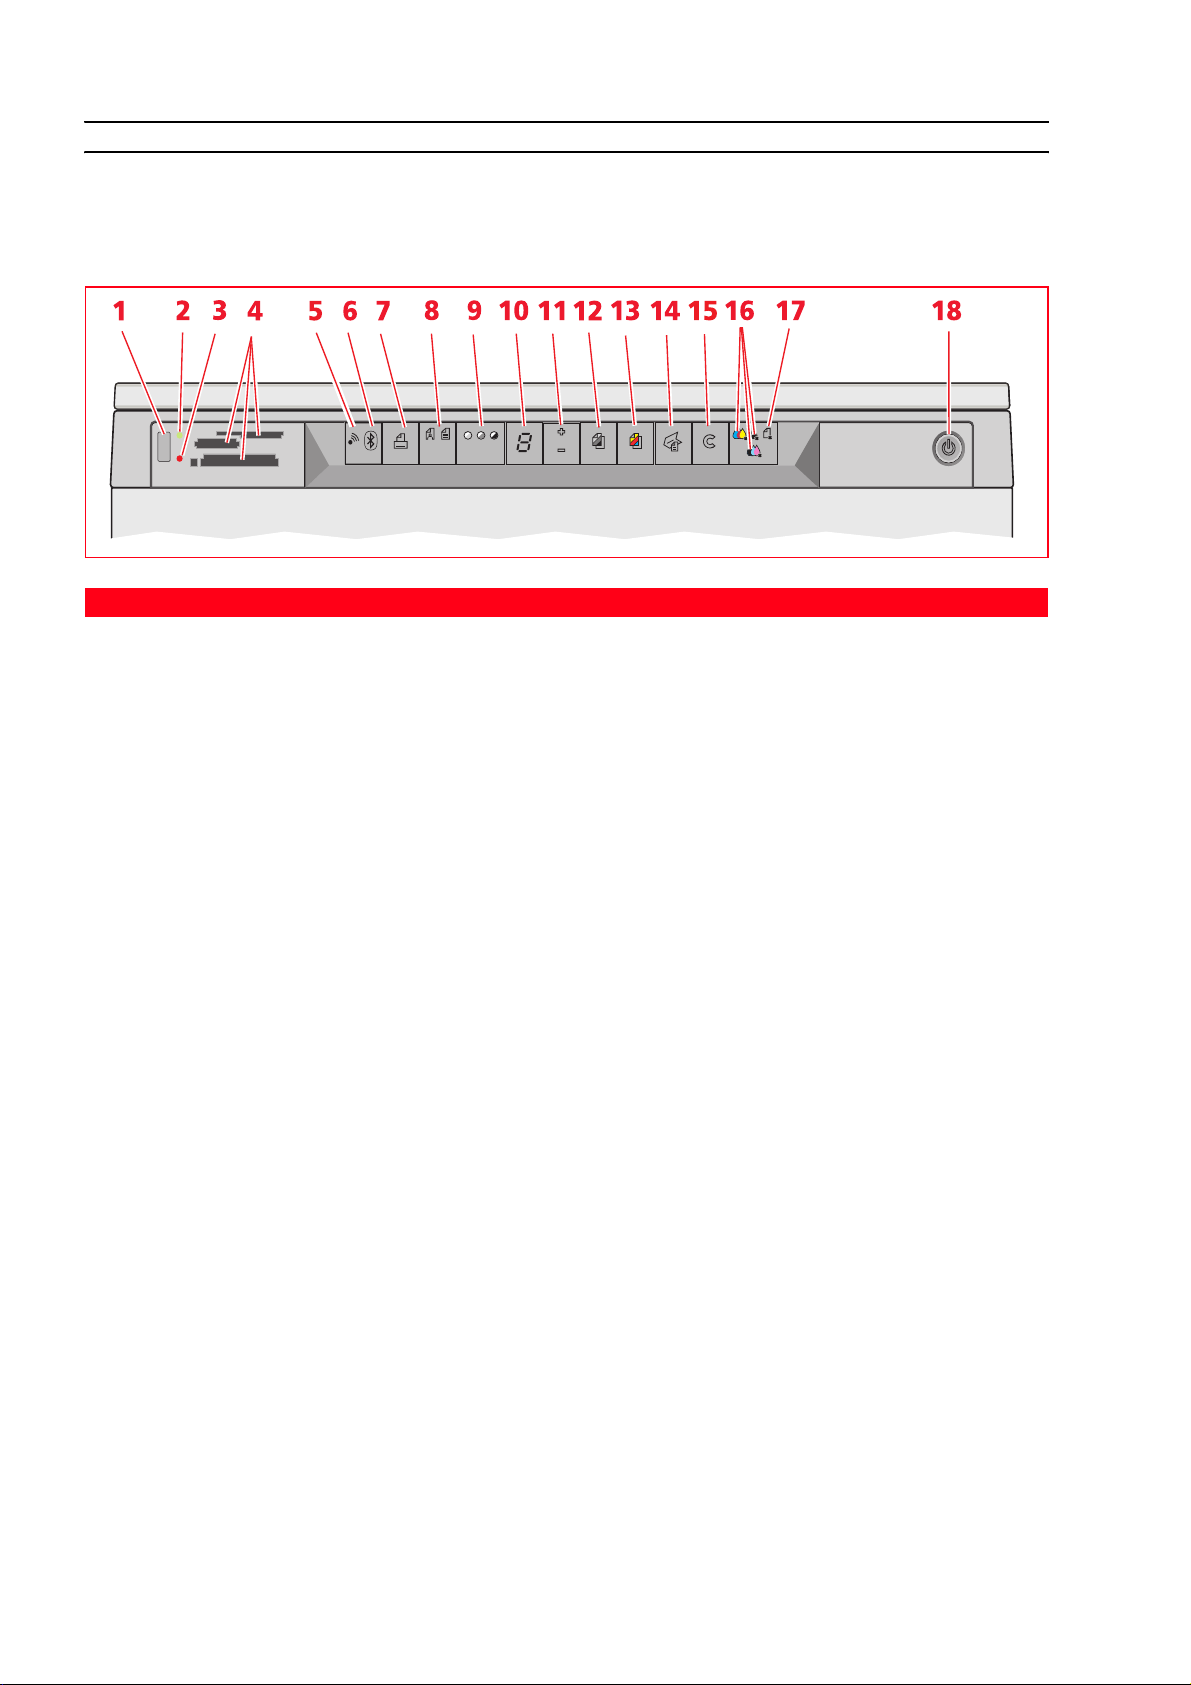
PRINTER FRONT PANEL
The front panel allows you to manually control the printing, scanning and copying of documents or
photos placed on the scanner glass, received from a digital camera or stored on the memory card
inserted in the related slots.
Reference Part Description
1 USB connector Plug the USB cable of your digital camera to print photographs
directly from your camera.
2 USB status LED Lights green to indicate when a digital camera is attached, flashes
to indicate when data is being transferred from the digital camera
to the printer.
3 USB error LED Lights red to indicate a USB error condition (data transfer error).
For more information, see "Meaning of the LED Indicators on the
Front Panel".
4 Memory card slots Can accommodate Compact Flash I, II, Microdrive, SmartMedia,
SecurDigital and MultiMedia cards, Memory Sticks and xD-Picture
cards.
5 Wi-Fi network icon
Lights green to indicate connection to Wi-Fi network.
(Wireless model)
6 Bluetooth icon
(Wireless model)
Switches on with a blue light to indicate that Bluetooth
connectivity is active and available for a connection.
7 Print button Lights up only when a non-Pictbridge digital camera or a memory
card is connected to the matching interface. This button flashes
whenever printing is in course.
8 Quality button Used to select print or copy quality; the printer automatically
adjusts its print resolution (high or normal) according to the
quality selected.
It is advisable to select photo mode if the original to be copied is
an image or when printing on photographic paper.
9 Copy contrast button Press to make your copy printout darker or lighter. A Dark, Normal
or Light contrast can be selected. The corresponding icons on this
button illuminate to indicate the selected setting.
10 Copy counter Displays the number of copies selected. The counter decreases as
the copies are printed.
CHAPTER 16
Page 13

Reference Part Description
11 Copy selection button • Press the Plus sign (+) to increase the number of copies
(max. of 9) to be made.
• Press the Minus sign (-) to decrease the number of copies
(min. of 1) to be made.
The selected number is displayed by the copy counter.
12 Monochrome copy
button
Press to make a black and white copy. Press and hold down to
activate the "Fit to Page" feature. See "Copying a Document".
13 Colour copy button Press to make a colour copy. Press and hold down to activate the
"Fit to Page" feature. See "Copying a Document".
14 Scan button • Illuminated when the printer is connected to a computer.
• Press this button to scan document or photo positioned on
the exposure bed.
See "Scanning from the front panel". A Toolbox window is
displayed which permits direct acquisition of the image in the
application program required and personalization of scanning
settings.
15 Cancel button • Press to immediately cancel a print, scan or copy job in
progress and eject the paper.·
• Restore selections to the factory values.
16 Out of ink indicators Flash or illuminate to indicate out of black, colour or photo ink
conditions.
17 Paper error indicator • Flashes to indicate a paper jam. See "Clearing Paper Jams".
• Flashes to indicate an out of paper condition.
• Flashes to indicate the feed of an incorrect paper size when
printing or copying.
18 ON/OFF Button Turn your printer ON or OFF.
The fax model can be switched off (see note) holding down the
ON/OFF button for 5 seconds; if there are documents in the
memory, switching off is inhibited.
note: If the fax model is switched off, the settings of the date and time will be lost; therefore, it is
advisable NOT to carry out this operation which has been replaced by automatic energy saving mode
GETTING STARTED 7
Page 14
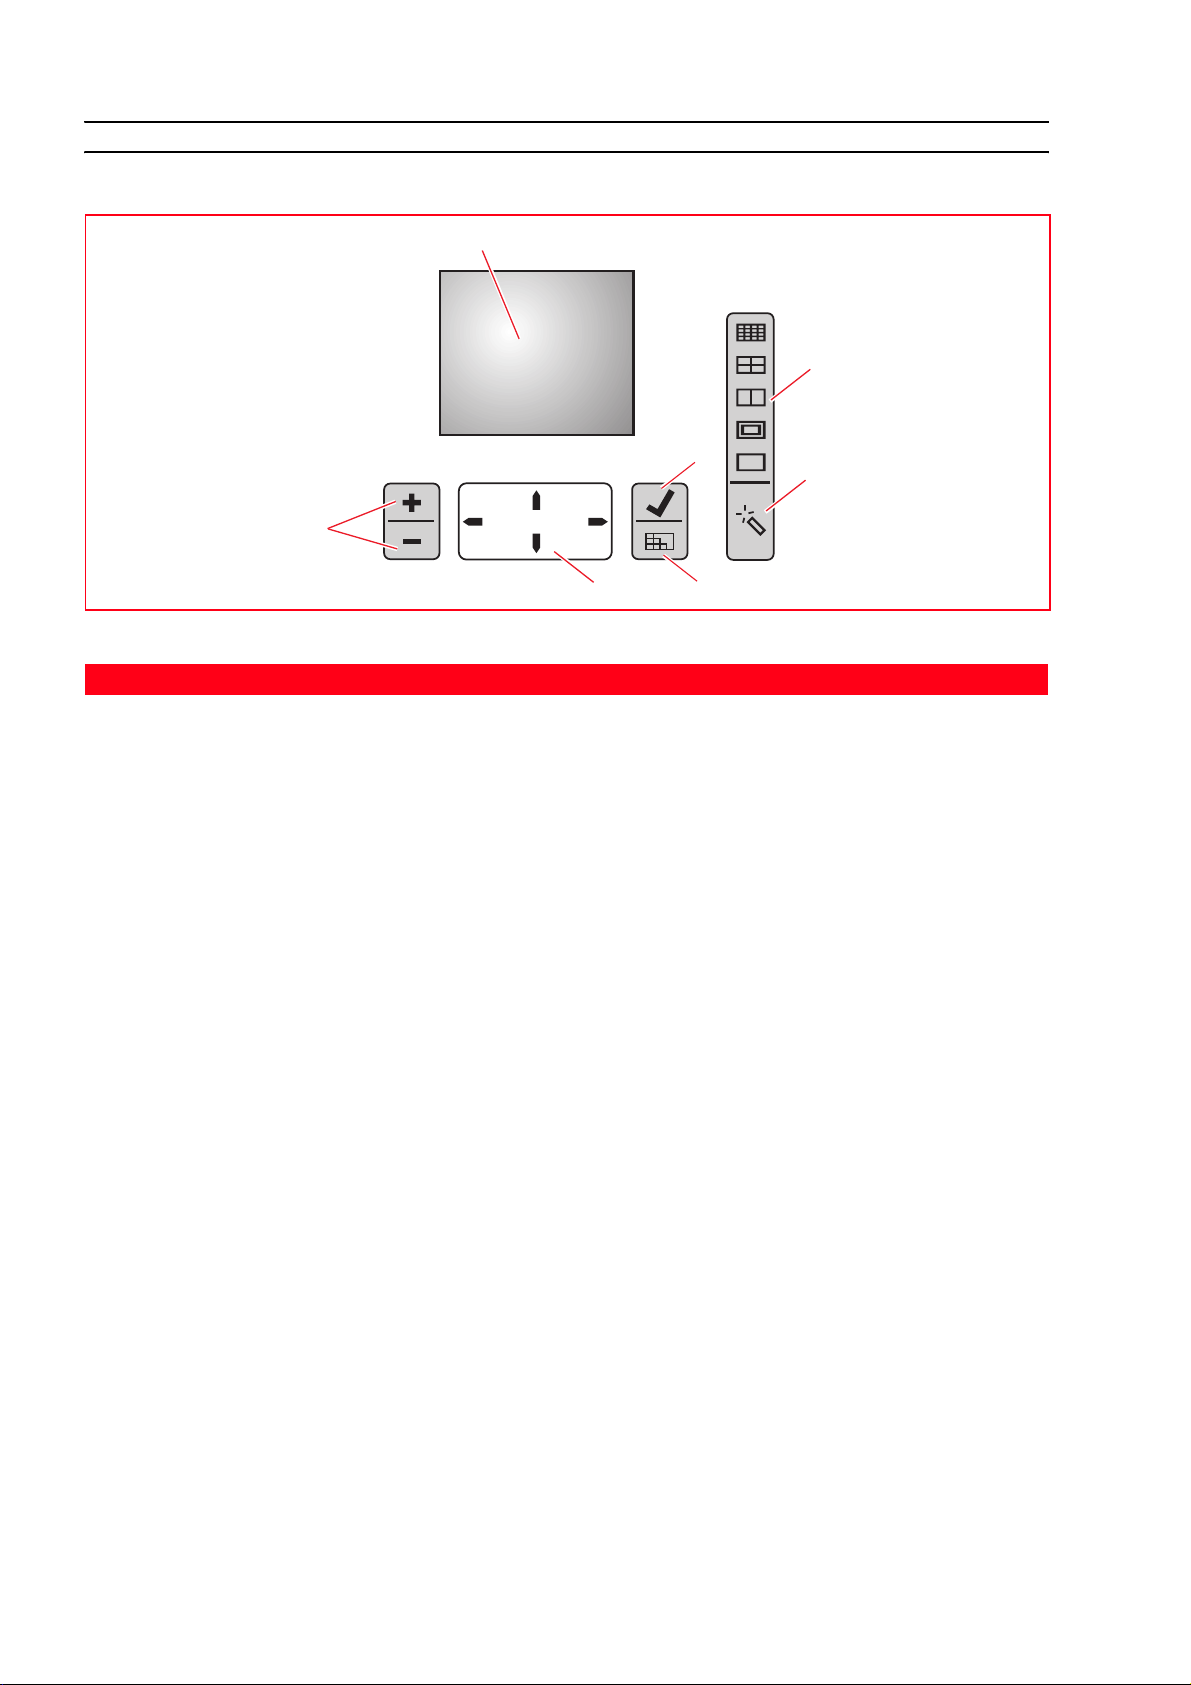
PHOTO PRINTING MANAGEMENT CONSOLE
2
1
3
6
4
7
Reference Part Description
1 No. of copies button • Press the Plus sign (+) button to increase the number of copies
(max. of 9) to be made.
• Press the Minus sign (-) button to decrease the number of
copies (min. of 1) to be made.
The selected number is displayed by the copy counter.
2 Colour display A 2.4" color Liquid Crystal Display (LCD) for previewing and
selecting your pictures.
The icon bar which, to the right, highlights the total number of
images selected for printing and, to the left, the icon that
represents the device connected, are shown in the lower part of
the display.
3 Page layout button Press to select the layout in which the photos will be printed on
the paper. Press this button sequentially to select:
• 1 borderless photo fitted on the page size
• 1 photo with borders and fitted on the page size
• 2 borderless photos fitted on the page size
• 4 borderless photos fitted on the page size
• the index of your pictures, which will be correctly printed if
already compiled by the device (digital camera). If an index is
not provided by the device, the printer will create its own
index of pictures by it may not be complete.
Only the icon selected remains ON.
5
4 Magic button Press the button to improve image quality.
The new image generated is not shown on the display or saved
but can be printed.
5 Display button Press this button to move from full screen display to thumbnail
(3x3 images).
6 Selection button Press this button to select/deselect printing of the image
highlighted.
CHAPTER 18
Page 15
Reference Part Description
7 Navigation button Makes it possible to move amongst the images displayed moving
a white highlight frame.
Hold down the button to automatically scroll from one image to
the next.
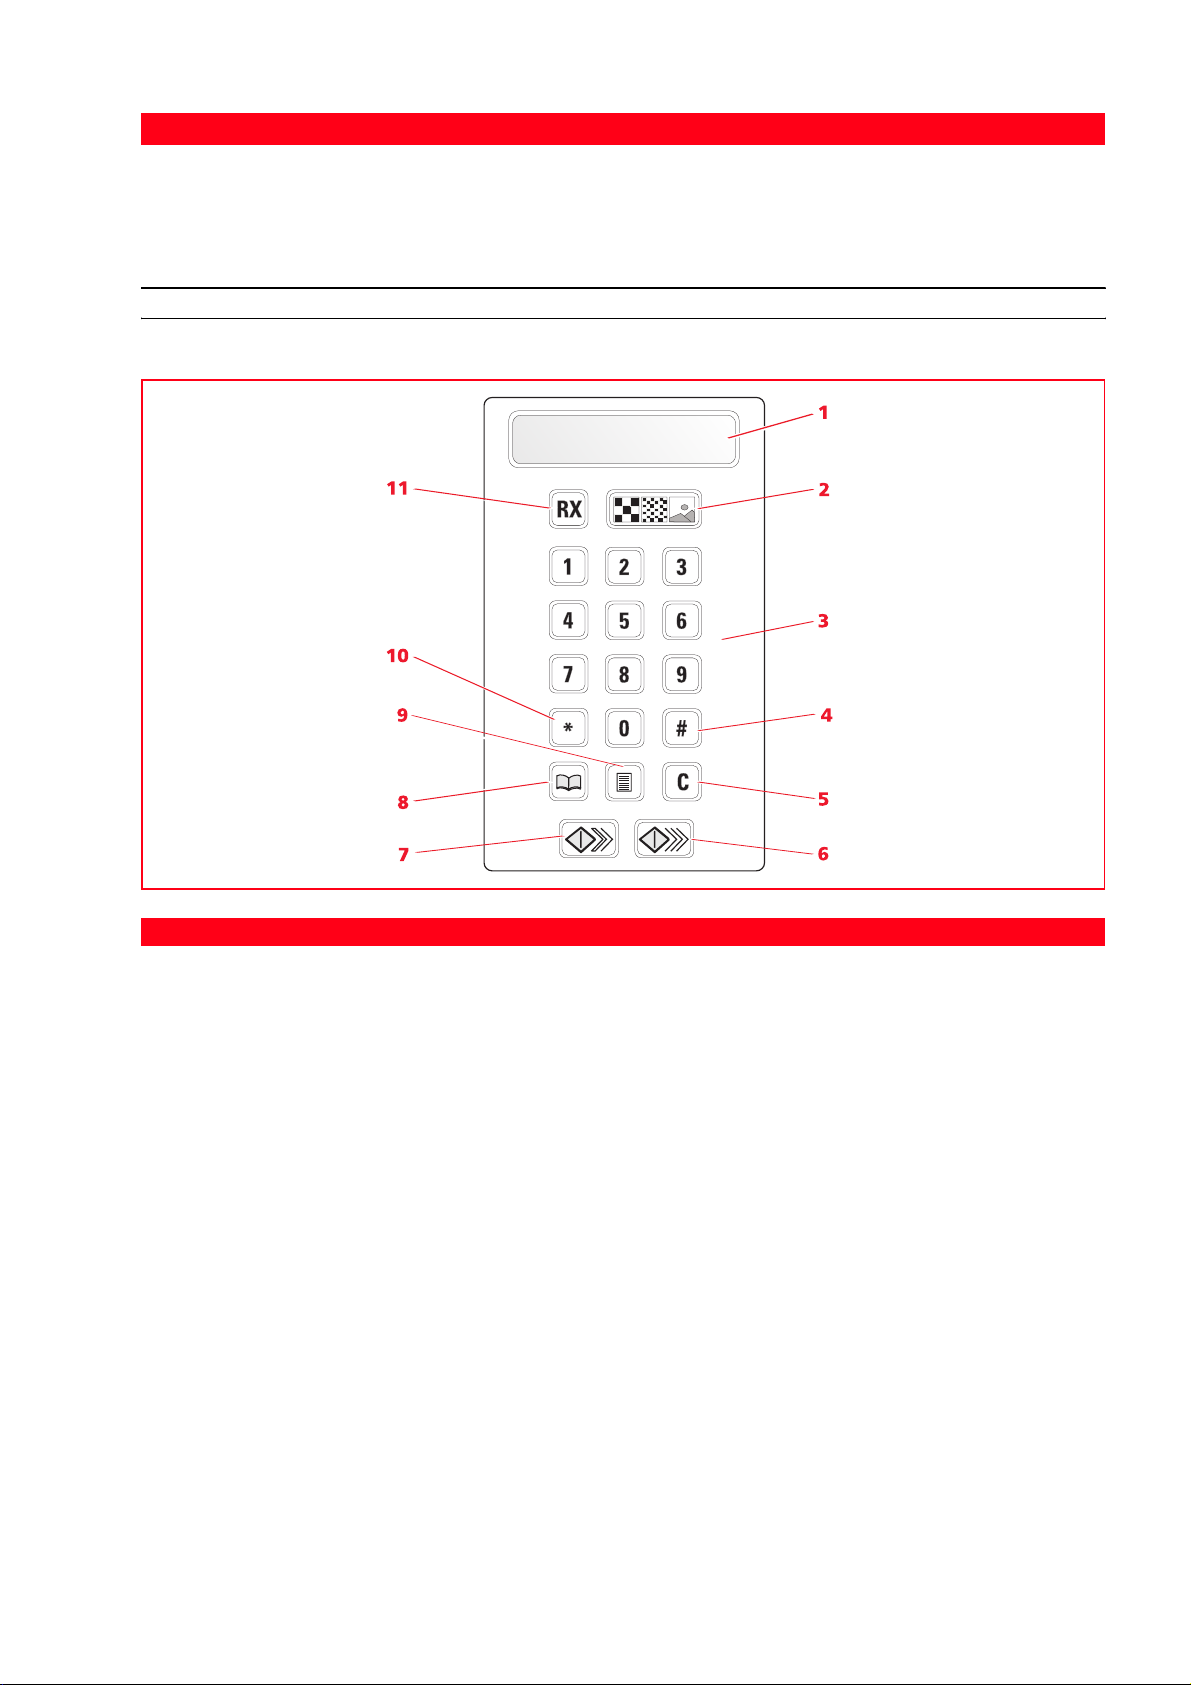
FAX CONTROL PANEL (FAX MODEL)
AUTO ANSWER
29/05/06
Reference Part Description
1 B/W display B/W alphanumeric LCD display with 2 lines of 16 characters each.
2 Fax quality selection
button
3 Numeric keypad
Press the button to modify the quality of the document to be
faxed.
Press the buttons to display the telephone number.
buttons
4 # button Press the # button to carry out special functions provided by the
telephone service manager.
5 Stop button Press the button to interrupt the current operation or to cancel
the phone number set.
6 Start color Fax button Press the Start button to receive or to send a color fax.
7 Start B/W Fax button Press the Start button to receive or send a B/W fax.
8 Agenda button Press the button to access the agenda. Pressing the button
enables a search for the name required in the agenda or the last
number called.
Agenda settings can be made only from the computer.
9 Report button Press the button to print a fax activity report.
10 Special functions
button
Press the special functions button to carry out operations
provided by the telephone service manager.
It is also used to switch from “Pulse” to “Tone dialing”.
GETTING STARTED 9
Page 16
Reference Part Description
11 RX button Press the button in stand-by mode to select reception mode:
• automatic reception (default setting).
• manual reception: advisable only if an additional telephone
has been connected.
• Telephone/fax: advisable only if an additional telephone has
been connected.
• TAD/fax: advisable only if an external answering device is
connected.
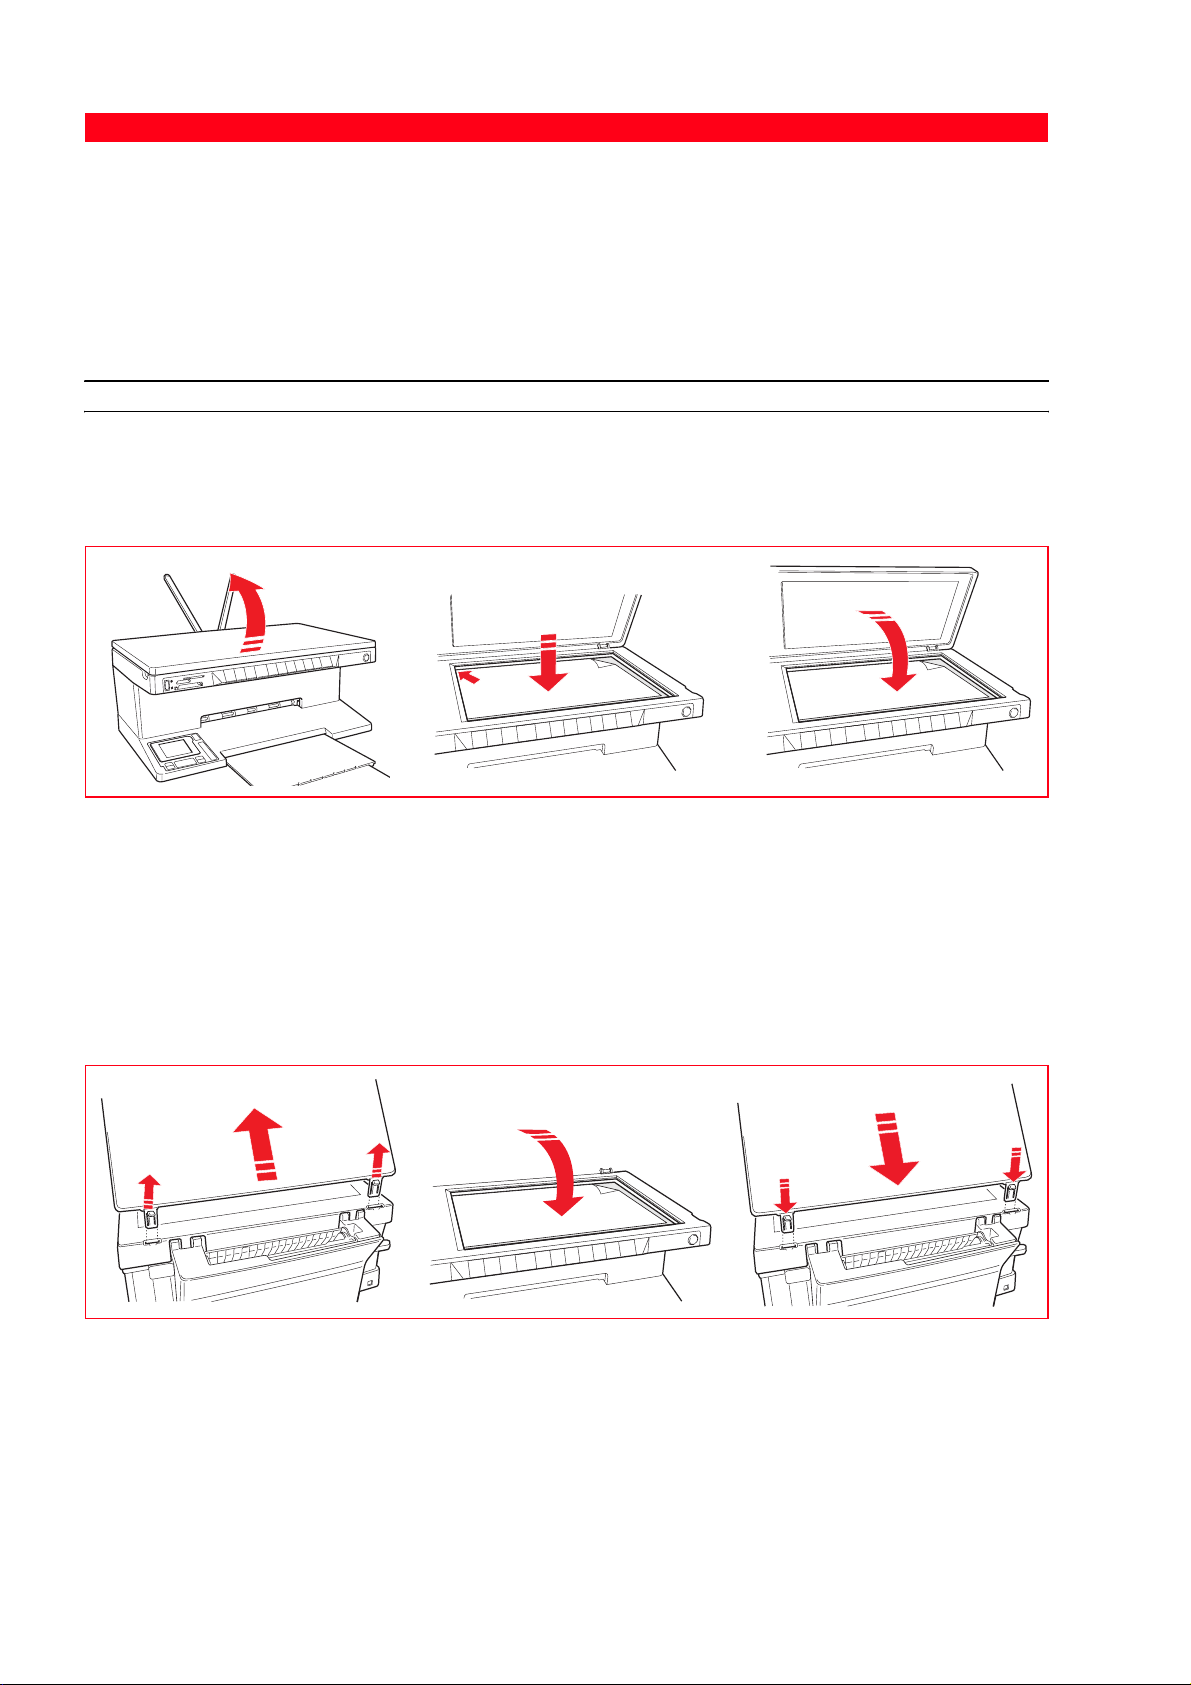
PLACING YOUR DOCUMENT ON THE SCANNER GLASS
1 Open the top cover.
2 Place the original document or photo to be scanned face down on the scanner glass and aligned with
the upper left corner. Close the top cover.
Placing of a bulky document on the exposure bed
1 To copy a bulky document such as a book, release the cover from its runners by pressing its securing
features and slide it off.
2 Place the original document or photo to be scanned face down on the scanner glass and aligned with
the upper left corner. Close the top cover.
3 If the top cover was removed, replace it after copying by sliding its tabs into the related slots on the rear
of the printer until they click into place. Close the top cover.
CHAPTER 110
Page 17

LOADING PAPER
1 Raise the two paper supports into their upright position, then squeeze and slide the paper width guide
to its outermost position.
note: When raising the paper supports make sure that they are in their correct upright position.
2 Load the paper vertically (portrait orientation), the side to print on facing the front of the printer and
against the guide on the right side of the paper support.
Squeeze and slide the left paper guide against the left edge of the paper.
GETTING STARTED 11
Page 18

Loading Different Types of Paper
To load: Proceed as follows:
Plain paper, coated
paper, glossy paper,
photo paper,
greeting cards,
index cards, post
• Load the media vertically against the right side of the paper support and with
the print side facing up.
• Squeeze and slide the paper guide against the left edge of the paper.
note: Load letterhead paper with the top of the letterhead entering the printer
first and facing up.
cards, envelopes,
transparencies,
ink-jet labels
Banner paper • Remove all paper from the paper support.
• Insert the leading edge of the banner paper vertically into the printer against
the right side of the paper support and with the print side facing up.
note: Do not use perforated fan-fold banner paper.
• Squeeze and slide the paper guide against the left edge of the banner paper.
Iron-on transfers • Read the instructions on the transfer package.
• Load the sheets vertically against the right-hand side of the paper support and
with the side to be printed facing towards the front part of the machine.
• Squeeze and slide the paper guide against the left edge of the transfer.
STATES OF THE FRONT PANEL OF THE PRINTER
Turning On Your Printer
Press the ON/OFF button on the right of the front panel.
note: Before pressing the ON/OFF button, make sure that the printer’s power cord is plugged into a
grounded electrical outlet. See the Setup Diagram, included in the printer’s box, for information on
how to setup your printer.
After pressing the ON/OFF button, the printer executes a series of autodiagnostic tests aimed at
detecting any possible system malfunction. Any error detected at this time will be signalled by the front
panel, or by the personal computer if connected to the printer. See "Meaning of the LED Indicators on
the Front Panel" for the corrective actions in case any error is detected.
Upon the successful completion of the autodiagnostic phase, certain buttons on the front panel will
illuminate to indicate the functions that are available according to the current printer configuration
(whether or not it is connected to a computer or to a digital camera).
When the printer is not connected to a computer, the following indicators or buttons are
illuminated:
CHAPTER 112
Page 19
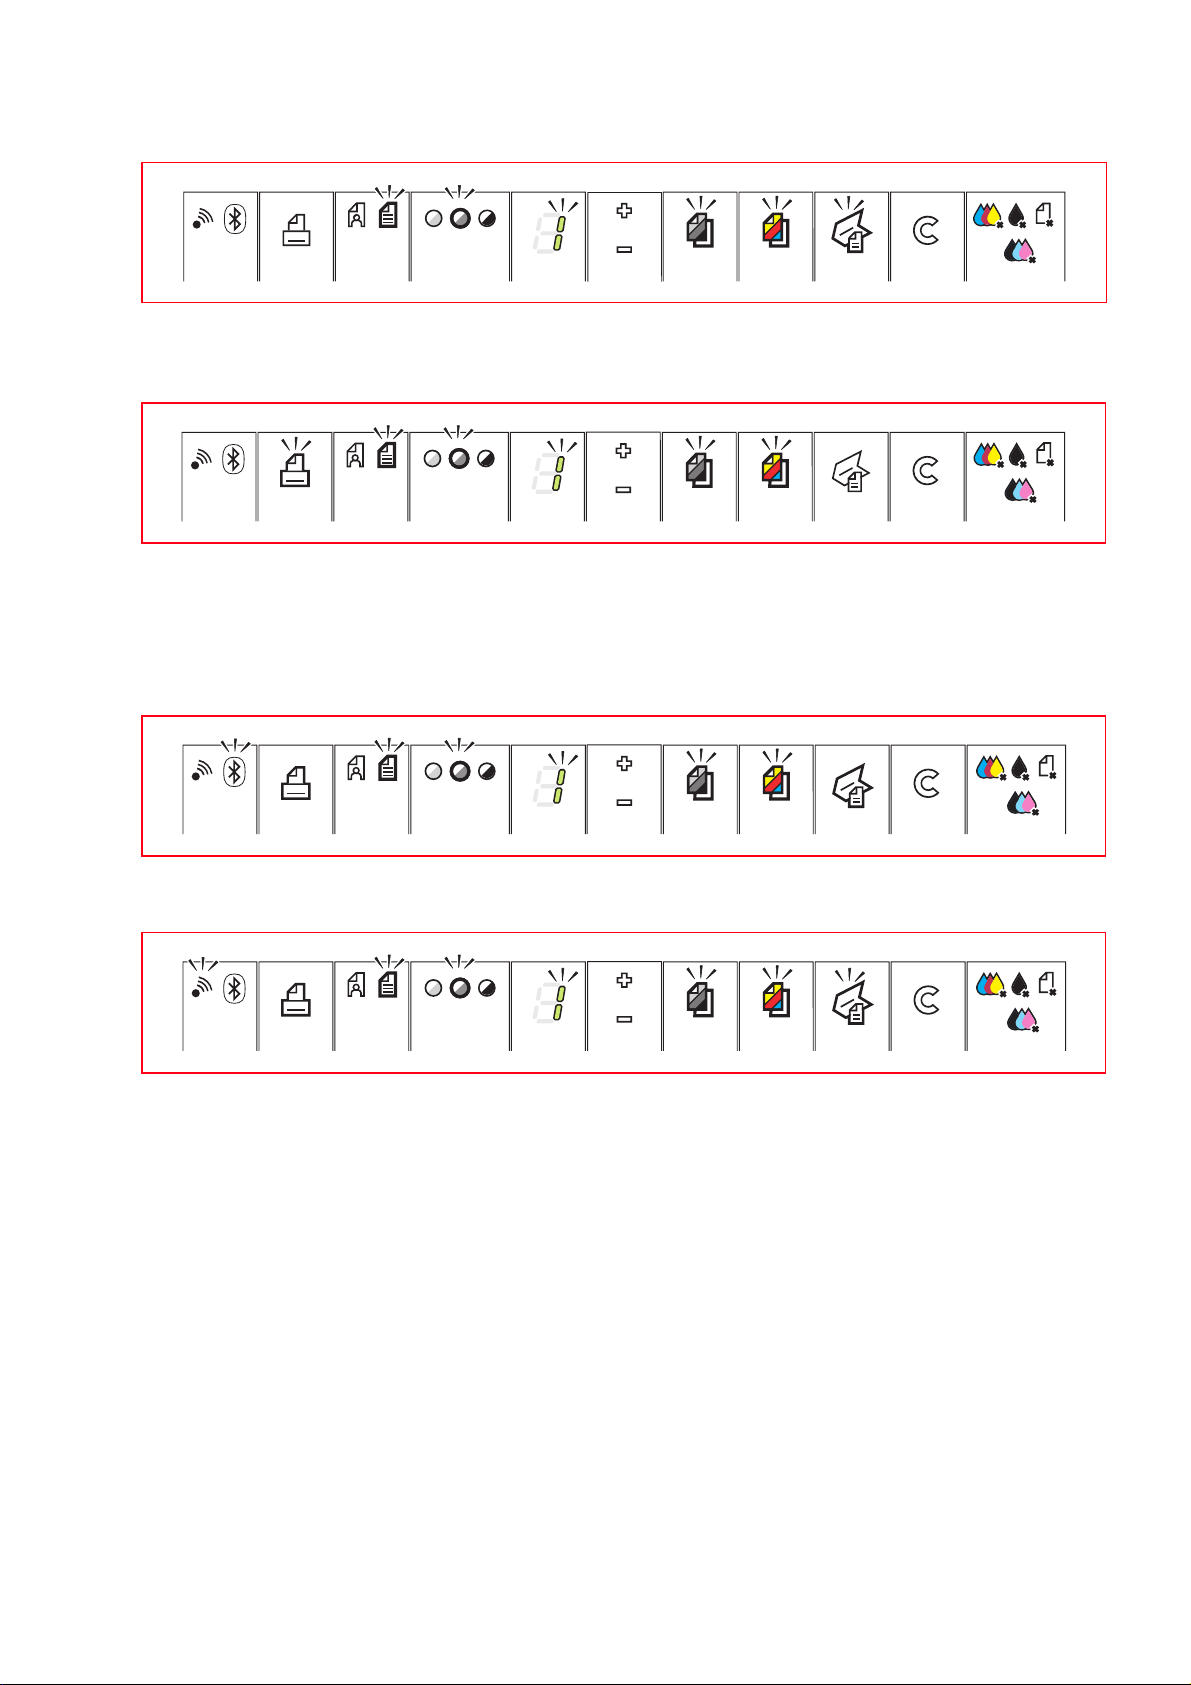
When the printer is connected to a computer, the following indicators or buttons are illuminated:
When a non-PictBridge digital camera is connected to the printer, the following indicators or
buttons are illuminated:
When a PictBridge digital camera is connected to the printer, the indicators or button icons are
illuminated according to whether the printer is connected or not to a computer. See the related
configurations above.
The blue Bluetooth led is ON when connectivity is active and therefore available for connection.
The green Wi-Fi led is ON when the connection to the wireless network is active.
Turning Off Your Printer
Press the ON/OFF button on the right of the front panel. All the lights on the front panel will turn off.
note: Switching off of the printer (fax model) causes cancellation of all the data in the memory and of
the current date and time and is therefore not recommended.
If there are data in the memory, a warning is shown on the display and switching off is inhibited.
Printer Stand-by/Economy mode
The printer features Standby and Economy states.
With Standby, the printer waits for a signal from the front panel or from the USB port connected to the
computer; the front panel remains ON as in normal operating conditions.
In Economy mode, after a period of time that can be programmed from the Toolbox, the printer
switches to energy saving mode: the keyboard switches off and only the display remains on, indicating
the number of copies. In this case also, the printer is re-activated when any signal is received.
GETTING STARTED 13
Page 20
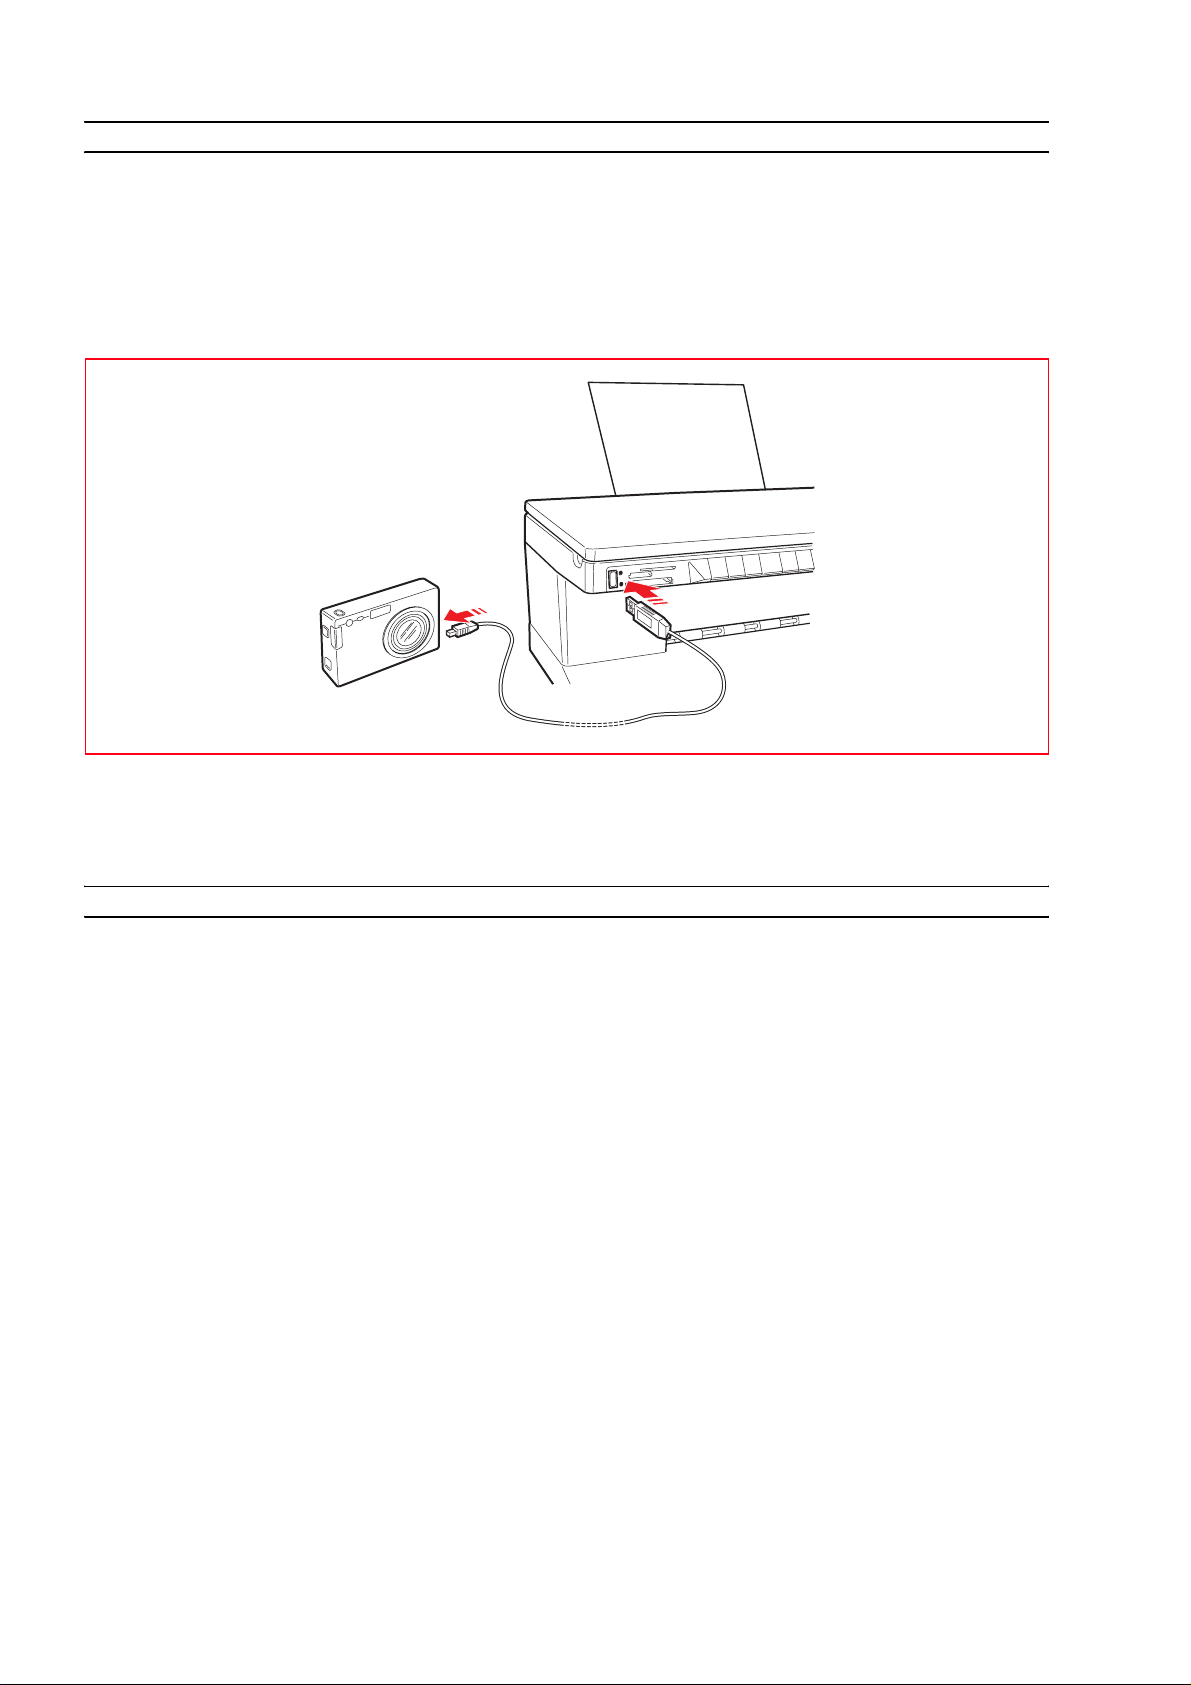
CONNECTING A DIGITAL CAMERA TO YOUR PRINTER
1 Turn on your digital camera. Read your camera’s User’s Guide for more information.
2 With your printer powered on, plug one end of the digital camera’s USB cable to the USB connector on
the camera and the other end to the USB connector on the printer front panel.
note: When you connect a PictBridge digital camera to your printer, only the print icon on the front
panel will turn off to indicate that printing will be controlled directly from the digital camera. Read your
camera’s User’s Guide for instructions on how to print your photos.
The USB green status light switches on to indicate connection of a digital camera.
If the printer does not recognize the digital camera connected, the red light switches on.
Make sure that you have connected a compatible device.
INSERTING AND REMOVING MEMORY CARDS
After taking pictures with your digital camera, you can remove the memory card where the pictures
taken are stored and insert it into your printer so that you can view and print them. Your printer can
read the following memory storage devices: Compact Flash I, II, Microdrive, SmartMedia, SecurDigital
and MultiMedia cards, Memory Sticks (Duo, Pro, Magic Gate) and xD-Picture cards.
note: Adaptors for reading Mini SD and MS Pro memory cards can be purchased separately.
Your printer can recognize and print the following file formats stored on the memory cards: DCF, JPEG,
Extif and DPOF.
Inserting a Memory Card
Before proceeding to insert the memory card into its related slot, follow these insertion guidelines
according to the card that you are using:
• When inserting a CompactFlash card, make sure that the label is facing upward (if the label has an
arrow it needs to be pointing towards the printer) with the metal pinholes entering the printer first.
• When inserting a Multimedia and SecureDigital cards, make sure that the angled corner is on the right
and the metal contacts are facing downward.
• When inserting a SmartMedia card or a Memory Stick, make sure that the angled corner is on the left
and the metal contacts are facing downward.
• When inserting a xD-Picture Card, make sure the curved side of the card is facing you and the metal
contacts are facing downward.
note: It is important that you remember the correct orientation of the card when you insert it into the
printer as inserting it any other way could damage the card and the printer.
CHAPTER 114
Page 21
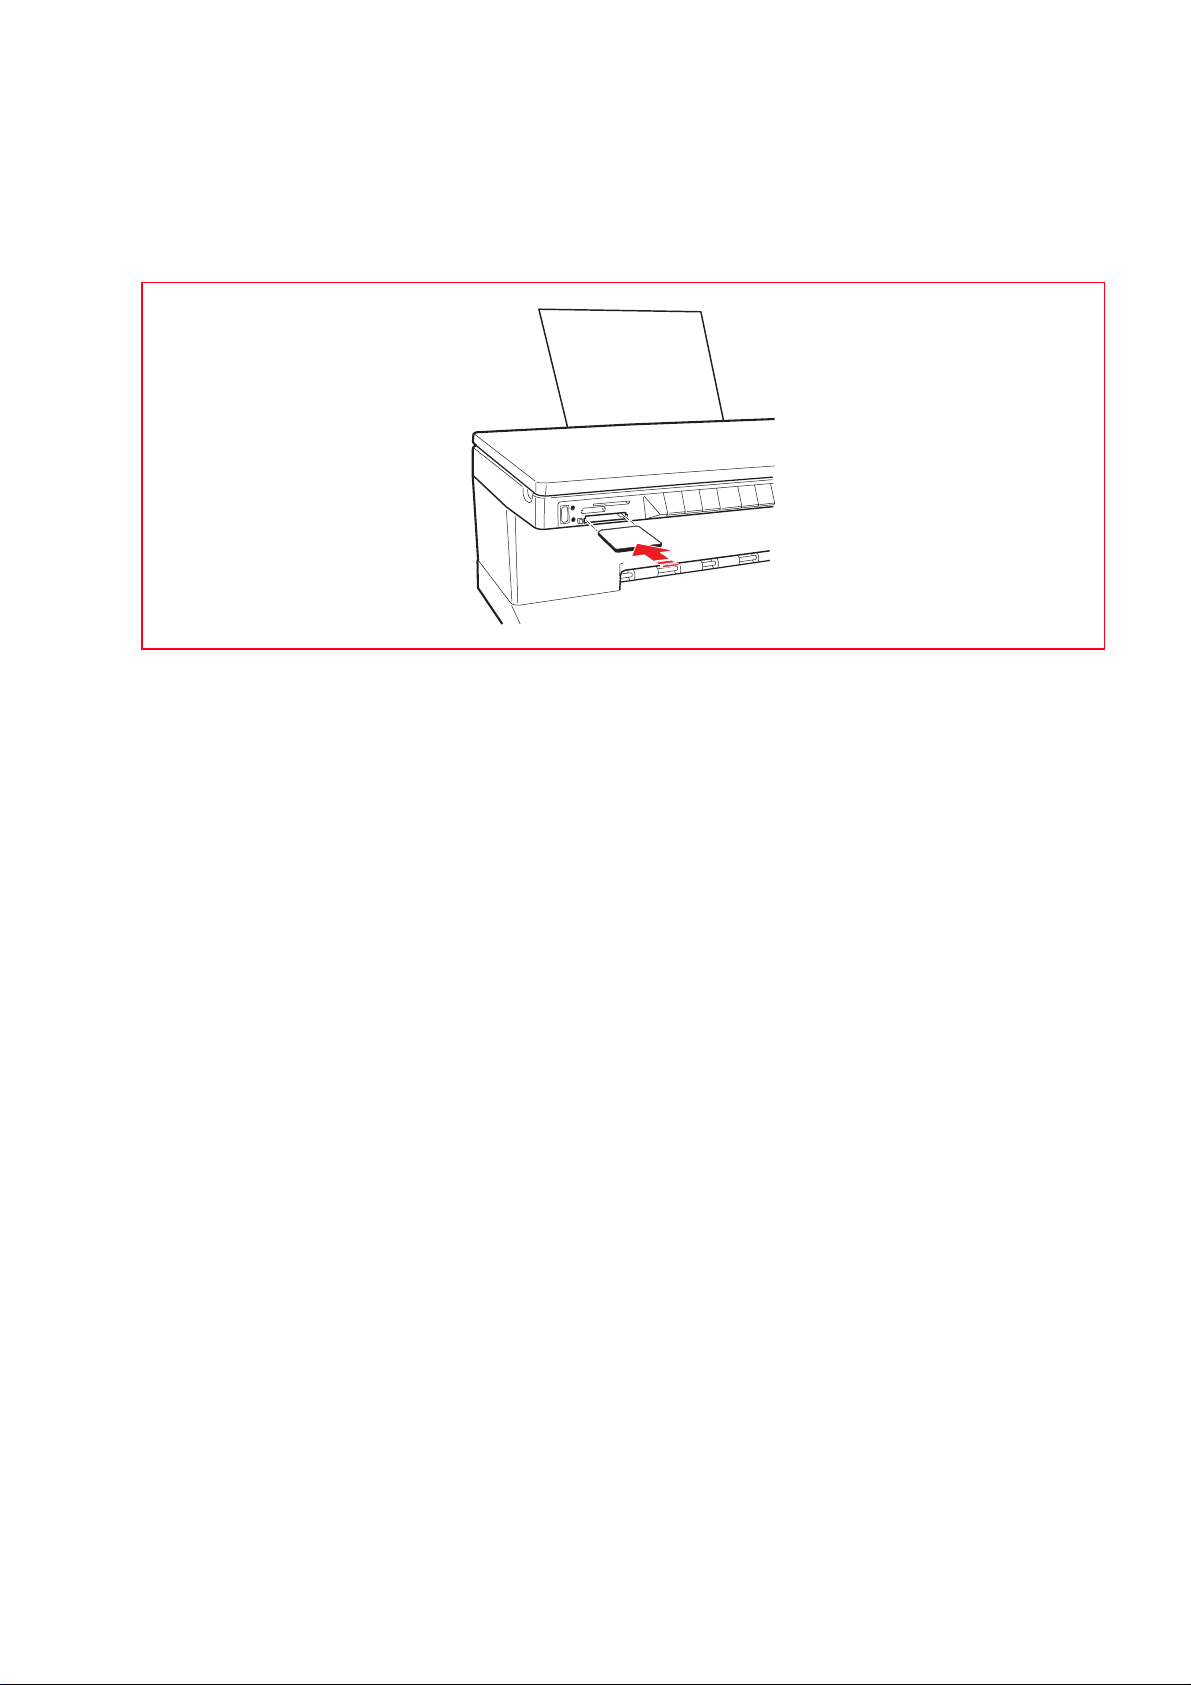
1 On your printer’s front panel, choose the correct slot for the memory card that you wish to insert.
2 Orient your specific memory card as indicated at the beginning of this section, carefully insert it into the
slot and gently push it in until it stops. The following figure shows an example of the insertion of a
MultiMedia card.
note: The memory card does not go in all the way; do not try to force it in since doing so will damage
the card and the printer.
If the card is inserted correctly, an iconis displayed on the LCD indicating the total number of photos
stored on the memory card (only the compatible files are opened and counted).
Removing a Memory Card
1 Carefully pull the card completely out of its slot.
CAUTION: DO NOT remove the memory card while it is still being accessed either by the printer or
personal computer since doing so could damage the photos stored on the card.
The printer’s Idle screen is displayed next, indicating that your printer is in stand-by waiting for further
operating commands.
GETTING STARTED 15
Page 22

ACTIVATION IN BLUETOOTH MODE (WIRELESS MODEL)
The wireless model permits direct printing of images captured using a mobile phone via Bluetooth
wireless connectivity.
To verify whether the Bluetooth capability is available, check that the blue led of the Bluetooth icon is ON.
If the blue led of the Bluetooth icon is OFF, proceed as follows:
• In the Windows environment:
1 Carry out USB installation as described in the documentation "Setting up your printer".
note: If installation has already been performed, it is not necessary to repeat it.
2 Open the Toolbox program (Start > Olivetti > Programs > Toolbox).
note: The USB cable must be connected and the printer must be ON.
3 Click on the "Settings" button and then on "Bluetooth Settings" to access configuration of
Bluetooth parameters.
4 Enable Bluetooth mode and click on "Send settings": wait for automatic reception of the data of the
Bluetooth network present: the blue light on the printer lights up.
Close the "Toolbox" program.
5 The printer is not able to operate in the Bluetooth environment.
If a password is requested in the connection phase, enter "0000" (or other if set by the user).
• In the Mac OS X environment:
1 Carry out USB installation as described in the documentation "Setting up your printer".
note: If installation has already been performed, it is not necessary to repeat it.
2 Run the Toolbox program from the desktop.
note: The USB cable must be connected and the printer must be ON.
3 Click on the "Settings" button and then on "Bluetooth Settings" to access configuration of
Bluetooth parameters.
4 Click on "Bluetooth Status". Activate Bluetooth mode and wait for automatic reception of the data
of the Bluetooth network present: press "Apply".
Close the "Toolbox" program.
5 The printer is not able to operate in the Bluetooth environment. If a password is requested in the
connection phase, enter "0000" (or other if set by the user).
CHAPTER 116
Page 23

INSTALLING THE WI-FI SYSTEM (WIRELESS MODEL)
Prerequisites
For initial installation or configuration of the printer, the following are required:
• A USB cable (not included in the packaging)
• A desktop or portable computer with active wireless device
• In the case of installation in infrastructure mode, an operating and functioning wireless network.
note: If you have just bought a portable or a desktop computer, consult the user guide provided to
activate and configure the wireless network settings.
Installation
For correct installation of the printer in Wi-Fi mode:
• Carry out USB installation
• Activate the Wi-Fi component of the printer
To enable wireless communication from the computer, use the software of the printer (Toolbox
application) selecting Ad-Hoc mode (peer to peer) or Infrastructure (with point of access)
Initially, the photo wireless model is set to connection via Bluetooth; enabling the Wireless
note:
connection, Bluetooth is automatically disabled: the two connections cannot be active at the same time.
• Create the network connection between the computer and the printer
• Perform Wi-Fi installation
To add the printer to the list of printers available in the system.
USB and Wi-Fi installation are carried out using the same "Installation" CD-Rom provided with the
printer; on completion, it will be possible to use the connection via USB cable and Wi-Fi mode.
For further information, consult the "Wifi Info" guide.
Installation in Macintosh environment
1 Switch on the computer and insert the "Installazione" (Installation) CD-ROM.
2 Connect the USB cable (not provided) to the printer and to the computer, switch on the printer.
3 Double click on the icon of the CD-ROM on the desktop and then on "Olivetti Series Installer.app".
4 Follow the instructions shown on the screen in order to carry out installation in USB mode.
5 To complete installation, it may be necessary to reboot the system.
6 After completing USB installation successfully, run the Toolbox program from the system desktop or
from the list of available programs.
note: The USB cable must be connected and the printer must be ON.
Click on the "Settings" button and in the next screen page "Wifi Settings".
7 Click on "Wireless Settings". Activate "Wireless Status" mode, set the Wi-Fi parameters of the
network and press "Apply": wait for automatic reception of the Wi-Fi network data: the green light
on the printer switches on.
note: Use of Mac OS X 10.2 or higher is recommended.
note: Access to the "wireless network" depends on the settings of the Wi-Fi network present on the
computer.
Consult the documentation of the computer to make the Wi-Fi connection.
8 Close the "Toolbox" program.
9 At the end, to set the printer, select System preferences > Print and Fax >. Select the ANY_WAY
printer present in the list and press the "+" key; find and select the ANY_WAY printer to add this to the
list of available printers.
10 The printer has been added to the list of printers available on the system and is now able to operate in
the Wi-Fi environment.
note: Wi-Fi and Bluetooth mode cannot be activated at the same time.
In Wi-Fi mode, the USB cable can be disconnected. For specific settings on the wireless network, refer
to the documentation provided with the computer.
The operating procedures for the various personalized settings are indicated below.
GETTING STARTED 17
Page 24

PRINTER NETWORK CONNECTION (WIRELESS MODEL)
To connect the wireless model printer to a network, you must set the method of communication that
defines the way in which the peripherals, such as computers and printers, communicate on a wireless
network.
Using the printer in Wi-Fi mode (i.e. without wires on radio waves), two different methods are available
for wireless communication:
• Infrastructure (Access Point): The printer communicates with network computers via a basic station
or wireless access point. The access point acts as central hub or gateway, connecting wireless
peripherals.
In infrastructure mode, all wireless communications between network peripherals pass through an
access point. Each wireless network peripheral must have a wireless network adapter for connection to
the access point.
Ad-Hoc (Peer-to-Peer) (pre-defined setting): The printer communicates directly with the computer
without passing through an access point. Each wireless peripheral in an Ad-Hoc network must have a
wireless network adapter. The adapter allows each peripheral to communicate with the other network
peripherals.
Use of Ad-Hoc mode is usually restricted to simple, relatively small wireless networks as performance
tends to deteriorate considerably following connection of several peripherals in the network.
note: (wireless model) If the printer has been set previously for Bluetooth and you no longer wish to
use this mode (or Wi-Fi mode is to be used instead of this), run the Toolbox program and in the settings
de-activate "Bluetooth". Bluetooth and Wi-Fi mode cannot be activated at the same time.
CHAPTER 118
Page 25

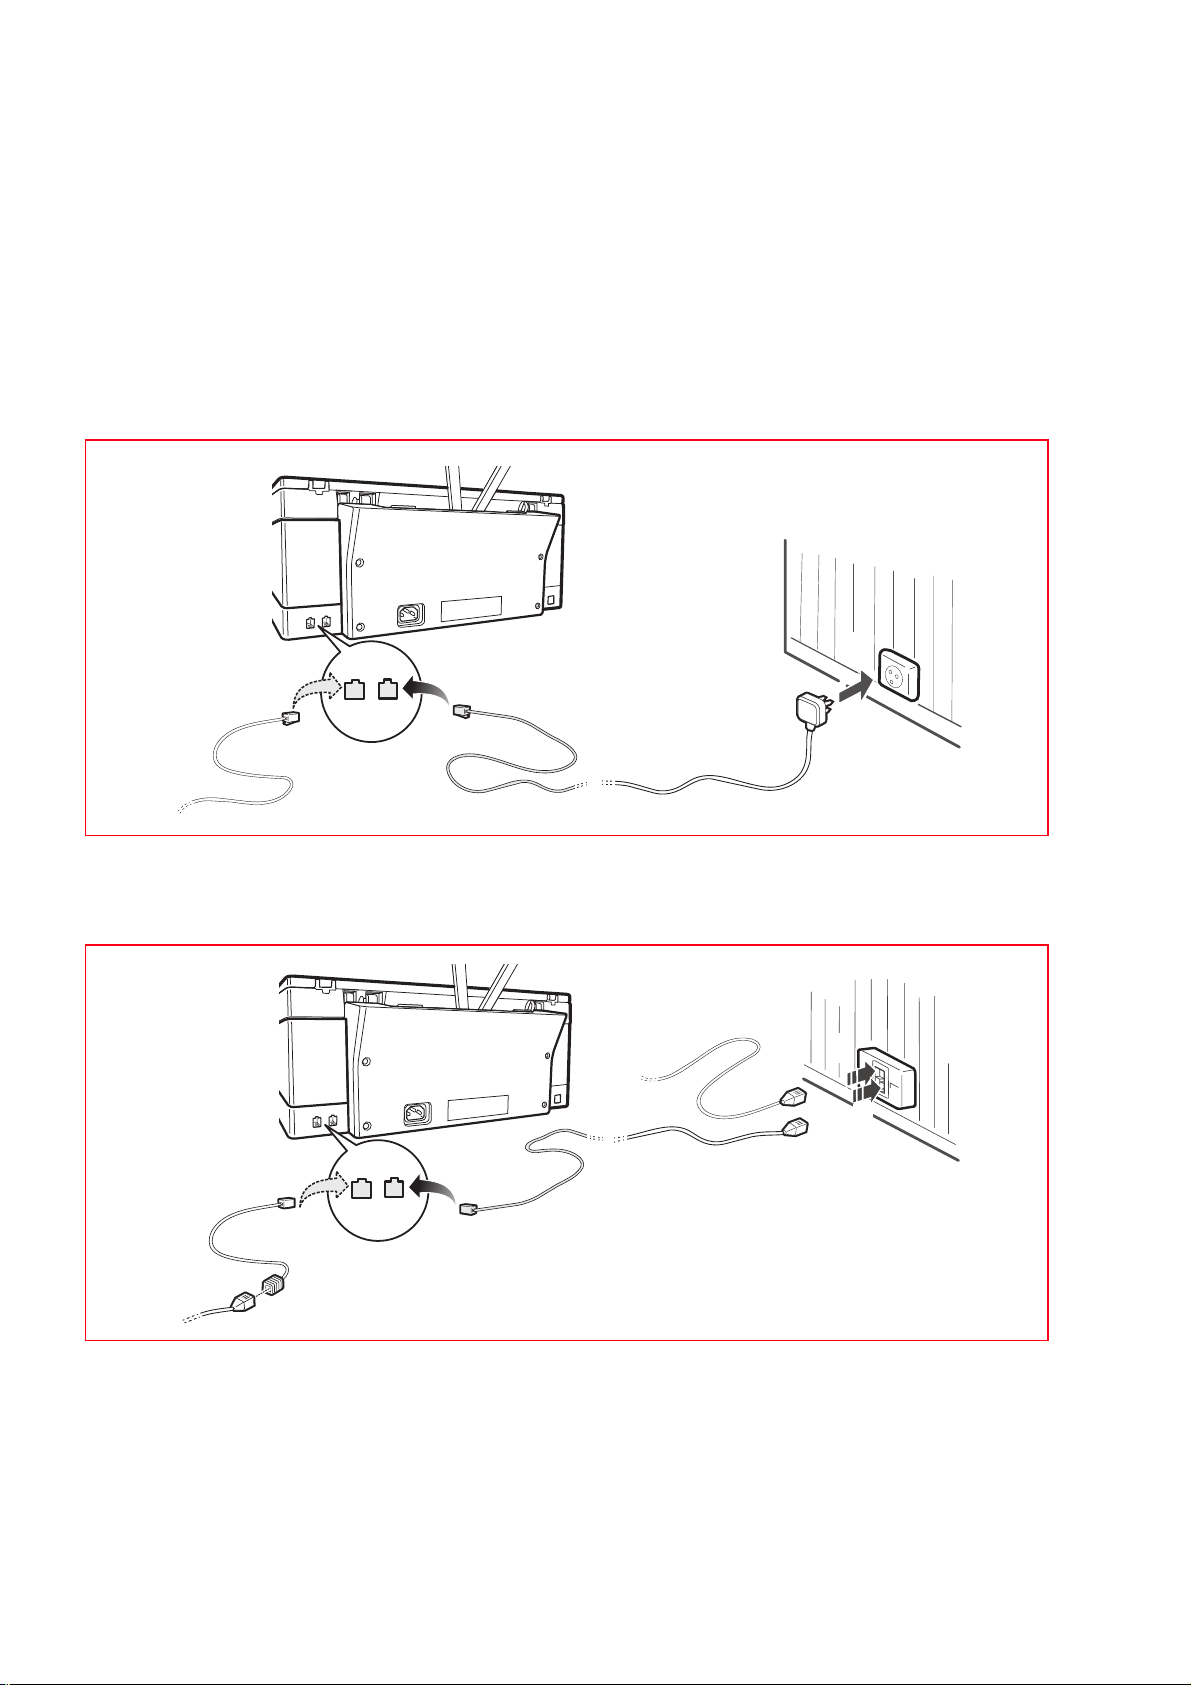
CONNECTION OF THE PRINTER TO THE TELEPHONE NETWORK (FAX MODEL)
Two RJ11 connectors, one "LINE" and one "EXT", are present on the back of the printer.
Using the telephone cord provided, connect the telephone line to the "LINE" socket on the back of the
printer.
An external telephone, a modem or TAD (Telephone Answer Device) can be connected to the "EXT"
socket.
The telephone connected in cascade can be used to make calls, to reply or to send a START signal in
order to receive a fax (DTMF code).
In this case, the display of the fax control panel on the printer shows a message indicating that an
additional telephone is on line.
Connection to the telephone network
As connection of the fax or additional telephone or other equipment to the telephone line is subject to
national regulations which vary from country to country, the diagrams below illustrate various examples
of number of connections. If, in the destination country, connection to the telephone line differs from
those specified in the examples, refer to current regulations in the destination country.
The fax is set for connection to the public telephone line. To connect it to a private line and to use it
also on a public line, refer to the paragraph “Installation of the fax”.
note: In the case of a multiple-socket telephone system, additional telephone appliances can be
connected to any of the available sockets provided that the system is of the type with several sockets in
parallel, i.e. if the dial tone is always present when the hand-sets of the pre-existing telephone
appliances are lifted at the same time.
note: If the dial tone is not present when the hand-sets of the pre-existing telephone appliances are
lifted at the same time, this means that the telephone system is of the type with several sockets in
series. In this case, the additional telephone appliances must be connected directly to the printer as
already explained above. If this is not possible, connect the printer to the socket with the lowest
priority.
Each country uses a specific telephone plug; the most frequently used connections are illustrated
below.
GETTING STARTED 19
Page 26
Connection case 1 (Italy and Switzerland)
On the back of the printer remove if necessary the cover of the "EXT" connection socket to the
telephone line and insert the connector of the additional telephone or other device in the abovementioned socket (see related diagram). If it is not possible to connect the additional telephone directly
to the "EXT" socket, use the specific adapter (which differs from country to country).
A = telephone line input (LINE IN)
B = wall socket for telephone plug
C = socket for external telephone, modem or telephone answering device (EXT)
D = socket for external telephone, modem or telephone answering device or other appliances
Connection case 1 Italy
A
C
C
LINE
EXT
C
Connection case 1 Switzerland
A
C
C
LINE
EXT
C
A
B
B
D
D
B
B
A
CHAPTER 120
Page 27
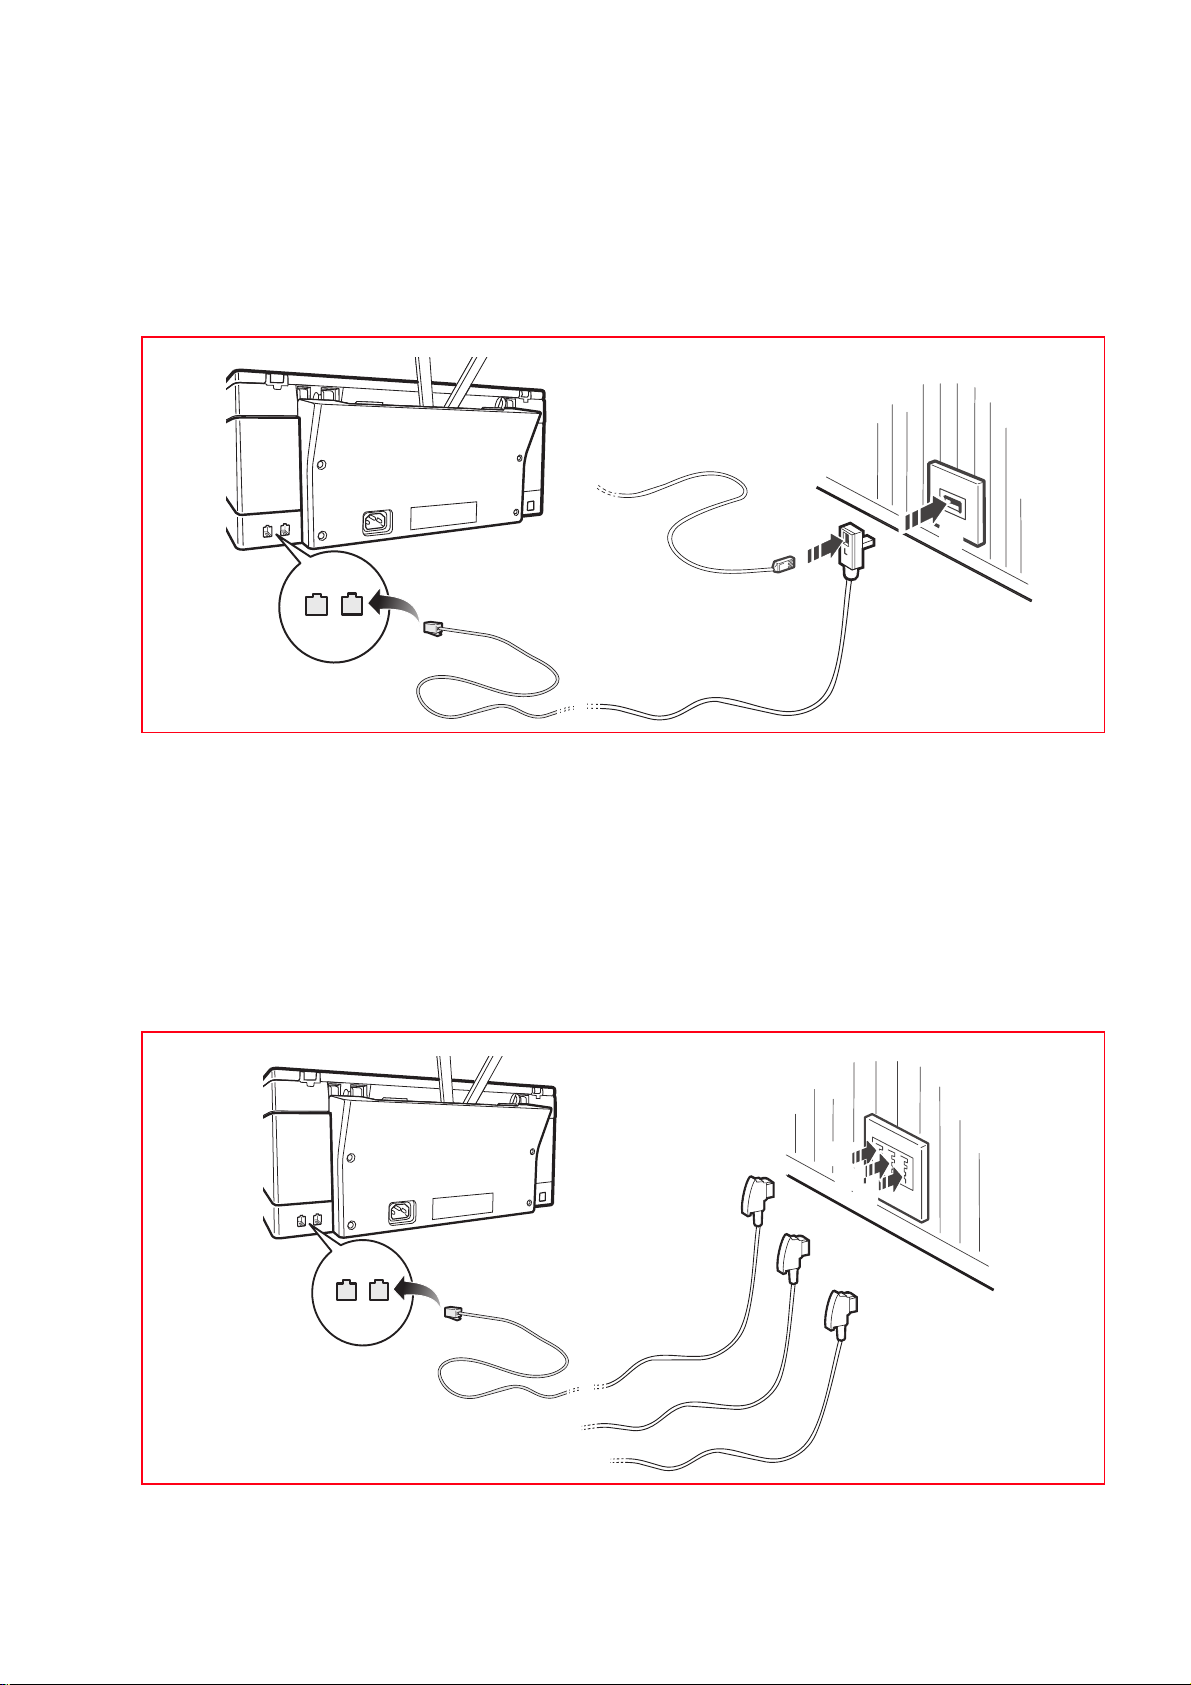
Connection case 2
Insert the connector or the plug (different from country to country) of the additional appliance in the
above socket (see the related diagram).
A = telephone line input (LINE IN)
B = wall socket for telephone plug
C = socket for external telephone, modem or telephone answering device (EXT)
D = socket for external telephone, modem or telephone answering device or other appliances
C
A
C
C
LINE
EXT
Connection case 3
Insert the plug of the additional appliance in the connection socket (wall type) to the telephone line
(see related diagram).
Also, using the specific adapter (as for the first type of connection), another appliance can be
connected in the "EXT" connection socket to the telephone line on the printer.
A = telephone line input (LINE IN)
B = wall socket for telephone plug
C = socket for external telephone, modem or telephone answering device (EXT)
D = socket for external telephone, modem or telephone answering device or other appliances
A
C
B
B
C
EXT
A
LINE
A
B
C
B
C
B
D
D
GETTING STARTED 21
Page 28

HOW TO INSTALL THE FAX (FAX MODEL)
After connecting the telephone cord and the power cord, press the ON button of the printer; a self-test
cycle is run and on completion a message indicating that the printer is ready for use as Fax is shown on
the display. If a list of available languages is shown in sequence on the display, use the numeric keypad
to select the language desired. The same procedure must then be carried out for selection of the
nationality, current date and time and any other settings that vary according to nationality and the
country selected.
Installation
1 If the printer has not been preconfigured, at power-on all the languages available are shown in
sequence on the display.
2 When the languages available are shown in sequence on the display with 2 digits "nn" which identify
these, press the keys referring to the number "nn" which matches the language desired.
3 Confirm selection pressing the key; the display shows possible selections for the destination
country.
note: If you press the key, you will return to point 2.
Each country shown on the display is identified by a number "nn" with which it is associated.
4 Press the keys of the "nn" number corresponding to the destination country desired.
5 Confirm your selection pressing the key; the display shows setting information of the current
data and time.
note: If you press the key, you will return to point 4.
6 Use the fax control panel and enter the date and time from the numeric keypad.
Set the date confirming this with the Start Fax button.
Set the time confirming this with the Start Fax button.
7 On completion, confirmation of the data entered is requested with the possibility of confirming with
the key or o canceling with the key.
8 Press the key; the request to enter the phone number of the sender is shown on the display.
note: Pressing the key, it is possible to return to setting of the current date and time return to
point 6.
9 Enter your phone number and then confirm with the Start Fax button.
note: Pressing the key, it is possible to cancel the digits entered. Pressing the key restores
previous status for entry of the telephone number (return to point 9).
10 Press the key, the printer switches to stand-by mode and is ready for use.
In certain countries, further settings are necessary; in these cases, continue installation.
11 After the phone number has been confirmed, a prompt to set recognition of the rhythm of the rings is
shown on the display. Press the 1 key to access the setting procedure.
Pressing of the key returns to stand-by mode and the printer is ready for use.
CHAPTER 122
Page 29

note: The ring rhythm recognition feature is available in certain countries and makes it possible to
assign two or more numbers corresponding to different users to the same telephone line.
When a call is received, the different rhythm of the rings will indicate which user must reply.
This function is very useful in the home or in small offices where the same telephone line is shared by
several people.
The Fax is able to learn one of these rhythms; in this way, when a call is received with that specific
rhythm, the Fax (in TAD/FAX reception mode) prepares always and only to receive a document. This
function is particularly suitable if associated with silent reception as the Fax will ring only in the case of
a phone call.
12 If the key has been pressed, a message is displayed indicating auto-recognition of the rhythm of
the rings. Calling the printer at the dedicated phone number, using the rhythm desired, the sequence
of the rings will be detected automatically. Confirmation of auto-recognition is provided on the display.
13 Fax installation has now been completed; the printer remains in stand-by mode.
note: In the case of a blackout, the date and time will be lost. At power-on, the printer requests entry
of the date and time:
press in sequence the keys + Start fax button.
note: If you wish to repeat the fax installation procedure in stand-alone mode, enter the following keys
in sequence: + + .
note: If your country is not amongst those shown on the display, refer to the following table:
Country
Argentina
Australia
Austria
Belgium
Brazil
Chile
China
Colombia
Denmark
Finland
France
Germany
Greece
Israel
Italy
Ireland
Luxembourg
Country to be Selected
AMERICA LATINA
NZL/AUSTRIA
ÖSTERREICH
BELGIUM
BRASILE
AMERICA LATINA
CHINA
AMERICA LATINA
DANMARK
FINLAND
FRANCE
DEUTSCHLAND
GREECE
ISRAEL
ITALIA
UK/IRLANDA
BELGIUM
Country
Mexico
New Zealand
Norway
The Netherlands
Portugal
Perù
Czech Republic
Rest of the world
Spain
South Africa
Sweden
Switzerland
Turkey
UK
Uraguay
Venezuela
Country to be Selected
AMERICA LATINA
NZL/AUSTRALIA
NORGE
HOLLAND
PORTUGAL
AMERICA LATINA
CZECH
INTERNATIONAL
ESPAÑA
S. AFRICA
SVERIGE
SCHWEIZ
TURKEY
U.K.
AMERICA LATINA
AMERICA LATINA
GETTING STARTED 23
Page 30

CHAPTER 124
Page 31

2USING YOUR PRINTER
WITHOUT A COMPUTER
COPYING A DOCUMENT
VIEWING PHOTOS ON YOUR PRINTER’S DISPLAY
CREATION AND PRINTING OF THE PHOTO INDEX
HOW TO IMPROVE PRINT QUALITY OF THE PHOTOS
PRINTING OF PHOTOS FROM MEMORY CARD OR CAMERA
PRINTING PHOTOS FROM YOUR PICTBRIDGE DIGITAL CAMERA
PRINTING PHOTOS FROM YOUR DPOF DIGITAL CAMERA
PRINTING OF PHOTOS FROM A BLUETOOTH MOBILE PHONE (WIRELESS MODEL)
HOW TO SET THE PRINTER TO RECEIVE FAX MESSAGES (FAX MODEL)
SENDING A FAX MESSAGE (FAX MODEL)
HOW TO PRINT REPORTS (FAX MODEL)
RESTORE OF FAX DATE AND TIME (FAX MODEL)
HOW TO MODIFY FAX SETTINGS: RESOLUTION AND CLEAR/DARK (FAX MODEL)
HOW TO ELIMINATE FAX MESSAGES FROM THE MEMORY (FAX MODEL)
INTERRUPTION OF FAX TRANSMISSION/RECEPTION (FAX MODEL)
MODIFICATION OF THE TYPE OF RING FOR REPLY (RING DIFFERENTIATION) (FAX MODEL)
USING YOUR PRINTER WITHOUT A COMPUTER 25
Page 32

COPYING A DOCUMENT
1 Turn on your printer. See "Turning Your Printer On and Off".
2 Make sure that the out of black or colour ink indicators on the front panel are not flashing, or are not
illuminated. If either one is, it is suggested that you replace the corresponding ink cartridge.
For more information see "Replacing the Ink Cartridges".
3 Load the paper on which you want to print. For information see "Loading Paper".
4 Open the top cover and place the document you want to copy face down on the scanner glass. Make
sure the upper left corner of the front of the item aligns with the upper left corner of the scanner glass.
For more information see "Placing Your Document on the Scanner Glass".
5 Close the top cover.
Select the copy quality, either Normal or Photo, by pressing the Quality button. If you are copying a normal
6
black/white text or a mixed black/white and colour document, choose Normal. If you are copying a photo
or a document with photos, choose Photo
. For more information see "Printer Front Panel".
7 Select the contrast, either Dark, Light or Normal, by pressing the Contrast button. For more information
see "Printer Front Panel".
8 To make more than one copy, press the plus sign (+) on the Copy selection button the number of times
needed until displaying the number of copies on the copy counter. For more information see "Printer
Front Panel".
9 Press the Black Copy button to create a black and white copy, or press the Colour Copy button to
create a colour copy. For more information see "Printer Front Panel".
note: If you are copying on different paper sizes with respect to the size of the original, press and hold
down the Black Copy or Colour Copy button to activate the Fit-to-Page feature. The printer will
automatically adjust the size of the original document to fit the size of the paper loaded.
VIEWING PHOTOS ON YOUR PRINTER’S DISPLAY
Full-Screen Views
Reference Part Description
1 Browse window Displays the current photo.
2 Select frame Indicates selection status and changes color when selection is
confirmed.
3 Image Total field Number of selected photos that you wish to print.
4 Device icon Represents the device connected.
5 Icon bar The bar with the various icons.
CHAPTER 226
Page 33

Thumbnail Views
7
Reference Part Description
1 Photo counter Shows how many photos are stored on the connected device.
2 Select frame Indicates that the photo was selected by using the Select button.
3 Browse frame Highlights the current image as a result of the of the pressing of
the Navigation button.
4 Thumbnail grid A total of 9 grids where the photos are displayed in miniature
format.
5 Image total field Indicates the number of photos that you want to print.
6 Device icon Indicates the device connected.
7 Icon bar The bar with the various icons.
Navigation and selection: use the Navigation key
1 Use the navigation key to scroll all the photos saved on the connected memory device.
2 Select the photo displayed and that you want to print, press the Select button.
3 Deselect the photo displayed, press the Select button again.
CREATION AND PRINTING OF THE PHOTO INDEX
When a non-PictBridge device is connected to the printer and when DPOF files are not associated with
the images saved, the Print button is active on the display of the printer (the Print button is lit).
If the Print button is pressed without having selected any of the images displayed, printing of the
Photo Index is started.
The Photo Index contains the images with borders in a 5x4 thumbnail format and a space is provided
under each for selection of the number of copies (1 to 4); at the bottom of the page, the user can
select printing with or without borders and the full formats, 2x1, 4x1.
The Photo Index, compiled with the selections desired, must be positioned on the exposure bed of the
scanner and printing is started pressing the Print button for a few seconds.
The printer recognizes the Photo Index positioned on the exposure bed and the photos selected will be
printed as indicated.
Print quality must be set from the front panel of the printer while the image will be adapted
automatically to the format of the paper present in the paper feed.
The Photo Index can be re-used several times; to re-use it correctly, the same device must be present,
the same photos positioned in the same order and the device must be connected to the printer.
USING YOUR PRINTER WITHOUT A COMPUTER 27
Page 34

HOW TO IMPROVE PRINT QUALITY OF THE PHOTOS
Photo print quality can be improved using the "Magic" button.
1 Press the "Magic" button: the printer analyzes the images and makes the necessary corrections.
note: The results of these operations are not shown on the LCD so as not to alter the original photo:
the result is visible only during printing.
2 Press the "Print" button to print the photos modified; hold down the "Magic" button selected.
PRINTING OF PHOTOS FROM MEMORY CARD OR CAMERA
To obtain the best results when printing photos, it is advisable to install the color cartridge and the
photo cartridge and to use photographic paper. See "Replacement of the black ink and photographic
cartridges using the garage".
1 Insert the memory card that you wish to print from into its related connector on the printer.
2 A screen indicating the total number of compatible photos stored on the memory card is displayed on
the control panel LCD. If needed, press the Change View button to toggle between full-screen and
thumbnail screen views. See "Viewing Photos on Your Printer’s Display". An icon on the bottom lefthand side of the screen’s icon bar will indicate the device connected.
3 Using the right, left, up and down navigation buttons, scroll the photos until the frame highlighted is
positioned on the photo to be printed and then select it.
4 Select the number of copies of the photo selected to be printed pressing the (+) or (-) button until the
number desired is shown to the bottom right of the photo. The total number of images that will be
printed is shown in the bottom right corner of the icon bar.
5 Select the layout in which you wish to print the selected photos by pressing the Page Layout button the
number of times needed to select the required layout. You have the following possibilities:
– Print 1 borderless photo fitted on the page size
– Print 1 photo with borders and fitted on the page size
– Print 2 borderless photos fitted on the page size
– Print 4 borderless photos fitted on the page size.
6 Clicking on the icon that indicates the total number of photos saved, it is also possible to print the
index of all the photos selecting the "All the Photos" layout.
7 Press the Print button to print the photos selected. The illuminated icons switch off, the photo
processing screen page is shown on the LCD. At the end of the printing process, the screen page that
indicates the total number of photos saved will be redisplayed.
PRINTING PHOTOS FROM YOUR PICTBRIDGE DIGITAL CAMERA
To obtain the best results when printing photos, it is advisable to install the color cartridge and the
photo cartridge and to use photographic paper. See "Replacement of the black ink and photographic
cartridges using the garage".
1 Make sure your PictBridge digital camera is turned on and connected to the printer. For more
information, see "Connecting a Digital Camera to Your Printer".
2 Printing is managed directly by your camera, so read your camera’s User’s Guide for instructions on how
to print your photos.
During printing, the Print button will flash to indicate that a print job is under way.
note: If the size of the paper loaded in the printer is different than the paper size selected from the
digital camera for printing and you begin to print, the printed output will be wrong.
CHAPTER 228
Page 35

PRINTING PHOTOS FROM YOUR DPOF DIGITAL CAMERA
Your printer is capable of recognizing the DPOF information associated to picture files. In the case of a
DPOF digital camera, the printer will print the photos that you select directly from your camera.
note: Before proceeding, make sure that your digital camera is DPOF-complaint by reading the
camera’s User’s Guide.
To obtain the best results when printing photos, it is advisable to install the color cartridge and the
photo cartridge and to use photographic paper. See"Exchanging Black and Photo Ink Cartridges".
1 Make sure your DPOF digital camera is turned on and connected to the printer. For more information,
see "Connecting a Digital Camera to Your Printer".
Select the print Quality according to your printing requirements.
2
3 Press the Print button on your printer’s front panel to print your photos. For more information see
“Printer Front Panel”.
note: If the size of the paper loaded in the printer is different than the paper size selected from the
digital camera for printing and you begin to print, the printed output will be wrong.
PRINTING OF PHOTOS FROM A BLUETOOTH MOBILE PHONE (WIRELESS MODEL)
The Bluetooth component is integrated in the wireless model.
The default password is 0000 so as to permit direct printing of any file transmitted by a mobile phone
in a radius of 10 meters from the printer.
note: If the printer is connected to a computer by means of a USB cable, the default Bluetooth
password can be modified using Toolbox software.
1 Make sure that paper has been inserted in the printer. For further information, see "Loading Paper".
2 Switch on the printer. The Bluetooth capabilities of the printer are activated automatically.
3 Activate the Bluetooth device from which you want to print in a radius of 10 meters from the printer,
start the Bluetooth search procedure directly from the device which will search for another nearby (in
this case, the printer) with which to share the data.
For information regarding the search procedure, refer to the User Guide of the device used.
4 When the Bluetooth device locates the printer, printing is started directly by the device.
For further information, refer to the User Guide of the device used.
USING YOUR PRINTER WITHOUT A COMPUTER 29
Page 36

HOW TO SET THE PRINTER TO RECEIVE FAX MESSAGES (FAX MODEL)
In fax mode, the printer is set to reply automatically to all calls.
If manual reply to fax messages has been set, the incoming call must be answered personally using an
additional telephone and then pressing the Start button to receive the fax.
The printer distinguishes automatically between fax calls and telephone calls setting one of the reply
modes described below.
Setting of reply mode
Reply mode establishes whether or not the printer is to answer incoming calls.
The following modes are available:
• AUTOMATIC: The printer switches automatically to fax reception mode (default setting). For all
occasions in which the user is absent but wishes to receive fax messages.
• MANUAL: Advisable only if an additional telephone is connected. The printer emits a sound and the
user must answer the call. For all occasions in which the user is present and can therefore answer the
call personally.
note: If an extension that works in multi-frequency mode and is preset for manual reception is
connected to the printer, at each call from a correspondent wishing to send a document, it is possible
to start fax reception sending the * + * code from the extension phone.
This operation is similar to pressing the Start Fax button from the control panel of the Fax.
Use the Toolbox to modify its settings.
• TELEPHONE/FAX: Advisable only if a second telephone is connected; the printer recognizes whether
the call is a fax or voice call. If an intermittent alarm is emitted by the loudspeaker and then a
continuous beep, the user can answer from the telephone; if the user does not answer within a certain
time, the fax issues a report. In this reception mode, after a certain number of rings (usually 2), the
printer connects to the telephone line and is able to recognize whether the incoming call is a fax call or
a telephone call.
• ANSWERING DEVICE/FAX: Advisable only if an external answering device is connected; the printer
automatically recognizes the fax or voice call; a voice call is saved externally on an audio device (TAD).
In this reception mode, the answering device receives the calls, records messages of the caller and if the
caller intends to send a fax message allows the printer to receive this. The number of rings of the
answering device must be lower than the number of rings set on the fax.
To set reception, switch on the printer and wait until it is on line.
Press the RX key and select one of the reception modes, i.e. AUTOMATIC, MANUAL,
TELEPHONE/FAX, ANSWERING DEVICE/FAX.
CHAPTER 230
Page 37

SENDING A FAX MESSAGE (FAX MODEL)
Fax messages can be sent in various ways:
• Transmission from the control panel of the fax.
• Transmission from the computer. See "Use of the printer from a Computer".
It is also possible to send a fax message manually from a connected telephone. In this way, it is possible
to speak to the recipient before sending the fax.
Transmission from the control panel of the fax
1 To send a fax message, switch on the printer, check that it is connected to the telephone line and wait
until it is on line.
2 Position the original on the scanning bed, press the Fax button B/W or color to acquire the document
via the scanner and load it in the memory. The display indicates that acquisition is in course.
note: Check that the other party is enabled to receive color fax messages.
3 When scanning has been completed, the display indicates that further pages can be acquired.
4 Press the key to acquire other pages or the key to terminate the acquisition phase and send
the fax.
5 Dial the phone number of the fax to which the document is to be sent with:
• the numeric keypad (manual transmission) and then press the Fax button.
• with the Agenda selecting this from the list of numbers present (automatic transmission with agenda)
and then press the Fax button.
How to use the Agenda of the fax
Up to 10 names can be saved in the agenda available on the fax pressing the "Agenda" button on the
fax control panel.
The following can be saved for each name:
• Fax telephone number (max. 48 characters)
• recallable name for which 16 characters are available.
note: Names can be inserted only by the "Toolbox" program via the computer.
Pressing the "Agenda" button on the fax control panel, the user accesses the Agenda in order to call
the names present or to recall the last telephone/fax number called.
The Agenda contains a maximum of 10 names.
1 Press the "Agenda" button; the display indicates that it is possible to recall the last number entered.
note: Press the Fax button to dial the last number entered.
2 Press the "Agenda" button: the first fax number inserted in the Agenda is shown on the display.
3 Continue to press the "Agenda" button to scroll the list of names until the number desired is
displayed and press the Fax button to confirm selection.
USING YOUR PRINTER WITHOUT A COMPUTER 31
Page 38

HOW TO PRINT REPORTS (FAX MODEL)
Fax activity reports are available from the control panel of the Fax pressing the "Reports" button.
When the "Report" button is pressed, the printer shows two print options on the display:
• Last transmission report: press the "Reports" button and then the Fax button.
• Fax mode activity report: press the "Reports" button twice and then the Fax button.
Printing of the last transmission report can be activated "always" (therefore a fax sent report is printed
automatically for each fax) or is printed only in the case of a transmission error (default setting), or is
never printed.
To enable or disable these conditions, select the fax Configuration menu from the "Toolbox" program.
The transmission report consists of two identifiers: the telephone number called and the reply number
obtained after making the connection, the result, etc.
The fax mode activity report provides a printout of the journal of the Fax with 42 positions saved
regarding fax activities.
The journal of the fax is printed automatically every 32 operations performed.
Fax power failure report
In the case of a power failure, at subsequent power-up, a report is printed and a message is shown on
the display requesting re-entry of the current date and time.
In the case of a power failure with loss of data, at power-up a report of the activity carried out by the
printer is printed.
RESTORE OF FAX DATE AND TIME (FAX MODEL)
In the case of a power failure, the messages saved will be lost and the next time the printer is switched
on an activity report is printed.
No back-up copy of the data in the memory is made and these are lost; information regarding the date
and time must also be re-entered.
To reset the date and time manually, switch on the printer; a request to enter the current data and time
is displayed.
Press the key followed by the Start Fax button.
The message to set the date is shown on the display.
Enter the date and press the Start Fax button. The message to set the time is shown on the display.
Enter the time and press the Start Fax button.
Press the key to confirm or the key to return to setting the date.
CHAPTER 232
Page 39

HOW TO MODIFY FAX SETTINGS: RESOLUTION AND CLEAR/DARK (FAX MODEL)
Resolution can be adjusted pressing the key on the control panel of the fax.
Possible options include: normal, fine and photo available in Black and White mode or fine and
photo for Color.
In photo mode, resolution is set to fine and shade levels are attributed with gray scale error diffusion.
note: The resolution may be modified during acquisition of several pages; the effect of the
modification will be visible from the page following the modification.
Contrast can be adjusted only from the "Toolbox" program via the computer; the printer permits
setting of 8 levels of contrast.
HOW TO ELIMINATE FAX MESSAGES FROM THE MEMORY (FAX MODEL)
Fax messages are stored automatically in the memory in the case in which:
• the printer is carrying out other activities (for example printing from computer)
• errors occur on the printer (paper out, ink out, etc.)
The documents in the memory are printed automatically as soon as the printer is available or once the
error has been eliminated.
During reception of fax messages in the memory, the display shows an information message indicating
that there are documents in the memory.
During printing of fax messages from the memory, it is possible to:
• receive other documents in the memory.
• call the external telephone (if any) connected to the printer.
INTERRUPTION OF FAX TRANSMISSION/RECEPTION (FAX MODEL)
Any activity on the fax can be interrupted at any time pressing the key.
The printer interrupts the current activity.
MODIFICATION OF THE TYPE OF RING FOR REPLY (RING DIFFERENTIATION) (FAX MODEL)
The printer can emit three types of sounds:
• Ringer: Telephone ringer and telephone/fax ringer.
• Alarm and warning: To regulate the level of the error signal.
• Line monitor: To hear the dialing tones when dialing the number.
Volume adjustment
The printer permits sound volume adjustment.
Adjustment is carried out from the computer via the "Toolbox" program and can be set separately for
all 3 environments: ringer, alarm and warning, line monitor.
USING YOUR PRINTER WITHOUT A COMPUTER 33
Page 40

CHAPTER 234
Page 41

3USING YOUR PRINTER
FROM A COMPUTER
BEFORE YOU BEGIN
THE TOOLBOX
THE PRINTER STATUS MONITOR
PRINTING, COPYING AND SCANNING FROM THE TOOLBOX
PRINTING FROM YOUR APPLICATION USING PRINT PROPERTIES
SCANNING AN ORIGINAL FROM YOUR APPLICATION
SCANNING AN ORIGINAL FROM THE PRINTER FRONT PANEL
TRANSFERRING FILES FROM A MEMORY CARD TO YOUR COMPUTER
HOW TO SET THE PARAMETERS TO IMPROVE PHOTO PRINT QUALITY
SETTING NETWORK CONNECTION PARAMETERS
USING THE WEB SERVER (WIRELESS MODEL)
BLUETOOTH SYSTEM SETTINGS (WIRELESS MODEL)
FAX SETTINGS FROM THE TOOLBOX PROGRAM (FAX MODEL)
HOW TO SEND A FAX USING THE COMPUTER (FAX MODEL)
USING YOUR PRINTER FROM A COMPUTER 35
Page 42

BEFORE YOU BEGIN
This chapter outlines the basic operating information that will put you in the condition to start using
your printer when connected to a computer. For more information to take full advantage of all the
features offered, read the Online Help.
To access the Online Help from Windows:
1 Select the Help button in the dialogue boxes.
Before you begin:
1 Make sure that your printer and personal computer are connected properly and that the software on
the “Installation" CD-ROM was successfully installed on the computer as indicated in the Setup
Diagram provided with your printer.
2 Load the paper on which you want to print. For more information see Loading Paper".
3 Make sure that the out of black or colour indicators on the front panel are not flashing, or not
illuminated. If either one is, it is suggested that you replace the corresponding ink cartridge. For more
information see “Replacing the Ink Cartridges".
THE TOOLBOX
The Toolbox application allows you to control printing, copying, and scanning operations directly from
a single user interface on your computer monitor. You can also fax the document that you have
scanned with your all-in-one printer if a fax application is installed in your computer and your computer
is equipped with a modem.
For the Wireless model, the parameters necessary to access a Wi-Fi network can be set.
Included in the “Installation" CD-ROM, the Toolbox is installed automatically on your computer when
you install the software contained on this CD-ROM.
note: "Guided installation of the printer" uses a network protocol to send and receive information.
During this exchange of information, when a firewall has been activated, certain communications may
be blocked; make sure that the network port used by the printer is "open", i.e. is unaffected by this
block (the predefined setting of the port of the printer is UDP).
In the case of irregular or discontinuous functioning, check the settings of the firewall on the PC in the
Windows 2000/XP environment. To do this, from "network resources", select the connection
concerned and using the right-hand button of the mouse access properties and then firewall settings: it
is advisable to disable the UDP port or, if in doubt, disable the protective action of the firewall.
note: "Guided installation of the printer" in the Mac OS X environment detects only printers shared via
the "Share printer" option when the computer uses the Mac OS X 10.2 or higher system.
From the Toolbox main screen, you can:
• Print images and make copies.
• Scan documents or photos and decide where to send the scanned image.
• View the amount of ink remaining in the ink cartridges installed.
• Access a solutions and assistance facility where you can:
– Clean and test the ink cartridge nozzles.
– Automatically align the ink cartridges to improve your print quality.
– Find the address of the manufacturer’s web site, where you can access the information needed to
purchase new ink cartridges.
– Access troubleshooting information.
• Access to the functions used to improve image quality.
• Access the network Settings function for the Wireless (Wi-Fi) mode (wireless model).
• Access the network Settings function for the Bluetooth (Wi-Fi) mode (wireless model).
• Access to fax setting functions for Fax mode (Fax model).
note: (wireless model) If the printer has been set previously for Bluetooth and you no longer wish to
use this mode (or Wi-Fi mode is to be used instead of this), run the Toolbox program and in the settings
de-activate "Bluetooth". Bluetooth and Wi-Fi mode cannot be activated at the same time.
CHAPTER 336
Page 43

THE PRINTER STATUS MONITOR
The Printer Status Monitor provides information on the current state of your printer. It is installed
permanently on your computer when you install the software contained on the "Installation" CD-ROM.
Displayed automatically at the beginning of a print or copy job, the Status Monitor:
• displays a graphical representation of the percentage of the print or copy job already completed.
• displays the page number being currently printed or copied out of the total number of pages of the job.
• displays a graphical representation of the estimated amount of ink, in percentage, still available in the
colour and black cartridges.
• allows you to cancel the print or copy job.
• provides you with the address of the manufacturer’s web site, where you can access the information
needed to purchase new ink cartridges.
The Status Monitor closes automatically at the end of the print or copy job, but you can close it to its
icon on the Windows task bar at any time.
If you decide to close the Status Monitor during a print or copy job, it will be automatically redisplayed
in the following conditions:
• when the ink remaining in the cartridges is low, or when the cartridges are out of ink. A coloured
exclamation mark will indicate the cartridge in a low ink condition (colour, black, or both) and the
importance of the condition. Pop-ups will be displayed with the address of the manufacturer’s web site,
where you can access the information needed to purchase new ink cartridges.
The Printer Status Monitor also displays error pop-ups when:
• your printer runs out of paper.
• a paper jam has occurred.
• an incorrect paper size was selected.
• your printer is busy with another task.
• your printer is not recognised.
• the ink cartridge carriage is jammed.
• your printer does not work (printer error).
In all of the above error conditions, you can choose whether to continue or cancel the print job by
clicking the related button on the screen.
USING YOUR PRINTER FROM A COMPUTER 37
Page 44

PRINTING, COPYING AND SCANNING FROM THE TOOLBOX
To access the Toolbox:
1 Right click your mouse button on the Olivetti icon on the Windows task bar, or click Start > Programs
or All Programs > Olivetti > Olivetti Toolbox. The Toolbox is displayed.
note: In the Mac OS X environment, the Toolbox program is available clicking on the icon present on
the desktop or selecting it from the list of programs installed.
The main area of the Toolbox includes the icons representing the different tools available.
Icon You can:
Print photos • Browse your hard disk or the memory of the non-Pictbridge/DPOF digital
camera connected to your computer, to search for the folder containing photos
to print.
• Select all the photos stored in the folder or just the individual ones wanted, and
choose how may copies to print.
• Select the type of paper to print on, and its size.
• Select whether to print the photos on a single page, two on one page or four
on one page.
• Print an index sheet of photos.
• Print the photos you have selected.
Photocopier • Define the type of document to be copied.
• Choose the paper on which to print your copy on, and its size.
• Define the quality for your copy.
• Lighten or darken your copy, and define whether it is colour or black and white.
• Select the layout of your printed copy: make multiple copies of the same image
on a single page, make poster-size copies by defining the number of pages on
which to fit the copied image, clone the copied image the number of times
needed without resizing the image, or just print the copied image on one page.
• Enlarge or reduce the document or photo to be copied, or automatically adjust
its size so that it fits on the selected paper size.
• Select the number of copies to make.
Memory card file
transfer
Scan to file
Scan to application
Scan to email
Scan to fax
• Transfer the contents of the memory card inserted in the printer to a folder on
your computer. See "Transferring Files from Memory Card to your Computer".
• Scan a preview of the document or photo placed on the scanner glass.
• Use selection handles to delimit the area of the preview image that you want to
scan.
• Rotate, flip, enlarge or reduce the preview image.
• Define the type of document to be scanned, and whether it is full-colour, has
shades of grey or is in black and white.
• Define the resolution, colour depth, brightness and contrast of the scanned
image.
Depending on the tool selected:
•With Scan to file, save the scanned image in a TIFF (.tif), bitmap (.bmp) or JPEG
(.jpg) format in a folder on your computer.
•With Scan to application, scan the document or photo to an application of
your choice (such as a graphics program, a word processor or desk-top
publisher).
•With Scan to email, attach the scanned document or photo, in compressed
.jpg format, to an e-mail message opened by the default e-mail application of
your computer.
•With Scan to fax, scan the document or photo, in compressed .jpg format, to
a fax application that you select.
CHAPTER 338
Page 45

The Toolbox main interface screen also provides links to Help, Solutions and assistance, and Settings.
Link You can:
Help • Read more information on the currently displayed topic.
Solutions and
assistance
• Clean and test the ink cartridges.
• Automatically align the ink cartridges. See "Aligning the Ink Cartridges From
the Toolbox".
• Find the address of the manufacturer’s web site, where you can access the
information needed to purchase new ink cartridges.
• Access troubleshooting information.
Settings • Change the Toolbox default settings.
PRINTING FROM YOUR APPLICATION USING PRINT PROPERTIES
1 With the document or photo open in the application that you are using, click File > Print to open the
Print dialogue box.
2 Click Preferences or Properties, depending on your operating system.
The printer driver user interface screen is displayed, allowing you to use your all-in-one printer as
indicated in the following table.
Preferences/Properties: You can:
Paper/Quality • Select manually whether the document to be printed consists of black
text or line art only, a combination of black text or line art and colour
graphics or photos, or just photos, or have the printer automatically
detect the document as consisting of a combination of black text or
line art and colour graphics or photos.
• Select the type of paper you want to use, and its size.
• Define the size, in either inches or millimetres, of any personalised
paper you may want to use.
• Select to print without borders after selecting Coated, Glossy or Cards
as your paper type.
• Select whether to load the paper manually, bearing in mind that if you
load paper that is smaller than the selection made, the printer will
eject the paper prompting you to load paper according to the
selected size.
• Select the quality of your printed output depending on your
requirements.
• Select whether to print your photos in true-life colour (Photo Quality)
when loading photo paper and selecting photos as your document
type.
• Select to print in Black and White or in Colour, depending on your
original document.
• Define the number of copies to print, and whether or not to start
printing from the last page first.
• Return the screen settings to their factory default values, or save the
settings so they are applied to your next print job.
USING YOUR PRINTER FROM A COMPUTER 39
Page 46

Preferences/Properties: You can:
Layout • Select to print the individual pages of your document, or your photos,
on a single page layout.
• Select to print multiple pages on a single sheet of paper, fitting 2, 3, 4
or 8 pages of your document, or photos, on the single sheet.
• Define the order in which the multiple pages will be fitted on the
single sheet of paper, and whether to place a border around the
individual page images on the single sheet of paper.
• Select to print multiple pages per poster, thus expanding the contents
of a single page onto more than one sheet of paper.
• Define on how many sheets (2x1, 2x2, 3x3 or 4x4) to fit the selected
poster image and decide whether to place a frame around each
individual image that will make up your poster.
• Return the screen settings to their factory default values, or save the
settings so they are applied to your next print job.
Ink Levels • View the estimated amount of ink remaining in the black and colour
ink cartridges.
• Link directly to the Toolbox Maintenance screen where you can view
maintenance and troubleshooting information.
• Link directly to a screen that provides you with the address of the
manufacturer’s web site, where you can access the information
needed to purchase new ink cartridges.
SCANNING AN ORIGINAL FROM YOUR APPLICATION
1 Open the top cover and place the document or photo you want to scan face down on the scanner
glass. Make sure the upper left corner of the front of the item aligns with the upper left corner of the
scanner glass. For more information see "Placing Your Document on the Scanner Glass".
2 Acquire the image from your application.
The scanner driver user interface screen is displayed with a low resolution preview of the document or
image on the left-hand side of the screen. You can:
• Use selection handles to delimit the area of the preview image that you want to scan.
• Rotate, flip, enlarge or reduce the preview image.
• Scan a new preview in case you accidentally removed the original from the scanner glass.
• Launch your final scan according to the settings that you have made.
On the right-hand side of the scanner driver interface screen, customise your scan settings as indicated
in the following table:
Driver of the scanner You can:
Standard • Define whether the document to be scanned consists of black text or
line art only, a combination of black text or line art and colour
graphics or photos, or just photos, and therefore scan at 150 dpi,
300 dpi or 600 dpi respectively.
• Select whether to scan in full colour at 24 bits/pixel, in grey at
8 bits/pixel or in black and white at 1 bit/pixel.
• Return the screen settings to their factory default values, or save the
settings so they are applied to your next print job.
CHAPTER 340
Page 47

Driver of the scanner You can:
Custom • Select the resolution at which you want to scan.
• Select the colour depth, meaning the number of distinct colours that
can be represented in number of bits.
• Lighten or darken the image you want to scan.
• Increase or decrease the contrast of the image you want to scan.
• Activate a filter that smooths the image, for example when scanning
magazine pages.
• Return the screen settings to their factory default values, or save the
settings so they are applied to your next print job.
SCANNING AN ORIGINAL FROM THE PRINTER FRONT PANEL
1 Open the top cover and place the document or photo you want to scan face down on the scanner
glass and aligned with the upper left corner. For more information see "Placing Your Document on the
Scanner Glass".
2 Press the Scan button on your printer’s front panel. A pop-up is displayed with the following Toolbox
tools: Scan to file, Scan to application, Scan to e-mail and Scan to fax. Select where you want to send
the scanned image by clicking on the corresponding tool icon. See "Printing, Copying and Scanning
From the Toolbox".
The scanner driver user interface screen is displayed with a low resolution preview of the document or
image on the left-hand side of the screen. You can:
• Use selection handles to delimit the area of the preview image that you want to scan.
• Rotate, flip, enlarge or reduce the preview image.
• Scan a new preview in case you accidentally removed the original from the scanner glass.
• Launch your final scan according to the settings that you have made.
On the right-hand side of the scanner driver interface screen, customise your scan settings as indicated
in the following table:
Driver of the scanner You can:
Standard • Define whether the document to scanned consists of black text or line
art only, a combination of black text or line art and colour graphics or
photos, or just photos, and therefore scan at 150 dpi, 300 dpi or
600 dpi respectively.
• Select whether to scan in full colour at 24 bits/pixel, in grey at
8 bits/pixel or in black and white at 1 bit/pixel.
• Return the screen settings to their factory default values, or save the
settings so they are applied to your next print job.
Custom • Select the resolution at which you want to scan.
• Select the colour depth, meaning the number of distinct colours that
can be represented in number of bits.
• Lighten or darken the image you want to scan.
• Increase or decrease the contrast of the image you want to scan.
• Activate a filter that smooths the image, for example when scanning
magazine pages.
• Return the screen settings to their factory default values, or save the
settings so they are applied to your next print job.
USING YOUR PRINTER FROM A COMPUTER 41
Page 48

TRANSFERRING FILES FROM A MEMORY CARD TO YOUR COMPUTER
1 Insert into the corrsponding slot on the printer, the memory card containing the files to transfer. See
"Inserting and Removing Memory Cards".
2 Click the Toolbox shortcut icon on your Windows task bar, or click Start > Programs or
All Programs > Olivetti > Olivetti Toolbox. The Toolbox is displayed.
3 Click the Memory Card File Transfer icon.
4 Click the Browse button and search for the folder on your computer in which to transfer the files.
5 Click the OK button once you have found the folder wanted.
6 Click the Transfer button to start the file transfer from the memory card to your computer.
note: To cancel the file transfer and return to the Toolbox’s main screen, click the Cancel button.
For information, click Help.
HOW TO SET THE PARAMETERS TO IMPROVE PHOTO PRINT QUALITY
1 Open the "Toolbox" program to access image quality improvement functions.
2 Select the "Print photo" item to apply a correction filter.
3 With a click of the mouse, select the photo to be printed from the list on the screen in order to apply an
image correction filter.
4 Apply the correction filter desired, clicking on the box before this.
The available correction settings differ and depend on the results to be achieved.
o It is possible, for example, to improve definition of details, to apply suitable contrast for the image
and other effects.
5 To print the photo, click on the "Print" button.
The number of copies to be printed can be defined before clicking on the Print button.
CHAPTER 342
Page 49

SETTING NETWORK CONNECTION PARAMETERS
To configure the network, the printer must have been connected in USB mode and the Toolbox
software must be installed. In the case of problems, refer to the "Printer Network Connection" and
"Before You Begin" chapters for further details of the Toolbox environment.
Toolbox is the main application that manages the available functions of the printer and, for the wireless
model, permits configuration of the network.
note: (wireless model) If the printer has been set previously for Bluetooth and you no longer wish to
use this mode (or Wi-Fi mode is to be used instead of this), run the Toolbox program and in the settings
de-activate "Bluetooth". Bluetooth and Wi-Fi mode cannot be activated at the same time.
note: "Guided installation of the printer" uses a network protocol to send and receive information.
During this exchange of information, when a firewall has been activated, certain communications may
be blocked; make sure that the network port used by the printer is "open", i.e. is unaffected by this
block (the predefined setting of the port of the printer is UDP).
In the case of irregular or discontinuous functioning, check the settings of the firewall on the PC in the
Windows 2000/XP environment. To do this, from "network resources", select the connection
concerned and using the right-hand button of the mouse access properties and then firewall settings: it
is advisable to disable the UDP port or, if in doubt, disable the protective action of the firewall.
note: The Wi-Fi settings of all the peripherals of a wireless network must be similar. This allows them to
communicate. When the printer is added to a wireless network for the first time, this cannot
communicate with network peripherals. The wireless network adapter of the printer must be
configured on the same network name (SSID), wireless channel and wireless protection key (WEP or
WPA), if used, as for all the other network peripherals.
In order to declare these parameters, the Toolbox program present in the list of applications must be
run from the computer and "Settings" must be selected.
The Toolbox software with the Wi-Fi settings is compatible with the Windows 2000/XP environment.
note:
In the Macintosh OS X 10.2 or higher environment, it can be run from the system finder in the list of
available programs or double clicking on the toolbox document in the folder in which the printer
software has been installed previously.
USING YOUR PRINTER FROM A COMPUTER 43
Page 50

Enter the parameters of the network so that the printer can be recognized on the network, making
sure that the Wi-Fi network on which the printer is to be installed is operative.
The wireless settings required are: SSID (network name) of the network used, wireless channel (only Ad
Hoc mode) used by the computer; method of communication, WEP key used by the wireless network.
note: The desktop computer or portable with wireless network connection support (only for Ad-Hoc
mode) must be functioning and correctly configured.
note: If you have just purchased a portable or a desktop computer with wireless capabilities: SSID
(network name) of the network used; wireless channel; method of communication, WEP password
used by the wireless network.
Described below are the network parameter definition fields:
• Enable wireless: To enable or disable wireless communication; if disabled, the printer can be accessed
in any case via the USB connection.
• Wireless communication mode: Makes it possible to select the type of connection for the Wi-Fi
network, which may be:
– ADHOC (Peer-to-Peer) (pre-defined setting): The printer communicates directly with the
computer without passing through an access point or basic station. Each wireless peripheral in an
Ad-Hoc network must have a wireless network adapter. The adapter allows each peripheral to
communicate with the other network peripherals.
Use of Ad-Hoc mode is usually restricted to simple, relatively small wireless networks as performance
tends to deteriorate considerably following connection of six peripherals in the network.
– Infrastructure (access point): The printer communicates with the network computers through a
wireless access point. The access point acts as a central hub or gateway connecting wireless
peripherals.
In infrastructure mode, all wireless communications between network peripherals pass through an
access point. Each wireless network peripheral must have a wireless network adapter for
connection to the access point.
– Channel: Indicates the path on which the digital information travels. By default, the channel is
selected automatically; however, it is possible to indicate a specific channel in order to improve data
reception/transmission in the case of disturbances or interference (Ad-Hoc).
• Wireless network name (SSID): Indicates the name of the wireless connection to which the printer
must belong. The precise name of the network must be declared in order to add the printer to the
existing group of network devices.
• Authentication: Selecting this mode, it is possible to connect to other devices in the wireless network.
Each device may have a specific access key which depends on the type of network.
– Open system: When the network devices do not have access protections and the network is
therefore open for any type of connection.
– Shared key: When network devices have common network access protection.
– EAP PSK (Infrastructure): EAP means Extensible Authentication Protocol and uses the PSK
algorithm. A single-direction authentication protocol, which authenticates the client using a
password protected by the PSK algorithm. PSK (Pre-Shared Key) uses manually-entered passwords
or keys to permit protection. PSK is designed for easy installation by the user at home or in small
offices.
• Encryption: This is the type of protection that can be activated on the network. A network with open
system authentication does not protect users according to their identity and generally requires entry of
the correct SSID.
– WEP: This network could use WEP (Wired Equivalent Privacy) encryption to provide a first level of
protection against occasional, indiscrete users. Up to 4 WEP keys are available: WEP key 1,
WEP key 2, WEP key 3, WEP key 4. The protection keys may be alphanumeric or hexadecimal.
– WPA: In Infrastructure mode with EAP/PSK authentication, WPA encryption is used.
This mode provides an improved, safer method of protection compared with WEP.
CHAPTER 344
Page 51

Declaration of Network Addresses
After declaring the type of network, you must enter the parameters for recognition of the printer
which must comply with the specifications of the TCP/IP network protocol; therefore, network address
(IP), subnet mask and gateway.
note: It is advisable to save or print this Configuration page; the data are important for any subsequent
settings. However, it is always possible to display this page opening the Toolbox program, selecting the
"Wireless" network settings or from the menu Start > Programs > Any_way Wi-Fi >
Configuration.
Described below are the network address definition fields:
• Manual IP configuration: Manual configuration is necessary when a DHCP server that assigns a
network address automatically is not available. In this case, manual configuration, which consists in
entering the available network addresses (IP, subnet mask, gateway), is necessary.
• Host name: Is the name of the printer in the network.
• IP, subnet mask, default gateway: The univocal names of the network parameters are those
required by TCP/IP (Transmission Control Protocol/Internet Protocol standard, a communication
protocol that defines the method of data transmission to network peripherals). Virtually, all modern
operating systems offer TCP/IP assistance and most large networks use the TCP/IP protocol for network
traffic. Indicate the IP address, subnet mask and the pre-defined Gateway maintaining the same class
of addresses as the Wireless router or access Point.
• Idle timeout [seconds]: Indicates the time during which the peripheral may wait to receive data on
the network (this depends on the characteristics of the network, in particular speed).
• Primary and secondary WINS Server: Indicate the characteristics of any WINS type servers present in
the network for management of peripherals.
• MDNS: Multicast Domain Name Server. Is used with local and ADHOC networks that do not use
central DNS servers. To execute service names with this method, an alternative DNS called mDNS is
used. Using the mDNS, the computer identifies and uses any printer connected to the LAN. It can also
work with any other peripheral enabled for Ethernet displayed on the network; in this case, declare the
name of the service and the name of the domain.
note: The MDNS method is particularly useful for connection in a Macintosh environment. Refer to the
OS X 10.2 or higher system for further information.
USING YOUR PRINTER FROM A COMPUTER 45
Page 52

USING THE WEB SERVER (WIRELESS MODEL)
Permits simple, trouble-free management of the printer (set as network peripheral). This function is
available only if the Wireless connection (WI-Fi mode) has been activated from the Toolbox program.
Using the internet (WEB) browser, it is possible to check status, to configure network parameters or
access printer functions.
When using the printer network mode, care must be taken when entering network keys in order to use
it correctly.
The settable network keys are of the WEP type (Wired Equivalent Privacy) or WPA.
WPA stands for Wi-Fi Protected Access. This method provides interoperable protection based on
standards to promote a considerable increase the level of data protection and access control for a
wireless LAN. To improve data encryption, WPA uses TKIP (Temporal Key Integrity Protocol). For stricter
user authentication, WPA implements EAP/PSK (Extensible Authentication Protocol).
note: WPA supports two basic solutions: Enterprise and Home/ SOHO. In the Enterprise environment
with IT resources, the WPA access is used together with an authentication server for management and
control of a centralized access. In a Home/SOHO environment, WPA is executed in a special home
mode called PSK (Pre-Shared Key) which uses manually-entered passwords or keys for protection. PSK
is designed for simple installation by the user at home or in a small office.
note: Toolbox software with Wi-Fi settings is compatible with the Windows 2000/XP,
Macintosh OS X 10.2 version or higher environment.
Accessing the Web Server Mode
Follow the procedure described below to access the Web Server mode:
1 From the system browser, enter the IP address of the printer in the address field of the browser (if this
has been set manually) or from the menu Start > Programs > Any_way Wi-Fi > Configuration.
note: In the Macintosh OS X 10.2 or higher environment, it can be run from Toolbox > Settings >
Settings Wi-Fi.
The Login Page of "Web Server" mode is displayed.
In the navigation menu of the Login Page, Enter the Password.
2 The Web page of the printer can be used to:
– Check printer status
– Display network statistics
– Set network configuration
– Scan pages on the network.
3 Click on Apply to confirm the settings.
note: The default password is "admin123".
note: Modifying the wireless network settings of the Web Server, the connection may be lost. If the
connection is lost, it may be necessary to use new settings for reconnection. If the Server Web loses the
network connection, it may be necessary to restore the pre-defined values and reinstall the software.
note: It is not possible to disable TCP/IP (Transmission Control Protocol/ Internet Protocol).
This protocol is necessary for communication in "Web Server" mode.
CHAPTER 346
Page 53

Entering WEP keys
To enter WEP keys in the Web Server mode proceed as follows:
1 Click on the Networking/Wireless tab.
2 Go to the Encryption section where you can add the Static coding parameters (WEP).
3 Select Activated.
4 Enter the WEP keys used by the network. Select whether the keys entered are Alphanumeric or
Hexadecimal. Select the key to be used for encryption of the data transmitted.
5 Click on Apply to save the keys in the printer.
note: If you have forgotten the WEP keys, display these via the access point. If the access point does
not display the keys, reconfigure the network and assign new keys.
Entering WPA Coding Data
The WPA (Wi-Fi Protected Access) function affords interoperable protection based on standards in
order to promote a considerable increase the level of data protection and access control for a wireless
LAN. To increase data encryption, WPA uses TKIP (Temporal Key Integrity Protocol). For stricter user
authentication, WPA implements EAP (Extensible Authentication Protocol).
If WPA is used on the network, PSK (Pre-Shared Key) authentication is used.
In the Web Server mode proceed as follows:
1 Click on the Networking tab.
2 In the network Settings page, select the Wireless tab.
3 Go to the Authentication section and click on Advanced configuration. The wireless communication
mode page is displayed.
4 Select Infrastructure and click on Next. A page with the name of the wireless network is displayed.
5 Select a network name (SSID) from the list of networks identified or enter the name of a new wireless
network. Click on Next. The Wireless authentication page is displayed.
6 Select EAP/PSK. Enter a password Phrase (with a length of between 8 and 63 characters including
spaces) that will be used by the software to generate a pre-shared key.
note: All network peripherals must use the same phrase as password.
7 Carry out the instructions displayed in order to configure the printer for the type of authentication and
coding selected. On completion, click on Next. The Configuration preview page is displayed.
8 Check that the information is correct, click on Apply to save the keys in the printer.
USING YOUR PRINTER FROM A COMPUTER 47
Page 54

BLUETOOTH SYSTEM SETTINGS (WIRELESS MODEL)
An active Bluetooth cellphone is required to use the Bluetooth connection.
Turn on the computer and insert the “Installation” CD-ROM into the drive:
1 Click Next > on the screen displayed and follow the instructions.
2 Carry out installation in USB mode. Connect the USB cable (non provided) to the printer and to the
personal computer only when requested.
3 On completing USB installation, open the Toolbox program (Start > Olivetti > Toolbox).
note: For the Mac OS X 10.2 version or higher, open the Toolbox program. It can be run from the
system finder in the list of available programs.
4 Click on the "Settings" button to access configuration of the Bluetooth parameters.
Activate Bluetooth mode and press "Send Settings" to the printer: wait for automatic reception of
the new settings (this may take several minutes).
The printer is now able to work in a Bluetooth environment.
note: If the printer has been set previously for Wi-Fi and this mode is no longer to be used (or
Bluetooth mode is to be used instead), run the Toolbox program and in the Wireless Settings
de-activate "Wireless" and press "Send Settings".
On completion, once again from Toolbox program > Settings > Bluetooth, activate Bluetooth mode
and press "Send Settings" to the printer".
Bluetooth and Wi-Fi mode cannot be activated at the same time.
Described below are the Bluetooth device setting fields:
• Enable Bluetooth: To enable or disable Bluetooth capability.
• Password: Enter a protection password for the Bluetooth connection.
The default password is 0000 so as to permit direct printing of any .jpg file transmitted by a Bluetooth
device (cellphone, personal computer, etc.) positioned in a radius of 10 meters from the printer.
• Sends Setting: To save the data in the printer.
CHAPTER 348
Page 55

FAX SETTINGS FROM THE TOOLBOX PROGRAM (FAX MODEL)
All the main fax mode functions can be controlled from the "Toolbox" program.
From the main screen page of the program, select the "Settings" item.
All printer settings and those specific to the fax environment are shown on the screen.
Possible settings:
• Print fax Reports
• Fax Agenda
•Pause time
• Date and time settings
• Fax installation, setting and reception
• Assistance
Print fax Reports
Available settings:
• Print last transmission report
• Print the list of calls
• Print fax activities.
Press the "Print" button to print the report selected.
Pause time
To set the time after which the printer switches to stand-by mode.
Agenda of the fax
To insert a name in the Agenda, select the "Agenda" item.
1 Select the position of the Agenda in which to insert the name.
note: Up to 10 names can be inserted.
2 Enter the characteristics of the name to be inserted:
• Number of positions from 0 to 9
• Transmission speed
• Telephone number
• Name.
3 At the end, confirm by clicking on the "Apply" button.
4 To save the name entered in the memory of the printer, click on the "Send Settings" button.
5 To check the data entered, it is possible to print the name, selecting this from 0 to 9 and printing this by
clicking on the "Print" button.
note: To remove a name, select the position required from 0 to 9 and then click on the "Cancel"
button.
USING YOUR PRINTER FROM A COMPUTER 49
Page 56

Date and time settings
To enter the current date and the time:
1 The date and time are retrieved by the system.
2 Click on the “Send Settings” button to send and save the information on the printer.
note: It is possible to enter the date and time in several formats:
format of the date: DD/MM/YYYY, MM/DD/YYYY, YYYY/MM/DD.
format of the time: 24H, 12H.
Fax installation, setting and reception
This is divided into several environments:
• Installation
• Configuration
• Reception.
The information regarding installation includes:
• Name: Insert the name of the sender.
• Number: Insert the fax number of the sender.
• Language: To set the language to be used in the interface of the commands.
Available languages: Danish, Dutch, English, French, German, Italian, Portuguese, Spanish, Swedish.
• Printer settings: Set the paper format paper present in the printer selecting this from those available:
A4, Letter, Legal, 70%, 76%, 80%, 94% reduction, no reduction.
Reduction: To set fax reception reduced by between 70% and 94%, printing exceeding the page
format, printing that does not exceed page format, printing with automatic page format management.
Black in three colors: To enable printing of black in three colors using the 3-color cartridge.
• Format of the time and of the date.
Format of the date: DD/MM/YYYY, MM/DD/YYYY, YYYY/MM/DD.
Format of the time: 24H, 12H.
Information regarding configuration includes:
• Settings of the telephone line.
Type of telephone line: Public or PBX, of the pulse or tone type.
Type of call: Caller ID, remote, PBX flash type or with line monitor.
note: A remote call code can be entered.
• Various settings.
Fax header: To set reception of the information forming the header of the original to be transmitted
(name, fax number, date and time and number of pages) in the area outside the text and therefore just
below the upper edge or in the area inside the text, slightly lower than in the previous case.
Type of error correction: To enable ECM type correction.
Print transmission report: Can be set to No, always or in case of error.
Transmission speed: Can be set to 33600/14400/9600.
Volume of the buzzer and loudspeaker: To set volume between level 0 and level 8.
Fax reception information includes:
• Volume of the buzzer: To set volume from 0 to 8.
Number of rings: Can be set between 1 and 8.
Different sound: To set a different type of sound for telephone and fax.
Fax activation time: To set the time within which the printer automatically activates fax mode on the
call received. Can be set between 15 and maximum 40 seconds.
Assistance information includes:
A list of information about the printer reserved for the assistance technician.
This list contains data regarding printer hardware and software adjustments.
CHAPTER 350
Page 57

HOW TO SEND A FAX USING THE COMPUTER (FAX MODEL)
A fax message can be sent from the "Toolbox" program. This operation can also be carried out in
stand-alone mode without using the computer, using the fax control panel; for further information, see
the "Use of the printer without a computer" section.
A fax message can be sent from the computer in two ways:
• Transmission of a fax by the "Toolbox" program.
• Transmission of a fax from a File created with a Windows program.
Sending a fax message from the "Toolbox" program
1 From the home page of the program, select the "Acquire in a fax" item.
Lift the cover of the exposure bed and place the document or the photo on the exposure bed with the
side to be scanned facing down. Make sure that the top left corner of the document or photo is
aligned with the top left corner of the bed.
For further information, see "Placing the original on the exposure bed".
2 The user interface of the scanning driver, with a low resolution preview of the image scanned, is shown
on the monitor of the PC. The format and the number of pixels of the preview are indicated below the
image.
If necessary, modify the preview until you have obtained the final image required. Delimit the area of
the preview that is to be scanned using the specific commands and then use the instruments displayed
to the right of the display box to invert the image so that it is specular, to rotate it in a clockwise or anticlockwise direction and to enlarge or reduce it.
3 Click on the Standard sheet and personalize scanning settings:
• Ty p e: Select the type of document to be scanned clicking on the matching button: Text (only black text
or graphics), Mixed (combination of black test or color graphics or photo) or Photo (only color photo).
• Colors: Select the color scale of the document or photo to be scanned clicking on the matching
button: Colors (full color scan 600 dpi), Gray (for scanning shades 300 dpi) or B/W (B/W scan 150 dpi).
4 Click on the Personalize sheet to personalize scanning settings:
• Resolution: From the drop-down menu, select scanning resolution from the following: 200 dpi.
note: To send a document in fax mode, it is not necessary to use high resolution.
• Color intensity: From the drop-down menu, select the number of separate colors that can be
represented in number of bits. The following values are available: 1-bit, 8-bit or 24-bit (B/W, shades of
gray, colors).
• Adjust Brightness and Contrast of the document or photo to be scanned. Move the brightness cursor
to the right to brighten the image or to the left to darken it. Move the contrast cursor to the right to
increase contrast and to the left to reduce it. In both cases, the central position corresponds to an
average setting.
• Select the Descreen (remove background) selection box to activate a filter that regularizes the
background of the image, for example when scanning pages of a newspaper.
5 Click on the Acquire button for final scanning of the document or photo.
6 After scanning, a dialogue box is opened that asks whether you want to scan other pages or to end
the process.
7 After scanning the document (or pages of the document to be sent), the screen shows:
• The fax transmission settings, if the ANY_WAY Fax printer has been set in the default parameters of
the Toolbox program.
• the possibility of selecting the Fax device to which to send the document scanned.
8 Click on the "OK" button and open the dialogue box with the settings of the fax.
USING YOUR PRINTER FROM A COMPUTER 51
Page 58

9 Compile the dialogue box regarding fax transmission mode.
The information required for transmission includes the data of the recipient:
• Name and surname.
• Company.
• Fax number.
• Title.
The Windows standard address-book can be used to file, recall and modify the recipient's data.
note: If the name of a recipient has been inserted previously in the Agenda, it can be recalled simply by
clicking on the addresses button of the Address-book.
Other options include:
• Use a cover page and send a message to the recipient.
• Print the document faxed.
note: Pressing the default button (predefined settings), the initial conditions provided by the
application program are restored.
10 Open the "Quality" dialogue box.
• Set the quality of the Fax choosing from:
– photo, normal, fine quality for B/W mode.
– photo and fine quality for color mode.
• Set the level of contrast using the sliding cursor.
11 Send the Fax with the settings entered.
The document is sent to the recipient.
Send fax from File
1 Open the file saved on the computer with the associated application program.
2 From the application program, open the print menu and select the "Olivetti ANY_WAY fax" printer.
3 Click on the "OK" button and open the dialogue box with the settings of the fax.
4 Compile the dialogue box regarding fax transmission mode.
The information required for transmission includes the data of the recipient:
• Name and surname.
• Company.
• Fax number.
• Title.
The Windows standard address-book can be used to file, recall and modify the recipient's data.
note: If the name of a recipient has been inserted previously in the Agenda, it can be recalled simply by
clicking on the Address-book.
Other available options include:
• Use a cover page and send a message to the recipient.
• Print the document faxed.
note: Pressing the default button (predefined settings), the initial conditions provided by the
application program are restored.
5 Open the "Quality" dialogue box.
• Set the quality of the Fax choosing from:
– photo, normal, fine quality for B/W mode.
– photo and fine quality for color mode.
• Set the level of contrast using the sliding cursor.
6 Send the Fax with the settings entered.
The document is sent to the recipient.
CHAPTER 352
Page 59

4INK CARTRIDGES
CHECKING INK LEVELS
REPLACING THE INK CARTRIDGES
ALIGNING THE INK CARTRIDGES
EXCHANGING BLACK AND PHOTO INK CARTRIDGES USING THE GARAGE
INK CARTRIDGES 53
Page 60

CHECKING INK LEVELS
To know when an ink cartridge is running out of ink and needs replacing, check the ink levels of the
cartridges in the following ways:
1 By viewing the ink level indicators on the Ink Levels tab of your print driver’s Preferences or Properties
dialogue box, as follows:
a With the document file open in the application that you are using, click File > Print. The Print
dialogue box is displayed.
bClick Preferences or Properties, depending on your operating system. The printer driver user
interface screen is displayed.
cClick the Ink Levels tab. The two ink capacity indicators show the percentage of ink left in the
cartridges.
2 By viewing the ink level indicators on the bottom of the scanner driver screens that are displayed when
scanning a document or photo. As for the Ink Levels tab, the indicators show the percentage of ink left
in the cartridges.
3 From the Toolbox, by viewing the ink level indicators on the bottom of the Toolbox’s main screen or in
the New ink cartridges dialogue box:
a Right click your mouse button on the Olivetti icon on the Windows task bar, or click Start >
Programs or All Programs > Olivetti > Olivetti Toolbox. The Toolbox is displayed.
bClick Solutions and Assistance.
cClick Select to choose New ink cartridges. The New ink cartridges dialogue box displayed includes
ink level indicators showing the amount of ink still present in the cartridges.
4 From pop-ups displayed by the Printer Status Monitor during a print or copy job, that show the amount
of ink remaining. See "The Printer Status Monitor" for more information.
5 From the Start menu:
aClick Start > Programs or All programs > Olivetti > ANY_WAY New ink cartridges. The Status
Monitor is displayed.
6 Directly on the printer front panel:
a When the black ink and/or colour ink indicators begin to flash, the ink level in the cartridge is
getting low; when the indicators are on steadily, the printer is in ink almost out condition and
replacement of the cartridge is recommended.
Information required to purchase new ink cartridges
To guarantee correct functioning of the printer and high print quality, it is essential to use only original
Olivetti cartridges.
Use the following codes to purchase the cartridges:
• Black ink cartridge, code
• Three-color ink cartridge, code
• Photographic ink cartridge, code
• High capacity black ink cartridge, code
• High capacity three-color ink cartridge, code
• High capacity photographic ink cartridge, code
CAUTION: The cartridges can be used once only.
IN501
IN503
IN505
IN502
IN504
IN506.
CHAPTER 454
Page 61

REPLACING THE INK CARTRIDGES
Before proceeding with the procedures indicated in this section, carefully read and follow the
information provided in "Safety Instructions" at the beginning of this manual.
For information on how to purchase new ink cartridges from the manufacturer, consult the Toolbox’s
Solutions and Assistance feature. To access the Toolbox, see “The Toolbox”. To guarantee the correct
operation of your printer and top quality printing, it is essential to use only the manufacturer’s original
ink cartridges.
note: Use a black and a colour cartridge for normal printing. For printing photographs, use a photo
cartridge and a colour cartridge. The printing time will be longer, but the final quality is the best that
you will achieve with your printer.
1 Turn on the printer.
2 Make sure that plain A4 sized paper is loaded. See "Loading Paper".
3 Slide the scanner unit’s release tab outwards and lift the scanner unit until it is supported in its open
position. The release tab is located underneath the scanner unit.
CAUTION: The ink cartridge carrier moves to its loading position at the far right-hand side of the
carriage.
4 Press inward the clip that secures the ink cartridge that you want to replace.
INK CARTRIDGES 55
Page 62

5 Remove the ink cartridge.
note: At this stage you can replace the black or photo cartridge installed in the right carrier with the
cartridge stored in the garage. See "Exchanging Black and Photo Ink Cartridges".
6 If you are installing a new ink cartridge, remove the cartridge from its box and then gently remove the
protection tape that covers the ink nozzles. DO NOT TOUCH THE CONTACTS or the ink nozzles.
Hold the ink cartridge by its sides.
7 Hold the ink cartridge with its nozzles facing downward and contacts facing the rear of the printer, and
insert the colour cartridge in the left carrier and the black or photo cartridge in the right carrier.
CHAPTER 456
Page 63

8 Push the ink cartridge firmly inward until it is locked by the securing clip.
9 Grasp the scanner unit, press its securing support and lift it slightly, then lower it until it is completely
closed.
10 If a new cartridge is installed, the printer will automatically perform a cartridge recognition procedure.
An ink cartridge alignment page will then be printed to indicate that the newly installed ink cartridge
was automatically aligned. For information see "Aligning the Ink Cartridges".
INK CARTRIDGES 57
Page 64

ALIGNING THE INK CARTRIDGES
The ink cartridges are automatically aligned by the printer whenever a new ink cartridge is installed.
However, you need to manually align the ink cartridges when the edges of the printed characters are
still not clear, or when the lines still appear wavy, even after cleaning the ink cartridge nozzles.
See “Aligning the Ink Cartridges From the Toolbox”.
Ink Cartridge Alignment Page
The ink cartridge alignment page contains a series of line patterns to show that the printer has
automatically aligned the newly installed ink cartridge. It is printed:
• automatically, once the scanner unit is closed after installing new ink cartridges.
• directly from the Toolbox installed on your personal computer, when you select the "Print the
alignment page" option from the Toolbox Maintenance screen.
Aligning the Ink Cartridges From the Toolbox
When the edges of the printed characters are still not clear, or when the lines still appear wavy, even
after cleaning the ink cartridge nozzles:
1 Right click your mouse button on the Windows task bar, or click Start > Programs or All Programs >
Olivetti > Olivetti Toolbox. The Toolbox is displayed.
note: In the Mac OS X environment, the Toolbox program is available clicking on the icon present on
the desktop or selecting it from the list of programs installed. The Toolbox window will be displayed.
2 Click Solutions and Assistance and then Select the "Print the alignment page" option.
3 Click the Print button.
4 When the alignment page is printed, the ink cartridges have been aligned. Click Close to return to the
Toolbox main screen.
CHAPTER 458
Page 65

EXCHANGING BLACK AND PHOTO INK CARTRIDGES USING THE GARAGE
Your printer comes with an ink cartridge garage that holds the unused black or photo ink cartridge.
Use the photo ink cartridge together with the colour ink cartridge to obtain best results when printing
photographs. Use the black and colour cartridge to print normal black and white or colour documents.
note: When using the black cartridge, store the photo ink cartridge in the garage, and vice versa.
To exchange the photo and black ink cartridges to best suit your printing requirements:
1 Open the lid of the garage and extract the ink cartridge.
2 Remove the ink cartridge being used from its right carrier and then insert the cartridge that you now
want to use. See "Replacing the Ink Cartridges".
3 Place the ink cartridge just removed from the printer into the garage, with its contacts facing
downward.
4 Place the lid back on the garage and gently press it downward until it is securely closed.
INK CARTRIDGES 59
Page 66

CHAPTER 460
Page 67

5MAINTENANCE AND
TROUBLESHOOTING
CLEANING YOUR PRINTER
CLEANING THE INK CARTRIDGE NOZZLES
TROUBLESHOOTING
FAX MESSAGES
ERROR CODES PRINTED WITH THE FAX REPORT
CLEARING PAPER JAMS
MAINTENANCE AND TROUBLESHOOTING 61
Page 68

CLEANING YOUR PRINTER
CAUTION: Do not clean the inside of your printer and do not use stain removers, acetone-based
products, liquid or aerosol cleaners. Doing so could damage your printer case and scanner
glass.
Cleaning the Printer Casing, the Inner Side of the Scanner Cover and the Scanner Glass
1 Clean the printer casing by using a soft dry cloth or moistened in warm water to wipe dust, dirt or
smears off the outer case of your printer only.
2 Gently clean the white inner side of the top cover with a soft dry cloth or moistened in warm water.
3 Clean the scanner glass with a soft cloth moistened with water or with a glass cleaning solution.
CLEANING THE INK CARTRIDGE NOZZLES
Clean the ink cartridge nozzles when:
• White or colour lines appear in your printouts.
• Colours fade, or do not print in parts or completely.
• The vertical lines of your printout are jagged.
To clean the ink cartridge nozzles:
1 Make sure A4 size paper is loaded in the printer. See "Loading Paper".
2 Right click your mouse button on the Windows task bar, or click Start > Programs or All Programs >
Olivetti > Olivetti Toolbox. The Toolbox is displayed.
note: In the Mac OS X environment, the Toolbox program is available clicking on the icon present on
the desktop or selecting it from the list of programs installed. The Toolbox window will be displayed.
3 Click Solutions and Assistance.
4 Select the "Clean and Test Nozzles" option.
5 Click the Print button. The printer automatically cleans the nozzles and prints a test page.
6 Check the quality of the printed output with the example displayed on the computer monitor. If you
are not satisfied with the quality of the printed output, click the Clean again button to repeat the
nozzle cleaning procedure.
7 When finished, click the Close button to return to the Toolbox main user interface screen.
CHAPTER 562
Page 69

TROUBLESHOOTING
Problems During Printer Setup
Before reading this section:
1 Make sure the printer is properly connected to a working grounded electrical outlet compliant
with your printer’s power requirements (100 - 240 Vac, 50 - 60 Hz) and that it is turned on.
2 If you are using your printer with a personal computer, make sure that you have turned on both your
printer and computer.
3 Make sure the computer’s operating system is Windows 98 SE, ME, 2000 or XP, or MAC OS X 10.2 or
later.
Problem Possible Cause Corrective Action
Your printer does not turn on. • The printer’s power cord is
not properly connected to
the printer and/or to the
power outlet.
• The power outlet may not be
working.
You insert the “Installation”
CD-ROM into your computer CD
drive and the installation
program does not start
automatically.
• An operating system
incompatible with the CDROM software may be
running on the personal
computer.
• The auto-run feature is
disabled.
• Your personal computer
cannot find setup.exe on the
CD-ROM.
1 Make sure that both ends of
the power cable are properly
connected.
2 Make sure that the grounded
power outlet is working.
1 Make sure the personal
computer is running
Windows 98 SE, ME, 2000 or
XP, or MAC OS X 10.2 or
later.
• In the Windows
environment:
1 Remove and replace the
“Installation” CD-ROM in the
CD drive with the written
label upwards.
2Select Start > Run and then
click Browse.
3 Find the CD-ROM drive
identifier and click Open.
4Select Setup and click Open.
The file setup.exe is displayed
in the dialogue box.
5Click OK and then follow the
instructions displayed
• In the Macintosh
environment:
1 Switch on the computer and
insert the "Installation"
CD-ROM (c) in the drive.
2 Double click on the icon of
the CD-ROM displayed to
start installation of the
software and follow the
instructions provided on the
screen.
MAINTENANCE AND TROUBLESHOOTING 63
Page 70

Problem Possible Cause Corrective Action
Your printer’s name is not
available when you select
File > Print from an application.
The printer is not shown in the
Printer folder on the Control
Panel.
When connecting the printer to
the computer with the USB
cable, the Plug and Play wizard
did not terminate.
When connecting your printer to
the computer with the USB
cable, the New Hardware Wizard
is not displayed on the
computer’s monitor.
• The printer driver was not
installed correctly.
• The computer did not find
the printer driver.
• The computer is running an
incompatible operating
system.
• The USB cable may not be
properly connected between
the printer and computer.
1 Close all applications
currently open.
2 Reinstall the printer software
as instructed by the Setup
Diagram or as indicated in
the step above.
1 Remove the “Installation”
CD-ROM from the drive and
re-boot the computer.
2 Place the “Installation” CD-
ROM in the drive with the
written label facing upwards.
3 Reinstall the printer software
as instructed in the Setup
Diagram or as indicated in
the step above.
1 Make sure the computer is
running Windows 98 SE, ME,
2000 or XP, or MAC OS
X 10.2 or later.
1 Turn off your printer and
computer, then unplug the
USB cable from these two
devices.
2 Reattach the USB cable to
the two devices by following
the instructions in the Setup
Diagram. Turn on the printer
first followed by the
computer.
CHAPTER 564
Page 71

Problem Possible Cause Corrective Action
• The computer may not be
enabled for USB operation.
• In the Windows
environment:
1Click Start > Settings >
Control Panel.
2 Double click on the System
icon.
3Click on the Device
Manager or Hardware tab,
then click on the Device
Manager button.
4 Click the Plus (+) sign next to
the USB (Universal Serial Bus)
Controller option.
– If USB host controller and
USB root hub are present,
the USB is enabled.
– If they are not present,
read your computer
manual for information
on how to enable a USB
connection.
• In the Macintosh
environment:
– From the control panel,
check the characteristics
of the system and the
presence of an active and
functioning USB
connection.
– Re-install the USB drivers
for Macintosh consulting
the system
manufacturer's
documentation provided.
MAINTENANCE AND TROUBLESHOOTING 65
Page 72

Problems When Powering On the Printer
Problem Possible Cause Corrective Action
The printer does not turn on
when you press the Power
ON/OFF button on the front
panel.
• The power cord is not
properly attached to the
printer and/or to a working
electrical outlet.
• Unplug the power cord from
the printer and from the
electrical outlet and then
plug it back.
• Make sure that the electrical
outlet is working by
attaching another appliance
that you know works into it
and then turn on the
appliance.
Individual LEDs on the front
panel come on.
• Specific printer error as
signalled by the LED.
• Check the corrective action
for the corresponding LED
that is explained in "Meaning
of the LED Indicators on the
Front Panel".
Printing Problems
Problem Possible Cause Corrective Action
Your printer does not print when
you click on the Print icon on the
task bar of the application you
are using.
• Your printer is not set as the
default printer.
• In the Windows
environment:
1 Click Start > Settings >
Printers and Fax.
2 Right-click on your printer’s
icon and select Set as
Default.
• In the Macintosh
environment:
1 Re-install the software
furnished with the printer
and check the print and
spooler settings of the Mac
OS X. Operating system.
• Your printer is not properly
connected to the computer.
1 Turn off your printer and
computer, and then unplug
the USB cable from these
two devices.
2 Reattach the USB cable, then
turn on the printer first
followed by your computer.
The printing stops in the middle
of a print job.
• The paper is jammed. 1 Clear the paper jam.
See "Clearing Paper Jams".
2 Press the Cancel button to
reset the error condition. The
print job continues from the
next page.
Horizontal streaks are printed. • The ink cartridges are dirty. • Clean the ink cartridges. See
"Cleaning the Ink Cartridge
Nozzles".
CHAPTER 566
Page 73

Problem Possible Cause Corrective Action
The printed characters are not
properly defined.
• The ink cartridges are no
longer aligned.
• Align the ink cartridges from
your computer. See
"Aligning the Ink Cartridges
From the Toolbox".
Copying/Scanning Problems
Problem Possible Cause Corrective Action
The printer or scanner makes
unusual noises during operation.
• Turn off the printer and then
turn it back on again by
pressing the ON/OFF button.
Horizontal streaks are printed. • The ink cartridges are dirty. • Clean the ink cartridges. See
"Cleaning the Ink Cartridge
Nozzles".
A completely black copy is
output.
• Faulty Contact Image Sensor. • Contact the field engineering
service.
Meaning of the LED Indicators on the Front Panel
Problem Possible Cause Corrective Action
The black ink LED on the front
panel is flashing.
• The black ink cartridge is
nearly out of ink.
• You can continue to print
until this LED remains
illuminated.
The black ink LED on the front
panel is illuminated.
The colour/photo ink LED on the
front panel is flashing.
The colour/photo ink LED on the
front panel is illuminated.
The Paper LED on the front panel
is illuminated.
• The black ink cartridge is out
of ink.
• The colour/photo ink
cartridge is nearly out of ink.
• The colour/photo ink
cartridge is out of ink.
• You launched a print or copy
job and there is no paper
loaded in the printer.
• The size of the paper that is
loaded does not match the
paper size that you selected
from the Toolbox application
or from the PictBridgecompliant digital camera
connected to the printer.
• Replace the black ink
cartridge. For information,
see "Replacing the Ink
Cartridges".
• You can continue to print
until this LED remains
illuminated.
• Replace the colour/photo ink
cartridge. For information,
see "Replacing the Ink
Cartridges".
• Load paper. For information
see "Loading Paper".
• Load the correct paper. For
information see "Loading
Paper".
• The size of the paper loaded
is not the A4 size needed to
print the ink cartridge
alignment page after
changing the ink cartridges.
• Load the correct paper. For
information see "Loading
Paper".
MAINTENANCE AND TROUBLESHOOTING 67
Page 74

Problem Possible Cause Corrective Action
• A paper jam has occurred. • Clear the paper jam. For
information see "Clearing
Paper Jams".
The PictBridge USB LED on the
front panel is flashing.
• Your printer is receiving data
from the digital camera
connected.
• This is indication that the
data is being transferred
correctly.
No action is required.
The USB LED on the front panel
does not come on even though a
USB device is connected to the
printer.
• The USB device connected to
the USB connector on the
front panel is not recognised
by the printer.
• Connect a USB device that
complies with the printer’s
requirements for the
connection of USB devices.
FAX MESSAGES
The display of the control panel of the fax, which usually shows the date and time, informs the user of
the status of the current activity of the fax. The messages displayed do not prevent normal operation of
the printer and can remain on the display until the next time the fax module is used.
To clear the message displayed, press the Stop ("C") key on the control panel of the fax.
Messages during transmission
Message Description
TX INTERRUPTED • The user has interrupted the current transmission pressing the STOP
button.
TX NOT POSSIBLE • The scanner is already occupied in other operations, for example from
the computer. Wait for completion of the operation in course on the
scanner to acquire a new document to be faxed.
TX MEMORY FULL • The memory available on the fax is full because too many documents
have been acquired by the scanner; no more documents can be
saved.Fax the documents in the memory or cancel these.
TX ERROR • Is displayed at the end of a fax transmission that failed. Try to fax
another document.
Error messages during reception
Message Description
RX INTERRUPTED • The user has interrupted reception in course pressing the STOP button.
RX ERROR • Is displayed at the end of a fax reception that has failed. Try to receive a
new document via fax.
MEMORY FULL • The memory available on the fax is full because many documents have
been received. If this type of error occurs, a generic error code is
indicated in the fax reportIt is advisable to print the documents received
present in the memory or cancel these if not desired.
CHAPTER 568
Page 75

General messages
Message Description
EMPTY • No data available in the memory of the fax.
Is displayed for example when an attempt is made to print reports of fax
message that are not present or when accessing the agenda that has no
information saved in its file.
ILLEGAL SETTING • Error during setting of the date and time. Repeat entry of the data
checking that the values are valid.
FAX NOT WORKING • Visual readout during diagnostics at printer power-on. Indicates a
functional problem on the FAX module; when it is displayed, switch the
printer off and on. If the problem persists, call technical assistance.
PRINTER ERROR • Generic error in the print module. A possible cause may be ink out of the
cartridges installed, no paper in the tray, paper jam, etc.
For further information, check the indicators on the front panel of the
printer; or if connected to a computer, use the status monitor to search
for any error messages.
ERROR CODES PRINTED WITH THE FAX REPORT
The error codes are printed automatically in the transmission or activity report of the fax.
Error codes in the transmission report
The error codes printed in the transmission report of the fax consist of two digits indicating the cause
of the error and a short description to facilitate understanding.
Code Description Cause of the error What to do
00 OK No error. No action. The fax has been
sent correctly.
02 IMPOSSIBLE
CONNECTION
03 RECEIVER DOES NOT
ANSWER
The fax has not detected any
line tone or receives irregular
messages.
The other party has not
answered the call or is not a
Check that the fax is connected
correctly to the telephone line.
Try to send another document.
Check that the number of the
recipient is correct.
fax.
04 ERR. WHILE
TRANSMITTING
RESEND FROM PAGE nn
A fault has been detected
during transmission.
"nn" indicates the page
Repeat transmission from the
page indicated in the report.
number in which the error has
been detected.
06 LINE BUSY The line is busy. Retry when the line is free.
09 STOP PRESSED Transmission has been
No action.
interrupted.
14 ERR. WHILE
TRANSMITTING
Durante la trasmissione del fax
si è verificato un errore oppure
il corrispondente a interrotto la
Try to resend the faxor make
sure that the recipient intends
to receive the fax.
ricezione del fax.
15 RETRY B/W A color document is being sent
but the recipient is unable to
Rimandare il fax selezionando la
modalità in bianco e nero (B/N).
receive it.
MAINTENANCE AND TROUBLESHOOTING 69
Page 76

Error codes in the activity report
Error codes printed in the activity report of the fax include both the transmission error codes described
above and the reception error codes listed below.
The error codes consist of two digits and indicate the cause of the error. Due to shortage of space,
only the two-digit code is indicated in the report without any description.
Code Description Cause of the error What to do
09 RX INTERRUPTED Reception has been interrupted
No action.
pressing the STOP ("C") key.
10 RX ERROR An error has occurred during
reception of the fax or the
Ask the other party to transmit
a new fax.
sender has interrupted
transmission of the fax.
11 MEMORY FULL The memory available on the
fax is full because many
documents have been received.
Print the documents received
present in the memory or cancel
those not desired.
CLEARING PAPER JAMS
1 Firmly grasp the jammed paper and gently pull it out from where it jammed. If the paper tears, make
sure you remove all the torn pieces from the printer.
2 Press the Cancel button on the front panel to clear the error condition.
note: If the paper jam occurred when copying or printing without a computer, the print job will
continue from the next page.
If the jam occurred when using a computer, the pop-up screen displayed allows you to either continue
to print from the next page or to cancel the print job.
CHAPTER 570
Page 77

6TECHNICAL
CHARACTERISTICS
GENERAL SPECIFICATIONS
PRINTER SPECIFICATIONS
COPIER SPECIFICATIONS
SCANNER SPECIFICATIONS
SPECIFICATIONS OF THE FAX SYSTEM
WI-FI SYSTEM SPECIFICATIONS
PAPER SPECIFICATIONS
TECHNICAL CHARACTERISTICS 71
Page 78

GENERAL SPECIFICATIONS
General Specifications
Photo printing management console display 2.4" color Liquid Crystal Display for photo preview
and selection
Memory capacity • 2 MB Read-only Memory (ROM)
• 32 MB Random Access Memory (RAM)
Dimensions and weight • Height: 7.71 in. (19.6 cm)
• Width: 18.1 in. (46.2 cm)
• Depth: 13.3 in (33.9 cm)
• Weight: 16.5 lbs (7.5 kg)
Power supply unit Auto-sensing universal power supply unit
Input voltage 100 - 240 Vac, 50-60 Hz, grounded
Power consumption Maximum 35 W
Connectivity • High-speed USB 2.0 on the rear panel for
connection to the personal computer.
• PictBridge-compliant USB 1.1 on the front
panel for connection of a digital camera.
Memory card interfaces Can accept the following memory card types:
• Compact Flash I, II
• Microdrive
• SmartMedia
• SecureDigital (Mini SD adaptor sold separately)
•MultiMedia card
• Duo, Pro, Magic Gate Memory Sticks
(MS Pro adaptor sold separately)
• xD-Picture card
• Up to 2 B memory cards.
All the images saved on memory cards can be
displayed, selected and printed or saved on the
computer also using the "Toolbox" program.
Temperature ranges • Operating: 15 °C to 35 °C
• Storage: -5 °C to +45 °C
• Transportation: -15 °C to +55 °C
Humidity ranges • Operating: 15% to 85%, non-condensing
• Storage: 15% to 85%, non-condensing
• Transportation: 5% to 95%, non-condensing
Software and documentation • Printer and scanner drivers (WIN/MAC)
• Toolbox application (WIN/MAC)
• User Documentation (WIN/MAC)
• Additional software (WIN)
CHAPTER 672
Page 79

General Specifications
Minimum system requirements for the connected
personal computer
Operating system: Microsoft Windows 98 SE, ME,
2000 or XP, or MAC OS X 10.2 or later
RAM: 128 MB (256 MB suggested)
Free hard disk space: 500 MB.
PRINTER SPECIFICATIONS
Printer Specifications
Printing technology Bubble ink-jet
Printing system Two disposable ink cartridges:
• 3-colour (Cyan, Magenta, Yellow)
•Black
• 3 photographic colors
For specific printing requirements, the
photographic ink cartridge (sold separately) can be
used instead of the black ink cartridge.
Print resolution • Up to 4800 dpi optimised.
Advanced print functions Applicable from the Toolbox program or from the
photographic printing control panel.
Optimization of image quality:
• Using proprietary software from the "Toolbox"
program.
• In stand-alone mode with the "Magic" key
from the photographic printing control panel.
Margins Borderless on all types of special paper for ink-jet
printers.
Direct printing mode Available from:
• Photo Index.
TECHNICAL CHARACTERISTICS 73
Page 80

COPIER SPECIFICATIONS
Copier Specifications
Resolution • Up to 1200 x 1200 dpi
Copy modes • In stand-alone mode
– 100%, fit to page
– Type of paper/speed:
normal paper and photographic paper
– Contrast adjustment:
light, normal, dark
• From the Toolbox program:
– Reduction/enlargement from 25% to
400%, clone, poster mode
Maximum number of copies • Up to 99 when copying from the Toolbox
application installed on the personal computer
• Up to 9 when copying in stand-alone.
SCANNER SPECIFICATIONS
Scanner Specifications
Type Flatbed, CIS (Contact Image Sensor)
Optical resolution • Up to 1200 x 1200 dpi
• Interpolated: up to 9600 dpi
Maximum scan area 215 mm (Wide) x 297 mm (High)
Functions • Photocopier
• Scan to file
• Scan to email
• Scan to application
•Scan to fax
SPECIFICATIONS OF THE FAX SYSTEM
Specifications of the fax
Fax transmission • Fax functions are accessible from the keyboard
or from the computer
• Transmission of color or b/w fax messages
• Compatibility with the G3-ITU T30 E standard
• Speed of 33.6Kb/sec with auto fall back
• Method of coding for files in MH, MR, MMR,
JPG format
•RX mode:
Auto, Manual, fax-TAD, fax-telephone
Call • Automatic
CHAPTER 674
Page 81

Specifications of the fax
Method of transmission without using
the computer
• Manually from the scanner; automatic loading
of the pages (ADF) is not available
• Activity and confirmation reports
• CCITT/ITU Group 3 fax with error correction
mode
LCD • Display of 32 characters on 2 lines
Available functions • Printing of TX activity report
• Printing of power failure report
Memory • More than 100 pages (Letter Slerexe)
Telephone functions • Automatic reception, manual reception,
simplex telephone / fax, TAD / fax
• Possibility of acoustic warning in the case of a
telephone call in fax reception fax mode
Connection to the computer • Transmission from computer
• Settings of the Toolbox program
• Compilation of the Agenda.
TECHNICAL CHARACTERISTICS 75
Page 82

WI-FI SYSTEM SPECIFICATIONS
Wi-Fi System Specifications
Wireless interface • The wireless connection system is integrated in
the printer and uses the IEEE 802.11 b/g
protocol: data are transmitted using high
frequency radio waves.
• The wireless system includes a network adapter
and the radio wave system.
The USB connection and Wi-Fi connection can
be used at the same time.
Transmission Speed • 54 Mbps on 2.4 GHz band, if available.
Available functions • All the functions can be used by the connection
via cable and via the wireless connection (only
reading of the memory card is not available).
Web server • For simple management of the printer, use the
web browser through which it is possible to
check status, define and modify setting
parameters.
Communication mode • Peer-to peer: The integrated wireless network
connection can connect directly with a PC
equipped with wireless functions for an Ad-Hoc
mode connection.
• The peer-to-peer method of connection is used
for small/medium web connections as the
increase of the number of network connections
reduces the quality and range of the
connection. This type of connection is set by
default.
• Infrastructure: The printer is connected with a
network of PCs via an access point connected
to a central hub or gateway that connects all
the wireless peripherals or with an Ethernet
connection.
• Installation and configuration of the printer in
Infrastructure mode requires connection with
an USB cable, which may be removed once the
parameters for network connection in wireless
mode have been set.
Security Settings • SSID (Service Set Identifier).
• WEP (Wired Equivalent Privacy) key.
Via Web Server mode it is possible to install
WPA (WiFi Protected Access) keys in PSK
(Pre Shared Key) mode Home/SOHO.
note: To enter the network protection keys, the
EWS must be accessed before installing the
software via the USB connection.
CHAPTER 676
Page 83

PAPER SPECIFICATIONS
Supported Paper Types
Paper type Paper weight Maximum feed capacity
A4 Plain paper 70 to 80 g/m
2
100 sheets
A4 Plain paper > 80 to 90 g/m
A4 Coated paper 100 to 170 g/m
A4 Transparencies 170 g/m
2
A4 Photo paper 160 to 280 g/m
A4 Glossy paper 160 to 180 g/m
A4 T-shirt transfers 150 to 180 g/m
A4 ink-jet labels 80 to 110 g/m
A4 Banners 80 to 90 g/m
2
10x15 cm Note Cards 130 to 280 g/m
10x15 cm and 13x18 cm
170 to 280 g/m
Photo paper
Envelopes 75 to 100 g/m
2
2
More than 50 sheets
50 sheets
20 sheets
2
2
2
2
20 sheets
20 sheets
5 sheets
20 sheets
20 banners, fed manually
2
2
2
20 cards
20 sheets
10 envelopes
TECHNICAL CHARACTERISTICS 77
Page 84

Supported Paper Formats and Sizes
Format Size Format Size
A4 8.27 x 11.7 in.
210 x 297 mm
A5 5.85 x 8.27 in.
148.5 x 210 mm
US Letter 8.5 x 11 in.
216 x 279 mm
US Legal 8.5 x 14 in.
216 x 356 mm
US Executive 7.25 x 10.5 in.
184 x 267 mm
US Folio 8.5 x 13 in.
215.9 x 330.2 mm
US Statement 5.5 x 8.5 in.
139.7 x 215.9 mm
B5 7.2 x 10.1 in.
182 x 256 mm
4x6" cards 4 x 6 in.
102 x 152 mm
5x8" cards 5 x 8 in.
127 x 203 mm
A6 4.135 x 5.85 in.
105 x 148.5 mm
13 x 18 cards 5.12 x 7.09 in.
130 x 180 mm
Index cards 3 x 5 in.
76.2 x 127 mm
Hagaki card 3.9 x 5.8 in.
100 x 148 mm
L 3.5 x 5 in.
89 x 127 mm
2L 5 x 7 in.
127 x 177.8 mm
US # 10 4.12 x 8.85 in.
105 x 225 mm
C5 envelope 6.38 x 9.0 in.
162 x 229 mm
DL envelope 4.33 x 8.66 in.
110 x 220 mm
C6 envelope 4.46 x 6.37 in.
114 x 162 mm
B6 4.92 x 6.93 in.
125 x 176 mm
B5 envelope 6.93 x 9.84 in.
176 x 250 mm
Monarch 3.875 x 7.50 in.
98.43 x 190 mm
Chokei 3 envelope 4.72 x 9.25 in.
120 x 235 mm
Chokei 4 envelope 3.54 x 8.0 in.
90 x 205 mm
Chokei 40 envelope 3.54 x 8.8 in.
90 x 225 mm
Karugata 3 envelope 8.5 x 11 in.
216 x 277 mm
Karugata 4 envelope 7.75 x 10.5 in.
197 x 267 mm
Karugata 5 envelope 7.75 x 10.5 in
190 x 240 mm
Banner (A4) 8.27 x 223.8 in.
210 x 5938 mm
note: All the formats listed above are detected automatically by the printer; sheets of particular size
can be used entering these in a specific window of the print and copy drivers (personalized print
format).
CHAPTER 678
Page 85

INDEX
A
Activation in Bluetooth 16
in the Mac OS X
environment 16
in the Windows
environment 16
Agenda 9
Agenda of the fax 31, 49
Aligning the Ink Cartridges 58
B
Bluetooth 48
Bluetooth system settings 48
C
Cancel 7
Cleaning your printer 62
Connecting a digital camera
to your printer 14
Connection to the telephone
network 19
Control panel 5, 9
# button 9
agenda button 9
B/W display 9
fax quality selection button 9
numeric keypad buttons 9
report button 9
special functions button 9
start B/W fax button 9
start color fax button 9
stop button 9
Copier specifications 74
Copy
colour 7
monochrome 7
contrast 6
counter 6
selection button 7
Copying a document 26
D
Date and time settings 50
Declaration of network
addresses 45
Display 8
B/W 9
colour 8
of the printer 26
E
Error
fax 68
during reception 68
during transmission 68
printed in the fax report 69
generic 69
Exchanging ink cartridges 59
Extractable top cover 5
F
Fax 9, 22
error messages 68
quality selection button 9
reception 50
reports 49
Fax settings
resolution and clear/dark 33
from the Toolbox program 49
Front panel 5, 6
Bluetooth icon 6
cancel 7
colour copy 7
copy contrast 6
copy counter 6
copy selection 7
meaning of the LED 67
memory card slots 6
monochrome copy 7
ON/OFF Button 7
out of ink indicator 7
paper error indicator 7
print 6
quality 6
scan 7
USB connector 6
USB error LED 6
USB status LED 6
Wi-Fi network icon 6
Full-Screen views 26
browse window 26
device icon 26
icon bar 26
image Total field 26
select frame 26
G
General specifications 72
H
High-speed USB interface 5
How
to eliminate fax messages from
the memory 33
to improve print quality of the
photoS 28
to install the fax 22
to print reports 32
to send a fax using the
computer 51
to use the agenda of the fax 31
I
Improve photo print
quality 42
Ink cartridge carrier 5
Ink cartridges
aligning 58
checking ink levels 54
purchase 54
replacing 55
Inserting a memory card 14
Installing
the Wi-Fi system 17
Interruption of fax
transmission/reception 33
INDEX 79
Page 86

K
Keys
WEP 47
WPA 47
L
LCD display 5
LED
Bluetooth 13
USB error 6
USB status 6
Wi-Fi 13
LinkToolbox 39
help 39
settings 39
solutions and assistance 39
Loading different types of
paper 12
M
Magic 8, 28
Management console 8
colour display 8
display button 8
Magic 8
navigation button 9
no. of copies button 8
page layout button 8
selection button 8
Manual IP configuration 45
Meaning of the LED 67
Memory card slots 5, 6
Memory cards 14
N
Navigation 9, 27
Nozzles
cleaning 62
Numeric keypad buttons 9
O
ON/OFF Button 7
Out of ink indicators 7
P
Page layout 8
Paper
error indicator 7
guide 5
jams 70
specifications 77
support 5
tray 5
Photo Index 27
Power supply connector 5
Print button 6
Print properties 39
ink levels 40
layout 40
paper/quality 39
Printer
network connection 18
specifications 73
Printing of photos 28
from a Bluetooth mobile
phone 29
from your DPOF digital
camera 29
from your PictBridge digital
camera 28
Printing of the Photo Index 27
Printing
problem 66
Printing, copying and
scanning from the
Toolbox 38
Purchase new ink
cartridges 54
Q
Quality button 6
R
Receive fax 30
answering device/fax 30
automatic 30
manual 30
telephone/fax 30
Removing a memory card 15
Replacing the ink
cartridges 55
Restore of fax date and
time 32
Ring differentiation 33
RJ11 connector 5
S
Scan 7
Scanner
glass 5
specifications 74
unit 5
Scanning an original 40
Selection 8, 27
Sending a fax message 31
from file 52
from the control panel 31
from the Toolbox 51
Setting network connection
parameters 43
Special functions 9
Specifications of the fax
system 74
Stand-by/Economy 13
Start fax
B/W 9
color 9
States of the front panel of
the printer 12
Status monitor 37
error pop-ups 37
Supported paper types 77
T
TCP/IP 45
Thumbnail views 27
browse frame 27
device icon 27
icon bar 27
image total field 27
photo counter 27
select frame 27
thumbnail grid 27
INDEX80
Page 87

Toolbox 36, 38
memory card file transfer 38
photocopier 38
print photos 38
scan to application 38
scan to email 38
scan to fax 38
scan to file 38
Troubleshooting 63
copying/scanning 67
during printer setup 63
printing problem 66
when powering on the
printer 66
Turning off your printer 12, 13
U
USB 5, 6
W
WEB server 46
Web Server mode 46
WEP keys 47
Wi-Fi 17
Wi-Fi system specifications 76
Wireless 6
WPA Coding 47
INDEX 81
Page 88

INDEX82
Page 89

Code: 522922 gb
 Loading...