

Olive OPUS, MELODY User Manual

Welcome
to Great
sound.
user manual
oPus
melodY


user manual | oPus | melodY
1
olive Home audio solution
- user manual edition 5, JanuarY 2009
Welcome!
Congratulations and thank you for purchasing an Olive OPUS and/or MELODY. Your Olive units
will provide you with a whole new concept of high delity listening throughout your home in this
era of innovative technology. Relax and enjoy the ease of your new OPUS and MELODY – and
their beautiful sound!
• To ensure the best possible performance, please read this manual carefully. Keep it in a safe
place for future reference.
• This manual applies for both OPUS and MELODY as they are part of an integrated Home
Audio Solution, though they also stand very well on their own. In many respects they are
similar in their operation, though of course the OPUS includes the storage and CD capabilit-
ies. Additional features or other differences are outlined in the text.
• Since the OPUS and MELODY software continues to be maintained and updated, the
version on your OPUS and MELODY may differ from the one that is referenced here in
screen messages or design. The most current version of this user manual can always be
found on the Olive website (www.olive.us).

2
Contents
1 Quick-Start Guide 04
1.1 Adding Music to Your Home 04
1.2 OPUS 06
1.3 MELODY 12
2 Playing Music 19
2.1 Playing a CD on Your OPUS 19
2.2 Playing Music from Your Music Library on both OPUS and MELODY 20
2.3 Listening to Internet Radio 28
2.4 Playing Music from a Networked PC/Mac/NAS 30
2.5 Playing Music from Your Apple® iPod™ 31
2.6 More on Using the Touchscreen and Remote Control 32
3 Making it Your Olive: Settings and System Services 38
3.1 General Settings, Alarm and Sleep Timer 38
3.2 CD Settings 39
3.3 Network Settings 41
3.4 System Services 45
3.5 Information about your Library and OPUS or MELODY 48
4 Editing Your Music Library 50
4.1 Information to Describe Your Music 50
4.2 Maestro Music Management Software (OPUS only) 58
4.3 Making the Most of Your Music: Shared and Private Playlists 62

user manual | oPus | melodY
3
5 Importing and Exporting Music on Your OPUS 64
5.1 Importing CDs 64
5.2 Importing From a Computer 65
5.3 Burning CDs 66
6 Tips and Troubleshooting 68
6.1 Icons and messages explained 68
6.2 First aid 70
6.3 Networking Issues 72
7 Further Resources 73
8 Safety and Cleaning 74
9 Regulatory and Environmental Compliance 77
9.1 Legal Notices 77
9.2 Environmental Compliance 84

4
1. Quick-start Guide
1.1 Adding Music to Your Home
With Olive’s Home Audio Solution we bring together the components you need to make the
most of your home network and HiFi system in an integrated solution. The key advantage is that
you simplify your music listening:
•
You have one place to keep and manage your music – in high quality.
•
You have your music right with your HiFi system for immediate listening, there’s no
computer to start rst.
•
The way you browse and play music looks the same on the OPUS as well as on the
MELODYs, no new interfaces to learn.
•
OPUS and MELODY are made to work together. Once you have made them part of your
home network and HiFi system, it is all about the music and relaxing.
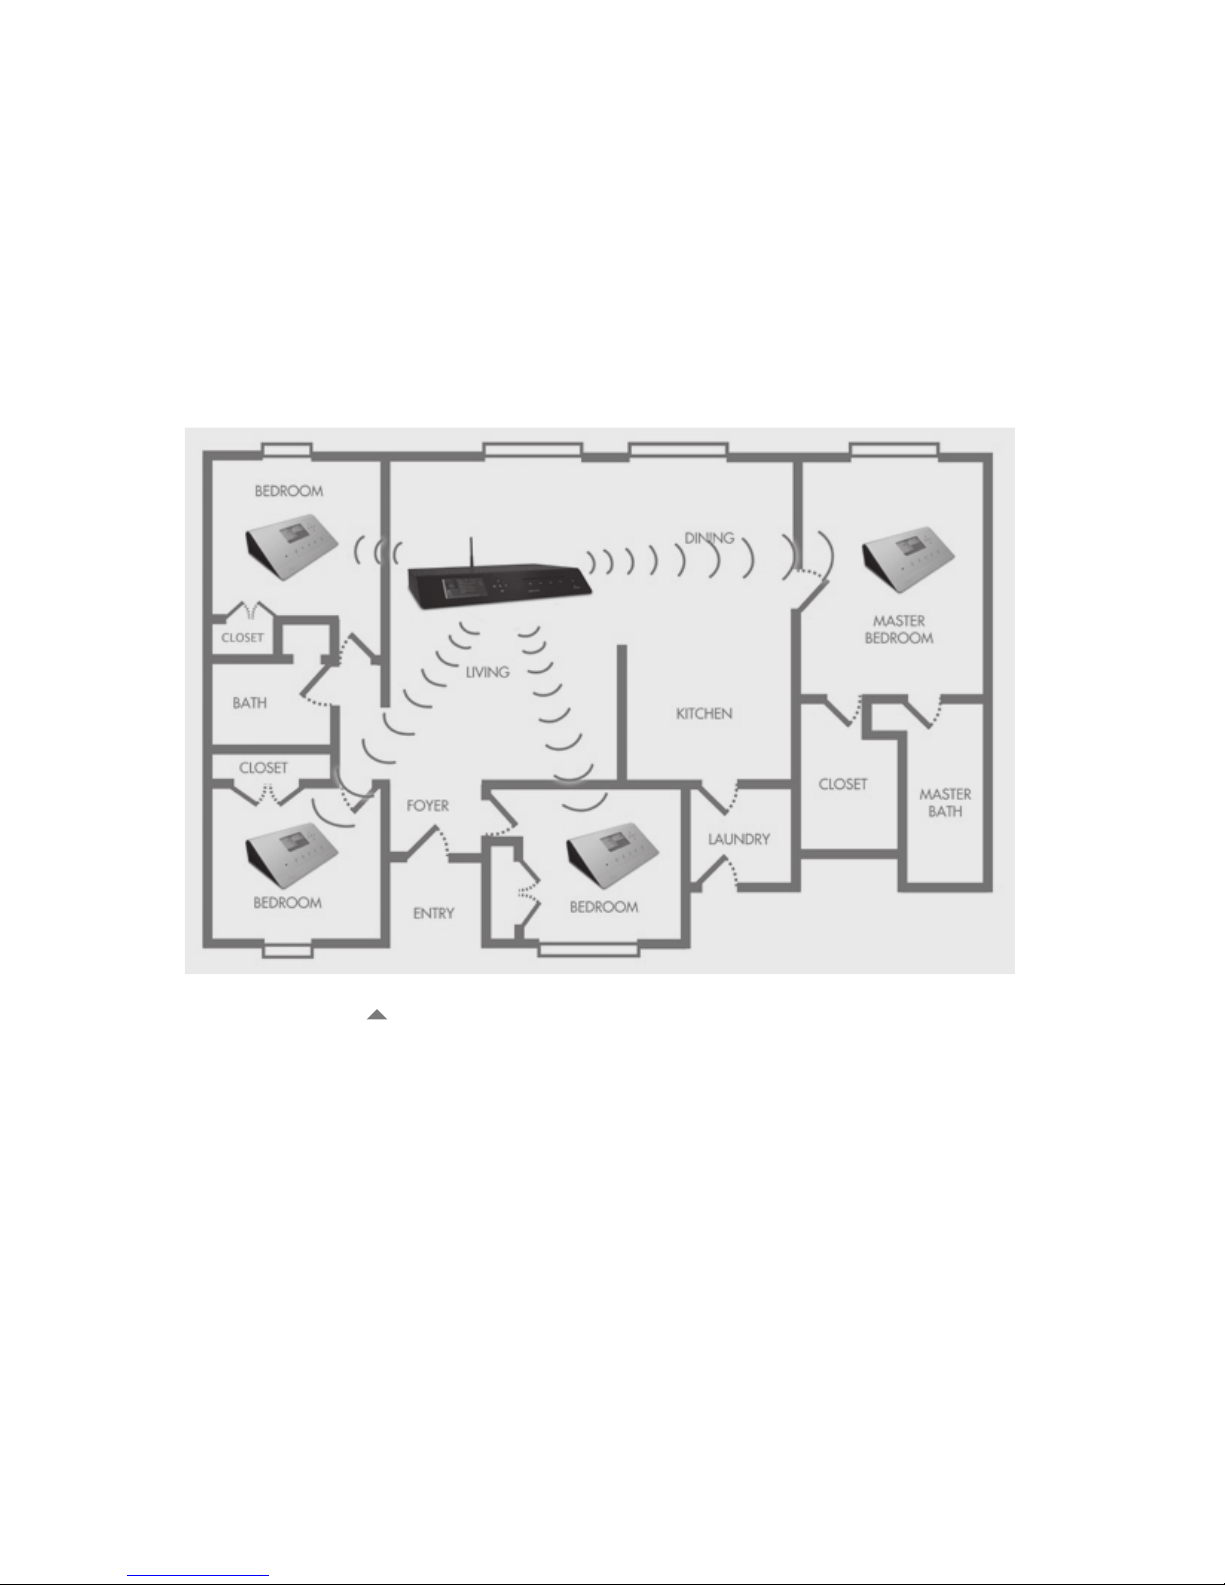
Layout
Here is a view of what a typical home setup looks like, with an OPUS to store all your music in
the living room and as part of the HiFi system, and MELODYs around the home to extend your
music library wherever you are:
user manual | oPus | melodY
5
Floorplan Layout
Both OPUS and MELODY are intended for use with an existing stereo amplier and/or (active)
speakers, with all the usual analog and digital connections to easily hook them up to your existing equipment. If you are installing both OPUS and MELODY(s), it makes sense to start with the
OPUS.

6
How many streams?
We test with standard networking gear available at the usual retailers, and look for reliable
connection build-up and uninterrupted playback as key indicators. In our most recent test we
achieved the following:
•
Wired (Ethernet): 15 MELODYs playing the same album off one OPUS.
•
Wireless: 5 MELODYs playing the same album off one OPUS.
In both cases the OPUS was connected to the router per wired connection. Our benchmark test
involves using a high-denition music stream of 4608 kbit/s throughput, which is equivalent to
music sampled at 96 kHz and recorded with 24 bit depth, without any compression. This goes
way beyond normal bit streams of uncompressed CD quality of 1411 kbit/s, or losslessly (FLAC)
compressed music streams of between 400 to 900 kbit/s, and so depending on the music you
are streaming you will usually have a very safe margin of additional bandwidth.
1.2 OPUS
Step 1: Unpacking your OPUS
Your package includes the following items:
•
OPUS
•
Remote control (w/ batteries)
•
Wireless antenna
user manual | oPus | melodY
7
•
Power cable
• Software: Recovery CD, User manual
Step 2: Setting up your OPUS
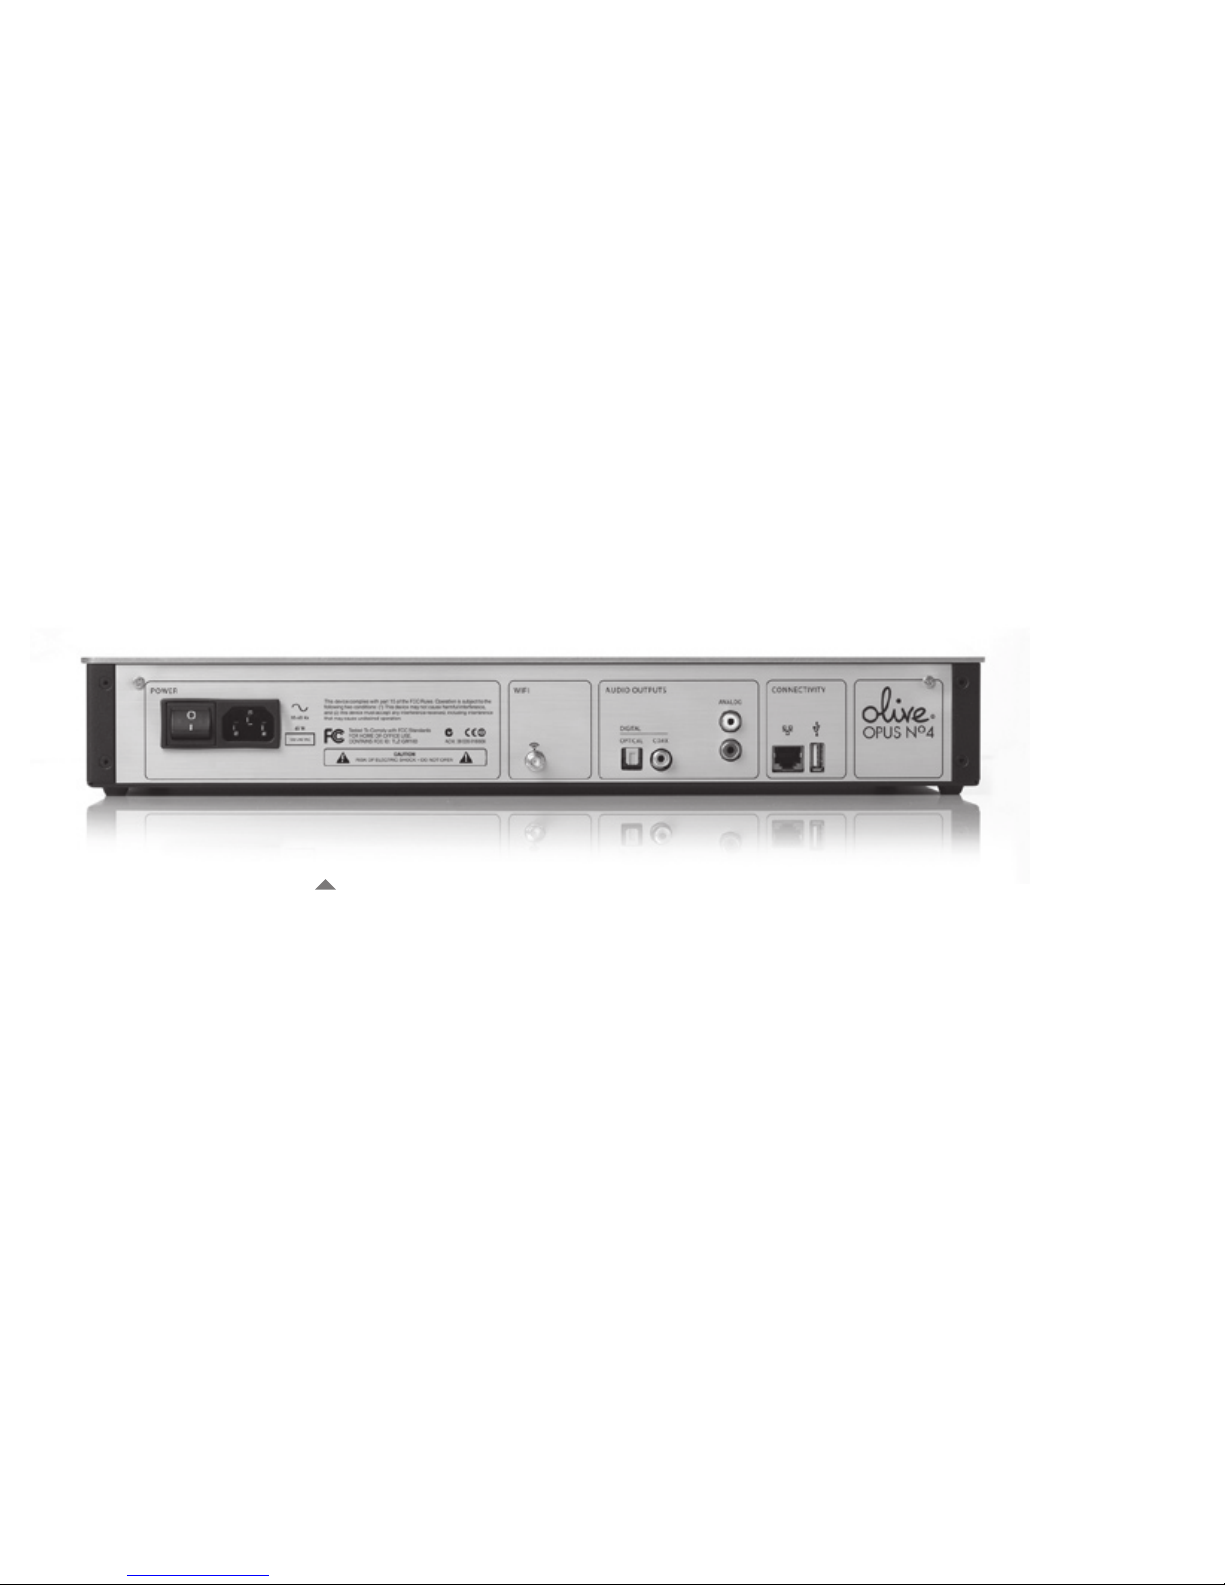
Backpanel OPUS
• Place your OPUS close to your stereo system, in a cool, well-ventilated place.
• Attach the wireless antenna to the back of the OPUS.
• Connect it via its RCA (analog) or digital output to the input of your stereo system.
• Plug the power cable into your OPUS and into the power outlet.
• Turn on the OPUS and your stereo system.
Your OPUS takes about 40 seconds to perform an initial start-up. It should then stay on or be in
8
power save mode to be immediately available at any time you wish, with a sophisticated power
saving ensuring that it powers down components that are not needed. Please never unplug your
device while it is turned on or in sleep mode, it might damage your device. Please make sure to
turn off a connected amplier or speakers before disconnecting the audio-out of the OPUS.
Step 3: Navigating your OPUS
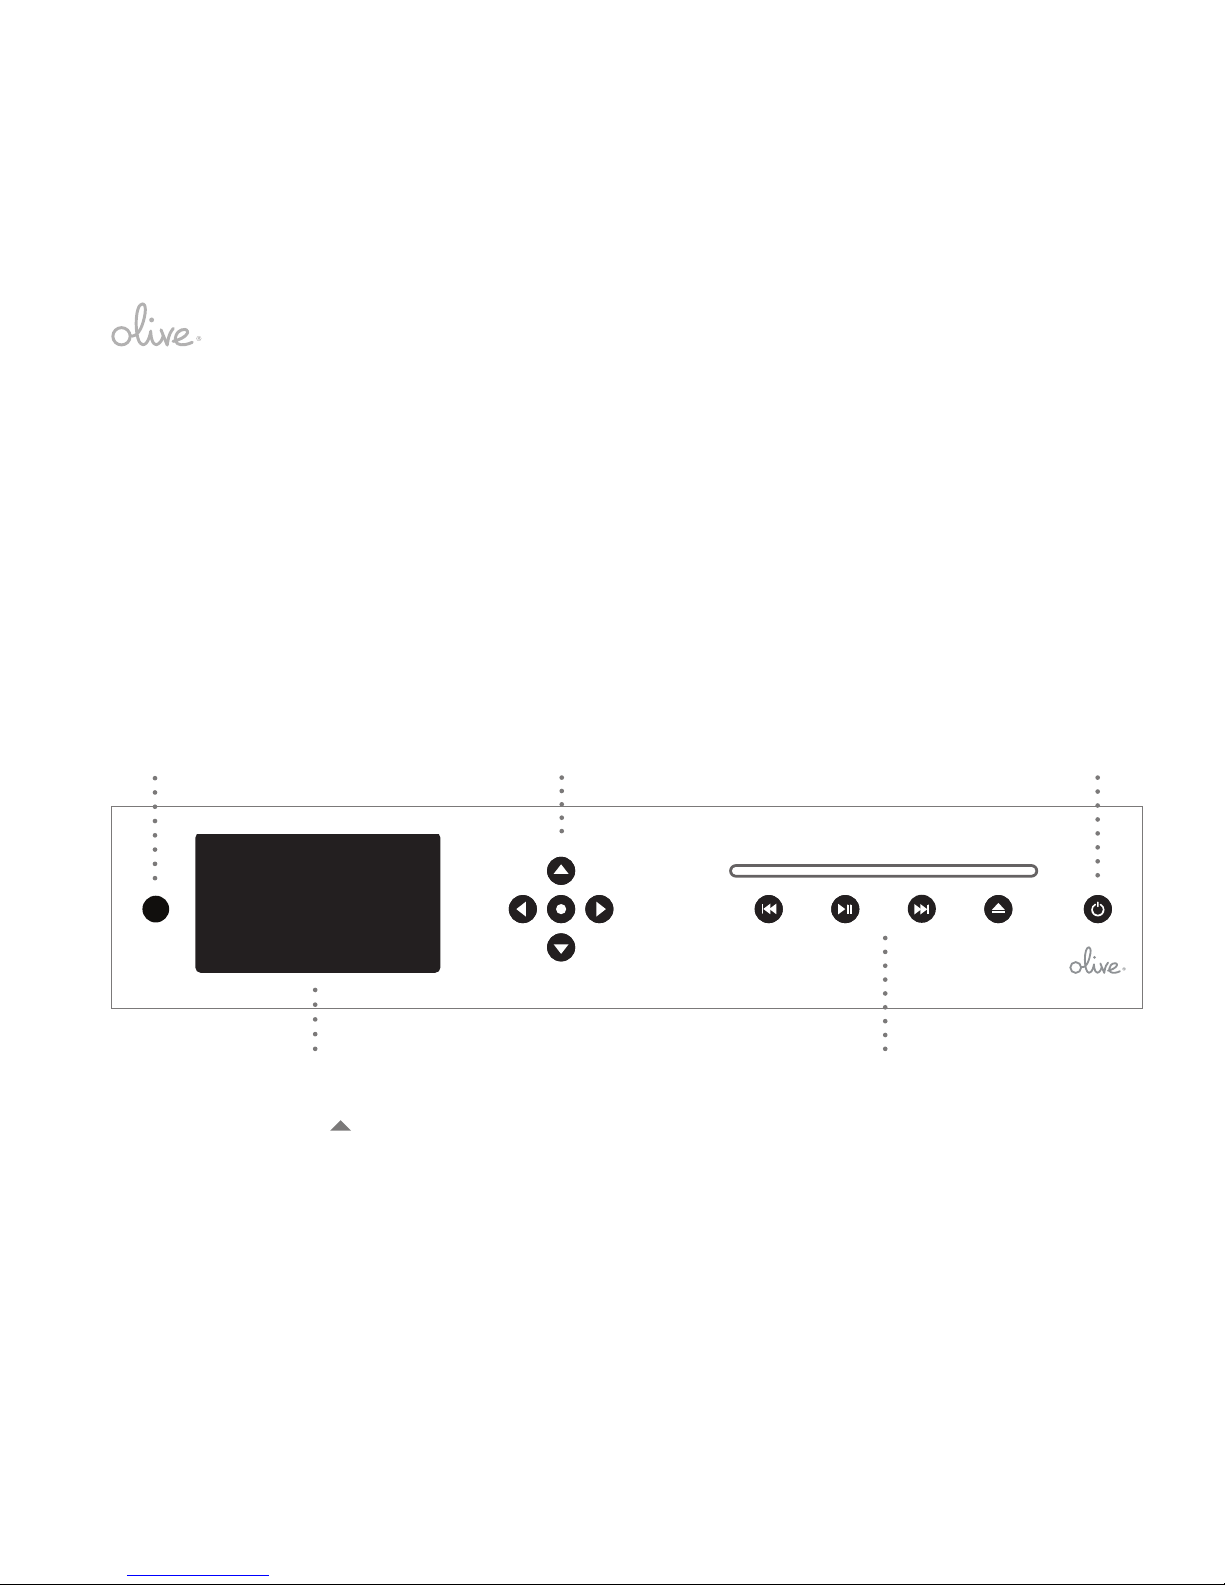
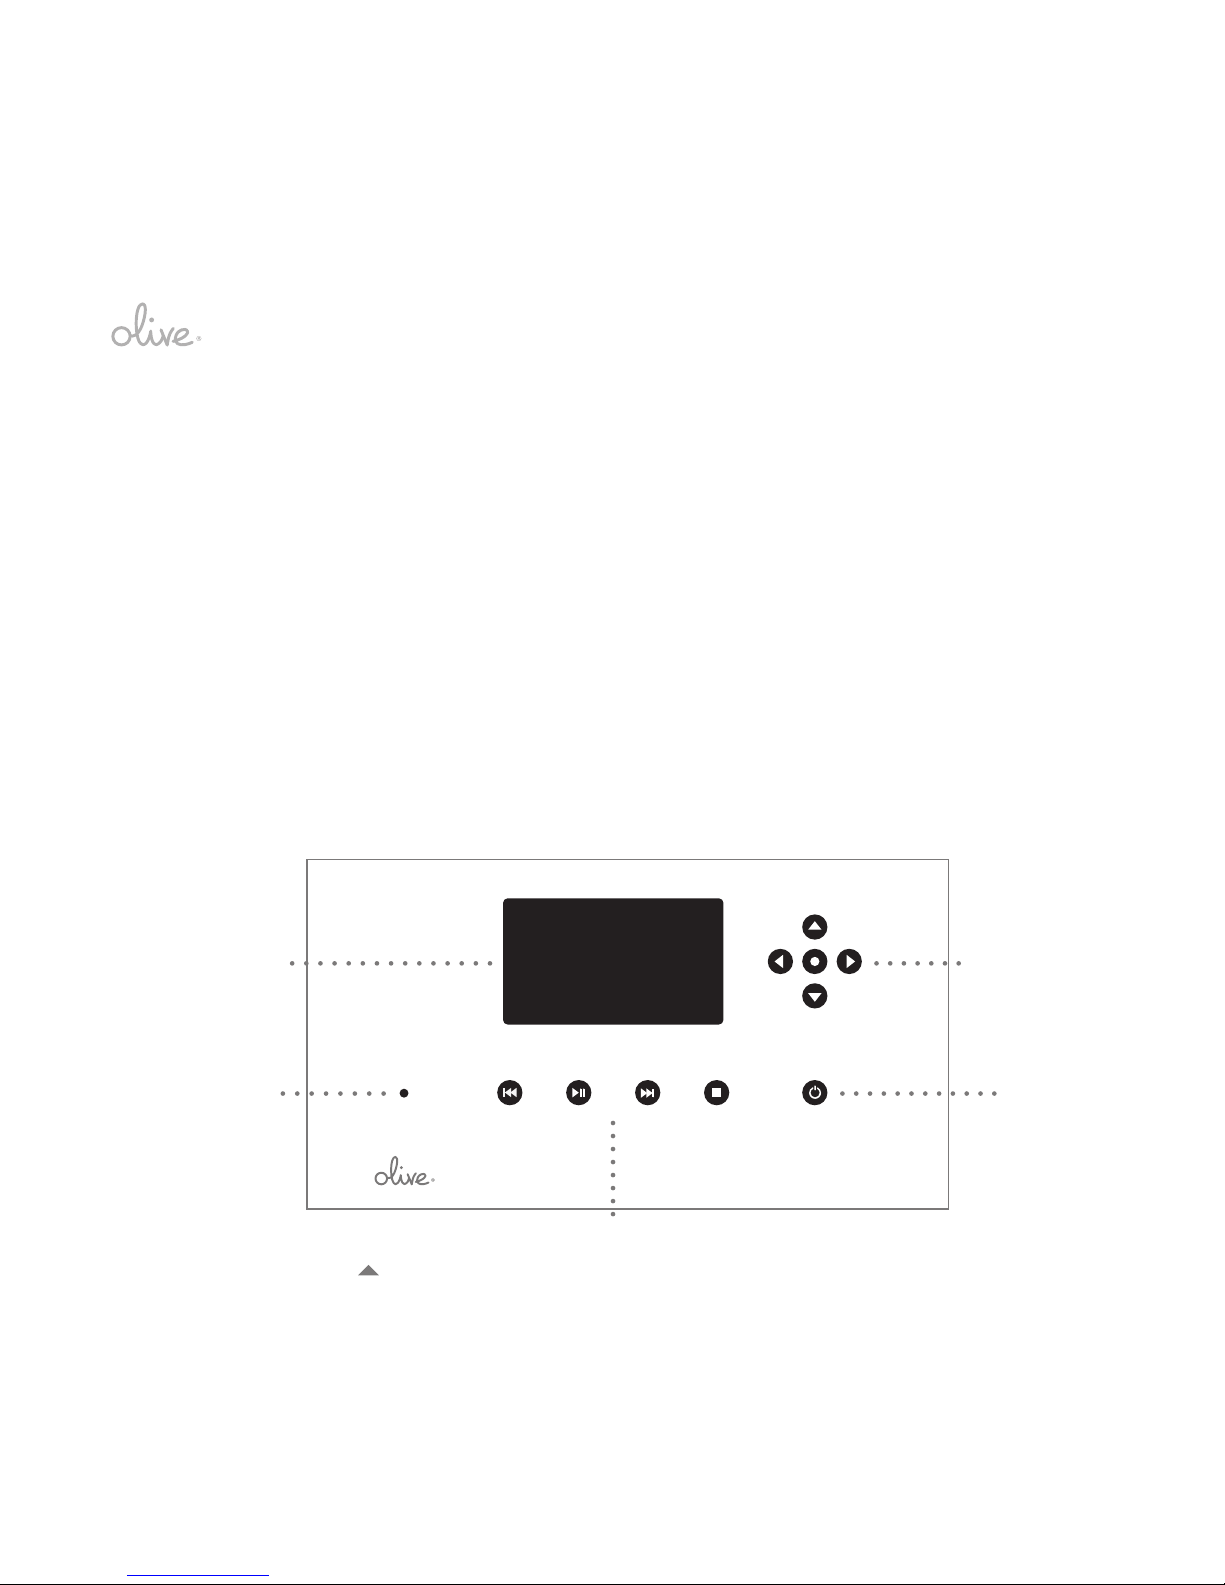
Your OPUS provides the following navigational controls:
OPUS Frontside
•
Once the OPUS is on, you’ll be using the 5 navigation keys to get around the menu
screens, and the play keys to control the actual playback like on any CD-player. Then
there’s the ON/OFF key, that’s about it.
OPUS No4
Touchscreen/Display
Infrared
Navigation Keys
Play Keys
On/Off

user manual | oPus | melodY
9
• Tip 1: Use the remote control just like the keys on the OPUS – while sitting down. It doesn’t
get much easier than that.
•
Tip 2: The touchscreen feature allows you to more directly point to what you want the
OPUS to do, the logic of the menu screens stays the same.
•
Tip 3: The menu screens start with the main menu. Then navigating to the right you
get to the music. To get back is to the left again. With the double panel display you can
easily tell where you are going and what options are available. Holding the left arrow
allows to jump back to the top menu (“Home” on the remote control). Holding the pause
button allows to stop current playback.
•
Tip 4: The main musical genres are color coded to easily tell them apart. Some of the
information that is shown on the track detail screen is different per genre to allow you to nd
out more about what you are listening to.
•
Tip 5: The lower part of the display consists of a status bar that allows you to quickly
view play mode (pause, repeat, shufe, etc.), alarm or timer set, track progress, volume
level, background progress and network status.
To put your OPUS to sleep, just press the ON/OFF button shortly. When you press it again (or
any other key) the OPUS will turn on again in a couple of seconds and return to the spot where
you left off.
Note: Within this user manual we will refer to screen menu options in CAPITAL letters for easier
readability. Starting point will always be the main menu, the top most menu to which you can
always return by navigating all the way to the left.

10
Step 4: Play a CD
Insert a CD into the slot and choose play from the pop-up menu.
Step 5: Connecting your OPUS to a home network
This is an important step to access music stored elsewhere on your network, listen to Internet
radio, use the web browser on a computer or PDA to browse your music, use the Maestro application to manage your music or to be able to receive online system updates:
•
Go to SETTINGS > NETWORK SETTINGS > NETWORK SETUP.
•
Select the mode that applies to your network, whether wired or wireless, automatic or
manual hookup, and press SAVE to continue. In the wired case you are usually done at this
point and will see a conrmation. In the wireless case you will have to choose the right
network, WEP or WPA encryption and enter a KEY if your network is protected. Often
wireless networks are quirky to set up, so be patient. If you experience problems we are
always happy to help, please call us toll-free at 1.877.BY.OLIVE.
Your OPUS is now integrated into your home network.
Step 6: Getting music into your OPUS and start listening
To add and listen to music to your OPUS you can …
• … import from CD: Just insert an audio CD and select IMPORT CD from the pop-up menu.
The CD is ripped, tagged and archived automatically. You can import CDs in different
qualities/formats. Go to SETTINGS > CD SETTINGS > CD IMPORT QUALITY and choose

user manual | oPus | melodY
11
the format you want. We recommend FLAC to retain CD quality audio but reduce size at
what is called “lossless” compression for the best compromise between quality and le size.
To leave the music in its original format, choose WAV.
•
… transfer music from a PC: Under NETWORK SETTINGS > NETWORK INFORMATION
you will nd the current IP-address of your OPUS. Use it on your PC to open a network
connection to the import folder that is shown, and simply drag & drop music to the OPUS.
Note: Only music formats that are supported by your OPUS can be imported (WAV, FLAC,
MP3, AAC). The OPUS does not play stored music protected by Digital Rights
Management (DRM).
•
… look under MUSIC SOURCES to nd other UPnP supported servers to browse and play
music from these.
•
… listen to Internet radio: In the main menu select INTERNET RADIO and choose from
a wide variety of stations that are sorted by genre, regions, public & information or favorites
you have added (play will start immediately, you might have to wait a few seconds until their
current stream information is loaded to the OPUS via the network).
Step 7: Creating playlists
Now that you have music on your OPUS, you can easily create playlists for every mood or occasion. There are two ways:
1) On the OPUS:
o
Go to MUSIC LIBRARY > PLAYLISTS, ADD PLAYLIST and enter the name of your play
list and save it.

12
o
Browse your music library and play the tracks you want to add to the playlist. Once a
song is playing you press the OK button to get a pop-up that allows you to rst rate and
delete a track, then on second press to add the track to a playlist, which you select from
the list of available playlists. Or just hit the ADD button on the remote control.
2) Via the Maestro library management application: 1) Simply enter the IP-address of your
OPUS into a browser on your PC/Mac replacing the x’s:
o http://xxx.xxx.xxx.xxx:8163/maestro.php
The Maestro application allows you to conveniently create new playlists and drag & drop single
tracks, albums or works to your list of playlists. The Maestro application is discussed in more
detail further down in this manual.
Step 8: Burn your music to CD
Choose the playlist that you want to burn and press the OK button for a popup menu that allows
you to initiate the burning process. Insert an audio CD and choose CONTINUE.
1.3 MELODY
Step 1: Unpacking your MELODY
Your package includes the following items:
•
MELODY networked player
•
Remote control (w/ batteries)
user manual | oPus | melodY
13
•
Wireless antenna
•
DC power supply
•
User manual
Step 2: Setting up your MELODY
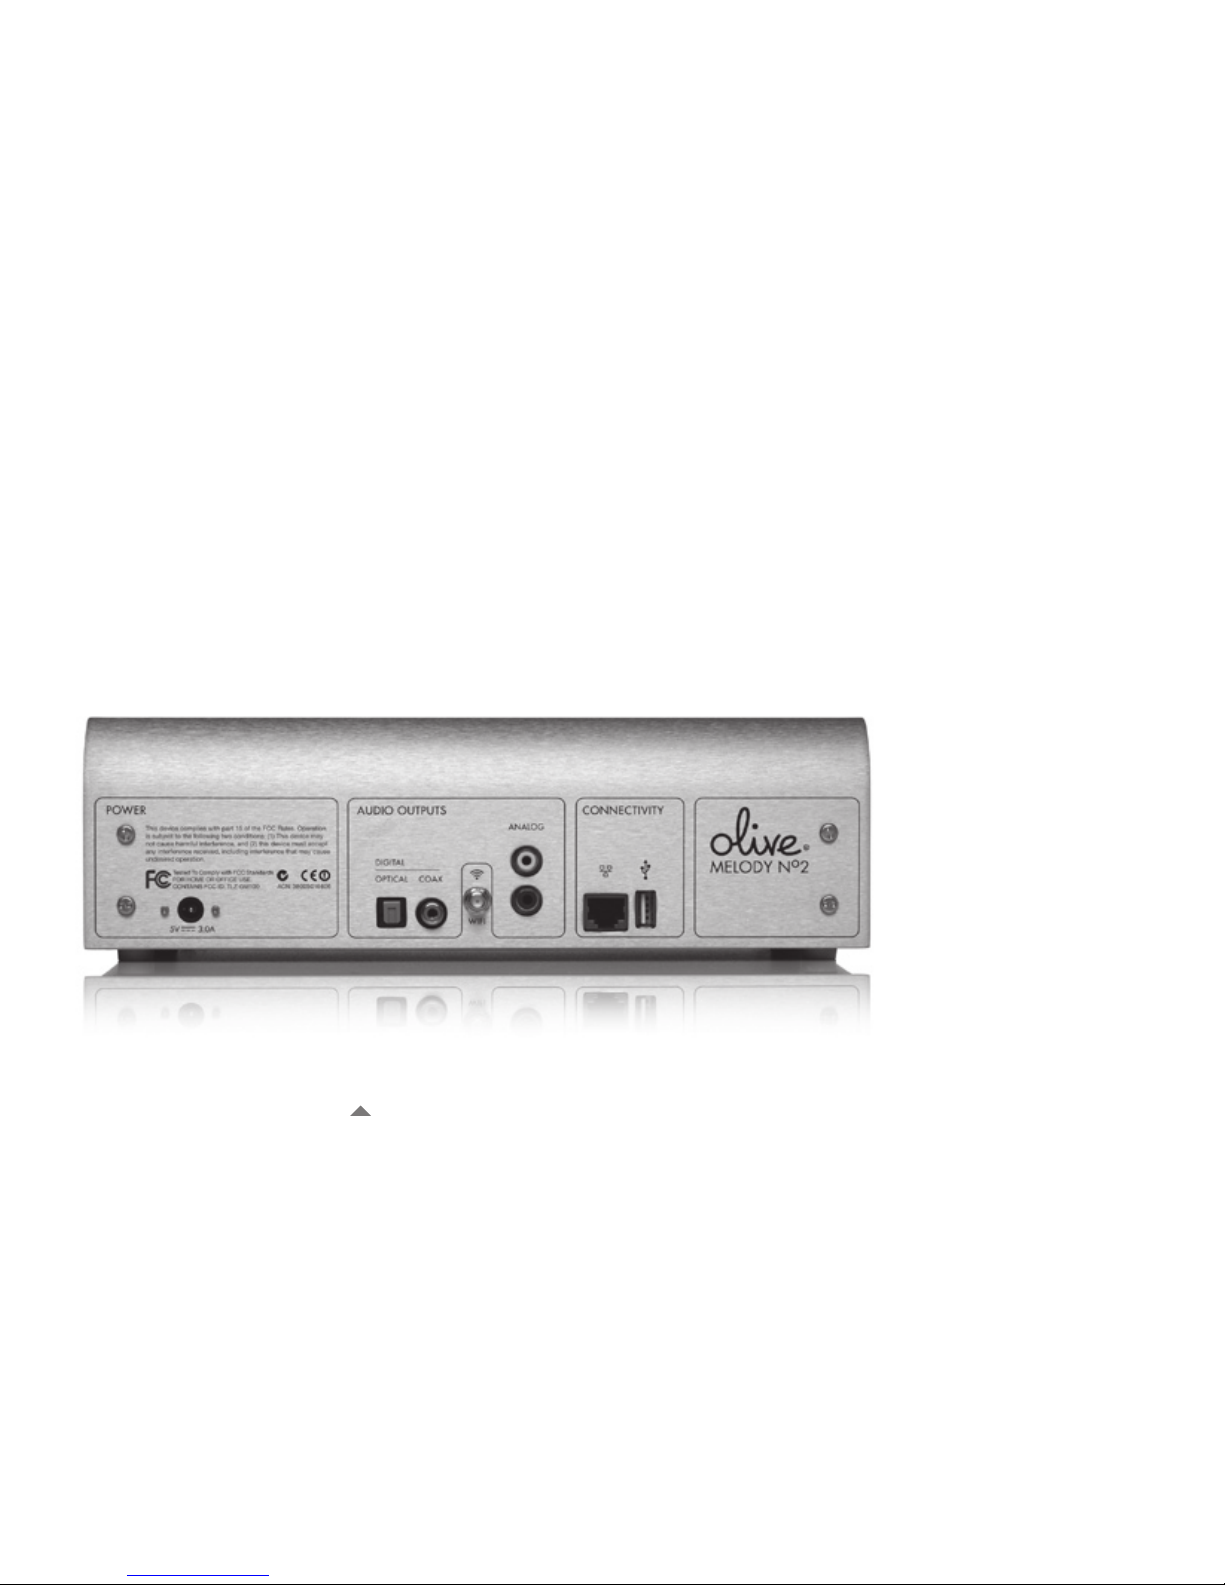
Backpanel MELODY
•
Place your MELODY close to your stereo system, in a cool, well-ventilated place.
•
Attach the wireless antenna to the back of the MELODY.
14
•
Connect it via its RCA or digital output to the input of your amplier or active speakers.
•
Connect the power supply to the MELODY and the power outlet.
•
Turn on the MELODY and your amplier or active speakers.
Your MELODY takes about 40 seconds to perform an initial start-up. It should then stay on or be
in power save mode to be immediately available at any time you wish. Please make sure to turn
off a connected amplier or speakers before disconnecting the audio-out of the MELODY.
Step 3: Navigating your MELODY
Your MELODY provides the following navigational controls:
MELODY Frontside
MELODY No2
Touchscreen/Display
Infrared
Navigation Keys
Play Keys
On/Off

user manual | oPus | melodY
15
• Once the MELODY is on, you’ll be using the 5 navigation keys to get around the menu
screens, and the play keys to control the actual playback like on any CD-player. Then
there’s the ON/OFF key, that’s about it.
•
Tip 1: Use the remote control just like the keys on the MELODY – while sitting down. It
doesn’t get much easier than that.
•
Tip 2: The touchscreen feature allows you to more directly point to what you want the
MELODY to do, the logic of the menu screens stays the same.
•
Tip 3: The menu screens start with the main menu. Then navigating to the right you get to
the music. To get back is to the left again. With the double panel display you can easily tell
where you are going and what options are available. Holding the left arrow allows to jump
back to the top menu (“Home” on the remote control).
•
Tip 4: The main musical genres are color coded to easily tell them apart. Some of the
information that is shown on the track detail screen is different per genre to allow you to nd
out more about what you are listening to.
•
Tip 5: The lower part of the display consists of a status bar that allows you to quickly view
play mode (pause, repeat, shufe, etc.), alarm or timer set, track progress, volume level,
background progress and network status.
To put your MELODY to sleep, just press the ON/OFF button shortly. When you press it again the
MELODY will turn on again and return to the spot where you left off.
Note: Within this user manual we will refer to screen menu options in CAPITAL letters for easier

16
readability. Starting point will always be the main menu, the top most menu to which you can
always return by navigating all the way to the left.
Step 4: Connecting your MELODY to a home network
This is an important step to access music stored on your OPUS, elsewhere on your network,
listen to Internet radio, use the web browser on a computer or PDA to browse your music, or be
able to receive online system updates:
•
Go to SETTINGS > NETWORK SETTINGS > NETWORK SETUP.
•
Select the mode that applies to your network, whether wired or wireless, automatic or
manual hookup, and press SAVE to continue. In the wired case you are usually done at this
point and will see a conrmation when successful. In the wireless case you will have to
choose the right network, WEP or WPA encryption and enter a KEY if your network is
protected. Often wireless networks are quirky to set up, so be patient. If you experience
problems we are always happy to help, please call us toll-free at 1.877.BY.OLIVE.
Your MELODY is now integrated into your home network.
Step 5: Listening
To listen to music you can …
•
… browse the music stored on your OPUS: If there is an OPUS in your home network the
MELODY will automatically select it as the main source. Simply select MUSIC LIBRARY and
browse and play your music as if you were directly navigating your OPUS.

user manual | oPus | melodY
17
• … look under MUSIC SOURCES to nd other UPnP supported servers to browse and play
music from these.
• … listen to Internet radio: In the main menu select INTERNET RADIO and choose from a
wide variety of stations that are sorted by genre, regions, public & information or favorites
you have added (play will start immediately, you might have to wait a few seconds until their
current stream information is loaded to the MELODY via the network).
Step 6: Creating playlists
Now that you have your MELODY connected, you can easily create playlists based on your
library in the OPUS for every mood or occasion. There are two ways:
•
On the MELODY:
o Go to MUSIC LIBRARY > PLAYLISTS, ADD PLAYLIST and enter the name of your
playlist and save it.
o Browse your music library and play the tracks you want to add to the playlist. Once a
song is playing you press the OK button to get a pop-up that allows you to rst rate and
delete a track, then on second press to add the track to a playlist, which you select from
the list of available playlists.
•
Via the Maestro library management application that looks onto your OPUS: 1) Enter the
IP-address of your OPUS into a browser on your PC/Mac replacing the x’s:
o http://xxx.xxx.xxx.xxx:8163/maestro.php

18
The Maestro application allows you to conveniently create new playlists and drag & drop
single tracks, albums or works to your list of playlists.
All playlists created on the OPUS are available for all MELODYs or other networked receivers
to see. Playlists created on the MELODY are private in that they are only relevant for that room
and only seen on that MELODY, e.g. if you have the MELODY in the bedroom you could have a
special “wake-up” or “sleepy” playlist there that you don’t need in the living or other rooms.
Keep in touch
Please register your Olive products online at our website (www.olive.us) to activate your warranty
and stay up-to-date with our latest product releases.
Great, now you can get back to your music!

user manual | oPus | melodY
19
2. PlaYinG music
2.1 Playing a CD on Your OPUS
When inserting a CD a pop-up menu will appear giving you the options to either play the CD,
select a particular track from the CD, or to import the CD. If you choose to play the CD it will be
played back directly from the CD drive. The top menu will change to include an additional item
CD IN DRIVE, which allows you at a later time to go back to your CD.
The OPUS takes a couple of seconds to recognize the CD and to look up the matching metadata as to album, track titles etc., which is not stored on the CD itself:
•
In almost all cases the metadata is available in the OPUS-internal CD reference database and
taken from there. Sometimes several CD information are returned for one CD, in this case an
additional online check can often nd the right one, so being online is an advantage. Even then in
rare cases you may end up with the wrong information being pulled for the CD you have entered.
•
If the CD can’t be found in the internal database and your OPUS is connected to the Internet,
the information is searched for in the online database.
•
If the CD cannot be found at all, generic titles for the album and titles are assigned, e.g.
“CD_08c342g” and “Track 01”, other elds are lled with “Unknown”. This information can
then be added manually via the Maestro application (see further down in this manual).
The CD is then listed on the main menu as the top item CD IN DRIVE, ready for play. As on any

20
CD player, the play keys below the CD slot give you the options to play, skip forwards or backwards, pause or stop play. The Eject button returns the CD to you.
2.2 Playing Music from Your Music Library
on both OPUS and MELODY
Your music library at your ngertips
There are different powerful navigation options available under MUSIC LIBRARY to quickly nd
the artists, composers, albums/works, playlists or track(s) you want to play.
•
GENRES: Here you will nd your music organized or classied by musical genre. There
can be up to three levels of hierarchy to each main genre, e.g. you could start with
“Classical”, have “Opera” and “Symphonic” underneath, and have “French Opera” and
“Italian Opera” underneath “Opera” again. This takes a little more navigation until you get to
your music, but it is very worthwhile as with large collections this classication rewards you
with only a short list of relevant artists or composers.
Once you have reached the end of the genre hierarchy the screen will then show
available artists, then albums and then tracks. Classical by its nature will show available
composers, works and then movements.
•
ALBUM ARTWORK: Flip through the album covers to nd the album you are looking for,
just like in old times.
•
ALBUM NAME: Get an alphabetical list of all albums, and drill down to nd the tracks of a
specic album.

user manual | oPus | melodY
21
•
ARTISTS: This option reveals an alphabetical list of all artists in your music library. Under
each artist you will nd the list of his/her albums and the respective tracks.
•
TRACKS: Here you nd an alphabetical list of all tracks.
•
PLAYLISTS: Here are all the playlists you’ve dened in alphabetical order. Choose the one
you like, or use your cursor to select the tracks to be played.
Tip: For long lists such as all artists, albums and tracks, press and hold the OK button to make
use of the “Alphabet Jump”, where you point to the rst letter of what you are looking for and the
menu screen will show you the selection of relevant items.
Starting playback
Pressing the play button starts the music playback, with the result depending on what you are
currently highlighting on the menu screen:
•
A track: The specic track will start to play and if the track is part of an album or work the
rest of the album or work will complete.
•
An album or work: The complete album or work will play. If you have merged a set of CDs
(e.g. greatest hits compilations) into one album, tracks will be played back by CD number
and then by original track number. The CD number needs to be maintained by you as part
of the metadata before merging.
•
An artist or composer: All of the albums of an artist or all the works of a composer will play.
•
All albums: When on the ALBUM NAME selection, pressing play will start playback of all

22
albums. As all music is sorted into an album in some way, this is an opportunity to play your
whole music library from beginning to end!
Gapless playback
For WAV and FLAC les as well as for CD playback the OPUS and MELODY recognize if tracks
are meant to be jointed – such as e.g. in an Opera where one scene reaches into the next – and
will play back the audio tracks as if they were one as intended.
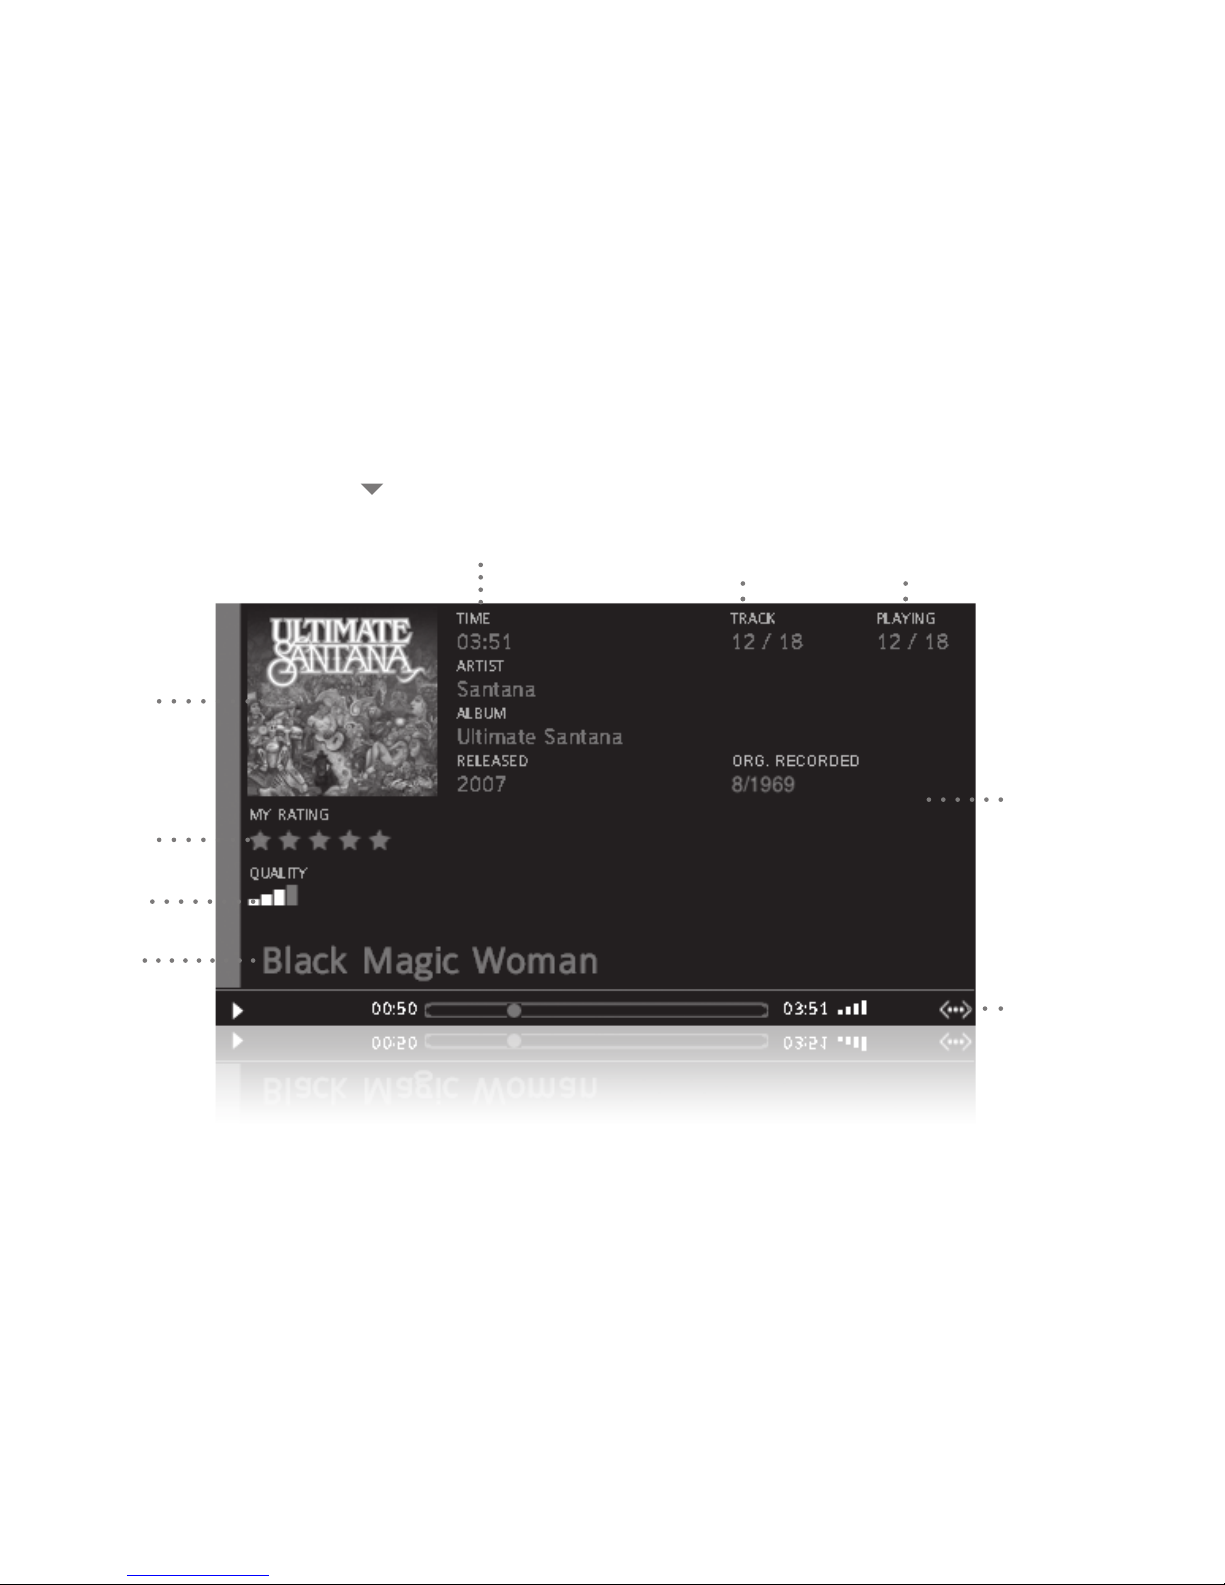
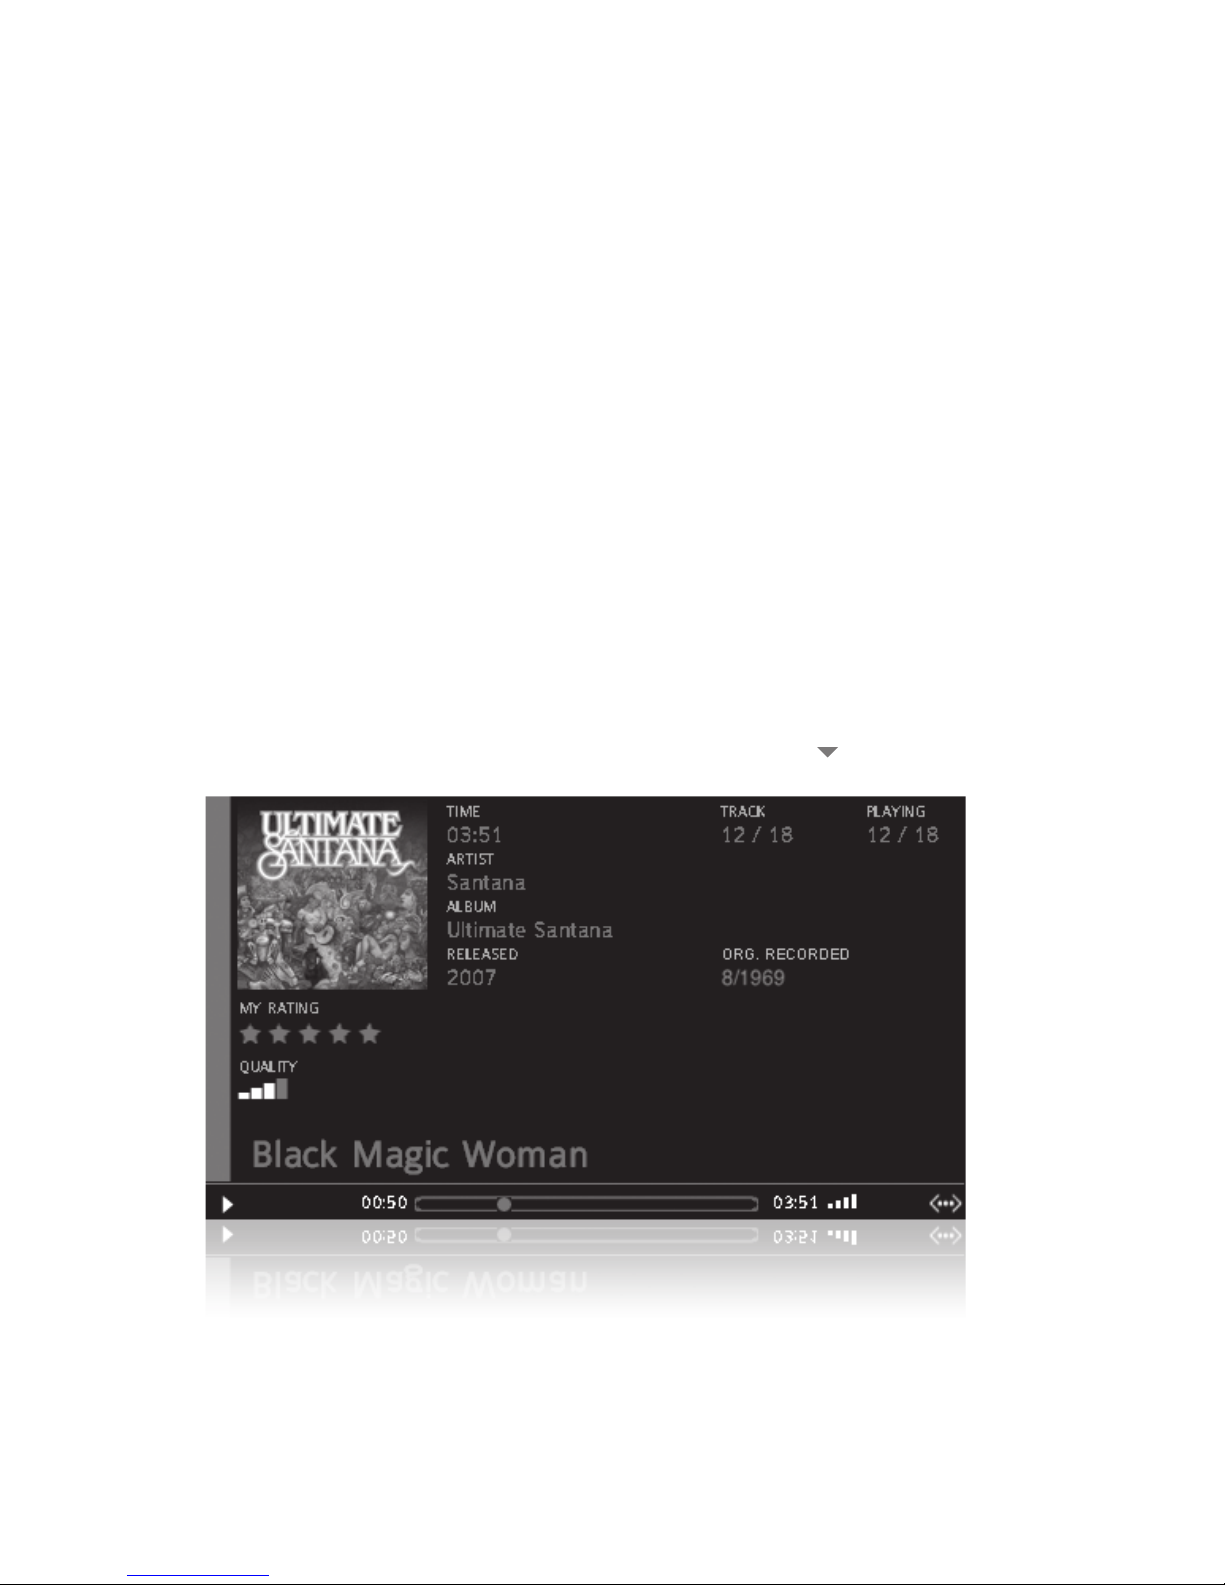
Screens during playback
Once you are playing back a song or movement two screens are used to show you all relevant
information about your music. When you rst come to a track as part of your selection process,
a rst screen shows as much metadata as is available about the music. It serves to conrm you
have arrived at what you were looking for with the whole range of metadata and album artwork,
it shows the sound quality, your personal rating if you’ve added one, which track it is as part of
its original album, and which part it is of your current selection.
Sound quality is determined by a combination of bit depth, sample rate and bit rate:
•
One bar: compressed audio of low quality
•
Two bars: compressed audio of acceptable quality
•
Three bars: CD quality, either in FLAC lossless encoding or WAV
•
Four bars: HD music of higher resolution than the CD standard, in general with a sample
rate of 96 kHz and a bit depth of 24, either in FLAC lossless encoding or WAV
user manual | oPus | melodY
23
Play Screen With Details
Personal
Rating
Album
Artwork
Main Body
Metadata
Status Bar
Track Duration Track as part of
original album
Track as part of
current selection
Quality
Track
Title

24
Long names may be truncated. After 8 seconds this screen is replaced with one that has large
letters and is intended to show just the key information from further away, like from your couch,
once your selection is made and conrmed:
Play Screen - Couch View
user manual | oPus | melodY
25
What is shown on each genre screen
Each music genre is different. That is why your OPUS and MELODY provide music context information specic to each genre, and in a much more detailed level than available from mainstream
music databases:
•
ROCK/POP, BLUES, SPOKEN WORD, OTHER: This can be considered the minimum
available metadata, with information on artist, album, and when the album was published
and originally recorded.
Rock/Pop/Blues/Spoken Word/Other Play Screen With Details
 Loading...