


Techcon Systems
TS250 / 255
Precision Dispensers
User Guide
English, German, French, Italian and Spanish version
TS250 / 255 |
TS250 / 255 |
TS250 / 255 |
TS250 / 255 |
Präzsions-Dosiergeräte |
Doseurs de |
Dosatore di |
Dosificadores de |
|
précision |
precisione |
precisión |
Benutzerhandbuch |
Guide de |
Manuale dell’utente |
Guía del usuario |
|
|||
|
l'utilisateur |
|
|
Copyright © OK International
|
|
CONTENTS |
|
|
Page Number |
1. |
Safety |
……………………………………………………………2 |
2. |
Symbol Definitions …………………………………………………3 |
|
3.Specifications ……………………………………………….…………...3
4. |
Features ……………………………………………………………4 |
|
5. |
Connecting the Unit |
……………………….…….………..…………5 |
6. |
Setup Instructions |
…………………………………………………5 |
7. |
Troubleshooting |
…………………………………………………6 |
8.Maintenance ……………………………………………………………7
9. |
Spare Parts and Accessories ………………………………………7 |
10. |
Warranty ……………………………………………………………7 |
11. |
I/O Configuration and End of Cycle Switch ……………………….…...7 |
1 |
SAFETY |
|
1.1 Intended Use: |
WARNING: Use of this equipment in ways other than those described in this User Guide may result in injury to persons or damage to property. Use this equipment only as described in this User Guide.
OK International cannot be responsible for injuries or damages resulting from unintended applications of its equipment. Unintended uses may result form taking the following actions:
•Making changes to equipment that has not been recommended in the User Guide
•Using incompatible or damaged replacement partsUsing unapproved accessories or auxiliary equipment
1.2Safety Precautions:
•Do not operate this unit in excess of maximum ratings/settings
•Always wear appropriate personal protective clothing or apparel
•Use only the following power adaptor models: PSA15R-240P(ZJ) or PW118RA2403B01, PW118RA2403H01, PW118RA2403M01, PW118RA2403G01
•Care must be taken to prevent the ingress of corrosive or flammable fluid back into the unit. If corrosive or flammable fluids are used, an inline filter (881- 000-000), not included, must be installed on the dispenser to help prevent the fluids from being sucked back into the unit
•The fluid being dispensed may be toxic and/or hazardous. Refer to Material Safety Data Sheet for proper handling and safety precautions
•If a piston is not used with the barrel, an inline filter (881-000-000), not included, and must be installed on the receiver head to help prevent fluids from
2
being sucked back into the unit. Also do not overfill the barrel and to lay the barrel on its side
•Do not smoke or use open flame when flammable materials are being dispensed
•This equipment is for indoor use only
2 SYMBOL DEFINITIONS
Symbol |
Definition |
|
Power On/Off |
|
Cycle Mode |
|
Timer |
|
Vacuum |
|
Pressure |
3 SPECIFICATIONS
Size |
152mm X 165mm X 178mm |
|
(6” X 6.5” X 7.0”) |
||
|
||
Weight |
1.2 kg (2.6lbs) |
|
|
|
|
Input Voltage |
24 VDC |
|
|
|
|
Rated Power |
10 W |
|
|
|
|
Air Input |
100 psi (6.9 bar) Max. |
|
|
|
|
Pollution Degree |
II |
|
|
|
|
Installation Category |
I |
|
|
|
|
Indoor Use |
Altitude up to 2,000m (6,562ft) |
|
|
|
|
Operating Temperature |
0˚C to 50˚C (32˚F to 122˚F) |
|
|
|
|
Storage Temperature |
-10˚C to 60˚C (14˚F to 140˚F) |
|
|
|
|
Max. Relative Humidity |
80% for temperature up to 31˚C (87.8˚F) Decreasing |
|
linearly to 50% relative humility at 40˚C (104˚F) |
||
|
||
|
|
|
Air Output |
TS250 = 0-100 psi (0- 6.9 bar) |
|
TS255 = 0-15 psi (0-1 bar) |
||
|
||
|
|
|
Vacuum |
406mm (16”) of Hg |
|
|
|
|
Timer |
0.020-60.000 seconds |
|
|
|
|
Cycle Mode |
PURGE, TIMED |
|
|
|
|
Timing Repeat Tolerance |
+/- 0.001% |
|
Cycle Rate |
600 cycles/min |
|
LCD |
16 X 2 display segments |
|
|
|
|
|
3 |
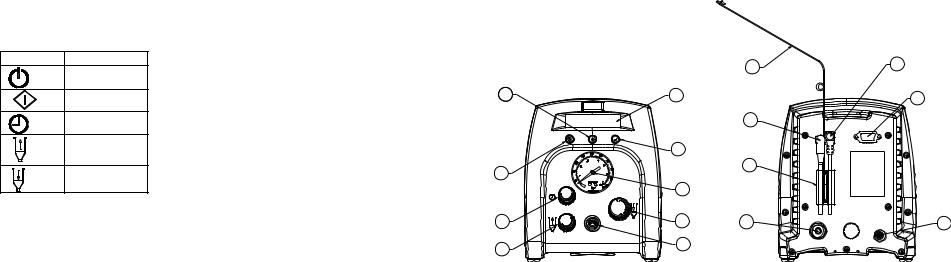
4 FEATURES
|
|
10 |
2 |
4 |
|
|
|
11 |
|
3 |
|
1 |
|
16 |
|
|
|
|
5 |
|
9 |
6 |
15 |
8 |
7 |
|
|
|
|
Figure 1.0 |
|
|
Items |
Description |
1 |
Power Button |
2 |
Mode Button |
3 |
Counter Reset Button |
4 |
Display |
5 |
Air Pressure Gauge |
6 |
Air Pressure Regulator |
7 |
Pulsed Air Outlet |
8 |
Vacuum Control |
9 |
Time Control Knob |
10 |
Receiver head air hose holder |
11 |
Foot Switch Receptacle |
12 |
Power Receptacle |
13 |
I/O Connection |
14 |
Exhaust Port |
15 |
Air Inlet |
16 |
Cord Lock |
4
12
13
14

5CONNECTING THE UNIT
CAUTION: A 5-micron filter (TSD800-6), not included, must be installed with the unit to ensure proper air filtration.
3
1
2
4
Figure 2.0
Items |
Description |
1 |
To Air Source |
2 |
Air Filter (Not included) |
3 |
Power Adapter |
4 |
Foot Switch |
6SETUP INSTRUCTIONS
Refer to Figure 1.0
6.1Manual Dispense Cycle Setting:
1.Turn on the unit by pressing the Power button (1)
2.Press the Mode button (2) until “PURGE” appears on the Display.
3.Turn up the air pressure by rotating the Air pressure regulator knob (6) until the desired pressure is indicated on the Air pressure gauge (5)
4.After filling the barrel or using pre-packaged adhesive, attach syringe to receiver head assembly. Make certain that the syringe locks into place.
5.Connect the plug end of the receiver head assembly to one of the air dispense outlet (7)
6.If vacuum “suck back” is needed, rotate the Vacuum regulator (8) counter clockwise until the desired vacuum pressure is obtained
7.Press and hold the Foot switch to activate dispensed cycle. (The Purge/Manual Mode is now activated)
6.2Automatic Dispense Cycle Setting:
1.Push the Mode button (2) to select “TIMED” mode
2.Rotate the Time control knob (9) to set desired dispense time
3.Repeat step 3 to 6 in Section 6.1
4.Depress Foot switch to activate timed dispensed cycle
5
6.3 Cycle Counter
The cycle counter records the numbers of dispense cycle being activated. Up to 65,535 cycles can be recorded. This number is shown at the lower right hand corner of the LCD. Press the Counter Reset button (3) to clear the counter.
7 TROUBLESHOOTING
PROBLEM |
POSSIBLE CAUSE |
CORRECTION |
||
LCD does not |
• |
No power input |
• |
Check power cord |
light |
|
|
• |
connections |
System will not |
|
|
Turn on power |
|
• |
Foot switch not |
• |
Check foot switch |
|
actuate |
|
plugged in or |
|
connection |
|
|
improperly plugged |
|
|
|
• |
in |
• |
|
|
Defective foot |
Foot switch needs to be |
||
|
• |
switch |
• |
repaired or replaced |
|
Broken wire or loose |
Unplug power cord and |
||
|
|
connection inside |
|
disconnect air supply. |
|
|
unit |
|
Remove cover and check |
|
|
|
|
for broken wires or loose |
|
• |
Defective solenoid |
• |
connections |
|
Replace solenoid |
|||
System will not |
• |
Defective PC board |
• |
Replace PC board |
• |
Insufficient air |
• |
Increase air supply |
|
pressurize |
• |
pressure |
• |
pressure |
|
Air hoses not |
Check connection |
||
|
• |
plugged in |
• |
|
System will not |
Regulator defective |
Replace regulator |
||
• |
Vacuum setting is |
• |
Increase vacuum setting |
|
pull vacuum |
• |
too low |
• |
|
|
Defective solenoid |
Replace solenoid valve |
||
|
• |
Defective vacuum |
• |
Replace venture |
|
• |
venturi |
• |
|
|
Defective vacuum |
Replace needle valve |
||
Inconsistent |
|
needle valve |
|
|
• |
Air bubbles in |
• |
Reduce vacuum setting |
|
dispensing |
• |
adhesive |
• |
|
|
Dispense time is too |
Increase dispensing time |
||
|
• |
low |
• |
|
|
Dispense needle |
Replace needle |
||
|
|
started to clog |
|
|
6
8MAINTENANCE
The dispenser is designed and built to be relatively maintenance free. To assure trouble free operation, the following recommendations should be followed:
1.Make certain air supply is clean and dry.
2.Avoid turning barrels upside down or laying barrel so that material may run through air line to internal components.
3.Avoid connecting the unit to excessive moisture or solvent saturation.
4.Avoid connecting air supply exceeding 100 psi (6.9 bar) for the TS250 and 15 psi (1.03 bar) for the TS255.
5.Use only Amyl Alcohol to clean outside surface of the main housing.
6.Use only soft cloth to clean the LCD.
9SPARE PARTS AND ACCESSORIES
For TS-3xx/2xx spare parts and accessories information, please visit the TS-3xx/2xx User Guide webpage at http://www.okinternational.com
10LIMITED WARRANTY
OK International warrants this product to the original purchaser for a period of one
(1)year from date of purchase to be free from material and workmanship defects but not normal wear-and-tear, abuse and faulty installation. Defective product or subassembly and components under warranty will be repaired or replaced (at OK International's option) free of charge. Customer with defective product under warranty must contact the nearest OK International office or distributor to secure a return authorization prior to shipping the product to the assigned OK International authorized service center. For nearest OK International office or distributor contact information, please visit www.okinternational.com. OK International reserves the right to make engineering product changes without notice.
11I/O Configuration and End of Cycle Switch
For TS3xx/2xx I/O Configuration and End of Cycle Switch information, please visit the TS-3xx/2xx User Guide webpage at http://www.okinternational.com
7
|
INHALTSVERZEICHNIS |
|
|
|
Seite |
1 |
Sicherheitshinweise........................................................................................ |
2 - 3 |
2 |
Erläuterung der Symbole................................................................................ |
3 |
3 |
Spezifikationen………………………......................…………………...…..4 |
|
4 |
Hauptkomponenten......................................................................................... |
5 |
5 |
Anschluss des Gerätes..................................................................................... |
6 |
6 |
Setup Anleitung............................................................................................... |
6 |
7 |
Fehlerbeseitigung............................................................................................ |
7 |
8 |
Wartung.......................................................................................................... |
8 |
9 |
Ersatzteile und Zubehör.................................................................................. |
8 |
10 |
Garantie........................................................................................................... |
8 |
11 |
I/O Konfiguration und Schalter zum Beenden des Zyklus............................. |
8 |
1SICHERHEITSHINWEISE
1.1 Bestimmungsgemäßer Gebrauch
WARNUNG: Wird dieses Gerät für andere Zwecke eingesetzt als in diesem Benutzerhandbuch beschrieben, kann es zu Personenoder Sachschäden kommen. Setzen Sie das Gerät nur gemäß der Anleitung ein.
OK International ist nicht haftbar für Personenoder Sachschäden, die auf nicht zweckgemäßen Einsatz der Geräte zurückzuführen sind. Zu nicht bestimmungsgemäßem Gebrauch zählen:
•Änderungen am Gerät, die nicht ausdrücklich im Benutzerhandbuch empfohlen werden
•Einsatz nicht kompatibler oder beschädigter Ersatzteile
•Verwendung nicht zugelassenen Zubehörs oder Hilfsgeräte
1.2Sicherheitsvorkehrungen
•Betreiben Sie das Gerät ausschließlich mit den maximal zugelassenen Nennleistungen/Einstellungen.
•Tragen Sie immer geeignete Schutzkleidung.
•Verwenden Sie nur die folgenden Adaptertypen: PSA15R-240P(ZJ) oder PW118RA2403B01, PW118RA2403H01, PW118RA2403M01, PW118RA2403G01
•Achten Sie darauf, dass korrosive oder brennbare Medien nicht in das Gerät zurückfließen. Wenn korrosive oder brennbare Medien eingesetzt werden, muss ein Inline-Filter (881-000-000), nicht im Lieferumfang enthalten, am Dosiersystem installiert werden, so dass die Medien nicht in das Gerät zurück gesaugt werden können.
2

•Das dosierte Medium kann giftig und/oder gefährlich sein. Weitere Einzelheiten bezüglich ordnungsgemäßer Handhabung und Sicherheitsvorkehrungen finden Sie im Sicherheitsdatenblatt.
•Wird kein Stopfen mit der Kartusche eingesetzt, ist am Schlauch des Kartuschenadapters ein Inline-Filter (881-000-000), nicht im Lieferumfang enthalten, zu montieren, so dass die Medien nicht in das Dosiergerät zurück gesaugt werden. Die Kartusche darf nicht überfüllt oder auf die Seite gelegt werden.
•Rauchen oder offenes Feuer sind bei der Dosierung brennbarer Medien untersagt.
•Dieses Gerät ist nur für den Gebrauch in geschlossenen Räumen geeignet.
2 ERLÄUTERUNG DER SYMBOLE
Symbol
Ein / Aus
Zyklusbetrieb
Timer
Vakuum
Druckluft
3
3 SPEZIFIKATIONEN
Abmessungen
Gewicht
Eingangsspannung
Nennleistung Drucklufteingang
Verunreinigungsgrad
Installationskategorie
Einsatz in Innenräumen
Betriebstemperatur
Lagertemperatur
max. relative Feuchtigkeit
Druckluftausgang
Rückhaltevakuum Timer Zyklusbetrieb Wiederholtoleranz
Zyklengeschwindigkeit
LCD
152 x 165 x 178 mm (6” x 6,5” x 7,0”)
1,2 kg (2.6lbs)
24 VDC
10 W
100 psi ( 6.9 bar) max.
II
I
Aufstellungshöhe bis zu 2,0 m (6,562 ft)
0 °C bis 40 °C (32 °F bis 104°F)
-10 °C bis 60 °C (14 °F bis 140 °F)
80 % für Temperaturen bis 31 °C (87,8 °F), linear abnehmend bis auf 50 % bei 40 °C (104 °F)
TS250 = 0-100 psi (0- 6,9 bar)
TS255 = 0-15 psi (0-1 ,03bar)
406 mm (16”) Hg
0,020 – 60,000 Sekunden
Zeitgesteuerten; Manuelle
+/- 0,001 %
600 Zyklen/Minute
16 X 2 Displaysegmente
4

4 HAUPTKOMPONENTEN
|
|
10 |
12 |
2 |
4 |
|
13 |
|
|
|
|
|
|
11 |
|
|
3 |
|
|
1 |
|
16 |
|
|
|
|
|
|
5 |
|
|
9 |
6 |
15 |
14 |
8 |
7 |
|
|
|
|
|
|
Abb. 1.0 |
|
|
Positionen |
Beschreibung |
1 |
Ein-/Aus-Taste |
2 |
Modustaste |
3 |
Nullstellung Zykluszähler |
4 |
Display |
5 |
Druckluftmesser |
6 |
Druckluftregler |
7 |
Ausgang für gepulste Luft |
8 |
Einstellung Rückhaltevacuum |
9 |
Einstellung Dosierzeit |
10 |
Schlauchhalter für Kartuschenadapter |
11 |
Fußschalterbuchse |
12 |
Netzbuchse |
13 |
I/O Anschluss |
14 |
Abluftöffnung |
15 |
Drucklufteingang |
16 |
Kabelsicherung |
5
5 ANSCHLUSS DES GERÄTES
ACHTUNG: Um eine ordnungsgemäße Luftfilterung zu gewährleisten, muss ein 5- Mikron Filter (TSD800-6), nicht im Lieferumfang enthalten, angebracht werden.
3
1
2
4
|
Abb. 2.0 |
|
|
Positionen |
Beschreibung |
1 |
zur Druckluftversorgung |
2 |
Luftfilter ( Nicht im Lieferumfang enthalten) |
3 |
Netzadapter |
4 |
Fußschalter |
6SETUP ANLEITUNG
Siehe Abb. 1.0
6.1Einstellen des manuellen/”PURGE MODE”-Dosierzyklus (Reinigungszyklus)
1.Schalten Sie das Gerät mit der Ein-/Aus-Taste (1) ein.
2.Drücken Sie die Modustaste (2), bis “PURGE” im Display erscheint.
3.Erhöhen Sie die Druckluftversorgung durch Drehen des Druckluftreglers (6), bis der gewünschte Druck am Druckluftmesser (5) angezeigt wird.
4.Füllen Sie die Kartusche oder verwenden Sie ein vorverpacktes Medium, danach bringen Sie die Kartusche am Kartuschenadapter an. Stellen Sie sicher, dass die Kartusche im Adapter einrastet.
5.Verbinden Sie den Stecker des Kartuschenadapters mit dem Druckluftausgang (7).
6.Um ein Auslaufen niederviskoser Medien zu verhindern drehen Sie den Vakuumregler (8) nach links bis das gewünschte Rückhaltevakuum erreicht ist.
7.Halten Sie den Fußschalter gedrückt, um den Dosierzyklus zu aktivieren. (Der manuelle/“Purge”-Modus ist jetzt eingeschaltet).
6.2Einstellen des automatischen Dosierzyklus
1.Drücken Sie die Modustaste (2) um den “TIMED” Modus (Zeitgesteuerten Modus) auszuwählen.
2.Mit dem Drehregler (9) wird die gewünschte Dosierzeit eingestellt.
6
 Loading...