

Page 1
S900 Scancopier
user's guide
Page 2

PREFACE
Ev ery ef for t ha s be en m ade to ens ure tha t th e in for ma tio n in thi s do cum en t is com ple te,
accurate, and up-to-date. The ma nufacturer assumes no responsibility for the results of
errors beyond its control. The manufacturer also cannot guarantee that changes in
software and equipment made by other manufacturers and referred to in this guide will
not affect the applicability of the information in it. Mention of software products
manufactured by other companies does not necessarily constitute endorsement by the
manufacturer.
While all reasonable efforts have been made to make this document as accurate and
helpful as possible, we make no warranty of any kind, expressed or implied, as to the
accuracy or completeness of the information contained herein.
The most up-to-date drivers and manuals are available from the Oki Europe web site:
http://www.okieurope.com
Copyright © 2004 Oki Europe Ltd.
Oki and Microline are registered trademarks of Oki Electric Industry Company, Ltd.
Microsoft, MS-DOS and Windows are registered trademarks of Microsoft Corporation.
Other product names and brand names are registered trademarks or trademarks of
their proprietors.
This product complies with the requirements of the Council
Directives 89/336/EEC (EMC) and 73/23/EEC (LVD) as amended
where applicable on the approximation of the laws of the member
states relating to electromagnetic compatibility and low voltage.
WARNING!
This is a Class A product. In a domestic environment this product may cause radio
interference, in which case the user may be required to take adequate measures.
PREFACE > 2
Page 3

CONTENTS
Preface .......................................................................... 2
Notes, cautions & warnings ............................................ 6
About this guide............................................................. 7
Introduction................................................................... 8
Scancopier components ............................................ 9
Utilities and documentation CD-ROM contents .... 10
Scancopier overview ............................................... 11
Front view .......................................................... 11
Rear view ........................................................... 12
Control panel ..................................................... 12
Automatic Document Feeder (ADF) components........ 16
Using the S900 as a copier........................................... 17
Loading paper......................................................... 18
Paper size auto detection ................................... 18
Placing a document on the glass (flatbed) ........... 19
When using the optional ADF.............................. 19
Placing documents in the ADF............................. 20
Using the copy features........................................... 21
Changing scaling ............................................... 22
Setting paper size .............................................. 23
Selecting copy mode .......................................... 24
Adjusting print density ....................................... 25
Increasing copy count ........................................ 26
Using the S900 as a scanner ........................................ 27
Scan method .......................................................... 29
Selecting an image type .......................................... 29
Black and white (Line art) ................................... 29
Halftone ............................................................ 30
8-Bit Gray .......................................................... 31
24-Bit Color ....................................................... 31
Determining your resolution .................................... 32
Enhancing your image ............................................. 33
Brightness ......................................................... 33
Contrast ............................................................ 33
Enlarging the previewed image ........................... 34
Invert image....................................................... 35
CONTENTS > 3
Page 4

Mirror ................................................................ 36
Auto select image .............................................. 36
Paper size.......................................................... 36
Units ................................................................. 37
Descreen ........................................................... 37
Sharpen............................................................. 38
Color adjustment ............................................... 38
Auto level .......................................................... 38
Advanced settings.............................................. 39
Custom settings................................................. 43
Miscellaneous ................................................... 44
Using the S900 with Unimessage Pro............................ 45
Maintenance ................................................................ 46
Cleaning the document glass................................... 46
ADF......................................................................... 47
Cleaning the ADF................................................ 47
Replacing the ADF Snap-in Pad Module ............... 49
Troubleshooting........................................................... 51
LCD Messages ........................................................ 51
LCD information codes ............................................ 51
Clearing a paper jam ............................................... 53
Specifications .............................................................. 54
Optional accessories.................................................... 55
Appendix A – Quick reference guide.............................. 56
Appendix B – Setting up a PIN ID and Print Control ........ 58
Introduction ............................................................ 58
Connection arrangement ......................................... 58
Setting up the Print Control Utility............................ 59
Setting the PIN ID .................................................... 59
Print Control usage ................................................. 60
Print Control example.............................................. 63
Appendix C – Updating the printer profile ..................... 64
CONTENTS > 4
Page 5

Appendix D – Setting up............................................... 65
Resiting the Scancopier........................................... 65
Locking the scanning head ...................................... 65
Precautions ............................................................ 66
Unlocking the scanning head................................... 67
Installing the ADF.................................................... 68
Connecting the Cables............................................. 70
Connecting the power and switching on .............. 71
Setting up Additional Settings ................................. 72
Installing utilities from the CD-ROM ......................... 77
Oki Europe ................................................................... 80
Index ........................................................................... 83
CONTENTS > 5
Page 6

NOTES, CAUTIONS & WARNINGS
NOTE
A note appears in this manual like this. A note provides additional
information to supplement the main text which may help you to use and
understand the product.
CAUTION!
A caution appears in this manual like this. A caution provides
additional information which, if ignored, may result in equipment
malfunction or damage.
WARNING!
A warning appears in this manual like this. A warning provides
additional information which, if ignored, may result in a risk of
personal injury.
Only use genuine Oki Original consumables to ensure the best quality
and performance from your hardware. Non-Oki Original products may
damage your printer's performance and invalidate your warranty.
Specifications subject to change without notice. All trademarks
acknowledged.
NOTES, CAUTIONS AND WARNINGS > 6
Page 7

ABOUT THIS GUIDE
This guide is intended to help you to get to know your S900
Scancopier, use it for copying and scanning functions, carry out basic
maintenance tasks and troubleshoot possible problems that might
arise.
It is suggested that you read the chapters in the order in which they
are presented to become familiar with the guide’s overall content and
then use the Contents list and/or Index to access specific sections of
interest.
A quick reference guide to copying is provided in Appendix A.
Although your Scancopier is engineer installed, setting up
information has been included in Appendix D for reference. This will
be of interest if you want to disconnect and relocate your Scancopier,
add an optional Automatic Document Feeder (ADF) at a later date or
reset your user default values.
Cross reference is made to the Unimessage Pro User’s Guide for
detailed user information on this application.
ABOUT THIS GUIDE > 7
Page 8

INTRODUCTION
Congratulations on your purchase of the S900 Scancopier.
The S900 Scancopier provides you with fast and affordable access to
digital color copying by simply connecting it to a compatible color
laser printer: OKI C9300 or C9500. It can also be used as a scanner
and in conjunction with the Unimessage Pro messaging software.
NOTE
The S900 Scancopier cannot be used with the C9200/C9400 printer.
Please spend a few minutes reading through this User’s Guide and the
Unimessage Pro User’s Guide to ensure the best results with the S900
Scancopier.
INTRODUCTION > 8
Page 9
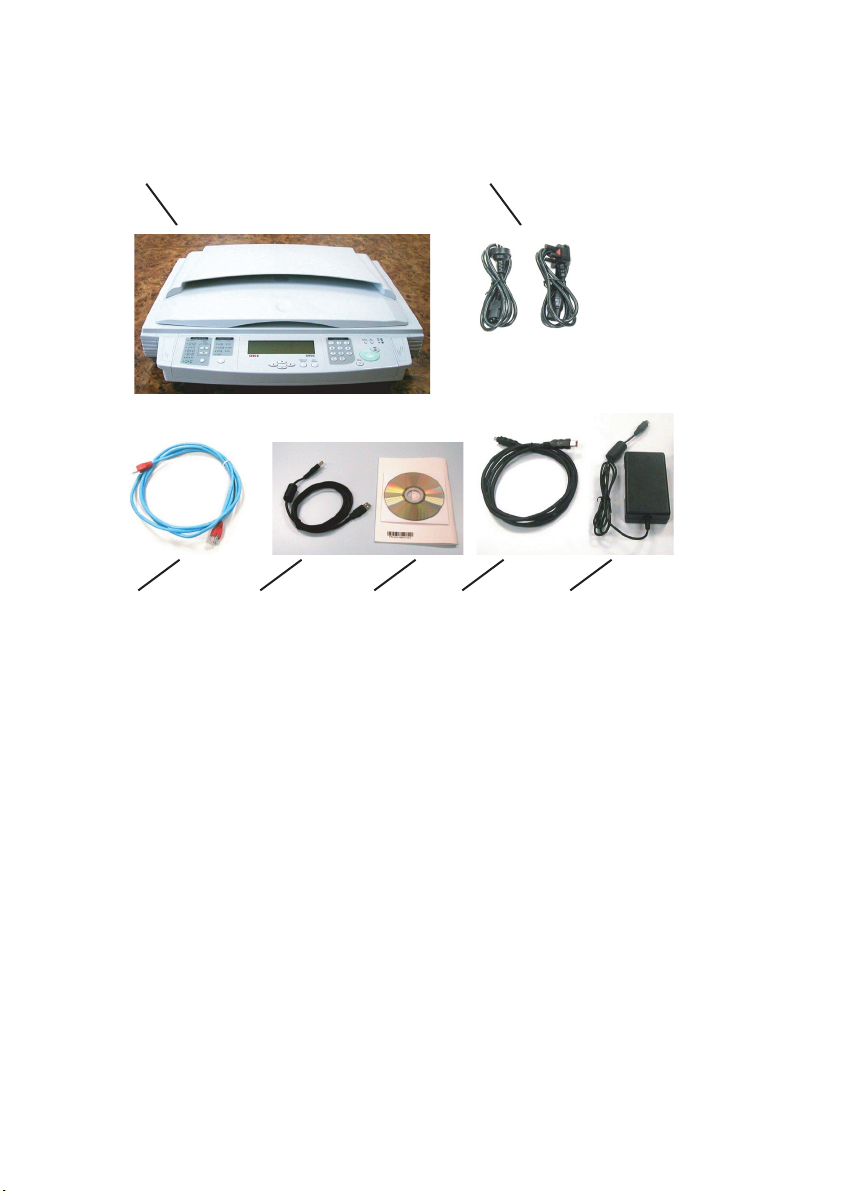
SCANCOPIER COMPONENTS
12
34567
S900 Scancopier
1.
Power cord (UK, Europe)
2.
Power Adapter
3.
IEEE1394 cable (for printer connection)
4.
Utilities & Documentation CD-ROM
5.
USB cable for Computer Connection
6.
Cross cable (for color profile updating)
7.
Engineer’s Installation guide (not shown)
8.
Safety Instructions (not shown)
9.
Firewire card (not shown)
10.
INTRODUCTION > 9
Page 10

UTILITIES AND DOCUMENTATION CD-ROM CONTENTS
The CD-ROM contains the following software:
l Update Tool (Printer Profile Utility): to enable you to update
your printer color profiles and firmware (not normally
required).
l TWAIN Utility: to provide a driver for your S900 Scancopier to
enable you to scan documents.
l Unimessage Pro Utility: to enable you to carry out a range of
functions such as creating and sending messages, e-mailing
or faxing scanned documents.
l IEEE1394 Utility: to enable the Firewire firmware to be
installed in the printer (for Engineer’s use only).
l Adobe Acrobat Reader: to enable you to install Acrobat Reader
(if required) so that you can view and print the user’s guide
documents listed below.
The CD-ROM contains the following documents in electronic form:
l S900 User’s Guide
l Unimessage Pro User’s Guide
l Additional Information
l Safety Instructions
Full details on how to use the CD-ROM are provided in Appendix D.
INTRODUCTION > 10
Page 11
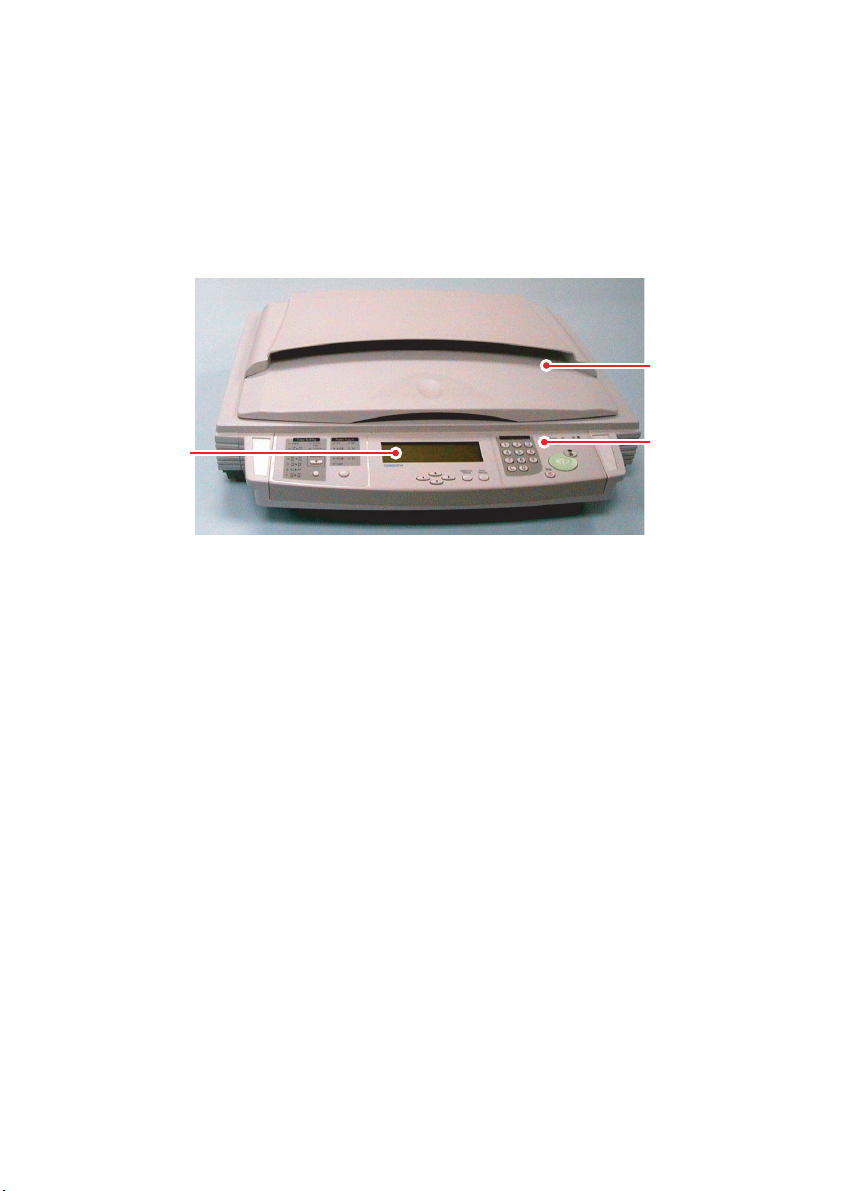
SCANCOPIER OVERVIEW
The S900 can be mounted on a table top surface close to your printer
or on an optional stand.
FRONT VIEW
1
3
Document cover
1.
Control panel
2.
LCD display
3.
2
INTRODUCTION > 11
Page 12
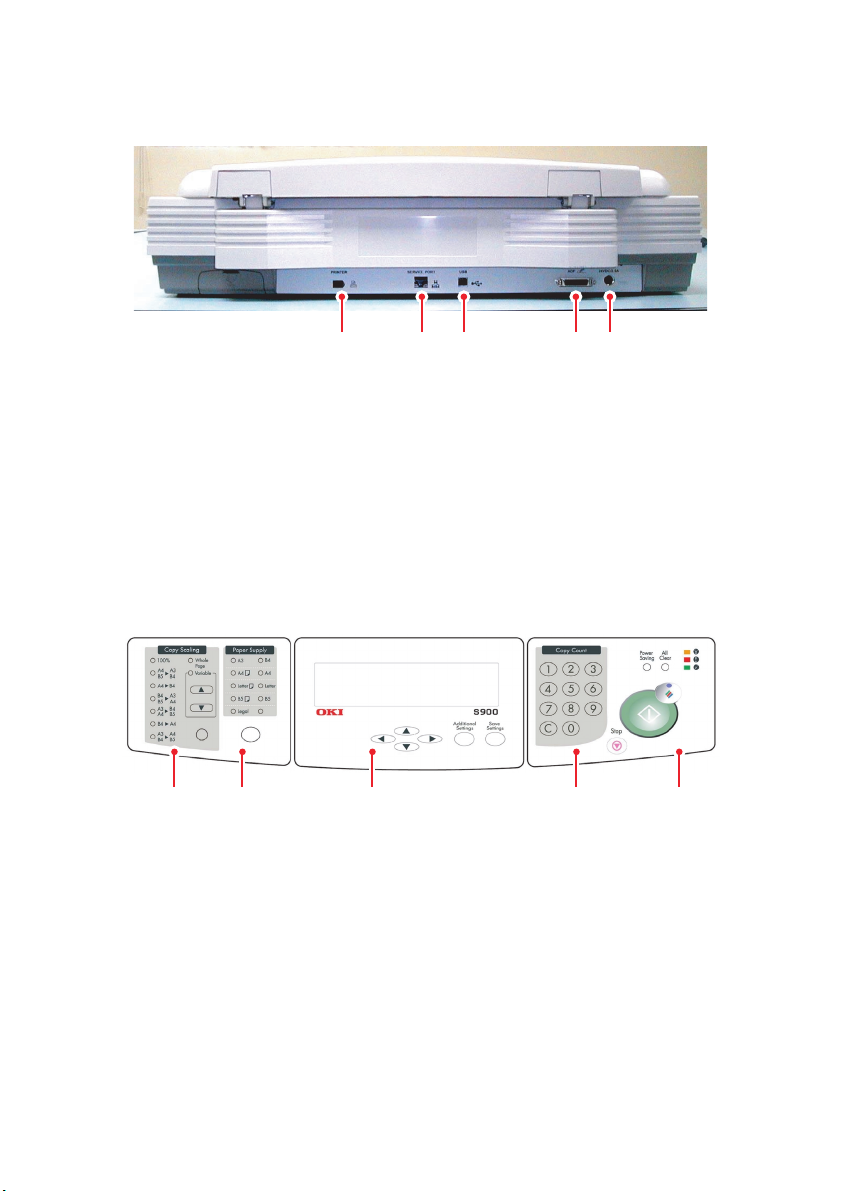
REAR VIEW
1 2 3 4 5
Printer port
1.
Service port
2.
USB port
3.
Automatic Document Feeder (ADF) (option) port
4.
Power jack
5.
CONTROL PANEL
1 2 3 4 5
The Control Panel consists of the following sections:
Copy Scaling
1.
Paper Supply
2.
LCD Display, Arrow Keys and Setting buttons
3.
Copy Count
4.
Copy and other Controls/Indicators
5.
INTRODUCTION > 12
Page 13
A brief overview of the controls follows. More detailed information is
given in subsequent chapters.
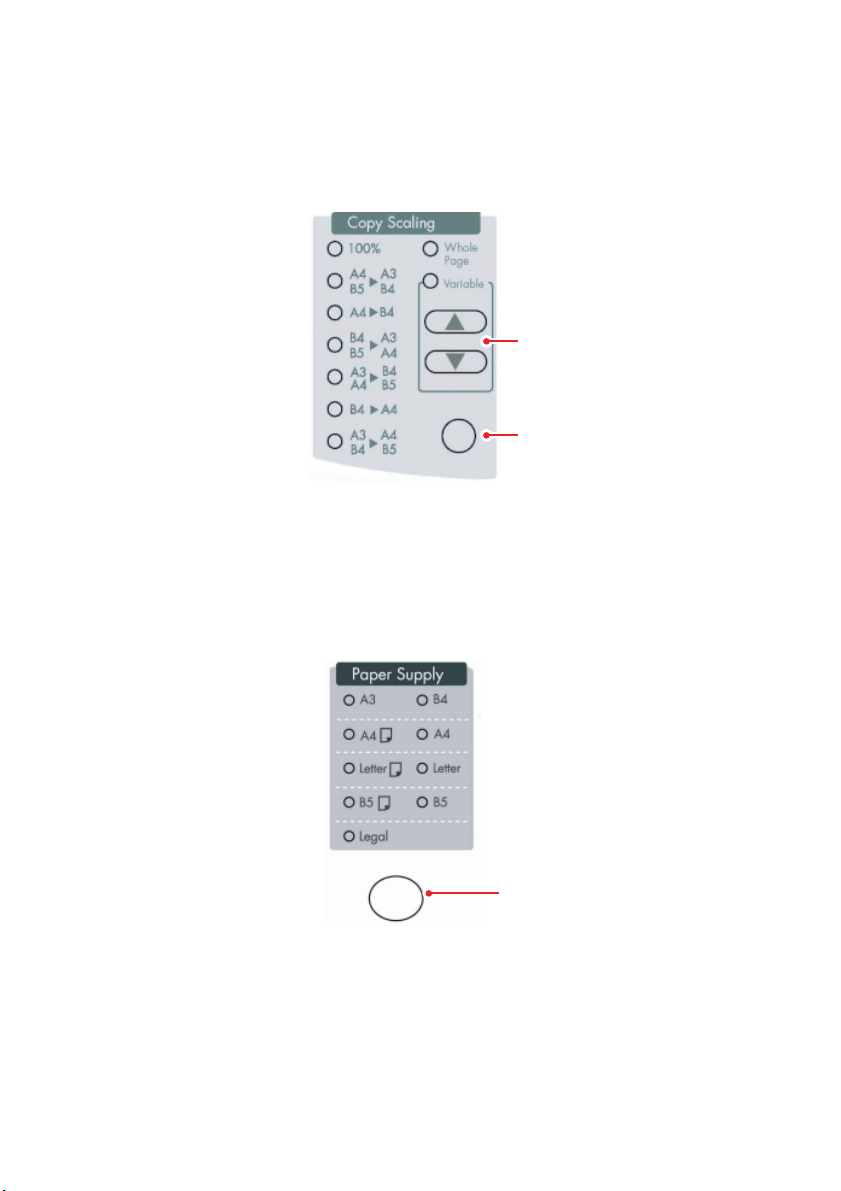
Copy Scaling
1.
2
1
Use the button (1) to select from a range of preset paper size
scaling ratios or use the arrow keys (2) to select scaling in 1%
increments or decrements from 25% to 400%.
Paper Supply
2.
1
Use the button (1) to select your output paper size. For paper
sizes where you have the choice of portrait (tall) or landscape
(wide), the paper symbol beside the paper size denotes
portrait (tall).
INTRODUCTION > 13
Page 14
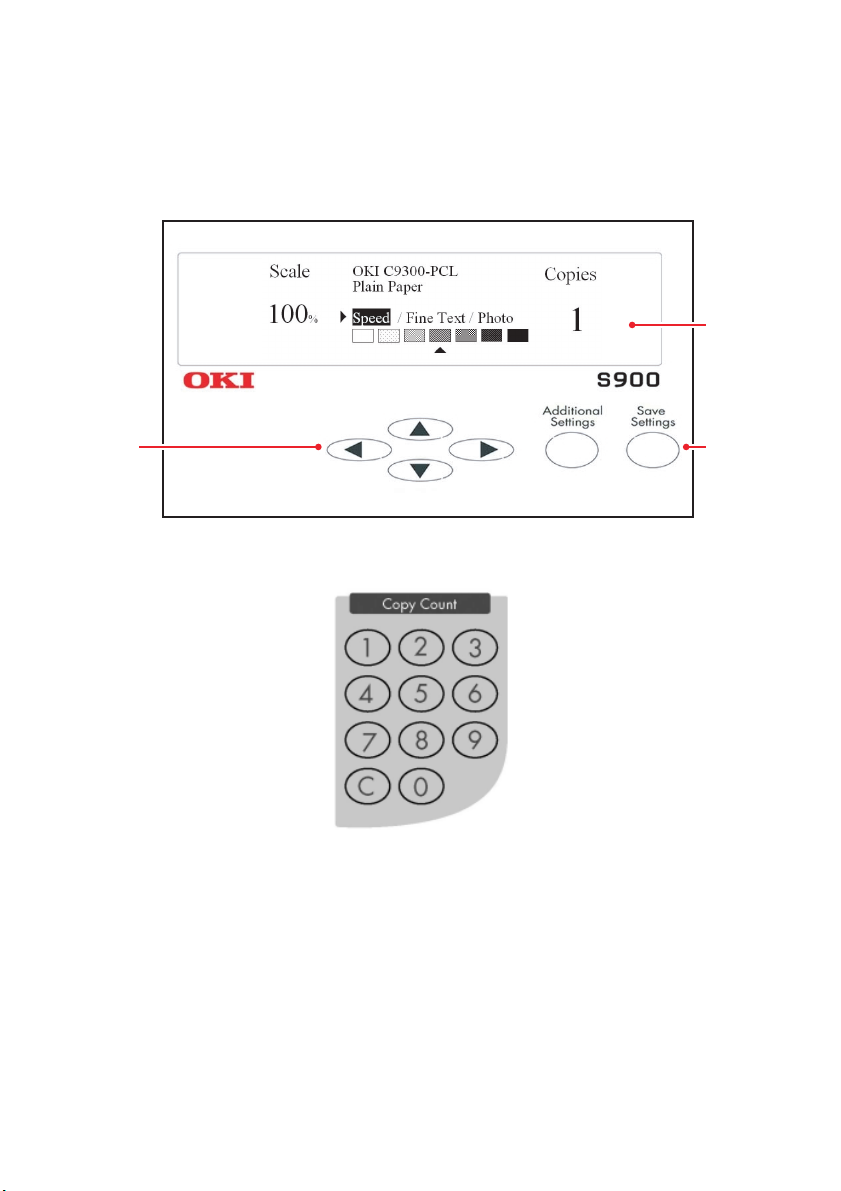
LCD display (1), arrow keys (2) and setting buttons (3)
3
3.
These are used to display the current settings and status
information and to select certain modes of operation.
1
2
Copy Count
4.
Use these buttons to enter your copy count (maximum 99). The
button marked “C” allows you to clear an entry.
INTRODUCTION > 14
Page 15
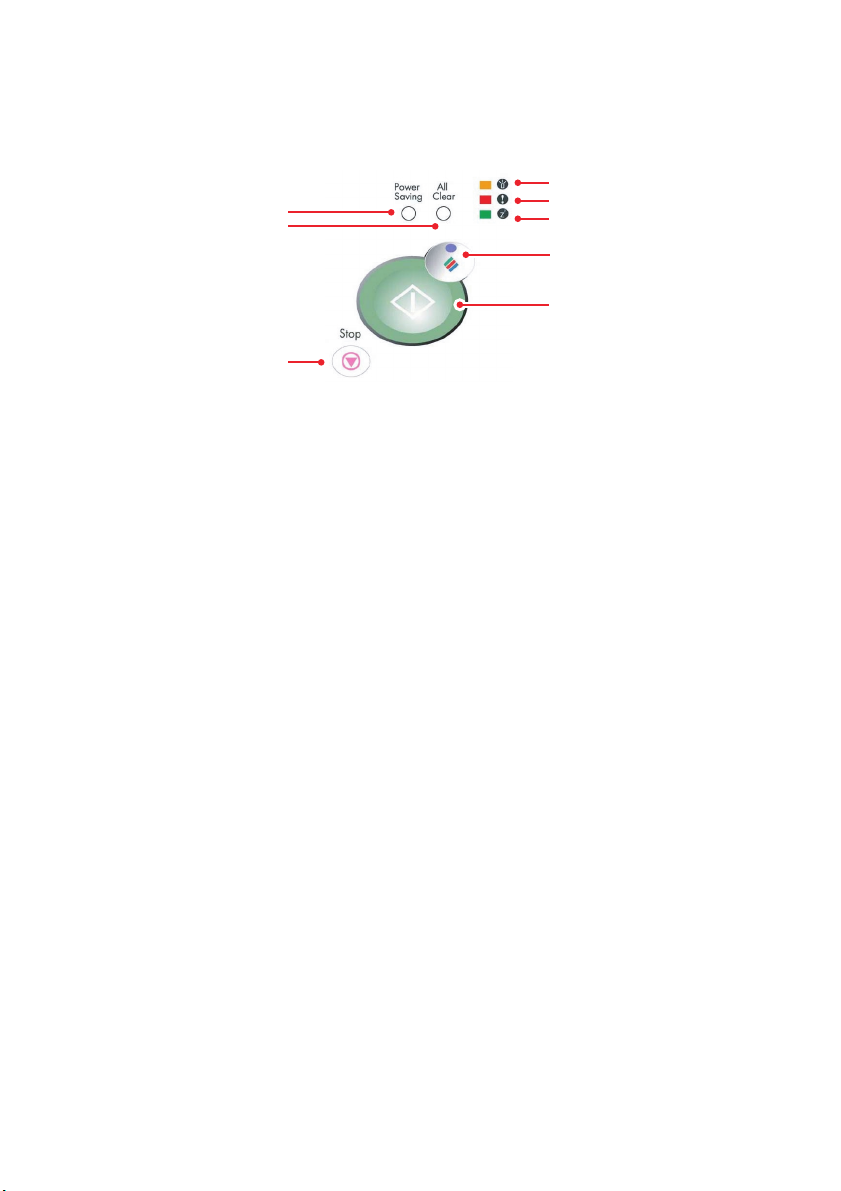
Copy button and other controls/indicators
5.
1
2
8
Use the button (1) to switch into power saving mode.
(a)
Hold down the button (2) for 5 seconds to clear current
(b)
(user) settings and return to the factory default settings.
The indicator LEDs have the following meanings when
(c)
illuminated:
The Power LED (3) indicates power on and ready status.
The Warning LED (4) indicates an error condition exists.
The Power Saving LED (5) indicates the machine is in
power saving mode.
3
4
5
6
7
Use the Stop button (8) to stop the copying process.
(d)
To make copies:
(e)
Press the Color button (6) to toggle between color
copying (illuminated) and black and white copying (not
illuminated) as required.
To make color copies, press the Copy button (7) while
the Color button (6) is illuminated.
To make black and white copies, press the Copy button
(7) while the Color button (6) is not illuminated.
INTRODUCTION > 15
Page 16

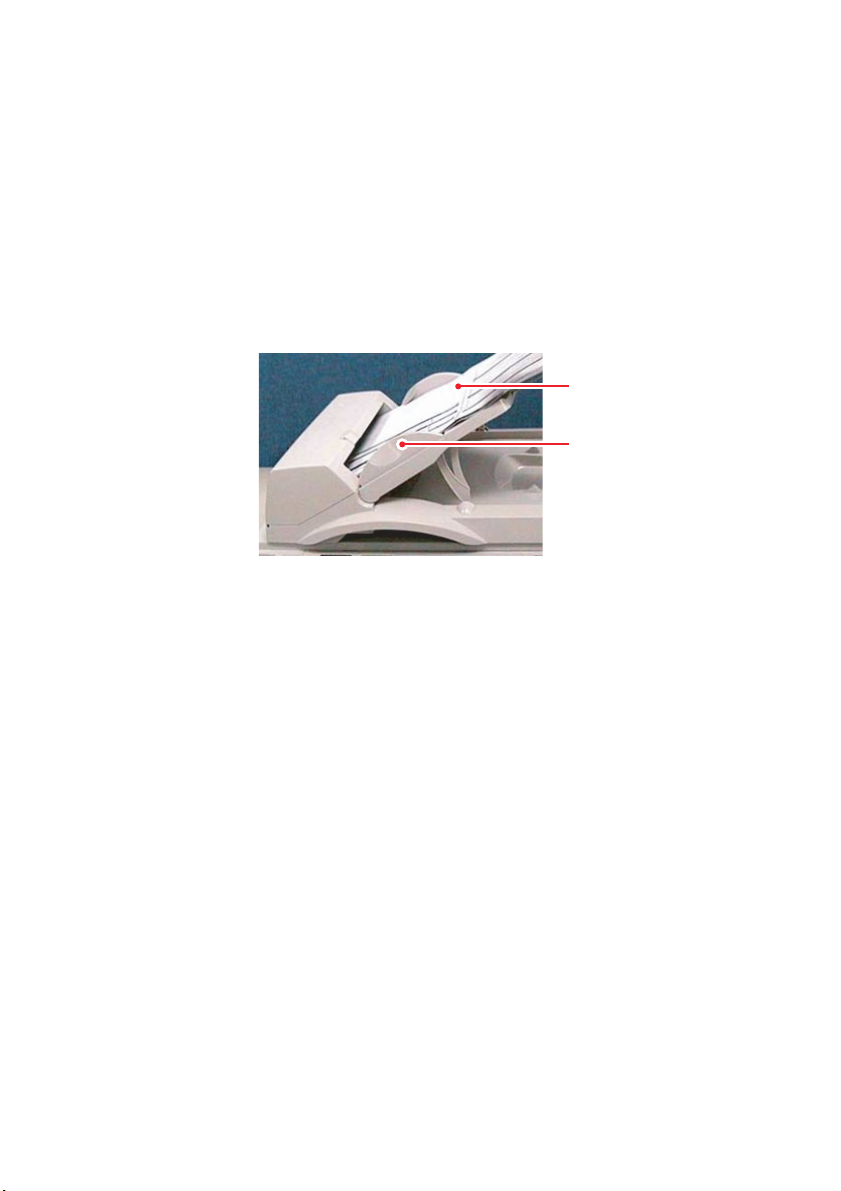
AUTOMATIC DOCUMENT FEEDER (ADF) COMPONENTS
The S900 Automatic Document Feeder (ADF) is a convenient addition
to your S900. With the ADF, you can automatically copy or scan up to
50 pages at a time.
NOTE
The ADF is optional in some countries.
ADF Document Cover (shown set up)
1.
INTRODUCTION > 16
Page 17

USING THE S900 AS A COPIER
The Scancopier has been designed to be easy-to-use. It takes three
basic steps to make a copy:
Place your document on the glass (flatbed) or in the optional
1.
ADF.
Enter your copy count.
2.
To ma ke cop i es:
3.
Press the Color button to toggle between color copying
(illuminated) and black and white copying (not illuminated).
The Scancopier is preset for color copying.
To make color copies, press the Copy button while the
(a)
Color button is illuminated.
To make black and white copies, press the Copy button
(b)
while the Color button is not illuminated.
The following sections describe in detail the things you should know
about the features of the Scancopier.
USING THE S900 AS A COPIER > 17
Page 18

LOADING PAPER
You can load the document to be copied either on the glass (flatbed)
or into the ADF (Automatic Document Feeder). To copy a multi-page
document, load the document into the ADF. The ADF can hold up to 50
pages at one time. If you need to copy pages from books, newspaper
clippings, or paper with wrinkles or curls, use the glass.
PAPER SIZE AUTO DETECTION
The S900 has an automatic paper size detection function. When you
place the document to be copied either on the glass (flatbed) or in the
ADF, the paper size area will indicate the matching paper size with an
illuminated LED on the Paper Supply panel. However, the paper sizes
which can be detected are limited and differ between the Flatbed and
ADF. The detectable paper sizes depend on how
Supply
in the Additional Settings menu is set (
(See Appendix D.)
Refer to the following tables, where LEF indicates Long Edge First and
SEF indicates Short Edge First:
Std Paper
Detectable Paper Size
Flatbed A3, A4 (LEF), A4 (SEF)
ADF A4 (SEF), A4 (LEF), B5 (LEF), B5 (SEF)
Option 11: Paper
Std Paper
or
Alt Paper
).
Alt Paper
Detectable Paper Size
Flatbed A3, A4 (LEF), A4 (SEF)
ADF A3, A4 (SEF), B4, B5 (SEF)
USING THE S900 AS A COPIER > 18
Page 19
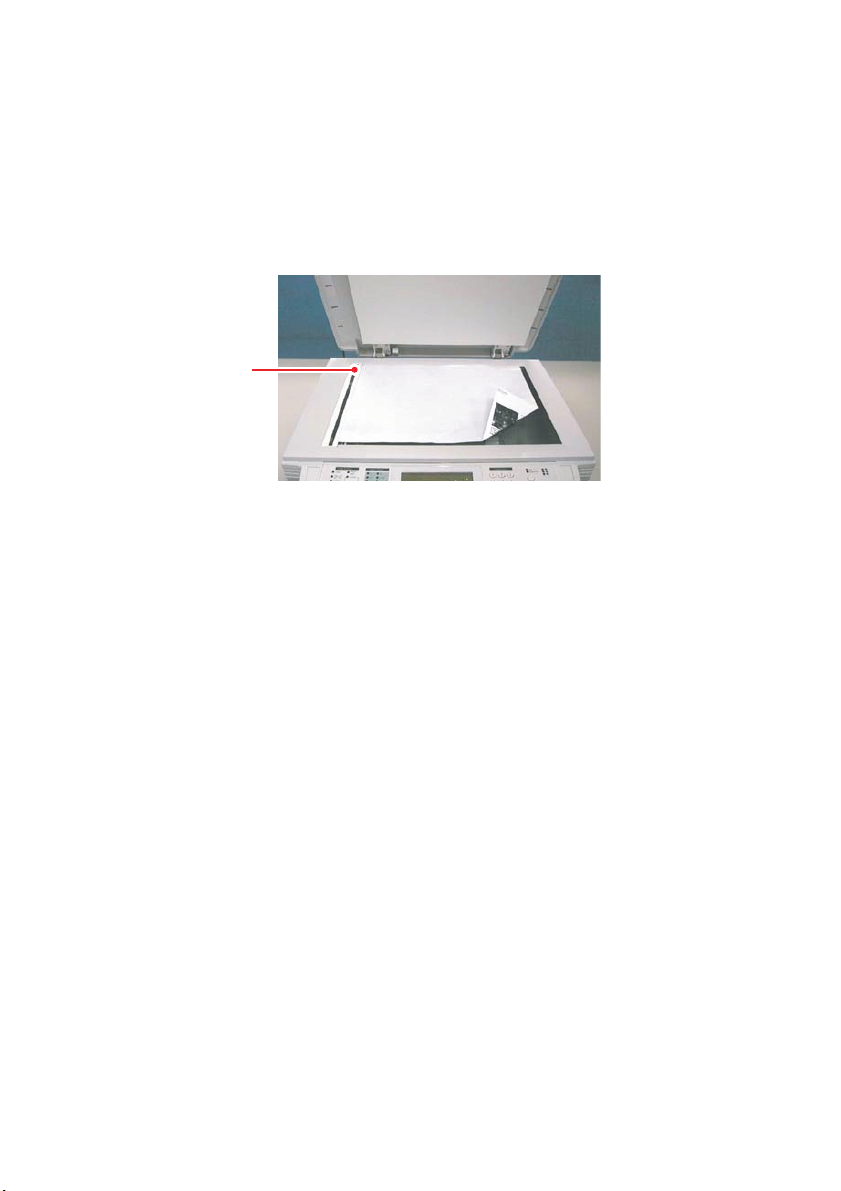
PLACING A DOCUMENT ON THE GLASS (FLATBED)
Open the document cover to reveal the glass.
1.
Place your document with the text FACE DOWN on the glass
2.
and align the top of the document in the upper-left corner (1)
of the glass.
1
Close the document cover.
3.
WHEN USING THE OPTIONAL ADF
Before using the ADF, please make sure that your paper meets the
following specifications:
l Documents can range in size from 114 x 139 mm
(4.5 by 5.5 inches) to 297 x 420 mm (11.69 by 16.54 inches).
l Documents can range in weight from 60 to 105 g/m²
(16 to 28 lbs).
l Documents should be square or rectangular and in good
condition (not fragile or worn).
l Documents should be free of curl, wrinkles, tears, wet ink,
punch holes or ragged edges.
l Documents should be free of staples, paper clips, adhesive
notes.
USING THE S900 AS A COPIER > 19
Page 20
PLACING DOCUMENTS IN THE ADF
Make sure your document meets the afore-mentioned
1.
requirements.
If you have multiple pages, fan your document(s) to avoid the
2.
occasional paper jam. The ADF can hold up to 50 pages at one
time.
Place your document(s) (2) with the text FACE UP in the ADF
3.
and make sure that the top of the pages is fed in first.
2
3
Adjust the Paper Guides (3) to centre the document(s) in the
4.
ADF.
USING THE S900 AS A COPIER > 20
Page 21

USING THE COPY FEATURES
The Scancopier provides the following features:
l Changing scaling
l Setting paper size
l Selecting copy mode
l Adjusting print density
l Increasing copy count
How to use the copy features is outlined on the following pages. (You
may wish to refer to the Control Panel illustrations in the section
entitled “Scancopier overview”.)
USING THE S900 AS A COPIER > 21
Page 22

CHANGING SCALING
The Scancopier scale factor is preset to 100%.
From the Copy Scaling panel, you can change the scaling by reducing
it to 25% or enlarging it to 400%.
Press the up arrow key to enlarge your document in 1 percent
1.
increments or press the down arrow key to reduce your
document in 1 percent decrements.
or
Press the button repeatedly until the LED for your desired
2.
preset scaling (e.g. A3 to A4) illuminates.
Your chosen scale factor is displayed in the LCD display.
NOTE
After you have made your copies, the settings you have just made will
remain in the LCD display for three minutes. After three minutes, the
machine will automatically return to the stand-by display and user
default settings.
USING THE S900 AS A COPIER > 22
Page 23

SETTING PAPER SIZE
NOTE
When you set the output paper size in the Scancopier, paper of that size
will be used from the printer.
The Scancopier is preset to A4 portrait.
Use the Paper Supply panel to specify your output paper size.
Press the button repeatedly until the LED for your desired
1.
paper size illuminates. For paper sizes where you have the
choice of portrait (tall) or landscape (wide), the paper symbol
beside the paper size denotes portrait (tall).
NOTE
After you have made your copies, the settings you have just made will
remain in the LCD display for three minutes. After three minutes, the
machine will automatically return to the stand-by display and user
default settings.
USING THE S900 AS A COPIER > 23
Page 24

SELECTING COPY MODE
The Scancopier is preset to the Speed mode.
You can change to Fine Text or Photo depending on the content of the
document you are copying to optimise your copy result.
Press the up arrow button below the LCD display (if required)
1.
to move the cursor to the Speed/FineText/Photo field in the
LCD display.
Highlight your required setting in the LCD display by using the
2.
left or right arrow buttons.
NOTE
After you have made your copies, the settings you have just made will
remain in the LCD display for three minutes. After three minutes, the
machine will automatically return to the stand-by display and user
default settings.
USING THE S900 AS A COPIER > 24
Page 25

ADJUSTING PRINT DENSITY
The Scancopier is preset to the normal level of print density.
If your original document comes with a lighter or darker contrast, you
can improve the copy quality by using the density adjusting feature.
Use the down arrow button below the LCD display (if required)
1.
to move the cursor down to the Density field.
Indicate your required setting in the LCD display by using the
2.
left (for lighter) or right (for darker) arrow buttons.
NOTE
After you have made your copies, the settings you have just made will
remain in the LCD display for three minutes. After three minutes, the
machine will automatically return to the stand-by display and user
default settings.
USING THE S900 AS A COPIER > 25
Page 26

INCREASING COPY COUNT
The Scancopier is preset to 1 copy.
If you wish to increase the number of copies, choose your desired
copy count using the Copy Count panel.
Enter your desired copy count, using the Clear (“C”) button if
1.
required to change the setting. The LCD display shows your
copy count (maximum value 99).
NOTE
After you have made your copies, the settings you have just made will
remain in the LCD display for three minutes. After three minutes, the
machine will automatically return to the stand-by display and user
default settings.
USING THE S900 AS A COPIER > 26
Page 27

USING THE S900 AS A SCANNER
NOTE
When printing scanned images from your computer, the printed output
may not look exactly the same as the pages copied directly using the
Scancopier copying function. Printed output from your computer
depends very much on the software used.
Open your scanning application.
1.
Pull down the File menu and choose
2.
If the Select Source command is not available on the File menu,
see your application’s user’s guide to determine how the
TWAIN link is used. A dialog box with a list of scanning sources
appears.
Select S900 /32x.xx
3.
You need to select the source only once, unless you want to
choose another scanner.
Place the document to be scanned in the ADF (face up) or on
4.
the flatbed glass platen (face down).
Pull down the File menu and choose
5.
A dialog box containing scanning features appears.
Select Source
Acquire
.
.
USING THE S900 AS A SCANNER > 27
Page 28

Select the scanning method you want to use on the
6.
Scan Method
Select the mode you want to use for your scans on
7.
the
Image Type
drop-down menu.
drop-down menu.
Select a scanning resolution on the
8.
down menu.
Select the settings for the scanning features (e.g.,
9.
, etc.) that you want to use.
Preview
or
button to preview or scan your
Scan
10.
Descreen
Click on the
document(s).
More details of the above steps follow.
Resolution
drop-
Sharpen
,
USING THE S900 AS A SCANNER > 28
Page 29

SCAN METHOD
Select how you want to scan on the
menu.
l
ADF/Single-page
automatic document feeder (ADF) to scan a single-page
document.
l
ADF/Multi-page
automatic document feeder (ADF) to scan batches of singlepage documents or multi-page documents at a time.
l
Flatbed
single page, a photograph or a newspaper clipping.
— use this setting if you are using the flatbed to scan a
— use this setting if you are using the
— use this setting if you are using the
SELECTING AN IMAGE TYPE
Select the most appropriate image type depending on your
application.
BLACK AND WHITE (LINE ART)
Scan Method
drop-down
Line Art presents the image in black and white only and there are no
intermediate shades of gray in between. This means each pixel* of the
image is 100% black or 100% white. Line art is the best choice of
image type if you want to scan text, pen or ink drawing. Since only 1bit of black or white information is required for each pixel, the disk
USING THE S900 AS A SCANNER > 29
Page 30

space required for saving line art images is only about 1/24 of that
required to save 24-bit true color images.
*Pixel: A combination of two words: picture and element, a pixel is a
single dot on a computer display or in a digital image.
HALFTONE
In addition to the black and white display, Halftone simulates
greyscale by using different sizes of dots. When viewed at a distance,
the image looks like a gray image yet it consumes much less disk
space. Newspapers generally use halftone images. Since halftone is a
type of black and white image, the disk space required is 1/24 of that
required to save a 24-bit true color image.
USING THE S900 AS A SCANNER > 30
Page 31

8-BIT GRAY
A single-channel image consists of at least 256 shades of gray. An 8bit scanner produces a greyscale image with 1024 shades of gray
between pure black and pure white. Choose this option if you are
scanning black and white photographs.
With 8 bits of color information per pixel, the file size of an image is
eight times larger than a black and white image and 1/3 the size of a
24-Bit Color image.
24-BIT COLOR
A 24-Bit Color image consists of three 8-bit color channels. The red,
green, and blue channels are mixed together to create a combination
of one billion colors which give a more true-to-life quality to the
image. Choose 24-Bit Color if you are scanning color photos.
USING THE S900 AS A SCANNER > 31
Page 32

DETERMINING YOUR RESOLUTION
Proper control of the resolution obtains satisfactory detail
of scanned images. Resolution is measured by dots per
inch (dpi). Normally, the higher the resolution the larger
the image file size will be, but at higher quality.
Greater resolution requires more time, memory and disk space. There
is a limit beyond which the resolution will not produce much visual
improvement, but will make your files more unmanageable.
Resolution: Left = 50 dpi Right = 100 dpi
An A4 size color image scanned at 300 dpi at True Color mode
consumes approximately 25 MB of disk space. A higher resolution is
recommended only for a small area at True Color mode.
The following table offers a suggestion to help you choose an
appropriate resolution.
I
MAGE TYPE
ESOLUTION (DPI
R
)
Line Art 200
Color Picture 100
OCR* 300
*
: Stands for Optical Character Recognition, the process to
OCR
convert an image to a text format.
USING THE S900 AS A SCANNER > 32
Page 33

ENHANCING YOUR IMAGE
BRIGHTNESS
Adjusts the lightness or darkness of an image. The higher
the value, the brighter the image.
CONTRAST
Adjusts the range between the darkest and the lightest
shades in the image.
The higher the contrast, the larger the difference between
different shades of gray.
USING THE S900 AS A SCANNER > 33
Page 34

ENLARGING THE PREVIEWED IMAGE
Use the Zoom View button to enlarge the previewed image to the full
width of the preview window.
NOTE
Zoom View enlarges only the preview image and does not enlarge the
actual image.
USING THE S900 AS A SCANNER > 34
Page 35

INVERT IMAGE
The invert command reverses the brightness and the color in
the image, producing a negative image. For color images,
each pixel will be changed into its complementary color with
the Invert Image command.
USING THE S900 AS A SCANNER > 35
Page 36

MIRROR
Click on the
mirror image).
Mirror
button to reverse the image (create a
AUTO SELECT IMAGE
Clicking on the
the whole area as the scan area. You may resize the area by
dragging the mouse pointer diagonally.
Auto Select Image
button automatically sets
PAPER SIZE
Select a size on the
sizes, or your current scan area to perform an immediate
selection of your scan size.
Paper Size
USING THE S900 AS A SCANNER > 36
list of frequently used scan
Page 37

UNITS
The
use (inch, cm, or Pixel) (See
button indicates the measuring system that is in
Units
Width
and
Height
).
DESCREEN
Click on the
that allows you to specify the type of document you are
scanning in order to eliminate the moiré pattern* commonly
found in printed matter. You can specify Newspaper,
Magazine, or Catalog.
*Moiré pattern—an undesirable pattern resulting from the incorrect
screen angle of the overprinting halftone.
Descreen
button to access a drop-down menu
USING THE S900 AS A SCANNER > 37
Page 38

SHARPEN
Click on the
that allows you to specify a level to sharpen the scanned
image. You can specify a Sharpen setting of Light, More, Heavy, or
Extra Heavy.
Sharpen
button to access a drop-down menu
COLOR ADJUSTMENT
Color adjustment adjusts the color quality of the image so that it
comes close to the original. This function uses default parameters to
adjust the image.
Click on the
for the
Advanced Settings
this feature.
Color Adjustment
Hue, Saturation
, and
button must be enabled in order to use
button to enable the button
Lightness
feature. Note that the
AUTO LEVEL
Click on the
shadow areas to reveal more detail in the image.
Auto Level
button to adjust the highlight and
USING THE S900 AS A SCANNER > 38
Page 39

ADVANCED SETTINGS
Click on the
Advanced Settings
button to view the advanced
settings buttons for Highlight / Shadow, Curves, Color
Balance, Hue / Saturation / Lightness, Color Drop-out, and
Custom Settings (six buttons on the right side of the TWAIN
dialog box).
Highlight / Shadow
This feature is available when 8-Bit Gray or 24-Bit Color is selected on
the
Image Type
drop-down menu. Highlight refers to the lightest point
in a scanned image; shadow refers to the darkest point.
Click on the
Highlight / Shadow
button to access the
Highlight / Shadow Levels dialog box. You can type values in
the text boxes or you can use the mouse to drag the pointer
at the bottom of the window to specify the values you want.
The text boxes have the following meanings:
S (Shadow): the darkest point of an image
G (Gamma): the midtones of an image
H (Highlight): the lightest point of an image
Use the
Highlight
and
Shadow
settings together to extend the range
of color and reveal more detail in a gray or color image.
USING THE S900 AS A SCANNER > 39
Page 40

Curves
When you select the
button, a dialog box appears
Curves
that allows you to adjust the midtones of the image without
losing detail in the lightest and darkest areas.
Select the
Curve
or
button, depending on whether you want a
Line
curved or an angled setting. Place the mouse cursor over the line, click
the left mouse button, and drag the line to set the curve you want.
Adjusting the curve up (1) or down (2) turns the image brighter or
darker respectively.
1
2
USING THE S900 AS A SCANNER > 40
Page 41

Color Balance
When you select the
Color Balance
button, a dialog box
appears that allows you to adjust the color of the image so
that it comes close to that of the original.
The default parameters are used to adjust the image. You can type
values in the Color Levels text boxes or you can drag the sliding
arrows under the colors.
Hue /Saturation /Lightness
Click on this button to adjust the hue, saturation, and
lightness of an image. This button is enabled when the
Adjustment
button is selected.
Color
You can type values in the text boxes or you can drag the sliding arrow
under the each item.
—specify a value in the
Hue
box to adjust the hue up to 360°.
Hue
Note that the level of intensity of a color simultaneously changes
when the hue adjustment is made.
Saturation
—specify a value in the
Saturation
box to adjust the
saturation level of the color. The level of saturation indicates whether
the color is pale or rich.
USING THE S900 AS A SCANNER > 41
Page 42

Lightness
—specify a value in the
Lightness
box to adjust the color
strength.
NOTE
These options are available only when the Color Adjustment button is
enabled.
Color drop-out
This feature is available when Black and White, Halftone, or
8-Bit Gray is selected on the
Click on the
Color Drop-out
Image Type
button to access a dialog box
that allows you to choose to remove the R (Red), G (Green),
or B (Blue) color channel while scanning.
For example, if your image contains red text or a red background,
choose
R channel
(red) to remove the red text or red background.
drop-down menu.
Increasing the brightness after removing one of the color channels
will make the image clearer.
This function is particularly useful when you have to convert text using
OCR software.
USING THE S900 AS A SCANNER > 42
Page 43

CUSTOM SETTINGS
Click on the Custom Settings button to access a dialog box
where you can save your scan settings and configuration
settings. There are two tabs: Scan Settings and
Configuration Settings.
Scan settings
The Scan Settings tab allows you to save your scanning feature
settings in a file, load an existing file, or delete an existing file.
Saving a scan settings file
Type a name for your settings in the
the
button. Your settings will be saved and the file name will
Save
File Name
text box and click on
appear in the list box.
Using a scan settings file
You can use an existing settings file. Right-click on the file name for
the settings you want to use and click on the
button. The settings
Load
in the file will automatically be specified in the scanning features
dialog box.
Deleting a scan settings file
Right-click on a file name and press the
Delete
button on the
computer keyboard to delete the file.
Configuration settings
The Configuration Settings tab allows you to customise some special
settings.
Energy Saving Mode
—check the
You can specify a time delay in the
box to enable energy saving.
Enable
Minutes
box. Click on the
Apply
button to save the changes.
Hint Setting
—check the
Show Hints
box if you want flags that show
the name of the item to appear when you place the mouse cursor on
an item in the dialog box. Click on the
button to save the
Apply
changes.
USING THE S900 AS A SCANNER > 43
Page 44

MISCELLANEOUS
Shows the current image width.
Width:
Length:
Size:
Shows the current image height.
Shows the current file size of the scanned image.
Lock image
Click on this button to fix the output width and height
despite the selected scan size.
The scale value automatically changes when you apply this
option and simultaneously resizes the selected area.
Information
Click on the Information button to access a window that
gives you information about the scanner and driver.
Preview:
Click on the
Preview
button to scan a document so you can
review the scanned image. This allows you to specify an area to be
scanned and any scanning feature settings to be used for future
scans. When a scanning feature is changed and applied, the Preview
image is updated for a real-time view of the change.
You can define the area to be scanned by dragging the cursor lines
with the mouse.
Zoom view:
Click on the
Scan:
Click on the
Scan
Zoom view
button to scan the area with the specified
button to preview a selected area.
parameters.
You can define the area to be scanned by dragging the cursor lines
with the mouse.
Click on the
Exit:
button to cancel the current job.
Exit
USING THE S900 AS A SCANNER > 44
Page 45

USING THE S900 WITH UNIMESSAGE PRO
When you start Unimessage Pro, the Welcome window is displayed.
A brief summary of the Unimessage Pro functions available from the
Unimessage Pro Welcome window is as follows:
l Use the Unimessage Pro message editor so that you can create
a message and send it.
l Access the list of folders within Unimessage Pro so that you
can check on the progress of messages, examine the lists of
received, transmitted and filed messages, and print these lists
or individual messages.
l Access the Unimessage Pro Scan Multiple dialog from where
you can scan once or many times from the S900 scanner then
compile the scanned images into a document before clicking
the Save As button to store the compiled scanned image in a
Windows Explorer folder of your choice.
l Scan a document or image using the S900 scanner then
automatically attach it to a new MAPI e-mail message, if you
have a MAPI e-mail application (such as Outlook) installed.
l Scan a document or image using the S900 scanner then
automatically attach it to a new Unimessage Pro message that
can then be sent to a fax number.
l Scan documents or images from the S900 scanner into your
PC.
l Access the Unimessage Pro Find dialog where you can search
your personal Unimessage Pro folders for filed items.
l Access Unimessage Pro on-line help.
For full details on how to use Unimessage Pro with the S900
Scancopier, please refer to the Unimessage Pro User’s Guide and online help files.
USING THE S900 WITH UNIMESSAGE PRO > 45
Page 46

MAINTENANCE
CLEANING THE DOCUMENT GLASS
The Scancopier is designed to be maintenance-free. However, it still
needs to be cleaned occasionally to ensure optimum image quality
and performance.
Open the document cover.
1.
Moisten a soft clean cloth with isopropyl alcohol (purity at
2.
least 95%).
Gently wipe the document glass (1) and the white sheet (2)
3.
beneath the document cover to remove any dust or toner
particles.
2
1
Close the document cover.
4.
MAINTENANCE > 46
Page 47

ADF
Disregard this and the following section if you do not have an ADF.
CLEANING THE ADF
From time to time, the pad assembly and feeding rollers of the ADF
may become contaminated with ink, toner particles or paper dust. In
this event, the ADF may not feed documents smoothly. If this occurs,
follow the cleaning procedure below.
Moisten a cotton swab with a non-corrosive solvent such as
1.
isopropyl alcohol (purity at least 95%).
Lift the release button (1) on the ADF front cover and carefully
2.
open the ADF front cover.
1
Wipe the feeding rollers (2) by moving the swab from side to
3.
side. Rotate the rollers forward with your finger and repeat
wiping until the rollers are clean. Be careful not to snag or
damage the ADF pad (3) springs.
2
3
2
MAINTENANCE > 47
Page 48

Wipe the ADF pad (3) from top to bottom, being careful not to
4.
hook the springs.
Close the ADF front cover.
5.
MAINTENANCE > 48
Page 49

REPLACING THE ADF SNAP-IN PAD MODULE
After approximately 20,000 pages have been fed through the ADF, the
ADF pad may be worn out, and you may experience problems with
document feeding. In this case, it is recommended that you replace
the pad module with a new one. To order a new pad module, contact
your Oki dealer.
Lift the release button (1) on the ADF front cover and carefully
1.
open the ADF front cover.
1
Press both arms of the ADF snap-in pad module (1) inward with two
2.
fingers and pull out the module.
MAINTENANCE > 49
2
Page 50

Remove the new ADF pad module from its box.
3.
Press both arms of the ADF snap-in pad module inward with
4.
two fingers.
Place the ADF snap-in pad module into the hole until it snaps
5.
into place.
MAINTENANCE > 50
Page 51

TROUBLESHOOTING
Use the following information to assist with solving any problems that
might arise when using your Scancopier.
LCD MESSAGES
LCD Message Action required
Copy function disables Download the printer profile. (See Appendix C
entitled “Updating the printer profile.”)
Check printer cable or status Check if the printer cable has been correctly
LCD INFORMATION CODES
Info code Meaning Action required
10001 SDRAM error Restart the Scancopier (i.e. switch OFF and then
10006 Home sensor error
10007 Lamp error
10009 Paper jam (ADF) Open the ADF cover, remove the paper and close the
10010 Cover open Close the cover.
10099 Lock error Turn OFF the S900.
20002 Connect printer
error
20003 Printer error Check that the printer is functioning properly.
20004 Printer off-line Check the printer.
20011-20019 Copy job error Reset the S900 and try again.
20021-20029 1394 protocol error Reset the S900 and printer and try again.
connected.
Check if the printer is turned on.
Restart the Scancopier and your printer (i.e. switch
OFF and then ON again).
If the message still appears, contact your Oki dealer.
ON).
If the code still appears, contact your Oki dealer.
cover.
If the code still appears, contact your Oki dealer.
If the code still appears, contact your Oki dealer.
Use the Lock/Unlock button to unlock the Scanning
head of the S900.
Restart the S900.
If the code still appears, contact your Oki dealer.
Check the IEEE1394 cable and connections.
If the code still appears, contact your Oki dealer.
If the code still appears, contact your Oki dealer.
If the code still appears, contact your Oki dealer.
TROUBLESHOOTING > 51
Page 52

Info code Meaning Action required
20031-20039 Printer profile error Check the printer profile version and printer model
20041-20049 Scanner error Check the S900 or reset the S900 if required.
name.
Update the printer profile. (See Appendix C.)
If the code still appears, contact your Oki dealer.
CAUTION!
Always confirm that ON-LINE is displayed on the operator panel LCD of
the printer before switching on the S900.
TROUBLESHOOTING > 52
Page 53

CLEARING A PAPER JAM
Disregard this section if you do not have an ADF.
In the event of a paper jam in the ADF, follow the procedure below to
clear the jam.
Turn the Scancopier off by disconnecting the power cable.
1.
Lift the release button (1) on the ADF front cover and carefully
2.
open the ADF front cover.
1
Slowly pull the paper out of the ADF unit.
3.
Close the ADF front cover.
4.
Turn on the Scancopier by reconnecting the power cable.
5.
TROUBLESHOOTING > 53
Page 54

SPECIFICATIONS
System overview
Image sensor Color CCD
Light source CCFL
Optical resolution 600x600 dpi
Color depth 48-bit (input), 24-bit (output)
LCD 240x64 dot graphic display
External connections Service port
Printer port (IEEE1394)
USB 2.0 (for scanner connection)
Copy area 300x422mm (11.8x16.6inches)
CPU 64 bit MIPS
Memory size Image: 64MB
Dimensions Scancopier: 589x502x153mm (23.2x19.8x6inches)
Weight Scancopier: 9kg (19.8lb)
ADF capacity 50 sheets
ADF document weight 60 – 105g/m² (16 –28lb)
ADF paper feed Face up
Glass (flatbed) paper feed Face down
Power supply 24V DC, 2A external power adapter
Power consumption <36W
Operating environment 10 – 35deg C (50 – 95 deg F)
Copy resolution 600x600dpi
Connector interface IEEE 1394
Features Scaling: 25 – 400% in 1% increments/decrements
System: 128MB
Scancopier and ADF: 589x502x318mm
(23.2x19.8x12.5inches)
Scancopier and ADF: 11.4kg (25lb)
Standby: 23W
Power saving mode: 18W
20 – 80% RH
Paper size auto detection (Flatbed: A4 landscape, A4 portrait,
A3; ADF: A4 landscape, A4 portrait, B4, B5 landscape,
B5 portrait, A3)
Color density control
Copy count: 1 – 99
SPECIFICATIONS > 54
Page 55

OPTIONAL ACCESSORIES
The following optional accessories can be used with your Scancopier.
Optional accessory Order code
C9000 Scancopier Automatic Document Feeder (ADF) 09002988
C9000 Scancopier Stand Kit (requires to be mounted on a
C9000 Finisher cabinet)
09004003
OPTIONAL ACCESSORIES > 55
Page 56

APPENDIX A – QUICK REFERENCE GUIDE
Load the document(s) to be copied
1.
Single-page document
(a)
Place the document face down on the glass, aligned to
the top left corner (1) of the glass.
1
Multi-page document
(b)
Place your document (2) face up in the ADF, top of the
document entered first and adjust the paper guides (3)
to centre the document.
2
APPENDIX A – QUICK REFERENCE GUIDE > 56
3
Page 57

Enter your copy count via the Copy Count panel.
4
2.
Make your copies
3.
5
Press the Color button (4) to toggle between color
(a)
copying (illuminated) and black and white copying (not
illuminated).
Color copies.
(b)
Press the Copy button (5) while the Color button (4) is
illuminated.
Black and white copies.
(c)
Press the Copy button (5) while the Color button (4) is
not illuminated.
APPENDIX A – QUICK REFERENCE GUIDE > 57
Page 58

APPENDIX B – SETTING UP A PIN ID AND PRINT CONTROL
INTRODUCTION
A printing limitation can be applied to every user via the PIN ID and the
Print Control Utility (option) of the C9300/C9500, and information
about printing jobs, e.g. total print count, can be acquired as log data.
The following conditions can be set:
l Printing limitation can be applied to certain users.
l Color printing limitation can be applied to certain users.
l Printing limitation can be applied to every user.
l Printing limitation can be applied to every section/department
l Print logs can be acquired.
CONNECTION ARRANGEMENT
2
1
The S900 Scancopier is connected via an IEEE1394 cable (1) to the
C9300/C9500 printer which is connected via the network hub (2) to
the PC.
APPENDIX B – SETTING UP A PIN ID AND PRINT CONTROL > 58
Page 59

SETTING UP THE PRINT CONTROL UTILITY
Refer to the Print Control Utility user’s guide for details of the steps
outlined below.
Using administrator rights, install the Print Control Utility in
1.
the PC.
Start the Print Control Utility and add the S900 Scancopier as a
2.
printer that acquires Print log.
After adding the S900, set the User ID.
3.
Add "100000" at the front of the 4-digit S900 PIN to create a
10-digit number, and register it.
Example: "1000001234" is the resulting number when the
S900 PIN is "1234".
Choose registered User ID, and set up "a use limitation" and
4.
"limitation value".
SETTING THE PIN ID
On the S900:
Press the
1.
Change the
2.
Press the
3.
The PIN ID input screen is displayed in the LCD.
4.
Input a 4-digit ID with the
5.
Press the
6.
Additional Settings
PIN Setting
Save Settings
button.
Copy
key.
from Disable to Enable.
key.
Copy Count
key panel.
NOTE
Once PIN Setting has been enabled, this entry is not displayed in the
menu until the All Clear button has been pressed and held for
5 seconds, returning all settings to the factory default values.
APPENDIX B – SETTING UP A PIN ID AND PRINT CONTROL > 59
Page 60

PRINT CONTROL USAGE
Examples of using the S900 ScanCopier and Print Control are listed in
the table below.
Examples Administrator PC setting S900 Scancopier
operation
To per mit on ly
certain users to
print, by restricting
users whose ID is
unregistered from
printing.
To per mit on ly
certain users to print
color, by restricting
users whose ID is
unregistered from
color printing.
To attach u se
restrictions o r collect
print logs by users.
To attach u sage
restrictions o r collect
logs by
departments.
To only collect logs. Logs are collected according to
Select User Name "Unregistered
ID" from Account ID Properties,
and check "Print not permitted"
in setting Use Restrictions.
Select User Name "Unregistered
ID" from Account ID Properties,
and check the "Inhibit color
print” in setting Use Restrictions.
Set Account ID for each user (ID)
to avoid duplicates and set Use
Restrictions.
Set Account ID for each
department. You can collect logs
for the department by Account ID.
the log collection schedule.
Browse for collected logs.
When an unregistered ID is
entered, the S900 scans data
but the C9300/C9500 will
ignore the data sent and not
print.
When an unregistered ID is
entered, the S900 will scan data
but the C9300/C9500 will
ignore data if it is color data and
not print.
When a user ID is entered, COPY
runs according to the setting in
Use restrictions.
Printing will not be permitted if
the set limit is exceeded.
When User ID is entered for each
department, Copy will run
according to the setting in Use
restrictions.
Printing will not be permitted if
the set limit is exceeded.
APPENDIX B – SETTING UP A PIN ID AND PRINT CONTROL > 60
Page 61

The types of log information you can obtain are listed in the following
table. (The logs that can be collected vary depending on printer
models and options.)
Item Description See note
Printer Printer name applicable to the log on display and its
Date Date of log on display
Log No. Log number
User ID The number entered when setting PIN ID for S900 (User ID
User "S900" fixed
Document Name "Scanner Job" fixed
Total printed
Sheets
Printed Pages The number of pages printed. Two pages per sheet in case
Status Result of print jobs
Paper Size Size of paper printed
Paper Type Type of paper printed 1, 2
Paper Weight Weight of paper printed 1, 2
Duplex Double-sided or Single-sided printing 1
Printed Sheets The number of printed sheets in each line when one print
Color The number of pages printed in color 1
Monochrome The number of pages printed in monochrome 1
Stapler The number of times the Stapler was used
Collection Time Time log was collected. 2
Start time Time printer accepted print jobs 2, 3
Process start
time
Process end
time
Print start time Time printer started printing 2, 3
End time Time printer ended printing 2, 3
Processing -
Offline time
connection destination
100000xxxx: First six digits from the left are fixed.)
The number of sheets printed
of Duplex print.
(Printing completed, Job cancelled, Printing denied, Color
printing denied, Log Buffer full, Unknown)
1
job is displayed in more than one column.
(e.g. Duplex, Color 1 sheet, Mono 1 sheet make Printed
Sheets take the value 2)
Time printer started process 2, 3
Time printer ended process 2, 3
Offline time (secs) during processing (if any) 2
APPENDIX B – SETTING UP A PIN ID AND PRINT CONTROL > 61
Page 62

Item Description See note
Printing - Offline
time
Tray 1 Number of sheets fed from Tray1 2
Tray2 Number of sheets fed from Tray2 2
Tray 3 Number of sheets fed from Tray3 2
Tray4 Number of sheets fed from Tray4 2
Tray 5 Number of sheets fed from Tray5 2
Multi Purpose
Tray
Multi Purpose
Feeder
300dpi Number of pages printed at 300dpi 2
600dpi Number of pages printed at 600dpi 2
600x1200dpi Number of pages printed at 600x1200dpi 2
1200dpi Number of pages printed at 1200dpi 2
Offline time (secs) during printing (if any) 2
Number of sheets fed from Multi Purpose Tray/Manual
Tray
Number of sheets fed from Optional Multi-pass Feeder 2
2
Notes:
When displayed in more than one line, the second line and
1.
thereafter will be displayed blank for other than this item.
Default setting is not displayed for this item.
2.
Left blank if time is not notified to printer.
3.
APPENDIX B – SETTING UP A PIN ID AND PRINT CONTROL > 62
Page 63

PRINT CONTROL EXAMPLE
The following table provides an example of four users, A, B, C, and D,
using the S900 Scancopier with Print Control.
Name User ID Setting usage
S900 operation
restrictions
A 1000002001 Inhibiting color print
From Account ID Properties,
select User Name A and
check the Inhibit color print
box on the Use Restrictions
tab.
B 1000002002 Print not permitted
C 1000002003 All permitted
D 1000002004
From Account ID Properties,
select User Name B and
check the Print not permitted
box.
No settings needed.
Can use up to £1000
From Account ID Properties,
select User Name D, check
the Charge box in Limits and
enter 1000 in Charge.
1
2001 is entered as PIN ID.
Mono Copying is permitted.
For Color Copying, the S900 will
scan but the C9300/C9500 will
ignore the data and not print.
2002 is entered as PIN ID.
For Copying, the S900 will scan
but the C9300/9500 will ignore
the data and not print.
2003 is entered as PIN ID.
Copying is permitted with no
restrictions.
2004 is entered as PIN ID.
Copying is permitted up to a
maximum value of £1000 based
on the charge per page set in the
definition of charges. Once
£1000 is reached, the S900 will
scan but the C9300/C9500 will
ignore the data and not print.
1. If you select "Define charges" when adding a printer, you can
define charge per page under "Printed page", "Finisher
(staple)", "Printer time usage", "Size", "Tray" and "Paper type"
screens.
APPENDIX B – SETTING UP A PIN ID AND PRINT CONTROL > 63
Page 64

APPENDIX C – UPDATING THE PRINTER PROFILE
The installed printer profile in the Scancopier should match the
printer model (C9300 or C9500) for optimum results. It is possible to
update the profile using the Update Tool via the cross cable supplied
through the service port at the rear of the Scancopier. For further
information, please refer to the CD (which contains the software and
explanatory documentation) supplied with your Scancopier.
APPENDIX C – UPDATING THE PRINTER PROFILE > 64
Page 65

APPENDIX D – SETTING UP
Although your Scancopier (and optional ADF) will have been fully
installed by an Installation Engineer, you may require to resite the
Scancopier or fit an ADF at a later date or change your user default
settings. In such events, you should read the relevant sections of the
following information.
RESITING THE SCANCOPIER
CAUTION!
Before moving the Scancopier you must remove the power from it, lock
the scanning head and disconnect any cables that may be attached to
it.
LOCKING THE SCANNING HEAD
Turn the power off the Scancopier.
1.
1
If the scanning head is not located at its home position (1),
2.
turn the Scancopier on to return the scanning head to position
(1).
After the scanning head is returned to the home position, turn
3.
the Scancopier off.
APPENDIX D – SETTING UP > 65
Page 66

Move the lock switch up to the locked position (1).
4.
1
2
PRECAUTIONS
Disconnect all cables (except the ADF cable) before moving the
Scancopier.
Keep the machine out of direct sunlight. Direct exposure to the sun or
excessive heat may cause damage.
Do not install the Scancopier near heating or air conditioning units.
Do not install the Scancopier in a humid or dusty place.
Be sure to use the proper AC power source.
Be sure to use the proper AC adap ter (see Specifications). Using other
AC adapters may damage the Scancopier and void the warranty.
Place the unit securely on an even, flat surface or on the optional
stand. Tilted or uneven surfaces may cause mechanical or paperfeeding problems.
CAUTION!
Do not connect AC power to the S900 until you have unlocked the
scanning head, otherwise damage to the Scancopier may result.
APPENDIX D – SETTING UP > 66
Page 67

UNLOCKING THE SCANNING HEAD
To protect the scanning head from damage during shipment or
resiting, the Scancopier is designed with a lock switch on the side of
the main unit. Therefore, BEFORE USING, THE MACHINE MUST BE
UNLOCKED by moving the lock switch to the Use position.
1
2
Shipping (locked) position
1.
Use (unlocked) position
2.
APPENDIX D – SETTING UP > 67
Page 68

INSTALLING THE ADF
CAUTION!
In some countries the ADF is an optional accessory. As such, it can be
installed at a later time. If the Scancopier has been used previously, be
sure to switch everything off and disconnect AC power from the
Scancopier before installing the ADF.
Remove the standard Scancopier document cover (1) by
1.
opening the cover and lifting the studs (2) from the hinge
holes at the rear of the S900.
1
2
2
Store the document cover on a flat surface in a safe place.
APPENDIX D – SETTING UP > 68
Page 69

Hold the ADF document cover (3) and insert its studs (4) into
2.
the hinge holes at the rear of the S900.
3
4
4
Close the ADF cover and raise the ADF Tray (5) to an angle of
3.
about 45 degrees.
7
5
6
Pull down the legs (6) under the ADF Tray and locate them in
4.
their support positions.
Pull the ADF Tray extension (7) out until it is fully extended.
5.
APPENDIX D – SETTING UP > 69
Page 70

CONNECTING THE CABLES
2
Connect the cables as shown.
1
3
IEEE1394 cable – to the IEEE1394 data port on the printer.
1.
USB cable – to the PC’s USB port. Only required for scanning
2.
images into the PC. Does not support printing from the PC via
USB.
ADF cable – attached to the ADF if you have one.
3.
CAUTION!
Do not connect AC power to the S900 until you have unlocked the
scanning head, otherwise damage to the Scancopier may result.
APPENDIX D – SETTING UP > 70
Page 71

CONNECTING THE POWER AND SWITCHING ON
CAUTION!
> Do not connect the S900 to the printer until the printer is turned
ON and displaying ON-LINE in its operator panel.
> You can leave the S900 switched ON at all times as it has an inbuilt
power saving function.
Press the Scancopier power switch (1) to the “0” position to
1.
ensure the Scancopier is turned off.
1
Connect the end of the power cable from the Adapter to the
2.
Scancopier power port (2).
Connect the Adapter to an appropriate power outlet with the
3.
power cable supplied and switch on the power.
Press the Scancopier power switch to the “I” position to turn
4.
on your Scancopier.
APPENDIX D – SETTING UP > 71
2
Page 72

As part of the warm-up message, the Scancopier LCD display shows
the installed Firmware version number and the Color Table version
number.
NOTE
The default installed Color Table is for the C9500 printer. To set up your
Scancopier for use with a C9300 printer, use the Additional Settings
button as described in the following section.
At the end of the warm-up message, the LCD display shows the
system default values in readiness for copying.
SETTING UP ADDITIONAL SETTINGS
Since the factory default settings for the S900 may not match your
particular application, you can set up your own defaults by using the
Additional Settings button in conjunction with the adjacent Arrow
Keys. Having made your own settings, use the Save Settings button to
save them as the new user default settings. To return to the original
factory default settings, hold down the All Clear button for 5 seconds.
When you press the Additional Settings button, the following menu
and factory default settings appear in the LCD display:
0. PIN Setting: Enable
1. Printer Profile: OKI C9500
2. Media Type: Plain Paper
3. Duplex: OFF
4. Staple: OFF
5. Hole Punch: OFF
6. Output Tray: Top Output (Face down)
7. Multi-Purpose Tray: ON
8. Collate: ON
9. Paper Tray: Tray1
10. Power Saving Mode: 30Min.
APPENDIX D – SETTING UP > 72
Page 73

11. Paper Supply: Std Paper
NOTE
The menu shown is that displayed when all printer options are installed.
Printer options that are not installed do not appear on the menu. If there
is a change in the condition of an option, the settings will be returned to
the factory default values.
The options available under each menu item (selectable by using the
adjacent Arrow Keys) are as follows:
PIN Setting
l Enable
l Disable
Refer to Appendix B, if required, for detailed information about
PIN setting.
Printer Profile (See also Appendix C)
l OKI C9300
l OKI C9500
Media Type
l Plain Paper
l Ultra Heavy
l Transparency
If Ultra Heavy or Transparency is set, Duplex, Staple, Hole
Punch, Output Tray, Multi-Purpose Tray settings are changed
to the following:
Duplex: OFF
Staple: OFF
Hole Punch: OFF
Output Tray: Rear Output (Face up). (If the Finisher option is
installed, however, paper will be output to the Finisher (Face
up)).
APPENDIX D – SETTING UP > 73
Page 74

Multi-Purpose Tray: ON
Duplex (only displayed when a Duplex unit is installed)
l OFF
l Top Edge: With Top Edge set, printing is such that pages are
bound on the top-edge, and the back of each page is printed in
the opposite direction to the front.
l Left Edge: With Left Edge set, printing is such that pages are
bound on the left-edge, and the back of each page is printed in
the same direction as the front.
Staple (only displayed when a Finisher is installed)
l ON
l OFF
If one of the following paper sizes is selected, the Staple
setting will be ignored: A3, B5 (SEF), B5 (LEF), B4, Legal,
Ledger.
Even if A4 or Letter is selected for Paper Size, if Short Edge First
is set on the C9300/C9500 side, the Staple setting will be
ignored.
Hole Punch (only displayed when a Finisher is installed)
l OFF
l Top Edge
l Left Edge
APPENDIX D – SETTING UP > 74
Page 75

Output Tray
l Top Output (Face down)
l Rear Output (Face up)
l Finisher (Face up)
l Finisher (Face down)
Selection
Notes
Stapler Hole Punch Job Offset
Function
Top Ou tput
(Face down)
Rear Output
(Face up)
Finisher
(Face up)
Finisher
(Face down)
Disabled Disabled Enabled Standard Face
down Tray
Disabled Disabled Disabled Standard Face Up
Tray
Disabled Enabled Disabled Finisher Upper Tray
(using the finisher
option)
Enabled Enabled Enabled Finisher Lower Tray
(using the finisher
option)
Multi-Purpose Tray
l ON: Feeds paper from the Multi-Purpose Tray
l OFF: Automatically selects from Tray 1 ~ Tray 5 the tray
containing paper that matches the size of printer image, and
feeds the paper.
Collate
l ON: Collate function is enabled
l OFF: Collate function is disabled
APPENDIX D – SETTING UP > 75
Page 76

Paper Tray
l Tray1
l Tray2
l Tray3
l Tray4
l Tray5
l MPT
l Auto
Power Saving Mode
l 30Min.
l 2 Hour
l 4 Hour
l OFF
Paper Supply
l Std Paper
Flatbed A3, A4 (LEF), A4 (SEF)
ADF A4 (SEF), A4 (LEF), B5 (LEF), B5 (SEF)
Detectable Paper Size
l Alt Paper
Flatbed A3, A4 (LEF), A4 (SEF)
ADF A3, A4 (SEF), B4, B5 (SEF)
Detectable Paper Size
APPENDIX D – SETTING UP > 76
Page 77

INSTALLING UTILITIES FROM THE CD-ROM
The utilities you need to install depend on how you plan to use your
Scancopier:
l For copying and/or scanning, install both the Update Tool
(Printer Profile Utility) (so that, if required, you can update the
color profiles or firmware) and the TWAIN Utility.
Details of how to use the Printer Profile Utility are given in
Appendix C.
The copying function is described in the chapter entitled
“Using the S900 as a copier”.
The scanning function is described in the chapter entitled
“Using the S900 as a scanner”.
To operate the S900 at optimum speed, the following minimum
requirements are recommended:
IBM compatible PC (Pentium or later);
Microsoft Windows 98/Me, Windows 2000/XP;
One USB port available;
100 Megabytes of available hard disk space for
installation;
128 Megabytes of RAM (256 Megabytes or higher
recommended);
VGA monitor;
A Microsoft Windows-compatible pointing device (e.g.,
amouse);
A CD-ROM drive.
Follow the steps below, omitting step 5(b).
l For copying, scanning and messaging (scanning to e-mail or
fax among other functions), install the Update Tool (Printer
Profile Utility), TWAIN Utility and Unimessage Pro Utility.
The Unimessage Pro functions are described in the chapter
entitled “Using S900 with Unimessage Pro”.
APPENDIX D – SETTING UP > 77
Page 78

For minimum system requirements, refer to the Unimessage
Pro User’s Guide.
Follow the steps below, omitting step 5(a).
Start Microsoft Windows.
1.
Insert the Utilities and Documentation CD-ROM into your CD-
2.
ROM drive.
The CD-ROM will autolaunch on most systems. However, if
3.
your system does not support autolaunching CD-ROMs, press
the Start button, choose RUN, type d:\setup.exe (d: the CDROM drive in use), and then click OK.
Double-click on your language.
4.
Carry out either (a) or (b).
5.
(a) For copying and/or scanning
Double-click on
Install Update Tool
and follow the on-
screen instructions.
(You can uninstall the Printer Profile Utility by selecting
Start>Programs>S900 Scancopier Printer Profile Utility
and clicking the
Double-click on
Uninstall Utility
Install TWAIN
icon in the group.)
and follow the on-screen
instructions to complete the driver installation. (You
may need to follow the instructions shown on the Add
New Hardware Wizard to let Windows identify your new
USB device before or after the driver installation.)
(You can uninstall the S900 driver by selecting
Start > Programs > S900 and clicking the
Uninstall Driver
icon from S900 group.)
(b) For copying and/or scanning and messaging
Double-click on
Install Update Tool
and follow the on-
screen instructions.
Double-click on
Install Unimessage Pro + TWAIN
follow the on-screen instructions, referring to the
Unimessage Pro User’s Guide for detailed instructions.
and
APPENDIX D – SETTING UP > 78
Page 79

When you have completed installation, click on the icon in the
6.
lower right of the screen to close the installation session.
APPENDIX D – SETTING UP > 79
Page 80

OKI EUROPE
Oki Systems (UK) Limited
550 Dundee Road
Slough Trading Estate
Slough, SL1 4LE
Tel: +44 (0) 1753 819819
Fax: +44 (0) 1753 819899
http://www.oki.co.uk
Oki Systems Ireland Limited
The Square Industrial Complex
Tallaght, Dublin 24Ireland
Tel: +353 1 4049590
Fax: +353 1 4049591
http://www.oki.ie
OKI Systems (Ireland) Ltd
40 Sydenham Park
Belfast, BT4 1PW
Tel: +44 (0)28 90 20 1110
http://www.oki.ie
Technical Support for all Ireland
Tel : +353 1 4049570
Fax: +353 1 4049555
E-mail: tech.support@oki.ie
Oki Systems (Holland) b.v.
Postbus 6902130 AR , Hoofddorp
Fax: 020 - 6531301
Helpdesk: 0900 - 2025285
http://www.oki.nl
Oki Systems (Belgium)
Schaarbeeklei 49 - 51B-1800 Vilvoorde
Fax: 02 - 2531848
Helpdesk: 0900 - 10610
http://www.oki.be
Oki Systèmes (France) S.A.
44-50 Av. du Général de Gaulle
94240 L'Hay les Roses
Téléphone: 01 46 15 80 00
Télécopie: 01 46 15 80 60
http://www.oki.fr
OKI Systems (Italia) S.p.A.
c.c. “Il Girasole” - Lotto 3.05/B20084
Lacchiarella (MI)
Tel. 02900261
Fax: 029007549
http://www.oki.it
Oki Systems (Deutschland) GmbH
Hansaallee 18740549 Düsseldorf
Tel: +49 (0) 211 52 66-0
Fax: +49 (0) 211 59 33-45
BBS: +49 (0) 211 5266-222
(300-33600 bps, 8, N, 1)
http://www.oki.de
Oki Systems (Ibérica) SA
Sucursal em Portugal
Rua Quinta do Paizinho
Edificio Bepor-Bloco 2-1 Dto.2795
Carnaxide
Tel: 21 424 67 40
Fax: 21 417 29 12
http://www.oki.pt
Oki Service (Portugal)
Serviço de apoio técnico ao cliente
Tel: 808 200 197
OKI EUROPE > 80
Page 81

Oki Systems (Iberica), S.A.
Paseo de la Habana
17628036 - Madrid, España
Tel: 91-3431620
Fax: 91-3431624
http://www.oki.es
Oki Systems (Magyarország ) Kft.
H1051 Budapest
Bajcsy-Zsilinszky út 12.
Tel: 327 – 4070
Fax: 327 – 4076, 327 – 4072
http://www.okihu.hu
OKI Systems (Norway) A/S
Hvamsvingen 9, P.O.Box 174
N-2013 Skjetten
Telefon: 63 89 36 00
Telefax: 63 89 36 01
Ordrefax: 63 89 36 02
http://www.oki.no
Oki Systems (Danmark) a·s
Park Allé 3822625 Vallensbæk
Tlf: 43 66 65 30
Fax: 43 66 65 90
http://www.oki.dk
OKI Systems (Sweden) AB
BOX 216161 26 BROMMA
Telefonsupport: 0726-101 20
Vardagar: 09.00 - 11.30, 13.00 - 16.00
http://www.oki.se
OKI Systems (Finland) Oy
Kutomotie 18 B, 5. krs, 00380 Helsinki
Puh. (09) 5404 420.
Int. +358 9 5404 420
Fax. 09) 5404 4223
Int. +358 9 5404 4223
Oki Systems (Polska) Sp. z o.o.
ul. Chmielna 132/134
00-805 Warszawa, Polska
Tel: (+48 22) 656-28-03
Fax: (+48 22) 656-27-97
BBS: (+48 22) 656-28-17
Bezpatna infolinia serwisowa:
0-800-1-20066
http://www.okieurope.co.uk
RUSSIA
Oki Europe Ltd.
Business Center “Parus”
7-th floor, office 10,
23, 1-st Tverskaya-Yamskaya Street
125047 Moscow
Tel: (+7 501/095) 258 6065
Fax: (+7 501/095) 258 6070
Email: info@oki.ru
http://www.oki.ru
UKRAINE
Oki Europe Ltd.
Office 24, 34/33 Ivan Franko Street
Kiev 252030
Tel: (+380 44) 462 0575/0576
Fax: (+380 44) 462 0574
Email: info@oki.kiev.ua
OKI EUROPE > 81
Page 82

GREECE
BULGARIA
Αντιπρόσωπος της Oki Systems στην
Ελλάδα
CPI S.A.
Μεσογείων 348, 153 41 Αγ. Παρασκευή
Τηγ: 65 45 802-5
Fax: 65 45 805
Email: cpi@hol.gr
TURKEY
Oki Europe Ltd. Liaison Office
18th Floor No. 35, Harmanci Sok
Harmanci Giz Plaza, Levent
Istanbul 80640
Tel: +90 212 279 2393
Fax: +90 212 279 2366
Алфа Линк О. О. Д.
Булевард “Черни ВрЪх” 51, п.к. 52
София 1407
Тел: (359) 2 689552, 689555
Факс: (359) 2 689556
OKI EUROPE > 82
Page 83

INDEX
A
accessories ................................55
,
additional settings............... 14
ADF ............................................12
Installing ..............................68
loading paper........................ 19
Unpacking ............................16
72
C
Cables
ADF....................................... 70
connecting............................ 70
IEEE1394 ..............................70
USB ......................................70
CD contents ................................10
Cleaning
ADF....................................... 47
Document glass ....................46
components
ADF....................................... 16
Scancopier..............................9
Control panel
location ................................11
copy
button...................................15
count ....................................26
mode ....................................24
procedure .............................17
D
Document Cover .........................11
E
error codes .................................51
I
installing
ADF....................................... 68
Installing utilities........................77
L
LCD Display ................................11
loading paper
ADF....................................... 20
glass..................................... 19
Lock
Scan head lock......................67
M
messages
error .....................................51
LCD.......................................51
Moire patterns
eliminating ...........................37
P
paper
loading .................................18
size....................................... 23
size auto detection ................18
specifications........................19
paper jam ...................................53
Power Jack..................................12
power on ....................................71
print density ...............................25
R
Replacing the ADF pad ................49
S
scaling ....................................... 22
Scanning
Adjusting brightness .............33
Adjusting contrast ................. 33
Advanced settings.................39
Auto level function ................ 38
Color adjustment...................38
Descreen function ................. 37
Inverting image (negatives)....35
Mirror function ......................36
Paper size .............................36
Previewing ............................36
INDEX > 83
Page 84

Saving custom settings .........43
,
Selecting image type ...... 28
Selecting method ........... 28
Selecting resolution ....... 28
Sharpen image......................38
Units of measure ...................37
Using the TWAIN driver ..........27
29
,
29
,
32
T
troubleshooting ..........................51
U
Unimessage Pro..........................45
Unlocking
Scan head lock......................67
Unpacking
ADF....................................... 16
Scancopier..............................9
INDEX > 84
Page 85

S900 Scancopier
Central House
Balfour Road, Hounslow
TW3 1HY
United Kingdom
tel +44 (0) 20 8219 2190
fax +44 (0) 20 8219 2199
07046301 ISS.02
 Loading...