

Page 1

PT34
0
/
PT341
Printer Driver
Installation Guide
Page 2

PT340/PT341 Printer Driver Installation Guide 1.0.0.0
Table of Contents
1 Introduction....................................................................................................................2
1.1 Overview.................................................................................................................................................2
1.2 Installed software....................................................................................................................................2
1.3 Trademarks.............................................................................................................................................2
1.4 System requirements..............................................................................................................................3
2 Installation...................................................................................................................... 4
2.1 How to use this manual ..........................................................................................................................4
2.2 Before starting the installation ................................................................................................................6
2.3 Installation procedures............................................................................................................................7
2.3.1 Driver Installation.............................................................................................................................7
2.3.2 Software Utilities............................................................................................................................16
2.3.3 Network Software ..........................................................................................................................17
3 How to Check the Installation..................................................................................... 18
3.1 Windows driver .....................................................................................................................................18
3.1.1 Installation confirmation.................................................................................................................18
3.1.2 If the test page does not print........................................................................................................20
3.2 OPOS driver..........................................................................................................................................22
3.2.1 Installation confirmation.................................................................................................................22
3.2.2 Check serial number......................................................................................................................25
3.3 Utility.....................................................................................................................................................26
3.4 Status Monitor.......................................................................................................................................28
3.5 Printer LAN Settings Tool......................................................................................................................29
4 Uninstallation............................................................................................................... 30
4.1 Windows driver .....................................................................................................................................30
4.1.1 Uninstallation of all Windows drivers.............................................................................................30
4.1.2 Uninstallation of each Windows driver...........................................................................................32
4.2 OPOS driver and other software...........................................................................................................36
5 Revision History .......................................................................................................... 38
Copyright (C) 2013 Oki Data Corporation
1 of 38
Page 3

1.1 Overview
This installer program is used to install the Windows driver, OPOS driver, and other software. You can
also use it to view the manual.
1.2 Installed software
This installer is used to install the following drivers and software.
Software Description
Windows driver
OPOS driver
Utility Utility software to remotely configure printer settings from PC.
Status Monitor
Printer LAN Settings Tool Software for configuring printer LAN settings using a Wizard.
PT340/PT341 Printer Driver Installation Guide 1.0.0.0
1 Introduction
Printer driver for printing from Windows applications (Word,
Excel, etc.)
Printer driver for developing POS systems that comply with
the OPOS (OLE POS Technology Council) specification.
Software to display the status of the printer.
* Windows driver installation is required.
1.3 Trademarks
All company names and product names contained in this manual are registered trademarks or
trademarks of their respective owners.
Copyright (C) 2013 Oki Data Corporation
2 of 38
Page 4

1.4 System requirements
This installer runs on the following operating system s.
Product name Edition Language Abbreviations
Microsoft® Windows® XP
Microsoft® Windows Vista®
Microsoft® Windows® 7
Microsoft® Windows® 8
Microsoft® Windows Server® 2003
Microsoft® Windows Server® 2008
Microsoft® Windows Server® 2008 R2
Microsoft® Windows Server® 2012
Microsoft® Windows® Embedded for
Point of Service
Microsoft® Windows® Embedded
POSReady 2009
*1) Windows XP (SP1, SP2)
The installer requires ".NET Framewor k 2.0" or later.
If not already installed, please download ".NET Framework 2.0" from the Microsoft web site
and install.
*2) WEPOS 2009
For using the LAN interface.
Please add the "Management and Monitoring Tool" component.
PT340/PT341 Printer Driver Installation Guide 1.0.0.0
Professional
Home Edition
Enterprise
Business
Ultimate
Home Premium
Home Basic
Ultimate
Enterprise
Professional
Home Premium
Starter
Enterprise
Pro
―
Enterprise
Standard
Enterprise
Standard
Enterprise
Standard
Standard
Essentials
― WEPOS
―
English
Windows XP
*1
Windows Vista
Windows 7
Windows 8
Server 2003
Server 2008
Server 2008 R2
Server 2012
WEPOS 2009
*2
Copyright (C) 2013 Oki Data Corporation
3 of 38
Page 5
2 Installation
2.1 How to use this manual
The procedures for performing the operations listed below are different depending on your OS. Please
refer to the instructions for the OS you are using.
Printer folder
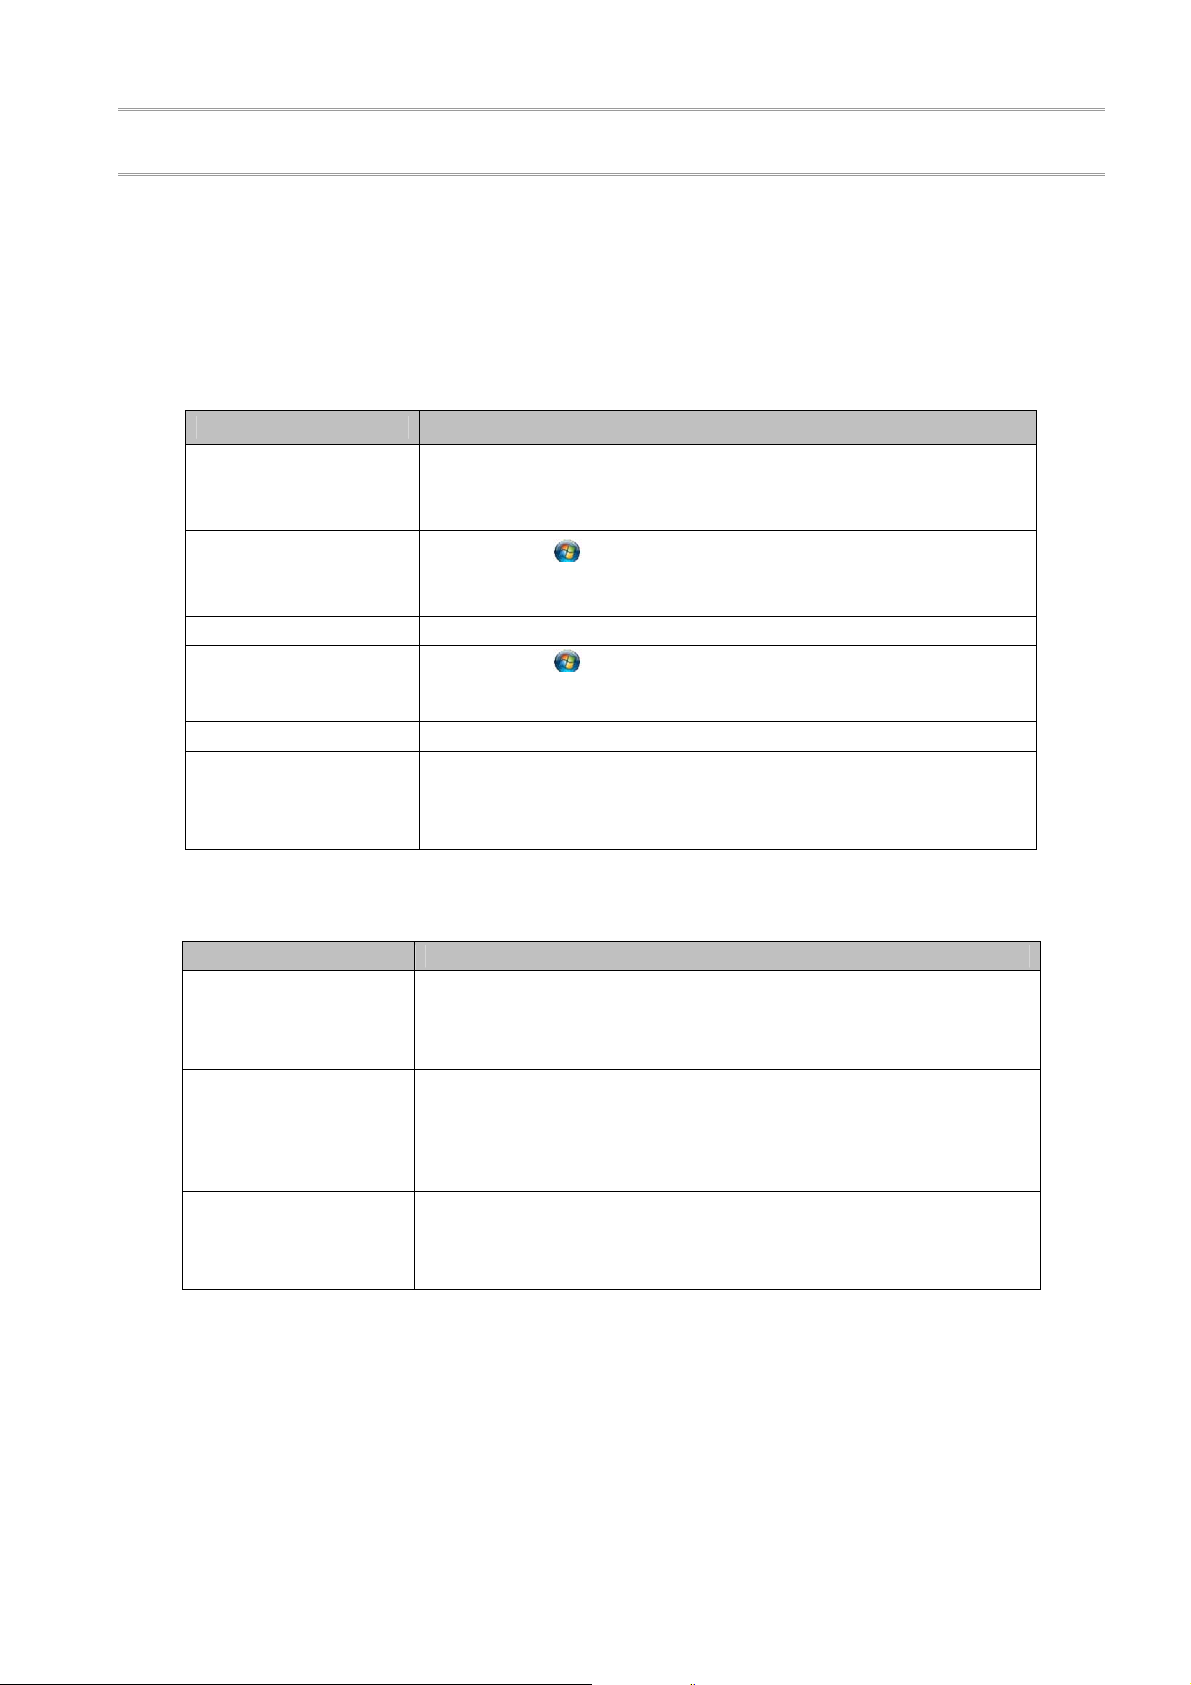
OS Procedure
PT340/PT341 Printer Driver Installation Guide 1.0.0.0
Windows 8
/ Server 2012
Windows 7
Server 2008 R2 Click [Start] [Devices and Printers].
Windows Vista
Server 2008 Click [Start] [Control Panel] [Hardware and Sound] [Printers].
Windows XP
/ Server 2003
/ WEPOS
/ WEPOS 2009
Printer properties
OS Procedure
Windows 8
/ Windows 7
/ Server 2012
/ Server 2008 R2
Windows Vista
/ Server 2008
Windows XP
/ Server 2003
/ WEPOS
/ WEPOS 2009
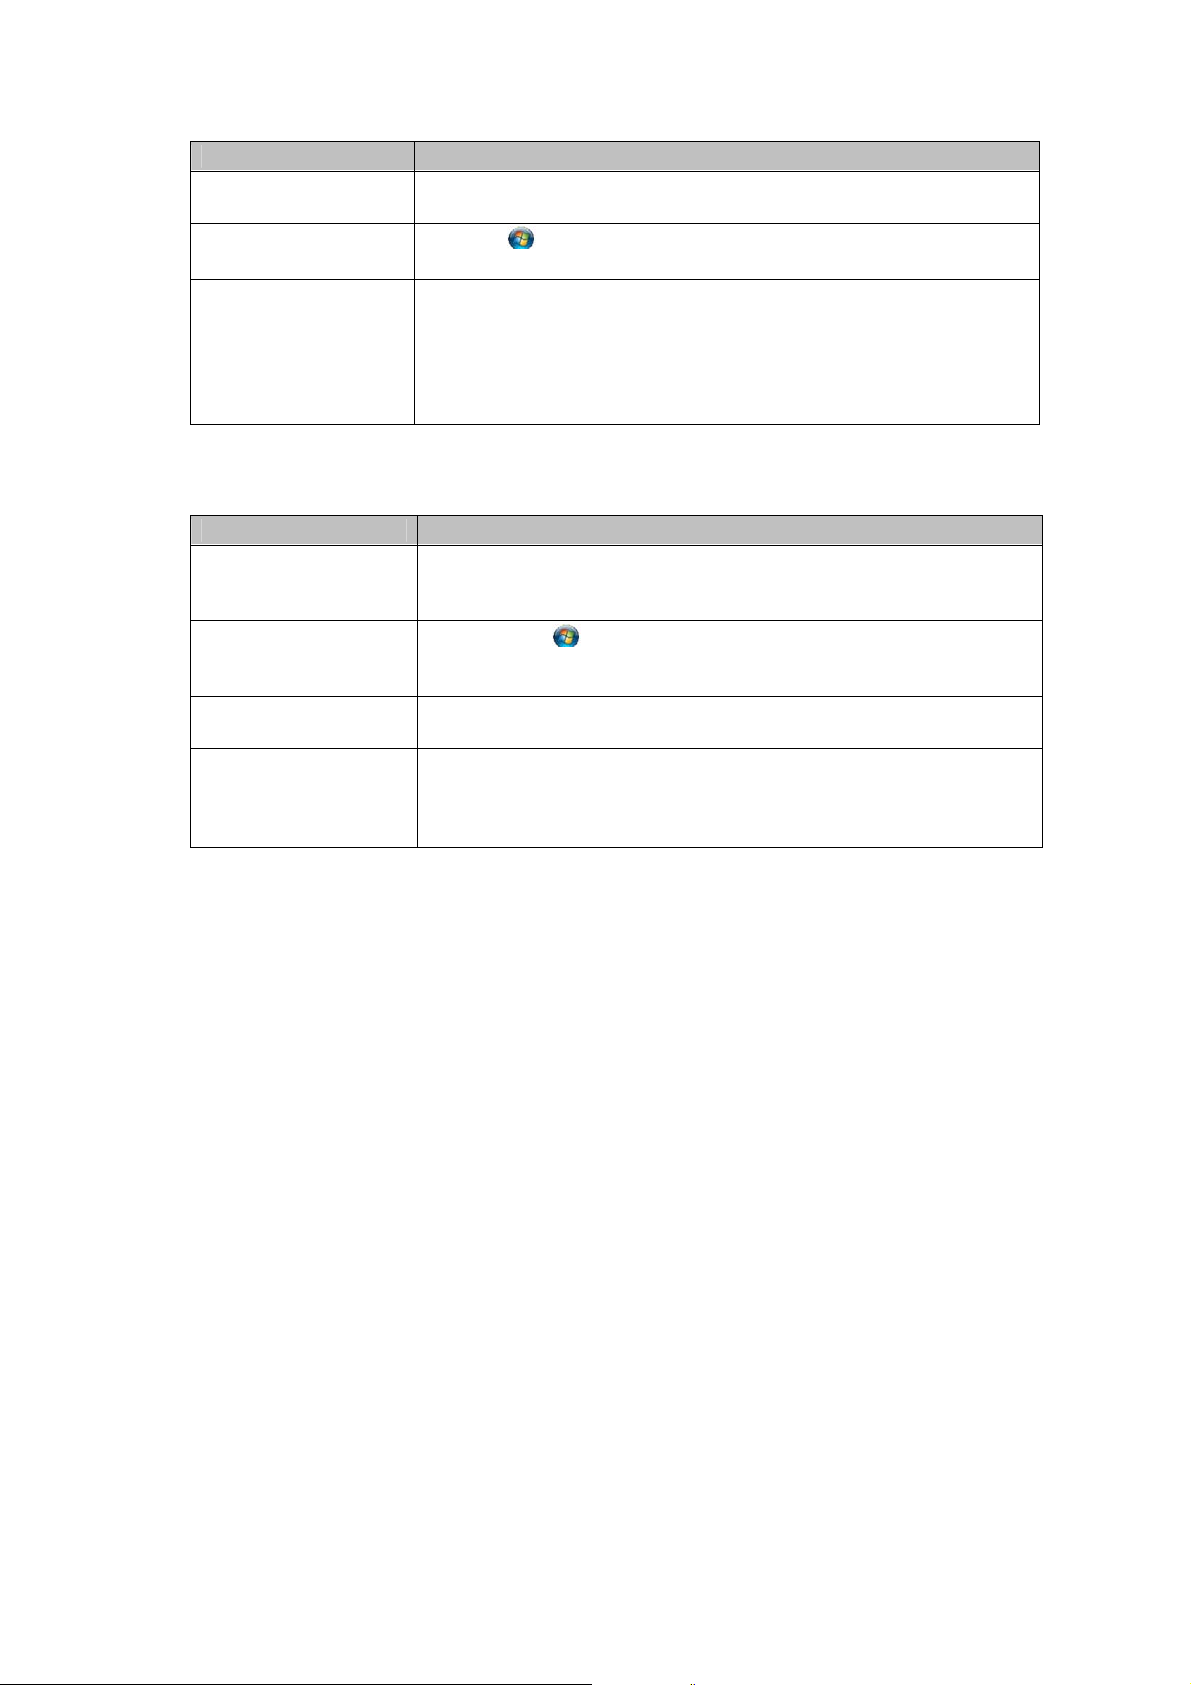
(1) Press the Windows logo key + X key, shortcut menu is
displayed bottom left of the screen.
(2) Click [Control Panel] and select [Devices and Printers].
(1) Click the
desktop screen.
(2) Click [Devices and Printers].
(1) Click the
desktop screen.
(2) Click [Control Panel] [Hardware and Sound] [Printers].
Click [Start] [Printers and Faxes].
* For Windows XP Home Edition
Click [Start] [Control Panel] [Printers and Other Hardware].
Right-click the "PT340-341 Raster" printer and then click [Printer
Properties].
Right-click the "PT340-341 Raster" printer and then click [Run as
administrator] [Properties].
* If you logged on to Server 2008 using the built-in administrator
account, right-click the "PT340-341 Raster" printer and then click
[Properties].
Right-click the "PT340-341 Raster" printer and then click
[Properties].
Windows logo button in the lower-left corner of the
Windows logo button in the lower-left corner of the
Copyright (C) 2013 Oki Data Corporation
4 of 38
Page 6
PT340/PT341 Printer Driver Installation Guide 1.0.0.0
All programs
OS Procedure
Windows 8
/ Server 2012
Windows 7 / Vista
Right-click the Start Screen, and click [All Apps].
Click the
Windows logo button in the lower-left corner of the
desktop screen and then click [All Programs].
Server 2008 R2
/ Server 2008
/ Windows XP
/ Server 2003
Select [Start] [All Programs].
/ WEPOS
/ WEPOS 2009
Uninstall a program
OS Procedure
Windows 8
/ Server 2012
Windows 7 / Vista
(1) Press the Windows logo key + X key , short cut menu is displaye d
bottom left of the screen.
(2) Click [Control Panel] [Programs] [Programs and Features].
(1) Click the
Windows logo button in the lower-left corner of the
desktop screen.
(2) Click [Control Panel] [Uninstall a program].
Server 2008 R2
/ Server 2008
Click [Start] [Control Panel] [Uninstall a program].
Windows XP
/ Server 2003
/ WEPOS
Click [Start] [Control Panel] [Add or Remove Programs].
/ WEPOS 2009
Copyright (C) 2013 Oki Data Corporation
5 of 38
Page 7

PT340/PT341 Printer Driver Installation Guide 1.0.0.0
2.2 Before starting the installation
When you install a driver, you must log on using an account with Administrative privileges.
If the printer drivers or associated software ar e already installed:
If the drivers and software for the PT340/PT341 printer are alre ady installed on your computer,
uninstall them before proceeding.
For more information about how to uninstall, see "4. Uninstallation".
Please turn off the printer before you install the driver.
The "Found New Hardware Wizard" screen might appear even if the printer turned on power.
In that case, click "Cancel" and close the screen.
When you use the Windows driver on a LAN
Setup may fail if you are using anti-virus security software because the printer cannot be found.
In this case, exit setup and add "Printer LAN Settings Tool" to the list of exception programs in the
anti-virus security software’s firewall configuration. Alternatively, temporarily disable the firewall
feature and then restart setup.
Configure the printer settings as follows depending on the interface you are using
For the LAN interface
• LAN : Enable
For the USB or Serial interface
• LAN : Disable
<Note>
The factory default value is "Enable".
Refer to the instruction manual for the printer for details on how to configure this setting.
When you use the OPOS driver on a LAN
When you use OPOS driver via LAN interface and IP address is not mapped by DHCP, IP address
should be set by "Printer LAN Settings Tool" prior to use.
See "Printer LAN Online Manual" for the usage.
Copyright (C) 2013 Oki Data Corporation
6 of 38
Page 8
2.3 Installation procedures
2.3.1 Driver Installation
Use the following procedure to install the software.
Common procedure 1
For Windows 8 / Server 2012
For Windows 7/Windows Vista/Server 2008 R2/Server 2008
PT340/PT341 Printer Driver Installation Guide 1.0.0.0
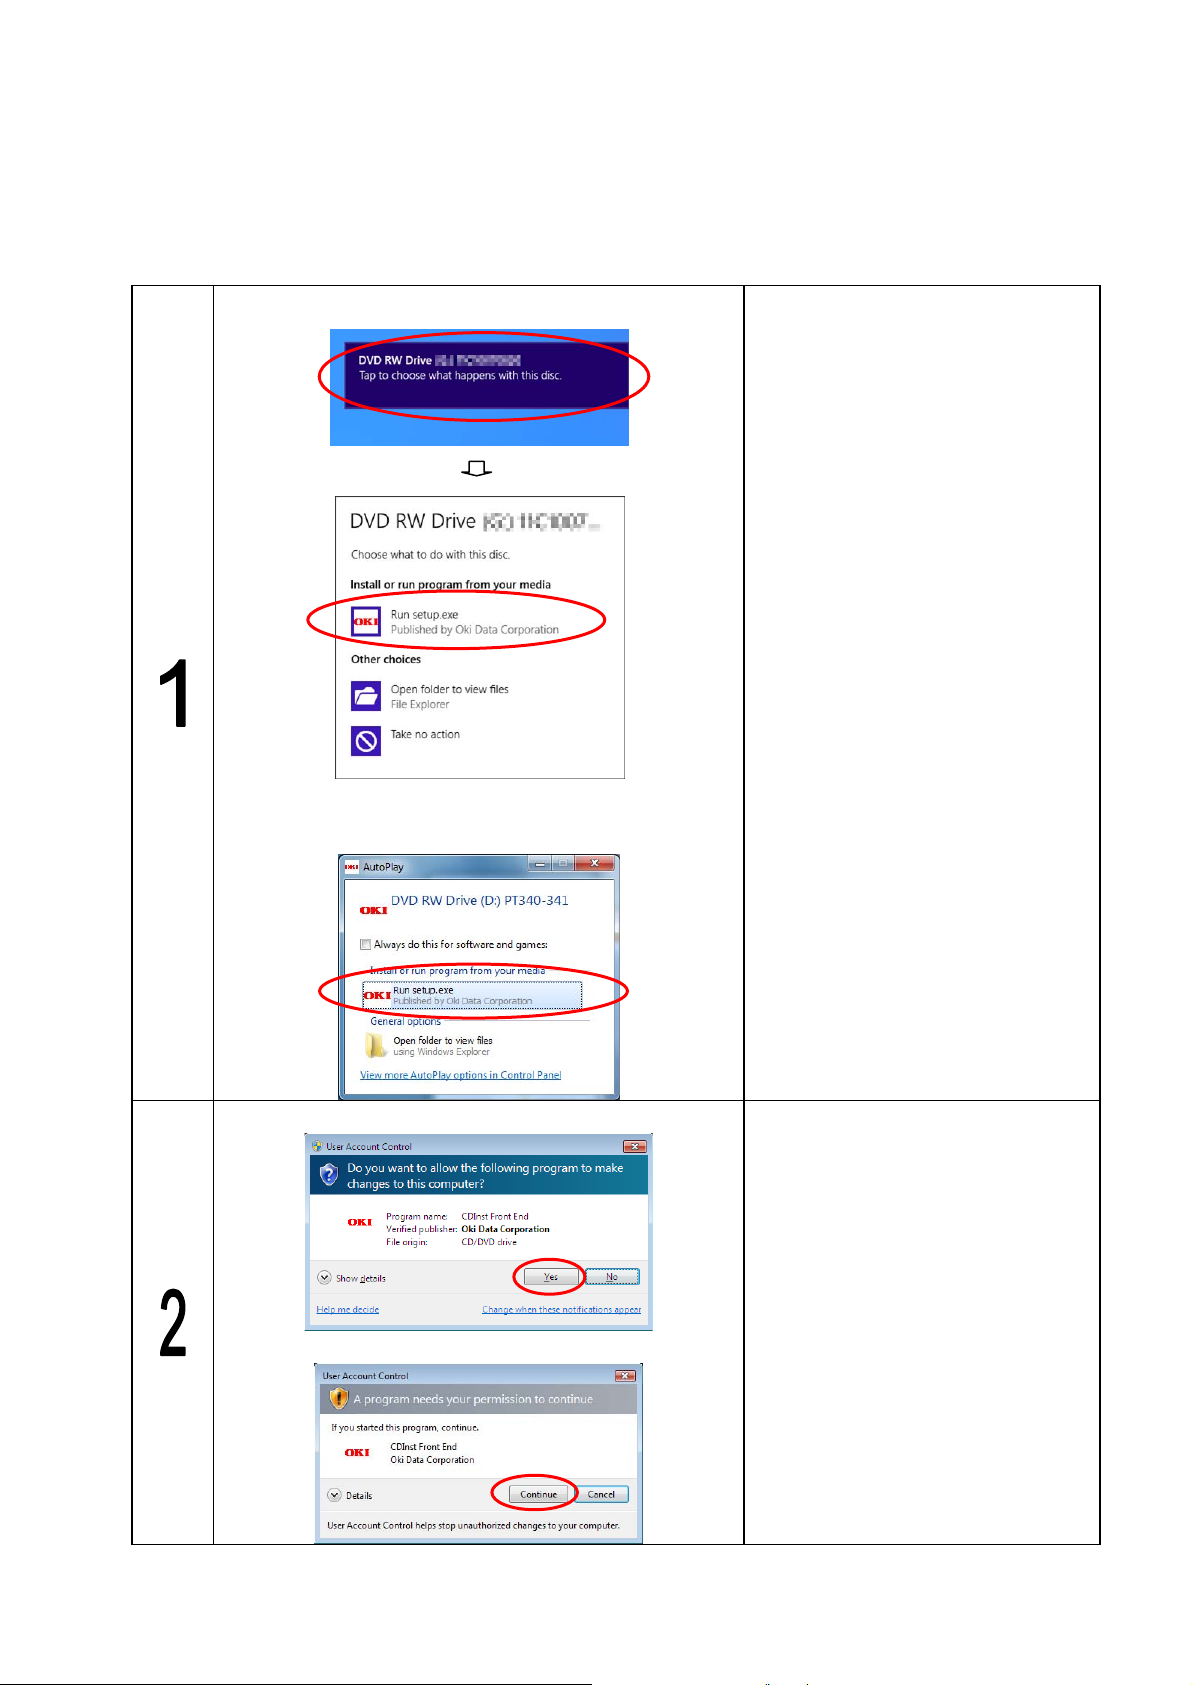
Insert the "PT340-341" into your PC's
CD-ROM drive.
For Windows 8 / Server 2012:
Click the Toast Notification, and click
[Run setup.exe].
For Windows 7 / Vista / Server 2008 /
2008 R2:
Click [Run setup.exe] when the "Auto
Play" screen is displayed.
* If the menu screen does not
appear, run "setup.exe" on this
CD.
For Windows 8/Server 2012/Windows 7/Server 2008 R2
For Windows Vista/Server 2008
Copyright (C) 2013 Oki Data Corporation
If the [User Account Control] dialog
box is displayed, click [Yes] or
[Continue].
7 of 38
Page 9
PT340/PT341 Printer Driver Installation Guide 1.0.0.0
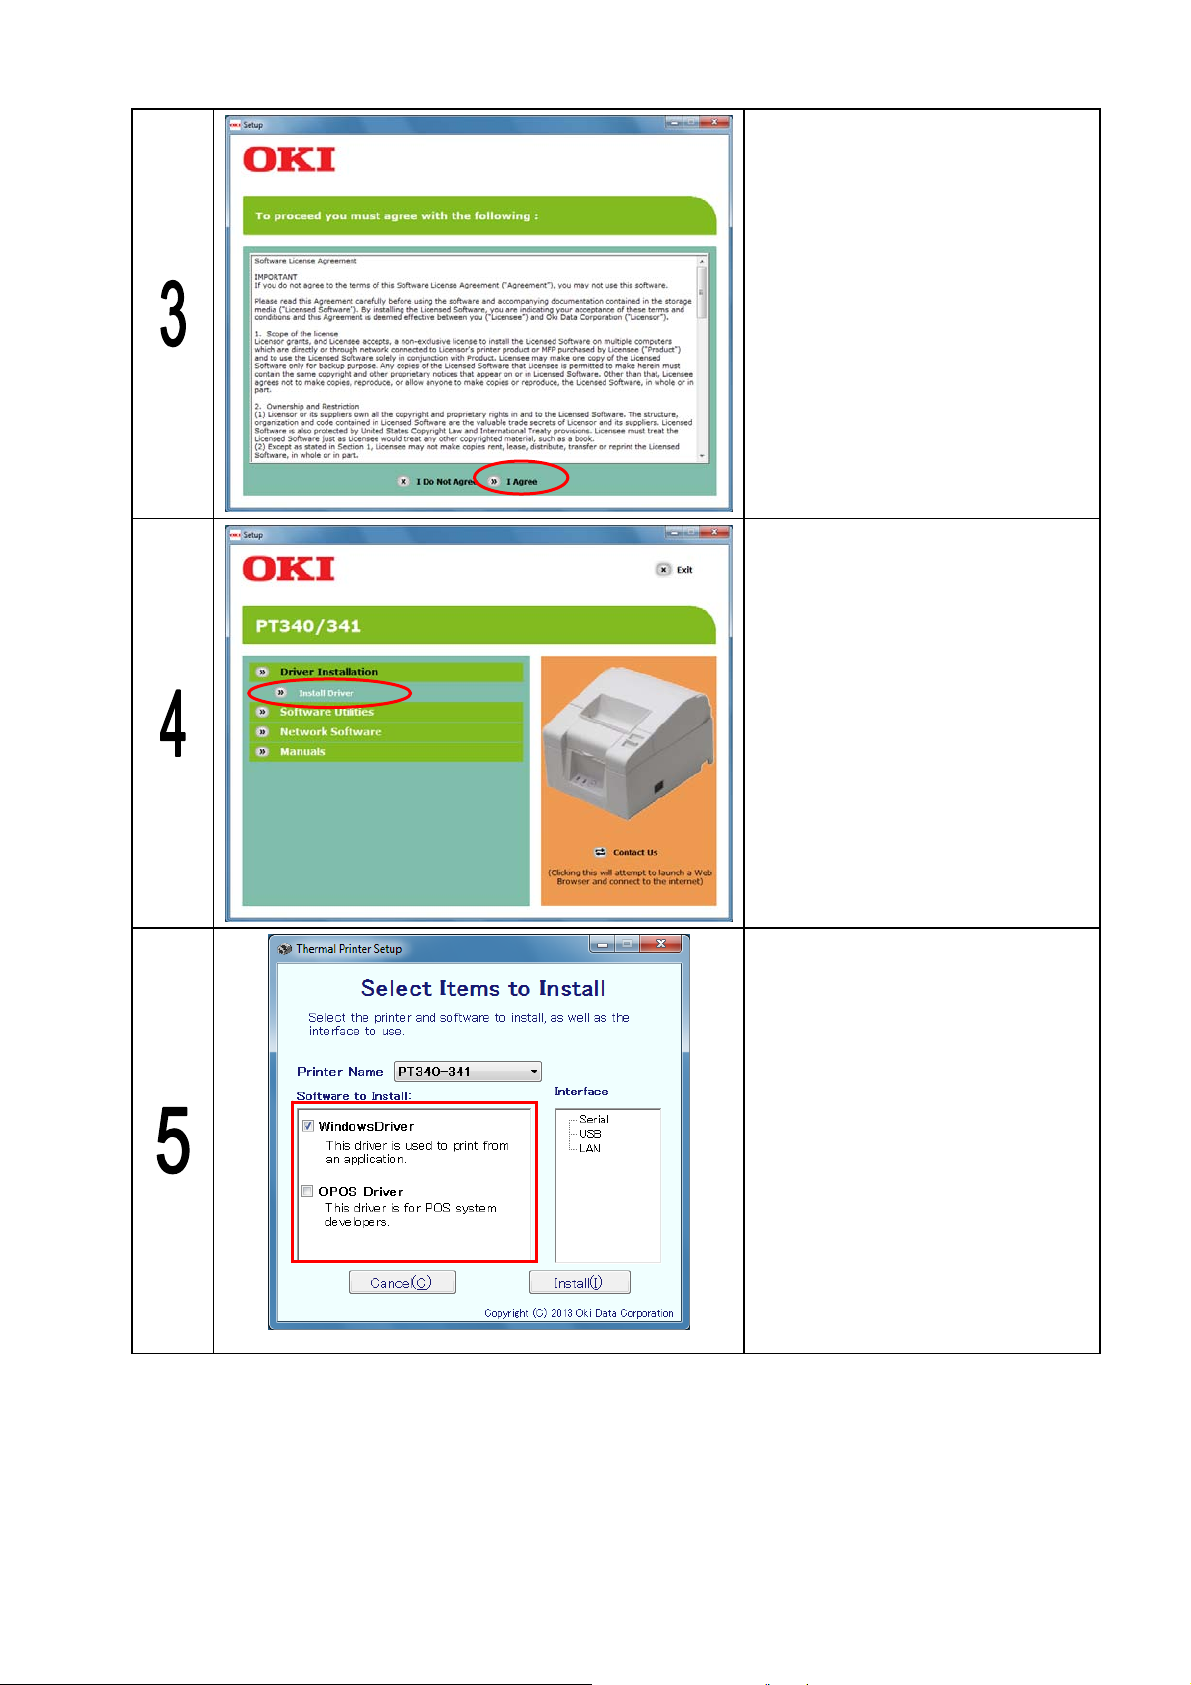
After reading the license agreement,
click [I Agree].
Click [Install].
Select the software you want to install.
Copyright (C) 2013 Oki Data Corporation
8 of 38
Page 10
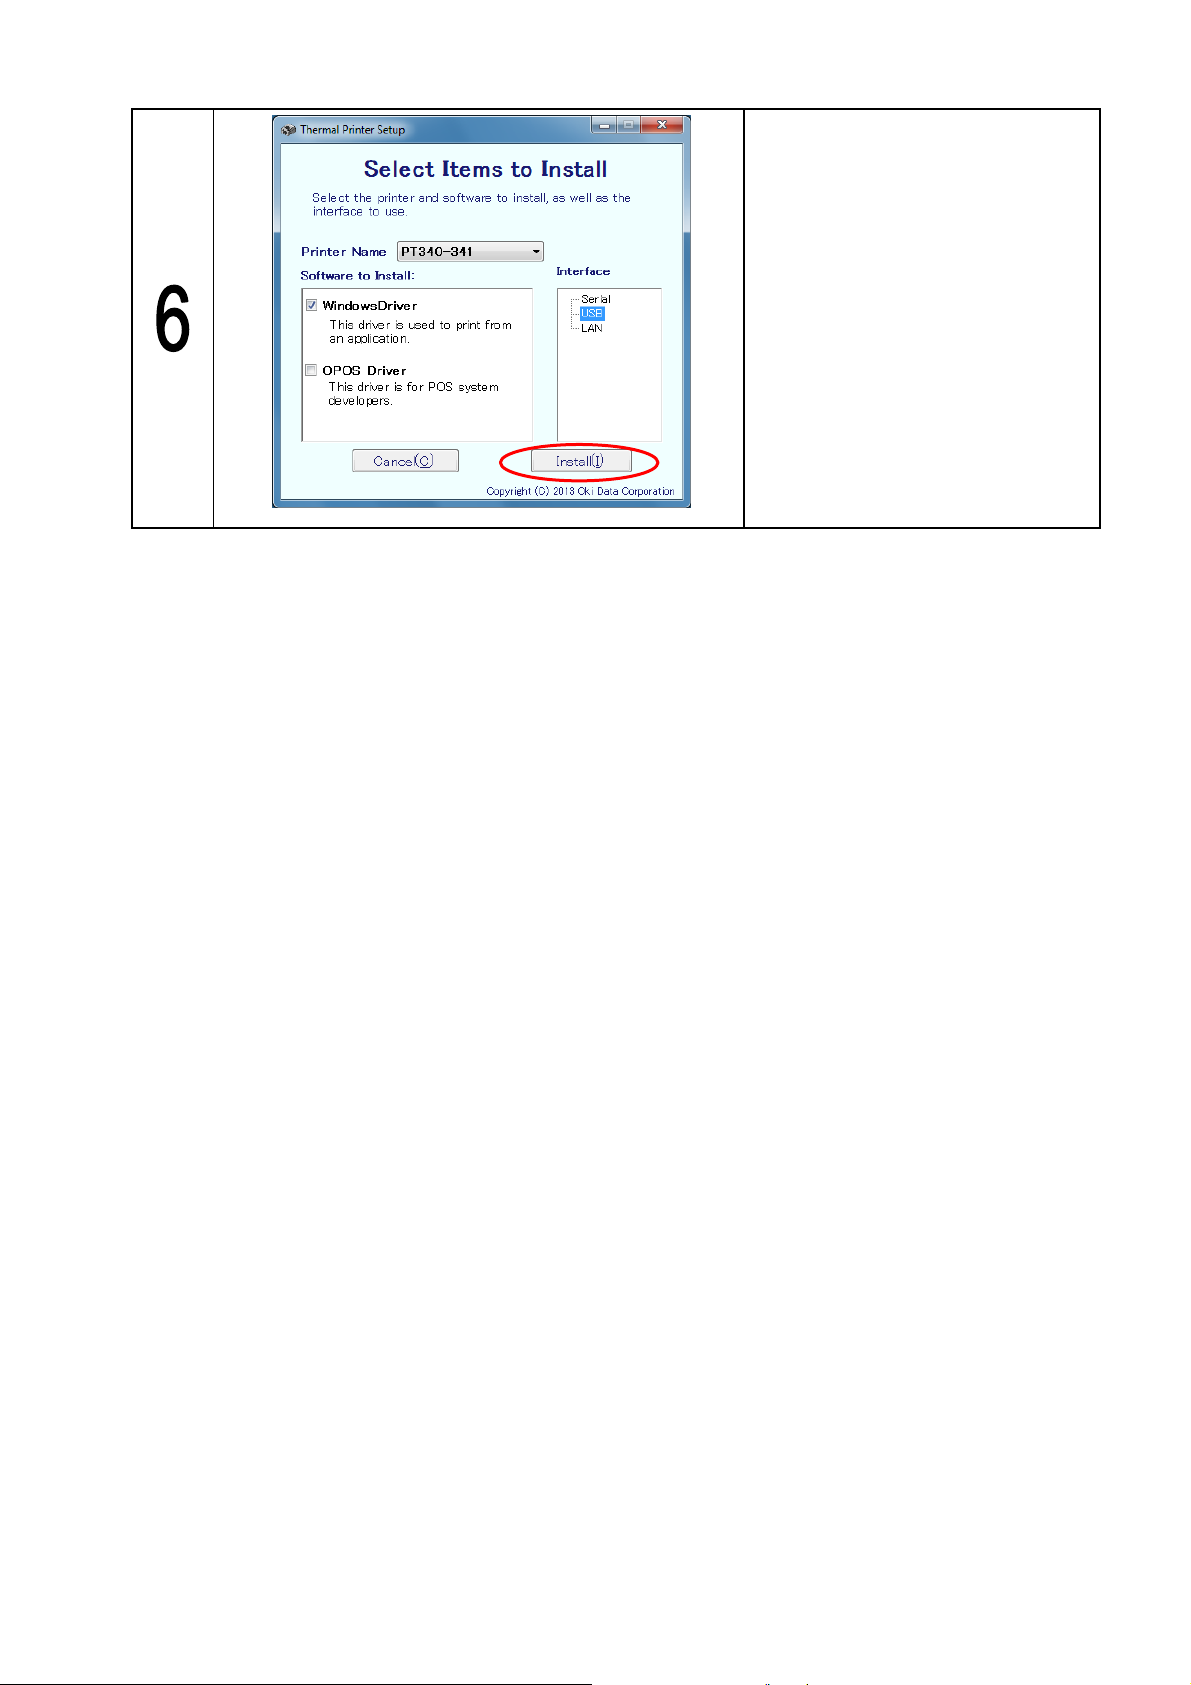
PT340/PT341 Printer Driver Installation Guide 1.0.0.0
Check the software to be installed and
click [Install].
* For install the OPOS Driver or
Windows driver on a Serial or
LAN
Connect the PC and printer, then
turn the printer’s power on. (*1)
Go to step “19” if you install the OPOS
Driver or Windows driver on a Serial
or USB.
*1) When using the OPOS driver with a USB interface
The new hardware is detected automatically when you turn on the printer.
Please follow the instructions below.
For Windows 8 / Server 2012
"Device Setup" in the task bar is displayed, but no operation is required.
For Windows 7 / Server 2008 R2
(1)The message "Installing device driver software" i s displayed in a balloon (lowe r right corner of
the screen).
(2)After a while, the message "Device driver sof tware was not successfully installed" is display ed.
This is not a problem.
For Windows Vista / Server 2008
(1)The "Found New Hardware" screen is displayed, select [Don't show this message again for
this device].
* When "User Account Co ntrol" screen is displayed, select [Continue].
For Windows XP / Server 2003 / WEPOS / WEPOS2009
(1)The "Found New Hardware Wizard" screen is displayed. Select [No, not this time] and then
click [Next].
(2)When "What do you want the wizard to do?" is displayed, select [Install from a list or specific
location] and then click [Next].
(3)Select [Search for the best driver in these locations], clear the all checkbox and then click
[Next].
(4)When "Cannot Install this Hardware" is displayed, click [Don't prompt me agai n to install this
software] and then click [Finish].
Copyright (C) 2013 Oki Data Corporation
9 of 38
Page 11
Procedure for configuring the IP address
PT340/PT341 Printer Driver Installation Guide 1.0.0.0
Configure the printer LAN settings.
Click [Next].
* If you are only adding a original
TCP/IP port, select the [Add
original TCP/IP port only] check
box and then click [Next]. And
go to step “14”.
* If you need not to configure the
IP address of the printer, click
[End], and go to step “18”.
When this screen is displayed, click
[Yes].
Select the printer to configure from
among the search results and click
[Next].
* If a list of search results
is not displayed, click [Search].
Copyright (C) 2013 Oki Data Corporation
Change the settings and click [Next].
If you disable DHCP, configure the
"IP address", "Subnet mask", and
"Gateway".
10 of 38
Page 12
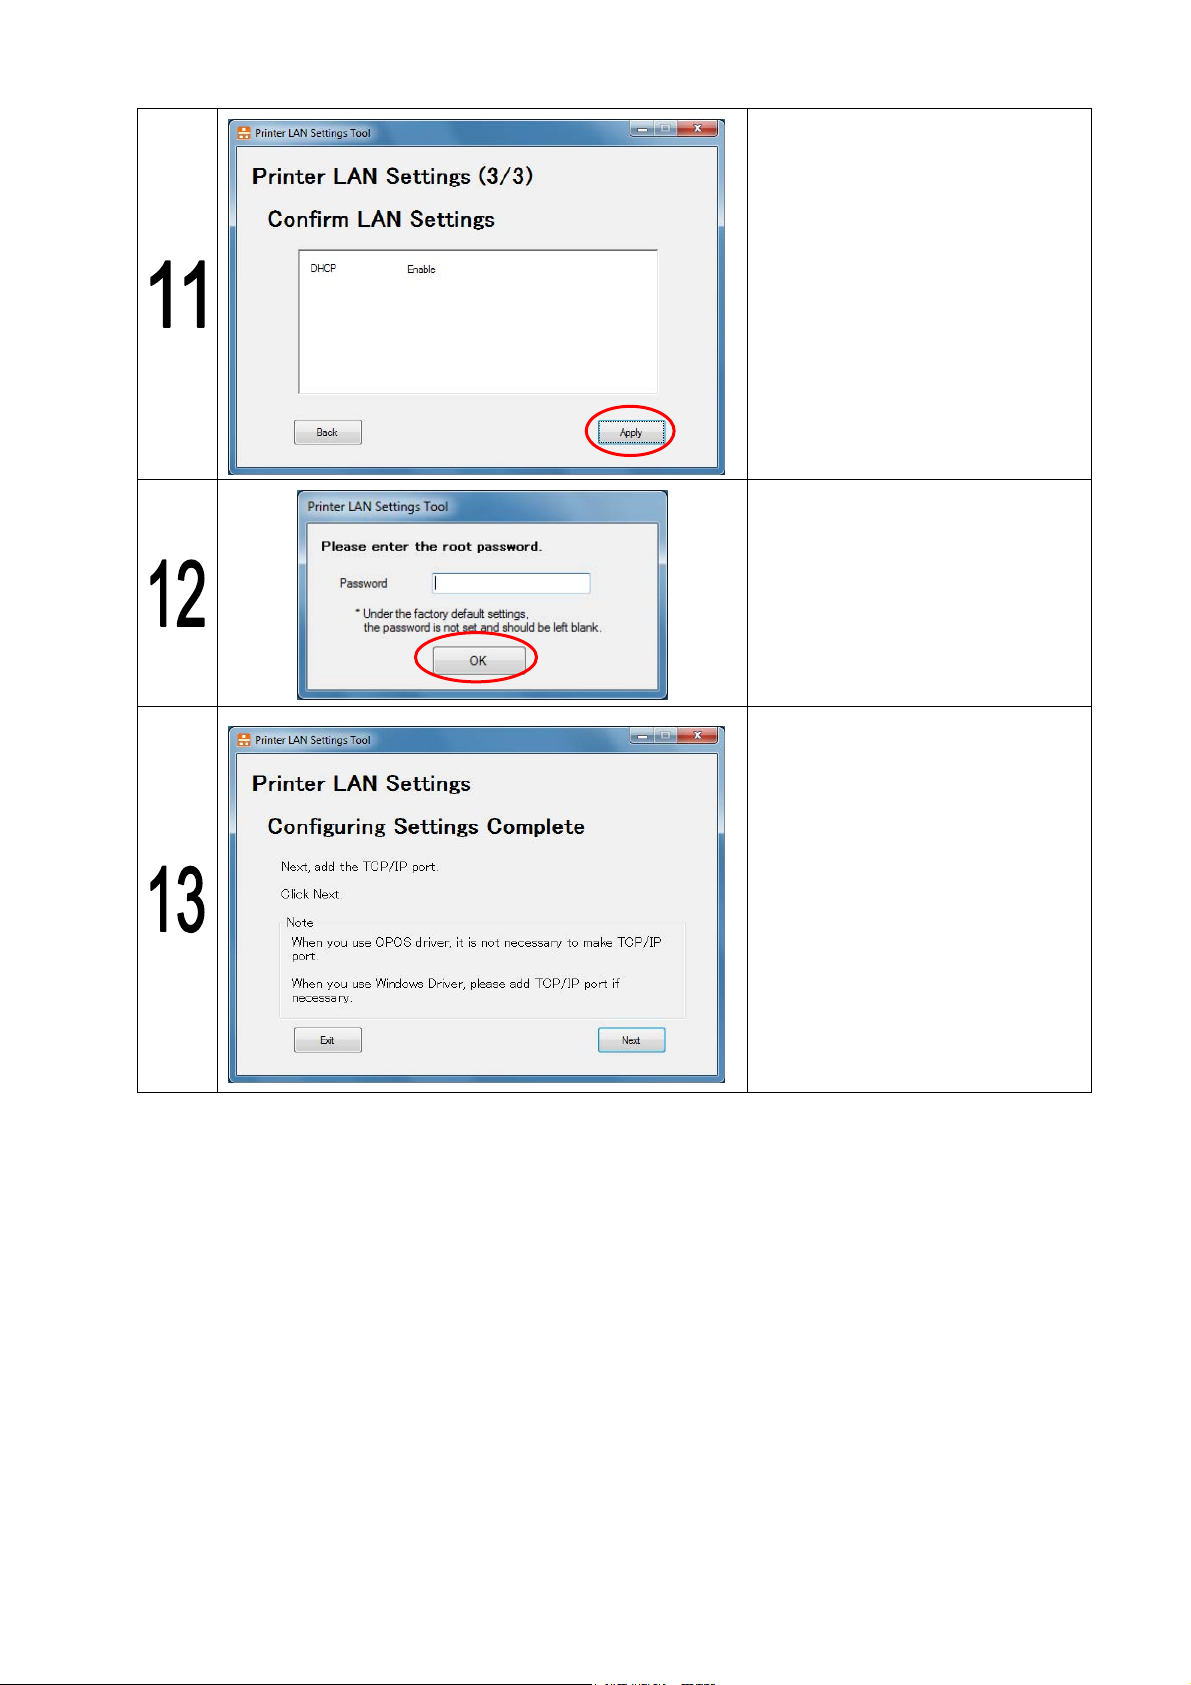
PT340/PT341 Printer Driver Installation Guide 1.0.0.0
Confirm the settings and click
[Apply].
Enter the "root password" set in the
print server and click [OK].
Note: Under the factory default
settings, the password is
not set and should be left
blank.
This completes settings
configuration.
To also create a "Original TCP/IP
Port", click [Next].
Copyright (C) 2013 Oki Data Corporation
11 of 38
Page 13
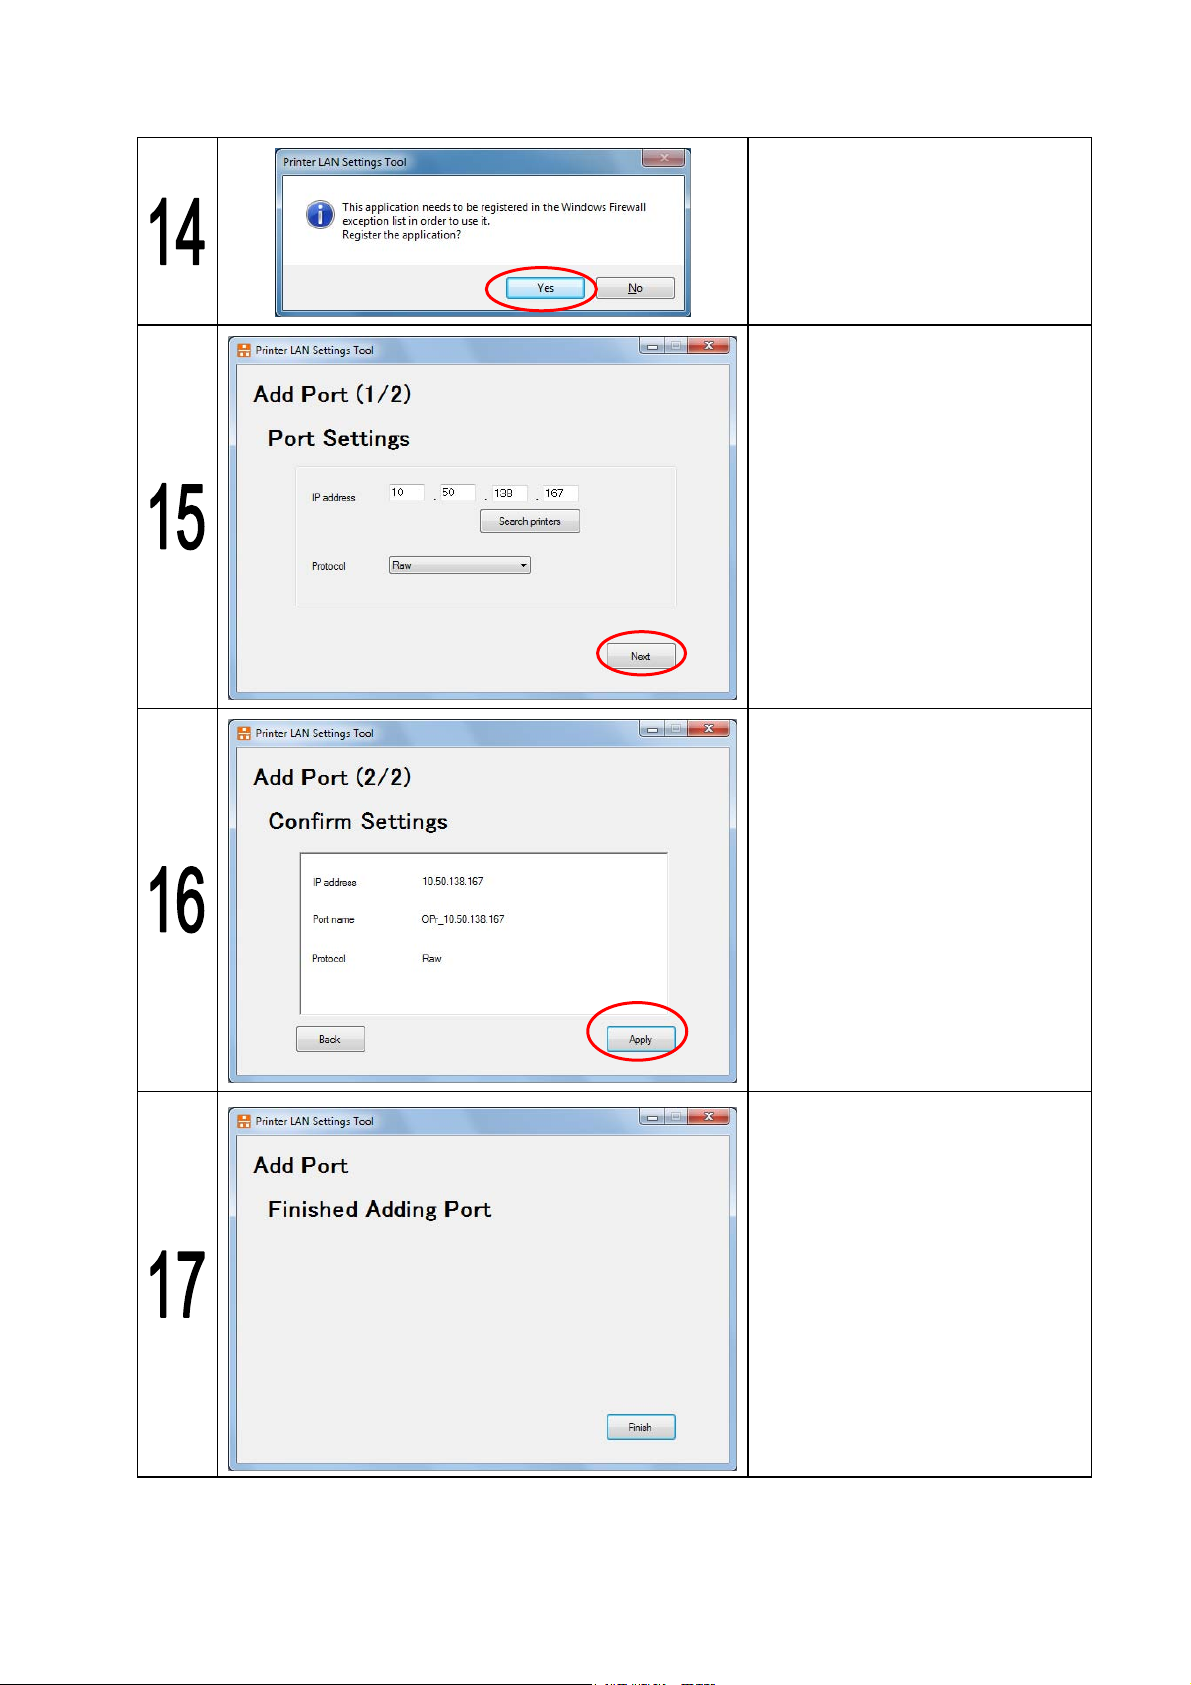
Procedure for adding a TCP/IP port
PT340/PT341 Printer Driver Installation Guide 1.0.0.0
When this screen is displayed, click
[Yes].
Change the settings as needed, and
click [Next].
Note: You can also specify the IP
address by searching for
the printer using [Search
printers].
Confirm the settings and click
[Apply].
Copyright (C) 2013 Oki Data Corporation
This completes adding the port.
12 of 38
Page 14

Common procedure 2
PT340/PT341 Printer Driver Installation Guide 1.0.0.0
If you are installing the Windows
driver using a TCP/IP port, the port
selection screen is displayed. Select
the port to use and click [OK].
A screen appears indicating that the
installation is in progress. Please wait
for the installation to complete.
Go to step “25” if you install the OPOS
Driver or Windows driver on a Serial
or LAN.
For you install the Windows driver on a USB
Click “Next”.
Click “Finish”.
Copyright (C) 2013 Oki Data Corporation
13 of 38
Page 15

PT340/PT341 Printer Driver Installation Guide 1.0.0.0
Connect the PC and printer, then turn
For Windows 7/Windows Vista/Server 2008 R2/Server 2008
the printer’s power on.
The message "Installing device driver
software" is displayed in a balloon
(lower right corner of the screen). No
operation is required.
For other OS : (*2)
When the installation is complete,
"Your device is ready to use" is
displayed and the procedure ends
automatically.
*2) When the "Found New Hardware Wizard" is displayed:
For Windows 8 / Server 2012
"Device Setup" in the task bar is displayed, but no operation is required.
For Windows XP/Windows 2003/WEPOS/WEPOS 2009
(1) The "Found New Hardware Wizard" screen is displayed. Select [No, not this time] and then
click [Next].
(2) When "What do you want the wizard to do?" is displayed, select [Install the software
automatically] and then click [Next].
(3) When "Hardware Installation" is displayed, click [Continue Anyway].
* When the “Files Needed" is displayed, click the [Browse] button to select folder
“\Drivers\Windows\x32\PT3401.XPB” of drive D: and click the [OK].(When the CD-drive is
D.)
(For 64-bit Windows, the path is "\Drivers\Windows\x64\PT3401.XPB ")
(4) When "Completing the Found New Hardware Wizard" is displayed, click [Finish].
*3) When using a USB interface
The "Found New Hardware Wizard" screen might not appear even if the printer turned on power.
In that case, keep the power on the printer, then restart the PC's.
Copyright (C) 2013 Oki Data Corporation
14 of 38
Page 16

Common procedure 3
(1) Windows driver installation
(2) OPOS driver installation
PT340/PT341 Printer Driver Installation Guide 1.0.0.0
Installation Complete.
This message is displayed after the
Windows driver or OPOS driver
installation completes. Follow the
on-screen instructions and click [Yes].
Note:
If you have any unsaved work on the
computer, please save it before
restarting.
Follow the instructions in "3. How to Check the Installation" to confirm that the driver was installed
successfully.
Copyright (C) 2013 Oki Data Corporation
15 of 38
Page 17

2.3.2 Software Utilities
Use the following procedure to install the software utilities.
PT340/PT341 Printer Driver Installation Guide 1.0.0.0
Click “Install Printer Utility” or “Install
Status Monitor”.
If the screen on the left appears
during the installation, follow the
instructions in the wizard to install
Printer Utility or Status Monitor.
Copyright (C) 2013 Oki Data Corporation
16 of 38
Page 18

PT340/PT341 Printer Driver Installation Guide 1.0.0.0
2.3.3 Network Software
Use the following procedure to install or run the network soft ware.
Click “Install Printer LAN Settings
Tool”.
If the screen on the left appears
during the installation, follow the
instructions in the wizard to install
Printer LAN Settings Tool.
Copyright (C) 2013 Oki Data Corporation
17 of 38
Page 19

PT340/PT341 Printer Driver Installation Guide 1.0.0.0
3 How to Check the Installation
3.1 Windows driver
3.1.1 Installation confirmation
Use the following procedure to confirm that the Windows driver installed successfully.
Open the [Printer Folder] (*)
screen.
* See the [Printer folder]
procedure in "2.1 How to use
this manual" for instructions on
how to open the screen in each
OS.
Open the [Printer Properties] (*)
for the "PT340-341 Raster”.
* See the [Printer property]
procedure in "2.1 How to use
this manual" for instructions on
how to open the printer
properties in each OS.
On the "PT340-341 Raster"
property screen, click [Print Test
Page].
This prints the test page.
* If the test page does not print
correctly, refer to "3.1.2 If the
test page does not print”.
Copyright (C) 2013 Oki Data Corporation
18 of 38
Page 20

*1) For Server 2003
When you install the printer may have been set to a shared printer.
If you do not set the shared printer, follo w the instructions below.
(1) Open the [Printer Folder]
(2) Open the "PT340-341 Raster" properties, and then click the [Sharing] tab.
(3) Select [Do not share this printer], and then click [OK].
PT340/PT341 Printer Driver Installation Guide 1.0.0.0
Copyright (C) 2013 Oki Data Corporation
19 of 38
Page 21

PT340/PT341 Printer Driver Installation Guide 1.0.0.0
3.1.2 If the test page does not print
When using a Serial, USB, or LAN interface connection
Check the following.
Confirm that the paper has been correctly inserted in the printer.
Confirm that the top cover is closed.
Confirm that the interface cable is connected.
Confirm that the printer power is turned on.
(If it is already turned on, turn it off and on again.)
If the printer status is offline, use the follow procedures to bring the printer online.
How to check and set the printer online/offline status:
(1) Open the [Printer Folder].
* See the [Printer folder] procedure in "2.1 How to use this manual" for instructions on how to
open the screen in each OS.
(2) Perform the following steps for the OS you are using.
For Windows 8/Windows 7/Server 2012/Server 2008 R2
• Right-click the "PT340-34 1 Ra ster" printer in the printers and faxes se ction and then click [See
what's printing]. If the [Use Printer Offline] checkbox in [Printer] is selected, clear it.
For Windows Vista/Server 2008
• Right-click the "PT340-341 Raster" printer and then click [Run as administrator]. Click [Use
Printer Online] if it is displayed.
* Log on using an Administrator account, right-click the "PT340-341 Raster" printer, and then
click [Use Printer Online] if it is displayed.
For Windows XP/Server 2003/WEPOS/WEPOS 2009
• Right-click the "PT340-341 Raster" printer and then click [Use Printer Online] if it is displayed.
Copyright (C) 2013 Oki Data Corporation
20 of 38
Page 22

PT340/PT341 Printer Driver Installation Guide 1.0.0.0
When using a USB interface connection
The USB port may vary depending on your system configuration.
Use the following procedure to change the printer driver setting and confirm it by printing a test page.
* See "2.1 How to use this manual" for instructions.
(1) Open the [Printer Folder].
(2) Open the "PT340-341 Raster" properties.
(3) Click the [Ports] tab.
(4) The following property screen is displayed.
Example: Change the port from "USB002" to "USB001"
←The [Printer] column is blank for unused ports.
Select the USB port you want to use.
(5) Click [Apply].
(6) Turn the printer power off.
(7) Turn the printer power on.
(8) Click the [General] tab and then click [Print Test Page].
(9) The test page will be printed.
Copyright (C) 2013 Oki Data Corporation
21 of 38
Page 23

PT340/PT341 Printer Driver Installation Guide 1.0.0.0
3.2 OPOS driver
3.2.1 Installation confirmation
Use the following procedure to confirm that the OPOS driver installed successfully.
* If you use LAN interface by OPOS, you should setting the LAN of the printer by the “Printer LAN settings to ol”.
Please install “Printer LAN settings tool” and configure LAN interfac e. Re fer to "Printer LAN Online Manual"
for the usage.
For Windows 8 / Server 2012
.
For Windows 7 and earlier
For Windows 8 / Server 2012 :
Click [Printer OPOS Setup] on Start
Screen.
For Windows 7 and earlier:
From All Programs (*), click [Okidata]
[OPOS] [Printer OPOS Setup].
* See the [All programs] procedure in
"2.1 How to use this manual" for
instructions on how to open the
screen in each OS.
The [OCX Setup] screen is displayed.
Select the interface you are using and
then click [OK].
* LAN: Go to 3
Others: Go to 4
Copyright (C) 2013 Oki Data Corporation
22 of 38
Page 24

PT340/PT341 Printer Driver Installation Guide 1.0.0.0
Configure LAN port settings.
(1) Click [Printer Detection].
(2) Select the printer that appears.
(2)
(1)
(3)
(3) Click [Printer Setting] button.
Note: When you use OPOS driver via
LAN interface and IP address is
not mapped by DHCP, IP address
should be set by "Printer LAN
Settings Tool" prior to use.
* See "Printer LAN Online Manual" for
the usage.
The screen on the left appears. Select
the port (*), make any other necessary
changes, and then click [OK].
This updates the printer settings and
completes the setup.
(For more information about the printer
setup, refer to the
“Application Programmer's Guide”.)
* See "How to specify the printer
port" below for instructions.
For LAN, change only the items
because the ports have already
been configured.
Launch OP OPOS Tester by running the
following program.
"\Drivers\OPOS\Sample\OP_OPO
S_Tester.exe"
Select an interface.
* For LAN
After selecting [PT340-341LAN] in the
interface selection, enter IP address of
the interface connected to the printer
in [IP Address].
Copyright (C) 2013 Oki Data Corporation
23 of 38
Page 25

How to specify the printer port
For a Serial port connection
Select “PT340-341SERPRT” or “PT340-341SER2PRT” in [Device Name].
Select the connected port name (e.g. COM1) in [Port Name].
For a USB port connection
Select “PT340-341USBPRT” or “PT340-341USB2PRT” in [Device Name].
Select the printer's serial number in [Serial Number].
To obtain the serial number, follow the instructions in "3.2.2 Check serial number”.
PT340/PT341 Printer Driver Installation Guide 1.0.0.0
Clicking [Print Test] prints a sample and
displays "Test: Success”.
If "Test: Fail" is displayed, check the
printer power and interface.
Copyright (C) 2013 Oki Data Corporation
24 of 38
Page 26

PT340/PT341 Printer Driver Installation Guide 1.0.0.0
p
3.2.2 Check serial number
Use the following procedure to check the serial number.
(1) Load paper in the printer and then close the cover.
(2) Turn the power on while holding down the FEED button. Keep holding it down until printing starts.
(3) Release the FEED button after the following printout is output.
Special Mode
1.Test Print
2.Setup Menu
3.LAN Setup Menu
4.Hex Dum
5.Command Trace
6.Sample Print
7.End
<Set>
Press FEED button for the number of times
as the same as your selecting item, and
wait more than 1 second.
Paper feed direction
用紙送り方向
(4) Press the FEED button once and then
(5) When printing finishes, turn the power off.
* Depending on the model, the printout may be long.
When you would like to stop it during printing, press FEED button again.
Serial number
wait for a second for printing to start.
Copyright (C) 2013 Oki Data Corporation
25 of 38
Page 27

3.3 Utility
Use the following procedure to launch the Utility.
For Windows 8 / Server 2012
For Windows 7 and earlier
PT340/PT341 Printer Driver Installation Guide 1.0.0.0
For Windows 8 / Server 2012 :
Click [PT340-341 Utility] on Start
Screen.
For Windows 7 and earlier:
Click All Programs (*) [Okidata]
[Utility] [PT340-341 Utility].
* See the [All programs] procedure in
"2.1 How to use this manual" for
instructions on how to open the
screen in each OS.
Follow the on-screen instructions to
select the name and port for your printer
and then click [OK].
Copyright (C) 2013 Oki Data Corporation
26 of 38
Page 28

PT340/PT341 Printer Driver Installation Guide 1.0.0.0
The [Printer Setup] screen is displayed.
* For information on how to use the
utility , click [Help] and then refer to the
"Utility User's Guide”.
Copyright (C) 2013 Oki Data Corporation
27 of 38
Page 29

3.4 Status Monitor
Use the following procedure to launch the Status Monitor.
For Windows 8 / Server 2012
For Windows 7 and earlier
PT340/PT341 Printer Driver Installation Guide 1.0.0.0
For Windows 8 / Server 2012 :
Click [PT340-341 Status Monitor] on
Start Screen.
For Windows 7 and earlier:
Click All Programs (*) [Okidata]
[Status Monitor] [PT340-34 1 Status
Monitor].
* See the [All programs] procedure in
"2.1 How to use this manual" for
instructions on how to open the
screen in each OS.
A printer icon appears in the task tray
* The installation add s a Status Monitor shortcut to the “Startup” folder . Thi s causes Status Monitor to sta rt
automatically when you log on to the computer.
if Status Monitor is running.
Copyright (C) 2013 Oki Data Corporation
28 of 38
Page 30

PT340/PT341 Printer Driver Installation Guide 1.0.0.0
3.5 Printer LAN Settings Tool
The following procedure is used to start the Printer LAN Settings Tool.
For Windows 8 / Server 2012
For Windows 7 and earlier
For Windows 8 / Server 2012 :
Click [Settings Tool] on Start Screen.
For Windows 7 and earlier:
Click All Programs (*) [Okidata] →
[Printer LAN Tool] [Settings Tool].
* Refer to [All Programs] in "2.1 How to
use this manual" for details on how to
display this screen in each OS.
The Printer LAN Settings Tool starts.
Copyright (C) 2013 Oki Data Corporation
29 of 38
Page 31

PT340/PT341 Printer Driver Installation Guide 1.0.0.0
4 Uninstallation
4.1 Windows driver
Use the following procedure to remove the Windows driver.
4.1.1 Uninstallation of all Windows drivers
Two or more Windows drivers are uninstalled.
If the [User Account Control] dialog box is displayed, click [Yes].
Uninstall procedure:
For Windows 8 / Server 2012
For Windows 7 and earlier
From Uninstall a program
For Windows 8 / Server 2012 :
Click [PT340-341 Uninstaller] on Start
Screen.
For Windows 7 and earlier:
Click All Programs (*)
[Okidata] → [WindowsDriver]
[PT340-341 Uninstaller].
* Refer to [All Programs] in "2.1 How to
use this manual" for details on how to
display this screen in each OS.
From Uninstall a program:
Open the [Uninstall a program] screen
(*).
* See the [Uninstall a program]
procedure in "2.1 How to use this
manual" for instructions on how to
open the screen in each OS.
Select "PT340-341 Windows Driver" and
then click [Uninstall] or [Remove].
Copyright (C) 2013 Oki Data Corporation
30 of 38
Page 32

PT340/PT341 Printer Driver Installation Guide 1.0.0.0
When the confirmation message
appears, click [OK].
Deleting the Windows Driver and the
related files.
Click [OK].
Copyright (C) 2013 Oki Data Corporation
31 of 38
Page 33

PT340/PT341 Printer Driver Installation Guide 1.0.0.0
4.1.2 Uninstallation of each Windows driver
A Windows driver is uni nstalled.
A. For Windows 8/Server 2012/Windows 7/Server 2008 R2
If the [User Account Control] dialog box is displayed, click [Yes].
Uninstall procedure:
Open the [Printer Folder] (*).
* See the [Printer folder]
procedure in "2.1 How to use
this manual" for instructions on
how to open the screen in each
OS.
Select "PT340-341 Raster" in the
[Printers and Faxes] section, and
then click [Remove device].
Click [Yes].
Copyright (C) 2013 Oki Data Corporation
32 of 38
Page 34

PT340/PT341 Printer Driver Installation Guide 1.0.0.0
Select an installed printer (such as
"Fax" or "Microsoft XPS Document
Writer") in the [Printers and Faxes]
section and then click [Print server
properties].
For Windows 8 / Windows 7
Click the [Drivers] tab and then
click [Change Driver Settings].
For Server 2012 / Server 2008 R2
Click [Drivers].
Select "PT340-341 Raster" from
the "Installed printer drivers" list
and then click [Remove].
Copyright (C) 2013 Oki Data Corporation
33 of 38
Page 35

PT340/PT341 Printer Driver Installation Guide 1.0.0.0
Select [Remove driver and driver
package.] and then click [OK].
Click [Yes].
Click [Delete].
Click [OK] after driver removal
completes and then click [Close] to
exit the [Print Server Properties]
dialog box.
Then, turn off the printer and
restart your computer.
Copyright (C) 2013 Oki Data Corporation
34 of 38
Page 36

PT340/PT341 Printer Driver Installation Guide 1.0.0.0
B. For Windows Vista/Server 2008
If the [User Account Control] dialog box is displayed, click [Continue].
Uninstall procedure:
(1) Open the [Printer Folder].
* See the [Printer folder] procedure in "2.1 How to use this manual" for instructions on how to
open the screen in each OS.
(2) Select "PT340-341 Raster" from the "printers folder" and then select [Organize] [Delete].
(3) When "Are you sure you want to delete PT340-341 Raster?" appears, click [Yes].
(4) Select [Organize] [Layout] [Menu Bar].
(5) Select [File] [Run as administrator] [Server Properties].
* If you logged on to Server 2008 using the built-in administrator account, select [Files]
[Server Properties].
(6) Click the [Drivers] tab, select "PT340-341 Raster" from the "Installed printer drivers" list, and
then click [Remove].
(7) When the [Remove Driver And Package] screen is displayed, select [Remove driver and driver
package.], and then click [OK].
(8) When the "Deleting this printer driver package will remove it from the system. Are you sure you
want to delete PT340-341 Raster?" screen appears, click [Yes].
(9) When the [Remove Driver And Package] screen appears, click [Delete].
(10) Click [OK] after driver removal completes and then click [Close] to exit the [Print Server
Properties] dialog box.
(11) Turn off the printer and restart your computer.
C. Other OS
Uninstall procedure:
(1) Open the [Printer Folder].
* See the [Printer folder] procedure in "2.1 How to use this manual" for instructions on how to
open the screen in each OS.
(2) Select "PT340-341 Raster" from the "printers folder" and then select [File] [Delete].
(3) When " Are you sure you want to delete PT340-341 Raster?" appears, click [Yes].
(4) Select [File] [Server Properties].
(5) Click the [Drivers] tab, select "PT340-341 Raster" from the "Installed printer drivers" list, and
then click [Remove].
(6) When the [Print Server Properties] screen appears, click [Yes].
(7) Click [Close] after driver removal is complete to exit the [Print Server Properties] dialog box.
(8) Turn off the printer and rest art your computer.
Copyright (C) 2013 Oki Data Corporation
35 of 38
Page 37

PT340/PT341 Printer Driver Installation Guide 1.0.0.0
4.2 OPOS driver and other software
Use the following procedure to remove software.
The following uses the OPOS driver as an example. The procedure for removing the other software is the
same.
When you uninstall software, you must first close the software to be remov ed.
Open the [Uninstall a program]
screen (*).
* See the [Uninstall a program]
procedure in "2.1 How to use
this manual" for instructions on
how to open the screen in
each OS.
Select " POS PRINTER OPOS
OCX" and then click [Uninstall] or
[Remove].
(*1)
When the confirmation message
appears, click [Yes].
This starts the uninstallation.
Some files may not be deleted.
Delete these manually from the
"C:\OPOS\Okidata\PT" folder.(*
2)
Copyright (C) 2013 Oki Data Corporation
36 of 38
Page 38

PT340/PT341 Printer Driver Installation Guide 1.0.0.0
*1) The program names for the utilities are as follows.
Windows Driver Uninstaller : PT340-341 Windows Driver
Utility : PT340-341 Utility
Status Monitor : PT340-341 StatusMonitor
Printer LAN Settings Tool : Printer LAN Settings Tool
*2) The folders to be deleted for the utilities are as follows.
Windows Driver Uninstaller : C:\Program Files\Okidata\PT340-341\WindowsDriverUninstal (*)
Utility : C:\Program Files\Okidata\PT340-341\Utility (*)
Status Monitor : C:\Program Files\Okidata\PT340-341\StatusMonitor (*)
Printer LAN Settings Tool : C:\Program Files\Okidata\LANSettingsTool (*)
* For 64-bit Windows, the path is "C:\Program Files(x86)\...".
Copyright (C) 2013 Oki Data Corporation
37 of 38
Page 39

PT340/PT341 Printer Driver Installation Guide 1.0.0.0
5 Revision History
Revision Updated date
1.0.0.0 First Edition (2013.04.24)
Copyright (C) 2013 Oki Data Corporation
38 of 38
Page 40

Oki contact details
Oki Systems (UK) Ltd
Blays House
Wick Road
Egham
Surrey
TW20 0HJ
Tel: +44 (0) 1784 274300
Fax: +44 (0) 1784 274301
http://www.oki.co.uk
Oki Systems Ireland Limited
The Square Industrial Complex
Tallaght
Dublin 24
Tel:+353 (0) 1 4049590
Fax:+353 (0)1 4049591
http://www.oki.ie
Oki Systems Ireland Limited Northern Ireland
19 Ferndale Avenue
Glengormley
BT36 5AL
Northern Ireland
Tel:+44 (0) 7767 271447
Fax:+44 (0) 1 404 9520
http://www.oki.ie
Technical Support for all Ireland:
Tel:+353 1 4049570
Fax:+353 1 4049555
E-mail: tech.support@oki.ie
OKI Systems (Czech and Slovak), s.r.o.
IBC – Pobřežní 3
186 00 Praha 8
Czech Republic
Tel: +420 224 890158
Fax:+420 22 232 6621
Website: www.oki.cz, www.oki.sk
Oki Systems (Deutschland)
GmbH
Hansaallee 187
40549 Düsseldorf
Tel: 01805/6544357**
01805/OKIHELP**
Fax: +49 (0) 211 59 33 45
Website:
www.okiprintingsolutions.de
info@oki.de
**0,14€/Minute aus dem dt.
Festnetz der T-Com (Stand
11.2008)
Διανομέας των συστημάτων OKI
CPI S.A1 Rafailidou str.
177 78 Tavros
Athens
Greece
Tel: +30 210 48 05 800
Fax:+30 210 48 05 801
EMail:sales@cpi.gr
Oki Systèmes (France) S.A.
44-50 Av. du Général de Gaulle
94246 L'Hay les Roses
Paris
Tel:+33 01 46 15 80 00
Télécopie:+33 01 46 15 80 60
Website: www.oki.fr
OKI Systems (Magyarország)
Kft.
Capital Square
Tower 2
7th Floor
H-1133 Budapest,
Váci út 76
Hungary
Telefon: +36 1 814 8000
Telefax: +36 1 814 8009
Website: www.okihu.hu
OKI Systems (Italia) S.p.A.
via Milano, 11,
20084 Lacchiarella (MI)
Tel:+39 (0) 2 900261
Fax:+39 (0) 2 90026344
Website: www.oki.it
OKI Printing Solutions
Platinium Business Park II, 3rd
Floor
ul. Domaniewska 42
02-672 Warsaw
Poland
Tel:+48 22 448 65 00
Fax:+48 22 448 65 01
Website: www.oki.com.pl
E-mail: oki@oki.com.pl
Hotline: 0800 120066
E-mail: tech@oki.com.pl
Oki Systems (Ibérica) S.A.
Sucursal Portugal
Edifício Prime -
Av. Quinta Grande 53
7º C Alfragide
2614-521 Amadora
Portugal
Tel:+351 21 470 4200
Fax:+351 21 470 4201
Website:www.oki.pt
E-mail : oki@oki.pt
Oki Service
Serviço de apoio técnico ao
Cliente
Tel: 808 200 197
E-mail : okiserv@oki.pt
OKI Europe Ltd. (Russia)
Ofce 702, Bldg 1
Zagorodnoye shosse
117152, Moscow
Tel: +74 095 258 6065
Fax: +74 095 258 6070
e-mail: info@oki.ru
Website: www.oki.ru
Technical support:
Tel: +7 495 564 8421
e-mail: tech@oki.ru
Oki Systems (Österreich)
Campus 21
Businesszentrum Wien Sued
Liebermannstrasse A02 603
22345 Brun am Gebirge
Tel: +43 223 6677 110
Drucker Support:
+43 (0) 2236 677110-501
Fax Support:
+43 (0) 2236 677110-502
Website: www.oki.at
OKI Europe Ltd. (Ukraine)
Raisy Opkinoy Street,8
Building B, 2
Kiev 02002
Ukraine
Tel: +380 44 537 5288
e-mail: info@oki.ua
Website: www.oki.ua
OKI Sistem ve Yazıcı Çözümleri
Tic. Ltd. Şti.
Harman sok Duran Is Merkezi,
No:4, Kat:6,
34394, Levent
İstanbul
Tel: +90 212 279 2393
Faks: +90 212 279 2366
Web: www.oki.com.tr
www.okiprintingsolutions.com.tr
Oki Systems (Belgium)
Medialaan 24
1800 Vilvoorde
Helpdesk: 02-2574620
Fax: 02 2531848
Website: www.oki.be
AlphaLink Bulgaria Ltd.
2 Kukush Str.
Building "Antim Tower", . 6
1463 Soa, Bulgaria
tel: +359 2 821 1160
fax: +359 2 821 1193
Website: http://bulgaria.oki.com
nd
Floor,
Page 41

OKI Printing Solutions
Herstedøstervej 27
2620 Albertslund
Danmark
Adm.: +45 43 66 65 00
Hotline: +45 43 66 65 40
Salg: +45 43 66 65 30
Fax: +45 43 66 65 90
Website: www.oki.dk
Oki Systems (Finland) Oy
Polaris Capella
Vänrikinkuja 3
02600 Espoo
Tel: +358 (0) 207 900 800
Fax: +358 (0) 207 900 809
Website: www.oki.
Oki Systems (Holland) b.v.
Neptunustraat 27-29
2132 JA Hoofddorp
Helpdesk: 0800 5667654
Tel:+31 (0) 23 55 63 740
Fax:+31 (0) 23 55 63 750
Website: www.oki.nl
Oki Systems (Norway) AS
Tevlingveien 23
N-1081 Oslo
Tel:+47 (0) 63 89 36 00
Telefax:+47 (0) 63 89 36 01
Ordrefax:+47 (0) 63 89 36 02
Website: www.oki.no
General Systems S.R.L. (Romania)
Sos. Bucuresti-Ploiesti Nr. 135.
Bucharest 1
Romania
Tel: +40 21 303 3138
Fax: +40 21303 3150
Website: http://romania.oki.com
Var vänlig kontakta din
Återförsäljare i första hand, för
konsultation. I andra hand kontakta
Oki Systems (Sweden) AB
Borgafjordsgatan 7
Box 1191
164 26 Kista
Tel. +46 (0) 8 634 37 00
e-mail:
info@oki.se för allmänna frågor om
Oki produkter
support@oki.se för teknisk support
gällandes Oki produkter
Vardagar: 08.30 - 12.00,
13.00 - 16.00
Website: www.oki.se
Oki Systems (Schweiz)
Baslerstrasse 15
CH-4310 Rheinfelden
Support deutsch +41 61 827 94 81
Support français +41 61 827 94 82
Support italiano +41 061 827 9473
Tel: +41 61 827 9494
Website: www.oki.ch
Oki Data Americas Inc.(United
States • États-Unis)
2000 Bishops Gate Blvd.
Mt. Laurel, NJ 08054
USA
Tel: 1-800-654-3282
Fax: 1-856-222-5247
WWW.OKIPRINTINGSOLUTIONS.
http://
COM
http://my.okidata.com
Oki Data Americas Inc.(Canada
• Canadá)
4140B Sladeview Crescent Unit 7 & 8
Mississauga, Ontario
Canada L5L 6A1
Tél: 1-905-608-5000
Téléc: 1-905-608-5040
http://
WWW.OKIPRINTINGSOLUTIONS.
COM
Oki Data Americas Inc.(América
Latina (OTRO))
2000 Bishops Gate Blvd.
Mt. Laurel, NJ 08054
USA
Tel (Español): 1-856-222-7496
1-856-222-5276
Fax: 1-856-222-5260
Email: LASatisfaction@okidata.com
Oki Data de Mexico, S.A. de C.V.
Mariano Escobedo #748, Piso 8
Col. Nueva Anzures
C.P. 11590, México, D.F.
Tel: 52-555-263-8780
Fax: 52-555-250-3501
http://
WWW.OKIPRINTINGSOLUTIONS.
COM
Oki Data do Brasil, Ltda.
Rua Alexandre Dumas, 2220-80
andar Chácara Santo Antonio
04717-004, São Paulo, SP Brasil
Tel: 55-11-3444-6747 (Grande São
Paulo)
0800-11-5577 (Demais
localidades)
Fax: 5511-3444-3501
e-mail: okidata@okidata.com.br
http://
WWW.OKIPRINTINGSOLUTIONS.
COM
Oki Data (Singapore) Pte. Ltd.
438A Alexandra Road #02-11/12,
Lobby 3, Alexandra Technopark
Singapore(119967)
Tel:(65) 6221 3722
Fax:(65) 6594 0609
http://www.okidata.com.sg
Oki Systems (Thailand) Ltd.
1168/81-82 Lumpini Tower,
27th Floor Rama IV Road
Tungmahamek, Sathorn
Bangkok 10120
Tel:(662) 679 9235
Fax:(662) 679 9243/245
http://www.okisysthai.com
Oki Data(Australia) Pty Ltd.
Level1 67 Epping Road, Macquarie
Park
NSW 2113, Australia
Tel: +61 2 8071 0000
(Support Tel: 1800 807 472)
Fax: +61 2 8071 0010
http://www.oki.com.au
Comworth Systems Ltd.
8 Antares Place Rosedale,
Auckland 0632, New Zealand
Tel:(64) 9 477 0500
Fax:(64) 9 477 0549
http://www.comworth.co.nz
Oki Data(S) P Ltd. Malaysia Rep
Ofce
Suite 21.03, 21st Floor Menara IGB,
Mid Valley City,
Lingkaran Syed Pura 59200,
Kuala Lumpur, Malaysia
Tel: (60) 3 2287 1177
Fax: (60) 3 2287 1166
Page 42

Oki Data Corporation
4-11-22 Shibaura, Minato-ku,Tokyo
108-8551, Japan
www.okiprintingsolutions.com
 Loading...