

Page 1

Chapter 1
Introduction
The printer is a general purpose color ink-jet printer that provides high quality text and graphics
printing. The printer can print on single sheet paper, envelopes, labels, index cards, and
transparencies.
Your printer combines the power and ease-of-use of Microsoft
®
WindowsTM with a compact printer.
This combination allows you to change printer settings and track the progress of your print job from
your computer screen.
This
Users Guide
describes the setup and operation of your printer.
OJ2010 ( 96-02-07 )
Page 2

Select a Location for the Printer
Place the printer on a flat, stable surface near your workstation. Leave enough space above the
printer to allow for easy paper loading. Also, leave enough space to extend the paper exit tray.
Do not place the printer:
In direct sunlight
Near heat sources or air conditioners
In dusty or dirty environments
OJ2010 ( 96-02-07 )
Page 3
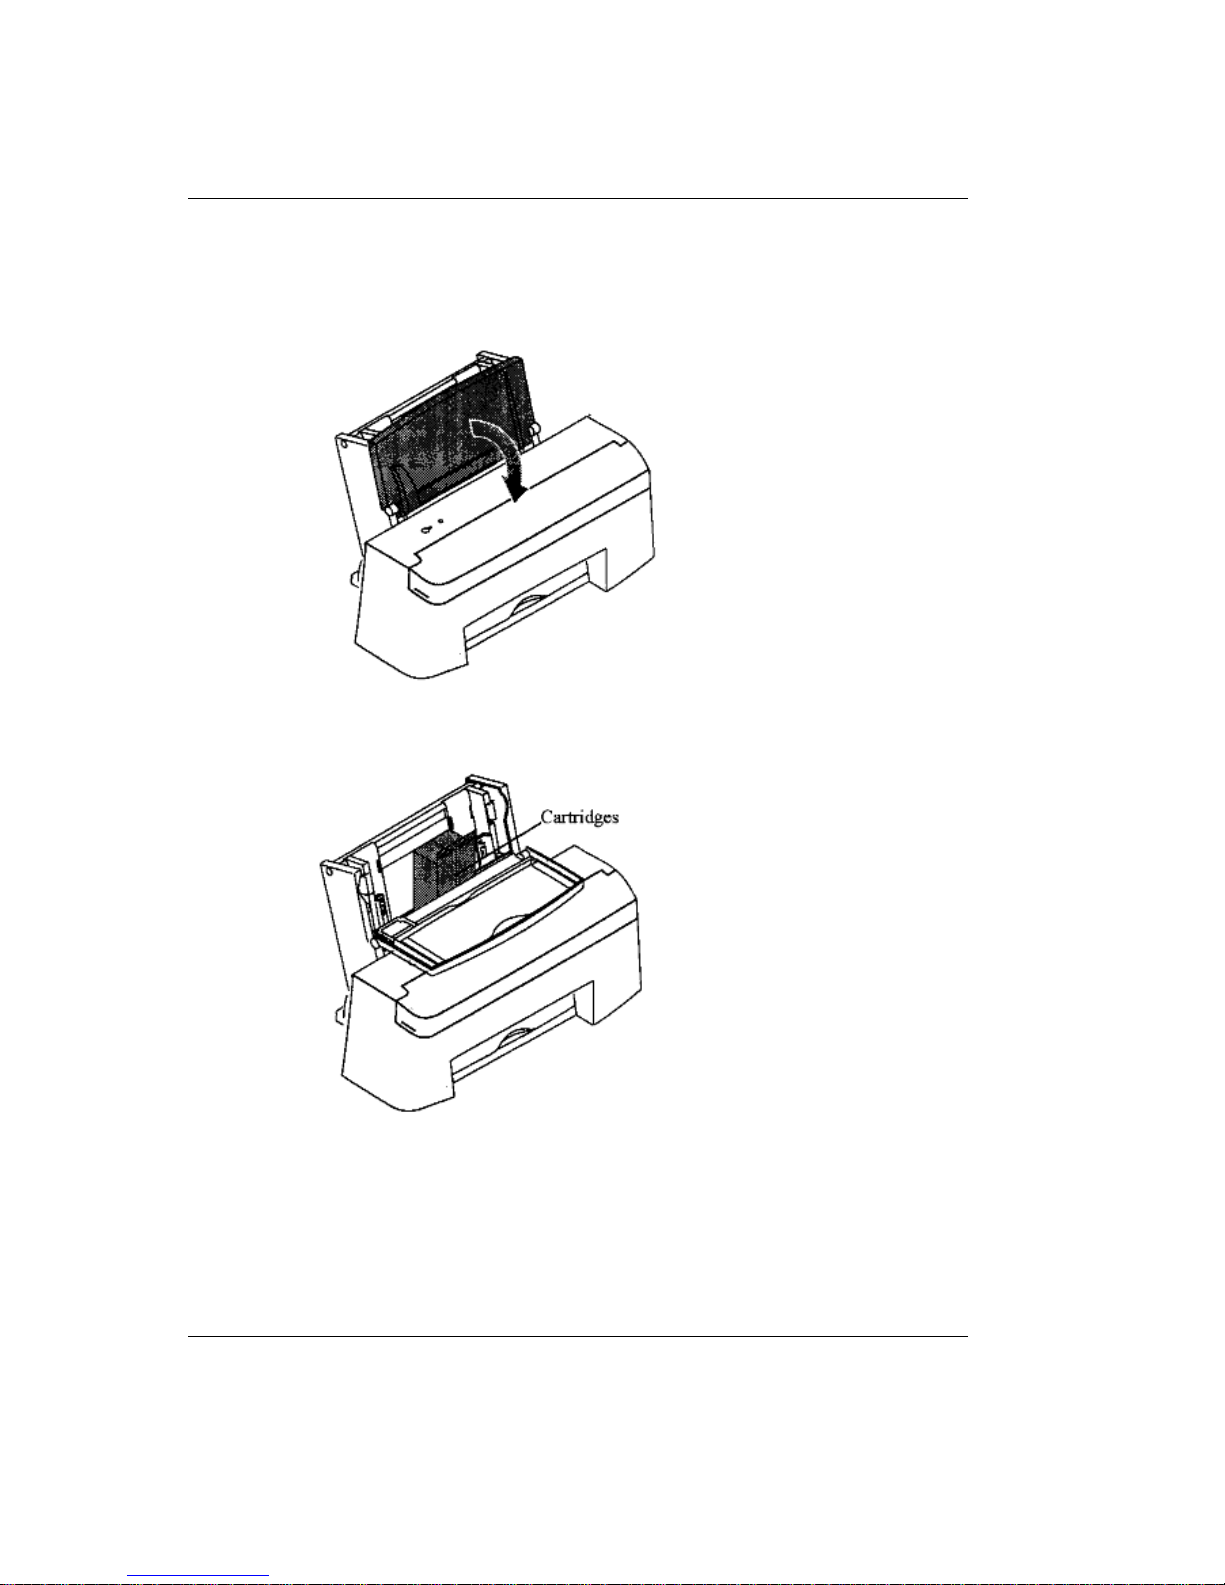
Unpack the Printer
Remove the printer and all accessories from the packing carton. Save the carton and packing
materials in case you need to repack the printer.
Remove the print cartridges packed inside the printer, behind the paper load door.
Make sure you have the following items:
Printer
Power cord
Printer setup diskette(s)
Paper support
Black print cartridge
Color print cartridge
If any items are missing, broken, or damaged, contact your dealer.
OJ2010 ( 96-02-07 )
Page 4

Begin Printer Setup
Follow the steps in this chapter to set up your printer. Then complete the steps in Chapter 2 ( )
to install the printer software on your personal computer.
Do not install the print cartridges in your printer
until you are instructed during the
installation of the printer software in Chapter 2 (
).
OJ2010 ( 96-02-07 )
Page 5
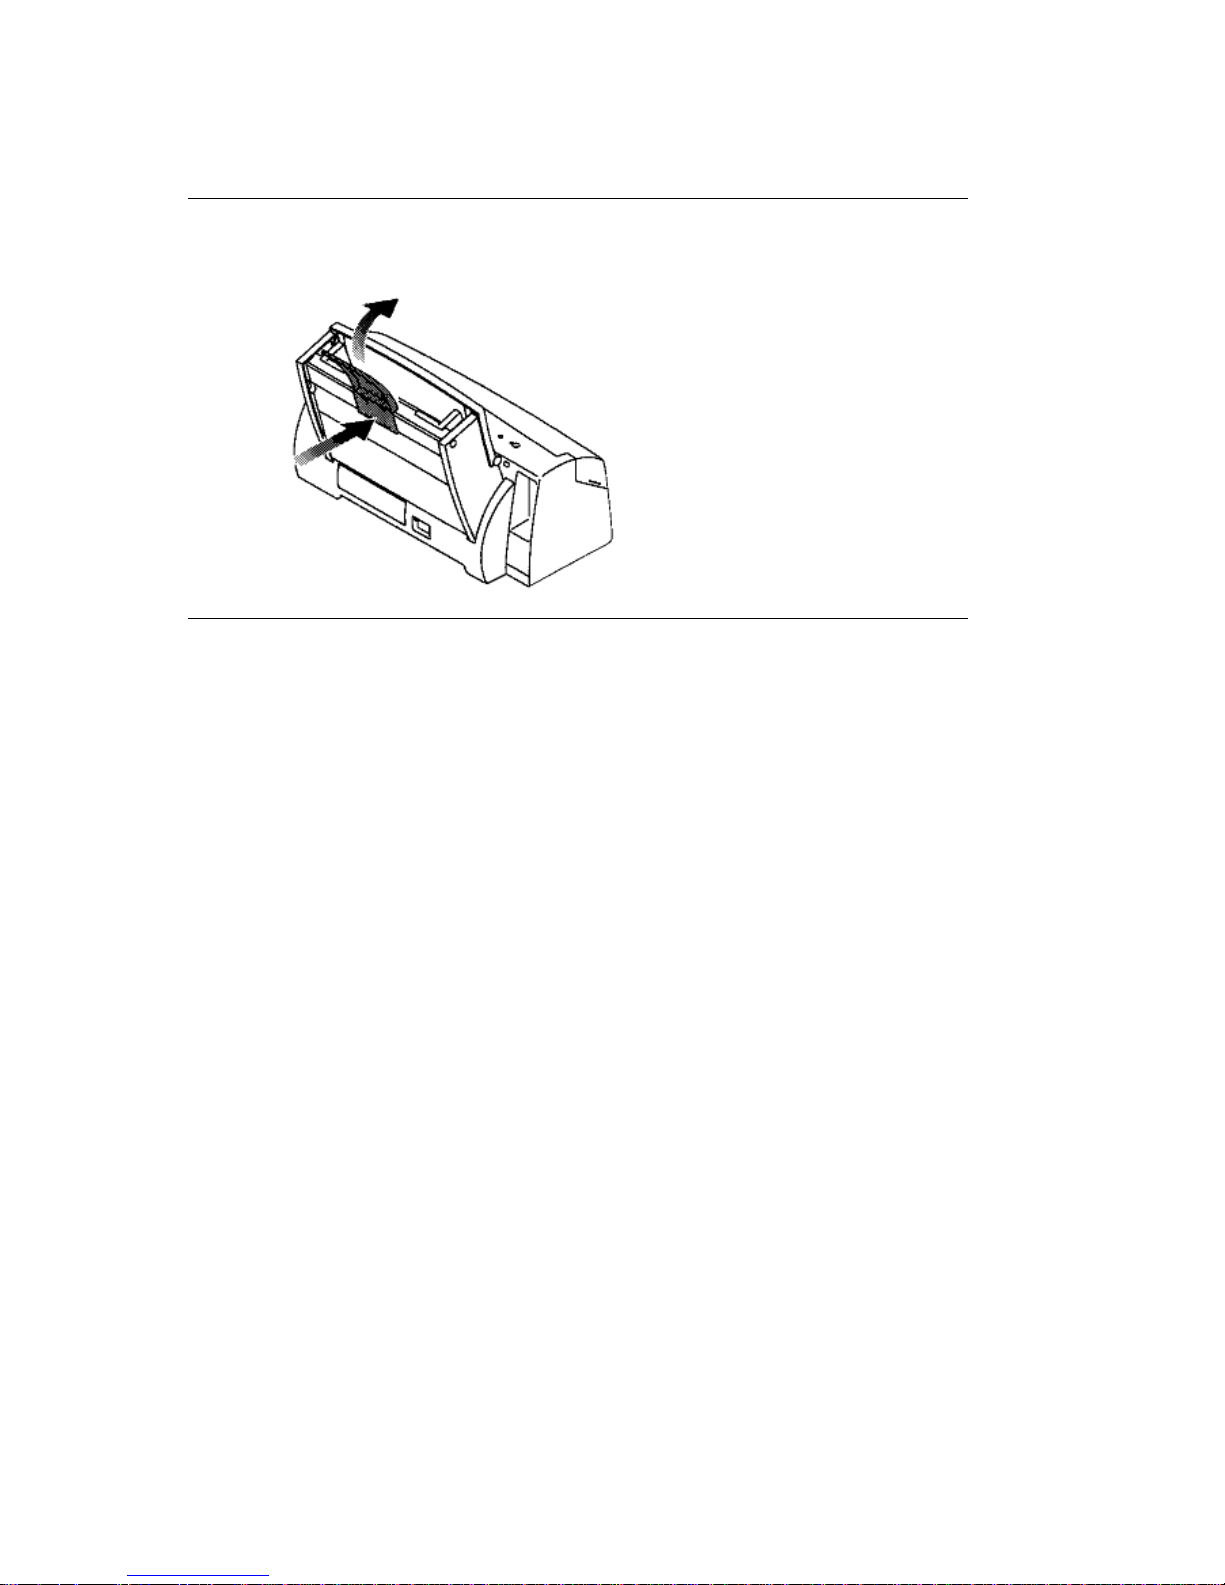
Install the Paper Support
Place the bottom edge of the paper support onto the back of the printer and push
forward until it clicks into place.
OJ2010 ( 96-02-07 )
Page 6
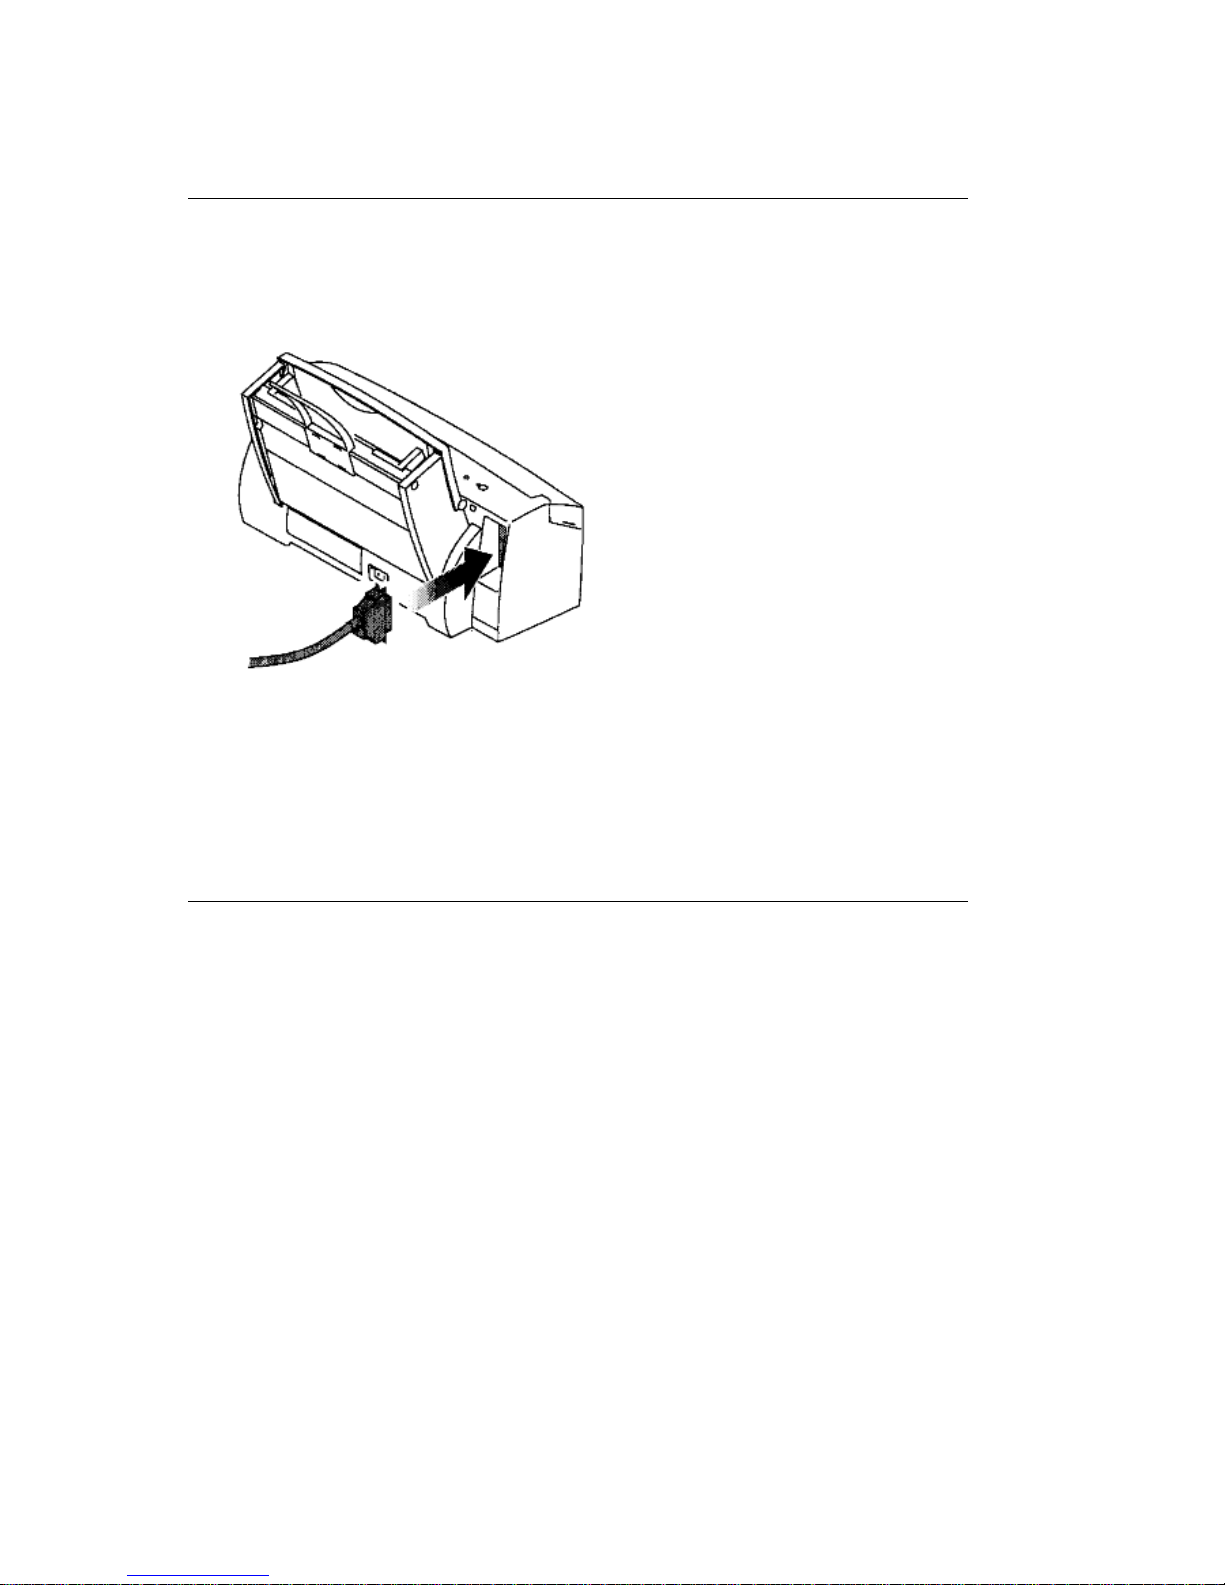
Connect the Printer and Computer
You need a parallel printer interface cable,
no longer than 6 feet
, capable of supporting
bidirectional communications to connect the printer to your computer. This cable is not supplied
with the printer.
Your printer should not be powered on or plugged in yet.
1) At the back of the printer, plug in the parallel interface cable.
2) Fasten the metal clips to the parallel interface cable.
If your parallel cable has a grounding wire, it is not necessary to attach it to the printer.
3) Refer to the instruction manuals that came with your computer to connect the other end of
the parallel interface cable to your computer.
OJ2010 ( 96-02-07 )
Page 7
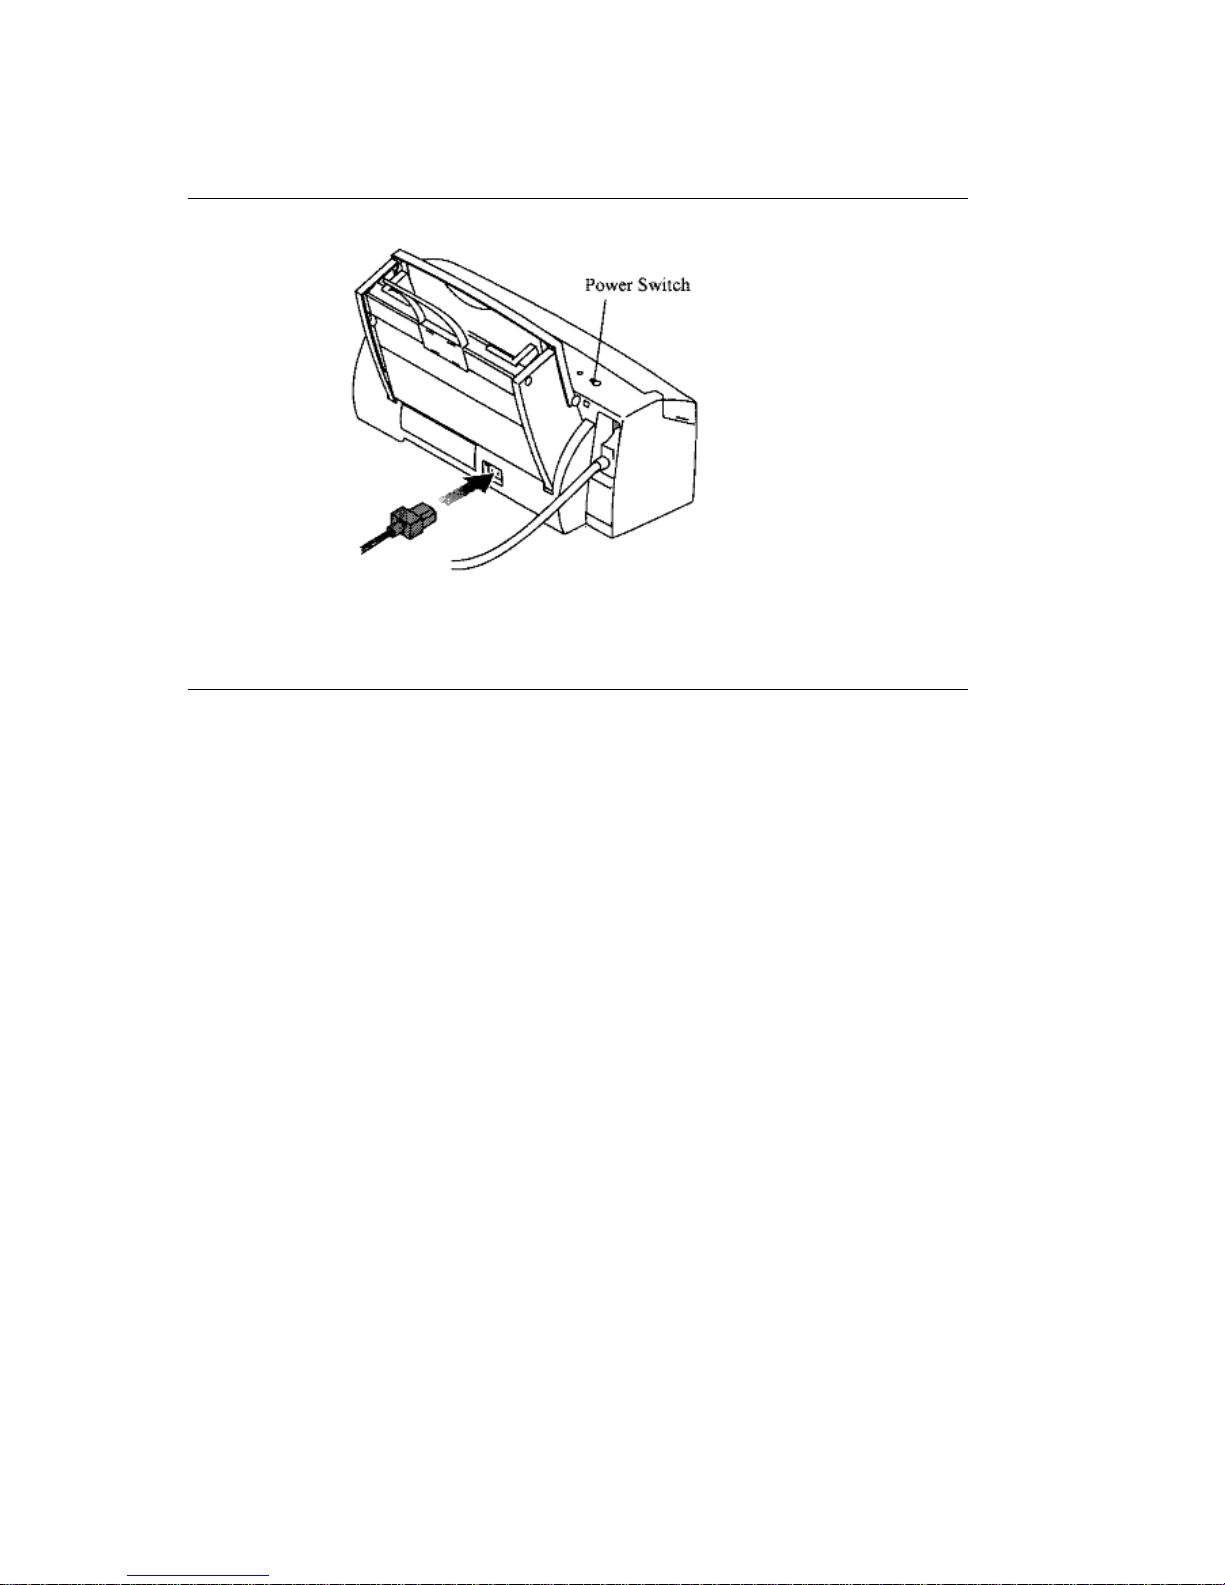
Plug in the Printer
1) Plug the printer power cord into the power socket on the back of the printer.
2) Plug the printer power cord into an electrical outlet.
3) Press the power switch to turn the printer on.
The power light comes on.
OJ2010 ( 96-02-07 )
Page 8
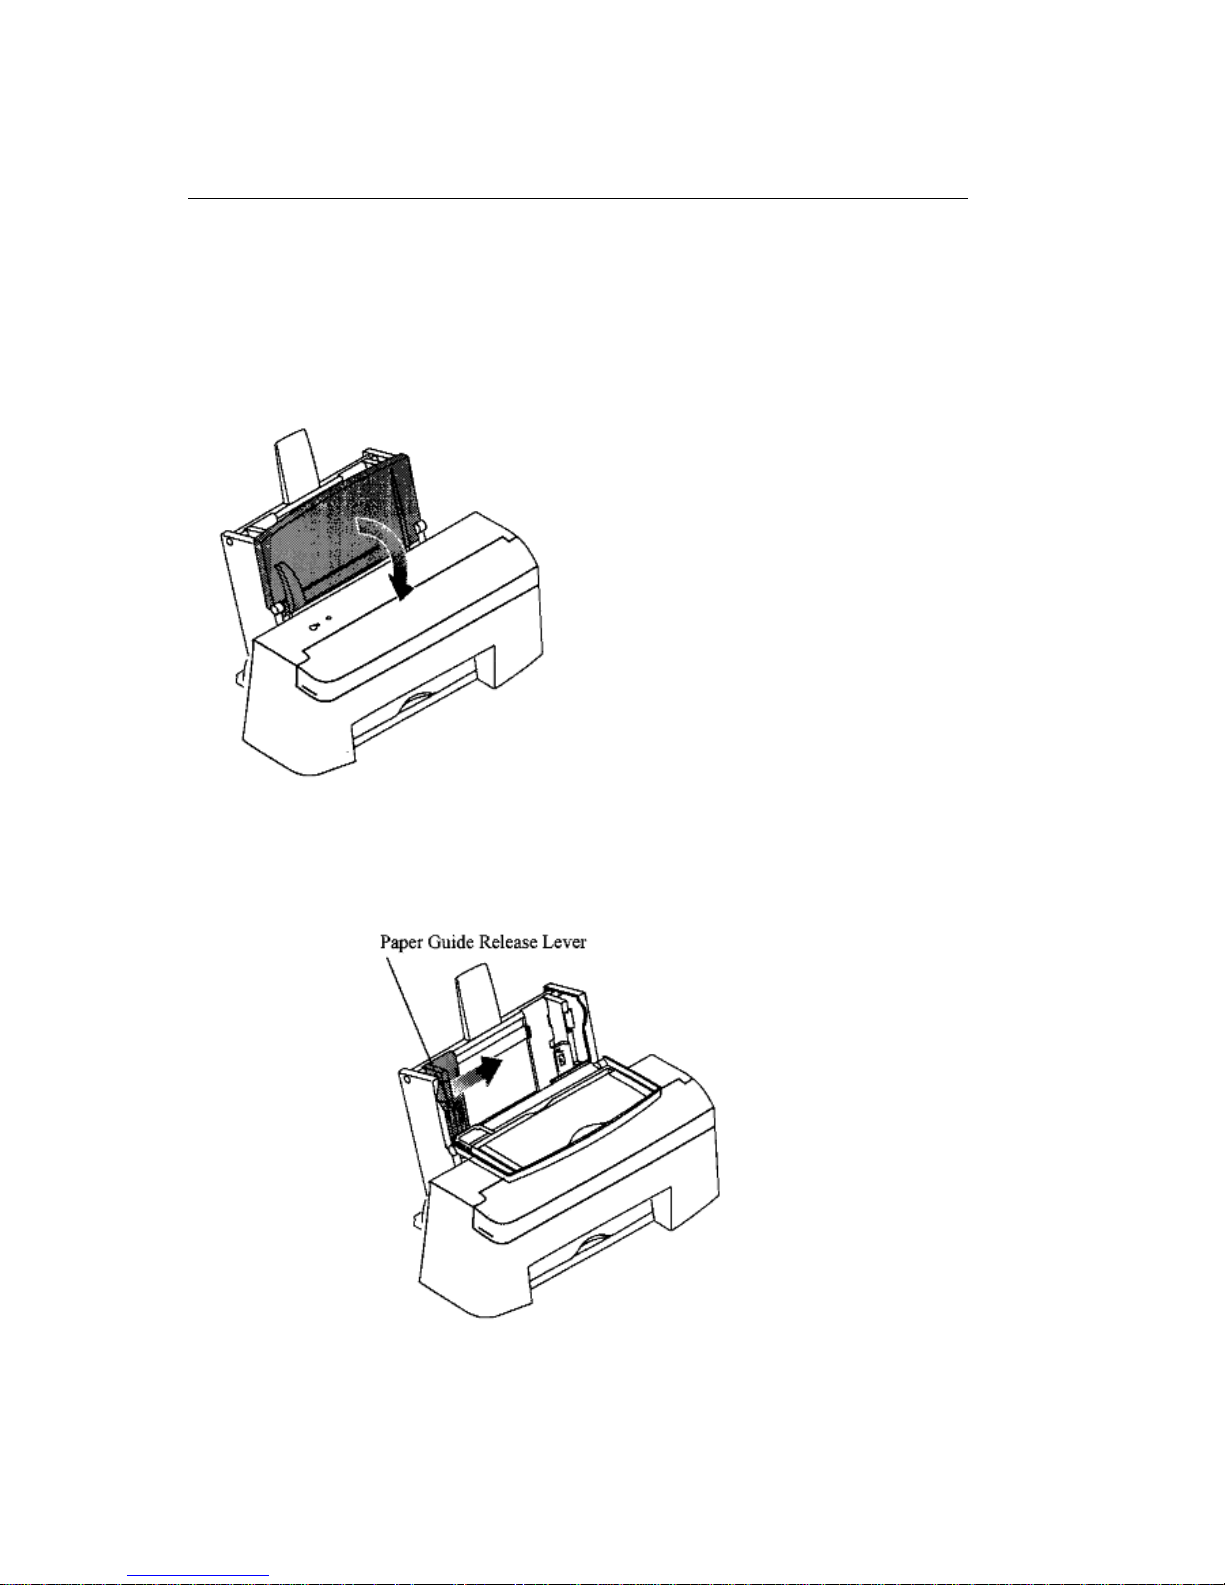
Load Paper
You can use most high-quality papers with your OKI
JET 2010
printer. For the best results when printing
with color, use coated paper.
You'll find detailed paper guidelines in the printer software on-line Help.
Depending on the thickness of your paper, the sheet feeder can hold up to 150 sheets.
1) At the front of the printer, open the paper load door.
2) Squeeze and hold the left paper guide release lever and move the left paper guide
edge to the correct paper size indicator.
Do not move the right paper guide
.
3) Place the paper in the sheet feeder behind the guides.
Depending on the thickness of the paper, the sheet feeder will hold a
maximum of 150 sheets: do not overload it!
- Do not force the paper under the feeder rollers.
- If the paper has a preferred print side, insert it facing you.
OJ2010 ( 96-02-07 )
Page 9
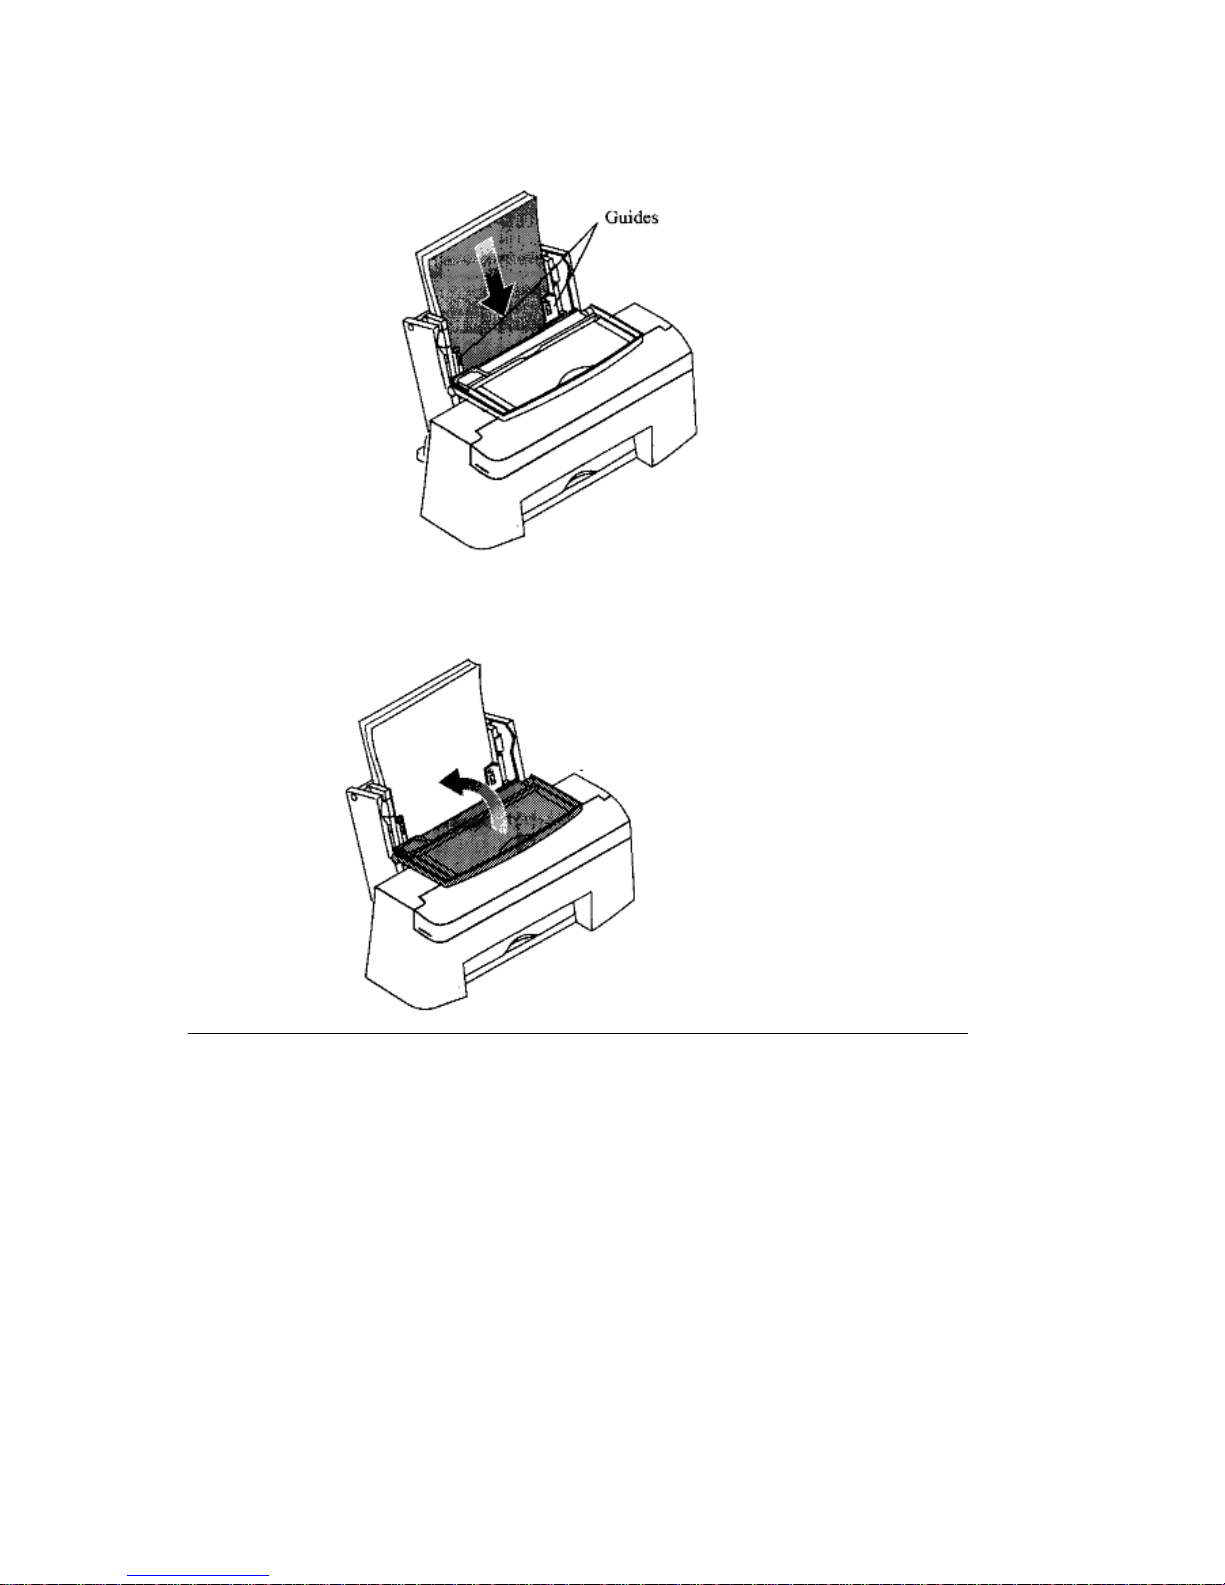
- Load letterhead stationery with the letter-head side facing you and
the top of the page pointed down.
4) Close the paper load door.
OJ2010 ( 96-02-07 )
Page 10
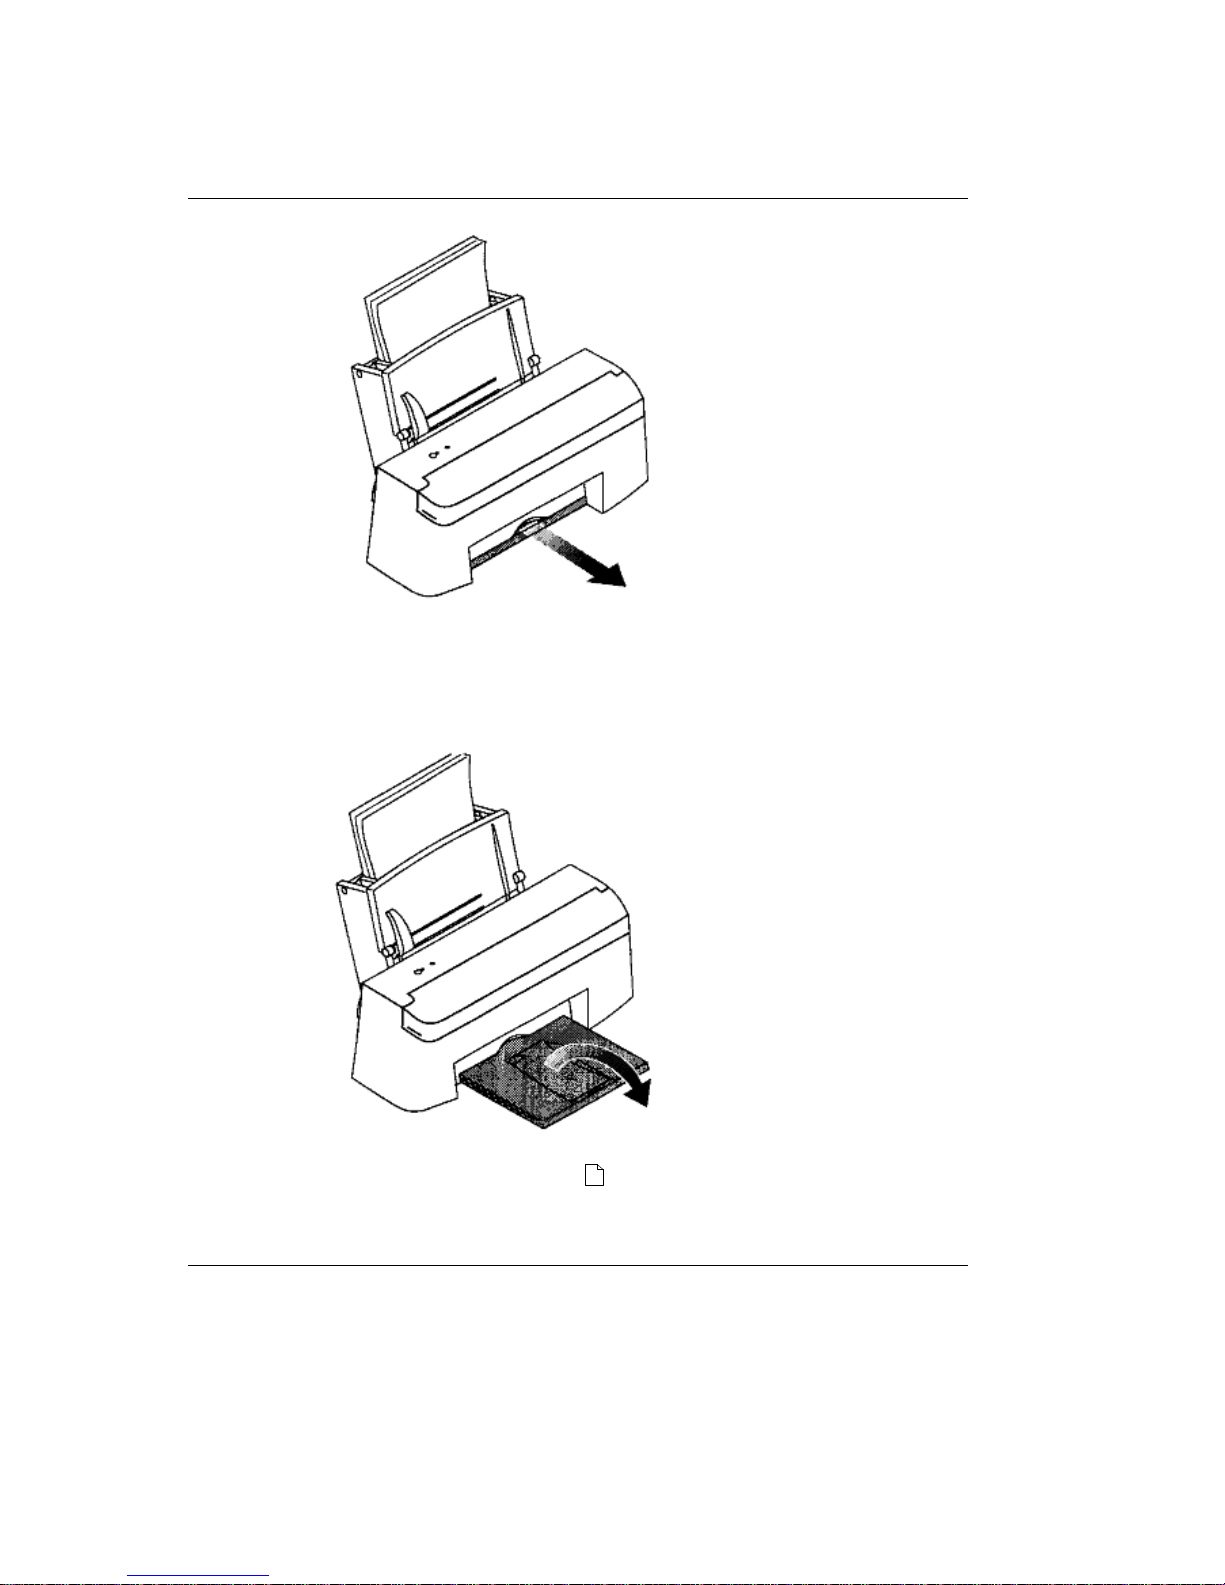
Extend the Paper Exit Tray
1) Gently pull the tray toward you until it stops.
2) Flip the tray extension out.
The paper exit tray is designed for use with paper shorter than 11.7 inches
(297 mm). When you print on paper longer than 11.7 inches (297 mm), close
the paper exit tray.
Now install the printer software: see page 11 ( ).
Note: During the installation of the printer software you will be prompted to
install the print cartridges.
OJ2010 ( 96-02-07 )
Page 11

Chapter 2
System Requirements
To run the Setup Program successfully, make sure you:
- Are running Windows 3.1 (or higher) or Windows for Workgroups 3.10 (or higher)
in enhanced mode.
- Have a 386 or faster IBM® compatible per-sonal computer with 4 MB of RAM.
- Have approximately 5 MB of free space on your hard drive.
OJ2010 ( 96-02-07 )
Page 12

Run the Setup Diskette
For help during installation, click the
Help
button on the dialog boxes, or press the
F1 function key on your PC keyboard.
Note: Before you use these instructions, you should be familiar with operating in
Microsoft Windows
-
choosing commands
- selecting and clicking items
- opening, resizing, and closing a window
- working with dialog boxes.
If you aren't familiar with these procedures, refer to your Microsoft Windows
documentation for detailed information.
Do not install the print cartridges until you have been prompted to do so by
the Setup Program!
To run the Setup Program, complete all of the steps in this chapter, as follows:
1) Start Windows.
2) Make sure the printer power is on.
3) Insert the Setup diskette into drive A (or B, depending on your computer).
4) In the Windows Program Manager, from the menu bar at the top of the screen,
click
File
, and then click
Run
.
5) In the Command Line box, type a:setup (or b:setup), and then click
OK
or press Enter.
6) Follow the instructions on the installation screens.
OJ2010 ( 96-02-07 )
Page 13
When You Are Prompted to Install the Print Cartridges
When you are prompted to install the print cartridges during the installation of the printer
software, follow the steps below
Note: The printer comes with two cartridges: one black and one color. The installation process
is the same for both. Each cartridge must be inserted into the correct position in the print cartridge carrier:
to do this, just match the color of the cartridge top to the color of the strips on the carrier: black to black
(black cartridge) and green to green (color cartridge).
1) Make sure the printer power is on.
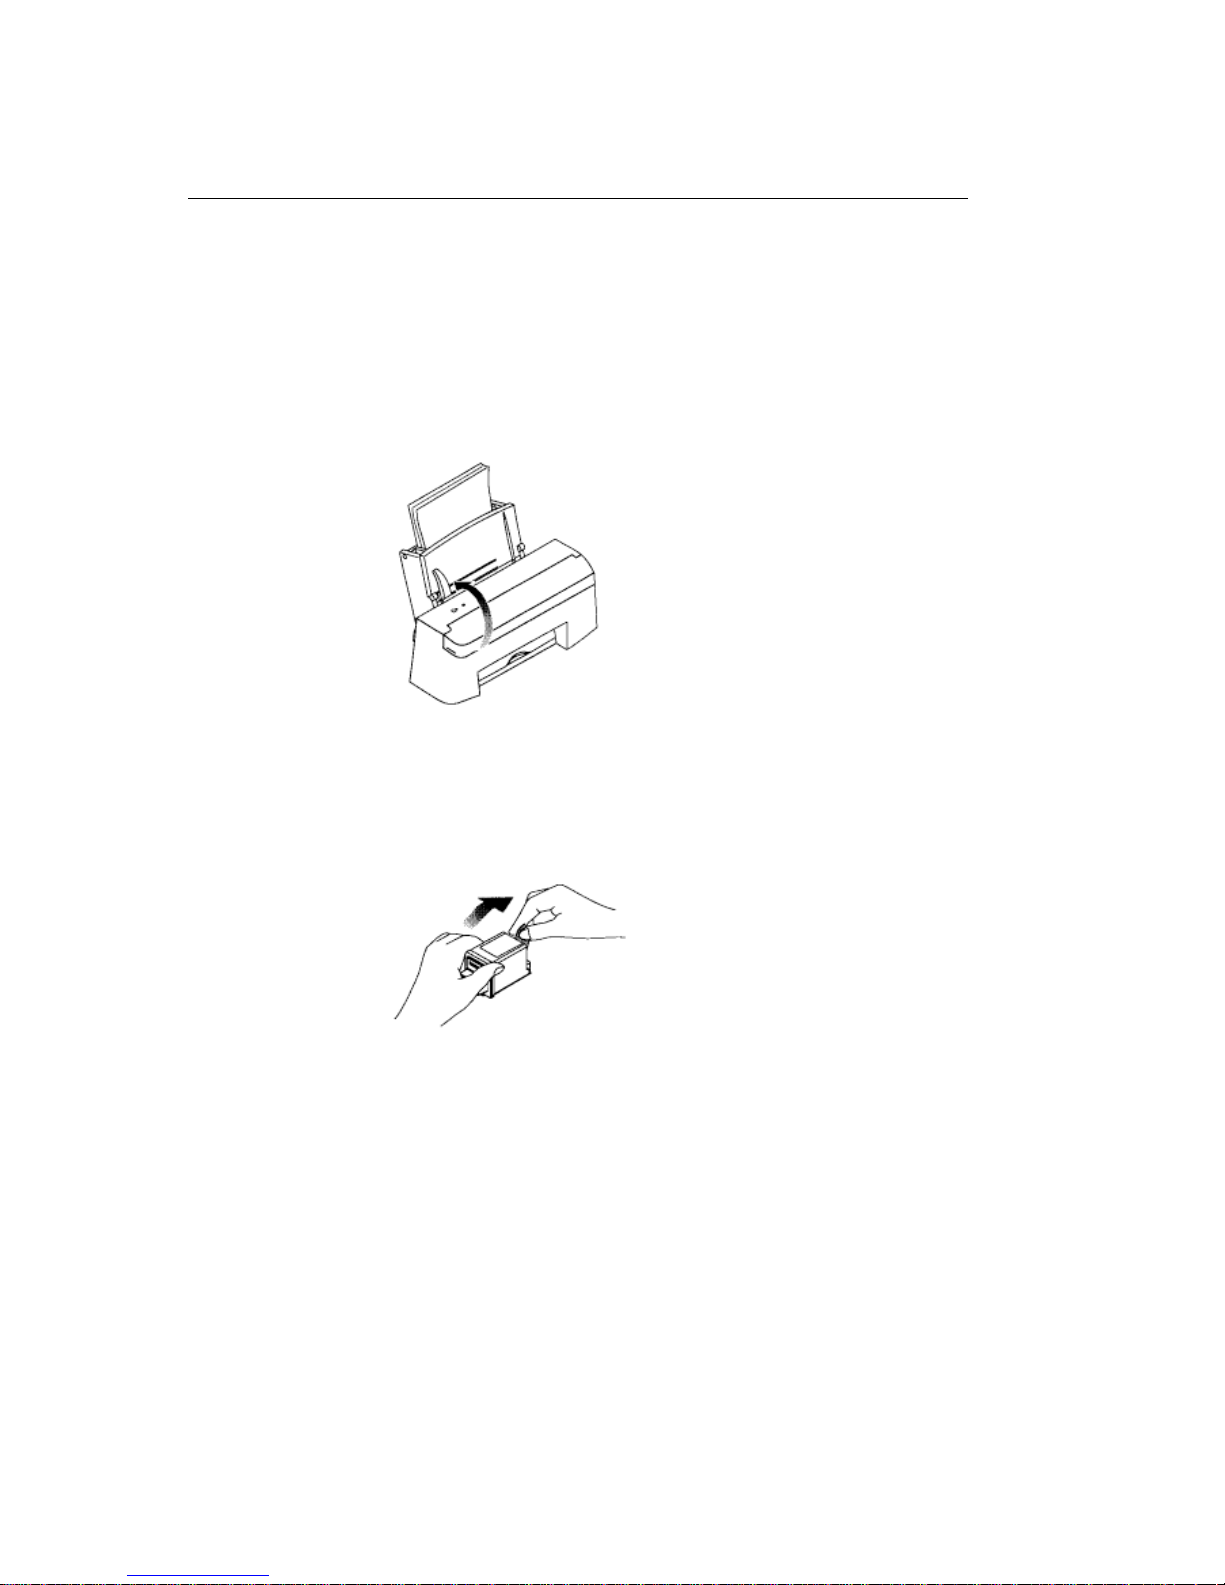
2) Open the printer access cover.
3) Remove the black print cartridge from its packaging.
Note: Do not touch the copper-colored area!
Hold the cartridge by the plastic
Surfaces only.
4) Carefully remove the tape covering the printhead on the print cartridge.
Be sure to remove all
the tape.
Do not touch the copper-colored area!
5) Insert the black print cartridge in the carrier.
The print cartridges must be inserted in the correct position in the carrier: match the
black print cartridge handle to the black color strip on the carrier. (As youre facing the
printer, the black print cartridge is installed in the
left-hand
position.)
OJ2010 ( 96-02-07 )
Page 14
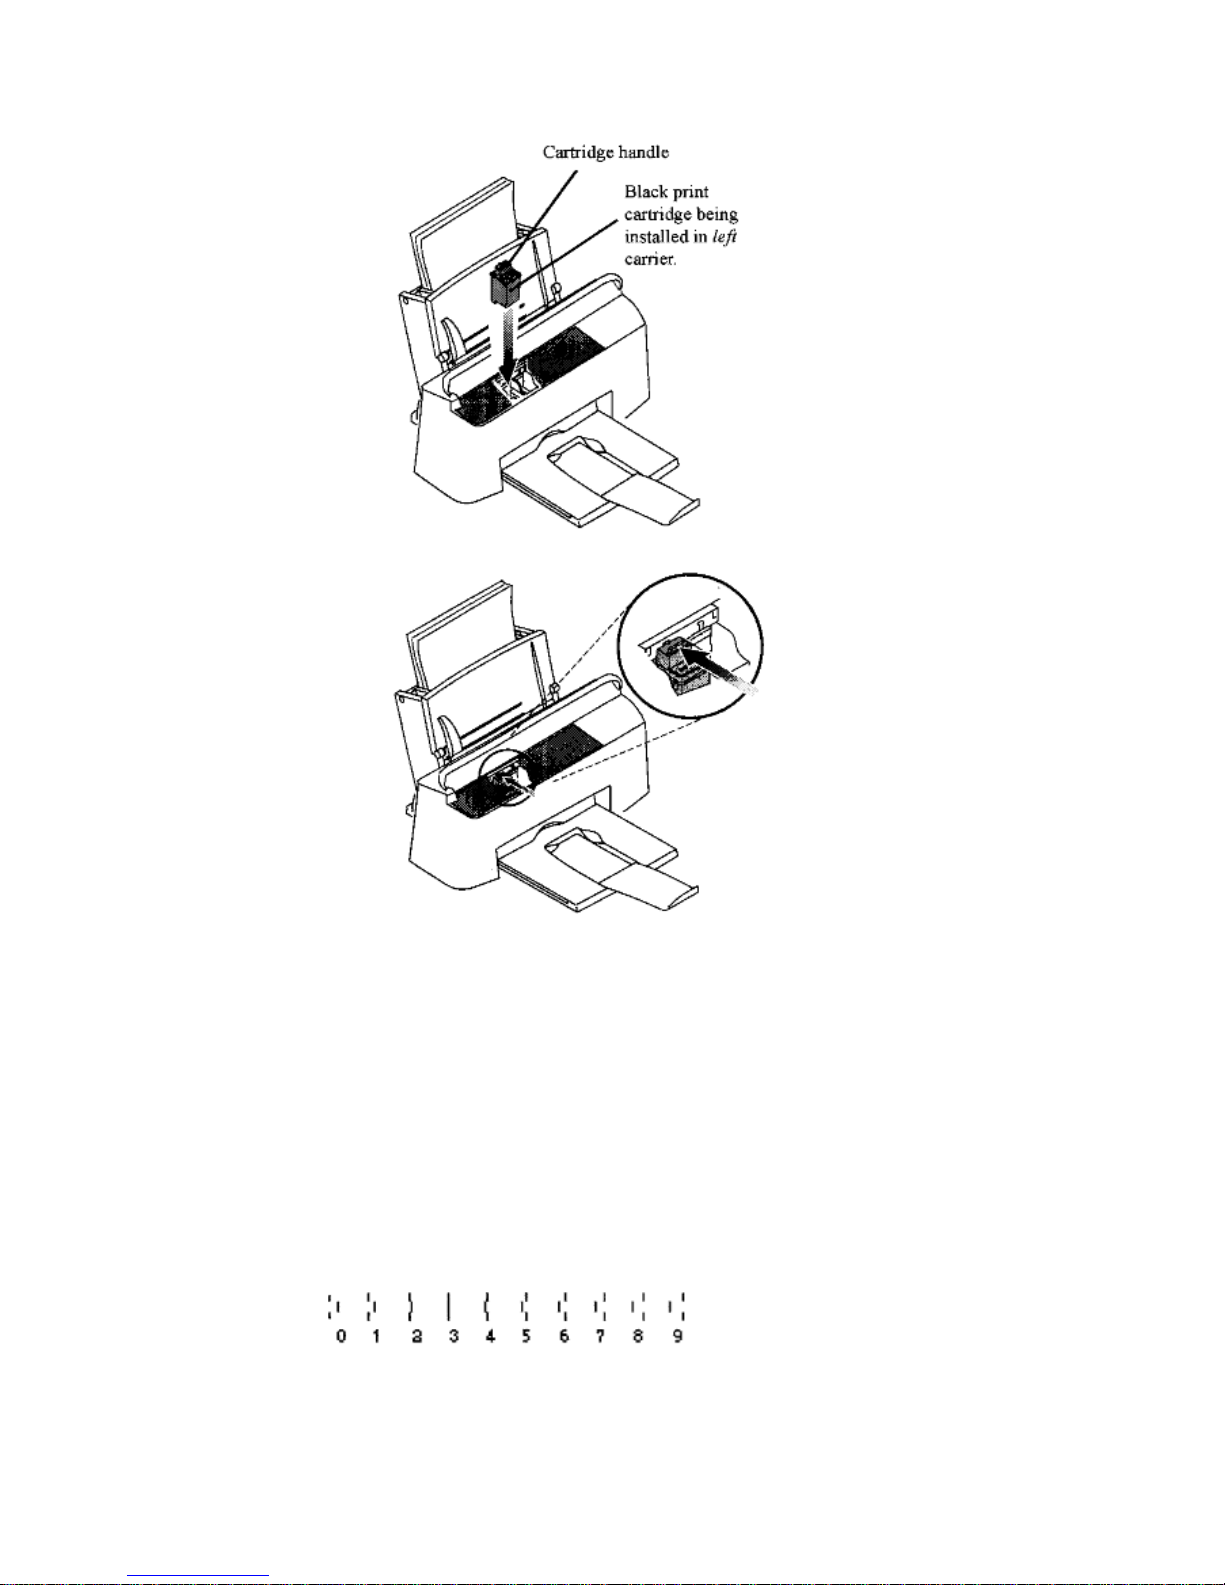
6) Push back firmly on the handle until the print cartridge snaps into place.
Note: If the print cartridge moves loosely in the carrier, it is not locked into place.
Repeat this step.
7) Install the color cartridge using the same steps.
Match the color print cartridges green handle to the green color strip on the carrier.
(As youre facing the printer, the color print cartridge is installed in the
right-hand
position.)
8) Close the printer access cover.
9) Continue following the instructions on your computer screen.
10) Align the printheads.
When the Align Cartridges dialog box appears, wait while the the printer prints a test
page with patterns. Each pattern has a number located beneath it. For example:
Horizontal Alignment of Heads
Vertical Alignment of Heads
OJ2010 ( 96-02-07 )
Page 15

Bi-directional Alignment Pattern (Black)
Bi-directional Alignment Pattern (Color)
11) Using the printed test page, select the numbers of the patterns that are
aligned correctly.
In our example, 3 is the correct choice for Horizontal Alignment, 4 is the correct choice
for Vertical Alignment, and 3 is the correct choice for both black and color Bi-directional
alignment.
12) Enter the number located under each pattern into the boxes on the Align Cartridges
dialog box.
13) Click
OK
.
14) The print cartridge installation is now complete. Continue to follow the instructions
on the installation screen.
Note:
If you remove the print cartridges, they will dry out. Remove them only when you
are instructed to do so, or to replace them.
OJ2010 ( 96-02-07 )
Page 16

Complete the Installation
Note: For the latest information on installing and using the printer,
open the README WRI
WW150C.WR
I
file on the Setup diskette.
1)When the installation is complete, click
Continue
and your PC will exit and restart
Windows.
When Windows restarts, you will see a new Program Group for your OKI
JET 2010,
and the OKI
JET 2010
printer driver will be listed in the Installed Printers box under
Printers in the Windows Control Panel.
2)Remove the diskette from the drive.
See Chapter 4(
) to learn how to print from Windows-based applications or
Chapter 5(
) to learn how to print from DOS applications.
OJ2010 ( 96-02-07 )
Page 17
Storing Your Users Guide
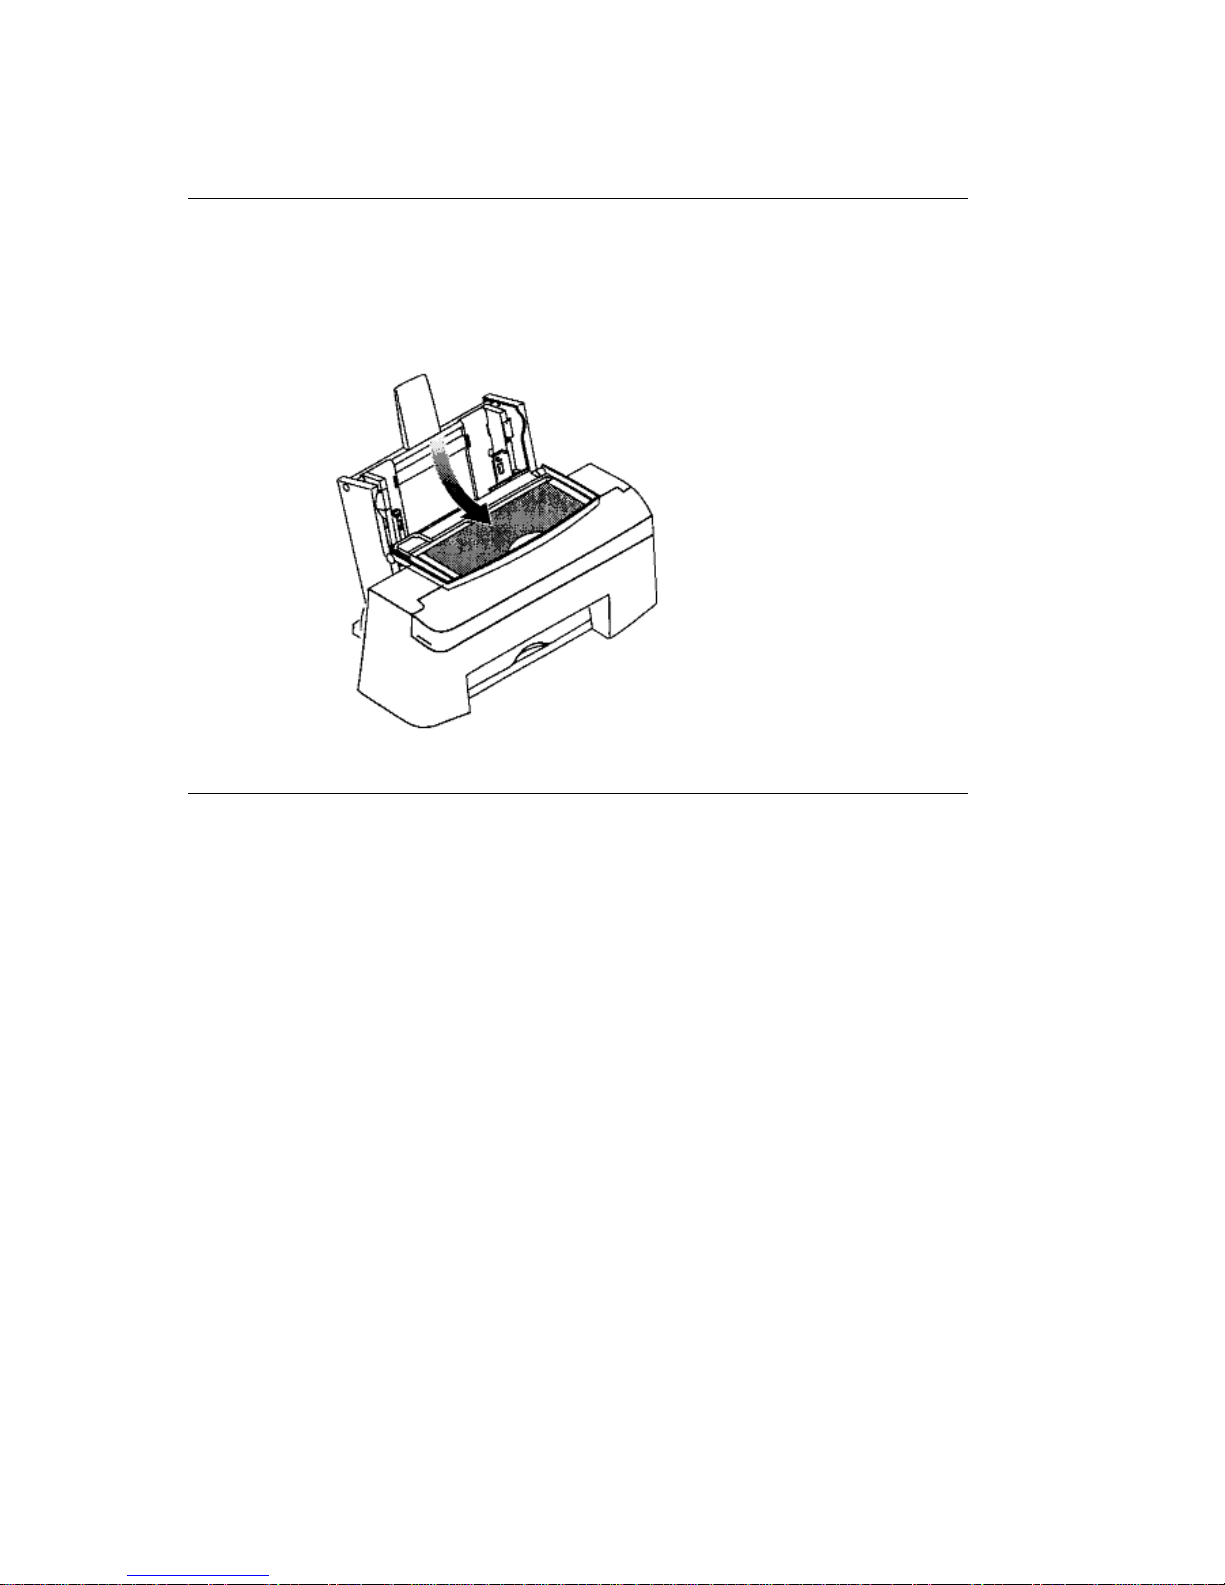
A handy spot has been provided inside the printer for storing this
Users Guide
.
To store it:
1) Open the paper load door.
2) Place the book in the holder.
3) Close the paper load door.
OJ2010 ( 96-02-07 )
Page 18

Chapter 3
Printer Control Software
The printer control software lets you:
- Monitor your print jobs.
- Watch the print job as it progresses.
- Monitor print cartridge ink levels.
- Initiate print cartridge installations, reinstallations, and maintenance.
- Access the Windows and DOS Printing dialog boxes to change printer settings.
- Print from applications that are Windows-based.
- Print from DOS-based applications that will run under the DOS prompt under Windows.
- Test your printer.
- Change the print queue parameters.
To start the program:
- Double-click the OKI
JET 2010
Printer Control icon in the OKI
JET 2010
Program Group.
- Use the tabs in the printer control dialog box to browse through the
available options.
The printer control software has extensive on-line Help where you can find more detailed
information. You can access the on-line Help from any dialog box: just click the Help button
or press the F1 function key on your keyboard.
OJ2010 ( 96-02-07 )
Page 19

Chapter 4
Before You Print
Before You Print
Before you print perform the following steps.
Check Your Default Printer ...............................................................(
)
Check Printer Settings Using the Printer Setup Dialog Box ..(
)
To Open the Dialog Box from a Windows Based Application ....... (
)
To Open the Dialog Box from the Windows Control Panel ............ (
)
To Open the Dialog Box from the Printer Control Program ............ (
)
The Print Spooler ................................................................................. (
)
On-Line Help ....................................................................................... (
)
OJ2010 ( 96-02-07 )
Page 20

Check Your Default Printer
Check Your Default Printer
Before you print, make sure the OKI
JET 2010
is listed as your default printer (the Setup
Program does this automatically during installation). You can check your current default
printer in the Windows Control Panel by click-ing on the Printers icon.
Note: The Control Panel is normally located in the Main Group in Windows.
Then, print as you normally would for example, by choosing Print from your applications
File menu.
OJ2010 ( 96-02-07 )
Page 21

Check Printer Settings Using the Printer Setup Dialog Box
Check Printer Settings Using the Printer Setup Dialog Box
Before you print, you may want to change some printer settings.
The printer setup dialog box lets you make changes to options such as paper size,
image settings, print quality, and halftoning.
You can open the printer setup dialog box from:
- A Windows-based application
- The Windows Control Panel
- The Printer Control program
The method you use determines whether your settings are applied to only one print job, stored
with the document youre printing, or applied to all print jobs. If you open the printer setup dialog
box from:
- An applications Print command, your choices apply only to that print job. The next time
you print, you have to choose the print settings again.
- An applications Print Setup command, the application stores the settings with your
document. The document prints with the settings until you change them.
- The Windows Control Panel or the Printer Control program, the settings you choose
apply to all print jobs and all applications until you change the settings.
OJ2010 ( 96-02-07 )
Page 22

To Open the Dialog Box from a Windows-Based Application
To Open the Dialog Box from a Windows-Based Application
The following steps are meant to be general instructions. Your application may handle this
procedure a little differently, but look for clues on the Printer dialog box such as a Printer
button or Options button to open the printer setup dialog box.
- Open the applications File menu.
- Click
Print Setup
(or
Printer Setup
).
- In the Print Setup dialog box, click
Options
to open the OKI
JET 2010
dialog box.
- Use the tabs to browse through the available options and make your selections.
OJ2010 ( 96-02-07 )
Page 23

To Open the Dialog Box from the Windows Control Panel
To Open the Dialog Box from the Windows Control Panel
- Click
Main
to open the Windows Main group window.
- In the Windows Main group window, click on the Control Panel icon, then
click on the Printers icon to open the Printers dialog box.
- Set OKI
JET 2010
as the default printer.
- Click
Setup
to open the printer setup dialog box.
- Click the tabs in the printer setup dialog box to browse through the available
options and make your selections.
OJ2010 ( 96-02-07 )
Page 24

To Open the Dialog Box from the Printer Control Program
To Open the Dialog Box from the Printer Control Program
- Double-click the OKI
JET 2010
Printer Control icon in the OKI
JET 2010
Program
Group to open the printer control dialog box.
- Click the Windows Printing tab.
- Click
Windows Driver Setup
.
- Click the tabs in the printer setup dialog box to browse through the available
options and make your selections.
OJ2010 ( 96-02-07 )
Page 25

The Print Spooler
The Print Spooler
When you initiate printing from Windows, the printer software uses a special OKI
JET 2010
Print
Spooler: you will see the spooler icon appear. Double click the icon to check or change the status of your
print job, or to delete the print job. You can also use the Print Spooler to stop printing the job and save it
for printing later.
OJ2010 ( 96-02-07 )
Page 26
On-line Help
The printer software has extensive on-line Help where you can find more detailed information
about your printer.
You can access on-line Help from any dialog
box. Just click the
Help
button, or press the F1
function key on your keyboard.
OKHELP.HLP
Within on-line Help, you will find underlined words or hot text. Just click on the hot text to instantly show
more information on a related topic.
OJ2010 ( 96-02-07 )
Page 27

Print from DOS Applications
Print from DOS Applications
If you have applications that are not Windows based, use the sections which follow to print.
If your DOS application runs from the DOS prompt displayed when you double-click the
MS-DOS
®
icon located in Windows, use the section DOS Applications in Windows which
follows.
If your DOS application runs only if you exit Windows and run from the DOS prompt,
see Non-Windows DOS Applications on page 27 (
).
OJ2010 ( 96-02-07 )
Page 28

DOS Applications in Windows
When you print from a DOS (not Windows-based) application, your printer uses the
HP
®
PCL® 3 emulation. You must install a PCL 3 printer driver such as HP 500C for
printing in each DOS application.
To print from DOS (not Windows-based) applications:
1) Make sure you are in Windows, not native DOS.
2) Click on the MS-DOS icon (normally located in the Main group of Windows
Program Manager).
3) Start your application from the MS-DOS prompt.
You may also create a Windows icon to start an application. See your
Windows manual for details.
4) Install HP
®
DeskJet® 500C as the current printer in the DOS application from
which you are printing.
Some applications offer a color or black (mono) version of the HP DeskJet 500C driver.
Choose the black (mono) version if you are printing in black only. Choose the color version
if you are printing in color and black.
If your application does not offer the HP DeskJet 500C printer driver, install the DeskJet 500
printer driver.
Note: You will not be able to print in color with the DeskJet 500 driver.
For help on installing a printer, see your application users documentation.
5) If you need to make printer setting changes that you cannot make in your
application, follow the instructions in the next section, DOS Printing .
6) Print as you normally would from your application.
OJ2010 ( 96-02-07 )
Page 29

The DOS Printing Tab
The DOS Printing Tab
Since settings specified in your application override dialog box settings, make changes to your
printer settings in your application if you can. If your DOS application does not allow you to
make these changes, use the DOS Printing tab.
To open the DOS Printing tab:
1) Double-click the OKI
JET 2010
Printer Control icon in the OKI
JET 2010
Program Group to open the printer control dialog box.
2) Click the DOS Printing tab.
Note: Click
Defaults
to return the settings to the factory defaults.
For information on using this dialog box, click the
Help
button or press the F1 key.
OJ2010 ( 96-02-07 )
Page 30
Non-Windows DOS Applications
Non-Windows DOS Applications
Use this procedure if your application does not run from the MS-DOS prompt in Windows.
1) Start your DOS application.
2) Install the HP DeskJet 500C as the current printer in the DOS application from
which you are printing.
- Some applications offer a color or black (mono) version of the HP DeskJet 500C driver.
- Choose the black (mono) version if you are printing in black only. Choose the color
version if you are printing in color and black.
- If your application does not offer the HP DeskJet 500C printer driver, install the DeskJet
500 printer driver.
Note: You will not be able to print in color with the DeskJet 500 driver.
Note: For help on installing a printer, see your application users documentation.
3) Create a print file using the Print To File function of your application.
Note: For help on Printing to a File, see your application users documentation.
4) Exit the DOS application.
5) Start Windows.
6) Double-click on the MS-DOS icon (normally in the Main group of Windows).
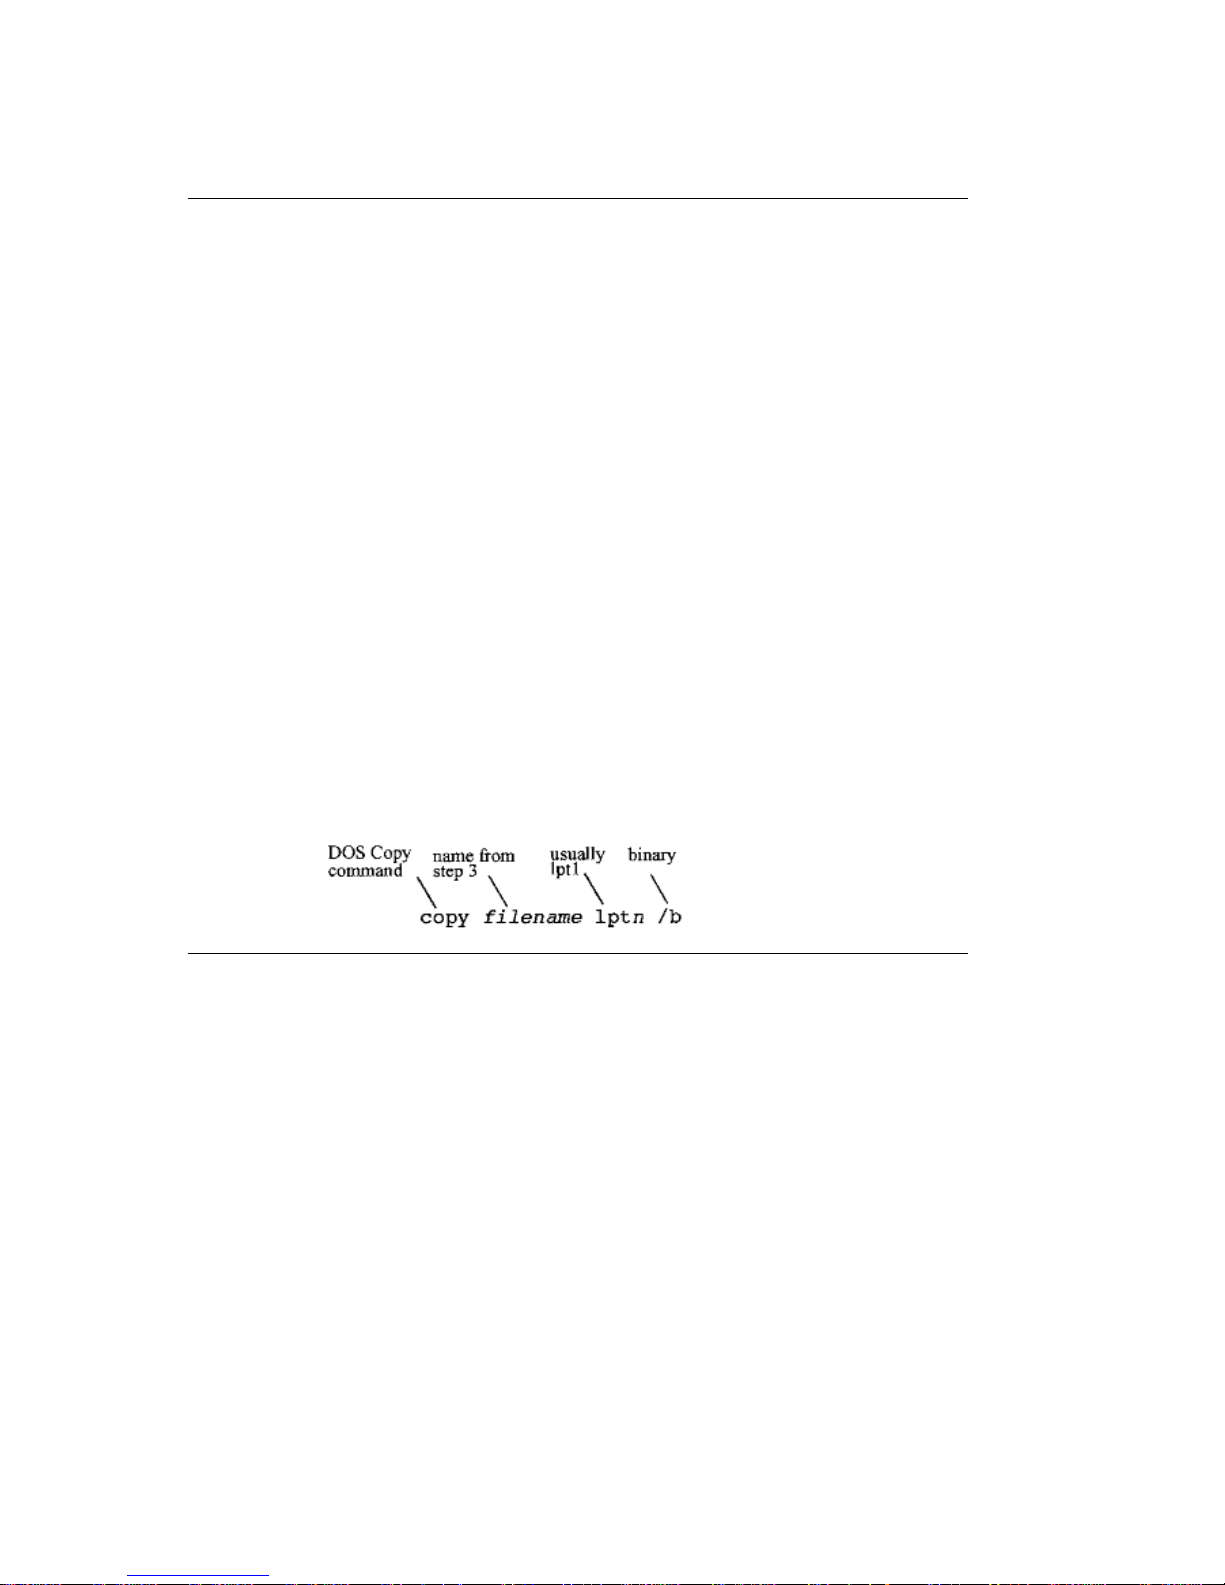
7) Use the DOS Copy command to copy the print file to the port where the printer
is connected.
OJ2010 ( 96-02-07 )
Page 31

Chapter 6
Load Paper and Other Media
The printer can print on paper, envelopes, labels, and transparencies. General guidelines for
purchasing paper, envelopes, labels, and transparencies follow. See the printer on-line (
) Help for
additional paper information.
Guidelines for Purchasing Paper
Paper Types and Sizes ............................... (
)
Envelope Types and Sizes ........................... (
)
Transparency Types and Sizes ..................... (
)
Label Types and Sizes ................................(
)
OJ2010 ( 96-02-07 )
Page 32

Paper Types and Sizes
Paper Types and Sizes
Satisfactory print quality can be obtained with many types of plain paper. You can use letter, legal,
A5, A4, B5, executive, and index card size paper with the printer
For the best results when printing with color, use coated paper.
Note: Paper types that work well with the color print cartridge may not work well with the
black print cartridge.
Since the quality of plain paper varies widely, you should test the print quality before buying
large quantities of paper.
OJ2010 ( 96-02-07 )
Page 33

Envelope Types and Sizes
Envelope Types and Sizes
You can use
# 7-¾
# 9 # 10 (U.S. Business)
DL C5 B5 C6 and postcard-sized envelopes with the printer.
OJ2010 ( 96-02-07 )
Page 34

Transparency Types and Sizes
Transparency Types and Sizes
The printer supports standard-sized (letter and A4) transparencies.
Use a transparency specifically designed for an ink-jet printer.
Do not use transparencies designed for copiers and laser printers or for pen plotters.
It is recommended that you use the sheet feeder to print on transparencies.
OJ2010 ( 96-02-07 )
Page 35

Label Types and Sizes
Label Types and Sizes
You can use letter and A4-size sheets of labels.
Use labels specifically designed for an ink-jet printer. Do not use labels designed for copiers and
laser printers or for pen plotters.
OJ2010 ( 96-02-07 )
Page 36

Load the Sheet Feeder
Load the Sheet Feeder
Depending on the thickness of the paper, the sheet feeder can hold up to 150 sheets of paper.
OJ2010 ( 96-02-07 )
Page 37

Load Paper, Transparencies, and Labels
Load Paper, Transparencies, and Labels
To load paper, transparencies, and labels, see Load Paper (
).
- When loading coated paper, make sure the preferred print side is facing forward.
- When loading transparencies, make sure the rough side is facing forward.
- Load transparencies which have paper backing with the glued edge pointing
down and the plastic surface facing forward.
- Load transparencies which have a paper strip on the edge with the strip
pointing down.
- When loading sheets of labels, make sure the label side is facing forward.
Note: Remove each transparency from the paper exit tray before the next transparency is
printed to avoid ink smearing.
OJ2010 ( 96-02-07 )
Page 38
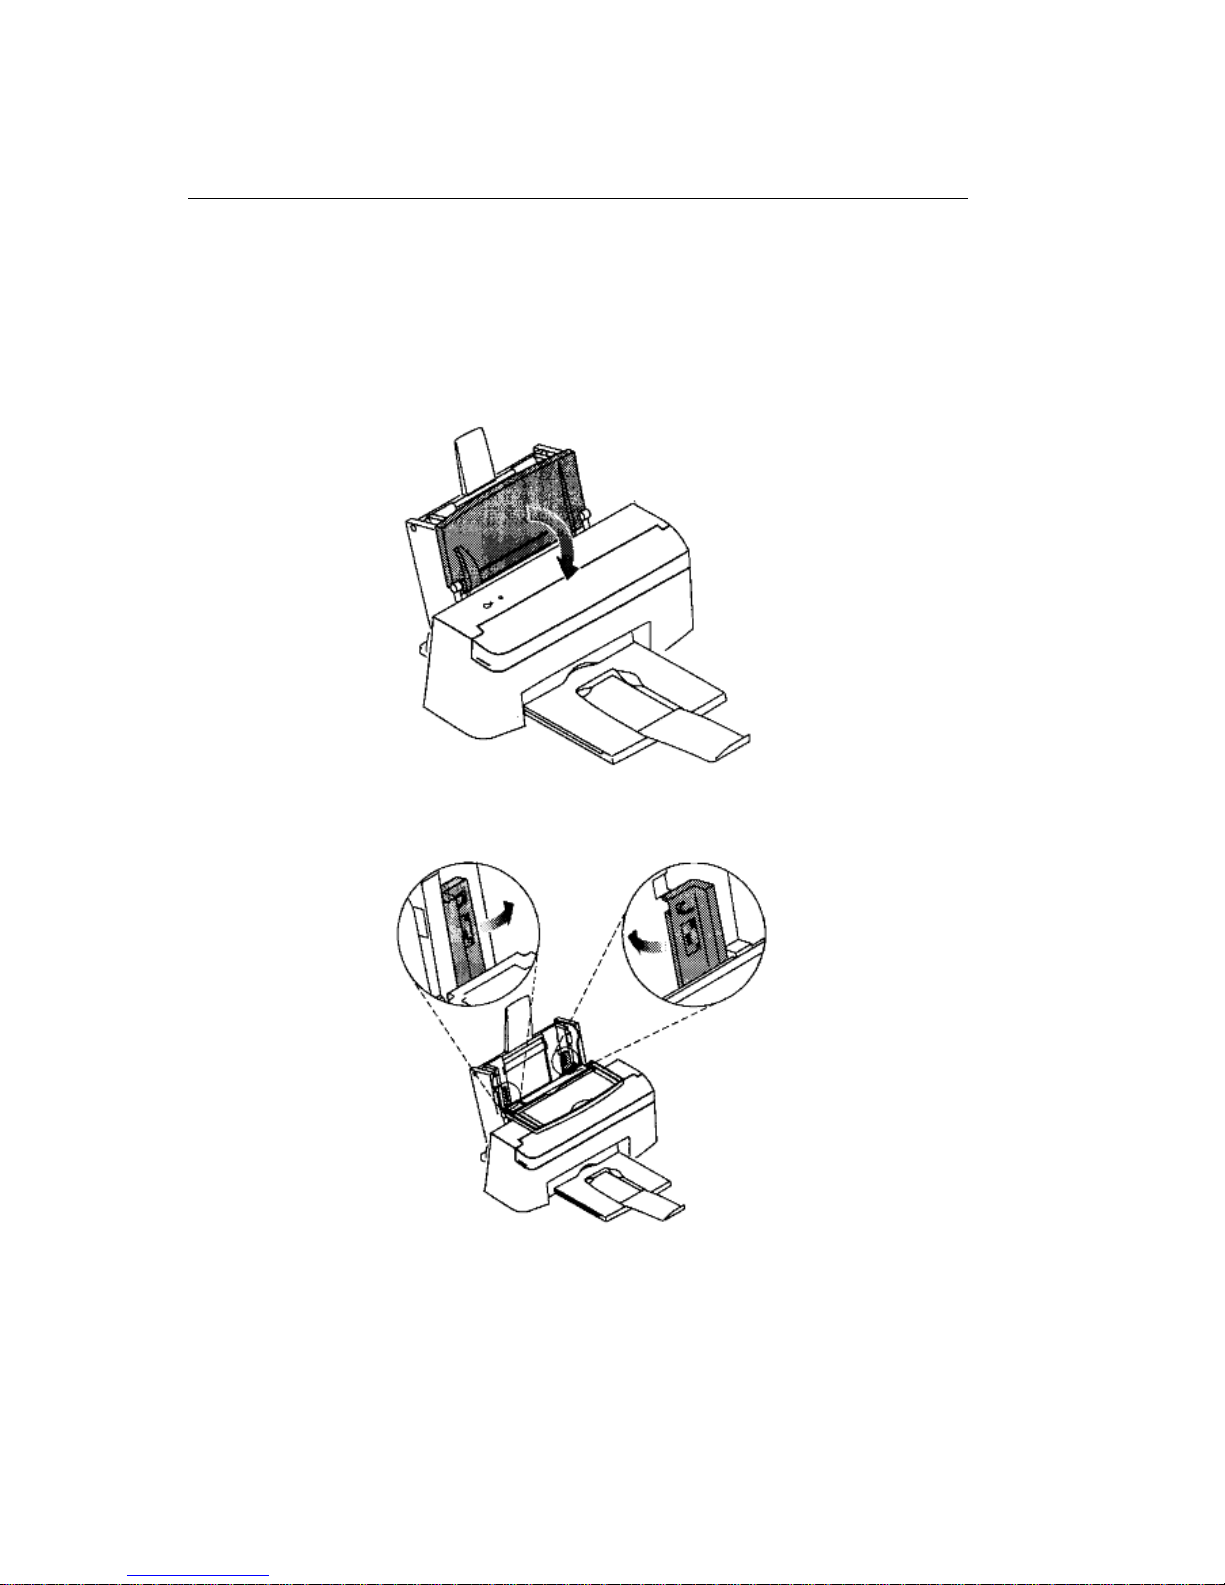
Load Envelopes and Index Cards
Load Envelopes and Index Cards
Note: For best results, use the sheet feeder to print on index cards.
Depending on the thickness of your envelopes, the sheet feeder can hold up to 15 envelopes
or index cards.
1) Open the paper load door.
Remove any paper in the sheet feeder.
2) Turn both the left and the right envelope guides to the envelope load position by
pressing on the envelope symbol area to rotate the guides inward until they snap into
position.
3) Place the envelopes or index cards in the sheet feeder behind the envelope guides.
OJ2010 ( 96-02-07 )
Page 39
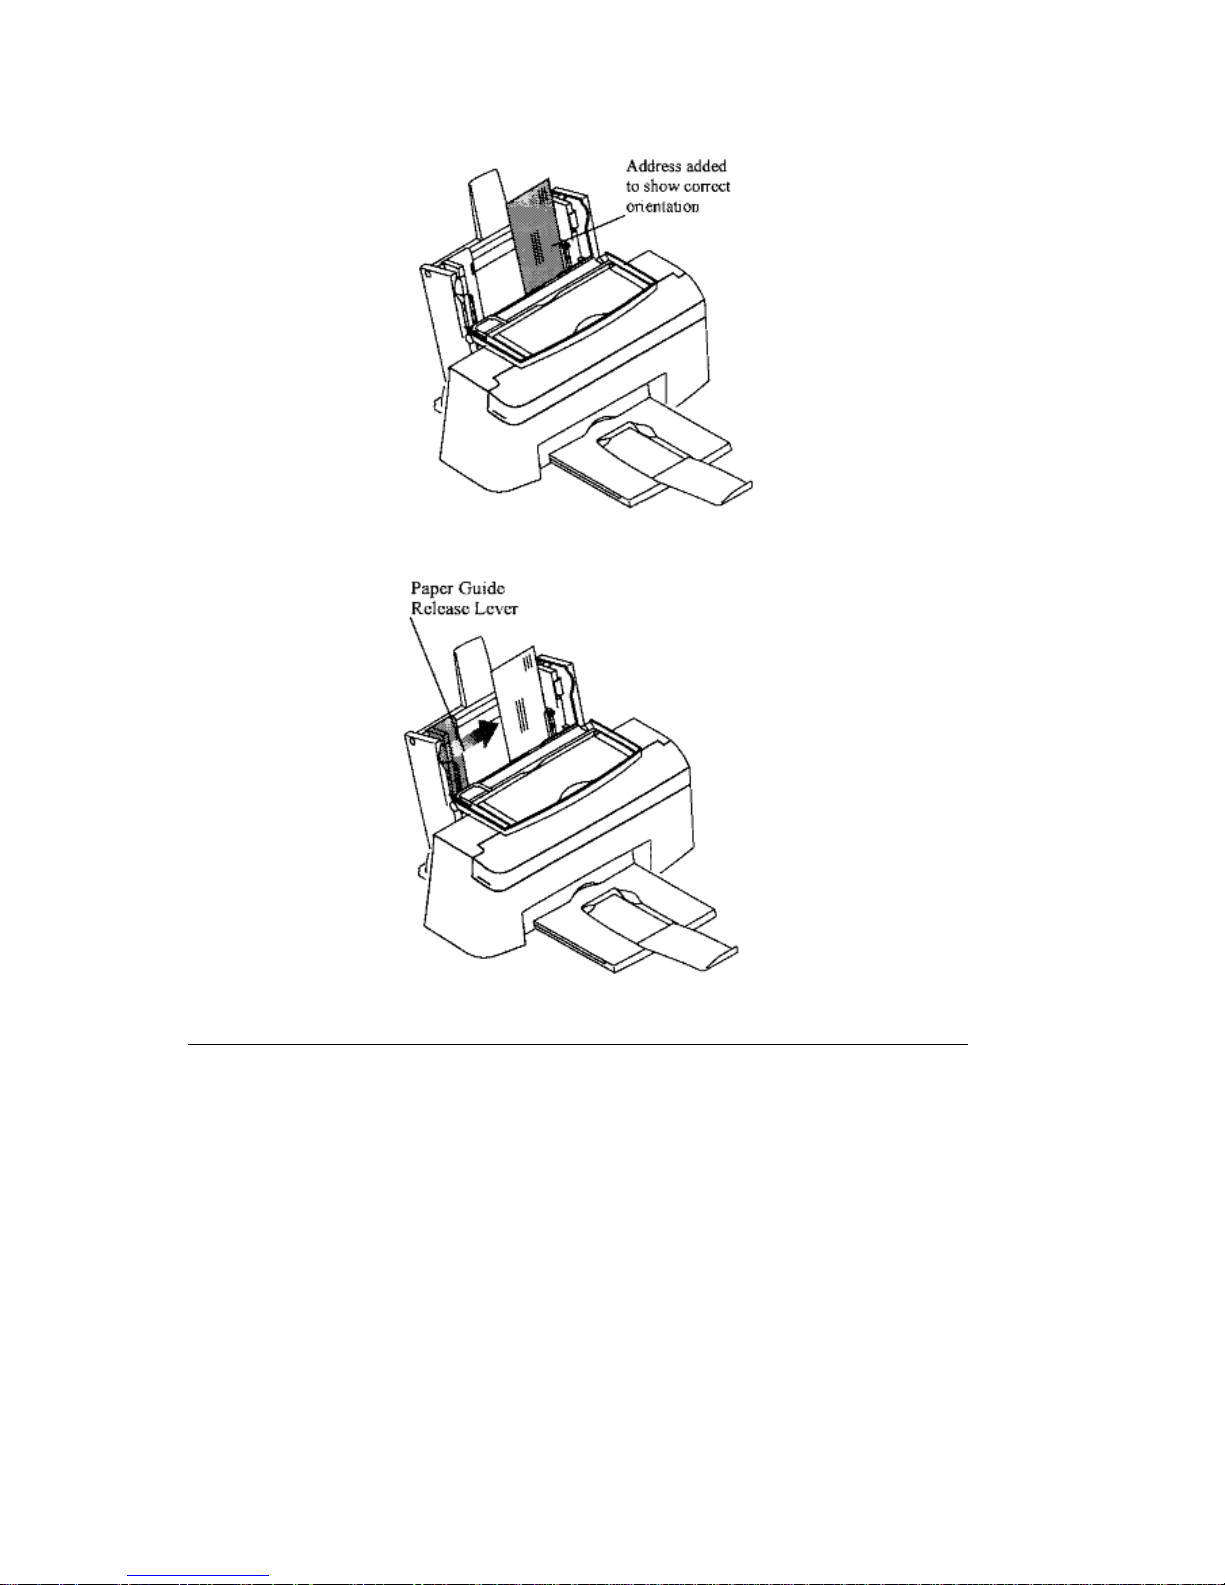
4) Squeeze and hold the left paper guide release lever while moving the paper guide against
the left side of the envelopes or index cards.
Note: Return the envelope guides to their original position when not printing envelopes or
index cards.
OJ2010 ( 96-02-07 )
Page 40
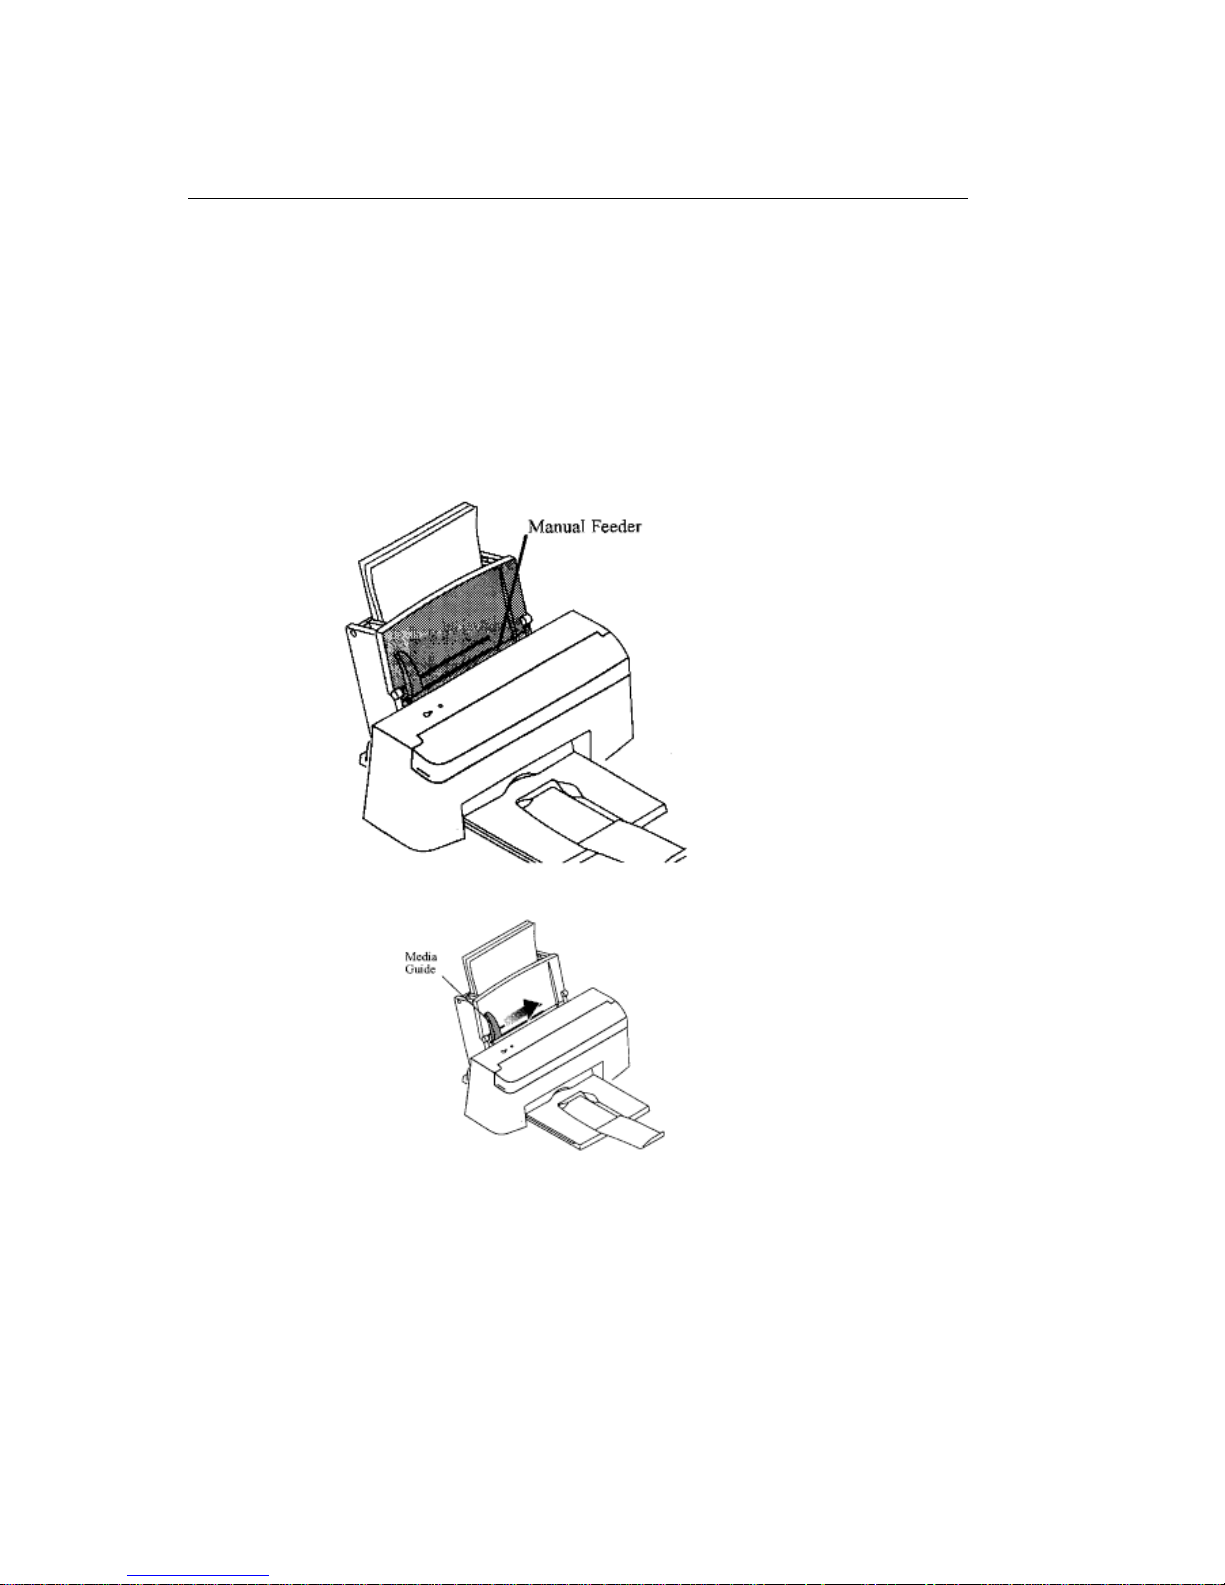
Load the Manual Feeder
Load the Manual Feeder
You can print from the manual feeder without removing paper or envelopes from the sheet feeder.
The manual feeder allows you to print one sheet at a time.
The manual feeder also allows you to use stan-dard and nonstandard paper sizes.
Note: Do not load paper until you are prompted to do so
.
To feed paper, transparencies, sheets of labels, envelopes, or index cards one at a time:
1) Locate the manual feeder.
2) Slide the media guide to the correct paper/envelope/card size.
3) Double click the OKI
JET 2010
Printer icon (in the OKI
JET 2010
Program Group) and
click the Paper tab. Then select Manual Feed in the Paper Source box and exit the
setup program.
4) Send the print job from your applica-tion software.
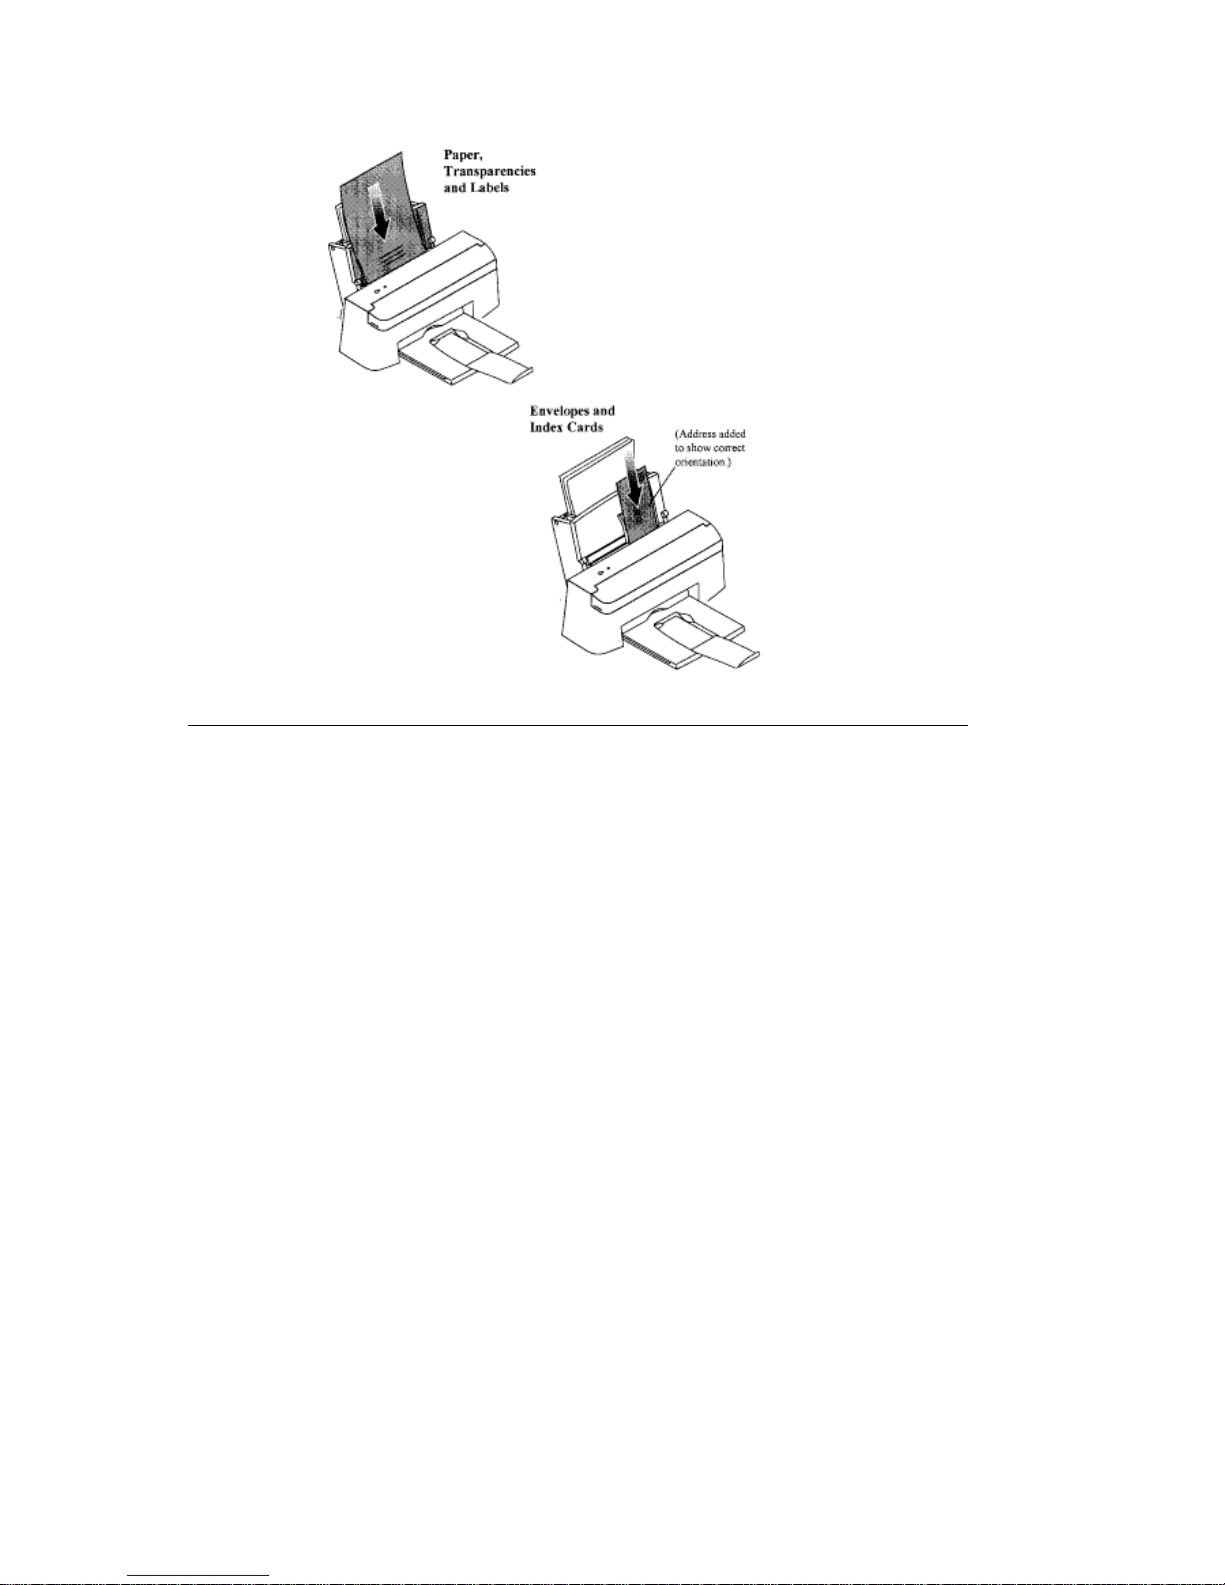
5) When prompted, insert the paper, transparency, label sheet, envelope, or index card
into the manual feeder as shown.
- Insert against the right edge of the manual feeder slot.
- Insert with preferred print side facing you.
- Insert letterhead with the top of the page pointed down.
OJ2010 ( 96-02-07 )
Page 41
OJ2010 ( 96-02-07 )
Page 42

Chapter 7
Maximum Benefit from your Print Cartridges:
To get the maximum benefit from your print cartridges:
Keep the print cartridges in their packaging until you are ready to install them: this prevents
the printhead from drying out.
Never refill the print cartridges.
Refilling empty print cartridges with unapproved ink will invalidate your warranty.
Incompatible inks can cause damage to the printhead or to the printer.
Note: For best results, use Okidata supplies with the printer.
Store the print cartridge in the same environment as the printer.
Always keep the print cartridges in the print carriage, except to replace or clean them.
Always leave the print carriage in the parked position (at the far right end of the printer) when
not printing: this prevents the printheads from drying out.
If you do remove the print cartridges, replace them immediately: they will not print correctly if they
are left exposed to air for an extended period.
Each print cartridge includes both the ink supply and the printhead. When you replace the print
cartridge, you also replace the printhead.
Note: When the
Ink Low
message appears for the black cartridge, you have enough ink to print
approximately 150 more pages of text.
Note: When the
Ink Low
message appears for the color cartridge, you have enough ink to print
approximately 30 pages.
Print Cartridge Okidata Part
Number
Black 52109301
Color 52109302
To purchase print cartridges directly from Okidata, call 1-800-OKIDATA.
OJ2010 ( 96-02-07 )
Page 43
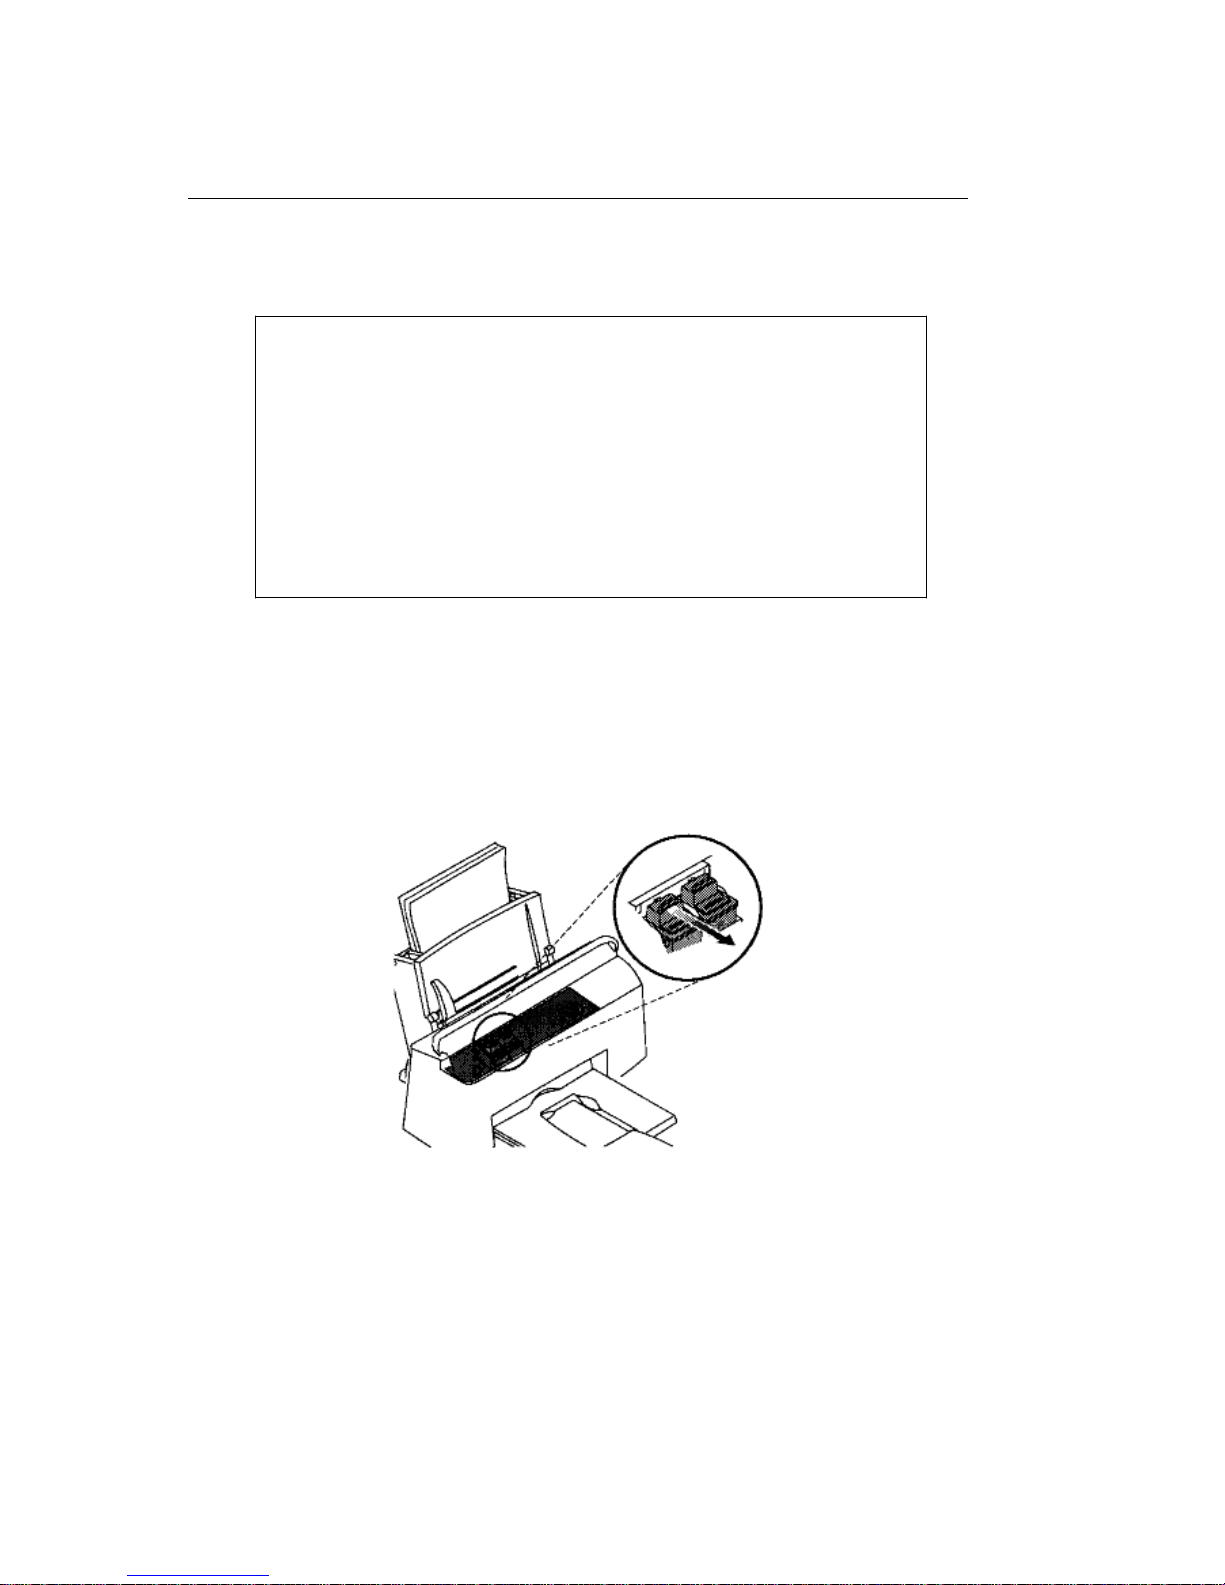
Replace The Print Cartridges
Replace The Print Cartridges
Be sure to perform all print cartridge replacement steps from start to finish without interruption.
If you are interrupted when replacing print cartridges and leave the print
cartridge carrier in the load position for more than 3 minutes, the carrier
automatically returns to the far right position. The Cartridges tab remains
displayed on your screen.
- If you have not yet inserted the new cartridge, click
Cancel
and begin the
installation process again.
- If you have inserted the new cartridge, click
New Cartridge Installed
.
1) Turn the printer power on.
2) Open the printer access cover.
3) Double-click the OKI
JET
Printer Control icon.
4) Click the Cartridges tab.
5) Click
Install Black Cartridge
or
Install Color Cartridge
, depending on which cartridge
you are replacing.
The print cartridge carrier moves to the load position.
6) Pull the handle of the cartridge you are replacing toward you until it snaps free.
7) Lift the cartridge out of the printer. If youre removing and reinserting the same
cartridge, skip to step 10.
OJ2010 ( 96-02-07 )
Page 44
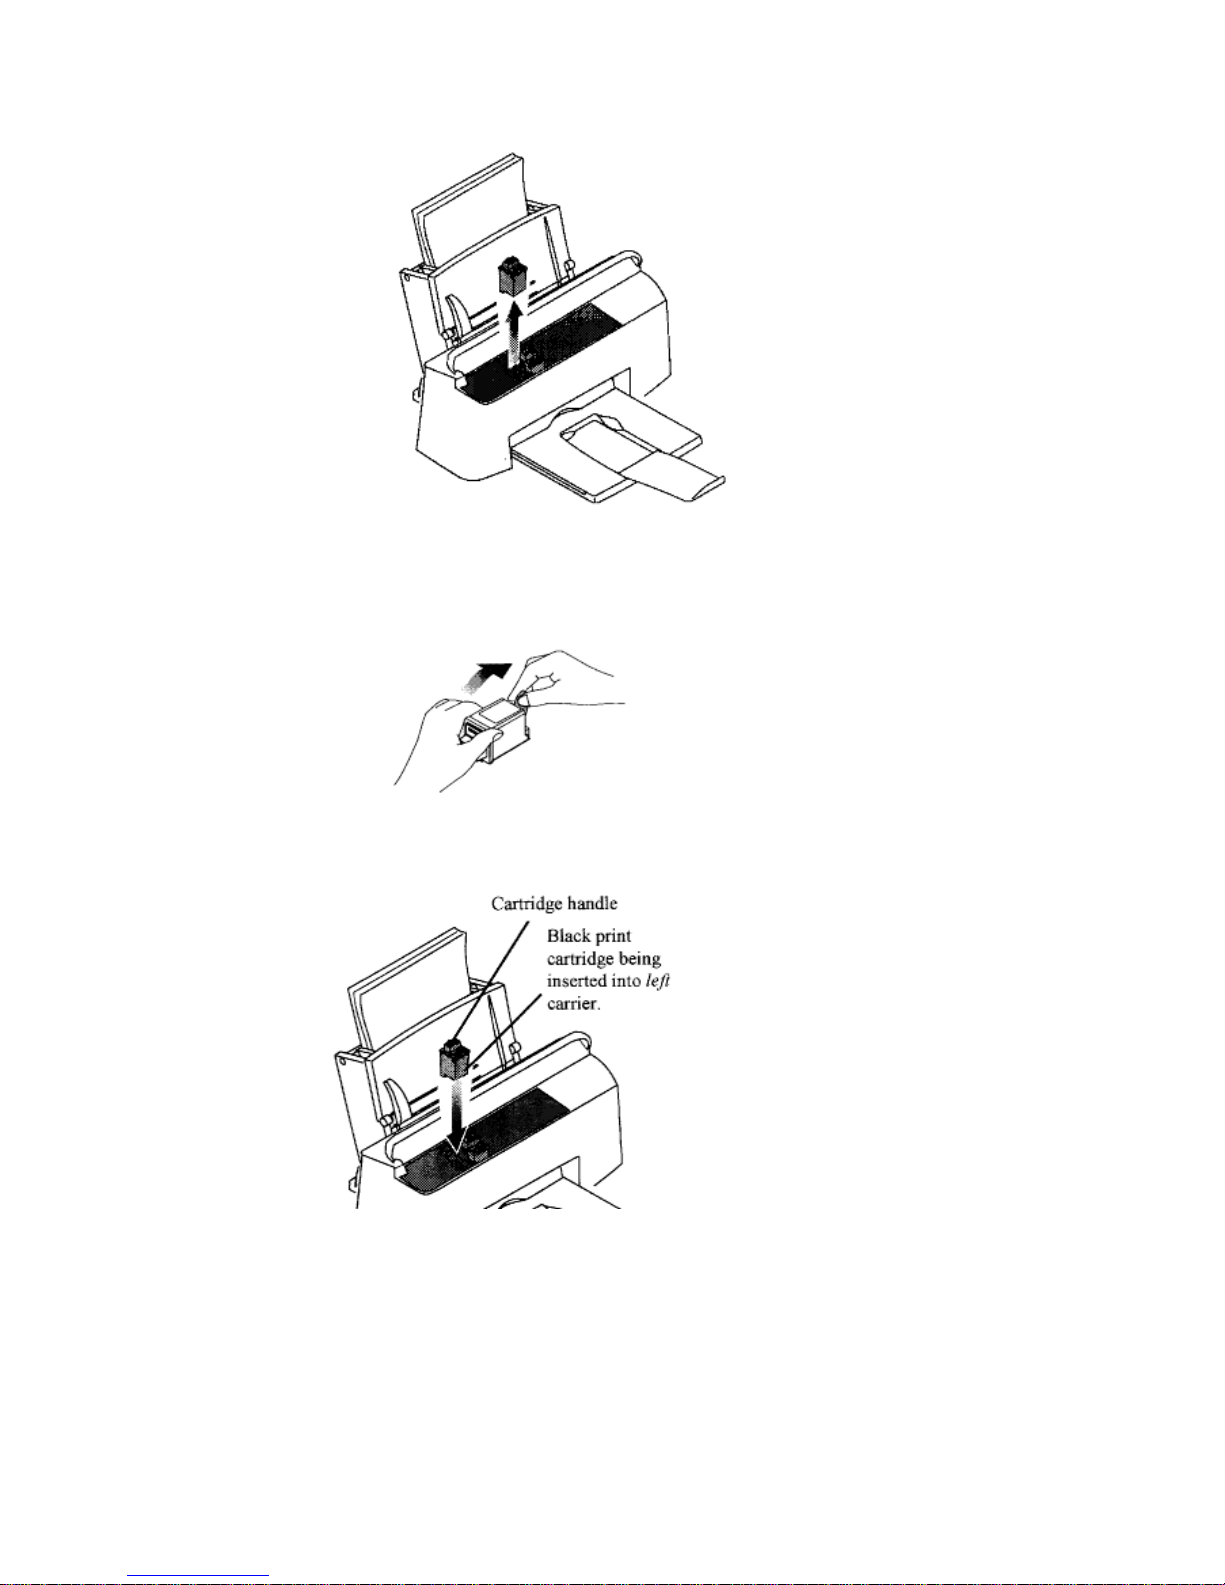
8) Remove the replacement print cartridge from its packaging.
Do not touch the copper-colored area!
Hold the cartridge by the plastic areas only.
9) Carefully remove the tape covering the printhead.
Be sure to remove all the tape.
Do not touch the copper-colored area!
10) Insert the cartridge in the carrier
(black print cartridge goes on left (match black handle to
black strip on carrier); color print cartridge goes on right (match green handle to green strip
on carrier).
11) Push back firmly on the handle until the cartridge snaps into place.
If the cartridge moves loosely in the carrier, it is not locked in place: repeat this step.
12) If you are installing a new print cartridge, click
New Cartridge Installed
, then go on to
step 13.
If you are removing and reinstalling the same print cartridge, click
Old Cartridge Installed
,
and you are done!
13) Click
Align Cartridges
.
The Align Cartridges dialog box appears on your screen and the printer prints a test page
OJ2010 ( 96-02-07 )
Page 45

with horizontal patterns and vertical patterns. Each pattern has a number located beneath it.
14) Refering to the printed test page, note the patterns that are aligned correctly.
15) Enter the number located under each properly aligned pattern into the boxes on the
screen.
See Align the Printheads on page 48 (
) for a sample alignment test pattern.
16) Click
OK
.
Close the printer access cover.
OJ2010 ( 96-02-07 )
Page 46

Dispose of Used Cartridges
Dispose of Used Cartridges
Do not shake the cartridge: the remaining ink can leak!
Before you discard the used print cartridge, put it in a leak-proof bag so any remaining ink
does not leak out.
OJ2010 ( 96-02-07 )
Page 47
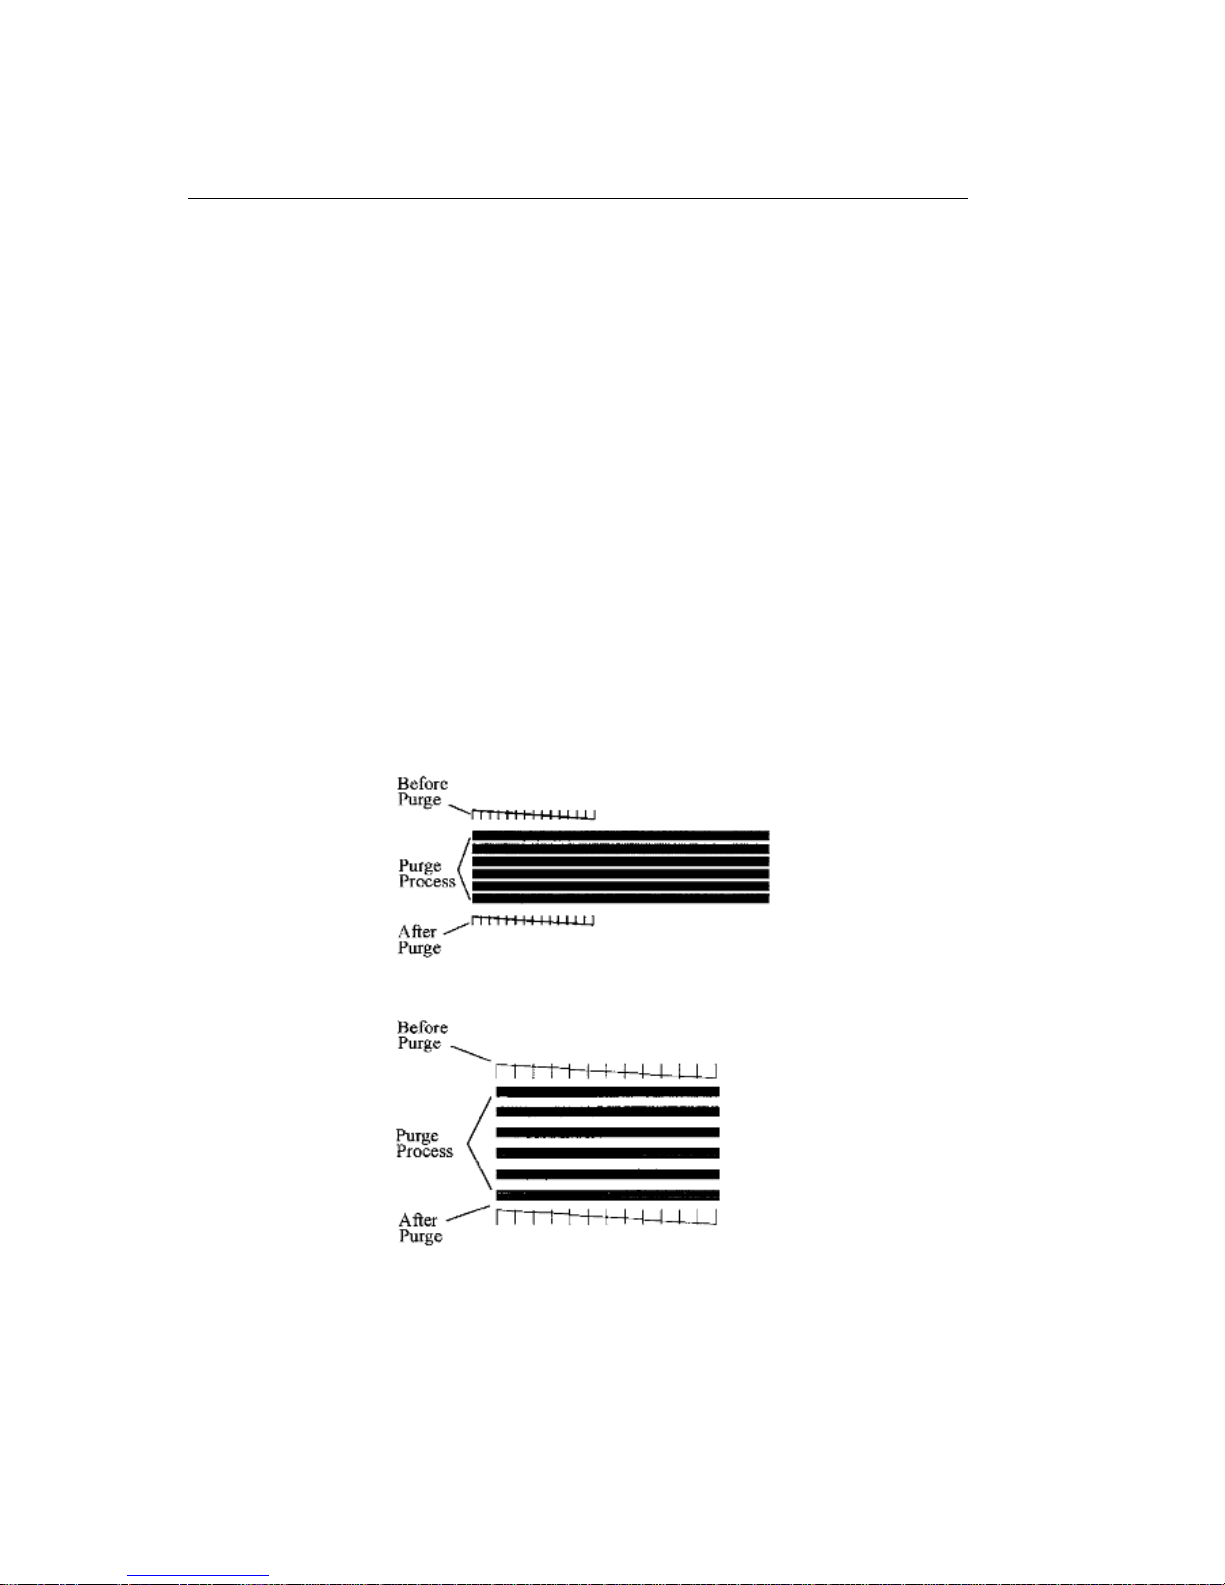
Print the Nozzle Test
Print the Nozzle Test
The Nozzle Test pinpoints and cleans (purges) any clogged nozzles in the print cartridges.
After the test is complete, a test line prints so you can see if the cleaning process was
successful.
Use this test
- if you suspect the nozzles are clogged
- or -
- if characters are not printing completely.
To run the Nozzle Test:
1) Load paper in the sheet feeder.
2) Open the OKI
JET 2010
printer control dialog box.
3) Click the Cartridges tab.
4) Click
Clean Print Nozzles
.
The printer feeds a sheet of paper and prints the nozzle test pattern.
5) Examine the test pattern.
This example shows a test pattern of all nozzles functioning correctly on the black print
cartridge.
A comparable example for the color cartridge (actual pattern will be in color):
6) Compare the diagonal line at the top and bottom of the test pattern.
- Look for a break in the diagonal line. A break in the line shows clogged nozzles.
- If the bottom line shows improvement, run the test again.
- If the improvement continues, run the test a third time.
- If all nozzles are not printing after running the test three times, continue with the next
step.
7) If the print quality still has not improved, remove and reinstall the print cartridge
OJ2010 ( 96-02-07 )
Page 48

(see page 40 ( )).
8) Repeat the Nozzle Test.
9) If the line is still broken, wipe the nozzles and contacts (
).
OJ2010 ( 96-02-07 )
Page 49
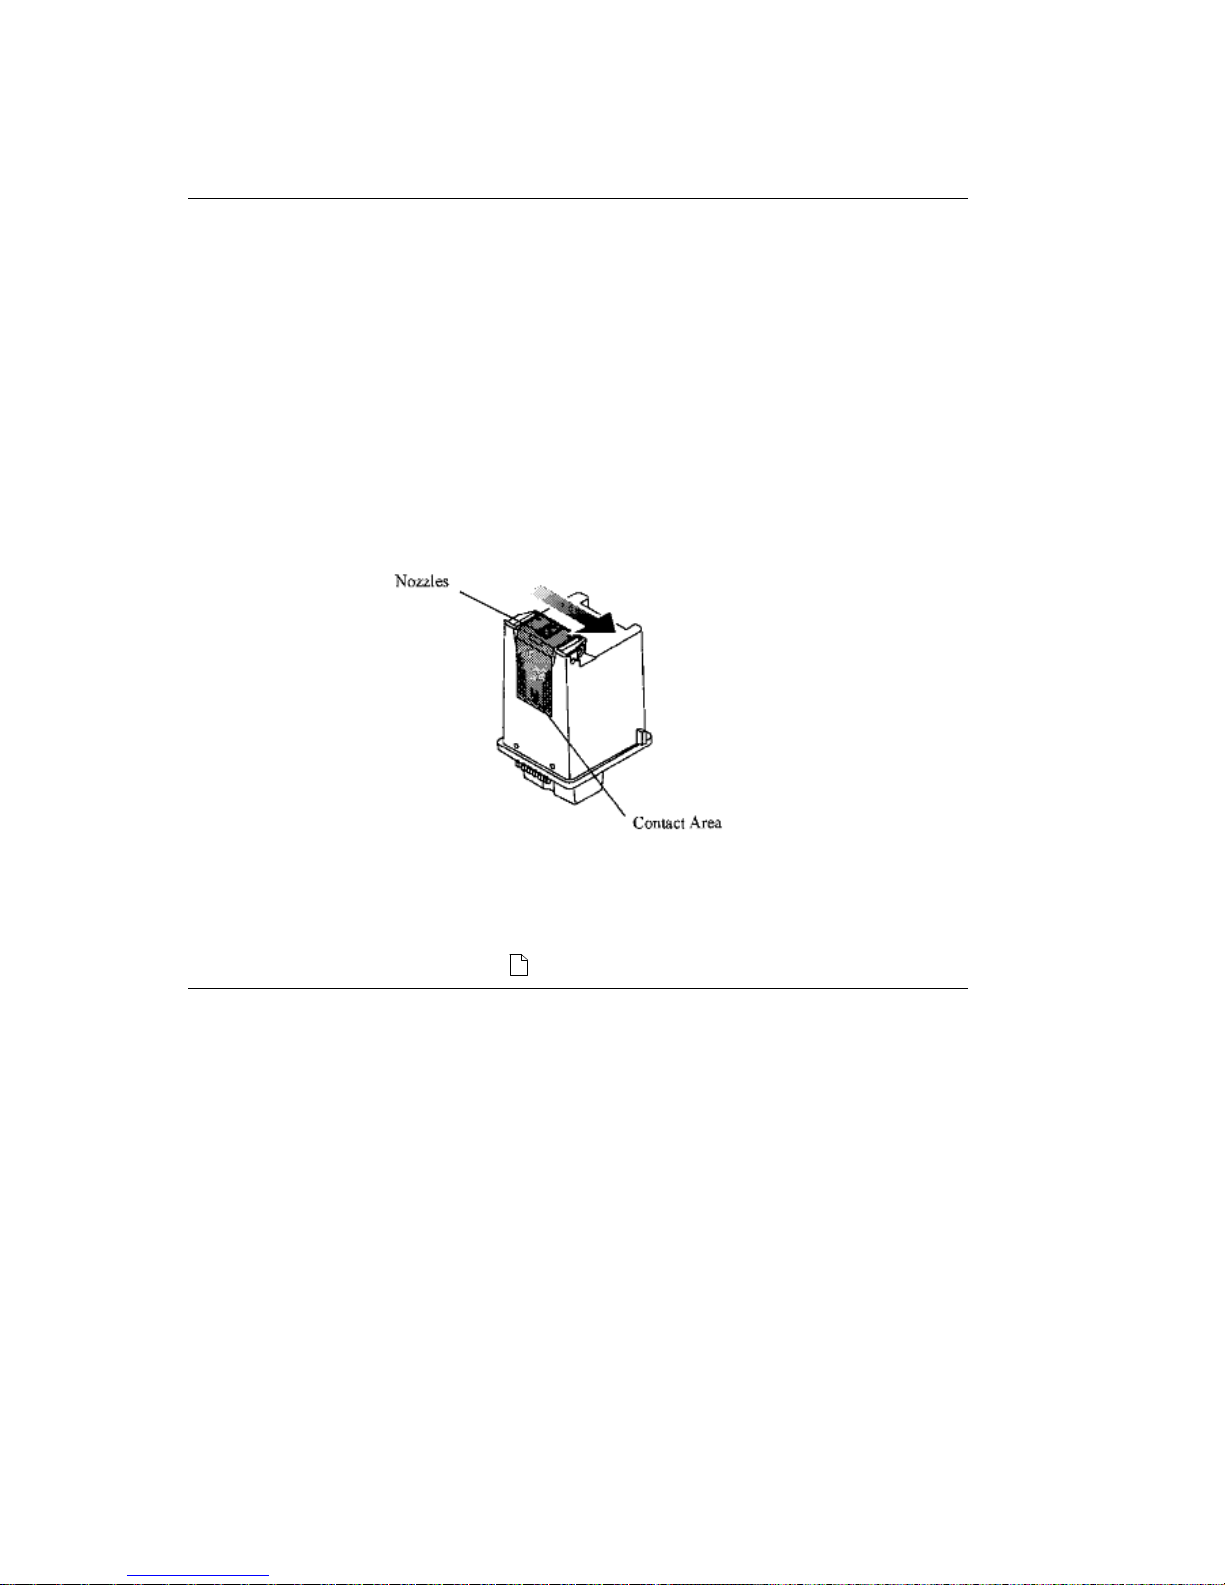
Wipe the Nozzles and Contacts
Wipe the Nozzles and Contacts
If the print quality does not improve after repeating the nozzle test three times, there may
be dried ink on the print cartridge nozzles. To clean it off:
1)Remove the print cartridge (see steps 1 through 7 on page 40).
2)Use a clean cloth, dampened with water only, to gently clean the entire copper colored
area, including the nozzles and contacts.
When cleaning the color print cartridge, wipe the nozzles in one direction so the colors
do not mix.
Do not touch the copper-colored area with your fingers!
To dissolve any dried ink, hold the damp cloth against the nozzles for about three seconds.
Gently blot and wipe dry.
3)Allow the copper-colored area to dry.
4)Reinstall the cartridge and repeat the NozzleTest.
5)If the line is still broken, clean the contacts inside the print cartridge carrier in your
printer: to do this, go to step 4 (
) on the next page.
OJ2010 ( 96-02-07 )
Page 50
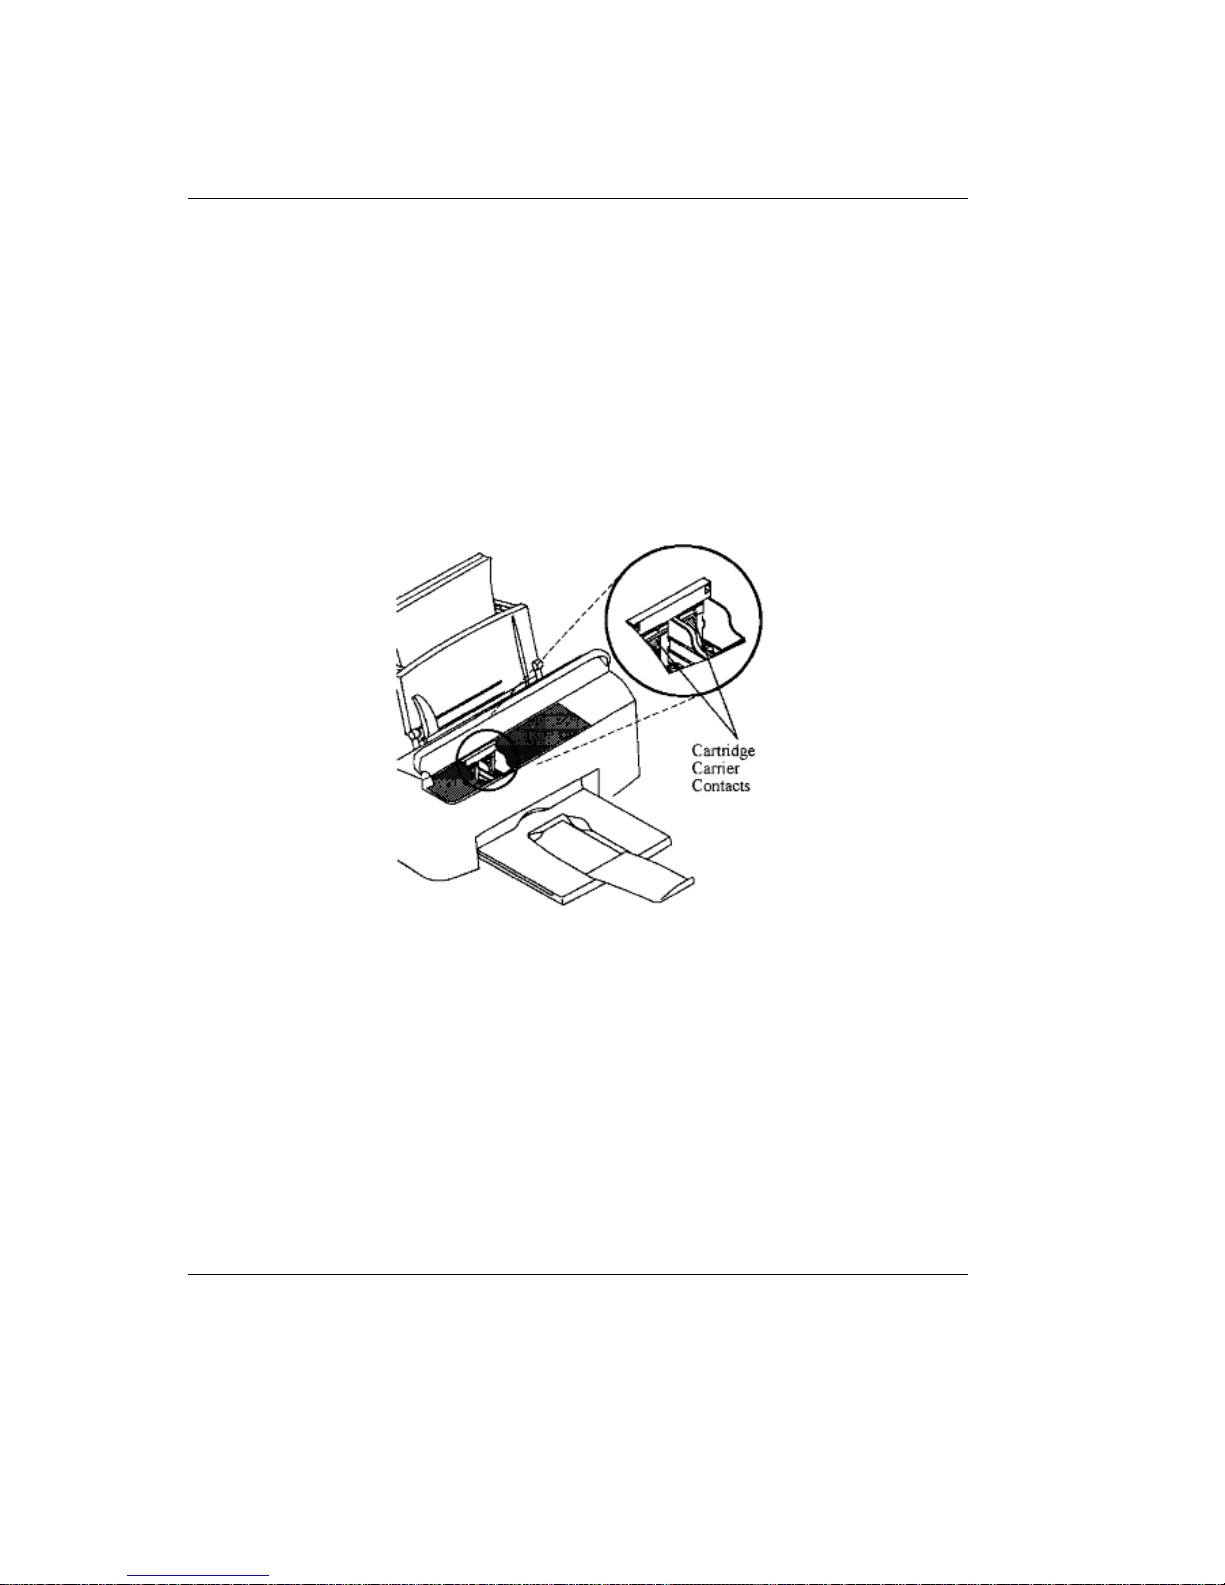
Clean the Carrier Contacts
Clean the Carrier Contacts
1)Open the OKI
JET 2010
printer control dialog box.
2)Click the Cartridges tab.
3)Click
Install Black Cartridge
or
Install Color Cartridge
to move the print cartridge carrier
to the load position.
4)Unplug the printer power cord from the electrical outlet. DO NOT TURN THE PRINTER
POWER OFF before you unplug it.
This will force the print cartridge carrier to remain in the load position.
5)Remove the cartridges.
6)Use a CLEAN, DRY CLOTH to clean the contacts inside the cartridge carrier in the printer.
7)Replace the cartridges.
8)Plug the printer power cord into an electrical outlet.
9)Turn the printer power on.
10) Click Old Cartridge Installed
.
Do NOT click New Cartridge installed: if you do, you'll reset the ink counter!
11) Test the cartridges by clicking
Clean Print Nozzles
on the Cartridges tab.
If print quality has not improved after this cleaning process, replace your print
cartridge. If print quality still does not improve, your printer may require service.
OJ2010 ( 96-02-07 )
Page 51
Align the Printheads
Align the Printheads
Printhead alignment is usually performed after installing a new print cartridge. However, if the
black portions of a graphic or text do not align properly with the color portions, you need to
realign the print-heads.
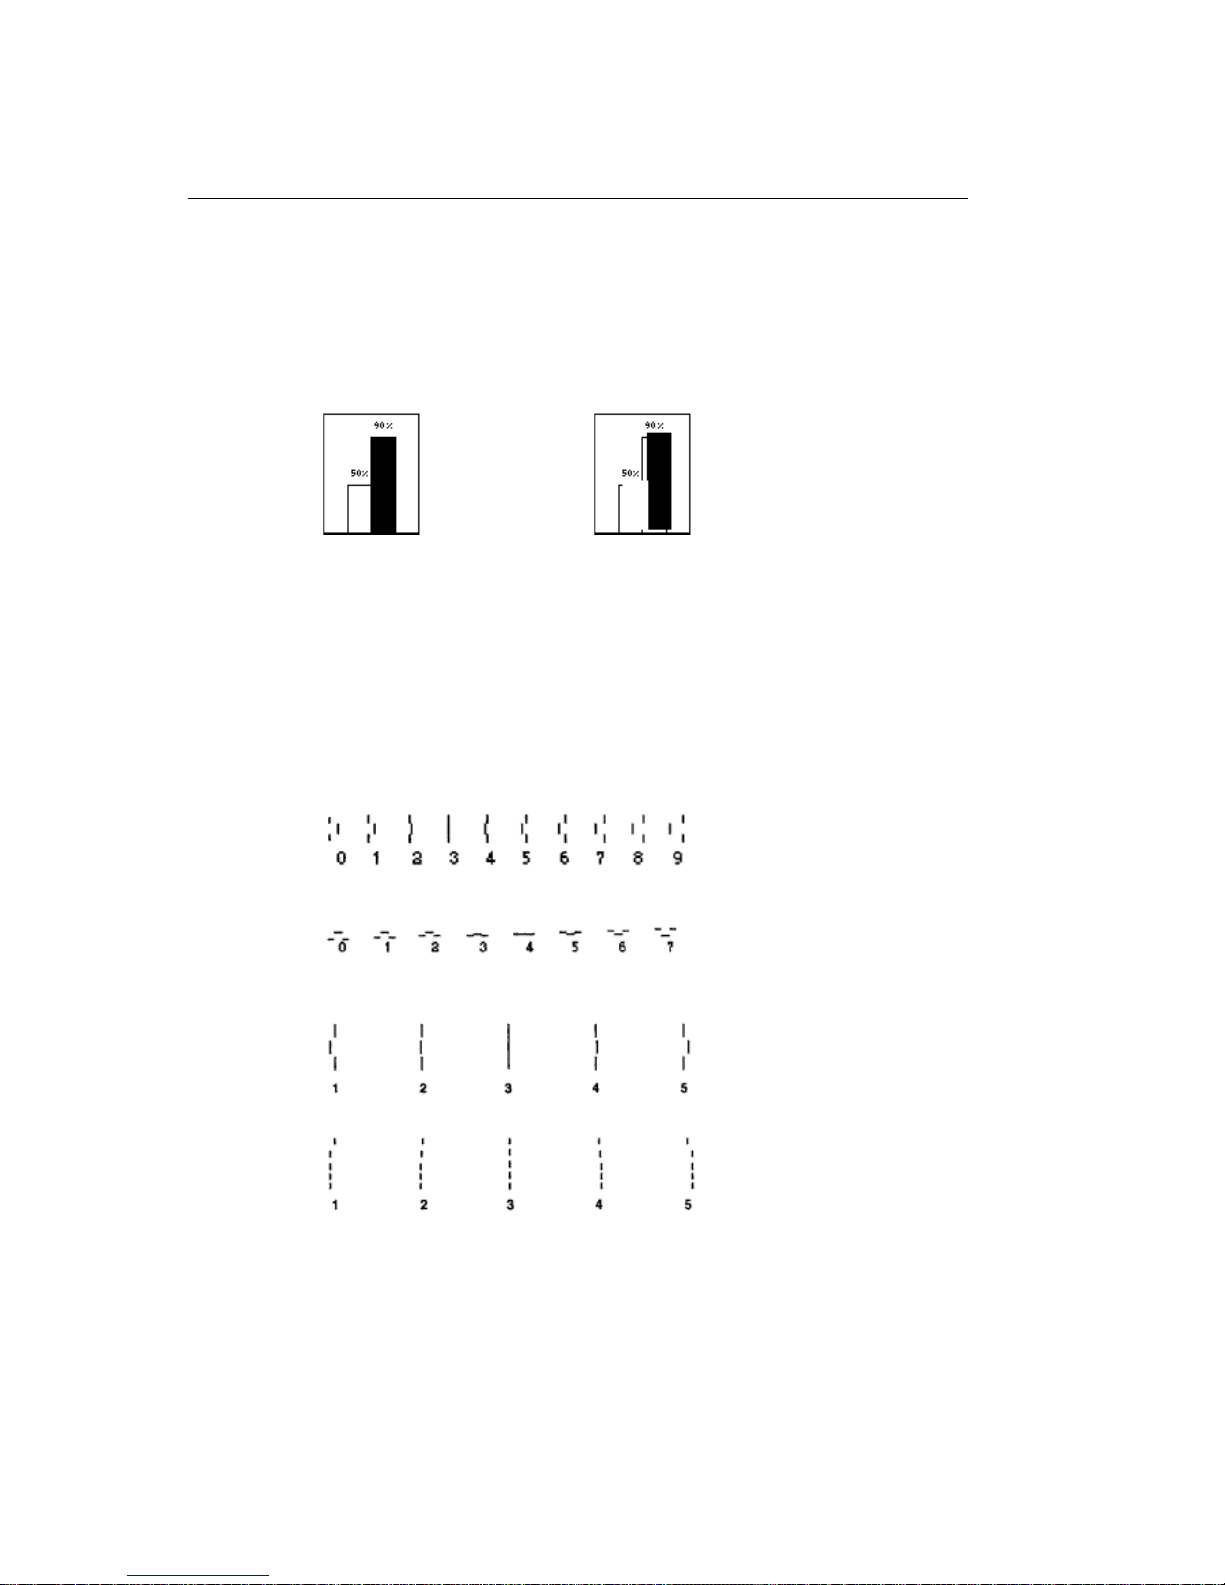
An example of aligned and misaligned printheads follows:
Aligned Misaligned
To align the printheads:
1) Open the OKI
JET 2010
printer control dialog box.
2)Click the Cartridges tab.
3)Click Align Cartridges
.
The Align Cartridges tab appears on your screen and the printer prints a test page with
horizontal patterns and vertical patterns. Each pattern has a number located beneath it.
An example follows:
Horizontal Alignment of Heads
Vertical Alignment of Heads
Bi-directional Alignment Pattern (Black)
Bi-directional Alignment Pattern (Color)
4)Using the printed test page, select the number of the patterns that are aligned correctly.
In our example
3 is the correct choice for Horizontal Alignment
4 is the correct choice for Vertical Alignment
3 is the correct choice for the Bi-directional Alignment
for both black and color.
5)Enter the number located under each pattern into the boxes on the Align Cartridges tab.
OJ2010 ( 96-02-07 )
Page 52

6)Click OK.
OJ2010 ( 96-02-07 )
Page 53

Chapter 8
Problem Solving (Troubleshooting)
Problem Solving (Troubleshooting)
Use this section to identify and solve printer problems.
Additional troubleshooting information can also be found in the On-Line Help (
) provided
with your printer control software.
Troubleshooting Tables
- Poor Print Quality ...... (
)
- Printing Problems ...... (
)
- Print Media Problems ..(
)
OJ2010 ( 96-02-07 )
Page 54
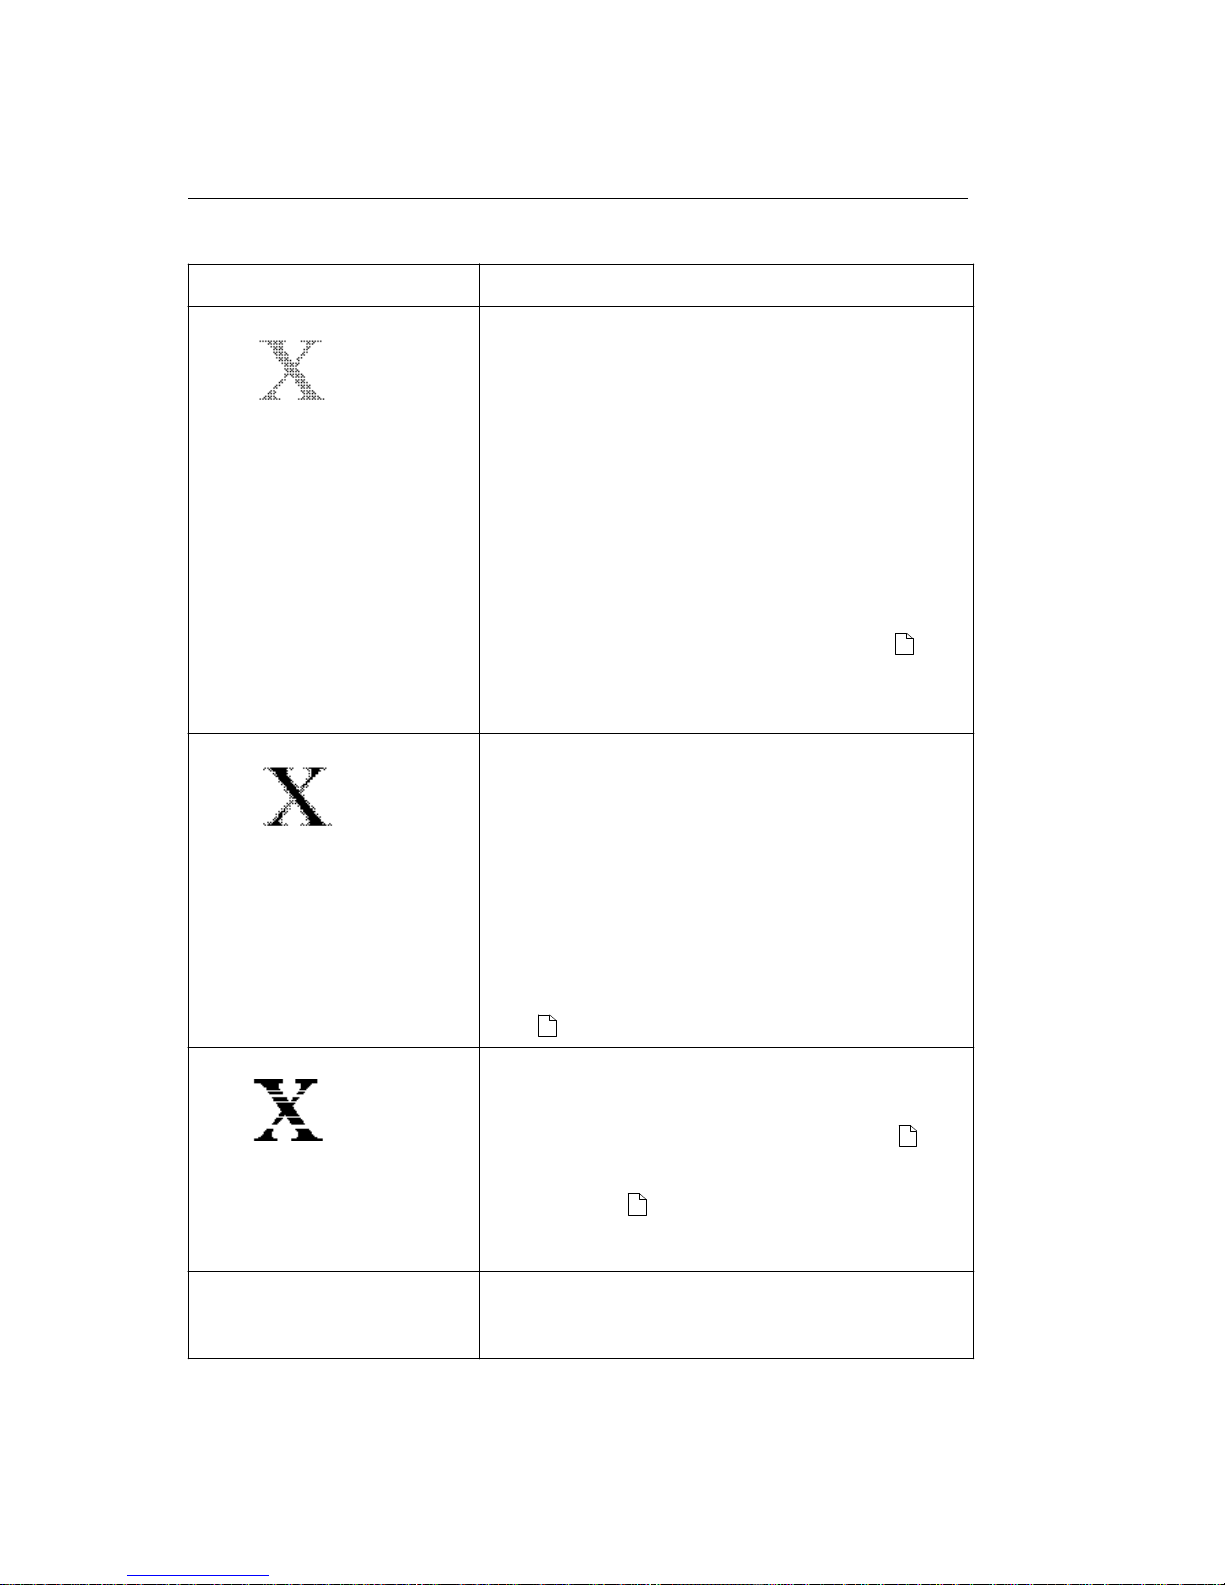
Poor Print Quality
Poor Print Quality
Problem Action
Light or blurred characters
In the printer setup dialog box:
Click the Media/Quality tab, then
- change the Print Quality setting to something other
than
Draft.
- and/or turn the Ink Saver setting off.
- Click the Image Settings tab, then make a Brightness
and Contrast adjustment.
Make sure you are using the correct type of paper.
Check print cartridges:
- Make sure the cartridges are installed correctly.
- Clean the nozzles: see Print the Nozzle Test (
).
- Check ink level (click Cartridges tab in the OKI
JET
2010
printer control dialog box).
Smudged or dark characters
In the printer setup dialog box, click the Media/Quality
tab, then change the Ink Saver setting to Medium or
Maximum.
Paper:
- Make sure you are using the correct type of paper.
- Make sure the paper is straight and unwrinkled.
- Let ink dry before handling paper.
In the printer setup dialog box, click the Media/Quality
tab, then change Print Quality to Draft.
Clean the print cartridge nozzles: see Print the Nozzle
Test (
).
Characters with white lines
Print cartridges:
- Check ink level (click Cartridges tab in the OKI
JET
2010
printer control dialog box).
- Remove and reinstall the print cartridge: see (
)
pages 40-43.
- Clean the print cartridge nozzles: see Print the
Nozzle Test (
).
If printing on transparencies, try changing the fill pattern
in your application software.
Solid black areas on
transparencies contain white
streaks
Try using a different fill pattern in your application
software.
OJ2010 ( 96-02-07 )
Page 55
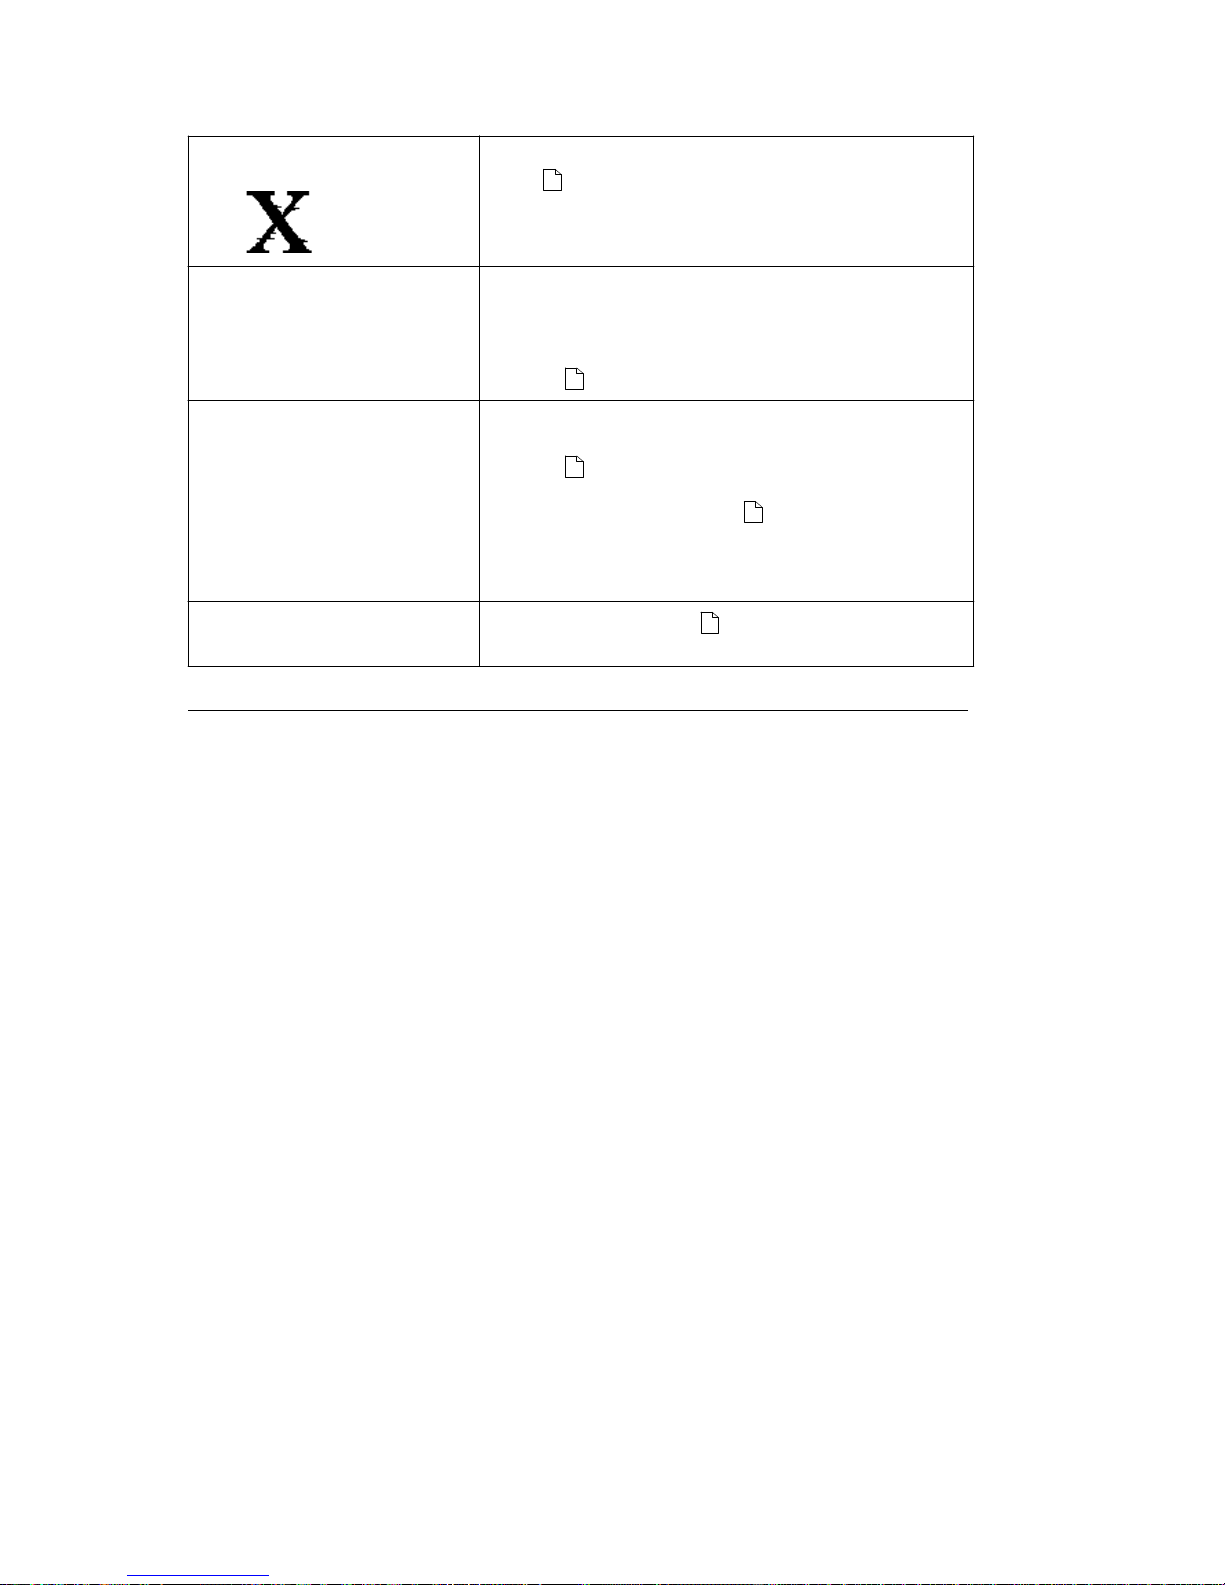
Improperly formed or
misaligned characters
Clean the print cartridge nozzles: see Print the Nozzle
Test (
).
Characters do not align
correctly at left margin
- Make sure you do not have hard-coded spaces at the
left margin.
- Clean the print cartridge nozzles: see Print the
Nozzle
Test (
).
Vertical straight lines are not
smooth in tables, borders, and
graphs
- Clean the print cartridge nozzles: see Print the
Nozzle
Test (
).
- If you are using high speed mode, perform the
printhead alignment tests: (
).
- In the printer setup dialog box, click the
Media/Quality
tab, then turn off the High Speed option.
Black portions of graphic do not
align with color portions
- Align the printheads: ( ).
OJ2010 ( 96-02-07 )
Page 56
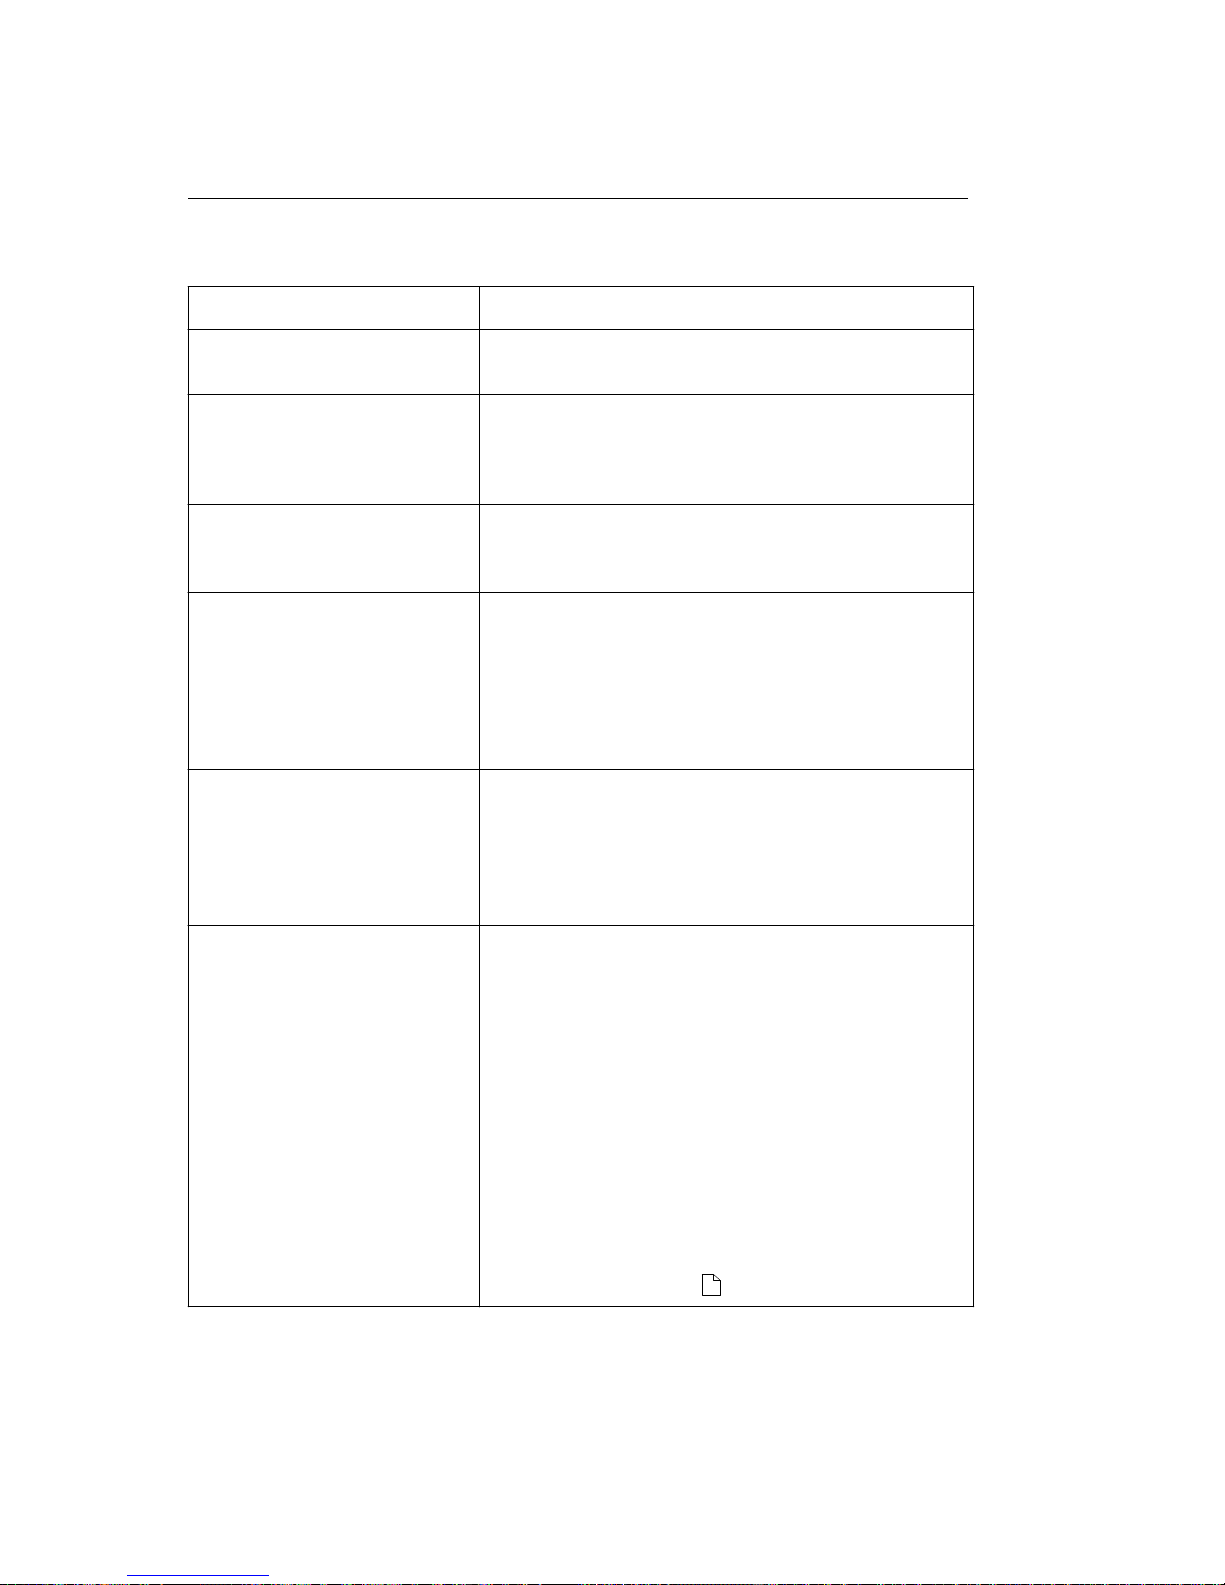
Printing Problems
Printing Problems
Problem Action
Printer has missing or damaged
parts
- Contact your service dealer or call 1-800-OKIDATA.
Power is turned on at a power
strip but the printer power light
is not on
- Press the printer power switch.
- Make sure the printer power cord is plugged into the
printer and the electrical outlet.
- Make sure the electrical outlet is working.
The printer power light (next to
power switch) does not come on
when printer is powered on
- Make sure the printer power cord is plugged into the
printer and the electrical outlet.
- Make sure the electrical outlet is working.
Printer seems to be printing, but
no characters appear on the
paper
Make sure:
- The print cartridges are installed in the printer and are
locked into place.
- The tape was removed from the print cartridges
before
they were installed.
Old document prints with
different fonts
When you print a document that has been formatted for
a different printer, Windows may substitute different
fonts. Line breaks and page breaks may change also.
Check your document and make any necessary
changes, then save your changes for the next time you
print.
Printer power is on, but nothing
prints (no action from the
printer)
- Make sure the paper load door is closed.
- Make sure the interface cable is firmly inserted in the
printers interface connector.
- Check the printer status in the control software Spool
Manager. In the spool manager dialog box, click
Queue,
then make sure no check mark appears next to the
Hold
option.
- Try to print the test page (click Control tab in OKIJET
2010 printer control dialog box). If it prints, the printer
is
functioning properly. If you are printing from a
non-Windows based application, check your DOS
printer port settings, driver, and your application
settings: see page 25 (
).
OJ2010 ( 96-02-07 )
Page 57

Unexpected characters are
printed or characters are
missing
- Replace the parallel interface cable.
- You may be printing a DOS application with the wrong
printer driver selected. If you don't know if you are
printing from a DOS or Windows-based application,
press Alt + Enter. If the appearance of your screen
changes, its a DOS application: press Alt + Enter again.
For instructions to print from DOS applications (
), see
pages 25 -28.
Printer settings in the printer
dialog boxes or the DOS
Printing dialog box were not in
effect
Printer settings in your application sometimes override
settings in the printer dialog boxes. Make all printer
setting changes in your application if possible. Use the
printer dialog boxes to make changes only if your
application does not have that option.
Printer prints very slowly - Change print quality to Draft.
- In the printer setup dialog box, click the Media/Quality
tab, then click the High Speed option.
- Consider purchasing more memory for your personal
computer.
- In Windows, consider increasing the virtual memory
to
a larger value.
Note: Graphics print more slowly than text.
Printer power light is blinking
and a Service Error message
appears on your computer
screen
- Turn the printer off, then unplug the printer power
cord
from the electrical outlet.
- Remove any paper fragments, objects, or paper jams
in the printer.
- Plug the printer power cord into an electrical outlet
and
turn the printer back on.
- If the light continues to blink, the printer needs
service.
OJ2010 ( 96-02-07 )
Page 58
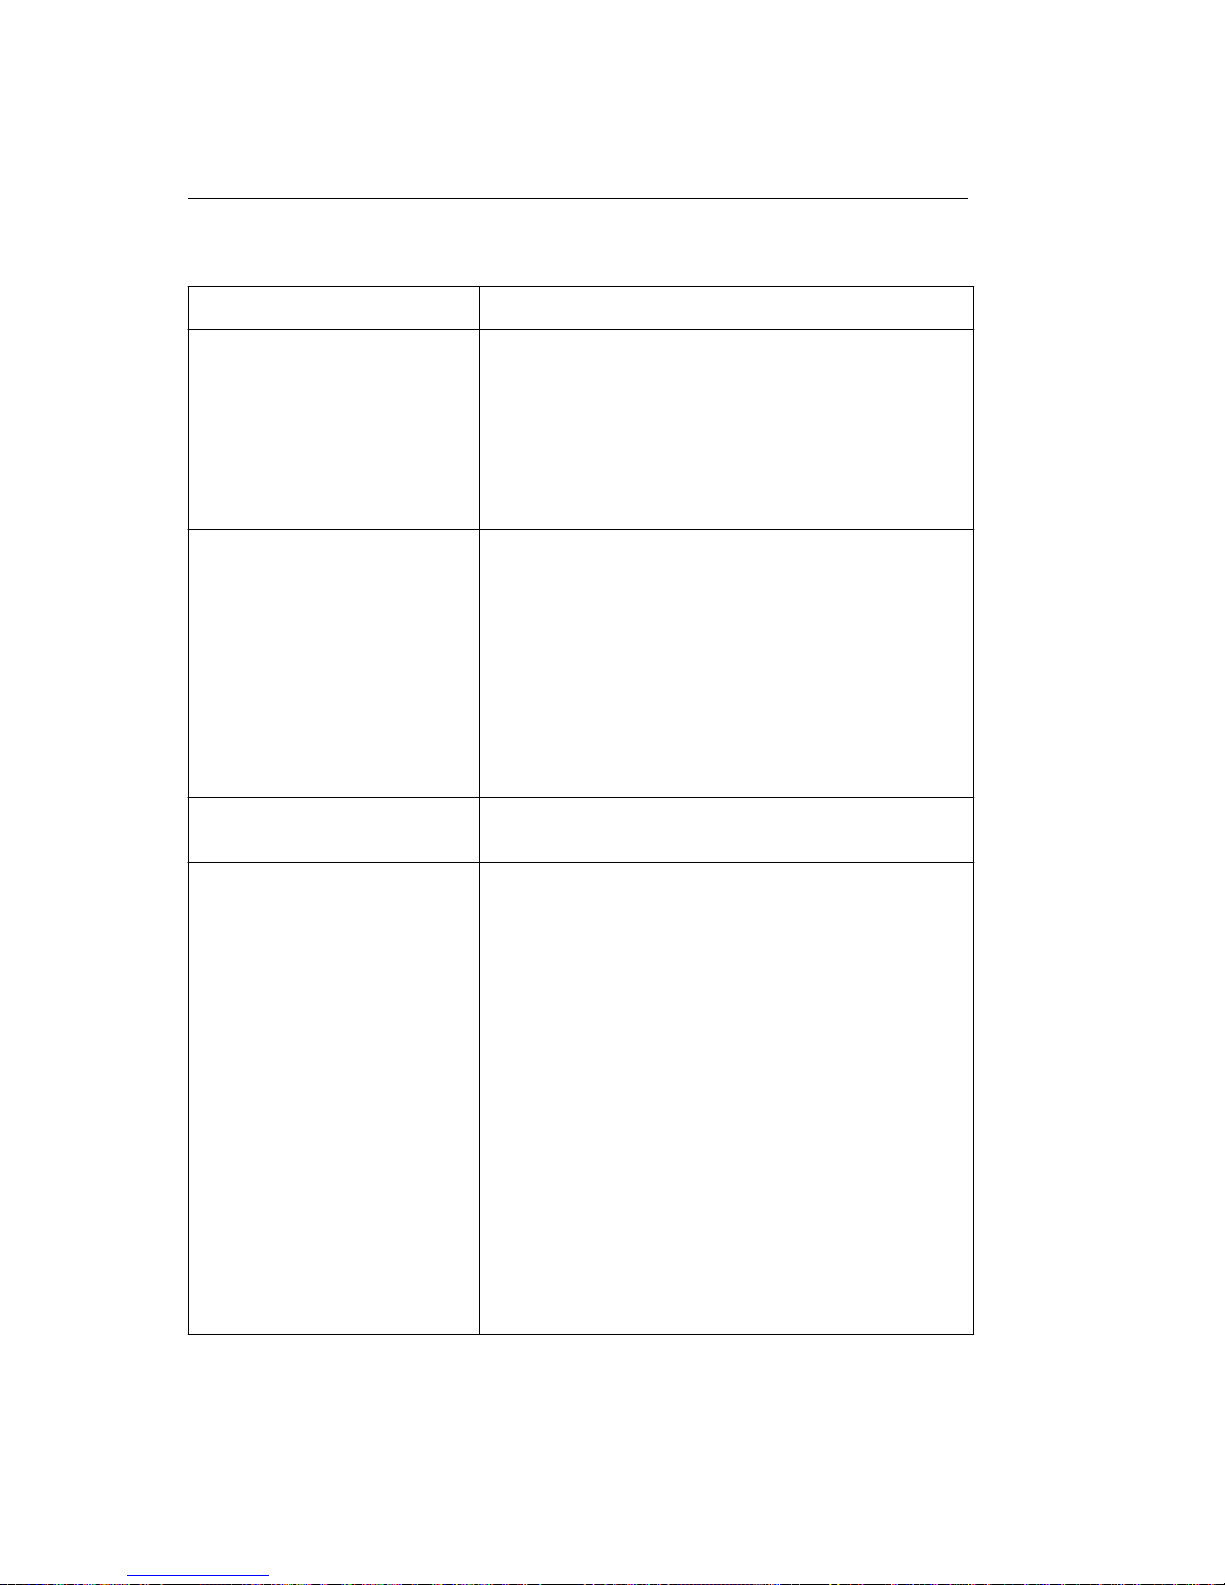
Print Media Problems
Print Media Problems
Problem Action
Paper Jam 1) Turn the printer power off and open the paper load
door.
2) Pull firmly on the paper to remove it.
3) Close the paper load door and turn the printer power
on.
4) Resend your print job. Start with the page on which
the
paper jam occured.
Paper sticks together/Multiple
sheets of paper feed
- Make sure there is not too much paper in the sheet
feeder.
- Make sure you are using the correct type of paper.
- Remove paper from the sheet feeder and flex or fan
it.
- Make sure the paper load door is closed.
- When loading paper, do not force the paper down
into
the printer.
Note: Humid conditions may cause some paper to stick
together.
Paper fails to feed Make sure the paper load door is closed.
Remove any obstructions inside the printer.
Paper skews or buckles - Make sure there is not too much paper in the sheet
feeder.
- Make sure the paper guides do not cause the paper
to
bow in the sheet feeder.
- Make sure you are using the correct type of paper.
- When loading paper, do not force the paper down
into
the printer.
- Make sure the right side of the paper is against the
right paper guide and the left paper guide is set
against
the left side of the paper.
- Make sure the envelope guides are not in the
envelope
position.
- If loading paper in the manual feeder, make sure the
media guide is next to the left side of the paper.
- Make sure the printer is installed on a flat, level
surface.
OJ2010 ( 96-02-07 )
Page 59

Envelopes skew or fail to feed
correctly
- Make sure the envelope guides have been turned to
the
envelope load position.
- Make sure envelopes are loaded using the envelope
guides.
- If loading envelopes in the sheet feeder, make sure
both envelope guides are against the envelopes.
- Make sure envelope guides do not cause envelopes
to
bow in the sheet feeder.
- If loading envelopes in the manual feeder, make sure
the right edge of the envelope is against the raised
edge beside the envelope symbol on the manual
feeder.
- Make sure the media guide is next to the left side of
the envelope.
Transparencies stick together in
exit tray
- Make sure youre using transparencies designed for
an
ink-jet printer.
- Remove each transparency as it exits from the
printer.
OJ2010 ( 96-02-07 )
Page 60
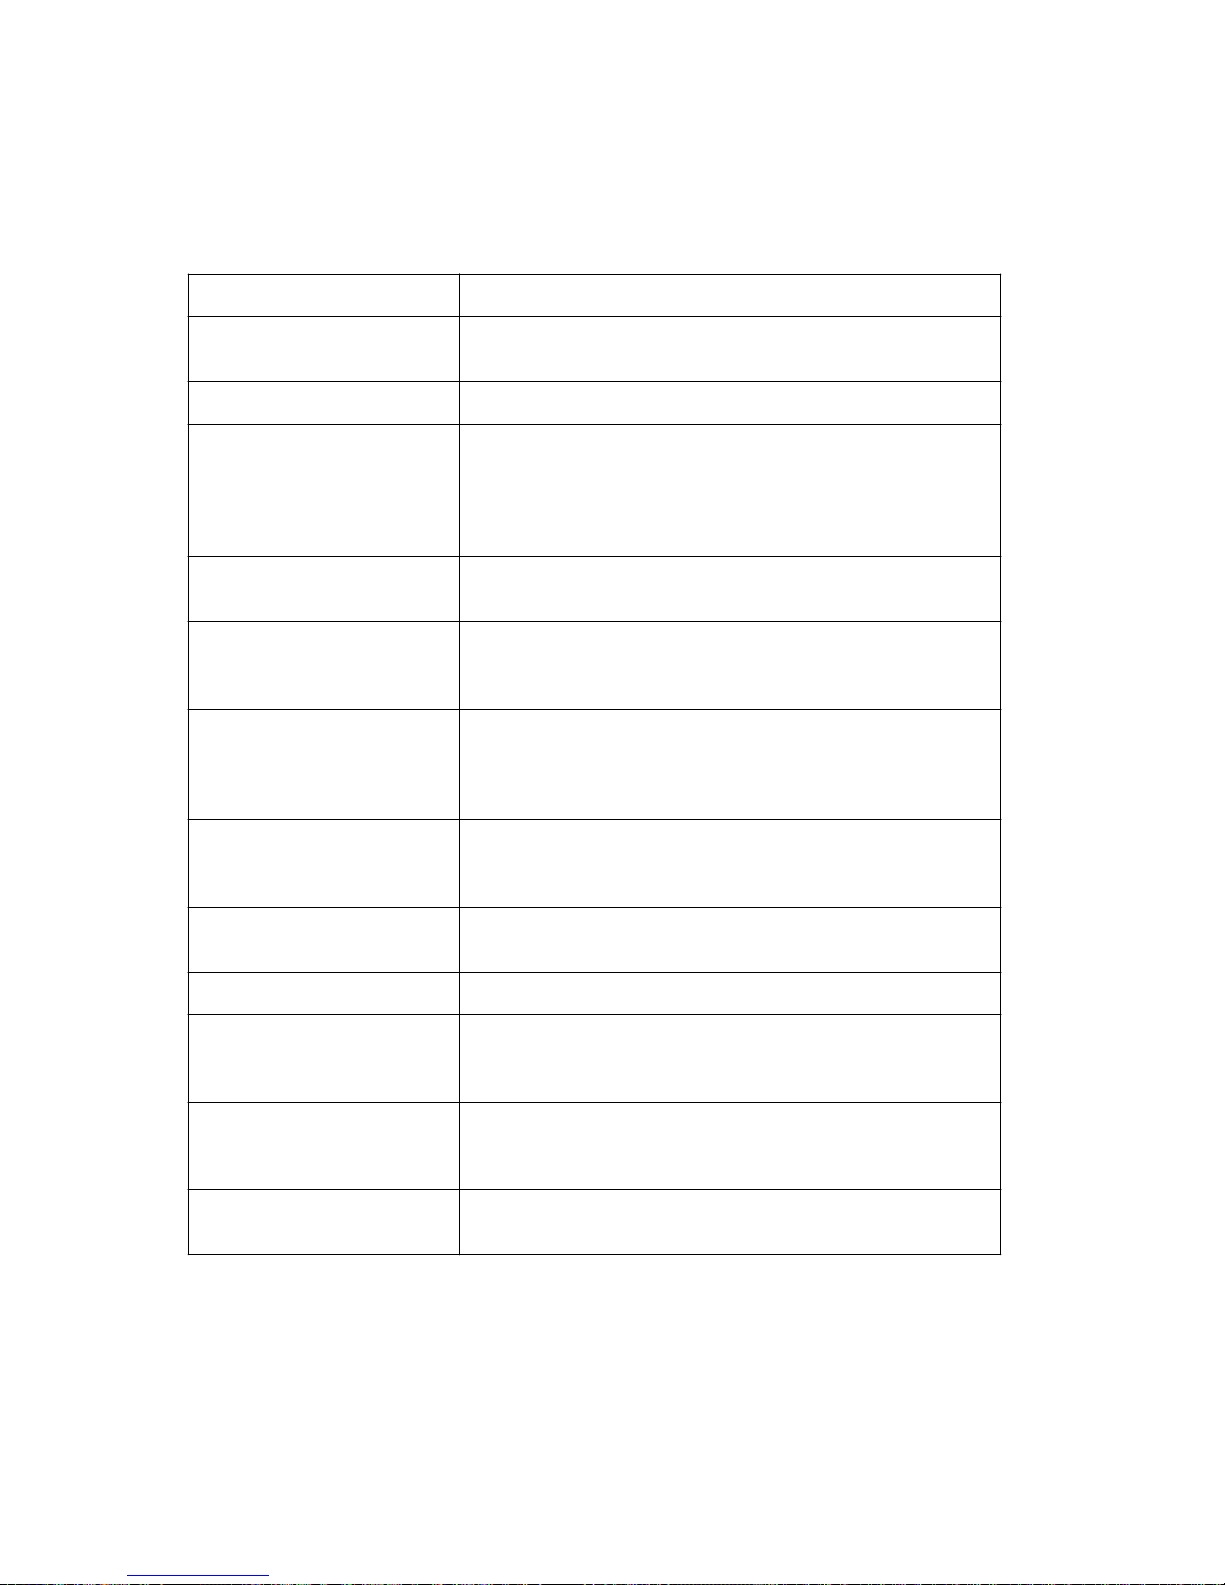
Appendix A
Printer Specifications
Print Method:
Four-color thermal ink jet, dual head (black and color)
Print Speed:
Black:
3 ppm, draft
Color:
2.5 to 7 min./page
Resolution:
300x300 dpi or 600x300 dpi
Compatibility:
Microsoft Windows 3.1 or higher (custom driver software
included)
Use PCL 3 emulation for DOS applications: select HP 500C
(color) or HP 500 (black only)
80386 or faster IBM-compatible PC
Interface:
Parallel, bi-directional. Cable must be IEEE 1284 complaint.
Black Print
Cartridge
Nozzles: 56, black ink
Average Life (Ink Saver OFF):
1000 pages at 5% coverage
Color Print
Cartridge
Nozzles: 48; 16 each cyan,
magenta, yellow
Average Life (Ink Saver OFF): 200
pages at 15% coverage of 7 colors
Reliability
MTBF:
Max. Usage:
25,000 hours
1000 pages/month
Dimensions:
17.2 W x 23.3 D x 13.5 H
(436x591x343 mm)
Weight:
9.4 lb. (4.3 kg)
Temperature
Operating:
Storage:
65 to 80×F (18 to 26.7×C)
50 to 110×F (10 to 43×C)
Humidity
Operating:
Storage:
30% to 60% RH
8% to 80% RH
Electrical:
90-259 volts, ac, 50/60 Hz;
7.5 watts idle, 25 watts peak.
OJ2010 ( 96-02-07 )
Page 61
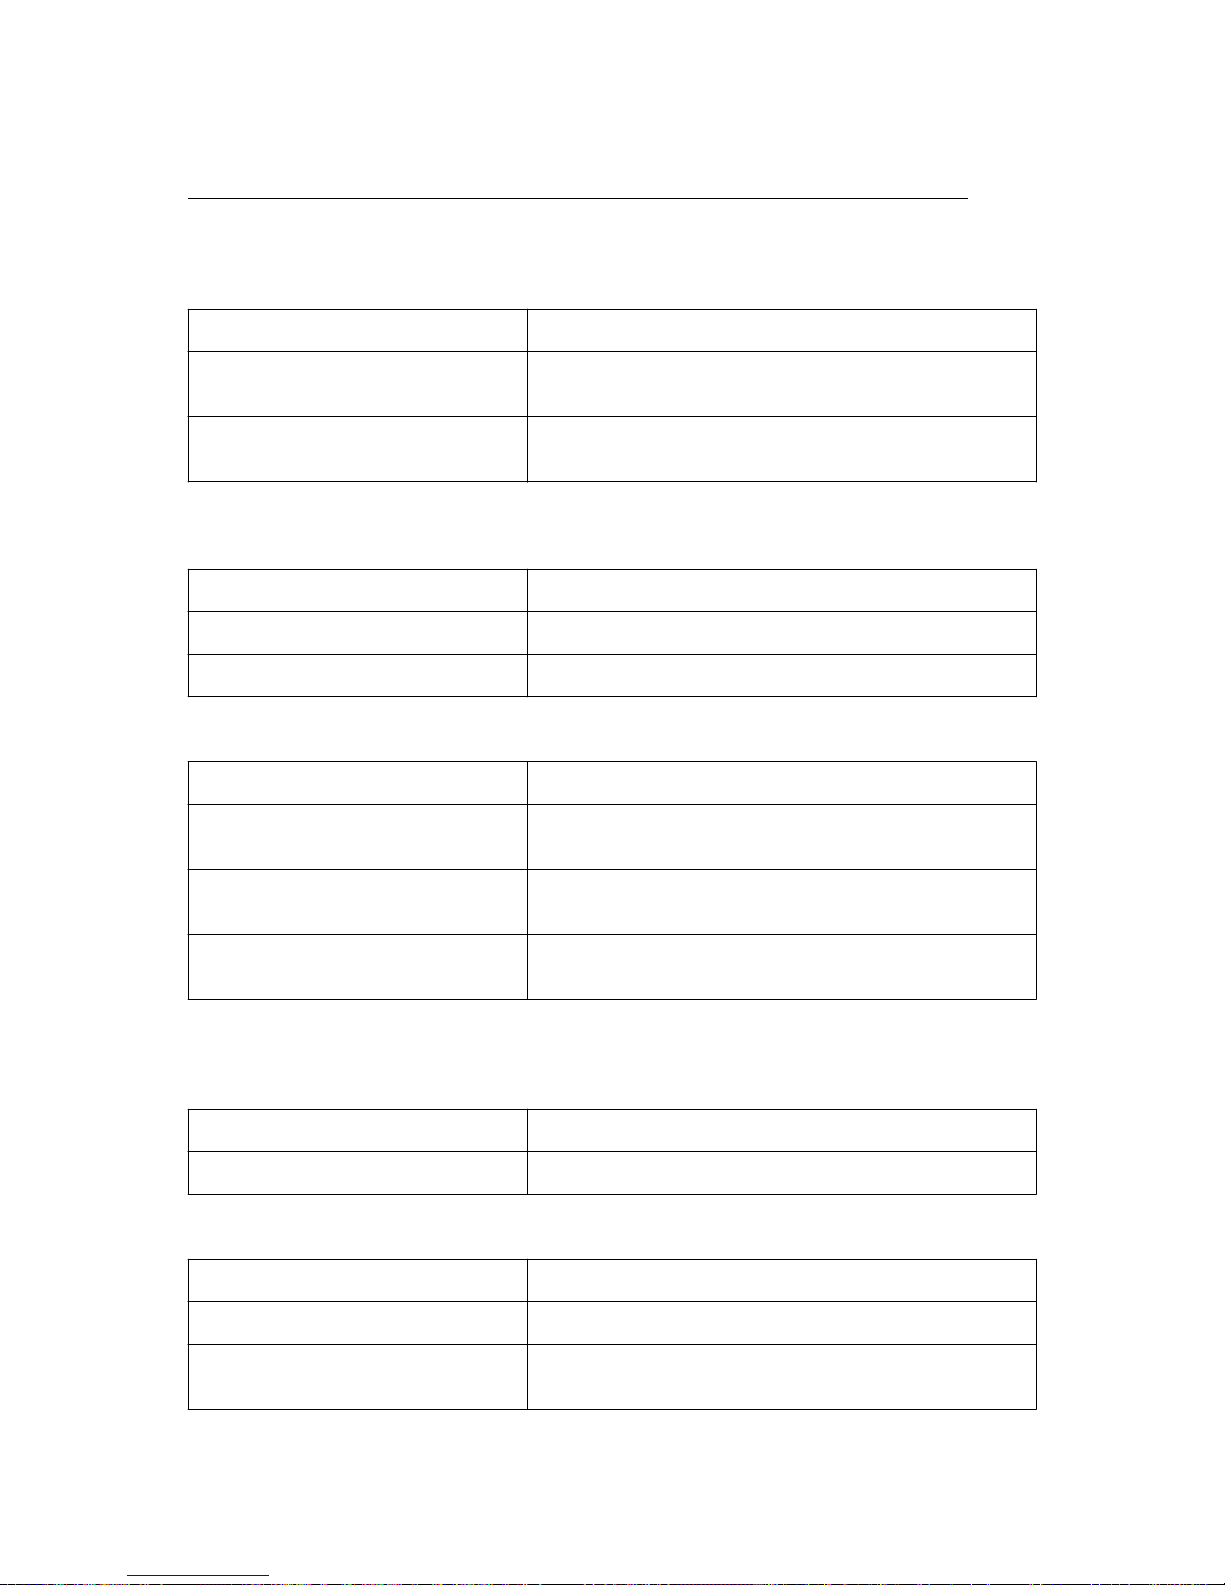
Media Specifications
Media Specifications
Paper
Feed
Sheet Feeder (up to 150 sheets) or Manual
Weight
16-24 lb. (60-90 g/m2) sheet feed
16-32 lb. (60-120 g/m2) manual
Size
Min.: 3.5x5.5 (89x140 mm)
Max.: 8.5x14 (215x356 mm)
Transparencies
Note: Always use transparencies designed specifically for inkjet printers
Feed/Qty
Sheet Feeder Preferred (takes up to 50 transparencies)
Basis Weight
138-146 kg/m2
Size
8.5x11 (215x279 mm)
Envelopes
Feed (Qty)
Sheet Feeder (up to 15 envelopes) or Manual
Usable Types
#7¾, #9, #10 (US business),
DL, C5, B5
Weight
20-24 lb. (75 to 90 g/m2) Sheet Feed
20-28 lb. (75 to 105 g/m2) Manual
Size
Min.: 3.5x5.5 (89x140 mm)
Max.: 8.5x14 (215x356 mm)
Labels
Note: Always use labels designed specifically for inkjet printers. Use only full sheets of labels:
partial sheets may cause labels to peel off and jam the printer.
Feed
Sheet Feeder (up to 50 sheets) or Manual
Sheet Size
8.5x11 (215x279 mm)
Cards
Feed
Sheet Feeder Preferred (less curl)
Weight
32 lb. (120 g/m2) max.
Size
Min.: 3x5 (76x127 mm)
Max.: 8.5x14 (215x356 mm)
OJ2010 ( 96-02-07 )
Page 62

Appendix B
Glossary
Glossary
A
A4.
Standard metric paper size designation 210 x 297 mmroughly equivalent to a sheet size of
8¼ x 11¾.
Application software.
Software product, such as a spreadsheet or word processing program,
designed for use on a PC.
B
Bidirectional Alignment Pattern.
Test pattern which prints as a part of the print cartridge
alignment procedure. The pattern indicates the correct setting to enter in the box on the Align
Cartridges dialog box (in the printer control software) to obtain the best printhead alignment.
Bidirectional Cable.
Interface cable which connects the printer to the computer and supports
communications between the two, in both directions.
Bidirectional Printing.
Printing in which the printhead moves left to right, then right to left, with
each succeeding line.
Byte.
Representation of a character: eight bits make up a byte.
C
Carrier Contact.
Area inside the cartridge carriers which touches the copper-colored section of
the print cartridges.
Coated Paper.
Paper with one side specially coated to provide optimum results for color printing
on an ink-jet printer.
D
DOS Application.
Software application which runs under MS-DOS rather than in the Microsoft
Windows environment.
Draft-quality print.
Rapid, low-density printing used for draft material. Contrast with
Letter-quality Print
.
Driver.
Program that translates the software applications language to that of the printer so the
two can communicate.
E
Emulation.
Set of commands that instruct the printer to imitate another printer.
Envelope Guides.
Pivoting guides on the sheet feeder which are rotated inward for loading
envelopes or index cards.
F
Faxable Facts.
Okidatas on-line document retrieval system, accessible by calling
1-800 OKIDATA.
OJ2010 ( 96-02-07 )
Page 63

Font.
Set of characters all of the same typeface, size, slant (normal versus italic), and weight
(normal versus bold).
G
Graphics Printing.
Printing line art or half-tones, as opposed to text.
H
Halftone.
Print method in which dots are used to produce colors and shades of gray.
Hard Drive
. Your PCs fixed drive on which MS-DOS and your software programs are installed
and which reads and stores data on disks in the floppy drives (designated A and/ or B). Also
called hard disk.
I
Icon.
Representation or symbol.
Ink-jet.
Non-impact printing technology that creates characters and graphics by applying
programmed patterns of ink dots to the print media.
Ink Saver.
Method by which the printer selectively removes dots, reducing the amount of ink
used.
Interface.
Data conversion device that allows communication between the printer and the
computer. See
Parallel Interface
.
K
KB.
Kilobyte. Unit of measure for disk storage capacity: 1 KB = 1024 bytes.
L
Letter-quality Print.
High-density printing that enhances the quality of characters. Contrast with
Draft-quality Print
.
M
Manual Feeder.
Printer mechanism for feeding paper, envelopes, etc., one piece at a time,
without removing the print media loaded in the sheet feeder (see
Sheet Feeder
).
Media Guide.
Sliding tool on the manual feeder which keeps the print media properly aligned as
it enters the printer.
MB.
Megabyte. Unit of measure for disk storage capacity: 1 MB = 1,048,576 bytes.
Mm.
Millimeter. Metric unit of linear measure equivalent to 0.0394-inch (a little less than
1
/32).
N
Nozzle Test.
Test run to pinpoint and clean out clogged nozzles in the printheads.
O
On-line Help.
Hints, tips and information available from within the OKI
JET
printer control
software. To access the Help, click the Help button in the dialog box or press the F1 function key
on your keyboard.
OJ2010 ( 96-02-07 )
Page 64

P
Parallel Interface.
A type of connection that links a printer to a computer, by which all 8 bits of a
character are sent at the same time. See
interface
.
PCL 3 Emulation
. Hewlett-Packard
®
Printer Control Language version 3 compatibility.
Print Cartridge
. Unit containing the ink reservoir and the printhead.
Printer Driver
. Program that translates a software applications language to that of the printer so
the two can communicate.
Purge.
A process in which the printhead nozzles in the print cartridges are cleaned (see also
Nozzle Test
).
R
RAM.
Random Access Memory. The fastest type of memory your computer has, RAM is used to
run your software applications.
Reset.
Clears the printer buffer and all temporary settings, and returns the printer to the initial
power-on state.
S
Sheet Feeder.
The printer mechanism that automatically feeds in single sheets from a stack of
paper, transparencies, etc.
Software Application
. A program loaded on your computers hard disk and used to perform a
specific task; for example, a word processing program.
T
Typeface
. A set or family of characters all having a similar configuration; for example, Times
New Roman
®
or Arial®.
OJ2010 ( 96-02-07 )
 Loading...