

Page 1
5780_5980.tif
User’s
Guide
P/N 59336802
Page 2

|
OKIFAX 5780/59802
Document Title and Part Number
OKIFAX 5780/5980 User’s Guide
P/N 59336802
Disclaimer
Every effort has been made to ensure that the information in this
document is complete, accurate, and up-to-date. Oki Data assumes no
responsibility for the results of errors or omissions beyond its control.
Oki Data also cannot guarantee that changes in software and
equipment made by other manufacturers and referred to in this
document will not affect the applicability of the information in it.
Mention of software products manufactured by other companies does
not necessarily constitute endorsement by Oki Data.
Copyright Information
Copyright 2002 by Oki Data. All Rights Reserved
Second Edition: January, 2002
Written and produced by the Oki Data Training and Publications
Department.
Contact Information
Please address any comments on this publication to:
Web Site
Please visit Oki Data’s multilingual web site at:
http://www.okidata.com
e-Mail Address
Mailing Address
Oki Data Americas, Inc.
Training and Publications Department
2000 Bishops Gate Boulevard
Mount Laurel, NJ 08054-4620
United States of America
Trademark Information
OKI and Oki Data are registered trademarks and OKIFAX is a
trademark of Oki Electric Industry Company, Ltd.
Wordcraft is a trademark of Wordcraft International Limited
Touch-Tone is a registered trademark of American Telephone and
Telegraph.
Windows is either a registered trademark or a trademark of Microsoft
Corporation in the United States and/or other countries
ZIP Code is a registered trademark of the United States Postal Service
Emergency First Aid Information
Refer to the Material Safety Data information in the Warranty,
Regulatory, and Safety Information document.
Page 3

|
User’s Guide: English 3
Contents
Help and Helpful Hints ......................................11
Help Key .............................................................................. 12
Help List .............................................................................. 13
Function List ....................................................................... 13
Saving Money ..................................................................... 14
Saving Time ........................................................................ 16
Helpful Hints ....................................................................... 17
References ........................................................................... 19
Introduction........................................................20
Oki Data Web Site ............................................................... 20
Features................................................................................ 21
Getting to Know Your Machine ........................ 24
Components ........................................................................ 24
Control Panel Keys and Indicators...................................... 29
One-Touch Keypad.............................................................. 34
One-Touch Keys, Second Panel ........................................ 37
Signal Tones ........................................................................ 38
Installation .......................................................... 39
Safety ................................................................................... 40
Installation Hints .............................................................. 40
Operation and Maintenance ............................................. 41
Toner Cartridge and Image Drum Handling ..................... 41
Emergency First Aid .......................................................... 42
Getting Started .................................................................... 42
Where to Install Your Fax Machine .................................. 42
Unpacking ......................................................................... 43
Setting Up Your Fax Machine ............................................. 44
Installing the Toner Cartridge........................................... 46
Attaching the Document Stacker ...................................... 48
Connecting to the Telephone Line ................................... 48
Connecting Optional External Devices ............................ 49
Handset ........................................................................... 49
Telephone ....................................................................... 49
Answering Machine........................................................ 50
Answering Machine and Telephone ............................... 50
Connecting Power ............................................................. 50
Loading Paper ................................................................... 51
Page 4

|
OKIFAX 5780/59804
Selecting Functions and Settings.......................53
Navigating the Function Menu ........................................... 54
Primary Menu Functions ..................................................... 54
Using the Help Key ............................................................. 55
Setting Features ................................................................... 55
Using Step Access ............................................................. 56
Using Speed Access........................................................... 57
Example .......................................................................... 57
Speed Access Numbers ................................................... 58
Setting Basic Features........................................62
Setting the Date and Time ................................................... 62
Setting the Language .......................................................... 62
Setting Your Fax Machine’s ID............................................ 63
TSI/CSI ........................................................................... 63
Sender ID ........................................................................ 63
Setting the TSI/CSI ......................................................... 63
Setting the Sender ID ...................................................... 63
Setting the Answering Mode ............................................... 64
List of Modes .................................................................... 64
Auto Receive Mode [FAX] ............................................. 65
Manual Receive Mode [TEL]......................................... 65
Telephone/Fax Mode [T/F] ............................................ 65
Telephone Answering Device Mode [TAD] .................... 66
Memory Reception Mode [MEM] ................................. 66
Forwarding Mode [FWD] ............................................... 67
PC Fax Mode [PC] .......................................................... 67
Dial and Incoming Call Parameter Settings ........................ 68
Setting Dial and Incoming Call Parameters ...................... 68
Dial Parameter Settings ..................................................... 68
Redial Tries .................................................................... 68
Redial Interval ................................................................ 68
Auto Start ........................................................................ 69
Dial Tone Detect ............................................................. 69
Busy Tone Detect ........................................................... 69
Tone/Pulse (MF/DP) ....................................................... 69
Tone (MF) Duration ........................................................ 70
PBX LINE ....................................................................... 70
FLASH/EARTH/NORMAL ............................................ 71
DIAL PREFIX ................................................................. 71
Incoming Call Parameters ................................................. 72
Incoming Ring ................................................................ 72
Remote Receive.............................................................. 72
Continuous Tone ............................................................ 73
PC/FAX Switch ............................................................... 73
Other Basic Parameters ........................................................ 74
Monitor Volume ................................................................ 74
Buzzer Volume .................................................................. 74
User Language .................................................................. 74
Width Reduction............................................................... 74
Paper-Size Setting ............................................................. 75
Relay Print ........................................................................ 75
Backup File TX ................................................................. 76
Page 5

|
User’s Guide: English 5
Connecting to a PBX........................................................... 77
Entering a PBX Dial Prefix ............................................... 78
Clearing the PBX Dial Prefix ............................................ 78
Programming Speed Dial Numbers ................. 79
Types of Speed Dials ........................................................... 79
One-Touch Speed Dials..................................................... 80
2- or 3-Digit Speed Dials .................................................. 82
Group Faxing .................................................................... 82
Programming Instructions ................................................... 83
Collect Information........................................................... 83
Program the Information ................................................... 85
Other Keys ...................................................................... 85
Numeric Keypad ............................................................. 85
One-Touch Keypad......................................................... 86
Programming a Speed Dial ............................................. 88
Clearing a Speed Dial ..................................................... 90
Basic Faxing ....................................................... 91
Document Guidelines .......................................................... 91
General .............................................................................. 91
Single Page Specifications ............................................... 92
Multiple Page Specifications............................................ 92
Loading Documents ............................................................ 93
Contrast ............................................................................... 94
Resolution ........................................................................... 94
Sending a Fax ...................................................................... 95
Using a One-Touch Speed Dial Key ............................... 96
Using 2- or 3-digit Speed Dial ........................................ 96
Using the Search Function ............................................. 97
Using the Numeric Keypad ............................................ 97
Using An External Telephone......................................... 97
Rejecting Unsolicited Fax Messages .................................. 98
Closed Network................................................................. 98
Setting a Closed Network ................................................. 98
Power Failures ..................................................................... 99
Power Outage Report ........................................................ 99
Display Messages .............................................................. 100
Basic Faxing Situations .................................................... 101
Real-Time Dialing .......................................................... 101
Redialing ........................................................................ 101
Confirming Results ......................................................... 101
Stopping a Transmission ................................................ 102
Receiving Faxes Manually ............................................. 102
No Paper Reception ........................................................ 103
No Toner Reception ........................................................ 103
Receiving Faxes to Memory ............................................. 104
When Are Faxes Received to Memory?.......................... 104
When Are Memory Messages Printed? ........................... 105
Memory Message Limitations ........................................ 105
Active Memory Files Report .......................................... 106
Printing the Active Memory Files Report .................... 106
Printing Messages Stored in Memory ............................. 107
Page 6

|
OKIFAX 5780/59806
Canceling Messages Stored in Memory ......................... 107
Erasing Messages Received in Memory Without Printing
Them ............................................................................. 107
Messages in Memory and Power Losses ......................... 108
Power Outage Report .................................................... 108
Dual Access ........................................................................ 109
What You Can Do While Making Copies ....................... 109
What You Can Do While Sending a Fax ......................... 110
What You Can Do While Receiving a Fax ..................... 111
Making Copies .................................................................. 112
To Make Copies .............................................................. 112
Manual Paper Feeder ...................................................... 113
Face Up Stacking/Face Down Stacking .......................... 114
Sending a Fax to Multiple Locations ..............115
Group vs. Broadcast .......................................................... 115
Group Faxing..................................................................... 117
What is a Group Fax? ...................................................... 117
Programming a Group ..................................................... 118
Deleting Groups .............................................................. 119
Sending a Fax to a Group................................................ 120
Finding a Group............................................................ 121
Finding a Group Name .................................................... 122
Group Directory Report ................................................ 122
Using Speed Dial/Search .............................................. 123
Broadcasting ..................................................................... 124
What is a Broadcast Fax? ................................................ 124
Sending a Broadcast Fax ................................................ 125
Deleting a Location from a Broadcast Fax ..................... 126
Advanced Operations ...................................... 127
Delayed Fax vs. Delayed Batch ........................................ 128
Delayed Faxing ................................................................. 129
What is Delayed Faxing? ................................................ 129
Sending a Delayed Fax ................................................. 130
Canceling Delayed Transmissions ............................... 131
Delayed Batch Transmission .......................................... 132
Program the Delayed Batch Destination Number ........ 132
Setting the Batch TX Time Function ........................... 133
Send a Fax as Part of a Delayed Batch ......................... 134
Canceling Delayed Batch Transmissions..................... 135
Priority Transmission ........................................................ 136
Sending a Priority TX ..................................................... 136
Confidential Faxes ............................................................ 137
Programming Personal (Confidential) Mailboxes .......... 138
Creating a Personal (Confidential) Mailbox ................ 139
Changing a Password ................................................... 140
Closing a Mailbox ........................................................ 141
Sending Confidential Faxes ........................................... 142
Receiving Confidential Faxes ........................................ 143
Page 7

|
User’s Guide: English 7
Knowing You’ve Received a Confidential Fax .............. 144
Confidential Reception Report .................................... 144
Printing Confidential Faxes ............................................ 144
Deleting Confidential Faxes ........................................... 145
Call Forwarding ................................................................. 146
Set a Forwarding Number ............................................. 146
Set the Auto Answer Mode to FWD .............................. 147
Clear Forwarding Mode................................................ 147
Forward on Paper/Toner Error ......................................... 148
Setting a Paper/Toner Error Forwarding Number ......... 148
Backup File TX ................................................................. 149
General Information ........................................................ 149
Activate Backup File TX /Set the Password ................... 149
Program Backup Recipient ............................................. 150
Relay Faxing ..................................................................... 151
Using Your Machine as a Relay Initiating Station ......... 152
Relay Password ............................................................. 152
Relay Group Numbers .................................................. 152
Relay Key Station (Hub) .............................................. 152
Contact Number for Relay Broadcast Report............... 153
Relay Broadcast Report................................................ 154
Initiating a Relay Broadcast ........................................... 155
Using Your Machine as a Relay Key Station (Hub) ........ 156
Program the Destination Numbers .................................. 157
Create the Destination Group(s) ..................................... 157
Create the Relay Broadcast Mailbox (includes Relay
Password) ........................................................................ 158
Relay Entry Report ....................................................... 159
Status of Relay Broadcast Report ................................... 160
Printing the Relay Fax at the Hub .................................. 161
Sending Documents Requested by Another Fax Machine
(Polling Transmission) ...................................................... 162
Explanation of Polling Transmission Types .................. 163
Feeder (Document Tray) Polling .................................... 165
Memory Polling .............................................................. 166
Setting Memory Polling ............................................... 166
Memory Polling (Bulletin) ............................................. 167
Create a Polling Mailbox ............................................. 168
Set Bulletin Polling ...................................................... 169
Printing Polling Documents in Memory ...................... 170
Dialing Another Fax Machine to Request Documents
(Polling Reception) ........................................................... 171
Printing Faxes Polled into Memory ................................ 172
Cancelling Polled Faxes in Memory .............................. 172
Customizing Features and Operations ........... 173
Identifying Current Settings ............................................. 173
Printing a Configuration Report ..................................... 173
Changing Operation Functions ......................................... 174
List of Operation Functions .............................................. 175
Remote Diagnosis ........................................................... 175
Transmission (TX) Mode Default ................................... 175
Memory Full Save ........................................................... 176
Instant Dial ...................................................................... 176
Page 8

|
OKIFAX 5780/59808
Department Code ............................................................ 177
ECM Function ................................................................ 177
Sender ID ......................................................................... 177
Pulse Dial Rate ................................................................ 178
Pulse Make Ratio ............................................................ 178
Pulse Dial Type ............................................................... 178
T/F Timer Prg. ................................................................. 179
CNG Count ..................................................................... 179
Ring Response ................................................................ 179
Distinctive Ring .............................................................. 180
Memory Password ........................................................... 181
Department Code ............................................................ 182
Service Function Settings ................................................. 184
Long Document Scanning/Transmission ....................... 184
MDY/DMY ...................................................................... 184
Time/Date Print ............................................................... 184
TSI Print .......................................................................... 184
Reports..............................................................185
Understanding Reports...................................................... 185
Printing Reports ................................................................ 185
Printing a Message Confirmation Report..................... 185
Printing Other Reports .................................................. 185
List of Reports ................................................................... 186
Printed from the Menu .................................................... 186
Automatically Generated ................................................ 186
Activity Report.................................................................. 187
Printing the Activity Report ........................................... 187
Active Memory Files Report ............................................. 188
Printing the Active Memory Files Report....................... 188
Broadcast Confirmation Report ........................................ 189
Printing the Broadcast Confirmation Report ................. 189
Telephone Directory .......................................................... 190
Printing the Telephone Directory ................................... 190
Group Directory Report ..................................................... 191
Printing the Group Directory .......................................... 191
Configuration Report ........................................................ 192
Printing the Configuration Report ................................. 192
Function List ..................................................................... 193
Printing the Function List ............................................... 193
Box Information ................................................................ 194
Personal Box List ............................................................ 195
Printing the Personal Box List ..................................... 195
Relay Entry Report ......................................................... 196
Printing the Relay Entry Report ................................... 196
Message Confirmation Report .......................................... 197
Printing the Message Confirmation Report .................... 197
Message Confirmation Report Options .......................... 198
MCF (Single-Loc) ......................................................... 198
MCF (Multi-Loc) .......................................................... 198
Image in MCF ............................................................... 198
Err. Report (MCF) ......................................................... 198
Power Outage Report......................................................... 199
Page 9

|
User’s Guide: English 9
Broadcast Entry Report ..................................................... 199
Confidential Reception Report ......................................... 199
Codes Used in Reports ...................................................... 200
Result Codes ................................................................... 200
Communication Codes ................................................... 201
Maintenance .....................................................202
Cleaning the Scanner Path ................................................ 202
Replacing the Toner Cartridge .......................................... 203
Toner Yield ...................................................................... 203
Replacing the Image Drum................................................ 207
Image Drum Yield............................................................ 207
Image Drum Replacement Procedure.............................. 208
Resetting the Drum Counter ........................................... 210
Options and Accessories .................................. 211
Obtaining........................................................................... 211
Part Numbers ................................................................... 212
Consumables ................................................................ 212
Options ......................................................................... 212
Problem Solving ............................................... 213
General Information .......................................................... 213
Internet Support .............................................................. 213
Printing a Cleaning Page................................................... 214
Clearing a Document Jam ................................................. 215
Clearing a Printing Paper Jam ........................................... 216
Display Panel Messages .................................................... 219
Normal Display in Standby Mode .................................. 219
Error Messages ................................................................ 219
Counters ............................................................................ 222
Accessing the Print/Scan Counters .............................. 222
Resetting the Image Drum Counter .............................. 222
List of Problems ................................................................. 223
Problem 1:
The display is blank. .................................................... 225
Problem 2:
Nothing happens when you press the control
panel keys. .................................................................... 225
Problem 3:
The display tells you to replace paper even though
there is paper in the paper tray...................................... 225
Problem 4:
Your documents jam. .................................................... 226
Problem 5:
Your machine won’t dial. ............................................. 226
Problem 6:
The display shows a communication error. .................. 227
Problem 7:
You sent a fax but the image the remote fax machine
received was very poor. ................................................ 228
Problem 8:
You keep getting reports you do not want. .................. 228
Page 10

|
OKIFAX 5780/598010
Problem 9:
You sent a fax but it was received completely blank. .. 228
Problem 10:
The image received on your machine was very poor ... 229
Problem 11:
You tried dialing using One-Touch, 2-or 3-digit Speed
Dial but nothing happened........................................... 229
Problem 12:
Your machine does not answer the phone or
receive faxes. ................................................................ 230
Problem 13:
Your received documents are light or have vertical streaks
on them and you are not out of toner............................ 230
Problem 14:
You set your machine for delayed transmission but it did
not send......................................................................... 231
Problem 15:
Your machine will not poll a remote fax machine. ...... 231
Problem 16:
Your machine is connected to a PBX and you can’t dial
out. ................................................................................ 231
Problem 17:
You want to answer an external telephone but your
machine always answers first. ....................................... 231
Problem 18:
Your received faxes sometimes look distorted. ............ 232
Problem 19:
You are constantly receiving unsolicited
advertising on your machine. ....................................... 232
Problem 20:
Your machine does not immediately switch to TEL mode
when you make or receive a voice call......................... 232
Problem 21:
Your machine receives faxes, but doesn’t print them... 233
Problem 22:
Your machine doesn’t print the Message Confirmation
Report or the Message Confirmation Report doesn’t print
the way you want it to. ................................................. 233
Shipping Your Machine .................................................... 234
United States and Canada ............................................... 234
Latin America .................................................................. 2 34
Specifications .................................................... 235
Dialing ............................................................................... 235
General .............................................................................. 236
Memory ............................................................................. 236
Scanning ............................................................................ 237
Consumables ..................................................................... 237
Paper Handling .................................................................. 238
Physical Dimensions ......................................................... 238
Electrical ........................................................................... 239
Environmental ................................................................... 239
Index ................................................................. 240
Page 11

|
User’s Guide: English 11
Help and Helpful Hints
The Help button provides valuable information to help you
operate the machine.
This section summarizes the features and capabilities directly
connected to saving money and time.
Details for these features and capabilities are provided in
other sections of this document.
You may want to use some of our Helpful Hints when
working with your machine.
Your fax machine has many features and capabilities that will
help you
· operate the machine
· save money
· save time
Page 12
|
OKIFAX 5780/598012
Help Key
Where is the Help Key?
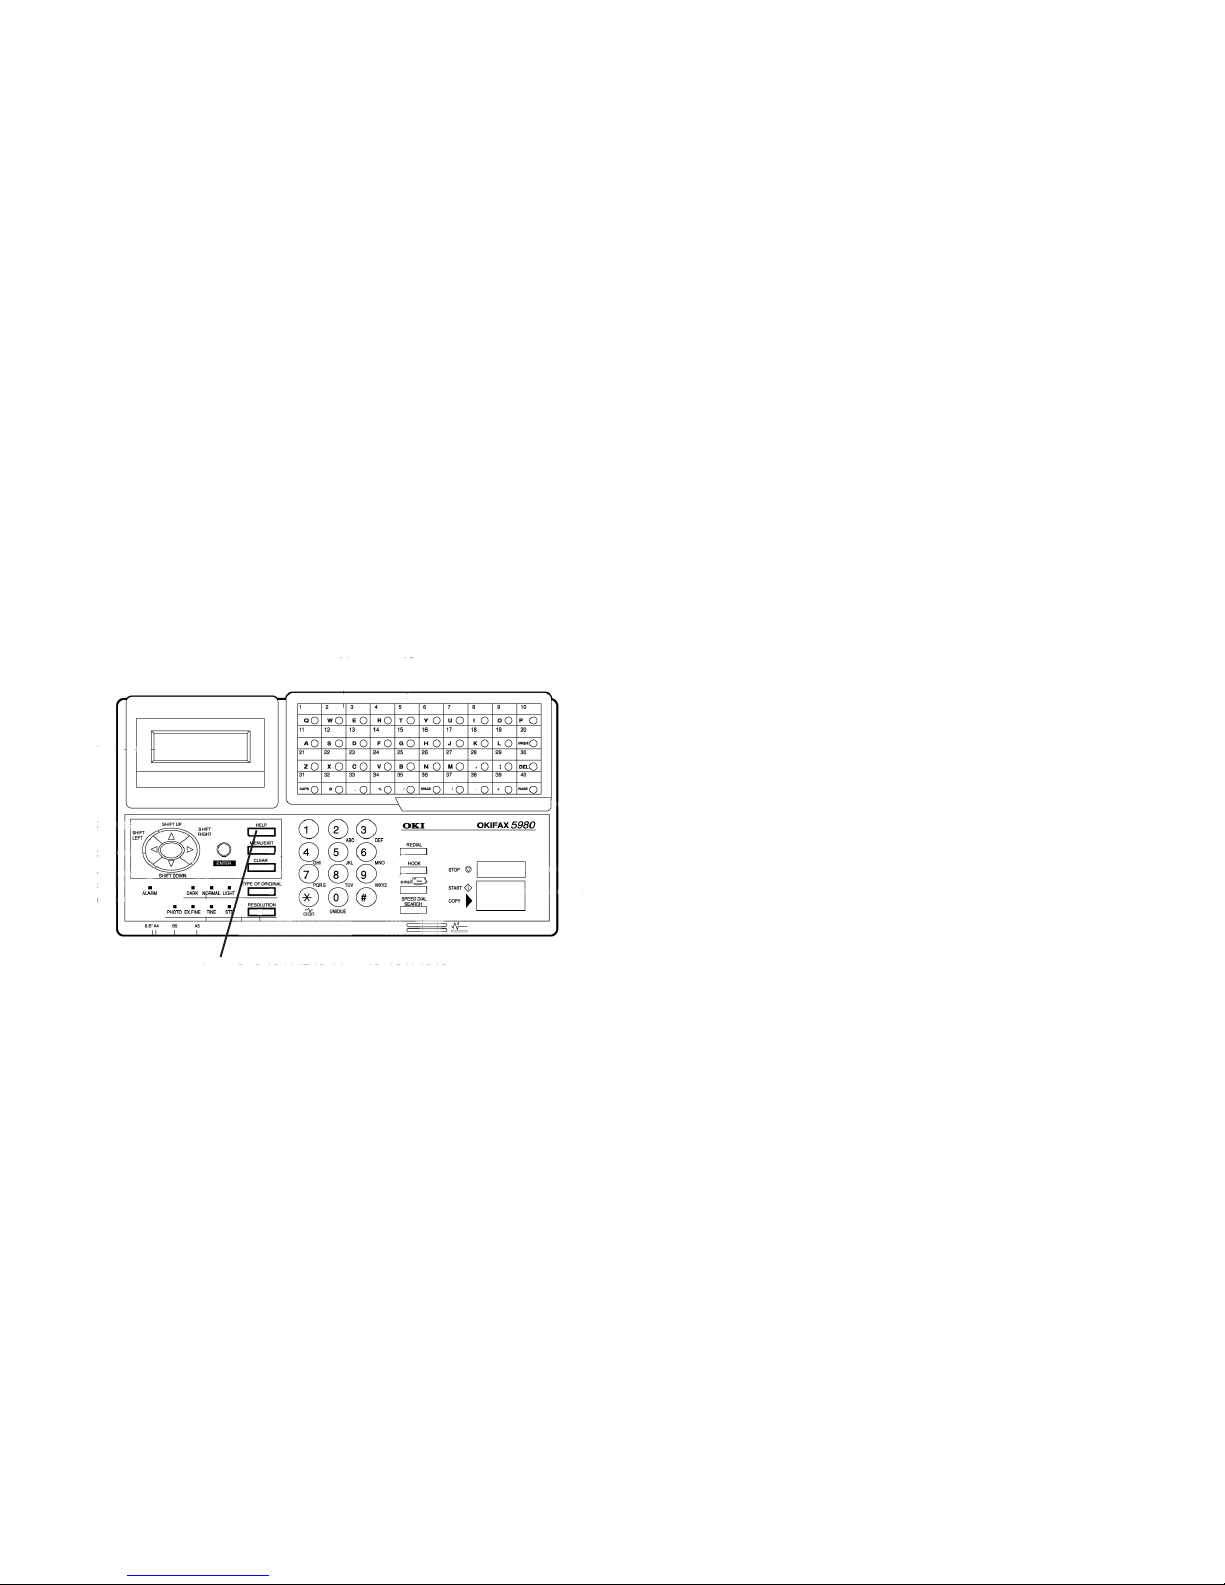
The Help key (1) is a control panel key.
Fig1_08a.eps
What Does Help Do?
When you press the Help key, a Help List and Function List
print.
The Help List is a guide for using key features of the
machine. It provides step-by-step instructions for using the
control panel to access or program various machine settings
and features.
The Function List is a printout of the menu structure. The
menu is set up in a multilevel structure of functions, options,
and settings. For more information, refer to “Selecting
Functions and Settings.”
1
Page 13

|
User’s Guide: English 13
Help List
The Help List covers the items listed below.
1 Program Speed Dial Numbers
2 Program Groups
3 Sending a Fax to Multiple Locations (Broadcast)
4 Sending a Fax to a Single Location
5 Copying
6 Delayed Faxing
7 Function Settings
8 Report Printing
9 Message Confirmation Report
Function List
The Function List is a report of the product’s menu
programming structure.
Use it as a reference while moving through the levels of the
menu.
It is NOT a report of the current menu settings.
The Configuration Report provides a list of the current menu
settings.
See “Reports, Configuration Report.”
Page 14

|
OKIFAX 5780/598014
Saving Money
Most phone services offer lower phone rates during off-peak
times and for local phone connections.
Your fax machine allows you to take advantage of lower
phone rates. Some savings depend on the options you have
purchased and the type of fax machines you communicate
with.
You can specify the time your outgoing faxes will be sent.
Delayed Transmission
This feature allows you to send documents at a specified time
and date.
You do not have to manually start the transmission.
For more information, refer to “Advanced Operations,
Delayed Fax Transmissions.”
Relay Faxing
This feature allows you to send documents to one distant fax
machine, which then forwards the documents to other fax
machines. This reduces the total number of long distance
calls.
Here is a typical relay fax situation.
The head office of a company sends a fax to the regional
head offices. The regional office forwards the fax to the local
branch offices.
For more information, refer to “Advanced Operations, Relay
Faxing.”
Page 15

|
User’s Guide: English 15
Control Access to Your Machine
You can control access to your machine. The method you
use determines the amount of access control.
· A password (Department Code) must be entered or the
machine cannot be used.
The machine can only be used by people who have the
password (Department Code). Up to 99 passwords
(Department Codes) can be programmed.
How could you use this?
If different departments share the machine, each
department could have its own password (Department
Code).
For more information, see “Customizing Features and
Operations, Changing Operation Functions, Department
Code.”
!
Be sure to record all passwords (Department Codes) .
Keep the record in a safe place. If you forget a
password, you will need to contact a Service Dealer for
assistance.
· The machine can only receive or send transmissions to
specified locations.
The fax numbers you program as Speed Dials will be the
only numbers your machine communicates with.
For more information, see “Basic Faxing, Rejecting
Unsolicited Fax Messages.”
· You can monitor the use of the machine by having a
copy of every fax it sends or receives to a predetermined
number.
For more information, see “Advanced Operation, Backup
File TX.”
Page 16

|
OKIFAX 5780/598016
Saving Time
Help Button
Press the Help Button to print a Help List and Function Lists.
These are great references to use while working with your
machine.
See “Help and Helpful Hints.”
Speed Dial Numbers
Speed Dial Numbers (One Touch, 2-Digit, 3-Digit) can be
programmed with frequently dialed numbers.
This greatly reduces the number of keystrokes and time
required when using these numbers.
For more information, refer to “Programming Speed Dial
Numbers.”
Dual Access
Your machine can multi-task.
You can load and prepare a document for sending while the
machine is receiving or sending another fax.
You do not have to wait for one operation to finish before
beginning another.
For more information, refer to “Basic Faxing, Dual Access.”
www.okidata.com
Oki Data’s web site, www.okidata.com, provides the most
current information available for your fax machine.
You can find information at your convenience, at any time.
Page 17

|
User’s Guide: English 17
Helpful Hints
Send a Fax and Save the Number
If you enter a number to send a fax, and want to save it as a
Speed Dial number, you can
1 Enter the number.
2 Place the document on the feeder.
3 Press Speed Dial/Search.
The machine goes to the next available (not yet
programmed) Speed Dial number.
LOC # displays.
4 Press Enter.
5 You are prompted to enter the information for this Speed
Dial (Name, Alternate Telephone Number,
Communications Speed, and Echo Protection State.
6 You may enter all of the requested information or press
Menu/Exit to return to sending your fax.
7 Either wait or press Start.
Wait, and the transmission begins in a few seconds.
Press Start and the transmission immediately begins.
!
Be sure to write the name for any Speed Dial numbers
you program on the One Touch Sheet(s).
The One Touch Sheet(s) provide space for Speed Dial
numbers 1 through xx
where xx =
40 (Model 5780)
or
80 (Model 5980)
For for higher Speed Dial numbers, program the
number(s) and print the Telephone Directory. For more
information, see “Reports, Telephone Directory.”
Page 18

|
OKIFAX 5780/598018
Quick Message Confirmation Report
To quickly print the Message Confirmation Report for the
most recent transmission performed by the machine, press
ENTER twice.
Recording Addresses and Passwords
!
Be sure to record any addresses and passwords you
program. Keep the record in a safe place. If you forget
a password, you will need to contact a Service Dealer
for assistance.
Some of the features that use addresses and passwords are:
· Confidential Faxes
See “Advanced Operations, Confidential Faxes.”
· Relay Faxes
See “Advanced Operations, Relay Faxing.”
· Deparment Codes
See “Customizing Features and Operations, Changing
Operation Functions, Department Codes.”
Page 19

|
User’s Guide: English 19
References
There are four very useful reference documents that you
should print and keep near your fax.
These documents are very helpful when programming your
machine.
1 Help and Function Lists
Press Help and these lists print.
The Help List provides instructions for using the control
panel to access or program various machine settings and
functions.
The Function List is a printout of the menu structure. It
IS NOT a report of current menu settings.
See “Help and Helpful Hints.”
2 Configuration Report
The Configuration Report is a list of the current
operational settings of your machine.
See “Reports, Configuration Report.”
3 Telephone Directory
This report provides a complete listing of all of the
telephone numbers programmed into your machine’s
Speed Dial numbers.
See “Reports, Telephone Directory.”
4 Group Directory
This report provides a complete listing of all of the
numbers programmed into a specific group. Each group
has an individual report.
See “Reports, Group Directory Report.”
Page 20

|
OKIFAX 5780/598020
Introduction
Oki Data Web Site
The Oki Data Web Site provides the most current information
available on your product.
An on-line version of this document is available for viewing
via Oki Data’s Web Site.
You may reach the Oki Data Web Site at: www.okidata.com
Thank you for purchasing this fax machine. This desktop,
plain-paper facsimile machine utilizes advanced lightemitting diode (LED) technology for quick and trouble-free
transmission/reception of data and images. In addition to the
many standard features, options can expand the machine’s
capabilities.
For information on the options, see “Options and
Accessories.”
Page 21

|
User’s Guide: English 21
Features
The machine includes the following features:
· Help Button
Pressing this button causes the unit to print a Help List
and the Function List.
· Control panel
Special programming keys, a 40-key plate for preprogrammed telephone numbers, and a 10-key pad for
standard dialing and programming.
· 80-character display (4 rows of 20 characters)
Easy-to-read display for operation guidance, clock
display, function information, etc.
· Automatic Document Feeder (ADF)
Capacity of up to 50 sheets of recommended letter/A4
paper.
· Speed Dial
Speed Dial numbers are pre-programmed telephone
numbers. There are two types of speed dial numbers:
one-touch and 2- or 3-digit entry faxing
OKIFAX 5780
40 one-touch
100 numbers for 2- or 3-digit entry faxing.
OKIFAX 5980
80 one-touch
150 numbers for 2- or 3-digit entry faxing.
· Group Faxing
Create as many as 20 groups of telephone numbers and
send documents to multiple locations with a single
selection.
· Automatic alternate call
Dials a second (alternative) telephone number if the
number originally dialed is busy.
Page 22

|
OKIFAX 5780/598022
· Alphanumeric telephone directory
Search for programmed telephone numbers by name.
· 72-hour battery backup
If power is lost, messages in memory will be saved for
72 hours.
· 33.6K bps transmission rate
Fast, efficient communications.
· Large-capacity memory
OKIFAX 5780
2.5 Mbyte
This provides storage capacity of up to 200 pages.
OKIFAX 5980
12.5 Mbyte
This provides storage capacity of up to 1,000 pages.
· Half-tone
Documents with half-tone areas (shades of gray, usually
graphics) are processed with 64-scale gradation (64
levels of gray).
· Advanced transmission and reception functions
Includes delayed transmission, broadcasting (multilocation transmission), confidential message
transmission/reception, relay broadcasting, polling, etc.
· Automatic redial and page retransmission
Ensures document transmission when a telephone
number is busy or a problem occurs in the
communications process.
· Advanced memory transmission/reception features
A number of convenient features including automatic
reception into memory without printing—ideal for
reception of confidential communications.
· Dual Access
Allows two tasks to be conducted at once (e.g., scan and
prepare a document for transmission while another
document is being received).
· Automatic answering mode detection
Distinguishes between incoming fax and voice
communications. Allows the use of an answering
machine on the same telephone line.
Page 23

|
User’s Guide: English 23
· Closed network
Prevents the reception of unsolicited communications.
· Large Paper Capacity
250 sheet paper cassette (universal size: legal, letter, A4).
A 500 sheet optional second paper tray is available.
With the second tray installed, the total capacity of the
machine is 750 sheets.
· Fax forwarding
Document can be forwarded to a designated location
after being stored in memory (setting can also be used to
forward a document when the local machine is out of
toner or paper).
· No paper reception
Allows continued reception of documents when toner or
paper run out by storing data not yet printed in the builtin memory.
· Polling
Allows the transmission/reception of documents from
remote facsimile machines with polling capabilities.
· Copier function
Make up to 99 copies of a document at one time.
· Progress reports.
Tracking transmission status, and machine operations,
settings and maintenance requirements.
· Security Features
Enables you to control access to your machine and faxes.
· 16 (total) Mailboxes
used for Confidential Faxing, Bulletin Polling, and
Relay Broadcasting Mailboxes.
· Confidential Reception
· Block Unsolicited (Junk) Fax Messages
Page 24
|
OKIFAX 5780/598024
Getting to Know Your Machine
1
2
3
Components
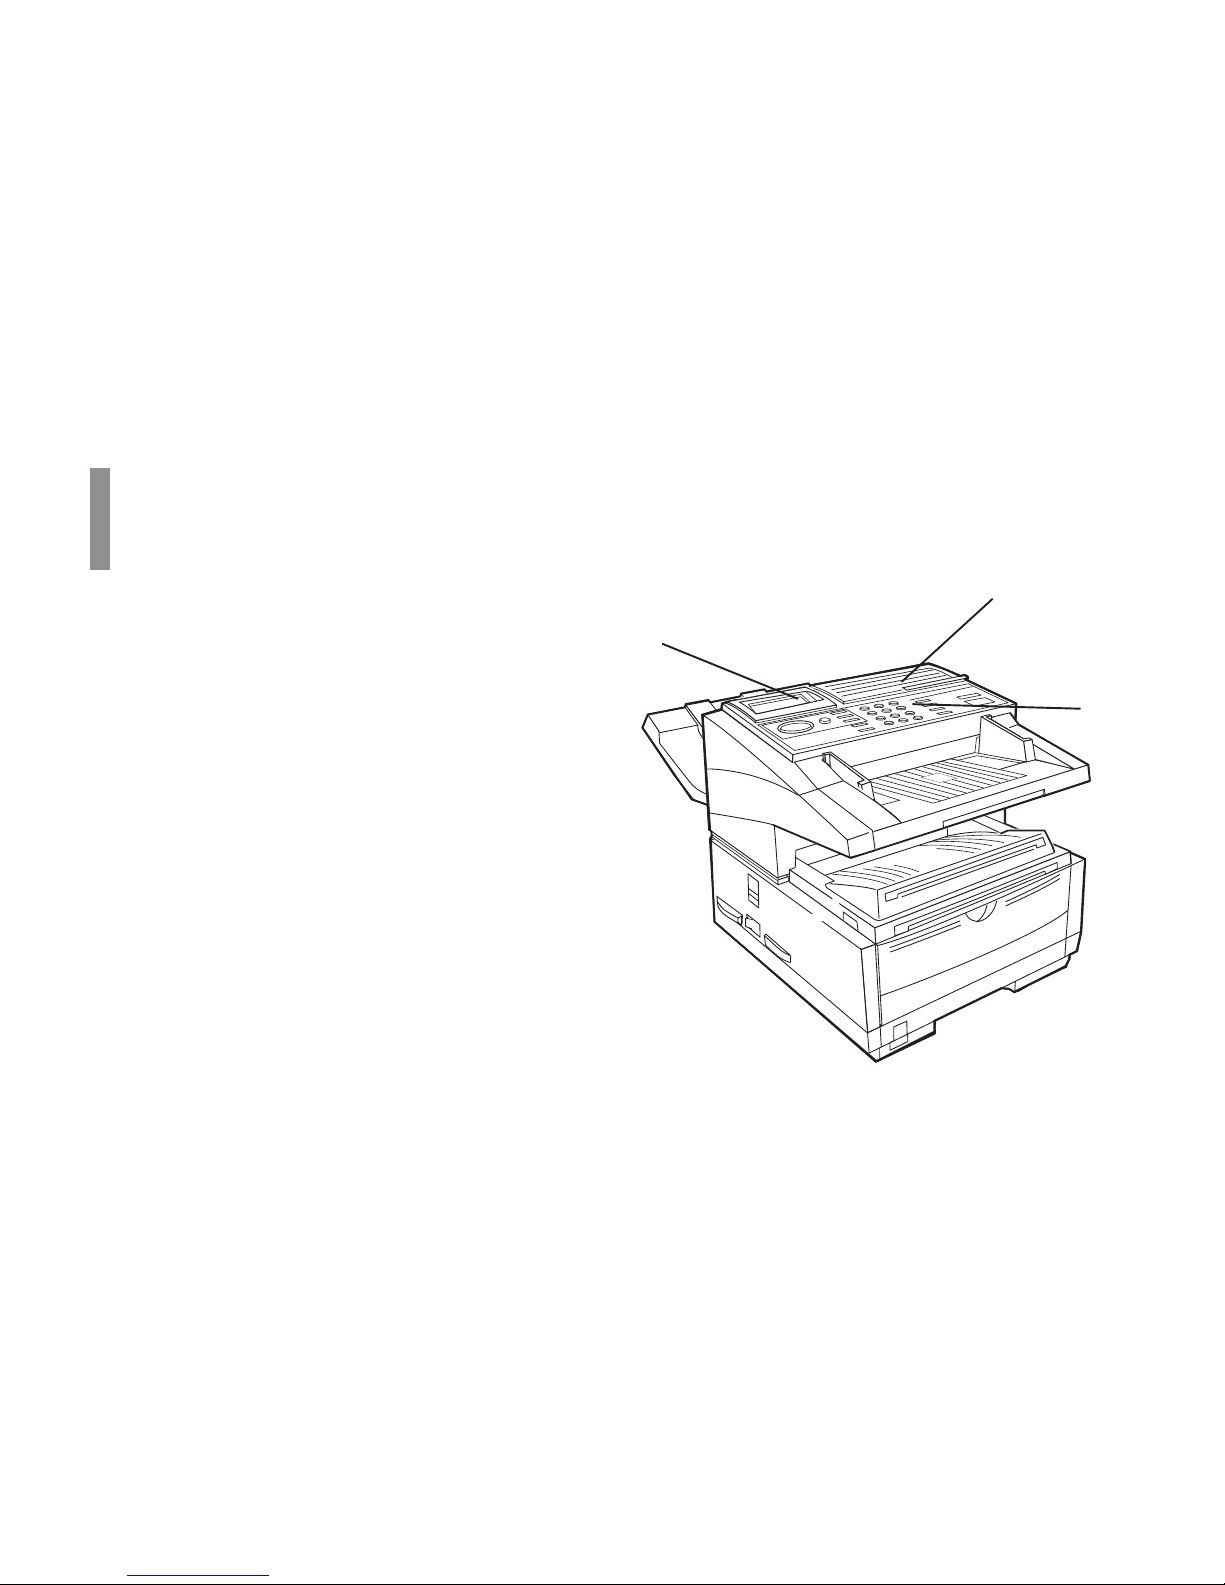
Refer to the illustrations for the location of the item(s).
1 Display Panel
Displays status of machine and operation in progress.
2 One-Touch Keypad
Use for one-touch dialing of preprogrammed telephone
numbers and for entering alphabetic, numeric and
special characters for programming and ID entries.
3 Numeric Keypad
Use to enter telephone numbers, program information,
and manual dialing.
Fig_01.eps
Page 25
|
User’s Guide: English 25
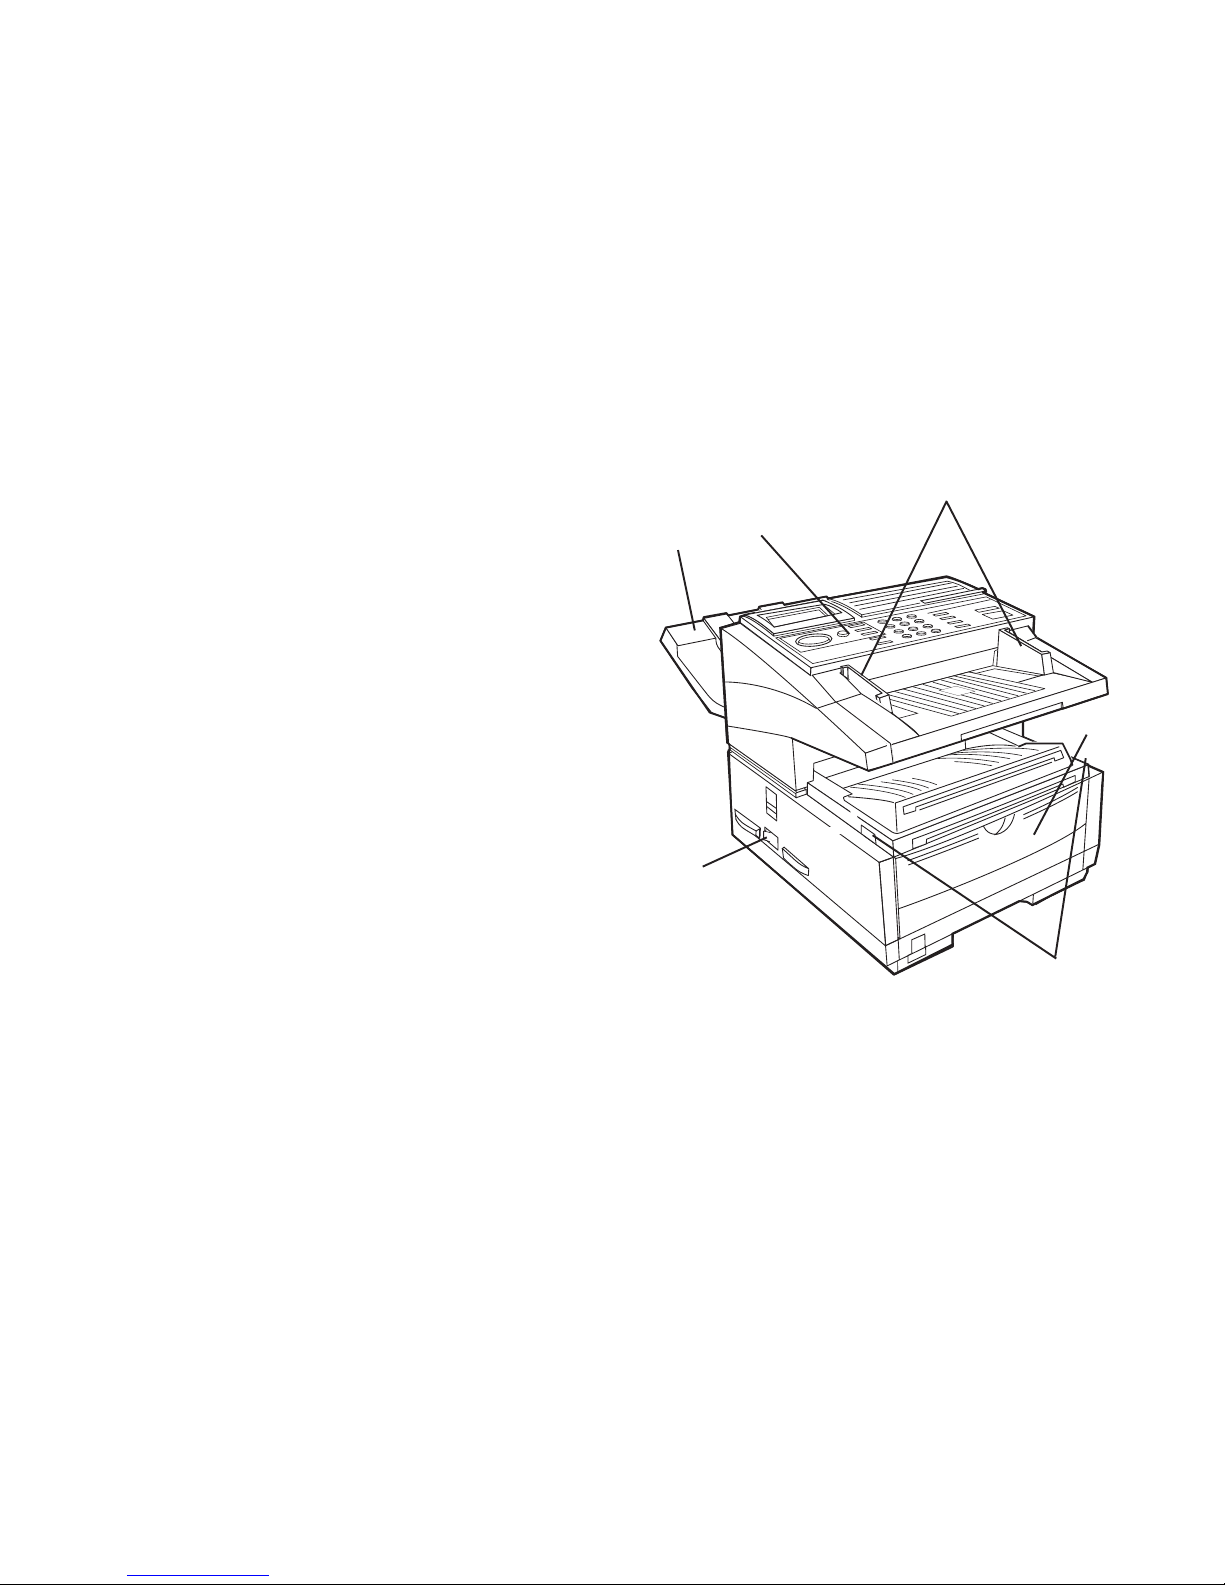
4 Manual Paper Feeder Tray
Fold out for manual paper feed (bypass paper tray).
Use this to feed different types of paper directly into the
machine.
5 Copy Stacker Release Buttons
Press these two buttons (one on each side), to gain entry
to the toner/image drum area.
6 Power Switch
Press 1 to turn on and 0 to turn off.
7 Control Panel (Programming) Keys
These are the main keys used for programming machine
settings and operations and navigating through the
function menu.
8 Document Stacker
Holds original documents after being faxed or copied.
9 Document Guides
Adjust guides to the width of documents being faxed or
copied.
Fig_01.eps
7
6
5
4
8
9
Page 26
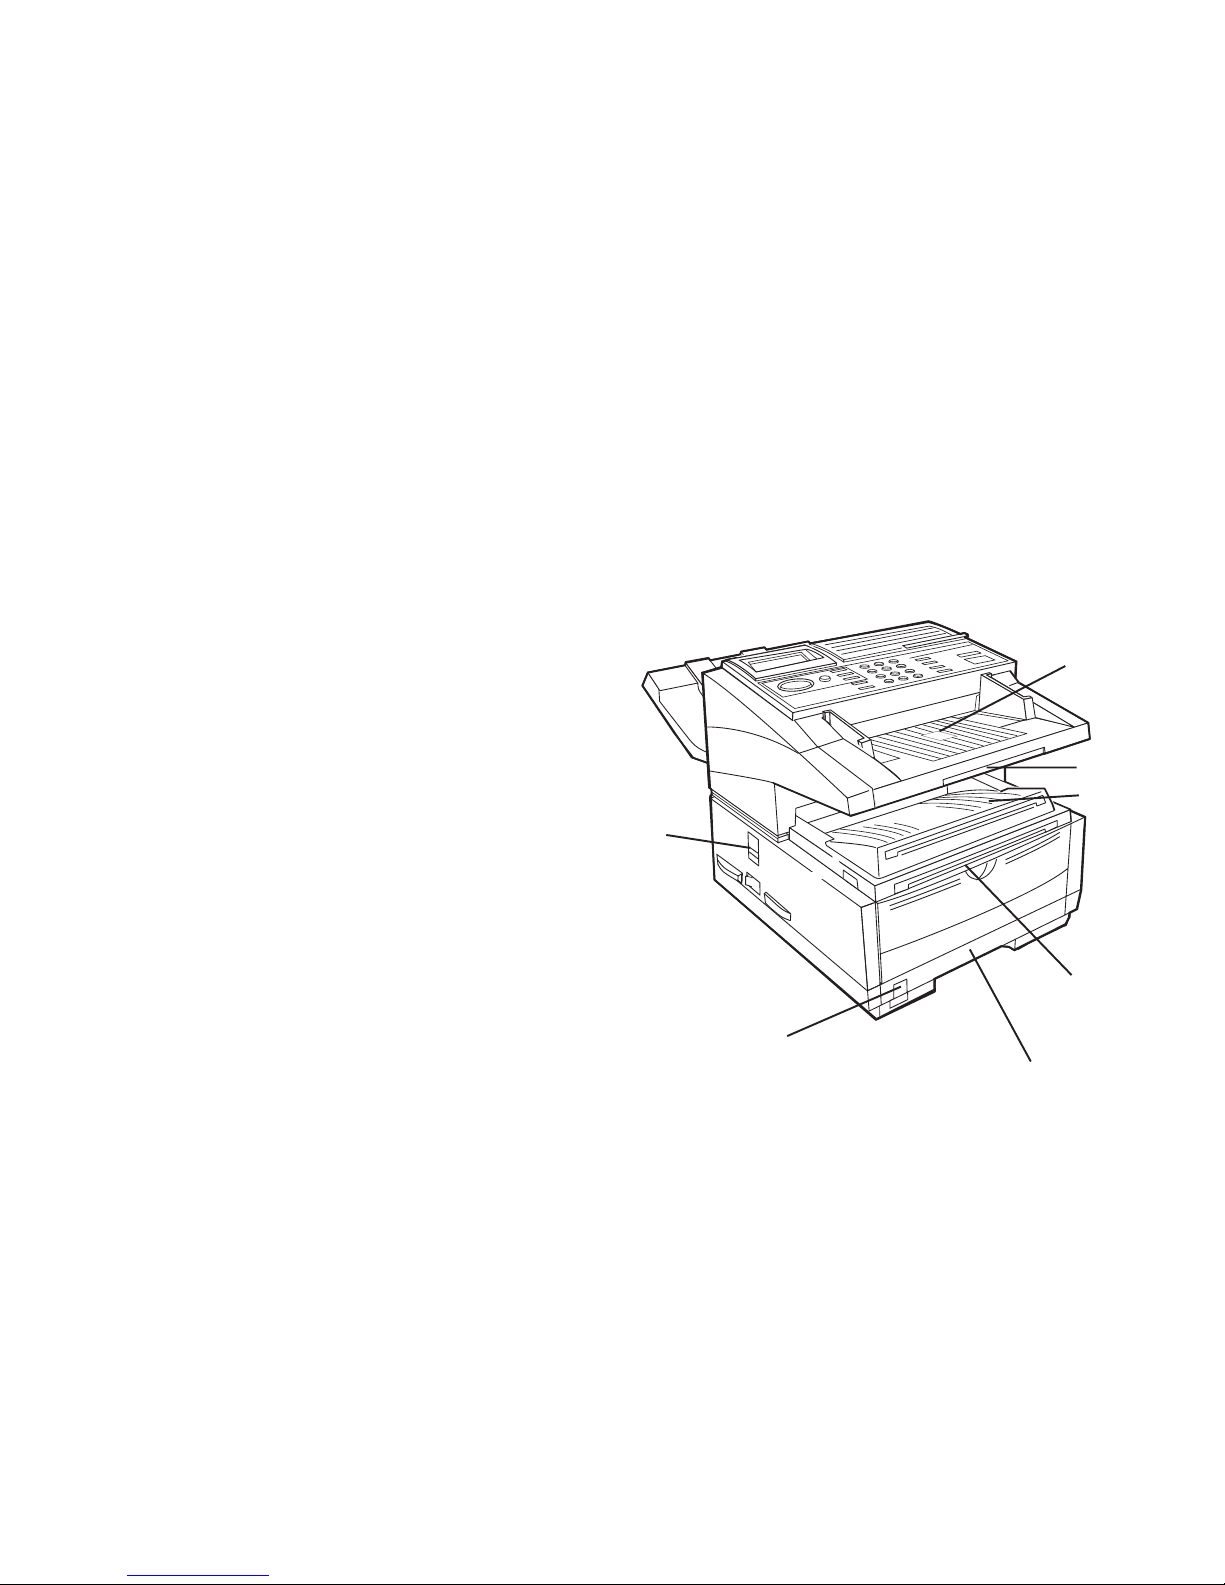
|
OKIFAX 5780/598026
10 Document Tray
Holds documents being faxed or copied.
11 Document Tray Extension
Pullout extension supports long pages.
12 Copy Stacker
Holds document copies after copying process.
13 Copy Stacker Extension
Pullout extension for supporting long documents.
14 Paper Tray
Holds 250 sheets of paper (universal type: legal, letter,
A4)
15 Paper Indicator
Shows level of paper remaining in paper tray.
16 Copy Output Lever
Up position: copies exit the machine face down.
Down position: copies exit the machine face up.
Use this lever when copying or when using the optional
printing capability.
!
Features vary according to the model of your machine.
Fig_01.eps
16
14
15
10
11
12
13
Page 27
|
User’s Guide: English 27
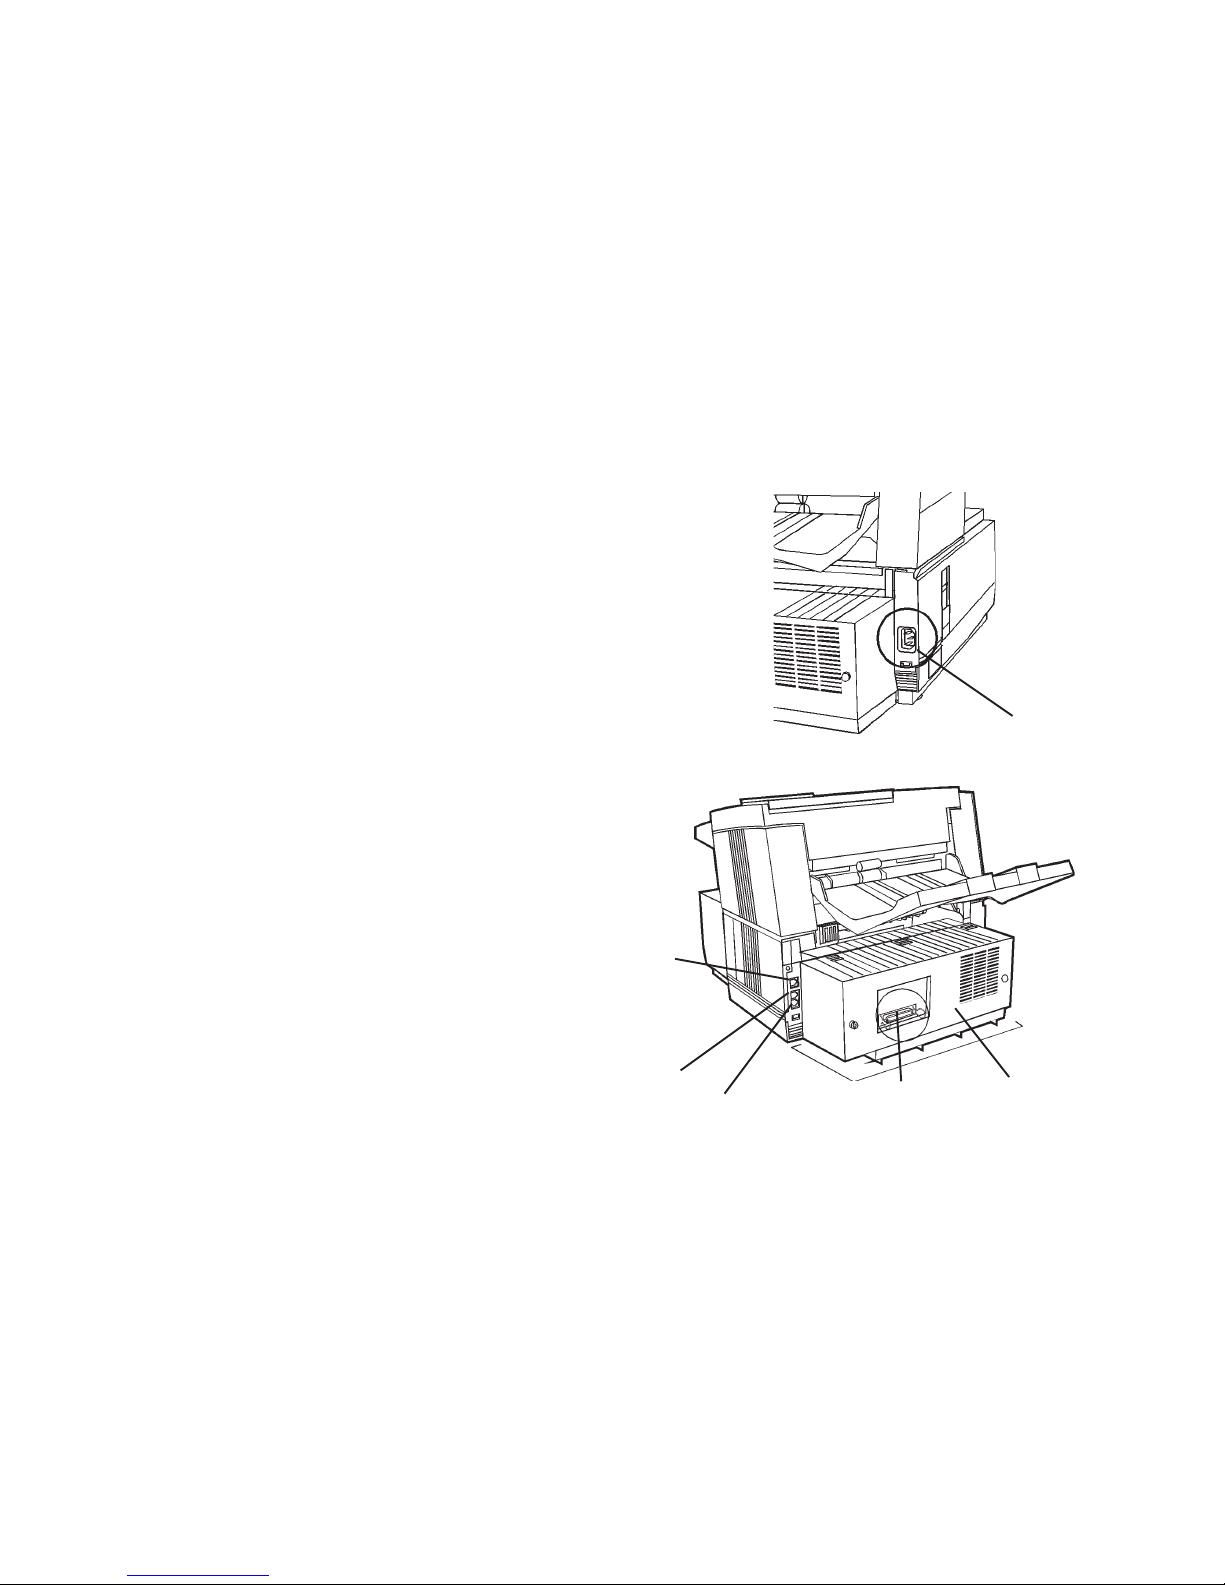
17 AC Power Cord Socket
Plug the AC power cord (supplied with the unit) into this
socket.
18 Line Jack
Jack for connection to main outside telephone line.
19 Back Cover
Remove this cover to expose the expansion (installation)
slots for certain options.
!
Options vary according to the the model of your
machine. See “Options and Accessories.”
20 IEEE-1284 Parallel Port
The parallel port provides multifunction capability (if
your machine is so equipped).
!
Options and features vary according to the model of
your machine. See “Options and Accessories.”
21 and 22
TEL Jack 1 (21) and TEL Jack 2 (22)
Jacks for connecting optional telephone handset,
external telephone, or answering machine.
5759_04.tif and 5759_03.tif
17
22
18
1920
21
Page 28
|
OKIFAX 5780/598028
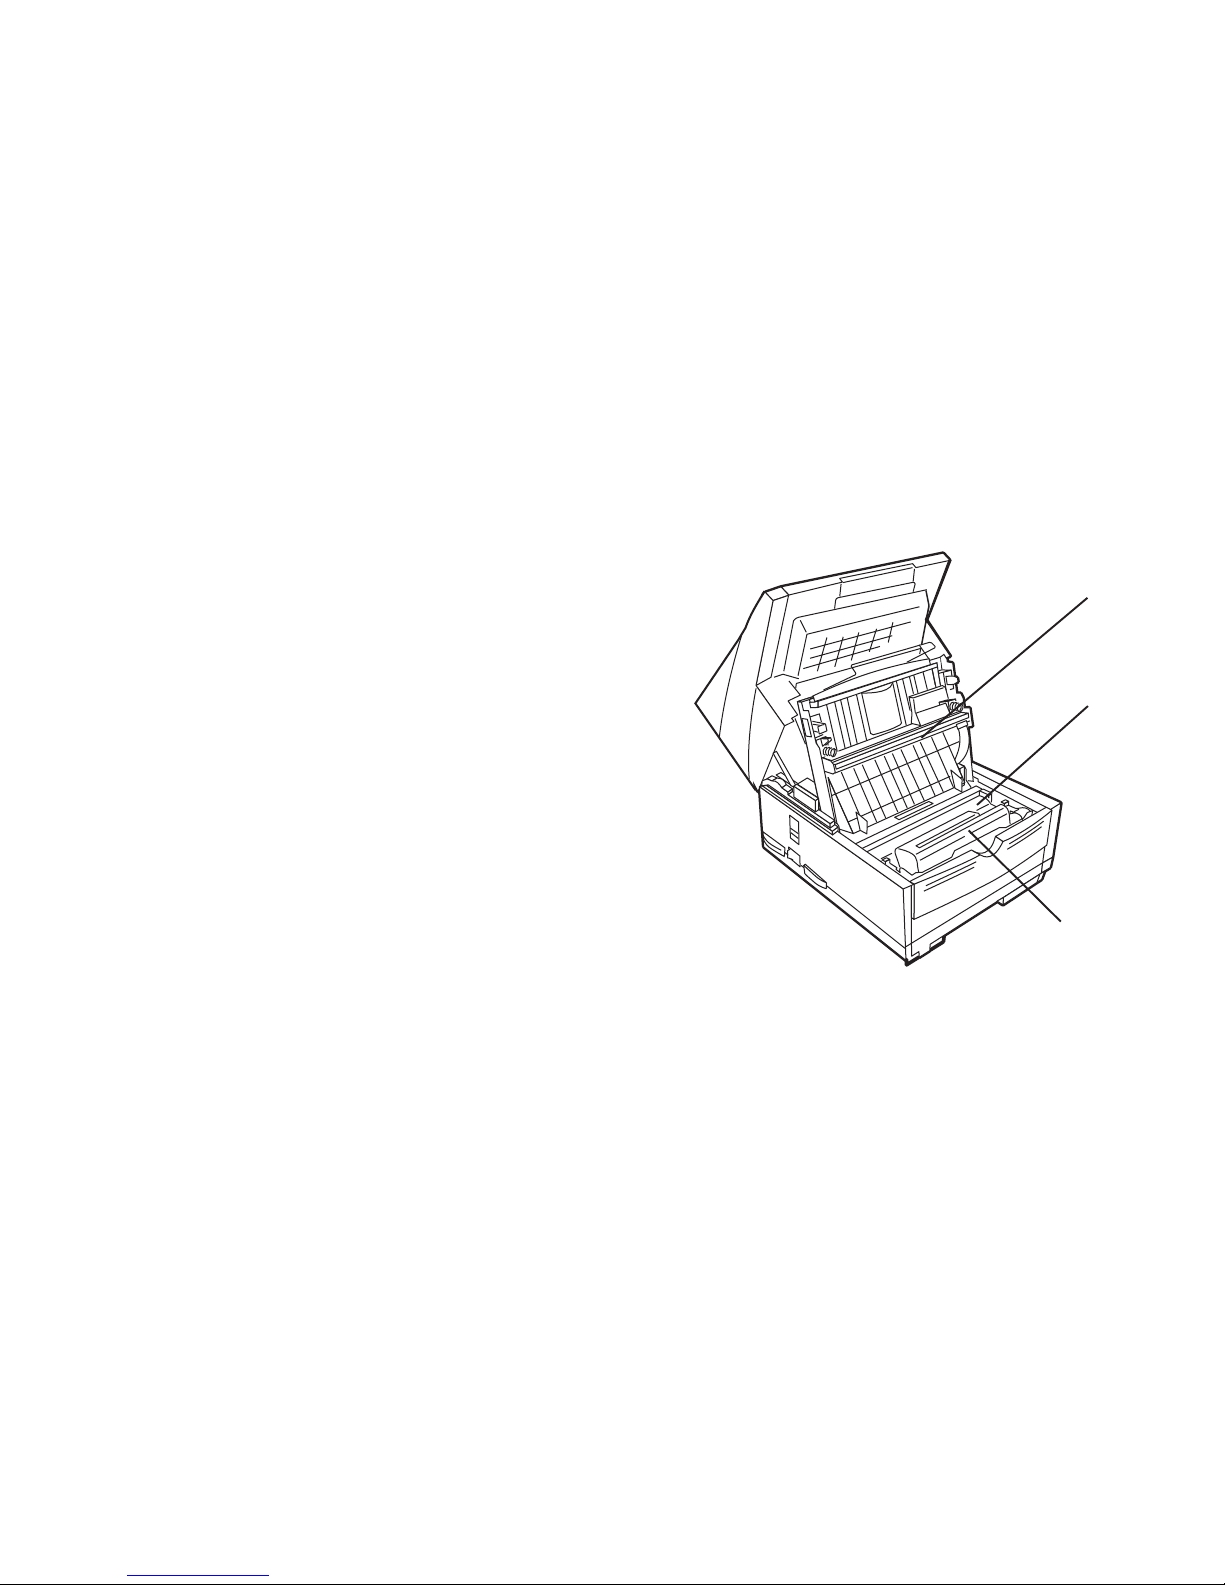
23 LED Printhead
This black bar is the transfer mechanism that writes
received/copied information to the image drum.
Clean the LED when you change the toner cartridge.
See “Maintenance.”
24 Image Drum Unit
The image drum contains a green photosensitive drum
which receives information from the LED print head and
transfers it to the printing paper.
Install a new image drum unit* when Replace Drum
appears on the display panel.
* Only install image drum units specified by OKI for use
in this machine!
See “Maintenance.”
25 Toner Cartridge
This black cylinder, installed inside the image drum unit,
contains the black powder used as the machine’s ink for
printing data.
Install a new toner cartridge* when Replace Toner
Cartridge appears on the display panel.
* Only install toner cartridges specified by OKI for use in
this machine!
See “Maintenance.”
Fig4_07.eps
23
24
25
Page 29
|
User’s Guide: English 29
Control Panel Keys and Indicators
Fig1_08.eps
Page 30

|
OKIFAX 5780/598030
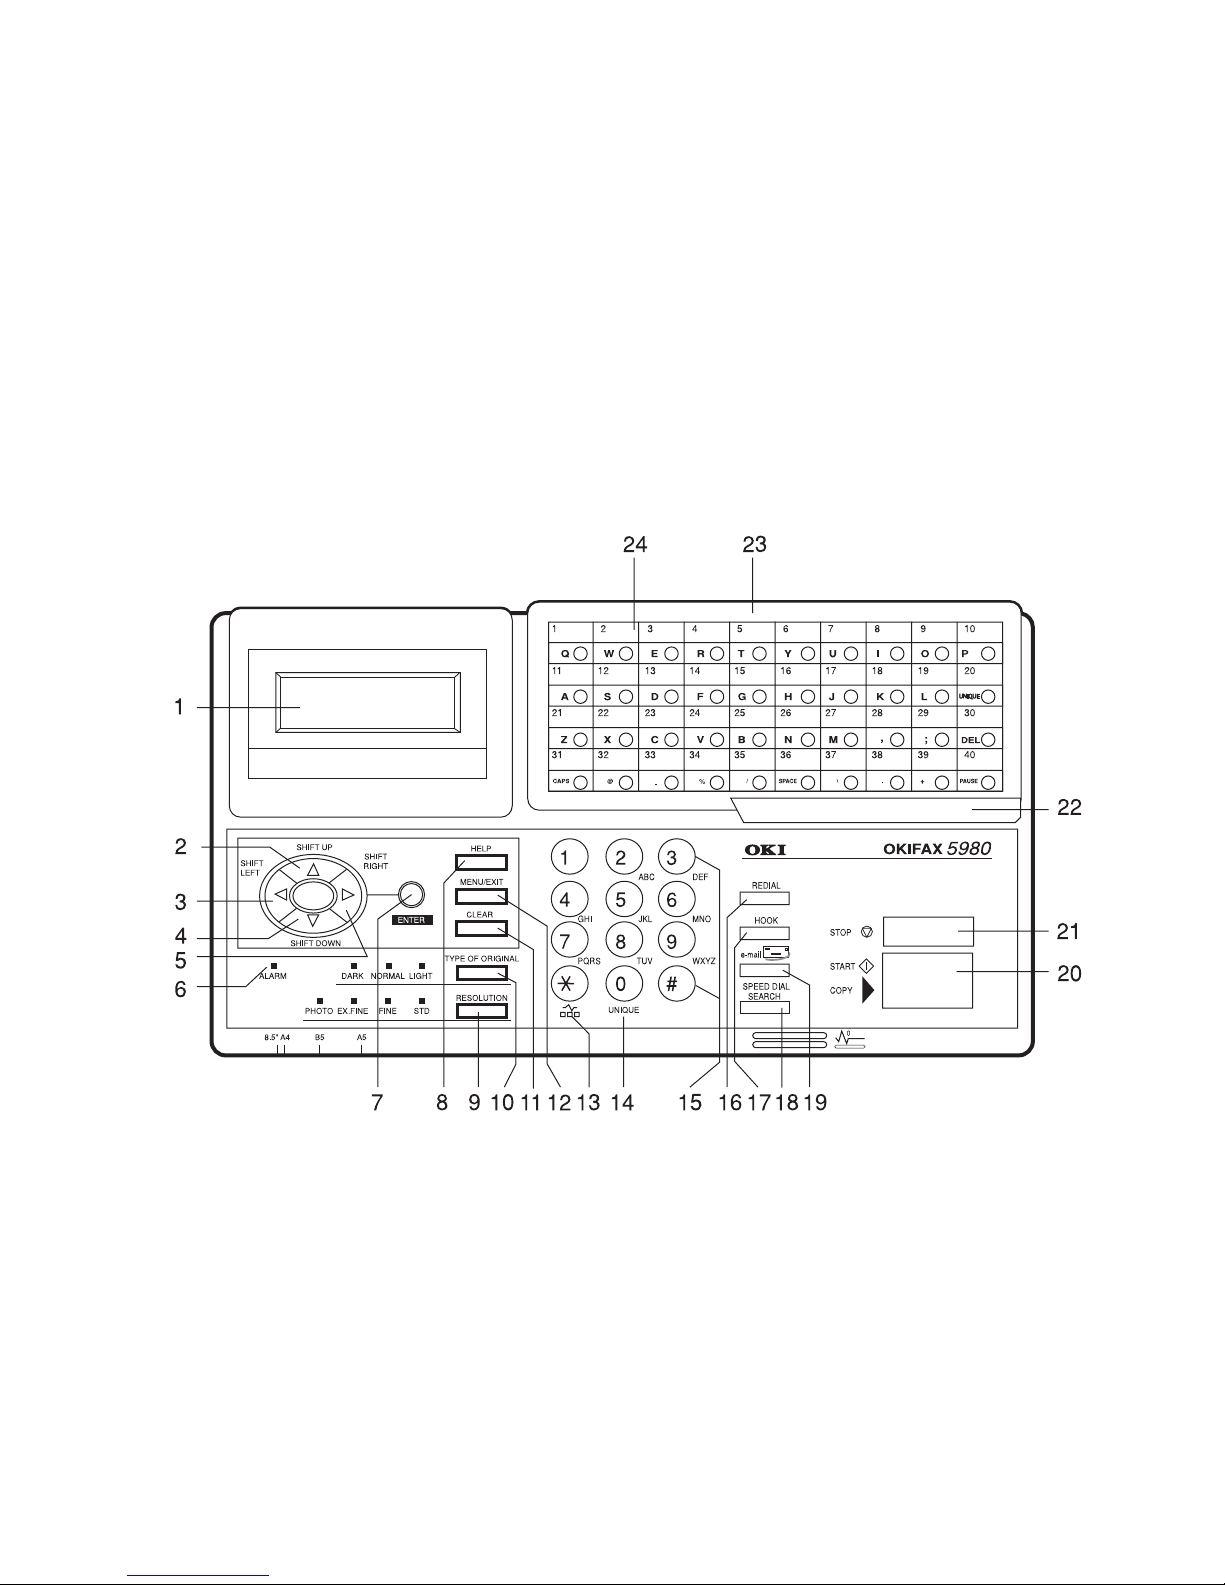
1 Display Panel
Refer to this display for instructions and information
while the machine is performing operations, or when
entering information or changing settings.
2 Shift Up ¶ Key
Use this key to:
- Move to the previously selected option in the same
operational layer when programming the machine.
- Move to the upper row from the lower row when
data (such as telephone numbers) is listed in two
rows.
3 Shift Left § Key
Use this key to:
- Return to the previous operational layers in the
programming of the machine.
- Move the cursor to the left during normal operation
4 Shift Down Key:
Use this key to:
- Move to the next option in the same operational
layer when programming the machine.
- Move to the lower row from the upper row when
data (such as telephone numbers) is listed in two
rows.
5 Shift Right
ÿ©ÿ
Key:
Use this key to:
- Move to the next operational layer in the
programming of the machine.
- Determine/register a menu option or setting.
- Move the cursor to the right during normal
operation.
6 Alarm Indicator
This indicator light flashes and an alarm sounds as an
alert for problems that occur. To turn off the alarm
indicator, press the Stop key and correct the problem.
7 Enter Key
Use this key to:
- Determine/register a menu option or setting.
- Determine the location of a broadcast operation.
- Display the results of a transmission or printout a
Message Confirmation Report when the machine is
in the standby mode with no document set in the
document tray.
Page 31

|
User’s Guide: English 31
8 Help Key
Press this key to print out Help and Function lists.
9 Resolution Key (Photo, Ex.fine, Fine, STD indicator
lights)
Use this key to set the desired resolution of the fax/copy
after loading the document. Use the Photo setting when
the original document includes half-tone images.
10 Type of Original Key (Dark, Normal, Light indicator
lights)
Use this key to set the contrast after loading the
document. Use Light for originals that are too light,
Normal for originals with good contrast, and Dark for
originals that are too dark.
11 Clear Key
Use this key to cancel ID, telephone number and
programming entries.
12 Menu/Exit
Use this key to:
- activate the Menu mode when the machine is in
standby state.
- exit the mode and return to standby state.
13 */Tone Key
If the machine is set for pulse dialing, pressing this key
will switch from pulse to tone dialing during the current
call. This key can also be used during programming to
create numbers with mixed pulse-tone operation.
14 0/Unique Key
Use this key as “0” when dialing telephone numbers.
When programming the Sender ID, Location ID, etc., use
this key to enter unique characters:
Symbols: ! # & ‘ ( ) * + , - . / : ; = ? ·
Internet characters: @ “ _ %
- l
The
- l
functions as a tilde symbol.
Umlaut characters: Ä ß Ñ Ö Ü
Norwegian characters: Æ Å Ø æ å ø
Page 32

|
OKIFAX 5780/598032
15 Numeric Keypad
These 12 keys work like the keypad on a standard
telephone when dialing a telephone number. They are
also used to move to another operation mode, enter
numbers, letters and other characters when programming
the machine, and input speed dial numbers after pressing
the Speed Dial key.
The “#” key is used for the creation of groups of
telephone numbers. After a document is loaded, this key
can also be used to select previously programmed groups
of telephone numbers for faxing.
16 Redial Key
Press this key to automatically redial the last telephone
number dialed on the machine.
17 Hook Key
Use this key to open the telephone line for manual
dialing with the numeric keypad or external telephone
handset. After pressing the key, you can hear the dial
tone and dialing code through the machine’s speaker.
18 Speed Dial/Search Key
After loading a document for faxing, press this key and
then enter the programmed Speed Dial (One-Touch or 2
or 3-digit) number for the location. The speed dialing
function automatically dials the telephone number and
transmits the fax. After pressing the Search key, you can
search corresponding location IDs when alphanumeric
characters are entered.
19 E-Mail Key
Press this key before manually entering an e-mail address
directly from the One-Touch keypad. This means that
the e-mail address HAS NOT been pre-programmed.
!
For more information on using the E-Mail Key, see the
T.37 Option Guide.
20 Start/Copy Key:
Use this key to:
- Start transmission of a document after loading the
document and selecting the location.
- Start manual fax transmission or reception.
- Start the copying function.
Page 33

|
User’s Guide: English 33
21 Stop Key
Use this key to:
- Cancel the operation shown on the display.
- Cancel the transmission of a fax (press twice within
3 seconds).
- Cancel an alarm (Alarm indicator light illuminates).
- Return to higher operational layers when
programming the machine.
22 One-Touch Keypad Latch to Second Panel
(Model 5980)
The One-Touch Keypad of the OKIFAX 5980 has two
panels, one above the other.
Lift this latch to reveal the second panel.
!
The One Touch Sheet(s) provide space for Speed Dial
numbers 1 through xx
where xx =
40 (Model 5780) or
80 (Model 5980).
For higher Speed Dial numbers, program the number(s)
and print the Telephone Directory. For more
information, see “Reports, Telephone Directory.”
23 One-Touch Keypad
Detailed descriptions of the One-Touch Keypad
functions are provided in a different section of this
document.
See “Getting to Know Your Machine, One-Touch
Keypad.”
24 One-Touch Labels
After programming a telephone number into a OneTouch key, write the name of the location on the label for
the One-Touch key. Remove the plastic covering the
label, use a pencil to write the name, and then replace the
cover.
You may need replacement (blank) labels.
See “Options and Accessories, Obtaining.”
Page 34

|
OKIFAX 5780/598034
One-Touch Keypad
Use these keys for quick, one-touch dialing and the
programming of other machine operations. In addition to the
ability to assign telephone numbers (up to 40 digits each) to
a One-Touch key, alphanumeric names of up to 15 characters
in length can be registered (Telephone Directory).
Using One-Touch Keys for Dialing
To use One-Touch keys for dialing, after the telephone
number(s) for the key have been programmed, simply load
the document to be faxed and press the key of the location
where the fax is to be sent. Two telephone numbers can be
programmed for each One-Touch key, a primary number that
is always dialed first, and an alternate number that is
automatically dialed if the first number is busy or the call is
not answered.
Using One-Touch Keys for Search
After pressing the Search key, use these keys to make an
alphabetical search for names of telephone numbers
previously programmed.
Using One-Touch Keys for Programming
The One-Touch keys are also useful in the programming of
names in the machine memory. In addition to the
alphanumeric keys, a number of special keys are provided for
programming convenience:
Page 35

|
User’s Guide: English 35
Alphabet Keys (One-Touch keys #1-27, except #20)
When programming the Sender ID and Location ID, use these
keys to enter alphabet characters.
Unique Key (One-Touch key #20)
Use the same as the “0” of a 10-keypad. Also used to enter
Symbols: ! # & ‘ ( ) * + , - . / : ; = ? ·
Internet characters: @ “ _ %
- l
The
- l
functions as a tilde (~) symbol.
Umlaut characters: Ä ß Ñ Ö Ü
Norwegian characters: Æ Å Ø æ å ø
Del Key (One-Touch key #30)
Use this key to delete characters at the position of the cursor
in the display panel when entering ID, telephone numbers or
programming functions.
Caps Key (One-Touch key #31)
Use this key to switch between uppercase and lowercase
when entering alphanumeric characters.
Space Key (One-Touch key #36)
Use this key to enter spaces when programming the machine.
Unlike the Pause key, spaces provide easier reading only and
have no effect on dialing characteristics.
Page 36

|
OKIFAX 5780/598036
Plus Key (One-Touch key #39)
For all feature set configurations: This key is used for chain
dialing. Each fax number entered or programmed into the
machine can be up to 40 digits long.
If you need to dial a number longer than 40 digits, you can
dial the number using any combination of Speed Dial
numbers or the numeric keypad.
To enter a chain dial number into a Speed Dial number, press
the Plus key at the 40th position of the first part of the
number to indicate it is a chain dial number, then complete
the process by entering the second part of the number
following the procedures required for inputting another
Speed Dial number.
If the Internet Fax feature set is installed: Use this key to
enter the “-” character when programming ID and PBX,
public line, international telephone, or Earthing/Flashing
switches. This key is also used to enter the “+” character in
TSI/CSI numbers.
Pause Key (One-Touch key #40)
Use this key to enter automatic 3-second pauses in dialing
when programming telephone numbers. For example, use
this key to tell the machine to wait for an outside or
international line to open. Pauses in a telephone number
dialing sequence are indicated by a “P”.
Other
Special character keys (, ; @ _ : / \ . +).
Page 37

|
User’s Guide: English 37
One-Touch Keys, Second Panel
!
The second panel of One-Touch keys is available only
with the OKIFAX 5980.
Accessing
To access the second panel of One-Touch keys (41-80), grasp
the latch at the bottom of the keypad and lift up on the main
panel, swinging it up and to the right.
After pressing the desired key(s), close the main panel.
!
The One Touch Sheet(s) provide space for Speed Dial
numbers 1 through xx
where xx =
40 (Model 5780) or
80 (Model 5980).
For for higher Speed Dial numbers, program the
number(s) and print the Telephone Directory. For more
information, see “Reports, Telephone Directory.”
Page 38

|
OKIFAX 5780/598038
Signal Tones
The machine emits sounds to identify specific conditions.
One Short Beep
This is the Key Select Tone.
You hear it every time a key is pressed.
Three Short Beeps
This an Error Tone.
You hear it when an inappropriate key is pressed.
Five Long Beeps
This an Error Tone.
You hear it when there is a problem with operations during
communications.
To stop the beeping (turn the error tone off), press the Stop
key.
Then, print a Message Confirmation Report to check the
source of the problem.
To print the report, press the Enter key twice (with no
documents loaded).
One Long Beep
This is the End of Session Tone.
You hear it at the end of each successful faxing session. It
confirms that there were no errors or problems in the
communication.
Intermittent Warbling
This is the Off-Hook Alarm Tone.
You hear this when the receiver of the handset is left out of
the cradle (when not in use).
The handset is an option; your machine may or may not have
one.
To stop the warbling, return the receiver to its cradle or press
the Stop key.
Page 39

|
User’s Guide: English 39
Installation
· Setting Up Your Fax Machine
Installing the Toner Cartridge
Attaching the Document Stacker
Connecting to the Telephone Line
Connecting Optional External Devices
Handset
Telephone
Answering Machine
Answering Machine and a Telephone
Connecting Power
Loading Paper
To install your fax machine, follow the steps in this section.
· Safety
Installation Hints
Operation and Maintenance
Toner Cartridge and Image Drum Handling
Emergency First Aid
· Getting Started
Where to Install Your Fax Machine
Unpacking
Page 40

|
OKIFAX 5780/598040
Safety
Installation Hints
· Install your fax machine in a dust-free location away
from direct sunlight.
· Do not plug your fax machine into a power source shared
by equipment that produces electrical noise (e.g., air
conditioners).
· Leave electronic adjustments to authorized service
personnel.
· The LINE terminal connects your fax machine to a
standard telephone line. To avoid damage to your
telephone system or to the fax machine, do not plug your
fax machine into anything other than a standard RJ-11C
jack.
· Your fax machine is intended to be grounded electrically
and is equipped with a three-wire grounded power cord.
For your safety, do not attempt to defeat your power
cord’s grounding plug.
· The electrical outlet and phone jack should be installed
near the equipment and should be easily accessible.
· The two TEL terminals on the back of the fax machine
are only suitable for 2–wire devices. Not all standard
telephones will respond to incoming calls when
connected to an extension jack.
· This equipment may not necessarily provide for the
effective hand-over of a call from a telephone connected
to the same line.
· The operation of this equipment on the same line as
telephone or other equipment with audible warning
devices (such as call waiting) or automatic ring detectors
may cause false tripping of the ring detector.
Page 41

|
User’s Guide: English 41
Operation and Maintenance
· Use a dry cloth to clean the control panel and the main
body of the unit.
· Aside from the instructions specifically mentioned in
this document, your fax machine is not user serviceable.
Do not attempt to service the machine or lubricate
moving parts by yourself.
· Pull out the AC plug before trying to remove any objects
that may have fallen into the machine.
· Immediately disconnect the fax machine if it becomes
physically damaged and arrange for its repair or disposal.
· When relocating your fax machine, always disconnect
the telephone line before disconnecting the power cord,
then reconnect the power cord first.
· This fax machine is not intended to be used in parallel
with any other telephone devices.
Toner Cartridge and Image Drum Handling
· Leave unused toner cartridges and image drums in their
packages until needed. When replacing a toner cartridge
or image drum, re-use the packaging to dispose of the
old toner cartridge or image drum.
· Do not expose these components to light for more than
five minutes. Never expose the green drum (inside the
image drum unit) to direct sunlight.
· Always hold the image drum by the ends—never by the
middle. Never touch the green drum inside the image
drum unit.
· Exercise care when removing the toner cartridge. Do not
let it touch your clothing or porous materials. The toner
powder causes permanent stains.
· Small amounts of toner spilled on skin or clothing can
be readily removed with soap and cold water. Using
warm water will make removing the stain much more
difficult.
Page 42

|
OKIFAX 5780/598042
Emergency First Aid
· If toner is swallowed
Dilute by giving two glasses of water and induce
vomiting by administering Syrup of Ipecac (follow
manufacturer’s instructions). Seek medical attention.
Never attempt to induce vomiting or give anything by
mouth to a person who is unconscious.
· If toner is inhaled
Take person to an open area for fresh air. Seek medical
attention.
· If toner gets in the eyes
Flush eyes with large quantities of cool water for 15
minutes, keeping eyelids open with fingers. Seek
medical attention.
Getting Started
Where to Install Your Fax Machine
Place your fax machine in a dust-free location away from
direct sunlight.
· Allow several inches on each side of the fax machine to
ensure adequate ventilation.
· Make sure that both power and telephone outlets are
available nearby.
· Choose a location where the relative humidity is
between 20% and 80%, and where the temperature is
between 50° F (10° C) and 92° F (32° C).
Page 43
|
User’s Guide: English 43
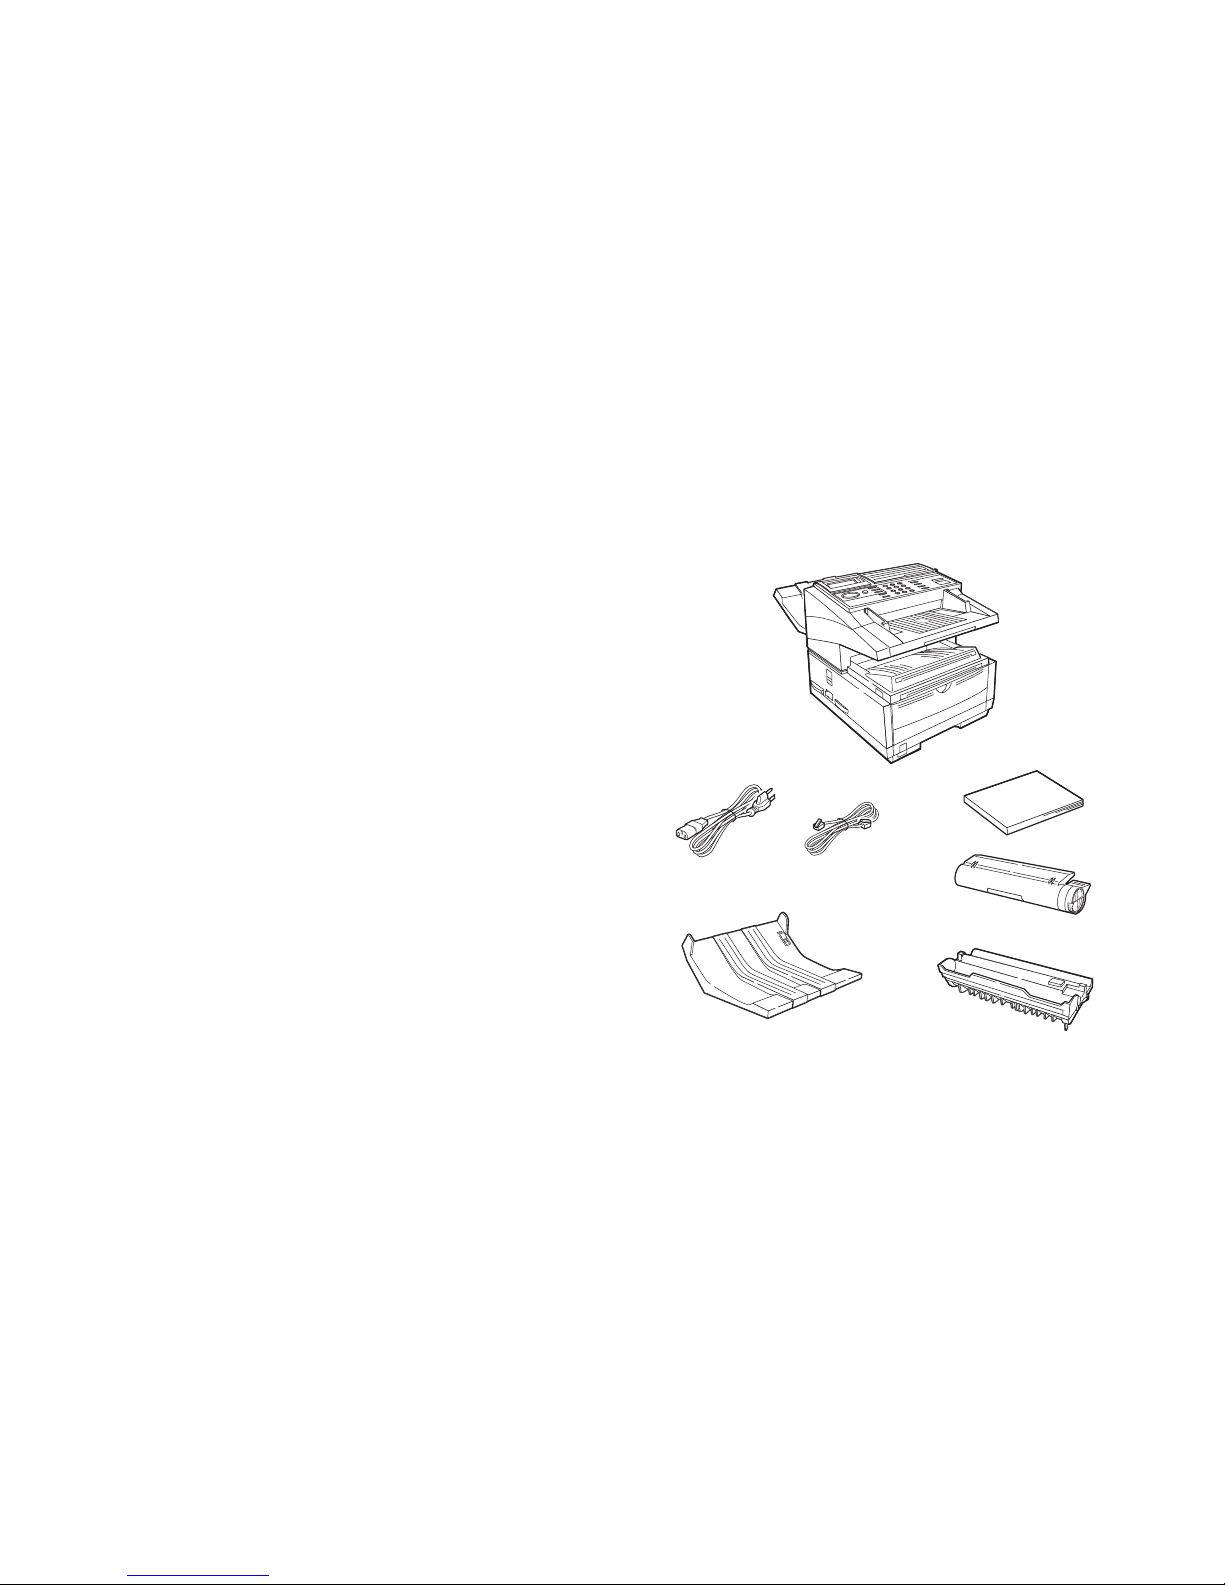
Unpacking
Remove contents from the carton. Be sure that all the items
listed below are included.
!
If any items are missing, contact Oki Data immediately.
Keep your packing materials and carton in case you
need to ship or transport the unit.
1 Fax Machine
2 Toner cartridge
3 Image drum (inside machine)
4 Power cord
5 Telephone line cord
6 Document Stacker
7 Documentation
Fig1_01.eps
1
2
3
4
5
6
7
Page 44
|
OKIFAX 5780/598044
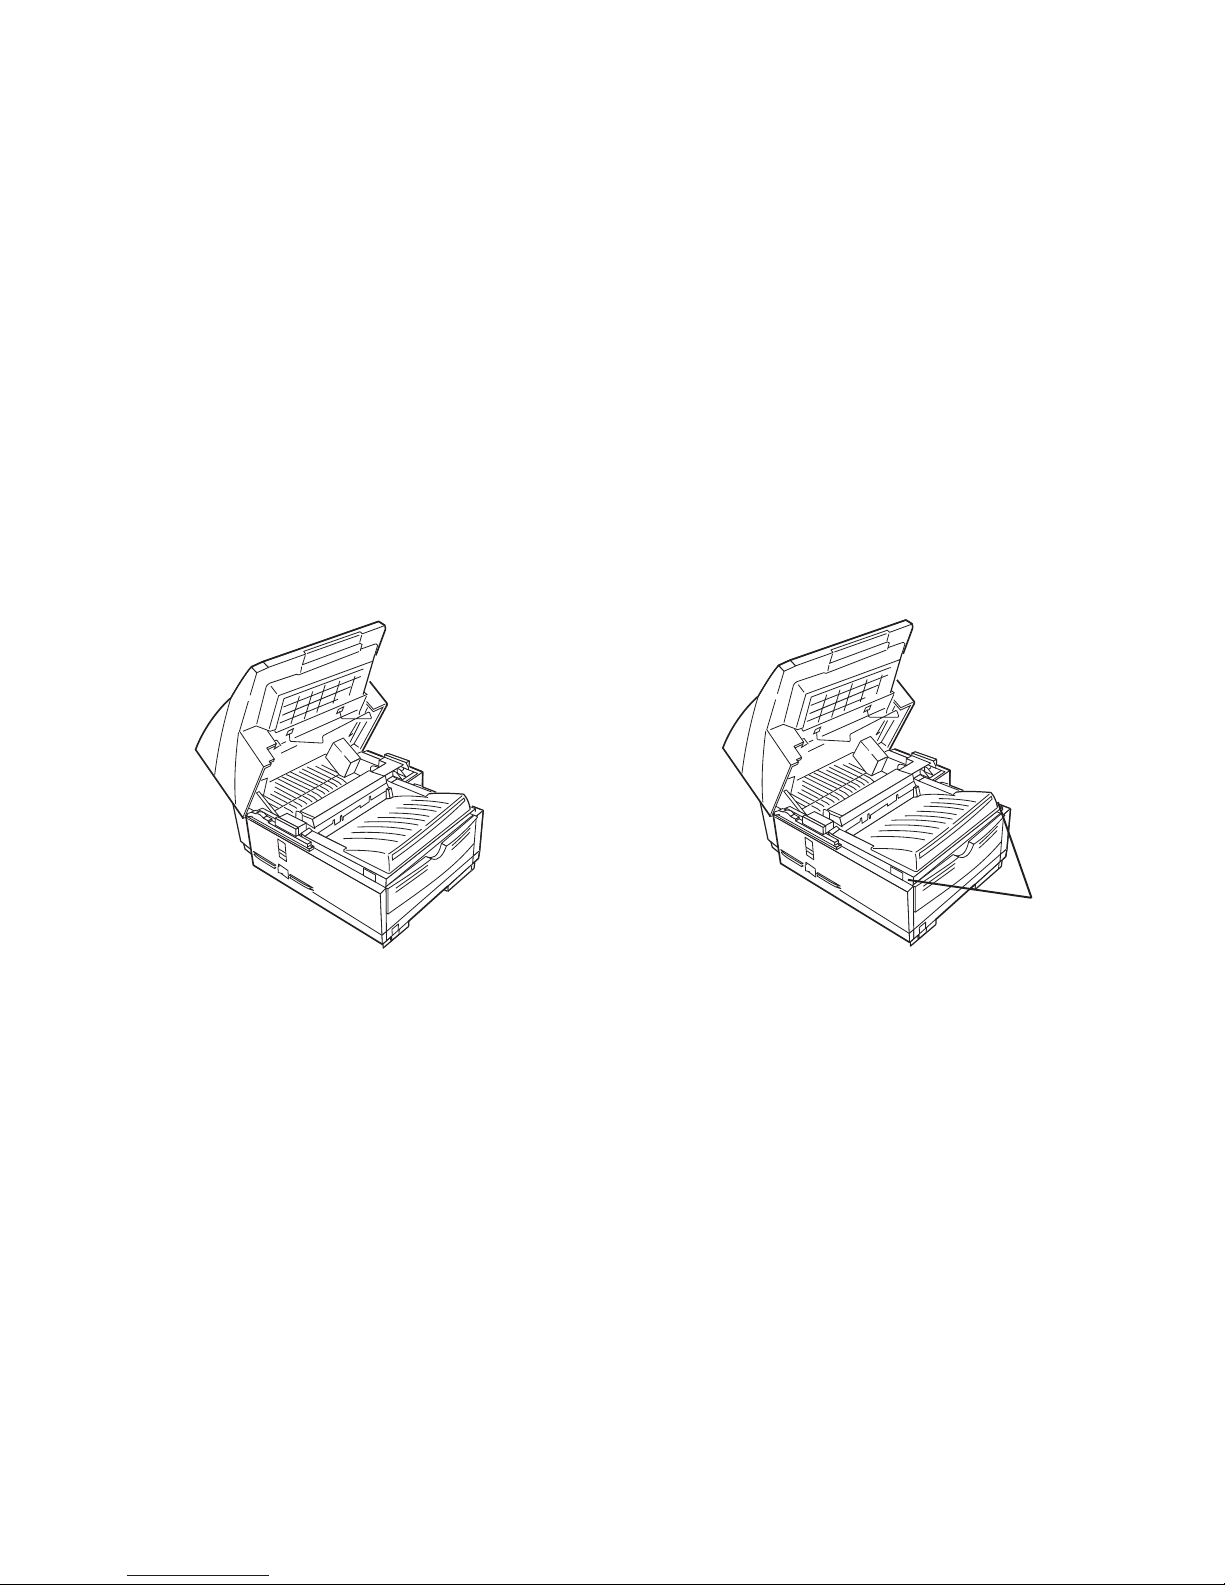
Setting Up Your Fax Machine
1 Lift up on the document tray and swing it up and out of
the way.
Fig4_02.eps
2 Press the release buttons (1) located on both sides of the
copy stacker. Lift up the stacker.
Fig4_02.eps
1
Page 45
|
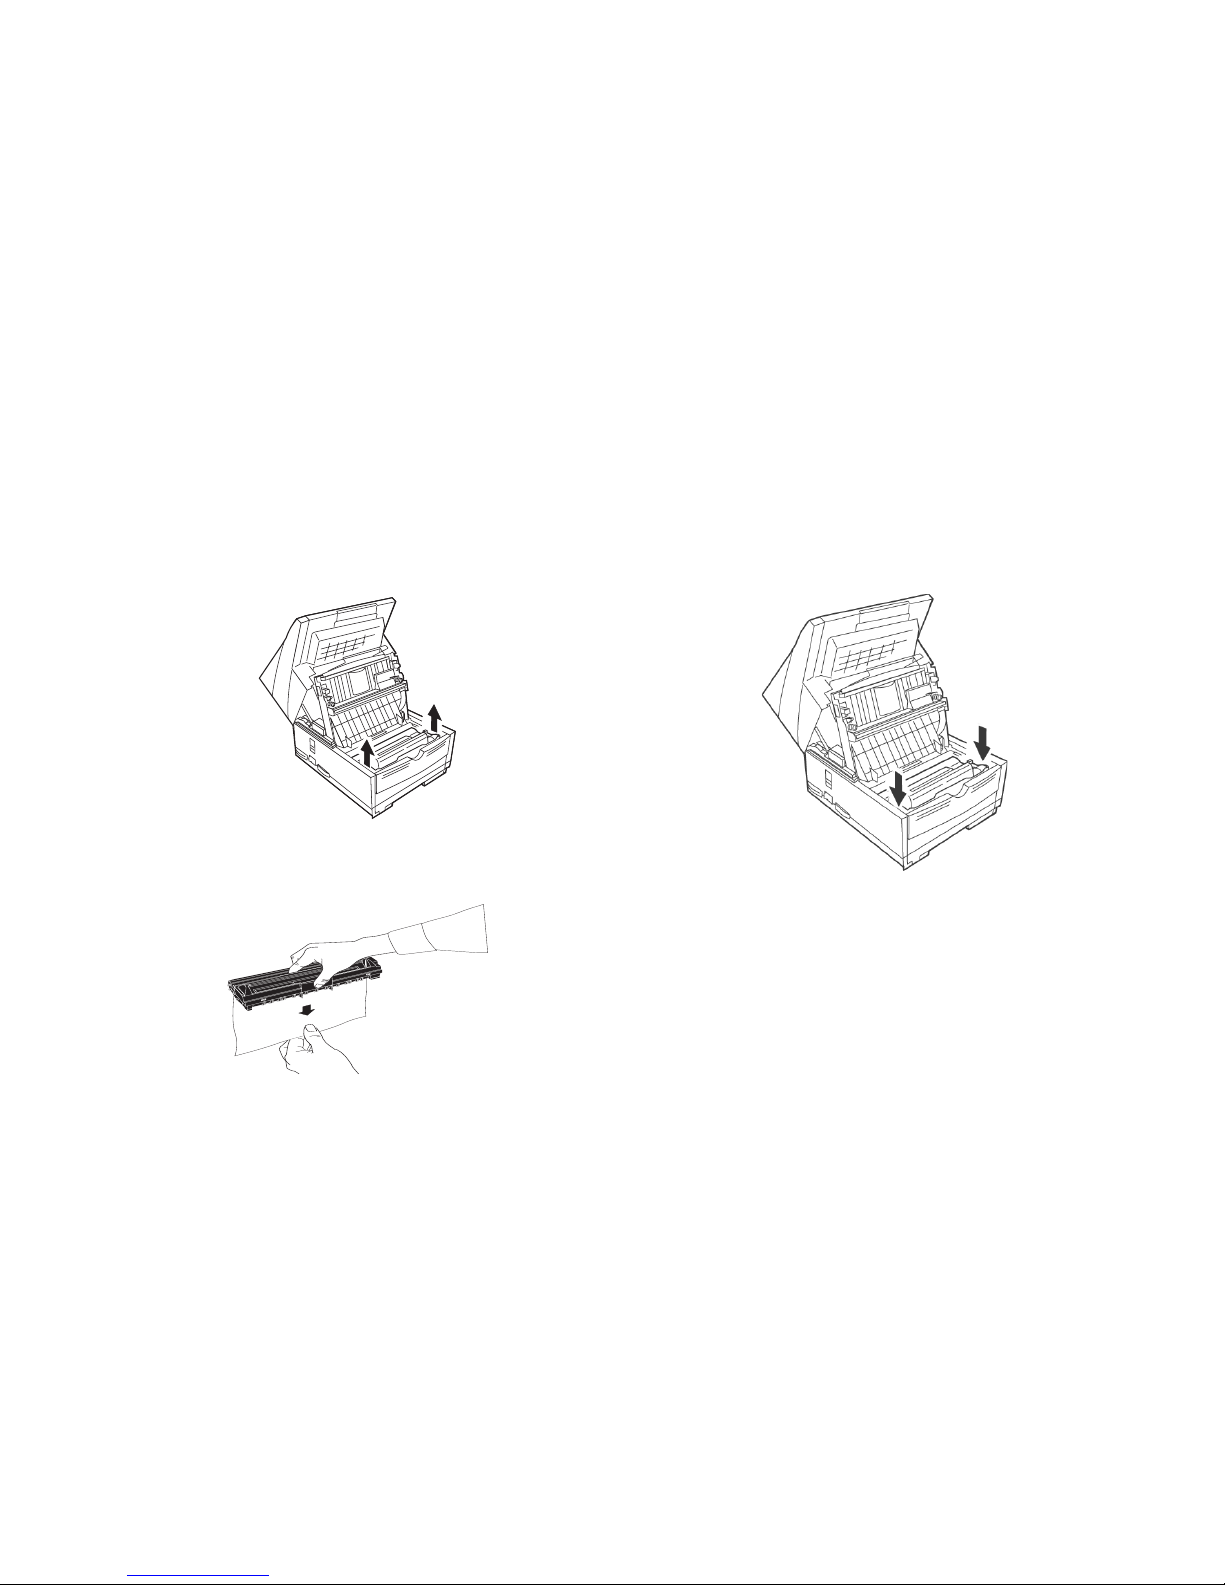
User’s Guide: English 45
3 Move aside the protective sheet and grasp the image
drum cartridge, then lift it out.
!
Caution: Do not touch the green drum surface!
Fig4_04.eps
4 Grasp the protective sheet and pull it out.
Fig019.eps
5 Put the image drum cartridge back into place.
6 Press down at each end of the image drum cartridge to
make sure it is installed correctly.
Fig4_04a.eps
Page 46
|
OKIFAX 5780/598046
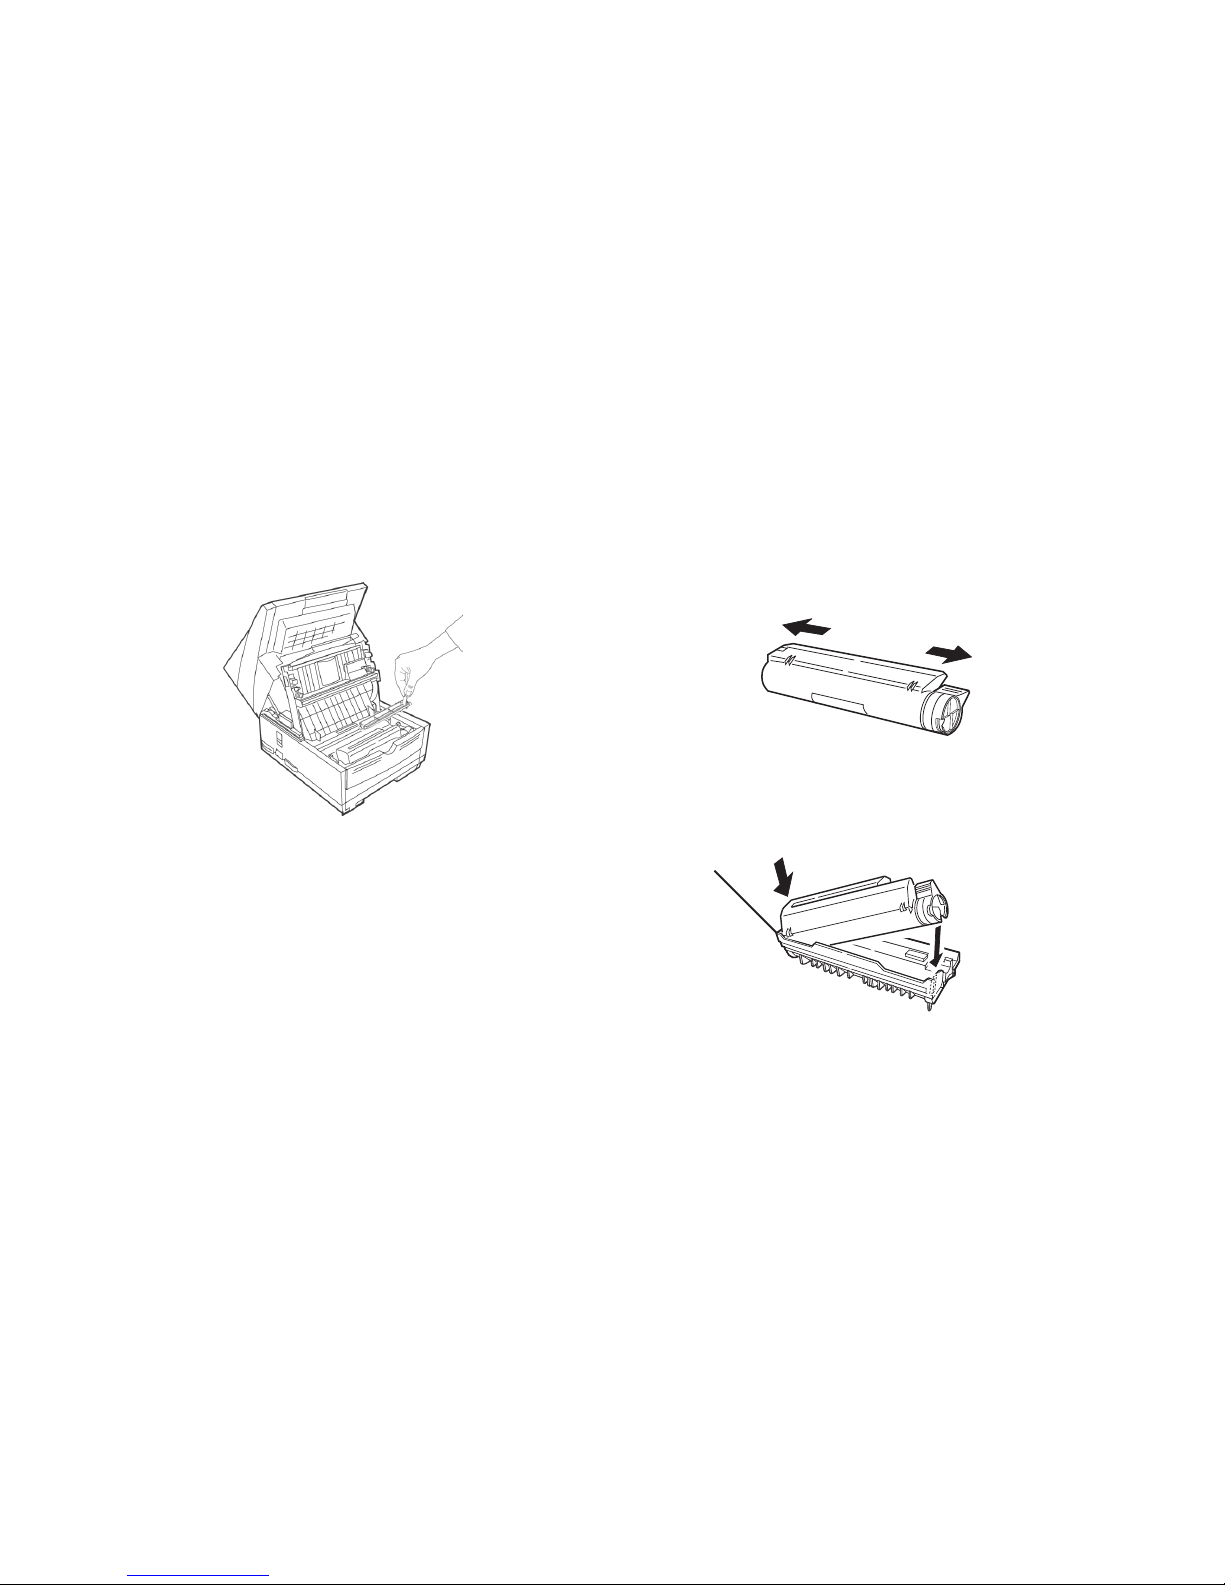
Installing the Toner Cartridge
1 Lift out the toner well cover and discard.
Fig4_07a.eps
!
Warning: Be careful when handling the toner cartridge.
Do not let toner spill onto your clothing or other porous
materials. If you experience any problems with toner,
see the Safety guides at the beginning of this section.
!
Important: This machine will only operate using toner
cartridges specified by OKI for this facsimile machine.
The use of any other toner will result in the display of
an operation error and in machine malfunction.
2 Unwrap the toner cartridge and gently shake it to
distribute the toner. Then carefully peel the tape from
the bottom of the toner cartridge.
Fig4_08.eps
3 Holding the toner cartridge with the bottom down, insert
the left side into the toner well, placing it under the tab
(a).
Fig4_10.eps
4 Lower the right side down into the toner well.
a
Page 47
|
User’s Guide: English 47
5 Push the lock lever in the direction of the arrow until it
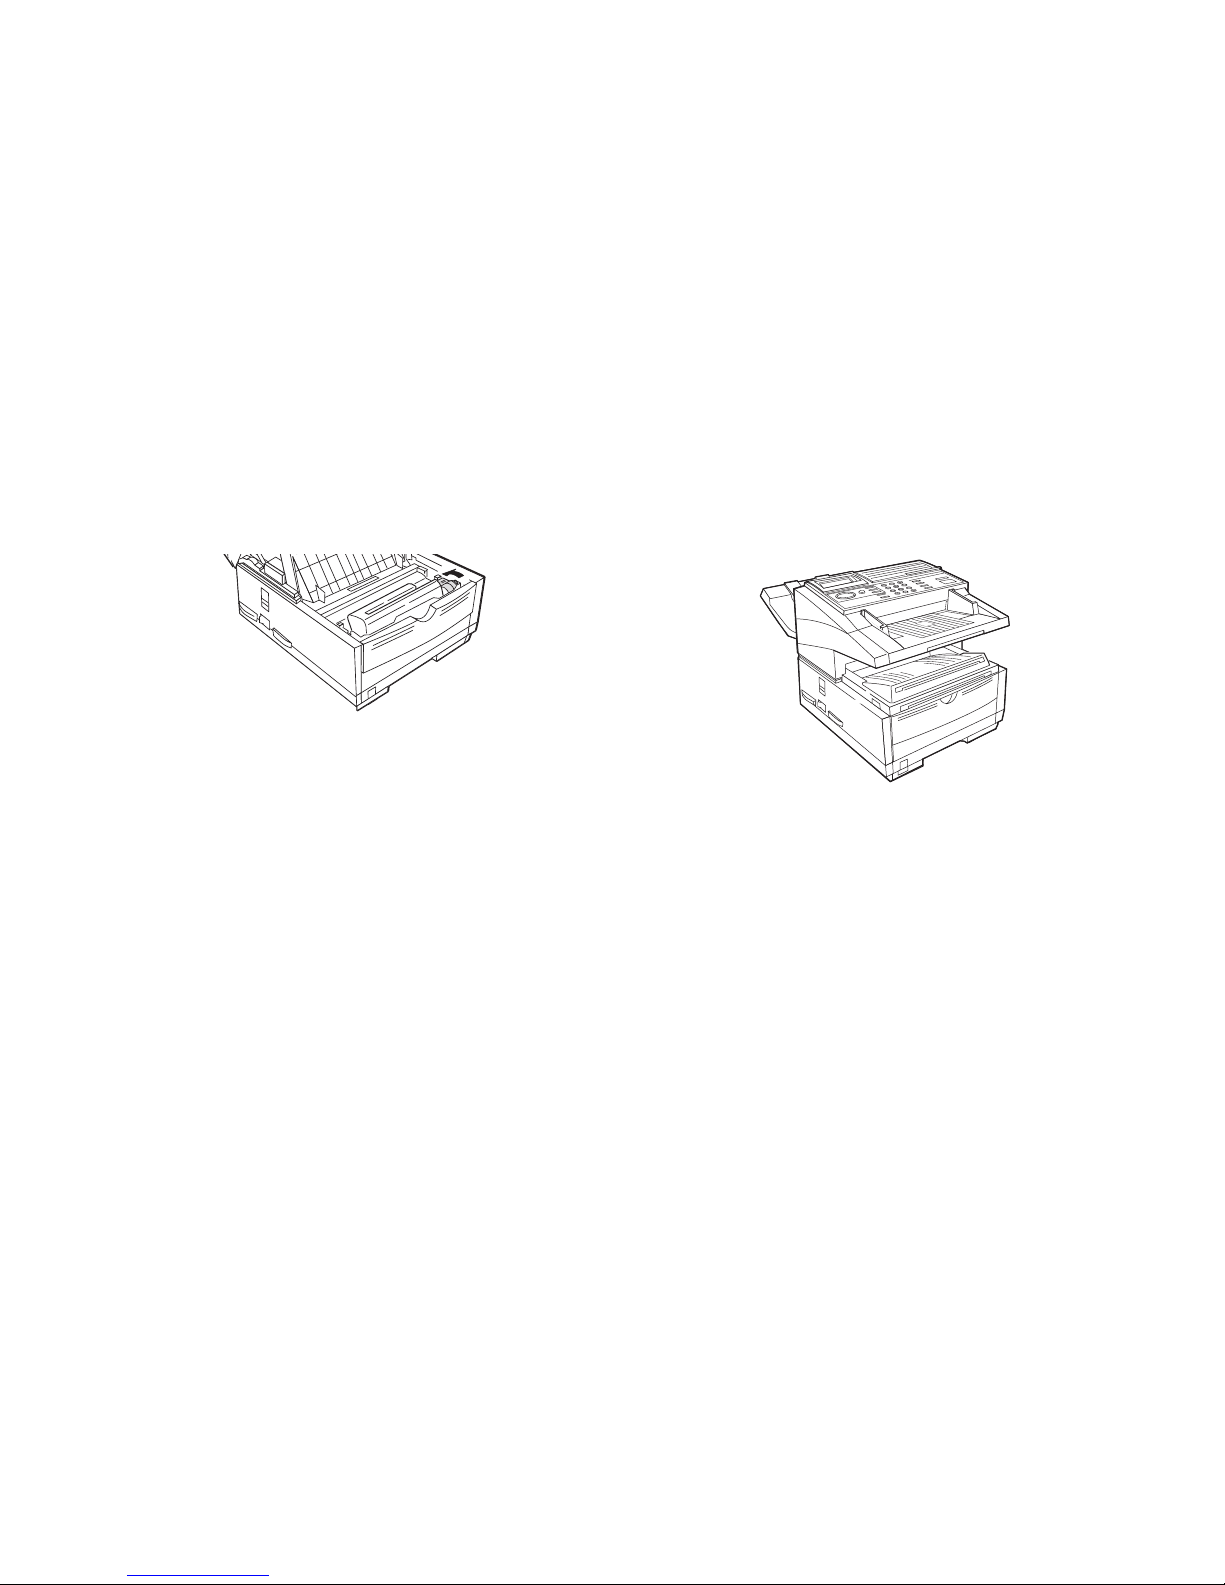
stops.
Fig4_11.eps
6 Close the copy stacker and document tray. Make sure
the cover is firmly closed.
Fig_01.eps
Page 48
|
OKIFAX 5780/598048
Attaching the Document Stacker
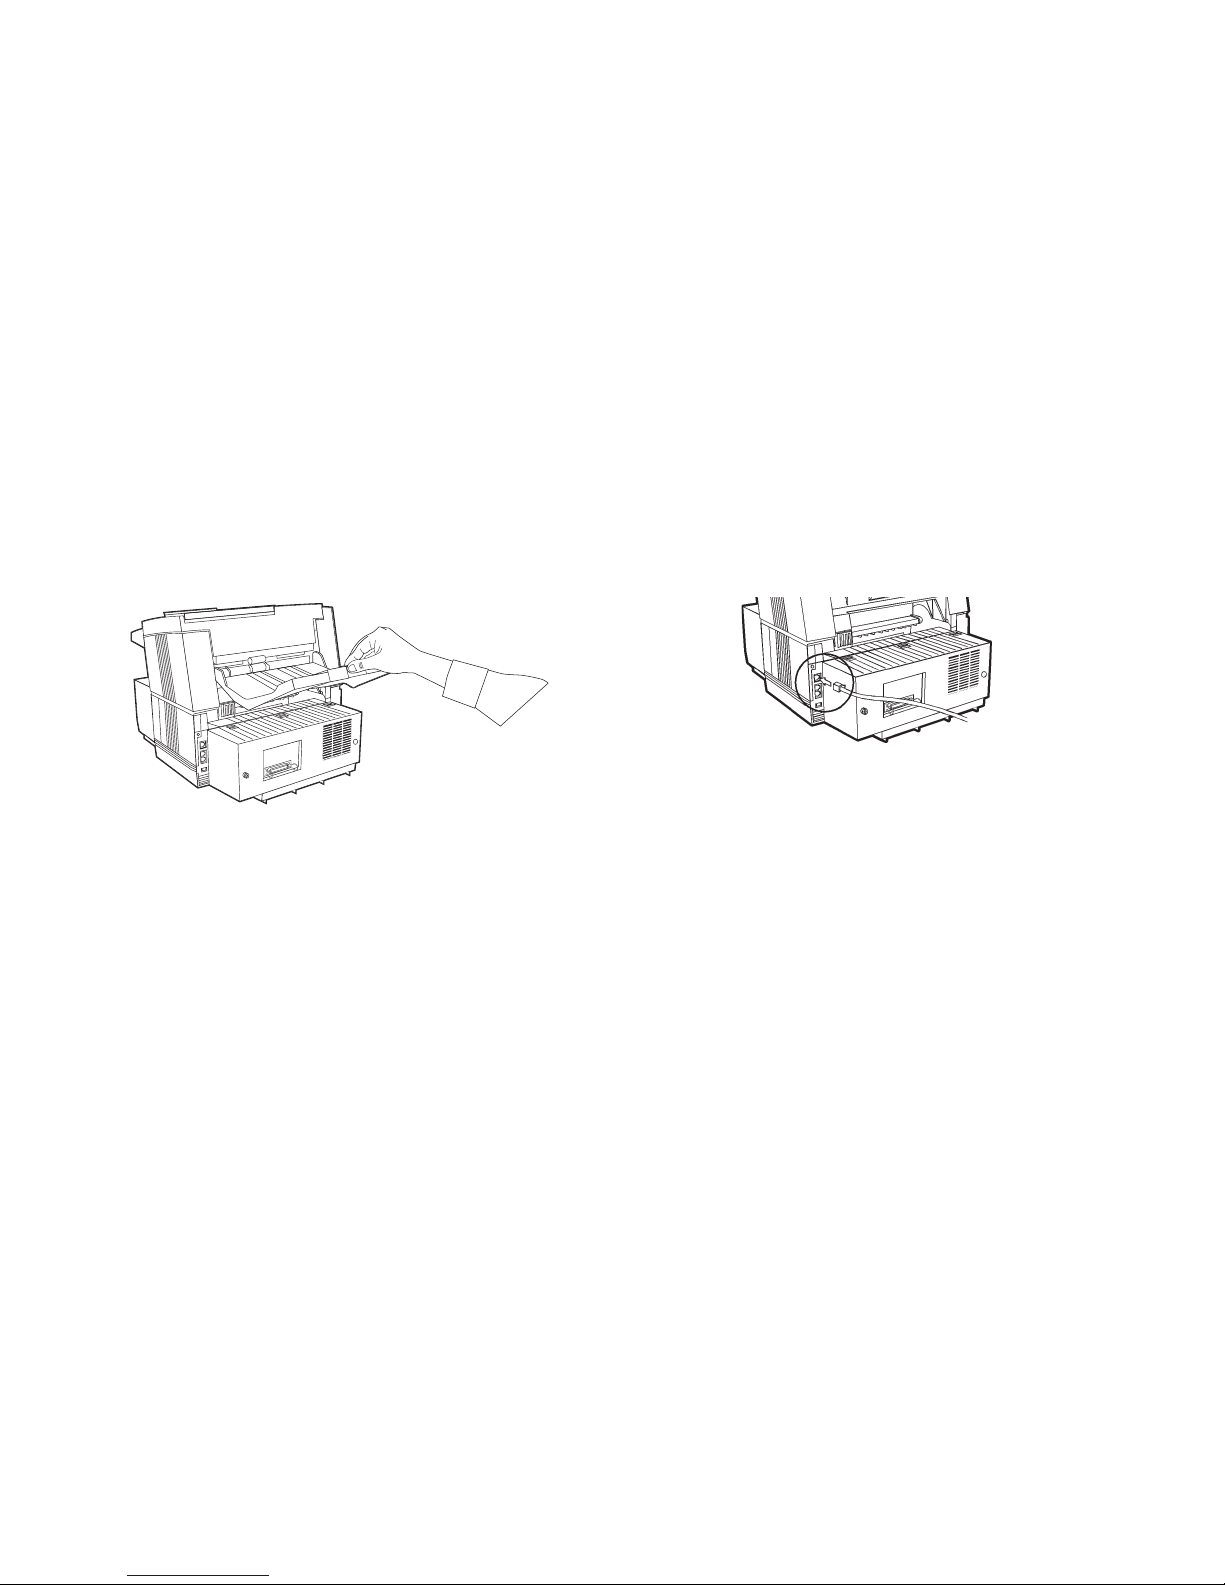
Attach the document exit stacker on the back of the machine
using the latching mechanism provided.
5759_7.eps
Connecting to the Telephone Line
1 Insert one end of the telephone cord into the LINE jack
in the back of the machine.
5759_45.tif
2 Insert the other end into your wall telephone jack.
Page 49
|
User’s Guide: English 49
Connecting Optional External Devices
Handset
If you purchased an external handset option with your fax
machine, follow these instructions to install it.
1 Plug in one end of the handset cord into the handset and
the other end into the jack on the front of the cradle.
Place the handset in the cradle.
2 Insert the supplied telephone cord into the jack located
on the back of the cradle.
3 Insert the end of the cord into the TEL jack on the back
of the fax machine.
5759_47.tif
!
The two TEL jacks are provided to allow you to connect
both an external handset and an answering machine.
Telephone
!
Important: Any external telephone or answering
machine connected to your fax machine must be FCC
(US) or CSA (Canada) approved.
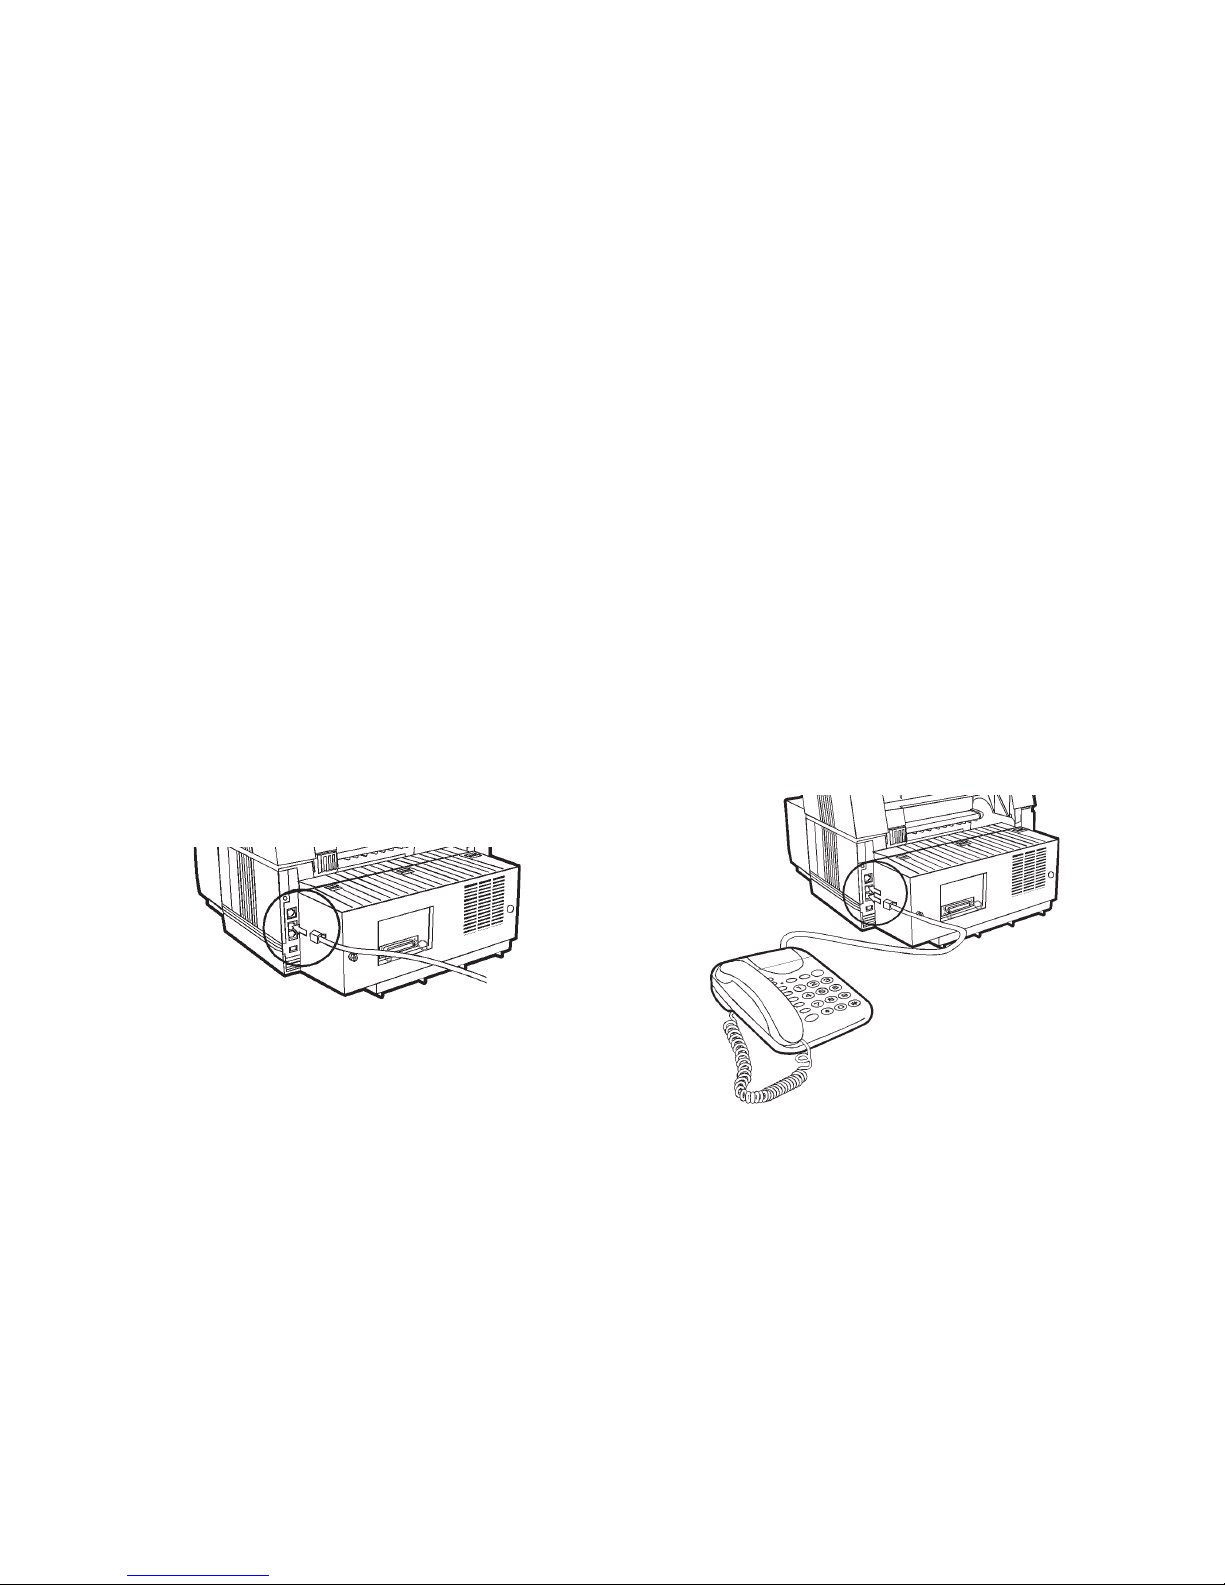
1 Insert one end of the telephone cord into the TEL jack
on the back of the fax machine.
2 Insert the other end into the jack in your external device.
5759_51.tif
Page 50

|
OKIFAX 5780/598050
Answering Machine
Refer to “Connecting an External Telephone.”
!
You must have the TAD mode feature turned on for an
answering machine to work with your fax machine. See
“Setting Basic Features, Setting the Answering Mode.”
Answering Machine and Telephone
1 Connect your answering machine to your fax machine.
2 Plug your external telephone’s cord into the telephone
jack on your answering machine.
!
You must have the TAD mode feature turned on for an
answering machine to work with your fax machine. See
“Setting Basic Features, Setting the Answering Mode.”
Connecting Power
1 Plug the power cord into the back of the unit.
5759_50.tif
2 Plug the other end into a grounded AC power outlet.
3 Turn on the power switch.
Page 51

|
User’s Guide: English 51
!
If you are receiving a document created on legal-size
paper, the document will be reduced to fit on letter size
paper. The vertical length of the received page image is
automatically reduced to fit on the paper loaded, down
to 75% of the original length.
!
Your fax machine is set at the factory to use letter size
paper. To use a different paper size, change the 1’st
Paper Size (User Function 25) to match your new paper
size.
See “Setting Basic Features, Other Basic Parameters,
Paper-Size Setting.”
Loading Paper
Your fax machine can hold up to 250 sheets of standardweight (20 lb. [75 g/m2]) paper in letter, legal, and A4 sizes.
For best results, use paper specially made for laser printers or
photocopiers.
!
Load paper into the tray print side DOWN.
If you are loading letterhead, place the paper print side
down, with the letterhead near the handle part of the
tray.
Page 52
|
OKIFAX 5780/598052
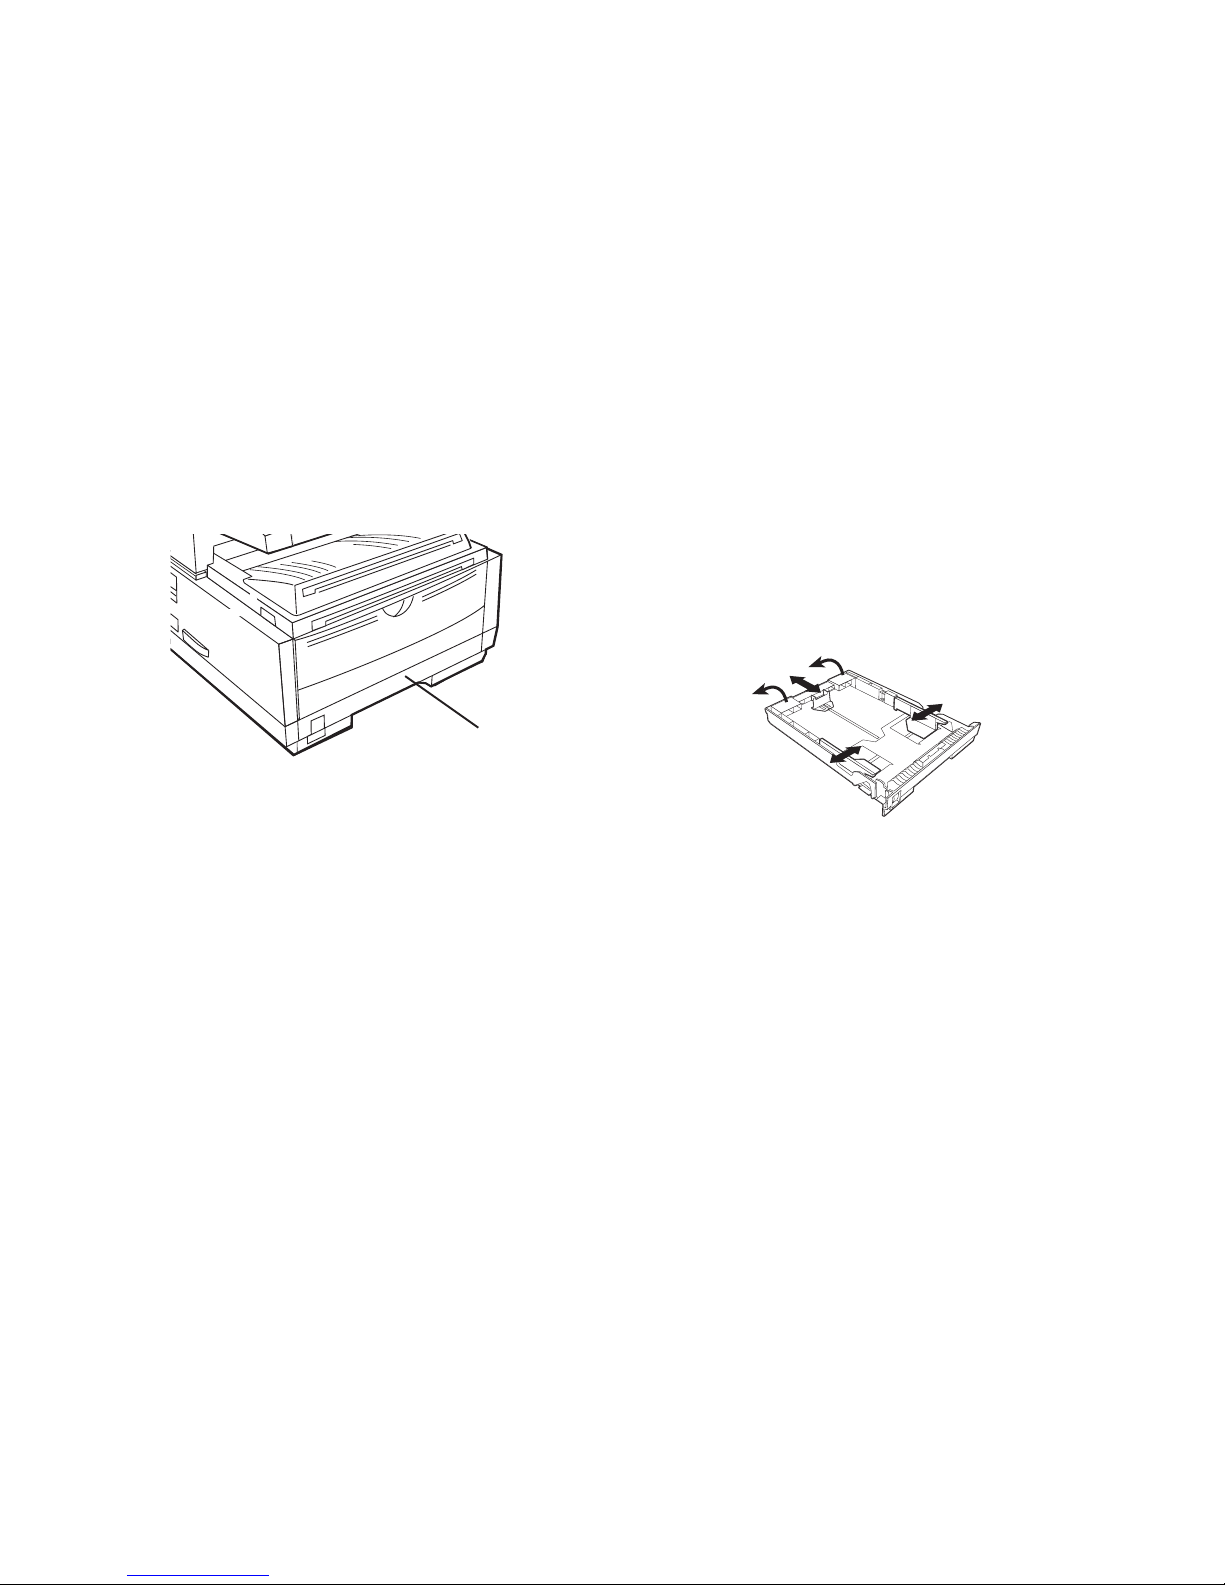
1 Pull out the paper tray (1).
Fig_01.eps
2 Adjust the paper guides (a) to the width of your paper.
Set the left guide all the way to the left. Set the right
guide to the marker for the size you’re using.
3 Lift up the paper length adjustment guide (b) and set it
to the length of your paper. If using legal size paper,
rotate the extension (c) at the back of the tray.
5959_53.eps
4 Remove the paper from its wrapper. Note the “print side”
notice printed on the label. Fan the paper.
5 Load the paper into the paper tray, print side down.
a
a
b
c
c
1
Page 53
|
User’s Guide: English 53
Selecting Functions and Settings
c
a
b
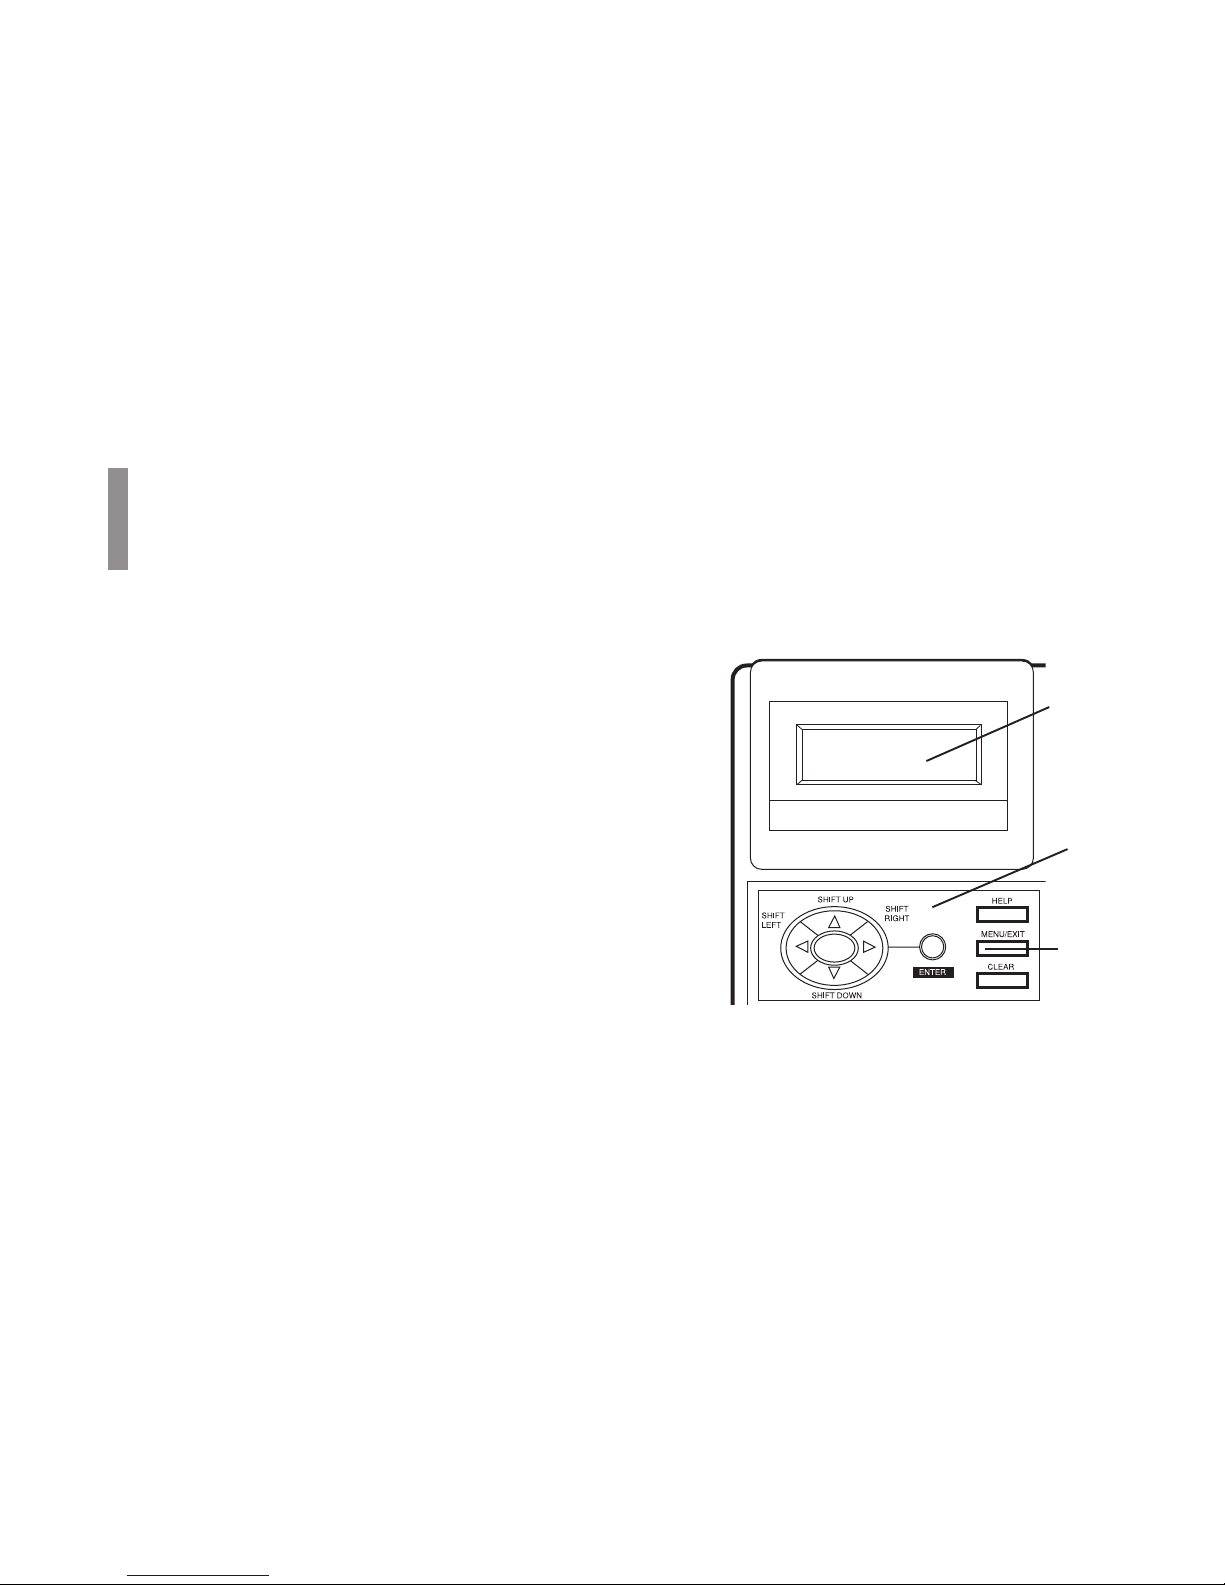
The display (a) and navigating keys (b) on the control panel
simplify setting your machine’s functions.
Press Menu/Exit (c) to access the menu.
The machine functions are organized in a menu structure.
Functions are shown in the display as you navigate through
the menu, using the navigation keys. If a document is loaded,
menu functions for sending documents are displayed first. If
no document is loaded, other menu functions are displayed.
5759_LCD.eps
Page 54

|
OKIFAX 5780/598054
Navigating the Function Menu
The menu is set up in a multilevel structure of functions,
options, and settings. A function can include a number of
options and settings.
For example, Polling TX/RX includes 2 options—Polling
TX and Polling RX. Each of these options includes a number
of possible settings.
cake.eps
Primary Menu Functions
Group TX
Delayed TX
Delayed Batch TX
Priority TX
Confidential TX
Relay Initiate TX
Polling TX/RX
Print From Memory
Report Print
Location Program
Setup
Counter
Printer Cleaning
Function
Options
Settings
Menu Structure
Page 55

|
User’s Guide: English 55
Using the Help Key
To see how the menu is organized, press HELP (1).
Your machine prints Help and Function Lists, which provide
instructions for accessing menu items. These are helpful
when you are setting your machine’s features.
See “Help and Helpful Hints.”
5950_10.eps
1
Setting Features
There are two ways to navigate through the functions.
Step Access
The step access method moves through the function
menu step by step. It lets you see your choices at each
level.
Speed Access
If you know exactly what settings you want to change,
the speed access method takes you directly to most
points on the menu. Speed access numbers are only
assigned to Set Up menu functions.
Page 56
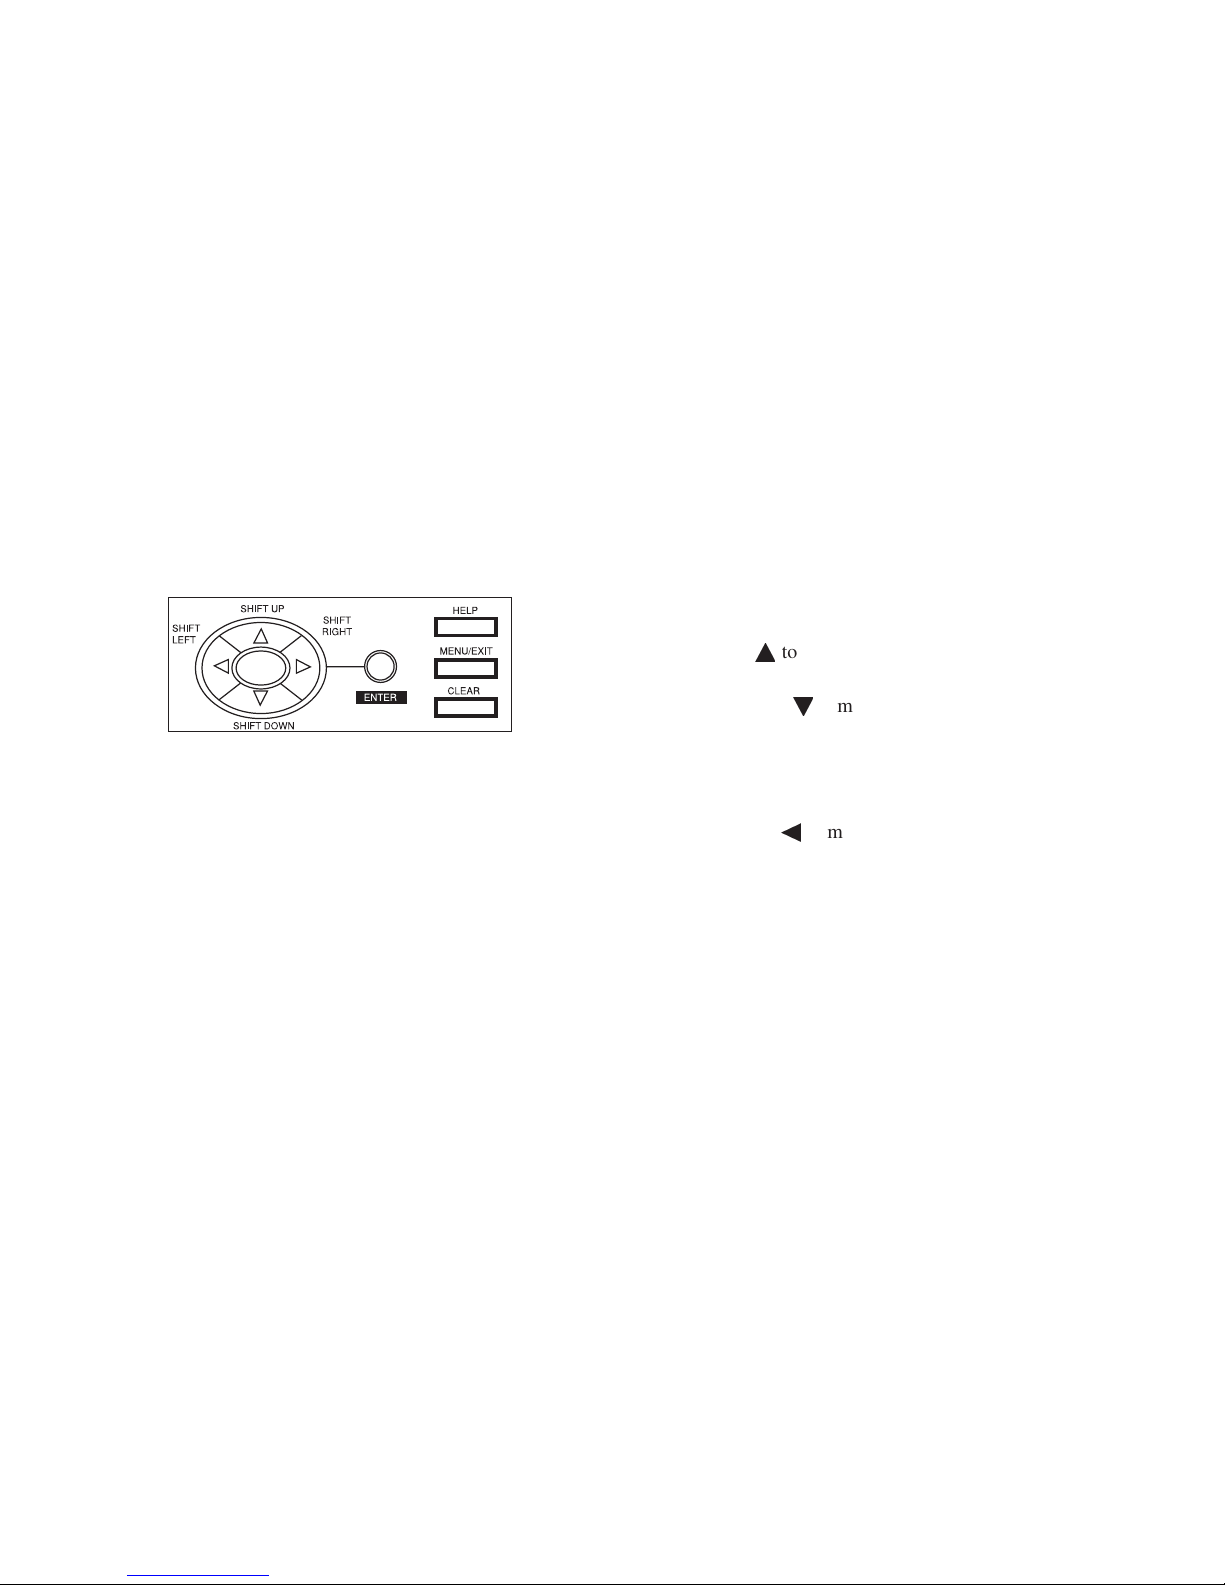
|
OKIFAX 5780/598056
Using Step Access
To navigate through the various functions step by step, use
the navigation keys.
5759_NAV.eps
Press the MENU/EXIT key to
· activate the function menu mode
· exit the function menu mode and return to standby
state.
Press SHIFT UP¶ÿto move to the previous function or
option
Press SHIFT DOWN Äÿto move
· to the next function
· from the upper row to the lower row when data is
entered in two rows.
Press SHIFT LEFT§ to move to the previous function or to
move the cursor to the left.
Press SHIFT RIGHT to move the cursor to the right.
Press ENTER to set an option.
Press CLEAR to clear entered data.
Page 57

|
User’s Guide: English 57
Using Speed Access
If a function has a speed access number, type in the number at
the menu display prompt to access the function.
Speed access numbers must be entered in two-digit format
(for example, 00 or 99).
A list of speed access numbers follows this section.
Example
Here is an example of using speed access.
To access the Redial Tries function, you only need to press
three keys.
From the standby mode with no document loaded:
1 Press Menu/Exit.
2 Press 4 key.
3 Press 0 key.
4 Redial Tries function appears.
5 Enter the setting you want.
Page 58

|
OKIFAX 5780/598058
Speed Access Numbers
There are seven types of speed access numbers.
Clock Adjustment
ID/Password Programming
Machine Settings
Dial Options
Incoming Options
Report Options
LAN Options
The speed access numbers and their assigned functions are
listed in the following sections.
Speed Access Numbers (by Type)
Clock Adjustment
00 Clock Adjustment
ID/Password Programming
01 TSI/CSI
03 Sender ID
04 Personal Box
05 Memory Password
Page 59

|
User’s Guide: English 59
Machine Settings
10 Auto Answer Mode
11 Monitor Volume
12 Buzzer Volume
13 User Language
14 Remote Diagnosis
15 TX Mode Default
16 No Toner Memory Receive
17 Memory Full Save
18 Instant Dial
19 Department Code
20 ECM Function
21 Closed Network
22 Toner Save
23 Sender ID
24 Width Reduction
25 1’st Paper Size
26 2nd Paper Size
This is active only when the second paper tray is
installed.
28 Relay Print
33 Backup File TX
Page 60

|
OKIFAX 5780/598060
Dial Options
40 Redial Tries
41 Redial Interval
42 Auto Start
43 Dial Tone Detect
44 Busy Tone Detect
45 MF/DP
46 Pulse Dial Rate *
47 Pulse Make Ratio *
48 Pulse Dial Type *
49 MF Tone Duration *
50 PBX Line
51 Flash/Earth/Normal *
52 Dial Prefix
* Settings for 46, 47, 48, 49, and 51 should only be
changed by Authorized Service Technicians.
Incoming Options
60 Incoming Ring
61 Remote Receive
62 T/F Timer Program
63 Continuous Tone
64 PC/FAX Switch
65 CNG Count
66 Ring Response
67 Distinctive Ring
Report Options
70 MCF (Single Loc.)
71 MCF (Multiple Loc.)
72 Image in MCF
73 Error Report (MCF)
Page 61

|
User’s Guide: English 61
LAN Options (for Internet Fax)
80 Auto Tray SW
81 Paper Size Check
82 LAN Print T.O.
83 POP Interval
84 DELET POP MSG.
85 Time Between GMT
86 Text Print
87 Header Print
88 Coding Mode
89 EX.FINE MODE
90 Sender ID (E-Mail)
91 DOMAIN Name
92 Return Receipt
93 Receipt Format
94 Send File Format
95 POP GW Setting
96 GW Forward Text
97 Send Notification
98 Network Settings
Page 62

|
OKIFAX 5780/598062
Setting Basic Features
Setting the Language
1 Press Menu/Exit to enter the menu.
2 Using the numeric keys (0-9), enter speed access number
13.
3 Select the language you want to appear on the display
panel.
4 Press Menu/Exit to return to standby mode.
Setting the Date and Time
Follow these instructions to set the date and time.
1 Press Menu/Exit to enter the menu.
2 Using the numeric keys (0-9), enter speed access number
00. The display shows:
5950_56.eps
3 Enter the current date (xx/xx/xxxx) and time (hh:mm)
using the numeric keys (0-9). Press Enter.
!
If invalid data is entered, the Enter key will not operate.
4 Press Menu/Exit to return to standby mode.
Page 63

|
User’s Guide: English 63
Setting Your Fax Machine’s ID
Fax machines must identify the sender (Sender ID) and the
sender’s telephone number (TSI/CSI) on each page of every
fax sent.
!
Important: Programming this information into your fax
machine is required by law in the United States.
TSI/CSI
This is the telephone number of your fax machine. This
number is printed at the top of the faxes you send, and
appears on the displays and reports of other fax machines you
are communicating with. A TSI/CSI can be up to 20
characters long.
Sender ID
This is a descriptive title that identifies the sender—usually
the location of your fax machine or the name of your
company or office. It is printed at the top of every fax you
send. You can enter up to 32 characters. The first 16
characters will also be used as your Personal ID, which may
appear on the displays or reports of other fax machines you
are communicating with.
Setting the TSI/CSI
1 Press Menu/Exit to enter the menu.
2 Input speed access number 01.
3 Input up to 20 numbers and characters (0-9/Hyphen/
Space/+).
4 Press Enter.
5 Press Menu/Exit.
Setting the Sender ID
1 Press Menu/Exit to enter the menu.
2 Input speed access number 03.
3 Input up to 32 numbers and characters (0-9/Hyphen/
Space/+).
4 Press Enter.
5 Press Menu/Exit.
Page 64

|
OKIFAX 5780/598064
Setting the Answering Mode
Procedure
1 Press Menu/Exit to enter the menu.
2 Input speed access no. 10 (Auto Answer).
3 Press or to select the desired mode. Press Enter.
4 Press Menu/Exit to return to standby mode.
Set the answering mode based on how you want your
machine to answer calls and what telephone equipment is
connected to it.
Choose the mode that best fits your needs.
5759_62.tif
List of Modes
· Auto Receive Mode [FAX]
· Manual Receive Mode [TEL]
· Telephone/Fax Mode [T/F]
· Telephone Answering Device Mode [TAD]
· Memory Reception Mode [MEM]
· Forwarding Mode [FWD]
· PC Fax Mode [PC]
Page 65

|
User’s Guide: English 65
Auto Receive Mode [FAX]
Your machine is connected to a telephone line reserved only
for fax communication.
This is the factory setting.
Your machine assumes all incoming calls are fax messages
and automatically receives all incoming fax messages.
Manual Receive Mode [TEL]
You use the same line for both fax and telephone calls and
the majority of your incoming calls are telephone calls.
To use this feature, you must have an external, optional
handset or telephone connected to your fax machine.
When someone calls, your machine rings like a telephone.
You can answer from an external telephone connected to
your machine. If you pick up the hand set and hear fax
machine tones, press the Start key to receive the fax. If you
do not answer the phone and someone tries to send you a fax
message, your machine will not accept it.
Telephone/Fax Mode [T/F]
Incoming calls are a mix of fax and telephone calls.
To use this feature, you must have an external, optional
handset or telephone connected to your fax machine.
The display will show Lift Handset.
In this mode, your machine detects whether the incoming call
is a fax or a voice call. When the call is from another fax
machine, your machine switches to fax mode and receives the
message. When the call is a voice call, your machine rings
like a telephone. If you do not answer, it switches back to fax
mode to allow the calling party to manually send a fax.
Page 66

|
OKIFAX 5780/598066
Telephone Answering Device Mode [TAD]
You have an external, optional answering machine
connected to your fax machine.
In this mode, your machine detects whether an incoming call
is a fax or voice call.
If it is a fax call, your machine receives the fax.
If it is a voice call, your machine rings, then your answering
machine activates. If you set the Remote Receive user
function, the caller can send a fax at any time during or after
the recorded message by using their keypad to enter the
remote receive number you have programmed. This number
activates fax reception. Add something like this to your
answering machine message: “To send a fax now, press XX
[the programmed number].”
See “Setting Basic Features, Dial and Incoming Call
Parameter Settings, Incoming Call Parameters.”
Memory Reception Mode [MEM]
Received data is not printed but is stored into memory, even
if there is fax paper on which to print.
Use the Print Operation function to print out data stored in
memory during Memory Reception mode.
You can set a password (USER PROGRAMMING under
MEM. PASSWORD PRG) to protect data received via
Memory Reception mode. The data cannot be accessed
without the password.
Page 67

|
User’s Guide: English 67
Forwarding Mode [FWD]
All fax communications are received into memory, then
forwarded to another telephone number.
When set to this mode, the machine receives all fax
communications into memory, and then automatically sends
the messages to the telephone number programmed into the
Call Forwarding function. This function displays only when
a forwarding number has been programmed.
PC Fax Mode [PC]
!
This mode is available only if an optional MFP Kit is
installed.
Incoming faxes are stored on you computer’s hard disk
instead of printing immediately.
This mode is only available when the machine is connected
to a personal computer via optional multifunction printer
(MFP) software. When activated, the machine forwards the
call directly to the computer. This lets you work with faxes
on your computer using the software included with the MFP
option.
Page 68

|
OKIFAX 5780/598068
Dial and Incoming Call Parameter
Settings
These settings allow you to control the way your machine
dials telephone numbers and receives incoming calls. Setting
these functions before beginning use of your machine will
make your fax communications more efficient.
Setting Dial and Incoming Call Parameters
1 Press Menu/Exit to enter the menu.
2 Input the speed access number for the dial or incoming
call parameter you want to change.
3 Use or to select the desired setting, Press Enter.
4 Press Menu/Exit to return to standby mode.
Dial Parameter Settings
Redial Tries
Speed access no. 40.
This function controls how many times your machine
automatically redials a number that is busy or does not
answer.
Available settings are from 0 to 10 tries.
1 try is the default setting.
Redial Interval
Speed access no. 41.
The function controls how long your machine waits between
each automatic redial attempt.
Available settings are from 1 to 6 minutes.
The default setting is 3 minutes between dialing attempts.
Page 69

|
User’s Guide: English 69
Auto Start
Speed Access no. 42.
With this function set to ON, the machine automatically
begins dialing as soon as a location is selected by pressing a
One-Touch key or by entering another Speed Dial number.
There is no need to press the Start key.
Available settings are ON and OFF.
ON is the default setting.
Dial Tone Detect
Speed access no. 43
This function allows your machine to wait for and detect a
dial tone before dialing.
Set to ON, a dial tone must be detected.
Available settings are ON and OFF.
OFF is the default setting.
Busy Tone Detect
Speed access no. 44
This function allows your machine to detect a busy tone
when sending a fax.
Available settings are ON and OFF.
ON is the default setting.
Tone/Pulse (MF/DP)
Speed access no. 45
This function controls which method your machine uses for
dialing.
DP: dial pulse dialing, which uses monotone pulses to dial a
number like a rotary telephone,
MF: multi-frequency dialing (touch tone), which uses
different tones to dial a number.
MF is the default setting.
Page 70

|
OKIFAX 5780/598070
Tone (MF) Duration
!
This setting can only be changed by an Authorized
Service Technician.
Speed access no.49
If the machine is set to the MF dialing method, this function
controls the duration of the tones used for dialing.
Tone duration varies by country.
Available settings are 75, 85, and 100 ms.
100 ms is the default setting.
PBX LINE
Speed access no. 50
To change this setting, see “Setting Basic Features,
Connecting to a PBX.”
This function must be ON if your machine is connected to a
PBX. Once this function has been turned on and the access
digit function has been programmed, your machine
recognizes the access digit you use in your PBX to get an
outside line.
Available settings are on and OFF.
OFF is the default setting.
Page 71

|
User’s Guide: English 71
FLASH/EARTH/NORMAL
!
This setting can only be changed by an Authorized
Service Technician.
Speed access no. 51
This function sets the type of PBX line your machine is
connected to (if your machine is connected to a PBX).
Available settings are NORMAL (N), flash (F) and earth (E).
NORMAL (N) is the default setting.
DIAL PREFIX
Speed access no. 52
To change this setting, see “Setting Basic Features,
Connecting to a PBX.”
If your machine is connected to a PBX, use this function to
tell your machine what access number is used to obtain an
outside line from your PBX. You can enter up to 4 digits.
Available settings are ON and OFF.
OFF is the default setting.
Page 72

|
OKIFAX 5780/598072
Incoming Call Parameters
Incoming Ring
Speed access no. 60
This function enables the machine to emit a soft ringing
sound (through the machine’s built-in speaker) when a call is
received.
If the function is set to OFF, the machine DOES NOT not emit
a ringing sound during incoming calls.
If the function is set to ON, the machine emits a ringing
sound when
the machine is set to TEL (manual receive mode)
or
Ring Response is set to 1 ring, 5 sec, 10 sec, 15 sec, or 20
sec.
If the function is set to to DRC, the machine emits a ringing
sound for every incoming call, no matter what type of call it
is (voice or fax).
Available settings are ON, OFF and DRC.
ON is the default setting.
Remote Receive
Speed access no. 61
This function allows switching from telephone to fax mode
to receive an incoming fax. Use the keypad on the optional
handset or external telephone to enter the remote receive
number programmed into the machine.
Available settings are: OFF, 00, 11, 22, 33, 44, 55, 66, 77, 88,
99, ** or ##.
OFF is the default setting.
Page 73

|
User’s Guide: English 73
Continuous Tone
Speed Access no. 63
When this function is set to ON, a completion tone is emitted
at the end of receiving a fax. Pressing the Stop key turns off
the tone.
Available settings are ON and OFF.
OFF is the default setting.
PC/FAX Switch
Speed Access no. 64
When set to ON, the machine automatically switches to FAX
when fax reception by a connected personal computer is not
possible.
When set to OFF, fax reception is disabled.
Available settings are ON and OFF.
ON is the default setting.
!
This parameter is available only if an optional MFP Kit
is installed.
Page 74

|
OKIFAX 5780/598074
Other Basic Parameters
Monitor Volume
Speed Access no. 11
The machine is equipped with a speaker for monitoring
operations. This function provides a 5-level audio
adjustment of the speaker.
Available settings are OFF, Low, Mid, High-Mid, High.
Mid is the default setting.
Buzzer Volume
Speed Access no. 12
The machine is equipped with a buzzer that sounds when a
fax communication ends or, if an external telephone is
connected, when the receiver is not properly returned to its
cradle after use.
Available settings are Low, Middle and High.
Middle is the default setting.
User Language
Speed Access no. 13
Your machine has two languages installed—English and
Spanish or French, depending on where you purchased it.
The language programmed is used to display messages on the
control panel as to well as to print reports.
Available settings are English, Spanish, or French.
English is the default setting.
Width Reduction
Speed Access no. 24
During transmission and copying, Width Reduction (when
set to ON), prevents omission of any data along the right and
left sides, beyond the printable area of a LETTER size
document.
Available settings are ON and OFF.
OFF is the default setting.
Page 75

|
User’s Guide: English 75
Paper-Size Setting
The machine can support two different paper settings (when
the 2nd-Tray option is installed).
1’ST Paper Size
Speed Access no. 25
Sets the size of the paper loaded in the standard (built-in)
paper tray. Default setting is Letter.
2’ND Paper Size*
Speed Access no. 26
Sets the size of the paper loaded in the second (optional)
paper tray. Default setting is Letter.
* This setting is only available when the second tray is
installed.
Relay Print
!
This function is ONLY available for the OKIFAX 5980.
Speed Access no. 28
During a Relay Fax transmission, your machine can
relay and print the document
or
relay, but not print, the document.
When Relay Print is set to ON, your machine relays and
prints the document.
Available settings are ON and OFF.
OFF is the default setting.
Page 76

|
OKIFAX 5780/598076
Backup File TX
Speed Access no. 33
This feature lets you set up your machine to automatically
send a copy of every fax it sends or receives to a
predetermined number.
To use this feature, you need to
· activate it (set it to ON)
· set a four-digit password
· program the number of the backup recipient
This is One Touch 40.
The backup recipient is the fax machine to which copies
of your correspondence are sent.
Refer to “Advanced Operation, Backup File TX.”
Available settings are ON and OFF.
OFF is the default setting.
!
You must enter the password in order to change the
location of the backup recipient, turn the feature
off, or change the password.
Page 77

|
User’s Guide: English 77
Connecting to a PBX
Private Branch Exchanges (PBXs) are private telephone
systems used to route calls internally (for example, in a
company). When dialing a telephone number, if a prefix
(access) number is required to open an outside line, the line is
connected to a PBX. If your machine is connected to a PBX,
please make the following changes to enable the machine to
recognize the prefix digits in the telephone numbers used to
obtain access to the outside line. After dialing the prefix
digits, the machine waits until the outside line is available
before dialing the rest of the number.
!
Service assistance may be required to make changes in
some countries.
Some PBX systems may require additional adjustments
to the machine.
If there are any problems with fax communications
after changing parameters, please contact the nearest
dealership for assistance.
Page 78

|
OKIFAX 5780/598078
Entering a PBX Dial Prefix
1 Press Menu/Exit to enter Menu.
2 Input speed access no. 50 (PBX Line). Wait.
3 Press or to select ON or OFF setting. Press Enter.
4 Press until you reach Dial Prefix. Press Enter*.
5 Input the digit(s) normally dialed to obtain an outside
line from the PBX. Press Enter.
6 Press Menu/Exit to return to standby mode.
* Dial Prefix can also be accessed from the main menu by
entering its speed access code 52.
!
Remember that all outside telephone numbers
programmed into the machine must begin with the dial
prefix of the PBX.
Clearing the PBX Dial Prefix
1 Press Menu/Exit to enter Menu.
2 Input speed access no. 50 (PBX Line). Wait.
3 Press or to select OFF setting. Press Enter.
4 Press Menu/Exit to return to standby mode.
Page 79

|
User’s Guide: English 79
Programming Speed Dial Numbers
Types of Speed Dials
There are four types of spaces:
· One-Touch Speed Dial
· 2-Digit Speed Dial
· 3-Digit Speed Dial
· Group Dial
!
Each fax number that you enter or program into your
machine can be up to 40 digits long. If you need to dial
a number with more digits, use the chain dial feature.
For more information on chain dialing, refer to
“Programming Speed Dial Numbers, Chain Dialing.”
!
This section describes programming fax numbers only.
See the T.37 Option Guide for information on
programming e-mail addresses.
You can program (save) frequently dialed numbers into your
machine. This way, you enter the full number once, and
access the number with one or a few keystrokes thereafter.
The total number of spaces available for programming varies
by model.
· 140 spaces (Model 5780)
· 230 spaces (Model 5980)
Page 80
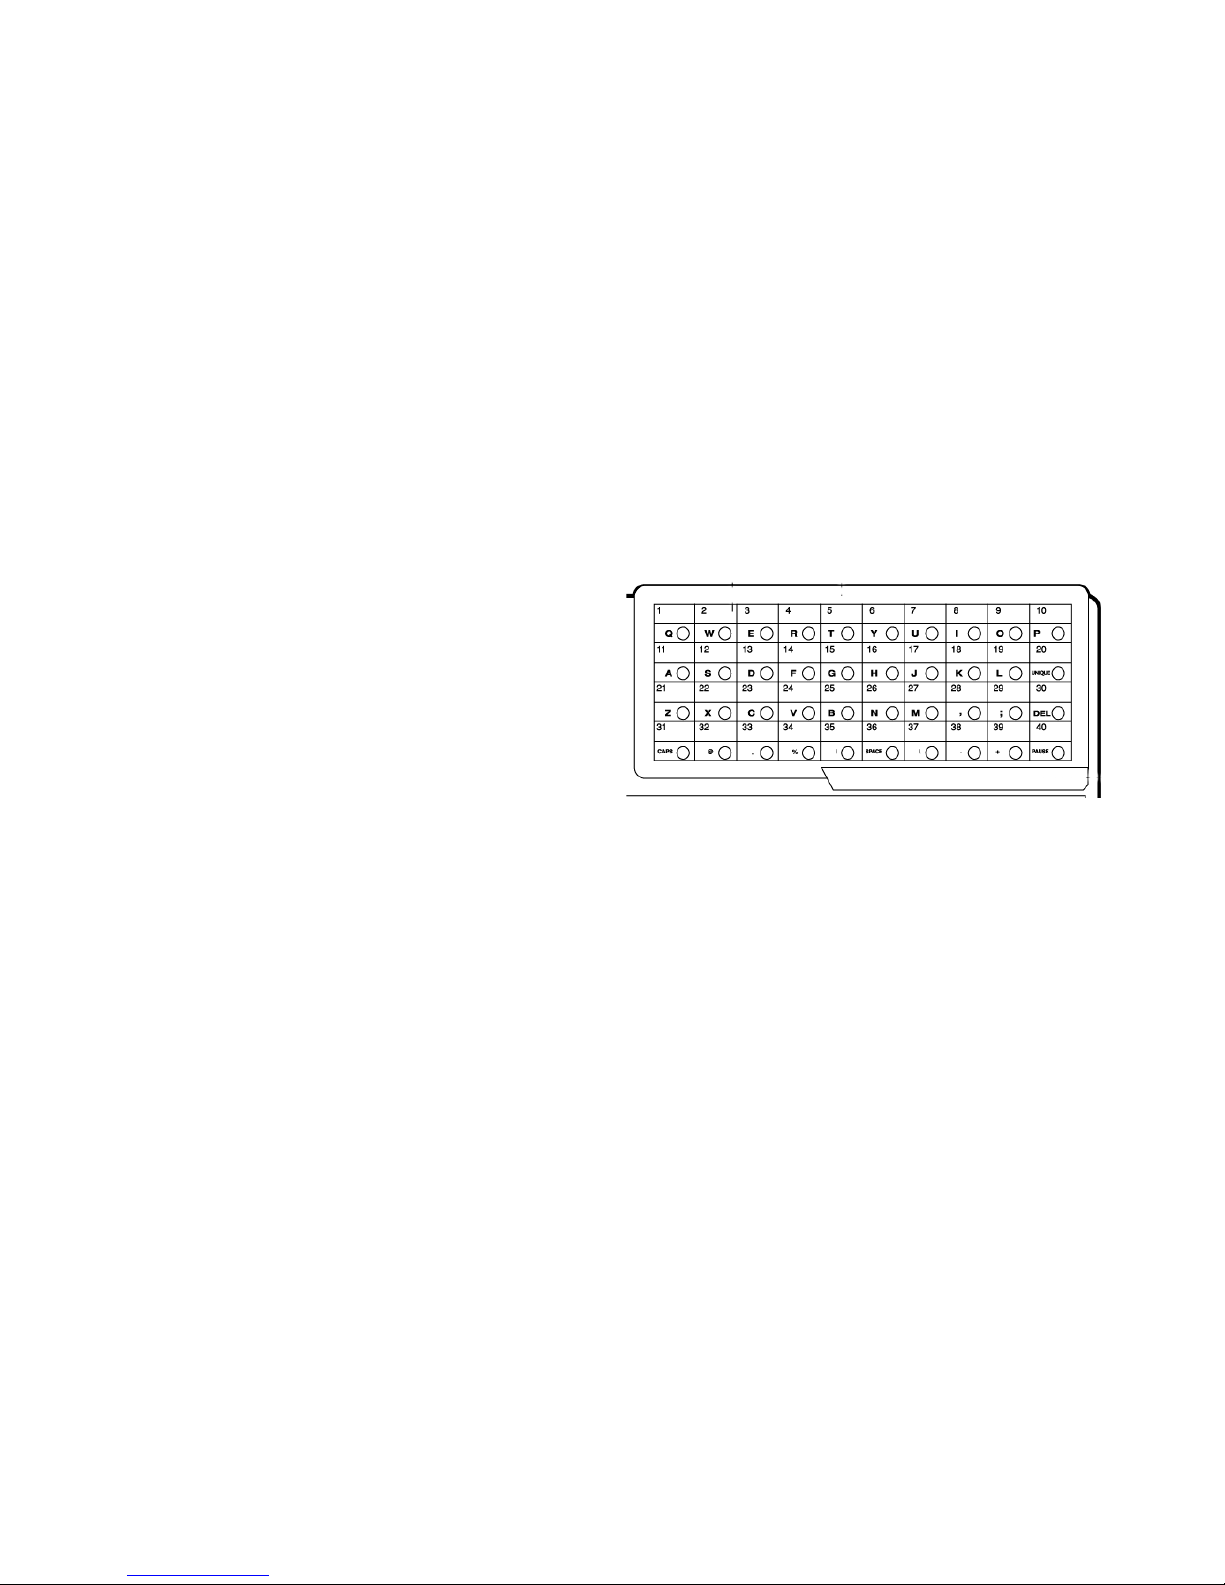
|
OKIFAX 5780/598080
One-Touch Speed Dials
For quick and easy faxing operations, you can store
telephone numbers in the machine’s memory and send
documents to a fax number by pressing a single key.
The total number of stored telephone numbers varies by
model.
· 40 (Model 5780)
· 80 (Model 5980, using the second hidden panel)
Fig1_08a.eps
Page 81

|
User’s Guide: English 81
Your fax machine is equipped with one-touch keys.
The total number of one-touch keys varies by model.
· 40 (Model 5780)
· 80 (Model 5980, using the second hidden panel)
Each one-touch key may be programmed with:
· Two 40-digit numbers
a primary number
an alternative number
used if the primary number is busy or goes
unanswered.
· a 15 character location ID (name) for each key.
!
You can program e-mail addresses into One-Touch keys
1 to xx.
where xx =
50 (Model 5780)
90 (Model 5980)
See the T.37 Option Guide for details.
Page 82

|
OKIFAX 5780/598082
2- or 3-Digit Speed Dials
In addition to one-touch speed faxing, you can program an
additional xxx numbers for 2- or 3-digit entry faxing.
where xx =
100 (Model 5780)
150 (Model 5980)
2-Digit Speed Dial Numbers
These are the remaining spaces up to 99.
They are called two-digit because you access them by
entering their two-digit space designation.
3-Digit Speed Dial Numbers
The spaces for 3-Digit Speed Dials vary by model.
100 to 140 (Model 5780)
100 to 230 (Model 5980).
They are called three-digit because you access them by
entering their three-digit space designation.
!
The One Touch Sheet(s) provide space for Speed Dial
numbers 1 through xx
where xx =
40 (Model 5780)
80 (Model 5980)
For for higher Speed Dial numbers, program the
number(s) and print the Telephone Directory. For more
information, see “Reports, Telephone Directory.”
Group Faxing
Speed dial numbers can be collected into a group. You can
quickly and easily use a group to send one fax to several
locations during one transmission session. This is called
group faxing.
For more information on group faxing, refer to “Sending a
Fax to Multiple Locations, Group Faxing.”
Page 83

|
User’s Guide: English 83
Programming Instructions
To program your speed dial numbers, follow these
instructions.
Programming speed dial numbers has two steps.
· collecting the information
· programming the information
Collect Information
Gather the following information for each Speed Dial number
you want to store:
· Name
· Primary Telephone Number (LOC#)
· Alternate Telephone Number (ALT#)
· Communications Speed
· Echo Protection State
Name
Use letters, numbers, and symbols, in any combination, for
the name.
The name can be up to 15 characters long.
Page 84

|
OKIFAX 5780/598084
Primary Telephone Number (LOC#)
This is the main number.
The main number can be up to 40 characters long.
Alternate Telephone Number (ALT#)
If the main number is busy or does not answer, the machine
automatically dials this alternate number.
The alternate number can be up to 40 characters long.
Communications Speed
The available settings are 33.6 K, 28.8 K, 14.4 K, 9.6 K, and
4.8 K.
The default setting is 33.6 K.
If the machine you are communicating with is an older fax
machine, and you are having problems communicating with
it, try adjusting the speed to a lower setting.
Echo Protection State
The available settings are ON or OFF.
The default setting is OFF.
If you are experiencing problems communicating with a
remote location in a very noisy telephone area, or with an
overseas location, set Echo Protection to ON for the onetouch key assigned to that location.
Page 85

|
User’s Guide: English 85
Program the Information
To enter the information for each speed dial number, use one
of the following input methods.
· Other Keys
· Numeric Keypad
· One-Touch Keypad
Other Keys
These keys are used in the programming process.
They include Menu/Exit, Shift keys, Enter, and Capital
(CAPS).
Numeric Keypad
0-9/*/#
Use these keys to enter numbers.
Unique Key
Use this key to enter a variety of unique characters.
Symbols: ! # & ‘ ( ) * + , - . / : ; = ? ·
Internet characters: @ “ _ %
- l
The
- l
functions as a tilde (~) symbol.
Umlaut characters: Ä ß Ñ Ö Ü
Norwegian characters: Æ Å Ø æ å ø
Clear Key
Use this key to delete mistakes made when you are
programming entries (for example, IDs or telephone
numbers).
When you press Clear, you delete the character to the
right of the cursor in the display.
Page 86

|
OKIFAX 5780/598086
One-Touch Keypad
The One-Touch keypad is arranged like a standard keyboard
for quick touch typing of names, Sender and Location ID.
Alphabet Keys: (#1-27, except #20)
Use these keys for easy entry of alphabetic characters.
Caps Key (One-Touch key #31)
Use this key to switch between uppercase and lowercase
when entering alphanumeric characters.
Unique Key (One Touch key #20)
Use the same as the “0” of the numeric keypad. Also
used to enter:
Symbols: ! # & ‘ ( ) * + , - . / : ; = ? ·
Internet characters: @ “ _%
- l
The
- l
functions as a tilde (~) symbol.
Umlaut characters: Ä ß Ñ Ö Ü
Norwegian characters: Æ Å Ø æ å ø
Pause Key (One-Touch key #40)
Use this key to enter automatic 3 second pauses in
dialing. For example, use this key to tell the machine to
wait for an outside or international line to open. Pauses
in a telephone number dialing sequence are indicated by
a “P.”
Space Key (One Touch key #36)
Use this key to enter spaces when programming. Unlike
the Pause key, spaces provide easier reading only and
have no effect on dialing.
Del Key: (One-Touch key #30)
Use this key to delete characters at the position of the
cursor in the display panel when entering, ID, telephone
numbers or programming functions.
5759_66.tif
Page 87
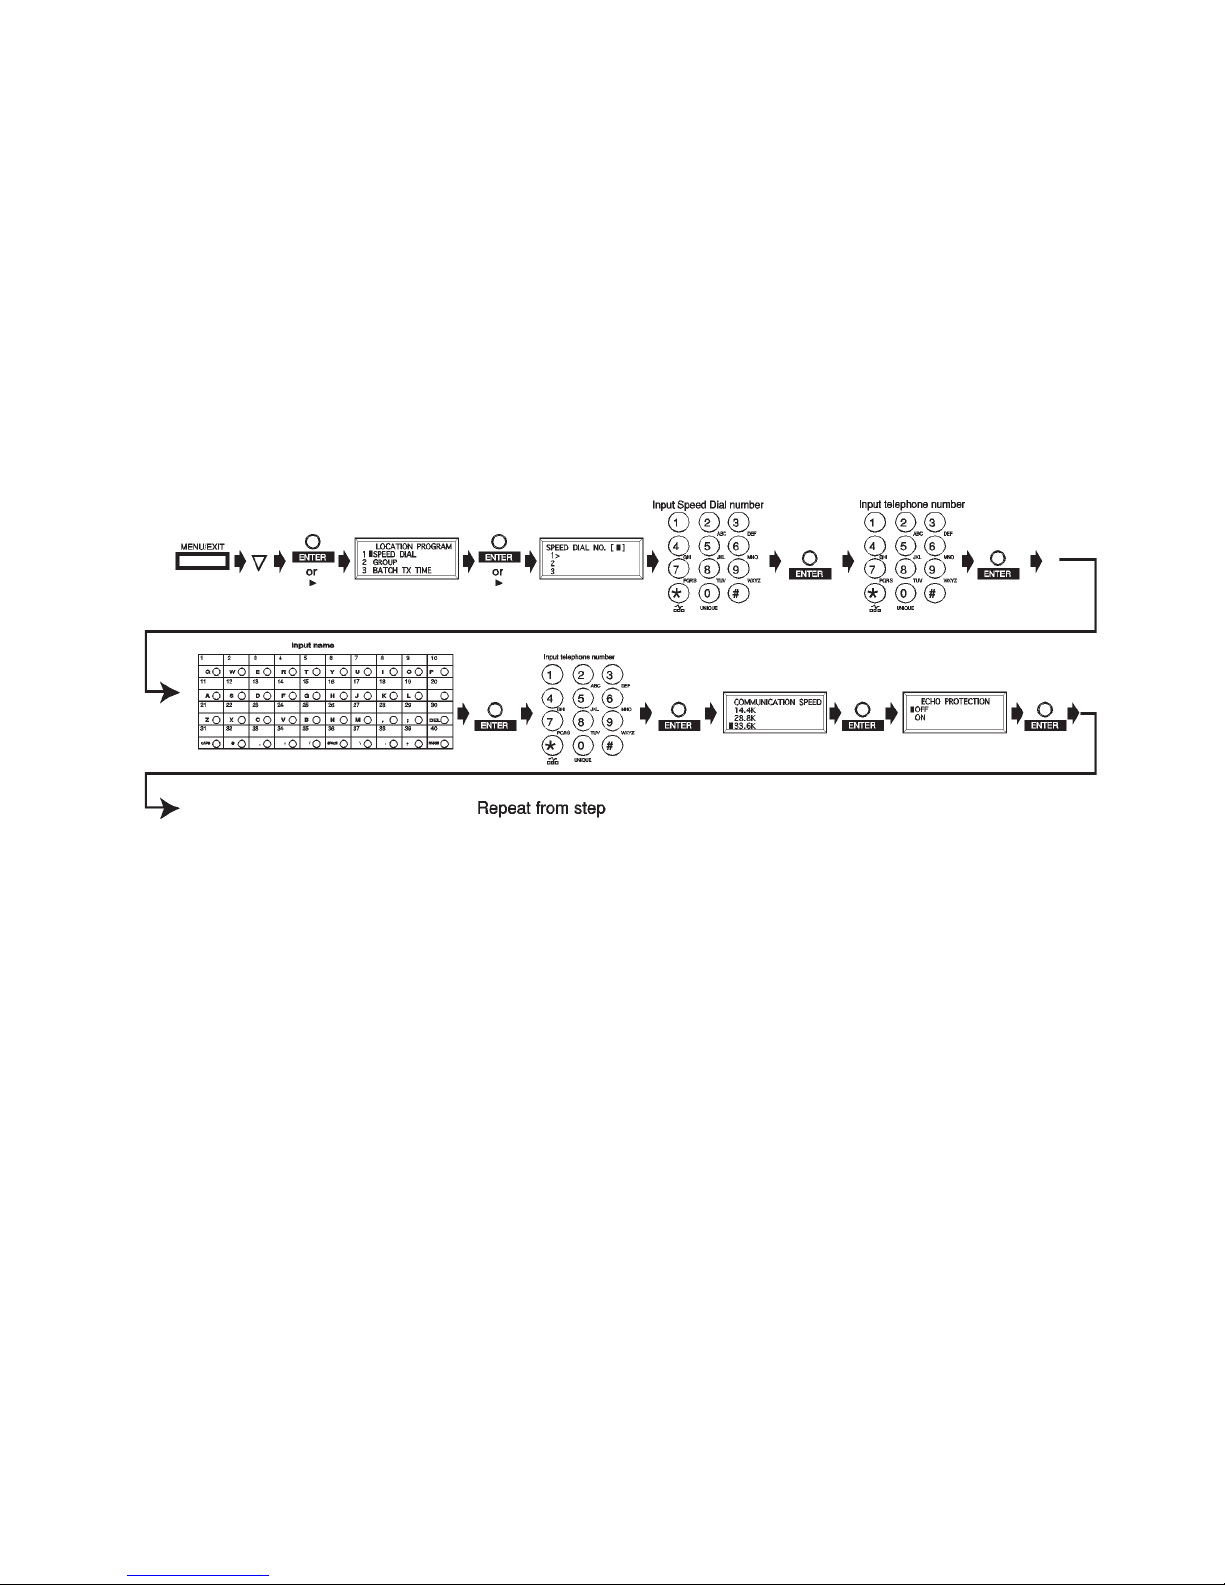
|
User’s Guide: English 87
See next page.
4
Page 88

|
OKIFAX 5780/598088
Programming a Speed Dial
!
Print the Telephone Directory before you begin
programming. This provides a reference of the speed
dial numbers already programmed.
See “Reports, Telephone Directory.”
Be sure to write the name for any Speed Dial numbers
you program on the One Touch Sheet(s).
The One Touch Sheet(s) provide space for Speed Dial
numbers 01 through xx
where xx =
40 (Model 5780)
80 (Model 5980)
For higher Speed Dial numbers, program the number(s)
and print the Telephone Directory. For more
information, see “Reports, Telephone Directory.”
1 Press Menu/Exit to enter the menu.
2 Press to select Location Program.
Press Enter.
3 The cursor will be at Speed Dial.
Press Enter.
4 Input the speed dial number you want to program.
Press Enter.
One-Touch Speed Dial Numbers are spaces 01 to xx
where xx =
40 (Model 5780)
80 (Model 5980)
2-Digit Speed Dial Numbers are the remaining spaces
up to 99.
3-Digit Speed Dial Numbers are spaces 100 to xxx
where xxx =
140 (Model 5780)
230 (Model 5980)
Page 89

|
User’s Guide: English 89
5 Input the telephone number (LOC #).
Press Enter.
6 Input a name if desired (up to 15 characters). Press
Enter.
7 Input alternate telephone number (ALT#) [if desired].
Press Enter.
8 Select Communication Speed, press Enter.
9 Select On or Off for Echo Protection, press Enter.
10 Repeat the above process from Step 4 until you have
finished programming.
11 Press Menu/Exit to return the machine to standby mode.
12 When finished with the programming of One-Touch
keys, lift off the plastic cover. Use a pencil to write the
name of the One-Touch key you have programmed.
!
Print the Telephone Directory when you finish
programming. This provides a reference of the speed
dial numbers already programmed.
See “Reports, Telephone Directory.”
Be sure to write the name for any Speed Dial numbers
you program on the One-Touch Sheet(s).
Page 90

|
OKIFAX 5780/598090
Clearing a Speed Dial
!
Print the Telephone Directory before you begin
clearing. See “Reports, Telephone Directory.”
This provides a reference of the speed dial numbers
already programmed.
There are three ways to clear a speed dial number.
· Programming new information as a replacement to the
existing speed dial information.
· Using DEL to erase the existing speed dial information.
· Using Clear
To program new information, refer to “Programming Speed
Dial Numbers.”
To use DEL, refer to “Programming Speed Dial Numbers.”
When the existing number is displayed, use DEL key to erase
the information.
Using Clear
1 Press Menu/Exit to enter the menu.
2 Press to select Location Program.
Press Enter.
3 The cursor will be at Speed Dial.
Press Enter.
4 Select the speed dial number to be deleted (One Touch,
2-digit, 3-digit).
5 Press Clear.
6 Press Enter.
7 Press Menu/Exit to return the machine to standby mode.
Page 91

|
User’s Guide: English 91
Basic Faxing
· Your machine can transmit documents with normal wear
(staple holes, letter folds and minor corner folds).
· If you are not sure how a document will fax, first make a
copy on your machine. Load the document (face down)
and press the Copy.
· If your documents are heavily bent, creased or torn, make
a copy on a photocopier and send the copy instead.
Document Guidelines
General
· Try to use good quality documents for your fax
transmission. Documents that work best are typed or
written with a black felt-tip pen on white (or light) paper.
· Do not send documents that are not rectangular.
· Never use documents that have wet or sticky surfaces,
wrinkles, staples, or paper clips.
Page 92

|
OKIFAX 5780/598092
Single Page Specifications
Also see “Basic Faxing, Document Guidelines, General.”
Width
Minimum 5.8 inches (148 millimeters)
Maximum 8.5 inches (216 millimeters)
Length
Minimum: 5 inches (128 millimeters)
Maximum: 14 inches (356 millimeters)
Paper Weight
Minimum 13 pounds (50 g/m²)
Maximum 28 pounds (105 g/m²)
Paper Thickness
Minimum 0.002 inches (0.06 millimeters)
Maximum 0.006 inches (0.15 millimeters)
Multiple Page Specifications
Also see “Basic Faxing, Document Guidelines, General.”
For very heavy paper, load and send pages individually.
Width
Minimum 5.8 inches (148 millimeters)
Maximum 8.5 inches (216 millimeters)
Length
Minimum: 5 inches (128 millimeters)
Maximum: 14 inches (356 millimeters)
Paper Weight
Minimum 13 pounds (50 g/m²)
Maximum 28 pounds (105 g/m²)
Paper Thickness
Minimum 0.003 inches (0.08 millimeters)
Maximum 0.005 inches (0.13 millimeters)
Capacity
50 sheets of standard paper, 20 pound (80 g/m²)
Page 93
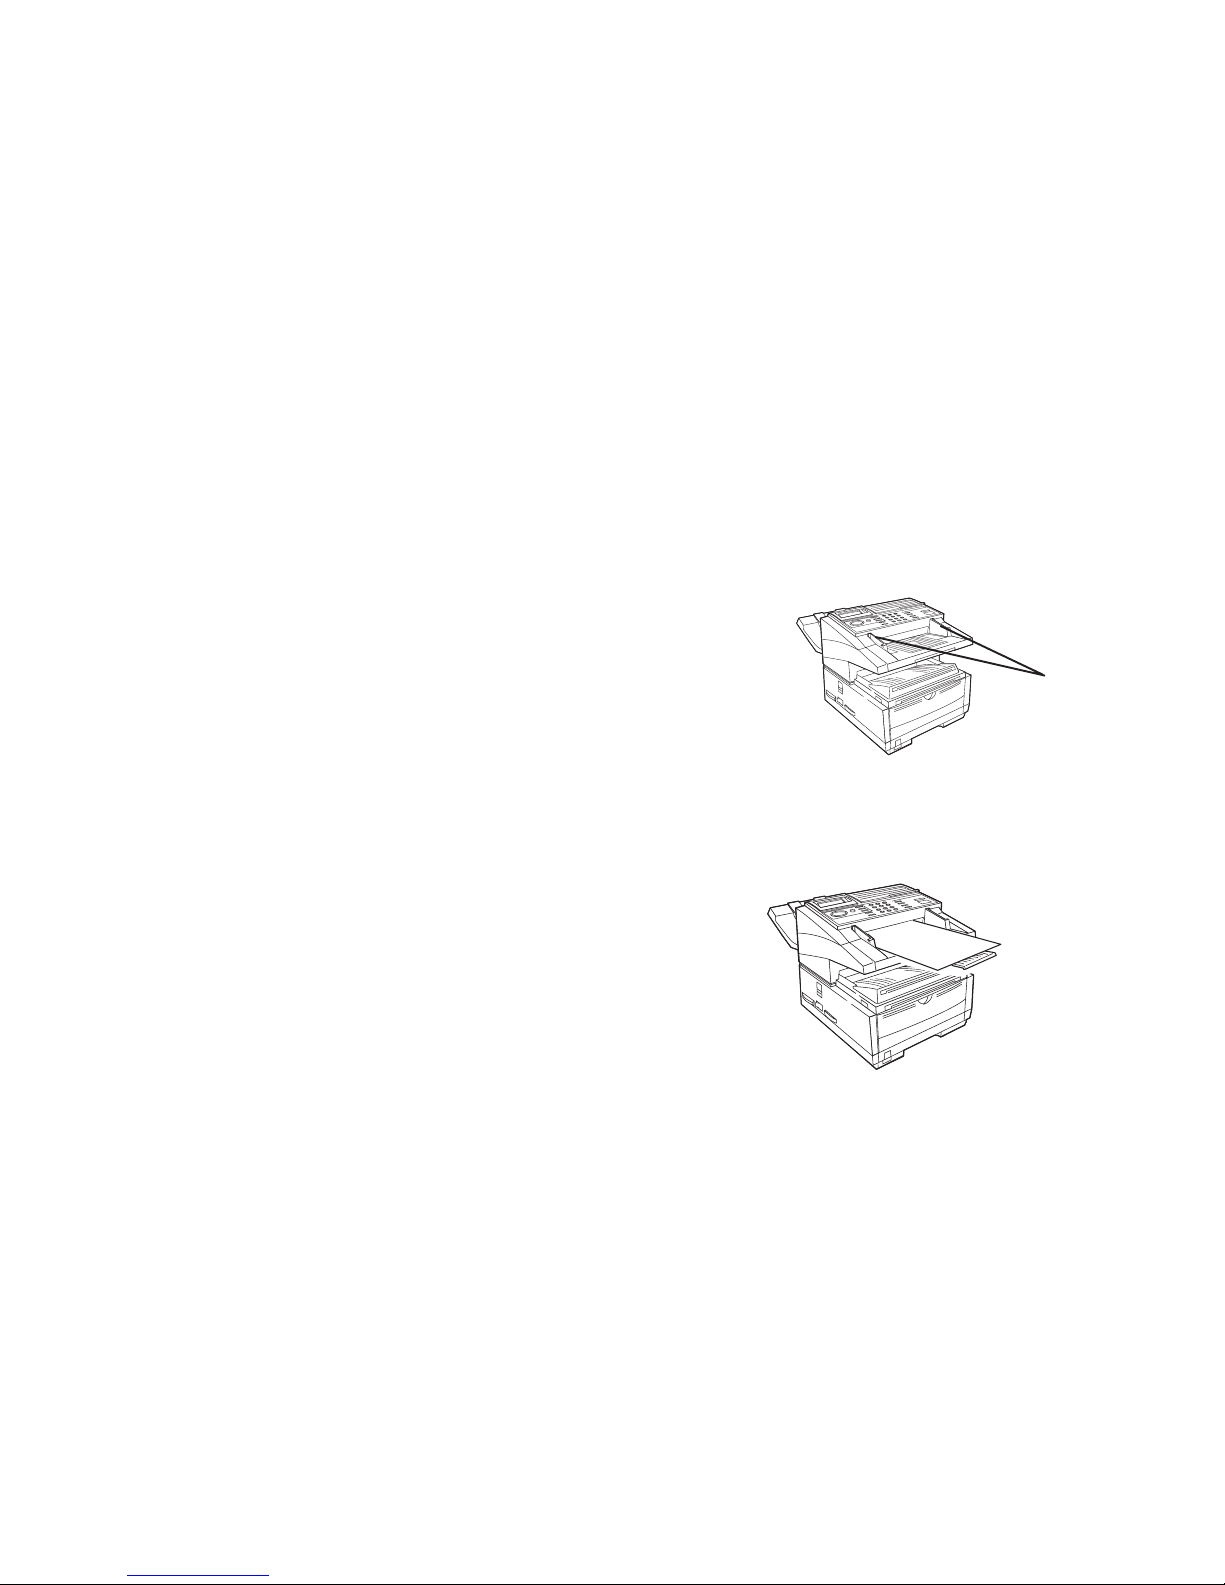
|
User’s Guide: English 93
1 Adjust the document guides (1) to the width of the paper
you are using.
Fig_01.eps
2 Neatly stack your documents, then insert them face down
into the document feeder. Adjust the document guides
for a snug fit.
Fig2_35.eps
Loading Documents
To prevent paper jams and problems during operation:
· Stack your documents neatly
· Align document edges before loading
· Don’t load different size documents at the same time
!
You can load and prepare to transmit a document while
your machine is still sending or receiving another
message (as long as the document feeder is clear).
This is called Dual Access.
To do this, load the document, select your location and
press the Start key. Your document will be sent when the
current communication ends.
1
Page 94

|
OKIFAX 5780/598094
3 The machine grips the documents, and pulls in the
bottom page.
4 If necessary, use the Type of Original (Contrast) and
Resolution keys to adjust for the best possible image
quality.
5759_quality.eps
5 Your documents are now ready for faxing or copying.
Contrast
Press the Type of Original key until the desired contrast
indicator (NORMAL, LIGHT, DARK) lights.
· For documents with normal contrast (default setting), use
NORMAL contrast.
· For documents that are too light, use LIGHT contrast.
· For documents that are too dark, use DARK contrast.
The default setting is NORMAL (NORMAL).
Resolution
Press the Resolution key until the desired resolution
indicator (STD, PHOTO, EX. FINE, FINE) lights.
· For normal office documents, use STD (standard)
resolution (default).
· For documents with small type or other fine details, use
FINE or EX.FINE resolution.
· For documents with photos or many shades of gray, use
PHOTO resolution.
The default resolution is standard (STD).
Page 95

|
User’s Guide: English 95
Sending a Fax
You may send a fax to a single location or to multiple
locations.
This section describes faxing to a single location.
There are two ways to send one fax to multiple locations
using one fax session: group fax or broadcast fax. See
“Sending a Fax to Multiple Locations.”
Procedure
1 Load your documents.
2 Select the entry method, referring to the instructions in
the following sections.
Entry methods are:
· One-Touch
· 2- or 3-Digit Speed Dial
· Search
· Numeric Keypad
· External Telephone
Page 96
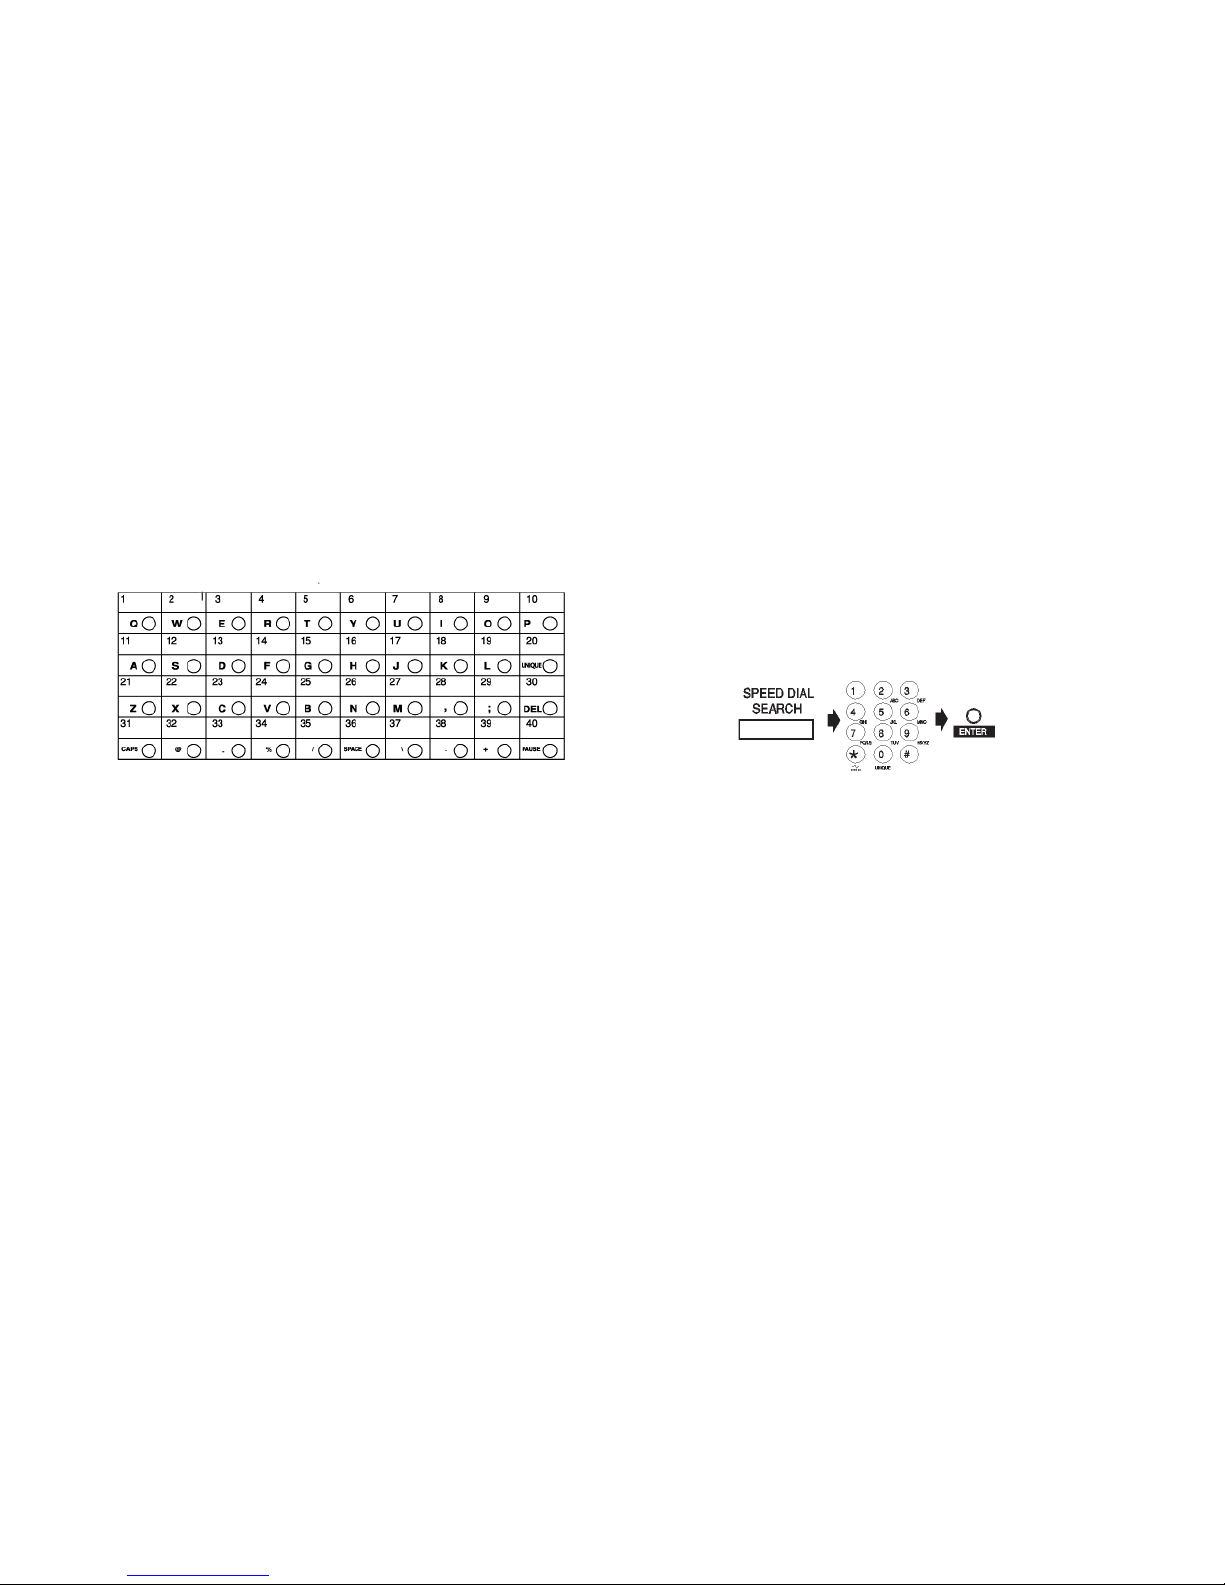
|
OKIFAX 5780/598096
Using a One-Touch Speed Dial Key
Press the One-Touch key you have programmed.
Fig1_08a.eps
Using 2- or 3-digit Speed Dial
1 Press the Speed Dial/Search key.
2 Enter the Speed Dial number (2 or 3-digit) using the
numeric keypad.
3 Press the Enter Key. Wait.
4 The document will begin faxing.
5759_74.tif
Page 97
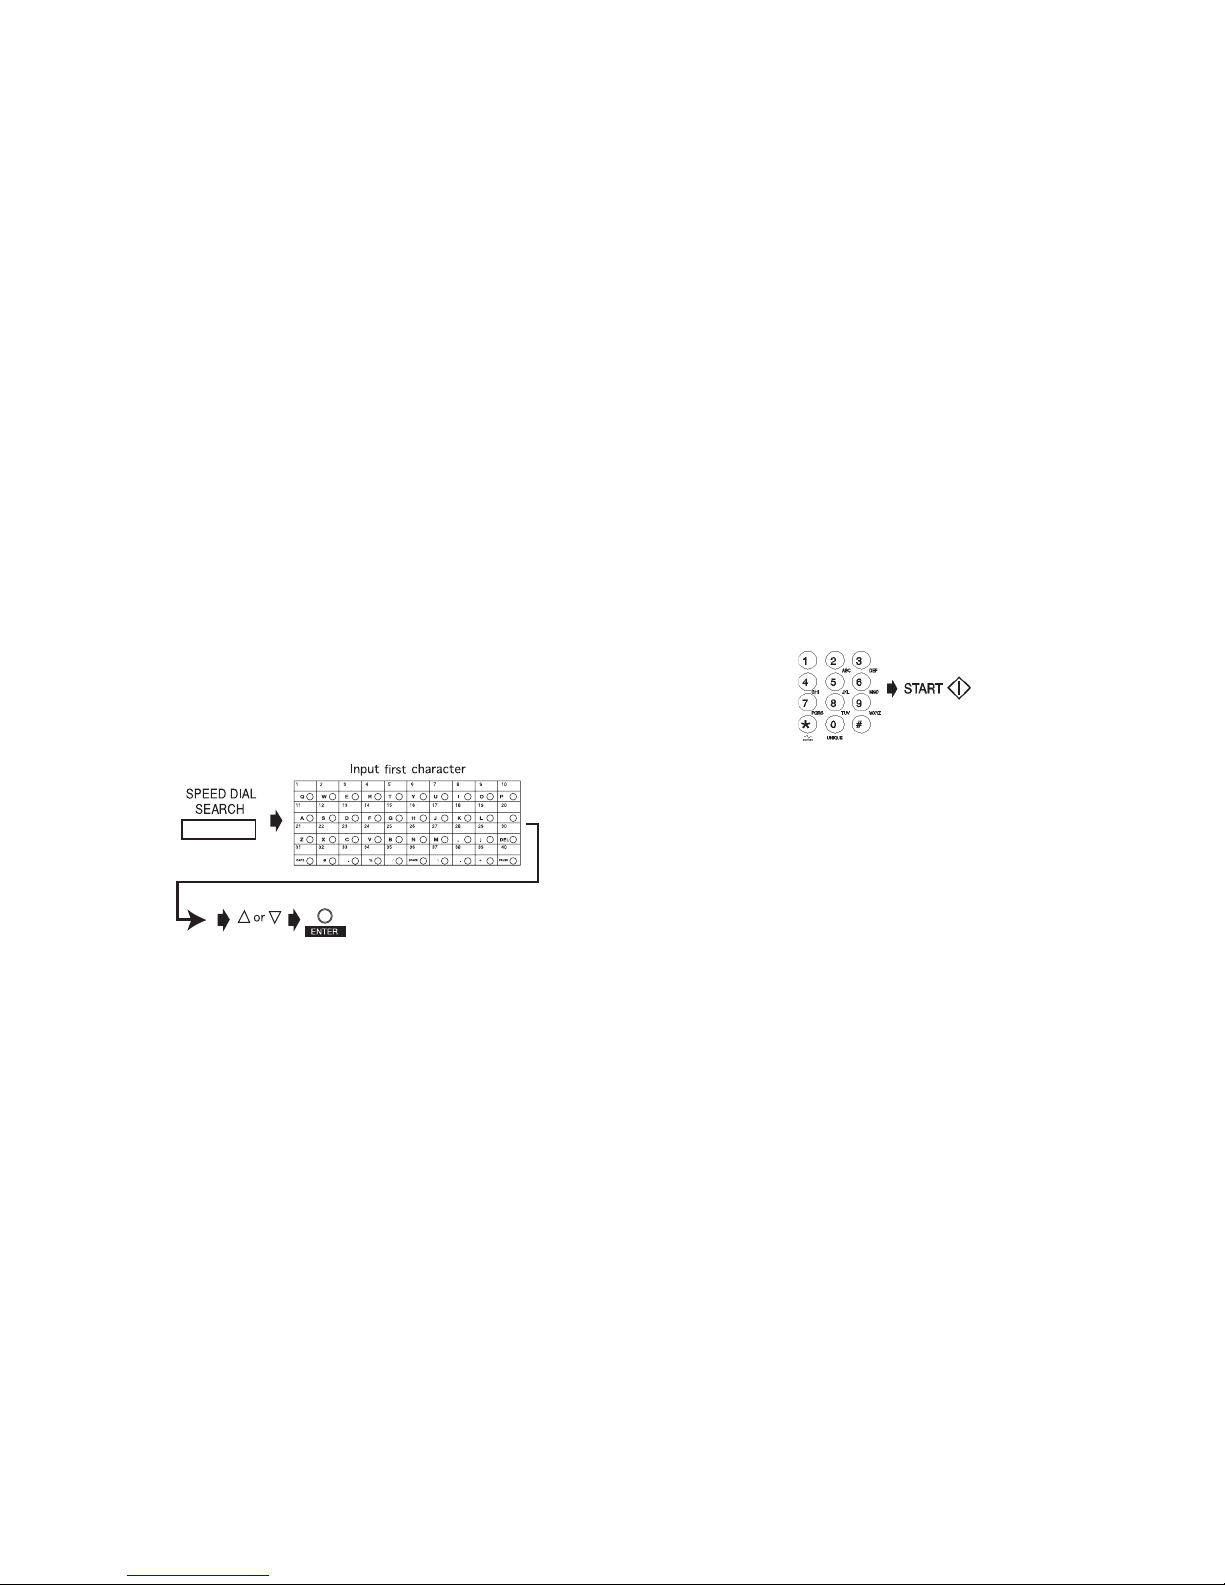
|
User’s Guide: English 97
Using the Search Function
1 Press the Speed Dial/Search key. The display will show
ENTER 1’ST CHAR.
2 Using the One-Touch key, enter the first letter of the
name of the location you want to transmit to.
3 Repeatedly press to scroll through the list of location
IDs beginning with the selected letter.
4 When the correct location is found, press the Start key to
begin faxing.
Fig2_31.eps
Using the Numeric Keypad
1 Dial as you would on a normal telephone.
2 If you make a mistake, press the SPACE key to back up
one space. Then, enter the correct number.
3 Press the Start key.
5759_82.tif
Using An External Telephone
To use this feature, you must have an external, optional
handset or telephone connected to your fax machine.
1 Pick up the receiver and dial the number. If the receiving
machine is in automatic reception mode, you will hear a
high-pitched tone.
2 If someone answers, tell them to press the Start key on
their machine.
3 You (the sender) must press the Start key on your
machine.
Page 98

|
OKIFAX 5780/598098
Rejecting Unsolicited Fax Messages
Closed Network
Speed Access 21
If closed network is on, your machine will ONLY accept faxes
from numbers programmed as Speed Dial Numbers.
This keeps out unwanted faxes (such as advertising).
You can also set your machine to send faxes to ONLY the
numbers programmed as Speed Dial Numbers.
The Closed Network settings are:
· Limited reception (RX)
· Limited transmission and reception (TX/RX)
· No limitations (OFF). This is the default setting.
!
If Closed Network is set to TX/RX or RX, your machine
will ONLY accept faxes from numbers programmed as
Speed Dial Numbers.
Any numbers NOT programmed as Speed Dials will be
rejected by the fax machine.
Setting a Closed Network
1 Press Menu/Exit to enter the menu.
2 Input speed access number 21 (Closed Network). Wait.
3 When Closed Network displays, press or to select
a setting. Press Enter.
4 Press Menu/Exit to return to standby mode.
Page 99

|
User’s Guide: English 99
Power Failures
A battery in your fax machine prevents the loss of data stored
in memory at the time of a power outage.
Typical memory-backup time with a fully charged battery is
72 hours.
If data is in memory when power is restored, the machine
continues operations from the point when power was lost.
If the data in memory is lost when power is restored, the
Power Outage Report prints.
Power Outage Report
Use this report to determine which received messages you
may have lost, and which transmissions you may have to
resend.
For more information, refer to “Basic Faxing, Receiving
Messages to Memory.”
Page 100

|
OKIFAX 5780/5980100
Display Messages
Here are some of the messages you may see during a typical
fax transmission.
(location)
The remote location’s Personal ID, TSI/CSI, Location ID or
the telephone number you entered will identify the location
during transmission.
CALLING
The machine dialled a number (remote location), made
contact, and that number is ringing.
SENDING
The machine is transmitting a fax.
RESULT = OK
The fax was sent successfully.
COMMUN. ERROR
If you see this or another error message, a problem occurred
during the communication. Try resending the fax. For more
information, see “Problem Solving.”
 Loading...