

Page 1
Quick Guide
Guide rapide
Guía rápida
Guia rápido
LP440, LP441
1
Page 2

2
Page 3

English ................................3
Français ..............................39
Español ..............................75
Português ...........................113
3
Page 4

Introduction
This manual is intended to help you become familiar with
the basic operation of Petit lapin the barcode printer in a
short time.
Please read this manual carefully to make full use of the
functions of Petit lapin.
Notes
1. Reproduction of all or part of this manual is prohibited
without permission of the copyright owner.
2. The information in this manual is subject to change
without notice.
3. If you find any ambiguous or erroneous information
in this manual, please contact your nearest dealer or
service center.
Warning
This is a Class B product based on the standard of the
Voluntary Control Council for Interference by Information
Technology Equipment (VCCI). If this equipment is used
in a domestic environment, radio disturbance may arise.
When such trouble occurs, the user may be required to
take corrective actions.
Caution! This printer can be damaged by exposure to
water. Whenever you use it outdoors, or in any area
where it might be exposed to water, always place it in the
optional waterproof case (OKI # 70061202) to protect it
from damage.
Second Edition March 2010
© 2010 Oki Data Americas, Inc.
4
Page 5
For Customers Using the Bluetooth or Wireless Communication Models
Notes on Radio Wave
This product has been approved of adaptability in the
technological standard based on Radio Law. Therefore, use
of this product does not require a license for radio station.
This product is limited for use in Japan only.
The following behavior may result in judicial
punishment.
•Disassembling/modifyingthisproduct
•Removingthecerticatelabel(serialnumberseal)
attached on this product
Use of this product in the following place may shorten the
communication distance or disable communication.
Near microwave oven, place where static electricity or
radio failure is caused, or near wireless LAN equipment.
“Bluetooth” is a trademark of Bluetooth
SIG, Inc., USA. We use the mark with a
license by the said company.
Before using wireless LAN interface, be sure to make
all the settings related to the security of wireless LAN
equipment in accordance with the manual supplied with
the equipment.
5
Page 6

Table of Contents
Unpacking ......................................... 6
Parts Name ........................................ 7
Name and Function of Controls . . . . . . . . . . . . . . . . . . . . . 9
Before Starting ....................................10
Charging the Battery Pack ........................ 10
Installing and removing the Battery Pack ............13
Using AC Adapter ............................... 15
Setting Labels .................................. 16
Continuous mode ............................ 16
Dispense mode ..............................18
Turning Printer On ..................................21
Test Printing.......................................22
Using RS-232C Interface.............................23
Using IrDA Interface ................................ 24
Using Bluetooth Interface or Wireless LAN Interface ......25
Printing........................................... 26
Daily Maintenance..................................28
Operation Modes................................30
6
Page 7
Unpacking
After unpacking, make sure that all the printer
components are present. If any component or part is
missing, contact your nearest dealer or service center.
Printer
Battery pack
Belt hook
* Belt holder has already installed on the printer when shipping.
Shape of cushioning material (protecting bad, etc. for supporting
printer) may partly differ by the lot.
Shoulder belt
7
Page 8
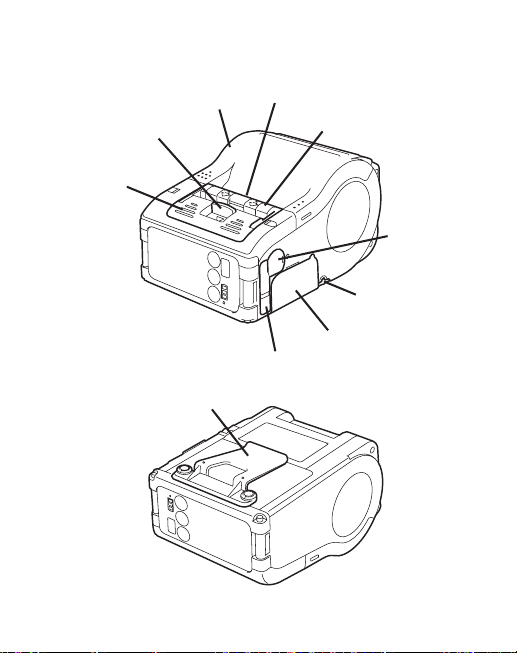
Parts Name
Parts Name
3
Coveropen/closelever
Dispenser unit
8
Open cover
Battery cover
Cover for DC input jack
Belt clip
Label ejection
Easy cutter
RS-232C
cover
Label guide
adjust dial
cover
Page 9
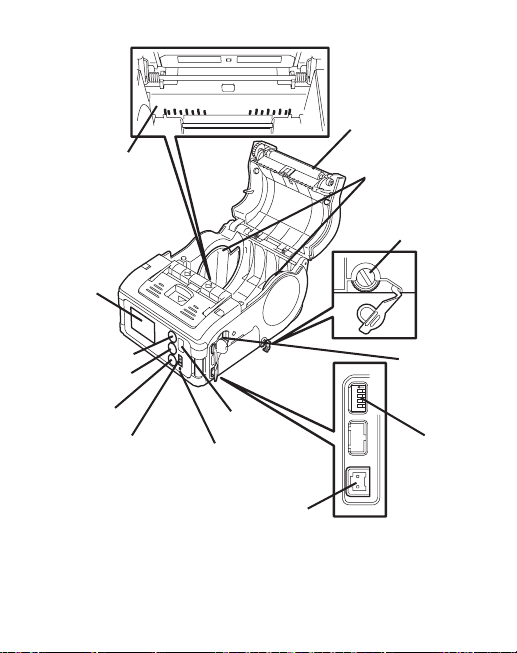
Name and Function of Controls
RS-232C Interface: Connects to
PC or handy terminal.
RS-232C cover: Cover for RS-
232C connector.
Open cover: Opened for setting
labels.
Cover Open/Close lever: Used to
open or close the cover.
Easy cutter: Cuts printed labels.
IrDA filter: Contains IrDA sensor
and emitter.
DIP switch: Sets the operation
mode of the printer. (See page
53.)
Dispenser unit: Moved to select
Dispense mode.
POWER key: Turns on/off the
printer.
Battery cover: Cover for special
battery pack.
Battery indicator (LED): Indicates
the remaining amount of
2 3 4
4
D
1
304050
58
304050
Platen
Label width scale
LCD
*1
POWER key
PRINT key
FEED key
Battery indicator
*2
(LED)
*1
Operation panel with LCD is built in the wireless LAN interface model
only (for manufacture option).
*2
Operation panel with LCD for the wireless LAN interface model has
CHARGE LED (for manufacture option).
IrDA filter
STATUS (LED)
DC input jack
Label guide
Label guide
adjust dial
RS-232C
connector
DIP switch
9
Page 10

Name and Function of Controls
RS-232C Interface: Connects to
PC or handy terminal.
RS-232C cover: Cover for RS-
232C connector.
Open cover: Opened for setting
labels.
Cover Open/Close lever: Used to
open or close the cover.
Easy cutter: Cuts printed labels.
IrDA filter: Contains IrDA sensor
and emitter.
DIP switch: Sets the operation
mode of the printer. (See
page 35.)
Dispenser unit: Moved to select
Dispense mode.
POWER key:Turnson/offthe
printer.
Battery cover: Cover for special
battery pack.
Battery indicator (LED): Indicates
the remaining amount of
battery of the printer.
Belt clip: Used when hanging the
printer on your belt.
* Do not hang the printer on to
anything but a belt.
10
Label guide: Set to meet the size
of the label used.
Label guide adjust dial: Adjusts
the label guide to the width of
the label used.
Label guide adjust dial cover:
Cover for label guide adjust
dial.
Label ejection: Ejects the printed
label.
Label width scale: Indicates the
width of label used.
DC input jack: Connects to AC
adapter.
Cover for DC input jack: Cover
for DC input terminal and DIP
switch.
FEED key: Press to feed label.
PRINT key: Sets the printer online
or offline.
STATUS (LED): Indicates the
status of the printer. (See pages
29 to 34.)
Page 11

Before Starting
Notice
• If the POWER lamp does not light at the start of charging, check the
power cord connection.
• If the CHARGE lamp does not light at the start of charging, make sure the
battery pack is firmly mounted to the battery charger. Poor mounting of
the battery pack may result in poor charging.
• When the fully charged battery pack is placed on the battery charger, the
CHARGE lamp goes on and then off.
In case of five-socket charger, the CHARGE lamp lights green.
• When charging a battery pack that has not been used for a long time, the
CHARGE lamp may blink for a while. This does not indicate an error. You
can continue charging.
• The battery pack can be recharged by about 300 times (when used in
normal temperature). If the battery is fully charged but runs out very soon,
3 After charging, remove
the battery pack from
the charger.
Slide the battery pack in the
opposite direction of step (2)
to remove the battery back.
the CHARGE lamp lights
green.
Notice
• If the POWER lamp does not light at the start of charging, check the
power cord connection.
• If the CHARGE lamp does not light at the start of charging, make sure the
battery pack is firmly mounted to the battery charger. Poor mounting of
the battery pack may result in poor charging.
• When the fully charged battery pack is placed on the battery charger, the
CHARGE lamp goes on and then off.
In case of five-socket charger, the CHARGE lamp lights green.
• When charging a battery pack that has not been used for a long time, the
CHARGE lamp may blink for a while. This does not indicate an error. You
can continue charging.
• The battery pack can be recharged by about 300 times (when used in
normal temperature). If the battery is fully charged but runs out very soon,
renew the battery pack.
Charging Time
It takes about 2.5 hours for the battery pack to reach full charge
from a fully discharged state.
3 After charging, remove
the battery pack from
the charger.
Slide the battery pack in the
opposite direction of step (2)
to remove the battery back.
the CHARGE lamp lights
green.
CHARGE
POWER
Notice
• If the POWER lamp does not light at the start of charging, check the
power cord connection.
• If the CHARGE lamp does not light at the start of charging, make sure the
battery pack is firmly mounted to the battery charger. Poor mounting of
the battery pack may result in poor charging.
• When the fully charged battery pack is placed on the battery charger, the
3 After charging, remove
the battery pack from
the charger.
Slide the battery pack in the
opposite direction of step (2)
to remove the battery back.
the CHARGE lamp lights
green.
Charging the Battery Pack
• Using the battery charger (option) to charge the
battery pack
Follow the steps below to charge the battery pack using
the battery charger.
Plug one end of the
➊
power cord to the battery
charger and the other to
the wall outlet. (POWER
lamp lights red.)
Put the battery pack
➋
on the battery charger
and then slide it in the
direction of the arrow.
Charging starts and the
CHARGE lamp lights orange.
When charging is completed
(fully charged), the CHARGE
lamp goes off. In case of
five-socket charger, charging
starts and the CHARGE lamp
lights orange. When charging is
completed (fully charged), the
CHARGE lamp lights green.
11
Page 12

After charging, remove the battery pack from the
➌
charger.
Slide the battery pack in the opposite direction of step (2) to remove
the battery back.
Notice
• IfthePOWERlampdoesnotlightatthestartofcharging,checkthe
power cord connection.
• IftheCHARGElampdoesnotlightatthestartofcharging,make
sure the battery pack is firmly mounted to the battery charger. Poor
mounting of the battery pack may result in poor charging.
• Whenthefullychargedbatterypackisplacedonthebatterycharger,
the CHARGE lamp goes on and then off.
In case of five-socket charger, the CHARGE lamp lights green.
• Whenchargingabatterypackthathasnotbeenusedforalongtime,
the CHARGE lamp may blink for a while. This does not indicate an
error. You can continue charging.
• Thebatterypackcanberechargedbyabout300times(whenusedin
normal temperature). If the battery is fully charged but runs out very
soon, renew the battery pack.
Charging Time
It takes about 2.5 hours for the battery pack to reach full charge
from a fully discharged state.
12
Page 13
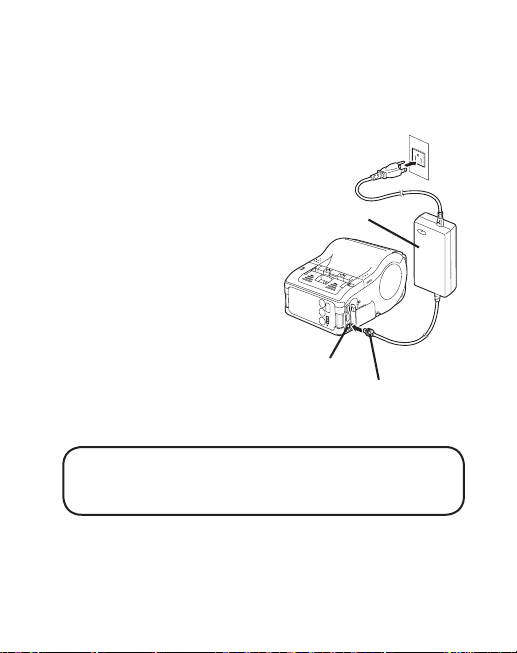
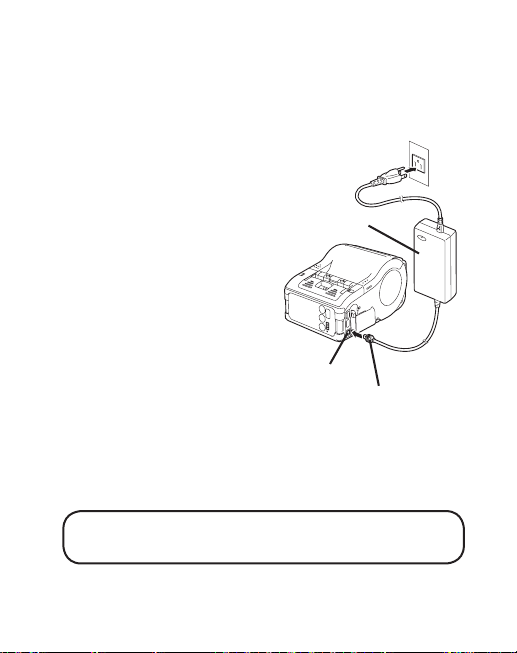
• Using the AC adapter (option) to charge the battery
Installing and removing the Battery Pack
1 Open the battery cover.
2 Insert the battery pack
while pressing and
holding the gray hook
and close the battery
cover.
Insert the battery pack with
the terminal side toward the
printer.
pack
The battery pack can be charged while it is mounted in
the printer.
Open the cover for
➊
DC input jack and
insert the DC output
terminal.
Plug the AC adapter
➋
AC adapter
to the wall outlet.
Charging starts and the
battery indicator lights
red. When charging is
completed (fully charged),
the battery indicator goes
off.
In the case of the LCD built-
in wireless LAN interface
model, CHARGE LED lights
red when charging starts and is completed (fully charged), the
CHARGE LED goes off.
DC input jack
DC output terminal
Charging Time
It takes about 5 hours for the battery pack to reach full charge
from a fully discharged state.
13
Page 14
Installing and removing the Battery Pack
4
Before Starting
4
Before Starting
4
Open the battery cover.
➊
Insert the battery pack
➋
while pressing and
holding the gray hook
and close the battery
cover.
Insert the battery pack with
the terminal side toward the
printer.
When removing the
➌
battery, press and hold
the gray hook and then
pull the tape.
14
Terminals
Hook
Battery pack
Page 15

* Make sure to turn the printer power off when
removing or replacing the battery.
When the printer is turned off, the STATUS LED goes
off. Do not remove the battery while the STATUS LED
is on. Remove the battery when the STATUS LED is
off. (See page 20.)
* If you turning off the printer otherwise, the
information stored in the printer may not be updated.
15
Page 16
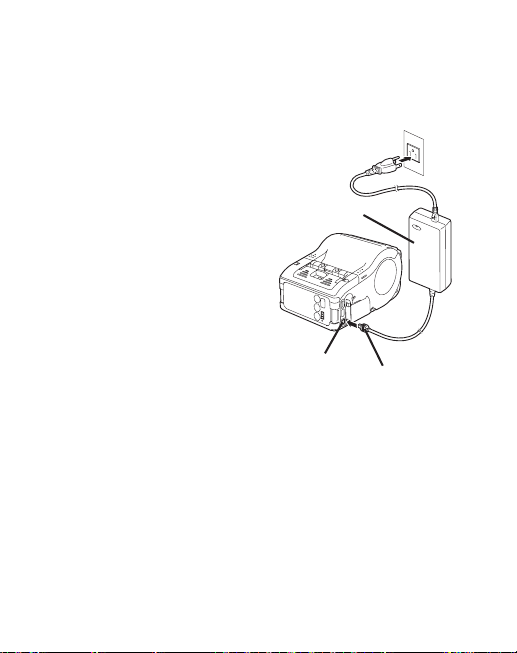
Using AC Adapter
Before Starting
4
Follow the procedure below to use the printer with the AC
adapter (option).
Open the cover for
➊
DC input jack and
insert the DC output
terminal.
Plug the AC adapter
➋
to the wall outlet.
AC adapter
* Be sure to turn the printer power off when
removing the DC output terminal of AC adapter or
disconnecting the power source.
* If you turning off the printer otherwise, the information
stored in the printer may not be updated.
* A battery pack is unnecessary when an AC adapter is
used. If a battery pack and an AC adapter are being
used at the same time, the printer starts charging
(when a battery is not fully charged) or the battery
indicator goes off (when a battery is fully charged).
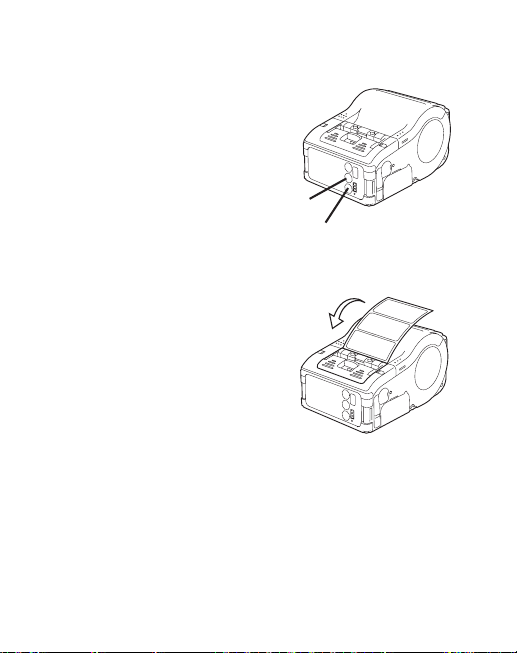
DC input jack
DC output terminal
16
Page 17
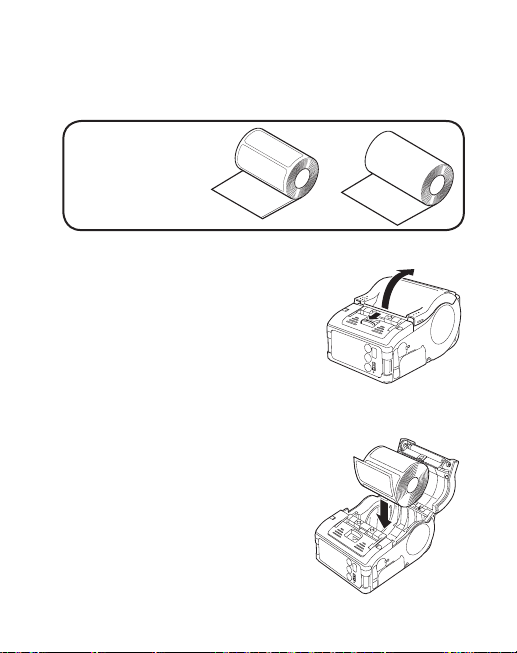
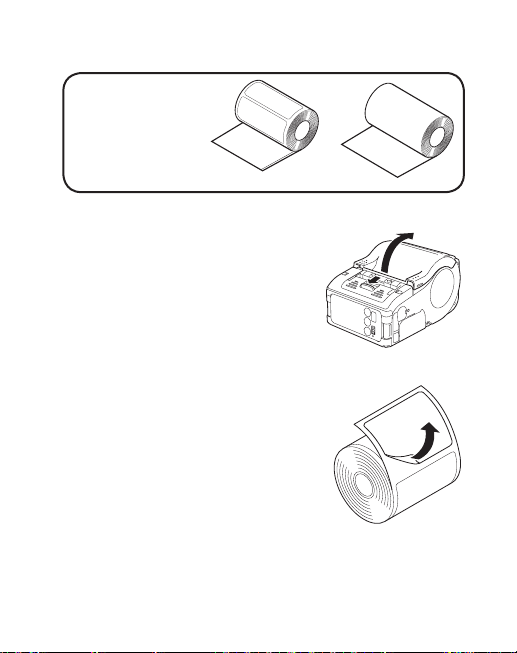
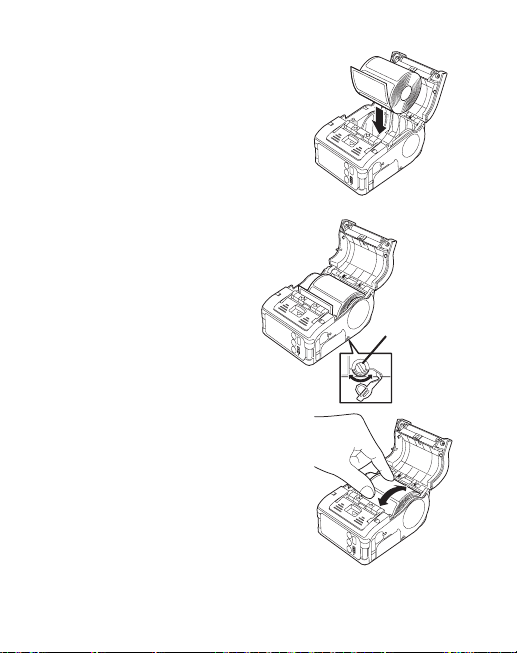
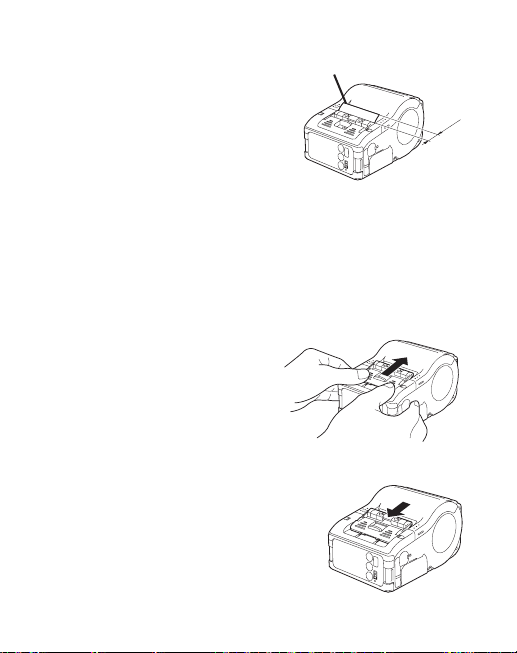
Setting Labels
3 Open the label guide
adjust dial cover and
turn the dial till the
label guide fits with
label roll.
Turn the label roll lightly by
3 Open the label guide
adjust dial cover and
turn the dial till the
label guide fits with
label roll.
Turn the label roll lightly by
the hand and confirm that it
rotates smoothly.
If a drags is felt, paper may
not be fed correctly. Return
the dial for adjustment.
When using the paper of the
same width as that used
previously, adjustment of the
label guide is not necessary.
Journal
3 Open the label guide
adjust dial cover and
turn the dial till the
label guide fits with
label roll.
Turn the label roll lightly by
the hand and confirm that it
rotates smoothly.
If a drags is felt, paper may
not be fed correctly. Return
the dial for adjustment.
When using the paper of the
same width as that used
previously, adjustment of the
label guide is not necessary.
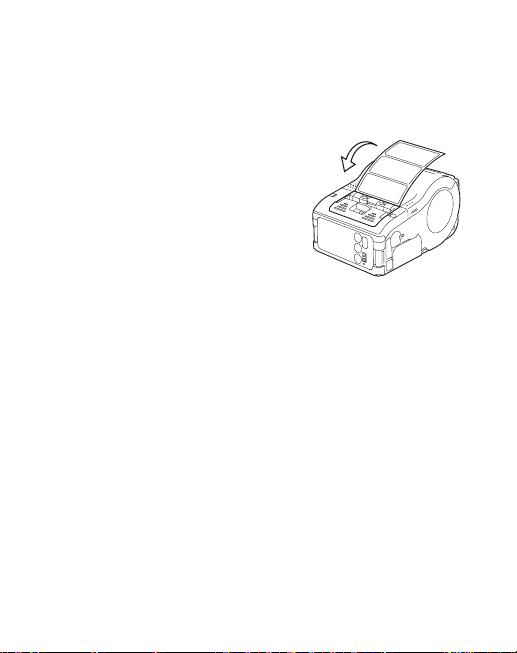
4 Close the cover after
confirming that the
leading edge of the
label is outside the
printer.
This completes the label setting in continuous mode.
Label leading edge
Journal
The method of setting label may vary depending on the
print mode.
Continuous mode
(See figure in page 29.)
SlidetheCoverOpen/
➊
Close lever in the
direction of arrow to
open the cover.
If you are using the printer
in Dispense mode, lifting
the change lever, slide the
dispenser unit until stops
(see page 19).
Place the label to the
➋
printer.
Pay attention to the
direction of the label roll.
Labels Journal
17
Page 18
Open the label guide
Before Starting
4
Before Starting
4
Before Starting
4
➌
adjust dial cover and
turn the dial till the
label guide fits with
label roll.
Turn the label roll lightly by
the hand and confirm that
it rotates smoothly.
If a drags is felt, paper may
not be fed correctly. Return
the dial for adjustment.
When using the paper
of the same width as
that used previously,
adjustment of the label
guide is not necessary.
Close the cover
➍
after confirming
that the leading
edge of the label is
outside the printer.
18
Label leading edge
Label guide
adjust dial
Page 19
This completes the label setting in continuous mode.
3 Open the label guide
adjust dial cover and
turn the dial till the
label guide fits with
label roll.
Turn the label roll lightly by
3 Set the label to the
printer.
Pay attention to the direction
of the label roll.
4 Open the label guide
adjust dial cover and
turn the dial till the
label guide fits with
label roll.
3 Set the label to the
printer.
Pay attention to the direction
of the label roll.
4 Open the label guide
adjust dial cover and
turn the dial till the
label guide fits with
label roll.
Turn the label roll lightly by
the hand and confirm that it
rotates smoothly.
If a drags is felt, paper may
not be fed correctly. Return
the dial for adjustment.
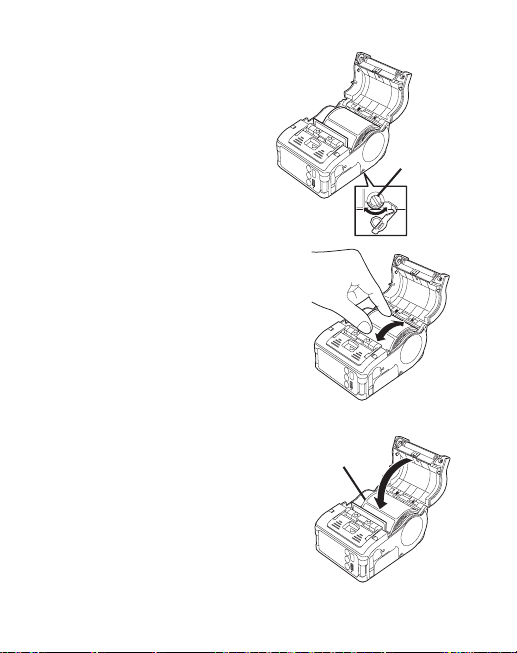
Dispense mode
(See figure in page 29.)
Labels Non-separate
SlidetheCoverOpen/
➊
Close lever in the
direction of arrow to
open the cover.
If you are using the printer
in Dispense mode, lifting
the change lever, slide the
dispenser unit until stops.
Peel the first label on
➋
the top of the label.
This step is unnecessary
when a non-separate label
is used.
labels
19
Page 20
Set the label to the
4
Before Starting
4
Before Starting
4
➌
printer.
Pay attention to the
direction of the label roll.
Open the label guide
➍
adjust dial cover and
turn the dial till the
label guide fits with
label roll.
Turn the label roll lightly
by the hand and confirm that it rotates
smoothly.
If a drags is felt, paper may not be fed
correctly. Return the dial for adjustment.
When using the paper of the same width
as that used previously, adjustment of the
label guide is not necessary.
20
Label guide
adjust dial
Page 21
Close the cover
5. Turning Printer On
After the procedure mentioned before has been finished, try
to turn the printer power on and off.
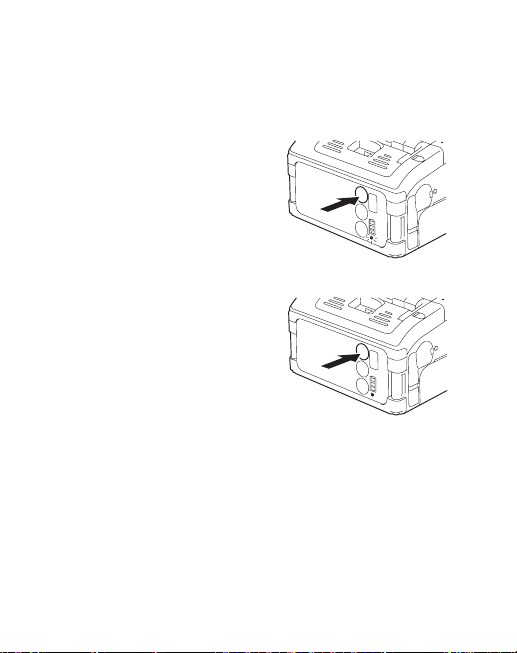
1 Press and hold the
5. Turning Printer On
After the procedure mentioned before has been finished, try
to turn the printer power on and off.
1 Press and hold the
POWER key. When the
STATUS LED lights
green, release the key.
2 Press and hold the
POWER key again.
When he STATUS LED
goes off, release the
key..
5. Turning Printer On
After the procedure mentioned before has been finished, try
to turn the printer power on and off.
1 Press and hold the
POWER key. When the
STATUS LED lights
green, release the key.
2 Press and hold the
POWER key again.
When he STATUS LED
goes off, release the
key..
➎
after confirming
that the leading
edge of the label is
outside the printer
(more than 10 mm).
When using a non-
separate label, press
FEED key to feed a
piece of label and pull
the label upward to cut
it along the perforation.
If the label is jammed,
retry label setting
procedure.
Slide the dispenser unit
➏
until it stops.
This completes the label setting in the Dispense mode.
• To changing Dispense mode to
continuous mode
Lifting the change lever, slide the
dispenser unit until stops.
Label leading edge
21
Page 22
Turning Printer On
Turning Printer On
5
POWER
PRINT
FEED
Turning Printer On
5
POWER
PRINT
FEED
POWER
PRINT
FEED
After the procedure mentioned before has been finished,
try to turn the printer power on and off.
Press and hold the
➊
POWER key. When
the STATUS LED lights
green, release the key.
Press and hold the
➋
POWER key again.
When he STATUS LED
goes off, release the
key.
22
Page 23
Test Printing
7. Using RS-232C Interface
Use the following procedure to print by connecting to a PC
or a handy terminal through an RS-232C cable option.
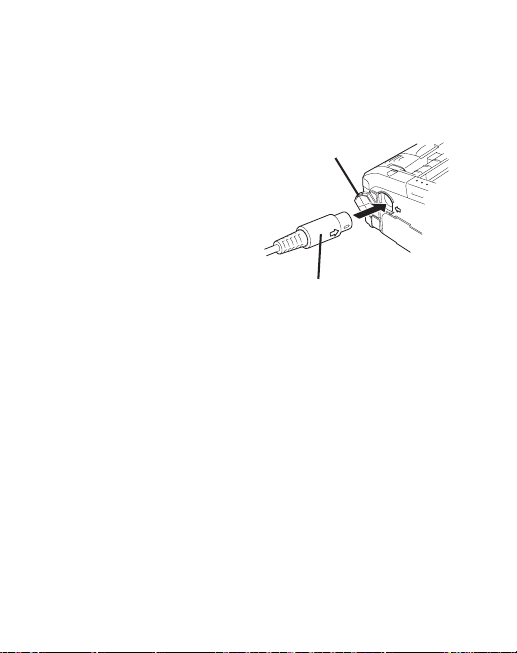
1 Open the RS-232C
cover.
2 Plug one end of the
RS-232C cable into the
POWER
PRINT
FEED
1
2
7. Using RS-232C Interface
Use the following procedure to print by connecting to a PC
or a handy terminal through an RS-232C cable option.
1 Open the RS-232C
cover.
2 Plug one end of the
RS-232C cable into the
connector firmly.
Be sure that the arrow mark
on the connector of the RS-
232C cable matches with the
arrow mark by the side of the
printer connector.
3 Plug the other end of
the RS-232C cable to
the connector of the
RS-232C
cover
RS-232C cable
POWER
PRINT
FEED
1
2
1234567
abcdefg
1234567
abcdefg
1234567
abcdefg
Pressing and holding
➊
the FEED key, set
the POWER key. The
printer enters the test
mode. Press the FEED
key again to start test
printing.
Verify the following using
➋
the output of the test
printing.
• Thereisnochipped
character.
• Printconditionisgood.
In the test printing, the battery residual is indicted by
( for full charge).
When the battery indicates , charge the battery.
* If any fault is detected, contact the store you bought the printer,
dealer, or service center.
23
Page 24
Using RS-232C Interface
7
Use the following procedure to print by connecting to a
PC or a handy terminal through an RS-232C cable option.
Open the RS-232C
➊
cover.
Plug one end of
➋
the RS-232C cable
into the connector
firmly.
Be sure that the arrow
mark on the connector
of the RS-232C cable
matches with the arrow
mark by the side of the
printer connector.
Plug the other
➌
end of the RS232C cable to
the connector of
the PC or handy
terminal.
For the information on
the connector of the PC
or handy terminal, refer to the manual supplied with the PC.
24
RS-232C cover
RS-232C cable
Page 25

Using IrDA Interface
The distance available for IrDA
communication is a maximum of 15 to 20 cm.
* This distance may vary depending on the
environment of use or the party to
communicate with. Especially under direct
sun light or in the environment exposed to
strong illumination, communication may be
disabled. In such a case, block the strong
light not to enter the IrDA filter or make the
PC contact the IrDA filter.
9. Using Bluetooth Interface
or Wireless LAN Interface
Note that when printing with Bluetooth interface or wireless
LAN interface, the distance between the printer and the host
may differ depending on the environment of use and the
performance of the PC or handy terminal used.
30°
30°
Use the following procedure to print through IrDA
interface.
Place the printer within the distance of 20 cm from the
➊
PC or handy terminal to communicate through IrDA.
Adjust the printer position to let the PC or the handy
➋
terminal in the range of 30˚ from the center of the IrDA
filter (a corn area shown below).
25
Page 26

The distance available for IrDA communication is a
maximum of 15 to 20 cm.
* This distance may vary depending on the
environment of use or the party to communicate
with. Especially under direct sun light or in the
environment exposed to strong illumination,
communication may be disabled. In such a case,
block the strong light not to enter the IrDA filter or
make the PC contact the IrDA filter.
Using Bluetooth Interface or Wireless LAN Interface
Note that when printing with Bluetooth interface or
wireless LAN interface, the distance between the printer
and the host may differ depending on the environment
of use and the performance of the PC or handy terminal
used.
26
Page 27
Printing
When next printing is not available
1 Press the PRINT key in
the online state to set
the printer off line state
(STATUS LED goes
off).
2 Press the FEED key to
feed label.
3 When the feeding
FEED key
PRINT key
123456
7
abcdefg
1234567
abcdefg
1234567
abcdefg
Allow data transmission from the PC.
➊
When printing is
➋
finished, pinch either
right or left corner of the
label top and pull it with
arrow direction.
* The number of sheets you can print in this mode differs with that in
the continuous or peel mode.
* When the non-separate label is cut at a place other than perforation
and next printing is not available, follow the procedure in page 35.
27
Page 28
When next printing is not available
Printing
10
Printing
10
123456
7
abcdefg
1234567
abcdefg
1234567
abcdefg
Press the PRINT key in
➊
the online state to set
the printer off line state
(STATUS LED goes
off).
Press the FEED key to
➋
PRINT key
feed label.
When the feeding stops,
➌
cut the label by pulling
the label top with arrow
direction.
Press the PRINT key to
➍
return to the online state
(STATUS LED lights
green).
FEED key
28
Page 29
Daily Maintenance
13. Reference
Options
User Option
Battery Pack (Supplied with the
printer)
Daily Maintenance
12
Use the following procedure after turning the printer off
and removing the battery pack.
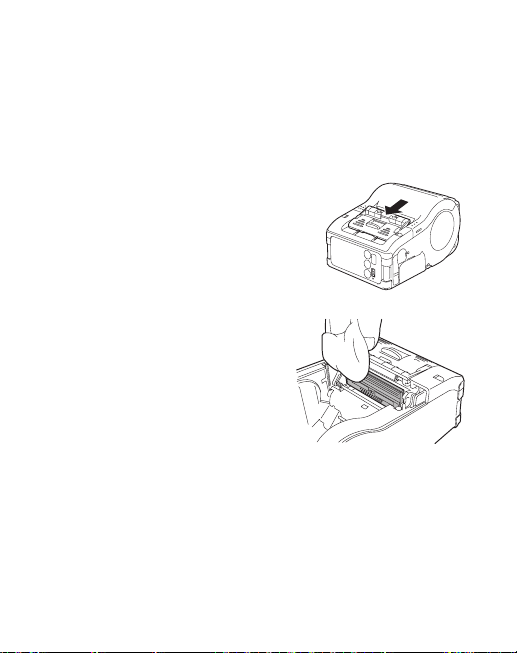
Cleaning thermal head
SlidethecoverOpen/
➊
Close lever and open the
Open cover.
If you are using the printer
in Dispense mode, lifting the
change lever, slide the dispenser
unit until it stops (see page 19).
Wipe off the dirt using
➋
cloth wetted (soaked)
in alcohol.
* Never use thinner,
benzene, or kerosene.
29
Page 30
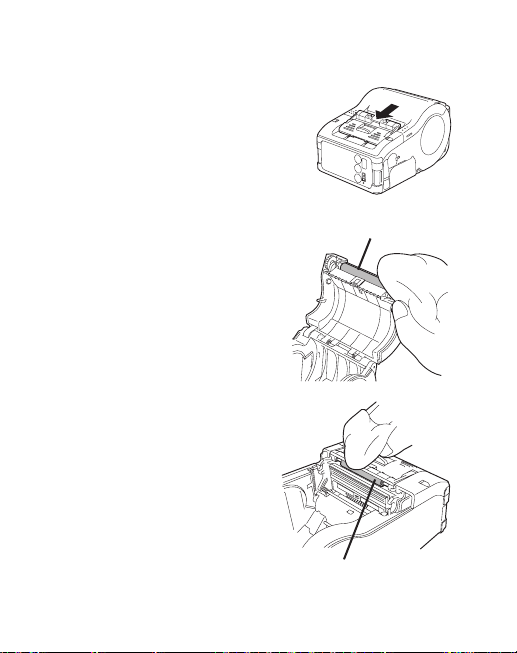
Cleaning the platen and peel roller
13. Reference
Options
User Option
Battery Pack (Supplied with the
printer)
13. Reference
Options
User Option
Battery Pack (Supplied with the
printer)
Preparing a spare battery pack will
insure uninterrupted operation due to
Low Battery.
Battery Charger (Single-socket)
Charges the battery pack.
Platen
13. Reference
Options
User Option
Battery Pack (Supplied with the
printer)
Preparing a spare battery pack will
insure uninterrupted operation due to
Low Battery.
Battery Charger (Single-socket)
Charges the battery pack.
Battery Charger (Five-socket)
Charges the battery pack (up to five
packs).
Platen
SlidethecoverOpen/
➊
Close lever and open the
Open cover.
If you are using the printer in
Dispense mode, lifting the change
lever, slide the dispense unit until
stops.
Wipe off the dirt using
➋
cloth wetted (soaked)
in alcohol.
* Never use thinner,
benzene, or kerosene.
30
Platen
Dispense roller
Page 31

Operation Modes
Reference
13
Continuous mode
Test Printing
Printing of printer status
Dispense mode
Continuous mode
Online printing
(Printing of data received
from PC or handy terminal) Dispense mode
Continuous mode Dispense mode Dispense mode
(Labels) (Non-separate labels)
1234567
abcdefg
1234567
abcdefg
1234567
abcdefg
1234567
abcdefg
1234567
abcdefg
Reference
13
Continuous mode
Dispense mode
Continuous mode
(Labels) (Non-separate labels)
1234567
abcdefg
1234567
abcdefg
Reference
13
1234567
abcdefg
The printer can operate in two modes: continuous mode
and dispense mode. In either mode, test printing and
online printing are available.
Continuous mode
Test Printing
Printing of printer status
Online printing
(Printing of data received
from PC or handy terminal)
Continuous mode Dispense mode
(Labels)
Dispense mode
Continuous mode
Dispense mode
Dispense mode
(Non-separate labels
* You can select Dispense mode (Non-separate labels) by using the
printer setting tool.
31
Page 32

Normal Operation
Power
On
POWER
Online PRINT
key
PRINT
LED indication in normal operation is as shown below.
Operating state STATUS (LED)
At the start of normal printing Light (Orange)
Online state Light (Green)
Offline state Not lit
* Battery indicator is lit even in offline state.
key
Online
Power Save Mode
1. Sleep Mode: STATUS (LED) blinks (Green) at intervals of 4 seconds.
In offline state, STATUS (LED) goes off. Battery indicator is lit even
in offline state. When you do not operate for 5 seconds, the printer
enters the Sleep mode (Standby state). When you press the PRINT
key or FEED key, when the printer receives data, or when you open
and close the Open cover, the printer returns to the normal state.
32
Page 33

Test Print Mode (FEED key + Power On)
Power On
FEED key + POWER
Start test printing.
FEED key
Test Printing
FEED
key
FEED
key
Printing Stop
LED indication at the test print mode is as shown below.
Operating state STATUS (LED)
At the start of test print mode Light (Orange)
Test print starting Blink (Green)
In test printing Light (Green)
Printing stop Not lit
33
Page 34

Dispense Mode
Specifying dispense mode
Type Operation Default
Auto print Prints one label after receiving data
Manual print Prints one label after receiving data
and waits for peeling. After peeling a
label, automatically prints next label.
and enters offline state. Pressing the
PRINT key allows next label to be
printed. After printing the specified
number of labels, printing terminates.
No printing occurs even when the
PRINT key is pressed.
Manual print
Dispense mode designation change
Change of dispense mode setting is available with the designation of
DSW and key at the printer power on. The setting is valid after turning
the printer off.
Auto dispense mode designation
➊
DSW-1, 2, 3, 4 = (OFF, OFF, OFF, ON) + Cover open + PRINT Key +
POWER
Manual dispense mode designation
➋
DSW-1, 2, 3, 4 = (OFF, OFF, OFF, ON) + Cover open + FEED key +
POWER
Dispense mode setting in process
(STATUS LED is blinking green.)
Setting complete
(STATUS LED lights green.)
34
Page 35

Note: When terminating the dispense mode designation, confirm that
the STATUS LED lights green and then turn the printer power off.
Head Check Setting Mode
In the Head Check Setting mode, head checking can be implemented in
two check ranges: normal print area and barcode print area.
Head check feature can be verified for presence or absence and head
check range can be set in accordance with DSW setting, status of
pressing key, and status of cover at the time of printer power on.
DIP switch setting
(A) OFF ON OFF ON
(B) ON OFF OFF ON
DSW-1 DSW-2 DSW-3 DSW-4
DSW setting Status of key and cover Function
(A) PRINT key + Cover open Sets head check range to
FEED key + Cover open Sets head check function
(B) PRINT key + Cover open Sets head check range to
FEED key + Cover open Sets head check function
DSWsetting(A/B)+Coveropen+(PRINT/FEEDkey)+POWER)
Head check function is being set.
(STATUS LED blinks green.)
Setting complete.
(STATUS LED lights green.)
print area.
to Disable.
only barcode print area.
to Disable.
35
Page 36

Note: You can check the current setting with the test printout (see
page 21). When terminating head check setting, confirm that
STATUS LED lights green and then turn the printer power off.
Online Command Setting Mode
Online Command Designation
Type Operation Default
Petit lapin compatible
command designation
SBPL command
designation
Uses online command
as Petit lapin standard
command.
Uses online command as
SBPL command.
SBPL
command
designation
Online command designation change
Change of online command designation is available with the designation
of DSW and key at the printer power on. The setting is valid after turning
the printer off.
Auto dispense mode designation
➊
DSW-1, 2, 3, 4 = (OFF, OFF, OFF, ON) + Cover open + PRINT Key +
POWER
Manual dispense mode designation
➋
DSW-1, 2, 3, 4 = (OFF, OFF, OFF, ON) + Cover open + FEED key +
POWER
Setting in process
(STATUS LED blinks green.)
Setting complete
(STATUS LED lights green.)
36
Page 37

Note: You can check the current setting with the test printout (see
Reference
13
2 3 4
4
D
1
page 21). When terminating the online command designation,
confirm that the STATUS LED lights green and then turn the
printer power off.
DIP Switch
Setting DIP switch
Turn the printer power off.
➊
Open the DIP switch cover.
➋
Change the position
➌
of the switch you want
to change using a
pointed tool such as
the tip of ball-point
pen.
37
Page 38

DIP Switch Setting
DIP switch
1 2 3 4 PRINT FEED Interface Description
OFF OFF OFF OFF Close OFF OFF RS-232C Normal print mode
OFF OFF ON ON Close OFF OFF RS-232C HEX dump mode
OFF OFF OFF ON Open ON OFF — Auto peeling
OFF ON OFF OFF Close OFF OFF Bluetooth
OFF ON OFF ON Open ON OFF — Head check (print
OFF ON ON ON Open OFF OFF Bluetooth
ON OFF OFF OFF Close OFF OFF IrDA
ON OFF ON ON Close OFF OFF IrDA
Key Starting mode
Cover
Close OFF ON — User test print
Open OFF ON — Manual print
interface/
Wireless
Close OFF ON — User test print
Open OFF ON — Head check
Open ON OFF — CRC check enable
Open OFF ON — CRC check
Close OFF ON — Test print mode
interface
interface/
Wireless
interface
interface
interface
mode
mode
mode
Normal print mode
mode
area) designation
designation clear
HEX dump mode
designation
disenable
designation
Normal print mode
HEX dump mode
38
Page 39

DIP Switch Setting (cont’d)
DIP switch
1 2 3 4 PRINT FEED Interface Description
ON OFF OFF ON Open ON OFF Head check
ON ON ON ON Open ON OFF — Online command
Key Starting mode
Cover
(Barcode print area)
Open OFF ON — Head check clear
Open OFF ON — Online command
designation
designation
(Petit lapin
compatible)
designation
(SBPL command)
39
Page 40

Introduction
Ce guide a pour objet de permettre à l’utilisateur de se
familiariser rapidement avec les fonctions de base de
l’imprimante de codes à barres Petit lapin.
Veuillez lire attentivement le présent guide pour utiliser
efficacement les fonctions de l’imprimante Petit lapin.
Remarques
1. La reproduction complète ou de toute partie du
présent guide est interdite sans l’autorisation du
détenteur du droit d’auteur.
2. Les renseignements mentionnés dans le présent
document sont sujets à changement sans préavis.
3. Si l’utilisateur identifie des renseignements ambigus
ou erronés, celui-ci doit communiquer avec le
revendeur ou le centre de réparation le plus proche.
Avertissement
Cet équipement est conforme aux normes pour
l’équipement de technologie de l’information de catégorie
B du Voluntary Control Council for Interference (VCCI).
Si cet équipement est utilisé dans un environnement
domestique, il est possible que du brouillage radio
se produise. Lorsqu’un tel brouillage se produit, il est
possible que l’utilisateur ait à remédier lui-même à cette
situation.
Attention! Cette imprimante peut être endommagée si
elle est exposée à l’eau. Si vous l’utilisez à l’extérieur ou
à tout endroit où elle peut être exposée à l’eau, placez-la
dans son sac hydrofuge optionnel (OKI # 70061202) pour
la protéger contre les dommages.
40
deuxième édition : mars 2010
© 2010 Oki Data Americas, Inc.
Page 41

Clients utilisant les modèles dotés de la technologie
Bluetooth ou de communications sans fil
Remarques concernant les radiofréquences
Ce produit a été approuvé en fonction de son adaptabilité
selon les normes technologiques de la loi sur les
radiofréquences. Par conséquent, l’utilisation de ce produit
n’exige pas de licence de station de radiodiffusion. Ce
produit doit être utilisé uniquement au Japon.
Les actions suivantes peuvent résulter en des poursuites
judiciaires :
•Désassemblage/modicationduproduit
•Retraitdel’étiquettedecertication(labeldenuméro
de série) apposée au produit.
L’utilisation du produit aux endroits suivants peut
raccourcir la portée des communications ou désactiver sa
capacité à communiquer : à proximité d’un micro-ondes,
où l’on retrouve de l’électricité statique ou des pannes
radio, ou à proximité d’équipement réseau sans fil.
« Bluetooth » est une marque de
commerce de Bluetooth SIG, Inc.,
USA. Nous utilisons cette marque sous
licence de ladite société.
Avant d’utiliser une interface réseau sans fil, assurez-vous
d’effectuer tous les réglages inhérents à la sécurité de
l’équipement réseau sans fil en fonction des directives
fournies dans le manuel accompagnant l’équipement.
41
Page 42

Table des matières
Déballage......................................... 42
Éléments de l’imprimante ............................43
Nom et fonction des commandes .................. 45
Avant de commencer ............................... 46
Charge du bloc-pile..............................46
Installation et retrait du bloc-pile . . . . . . . . . . . . . . . . . . . 49
Utilisation de l’adaptateur CA...................... 51
Installation des étiquettes.........................52
Mode continu ...............................52
Mode distribution ............................54
Mise sous tension de l’imprimante..................... 57
Test d’impression ..................................58
Utilisation de l’interface RS-232C......................59
Utilisation de l’interface IrDA .........................60
Utilisation de l’interface Bluetooth ou de l’interface
réseau sans fil . . . . . . . . . . . . . . . . . . . . . . . . . . . . . . . . . . 61
Impression ........................................62
Entretien quotidien .................................64
Modes d’utilisation .............................. 66
42
Page 43

Déballage
Une fois déballés, vérifiez que tous les éléments de
l’imprimante sont présents. S’il manque un ou plusieurs
éléments, veuillez communiquer avec le revendeur ou le
centre de réparation le plus proche.
Imprimante
Bloc-pile
Crochet pour
bandoulière
* Le dispositif de retenue de la bandoulière est installé sur l’imprimante
avant d’être expédiée.
La forme des matériaux de rembourrage (p. ex., qui soutient
l’imprimante) peut différer en fonction du lot.
Bandoulière
43
Page 44

Éléments de l’imprimante
Parts Name
3
Éjection de l’étiquette
Levierd’ouverture/
fermeture du capot
Unité de distribution
Agrafe pour ceinture
44
Capot
Capot de la prise
d’alimentation CC
Coupeuse
Capot du bloc-pile
Capot de la
molette de
réglage des
guides-papier
Capot du
connecteur
RS-232C
Page 45

Name and Function of Controls
RS-232C Interface: Connects to
PC or handy terminal.
RS-232C cover: Cover for RS-
232C connector.
Open cover: Opened for setting
labels.
Cover Open/Close lever: Used to
open or close the cover.
Easy cutter: Cuts printed labels.
IrDA filter: Contains IrDA sensor
and emitter.
DIP switch: Sets the operation
mode of the printer. (See page
53.)
Dispenser unit: Moved to select
Dispense mode.
POWER key: Turns on/off the
printer.
Battery cover: Cover for special
battery pack.
Battery indicator (LED): Indicates
the remaining amount of
2 3 4
4
D
1
304050
58
304050
Plateau
Indicateur de
largeur d’étiquette
*1
ACL
Bouton
TENSION
Bouton
IMPRESSSION
Bouton
ALIMENTATION
Témoin de charge du
bloc-pile (DEL)
*1
Le panneau de commande à ACL est intégré au modèle à interface
réseau sans fil seulement (pour l’option de fabricant).
Filtre IrDA
Témoin d’état (DEL)
*2
Prise d’alimentation CC
Guides-papier
Molette de
réglage des
guides-papier
Connecteur
RS-232C
45
Page 46

*2
Le panneau de commande à ACL du modèle à interface réseau sans
fil est doté d’un témoin à DEL de charge du bloc-pile.
46
Page 47

Nom et fonction des commandes
47
Page 48

Interface RS-232C : Relie
l’imprimante à l’ordinateur ou à
un terminal
Capot du connecteur RS-232C :
Protège le connecteur RS232C.
Capot : Ouvrir pour installer les
étiquettes.
Levier d’ouverture/fermeture du
capot : Utilisé pour ouvrir ou
fermer le capot.
Coupeuse : Coupe les étiquettes
imprimées.
Filtre IrDA : Contient le capteur et
l’émetteur IrDA.
Commutateur DIP : Sélectionne
le mode de fonctionnement de
l’imprimante.
Unité de distribution : Permet
de sélectionner le mode
distribution une fois déplacée.
Bouton TENSION :Allume/éteint
l’imprimante.
Capot du bloc-pile : Protège le
bloc-pile spécial.
Témoin de charge du bloc-pile
(DEL) : Indique la charge
restante du bloc-pile de
l’imprimante.
* Suspendez l’imprimante
uniquement à une ceinture.
48
Guides-papier : Réglez pour
convenir au format des
étiquettes utilisées.
Molette de réglage des guides-
papier : Règle les guides pour
convenir à la largeur des
étiquettes utilisées.
Capot de la molette de réglage
des guides-papier : Protège la
molette de réglage des guidespapier.
Éjection de l’étiquette : Éjecte
l’étiquette imprimée.
Indicateur de largeur d’étiquette :
Indique la largeur des
étiquettes utilisées.
Prise d’alimentation CC : Pour
brancher l’adaptateur CA.
Capot de la prise d’alimentation
CC : Protège la prise
d’alimentation CC et le
commutateur DIP.
Bouton ALIMENTATION : Appuyez
pour alimenter une étiquette.
Bouton IMPRESSION : Place
l’imprimante en ligne ou hors
ligne.
Témoin ÉTAT (DEL) : Indique l’état
de l’imprimante.
Agrafe pour ceinture : Utilisée
pour suspendre l’imprimante à
la ceinture.
Page 49

Avant de commencer
Notice
• If the POWER lamp does not light at the start of charging, check the
power cord connection.
• If the CHARGE lamp does not light at the start of charging, make sure the
battery pack is firmly mounted to the battery charger. Poor mounting of
the battery pack may result in poor charging.
• When the fully charged battery pack is placed on the battery charger, the
CHARGE lamp goes on and then off.
In case of five-socket charger, the CHARGE lamp lights green.
• When charging a battery pack that has not been used for a long time, the
CHARGE lamp may blink for a while. This does not indicate an error. You
can continue charging.
• The battery pack can be recharged by about 300 times (when used in
normal temperature). If the battery is fully charged but runs out very soon,
3 After charging, remove
the battery pack from
the charger.
Slide the battery pack in the
opposite direction of step (2)
to remove the battery back.
the CHARGE lamp lights
green.
Notice
• If the POWER lamp does not light at the start of charging, check the
power cord connection.
• If the CHARGE lamp does not light at the start of charging, make sure the
battery pack is firmly mounted to the battery charger. Poor mounting of
the battery pack may result in poor charging.
• When the fully charged battery pack is placed on the battery charger, the
CHARGE lamp goes on and then off.
In case of five-socket charger, the CHARGE lamp lights green.
• When charging a battery pack that has not been used for a long time, the
CHARGE lamp may blink for a while. This does not indicate an error. You
can continue charging.
• The battery pack can be recharged by about 300 times (when used in
normal temperature). If the battery is fully charged but runs out very soon,
renew the battery pack.
Charging Time
It takes about 2.5 hours for the battery pack to reach full charge
from a fully discharged state.
3 After charging, remove
the battery pack from
the charger.
Slide the battery pack in the
opposite direction of step (2)
to remove the battery back.
the CHARGE lamp lights
green.
CHARGE
POWER
Notice
• If the POWER lamp does not light at the start of charging, check the
power cord connection.
• If the CHARGE lamp does not light at the start of charging, make sure the
battery pack is firmly mounted to the battery charger. Poor mounting of
the battery pack may result in poor charging.
• When the fully charged battery pack is placed on the battery charger, the
3 After charging, remove
the battery pack from
the charger.
Slide the battery pack in the
opposite direction of step (2)
to remove the battery back.
the CHARGE lamp lights
green.
Charge du bloc-pile
• Utilisationduchargeur(enoption)pour
charger le bloc-pile
Observez les étapes suivantes pour charger le bloc-pile
en utilisant le chargeur.
Branchez une extrémité
➊
du cordon d’alimentation
dans le chargeur et l’autre
extrémité dans une prise
murale. (Le témoin POWER
s’allume en rouge.)
Placez le bloc-pile dans le
➋
chargeur et coulissez-le
dans le sens indiqué par la
flèche.
La charge débute immédiatement
et le témoin CHARGE s’allume
en orange. Une fois la charge
terminée (bloc-pile chargé
à fond), le témoin CHARGE
s’éteint. Lorsqu’un chargeur à
cinq logements est utilisé, la
charge débute immédiatement
et le témoin CHARGE passe
à l’orange. Une fois la charge
terminée (bloc-pile chargé à
fond), le témoin CHARGE passe
au vert.
49
Page 50

Lorsque la charge est terminée, retirez le bloc-pile du
➌
chargeur.
Coulissez le boc-pile dans le sens opposé à celui indiqué à l’étape
(2) pour le retirer.
Avis
• SiletémoinPOWERnes’allumepasaudébutdelacharge,vériez
la connexion du cordon d’alimentation.
• SiletémoinCHARGEnes’allumepasaudébutdelacharge,
assurez-vous que le bloc-pile est bien installé dans le chargeur. Un
bloc-pile mal installé peut entraîner une charge inadéquate.
• Lorsqu’unbloc-pilechargéàfondestplacédanslechargeur,le
témoin CHARGE s’allume, puis s’éteint.
Lorsqu’un chargeur à cinq logements est utilisé, le témoin CHARGE
passe au vert.
• Lorsqu’unbloc-pilequin’apasétéutilisédepuisunepériode
prolongée est placé dans le chargeur, le témoin CHARGE peut
clignoter pendant un certain temps. Cela est normal. La charge du
bloc-pile est tout de même effectuée.
• Lebloc-pilepeutêtrerechargéenviron300fois(lorsqu’ilestutilisé
à température normale). Si le bloc-pile est chargé à fond mais se
décharge rapidement, remplacez le bloc-pile.
Temps de charge
Environ 2,5 heures sont requises pour charger à fond le bloc-pile.
50
Page 51
• Utilisationdel’adaptateurCA(enoption)pour
Installing and removing the Battery Pack
1 Open the battery cover.
2 Insert the battery pack
while pressing and
holding the gray hook
and close the battery
cover.
Insert the battery pack with
the terminal side toward the
printer.
charger le bloc-pile
Le bloc-pile peut être chargé lorsqu’il est installé dans
l’imprimante.
Ouvrez le capot de la
➊
prise d’alimentation
CC et insérez le
câble CC.
Branchez
➋
Adaptateur CA
l’adaptateur CA dans
une prise murale.
La charge débute
immédiatement et le
témoin de charge du
bloc-pile s’allume en
rouge. Une fois la charge
terminée (bloc-pile
chargé à fond), le témoin
de charge du bloc-pile
s’éteint.
En ce qui concerne le
modèle à interface réseau
sans fil avec ACL intégré,
le témoin CHARGE
s’allume en rouge pendant la charge et s’éteint une fois le bloc-pile
chargé à fond.
Prise
d’alimentation CC
Fiche CC
Temps de charge
Environ 5 heures sont requises pour charger à fond le bloc-pile.
51
Page 52

Installation et retrait du bloc-pile
4
Before Starting
4
Before Starting
4
Ouvrez le capot du bloc-pile.
➊
Insérez le bloc-pile
➋
tout en maintenant le
levier gris appuyé vers
la droite, puis fermer le
capot.
Insérez le bloc-pile avec
les bornes de contact vers
l’intérieur de l’imprimante.
Pour retirer le bloc-
➌
pile, appuyez vers
la droite sur le levier
gris et maintenez-le
en place, puis tirez le
ruban.
52
Bornes de contact
Crochet
Bloc-pile
Page 53

* Veillez à mettre l’imprimante hors
tension avant de retirer ou de remplacer le blocpile.
Lorsque l’imprimante est éteinte, le
témoin ÉTAT s’éteint. Ne retirez pas le bloc-pile
lorsque le témoin ÉTAT est allumé. Retirez le
bloc-pile lorsque le témoin ÉTAT est éteint.
* Si vous éteignez l’imprimante en
utilisant une autre méthode, l’information stockée
dans l’imprimante peut ne pas être actualisée.
53
Page 54

Utilisation de l’adaptateur CA
Before Starting
4
Observez la procédure ci-dessous pour utiliser
l’imprimante avec l’adaptateur CA (en option).
Ouvrez le capot de la
➊
prise d’alimentation
CC et insérez le
câble CC.
Branchez
➋
l’adaptateur CA dans
une prise murale.
* Assurez-vous de mettre l’imprimante hors tension avant
de débrancher le câble CC de l’adaptateur CA ou de
débrancher la source d’alimentation.
Si vous éteignez l’imprimante en utilisant une autre
méthode, l’information stockée dans l’imprimante peut
ne pas être actualisée.
Il n’est pas nécessaire d’utiliser le bloc-pile lorsque
l’adaptateur CA est utilisé. Lorsque le bloc-pile
et l’adaptateur CA sont utilisés simultanément,
l’imprimante charge le bloc-pile (lorsqu’il n’est pas
chargé à fond) ou le témoin de charge du bloc-pile
s’éteint (lorsque le bloc-pile est chargé à fond).
54
Adaptateur CA
Prise
d’alimentation CC
Fiche CC
Page 55

Installation des étiquettes
3 Open the label guide
adjust dial cover and
turn the dial till the
label guide fits with
label roll.
Turn the label roll lightly by
3 Open the label guide
adjust dial cover and
turn the dial till the
label guide fits with
label roll.
Turn the label roll lightly by
the hand and confirm that it
rotates smoothly.
If a drags is felt, paper may
not be fed correctly. Return
the dial for adjustment.
When using the paper of the
same width as that used
previously, adjustment of the
label guide is not necessary.
Journal
3 Open the label guide
adjust dial cover and
turn the dial till the
label guide fits with
label roll.
Turn the label roll lightly by
the hand and confirm that it
rotates smoothly.
If a drags is felt, paper may
not be fed correctly. Return
the dial for adjustment.
When using the paper of the
same width as that used
previously, adjustment of the
label guide is not necessary.
4 Close the cover after
confirming that the
leading edge of the
label is outside the
printer.
This completes the label setting in continuous mode.
Label leading edge
Journal
La méthode d’installation des étiquettes varie en fonction
du mode d’impression.
Mode continu
Étiquettes Journal
Appuyez sur le levier
➊
d’ouverture/fermeture
du capot dans le sens
indiqué par la flèche
et ouvrez le capot.
Si vous utilisez l’imprimante
en mode Distribution,
soulevez le levier et
coulissez l’unité de
distribution jusqu’à butée.
Placez le rouleau
➋
d’étiquettes dans
l’imprimante.
Portez une attention
particulière au sens
d’installation du rouleau.
55
Page 56

Ouvrez le capot de la
Before Starting
4
Before Starting
4
Before Starting
4
➌
molette de réglage des
guides-papier et tournez la
molette jusqu’à ce que les
guides-papier conviennent
au rouleau d’étiquettes.
Tournez légèrement le rouleau
d’étiquettes à la main pour
confirmer sa facilité de rotation.
Si l’on ressent de la résistance,
les étiquettes peuvent ne pas
être alimentées correctement.
Utilisez la molette pour régler les
guides-papier.
Lorsque vous utilisez un
rouleau de papier de la même
largeur que le rouleau utilisé
antérieurement, il n’est alors pas
nécessaire de régler les guidespapier.
Fermez le capot une
➍
fois le bord d’attaque du
rouleau d’étiquettes à
l’extérieur de l’imprimante.
56
Bord d’attaque
du rouleau
Molette
de réglage
Page 57

L’installation des étiquettes pour
3 Open the label guide
adjust dial cover and
turn the dial till the
label guide fits with
label roll.
Turn the label roll lightly by
3 Set the label to the
printer.
Pay attention to the direction
of the label roll.
4 Open the label guide
adjust dial cover and
turn the dial till the
label guide fits with
label roll.
3 Set the label to the
printer.
Pay attention to the direction
of the label roll.
4 Open the label guide
adjust dial cover and
turn the dial till the
label guide fits with
label roll.
Turn the label roll lightly by
the hand and confirm that it
rotates smoothly.
If a drags is felt, paper may
not be fed correctly. Return
the dial for adjustment.
l’impression en mode continu est terminée.
Mode distribution
Étiquettes Étiquettes sans
Appuyez sur le levier
➊
d’ouverture/fermeture
du capot dans le sens
indiqué par la flèche
et ouvrez le capot.
Si vous utilisez
l’imprimante en mode
Distribution, soulevez le
levier et coulissez l’unité de
distribution jusqu’à butée.
Retirer la première
➋
étiquette du rouleau
d’étiquettes.
Cette étape n’est pas
nécessaire si des
étiquettes sans interstices
sont utilisées.
interstices
57
Page 58

Placez le rouleau
4
Before Starting
4
Before Starting
4
➌
d’étiquettes dans
l’imprimante.
Portez une attention
particulière au sens
d’installation du rouleau.
Ouvrez le capot de
➍
la molette de réglage
des guides-papier
et tournez la molette
jusqu’à ce que
les guides-papier
conviennent au rouleau
d’étiquettes.
Tournez légèrement le rouleau
d’étiquettes à la main pour confirmer
sa facilité de rotation.
Si l’on ressent de la résistance,
les étiquettes peuvent ne pas être
alimentées correctement. Utilisez la
molette pour régler les guides-papier.
58
Molette de
réglage des
guides-
Page 59

Lorsque vous utilisez un rouleau de papier de la même largeur que
5. Turning Printer On
After the procedure mentioned before has been finished, try
to turn the printer power on and off.
1 Press and hold the
5. Turning Printer On
After the procedure mentioned before has been finished, try
to turn the printer power on and off.
1 Press and hold the
POWER key. When the
STATUS LED lights
green, release the key.
2 Press and hold the
POWER key again.
When he STATUS LED
goes off, release the
key..
le rouleau utilisé antérieurement, il n’est alors pas nécessaire de
régler les guides-papier.
Fermez le capot une fois le
➎
bord d’attaque du rouleau
d’étiquettes à l’extérieur
de l’imprimante (plus de
10 mm).
Lorsque des étiquettes sans
interstices sont utilisées, appuyez
sur le bouton ALIMENTATION pour
faire sortir un bout d’étiquette de
l’imprimante et le tirer vers le haut
pour couper l’étiquette le long des
perforations.
Si l’étiquette se bloque,
effectuez à nouveau la procédure
d’installation des étiquettes.
Coulissez l’unité de
➏
distribution jusqu’à
butée.
L’installation des étiquettes pour l’impression en mode
distribution est terminée.
Bord d’attaque du rouleau
d’étiquettes
59
Page 60

• Sélectiondumode
5. Turning Printer On
After the procedure mentioned before has been finished, try
to turn the printer power on and off.
1 Press and hold the
POWER key. When the
STATUS LED lights
green, release the key.
2 Press and hold the
POWER key again.
When he STATUS LED
goes off, release the
key..
Turning Printer On
5
POWER
PRINT
FEED
Turning Printer On
5
POWER
PRINT
FEED
POWER
PRINT
FEED
continu depuis le mode distribution
En soulevant le levier, coulissez
l’unité de distribution jusqu’à butée.
Mise sous tension de
l’imprimante
Une fois la procédure mentionnée ci-haut terminée,
mettez l’imprimante sous tension et hors tension.
Maintenez enfoncé
➊
le bouton TENSION.
Lorsque le témoin
ÉTAT s’allume en vert,
relâchez le bouton.
Maintenez de nouveau
➋
enfoncé le bouton
TENSION. Lorsque le
témoin ÉTAT s’éteint,
relâchez le bouton.
60
Page 61

Test d’impression
7. Using RS-232C Interface
Use the following procedure to print by connecting to a PC
or a handy terminal through an RS-232C cable option.
1 Open the RS-232C
cover.
2 Plug one end of the
RS-232C cable into the
POWER
PRINT
FEED
1
2
7. Using RS-232C Interface
Use the following procedure to print by connecting to a PC
or a handy terminal through an RS-232C cable option.
1 Open the RS-232C
cover.
2 Plug one end of the
RS-232C cable into the
connector firmly.
Be sure that the arrow mark
on the connector of the RS-
232C cable matches with the
arrow mark by the side of the
printer connector.
3 Plug the other end of
the RS-232C cable to
the connector of the
RS-232C
cover
RS-232C cable
POWER
PRINT
FEED
1
2
1234567
abcdefg
1234567
abcdefg
1234567
abcdefg
En maintenant le
➊
bouton ALIMENTATION
enfoncé, appuyez sur
le bouton TENSION. Le
mode test d’impression
est activé sur
l’imprimante. Appuyez
de nouveau sur le
bouton ALIMENTATION
pour lancer le test d’impression.
Vérifiez ce qui suit
➋
en consultant le test
d’impression imprimé.
• Aucuncaractèren’est
incomplet.
• Laqualitéd’impression
est bonne.
Dans le test d’impression, la charge restante du
bloc-pile est indiqué par ( lorsque le bloc-pile est
chargé à fond).
Lorsque est indiqué, chargez le bloc-pile.
* En cas d’anomalie, communiquez avec le magasin où vous avez
acheté l’imprimante ou avec un centre de réparation.
61
Page 62

Utilisation de l’interface
7
RS-232C
Effectuez la procédure suivante pour raccorder
l’imprimante à un ordinateur ou à un terminal en utilisant
un câble RS-232C.
Ouvrez le capot du
➊
connecteur RS-232C.
Branchez une extrémité
➋
du câble RS-232C dans
le connecteur.
Assurez-vous que la flèche
indiquée sur le connecteur
du câble RS-232C est alignée
avec la flèche du connecteur
de l’imprimante.
Branchez l’autre
➌
extrémité du câble
RS-232C dans
le connecteur de
l’ordinateur ou du
terminal.
Pour plus de renseignements
sur le connecteur de
l’ordinateur ou du terminal,
veuillez consulter le guide
fourni avec l’ordinateur.
62
Capot du
connecteur RS-
232C
Page 63

Utilisation de l’interface IrDA
The distance available for IrDA
communication is a maximum of 15 to 20 cm.
* This distance may vary depending on the
environment of use or the party to
communicate with. Especially under direct
sun light or in the environment exposed to
strong illumination, communication may be
disabled. In such a case, block the strong
light not to enter the IrDA filter or make the
PC contact the IrDA filter.
9. Using Bluetooth Interface
or Wireless LAN Interface
Note that when printing with Bluetooth interface or wireless
LAN interface, the distance between the printer and the host
may differ depending on the environment of use and the
performance of the PC or handy terminal used.
30°
30°
Effectuez la procédure suivante pour imprimer en utilisant
l’interface IrDA.
Placez l’imprimante à une distance de 20 cm ou moins
➊
de l’ordinateur ou du terminal pour permettre les
communications avec l’imprimante par l’entremise de
l’interface IrDA.
Réglez la position de l’imprimante pour permettre à
➋
l’ordinateur ou au terminal d’être situé dans les 30˚
du centre du filtre IrDA (zone conique montrée cidessous).
63
Page 64

La portée de communication de
l’interface IrDA est de 15 cm à 20 cm maximum.
* Cette distance peut varier en fonction
de l’environnement d’utilisation
ou de l’appareil utilisé pour
communiquer avec l’imprimante. Plus
spécifiquement sous la lumière directe
du soleil ou dans un environnement
très éclairé, les communications
peuvent ne pas se faire. Dans un tel
cas, bloquez la source de lumière
intense pour l’empêcher d’accéder
au filtre IrDA ou faites en sorte que
l’ordinateur entre en contact avec le
filtre IrDA.
Utilisation de l’interface
Bluetooth ou de l’interface
réseau sans fil
Veuillez noter que pour l’impression avec l’interface
Bluetooth ou l’interface réseau sans fil, la distance entre
l’imprimante et l’ordinateur ou le terminal peut différer
64
Page 65

en fonction de l’environnement d’utilisation et de la
When next printing is not available
1 Press the PRINT key in
the online state to set
the printer off line state
(STATUS LED goes
off).
2 Press the FEED key to
feed label.
3 When the feeding
FEED key
PRINT key
123456
7
abcdefg
1234567
abcdefg
1234567
abcdefg
performance de l’ordinateur ou du terminal utilisé.
Impression
Autorisez la transmission de données depuis
➊
l’ordinateur.
Une fois l’impression
➋
terminée, pincez le coin
droit ou le coin gauche
de l’étiquette et retirezlà dans le sens de la
flèche.
* Le nombre de feuilles ou d’étiquettes pouvant être imprimées dans ce
mode varie en fonction du mode continu ou de distribution.
* Lorsque l’imprimante coupe une étiquette ailleurs qu’à ses
perforations et qu’aucune autre étiquette ne sera imprimée.
65
Page 66

Lorsque aucune autre étiquette ne sera imprimée
Printing
10
Printing
10
123456
7
abcdefg
1234567
abcdefg
1234567
abcdefg
Appuyez sur
➊
le bouton
IMPRESSION
lorsque
l’imprimante est en
ligne pour la placer
hors ligne (le témoin
ÉTAT s’éteint).
Appuyez sur
➋
Bouton
IMPRESSION
ALIMENTATION
Bouton
le bouton
ALIMENTATION
pour alimenter
l’étiquette.
Lorsque l’étiquette
➌
s’arrête, coupez
l’étiquette en tirant dans
le sens indiqué par la
flèche.
Appuyez sur le bouton
➍
IMPRESSION pour
remettre l’imprimante
en ligne (le témoin ÉTAT
s’allume en vert).
66
Page 67

Entretien quotidien
13. Reference
Options
User Option
Battery Pack (Supplied with the
printer)
Daily Maintenance
12
Effectuez la procédure suivante Use après avoir mis hors
tension l’imprimante et retiré le bloc-pile.
Nettoyage de la tête d’impression thermique
Appuyez sur le levier
➊
d’ouverture/fermeturedu
capot et ouvrez le capot.
Si vous utilisez l’imprimante
en mode Distribution, soulevez
le levier et coulissez l’unité de
distribution jusqu’à butée.
Essuyez la saleté en
➋
utilisant un chiffon
imbibé d’alcool.
* N’utilisez jamais de
solvant, de benzène ou de
kérosène.
67
Page 68

Nettoyage du plateau et du rouleau
13. Reference
Options
User Option
Battery Pack (Supplied with the
printer)
13. Reference
Options
User Option
Battery Pack (Supplied with the
printer)
Preparing a spare battery pack will
insure uninterrupted operation due to
Low Battery.
Battery Charger (Single-socket)
Charges the battery pack.
Platen
13. Reference
Options
User Option
Battery Pack (Supplied with the
printer)
Preparing a spare battery pack will
insure uninterrupted operation due to
Low Battery.
Battery Charger (Single-socket)
Charges the battery pack.
Battery Charger (Five-socket)
Charges the battery pack (up to five
packs).
Platen
Appuyez sur le levier
➊
d’ouverture/fermeturedu
capot et ouvrez le capot.
Si vous utilisez l’imprimante
en mode Distribution, soulevez
le levier et coulissez l’unité de
distribution jusqu’à butée.
Essuyez la saleté en
➋
utilisant un chiffon
imbibé d’alcool.
* N’utilisez jamais de
solvant, de benzène ou
de kérosène.
68
Plateau
Rouleau de distribution
Page 69

Modes d’utilisation
Reference
13
Continuous mode
Test Printing
Printing of printer status
Dispense mode
Continuous mode
Online printing
(Printing of data received
from PC or handy terminal) Dispense mode
Continuous mode Dispense mode Dispense mode
(Labels) (Non-separate labels)
1234567
abcdefg
1234567
abcdefg
1234567
abcdefg
1234567
abcdefg
1234567
abcdefg
Reference
13
Continuous mode
Dispense mode
Continuous mode
(Labels) (Non-separate labels)
1234567
abcdefg
1234567
abcdefg
Reference
13
1234567
abcdefg
L’imprimante peut être utilisée en deux modes : mode
continu et mode distribution. Quel que soit le mode
utilisé, le test d’impression et l’impression en ligne sont
disponibles.
Mode continu
Test d’impression
Impression de l’état de
l’imprimante
Mode distribution
Impression en ligne
(Impression des données reçues
d’un ordinateur ou terminal)
Mode continu Mode distribution
(étiquettes)
Mode distribution
Mode distribution
(étiquettes sans
Mode continu
* Vous pouvez sélectionner le mode distribution (étiquettes sans
interstices) en utilisant l’outil de configuration de l’imprimante.
interstices)
69
Page 70

Fonctionnement normal
Sous tension
TENSION
En ligne
Bouton
IMPRESSION
État du témoin ÉTAT en mode normal :
État de fonctionnement ÉTAT (DEL)
Au lancement de l’impression
normale
État en ligne Allumé (vert)
État hors ligne Éteint
* Le témoin de charge du bloc-pile est actif même lorsque l’imprimante
est hors ligne.
En ligne
Bouton
IMPRESSION
Bouton
Allumé (orange)
Mode économie d’énergie
1. Mode veille : Le témoin ÉTAT clignote (en vert) à toutes les 4
secondes. En état hors ligne, le témoin ÉTAT s’éteint. Le témoin
de charge de bloc-pile est actif même lorsque l’imprimant est en
état hors ligne. Lorsque l’imprimante n’est pas utilisée dans les
5 secondes, le mode veille est alors activé sur l’imprimante (état
attente). Lorsque vous appuyez sur le bouton IMPRESSION ou
le bouton ALIMENTATION pendant que l’imprimante reçoit des
données ou lorsque vous ouvrez ou fermez le capot, l’imprimante
70
Page 71

Mode test d’impression (bouton ALIMENTATION + mise
sous tension)
Sous tension
Bouton ALIMENTATION + TENSION
Lancement du test
d’impression.
Bouton ALIMENTATION
Test
d’impression
Bouton ALIMENTATION
État du témoin ÉTAT en mode test d’impression :
État de fonctionnement ÉTAT (DEL)
Au lancement du mode test
d’impression
Lancement du test d’impression Clignote (vert)
Au cours du test d’impression Allumé (vert)
Arrêt de l’impression Éteint
Bouton
ALIMENTATION
Allumé (orange)
71
Page 72

Mode distribution
Sélection du mode distribution
Type Fonction Défaut
Impression
automatique
Impression
manuelle
Imprime une étiquette après avoir reçu
les données et attend d’être retirée. Une
fois l’étiquette décollée et retirée, imprime
automatique l’étiquette suivante.
Imprime une étiquette après avoir reçu les
données et passe en mode hors ligne. Appuyez
sur le bouton IMPRESSION pour imprimer
l’étiquette suivante. Une fois l’impression
d’un nombre spécifié d’étiquettes terminée,
l’impression s’arrête. Aucune étiquette ne sera
ensuite imprimée si l’on appuie sur le bouton
IMPRESSION.
Impression
manuelle
Modification du type de mode distribution
Il est possible de modifier le réglage de mode distribution à la mise sous
tension de l’imprimante en utilisant le commutateur DIP. Ce réglage est
validé une fois l’imprimante mise hors tension.
Sélection du mode distribution automatique
➊
DSW-1, 2, 3, 4 = (OFF, OFF, OFF, ON) + capot ouvert + bouton
IMPRESSION + TENSION
Sélection du mode distribution manuelle
➋
DSW-1, 2, 3, 4 = (OFF, OFF, OFF, ON) + capot ouvert + bouton
ALIMENTATION + TENSION
Réglage du type de mode distribution en cours
(témoin ÉTAT clignotant en vert.)
Réglage terminé (témoin ÉTAT allumé
Note : Une fois le type de mode distribution sélectionné, confirmez que le témoin ÉTAT
est allumé en vert et mettez l’imprimante hors tension.
en vert.)
72
Page 73

Mode configuration pour la vérification de la tête d’impression
Le mode configuration pour la vérification de la tête d’impression
comporte deux types de vérification : zone d’impression normale et zone
d’impression de codes à barres.
Cette fonction peut être activée ou désactivée en fonction des cavaliers
du commutateur DIP, de l’utilisation de boutons et du capot ouvert ou
fermé au moment de la mise sous tension de l’imprimante.
Réglage des cavaliers du commutateur DIP
DSW-1 DSW-2 DSW-3 DSW-4
(A) OFF ON OFF ON
(B) ON OFF OFF ON
Réglage du
commutateur DIP
(A) Bouton IMPRESSION +
(B) Bouton IMPRESSION +
RéglageducommutateurDIP(A/B)+capotouvert+(bouton
Réglage en cours de la fonction de vérification de la tête d’impression.
État du bouton
et du capot
capot ouvert
Bouton ALIMENTATION
+ capot ouvert
capot ouvert
Bouton ALIMENTATION
+ capot ouvert
IMPRESSION/ALIMENTATION)+TENSION)
(Témoin ÉTAT clignotant en vert.)
Réglage terminé. (Témoin ÉTAT
allumé en vert.)
Fonction
Active la vérification de la
zone d’impression normale.
Désactive la vérification de la
zone d’impression normale.
Active la vérification de la
zone d’impression de codes
à barres seulement.
Désactive la fonction
de vé ri fication de la tête
d’impression.
73
Page 74

Note : Pour connaître le réglage courant, consultez le test d’impression. Une fois le
réglage du mode vérification de la tête d’impression terminé, confirmez que le
témoin ÉTAT est allumé en vert et mettez l’imprimante hors tension.
Mode de configuration pour les commandes en ligne
Type de commandes en ligne
Type Fonction Défaut
Commandes
compatibles avec
l’imprimante Petit lapin
Commandes SBPL Utilise les commandes SBPL
Utilise les commandes
normales de l’imprimante Petit
Lapin pour les commandes
en ligne.
pour les commandes en ligne.
Commandes
SBPL
Modification du type de commandes en ligne
Il est possible de modifier le type de commandes en ligne à la mise sous
tension de l’imprimante en utilisant le commutateur DIP. Cette sélection
est validée après avoir mis l’imprimante hors tension.
Commandes compatibles avec l’imprimante Petit lapin.
➊
DSW-1, 2, 3, 4 = (ON, ON, ON, ON) + capot ouvert + bouton
IMPRESSION + TENSION
Commandes SBPL
➋
DSW-1, 2, 3, 4 = (ON, ON, ON, ON) + capot ouvert + bouton
ALIMENTATION + TENSION
Réglage en cours
(témoin ÉTAT clignotant en vert.)
Réglage terminé.
(témoin ÉTAT allumé en vert.)
74
Page 75
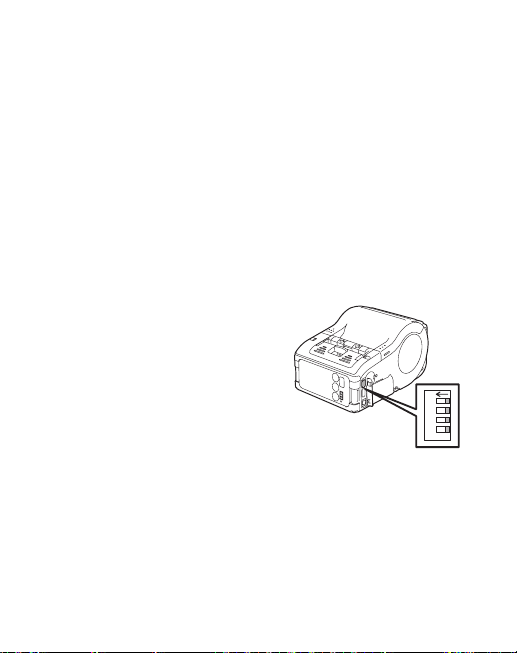
Reference
13
2 3 4
4
D
1
Réglage des cavaliers du commutateur DIP (suite)
Note : Pour connaître le réglage courant, consultez le test d’impression.
Une fois le type de commandes sélectionné, confirmez que
le témoin ÉTAT est allumé en vert et mettez l’imprimante hors
tension.
Commutateur DIP
Réglage des cavaliers du commutateur DIP
Mettez l’imprimante hors tension.
➊
Ouvrez le capot du commutateur DIP.
➋
Modifiez la position
➌
du cavalier en utilisant
un outil pointu comme
la pointe d’un stylo à
bille.
75
Page 76

Introducción
Este manual lo ayudará a familiarizarse en poco tiempo
con el funcionamiento básico de la unidad Petit lapin, la
impresora de código de barras.
Favor leer este manual con atención para que pueda
disfrutar de todas las funciones de Petit lapin.
Notas
1. La reproducción completa o en parte de este manual
está expresamente prohibida si no cuenta con la
autorización del dueño del copyright.
2. La información contenida en este manual está sujeta a
cambios sin previo aviso.
3. Si encuentra información ambigua o equivocada en el
manual, favor comunicarse con el distribuidor o centro
de servicio más cercano.
Advertencia
Este es un producto Clase B basado en la norma del
Consejo de Control Voluntario de Interferencias (VCCI, por
sus siglas en inglés, Voluntary Control Council for the Interference
by Information Technology Equipment). Si utiliza este equipo en
una residencia puede que interfiera con la recepción
del radio. Si esto ocurre, el usuario deberá corregir la
situación.
¡Cuidado! La impresora se puede averiar si está expuesta
al agua. Cuando la utilice a la intemperie o en cualquier
lugar donde quede expuesta al agua, siempre colóquela
dentro del estuche a prueba de agua opcional (OKI #
70061202) para protegerla contra daños.
Segundos Edición, Marzo 2010
© 2010 Oki Data Americas, Inc.
76
Page 77

Para los clientes que cuentan con el modelo Bluetooth
o de Comunicación Inalámbrica
Notas sobre las ondas de radio
La adaptabilidad de este producto ha sido aprobada
de acuerdo al estándar tecnológico de la ley sobre la
recepción radial. Por tanto, no hace falta una licencia de
estación de radio para utilizar este producto. El uso de este
producto está limitado al Japón.
Los siguientes actos pueden acarrear penalización
judicial.
•Desmontar/modicaresteproducto
•Desprenderlaetiquetadelcerticado(sellodelnúmero
de serie) de este producto
El uso de este producto cerca de los siguientes lugares
puede reducir la distancia de comunicación o impedir las
comunicaciones.
Cerca de un horno microondas, un lugar donde se produce
electricidad estática o donde no es posible la recepción
radial, o cerca de un equipo LAN inalámbrico.
“Bluetooth” es una marca comercial de
Bluetooth SIG, Inc., USA. Utilizamos
esta marca bajo una licencia otorgada
por dicha compañía.
AntesdeutilizarlainterfazLANinalámbrica,asegúresede
que configuró todos los parámetros relacionados con la
seguridad de un equipo LAN inalámbrico, de acuerdo con el
manual que viene con el equipo.
77
Page 78

Contenido
Desembalaje ......................................78
Nombre de las piezas ...............................79
Nombre y función de los controles .................81
Antes de comenzar .................................82
Cargar la batería ................................ 82
Instalación y remoción de la batería ................85
Uso del adaptador CA............................87
Colocación de las etiquetas .......................88
Modo continuo ..............................88
Modo dispensador ...........................90
Cómo encender la impresora .........................93
Impresión de prueba ................................94
Cómo utilizar la Interfaz RS-232C .....................95
Cómo utilizar la Interfaz IrDA .........................96
Cómo utilizar la Interfaz Bluetooth
o la Interfaz LAN inalámbrica ...................... 97
Impresión.........................................98
Mantenimiento Diario ..............................100
Modo de funcionamiento ........................ 102
78
Page 79

Desembalaje
Despuésdedesembalarelequipo,asegúresedeque
cuenta con todos los componentes de la impresora. Si
faltaalgúncomponenteopieza,comuníqueseconsu
distribuidor o centro de servicio más cercano.
Impresora
Batería
Gancho
para
correa
* La correa del hombro ya viene instalada en la impresora
El tipo de material de acojinamiento (almohadilla de protección, etc.
para acojinar la impresora) puede ser diferente de acuerdo al lote
Correa para
colgar del
hombro
79
Page 80

Nombre de las piezas
Parts Name
3
Salida de etiquetas
Tapa
Palancaparaabrir/
cerrar la tapa
Unidad dispensadora
Tapa del jack de entrada de CC
Clip de correa
80
Cortador fácil
Tapa de la batería
Tapa del
RS-232C
Tapa del dial de
ajuste de la guía
de etiquetas
Page 81

Name and Function of Controls
RS-232C Interface: Connects to
PC or handy terminal.
RS-232C cover: Cover for RS-
232C connector.
Open cover: Opened for setting
labels.
Cover Open/Close lever: Used to
open or close the cover.
Easy cutter: Cuts printed labels.
IrDA filter: Contains IrDA sensor
and emitter.
DIP switch: Sets the operation
mode of the printer. (See page
53.)
Dispenser unit: Moved to select
Dispense mode.
POWER key: Turns on/off the
printer.
Battery cover: Cover for special
battery pack.
Battery indicator (LED): Indicates
the remaining amount of
2 3 4
4
D
1
304050
58
304050
Rodillo
Escala del ancho
de la etiqueta
*1
LCD
Botón de
ENCENDIDO
Botón de
IMPRESIÓN
Botón de
ALIMENTACIÓN
Indicador de batería
*1
El Panel de funcionamiento con LCD está integrado solamente en el
modelo con la interfaz LAN inalámbrica (opción de fabricación).
*2
El Panel de funcionamiento con LCD del modelo con la interfaz
LAN inalámbrica cuenta con un INDICADOR DE CARGA (opción de
fabricación).
(LED)
*2
Filtro IrDA
Indicador de
ESTADO (LED)
Jack de entrada CC
Guía de
etiquetas
Dial de ajuste de la
guía de etiquetas
Conector
RS-232C
81
Page 82

Nombre y función de los controles
Botón de ALIMENTACIÓN: Pulsar
para hacer avanzar la etiqueta.
Botón de ENCENDIDO:Encender/
apagar la impresora.
Botón de IMPRESIÓN: Coloca la
impresora en línea o fuera de línea.
Clip de correa: Para colgar la
impresora de su cinturón.
* Sólo cuelgue la impresora de su
cinturón.
Conmutador DIP: Para seleccionar
el modo de funcionamiento de la
impresora. (Ver página 37).
Cortador fácil: Para cortar las
etiquetas impresas.
Dial de ajuste de la guía de
etiquetas: Ajusta la guía de
etiquetas de acuerdo al ancho de
las etiquetas utilizadas.
Escala del ancho de la etiqueta:
Para indicar el ancho de la etiqueta
utilizada.
Filtro IrDA: Contiene el sensor y
emisor IrDA.
Guía de etiquetas: Ajustar de
acuerdo al tamaño de las etiquetas
utilizadas
Indicador de batería (LED): Indica
el nivel de carga de la batería de la
impresora.
82
Indicador de ESTADO (LED):
Sirve para indicar el estado de
la impresora. (Ver las páginas 29
a 36).
Interfaz RS-232C: Para conectar a
la PC o un terminal disponible.
Jack de entrada CC: Para
conectar el adaptador de CC.
Palanca para abrir/cerrar la tapa:
Para abrir o cerrar la tapa.
Salida de etiquetas: Lugar por
donde se expulsan las etiquetas
impresas.
Tapa abierta: Se abre para colocar
las etiquetas.
Tapa de la batería: Tapa de la
batería especial.
Tapa del dial de ajuste de la guía
de etiquetas: Tapa del dial de
ajuste de la guía de etiquetas.
Tapa del jack de entrada de CC:
Tapa del terminal de entrada CC y
del conmutador DIP.
Tapa del RS-232C: Tapa del
conector RS-232C.
Unidad dispensadora: Se
desliza para seleccionar el modo
dispensador.
Page 83

Antes de comenzar
Notice
• If the POWER lamp does not light at the start of charging, check the
power cord connection.
• If the CHARGE lamp does not light at the start of charging, make sure the
battery pack is firmly mounted to the battery charger. Poor mounting of
the battery pack may result in poor charging.
• When the fully charged battery pack is placed on the battery charger, the
CHARGE lamp goes on and then off.
In case of five-socket charger, the CHARGE lamp lights green.
• When charging a battery pack that has not been used for a long time, the
CHARGE lamp may blink for a while. This does not indicate an error. You
can continue charging.
• The battery pack can be recharged by about 300 times (when used in
normal temperature). If the battery is fully charged but runs out very soon,
3 After charging, remove
the battery pack from
the charger.
Slide the battery pack in the
opposite direction of step (2)
to remove the battery back.
the CHARGE lamp lights
green.
Notice
• If the POWER lamp does not light at the start of charging, check the
power cord connection.
• If the CHARGE lamp does not light at the start of charging, make sure the
battery pack is firmly mounted to the battery charger. Poor mounting of
the battery pack may result in poor charging.
• When the fully charged battery pack is placed on the battery charger, the
CHARGE lamp goes on and then off.
In case of five-socket charger, the CHARGE lamp lights green.
• When charging a battery pack that has not been used for a long time, the
CHARGE lamp may blink for a while. This does not indicate an error. You
can continue charging.
• The battery pack can be recharged by about 300 times (when used in
normal temperature). If the battery is fully charged but runs out very soon,
renew the battery pack.
Charging Time
It takes about 2.5 hours for the battery pack to reach full charge
from a fully discharged state.
3 After charging, remove
the battery pack from
the charger.
Slide the battery pack in the
opposite direction of step (2)
to remove the battery back.
the CHARGE lamp lights
green.
CHARGE
POWER
Notice
• If the POWER lamp does not light at the start of charging, check the
power cord connection.
• If the CHARGE lamp does not light at the start of charging, make sure the
battery pack is firmly mounted to the battery charger. Poor mounting of
the battery pack may result in poor charging.
• When the fully charged battery pack is placed on the battery charger, the
3 After charging, remove
the battery pack from
the charger.
Slide the battery pack in the
opposite direction of step (2)
to remove the battery back.
the CHARGE lamp lights
green.
Cargar la batería
• Uso del cargador de batería (opcional) para cargar la
batería
Siga las instrucciones siguientes para cargar la batería
utilizando el cargador de batería.
Enchufe un extremo del
➊
cable de alimentación al
cargador de batería y el otro
al tomacorriente. (El indicador
de ENCENDIDO se ilumina en
color rojo.)
Coloque la batería en el
➋
cargador y luego deslícela en
dirección de la flecha.
La batería se empieza a cargar
cuando el indicador de CARGA se
ilumina en color naranja. Cuando
se termina de cargar la batería
(totalmente cargada), el indicador
de CARGA se apaga. En caso de
un cargador de cinco clavijas, la
batería se empieza a cargar cuando
el indicador de CARGA se ilumina en
color naranja. Cuando se termina de
cargar la batería (totalmente cargada),
el indicador de CARGA se ilumina en
color verde.
83
Page 84

Después de cargarla, saque la batería del cargador.
➌
Deslice la batería en sentido contrario del paso (2) para sacarla del
cargador de batería.
Aviso
• SielindicadordeENCENDIDOnoseiluminacuandoempiezaa
cargar la batería, verifique que esté correctamente conectado el
cable de alimentación.
• SielindicadordeCARGAnoseiluminacuandoempiezaacargarla
batería,asegúresedequelabateríaestácorrectamentecolocadaen
el cargador de batería. Si la batería está incorrectamente colocada
en el cargador la batería no se carga adecuadamente.
• Sicolocaunabateríaqueestátotalmentecargadaenelcargador,el
indicador de CARGA se enciende y luego se apaga.
En caso de un cargador de cinco clavijas, el indicador de de CARGA
se ilumina en color verde.
• Cuandocargaunabateríaquenohasidorecargadaenmucho
tiempo, el indicador de CARGA puede que centellee un rato. Eso no
quiere decir que existe un problema. Déjela cargarse.
• Labateríapuedeserrecargadaalrededorde300veces(silautiliza
en un entorno con temperatura normal). Si la batería está totalmente
cargada pero se descarga rápidamente, debe reemplazar la batería.
Tiempo de carga
La batería se demora unas 2,5 horas para recargarse cuando está
totalmente descargada.
84
Page 85

• Uso del adaptador de CA (opcional) para cargar la
Installing and removing the Battery Pack
1 Open the battery cover.
2 Insert the battery pack
while pressing and
holding the gray hook
and close the battery
cover.
Insert the battery pack with
the terminal side toward the
printer.
batería
Puede cargar la batería mientras está montada en la
impresora.
Abra la tapa del jack
➊
de entrada CC y
enchufe el terminal de
salida CC
Enchufe el adaptador
➋
Adaptador CA
de CA en el
tomacorriente
La batería se comienza a
cargar cuando el indicador
de batería se ilumina en
rojo. Cuando se termina de
cargar la batería (totalmente
cargada), el indicador de
batería se apaga.
En el caso del modelo con
interfaz LAN inalámbrico con LCD incorporado, el indicador de
CARGA se ilumina en rojo cuando se empieza cagar la batería y
cuando está totalmente cargada, el indicador de CARGA se apaga.
Jack de
entrada CC
Terminal de salida CC
Tiempo de carga
La batería se demora unas 5 horas para recargarse cuando está
totalmente descargada.
85
Page 86

Instalación y remoción de la batería
4
Before Starting
4
Before Starting
4
Abra la tapa de la batería.
➊
Instale la batería
➋
mientras presiona y
sostiene el gancho gris y
luego cierre la tapa de la
batería.
Coloque la batería
introduciendo el extremo con
los terminales primero en
dirección de la impresora.
Para sacar la batería,
➌
mantenga presionado
el gancho gris y hale la
cinta.
86
Terminales
Gancho
Page 87

* Asegúrese de apagar la impresora
cuando vaya a instalar o sacar la
batería.
Cuando la impresora está apagada,
el indicador de ESTADO se apaga. No
saque la batería cuando el indicador
de ESTADO está encendido. Saque la
batería cuando el indicador de ESTADO
está apagado. (Ver página 20).
* Si desconecta la impresora de otra
manera, la información guardada en la
impresora puede que no se actualice.
87
Page 88

Uso del adaptador CA
Before Starting
4
Siga el procedimiento siguiente para utilizar la impresora
con el adaptador CA (opcional).
Abra la tapa del jack de
➊
entrada CC y enchufe el
terminal de salida CC.
Adaptador CA
Enchufe el adaptador de
➋
CA en el tomacorriente.
* Asegúrese de apagar la
impresora cuando vaya
a retirar el terminal de
salida CC o cuando vaya
a desconectar el cable de alimentación.
* Si desconecta la impresora de otra manera, la
información guardada en la impresora puede que no
se actualice.
* No hace falta tener instalada la batería cuando utiliza
el adaptador CA. Si utiliza la batería y el adaptador de
CA al mismo tiempo, la impresora empieza a cargar
la batería (si la misma no está totalmente cargada)
o el Indicador de batería se apaga (si la misma está
totalmente cargada).
Jack de entrada CC
Terminal de salida CC
88
Page 89

Colocación de las etiquetas
3 Open the label guide
adjust dial cover and
turn the dial till the
label guide fits with
label roll.
Turn the label roll lightly by
3 Open the label guide
adjust dial cover and
turn the dial till the
label guide fits with
label roll.
Turn the label roll lightly by
the hand and confirm that it
rotates smoothly.
If a drags is felt, paper may
not be fed correctly. Return
the dial for adjustment.
When using the paper of the
same width as that used
previously, adjustment of the
label guide is not necessary.
Journal
3 Open the label guide
adjust dial cover and
turn the dial till the
label guide fits with
label roll.
Turn the label roll lightly by
the hand and confirm that it
rotates smoothly.
If a drags is felt, paper may
not be fed correctly. Return
the dial for adjustment.
When using the paper of the
same width as that used
previously, adjustment of the
label guide is not necessary.
4 Close the cover after
confirming that the
leading edge of the
label is outside the
printer.
This completes the label setting in continuous mode.
Label leading edge
Journal
El método para colocar las etiquetas depende del modo
de impresión seleccionado.
Modo continuo
(Ver figura en la página 29).
Deslice la palanca de
➊
abrir/cerrarlatapaen
dirección de la flecha
para abrir la tapa.
Si está utilizando la
impresora en modo
dispensador, al levantar la
palanca de cambio deslice
la unidad dispensadora
hasta que se detenga (ver página 19).
Coloque las etiquetas en
➋
la impresora.
Preste atención a la
dirección del rollo de
etiquetas.
Etiquetas Diario
89
Page 90
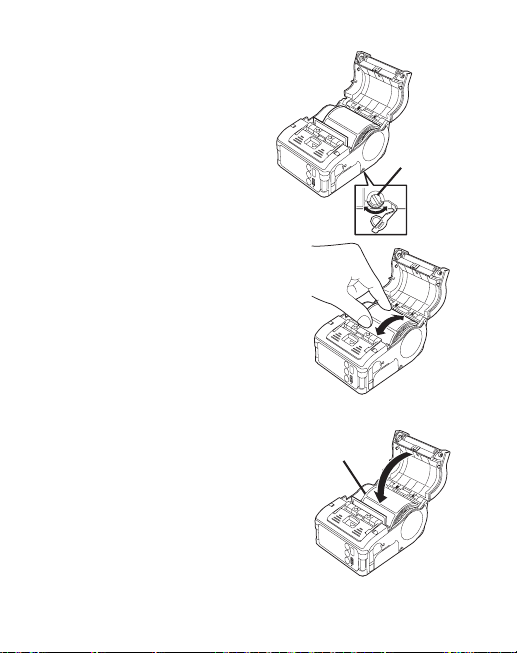
Abra la tapa del dial
Before Starting
4
Before Starting
4
Before Starting
4
➌
de ajuste de la guía
de etiquetas y gire el
dial hasta que la guía
de etiquetas se ajuste
al tamaño del rollo de
etiquetas.
Gire el rollo de etiquetas
ligeramente con la mano para
verificar que el mismo gira con
facilidad.
Si hay resistencia quiere decir que el
papel no se alimentó correctamente.
Gire el dial en dirección opuesta para
ajustarlo.
Cuando utiliza papel del mismo ancho
que utilizó anteriormente, no hace falta
ajustar otra vez la guía de etiquetas.
Cierre la tapa después de
➍
verificar que el punto de
inserción de la etiqueta
está por fuera de la
impresora.
90
Punto de inserción
de la etiqueta
Dial de
ajuste de
la guía de
etiquetas
Page 91

Esta es toda la configuración necesaria para imprimir en
3 Open the label guide
adjust dial cover and
turn the dial till the
label guide fits with
label roll.
Turn the label roll lightly by
3 Set the label to the
printer.
Pay attention to the direction
of the label roll.
4 Open the label guide
adjust dial cover and
turn the dial till the
label guide fits with
label roll.
3 Set the label to the
printer.
Pay attention to the direction
of the label roll.
4 Open the label guide
adjust dial cover and
turn the dial till the
label guide fits with
label roll.
Turn the label roll lightly by
the hand and confirm that it
rotates smoothly.
If a drags is felt, paper may
not be fed correctly. Return
the dial for adjustment.
modo continuo.
Modo dispensador
(Ver la figura en página 29).
Etiquetas Etiquetas
Deslice la palanca de
➊
abrir/cerrarlatapaen
dirección de la flecha
para abrir la tapa.
Si está utilizando la
impresora en modo
dispensador, al levantar la
palanca de cambio, deslice
la unidad dispensadora hasta que se detenga.
Retire la primera
➋
etiqueta del rollo.
Este paso no es necesario
cuando utiliza etiquetas
perforadas.
perforadas
91
Page 92

Coloque las etiquetas en
4
Before Starting
4
Before Starting
4
➌
la impresora.
Preste atención a la dirección del
rollo de etiquetas.
Abra la tapa del dial
➍
de ajuste de la guía
de etiquetas y gire el
dial hasta que la guía
de etiquetas se ajuste
al tamaño del rollo de
etiquetas.
Gire el rollo de etiquetas ligeramente
con la mano para verificar que el
mismo gira con facilidad.
Si hay resistencia quiere decir que el
papel no se alimentó correctamente.
Gire el dial en dirección opuesta para
ajustarlo.
Cuando utiliza papel del mismo
ancho que utilizó anteriormente, no
hace falta ajustar otra vez la guía de
etiquetas.
92
Dial de ajuste
de la guía de
etiquetas
Page 93

Cierre la tapa después de
5. Turning Printer On
After the procedure mentioned before has been finished, try
to turn the printer power on and off.
1 Press and hold the
5. Turning Printer On
After the procedure mentioned before has been finished, try
to turn the printer power on and off.
1 Press and hold the
POWER key. When the
STATUS LED lights
green, release the key.
2 Press and hold the
POWER key again.
When he STATUS LED
goes off, release the
key..
5. Turning Printer On
After the procedure mentioned before has been finished, try
to turn the printer power on and off.
1 Press and hold the
POWER key. When the
STATUS LED lights
green, release the key.
2 Press and hold the
POWER key again.
When he STATUS LED
goes off, release the
key..
➎
verificar que el punto de
inserción de la etiqueta
está por fuera de la
impresora (más de 10 mm).
Cuando utiliza etiquetas con
perforación, pulse el botón de
ALIMENTACIÓN para alimentar
una etiqueta y hale la etiqueta hacia arriba para cortarla por la línea
perforada.
Si la etiqueta está atascada, siga nuevamente las instrucciones
para colocar el rollo de etiquetas.
Gire el dispensador
➏
hasta que se detenga.
Esta es toda la configuración necesaria para imprimir en
modo dispensador.
• Cómo cambiar del modo dispensador al modo
continuo
Al levantar la palanca de cambio,
deslice la unidad dispensadora
hasta que se detenga.
Punto de inserción de la
etiqueta
93
Page 94
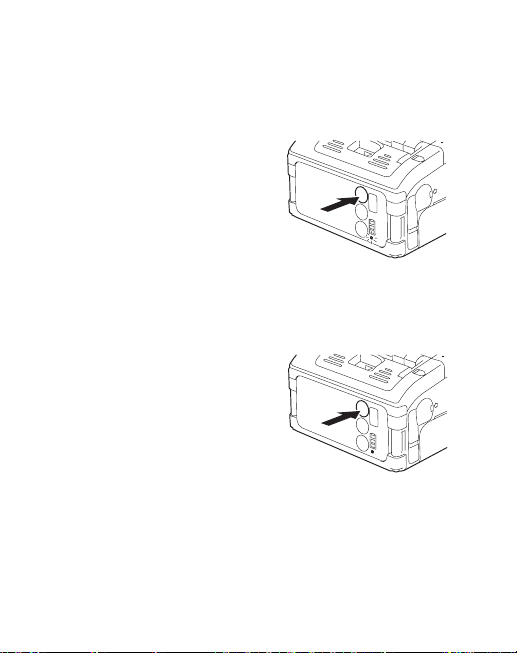
Cómo encender la impresora
Turning Printer On
5
POWER
PRINT
FEED
Turning Printer On
5
POWER
PRINT
FEED
POWER
PRINT
FEED
Después de seguir el procedimiento anterior, intente
encender y apagar la impresora.
Mantenga presionado
➊
el botón de
ENCENDIDO. Cuando
el indicador de
ESTADO se enciende
en color verde, suelte
el botón.
Vuelva a presionar
➋
y mantenga
presionado el botón
de ENCENDIDO.
Cuando el indicador
de ESTADO se apaga,
suelte el botón.
94
Page 95

Impresión de prueba
7. Using RS-232C Interface
Use the following procedure to print by connecting to a PC
or a handy terminal through an RS-232C cable option.
1 Open the RS-232C
cover.
2 Plug one end of the
RS-232C cable into the
POWER
PRINT
FEED
1
2
7. Using RS-232C Interface
Use the following procedure to print by connecting to a PC
or a handy terminal through an RS-232C cable option.
1 Open the RS-232C
cover.
2 Plug one end of the
RS-232C cable into the
connector firmly.
Be sure that the arrow mark
on the connector of the RS-
232C cable matches with the
arrow mark by the side of the
printer connector.
3 Plug the other end of
the RS-232C cable to
the connector of the
RS-232C
cover
RS-232C cable
POWER
PRINT
FEED
1
2
1234567
abcdefg
1234567
abcdefg
1234567
abcdefg
Mantenga presionado el
➊
botón de ALIMENTACIÓN y
al mismo tiempo presione
el botón de ENCENDIDO.
La impresora entra en
modo de prueba. Vuelva
a presionar el botón de
ALIMENTACIÓN para hacer
una impresión de prueba.
Examine el impreso para
➋
verificar lo siguiente.
• Loscaracteresestán
completamente impresos.
• Lacalidaddeimpresiónes
buena.
En la prueba de impresión,
el nivel de la batería se muestra de esta manera
( en caso de una carga completa).
Cuando la batería se muestra de esta manera ,
cargue la batería.
* Si detecta alguna falla, comuníquese con la tienda donde compró la
impresora, un distribuidor o centro de servicio.
95
Page 96

Cómo utilizar la Interfaz RS-232C
7
Utilice el siguiente procedimiento para imprimir al
conectar la unidad a una PC o a un terminal disponible
por medio del cable RS-232C (opcional).
Abra la tapa del
➊
RS-232C.
Enchufe
➋
firmemente un
extremo del cable
RS-232C en el
conector.
Asegúresedequela
flecha del conector
del cable RS-232C
concuerda con la flecha
del lado del conector de
la impresora.
Enchufe el otro extremo del cable RS-232C al
➌
conector de la PC o del terminal disponible
Para mayor información sobre el conector de la PC o el
terminal disponible, vea los manuales del PC o del terminal
correspondientes.
96
Tapa del RS-232C:
Cable RS-232C
Page 97

Cómo utilizar la Interfaz IrDA
The distance available for IrDA
communication is a maximum of 15 to 20 cm.
* This distance may vary depending on the
environment of use or the party to
communicate with. Especially under direct
sun light or in the environment exposed to
strong illumination, communication may be
disabled. In such a case, block the strong
light not to enter the IrDA filter or make the
PC contact the IrDA filter.
9. Using Bluetooth Interface
or Wireless LAN Interface
Note that when printing with Bluetooth interface or wireless
LAN interface, the distance between the printer and the host
may differ depending on the environment of use and the
performance of the PC or handy terminal used.
30°
30°
Siga el procedimiento siguiente para imprimir a través de
la interfaz IrDA.
Coloque la impresora a una distancia no mayor
➊
de 20 cm de la PC o del terminal disponible para
comunicarse a través de la interfaz IrDA.
Ajuste la posición de la impresora de manera que la
➋
PC o el terminal disponible esté a un ángulo de 30˚
con respecto al centro del filtro IrDA (zona en forma
de cono que se muestra abajo).
97
Page 98

La distancia máxima para la comunicación con la
interfaz IrDA es de 15 a 20 cm.
* Esta distancia puede variar dependiendo del
entorno donde utiliza el equipo o la unidad con la
que debe comunicarse. La comunicación puede
fallar si el equipo se encuentra bajo la luz directa
del sol o en un ambiente demasiado iluminado.
En ese caso, evite que la luz fuerte ilumine el filtro
IrDA o facilite el contacto entre la PC y el filtro
IrDA.
Cómo utilizar la Interfaz Bluetooth
o la Interfaz LAN inalámbrica
Favor tomar nota de que cuando imprime con la interfaz
Bluetooth o la interfaz LAN inalámbrica, la distancia entre
la impresora y el host puede variar dependiendo del
entorno que utiliza y el rendimiento de la PC o el terminal
disponible que utilice.
98
Page 99

Impresión
When next printing is not available
1 Press the PRINT key in
the online state to set
the printer off line state
(STATUS LED goes
off).
2 Press the FEED key to
feed label.
3 When the feeding
FEED key
PRINT key
123456
7
abcdefg
1234567
abcdefg
1234567
abcdefg
Permita la transmisión desde la PC.
➊
Cuando termine de
➋
imprimir, sujete el borde
derecho o izquierdo de
la etiqueta y hálelo en
dirección de la flecha.
* Elnúmerodehojasquepuedeimprimirenestemodovaríade
acuerdo al modo que utiliza, continuo o dispensador.
* Cuando corta la etiqueta perforada en un lugar distinto a la línea
de perforación y no está disponible la siguiente impresión, siga el
procedimiento de la página 26.
99
Page 100

Cuando no está disponible la siguiente impresión
Printing
10
Printing
10
123456
7
abcdefg
1234567
abcdefg
1234567
abcdefg
Presione el botón de
➊
IMPRESIÓN cuando
está en modo en
línea para colocar la
impresora en modo
fuero de línea (el
indicador de ESTADO se
apaga).
Presione el botón de
➋
Botón de
IMPRESIÓN
Botón de
ALIMENTACIÓN
ALIMENTACIÓN para hacer avanzar la etiqueta.
Cuando la etiqueta
➌
termina de avanzar,
corte la etiqueta
halándola hacia arriba
en dirección de la
flecha.
Presione la tecla de
➍
IMPRESIÓN para volver a colocar la impresora en
línea (el indicador de ESTADO se enciende en verde).
100
 Loading...