

Page 1

LE810DT
Setup Guide
Guide d’installation
Guía de Instalación
Manual de Instalação
Page 2

LE810DT
Setup Guide
Guide d’installation
Guía de Instalación
Manual de Instalação
3
8
13
18
© 2010 OKI Data Americas, Inc.
Page 3

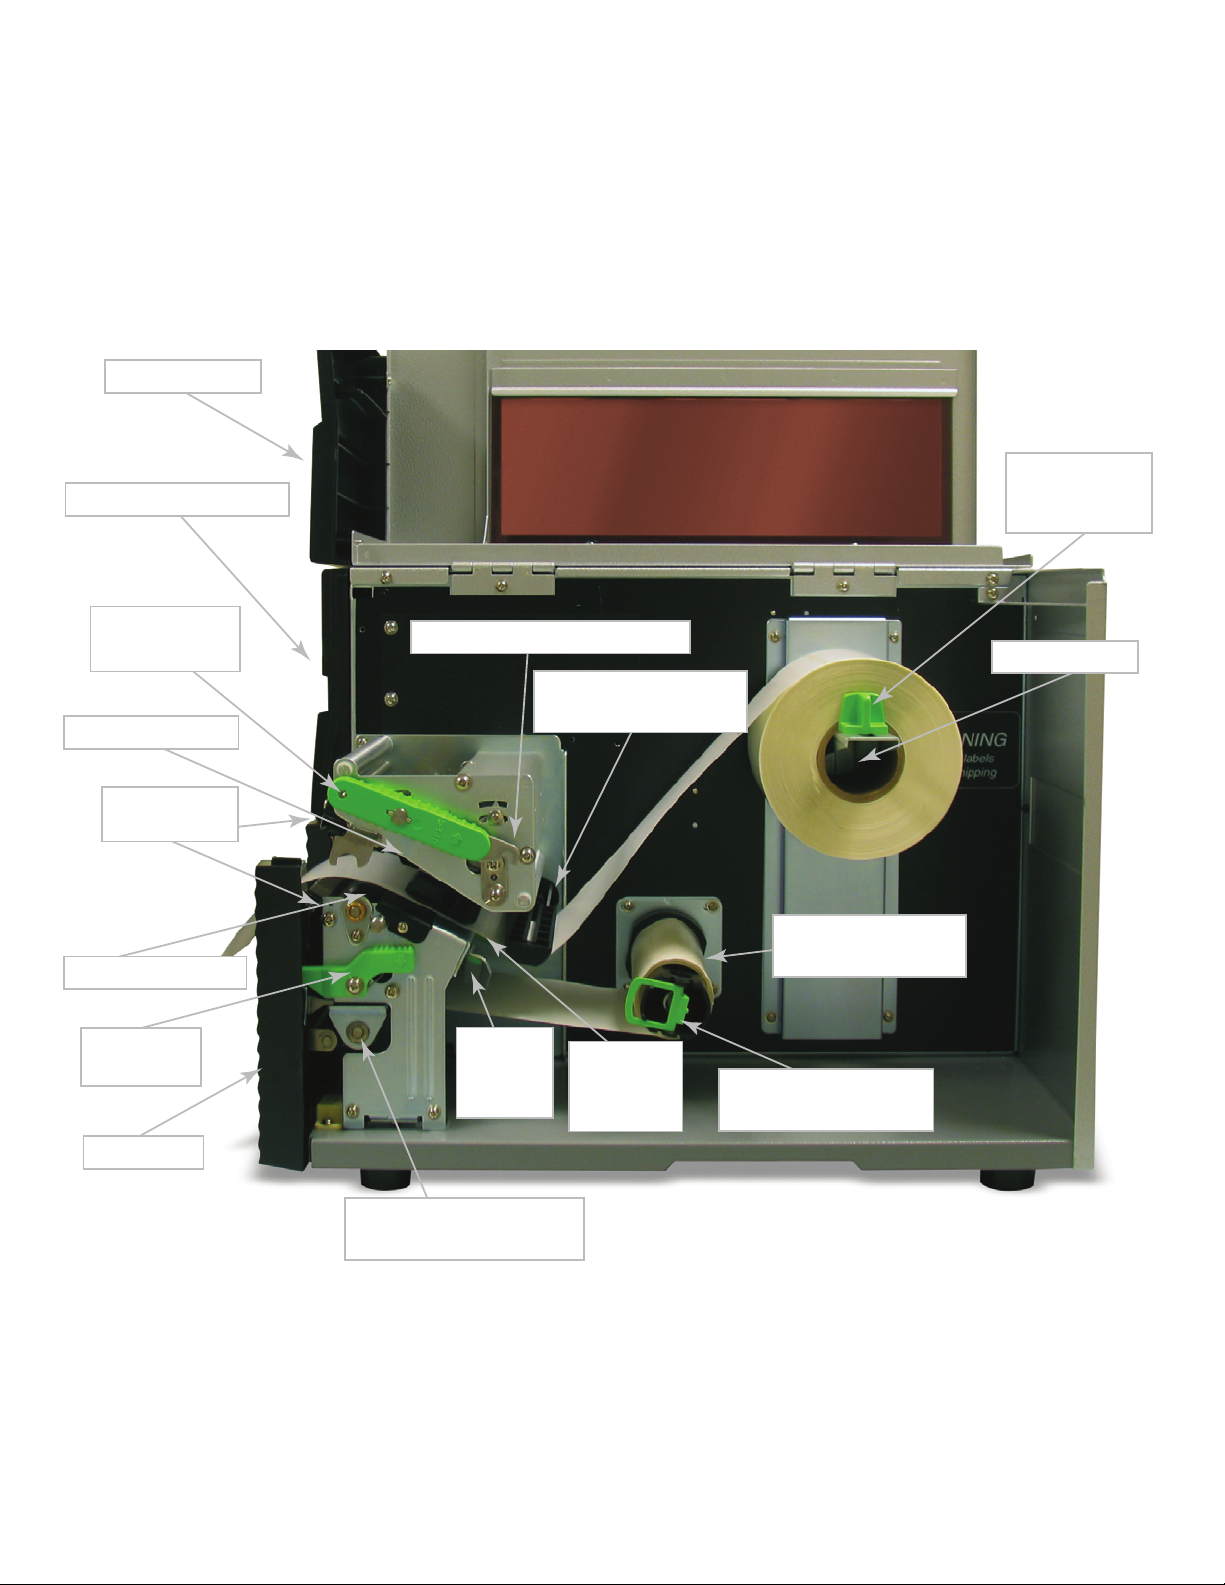
LE810DT
Operator Panel
Print Head
Print Assembly
Media Holder
Print Head Latch
Media Hold-
Down
Backing Take-Up
Spindle
Platen Roller
Top Access Door
Front Access Door
Media Supply
Guide
Backing Retainer
Prongs
Print Head
Latch
Backing Drive
Roller
Dispenser Latch
Outside
Media
Guide
Sensor
Adjust
Knob
3
Page 4
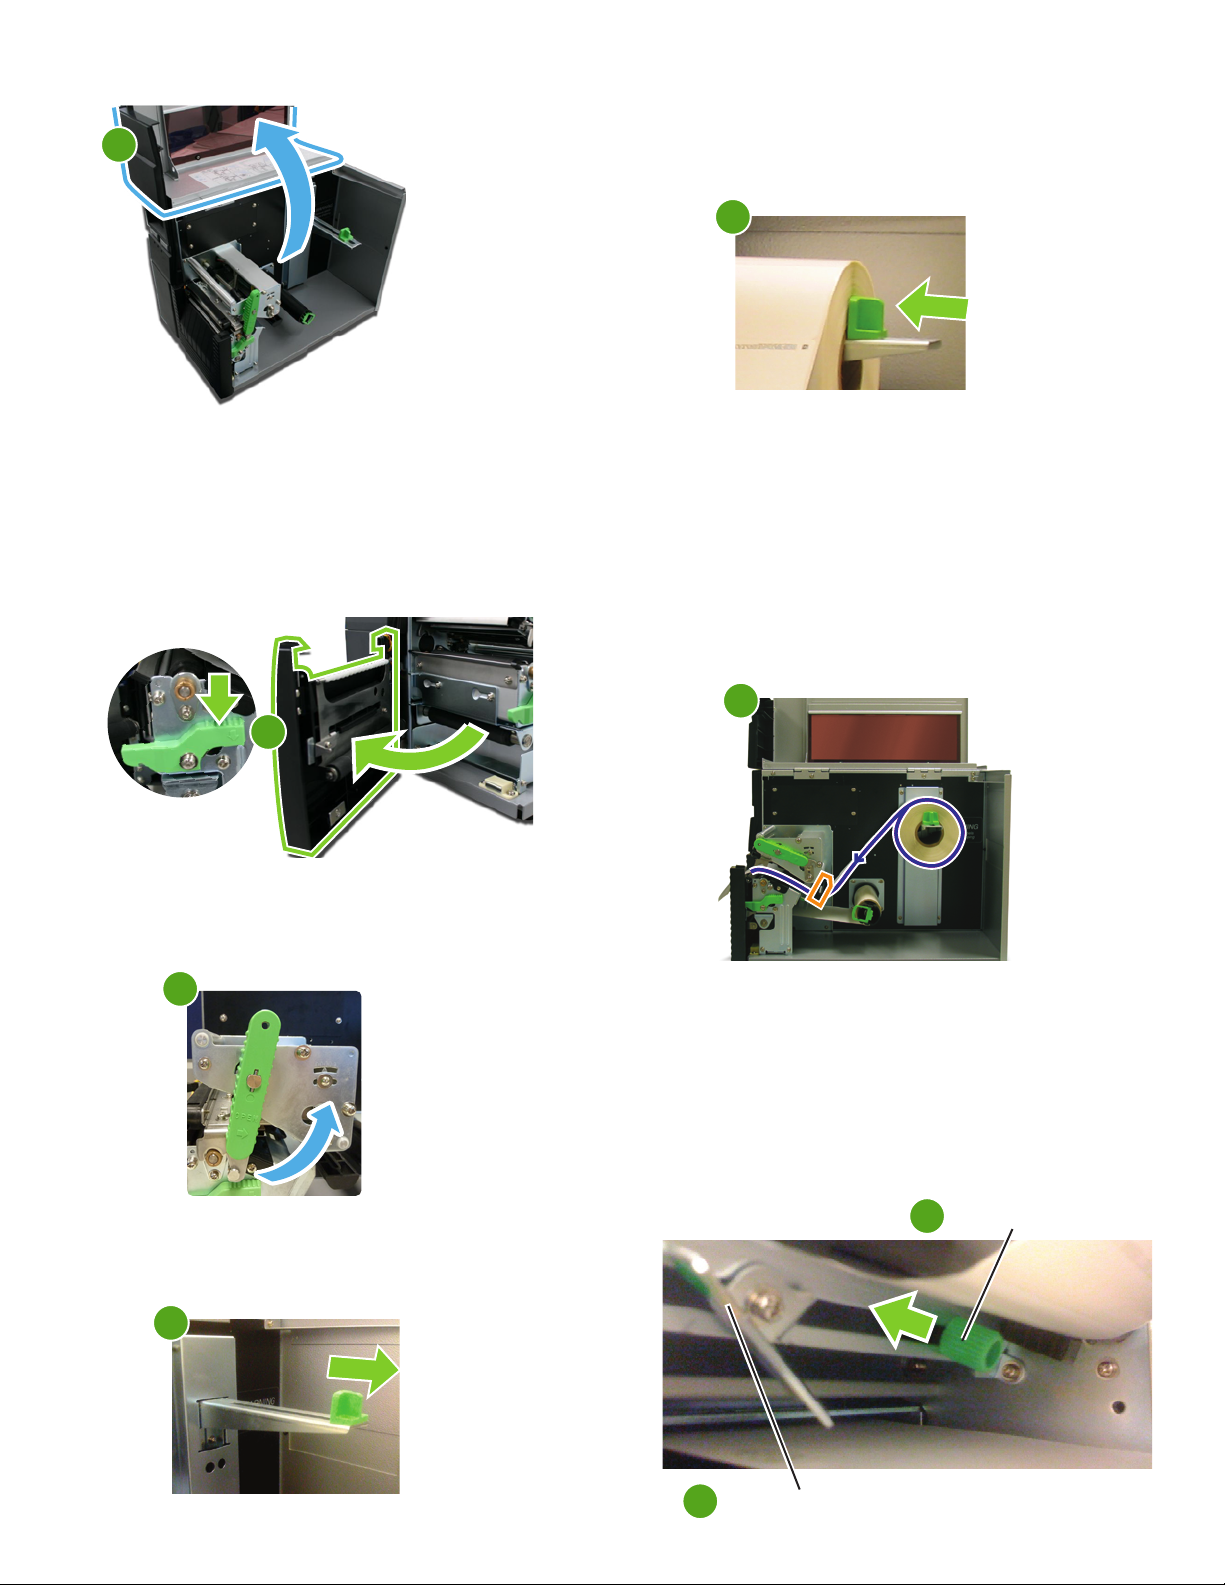
1. Open the Top Access Door by swinging it up.
1
2. Open the Front Access Door by pushing down on
the green Dispenser Latch and swinging the door
forward and to the left. This gives access to the print
mechanism on three sides.
Note: The Top Access Door must be open
before the Front Access Door can be opened.
5. Load the roll onto the Media Holder so that the printing
side of the media faces upwards as it unwinds from the
roll. Push the roll all the way to the inside of the printer,
then push the Media Supply Guide back in until it fits
snugly against the outside of the media roll.
5
6. Route the media under the Media Hold-Down, through the
Media Sensor Assembly, under the Print Head and out
the front of the print mechanism. Push the media all the
way to the inside of the printer. Clear access is provided
to the label path by pulling the top of the Outside Media
Guide down.
Note: Make sure the media is routed through the
Media Sensor Assembly. If it is not, the printer will
react as if there is no media loaded and will refuse
to print.
2
3. Open the Print Head Assembly by rotating the green Head
Latch counter clockwise. The head is spring loaded and will
automatically raise to the opened position.
3
4. Pull the Media Supply Guide to the outside of the printer to
give the maximum media width.
6
7. Adjust the media sensor to compensate for irregularities
in the media (i.e.: notch, tag hole, gap, perforation or
markings). The proper position will be media-dependent.
To properly adjust the sensor position, loosen the green
Sensor Adjust Knob located on the bottom side of the
Media Transport Assembly and move the sensor in ¼
inch increments (or finer) until the sensor error is cleared.
After the error is cleared, retighten the green Sensor
Adjust Knob.
7
Sensor Adjust Knob
4
Outside Media Guide
8
4
Page 5
b
8. Raise the Outside Media Guide to the closed position and
push the guide inward until it barely contacts the outside
edge of the media.
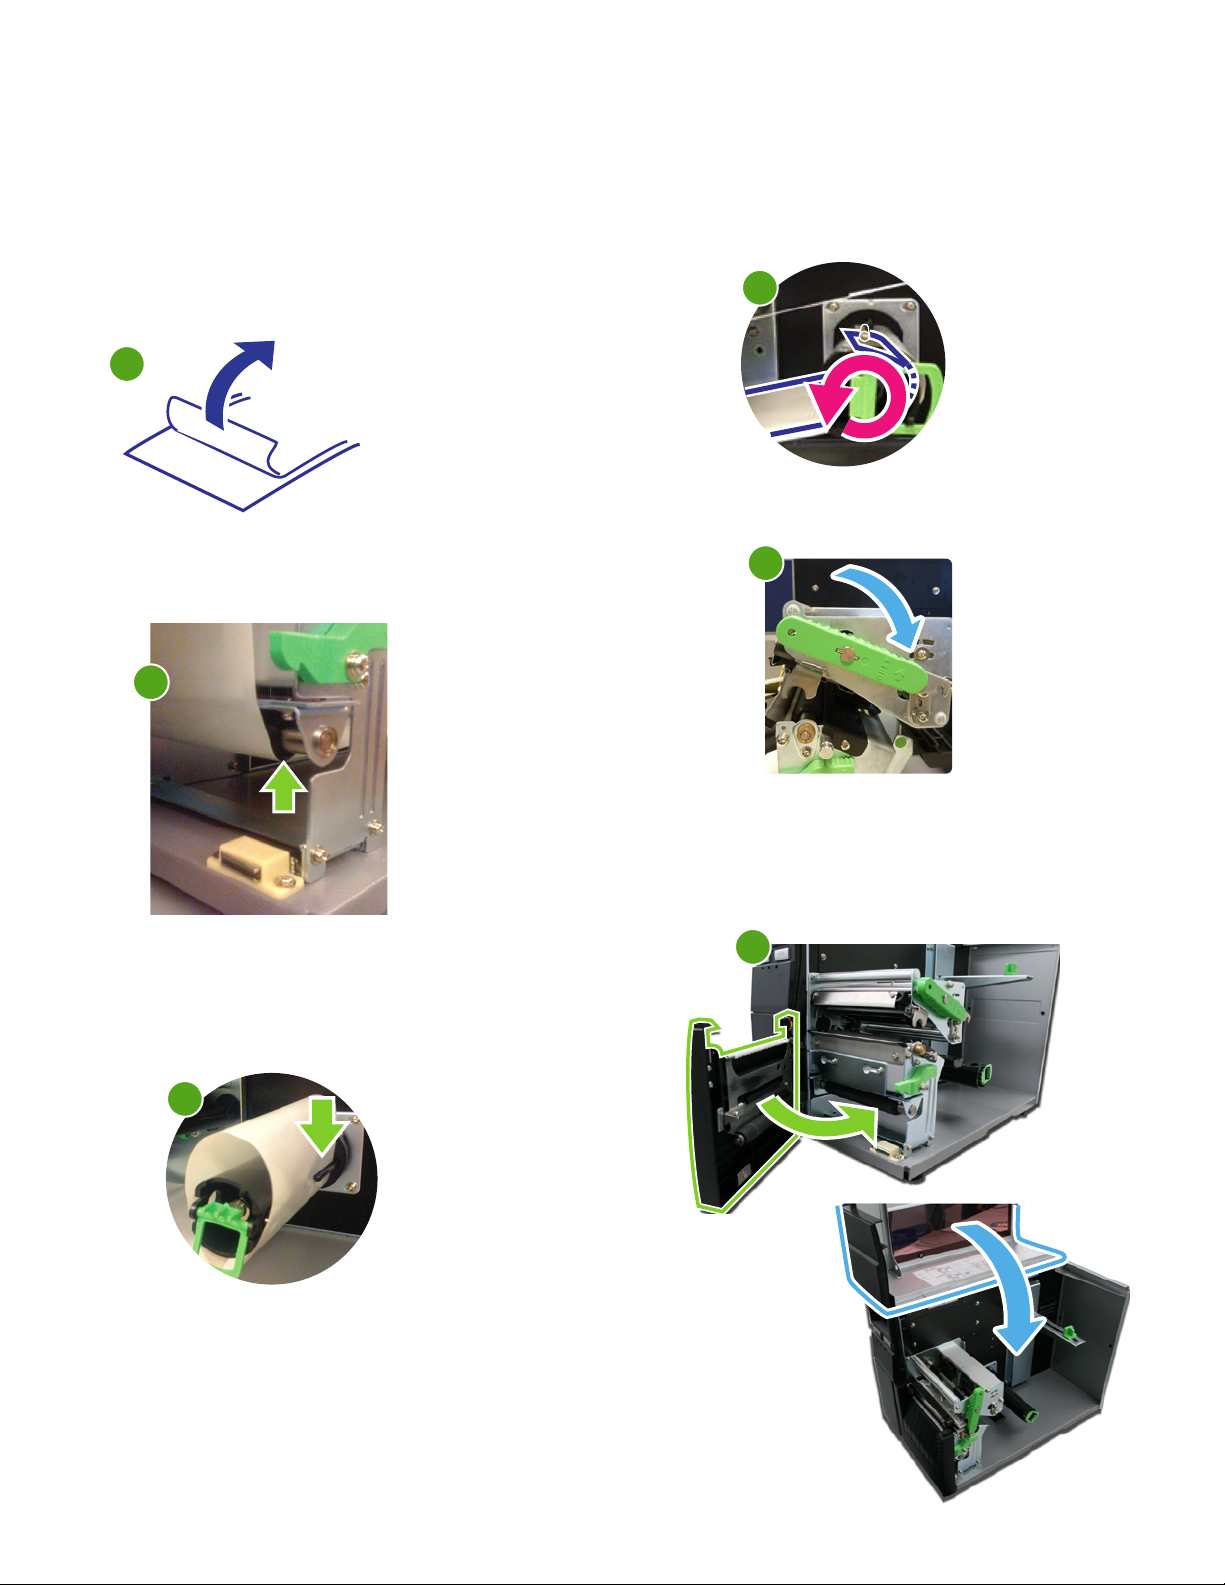
9. If your printer does not have an internal
rewinder, then skip to step 14.
10. Remove 24" to 30" of labels from the backing paper
to provide enough backing paper free of labels to
wrap around the Backing Take-Up Spindle.
10
13. Manually turn the Backing Take-Up Spindle counter-
clockwise to take up all the slack in the backing.
Note: Inspect the media routing and verify that
the path matches that illustrated in the Media
Loading diagram on the inside of the Top
Access Door.
13
14. Close the Print Head and latch it in the down position.
11. Route the label backing down the front of the print
mechanism and around the Backing Drive Roller.
11
12. Wrap the backing under and around the Backing
Take-Up Spindle, routing it under the two Backing
Retainer Prongs.
12
14
15. Close the Front Access Door. After the Front Access
Door is closed, the Top Access Door may be closed.
These covers have interlock switches and the printer
will not operate if either is open.
15
5
Page 6
LE810DT
Install the Driver
1. Insert the Printer Software CD in the CD-ROM drive.
The CD will autorun.
2. Select your language.
3. If you accept the license agreement, select I Accept.
4. Select Install Driver under Driver Setup.
5. When the Add Printer wizard appears, select Next.
6
Page 7
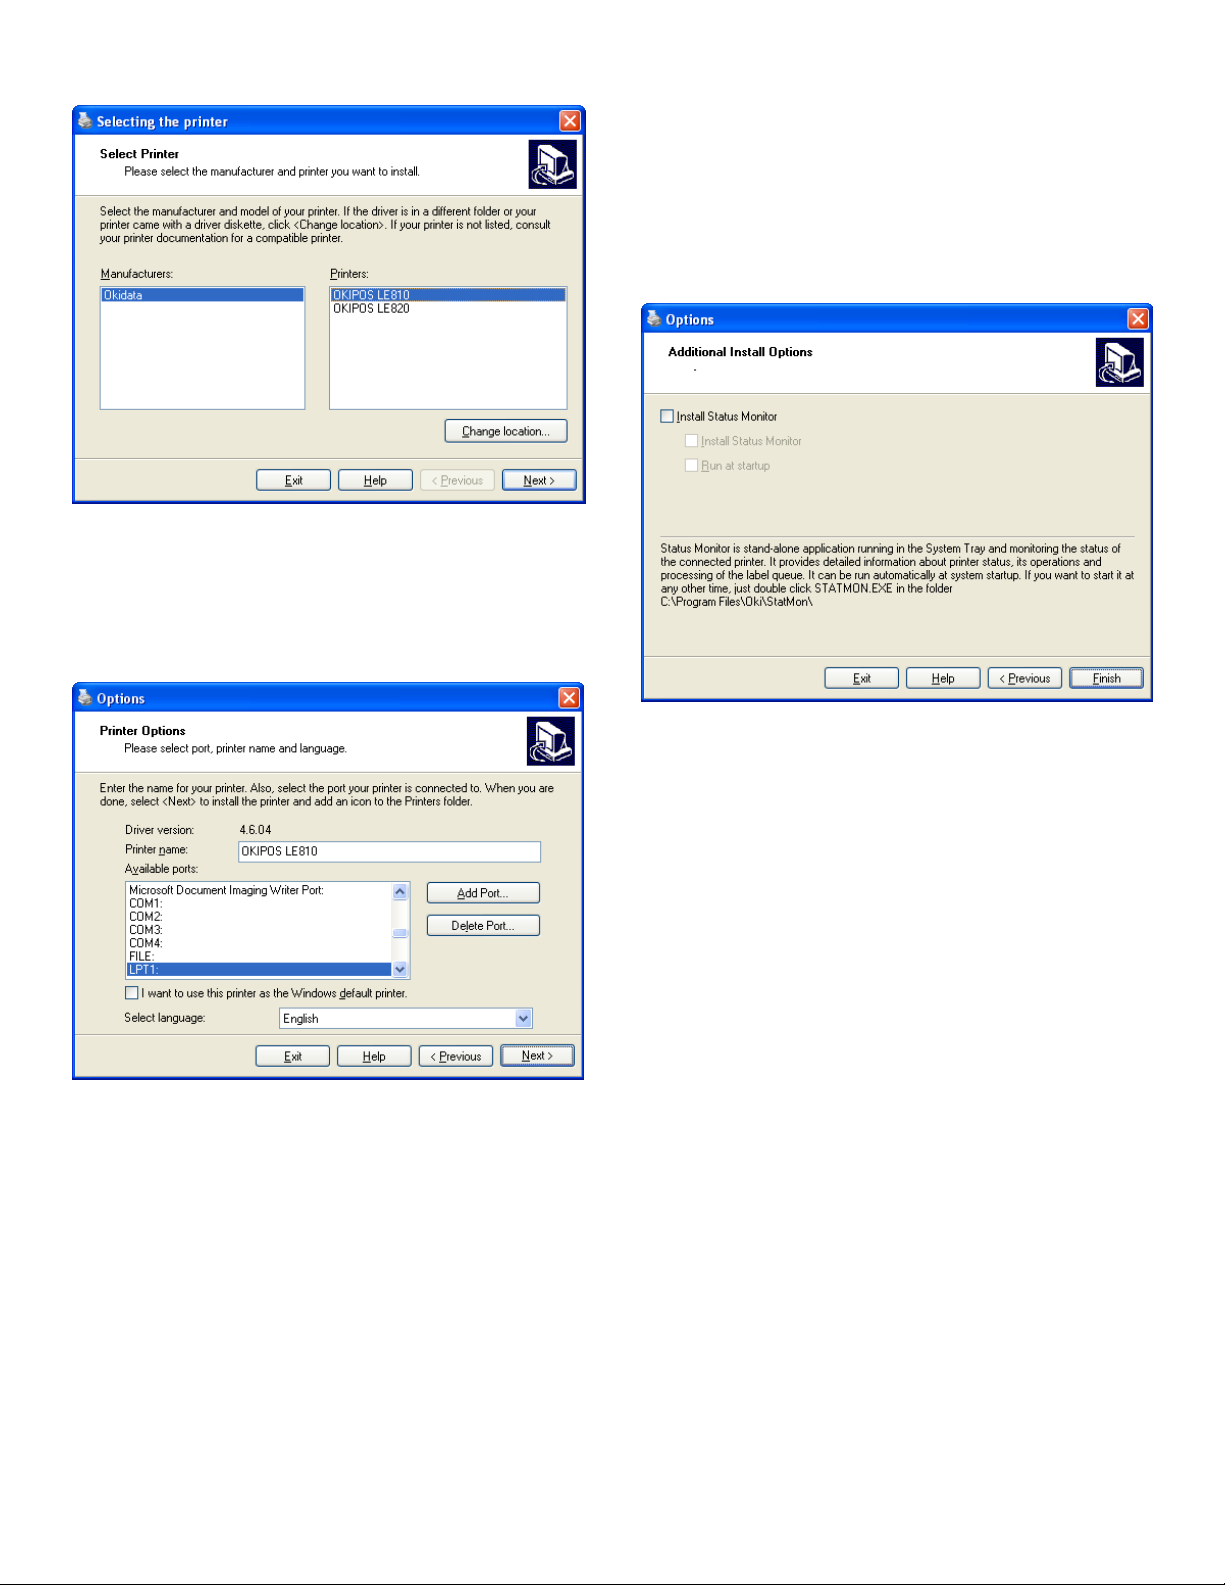
6. Select OKIPOS LE810 and then select Next.
7. Select the port that your LE810DT is connected to from
the list of Available Ports. If you want this printer to be
your default printer, then check the box next to “I want
to use this printer as the Windows default printer”.
Select Next when completed.
8. Check the box if you want to install the Status monitor.
Status Monitor is stand-alone application running
in the System Tray and monitoring the status of the
connected printer. It provides detailed information
about printer status, its operations and processing of
the label queue. It can be run automatically at system
startup. If you want to start it at any other time, just
double click STATMON.EXE in the folder
C:\Program Files\Oki\StatMon\
7
Page 8
LE810DT
Panneau de commande
Tête d’impression
Assemblage
d’impression
Porte-support
Loquet de tête d’impression
Dispositif de maintien
du support
Plateau de la bobine
réceptrice de support
Rouleau de platine
Capot supérieur
Capot avant
Guide
d’alimentation
des supports
Broches de retenue
du support
Loquet de tête
d’impression
Rouleau d’entraînement
du support
Loquet du
distributeur
Guide de
support
extérieur
Molette de
réglage du
capteur
8
Page 9

1. Ouvrez le capot supérieur en le basculant vers le haut.
1
2. Ouvrez le capot avant en enfonçant le loquet du
distributeur vert et en basculant le capot vers l’avant
et vers la gauche. Cela donne accès au mécanisme
d’impression sur trois côtés.
Remarque : Le capot supérieur doit être ouvert
avant de pouvoir ouvrir le capot avant.
5. Chargez le rouleau sur le porte-support de sorte que la face
d’impression du support soit orientée vers le haut lorsqu’il
est déroulé. Poussez le rouleau complètement à l’intérieur
de l’imprimante, puis poussez le guide d’alimentation des
supports à l’intérieur jusqu’à ce qu’il soit bien serré contre
l’extérieur du rouleau de support.
5
6. Acheminez le support sous le dispositif de maintien du support,
à travers l’assemblage de détection du support, sous la tête
d’impression, en le faisant sortir par l’avant du mécanisme
d’impression. Poussez le support à fond dans l’imprimante.
Un accès est fourni au chemin des étiquettes en tirant vers le
bas le haut du guide de support extérieur.
Remarque : Assurez-vous que le support est acheminé
par l’assemblage du capteur du support. Sinon,
l’imprimante assumera qu’aucun support n’est chargé
et refusera d’imprimer.
2
3. Ouvrez l’assemblage de tête d’impression en tournant le
compteur de loquet de tête vert dans le sens horaire. Cette tête
est à ressort et se hissera automatiquement à la position ouverte.
3
4. Tirez vers l’extérieur de l’imprimante le guide d’alimentation des
supports pour obtenir une largeur maximum.
6
7. Ajustez le capteur du support pour compenser les irrégularités
du support (p. ex., : encoche, trou, écart, perforation ou
marquages). La bonne position est fonction du support. Pour
ajuster correctement la position du capteur, desserrez la molette
de réglage du capteur vert situé au bas de l’assemblage de
transport des supports et déplacez le capteur par incréments de
¼ po (ou moins) jusqu’à effacement de l’erreur de capteur. Une
fois l’erreur effacée, resserrez la molette de réglage du capteur.
Molette de réglage du
7
capteur
4
8
Guide de support extérieur
9
Page 10

b
8. Soulevez le guide de support extérieur à la position fermée et
poussez le guide vers l’intérieur jusqu’à ce qu’il fasse à peine
contact avec le bord extérieur du support.
13. Tournez manuellement le plateau de la bobine réceptrice de
support dans le sens antihoraire pour rattraper le mou du
support.
9. Si votre imprimante ne dispose pas d’un enrouleur
interne, sautez alors l’étape 14.
10. Retirez 24 à 30 po d’étiquettes du papier de support pour
obtenir suffisamment de papier de support libre d’étiquettes
pour envelopper autour du plateau de la bobine réceptrice.
10
11. Acheminez le support d’étiquette vers le bas de l’avant du
mécanisme d’impression et autour du rouleau d’entraînement
de support.
11
Remarque : Inspectez l’acheminement du support et
vérifiez que le chemin correspond à celui illustré dans
le diagramme de chargement du support à l’intérieur
du capot supérieur.
13
14. Fermez la tête d’impression et bloquez-la en position
abaissée.
14
12. Enveloppez le support sous et autour du plateau de la
bobine réceptrice de support, en l’acheminant sous les
deux broches de fixation de support.
12
15. Fermez le capot avant. Après la fermeture du capot avant,
le capot supérieur peut être fermé. Ces couvercles ont
des interrupteurs d’interverrouillage et l’imprimante ne
fonctionnera pas si l’un d’eux est ouvert.
15
10
Page 11

LE810DT
Installation du pilote
1. Insérez le CD du logiciel d’impression dans le lecteur de
CD-ROM. Le CD fonctionne en lecture automatique.
2. Sélectionnez votre langue.
3. Si vous acceptez le contrat de licence, sélectionnez I Accept
(J’accepte).
4. Sélectionnez Install Driver (Installer le pilote) sous Driver Setup
(Configuration du pilote).
5. Quand l’assistant Add Printer (Ajout d’imprimante) s’affiche,
sélectionnez Next (Suivant).
11
Page 12

6. Sélectionnez OKIPOS LE810, puis sélectionnez Next.
7. Sélectionnez le port dans lequel est connecté l’imprimante
LE810DT à partir la liste des ports disponibles. Pour faire de
cette imprimante l’imprimante par défaut, cochez la case à côté
de « I want to use this printer as the Windows default printer »
(je veux utiliser cette imprimante comme imprimante par défaut
Windows). Sélectionnez Next une fois terminé.
8. Cochez la case si vous voulez installer le moniteur d’état. Le
moniteur d’état est une application autonome tournant dans
la barre d’état système qui surveille l’état de l’imprimante
connectée. Il fournit des renseignements détaillés sur l’état
de l’imprimante, ses opérations et le traitement de la file
d’attente des étiquettes. Il peut être lancé automatiquement
au démarrage du système. Pour le lancer à tout autre
moment, il suffit de double-cliquer sur STATMON.EXE dans
le dossier C:\Program Files\Oki\StatMon\
12
Page 13

LE810DT
Panel del operador
Cabezal de impresión
Ensamble de
impresión
Sujetador
de medios
Sujetador del cabezal
de impresión
Inmovilizador
de medios
Eje de recepción de
papel soporte
Rodillo
Puerta de acceso superior
Puerta de acceso
delantera
Guía de suministro
de medios
Dientes de retención
de papel soporte
Sujetador del
cabezal de impresión
Rodillo de papel
soporte
Palanca
dispensadora
Guía de
medios
externa
Perilla de
ajuste de
sensor
13
Page 14

1. Abra la Puerta superior de acceso girándola hacia arriba.
1
2. Abra la Puerta de acceso delantera presionando la
Palanca dispensadora verde y girando la puerta hacia
delante y hacia la izquierda. De esta manera tiene acceso
al mecanismo de la impresora desde los tres costados.
Nota: La Puerta de acceso superior debe estar
abierta antes de que abra la puerta de acceso
delantera.
5. Cargue el rollo en el Sujetador de medios de manera que el lado
de impresión quede cara arriba cuando se gira el rollo. Empuje
el rollo hasta el fondo de la impresora y luego empuje la Guía de
suministros de medios para que calce correctamente sobre el
rollo de medios.
5
6. Coloque el medio debajo del Inmovilizador de medios, a través
del Ensamble de sensor de medios y por debajo del Cabezal de
impresión hasta que salga por la parte delantera del mecanismo
de impresión. Empuje el medio al fondo de la impresora. El
acceso libre al trayecto de etiquetas se logra empujando la parte
superior de la Guía de medios externa hacia abajo.
Nota: Asegúrese de que el medio está correctamente
colocado en el Ensamble de sensor de medios. Si no
es así, la impresora no reconoce que tiene el medio
instalado y no imprimirá.
2
3. Abra el Ensamble del cabezal de impresión girando el Sujetador
de cabezal verde en dirección anti-horario. El cabezal descansa
sobre un resorte y subirá automáticamente a la posición de
abierto.
3
4. Hale hacia afuera de la impresora la Guía de suministro de
medios para lograr el mayor ancho para los medios.
6
7. Ajuste el sensor de medios para compensar las irregularidades
del medio (por ejemplo, muescas, huecos, separaciones,
perforaciones o marcas). La posición correcta depende del tipo
de medio. Para ajustar el sensor correctamente, afloje la Perilla
de ajuste de sensor ubicado en la parte inferior del Ensamble
de transporte de medios y mueva el sensor en incrementos de
¼ de pulgada (6 mm) o menos hasta que el error del sensor
desaparezca. Después de resolver del error, vuelva a apretar la
Perilla de ajuste de sensor.
Perilla de ajuste de sensor
7
4
Guía de medios externa
8
14
Page 15

b
8. Suba la Guía de medios externa a la posición de cierre y empuje
la guía hacia adentro hasta que haga contacto ligeramente con
el borde externo del medio.
13. Gire manualmente el Eje de recepción de papel soporte
en dirección anti-horario hasta que el papel de soporte
quede bien tensado.
9. Si la impresora no cuenta con un rebobinador interno,
vaya al paso 14.
10. Retire las etiquetas necesarias para despejar de 24 a
30 pulgadas (60 a 76 cm) de papel soporte libre de etiquetas
para pasarlo por el Eje de recepción de papel soporte.
10
11. Pase el papel soporte hacia abajo por la parte delantera
del mecanismo de impresión y alrededor del Rodillo de
papel soporte.
11
Nota: Inspeccione el trayecto del medio y asegúrese
de que concuerde con el diagrama de cómo cargar
el medio que se encuentra en la parte interna de la
Tapa de acceso superior.
13
14. Cierre el Cabezal de impresión y sujételo en la posición hacia
abajo.
14
12. Pase el papel de soporte por debajo y alrededor del Eje de
recepción de papel soporte, colocándolo por debajo de
los dos Dientes de retención de papel soporte.
12
15. Cierre la Puerta de acceso delantera. Después de cerrar
la Puerta de acceso delantera, cierre la Puerta de acceso
superior. Estas puertas tienen interruptores entrelazados y
la impresora no funcionará si una de ellas está abierta.
15
15
Page 16

LE810DT
Instale el controlador
1. Coloque el CD de software de la impresora en su unidad de
CD-ROM. El CD se autoejecuta.
2. Seleccione su idioma.
3. Para aceptar el contrato de licencia, seleccione I Accept
(Acepto).
4. Seleccione Install Driver (Instalar controlador) bajo Driver
Setup (Config. del controlador).
5. Cuando aparezca el Asistente para agregar impresoras,
seleccione Next (Siguiente).
16
Page 17

6. Seleccione OKIPOS LE810 y luego seleccione Next (Siguiente).
7. Seleccione el puerto al que está conectado la LE810DT de la
lista bajo Available Ports (Puertos disponibles). Si desea que
esta impresora sea la impresora por defecto, coloque una
marca en la casilla al lado de “I want to use this printer as
the Windows default printer” (Deseo que esta impresora sea
mi impresora por defecto bajo Windows).
Seleccione Next (Siguiente) al terminar.
8. Seleccione la casilla si desea instalar Status Monitor
(Monitor de estado). El Monitor de estado es una aplicación
autónoma que corre desde la Bandeja del sistema y que
monitorea el estado de la impresora conectada. Ofrece
información detallada sobre el estado de la impresora, su
funcionamiento y el procesamiento de la cola impresión
de etiquetas. Puede ejecutarse automáticamente al
iniciar el sistema. Si desea iniciarlo en otro momento,
haga doble clic en STATMON.EXE en la carpeta
C:\Program Files\Oki\StatMon\.
17
Page 18

LE810DT
Painel de operação
Cabeça de impressão
Conjunto de
impressão
Retentor da mídia
de impressão
Trava da cabeça
de impressão
Mecanismo de
sujeição da mídia
Carretel de
rebobinamento
Rolete do cilindro
Tampa de acesso superior
Tampa de acesso
frontal
Guia da mídia de
impressão
Mecanismos de
retenção
Trava da cabeça de
impressão
Rolo de recolhimento
Trava da unidade
dispensadora
Guia externa
da mídia de
impressão
Botão
de ajuste
do sensor
18
Page 19

1. Abra a tampa de acesso superior puxando-a para cima.
1
2. Abra a tampa de acesso frontal empurrando para baixo a
trava verde da unidade dispensadora e puxando a tampa
para a frente e para a esquerda. Isto dará acesso ao
mecanismo de impressão nos três lados.
Nota: A tampa de acesso superior deve ser aberta
antes de abrir a tampa de acesso frontal.
5. Coloque o rolo no retentor de mídia de impressão de modo que
o lado destinado à impressão fique virado para cima quando
desenrolar do rolo. Empurre o rolo totalmente para dentro
da impressora e, em seguida, empurre a guia da mídia de
impressão de volta para dentro até que se encaixe bem contra a
parte externa do rolo da mídia de impressão.
5
6. Passe a mídia de impressão sob o mecanismo de sujeição da
mídia, através do sensor de mídia, sob a cabeça de impressão
e para fora da frente do mecanismo de impressão. Empurre a
mídia de impressão totalmente para dentro da impressora. Para
obter acesso ao percurso das etiquetas, puxe para baixo o topo
da guia externa da mídia de impressão.
Nota: Certifique-se de que a mídia de impressão esteja
passando através do sensor de mídia. Se não estiver,
a impressora agirá como se não tivesse mídia de
impressão e não imprimirá.
2
3. Abra o conjunto da cabeça de impressão girando a trava verde
da cabeça de impressão no sentido anti-horário. A cabeça de
impressão tem ação de mola e levantará automaticamente até a
posição aberta.
3
4. Afaste o máximo que puder a guia da mídia de impressão no
sentido de fora da impressora.
6
7. Ajuste o sensor de mídia para compensar irregularidades na
mídia de impressão (incisões, orifícios, espaços, perfurações ou
marcações). A posição correta depende da mídia. Para ajustar
corretamente a posição do sensor, afrouxe o botão verde de
ajuste do sensor localizado na parte inferior do conjunto de
alimentação da mídia e mova o sensor em incrementos de
64 mm (ou menos) até eliminar o erro de sensor. Depois de
eliminar o erro, reaperte o botão verde de ajuste do sensor.
Botão de ajuste do sensor
7
4
Guia externa da mídia de impressão
8
19
Page 20

b
8. Levante a guia externa da mídia de impressão até a posição
fechada e empurre-a para dentro até que faça contato mínimo
com a borda externa da mídia.
9. Se a impressora não tiver um rebobinador interno,
passe para a etapa 14.
10. Remova de 60 a 75 cm de etiquetas do papel de proteção
para que o papel sem etiquetas possa ser enrolado no
carretel de rebobinamento.
10
13. Gire manualmente o carretel de rebobinamento no sentido
anti-horário para eliminar a folga no papel sem etiquetas.
Nota: Inspecione o percurso da mídia de impressão
e confirme se coincide com o percurso ilustrado
no diagrama de colocação da mídia de impressão
localizado na parte interna da tampa de acesso
superior.
13
14. Feche a cabeça de impressão e trave-a na posição para baixo.
11. Passe o papel sem etiquetas por baixo da frente
do mecanismo de impressão e ao redor do rolo de
recolhimento.
11
12. Passe o papel sem etiquetas por baixo e ao redor do
carretel de rebobinamento, passando-o por baixo dos
dois mecanismos de retenção.
12
14
15. Feche a tampa de acesso frontal. A tampa de acesso
superior pode ser fechada depois que a tampa de
acesso frontal for fechada. Estas tampas têm chaves de
intertravamento e a impressora não funciona se uma delas
estiver aberta.
15
20
Page 21

LE810DT
Instale o driver
1. Insira o CD do software da impressora na unidade de CD-
ROM. O CD será executado automaticamente.
2. Selecione o idioma desejado.
3. Se aceitar o contrato de licença, clique em I Accept (Aceito).
4. Selecione Install Driver (Instalar driver) em Driver Setup
(Instalação do driver).
5. Quando o Assistente para adicionar impressora aparecer,
selecione Next (Avançar).
21
Page 22

6. Selecione OKIPOS LE810 e, em seguida, selecione Next (Avançar).
7. Selecione a porta à qual a LE810DT está conectada na lista
de portas disponíveis. Se quiser que a impressora seja
considerada a impressora padrão, marque a caixa de seleção
ao lado de “I want to use this printer as the Windows default
printer” (Quero usar esta impressora como a impressora padrão
do Windows). Selecione Next (Avançar) quando terminar.
8. Marque a caixa se quiser instalar o Status Monitor. O
Status Monitor é um aplicativo independente que reside
na bandeja do sistema e monitora o status da impressora
conectada. Ele fornece informações detalhadas sobre o
status da impressora, suas operações e o processamento
da fila de impressão de etiquetas. Pode ser executado
automaticamente quando o sistema é inicializado. Se
quiser iniciá-lo em qualquer outro momento, basta clicar
duas vezes no arquivo STATMON.EXE, localizado na pasta
C:\Program Files\Oki\StatMon\
22
Page 23

Page 24

59405901
 Loading...